zSpace Studio
25
zspace.com zSpace Studio Demonstration Script zSpace Studio Demonstration Script Version 1.0 - 2014 Beta, pre-release
Transcript of zSpace Studio
zspace.com zSpace Studio Demonstration Script
zSpace Studio Demonstration Script
Version 1.0 - 2014 Beta, pre-release

zSpace is a registered trademark of zSpace, Inc. All other trademarks are the property of their respective
owners.
© zSpace, Inc. 2014

visit us online at zspace.com
Contents
Setup .............................................................................................................................................................1
Demo ............................................................................................................................................................5


zspace.com
1
Setup
This section will help you create your account information and select models to use during your demonstration.
1. Launch the zSpace Studio application and wait for the login screen to appear.
2. Create a login for “student” by entering that into the Username field. You do not need to enter a
password. (Note: You do not need to press “Alt-T” for a teacher account for this demonstration.)
a. If you’re logged in under a different username, you will see it in the dialog box and at the
top left of the screen. Click on Logout and then enter “student” and click Log In.
b. The following dialog box appears.
zspace.com
2
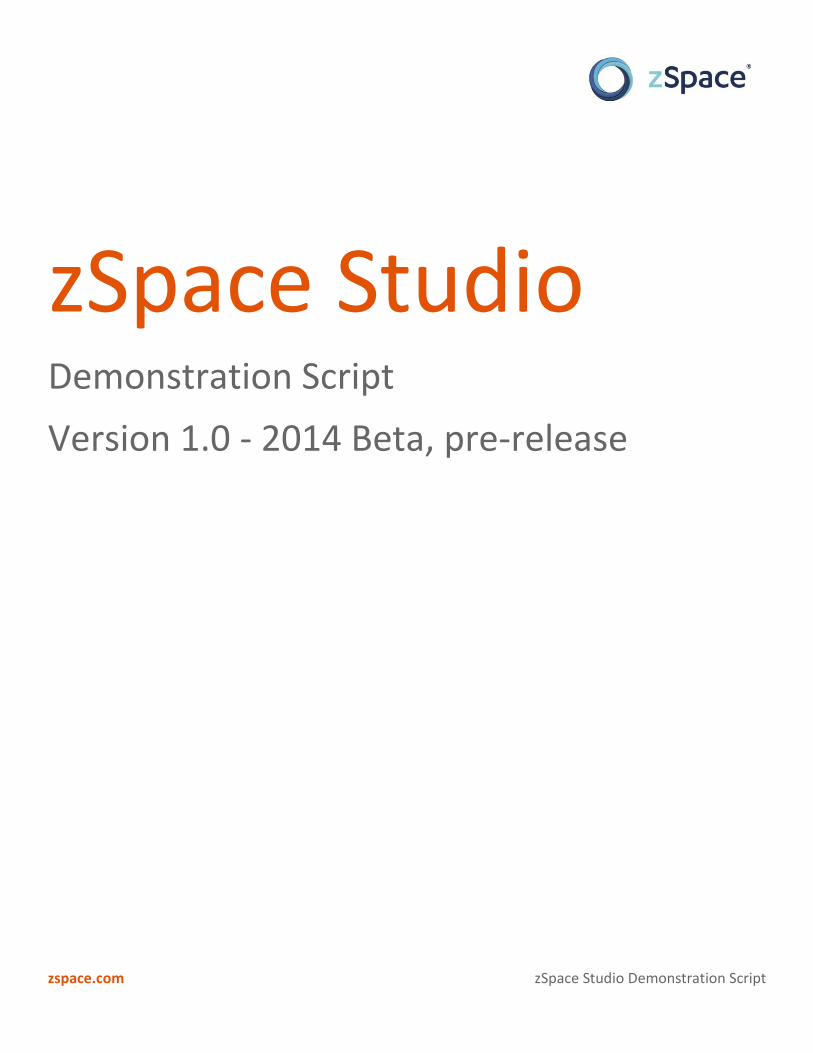
c. You can leave the first and last names blank. You can leave the password fields blank. Click
“Create” and wait to be logged in. (This may take a few seconds.)
3. If prompted to select a server, select “Offline”.
d. zSpace Studio may not prompt you to choose a server. If you do not see the “Server List”
window, Studio has automatically selected “Offline”. After hitting “Create” in Step 2c above,
you will be directly taken to the main menu shown in Step 4 and you can proceed as normal
from that point. Any type of user can access the server list window at a later time by clicking
on the words “Offline connection.” in the bottom right of the main menu.
4. Select “Sandbox” from the right-hand panel in the main menu.
zspace.com
3
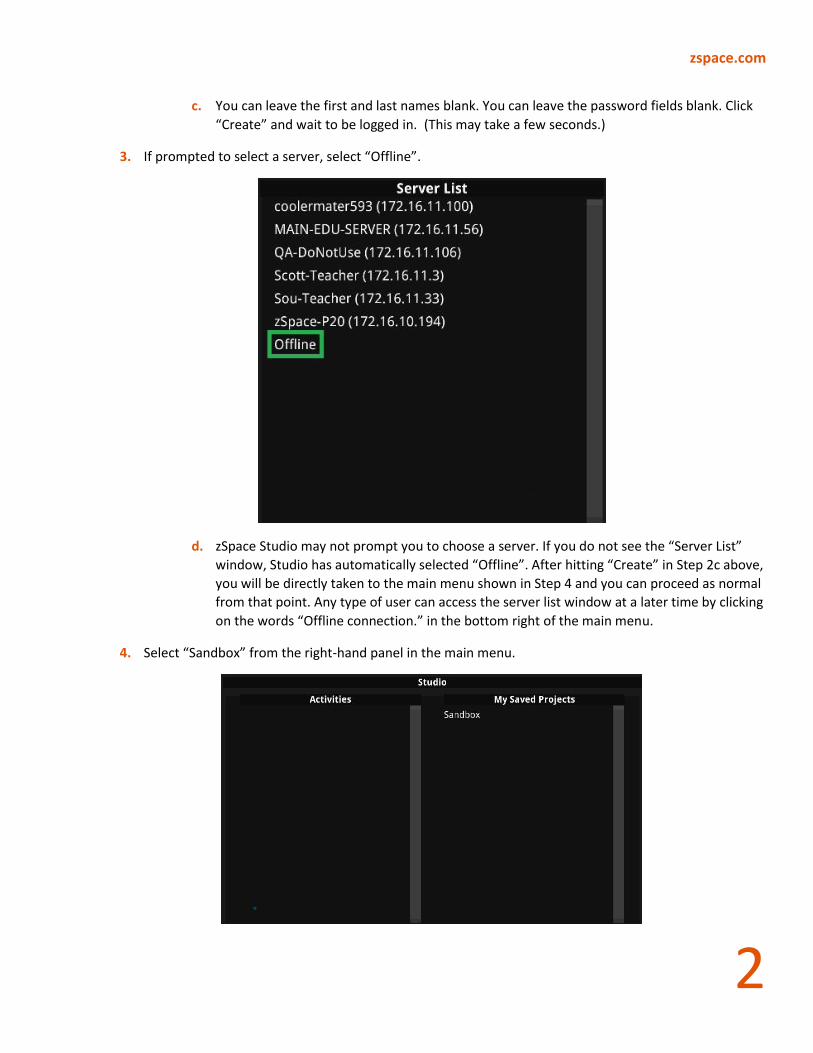
a. You will see a loading screen. It will last 30 seconds or more.
5. On the Control Bar, select the “Object Library” icon to bring up the published models.
6. Locate models and mark them as “Favorites.”
a. Many users find it is easier to navigate the Object Library using the mouse than with the
stylus. Use either during setup, but try to use only the stylus for the actual demonstration.
b. To locate a model, type its name in the Search box and press Enter. Start with “Tree Trunk”.
c. Mark the model as a favorite by clicking on the box in the model’s upper right corner.

zspace.com
4
d. Click on Clear, then repeat the search for these model names: Saturn, Mammoth (w/
Skeleton), Ibuprofen, Centrifugal Pump, Torque Converter, Turbocharger, Female Head, and
Female Arm. Click on Clear between each search. Mark each as a Favorite. If a model does
not appear right away, try switching the first letter of the word between upper and lower
case.
e. Click on Clear, and check that you have 9 models in the Favorites category at the top left
sidebar.

zspace.com
5
Demo
This section assumes you have completed all the setup steps. We suggest you review the following models as described below to demonstrate the existing functions of zSpace Studio:
Tree Trunk Layers - to demonstrate the basic functions and labels. It is understandable and everyone
knows what the object is.
Turbocharger - to show off measurement with a complex mechanical model.
Torque Converter - to show off another kind of measurement and scaling.
Female Head - to show off the use of the cutting plane tool with an object with complex internal
geometry.
The other recommended favorite models provide a few other rich examples of different types of models:
Mammoth - Shows the richness of detail in an object and its internal skeleton.
Saturn - Shows the parts of the planet as part of the astronomy model set.
Ibuprofen - Shows off a chemical model in zSpace.
WARNING There are a few features that will not be used for demonstrations. They are listed below with their icons:
Tour Builder - You can create snapshots, but when you play them back the results are random. Sometimes clicking on a slide to play it back does nothing.

zspace.com
6
Viewpoints - You can create viewpoint images, but cannot recall them.
Start your demo:
1. Log into the “student” account you made during Setup.
2. Select “Sandbox” from the right-hand panel. Wait for the loading screen to disappear after 30 seconds.
3. Open the Object Library and select the “Favorites” category (1st tab in the top left sidebar). The 9
models you marked during setup will appear.
Tree Trunk Layers
4. Select “Tree Trunk Layers” using the stylus and drag it to the open area. When you select the model, the
flat image will turn into a 3D cube; that is what you drag and drop into the scene.

zspace.com
7
5. Close the Object Library for now by clicking on the “X” in the upper right corner of the window.
6. Click on “Move” and drag the model around the screen. When selected, the “Move” icon will be blue.
The labels will move with the model.
7. Click on “Dissect.” When selected, the “Dissect” icon will be blue. Click and drag on the layers on the
right side of the tree trunk to take it apart. The labels follow the pieces they are attached to.

zspace.com
8
8. Toggle the labels on and off by clicking the “Hide/Show” icon (it looks like an eye) in the Control Bar,
then selecting “Labels”.

zspace.com
9
9. Click “Reset Parts” to snap the pieces back to the model.
10. Hit “Dissect” and take some pieces off the model. Move those pieces to the trashcan and show that you
can throw out individual pieces of a model. Throw out a few pieces.
11. Hit “Move” and move the rest of the model to the trashcan to remove it from the scene. When using
“Move” mode, all the remaining pieces will move together.
a. You can also remove the model from the scene by selecting “Reset Activity” in the Control
Bar. Demonstrate this if you cannot get the trashcan icon to work.
Turbocharger
12. Reopen the Object Library. This time, drag the Turbocharger into the scene using the stylus.
13. Close the Object Library for now using the ‘x’ in the upper right corner of the window.
14. In the right sidebar, select “Tools” and then select the “Straight Ruler” icon.
15. Show how you can use this measuring tool. Features to highlight are:
a. Dragging the white arrows on the sides of the measure to change the length.

zspace.com
10
b. Dragging the tendrils down will let you accurately pick a section of the model to measure.
The tendrils will stay in place when you let them go.
c. Click the gray circle to the right of the measurement number to change the units of
measurement.
d. Measurements are taken as the distance between the points at the ends of the tendrils.
16. Remove the Turbocharger model from the scene by selecting “Reset Activity” in the Control Bar.

zspace.com
11
Torque Converter
17. Reopen the Object Library and drag the Torque Converter into the scene.
18. Close the Object Library for now.
19. Dissect the model into a few parts, then return to the Move stylus mode. (Note: Bring at least one
curved piece to the forefront.)
20. Under “Tools”, this time select the “Surface Ruler”.
21. Show the differences of this measuring tool. The Surface Ruler functions similarly to the Straight Ruler,
but:
a. The tendrils ending with a vertical rectangle will snap to a model and try to automatically
measure a surface. You can show this on a flat surface and a curved one.
zspace.com
12
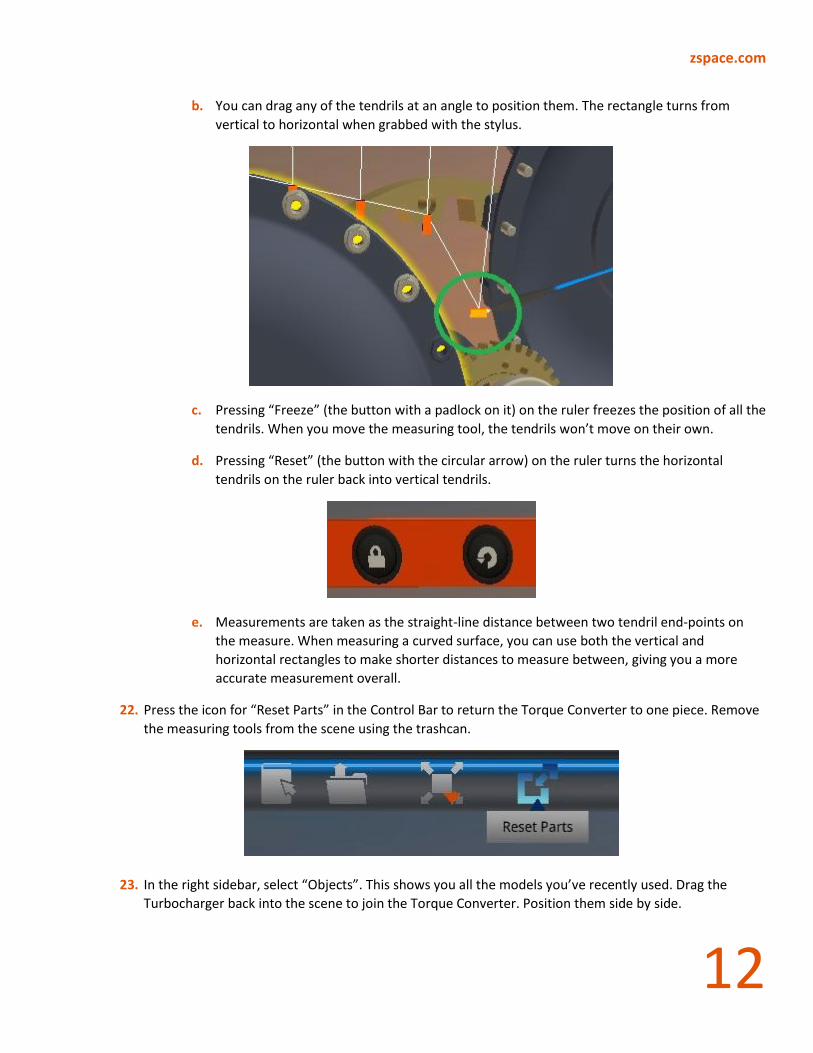
b. You can drag any of the tendrils at an angle to position them. The rectangle turns from
vertical to horizontal when grabbed with the stylus.
c. Pressing “Freeze” (the button with a padlock on it) on the ruler freezes the position of all the
tendrils. When you move the measuring tool, the tendrils won’t move on their own.
d. Pressing “Reset” (the button with the circular arrow) on the ruler turns the horizontal
tendrils on the ruler back into vertical tendrils.
e. Measurements are taken as the straight-line distance between two tendril end-points on
the measure. When measuring a curved surface, you can use both the vertical and
horizontal rectangles to make shorter distances to measure between, giving you a more
accurate measurement overall.
22. Press the icon for “Reset Parts” in the Control Bar to return the Torque Converter to one piece. Remove
the measuring tools from the scene using the trashcan.
23. In the right sidebar, select “Objects”. This shows you all the models you’ve recently used. Drag the
Turbocharger back into the scene to join the Torque Converter. Position them side by side.
zspace.com
13
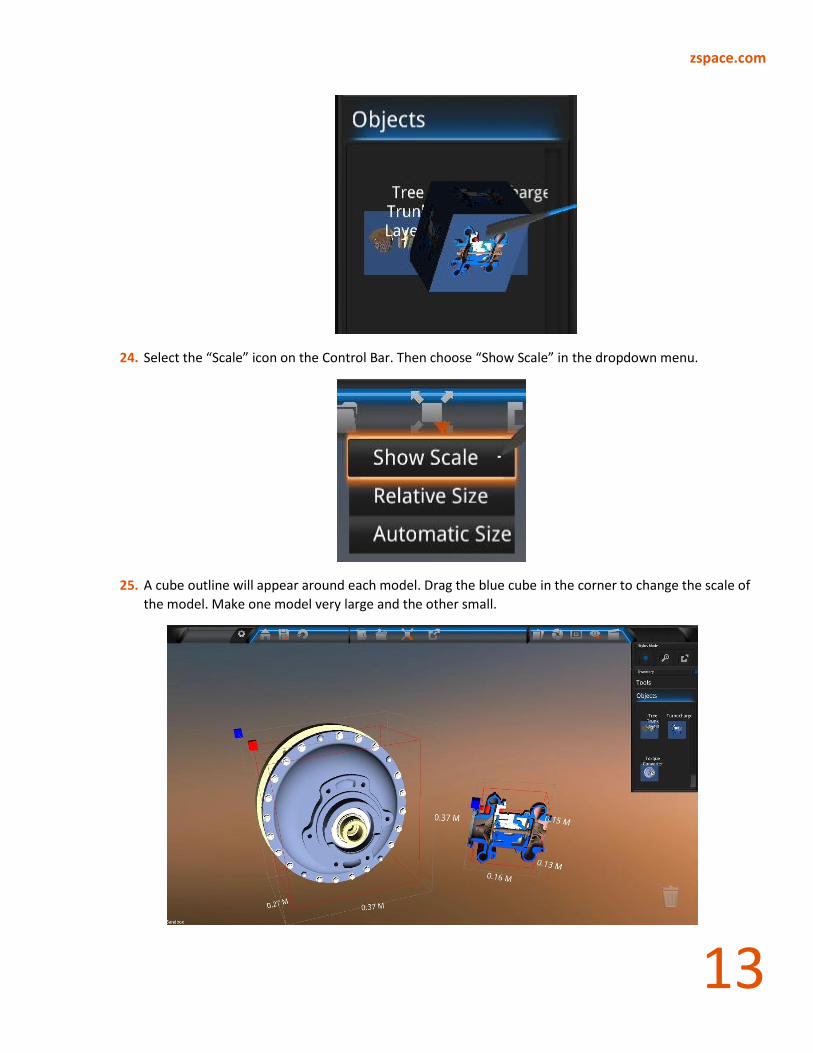
24. Select the “Scale” icon on the Control Bar. Then choose “Show Scale” in the dropdown menu.
25. A cube outline will appear around each model. Drag the blue cube in the corner to change the scale of
the model. Make one model very large and the other small.
zspace.com
14
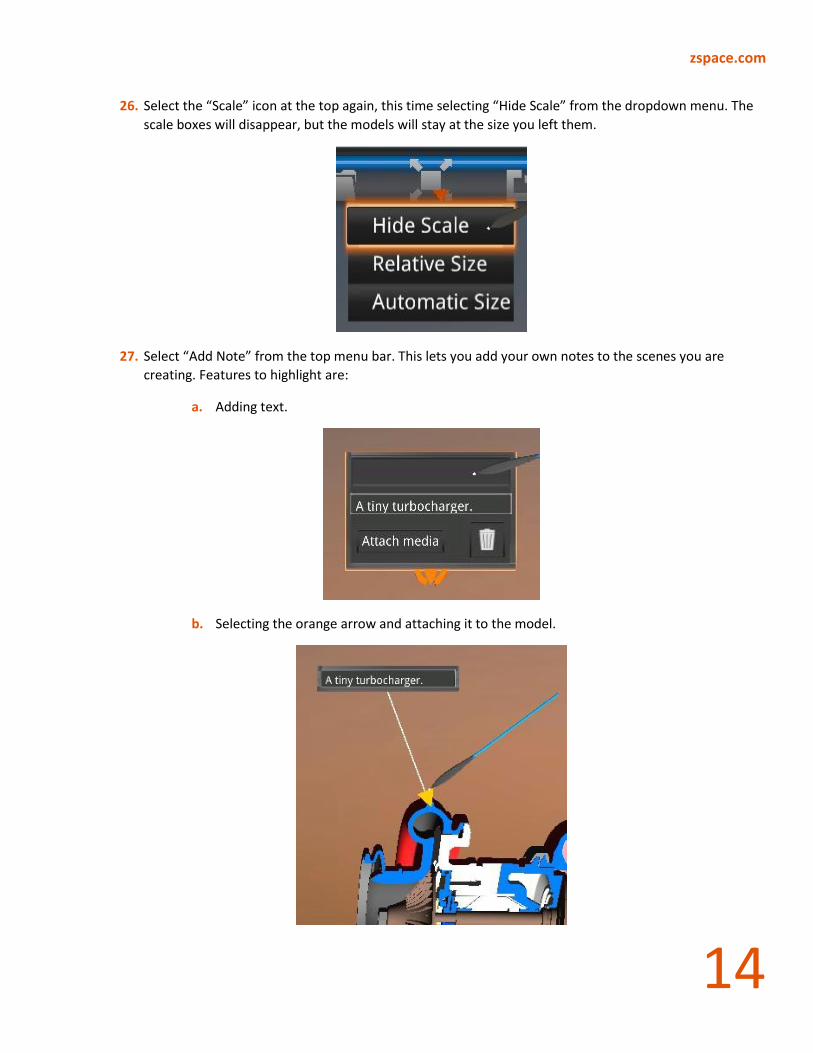
26. Select the “Scale” icon at the top again, this time selecting “Hide Scale” from the dropdown menu. The
scale boxes will disappear, but the models will stay at the size you left them.
27. Select “Add Note” from the top menu bar. This lets you add your own notes to the scenes you are
creating. Features to highlight are:
a. Adding text.
b. Selecting the orange arrow and attaching it to the model.

zspace.com
15
c. You are able to move this note at any time.
28. Use the “Reset Activity” icon on the Control Bar to empty the scene.
Mammoth (w/ Skeleton) and Female Arm
29. Reopen the Object Library.
30. Drag the Female Arm and the Mammoth (w/ Skeleton) into the scene.
31. Close the Object Library for now.
32. Select the “Scale” icon at the top again, this time selecting “Relative Scale” from the dropdown menu.
33. Relative Scale reflects the real life sizes of the models. The human arm will be much smaller compared
to the mammoth.
zspace.com
16
34. Use the “Reset Activity” icon on the Control Bar to empty the scene.
Female Head
35. Reopen the Object Library.
36. Drag the Female Head into the scene. (This model may take a while to load.)
37. Close the Object Library for now.
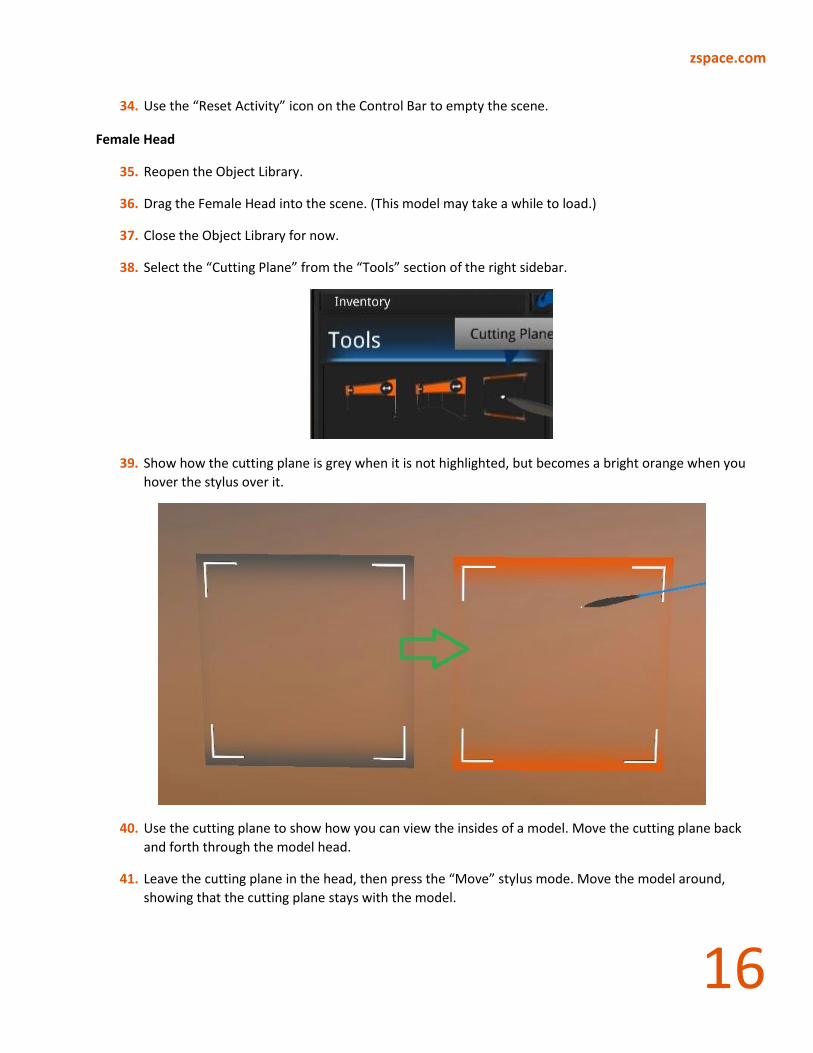
38. Select the “Cutting Plane” from the “Tools” section of the right sidebar.
39. Show how the cutting plane is grey when it is not highlighted, but becomes a bright orange when you
hover the stylus over it.
40. Use the cutting plane to show how you can view the insides of a model. Move the cutting plane back
and forth through the model head.
41. Leave the cutting plane in the head, then press the “Move” stylus mode. Move the model around,
showing that the cutting plane stays with the model.

zspace.com
17
42. Add another cutting plane into the scene and adjust its angle. Show both cutting planes intersecting to
create cross sections in the human head.
43. Select “Screenshots” in the Control Bar. You’re going to take a picture of the cross-sectioned head.

zspace.com
18
44. The screenshot window appears at the top right of screen, and the end of the stylus pointer will become
a viewfinder. You can zoom in and out by pressing the left and right stylus buttons. You may have to
adjust the position of your hand or move the model further back into the environment as well.
45. Click the center button of the stylus to take a screenshot. It will appear in the window at the upper right
of the screen. You can take lots of screenshots. Click on the trash icon in the screenshot’s thumbnail to
delete unwanted ones. Screenshots will be saved in the “zSpace Saved Files” folder on your desktop.
46. Turn off screenshot mode by clicking on the “Screenshots” icon again or by clicking the “x” icon in the
upper right of the screenshot window.
47. Grab the two cutting planes and drag them to the trash to remove them from the scene.

zspace.com
19
48. Hit “Dissect” and take apart the Female Head model, scattering pieces around the scene.
49. Select “Zoom” from the stylus mode section.
50. Point the stylus at a piece of the human head and hit the center stylus button. The camera will zoom
and rotate to give you a different viewing angle of the piece. You can do this multiple times to move
around the scene and get closer to individual model pieces.

zspace.com
20
51. Hit the right stylus button to zoom back out to the default view. Leave the pieces of the human head
scattered around the scene.
52. Select the “Save” icon in the Control Bar. You use this feature to save whatever is currently in the scene
you’ve made. Select “Save As” to save your scene. (Note: “Save” will also prompt the same saving
window when it is your first time saving.)
a. The default name for a saved scene is the date and time when you hit save. You can enter a
new name for your saved scene if you’d like (ie: Female Head), then select “Save”. It may
take awhile for the save to complete.
53. Return to the home screen by selecting the “Home” icon.
zspace.com
21
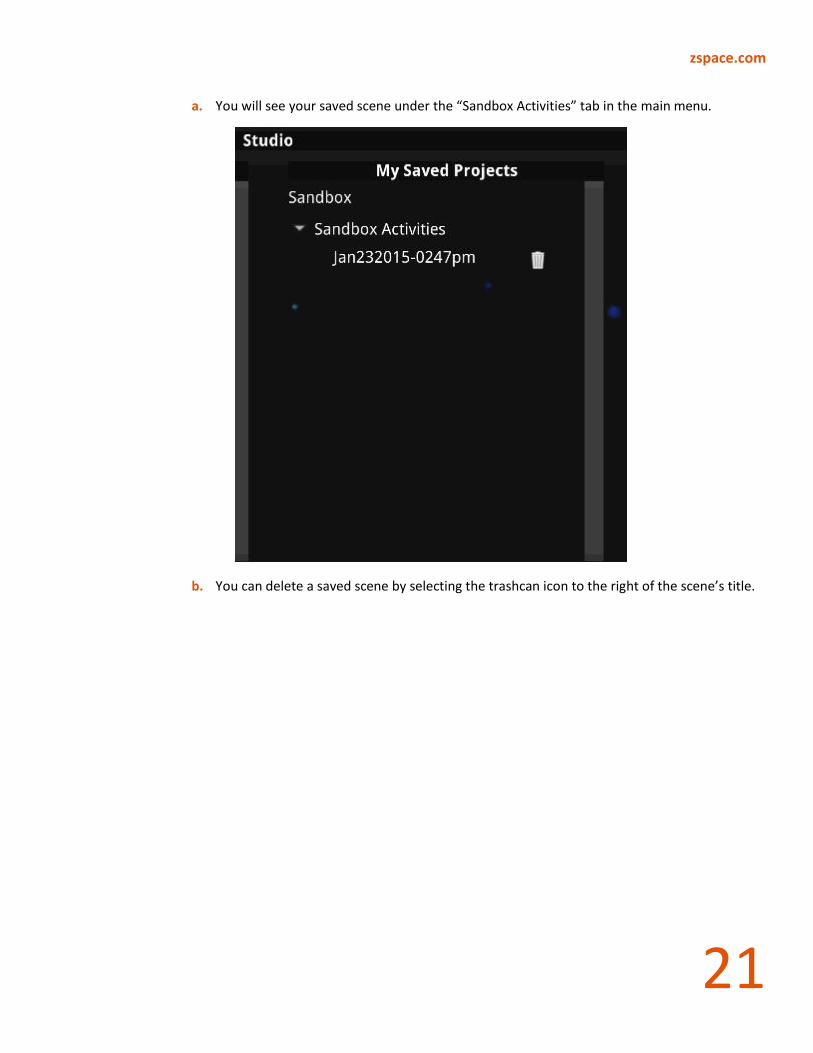
a. You will see your saved scene under the “Sandbox Activities” tab in the main menu.
b. You can delete a saved scene by selecting the trashcan icon to the right of the scene’s title.