ZENworks 11 Configuration Policies Reference - Novell
134
www.novell.com/documentation Configuration Policies Reference ZENworks® 11 Support Pack 2 October 2013
Transcript of ZENworks 11 Configuration Policies Reference - Novell

www.novell.com/documentation
Configuration Policies ReferenceZENworks® 11 Support Pack 2 October 2013

Legal Notices
Novell, Inc., makes no representations or warranties with respect to the contents or use of this documentation, and specifically disclaims any express or implied warranties of merchantability or fitness for any particular purpose. Further, Novell, Inc., reserves the right to revise this publication and to make changes to its content, at any time, without obligation to notify any person or entity of such revisions or changes.
Further, Novell, Inc., makes no representations or warranties with respect to any software, and specifically disclaims any express or implied warranties of merchantability or fitness for any particular purpose. Further, Novell, Inc., reserves the right to make changes to any and all parts of Novell software, at any time, without any obligation to notify any person or entity of such changes.
Any products or technical information provided under this Agreement may be subject to U.S. export controls and the trade laws of other countries. You agree to comply with all export control regulations and to obtain any required licenses or classification to export, re‐export or import deliverables. You agree not to export or re‐export to entities on the current U.S. export exclusion lists or to any embargoed or terrorist countries as specified in the U.S. export laws. You agree to not use deliverables for prohibited nuclear, missile, or chemical biological weaponry end uses. See the Novell International Trade Services Web page (http://www.novell.com/info/exports/) for more information on exporting Novell software. Novell assumes no responsibility for your failure to obtain any necessary export approvals.
Copyright © 2007 ‐ 2013 Novell, Inc. All rights reserved. No part of this publication may be reproduced, photocopied, stored on a retrieval system, or transmitted without the express written consent of the publisher.
Novell, Inc.1800 South Novell PlaceProvo, UT 84606U.S.A.www.novell.com
Online Documentation: To access the latest online documentation for this and other Novell products, see the Novell Documentation Web page (http://www.novell.com/documentation).
Novell Trademarks
For Novell trademarks, see the Novell Trademark and Service Mark list (http://www.novell.com/company/legal/trademarks/tmlist.html).
Third-Party Materials
All third‐party trademarks are the property of their respective owners.

Contents
About This Guide 7
1 Overview 91.1 What Is a Policy? . . . . . . . . . . . . . . . . . . . . . . . . . . . . . . . . . . . . . . . . . . . . . . . . . . . . . . . . . . . . . . . . . 91.2 What Is a Policy Group? . . . . . . . . . . . . . . . . . . . . . . . . . . . . . . . . . . . . . . . . . . . . . . . . . . . . . . . . . . . 91.3 Understanding the Policy Types . . . . . . . . . . . . . . . . . . . . . . . . . . . . . . . . . . . . . . . . . . . . . . . . . . . . 101.4 Understanding the Features of a Policy . . . . . . . . . . . . . . . . . . . . . . . . . . . . . . . . . . . . . . . . . . . . . . . 11
2 Creating Linux Configuration Policies 132.1 External Services Policy. . . . . . . . . . . . . . . . . . . . . . . . . . . . . . . . . . . . . . . . . . . . . . . . . . . . . . . . . . . 132.2 Puppet Policy . . . . . . . . . . . . . . . . . . . . . . . . . . . . . . . . . . . . . . . . . . . . . . . . . . . . . . . . . . . . . . . . . . . 15
3 Creating Windows Configuration Policies 193.1 Browser Bookmarks Policy . . . . . . . . . . . . . . . . . . . . . . . . . . . . . . . . . . . . . . . . . . . . . . . . . . . . . . . . 193.2 Dynamic Local User Policy . . . . . . . . . . . . . . . . . . . . . . . . . . . . . . . . . . . . . . . . . . . . . . . . . . . . . . . . 21
3.2.1 Rules for Workstations. . . . . . . . . . . . . . . . . . . . . . . . . . . . . . . . . . . . . . . . . . . . . . . . . . . . . 243.2.2 Rules for Users . . . . . . . . . . . . . . . . . . . . . . . . . . . . . . . . . . . . . . . . . . . . . . . . . . . . . . . . . . 253.2.3 Implementing the Dynamic Local User Policy Without the Novell Client . . . . . . . . . . . . . . . 26
3.3 Local File Rights Policy . . . . . . . . . . . . . . . . . . . . . . . . . . . . . . . . . . . . . . . . . . . . . . . . . . . . . . . . . . . 263.4 Power Management Policy . . . . . . . . . . . . . . . . . . . . . . . . . . . . . . . . . . . . . . . . . . . . . . . . . . . . . . . . 293.5 Printer Policy . . . . . . . . . . . . . . . . . . . . . . . . . . . . . . . . . . . . . . . . . . . . . . . . . . . . . . . . . . . . . . . . . . . 313.6 Remote Management Policy . . . . . . . . . . . . . . . . . . . . . . . . . . . . . . . . . . . . . . . . . . . . . . . . . . . . . . . 373.7 Roaming Profile Policy . . . . . . . . . . . . . . . . . . . . . . . . . . . . . . . . . . . . . . . . . . . . . . . . . . . . . . . . . . . . 373.8 SNMP Policy . . . . . . . . . . . . . . . . . . . . . . . . . . . . . . . . . . . . . . . . . . . . . . . . . . . . . . . . . . . . . . . . . . . 383.9 Windows Group Policy . . . . . . . . . . . . . . . . . . . . . . . . . . . . . . . . . . . . . . . . . . . . . . . . . . . . . . . . . . . . 403.10 ZENworks Explorer Configuration Policy . . . . . . . . . . . . . . . . . . . . . . . . . . . . . . . . . . . . . . . . . . . . . . 423.11 Creating Policies by Using the zman Command Line Utility . . . . . . . . . . . . . . . . . . . . . . . . . . . . . . . 44
3.11.1 Creating a Policy without Content . . . . . . . . . . . . . . . . . . . . . . . . . . . . . . . . . . . . . . . . . . . . 443.11.2 Creating a Policy with Content. . . . . . . . . . . . . . . . . . . . . . . . . . . . . . . . . . . . . . . . . . . . . . . 463.11.3 Understanding the zman Policy XML File Format . . . . . . . . . . . . . . . . . . . . . . . . . . . . . . . . 47
4 Managing Policies 514.1 Creating Policies . . . . . . . . . . . . . . . . . . . . . . . . . . . . . . . . . . . . . . . . . . . . . . . . . . . . . . . . . . . . . . . . 524.2 Viewing the Policy’s Summary . . . . . . . . . . . . . . . . . . . . . . . . . . . . . . . . . . . . . . . . . . . . . . . . . . . . . . 52
4.2.1 General . . . . . . . . . . . . . . . . . . . . . . . . . . . . . . . . . . . . . . . . . . . . . . . . . . . . . . . . . . . . . . . . 524.2.2 Policy Status . . . . . . . . . . . . . . . . . . . . . . . . . . . . . . . . . . . . . . . . . . . . . . . . . . . . . . . . . . . . 534.2.3 Message Log . . . . . . . . . . . . . . . . . . . . . . . . . . . . . . . . . . . . . . . . . . . . . . . . . . . . . . . . . . . . 54
4.3 Policy Groups. . . . . . . . . . . . . . . . . . . . . . . . . . . . . . . . . . . . . . . . . . . . . . . . . . . . . . . . . . . . . . . . . . . 554.4 Editing Policies. . . . . . . . . . . . . . . . . . . . . . . . . . . . . . . . . . . . . . . . . . . . . . . . . . . . . . . . . . . . . . . . . . 554.5 Deleting Policies. . . . . . . . . . . . . . . . . . . . . . . . . . . . . . . . . . . . . . . . . . . . . . . . . . . . . . . . . . . . . . . . . 564.6 Adding Policies to Groups . . . . . . . . . . . . . . . . . . . . . . . . . . . . . . . . . . . . . . . . . . . . . . . . . . . . . . . . . 574.7 Assigning a Policy to Devices . . . . . . . . . . . . . . . . . . . . . . . . . . . . . . . . . . . . . . . . . . . . . . . . . . . . . . 584.8 Assigning a Policy to Users . . . . . . . . . . . . . . . . . . . . . . . . . . . . . . . . . . . . . . . . . . . . . . . . . . . . . . . . 594.9 Assigning a Roaming Profile Policy for a User Profile Stored on a Windows, Linux, or
NetWare Share . . . . . . . . . . . . . . . . . . . . . . . . . . . . . . . . . . . . . . . . . . . . . . . . . . . . . . . . . . . . . . . . . 60
Contents 3

4 ZEN
4.9.1 Creating a Default Profile Folder in a Shared Location . . . . . . . . . . . . . . . . . . . . . . . . . . . . 614.9.2 Creating the Default Profile from a Windows Vista, Windows 2008, or Windows 7
Device to the Default Profile Folder in the Shared Location . . . . . . . . . . . . . . . . . . . . . . . . 614.9.3 Configuring the Permissions for the Default Profile Registry Hive. . . . . . . . . . . . . . . . . . . . 614.9.4 Copying the Default Profile to User Folders . . . . . . . . . . . . . . . . . . . . . . . . . . . . . . . . . . . . 624.9.5 Configuring Novell Client 2 for Windows 7 . . . . . . . . . . . . . . . . . . . . . . . . . . . . . . . . . . . . . 624.9.6 Enable Do not check for user Ownership of Roaming Profile Folders . . . . . . . . . . . . . . . . 62
4.10 Assigning a Roaming Profile Policy for a User Profile Stored on a Home Directory . . . . . . . . . . . . . 624.11 Assigning the Local File Rights Policy to Devices Running Different Languages . . . . . . . . . . . . . . . 634.12 Unassigning a Policy from Devices . . . . . . . . . . . . . . . . . . . . . . . . . . . . . . . . . . . . . . . . . . . . . . . . . . 644.13 Unassigning a Policy from Users . . . . . . . . . . . . . . . . . . . . . . . . . . . . . . . . . . . . . . . . . . . . . . . . . . . . 644.14 Adding System Requirements for a Policy. . . . . . . . . . . . . . . . . . . . . . . . . . . . . . . . . . . . . . . . . . . . . 64
4.14.1 Filter Conditions. . . . . . . . . . . . . . . . . . . . . . . . . . . . . . . . . . . . . . . . . . . . . . . . . . . . . . . . . . 644.14.2 Filter Logic . . . . . . . . . . . . . . . . . . . . . . . . . . . . . . . . . . . . . . . . . . . . . . . . . . . . . . . . . . . . . . 69
4.15 Disabling Policies . . . . . . . . . . . . . . . . . . . . . . . . . . . . . . . . . . . . . . . . . . . . . . . . . . . . . . . . . . . . . . . . 704.16 Enabling the Disabled Policies. . . . . . . . . . . . . . . . . . . . . . . . . . . . . . . . . . . . . . . . . . . . . . . . . . . . . . 704.17 Copying a Policy to a Content Server . . . . . . . . . . . . . . . . . . . . . . . . . . . . . . . . . . . . . . . . . . . . . . . . 704.18 Publish a Policy . . . . . . . . . . . . . . . . . . . . . . . . . . . . . . . . . . . . . . . . . . . . . . . . . . . . . . . . . . . . . . . . . 72
4.18.1 Publish as New Version. . . . . . . . . . . . . . . . . . . . . . . . . . . . . . . . . . . . . . . . . . . . . . . . . . . . 734.18.2 Publish as New Policy . . . . . . . . . . . . . . . . . . . . . . . . . . . . . . . . . . . . . . . . . . . . . . . . . . . . . 73
4.19 Reviewing the Status of the Policies at the Managed Device . . . . . . . . . . . . . . . . . . . . . . . . . . . . . . 734.20 Policy Issues on a Windows 7, Windows Server 2008, or Windows Server 2008 R2 device . . . . . . 744.21 Viewing the Predefined Reports. . . . . . . . . . . . . . . . . . . . . . . . . . . . . . . . . . . . . . . . . . . . . . . . . . . . . 754.22 Understanding Policy Versions . . . . . . . . . . . . . . . . . . . . . . . . . . . . . . . . . . . . . . . . . . . . . . . . . . . . . 754.23 Managing Policy Versions . . . . . . . . . . . . . . . . . . . . . . . . . . . . . . . . . . . . . . . . . . . . . . . . . . . . . . . . . 764.24 Publishing a Sandbox . . . . . . . . . . . . . . . . . . . . . . . . . . . . . . . . . . . . . . . . . . . . . . . . . . . . . . . . . . . . 77
4.24.1 Publishing a Sandbox as a New Version. . . . . . . . . . . . . . . . . . . . . . . . . . . . . . . . . . . . . . . 774.24.2 Publishing a Sandbox as a New Policy . . . . . . . . . . . . . . . . . . . . . . . . . . . . . . . . . . . . . . . . 774.24.3 Publishing Multiple Sandbox as New Versions . . . . . . . . . . . . . . . . . . . . . . . . . . . . . . . . . . 78
4.25 Policy Behavior Based on Content Replication Settings . . . . . . . . . . . . . . . . . . . . . . . . . . . . . . . . . . 78
5 Managing Policy Groups 815.1 Creating Policy Groups . . . . . . . . . . . . . . . . . . . . . . . . . . . . . . . . . . . . . . . . . . . . . . . . . . . . . . . . . . . 815.2 Renaming or Moving Policy Groups. . . . . . . . . . . . . . . . . . . . . . . . . . . . . . . . . . . . . . . . . . . . . . . . . . 825.3 Deleting a Policy Group . . . . . . . . . . . . . . . . . . . . . . . . . . . . . . . . . . . . . . . . . . . . . . . . . . . . . . . . . . . 825.4 Assigning a Policy Group to Devices . . . . . . . . . . . . . . . . . . . . . . . . . . . . . . . . . . . . . . . . . . . . . . . . . 835.5 Assigning a Policy Group to Users. . . . . . . . . . . . . . . . . . . . . . . . . . . . . . . . . . . . . . . . . . . . . . . . . . . 835.6 Adding a Policy to a Group . . . . . . . . . . . . . . . . . . . . . . . . . . . . . . . . . . . . . . . . . . . . . . . . . . . . . . . . 84
6 Managing Folders 856.1 Creating Folders. . . . . . . . . . . . . . . . . . . . . . . . . . . . . . . . . . . . . . . . . . . . . . . . . . . . . . . . . . . . . . . . . 856.2 Renaming or Moving Folders . . . . . . . . . . . . . . . . . . . . . . . . . . . . . . . . . . . . . . . . . . . . . . . . . . . . . . . 856.3 Deleting a Folder . . . . . . . . . . . . . . . . . . . . . . . . . . . . . . . . . . . . . . . . . . . . . . . . . . . . . . . . . . . . . . . . 86
A Troubleshooting Policy Management 87A.1 Browser Bookmarks Policy Errors . . . . . . . . . . . . . . . . . . . . . . . . . . . . . . . . . . . . . . . . . . . . . . . . . . . 87A.2 Browser Bookmarks Policy Troubleshooting . . . . . . . . . . . . . . . . . . . . . . . . . . . . . . . . . . . . . . . . . . . 88A.3 Dynamic Local User Policy Errors . . . . . . . . . . . . . . . . . . . . . . . . . . . . . . . . . . . . . . . . . . . . . . . . . . . 90A.4 Dynamic Local User Policy Troubleshooting . . . . . . . . . . . . . . . . . . . . . . . . . . . . . . . . . . . . . . . . . . . 90A.5 General Policy Troubleshooting . . . . . . . . . . . . . . . . . . . . . . . . . . . . . . . . . . . . . . . . . . . . . . . . . . . . 93A.6 Local File Rights Policy Errors . . . . . . . . . . . . . . . . . . . . . . . . . . . . . . . . . . . . . . . . . . . . . . . . . . . . . . 96A.7 Local File Rights Policy Troubleshooting . . . . . . . . . . . . . . . . . . . . . . . . . . . . . . . . . . . . . . . . . . . . . 97
works 11 Configuration Policies Reference

A.8 Printer Policy Errors . . . . . . . . . . . . . . . . . . . . . . . . . . . . . . . . . . . . . . . . . . . . . . . . . . . . . . . . . . . . . . 97A.9 Printer Policy Troubleshooting . . . . . . . . . . . . . . . . . . . . . . . . . . . . . . . . . . . . . . . . . . . . . . . . . . . . 100A.10 Roaming Profile Policy Errors . . . . . . . . . . . . . . . . . . . . . . . . . . . . . . . . . . . . . . . . . . . . . . . . . . . . . 105A.11 Roaming Profile Policy Troubleshooting . . . . . . . . . . . . . . . . . . . . . . . . . . . . . . . . . . . . . . . . . . . . . 105A.12 SNMP Policy Errors . . . . . . . . . . . . . . . . . . . . . . . . . . . . . . . . . . . . . . . . . . . . . . . . . . . . . . . . . . . . . 106A.13 Windows Group Policy Errors . . . . . . . . . . . . . . . . . . . . . . . . . . . . . . . . . . . . . . . . . . . . . . . . . . . . . 107A.14 Windows Group Policy Troubleshooting . . . . . . . . . . . . . . . . . . . . . . . . . . . . . . . . . . . . . . . . . . . . . 110A.15 ZENworks Explorer Configuration Policy Errors. . . . . . . . . . . . . . . . . . . . . . . . . . . . . . . . . . . . . . . . 116
B Best Practices 121B.1 Local File Rights Policy . . . . . . . . . . . . . . . . . . . . . . . . . . . . . . . . . . . . . . . . . . . . . . . . . . . . . . . . . . 121B.2 Dynamic Local User Policy . . . . . . . . . . . . . . . . . . . . . . . . . . . . . . . . . . . . . . . . . . . . . . . . . . . . . . . 121B.3 Roaming Profile Policy . . . . . . . . . . . . . . . . . . . . . . . . . . . . . . . . . . . . . . . . . . . . . . . . . . . . . . . . . . . 121B.4 SNMP Policy . . . . . . . . . . . . . . . . . . . . . . . . . . . . . . . . . . . . . . . . . . . . . . . . . . . . . . . . . . . . . . . . . . 122B.5 Windows Group Policy . . . . . . . . . . . . . . . . . . . . . . . . . . . . . . . . . . . . . . . . . . . . . . . . . . . . . . . . . . . 122B.6 Printer Policy . . . . . . . . . . . . . . . . . . . . . . . . . . . . . . . . . . . . . . . . . . . . . . . . . . . . . . . . . . . . . . . . . . 122
C iPrint Policy Management Utility 123C.1 Installing the IPPman Utility . . . . . . . . . . . . . . . . . . . . . . . . . . . . . . . . . . . . . . . . . . . . . . . . . . . . . . . 123C.2 Using IPPman Commands to Configure iPrint Printers . . . . . . . . . . . . . . . . . . . . . . . . . . . . . . . . . . 124
C.2.1 Creating an iPrint Printer . . . . . . . . . . . . . . . . . . . . . . . . . . . . . . . . . . . . . . . . . . . . . . . . . 124C.2.2 Cloning an iPrint Printer . . . . . . . . . . . . . . . . . . . . . . . . . . . . . . . . . . . . . . . . . . . . . . . . . . 125C.2.3 Renaming an iPrint Printer . . . . . . . . . . . . . . . . . . . . . . . . . . . . . . . . . . . . . . . . . . . . . . . . 126C.2.4 Modifying an iPrint Printer . . . . . . . . . . . . . . . . . . . . . . . . . . . . . . . . . . . . . . . . . . . . . . . . . 127C.2.5 Deleting an iPrint Printer . . . . . . . . . . . . . . . . . . . . . . . . . . . . . . . . . . . . . . . . . . . . . . . . . . 128C.2.6 Exporting iPrint Printer . . . . . . . . . . . . . . . . . . . . . . . . . . . . . . . . . . . . . . . . . . . . . . . . . . . 128C.2.7 Importing an iPrint Printer . . . . . . . . . . . . . . . . . . . . . . . . . . . . . . . . . . . . . . . . . . . . . . . . . 129
C.3 Understanding the Format of the iPrint Printer Configuration File . . . . . . . . . . . . . . . . . . . . . . . . . . 130C.3.1 Format of iPrint Printer Configuration File with Default Printing Preferences . . . . . . . . . . 130C.3.2 [Example] iPrint Printer Configuration File with Some Printing Preferences Specified . . . 131
C.4 Printing Preferences for an iPrint Printer . . . . . . . . . . . . . . . . . . . . . . . . . . . . . . . . . . . . . . . . . . . . . 131C.5 iPrint Printer List Import File Format . . . . . . . . . . . . . . . . . . . . . . . . . . . . . . . . . . . . . . . . . . . . . . . . 132
D Documentation Updates 133D.1 October 2013: Updated for ZENworks 11 SP2 (11.2.4) . . . . . . . . . . . . . . . . . . . . . . . . . . . . . . . . . . 133D.2 March 2013: Updated for ZENworks 11 SP2 (11.2.3) . . . . . . . . . . . . . . . . . . . . . . . . . . . . . . . . . . . 133
Contents 5

6 ZENworks 11 Configuration Policies Reference

About This Guide
This Novell ZENworks 11 SP2 Configuration Management Policy Management Reference includes information about Policy Management features and procedures to help you configure and maintain your Novell ZENworks 11 SP2 Configuration Management system.
For information on policies that control a range of security‐related functionalities for Windows devices or help protect and configure the ZENworks Endpoint Security Agent, see the ZENworks 11 SP2 Endpoint Security Policies Reference.
The information in this guide is organized as follows:
Chapter 1, “Overview,” on page 9Chapter 2, “Creating Linux Configuration Policies,” on page 13Chapter 3, “Creating Windows Configuration Policies,” on page 19Chapter 4, “Managing Policies,” on page 51Chapter 5, “Managing Policy Groups,” on page 81Chapter 6, “Managing Folders,” on page 85Appendix A, “Troubleshooting Policy Management,” on page 87Appendix B, “Best Practices,” on page 121Appendix C, “iPrint Policy Management Utility,” on page 123Appendix D, “Documentation Updates,” on page 133
AudienceThis guide is intended for Novell ZENworks administrators.
FeedbackWe want to hear your comments and suggestions about this manual and the other documentation included with this product. Please use the User Comments feature at the bottom of each page of the online documentation.
Additional DocumentationZENworks Configuration Management is supported by other documentation (in both PDF and HTML formats) that you can use to learn about and implement the product. For additional documentation, see the ZENworks 11 SP2 documentation Web site (http://www.novell.com/documentation/zenworks11).
About This Guide 7

8 ZENworks 11 Configuration Policies Reference

1 1Overview
Novell ZENworks 11 SP2 Configuration Management provides policies to configure operating system settings and select application settings. By applying a policy to multiple devices, you can ensure that all of the devices have the same configuration.
The following sections contain additional information:
Section 1.1, “What Is a Policy?,” on page 9Section 1.2, “What Is a Policy Group?,” on page 9Section 1.3, “Understanding the Policy Types,” on page 10Section 1.4, “Understanding the Features of a Policy,” on page 11
1.1 What Is a Policy?A policy is a rule that controls a range of hardware and software configuration settings on the managed devices. For example, an administrator can create policies to control browser bookmarks available in the browser, printers to access, and security and system configuration settings on the managed devices.
You can use the policies to create a set of configurations that can be assigned to any number of managed devices. It helps you to provide the devices with a uniform configuration, and it eliminates the need to configure each device separately.
You can assign a policy directly to a device or a user. You can also assign the policy to a folder or group where the user or device is a member. Assigning a policy to device groups rather than device folders is the preferred way, because a device can be a member of multiple device groups, but it can be a member of only one device folder.
On managed devices, each policy type is enforced by a Policy Handler or Enforcer, which makes all the configuration changes necessary to enforce or unenforce the settings in a given policy.
1.2 What Is a Policy Group?A policy group is a collection of one or more policies. Creating policy groups eases the administration efforts in managing policies. You can create policy groups and assign them to managed devices the same way you would assign individual policies.
Because the policy inherits the group’s assignments, managing a policy group is easier than managing individual policies. For example, if multiple policies are included in a policy group and the policy group is assigned to a device or a device group, then all the policies included in the policy group are automatically assigned to the device or device group at the same time. You need not individually assign each policy to a device or a device group.
Overview 9

1.3 Understanding the Policy TypesZENworks 11 SP2 lets you create the following policy types:
Linux Configuration Policies: Lets you configure policies supplied by ZENworks Configuration Management that are used to manage configuration settings for Linux devices. The following policies are located in this category:
External Services policyPuppet policy
Windows Configuration Policies: Lets you configure policies supplied by ZENworks Configuration Management that are used to manage configuration settings for Windows devices. The following policies are located in this category:
Browser Bookmarks policyDynamic Local User policyLocal File Rights policyPower Management policyPrinter policyRemote Management policyRoaming Profile policySNMP policyWindows Group policyZENworks Explorer Configuration policy
Windows Endpoint Security Policies: Lets you configure policies supplied by ZENworks Endpoint Security Management that are used to manage security settings for Windows devices. The following policies are located in this category:
Application Control policyCommunication Hardware policyData Encryption policyFirewall policyLocation Assignment policyScripting policySecurity Settings policyStorage Device Control policyUSB Connectivity policyVPN Enforcement policyWireless policy
The Windows Endpoint Security policies are not covered in this guide. For information about these policies, see the ZENworks 11 SP2 Endpoint Security Policies Reference.Windows Full Disk Encryption Policies: Lets you configure policies supplied by ZENworks Full Disk Encryption that are used to encrypt entire disks (or volumes) for Windows devices. The following policy is located in this category:
Full Disk Encryption policyThe Windows Full Disk Encryption policies are not covered in this guide. For information about these policies, see the ZENworks 11 SP2 Full Disk Encryption Policy Reference.
10 ZENworks 11 Configuration Policies Reference

1.4 Understanding the Features of a PolicyA policy is applied to a device or a user only if the policy is directly or indirectly associated to that device or user.
The Browser Bookmarks policy, Dynamic Local User policy, Printer policy, Remote Management policy, Windows Group policy, and ZENworks Explorer Configuration policy can be applied to a device or a user:
The Local File Rights and SNMP policies can be applied only to a device.
The Roaming Profile policy can be applied only to a user.A policy can be associated to groups and containers.In ZENworks Control Center, devices and users can be organized by using containers and groups. A device or user can be a member of multiple groups. The containers can be nested within other containers. If a policy is associated to a group of users, it applies to all users in that group. If a policy is associated to a user container, it applies to all users in the entire subtree rooted at that container. The same behavior applies to device groups and containers.A policy can be associated to query groups.In ZENworks Control Center, the devices can also be members of query groups. Query groups are similar to ordinary groups except that the membership is determined by a query defined by the administrator. All devices that satisfy the query become members of that device group. The query is evaluated periodically and the membership is updated with the results. An administrator can configure the periodicity of the evaluation. An administrator can also force an immediate refresh of a query group. Query groups act just like other groups where policies are concerned.Policies are chronologically ordered by default.When multiple policies are associated to a device, user, group, or container, the associations are chronologically ordered by default. The administrator can change the ordering. If a device or user belongs to multiple groups, the groups are ordered. Consequently, the policies associated to those groups are also ordered. The administrator can change the ordering of groups for a device or user at any time.In addition, the policies in a policy group are ordered.Policies have a precedence configured to determine the policy that is effective for a device or a user.Many policies of the same type can be applied to a user or a device through direct association and inheritance. For example, if a Browser Bookmark policy is associated to a user and another Browser Bookmark policy is associated to a container containing that user, the policy directly associated to that user overrides the policy associated to the container.Policies support management by exception.You can define a global policy for your enterprise and associate it to the top‐level container containing all your user objects. You can then override configuration items in the global policy by defining a new policy and associating it to specific users or user groups. These users receive their configuration from the new policy. All other users receive their configuration from the global policy.Policies support system requirements.You can specify the system requirements of a device or user in a policy. The policy is applied to a device or user only if the device or user meets the system requirements.For example, the SNMP policy is applied by default on all devices having the SNMP service installed.
Overview 11

ZENworks Configuration Management supports singular and plural policies.Singular Policy: If multiple policies of the same policy type are assigned to a device or a user and the policy type is a Singular policy, then only the nearest associated policy meeting the system requirements is applied. If the policy type is associated to both user and device, then two different policies can be assigned to user and device.The SNMP policy, Dynamic Local User policy, Remote Management policy, Roaming Profile policy, Power Management policy, and ZENworks Explorer Configuration policy are singular policies.Plural Policy: If multiple policies of the same policy type are assigned to a device or a user and the policy type is a Plural type, then all policies meeting the associated system requirement are applied. The Browser Bookmarks policy, Local File Rights policy, Windows Group policy, and Printer policy are plural policies. However, the security settings in the Windows Group policy are not plural. Policies can be disabled.When you create a policy in ZENworks Configuration Management, the policy is enabled by default. You can disable it if you do not want to apply it on a user or a device.ZENworks Configuration Management allows you to resolve policy conflicts.The set of effective policies is a subset of the set of assigned policies. The set of effective policies for a device or user is calculated by applying precedence rules, multiplicity rules, and system requirements filters on the set of assigned policies. Effective policies are calculated separately for devices and users. The Policy Conflict Resolution setting determines how user and device policies interact for a specific user and device combination.Effective policies are calculated separately for devices and users. When a user logs in to a device, policies associated to both the user and the device must be applied. Policy Conflict Resolution settings are used only when policies of the same type are associated to both the device and the user. This setting determines the precedence order among the policies associated to the user and those associated to the device. The Policy Conflict Resolution settings are applied after the effective policies are calculated. Policy Conflict Resolution settings are defined when associating a policy to a device. The settings cannot be defined for associations to users. For each policy type, the Policy Conflict Resolution setting defined in the closest effective policy of that type is applied for all policies of that type.A Policy Resolution Conflict setting can have one of the following values:
User Last: Applies the policies associated to the device first, then the policies associated to the user. This is the default value.Device Last: Applies the policies associated to the user first, then the policies associated to the device.User Only: Applies only the policies associated to the user and ignores the policies associated to the device.Device Only: Applies only the policies associated to the device and ignore the policies associated to the user.
NOTE: The Policy Conflict Resolution setting is taken from the device‐associated policy with the highest precedence.
When a user manually logs out of Z‐Icon login and logs in as a different ZENworks user, the Roaming Profile policy, Dynamic Local User policy, and Group policy will not be applied. However, ZENworks Configuration Management will enforce these policies at the next general refresh and the user will be prompted for a re‐login if required.
12 ZENworks 11 Configuration Policies Reference

2 2Creating Linux Configuration Policies
Novell ZENworks 11 SP2 Configuration Management lets you create policies by using ZENworks Control Center or by using the zman command line utility.
The following sections contain step‐by‐step instructions about creating the Linux configuration policies by using ZENworks Control Center.
Section 2.1, “External Services Policy,” on page 13Section 2.2, “Puppet Policy,” on page 15
2.1 External Services PolicyThe External Services policy lets you configure the external services on a Linux managed device for YUM, ZYPP or MOUNT repositories. It enables you to download and install the software packages or updates from these repositories on the managed devices.
1 In ZENworks Control Center, click the Policies tab.2 In the Policies list, click New, then click Policy.
orIn the Policy Tasks, click New Policy.The Select Platform page is displayed.
3 Select Linux, then click Next.The Select Policy Category page is displayed.
4 Select Linux Configuration Policies, then click Next.5 Select External Services Policy as the Policy Type, then click Next.6 In the Define Details page fill in the following fields:Policy Name: Provide a name for the policy. The policy name must be different from the name of any other item (group, folder, and so forth) that resides in the same folder. The name you provide displays in ZENworks Control Center.Folder: Type the name or browse to and select the ZENworks Control Center folder where you want the policy to reside. The default is /Policies, but you can create additional folders to organize your policies.Administrator Notes: Provide a short description of the policy’s content. This description displays in ZENworks Control Center.
7 Click Next to display the External Services Policy page.8 In the External Services Policy page, click Add to display the External Services Policy dialog box.9 The following table lists the tasks you can perform in the External Services policy dialog box.
Creating Linux Configuration Policies 13

10 Review the information on the Summary page and, if necessary, use the Back button to make changes to the information on the Summary page.
11 (Conditional) Select Create as Sandbox, if you want to create the sandbox version of the policy.12 Select the check box for Define Additional Properties.13 Click Finish to create the new External Services policy.14 Click Relationships and assign the newly created External Services policy to a test device and a
non‐test device.
NOTEIf you disable the Bundle Management module, services that are a part of the External Services policy do not flow down to the agent.
Task Steps Additional Details
Add an External Service
1. Click Add to display the External Services Policy dialog box.
2. Specify the name of the service, the URL for the service, and the type of repository to which you want to add the service. Click Help for information on how to fill the required fields.
3. Select the checkbox Recursive to add services on the managed device for the Romps present under all the subdirectories of the specified URL. The recursive property is applicable only to the MOUNT service type.
4. For External Services that require authentication, click to browse to and select an existing credential from the Credential Vault.
5. Select the check box Synchronize with External Package Management Tools, to synchronizes the External Services with the package management tools.
6. Click OK.
The available repository types are AUTO, ZYPP, YUM, and MOUNT.
AUTO is a default repository type, if selected, the system automatically detects either ZYPP or YUM as the type of repository.
The credential option is not applicable to the MOUNT service type.
Edit an External Service
1. Select the External Service you want to edit, then click Edit.
2. Follow the online prompts to make changes.
3. Click OK.
The service name and recursive property once specified cannot be edited. To edit these options for the existing service, remove the service and add a new External Service.
Remove an External Service
1. Select one or more External Services that you want to remove, then click Remove.
14 ZENworks 11 Configuration Policies Reference

2.2 Puppet PolicyThe Puppet policy lets you apply the Linux configuration on the Linux devices.
1 In ZENworks Control Center, click the Policies tab.2 In the Policies list, click New, then click Policy.
orIn the Policy Tasks, click New Policy.The Select Platform page is displayed.
3 Select Linux, then click Next.The Select Policy Category page is displayed.
4 Select Linux Configuration Policies, then click Next.5 Select Puppet Policy as the Policy Type, then click Next.6 In the Define Details page fill in the following fields:Policy Name: Provide a name for the policy. The policy name must be different from the name of any other item (group, folder, and so forth) that resides in the same folder. The name you provide displays in ZENworks Control Center.Folder: Type the name or browse for and select the ZENworks Control Center folder where you want the policy to reside. The default is /Policies, but you can create additional folders to organize your policies.Administrator Notes: Provide a short description of the policy’s content. This description displays in ZENworks Control Center.
7 Click Next to display the Puppet Policy page. You can create a puppet policy to run scripts as either Manifest or Module.The following options lets you run puppet scripts on a managed device, upload the script file, and specify if a dry run on the script should be performed.
Run Script As: You can create a policy to run script as either Manifest or Module.FileName: Depending on your selection to run the script as Manifest or Module, browse for and upload the script file in the following formats:Manifest: Upload a .pp file.Module: Upload a .zip, .tar, .tar.gz, .tar.bz2, .tgz, or .tbz2 file.
NOTE: After creating either Manifest or Module on a Windows operating system, run the dos2unix command on the puppet script file, to avoid parsing errors on the managed device.
Dry Run: Select this option to have ZENworks Configuration Management perform a test to determine if the Puppet policy can be successfully enforced on a managed device.If there are any issues that could prevent the policy from being enforced, you can view the issues in the log file created to troubleshoot the policy creation process. The log file is located at /var/opt/novell/log/zenworks/puppet.log. A successful dry run ensures that the policy can be successfully enforced on the managed device.Advanced Options: Select this option to specify the Puppet Command Options. The Run Puppet Command As field displays the puppet command that will be run on the managed device. The command consists of the following two parts:Part 1: Includes the non‐editable part of the command as follow:
Creating Linux Configuration Policies 15

/opt/novell/zenworks/bin/puppet script_name --noop
/opt/novell/zenworks/bin/puppet is the portion of the command that is displayed by default. Based on your choice to run the script as a manifest or a module, the script_name parameter is replaced by the name of the manifest file or the module name. If the Dry Run option is enabled, then ‐‐noop string gets appended to the command.Part 2: Includes the editable part of the command. The following portion of the command is displayed by default:-dv --detailed-exitcodes --confdir /etc/opt/novell/zenworks/puppet -l /var/opt/novell/log/zenworks/puppet.log For information on the parameters used in the command, see the following table:
You can choose to edit this portion of the command as in the following examples.Example 1: The default log path is /var/opt/novell/log/zenworks/puppet.log. However, you can choose to specify a different log file such as a /tmp/puppet.log using the following command./opt/novell/zenworks/bin/puppet script_name --noop -dv --detailed-exit codes --confdir /etc/opt/novell/zenworks/puppet -l /tmp/puppet.log
Example 2: The default puppet configuration file is /etc/opt/novell/zenworks/puppet/puppet.conf. However, you can choose to specify a different configuration file as follows:/opt/novell/zenworks/bin/puppet script_name --noop --config=/tmp/mypuppet.conf -l /tmp/puppet.log
8 Review the information on the Summary page and, if necessary, use the Back button to make changes to the information on the Summary page. In the Summary page the Module file content displays the list of files that are packaged as either Module or Manifest.
9 (Conditional) Select Create as Sandbox, if you want to create the sandbox version of the policy.10 Select the check box for Define Additional Properties.
Parameter Description
d Enables full debugging.
v Prints extra information.
detailed-exitcodes Provides transaction information through exit codes.
l Creates a log file.
log_file_path Path of the log file, the default path is
/var/opt/novell/log/zenworks/puppet.log.
--confdir Is the Puppet Configuration Directory.
The availability of the supported parameters is dependent on the version of the puppet installed on the managed device.
16 ZENworks 11 Configuration Policies Reference

11 Click Finish to create the new Puppet policy.12 Click Relationships and assign the newly created Puppet policy to a test device and a non‐test
device.
Creating Linux Configuration Policies 17

18 ZENworks 11 Configuration Policies Reference

3 3Creating Windows Configuration Policies
Novell ZENworks 11 SP2 Configuration Management lets you create policies by using ZENworks Control Center or by using the zman command line utility.
The following sections contain step‐by‐step instructions about creating the Windows Configuration policies by using ZENworks Control Center:
Section 3.1, “Browser Bookmarks Policy,” on page 19Section 3.2, “Dynamic Local User Policy,” on page 21Section 3.3, “Local File Rights Policy,” on page 26Section 3.4, “Power Management Policy,” on page 29Section 3.5, “Printer Policy,” on page 31Section 3.6, “Remote Management Policy,” on page 37Section 3.7, “Roaming Profile Policy,” on page 37Section 3.8, “SNMP Policy,” on page 38Section 3.9, “Windows Group Policy,” on page 40Section 3.10, “ZENworks Explorer Configuration Policy,” on page 42
The following section explains how to create policies by using the zman command line utility:
Section 3.11, “Creating Policies by Using the zman Command Line Utility,” on page 44
3.1 Browser Bookmarks PolicyThe Browser Bookmarks policy lets you configure Internet Explorer favorites for Windows devices and users.
1 In ZENworks Control Center, click the Policies tab.2 In the Policies list, click New, then click Policy.
orIn the Policy Tasks, click New Policy.The Select Platform page is displayed.
3 Select Windows, then click Next.The Select Policy Category page is displayed.
4 Select Windows Configuration Policies, then click Next.5 Select Browser Bookmarks Policy as the Policy Type, then click Next6 In the Define Details page fill in the following fields:
Creating Windows Configuration Policies 19

Policy Name: Provide a name for the policy. The policy name must be different than the name of any other item (group, folder, and so forth) that resides in the same folder. The name you provide displays in ZENworks Control Center.Folder: Type the name or browse to and select the ZENworks Control Center folder where you want the policy to reside. The default is /policies, but you can create additional folders to organize your policies.Administrator Notes: Provide a short description of the policy’s content. This description displays in ZENworks Control Center.
7 Click Next to display the Bookmarks Tree Data Source page.8 Create a browser bookmarks tree by importing a previously exported file or manually entering
the data. Before you import a book marks file ensure that it is in UTF‐8 format. To manually convert the bookmark file into UTF‐8 format, use a text editorThe following list contains browser‐specific information to create the exported file:
Internet Explorer 8.x/9.x: In the browser window, click File > Import and Export. Follow the instructions given in the Import/Export Wizard to create the bookmark.htm file.Mozilla Firefox 3.x: In the browser window, click Bookmarks > Organize Bookmarks, then click Import and Backup > Export HTML to create the bookmarks.html file.Mozilla Firefox 4.x to 10.x: In the browser window, click Bookmarks > Show All Bookmarks to open the library. From the toolbar on the library, click Import and Backup > Export Bookmarks to HTML to create the bookmarks.html file.
9 Click Next to display the Bookmarks Tree Configuration page, then use the options to configure the bookmarks tree.The following table lists the tasks you can perform with the New, Edit, and Delete options.
10 Review the information on the Summary page and, if necessary, use the Back button to make changes to the information on the Summary page.
Field Details
New Click New > Folder to display the Add Folder to Bookmarks dialog box, through which you can add a new folder to the bookmarks tree.
Click New > Bookmark to display the Add Bookmark to Bookmarks dialog box, through which you can add a new bookmark to the bookmarks tree by specifying the bookmark name and a URL. Click the button next to the URL field to verify that the URL entered by you is correct and functional.
Edit Select the bookmark name you want to change, click Edit > Rename, then specify a new name.
Click Edit > Sort to organize the bookmarks in ascending or descending order.
Click Edit > Move Up, Move Down, or Move To to relocate a bookmark.
Click Edit > Select All Children > to select all the subdirectories and bookmarks of the selected parent directory.
Click Edit > Deselect All Children > to deselect all the subdirectories and bookmarks of the selected parent directory.
Click Edit > Clear Selection > to clear the selections.
Delete Click Delete to delete the selected bookmarks and the bookmarks folder from the bookmarks tree. However, you cannot delete the default bookmarks folder named Bookmarks.
20 ZENworks 11 Configuration Policies Reference

11 (Conditional) Select Create as Sandbox, if you want to create the sandbox version of the policy.12 Click Finish to create the policy now, or select Define Additional Properties to specify additional
information, such as policy assignment, system requirements, enforcement, status, and which group the policy is a member of.
3.2 Dynamic Local User PolicyThe Dynamic Local User policy lets you create new users and manage existing users on the managed device after they have successfully authenticated to user source.
NOTE:
It is recommended that you install the latest version of the Novell Client on the managed device before the Dynamic Local User policy is enforced. To obtain the latest version of Novell Client, see the Novell Download Web site (http://download.novell.com/index.jsp).To implement the Dynamic Local User policy without the Novell Client, see Section 3.2.3, “Implementing the Dynamic Local User Policy Without the Novell Client,” on page 26
1 In ZENworks Control Center, click the Policies tab.2 In the Policies list, click New, then click Policy.
orIn the Policy Tasks, click New Policy.The Select Platform page is displayed.
3 Select Windows, then click Next.The Select Policy Category page is displayed.
4 Select Windows Configuration Policies, then click Next.5 Select Dynamic Local User Policy as the Policy Type, click Next.6 In the Define Details page fill in the following fields:Policy Name: Provide a name for the policy. The policy name must be different than the name of any other item (group, folder, and so forth) that resides in the same folder. The name you provide displays in ZENworks Control Center.Folder: Type the name or browse to the ZENworks Control Center folder where you want the policy to reside. The default is /policies, but you can create additional folders to organize your policies.Administrator Notes: Provide a short description of the policy’s content. This description displays in ZENworks Control Center.
7 Click Next to display the User Configurations page, then use the options on the page to configure the user account.The following table contains information about configuring dynamic local user accounts and managing them on managed devices:
Field Details
Use User Source Credentials
Enables logging in through the user source credentials instead of the Windows Operating System credentials.
Creating Windows Configuration Policies 21

Use the Credentials Specified Below (Always volatile)
If you do not select Use User Source Credentials, the user account that is created is always volatile and is not accessible. This setting allows you to specify the following user credentials for a volatile user:
User Name: Specify the user’s name.
Full Name: Specify the user’s complete name.
Description: Provide any additional information that helps the administrator to further identify this user account.
Use User Source Password: Select this option to create the account with the password configured in the user source. Ensure that you enable the setting Manage Existing User Account (if any). If both settings are enabled, a user who has logged into the workstation at least once, can login locally on the workstation and access it even in case of network logon failure.
If a user logs in to a device that has the Dynamic Local User policy applied and then logs out of the device when the device is disconnected from the network, the user is unable to log in to the disconnected device again. For information on this issue, see “Dynamic Local User Policy Troubleshooting” on page 90.
Manage Existing User Account (if any)
Helps you to manage a user object that already exists.
If you select both the Volatile User and the Manage Existing User Account (If Any) check boxes, and the user has a permanent local account that uses the same username specified in the user source, the permanent account is changed to a volatile (temporary) account and is removed when the user logs out.
If a local user object already exists with a DLU user name, any changes to the DLU user name cannot be applied on the policy unless you enable Manage Existing User Account (if any). This setting must be enabled for the following scenarios to work:
Manually changing the user password.
Changing the user e-directory password.
Applying updated settings if the local user account is present on the device.
Volatile User Specifies the use of a volatile user account for login. The user account that NWGINA creates on the local workstation can be either a volatile or a nonvolatile account.
Enable Volatile User Cache
Enables the caching of the volatile user account on the device for a specified period of time.
If the Enable Volatile User Cache setting is set in disconnected mode, the following are possible:
On a device that has Novell Client installed, the last logged in user can log in to the system locally.
If you have enabled ZENworks GINA to use DLU without the Novell Client, then any previously logged in cached user can log in to the system locally.
Field Details
22 ZENworks 11 Configuration Policies Reference

8 Click Next to display the Login Restrictions page, then fill in the fields to configure user access:Included / Excluded Users: Lists the users and containers that you want to include or exclude access to. For more information, see “Rules for Users” on page 25.Included / Excluded Workstations: Lists the workstations and containers that you want to include or exclude access to. For more information, see “Rules for Workstations” on page 24.
The Excluded Workstations List displays the workstations and containers that you want to exclude DLU access to. Workstations listed or workstations that are in the containers listed here cannot use DLU access. You can make exceptions for individual workstations by listing them in the Included Workstations List. This allows DLU access to those workstations only, and excludes DLU access to the remaining workstations in the container. If the user account is already on the workstation, the option to exclude the device from receiving the DLU policy is ignored.
9 Click Next to display the File Rights page.For a DLU Policy, the timeout duration for enforcing file rights, if it is configured, is 120 seconds. For large directory structures, the DLU policy might not be enforced because of a time out. To enforce the file rights, follow instructions in TID 7004171, in the Novell Support Knowledge base (http://www.novell.com/support/search.do?usemicrosite=true&searchString=7004171).The following table contains information about managing Dynamic Local User file system access on the managed device:
Cache Volatile User for Time Period (Days)
Allows you to specify the number of days to cache the volatile user account on the device. The default value is 5. You can specify a value from 1 to 999 days.
This volatile user account is deleted after the expiry of the specified cache period when another DLU user logs out from the device.
Not a Member Of Displays the available group to which a user can be assigned as a member.
Member Of Displays groups a user is member of.
Custom Click Custom to display the Custom Group Properties dialog box, through which you can add a new custom group and configure its rights.
Edit Click Edit to view and edit the details of a custom group. You cannot edit the default Windows groups with this option.
Delete Click Delete to delete a custom group. You cannot delete the default Windows groups with this option.
Field Details
Add Allows you to select and assign appropriate file rights.
To add a file/folder:
1. Click Add, then specify a file or folder.
2. Select the file rights you want to assign to the specified file or folder.
3. If you want to restrict the inheritance of the rights to only the immediate child file or folder, select Restrict inheritance to immediate child files/folders only.
4. Click OK.
Field Details
Creating Windows Configuration Policies 23

10 Click Next to display the Summary page. Review the information and, if necessary, use the Back button to make changes to the information on the Summary page.
11 (Conditional) Select Create as Sandbox, if you want to create the sandbox version of the policy.12 Click Finish to create the policy now, or select Define Additional Properties to specify additional
information, such as policy assignment, system requirements, enforcement, status, and which group the policy is a member of.
3.2.1 Rules for WorkstationsBe aware of the following:
By default, all workstations are included.For an indirect association, if an object is in both lists, the closeness of the association is considered. A direct association is closer than a group association, which in turn is closer than a folder.If the closeness is the same, a workstation is directly added to Group A and Group B, and the Included List takes precedence.
Edit Copy: Allows you to copy and add a file rights setting to the list.
1. Select a file or folder, then click Edit.
2. Click Copy.
3. Specify a new name.
4. Click OK.
Rename: Allows you to edit only the filename.
1. Select a file or folder, then click Edit.
2. Click Rename.
3. Specify a new filename.
4. Click OK.
Move Up or Move Down
Allows you to reorder the files or folders.
1. Select the check box next to the file or folder you want to move.
2. Click Move Up or Move Down to relocate it.
Remove Allows you to remove a file or a folder from the list.
1. Select the check box next to the file or folder.
2. Click Remove.
Field Details
Excluded List Included List Result
Workstation-A Workstation-B The policy is applied on all workstations except Workstation-A.
24 ZENworks 11 Configuration Policies Reference

3.2.2 Rules for UsersBe aware of the following:
By default, all users are included.For an indirect association, if an object is in both the lists, the closeness of the association is considered. A direct association is closer than a group association, which in turn is closer than a folder.If the closeness is the same, a user is directly added to Group A and Group B, and the Included List takes precedence.
Workstation Group-1 Workstation-A The policy is not applied on any workstations in Workstation Group-1, except for Workstation -A.
The policy is applied on workstations that are not contained in Workstation Group-1.
Container-1 Workstation Group-1 or Workstation-A
The policy is not applied on any workstations in Container-1, except for Workstation Group-1 or Workstation-A.
The policy is also applied on workstations that are not contained in Container-1.
Excluded List Included List Result
Excluded List Included List Result
User-A User-B The policy is applied on all users except User-A.
User Group-1 User-A The policy is not applied on any users in User Group-1, except for User -A.
The policy is also applied on users that are not contained in User Group-1.
Container-1 User Group-1 or User-A The policy is not applied on any users in Container-1, except for User Group-1 or User-A.
The policy is also applied on users that are not contained in Container-1.
Creating Windows Configuration Policies 25

3.2.3 Implementing the Dynamic Local User Policy Without the Novell ClientTo log a dynamic user with an e‐directory account into a workstation using the Dynamic Local User policy:
1 Install the ZENworks Adaptive Agent on the workstation.2 After successful installation, create a DWORD value AllowDLUWithoutNovellClient under the
following registry key and set its data to 1:Windows XP (32‐bit): HKEY_LOCAL_MACHINE\\SOFTWARE\\Novell\\NWGINAWindows Vista (32‐bit and 64‐bit): HKEY_LOCAL_MACHINE\\SOFTWARE\\Novell\\Authentication
Windows 7 (32‐bit and 64‐bit): HKEY_LOCAL_MACHINE\\SOFTWARE\\Novell\\AuthenticationThis support is not available on managed devices running Windows Server operating systems.
NOTE: In Windows Vista or Windows 7, if the initial login screen does not have an option to enter the username, then do one of the following: 1. Enable the following setting from the Local Security policy:
a. Launch secpol.msc.b. Navigate to Security Settings > Local Policies > Security Options.c. Enable Interactive Logon: > Do not display last user name.
or2. Create the following registry key
[HKEY_LOCAL_MACHINE\SOFTWARE\Microsoft\Windows\CurrentVersion\Policies\System] dontdisplaylastusername ?=dword:00000001
For more information on the Registry key see, ZENworks 11 Registry Keys Reference.
3 Create a user source on the ZENworks server, assuming the user source has one user with the credentials admin/novell.
4 Log in to the workstation using user‐source credentials (admin/novell).A Dynamic Local User account gets created.
IMPORTANT: If the DLU policy is created to take the credentials other than the user‐source credentials, a DLU user fails to unlock the workstation.
3.3 Local File Rights PolicyThe Local File Rights policy allows you to configure rights for files or folders that exist on the NTFS file systems.
1 In ZENworks Control Center, click the Policies tab.2 In the Policies list, click New, then click Policy.
orIn the Policy Tasks, click New Policy.The Select Platform page is displayed.
3 Select Windows, then click Next.
26 ZENworks 11 Configuration Policies Reference

The Select Policy Category page is displayed.4 Select Windows Configuration Policies, then click Next.5 Select Local File Rights Policy as the Policy Type, then click Next6 In the Define Details page fill in the following fields:Policy Name: Provide a name for the policy. The policy name must be different than the name of any other item (group, folder, and so forth) that resides in the same folder. The name you provide displays in ZENworks Control Center.Folder: Type the name or browse to and select the ZENworks Control Center folder where you want the policy to reside. The default is /policies, but you can create additional folders to organize your policies.Administrator Notes: Provide a short description of the policy’s content. This description displays in ZENworks Control Center.
7 Click Next to display the Configure Basic Properties page, then use the options on the page to configure the attributes.The following table contains information about configuring a file or folder and the attributes associated with it:
This page allows you to configure permissions for only one file or folder. If you want to assign permissions to multiple files or folders, then configure them in the Details page after creating the policy.
8 Click Next to display the Configure Permissions page, then use the options on the page to configure permissions for selected users or groups.The following table contains information about configuring permissions:
Field Details
File / Folder Path Allows you to specify the complete path of a file or folder on the managed device. You can use the ZENworks system variables or environment variables to specify the path.
To configure system variables in ZENworks Control Center, click the Configuration tab > the Device Management setting in the Management Zone Settings panel > System Variables. Click the Help button for details about configuring system variables.
Notify if the file or folder does not exist
When you select this option, a message is sent to the Primary Server. If a folder entered by the user is not present on the ZENworks Adaptive Agent, then the policy fails to enforce on the managed device.
If you de-select this option, even if a folder is not present on the ZENworks Adaptive Agent, a message will not be sent to the Primary Server and the policy will be enforced successfully on the managed device.
Attributes Allows you to specify the attributes of a file or folder, such as Read only and Hidden.
Creating Windows Configuration Policies 27
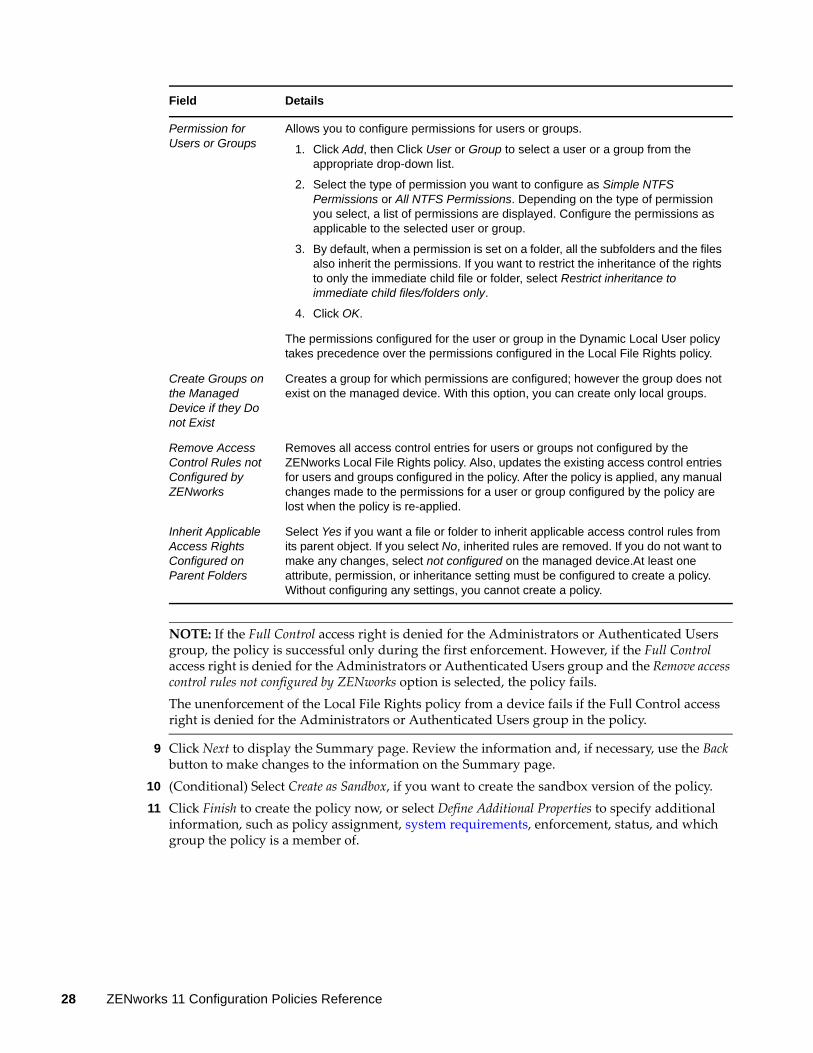
NOTE: If the Full Control access right is denied for the Administrators or Authenticated Users group, the policy is successful only during the first enforcement. However, if the Full Control access right is denied for the Administrators or Authenticated Users group and the Remove access control rules not configured by ZENworks option is selected, the policy fails.The unenforcement of the Local File Rights policy from a device fails if the Full Control access right is denied for the Administrators or Authenticated Users group in the policy.
9 Click Next to display the Summary page. Review the information and, if necessary, use the Back button to make changes to the information on the Summary page.
10 (Conditional) Select Create as Sandbox, if you want to create the sandbox version of the policy.11 Click Finish to create the policy now, or select Define Additional Properties to specify additional
information, such as policy assignment, system requirements, enforcement, status, and which group the policy is a member of.
Field Details
Permission for Users or Groups
Allows you to configure permissions for users or groups.
1. Click Add, then Click User or Group to select a user or a group from the appropriate drop-down list.
2. Select the type of permission you want to configure as Simple NTFS Permissions or All NTFS Permissions. Depending on the type of permission you select, a list of permissions are displayed. Configure the permissions as applicable to the selected user or group.
3. By default, when a permission is set on a folder, all the subfolders and the files also inherit the permissions. If you want to restrict the inheritance of the rights to only the immediate child file or folder, select Restrict inheritance to immediate child files/folders only.
4. Click OK.
The permissions configured for the user or group in the Dynamic Local User policy takes precedence over the permissions configured in the Local File Rights policy.
Create Groups on the Managed Device if they Do not Exist
Creates a group for which permissions are configured; however the group does not exist on the managed device. With this option, you can create only local groups.
Remove Access Control Rules not Configured by ZENworks
Removes all access control entries for users or groups not configured by the ZENworks Local File Rights policy. Also, updates the existing access control entries for users and groups configured in the policy. After the policy is applied, any manual changes made to the permissions for a user or group configured by the policy are lost when the policy is re-applied.
Inherit Applicable Access Rights Configured on Parent Folders
Select Yes if you want a file or folder to inherit applicable access control rules from its parent object. If you select No, inherited rules are removed. If you do not want to make any changes, select not configured on the managed device.At least one attribute, permission, or inheritance setting must be configured to create a policy. Without configuring any settings, you cannot create a policy.
28 ZENworks 11 Configuration Policies Reference

3.4 Power Management PolicyThe Power Management policy allows you to configure the Power Management settings on the managed devices by creating a power scheme. It lets you configure the plugged in and battery power management settings and assign them to a device or a user.
1 In ZENworks Control Center, click the Policies tab.2 In the Policies list, click New, then click Policy.
orIn the Policy Tasks, click New Policy.The Select Platform page is displayed.
3 Select Windows, then click Next.The Select Policy Category page is displayed.
4 Select Windows Configuration Policies, then click Next.5 Select Power Management Policy as the Policy Type, then click Next.6 In the Define Details page fill in the following fields:Policy Name: Provide a name for the policy. The policy name must be different than the name of any other item (group, folder, and so forth) that resides in the same folder. The name you provide displays in ZENworks Control Center.Folder: Type the name or browse to and select the ZENworks Control Center folder where you want the policy to reside. The default is /policies, but you can create additional folders to organize your policies.Administrator Notes: Provide a short description of the policy’s content. This description displays in ZENworks Control Center.
7 Click Next to configure the power settings for a managed device.8 In the Add Power Scheme Settings page fill in the following fields:Scheme Name: The policy name specified on the Define Details page is automatically displayed. You can either retain the policy name for the scheme or specify a new scheme name. ZENworks 11 creates a scheme with the specified name on the managed device.Scheme Description: Provide a description for the power scheme. The description is displayed as a tooltip for the power scheme on the managed device.Power Settings: To add power scheme settings to a device or user, refer to the following table:
Task Description
Turn off hard disk after How long your hard disk is inactive before the disk turns off.
Slide show The duration for which you want the desktop background slide show to be active.
Power saving mode The power saving mode for a wireless adapter.
Sleep after How long your computer will be inactive before switching to sleep mode.
Allow hybrid sleep If your system needs to save work it can, enter a low power state and resume work immediately.
Enable System Hibernation If system hibernation is enabled or not.
Creating Windows Configuration Policies 29

Hibernate after How long your system will be inactive before switching to hibernate mode.
Allow wake timer If timed events should change the state of the computer from sleep mode to active mode.
USB selective suspend setting If the USB selective suspend feature is turned Off or On.
Lid close action The action that the computer takes when you close the lid of your mobile-PC.
Power button action The action to be taken when you press the Power button.
Sleep button action The action to be taken when you press the Sleep button.
Link state The Active State Power Management mode to be used for PCI Express-based serial links when the links are idle or less active.
Minimum processor state The minimum performance state of your processor.
System cooling policy The cooling mode for your system.
Maximum processor state The maximum performance state of your processor.
Dim display after How long your system is inactive before the display dims.
Turn off display after How long your system is inactive before the display turns off.
Display brightness The normal brightness level of your system.
Dimmed display brightness The display brightness when your monitor display is dimmed.
Enable adaptive brightness If your monitor supports adaptive brightness.
When sharing media What your computer does when sharing media files.
When playing video The power optimization mode used by your computer's video playback pipeline.
JavaScript timer frequency The power optimization mode used by your computer for Internet Explorer 9 and Internet Explorer 10 browsers.
Critical battery action The action that your computer takes when the battery reaches the critical level.
Low battery level The percentage of battery capacity remaining that initiates the low battery action.
Critical battery level The percentage of battery capacity remaining that initiates the critical battery action.
Low battery notification Whether a notification is shown when the battery capacity reaches the low level.
Low battery action The action that your computer takes when battery capacity reaches the low level.
Reserve battery level The percentage of battery capacity remaining that initiates reserve power action.
Task Description
30 ZENworks 11 Configuration Policies Reference

NOTE: We recommend that you configure the power scheme duration in the following descending order: System Hibernation > System Standby > Hard Disks > Monitor. The values of System Standby and System Hibernation are interdependent. If you choose to set the state of these settings to Not Configured, in such a case, the other setting can only be set to either Never or Not Configured. This is to ensure that the ʹStandby Timeoutʹ is always lesser than the ʹHibernate Timeoutʹ.For example, if you set a duration for the System Standby value and then set the System Hibernation value to Not Configured, the System Standby value automatically changes to Not Configured. When you apply power management settings on a Windows XP managed device, the scheme name is displayed in the settings panel of the Windows Power Options console only for a system user.
3.5 Printer PolicyThe Printer policy allows you to configure Local, SMB, HTTP, TCP/IP, CUPS, and iPrint printers on a Windows device.
1 In ZENworks Control Center, click the Policies tab.2 In the Policies list, click New, then click Policy.
orIn the Policy Tasks, click New Policy.The Select Platform page is displayed.
3 Select Windows, then click Next.The Select Policy Category page is displayed.
4 Select Windows Configuration Policies, then click Next.5 Select Printer Policy as the Policy Type, then click Next.6 In the Define Details page fill in the following fields:Policy Name: Provide a name for the policy. The policy name must be different than the name of any other item (group, folder, and so forth) that resides in the same folder. The name you provide displays in ZENworks Control Center.Folder: Type the name or browse to and select the ZENworks Control Center folder where you want the policy to reside. The default is /policies, but you can create additional folders to organize your policies.Administrator Notes: Provide a short description of the policy’s content. This description displays in ZENworks Control Center.
7 Click Next to display the Printer Identification page, then select the type of printer to be installed on the managed device.
8 Click Next, then skip to the appropriate step, depending on which printer type you chose in Step 7:
Local Printer: Continue with Step 9. Network Printer: Skip to Step 10.iPrint Printer: Skip to Step 11.
Creating Windows Configuration Policies 31

NOTE: Create and assign separate policies for different platforms for a printer.
9 (Conditional) If you are configuring a local printer, refer to the following table for more information:
Field Details
Name Specify the name of the local printer that you want to configure on the target device.
Driver Browse to and select a suitable driver for the printer. If the driver is not contained in the browser list, type in the correct model name. The driver must either be installed on the target device or specified in the enforced policies. The driver must be digitally signed by Microsoft. However, if you choose to use a driver that is not digitally signed, see the Troubleshooting Scenario.
Port Select the physical port to which the printer is added, such as LPT1, COM1 or Standard TCP/IP.
NOTE: If you assign a TCP/IP Printer policy to a 11 SP1 or older version of the agent, the policy gets applied and then fails and sends errors to the server at every refresh, as it is not supported.
Remove the association with the lower version of the agents from the TCP/IP printer policy, to prevent it from being applied at every refresh.
IP Address Specify the IP address of the local printer. This field appears only if you select Standard TCP/IP as the port.
Protocol Specify the protocol of the local printer. You can select either RAW or LPR from the drop-down options. This field appears only if you select Standard TCP/IP as the port.
Port Number Specify the port number for the protocol. Typically the port number is 9100. This field appears only if you select the RAW protocol on the Standard TCP/IP settings page.
Queue Name Specify the queue name to be used by this port, if a name is required by your printer. This field appears only if you select the LPR protocol on the Standard TCP/IP settings page.
LPR Byte Counting Enabled
Choose this option if you encounter problems such as missing or incomplete documents when printing. When LPR byte counting is enabled, the system counts the number of bytes in a document before processing the print request. Most printers do not need byte counting enabled because it can be very time consuming. This field appears only if you select the LPR protocol on the Standard TCP/IP settings page.
SNMP Status Enabled Select this option if the printer attached to this port supports RFC1759. This field appears only if you select Standard TCP/IP as the port.
Community Name: Specify a community name, for example: public.
SNMP Device Index: Specify the device index, for example: 1.
32 ZENworks 11 Configuration Policies Reference

10 (Conditional) If you are configuring a Network printer, refer to the following table for more information:
Install a Driver Select this option to install a driver on the target device. The driver installation must be non-interactive and silent. The supported driver installation type is .inf and the .inf driver files can be bundled in .zip or .tar formats. The .inf file can be specified directly if it is already available on the target device. Ensure that the .inf file supports the installation of the driver.
NOTE: To add a new printer driver to the existing driver list:
Edit the zenworks_installdir\novell\zenworks\share\tomcat\webapps\zenworks\WEB-INF\conf\printerDriverDetails.conf file to add the following line:
Printer_ Manufacturername = Printer_ Model
For example, if you want to add an HP Color LaserJet 4550 PCL printer, then add the following line:
HP = HP Color LaserJet 4550 PCL
Model Name Browse to select the model name of the driver.
Driver File Path Specify the driver files either from a particular device where the browser is running or from a path on the managed device, such as C:\temp\nipp.zip.
NOTE: While configuring the policy, if you are using a UNC path to access the Driver file, make sure the file you access must be on an anonymous share.
Supported Platforms Specify a platform for the driver. The platform information helps to select a suitable driver from the available drivers list, which is based on the installation platform.
Language of Installation
Select the installation language. Your choices are English (United States), French, German, Portuguese, Spanish, Italian, Chinese (Traditional), Chinese (Simplified), or Japanese.
Install Forcefully Even if the Driver is Already Installed
Select this option to force installation of the driver, even though it is already installed on the target device.
Field Details
Name / Location Specify the UNC path or URL name of the HTTP, SMB or CUPS printer.
For example, it is \\server-name\printer-name for an SMB printer, http://server:631/printers/myprinter for a CUPS printer, or http://server/printers/.myprinter/.printer for a HTTP printer.
NOTE: Support for network printer that prompts for user credentials is not provided.
Driver Browse to add and select a suitable driver for the Windows HTTP printer. You can ignore this for SMB printers.
The driver must be digitally signed by Microsoft. However, if you choose to use a driver that is not digitally signed, see the Troubleshooting Scenario
Field Details
Creating Windows Configuration Policies 33

11 (Conditional) If you are configuring an iPrint printer, refer to the following table for more information:On Windows Vista devices, you need to install the Novell iPrint client 5.04 or later.
Install a Driver Use this option to install a driver on the target device. The driver installation is non-interactive and silent. The supported driver installation types is .inf and the .inf driver files can be bundled in .zip or .tar formats. The .inf file can be specified directly if it is already available on the target device. Ensure that the .inf file supports the installation of the driver.
NOTE: To add a new printer driver to the existing driver list:
Edit the zenworks_installdir\novell\zenworks\share\tomcat\webapps\zenworks\WEB-INF\conf\printerDriverDetails.conf file to add the following line:
Printer_ Manufacturername = Printer_ Model
For example, if you want to add an HP Color LaserJet 4550 PCL printer, then add the following line:
HP = HP Color LaserJet 4550 PCL
Model Name Browse to select the model name of the driver.
Driver File Path Specify the driver files either from a particular device where the browser is running or from a path in the managed device, such as c:\temp\nip.zip.
NOTE: While configuring the policy, if you are using a UNC path to access the Driver file, make sure the file you access must be on an anonymous share.
Supported Platforms Specify a platform for the driver. The platform information helps to select a suitable driver from the available drivers list, which is based on the installation platform.
Language of Installation
Select the installation language. Your choices are English (United States), French, German, Portugese, Spanish, Italian, Chinese (Traditional), Chinese (Simplified), or Japanese.
Install Forcefully Even if the Driver is Already Installed
Select this option to force the installation of the driver on the device every time the policy is applied on the device, even if the driver is already installed on the device.
Field Details
Name / Location Specify the URI name of the iPrint printer. For example, ipp://acme.com/ipp/servername.
Update iPrint Printer while Installing the Driver
Select this option to update the printer driver and to reinstall the printer driver from the iPrint server while installing the iPrint printer.
Field Details
34 ZENworks 11 Configuration Policies Reference

12 Click Next to display the Printing Preferences page, then use the options to specify the preferences. Refer to the following table for more information:
Install iPrint Client Select this option to install the iPrint client on a target machine. The iPrint client is not supported on 64-bit versions of Windows Server 2003.
The installation file can be either nipp.zip or nipp-s.exe, both of which are capable of carrying out non-interactive silent installation.These files can be uploaded from the machine where the browser is running.
To install the iPrint client, you cannot use a .exe file that does not support a silent installation. For example, you cannot use a nipp.exe file to install iPrint client.
iPrint Client Installer File Path
Allows to specify the path to the iPrint Client Installer (which installs the iPrint client on the managed device).
On the Managed Device: Select this option to specify the path to the iPrint client installer on the managed device.
Select from this Device: Select this option to add the iPrint client installer as content with the policy. You can also distribute the iPrint client installer along with the policy.
If the installer file path is a UNC path, the Novell iPrint Client dialog box is displayed until the installation process completes. This process can be perfomed only by users with administrative rights.
Install Forcefully Even if the Driver is Already Installed
Select this option to force installation of the driver, even though it is already installed on the target device.
Configure iPrint Client Select this option to configure the iPrint proxy server.
If the workstations are located outside the physical firewall, you can use this option to specify the proxy address followed by a (:) and the port number.
Proxy Server Specify the iPrint proxy server name. For example, http://proxy.companyx.com:8080
Field Details
Orientation Select this option to specify the paper layout for the printer, such as landscape or portrait.
Duplex Printing Specify whether or not to print on both sides of the paper, if the printer has that capability.
Collate Specify whether or not the printer should organize multiple copies of a document, if the printer has that capability.
Print Quality Select the print quality. Select High quality, for the best possible resolution, or select Low quality for lower resolution and lower quality.
Field Details
Creating Windows Configuration Policies 35

13 Click Next to display the Additional Printer Policy settings, then use the options to specify the settings. Refer to the following table for more information:
14 Click Next to display the Summary page. Review the information and, if necessary, use the Back button to make changes to the information on the Summary page.This wizard allows you to configure only one printer. If you want to configure additional printers, then configure them in the Details page after creating the policy.
15 (Conditional) Select Create as Sandbox, if you want to create the sandbox version of the policy.16 Click Finish to create the policy now, or select Define Additional Properties to specify additional
information, such as policy assignment, system requirements, enforcement, status, and which group the policy is a member of.Only the preferences that are supported by the printer are configured on that printer.
NOTE: Upon unenforcement of a user‐assigned printer, a user with administrative privileges continues to have access to the local printer on a Windows XP managed device.
Paper Source Specify the paper source for the printer. A source that is not listed in the standard available list can also be specified, but it must be supported by the printer. Information on supported paper sources is available in the printer documentation or in the registry key HKEY_LOCAL_MACHINE\SOFTWARE\Microsoft\Windows NT\CurrentVersion\Print\Printers\printer-name\DsDriver\printBinNames on a Windows machine.
Paper Size Specify the paper size for the printer. You can specify any paper size supported by the printer, in addition to the options listed in the menu. Information on supported sizes is available in the printer documentation or in the registry key HKEY_LOCAL_MACHINE\SOFTWARE\Microsoft\Windows NT\CurrentVersion\Print\Printers\printer-name\DsDriver\printMediaSupported on a Windows machine, where a printer is locally installed.
Field Details
Set as Default Printer
Select this option to specify a printer as the default printer to which the print requests are sent if no other printer is specified by the user.
On a Windows 7 managed device, the assigned printer might be set as a default printer on the device even if the Set as Default Printer option is not selected in the policy.
Remove all Printers not Specified by ZENworks Printer Policies
Select this option to remove all printers that are not specified through the ZENworks Printer policy.
Field Details
36 ZENworks 11 Configuration Policies Reference

3.6 Remote Management PolicyThe Remote Management policy lets you configure the behavior or execution of a Remote Management session on the managed device. The policy includes properties such as Remote Management operations and security.
By default, a secure Remote Management policy is created on the managed device when the ZENworks Adaptive Agent is deployed with the Remote Management component on the device. You can use the default policy to remotely manage a device. To override the default policy, you can explicitly create a Remote Management policy for the device.
For information on creating the Remote Management policy, see “Creating the Remote Management Policy” in the ZENworks 11Remote Management Reference.
3.7 Roaming Profile PolicyThe Roaming Profile policy allows you to create a user profile that is stored in a network path. An administrator can either use the roaming profile stored in the user’s home directory or the profile stored in the network directory location.
IMPORTANT: Because of the security settings in Microsoft Vista, administrators must manually add the appropriate security rights to the user registry hive to enable roaming profiles. For more information, see Section 4.9, “Assigning a Roaming Profile Policy for a User Profile Stored on a Windows, Linux, or NetWare Share,” on page 60.
1 In ZENworks Control Center, click the Policies tab.2 In the Policies list, click New, then click Policy.
orIn the Policy Tasks, click New Policy.The Select Platform page is displayed.
3 Select Windows, then click Next.The Select Policy Category page is displayed.
4 Select Windows Configuration Policies, then click Next.5 Select Roaming Profile Policy as the Policy Type, then click Next.
NOTE: If you log into Windows Vista or Windows 7 by using a domain account, Roaming Profile policy is not supported.
6 In the Define Details page fill in the following fields:Policy Name: Provide a name for the policy. The policy name must be different than the name of any other item (group, folder, and so forth) that resides in the same folder. The name you provide displays in ZENworks Control Center.Folder: Type the name or browse to and select the ZENworks Control Center folder where you want the policy to reside. The default is /policies, but you can create additional folders to organize your policies.Administrator Notes: Provide a short description of the policy’s content. This description displays in ZENworks Control Center.
7 Click Next to display the Roaming Profile Policy page, then use the options to specify the settings. Refer to the following table for more information:
Creating Windows Configuration Policies 37

8 Click Next to display the Summary page. Review the information and, if necessary, use the Back button to make changes to the information on the Summary page.
9 (Conditional) Select Create as Sandbox, if you want to create the sandbox version of the policy.10 Click Finish to create the policy now, or select Define Additional Properties to specify additional
information, such as policy assignment, system requirements, enforcement, status, and which group the policy is a member of.
3.8 SNMP PolicyThe SNMP policy allows you to configure SNMP parameters on the managed devices.
1 In ZENworks Control Center, click the Policies tab.2 In the Policies list, click New, then click Policy.
orIn the Policy Tasks, click New Policy.The Select Platform page is displayed.
3 Select Windows, then click Next.The Select Policy Category page is displayed.
4 Select Windows Configuration Policies, then click Next.5 Select SNMP Policy as the Policy Type, then click Next.6 In the Define Details page fill in the following fields:Policy Name: Provide a name for the policy. The policy name must be different than the name of any other item (group, folder, and so forth) that resides in the same folder. The name you provide displays in ZENworks Control Center.Folder: Type the name or browse to the ZENworks Control Center folder where you want the policy to reside. The default is /policies, but you can create additional folders to organize your policies.Administrator Notes: Provide a short description of the policy’s content. This description displays in ZENworks Control Center.
7 Click Next to display the SNMP Community Strings page. Refer to the following table for more information:
Field Details
Store User Profile in User’s Home Directory
Select this option to load and save a user’s profile from the user’s home directory as specified in eDirectory.
This option is applicable only if the user object is in eDirectory. However, it is currently not supported in Domain Services for Windows environment.
User Profile Path Select a UNC path to a user’s roaming profile. If you want to administer the policy on more than one user object, use %USERNAME% as the environment variable. In this case, the environment variable is resolved with the logged-on username and the user profile is loaded from the specified path.
Override Terminal Server Profile
If a user is accessing a terminal server that has its own profile, enable this option to override the terminal server’s profile.
38 ZENworks 11 Configuration Policies Reference

This page allows you to add only one community string to the policy. If you want to add multiple community strings, then configure them in the Details page after creating the policy.
8 Click Next to display the SNMP Default Access Control List page, then use the options to specify the settings. Refer to the following table for more information:
9 Click Next to display the SNMP Trap Targets page, then use the options to specify the settings. Refer to the following table for more information:
This page allows you to add only one trap target to the policy. If you want to add multiple trap targets, then configure them in the Details page after creating the policy.
10 Click Next to display the Default System Requirements for SNMP Policy page, then use the options to specify the settings. Refer to the following table for more information:
Field Details
Add a Community String Allows you to add a community string.
Community String Specify the name of the SNMP community string to be added.
Community Rights Allows you to administer rights for a selected community, such as Read Only, Read & Write, Read & Create, and Notify.
Remove All SNMP Community Strings not specified by ZENworks SNMP Policies
Select this option to remove all the community strings that are not specified through ZENworks SNMP policy.
Send SNMP Authentication Trap
Select this option if you want to send authentication trap information.
Field Details
Allow SNMP Communication Select this option to specify whether SNMP communication is allowed from any host or a list of predefined hosts.
Remove All SNMP Allowed Hosts not Specified by ZENworks SNMP Policies
Select this option to remove all the SNMP allowed hosts that are not specified through the ZENworks SNMP policy.
Field Details
Add a Trap Target Allows you to add a trap target for the SNMP service.
IP Address / Host Name Specify an IP address or host name of the target device.
Community String Specify a community string for the trap target defined in IP address/ Host name.
Remove All SNMP Trap Targets Not Specified by ZENworks SNMP Policies
Select this option to remove all the trap targets that are not specified through the ZENworks SNMP policy.
Creating Windows Configuration Policies 39

11 Click Next to display the Summary page. Review the information and, if necessary, use the Back button to make changes to the information on the Summary page.
12 (Conditional) Select Create as Sandbox, if you want to create the sandbox version of the policy.13 Click Finish to create the policy now, or select Define Additional Properties to specify additional
information, such as policy assignment, system requirements, enforcement, status, and which group the policy is a member of.
3.9 Windows Group PolicyThe Windows Group Policy allows you to configure a Group Policy for Windows devices.
1 In ZENworks Control Center, click the Policies tab.2 In the Policies list, click New, then click Policy.
orIn the Policy Tasks, click New Policy.The Select Platform page is displayed.
3 Select Windows, then click Next.The Select Policy Category page is displayed.
4 Select Windows Configuration Policies, then click Next.5 Select Windows Group Policy as the Policy Type, then click Next6 In the Define Details page fill in the following fields:Policy Name: Provide a name for the policy. The policy name must be different than the name of any other item (group, folder, and so forth) that resides in the same folder. The name you provide displays in ZENworks Control Center.Folder: Type the name or browse to and select the ZENworks Control Center folder where you want the policy to reside. The default is /policies, but you can create additional folders to organize your policies.Administrator Notes: Provide a short description of the policy’s content. This description displays in ZENworks Control Center.
7 Click Next to display the Windows Group Policy Settings page, then use the options to specify the settings. Refer to the following table for more information:
Field Details
Apply Policy Only if SNMP Service Exists On the Target Device
Select this option apply the SNMP policy only if the SNMP service exists on the target device. If the target device does not contain the SNMP service, the SNMP policy cannot be fully applied or effective on the target device.
40 ZENworks 11 Configuration Policies Reference

8 Click Next to display the Summary page. Review the information and, if necessary, use the Back button to make changes to the information on the Summary page.
9 (Conditional) Select Create as Sandbox, if you want to create the sandbox version of the policy.
Field Details
Select the Type of Group Policy to Manage
With the Windows Group Policy, you can manage either a Local group or an Active Directory group policy.
Before you can configure the Group Policy, you need to install a helper application. Click Install the Group Policy Helper to install the novell-zenworks-grouppolicyhelper-11.x.x.x.msi, which is a Windows installer package. This installation needs to be done only once. After the helper is installed, clicking Configure launches the helper, which you then use to configure or import a policy.
Local Group Policy: Select this option to configure a Local Group policy.
To launch the group policy helper, click Configure. Configure or edit the settings in the Local Group policy, then upload the configured policy to the ZENworks Server.
Active Directory Group Policy: Select this option to use an Active Directory Group policy.
To launch the group policy helper, click Configure. Import an Active Directory Group policy created from Windows Server 2003 or Windows Server 2008 Active Directory, then upload to the ZENworks Server. (You cannot edit an Active Directory policy through ZENworks Control Center.)
Select the Configuration Settings to Be Applied On the Managed Device
After you have adjusted the policy settings as you prefer, you can select how to apply the settings to the managed device.
Computer Configuration Select this option to apply the computer configuration settings to the managed device.
Apply all settings: Select this option to apply all the computer configuration settings to the managed device.
Apply only security settings: Select this option to apply only the security settings to the managed device.
However, if you select this option, the software restrictions in security settings are not enforced on the device. To enforce the software restrictions, select Apply all settings.
Apply all settings except security settings: Select this option to apply all the computer configuration settings except for security settings to the managed device.
User Configuration Select this option to apply the user configuration settings to the managed device.
NOTE:
The Computer Configuration settings from a user associated group policy are not applied when the user logs into a Windows 2000 or Windows 2003 Terminal Server.
Group Policy Objects get assigned to a device on a general refresh. The Computer Configuration settings of a device-assigned Group Policy Object remains in-effect on user logout.
Creating Windows Configuration Policies 41

10 Click Finish to create the policy now, or select Define Additional Properties to specify additional information, such as policy assignment, system requirements, enforcement, status, and which group the policy is a member of.If the login/logoff scripts are configured in a user‐associated group policy and the After enforcement, force a re‐login on the managed device, if necessary, then a relogin is forced and the login scripts run when the user logs into the managed device again. The startup scripts from a device‐associated policy run only when the device reboots the next time.The Group policy login scripts do not support the environment variables for users on Windows Vista, Windows Server 2003, Windows Server 2008, Windows 7, and Windows Server 2008 R2.The scripts configured through Active Directory group policy are not enforced on the device even though the policy displays success in the ZENworks Adaptive Agent Policies page. For more information see, Section A.14, “Windows Group Policy Troubleshooting,” on page 110.
IMPORTANT: If you want to apply the security settings of the Windows Group policy on Windows XP SP1 or SP2 managed device, ensure that the device has Windows Hotfix KB897327 installed. For more information about how to install the Hotfix, see the Microsoft Support Web site (http://support.microsoft.com/KB/897327).
3.10 ZENworks Explorer Configuration PolicyThe ZENworks Explorer Configuration Policy allows you to administer and centrally manage the behavior and features of ZENworks Explorer.
1 In ZENworks Control Center, click the Policies tab.2 In the Policies list, click New, then click Policy.
orIn the Policy Tasks, click New Policy.The Select Platform page is displayed.
3 Select Windows, then click Next.The Select Policy Category page is displayed.
4 Select Windows Configuration Policies, then click Next.5 Select ZENworks Explorer Configuration Policy as the Policy Type, then click Next.6 In the Define Details page fill in the following fields:Policy Name: Provide a name for the policy. The policy name must be different than the name of any other item (group, folder, and so forth) that resides in the same folder. The name you provide displays in ZENworks Control Center.Folder: Type the name or browse to and select the ZENworks Control Center folder where you want the policy to reside. The default is /policies, but you can create additional folders to organize your policies.Administrator Notes: Provide a short description of the policy’s content. This description displays in ZENworks Control Center.
7 Click Next to display the ZENworks Explorer Configuration Settings page, then use the options to specify the settings. Refer to the following table for more information:
42 ZENworks 11 Configuration Policies Reference

8 Click Next to display the Summary page. Review the information and, if necessary, use the Back button to make changes to the information on the Summary page.
Field Details
Enable Folder View Use this option to display a folder list in the application window.
The values are Yes, No, and Unconfigured. If you select the value as Unconfigured, the default value Yes is set on the managed device.
Expand the Entire Folder Tree
Use this option to expand the entire folder tree when the application window is opened.
The values are Yes, No, and Unconfigured. If you select the value as Unconfigured, the default value No is set on the managed device.
Display Applications in Windows Explorer
Use this option to display the application list in Windows Explorer.
The values are Yes, No, and Unconfigured. If you select the value as Unconfigured, the default value Yes is set on the managed device.
Name of Root Folder Use this option to change the name of the root folder.
Hide the Zicon in the taskbar
Use this option to hide the ZENworks icon in the taskbar.
The values are Yes, No, and Unconfigured. If you select the value as Unconfigured, the default value No is set on the managed device.
Enable Manual Refresh Use this option to specify whether manual refresh of applications is enabled after starting ZENworks Explorer.
The values are Yes, No, and Unconfigured. If you select the value as Unconfigured, the default value Yes is set on the managed device.
Allow Logout / Login as a New User
Use this option to enable the user to log out and log in as a new user.
The values are Yes, No, and Unconfigured. If you select the value as Unconfigured, the default value Yes is set on the managed device.
Show Progress Use this option to specify whether the progress of the bundle operations should be displayed.
The values are Yes, No, and Unconfigured. If you select the value as Unconfigured, the default value Yes is set on the managed device.
Show Default Notifications
Use this option to specify whether the default notification should be displayed. The notification is displayed when the content associated with a policy or a bundle is downloaded on the device. For example, during the enforcement of the Printer policy on a device, the following message is displayed in the notification area of the device:
Downloading Files for Printer Policy
The values are Yes, No, and Unconfigured. If you select the value as Unconfigured, the default value Yes is set on the managed device.
Start the ZENworks Explorer with the {All} Folder Displayed
Use this option to specify whether the [All] folder should be displayed when ZENworks Explorer starts.
The values are Yes, No, and Unconfigured. If you select the value as Unconfigured, the default value Yes is set on the managed device.
Creating Windows Configuration Policies 43

9 (Conditional) Select Create as Sandbox, if you want to create the sandbox version of the policy.10 Click Finish to create the policy now, or select Define Additional Properties to specify additional
information, such as policy assignment, system requirements, enforcement, status, and which group the policy is a member of.
3.11 Creating Policies by Using the zman Command Line Utility ZENworks Configuration Management allows you to create different types of policies, such as Browser Bookmarks policy, Dynamic Local User policy, Local File Rights policy, and Printer policy. Each policy has its own set of data and configuration settings. Because it is complex to pass the data as arguments in the command line, the zman utility takes XML files as an input to create policies. You can use exported XML files as a templates to create polices. To use the zman command line utility to create a policy, you must have a policy of the same type already created through ZENworks Control Center and export it to an XML file. For more information on creating policies by using ZENworks Control Center, see Chapter 3, “Creating Windows Configuration Policies,” on page 19.
For example, you can export a Browser Bookmarks Policy already created through ZENworks Control Center into an XML file, then use it to create another Browser Bookmarks Policy by using zman.
A policy can have file content associated with it. For example, the printer driver to be installed is a file associated with the Printer policy.
Review the following sections to create a policy by using the zman command line utility:
Section 3.11.1, “Creating a Policy without Content,” on page 44Section 3.11.2, “Creating a Policy with Content,” on page 46Section 3.11.3, “Understanding the zman Policy XML File Format,” on page 47
3.11.1 Creating a Policy without Content1 Create a policy in ZENworks Control Center.
For example, use ZENworks Control Center to create a Browser Bookmarks Policy called google containing a bookmark to http://www.google.co.in.
2 Export the policy to an XML file by using the following command:zman policy-export-to-file policy_name policy_filename.xml
For example, export the google policy to google.xml by using the following command:zman policy-export-to-file google google.xml If you want to create a new policy with new data, continue with Step 3. If you want to create a new policy with the same data as the google policy, skip to Step 4.
3 Modify the XML file according to your requirements.For example, in google.xml, change the value of <URL> from http://www.google.co.in to http://www.yahoo.com in the browserbookmarkspolicy action of the Enforcement action set and <PolicyData> element in both <Actions> and <PolicyData> elements as shown below.
<ns2:ActionSets>
<Id>879de60b7591b6f6aefae09fcd83db54</Id>
<Type>Enforcement</Type>
<Version>1</Version>
44 ZENworks 11 Configuration Policies Reference

<Modified>false</Modified>
<Actions>
<Id>0ab9a1785370bcd38bc862bd2817abac</Id>
<Name>browserbookmarkspolicy</Name>
<Type>browserbookmarkspolicy</Type>
<Data>
<PolicyData xmlns="http://novell.com/zenworks/datamodel/objects/policies">
<BookmarksPolicyHandlerData xmlns="">
<EnforcePolicy>
<Bookmarks>
<Bookmark Type="url_string">
<Name>Google</Name>
<Url>http://www.yahoo.com</Url>
<Folder>/</Folder>
</Bookmark>
</Bookmarks>
</EnforcePolicy>
</BookmarksPolicyHandlerData>
</PolicyData>
</Data>
<ContinueOnFailure>true</ContinueOnFailure>
<Enabled>true</Enabled>
<Properties>StandaloneName=browserbookmarksenf;Impersonation=SYSTEM;</Properties>
</Actions>
</ns2:ActionSets>
<ns2:ActionSets xmlns:ns2="http://novell.com/zenworks/datamodel/objects/actions" xmlns="http://novell.com/zenworks/datamodel/objects/actions">
<Id>4efa37c827cf0e8a8ac20b23a3022227</Id>
<Type>Distribution</Type>
<Version>1</Version>
<Modified>false</Modified>
<Actions>
<Id>27c4a42544210b3ac3b067ff6aff2d5c</Id>
<Name>Distribute Action</Name>
<Type>Distribute Action</Type>
<ContinueOnFailure>true</ContinueOnFailure>
Creating Windows Configuration Policies 45

<Enabled>true</Enabled>
<Properties />
</Actions> </ns2:ActionSets>
<ApplyImmediate>false</ApplyImmediate>
<PolicyData>
<BookmarksPolicyHandlerData>
<EnforcePolicy>
<Bookmarks>
<Bookmark Type="url_string">
<Name>Google</Name>
<Url>http://www.yahoo.com</Url>
<Folder>/</Folder>
</Bookmark>
</Bookmarks>
</EnforcePolicy>
</BookmarksPolicyHandlerData>
</PolicyData>
4 Create a new policy by using the following command:zman policy-create new_policy_name policy_xml_filename.xml
For example, to create a policy named yahoo, use the following command:zman policy-create yahoo google.xml
3.11.2 Creating a Policy with Content1 Create a policy in ZENworks Control Center.
For example, use ZENworks Control Center to create a Printer policy of type iPrint called iPrint Policy that automatically installs an iPrint driver from the driver.zip file provided as the policy content, and configures an iPrint printer on the device.
2 Export the policy to an XML file by using the following command:zman policy-export-to-file policy_name policy_filename.xml
This creates policy_filename.xml and policy_filename_ActionContentInfo.xml files.For example, export iPrintPolicy to iPrintPolicy.xml by using the following command:zman policy-export-to-file iPrintPolicy iPrintPolicy.xml The iPrintPolicy.xml and iPrintPolicy_ActionContentInfo.xml files are created. For more information about ActionContentInfo.xml, see Section 3.11.3, “Understanding the zman Policy XML File Format,” on page 47.If you want to create a new policy with new data, continue with Step 3. If you want to create a new policy with the same data as iPrintPolicy, skip to Step 4.
3 Modify the iPrintPolicy.xml and iPrintPolicy_actioncontentinfo.xml files according to your requirements.
46 ZENworks 11 Configuration Policies Reference

For example, to create a new policy to configure and install another iPrint in the network with a newer version of the driver, do the following:
Change all references of driver.zip to newDriver.zip in the <ActionSet> and the <PolicyData> section of iPrintPolicy.xml, and in the <ActionSet> section of iPrintPolicy_actioncontentinfo.xml.Replace the name of the printer in the iPrintPolicy.xml file with the new name of the printer.
A sample iPrintPolicy_actioncontentinfo.xml is shown below.
<ActionInformation>
<ActionSet type="Enforcement">
<Action name="printer policy" index="1">
<Content>
<ContentFilePath>driver.zip</ContentFilePath>
</Content>
</Action>
</ActionSet>
</ActionInformation>
4 Create a new policy by using the following command:zman policy-create new_policy_name policy_xml_filename.xml --actioninfo policy_name_actioncontentinfo.xml
For example, use the following command to create a policy called New_iPrintPolicy:zman policy-create New_iPrintPolicy iPrintPolicy.xml --actioninfo iPrintPolicy_ActionContentInfo.xml
3.11.3 Understanding the zman Policy XML File FormatThe policy-export-to-file command serializes the policy information, which is stored in the database, into an XML file. Each policy contains actions that are grouped into Action Sets, Enforcement, and Distribution. An exported policy XML file contains information for the policy, such as UID, Name, Path, PrimaryType, SubType, PolicyData, System Requirements, and information on all Action Sets and their actions. The file does not include information about assignment of the policy to devices or users.
A sample XML format template, WindowsGroupPolicy.xml, is available at /opt/novell/zenworks/share/zman/samples/policies on a Linux server and in ZENworks_Installation_directory:\Novell\Zenworks\share\zman\samples\policies on a Windows server.
NOTE: If the exported XML file contains extended ASCII characters, you must open it in an editor by using UTF‐8 encoding instead of ANSI coding, because ANSI coding displays the extended ASCII characters as garbled.
When you create a policy from the XML file, zman uses the information specified in the <Description>, <SubType>,<Category>, <ActionSets>, <PolicyData>, and <SysReqs> tags of the file. The values for the Name and Parent folder are taken from the command line. For the remaining elements, the default value is used.
Creating Windows Configuration Policies 47

Follow the guidelines listed below to work with the XML file:
If you want to create a policy without file content, you need only the policy XML file to create the policy.
For example, a Local File Rights Policy does not have file content associated with it. If you want to create a policy with content, you must provide an additional XML file, which contains the path of the content file, as an argument to the -–actioninfo option of the policy-create command. For example, a Printer policy can have the printer drivers to be installed as associated file content.A sample XML format template, ActionInfo.xml, is available at /opt/novell/zenworks/share/zman/samples/policies on a Linux server and in ZENworks_Installation_directory:\Novell\Zenworks\share\zman\ samples\policies on a Windows server.If you want to modify the <Data> element of actions in the exported XML file, ensure that the new data is correct and that it conforms to the schema. The zman utility does a minimal validation of the data and does not check for the errors. Hence, the policy might be successfully created, but with invalid data. Such a policy fails when deployed on a managed device. File content is associated with a particular action in an Action Set. The Action Content Information XML file should contain the path of the file to which the file content is to be associated and the index of the action in the Action Set.For example, the Printer driver selected to be installed when creating a Printer policy is associated to the printerpolicy action in the Enforcement action set of the created Printer policy.The Action Set is specified by the type attribute in <ActionSet> element. It should be the same as the Action Set type of the policy XML file.The <Action> element has a name attribute, which is optional, for user readability.The index attribute is mandatory. It specifies the action to which the content should be associated to. The index value of the first action in the Action Set is 1.Each action can have multiple <Content> elements, each containing a <ContentFilePath> element. The <ContentFilePath> element contains the path of the file content to be associated with the Action. Ensure that the filename is the same as the filename specified in the policy XML file in <Data> for that action.Ensure that the order of the <Content> elements is in accordance with the order in the policy XML file. For example, a Printer Policy can have multiple drivers configured.The path to the driver files should be specified in the <Content> elements in the order the files are specified in the data for the action as show below.
<ActionInformaion>
<ActionSet type="Enforcement">
<Action name="printer policy" index="1">
<Content>
<ContentFilePath>driver1.zip</ContentFilePath>
</Content>
<Content>
<ContentFilePath>driver2.zip</ContentFilePath>
</Content>
48 ZENworks 11 Configuration Policies Reference

</Action>
</ActionSet>
</ActionInformation>
Creating Windows Configuration Policies 49

50 ZENworks 11 Configuration Policies Reference

4 4Managing Policies
Novell ZENworks 11 SP2 Configuration Management lets you use effectively manage software and content in your ZENworks system. In addition to editing and deleting existing objects, you can create new objects and perform various tasks on the objects.
You can use ZENworks Control Center or the zman command line utility to manage policies. This section explains how to perform this task by using ZENworks Control Center. If you prefer the zman command line utility, see “Policy Commands” in the ZENworks 11 Command Line Utilities Reference.
Section 4.1, “Creating Policies,” on page 52Section 4.2, “Viewing the Policy’s Summary,” on page 52Section 4.3, “Policy Groups,” on page 55Section 4.4, “Editing Policies,” on page 55Section 4.5, “Deleting Policies,” on page 56Section 4.6, “Adding Policies to Groups,” on page 57Section 4.7, “Assigning a Policy to Devices,” on page 58Section 4.8, “Assigning a Policy to Users,” on page 59Section 4.9, “Assigning a Roaming Profile Policy for a User Profile Stored on a Windows, Linux, or NetWare Share,” on page 60Section 4.10, “Assigning a Roaming Profile Policy for a User Profile Stored on a Home Directory,” on page 62Section 4.11, “Assigning the Local File Rights Policy to Devices Running Different Languages,” on page 63Section 4.12, “Unassigning a Policy from Devices,” on page 64Section 4.13, “Unassigning a Policy from Users,” on page 64Section 4.14, “Adding System Requirements for a Policy,” on page 64Section 4.15, “Disabling Policies,” on page 70Section 4.16, “Enabling the Disabled Policies,” on page 70Section 4.17, “Copying a Policy to a Content Server,” on page 70Section 4.18, “Publish a Policy,” on page 72Section 4.19, “Reviewing the Status of the Policies at the Managed Device,” on page 73Section 4.20, “Policy Issues on a Windows 7, Windows Server 2008, or Windows Server 2008 R2 device,” on page 74Section 4.21, “Viewing the Predefined Reports,” on page 75Section 4.22, “Understanding Policy Versions,” on page 75Section 4.23, “Managing Policy Versions,” on page 76Section 4.24, “Publishing a Sandbox,” on page 77Section 4.25, “Policy Behavior Based on Content Replication Settings,” on page 78
Managing Policies 51

4.1 Creating PoliciesFor step‐by‐step instructions on creating Linux policies, see Chapter 2, “Creating Linux Configuration Policies,” on page 13 and for creating Windows policies, see Chapter 3, “Creating Windows Configuration Policies,” on page 19.
4.2 Viewing the Policy’s SummaryThe Summary page of a policy displays the following panels:
Section 4.2.1, “General,” on page 52Section 4.2.2, “Policy Status,” on page 53Section 4.2.3, “Message Log,” on page 54
4.2.1 General The General panel provides a summary of the policy’s general settings. Click the headings below for descriptions of the settings.
Policy TypeDisplays the type of policy.
SizeClick Compute to display the size of the content associated with the policy.
VersionDisplays the policy’s version number.
EnabledDisplays whether or not the policy can be deployed to managed devices and copied to content servers.
If a policy is enabled, it can be deployed to managed devices and copied to content servers.
If you disable a policy that has already been deployed to some managed devices and content servers, the policy is removed from those devices and content servers. Also, it cannot be deployed to new devices and content servers.
Number of Errors Not AcknowledgedAn error is anything that causes the deployment or installation of the policy to fail. The number displayed indicates the number of unacknowledged errors, which are any errors that you have not specifically marked as acknowledged. Unacknowledged errors are displayed in the Message Log section.
52 ZENworks 11 Configuration Policies Reference

Number of Warnings Not AcknowledgedA warning is anything that does not cause the deployment or installation of the policy to fail, but indicates minor problems with the policy. The number displayed indicates the number of unacknowledged warnings, which are any warnings that you have not specifically marked as acknowledged. Unacknowledged warnings are displayed in the Message Log section.
GUIDLists the policy’s GUID (global unique identifier), a randomly generated string that provides a unique identifier for the policy. You cannot edit the GUID.
Administrator NotesDisplays the policy’s description, if one was provided when the policy was created. The description appears in ZCC and the ZENworks Adaptive Agent (on managed devices). Click Edit to change the description.
4.2.2 Policy StatusThe Policy Status panel displays a summary of the policy’s assignment and enforcement status. The User row displays the status of the policy through assignment to users; the Device row displays the status of the policy through assignment to devices. A policy can be directly assigned or assigned through membership in a folder or group. You can click an underlined link in any column to view the status of the individual users and devices to which the policy is assigned, retry a failed policy, or export the data to a CSV file.
A policy’s status is calculated using the status of many events. The numbers in the various columns represent an overall view of the policy’s status.
NOTE: The Policy Status panel on the policy’s sandbox or the older versions page does not display the status. However, the Policy Status panel on the policy’s published version page displays the status of the policy’s published version, sandbox, and the older versions.
The policy status information is separated into the following groups, which are independent of each other. For example, it is possible for an installation to be successful, but the launch to be unsuccessful.
Assignment StatusThe following status information is available:
Targeted: Displays the number of users and devices on which the policy is enforced.
Devices Effective: Displays the number of devices on which the policy is effective through a user or device assignment. A policy is effective for a device if the device meets the system requirements of the policy. The number of users or devices in the Devices Effective column might be less than the number in the Targeted column because the policy might be enforced on a device that does not meet the policy’s system requirements. For example, you might have a Windows policy enforced on a Linux device, but the policy is not effective for that device.
Devices Not Effective: Displays the number of devices on which the policy is not effective through a user or device assignment. If a policy is not effective for the device, it means that the device does not meet the policy’s system requirements.
Managing Policies 53

Pending: The pending status for the device displays the number of devices on which the policy is not yet enforced, such as devices that are switched off. Click the underlined link to display the list of such devices.
Enforcement StatusThe following status information is available:
Devices Pending: Displays the number of devices on which the policy is pending. A policy’s status is pending if the policy has met the device’s system requirements, but the policy has not been enforced on the device.
Devices Succeeded: Displays the number of devices on which the policy was successfully enforced.
Devices Failed: Displays the number of devices on which the policy’s enforcement failed.
4.2.3 Message LogThe Message Log panel displays all unacknowledged messages generated for the object. An unacknowledged message is one that you have not yet reviewed and marked as acknowledged.
Status: Displays an icon indicating the type of message: critical, warning, and normal.Message: Displays a brief description of the event that occurred.Date: Displays the date and time the event occurred.
NOTE: The Message Log panel on the policy’s sandbox or the older versions page does not display any messages. However, the Message Log panel on the policy’s published version page displays the messages of the policy’s published version, sandbox, and the older versions.
A message remains in the Message Log list until you acknowledge it. You can acknowledge individual messages, acknowledge all messages at one time, or view more information about both acknowledged and unacknowledged messages. The following table explains how to do these tasks:
Task Steps Additional Details
Acknowledge a message
1. Click the message to display the Message Detail Information dialog box.
2. Click Acknowledge.
If you decide that you do not want to acknowledge the message, click Finished to dismiss the dialog box. This causes the message to remain in the Message Log list.
Acknowledge all messages
1. In the Tasks list located in the left navigation pane, click Acknowledge All Messages.
View all acknowledged or unacknowledged messages
1. Click the Advanced button to display the Edit Message Log page.
In addition to viewing all acknowledged and unacknowledged messages, you can also view only those messages with a specific status or date, view more details about messages, and acknowledge messages.
Click the Help button on the Edit Message Log page for specific information about performing tasks on that page.
54 ZENworks 11 Configuration Policies Reference

4.3 Policy GroupsA policy group consists of two or more policies. Creating policy groups eases administration efforts by letting you assign the group, rather than each individual policy, to devices and users. You can create a policy group with a single policy and then add policies to the group as and when required.
1 In ZENworks Control Center, click the Policies tab.2 In the Policies list, click New, click Policy Group to display the Basic Information page, then fill in
the fields:Group Name: Provide a unique name for your policy group. The name you provide displays in the ZENworks Control Center interface.Folder: Type the name or browse to and select the folder that contains this policy groupDescription: Provide a short description of the policy group’s content. This description displays in ZENworks Control Center.
3 Click Next to display the Add Group Members page. You can add any number of policies to the group. You cannot add other policy groups to the group.To add a policy:3a Click Add to display the Select Members dialog box.
Because you are adding policies to the group, the Select Members dialog box opens with the Policies folder displayed.
3b Browse for and select the policies you want to add to the group. To do so:3b1 Click next to a folder to navigate the folders until you find the policy you want to
select.If you know the name of the policy you are looking for, you can also use the Item name box to search for the policy.
3b2 Click the underlined link in the Name column to select the policy and display its name in the Selected list.
3b3 (Optional) Repeat Step 3b1 and Step 3b2 to add additional policies to the Selected list.3b4 Click OK to add the selected policies to the group.
4 Click Next to display the Summary page. Review the information and, if necessary, use the Back button to make changes to the information on the Summary page.
5 (Conditional) Select Create as Sandbox, if you want to create the sandbox version of the policy.6 Click Finish to create the policy group now, or select Define Additional Properties to specify
additional information, such as user assignment, device assignment, and which members the policy group is a member of.
4.4 Editing PoliciesThe following table lists the tasks you can perform for a policy:
Delete a message 1. Click the message to display the Message Detail Log dialog box.
2. Click Delete.
Deleting a message completely removes the message from your ZENworks system.
Task Steps Additional Details
Managing Policies 55

4.5 Deleting Policies1 In ZENworks Control Center, click the Policies tab.2 Select the check box next to the policy (or policies) that you want to delete.3 Click Delete.
Task Steps Additional Details
Edit the content of a policy
1. Click the policy whose content you want to edit.
2. Click the Details tab, then edit the settings according to your requirements.
3. Click Apply.
4. Click the Summary page.
5. Increment the version of the policy to enforce the changes made to the policy on the managed device.
Rename a policy 1. Select the check box next to the policy.
2. Click Edit > Rename, then specify the new name.
3. (Conditional) Select Publish changed display name immediately.
4. Click OK.
If more than one check box is selected, the Rename option is not available in the Edit menu.
If a sandbox exists, the policy is updated to a sandbox.
If a sandbox does not exist, you can choose to publish the policy as a new version or update to a sandbox.
Create a copy of the policy
1. Select the check box next to the policy.
2. Click Edit > Copy, then specify a new name.
If more than one check box is selected, the Copy option is not available in the Edit menu.
The copy option is useful to create a new policy that is similar to an existing policy. You can copy a policy and then edit the new policy's settings.
Move a policy to a different folder
1. Select the check box next to the policy (or policies).
2. Click Edit > Move, then select the target folder.
Copy the system requirements of one policy to another policy
1. Select the check box next to the policy.
2. Click Edit > Copy System Requirements.
3. Select Policies, then click Add to select the policies to which you want to copy the selected policy’s system requirements.
If more than one check box is selected, the Copy System Requirements option is not available in the Edit menu.
56 ZENworks 11 Configuration Policies Reference

4.6 Adding Policies to Groups 1 In ZENworks Control Center, click the Policies tab.2 Select the check box next to the policy (or policies) that you want to add to the group.3 Click Action > Add to Group to display the Existing Group or a New Group page.4 You can add the selected objects (users, devices, bundles, policies) to an existing group or a new
group.If the group to which you want to add the objects already exists, select Add selected items to an existing group, then click Next to continue with Step 5.If you need to create a new group for the selected objects, select Create a new group to contain the selected items, then click Next to skip to Step 6.
5 (Conditional) If you are adding selected items to an existing group, the Targets page is displayed. Select the groups to which you want to add the objects (users, devices, bundles, policies).You can add any number of policies to the group. You cannot add other policy groups to the group.5a Click Add to display the Select Groups dialog box.
Because you are adding policies to the group, the Select Members dialog box opens with the Policies folder displayed.
5b Browse for and select the policies you want to add to the group. To do so:5b1 Click next to a folder to navigate the folders until you find the policy you want to
select.If you know the name of the policy you are looking for, you can also use the Item name box to search for the policy.
5b2 Click the underlined link in the Name column to select the policy and display its name in the Selected list.
5b3 (Optional) Repeat Step 5a and Step 5b to add additional policies to the Selected list.5b4 Click OK to add the selected policies to the group.
5c Click Next to skip to Step 7.6 (Conditional) If you are creating a new group to contain the selected items, the Basic Information
page is displayed. Fill in the following fields, then click Next to continue with Step 7.Group Name: Provide a unique name for your policy group. The name you provide displays in the ZENworks Control Center interface.Folder: Type the name or browse to and select the folder that contains this policy groupDescription: Provide a short description of the policy group’s content. This description displays in ZENworks Control Center.
7 On the Finish page, review the information and, if necessary, use the Back button to make changes to the information.
8 Click Finish.
Managing Policies 57

4.7 Assigning a Policy to DevicesCertain key points that you must be aware of before you assign a policy to a device are as follows:
If you are assigning a Local File Rights policy to a network made up of devices running different languages, see Section 4.11, “Assigning the Local File Rights Policy to Devices Running Different Languages,” on page 63.The Dynamic Local User policy and The Roaming Profile policy are not supported on a 64‐bit Windows Server 2003 device.
Perform the following steps to assign a policy to a device:
1 In ZENworks Control Center, click the Policies tab.2 In the Policies list, select the check box next to the objects such as policies or policy groups.3 Click Action > Assign to Device.4 Browse for and select the devices, device groups, and device folders to which you want to assign
the group. To do so:4a Click next to a folder (for example, the Workstations folder or Servers folder) to
navigate through the folders until you find the device, group, or folder you want to select.If you are looking for a specific item, such as a Workstation or a Workstation Group, you can use the Items of type list to limit the types of items that are displayed. If you know the name of the item you are looking for, you can use the Item name box to search for the item.
4b Click the underlined link in the Name column to select the device, group, or folder and display its name in the Selected list box.
4c Click OK to add the selected devices, folders, and groups to the Devices list.5 Click Next to display the Policy Conflict Resolution page.6 Set the priority between device‐associated policies and user‐associated policies for resolving
conflicts that arise when policies of the same type are associated to both devices and users. User Last: Select this option to apply policies that are associated to devices first and then the users.Device Last: Select this option to apply policies that are associated to users first and then the devices.Device Only: Select this option to apply policies that are associated only to devices.User Only: Select this option to apply policies that are associated only to users.
7 Click Next to display the Finish page, review the information and, if necessary, use the Back button to make changes to the information.If you want the policies to be immediately enforced on all the assigned devices, select Enforce Policies Immediately on all Assigned Devices. Polices might not be enforced immediately if the server is loaded, the duration for policies to be enforced on the managed devices depends upon the server load.
8 Click Finish.
The following points are applicable when you assign a policy to a device:
If you assign a DLU policy to a device on which a user has logged in, the user is prompted to log in to the device again. Unless the user logs in to the device again, no new policies are enforced on the device.
58 ZENworks 11 Configuration Policies Reference

When you assign a ZENworks Explorer Configuration Policy to a device, the settings configured in the policy are not immediately reflected on the device. For example, even if Hide the Z icon in the taskbar is enabled in the policy, the ZENworks icon is displayed for a few seconds on the device after the policy is assigned to the device.If both user‐associated and device‐associated policies are effective for a device, only the policy that takes precedence according to the Policy Conflict Resolution settings is applied on the device. However, the Effective status for both policies is displayed as Success in the ZENworks Adaptive Agent iconUser settings of a device associated Group policy cannot be enforced in console sessions of a Windows Server 2003, Windows Server 2008, or Windows Server 2008 R2 device.On a managed device, if you launch a published application that is installed on a Citrix server having iPrint policy configured, it might take considerable time for the policy to be enforced on the server. During this period, the iPrint functionality is not available for the application. The iPrint policy is not enforced on the device if you set the ZENUserDaemon and the DisableUserDaemonHealing registry keys on the device to enable the user configuration settings configured in the Group policy to be applied in terminal sessions of Windows Server 2003, Windows Server 2008, and Windows Server 2008 R2 devices.
4.8 Assigning a Policy to UsersCertain key points that you must be aware of before you assign a policy to a user are as follows
There are two types of users: users in the corporate directory and local users on managed devices. Policies can be associated to users in the corporate directory. ZENworks assumes that a mapping exists between users in the corporate directory and users on a device. When a user logs in to the corporate directory, ZENworks obtains the policies for the corporate user and caches them on the device. If a mapping exists between a corporate user and a local user, ZENworks also associates the cached policies with the local user. When a user logs in to the device, the previously cached policies are enforced for the local user. When the user also logs in to the corporate directory, the policies for the corporate user are refreshed, then enforced.The set of policies, both directly assigned and inherited, is called as a set of assigned policies for a device or a user. When calculating the set of assigned policies, filters such as multiplicity or system requirements are not applied. Groups and containers also have assigned policies. Policies that are disabled are not included in the set of assigned policies.If you are assigning a Local File Rights policy to a network made up of devices running different languages, see Section 4.11, “Assigning the Local File Rights Policy to Devices Running Different Languages,” on page 63.Before assigning a Roaming Profile policy to a user on a Windows Vista device or Windows Server 2008 device, make sure a user profile with correct registry hive permissions is available on the device. See Section 4.9, “Assigning a Roaming Profile Policy for a User Profile Stored on a Windows, Linux, or NetWare Share,” on page 60.
Perform the following steps to assign a policy to a user:
1 In ZENworks Control Center, click the Policies tab.2 In the Policies list, select the check box next to the objects such as policies or policy groups.3 Click Action > Assign to User.
Managing Policies 59

4 Browse for and select the user, user groups, and user folders to which you want to assign the group. To do so:4a Click next to a folder to navigate through the folders until you find the user, group, or
folder you want to select.If you are looking for a specific item, such as a User or a User Group, you can use the Items of type list to limit the types of items that are displayed. If you know the name of the item you are looking for, you can use the Item name box to search for the item.
4b Click the underlined link in the Name column to select the user, group, or folder and display its name in the Selected list box.
4c Click OK to add the selected devices, folders, and groups to the Users list.5 Click Next to display the Finish page, review the information and, if necessary, use the Back
button to make changes to the information.6 Click Finish.
The following points are applicable when you assign a policy to a user:
When you assign a ZENworks Explorer Configuration Policy to a user, the settings configured in the policy are not immediately reflected on the device on which the user logs on. For example, even if Hide the Z icon in the taskbar is enabled in the policy, the ZENworks icon is displayed for a few seconds on the device after the policy is assigned to the user.User assigned policies are not enforced in the console sessions of Windows Server 2003, Windows Server 2008, and Windows Server 2008 R2 device.If you launch a published application from a Citrix server on to the device, it might take some considerable time for the list of the iPrint printers to be displayed on the device. If you launch a published application installed on a Citrix server that has the iPrint printer policy configured, it might take considerable time for the policy to be enforced on the server. During this period, the iPrint functionality is not available for the application.
4.9 Assigning a Roaming Profile Policy for a User Profile Stored on a Windows, Linux, or NetWare ShareIf a default profile already exists at a shared location, start with Step 3 in the following procedure. If you do not yet have a default profile, start with Step 1.
1 Create a default profile folder in a shared location that will be used to pre‐populate each user’s home directory. For information on creating the default profile folder, see Section 4.9.1, “Creating a Default Profile Folder in a Shared Location,” on page 61.
2 Create the default profile from a Windows Vista device, Windows 2008 device, or a Windows 7 device to the default profile folder in the shared location. For information on creating the default profile in the shared location, see Section 4.9.2, “Creating the Default Profile from a Windows Vista, Windows 2008, or Windows 7 Device to the Default Profile Folder in the Shared Location,” on page 61.
3 Configure the registry hive permissions for the default profile.For information on configuring the registry hive permissions, see Section 4.9.3, “Configuring the Permissions for the Default Profile Registry Hive,” on page 61.
60 ZENworks 11 Configuration Policies Reference

4.9.1 Creating a Default Profile Folder in a Shared LocationCreate a default profile folder in a shared location, depending on where you want to store the user profile. For example:
User Profile Path: \\DNS_name_of_file_ server\profiles\DefaultProfile.V2
4.9.2 Creating the Default Profile from a Windows Vista, Windows 2008, or Windows 7 Device to the Default Profile Folder in the Shared LocationEnsure that the user profile you want to copy as a default profile already exists on the device. If the desired profile is not available, create a new user account and then log in to the device with the new account credentials to create the profile.
Perform the following steps to copy the default profile to the default profile folder in the shared location:
1 Log in to the device as an administrator.2 Right‐click Computer, then click Properties > Advanced system settings.3 In the User Profiles section, click Settings.4 Select a profile on the device to store as a default profile.5 Click Copy To.6 Browse to and select the default profile folder you created in Section 4.9.1, “Creating a Default
Profile Folder in a Shared Location,” on page 61.7 Click Change in the Permitted to Use section.8 Specify Everyone in the Enter the object name to select option to provide permissions, then click OK.
9 Click OK to copy the profile to the shared location, then click OK.10 Click OK.
4.9.3 Configuring the Permissions for the Default Profile Registry Hive1 To open the Registry Editor when the shared location is on a Windows device, run regedit.
orTo open the Registry Editor when the shared location is on a Linux or NetWare device, map the location from a Windows device, then open the Registry Editor on the Windows device.
2 Select HKEY_USERS, then click File > Load Hive.3 Open the NTUSER.DAT file from the default profile folder created in Section 4.9.1, “Creating a
Default Profile Folder in a Shared Location,” on page 61.The NTUSER.DAT file might be hidden. To unhide the file:1. Open the default profile folder in Windows Explorer.2. Click Tools > Folder Options > View.3. Deselect Hide protected operating system files.
4 In the Load Hive dialog box, specify the Key Name for the hive. For example, Vista.5 Right‐click the Vista hive, then click Permissions.
Managing Policies 61

6 Ensure that the following groups or usernames have Full Control permissions:EveryoneSYSTEMAuthenticated Users
7 Click Advanced. 8 Select the Replace permission entries on all child objects with entries shown here that apply to child objects option, click OK, then click Yes.
9 Click OK.10 To unload the hive, select the Vista registry hive that you created, then click File > Unload Hive.
4.9.4 Copying the Default Profile to User FoldersEnsure that you copy the default profile from Section 4.9.3, “Configuring the Permissions for the Default Profile Registry Hive,” on page 61 to the user folders before assigning the Roaming Profile policy to the users. Depending on the user profiles stored, these user folders are:
User Profile Path: \\UNC_Path_of User's Home Directory\Windows NT 6.1 Workstation Profile.V2
4.9.5 Configuring Novell Client 2 for Windows 7Under the Advanced Login Tab in the Novell Client Properties Window, ensure that “Allow Roaming User Profile paths to non‐Windows servers is enabled. (Note: This is the default value.)
4.9.6 Enable Do not check for user Ownership of Roaming Profile Folders 1 Create or Edit a Group Policy Object.2 Browse to the following folder: Computer Configuration\Administrative
Templates\System\User Profiles.3 In the right pane, double click Do not check for user Ownership of Roaming Profile Folders.4 Click Enabled. 5 Click OK.
4.10 Assigning a Roaming Profile Policy for a User Profile Stored on a Home DirectoryIf a Roaming Profile policy is assigned to a user, the policy fails if the user profile is stored on Linux or NetWare Home Directory. This is because the registry hive of the user profile does not have permissions to load the profile to other devices. If a default profile already exists at a shared location, you need to configure the permissions for the default profile registry hive.
For more information, see TID 7007207 in the Novell Support Knowledgebase (http://www.novell.com/support/search.do?usemicrosite=true&searchString=7007207).
To Configure the Permissions for the Default Profile Registry Hive1 At the shared location, run regedit to open the Registry Editor.
62 ZENworks 11 Configuration Policies Reference

If the shared location is on a NetWare or Linux device, map the location from a Windows device then open the Registry Editor on the Windows device.
2 Select HKEY_USERS, then click File > Load Hive.3 Open the NTUSER.DAT file from the default profile folder.
The NTUSER.DAT file might be hidden. To unhide the file:3a Open the default profile folder in Windows Explorer.3b Click Tools > Folder Options > View.3c Deselect Hide protected operating system files.
4 In the Load Hive dialog box, specify the Key Name for the hive. For example, Vista.5 Right‐click the Vista hive, then click Permissions.6 Ensure that the following groups or usernames have Full Control permissions:
AdministratorsSYSTEMUsers
7 Click Advanced. 8 Select the Replace permission entries on all child objects with entries shown here that apply to child objects option, click OK, then click Yes.
9 Click OK.10 To unload the hive, select the Vista registry hive that you created, then click File > Unload Hive.
4.11 Assigning the Local File Rights Policy to Devices Running Different Languages
1 Create a separate Local File Rights policy for each language. For more information on creating the policy, see Section 3.3, “Local File Rights Policy,” on page 26.
2 Add a filter for each policy:2a Click the policy, then click Requirements.2b Click Add Filter, select the Registry Key Value condition, then specify the following:
Key: \HKEY_LOCAL_MACHINE\SOFTWARE\Microsoft\WindowsNT\CurrentVersion\WOW\boot.description
Value: language.dllComparator: = (String Type)Value Data: language For example, on a device with the English language, language is English (American). You can use the registry editor to determine the value data of the language.
2c Click Apply.3 Assign the policy to the device. For more information on assigning a policy to a device, see
Section 4.7, “Assigning a Policy to Devices,” on page 58.orAssign the policy to the user. For more information on assigning a policy to a user, see Section 4.8, “Assigning a Policy to Users,” on page 59.
Managing Policies 63

4.12 Unassigning a Policy from Devices1 In ZENworks Control Center, click the Policies tab.2 In the Policies list, click the policy you want to unassign.3 Click Relationships.4 In the Device Assignments panel, select the devices from which you want to unassign the policy.5 Click Remove.
On a Windows Server 2008 device, the Group policy user settings associated to a user are not unenforced when the user logs out.
4.13 Unassigning a Policy from Users1 In ZENworks Control Center, click the Policies tab.2 In the Policies list, click the policy you want to unassign.3 Click Relationships.4 In the User Assignments panel, select the users from whom you want to unassign the policy.5 Click Remove.
When you unassign a printer policy that is assigned to a user, the printer permissions for the user are removed from the device. However, the printer continues to be configured on the device.
4.14 Adding System Requirements for a PolicyThe System Requirements panel lets you define specific requirements that a device must meet for the specified version of the policy to be assigned to it. You can choose to edit the requirement.
You define requirements through the use of filters. A filter is a condition that must be met by a device in order for the policy to be applied. For example, you can add a filter to specify that the device must have exactly 512 MB of RAM in order for the policy to be applied, and you can add another filter to specify that the hard drive be at least 20 GB in size.
To create system requirements for a policy:
1 In ZENworks Control Center, click the Policies tab.2 Click the underlined link for the desired policy to display the policy’s Summary page.3 Click the Requirements tab.4 Click Add Filter, select a filter condition from the drop‐down list, then fill in the fields.
As you construct filters, you need to know the conditions you can use and how to organize the filters to achieve the desired results. For more information, see Section 4.14.1, “Filter Conditions,” on page 64 and Section 4.14.2, “Filter Logic,” on page 69.
5 (Conditional) Add additional filters and filter sets.6 Click Apply to save the settings.
4.14.1 Filter ConditionsYou can choose from any of the following conditions when creating a filter:
64 ZENworks 11 Configuration Policies Reference

Architecture: Determines the architecture of Windows running on the device. The condition you use to set the requirement includes a property, an operator, and a property value. The possible operators are equals (=) and does not equal (<>). For example, if you set the condition to architecture = 32, the device’s Windows operating system must be 32‐bit to meet the requirement.
Bundle Installed: Determines if a specific policy is installed. After specifying the bundle, the two conditions you can use to set the requirement are Yes and No. If you select Yes, the specified bundle must already be installed to meet the requirement. If you select No, the bundle must not be installed.
Configuration Location: Determines if the policy is applicable to a specific location. The condition you use to set the requirement includes an operator and a value. The possible operators are equals (=) and does not equal (<>). The values are the existing locations in the Management Zone. For example, if you set the condition to =location_name, the selected location must match the device’s location to meet the requirement.
NOTE: This system requirement is applicable for Linux Configuration Policies and Windows Configuration Policies only.
Configuration Network Environment: Determines if the policy is applicable to a specific network environment. The condition you use to set the requirement includes an operator and a value. The possible operators are equals (=) and does not equal (<>). The values are the existing network environments in the Management Zone. For example, if you set the condition to =network_environment_name, the selected network environment must match the device’s current network environment to meet the requirement.
NOTE: This system requirement is applicable for Linux Configuration Policies and Windows Configuration Policies only.
Connected: Determines if the device is connected to a network. The two conditions you can use to set the requirement are Yes and No. If you select Yes, the device must be connected to the network to meet the requirement. If you select No, it must not be connected.
Connection Speed: Determines the speed of the device’s connection to the network. The condition you use to set the requirement includes an operator and a value. The possible operators are equals (=), does not equal (<>), is greater than (>), is greater than or equal to (>=), is less than (<), and is less than or equal to (<=). The possible values are bits per second (bps), kilobits per second (Kbps), megabits per second (Mbps), and gigabits per second (Gbps). For example, if you set the condition to >= 100 Mbps, the connection speed must be greater than or equal to 100 megabits per second to meet the requirement.
Disk Space Free: Determines the amount of free disk space on the device. The condition you use to set the requirement includes a disk designation, an operator, and a value. The disk designation must be a local drive map (for example, c: or d:). The possible operators are equals (=), does not equal (<>), is greater than (>), is greater than or equal to (>=), is less than (<), and is less than or equal to (<=). The possible values are bytes (Bytes), kilobytes (KB), megabytes (MB), and gigabytes (GB). For example, if you set the condition to c: >= 80 MB, the free disk space must be greater than or equal to 80 megabytes to meet the requirement.
Disk Space Total: Determines the amount of total disk space on the device. The condition you use to set the requirement includes a disk designation, an operator, and a value. The disk designation must be a local drive map (for example, c: or d:). The possible operators are equals (=), does not equal (<>), is greater than (>), is greater than or equal to (>=), is less than (<), and is less than or equal to (<=). The possible values are bytes (Bytes), kilobytes (KB), megabytes (MB), and gigabytes (GB). For example, if you set the condition to c: >= 40 GB, the total disk space must be greater than or equal to 40 gigabytes to meet the requirement.
Managing Policies 65

Disk Space Used: Determines the amount of used disk space on the device. The condition you use to set the requirement includes a disk designation, an operator, and a value. The disk designation must be a local drive map (for example, c: or d:). The possible operators are equals (=), does not equal (<>), is greater than (>), is greater than or equal to (>=), is less than (<), and is less than or equal to (<=). The possible values are bytes (Bytes), kilobytes (KB), megabytes (MB), and gigabytes (GB). For example, if you set the condition to c: <= 10 GB, the used disk space must be less than or equal to 10 gigabytes to meet the requirement.
Environment Variable Exists: Determines if a specific environment variable exists on the device. After specifying the environment variable, the two conditions you can use to set the requirement are Yes and No. If you select Yes, the environment variable must exist on the device to meet the requirement. If you select No, it must not exist.
Environment Variable Value: Determines if an environment variable value exists on the device. The condition you use to set the requirement includes the environment variable, an operator, and a variable value. The environment variable can be any operating system supported environment variable. The possible operators are equal to, not equal to, contains, and does not contain. The possible variable values are determined by the environment variable. For example, if you set the condition to Path contains c:\windows\system32, the Path environment variable must contain the c:\windows\system32 path to meet the requirement.
File Date: Determines the date of a file. The condition you use to set the requirement includes the filename, an operator, and a date. The filename can be any filename supported by the operating system. The possible operators are on, after, on or after, before, and on or before. The possible dates are any valid dates. For example, if you set the condition to app1.msi on or after 6/15/07, the app1.msi file must be dated 6/15/2007 or later to meet the requirement.
File Exists: Determines if a file exists. After specifying the filename, the two conditions you can use to set the requirement are Yes and No. If you select Yes, the specified file must exist to meet the requirement. If you select No, the file must not exist.
File Size: Determines the size of a file. The condition you use to set the requirement includes the filename, an operator, and a size. The filename can be any file name supported by the operating system. The possible operators are equals (=), does not equal (<>), is greater than (>), is greater than or equal to (>=), is less than (<), and is less than or equal to (<=). The possible sizes are designated in bytes (Bytes), kilobytes (KB), megabytes (MB), and gigabytes (GB). For example, if you set the condition to doc1.pdf <= 3 MB, the doc1.pdf file must be less than or equal to 3 megabytes to meet the requirement.
File Version: Determines the version of a file. The condition you use to set the requirement includes the filename, an operator, and a version. The filename can be any file name supported by the operating system. The possible operators are equals (=), does not equal (<>), is greater than (>), is greater than or equal to (>=), is less than (<), and is less than or equal to (<=).
Be aware that file version numbers contain four components: Major, Minor, Revision, and Build. For example, the file version for calc.exe might be 5.1.2600.0. Each component is treated independently. For this reason, the system requirements that you set might not provide your expected results. If you do not specify all four components, wildcards are assumed.
For example, if you set the condition to calc.exe <= 5, you are specifying only the first component of the version number (Major). As a result, versions 5.0.5, 5.1, and 5.1.1.1 also meet the condition.
However, because each component is independent, if you set the condition to calc.exe <= 5.1, the calc.exe file must be less than or equal to version 5.1 to meet the requirement.
IP Segment: Determines the device’s IP address. After specifying the IP segment name, the two conditions you can use to set the requirement are Yes and No. If you select Yes, the device’s IP address must match the IP segment. If you select No, the IP address must not match the IP segment.
66 ZENworks 11 Configuration Policies Reference

Linux Service Pack: Determines whether the Linux Operating System on the managed device has been upgraded to a particular Service Pack. For example, if you add a system requirement, Linux Service Pack >= 2, if using a SLES 10 box, the requirement is satisfied only when the Operating System has been upgraded to SLES 10 SP 2. The possible operators are equals (=), does not equal (<>), is greater than (>), is greater than or equal to (>=), is less than (<), and is less than or equal to (<=).
Linux Kernel Version: Determines the version of the core Linux kernel installed on the managed device. For example, if you add a system requirement, Linux Kernel Version >= 2.6, then the requirement evaluates to true only if kernel version is actually greater than or equal to 2.6, say if itʹs 2.6.16 and so on. The possible operators are equals (=), does not equal (<>), is greater than (>), is greater than or equal to (>=), is less than (<), and is less than or equal to (<=).
Linux Distribution: Determines the flavour of the Linux Operating System installed and differentiates between architecture and version of the desktop or server installed. For example, if you add a system requirement, Linux Distribution = SUSE Linux Enterprise Desktop 11 - i586, then the requirement evaluates to true only on SLED 11 32 bit managed devices. The possible operators are equals (=) and does not equal (<>).
Logged on to Primary Workstation: Determines whether the user is logged on to his or her primary workstation. The two conditions you can use to set the requirement are Yes and No. If you select Yes, the user must be logged on to his or her primary workstation to meet the requirement. If you select No, and no user is logged on to the workstation, the requirement is not met. However, if a user other than the primary user is logged on to the workstation, the requirement is met.
Memory: Determines the amount of memory on the device. The condition you use to set the requirement includes an operator and a memory amount. The possible operators are equals (=), does not equal (<>), is greater than (>), is greater than or equal to (>=), is less than (<), and is less than or equal to (<=). The memory amounts are designated in megabytes (MB) and gigabytes (GB). For example, if you set the condition to >= 2 GB, the device must have at least 2 gigabytes of memory to meet the requirement.
Novell Client Installed: Determines if the device is using the Novell Client for its network connection. The two conditions you can use to set the requirement are Yes and No. If you select Yes, the device must be using the Novell Client to meet the requirement. If you select No, it must not be using the Novell Client.
Operating System ‐ Windows: Determines the service pack level, server type, and version of Windows running on the device. The condition you use to set the requirement includes a property, an operator, and a property value. The possible properties are service pack, server type, and version. The possible operators are equals (=), does not equal (<>), is greater than (>), is greater than or equal to (>=), is less than (<), and is less than or equal to (<=). The property values vary depending on the property. For example, if you set the condition to version = Windows XP Versions, the device’s Windows version must be XP to meet the requirement.
NOTE: Be aware that operating system version numbers contain four components: Major, Minor, Revision, and Build. For example, the Windows 2000 SP4 release’s number might be 5.0.2159.262144. Each component is treated independently. For this reason, the system requirements that you set might not provide your expected results.
For example, if you specify Operating System ‐ Windows in the first field, Version in the second field, > in the third field, and 5.0 ‐Windows 2000 Versions in the last field, you are specifying only the first two components of the version number: Major (Windows) and Minor (5.0). As a result, for the requirement evaluated to true, the OS will have to be at least 5.1 (Windows XP). Windows 2003 is version 5.2, so specifying > 5.2 will also evaluate to true.
However, because each component is independent, if you specify the version > 5.0, Windows 2000 SP4 evaluates to false because the actual version number might be 5.0.2159.262144. You can type 5.0.0 to make the requirement evaluate as true because the actual revision component is greater than 0.
Managing Policies 67

When you select the OS version from the drop‐down, the Major and Minor components are populated. The Revision and Build components must be typed in manually.
Primary User Is Logged In: Determines if the device’s primary user is logged in. The two conditions you can use to set the requirement are Yes and No. If you select Yes, the primary user must be logged in to meet the requirement. If you select No, the user must not be logged in.
Processor Family: Determines the device’s processor type. The condition you use to set the requirement includes an operator and a processor family. The possible operators are equals (=) and does not equal (<>). The possible processor families are Pentium, Pentium Pro, Pentium II, Pentium III, Pentium 4, Pentium M, WinChip, Duron, BrandID, Celeron, and Celeron M. For example, if you set the condition to <> Celeron, the device’s processor can be any processor family other than Celeron to meet the requirement.
Processor Speed: Determines the device’s processor speed. The condition you use to set the requirement includes an operator and a processor speed. The possible operators are equals (=), does not equal (<>), is greater than (>), is greater than or equal to (>=), is less than (<), and is less than or equal to (<=). The possible processor speeds are hertz (Hz), kilohertz (KHz), megahertz (MHz), and gigahertz (GHz). For example, if you set the condition to >= 2 GHz, the device’s speed must be at least 2 gigahertz meet the requirement.
Registry Key Exists: Determines if a registry key exists. After specifying the key name, the two conditions you can use to set the requirement are Yes and No. If you select Yes, the specified key must exist to meet the requirement. If you select No, the key must not exist.
Registry Key Value: Determines if a registry key value exists on the device. The condition you use to set the requirement includes the key name, the value name, an operator, a value type, and a value data. The key and value names must identify the key value you want to check. The possible operators are equals (=), does not equal (<>), is greater than (>), is greater than or equal to (>=), is less than (<), and is less than or equal to (<=). The possible value types are INT_TYPE and STR_TYPE. The possible value data is determined by the key, value name, and value type.
Registry Key and Value Exists: Determines if a registry key and value exists. After specifying the key name and value, the two conditions you can use to set the requirement are Yes and No. If you select Yes, the specified key and value must exist to meet the requirement. If you select No, the key and value must not exist.
Security Location: Determines if the policy is applicable for a specific security location. The condition you use to set the requirement includes an operator and a value. The possible operators are equals (=) and does not equal (<>). The values are the existing security locations in the Management Zone. For example, if you set the condition to =security_location_name, the selected security location must match the device’s security location to meet the requirement.
NOTE: This system requirement is applicable for Linux Configuration Policies and Windows Configuration Policies only. The system requirement is applied to a managed device only if the Location Assignment Policy has been applied to the device. If the policy has Security Location system requirement configured, the policy enforcement fails on Windows Server 2003 and Windows Server 2008 devices because the ZENworks Endpoint Security Management policies are not supported on these devices.
Service Exists: Determines if a service exists. After specifying the service name, the two conditions you can use to set the requirement are Yes and No. If you select Yes, the service must exist to meet the requirement. If you select No, the service must not exist.
68 ZENworks 11 Configuration Policies Reference

Specified Devices: Determines if the device is one of the specified devices. After specifying the devices, the two conditions you can use to set the requirement are Yes and No. If you select Yes, the device must be included in the specified devices list to meet the requirement (an inclusion list). If you select No, the device must not be included in the list (an exclusion list).
Version of RPM: Determines the version of the RPM name provided if installed. For example, if you add a system requirement, Version of RPM cups > 1.0, then the requirement evaluates to true, if cups rpm is installed and the version of the installed cups rpm is greater than 1.0. If cups rpm is not installed, the requirement is evaluated to be false. The possible operators are equals (=), does not equal (<>), is greater than (>), is greater than or equal to (>=), is less than (<), and is less than or equal to (<=).
4.14.2 Filter LogicYou can use one or more filters to determine whether the policy should be applied to a device. A device must match the entire filter list (as determined by the logical operators that are explained below) for the policy to be applied to the device.
There is no technical limit to the number of filters you can use, but there are practical limits, such as:
Designing a filter structure that is easy to understand Organizing the filters so that you do not create conflicting filters
Filters, Filter Sets, and Logical OperatorsYou can add filters individually or in sets. Logical operators, either AND or OR, are used to combine each filter and filter set. By default, filters are combined using OR (as determined by the Combine Filters Using field) and filter sets are combined using AND. You can change the default and use AND to combined filters, in which case filter sets are automatically combined using OR. In other words, the logical operator that is to combine individual filters (within in a set) must be the opposite of the operator that is used between filter sets.
You can easily view how these logical operators work. Click both the Add Filter and Add Filter Set options a few times each to create a few filter sets, then switch between AND and OR in the Combine Filters Using field and observe how the operators change.
As you construct filters and filter sets, you can think in terms of algebraic notation parentheticals, where filters are contained within parentheses, and sets are separated into a series of parenthetical groups. Logical operators (AND and OR) separate the filters within the parentheses, and the operators are used to separate the parentheticals.
For example, “(u AND v AND w) OR (x AND y AND z)” means “match either uvw or xyz.” In the filter list, this looks like:
u ANDv ANDwORx ANDy ANDz
Nested Filters and Filter SetsFilters and filter sets cannot be nested. You can only enter them in series, and the first filter or filter set to match the device is used. Therefore, the order in which they are listed does not matter. You are simply looking for a match to cause the policy to be applied to the device.
Managing Policies 69

4.15 Disabling PoliciesWhen you create a policy in ZENworks Configuration Management, the policy is enabled by default. Policies can be disabled by an administrator. If a policy is disabled, it is not considered for enforcement on any of the devices and users that it applies to.
To disable a policy:
1 In ZENworks Control Center, click the Policies tab.2 Select the check box next to the policy (or policies) that you want to disable.3 Click Action > Disable Policies.
In the Policies list, the status of Enabled for the policy (or policies) is changed to No.When you disable a policy that has already been enforced for some managed devices and users, the policy is removed from those devices and it is not enforced for new devices and users.
NOTE: If policies are disabled for the management zone using ZENworks Control Center, some policies like Group policy, Launcher policy and DLU policy can be created and applied to the managed device if there is an active ZESM license.
4.16 Enabling the Disabled Policies1 In ZENworks Control Center, click the Policies tab.2 Select the check box next to the policy (or policies) that you want to enable.3 Click Action > Enable Policies.
In the Policies list, the status of the Enabled column for the policy (or policies) is changed to Yes.
4.17 Copying a Policy to a Content ServerBy default, a policy is copied to each content server. If you specify certain content servers as hosts, the policy is hosted on only those content servers; it is not copied to all content servers. You can also specify whether the selected policy is replicated to new content servers (ZENworks Servers and satellite servers) that are added to the Management Zone.
To specify a content server:
1 In ZENworks Control Center, click the Policies tab.2 In the Policies list, select the check box next to the policy (or policies).3 Click Action > Specify Content Server to display the New Content Replication Rules page.
70 ZENworks 11 Configuration Policies Reference

4 Specify the default replication behavior for new servers added to the system:New Primary Servers Will: Specify the default replication behavior for new ZENworks Primary Servers added to the system:
Include This Content: Replicates the content to any servers created in the future.Exclude This Content: Excludes the content from being replicated to any servers created in the future.
New Satellite Servers Will: Specify the default replication behavior for new ZENworks satellite servers added to the system:
Include This Content: Replicates the content to any servers created in the future.Exclude This Content: Excludes the content from being replicated to any servers created in the future.
Be aware that any content replication relationships previously set between the content and servers are lost upon completion of this wizard.
5 Click Next to display the Include or Exclude Primary Servers/Satellite Servers page:
Managing Policies 71
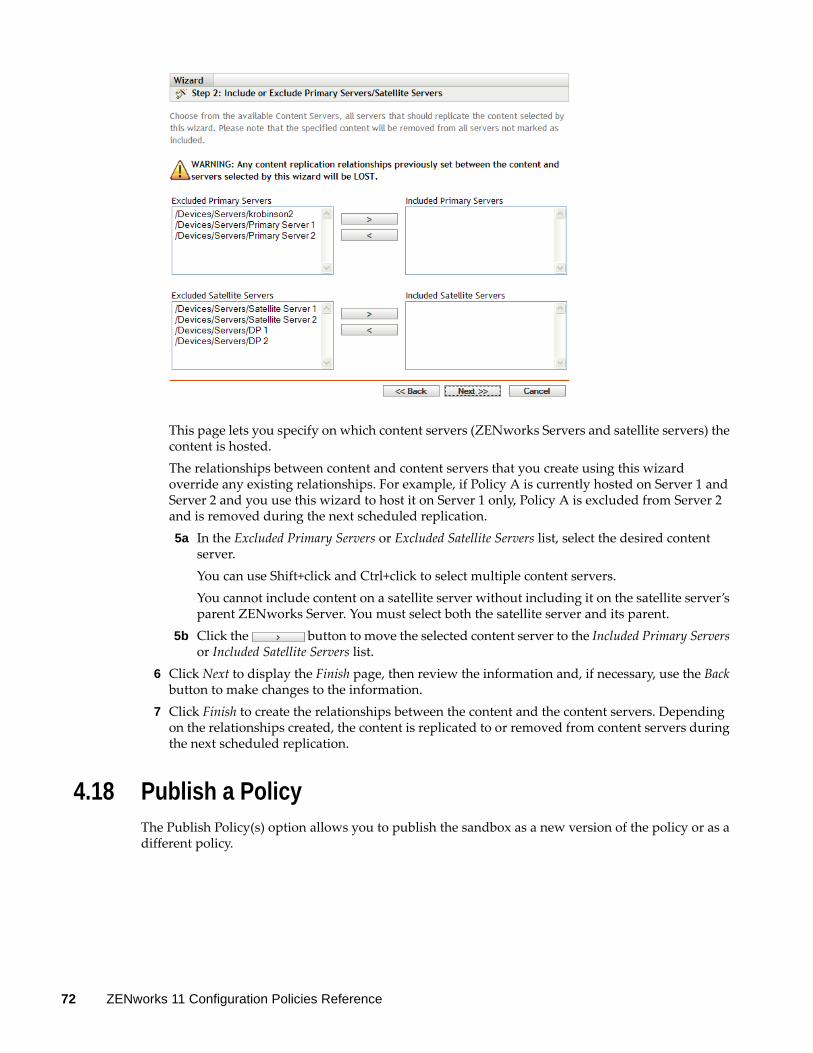
This page lets you specify on which content servers (ZENworks Servers and satellite servers) the content is hosted.The relationships between content and content servers that you create using this wizard override any existing relationships. For example, if Policy A is currently hosted on Server 1 and Server 2 and you use this wizard to host it on Server 1 only, Policy A is excluded from Server 2 and is removed during the next scheduled replication.5a In the Excluded Primary Servers or Excluded Satellite Servers list, select the desired content
server.You can use Shift+click and Ctrl+click to select multiple content servers. You cannot include content on a satellite server without including it on the satellite server’s parent ZENworks Server. You must select both the satellite server and its parent.
5b Click the button to move the selected content server to the Included Primary Servers or Included Satellite Servers list.
6 Click Next to display the Finish page, then review the information and, if necessary, use the Back button to make changes to the information.
7 Click Finish to create the relationships between the content and the content servers. Depending on the relationships created, the content is replicated to or removed from content servers during the next scheduled replication.
4.18 Publish a PolicyThe Publish Policy(s) option allows you to publish the sandbox as a new version of the policy or as a different policy.
72 ZENworks 11 Configuration Policies Reference

4.18.1 Publish as New VersionLets you create a new version of the policy that has the version number incremented by one from the latest available version of the policy.
Select the Include policies from subfolders option to enable all the policies that are within the subfolders of the selected folders to be published.
1 In ZENworks Control Center, click the Policies tab.2 Select the check box next to the policy (or policies) that has a sandbox.3 Click Action > Publish Policy(s). 4 Follow the on‐screen prompts. Click the Help button if you need additional information.
4.18.2 Publish as New PolicyLets you create a new policy.
NameProvide a name for the policy. The policy name must be different from the names of any other items (policy, group, folder, and so forth) that reside in the same folder. The name you provide displays in ZENworks Control Center and the ZENworks Adaptive Agent (on managed devices).
FolderSpecify the name or browse to the ZENworks Control Center folder where you want the policy to reside. The default is /Policies, but you can create additional folders to organize your policies.
Create as SandboxSelect the Create as Sandbox check box to enforce the policy as a sandbox version. A sandbox version of a policy enables you to try it in a test environment before actually implementing it on your device.
Select GroupsLists all the available policy groups. Select the policy groups that the new policy should be a member of.
4.19 Reviewing the Status of the Policies at the Managed DeviceThe ZENworks Adaptive Agent applies policies that your administrator defines. Policies are rules that control a range of hardware and software configuration settings. For example, your administrator can create policies that control the Adaptive Agent features you can use, the bookmarks available in your browser, the printers you can access, and the security and system configuration settings for your.
You cannot change the policies applied by your administrator. Policies might be assigned to you or they might be assigned to your device. Policies assigned to you are referred to as user‐assigned policies, and policies assigned to your device are referred to as device‐assigned policies
Managing Policies 73

The ZENworks Adaptive Agent enforces your user‐assigned policies only when you are logged in to your user directory (Microsoft Active Directory or Novell eDirectory). If you are not logged in, you can log in through the ZENworks Configuration Management login screen. To do so, right‐click the ZENworks icon in the notification area, then click Login.
The Adaptive Agent always enforces the device‐assigned policies regardless of whether or not you are logged in. Therefore, device‐assigned policies are enforced for all users of the device.
To view the policies assigned to you and your device:
1 Double‐click the ZENworks icon in the notification area.2 In the left navigation pane, click Policies.
4.20 Policy Issues on a Windows 7, Windows Server 2008, or Windows Server 2008 R2 device
Roaming Profile policy with the home directory option is not enforced in a terminal session of a Windows Server 2008 or Windows Server 2008 R2 device if you have launched the terminal session from a Windows Vista, Windows 7, Windows Server 2008, or Windows Server 2008 R2 device. This is because the Novell Client login dialog box is not displayed on the device and only the Remote Desktop login is performed on the device.
To display the Novell Client login dialog box, do the following:1. Open the registry editor.2. Go to HKEY_LOCAL_MACHINE\SOFTWARE\Novell\Login.3. Create a string called TSClientAutoAdminLogon, and set its value to 1. 4. Create a string called DefaultLoginProfile, and set its value to Default. 5. Close the registry editor.6. From a Windows Vista or Windows 7 device, launch a Remote Desktop session to the
Windows Server 2008 R2 device and specify the Windows user credentials. 7. A Novell Client window is displayed. Click Cancel.8. In the next screen, click Novell Logon to display the Novell Client login dialog box.
Dynamic Local User Profile policy is not enforced in a terminal session of a Windows Server 2008 or Windows Server 2008 R2 device if you have launched the terminal session from a Windows Vista, Windows 7, Windows Server 2008, or Windows Server 2008 R2 device. This is because Novell Client login dialog box is not displayed on the device and only the Remote Desktop login is performed on the device. For information on resolving this issue, search for the Using Dynamic Local User Policy in Windows Server 2008 R2 Remote Desktop Session Host article at the ZENworks Cool Solutions Community (http://www.novell.com/communities/coolsolutions/zenworks)If a Roaming Profile user logs in to a Windows Server 2008 or Windows Server 2008 R2 device and then logs out, the user cannot log in to a Windows 7 device or to other Windows Server 2008 or Windows Server 2008 R2 devices. A Roaming Profile policy cannot be enforced on a Windows 7, Windows Server 2008, or Windows Server 2008 R2 device if the user profile is stored on a Windows Server 2003 shared location. For more information, see the troubleshooting scenario “Unable to enforce a Roaming Profile policy on a Windows Vista, Windows 7, Windows Server 2008, or Windows Server 2008 R2 device if the user profile is stored in a shared folder on a Windows Server 2003 device” on page 105.
74 ZENworks 11 Configuration Policies Reference

4.21 Viewing the Predefined ReportsYou must have installed ZENworks Reporting Server to view the Predefined reports. For more information on how to install ZENworks Reporting Server, see ZENworks 11 Server Installation Guide
To view the Predefined reports for Policies, do the following:
1 In the ZENworks Control Center, click Reports.2 In the ZENworks Reporting Server Reporting panel, click ZENworks Reporting Server InfoView to
launch the ZENworks Reporting Server InfoView.3 Navigate to the Novell ZENworks Reports folder > Predefined Reports > Bundles and Policies folder.4 The following Predefined reports are included for Policies:
Assigned Bundles and Policies by Device: Displays information on all the policies that are assigned to a particular device.Content By Server: Displays the content information for the selected server. The information includes the content name, content type, replication state, and the disk space.Content By Bundle and Policy: Displays the content information for the bundles and policies. This information includes the content server, content type, replication state, and disk space.
For more information on creating and managing reports, see the ZENworks 11 System Reporting Reference documentation.
4.22 Understanding Policy VersionsPolicy Change Management allows you to create either a sandbox‐only policy or a Published version of the policy. If you edit a published version of the policy, a sandbox is created. You can choose to publish the sandbox either as a new version of the policy or a new policy.
For more information on publishing the sandbox, see Section 4.24, “Publishing a Sandbox,” on page 77.
For more information on the policy versions, see Section 4.23, “Managing Policy Versions,” on page 76.
The Displayed Version option on the policy’s page lists all the existing versions of the policy, and the latest version of the policy is selected by default. However, if a sandbox exists, the sandbox is selected by default.
Scenario: 1 Consider a policy named sos1 that is created as a sandbox. The Displayed Version option on the
policy page lists sandbox and it is selected by default.2 Click Publish to publish the sandbox to a new version. The Displayed Version option on the policy
page now lists 0(Published) and it is selected by default.3 Edit the policy’s description to create a sandbox. The Displayed Version option on the policy page
now lists 0(Published) and sandbox. sandbox is selected by default.4 Click Publish to publish the sandbox to a new version. The Displayed Version option on the policy
page now lists 0(Published), and 1(Published). The policy’s latest version, 1(Published), is selected by default.0(Published) is the older version of the policy.
Managing Policies 75

5 Edit the policy’s description again to create a sandbox. The Displayed Version option on the policy page now lists 0(Published), 1(Published), and sandbox. sandbox is selected by default.0(Published) is the older version of the policy and 1(Published) is the latest version of the policy.
6 Click Publish to publish the sandbox to a new version. The Displayed Version option on the policy page now lists 0(Published), 1(Published), 2(Published). The policy’s latest version, 2(Published), is selected by default.0(Published) and 1(Published) are the older versions of the policy; and 2(Published) is the latest version of the policy.
4.23 Managing Policy Versions The Displayed Version option on the policy’s page lists all existing versions of the policy, and the latest version of the policy is selected by default. However, if a sandbox exists, the sandbox is selected by default.
For more information on the policy versions, see Section 4.22, “Understanding Policy Versions,” on page 75.
Select the version of the policy whose details you want to view or edit.
Task Steps Additional Details
Create a sandbox from the published version of the policy
1. Select the published version of the policy.
2. Edit the policy.
A single modification made to the policy creates a sandbox. The created sandbox is a copy of the policy and also includes the additional edit. However, the change is not made to the published version of the policy.
Changes can now be made to the sandbox.
You can revert a sandbox to the original version of the policy or publish a sandbox to create a new version or a new policy.
Create a sandbox from an older version of the policy
1. Select an older version of the policy.
2. Click Create sandbox.
The created sandbox is an exact copy of the policy.
Changes can now be made to the sandbox.
Publish a sandbox 1. Select sandbox.
2. Click Publish to display the Publish Option page.
The sandbox must be published for the changes to be effective on the devices and users to whom the policy is assigned.
Revert a sandbox 1. Select sandbox.
2. Click Revert to delete the sandbox.
All the changes made are discarded. The sandbox no longer exists.
The published version of the policy is displayed in the Displayed Version option.
76 ZENworks 11 Configuration Policies Reference

4.24 Publishing a Sandbox The sandbox must be published for the changes to be effective on the devices and users to whom the policy is assigned. You can choose to publish the sandbox either as a new version or as a new policy. Review the following sections:
Section 4.24.1, “Publishing a Sandbox as a New Version,” on page 77Section 4.24.2, “Publishing a Sandbox as a New Policy,” on page 77Section 4.24.3, “Publishing Multiple Sandbox as New Versions,” on page 78
4.24.1 Publishing a Sandbox as a New VersionPublishing a sandbox as a new version lets you create a new version of the policy that has a version number incremented by one from the latest available version of the policy.
To publish the sandbox as a new version:
1 In the Displayed Version option on the policy page, select sandbox.2 Click Publish to display the Publish Option page.3 Click Publish as New Version.4 Click Finish to create a new published version.
For example, if the Displayed Version option on the policy page lists 0(Published), 1(Published), and sandbox, publishing the sandbox as a new version creates a version 2. The Displayed Version option on the policy page now lists 0(Published), 1(Published), and 2(Published).
4.24.2 Publishing a Sandbox as a New PolicyPublishing a sandbox as a new policy creates a new policy.
1 In the Displayed Version option on the policy page, select sandbox.2 Click Publish to display the Publish Option page.3 Click Publish as New Policy.4 Specify a name for the policy.
The policy name must be different from the name of any other item (policy, group, folder, and so forth) that resides in the same folder. The name you provide displays in ZENworks Control Center and the ZENworks Adaptive Agent (on managed devices).For more information, see “Naming Objects in ZENworks Control Center” in the ZENworks 11 ZENworks Control Center Reference.
Delete an older version of the policy 1. Select an older version of the policy.
2. Click Delete Selected Version.
To delete all older versions of a policy or delete all versions older than a particular version, click Delete Older Versions under the Policy Tasks list located in the ZENworks Control Center left navigation pane.
Task Steps Additional Details
Managing Policies 77

5 Specify the folder name or browse to the ZENworks Control Center folder where you want the policy to reside. The default is /Policies, but you can create additional folders to organize your policies.
6 Select the Create as Sandbox option to enforce the policy as a sandbox version. A sandbox version of a policy enables you to try it in a test environment before actually implementing it on your device
7 Select the policy groups that the new policy should be a member of.8 Click Next to display the Select Assignments page.9 Select the device and user assignments that you want to apply to the new policy.
10 Click Next.11 On the Summary Page, review the information and, if necessary, use the Back button to make
changes to the information.12 Click Finish to create the policy.
4.24.3 Publishing Multiple Sandbox as New VersionsPerform the following steps in the ZENworks Control Center:
1 Select a few policy folders, policy groups, and policies.2 Click Action > Publish Policy(s) to display the Publish Options page.3 (Conditional) Select the Include policys from subfolders also option to publish all the policies within
the selected folders as new versions of the policies.This option is displayed only if you have selected a policy folder in Step 1.
4 Click Next. On the Select Policys page, select the policy you want to publish to nextversion, then click Next.
5 Click Finish to create a new published version.For example, if the Displayed Version option on the policy page lists 0(Published), 1(Published), and Sandbox, publishing the sandbox as a new version creates a version 2. The Displayed Version option on the policy page now lists 0(Published), 1(Published), and 2(Published).
4.25 Policy Behavior Based on Content Replication SettingsWhen you created a policy in earlier versions of ZENworks, the policy inherited the content replication settings from its parent folder by default. However, with the introduction of Policy Change Management, the behavior has been changed. For more information on this change, see the following table:
Task Information
Creating a policy (not as a sandbox)
The new policy inherits the settings from its parent folder by default.
78 ZENworks 11 Configuration Policies Reference

Creating a policy as a sandbox The new policy neither inherits settings from its parent folder nor does it replicate content by default.
To replicate the content on new Primary Servers:
1. In ZENworks Control Center, click the policy.
2. Click the Settings tab.
3. Click Primary Server Replication.
4. In the Primary Server Replication Status panel, select the New Primary Servers added to the system will include this content by default option.
To replicate the content on new Satellite Servers:
1. In ZENworks Control Center, click the policy.
2. Click the Settings tab.
3. Click Satellite Server Replication.
4. In the Satellite Server Replication Status panel, select the New Satellite Servers added to the system will include this content by default option.
NOTE: The Sync sandbox Content to Content Servers option on the sandbox Settings page of the policy is deselected and is not editable.
Creating a sandbox from a published version or an older version of the policy
The sandbox version of the policy neither inherits settings from its parent folder nor does it replicate content by default.
To replicate the content on new Primary and Satellite Servers:
1. In ZENworks Control Center, click the policy.
2. Click the Settings tab.
3. Click sandbox Settings.
4. In the sandbox Content Replication panel, select the Sync sandbox Content to Content Servers option.
Task Information
Managing Policies 79

Publishing a policy to create a new policy as a sandbox
If you publish a policy to create a new policy with the Create as Sandbox option selected then the new policy is created as a sandbox. The new policy neither inherits settings from its parent folder nor does it replicate content by default.
To replicate the content on new Primary Servers:
1. In ZENworks Control Center, click the policy.
2. Click the Settings tab.
3. Click Primary Server Replication.
4. In the Primary Server Replication Status panel, select the New Primary Servers added to the system will include this content by default.
If you want to replicate the content on new Satellite Servers, do the following:
1. Click the policy.
2. Click the Settings tab.
3. Click Satellite Server Replication.
4. In the Satellite Server Replication Status panel, select the New Satellite Servers added to the system will include this content by default option.
NOTE: The Sync sandbox Content to Content Servers option on the sandbox Settings page of the policy is deselected and is not editable.
Publishing a policy to create a new policy (not as a sandbox)
The settings of the new policy depend on the source policy from which it has been created.
If you publish a sandbox-only policy whose replication settings have not been modified, the new policy inherits settings from the parent folder.
If you publish a sandbox-only policy whose replication settings have been modified, the modified replication settings are copied to the new policy.
If you publish a sandbox that has been created from a published version or an older version of a policy, the content replication settings from the published version of the source policy are copied to new policy.
Task Information
80 ZENworks 11 Configuration Policies Reference

5 5Managing Policy Groups
A policy group lets you group policies to ease administration and to provide easier assigning and scheduling of the policies in the policy group.
You can use ZENworks Control Center or the zman command line utility to create policy groups. This section explains how to perform this task using the ZENworks Control Center. If you prefer the zman command line utility, see “Policy Commands” in the ZENworks 11 Command Line Utilities Reference.
Section 5.1, “Creating Policy Groups,” on page 81Section 5.2, “Renaming or Moving Policy Groups,” on page 82Section 5.3, “Deleting a Policy Group,” on page 82Section 5.4, “Assigning a Policy Group to Devices,” on page 83Section 5.5, “Assigning a Policy Group to Users,” on page 83Section 5.6, “Adding a Policy to a Group,” on page 84
5.1 Creating Policy Groups1 In ZENworks Control Center, click the Policies tab.2 Click New > Policy Group.3 Fill in the fields:Group Name: Provide a name for the policy group. The name must be different than the name of any other item (policy, group, folder, and so forth) that resides in the same folder. The name you provide displays in ZENworks Control Center.For more information, see “Naming Objects in ZENworks Control Center” in the ZENworks 11 ZENworks Control Center Reference.Folder: Type the name or browse to and select the ZENworks Control Center folder where you want the policy to reside. The default is /policies, but you can create additional folders to organize your policies.If you want to create the group in another folder, browse to and select the folder. By default, the group is created in the current folder.Description: Provide a short description of the policy groupʹs contents. This description displays in ZENworks Control Center.
4 Click Next to display the Add Group Members page, then specify policies to be members for the group.You can add any number of policies to the group. You cannot add other policy groups to the group.4a Click Add to display the Select Members dialog box.
Because you are adding policies to the group, the Select Members dialog box opens with the Policies folder displayed.
Managing Policy Groups 81
4b Browse for and select the policies you want to add to the group. To do so:4b1 Click next to a folder to navigate the folders until you find the policy you want to
select.If you know the name of the policy you are looking for, you can also use the Item name box to search for the policy.
4b2 Click the underlined link in the Name column to select the policy and display its name in the Selected list.
4b3 (Optional) Repeat Step 4a and Step 4b to add additional policies to the Selected list.4b4 Click OK to add the selected policies to the group.
5 Click Next to display the Summary page. Review the information and, if necessary, use the Back button to make changes to the information.
6 (Conditional) Select Create as Sandbox, if you want to create the sandbox version of the policy.7 (Optional) Select the Define Additional Properties option to display the group’s properties page
after the group is created. You can then configure additional policy properties.8 Click Finish to create the group.
Before the policy group’s contents are distributed to devices or users, you must continue with Section 4.7, “Assigning a Policy to Devices,” on page 58 or Section 4.8, “Assigning a Policy to Users,” on page 59.
5.2 Renaming or Moving Policy GroupsUse the Edit drop‐down list on the Policies page to edit an existing object. To access the Edit drop‐down list, you must select an object by clicking the check box next to the objectʹs name in the list.
Depending on the type of object you select, you can rename, copy, or move the selected object. For example, if you select a policy object, you can rename, copy, and move the policy. If you select a Policy Group object, you can rename or move the policy group object, but not copy it. If the option is dimmed, that option is not available for the selected object type.
Some actions cannot be performed on multiple objects. For example, if more than one check box is selected, the Rename option is not available from the Edit menu.
1 In ZENworks Control Center, click the Policies tab.2 In the Policies list, select the box next to the policy group’s name, click Edit, then click an option:Rename: Click Rename, provide a new name for the policy group, then click OK.Move: Click Move, select a destination folder for the selected objects, then click OK.
5.3 Deleting a Policy GroupDeleting a policy group does not delete its policies. It also does not unenforce the policies from devices where they have already been enforced. To unenforce the policy from devices, remove the assignment of each policy from the devices or users before deleting the policy group.
For information on unassigning policy from a user, see Section 4.13, “Unassigning a Policy from Users,” on page 64.
For information on unassigning policy from a device, see Section 4.12, “Unassigning a Policy from Devices,” on page 64.
82 ZENworks 11 Configuration Policies Reference

To delete the policy group:
1 In ZENworks Control Center, click the Policies tab.2 In the Policies list, select the check box next to the policy group (or policy groups).3 Click Delete.
5.4 Assigning a Policy Group to Devices1 In ZENworks Control Center, click the Policies tab.2 In the Policies list, select the check box next to the policy group (or policy groups).3 Click Action > Assign to Device.4 Browse for and select the devices, device groups, and device folders to which you want to assign
the group. To do so:4a Click next to a folder (for example, the Workstations folder or Servers folder) to
navigate through the folders until you find the device, group, or folder you want to select.If you are looking for a specific item, such as a Workstation or a Workstation Group, you can use the Items of type list to limit the types of items that are displayed. If you know the name of the item you are looking for, you can use the Item name box to search for the item.
4b Click the underlined link in the Name column to select the device, group, or folder and display its name in the Selected list box.
4c Click OK to add the selected devices, folders, and groups to the Devices list.5 Click Next to display the Finish page, review the information and, if necessary, use the Back
button to make changes to the information.6 Click Finish.
5.5 Assigning a Policy Group to Users1 In ZENworks Control Center, click the Policies tab.2 In the Policies list, select the check box next to the policy group (or policy groups).3 Click Action > Assign to User.4 Browse for and select the user, user groups, and user folders to which you want to assign the
group. To do so:4a Click next to a folder to navigate through the folders until you find the user, group, or
folder you want to select.If you are looking for a specific item, such as a User or a User Group, you can use the Items of type list to limit the types of items that are displayed. If you know the name of the item you are looking for, you can use the Item name box to search for the item.
4b Click the underlined link in the Name column to select the user, group, or folder and display its name in the Selected list box.
4c Click OK to add the selected devices, folders, and groups to the Users list.5 Click Next to display the Finish page, review the information and, if necessary, use the Back
button to make changes to the information.6 Click Finish.
Managing Policy Groups 83

5.6 Adding a Policy to a GroupFor more information, see Section 4.6, “Adding Policies to Groups,” on page 57.
84 ZENworks 11 Configuration Policies Reference

6 6Managing Folders
A folder is an organizational object. You can use folders to structure your polices and policy groups into a manageable hierarchy for your ZENworks system. For example, you might want a folder for each type of policy (Browser Bookmarks policy, Dynamic Local User policy, and so forth), or, if applications are department‐specific, you might want a folder for each department (Accounting Department folder, Payroll Department folder, and so forth).
The following sections contain additional information:
Section 6.1, “Creating Folders,” on page 85Section 6.2, “Renaming or Moving Folders,” on page 85Section 6.3, “Deleting a Folder,” on page 86
6.1 Creating Folders1 In ZENworks Control Center, click the Policies tab.2 Click New > Folder.3 Provide a unique name for your folder. This is a required field.
When you name an object in ZENworks Control Center (folders, policies, policy groups, and so forth), ensure that the name adheres to the naming conventions; not all characters are supported. For more information on naming conventions, see “Naming Objects in ZENworks Control Center” in the ZENworks 11 ZENworks Control Center Reference.
4 Type the name or browse to and select the folder that will contain this folder in the ZENworks Control Center interface. This is a required field.
5 Provide a short description of the folderʹs contents.6 Click OK.
6.2 Renaming or Moving FoldersUse the Edit drop‐down list on the Policies page to edit an existing object. To access the Edit drop‐down list, you must select an object by clicking the check box next to the objectʹs name in the list.
Depending on the type of object you select, you can rename, copy, or move the selected object. For example, if you select a Policy object, you can rename, copy, and move the policy. If you select a Folder object, you can rename or move the Folder object, but not copy it. If the option is dimmed, that option is not available for the selected object type.
Some actions cannot be performed on multiple objects. For example, if more than one check box is selected, the Rename option is not available from the Edit menu.
1 In ZENworks Control Center, click the Policies tab.2 In the Policies list, select the box next to the folder’s name, then click Edit.
Managing Folders 85

3 Select an option:Rename: Click Rename, provide a new name for the folder, then click OK.Move: Click Move, choose a destination folder for the selected objects, then click OK.
6.3 Deleting a FolderDeleting a folder also deletes all of its contents (policies, policy groups, and subfolders).
1 In ZENworks Control Center, click the Policies tab.2 In the Policies list, select the check box next to the folder (or folders).3 Click Delete.
86 ZENworks 11 Configuration Policies Reference

A ATroubleshooting Policy Management
The following sections contain detailed explanations of the error messages or problems you might encounter when using the Novell ZENworks 11 SP2 Configuration Management policies.
Section A.1, “Browser Bookmarks Policy Errors,” on page 87Section A.2, “Browser Bookmarks Policy Troubleshooting,” on page 88Section A.3, “Dynamic Local User Policy Errors,” on page 90Section A.4, “Dynamic Local User Policy Troubleshooting,” on page 90Section A.5, “General Policy Troubleshooting,” on page 93Section A.6, “Local File Rights Policy Errors,” on page 96Section A.7, “Local File Rights Policy Troubleshooting,” on page 97Section A.8, “Printer Policy Errors,” on page 97Section A.9, “Printer Policy Troubleshooting,” on page 100Section A.10, “Roaming Profile Policy Errors,” on page 105Section A.11, “Roaming Profile Policy Troubleshooting,” on page 105Section A.12, “SNMP Policy Errors,” on page 106Section A.13, “Windows Group Policy Errors,” on page 107Section A.14, “Windows Group Policy Troubleshooting,” on page 110Section A.15, “ZENworks Explorer Configuration Policy Errors,” on page 116
A.1 Browser Bookmarks Policy Errors“The folder cannot be created to add bookmark as Internet Explorer does not allow such folder” on page 87“The bookmark cannot be created as the bookmark name is not proper. Internet Explorer does not allow such bookmarks” on page 88“Unable to apply the Browser Bookmark Policy” on page 88“On a managed device, unable to create empty folders in a user’s favorites folder” on page 88“The Browser Bookmarks policy fails on a Windows Vista managed device” on page 88
The folder cannot be created to add bookmark as Internet Explorer does not allow such folder
Source: ZENworks 11 Configuration Management; Policy Management; Windows Configuration Policy.
Troubleshooting Policy Management 87

Possible Cause: On Windows managed devices, Internet Explorer does not allow a bookmark folder name with special characters such as ! , *, / , or \\.
Action: When creating the policy, ensure that special characters such as ! , *, / , or \\ are not used in the bookmark folder name.
The bookmark cannot be created as the bookmark name is not proper. Internet Explorer does not allow such bookmarks
Source: ZENworks 11 Configuration Management; Policy Management; Windows Configuration Policy.
Possible Cause: On Windows managed devices, the Internet Explorer does not allow a bookmark name with special characters such as ! , *, / , or \\.
Action: When creating the policy, ensure that special characters such as ! , *, / , or \\ are not used in the bookmark name.
Unable to apply the Browser Bookmark PolicySource: ZENworks 11 Configuration Management; Policy Management; Windows
Configuration Policy.
Action: Ensure that the Browser Bookmark policy has been correctly created. For more information on the ZENworks error message, see Section 3.1, “Browser Bookmarks Policy,” on page 19.
Action: If the problem persists, contact Novell Support (http://www.novell.com/support).
On a managed device, unable to create empty folders in a user’s favorites folderSource: ZENworks 11 Configuration Management; Policy Management; Windows
Configuration Policy.
Action: None.
The Browser Bookmarks policy fails on a Windows Vista managed deviceSource: ZENworks 11 Configuration Management; Policy Management; Windows
Configuration Policy.
Explanation: If you assign a Browser Bookmarks policy to a Windows Vista managed device, the following error is displayed:.
The Favorites folder for the user was not found to operate on.
Action: Refresh the managed device.
A.2 Browser Bookmarks Policy Troubleshooting“The Browser Bookmarks policy settings are not removed from the user’s favorites when the ZENworks Adaptive Agent is uninstalled” on page 89“The bookmark file exported in .json file format is not yet supported” on page 89“Bookmark policy fails with a redirected home directory” on page 89
88 ZENworks 11 Configuration Policies Reference

The Browser Bookmarks policy settings are not removed from the user’s favorites when the ZENworks Adaptive Agent is uninstalled
Source: ZENworks 11 Configuration Management; Policy Management; Windows Configuration Policy.
Explanation: If a Browser Bookmarks policy is assigned to a user or the managed device, the Browser Bookmarks policy settings are not removed from the user’s Favorites when the ZENworks Adaptive Agent is uninstalled.
Action: To remove the Browser Bookmarks policy settings from the user’s Favorite, unassign the policy from the device or the user and refresh the managed device before uninstalling the ZENworks Adaptive Agent.
The bookmark file exported in .json file format is not yet supportedSource: ZENworks 11 Configuration Management; Policy Management; Windows
Configuration Policy.
Explanation: On Mozilla Firefox 3.0 or above, if you click Bookmarks > Organize Bookmarks > Import and Backup > Backup to export the bookmarks, the bookmarks are exported to a .json file. However, the .json file format is not yet supported in ZENworks.
Action: Export the bookmarks to a html file. Click Bookmarks > Organize Bookmarks > Import and Backup > Export HTML to export the bookmarks.
Bookmark policy fails with a redirected home directorySource: ZENworks 11 Configuration Management; Policy Management; Windows
Configuration Policy.
Explanation: Bookmark policies fail when they are redirected to a userʹs home directory.
Action: To configure the policy settings:
1 Create a mapped drive, for example H:, with a Favorites folder that has write permission.
2 On a Windows managed device, open the Registry Editor.3 Go to
HKEY_CURRENT_USER\Software\Microsoft\Windows\CurrentVersion\Explorer\ShellFolders and set the value of the registry key to H:\Favorites.
4 Go to HKEY_CURRENT_USER\Software\Microsoft\Windows\CurrentVersion\Explorer\UserShell Folders and set the value of the registry key to H:\Favorites.
5 Go to the HKLM\SOFTWARE\NOVELL\ZCM\ folder.6 Configure the runBookmarksMappedDrive registry key with a string value =
True.7 Assign and then enforce the policy on a user or device.
Troubleshooting Policy Management 89

A.3 Dynamic Local User Policy Errors“The policy failed in the included and excluded user/workstation list calculation” on page 90“Error while applying settings to a file or a group” on page 90“Unable to enforce a policy because the policy data is empty” on page 90
The policy failed in the included and excluded user/workstation list calculationSource: ZENworks 11 Configuration Management; Policy Management; Windows
Configuration Policy.
Explanation: This error occurs if either the included/excluded workstation list or the user list is configured, and the workstation or the user did not qualify.
Action: Remove the user or the workstation from the excluded list configured in the policy and increment the version of the policy to enforce the policy updates to the managed device.
Error while applying settings to a file or a group Source: ZENworks 11 Configuration Management; Policy Management; Windows
Configuration Policy.
Action: Turn on debug logging on the managed device and refer to the zmd-messages.log file to obtain more details about the error.
For more information on how to turn on debug logging, see “Using Message Logging” in the ZENworks 11 ZENworks Control Center Reference or contact Novell Support (http://www.novell.com/support).
Unable to enforce a policy because the policy data is emptySource: ZENworks 11 Configuration Management; Policy Management; Windows
Configuration Policy.
Possible Cause: The ZENworks Adaptive Agent did not receive any data to be configured on the managed device.
Action: Review the policy content in ZENworks Control Center. For more information about the Dynamic Local User Policy, see Section 3.2, “Dynamic Local User Policy,” on page 21.
A.4 Dynamic Local User Policy Troubleshooting “Unable to update the group membership of the user on the managed device” on page 91“Dynamic Local User is unable to log on to the managed device” on page 91“Subsequent to the first login, the DLU user is prompted to provide the credentials when he or she tries to log into the device again during the cache period specified in the policy” on page 91“After logging out of a managed device that is disconnected from the network, a Dynamic Local User is unable to log in to the device again” on page 92“The DLU policy does not delete user profiles if the Roaming Profile policy is applied” on page 92
90 ZENworks 11 Configuration Policies Reference

“The DLU based login corrupts user profile when logging‐in to different devices with roaming profile” on page 93“The DLU policy allows excluded user to Log in” on page 93
Unable to update the group membership of the user on the managed device Source: ZENworks 11 Configuration Management; Policy Management; Windows
Configuration Policy.
Explanation: On the managed device, the group membership of the user is not updated according to the User Configurations settings of the Dynamic Local User policy.
Possible Cause: The DontUpdateGroupMemberships registry key is set to 1
Action: On the managed device for a 32‐bit machine, set the registry key HKEY_LOCAL_MACHINE\SOFTWARE\Novell\NWGINA\Dynamic Local User\DontUpdateGroupMemberships to 0.
On the managed device for a 64‐bit machine, set the registry key HKEY_LOCAL_MACHINE\SOFTWARE\Wow6432Node\Novell\NWGINA\Dynamic Local User\DontUpdateGroupMemberships to 0.
Dynamic Local User is unable to log on to the managed deviceSource: ZENworks 11 Configuration Management; Policy Management; Windows
Configuration Policy.
Explanation: If the password of the Dynamic Local User in the user source does not meet the password complexity requirements, the user fails to log on to the managed device.
Possible Cause: Password must meet complexity requirements is enabled in the password policy setting of the Group policy of the device (Computer Configuration > Windows Settings > Security Settings > Account Policies > Password Policy).
Action: Do one of the following:
Ensure that the password specified for the user in the user source meets the password complexity requirements. For information on the password complexity requirements, double‐click Password must meet complexity requirements in the password policy setting of the Group policy (Computer Configuration > Windows Settings > Security Settings > Account Policies > Password Policy).Disable the Password must meet complexity requirements setting on the managed device.
Subsequent to the first login, the DLU user is prompted to provide the credentials when he or she tries to log into the device again during the cache period specified in the policy
Source: ZENworks 11 Configuration Management; Policy Management; Windows Configuration Policy.
Explanation: If the Use the credential specified below and Enable Volatile User cache settings are configured in the Dynamic Local User policy, then subsequent to the first login, the DLU user is prompted to provide the credentials when he or she tries to log into the device again during the cache period specified in the policy.
Troubleshooting Policy Management 91

Action: To enable the user to log into the device without being prompted on subsequent logins, ensure that the Manage existing user account option is enabled in the policy. This ensures that the ZENworks Agent manages the password on behalf of the user.
After logging out of a managed device that is disconnected from the network, a Dynamic Local User is unable to log in to the device again
Source: ZENworks 11 Configuration Management; Policy Management; Windows Configuration Policy.
Explanation: If a Dynamic Local User policy that has Use the credential specified below, Manage existing user account, and Enable Volatile User Cache options enabled is assigned to a device and a user logs out of the device when the device is disconnected from the network, the user is unable to log in to the disconnected device again.
Action: Before the policy is assigned to the device or the device is disconnected from the network, perform the following steps on the managed device:
1 (Recommended) Select the option Use User Source Password for logging in to the device.or
2 Do the following:2a Open the Registry Editor.2b For a 32‐bit machine, go to
\HKLM\SOFTWARE\Novell\NWGINA\Dynamic Local User\.For a 64‐bit machine, go to HKLM\SOFTWARE\Wow6432Node\Novell\NWGINA\Dynamic Local User\.
2c Create a DWORD called EnableEDirPasswordForFA, and set the value to 1.
The DLU policy does not delete user profiles if the Roaming Profile policy is applied
Source: ZENworks 11 Configuration Management; Policy Management; Windows Configuration Policy.
Explanation: User profiles created with a volatile DLU (Dynamic Local User) that has a Roaming Profile policy in effect are sometimes not deleted on user logoff.
Action: Set the DeleteRoamingCache registry key value. For details on setting the key value, see the Microsoft Support Web site (http://technet.microsoft.com/en‐us/library/cc957394.aspx).
For more information, see TID 7006386 in the Novell Support Knowledge base (http://www.novell.com/support/search.do?usemicrosite=true&searchString=7006386).
92 ZENworks 11 Configuration Policies Reference

The DLU based login corrupts user profile when logging-in to different devices with roaming profile
Source: ZENworks 11 Configuration Management; Policy Management; Windows Configuration Policy.
Explanation: Roaming profile will not work stable while logging on to different devices, if the user profile is not deleted on every logout of each device.
Action: Set the local user profile removed on each user logoff using the DLU policy Volatile user option.
This requires the DLU Volatile User cache to be disabled. This can be done at: ZCC > Policies > [DLU Volatile User Policy] > Details > Volatile user > Enable Volatile User cache.
For more information, see TID 7010457 in the Novell Support Knowledge base (http://www.novell.com/support/kb/doc.php?id=7010457)The .
The DLU policy allows excluded user to Log inSource: ZENworks 11 Configuration Management; Policy Management; Windows
Configuration Policy.
Explanation: When you assign a DLU policy with excluded users to a device and restart the device immediately after enforcing the DLU policy, it still allows an excluded user to log in.
Possible Cause: Random refresh is enabled.
Action: Disable Random refresh.
A.5 General Policy Troubleshooting “The user is prompted to log in again immediately after logging in to ZENworks by using ZENworks icon” on page 94“Unable to view the newly added user source in all the other concurrent sessions of ZENworks Control Center” on page 94“The Wake‐on‐LAN policy is not available in ZENworks Configuration Management” on page 94“The zman pvst command might not display the correct status of the policy assignment and deployment on a managed device” on page 94“The enforcement of policies such as DLU policy, Roaming Profile policy, or Group Policy fails on the managed device” on page 95“Closing a published application or logging out of the shared desktop of a Citrix server fails to terminate the session on the Citrix server” on page 95“Some of the policy settings might not get enforced on a Terminal Server session” on page 95“Policies might not be listed on Linux managed devices even if the policies are enforced” on page 96
Troubleshooting Policy Management 93

The user is prompted to log in again immediately after logging in to ZENworks by using ZENworks icon
Source: ZENworks 11 Configuration Management; Policy Management.
Explanation: If the following conditions are met, a ZENworks user is prompted to log in again immediately after logging in to the device, in spite of providing the right credentials:
The user has logged in to a device where another ZENworks user has logged in and logged out within 5 to 10 minutes of the desktop login.The Dynamic Local User policy or the Windows Group policy that is assigned to the user has the After enforcement, force a re‐login on the managed device, if necessary option selected.
Action: Edit the policy to deselect After enforcement, force a re‐login on the managed device, if necessary.
Unable to view the newly added user source in all the other concurrent sessions of ZENworks Control Center
Source: ZENworks 11 Configuration Management; Policy Management.
Explanation: If ZENworks Control Center is opened by more than one user at the same time and a new user source is added to the management zone by one of the users, the newly added user source is not reflected in the other open sessions of ZENworks Control Center. Consequently, the policies might not be assigned to the new user source.
Action: To assign policies to the new user source, log in to ZENworks Control Center again.
The Wake-on-LAN policy is not available in ZENworks Configuration Management
Source: ZENworks 11 Configuration Management; Policy Management.
Action: Perform the following steps to create the functionality of the Wake‐on‐LAN policy:
1. In ZENworks Control Center, create an empty bundle without any actions.2. Select the bundle and click Action > Assign Bundle to Device, then click Next.3. Select the Distribution Schedule option, then click Next.4. Select the Wake‐on‐LAN option, then click Next.5. Click Finish.
The zman pvst command might not display the correct status of the policy assignment and deployment on a managed device
Source: ZENworks 11 Configuration Management; Policy Management.
Explanation: If you assign a policy to a user or device and run the zman pvst command on the server, the assignment status and the overall deployment status of the policy might not be displayed correctly.
94 ZENworks 11 Configuration Policies Reference

Action: Refresh the device.
The enforcement of policies such as DLU policy, Roaming Profile policy, or Group Policy fails on the managed device
Source: ZENworks 11 Configuration Management; Policy Management.
Possible Cause: If a user logs into a managed device by authenticating with a eDirectory user account that has trailing space characters, policies such as DLU policy, Roaming Profile policy, or Group Policy are not enforced on the managed device.
Action: Ensure that the eDirectory user account does not have trailing space characters.
Closing a published application or logging out of the shared desktop of a Citrix server fails to terminate the session on the Citrix server
Source: ZENworks 11 Configuration Management; Policy Management.
Explanation: Even after closing a published application or logging out of the shared desktop of a Citrix server, a user remains logged in to ZENworks. Consequently, some of the policies might not be unenforced on the device.
Action: Perform the following steps on the device:
1 Open the Registry Editor.2 Go to
HKEY_LOCAL_MACHINE\SYSTEM\CurrentControlSet\Control\Citrix\wfshell\TWI.
3 Change the value of LogoffCheckSysModules from ZCMUMHelper.exe to ZenUserDaemon.exe,ZCMUMHelper.exe
4 Reboot the device.
Some of the policy settings might not get enforced on a Terminal Server sessionSource: ZENworks 11 Configuration Management; Policy Management; Windows
Configuration Policy.
Explanation: Some policies might not be applied when a user logs into a Terminal Server session. The policy would get automatically enforced during the next device refresh schedule. For example, Browser Bookmarks policy, iPrint policy, and Internet Explorer maintenance settings that are configured in the Group policy are not applied to the device.
Possible Cause: ZEN user daemon might not have started when the policies were getting enforced on the device.
Action: If you want to enforce the policy immediately on the device, you must manually refresh the ZENworks Adaptive Agent in one of the following ways:
Right‐click the ZENworks icon, then select Refresh.In the command prompt, run the zac ref command.
Troubleshooting Policy Management 95

Policies might not be listed on Linux managed devices even if the policies are enforced
Source: ZENworks 11 Configuration Management; Policy Management; Linux Configuration Policy.
Explanation: After you have enforced a policy on a device, the policies might not be listed on the Linux managed devices.
Action: To ensure that the policies are listed correctly on the device:
1 Forcefully reapply the policy on the Linux managed device by using the zac pr command.
2 To verify that the policy is getting listed on the managed device use the zac pl command or use the icon.
A.6 Local File Rights Policy Errors“The file or folder was not found while enforcing the policy” on page 96“Error while applying or unenforcing a policy” on page 96
The file or folder was not found while enforcing the policySource: ZENworks 11 Configuration Management; Policy Management; Windows
Configuration Policy.
Possible Cause: This occurs when a file or folder configured in the policy is not found on the managed device.
Action: On the managed device, do the following:
Verify whether the file or folder exists and the name and path are correct.Ensure that Windows Explorer is configured to display extensions for a file of a known type. In Windows Explorer, click Tools > Folder Options to display the Folder Options dialog box. Click the View tab, then ensure that the Hide Extension for known file types option is not selected.
Error while applying or unenforcing a policySource: ZENworks 11 Configuration Management; Policy Management; Windows
Configuration Policy.
Action: Turn on debug logging on the managed device and refer to the zmd-messages.log file to obtain more details about the error. For more information on how to turn on debug logging, see “Using Message Logging” in the ZENworks 11 ZENworks Control Center Reference or contact Novell Support (http://www.novell.com/support).
96 ZENworks 11 Configuration Policies Reference

A.7 Local File Rights Policy Troubleshooting “The user permissions configured in the Local File Rights policy are not effective on the device” on page 97
The user permissions configured in the Local File Rights policy are not effective on the device
Source: ZENworks 11 Configuration Management; Policy Management; Windows Configuration Policy.
Possible Cause: The user permissions configured in the Local File Rights policy might conflict with the user permissions configured in the Dynamic Local User policy. The permissions configured for the user or group in the Dynamic Local User policy take precedence over the permissions configured in the Local File Rights policy.
Action: Ensure that the user permissions configured in the Local File Rights policy are not conflicting with the user permissions configured in Dynamic Local User policy.
A.8 Printer Policy Errors“Printer driver installation failed for printer_name. The provided driver install file type is not supported” on page 97“Printer driver installation failed for printer_name. File extraction failed for filename” on page 98“Printer driver installation failed for printer_name. Check if provided drivers inf file is in proper format” on page 98“Unable to get iprint install file from the specified location in managed device, please check if file is there in specified location” on page 98“Unable to extract iprint client installer from the content” on page 98“Bad iprint install file. Unable to extract setupipp.exe file. Expectation is for a zip file which extracts setupipp.exe on the root. check the file mentioned for install” on page 99“iPrint client install failed. Check if the provided iprint client supports silent install” on page 99“Failed to add smb printer printer_name” on page 99“Failed to add iprint printer printer_name” on page 99“An incorrect error message that the iPrint policy could not be enforced is displayed on the managed device” on page 99
Printer driver installation failed for printer_name. The provided driver install file type is not supported
Source: ZENworks 11 Configuration Management; Policy Management; Windows Configuration Policy.
Possible Cause: The Printer policy supports only .inf drivers.
Troubleshooting Policy Management 97

Action: A .inf type driver along with all the dependent files can be zipped or tarred and uploaded using the policy. If you have a self‐extracting exe, extract it to a temporary location, compress it into a .zip file, then distribute it through the policy.
Printer driver installation failed for printer_name. File extraction failed for filename
Source: ZENworks 11 Configuration Management; Policy Management; Windows Configuration Policy.
Possible Cause: The policy cannot extract the zipped or tarred files for the driver because the file might be corrupted.
Action: Ensure that the files are not corrupted by manually extracting the .tar or .zip file, then include the .tar or .zip file in the policy.
Printer driver installation failed for printer_name. Check if provided drivers inf file is in proper format
Source: ZENworks 11 Configuration Management; Policy Management; Windows Configuration Policy.
Possible Cause: This error message can occur if the driver .inf file is not in proper format, or the .inf file does not contain installation instructions for the driver’s model name.
Action: Extract the driver files and verify whether the driver’s model name provided in the Printer policy is contained in the .inf file. The model name must exactly match the name contained in the file.
Unable to get iprint install file from the specified location in managed device, please check if file is there in specified location
Source: ZENworks 11 Configuration Management; Policy Management; Windows Configuration Policy.
Possible Cause: The iPrint installer is not found on the managed device. This error message can occur if the location of the file is not correctly specified in the Printer policy, or the file resides in a shared network location and is not available to the Printer policy handler module.
Action: Ensure that the file exists on the managed device or it is directly associated to the Printer policy.
Unable to extract iprint client installer from the contentSource: ZENworks 11 Configuration Management; Policy Management; Windows
Configuration Policy.
Possible Cause: The iPrint client attached with the Printer policy is not available on the managed device. This error message can occur if the policy is enforced immediately after it’s created.
Action: After creating the policy, wait for five to ten minutes before enforcing the policy, then try to log into the managed device.
98 ZENworks 11 Configuration Policies Reference

Bad iprint install file. Unable to extract setupipp.exe file. Expectation is for a zip file which extracts setupipp.exe on the root. check the file mentioned for install
Source: ZENworks 11 Configuration Management; Policy Management; Windows Configuration Policy.
Possible Cause: The Printer policy supports iPrint installation only in silent mode and does not require user intervention. Hence, nipp-s.exe or nipp.zip can be used, but not nipp.exe.
Action: If nipp.zip is used for installation, extract it to verify whether the installation file is correct and the extracted files contain setupipp.exe.
iPrint client install failed. Check if the provided iprint client supports silent installSource: ZENworks 11 Configuration Management; Policy Management; Windows
Configuration Policy.
Possible Cause: The Printer policy supports iPrint installation only in silent mode and does not require a user intervention.Hence, nipp-s.exe or nipp.zip can be used, but not nipp.exe.
Action: If nipp.zip is used for installation, extract it to verify whether the installation file is correct and the extracted files contain setupipp.exe.
Failed to add smb printer printer_nameSource: ZENworks 11 Configuration Management; Policy Management; Windows
Configuration Policy.
Possible Cause: The SMB printer connection is not valid.
Action: Ensure that there is no problem in the network by using the UNC path to add the printer through the Windows Add Wizard.
Failed to add iprint printer printer_nameSource: ZENworks 11 Configuration Management; Policy Management; Windows
Configuration Policy.
Action: Verify whether the iPrint URL is correct. The iPrint URL must be specified in the format ipp://server-address/ipp/printer name.
Also, check if the iPrint client is installed on the target device. If the client is not installed, attach it through the Printer policy.
An incorrect error message that the iPrint policy could not be enforced is displayed on the managed device
Source: ZENworks 11 Configuration Management; Policy Management; Windows Configuration Policy.
Explanation: The iPrint policy might take some time to install an iPrint printer on a device, depending on the size of the iPrint printer driver and the network connectivity. In such a scenario, even if the iPrint printer is successfully installed on the device, an incorrect message that the iPrint policy could not be enforced is displayed on the managed device.
Troubleshooting Policy Management 99

Action: Ignore the error message and refresh the device.
The correct message indicating that the policy has been successfully enforced is displayed on the device after a manual or automatic refresh.
A.9 Printer Policy Troubleshooting “Unable to install a printer driver on Windows managed devices through the Printer Policy” on page 100“Unable to install the printer driver on a Windows Vista SP1 device” on page 101“Changing the iPrint printer driver on a server does not update the driver on the managed device” on page 101“Unable to install or update the printer drivers on re‐enforcing the policy” on page 101“Unable to install iPrint printer on a Windows 2000 managed device” on page 101“Unable to install iPrint printer on a Windows XP managed device” on page 102“Uninstall does not roll back the previously enforced Printer policies” on page 102“Installation of the iPrint printer fails on a device if the printer does not have the supported drivers” on page 102“Installation of the network printer might fail on a Windows Server 2008 R2 device” on page 102“Unable to enforce a printer policy on a managed device if the printer driver that is installed on the device is unsigned” on page 103“The Printer policy might fail to install an iPrint printer on a managed device if iPrint printer drivers are configured in the policy” on page 103“The Printer policy fails because of a handler timeout” on page 103“The Printer policy with a Samba or network printer installation does not complete as timeout for the Printer Driver installation command is not effective” on page 104“The user‐assigned printers are not uninstalled at logout” on page 104
Unable to install a printer driver on Windows managed devices through the Printer Policy
Source: ZENworks 11 Configuration Management; Policy Management; Windows Configuration Policy.
Possible Cause: A printer model name is represented in different ways on Windows managed devices. For example, the HP LaserJet 8100 Series PCL6 printer model is represented as HP LaserJet 8100 Series PCL 6 on Windows 2000. (Note that there is a space between PCL and 6).
While creating a Printer policy, you can manually specify the printer model or select it from a predefined list. If you select it from a predefined list, the printer is installed based on the model name defined in the list, which might not be the printer model name on the Windows managed device. For example, if you select HP LaserJet 8100 Series PCL6, the printer driver is installed only on the managed devices having the HP LaserJet 8100 Series PCL6 printer model. Consequently, the driver is not installed on the Windows 2000 managed device.
Action: While creating the Printer policy, ensure that the correct printer model name is specified.
100 ZENworks 11 Configuration Policies Reference

Unable to install the printer driver on a Windows Vista SP1 deviceSource: ZENworks 11 Configuration Management; Policy Management; Windows
Configuration Policy.
Explanation: If the printer driver contains more than one .inf file, the installation of the driver fails because the policy handler does not know which .inf file to use.
Action: While installing the printer driver, ensure that only the valid .inf file is available in the ZIP file. For example, if you download the HP 4700 Color LaserJet print drivers for Vista, the ZIP file contains more than one .inf file. Remove all the .inf files other than hpc4700c.inf because this is the only .inf file required to install the HP 4700 Color LaserJet print driver.
Changing the iPrint printer driver on a server does not update the driver on the managed device
Source: ZENworks 11 Configuration Management; Policy Management; Windows Configuration Policy.
Explanation: If you update the iPrint printer driver on a server through a console such as iManager, the driver is not updated on the managed device.
Action: After updating the iPrint driver in iManager, perform the following steps to update the driver on the device:
1 In ZENworks Control Center, click Policies.2 Select the policy, then click Action > Disable Policies to disable the policy.3 Click Quick Tasks > Refresh All Devices. 4 Click Action > Enable Policies to enable the policy.5 Click Quick Tasks > Refresh All Devices.
Unable to install or update the printer drivers on re-enforcing the policySource: ZENworks 11 Configuration Management; Policy Management; Windows
Configuration Policy.
Explanation: The Printer policy installs the printer driver during the first enforcement of the policy. If the driver is changed after the first enforcement of the policy, the new drivers are not installed or updated on the subsequent enforcement of the policy.
Action: Create a new printer policy with the new driver and assign it to the same device or user.
Unable to install iPrint printer on a Windows 2000 managed deviceSource: ZENworks 11 Configuration Management; Policy Management; Windows
Configuration Policy.
Explanation: If a printer policy that is configured to install an iPrint printer on a managed device is assigned to a user who logs in to a Windows 2000 managed device, the iPrint printer is not installed on the device.
Action: Assign the printer policy to the device.
Troubleshooting Policy Management 101
Unable to install iPrint printer on a Windows XP managed deviceSource: ZENworks 11 Configuration Management; Policy Management; Windows
Configuration Policy.
Explanation: If a printer policy that is configured to install an iPrint printer on a managed device is assigned to a user who logs in to a Windows XP device that has an iPrint Client 4.x installed, the iPrint printer is not installed on the device.
Action: Do the following:
1 Uninstall the iPrint Client 4.x from the device.2 Download the iPrint Client 5.x from the Novell Downloads site (http://
download.novell.com/index.jsp).3 Install the iPrint Client 5.x on the managed device.
For more information on installing the iPrint Client, see Step 11 in Section 3.5, “Printer Policy,” on page 31
Uninstall does not roll back the previously enforced Printer policiesSource: ZENworks 11 Configuration Management; Policy Management; Windows
Configuration Policy.
Explanation: The previously enforced printer policies does not roll back when ZENworks is uninstalled.
Action: Before uninstalling ZENworks, disassociate the Printer policy from the users or devices to unenforce the policy.
Installation of the iPrint printer fails on a device if the printer does not have the supported drivers
Source: ZENworks 11 Configuration Management; Policy Management; Windows Configuration Policy.
Explanation: If a printer configured in the iPrint policy has assigned drivers that are not supported by the operating system on the managed device, then the Installation of the printer fails.
For example, if a printer that has Windows XP and Windows Vista drivers is configured in a iPrint policy and the policy is assigned to a Windows 7 device, the installation of the printer on the Windows 7 device fails.
Action: Before assigning a iPrint policy to a device, ensure that the drivers assigned to the printer configured in the policy are supported by the operating system on the device.
Installation of the network printer might fail on a Windows Server 2008 R2 deviceSource: ZENworks 11 Configuration Management; Policy Management; Windows
Configuration Policy.
Explanation: If you assign a Printer policy that has a Network printer configured for a Windows Server 2008 R2 device, the installation of the printer might fail if the Internet Printing Client is not installed on the device.
102 ZENworks 11 Configuration Policies Reference

Action: Perform the following steps to install the Internet Printing Client on the device:
1 Click Start > All Programs > Administrative Tools > Server Manager.2 In the Server Manager window, click Features > Add Features.3 Select Internet Printing Client.4 Click Install.5 Restart the device.
Unable to enforce a printer policy on a managed device if the printer driver that is installed on the device is unsigned
Source: ZENworks 11 Configuration Management; Policy Management; Windows Configuration Policy.
Explanation: The printer driver that is installed on the device has not been digitally signed by Microsoft.
Action: Enable using unsigned drivers in the printer policy:
1 On the device, right‐click My Computers > Properties.2 In the System Properties window, click Hardware > Driver Signing.3 Select Ignore ‐ Install the software anyway and donʹt ask for my approval.
The Printer policy might fail to install an iPrint printer on a managed device if iPrint printer drivers are configured in the policy
Source: ZENworks 11 Configuration Management; Policy Management; Windows Configuration Policy.
Explanation: The iPrint policy might fail to install the iPrint printer on a device if iPrint printer drivers are configured in the policy. You must not add iPrint printer drivers in the Printer Driver Installation panel of a printer policy details page because the iPrint drivers are automatically downloaded from the iPrint servers when the iPrint printer is installed on the device.
Action: Edit the policy to remove the iPrint printers from the Driver List in the Printer Driver Installation panel of the printer policy details page.
The Printer policy fails because of a handler timeoutSource: ZENworks 11 Configuration Management; Policy Management; Windows
Configuration Policy.
Explanation: The printers that are being installed or configured might take a considerable amount of time because the devices need to access and then install the related printer drivers. This could result in a printer handler time‐out.
Troubleshooting Policy Management 103
Action: To set a default value that forces the Printer policy handler to wait for a set amount of time:
1 On a Windows managed device, open the Registry Editor.2 Go to HKLM\Software\Novell\ZCM.3 Create the MaxZenPrinterProcessingTimeOut registry key with an
appropriate timeout value, in seconds, depending on the number of printers to be configured. The default value is two minutes. If the value is very large, it will slow down the login process. For more information on Registry Keys, see ZENworks 11 Registry Keys Reference.
The Printer policy with a Samba or network printer installation does not complete as timeout for the Printer Driver installation command is not effective
Source: ZENworks 11 Configuration Management; Policy Management; Windows Configuration Policy.
Explanation: If you are planning to install a Samba or a network printer by using a Printer policy, the Printer driver installation command that is invoked might need to wait more than the default timeout of 40 sec before terminating.
This can be controlled by setting the appropriate timeout value for the printer driver install command to complete.
Action: To change the default wait time value for the installation or configuration of a network or Samba printer, perform the following:
1 On a Windows managed device, open the Registry Editor.2 Go to HKLM\Software\Novell\ZCM\PrinterPolicy.3 Change the value for the PrintWaitTime parameter from the default value
of 40 seconds to 200 seconds or higher.
The user-assigned printers are not uninstalled at logoutSource: ZENworks 11 Configuration Management; Policy Management; Windows
Configuration Policy.
Explanation: You can choose to either install or uninstall the user‐assigned printers at logout.
Action: To change the value of the user‐assigned printers:
1 On a Windows managed device, open the Registry Editor.2 Go to HKLM\SOFTWARE\Novell\ZCM.3 To uninstall the user‐assigned printers at logout, change the value of the
RemoveZenPrintersAtLogout parameter to True.If you do not want to uninstall the user‐assigned printers at logout, change the value of the RemoveZenPrintersAtLogout parameter to False.
104 ZENworks 11 Configuration Policies Reference

A.10 Roaming Profile Policy Errors“The policy policy_name could not be successfully enforced as policy data was empty” on page 105
The policy policy_name could not be successfully enforced as policy data was empty
Source: ZENworks 11 Configuration Management; Policy Management; Windows Configuration Policy.
Action: Turn on debug logging on the managed device and refer to the zmd-messages.log file to obtain more details about the error. For more information on how to turn on debug logging, see “Using Message Logging” in the ZENworks 11 ZENworks Control Center Reference.
Action: If the problem persists, contact Novell Support (http://www.novell.com/support).
A.11 Roaming Profile Policy Troubleshooting“Unable to enforce a Roaming Profile policy on a Windows Vista, Windows 7, Windows Server 2008, or Windows Server 2008 R2 device if the user profile is stored in a shared folder on a Windows Server 2003 device” on page 105“Windows 7 Roaming Profiles fails when user is assigned a temporary profile or fails to log on” on page 106
Unable to enforce a Roaming Profile policy on a Windows Vista, Windows 7, Windows Server 2008, or Windows Server 2008 R2 device if the user profile is stored in a shared folder on a Windows Server 2003 device
Source: ZENworks 11 Configuration Management; Policy Management; Windows Configuration Policy.
Explanation: If a Roaming Profile policy is assigned to a user who has not logged into a Windows Vista, Windows 7, Windows Server 2008, or Windows Server 2008 R2 device at least once before the policy was assigned, enforcing the policy fails on the device. This is because of insufficient permissions configured for the shared folder containing the user profile on the Windows Server 2003 device.
Action: Perform the following steps on the Windows Server 2003 device:
1 Create a local user account with the same credentials that the user specifies to log in to the Windows Vista, Windows 7, Windows Server 2008, or Windows Server 2008 R2 device.For example, if the username is user1, create a local account with user1 credentials.
2 Create a folder named username.v2. For example, user1.v2.
3 Right‐click the folder, then click Properties. 4 Click Sharing and share the folder.
Troubleshooting Policy Management 105

5 Click Permissions to provide Full Control permissions for the user, click Apply, then click OK.
6 Click Security.7 In the Group or user names panel, click CREATOR OWNER, then click Advanced.
8 In the Advanced Security Settings box, click Owner.9 Click Other Users or Groups.
10 In the Select User or Group dialog box, click Advanced to add this user as the current owner of the folder.
11 Click OK.12 Provide Full Control permissions for the CREATOR OWNER.13 Click Apply, then click OK.
Windows 7 Roaming Profiles fails when user is assigned a temporary profile or fails to log on
Source: ZENworks 11 Configuration Management; Policy Management; Windows Configuration Policy.
Action:
Ensure the Novell Client has the following:Set NetWare Client > Properties > Advanced Login > Allow Roaming User Profile Paths to non‐Windows servers = ON.Refer to the Novell Client documentation, Setting Properties on a Single Workstation after Installation, at http://www.novell.com/documentation/vista_client/vista_client_admin/data/a3llvcg.html#b856y7f
Ensure that the home directory has been pre‐populated with a default profile and the permissions set correctly.
The default user profile should be stored in the userʹs home directory in a subdirectory named exactly as, Windows NT 6.1 Workstation Profile.V2.
Ensure that any LDAP Proxy users used by ZCM have Read and Compare rights to the userʹs Home Directory attribute.Remove all duplicate entries for the user under HKEY_LOCAL_MACHINE\SOFTWARE\Microsoft\Windows NT\CurrentVersion\ProfileList and try logging on again.
A.12 SNMP Policy Errors“The policy policy_name could not be successfully enforced due to an error” on page 107“The policy policy_name could not be successfully enforced as policy data was empty” on page 107
106 ZENworks 11 Configuration Policies Reference
The policy policy_name could not be successfully enforced due to an errorSource: ZENworks 11 Configuration Management; Policy Management; Windows
Configuration Policy.
Possible Cause: An internal error was occurred while configuring the policy.
Action: Turn on debug logging on the managed device and refer to the zmd-messages.log file to obtain more details about the error. For more information on how to turn on debug logging, see “Using Message Logging” in the ZENworks 11 ZENworks Control Center Reference.
Action: If the problem persists, contact Novell Support (http://www.novell.com/support).
The policy policy_name could not be successfully enforced as policy data was empty
Source: ZENworks 11 Configuration Management; Policy Management; Windows Configuration Policy.
Possible Cause: The agent did not receive the data to be configured on the managed device.
Action: Review the policy content in ZENworks Control Center.
A.13 Windows Group Policy Errors“Error while enforcing the policy policy_name” on page 107“The policy policy_name was not applied” on page 108“The security settings in policy policyname were not applied” on page 108“The Windows Hotfix ʺKB897327ʺ required for exporting and applying Group policy security settings on Windows XP was not found. Computer configuration security settings could not be exported/applied” on page 108“Error while unenforcing Group policy settings” on page 108“Error while cleaning up Group policy settings at logout for user username” on page 108“Error while accessing content for policy policy_name” on page 109“Some security settings could not be configured” on page 109“To operate on security settings, Windows XP Hotfix KB897327 is required” on page 109“Failure importing group policy settings” on page 109
Error while enforcing the policy policy_nameSource: ZENworks 11 Configuration Management; Policy Management; Windows
Configuration Policy.
Action: Turn on debug logging on the managed device and refer to the zmd-messages.log file to obtain more details about the error. For more information on how to turn on debug logging, see “Using Message Logging” in the ZENworks 11 ZENworks Control Center Reference.
Action: If the problem persists, contact Novell Support (http://www.novell.com/support).
Troubleshooting Policy Management 107
The policy policy_name was not appliedSource: ZENworks 11 Configuration Management; Policy Management; Windows
Configuration Policy.
Action: Ensure that the managed device meets the ZENworks Configuration Management requirements. For more information about the managed device system requirements, see the ZENworks 11 Server Installation Guide.
The security settings in policy policyname were not appliedSource: ZENworks 11 Configuration Management; Policy Management; Windows
Configuration Policy.
Possible Cause: The security settings are not applied if a local group policy is created on a higher version of Windows but applied to a managed device that is running a lower version of Windows.
Action: Ensure that the ZENworks server and the managed device meet the ZENworks Configuration Management requirements. For more information about the managed device system requirements, see the ZENworks 11 Server Installation Guide.
The Windows Hotfix "KB897327" required for exporting and applying Group policy security settings on Windows XP was not found. Computer configuration security settings could not be exported/applied
Source: ZENworks 11 Configuration Management; Policy Management; Windows Configuration Policy.
Possible Cause: This message is logged if the Hotfix KB897327 is not applied on Windows XP SP1 or SP2 device before the policy is applied. The Hotfix is required for security settings to be configured on the managed device.
Action: Install Windows Hotfix KB897327 on the Windows XP SP1 or SP2 managed device from the Microsoft Support Web site (http://support.microsoft.com/KB/897327).
Error while unenforcing Group policy settingsSource: ZENworks 11 Configuration Management; Policy Management; Windows
Configuration Policy.
Action: Turn on debug logging on the managed device and refer to the zmd-messages.log file to obtain more details about the error. For more information on how to turn on debug logging, see “Using Message Logging” in the ZENworks 11 ZENworks Control Center Reference.
Action: If the problem persists, contact Novell Support (http://www.novell.com/support).
Error while cleaning up Group policy settings at logout for user usernameSource: ZENworks 11 Configuration Management; Policy Management; Windows
Configuration Policy.
108 ZENworks 11 Configuration Policies Reference

Action: Turn on debug logging on the managed device and refer the zmd-messages.log file to obtain more details about the error. For more information on how to turn on debug logging, see “Using Message Logging” in the ZENworks 11 ZENworks Control Center Reference.
Action: If the problem persists, contact Novell Support (http://www.novell.com/support).
Error while accessing content for policy policy_nameSource: ZENworks 11 Configuration Management; Policy Management; Windows
Configuration Policy.
Possible Cause: The error occurs if the managed device is immediately refreshed after the policy was created and assigned. Hence, the content for the policy might have not been completely processed at the server.
Action: Wait for five minutes and refresh the managed device.
Some security settings could not be configuredSource: ZENworks 11 Configuration Management; Policy Management; Windows
Configuration Policy.
Possible Cause: This message is logged if some of the security settings of a policy are not applied on the managed device.
Action: Contact Novell Support (http://www.novell.com/support).
To operate on security settings, Windows XP Hotfix KB897327 is required Source: ZENworks 11 Configuration Management; Policy Management; Windows
Configuration Policy.
Explanation: The error message might occur while creating or editing group policies for Windows XP SP1 or SP2 managed device.
Possible Cause: The Windows Hotfix KB897327 is not installed on the Windows XP SP1 or SP2 managed device.
Action: Ignore the error message if you are not configuring security settings in the Windows Group policy.
Action: Install Windows Hotfix KB897327 on the Windows XP SP1 or SP2 managed device from the Microsoft Support Web site (http://support.microsoft.com/KB/897327).
Failure importing group policy settingsSource: ZENworks 11 Configuration Management; Policy Management; Windows
Configuration Policy.
Explanation: When gpedit.msc is closed, the GPHelper displays the error message with the ID POLICYHANDLERS.WinGPPolicy.ExportFailure.
Possible Cause: The Windows Hotfix KB897327 is not installed on the Windows XP SP1 or SP2 managed device.
Action: Ignore the error message if you are not configuring security settings in the Windows Group policy.
Troubleshooting Policy Management 109

Action: Install Windows Hotfix KB897327 on the Windows XP SP1 or SP2 managed device from the Microsoft Support Web site (http://support.microsoft.com/KB/897327).
A.14 Windows Group Policy Troubleshooting “The Group Policy Helper tool is not backward compatible with the earlier versions of ZENworks Configuration Management releases” on page 110“Favorites configured by using the Group policy are not cleared when the group policy is unenforced” on page 111“Internet Explorer Settings configured in the Group policy are not applied on the Internet Explorer” on page 111“Security settings of the Windows Group policy are not effective on the device” on page 111“The Security settings configured in the Windows Group policy are not applied on a Windows XP SP1 or SP2 managed device” on page 111“Unable to launch the Group Policy Helper tool on a Windows Vista or Windows 7 device” on page 112“Policy Enforcement status is not properly displayed” on page 112“Unable to export Group policy content” on page 112“Log‐on and Log‐off scripts that launch GUI applications do not functional properly on terminal server and Windows Vista devices” on page 113“Assigning an Active Directory Group policy to a user or a device might generate some application event logs on the device” on page 113“Group policy created on a device with a specific operating system is not enforced on a device with a different operating system” on page 113“Scripts configured through Active Directory Group policy are not enforced on a device” on page 114“Security settings that have not been configured in a ZENworks Group Policy are also enforced on a managed device when the ZENworks Group Policy is enforced on the managed device” on page 114“The screen remains blank after logging into a terminal server” on page 114“Partial failure of Group Policy unenforcement settings” on page 115“Users need to log in again on a managed device, even though the setting for a forced login is not selected” on page 115“Security settings are not applied randomly for Group policies at device startup” on page 115“Group policy user settings are not always enforced for a user if there is no change in the user‐assigned group policy from a previous login” on page 116“The Group policy security settings created locally gets overridden by zenworks Group policy settings” on page 116
The Group Policy Helper tool is not backward compatible with the earlier versions of ZENworks Configuration Management releases
Source: ZENworks 11 Configuration Management; Policy Management; Windows Configuration Policy.
110 ZENworks 11 Configuration Policies Reference
Action: Install the version of the Group Policy Helper tool available with the corresponding ZENworks Configuration Management release.
Favorites configured by using the Group policy are not cleared when the group policy is unenforced
Source: ZENworks 11 Configuration Management; Policy Management; Windows Configuration Policy.
Explanation: If you use the Internet Explorer Maintenance settings of the Group policy to configure favorites, the favorites are not cleared when the Group policy is unenforced.
Action: Use the Browser Bookmark policy to configure the favorites.
Internet Explorer Settings configured in the Group policy are not applied on the Internet Explorer
Source: ZENworks 11 Configuration Management; Policy Management; Windows Configuration Policy.
Explanation: On launching the Internet Explorer browser, the runonce (http://runonce.msn.com/runonce2.aspx) page is displayed instead of the home page configured in the Group policy.
Action: On the runonce (http://runonce.msn.com/runonce2.aspx) page, follow the on‐screen prompts to configure the settings.
Security settings of the Windows Group policy are not effective on the device Source: ZENworks 11 Configuration Management; Policy Management; Windows
Configuration Policy.
Explanation: If the security settings are not configured in the Windows Group policy, the policy uses the default security settings of the device on which it was created. When more than one Windows Group policy is applied to a device, the security settings of the last applied policy are effective on the device.
Action: If you assign multiple policies to a device, ensure that the policy whose security settings you want to be effective on the device is applied last on the device.
The Security settings configured in the Windows Group policy are not applied on a Windows XP SP1 or SP2 managed device
Source: ZENworks 11 Configuration Management; Policy Management; Windows Configuration Policy.
Action: On the Windows XP SP1 or SP2 managed device, install Windows Hotfix KB897327 from the Microsoft Support Web site (http://support.microsoft.com/KB/897327).
Troubleshooting Policy Management 111

Unable to launch the Group Policy Helper tool on a Windows Vista or Windows 7 device
Source: ZENworks 11 Configuration Management; Policy Management; Windows Configuration Policy.
Explanation: The Group Policy Helper tool does not launch on a Windows 7/Vista device if the User Account Control (Start > Settings > Control Panel > User Accounts) is enabled and Mozilla Firefox or any other browser is used.
Action: Configure the Internet Explorer or Mozilla Firefox browser to run with administrator credentials.
To configure Internet Explorer or Mozilla Firefox for a session, right‐click the selected browser’s shortcut icon on the desktop, then select Run as administrator. To configure the Internet Explorer or Mozilla Firefox browser permanently:1. On the desktop, right‐click the selected browser’s shortcut icon and
select Properties. Click the Shortcut tab, then click the Advanced button. In the Advanced Properties dialog box, select Run as administrator.orIn Windows Explorer, navigate to the Internet Explorer or Mozilla Firefox executable file, right‐click the file, then select Properties. Click the Compatibility tab, then select Run this program as an administrator.
2. Restart the browser.
For more information, see TID 7013019 in the Novell Support Knowledgebase (http://www.novell.com/support/search.do?usemicrosite=true&searchString=7013019)
Policy Enforcement status is not properly displayedSource: ZENworks 11 Configuration Management; Policy Management; Windows
Configuration Policy.
Explanation: If you assign more than one policy to a user or a device, the policy enforcement status is not properly displayed.The consolidated status of a Group policy is displayed in the ZENworks icon only for the last enforced policy. That is, if any of the Group policies fail, the last effective policy is displayed in the ZENworks icon as Failed and rest of the policies are displayed as Success.
Possible Cause: The consolidated settings are applied only for the last policy.
Action: None.
Unable to export Group policy contentSource: ZENworks 11 Configuration Management; Policy Management; Windows
Configuration Policy.
Explanation: If you use the zman command to export a policy with content, the content (.zip file) is not exported.
Action: Perform the following steps:
1. In ZENworks Control Center, edit the policy you want to export.
112 ZENworks 11 Configuration Policies Reference

2. Click Upload to upload the policy settings to the content server.3. The Upload Confirm dialog box displays the name of the .zip file that
stores the policy settings. Copy the .zip file to the required location, such as c:\.
4. Run the zman petf command to export the policy to an XML file, such as export.xml.For example, zman petf \policies c:\export.xml.
5. Edit the export_actioncontentinfo.xml file to update the path of the .zip file.
Log-on and Log-off scripts that launch GUI applications do not functional properly on terminal server and Windows Vista devices
Source: ZENworks 11 Configuration Management; Policy Management; Windows Configuration Policy.
Explanation: On the terminal server and Windows Vista devices, the log‐on and log‐off scripts launching GUI applications do not functional properly because the Graphical User Interface is not launched on the desktop.
Action: Use Directive bundles to launch the GUI applications:
1 Create a Directive bundle. 2 Add a Launch Windows Executable action to launch a GUI application,
such as mspaint.3 Assign the bundle to a device.4 Select Launch Schedule, then select the schedule type as Event.5 Select the User Login or User Logout event to trigger the schedule.
Assigning an Active Directory Group policy to a user or a device might generate some application event logs on the device
Source: ZENworks 11 Configuration Management; Policy Management; Windows Configuration Policy.
Explanation: If you configure an Active Directory Group policy and assign the policy to a user or a device, some application event logs might be generated on the device even if the policy is successfully enforced on the device.
Action: Ignore the application event logs.
Group policy created on a device with a specific operating system is not enforced on a device with a different operating system
Source: ZENworks 11 Configuration Management; Policy Management; Windows Configuration Policy.
Explanation: The Windows Group policy containing the local group policy settings is not applied on a device if the operating system of the device where the policy is applied is different from the operating system of the device where the policy is created.
Troubleshooting Policy Management 113

Action: Remove the Operating System specific System Requirement from the Windows Group policy and then apply the policy.
However, the security settings are applied only if the operating system version of the device where the policy is applied is later than the operating system version of the device where the policy is created.
Scripts configured through Active Directory Group policy are not enforced on a device
Source: ZENworks 11 Configuration Management; Policy Management; Windows Configuration Policy.
Explanation: The scripts configured through Active Directory group policy are not enforced on a device even though the policy displays success in the ZENworks Adaptive Agent Policies page. However, the other settings if any configured in the policy are enforced on the device.
Action: Configure scripts through Local Group policy.
Security settings that have not been configured in a ZENworks Group Policy are also enforced on a managed device when the ZENworks Group Policy is enforced on the managed device
Source: ZENworks 11 Configuration Management; Policy Management; Windows Configuration Policy.
Explanation: If you create a Windows Group policy through the ZENworks Control Center of a device that already has some security settings configured and assign this policy to a managed device, the security settings that were configured on the device, on which you created the group policy, are also applied on the managed device.
Action: To remove all the previously configured security settings on a device, run the following command before you launch the ZENworks Control Center on the device to create the Group policy:
secedit /configure /cfg %windir%\repair\secsetup.inf /db secsetup.sdb /verbose
The screen remains blank after logging into a terminal serverSource: ZENworks 11 Configuration Management; Policy Management; Windows
Configuration Policy.
Explanation: When enforcing few group policy settings, ZCM restarts the explorer.exe or Relaunching of Windows Explorer may have failed.
Action: To manually launch the explorer perform the following steps:
1. Press Ctrl+Shift+Esc to launch the Windows Task Manager.2. Select File > New Task (Run)3. In the Create New Task pane, enter explorer.4. Click OK, to launch the Windows Explorer.
114 ZENworks 11 Configuration Policies Reference

orSet a registry key value DisableExplorerRestart at HKLM\Software\Novel\ZCM\GroupPolicy and set it to true. This ensures that ZENworks Configuration Management does not restart the explorer.
Partial failure of Group Policy unenforcement settingsSource: ZENworks 11 Configuration Management; Policy Management; Windows
Configuration Policy.
Explanation: When Group Policy settings are unenforced on a device, URLs added in Favorites and Links do not get removed.
Action: To unenforce the Group Policy settings and restore the system to a clean state, make sure you select the option Delete Existing Favorites and Links, if present, when the system is in the default state prior to applying any policies.
Users need to log in again on a managed device, even though the setting for a forced login is not selected
Source: ZENworks 11 Configuration Management; Policy Management; Windows Configuration Policy.
Explanation: After applying an updated Windows Group Policy on a managed device, logged‐in users are forced to log out even though the After enforcement, force a re‐login on the managed device, if necessary setting is not selected.
Action: To ensure that a user does not need to log in again to the managed device, deselect the After enforcement, force a re‐login on the managed device, if necessary option on any Roaming Profile Policy that is associated with the same user or device.
For more information, see TID 7007600 in the Novell Support Knowledgebase (http://www.novell.com/support/search.do?usemicrosite=true&searchString=7007600).
Security settings are not applied randomly for Group policies at device startupSource: ZENworks 11 Configuration Management; Policy Management; Windows
Configuration Policy.
Explanation: Security settings are not applied randomly for Group policies at device startup if Haspolicychanged flag is false.
Action: Even if there is no change in the Group policy, you can apply Group policy again at device start up:
1 On a Windows managed device, open the Registry Editor.2 Go to HKLM\Software\Novell\ZCM\GroupPolicy.3 Configure the ReApplyPolicyatDeviceStartup registry key, with any
string value other than Null.If configured, the device assigned Group policy gets processed, even if the value of the Haspolicychanged parameter is False.
Troubleshooting Policy Management 115

Group policy user settings are not always enforced for a user if there is no change in the user-assigned group policy from a previous login
Source: ZENworks 11 Configuration Management; Policy Management; Windows Configuration Policy.
Explanation: If you have assigned Group policy settings to a user, and there is no change in the policy from the previous enforcement, the settings might not apply on a logged‐in user.
Action: To configure the Group policy settings:
1 On a Windows managed device, open the Registry Editor.2 Go to HKLM\Software\Novell\ZCM\GroupPolicy.3 Configure the ReApplyPolicyatUserPredeskTop registry key with any
string value other than Null.If you configure this registry key, logging in might be slow.
The Group policy security settings created locally gets overridden by zenworks Group policy settings
Source: ZENworks 11 Configuration Management; Policy Management; Windows Configuration Policy.
Explanation: ZENworks Configuration Management enforces default security settings even if the option ApplyAllSettingsExceptSecuritySettings is selected in the policy. This will override the security settings configured in the local group policy of the managed device.
Action: The registry key IgnorePrezenworksSecuritySettings needs to be created at HKLM\Software\Novell\ZCM\GroupPolicy\ and set to True before applying the Group policies on the managed device.
A.15 ZENworks Explorer Configuration Policy Errors“There was an error while unenforcing the policy” on page 117“There was an error while enforcing the policy policy_name. Please refer the managed device log for details” on page 117“There was an error while setting the desktop icon name” on page 117“The policy policy_name could not be successfully enforced as policy data was empty” on page 117“There was an error while configuring the setting “Enable manual refresh”” on page 118“Error while configuring the setting “Enable folder view”” on page 118“Error while configuring the setting “Expand the entire folder tree”” on page 118“Error while configuring the setting “Display applications in windows explorer”” on page 118“Error while configuring the setting “Allow logout/login as new user”” on page 118
116 ZENworks 11 Configuration Policies Reference

There was an error while unenforcing the policySource: ZENworks 11 Configuration Management; Policy Management; Windows
Configuration Policy.
Action: Turn on debug logging on the managed device and refer to the zmd-messages.log file to obtain more details about the error. For more information on how to turn on debug logging, see “Using Message Logging” in the ZENworks 11 ZENworks Control Center Reference.
Action: If the problem persists, contact Novell Support (http://www.novell.com/support).
There was an error while enforcing the policy policy_name. Please refer the managed device log for details
Source: ZENworks 11 Configuration Management; Policy Management; Windows Configuration Policy.
Action: Turn on debug logging on the managed device and refer to the zmd-messages.log file to obtain more details about the error. For more information on how to turn on debug logging, see “Using Message Logging” in the ZENworks 11 ZENworks Control Center Reference.
Action: If the problem persists, contact Novell Support (http://www.novell.com/support).
There was an error while setting the desktop icon nameSource: ZENworks 11 Configuration Management; Policy Management; Windows
Configuration Policy.
Possible Cause: This message is logged if an error occurred while configuring the Desktop icon of ZENworks Application Launcher.
Action: Turn on debug logging on the managed device and refer to the zmd-messages.log file to obtain more details about the error. For more information on how to turn on debug logging, see “Using Message Logging” in the ZENworks 11 ZENworks Control Center Reference.
Action: If the problem persists, contact Novell Support (http://www.novell.com/support).
The policy policy_name could not be successfully enforced as policy data was empty
Source: ZENworks 11 Configuration Management; Policy Management; Configuration Policy.
Action: Turn on debug logging on the managed device and refer to the zmd-messages.log file to obtain more details about the error. For more information on how to turn on debug logging, see “Using Message Logging” in the ZENworks 11 ZENworks Control Center Reference.
Action: If the problem persists, contact Novell Support (http://www.novell.com/support).
Troubleshooting Policy Management 117

There was an error while configuring the setting “Enable manual refresh”Source: ZENworks 11 Configuration Management; Policy Management; Windows
Configuration Policy.
Action: Turn on debug logging on the managed device and refer to the zmd-messages.log file to obtain more details about the error. For more information on how to turn on debug logging, see “Using Message Logging” in the ZENworks 11 ZENworks Control Center Reference.
Action: If the problem persists, contact Novell Support (http://www.novell.com/support).
Error while configuring the setting “Enable folder view”Source: ZENworks 11 Configuration Management; Policy Management; Windows
Configuration Policy.
Action: Turn on debug logging on the managed device and refer to the zmd-messages.log file to obtain more details about the error. For more information on how to turn on debug logging, see “Using Message Logging” in the ZENworks 11 ZENworks Control Center Reference.
Action: If the problem persists, contact Novell Support (http://www.novell.com/support).
Error while configuring the setting “Expand the entire folder tree”Source: ZENworks 11 Configuration Management; Policy Management; Windows
Configuration Policy.
Action: Turn on debug logging on the managed device and refer to the zmd-messages.log file to obtain more details about the error. For more information on how to turn on debug logging, see “Using Message Logging” in the ZENworks 11 ZENworks Control Center Reference.
Action: If the problem persists, contact Novell Support (http://www.novell.com/support).
Error while configuring the setting “Display applications in windows explorer”Source: ZENworks 11 Configuration Management; Policy Management; Windows
Configuration Policy.
Action: Turn on debug logging on the managed device and refer to the zmd-messages.log file to obtain more details about the error. For more information on how to turn on debug logging, see “Using Message Logging” in the ZENworks 11 ZENworks Control Center Reference.
Action: If the problem persists, contact Novell Support (http://www.novell.com/support).
Error while configuring the setting “Allow logout/login as new user”Source: ZENworks 11 Configuration Management; Policy Management; Windows
Configuration Policy.
118 ZENworks 11 Configuration Policies Reference

Action: Turn on debug logging on the managed device and refer to the zmd-messages.log file to obtain more details about the error. For more information on how to turn on debug logging, see “Using Message Logging” in the ZENworks 11 ZENworks Control Center Reference.
Action: If the problem persists, contact Novell Support (http://www.novell.com/support).
Troubleshooting Policy Management 119

120 ZENworks 11 Configuration Policies Reference

B BBest Practices
The following sections contain information on the best practices to follow when using the Novell ZENworks 11 SP2 Configuration Management policies:
Section B.1, “Local File Rights Policy,” on page 121Section B.2, “Dynamic Local User Policy,” on page 121Section B.3, “Roaming Profile Policy,” on page 121Section B.4, “SNMP Policy,” on page 122Section B.5, “Windows Group Policy,” on page 122Section B.6, “Printer Policy,” on page 122
B.1 Local File Rights PolicyFor information on managing access control to files and folders, see Microsoft’s Access Control Best Practices Web site (http://technet2.microsoft.com/windowsserver/en/library/5a6d7830‐6c5e‐4c93‐b8e7‐fb446954d91b1033.mspx?mfr=true).
B.2 Dynamic Local User PolicyIf the Novell Client is installed, ensure that it is the latest version of the Novell Client before the Dynamic Local User policy is enforced. To obtain the latest version of Novell Client, see the Novell Download Web site (http://download.novell.com/index.jsp).If a Dynamic Local User policy that has no login restrictions configured is assigned to a managed device, the time taken to log in to the managed device can be significantly improved by adding a DonotFetchUserGroups registry key as follows: 1. Open the Registry Editor.2. Go to HKLM\Software\Novell\ZCM\AgentSettings.3. Create a String called DonotFetchUserGroups and set its value to True.
B.3 Roaming Profile PolicyThe local user account must have the same username and password on both the managed device and the shared server that has the user profile stored because Windows authenticates the user before loading or saving the profile across the devices.Provide the necessary permission on the shared location to users whose profile is configured for roaming.
Best Practices 121

B.4 SNMP PolicyEnsure that the SNMP service is running before applying the SNMP policy.
B.5 Windows Group PolicyDo not apply the Windows Group policy on Windows 2000 or Windows 2003 domain controllers.Do not apply the Windows Group policy to a Windows managed device that is a part of the Microsoft domain and has a group policy from the Windows domain controller applied. The ZENworks Windows Group policy must be applied only if the group policy from the Windows domain controller is not applied.If you want the Windows Group policy settings to be applied to all users of a device, the settings must be configured as a part of a device‐assigned policy. The user‐assigned policies must contain only the configuration settings specific to the user to whom the policy is assigned.If you apply Local Group policies on a managed device that has ZENworks Group policies already applied, some of the settings might not work correctly.If you want to configure the security settings for a ZENworks Group Policy on a newly installed 64‐bit Windows device, launch and close the Group Policy editor, gpedit.msc, before running the Group Policy Helper tool.
B.6 Printer PolicyYou must not edit the Printer policy to add iPrint printer drivers in the Printer Driver Installation panel of a printer policy details page. This is because the iPrint drivers are automatically downloaded from the iPrint servers when the iPrint printer is installed on a device. However, you can add local or network printer drivers to the drivers list if the policy has local or network printers configured.
122 ZENworks 11 Configuration Policies Reference

C CiPrint Policy Management Utility
The iPrint Policy Management (IPPman) utility allows you to perform repetitive and mass operations on printer policies that have an iPrint printer matching a specific iPrint URI or a specific search criteria. You can use this utility to migrate the iprint printers from one iPrint server to another.
The IPPman utility enables you to create, clone, rename, modify, and delete the iPrint objects by editing the existing printer policies that have iPrint printers. You can also export and import the iPrint printer configurations for all the policies that match specific printer URI criteria.
The following sections contain more information on this utility:
Section C.1, “Installing the IPPman Utility,” on page 123Section C.2, “Using IPPman Commands to Configure iPrint Printers,” on page 124Section C.3, “Understanding the Format of the iPrint Printer Configuration File,” on page 130Section C.4, “Printing Preferences for an iPrint Printer,” on page 131Section C.5, “iPrint Printer List Import File Format,” on page 132
C.1 Installing the IPPman UtilityThe IPPman utility is installed by default in the ZENworks installation directory of the ZENworks Configuration Management server. However, you might need to manually install the utility on a device in the following scenarios:
Migrate an iPrint printer from one device to another.Install the utility on a device that is not a ZENworks server.
1 Copy the ippmanagement.zip file from the ZENworks_installation_directory\novell\zenworks\install\downloads\tools directory to a temporary location.orDownload the file from ZENworks Control Center (in the Common Tasks, click Download ZENworks Tools > Administrative Tools).
2 Extract the ippmanagement.zip file to a temporary location.3 Set the IPPMAN_HOME environment variable to the directory where you extracted IPPman.4 Set the JAVA_HOME environment variable to the JDK installation directory.
For information related with JAVA version specifications, see “Administration Browser Requirements” in the ZENworks 11 Server Installation Guide.
5 At the command prompt of the device, go to the directory where the .zip contents are extracted and run ippman.bat from the bin folder.
iPrint Policy Management Utility 123

C.2 Using IPPman Commands to Configure iPrint PrintersYou can configure iPrint printers by using ZENworks Control Center or by using the zman command line utility. In addition, you can use the IPPman utility to perform repetitive and mass operations on printer policies that have an iPrint printer matching a specific iPrint URI or matching a specific search criteria.
For more information on creating printer policies by using ZENworks Control Center, see Section 3.5, “Printer Policy,” on page 31.
For more information on creating printer policies by using zman command line utility, see “ZENworks Command Line Utilities”.
Review the following sections for more information on using the IPPman commands:
Section C.2.1, “Creating an iPrint Printer,” on page 124Section C.2.2, “Cloning an iPrint Printer,” on page 125Section C.2.3, “Renaming an iPrint Printer,” on page 126Section C.2.4, “Modifying an iPrint Printer,” on page 127Section C.2.5, “Deleting an iPrint Printer,” on page 128Section C.2.6, “Exporting iPrint Printer,” on page 128Section C.2.7, “Importing an iPrint Printer,” on page 129
C.2.1 Creating an iPrint Printer To create a new iPrint printer configuration for all the policies that match specific printer URI criteria:
1 Create the iPrint printer configuration file.For information on creating the iPrint printer configuration file, see Section C.3, “Understanding the Format of the iPrint Printer Configuration File,” on page 130.
2 Use the ippman create command to create a new iPrinter printer for all the printer policies that have an iPrint printer with the URI specified in the command. The printer name and the printing preferences for the new iPrinter printer are specified in the iPrint printer configuration file.
On a ZENworks server, enter the command as follows:ippman create -uri iprint_printer_uri -conf iprint_printer_configuration file -username username -password password
Example:ippman create -uri ipp://10.0.0.0/ipp/Printer1 -conf "c:\\printerdata.xml" -username Administrator -password xxxxx
On a device other than the ZENworks server, enter the command as follows:ippman create -uri iprint_printer_uri -conf iprint_printer_configuration file -server ZENworks_server_ip -port port_number -username username -password password
Example:ippman create -uri ipp://10.0.0.0/ipp/Printer1 -conf "c:\\printerdata.xml" -server 10.0.0.0 -port 80 -username Administrator -password xxxxx
124 ZENworks 11 Configuration Policies Reference

Table C-1 Options Used with the Create Command
To refer to the online help for the command, enter the following command:
ippman create -help
C.2.2 Cloning an iPrint Printer To clone the iPrint printer configuration for all policies that match specific printer URI criteria, use the ippman clone command.
This command creates a new iPrinter printer for all the printer policies that have an iPrint printer with the URI specified in the command. The URI of the new iPrint printer is also specified in the command. The cloned printer has the same printing preferences as the original printer.
On a ZENworks server, enter the command as follows:
ippman clone -uri iprint_printer_uri -uri2 iprint_printer_uri_for_clone -default true/false -updatedriver true/false -username username -password password
Example:
ippman clone -uri ipp://10.0.0.0/ipp/Printer -uri2 ipp://10.0.0.0/ipp/Printer1 -default true -updatedriver true -username Administrator -password xxxxx
On a device other than the ZENworks server, enter the command as follows:ippman clone -uri iprint_printer_uri -uri2 iprint_printer_uri_for_clone -default true/false -updatedriver true/false -server ZENworks_server_ip -port port_number -username username -password password
Example:ippman clone -uri ipp://10.0.0.0/ipp/Printer -uri2 ipp://10.0.0.0/ipp/Printer1 -default true -updatedriver true -server 10.0.0.0 -port 80 -username Administrator -password xxxxx
Table C-2 Options Used with the Clone Command
Option Description
uri URI of the iPrint printer to search.
conf iPrint printer configuration file containing the printer name and the printing preferences.
username and password
Credentials of the ZENworks administrator.
server IP address of the ZENworks server.
port Port of the ZENworks server. The default port is 80.
Option Description
uri URI of the iPrint printer to search.
uri2 URI of the iPrint printer to clone.
default Whether this is the default printer. The available options are true or false.
iPrint Policy Management Utility 125
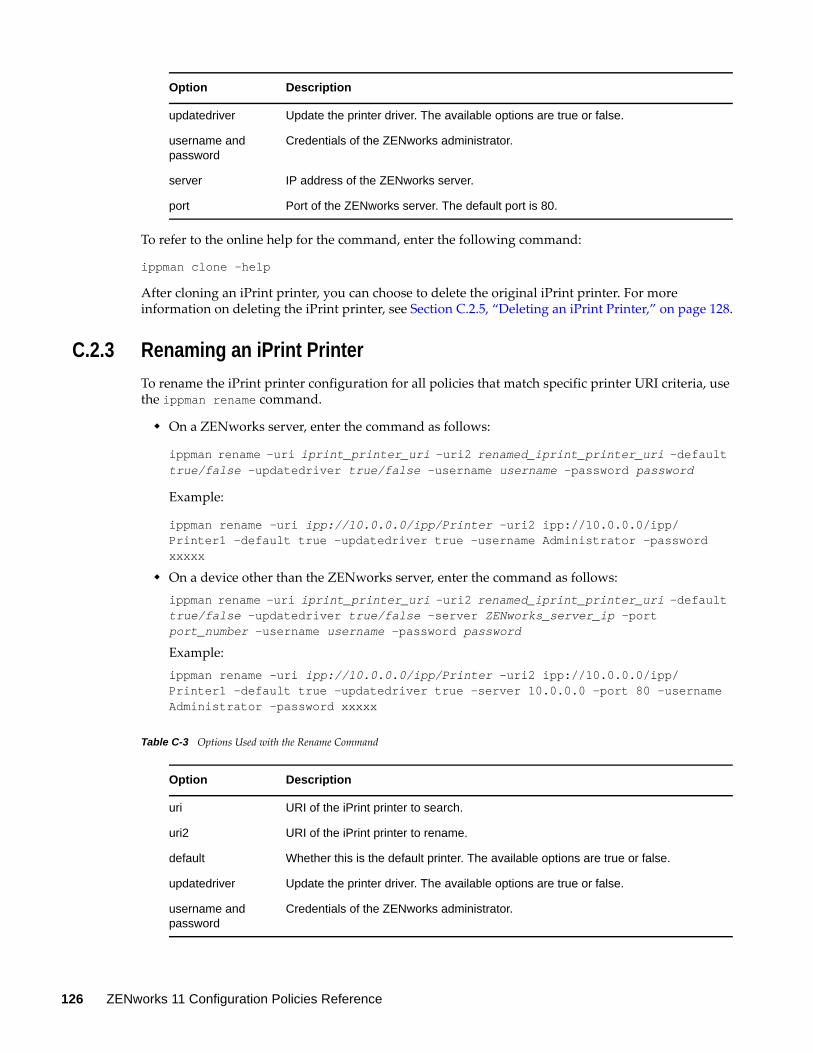
To refer to the online help for the command, enter the following command:
ippman clone -help
After cloning an iPrint printer, you can choose to delete the original iPrint printer. For more information on deleting the iPrint printer, see Section C.2.5, “Deleting an iPrint Printer,” on page 128.
C.2.3 Renaming an iPrint Printer To rename the iPrint printer configuration for all policies that match specific printer URI criteria, use the ippman rename command.
On a ZENworks server, enter the command as follows:
ippman rename -uri iprint_printer_uri -uri2 renamed_iprint_printer_uri -default true/false -updatedriver true/false -username username -password password
Example:
ippman rename -uri ipp://10.0.0.0/ipp/Printer -uri2 ipp://10.0.0.0/ipp/Printer1 -default true -updatedriver true -username Administrator -password xxxxx
On a device other than the ZENworks server, enter the command as follows:ippman rename -uri iprint_printer_uri -uri2 renamed_iprint_printer_uri -default true/false -updatedriver true/false -server ZENworks_server_ip -port port_number -username username -password password
Example:ippman rename -uri ipp://10.0.0.0/ipp/Printer -uri2 ipp://10.0.0.0/ipp/Printer1 -default true -updatedriver true -server 10.0.0.0 -port 80 -username Administrator -password xxxxx
Table C-3 Options Used with the Rename Command
updatedriver Update the printer driver. The available options are true or false.
username and password
Credentials of the ZENworks administrator.
server IP address of the ZENworks server.
port Port of the ZENworks server. The default port is 80.
Option Description
Option Description
uri URI of the iPrint printer to search.
uri2 URI of the iPrint printer to rename.
default Whether this is the default printer. The available options are true or false.
updatedriver Update the printer driver. The available options are true or false.
username and password
Credentials of the ZENworks administrator.
126 ZENworks 11 Configuration Policies Reference

To refer to the online help for the command, enter the following command:
ippman rename -help
C.2.4 Modifying an iPrint Printer To create a new iPrint printer configuration for all policies that match specific printer URI criteria, and modify the default settings:
1 Create the iPrint printer configuration file.For information on creating the iPrint printer configuration file, see Section C.3, “Understanding the Format of the iPrint Printer Configuration File,” on page 130.
2 Use the ippman modify command. On a ZENworks server, enter the command as follows:ippman modify -uri iprint_printer_uri -conf iprint_printer_configuration file -username username -password password
Example:ippman modify -uri ipp://10.0.0.0/ipp/Printer1 -conf "c:\\printerdata.xml" -username Administrator -password xxxxx
On a device other than the ZENworks server, enter the command as follows:ippman modify -uri iprint_printer_uri -conf iprint_printer_configuration file -server ZENworks_server_ip -port port_number -username username -password password
Example:ippman modify -uri ipp://10.0.0.0/ipp/Printer1 -conf "c:\\printerdata.xml" -server 10.0.0.0 -port 80 -username Administrator -password xxxxx
Table C-4 Options Used with the Modify Command
To refer to the online help for the command, enter the following command:
ippman modify -help
server IP address of the ZENworks server.
port Port of the ZENworks server. The default port is 80.
Option Description
Option Description
uri URI of the iPrint printer to search.
conf iPrint Printer Configuration file containing the printer name and the printing preferences.
username and password
Credentials of the ZENworks administrator.
server IP address of the ZENworks server.
port Port of the ZENworks server. The default port is 80.
iPrint Policy Management Utility 127

C.2.5 Deleting an iPrint Printer To delete a new iPrint printer configuration for all policies that match specific printer URI criteria, use the ippman delete command.
On a ZENworks server, enter the command as follows:
ippman delete -uri iprint_printer_uri -username username -password password
Example:
ippman delete -uri ipp://10.0.0.0/ipp/Printer1 -username Administrator -password xxxxx
On a device other than the ZENworks server, enter the command as follows:ippman delete -uri iprint_printer_uri -server ZENworks_server_ip -port port_number -username username -password password
Example:ippman delete -uri ipp://10.0.0.0/ipp/Printer1 -server 10.0.0.0 -port 80 -username Administrator -password xxxxx
Table C-5 Options Used with the Delete Command
To refer to the online help for the command, enter the following command:
ippman delete -help
C.2.6 Exporting iPrint Printer To export the iPrint printer configuration for all policies that match a specific printer URI criteria, use the ippman export command.
On a ZENworks server, enter the command as follows:
ippman export -uri iprint_printer_uri -folder export_folder -username username -password password
Example:
ippman export -uri ipp://10.0.0.0/ipp/Printer1 -folder "c:\\export" -username Administrator -password xxxxx
On a device other than the ZENworks server, enter the command as follows:ippman export -uri iprint_printer_uri -folder export_folder -server ZENworks_server_ip -port port_number -username username -password password
Option Description
uri URI of the iPrint printer to delete.
username and password
Credentials of the ZENworks administrator.
server IP address of the ZENworks server.
port Port of the ZENworks server. The default port is 80.
128 ZENworks 11 Configuration Policies Reference

Example:ippman export -uri ipp://10.0.0.0/ipp/Printer1 -folder "c:\\export" -server 10.0.0.0 -port 80 -username Administrator -password xxxxx
Table C-6 Options Used with the Export Command
To refer to the online help for the command, enter the following command:
ippman export -help
C.2.7 Importing an iPrint Printer To import the iPrint printer configuration to a printer policy, you must use the XML file that contains the exported iPrint printer configuration information
For information on the format of the file, see Section C.5, “iPrint Printer List Import File Format,” on page 132.
1 (Conditional) Depending on the requirements, modify the XML file created when you export the iPrint printer.For more information on exporting the iPrint printer, see “Exporting iPrint Printer” on page 128.
2 Use the ippman import command to import the iPrint printer configuration to all the printer policies matching a specific iPrint URI or a specific search criteria.
On the ZENworks server, enter the command as follows:ippman import -uri iprint_printer_uri -folder import_folder -username username -password password
Example:ippman import -uri ipp://10.0.0.0/ipp/Printer1 -folder "c:\\export" -username Administrator -password xxxxx
On the device other than the ZENworks server, enter the command as follows:ippman import -uri iprint_printer_uri -folder import_folder -server ZENworks_server_ip -port port_number -username username -password password
Option Description
uri URI of the iPrint printer to search.
folder Folder to which the XML files containing the iPrint printer configuration is exported. For every printer policy that matches the search criteria, an XML file is created.
The XML file is named policyname_policyUID.
where policyname is the name of the printer policy and policyUID is the unique ID of the printer policy.
username and password
Credentials of the ZENworks administrator.
server IP address of the ZENworks server.
port Port of the ZENworks server. The default port is 80.
iPrint Policy Management Utility 129

Example:ippman import -uri ipp://10.0.0.0/ipp/Printer1 -folder "c:\\export" -server 10.0.0.0 -port 80 -username Administrator -password xxxxx
Table C-7 Options Used with the Import Command
To refer to the online help for the command, enter the following command:
ippman import -help
C.3 Understanding the Format of the iPrint Printer Configuration File The iPrint printer configuration file contains information about the iPrint printer such as printer name, iPrint URI, and the printing preferences.
Section C.3.1, “Format of iPrint Printer Configuration File with Default Printing Preferences,” on page 130Section C.3.2, “[Example] iPrint Printer Configuration File with Some Printing Preferences Specified,” on page 131
C.3.1 Format of iPrint Printer Configuration File with Default Printing Preferences<?xml version="1.0" encoding="utf-8"?>
<Printer name="ipp://10.0.0.0/ipp/Printer2" type="iPrint" updateiPrintDriver="true">
<DefaultPrintingPreferences/>
</Printer>
For information on the default printing preferences, see Section C.4, “Printing Preferences for an iPrint Printer,” on page 131.
Option Description
uri URI of the iPrint printer to search.
folder Folder from which the iPrint printer configuration is imported.
This folder contains the exported iPrint printer configuration saved in an XML file named policyname_policyUID.
where policyname is the name of the printer policy and policyUID is the unique ID of the printer policy.
username and password
Credentials of the ZENworks administrator.
server IP address of the ZENworks server.
port Port of the ZENworks server. The default port is 80.
130 ZENworks 11 Configuration Policies Reference

C.3.2 [Example] iPrint Printer Configuration File with Some Printing Preferences SpecifiedYou can specify printing preferences in the iPrint printer configuration file. For more information on the available printing preferences, see Section C.4, “Printing Preferences for an iPrint Printer,” on page 131.
A sample of the iPrint printer configuration file with some printing preferences specified is as follows:
<?xml version="1.0" encoding="utf-8"?>
<Printer name="ipp://10.0.0.0/ipp/Printer2" type="iPrint" updateiPrintDriver="true">
<DefaultPrintingPreferences>
<PrinterOrientation>Portrait</PrinterOrientation>
<PaperSource>Envmanual</PaperSource>
<Duplex>true</Duplex>
<Collate>true</Collate>
<PaperSize>Ledger</PaperSize>
<PrintQuality>High</PrintQuality>
<IsDefault>true</IsDefault>
</DefaultPrintingPreferences>
</Printer>
C.4 Printing Preferences for an iPrint Printer Table C-8 iPrint Printer Printing Preferences
Printing Preference Possible Values Default Value
PrinterOrientation Portrait, Landscape Portrait
Duplex true, false true
Collate true, false true
PrintQuality High, Low high
PaperSource Auto, Cassette, Envelope, Envmanual, Formsource, Largecapacity, Lower, Largefmt, Largecapacity, Manual, Onlyone, Tractor, Smallfmt, Tray 1, Tray 2, Tray 3, Tray 4
No default value
PaperSize Letter, Letter Small, Tabloid, Ledger, Legal, Statement, Executive, 11x17,16K, 8K, A3, A4, A4 Small, A5, B4, B5
No default value
iPrint Policy Management Utility 131

C.5 iPrint Printer List Import File Format To import the iPrint printer configuration to all the policies that match specific printer URI, use the XML file created when you exported the iPrint printer. For more information on exporting the iPrint printer, see Section C.2.6, “Exporting iPrint Printer,” on page 128.
The format of the iPrint printer list import file that is used with the printer policy import command is as follows.
<?xml version="1.0" encoding="UTF-8"?>
<PrinterList removeOthers="false">
<Printer name="ipp://164.99.147.66/ipp/Printer2" type="iPrint" updateiPrintDriver="true">
<DefaultPrintingPreferences />
</Printer>
<Printer name="ipp://164.99.147.66/ipp/Printer3" type="iPrint" updateiPrintDriver="false"> <DefaultPrintingPreferences/>
</Printer>
</PrinterList>
132 ZENworks 11 Configuration Policies Reference

D DDocumentation Updates
This section contains information on documentation content changes that were made in this ZENworks Configuration Policies Reference for Novell ZENworks 11 Configuration Management. The information can help you to keep current on updates to the documentation.
The documentation for this product is provided on the Web in two formats: HTML and PDF. The HTML and PDF documentation are both kept up‐to‐date with the changes listed in this section.
If you need to know whether a copy of the PDF documentation that you are using is the most recent, the PDF document includes a publication date on the title page.
The following updates were made to the document:
Section D.1, “October 2013: Updated for ZENworks 11 SP2 (11.2.4),” on page 133Section D.2, “March 2013: Updated for ZENworks 11 SP2 (11.2.3),” on page 133
D.1 October 2013: Updated for ZENworks 11 SP2 (11.2.4)Update was made to the following section.
D.2 March 2013: Updated for ZENworks 11 SP2 (11.2.3)Update was made to the following section.
Location Change
Section 1.4, “Understanding the Features of a Policy,” on page 11
Updated this section.
Location Change
Chapter 3, “Creating Windows Configuration Policies,” on page 19
Updated Section 3.4, “Power Management Policy,” on page 29, to introduce the new Power Setting options.
Documentation Updates 133

134 ZENworks 11 Configuration Policies Reference