Zeiss GT2 3D GT2 3D Short - Online Optical labs in PA · Rx Range Availability Chart Fitting Zeiss...
2
0 0 35 30 25 35 30 25 6 6 0 10 10 17 20 20 25 25 30 30 35 35 40 40 13 13 13 3 3 0 10 17 20 25 30 35 40 R 5 0 GT2 3D Short GT2 3D 5 0 L GT2 3D Short GT2 3D 0 5 0 5 75/80 70/75 75/80 70/75 Lens Cut Out To be used with Zeiss GT2 3D and Zeiss GT2 3D Short only. Zeiss GT2 ™ 3D & GT2 3D Short Fitting and Dispensing Guide Lens Engravings (As viewed from the front) To Locate the Lens Engravings Use a good light source and dark background to locate the engravings. The engraved add power is below the temporal logo, and the engraved design material code is below the nasal logo. The engravings are located on the lens surface, 34 mm apart or 17 mm to either side of the prism reference point. Use a felt-tip pen to dot the center of the engraving. Apply verification mask (part #000-0139-15150 for Zeiss GT2 3D and 000-0139-15160 for Zeiss GT2 3D Short), available from Carl Zeiss Vision. If verification mask is not available, place the front surface of the lens over the lens cut out, lining up the dots with the corresponding engravings. Draw in the remaining markings with a felt- tip pen. Material Codes 50 = Hard Resin, Transitions ® VI 59 = Polycarbonate, Transitions ® VI 60 = 1.60 High Index 67 = 1.67 High Index and Transitions ® VI Questions? Call the Carl Zeiss Vision Technical Service Hotline at 800-358-8258 press 3 Engraved Add Power 20 2Sxx Two Digit Engraved Material Code R NASAL Design Code 2N = GT2 3D 2S = GT2 3D Short 2Nxx Helpful Hints for Fitting Progressives 1 Avoid aviator shape frames. They reduce the reading area and often will not cut out. 2 The frame should have an adequate face form wrap to follow the contour of the face and allow for maximum peripheral vision. 3 Fit the frame as close to the eyes as possible without touching the lashes. 4 Pantoscopic angle should be at least 7° to 12° to give the patient a maximum reading area. 5 While fitting, the patient’s back should be straight. His/her eyes should be on the same level as yours to reduce parallax errors. 6 The fitting cross should intersect the center of the pupil.
Transcript of Zeiss GT2 3D GT2 3D Short - Online Optical labs in PA · Rx Range Availability Chart Fitting Zeiss...
0 035 30 25 353025
66
0
1010
172020
2525
3030
3535
4040
131313
330
10
1720
25
30
35
40
R5 0
GT2 3D Short
GT2 3D
5 0
L
GT2 3D Short
GT2 3D
0 5
0 5
75/8070/75
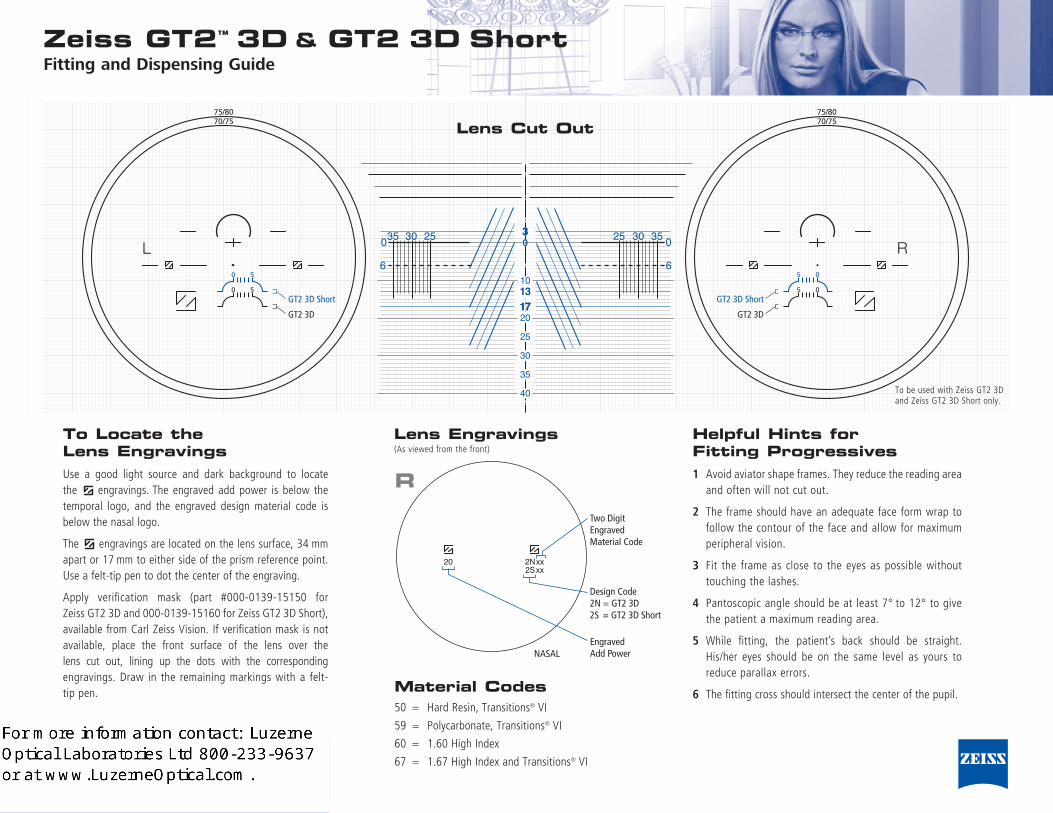
75/8070/75Lens Cut Out
To be used with Zeiss GT2 3D and Zeiss GT2 3D Short only.
Zeiss GT2™ 3D & GT2 3D Short Fitting and Dispensing Guide
Lens Engravings(As viewed from the front)
To Locate the Lens EngravingsUse a good light source and dark background to locate the engravings. The engraved add power is below the temporal logo, and the engraved design material code is below the nasal logo.
The engravings are located on the lens surface, 34 mm apart or 17 mm to either side of the prism reference point. Use a felt-tip pen to dot the center of the engraving.
Apply verifi cation mask (part #000-0139-15150 for Zeiss GT2 3D and 000-0139-15160 for Zeiss GT2 3D Short), available from Carl Zeiss Vision. If verifi cation mask is not available, place the front surface of the lens over the lens cut out, lining up the dots with the corresponding engravings. Draw in the remaining markings with a felt-tip pen. Material Codes
50 = Hard Resin, Transitions® VI
59 = Polycarbonate, Transitions® VI
60 = 1.60 High Index
67 = 1.67 High Index and Transitions® VIQuestions? Call the Carl Zeiss Vision Technical Service Hotline at
800-358-8258 press 3
Engraved Add Power
202Sxx
Two Digit Engraved Material Code
R
NASAL
Design Code2N = GT2 3D2S = GT2 3D Short
2Nxx
Helpful Hints for Fitting Progressives1 Avoid aviator shape frames. They reduce the reading area and often will not cut out.
2 The frame should have an adequate face form wrap to follow the contour of the face and allow for maximum peripheral vision.
3 Fit the frame as close to the eyes as possible without touching the lashes.
4 Pantoscopic angle should be at least 7° to 12° to give the patient a maximum reading area.
5 While fi tting, the patient’s back should be straight. His/her eyes should be on the same level as yours to reduce parallax errors.
6 The fi tting cross should intersect the center of the pupil.
Stephen
TextBox
For more information contact: Luzerne Optical Laboratories Ltd at 1-800-233-9637 or on the web at www.LuzerneOptical.com.
Stephen
TextBox
For more information contact: Luzerne Optical Laboratories Ltd 800-233-9637 or at www.LuzerneOptical.com.
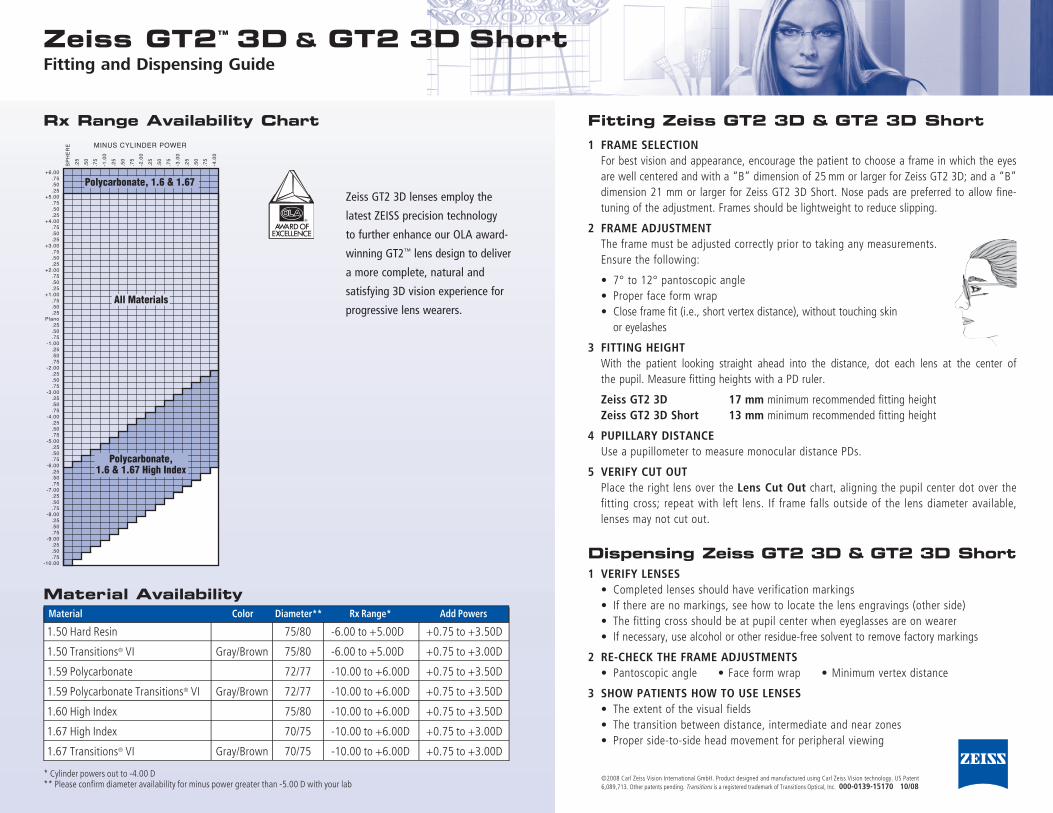
Rx Range Availability Chart Fitting Zeiss GT2 3D & GT2 3D Short1 FRAME SELECTION
For best vision and appearance, encourage the patient to choose a frame in which the eyes are well centered and with a “B” dimension of 25 mm or larger for Zeiss GT2 3D; and a “B” dimension 21 mm or larger for Zeiss GT2 3D Short. Nose pads are preferred to allow fi ne-tuning of the adjustment. Frames should be lightweight to reduce slipping.
2 FRAME ADJUSTMENT The frame must be adjusted correctly prior to taking any measurements. Ensure the following:
• 7° to 12° pantoscopic angle • Proper face form wrap • Close frame fi t (i.e., short vertex distance), without touching skin or eyelashes
3 FITTING HEIGHT With the patient looking straight ahead into the distance, dot each lens at the center of the pupil. Measure fi tting heights with a PD ruler.
Zeiss GT2 3D 17 mm minimum recommended fi tting height Zeiss GT2 3D Short 13 mm minimum recommended fi tting height
4 PUPILLARY DISTANCE Use a pupillometer to measure monocular distance PDs.
5 VERIFY CUT OUT Place the right lens over the Lens Cut Out chart, aligning the pupil center dot over the fitting cross; repeat with left lens. If frame falls outside of the lens diameter available, lenses may not cut out.
Dispensing Zeiss GT2 3D & GT2 3D Short1 VERIFY LENSES • Completed lenses should have verification markings • If there are no markings, see how to locate the lens engravings (other side) • The fitting cross should be at pupil center when eyeglasses are on wearer • If necessary, use alcohol or other residue-free solvent to remove factory markings
2 RE-CHECK THE FRAME ADJUSTMENTS • Pantoscopic angle • Face form wrap • Minimum vertex distance
3 SHOW PATIENTS HOW TO USE LENSES • The extent of the visual fields • The transition between distance, intermediate and near zones • Proper side-to-side head movement for peripheral viewing
Zeiss GT2 3D lenses employ the
latest ZEISS precision technology
to further enhance our OLA award-
winning GT2™ lens design to deliver
a more complete, natural and
satisfying 3D vision experience for
progressive lens wearers.
©2008 Carl Zeiss Vision International GmbH. Product designed and manufactured using Carl Zeiss Vision technology. US Patent 6,089,713. Other patents pending. Transitions is a registered trademark of Transitions Optical, Inc. 000-0139-15170 10/08
Zeiss GT2™ 3D & GT2 3D Short Fitting and Dispensing Guide
+6.00.75.50.25
+5.00.75.50.25
+4.00.75.50.25
+3.00.75.50.25
+2.00.75.50.25
+1.00.75.50.25
Plano.25.50.75
-1.00.25.50.75
-2.00.25.50.75
-3.00.25.50.75
-4.00.25.50.75
-5.00.25.50.75
-6.00.25.50.75
-7.00.25.50.75
-8.00.25.50.75
-9.00.25.50.75
-10.00
MINUS CYLINDER POWER
SP
HE
RE
.25
.50
.75
-1.0
0
.25
.50
.75
-2.0
0
.25
.50
.75
-3.0
0
.25
.50
.75
-4.0
0
All Materials
Polycarbonate,1.6 & 1.67 High Index
Polycarbonate, 1.6 & 1.67
1.50 Hard Resin 75/80 -6.00 to +5.00D +0.75 to +3.50D
1.50 Transitions® VI Gray/Brown 75/80 -6.00 to +5.00D +0.75 to +3.00D
1.59 Polycarbonate 72/77 -10.00 to +6.00D +0.75 to +3.50D
1.59 Polycarbonate Transitions® VI Gray/Brown 72/77 -10.00 to +6.00D +0.75 to +3.50D
1.60 High Index 75/80 -10.00 to +6.00D +0.75 to +3.50D
1.67 High Index 70/75 -10.00 to +6.00D +0.75 to +3.00D
1.67 Transitions® VI Gray/Brown 70/75 -10.00 to +6.00D +0.75 to +3.00D
Material Color Diameter** Rx Range* Add Powers
* Cylinder powers out to -4.00 D** Please confi rm diameter availability for minus power greater than -5.00 D with your lab
Material Availability
Stephen
TextBox
For more information contact: Luzerne Optical Laboratories Ltd 800-233-9637 or at www.LuzerneOptical.com.