YuJa Student Guide
10
YuJa Student Guide 1
Transcript of YuJa Student Guide
YuJa StudentGuide
1
Getting StartedViewing Instructor Recordings……………………………………………..………...3Using the Sidebar……………………………………………………………………………4Installing the YuJa Software Station…………………………………………………5
Creating & Editing RecordingsCreating a Recording……………………………………………………………………….6About the YuJa Software Station…………………………………………………….7The Video Editor……………………………………………………………………………..8
Sharing Your YuJa Videos:Publishing a Video to a Course………………………………………………………..9Providing a Direct Link to a Video……………………..………………………......9
Exam Proctoring...............................................................................10
TABLE OF CONTENTS
2
Instructors can share YuJa videos with you in three different ways:
1. Posting a URL link to each video in Blackboard2. By asking you to open YuJa from your course menu and locate the video3. Embedding the video in your course in Blackboard
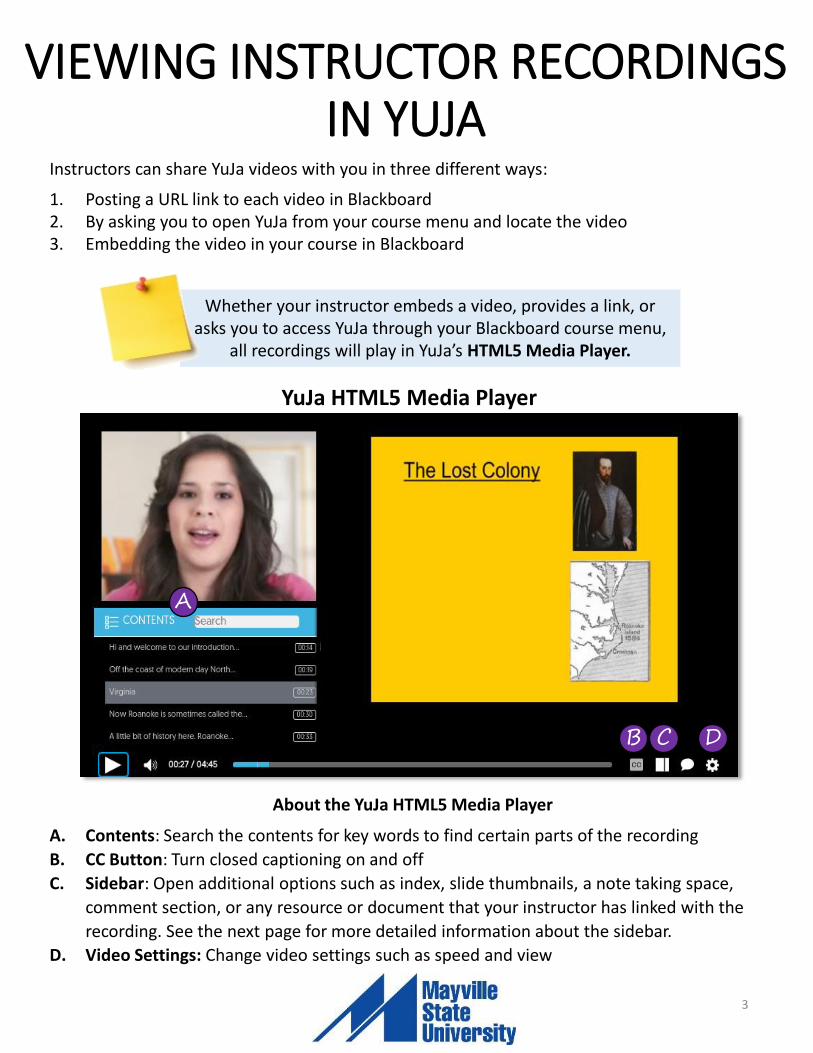
About the YuJa HTML5 Media Player
A. Contents: Search the contents for key words to find certain parts of the recording
B. CC Button: Turn closed captioning on and off
C. Sidebar: Open additional options such as index, slide thumbnails, a note taking space,
comment section, or any resource or document that your instructor has linked with the
recording. See the next page for more detailed information about the sidebar.
D. Video Settings: Change video settings such as speed and view
A
B C D
Whether your instructor embeds a video, provides a link, or asks you to access YuJa through your Blackboard course menu,
all recordings will play in YuJa’s HTML5 Media Player.
YuJa HTML5 Media Player
VIEWING INSTRUCTOR RECORDINGS IN YUJA
3
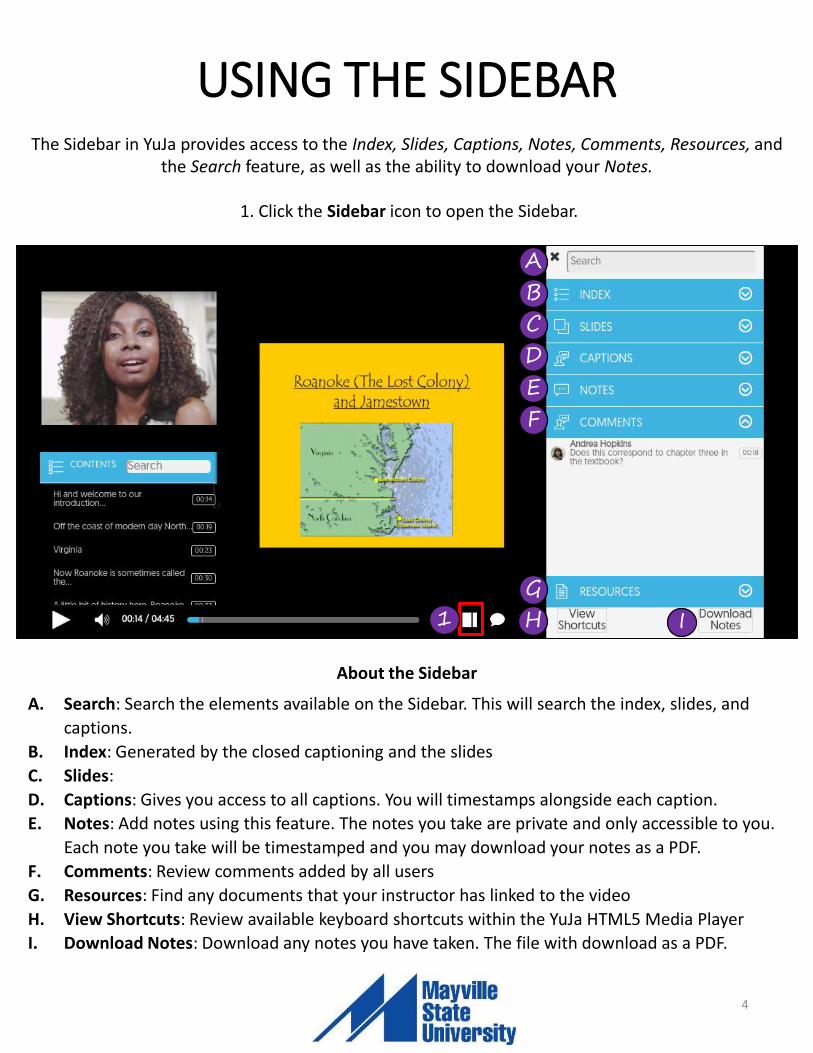
The Sidebar in YuJa provides access to the Index, Slides, Captions, Notes, Comments, Resources, and the Search feature, as well as the ability to download your Notes.
1. Click the Sidebar icon to open the Sidebar.
About the Sidebar
A. Search: Search the elements available on the Sidebar. This will search the index, slides, and
captions.
B. Index: Generated by the closed captioning and the slides
C. Slides:
D. Captions: Gives you access to all captions. You will timestamps alongside each caption.
E. Notes: Add notes using this feature. The notes you take are private and only accessible to you.
Each note you take will be timestamped and you may download your notes as a PDF.
F. Comments: Review comments added by all users
G. Resources: Find any documents that your instructor has linked to the video
H. View Shortcuts: Review available keyboard shortcuts within the YuJa HTML5 Media Player
I. Download Notes: Download any notes you have taken. The file with download as a PDF.
1
A
B
C
D
E
F
G
H I
USING THE SIDEBAR
4
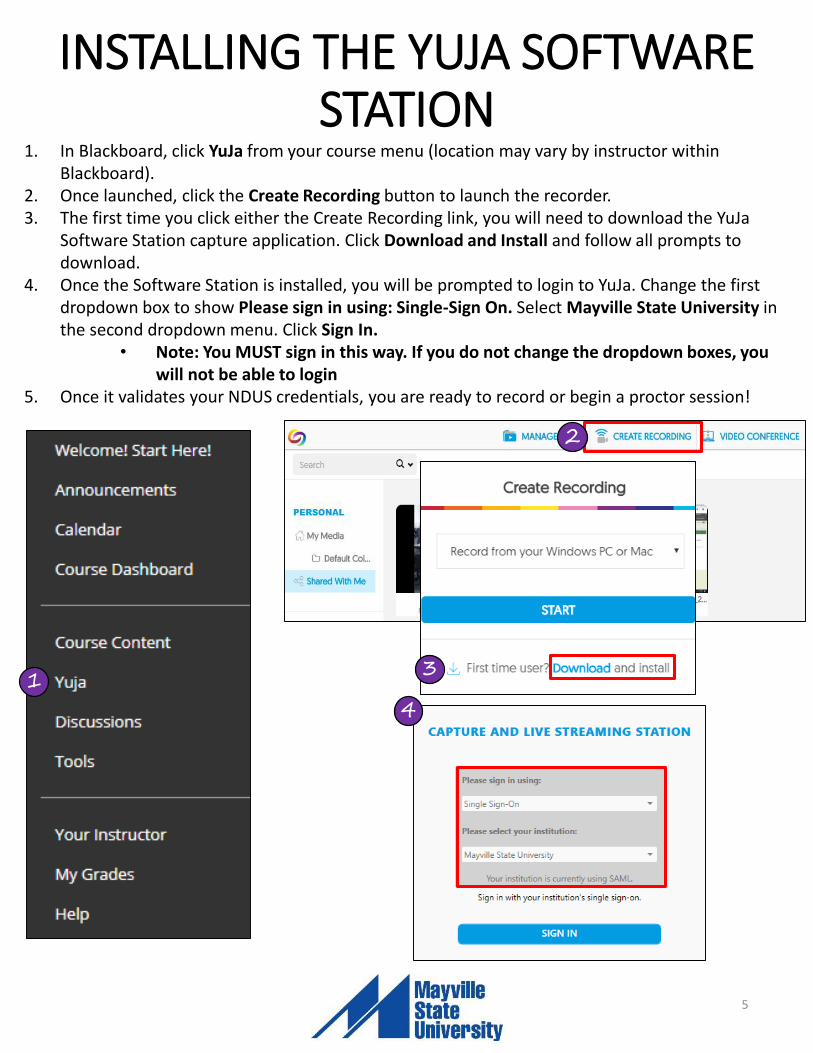
1. In Blackboard, click YuJa from your course menu (location may vary by instructor within Blackboard).
2. Once launched, click the Create Recording button to launch the recorder.3. The first time you click either the Create Recording link, you will need to download the YuJa
Software Station capture application. Click Download and Install and follow all prompts to download.
4. Once the Software Station is installed, you will be prompted to login to YuJa. Change the first dropdown box to show Please sign in using: Single-Sign On. Select Mayville State University in the second dropdown menu. Click Sign In.
• Note: You MUST sign in this way. If you do not change the dropdown boxes, you will not be able to login
5. Once it validates your NDUS credentials, you are ready to record or begin a proctor session!
1
2
INSTALLING THE YUJA SOFTWARE STATION
5
3
4
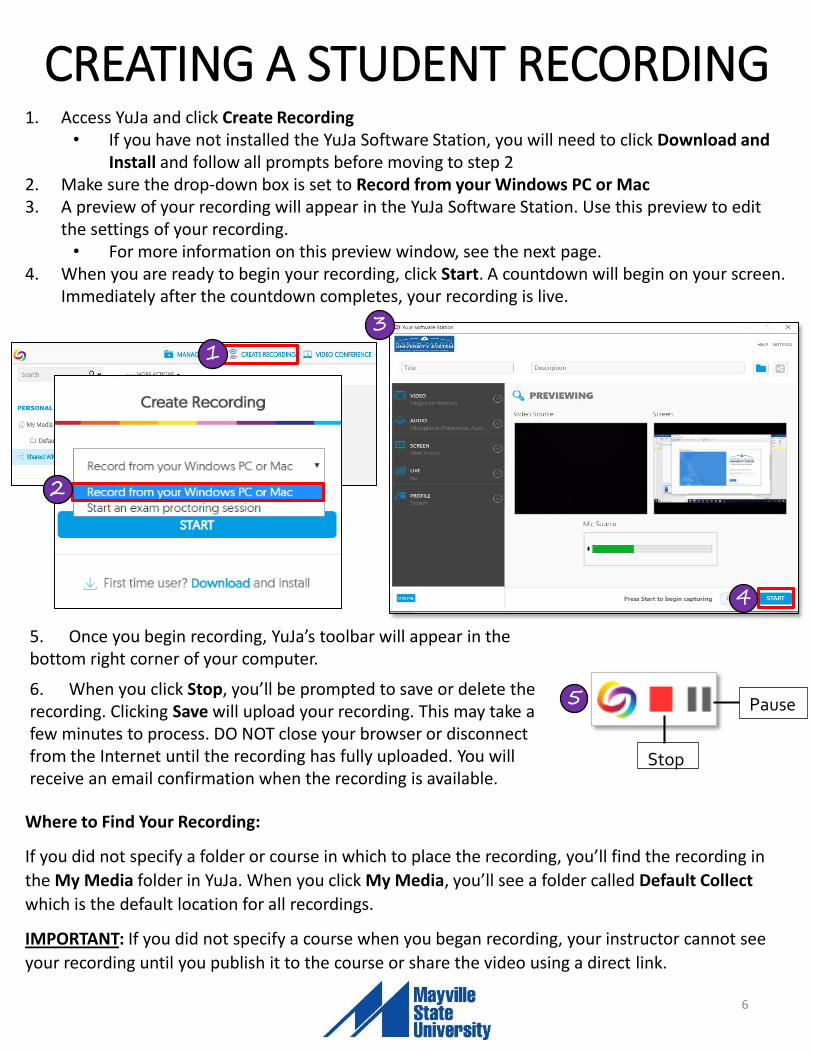
1. Access YuJa and click Create Recording• If you have not installed the YuJa Software Station, you will need to click Download and
Install and follow all prompts before moving to step 22. Make sure the drop-down box is set to Record from your Windows PC or Mac3. A preview of your recording will appear in the YuJa Software Station. Use this preview to edit
the settings of your recording. • For more information on this preview window, see the next page.
4. When you are ready to begin your recording, click Start. A countdown will begin on your screen. Immediately after the countdown completes, your recording is live.
1
CREATING A STUDENT RECORDING
5. Once you begin recording, YuJa’s toolbar will appear in the bottom right corner of your computer.
6. When you click Stop, you’ll be prompted to save or delete the recording. Clicking Save will upload your recording. This may take a few minutes to process. DO NOT close your browser or disconnect from the Internet until the recording has fully uploaded. You will receive an email confirmation when the recording is available.
Stop
Pause5
3
4
Where to Find Your Recording:
If you did not specify a folder or course in which to place the recording, you’ll find the recording in
the My Media folder in YuJa. When you click My Media, you’ll see a folder called Default Collect
which is the default location for all recordings.
IMPORTANT: If you did not specify a course when you began recording, your instructor cannot see
your recording until you publish it to the course or share the video using a direct link.
6
2
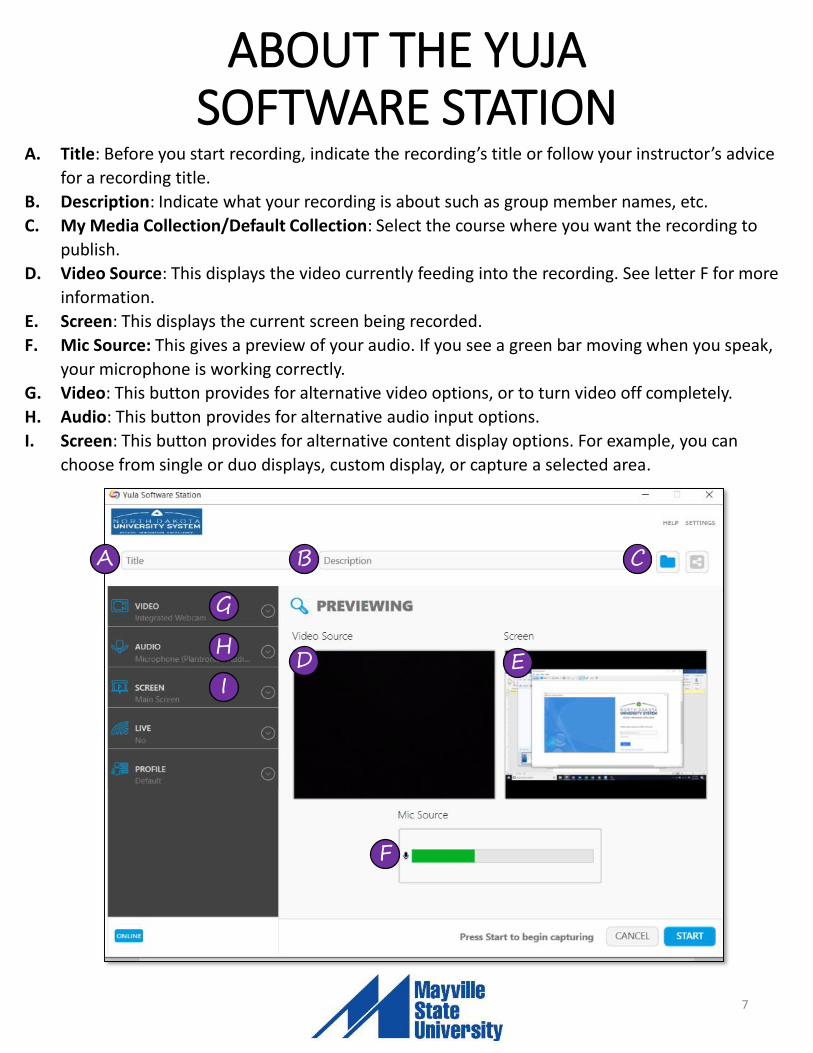
A. Title: Before you start recording, indicate the recording’s title or follow your instructor’s advice
for a recording title.
B. Description: Indicate what your recording is about such as group member names, etc.
C. My Media Collection/Default Collection: Select the course where you want the recording to
publish.
D. Video Source: This displays the video currently feeding into the recording. See letter F for more
information.
E. Screen: This displays the current screen being recorded.
F. Mic Source: This gives a preview of your audio. If you see a green bar moving when you speak,
your microphone is working correctly.
G. Video: This button provides for alternative video options, or to turn video off completely.
H. Audio: This button provides for alternative audio input options.
I. Screen: This button provides for alternative content display options. For example, you can
choose from single or duo displays, custom display, or capture a selected area.
ABOUT THE YUJA SOFTWARE STATION
CA
D
B
E
G
H
I
F
7
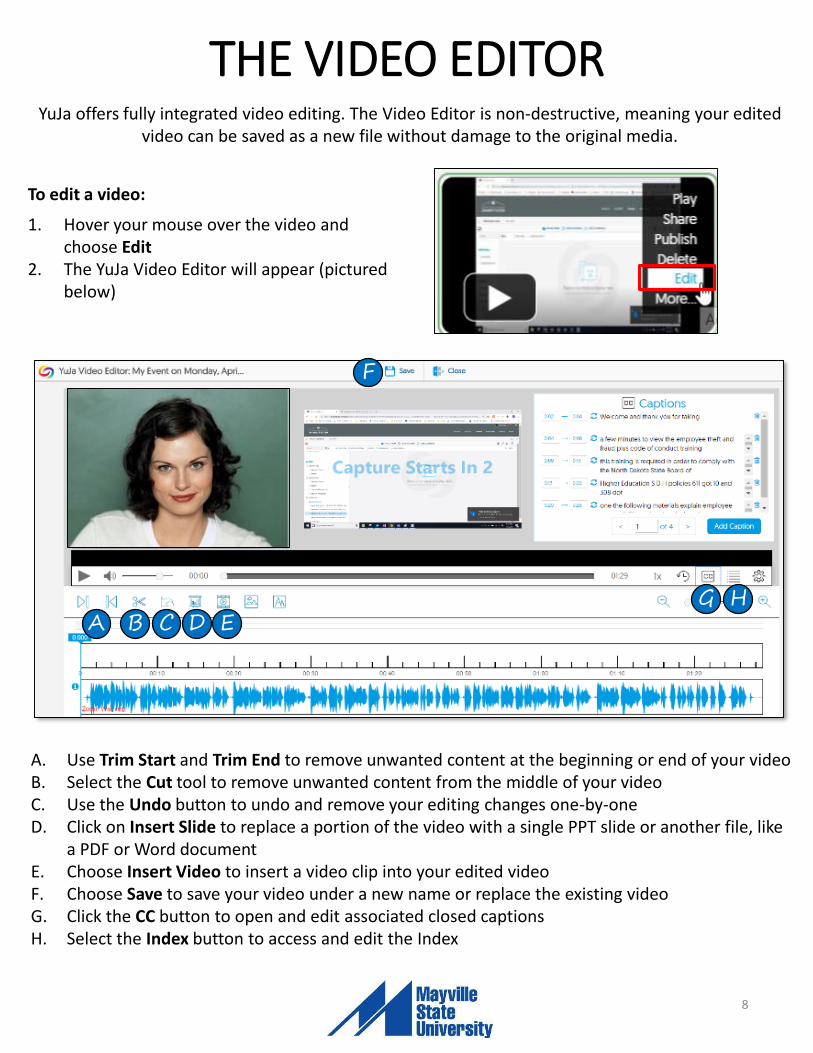
YuJa offers fully integrated video editing. The Video Editor is non-destructive, meaning your edited video can be saved as a new file without damage to the original media.
To edit a video:
1. Hover your mouse over the video and choose Edit
2. The YuJa Video Editor will appear (pictured below)
A. Use Trim Start and Trim End to remove unwanted content at the beginning or end of your videoB. Select the Cut tool to remove unwanted content from the middle of your videoC. Use the Undo button to undo and remove your editing changes one-by-oneD. Click on Insert Slide to replace a portion of the video with a single PPT slide or another file, like
a PDF or Word documentE. Choose Insert Video to insert a video clip into your edited videoF. Choose Save to save your video under a new name or replace the existing videoG. Click the CC button to open and edit associated closed captionsH. Select the Index button to access and edit the Index
A B C D E
F
G H
THE VIDEO EDITOR
8
1
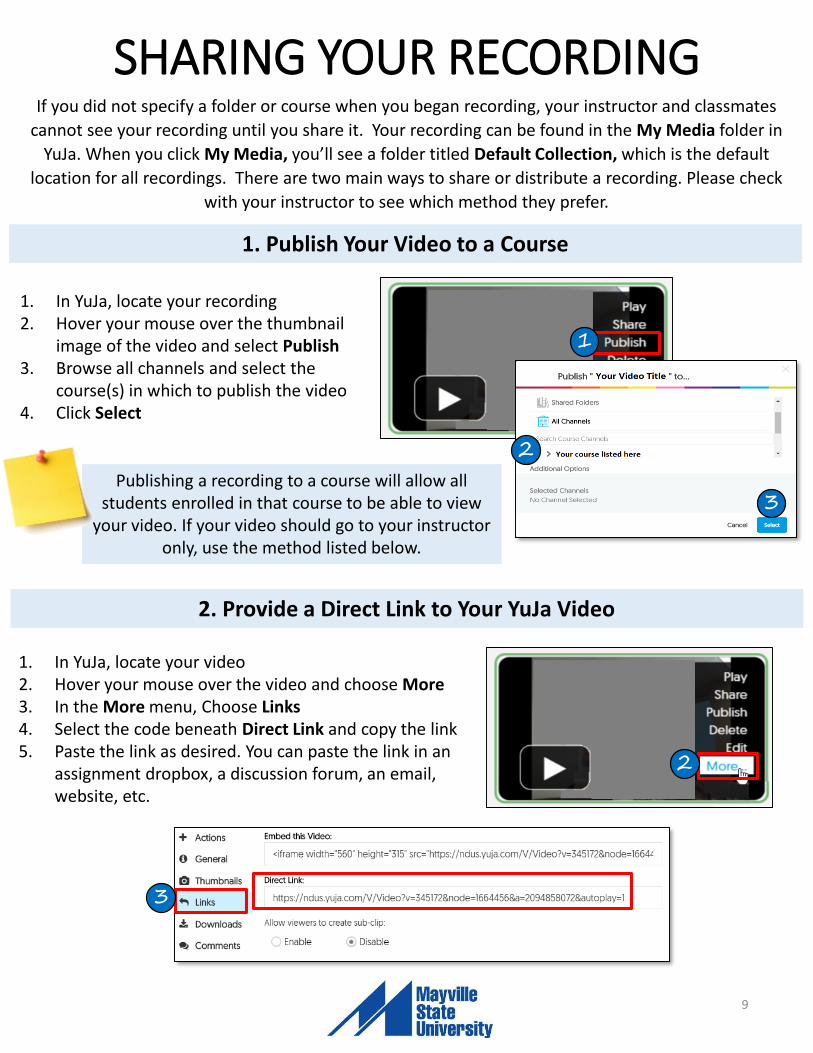
If you did not specify a folder or course when you began recording, your instructor and classmates
cannot see your recording until you share it. Your recording can be found in the My Media folder in
YuJa. When you click My Media, you’ll see a folder titled Default Collection, which is the default
location for all recordings. There are two main ways to share or distribute a recording. Please check
with your instructor to see which method they prefer.
1. Publish Your Video to a Course
2. Provide a Direct Link to Your YuJa Video
1. In YuJa, locate your recording2. Hover your mouse over the thumbnail
image of the video and select Publish3. Browse all channels and select the
course(s) in which to publish the video 4. Click Select
2
3Publishing a recording to a course will allow all
students enrolled in that course to be able to view your video. If your video should go to your instructor
only, use the method listed below.
1. In YuJa, locate your video2. Hover your mouse over the video and choose More3. In the More menu, Choose Links4. Select the code beneath Direct Link and copy the link5. Paste the link as desired. You can paste the link in an
assignment dropbox, a discussion forum, an email, website, etc.
2
3
SHARING YOUR RECORDING
9
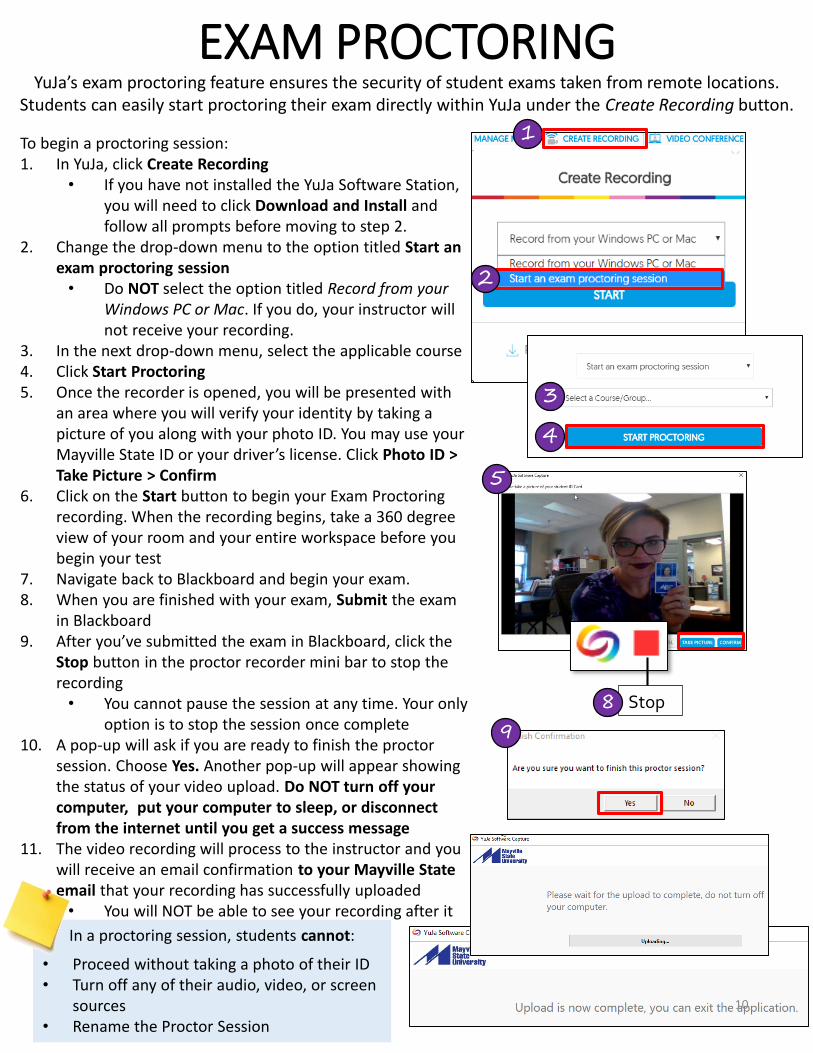
YuJa’s exam proctoring feature ensures the security of student exams taken from remote locations. Students can easily start proctoring their exam directly within YuJa under the Create Recording button.
To begin a proctoring session:1. In YuJa, click Create Recording
• If you have not installed the YuJa Software Station, you will need to click Download and Install and follow all prompts before moving to step 2.
2. Change the drop-down menu to the option titled Start an exam proctoring session• Do NOT select the option titled Record from your
Windows PC or Mac. If you do, your instructor will not receive your recording.
3. In the next drop-down menu, select the applicable course4. Click Start Proctoring5. Once the recorder is opened, you will be presented with
an area where you will verify your identity by taking a picture of you along with your photo ID. You may use your Mayville State ID or your driver’s license. Click Photo ID > Take Picture > Confirm
6. Click on the Start button to begin your Exam Proctoring recording. When the recording begins, take a 360 degree view of your room and your entire workspace before you begin your test
7. Navigate back to Blackboard and begin your exam.8. When you are finished with your exam, Submit the exam
in Blackboard9. After you’ve submitted the exam in Blackboard, click the
Stop button in the proctor recorder mini bar to stop the recording• You cannot pause the session at any time. Your only
option is to stop the session once complete10. A pop-up will ask if you are ready to finish the proctor
session. Choose Yes. Another pop-up will appear showing the status of your video upload. Do NOT turn off your computer, put your computer to sleep, or disconnect from the internet until you get a success message
11. The video recording will process to the instructor and you will receive an email confirmation to your Mayville State email that your recording has successfully uploaded• You will NOT be able to see your recording after it
has uploaded to the instructor.In a proctoring session, students cannot:
• Proceed without taking a photo of their ID• Turn off any of their audio, video, or screen
sources• Rename the Proctor Session
9
EXAM PROCTORING
10
1
2
3
4
5
Stop8