Youth HORSE Training Program: Trainer's Guide - … · HORSE Training program in order to announce...
47
Youth HORSE Training Program Horse Ownership Responsibility Safety & Education Trainer’s Guide South Dakota 4-H Horse Project
Transcript of Youth HORSE Training Program: Trainer's Guide - … · HORSE Training program in order to announce...
Youth HORSE Training Program
Horse Ownership Responsibi l i ty Safety & Educat ion
Trainer’s GuideSouth Dakota 4-H Horse Project

Youth HORSE Training Program
Horse Ownership Responsibi l i ty Safety & Educat ion
Trainer’s GuideEvaluat ion & Select ion
South Dakota State University, South Dakota count ies, and U.S. Department of Agr iculture cooperat ing . South Dakota State University is an Aff i rmat ive Act ion/Equal Opportunity Employer and offers a l l benef i ts, ser vices, educat ion, and employment opportunit ies without regard for race, color, creed, rel ig ion, nat ional or ig in, ancestr y, c i t izenship, age, gender, sexual or ienta-t ion, d isabi l i t y or Vietnam Era Veteran Status.
Publication: 01-4034-2013
Table of Contents
Dear Youth HORSE Trainer. . . . . . . . . . . . . . . . . . . . . . . . . . . . . . . . . . . . . . . . . . .1
Acknowledgement. . . . . . . . . . . . . . . . . . . . . . . . . . . . . . . . . . . . . . . . . . . . . . . . .1
Dear 4-H Youth Advisors, Leaders, & Volunteers . . . . . . . . . . . . . . . . . . . . . . . . . .2
Youth HORSE Training Overview . . . . . . . . . . . . . . . . . . . . . . . . . . . . . . . . . . . . . .3
Youth HORSE Trainer Guidelines . . . . . . . . . . . . . . . . . . . . . . . . . . . . . . . . . . . . . .4
Youth HORSE Trainer Speaker’s Notes. . . . . . . . . . . . . . . . . . . . . . . . . . . . . . . 5-13
Youth HORSE Training Activities
Horse Feet & Leg Conformation BINGO . . . . . . . . . . . . . . . . . . . . . . . . . . 14
Horse Feet & Leg Conformation BINGO Scorecard. . . . . . . . . . . . . . . . . . 15
Horse Feet & Leg Conformation BINGO Game Pieces . . . . . . . . . . . . . . . 16
Design a Pattern . . . . . . . . . . . . . . . . . . . . . . . . . . . . . . . . . . . . . . . . . . . 17
Design a Pattern Activity Sheet . . . . . . . . . . . . . . . . . . . . . . . . . . . . . 18-20
Rider Skill Level Match Up . . . . . . . . . . . . . . . . . . . . . . . . . . . . . . . . . . . .21
Rider Skill Level Match Up ID Cards . . . . . . . . . . . . . . . . . . . . . . . . . . 22-31
How do You Measure Up? . . . . . . . . . . . . . . . . . . . . . . . . . . . . . . . . . . . .32
How do You Measure Up? – Horse Breed Measuring Chart . . . . . . . . . . .33
How do You Measure Up? Activity Sheet . . . . . . . . . . . . . . . . . . . . . . . . .34
Youth HORSE Training Worksheets
Horse of a Different Color . . . . . . . . . . . . . . . . . . . . . . . . . . . . . . . . . . . .35
Horse of a Different Color Answer Key. . . . . . . . . . . . . . . . . . . . . . . . . . .36
Horse Body Part Identification . . . . . . . . . . . . . . . . . . . . . . . . . . . . . . . . .37
Horse Body Part Identification Answer Key . . . . . . . . . . . . . . . . . . . . . . .38
Blemish vs. Unsoundness . . . . . . . . . . . . . . . . . . . . . . . . . . . . . . . . . . . .39
Blemish vs. Unsoundness Answer Key. . . . . . . . . . . . . . . . . . . . . . . . . . .40
Safety Tips & Reminders . . . . . . . . . . . . . . . . . . . . . . . . . . . . . . . . . . . . . . . . 41-42

Page 1
© 2013 South Dakota Board of Regents
s o u t h d a k o t a 4 - h
Youth HORSE Training Program Horse Ownership Responsibility Safety & Education
author: Rebecca Bott, Ph.d. | Assistant Professor & Extension Equine Specialist
DEaR YOuTH HORSE TRainER:
We are excited to announce some upcoming changes in the 4-H Horse & Pony Project. SDSU Extension is proud to continue offering resources for fun and interactive learning about horses. While this information has been designed to promote access to information for our 4-H youth, parents, leaders, and educators, we trust that it will be interesting for any horse enthusiast.
With Youth HORSE Training we are moving away from the old system where safety training was a dreaded event. Now we will offer pre-packaged information that will be useful to everyone who works with horses-ultimately leading to a more complete 4-H project. Safety is still an important component of Youth HORSE Training, but our focus has broadened to include ownership, responsibility and general horse care education.
Positive outcomes:The materials we are producing will create a more rigorous, fair, and fun learning environment for the participants.
The establishment of these supportive materials may also draw more people interested in the information, ultimately leading to a stronger support base for the 4-H Horse & Pony Project and potentially an increase in enrollment.
Finally, we hope to see a shift where more of the project participants will be willing to participate in the youth in action events.
We are very excited about the potential benefits from these changes. We are looking forward to working with you and offering outstanding educational opportunities for 4-H youth.
acknOwlEDGEmEnTSSouth Dakota 4-H would like to thank the individuals who have participated in the creation of the Youth HORSE Training materials.
Dr. Rebecca Bott Brianna Sandager
Megan Nielson Andy Jensen
Lindsey Gerard Tracey Renelt
Rod Geppert Will Kennedy
Keri Deaver Kirsten Johnson
Tiffany Meyer Megan Schiferl

Page 2
© 2013 South Dakota Board of Regents
DEaR 4-H aDviSORS, lEaDERS, anD vOlunTEERS:
Safety is of the upmost importance to South Dakota 4-H. The new Youth HORSE Training program was designed to incorporate additional working knowledge into yearly activities, not to replace an emphasis on safety. It is important to realize that safe-skills are developed over time, and cannot be sufficiently covered or learned in a one-hour meeting each year.
Since safety is an important part of Youth HORSE Training, we would like each group to cover several of the following safety procedures with their youth and their parents throughout the 4-H calendar year. We have provided a general list of things to work on and encourage you and your groups to work additional safe-skills into your meetings.• Haltering • Checking tack for weak/unsafe spots• Bridling without horse being anchored to a physical structure• Saddling (back cinch on last, off first)• Riding in groups (safety in distance) & safely approaching a group of riders (don’t run up behind them)• Sitting properly in the saddle (one leg on each side of the horse-no legs crossed over the saddle)• Loading and tying horses on trailers• Holding a horse for the vet or farrier & picking up a hoof• Lunging (if anyone in your group does this)• Round-penning• Tying a horse by lead rope, never reins; use safety release knot• Properly adjusting the girth/cinch before mounting• Mounting and dismounting• Proper hold on reins and leads & proper commands for “whoa” and “go”• Passing in an arena and on a trail• Safe distances (between horses, to jumps, etc.)• What to do if your horse spooks or runs away with you• Know your limits, and your horse’s limits
Many of your youth may already be proficient in these safety skills. However, dedicating quality time with new youth and parents improves the experience and safety of everyone. Briefly touching on a few of these each ride with a more experienced group is still a great reminder. Work on the safe-skills that you can with your group.
Many times a parent, leader, or member of the community can assist in these demos. If you don’t have someone in your area who feels comfortable with these basic safety skills, please contact Dr. Rebecca Bott for help in identifying someone who is qualified and willing to help!
Thanks for your part in creating a fun and safe learning environment!
Page 3
© 2013 South Dakota Board of Regents
YOuTH HORSE TRaininG PROGRam OvERviEw
This trainer’s guide was created to make teaching the Youth HORSE Training program easy. The best way to prepare to teach these materials is to review the components for each lesson. This guide is designed to help you structure the lesson to meet your group’s needs and provide ideas for delivering the material. Youth HORSE Trainers are encouraged to make the program as interactive as possible. When teaching each lesson you will see several items including:
1. Youth HORSE Training PowerPoint Presentation• The topic provided in the PowerPoint presentation should be covered during the Youth HORSE
Training program• You do not have to deliver this in a lecture style, as long as the topic is discussed thoroughly with
the youth during the Youth HORSE Training program• You are welcome to think creatively about how to present the information inside a classroom
setting or outside in a horse arena area
2. Youth HORSE Training Speaker’s Notes• Provided for each slide in the lesson • Can be found in the Youth HORSE Trainer’s Speaker’s Notes as well as in the notes section of the
PowerPoint file• Designed to add supplemental information to the PowerPoint presentation • Also trainers are encourage to draw from your own experiences and background to provide
supplemental information for the training program
3. Youth HORSE Training Activities• Youth must complete a Youth HORSE Training Activity provided or create your own hands on
activity related to the topic presentation being covered• Choose to use as many or as few activities as needed to fill your allotted teaching time
4. Youth HORSE Worksheets• Youth must complete one of Youth HORSE Worksheets provided• Various Youth HORSE Worksheets are provided that vary in age level for the audience you are
delivering the training to• Youth HORSE Worksheets can be completed during the training or assign them for the learners to
do on their own time prior to coming to the Youth HORSE Training• Discuss the answers for the Youth HORSE Worksheet used during or at the end of the program
5. Youth HORSE Safety Tips Information Sheet• Provide each youth with a Safety Tips information sheet for them to review with their guardian
Page 4
© 2013 South Dakota Board of Regents
YOuTH HORSE TRainER GuiDElinES
Who can administer Youth HORSE Training?SDSU Extension has an obligation to ensure the safety of the youth it serves. This obligation extends to the volunteers who deliver or assist in the delivery of educational programs. People who would like to administer a Youth HORSE Training program must be a State 4-H Volunteer through the Volunteer Enrollment program outlined by South Dakota 4-H. The Youth HORSE Training program can also be presented by SDSU Extension personnel.
Youth HORSE Trainer QualificationsThere is no special training for volunteers who would like to administer Youth HORSE Training. However, that person must be registered as a State 4-H Volunteer through South Dakota 4-H or a SDSU Extension employee. People who have experience working with horses are encouraged to become Youth HORSE Trainers.
How to schedule a Youth HORSE Training programThe Youth HORSE Trainer must notify the area 4-H Youth Program Advisor prior to administering the Youth HORSE Training program in order to announce the event to area 4-H Horse project members and verify the person administering the Youth HORSE Training is a State 4-H Volunteer. Youth HORSE Trainers are encouraged to coordinate with area 4-H project leaders and 4-H Youth Program Advisors to publicize the training.
Program requirements to cover in Youth HORSE Training programYouth must learn and cover one of the topics outlined in the Youth HORSE Training program materials each year. A corresponding Worksheet and Training Activity must also be completed during the training program. Youth HORSE Trainers are encouraged to integrate this program into current or existing horse project meetings or activities to help expand the learning opportunities for youth in the horse project.
Who can help with administering a Youth HORSE Training program?Volunteers who have a strong interest in assisting with Youth HORSE Training are encouraged to help in planning and administering the Youth HORSE Training program. Local veterinarians, equine specialists, or feed salesmen are great resources to help teach Youth HORSE training materials. However, a Youth HORSE Trainer or SDSU Extension employee must be present to verify a youth’s completion in the Youth HORSE Training program.
Documenting youth completion of Youth HORSE TrainingYouth HORSE Trainers must complete the Youth HORSE Training completion section on the South Dakota 4-H Horse Project- Achievement Program form. The trainer will have to identify which Worksheet and Training Activity was performed and sign their name and date of when the training was administered. The youth and their guardian will also sign this section stating they have reviewed the Youth HORSE Training Safety Tips information sheet together before turning in the form to their 4-H Youth Program Advisor.
Page 5
© 2013 South Dakota Board of Regents
Youth HORSE TrainingSPEakER’S nOTES –EvaluaTiOn & SElEcTiOnSlide 1 – Introduction
speaker’s Notes: Welcome to the Youth HORSE Training program for 4-H youth enrolled in the South Dakota 4-H project! The Youth Horse Ownership Responsibility Safety & Education Training teaches youth about proper horse care management and safety, while always covering an aspect of equine welfare. We will be discussing basic selection and evaluation of horses. This includes conformation, at-titude, discipline, and sometimes color.
Selecting a good horse to responsibly match the experience of the rider is arguably one of the most important decisions you can make in the horse industry. For example: Is the horse an appropri-ate age and energy level for a particular rider? Is the horse built for and trained for a riding discipline that the rider is interested in?
Unfortunately, we have all seen young riders who are over-mounted, and horses who are being asked to perform in disciplines that their bodies are not built for. Today we will discuss important things to consider when evaluating and selecting horses to make the best match for both horse and rider.
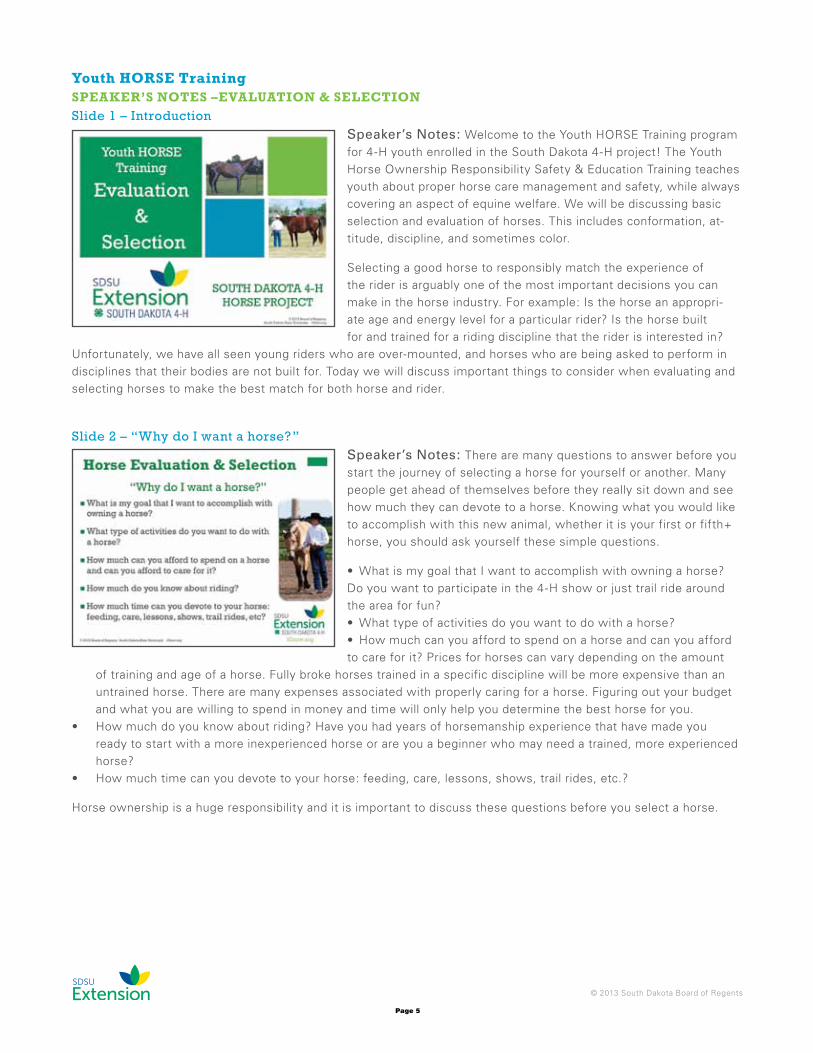
Slide 2 – “Why do I want a horse?”speaker’s Notes: There are many questions to answer before you start the journey of selecting a horse for yourself or another. Many people get ahead of themselves before they really sit down and see how much they can devote to a horse. Knowing what you would like to accomplish with this new animal, whether it is your first or fifth+ horse, you should ask yourself these simple questions.
• What is my goal that I want to accomplish with owning a horse? Do you want to participate in the 4-H show or just trail ride around the area for fun?• What type of activities do you want to do with a horse?• How much can you afford to spend on a horse and can you afford to care for it? Prices for horses can vary depending on the amount
of training and age of a horse. Fully broke horses trained in a specific discipline will be more expensive than an untrained horse. There are many expenses associated with properly caring for a horse. Figuring out your budget and what you are willing to spend in money and time will only help you determine the best horse for you.
• How much do you know about riding? Have you had years of horsemanship experience that have made you ready to start with a more inexperienced horse or are you a beginner who may need a trained, more experienced horse?
• How much time can you devote to your horse: feeding, care, lessons, shows, trail rides, etc.?
Horse ownership is a huge responsibility and it is important to discuss these questions before you select a horse.
Page 6
© 2013 South Dakota Board of Regents
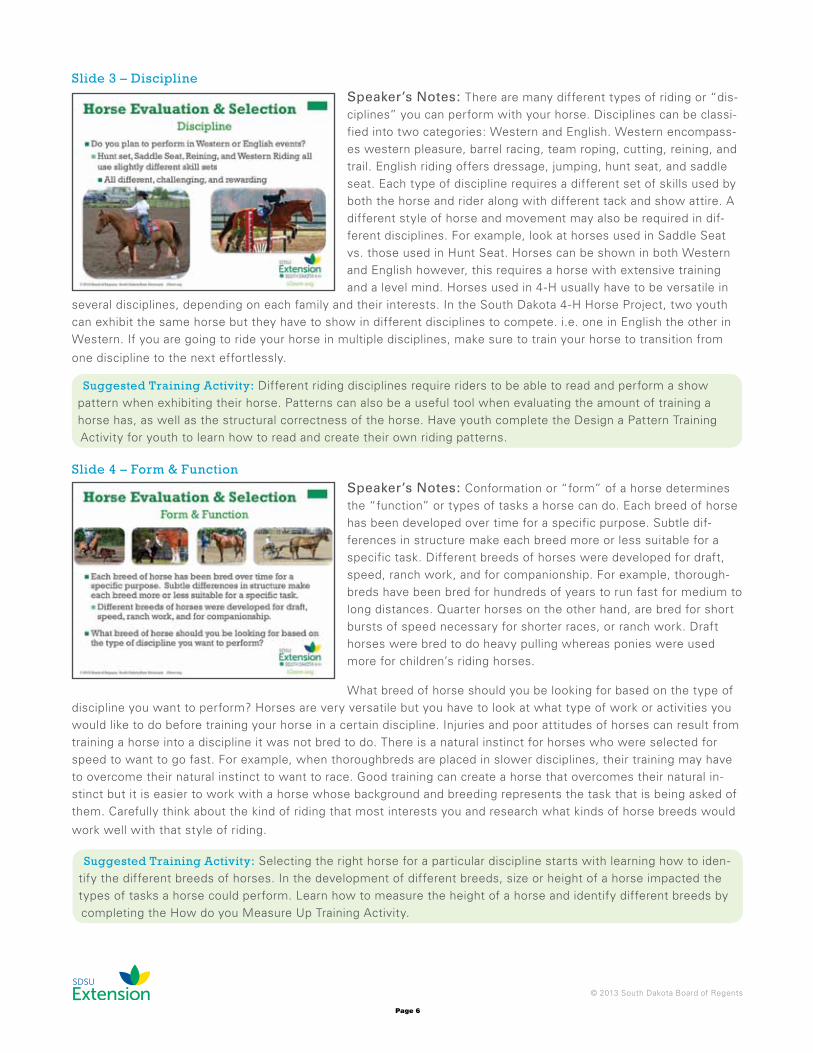
Slide 3 – Disciplinespeaker’s Notes: There are many different types of riding or “dis-ciplines” you can perform with your horse. Disciplines can be classi-fied into two categories: Western and English. Western encompass-es western pleasure, barrel racing, team roping, cutting, reining, and trail. English riding offers dressage, jumping, hunt seat, and saddle seat. Each type of discipline requires a different set of skills used by both the horse and rider along with different tack and show attire. A different style of horse and movement may also be required in dif-ferent disciplines. For example, look at horses used in Saddle Seat vs. those used in Hunt Seat. Horses can be shown in both Western and English however, this requires a horse with extensive training and a level mind. Horses used in 4-H usually have to be versatile in
several disciplines, depending on each family and their interests. In the South Dakota 4-H Horse Project, two youth can exhibit the same horse but they have to show in different disciplines to compete. i.e. one in English the other in Western. If you are going to ride your horse in multiple disciplines, make sure to train your horse to transition from
one discipline to the next effortlessly.
Slide 4 – Form & Functionspeaker’s Notes: Conformation or “form” of a horse determines the “function” or types of tasks a horse can do. Each breed of horse has been developed over time for a specific purpose. Subtle dif-ferences in structure make each breed more or less suitable for a specific task. Different breeds of horses were developed for draft, speed, ranch work, and for companionship. For example, thorough-breds have been bred for hundreds of years to run fast for medium to long distances. Quarter horses on the other hand, are bred for short bursts of speed necessary for shorter races, or ranch work. Draft horses were bred to do heavy pulling whereas ponies were used more for children’s riding horses.
What breed of horse should you be looking for based on the type of discipline you want to perform? Horses are very versatile but you have to look at what type of work or activities you would like to do before training your horse in a certain discipline. Injuries and poor attitudes of horses can result from training a horse into a discipline it was not bred to do. There is a natural instinct for horses who were selected for speed to want to go fast. For example, when thoroughbreds are placed in slower disciplines, their training may have to overcome their natural instinct to want to race. Good training can create a horse that overcomes their natural in-stinct but it is easier to work with a horse whose background and breeding represents the task that is being asked of them. Carefully think about the kind of riding that most interests you and research what kinds of horse breeds would
work well with that style of riding.
Suggested Training Activity: Different riding disciplines require riders to be able to read and perform a show pattern when exhibiting their horse. Patterns can also be a useful tool when evaluating the amount of training a horse has, as well as the structural correctness of the horse. Have youth complete the Design a Pattern Training Activity for youth to learn how to read and create their own riding patterns.
Suggested Training Activity: Selecting the right horse for a particular discipline starts with learning how to iden-tify the different breeds of horses. In the development of different breeds, size or height of a horse impacted the types of tasks a horse could perform. Learn how to measure the height of a horse and identify different breeds by completing the How do you Measure Up Training Activity.

Page 7
© 2013 South Dakota Board of Regents
Slide 5 – Do I want a registered horse?speaker Notes: Sometimes, having a horse that is registered with a well-known breed organization can add sale value to that horse. Although this can benefit the owners if they are wishing to sell the horse, having a “registered” horse does not guarantee that the horse will perform well in the show pen. The saying “you can’t ride papers” is adage for that. The papers are not what show up in the arena, rather the horse has to perform. Having a quiet, willing horse may be much more important than having a well-papered horse. However, a pedigree can give you hints about a particular horse and clues about what the ancestor’s personalities and performance were like.
Slide 6 – Experience: “Green & green make black & blue!”speaker Notes: Training is extremely important for a successful 4-H experience. Before you buy a horse, it is important to under-stand what kind of background the horse has and what kind of train-ing the horse has had. Many times, people will buy young horses when they have young and un-experienced riders, even though that may not be in the best interest of the horse or the rider. Horses and riders without experience or without much training are often called “green” and there is an old cowboy saying that “Green and green make black and blue.” Certainly there have been instances of green horses and riders getting along. However, the potential for risk and injury are elevated in situations where neither the horse, nor the rider have years of experience to fall back upon. Keep in mind when
selecting a horse: what kind of training has the horse had, who trained the horse, how long was the horse trained for, was the horse trained in a desired discipline or would it need further training?
Suggested Training Activity: For safety, a rider and horse should be paired based on the skill level of a rider and the amount of training a horse has received. Complete the Rider Skill Level Match Up Training Activity to teach youth how to recognize a rider’s skill level and how to properly pair a horse with a rider.
Page 8
© 2013 South Dakota Board of Regents
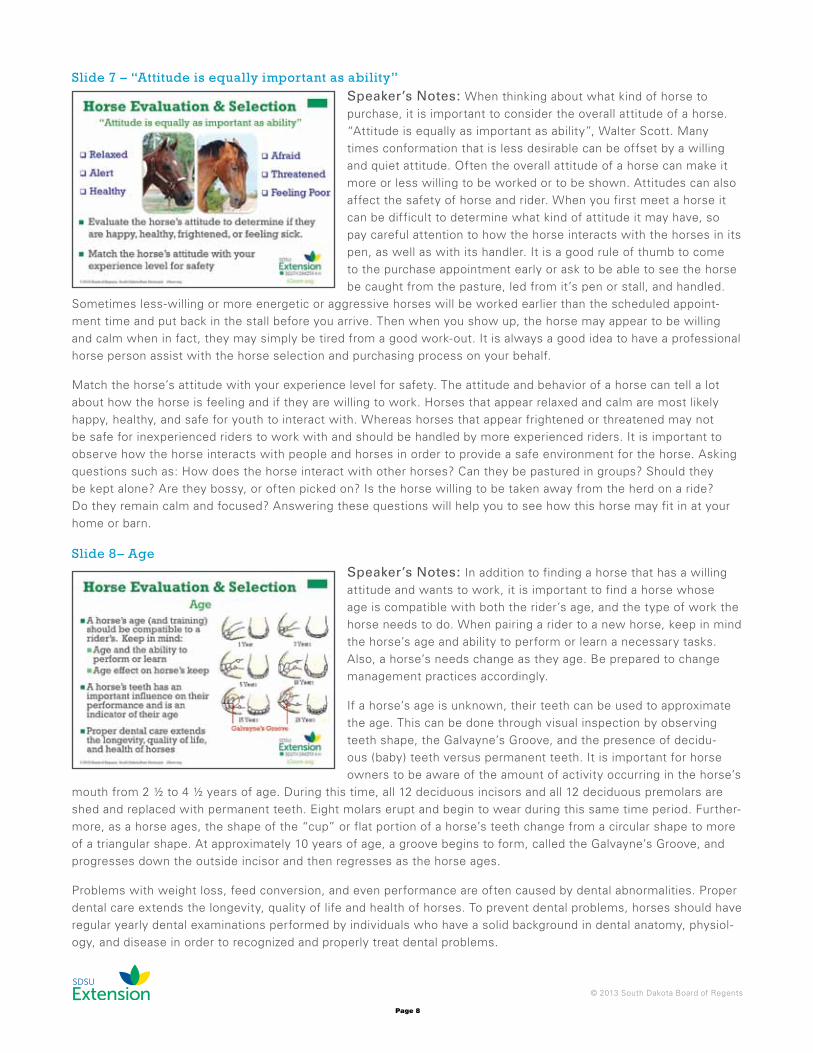
Slide 7 – “Attitude is equally important as ability”speaker’s Notes: When thinking about what kind of horse to purchase, it is important to consider the overall attitude of a horse. “Attitude is equally as important as ability”, Walter Scott. Many times conformation that is less desirable can be offset by a willing and quiet attitude. Often the overall attitude of a horse can make it more or less willing to be worked or to be shown. Attitudes can also affect the safety of horse and rider. When you first meet a horse it can be difficult to determine what kind of attitude it may have, so pay careful attention to how the horse interacts with the horses in its pen, as well as with its handler. It is a good rule of thumb to come to the purchase appointment early or ask to be able to see the horse be caught from the pasture, led from it’s pen or stall, and handled.
Sometimes less-willing or more energetic or aggressive horses will be worked earlier than the scheduled appoint-ment time and put back in the stall before you arrive. Then when you show up, the horse may appear to be willing and calm when in fact, they may simply be tired from a good work-out. It is always a good idea to have a professional horse person assist with the horse selection and purchasing process on your behalf.
Match the horse’s attitude with your experience level for safety. The attitude and behavior of a horse can tell a lot about how the horse is feeling and if they are willing to work. Horses that appear relaxed and calm are most likely happy, healthy, and safe for youth to interact with. Whereas horses that appear frightened or threatened may not be safe for inexperienced riders to work with and should be handled by more experienced riders. It is important to observe how the horse interacts with people and horses in order to provide a safe environment for the horse. Asking questions such as: How does the horse interact with other horses? Can they be pastured in groups? Should they be kept alone? Are they bossy, or often picked on? Is the horse willing to be taken away from the herd on a ride? Do they remain calm and focused? Answering these questions will help you to see how this horse may fit in at your home or barn.
Slide 8– Agespeaker’s Notes: In addition to finding a horse that has a willing attitude and wants to work, it is important to find a horse whose age is compatible with both the rider’s age, and the type of work the horse needs to do. When pairing a rider to a new horse, keep in mind the horse’s age and ability to perform or learn a necessary tasks. Also, a horse’s needs change as they age. Be prepared to change management practices accordingly.
If a horse’s age is unknown, their teeth can be used to approximate the age. This can be done through visual inspection by observing teeth shape, the Galvayne’s Groove, and the presence of decidu-ous (baby) teeth versus permanent teeth. It is important for horse owners to be aware of the amount of activity occurring in the horse’s
mouth from 2 ½ to 4 ½ years of age. During this time, all 12 deciduous incisors and all 12 deciduous premolars are shed and replaced with permanent teeth. Eight molars erupt and begin to wear during this same time period. Further-more, as a horse ages, the shape of the “cup” or flat portion of a horse’s teeth change from a circular shape to more of a triangular shape. At approximately 10 years of age, a groove begins to form, called the Galvayne’s Groove, and progresses down the outside incisor and then regresses as the horse ages.
Problems with weight loss, feed conversion, and even performance are often caused by dental abnormalities. Proper dental care extends the longevity, quality of life and health of horses. To prevent dental problems, horses should have regular yearly dental examinations performed by individuals who have a solid background in dental anatomy, physiol-ogy, and disease in order to recognized and properly treat dental problems.
Page 9
© 2013 South Dakota Board of Regents
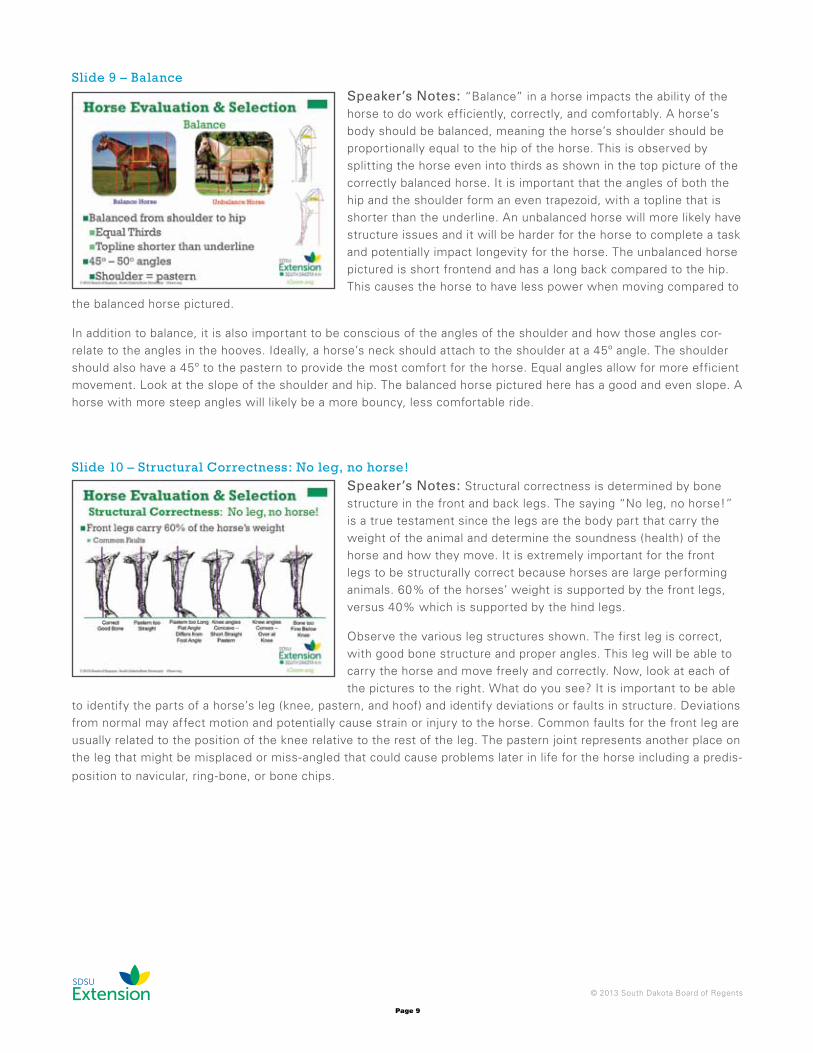
Slide 9 – Balance speaker’s Notes: “Balance” in a horse impacts the ability of the horse to do work efficiently, correctly, and comfortably. A horse’s body should be balanced, meaning the horse’s shoulder should be proportionally equal to the hip of the horse. This is observed by splitting the horse even into thirds as shown in the top picture of the correctly balanced horse. It is important that the angles of both the hip and the shoulder form an even trapezoid, with a topline that is shorter than the underline. An unbalanced horse will more likely have structure issues and it will be harder for the horse to complete a task and potentially impact longevity for the horse. The unbalanced horse pictured is short frontend and has a long back compared to the hip. This causes the horse to have less power when moving compared to
the balanced horse pictured.
In addition to balance, it is also important to be conscious of the angles of the shoulder and how those angles cor-relate to the angles in the hooves. Ideally, a horse’s neck should attach to the shoulder at a 45º angle. The shoulder should also have a 45º to the pastern to provide the most comfort for the horse. Equal angles allow for more efficient movement. Look at the slope of the shoulder and hip. The balanced horse pictured here has a good and even slope. A horse with more steep angles will likely be a more bouncy, less comfortable ride.
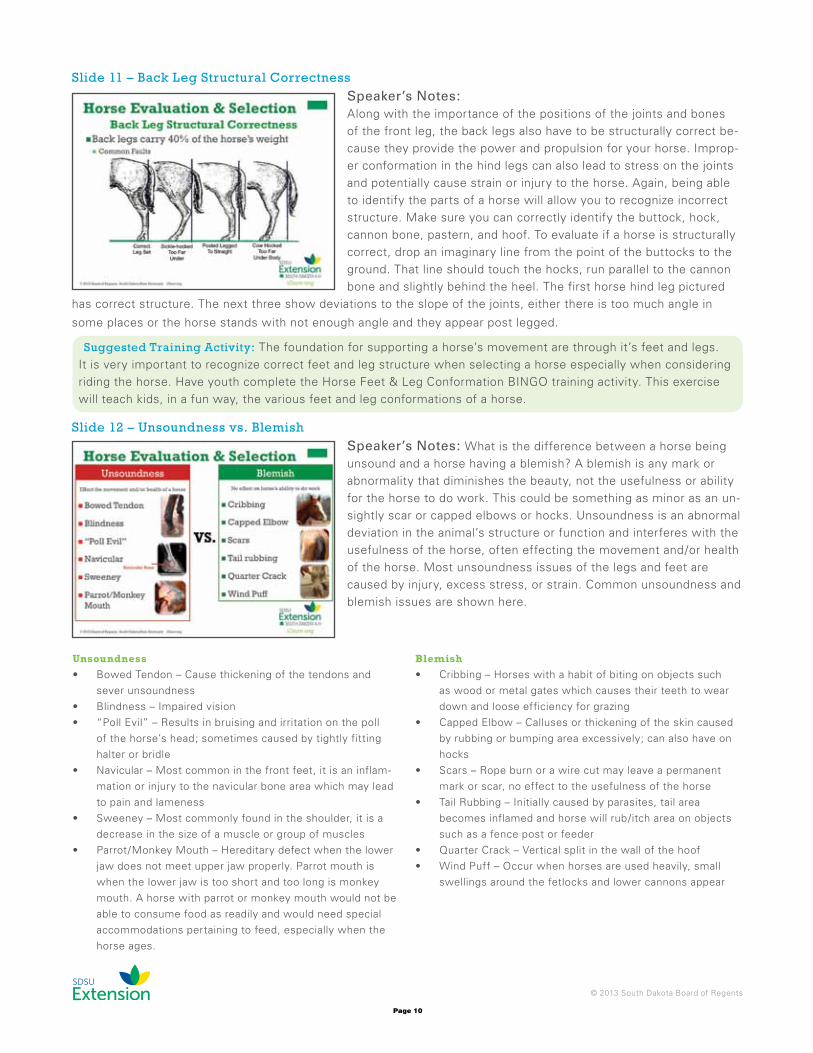
Slide 10 – Structural Correctness: No leg, no horse!speaker’s Notes: Structural correctness is determined by bone structure in the front and back legs. The saying “No leg, no horse!” is a true testament since the legs are the body part that carry the weight of the animal and determine the soundness (health) of the horse and how they move. It is extremely important for the front legs to be structurally correct because horses are large performing animals. 60% of the horses’ weight is supported by the front legs, versus 40% which is supported by the hind legs.
Observe the various leg structures shown. The first leg is correct, with good bone structure and proper angles. This leg will be able to carry the horse and move freely and correctly. Now, look at each of the pictures to the right. What do you see? It is important to be able
to identify the parts of a horse’s leg (knee, pastern, and hoof) and identify deviations or faults in structure. Deviations from normal may affect motion and potentially cause strain or injury to the horse. Common faults for the front leg are usually related to the position of the knee relative to the rest of the leg. The pastern joint represents another place on the leg that might be misplaced or miss-angled that could cause problems later in life for the horse including a predis-
position to navicular, ring-bone, or bone chips.
Page 10
© 2013 South Dakota Board of Regents
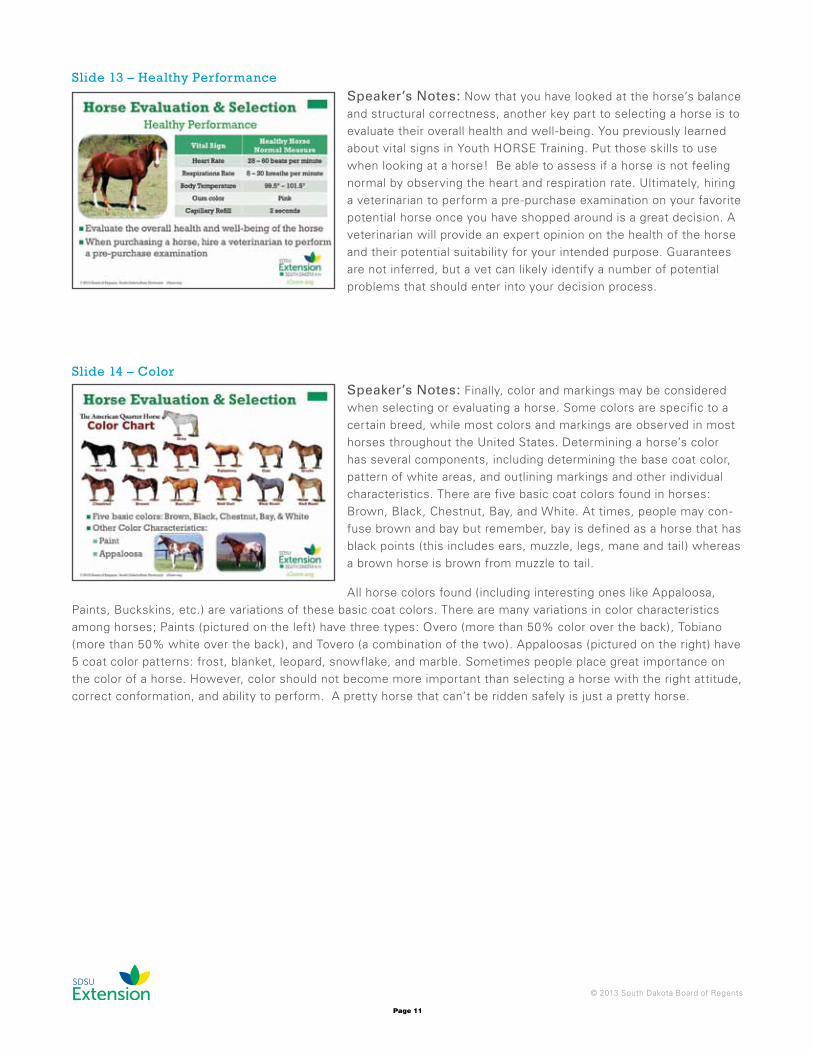
Slide 11 – Back Leg Structural Correctnessspeaker’s Notes:Along with the importance of the positions of the joints and bones of the front leg, the back legs also have to be structurally correct be-cause they provide the power and propulsion for your horse. Improp-er conformation in the hind legs can also lead to stress on the joints and potentially cause strain or injury to the horse. Again, being able to identify the parts of a horse will allow you to recognize incorrect structure. Make sure you can correctly identify the buttock, hock, cannon bone, pastern, and hoof. To evaluate if a horse is structurally correct, drop an imaginary line from the point of the buttocks to the ground. That line should touch the hocks, run parallel to the cannon bone and slightly behind the heel. The first horse hind leg pictured
has correct structure. The next three show deviations to the slope of the joints, either there is too much angle in
some places or the horse stands with not enough angle and they appear post legged.
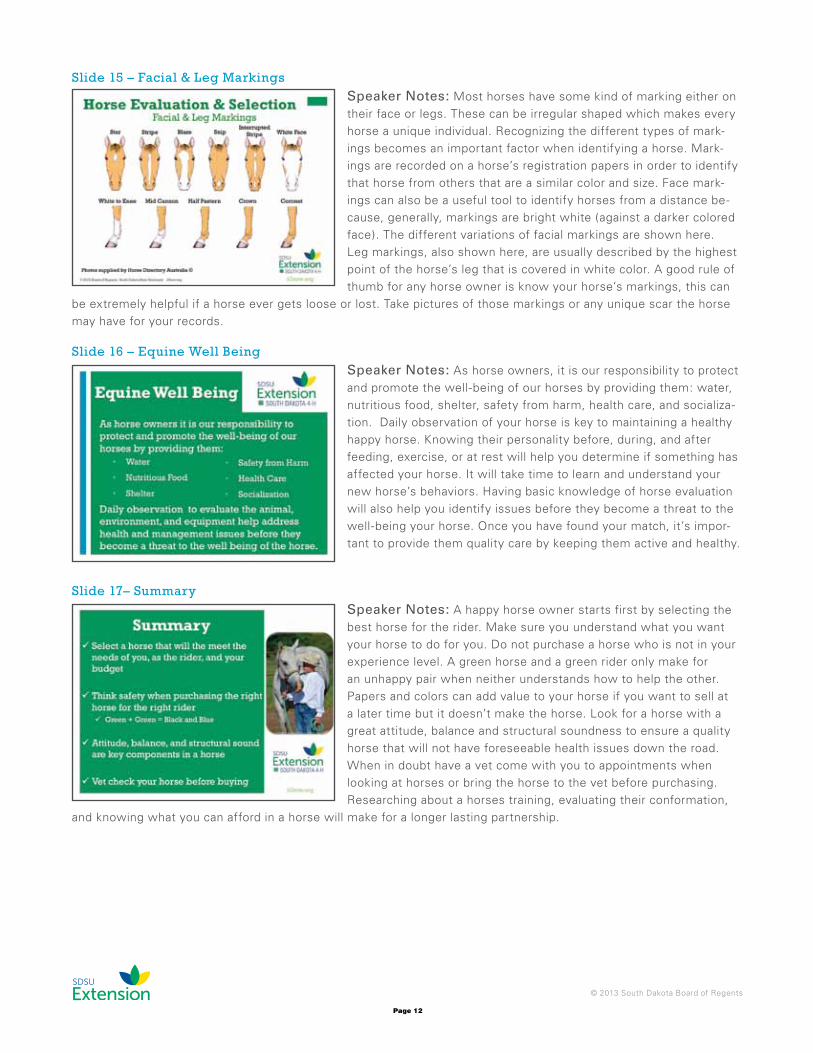
Slide 12 – Unsoundness vs. Blemishspeaker’s Notes: What is the difference between a horse being unsound and a horse having a blemish? A blemish is any mark or abnormality that diminishes the beauty, not the usefulness or ability for the horse to do work. This could be something as minor as an un-sightly scar or capped elbows or hocks. Unsoundness is an abnormal deviation in the animal’s structure or function and interferes with the usefulness of the horse, often effecting the movement and/or health of the horse. Most unsoundness issues of the legs and feet are caused by injury, excess stress, or strain. Common unsoundness and blemish issues are shown here.
Suggested Training Activity: The foundation for supporting a horse’s movement are through it’s feet and legs. It is very important to recognize correct feet and leg structure when selecting a horse especially when considering riding the horse. Have youth complete the Horse Feet & Leg Conformation BINGO training activity. This exercise will teach kids, in a fun way, the various feet and leg conformations of a horse.
unsoundness
• Bowed Tendon – Cause thickening of the tendons and sever unsoundness
• Blindness – Impaired vision• “Poll Evil” – Results in bruising and irritation on the poll
of the horse’s head; sometimes caused by tightly fitting halter or bridle
• Navicular – Most common in the front feet, it is an inflam-mation or injury to the navicular bone area which may lead to pain and lameness
• Sweeney – Most commonly found in the shoulder, it is a decrease in the size of a muscle or group of muscles
• Parrot/Monkey Mouth – Hereditary defect when the lower jaw does not meet upper jaw properly. Parrot mouth is when the lower jaw is too short and too long is monkey mouth. A horse with parrot or monkey mouth would not be able to consume food as readily and would need special accommodations pertaining to feed, especially when the horse ages.
Blemish
• Cribbing – Horses with a habit of biting on objects such as wood or metal gates which causes their teeth to wear down and loose efficiency for grazing
• Capped Elbow – Calluses or thickening of the skin caused by rubbing or bumping area excessively; can also have on hocks
• Scars – Rope burn or a wire cut may leave a permanent mark or scar, no effect to the usefulness of the horse
• Tail Rubbing – Initially caused by parasites, tail area becomes inflamed and horse will rub/itch area on objects such as a fence post or feeder
• Quarter Crack – Vertical split in the wall of the hoof• Wind Puff – Occur when horses are used heavily, small
swellings around the fetlocks and lower cannons appear
Page 11
© 2013 South Dakota Board of Regents
Slide 13 – Healthy Performancespeaker’s Notes: Now that you have looked at the horse’s balance and structural correctness, another key part to selecting a horse is to evaluate their overall health and well-being. You previously learned about vital signs in Youth HORSE Training. Put those skills to use when looking at a horse! Be able to assess if a horse is not feeling normal by observing the heart and respiration rate. Ultimately, hiring a veterinarian to perform a pre-purchase examination on your favorite potential horse once you have shopped around is a great decision. A veterinarian will provide an expert opinion on the health of the horse and their potential suitability for your intended purpose. Guarantees are not inferred, but a vet can likely identify a number of potential problems that should enter into your decision process.
Slide 14 – Colorspeaker’s Notes: Finally, color and markings may be considered when selecting or evaluating a horse. Some colors are specific to a certain breed, while most colors and markings are observed in most horses throughout the United States. Determining a horse’s color has several components, including determining the base coat color, pattern of white areas, and outlining markings and other individual characteristics. There are five basic coat colors found in horses: Brown, Black, Chestnut, Bay, and White. At times, people may con-fuse brown and bay but remember, bay is defined as a horse that has black points (this includes ears, muzzle, legs, mane and tail) whereas a brown horse is brown from muzzle to tail.
All horse colors found (including interesting ones like Appaloosa, Paints, Buckskins, etc.) are variations of these basic coat colors. There are many variations in color characteristics among horses; Paints (pictured on the left) have three types: Overo (more than 50% color over the back), Tobiano (more than 50% white over the back), and Tovero (a combination of the two). Appaloosas (pictured on the right) have 5 coat color patterns: frost, blanket, leopard, snowflake, and marble. Sometimes people place great importance on the color of a horse. However, color should not become more important than selecting a horse with the right attitude, correct conformation, and ability to perform. A pretty horse that can’t be ridden safely is just a pretty horse.
Page 12
© 2013 South Dakota Board of Regents
Slide 15 – Facial & Leg Markingsspeaker Notes: Most horses have some kind of marking either on their face or legs. These can be irregular shaped which makes every horse a unique individual. Recognizing the different types of mark-ings becomes an important factor when identifying a horse. Mark-ings are recorded on a horse’s registration papers in order to identify that horse from others that are a similar color and size. Face mark-ings can also be a useful tool to identify horses from a distance be-cause, generally, markings are bright white (against a darker colored face). The different variations of facial markings are shown here. Leg markings, also shown here, are usually described by the highest point of the horse’s leg that is covered in white color. A good rule of thumb for any horse owner is know your horse’s markings, this can
be extremely helpful if a horse ever gets loose or lost. Take pictures of those markings or any unique scar the horse may have for your records.
Slide 16 – Equine Well Beingspeaker Notes: As horse owners, it is our responsibility to protect and promote the well-being of our horses by providing them: water, nutritious food, shelter, safety from harm, health care, and socializa-tion. Daily observation of your horse is key to maintaining a healthy happy horse. Knowing their personality before, during, and after feeding, exercise, or at rest will help you determine if something has affected your horse. It will take time to learn and understand your new horse’s behaviors. Having basic knowledge of horse evaluation will also help you identify issues before they become a threat to the well-being your horse. Once you have found your match, it’s impor-tant to provide them quality care by keeping them active and healthy.
Slide 17– Summaryspeaker Notes: A happy horse owner starts first by selecting the best horse for the rider. Make sure you understand what you want your horse to do for you. Do not purchase a horse who is not in your experience level. A green horse and a green rider only make for an unhappy pair when neither understands how to help the other. Papers and colors can add value to your horse if you want to sell at a later time but it doesn’t make the horse. Look for a horse with a great attitude, balance and structural soundness to ensure a quality horse that will not have foreseeable health issues down the road. When in doubt have a vet come with you to appointments when looking at horses or bring the horse to the vet before purchasing. Researching about a horses training, evaluating their conformation,
and knowing what you can afford in a horse will make for a longer lasting partnership.

Page 13
© 2013 South Dakota Board of Regents
Slide 19 – How do you Measure Up? Horse Measuring Chartsupplemental Material: Use the How do you Measure Up? Horse Measuring Chart PowerPoint slide instead of making multiple color copies for completing the training activity.
Slide 20 – Horse of a Different Colorsupplemental Material: Use the Horse of a Different Color Pow-erPoint slide instead of making multiple color copies for completing the worksheet.
suggested Worksheet: For youth who are inexperienced with horses, complete the Horse of a Different Color Worksheet to learn
the different colors of horses.
Suggested Training Activity: Selecting the right horse for a particular discipline starts with learning how to iden-tify the different breeds of horses. In the development of different breeds, size or height of a horse impacted the types of tasks a horse could perform. Learn how to measure the height of a horse and identify different breeds by completing the How do you Measure Up Training Activity.
Page 14
© 2013 South Dakota Board of Regents
Youth HORSE TrainingTraining activity
Horse Feet & leg conformation BinGO
Objective:Feet and legs are the foundation for supporting a horse’s movement. It is very important to recognize correct feet and leg structure when selecting a horse especially when considering riding the horse. This exercise will teach kids, in a fun way, the various feet and leg conformations of a horse.
Materials:• Horse Feet & Leg Conformation BINGO Scorecard• Horse Feet & Leg Conformation Game Pieces• Scissors• Glue or Tape• BINGO markers
Directions:1. Distribute a Horse Feet & Leg Conformation BINGO Scorecard and a Horse Feet & Leg
Conformation Game Pieces sheet to each youth.2. Have kids cut out the game pieces and place them on their BINGO card. Keep in mind, not all
pieces will be used on a BINGO card.3. Place a set of Horse Feet & Leg Conformation game pieces in a container to randomly draw for
playing.4. Call out the various feet and leg structures until someone yells “B-I-N-G-O!” in a winning pattern.
Confirm each of the feet and leg structures have been called before having kids clear their cards to play again.
Timeframe:10-20 Minutes
Age Level: All
For more experienced kids:Use pictures of real horse’s feet and leg structures and have kids recognize which structure is represented to mark on their BINGO scorecard.
Other uses for the Horse Feet & Leg Conformation Game Pieces• Flash cards for studying• Play Memory or “Go Fish”
Page 15
© 2013 South Dakota Board of Regents
Youth HORSE TrainingTraining activity
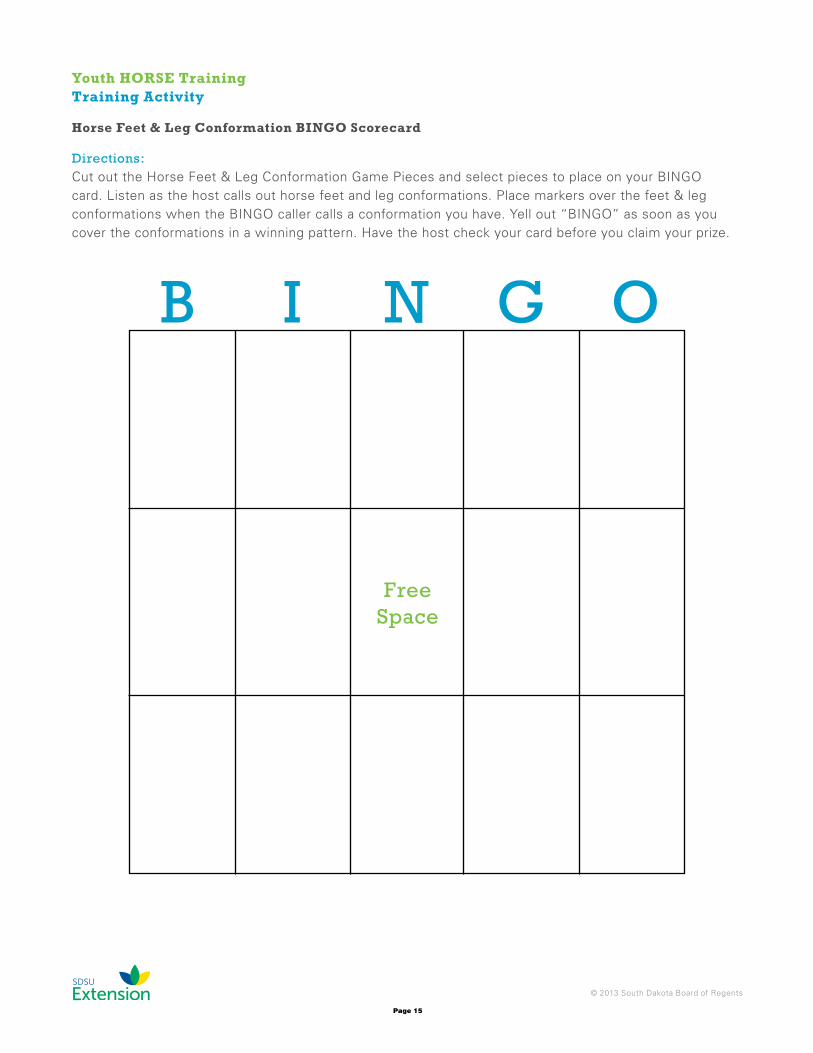
Horse Feet & leg conformation BinGO Scorecard
Directions:Cut out the Horse Feet & Leg Conformation Game Pieces and select pieces to place on your BINGO card. Listen as the host calls out horse feet and leg conformations. Place markers over the feet & leg conformations when the BINGO caller calls a conformation you have. Yell out “BINGO” as soon as you cover the conformations in a winning pattern. Have the host check your card before you claim your prize.
B I N G O
Free Space
Page 16
© 2013 South Dakota Board of Regents
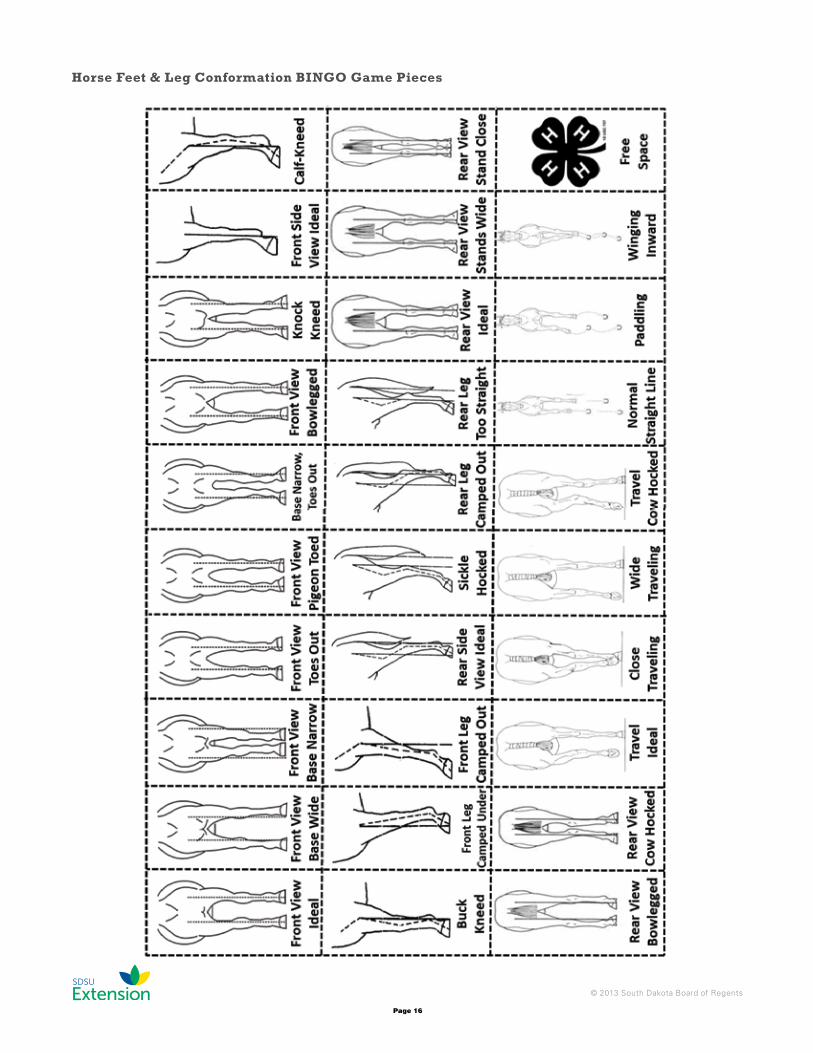
Horse Feet & leg conformation BinGO Game Pieces
Page 17
© 2013 South Dakota Board of Regents
Youth HORSE TrainingTraining activity
Design a Pattern
Objective:Patterns allow riders to demonstrate their level of horsemanship. However, they can also be used to evaluate horses both in the show ring and out. Watching horses complete patterns allow you to evaluate the structure of the animal as well as determine the amount of training a horse may have. This exercise will help teach youth how to read and create their own patterns.
Materials:• Design A Pattern Worksheets• Pens/ Pencils/ or Markers
Directions:1. Hand out the Design A Pattern Worksheet.2. Have youth draw their own pattern using the riding elements provided. Then have them write out
each step of the pattern.a. Beginners or new horse riders should be able to perform 1-3 riding elements such as walk, trot,
halt, back, and a pivot.b. Juniors should be able to perform 3-5 of any of the riding elements listed including simple or
flying lead changes.c. Seniors or advanced riders should be able to perform the same riding elements as Juniors but at
a higher level of skill.3. Next, have the youth talk through their pattern with a partner. Have them discuss which side of the
cone they would be on, when to pick up certain gaits, and if there are any special things they need to know about a horse in order to perform the pattern. For example: a horse might have trouble with a left hand lead.
Timeframe:5-10 Minutes
Age Level: 8-13 year old
Activity can also be done with horses depending on the experience level of youth participating. Have kids watch an experienced rider perform an unknown pattern and see if the kids can recreate and draw the pattern on the Design a Pattern Worksheet.
Page 18
© 2013 South Dakota Board of Regents
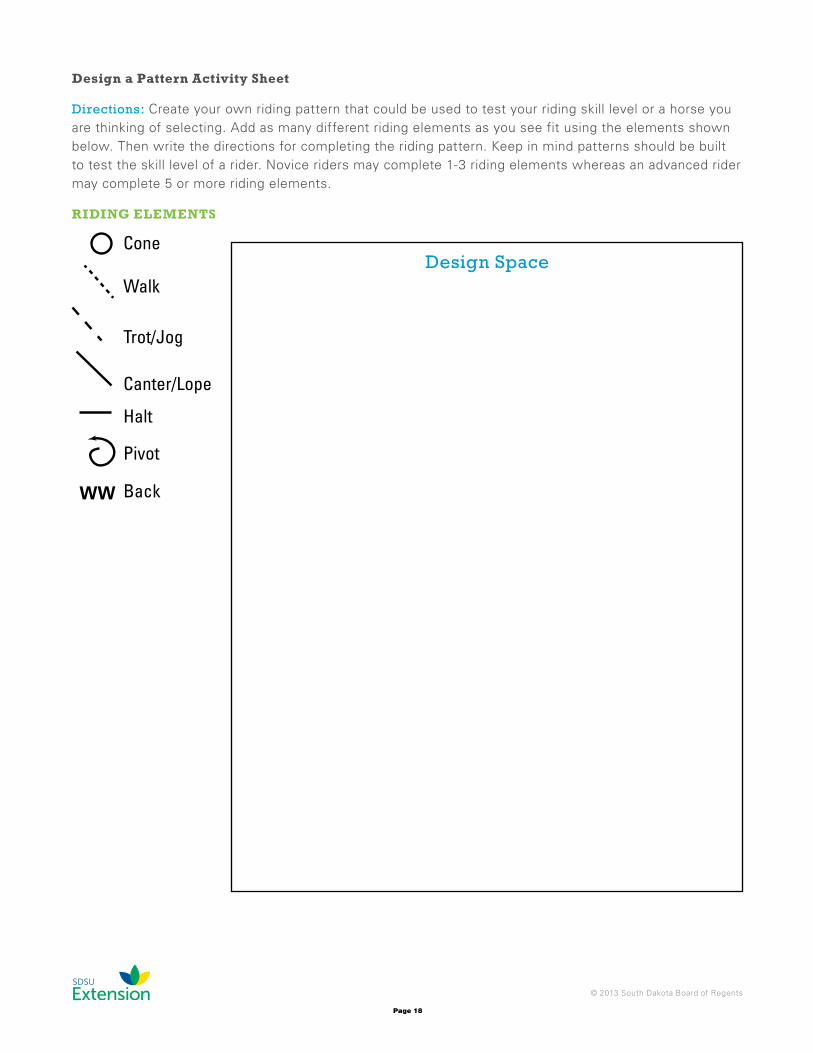
Design a Pattern activity Sheet
Directions: Create your own riding pattern that could be used to test your riding skill level or a horse you are thinking of selecting. Add as many different riding elements as you see fit using the elements shown below. Then write the directions for completing the riding pattern. Keep in mind patterns should be built to test the skill level of a rider. Novice riders may complete 1-3 riding elements whereas an advanced rider may complete 5 or more riding elements.
RiDinG ElEmEnTS
Design Space
WW
Cone
Walk
Trot/Jog
Canter/Lope
Halt
Pivot
Back
Page 19
© 2013 South Dakota Board of Regents
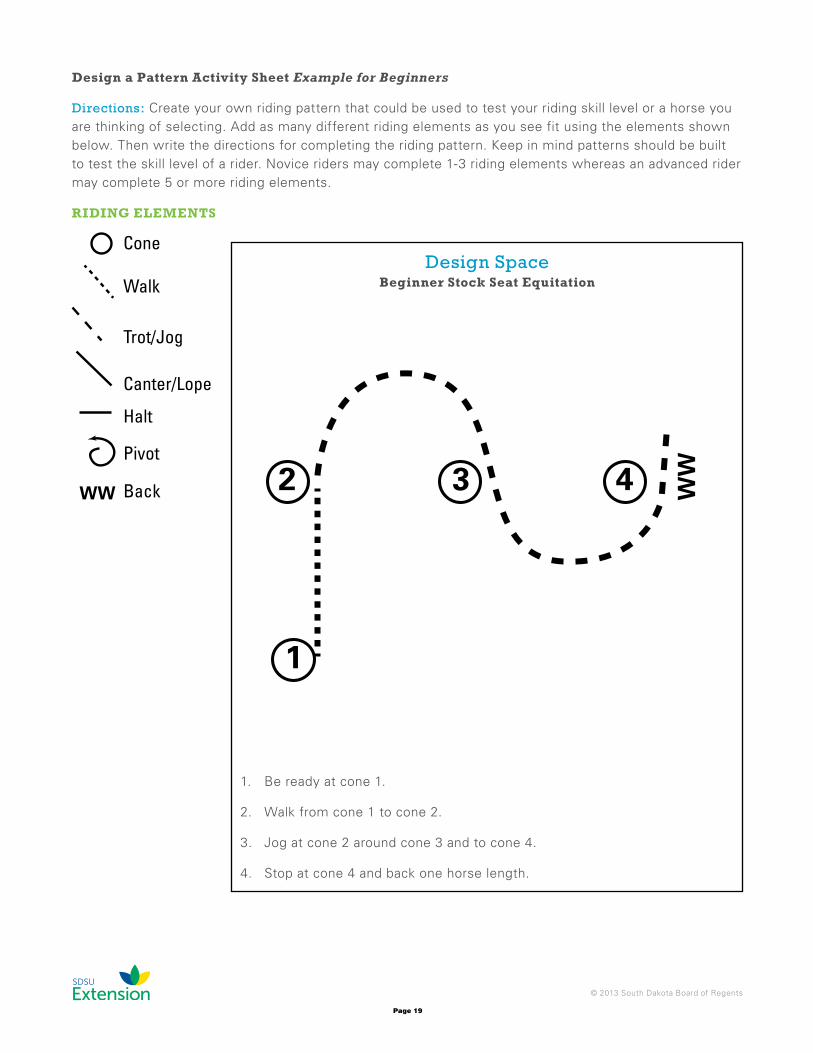
Design a Pattern activity Sheet Example for Beginners
Directions: Create your own riding pattern that could be used to test your riding skill level or a horse you are thinking of selecting. Add as many different riding elements as you see fit using the elements shown below. Then write the directions for completing the riding pattern. Keep in mind patterns should be built to test the skill level of a rider. Novice riders may complete 1-3 riding elements whereas an advanced rider may complete 5 or more riding elements.
RiDinG ElEmEnTS
Design SpaceBeginner Stock Seat Equitation
1. Be ready at cone 1.
2. Walk from cone 1 to cone 2.
3. Jog at cone 2 around cone 3 and to cone 4.
4. Stop at cone 4 and back one horse length.
1
2 3 4 WW
WW
Cone
Walk
Trot/Jog
Canter/Lope
Halt
Pivot
Back
Page 20
© 2013 South Dakota Board of Regents
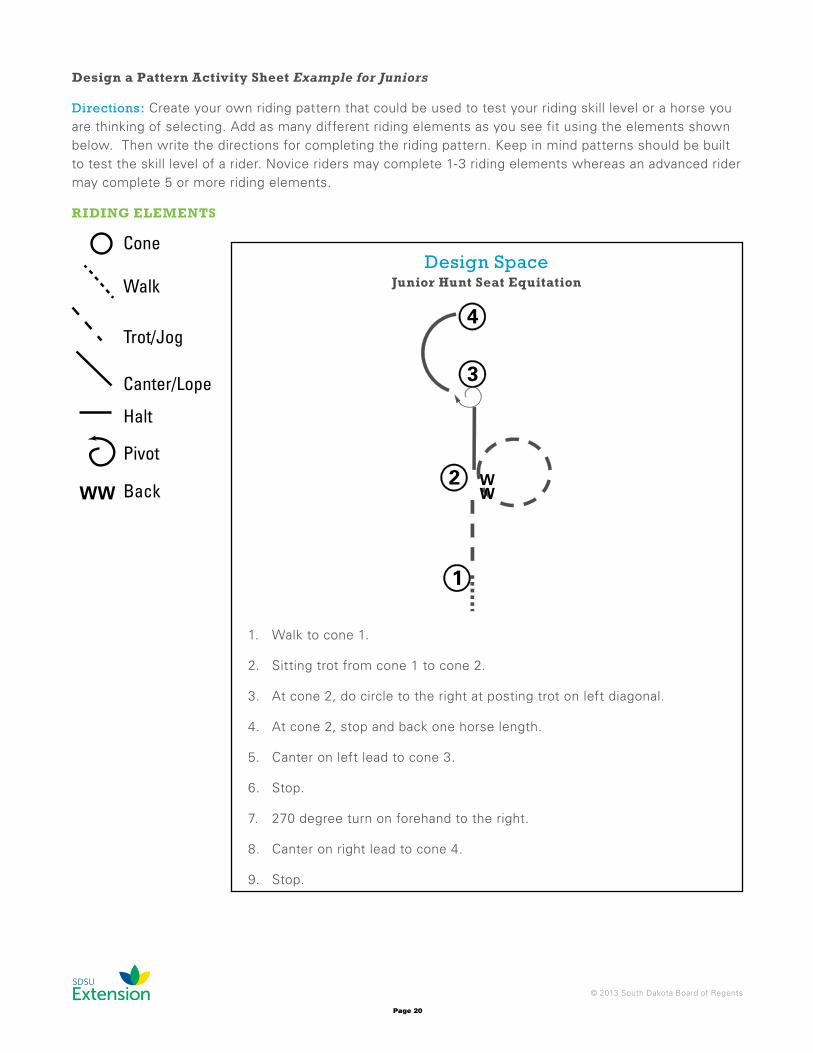
Design a Pattern activity Sheet Example for Juniors
Directions: Create your own riding pattern that could be used to test your riding skill level or a horse you are thinking of selecting. Add as many different riding elements as you see fit using the elements shown below. Then write the directions for completing the riding pattern. Keep in mind patterns should be built to test the skill level of a rider. Novice riders may complete 1-3 riding elements whereas an advanced rider may complete 5 or more riding elements.
RiDinG ElEmEnTS
Design SpaceJunior Hunt Seat Equitation
1. Walk to cone 1.
2. Sitting trot from cone 1 to cone 2.
3. At cone 2, do circle to the right at posting trot on left diagonal.
4. At cone 2, stop and back one horse length.
5. Canter on left lead to cone 3.
6. Stop.
7. 270 degree turn on forehand to the right.
8. Canter on right lead to cone 4.
9. Stop.
1
2
3
4
WW
WW
Cone
Walk
Trot/Jog
Canter/Lope
Halt
Pivot
Back
Page 21
© 2013 South Dakota Board of Regents
Youth HORSE TrainingTraining activity
Rider Skill level match up
Objective:For safety, a rider and horse should be paired based on the skill level of a rider and the amount of training a horse has received. This activity will teach youth how to recognize rider skill level and how to properly pair a horse with a rider.
Materials:• Match up Character ID Cards• Scissors
Directions:1. Cut out the Match up Character ID Cards.2. Hand out a card to each kid for them to role play. Have them read aloud their character’s skill or
training level.3. Match the rider to the proper horse for the safest scenario.4. Discuss with the kids what could be done to help train the horse or improve the rider’s skill level for
in the future.
Answers: Rider Horse Julie Captain Alexis Sage Robert Gypsy Tim Zinger Zoe Ditto
Timeframe:10-15 Minutes
Age Level: 8-13 year old
This activity can also be done by having the kids discuss with one another their own riding skill level along with their own horse’s training to see if there is any skill or training area that needs to be improved.
Page 22
© 2013 South Dakota Board of Regents
Rider Skill level match up iD cards
Juli
eJulie
is a 14 year o
ld se
nio
r wh
o h
as be
en
in 4-H
fo
r 5 years. Sh
e love
s ridin
g E
ng
lish an
d th
is ye
ar ho
pe
s to start jum
pin
g fo
r the
first time.
She
ne
ed
s a new
ho
rse b
ecause
he
r old
po
ny, Jim
iny Cricke
t, has g
otte
n to
o sm
all for h
er.
Page 23
© 2013 South Dakota Board of Regents
Rider Skill level match up iD cards
Ale
xis
Alexis is a b
eg
inn
er w
ho
just started
4-H. Sh
e h
as ow
ne
d a h
orse
be
fore
and
ho
pe
s this ye
ar to co
mp
ete
in
Walk
-Tro
t and
Show
man
ship
. She
has b
ee
n tak
ing
le
sson
s at a local b
arn an
d is re
ady fo
r he
r own
ho
rse. Sh
e can
be
timid
at time
s but re
ally loves h
orse
s and
g
ettin
g th
e ch
ance
to rid
e th
em
ofte
n at h
er w
ee
kly
practice
s.
Page 24
© 2013 South Dakota Board of Regents
Rider Skill level match up iD cards
Ro
be
rtR
ob
ert is 17 ye
ars old
and
this is h
is final ye
ar in
4-H. H
e k
now
s that h
e can
win
bo
th th
e b
arrels
and
po
les co
mp
etitio
ns at th
e State
Ho
rse Sh
ow if
he
has th
e rig
ht h
orse. Last ye
ar he
rod
e a h
orse
h
e h
ad le
ased
from
a frien
d b
ut now
he
wan
ts to
buy an
d train
his ow
n b
arrel p
rosp
ect.
Page 25
© 2013 South Dakota Board of Regents
Rider Skill level match up iD cards
Tim
Tim
is a 15 year o
ld an
d h
as be
en
in 4-H
for 7
years. H
e love
s to ro
pe
and
starts his ow
n
ho
rses. H
e just so
ld h
is last rop
ing
ho
rse an
d is
loo
kin
g fo
r a ho
rse to
start wo
rkin
g w
ith fo
r this
year.
Page 26
© 2013 South Dakota Board of Regents
Rider Skill level match up iD cards
Zoe
Zoe
is 11 years o
ld an
d h
as be
en
ridin
g an
d
show
ing
for 3 ye
ars. She
has g
otte
n to
o tall fo
r h
er o
ld p
ony an
d is lo
ok
ing
to m
ove up
to th
e
next leve
l. She
loves re
inin
g an
d w
este
rn rid
ing
b
ut wo
uld like
to sh
ow trail an
d sh
owm
ansh
ip
also.
Page 27
© 2013 South Dakota Board of Regents
Rider Skill level match up iD cards
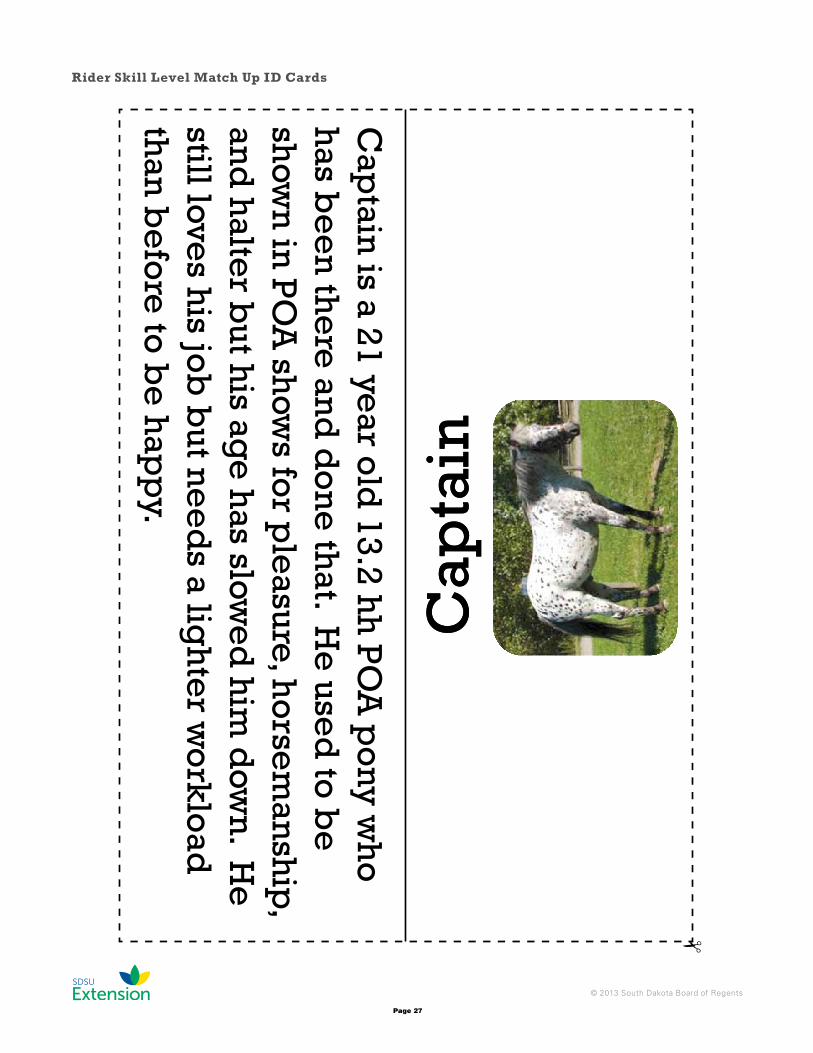
Cap
tain
Cap
tain is a 21 ye
ar old
13.2 hh
PO
A p
ony w
ho
h
as be
en
the
re an
d d
on
e th
at. He
used
to b
e
show
n in
PO
A sh
ows fo
r ple
asure, ho
rsem
ansh
ip,
and
halte
r but h
is age
has slow
ed
him
dow
n. H
e
still loves h
is job
but n
ee
ds a lig
hte
r wo
rklo
ad
than
be
fore
to b
e h
app
y.
Cap
tain
Page 28
© 2013 South Dakota Board of Regents
Rider Skill level match up iD cards
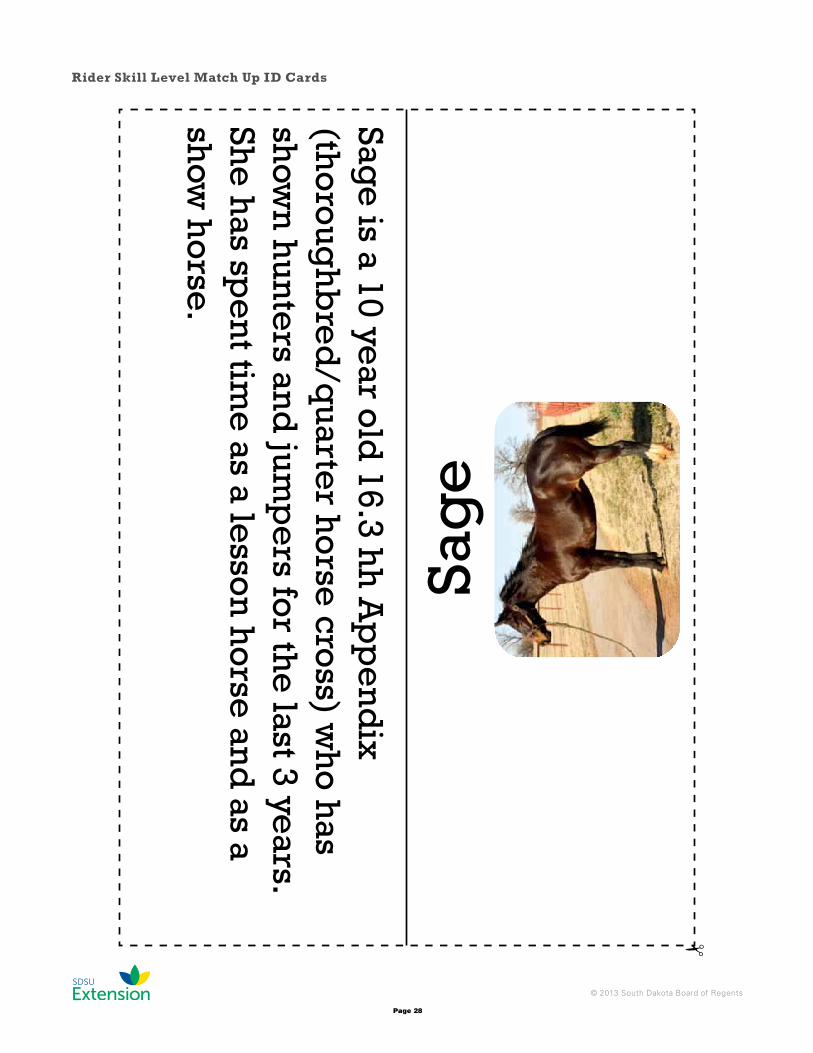
Sage
is a 10 year o
ld 16.3 h
h A
pp
en
dix
(tho
roug
hb
red
/quarte
r ho
rse cro
ss) wh
o h
as sh
own
hun
ters an
d jum
pe
rs for th
e last 3 ye
ars. Sh
e h
as spe
nt tim
e as a le
sson
ho
rse an
d as a
show
ho
rse.
Sag
e
Page 29
© 2013 South Dakota Board of Regents
Rider Skill level match up iD cards
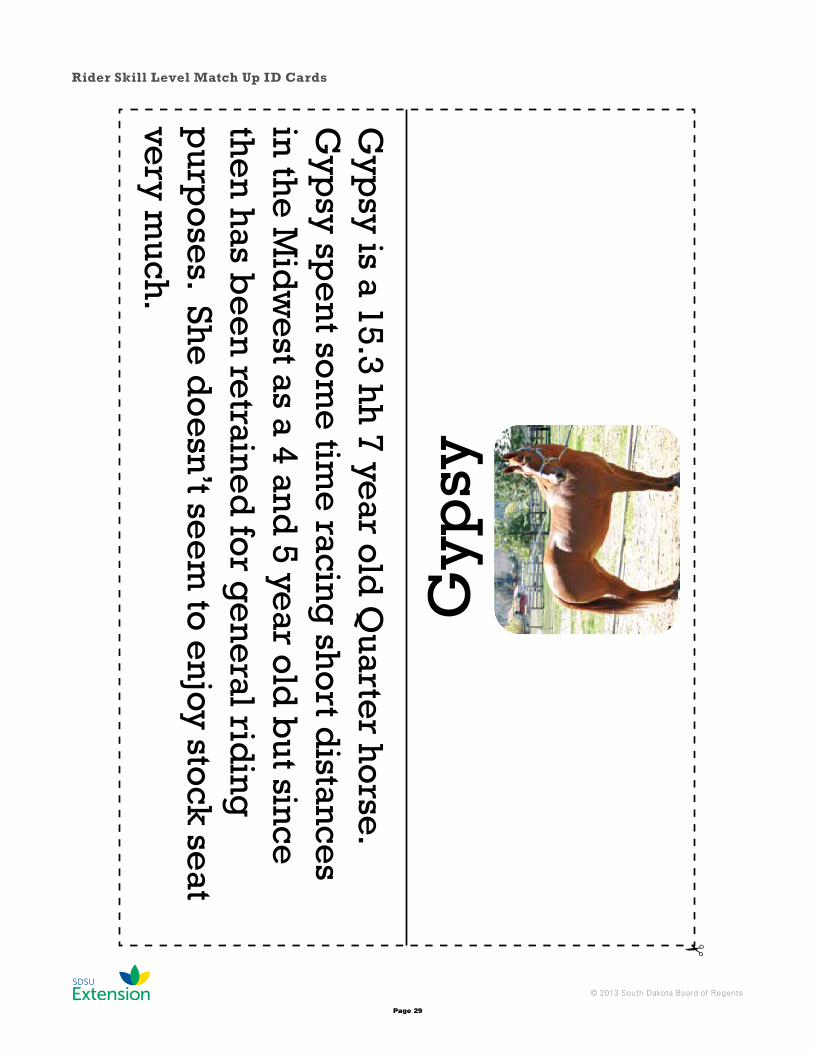
Gyp
sy is a 15.3 hh
7 year o
ld Q
uarter h
orse.
Gyp
sy spe
nt so
me
time
racing
sho
rt distan
ces
in th
e M
idw
est as a 4 an
d 5 ye
ar old
but sin
ce
the
n h
as be
en
retrain
ed
for g
en
eral rid
ing
p
urpo
ses. Sh
e d
oe
sn’t se
em
to e
njoy sto
ck se
at ve
ry much
.
Gyp
sy
Page 30
© 2013 South Dakota Board of Regents
Rider Skill level match up iD cards
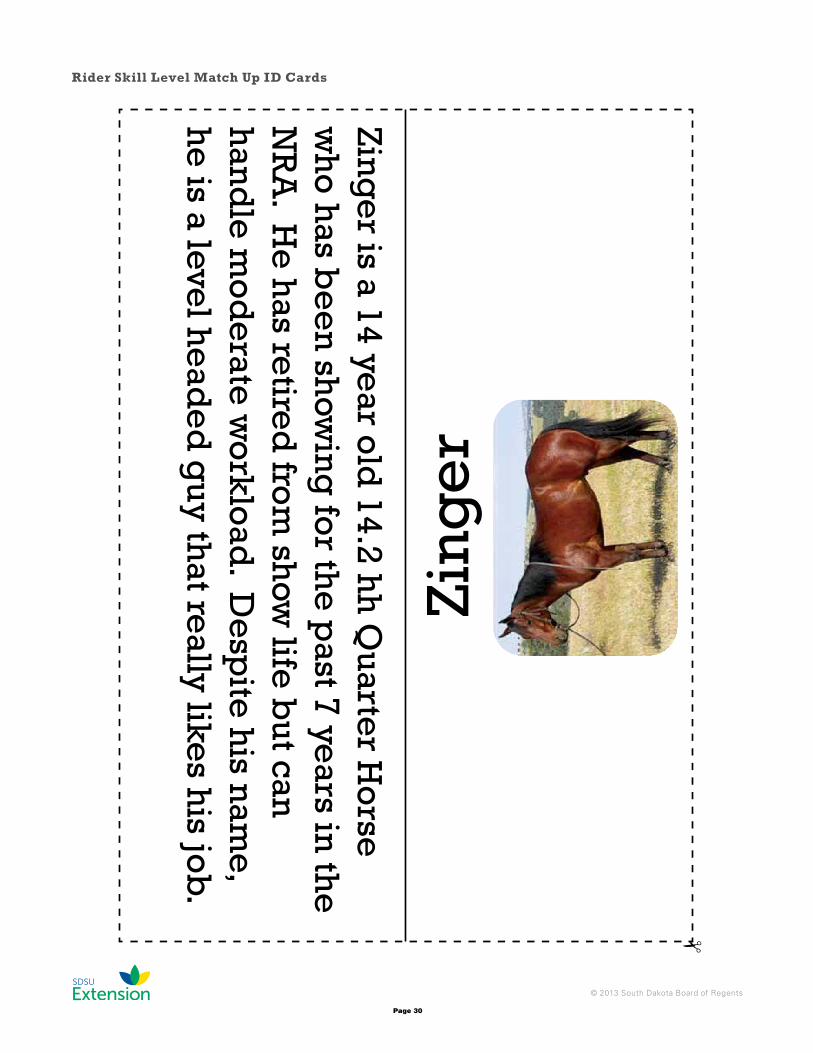
Zing
er is a 14 ye
ar old
14.2 hh
Quarte
r Ho
rse
wh
o h
as be
en
show
ing
for th
e p
ast 7 years in
the
N
RA
. He
has re
tired
from
show
life b
ut can
han
dle
mo
de
rate w
ork
load
. De
spite
his n
ame,
he
is a level h
ead
ed
guy th
at really like
s his jo
b.
Zin
ge
r
Page 31
© 2013 South Dakota Board of Regents
Rider Skill level match up iD cards
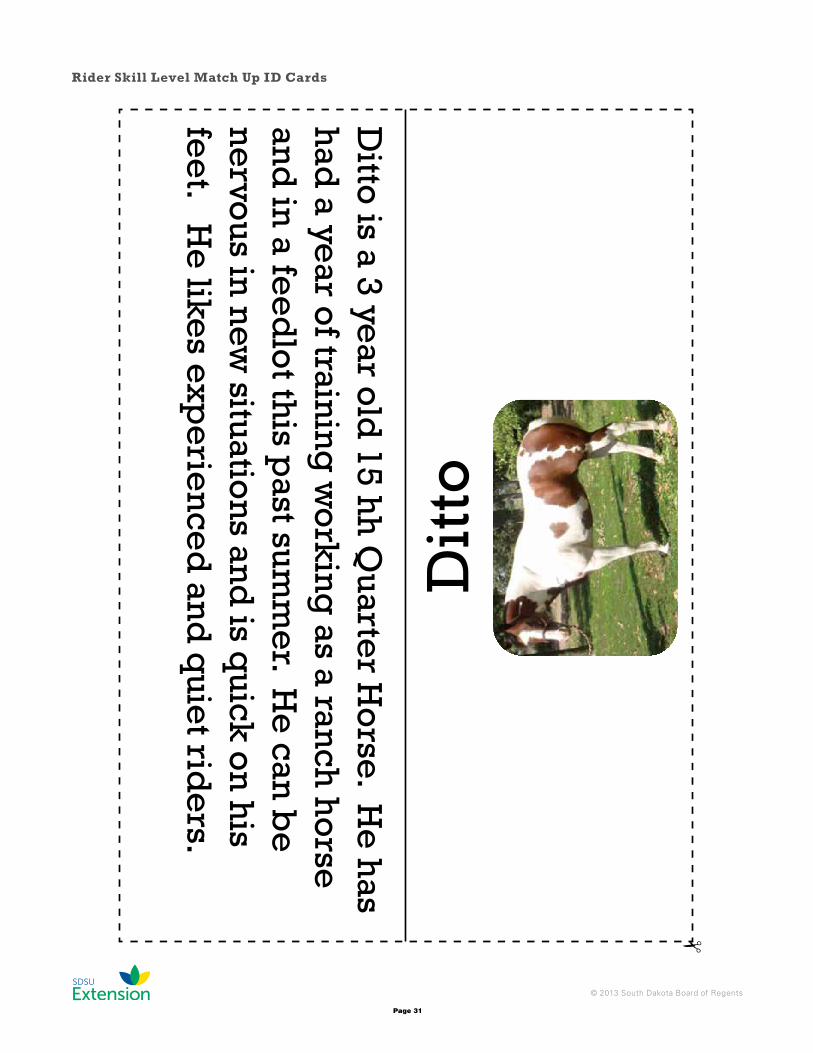
Ditto
is a 3 year o
ld 15 h
h Q
uarter H
orse. H
e h
as h
ad a ye
ar of train
ing
wo
rkin
g as a ran
ch h
orse
an
d in
a fee
dlo
t this p
ast summ
er. H
e can
be
n
ervo
us in n
ew situatio
ns an
d is q
uick o
n h
is fe
et. H
e like
s expe
rien
ced
and
quie
t ride
rs.
Dit
to
Page 32
© 2013 South Dakota Board of Regents
Youth HORSE TrainingTraining activity
How do you measure up?
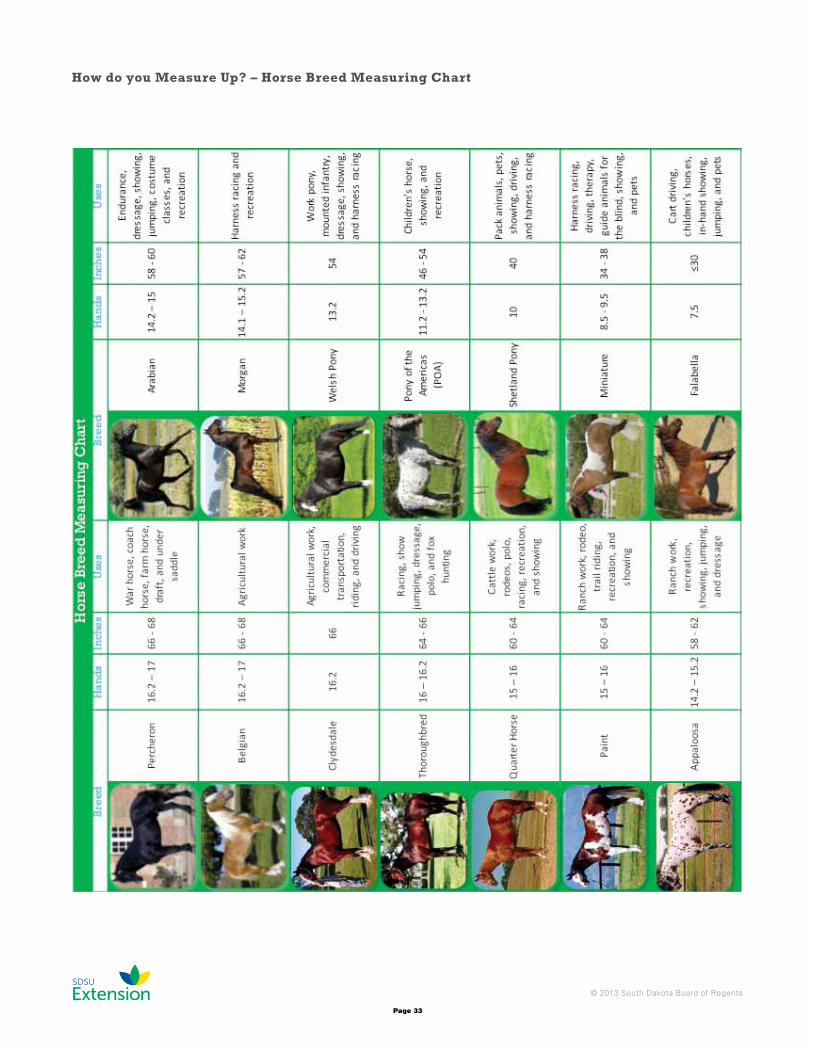
Objective:Selecting an appropriate horse for a rider may be based on breed, training, attitude, and soundness. Occasionally, size may also be an important selection factor. This activity will teach youth how to measure the height of a horse and identify different breeds.
Materials:• Pony/Horse Measuring Stick, Yard Stick, Measuring Tape, or Ruler• Pens/ Pencils/ or Markers• How do you Measure Up? Worksheets• Horse Breed Measuring Chart
Directions:1. Hand out the How do you Measure Up? Worksheet and the Horse Breed Measuring Chart
• Supplemental Material: Use the How do you Measure Up? Horse Measuring Chart PowerPoint slide instead of making multiple color copies for completing the training activity.
2. Have youth pair up and help measure each other from the top of their shoulder (withers) to the ground. Keep in mind if measuring in inches, 4 inches = 1 hand.
3. Have the youth fill out their How do you Measure Up? Worksheet and determine what breed of horse they would most likely be based off the Horse Breed Measuring Chart.
4. Next, have youth measure other people or object to learn and explore the other breeds of horses.
Timeframe:10-15 Minutes
Age Level: 8-13 year old
Make your own measuring tape from ribbon. Use hands as the unit of measure on the ribbon and then have kids convert the hands into inches. Remember 1 hand = 4 inches!
Page 33
© 2013 South Dakota Board of Regents
How do you measure up? – Horse Breed measuring chart
Page 34
© 2013 South Dakota Board of Regents
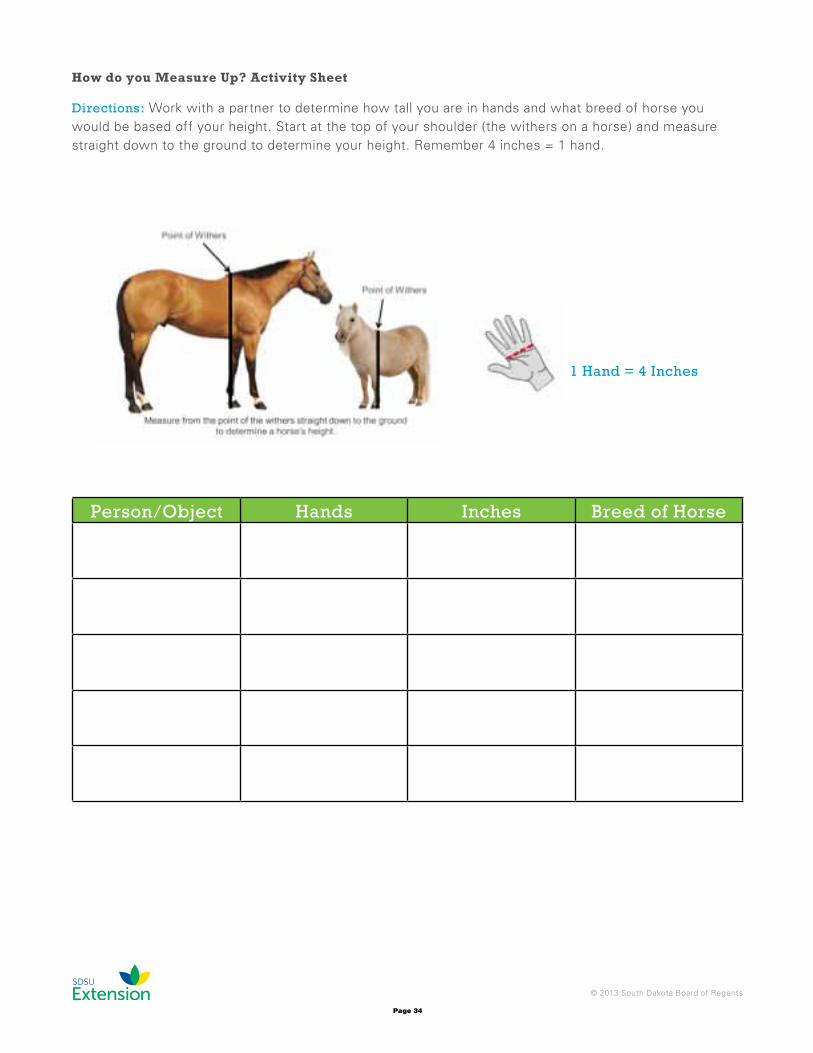
How do you measure up? activity Sheet
Directions: Work with a partner to determine how tall you are in hands and what breed of horse you would be based off your height. Start at the top of your shoulder (the withers on a horse) and measure straight down to the ground to determine your height. Remember 4 inches = 1 hand.
Person/Object Hands Inches Breed of Horse
1 Hand = 4 Inches
Page 35
© 2013 South Dakota Board of Regents
Youth HORSE Trainingworksheet
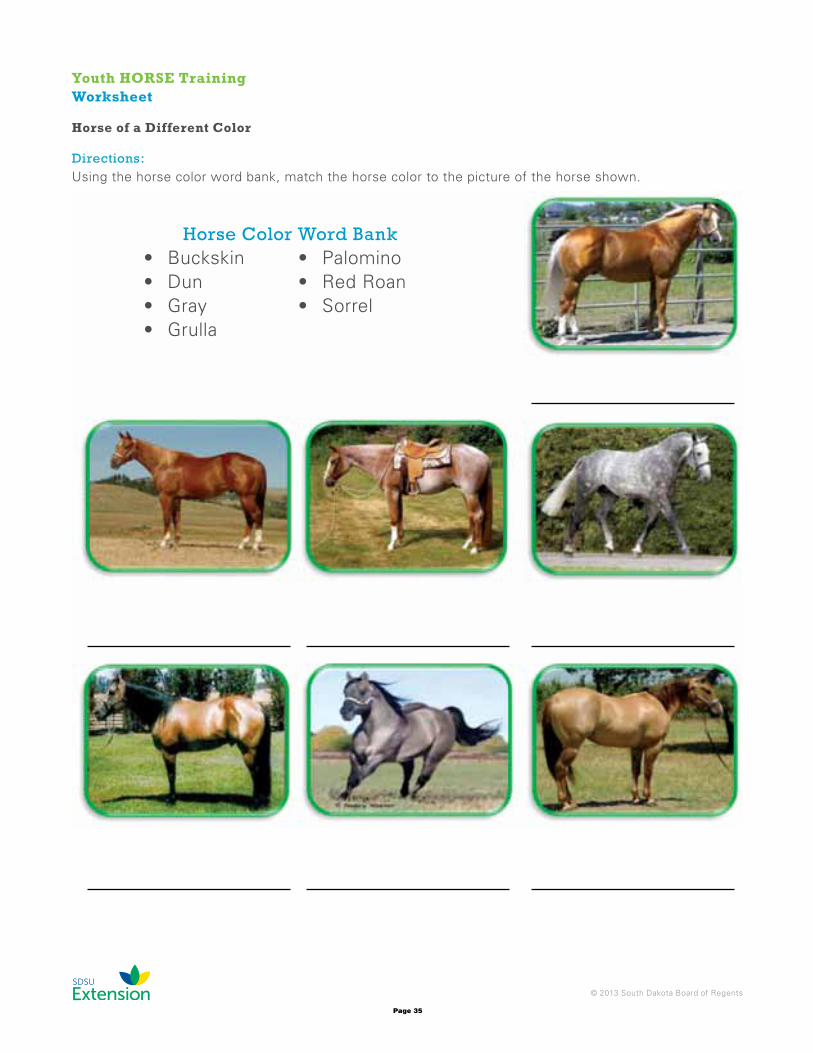
Horse of a Different color
Directions:Using the horse color word bank, match the horse color to the picture of the horse shown.
Horse Color Word Bank• Buckskin• Dun• Gray• Grulla
• Palomino• Red Roan• Sorrel

Page 36
© 2013 South Dakota Board of Regents
Horse of a Different color – anSwER SHEET
Directions:Using the horse color word bank, match the horse color to the picture of the horse shown.
Horse Color Word Bank• Buckskin• Dun• Gray• Grulla
• Palomino• Red Roan• Sorrel
Palomino
sorrel Red Roan Gray
Buckskin Grulla dun

Page 37
© 2013 South Dakota Board of Regents
Youth HORSE Trainingworksheet
Horse Body Part identification
Directions:On the horse diagram, label the different parts of the horse using the words provided in the Horse Body Part Word Bank.
Horse Body Part Word Bank• Barrel• Cannon• Dock• Elbow
• Hock• Knee• Muzzle• Pastern
• Point of Hip• Poll• Stifle• Withers
Page 38
© 2013 South Dakota Board of Regents
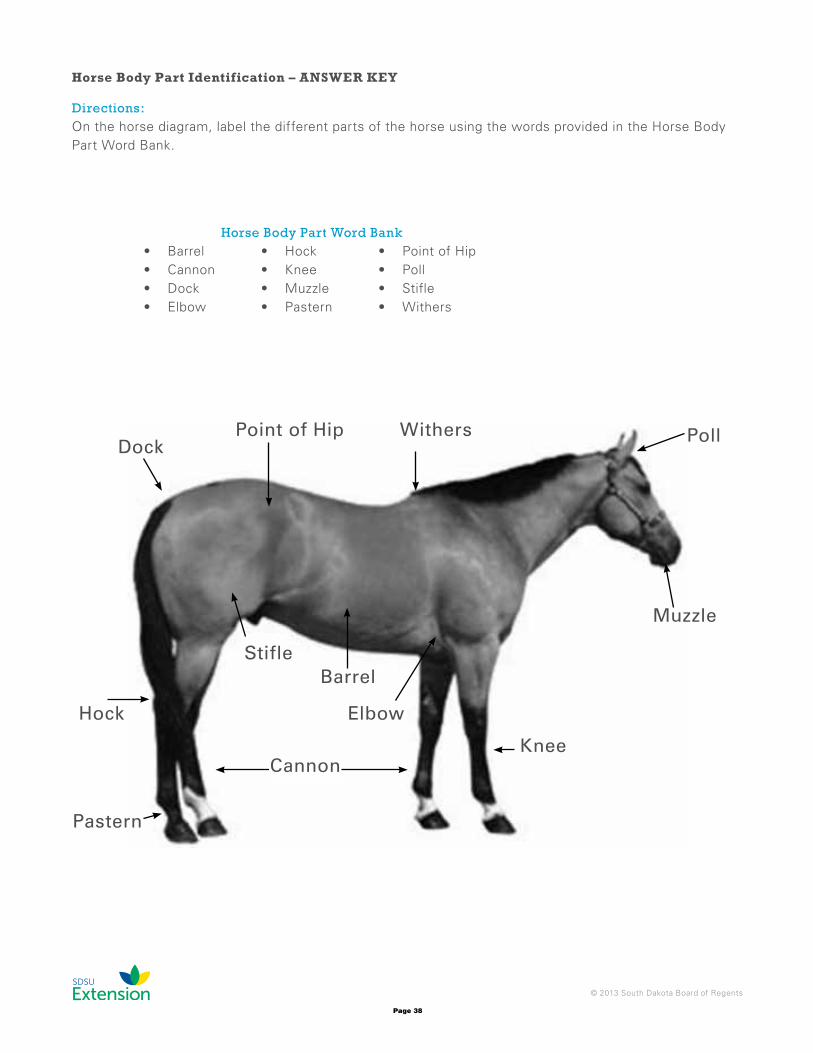
Horse Body Part identification – anSwER kEY
Directions:On the horse diagram, label the different parts of the horse using the words provided in the Horse Body Part Word Bank.
Horse Body Part Word Bank• Barrel• Cannon• Dock• Elbow
• Hock• Knee• Muzzle• Pastern
• Point of Hip• Poll• Stifle• Withers
dock
hock
Point of hip Withers Poll
Muzzle
knee
Elbow
Barrelstifle
Pastern
Cannon
Page 39
© 2013 South Dakota Board of Regents
Youth HORSE Trainingworksheet
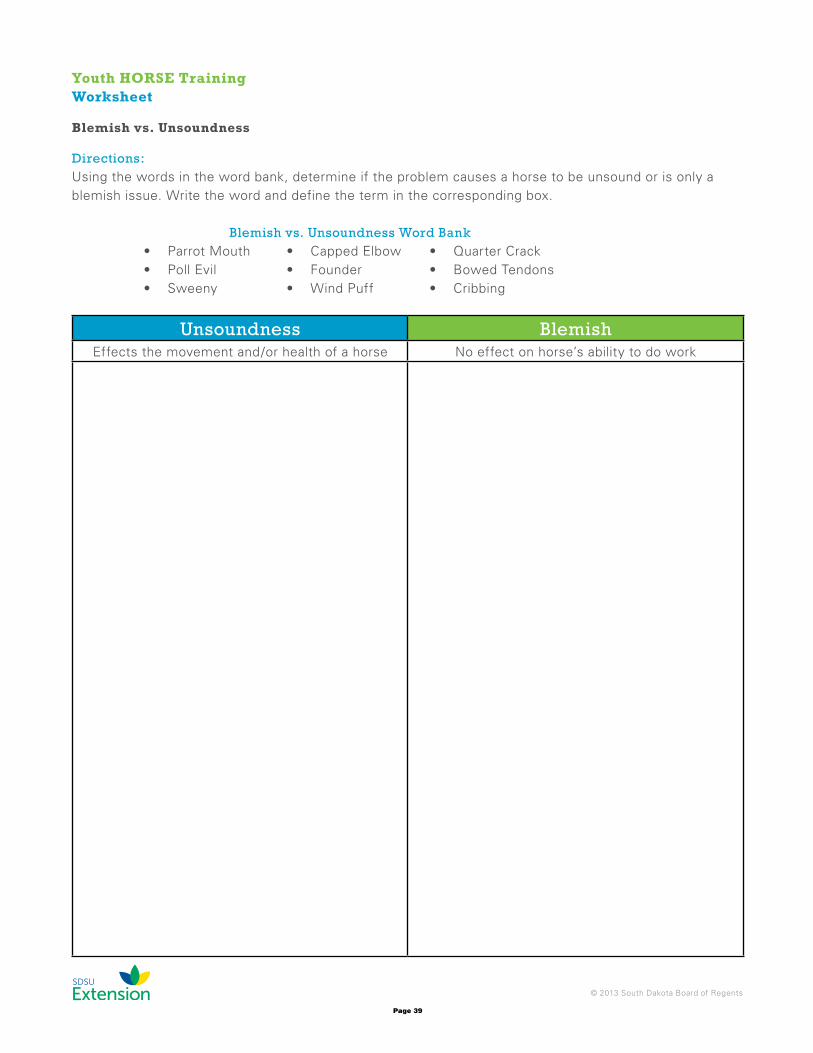
Blemish vs. unsoundness
Directions:Using the words in the word bank, determine if the problem causes a horse to be unsound or is only a blemish issue. Write the word and define the term in the corresponding box.
Blemish vs. Unsoundness Word Bank• Parrot Mouth• Poll Evil• Sweeny
• Capped Elbow• Founder• Wind Puff
• Quarter Crack• Bowed Tendons• Cribbing
Unsoundness BlemishEffects the movement and/or health of a horse No effect on horse’s ability to do work
Page 40
© 2013 South Dakota Board of Regents
Youth HORSE Trainingworksheet
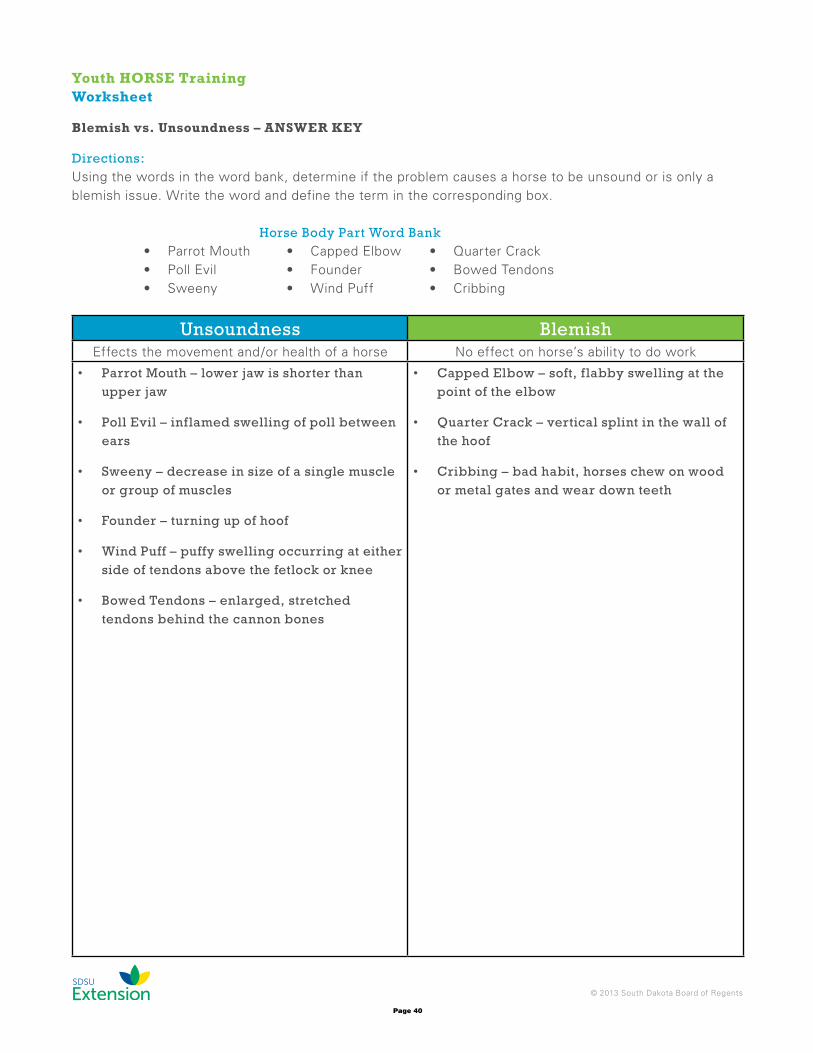
Blemish vs. unsoundness – anSwER kEY
Directions:Using the words in the word bank, determine if the problem causes a horse to be unsound or is only a blemish issue. Write the word and define the term in the corresponding box.
Horse Body Part Word Bank• Parrot Mouth• Poll Evil• Sweeny
• Capped Elbow• Founder• Wind Puff
• Quarter Crack• Bowed Tendons• Cribbing
Unsoundness BlemishEffects the movement and/or health of a horse No effect on horse’s ability to do work
• Parrot Mouth – lower jaw is shorter than upper jaw
• Poll Evil – inflamed swelling of poll between ears
• Sweeny – decrease in size of a single muscle or group of muscles
• Founder – turning up of hoof
• Wind Puff – puffy swelling occurring at either side of tendons above the fetlock or knee
• Bowed Tendons – enlarged, stretched tendons behind the cannon bones
• Capped Elbow – soft, f labby swelling at the point of the elbow
• Quarter Crack – vertical splint in the wall of the hoof
• Cribbing – bad habit, horses chew on wood or metal gates and wear down teeth
Page 41
© 2013 South Dakota Board of Regents
SaFETY TiPS & REminDERSAlways remember horses are large animals with a mind of their own. When horses become scared they will react with either a fight (striking, kicking, etc) or flight (bolting) response. Interacting with your horse in a calm and confident manner will reassure your horse and lead to a more positive experiences for all involved.
YOuTH SHOulD REviEw THESE SaFETY TiPS anD REminDERS wiTH a GuaRDian.Before Riding
• ask for help. Find a knowledgeable mentor who you can go to for advice about your horse project.• Match a horse with a rider’s skill level. Pairing an inexperienced rider with an inexperienced
horse so “they can grow together” is a recipe for dangerous situations. It takes years of training for a horse and for a rider to fully understand how to consistently react well to every situation. Even then, there are no guarantees. It is more appropriate to pair a young rider with an experienced horse. An experienced rider may be able to handle a younger horse
• Wear proper attire. The rider should wear protective clothing and long pants with boots that have a slight heal when working with a horse. Make sure that your tack is in good repair, clean, and fitted properly to your horse.
• Emergency contact list. Maintain a list of emergency contacts to carry with you and have posted in your barn. Have this readily available in case of emergency. When a traumatic event occurs we are often too distracted to recall simple phone numbers.
Facilities• a tidy stable is a safe stable. Keep the ground free of clutter and put things away after use.• Identify and fix any hazards. Check fences, stalls, aisles, and equipment and repair any sharp
edges, protruding nails, or loose board before they find you or your horse.• If you open a door or gate, close it behind you. Fences, doors, and gates are all designed to
keep something in or something out.• safe, secure tying place. Make sure you have a safe and sturdy place to tie your horse for
grooming, tacking, or bathing. Tie only to solid posts or support beams, not to the smaller filler planks between. A horse that has spooked and pulls back can break the board and become injured.
Ground Work• approach horse calmly & slowly. Let your horse know that you are approaching by speaking
to them calmly. Approach the shoulder; avoid walking straight towards the head or near the hindquarters. When walking around your horse you are safest staying next to the horse’s body with your hand on them or walking 12-15 feet around them. When a horse kicks you are in most danger of injury at intermediate distances just a few feet away from the horse.
• safe length of lead. Select a lead that is an appropriate length so you are not tripping over the slack. Fold, don’t wrap, the extra length neatly and hold in your left hand. The lead and reins should never drag on the ground. Do not get into a tugging war because you will not win. Your horse weighs several times more than you and is much stronger. If a horse is rearing or bolting it is better to release the lead than to be drug behind and potential under the horse.
• Never walk under or over the horse or lead rope. Always walk around your horse.• Positioning yourself around the horse. Always lead your horse from the near or left side so your
right hand is closest to the horse. You should be to the side, out of the way of the path of travel for the front legs. Don’t hold the lead rope right next to the buckle; instead run your hand down the lead rope several inches. Like us, horses need some personal space. If you are leading your horse and need to turn around, turn your horse away from you so you are walking towards and around the horse rather than them turning and walking over you.
Page 42
© 2013 South Dakota Board of Regents
• don’t drag your horse behind you. You and your horse are a team and should walk together so that you are between the horses head and shoulder. This is the safest place to be.
• Walking in groups. Walk in single file and maintain a couple horse-lengths between each horse. Horses should be tied by a lead rope. Use a quick release knot and tie them at the wither height. NEVER tie a horse by the reins. Tying a horse by the reins can lead to severe mouth injuries.
Riding• Groom and pick hooves every time you ride. Being in a rush is no excuse not to check over your
horse’s body and hooves before taking them for a ride.• double check that your girth or cinch is snug. It is your responsibility as a rider to check, even if
your parent checks it first (and they should). If riding with a back cinch always fasten it second and remove it first.
• Ride in pairs or small groups. An adult should always supervise young children. Older, experienced riders should still let an adult know where and when they will be riding.
• always sit safely and correctly on the saddle. Sit in the correct position facing forward with legs down along the barrel on each side of the horse.
• Reins should be held properly in your hand(s). Reins that are dropped or set down on the neck quickly become weapons that may entangle a horse leg and cause injury.
• don’t over work your horse. Riding should be fun for both of you. Galloping (running? Spinning? etc) for long stretches of time can be exhausting for your horse.
After the ride• Cool down your horse. Always completely cool your horse down before putting them away.
Horses that just completed a workout should have small drinks of cool (not cold) water.• Groom horse after riding. Grooming your horse after every ride can help you detect hot spots,
stones, or nails in the hooves, and will help create a strong bond between horse and rider. • Clean and store all tack. Clean sweat and dirt off of your tack and wipe down the bit with clean
(not soapy) water. Put all tack and belongings away so you can return to a clean barn tomorrow.