Your new merchandiser has been engineered to our own rigid … › wp-content › uploads › 2012...
210
Transcript of Your new merchandiser has been engineered to our own rigid … › wp-content › uploads › 2012...


Your new merchandiser has been engineered to our own rigid safety and performance standards. It has been designed to comply with sanitation and health guidelines recommended by the Automatic Merchandising Health-Industry Council (AMHIC) and it conforms to all NAMA safety recommendations. This machine has been manufactured in accordance with the safety standards of both Underwriter’s Laboratories and the Canadian Standards Association. To maintain this degree of safety and to continue to achieve the level of performance built into this machine, it is important that installation and maintenance be performed so as to not alter the original construction or wiring and that replacement parts are as specified in the Parts Manual. Your investment in this equipment will be protected by using this Operators’ Guide and the Parts Manual in your operation, service and maintenance work. By following prescribed procedures, machine performance and safety will be preserved.
Models 180, 181, 448 & 449
Parts and Support
Call
National Vendors
Parts: 1-800-621-7278
Service: 1-800-628-8363
www.cranems.com
For faster service, please have your account number ready before calling
Models 980 & 981
Parts and Support
Call
Automatic Products
Parts: 1-800-784-6438
Service: 1-800-523-5932
www.automaticproducts.com
12955 ENTERPRISE WAY · BRIDGETON, MISSOURI 63044-1200 USA

Merchant™ Operators’ Guide Table of Contents
1810025 i August 2009
Preliminary ................................................................................................................ 5Power Requirements...................................................................................................................... 5Unpacking the Merchandiser......................................................................................................... 5Controls and Indicators.................................................................................................................. 6Turning the Merchandiser ON and OFF........................................................................................ 8
Initial Set-Up.............................................................................................................. 9Moving the Merchandiser Through a Narrow Doorway ............................................................... 9Positioning the Merchandiser ...................................................................................................... 11
Snack Section Set-Up .............................................................................................. 11Placing Trays in the Loading Position......................................................................................... 11Setting Up Trays to Vend Products ............................................................................................. 12Setting Up Trays to Vend Wide Products.................................................................................... 12Removing Standard Trays ........................................................................................................... 13Installing Standard Trays............................................................................................................. 14Removing a Bottle Tray............................................................................................................... 15Installing a Bottle Tray ................................................................................................................ 15Removing and Installing Column Dividers ................................................................................. 16Operating Trays Outside the Merchandiser................................................................................. 16Replacing a Motor With a Spiral Bearing ................................................................................... 16Connecting and Disconnecting a Motor Harness ........................................................................ 17Removing and Installing Spirals.................................................................................................. 18Removing a Spiral Coupler ......................................................................................................... 20Removing and Installing a Spiral Motor ..................................................................................... 20Installing a Gear........................................................................................................................... 21Installing a Spiral Coupler ........................................................................................................... 22Moving Trays Up or Down.......................................................................................................... 23Installing and Removing Product Spacers................................................................................... 25Loading Trays with Product ........................................................................................................ 26Spiral Capacity Color Codes ....................................................................................................... 26Returning the Trays to the Vending Position .............................................................................. 31Installing and Setting Price Labels .............................................................................................. 32Installing Selection ID Labels ..................................................................................................... 34Motor Position ............................................................................................................................. 35
Final Installation ..................................................................................................... 36Leveling the Merchandiser .......................................................................................................... 36Installing the Base Plate............................................................................................................... 37Setting Up and Loading the Coin Mechanism............................................................................. 38TriTeq Lock Information............................................................................................................. 38
Final Checkout......................................................................................................... 39Operational Readiness Check ...................................................................................................... 39Spiral Indexing Procedure (Two Spirals, One Or Two Motors) ................................................. 40Spiral Indexing Procedure (One Spiral, One Motor)................................................................... 40
Table of Contents

Table of Contents Merchant™ Operators’ Guide
August 2009 ii 1810025
Testing the Bill Validator ........................................................................................................... 41Service Keypad Shortcut Keys ................................................................................................... 43
Programming: Data Recall ..................................................................................... 45View Non Resettable Sales and Vend Data................................................................................ 45View Non Resettable Sales and Vend Data By Product............................................................. 47View Non Resettable Sales and Vend Data - Cash .................................................................... 49View Non Resettable Sales and Vend Data - Cashless .............................................................. 51View Non Resettable Sales and Vend Data - Token .................................................................. 53View Resettable Sales and Vend Data ....................................................................................... 55View Resettable Sales and Vend Data - Cash ............................................................................ 59View Resettable Sales and Vend Data - Cashless ...................................................................... 61Clear Resettable Sales and Vend Data........................................................................................ 65View Timed Events - Main Door Openings ............................................................................... 66View Timed Events - Power Losses ........................................................................................... 67View Timed Events - Last Data Clear ........................................................................................ 68View Timed Events - Last Price Setting..................................................................................... 69View Timed Events - Last Vend................................................................................................. 70View Timed Events - Last Clock Set.......................................................................................... 71View Timed Events - Last Timed Backup.................................................................................. 72View Identification Numbers - Main PCB ................................................................................. 73View Identification Numbers - Coin Mechanism....................................................................... 74View Identification Numbers - Bill Validator ............................................................................ 75View Identification Numbers - Card Reader .............................................................................. 76Print Data .................................................................................................................................... 77
Programming: Diagnostic....................................................................................... 78Check for Errors.......................................................................................................................... 78Diagnostic Error Messages ......................................................................................................... 79
Programming: Test ................................................................................................. 82Test Vend a Selection ................................................................................................................. 82Test Vend Without SureVend™................................................................................................. 83Test SureVend™ Calibration ..................................................................................................... 84Testing the Motors - Motor Test Summary ................................................................................ 85Homing the Motors - Motor Status Detail .................................................................................. 86Table: Motor Status Detail Menu Screen ................................................................................... 88Test the Coin Return Motor ........................................................................................................ 89Test the Display .......................................................................................................................... 92Test the Keypads - Keypad Entry ............................................................................................... 93
Programming: Prices .............................................................................................. 94Set Prices for Individual Selections ............................................................................................ 94Set One Price for the Entire Machine ......................................................................................... 95Set Prices by Trays ..................................................................................................................... 96
Programming: Product Configuration.................................................................. 97View Configuration Version....................................................................................................... 97Turn SureVend™ On and Off..................................................................................................... 98Set SureVend™ Options............................................................................................................. 99Set SureVend™ Anti-Jackpot Timer ........................................................................................ 101

Merchant™ Operators’ Guide Table of Contents
1810025 iii August 2009
Set SureVend™ Anti-Jackpot Trigger....................................................................................... 102Selection Configuration ............................................................................................................. 103FIFO (First In, First Out) ........................................................................................................... 104FIFO Setup - Adding Groups .................................................................................................... 104FIFO Setup - Deleting Groups................................................................................................... 105FIFO Setup - Editing Groups..................................................................................................... 106FIFO Setup - View FIFO Mappings.......................................................................................... 107Couple Motors ........................................................................................................................... 108
Special Vend Modes .............................................................................................. 109Timed Events-Time of Day Events ........................................................................................... 109Timed Events - Backup Events.................................................................................................. 119Winner Mode ............................................................................................................................. 122Combo Vends ............................................................................................................................ 125Token Enable ............................................................................................................................. 128Enable OK Button...................................................................................................................... 129
Programming: Free Vend..................................................................................... 130Turn Free Vend On/Off ............................................................................................................. 130
Programming: System Settings............................................................................ 131Machine Information - ID Number............................................................................................ 131Machine Information - Location................................................................................................ 133Set the Date................................................................................................................................ 135Set the Time............................................................................................................................... 136Set Daylight Saving Time.......................................................................................................... 137Select a Language ...................................................................................................................... 138Select the Coin Mechanism ....................................................................................................... 139View Coins In/Out..................................................................................................................... 140Set Change Without Purchase ................................................................................................... 141Set Low Change Message.......................................................................................................... 142Select the Bill Validator............................................................................................................. 143Set Accept on Low Change ....................................................................................................... 144Set Bill Acceptance.................................................................................................................... 146Set Token/Coupon Acceptance.................................................................................................. 147Select the Card Reader............................................................................................................... 148Set Card Revalue ....................................................................................................................... 149Set Multiple Vend Mode ........................................................................................................... 151Set Credit for Failed Vend......................................................................................................... 153Set Communication Mode ......................................................................................................... 155Set Data List .............................................................................................................................. 156Set CA304 Data Type................................................................................................................ 157Set Data Reset Mode ................................................................................................................. 158Set Event Reset Mode................................................................................................................ 159Set Printer Baud Rate................................................................................................................. 160Connect and Disconnect the Data Key ...................................................................................... 161Firmware Selection (Serial Flash Menu)................................................................................... 162Save Configuration Data to Data Key ....................................................................................... 163Save Configuration and Sales Data to Data Key ....................................................................... 165

Table of Contents Merchant™ Operators’ Guide
August 2009 iv 1810025
View Image Info (Data Description) on Data Key ................................................................... 167Load Configuration Data from Data Key to Machine .............................................................. 169Delete Configuration Data or Configuration and Sales Data from Data Key .......................... 171View Last Backup..................................................................................................................... 173Backup Data.............................................................................................................................. 174Restore Data.............................................................................................................................. 175Set Screen Contrast ................................................................................................................... 176View Software Version............................................................................................................. 177View SureVend™ Version ....................................................................................................... 178View IO Board Software .......................................................................................................... 179Set Temperature........................................................................................................................ 180Select Tray and Selections to be Controlled by Health Control ............................................... 181Set Temperature Units .............................................................................................................. 183Set Idle Screen Time/Temp Options......................................................................................... 184Set Idle Screen Message ........................................................................................................... 186Set Custom Messages ............................................................................................................... 188Reset Custom Messages............................................................................................................ 190NUMERIC/CHARACTER TABLE......................................................................................... 191Talker Setup.............................................................................................................................. 192
Programming: Security Codes ............................................................................. 193Enter Security Code .................................................................................................................. 193Edit the Supervisor PIN ............................................................................................................ 194Lock/Unlock Menu Items ......................................................................................................... 195
Programming: Security Codes ............................................................................. 198448/449 Merchant Refrigeration Removal ............................................................................... 198448/449 Merchant Refrigeration Installation............................................................................ 198Schematic.................................................................................................................................. 199

Merchant™ Operators’ Guide Initial Setup
1810025 1 August 2009
FRONT EXTERIOR VIEWS

Initial Setup Merchant™ Operators’ Guide
August 2009 2 1810025
MODEL 181 - EXTERIOR VIEW(Models 180, 980, 981, 448 and 449 have similar appearance)
STANDARD

Merchant™ Operators’ Guide Initial Setup
1810025 3 August 2009
ALL MODELS - MONETARY
STANDARD

Initial Setup Merchant™ Operators’ Guide
August 2009 4 1810025
INTERIOR VIEW
Merchant™ Operators’ Guide Initial Setup
1810025 5 August 2009
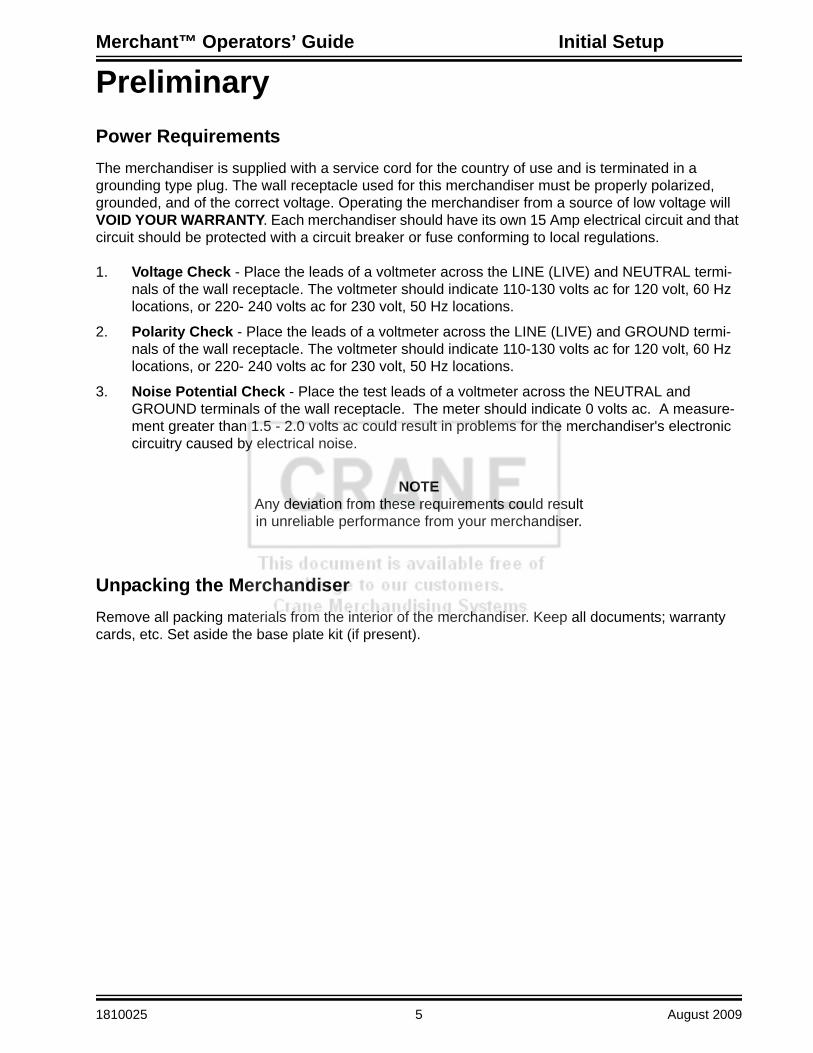
PreliminaryPower RequirementsThe merchandiser is supplied with a service cord for the country of use and is terminated in a grounding type plug. The wall receptacle used for this merchandiser must be properly polarized, grounded, and of the correct voltage. Operating the merchandiser from a source of low voltage will VOID YOUR WARRANTY. Each merchandiser should have its own 15 Amp electrical circuit and that circuit should be protected with a circuit breaker or fuse conforming to local regulations.
1. Voltage Check - Place the leads of a voltmeter across the LINE (LIVE) and NEUTRAL termi-nals of the wall receptacle. The voltmeter should indicate 110-130 volts ac for 120 volt, 60 Hz locations, or 220- 240 volts ac for 230 volt, 50 Hz locations.
2. Polarity Check - Place the leads of a voltmeter across the LINE (LIVE) and GROUND termi-nals of the wall receptacle. The voltmeter should indicate 110-130 volts ac for 120 volt, 60 Hz locations, or 220- 240 volts ac for 230 volt, 50 Hz locations.
3. Noise Potential Check - Place the test leads of a voltmeter across the NEUTRAL and GROUND terminals of the wall receptacle. The meter should indicate 0 volts ac. A measure-ment greater than 1.5 - 2.0 volts ac could result in problems for the merchandiser's electronic circuitry caused by electrical noise.
NOTEAny deviation from these requirements could resultin unreliable performance from your merchandiser.
Unpacking the MerchandiserRemove all packing materials from the interior of the merchandiser. Keep all documents; warranty cards, etc. Set aside the base plate kit (if present).
Initial Setup Merchant™ Operators’ Guide
August 2009 6 1810025
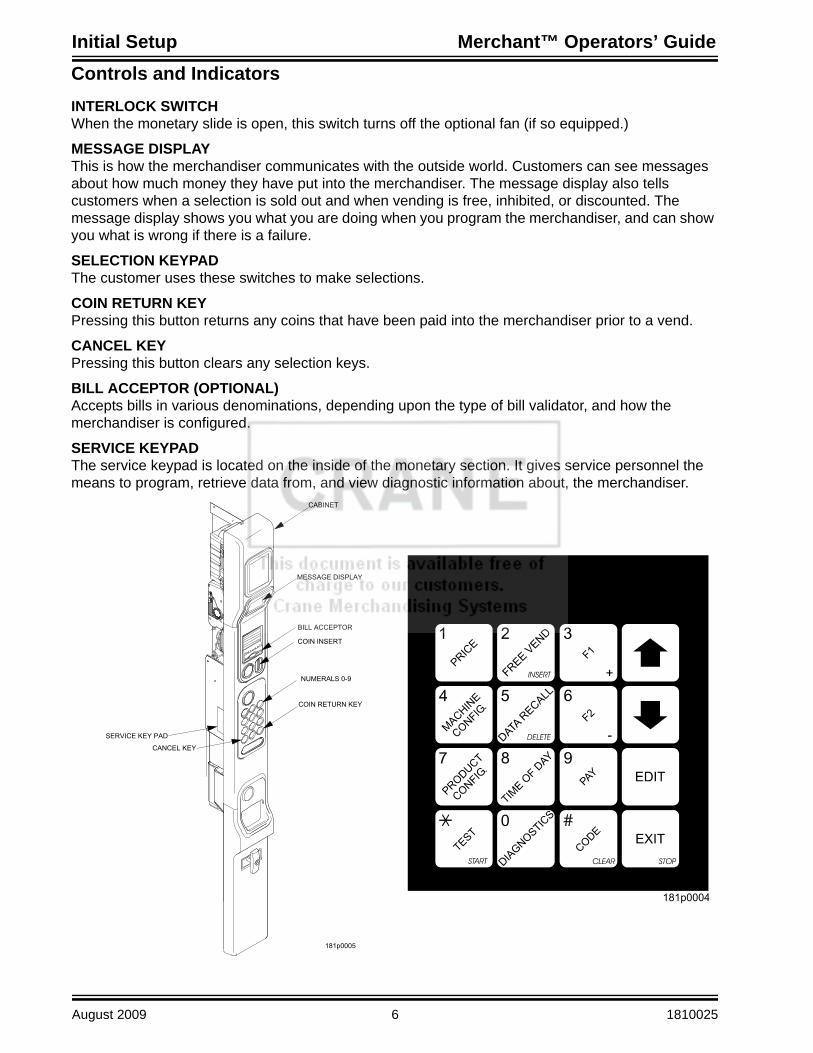
Controls and IndicatorsINTERLOCK SWITCHWhen the monetary slide is open, this switch turns off the optional fan (if so equipped.)
MESSAGE DISPLAYThis is how the merchandiser communicates with the outside world. Customers can see messages about how much money they have put into the merchandiser. The message display also tellscustomers when a selection is sold out and when vending is free, inhibited, or discounted. Themessage display shows you what you are doing when you program the merchandiser, and can show you what is wrong if there is a failure.
SELECTION KEYPADThe customer uses these switches to make selections.
COIN RETURN KEYPressing this button returns any coins that have been paid into the merchandiser prior to a vend.
CANCEL KEYPressing this button clears any selection keys.
BILL ACCEPTOR (OPTIONAL)Accepts bills in various denominations, depending upon the type of bill validator, and how themerchandiser is configured.
SERVICE KEYPADThe service keypad is located on the inside of the monetary section. It gives service personnel the means to program, retrieve data from, and view diagnostic information about, the merchandiser.

Merchant™ Operators’ Guide Initial Setup
1810025 7 August 2009
Controls and Indicators (continued)
MAIN CONTROLLER PCB DISPLAYThis display consists of two light emitting diodes (LED) mounted on the controller PCB.
WARNINGRisk of explosion if battery is replaced with an incorrect type. Battery type is CR2032 / 3V
Dispose of used batteries according to the manufacturer's instructions.
POWER ON(L.E.D. 1)
When lit, this red LED indicates electrical power is applied to thecontroller PCB.
HEARTBEAT(L.E.D. 2)
When flashing, this red LED indicates that the controller PCB is active, and the software is operating.
NORMAL CONDITIONS:When the merchandiser is operating normally, you should see a steady
red POWER ON indicator and a flashing red HEARTBEAT indicator.Contact a service representative if any other condition exists.

Initial Setup Merchant™ Operators’ Guide
August 2009 8 1810025
• Power to the merchandiser is controlled by the main power switch, located on the power panel.
• The power panel is on the right side of the merchandiser, behind the monetary door.
WARNINGLethal voltages are present. Unplug the merchandiser wheneveryou do one of the following tasks:• Change the fluorescent lamp.• Change the ballast.• Connect or disconnect a harness
(except a motor harness when the tray has been removed.)Failure to do so may result in personal injury.
LABEL
MAIN
POWER
SWITCH
ELECTRONICS
BREAKER
O
I
626P0005
U.S./CANADA POWER PANEL INTERNATIONAL POWER PANEL
Turning the Merchandiser ON and OFF

Merchant™ Operators’ Guide Initial Setup
1810025 9 August 2009
Initial Set-UpMoving the Merchandiser Through a Narrow Doorway
NOTEIf necessary, this merchandiser can be moved through an opening as
narrow as 30 inches by removing panels at the top and bottom of the cabinet.
REMOVING THE TOP PANEL(Refer to Figure 1 at right.)
1. Remove the two screws that secure each end of the panel to the cabinet.
2. Pull the panel forward to remove it from the merchandiser.
REMOVING THE LOWER PANELAND DELIVERY BIN(Refer to Figures 2 and 3 at right.)
1. Open the slide-out monetary and the glass door. Locate the silver tab of the delivery bin latch on the lower delivery bin side of themonetary wall.
2. Lift the latch up to allow thedelivery bin assembly to hinge down.
3. Lift up the delivery bin slightly and lift up on the drop rods to allow the rods to clear the stop brackets.
4. Slide the delivery bin assembly to the right to clear the hinges. The delivery bin assembly will not be attached to the machine.
5. Unhook the SureVend™ harness at the SureVend™ board, noting the wire routing.
6. Remove the screws that secure the bottom panel to the cabinet.
7. Pull the panel forward to remove it from the cabinet.
Figure 1
Figure 2
Figure 3
NOTETo fit the merchandiser through
some of the most narrow doorways, you may have to remove the trays.If you do, follow the procedure as
outlined on the following page.

Initial Setup Merchant™ Operators’ Guide
August 2009 10 1810025
REASSEMBLING THEMERCHANDISER
Replace the upper and lower panels and delivery bin.If you are not sure that you can fit your merchandiser through the doorway, use the dimensioned drawing to make a cut out in cardboard. The drawing shown has the following removed:
•Delivery bin assembly •Upper knockout and the anti-theft bar•Lower knockout•Main Glass Door•Trays removed if needed
MOVING THE MERCHANDISER THROUGH THE OPENING1. Open the cabinet door and
place it square with the left side of the cabinet.
2. Carefully walk the merchandiser through the opening.
Moving the Merchandiser Through a Narrow Doorway (continued)CAUTION
Be careful to not damage the tray harnesseswhen removing trays from the merchandiser.
REMOVING THE TRAYS1. Unplug the tray harnesses from the PCB mounted inside the slide-out monetary.2. Pull the harnesses through the cabinet.3. Lift up the front of the tray, so that the stop built into the tray clears the roller, then pull
the tray forward and let it return to horizontal position.Pull the tray forward in the horizontal position until the back stop on the tray hits the roller,then lift the tray straight up to clear the roller and remove the tray from the merchandiser.

Merchant™ Operators’ Guide Initial Setup
1810025 11 August 2009
Positioning the Merchandiser
WARNINGThis merchandiser is only rated forinstallation in an INDOOR location.
Move the merchandiser to its approximate position. (There are some procedures you need to do before it is in its permanent location.) Plug in your merchandiser and turn the power switch to ON.
• You can position this merchandiser anywhere in a bank of machines. It can even be placed on an end flush against a side wall.
• The merchandiser should be located at least one inch away from the back wall.• There should be enough room in front of the merchandiser for the door to move freely.
Now that you have placed your merchandiser near its permanent location, you need to set up some of the special options you may have............... Go on to the next page and continue with the snack section set up.
Snack Section Set-UpPlacing Trays in the Loading Position
WARNINGThe bottom tray will rest on the delivery pan assembly. Take care to avoid striking your fingers against the delivery pan assembly.
1. Lift up the front of the tray, so that the stop built into the tray clears the roller, then pullthe tray forward and let it return to horizontal position.
2. Continue pulling the tray forward, then when you are able, tilt the tray downward into theloading position as shown below.

Initial Setup Merchant™ Operators’ Guide
August 2009 12 1810025
Setting Up Trays to Vend ProductsThese instructions will guide you through setting up your trays for vending. You will be asked to determine if your tray can physically hold the products you intend to vend. If not, you will be directed to other procedures which will help you get them set up. Follow these nine steps for each tray in your merchandiser:1. Make sure the tray is in the loading position.2. Is the column wide enough for the intended product? If so, proceed to the next step. Otherwise,
set up your tray to vend wider products (see below, this page). When you're done, return to step 3 in this procedure.
3. Will the products fit between the spiral turns? If so, proceed to the next step. Otherwise, change the spiral.
4. Will the product pass under the tray immediately above? If so, proceed to the next step.Otherwise, reposition the tray and guides.
5. Will the product touch products on either side? If not, proceed to the next step. Otherwise, install a product spacer.
6. Load products in the tray.7. Return the tray to the vending position.8. Install the price rolls.9. Install the selection ID numbers.
Setting Up Trays to Vend Wide ProductsThe following steps will help you configure your trays to vend wide products. When you havecompleted the procedures called out in each step, return to the next step in the procedure. When you are done with the entire wide product steps, return to the set-up procedures above.1. Remove the tray from the merchandiser, unplug harness and place on a flat surface.2. Based on the size of the product you want to vend, decide how many spiral positions it will
occupy. Please remember that the leftmost spiral in the group must have an ODD ID number (1, 3, 5, etc.) For example, if a product is three spirals wide, the left spiral will be ID number 1, and the right spiral will be ID number 3. Be careful how wide you set up for, because really wide products could get hung up in the delivery door.
3. Remove the column dividers inside the group. In the example of three spiral positions, you would be removing the dividers between spiral ID numbers 1 and 2, and 2 and 3.
4. If your group only consists of 2 spirals, replace the rightmost motor with a spiral bearing and gear, and install a gear on the leftmost motor. Skip to step 8.
5. Remove all spirals in the group except the leftmost spiral.6. Do one of the following:
a. If your group has an ODD number of spirals (3, 5, etc.) remove the harnesses from all motors in the group except the leftmost one. To the rightmost motor, connect the harness from the motor immediately to its left.
b. If your group has an EVEN number of spirals (4, 6, etc.) remove the harnesses from all motors inside the group (leave the harnesses connected to the leftmost and rightmost motors).
7. Install a spiral at the rightmost position in your group. Make sure it has the same product capacity and is opposite to the one in the leftmost position.
8. Return the tray to the merchandiser. See “Installing Standard Trays in the Merchandiser” on page 14
9. Electronically couple the motors as needed Return to step 3 in the section “Setting Up Trays to Vend Products” on page 12, above.

Merchant™ Operators’ Guide Initial Setup
1810025 13 August 2009
Removing Standard TraysCAUTION
Be careful to not damage the tray harnesseswhen removing trays from the merchandiser.
NOTEStudy this procedure before you remove a tray for the first time;
while you are holding the tray you will not be able to see this area.
1. Unplug the tray harnesses from the PCB mounted inside the slide-out monetary.
2. Pull the harnesses through the cabinet.
3. Lift up the front of the tray, so that the stop built into the tray clears the roller, then pull the tray forward and let it return to horizontal position.
4. Pull the tray forward in the horizontal position until the back stop on the tray hits the roller, then lift the tray straight up to clear the roller and remove the tray from the merchandiser.

Initial Setup Merchant™ Operators’ Guide
August 2009 14 1810025
Installing Standard TraysStudy this procedure before you install a tray for the first time; while you are holding the tray you will not be able to see this area.
Proceed as follows:
1. Place the back of the tray inthe machine so the back tabson the tray are behind the trayrail rollers.
2. Slide the tray straight back intothe machine, insuring that the tray axle stop is engaged in the tray rail. Keep pushing the tray back until it hits the front stop.
3. Lift the front of the tray, so thestop built into the tray clears the roller. Push the tray forward and let it return to horizontal. It will “lock in” to place.
4. Load the tray harnesses into the cabinet, over the tray rail and into the cabinet behind the slide out monetary. Reach through the hole provided in the monetary section and grab the tray harness. Plug the Tray harness into the correct PCB tray harness header.
5. Slide the harnesses up into the round hole provided and secure them with the plastic grommet. Pull the slack of the harnesses back into the cabinet.

Merchant™ Operators’ Guide Initial Setup
1810025 15 August 2009
Removing a Bottle TrayCAUTION
Be careful to not damage the tray harnesseswhen removing trays from the merchandiser.
1. Remove all product from the tray.
2. Push down on the left and right front tray latches with your thumbs and slide out the tray as far as it will go.
3. Unplug the tray harnesses from the PCB mounted inside the slide-out monetary.
4. Pull the harnesses through the cabinet.
5. Locate a small lever on each side of the tray, where it attaches to the slide. The left lever will be up, the right will be down. Press down on the left lever and up on the right lever.
6. Pull the tray towards you, off of the slides.
Installing a Bottle Tray1. Push the slides back into the cabinet until they stop.
2. With the tray held at a 45ºangle (with the back higher than the front), align the lower edge of the rail on the tray with the lower edge of the rail in the cabinet on both sides.
3. Slowly raise the shelf to a horizontal position, and push the shelf all the way back into the cabi-net.
4. Push down on the left and right hand front tray latches with your thumbs and slide the tray for-ward against the intermediate stop to test that the tray is correctly engaged.
5. Re-route the harnesses through the cabinet.
6. Plug the tray harnesses into the PCB mounted inside the slide-out monetary.
NOTEIt is much easier to replace a bottle tray if you have assistance lining up the
tray rails and slides.

Initial Setup Merchant™ Operators’ Guide
August 2009 16 1810025
Operating Trays Outside the MerchandiserThe tray harnesses are long enough to remove the trays and set the middle and bottom trayson the floor in front of the merchandiser and the top trays on the top of the merchandiser without unplugging the tray harnesses.
Replacing a Motor With a Spiral BearingREMOVING A MOTOR1. Disconnect the harness from the motor.
(See “Connecting and Disconnecting a Motor Harness” on page 17).2. Remove the spiral. (See “Removing and Installing Spirals” on page 18).3. Remove the spiral coupler. (See “Removing a Spiral Coupler” on page 20).4. Remove the motor. (See “Removing and Installing a Spiral Motor” on page 20).
INSTALLING A SPIRAL BEARING1. Put the gear into position if required in this set-up as shown.
(See “Installing a Gear” on page 21).2. Install the spiral coupler. (See “Installing a Spiral Coupler” on page 22).
A coupled spiral does not use a motor.
Removing and Installing Column Dividers 1. Push the column divider toward the back
of the tray - .2. Lift the column divider clear of the
tray - .3. Install the column divider in the reverse
order of removal.
1
2
SPIRALBEARING
GEAR
SPIRALCOUPLER
BACKWALLOF TRAY
˜

Merchant™ Operators’ Guide Initial Setup
1810025 17 August 2009
Connecting and Disconnecting a Motor Harness
CAUTIONTo avoid breaking the motor circuit board, hold the header on the
circuit board whenever connecting or disconnecting a motor harness.
DISCONNECTING A MOTOR HARNESS
1. Pull the harness connector away from the circuit board as shown.2. Tuck the unused part of the harness out of the way in the trough at the back of the tray.
CONNECTING A MOTOR HARNESS
3. Locate the harness connector for the appropriate tray position.4. Push the harness connector over the header pins on the motor circuit board as shown.

Initial Setup Merchant™ Operators’ Guide
August 2009 18 1810025
Removing and Installing Spirals
• Spirals are available in the capacities shown below.
MODELS 180, 181, 980, 981
ITEM CAPACITYOF SPIRAL
PART NUMBERCLIP
COLOR
Dimension Between
CoilsCOUNTER
CLOCKWISE (LH) CLOCKWISE (RH)
5 (Optional) 1477178 1477179 Orange 4.57”6 (Optional) 1477102 1477104 Purple 3.78”9 (Optional) 1477153 1477150 Gray 2.46”
11 (Standard) 1477024 1477027 Blue 1.98”13 (Standard) 1477030 1477033 Yellow 1.65”15 (Standard) 1477036 1477039 Red 1.41”17 (Standard) 1477100 1477098 Brown 1.23”20 (Standard) 1477042 1477045 White 1.02”25 (Optional) 1477048 1477051 Green .75”30 (Optional) 1477054 1477057 Black .60”38 (Optional) 1477060 1477063 Orange .44”
MODELS 448, 4494 1707048 1707050 Green 3.66”5 1707044 1707046 Tan 2.90”6 1707040 1707042 Purple 2.46”7 1707057 1707059 Brown 2.23”8 1707017 1707019 Gray 1.81”10 1707005 1707007 Blue 1.44”12 1707009 1707011 Yellow 1.18”14 1707013 1707015 Red 1.00”18 1707021 1707023 White .75”
• All spirals are the same diameter:
• There are two types of spirals:
COUNTER-CLOCKWISE (left hand) CLOCKWISE (right hand)

Merchant™ Operators’ Guide Initial Setup
1810025 19 August 2009
Removing and Installing Spirals (continued)REMOVING A SPIRAL1. Pull forward on the retaining clip and
remove the end of the spiral from thespiral coupler as shown.
2. Remove the spiral from the tray.
INSTALLING A SPIRAL1. Pull the bottom of the retaining clip
toward the front of the spiral.2. Lower the spiral into the tray column
and insert the end of the spiral intothe spiral coupler as shown.
3. Release the retaining clip.
SHOULD I USE A CLOCKWISE OR A COUNTERCLOCKWISE SPIRAL?
1. The type of spiral used is determined by the column position it will occupy in the tray.2. Refer to the figure below to find the correct spiral type.
PULL
LIFT
SPIRALRETAINING
CLIP
SPIRALCOUPLER

Initial Setup Merchant™ Operators’ Guide
August 2009 20 1810025
PRONGS
SPIRALCOUPLER
PULL
GEAR
SPIRALCOUPLER
BACKWALLOF TRAY
˜
SPIRALMOTOR
Removing a Spiral Coupler1. Pinch together the prongs on the end of the
spiral coupler as shown.2. Pull the coupler forward in the direction of
the arrow as shown.
Removing and Installing a Spiral MotorREMOVING A SPIRAL MOTOR
NOTESome steps may already be completed.
1. Remove the tray.(See “Removing Standard Trays” on page 13).
2. Disconnect the motor harness. (See “Connecting and Disconnecting a Motor Harness” on page 17).
3. Remove the spiral. (See“Removing and Installing Spirals” on page 18).
4. Remove the spiral coupler. (See “Removing a Spiral Coupler” on page 20).
5. Lift the motor clear of the tray.6. Return the tray to the merchandiser.
INSTALLING A SPIRAL MOTOR1. Remove the tray.
(See “Removing Standard Trays” on page 13).2. Place the motor in the correct position at the rear of
the tray as shown.3. Place a gear in position if required by this set-up.
(See “Installing a Gear” on page 21).4. Install a spiral coupler in the proper orientation.
(See “Installing a Spiral Coupler” on page 22).5. Connect the motor harness.
(See “Connecting and Disconnecting a Motor Harness” on page 17).6. Return the tray to the merchandiser.
See “Installing Standard Trays in the Merchandiser” on page 14

Merchant™ Operators’ Guide Initial Setup
1810025 21 August 2009
Installing a GearWHEN ARE GEARS USED?
• Gears are used to mechanically couple the spirals together.• This happens whenever you have two spirals and only one motor for vending a selection.
WHERE ARE THE GEARS PLACED?• The gear is placed between the back of the tray and the spiral coupler.
HOW IS THE GEAR ORIENTED?• There are two possible orientations for the gear:
• There are two rules to follow when orienting gears:RULE 1 – The gears for single spiral selections next to each other cannot use thesame gear orientation.RULE 2 – All gears for a single coupled or double spiral selection must use thesame orientation.

Initial Setup Merchant™ Operators’ Guide
August 2009 22 1810025
Installing a Spiral Coupler Place the gear in position if one is required for this set-up. (See “Installing a Gear” on page 21.)
WHEN USED WITH A MOTORHold the motor in place and push the spiral coupler through the motor gear box until it clicks into position. Be sure the spiral couplers are oriented as shown below:
NOTEThe motor output shaft opening contains eight facets to allowthe spiral coupler to be installed in any one of eight positions.
SPIRAL COUPLER ORIENTATION
MOTOR
SPIRALCOUPLER
FRONT VIEW OFMOTOR OUTPUT SHAFT
LEFT SPIRALCOUPLER
RIGHT SPIRALCOUPLER
AS VIEWED FROM FRONT OF TRAY
ONE POSITIONCOUNTERCLOCKWISE
FROM VERTICAL
ONE POSITIONCLOCKWISE
FROM VERTICAL

Merchant™ Operators’ Guide Initial Setup
1810025 23 August 2009
Installing a Spiral Coupler (continued)WHEN USED WITH A COUPLER BEARINGHold the coupler bearing in place and push the spiral coupler through the bearing until the coupler clicks into position. Be sure the coupler is in the proper orientation as shown.
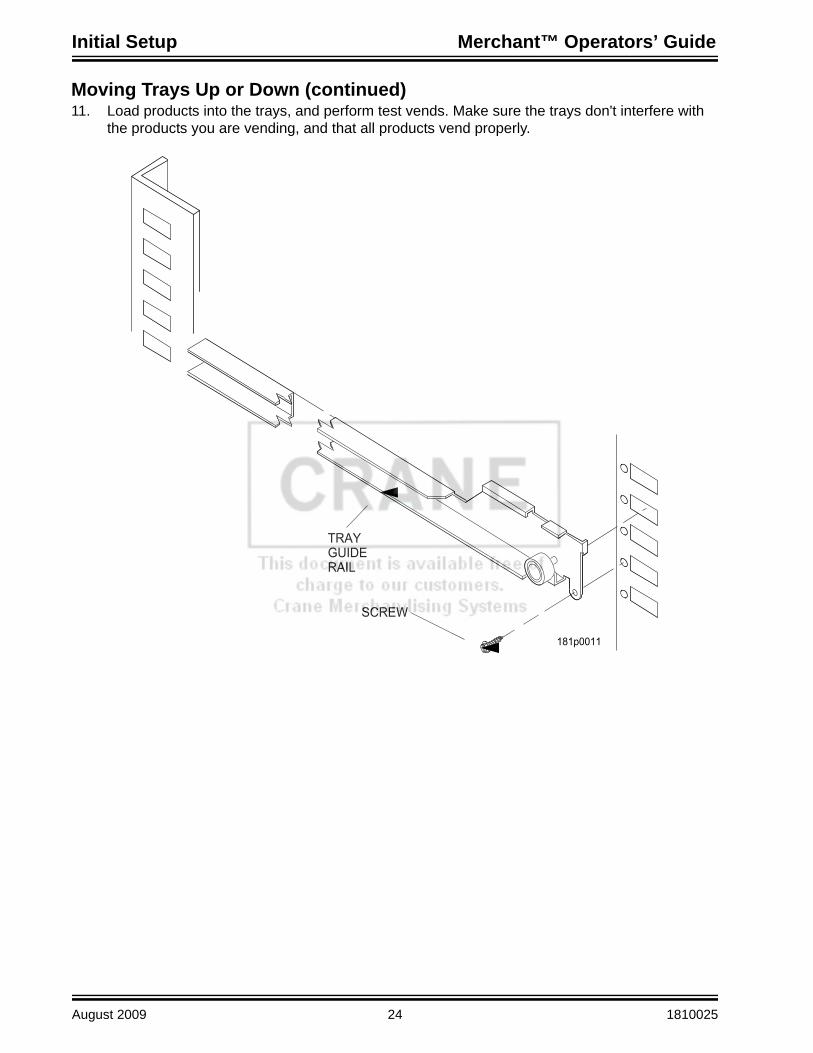
Moving Trays Up or DownThis merchandiser can be adjusted to vend taller products. Some guidelines must be followed:
• Keep in mind that when you increase the product height available to a tray by lowering it, you will be decreasing the product height available to the tray below.
• If a tray is in the lowest position, the tray below it should not be in the highest position.• If a tray is in the highest position, the tray above it should not be in the lowest position.• You will need to experiment with various tray positions to get the best results for your
products.
Proceed as follows:1. Remove the tray from the merchandiser. (See“Removing Standard Trays” on page 13).2. Remove the screw that secures the right tray guide rail to the front guide mounting channel as
shown.3. Tap up on the guide rail and unseat the guide rail tabs from the channel slots.4. Pull the guide rail away from the front and rear guide mounting channels.5. Move the guide rail to the desired position.6. Insert the guide rail tabs into the mounting channel slots as shown.7. Tap down on the guide rail to seat the tabs in the channel slots.8. Replace the screw that secures the guide rail to the front guide mounting channel.9. Repeat steps 2 through 8 for the left guide rail.10. Return the tray to the merchandiser. See “Installing Standard Trays in the Merchandiser” on
page 14
SPIRALCOUPLER
SPIRALBEARING
Initial Setup Merchant™ Operators’ Guide
August 2009 24 1810025
Moving Trays Up or Down (continued)11. Load products into the trays, and perform test vends. Make sure the trays don't interfere with
the products you are vending, and that all products vend properly.

Merchant™ Operators’ Guide Initial Setup
1810025 25 August 2009
Installing and Removing Product Spacers
PRODUCTSPACER
COLUMNDIVIDER
MOUNTINGPINS
MOUNTINGPINS
REMOVING A PRODUCT SPACER
• Pull the product spacer mounting pins from the column divider.
INSTALLING A PRODUCT SPACER
• The product spacer will keep a tall, narrow product upright.• Shown below are spacers and column dividers on both deep and shallow trays.• Insert the product spacer onto the column divider as shown.

Initial Setup Merchant™ Operators’ Guide
August 2009 26 1810025
LOADING TRAYS WITH PRODUCTS IN GENERAL• See “PRODUCT PUSHER USAGE” on page 28 for spirals with capacity of 11, 13, or 15.• See “SPIRAL WALL RETAINER USAGE” on page 27 for spirals with capacity of 20, 25, 30,
or 38.• Begin loading products at the front of the tray and work toward the back. Position the product
so the package rests on the tray. DO NOT force a product into a spiral.• If the fit is too tight or too loose, change the spiral size.
(See “Removing and Installing Spirals” on page 18).• Be sure there are no empty positions between products in each spiral.
SPECIAL CONSIDERATIONS
Bagged Products Position package upright, then push the tops slightly toward the rear ofthe tray. Also, (see “PRODUCT PUSHER USAGE” on page 28).
Thin Packages Position the package upright. Also, (see “SPIRAL WALL RETAINER USAGE” on page 27).
Kit Kat The two right-most columns of the candy tray are designed to accept theKit Kat candy bar.
WARNINGWhen set to “Ambient” or “Chilled Snack” this merchandiser
does not have a health control circuit. It is not approved for the vending of perishable food items in these modes.
MODELS 180, 181, 980, 981
SPIRAL CAPACITY
SPIRAL COUPLER
COLOR
SPIRAL CAPACITY
SPIRAL COUPLER COLOR
6 Purple 20 White11 Blue 25 Green13 Yellow 30 Black15 Red 38 Orange
The color of the spiral coupler(the little plastic tab attachedto the rear of the spiral) willtell you how many productswill fit in the spiral (see thetables at right).
NOTEAnother way to determinespiral capacity is to countthe spaces in the spiral.
MODELS 448, 449SPIRAL
CAPACITYSPIRAL COUPLER
COLOR8 Grey
10 Blue12 Yellow14 Red18 White
Loading Trays with Product
Table 1: SPIRAL CAPACITY COLOR CODES

Merchant™ Operators’ Guide Initial Setup
1810025 27 August 2009
Loading Trays with Product (continued)
• To install a spiral wall retainer, insert the retainer in the square slot near the front of thecolumn divider.
• The spiral wall retainer must be removed in two cases:- A Kit Kat bar loaded into either of the two right hand positions of a tray will not clear the
retainer on the column divider between the two positions.- A product pusher will catch on a retainer in ORIENTATION A.
SPIRALWALL
RETAINER
SPIRAL WALL RETAINER USAGEA spiral wall retainer serves to compress the spiral and make it act like a spring to more forcefully eject a product. Do some test vends and use a spiral wall retainer when a product does not readily leave the spiral.
• Use a spiral wall retainer in the following cases:- The spiral has a capacity of 20, 25, 30, or 38.- The product is thin.- The product is on a candy tray.
• The spiral wall retainer can also be used with other spirals and types of products.
• The spiral wall retainer is installed near the front of the column divider.
There are two ways to install the spiral wall retainer.
ORIENTATION A
DIVIDER
ORIENTATION B
RETAINER ORIENTATION
A B
COLUMN DIVIDER
BETWEEN THESE
POSITIONS
0 and 1 1 and 2
2 and 3 3 and 4
4 and 5 5 and 6
6 and 7 7 and 8
8 and 9

Initial Setup Merchant™ Operators’ Guide
August 2009 28 1810025
LEFT SPIRALCOUPLER
RIGHT SPIRALCOUPLER
AS VIEWED FROM FRONT OF TRAY
ONE POSITIONCOUNTERCLOCKWISE
FROM VERTICAL
ONE POSITIONCLOCKWISE
FROM VERTICAL
PRODUCT PUSHER USAGEThe product pusher will give the top of a product an extra tilt to help it fall into the delivery pan.Use a product pusher in the following cases:
• The spiral has a capacity of 15, 13, or 11.• The package is non-rigid like bagged peanuts.
The product pusher can also be used with other spiral and types of products.A bag of product pushers has been shipped with the merchandiser. Additional product pushers are available from the National Vendors part department. To use a product pusher, snap it on the spiral as shown. You can adjust the product pusher by moving it around on the spiral to achieve the best vending results.
PREPARING THE MERCHANDISER FOR VEND-ING "LUNCH BUCKET"Because of the weight and shape of the package, National Vendors recommends that this product be vended only from the bottom tray.To vend this product, two adjacent positions must be coupled together.(See “Installing a Gear” on page 21 for mechanicalcoupling directions and see “Couple Motors” on page 108 for electrical coupling directions).The left spiral coupler should be installed oneposition counterclockwise from the vertical position.The right spiral coupler should be installed oneposition clockwise from the vertical position.Replace the current spirals with six-count spirals. These are available from the National Vendors parts department. (See “Removing and Installing Spirals” on page 18).A pad can be installed in the bottom of the delivery pan to quiet and cushion product delivery.This part is available from the National Vendors parts department.
Load "Lunch Bucket" products as shown below:
Loading Trays with Product (continued)
Proper Loading of "Lunch Bucket"
FOOD SELECTIONS
LOADED IN SPIRALS
157P0039
PRODUCTPUSHER

Merchant™ Operators’ Guide Initial Setup
1810025 29 August 2009
PREPARING THE MERCHANDISER FOR VENDING "TOP SHELF"
National Vendors recommends that this product be vended from a candy tray.Move the tray so the package can be loaded standing on its left or right edge. (See “Hold the coupler bearing in place and push the spiral coupler through the bearing until the cou-pler clicks into position. Be sure the coupler is in the proper orientation as shown.” on page 23).The following steps must be completed for three adjacent positions on the tray:
NOTEThe left-most position in the group of three
must be an even numbered position.
NOTEIf the motor harness you disconnected in step 5 does not reach, use the
motor skip harness, P/N 1599024, available from the National Vendors Parts Department.
Couple the left motor to the right motor. (See “Couple Motors” on page 108.)
Loading Trays With Product (continued)
1. REMOVE COLUMN
DIVIDERS
2. REMOVE
SPIRALS
7. INSTALL AN 11-COUNT LEFT HAND
SPIRAL IN THIS POSITION
INSTALL AN 11-COUNT RIGHT-HAND
SPIRAL IN THIS POSITION
8.
157P0040
4.
DISCONNECT THIS
MOTOR CONNECTOR
3.
LEAVE THIS MOTOR
CONNECTOR ALONE
5.
MOVE CONNECTOR
FROM THIS MOTOR
6.
TO THIS MOTOR

Initial Setup Merchant™ Operators’ Guide
August 2009 30 1810025
Load the "Top Shelf" products as shown below:
TOP SHELFPRODUCT
Motor Skip Harness
Loading Trays With Product (continued)

Merchant™ Operators’ Guide Initial Setup
1810025 31 August 2009
1. Lift the tray until it is parallel to the floor as shown.
2. Push the tray toward the back of the cabinet.
Returning the Trays to the Vending Position

Initial Setup Merchant™ Operators’ Guide
August 2009 32 1810025
• If the product to be vended is to cost more than $2.35, install per this example:1. Insert the dollar roll in the left-most pair of slots as shown if the price is $1.00 or more.2. Insert the cents roll in the center pair of slots as shown.3. The low-number end of the roll goes in the top slot and the high-number end of the roll goes in
the bottom slot.
Installing and Setting Price Labels
• Price rolls are printed on coiled-up strips as shown in this example. If you use another type of currency, you will find the appropriate price rolls in the plastic bag that contained this manual.
• The price roll installed indicates.30 to 2.35 in.05 increments.• Remove the price rolls as required, and install the appropriate one(s) for your currency.

Merchant™ Operators’ Guide Initial Setup
1810025 33 August 2009
ADJUSTING THE PRICE ROLL
You can set selection prices within the following range:
Minimum price $.00Maximum price $12.95Increment $.05
Use your thumb as shown to move each price roll up or down as needed to set the desired price.
NOTEYou will see the word STOP near either end of the roll.
Installing and Setting Price Labels (continued)
157P0045

Initial Setup Merchant™ Operators’ Guide
August 2009 34 1810025
Selection ID numbers are printed on clear plastic sheets. You will find these in the plastic bag that contained this manual. You will need to separate them along the scored lines between the selections.
CAUTION BE CAREFUL when doing this, because it is easy to split the labels.
TO INSTALL SELECTION ID NUMBERS
1. Press together the two long edges of the selection ID label.2. Snap the selection ID label into position on the front of the tray as shown.
Installing Selection ID Labels

Merchant™ Operators’ Guide Initial Setup
1810025 35 August 2009
WHICH ID LABEL GOES WITH WHICH SELECTION?
See the figures below for snack and candy tray positions.
NOTEThe example above shows a 4-tray merchandiser.
Some merchandisers can have up to 7 trays.
Installing Selection ID Labels (continued)
Table 1: Motor Position
TOP TRAY TRAY 100 101 102 103 104 105 106 107 108 109 110 111 112
TRAY 200 201 202 203 204 205 206 207 208 209 210 211 212
BOTTOM TRAY
TRAY 300 301 302 303 304 305 306 307 308 309 310 311 312
SQUAT TRAY
TRAY 700 702 703 704 705 706 707 708 709 710 711
EXAMPLE OF A BASIC SNACK TRAY
ID LABEL TO USE
EXAMPLE OF A BASIC CANDY TRAY
ID LABEL TO USE
EXAMPLE OF A BASIC SQUAT TRAY
ID LABEL TO USE

Final Installation Merchant™ Operators’ Guide
August 2009 36 1810025
Final InstallationMove the merchandiser to its final position
• You can position this merchandiser anywhere in a bank of machines.It can even be placed on an end flush against a side wall.
• There should be enough room in front of the merchandiser for the door to move freely.
WARNINGThis merchandiser is only rated for installation in an indoor location.
Using a spirit level, adjust the legs until the cabinet is level from side to side and front to back.
NOTEA slight slope from front to back will improve the draining of condensate from merchandisers with
refrigerating units. When the merchandiser is part of a bank of machines, level it in reference to the other machines. After leveling is complete, check that the door operates easily.
Leveling the Merchandiser

Merchant™ Operators’ Guide Final Installation
1810025 37 August 2009
Installing the Base PlateRefer to the figure below while completing the following procedures:
1. Insert the long arms of the slides into the holes in the legs.2. Insert and secure a cotter pin through the hole in the back of each of the slides.3. Push the base plate toward the merchandiser cabinet. The front tabs of the base plate
brackets should seat in the notches in the long arms of the slides.
WARNING!Do not use this base plate on Models 448 or 449!
Doing so could result in damage to the refrigeration unit.

Final Installation Merchant™ Operators’ Guide
August 2009 38 1810025
Once you arrive at the steps that tell you how to setup your coin mechanism, please perform thefollowing steps:
CAUTIONThe main power switch must be turned OFF before you go any further!
1. If not already plugged in, plug the power cord into the electric outlet and turn ON the main power switch.2. Perform the steps outlined in the procedure to “Select the Coin Mechanism” on page 139
Setting Up and Loading the Coin Mechanism
TriTeq Lock Information
If your machine has a TriTeq lock installed in it, please call 1-410-223-2140 for all service issues.

Merchant™ Operators’ Guide Final Checkout
1810025 39 August 2009
Final CheckoutNow, you have connected your merchandiser to the utilities, placed it in its final location, loaded it with products, and set the prices. Before you lock the door and move on, you should check to see if your merchandiser will vend products. In case of problems, perform the operational readiness checks beginning on this page.
1. Perform test vends on all selections.(See “Test Vend a Selection” on page 82.)2. Do any of the snack or candy products catch on the tray and fail to vend? If not, skip to step 3.
If so, perform the following procedures on the affected areas until all products vend properly:a. Install and/or adjust a product spacer. (See “Installing and Removing Product Spacers” on
page 25.) b. Install a product pusher. (See “PRODUCT PUSHER USAGE” on page 28.)c. Install and/or remove spiral wall retainers.(See “SPIRAL WALL RETAINER USAGE” on
page 27.)d. Perform the appropriate spiral anti-hang-up procedure(s) (See the “Spiral Indexing Proce-
dures” on the next page.)3. Test the operation of the coin mechanism (See “Setting Up and Loading the Coin Mechanism”
on page 38 for the proper procedure.)4. Test the operation of the bill validator.(See “Testing the Bill Validator” on page 41.)5. Return all test vended products to the trays.
Operational Readiness Check

Final Checkout Merchant™ Operators’ Guide
August 2009 40 1810025
The spiral indexing procedures involve rotating spirals one position at a time until the productvends properly.1. Home all the motors (see “Homing the Motors - Motor Status Detail” on page 86.)2. Remove the affected spiral.3. Is the coupler in the proper position?
NO - Move the coupler to the position as shown in “Installing a Spiral Coupler” on page 22.Go to step 4.YES - Move the coupler to the next clockwise position (if it's on a right-hand motor), or the next counterclockwise position (if it's on a left-hand motor). Go to step 4.
4. Replace the spiral.5. Perform a test vend (see the previous page).6. Did the product hang up?
NO - You're finished. Continue to test vend the remaining selections until everythingworks properly.YES - Go to step 7.
7. Did you previously move the coupler to the next clockwise or counterclockwise position?NO - Move the coupler to the next clockwise position (if it's on a right-hand motor), or the next counterclockwise position (if it's on a left-hand motor). Return to step 6.YES - Return to step 2 in the operational readiness check and try another procedure. Do not move the coupler again.
The spiral indexing procedures involve rotating spirals one position at a time until the productvends properly.1. Home all the motors (see“Homing the Motors - Motor Status Detail” on page 86.)2. Remove the left hand spiral of the affected pair.3. Is the coupler in the proper position?
NO - Move the coupler to the position as shown in “Installing a Spiral Coupler” on page 22.Go to step 4.YES - Move the left coupler to the next counterclockwise position. Go to step 4.
4. Replace the left hand spiral.5. Remove the right hand spiral, spiral coupler, and gear (if used) of the affected pair as a unit.6. Rotate this unit until the right hand spiral mirrors the position of the left hand spiral.7. Replace the right hand spiral, spiral coupler, and gear (if used).8. Perform a test vend (see “Test Vend a Selection” on page 82.)9. Did the product hang up?
NO - You're finished. Continue to test vend the remaining selections until everythingworks properly.YES - Go to step 10.
10. Did you previously move the left hand coupler to the next counterclockwise position?NO - Remove the left hand spiral of the affected pair. Turn the left spiral coupler to the next counterclockwise position. Return to step 4.YES - Return to step 2 in the operational readiness check and try another procedure. Do not move the coupler again.
Spiral Indexing Procedure (One Spiral, One Motor)
Spiral Indexing Procedure (Two Spirals, One Or Two Motors)

Merchant™ Operators’ Guide Final Checkout
1810025 41 August 2009
Testing the Bill Validator1. Insert a $1 bill into the validator.
2. Push the coin return button.• If Change without Purchase (See “Set Change Without Purchase” on page 141.) is set less
than $1.00 and the bill is stacked - no money is returned - you must make a selection in order to receive any change. Proceed to step 3.
• If Change without Purchase (See “Set Change Without Purchase” on page 141.) is set less than $1.00 and the bill is NOT stacked - the $1.00 bill will be returned.
• If Change without Purchase (See “Set Change Without Purchase” on page 141.) is set to $1.00 or more - you will receive four quarters in change.
3. Make a selection. The correct selection should be vended and correct change should be returned.
NOW WHAT?There are many things you can do with your
merchandiser to make it more flexible. Refer tothe following Programming Section beginningwith “Programming: Introduction” on page 42
for this and other procedures.

Programming: Introduction Merchant™ Operators’ Guide
August 2009 42 1810025
Programming: IntroductionThe DisplayThe Merchant™ features our new interactive menu display. The LCD display makes navigating the programming menu structure easy and intuitive.
The KeypadsThis merchandiser has two keypads:
a. Service Keypad This 16 button keypad is located on the upper left hand side of the monetary assembly and is only available with the merchandiser’s door open. This is the principal keypad operators use to program the merchandiser.
b. Customer Keypad This is the 13 button keypad on the front of the merchandiser. Customers use it to make selections, and operators can use it to enter numbers when programming the merchandiser.
•The top line of the screen is the menu title. •Selected items are highlighted in white.
•Press or to highlight an item.
•Press to select it. In the example at
right, pressing will display the
Screen Contrast menu.
•Pay attention to the bottom line of the display as it often shows important information. In certain configuration menus, it will display the current value for the selected item. In the example above, we can see that the setting for Screen Contrast is reading “= 9”. This is a valuable way to quickly check the settings of the merchandiser, and to confirm that a value you changed is correct.
•To return to the Idle mode from any screen, simply press until the display shows an
idle message.
System SettingsData Transfer 5
Serial FlashBackup/Restore Data Screen ContrastSoftware Version 6
= 9
SERVICE KEYPAD CUSTOMER KEYPAD

Merchant™ Operators’ Guide Programming: Introduction
1810025 43 August 2009
Service Keypad Shortcut KeysFrom the idle mode, these service keys will take you directly to specific programs without having to go through the Main Menu..
Press this button to put your machine into the Price Setting menu. You can see maximumand minimum machine prices, and change prices for entire machine, entire tray, or individual selections.
Press this button to select the Free Vend modes.
Press this button to view the temperature of a cold unit, or software version numbers.
Press this button to enter the System Settings menu to:• Select display language.• Select coin mechanism bill validator,
card reader, and options.
• Set Display Options.• Set Data Transfer Options.• Set Temperature and more.
Press this button to view total sales and vends by whole machine or selection.Clear resettable data.
Press this button to enter the Data Transfer menu (found in System Settings menu):
Press this button to enter the Product Configuration menu to:• Set machine configuration• Set which selections are active• Set FIFO
• Couple/uncouple tray motors• Set up SureVend™ options
Press this button to set time of day and date.
Press this button to fill the coin mech to pay one or more coins from the coin mechanism and to see the tube status.
• Allows you to see any fault in the machine.
Press this button to:• Perform test vends• Test various machine functions
• Test displays
Press this button to enter the Supervisor mode.

Programming: Introduction Merchant™ Operators’ Guide
August 2009 44 1810025
Other KeysThe MOVEMENT keys on the service keypad move you around a menu, and back and forth between menus. Along with the number keys on the Customer Keypad, every function for the Merchant™ can be programmed with these keys.
Use the up and down arrow keys to scroll through any menu list and highlight the
desired option. An option is not selected until it is highlighted and is
pressed.
This key performs these functions: First, from the idle mode, it enters the Main Menu. Second, in a menu screen, it selects the highlighted option and moves to that screen. Third, in a screen that requires a value to be entered, it “locks in” the entered value and moves up to the parent menu.
This is your "end" key. Pressing it one or more times will move you up the menu hierarchy, ending back at the idle mode.
ImportantNote:
When in a screen that requires a selection, use rather than to lock in
the entered value and move up to the previous menu. will move to the
previous menu without locking in the entered value, except on those menu screens using the “X” boxes.

Merchant™ Operators’ Guide Programming: Data Recall
1810025 45 August 2009
Programming: Data RecallView Non Resettable Sales and Vend Data
1. Press until you reach the Main
Menu, then use or to select
Data Recall and press .
2. In the Data Recall menu, use
or to select Non Resetta-
ble Sales Data and press .
3. To view Overall Totals for the merchan-diser, select Overall Totals and press
.
+_
+_
Main MenuData Recall 5
DiagnosticTestPriceProduct Configuration 6
Press EDIT to Select
Data RecallNon Resettable Sales Data 5
Resettable Sales DataTimed EventsIdentification NumbersPrint Data 6
Press EDIT to Select
Non Resettable Sales DataOverall Totals 5
By ProductCashCashlessToken 6
Press EDIT to Select

Programming: Data Recall Merchant™ Operators’ Guide
August 2009 46 1810025
View Non Resettable Sales and Vend Data (continued)
4. The Overall Totals menu displays both the total dollar amount and total vend amountsfor the following data:• Sales • Discount• Test Vend• Surcharge• Free Vend
Overall TotalsSales-$ 688.75 5Sales-# 551Discounts-$ 0.50Discounts-# 5Test Vend-$ 8.75Test Vend-# 7 6
5. For example, Sales-$ Displays the total merchandiser sales in dollars.
Sales-# Displays the total number of merchandiser vends (Sales totals includes Discount and Surcharge totals.)
Discount-$ Displays the total dollar value of all discounts in dollars (ex. 5 discount vends of 10% on $1.00 selection will total $.50.)
Discount-# Displays the total number of discounted vends.
Test Vend-$ Displays the total dollar value of all test vends.
Test Vend-# Displays the total number of test vends.
*Surcharge-$ Displays the total dollar value of all surcharges.
*Surcharge-# Displays the total number of surcharge vends.
Free Vend-$ Displays the total dollar value of free vends.
Free Vend-# Displays the total number of free vends.
* - Surcharge refers to the amount of money charged above the cost to accommodate a coin mech and bill validator function when separate prices are set for card reader.
6. Press and to scroll through the entire list.
7. Press once to return to the Non Resettable Sales Data menu or continue to press
to return to the Main Menu.

Merchant™ Operators’ Guide Programming: Data Recall
1810025 47 August 2009
View Non Resettable Sales and Vend Data By Product
1. Press until you reach the Main
Menu, then use or to
select Data Recall and press .
2. In the Data Recall menu,
use or to select Non
Resettable Sales Data and press
.
3. In the Non Resettable Sales Data
menu, use or to select By
Product and press .
NOTEThe By Product menu lists all
currently programmed selections.
4. Press or to scroll through
the entire list.
5. Highlight a selection and press to
view its sales totals.
+_
+_
+_
Main MenuData Recall 5
DiagnosticTestPriceProduct Configuration 6
Press EDIT to Select
Data RecallNon Resettable Sales Data 5
Resettable Sales DataTimed EventsIdentification NumbersPrint Data 6
Press EDIT to Select
Non Resettable Sales DataOverall Totals 5
By ProductCashCashlessToken 6
Press EDIT to Select
By Product101 5
102103104105 6
Press EDIT to Select

Programming: Data Recall Merchant™ Operators’ Guide
August 2009 48 1810025
View Non Resettable Sales and Vend Data By Product (continued)
6. The Product Total (“XXX”) menu screendisplays the price of the selection, and both the total dollar amount and total vendamount for the following data:• Sales• Discount• Surcharge• Test Vend• Free Vend
101Price-$ 1.25 5Sales-$ 388.75Sales-# 311Discounts-$ 0.45Discounts-# 3Surcharge-$ 0.85 6
For example,
Sales-$ Displays the total merchandiser sales in dollars.
Sales-# Displays the total number of merchandiser vends (Sales totals includes Discount and Surcharge totals.)
Discount-$ Displays the total dollar value of all discounts in dollars (ex. 5 discount vends of 10% on $1.00 selection will total $.50.)
Discount-# Displays the total number of discounted vends.
Test Vend-$ Displays the total dollar value of all test vends.
Test Vend-# Displays the total number of test vends.
*Surcharge-$ Displays the total dollar value of all surcharges.
*Surcharge-# Displays the total number of surcharge vends.
Free Vend-$ Displays the total dollar value of free vends.
Free Vend-# Displays the total number of free vends.
* - Surcharge refers to the amount of money charged above the cost to accommodate a coin mech and bill validator function when separate prices are set for card reader.
7. Press once to return to the By Product menu, twice to return to the Resettable Sales
Data menu, or continue to press until you reach the Main Menu.

Merchant™ Operators’ Guide Programming: Data Recall
1810025 49 August 2009
View Non Resettable Sales and Vend Data - Cash
1. Press until you reach the Main
Menu, then use or to select
Data Recall and press .
2. In the Data Recall menu,
use or to select Non
Resettable Sales Data and press .
3. In the Non Resettable Sales Data menu,
use or to select Cash and
press .
4. The Cash menu displays both the total dollar amount and total vend amountsfor the following data:• Cash In• To Cashbox• To Tubes• Bills In • Dispensed• Man. Dispense• Sales• Discounts• Surcharge• Overpay• Filled• Credited
+_
+_
+_
Main MenuData Recall 5
DiagnosticTestPriceProduct Configuration 6
Press EDIT to Select
Data RecallNon Resettable Sales Data 5
Resettable Sales DataTimed EventsIdentification NumbersPrint Data 6
Press EDIT to Select
Non Resettable Sales DataOverall Totals 5
By ProductCashCashlessToken 6
Press EDIT to Select
CashCash In-$ 153.00 5To Cashbox-$ 65.00To Tubes-$ 88.00Bills In-$ 115.00Dispensed 93.00Man. Dispense 6.00 6

Programming: Data Recall Merchant™ Operators’ Guide
August 2009 50 1810025
View Non Resettable Sales and Vend Data - Cash (continued)
5. For example, Cash In-$ Displays the total cash value in (including manual feed).
To Cashbox-$ Displays the total coin value to the cash box.
To Tubes-$ Displays the total coin value to coin tubes (including manual feed).
Bills In-$ Displays the total bill value in both the recycler and manual dispense.
Dispensed-$ Displays the total cash value dispensed in both the recycler and manual dispense).
Man. Dispense-$ Displays the total cash value dispensed manually and by the recycler.
Sales-$ Displays the total merchandiser sales in dollars.
Sales-# Displays the total number of merchandiser vends (Sales totals includes Discount and Surcharge totals.)
Discount-$ Displays the total dollar value of all discounts in dollars (ex. 5 discount vends of 10% on $1.00 selection will total $.50.)
Discount-# Displays the total number of discounted vends.
*Surcharge-$ Displays the total dollar value of all surcharges.
*Surcharge-# Displays the total number of surcharge vends.
**Overpay-$ Displays the total cash value of overpays.
**Overpay-# Displays the total number of overpays.
Filled-$ Displays the total cash value of overfills.
Filled-# Displays the total number of overfills.
* - Surcharge refers to the amount of money charged above the cost to accommodate a coin mech and bill validator function when separate prices are set for card reader.
** - Overpay allows the customer to make purchases even if there is no change. The merchandiser screen will display “USE EXACT AMOUNT”.
6. Press and to scroll through the entire list.
7. Press once to return to the Non Resettable Sales Data menu or continue to press
to return to the Main Menu.

Merchant™ Operators’ Guide Programming: Data Recall
1810025 51 August 2009
View Non Resettable Sales and Vend Data - Cashless
1. Press until you reach the Main
Menu, then use or to select
Data Recall and press .
2. In the Data Recall menu,
use or to select Non
Resettable Sales Data and press .
3. In the Non Resettable Sales Data menu,
use or to select Cashless
and press .
4. The Cashless menu displays both the total dollar amount and total vend amountsfor the following data:• Sales• Debited• Credited• Discounts• Surcharge• Revalue
+_
+_
+_
Main MenuData Recall 5
DiagnosticTestPriceProduct Configuration 6
Press EDIT to Select
Data RecallNon Resettable Sales Data 5
Resettable Sales DataTimed EventsIdentification NumbersPrint Data 6
Press EDIT to Select
Non Resettable Sales DataOverall Totals 5
By ProductCashCashlessToken 6
Press EDIT to Select
CashlessSales-$ 153.00 5Sales-# 65.00Debited-$ 88.00Debited-# 115.00Credited-$ 93.00Credited-# 6.00 6

Programming: Data Recall Merchant™ Operators’ Guide
August 2009 52 1810025
View Non Resettable Sales and Vend Data - Cashless (continued)
5. For example, Sales-$ Displays the total value of cashless sales.
Sales-# Displays the total number of cashless sales.
Debited-$ Displays the total value of debited sales.
Debited-# Displays the total number of debited sales.
Credited-$ Displays the total value of credited sales.
Credited-# Displays the total number of credited sales.
Discounts-$ Displays the total value of cashless discounts
Discounts-# Displays the total number of cashless discounts.
*Surcharge-$ Displays the total value of cashless surcharges.
*Surcharge-# Displays the total number of cashless surcharges.
**Revalue-$ Displays the total value of revalues.
**Revalue-# Displays the total number of revalues.
* - Surcharge refers to the amount of money charged above the cost to accommodate a coin mech and bill validator function when separate prices are set for card reader.
** - Credits cash that has been deposited into the merchandiser onto a card which is then used for that specific merchandiser. (Only certain card readers offer this option.)
6. Press and to scroll through the entire list.
7. Press once to return to the Non Resettable Sales Data menu or continue to press
to return to the Main Menu.

Merchant™ Operators’ Guide Programming: Data Recall
1810025 53 August 2009
View Non Resettable Sales and Vend Data - Token
1. Press until you reach the Main Menu,
then use or to select Data
Recall and press .
2. In the Data Recall menu,
use or to select Non
Resettable Sales Data and press .
3. In the Non Resettable Sales Data menu,
use or to select Token
and press .
4. The Token menu displays both the total dollar amount and total vend amountsfor the following data:• Vend Token• Value Token• Overpay
+_
+_
+_
Main MenuData Recall 5
DiagnosticTestPriceProduct Configuration 6
Press EDIT to Select
Data RecallNon Resettable Sales Data 5
Resettable Sales DataTimed EventsIdentification NumbersPrint Data 6
Press EDIT to Select
Non Resettable Sales DataOverall Totals 5
By ProductCashCashlessToken 6
Press EDIT to Select
TokenVend Token-$ 153.00 5Vend Token-# 65.00Value Token-$ 88.00Value Token-# 115.00Overpay-$ 93.00Overpay-# 6.00 6

Programming: Data Recall Merchant™ Operators’ Guide
August 2009 54 1810025
View Non Resettable Sales and Vend Data - Token (continued)
5. For example, Vend Token-$ Displays the total values of token vends.
Vend Token-# Displays the total number of token vends.
Value Token-$ *(see below)
Value Token-# *(see below)
Overpay-$ *(see below)
Overpay-# *(see below)
NOTEThe above functions marked with a * are not currently available,
even though they may appear on the menu screen. These functionswill be supported in a future release of merchandiser software.
6. Press and to scroll through the entire list.
7. Press once to return to the Non Resettable Sales Data menu or continue to press
to return to the Main Menu.

Merchant™ Operators’ Guide Programming: Data Recall
1810025 55 August 2009
View Resettable Sales and Vend Data
1. Press until you reach the Main
Menu, then use or to select
Data Recall and press .
2. In the Data Recall menu, use
or to select Resettable Sales
Data and press .
3. To view Resettable Sales Data Overall Totals for the merchandiser, select Overall
Totals and press .
+_
+_
Main MenuData Recall 5
DiagnosticTestPriceProduct Configuration 6
Press EDIT to Select
Data RecallNon Resettable Sales Data 5
Resettable Sales DataTimed EventsIdentification NumbersPrint Data 6
Press EDIT to Select
Resettable Sales DataOverall Totals 5
By ProductCashCashlessToken 6
Press EDIT to Select

Programming: Data Recall Merchant™ Operators’ Guide
August 2009 56 1810025
View Resettable Sales and Vend Data (continued)
4. The Overall Totals menu displays both the total dollar amount and total vend amountfor the following data:• Sales • Discount• Test Vend• Surcharge• Free Vend
Overall TotalsSales-$ 688.75 5Sales-# 551Discounts-$ 0.50Discounts-# 5Test Vend-$ 8.75Test Vend-# 7 6
5. For example, Sales-$ Displays the total merchandiser sales in dollars.
Sales-# Displays the total number of merchandiser vends (Sales totals includes Discount and Surcharge totals.)
Discount-$ Displays the total dollar value of all discounts in dollars (ex. 5 discount vends of 10% on $1.00 selection will total $.50.)
Discount-# Displays the total number of discounted vends.
Test Vend-$ Displays the total dollar value of all test vends.
Test Vend-# Displays the total number of test vends.
*Surcharge-$ Displays the total dollar value of all surcharges.
*Surcharge-# Displays the total number of surcharge vends.
Free Vend-$ Displays the total dollar value of free vends.
Free Vend-# Displays the total number of free vends.
* - Surcharge refers to the amount of money charged above the cost to accommodate a coin mech and bill validator function when separate prices are set for card reader.
6. Press and to scroll through the entire list.
7. Press once to return to the Resettable Sales Data menu or continue to press to
return to the Main Menu.

Merchant™ Operators’ Guide Programming: Data Recall
1810025 57 August 2009
View Resettable Sales and Vend Data By Product
1. Press until you reach the Main
Menu, then use or to select
Data Recall and press .
2. In the Data Recall menu, use
or to select Resettable
Sales Data and press .
3. In the Resettable Sales Data menu, use
or to select By Product and
press .
NOTEThe By Product menu lists all
currently programmed selections.
4. Press or to scroll through the
entire list.
5. Highlight a selection and press to
view its sales totals.
+_
+_
+_
Main MenuData Recall 5
DiagnosticTestPriceProduct Configuration 6
Press EDIT to Select
Data RecallNon Resettable Sales Data 5
Resettable Sales DataTimed EventsIdentification NumbersPrint Data 6
Press EDIT to Select
Resettable Sales DataOverall Totals 5
By ProductCashCashlessToken 6
Press EDIT to Select
By Product101 5
102103104105 6
Press EDIT to Select

Programming: Data Recall Merchant™ Operators’ Guide
August 2009 58 1810025
View Resettable Sales and Vend Data By Product (continued)
6. The Product Total (“XXX”) menu screendisplays the price of the selection, and both the total dollar amount and total vendamount for the following data:• Sales• Discount• Surcharge• Test Vend• Free Vend
101Price-$ 1.25 5Sales-$ 388.75Sales-# 311Discounts-$ 0.45Discounts-# 3Surcharge-$ 0.85 6
For example,
Sales-$ Displays the total merchandiser sales in dollars.
Sales-# Displays the total number of merchandiser vends (Sales totals includes Discount and Surcharge totals.)
Discount-$ Displays the total dollar value of all discounts in dollars (ex. 5 discount vends of 10% on $1.00 selection will total $.50.)
Discount-# Displays the total number of discounted vends.
Test Vend-$ Displays the total dollar value of all test vends.
Test Vend-# Displays the total number of test vends.
*Surcharge-$ Displays the total dollar value of all surcharges.
*Surcharge-# Displays the total number of surcharge vends.
Free Vend-$ Displays the total dollar value of free vends.
Free Vend-# Displays the total number of free vends.
* - Surcharge refers to the amount of money charged above the cost to accommodate a coin mech and bill validator function when separate prices are set for card reader.
7. Press once to return to the By Product menu, twice to return to the Resettable Sales
Data menu, or continue to press until you reach the Main Menu.

Merchant™ Operators’ Guide Programming: Data Recall
1810025 59 August 2009
View Resettable Sales and Vend Data - Cash
1. Press until you reach the Main
Menu, then use or to select
Data Recall and press .
2. In the Data Recall menu,
use or to select
Resettable Sales Data and press .
3. In the Non Resettable Sales Data menu,
use or to select Cash and
press .
4. The Cash menu displays both the total dollar amount and total vend amountsfor the following data:• Cash In• To Cashbox• To Tubes• Bills In • Dispensed• Man. Dispense• Sales• Discounts• Surcharge• Overpay• Filled• Credited
+_
+_
+_
Main MenuData Recall 5
DiagnosticTestPriceProduct Configuration 6
Press EDIT to Select
Data RecallNon Resettable Sales Data 5
Resettable Sales DataTimed EventsIdentification NumbersPrint Data 6
Press EDIT to Select
Resettable Sales DataOverall Totals 5
By ProductCashCashlessToken 6
Press EDIT to Select
CashCash In-$ 153.00 5To Cashbox-$ 65.00To Tubes-$ 88.00Bills In-$ 115.00Dispensed 93.00Man. Dispense 6.00 6

Programming: Data Recall Merchant™ Operators’ Guide
August 2009 60 1810025
View Resettable Sales and Vend Data - Cash (continued)5. For example, Cash In-$ Displays the total cash value in (including manual feed).
To Cashbox-$ Displays the total coin value to the cash box.
To Tubes-$ Displays the total coin value to coin tubes (including manual feed).
Bills In-$ Displays the total bill value in both the recycler and manual dispense.
Dispensed-$ Displays the total cash value dispensed in both the recycler and manual dispense).
Man. Dispense-$ Displays the total cash value dispensed manually and by the recycler.
Sales-$ Displays the total merchandiser sales in dollars.
Sales-# Displays the total number of merchandiser vends (Sales totals includes Discount and Surcharge totals.)
Discount-$ Displays the total dollar value of all discounts in dollars (ex. 5 discount vends of 10% on $1.00 selection will total $.50.)
Discount-# Displays the total number of discounted vends.
*Surcharge-$ Displays the total dollar value of all surcharges.
*Surcharge-# Displays the total number of surcharge vends.
Overpay-$ Displays the total cash value of overpays.
Overpay-# Displays the total number of overpays.
Filled-$ Displays the total cash value of overfills.
Filled-# Displays the total number of overfills.
* - Surcharge refers to the amount of money charged above the cost to accommodate a coin mech and bill validator function when separate prices are set for card reader.
** - Overpay allows the customer to make purchases even if there is no change. The merchandiser screen will display “USE EXACT AMOUNT”.
6. Press and to scroll through the entire list.
7. Press once to return to the Resettable Sales Data menu or continue to press to
return to the Main Menu.

Merchant™ Operators’ Guide Programming: Data Recall
1810025 61 August 2009
View Resettable Sales and Vend Data - Cashless
1. Press until you reach the Main
Menu, then use or to select
Data Recall and press .
2. In the Data Recall menu, use
or to select
Resettable Sales Data and press .
3. In the Resettable Sales Data menu, use
or to select Cashless and
press .
4. The Cashless menu displays both the total dollar amount and total vend amountsfor the following data:• Sales• Debited• Credited• Discounts• Surcharge• Revalue
+_
+_
+_
Main MenuData Recall 5
DiagnosticTestPriceProduct Configuration 6
Press EDIT to Select
Data RecallNon Resettable Sales Data 5
Resettable Sales DataTimed EventsIdentification NumbersPrint Data 6
Press EDIT to Select
Resettable Sales DataOverall Totals 5
By ProductCashCashlessToken 6
Press EDIT to Select
CashlessSales-$ 153.00 5Sales-# 65.00Debited-$ 88.00Debited-# 115.00Credited-$ 93.00Credited-# 6.00 6

Programming: Data Recall Merchant™ Operators’ Guide
August 2009 62 1810025
View Resettable Sales and Vend Data - Cashless (continued)
5. For example,
Sales-$ Displays the total value of cashless sales.
Sales-# Displays the total number of cashless sales.
Debited-$ Displays the total value of debited sales.
Debited-# Displays the total number of debited sales.
Credited-$ Displays the total value of credited sales.
Credited-# Displays the total number of credited sales.
Discounts-$ Displays the total value of cashless discounts
Discounts-# Displays the total number of cashless discounts.
*Surcharge-$ Displays the total value of cashless surcharges.
*Surcharge-# Displays the total number of cashless surcharges.
**Revalue-$ Displays the total value of revalues.
**Revalue-# Displays the total number of revalues.
* - Surcharge refers to the amount of money charged above the cost to accommodate a coin mech and bill validator function when separate prices are set for card reader.
** - Credits cash that has been deposited into the merchandiser onto a card which is then used for that specific merchandiser. (Only certain card readers offer this option.)
6. Press and to scroll through the entire list.
7. Press once to return to the Non Resettable Sales Data menu or continue to press
to return to the Main Menu.

Merchant™ Operators’ Guide Programming: Data Recall
1810025 63 August 2009
View Resettable Sales and Vend Data - Token
1. Press until you reach the Main Menu,
then use or to select Data
Recall and press .
2. In the Data Recall menu,
use or to select
Resettable Sales Data and press .
3. In the Non Resettable Sales Data menu,
use or to select Token
and press .
4. The Token menu displays both the total dollar amount and total vend amountsfor the following data:• Vend Token• Value Token• Overpay
+_
+_
+_
Main MenuData Recall 5
DiagnosticTestPriceProduct Configuration 6
Press EDIT to Select
Data RecallNon Resettable Sales Data 5
Resettable Sales DataTimed EventsIdentification NumbersPrint Data 6
Press EDIT to Select
Resettable Sales DataOverall Totals 5
By ProductCashCashlessToken 6
Press EDIT to Select
TokenVend Token-$ 153.00 5Vend Token-# 65.00Value Token-$ 88.00Value Token-# 115.00Overpay-$ 93.00Overpay-# 6.00 6

Programming: Data Recall Merchant™ Operators’ Guide
August 2009 64 1810025
View Resettable Sales and Vend Data - Token (continued)
5. For example, Vend Token-$ Displays the total values of token vends.
Vend Token-# Displays the total number of token vends.
Value Token-$ *(see below)
Value Token-# *(see below)
Overpay-$ *(see below)
Overpay-# *(see below)
6. Press and to scroll through the entire list.
7. Press once to return to the Resettable Sales Data menu or continue to press to
return to the Main Menu.
NOTEThe above functions marked with a * are not currently available,
even though they may appear on the menu screen. These functionswill be supported in a future release of merchandiser software.

Merchant™ Operators’ Guide Programming: Data Recall
1810025 65 August 2009
Clear Resettable Sales and Vend Data
1. Press until you reach the Main
Menu, then use or to select
Data Recall and press .
2. In the Data Recall menu, use
or to select Resettable
Sales Data and press .
NOTETo access the Clear Data menu screen, you must first have entered the Supervisor’s PIN code. For instructions on entering this code, refer to “Enter Security Code” on page 193.
3. In the Resettable Data screen, select
Clear Data and press .
4. The Clear Data screen confirms that you want to clear resettable data.
a. Press to clear the data.
b. Press to exit without clearing
the data.
5. After clearing data, you will automatically return to the Resettable Sales Data menu
screen. Press once to return to the
Data Recall menu screen or twice to return to the Main Menu.
+_
+_
Main MenuData Recall 5
DiagnosticTestPriceProduct Configuration 6
Press EDIT to Select
Data RecallNon Resettable Sales Data 5
Resettable Sales DataTimed EventsIdentification NumbersPrint Data 6
Press EDIT to Select
Resettable Sales Data By Product 5
CashCashlessTokenClear Data 6
Press EDIT to select
Clear Data
Are you sure you want to set all resettable
data to zero?
CANCEL-EXIT CONITNUE-*

Programming: Data Recall Merchant™ Operators’ Guide
August 2009 66 1810025
View Timed Events - Main Door Openings
1. Press until you reach the Main
Menu, then use or to select
Data Recall, and press .
2. In the Data Recall menu, use
or to select Timed Events
and press .
3. In the Timed Events menu, use
or to select Main Door
Openings and press .
4. The Main Door Openings screen displays a list of dates, times and durations of main door openings.
5. Press once to return to the
Timed Events menu, twice to return to the Data Recall menu, or three times to return to the Main Menu.
NOTEEach option in the Timed Events
menu has a maximum of 16 eventsthat can be viewed and/or set.
+_
+_
+_
Main MenuData Recall 5
DiagnosticTestPriceProduct Configuration 6
Press EDIT to Select
Data RecallNon Resettable Sales Data 5
Resettable Sales DataTimed EventsIdentification NumbersPrint Data 6
Press EDIT to Select
Timed EventsMain Door Openings 5
Power LossesLast Data Clear Last Price SettingLast Vend 6
Press EDIT to Select
Main Door Openings03-03-07 17:40 10 min 5
6

Merchant™ Operators’ Guide Programming: Data Recall
1810025 67 August 2009
View Timed Events - Power Losses
1. Press until you reach the Main
Menu, then use or to select
Data Recall, and press .
2. In the Data Recall menu, use
or to select Timed Events
and press .
3. In the Timed Events menu, use
or to select Power Losses
and press .
4. The Power Losses screen displays a list of dates, times and durations of power losses.
5. Press once to return to the
Timed Events menu, twice to return to the Data Recall menu, or three times to return to the Main Menu.
NOTEEach option in the Timed Events
menu has a maximum of 16 eventsthat can be viewed and/or set.
+_
+_
+_
Main MenuData Recall 5
DiagnosticTestPriceProduct Configuration 6
Press EDIT to Select
Data RecallNon Resettable Sales Data 5
Resettable Sales DataTimed EventsIdentification NumbersPrint Data 6
Press EDIT to Select
Timed EventsMain Door Openings 5
Power LossesLast Data Clear Last Price SettingLast Vend 6
Press EDIT to Select
Power Losses 03-15-07 11:20 15 min 5
6

Programming: Data Recall Merchant™ Operators’ Guide
August 2009 68 1810025
View Timed Events - Last Data Clear
1. Press until you reach the Main Menu,
then use or to select Data
Recall and press .
2. In the Data Recall menu, use
or to select Timed Events
and press .
3. In the Timed Events menu, use
or to select Last Data Clear
and press .
4. The Last Data Clear screen displays the date and time of the last data clear.
5. Press once to return to the
Timed Events menu, twice to return to the Data Recall menu, or three times to returnto the Main Menu.
NOTEEach option in the Timed Events
menu has a maximum of 16 eventsthat can be viewed and/or set.
+_
+_
+_
Main MenuData Recall 5
DiagnosticTestPriceProduct Configuration 6
Press EDIT to Select
Data RecallNon Resettable Sales Data 5
Resettable Sales DataTimed EventsIdentification NumbersPrint Data 6
Press EDIT to Select
Timed EventsMain Door Openings 5
Power LossesLast Data Clear Last Price SettingLast Vend 6
20-12-07 09:38
Last Data Clear 20-12-07 09:38

Merchant™ Operators’ Guide Programming: Data Recall
1810025 69 August 2009
View Timed Events - Last Price Setting
1. Press until you reach the Main
Menu, then use or to select
Data Recall and press .
2. In the Data Recall menu, use
or to select Timed Events
and press .
3. In the Timed Events menu, use
or to select Last Price
Setting and press .
4. The Last Price Setting screen displays the date and time of the last price setting.
5. Press once to return to the
Timed Events menu, twice to return to the Data Recall menu, or three times to return to the Main Menu.
NOTEEach option in the Timed Events
menu has a maximum of 16 eventsthat can be viewed and/or set.
+_
+_
+_
Main MenuData Recall 5
DiagnosticTestPriceProduct Configuration 6
Press EDIT to Select
Data RecallNon Resettable Sales Data 5
Resettable Sales DataTimed EventsIdentification NumbersPrint Data 6
Press EDIT to Select
Timed EventsMain Door Openings 5
Power LossesLast Data Clear Last Price SettingLast Vend 6
20-12-07 13:20
Last Price Setting 20-12-07 13:20

Programming: Data Recall Merchant™ Operators’ Guide
August 2009 70 1810025
View Timed Events - Last Vend
1. Press until you reach the Main
Menu, then use or to select
Data Recall and press .
2. In the Data Recall menu, use
or to select Timed Events
and press .
3. In the Timed Events menu, use
or to select Last Vend and
press .
4. The Last Vend screen displays the date and time of the last vend.
5. Press once to return to the
Timed Events menu, twice to return to the Data Recall menu, or three times to return to the Main Menu screen.
NOTEEach option in the Timed Events
menu has a maximum of 16 eventsthat can be viewed and/or set.
+_
+_
+_
Main MenuData Recall 5
DiagnosticTestPriceProduct Configuration 6
Press EDIT to Select
Data RecallNon Resettable Sales Data 5
Resettable Sales DataTimed EventsIdentification NumbersPrint Data 6
Press EDIT to Select
Timed EventsMain Door Openings 5
Power LossesLast Data Clear Last Price SettingLast Vend 6
101
Last Vend
10116-07-08 09:30

Merchant™ Operators’ Guide Programming: Data Recall
1810025 71 August 2009
View Timed Events - Last Clock Set
1. Press until you reach the Main Menu,
then use or to select Data
Recall and press .
2. In the Data Recall menu, use
or to select Timed Events and
press .
3. In the Timed Events menu, use
or to select Last Clock Set
and press .
4. The Last Clock Set screen displays the last date and time the clock was set.
5. Press once to return to the
Timed Events menu, twice to return to the Data Recall menu, or three times to return to the Main Menu screen.
NOTEEach option in the Timed Events
menu has a maximum of 16 eventsthat can be viewed and/or set.
+_
+_
+_
Main MenuData Recall 5
DiagnosticTestPriceProduct Configuration 6
Press EDIT to Select
Data RecallNon Resettable Sales Data 5
Resettable Sales DataTimed EventsIdentification NumbersPrint Data 6
Press EDIT to Select
Timed EventsLast Data Clear 5
Last Price SettingLast Vend Last Clock SetLast Timed Backup 6
20-06-08 10:30
Last Clock Set 20-06-08 10:30

Programming: Data Recall Merchant™ Operators’ Guide
August 2009 72 1810025
View Timed Events - Last Timed Backup
1. Press until you reach the Main
Menu, then use or to select
Data Recall and press .
2. In the Data Recall menu, use
or to select Timed Events
and press .
3. In the Timed Events menu, use
or to select Last Timed
Backup and press .
4. The Last Timed Backup screen displays the last date and time a timed backup was performed.
5. Press once to return to the
Timed Events menu, twice to return to the Data Recall menu, or three times to return to the Main Menu screen.
NOTEEach option in the Timed Events
menu has a maximum of 16 eventsthat can be viewed and/or set.
+_
+_
+_
Main MenuData Recall 5
DiagnosticTestPriceProduct Configuration 6
Press EDIT to Select
Data RecallNon Resettable Sales Data 5
Resettable Sales DataTimed EventsIdentification NumbersPrint Data 6
Press EDIT to Select
Timed EventsLast Data Clear 5
Last Price SettingLast Vend Last Clock SetLast Timed Backup 6
15-06-08 11:25
Last Timed Backup 15-06-08 11:25

Merchant™ Operators’ Guide Programming: Data Recall
1810025 73 August 2009
View Identification Numbers - Main PCB
1. Press until you reach the Main
Menu, then use or to select
Data Recall and press .
2. In the Data Recall menu, use
or to select Identification
Numbers and press .
4. In the Identification Numbers menu, use
or to select Main PCB and
press .
5. In the Main PCB menu, you can view:
• S/N - Serial number of board
• Model - Model number of board
• Version - Version of board software
6. Press once to return to the
Main PCB menu, twice to return to the Identification Numbers menu or con-
tinue to press until you reach the
Main Menu.
+_
+_
+_
Main MenuData Recall 5
DiagnosticTestPriceProduct Configuration 6
Press EDIT to Select
Data RecallNon Resettable Sales Data 5
Resettable Sales DataTimed EventsIdentification NumbersPrint Data 6
Press EDIT to Select
Identification NumbersMain PCB 5
Coin MechanismBill Validator
6
Press EDIT to Select
Main PCBS/N 1 5
Model 99889850Version 181.01.00.C
6

Programming: Data Recall Merchant™ Operators’ Guide
August 2009 74 1810025
View Identification Numbers - Coin Mechanism
1. Press until you reach the Main
Menu, then use or to select
Data Recall and press .
2. In the Data Recall menu, use
or to select Identification
Numbers and press .
NOTEThe Coin Mechanism selection will only
be available if an MDB level 3 or higher coin mechanism is installed in your merchandiser.
3. In the Identification Numbers menu,
use or to select Coin
Mechanism and press .
4. The Coin Mechanism screen will displaythe serial number, manufacturer information, the model and the version of the installedcoin mechanism.
5. Press once to return to the
Identification Numbers menu, twiceto return to the data Recall menu, or three times to return to the Main Menu.
+_
+_
+_
Main MenuData Recall 5
DiagnosticTestPriceProduct Configuration 6
Press EDIT to Select
Data RecallNon Resettable Sales Data 5
Resettable Sales DataTimed EventsIdentification NumbersPrint Data 6
Press EDIT to Select
Identification NumbersMain PCB 5
Coin MechanismBill ValidatorCard Reader
6
Press EDIT to Select
Coin MechanismS/N 5
Manuf.Model Version
6

Merchant™ Operators’ Guide Programming: Data Recall
1810025 75 August 2009
View Identification Numbers - Bill Validator
1. Press until you reach the Main
Menu, then use or to select
Data Recall and press .
2. In the Data Recall menu, use
or to select Identification
Numbers and press .
3. In the Identification Numbers menu,
use or to select Bill
Validator and press .
4. The Bill Validator screen will displaythe serial number, manufacturer information, the model and the version of the installed bill validator.
5. Press once to return to the
Identification Numbers menu, twiceto return to the data Recall menu, or three times to return to the Main Menu.
+_
+_
+_
Main MenuData Recall 5
DiagnosticTestPriceProduct Configuration 6
Press EDIT to Select
Data RecallNon Resettable Sales Data 5
Resettable Sales DataTimed EventsIdentification NumbersPrint Data 6
Press EDIT to Select
Identification NumbersMain PCB 5
Coin MechanismBill ValidatorCard Reader
6
Press EDIT to Select
Bill ValidatorS/N 5
Manuf.Model Version
6

Programming: Data Recall Merchant™ Operators’ Guide
August 2009 76 1810025
View Identification Numbers - Card Reader
1. Press until you reach the Main
Menu, then use or to select
Data Recall and press .
2. In the Data Recall menu, use
or to select Identification
Numbers and press .
NOTEThe Card Reader selection will
only be available if a card reader isinstalled in your merchandiser.
3. In the Identification Numbers menu,
use or to select Card
Reader and press .
4. The Card Reader screen will displaythe serial number, manufacturer information, the model and the version of the installed card reader.
5. Press once to return to the
Identification Numbers menu, twiceto return to the data Recall menu, or three times to return to the Main Menu.
+_
+_
+_
Main MenuData Recall 5
DiagnosticTestPriceProduct Configuration 6
Press EDIT to Select
Data RecallNon Resettable Sales Data 5
Resettable Sales DataTimed EventsIdentification NumbersPrint Data 6
Press EDIT to Select
Identification NumbersMain PCB 5
Coin MechanismBill ValidatorCard Reader
6
Press EDIT to Select
Card ReaderS/N 5
Manuf.Model Version
6

Merchant™ Operators’ Guide Programming: Data Recall
1810025 77 August 2009
Print Data
1. Press until you reach the
Main Menu, then use or to
select Data Recall and press .
2. In the Data Recall menu, use
or to select Print Data and
press .
4. To print data using an external printer, press;1 to print All Data2 to print Overall Totals3 to print By Product4 to print Cash
5. Press once to return to the
Data Recall menu or twice to return to the Main Menu screen.
+_
+_
Main MenuData Recall 5
DiagnosticTestPriceProduct Configuration 6
Press EDIT to Select
Data RecallNon Resettable Sales Data 5
Resettable Sales DataTimed EventsIdentification NumbersPrint Data 6
Press EDIT to Select
Print DataPress Data Type
1 All Data2 Overall Totals3 By Product4 Cash

Programming: Diagnostic Merchant™ Operators’ Guide
August 2009 78 1810025
Programming: DiagnosticCheck for Errors
1. Press until you reach the Main Menu,
then use or to select
Diagnostic and press .
2. In the Diagnostic screen, if there are no errors, the screen will display “No Errors”. If an error code does display, see the tableof “Diagnostic Error Messages” on page 79 to learn about the error code(s) displayed.
3. Press once to return to
the Main Menu.
+_
Main MenuData Recall 5
DiagnosticTestPriceProduct Configuration 6
No Errors
Diagnostic
No Errors

Merchant™ Operators’ Guide Programming: Diagnostic
1810025 79 August 2009
DIAGNOSTIC ERROR MESSAGES
ERROR MESSAGE ERROR DESCRIPTION
All Bills Disabled The bill validator has been disabled.
All Coins Disabled The coin mech is reporting that all the coin tubes are disabled and are out of service.
All Selections Disabled All of the machine selections have been disabled by the user.
Bill Validator Accept Jam A bill is jammed in the acceptance path of the bill validator.
Bill Validator Comm Communication has been lost between the main controller and the bill validator. Check wiring harnesses and bill validator.
Bill Validator Motor The bill validator is reporting a defective motor.
Bill Validator ROM The bill validator is reporting a ROM checksum error.
Bill Validator Sensor The bill validator is reporting a sensor problem.
Bill Validator Stacker is Full The bill stacker in the bill validator is full.
Bill Validator Stacker is open The bill validator stacker is open or removed.
Cabinet Temperature Sensor Error
An error has been reported from the cabinet temperature sensor or the sensor is not plugged in properly to the IO Board
Card Jammed in Card Reader Card reader has failed because a card is jammed in the unit.
Card Reader Comm Communication has been lost between the main controller and the card reader. Check wiring harnesses and card reader.
Card Reader Error The card reader is reporting a repeating error.
Card Reader Failed OOS Err The card reader is reporting a failure and is out of service.
Card Reader Failure The card reader has reported a failure and is out of service.
Card Reader Reports a Comm Error & is OOS
Card reader is reporting a communication problem and is out of service.
Card Reader Reports a Comm Error
The card reader is reporting a repeating communication error but is operational.
Card Reader Requests Servicing Card reader indicates that it requires service, reader is still operational.
Check Prices An Invalid price has been set.
Check Winner Prize The selection chosen for the winner prize is not valid.
Coin Mech Accept Jam The coin mech is reporting that a coin is jammed in the acceptor section.
Coin Mech Accept Unplugged The coin mech is reporting that the coin acceptor is unplugged from the main body of the coin mech and is out of service.

Programming: Diagnostic Merchant™ Operators’ Guide
August 2009 80 1810025
Coin Mech All Tubes Err The coin mech is reporting errors in all the coin tubes and is out of service.
Coin Mech Comm Communication has been lost between the main controller and the coin mechanism. Check wiring harnesses and coin mech.
Coin Mech Payout Jam The coin mech is reporting that a tube payout attempt has resulted in a jammed condition, it is still operational.
Coin Mech ROM The coin mech is reporting a ROM failure and is out of service.
Coin Mech Tube Err The coin mech is reporting a tube error, it is still operational.
Coin Mech Tube Sensor The coin mech is reporting a tube sensor error, it is still operational.
Coin Return Motor Not Present The coin return motor is not connected.
Coin Return Motor Run Time Timeout The coin return motor is jammed.
Coin Return Motor Short Circuit The coin return motor is reporting a short circuit.
Coin Return Motor Drive Failure The coin return motor is reporting a motor error.
Condenser Coil Sensor Error An error has been reported from the condenser coil temperature sensor or the sensor is not plugged in properly to the IO Board.
Condenser High Side Service Required: Warning
The condenser is running at too high of a temperature for an extended amount of time. Clean the condenser, check the fan motor and clean the screen.
Condenser High Side Service Required: Fatal
The condenser is running at too high of a temperature for an extended amount of time. Clean the condenser, check the fan motor and clean the screen. Refrigeration has been disabled; power cycle is required to clear.
Evaporator Coil Sensor Error An error has been reported from the evaporator coil temperature sensor or the sensor is not plugged in properly to the IO Board.
Exec Mech Price Error The exec coin mechanism is reporting a price error.
Factory Init Occurred A factory initialization has occurred while the door was closed. The door must be closed while the power is on to clear this diagnostic.
Health Control Error On a refrigerated Merchant the cabinet temperature has exceeded 41ºF for an extended amount of time.
Init Failed The snack motor interface has failed to initialize.
IO Board Voltage The IO board voltage is out of the normal range.
Low Change The machine is currently low on change. The low change threshold is user defined.
No Errors Indicates there are no errors in the system.
No I/O Comm Communication between the main controller and the IO board has been lost. Check wiring harnesses.
DIAGNOSTIC ERROR MESSAGES

Merchant™ Operators’ Guide Programming: Diagnostic
1810025 81 August 2009
No Monetary Device There are no monetary devices present. The machine is still operational.
No Monetary Device - Fatal There are no monetary devices present. The machine will be out of service.
Refrigeration Low Side Service Required: Warning
The IO board has reported that the machine has re-entered defrost too quickly. Cleared on a door close.
Refrigeration Low Side Service Required: Fatal
The IO board has reported that the machine has re-entered defrost too quickly. Service is required. Power cycle required to clear.
Single Card Reader Error The card reader has reported a single error.
Snack Motor Error The indicated selection is reporting a snack motor error. View the individual motor detail of this selection for more information.
Sold Out Selection The indicated selection is sold out.
Stuck Key The main controller has detected a single stuck key.
Stuck Keys - Fatal The main controller has detected two or more stuck keys and the machine is out of service.
SureVend Anti Jackpot Error SureVend has detected multiple sold out selections since the last door closure. The Anti-Jackpot trigger is user defined.
SureVend Calibration Error SureVend is reporting a short circuit.
SureVend Comm Error The IO board has lost communication with SureVend. Check wiring harnesses.
SureVend Is Blocked SureVend is reporting a blocked sensor.
DIAGNOSTIC ERROR MESSAGES

Programming: Test Merchant™ Operators’ Guide
August 2009 82 1810025
Programming: TestTest Vend a Selection
1. Press until you reach the Main Menu,
then use or to select Test
and press .
2. In the Test menu, use or to
select Test Vend and press .
3. Make a selection (Example: 1-0-3), then press the OK button.
4. The merchandiser will dispense theselection and return to the originalTest Vend menu.
5. Test vend another selection, or press
once to return to the Test menu or twice to return to the Main Menu.
NOTEIf Merchant™ door is shut while the
menu is on the Test Vend or theTest Vend w/o SureVend screens,
the screen will be displayed until oneTest Vend or Test Vend w/o
SureVend is completed.
+_
+_
Main MenuData Recall 5
DiagnosticTestPriceProduct Configuration 6
Press EDIT to Select
TestTest Vend 5
Test Vend w/o SureVendSureVend DetectorsMotor Test SummaryMotor Status Detail 6
Press EDIT to Select
Test Vend
Insert Moneyor
Make a Selection
Credit 0.00 12:56
Test Vend
103Price: $1.25
Credit 0.00 12:56

Merchant™ Operators’ Guide Programming: Test
1810025 83 August 2009
Test Vend Without SureVend™
1. Press until you reach the
Main Menu, then use or to
select Test and press .
2. In the Test menu, use or to
select Test Vend w/o SureVend and
press .
3. Make a selection (Ex. 1-0-3), then press the OK button.
4. The merchandiser will dispense theselection and return to the originalTest Vend w/o SureVend menu.
5. Test vend another selection, or press
once to return to the Test menu or twice to return to the Main Menu.
NOTEIf Merchant™ door is shut while the
menu is on the Test Vend or theTest Vend w/o SureVend screens,
the screen will be displayed until oneTest Vend or Test Vend w/o
SureVend is completed.
+_
+_
Main MenuData Recall 5
DiagnosticTestPriceProduct Configuration 6
Press EDIT to Select
TestTest Vend 5
Test Vend w/o SureVendSureVend DetectorsMotor Test SummaryMotor Status Detail 6
Press EDIT to Select
Test Vend w/o SureVend
Insert Moneyor
Make a Selection
Credit 0.00 12:56
Test Vend
103Price: $1.25
Credit 0.00 12:56

Programming: Test Merchant™ Operators’ Guide
August 2009 84 1810025
Test SureVend™ Calibration
1. Press until you reach the Main
Menu, then use or to select
Test, and press .
2. In the Test menu, use or to
select SureVend Calibration and
press .
3. The SureVend Calibration screen willdisplay the Calibration Values as the machine cycles through the SureVendCalibration test.
NOTE The first sensor calibration value shownin the top line of the calibration valuesis for the sensor which is located in theback of the merchandiser, farthest from
the front door. The last sensor calibrationvalue shown in the bottom line of the
calibration values is for the sensor which is located in the front, closest to the front door.
The calibration values indicate“gain”. The lower calibration (gain)
values are desirable. (Optimal rangeis 4). High calibration (gain) values indicate a problem with the sensor.
+_
+_
Main MenuData Recall 5
DiagnosticTestPriceProduct Configuration 6
Press EDIT to Select
TestTest Vend 5
Test Vend w/o SureVendSureVend CalibrationMotor Test SummaryMotor Status Detail 6
Press EDIT to Select
SureVend CalibrationCalibration Values4 5 4 5 4
4 4 4 4

Merchant™ Operators’ Guide Programming: Test
1810025 85 August 2009
Testing the Motors - Motor Test Summary
1. Press until you reach the
Main Menu, then use or to
select Test and press .
2. In the Test menu, use or
to select Motor Test Summary and
press .
3. The Motor Test Summary screen will appear, and will cycle through one screen while motors are being pinged.
4. The Motor Test Summary status screenwill then appear, indicating information on homed and present motors and indicating errors. If any motors are unhomed or have any other error status, they will be indicated as Errors. If this is the case, you will need to home the motor(s.) See “Homing the Motors - Motor Status Detail” on page 86.
5. Press once to return to the Test
menu, or twice to return to the Main Menu.
+_
+_
Main MenuData Recall 5
DiagnosticTestPriceProduct Configuration 6
Press EDIT to Select
TestTest Vend 5
Test Vend w/o SureVendSureVend DetectorsMotor Test SummaryMotor Status Detail 6
Press EDIT to Select
Motor Test Summary
Pinging Motors
Please Wait......
* = CANCEL
Motor Test Summary
StatusHomed: 82 Present: 84
Errors: 2
RUN: * = ALL #=UNHOMED

Programming: Test Merchant™ Operators’ Guide
August 2009 86 1810025
Homing the Motors - Motor Status Detail
1. Press until you reach the Main
Menu, then use or to select
Test, and press .
2. In the Test menu, use or
to select Motor Status Detail and
press .
3. In the Motor Status Detail menu, select the tray where the product spiral with the motor needing homing is located.
NOTEIn the Tray X menu, the product spirals with
homed motors will be indicated with an “H” in the line adjacent to the spiral number(s.)
4. In the Tray X menu, select the productspiral number where the motor needing homing is located.
NOTEThe Tray X menu indicates not onlythe homed motor status, but also:
• If spiral is a FIFO group member• If spiral is coupled with another spiral• If there is an error present for the spiral• If spiral is part of a winner combo• If spiral is a token member• If spiral is a time of day member
+_
+_
Main MenuData Recall 5
DiagnosticTestPriceProduct Configuration 6
Press EDIT to Select
TestTest Vend 5
Test Vend w/o SureVendSureVend DetectorsMotor Test SummaryMotor Status Detail 6
Press EDIT to Select
Motor Status DetailTray 1 5
Tray 2Tray 3Tray 4Tray 5 6
Press EDIT to Select
Tray 3101 – H FC – – – – – 5
102 – H –C – – – – –303 XH – – ERR – – 304 – H – – – – – W –305 – H – – – – – – T 6
Press EDIT to Select
NOTERefer to the figure of “Motor Status Detail Menu Screen” on page 88 and the “Table: Motor Status Detail Menu Screen” on page 88 (at the end of this procedure) for location of above information and for more information.

Merchant™ Operators’ Guide Programming: Test
1810025 87 August 2009
Homing the Motors - Motor Status Detail (continued)
5. In the XXX menu, choose Press START
To Home.” and press once.
6. While motor is being homed, the screen will change to “HOMING PLEASE WAIT.”
7. After motor is homed, the screen will cycle to the XXX menu, and will indicate that the motor is homed by displaying “H=Homed.”
8. Press once to return to the Tray X
menu. The line for the product spiralnumber you originally selected to be homed should indicate “- H - - - - - - -.”
9. You may then select a different product
spiral for motor homing, or press
to return to the Motor Status Detail.
10. From the Motor Status Detail menu, you may select a different tray where another product spiral with a motor needinghoming is located, or you may press
once to return to the Test menu
or twice to return to the Main Menu.
103 Press START To Home 5
- - - - - - - - - - - - - - - - - - - - - - - - - - - - - -H=Homed F=FIFO MemberC=Coupled
6
103 HOMING PLEASE WAIT
103 Press START To Home 5
- - - - - - - - - - - - - - - - - - - - - - - - - - - - - -H=HomedF=FIFO MemberC=Coupled
6
Tray 3301 – H – – – – – – – 5
302 – H – – – – – – –303 – H – – – – – – – 304 – H – – – – – – –305 – H – – – – – – – 6
Press EDIT to Select

Programming: Test Merchant™ Operators’ Guide
August 2009 88 1810025
Homing the Motors - Motor Status Detail (continued)
Table: Motor Status Detail Menu Screen
First Field Second Field
Tray number Indicates tray number.
Column 1 Indicates spiral number.
Column 2 “X” indicates the spiral motor is present, but not configured.
“H” indicates that spiral motor is homed. An absence of an “H”indicates that the spiral motor is NOT homed.
Column 3 “F” indicates spiral is a FIFOmember (see page 104).
“C” indicates spiral is coupled(see page 108).
Column 4 “ERR” indicates error is present for the spiral.
Column 5 “W” indicates spiral is a Winner member (see page 122), Token member (see page 128) or a Combo member (see page 125).
“T” indicates spiral is aTime of Day event member(see page 109).
Motor Status Detail Menu Screen

Merchant™ Operators’ Guide Programming: Test
1810025 89 August 2009
Test the Coin Return Motor
1. Press until you reach the Main Menu,
then use or to select Test and
press .
2. In the Test menu, use or
to select Coin Return Motor, then
press .
3. Press to begin the test. The
Coin Return Motor status screen willcycle from “Idle” to “Return Change” for the duration of the test.
NOTEIf the Coin Return Motor status screen
cycles to Error instead of Return Change,
exit this procedure by pressing
until you reach the Main Menu, thenfollow the procedure to “Check for Errors” on
page 78 to further investigate the error.
4. When the test is completed, theCoin Return Motor status screenwill change back to Idle.
5. After the test, press once to return
to the Test menu, or twice to return to the Main Menu.
+_
+_
Main MenuData Recall 5
DiagnosticTestPriceProduct Configuration 6
Press EDIT to Select
TestSureVend Detectors 5
Motor Test SummaryMotor Status Detail Coin Return MotorDisplay 6
Press EDIT to Select
Coin Return Motor
IDLEPress START to Begin
Coin Return Motor
Return Change
Coin Return Motor
IDLEPress START to Begin

Programming: Test Merchant™ Operators’ Guide
August 2009 90 1810025
Test the Light Relay
1. Press until you reach the Main
Menu, then use or to select
Test and press .
2. In the Test menu, use or
to select Lighting Relay, then
press .
3. Press to begin the test. The
Lighting Relay status screen willchange from “On” to “Off” and the lights should turn off.
4. Press again. The
Lighting Relay status screen willchange from “Off” to “On” and the lights should turn back on.
5. After the test, press once to return
to the Test menu, or twice to return to the Main Menu.
+_
+_
Main MenuData Recall 5
DiagnosticTestPriceProduct Configuration 6
Press EDIT to Select
TestSureVend Calibration 5
Motor Test SummaryMotor Status DetailCoin Return MotorLighting Relay 6
Press EDIT to Select
Lighting Relay
OnPress START to Turn Off
Lighting Relay
OffPress START to Turn On

Merchant™ Operators’ Guide Programming: Test
1810025 91 August 2009
Check the Temperature
1. Press until you reach the Main Menu,
then use or to select Test and
press .
2. In the Test menu, use or
to select Temperature Sensors, then
press .
3. In the Temperature Sensors screen you can view and test:
• Cabinet - This is the temperature inside the cabinet.
• Evap - This is the temperature of the evaporator.
• Cond - This is the temperature of the condenser.
These temperatures are only good for testing the sensors.
4. Press once to return to the
Test menu, or twice to return to the Main Menu.
+_
+_
Main MenuData Recall 5
DiagnosticTestPriceProduct Configuration 6
Press EDIT to Select
TestMotor Test Summary 5
Motor Status DetailCoin Return MotorLighting RelayTemperature Sensors 6
Press EDIT to Select
Temperature Sensors Fahrenheit
Cabinet: XXX Evap: YYY Cond: ZZZ
Ready
Cab: 49ºF
NOTEThe actual running temperatures of the Cabinet,Evaporator, Condenser and the current state of theCompressor can be rotated through by pressing the“OK” key while the door is closed. These tempera-tures will be displayed in the lower right hand cornerof the display.

Programming: Test Merchant™ Operators’ Guide
August 2009 92 1810025
Test the Display
1. Press until you reach the
Main Menu, then use or to
select Test, and press .
2. In the Test menu, use or to
select Display and press .
3. Press repeatedly to cycle through
different display test patterns. The display test patterns will reveal any flaw inthe display.
NOTEIf a flaw is detected in the display byperforming this test, the display may
have to serviced or replaced.
4. When you have cycled through all of thedifferent display test patterns, the test is
complete. Press once to return to the
Test menu screen or twice to return to the Main Menu.
+_
+_
Main MenuData Recall 5
DiagnosticTestPriceProduct Configuration 6
Press EDIT to Select
TestSureVend Detectors 5
Motor Test SummaryMotor Status Detail Change Return MotorDisplay 6
Press EDIT to Select

Merchant™ Operators’ Guide Programming: Test
1810025 93 August 2009
Test the Keypads - Keypad Entry
1. Press until you reach the Main Menu,
then use or to select Test and
press .
2. In the Test menu, use or to
select Keypad Entry and press .
3. In the Keypad Entry screen, press any key on the main or service keypads. The key you pressed should display (or if pressing a spe-cial button, refer to the list below).On the Main Keypad:
• If you press , you should see “C”.
• If you press the Coin Return button, you should see “R”.
• If you press the OK button, you should see “S”.
On the Service Keypad:
• If you press , you should see
.
• If you press , you should see
.
NOTEIf the key you have pressed does notdisplay, the keypad may have to be
serviced or replaced.
+_
+_
+
_
Main MenuData Recall 5
DiagnosticTestPriceProduct Configuration 6
Press EDIT to Select
TestMotor Test Summary 5
Motor Status Detail Change Return MotorDisplayKeypad Entry 6
Press EDIT to Select
Keypad Entry7
Press Key
4. When you have finished testing the keypad(s), press once to return to the Test menu or
three times to return to the Main Menu.

Programming: Prices Merchant™ Operators’ Guide
August 2009 94 1810025
Programming: PricesSet Prices for Individual Selections
1. Press until you reach the Main Menu,
then use or to select Price and
press .
2. In the Price menu, use or to
select Individual Prices and press .
NOTEThe Individual Prices menu lists all
selections programed for the merchandiser. Notice how the status (bottom) line displaysthe current price of the highlighted selection.
3. Use or to highlight a selection
and press to set its price.
4. Using the number keys on either keypad, enter a price for the selection. If the price is less than 10,000.00, use leading zeros.The arrow keys will reposition the cursor.
5. Press to return to the Individual
Prices menu. Verify that the new pricedisplays in the status (bottom) line when the selection is highlighted.
6. Press once more to return to the
Price menu or twice to return to theMain Menu.
+_
+_
+_
Main MenuData Recall 5
DiagnosticTestPriceProduct Configuration 6
Press EDIT to SelectPrice
PriceIndividual Prices 5
Entire MachineTray 1Tray 2Tray 3 6
=$ 1.00
Individual Prices101 5
102103104105 6
=$ 1.00
101
00001.00
# = Backspace, EDIT = AcceptEXIT = Cancel

Merchant™ Operators’ Guide Programming: Prices
1810025 95 August 2009
Set One Price for the Entire Machine
1. Press until you reach the Main
Menu, then use or to select
Price and press .
2. In the Price menu, use or to
select Entire Machine and press .
TIP: If most selections will have the same price, use this feature to quickly set the entire machine to that price, then go to “Set Prices for Individual Selections” on page 94 to adjust the prices for individual selections.
3. Using the number keys on either keypad, enter a price for the entire machine. If the price is less than 10,000.00, use leading zeros.The arrow keys will reposition the cursor.
4. Press to set the new price and
return to the Price menu. Verify that the new price displays in the status(bottom) line.
5. Press once more to return to the
Main Menu.
+_
+_
Main MenuData Recall 5
DiagnosticTestPriceProduct Configuration 6
Press EDIT to SelectPrice
PriceIndividual Prices 5
Entire MachineTray 1Tray 2Tray 3 6
=$1.00
Entire Machine
001.25
# = Backspace, EDIT = AcceptEXIT = Cancel
PriceIndividual Prices 5
Entire MachineTray 1Tray 2Tray 3 6
=$1.25

Programming: Prices Merchant™ Operators’ Guide
August 2009 96 1810025
Set Prices by Trays
1. Press until you reach the
Main Menu, then use or to
select Price and press .
2. In the Price menu, use or
to select the tray number you wish to set
the price for and press .
TIP: If most selections on the same tray will have the same price, use this feature to quickly set the entire tray to that price, then go to “Set Prices for Individual Selections” on page 94 to adjust the prices for individual selections.
3. Using the number keys on either keypad, enter a price for the selected tray. If the price is less than 100.00, use leading zeros.The arrow keys will reposition the cursor.
4. Press to set new price and return to
the Price menu. Verify that the new price displays in the status (bottom) line.
5. Press once more to return to the
Main Menu.
+_
+_
Main MenuData Recall 5
DiagnosticTestPriceProduct Configuration 6
Press EDIT to SelectPrice
PriceIndividual Prices 5
Entire MachineTray 1 Tray 2Tray 3 6
= $0.75
Tray 1
001.00
# = Backspace, EDIT = AcceptEXIT = Cancel
PriceIndividual Prices 5
Entire MachineTray 1 Tray 2Tray 3 6
= $1.00

Merchant™ Operators’ Guide Program: Product Config.
1810025 97 August 2009
Programming: Product ConfigurationView Configuration Version
1. Press until you reach the Main
Menu, then use or to select
Product Configuration and press .
2. In the Product Configuration menu, use
or to select Configuration
Version. The configuration of the merchandiser will be displayed on the status (bottom) line of the Product Configuration menu.
3. Press to access the Configuration
Version screen. This screen will also display the current configurationversion indicated by the filled in circle and shown at the bottom of the screen.
4. In the Configuration Version menu, use
or to select the desired
configuration.
5. Press once to return to the
Product Configuration menu, or twice to return to the Main Menu.
+_
+_
+_
Main MenuData Recall 5
DiagnosticTestPriceProduct Configuration 6
Press EDIT to Select
Product ConfigurationConfiguration Version 5
SureVendSelection ConfigurationFIFO SetupCouple Motors 6
Ambient Merchant
Configuration Version h Ambient Merchant 5
o Refrigerated Merchant
o Merchant Chilled Snack
Ambient Snack Machine 6
DEFINITIONSAmbient Merchant - No temperature control. This setting must not be used when selling perishable items.Refrigerated Merchant -The target temperature is fixed at +36ºF (2ºC). Should be used when selling perishable items that require Health Control. See page 172 for Health Control information.Merchant Chilled Snack - The target temperature is settable from +49º to +69ºF (9º to 20ºC). This setting must not be used when selling perishable items.

Program: Product Config. Merchant™ Operators’ Guide
August 2009 98 1810025
Turn SureVend™ On and Off
1. Press until you reach the Main
Menu, then use or to select
Product Configuration and press .
2. In the Product Configuration menu, use
or to select SureVend.
3. In the SureVend menu, use
or to select SureVend.
4. A second SureVend menu will appear.
Use or to select the status
(Off or On.) The selection is the one with
the filled-in circle. Press to lock in
the selection.
5. The screen will cycle back to the first SureVend menu.Verify that the status of SureVend™ (Off or On) is displayed in the status (bottom) line of this SureVend menu.
6. Press once to return to the Product
Configuration menu or twice to return tothe Main Menu.
+_
+_
+_
+_
Main MenuData Recall 5
DiagnosticTestPriceProduct Configuration 6
Press EDIT to Select
Product ConfigurationConfiguration Version 5
SureVendSelection ConfigurationFIFO SetupCouple Motors 6
Press EDIT to Select
SureVendSureVend 5
SureVend OptionsAnti-Jackpot TimerAnti-Jackpot Trigger
6
Off
SureVend o Off 5
h On
6

Merchant™ Operators’ Guide Program: Product Config.
1810025 99 August 2009
Set SureVend™ Options
1. Press until you reach the Main Menu,
then use or to select Product
Configuration and press .
2. In the Product Configuration menu, use
or to select SureVend.
NOTEThe status (Off or On) of SureVend™
must be On for the SureVend Optionsselection to show up on the menu screen
and be accessed. For instructions onsetting SureVend™ status (Off or On), see “Turn SureVend™ On and Off” on page 98.
3. In the SureVend menu, use or
to select SureVend Options. The status of SureVend Options (Option SureVend or Must SureVend) will display in the status (bottom) line of the SureVend menu. Press
to access the SureVend Options
menu to change status, if desired.
4. In the SureVend menu, use
or to select Option
SureVend or Must SureVend. Theselection is the one with the filled-in circle.
Press to lock in your selection and
return to the SureVend menu.
+_
+_
+_
+_
Main MenuData Recall 5
DiagnosticTestPriceProduct Configuration 6
Press EDIT to Select
Product ConfigurationConfiguration Version 5
SureVendSelection ConfigurationFIFO SetupCouple Motors 6
Press EDIT to Select
SureVendSureVend 5
SureVend OptionsAnti-Jackpot TimerAnti-Jackpot Trigger
6
Must SureVend
SureVend Options h Option SureVend 5
o Must SureVend
SureVend Off When Failed 6

Program: Product Config. Merchant™ Operators’ Guide
August 2009 100 1810025
Set SureVend Options (continued)
5. Verify that the selection you made is now displayed in the status (bottom) line of the SureVend menu when SureVend Options is selected.
6. Press once to return to the Product
Configuration menu or twice to return to the Main Menu.
SureVendSureVend 5
SureVend OptionsAnti-Jackpot TimerAnti-Jackpot Trigger
6
Option SureVend

Merchant™ Operators’ Guide Program: Product Config.
1810025 101 August 2009
Set SureVend™ Anti-Jackpot Timer
1. Press until you reach the Main Menu,
then use or to select Product
Configuration and press .
2. In the Product Configuration menu, use
or to select SureVend and
press .
NOTEThe status (Off or On) of SureVend™
must be On for the Anti-Jackpot Timerselection to show up on the menu screen
and be accessed. For instructions on setting SureVend™ status (Off or On), see
“Turn SureVend™ On and Off” on page 98.
3. In the SureVend menu, use or
to select Anti-Jackpot Timer. The setting of Anti-Jackpot Timer will display on thestatus (bottom) of the SureVend menu.
Press to access the Anti-Jackpot
Timer menu to change status, if desired.
4. Using the number keys on either keypad, enter a setting for Anti-Jackpot Timer. If the setting is less than 10, use leading zeros:
Example: press 0-5 to set the setting for 5. If you enter more than two numbers, the display will scroll back to the first digit.
5. Press to save setting and return to the
SureVend menu. Verify that the new setting is now displayed in the status (bottom) line of the SureVend menu.
+_
+_
+_
Main MenuData Recall 5
DiagnosticTestPriceProduct Configuration 6
Press EDIT to Select
Product ConfigurationConfiguration Version 5
SureVendSelection ConfigurationFIFO SetupCouple Motors 6
Press EDIT to Select
SureVendSureVend 5
SureVend OptionsAnti-Jackpot TimerAnti-Jackpot Trigger
6
= 0
Anti-Jackpot Timer
00
# = Backspace, EDIT = AcceptEXIT = Cancel
6. Press once to return to the Product Configuration menu or twice to return to
the Main Menu.

Program: Product Config. Merchant™ Operators’ Guide
August 2009 102 1810025
Set SureVend™ Anti-Jackpot Trigger
1. Press until you reach the Main Menu,
then use or to select Product
Configuration and press .
2. In the Product Configuration menu, use
or to select SureVend.
NOTEThe status (Off or On) of SureVend™
must be On for the Anti-Jackpot Triggerselection to show up on the menu screen
and be accessed. For instructions on setting SureVend™ status (Off or On), see “Turn
SureVend™ On and Off” on page 98.
3. In the SureVend menu, use or
to select Anti-Jackpot Trigger. The setting of Anti-Jackpot Trigger will display in thestatus (bottom) line of the SureVend menu.
Press to access the Anti-Jackpot
Trigger screen to change status, if desired.
4. Using the number keys on either keypad, enter a setting for Anti-Jackpot Trigger. If the setting is less than 10, use leading zeros:
Example: press 0-5 to set the setting for 5. If you enter more than two numbers, the display will scroll back to the first digit.
5. Press to save setting and return to
the SureVend menu. Verify that the newsetting is now displayed in the status (bot-tom) line of the SureVend menu.
+_
+_
+_
Main MenuData Recall 5
DiagnosticTestPriceProduct Configuration 6
Press EDIT to Select
Product ConfigurationConfiguration Version 5
SureVendSelection ConfigurationFIFO SetupCouple Motors 6
Press EDIT to Select
SureVendSureVend 5
SureVend OptionsAnti-Jackpot TimerAnti-Jackpot Trigger
6
= 0
Anti-Jackpot Trigger
00
# = Backspace, EDIT = AcceptEXIT = Cancel
6. Press once to return to the Product Configuration menu or twice to return to
the Main Menu.

Merchant™ Operators’ Guide Program: Product Config.
1810025 103 August 2009
Selection Configuration
1. Press until you reach the Main
Menu, then use or to select
Product Configuration and press .
2. In the Product Configuration menu,
use or to select Selection
Configuration and press .
NOTEA screen that indicates “pinging”
will appear momentarily.
3. In the Selection Configuration menu,
use or to select the
product(s) you wish to configure orunconfigure.
4. Press to remove or add the “X”(s)
from the box(es) preceding the productnumber(s).
NOTE:
By pressing , you will auto configure
(ie. all selections that have spirals physically connected will configure).
5. Press once to return to the
Product Configuration menu, or twice to return to the Main Menu.
+_
+_
+_
Main MenuData Recall 5
DiagnosticTestPriceProduct Configuration 6
Press EDIT to Select
Product ConfigurationConfiguration Version 5
SureVendSelection ConfigurationFIFO SetupCouple Motors 6
Press EDIT to Select
Selection Configuration
...Pinging...
Selection Configuration
X 101 5
X 102 103
X 104105 6
* = Auto Configure

Program: Product Config. Merchant™ Operators’ Guide
August 2009 104 1810025
FIFO (First In, First Out)FIFO (First In, First Out) allows you to program your Merchant™ to run selections as a singleselection. No matter which selection ID of the group is entered, the Merchant™ will vend round-robin from the group of spirals, skipping selections that are out-of-service. This feature can providea First-In-First-Out for perishable foods. It also helps to prevent one spiral of duplicate selections to go empty before the others of the same selection.Note: Ensure that all selections chosen for each FIFO group are the same price.
FIFO Setup - Adding Groups
1. Press until you reach the Main
Menu, then use or to select
Product Configuration and press .
2. In the Product Configuration menu, use
or to select FIFO Setup and
press .
3. In the FIFO Setup menu, use
or to select Add Group 1
and press .
4. In the Add Group 1 menu, use
or to select the product(s)
you wish to add or delete from the group by
pressing to remove or add the
“X”(s) next to the products.
NOTE
By pressing , you are able to
quickly remove or add the “X”(s)from all listed products for the group.
+_
+_
+_
+_
Main MenuData Recall 5
DiagnosticTestPriceProduct Configuration 6
Press EDIT to Select
Product ConfigurationConfiguration Version 5
SureVendSelection ConfigurationFIFO SetupCouple Motors 6
Press EDIT to Select
FIFO SetupAdd Group 1 5
6
Press EDIT to Select
Add Group 1101 5
X 102 103
X 104
X 105 6
* = Set or Clear All

Merchant™ Operators’ Guide Program: Product Config.
1810025 105 August 2009
FIFO Setup - Adding Groups (continued)
5. Press once to return to the
FIFO Setup menu.
NOTEOnce you have set up the first group
for FIFO Setup, you will now have additional choices on the FIFO Setup menu.
For adding additional groups, followsteps 3 thru 5 on the preceding page.
FIFO Setup - Deleting Groups
1. From the FIFO Setup menu, use
or to select Delete Group
and press .
2. Select which group you wish to delete and
press .
3. You will see a warning screen reminding you that once accomplished, the deletion cannot be undone.
4. Press to delete the selected group.
– OR –
Press to cancel this action.
NOTE
Pressing to cancel will return you
directly back to the FIFO Setup menu if all groups have been deleted. If there are more
groups remaining, you will return to theDelete Group menu screen.
5. If you are at the Delete Group menu, press
to return to the FIFO Setup menu.
+_
FIFO SetupAdd Group 2 5
Delete GroupEdit GroupFIFO Mappings
6
Press EDIT to Select
FIFO SetupAdd Group 2 5
Delete GroupEdit GroupFIFO Mappings
6
Press EDIT to Select
Delete GroupDelete Group 1 5
Delete Group 2
6
Press EDIT to Select
Delete Group 2 Warning! The actions of this function cannot be reversed.
CANCEL-EXIT CONTINUE-*

Program: Product Config. Merchant™ Operators’ Guide
August 2009 106 1810025
FIFO Setup - Editing Groups
1. From the FIFO Setup menu, use
or to select Edit Group and
press .
2. Using or , select which group
you wish to edit and press .
3. In the Edit Group (#) menu, select the product(s) you wish to add or delete from
the group by using the or
to select a product and then pressing
to remove or add the “X”(s) next to
the products.
NOTE
By pressing , you are able to
quickly remove or add the “X”(s)from all listed products for the group.
+_
+_
+_
FIFO SetupAdd Group 2 5
Delete GroupEdit GroupFIFO Mappings
6
Press EDIT to Select
Edit GroupEdit Group 1 5
Edit Group 2
6
Press EDIT to Select
Edit Group 1
X 101 5
102
X 103104
X 105 6
* = Set or Clear All
4. Press once to return to the Edit Group menu.
5. You may now choose another group to edit from this menu, or press again to return to
the FIFO Setup menu.
NOTEWhen adding or editing groups, if only one product selection number is
selected, no group will be added, or the group being edited will be deleted.

Merchant™ Operators’ Guide Program: Product Config.
1810025 107 August 2009
FIFO Setup - View FIFO Mappings
1. From the FIFO Setup menu, use
or to select FIFO Mappings
and press .
2. In the FIFO Mappings menu, use
or to select the tray you wish
to view FIFO mappings for and press
.
3. The Tray X FIFO Selections screen will appear for the tray which you selected,indicating which products are mapped into which groups.
NOTEFIFO mappings are unable to be changed in this screen. To change FIFO mappings for
products, you must use the steps outlined in “FIFO Setup - Adding Groups” on page 104, “FIFO Setup - Deleting Groups” on page 105
and/or “FIFO Setup - Editing Groups” on page 106.
4. After viewing and making note of aparticular product tray’s FIFO mappings,
press once to return to the FIFO
Mappings menu, twice to return to theFIFO Setup menu, or continue to press
until you reach the Main Menu.
+_
+_
FIFO SetupAdd Group 2 5
Delete GroupEdit GroupFIFO Mappings
6
Press EDIT to Select
FIFO MappingsTray 1 FIFO Selections 5
Tray 2 FIFO SelectionsTray 3 FIFO SelectionsTray 4 FIFO SelectionsTray 5 FIFO Selections 6
Press EDIT to Select
Tray 4 FIFO Selections101 Group 1 5
102 N/A103 Group 2104 Group 1105 N/A106 Group 2 6

Program: Product Config. Merchant™ Operators’ Guide
August 2009 108 1810025
Couple MotorsThe Merchant™ can be set to couple adjacent product tray motors to vend together. There are times when you will need to set adjacent motors on a tray to vend together, as in the case of vending wide products. Follow this procedure to electronically couple adjacent motors.
NOTEOnce coupled, motors will never run separately. This includes when testing from
the Motor Test Summary (page 85) and/or the Motor Status Detail (page 86) menus.
1. Press until you reach the Main Menu,
then use or to select Product
Configuration and press .
2. In the Product Configuration menu,
use or to select Couple
Motors and press .
3. In the Couple Motors menu, you will see a list of all Motor Pairs that are able to be coupled to vend together. Select the Motor Pair(s) you wish to couple by using the
or to select a Motor Pair and
then pressing to remove or add the
“X”(s) next to the Motor Pair(s).
NOTE
By pressing , you are able to
quickly remove or add the “X”(s)from all listed Motor Pairs.
+_
+_
+_
Main MenuData Recall 5
DiagnosticTestPriceProduct Configuration 6
Press EDIT to Select
Product ConfigurationConfiguration Version 5
Selection ConfigurationFIFO SetupCouple Motors
6
Press EDIT to Select
Couple MotorsX 101 + 102 5
105 + 106 107 + 108
X 111 + 112201 + 202 6
* = Set or Clear All
4. Press once to return to the Product Configuration menu or twice to return to
the Main Menu.

Merchant™ Operators’ Guide Special Vend Modes
1810025 109 August 2009
Special Vend ModesTimed Events-Time of Day EventsThe Merchant™ can be programmed for up to 16 discrete time of day events, which can be programmed to include Inhibit, Free Vend, Discount and Combo Vend.
1. Press until you reach the Main
Menu, then use or to select
Special Vend Modes and press .
2. From the Special Vend Modes menu, use
or to select Timed Events
and press .
3. From the Timed Events menu, use
or to select Time of Day
Events and press .
4. In the Time of Day Events menu, use
or to select Inhibit and
press .
+_
+_
+_
+_
Main MenuDiagnostic 5
TestPriceProduct ConfigurationSpecial Vend Modes 6
Press EDIT to Select
Special Vend ModesTimed Events 5
Winner ModesCombo VendsToken EnableEnable OK Button 6
Press EDIT to Select
Timed EventsTime of Day Events 5
Backup Events
6
Press EDIT to Select
Time of Day Events1 Inhibit Off 5
2 Inhibit Off3 Inhibit Off4 Inhibit Off5 Free Vend Off6 Free Vend Off 6

Special Vend Modes Merchant™ Operators’ Guide
August 2009 110 1810025
Timed Events-Time of Day Events (continued)
5. If the event is set to Off, use or
to select State and press .
6. In the State menu screen, use or
to select On. The selected option is
the one with the filled-in circle.
Press to lock in the selection and
return to the Event (#) menu. Verify that the status (bottom) line displays On when State is selected.
7. In the Event (#) menu, select Event Type
and press .
8. In the Event Type menu, the selected option is the one with the filled-in circle.
Press or to change the
selected option.
9. Press to lock in the selection and
return to the Event (#) menu. Verify that the status (bottom) line displays the choice made in step 8 above when Event Type is selected.
+
_
+
_
+_
1State 5
Event TypeStart TimeStop TimeDays of Week 6
Off
State
o Off 5
h On
6
EDIT = Accept EXIT = Cancel
1State 5
Event TypeStart TimeStop TimeDays of Week 6
Inhibit
Event Type
h Inhibit 5
o Free Vend
o Discount
o Combo Vend
o Lighting 6
EDIT = Accept EXIT = Cancel

Merchant™ Operators’ Guide Special Vend Modes
1810025 111 August 2009
Timed Events-Time of Day Events (continued)
10. In the Event (#) menu, use
or to select Start Time and
press .
11. In the Start Time menu, using the number keys on either keypad, enter the time you wish the event to start. After you have entered four digits, 24 will be selected.
Press or to toggle between
AM, PM, and 24 hour modes.If you enter more than four numbers, the display will scroll back to the first digit.
12. Press to lock in the time and return
to the Event (#) menu. Verify that the status (bottom) line displays the correct start time when Start Time is selected.
13. In the Event (#) menu, press
or to select Stop Time and
press .
14. In the Stop Time menu, using the number keys on either keypad, enter the time you wish the event to stop. After you have entered four digits, the hour mode (AM or
PM) will be selected. Press or
to toggle between AM, PM, and 24
hour modes. If you enter more than four numbers, the display will scroll back to the first digit.
_
_
1State 5
Event TypeStart TimeStop TimeDays of Week 6
00:00
Start Time
hh/ mm / mode: 12/24
12 : 00 24
Press 0-9 to Edit Value
1State 5
Event TypeStart TimeStop TimeDays of Week 6
00:00
Stop Time
hh/ mm / mode: 12/24
12 : 00 24
Press 0-9 to Edit Value
15. Press to lock in the time and return to the Event (#) menu. Verify that the status (bottom)
line displays the correct stop time when Stop Time is selected.

Special Vend Modes Merchant™ Operators’ Guide
August 2009 112 1810025
Timed Events-Time of Day Events (continued)
16. In the Event (#) menu, press
or to select Days of Week
and press .
17. Press or to highlight a day of
the week, then press to select it.
Selected day(s) will have “X”(s) to the left.
NOTE
By pressing , you are able
to quickly remove or add the“X”(s) from all days of the week.
18. Press to lock in the selected days
and return to the Event (#) menu. Verify that the status (bottom) line displays the correct day(s) of the week that were set.
NOTEDays of the week appear in the statusline as dashes, in the order of Sunday
through Saturday, if they are not selected.
19. In the Event (#) menu, press
or to choose Selections
and press .
_
_
_
1State 5
Event TypeStart TimeStop TimeDays of Week 6
– M – – T – S
Days Of WeekX Monday 5
TuesdayX Wednesday
ThursdayX Friday 6
* =Set or Clear All
1Event Type 5
Start TimeStop TimeDays of WeekSelections 6
– M – W – F –
1Event Type 5
Start TimeStop TimeDays of WeekSelections 6
– M – W – F –

Merchant™ Operators’ Guide Special Vend Modes
1810025 113 August 2009
Timed Events-Time of Day Events (continued)
20. In the Selections menu, press or
to choose a Selection (XXX) and
press to select it. Chosen
Selections (XXX) will have an “X”(s) tothe left.
NOTE
By pressing , you are able to quickly
remove or add the “X”(s) from all Selections.
21. Press to lock in your Selections
and return to the Event (#) menu.
22. In the Event (#) menu, press
or to select Messages and
press .
23. In the Message menu, the selected option is the one with the filled-in circle. Press
or to change the selected
option.
24. Press to lock in the selection and
return to the Event (#) menu. Verify that the status (bottom) line displays the choice made in step 24 above when Message is selected.
_
_
+_
Selections
X 101 5
102 103
X 104105 6
* = Set or Clear All
1Start Time 5
Stop TimeDays of WeekSelectionsMessage 6
<None>
Message
o Ready 5
o Temporarily Out of Service
h No Money Required
o Custom Messages 4
o Custom Messages 5 6
EDIT = Accept EXIT = Cancel
1Start Time 5
Stop TimeDays of WeekSelectionsMessage 6
No Money Required
25. Press once to return to the Time of Day Events menu to set more Events, or continue to
press to return to the Main Menu.

Special Vend Modes Merchant™ Operators’ Guide
August 2009 114 1810025
Timed Events-PowersaveUse the Powersave feature to set up time intervals when the machine can turn off the lights and go into a low power mode.
1. Press until you reach the Main
Menu, then use or to select
Special Vend Modes and press .
2. From the Special Vend Modes menu, use
or to select Timed Events
and press .
3. From the Timed Events menu, use
or to select Time of Day
Events and press .
4. In the Time of Day Events menu, use
or to select the Time of Day
event you want to modify and press .
Note: In this example we are using event number 1
but any event 1 -16 may be used.
Note:The names assigned to each timed event 1 - 16 will change as the Time of Day Events are modified. In our example the description next to event 1 will say “Lighting” instead of “Inhibit” the next time we view the Time of Day Events screen.
+_
+_
+_
+_
Main MenuDiagnostic 5
TestPriceProduct ConfigurationSpecial Vend Modes 6
Press EDIT to Select
Special Vend ModesTimed Events 5
Winner ModesCombo VendsToken EnableEnable OK Button 6
Press EDIT to Select
Timed EventsTime of Day Events 5
Backup Events
6
Press EDIT to Select
Time of Day Events1 Inhibit Off 5
2 Inhibit Off3 Inhibit Off4 Inhibit Off5 Free Vend Off6 Free Vend Off 6

Merchant™ Operators’ Guide Special Vend Modes
1810025 115 August 2009
Timed Events-Powersave (continued)
5. If the event is set to Off, use or
to select State and press .
6. In the State menu screen, use or
to select On. The selected option is
the one with the filled-in circle.
Press to lock in the selection and
return to the Event (#) menu. Verify that the status (bottom) line displays On when State is selected.
7. In the Event (#) menu, select Event Type
and press .
8. In the Event Type menu, the selected option is the one with the filled-in circle.
Press or to select Lighting.
9. Press to lock in the selection and
return to the Event (#) menu. Verify that the status (bottom) line displays the choice made in step 8 above when Event Type is selected.
+
_
+
_
+_
1State 5
Event TypeStart TimeStop TimeDays of Week 6
Off
State
o Off 5
h On
6
EDIT = Accept EXIT = Cancel
1State 5
Event TypeStart TimeStop TimeDays of Week 6
Inhibit
Event Type
o Inhibit 5
o Free Vend
o Discount
o Combo Vend
h Lighting 6
EDIT = Accept EXIT = Cancel

Special Vend Modes Merchant™ Operators’ Guide
August 2009 116 1810025
Timed Events-Powersave (continued)10. In the Event (#) menu, use
or to select Start Time and
press .
11. In the Start Time menu, using the number keys on either keypad, enter the time you wish the event to start. After you have entered four digits, 24 will be selected.
Press or to toggle between
AM, PM, and 24 hour modes.If you enter more than four numbers, the display will scroll back to the first digit.
12. Press to lock in the time and return
to the Event (#) menu. Verify that the status (bottom) line displays the correct start time when Start Time is selected.
13. In the Event (#) menu, press
or to select Stop Time and
press .
14. In the Stop Time menu, using the number keys on either keypad, enter the time you wish the event to stop. After you have entered four digits, the hour mode (AM or
PM) will be selected. Press or
to toggle between AM, PM, and 24 hour modes. If you enter more than four numbers, the display will scroll back to the first digit.
15. Press to lock in the time and return
to the Event (#) menu. Verify that the status (bottom) line displays the correct stop time when Stop Time is selected
_
_
1State 5
Event TypeStart TimeStop TimeDays of Week 6
00:00
Start Time
hh/ mm / mode: 12/24
12 : 00 24
Press 0-9 to Edit Value
1State 5
Event TypeStart TimeStop TimeDays of Week 6
00:00
Stop Time
hh/ mm / mode: 12/24
12 : 00 24
Press 0-9 to Edit Value

Merchant™ Operators’ Guide Special Vend Modes
1810025 117 August 2009
Timed Events-Powersave (continued)16. In the Event (#) menu, press
or to select Days of Week
and press .
17. Press or to highlight a day
of the week, then press to select
it. Selected day(s) will have “X”(s) to the left.
NOTE
By pressing , you are able
to quickly remove or add the“X”(s) from all days of the week.
18. Press to lock in the selected days
and return to the Event (#) menu. Verify that the status (bottom) line displays the correct day(s) of the week that were set.
NOTEDays of the week appear in the statusline as dashes, in the order of Sunday
through Saturday, if they are not selected.
19. In the Event (#) menu, press
or to choose Lighting
Timeout and press .
_
_
_
1State 5
Event TypeStart TimeStop TimeDays of Week 6
– – – – – – –
Days Of WeekX Monday 5
TuesdayX Wednesday
ThursdayX Friday 6
* =Set or Clear All
1State 5
Event TypeStart TimeStop TimeDays of Week 6
– M – W – F –
1Event Type 5
Start TimeStop TimeDays of WeekLighting Timeout 6
0 Minute(s)

Special Vend Modes Merchant™ Operators’ Guide
August 2009 118 1810025
Timed Events-Powersave (continued)20. Using the number keys on either keypad,
enter the setting for the Lighting Timeout from 1 to 999 minutes.If the setting is less than 10, use leading zeros:
For example, if you wish to set the Light-ing Timeout to 9 minutes, press 0-0-9If you enter more than three numbers, the display will scroll back to the first digit.
Lighting Timeout
000
Enter # of Minutes of Machine Inactivity
21. Press to lock in the setting and return
to the Event (#) menu.
22. In the Event (#) menu, verify that the value you entered matches the status (bottom) line when Lighting Timeout is selected.
23. Press once to return to the
Time of Day Events menu, or continue to
press to return to the Main Menu.
NOTEThe Lighting Timeout setting is the length of
time of inactivity that will pass before the lights go off if a customer has turned the
lights on during this timed event.
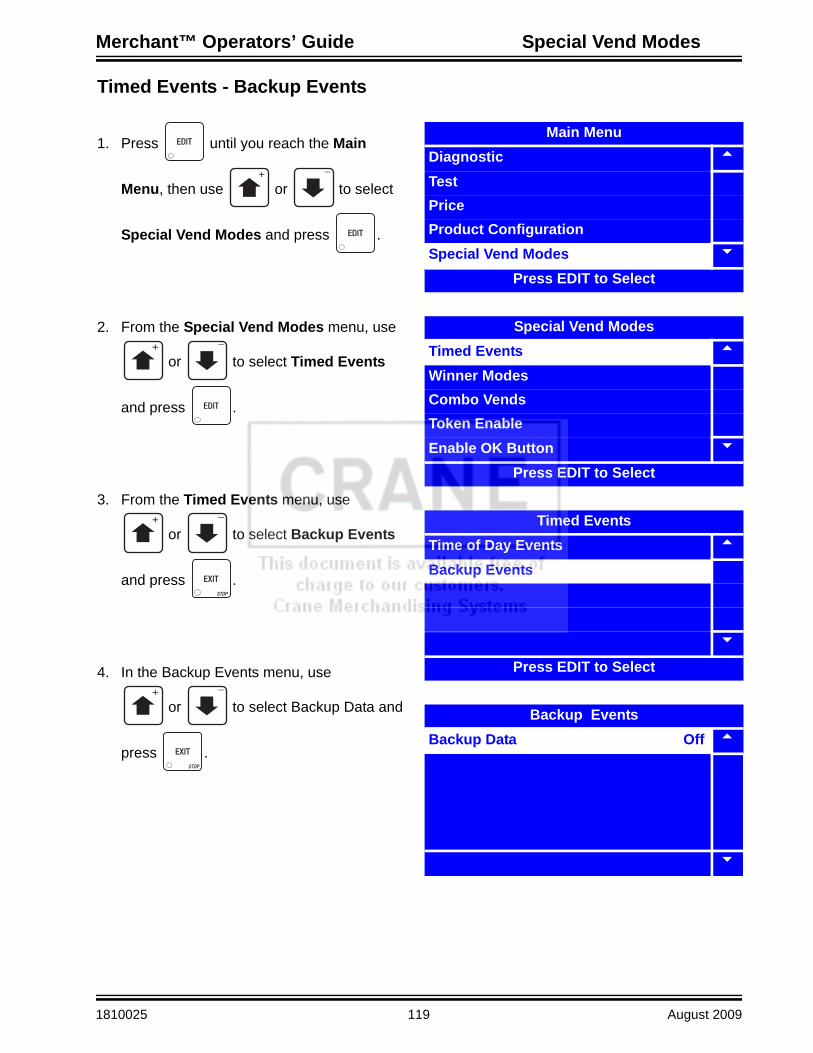
Merchant™ Operators’ Guide Special Vend Modes
1810025 119 August 2009
Timed Events - Backup Events
1. Press until you reach the Main
Menu, then use or to select
Special Vend Modes and press .
2. From the Special Vend Modes menu, use
or to select Timed Events
and press .
3. From the Timed Events menu, use
or to select Backup Events
and press .
4. In the Backup Events menu, use
or to select Backup Data and
press .
+_
+_
+_
+_
Main MenuDiagnostic 5
TestPriceProduct ConfigurationSpecial Vend Modes 6
Press EDIT to Select
Special Vend ModesTimed Events 5
Winner ModesCombo VendsToken EnableEnable OK Button 6
Press EDIT to Select
Timed EventsTime of Day Events 5
Backup Events
6
Press EDIT to Select
Backup EventsBackup Data Off 5
6

Special Vend Modes Merchant™ Operators’ Guide
August 2009 120 1810025
Timed Events - Backup Events (continued)
5. If Backup Data is set to Off, use or
to select State and press .
6. In the State menu screen, use or
to select On. The selected option is
the one with the filled-in circle.
Press to lock in the selection and
return to the Event (#) menu. Verify that the status (bottom) line displays On when State is selected.
10. In the Event (#) menu, use
or to select Start Time
and press .
11. In the Start Time menu, using the number keys on either keypad, enter the time you wish the event to start. After you have entered four digits, AM will be selected.
Press or to toggle between
AM, PM, and 24 hour modes.If you enter more than four numbers, the dis-play will scroll back to the first digit.
12. Press to lock in the time and return to
the Event (#) menu. Verify that the status (bottom) line displays the correct start time when Start Time is selected.
+
_
+
_
_
_
1State 5
Start TimeDays of Week
6
Off
State
o Off 5
h On
6
EDIT = Accept EXIT = Cancel
1State 5
Start TimeDays of Week
6
00:00
Start Time
hh/ mm / mode: 12/24
12 : 00 AM
Press 0-9 to Edit Value

Merchant™ Operators’ Guide Special Vend Modes
1810025 121 August 2009
Timed Events - Backup Events (continued)
13. In the Event (#) menu, press
or to select Days of Week
and press .
14. Press or to highlight a day of
the week, then press to select it.
Selected day(s) will have “X”(s) to the left.
NOTE
By pressing , you are able
to quickly remove or add the“X”(s) from all days of the week.
15. Press to lock in the selected days and
return to the Event (#) menu. Verify that the status (bottom) line displays the correct day(s) of the week that were set.
NOTEDays of the week appear in the statusline as dashes, in the order of Sunday
through Saturday, if they are not selected.
16. Press twice to reach the Timed
Events menu, three times to reach theSpecial Vend Modes menu, or four timesto reach the Main Menu.
_
_
1State 5
Start TimeDays of Week
6
- - - - - - -
Days Of WeekX Monday 5
TuesdayX Wednesday
ThursdayX Friday 6
* =Set or Clear All
1State 5
Start TimeDays of Week
6
- M - W - F -

Special Vend Modes Merchant™ Operators’ Guide
August 2009 122 1810025
Winner ModeThe Winner Mode provides a method to reward the frequent user of the Merchant™by occasionally giving away a free product or a special prize from a designated spiral.To set up the Winner Mode, perform the following steps:
1. Press until you reach the
Main Menu, then use the or
to select Special Vend Modes and
press .
2. From the Special Vend Modes menu, use
or to select Winner Mode
and press .
3. From the Winner Mode menu, use
or to select Winner State.
The status (bottom) line will then indicateif the Winner Mode is currently turnedOn or Off.
4. To change the Winner Mode state, press
with Winner State selected.
5. In the Winner State menu, use
or to select On or Off.
The selected option is the one with thefilled-in circle.
6. Press to lock in the selection and
return to the Winner Mode menu. Verify that the status (bottom) line displays On or Off when Winner State is selected.
+_
+_
+_
+_
Main MenuDiagnostic 5
TestPriceProduct ConfigurationSpecial Vend Modes 6
Press EDIT to Select
Special Vend ModesTimed Events 5
Winner ModeCombo VendsToken Enable
6
Press EDIT to Select
Winner ModeWinner State 5
Winner FrequencyWinner PrizeWinner Selections
6
Win = Off
Winner State
o Off 5
h On
6
EDIT = Accept EXIT = Cancel

Merchant™ Operators’ Guide Special Vend Modes
1810025 123 August 2009
Winner Mode (continued)
7. From the Winner Mode menu, use
or to select Winner
Frequency. The status (bottom) line of the will display how often the merchandiser is set to vend a winner.
8. To change the winner frequency, press
with Winner Frequency selected.
9. Using the number keys on either keypad, enter an interval for the Winner Frequency. If the frequency of a winning vend is less than 1,000, use leading zeros:
For example, if you wish to set themerchandiser to vend a winner every 500 vends, press 0-5-0-0.If you enter more than four numbers, the display will scroll back to the first digit.
10. Press to lock in the selection and
return to the Winner Mode menu. Verify that the status (bottom) line displays the number of vends that the Winner Frequency has been set for.
11. From the Winner Mode menu, use
or to select Winner Prize.
The status (bottom) line of the Winner Mode menu will then indicate which spiral thewinner will vend from. If the status line of the menu states Prize Mode OFF, then a Winner Prize spiral has not yet been chosen.
+_
+_
Winner ModeWinner State 5
Winner FrequencyWinner PrizeWinner Selection
6
Every 500 Vends
Winner Frequency
0750
# = Backspace, EDIT = AcceptEXIT = Cancel
Winner ModeWinner State 5
Winner FrequencyWinner PrizeWinner Selection
6
Every 750 Vends
Winner ModeWinner State 5
Winner FrequencyWinner PrizeWinner Selection
6
Prize Mode OFF
NOTE
The status (bottom) line will display INVALID if the selection is not valid or if theselection is part of a FIFO group or is the coupled spiral of a coupled selection.
12. To set or change the Winner Prize spiral, press with Winner Prize selected.

Special Vend Modes Merchant™ Operators’ Guide
August 2009 124 1810025
Winner Mode (continued)
13. Using the number keys on either keypad, enter a spiral for the winner to vend from.For example, to set the merchandiser to vend the winners from spiral 103, enter1-0-3. If you enter more than threenumbers, the display will scroll back tothe first digit.
14. Press to lock in the selection and
return to the Winner Mode menu. Verify that the status (bottom) line displays the spiral that the Winner Prize is set to vend from.
15. From the Winner Mode menu, use
or to select
Winner Selection.
NOTEWinner Selections are the Selectionsthat will trigger a Winner Prize vend.
16. In the Winner Selections menu, press
or to highlight a Selection
(XXX), and press to select it. Cho-
sen Winner Selection(s) (XXX) will have “X”(s) to the left.
NOTE
By pressing , you are able to
quickly remove or add the “X”(s)from all Winner Selections.
+_
_
Winner Prize
103
Enter ID of Prize Spiralor 000 to return Price
Winner ModeWinner State 5
Winner FrequencyWinner PrizeWinner Selection
6
103
Winner ModeWinner State 5
Winner FrequencyWinner PrizeWinner Selection
6
Press EDIT to Select
Winner Selections
X 101 5
102 103
X 104105 6
* = Set or Clear All
17. Press to lock in your Winner Selection(s) and return to the Winner Mode menu.
18. Press once to return to the Special Vend Modes menu or twice to return to the
Main Menu.

Merchant™ Operators’ Guide Special Vend Modes
1810025 125 August 2009
Combo VendsThe Merchant™ can be programmed to support up to four combination groups of products to be vended together at a discounted price. Combo Vends require a Time-Of-Day Event to vend. Combo Groups are associated with Combo Event Time-Of-Day events. Products selected in the Time-Of-Day event (see Timed Events, step 20 on page 113) are “Combo Items” with those products in the assigned Combo Group. To program your Merchant™ to vend combination vends, perform thefollowing procedure.
1. Press until you reach the Main Menu,
then use or to select
Special Vend Modes and press .
2. From the Special Vend Modes menu, use
or to select Combo Vends and
press .
3. From the Combo Vends menu, use
or to select which Combo
Group you want to program, and then press
.
4. From the Combo Group X menu, use
or to choose Selections and
press .
+_
+_
+_
+_
Main MenuDiagnostic 5
TestPriceProduct ConfigurationSpecial Vend Modes 6
Press EDIT to Select
Special Vend ModesTimed Events 5
Winner ModeCombo VendsToken Enable
6
Press EDIT to Select
Combo VendsCombo Group 1 5
Combo Group 2Combo Group 3Combo Group 4Combo Vend Timeout 6
Press EDIT to Select
Combo Group 1Selections 5
DiscountMessage
6
Press EDIT to Select

Special Vend Modes Merchant™ Operators’ Guide
August 2009 126 1810025
Combo Vends (continued)
5. In the Selections menu, use
or to highlight a selection,
and press to select it. Chosen
selection(s) will have “X” (s) to the left.
NOTE
By pressing , you are able
to quickly remove or add the“X” (s) from all of the selection(s).
6. Press to lock in the selection and
return to the Combo Group X menu.
7. From the Combo Group X menu, use
or to choose Discount and
press .
8. Using the number keys on either keypad, enter a percentage of discount for Combo Group X. If the percentage ofdiscount is less than 10%, use leading zeros:
For example, if you wish to set themerchandiser to discount a Combo Vend Group 5%, press 0-5.If you enter more than two numbers, the display will scroll back to the first digit.
_
+_
Selections
X 101 5
102 103
X 104105 6
* = Set or Clear All
Combo Group 1Selections 5
DiscountMessage
6
0 %
Discount
25
# = Backspace, EDIT = AcceptEXIT = Cancel
Combo Group 1Selections 5
DiscountMessage
6
25 %
9. Press to lock in the selection and return to the Combo Group X menu. Verify that the
status (bottom) line displays the percentage of discount for Combo Group X.

Merchant™ Operators’ Guide Special Vend Modes
1810025 127 August 2009
Combo Vends (continued)
10. From the Combo Group X menu, use
or to select Message and
press .
11. From the Message menu, use
or to select which message
you would like your merchandiser to display regarding Combo Group X.
NOTEFor an explanation of Custom Messages thatcan be chosen or programed to display for the Combo Group you are setting up, please refer
to “Set Custom Messages” on page 188.
12. Press to lock in the selection and
return to the Combo Group X menu.Verify that the status (bottom) linedisplays the percentage of discount for Combo Group X.
13. Press once to return to the
Combo Vends menu, twice to return to the Special Vend Modes menu or three timesto return to the Main Menu.
+_
+_
Combo Group 1Selections 5
DiscountMessage
6
Ready
Winner State
o Custom Messages 4 5
o Custom Messages 5
o Custom Messages 6
h Custom Messages 7
o Custom Messages 8 6
Combo Group 1Selections 5
DiscountMessage
6
Custom Messages 7

Special Vend Modes Merchant™ Operators’ Guide
August 2009 128 1810025
Token EnableThe Merchant™ allows you to program token vending for certain products.To program the Merchant™ for token vending, perform the following procedure.
1. Press until you reach the Main
Menu, then use or , to select
Special Vend Modes and
press .
2. From the Special Vend Modes menu,
use or to select
Token Enable and press .
3. In the Token Enable menu, press
or to highlight a selection,
and press to select it. Chosen
selections will have “X”(s) to the left.
NOTE
By pressing , you are able
to quickly remove or add the“X”(s) from all of the selections.
4. Press once to return to the
Special Vend Modes menu or twice to return to the Main Menu.
+_
+_
_
Main MenuDiagnostic 5
TestPriceProduct ConfigurationSpecial Vend Modes 6
Press EDIT to Select
Special Vend ModesTimed Events 5
Winner ModeCombo VendsToken EnableEnable OK Button 6
Press EDIT to Select
Token Enable
X Product 101 5
Product 102 Product 103
X Product 104Product 105 6
* = Set or Clear All
NOTEToken acceptance must be enabled in the Monetary menu for token and coupon acceptance to function properly.See ““Set Token/Coupon Acceptance” on page 147

Merchant™ Operators’ Guide Special Vend Modes
1810025 129 August 2009
Enable OK Button
1. Press until you reach the Main
Menu, then use or , to select
Special Vend Modes and
press .
2. From the Special Vend Modes menu,
use or to select
Enable OK Button and press .
3. In the Enable OK Button menu, use
or to select Press OK to
Vend or Don’t Press OK to Vend. The selected option is the one with thefilled-in circle.
4. Press to lock in your selection and
return to the Special Vend Modes menu. Verify that the selected option appears in the status (bottom) line of the menu.
5. Press to return to the Main Menu.
+_
+_
+_
Main MenuDiagnostic 5
TestPriceProduct ConfigurationSpecial Vend Modes 6
Press EDIT to Select
Special Vend ModesTimed Events 5
Winner ModeCombo VendsToken EnableEnable OK Button 6
Don’t Press OK to Vend
Enable OK Button
h Press OK to Vend 5
o Don’t Press OK to Vend
6
EDIT = Accept EXIT = Cancel
Special Vend ModesTimed Events 5
Winner ModeCombo VendsToken EnableEnable OK Button 6
Press OK to Vend

Programming: Free Vend Merchant™ Operators’ Guide
August 2009 130 1810025
Programming: Free VendTurn Free Vend On/Off
1. Press until you reach the
Main Menu, then use or to
select Free Vend and press .
2. In the Free Vend menu, press
or to select Off or On.
The selected option is the one with the filled-in circle.
3. Press to lock in your selection
(Off or On) and return to the Main Menu. Verify that the status (bottom) line displays the correct option when Free Vend is selected.
NOTEWhen Free Vend is On, the standby
message will display “No Money Required”, alternating with “Make a Selection”.
+_
Main MenuDiagnostic 5
TestPriceProduct ConfigurationFree Vend 6
Off
Free Vend
h Off 5
o On
6
EDIT = Accept EXIT = Cancel

Merchant™ Operators’ Guide Program: System Settings
1810025 131 August 2009
Programming: System SettingsMachine Information - ID Number
1. Press until you reach the Main
Menu, then use or to select
System Settings and press .
2. In the System Settings menu, use
or to select Machine
Information and press .
3. In the Machine Information menu, use the
or to select Machine ID (in
this example, it is “ID106-Asset Number”)
and press .
4. The Machine ID screen will allow you to use the keypad to enter an alternate Machine ID.
Using the and will move the
cursor to the left and right. Press to
remove the letters and numbers.
Press to move to uppercase letters
and lowercase. Press 0-9 to add a letter or number. Press the number once to bring up the character screen (lower bottom). Press the number again to scroll to the character. Refer to the “NUMERIC/CHARACTER TABLE” on page 191. In this case, we have entered “Merchandiser 407.”
+_
+_
+_
+_
Main MenuPrice 5
Product ConfigurationFree VendSpecial Vend ModesSystem Settings 6
Press EDIT to Select
System SettingsMachine Information 5
ClockLanguage MonetaryData Transfer 6
Press EDIT to Select
Machine InformationID106-Asset Number 5
ID104-Location
6
ID106-Asset Number
Merchandiser 407
abc

Program: System Settings Merchant™ Operators’ Guide
August 2009 132 1810025
Machine Information - ID Number (continued)
5. Press to lock in your entered
information and return to the Machine Information menu. Verify that the new information you have entered appears in the status (bottom) line.
6. Press once to return to the
System Settings menu or twice to return to the Main Menu.
Machine InformationID106-Asset Number 5
ID104-Location
6
Merchandiser 407

Merchant™ Operators’ Guide Program: System Settings
1810025 133 August 2009
Machine Information - Location
1. Press until you reach the Main
Menu, then use or to select
System Settings and press .
2. In the System Settings menu, use
or to select Machine
Information and press .
3. In the Machine Information menu,
use or to select Machine
Location (in this example it is “ID106-
Asset Number”) and press .
4. The Machine ID screen will allow you to use the keypad to enter an alternate
Machine ID. Using the and
will move the cursor to the left and right.
Press to remove the letters and
numbers.
Press to move to uppercase letters
and lowercase. Press 0-9 to add a letter or number. Press the number once to bring up the character screen (lower bottom). Press the number again to scroll to the character. Refer to the “NUMERIC/CHARACTER TABLE” on page 191.In this case, we have entered “St. Louis - 27.”
+_
+_
+_
+_
Main MenuPrice 5
Product ConfigurationFree VendSpecial Vend ModesSystem Settings 6
Press EDIT to Select
System SettingsMachine Information 5
ClockLanguage MonetaryData Transfer 6
Press EDIT to Select
Machine InformationID106–Asset Number 5
ID104–Location
6
Press EDIT to Select
ID106-Asset Number
St. Louis - 27
abc

Program: System Settings Merchant™ Operators’ Guide
August 2009 134 1810025
Machine Information - Location (continued)
5. Press to lock in your entered
information and return to the Machine Information menu. Verify that the new information you have entered appears in the status (bottom) line.
6. Press once to return to the
System Settings menu or twice to return to the Main Menu.
Machine InformationID106–Asset Number 5
ID104–Location
6
Press EDIT to Select

Merchant™ Operators’ Guide Program: System Settings
1810025 135 August 2009
Set the Date
1. Press until you reach the Main
Menu, then use or to select
System Settings and press .
2. In the System Settings menu, use
or to select Clock and
press .
3. In the Clock menu, use or
to select Date and press .
4. Using the number keys on either keypad,
enter the correct date. Press to
toggle between MM/DD/YY andDD-MM-YY formats.
NOTEAfter you enter the last digit of the year,
the cursor will return to the first digit.This is helpful if you enter the wrong date.
Using or will allow you to
move the cursor to the position you desire.
5. Press to lock in the date and return
to the Clock menu. With Date selected, verify that the status (bottom) line displays the date you entered, in the format you selected.
6. Press once to return to the System
Settings menu or twice to return to the Main Menu.
+_
+_
+_
+_
Main MenuTest 5
PriceProduct ConfigurationFree VendSystem Settings 6
Press EDIT to Select
System SettingsMachine Information 5
ClockLanguage MonetaryData Transfer 6
Press EDIT to Select
ClockDate 5
TimeDaylight Saving Time
6
11-02-07 (dd-mm-yy)
Date
dd - mm - yy
11 - 03 - 07
Press * To Change Mode
ClockDate 5
TimeDaylight Saving Time
6
11-03-07 (dd-mm-yy)

Program: System Settings Merchant™ Operators’ Guide
August 2009 136 1810025
Set the Time
1. Press until you reach the Main
Menu, then use or to select
System Settings and press .
2. In the System Settings menu, use
or to select Clock and
press .
3. In the Clock menu, use or to
select Time and press .
4. Using the number keys on either keypad,
enter the correct time. Press to
toggle between AM, PM and 24-hr. formats.
NOTEAfter you enter the last digit of the time,
the cursor will return to the first digit.This is helpful if you enter the wrong time.
Using or will allow you
to move the cursor to the position youdesire, and change the hour modes.
5. Press to lock in the time and
return to the Clock menu. With Time selected, verify that the status (bottom)line displays the date you entered, in the format you selected.
6. Press once to return to the System
Settings menu or twice to return to the Main Menu.
+_
+_
+_
+_
Main MenuTest 5
PriceProduct ConfigurationFree VendSystem Settings 6
Press EDIT to Select
System SettingsMachine Information 5
ClockLanguage MonetaryData Transfer 6
Press EDIT to Select
ClockDate 5
TimeDaylight Saving Time
6
11:03 AM
Time
hh / mm / mode:12/24
12 - 03 PM
Press * To Change Mode
ClockDate 5
TimeDaylight Savings Time
6
12:03 PM

Merchant™ Operators’ Guide Program: System Settings
1810025 137 August 2009
Set Daylight Saving Time
1. Press until you reach the Main Menu,
then use or to select
System Settings and press .
2. In the System Settings menu, use
or to select Clock and
press .
3. In the Clock menu, use or
to select Daylight Saving Time and
press .
4. In the Daylight Saving Time menu, press
or to select which daylight
saving time option you desire.The selected option is the one with thefilled-in circle.
5. Press to lock in the selection and
return to the Clock menu. With Daylight Saving Time selected, verify that the status (bottom) line displays the daylight saving time option you selected.
6. Press once to return to the System
Settings menu or twice to return to theMain Menu.
+_
+_
+_
Main MenuTest 5
PriceProduct ConfigurationFree VendSystem Settings 6
Press EDIT to Select
System SettingsMachine Information 5
ClockLanguage MonetaryData Transfer 6
Press EDIT to Select
ClockDate 5
TimeDaylight Saving Time
6
Off
Daylight Saving Time
h North American 5
o US 2007o Europeano Australiano Off 6
EDIT = Accept EXIT = Cancel
ClockDate 5
TimeDaylight Saving Time
6
North American

Program: System Settings Merchant™ Operators’ Guide
August 2009 138 1810025
Select a Language
1. Press until you reach the Main Menu,
then use or to select
System Settings and press .
2. In the System Settings menu, use
or to select Language and
press .
3. In the Language menu, press
or to select the desired
language option. The selected option is the one with the filled-in circle.
4. Press to lock in the selection and
return to the System Settings menu. Verify that the status (bottom) line of the menu dis-plays the selected option.
5. Press once to return to the
Main Menu.
+_
+_
Main MenuPrice 5
Product ConfigurationSpecial Vend ModesFree VendSystem Settings 6
Press EDIT to Select
System SettingsMachine Information 5
ClockLanguage MonetaryData Transfer 6
Spanish
Language
h English U.S. 5
o English U.K.
o German
o French
o Spanish 6
EDIT = Accept EXIT = Cancel
System SettingsMachine Information 5
ClockLanguage MonetaryData Transfer 6
English U.S.

Merchant™ Operators’ Guide Program: System Settings
1810025 139 August 2009
Select the Coin Mechanism
1. Press until you reach the Main Menu,
then use or to select
System Settings and press .
2. In the System Settings menu, use
or to select Monetary and
press .
NOTEThe selections in the Monetary menu mayvary, depending upon how the selectionsfor Coin Mechanism, Bill Validator andCard Reader are set. You will always be
able to access Coin Mechanism.
3. In the Monetary menu, use or
to select Coin Mechanism and press
.
4. In the Coin Mechanism menu, press
or to select the desired Coin
Mechanism option. The selected option is the one with the filled-in circle.
5. Press to lock in the selection and
return to the Monetary menu. With Coin Mechanism selected, verify that the status (bottom) line of the Monetary menu displays your Coin Mechanism option selection.
6. Press once to return to the System
Settings menu, or twice to return to the Main Menu.
+_
+_
+_
Main MenuPrice 5
Product ConfigurationSpecial Vend ModesFree VendSystem Settings 6
Press EDIT to Select
System SettingsMachine Information 5
ClockLanguage MonetaryData Transfer 6
Press EDIT to Select
MonetaryCoin Mechanism 5
Bill ValidatorCard Reader
6
No Coin Mechanism
Coin Mechanism o No Coin Mechanism 5
h MDB Coin Mechanism
o Exec Coin Mechanism
6
EDIT = Accept EXIT = Cancel
MonetaryCoin Mechanism 5
Bill ValidatorCard ReaderBill AcceptanceMultiple Vend Mode 6
MDB Coin Mechanism

Program: System Settings Merchant™ Operators’ Guide
August 2009 140 1810025
View Coins In/Out
NOTEThe Coins In/Out menu selection is
accessed from the Main Menu, and is only available when a Coin Mechanism is activated. See “Select the Coin Mechanism” on page 139.
1. Press until you reach the Main
Menu, then use or to select
Coins In/Out.
The Coins In/Out menu displays thefollowing information:
• The value of the coins that yourmerchandiser is set to accept.
• The count of each value of coincurrently in the merchandiser.
• The total dollar amount of each type of coin that is currently inside your merchandiser.
You can also dispense excess or desired
_
Main MenuSpecial Vend Modes 5
Free VendCoins In/OutSystem SettingsSecurity Codes 6
Press EDIT to Select
Coins In/OutPress Coins Count Value
1 .05 100 5.002 .10 215 21.503 .25 220 55.004 1.00 15 15.00
2. Press the number that corresponds with the coin value you wish to dispense. For example, pressing “3” would dispense one quarter. Each time you press the number, the merchandiserwill dispense one of the corresponding value coin.
3. When you are finished viewing the information and/or dispensing excess or desired coins,
press once to return to the Main Menu.
NOTEIf your merchandiser has a recycler
installed, the recycler contents will be reportedas part of the count and value totals.

Merchant™ Operators’ Guide Program: System Settings
1810025 141 August 2009
Set Change Without Purchase
1. Press until you reach the Main Menu,
then use or to select
System Settings.
2. In the System Settings menu, use or
to select Monetary and press .
NOTEThe Change Without Purchase menu
selection is only available when aCoin Mechanism is activated. See
“Select the Coin Mechanism” on page 139.
3. In the Monetary menu, use or
to select Change Without Purchase and
press .
4. Using the number keys on either keypad, enter the highest denomination of coin or bill that can be changed without purchase. The arrow keys will reposition the cursor.
For example, if 0.00 is set, no changewill be returned without purchase. If00.25 is set, change will be returned isnickels, dimes and/or quarters are inserted. If 01.00 is set, $1.00 bills and coins will be changed without purchase. Nickels, dimes and quarters are also returned.
5. Press to lock in the selection and
return to the Monetary menu.Verify that the status (bottom) line displays the amount of change that Change Without Purchase is set for.
6. Press once to return to the
System Settings menu or twice to return to the Main Menu.
_
+
_
_
Main MenuSpecial Vend Modes 5
Free VendCoins In/OutSystem SettingsSecurity Codes 6
Press EDIT to Select
System SettingsMachine Information 5
ClockLanguage MonetaryData Transfer 6
Press EDIT to Select
MonetaryCoin Mechanism 5
Bill ValidatorCard ReaderMultiple Vend ModeChange Without Purchase 6
= $ 0.25
Change Without Purchase
05.00
# = Backspace, EDIT = AcceptEXIT = Cancel
MonetaryCoin Mechanism 5
Bill ValidatorCard ReaderMultiple Vend ModeChange Without Purchase 6
= $ 5.00

Program: System Settings Merchant™ Operators’ Guide
August 2009 142 1810025
Set Low Change Message
1. Press until you reach the Main Menu,
then use or to select
System Settings.
2. In the System Settings menu, use or
to select Monetary and press .
NOTEThe Low Change Message menuselection is only available when a
Coin Mechanism is activated. See“Select the Coin Mechanism” on page 139.
3. In the Monetary menu, use or
to select Low Change Message and
press .
4. Using the number keys on either keypad, enter the amount of change that will be remaining when you wish the merchandiser to start displaying a “Low Change” message. If the amount of change is less than $10.00, use leading zeros.The arrow keys willreposition the cursor.
5. Press to lock in the selection and
return to the Monetary menu. Verify that the status (bottom) line displays the remaining change in the merchandiser when the Low Change Message is set to display.
6. Press once to return to the
System Settings menu or twice to return to the Main Menu.
_
+
_
_
Main MenuSpecial Vend Modes 5
Free VendCoins In/OutSystem SettingsSecurity Codes 6
Press EDIT to Select
System SettingsMachine Information 5
ClockLanguage MonetaryData Transfer 6
Press EDIT to Select
MonetaryBill Validator 5
Card ReaderMultiple Vend ModeChange Without Purchase Low Change Message 6
= $ 0.00
Low Change Message
09.95
# = Backspace, EDIT = AcceptEXIT = Cancel
MonetaryBill Validator 5
Card ReaderMultiple Vend ModeChange Without Purchase Low Change Message 6
= $ 9.95

Merchant™ Operators’ Guide Program: System Settings
1810025 143 August 2009
Select the Bill Validator
1. Press until you reach the Main Menu,
then use or to select
System Settings and press .
2. In the System Settings menu, use
or to select Monetary and
press .
NOTEThe selections in the Monetary menu mayvary, depending upon how the selectionsfor Coin Mechanism, Bill Validator andCard Reader are set. You will always be
able to access Bill Validator.
3. In the Monetary menu, use or
to select Bill Validator and press .
4. In the Bill Validator menu, press
or to select the desired Bill
Validator option. The selected option is the one with the filled-in circle.
5. Press to lock in the selection and
return to the Monetary menu. With Bill Validator selected, verify that the status(bottom) line displays your Bill Validatoroption selection.
6. Press until you reach the Main Menu.
You must do this to initialize the Bill Validator and activate the Bill Acceptance menu.
+_
+_
+_
Main MenuTest 5
PriceProduct ConfigurationFree VendSystem Settings 6
Press EDIT to Select
System SettingsMachine Information 5
ClockLanguage MonetaryData Transfer 6
Press EDIT to Select
MonetaryCoin Mechanism 5
Bill ValidatorCard Reader
6
No Bill Validator
Bill Validator
o No Bill Validator 5
h MDB Bill Validator
6
EDIT = Accept EXIT = Cancel
MonetaryCoin Mechanism 5
Bill ValidatorCard ReaderMultiple Vend ModeChange Without Purchase 6
MDB Bill Validator

Program: System Settings Merchant™ Operators’ Guide
August 2009 144 1810025
Set Accept on Low Change
1. Press until you reach the Main
Menu, then use or to select
System Settings.
2. In the System Settings menu, use or
to select Monetary and press .
NOTEThe Accept on Low Change menu selection
is only available when a Coin Mechanismand/or a Bill Validator are activated. See
“Select the Coin Mechanism” on page 139 and/or “Select the Bill Validator” on page 143.
3. In the Monetary menu, use or
to select Accept on Low Change and
press .
4. Using the number keys on either keypad, enter the Accept on Low Change value. The arrow keys will reposition the cursor. This value has two purposes:
A. This value tells the merchandiser how large a bill or coin to accept even though there is not enough change in the coin mech to cover all possible paybacks.For example: enter 01.00. In this case, the merchandiser will take a dollar bill or coin, even though there is less than $1.00 worth of change in the coin mech.
_
_
_
Main MenuSpecial Vend Modes 5
Free VendCoins In/OutSystem SettingsSecurity Codes 6
Press EDIT to Select
System SettingsMachine Information 5
ClockLanguage MonetaryData Transfer 6
Press EDIT to Select
MonetaryCard Reader 5
Multiple Vend ModeChange Without Purchase Low Change MessageAccept on Low Change 6
= $ 0.00
Accept on Low Change
05.00
# = Backspace, EDIT = AcceptEXIT = Cancel
Entering 05.00 tells the merchandiser to take a five dollar bill even though there is less than $5.00 worth of change in the coin mech.
NOTEThis could cause a customer to be short-changed. Entering00.00 means that bills or coins will only be accepted if there
is enough change in the coin mech to cover the payback.

Merchant™ Operators’ Guide Program: System Settings
1810025 145 August 2009
Set Accept on Low Change (continued)
B. This value also tell the merchandiser how much the customer is allowed to overbuy a product. The customer will be short-changed when an overbuy occurs.For example: for a value of 00.25, if there is no change in the coin mech, and the customer inserts a $1.00 bill, a $0.75 product can be purchased even though change cannot be paid back. The customer will be short-changed. Normally, a purchase will not be approved unless all change can be paid. Entering 00.00 means that the vend will only be approved when the correct change can be returned (overbuy disabled).
5. Press to lock in the selection and
return to the Monetary menu. Verify that the status (bottom) line displays the bill value that Accept on Low Change is set for.
6. Press once to return to the
System Settings menu or twice to return to the Main Menu.
MonetaryCard Reader 5
Multiple Vend ModeChange Without Purchase Low Change MessageAccept on Low Change 6
= $ 5.00

Program: System Settings Merchant™ Operators’ Guide
August 2009 146 1810025
Set Bill Acceptance
1. Press until you reach the Main
Menu, then use the or to
select System Settings and press .
2. In the System Settings menu, use
or to select Monetary and
press .
NOTEThe Bill Acceptance menu selection is only available when a Bill Validator is activated.See “Select the Bill Validator” on page 143.
3. In the Monetary menu, use or
to select Bill Acceptance and press .
4. In the Bill Acceptance menu, select the value of the bill you wish to set acceptance
(Off or On) for and press .
5. In the “X” menu, press or
to select Off or On.The selected option is the one with thefilled-in circle.
6. Press to lock in your selection (Off
or On) and return to the Bill Acceptance menu. Verify that the status displayed nextto the bill values is are correct.
7. Press once to return to the
System Settings menu, or twice to returnto the Main Menu.
_
+_
_
Main MenuSpecial Vend Modes 5
Free VendCoins In/OutSystem SettingsSecurity Codes 6
Press EDIT to Select
System SettingsMachine Information 5
ClockLanguage MonetaryData Transfer 6
Press EDIT to Select
MonetaryCoin Mechanism 5
Bill ValidatorCard Reader Bill AcceptanceMultiple Vend Mode 6
Press EDIT to Select
Bill Acceptance1 1.00 On 5
2 2.00 Off
3 5.00 On
4 10.00 Off5 20.00 Off 6
Press EDIT to Select
5
h Off 5
o On
6
EDIT = Accept EXIT = Cancel

Merchant™ Operators’ Guide Program: System Settings
1810025 147 August 2009
Set Token/Coupon Acceptance
1. Press until you reach the Main
Menu, then use the or to
select System Settings and press .
2. In the System Settings menu, use
or to select Monetary and
press .
NOTEThe Bill Acceptance menu selection is only available when a Bill Validator is activated.See “Select the Bill Validator” on page 143.
3. In the Monetary menu, use or
to select Bill Acceptance and press .
4. In the Bill Acceptance menu, select Token
1 and press .
5. In the “6” menu, press or
to select Off or On. The selected option is the one with the filled-in circle.
_
+_
_
Main MenuSpecial Vend Modes 5
Free VendCoins In/OutSystem SettingsSecurity Codes 6
Press EDIT to Select
System SettingsMachine Information 5
ClockLanguage MonetaryData Transfer 6
Press EDIT to Select
MonetaryCoin Mechanism 5
Bill ValidatorCard Reader Bill AcceptanceMultiple Vend Mode 6
Press EDIT to Select
Bill Acceptance4 10.00 On 5
5 20.00 Off6 Token 1 Off 6
6
Press EDIT to Select
6
h Off 5
o On
6
EDIT = Accept EXIT = Cancel
6. Press to lock in your selection (Off
or On) and return to the Bill Acceptance menu. Verify that the status displayed nextto Token 1 is correct.
7. Press once to return to the System
Settings menu, or twice to return to the Main Menu.
NOTESelections must be enabled in the SpecialVend Modes menu for token and couponacceptance to function properly. See ““Token Enable” on page 128

Program: System Settings Merchant™ Operators’ Guide
August 2009 148 1810025
Select the Card Reader
1. Press until you reach the Main
Menu, then use or to select
System Settings and press .
2. In the System Settings menu, use
or to select Monetary and
press .
NOTEThe selections in the Monetary menu mayvary, depending upon how the selectionsfor Coin Mechanism, Bill Validator andCard Reader are set. You will always be
able to access Card Reader.
3. In the Monetary menu, use
or to select Card Reader
and press .
4. In the Card Reader menu, press
or to select the desired Card
Reader option. The selected option is the one with the filled-in circle.
5. Press to lock in the selection and
return to the Monetary menu. With Card Reader selected, verify that the status(bottom) line displays your Card Reader option selection.
6. Press once to return to the
System Settings menu or twice toreturn to the Main Menu.
+_
+_
+_
Main MenuTest 5
PriceProduct ConfigurationFree VendSystem Settings 6
Press EDIT to Select
System SettingsMachine Information 5
ClockLanguage MonetaryData Transfer 6
Press EDIT to Select
MonetaryCoin Mechanism 5
Bill ValidatorCard Reader
6
No Card Reader
Card Reader
o No Card Reader 5
h MDB Card Reader
6
EDIT = Accept EXIT = Cancel
MonetaryCoin Mechanism 5
Bill ValidatorCard ReaderMultiple Vend ModeCredit for Failed Vend 6
MDB Card

Merchant™ Operators’ Guide Program: System Settings
1810025 149 August 2009
Set Card Revalue
Card Revalue set to On will allow customers to insert a card, then insert money and have credit applied to their card.
1. Press until you reach the Main
Menu, then use or to select
System Settings and press .
2. In the System Settings menu, use
or to select Monetary and
press .
NOTEThe Card Revalue selection will not be
available unless a Card Reader is selected. See “Select the Card Reader” on page 148.
3. In the Monetary menu, press
or to select Card Revalue
and press .
4. In the Card Revalue menu, press
or to select On or Off. The
selected option is the one with the filled-incircle.
5. Press to lock in the selection and
return to the Monetary menu.
+_
+_
Main MenuTest 5
PriceProduct ConfigurationFree VendSystem Settings 6
Press EDIT to Select
System SettingsMachine Information 5
ClockLanguage MonetaryData Transfer 6
Press EDIT to Select
MonetaryChange Without Purchase 5
Low Change Message Accept on Low ChangeCredit for Failed VendCard Revalue 6
Off
Card Revalue h On 5
o Off
6
EDIT = Accept EXIT = Cancel

Program: System Settings Merchant™ Operators’ Guide
August 2009 150 1810025
Set Card Revalue (continued)
6. Verify that the status (bottom) line of the Monetary menu displays the selectedoption (On or Off) when Card Revalueis highlighted.
7. Press once to return to the
System Settings menu or twice to returnto the Main Menu.
MonetaryChange Without Purchase 5
Low Change Message Accept on Low ChangeCredit for Failed VendCard Revalue 6
On

Merchant™ Operators’ Guide Program: System Settings
1810025 151 August 2009
Set Multiple Vend ModeThe Multiple Vend Mode option specifies how the merchandiser will dispense change once a purchase is made. There are two Multiple Vend Mode options:
a. Single Vend - change is dispensed as soon as a valid selection is made.
b. Multi Vend - also called Declining Balance. The customer can make multiple vends as long as there is sufficient credit. In order to get change, the customer must press the coin return.
1. Press until you reach the Main
Menu, then use or to select
System Settings and press .
2. In the System Settings menu, use
or to select Monetary and
press .
NOTEThe Multiple Vend Mode menu selection is
only available when one or any combination of Coin Mechanism, Bill Validator or Card
Reader are activated. See “Select the Coin Mechanism” on page 139, “Select the Bill Vali-
dator” on page 143 and/or “Select the Card Reader” on page 148.
3. In the Monetary menu, select Multiple
Vend Mode and press .
4. In the Multiple Vend Mode menu, press
or to select the desired
option. The selected option is the one with the filled-in circle.
+_
+_
Main MenuPrice 5
Product ConfigurationSpecial Vend ModeFree VendSystem Settings 6
Press EDIT to Select
System SettingsMachine Information 5
ClockLanguage MonetaryData Transfer 6
Press EDIT to Select
MonetaryBill Validator 5
Card ReaderMultiple Vend ModeChange Without Purchase Low Change Message 6
Single Vend
Multiple Vend Mode o Single Vend 5
h Multi Vend
6
EDIT = Accept EXIT = Cancel

Program: System Settings Merchant™ Operators’ Guide
August 2009 152 1810025
Set Multiple Vend Mode (continued)
5. Press to lock in the selection and
return to the Monetary menu.
6. Verify that the status (bottom) line displays the selected option when Multiple Vend Mode is highlighted.
7. Press once to return to the
System Settings menu or twice to return to the Main Menu.
MonetaryBill Validator 5
Card ReaderMultiple Vend ModeCredit for Failed VendCard Revalue 6
Multi Vend

Merchant™ Operators’ Guide Program: System Settings
1810025 153 August 2009
Set Credit for Failed Vend
If a failed vend occurs, the customer’s money may be returned, or the customer’s credit could be restored to the merchandiser for another selection. There are two Credit for Failed Vend options:
a. Hold Credit - this allows the customer’s credit to be restored to the merchandiser for another selection.
b. Return Change - this allows for the customer’s money to be returned.
1. Press until you reach the Main Menu,
then use or to select
System Settings and press .
2. In the System Settings menu, use
or to select Monetary and
press .
NOTEThe Credit for Failed Vend menu selection is only available when one or any combination of
Coin Mechanism, Bill Validator or Card Reader are activated. See “Select the Coin
Mechanism” on page 139, “Select the Bill Valida-tor” on page 143 and/or “Select the Card
Reader” on page 148.
3. In the Monetary menu, select Credit for
Failed Vend and press .
4. In the Credit for Failed Vend menu, press
or to select the desired option.
The selected option is the one with thefilled-in circle.
+_
+_
Main MenuPrice 5
Product ConfigurationSpecial Vend ModeFree VendSystem Settings 6
Press EDIT to Select
System SettingsMachine Information 5
ClockLanguage MonetaryData Transfer 6
Press EDIT to Select
MonetaryBill Validator 5
Card ReaderMultiple Vend ModeCredit for Failed VendCard Revalue 6
Return Change
Credit for Failed Vend h Hold Credit 5
o Return Change
6
EDIT = Accept EXIT = Cancel

Program: System Settings Merchant™ Operators’ Guide
August 2009 154 1810025
Set Credit for Failed Vend (continued)
5. Press to lock in the selection and
return to the Monetary Menu.
6. In the Monetary menu, verify that the option you selected matches the status (bottom) line when Credit for Failed Vend is selected.
7. Press once to return to the
System Settings menu or twice toreturn to the Main Menu.
MonetaryBill Validator 5
Card ReaderMultiple Vend ModeCredit for Failed VendCard Revalue 6
Hold Credit

Merchant™ Operators’ Guide Program: System Settings
1810025 155 August 2009
Set Data Transfer
Set Communication Mode
1. Press until you reach the Main
Menu, then use or to select
System Settings and press .
2. In the System Settings menu, use
or to select Data Transfer
and press .
3. In the Data Transfer menu, use
or to select
Communication Mode and press .
4. In the Communication Mode menu, use
or to select the desired
option. (This sets the desired data collection mode. DEX is most commonly used in the US.) The selected option is the one with the filled-in circle.
5. Press to lock in the selection and
return to the Data Transfer menu.
6. In the Data Transfer menu, verify that the option you selected matches the status(bottom) line of the display whenCommunication Mode is selected.
7. Continue on to the next procedure to “Set Data List” on page 156.
+_
+_
+_
+_
Main MenuPrice 5
Product ConfigurationSpecial Vend ModeFree VendSystem Settings 6
Press EDIT to Select
System SettingsMachine Information 5
ClockLanguage MonetaryData Transfer 6
Press EDIT to Select
Data TransferCommunication Mode 5
Data ListCA304 Data TypeData Reset ModeEvent Reset Mode 6
DEX
Communication Mode o DEX 5
h DDCMP
6
EDIT = Accept EXIT = Cancel
Data TransferCommunication Mode 5
Data ListCA304 Data TypeData Reset ModeEvent Reset Mode 6
DDCMP

Program: System Settings Merchant™ Operators’ Guide
August 2009 156 1810025
Set Data List
Data TransferCommunication Mode 5
Data ListCA304 Data TypeData Reset ModeEvent Reset Mode 6
Press EDIT to Select
Data ListID1 5
ID2ID3
X ID4X ID5 6
* = Set or Clear All
1. In the Data Transfer menu, use
or to select Data List and
press .
2. In the Data List menu, use or
to highlight a selection and press to
enable or disable it. Enabled selections will have an “X”(s) to the left.
NOTE
By pressing , you are able
to quickly remove or add the“X”(s) from all of the selections.
3. Press once to return to the
Data Transfer menu.
4. Continue on to the next procedure to “Set CA304 Data Type” on page 157.
+_
+_

Merchant™ Operators’ Guide Program: System Settings
1810025 157 August 2009
Set CA304 Data Type
1. In the Data Transfer menu, use
or to select CA304 Data
Type and press .
2. In the CA304 Data Type menu, use
or to select the desired
option. The selected option is the one with the filled-in circle.
NOTECurrency - the value of bills in the stacker will be transmitted in a cash format.For example, 200 for two dollars. (Currency is the default setting.)Numeric - the value of the bills in the stacker will be transmitted in a dollar-count format.For example, 2 for two dollars.
3. Press to lock in the selection and
return to the Data Transfer menu. Verify that the selected option is displayed in the status (bottom) line when CA304 Data Type is selected.
NOTEIf your bill count is incorrect, the CA304
setting may be wrong. Try using theopposite CA304 setting.
4. Continue on to the next procedure to “Set Data Reset Mode” on page 158.
+_
+_
Data TransferCommunication Mode 5
Data ListCA304 Data TypeData Reset ModeEvent Reset Mode 6
Currency
CA304 Data Typeo Currency 5
h Numeric
6
EDIT = Accept EXIT = Cancel
Data TransferCommunication Mode 5
Data ListCA304 Data TypeData Reset ModeEvent Reset Mode 6
Numeric

Program: System Settings Merchant™ Operators’ Guide
August 2009 158 1810025
Set Data Reset Mode
1. In the Data Transfer menu, use
or to select
Data Reset Mode and press .
2. In the Data Reset Mode menu, use
or to select the desired
(Reset On Transfer or No Reset OnTransfer) option. The selected option isthe one with the filled-in circle.
3. Press to lock in the selection and
return to the Data Transfer menu. Verify that the selected option is displayed in the status (bottom) line of the menu when Data Reset Mode is selected.
4. Continue on to the next procedure to “Set Event Reset Mode” on page 159.
+_
+_
Data TransferCommunication Mode 5
Data ListCA304 Data TypeData Reset ModeEvent Reset Mode 6
Reset On Transfer
Data Reset Modeo Reset On Transfer 5
h No Reset On Transfer
6
EDIT = Accept EXIT = Cancel
Data TransferCommunication Mode 5
Data ListCA304 Data TypeData Reset ModeEvent Reset Mode 6
No Reset On Transfer

Merchant™ Operators’ Guide Program: System Settings
1810025 159 August 2009
Set Event Reset Mode
1. In the Data Transfer menu, use
or to select
Event Reset Mode and press .
2. In the Event Reset Mode menu, use
or to select the desired
(Reset On Transfer or No Reset OnTransfer) option. The selected optionis the one with the filled-in circle.
3. Press to lock in the selection and
return to the Data Transfer menu. Verify that the selected option is displayed in the status (bottom) line of the menu when Event Reset Mode is selected.
4. Continue on to the next procedure to “Set Printer Baud Rate” on page 160.
+_
+_
Data TransferData List 5
CA304 Data TypeData Reset ModeEvent Reset ModePrinter Baud Rate 6
Reset On Transfer
Event Reset Modeo Reset On Transfer 5
h No Reset On Transfer
6
EDIT = Accept EXIT = Cancel
Data TransferData List 5
CA304 Data TypeData Reset ModeEvent Reset ModePrinter Baud Rate 6
No Reset On Transfer

Program: System Settings Merchant™ Operators’ Guide
August 2009 160 1810025
Set Printer Baud Rate
1. In the Data Transfer menu, use
or to select
Printer Baud Rate and press .
2. In the Printer Baud Rate menu, use
or to select the desired
option. The selected option is the one with the filled-in circle.
NOTEThe Printer Baud Rate is the ratethat information is passed from themain controller to the buffer so that
data can be printed. Failure to set the proper Printer Baud Rate willcause the printer to not print all
the data in a legible format.
3. Press to lock in the selection and
return to the Data Transfer menu. Verify that the selected option is displayed in the status (bottom) line of the menu when Printer Baud Rate is selected.
4. Press once to return to the
System Settings menu or twice to returnto the Main Menu.
+_
+_
Data TransferData List 5
CA304 Data TypeData Reset ModeEvent Reset ModePrinter Baud Rate 6
9600
Printer Baud Rateo 1200 5
o 2400o 4800
o 9600
h 19200 6
EDIT = Accept EXIT = Cancel
Data TransferData List 5
CA304 Data TypeData Reset ModeEvent Reset ModePrinter Baud Rate 6
19200

Merchant™ Operators’ Guide Program: System Settings
1810025 161 August 2009
Connect and Disconnect the Data Key
1. Turn off power to the machine.
2. Open monetary door and remove circuit board cover.
3. Install the Data Key onto the main controller at J9A, as shown in figure below. Note the proper orientation of the Data Key onto the PCB header.
WARNINGUse care when powering up the machine,
due to high voltage components and parts.
4. Turn on power to the machine.
5. Access the service keypad and display.
6. Perform the procedure(s) that you wish to perform while Data Key is installed.
7. Turn off power to the machine.
8. Carefully remove the Data Key from the PCB header of the main controller at J9A.
9. Re-install the circuit board cover.
10. Turn on power to the machine.

Program: System Settings Merchant™ Operators’ Guide
August 2009 162 1810025
Firmware Selection (Serial Flash Menu)
The Firmware selection line in the Serial Flash menu will not always appear. This is because it may not be loaded up on the currently inserted Data Key.
If the Firmware selection line does appear, it is IMPERATIVE that you DO NOT attempt to perform this procedure.
WARNINGLoading or copying Firmware to the Data Key will result in the system software that operates the machine being transferred to the Data Key
and will cause your machine to be inoperable.
DO NOT CHOOSE or try to perform this function!
System SettingsClock 5
LanguageMonetaryData TransferSerial Flash 6
Press EDIT to Select
Serial FlashFirmware 0Configuration Data 0Config & Sales Data 0
Press EDIT to Select

Merchant™ Operators’ Guide Program: System Settings
1810025 163 August 2009
Save Configuration Data to Data KeyThis procedure allows you to copy data such as Custom Marketing Messages and Timed Events settings to the Data Key for back up and/or transfer to other machines.
1. Follow the instructions in “Connect and Disconnect the Data Key” on page 161 to install the Data Key
2. After installing the Data Key, access the
System Settings menu by pressing
until you reach the Main Menu, then press
to scroll down to System Settings
and press .
3. In the System Settings menu, press
to select Serial Flash and press .
4. In the Serial Flash menu, press
to select Configuration Data and
press .
NOTEIf the Data Key has no configuration
data stored, the only itemdisplayed in the Configuration Data
menu will be “Save Data.”
5. In the Configuration Data menu,
press to select Save Data and
press .
6. In the Save Data menu, press
to select a blank description line and
press .
System SettingsClock 5
LanguageMonetaryData TransferSerial Flash 6
Press EDIT to Select
Serial FlashFirmware 0Configuration Data 0Config & Sales Data 00
Press EDIT to Select
Configuration DataImage Info 5
Load DataDelete DataSave Data
6
Press EDIT to Select
Save Data 1. _ _ _ _ _ _ _ _ 5
2. _ _ _ _ _ _ _ _3. _ _ _ _ _ _ _ _4. _ _ _ _ _ _ _ _5. _ _ _ _ _ _ _ _6. _ _ _ _ _ _ _ _ 6

Program: System Settings Merchant™ Operators’ Guide
August 2009 164 1810025
Save Configuration Data to Data Key (continued)
7. A second Save Data menu will appear.
Press to select Edit Description
and press .
8. Enter a description of the data you are saving by using the keypad. Refer to the “NUMERIC/CHARACTER TABLE” on page 191.
Confirm by pressing .
9. The screen will then return to the second
Save Data menu. Press to select
Save Data and press to confirm.
10. A third Save Data screen will appear, asking you if you are sure you want to save that particular Data Description from the
Data Key. Confirm by pressing .
The menu screen will then cycle to the Ready screen.
11. To confirm that the Data Description you entered was saved, follow the steps in “View Image Info (Data Description) on Data Key” on page 167.
12. Remove the Data Key (refer to “Connect and Disconnect the Data Key” on page 161.)
Save Data Edit Desc 5
Save Data
6
Edit Desc
DEC 22
abc
Save Data Edit Desc 5
Save Data
6
Press EDIT to Select
Save DataAre you sure you wantto save this datato the disk?
CANCEL - EXIT CONTINUE - *
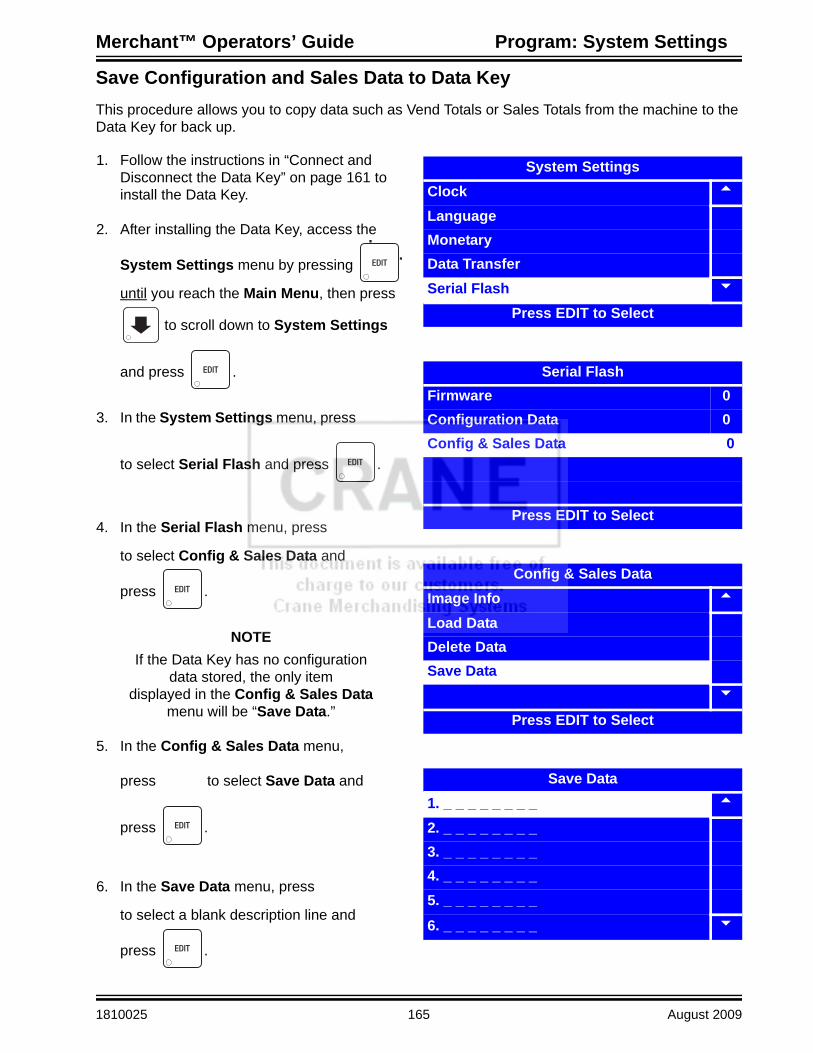
Merchant™ Operators’ Guide Program: System Settings
1810025 165 August 2009
Save Configuration and Sales Data to Data KeyThis procedure allows you to copy data such as Vend Totals or Sales Totals from the machine to the Data Key for back up.
1. Follow the instructions in “Connect and Disconnect the Data Key” on page 161 to install the Data Key.
2. After installing the Data Key, access the
System Settings menu by pressing
until you reach the Main Menu, then press
to scroll down to System Settings
and press .
3. In the System Settings menu, press
to select Serial Flash and press .
4. In the Serial Flash menu, press
to select Config & Sales Data and
press .
NOTEIf the Data Key has no configuration
data stored, the only itemdisplayed in the Config & Sales Data
menu will be “Save Data.”
5. In the Config & Sales Data menu,
press to select Save Data and
press .
6. In the Save Data menu, press
to select a blank description line and
press .
System SettingsClock 5
LanguageMonetaryData TransferSerial Flash 6
Press EDIT to Select
Serial FlashFirmware 0Configuration Data 0Config & Sales Data 00
Press EDIT to Select
Config & Sales DataImage Info 5
Load DataDelete DataSave Data
6
Press EDIT to Select
Save Data 1. _ _ _ _ _ _ _ _ 5
2. _ _ _ _ _ _ _ _3. _ _ _ _ _ _ _ _4. _ _ _ _ _ _ _ _5. _ _ _ _ _ _ _ _6. _ _ _ _ _ _ _ _ 6

Program: System Settings Merchant™ Operators’ Guide
August 2009 166 1810025
Save Configuration and Sales Data to Data Key (continued)
7. A second Save Data menu will appear.
Press to select Edit Description
and press .
8. Enter a description of the data you are saving by using the keypad. Refer to the “NUMERIC/CHARACTER TABLE” on page 191.
Confirm by pressing .
6. The screen will then return to the second
Save Data menu. Press to select
Save Data and press to confirm.
7. A third Save Data screen will appear, asking you if you are sure you want to save that particular Data Description from the
Data Key. Confirm by pressing .
The menu screen will then cycle to the Ready screen.
8. To confirm that the Data Description you entered was saved, follow the steps in “View Image Info (Data Description) on Data Key” on page 167.
9. Remove the Data Key (refer to “Connect and Disconnect the Data Key” on page 161.)
Save Data Edit Desc 5
Save Data
6
Edit Desc
DEC 23
abc
Save Data Edit Desc 5
Save Data
6
Press EDIT to Select
Save DataAre you sure you wantto save this datato the disk?
CANCEL - EXIT CONTINUE - *

Merchant™ Operators’ Guide Program: System Settings
1810025 167 August 2009
View Image Info (Data Description) on Data Key
NOTEIn performing this procedure, follow the
instructions in “Connect and Disconnect the Data Key” on page 161 to install and remove
the Data Key
1. After installing the Data Key, access the
System Settings menu by pressing
until you reach the Main Menu, then press
to scroll down to System Settings
and press .
2. In the System Settings menu, press
to select Serial Flash and press .
NOTEThis procedure is performed in exactly the
same manner whether using the Configuration Data or the Config & Sales Data functions.
3. In the Serial Flash menu, press
to select Configuration Data OR Config &
Sales Data and press .
NOTEIf the Data Key has no data stored, the only item in the Configuration Data OR Config & Sales
Data menu will be “Save Data,” In that case, there will be no Image Info to view.
4. In the Configuration Data OR Config &
Sales Data menu, press to select
Image Info and press .
System SettingsClock 5
LanguageMonetaryData TransferSerial Flash 6
Press EDIT to Select
Serial FlashConfiguration Data 1Config & Sales Data 0 0
Press EDIT to Select
Configuration DataImage Info 5
Load DataDelete DataSave Data
6
Press EDIT to Select

Program: System Settings Merchant™ Operators’ Guide
August 2009 168 1810025
View Image Info (Data Description) on Data Key (continued)
NOTEImage Info will initially be displayed as the
original software version number (for example, in screen at right, it is 181.01.00.H) followed by the date the Image Info (Data Description) was saved. You will have to choose Image Info by selecting the date that it was originally saved.
5. In the Image Info menu, press to
select the Image Info you wish to display
and press .
6. A second Image Info screen will appear, displaying the software version, the Data Description that was originally entered,the date the data was saved, and the time the data was saved. In the example atright, the Data Description is displayed as ABC123.
7. Press once to return to the Image
Info menu to choose another Data Description, twice to return to the Configuration Data OR Config & Sales Data menu to perform a different Data function, or several times to reach the Main Menu.
8. If you have finished performing all Data Key functions, remove the Data Key (refer to “Connect and Disconnect the Data Key” on page 161.)
Image Info 1. 181.01.00.H 12/17/07 5
2. 181.01.00.H 11/15/073. 181.01.00.H 11/01/074. _ _ _ _ _ _ _ _5. _ _ _ _ _ _ _ _6. _ _ _ _ _ _ _ _ 6
Image InfoVersion: 181.01.00.H
Desc: ABC123Date: 12/17/07
Time: 10:15 AM

Merchant™ Operators’ Guide Program: System Settings
1810025 169 August 2009
Load Configuration Data from Data Key to Machine
NOTEIn performing this procedure, follow the
instructions in “Connect and Disconnect the Data Key” on page 161 to install and remove
the Data Key.
1. Access the System Settings menu by
pressing until you reach the Main
Menu, then press to scroll down to
System Settings and press .
2. In the System Settings menu, press
to select Serial Flash and press .
3. In the System Settings menu, press
to select Serial Flash and press .
4. In the Serial Flash menu, press
to select Configuration Data and
press .
5. In the Configuration Data menu, press
to select Load Data and
press .
System SettingsClock 5
LanguageMonetaryData TransferSerial Flash 6
Press EDIT to Select
Serial FlashConfiguration Data 1Config & Sales Data 0 0
Press EDIT to Select
Configuration DataSave Data 5
Load Data
6
Press EDIT to Select

Program: System Settings Merchant™ Operators’ Guide
August 2009 170 1810025
Load Configuration Data from Data Key to Machine (continued)
6. In the Load Data menu, press to
select the Data Description you wish to copy
and press .
7. A second Load Data screen will appear, asking you if you are sure you want to load that particular Data Description from the
Data Key. Confirm by pressing .
8. The menu screen will then cycle to the Ready screen.
NOTEYou may wish to store Data Key Configuration Data to the machine’s memory. To do so, follow
the steps in “Backup Data” on page 174.
9. If you have finished performing all Data Key functions, remove the Data Key (refer to “Connect and Disconnect the Data Key” on page 161.)
Load Data 1. 181.00.01.H 12/17/07 5
2. 181.00.01.H 11/15/073. 181.00.01.H 11/01/074. _ _ _ _ _ _ _ _5. _ _ _ _ _ _ _ _6. _ _ _ _ _ _ _ _ 6
Load DataAre you sure you wantto load this imagefrom the disk?
CANCEL - EXIT CONTINUE - *
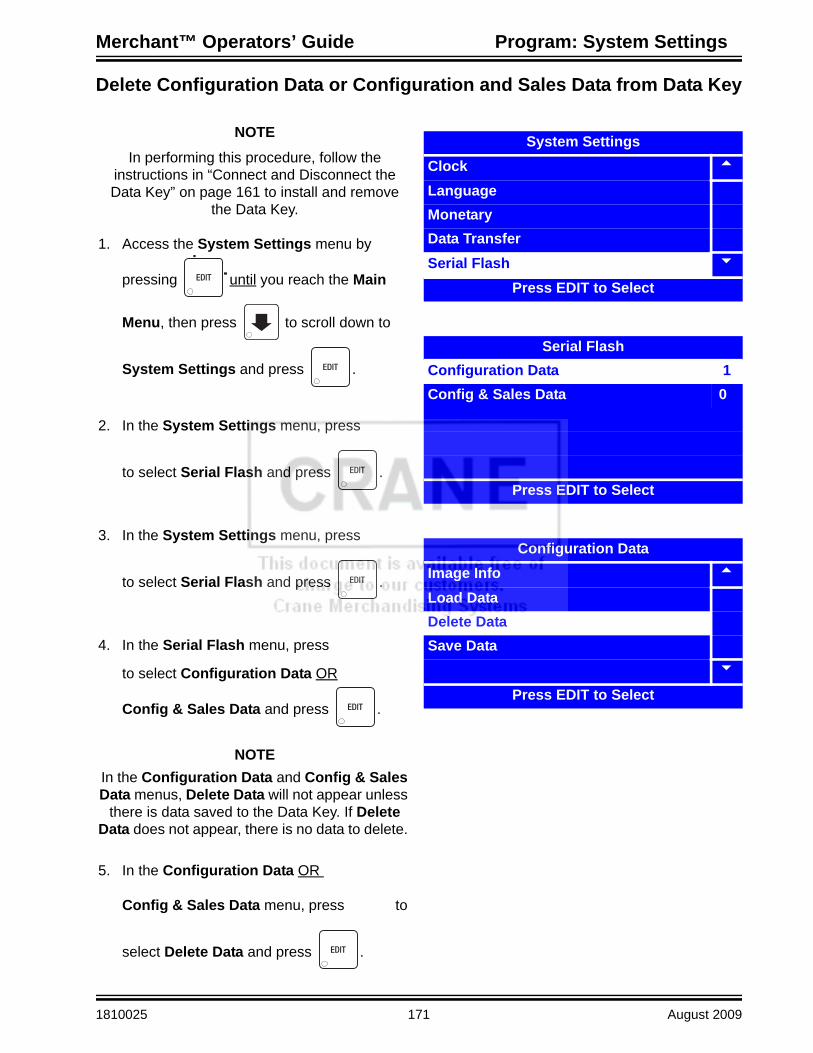
Merchant™ Operators’ Guide Program: System Settings
1810025 171 August 2009
Delete Configuration Data or Configuration and Sales Data from Data Key
NOTEIn performing this procedure, follow the
instructions in “Connect and Disconnect the Data Key” on page 161 to install and remove
the Data Key.
1. Access the System Settings menu by
pressing until you reach the Main
Menu, then press to scroll down to
System Settings and press .
2. In the System Settings menu, press
to select Serial Flash and press .
3. In the System Settings menu, press
to select Serial Flash and press .
4. In the Serial Flash menu, press
to select Configuration Data OR
Config & Sales Data and press .
NOTEIn the Configuration Data and Config & Sales Data menus, Delete Data will not appear unless
there is data saved to the Data Key. If Delete Data does not appear, there is no data to delete.
5. In the Configuration Data OR
Config & Sales Data menu, press to
select Delete Data and press .
System SettingsClock 5
LanguageMonetaryData TransferSerial Flash 6
Press EDIT to Select
Serial FlashConfiguration Data 1Config & Sales Data 0 0
Press EDIT to Select
Configuration DataImage Info 5
Load DataDelete DataSave Data
6
Press EDIT to Select

Program: System Settings Merchant™ Operators’ Guide
August 2009 172 1810025
Delete Configuration Data or Configuration and Sales Data from Data Key(continued)
6. In the Delete Data menu, press to
select the Data Description you wish to
delete and press .
7. A second Delete Data screen will appear, asking you if you are sure you want to delete that particular Data Description from the
Data Key. Confirm by pressing .
8. The menu screen will then cycle to the Ready screen.
9. If you have finished performing all Data Key functions, remove the Data Key (refer to “Connect and Disconnect the Data Key” on page 161.)
Delete Data 1. 181.00.01.H 12/17/07 5
2. 181.00.01.H 11/15/073. 181.00.01.H 11/01/074. _ _ _ _ _ _ _ _5. _ _ _ _ _ _ _ _6. _ _ _ _ _ _ _ _ 6
Delete DataAre you sure you wantto delete this imagefrom the disk?
CANCEL - EXIT CONTINUE - *
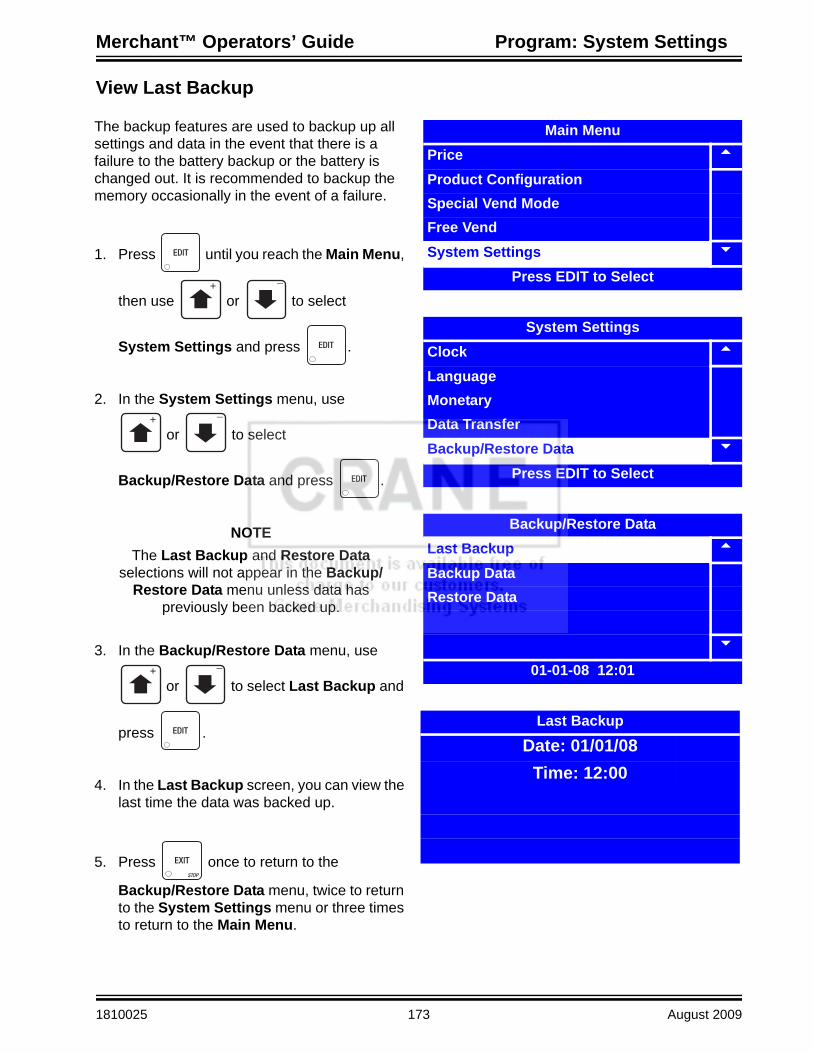
Merchant™ Operators’ Guide Program: System Settings
1810025 173 August 2009
View Last Backup
The backup features are used to backup up all settings and data in the event that there is a failure to the battery backup or the battery is changed out. It is recommended to backup the memory occasionally in the event of a failure.
1. Press until you reach the Main Menu,
then use or to select
System Settings and press .
2. In the System Settings menu, use
or to select
Backup/Restore Data and press .
NOTEThe Last Backup and Restore Data
selections will not appear in the Backup/Restore Data menu unless data has
previously been backed up.
3. In the Backup/Restore Data menu, use
or to select Last Backup and
press .
4. In the Last Backup screen, you can view the last time the data was backed up.
5. Press once to return to the
Backup/Restore Data menu, twice to return to the System Settings menu or three times to return to the Main Menu.
+_
+_
+_
Main MenuPrice 5
Product ConfigurationSpecial Vend ModeFree VendSystem Settings 6
Press EDIT to Select
System SettingsClock 5
Language MonetaryData TransferBackup/Restore Data 6
Press EDIT to Select
Backup/Restore DataLast Backup 5
Backup DataRestore Data
6
01-01-08 12:01
Last Backup
Date: 01/01/08Time: 12:00

Program: System Settings Merchant™ Operators’ Guide
August 2009 174 1810025
Backup DataThe backup features are used to backup up all settings and data in the event that there is a failureto the battery backup or the battery is changed out. It is recommended to backup the memoryoccasionally in the event of a failure
1. Press until you reach the Main
Menu, then use or to select
System Settings and press .
2. In the System Settings menu, use
or to select
Backup/Restore Data and press .
3. In the Backup/Restore Data menu, use
or to select Backup Data and
press .
NOTE
When is pressed to save
data, the system will reset.
4. In the Backup Data menu, press to
save all data. Press to cancel. You
will be automatically returned to the Backup/Restore Data menu.
5. Press once to return to the
System Settings menu or twice to return to the Main Menu.
+_
+_
+_
Main MenuPrice 5
Product ConfigurationSpecial Vend ModeFree VendSystem Settings 6
Press EDIT to Select
System SettingsClock 5
Language MonetaryData TransferBackup/Restore Data 6
Press EDIT to Select
Backup/Restore DataLast Backup 5
Backup DataRestore Data
6
Press EDIT to Select
Backup DataWarning! The actions ofthis function cannot bereversed.
CANCEL-EXIT CONTINUE=*

Merchant™ Operators’ Guide Program: System Settings
1810025 175 August 2009
Restore DataRestoring data will restore all saved data that was backed up in memory.
1. Press until you reach the Main Menu,
then use or to select
System Settings and press .
2. In the System Settings menu, use
or to select
Backup/Restore Data and press .
NOTEThe Last Backup and Restore Data
selections will not appear in the Backup/Restore Data menu unless data has
previously been backed up.
3. In the Backup/Restore Data menu, use
or to select Restore Data and
press .
NOTE
When is pressed to save
data, the system will reset.
4. In the Restore Data menu, press to
save all data. Press to cancel. You
will be automatically returned to theBackup/Restore Data menu.
+_
+_
+_
Main MenuPrice 5
Product ConfigurationSpecial Vend ModeFree VendSystem Settings 6
Press EDIT to Select
System SettingsClock 5
Language MonetaryData TransferBackup/Restore Data 6
Press EDIT to Select
Backup/Restore DataLast Backup 5
Backup DataRestore Data
6
Press EDIT to Select
Restore DataWarning! The actions ofthis function cannot bereversed.
CANCEL-EXIT CONTINUE=*
5. Press once to return to the System Settings menu or twice to return to the Main Menu.

Program: System Settings Merchant™ Operators’ Guide
August 2009 176 1810025
Set Screen Contrast
For most installations, the factory defaultscreen contrast setting should be adequate.For installations with special considerations (very low or high ambient light), adjust the screen contrast to improve menu readability.
1. Press until you reach the Main
Menu, then use or to select
System Settings and press .
2. In the System Settings menu, use
or to select Screen Contrast
and press .
3. Using the number keys on either keypad, enter the setting for the screen contrast.If the setting is less than 10, use leading zeros:
For example, if you wish to set the screen contrast at 9, press 0-9If you enter more than two numbers, the display will scroll back to the first digit.
4. Press to lock in the setting and return
to the System Settings menu.
5. In the Systems Settings menu, verify that the value you entered matches the status (bottom) line when Screen Contrast is selected.
6. Press once to return to the
Main Menu.
+_
+_
Main MenuPrice 5
Product ConfigurationSpecial Vend ModeFree VendSystem Settings 6
Press EDIT to Select
System SettingsMonetary 5
Data TransferBackup/Restore Data Screen ContrastSoftware Version 6
= 7
Screen Contrast
09
# = Backspace, EDIT = AcceptEXIT = Cancel
System SettingsMonetary 5
Data TransferBackup/Restore Data Screen ContrastSoftware Version 6
= 9

Merchant™ Operators’ Guide Program: System Settings
1810025 177 August 2009
View Software Version
1. Press until you reach the Main Menu,
then use or to select System
Settings and press .
2. In the System Settings menu, use
or to select Software Version
and press .
3. The Software Version screen displays the software version, date and time of software and checksum of software.
4. Press once to return to the
System Settings menu or twice to return to the Main Menu.
+_
+_
Main MenuTest 5
PriceProduct ConfigurationFree VendSystem Settings 6
Press EDIT to Select
System SettingsMonetary 5
Data TransferBackup/Restore Data Screen ContrastSoftware Version 6
Version 181.01.00
Software Version
Version: 181.01.00Date: 01/10/08Time: 15:33:13
Checksum: 490B

Program: System Settings Merchant™ Operators’ Guide
August 2009 178 1810025
View SureVend™ Version
1. Press until you reach the Main
Menu, then use or to select
System Settings and press .
2. In the System Settings menu, use
or to select SureVend
Version and press .
3. The Software Version screen displaysthe identifying number of the current SureVend™ software version.
4. Press once to return to the
System Settings menu or twice to return to the Main Menu.
+_
+_
Main MenuTest 5
PriceProduct ConfigurationFree VendSystem Settings 6
Press EDIT to Select
System SettingsBackup/Restore Data 5
Screen ContrastSoftware VersionSureVend VersionIO Board Software 6
Version: 123
SureVend Version
Version: 123

Merchant™ Operators’ Guide Program: System Settings
1810025 179 August 2009
View IO Board Software
1. Press until you reach the Main
Menu, then use or to select
System Settings and press .
2. In the System Settings menu, use
or to select IO Board
Software and press .
3. The IO Board Software screen displaysthe software version of the IO Board Software.
4. Press once to return to the
System Settings menu or twice to return to the Main Menu.
+_
+_
Main MenuTest 5
PriceProduct ConfigurationFree VendSystem Settings 6
Press EDIT to Select
System SettingsBackup/Restore Data 5
Screen ContrastSoftware VersionSureVend VersionIO Board Software 6
Version: 0101
IO board software
Version: 0111

Program: System Settings Merchant™ Operators’ Guide
August 2009 180 1810025
Set Temperature
1. Press until you reach the Main
Menu, then use or to select
System Settings and press .
2. In the System Settings menu, use
or to select Refrigeration
Settings and press .
3. In the Refrigeration Settings menu, use
or to select Adjust Tempera-
tures and press .
4. In the Adjust Temperature screen, use the numeric keypad to enter the desired temper-ature between +49º and +69ºF (9º to 20ºC).
Press to lock in your selection and
return to the Refrigeration Settings menu. Verify that the selected Temperature is dis-played on the status (bottom) line.
5. Press once to return to the
System Settings menu or twice to return to the Main Menu.
+_
+_
+_
Main MenuProduct Configuration 5
Special Vend ModesFree VendCoins In/OutSystem Settings 6
Press EDIT to Select
System SettingsScreen Contrast 5
Software VersionSureVend VersionI/O Board SoftwareRefrigeration Settings 6
Press EDIT to Select
Refrigeration SettingsAdjust Temperature 5
Temperature Units
6
Setting: 49ºF Actual: 51ºF
Adjust Temperature
49
Enter Desired Temperature49 - 69 Degrees Fahrenheit
A settable temperature is available only when the machine is configured to Merchant Chilled Snack
WARNINGThe “Merchant Chilled Snack” setting does not have a health control circuit. It is not approved
for the vending of perishable food items

Merchant™ Operators’ Guide Program: System Settings
1810025 181 August 2009
Select Tray and Selections to be Controlled by Health Control
Main MenuProduct Configuration 5
Special Vend ModesFree VendCoins In/OutSystem Settings 6
Press EDIT to Select
System SettingsScreen Contrast 5
Software VersionSureVend VersionI/O Board SoftwareRefrigeration Settings 6
Press EDIT to Select
Refrigeration SettingsTemperature Units 5
Health Control Menu
6
Press EDIT to Select
Health Control MenuTray 1 5
Tray 2Tray 3 Tray 4Tray 5 6
Press EDIT to Select
1. Press until you reach the Main
Menu, then use or to select
System Settings and press .
2. In the System Settings menu, use
or to select Refrigeration
Settings and press .
3. In the Refrigeration Settings menu, use
or to select Health Control
menu and press .
4. In the Health Control menu, use
or to select the Tray you
would like to view/modify for Health Control
and press .
+_
+_
+_
+_

Program: System Settings Merchant™ Operators’ Guide
August 2009 182 1810025
Health Control (continued)
5. In the Tray menu, use
or to select the Selection you
would like to modify for Health Control and
press to turn on/off the Health Control
for that selection.
+_
Tray 1
X 101 5
X 102 103
X 104105 6
* = Set or Clear AllNOTEAn X to the left of the selection number means that the selection is currently being monitored by Health Control. In the example to the right
selections 101, 102 and 104 are currently being monitored while selections 103 and 105 are not.
6. Press once to return to the
Health Control menu or press or con-
tinue pressing until you reach the
main menu.NOTE
By pressing , you are able to
quickly remove or add the “X”(s)from all selections on the selected tray.
Additional Information• When the entire machine is set to “Health
Control” and there is a “Health Control” errorthe display will read “Temporarily Out of Order”and no vending will be allowed.
• If only several selections or rows are set to“Health Control” and there is a Health Controlerror, no message is posted until a selection ismade. Once the selection is made the displaywill say “Health Control Inhibited”.

Merchant™ Operators’ Guide Program: System Settings
1810025 183 August 2009
Set Temperature Units
1. Press until you reach the Main
Menu, then use or to select
System Settings and press .
2. In the System Settings menu, use
or to select Temperature
Units and press .
3. In the Temperature Units menu, use
or to select Celsius or
Fahrenheit. The selected option is the one with the filled-in circle.
4. Press to lock in your selection and
return to the System Settings menu. Verify that the selected Temperature Unit isdisplayed on the status (bottom) line.
5. Press once to return to the
System Settings menu or twice to return to the Main Menu.
+_
+_
+_
Main MenuProduct Configuration 5
Special Vend ModesFree VendCoins In/OutSystem Settings 6
Press EDIT to Select
System SettingsScreen Contrast 5
Software VersionSureVend VersionI/O Board SoftwareTemperature Units 6
Fahrenheit (Fo)
Temperature Units
h Celsius(oC) 5
o Fahrenheit(oF)
6
EDIT = Accept EXIT = Cancel
System SettingsScreen Contrast 5
Software VersionSureVend VersionI/O Board SoftwareTemperature Units 6
Celsius(oC)

Program: System Settings Merchant™ Operators’ Guide
August 2009 184 1810025
Set Idle Screen Time/Temp Options One of these 3 options can be set to appear on the display:None - “Make a Selection” appears with an alternating “Ready” message.Time - The time will appear on the lower left hand corner of the display in addition to the alternating “Make a Selection” and “Ready” message.Time and Temp - The time will appear in the lower left hand corner and the water tank temperature will appear in the lower right hand corner of the display in addition to the alternating “Make aSelection” and “Ready” message.
1. Press until you reach the Main
Menu, then use or to select
System Settings and press .
2. In the System Settings menu, use
or to select Idle Screen
Options and press .
3. In the Idle Screen Options menu use
or to select Time/Temp
Options and press .
4. In the Time and Temp Options menu, use
or to select None, Time or
Time and Temp. The selected option is the one with the filled-in circle.
+_
+_
+_
+_
Main MenuTest 5
PriceProduct ConfigurationFree VendSystem Settings 6
Press EDIT to Select
System SettingsSoftware Version 5
SureVend VersionI/O Board SoftwareTemperature UnitsIdle Screen Options 6
Press EDIT to Select
Idle Screen OptionsTime/Temp Options 5
Idle Screen Message
6
None
Time/Temp Options o None 5
o Time
h Time and Temp
6

Merchant™ Operators’ Guide Program: System Settings
1810025 185 August 2009
Set Idle Screen Time/Temp Options (continued)
5. Press to lock in your selection and
return to the Idle Screen Options menu.Verify that the selected Time/Temp Option is displayed on the status (bottom) line.
6. Press once to return to the
Main Menu.
Idle Screen OptionsTime/Temp Options 5
Idle Screen Message
6
Time and Temp

Program: System Settings Merchant™ Operators’ Guide
August 2009 186 1810025
Set Idle Screen Message
1. Press until you reach the Main
Menu, then use or to select
System Settings and press .
2. In the System Settings menu, use
or to select Idle Screen
Options and press .
3. In the Idle Screen Options menu use
or to select Idle Screen
Message and press .
4. In the Idle Screen Message menu, use
or to select Make a
Selection, Press Selection or UseCustom Message. The selected optionis the one with the filled-in circle.
+_
+_
+_
+_
Main MenuTest 5
PriceProduct ConfigurationFree VendSystem Settings 6
Press EDIT to Select
System SettingsSoftware Version 5
SureVend VersionI/O Board SoftwareTemperature UnitsIdle Screen Options 6
Press EDIT to Select
Idle Screen OptionsTime/Temp Options 5
Idle Screen Message
6
Make a Selection
Idle Screen Message o Make a Selection 5
h Press Selection
o Use Custom Message
6

Merchant™ Operators’ Guide Program: System Settings
1810025 187 August 2009
Set Idle Screen Message (continued)
5. If your selection was Make a Selection
or Press Selection, press to lock
in your selection to return to the Idle Screen Options menu. Verify that the selected option is displayed on the status (bottom) line.-OR- If your selection was Use Custom
Message, press to lock in your
selection and the screen will cycle to the Idle Screen Options menu, with the only option being Select Custom Message.
NOTEIf your selection is Use Custom Message,
follow steps 6-8. If not, skip to step 8.
6. Press to access the Select Custom
Message menu.
NOTETo program custom messages, see
“Set Custom Messages” on page 188
7. Use or to select the option
you desire and press . Verify that
Use Custom Message appears in thestatus (bottom) line of the Idle Screen Options menu.
8. Press once to return to the
System Settings menu, or twice toreturn to the Main Menu.
+_
Idle Screen OptionsTime/Temp Options 5
Idle Screen Message
6
Make a Selection
Idle Screen OptionsSelect Custom Message 5
6
Make a Selection
Select Custom MessageReady 5
Temporarily Out of ServiceNo Money RequiredCustom Messages 4Custom Messages 5 6
EDIT = Accept
Idle Screen OptionsTime/Temp Options 5
Idle Screen Message
6
Use Custom Message

Program: System Settings Merchant™ Operators’ Guide
August 2009 188 1810025
Set Custom Messages
1. Press until you reach the Main
Menu, then use or to select
System Settings and press .
2. In the System Settings menu, use
or to select
Custom Messages and press .
3. In the Custom Messages menu, use
or to select
Custom Messages and press .
4. In the second Custom Messages menu,
use or to select the custom
message you wish to edit and press .
+_
+_
+_
+_
Main MenuTest 5
PriceProduct ConfigurationFree VendSystem Settings 6
Press EDIT to Select
System SettingsSureVend Version 5
I/O Board SoftwareTemperature UnitsIdle Screen OptionsCustom Messages 6
Press EDIT to Select
Custom MessagesCustom Messages 5
Reset Custom Messages
6
Press EDIT to Select
Custom MessagesReady 5
Temporarily Out of ServiceNo Money RequiredCustom Messages 4Custom Messages 5 6
Custom Messages 5

Merchant™ Operators’ Guide Program: System Settings
1810025 189 August 2009
Set Custom Messages (continued)
5. In the Custom Messages X screen, use the
and to move the cursor to the
left and right. Press to remove the
letters and numbers. Press to move
to uppercase and lowercase letters.Press 0-9 to add a letter or number. Press the number once to bring up the character screen (lower bottom). Press the number again to scroll to the character. Refer to the “NUMERIC/CHARACTER TABLE” on page 191.
6. Press to lock in your new custom
message and return to the previousCustom Messages menu. Verify that the new custom message that you just entered appears in the status (bottom) line whenthe corresponding Custom Messages Xis selected.
7. Press once to return to the first
Custom Messages menu, twice to return to the System Settings menu, or three times to return to the Main Menu.
+_
Custom Messages 5All Selections Half Price
abc
Custom MessagesReady 5
Temporarily Out of ServiceNo Money RequiredCustom Messages 4Custom Messages 5 6
All Selections Half Price

Program: System Settings Merchant™ Operators’ Guide
August 2009 190 1810025
Reset Custom MessagesThis procedure allow you to erase all custom set messages and restore the merchandiser’smessage data to factory default.
1. Press until you reach the Main
Menu, then use or to select
System Settings and press .
2. In the System Settings menu, use
or to select
Custom Messages and press .
3. In the Custom Messages menu, use
or to select Reset Custom
Messages and press .
4. In the Reset Custom Messages menu,
press to restore Custom Messages
to factory default. Press to cancel.
You will be automatically returned to theCustom Messages menu.
5. Press once to return to the
System Settings menu, or twice toreturn to the Main Menu.
+_
+_
+_
Main MenuTest 5
PriceProduct ConfigurationFree VendSystem Settings 6
Press EDIT to Select
System SettingsSureVend Version 5
I/O Board SoftwareTemperature UnitsIdle Screen OptionsCustom Messages 6
Press EDIT to Select
Custom MessagesCustom Messages 5
Reset Custom Messages
6
Press EDIT to Select
Reset Custom MessagesWarning! This will restorecustom message datato factory defaults.
CANCEL-EXIT CONTINUE=*

Merchant™ Operators’ Guide Program: System Settings
1810025 191 August 2009
NUMERIC/CHARACTER TABLE« (backspace ) », » (space), (paragraph) (new line), - / $ @ % # & 0
, . ? ! ‘ ; : “ * 1
a b c 2
d e f 3
g h i 4
j k l 5
m n o 6
p q r s 7
t u v 8
w x y z 9
Moves the cursor backwards.
Moves the cursor forward.
Saves the message.
Backs out of the menu, does not save message.
Removes characters and numbers.
Switches the lower case letters to uppercase letters.
+
_

Program: System Settings Merchant™ Operators’ Guide
August 2009 192 1810025
Talker Setup
1. Press until you reach the Main Menu,
then use or to select System
Settings and press .
NOTEThe Talker Setup selection enables you to turn on or off your merchandiser’s speaker. If your
merchandiser does not have a speaker installed, leave the Talker Setup selection set to Off.
2. In the System Settings menu, use
or to select Talker Setup
and press .
3. In the Talker Setup menu, press
or to select On or Off.
The selected option is the one with thefilled-in circle.
4. Press to lock in the selection and
return to the System Settings menu.
6. Verify that the status (bottom) line of theSystem Settings menu displays the selected option (On or Off) when Talker Setup is highlighted.
7. Press once to return to the
System Settings menu or twice to returnto the Main Menu.
+_
+_
Main MenuTest 5
PriceProduct ConfigurationFree VendSystem Settings 6
Press EDIT to Select
System SettingsI/O Board Software 5
Temperature UnitsIdle Screen OptionsCustom MessagesTalker Setup 6
Off
Talker Setup o Off 5
h On
6
EDIT = Accept EXIT = Cancel =
System SettingsI/O Board Software 5
Temperature UnitsIdle Screen OptionsCustom MessagesTalker Setup 6
On

Merchant™ Operators’ Guide Program: System Settings
1810025 193 August 2009
Programming: Security CodesEnter Security Code
1. Press until you reach the Main
Menu, then use or to select
Security Codes and press .
2. In the Security Codes menu, use
or to select Enter PIN and
press .
NOTEThe factory default setting for the Supervisor
PIN code is 0000. The Supervisor Mode grants access to Main Menu selections that can be programmed to not appear in the Main Menu unless the Supervisor Mode is activated. To
change the Supervisor PIN code, see “Edit the Supervisor PIN” on page 194.
3. Enter the Supervisor PIN code. The code should be four digits. Be careful whenentering the PIN code – if you enter more than four numbers, the display will scroll back to the first digit.
4. Press to lock in the setting.
5. When a correct PIN code is entered, the screen will display Supervisor Approved then cycle back to the Security Codes menu. The respective menu(s) will be accessible from the Main Menu.Proceed to:
a. The Main Menu by pressing .
-or-b. “Edit the Supervisor PIN” on page 194.
+_
+_
Main MenuProduct Configuration 5
Special Vend ModesFree VendSystem SettingsSecurity Codes 6
Press EDIT to Select
Security CodesEnter PIN 5
6
Press EDIT to Select
Enter PIN
0000
# = Backspace, EDIT = AcceptEXIT = Cancel
Enter PIN
SupervisorApproved

Program: System Settings Merchant™ Operators’ Guide
August 2009 194 1810025
Edit the Supervisor PIN
The Supervisor PIN code on the Merchant™can be changed.
First, follow the procedure in “Enter Security Code” on page 193 to unlock theEdit Supervisor PIN menu.
1. Once the current Supervisor PIN is entered, access the Security Codes menu by
pressing until you reach the Main
Menu, then use or to select
Security Codes and press .
2. In the Security Codes menu, use
or to select Edit
Supervisor PIN and press .
NOTEIf Edit Supervisor PIN does not
display in the Security Codes menu,follow the procedure in
“Enter Security Code” on page 193 tounlock the Edit Supervisor PIn menu.
+_
+_
Main MenuProduct Configuration 5
Special Vend ModesFree VendSystem SettingsSecurity Codes 6
Press EDIT to Select
Security CodesLock Menu Items 5
Enter PINEdit Supervisor PIN
6
Edit PIN
Edit Supervisor PIN
1234
# = Backspace, EDIT = AcceptEXIT = Cancel
3. In the Edit Pin screen, enter a new PIN number and press . The code should be four
digits. Be careful when entering the PIN code – if you enter more than four numbers, the display will scroll back to the first digit.
4. Write the new Supervisor PIN code number down and keep it in a secure place.
5. Press to lock in the setting and return to the Security Codes menu.
6. Press once to return to the Main Menu.

Merchant™ Operators’ Guide Program: System Settings
1810025 195 August 2009
Lock/Unlock Menu Items
First, follow the procedure in “Enter Security Code” on page 193 to unlock the Lock Menu Items menu.
1. Once the Supervisor PIN is entered, access the Security Codes menu by
pressing until you reach the Main
Menu, then use or to select
Security Codes and press .
2. In the Security Codes menu, use
or to select Lock Menu
Items and press .
NOTEIf Lock Menu Items does not display in theSecurity Codes menu, follow the procedure
in “Enter Security Code” on page 193 tounlock the Lock Menu Items menu.
+_
+_
Main MenuProduct Configuration 5
Special Vend ModesFree VendSystem SettingsSecurity Codes 6
Press EDIT to Select
Security CodesLock Menu Items 5
Enter PINEdit Supervisor PIN
6
Press EDIT to Select
The following menu selections can be locked or unlocked in thisLock/Unlock Menu Items procedure:
• Clear Data• Data Recall• Test• Price• Product Configuration• Free Vend• Special Vend Modes• System Settings

Program: System Settings Merchant™ Operators’ Guide
August 2009 196 1810025
Lock/Unlock Menu Items (continued)
3. Select the Menu Item(s) you wish to make available/unavailable by using the
or to select a Menu Item and
then pressing to remove or add the
“X”(s) next to the Menu Item(s).
NOTE
By pressing , you are able to
quickly remove or add the “X”(s)from all listed Menu Items.
4. Press to lock in your selection(s)
and return to the Security Codes menu.
5. Press to return to the Main Menu.
+_
Lock Menu ItemsClear Data 5
Data RecallX Test
PriceX Product Configuration 6
* = Set or Clear All

Merchant™ Operators’ Guide Program: System Settings
1810025 197 August 2009
448/449 Merchant Refrigeration Removal1. Open the door and turn the power off.
2. Lower the delivery bin and remove the stop rod.
3. Unplug the harness to the Surevend boards and remove it from where it runs along the front of the machine floor. Set the harness to the right out of the way.
4. Remove the delivery bin. (taking care not to damage the insulation).
5. Remove the bottom tray from the machine to gain access to the horizontal barrier.
6. Unplug the harnesses to the refrigeration unit and temperature sensors on the left side of the refrigeration unit. Take the harnesses off where they run along the top of the horizontal barrier.
7. Remove the screws along the back of the horizontal barrier and the screws holding the front left and right side angle brackets.
8. To remove the horizontal barrier you must lift the barrier up before pulling it forward and out of the machine.
9. Remove the condenser inlet screen on the floor of the machine.
10. Remove the bolt holding the refrigeration lock plate on the left side. The plate can be removed by using a large screwdriver as a lever to pry it up and out.
11. Slide the refrigeration unit forward and to the left and out of the front of the machine.
448/449 Merchant Refrigeration Installation1. Reverse procedures above to install the refrigeration unit.
2. Be sure to push the unit to the back and to the right. The bolt hole in the refrigeration lock plate will line up with the bolt hole in the floor of the machine when the unit is position correctly.
3. Tap the lock plate down and into position.
4. After completing the installation, test the machine for proper operation.
Service

Program: System Settings Merchant™ Operators’ Guide
August 2009 198 1810025
Service

Merchant™ Operators’ Guide Program: System Settings
1810025 199 August 2009
WD-MerchantAmbient.sch-1 - Fri May 29 11:12:55 2009
Service

Merchant™ Operators’ Guide Index
1810025 Index - 1 August 2009
A
Accept on low change, set .......................... 144Acceptor, bill (optional) ................................... 6Anti-Jackpot timer, SureVend, set .............. 101
B
Backup, last timed, timed events, view ........ 72Backup, last, view ....................................... 173Base plate, installing ..................................... 37Bill acceptor (optional) .................................... 6Bill validator, identification numbers, view .... 75Bill validator, select ..................................... 143Bill validator, testing ...................................... 41Bin, delivery, removing ................................... 9Button, OK, enable ...................................... 129
C
CA304 data type, set .................................. 157Calibration, SureVend, test ........................... 84Cancel key ...................................................... 6Card reader, identification numbers, view .... 76Card reader, select ..................................... 148Card revalue, set ......................................... 149Change, low, accept on, set ....................... 144Change, without purchase, set ................... 141Character/Numeric table ............................. 191Check, operational readiness ....................... 39Clock set, last, timed events, view ................ 71Code, security, enter ................................... 193Codes, security, programming .................... 193Coin mechanism, identification numbers ...... 74Coin mechanism, loading ............................. 38Coin mechanism, select .............................. 139Coin mechanism, setting up ......................... 38Coin return key ................................................ 6Coins, in/out, view ....................................... 140Combo vends .............................................. 125Communication mode, set .......................... 155Configuration and sales data, save to key . 165Configuration data and Config & sales data,delete from Data Key .................................. 171
Configuration data, load from data key tomachine ....................................................... 169Configuration data, save to data key .......... 163Configuration version, view .......................... 97Configuration, product, programming ........... 97Configuration, selection .............................. 103Contrast, screen, set ................................... 176Controller, main, PCB display ......................... 7Controls and indicators ................................... 6Couple motors ............................................. 108Coupler, spiral, installing ............................... 22Coupler, spiral, installing when used with coupler bearing ............................................. 23Coupler, spiral, installing when used withmotor ............................................................. 22Coupler, spiral, orientation ............................ 22Coupler, spiral, removing .............................. 20Credit for failed vend, set ............................ 153Custom dividers, installing ............................ 16Custom dividers, removing ........................... 16Custom messages, reset ............................ 190Custom messages, set ............................... 188Customer keypad .......................................... 42
D
Data clear, timed events, view last ............... 68Data key, connect and disconnect ............. 161Data Key, delete configuration data and config &sales data from ........................................... 171Data key, load configuration data ............... 169Data key, save configuration and sales data165Data key, save configuration data to .......... 163Data key, view image info (data description)167Data list, set ................................................ 156Data reset mode, set .................................. 158Data transfer, set ........................................ 155Data type, CA304, set ................................. 157Data, backup ............................................... 174Data, configuration and sales, save to key 165Data, configuration, load ............................. 169Data, configuration, save to data key ......... 163Data, non resettable, view ............................ 45Data, print ...................................................... 77
Alphabetical Index

Index Merchant™ Operators’ Guide
August 2009 Index - 2 1810025
Data, restore ............................................... 175Data, vend, clear ........................................... 65Data, vend, non resettable, cash .................. 49Data, vend, non resettable, cashless ........... 51Data, vend, non resettable, token ................. 53Data, vend, non resettable, view by product 47Data, vend, resettable, cash ......................... 59Data, vend, resettable, cashless .................. 61Data, vend, resettable, token ........................ 63Data, vend, resettable, view ......................... 55Data, vend, view by product ......................... 57Date, set ...................................................... 135Daylight saving time, set ............................. 137Delivery bin, removing .................................... 9Diagnostic error messages, table ................. 79Display .......................................................... 42Display, keypad ............................................... 6Display, test ................................................... 92Door, main, openings, timed events, view ... 66
E
error messages, diagnostic, table ................. 79Errors, check for ............................................ 78Event reset mode, set ................................. 159Events, timed - time of day events ..... 109, 114
F
Failed vend, credit for, set .......................... 153FIFO ............................................................ 104FIFO setup, adding groups ......................... 104FIFO setup, groups, deleting ...................... 105FIFO setup, groups, editing ........................ 106FIFO, adding groups, setup, ....................... 104Final installation ............................................ 36Firmware selection, serial flash menu ........ 162First In, First Out (FIFO) ............................. 104Free vend, programming ............................ 130Free vend, turn on/off ................................. 130
G
Gear, installing .............................................. 21Gear, orientation of ....................................... 21Gear, placement of ....................................... 21Gear, use of .................................................. 21
Groups, FIFO setup, deleting ..................... 105Groups, FIFO setup, editing ....................... 106
H
Harness, motor, connecting .......................... 17Harness, motor, disconnecting ..................... 17
I
ID number, machine ................................... 131Idle screen message, set ............................ 186Idle screen, set time/temp options .............. 184Image info (data description), view on data key 167Indexing procedure, spiral (one spiral, one mo-tor) ................................................................. 40Indexing procedure, spiral (two spirals, one ortwo motors) ................................................... 40Indicators, controls and ................................... 6Individual selections, set prices for ............... 94Initial set-up ..................................................... 9Installation, final ............................................ 36Interlock switch ............................................... 6IO board software, view .............................. 179
K
Key, cancel ...................................................... 6Key, coin return ............................................... 6Key, data, connect and disconnect ............ 161Key, Data, delete configuration data and config &sales data from ........................................... 171Key, data, load configuration data from tomachine ....................................................... 169Key, data, save configuration ..................... 165Key, data, save configuration data to ......... 163Key, data, view image info........................... 167Key, selection .................................................. 6Keypad display ................................................ 6Keypad, customer ......................................... 42Keypad, service ........................................ 6, 42Keypad, service, shortcut keys ..................... 43Keypads, test ................................................ 93Keys, other .................................................... 44Keys, shortcut, service keypad ..................... 43

Merchant™ Operators’ Guide Index
1810025 Index - 3 August 2009
L
Labels, selection ID, installing ...................... 34Language, select ......................................... 138Last backup, view ....................................... 173Last clock set, timed events, view ................ 71Last data clear, timed events, view .............. 68Last price setting, timed events,view ............ 69Last vend, timed events, view ...................... 70List, data, set ............................................... 156Location, machine information .................... 133Low change message, set .......................... 142Low change, accept on, set ........................ 144Low voltage switch .......................................... 6Lower panel, removing ................................... 9
M
Machine ID number ..................................... 131Machine information, location ..................... 133Main controller PCB display ........................... 7Main door openings, timed events, view ...... 66Main keypad, test .......................................... 93Main PCB identification numbers, view ........ 73Mechanism, coin, select ............................. 139Menu items, lock/unlock ............................. 195Merchandiser, leveling .................................. 36Merchandiser, positioning ............................. 11Merchandiser, reassembling ........................ 10Merchandiser, turning On/Off ......................... 8Merchandiser, unpacking ................................ 5Message, idle screen, set ........................... 186Message, low change, set .......................... 142Messages, custom, reset ............................ 190Messages, custom, set ............................... 188messages, error, diagnostic, table ................ 79Mode, winner .............................................. 122Motor harness, connecting ........................... 17Motor harness, disconnecting ....................... 17Motor status detail menu screen, figure ....... 88Motor test, return coin ....................... 89, 90, 91Motor with a spiral bearing, replacing ........... 16Motor, removing ............................................ 16Motor, spiral, installing .................................. 20Motor, spiral, removing ................................. 20Motor, status detail ........................................ 86
Motor, test summary ..................................... 85Motors, couple ............................................ 108Moving, merchandiser through doorway ........ 9Multiple vend mode, set .............................. 151
N
Non resettable data, view ............................. 45Non resettable sales, cash ........................... 49Non resettable sales, cashless ..................... 51Non resettable sales, token .......................... 53Non resettable sales, view by product .......... 47Numeric/Character table ............................. 191
O
OK button, enable ....................................... 129One price, set for entire machine ................. 95Options, SureVend, set ................................. 99
P
Panel, lower, removing ................................... 9Panel, top, removing ....................................... 9PCB display, main controller .......................... 7PCB, main, identification numbers, view ...... 73PIN code, supervisor, factory default ......... 193PIN, supervisor, edit ................................... 194Power losses, timed events, view ................ 67Power, requirements ....................................... 5Powersave .................................................. 114Price labels, installing and setting ................ 32Price roll, adjusting ....................................... 33Price setting, timed events, view last ........... 69Price, set one for the entire machine ............ 95Prices, for individual selections, set ............. 94Prices, set by trays ....................................... 96Print data ....................................................... 77Product configuration, programming ............ 97Product pusher, usage .................................. 28Product spacers, installing ............................ 25Product spacers, removing ........................... 25Product, loading trays with ........................... 26Products, loading trays ................................. 26Programming, introduction ........................... 42Pusher, product, usage ................................. 28
Index Merchant™ Operators’ Guide
August 2009 Index - 4 1810025
R
Reader, card, identification numbers, view .. 76Reader, card, select .................................... 148Reset mode, data, set ................................. 158Reset mode, event, set ............................... 159Resettable sales data, view .......................... 55Resettable sales, cash .................................. 59Resettable sales, cashless ........................... 61Resettable sales, clear ................................. 65Resettable sales, token ................................ 63Resettable sales, view by product ................ 57Retainer, spiral wall, usage ........................... 27Return coin motor, test ..................... 89, 90, 91Revalue, card, set ....................................... 149
S
Sales and configuration data, save key ...... 165Sales data, resettable, view .......................... 55Sales, non resettable, cash .......................... 49Sales, non resettable, cashless .................... 51Sales, non resettable, token ......................... 53Sales, non resettable, view by product ......... 47Sales, resettable, cash ................................. 59Sales, resettable, cashless ........................... 61Sales, resettable, clear ................................. 65Sales, resettable, token ................................ 63Sales, resettable, view by product ................ 57Screen contrast, set .................................... 176Screen, idle, set time/temp options ............ 184Security code, enter .................................... 193Security codes, programming ..................... 193Selection configuration ............................... 103Selection ID labels, installing ........................ 34Selection key ................................................... 6Selection, test vend ....................................... 82Selections, individual, set prices for ............. 94Service keypad ......................................... 6, 42Service keypad, shortcut keys ...................... 43Service keypad, test ..................................... 93Settings, system, programming .................. 131Set-up, initial ................................................... 9Set-up, snack section ................................... 11Shortcut keys, service keypad ...................... 43Snack section set-up .................................... 11
Software version, view ................................ 177software, IO board, view ............................. 179Spacers, product, installing .......................... 25Spacers, product, removing .......................... 25Spiral bearing, installing ................................ 16Spiral bearing, motor with, replacing ............ 16Spiral coupler, installing ................................ 22Spiral coupler, installing when used withcoupler bearing ............................................. 23Spiral coupler, installing when used withmotor ............................................................. 22Spiral coupler, orientation ............................. 22Spiral coupler, removing ............................... 20Spiral motor, installing .................................. 20Spiral motor, removing .................................. 20Spiral wall retainer, usage ............................ 27Spiral, clockwise or counterclockwise, use of 19Spiral, installing ............................................. 19Spiral, removing ............................................ 19Status, detail, motor ...................................... 86Supervisor PIN code, factory default .......... 193Supervisor PIN, edit .................................... 194SureVend Anti-Jackpot timer, set ............... 101SureVend calibration, test ............................ 84SureVend options, set .................................. 99SureVend version, view .............................. 178SureVend, test vend without ......................... 83SureVend, turn off ......................................... 98SureVend,turn on .......................................... 98Switch, interlock .............................................. 6Switch, low voltage ......................................... 6System settings, programming ................... 131
T
Talker, setup ............................................... 192Temperature units, set ........ 180, 181, 182, 183Test, summary, motor ................................... 85Testing, return coin motor ................. 89, 90, 91Time, daylight saving, set ........................... 137Time, set ..................................................... 136Time/Temp options, idle screen, set .......... 184Timed backup, last, timed events, view ........ 72Timed events - time of day events ..... 109, 114Token enable .............................................. 128Top panel, removing ....................................... 9

Merchant™ Operators’ Guide Index
1810025 Index - 5 August 2009
Trays, installing in merchandiser .................. 14Trays, loading with product ........................... 26Trays, moving up or down ............................ 23Trays, operating outside merchandiser ........ 16Trays, placing in loaded position .................. 11Trays, product loading .................................. 26Trays, removing ................................ 10, 13, 15Trays, returning to vending position ............. 31Trays, set prices by ....................................... 96Trays, setting up to vend products ............... 12Trays, setting up to vend wide products ....... 12TriTeq Lock ................................................... 38
V
Validator, bill, identification numbers, view .. 75Validator, bill, select .................................... 143Validator, bill, testing ..................................... 41Vend data, clear ............................................ 65Vend data, non resettable, cash ................... 49Vend data, non resettable, cashless ............ 51
Vend data, non resettable, token ................. 53Vend data, non resettable, view by product . 47Vend data, resettable, cash .......................... 59Vend data, resettable, cashless ................... 61Vend data, resettable, token ......................... 63Vend data, resettable, view .......................... 55Vend data, view by product .......................... 57Vend mode, multiple, set ............................ 151Vend, failed, credit for, set .......................... 153Vend, free, turn on/off ................................. 130Vend, last, timed events, view ...................... 70Vend, selection, test ..................................... 82Vend, test without SureVend ........................ 83Vending products, tray set-up ....................... 12Vending wide products, tray set-up .............. 12Vending, "lunchbucket ................................... 28Vends, combo ............................................. 125
W
Winner mode ............................................... 122