Your Learning Guide for Expression Webfaculty.winthrop.edu/kosterj/writ510/HowTo/Your Learning Guide...
60
Your Learning Guide for Expression ® Web Tutorial for Pre-Collegiate Students Microsoft ® Expression ® Web 2 (5/21/2008)
Transcript of Your Learning Guide for Expression Webfaculty.winthrop.edu/kosterj/writ510/HowTo/Your Learning Guide...
Your Learning Guide for Expression® Web
Tutorial for Pre-Collegiate Students
Microsoft® Expression® Web 2
(5/21/2008)

Page 2
Table of Contents
Welcome ...................................................................... Error! Bookmark not defined.3
Launching Expression Web ............................................................................................ 5
The Microsoft® Expression® Web Workspace ............................................................. 6
Starting a New Site ......................................................................................................... 8
Creating a New Page ..................................................................................................... 10
Creating Page Layouts with Layers .............................................................................. 14
Making Layers Fit Images ............................................................................................ 16
Adding and Adjusting Layers ....................................................................................... 20
Formatting Headline Styles........................................................................................... 23
Positioning Layers with the CSS Properties Task Pane................................................ 27
Using CSS to Align Images .......................................................................................... 29
Look at the Page in a Browser ...................................................................................... 33
Getting Ready to Add More Pages ............................................................................... 34
Creating External Style Sheets ...................................................................................... 35
Creating a Master Page ................................................................................................. 36
Attaching a Style Sheet to the Master Page .................................................................. 40
Building a Site Based Upon a Master Page .................................................................. 42
Creating Links ............................................................................................................... 45
Extra Fun With a Calendar ........................................................................................... 49
Wrap-up ........................................................................................................................ 51
A Glossary .................................................................................................................... 52
Page 3
Microsoft® Expression® Web Tutorial
Welcome Thank you for participating in test driving this tutorial and the curriculum unit that accompanies it. We look forward to receiving your suggestions and ideas so that we can improve these materials for the students and teachers who will use them in the future. The goals of this tutorial are to teach you the basics of using Microsoft® Expression® Web, exciting new software, and to guide you in developing a Web site. This tutorial uses a sample from the curriculum unit ―E-cessories‖ to take you through the steps of Web site development. You will be able to apply what you learn in this tutorial to the creation of any type of Web site. The Expression Web Pilot Program encourages teachers and students to integrate technology as a tool for learning and communicating into all curricular areas. Each Expression Web Pilot project focuses on an essential question—a question that requires analysis and evaluation, and encourages sharing through technology. The essential question for the project in this tutorial is, ―What e-cessory—electronic accessory— has had the greatest impact upon you, your family, friends, or community?‖ Each project can be focused toward the national standards of many curricular areas such as technology, math, science, social studies, etc. We will be creating additional Expression Web curriculum units and essential questions in the future.

Welcome Page 4
ASP.NET 101
Before creating your first page with Microsoft® Expression® Web, it will be helpful to deepen your understand of ASP.NET.
ASP.NET is the latest version of Microsoft's Active Server Pages technology (ASP). It is a powerful tool for creating dynamic and interactive Web pages. Web sites that pull up-to-date information from databases, (such as e-commerce sites or others with forms that request user information,) are described as dynamic or interactive. The names of Web page files created with ASP.NET technology have an .aspx extension. An example of a site built upon ASP.NET is Microsoft’s Live Search http://local.live.com/default.aspx?wip=2&v=2&style=r&rtp=~&&msnurl=home.aspx?&redirect=false&msnculture=en-US
The PowerPoint presentation accompanying this tutorial illustrates the interaction between the browser and the server that occurs when an ASP.NET Web page is viewed.
To learn more about ASP.NET, visit http://asp.net/get-started/
Welcome Page 5
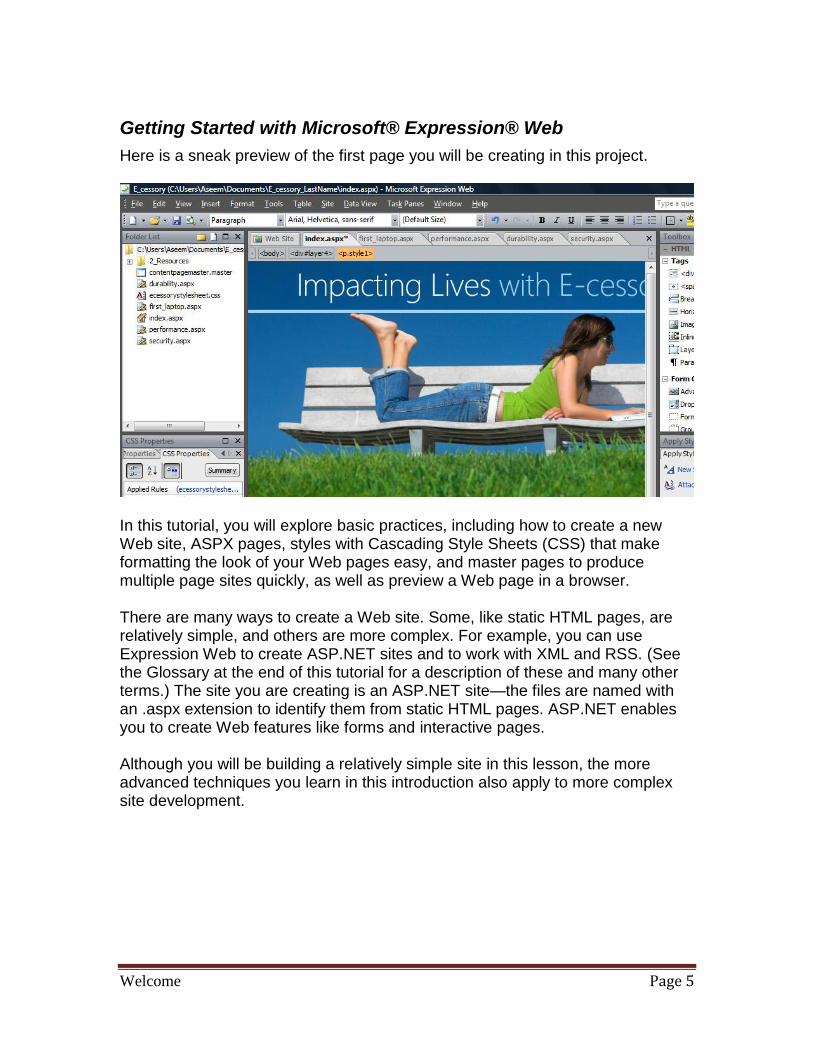
Getting Started with Microsoft® Expression® Web
Here is a sneak preview of the first page you will be creating in this project.
In this tutorial, you will explore basic practices, including how to create a new Web site, ASPX pages, styles with Cascading Style Sheets (CSS) that make formatting the look of your Web pages easy, and master pages to produce multiple page sites quickly, as well as preview a Web page in a browser. There are many ways to create a Web site. Some, like static HTML pages, are relatively simple, and others are more complex. For example, you can use Expression Web to create ASP.NET sites and to work with XML and RSS. (See the Glossary at the end of this tutorial for a description of these and many other terms.) The site you are creating is an ASP.NET site—the files are named with an .aspx extension to identify them from static HTML pages. ASP.NET enables you to create Web features like forms and interactive pages. Although you will be building a relatively simple site in this lesson, the more advanced techniques you learn in this introduction also apply to more complex site development.

Welcome Page 6
Launching Expression Web
When you first launch the program, you will find a number of task panes, toolbars, and dialogs with a wide range of features. You can customize the workspace by docking and undocking toolbars, opening and closing task panes, and changing preferences settings. You will find the various toolbars, including dedicated toolbars for working with images and CSS, under the View menu when you choose Toolbars. You can open and close task panes by selecting them from the Task Panes menu. To change preferences, select Tools | Application Options or Tools | Page Editor Options. Specify preferences for a particular site by choosing Site | Site Settings. It will be useful to become familiar with the Expression Web workspace layout. The following picture identifies a few of the toolbars and task panes you will be using in this tutorial. Power User Tip: To reset the workspace to the default arrangement, on the Task Panes menu, click Reset Workspace Layout.

Welcome Page 7
The Microsoft® Expression® Web Workspace
1. Common Toolbar
2. Folder List
3. File Tabs
4. Toolbox
5. Style and Layer Task Panes
6. View Tabs ** for this tutorial keep this set to Design
7. Tag and CSS Property Task Panes
8. Bread Crumb Trail
Power User Tip: You can see the code behind your Web page design by selecting Code in the View Tab at the bottom of the workspace. Expression Web generates this code as you modify your design. Unless you are familiar with the html language, do not modify this code. The Split view option shows both the design and code of the page. As you make changes to the design, the code is modified.

Welcome Page 8
Starting a New Site
Note to instructor: The network used in a classroom environment may require different directions for saving projects. Modify steps 1 – 10 as appropriate for you system. Before you begin identify or create a folder location where you will save your new site folder. Copy the folder named Resources (found in the Student and Teacher materials folders) into this folder so you can easily find the images and text documents needed to complete this tutorial. Because you are building a multi-page site, you will start by creating a new Web site in Expression Web to help manage all of the pages.
1. Open Expression Web and take note of the toolbars and task panels labeled on the image above.
2. Choose File | New | Web site
3. In the New dialog, choose the Web site tab at the top of the dialog window.
4. Choose General and then choose Empty Web site.
5. Do not hit OK yet.
You selected the Empty Web site option because you plan to create a new site with more than one page. When you select this option, Expression Web creates a new blank folder where you can save all of the files and folders in your Web site. When you first create a site like this you have the opportunity to name it. If you do not give it a name, Expression Web will assign one for you, such as Web 1, Web 2, etc. If you are working on multiple sites, it is easier to keep track of them if you choose a name that has meaning to you.
6. By default Expression Web offers to save your site at …\UserName\Documents\ and to name it My Web Sites (Windows Vista) or mysite (Windows XP.) It might be more convenient to save your site outside of your Documents folder. Use the Browse button to locate and select the folder into which you want the site folder and these web documents to be saved.

Welcome Page 9
In the following picture, you will see a folder named EW Web site where all of the folders and files related to this project will be saved. In a classroom setting the instructor will give you specific directions concerning the location you should create or select.
7. Click Open.
8. If you want to specify a name yourself, highlight the automatically generated name at the end of the path at the bottom of the New Site dialog and enter a new name to replace it. For this example, call this site "E_cessory_LastName." (Replace the words ―LastName‖ with your last name.)

Welcome Page 10
This will create a root folder for your site and EW will store all of your files in this folder. This helps ensure that your links and images will work properly when you publish them to a Web server.
9. Now Click OK.
Creating a New Page
1. To create a new ASPX Web page document, choose File | New | Page.
2. Specify the type of page you want to create. For this example, you will be
working with an ASPX file.
3. Before you do anything else, it is good to get into the habit of saving your
page—File | Save. If this is the main page of your site, you will want to name it index.aspx or default.aspx, depending on how your server is set (check with your hosting service or system administrator.) The default location for saving this file is the folder created when you made this new site—E_cessory_LastName.
Power User Tip: As a shortcut, you can choose File | ASPX.
Welcome Page 11
Name your remaining files and folders in your site anything you like, but do not use spaces or special characters such as *, %, $, or / because many Web servers have strict naming conventions and the file name affects your links.
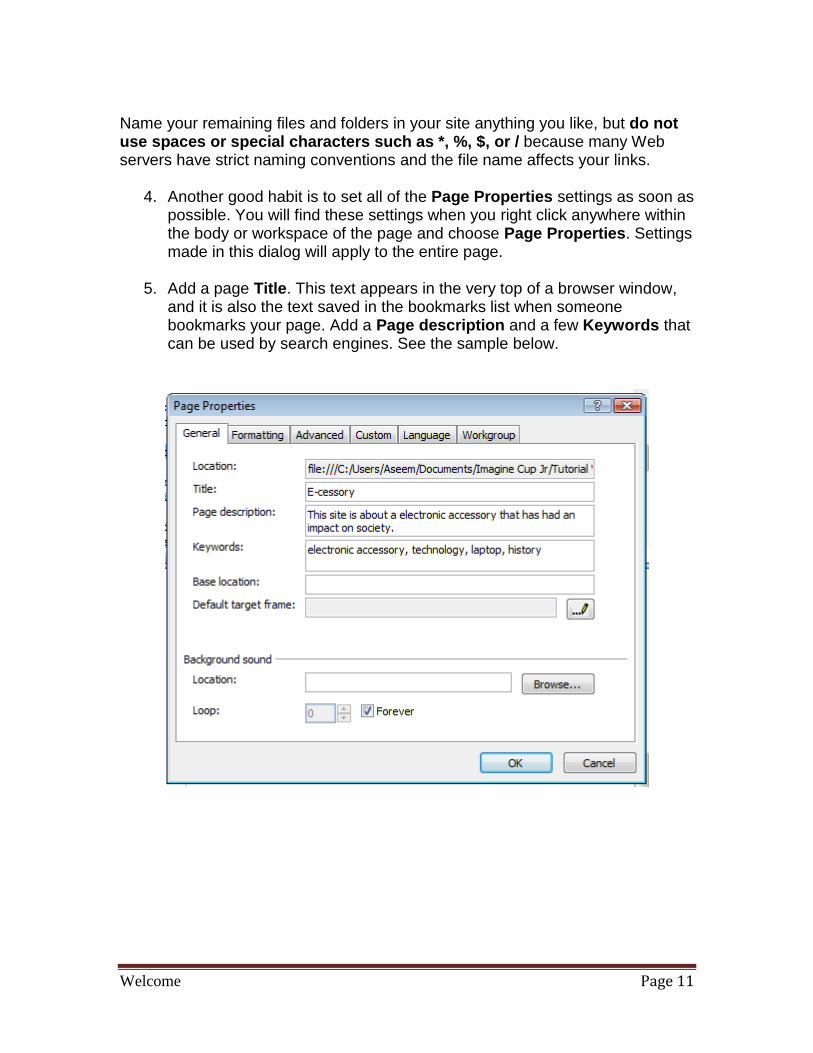
4. Another good habit is to set all of the Page Properties settings as soon as possible. You will find these settings when you right click anywhere within the body or workspace of the page and choose Page Properties. Settings made in this dialog will apply to the entire page.
5. Add a page Title. This text appears in the very top of a browser window,
and it is also the text saved in the bookmarks list when someone bookmarks your page. Add a Page description and a few Keywords that can be used by search engines. See the sample below.
Welcome Page 12
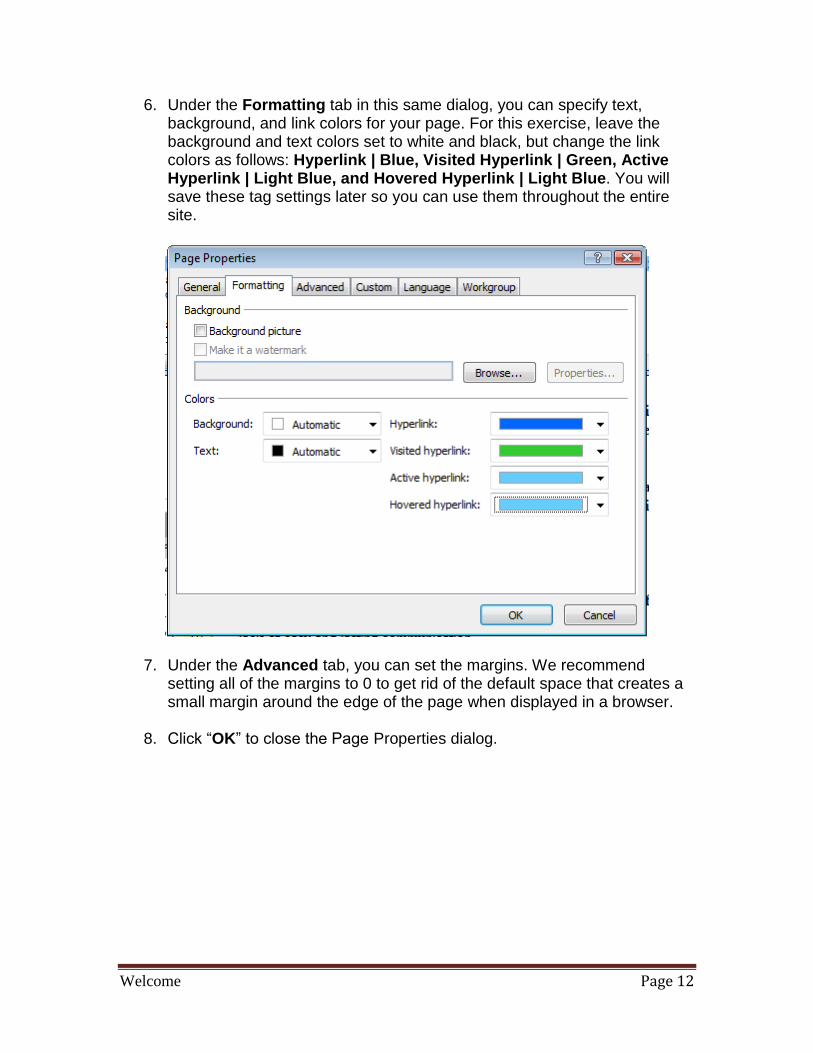
6. Under the Formatting tab in this same dialog, you can specify text, background, and link colors for your page. For this exercise, leave the background and text colors set to white and black, but change the link colors as follows: Hyperlink | Blue, Visited Hyperlink | Green, Active Hyperlink | Light Blue, and Hovered Hyperlink | Light Blue. You will save these tag settings later so you can use them throughout the entire site.
7. Under the Advanced tab, you can set the margins. We recommend setting all of the margins to 0 to get rid of the default space that creates a small margin around the edge of the page when displayed in a browser.
8. Click ―OK‖ to close the Page Properties dialog.

Welcome Page 13
Power User Tip: Microsoft® Expression® Web maintains a list of the last 30 actions and lets you undo each in sequence. Similarly, you can redo any of the last 30 actions you have undone.
To undo the last action you performed, click Undo (or just press CTRL + Z). If you click Undo again, Expression Web will undo the action you performed before that, and so on.
To see a list of the most recent actions that you can undo, click the arrow
next to Undo , and then select the action or actions that you want to
undo.
To redo the last action you undid, click Redo (or just press CTRL + Y).
To see a list of the most recent undone actions that you can redo, click the
arrow next to Redo , and then select the undone action or actions that
you want to redo.

Welcome Page 14
Creating Page Layouts with Layers
Now that you have set up your site and your first page, you are ready to start adding content. Let’s begin by creating the layout for this page using the Layers option. Layers are containers that hold elements on your Web site, but are invisible when the page is viewed in the browser. Layers are found in the Toolbox and dragged onto the design surface. Layers in Expression Web are created using div tags with CSS so you can place them anywhere on the page. This is called absolute positioning. Once you have inserted a layer into your page, you can insert any element, such as a graphic or text, into the layer. Layers are a popular choice among designers because they provide such precise layout control, but you should know that this is only one of many ways to create designs using CSS in Expression Web.
1. To add a layer to a page, click to select the Layer icon in the Toolbox task pane and drag it onto the page. The layer will automatically appear in the top left of the page.
2. To create the page layout for this design, click and drag to insert a layer at
the top of the page. You can resize a layer by clicking and dragging on any of its corners. You can also use the CSS Properties task pane usually found in the bottom left corner to specify the height and width.
Power User Tip: If the CSS Properties Task Pane is not visible, select it from the list beneath the Task Panes menu at the top of the Expression Web Window.

Welcome Page 15
Note: If you are inserting an image and know its width, you can specify the layer size to match. If you do not know the image size, you can insert the image in a layer that is too small, and it will expand to accommodate the image. You can then check the actual image size by selecting it and noting the height and width in the Tag Properties task pane.
3. To insert an image, click inside the layer to place the cursor within the layer. Choose Insert | Picture | From File and select an image from your hard drive. If you are using the lesson files provided, choose the laptop_picture.jpg file located in the Resources folder that came with this tutorial.
4. If you attempt to move the layer but the image does not move, it is likely that the image was not inserted into the layer. Delete the picture and repeat step 3.
5. In the Accessibility Properties dialog, enter a description of the photo. For this example, enter "photo of a girl with laptop."
Why do you add text that describes our images? It makes our pages more accessible to users who might not be able to download the images or who are visually impaired. Some users who are unable to see, have Web browsers read them the text on the page. These special browser features ―tell‖ the user what the graphics show according to the alternate text. Type the text you want to display for pictures when the graphic is downloading, when it can't be found, or when a site visitor moves the pointer over it. The alternate text entered into the Accessibility Properties dialog is inserted into the code behind the image and is a requirement for compliance with accessibility standards established by Web design organizations. For more about accessibility standards visit http://www.w3.org/WAI/
Power User Tip: To open the Accessibility Properties dialog box in
Design view, double-click the picture or single click the picture you
want to set, and then on the Format menu, click Properties.

Welcome Page 16
It is a good idea to get in the habit of saving your files frequently. When you finish a section of this tutorial or when it is convenient, take a moment to click ―Save‖. Note: If you are saving this file for the first time and used the images provided, Expression Web will offer to copy those files into your root site folder. Click ―Yes‖ and any associated files will automatically be copied into your Web site folder.
Making Layers Fit Images
You can use the Tag Properties task pane (usually in the lower left corner) to see the actual size of the image.
1. Click on the picture on the page and observe the height and width values in the Properties pane. These represent the measurements of your image in pixels.
2. Set the layer to the exact size of your image in the CSS Properties task pane by first selecting the layer. This is easily done by selecting the layer in the Layer pane in the bottom right corner. You will know you have the layer selected because it appears with a blue overcast. If the Layer pane is not already visible, you can access it (as well as all other panes) by selecting Task Panes | Layers from the Toolbar at the top of the screen.

Welcome Page 17
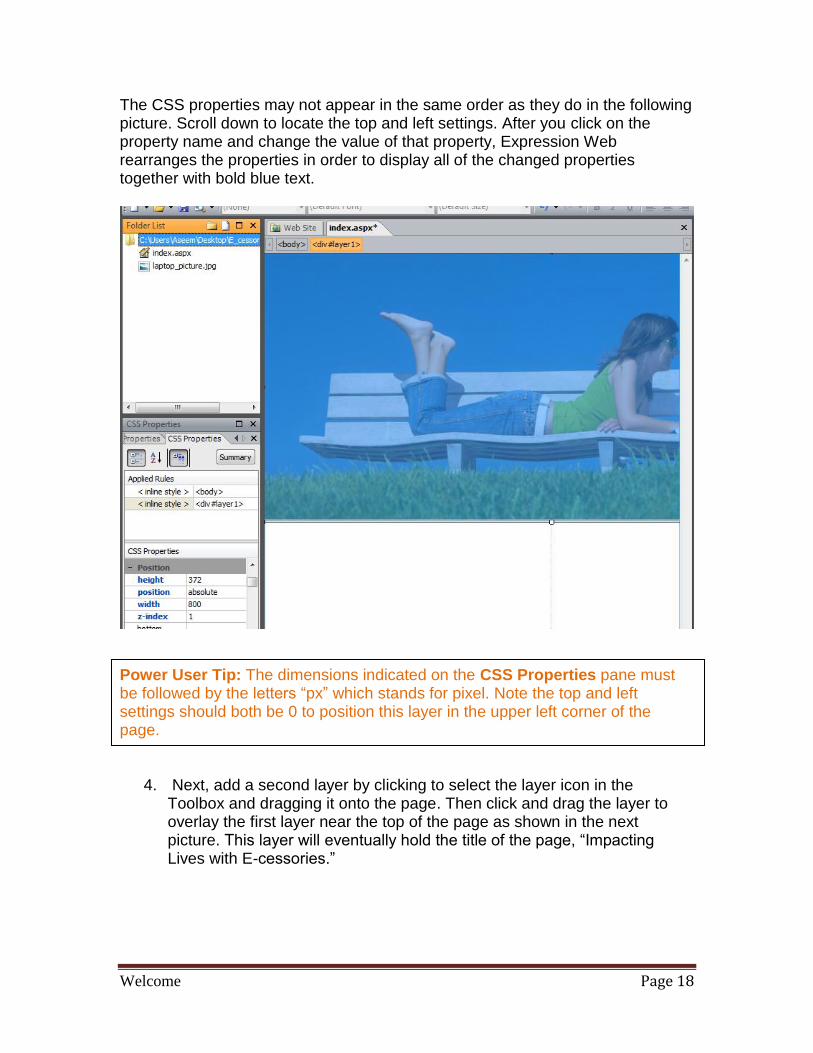
3. Change the property values of the layer in the CSS Properties pane. In
this example, the Layer width is set to 800 pixels and the height to 372 to accommodate this image perfectly.
Welcome Page 18
The CSS properties may not appear in the same order as they do in the following picture. Scroll down to locate the top and left settings. After you click on the property name and change the value of that property, Expression Web rearranges the properties in order to display all of the changed properties together with bold blue text.
Power User Tip: The dimensions indicated on the CSS Properties pane must be followed by the letters ―px‖ which stands for pixel. Note the top and left settings should both be 0 to position this layer in the upper left corner of the page.
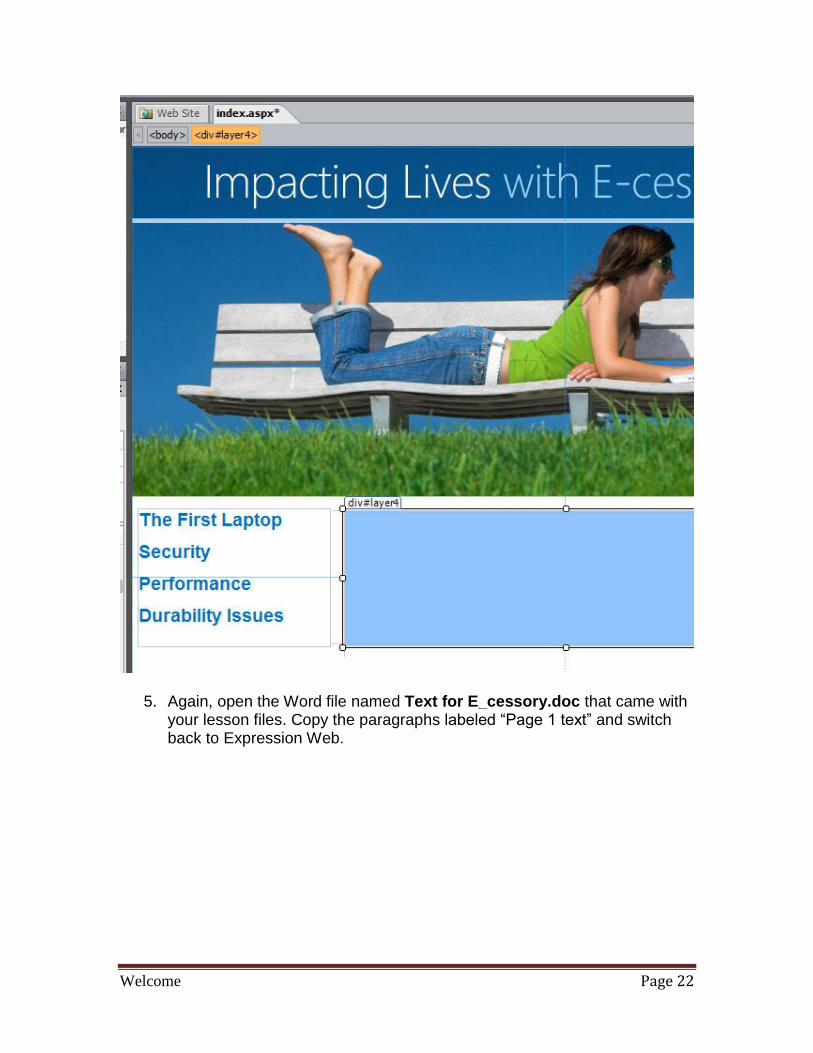
4. Next, add a second layer by clicking to select the layer icon in the Toolbox and dragging it onto the page. Then click and drag the layer to overlay the first layer near the top of the page as shown in the next picture. This layer will eventually hold the title of the page, ―Impacting Lives with E-cessories.‖

Welcome Page 19
5. Again you can set the height and width in the CSS Properties task pane. You can also specify the position of the layer in this task pane. This second layer should be set to Left 0, and Top 0 to appear on top of the photo layer aligned to the far left. For this example, I set the height and width to accommodate the image, which is 800 by 80.
6. Click outside of the layer to de-select it. Now click inside of it to place the insertion cursor into the layer, making it ready to accept an image.
7. Insert another image into the second layer. If you are using the files
provided for this exercise, insert the heading.jpg image just as you inserted the laptop image by choosing Insert | Picture | From File and then selecting the file heading.jpg.
8. Add ―Impacting Lives with E-cessories‖ as Alt Text to the image.
You might want to create your own heading using a graphics program. Be sure to save your graphic file in the Web site folder as a .jpg file.

Welcome Page 20
Adding and Adjusting Layers
Continuing with this page design, you will now add two more layers, inserting content into each one. In a later step, you will use the CSS Properties task pane to position them precisely - so that the top of each layer lines up perfectly.
1. Click to select the Layer icon in the Toolbox and drag in another layer. Use the following images as guides to help in positioning each layer on the page. Do not worry about getting the layer in exactly the right place on the page or exactly the right size; you will make those adjustments next.
2. Minimize Expression Web to view the desktop.
3. Open the word file named ―Text content for E_cessory Web site‖
included in the Resources folder provided with this guide and copy four lines of text under the word Menu. Switch over to Expression Web, place your cursor in the new layer, and paste the text.
Power User Tip: You can use the key command Alt + tab to switch between open programs.

Welcome Page 21
Alternatively, you can place your cursor into the new layer and enter the text by typing: The First Laptop Security Performance Durability Issues
4. Next click and drag in another new layer and position it at the far right side of the page, as you see in the following image.
Welcome Page 22
5. Again, open the Word file named Text for E_cessory.doc that came with your lesson files. Copy the paragraphs labeled ―Page 1 text‖ and switch back to Expression Web.
Welcome Page 23
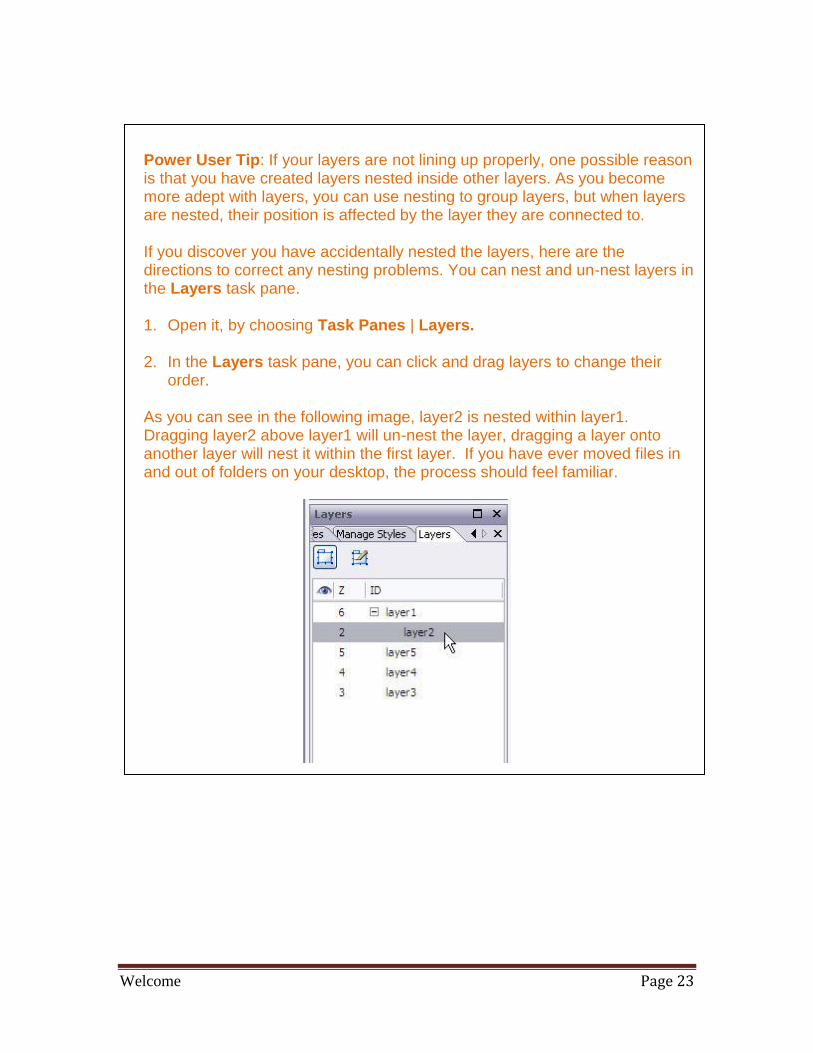
Power User Tip: If your layers are not lining up properly, one possible reason is that you have created layers nested inside other layers. As you become more adept with layers, you can use nesting to group layers, but when layers are nested, their position is affected by the layer they are connected to. If you discover you have accidentally nested the layers, here are the directions to correct any nesting problems. You can nest and un-nest layers in the Layers task pane. 1. Open it, by choosing Task Panes | Layers. 2. In the Layers task pane, you can click and drag layers to change their
order. As you can see in the following image, layer2 is nested within layer1. Dragging layer2 above layer1 will un-nest the layer, dragging a layer onto another layer will nest it within the first layer. If you have ever moved files in and out of folders on your desktop, the process should feel familiar.

Welcome Page 24
6. Click to place your cursor in the new layer and this time, choose Edit | Paste Text to open the paste text dialog. This feature provides more options for how you include formatting when you paste text into Expression Web. For this example, I recommend the last option: Normal paragraphs without line breaks. This allows you to format the spacing as you would like it.
7. Finally, add a headline to the story. Click to insert your cursor into the new layer on the right. Use the arrow keys as necessary to get your cursor in exactly the top left corner of the layer.
8. Press the return key to add two lines, use the arrow keys to return to the top left, and type "The Early Laptop."
Welcome Page 25
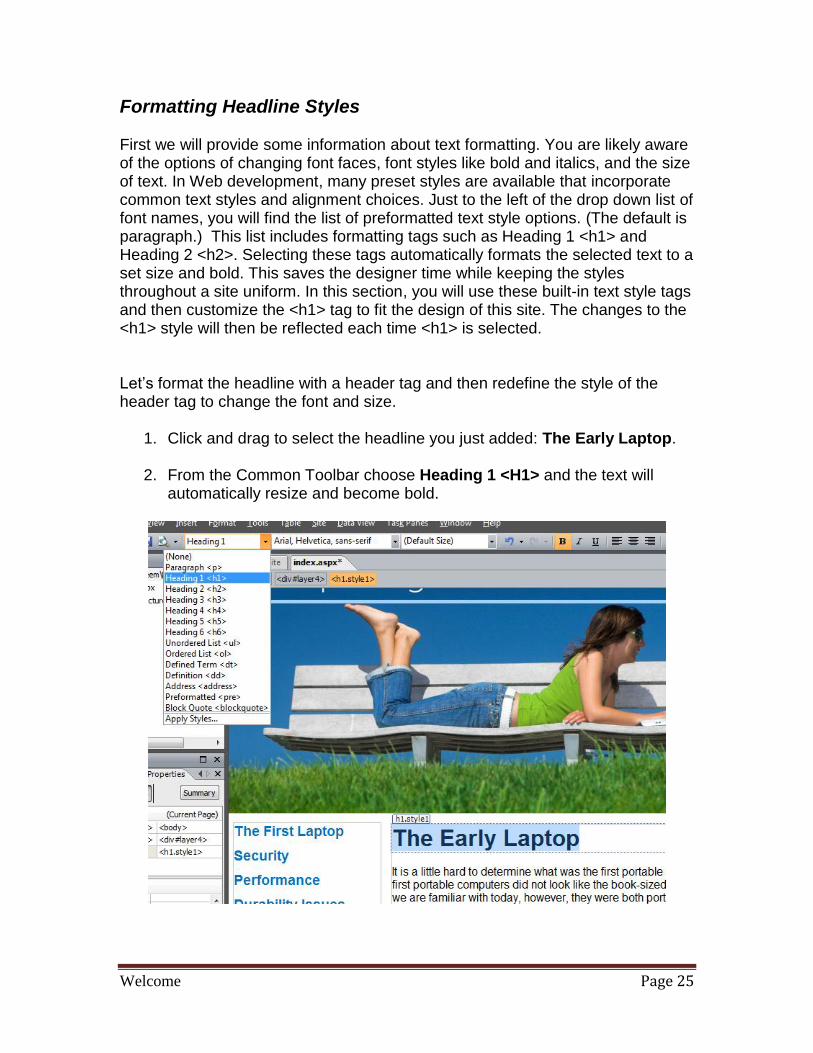
Formatting Headline Styles First we will provide some information about text formatting. You are likely aware of the options of changing font faces, font styles like bold and italics, and the size of text. In Web development, many preset styles are available that incorporate common text styles and alignment choices. Just to the left of the drop down list of font names, you will find the list of preformatted text style options. (The default is paragraph.) This list includes formatting tags such as Heading 1 <h1> and Heading 2 <h2>. Selecting these tags automatically formats the selected text to a set size and bold. This saves the designer time while keeping the styles throughout a site uniform. In this section, you will use these built-in text style tags and then customize the <h1> tag to fit the design of this site. The changes to the <h1> style will then be reflected each time <h1> is selected. Let’s format the headline with a header tag and then redefine the style of the header tag to change the font and size.
1. Click and drag to select the headline you just added: The Early Laptop.
2. From the Common Toolbar choose Heading 1 <H1> and the text will automatically resize and become bold.

Welcome Page 26
3. Heading styles offer many advantages, but if you do not like the way they appear, you can change the style by creating a new CSS Style. To do so, click on the New Style link in the Apply Styles or Manage Styles task panes (lower right corner).
4. In the New Style dialog, choose a selector. If you click on the arrow next to the Selector field, you can choose any HTML tag to redefine its appearance. For this example, choose h1. Leave the Define in option set to Current Page. (Note: You can also create external style sheets with Expression Web. You will do that later on.)
5. With the Font Category open, set the Font-Family to Arial, Helvetica, sans-serif.
6. In the Font-size field enter ―16‖ and make sure the size is set to px for pixels.
7. When you click OK, the new style is automatically applied and the
headline you formatted with the <h1> tag automatically changes to reflect the new style.
Welcome Page 27
Positioning Layers with the CSS Properties Task Pane
Even after you add content to layers, you can still use click and drag to resize and move them around. If you want to be even more precise, you can use the CSS Properties task pane and enter in the exact height and width, as well as the position for each layer. Here is how you can use the CSS Properties task pane to align images:
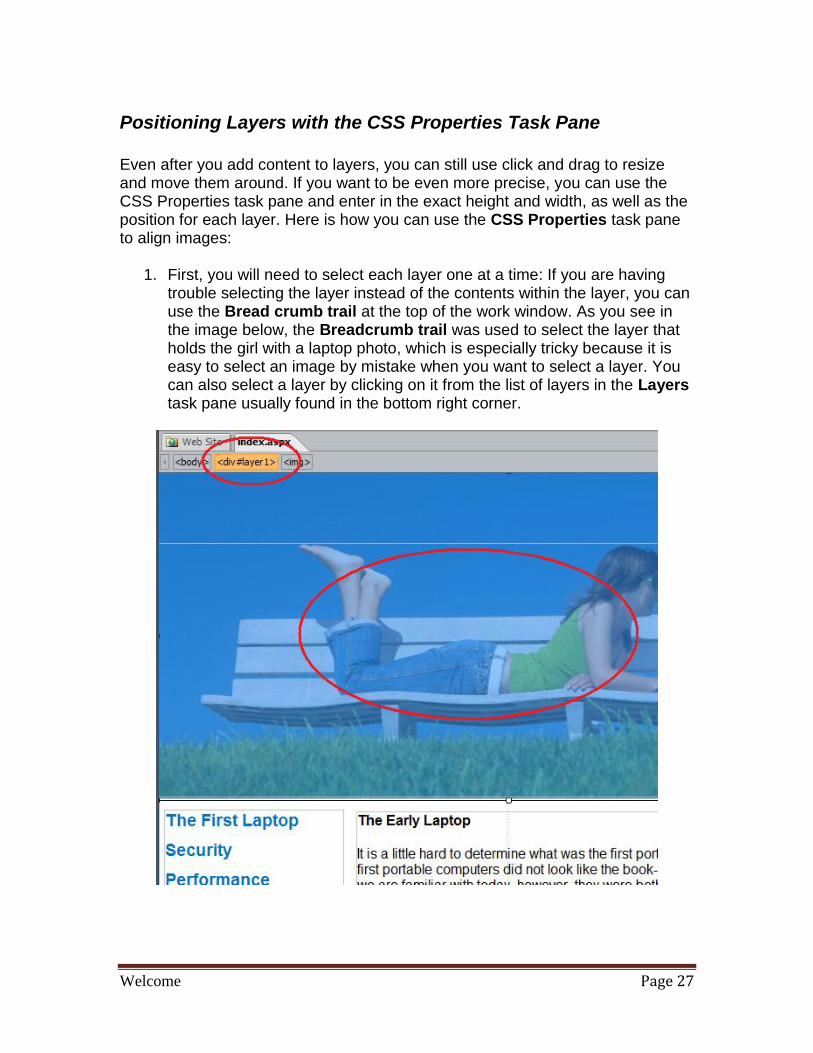
1. First, you will need to select each layer one at a time: If you are having trouble selecting the layer instead of the contents within the layer, you can use the Bread crumb trail at the top of the work window. As you see in the image below, the Breadcrumb trail was used to select the layer that holds the girl with a laptop photo, which is especially tricky because it is easy to select an image by mistake when you want to select a layer. You can also select a layer by clicking on it from the list of layers in the Layers task pane usually found in the bottom right corner.
Welcome Page 28
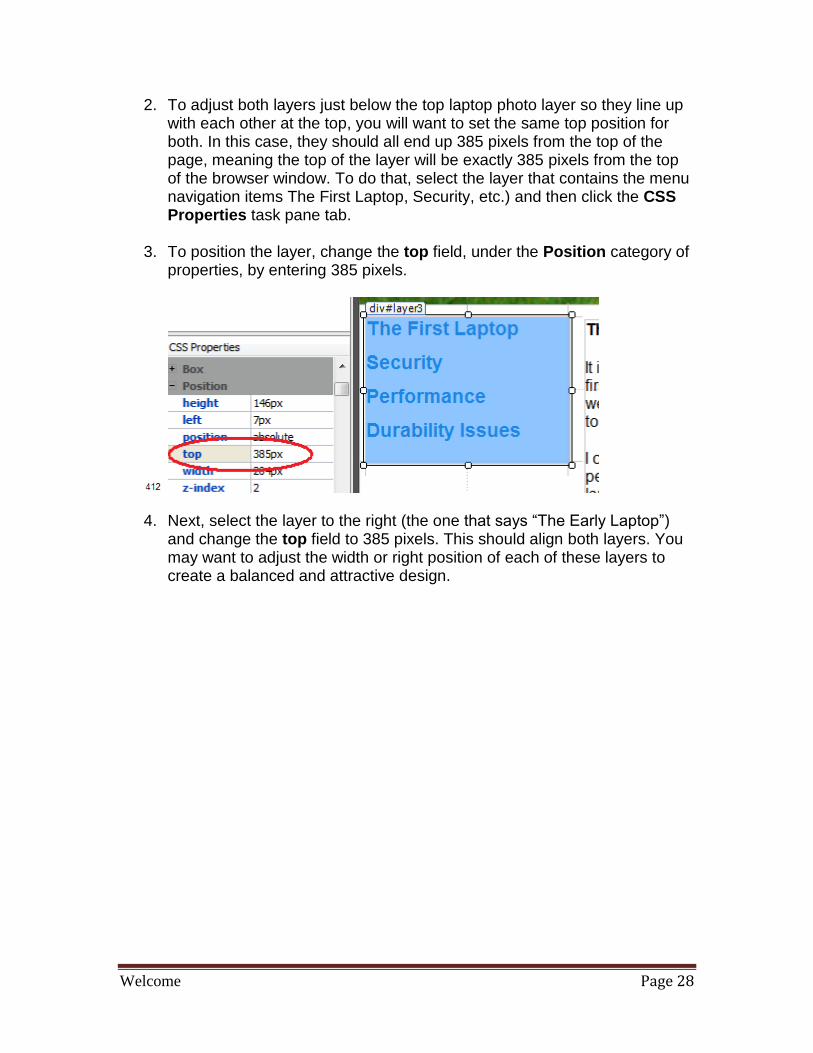
2. To adjust both layers just below the top laptop photo layer so they line up with each other at the top, you will want to set the same top position for both. In this case, they should all end up 385 pixels from the top of the page, meaning the top of the layer will be exactly 385 pixels from the top of the browser window. To do that, select the layer that contains the menu navigation items The First Laptop, Security, etc.) and then click the CSS Properties task pane tab.
3. To position the layer, change the top field, under the Position category of
properties, by entering 385 pixels.
4. Next, select the layer to the right (the one that says ―The Early Laptop‖) and change the top field to 385 pixels. This should align both layers. You may want to adjust the width or right position of each of these layers to create a balanced and attractive design.
Welcome Page 29
Using CSS to Align Images
Next, you will add a small image to the layer with the story and headline and create a style to align that image so the text wraps around it.
1. First, click to place your cursor at the beginning of the first paragraph in the story, just before the words "It is a little hard to determine what was the first…"
2. Choose Insert | Picture | From File.
3. Select the image called laptop.jpg and click OK.
4. In the Accessibility Properties dialog, enter a description of the photo. For this example, enter "Photo of a laptop.‖
When you add an image to a Web page next to text, the image is automatically placed on its own line. The text will begin at the very bottom of the image and continue below. If you want your images to be aligned to the left or right of the page and your text to wrap about them, you will need to change the alignment of the image. A convenient way to ensure all of the images in your site are aligned in a similar fashion is to create a new style specifically for aligning images. For this purpose, you will create a class style that can be applied to any element on the page.
1. Choose New Style from the Apply Styles task pane.
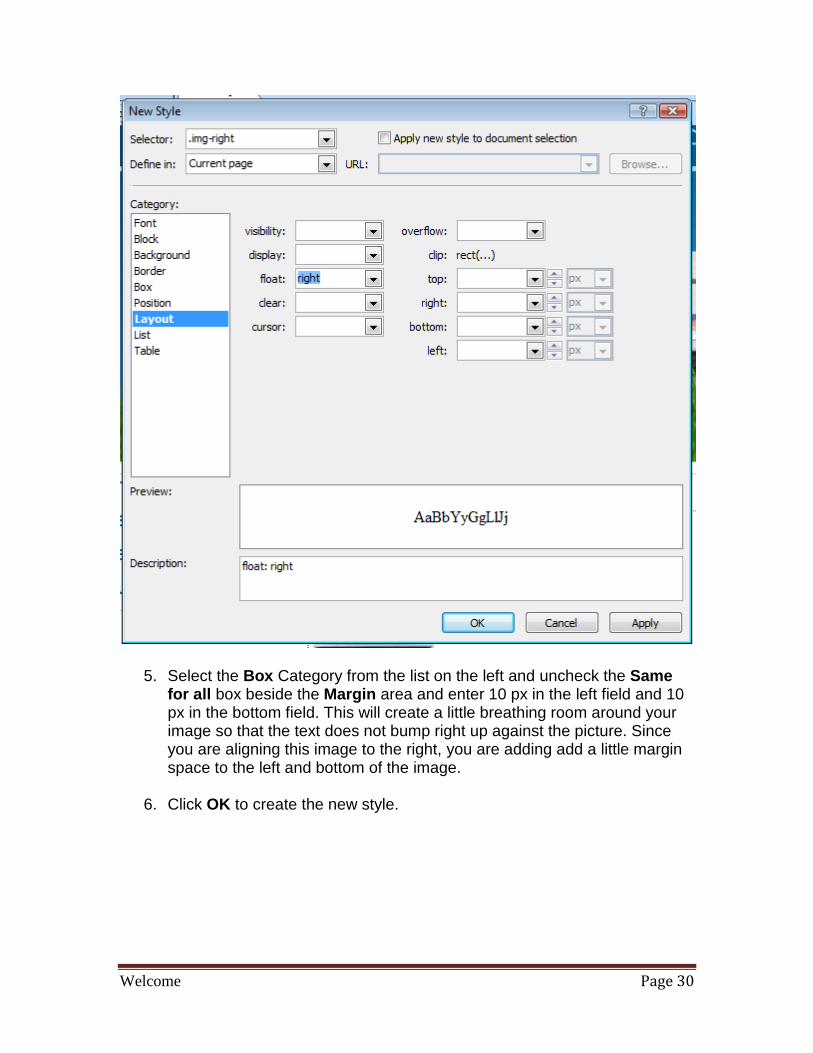
2. In New Style dialog, enter .img-right in the Selector field. You must key in the .img-right because it is not a style already defined.
3. Note: All class styles must begin with a dot or period.
4. In the Category section of the New Style dialog, click on Layout. Set
Float to right.
Welcome Page 30
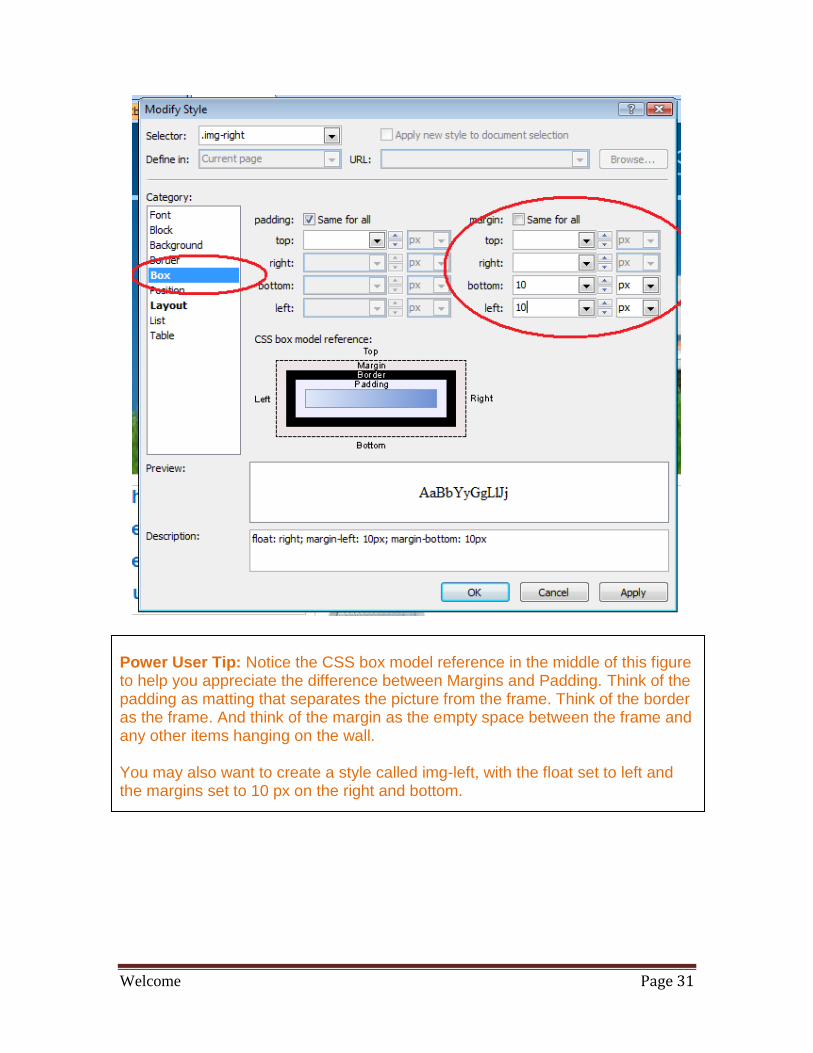
5. Select the Box Category from the list on the left and uncheck the Same for all box beside the Margin area and enter 10 px in the left field and 10 px in the bottom field. This will create a little breathing room around your image so that the text does not bump right up against the picture. Since you are aligning this image to the right, you are adding add a little margin space to the left and bottom of the image.
6. Click OK to create the new style.
Welcome Page 31
Power User Tip: Notice the CSS box model reference in the middle of this figure to help you appreciate the difference between Margins and Padding. Think of the padding as matting that separates the picture from the frame. Think of the border as the frame. And think of the margin as the empty space between the frame and any other items hanging on the wall. You may also want to create a style called img-left, with the float set to left and the margins set to 10 px on the right and bottom.
Welcome Page 32
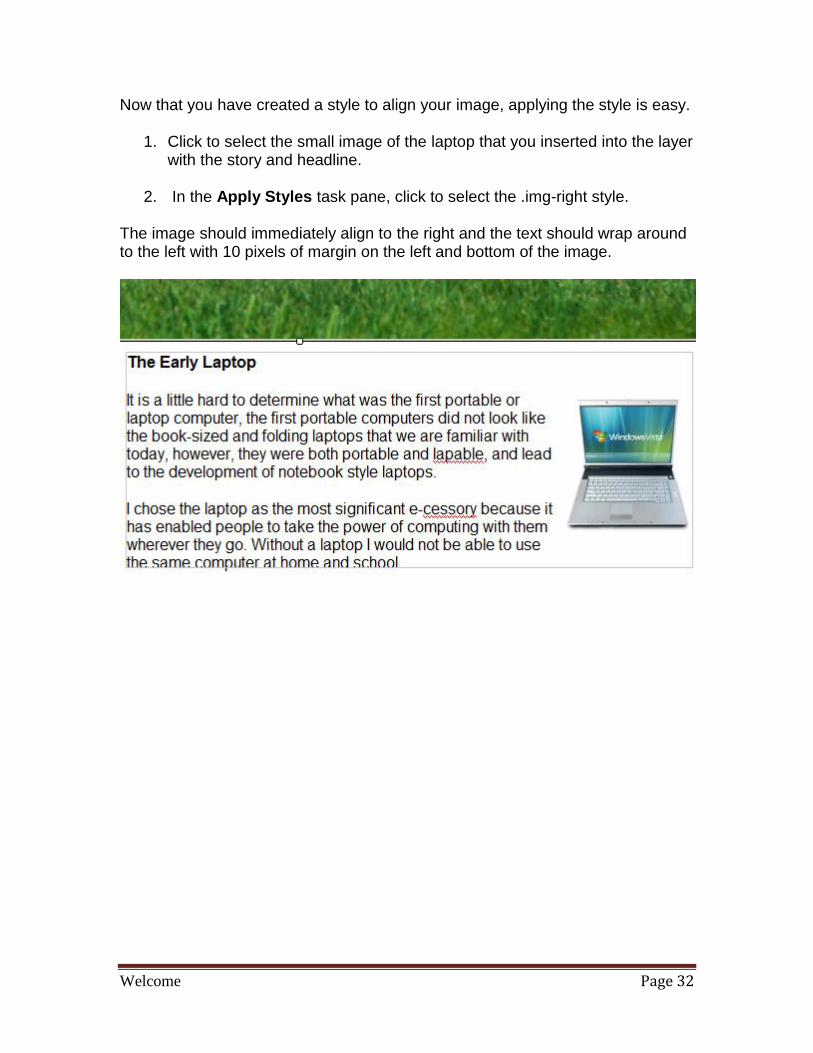
Now that you have created a style to align your image, applying the style is easy.
1. Click to select the small image of the laptop that you inserted into the layer with the story and headline.
2. In the Apply Styles task pane, click to select the .img-right style. The image should immediately align to the right and the text should wrap around to the left with 10 pixels of margin on the left and bottom of the image.
Welcome Page 33
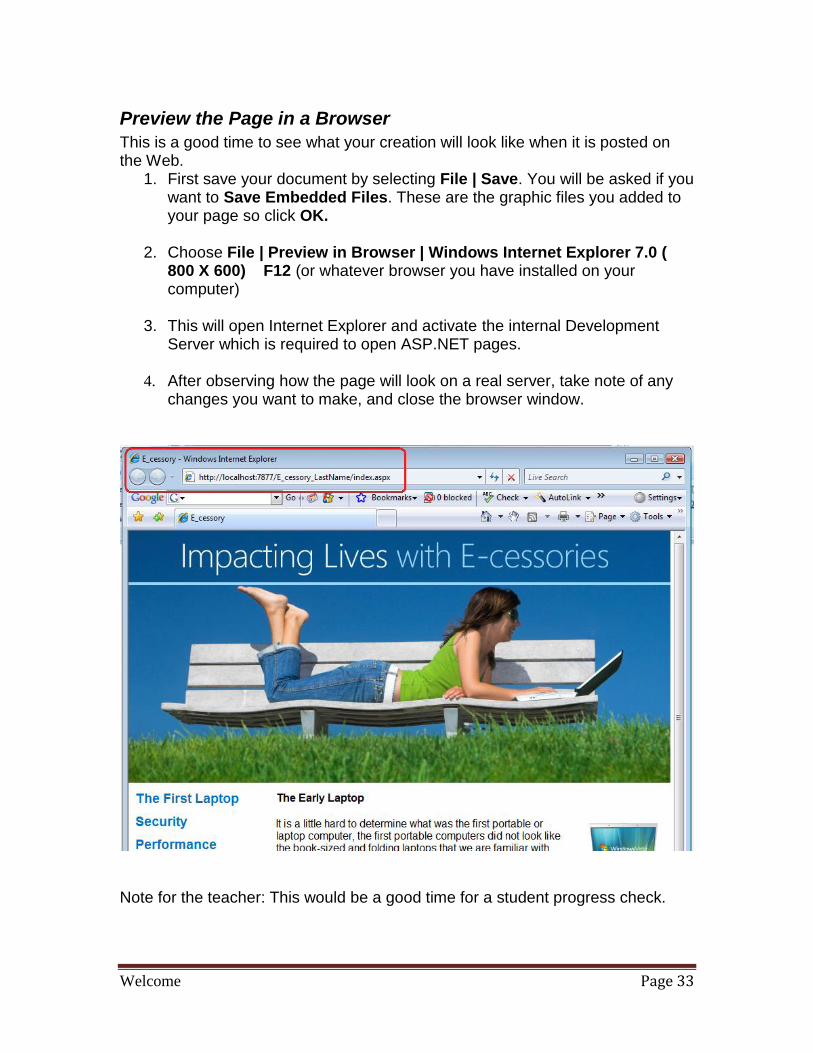
Preview the Page in a Browser
This is a good time to see what your creation will look like when it is posted on the Web.
1. First save your document by selecting File | Save. You will be asked if you want to Save Embedded Files. These are the graphic files you added to your page so click OK.
2. Choose File | Preview in Browser | Windows Internet Explorer 7.0 ( 800 X 600) F12 (or whatever browser you have installed on your computer)
3. This will open Internet Explorer and activate the internal Development Server which is required to open ASP.NET pages.
4. After observing how the page will look on a real server, take note of any changes you want to make, and close the browser window.
Note for the teacher: This would be a good time for a student progress check.
Welcome Page 34
Getting Ready to Add More Pages
Before you add more pages to the site, let’s discuss two techniques that allow Web designers to create sites that are consistent from page to page. You will then apply these techniques to the next four pages in this Web site. For more information on CSS concepts such as these, please visit http://www.microsoft.com/expression/kc/resources.aspx?product=web&type=all for a large selection of video training materials.
External Style Sheets Earlier in this lesson you modified the Heading 1 <h1> style tag and created a new style, .img-right, to use with images. An external style sheet is contained in a file that saves these modified and new styles so they can be applied to other pages and even to other sites. The file name ends with .css—such as in mystyles.css. The CSS stands for Cascading Style Sheet—another name for style sheet.
Use an external style sheet when you want to apply the same styles consistently across some or all Web pages in your Web site. By defining styles in external style sheets (in a .css files) and attaching them to Web pages, you can ensure your entire Web site has a consistent appearance. If you decide to change a style, you need to make only one change—in the external CSS—and the change is automatically reflected in all Web pages that reference that style and CSS.
Master Pages ASP.NET master pages enable you to create a consistent layout for the pages in your application. A single master page defines the look and feel, and standard behavior that you want for all of the pages (or a group of pages) in your Web site. You can then create the actual content pages that contain the information and images you want to display. For instance, on the master page you might set up the spaces for images and text, as well as the actual links you want to have on every content page of the site. When the content pages are displayed, they represent a merge of the layout of the master page with the content from the content page. Think of master pages as the foundation for the content pages. Master pages serve as the structure on to which other content is added.
Just like professional Web designers, you want all of the remaining pages of this site to look and feel similar, so you are going to create an external style sheet. This will save all of the styles you created on the first page so you can apply them to the rest of the site. Then you will create a master page to serve as the foundation for the design of the rest of the site. These two techniques will enable you to create four pages that share a basic design plus a common look and feel.
Welcome Page 35
Creating External Style Sheets
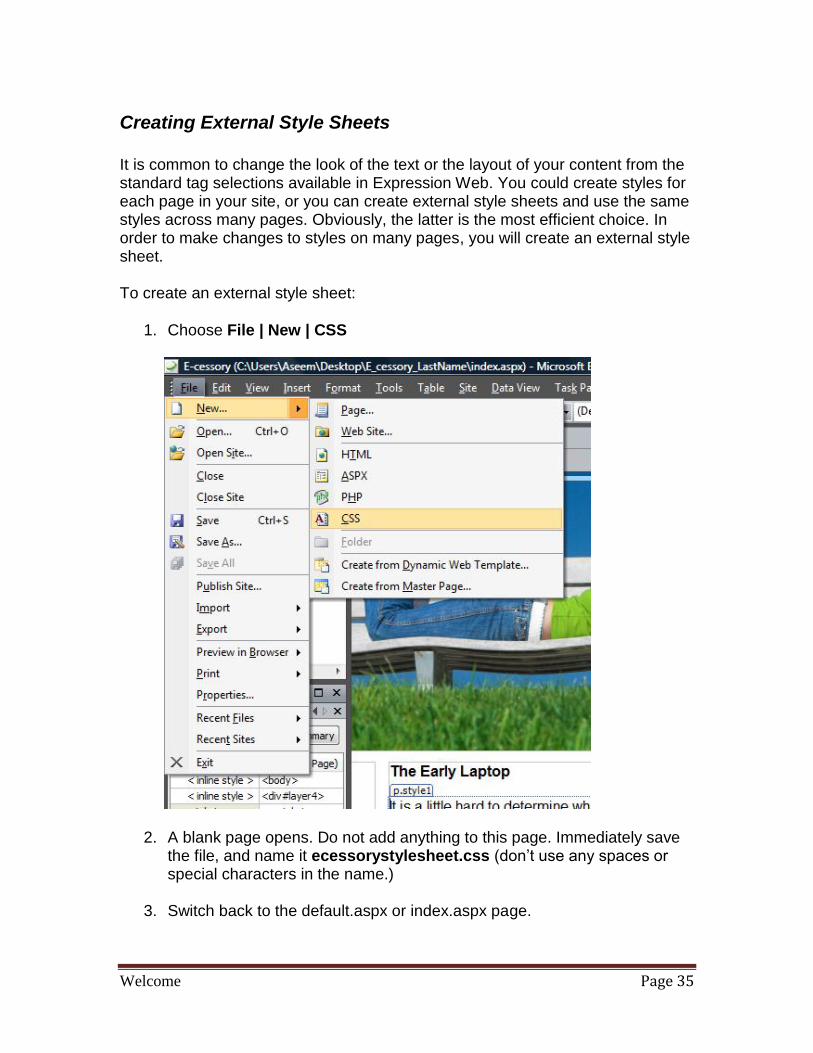
It is common to change the look of the text or the layout of your content from the standard tag selections available in Expression Web. You could create styles for each page in your site, or you can create external style sheets and use the same styles across many pages. Obviously, the latter is the most efficient choice. In order to make changes to styles on many pages, you will create an external style sheet. To create an external style sheet:
1. Choose File | New | CSS
2. A blank page opens. Do not add anything to this page. Immediately save the file, and name it ecessorystylesheet.css (don’t use any spaces or special characters in the name.)
3. Switch back to the default.aspx or index.aspx page.

Welcome Page 36
4. Attach the new CSS file to a Web page by clicking on the Attach Style Sheet link in the Manage Styles task pane. Click the Browse button in the Attach Style Sheet dialog to locate and select the new CSS file— ecessorystylesheet.css.
5. In the Manage Styles task pane, click to select the styles you want to move to the external style sheet and drag them onto the name of the attached CSS file (ecessorystylesheet). As you read the list of CSS styles at the bottom of the Manage Styles pane, notice that these are all of the styles you selected (such as the colors for links) or modified (the h1 tag), or created (.img-right). You can move styles one at a time, or select multiple styles and drag them all at once.

Welcome Page 37
Once you have moved your styles to an external style sheet, the style sheet can be attached to any other pages in your Web site. Any changes to a style in an external style sheet are automatically applied in all pages where that style sheet is attached. A little later you will apply this style sheet to the rest of the pages you create.
NOTE: There is a correct version of the ecessorystylesheet.css in the Resources for Tutorial folder within the Student Materials folder.
A style sheet .css file is not a document that gets displayed in the browser like an .aspx or html page—it is a special type of file that is saved along with all of the Web pages and image files. It identifies the style tags you have modified or created and have added to the style sheet. Think of it as an extra file of special instructions. All you need to do to make use of these modified or new tags on any page is to attach the style sheet to that particular page.
This would be a good time to save your files.

Welcome Page 38
Creating a Master Page You are now ready to create the master page from which all the rest of the pages in this site will be created. This will serve as a foundation for other pages. A great deal of thought and pre-planning must go into the design of a master page. The designer should ask these questions before creating the master page.
1. What elements will be exactly the same on every page to be based upon this master page design? The answer might include navigation links or a title.
2. What elements will be positioned in the same location on every page, but will contain different content? The answer might include containers to hold images or text with different content for each page.
Think of this example: Imagine you are designing a Web site for the local zoo. The first page might contain information about the zoo, its hours, fees, and location. The rest of the site might consist of 20 pages, each about a different animal at the zoo. It would make sense to create a master page to serve as the foundation for the 20 animal pages. The links and title on each page might be exactly the same, but the images and content would be different for each animal. On this master page document, you would place the links to the various sections of the site and to the home page. In addition, you would add and position a content holder to hold the unique image and another content holder to hold the unique text for of the 20 animal pages.
Welcome Page 39
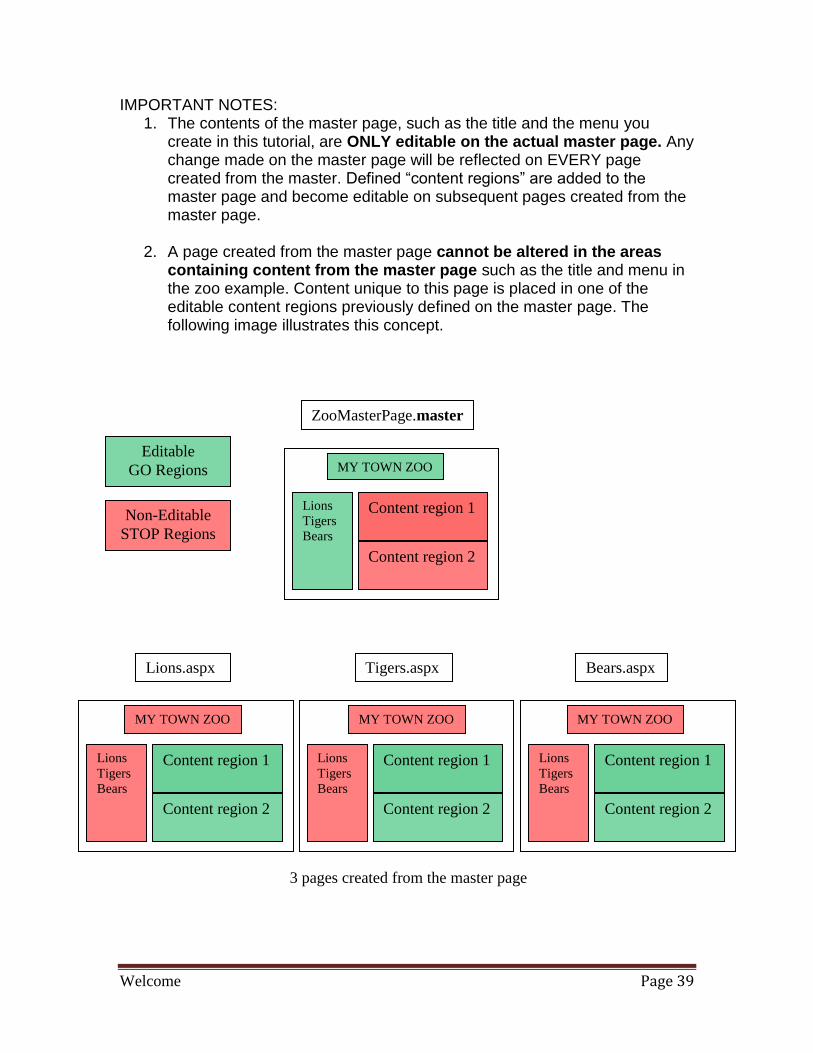
IMPORTANT NOTES: 1. The contents of the master page, such as the title and the menu you
create in this tutorial, are ONLY editable on the actual master page. Any change made on the master page will be reflected on EVERY page created from the master. Defined ―content regions‖ are added to the master page and become editable on subsequent pages created from the master page.
2. A page created from the master page cannot be altered in the areas containing content from the master page such as the title and menu in the zoo example. Content unique to this page is placed in one of the editable content regions previously defined on the master page. The following image illustrates this concept.
Non-Editable
STOP Regions
Editable
GO Regions
MY TOWN ZOO
Lions
Tigers
Bears
Lions.aspx
Content region 1
Content region 2
Lions
Tigers
Bears
Tigers.aspx
Content region 1
Content region 2
Lions
Tigers
Bears
Bears.aspx
Content region 1
Content region 2
MY TOWN ZOO
Lions
Tigers
Bears
ZooMasterPage.master
Content region 1
Content region 2
MY TOWN ZOO MY TOWN ZOO
3 pages created from the master page

Welcome Page 40
1. Choose File | New | Page.
2. In the Page tab of the New dialog box, select General in the list at the left
and select Master Page in the center list. Click OK.
3. The new master page opens in the editor. Save the file with the name
contentpagemaster. A filename extension, .master, will be created
automatically when the document is saved.
4. Delete the ContentPlaceHolder1 from the design surface. If you get a
warning click OK.
5. Drag a layer onto the master page. Set the CSS properties for the width =
800, height = 80, left=0, and top = 0.
6. Select Insert | Picture … | From file and browse to locate the heading.jpg
image file.
Welcome Page 41
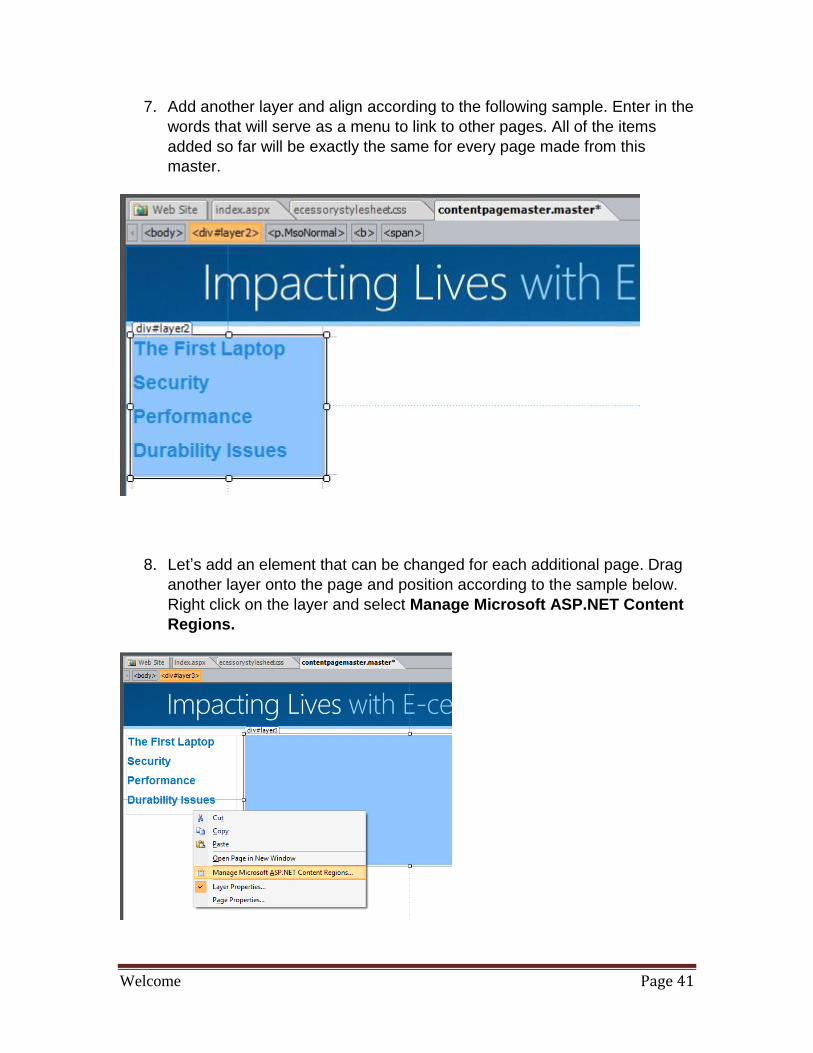
7. Add another layer and align according to the following sample. Enter in the
words that will serve as a menu to link to other pages. All of the items
added so far will be exactly the same for every page made from this
master.
8. Let’s add an element that can be changed for each additional page. Drag
another layer onto the page and position according to the sample below.
Right click on the layer and select Manage Microsoft ASP.NET Content
Regions.
Welcome Page 42
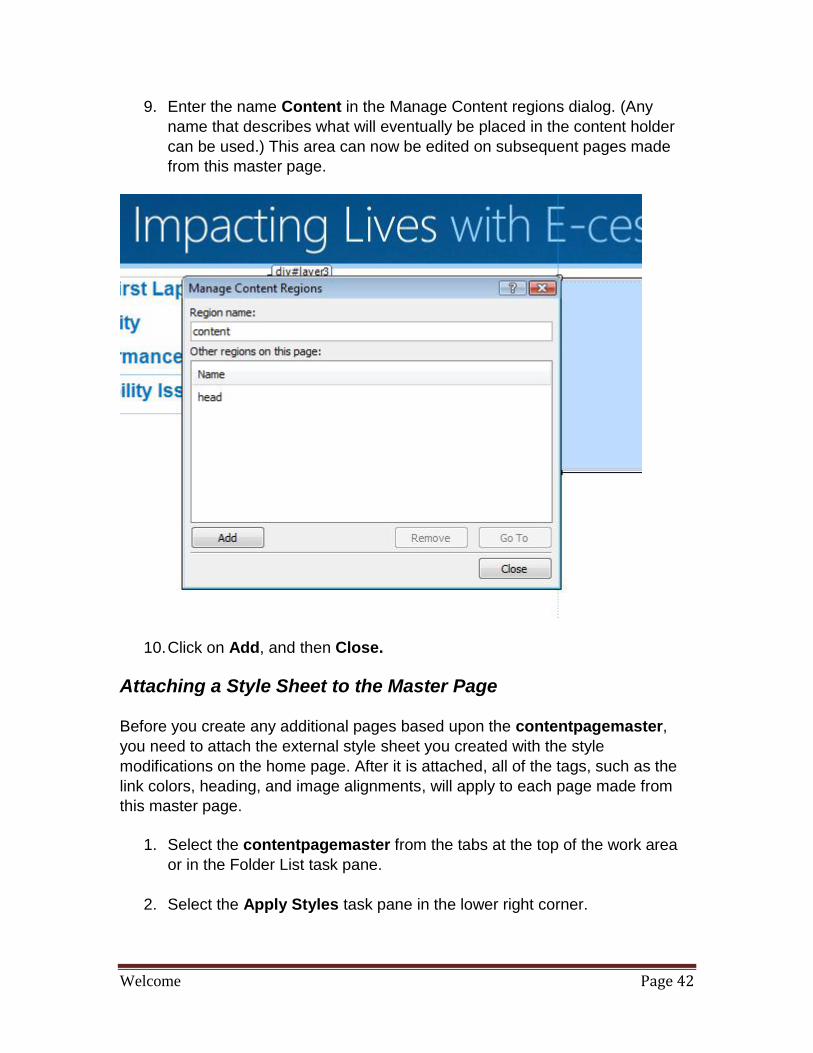
9. Enter the name Content in the Manage Content regions dialog. (Any
name that describes what will eventually be placed in the content holder
can be used.) This area can now be edited on subsequent pages made
from this master page.
10. Click on Add, and then Close.
Attaching a Style Sheet to the Master Page
Before you create any additional pages based upon the contentpagemaster,
you need to attach the external style sheet you created with the style
modifications on the home page. After it is attached, all of the tags, such as the
link colors, heading, and image alignments, will apply to each page made from
this master page.
1. Select the contentpagemaster from the tabs at the top of the work area
or in the Folder List task pane.
2. Select the Apply Styles task pane in the lower right corner.

Welcome Page 43
3. Click the ―Attach Style Sheet‖ link.
4. Click on Browse to locate the ecessorystylesheet.css file.
5. Select that file and click OK.
Now when you choose Heading 1 from the Common Toolbar at the top of the
window, the heading style defined on the home page and saved in the external
style sheet will apply.
This would be a good time to save your files.
Welcome Page 44
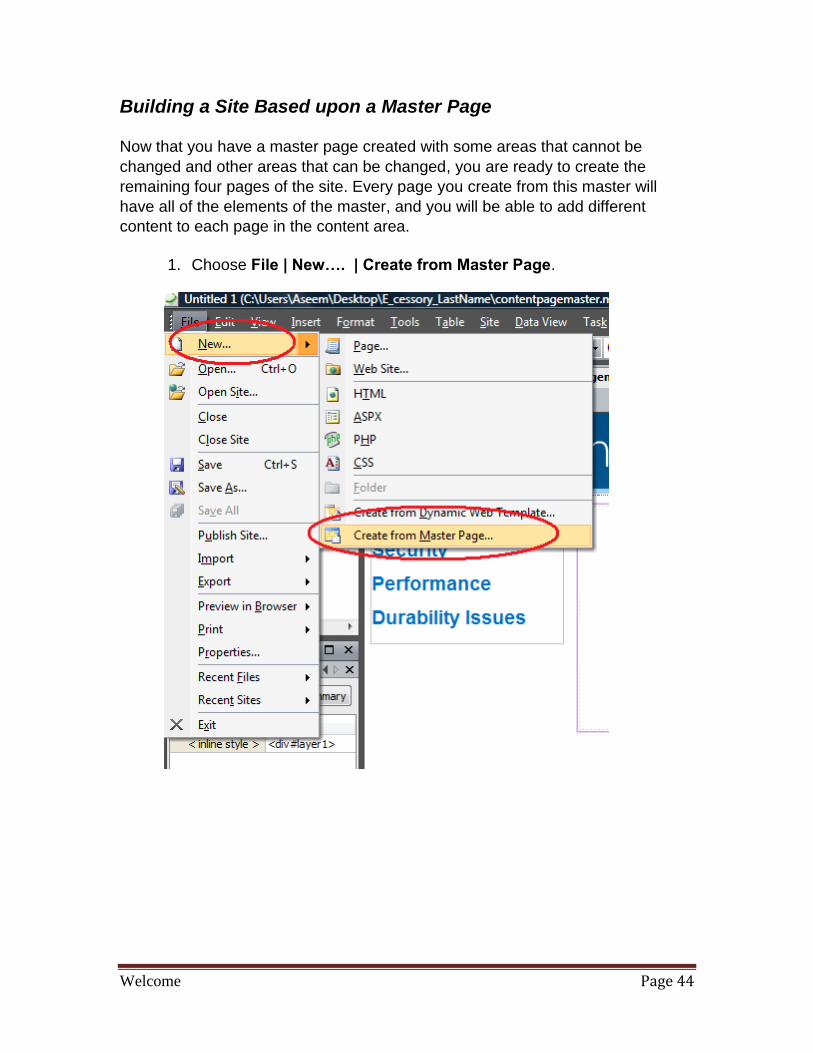
Building a Site Based upon a Master Page
Now that you have a master page created with some areas that cannot be
changed and other areas that can be changed, you are ready to create the
remaining four pages of the site. Every page you create from this master will
have all of the elements of the master, and you will be able to add different
content to each page in the content area.
1. Choose File | New…. | Create from Master Page.

Welcome Page 45
2. To select the master page from which this page will be created, click
Browse and locate the contentpagemaster.master file. Click OK.
3. A new untitled page opens containing all of the elements of the master
page. Notice the small area labeled ―(content)‖ circled on the sample
below. This is the area where you will add information about the first
menu item. ―The First Laptop.‖
4. Open the file ―Text content for E-cessory Web site‖ from the Resources folder that you copied into your Web site folder. Copy the text below the section labeled page 2 text.
Welcome Page 46
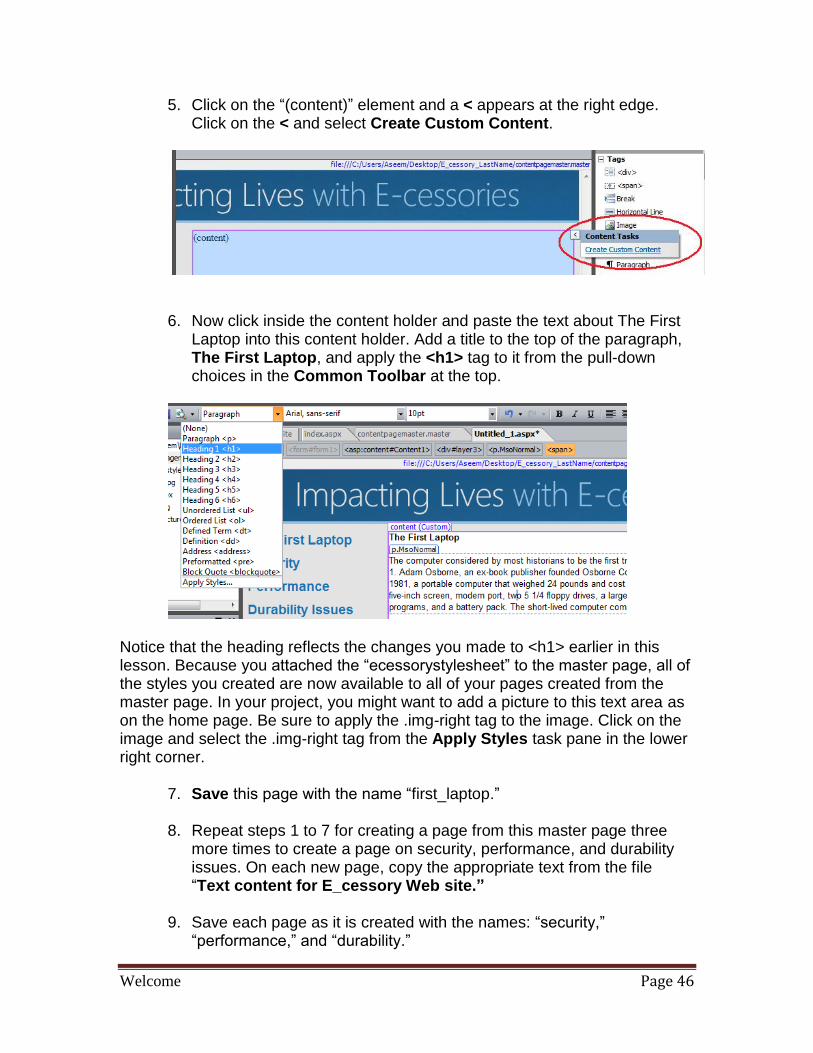
5. Click on the ―(content)‖ element and a < appears at the right edge. Click on the < and select Create Custom Content.
6. Now click inside the content holder and paste the text about The First
Laptop into this content holder. Add a title to the top of the paragraph, The First Laptop, and apply the <h1> tag to it from the pull-down choices in the Common Toolbar at the top.
Notice that the heading reflects the changes you made to <h1> earlier in this lesson. Because you attached the ―ecessorystylesheet‖ to the master page, all of the styles you created are now available to all of your pages created from the master page. In your project, you might want to add a picture to this text area as on the home page. Be sure to apply the .img-right tag to the image. Click on the image and select the .img-right tag from the Apply Styles task pane in the lower right corner.
7. Save this page with the name ―first_laptop.‖
8. Repeat steps 1 to 7 for creating a page from this master page three more times to create a page on security, performance, and durability issues. On each new page, copy the appropriate text from the file ―Text content for E_cessory Web site.”
9. Save each page as it is created with the names: ―security,‖
―performance,‖ and ―durability.‖

Welcome Page 47
Creating Links
Now that you have all of the pages created, it is time to make the links functional. Whether you want to create links to pages in your own site or to another Web site on the Internet, creating links with Expression Web is an easy process. To switch back to the first page you designed in the first part of this lesson, click on the index.aspx tab at the top of the workspace or double click on it in the Folder List on the left. Notice that any time you have more than one page open in Expression Web you can switch between pages by selecting the corresponding tab at the top of the page.
Welcome Page 48
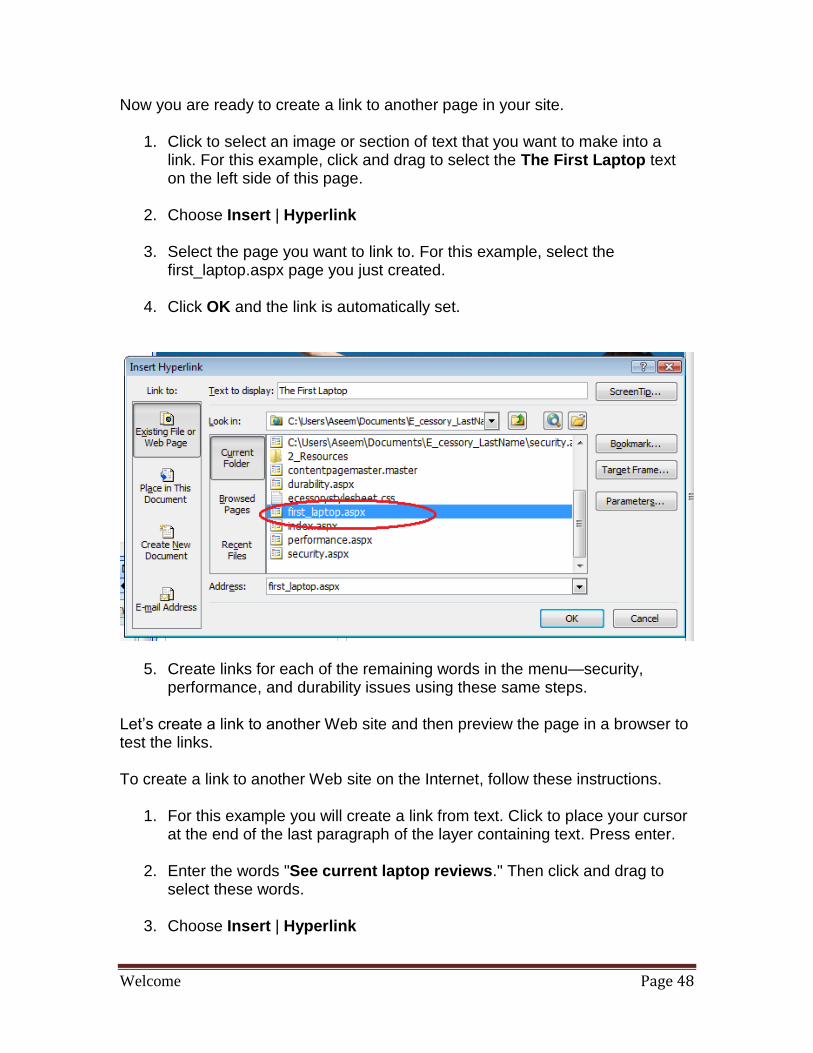
Now you are ready to create a link to another page in your site.
1. Click to select an image or section of text that you want to make into a link. For this example, click and drag to select the The First Laptop text on the left side of this page.
2. Choose Insert | Hyperlink
3. Select the page you want to link to. For this example, select the first_laptop.aspx page you just created.
4. Click OK and the link is automatically set.
5. Create links for each of the remaining words in the menu—security, performance, and durability issues using these same steps.
Let’s create a link to another Web site and then preview the page in a browser to test the links. To create a link to another Web site on the Internet, follow these instructions.
1. For this example you will create a link from text. Click to place your cursor at the end of the last paragraph of the layer containing text. Press enter.
2. Enter the words "See current laptop reviews." Then click and drag to select these words.
3. Choose Insert | Hyperlink

Welcome Page 49
4. To create a link to another site, enter the full URL of the site in the Address field. Enter http://reviews.cnet.com/laptops/
5. Click OK and the link is automatically set.
You can also create links from pictures. Just select the graphic you wish to link from and follow the same steps. To test your links, you have to preview your page in a browser.
1. First, save your page by choosing File | Save.
2. Choose File | Preview in Browser | and select a browser from the pull-out list.
Note: You can preview your pages with Expression Web using any browser available on your computer. Testing your pages in different browsers is important to ensure your pages will work for the broadest audience on the Internet.
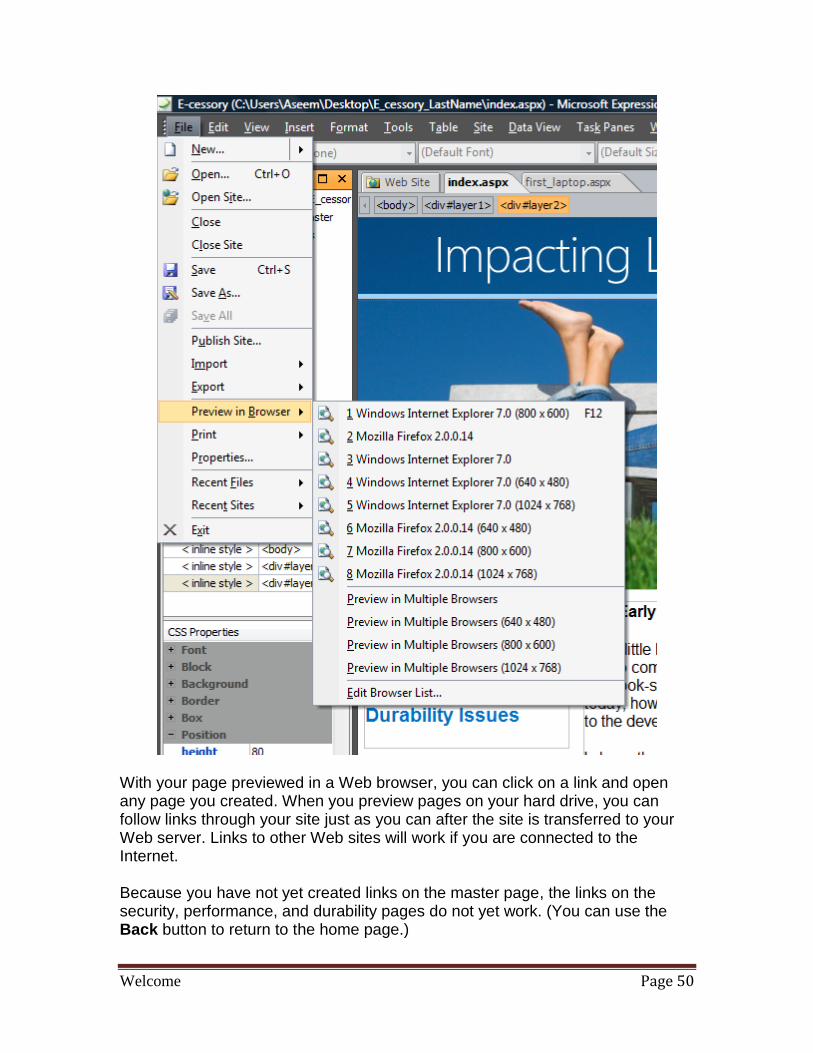
Welcome Page 50
With your page previewed in a Web browser, you can click on a link and open any page you created. When you preview pages on your hard drive, you can follow links through your site just as you can after the site is transferred to your Web server. Links to other Web sites will work if you are connected to the Internet. Because you have not yet created links on the master page, the links on the security, performance, and durability pages do not yet work. (You can use the Back button to return to the home page.)

Welcome Page 51
Let’s fix that navigation problem now.
1. Close Windows Internet Explorer.
2. Open the contentpagemaster.master file from the tabs at the top of the work space or from the file in the File list task pane.
3. Click and drag to select the text ―Security‖ in the menu layer.
4. Choose Insert | Hyperlink.
5. Select the file security.aspx.
6. Repeat this procedure for the remaining words in the menu list.
7. Link the word ―Home‖ to index.aspx.
8. Preview in the browser to check if all of the links work correctly.
Creating Interactive Buttons
Now that you know how to create links, let’s rework the main navigation a bit to make it look better. You have probably seen interactive buttons on other websites. They are buttons that change as you move your mouse over them and as you click on them. In the past you had to write a lot of HTML and javascript to add an interactive button to a page, but Expression Web makes it easy.
1. Switch to the index.aspx page by clicking on the appropriate tab or use the Folder List
2. Highlight the four navigation links on the left side of this page and press Backspace on your keyboard. Make sure you don’t delete the Layer that the links were in. Your cursor should be on the top-left side of this layer.
3. Choose Insert | Interactive Button
4. Select the button style that you want to use. Notice the preview button will change to display the highlighted style. For this example, select Metal Rectangle 1.
5. In the Text field enter ―The First Laptop.‖ This will be the text that appears on the button.
6. Click the Browse button next to the Link field.
Welcome Page 52
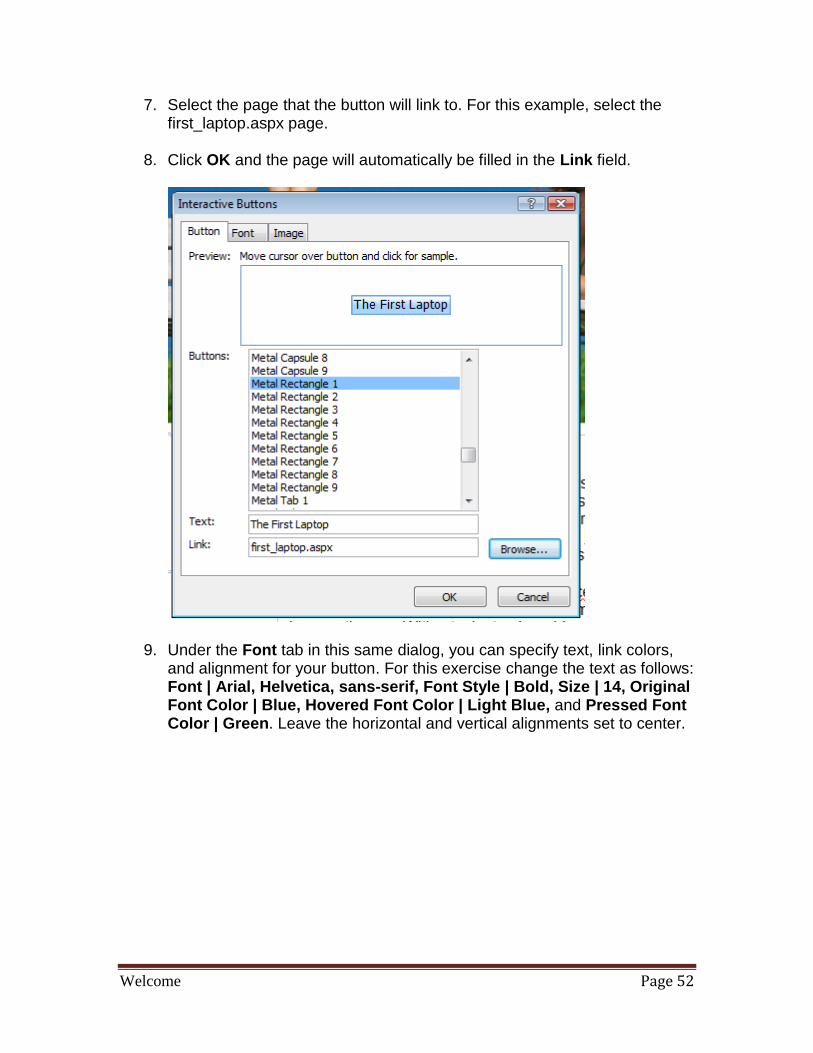
7. Select the page that the button will link to. For this example, select the first_laptop.aspx page.
8. Click OK and the page will automatically be filled in the Link field.
9. Under the Font tab in this same dialog, you can specify text, link colors, and alignment for your button. For this exercise change the text as follows: Font | Arial, Helvetica, sans-serif, Font Style | Bold, Size | 14, Original Font Color | Blue, Hovered Font Color | Light Blue, and Pressed Font Color | Green. Leave the horizontal and vertical alignments set to center.

Welcome Page 53
10. Under the Image tab you can specify size, settings, and background for your image. For this exercise, change the Width to ―197‖ and leave the other settings as is. Make sure the Maintains proportions box is checked.

Welcome Page 54
11. Click OK and the button is automatically created.
12. Create buttons for each of the remaining words in the menu—security, performance, and durability issues using these same steps.

Welcome Page 55
To test your buttons, you have to preview your page in a browser. 1. First, save your page by choosing File | Save.
2. A dialogue will appear to save the newly created image files for the
buttons you just created. Click OK.
3. Choose File | Preview in Browser | and select a browser from the pull-out list.
With your page previewed in a Web browser, your buttons will change when you put your mouse over them and when they are being clicked. Notice that the whole button changes, not just the text. When you click the button you will be taken to the appropriate page. Because you have not yet created buttons on the master page, no buttons on the security, performance, and durability pages appear. To fix this, follow the steps above on the master page. (Make sure to create a button leading back to the home page.) Congratulations! Your project is now complete. You are ready to select what you think is the most important ―E-cessory‖ and investigate the history of that device. You can also investigate a different essential question, or work on another project with Web site development. See the guides in the Student Materials folder for more specific instructions.

Welcome Page 56
There are many other ways to create Web designs with this program, including other CSS design options, tables, frames, templates, and more dynamic development features for ASP.NET sites. You may want to experiment with these other options. There are many online resources to help you learn more about the features described in this tutorial and other cool features. Check out the Knowledge Center at http://www.microsoft.com/expression/.
Extra Fun With a Calendar Half of the fun of learning any new software is to experiment with some of the features you did not have the opportunity to learn during the exercises. A simple and fun control to add to any Webpage is a calendar. Create a new layer on either the index page or the contentpagemaster. Carefully move it to the bottom of the page. Remember to use the Layers task panel to select the layer in order to more easily move it. If you accidentally move other layers in the process, remember ―Undo‖ will put things back.
1. Set the dimensions of this new frame to width = 203 and height = 142. This is the standard calendar size. You can make the calendar larger by stretching it if you want.
2. Click in the new layer to position the insert cursor in that location.
3. Look in the Toolbox under ASP.NET Controls | Standard to locate the Calendar control.
4. Drag the Calendar into the new layer.
5. Click on the small > that is hanging off the top right corner of the calendar.
6. Select AutoFormat to choose an appealing design.
You have incorporated one more ASP.NET control into your design. When you preview your site in a browser, the calendar will be operational. Learn about more fun controls by exploring the Help menu or other tutorials in the Knowledge Center http://www.microsoft.com/expression/.

Welcome Page 57
Wrap-Up Let’s review what you have learned.
1. ASP.NET is a Microsoft technology for creating dynamic and interactive Web sites.
2. Microsoft’s Expression Web environment offers ―Drag and Drop‖ Web design through the use of tools found in a variety of toolbars, toolboxes, and panes.
3. Creating a new site creates a folder that holds all of the files related to your site.
4. Pages in a site can be created from scratch, from html templates, or from aspx master pages.
5. Layers are used to position page elements such as images or text and can be positioned to allow for creative designs.
6. Images should have alternate text to meet accessibility standards. 7. The Tag Properties and CSS Properties panes provide information about
page elements and allow for precise manipulation of elements. 8. Standard formatting tags such as headings, fonts, and font size are
selected from the Common Toolbar. 9. The standard tags can be modified or new styles created by selecting New
Style in the Apply Styles or Manage Styles task pane. 10. Web pages can be viewed as they will appear in various browsers by
selecting File | Preview in Browser. The pages are rendered through the internal Development Server.
11. To ensure uniformity from page to page in a Web site, external style sheets can be created by selecting and saving the desired styles and tags in a .css file. The styles saved in external style sheets become available on individual pages when the .css file is attached to that page.
12. Master pages are used to maintain uniformity throughout a site and as a time saver.
13. Elements on a master page are either fixed content or content placeholder regions. The fixed content areas can only be edited on the master page. The content placeholder regions are editable on the pages created from the master.
14. Links to other pages or to other Web sites on the Internet can be attached to text or images.
15. The calendar is an ASP.NET control and demonstrates a dynamic feature.

Welcome Page 58
A Glossary for Microsoft® Expression® Web
Accessibility Standards have been established for Web sites to ensure that everyone has access to Web content. These standards include alternate tags for visual elements (such as images) that describe them for users who use browsers that are unable to view images, or users who are visually handicapped. See http://www.w3.org/WAI/ for more accessibility standards. ASP.NET The latest version of Microsoft's Active Server Pages technology (ASP) is a powerful tool for creating dynamic and interactive Web pages. Bread Crumb Trail A navigation tool found at the top of the workspace window enables the user to select the layer or element recently used within the Web site files. Common Toolbar Frequently used options and actions are located at the top of the workspace and include a variety of choices under File, Edit, View, Insert, Format, Tools, Table Site, Data View, Task Panes, Window, and Help. Content Placeholder A container defined and positioned on a master page that can only be edited on pages created from that master page. CSS (Cascading Style Sheets) Cascading Style Sheets contain details for modifying standard formatting tags, such as Heading 1, or for entirely new styles named and defined by the designer. These details can be saved in a .css file and attached to Web pages. The details over-ride standard formatting tag specifications. See External Style Sheet. Folder List A pane within the workspace that shows all of the files within the folder created to hold the Web site files. It is usually located at the top left of the workspace. External Style Sheet Formatting details saved in a .css file and attached to Web pages. The details over-ride standard formatting tag specifications. HTML (HyperText Markup Language) HyperText Markup Language is the basic code used to create Web pages. It uses tags in the form of <some tag> to instruct a browser how to display content.

Layer A layer is a container that holds an element on your Web site but is invisible when the page is viewed in the browser. Layers are found in the Toolbox and dragged on to the design surface. Master page A master page defines the look , feel, and standard behaviors that you want for all of the pages (or a group of pages) in your Web site. It serves as a foundation for pages, containing common content and placeholders to contain unique content on each of the derived pages. RSS A Web feed format used to gather updated Web content such as blog entries, news headlines or podcasts. An RSS "feed" contains content from an associated Web site. RSS makes it easy to keep up with frequently changing Web sites. Style Sheet See Cascading Style Sheet (CSS) Tag The basic HTML code structure that defines the formatting required for the content of a Web page for a browser. Task Panes The workspace of Expression Web is organized into areas called task panes. Each task pane provides the choices for actions to take on various elements in the Web site project. The panes include the Folder List, CSS Properties, Tag Properties, the Toolbox, Layers, Managing and Applying Styles, plus others required for specialized work. Toolbox This task pane contains the drag-and-drop elements that can be added to a Web page. The tools are divided into specialized groups including Tags, Form Controls, ASP.NET Controls, and others. View Tabs View Tabs located at the bottom of the workspace enable the designer to select to view a Web page by its design, code, or in a split window showing both design and code. XML XML is a general-purpose markup language that allows users to define their own tags. It is primarily used to share data between different information systems via the Internet. It allows unlike computers to communicate.

Welcome Page 60