Your Guide to Supplying Print-Ready s
24
Your Guide to Supplying Print-Ready PDF Files
Transcript of Your Guide to Supplying Print-Ready s

Your Guide to SupplyingPrint-Ready PDF Files

Introduction 4File Requirements 5Programmes For PDF 6
Text File Set Up 7Design Program Set Up 8
Cover Set Ups 10Saddle Stitch Cover Set Up 11Wiro / Spiral Cover Set Up 13Paperback Cover Set Up 15Hardback Cover Set Up 17Dustjacket Cover Set Up 19
Foil Blocking 21Image Resolution / DPI 22Bleed - What is it? 24Colour 25
Contents

4
The aim of this guide is to teach you a few technical requirements and aid you in preparing print-ready PDF files that will mean your book is produced just how you want it.
Service expectations
Files supplied to us are checked when they arrive at our pre-press department for the technical requirements of commercial printing, and “Fit For Purpose” checked against the job brief i.e. does the artwork match the order’s size? are the cover dimensions correct for the expected size of book? etc. We do not check for spelling and grammar and assume proof-read.
What is a PDF and why use it?
PDF “locks” the words and images in place on the page and when set up correctly ensures that everything needed for printing is contained within the file, so regardless of computer platform or printing press, the end printed result is the same.
This is unlike supplying a Word file, for example – Word files do not transfer well between systems, as they rely on the individual computer’s fonts and printer settings, which vary from computer to computer.
Introduction

5
Interior Files
• Single page, portrait orientation layout
• Embedded images are 300dpi
• All fonts are embedded
• Transparent layers flattened
• Allow a safety margin of 20mm on the gutter
• Do not include trim / bleed marks
• Do not use any security / password protected files
• Page size matches the specification of print run - including bleed if
necessary. Example: A US royal book ( 152mm x 229mm), with bleed
would need to be exported at 158mm x 235mm.
Cover Files
• Supply back cover, spine and front cover as a combined spread
• Embedded images are 300dpi
• All fonts are embedded
• Transparent layers flattened
• Allow a safety margin of 15mm on content from the trim area
• Do not include trim / bleed marks
• Do not use any security / password protected files
• Cover size matches that of the specifcation including bleed - see pg.
6 for different set up for paperback / hardback etc.
File Requirements

6
Any program that can print to a printer can be used to create a PDF. If you can’t save-as or export to PDF, you can always print to PDF by using a PDF printer.
There are many page layout and desktop publishing programs that can create a PDF. The industry standard is Adobe InDesign but so long as the specifications outlined in this booklet are met, the program used is less important.
Programs For Creating PDF’s

7
All text files no matter what binding method you select, should be uploaded in either one of two ways, depending if bleed is required.
We will use an example of A5 (210mm x 148mm).
If there is no artwork on the book that needs to bleed, then the final size dimensions that should be uploaded are 210mm height x 148mm width.
If there is to be artwork on the book that is required to run right to the very edge of the page, then bleed will need to be supplied. Bleed that we require for text is 3mm on each edge. So this would result in a book size of 216mm height, 154mm width.
Please note other factors to look out for when creating your text file:
• The first page of your PDF file, will be printed on a right hand page as you open the book. For paperbacks, it would be printed on the first right hand side page. For hardbacks, it would be printed on the second right hand side page.
• All fonts must be embedded to ensure our printer can use them - if a font is not embedded our printer will use a substitute which can impact the desired look of the book.
• If you using our BookVAULT system, a barcode will be added to the last page of the document to aid it through our production facility to ensure that the cover / text are matching. To minmise the amount of blank pages at the rear of your book, try and supply a page count
that is one less than a divisible of 4. Example: 39, 43, 47 etc.
Text File Set Up
8
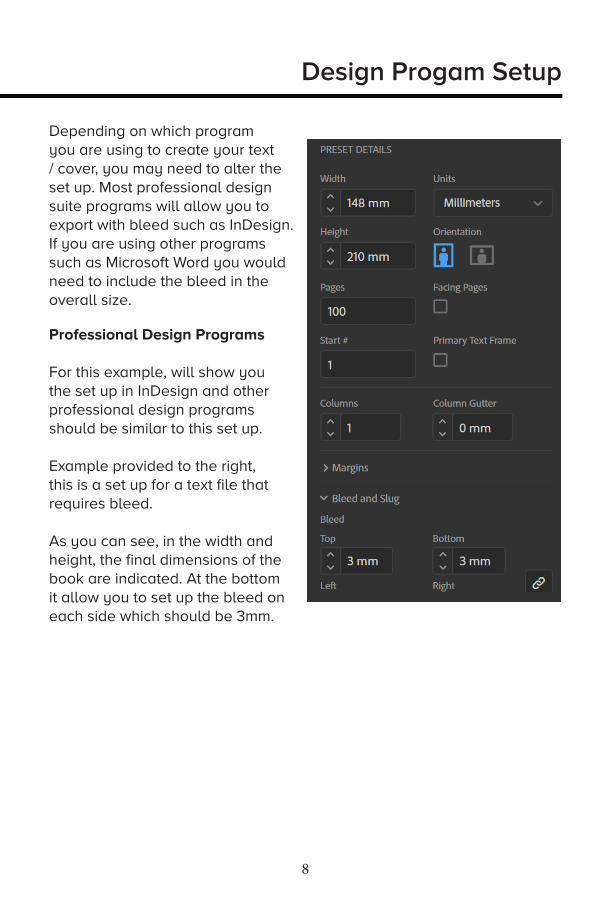
Depending on which program you are using to create your text / cover, you may need to alter the set up. Most professional design suite programs will allow you to export with bleed such as InDesign. If you are using other programs such as Microsoft Word you would need to include the bleed in the overall size.
Professional Design Programs
For this example, will show you the set up in InDesign and other professional design programs should be similar to this set up.
Example provided to the right, this is a set up for a text file that requires bleed.
As you can see, in the width and height, the final dimensions of the book are indicated. At the bottom it allow you to set up the bleed on each side which should be 3mm.
Design Progam Setup

9
Other Programs
For this example, we are producing a text file with bleed in Microsoft Word. Firstly, you would need to navigate to this area : Layout Tab > Size > More Paper Sizes
This will then give you a drop down of standard paper sizes. What you would need to do is select custom size and / or start inputting the relevant dimensions. Note that this is set up in cm rather than mm, so would need to ensure anything calculated is in the right unit. If your text file has any images that bleed off the page, make sure 3mm is added on each edge.
This program can also be used for cover artwork, in which you would do the same and indicate the dimensions including bleed.
For the example on pg 15. This would be 307.8mm or 30.78cm in the width and 216mm or 21.6cm for the height. On the margins page, change these all to 0 which will allow you to add content to the full artwork canvas.
Note : when changing the margins to 0 it will come up with a popup about print area, click ignore on this.
Design Progam Setup - Continued

10
Saddle Stitch Booklet - Pg. 11
Wire-O-Bound / Spiral Bound - Pg. 13
Paperback books - Pg. 15
Hardback books - Pg. 17
What Book Are You Printing?

11
Saddle Stitch Booklet - Cover Setup
FrontBack
Below is a flat plan to explain the set up of the cover for a saddle stitch booklet. For this
example we will use an A5 size (210x148).
Saddle stitched books have no spine so be wary of that when creating your artwork.
To calculate the full dimensions of this are very simple:
Height : this is the height of the finished article size, 210mm + 3mm bleed on the top and +3mm bleed on the bottom. Total 216mm.
Width: this is width of the final size x2, plus bleed. So 148 x 2 = 296. 296 +3mm bleed for the left, 3mm bleed for the right. Total 302mm.
Be aware of content too close to the trim size, allow a safety margin of 5mm from the edge of this.

12
302mm - Full width including bleed
296mm - Final trim size210m
m - Final trim
size
216mm
- Full height including bleed
No spine on saddle stitch it is folded and stitched
286mm - Safe area for content200m
m - Safe area for content
FrontBack

13
Wiro / Spiral Bound- Cover Setup
Below is a flat plan to explain the set up of the cover for a wiro / spiral bound book. For this example we will
use an A5 size (210x148).
This is the only format that does not require a spread for the cover, this needs the covers as individual pages. If you are printing on the front and back there would be 2 pages, if it was printed on the front, inside front, inside back and back, it would require 4.
To calculate the full dimensions of this are:
Height : this is the height of the finished article size, 210mm + 3mm bleed on the top and +3mm bleed on the bottom. Total 216mm.
Width: this is width of the final size plus bleed. So 148 +3mm bleed for the left, 3mm bleed for the right. Total 154mm.
Be aware that on the left hand side there will be the holes punched for spiral / wiro-binding, we suggest giving a margin of roughly 25mm.
Front Back

14Front
25mm
allowance for punched holes
216mm
- Full height including bleed
210mm
- Final trim size
154mm - Full width including bleed
148mm - Final trim size
200mm
- Safe area for content
118mm - Safe area for content
Back
154mm - Full width including bleed
148mm - Final trim size
118mm - Safe area for content
25mm
allowance for punched holes
216mm
- Full height including bleed
210mm
- Final trim size
200mm
- Safe area for content

15
Paperback Book- Cover Setup
Below is a flat plan to explain the set up of the cover for a paperback book. For this example we will use an A5 size (210x148).
First of all, you need to calculate the width of the spine, this can be done on our website, for this example, 100 pages on 80gsm bond.Go to our home page > Resources > Spine Width Calculator.
This indicates that the spine should be 5.8mm.
Use this to calculate the full dimensions of the cover:
Height : This is the height of the finished article size, 210mm + 3mm bleed on the top and +3mm bleed on the bottom. Total 216mm.
Width:This is width of the final size x2, plus spine, plus bleed. So 148 x 2 = 296. // 296 + 5.8mm for the spine.301.8mm + 3mm bleed left + 3mm bleed right. Total 307.8mm
Be aware of content too close to the trim size, allow a safety margin of 5mm from the edge of this. Also, if you are printing on the inside of the cover, you would need to allow for a blank area for the spine - 5mm each side of the spine. This is so that the glue will be able to stick better.
FrontBack

16
307.8mm - Full width including bleed
301.8mm - Final trim size
210mm
- Final trim size
216mm
- Full height including bleed
291.8mm - Safe area for content
200mm
- Safe area for content
5.8mm
spine
Back Front
17
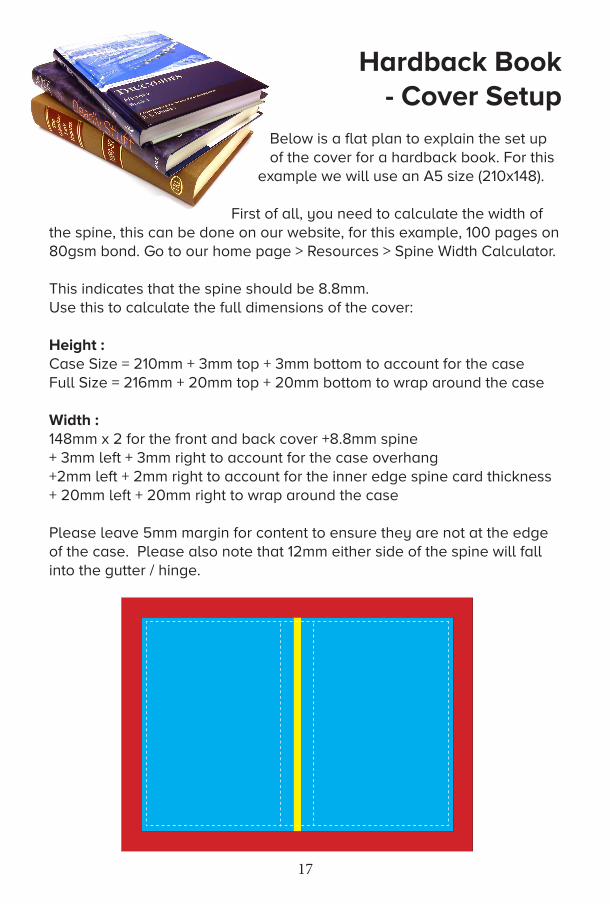
Hardback Book- Cover Setup
Below is a flat plan to explain the set up of the cover for a hardback book. For this
example we will use an A5 size (210x148).
First of all, you need to calculate the width of the spine, this can be done on our website, for this example, 100 pages on 80gsm bond. Go to our home page > Resources > Spine Width Calculator.
This indicates that the spine should be 8.8mm.Use this to calculate the full dimensions of the cover:
Height : Case Size = 210mm + 3mm top + 3mm bottom to account for the caseFull Size = 216mm + 20mm top + 20mm bottom to wrap around the case Width : 148mm x 2 for the front and back cover +8.8mm spine+ 3mm left + 3mm right to account for the case overhang+2mm left + 2mm right to account for the inner edge spine card thickness+ 20mm left + 20mm right to wrap around the case
Please leave 5mm margin for content to ensure they are not at the edge of the case. Please also note that 12mm either side of the spine will fall into the gutter / hinge.

18
354.8mm - Full width including wraparound bleed
320.8mm - Final case width
222 mm
- Final case size
256mm
- Full height including wraparound bleed
291.8mm - Safe area for content
200mm
- Safe area for content
8.8mm
spine**Please note, allow for 12mm on each side of the spine for the hinge on the cover
19
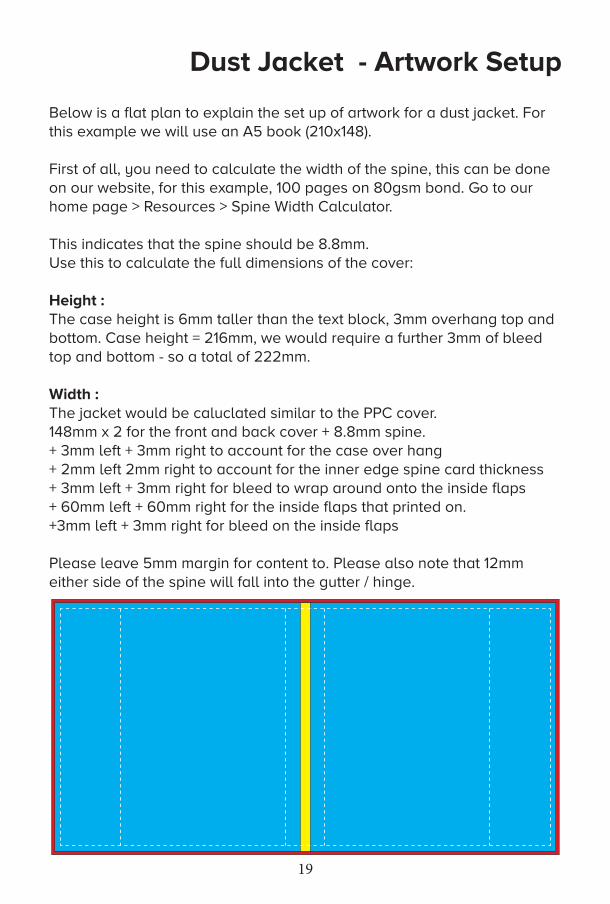
Dust Jacket - Artwork Setup
Below is a flat plan to explain the set up of artwork for a dust jacket. For this example we will use an A5 book (210x148).
First of all, you need to calculate the width of the spine, this can be done on our website, for this example, 100 pages on 80gsm bond. Go to our home page > Resources > Spine Width Calculator.
This indicates that the spine should be 8.8mm.Use this to calculate the full dimensions of the cover:
Height : The case height is 6mm taller than the text block, 3mm overhang top and bottom. Case height = 216mm, we would require a further 3mm of bleed top and bottom - so a total of 222mm.
Width : The jacket would be caluclated similar to the PPC cover.148mm x 2 for the front and back cover + 8.8mm spine.+ 3mm left + 3mm right to account for the case over hang+ 2mm left 2mm right to account for the inner edge spine card thickness+ 3mm left + 3mm right for bleed to wrap around onto the inside flaps+ 60mm left + 60mm right for the inside flaps that printed on.+3mm left + 3mm right for bleed on the inside flaps
Please leave 5mm margin for content to. Please also note that 12mm either side of the spine will fall into the gutter / hinge.

20
**Please note, allow for 12mm on each side of the spine for the hinge on the cover
60mm for fl aps156mm - back cover case width
60mm for fl aps156mm - front cover case width
8.8mm
spine
222mm
- full artwork dim
ensions including bleed
216mm
- fi nal jacket trim size
206mm
- safe area for content

21
Additional Components
Brass (Blocking) Artwork:
In order to add a silver, gold (or other basic colour) wording or design to a cloth case, it is necessary to create a “brass” - a slab of metal with the design embossed which is then used to stamp the design into the case. In order for us to do this, the artwork needs to be supplied as black only. Simple line-art can be used that is not too intricate and must also be black only at 1200dpi.
To convert images to black only using Photoshop: 1. Image Menu -> Image Size -> Resolution: 1200dpi;
Resample image (Bicubic smoother if possible); OK. 2. Image menu -> Adjustments -> Threshold - adjust the
slider to best represent the image. 3. Image menu -> Mode -> Greyscale. 4. Image menu -> Mode -> Bitmap; Method: 50%
Threshold.
The spine, front and back elements should be supplied separately, and the size of the artwork should be as follows: All Heights = Height of the trim size + 6mm Spine Width = As obtained from us. Front/Back Width = Width of trim size minus 4mm. Remember trim size is the size of the internal book block.
Multiple colours can be used on the same case. Each colour should be supplied as a separate file. For example, gold lettering can be overlaid on a block of red colour (called a crusher panel) such as the example shown. Blind embossing can also be achieved using similar blocking artwork where no colour is applied. This gives the effect of the design pressed into the case.
The Gibraltar
Law Reports
1980-87
LRI
We have two different options of foil blocking, we have one machine with a specific font family that is very efficient and cost effective, but limited to the font and size we have. The other is much more flexible but costly, we can have a brass plate produced which is then stamped onto the book with the colour of foil you choose.
Daisy Wheel Blocking
In regards to the file artwork for this, it is quite simple and would need a PDF creating to the book size / spine size with contents to be foiled blocked in black only.
See the example to the side.
Please position this on the file where you would like the blocking to be done. If this is not indicated, our operators will match where possible to layout from text pages.
Please note that the artwork dimensions need to be within 220x150, otherwise additional costs for plate and production will be incurred.
This is the most cost effective and is the only offering we have on our Print On Demand service for single books. This font is ‘Record Gothic’ and the size that we have is 18pt. We have upper case, lower case, numbers and a standard set of sybmols on offer. A file would not need to be supplied for this, we would just need an indication of what is to be added, and where.
Foil Plate Blocking
Foil Blocking

22
Image Resolution
Here’s a collection of images at different resolutions for you to evaluate their quality. An image’s resolution can be found using Photoshop: Image Menu -> Image Size. For colour/monochrome photographs, 300dpi is the optimum resolution to use. For 1-bit images (e.g. scanned text / line-art) 600-1200dpi is best.
Remember that by enlarging or reducing the image, it’s resolution is also affected. For example, a fair 200dpi image doubled in size will reduce it’s resolution to a poor 100dpi.
x2
Guide to Supplying Print-Ready PDF Files 9
300dpi 200dpi 150dpi 120dpi
100dpi 85dpi 72dpi 50dpi
DPI stands for dots per inch, which is used to measure the quality of an image by counting the amount of dots per inch, the more dots the higher the quality and sharpness of hte image.
Below are 3 images with different DPI properties, which show the variance of quality.
72dpi - this is a standard dpi output for web graphics, this will not result in a great print production
150dpi - this is the minimum dpi that we would recommend for print production, simple diagrams / drawings should be okay with this.
300dpi - anything that is requiring a good quality print production, we would require it to be set as 300dpi
Image Resolution / DPI

23
How Do I Check The DPI Of An Image?
An easy way to find the dpi of an image is using file explorer.
Locate the image in the directory, right click and select properties, click the details tab and at the bottom under the ‘Image’ section, it will indicate the dpi of both the horizontal / vertical resolution.
Remember that by enlarging or reducing the image, its dpi is also affected. For example, a 200dpi image doubled in size will be reduced to 100dpi.
Image Resolution
Here’s a collection of images at different resolutions for you to evaluate their quality. An image’s resolution can be found using Photoshop: Image Menu -> Image Size. For colour/monochrome photographs, 300dpi is the optimum resolution to use. For 1-bit images (e.g. scanned text / line-art) 600-1200dpi is best.
Remember that by enlarging or reducing the image, it’s resolution is also affected. For example, a fair 200dpi image doubled in size will reduce it’s resolution to a poor 100dpi.
x2
Guide to Supplying Print-Ready PDF Files 9
300dpi 200dpi 150dpi 120dpi
100dpi 85dpi 72dpi 50dpi
Image Resolution / DPI - Continued

24
IMAGE
Lorem ipsum dolor sit amet, consectetur adipiscing elit, sed do eiusmod tempor incididunt ut labore et dolore magna aliqua. Ut sem nulla pharetra diam sit amet nisl suscipit. Fermentum iaculis eu non diam. Non pulvinar neque laoreet suspendisse interdum consectetur libero id faucibus. Eget magna fermentum iaculis eu non diam phasellus. Sit amet est placerat in egestas erat. In massa tempor nec feugiat nisl. Ornare massa eget egestas purus viverra. Ultrices sagittis orci a scelerisque purus semper eget duis at. Purus non enim praesent elementum facilisis leo vel fringilla est. Enim nulla aliquet porttitor lacus luctus accumsan tortor posuere ac. Nulla at volutpat diam ut venenatis tellus in metus vulputate. At elementum eu facilisis sed odio morbi quis. Eget nunc scelerisque viverra mauris in. Id vo-lutpat lacus laoreet non curabitur gravida arcu ac tortor. Sit amet tellus cras adipiscing enim. Magna eget est lorem ipsum dolor sit. Ac tortor dignissim convallis aenean et tortor at risus.
Maecenas sed enim ut sem viverra aliquet eget sit. In ante metus dictum at tempor. Sem nulla pharetra diam sit. A diam sollicitudin tempor id. Facili-sis magna etiam tempor orci eu lobortis. Porttitor leo a diam sollicitudin tempor. Id faucibus nisl tincidunt eget nullam non nisi est. Eget nullam non nisi est sit. Sollicitudin ac orci phasellus egestas tellus rutrum. Vel elit sce-lerisque mauris pellentesque pulvinar pellentesque habitant. Urna et phare-tra pharetra massa. Semper viverra nam libero justo laoreet sit amet cursus sit. Egestas purus viverra accumsan in nisl nisi.
Aliquet lectus proin nibh nisl condimentum id venenatis. Nisi quis eleifend quam adipiscing vitae proin sagittis nisl. Lacus vel facilisis volutpat est velit
No Bleed Required
IMAGE
Lorem ipsum dolor sit amet, consectetur adipiscing elit, sed do eiusmod tempor incididunt ut labore et dolore magna aliqua. Ut sem nulla pharetra diam sit amet nisl suscipit. Fermentum iaculis eu non diam. Non pulvinar neque laoreet suspendisse interdum consectetur libero id faucibus. Eget magna fermentum iaculis eu non diam phasellus. Sit amet est placerat in egestas erat. In massa tempor nec feugiat nisl. Ornare massa eget egestas purus viverra. Ultrices sagittis orci a scelerisque purus semper eget duis at. Purus non enim praesent elementum facilisis leo vel fringilla est. Enim nulla aliquet porttitor lacus luctus accumsan tortor posuere ac. Nulla at volutpat diam ut venenatis tellus in metus vulputate. At elementum eu facilisis sed odio morbi quis. Eget nunc scelerisque viverra mauris in. Id vo-lutpat lacus laoreet non curabitur gravida arcu ac tortor. Sit amet tellus cras adipiscing enim. Magna eget est lorem ipsum dolor sit. Ac tortor dignissim convallis aenean et tortor at risus.
Maecenas sed enim ut sem viverra aliquet eget sit. In ante metus dictum at tempor. Sem nulla pharetra diam sit. A diam sollicitudin tempor id. Facili-sis magna etiam tempor orci eu lobortis. Porttitor leo a diam sollicitudin
Bleed Required
IMAGE
Lorem ipsum dolor sit amet, consectetur adipiscing elit, sed do eiusmod tempor incididunt ut labore et dolore magna aliqua. Ut sem nulla pharetra diam sit amet nisl suscipit. Fermentum iaculis eu non diam. Non pulvinar neque laoreet suspendisse interdum consectetur libero id faucibus. Eget magna fermentum iaculis eu non diam phasellus. Sit amet est placerat in egestas erat. In massa tempor nec feugiat nisl. Ornare massa eget egestas purus viverra. Ultrices sagittis orci a scelerisque purus semper eget duis at. Purus non enim praesent elementum facilisis leo vel fringilla est. Enim nulla aliquet porttitor lacus luctus accumsan tortor posuere ac. Nulla at volutpat diam ut venenatis tellus in metus vulputate. At elementum eu facilisis sed odio morbi quis. Eget nunc scelerisque viverra mauris in. Id vo-lutpat lacus laoreet non curabitur gravida arcu ac tortor. Sit amet tellus cras adipiscing enim. Magna eget est lorem ipsum dolor sit. Ac tortor dignissim convallis aenean et tortor at risus.
Maecenas sed enim ut sem viverra aliquet eget sit. In ante metus dictum at tempor. Sem nulla pharetra diam sit. A diam sollicitudin tempor id. Facili-sis magna etiam tempor orci eu lobortis. Porttitor leo a diam sollicitudin tempor. Id faucibus nisl tincidunt eget nullam non nisi est. Eget nullam non nisi est sit. Sollicitudin ac orci phasellus egestas tellus rutrum. Vel elit sce-lerisque mauris pellentesque pulvinar pellentesque habitant. Urna et phare-tra pharetra massa. Semper viverra nam libero justo laoreet sit amet cursus sit. Egestas purus viverra accumsan in nisl nisi.
Aliquet lectus proin nibh nisl condimentum id venenatis. Nisi quis eleif-end quam adipiscing vitae proin sagittis nisl. Lacus vel facilisis volut-pat est velit egestas dui. Donec ultrices tincidunt arcu non sodales neque sodales ut. Pellentesque id nibh tortor id aliquet lectus proin nibh. Blandit cursus risus at ultrices mi. Consectetur adipiscing elit ut aliquam purus sit. Ultrices vitae auctor eu augue. Diam vulputate ut pharetra sit. Dignissim cras tincidunt lobortis feugiat vivamus. Consequat mauris nunc congue nisi vitae.
Gravida arcu ac tortor dignissim convallis aenean et. Erat pellentesque adipisc-ing commodo elit at imperdiet dui.
Bleed Required
Bleed is artwork that is printed beyond the final trim size, to ensure artwork is right up to the edge of the book after trimming. As there is a degree of movement during the print process, the industry strandard for bleed is 3mm. Supplying your job without bleed may result in white lines still being visible after being trimmed.
For example, a book that was A5 (210mm x 148mm) would need artwork supplied as 216mm x 154mm. Below are some examples of where bleed would be required. If any pages in your file are going to require bleed, the whole document should be set up in the same format.
What Is Bleed?

25
Because printing processes use CMYK (cyan, magenta, yellow, black) inks, and the artwork you see on screen is RGB (red, green, blue), there would be a slight difference between what you see on screen and what is printed.
If your software is capable of CMYK workflow, use CMYK based colours, and convert source images to CMYK (e.g. using Photoshop) before placing into your page layout program. For best colour conversion use a FOGRA colour profile if available.
Where this is not possible, we can accept RGB images, but please note that RGB will be converted to CMYK on the press, and the colour conversion may not be as good as the method described above. Most digital devices (such as digital cameras) tag the RGB image with a source colour profile, which makes the RGB conversion more accurate.
Colour
Computer monitors emit colour as RGB (red, green, blue) light. Although all colours of the visible spectrum can be produced by merging red, green and blue light, monitors are capable of displaying only a limited gamut (i.e., range) of the visible spectrum.
Whereas monitors emit light, inked paper absorbs or reflects specific wavelengths. Cyan, magenta and yellow pigments serve as filters, subtracting varying degrees of red, green and blue from white light to produce a selective gamut of colours. Like monitors, printing inks also produce a colour gamut that is only a subset of the visible spectrum, and the colour range is not the same for both, and is wider on RGB than CMYK. To add to this the CMYK model is also subject to the ambient lighting conditions - e.g. a printed page viewed in sunlight will appear differently to that in incandescent light. Consequently, the same art displayed on a computer monitor may not match to that printed in a publication. Because printing processes use CMYK (cyan, magenta, yellow, black) inks, digital art must be converted from the RGB (Red Green Blue) colour for displaying on a monitor to CMYK colour for print, at some point in the design/print process.
RGB CMYK
If your page layout software is capable of CMYK workflow, use CMYK based colours, and convert source images to CMYK (e.g. using Photoshop) before placing into your page layout program. For best colour conversion use a FOGRA colour profile if available.
Where this is not possible, we can accept RGB images, but please note that RGB will be converted to CMYK on the press, and the colour conversion may not be as good as the method described above. Most digital devices (such as digital cameras) tag the RGB image with a source colour profile, which makes the RGB conversion more accurate.
Spot Colours
If printing Offset Litho method, you can increase the range of colours by adding one or more spot colours from a Pantone colour swatchbook.
Digital printing only uses the CMYK primaries, so any spot colours used are converted on the press to CMYK. However using spot colours on a digital product can be a more accurate way of colour matching - Pantone to CMYK conversion will be a closer match than trying to match a colour on a RGB monitor screen.
Colour Conversion / Profiles