Your Gateway Connected DVD Player User's...
97
user's guide Your Gateway Connected DVD Player Installing Configuring
Transcript of Your Gateway Connected DVD Player User's...

user'sguideYour Gateway Connected DVD Player
Installing Configuring


Contents1 Checking Out Your Gateway DVD Player . . . . . . . . . . . . . . . . . . . . . . . . 1
Features . . . . . . . . . . . . . . . . . . . . . . . . . . . . . . . . . . . . . . . . . . . . . . . . . . . . . . . 1Compatible discs . . . . . . . . . . . . . . . . . . . . . . . . . . . . . . . . . . . . . . . . . . . . . . . . . 2
Player overview . . . . . . . . . . . . . . . . . . . . . . . . . . . . . . . . . . . . . . . . . . . . . . . . . . . . . 2Front controls . . . . . . . . . . . . . . . . . . . . . . . . . . . . . . . . . . . . . . . . . . . . . . . . . . . 2Back . . . . . . . . . . . . . . . . . . . . . . . . . . . . . . . . . . . . . . . . . . . . . . . . . . . . . . . . . . 5Remote control . . . . . . . . . . . . . . . . . . . . . . . . . . . . . . . . . . . . . . . . . . . . . . . . . . 7
2 Setting Up Your Player . . . . . . . . . . . . . . . . . . . . . . . . . . . . . . . . . . . . . . . . . 11About your home network . . . . . . . . . . . . . . . . . . . . . . . . . . . . . . . . . . . . . . . . . . . . 12Installing Gateway D5 Media Server . . . . . . . . . . . . . . . . . . . . . . . . . . . . . . . . . . . 13
Computer requirements . . . . . . . . . . . . . . . . . . . . . . . . . . . . . . . . . . . . . . . . . . 13Connecting the player . . . . . . . . . . . . . . . . . . . . . . . . . . . . . . . . . . . . . . . . . . . . . . . 15
Connecting to your audio/video system . . . . . . . . . . . . . . . . . . . . . . . . . . . . . . 15Installing the network card . . . . . . . . . . . . . . . . . . . . . . . . . . . . . . . . . . . . . . . . 17Installing batteries into the remote control . . . . . . . . . . . . . . . . . . . . . . . . . . . . 18Turning on your player . . . . . . . . . . . . . . . . . . . . . . . . . . . . . . . . . . . . . . . . . . . 19
Navigating the player’s Setup menus . . . . . . . . . . . . . . . . . . . . . . . . . . . . . . . . . . . 20Setting up the network . . . . . . . . . . . . . . . . . . . . . . . . . . . . . . . . . . . . . . . . . . . . . . 20
Wired Ethernet setup . . . . . . . . . . . . . . . . . . . . . . . . . . . . . . . . . . . . . . . . . . . . 21Wireless access point setup . . . . . . . . . . . . . . . . . . . . . . . . . . . . . . . . . . . . . . . 22Wireless peer-to-peer setup . . . . . . . . . . . . . . . . . . . . . . . . . . . . . . . . . . . . . . . 24Setting the IP address . . . . . . . . . . . . . . . . . . . . . . . . . . . . . . . . . . . . . . . . . . . 27Changing the player name . . . . . . . . . . . . . . . . . . . . . . . . . . . . . . . . . . . . . . . . 28
Playing computer media files . . . . . . . . . . . . . . . . . . . . . . . . . . . . . . . . . . . . . . . . . 29Entering Network mode . . . . . . . . . . . . . . . . . . . . . . . . . . . . . . . . . . . . . . . . . . 29Exiting Network mode . . . . . . . . . . . . . . . . . . . . . . . . . . . . . . . . . . . . . . . . . . . . 30Playing music . . . . . . . . . . . . . . . . . . . . . . . . . . . . . . . . . . . . . . . . . . . . . . . . . . 30Playing movies . . . . . . . . . . . . . . . . . . . . . . . . . . . . . . . . . . . . . . . . . . . . . . . . . 31Viewing pictures . . . . . . . . . . . . . . . . . . . . . . . . . . . . . . . . . . . . . . . . . . . . . . . . 31
Maintaining your player . . . . . . . . . . . . . . . . . . . . . . . . . . . . . . . . . . . . . . . . . . . . . . 32
3 Customizing . . . . . . . . . . . . . . . . . . . . . . . . . . . . . . . . . . . . . . . . . . . . . . . . . . . . 35Setup menu overview . . . . . . . . . . . . . . . . . . . . . . . . . . . . . . . . . . . . . . . . . . . . . . . 35
Using the remote control in Setup menus . . . . . . . . . . . . . . . . . . . . . . . . . . . . 36Setting up languages . . . . . . . . . . . . . . . . . . . . . . . . . . . . . . . . . . . . . . . . . . . . . . . . 36Setting up video . . . . . . . . . . . . . . . . . . . . . . . . . . . . . . . . . . . . . . . . . . . . . . . . . . . . 38Setting up digital audio . . . . . . . . . . . . . . . . . . . . . . . . . . . . . . . . . . . . . . . . . . . . . . 39
Configuring Dolby Digital . . . . . . . . . . . . . . . . . . . . . . . . . . . . . . . . . . . . . . . . . 40Configuring DTS . . . . . . . . . . . . . . . . . . . . . . . . . . . . . . . . . . . . . . . . . . . . . . . . 41Configuring MP3 audio . . . . . . . . . . . . . . . . . . . . . . . . . . . . . . . . . . . . . . . . . . . 42Configuring CD audio . . . . . . . . . . . . . . . . . . . . . . . . . . . . . . . . . . . . . . . . . . . . 43Configuring LPCM . . . . . . . . . . . . . . . . . . . . . . . . . . . . . . . . . . . . . . . . . . . . . . . 44Configuring for other formats . . . . . . . . . . . . . . . . . . . . . . . . . . . . . . . . . . . . . . 45Adjusting the speaker balance . . . . . . . . . . . . . . . . . . . . . . . . . . . . . . . . . . . . . 46
Setting up analog audio . . . . . . . . . . . . . . . . . . . . . . . . . . . . . . . . . . . . . . . . . . . . . 47
i
Configuring Pro Logic virtual surround sound . . . . . . . . . . . . . . . . . . . . . . . . . .47Adjusting center delay . . . . . . . . . . . . . . . . . . . . . . . . . . . . . . . . . . . . . . . . . . . .49Adjusting surround delay . . . . . . . . . . . . . . . . . . . . . . . . . . . . . . . . . . . . . . . . . .49Defining the speaker set . . . . . . . . . . . . . . . . . . . . . . . . . . . . . . . . . . . . . . . . . .51
Setting up parental controls . . . . . . . . . . . . . . . . . . . . . . . . . . . . . . . . . . . . . . . . . . .52
4 Using Media Server. . . . . . . . . . . . . . . . . . . . . . . . . . . . . . . . . . . . . . . . . . . . . .55Starting the program . . . . . . . . . . . . . . . . . . . . . . . . . . . . . . . . . . . . . . . . . . . . . . . . .56Importing media files . . . . . . . . . . . . . . . . . . . . . . . . . . . . . . . . . . . . . . . . . . . . . . . .56
Importing media directly from your hard drive . . . . . . . . . . . . . . . . . . . . . . . . . .57Importing media using plugins . . . . . . . . . . . . . . . . . . . . . . . . . . . . . . . . . . . . . .58Scheduling automatic scans . . . . . . . . . . . . . . . . . . . . . . . . . . . . . . . . . . . . . . .59
Working with media files . . . . . . . . . . . . . . . . . . . . . . . . . . . . . . . . . . . . . . . . . . . . . .59Listing media files . . . . . . . . . . . . . . . . . . . . . . . . . . . . . . . . . . . . . . . . . . . . . . . .60Hiding media files . . . . . . . . . . . . . . . . . . . . . . . . . . . . . . . . . . . . . . . . . . . . . . . .60Revealing media files . . . . . . . . . . . . . . . . . . . . . . . . . . . . . . . . . . . . . . . . . . . . .60Editing media file attributes . . . . . . . . . . . . . . . . . . . . . . . . . . . . . . . . . . . . . . . .61Deleting media files . . . . . . . . . . . . . . . . . . . . . . . . . . . . . . . . . . . . . . . . . . . . . .61
Working with playlists . . . . . . . . . . . . . . . . . . . . . . . . . . . . . . . . . . . . . . . . . . . . . . . .62Creating a new playlist . . . . . . . . . . . . . . . . . . . . . . . . . . . . . . . . . . . . . . . . . . . .62Editing a playlist . . . . . . . . . . . . . . . . . . . . . . . . . . . . . . . . . . . . . . . . . . . . . . . . .63Renaming a playlist . . . . . . . . . . . . . . . . . . . . . . . . . . . . . . . . . . . . . . . . . . . . . .63Deleting a playlist . . . . . . . . . . . . . . . . . . . . . . . . . . . . . . . . . . . . . . . . . . . . . . . .64Importing a playlist . . . . . . . . . . . . . . . . . . . . . . . . . . . . . . . . . . . . . . . . . . . . . . .64
Working with slideshows . . . . . . . . . . . . . . . . . . . . . . . . . . . . . . . . . . . . . . . . . . . . .65Creating a new slideshow . . . . . . . . . . . . . . . . . . . . . . . . . . . . . . . . . . . . . . . . .65Deleting music from a slideshow . . . . . . . . . . . . . . . . . . . . . . . . . . . . . . . . . . . .66Editing a slideshow . . . . . . . . . . . . . . . . . . . . . . . . . . . . . . . . . . . . . . . . . . . . . .66Renaming a slideshow . . . . . . . . . . . . . . . . . . . . . . . . . . . . . . . . . . . . . . . . . . . .66Deleting a slideshow . . . . . . . . . . . . . . . . . . . . . . . . . . . . . . . . . . . . . . . . . . . . .67
Viewing and changing network settings . . . . . . . . . . . . . . . . . . . . . . . . . . . . . . . . . .67Changing the computer name . . . . . . . . . . . . . . . . . . . . . . . . . . . . . . . . . . . . . .68Selecting the network card . . . . . . . . . . . . . . . . . . . . . . . . . . . . . . . . . . . . . . . .69Changing the language . . . . . . . . . . . . . . . . . . . . . . . . . . . . . . . . . . . . . . . . . . .69
5 Playing Media . . . . . . . . . . . . . . . . . . . . . . . . . . . . . . . . . . . . . . . . . . . . . . . . . . .71Playing discs . . . . . . . . . . . . . . . . . . . . . . . . . . . . . . . . . . . . . . . . . . . . . . . . . . . . . . .71
Accessing advanced features . . . . . . . . . . . . . . . . . . . . . . . . . . . . . . . . . . . . . .75Playing photo CDs . . . . . . . . . . . . . . . . . . . . . . . . . . . . . . . . . . . . . . . . . . . . . . .79
6 Troubleshooting . . . . . . . . . . . . . . . . . . . . . . . . . . . . . . . . . . . . . . . . . . . . . . . . .81Network troubleshooting . . . . . . . . . . . . . . . . . . . . . . . . . . . . . . . . . . . . . . . . . . . . . .81DVD troubleshooting . . . . . . . . . . . . . . . . . . . . . . . . . . . . . . . . . . . . . . . . . . . . . . . . .83Getting help . . . . . . . . . . . . . . . . . . . . . . . . . . . . . . . . . . . . . . . . . . . . . . . . . . . . . . .86
A Specifications . . . . . . . . . . . . . . . . . . . . . . . . . . . . . . . . . . . . . . . . . . . . . . . . . . .87
B Safety, Regulatory, and Legal Information. . . . . . . . . . . . . . . . . . . . . . .89
ii

1
Checking OutYour GatewayDVD Player
FeaturesWith your Gateway Connected DVD Player, you can play DVDs, CDs, and digital media files on your home network.
Fully compatible with DVD, CD, VCD/SVCD, Kodak Picture CD, and MP3 files on CD-R/CD-RW discs.
PC Card slot for wired or wireless access to a Microsoft Windows®-based home network
Capability to stream digital content from your computer to your TV, including MPEG1/MPEG2 video, JPG photos, and MP3/WMA audio files
Dolby Digital and DTS decoding and output
Composite video, S-Video, and component video outputs (including progressive scan)
Optical and coaxial digital audio jacks
5.1-channel audio jacks
1

Chapter 1: Checking Out Your Gateway DVD Player
Compatible discsThis DVD player can play discs of the following formats:
DVD (Region 1, North America)
Dolby Digital 5.1
DTS
Audio CD (CDDA)
Video CD (VCD and SVCD)
MP3 files on CD-R and CD-RW
Kodak Picture CD
Player overview
Front controls
POWER buttonPress to turn the player on and off.
When this button is on, the yellow Power LED turns on and the player enters On mode. Press the POWER button on the remote control to switch between On (fully operational) and Standby (low power) modes. When the player enters Standby mode, the red Power LED turns on. When the player is off, the Power LED turns off.
MIC jacksInsert ¼-inch microphone plugs here for karaoke.
Power button Sound controls DVD playback controls
Menu button
Menu controls
MIC jacks
2 www.gateway.com

Player overview
Sound controls
Menu controls
VOL Rotate to adjust the microphone input volume.
ECHO Rotate to adjust the echo effect for the microphone input.
(Left, Right, Up, and Down buttons)
Press to navigate the on-screen menus. You can use these buttons as an alternative to the remote control’s arrow buttons.
ENTER Press to make on-screen selections. You can use this button as an alternative to the remote control’s ENTER button.
CONNECT Press to connect the player to the network. You can use this button as an alternative to the remote control’s CONNECT button.
Up button
Down button
Connect button
Enter button
Right buttonLeft button
3www.gateway.com

Chapter 1: Checking Out Your Gateway DVD Player
DVD playback controls
OPEN/CLOSE Press to open and close the disc tray.
PREV Press to skip to the previous chapter or track while in playback mode.
NEXT Press to skip to the next chapter or track while in playback mode.
STOP Press to stop playback, and press again to return to the menu on the DVD. Press PLAY to resume playback.
PLAY Press to start playback.
PAUSE Press to pause playback and view the current frame. Press PLAY to resume playback.
MENU Press to view the DVD menu.
Open/close button Menu button
Prev button Play button
Next button Stop button
Pause button
4 www.gateway.com

Player overview
Back
Network card slotInsert a network PC Card into this slot.
Audio jacks
5.1 channel (surround sound)
Connect to the analog audio inputs of a 5.1-channel amplifier.
2 channel (stereo) Connect to the left/right analog audio inputs of a TV, stereo, or 2-channel amplifier.
Coaxial (digital audio) Connect to the coaxial digital audio input of a 5.1-channel amplifier.
Optical digital audio Connect to the optical digital audio input of a 5.1-channel amplifier.
Network card slot Video jacks
Audio jacks
5.1 channel (surround sound) 2 channel (stereo)
Coaxial (digital audio)
Optical digital audio
5www.gateway.com
Chapter 1: Checking Out Your Gateway DVD Player
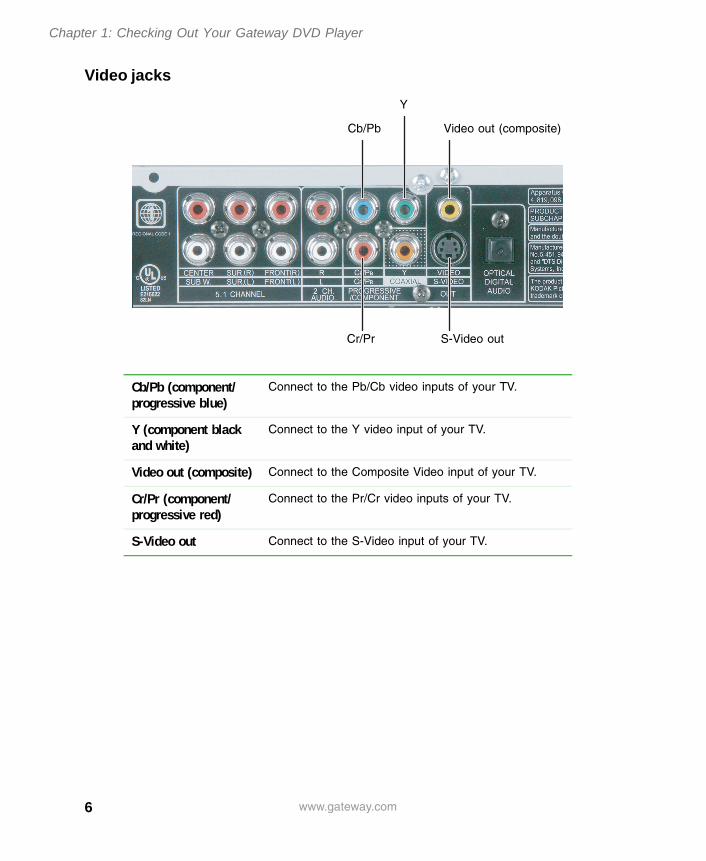
Video jacks
Cb/Pb (component/ progressive blue)
Connect to the Pb/Cb video inputs of your TV.
Y (component black and white)
Connect to the Y video input of your TV.
Video out (composite) Connect to the Composite Video input of your TV.
Cr/Pr (component/ progressive red)
Connect to the Pr/Cr video inputs of your TV.
S-Video out Connect to the S-Video input of your TV.
Cb/Pb
S-Video out
Y
Cr/Pr
Video out (composite)
6 www.gateway.com
Player overview
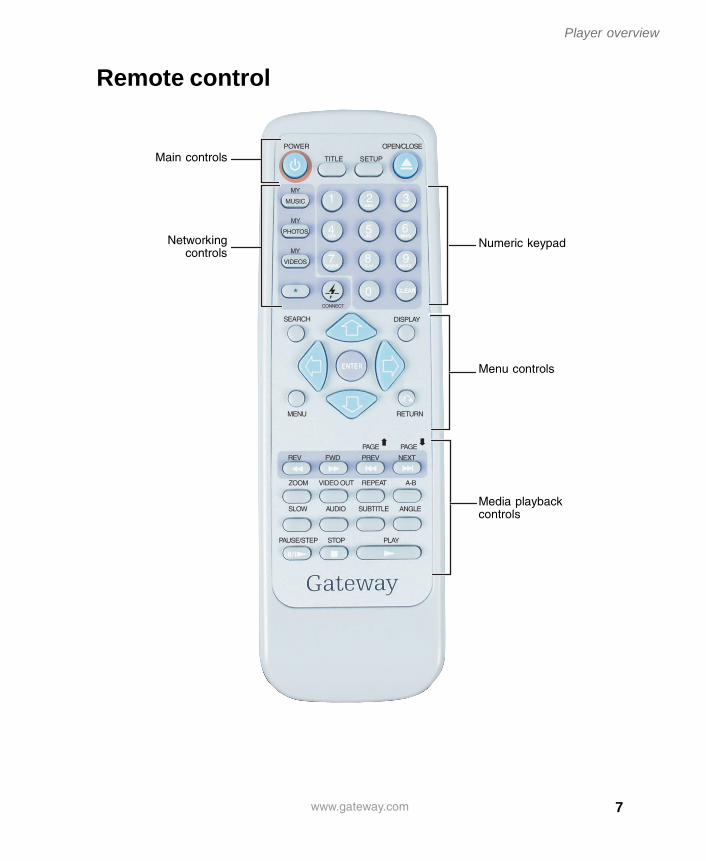
Remote control
POWER
TITLE SETUP
OPEN/CLOSE
MY
MUSIC
MY
PHOTOS
MY
VIDEOS
DISPLAYSEARCH
RETURNMENU
CONNECT
PAGE
REV FWD PREV NEXT
ZOOM VIDEO OUT REPEAT A-B
SLOW AUDIO SUBTITLE ANGLE
PAUSE/STEP STOP PLAY
PAGE
1 2 3
4 5 6
7 8 9
0 CLEAR
ABC DEF
GHI JKL MNO
PQRS TUV WXYZ
Numeric keypad
Menu controls
Media playback controls
Networkingcontrols
Main controls
7www.gateway.com

Chapter 1: Checking Out Your Gateway DVD Player
Main controls
Networking controls
Numeric keypadPress these buttons to input numbers (such as the chapter, track, or time) in on-screen menus.
POWER Press to switch the player between Standby (low power) and On (fully operational) modes.
The blue LED behind the front arrow buttons on the player lights when the unit is On.
This button works only when the POWER button on the front of the player is pressed.
TITLE Press to display DVD title menus for discs with multiple titles. If a disc has a single title, TITLE functions like MENU.
SETUP While disc playback is stopped, press to open the Setup menu for adjusting DVD and Network settings.
OPEN/CLOSE Press to open and close the disc tray.
MY MUSIC Press to display the player’s My Music folder on the TV, which lists the music media files available on your networked computers. If a computer has not been detected, only the Connect screen appears.
MY PHOTOS Press to display the player’s My Photos folder on the TV, which lists the JPG image files available on your networked computers. If a computer has not been detected, only the Connect screen appears.
MY VIDEOS Press to display the player’s My Videos folder on the TV, which lists the MPEG movie files available on your networked computers. If a computer has not been detected, only the Connect screen appears.
CONNECT Press to search the network for shared media. A screen will show you the My Music, My Photos, and My Videos folders.
8 www.gateway.com

Player overview
Menu controls
Media playback controls
Arrow buttons Press to navigate on-screen menus.
ENTER Press to confirm menu settings.
SEARCH Press to jump to a specific time, title, chapter, or track during disc playback.
DISPLAY Press to display current disc time and status information.
MENU Press to view the DVD’s main menu.
RETURN Press to return to the main Setup menu.
REV Press repeatedly to scan backward at variable speeds.
FWD Press repeatedly to scan forward at variable speeds.
PREV Press to skip to the previous chapter or track.
NEXT Press to skip to the next chapter or track.
ZOOM Press to zoom in or out at various levels of magnification.
VIDEO OUT While playback is stopped, press repeatedly until the setting matches your video cable connection. For more information, see “Turning on your player” on page 19.
REPEAT Press to set special playback functions, including Repeat.
A-B Press to repeat an audio or video segment between two points (A and B). For more information, see “Repeating a scene or segment” on page 76.
SLOW Press repeatedly for slow motion playback at variable speeds.
AUDIO Press to select among available audio tracks/formats/channels during DVD/SVCD/VCD playback.
SUBTITLE Press to select among available subtitle languages during DVD/SVCD playback.
9www.gateway.com

Chapter 1: Checking Out Your Gateway DVD Player
ANGLE Press to view alternate angles during DVD playback (if available).
PAUSE/STEP Press once to pause playback, and press again to step forward one frame at a time.
STOP Press once to stop playback (press PLAY to resume). Press twice to stop playback and reset to the beginning of the disc.
PLAY Press to start playback.
10 www.gateway.com
2
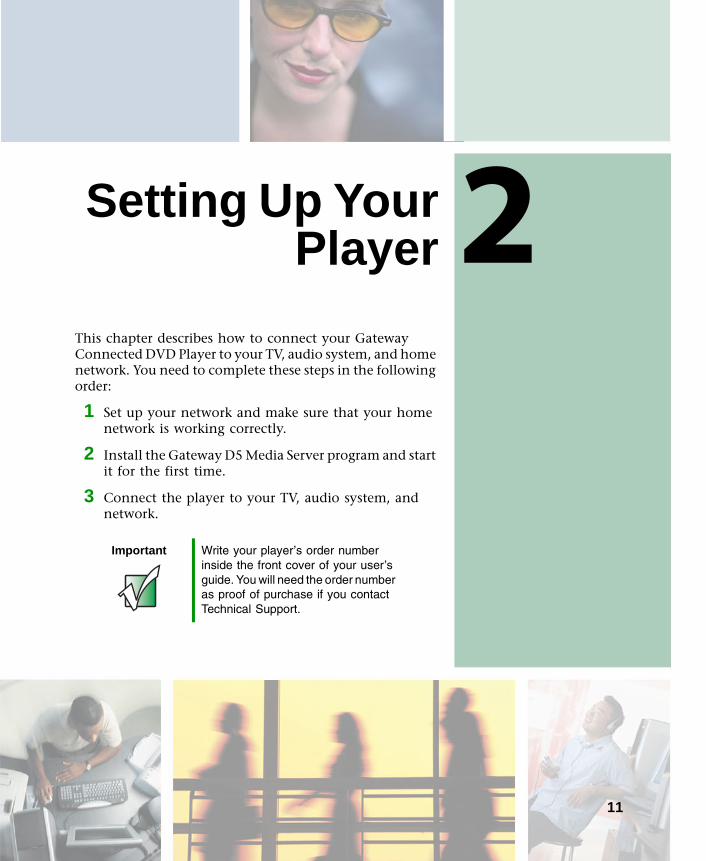
Setting Up YourPlayerThis chapter describes how to connect your Gateway Connected DVD Player to your TV, audio system, and home network. You need to complete these steps in the following order:
1 Set up your network and make sure that your home network is working correctly.
2 Install the Gateway D5 Media Server program and start it for the first time.
3 Connect the player to your TV, audio system, and network.
Important Write your player’s order number inside the front cover of your user’s guide. You will need the order number as proof of purchase if you contact Technical Support.
11

Chapter 2: Setting Up Your Player
About your home networkBefore you begin, you must have a Microsoft Windows-based home network set up. If you do not already have a network installed, you need to purchase the network components and follow the installation instructions provided by the manufacturer. The Gateway Connected DVD Player supports all major types of home networks, including:
Wired Ethernet
A wired Ethernet network consists of two or more devices connected through an Ethernet cable.
Wireless access point
A Wireless access point network uses radio waves to link devices using a wireless network card, an access point, and a wired Ethernet network.
Wireless peer-to-peer
A wireless peer-to-peer network consists of two or more wireless Ethernet computers that communicate with each other without a wireless access point.
If your Gateway Connected DVD Player came with a network card, the card is one of the following types:
PC Card to Ethernet adapter card
Wireless 802.11b network PC Card
Important If you are using a wireless network with an access point, be sure to configure the access point according to the manufacturer’s instructions before continuing.
12 www.gateway.com

Installing Gateway D5 Media Server
Installing Gateway D5 Media Server
After you have made sure that your home network is working correctly, install the Media Server program onto each computer that has media files you want to access.
Computer requirements Computer with Pentium processor, 700 MHz or faster
Network connection (wired or wireless)
Hard drive with at least 20 MB of free space
128 MB of memory
CD drive
Network PC Card (also known as PCMCIA). A wired Ethernet adapter card or wireless network card may already be included with your player.
Microsoft Windows 98 SE, Windows Me, Windows 2000, or Windows XP
To install Media Server:1 Turn on the computer, then close all open programs.
2 Insert the Gateway Connected DVD Player Installation CD into the CD drive on your computer. The install wizard starts.
3 Follow the on-screen instructions to finish the installation.
If you are prompted to select your computer’s network card, click the network card you want to use, then click Next.
Important Do not install Media Server until you make sure that your home network is working correctly.
13www.gateway.com

Chapter 2: Setting Up Your Player
Media Server opens after the install program is finished, and opens automatically whenever your computer is started. The Media Server icon in the Windows taskbar shows that the program is running.
You are prompted to import media.
4 If you do not have any music, movies, or pictures on your computer, click No. Your first-time setup of Media Server is complete.
- OR -
If you have media on your computer, click Yes. You are prompted to select plugins.
5 Click the plugin you want to use, then click Scan. Your files are imported into Media Server. Your first-time setup of Media Server is complete.
6 Repeat Steps 1-5 for each computer you want to access from the player. For more information on using Media Server, see “Using Media Server” on page 55.
Tips & Tricks Select only one plugin for each type of media. For example, to import MP3 files on a computer where you have both MusicMatch Jukebox and Windows Media Player installed, select only one of the two plugins.
You can select only one plugin at a time. If you have more than one media type, select one plugin and import the media for that plugin. Then select another plugin and import the media for that plugin.
14 www.gateway.com

Connecting the player
Connecting the player
Connecting to your audio/video system
To connect your player to your audio/video system:
1 Make sure that all video components are turned off.
2 Connect the player to your TV in one of three ways:
Composite video
Connect one end of the supplied yellow video cable to the VIDEO OUT jack on the back of the player, then connect the other end to the jack on your TV.
S-Video
Connect one end of an S-Video cable (not included) to the S-VIDEO OUT jack on the back of the player, then connect the other end to the S-Video jack on your TV.
Cb/Pb (component/progressive blue)
Y (component/ progressive black and white)
Video out (composite)
Cr/Pr (component/progressive red)
S-Video out
15www.gateway.com

Chapter 2: Setting Up Your Player
Progressive/component video
For best video quality, connect one end of each component video cable (not included) to the PROGRESSIVE/COMPONENT Cb/Pb, Y, and Cr/Pr jacks on the back of the player, then connect the other ends to the corresponding color-coded jacks on your TV.
3 Connect your player to your audio system in one of four ways:
2-channel audio (stereo)
Connect one end of the included red and white audio/video cables to the 2 CH. AUDIO R and L jacks on the back of the player, then connect the other ends to the right/left audio jacks on your TV, stereo, or 2-channel analog amplifier.
5.1-channel surround analog audio
Connect one end of the six audio cables (not included) to the 5.1 CHANNEL CENTER, SUR.(R), FRONT(R), SUB W., SUR(L), and FRONT(L) jacks on the back of the player, then connect the other ends to the corresponding analog audio jacks of your 5.1-channel amplifier.
2 Ch. R (right stereo)
5.1 channel front(R) (surround sound front right)
5.1 channel sur.(R) (surroundsound right)
5.1 channel center(surround sound center)
5.1 channel sub w. (surround sound subwoofer)
5.1 channel sur.(L) (surround sound left)
5.1 channel front(L)(surround sound front left)
2 Ch. L (left stereo)
Coaxial (digital audio)
Optical digital audio
16 www.gateway.com

Connecting the player
Digital audio (coaxial)
Connect one end of a digital coaxial cable (not included) to the COAXIAL jack on the back of the player, then connect the other end to the coaxial digital audio jack of your amplifier.
Digital audio (optical)
Connect one end of an optical cable (not included) to the OPTICAL DIGITAL AUDIO jack on the back of the player, then connect the other end to the optical digital audio jack of your amplifier.
Installing the network cardDo not plug in the player’s power cord or press the POWER button on the front until you have installed the network card.
To install the network card:1 Make sure that the player is turned off.
2 Insert your network PC Card (one may have been provided with your player) into the NETWORK CARD slot in the back of the player. Make sure that the network card is pressed all the way in.
Tips & Tricks If you are using a digital audio connection (COAXIAL or OPTICAL DIGITAL AUDIO), you must set the audio output format to match the digital decoding capabilities of your amplifier. For more information, see “Setting up digital audio” on page 39.
Network card slot
17www.gateway.com

Chapter 2: Setting Up Your Player
3 If the player’s network card is a wired Ethernet card, connect one end of an Ethernet cable to the network card, then connect the other end to an Ethernet jack on your existing network.
4 After you connect video and audio cables and install the network card, configure your video by following the instructions in “Turning on your player” on page 19.
Installing batteries into the remote control
To install the batteries:
1 Turn the remote control over, then remove the battery cover.
2 Insert two AAA batteries into the battery bay. Make sure that the batteries are oriented according to the diagram inside the battery bay.
3 Replace the battery cover.
Important Do not remove the card while the player is turned on. If you remove the card while the player is on, all playback of networked media will stop.
18 www.gateway.com

Connecting the player
Turning on your player
To turn on your player:
1 Make sure that your computer is on and running Media Server, your home network is set up, and all audio and video devices are turned on.
2 Connect the player’s power cord to a wall outlet, then press the POWER button on the front of the player. The Power LED turns yellow.
3 Turn on your TV, then use its controls to set it to the audio/video input type connected to the player.
4 Turn on your audio system (if using an external amplifier or audio system), then use its controls to set it to the input type connected to the player.
5 Press VIDEO OUT repeatedly until the setting matches your video connection. See the table below for combinations of video settings and connections that also work. The rows on the left name the type of cable connection your player and TV use, and the columns across the top name the video setting you can select by pressing the VIDEO OUT button.
Audio jacks
Composite setting
S-Video setting
Interlaced Component
setting
Progressive Component
setting
Composite jack Best Works
S-Video jack Works Best
Interlaced component jacks
Works Best
Progressive component jacks
Best
19www.gateway.com

Chapter 2: Setting Up Your Player
6 Go to “Setting up the network” on page 20 to complete the initial setup of your player.
Navigating the player’s Setup menus
To navigate the player’s Setup menus, press the following buttons on your remote control:
Setting up the networkSetting the Network Setup options lets your player connect to your home network. Choose one of the three setup options depending on your network configuration:
For wired Ethernet setup, see “Wired Ethernet setup” on page 21.
For wireless access point setup, see “Wireless access point setup” on page 22.
Remote Button Function
STOP Press before pressing SETUP.
SETUP Press to open and close the Setup menu.
(up and down arrows)
Press to highlight options within menus.
(left and right arrows)
Press to change option settings within menus.
ENTER Press to activate the current selection.
RETURN Press to close the Setup menu.
Tips & Tricks Unless specified otherwise, all buttons mentioned in the following procedures are buttons on the remote control.
20 www.gateway.com
Setting up the network
For wireless peer-to-peer setup, see “Wireless peer-to-peer setup” on page 24.
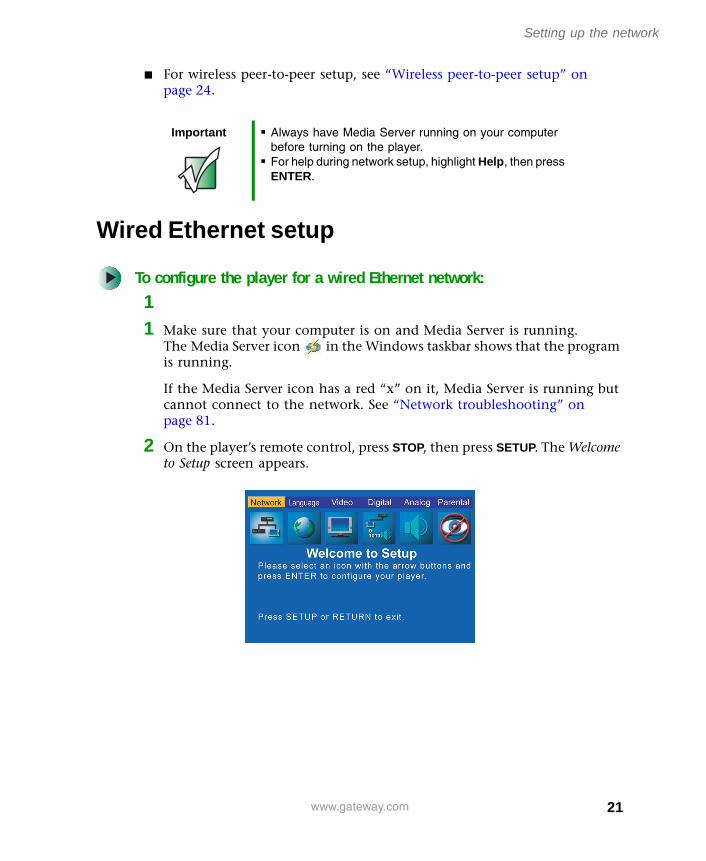
Wired Ethernet setup
To configure the player for a wired Ethernet network:
11 Make sure that your computer is on and Media Server is running.
The Media Server icon in the Windows taskbar shows that the program is running.
If the Media Server icon has a red “x” on it, Media Server is running but cannot connect to the network. See “Network troubleshooting” on page 81.
2 On the player’s remote control, press STOP, then press SETUP. The Welcome to Setup screen appears.
Important Always have Media Server running on your computer before turning on the player.
For help during network setup, highlight Help, then press ENTER.
21www.gateway.com

Chapter 2: Setting Up Your Player
3 Use your remote control’s arrow buttons to highlight Network, then press ENTER. The message “Loading network settings” appears, and the player automatically connects to the wired Ethernet network. If multiple networks are available, highlight the Network setting, then press ENTER again to select the correct network from the network list.
The IP address appears in the lower-right corner of the screen. To change the way the IP address is selected, see “Setting the IP address” on page 27.
To change the player name (as it appears to other players), see “Changing the player name” on page 28.
4 Highlight OK, then press ENTER. Network setup is complete.
5 Press SETUP or RETURN to close the Setup menu.
6 Go to “Customizing” on page 35 for instructions on customizing your player’s other settings.
Wireless access point setup
To configure the player for a wireless access point network:1 Make sure that your computer is on and Media Server is running.
The Media Server icon in the Windows taskbar shows that the program is running.
If the Media Server icon has a red “x” on it, Media Server is running but cannot connect to the network. See “Network troubleshooting” on page 81.
22 www.gateway.com
Setting up the network
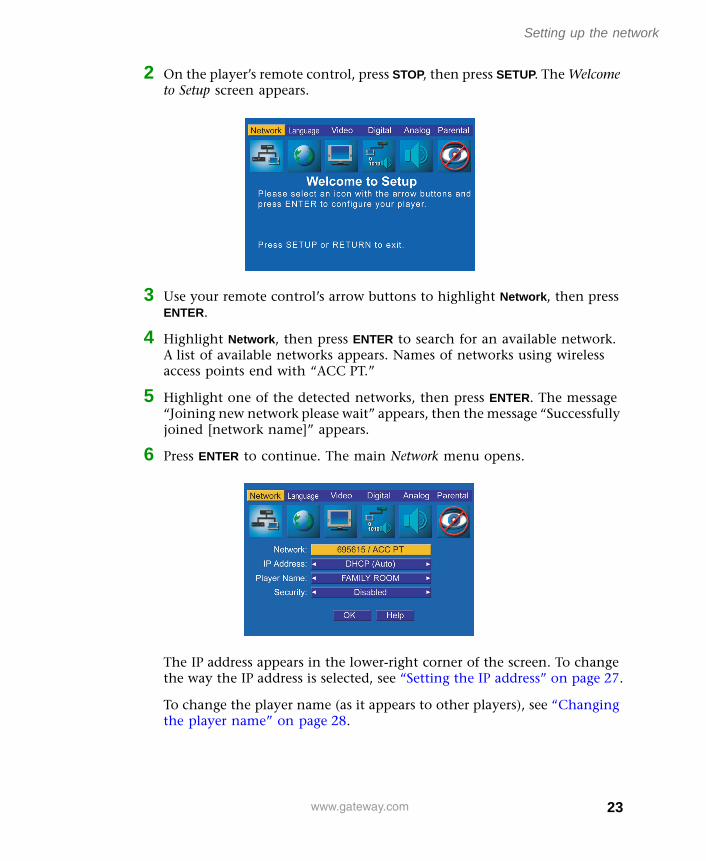
2 On the player’s remote control, press STOP, then press SETUP. The Welcome to Setup screen appears.
3 Use your remote control’s arrow buttons to highlight Network, then press ENTER.
4 Highlight Network, then press ENTER to search for an available network. A list of available networks appears. Names of networks using wireless access points end with “ACC PT.”
5 Highlight one of the detected networks, then press ENTER. The message “Joining new network please wait” appears, then the message “Successfully joined [network name]” appears.
6 Press ENTER to continue. The main Network menu opens.
The IP address appears in the lower-right corner of the screen. To change the way the IP address is selected, see “Setting the IP address” on page 27.
To change the player name (as it appears to other players), see “Changing the player name” on page 28.
23www.gateway.com

Chapter 2: Setting Up Your Player
7 Highlight Security, then use the buttons to choose one of the following options:
Disabled (recommended)
64 bit Key — Check your wireless network’s documentation to confirm this setting.
128 bit Key — Check your wireless network’s documentation to confirm this setting.
8 Highlight OK, then press ENTER. Network setup is complete.
9 Press SETUP or RETURN to close the Setup menu.
10 Go to “Customizing” on page 35 for instructions on customizing your player’s other settings.
Wireless peer-to-peer setup
To configure the player for a wireless peer-to-peer network:
1 Make sure that your computer is on and Media Server is running. The Media Server icon in the Windows taskbar shows that the program is running.
If the Media Server icon has a red “x” on it, Media Server is running but cannot connect to the network. See “Network troubleshooting” on page 81.
Important Wireless network cards used in a peer-to-peer network must be set to ad hoc mode instead of infrastructure mode. For more information, see your network card’s documentation.
24 www.gateway.com

Setting up the network
2 On the player’s remote control, press STOP, then press SETUP. The Welcome to Setup screen appears.
3 Use your remote control’s arrow buttons to highlight Network, then press ENTER.
4 Highlight Network, then press ENTER. A list of available networks appears. Names of peer-to-peer networks end with “P2P.”
5 Highlight Create Peer-to-Peer Network, then press ENTER.
25www.gateway.com

Chapter 2: Setting Up Your Player
6 Enter the name of the network by pressing the remote control’s number buttons according to the following table. Press to set the next character, and press CLEAR to erase a character.
7 Highlight OK, then press ENTER. “Successfully created P2P network” appears.
8 Press ENTER.
9 On your computer, click Start, Control Panel, then click Network Connections.
10 Right-click Wireless Network Connection, then click View Available Wireless Networks.
11 Click the P2P network name you just created on the player, then click Connect.
If you want to change the player name (as it appears to other players), see “Changing the player name” on page 28.
12 On the player, highlight OK, then press ENTER on the remote control. Network setup is complete.
13 Press SETUP or RETURN to close the Setup menu.
14 Go to “Customizing” on page 35 for instructions on customizing your player’s other settings.
Press: For:1 1
2 2, A, B, C
3 3, D, E, F
4 4, G, H, I
5 5, J, K, L
6 6, M, N, O
7 7, P, Q, R, S
8 8, T, U, V
9 9, W, X, Y, Z
0 0
26 www.gateway.com

Setting up the network
Setting the IP addressWhile connecting to a network, networked devices are assigned a unique identifier known as an IP address. IP addresses are used to direct network traffic to the correct destination. An IP address is usually displayed as numbers separated by periods, such as 192.168.0.2.
To change the way the IP address is assigned:
1 On the player’s remote control, press STOP, then press SETUP.
2 Highlight Network, then press ENTER.
3 Highlight IP Address.
4 Press the arrow buttons to choose one of the following:
DHCP (Auto) — Automatically assigns an IP address and provides other configuration information (recommended)
Important DHCP (Dyanamic Host Configuration Protocol) is an Internet protocol for automatically configuring computers that use TCP/IP. DHCP can be used to automatically assign IP addresses and to provide other configuration information.
27www.gateway.com

Chapter 2: Setting Up Your Player
Auto IP — Lets the player obtain an IP address for itself.
Static (Manual) — Lets you set the IP address and Subnet Mask.
5 Highlight OK, then press ENTER.
6 Press SETUP or RETURN to close the Setup menu.
Changing the player name
To change the name of the player on the network:
1 On the player’s remote control, press STOP, then press SETUP.
2 Highlight Network, then press ENTER.
3 Highlight Player Name, then use the following buttons to name the player:
— Move the text insertion point left and right.
0-9 buttons — Press repeatedly to select the desired character, then press the button to save the character and move to the next character.
CLEAR — Press to erase a character.
4 Highlight OK, then press ENTER.
5 Press SETUP or RETURN to close the Setup menu.
Important Static IP addresses are numeric addresses that you assign to uniquely identify your network devices. Only experienced network users should manually set the IP address.
If you select Static (Manual), press the button to select “Set,” then manually enter the IP address and Subnet Mask with the 0 through 9 buttons. Highlight OK, then press ENTER to save and exit.
28 www.gateway.com

Playing computer media files
Playing computer media filesYou can play three types of computer media on your player:
Audio — MP3 and WMA files
Video — MPEG-1 and MPEG-2 video files
Images — JPG/JPEG files
Entering Network modeTo play computer media files, your player must first enter Network mode.
To enter Network mode:
1 Make sure your computer is on and running Media Server.
2 Press the POWER button on the front of the player. If the player is in Standby power mode, press POWER on the remote control to turn on the player.
3 Turn on your TV, then set it to the audio/video input that is connected to your player.
4 Turn on your audio system if using an external amplifier or audio system, then set it to the input connected to the player.
5 Press CONNECT on the remote control to enter Network mode. The player connects to the network, then displays the Network main menu. Use the following remote control buttons to navigate in Network mode:
Button Function
NETWORK Press to switch between Network mode and DVD mode.
Press to move the cursor left, right, up, and down in the Network menu.
ENTER Press to make selections in the Network menu.
29www.gateway.com

Chapter 2: Setting Up Your Player
Exiting Network mode
To exit Network mode and return to DVD mode:
Press the CONNECT button. The player exits Network mode and enters DVD mode. If a DVD is in the disc tray, the DVD plays automatically.
Playing musicYou can play your computer’s MP3 and WMA audio files on your audio system.
To play music:1 Enter Network mode. For more information, see page 29.
2 Highlight Audio, then press ENTER.
3 Highlight a category (for example, Artist), then press ENTER.
4 Highlight an artist, then press ENTER.
5 To play a song, highlight the song by the artist, then press ENTER.
- OR -
To play all songs in the current folder in a repeating loop, press PLAY
Playing a playlistFor information on creating a playlist, see “Working with playlists” on page 62.
To play a playlist:
1 Enter Network mode. For more information, see page 29.
2 Highlight Audio, then press ENTER.
3 Highlight Playlists, then press ENTER.
4 Highlight the playlist you want, then press PLAY to play the entire playlist.
- OR -
If you want to play only a certain song within playlist, highlight the playlist, press ENTER, then highlight the song and press PLAY.
30 www.gateway.com

Playing computer media files
Playing moviesYou can play MPEG-1 and MPEG-2 video files from your computer on your TV.
To play a movie:
1 Enter Network mode. For more information, see page 29.
2 Highlight Video, then press ENTER.
3 To play one movie, highlight the movie, then press ENTER.
- OR -
To play all movies in a repeating loop, highlight the first movie you want to play, then press PLAY.
Viewing pictures
To view a picture:
1 Enter Network mode. For more information, see page 29.
2 Highlight Images, then press ENTER.
3 Highlight a category, then press ENTER.
4 To view only one picture, highlight the picture you want to view, then press ENTER.
- OR -
To view all pictures in a repeating loop, press PLAY.
Tips & Tricks If you view the first picture in the list, all of the remaining pictures in the list will automatically display in a slideshow.
31www.gateway.com

Chapter 2: Setting Up Your Player
For information on creating a slideshow, see “Working with slideshows” on page 65.
To view a slideshow:
1 Enter Network mode. For more information, see page 29.
2 Highlight Images, then press ENTER.
3 Highlight Slideshows, then press ENTER.
4 To play a slideshow, highlight the slideshow you want, then press PLAY.
- OR -
To display the list of pictures in the slideshow and the song for the slideshow, highlight the slideshow you want, then press ENTER.
To view thumbnails of your images:
While viewing an image or a slideshow, press ZOOM to view up to 16 thumbnails per screen.
Maintaining your player Unplug the power before you clean the outside of the player. Use a damp
cloth for cleaning. Do not use liquid cleaners or aerosol cleaners.
Do not use this product near water or in damp environments, such as a bathroom, and do not use this product near heat sources, such as radiators and stoves.
Never block the ventilation openings. Do not put the player on a soft surface such as a bed, couch, or carpet.
Do not place the power cord in a location where it can be pinched (such as behind a hinge of a cabinet door) or stepped on, and plug the player into a surge protector instead of directly into a wall outlet. For extra protection during a lightning storm, unplug the player from the surge protector or wall outlet.
Do not try to service this product yourself. Opening or removing any covers can expose you to dangerous voltages and will void the player’s warranty.
32 www.gateway.com

Maintaining your player
Caring for DVDs and other discs To keep the disc clean, always hold it by the edges. Do not touch the
surface. When the disc is not being played, store it in its case.
Do not expose the disc to direct sunlight or heat sources. Leaving it in a car parked in direct sunlight is likely to damage the disc because temperatures may rise considerably inside the car.
Cleaning discsClean discs by wiping from the center to the edge, not around in a circle, using a product, such as a soft cloth, made especially for cleaning CDs and DVDs. Do not use solvents such as benzine, thinner, or anti-static spray made for vinyl records.
33www.gateway.com

Chapter 2: Setting Up Your Player
34 www.gateway.com
3
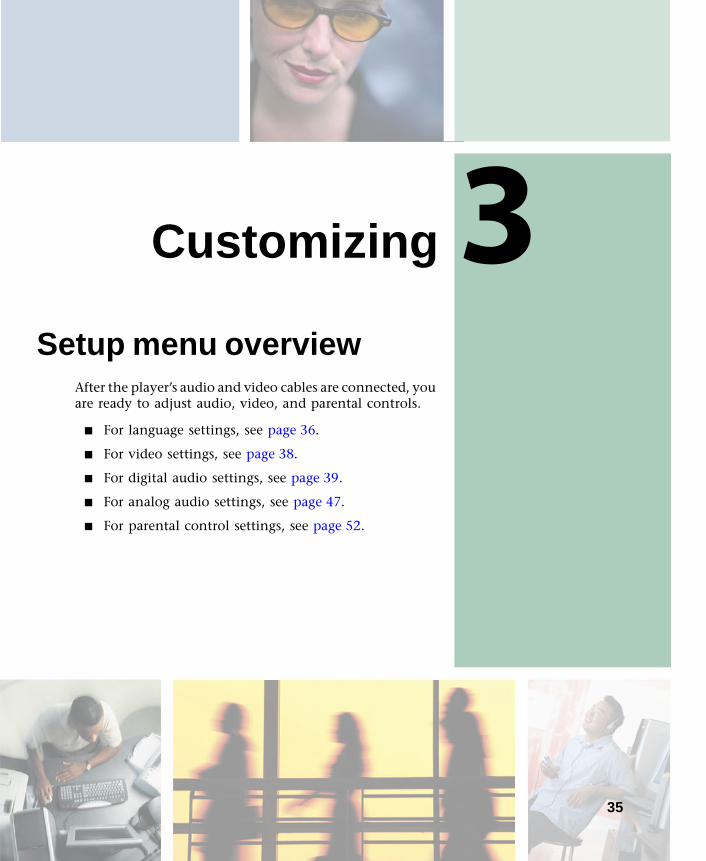
CustomizingSetup menu overviewAfter the player’s audio and video cables are connected, you are ready to adjust audio, video, and parental controls.
For language settings, see page 36.
For video settings, see page 38.
For digital audio settings, see page 39.
For analog audio settings, see page 47.
For parental control settings, see page 52.
35

Chapter 3: Customizing
Using the remote control in Setup menusTo move through the player’s Setup menus, press the following buttons on your remote control:
Setting up languagesThe Language menu lets you set your language preferences for DVD subtitles, DVD audio soundtracks, and DVD menus.
Remote Button Function
STOP Press before pressing SETUP.
SETUP Press to open and close the Setup menu.
(up and down arrows)
Press to highlight options within menus.
(left and right arrows)
Press to change option settings within menus.
ENTER Press to activate the current selection.
RETURN Press to return to the main Setup menu.
Tips & Tricks Unless otherwise specified, all buttons mentioned in the following procedures are buttons on the remote control.
36 www.gateway.com

Setting up languages
To set your language preferences:1 On the player’s remote control, press STOP, then press SETUP. The main
Setup menu opens.
2 Use your remote control’s arrow buttons to highlight Language, then press ENTER. The Language setup menu opens.
37www.gateway.com

Chapter 3: Customizing
3 Press the buttons to highlight any of the following:
SubtitlePress the buttons to select English, French, Spanish, Auto, or Off (default). Select Auto to always select the DVD’s default subtitle language. Select Off to always turn subtitles off (default). Because subtitle selections vary among DVDs, the DVD itself may override your selection.
AudioPress the buttons to select English (default), French, or Spanish. Because audio language selections vary among DVDs, the DVD itself may override your selection.
Disc MenuPress the buttons to select English (default), French, or Spanish. Because menu language selections vary among DVDs, the DVD itself may override your selection.
4 Highlight OK, then press ENTER.
5 Press SETUP or RETURN to close the Setup menu.
Setting up videoThe Video menu lets you set the aspect ratio (video format to match the shape of your TV screen) for DVD movies.
To set the aspect ratio:
1 On the player’s remote control, press STOP, then press SETUP. The main Setup menu opens.
38 www.gateway.com

Setting up digital audio
2 Use your remote control’s arrow buttons to highlight Video, then press ENTER. The Video setup menu opens.
3 Press the buttons to select TV aspect.
4 Press the buttons to select:
Fullscreen (default)Select if you have a standard 4:3 television and prefer to watch full-screen versions of DVD movies (if available).
LetterboxSelect if you have a standard 4:3 television and prefer to watch widescreen versions of DVD movies (if available).
WidescreenSelect if you have a widescreen 16:9 television.
5 Highlight OK, then press ENTER.
6 Press SETUP or RETURN to close the Setup menu.
Setting up digital audioThe Digital menu lets you set the signal format for the coaxial and optical digital audio jacks. For example, if you connected the player to an external amplifier that has a Dolby Digital decoder, you should set the Dolby Digital and DTS settings to Bitstream (to let your amplifier’s Dolby Digital decoder work with the player’s audio signal).
39www.gateway.com

Chapter 3: Customizing
Configuring Dolby DigitalThis setting configures the format of Dolby Digital 5.1 output signals.
To set your Dolby Digital preferences:
1 On the player’s remote control, press STOP, then press SETUP. The main Setup menu opens.
2 Use your remote control’s arrow buttons to highlight Digital, then press ENTER. The Digital audio setup menu opens.
40 www.gateway.com

Setting up digital audio
3 Highlight Dolby, then press the buttons to select:
BitstreamOutputs raw 5.1-channel digital signals from the optical or coaxial digital audio jacks. Use this setting when the player is connected to an external amplifier with a Dolby Digital decoder.
PCMOutputs 2-channel digital audio from the optical or coaxial digital audio jacks.
OffTurns off Dolby Digital output.
4 Highlight OK, then press ENTER.
Configuring DTSThis setting configures the format of DTS (Digital Theater Sound) output signals.
To set your DTS preferences:
1 On the player’s remote control, press STOP, then press SETUP. The main Setup menu opens.
2 Use your remote control’s arrow buttons to highlight Digital, then press ENTER. The Digital audio setup menu appears.
41www.gateway.com

Chapter 3: Customizing
3 Highlight DTS, then press the buttons to select:
BitstreamOutputs raw 5.1-channel digital signals from the optical or coaxial digital audio jacks. Use this setting when the player is connected to an external amplifier with a DTS decoder.
PCMOutputs 2-channel digital audio from the optical or coaxial digital audio jacks.
OffTurns off DTS output.
4 Highlight OK, then press ENTER.
Configuring MP3 audioThis option sets the outgoing digital audio format of MP3 tracks.
To set your MP3 output format:
1 On the player’s remote control, press STOP, then press SETUP. The main Setup menu opens.
2 Use your remote control’s arrow buttons to highlight Digital, then press ENTER. The Digital audio setup menu appears.
42 www.gateway.com

Setting up digital audio
3 Highlight MP3, then press the buttons to select:
BitstreamOutputs raw MP3 digital signals from the optical or coaxial digital audio jacks.
PCMOutputs 2-channel digital audio from the optical or coaxial digital audio jacks.
OffTurns off MP3 output.
4 Highlight OK, then press ENTER.
Configuring CD audioThis option sets the outgoing digital audio format of CD tracks.
To set your CD output format:
1 On the player’s remote control, press STOP, then press SETUP. The main Setup menu opens.
2 Use your remote control’s arrow buttons to highlight Digital, then press ENTER. The Digital audio setup menu opens.
43www.gateway.com

Chapter 3: Customizing
3 Highlight CD, then press the buttons to select:
Origin (default)Outputs CD digital audio from the optical or coaxial digital audio jacks in its original format.
PCMOutputs 2-channel digital audio from the optical or coaxial digital audio jacks.
OffTurns off CD audio output.
4 Highlight OK, then press ENTER.
Configuring LPCMThis option sets the outgoing digital audio format of LPCM tracks.
To set your LPCM output format:
1 On the player’s remote control, press STOP, then press SETUP. The main Setup menu opens.
2 Use your remote control’s arrow buttons to highlight Digital, then press ENTER. The Digital audio setup menu opens.
3 Highlight More, then press ENTER.
44 www.gateway.com

Setting up digital audio
4 Highlight LPCM, then press the buttons to select:
Origin (default)Outputs the LPCM digital audio signals from the optical or coaxial digital audio jacks in its original format.
PCMOutputs 2-channel digital audio from the optical or coaxial digital audio jacks.
OffTurns off LPCM audio output.
5 Highlight OK, then press ENTER.
Configuring for other formatsThis option sets the outgoing digital audio for formats not covered in the previous procedures.
To set your digital output for other formats:
1 On the player’s remote control, press STOP, then press SETUP. The main Setup menu opens.
2 Use your remote control’s arrow buttons to highlight Digital, then press ENTER. The Digital audio setup menu opens.
3 Highlight More, then press ENTER.
45www.gateway.com

Chapter 3: Customizing
4 Highlight Others, then press the buttons to select:
Bitstream (default)Outputs digital audio signals from the optical or coaxial digital audio jacks.
PCMOutputs 2-channel digital audio from the optical or coaxial digital audio jacks.
OffTurns off audio output for other formats.
5 Highlight OK, then press ENTER.
Adjusting the speaker balanceThis feature adjusts the sound balance of your 5.1-channel speakers system.
To run the speaker test:
1 On the player’s remote control, press STOP, then press SETUP. The main Setup menu opens.
2 Use your remote control’s arrow buttons to highlight Digital, then press ENTER. The Digital audio setup menu opens.
3 Highlight More, then press ENTER.
4 Highlight Speaker Test, then press ENTER. A five-second test tone is sent to each of the six speakers in the following order: Left, Right, Left Surround, Right Surround, Center, Subwoofer.
46 www.gateway.com

Setting up analog audio
5 Adjust the speaker levels on your amplifier as required.
6 Press STOP to cancel the test tone.
Setting up analog audioThe Analog Audio menu lets you set the format of the signal from the 5.1 channel (surround) and 2 channel (stereo) audio jacks.
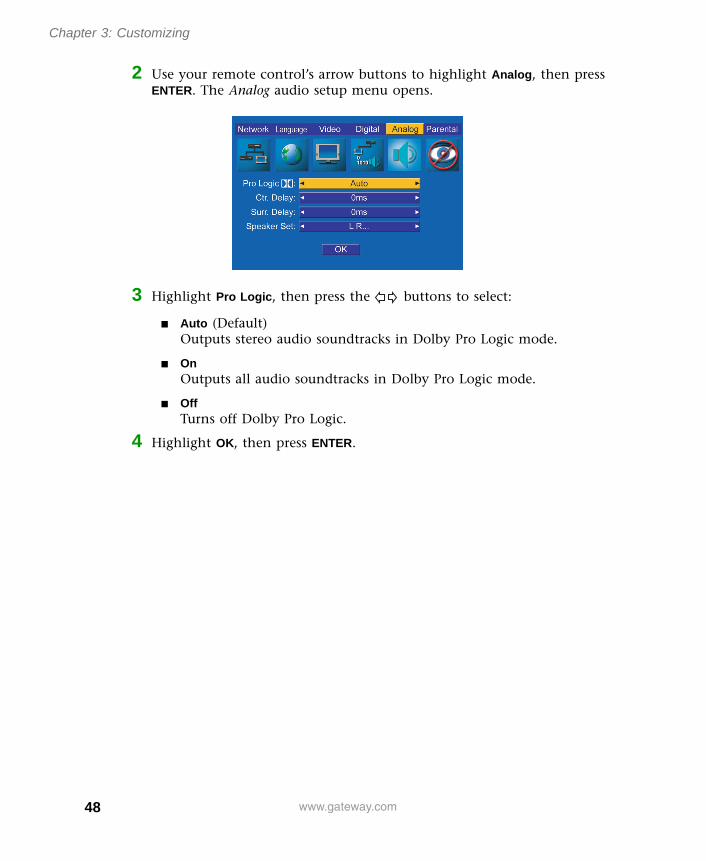
Configuring Pro Logic virtual surround soundThe player has a built-in Dolby Pro Logic decoder to provide virtual surround sound for PCM (stereo) from the 5.1-channel analog audio jacks.
To adjust Pro Logic settings:
1 On the player’s remote control, press STOP, then press SETUP. The main Setup menu opens.
47www.gateway.com
Chapter 3: Customizing
2 Use your remote control’s arrow buttons to highlight Analog, then press ENTER. The Analog audio setup menu opens.
3 Highlight Pro Logic, then press the buttons to select:
Auto (Default)Outputs stereo audio soundtracks in Dolby Pro Logic mode.
OnOutputs all audio soundtracks in Dolby Pro Logic mode.
OffTurns off Dolby Pro Logic.
4 Highlight OK, then press ENTER.
48 www.gateway.com

Setting up analog audio
Adjusting center delayUse this setting to delay the sound from the center speaker so it arrives at your listening area at the same time as the left and right front speakers. Use this setting only if the center speaker is closer to your listening area than your front speakers are.
To adjust the center delay:
1 On the player’s remote control, press STOP, then press SETUP. The main Setup menu opens.
2 Use your remote control’s arrow buttons to highlight Analog, then press ENTER. The Analog audio setup menu opens.
3 Highlight Ctr. Delay, then press the buttons to set the delay from 0 to 1.75 milliseconds.
Assume one millisecond of delay for every one foot of difference in distance. For example, if your center speaker is one foot closer than your front speakers, set the delay to 1 millisecond.
4 Highlight OK, then press ENTER.
Adjusting surround delay
Use this setting to delay the sound from the surround left and right speakers so it arrives at your listening area at the same time as the left and right front speakers. Use this setting only if the surround speakers are closer to your primary listening area than your front speakers are.
49www.gateway.com

Chapter 3: Customizing
To adjust the surround delay:1 On the player’s remote control, press STOP, then press SETUP. The main
Setup menu opens.
2 Use your remote control’s arrow buttons to highlight Analog, then press ENTER. The Analog audio setup menu opens.
3 Highlight Surr. Delay, then press the buttons to set the delay from 0 to 5.25 milliseconds.
Assume 1 millisecond of delay for every one foot of difference in distance. For example, if your surround speakers are one foot closer than your front speakers, set the surround delay to 1 millisecond.
4 Highlight OK, then press ENTER.
50 www.gateway.com

Setting up analog audio
Defining the speaker setUse this setting to identify the type of speakers in your audio setup.
To define your speaker setup:
1 On the player’s remote control, press STOP, then press SETUP. The main Setup menu opens.
2 Use your remote control’s arrow buttons to highlight Analog, then press ENTER. The Analog audio setup menu opens.
3 Highlight Speaker Set, then press ENTER. The active speakers are listed.
4 Highlight each of the following speakers, then press the buttons to turn them on or off:
SubwooferTurns subwoofer output on or off.
SurroundTurns left/right surround speaker output on or off.
CenterTurns center speaker output on or off.
5 Highlight Ctr Spkr Size, then press the buttons to select Large or Small to indicate the relative size of the center speaker.
6 Highlight OK, then press ENTER.
51www.gateway.com

Chapter 3: Customizing
Setting up parental controlsThe Rating menu lets you block playback of DVDs by using a password-protected rating system. Not all DVDs are rated.
To set parental controls:1 On the player’s remote control, press STOP, then press SETUP. The main
Setup menu opens.
2 Use your remote control’s arrow buttons to highlight Parental, then press ENTER. The Password menu opens.
52 www.gateway.com

Setting up parental controls
3 Highlight Password, then press the following buttons to enter a four-character password:
— Move the text insertion point left and right.
0-9 buttons — Press repeatedly to select the desired character, then press the button to save the character and move to the next character.
CLEAR — Press to erase a character.
ENTER — Press to save the password.
4 Highlight Rating, then press to change the rating level. DVDs that are rated higher than the level you select will not play without entering the correct password.
If a password has already been set, you will not be able to select Rating until you enter the correct password.
5 Highlight OK, then press ENTER.
Tips & Tricks If you forget the Rating password, enter 0106 to unlock the parental control setting. Keep this password out of reach of children.
53www.gateway.com

Chapter 3: Customizing
54 www.gateway.com

4
Using MediaServerThe Gateway D5 Media Server program lets you make the media files on your computer available to the Gateway Connected DVD Player. Media Server must be running on your computer for the DVD player to communicate with your computer.
Compatible file formatsMedia Server supports the following media formats:
Format Supported specification
JPEG At least 108 × 171 pixels
MP3 Bit rate at least 80 kbps
MPEG-1 and 2 Not greater than 3 MB/sec
WMA Bit rate at least 48 kbps
55

Chapter 4: Using Media Server
Starting the programDuring installation, Media Server was added to your Startup menu so it loads automatically when your computer starts.
To start Media Server:1 Click the Gateway D5 Media Server icon in the Windows system tray.
Media Server opens.
- OR -
Click Start, Programs, Gateway D5 Media Server, then click Gateway D5 Media Server. Media Server opens.
2 For information about:
Importing media files, see page 56.
Working with media files, see page 59.
Working with playlists, see page 62.
Working with slideshows, see page 65.
Viewing and changing network settings, see page 67.
Importing media filesYou can import audio, video, and image files into Media Server so the DVD player can display or play them. You can import files from media programs (such as Windows Media Player) or directly from your hard drive.
Important You can import files only from hard drives, not from mapped drives or removable media drives. If you have data on mapped or removable drives that you want to play through the DVD player, copy the files to your hard drive and import them from the hard drive.
56 www.gateway.com

Importing media files
Importing media directly from your hard drive
To import media:
1 Open Media Server, then click the Media Import tab.
2 Click the check boxes for the media types you want to import:
Audio (MP3)
Audio (WMA)
Video (MPEG)
Picture (JPEG)
3 Click the folder containing the media files you want to import. To scan all subfolders within the folder you selected, click the Subfolders check box.
4 Click Scan. Media files from the selected folder are imported into Media Server. To stop the scan before it completes, click Stop Scan.
57www.gateway.com

Chapter 4: Using Media Server
Importing media using pluginsYou can import files that are associated with a media player program into Media Server. This method of importing uses a part of the media player’s program (called a plugin) to import the files.
To import files using plugins:
1 Open Media Server, then click the Media Import tab.
2 Click Plugin Import. The Plugins dialog box opens.
3 Click the plugin you want to use, then click Scan. Media files for the selected plugin are imported into Media Server.
Tips & Tricks To import files using more than one plugin, do a separate import for each plugin.
58 www.gateway.com

Working with media files
Scheduling automatic scansYou can schedule automatic scans for importing media files, or you can set a time interval for periodic scans.
To schedule automatic scans:
1 Open Media Server, then click the Media Import tab.
2 Click Scheduler. The Time Scheduler dialog box opens.
3 From the Plugin list, click Hard Drive Scanner or the plugin you want to use.
4 Click the Update Period you want to use:
Manual Only (default) — Scans will not be automatic.
Every — Select a preset interval to scan, from every 15 minutes to every 12 hours.
Time — Define a time of day to scan.
5 Click Set. The scan will occur automatically at the time you specified, but only while the computer is on and Media Server is running.
Working with media filesThe Media Files tab displays the audio, video, and image files that have been imported from your hard drive into Media Server. You can list, hide, reveal, delete, and edit file attributes for each file.
59www.gateway.com

Chapter 4: Using Media Server
Listing media files
To list the media files on your hard drive:
1 Open Media Server, then click the Media Files tab.
2 Click the media type you want (All, Audio, Video, or Image) in the Media types list.
In the Name pane, the media file names are listed in alphabetical order. The other panes display the Artist and Album, if applicable.
If you have not imported any media files yet, the Artist, Album, and Name panes are blank.
Hiding media filesYou can hide imported media files so the player cannot access them. Hiding the file only removes it from the Media Files list (the file is not deleted). To reveal a hidden file, see “Revealing media files” on page 60.
To hide media files:
1 Open Media Server, then click the Media Files tab.
2 Click the media type you want (All, Audio, Video, or Image) in the Media types list.
3 In the Name pane, click the file you want to hide, then click Hide. To select multiple files, press and hold CTRL while clicking the file names.
The file will not be displayed in the list of media files, even if you rescan your hard drive.
Revealing media filesYou can reveal media files that were previously hidden. When you reveal hidden files, you can also delete them from the list.
60 www.gateway.com

Working with media files
To reveal media files:1 Open Media Server, then click the Media Files tab.
2 Click Reveal.
3 Click the media type you want (All, Audio, Video, or Image) in the Media types list.
4 In the Name pane, click the file you want to reveal, then click Reveal. To select multiple files, press and hold CTRL while clicking the file names.
Editing media file attributesYou can edit the attributes for all media files.
To edit media file attributes:
1 Open Media Server, then click the Media Files tab.
2 Click the media type you want (All, Audio, Video, or Image) in the Media types list.
3 In the Name pane, click the file you want to edit the attributes for. Only one file can be edited at a time.
4 Click Edit. The Edit Media Attributes dialog box opens.
5 Type your changes to the Media, Artist, Album, or Genre fields, then click Update.
Deleting media filesYou can delete media files from Media Server.
To delete media files:
1 Open Media Server, click the Media Files tab, then click the media type you want (All, Audio, Video, or Image) in the Media types list.
2 In the Name pane, click the file you want to delete, then click Delete. To select multiple files, press and hold CTRL while clicking the file names.
61www.gateway.com

Chapter 4: Using Media Server
3 Click Yes. The file is deleted from Media Server, but not from your hard drive.
Working with playlistsYou can create, edit, rename, or delete music playlists that can be played through your DVD player. You can also import playlists from other media player programs.
Creating a new playlist
To create a new playlist:
1 Open Media Server, then click the List Manager tab.
Important Subsequent scans of your hard drive will find deleted files.
To prevent media files from reappearing in Media Server, hide them. For more information, see “Hiding media files” on page 60.
62 www.gateway.com

Working with playlists
2 Click the arrow to open the Available Playlists list, then click Music Playlist.
3 Click New. The New - List Manager dialog box opens.
4 Type a name, then click Create. The Select Media dialog box opens.
5 Click the music tracks you want to include in the playlist, then click OK. The playlist is added to the List Manager.
Editing a playlist
To edit an existing playlist:
1 Open Media Server, then click the List Manager tab.
2 Click the arrow to open the Available Playlists list, then click Music Playlist.
3 Click the playlist you want to edit, then click Edit. The Edit - List Manager dialog box opens.
4 Click Add or Delete to add or delete tracks, then click Up or Down to change the order of tracks.
5 When you are finished, click Close.
Renaming a playlist
To rename a playlist:
1 Open Media Server, then click the List Manager tab.
2 Click the arrow to open the Available Playlists list, then click Music Playlist.
3 Click the playlist you want to rename, then click Rename.
4 Type the new name, then press ENTER on the keyboard.
63www.gateway.com

Chapter 4: Using Media Server
Deleting a playlist
To delete a playlist:
1 Open Media Server, then click the List manager tab.
2 Click the arrow to open the Available Playlists list, then click Music Playlist.
3 Click the playlist you want to delete, then click Delete.
Importing a playlist
To import a playlist:
1 Open Media Server, then click the List Manager tab.
2 Click the arrow to open the Available Playlists list, then click Music Playlist.
3 Click Playlist import. The Import Playlist dialog box opens.
4 Click the M3U (MusicMatch) or the PLS (WinAmp) check boxes. You can click both check boxes.
5 Click the folder containing the playlists you want to import. To scan all subfolders within the folder you selected, click the Subfolders check box.
6 Click Scan.
64 www.gateway.com

Working with slideshows
Working with slideshowsYou can create slideshows containing images and background music. You can even import and play slideshows created in other media player programs.
Creating a new slideshowWhen you create a new slideshow in Media Server, each image is displayed for five seconds, and the image list starts over again if the music has not completed by the time the last picture is finished displaying.
To create a new slideshow:1 Open Media Server, then click the List Manager tab.
2 Click the arrow to open the Available Playlists list, then click Slideshow.
3 Click New. The New - List Manager dialog box opens.
4 Type a name, then click Create. The Select Media dialog box opens.
5 Click the media files to add, then click OK. The slideshow is added to the List Manager.
65www.gateway.com
Chapter 4: Using Media Server
6 To add music, click Add Music. The Select Media dialog box opens.
7 Click the song you want to play during the slideshow, then click OK. You can select only one song.
Deleting music from a slideshow
To delete music from a slideshow:
1 Open Media Server, then click the List Manager tab.
2 Click the arrow to open the Available Playlists list, then click Slideshow. A list of available slideshows is displayed.
3 Click the slideshow you want to remove music from, then click Delete Music. The music is removed from that slideshow.
Editing a slideshow
To edit an existing slideshow:1 Open Media Server, then click the List Manager tab.
2 Click the arrow to open the Available Playlists list, then click Slideshow. A list of available slideshows is displayed.
3 Click the slideshow you want to edit, then click Edit. The Edit - List Manager dialog box opens.
4 Click Add or Delete to add or delete images, and click Up or Down to change the order of the images.
5 When you are finished editing the slideshow, click Close.
Renaming a slideshow
To rename a slideshow:1 Open Media Server, then click the List Manager tab.
2 Click the arrow to open the Available Playlists list, then click Slideshow. A list of available slideshows is displayed.
66 www.gateway.com

Viewing and changing network settings
3 Click the slideshow you want to rename, then click Rename.
4 Type the new name, then press ENTER on the keyboard.
Deleting a slideshow
To delete a slideshow:
1 Open Media Server, then click the List Manager tab.
2 Click the arrow to open the Available Playlists list, then click Slideshow. A list of available slideshows is displayed.
3 Click the slideshow you want to delete, then click Delete.
Viewing and changing network settings
You can view and change the following information about your computer’s network settings:
Network information
Network status
Network adapter status
Language
67www.gateway.com

Chapter 4: Using Media Server
Changing the computer nameYou can change the name of the computer as it appears on the DVD player menus.
To change the computer name:
1 Open Media Server, then click the System tab.
2 Click Change. The New - Server Name dialog box opens.
3 Type the name you want, then click Update Name.
68 www.gateway.com

Viewing and changing network settings
Selecting the network cardIf your computer has more than one network adapter card installed, you must select the card to use for the network connected to your DVD player.
To select the network card:
1 Open Media Server, click the System tab, then click Change Adapter. The Network Adapters dialog box opens.
2 Click the appropriate network adapter card, then click OK.
Changing the languageYou can change the language for the Media Server program.
To change the language:
1 Open Media Server, then click the System tab.
2 Click Language. The Change Language dialog box opens.
3 Click the language you want, then click OK. The change in language takes effect the next time you start the Media Server program.
69www.gateway.com

Chapter 4: Using Media Server
70 www.gateway.com

5
Playing MediaPlaying discsBefore you begin:
1 Turn on the player using the POWER button on the front of the player. If the player is in Standby power mode, press POWER on the remote control. The Power LED turns yellow.
2 Turn on your TV, then set it to the audio/video input connected to the DVD player.
3 Turn on your audio system (if using an external amplifier or audio system), then set it to the audio input connected to the DVD player.
71

Chapter 5: Playing Media
To play a disc:1 Press OPEN/CLOSE on the remote control or on the front of the player. The
disc tray opens.
2 Place the disc in the tray with the label side facing up. If the disc has no label and both sides are playable, make sure that the playback side you want is facing down.
72 www.gateway.com

Playing discs
3 Press OPEN/CLOSE to close the disc tray. The disc begins playing. If the disc is scratched, dirty, or if the DVD is not encoded for Region 1, the disc will not play.
4 If the disc does not automatically begin playing, press PLAY on the remote control or on the front of the player.
5 Press the following remote control buttons for other playback features:
Warning Always press STOP to stop playback of a disc before turning off the player.
Button Function
PAUSE/STEP Press to freeze at the current frame during playback. Press again to advance one frame at a time. Press PLAY to resume normal playback.
PREV/NEXT Press to skip to the previous or next chapter or track.
REV/FWD Press repeatedly to scan backward or forward at variable speeds during playback.
SLOW Press repeatedly to play in slow motion at variable speeds.
STOP Press to stop playback, then press PLAY to resume playback. Press STOP twice to stop playback and start over at the main menu.
73www.gateway.com

Chapter 5: Playing Media
6 Press the following remote control buttons to navigate within disc menus:
Playing MP3 CDsYou can play MP3 files that have been burned (recorded) onto a CD-R or CD-RW.
To play an MP3 CD:1 Insert a CD-R or CD-RW disc containing MP3 files into the disc tray. The
MP3 main screen opens.
2 To select a different folder, use the arrow buttons to highlight the name of the folder you want, then press ENTER.
Button Function
MENU Press to display the disc menu for the currently loaded disc.
Press to move the cursor left, right, up, and down in the disc menu.
ENTER Press to make selections in the disc menu.
0-9 Press to make direct selections in some disc menus.
RETURN Press to display the previous menu or to close the disc menu.
CLEAR Press to erase a character when entering names in some menus.
Important To ensure proper playback of discs burned from MP3 files, make sure that the files on the MP3 CD have been recorded at a bit rate of at least 128 kbps.
If there are any gaps (blank data) on multi-session discs, you may experience playback problems.
Important Depending on the number of tracks or folders on the CD, the player may take up to one minute to read the CD.
If the CD contains multiple folders, only the first folder’s contents are displayed.
Folder track names are abbreviated to twelve characters.
74 www.gateway.com

Playing discs
3 To play a track, use the arrow buttons to navigate to the track you want, then press ENTER.
To move up and down the track list, press the buttons.
To move to the previous or next page, press the buttons.
To skip to the previous or next track, press PREV or NEXT .
4 To stop playback, press STOP .
To create a custom playlist for an MP3 CD:
1 Highlight Browse Disc, then press ENTER.
2 Highlight a track you want to add to the playlist, then press ENTER. Repeat for each track you want to add.
3 When you are finished, highlight Create Prog, then press ENTER. The tracks you selected are displayed.
4 Highlight the first track, then press PLAY to play the playlist.
Accessing advanced featuresSelecting a title
When you play a DVD that contains more than one title, you can select the title you want.
To select the title:
1 Press TITLE. The DVD’s Title menu opens. If no Title menu opens, the DVD does not contain multiple titles.
2 Press or the 0-9 buttons to select a title, then press ENTER to start playback.
75www.gateway.com

Chapter 5: Playing Media
Repeating a scene or segmentYou can repeat any segment of a DVD or CD indefinitely.
To repeat a disc segment:
1 Press A-B during playback to select the starting point (point A).
2 Press A-B again to select the ending point (point B). The segment repeats in a continuous loop.
3 Press A-B again to cancel.
Adjusting the zoom of the imageYou can adjust the zoom (scale) of the on-screen image during DVD playback.
To adjust the zoom of the DVD image:
Press ZOOM repeatedly. The size of the on-screen image is progressively increased, then zoom turns off.
Changing anglesSome DVDs contain scenes filmed from multiple angles. If additional angles are available for a scene, the Angle icon is displayed during playback.
To change the selected angle:
1 Press ANGLE when you see the Angle icon appear on screen during DVD playback.
2 Press ANGLE repeatedly to select from all available angles on the disc. You cannot change the angle setting during VCD playback.
76 www.gateway.com

Playing discs
Displaying subtitlesOn some DVDs, you can select subtitles in various languages.
To change subtitles:
1 Press SUBTITLE during DVD playback. Subtitles appear on the bottom of the TV screen.
2 Press SUBTITLE repeatedly to select from all available subtitle languages, or to turn subtitles off.
Selecting audio formatOn some DVDs, you can select from multiple audio formats, such as Dolby Digital 5.1 or 2-channel stereo. You may also be able to select soundtracks in multiple languages.
To select audio format or soundtrack:
1 Press AUDIO during DVD playback. The selected audio format or soundtrack changes.
2 Press AUDIO repeatedly to select from all available audio formats or soundtracks.
Searching for a location on the discYou can jump to a specific time, title, chapter, or track on the disc.
To search for a specific location on the disc:
1 Press SEARCH during disc playback. The Search menu opens.
2 Press to select Time, Title/Chapter, or Track.
3 Press 0-9 to enter the time, title/chapter, or track you want. Press CLEAR to delete a character.
4 Press ENTER to start playback at the location you specified.
77www.gateway.com

Chapter 5: Playing Media
Turning on progressive scanIf you connected the player to your TV using the Component Out jacks, you can change the video output to Progressive Scan for superior video quality.
To turn on progressive scan:
While playback is stopped, press VIDEO OUT repeatedly to cycle through the video settings until “Progressive Scan” appears on the screen. You need to set this only once.
Displaying disc information on the screenYou can select the type of information to display on the TV screen during DVD playback.
To select the information to display:1 Press DISPLAY to view information about the disc being played.
2 Press DISPLAY once to view elapsed/remaining time.
3 Press DISPLAY again for detailed disc information such as disc type, title number, chapter number, angle number, audio soundtrack, and subtitle language.
4 Press DISPLAY again to turn off the display.
Selecting audio channelsYou can select a specific audio channel from all the available audio channels.
To select an audio channel:
1 Press AUDIO during VCD playback.
2 Press AUDIO repeatedly to select the audio channel you want to hear, such as STEREO, LEFT, and RIGHT.
78 www.gateway.com

Playing discs
Playing photo CDsPhoto CDs contain JPG images that you can view on your TV.
To view images on a photo CD:
1 Insert a photo CD into the disc tray. The first image on the disc displays on the TV screen.
2 To display the previous or next image, press PREV or NEXT .
3 To display a specific image, press the 0-9 buttons to enter the image number, then press ENTER.
4 To see the number of the current image, press DISPLAY.
5 To view up to 16 thumbnails of the pictures per page, press TITLE, press the arrow buttons to highlight the image you want to display, then press ENTER.
To manipulate the displayed image:
1 To rotate a picture 180°, press the button.
2 To rotate a picture 90° increments, press the ANGLE button.
3 To magnify an image, press ZOOM. While an image is magnified, press the buttons to scroll the image.
4 To return to normal, press the button.
To create a slideshow of images on a photo CD:1 Press the buttons to highlight Browse Disc, then press ENTER.
2 Highlight an image you want to add to the slideshow, then press ENTER. Repeat for each image you want to add.
3 When you are finished, highlight Create Prog, then press ENTER. A list of the pictures you selected is displayed.
4 Highlight the first image, then press PLAY. The slideshow plays.
5 To stop the slideshow and re-open the menu, press STOP.
79www.gateway.com

Chapter 5: Playing Media
80 www.gateway.com

6
TroubleshootingThis chapter provides some solutions to common networking and DVD problems. If the suggestions in this chapter do not correct the problem, see “Getting help” on page 86.
Network troubleshootingThe DVD player cannot connect to the network.
Make sure that Gateway D5 Media Server is installed and running on the computer.
Make sure that you have selected a network card in the Media Server program. For more information, see “Selecting the network card” on page 69.
81
Chapter 6: Troubleshooting
Make sure that your computer has an IP address assigned to it. To check, open Media Server, then click the About tab.
Make sure that you do not have a software firewall activated, such as Norton Antivirus or the Windows XP firewall.
When I try to set up a network connection at the player, I get the message “No Network Card. Please insert a supported card and restart.”
Make sure that the network PC Card is installed correctly. For more information, see “Installing the network card” on page 17.
Make sure that the PC Card you are using is a supported card. View a list of supported PC Cards at support.gateway.com.
The DVD player searches for a computer, but cannot find one. Make sure that the network PC Card is installed correctly. For more
information, see “Installing the network card” on page 17.
Make sure that Gateway D5 Media Server is running on the computer.
Turn the DVD player off, then turn it back on again.
Restart the computer.
No songs are found when I try to import the files into Media Server. Open music files in a media player program such as Windows Media Player,
then import music files into the Gateway D5 Media Server program using the appropriate plugin. For more information, see “Importing media using plugins” on page 58.
A song starts playing, then it stops for no reason. Try to play the song again. If the song still does not start, make sure that
your network connection is working.
If your network uses a wireless access point, restart the access point, then restart the switch or router.
Media Server cannot find music files that I know are there. Make sure that Media Server is installed and running on the computer that
has the music files.
Make sure that the songs are supported formats (MP3 and WMA).
82 www.gateway.com
DVD troubleshooting
Songs must meet the bit rate requirements (at least 80 kbps for MP3, at least 48 kbps for WMA). If the media file does not meet the bit rate requirements of the DVD player, the file is not displayed.
Media Server cannot find picture files that I know are there. Make sure that Media Server is installed and running on the computer that
has the picture files.
Place all pictures within a single folder on your computer, then import the images into Media Server. For more information, see “Importing media directly from your hard drive” on page 57
Media Server cannot find all of my pictures. Make sure that the pictures are JPEG or JPG format.
Pictures must be at least 171 pixels in width and 108 pixels in height.
Media Server cannot find the movies on my hard drive. Make sure that Media Server is installed and running on the computer that
has the movie files.
Open movie files in a media player program such as Windows Media Player, then import them into Media Server. For more information, see “Importing media using plugins” on page 58.
Make sure that they are supported movie formats (MPEG-1 and MPEG-2). AVI files are not supported.
MPEGs must not have a display rate greater than 3 MB/sec.
DVD troubleshootingThe player does not have power.
Make sure that the AC power cord is securely plugged into the wall outlet.
Make sure that the POWER button on the front of the player is pressed in.
Make sure that the player is not in sleep mode (press POWER on the remote control).
No picture appears on my TV. Make sure that the video cables are securely plugged into the player and
the TV.
83www.gateway.com

Chapter 6: Troubleshooting
If the video cables are damaged, replace them.
Make sure that the player is connected to the correct TV input.
Make sure that the video input on the TV is set to view the DVD player.
Make sure that video is set to the correct mode. Press the VIDEO OUT button on the remote control until a picture is visible.
The picture on my TV has a lot of static, or “noise” Make sure that the DVD is not dirty or flawed.
If the picture output from your player goes through your VCR to get to your TV, the copy-protection signal used on some DVDs could diminish the picture quality. Try connecting the player directly to the TV. If you still experience problems, try connecting your player to your TV’s S-Video input.
The DVD picture does not fill the screen on my standard television. Change the aspect ratio. For more information, see “To set the aspect ratio:”
on page 38.
If the picture does not change, the DVD’s aspect ratio may be fixed and cannot be adjusted.
No sound plays while playing media through the player. Make sure that all audio cables are securely plugged in.
If any audio or speaker cables are damaged, replace them.
Make sure that the volume is turned up on your TV.
Make sure that the player’s audio settings match your TV and audio system settings.
The player may be in Pause, Slow Motion, or Forward/Reverse Scan mode. Press PLAY on the remote control to return to normal playback mode.
There is no surround effect during playback of Dolby Digital soundtrack.
Make sure your audio cables are correctly connected. For more information, see “Connecting the player” on page 15.
Depending on the DVD, the audio output may not use all 5.1 channels, but instead output mono or stereo sound, even if the soundtrack is recorded in Dolby Digital format.
84 www.gateway.com

DVD troubleshooting
I keep hearing a loud hum or noise. Make sure that all components in your audio system are securely
plugged in.
Make sure that you keep your audio system’s cables away from a transformer or motor, and that you keep them at least 10 feet away from a TV or fluorescent lights.
Move your TV away from your audio components.
The plugs and jacks may be dirty. Unplug them, then wipe them clean with a cloth slightly moistened with isopropyl alcohol.
Clean the DVD.
The remote control does not work. Point the remote control directly at the sensor on the front of the player.
Remove any obstacles between the remote control and the player.
Move closer to the player when using the remote control.
Replace the batteries.
The DVD does not play. Make sure that there is a DVD in the tray.
If the DVD has two playable sides, make sure that the side you want to play is facing down in the tray.
The DVD may be warped and unplayable.
The region code on the DVD may not be Region 1.
Moisture may have condensed inside the player. Remove the DVD and leave the player turned on for about half an hour to dry the condensation.
The DVD does not start playing from the beginning. Resume Play is active. Press STOP twice, then restart DVD playback.
When I play a DVD, the voice audio is really quiet, but the music is really loud.
Your player may be outputting a 5.1-channel sound signal, while you have only stereo speakers connected. Check your audio settings and speaker connections.
85www.gateway.com

Chapter 6: Troubleshooting
Getting helpIf the troubleshooting information in this chapter does not solve your problem, contact Gateway Technical Support at 800-846-2301, Monday through Friday, from 7:00 a.m. to 9:00 p.m. Central Time.
TDD technical support (for the hearing impaired) is available weekdays from 6:00 a.m. to 8:00 p.m. Central Time, and weekends from 6:00 a.m. to 5:00 p.m. Central Time.
86 www.gateway.com

A
SpecificationsVideo
Video Out 1.0Vp-p 75Ω sync, negative polarity, RCA pin jack (1)
S-Video Out (separate Y and C signal output)
Y: 1.0Vp-p 75Ω sync, negative polarityC: 0.286Vp-p 75Ω
Component Video Out (progressive/ interlace scan modes)
Y: 1.0Vp-p 75ΩCb: 0.7Vp-p 75ΩCr: 0.7Vp-p 75Ω
Supported video and image formats
MPEG1: <3 MbpsMPEG2: <3 MbpsJPEG/JPG: >25 Kbps
Audio
Analog Out 1.85V(rms)/10kΩ RCA L/R pin jack (1)
Coaxial Out 0.5Vp-p 75Ω; RCA pin jack (1)
87
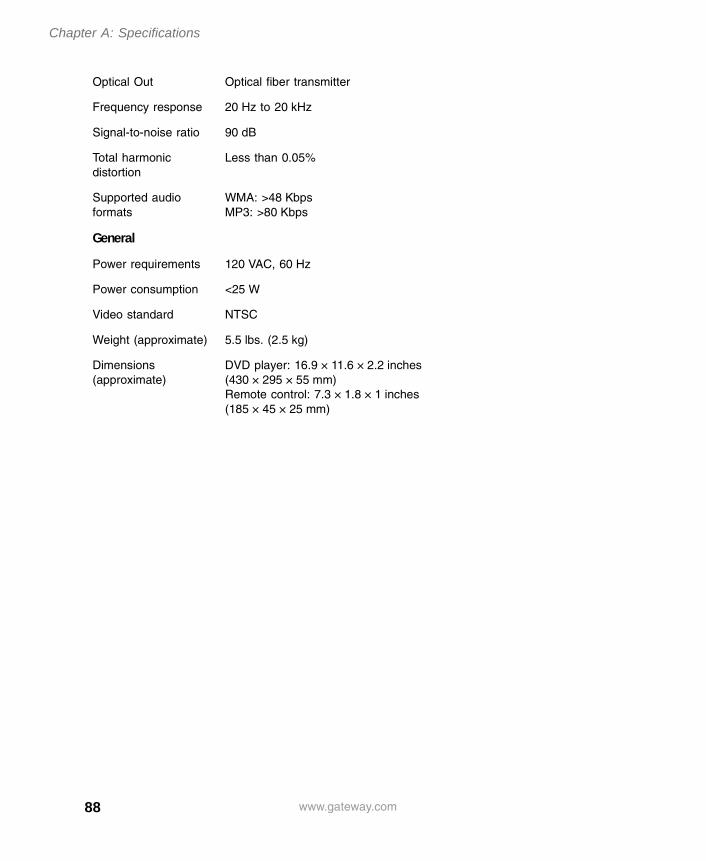
Chapter A: Specifications
Optical Out Optical fiber transmitter
Frequency response 20 Hz to 20 kHz
Signal-to-noise ratio 90 dB
Total harmonic distortion
Less than 0.05%
Supported audio formats
WMA: >48 KbpsMP3: >80 Kbps
General
Power requirements 120 VAC, 60 Hz
Power consumption <25 W
Video standard NTSC
Weight (approximate) 5.5 lbs. (2.5 kg)
Dimensions (approximate)
DVD player: 16.9 × 11.6 × 2.2 inches (430 × 295 × 55 mm)Remote control: 7.3 × 1.8 × 1 inches (185 × 45 × 25 mm)
88 www.gateway.com

B
Safety,Regulatory, andLegal Information
Regulatory compliance statements
United States of AmericaFederal Communications Commission (FCC) Unintentional emitter per FCC Part 15
This device has been tested and found to comply with the limits for a Class B digital device, pursuant to Part 15 of the FCC rules. These limits are designed to provide reasonable protection against harmful interference in a residential installation.
89

Appendix A: Safety, Regulatory, and Legal Information
This equipment generates, uses, and can radiate radio frequency energy and, if not installed and used in accordance with the instructions, may cause harmful interference to radio or television reception. However, there is no guarantee that interference will not occur in a particular installation. If this equipment does cause interference to radio and television reception, which can be determined by turning the equipment off and on, the user is encouraged to try to correct the interference by one or more of the following measures:
Reorient or relocate the receiving antenna Increase the separation between the equipment and receiver Connect the equipment to an outlet on a different circuit from that to which the receiver is
connected Consult the dealer or an experienced radio/TV technician for help.
Compliance Accessories: The accessories associated with this equipment are: shielded video cable. These accessories are required to be used in order to ensure compliance with FCC rules.
CanadaIndustry Canada (IC) Unintentional emitter per ICES-003
This digital apparatus does not exceed the Class B limits for radio noise emissions from digital apparatus as set out in the radio interference regulations of Industry Canada.
Le présent appareil numérique n’émet pas de bruits radioélectriques dépassant les limites applicables aux appareils numériques de Classe B prescrites dans le règlement sur le brouillage radioélectrique édicté par Industrie Canada.
Laser safety statementAll Gateway systems equipped with CD and DVD drives comply with the appropriate safety standards, including IEC 825. The laser devices in these components are classified as “Class 1 Laser Products” under a US Department of Health and Human Services (DHHS) Radiation Performance Standard. Should the unit ever need servicing, contact an authorized service location.
Caution Changes or modifications not expressly approved by Gateway could void the FCC compliance and negate your authority to operate the product.
Warning Use of controls or adjustments or performance of procedures other than those specified in this manual may result in hazardous radiation exposure. To prevent exposure to laser beams, do not try to open the enclosure of a CD or DVD drive.
90 www.gateway.com

Notices
California Proposition 65 Warning
NoticesCopyright © 2003 Gateway, Inc.All Rights Reserved14303 Gateway PlacePoway, CA 92064 USA
All Rights ReservedThis publication is protected by copyright and all rights are reserved. No part of it may be reproduced or transmitted by any means or in any form, without prior consent in writing from Gateway.
The information in this manual has been carefully checked and is believed to be accurate. However, changes are made periodically. These changes are incorporated in newer publication editions. Gateway may improve and/or change products described in this publication at any time. Due to continuing system improvements, Gateway is not responsible for inaccurate information which may appear in this manual. For the latest product updates, consult the Gateway Web site at www.gateway.com. In no event will Gateway be liable for direct, indirect, special, exemplary, incidental, or consequential damages resulting from any defect or omission in this manual, even if advised of the possibility of such damages.
In the interest of continued product development, Gateway reserves the right to make improvements in this manual and the products it describes at any time, without notices or obligation.
Trademark Acknowledgments1-800-GATEWAY, ActiveCPR, ALR, AnyKey, black-and-white spot design, CrystalScan, Destination, DestiVu, EZ Pad, EZ Point, Field Mouse, Gateway 2000, Gateway Country, gateway.net, Gateway stylized logo, Perfect Scholar, Solo, TelePath, Vivitron, stylized “G” design, and “You’ve got a friend in the business” slogan are registered trademarks and black-and-white spotted box logo, GATEWAY, Gateway Astro, Gateway@Work, Gateway Connected touch pad, Gateway Connected music player, Gateway Cyber:)Ware, Gateway Education:)Ware, Gateway Flex Case, Gateway Gaming:)Ware, Gateway GoBack, Gateway Gold, Gateway Learning:)Ware, Gateway Magazine, Gateway Micro Server, Gateway Money:)Ware, Gateway Music:)Ware, Gateway Networking Solutions, Gateway Online Network (O.N.) solution, Gateway Photo:)Ware, Gateway Professional PCs, Gateway Profile, Gateway Solo, green stylized GATEWAY, green stylized Gateway logo, Gateway Teacher:)Ware, Gateway Video:)Ware, HelpSpot, InforManager, Just click it!, Learn@Gateway, Kids BackPack, SERVE-TO-ORDER, Server Watchdog, the Spotted G Gateway Logo and the Spotted G Logo, SpotShop, Spotshop.com, and Your:)Ware are trademarks of Gateway, Inc. Intel, Intel Inside logo, and Pentium are registered trademarks and MMX is a trademark of Intel Corporation. Microsoft, MS, MS-DOS, and Windows are trademarks or registered trademarks of Microsoft Corporation. All other product names mentioned herein are used for identification purposes only, and may be the trademarks or registered trademarks of their respective companies.
Warning This product contains chemicals, including lead, known to the State of California to cause cancer and/or birth defects or reproductive harm.
91www.gateway.com

Appendix A: Safety, Regulatory, and Legal Information
92 www.gateway.com

MAN CONNECT DVD PLAYER GDE R1 7/03