XW Series Hybrid Inverter/Charger - Wholesale Solar
112
Hybrid Inverter/Charger XW Series Hybrid Inverter/Charger Operation Guide XW4024-120/240-60 XW4548-120/240-60 XW6048-120/240-60
Transcript of XW Series Hybrid Inverter/Charger - Wholesale Solar

Hybrid Inverter/Charger
XW Series Hybrid Inverter/Charger
Operation Guide
XW4024-120/240-60XW4548-120/240-60XW6048-120/240-60

XW Series Inverter/Charger
Operation Guide

About XantrexXantrex Technology Inc. is a world-leading supplier of advanced power electronics and controls with products from 50 watt mobile units to one MW utility-scale systems for wind, solar, batteries, fuel cells, microturbines, and backup power applications in both grid-connected and stand-alone systems. Xantrex products include inverters, battery chargers, programmable power supplies, and variable speed drives that convert, supply, control, clean, and distribute electrical power.
TrademarksXW Series Inverter/Charger is a trademark of Xantrex International. Xantrex is a registered trademark of Xantrex International.Other trademarks, registered trademarks, and product names are the property of their respective owners and are used herein for identification purposes only.
Notice of CopyrightXW Series Inverter/Charger Operation Guide © May 2007 Xantrex International. All rights reserved.
Exclusion for DocumentationUNLESS SPECIFICALLY AGREED TO IN WRITING, XANTREX TECHNOLOGY INC. (“XANTREX”)(A) MAKES NO WARRANTY AS TO THE ACCURACY, SUFFICIENCY OR SUITABILITY OF ANY TECHNICAL OR OTHER INFORMATION PROVIDED IN ITS MANUALS OR OTHER DOCUMENTATION.(B) ASSUMES NO RESPONSIBILITY OR LIABILITY FOR LOSSES, DAMAGES, COSTS OR EXPENSES, WHETHER SPECIAL, DIRECT, INDIRECT, CONSEQUENTIAL OR INCIDENTAL, WHICH MIGHT ARISE OUT OF THE USE OF SUCH INFORMATION. THE USE OF ANY SUCH INFORMATION WILL BE ENTIRELY AT THE USER’S RISK; AND
(C) REMINDS YOU THAT IF THIS MANUAL IS IN ANY LANGUAGE OTHER THAN ENGLISH, ALTHOUGH STEPS HAVE BEEN TAKEN TO MAINTAIN THE ACCURACY OF THE TRANSLATION, THE ACCURACY CANNOT BE GUARANTEED. APPROVED XANTREX CONTENT IS CONTAINED WITH THE ENGLISH LANGUAGE VERSION POSTED AT WWW.XANTREX.COM.
Date and RevisionMay 2007 Revision A
Part Number975-0240-01-01
Product Number865-1000 (XW6048), 865-1005 (XW4548), 865-1010 (XW4024)
Contact InformationTelephone: 1 800 670 0707 (toll free North America)
1 360 925 5097 (direct)Fax: 1 800 994 7828 (toll free North America)
1 360 925 5143 (direct)Email: [email protected]: www.xantrex.com
About This Guide
PurposeThe purpose of this Operation Guide is to provide explanations and procedures for configuring, operating, maintaining, and troubleshooting the XW Series Inverter/Charger.
ScopeThe Guide provides safety guidelines, detailed setup information, and information about operating and troubleshooting the unit. It does not provide installation procedures or details about particular brands of batteries, photoelectric cells, or generators. Consult the equipment manufacturers for this information.This manual includes information about monitoring and configuring the XW Inverter/Charger.For more information about XW Series products features and accessories, see the XW Series Inverter/Charger Installation Guide.
AudienceThe Guide is intended for anyone who needs to operate, configure, and troubleshoot the XW Series Inverter/Charger. Certain configuration tasks should only be performed in consultation with your local utility and/or an authorized dealer.
OrganizationThis Guide is organized into four chapters.Chapter 1, “Introduction”, describes the operational features of the XW Series Inverter/Charger.Chapter 2, “Monitoring Operation”, contains information about monitoring XW Inverter/Charger operation using the Inverter Information Panel or the XW System Control Panel.Chapter 3, “Configuration” explains how to navigate through the XW System Control Panel menus and configure the XW Inverter/Charger., Chapter 4, “Troubleshooting”, contains information and procedures for solving possible problems with the XW Inverter/Charger.
975-0240-01-01 iii

About This Guide
Conventions UsedThe following conventions are used in this guide.
Related InformationXW Power System Installation Overview (975-0238-01-01)XW Power System Installation Guide (975-0239-01-01)You can find more information about Xantrex Technology Inc. as well as its products and services at www.xantrex.com
WARNINGWarnings identify conditions or practices that could result in personal injury or loss of life
CAUTIONCautions identify conditions or practices that could result in damage to the unit or other equipment.
Important: These notes describe things which are important for you to know, but not as serious as a caution or warning.
iv 975-0240-01-01

Important Safety Instructions
1. Before using the XW Inverter/Charger, read all instructions and cautionary markings on the XW Inverter/Charger, the batteries, and all appropriate sections of this guide.
2. Ensure the XW Inverter/Charger is installed according to the guidelines and procedures in the XW Power System Installation Guide.
3. Do not expose the XW Inverter/Charger to rain, snow, or spray. To reduce risk of fire hazard, do not cover or obstruct the ventilation openings.
4. Use only attachments recommended or sold by Xantrex Technology. Doing otherwise may result in a risk of fire, electric shock, or injury to persons.
5. To avoid a risk of fire and electric shock, make sure that existing wiring is in good condition and that wire is not undersized. Do not operate the XW Inverter/Charger with damaged or substandard wiring.
6. Do not operate the XW Inverter/Charger if it has received a sharp blow, been dropped, or otherwise damaged in any way. If the XW Inverter/Charger is damaged, see the Warranty section.
7. Do not disassemble the XW Inverter/Charger. It contains no user-serviceable parts. See Warranty for instructions on obtaining service. Attempting to service the XW Inverter/Charger yourself may result in a risk of electrical shock or fire and will void your warranty. Internal capacitors remain charged after all power is disconnected.
8. To reduce the risk of electrical shock, authorized service personnel must disconnect both AC and DC power from the XW Inverter/Charger before attempting any maintenance or cleaning or working on any circuits connected to the XW Inverter/Charger. Turning off controls will not reduce this risk.
9. To reduce the chance of short-circuits, authorized service personnel must use insulated tools when installing or working with this equipment.
WARNINGThis chapter contains important safety and operating instructions. Read and keep this Operation Guide for future reference.
WARNING: Limitations on useThe XW Inverter/Charger is not intended for use in connection with life support systems or other medical equipment or devices.
975-0240-01-01 v

Safety
Explosive gas precautions
1. Working in the vicinity of batteries may be dangerous. Batteries can generate explosive gases during normal operation. Therefore, you must read this guide and follow the instructions exactly before installing or using your XW Inverter/Charger.
2. To reduce the risk of battery explosion, follow these instructions and those published by the battery manufacturer and the manufacturer of the equipment in which the battery is installed.
Precautions When Working With Batteries
1. Follow all instructions published by the battery manufacturer and the manufacturer of the equipment in which the battery is installed.
2. Make sure the area around the battery is well ventilated.3. Never smoke or allow a spark or flame near the engine or batteries.4. Use caution to reduce the risk of dropping a metal tool on the battery. It could
spark or short circuit the battery or other electrical parts and could cause an explosion.
5. Remove all metal items, like rings, bracelets, and watches when working with batteries. Batteries can produce a short circuit current high enough to weld metal to skin, causing a severe burn.
6. Have someone within range of your voice or close enough to come to your aid when you work near a battery.
7. Have plenty of fresh water and soap nearby in case battery acid contacts skin, clothing, or eyes.
8. Wear complete eye protection and clothing protection. Avoid touching your eyes while working near batteries.
9. If battery acid contacts skin or clothing, wash immediately with soap and water. If acid enters your eye, immediately flood it with running cold water for at least twenty minutes and get medical attention immediately.
WARNING: Explosion hazard
WARNING: Explosion or fire hazard
vi 975-0240-01-01

Safety
FCC Information to the User
This equipment has been tested and found to comply with the limits for a Class B digital device, pursuant to part 15 of the FCC Rules. These limits are designed to provide reasonable protection against harmful interference in a residential installation. This equipment generates, uses and can radiate radio frequency energy and, if not installed and used in accordance with the instructions, may cause harmful interference to radio communications. However, there is no guarantee that interference will not occur in a particular installation. If this equipment does cause harmful interference to radio or television reception, which can be determined by turning the equipment off and on, the user is encouraged to try to correct the interference by one or more of the following measures:• Reorient or relocate the receiving antenna.• Increase the separation between the equipment and the receiver.• Connect the equipment to a different circuit from that to which the receiver is
connected.• Consult the dealer or an experienced radio/TV technician for help.
975-0240-01-01 vii

vi
ii
Contents
Important Safety Instructions - - - - - - - - - - - - - - - - - - - - - - - - - - - - - - - - - - - - - - - - - - - -v
1 IntroductionBasic Features- - - - - - - - - - - - - - - - - - - - - - - - - - - - - - - - - - - - - - - - - - - - - - - - - - - - - - - - - 1–2Basic Operation- - - - - - - - - - - - - - - - - - - - - - - - - - - - - - - - - - - - - - - - - - - - - - - - - - - - - - - - 1–3
Surge Performance - - - - - - - - - - - - - - - - - - - - - - - - - - - - - - - - - - - - - - - - - - - - - - - - - - - 1–4Islanding Protection - - - - - - - - - - - - - - - - - - - - - - - - - - - - - - - - - - - - - - - - - - - - - - - - - - 1–5
Monitoring the Inverter - - - - - - - - - - - - - - - - - - - - - - - - - - - - - - - - - - - - - - - - - - - - - - - - - - 1–6Inverter Information Panel - - - - - - - - - - - - - - - - - - - - - - - - - - - - - - - - - - - - - - - - - - - - - - 1–6XW System Control Panel - - - - - - - - - - - - - - - - - - - - - - - - - - - - - - - - - - - - - - - - - - - - - - 1–7
2 Monitoring OperationMonitoring Operation with the Inverter Information Panel - - - - - - - - - - - - - - - - - - - - - - - - - - - 2–2
Monitoring AC Input Status - - - - - - - - - - - - - - - - - - - - - - - - - - - - - - - - - - - - - - - - - - - - - 2–2Monitoring Inverter Status - - - - - - - - - - - - - - - - - - - - - - - - - - - - - - - - - - - - - - - - - - - - - - 2–3Monitoring Charger Status - - - - - - - - - - - - - - - - - - - - - - - - - - - - - - - - - - - - - - - - - - - - - - 2–3Monitoring Faults and Warnings - - - - - - - - - - - - - - - - - - - - - - - - - - - - - - - - - - - - - - - - - - 2–3Equalizing Batteries - - - - - - - - - - - - - - - - - - - - - - - - - - - - - - - - - - - - - - - - - - - - - - - - - - 2–4Turning the XW Inverter/Charger On and Off - - - - - - - - - - - - - - - - - - - - - - - - - - - - - - - - - 2–5Monitoring Battery Level - - - - - - - - - - - - - - - - - - - - - - - - - - - - - - - - - - - - - - - - - - - - - - 2–6Reading the Display Screen - - - - - - - - - - - - - - - - - - - - - - - - - - - - - - - - - - - - - - - - - - - - - 2–6
Monitoring Operation with the XW System Control Panel - - - - - - - - - - - - - - - - - - - - - - - - - - - 2–7XW System Control Panel Features - - - - - - - - - - - - - - - - - - - - - - - - - - - - - - - - - - - - - - - 2–7Using the Standby Button - - - - - - - - - - - - - - - - - - - - - - - - - - - - - - - - - - - - - - - - - - - - - - 2–8System Control Panel Navigation - - - - - - - - - - - - - - - - - - - - - - - - - - - - - - - - - - - - - - - - - 2–8
Viewing the System Control Panel Home Screens - - - - - - - - - - - - - - - - - - - - - - - - - - - 2–8Viewing Other Screens - - - - - - - - - - - - - - - - - - - - - - - - - - - - - - - - - - - - - - - - - - - - 2–10
Reading the System Status Screen - - - - - - - - - - - - - - - - - - - - - - - - - - - - - - - - - - - - - - - - 2–11Reading the XW Inverter/Charger Home Screen - - - - - - - - - - - - - - - - - - - - - - - - - - - - - - 2–11Reading the Meters Screen - - - - - - - - - - - - - - - - - - - - - - - - - - - - - - - - - - - - - - - - - - - - 2–14
3 ConfigurationUsing the XW System Control Panel - - - - - - - - - - - - - - - - - - - - - - - - - - - - - - - - - - - - - - - - - 3–2
XW Inverter/Charger Setup Menu - - - - - - - - - - - - - - - - - - - - - - - - - - - - - - - - - - - - - - - - 3–2Setting the Time and Date - - - - - - - - - - - - - - - - - - - - - - - - - - - - - - - - - - - - - - - - - - - - - - 3–3
Using the Setup Menus- - - - - - - - - - - - - - - - - - - - - - - - - - - - - - - - - - - - - - - - - - - - - - - - - - - 3–4Inverter Settings Menu - - - - - - - - - - - - - - - - - - - - - - - - - - - - - - - - - - - - - - - - - - - - - - - - - - - 3–7
975-0240-01-01 ix

Contents
Using the Low Battery Cut Out and LBCO Delay Settings - - - - - - - - - - - - - - - - - - - - - - - 3–7Using Search Mode - - - - - - - - - - - - - - - - - - - - - - - - - - - - - - - - - - - - - - - - - - - - - - - - - - 3–8
Charger Settings Menu - - - - - - - - - - - - - - - - - - - - - - - - - - - - - - - - - - - - - - - - - - - - - - - - - -3–10Battery Charger Functions - - - - - - - - - - - - - - - - - - - - - - - - - - - - - - - - - - - - - - - - - - - - -3–11Multi-Stage Charging Process - - - - - - - - - - - - - - - - - - - - - - - - - - - - - - - - - - - - - - - - - - -3–11Equalize Charging the Batteries - - - - - - - - - - - - - - - - - - - - - - - - - - - - - - - - - - - - - - - - - -3–13Using Charger Block - - - - - - - - - - - - - - - - - - - - - - - - - - - - - - - - - - - - - - - - - - - - - - - - -3–14Custom Battery Settings Menu - - - - - - - - - - - - - - - - - - - - - - - - - - - - - - - - - - - - - - - - - -3–15
AC Settings - - - - - - - - - - - - - - - - - - - - - - - - - - - - - - - - - - - - - - - - - - - - - - - - - - - - - - - - - -3–16Grid Support Settings - - - - - - - - - - - - - - - - - - - - - - - - - - - - - - - - - - - - - - - - - - - - - - - - - - -3–17
Energy Management - - - - - - - - - - - - - - - - - - - - - - - - - - - - - - - - - - - - - - - - - - - - - - - - -3–18Charger Block - - - - - - - - - - - - - - - - - - - - - - - - - - - - - - - - - - - - - - - - - - - - - - - - - - -3–18Grid Support - - - - - - - - - - - - - - - - - - - - - - - - - - - - - - - - - - - - - - - - - - - - - - - - - - - -3–18Peak Load Shaving - - - - - - - - - - - - - - - - - - - - - - - - - - - - - - - - - - - - - - - - - - - - - - -3–19Time-of-Use Metering - - - - - - - - - - - - - - - - - - - - - - - - - - - - - - - - - - - - - - - - - - - - -3–19
Generator Support Settings - - - - - - - - - - - - - - - - - - - - - - - - - - - - - - - - - - - - - - - - - - - - - - -3–21Auxiliary Output Settings - - - - - - - - - - - - - - - - - - - - - - - - - - - - - - - - - - - - - - - - - - - - - - - -3–21
Trigger Source Descriptions - - - - - - - - - - - - - - - - - - - - - - - - - - - - - - - - - - - - - - - - - - - -3–22Multi-Unit Config Menu - - - - - - - - - - - - - - - - - - - - - - - - - - - - - - - - - - - - - - - - - - - - - - - - -3–23
Setting the Device Name - - - - - - - - - - - - - - - - - - - - - - - - - - - - - - - - - - - - - - - - - - - - - -3–24Setting the Device Number - - - - - - - - - - - - - - - - - - - - - - - - - - - - - - - - - - - - - - - - - - - - -3–25
Connections Menu - - - - - - - - - - - - - - - - - - - - - - - - - - - - - - - - - - - - - - - - - - - - - - - - - - - - -3–26Operating Without Connections - - - - - - - - - - - - - - - - - - - - - - - - - - - - - - - - - - - - - - - - - -3–27
Copying Settings From Another Unit- - - - - - - - - - - - - - - - - - - - - - - - - - - - - - - - - - - - - - - - -3–28Resetting the XW Inverter/Charger to Default Settings - - - - - - - - - - - - - - - - - - - - - - - - - - - - -3–28
4 TroubleshootingTroubleshooting Reference - - - - - - - - - - - - - - - - - - - - - - - - - - - - - - - - - - - - - - - - - - - - - - - 4–2General Troubleshooting Guidelines - - - - - - - - - - - - - - - - - - - - - - - - - - - - - - - - - - - - - - - - - 4–2Inverter Applications- - - - - - - - - - - - - - - - - - - - - - - - - - - - - - - - - - - - - - - - - - - - - - - - - - - - 4–3
Resistive Loads - - - - - - - - - - - - - - - - - - - - - - - - - - - - - - - - - - - - - - - - - - - - - - - - - - - - - 4–3Motor Loads - - - - - - - - - - - - - - - - - - - - - - - - - - - - - - - - - - - - - - - - - - - - - - - - - - - - - - - 4–3Problem Loads - - - - - - - - - - - - - - - - - - - - - - - - - - - - - - - - - - - - - - - - - - - - - - - - - - - - - 4–4
Very Small Loads - - - - - - - - - - - - - - - - - - - - - - - - - - - - - - - - - - - - - - - - - - - - - - - - 4–4Fluorescent Lights and Power Supplies - - - - - - - - - - - - - - - - - - - - - - - - - - - - - - - - - - 4–4Clocks - - - - - - - - - - - - - - - - - - - - - - - - - - - - - - - - - - - - - - - - - - - - - - - - - - - - - - - - 4–4Searching - - - - - - - - - - - - - - - - - - - - - - - - - - - - - - - - - - - - - - - - - - - - - - - - - - - - - - 4–4
Inverter Troubleshooting - - - - - - - - - - - - - - - - - - - - - - - - - - - - - - - - - - - - - - - - - - - - - - - - - 4–5Battery Charger Troubleshooting - - - - - - - - - - - - - - - - - - - - - - - - - - - - - - - - - - - - - - - - - - - 4–8Faults and Warnings - - - - - - - - - - - - - - - - - - - - - - - - - - - - - - - - - - - - - - - - - - - - - - - - - - - -4–10
Warning Messages - - - - - - - - - - - - - - - - - - - - - - - - - - - - - - - - - - - - - - - - - - - - - - - - - -4–10Warning Types - - - - - - - - - - - - - - - - - - - - - - - - - - - - - - - - - - - - - - - - - - - - - - - - - -4–11
x 975-0240-01-01
Contents
Fault Messages - - - - - - - - - - - - - - - - - - - - - - - - - - - - - - - - - - - - - - - - - - - - - - - - - - - - 4–15Fault Types - - - - - - - - - - - - - - - - - - - - - - - - - - - - - - - - - - - - - - - - - - - - - - - - - - - - 4–16Inverter Operation After Faults - - - - - - - - - - - - - - - - - - - - - - - - - - - - - - - - - - - - - - - 4–16
A SpecificationsElectrical Specifications - - - - - - - - - - - - - - - - - - - - - - - - - - - - - - - - - - - - - - - - - - - - - - - - - -A–2
XW Inverter/Charger Overload Capability - - - - - - - - - - - - - - - - - - - - - - - - - - - - - - - - - - -A–3Output Power Versus Ambient Temperature - - - - - - - - - - - - - - - - - - - - - - - - - - - - - - - - - -A–4XW Inverter/Charger Efficiency - - - - - - - - - - - - - - - - - - - - - - - - - - - - - - - - - - - - - - - - - -A–4
Inverting Efficiency (Typical) - - - - - - - - - - - - - - - - - - - - - - - - - - - - - - - - - - - - - - - -A–4Charging Efficiency (Typical) - - - - - - - - - - - - - - - - - - - - - - - - - - - - - - - - - - - - - - - -A–5Sell Mode Efficiency (Typical) - - - - - - - - - - - - - - - - - - - - - - - - - - - - - - - - - - - - - - - -A–5
Mechanical Specifications - - - - - - - - - - - - - - - - - - - - - - - - - - - - - - - - - - - - - - - - - - - - - - - -A–5Accessories - - - - - - - - - - - - - - - - - - - - - - - - - - - - - - - - - - - - - - - - - - - - - - - - - - - - - - - - - -A–6
B Default SettingsDefault Settings and Ranges - - - - - - - - - - - - - - - - - - - - - - - - - - - - - - - - - - - - - - - - - - - - - - -B–2
Inverter Menu - - - - - - - - - - - - - - - - - - - - - - - - - - - - - - - - - - - - - - - - - - - - - - - - - - - - - -B–3Charger Menu - - - - - - - - - - - - - - - - - - - - - - - - - - - - - - - - - - - - - - - - - - - - - - - - - - - - - -B–3Custom Battery Menu - - - - - - - - - - - - - - - - - - - - - - - - - - - - - - - - - - - - - - - - - - - - - - - - -B–4AC Menu - - - - - - - - - - - - - - - - - - - - - - - - - - - - - - - - - - - - - - - - - - - - - - - - - - - - - - - - -B–4Grid Support Menu - - - - - - - - - - - - - - - - - - - - - - - - - - - - - - - - - - - - - - - - - - - - - - - - - - -B–5Gen Support Menu - - - - - - - - - - - - - - - - - - - - - - - - - - - - - - - - - - - - - - - - - - - - - - - - - - -B–5Aux Menu - - - - - - - - - - - - - - - - - - - - - - - - - - - - - - - - - - - - - - - - - - - - - - - - - - - - - - - - -B–6Connections Menu - - - - - - - - - - - - - - - - - - - - - - - - - - - - - - - - - - - - - - - - - - - - - - - - - - -B–6
Warranty and Return Information - - - - - - - - - - - - - - - - - - - - - - - - - - - - - - - - - - - - WA–1
Index - - - - - - - - - - - - - - - - - - - - - - - - - - - - - - - - - - - - - - - - - - - - - - - - - - - - - - - - - - - - - - - - IX–1
975-0240-01-01 xi

xii
1 Introduction
Chapter 1, “Introduction”, describes the operational features of the XW Series Inverter/Charger.
Topics in this chapter include:• “Basic Features” on page 1–2• “Basic Operation” on page 1–3
Introduction
Basic FeaturesCongratulations on your purchase of a XW Series Inverter/Charger from Xantrex Technology Inc. The XW Inverter/Charger is one of the finest inverter/chargers on the market today, incorporating state-of-the-art technology, high reliability, and convenient control features.Additional XW Inverter/Charger features include:• Building block power levels—units can be installed in parallel configuration
to produce up to 18 kilowatts• High efficiency true sine wave output• Split phase output on 120/240 60 Hz models to simplify system configuration
by eliminating the need for an autotransformer or stacking multiple inverters• Surge capacity to start difficult loads like well pumps, refrigerator or A/C
compressors• Power factor-corrected (PFC) input minimizes AC power required for
charging, effectively increasing AC pass-through capacity• High output, multi-stage charging to minimize charging time• Easy to configure and install systems at a competitive dollar-per-watt cost• Optional XW Automatic Generator Start allows operation with a wide range
of generators, supported through a dedicated generator input• Supports multi-mode grid-tie operation• Integrated transfer switch• Temperature-controlled, variable-speed internal cooling fan. The fan turns on
when the internal temperature reaches 45 °C and reaches maximum speed at 70 °C. The fan turns off when the internal temperature falls to 40 °C.
• Housing design promotes vertical air flow through the inverter. This natural “chimney effect” helps provide convection cooling at lower power levels, and reduces fan run time.
• Designed for reliability and field serviceability.System component
The XW Inverter/Charger uses Xanbus™, a network communications protocol developed by Xantrex, to communicate its settings and activity to other Xanbus-enabled devices. You can configure and monitor the XW Inverter/Charger and every Xanbus-enabled device in the system using an XW System Control Panel (part number 865-1050).
1–2 975-0240-01-01

Basic Operation
Basic OperationThe XW Series Inverter/Charger is a modular “building block” sine-wave inverter/charger that can be used for both residential and commercial stand-alone, grid-backup, and grid-tie applications with battery energy storage. The XW Inverter/Charger is a self-contained DC to AC inverter, battery charger and integrated AC transfer switch. Up to three inverters can be installed together in a 120/240 V split phase configuration.
Multi-unit operation Inverting For multiple XW Inverter/Chargers, the master inverter/charger broadcasts pulses on the Xanbus network to synchronize and arbitrate operation between the other paralleled units. This coordination of multi-unit operation results in reduced tare loss and improved efficiency—other paralleled units stay in low-power mode until they are needed.For paralleled XW Inverter/Chargers, only one inverter/charger operates, and additional devices come on-line only when the load exceeds approximately 60 per cent of the rated output of the master inverter/charger. In a three-unit system, additional slave units come on sequentially if the load on the master does not drop below 60 per cent about 3 to 5 seconds after a slave unit turns on to assist the master. When the load drops below 20 per cent of the master’s rated output, the slave units turn off in reverse order; that is, the last slave unit to turn on will be first to turn off.The current sharing imbalance for a single inverter/charger does not exceed 10 per cent of the rated maximum nominal output power. All non-utilized inverter/chargers are off-line when no load is present.Parallel charging When multiple XW Inverter/Chargers are charging in a system, they synchronize charging stages to ensure efficient charging of the battery bank. All units transition from bulk to absorption when a single unit does. In absorption, all units must complete the absorption stage before transitioning to the next stage. Note that units do not load share when charging. Each unit charges batteries based on the Max Charge Rate setting and active internal (temperature-based) deratings.If equalize is enabled on one or more devices capable of equalization charging (such as XW Inverter/Chargers or XW Series Solar Charge Controllers), only those devices initiate and perform a equalize cycle after absorption. Other devices will float (if three-stage charging is selected) or transition to AC pass-through (if two-stage charging is selected).When one or more XW Series Solar Charge Controllers are installed and operating in the system, the XW Inverter/Chargers synchronize charging stage (bulk, absorption, or float) with the charge controllers. In a similar fashion to the XW Inverter/Charger charge behavior, charge controllers also harmonize charging among themselves.AC Transfer XW Inverter/Chargers monitor each other using a peer-to-peer monitoring technique to determine the quality of AC input. If AC input is deemed bad by any of the paralleled units, no transfer to AC occurs and the units may
975-0240-01-01 1–3

Introduction
continually flash the AC LED on their respective information panels. If the system was in pass-through and AC fails on any unit, all units transfer to invert simultaneously.Faults When an XW Inverter/Charger in a multi-unit system has a fault, only the affected device shuts down, except in the following cases:• When a master unit has an invert mode fault that causes it to stop inverting, a
system wide fault occurs. Invert mode faults on a slave unit shut down only the affected slave unit.
• Battery-related faults such as battery over-temperature or over-voltage.Other modes of operation XW inverter/chargers operate independently when in grid support mode (including sell mode), load shave, generator support and charger block modes. This allows units to be configured to perform a multiple of functions independently and allowing greater flexibility in operating the system.
Auxiliary output Each XW Inverter/Charger has one programmable auxiliary output that is able to run a small 12 V fan or operate an external relay to perform other functions, such as to remotely start a generator (if the Xanbus-enabled XW-AGS is not used), to disconnect external non-critical loads, or to turn on a diversion load for battery voltage regulation.
Transfer relay The built-in transfer relay is rated for 60 amps. When an external AC source is detected on either of its two AC inputs, the switch transfers loads from the XW Inverter/Charger to the external power source, and then activates the battery charger to re-charge the battery bank.
AC1 and AC2 relay The XW Inverter/Charger design does not allow the AC1 and AC2 inputs to feed into each other. The relays controlling AC1 and AC2 input can never close simultaneously. This design prevents generator input from feeding out to the utility grid.
Surge Performance
Unlike many other inverters, the XW Inverter/Charger prevents voltage from sagging dramatically during surge conditions. The XW Inverter/Charger handles surges of over twice the inverter’s rated output with only a minimal drop in output voltage.
1–4 975-0240-01-01
Basic Operation
Islanding Protection
Islanding protection is an essential safety feature that ensures no person working on the utility grid is harmed by a distributed energy source, such an XW Inverter/Charger. Islanding protection also prevents loads connected to the inverter from being damaged by fluctuating utility grid input. Default software settings are programmed into each XW Inverter/Charger at the factory to ensure it does not “island” according to applicable safety regulations (such as IEEE 1547 and UL 1741).As well, the XW Inverter/Charger uses a proprietary positive feedback controller that has minimal effect on total harmonic distortion, and is guaranteed to detect islanding conditions for all power levels, as governed by IEEE and UL standards.In some instances it may be desirable from both a utility and customer point of view to adjust default anti-islanding settings. For example, the XW Inverter/Charger may experience “nuisance trips” if the grid is weak and the voltage falls outside the allowable range specified in the regulations. It may be difficult for a utility to upgrade the grid to eliminate this problem. With permission from the utility, the factory settings may be changed to allow the XW Inverter/Charger to operate over a wider grid voltage range.These settings should only be changed by qualified service personnel, using a special software application provided by Xantrex. Changing any values may compromise compliance with safety regulations. Do not do so without first consulting with the utility and agreeing on acceptable settings.While selling power, the XW Inverter/Charger continuously monitors utility grid voltage and frequency. If the grid voltage and frequency move beyond the XW Inverter/Charger default ranges1—during a power surge or outage, for example—the XW Inverter/Charger stops selling power to AC1 and disconnects from the utility grid for five minutes (Five minutes is the minimum reconnect time, and is not adjustable.) If the utility grid voltage and frequency have returned to their nominal values when the reconnect time has expired, the XW Inverter/Charger begins selling power again.The Fault light on the XW Inverter/Charger information panel indicates that a utility fault has occurred. No fault code appears on the three-character display because the fault is with the utility grid, not the XW Inverter/Charger.The XW System Control Panel indicates a utility fault with the Fault light and a fault message on its screen (faults F23 to F40 are utility faults—see Table 4-5 on page 4–18). The fault cannot be manually cleared. Utility faults clear automatically when the utility grid voltage and frequency return to their nominal values.
1.See “Electrical Specifications” on page A–2.
975-0240-01-01 1–5

Introduction
Monitoring the InverterYou can monitor XW Inverter/Charger operation using either the factory-installed Inverter Information Panel or the optional XW System Control Panel. You can configure the inverter only with the System Control Panel.
Inverter Information Panel
The Information Panel features:• Buttons for XW Inverter/Charger on and off control, clearing faults and
warnings, and battery equalization• Three-character display to indicate power output, charge current or
troubleshooting information• Light-emitting diodes (LEDs) to indicate inverter input status, inverter output
status, battery condition, and system warnings or faults.
Figure 1-1 Inverter Information Panel
Hybrid Inverter/Charger
Grid (AC1)
Gen (AC2)
Fault /Warning
EqualizeBattery
Charging
Invertingflashing = sell
kW
A
1–6 975-0240-01-01

Monitoring the Inverter
XW System Control Panel
The XW System Control Panel is required for configuring the XW Inverter/Charger and other Xanbus-enabled system components.The System Control Panel features:• Liquid crystal display that provides graphics and text describing operation
and status information in real time• LED fault and warning indicator• Internal clock to control time-dependent XW Inverter/Charger settings• Buttons to select configuration menus, customize inverter/charger settings,
and clear faults and warnings.
Figure 1-2 XW System Control Panel
Fault/Warning
System Control Panel II
Standby
975-0240-01-01 1–7

1–8

2 Monitoring Operation
Chapter 2, “Monitoring Operation”, contains information about monitoring XW Inverter/Charger operation using the Inverter Information Panel or the XW System Control Panel.
The topics in this chapter include:• “Monitoring Operation with the Inverter Information Panel” on
page 2–2• “Monitoring Operation with the XW System Control Panel” on
page 2–7

Monitoring Operation
Monitoring Operation with the Inverter Information PanelThe Inverter Information Panel displays basic information that enables you to monitor a single XW Inverter/Charger. The Inverter Information Panel also allows you to turn the XW Inverter/Charger on and off and start battery equalization. LEDs on the Information Panel indicate AC input status, inverter status, battery condition, and charging and equalization status. The LEDs and three-character display screen also alert you to XW Inverter/Charger warning and fault conditions.
Monitoring AC Input Status
Grid (AC1) The green Grid (AC1) LED indicates the presence and status of AC source connected to the AC1 input. In most installations, AC1 input is from the utility grid. However, any AC source can be connected to the AC1 input.
Gen (AC2) The green Gen (AC2) LED indicates the presence and status of a generator or other auxiliary AC source on the AC2 input.
Figure 2-1 Inverter Information Panel
Grid (AC1)
Gen (AC2)
Fault /Warning
EqualizeBattery
Charging
Invertingflashing = sell
kW
A8.88
Symbol LED On LED Flashing LED Off
AC input is present and qualified. The XW Inverter/Charger is ready to charge batteries, sell power to the grid, or pass AC through to the loads.
AC input is present, within nominal range and is being qualified.
The XW Inverter/Charger is not connected to the grid. AC input is not present, or AC input is present but not within nominal range.
2–2 975-0240-01-01

Monitoring Operation with the Inverter Information Panel
When one AC input LED is on and the other AC input LED is flashing, AC input is present on both AC1 and AC2. However, the XW Inverter/Charger can qualify and receive AC input from only one source at a time. The qualified source is represented by the LED that is on. When two sources of AC input are present, the XW Inverter/Charger uses the source selected under AC Priority on the System Control Panel AC Settings menu. The AC sources connected to AC1 and AC2 can be the utility grid and a generator, or two generators.
Monitoring Inverter Status
The green kW LED indicates the XW Inverter/Charger is inverting DC input to AC output. When this LED is on or flashing, the display screen shows inverter output power in kilowatts.
Monitoring Charger Status
The green A LED indicates the XW Inverter/Charger is charging the battery bank. When this LED is on, the display screen shows battery charging current in amps.
Monitoring Faults and Warnings
The red Fault/Warning LED indicates the presence of a fault or warning in the system. To clear active faults, press the On/Off button momentarily.
Symbol LED On LED Flashing LED Off
The AC source is present and AC input is qualified. The XW Inverter/Charger is ready to charge batteries and pass power through to the loads.
AC input is present, within nominal range and is being qualified.
AC input is not present, or AC input is present but not within nominal range.
Symbol LED On LED Flashing LED Off
The XW Inverter/Charger is inverting, and producing power for connected loads.
The XW Inverter/Charger is selling power to the grid.
The XW Inverter/Charger is not inverting.
Note: When a charge cycle ends or charging is manually disabled, the XW Inverter/Charger does not leave charge mode immediately, and the charging LED remains on for 60 seconds.
Symbol LED On LED Off
The XW Inverter/Charger is charging the batteries.
The XW Inverter/Charger is not charging.
975-0240-01-01 2–3

Monitoring Operation
Equalizing Batteries
Button Pressing the Equalize button (indicated by the symbol) for five seconds turns battery equalization on and off. After this button is pressed, the XW Inverter/Charger begins the equalization charge after the next charge cycle is complete. Equalization functions only if AC is present and qualified and the charger is enabled. Otherwise the inverter/charger generates a “cannot equalize” fault (W96).
For more information, see “Equalize Charging the Batteries” on page 3–13LED The yellow Equalize LED indicates that the XW Inverter/Charger is equalizing
batteries.
Symbol LED On LED Flashing
The XW Inverter/Charger has a fault and has stopped charging or inverting. The LED also turns on steadily if the unit has both a fault and a warning.
The XW Inverter/Charger has a warning. Warnings may escalate to a fault if the warning condition does not go away.
CAUTION: Battery damageEqualization may damage your battery. Consult your battery supplier for details on equalize charging for the battery type in your system.
Important: In a system where more than one device is capable of equalizing batteries (such as a system including multiple XW Inverter/Chargers and Solar Charge Controllers), there is no system-wide equalization command for all devices. To equalize with multiple devices, each would have to be enabled individually. Alternatively, equalization can be performed using only one device. During the equalization process, one device applies the equalization charge while the other devices continue to operate in synchronized charge mode, typically in float (three-stage charging) or no-float (two-stage charging).
Symbol LED On LED Flashing
The XW Inverter/Charger has begun equalizing the batteries.
Equalization has been enabled but has not begun. The XW Inverter/Charger must complete a charge cycle before applying the equalization charge.
2–4 975-0240-01-01

Monitoring Operation with the Inverter Information Panel
Turning the XW Inverter/Charger On and Off
On/Off control When the XW Inverter/Charger is operating, pressing and holding the On/Off button () for five seconds turns the unit off. Pressing the On/Off button momentarily returns the unit to its previous operating state.When the XW Inverter/Charger is being turned off, the other Inverter Information Panel buttons stop working. The shutdown process cannot be cancelled. The XW Inverter/Charger can only be turned back on once the display is blank.
Standby mode In Standby mode, the XW Inverter/Charger stops charging, inverting, and passing through AC input. However, the unit remains powered up and present on the Xanbus network.To put the XW Inverter/Charger into Standby mode, press and hold the On/Off button and the Equalize button simultaneously for about five seconds. The display shows “Stb.” To return the XW Inverter/Charger to operating mode, press the On/Off button momentarily.Pressing the On/Off button momentarily while the XW Inverter/Charger is operating clears active faults and warnings.
Single-unit installations
In a single-unit installation, when the XW Inverter/Charger is turned off using the On/Off button, Xanbus network power is lost. When Xanbus network power is lost, network-connected accessories such as the Automatic Generator Start (XW-AGS) and XW System Control Panel lose power and stop operating. XW Charge Controllers continue to operate and communicate between each other if Xanbus network power is removed.
Multiple-unit installations
If the On/Off power button is pressed and held on a master XW Inverter/Charger (see “Inverter Mode” on the “Multi-Unit Config Menu” on page 3–23) and an XW-AGS is installed in the system, the unit stops inverting/charging immediately and turns off completely in 120 seconds. During this time, the display shows “OFF.” This interval allows the XW-AGS to stop the generator after a “cool down” period. During the 120-second shutdown time all network communication is blocked and the unit sends a shutdown command to all other devices in the system. As well, the Inverter Information Panel buttons stop working and the shutdown process cannot be cancelled. The XW Inverter/Charger can only be turned back on once the display is blank.In a multiple-unit installation, when a Slave XW Inverter/Charger is turned off, other XW Inverter/Chargers continue to supply Xanbus network power and the XW-AGS and XW System Control Panel continue operating.
975-0240-01-01 2–5
Monitoring Operation
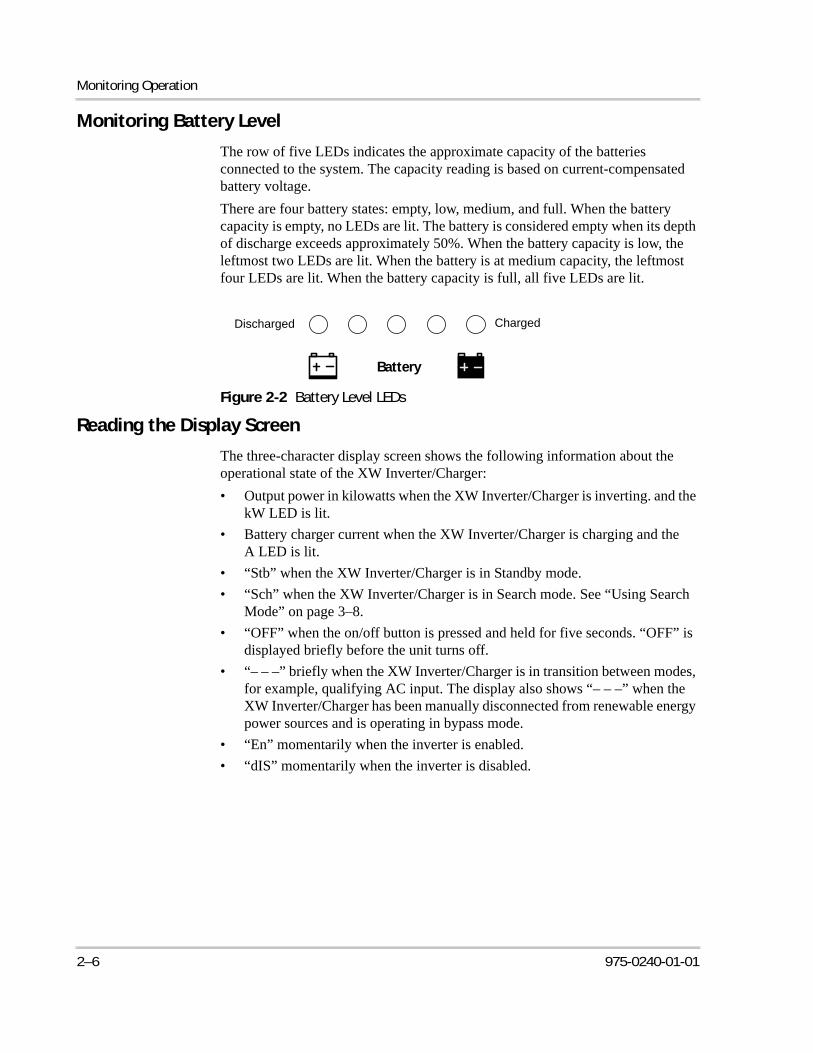
Monitoring Battery Level
The row of five LEDs indicates the approximate capacity of the batteries connected to the system. The capacity reading is based on current-compensated battery voltage.There are four battery states: empty, low, medium, and full. When the battery capacity is empty, no LEDs are lit. The battery is considered empty when its depth of discharge exceeds approximately 50%. When the battery capacity is low, the leftmost two LEDs are lit. When the battery is at medium capacity, the leftmost four LEDs are lit. When the battery capacity is full, all five LEDs are lit.
Reading the Display Screen
The three-character display screen shows the following information about the operational state of the XW Inverter/Charger:• Output power in kilowatts when the XW Inverter/Charger is inverting. and the
kW LED is lit.• Battery charger current when the XW Inverter/Charger is charging and the
A LED is lit.• “Stb” when the XW Inverter/Charger is in Standby mode.• “Sch” when the XW Inverter/Charger is in Search mode. See “Using Search
Mode” on page 3–8.• “OFF” when the on/off button is pressed and held for five seconds. “OFF” is
displayed briefly before the unit turns off.• “– – –” briefly when the XW Inverter/Charger is in transition between modes,
for example, qualifying AC input. The display also shows “– – –” when the XW Inverter/Charger has been manually disconnected from renewable energy power sources and is operating in bypass mode.
• “En” momentarily when the inverter is enabled.• “dIS” momentarily when the inverter is disabled.
Figure 2-2 Battery Level LEDs
Battery
Discharged Charged
2–6 975-0240-01-01

Monitoring Operation with the XW System Control Panel
Monitoring Operation with the XW System Control PanelThe XW System Control Panel provides remote configuration and monitoring capability for the XW Inverter/Charger and other Xanbus-enabled devices in the power system.You can monitor XW Inverter/Charger operation on the XW System Control Panel using the:• System Status screen (see page 2–11)• XW Inverter/Charger Home screen (see page 2–11)• XW Inverter/Charger Meters Menu (see page 2–14).
XW System Control Panel Features
Feature Description
1 Fault/Warning light indicates a device has a fault or warning condition and requires attention. The light flashes when a warning occurs, and turns on steadily when a fault occurs.
2 Enter button confirms selection of a menu item or displays the next screen.
3 Up arrow button scrolls upwards through screen text or increases a selected value.
4 Down arrow button scrolls downwards through screen text or decreases a selected value.
5 Exit button cancels selection of a menu item or displays the previous screen.
6 Screen shows menus, settings, and system information.
7 Standby button disables inverting and charging on all XW Inverter/Chargers in the system when pressed for one to two seconds. To enable inverting and charging, press the Standby button again.
Fault/Warning
System Control Panel II
Standby
1
2 3 4 5
7
6
975-0240-01-01 2–7
Monitoring Operation
Using the Standby Button
The Standby button has two functions, depending on how it is pressed. The Standby button can disable inverting and charging for all XW Inverter/Chargers in the system, or, when pressed simultaneously with the Exit button, put the entire system into Standby mode.Pressing the Standby button produces the same result as disabling “Invert” and “AC Charge” from the System Settings menu on the XW System Control Panel. Pressing the Standby button momentarily affects only XW Inverter/Chargers; it does not affect Charge Controller operation. After disabling inverting and charging with the Standby button, the system continues to pass AC input through to the loads, and “– – –” is displayed on the Inverter Information Panel.Pressing the Exit and Standby buttons at the same time puts the entire XW power system (including Charge Controllers) into Standby mode. In Standby mode, the XW Inverter/Chargers stop passing AC input through to the loads, and “Stb” is displayed on Inverter Information Panel.After the keypress command to enter Standby mode, the XW-AGS (if installed) shuts down the generator (if it is running) after a cool-down cycle.
System Control Panel Navigation
This section describes the different types of screens and menus on the System Control Panel. To monitor XW Inverter/Charger operation, it is helpful to know how to locate these screens and menus.
Viewing the System Control Panel Home Screens
The top level screens on the System Control Panel are the Startup screen, the System Status screen and the Device Home screens. After power is applied and the Startup screen appears, the System Control Panel displays the System Status screen. The Device Home screens for the XW Inverter/Charger and other devices in the system can be viewed by pressing the up and down arrows, as shown in Figure 2-3.
2–8 975-0240-01-01

Monitoring Operation with the XW System Control Panel
System Status Screen
The System Status screen appears after the Startup screen. The System Status screen displays aggregated status information for the entire power system. For example, a single system may have three Xanbus™ network-connected XW Inverter/Chargers, two XW Solar Charge Controllers, one XW-Automatic Generator Start module and one XW System Control Panel all connected to a single battery bank, a single generator and a common utility grid.The System Status screen always features a “Menu” arrow pointing to the Enter button. Pressing Enter takes you to the Select Device menu. For more information, see “Reading the System Status Screen” on page 2–11.
Figure 2-3 System Control Panel Top Level Screens
Startup screen
SystemStatus screen
System Status
Select Devicemenu
Select Device
XWInverter/ChargerHome screen
XW6048:Home
Device 2Home screen
Device 2:Home
Device 3Home screen
Device 3:Home
Device nHome screen
Device n:Home
Appears for a few seconds after the system starts up or when the system has been reset.
Press Enter to view Select Device menu.
Select device from list and press Enter to view Device Setup menu.
Press Enter from a Device Home screen to view the Device Setup menu.
The number of Home screens depends on the number of Xanbus-enabled devices installed in the system.
Important: If you are uncertain which System Control Panel screen or menu you are viewing, you can always return to the starting point—the System Status screen—by pressing Exit repeatedly until the screens stop changing.
975-0240-01-01 2–9

Monitoring Operation
XW Inverter/Charger Home Screen
The XW Inverter/Charger Home screen is the first of the Device Home screens. Each XW Inverter/Charger installed in the system has its own Home screen.The XW Inverter/Charger Home screen displays status information for the XW Inverter/Charger. The screen appearance varies with the status of the inverter/charger (Standby, Inverting, Charging, AC Bypass, Search, or Equalize). For more information, see “Reading the XW Inverter/Charger Home Screen” on page 2–11.To display the XW Inverter/Charger Home screen:u Press the down arrow key from the System Status screen.
Viewing Other Screens
This section describes the next level of screens and menus on the System Control Panel.
Select Device Menu
The Select Device menu displays a list of Xanbus-enabled devices in the system, including the XW Inverter/Charger and the System Control Panel. The Select Device menu is where you can access the Setup menus for each device in the system. The length of the Select Device menu depends on how many Xanbus-enabled devices are installed.The Select Device menu also contains the Clock menu (where the time and date are set) and the System Settings menu (where system-level settings can be configured). The System Settings, SCP, and Clock menus are always available from the Select Device menu, regardless of the number of Xanbus-enabled devices installed.To display the Select Device menu:u Press Enter from the System Status screen.
Device Setup Menus
Device Setup menus display status information (on the Meters screen) and changeable settings. Changeable settings are identified by the square brackets [ ] around values in the right-hand column.To display the Setup menu for a device:u Highlight the device name on the Select Device menu and press Enter.
-Or-From the Device Home screen, press Enter.
2–10 975-0240-01-01

Monitoring Operation with the XW System Control Panel
Reading the System Status Screen
The System Status screen displays:• Qualified AC source (if applicable) and total power to and from the source• Battery voltage and capacity level• Net battery input or output current• Total inverter loading.
Reading the XW Inverter/Charger Home Screen
The XW Inverter/Charger Home screen displays real-time operational data specific to the XW Inverter/Charger. The XW Inverter/Charger status changes according to the states described in Table 2-1 on page 2–12.To view the XW Inverter/Charger Home screen:u On the System Home screen, press the down arrow button until the XW
Inverter/Charger Home screen appears.
Figure 2-4 Selecting a Device Setup Menu
Select Device menu
Select Device
XW6048
XW6048 00: Setup
Meters[Enabled][Disabled][Disabled][Enabled]
[Bulk][Disabled][Operating]
XW Inverter/ChargerSetup menu
Select device from list and press Enter to view Device Setup menu
Figure 2-5 System Status Screen
System Status
menu
20.4A 53.9V
115V 3202W
E--F1235W
Line 1: Battery voltage and input/output currentLine 2: Battery level meterLine 3: Power supplied to loadsLine 4: AC input source and line-to-neutral voltage (averaged between L1 and L2). Bottom left corner displays “AC1” or “AC2” depending on the active input source. When selling to the grid, the power displayed is negative.
“Menu” arrow indicates the Enter button. Pressing Enter displays the Select Device menu.
975-0240-01-01 2–11

Monitoring Operation
Pressing the down arrow button from the XW Inverter/Charger Home screen displays the Home screens for other XW Inverter/Chargers and other Xanbus-enabled devices in the system.
Figure 2-6 XW Inverter/Charger Home Screen
setup system
XW6048 00:HomeInvert
-26.4A 51.9V1250W
0.0V 0W
Top Line: Device name and numberLine 1: Inverter/charger statusLine 2: Battery current (in + or out –) and voltageLine 3: Power supplied to loadsLine 4: AC in status
“Setup” arrow indicates the Enter button. Pressing Enter displays the XW Inverter/Charger setup menu.
“System” arrow indicates the Exit button. Pressing Exit displays the System Home screen.
Table 2-1 XW Inverter/Charger Home Screen States
XW Inverter/Charger Status Displayed When...
Invert The XW Inverter/Charger is supplying power to loads by inverting power from the batteries. AC input from the utility or generator is absent or out of nominal range.
Qualifying AC The XW Inverter/Charger is determining if AC input is within a usable voltage and frequency range. “Qualifying AC” is also displayed when the XW Inverter/Charger is awaiting application of AC power or a command to enable invert mode.
Charging The XW Inverter/Charger is charging the batteries from qualified AC input from the utility grid or a generator. The charge state is in transition to either Bulk, Absorption, Float or Equalize. AC input is also passed through to the load while charging.
Bulk The XW Inverter/Charger is bulk charging the batteries from qualified AC input from the utility grid or a generator. AC input is also passed through to the load while bulk charging.
Absorption The XW Inverter/Charger is absorption charging the batteries from qualified AC input from the utility grid or a generator. AC input is also passed through to the load while absorption charging.
ABS Finish The XW Inverter/Charger has completed the absorption stage and is waiting for other chargers in the system to complete absorption. This status can occur only when there is another device (an inverter/charger or charge controller) also charging the battery.
Float The XW Inverter/Charger is float charging the batteries from qualified AC input from the utility grid or a generator. The XW Inverter/Charger is set for three-stage charging. AC input is also passed through to the load while float charging.
CHG Finish The XW Inverter/Charger has completed charging or the charge cycle has been interrupted and is transitioning to the next state. This stage last about one minute, while the battery is allowed to settle. The delay keeps the inverter/charger from unnecessarily transitioning to Grid Support (if enabled) after a charge cycle.
2–12 975-0240-01-01

Monitoring Operation with the XW System Control Panel
Fault The XW Inverter/Charger has an active fault. The Fault/Warning light on the System Control Panel is on.
Gen Support There is AC input from the generator, and the XW Inverter/Charger is supporting the generator by supplying additional power to the critical loads.The XW Inverter/Charger supports the generator (or other power source connected to the AC2 input) when the AC load current drawn from AC2 exceeds 80 per cent of the AC2 breaker setting or GenSup Amps setting for 1 to 2 seconds.The XW Inverter/Charger uses stored DC capacity to load share with the generator until the total AC load current (generator plus inverter output) drops by 2 amps plus 10 per cent of the GenSup Amps setting for 6 seconds.For example if GenSup Amps is set to 10 amps, the inverter starts to support when the load exceeds 10 amps for 2 seconds and stops when it drops more than 3 amps below the GenSup Amps setting, or 7 amps (2 amps plus 10 per cent of 10 amps = 3 amps).The system can enter this state if the battery voltage is above the Low Batt Cut Out setting and Gen Support is enabled. See “Generator Support Settings” on page 3–21.
Grid Support There is AC input from the utility and the XW Inverter/Charger is supporting the utility grid by supplying additional power to the critical loads.The XW Inverter/Charger supports the utility grid by limiting the power drawn from the utility to less than 10 per cent of the load demand. This mode is desirable for using excess energy from auxiliary DC sources like PV, while still maintaining a charged battery bank. No power is sold to the utility in this mode.The XW Inverter/Charger uses stored DC capacity to support the grid until the total AC load current (grid plus inverter output) drops by 2 amps plus 10 per cent of the Load Shave Amps setting for 6 seconds.The XW Inverter/Charger enters this state only when the Grid Support is set to “On” and battery voltage is above the Grid Supp Volts setting. See “Grid Support Settings” on page 3–17.
Load Shaving There is AC input from the utility, and the XW Inverter/Charger is supporting the utility grid when the current required to power the loads rises above the Load Shave Amps setting between the Load Shave Start and Load Shave Stop times set on the Grid Support menu.Many utilities impose a surcharge on their customers based on the peak load used by a facility. When load shaving, the XW Inverter/Charger uses stored DC capacity to reduce the peak load on the utility grid and keep current draw from the grid equal to or under the Load Shave Amps setting. The XW Inverter/Charger enters this state only when Grid Support is enabled, the Load Shave time window is valid and the load draw exceeds the Load Shave Amps setting. See “Grid Support Settings” on page 3–17.
Search Search Mode is enabled and the XW Inverter/Charger is standing by, waiting to begin inverting. See “Using Search Mode” on page 3–8.
SellToGrid The XW Inverter/Charger is grid tied (grid voltage and frequency are within the limits specified by UL1741) and selling power to the utility grid. Both Grid Support and Sell must be enabled in order to sell power back to the utility. See Table 3-1 on page 3–3 and “Grid Support Settings” on page 3–17.
Table 2-1 XW Inverter/Charger Home Screen States
XW Inverter/Charger Status Displayed When...
975-0240-01-01 2–13

Monitoring Operation
Reading the Meters Screen
The Meters screen displays total system power production, grid voltage and current status, and load voltage and current status.To view the Meters screen:u On the XW Inverter/Charger setup menu, highlight “Meters” and press Enter.
Standby The unit is placed in Standby mode using the XW System Control Panel “Mode” on the Setup menu or the Standby button on the SCP or using the Standby key press (On/Off and Equalization) on the Inverter Information Panel.
Passthru The AC connected to the AC1 or AC2 input is passing directly through the XW Inverter/Charger to the loads. The batteries are not being charged in this state.
Equalize Equalization has been turned on and the XW Inverter/Charger is equalizing the batteries after completing a full charge cycle. The equalize screen (see Figure 2-7) shows battery voltage, input current, battery temperature, and equalization time elapsed and remaining.
Figure 2-7 XW Inverter/Charger Home Screen (Equalize)
Table 2-1 XW Inverter/Charger Home Screen States
XW Inverter/Charger Status Displayed When...
menu
XW6048 00:Equalize
48V +5A 95oF
31 min. 60 min.
Figure 2-8 Viewing the Meters Screen
Meters
3200W 4500VA21.1A 120V21.1A 120V
0W 0VA0.0A 0V0.0A 0V
3200W 4500VA21.1A 120V21.1A 120V
Float3.7A 57.4V
20°C
XW6048 00: SetupMeters
[Enabled][Disabled][Disabled][Enabled]
[Bulk][Disabled]
[Operating]
2–14 975-0240-01-01

Monitoring Operation with the XW System Control Panel
Table 2-2 Meters Screen
Screen Item Description
AC1 AC input power connected to the XW Inverter/Charger AC1 terminals, in Watts and Volt-Amps. AC1 is assumed to be connected to the utility grid, but can be connected to any other 240 Vac source.
AC1 in L1 AC input voltage and current connected to the XW Inverter/Charger AC L1 terminals. This input voltage display may drift slightly before the inverter has synchronized to the grid.
AC1 in L2 AC input voltage and current connected to the inverter’s AC L2 terminals. This input voltage display may drift slightly before the inverter has synchronized to the grid.
AC2 AC input power connected to the XW Inverter/Charger AC2 terminals, in Watts and Volt-Amps. AC2 is assumed to be connected to a generator, but can be connected to any other 240 Vac source.
AC2 in L1 AC input voltage and current supplied to the inverter/charger from the AC2 L1 input. This meter indicates the inverter/charger is drawing power from the generator to charge the battery or power the AC loads.
AC2 in L2 AC input voltage and current supplied to the inverter/charger from the AC2 L2 input. This meter indicates the inverter/charger is drawing power from the generator to charge the battery or power the AC loads.
Load Power Power consumed by the AC loads, in Watts and Volt-Amps.
Load L1 AC voltage and current supplied from L1 to the AC loads.
Load L2 AC voltage and current supplied from L2 to the AC loads.
State Operating state of the XW Inverter/Charger. For more information, see Table 2-1 on page 2–12.
DC Charging current and battery voltage.
Batt Temp Battery Temperature, as read by the BTS. If the BTS is not installed, this reads “NotAvailable.”
975-0240-01-01 2–15

2–16
3 Configuration
Chapter 3, “Configuration” explains how to navigate through the XW System Control Panel menus and configure the XW Inverter/Charger.
Topics in this chapter include:• “Using the XW System Control Panel” on page 3–2• “Using the Setup Menus” on page 3–4

Configuration
Using the XW System Control PanelThe XW Inverter/Charger is configured using the XW System Control Panel. The System Control Panel provides access to settings relating to AC input and output, battery charging, and grid-tie operation.
XW Inverter/Charger Setup Menu
The XW Inverter/Charger Setup menu is accessible either from the System Home screen or from the XW Inverter/Charger Home screen.To navigate to the XW Inverter/Charger Setup menu:1. From the System Home screen, press Enter to view the Select Device menu.
Go to step 2.OrFrom the XW Inverter/Charger Home screen, press Enter. The XW Inverter/Charger Setup menu appears.
2. Highlight the XW Inverter/Charger device name, and press Enter.
WARNING: Risk of fire and shock hazardThe following information is for qualified installation/service personnel only. Incorrect configuration can lead to battery damage and risk of fire.Consult the local utility before changing any Grid Support settings. Before changing XW Inverter/Charger settings, you must be familiar with the settings and the system-wide impact of changing those settings. Setting these parameters incorrectly could damage connected equipment (such as batteries) or could severely affect the performance of your system.
Figure 3-1 XW Inverter/Charger Setup menu
XW6048 00: SetupMeters
[Enabled][Disabled][Disabled][Enabled]
[None][Disabled]
[Operating]Note: The System Control Panel displays only four lines of the Setup menu at one time. To view additional settings, press the Down arrow button.
3–2 975-0240-01-01

Using the XW System Control Panel
Setting the Time and Date
XW Inverter/Charger advanced features such as peak load shaving, Charger Block, and time-stamped events (faults and warnings and logged historical data) require that the system be set to the correct time. The System Control Panel has an internal clock that controls the time for all Xanbus-enabled devices in the system. You can set the time, time format, and date on the Clock menu. The Clock menu is accessible on the Select Device menu.For more information, see “Setting the Time” and “Setting the Date” in the XW System Control Panel Owner’s Guide.
Table 3-1 XW Inverter/Charger Setup menu
Menu Item Description
Meters Displays the Meters screen.
Inverter Enables or disables the inverter.
Search Mode Turns Search Mode on and off. See “Using Search Mode” on page 3–8.
Grid Support Enables or disables grid-interactive inverter/charger features, such as Peak Load Shaving and Grid Sell mode. See “Grid Support Settings” on page 3–17. To allow Grid Support to function after battery charging has completed, it is recommended to set the Charge Cycle to 2-Stage. See “Charger Settings Menu” on page 3–10.
Charger Enables or disables the charger.
Force Chg Manually changes the charge stage to either Bulk or Float (when 3-Stage cycle is selected) or Bulk or NoFloat (when 2-Stage cycle is selected).
Equalize Enables or disables battery equalization.
Mode Selects the XW Inverter/Charger operating mode: Operating or Standby. The red Standby button on the System Control Panel has similar functionality (see “XW System Control Panel Features” on page 2–7).
Clear Faults/Warnings Clears any active faults or warnings. If the fault or warning condition is still present, the fault or warning message may reappear.
View Device Info Displays the Device Info screen. On the Device Info screen you can view the Warning Log, Fault Log and Event Log.
Basic Settings Select to display and/or adjust the basic XW Inverter/Charger settings. See “Using the Setup Menus” on page 3–4.
975-0240-01-01 3–3
Configuration
Using the Setup MenusBasic menu The XW Inverter/Charger configuration settings can be viewed in Basic and
Advanced formats (see Figure 3-3, “Basic and Advanced Settings” on page 3–6). The Basic settings include configuration items you may have to adjust routinely, or as part of initial setup.
Advanced menu The Advanced settings option gives you access to the full range of settings for the XW Inverter/Charger, including everything displayed on the Basic menu. As a safeguard against unintended advanced configuration, the XW Inverter/Charger displays the Basic settings by default. To view the Advanced settings, you must perform a special keypress.
To view the Advanced settings:u Press Enter + up arrow + down arrow at the same time.
The XW Inverter/Charger Advanced settings include menus for configuring:• Inverter settings (see page 3–7)• Charger settings (see page 3–10)• AC transfer limit settings (see page 3–16)• Grid Support and Peak Load Shaving settings (see page 3–17)• Generator Support settings (see page 3–21)• Auxiliary output settings (see page 3–21).• Multi-Unit Operation, including customizing the default model name of the
inverter/charger, and setting its network device number. Setting the device number is important when multiple XW Inverter/Chargers are on the Xanbus network and sharing connections such as AC loads, utility grid, and generator. The device number is also used when configuring paralleled XW Inverter/Chargers for master-slave operation (see page 3–7).
In the Advanced settings you can also copy another unit’s settings using the “Copy from” command.
WARNING: Risk of fire and shock hazardThe Advanced settings are intended for qualified installation/service personnel only. Incorrect configuration can lead to battery damage and risk of fire.Consult the local utility before changing any Grid Support settings. Before changing XW Inverter/Charger settings, you must be familiar with the settings and the system-wide impact of changing those settings. Setting these parameters incorrectly could damage connected equipment (such as batteries) or could severely affect the performance of your system.
Notes:• This keypress enables the Advanced settings for every device in the system.• After performing the keypress, “Advanced Settings” appears at the top of the Setup
menu. When the keypress is performed again, the Setup menu displays “Basic Settings” as the last item on the menu.
3–4 975-0240-01-01

Using the Setup Menus
To select the Advanced or Basic settings:u From the Setup menu, with Basic Settings or Advanced Settings highlighted,
press Enter. See Figure 3-2.
To select and change a configurable setting:1. On the desired configuration menu, press the up arrow or down arrow button
to highlight the setting you want to change.2. Press Enter to highlight the current value of the setting.3. Press the up arrow or the down arrow button to change the value. Hold down
the button to scroll through a large range of values quickly.The previously set value appears with an asterisk (*) beside it.
4. Press Enter to select the value.5. If you have another setting to change, return to step 1.
OrIf you have no more settings to change, press Exit until the System Control Panel displays the desired screen or menu.
Figure 3-2 Selecting Advanced Settings
XW6048 00: AdvInverter Settings
[XW6048 01]
XW6048 00: Setup
Advanced Settings
[Enabled][Disabled][Disabled][Enabled]
[None][Disabled]
[Operating]
Important: If you have no more settings to change, it is recommended to leave the Setup menu in the Basic Settings format to help prevent unintended configuration. If the Setup menu displays “Advanced Settings,” press Enter + up arrow + down arrow at the same time. The Setup menu should then display “Basic Settings” as the last item on the menu.
975-0240-01-01 3–5

Configuration
Figure 3-3 Basic and Advanced Settings
XW6048 00:AC
XW6048 00:Inv
XW6048 00: Multi
XW6048 00:Gen
XW6048 00: Aux
XW6048 00:Grid
XW6048 00:Chg
Custom Settings
XW6048 00: Adv
Connections
[44V][10s][70V][50W][2s]
[Disabled][64.0V][57.6V][57.6V][54.0V]
[108mV/C]
[Flooded]
[440Ah][100%]
[2-Stage][Warm][50V]
[180min][12:00AM][12:00AM]
[AC1][60A][106V][132V][55Hz][65Hz][60A][80V][138V][55Hz][65Hz]
[54V][Disabled]
[28A][Disabled]
[60A][12:00AM][12:00AM]
[ManualOff][ActHi]
[LowBattV][42V][1sec][48V][1sec]
[XW6048][00]
[SplitPhMstr]
[HouseBatt1][ACLoad1][Grid1][Gen1]
[Disabled][10A]
[XW6048 01]
XW6048 00:BasicBatt Type [Flooded]
[440Ah][100%]
[2-Stage][50V][AC1][60A][60A][54V][44V]
Advanced Settings
Basic Settings
Note: The System Control Panel displays only four lines of the configuration menus at one time. To view additional settings, press the down arrow button.
“Custom Settings” is displayed only when “Custom” is selected under “Batt Type.”
“Eqlz Voltage” is displayed only when “Eqlz Support” is Enabled.
Trigger and Clear settings are displayed only when “Automatic” is selected under “Manual Aux.”
3–6 975-0240-01-01

Inverter Settings Menu
Inverter Settings MenuThe Inverter Settings Menu contains settings that control when the XW Inverter/Charger turns on and off when it is inverting.
For default settings, see “Inverter Menu” on page B–3.
Using the Low Battery Cut Out and LBCO Delay Settings
The Low Batt Cut Out setting is the lowest voltage level acceptable for battery use by the inverter. When the batteries discharge to the Low Batt Cut Out setting, and are held at or below this level for the LBCO Delay time, the inverter output shuts down and transfers any available AC source (generator or grid) to the charger to
Table 3-2 Inverter Settings menu
Item Description
Low Batt Cut Out
This setting controls when the inverter turns off due to a low battery voltage condition. The inverter will turn off only after this level has been reached for the period of time set by the LCBO Delay. This setting is not temperature compensated.
LBCO Delay
LBCO Delay controls how long the inverter is allowed to operate at or below the Low Battery Cut Out level before turning off due to a low battery voltage condition. The inverter will turn off only after the Low Batt Cut Out level has been reached for this uninterrupted period of time.Once the inverter has shut off, the battery voltage must rise 4 volts above the Low Batt Cut Out setting for inverter operation to resume.
High Batt Cut Out
High Batt Cut Out sets the maximum battery voltage at which the inverter will operate. If the battery voltage exceeds this limit for more than 1 minute, the inverter displays a fault message (F49) and shuts down. The inverter will not support AC loads when in this condition. If a qualified AC source is present, the unit passes AC through to the loads. The inverter automatically restarts when the voltage drops to 3 volts (24-volt system) or 6 volts (48-volt system) below the High Batt Cut Out setting. If battery voltage continues to rise after shutdown, an external charger may still be charging the batteries. The XW Inverter/Charger cannot control how external chargers operate.
Search Watts
Search Watts sets the inverter’s search sensitivity when Search mode is enabled. When a load larger than this setting is present, the inverter turns on. Enabling Search mode from the Setup Menu (see page 3–2) can minimize power draw from the battery during periods of low demand from loads. Also see “Using Search Mode” on page 3–8.
Search Delay
Search Delay sets the time between search pulses. When searching for loads, the XW Inverter/Charger sends out search pulses to determine if a load is present. If the XW Inverter/Charger finds a load above the Search Watts setting, the inverter comes on. XW Inverter/Charger power draw while in Search mode decreases when Search Delay is increased, but the inverter’s response time to active loads is reduced.
975-0240-01-01 3–7

Configuration
bring the battery level back above the Low Batt Cut Out setting. After shutdown, the inverter does not support any AC loads, and AC loads must be powered by either a generator or grid power.If using an automatic generator starting system, it is recommended to set the AGS voltage trigger setting higher than the XW Inverter/Charger Low Batt Cut Out voltage. Otherwise, inverter output turns off and then back on when the generator auto-starts.If using an automatic generator starting system with the start trigger set to the same voltage as the LBCO voltage, do not set the LBCO Delay for less than the amount of time it takes the generator to start and connect. Otherwise, inverter output turns off and then back on when the generator auto-starts.
Using Search Mode
While idling in Search mode, the inverter sends out an electrical search pulse that travels through the AC wiring “looking” for connected loads. The frequency of the search pulse is set using the Search Delay setting.After a load larger than the Search Watts setting is detected, the inverter turns on.
Why use Search mode?
Search mode allows you to selectively power only items that draw more than a certain amount of power, which can result in power savings.The XW Inverter/Charger has a no-load power draw of about 28 watts. Enabling Search mode reduces this power draw to less than 8 watts.
When to set up Search mode
The Search mode feature on the inverter is only valuable if the inverter can spend a fair amount of time “sleeping” each day. Therefore, if Search mode is to be utilized it must be adjusted properly. The initial adjustment should be made so that the inverter comes on only when needed.Certain types of loads can cause Search mode not to work as expected. These types of loads are described on page 4–3 of the Troubleshooting chapter. If these kinds of loads are in the system, follow the suggestions given to eliminate the problem. Some televisions with instant-on circuits have a menu or control to disable it. If clocks are the problem load, consider using battery-powered units.If the problem loads cannot be eliminated, there are two work-around solutions:1. Disable Search Mode from the main XW Inverter/Charger Setup menu,
causing the inverter to always remain at full output voltage.2. Use a search-friendly “companion load” whose only purpose is to be switched
on to “wake up” the inverter to power the load that is unable to bring the inverter out of Search mode.
Important: Search mode does not function in installations with multiple XW Inverter/Chargers. The combined current draw of multiple inverter/chargers falsely brings the units out of Search mode. Search Mode should be disabled on the Setup menu of each XW Inverter/Charger.
3–8 975-0240-01-01

Inverter Settings Menu
Notes:• Search mode, by function, cannot work with clocks and timers or devices that need
power 24 hours a day. Examples of devices with timers include video recorders, coffee makers with brew timers, refrigerators, and freezers with defrost timers. Examples of devices that need power 24 hours a day include telephone answering machines, alarm systems, motion detection lights, and some thermostats.
• When the inverter is searching the output for loads, lights that have a wattage lower than this setting may flash momentarily.
975-0240-01-01 3–9

Configuration
Charger Settings MenuThe Charger Settings menu gives you options for configuring the XW Inverter/Charger to operate from your battery bank.
For default settings, see “Charger Menu” on page B–3.
Table 3-3 Charger menu items
Item Description
Batt Type Batt Type selects the system battery chemistry and type: Flooded (default), AGM, Gel and Custom.Selecting Custom displays the Custom Settings item, which allows you to adjust the settings for each charging stage.
Custom Settings Displays the Custom Battery Settings menu, where you can adjust settings specific to your battery type and installation.The Custom Settings item is displayed only after “Custom” is selected under Batt Type.
Batt Capacity Selects the system battery capacity in amp-hours.Max Chg Rate Sets the percentage of the maximum DC output current that is
available to the charger. The maximum DC output current for different models is:• XW4024—150 Adc• XW4548—85 Adc• XW6048—100 Adc.
Charge Cycle Sets the charging method: 3-Stage (Bulk, Absorption, Float) and 2-Stage (Bulk, Absorption, NoFloat).
Default Batt Temp
Selects the battery temperature charging compensation if a battery temperature sensor is not installed. In the absence of a battery temperature sensor, the charger uses one of three settings: “Cool” (5 °C), “Warm” (25 °C), or “Hot” (40 °C).
ReCharge Volts Sets the battery voltage level at which a new charge cycle begins.Absorb Time Sets the time spent in the Absorption stage, before transitioning to
Float or NoFloat.Chg Block Start Sets the time to halt charging on AC1 (Grid). The AC2 (Gen) port is
unaffected by the Charger Block settings. The Charger Block Start and Stop settings allow you to select when the charger stops charging on AC1.To disable the Charger Block function, set Chg Block Start and Chg Block Stop to the same time. See “Using Charger Block” on page 3–14.
Chg Block Stop Sets the time that charging on AC1 can resume. At the Chg Block Stop time, charging on AC1 is enabled again.
3–10 975-0240-01-01

Charger Settings Menu
Battery Charger Functions
When AC power is available, the XW Inverter/Charger can operate as a battery charger. Different battery types and chemistries require different charging voltage levels. Not charging batteries at the required levels can shorten battery life or possibly damage them. The XW Inverter/Charger is configured at the factory to work with the battery types recommended for inverter applications. If the default settings do not work for your specific installation, you can adjust the charge stage settings (as recommended by the battery manufacturer) on the Custom Battery Settings menu (see page 3–15). It will be necessary to select the voltage levels required and to set the voltage limits for the various stages of charging.
Multi-Stage Charging Process
The charging cycle uses a multi-stage charging process to maintain the batteries. Whenever AC power that is within the range of the inverter’s settings is present at the inverter’s input, it passes power through to the connected load and begins charging the batteries.
Bulk Stage Bulk charge is the first stage in the charging process and provides the batteries with a controlled, constant current. Once the battery voltage rises to the bulk voltage threshold, the charger switches to the Absorption stage.
Note: This information is provided for guidance only. Variations in battery chemistry and site-specific environmental considerations mean that you should consult your system designer or battery manufacturer for specific recommendations for appropriate battery voltage and current settings.
Figure 3-4 Three-Stage Battery Charging Cycle
Bulk Stage Absorption Stage Float Stage
DC Voltage
DC Current
Time
ChargingStarted
Increased Voltage
Bulk/AbsorptionVolts Setting
Absorption Time
Constant Voltage
Max Charge RateSetting
Constant Current Reduced Current Reduced Current
Float Volts Setting
Reduced Voltage
975-0240-01-01 3–11

Configuration
Absorption Stage Absorption charge is the second stage of battery charging and provides the batteries a controlled, constant voltage. During this stage, the current supplied to the batteries slowly decreases. When this current falls below 2% of the battery capacity, or when the configurable Absorb Time expires, the charger switches to the Float or NoFloat stage, depending on the selected charge cycle.
Float Stage Float charge maintains a trickle charge on the batteries whenever AC is present on the inverter’s input. Float charging reduces battery gassing, minimizes watering requirements (for flooded batteries), and ensures the batteries are in a constant state of readiness. When three-stage charging is selected, the charger will automatically switch to the float stage after the batteries have received a bulk and absorption charge (see Figure 3-4 on page 3–11). The batteries will be maintained at the default float voltage level for the selected battery type or the voltage selected under Float Voltage on the Custom Battery Settings menu.
2-Stage 2-Stage (or No Float) mode differs from an ordinary three-stage charge mode in that it does not continuously maintain the battery at float voltage. Instead, the XW Inverter/Charger begins charging the battery in bulk mode whenever the battery voltage drops below the recharge level. While the battery voltage is above the recharge level the inverter’s AC transfer switch continues to pass power through from the utility grid to the loads, but does not actively charge the batteries. 2-Stage mode increases efficiency of utility connected systems by reducing the amount of power consumed by the inverter and batteries compared to when the battery is continuously maintained at Float voltage. This feature can extend the life of most batteries.To allow Grid Support and Sell Mode to function after battery charging has completed, it is recommended to set the Charge Cycle to 2-Stage.
Note: If there are DC loads on the batteries, the charger’s current may never decrease to a level to initiate the next stage of charging. In this case, the charger would stay in absorption until the Absorb Time setting is reached.To ensure the charger does not remain in absorption for too long, adjust Absorb Time on the Charger Settings menu. The timer begins at the start of the absorption stage and terminates absorption charging if the charge current does not decrease to below 2% of the battery capacity before the Absorb Time setting expires. The Absorb Time setting may be increased if the charge cycle continually runs the full Absorb Time in the absence of DC loads. This is an indication of too large a battery bank for the selected Absorb Time setting.
Note: The battery voltage can increase above the float voltage when using an external charging device such as PV arrays, wind turbines, and micro-hydro generators. Be sure to include appropriate charge management equipment with all external DC sources.
Note: If the AC input fails or drops below the lower Vac limit (as set in “AC Settings”), the complete multi-stage charge cycle (Bulk, Absorption, Float/No Float) restarts once the source AC returns to an in-tolerance condition. If the batteries are already nearly full, the charge cycle will take little time to complete.
3–12 975-0240-01-01

Charger Settings Menu
Equalize Charging the Batteries
Many battery manufacturers recommend periodic equalize charging to level out the voltage between individual cells, improving battery performance and lifespan.Over time, the battery’s electrolyte can become “stratified,” causing inactive areas in the plate material. If this condition is allowed to continue for extended periods, the battery plates can “sulfate” and become unusable. Equalizing the batteries is a controlled overcharging method that mixes up the electrolyte and reactivates the unused areas of the plate material, restoring batteries to a full state of charge.Consult the battery manufacturer’s recommendation for equalize charging settings.To start equalizing the batteries:u On the XW Setup menu, highlight Equalize and select Enable.
OrPress the equalize button on the Inverter Information Panel for five seconds.
Figure 3-5 2-Stage Charging Cycle
Bulk Stage Absorption Stage NoFloat Stage
DC Voltage
DC Current
Time
ChargingStarted
Increased Voltage
Bulk/AbsorptionVolts Setting
Absorption Time
Constant Voltage
Max Charge RateSetting
Constant Current Reduced Current NoFloat Stage
Exit Current Threshold
ReCharge Voltage
WARNING: Explosion hazardOnly flooded or vented batteries should be equalize charged. Hydrogen and oxygen gases are produced when batteries are equalize charged. Provide adequate ventilation and remove all sources of ignition to prevent explosion.
Important: In a system where more than one device is capable of equalizing batteries (such as a system including multiple XW Inverter/Chargers and Solar Charge Controllers), there is no system-wide equalization command for all devices. To equalize with multiple devices, each would have to be enabled individually. Alternatively, equalization can be performed using only one device. During the equalization process, one device applies the equalization charge while the other devices continue to operate in synchronized charge mode, typically in float (three-stage charging) or no-float (two-stage charging).
975-0240-01-01 3–13

Configuration
Using Charger Block
The Charger Block feature halts charging on AC1 (Grid) for a period of time each day. This period of time is defined by the Chg Block Start and Chg Block Stop settings. In areas where the utility charges variable rates for electricity, it is preferable to use utility power for charging only during non-peak hours. Charger Block can prevent utility power from being used for battery charging during peak billing periods.During the time period set between Chg Block Start and Chg Block Stop, AC1 (Grid) input continues to be passed through to the loads. Inverter operation remains unaffected during the charger block period.During the Charger Block period, no charging on AC1 occurs even if the batteries discharge below ReCharge Volts setting. However, a generator connected to AC2 (in the absence of utility/AC1 power) or an XW Solar Charge Controller may charge batteries during the Charger Block period. AC priority must be set to AC2 to charge batteries with a generator connected to AC2 during the Charger Block period.If the charger is operating (that is, in Float, Absorption, Bulk or Equalize stage) at the Chg Block Start time, charging on AC1 stops immediately and the charger enters an idle state identical to No Float (see “2-Stage” on page 3–12). When the Charger Block period is over, the charger does not resume the charge stage that Chg Block Start interrupted. Instead, if the batteries are above the ReCharge Volts setting, the charger remains idle.If the batteries have fallen to the ReCharge Volts setting during the Charger Block period, the XW Inverter/Charger begins a new charge cycle with the Bulk stage after the Charger Block period has expired (at the Chg Block Stop time).For example, Charger Block is set to start at 5:00 PM and end at 8:00 PM. If the XW Inverter/Charger is charging from AC1, charging stops at 5:00. When Charger Block ends at 8:00, the XW Inverter/Charger does not automatically resume charging. The unit first measures the battery voltage. If the voltage is below the ReCharge Volts setting, then the XW Inverter/Charger starts a new charge cycle from Bulk. If the battery voltage is above the ReCharge Volts setting, the XW Inverter/Charger remains idle and continues passing through AC to the loads. The XW Inverter/Charger also keeps measuring the battery voltage as before to determine whether to start a new charge cycle.
3–14 975-0240-01-01

Charger Settings Menu
Custom Battery Settings Menu
The Custom Settings menu can be selected after “Custom” is selected under Batt Type.The Custom Settings menu allows you to adjust charging and equalization voltage for batteries with specifications that fall outside the default settings for the battery types the XW Inverter/Charger offers.You can also adjust the temperature compensation constant for the Battery Temperature Sensor on the Custom Battery menu.
Table 3-4 describes the options available on the Custom Battery menu.
For default settings, see “Custom Battery Menu” on page B–4.
CAUTION: Equipment damageTo avoid damaging your batteries during charging or equalization, consult your battery manufacturer and associated documentation before setting a custom battery type.
Important: All settings for configuring a custom battery type are based on the default settings for a Flooded battery type.
Table 3-4 Custom Battery Settings menu items
Item Description
Eqlz Support Enables or disables the ability to enter an equalization cycle. Refer to the battery manufacturer’s specifications to determine whether equalization is recommended.
Eqlz Voltagea
a.The Eqlz Voltage setting is displayed when Eqlz Support is set to On.
Selects the equalization voltage. Consult your battery manufacturer for equalization voltage setting.
Bulk Voltage Sets the bulk voltage for a custom battery type.Absorb Voltage Sets the absorption voltage for a custom battery type.Float Voltage Sets the float voltage for a custom battery type.Batt Temp Comp
Battery temperature compensation for a custom battery type. This setting is the reference that the BTS uses to adjust the charging voltage when the temperature falls above or below 25 °C.
975-0240-01-01 3–15

Configuration
AC SettingsThe AC Settings menu configures the voltage and frequency limits for AC line 1 (grid) and AC line 2 (generator). These are the limits at which the XW Inverter/Charger considers input voltage qualified—that is, suitable for charging batteries or powering loads. If the input voltage is not qualified according to these settings, the XW Inverter/Charger transfers from using AC input to inverting.
For default settings, see “AC Menu” on page B–4.
Table 3-5 AC Settings menu
Item Description
AC Priority Sets the priority for the AC source (AC1 or AC2) for qualification and transfer. For example, this setting allows the XW Inverter/Charger to use a renewable energy source (such as an AC hydro generator) connected to AC2 on a first-priority basis and use utility power only when renewable energy is insufficient or unavailable to power loads.
In systems that use both utility grid (AC1) and generator (AC2) input, AC Priority is recommended to be set to AC2. Assuming the generator is intended for occasional use only, the XW Inverter/Charger will use utility power until the generator is started.
AC1 Breaker Sets the AC1 (Grid) breaker size, based on the size of the breaker installed on AC1. The installed breaker size must not exceed the capacity of the upstream distribution panel. The XW Inverter/Charger limits the maximum input current to this setting by derating its charging current. If the connected loads exceed the AC1 breaker setting, the AC breaker trips (causing fault F63, F64, or F65). The breaker may not trip if Grid Support is enabled and battery voltage is above the Grid Support Volts setting, or if Peak Load Shave is enabled and the Load Shave Time window is active.
AC1 Lo Volt Minimum acceptable input voltage level from the utility grid.AC1 Hi Volt Maximum acceptable input voltage level from the utility grid.AC1 Lo Freq Minimum acceptable utility grid input frequency.AC1 Hi Freq Maximum acceptable utility grid input frequency.AC2 Breaker Sets the AC2 (Gen) breaker size, based on the size of the installed AC
breaker. The breaker size must not exceed the capacity of the generator. The XW Inverter/Charger limits the maximum input current to this setting by derating its charging current. If the connected loads exceed the AC2 breaker setting, the AC breaker trips (causing fault F63, F64, or F65). The breaker may not trip if Grid Support is enabled and battery voltage is above the Grid Support Volts setting, or if Peak Load Shave is enabled and the Load Shave Time window is active.
AC2 Lo Volt Minimum acceptable input voltage level from the generator.AC2 Hi Volt Maximum acceptable input voltage level from the generator.AC2 Lo Freq Minimum acceptable generator input frequency.AC2 Hi Freq Maximum acceptable generator input frequency.
3–16 975-0240-01-01

Grid Support Settings
Grid Support SettingsThe Grid Support Settings menu contains configuration options for grid-tie operation. To enable all these settings, Grid Support must be enabled in the Setup menu (see “XW Inverter/Charger Setup Menu” on page 3–2).
Important: To allow Grid Support to function after battery charging has completed, it is recommended to set the Charge Cycle to 2-Stage. After completing the absorption charger stage the XW Inverter/Charger checks whether battery voltage is above the Grid Supp Volts setting. If battery voltage is above the Grid Supp Volts setting, the XW Inverter/Charger uses available DC power to support the loads. See “Charger Settings Menu” on page 3–10.
Turning the charger off also enables Grid Support functionality.
If the Charge Cycle is set to 3-Stage, the Grid Supp Volts setting must be higher than the float voltage setting for your battery type for Grid Support settings to function (see “Custom Battery Menu” on page B–4 for default Float voltage settings).Important: Upon startup, the XW Inverter/Charger does not enable Grid Support functions for five minutes. During this five-minute period the XW Inverter/Charger determines whether the utility grid voltage and frequency are stable and within nominal range. For more information, see “Islanding Protection” on page 1–5.
Table 3-6 Grid Support Settings menu
Item Description
Grid Supp Volts Sets the level to which the batteries will be discharged when the inverter is selling power to the grid or supporting the power grid by providing additional power to the loads. This setting is not adjusted for the battery temperature if the temperature sensor is installed.
Sell Turns Sell mode on and off. When Sell is enabled, the XW Inverter/Charger AC output is divided between powering loads and delivering power to the utility grid. Sell mode requires the battery voltage to be above the Grid Supp Volts.
Max Sell Amps Sets the maximum AC amps allowed to be delivered to the utility grid from a solar array and/or the batteries during grid-tie operation. This setting is only used if Sell mode is enabled.The Max Sell Amps must be less than 80 per cent of the selected AC1 breaker setting. If set higher, the breaker setting will override the Max Sell Amps setting to avoid tripping the breaker.
Load Shave Enables or disables the Load Shave feature. Load Shave allows the XW Inverter/Charger to support the grid in powering local loads during a defined window of time (set using Load Shave Start and Load Shave Stop). When in this mode, the XW Inverter/Charger operates until the batteries discharge to the LBCO threshold, after which the unit reverts to AC pass-through. The charger is automatically blocked during the Load Shave time window.
975-0240-01-01 3–17
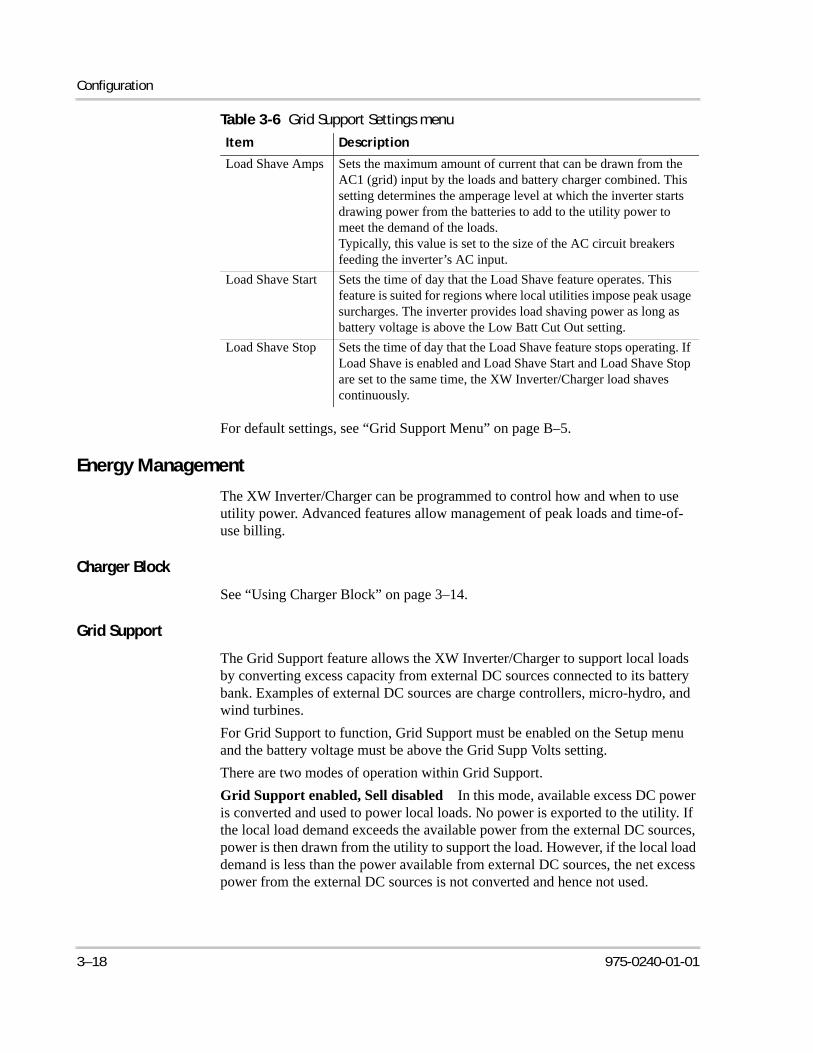
Configuration
For default settings, see “Grid Support Menu” on page B–5.
Energy Management
The XW Inverter/Charger can be programmed to control how and when to use utility power. Advanced features allow management of peak loads and time-of-use billing.
Charger Block
See “Using Charger Block” on page 3–14.
Grid Support
The Grid Support feature allows the XW Inverter/Charger to support local loads by converting excess capacity from external DC sources connected to its battery bank. Examples of external DC sources are charge controllers, micro-hydro, and wind turbines.For Grid Support to function, Grid Support must be enabled on the Setup menu and the battery voltage must be above the Grid Supp Volts setting.There are two modes of operation within Grid Support.Grid Support enabled, Sell disabled In this mode, available excess DC power is converted and used to power local loads. No power is exported to the utility. If the local load demand exceeds the available power from the external DC sources, power is then drawn from the utility to support the load. However, if the local load demand is less than the power available from external DC sources, the net excess power from the external DC sources is not converted and hence not used.
Load Shave Amps Sets the maximum amount of current that can be drawn from the AC1 (grid) input by the loads and battery charger combined. This setting determines the amperage level at which the inverter starts drawing power from the batteries to add to the utility power to meet the demand of the loads.Typically, this value is set to the size of the AC circuit breakers feeding the inverter’s AC input.
Load Shave Start Sets the time of day that the Load Shave feature operates. This feature is suited for regions where local utilities impose peak usage surcharges. The inverter provides load shaving power as long as battery voltage is above the Low Batt Cut Out setting.
Load Shave Stop Sets the time of day that the Load Shave feature stops operating. If Load Shave is enabled and Load Shave Start and Load Shave Stop are set to the same time, the XW Inverter/Charger load shaves continuously.
Table 3-6 Grid Support Settings menu
Item Description
3–18 975-0240-01-01

Grid Support Settings
Grid support enabled, Sell enabled In this mode all available excess DC power is first used to power local loads, and any excess is exported to the utility grid.
Peak Load Shaving
Many utilities impose a surcharge on their customers based on the peak load used by a facility. To reduce utility peak demand charges, the inverter can be configured (using the Load Shave Amps setting) to limit the maximum draw the AC loads place on the utility. The inverter can be programmed to provide power above a specified level, eliminating the surcharge. When the utility current draw reaches the maximum level, the inverter assists by providing battery powered AC to the loads.For Peak Load Shaving to be effective, all loads must be connected to the inverter. For large loads, multiple (or stacked) inverters may be required.To further ensure the batteries are able to supplement the power requirements of the connected load, an additional source of power (solar, wind or hydroelectric) is recommended.Peak Load Shaving can also be used in addition to the time-of-use metering.
Time-of-Use Metering
Utilities use time-of-use metering to determine utility charges during peak usage hours and to impose a surcharge. The XW Inverter/Charger can be configured (using the Load Shave Start, Load Shave Stop and Charger Block settings) to overcome these peak charges by using utility power to charge the battery bank during the inexpensive energy hours and consuming the battery energy during expensive energy hours.For example, if Charger Block is set between 9:00 AM and 10:00 PM and Load Shave is set between 6:00 PM and 9:00 PM, charging on AC1 stops at 9:00 AM and continues to pass utility AC through to the loads. If charging is required during the charger block period, and AC Priority is set to AC2, the XW Inverter/Charger can use any AC source connected to AC2. Loads will transfer to the AC source on AC2 as well. The inverter connects to the utility grid at 6:00 PM and supports loads using the batteries. The inverter continues to run until 9:00 PM. The XW Inverter/Charger then stops supporting the utility grid and passes utility AC through to the loads. At 10:00 PM utility AC begins maintaining the batteries based on the battery charger settings.The above example allows an external renewable energy source to be utilized as a primary charging source during a desired time window. The charger (using utility AC connected to AC1) can then be used to supplement the battery charging when the rates utility rates are low.
Note: Running and Start-up (Peak) currents are limited to the maximum current limits of the inverter.
975-0240-01-01 3–19

Configuration
When using the system for time-of-use metering, the system should be designed with a battery capacity large enough to support loads during the entire peak rate period without reaching the Low Battery Cut Out setting.To further ensure the batteries are able to support the loads, an additional source of power (solar, wind or hydroelectric) is recommended. Depending upon the capacity of the system, certain heavy loads should only be run during non-peak periods.
Note: In the event the batteries reach their Low Battery Cut Out voltage, the inverter will automatically reconnect to the utility grid to maintain the connected load.
3–20 975-0240-01-01

Generator Support Settings
Generator Support SettingsGenerator support allows power to be automatically drawn from the batteries to assist an AC generator to support heavy loads (loads that exceed the available current from the generator).Generators have a limited output current and it is possible to reach this limit when operating heavy loads. The XW Inverter/Charger is designed to assist the generator when heavy current demands load down the generator by supplying additional power from the batteries.In addition, the battery charger can back off its charging current to the batteries so the combined load of the charger and load support does not exceed the capacity of the generator or trip its output breakers or fuses.
For default settings, see “Gen Support Menu” on page B–5.
Auxiliary Output SettingsThe Aux menu allows you to enable and configure the auxiliary output. The auxiliary output provides 12 Vdc at 250 mA to power a relay, indicator light or alarm.
Note: Running and Start-up (Peak) currents are limited to the maximum current limits of the inverter.
Table 3-7 Gen Support Menu Values
Setting Description
GenSupp Mode Turns the Generator Support feature on and off.GenSupp Amps Sets the generator load level at which the XW Inverter/Charger
supplies power from the batteries to support the generator.
Table 3-8 Aux Menu Values
Setting Description
Manual Aux Sets the state of the Auxiliary Output. ManualOn or ManualOff allow manual control of the Auxiliary Output. When set to Automatic, a trigger source can then be selected.
Active Lvl Sets the mode (polarity) of the aux output. When triggered, the output can be active high (12 Vdc output turns on) or active low (output is high until the trigger turns it off).
Trigger Src Selects the desired condition (Trigger Source) to activate the Aux Output. The Trigger Source options are LowBattV, HighBattV, LowBattTemp, HighBattTemp, and Fault.
Trigger Level Sets the voltage or temperature level (depending on the selected trigger source) at which the aux output is activated. If the selected Trigger Source is a Battery Voltage, the range also varies according to the nominal battery voltage of your system.
975-0240-01-01 3–21

Configuration
For default settings, see “Aux Menu” on page B–6.
Trigger Source Descriptions
Low Batt Voltage Activates the Auxiliary Output when the battery voltage falls below the Low Batt Voltage setting for the trigger delay time. The Auxiliary Output turns off when the battery voltage rises above the Clear setting for the Clear Delay time. Use this setting if you want the auxiliary output to control a relay to disconnect loads from a battery that is nearly discharged, or to activate a low-battery-voltage alarm such as a buzzer or light.High Batt Voltage Activates the Auxiliary Output when the battery voltage rises above the Hi Batt Voltage setting for the trigger delay time. The Auxiliary Output turns off when the battery voltage falls below the Clear setting for the Clear Delay time. This setting is useful for:• Installations that have another external charging source such as a wind
generator or hydro generator connected directly to the batteries. The XW Inverter/Charger Auxiliary Output can control a relay to disconnect the external charging source from the battery when the battery is in danger of being overcharged, or control a relay to turn on a diversion load.
• Activating a high-battery-voltage alarm such as a buzzer or light.• Activating a vent fan to disperse hydrogen from the battery compartment
when the batteries reach their gassing voltage.Low Batt Temp Activates the Auxiliary Output when the battery temperature falls below the Low Batt Temp setting for the trigger delay time. The Auxiliary Output turns off when the battery temperature rises above the Clear setting for the Clear Delay time. Battery temperature is measured with a battery temperature sensor. Do not use this setting if a battery temperature sensor is not installed. With this setting, the auxiliary output can turn on an indicator alarm if the batteries are too cold. A battery with frozen electrolyte will not accept a charge.High Batt Temp Activates the Auxiliary Output when the battery temperature rises above the Hi Batt Temp setting for the trigger delay time. The Auxiliary Output turns off when the battery temperature falls below the Clear setting for the
Trigger Delay Sets a delay period between when the trigger occurs and when the aux output is activated.
Clear Level Sets the voltage or temperature level (depending on the selected trigger source) at which the aux output becomes inactive.
Clear Delay Sets a delay period between when the Clear Level setting occurs and when the aux output becomes inactive.
Table 3-8 Aux Menu Values
Setting Description
Important: Changing the Trigger Level resets the auxiliary output. If an auxiliary output trigger is active, changing the trigger level will clear the trigger.
3–22 975-0240-01-01

Multi-Unit Config Menu
Clear Delay time. Battery temperature is measured with a battery temperature sensor. Do not use this setting if a battery temperature sensor is not installed. With this setting, the auxiliary output can turn on a fan to cool the battery compartment.Fault Activates the Auxiliary Output when a fault occurs. The Auxiliary Output clears when the fault is cleared.
Multi-Unit Config MenuThe Multi-Unit Config menu configures the XW Inverter/Charger to operate as a part of a multi-unit installation.
When installing a multi-unit system, each setting on the Multi-Unit Config menu (except for “Dev Name”) must be configured for each XW Inverter/Charger in the system. The Multi-Unit Config settings should be configured in the following order:• Dev Number• Inverter Mode• Connections.
Important: Accessing this menu automatically places the XW Inverter/Charger in Standby mode. When entering the Multi-Unit Config menu, the unit also identifies itself by flashing all front panel lights. After exiting the Multi-Unit Config menu, the XW Inverter/Charger returns to Operating mode and the front panel lights stop flashing.
Table 3-9 Multi-Unit Config menu
Item Description Default Range
Dev Name Allows customization of the default device name. This setting is optional and does not affect operation. See “Setting the Device Name” on page 3–24.
n/a n/a
Dev Number Allows setting of a unique unit number in a multiple-unit system. See “Setting the Device Number” on page 3–25.
00 00–31
Inverter Mode For a multi-unit system to operate, one XW Inverter/Charger must be configured to “SplitPhMaster” and the rest as “SplitPhSlave,” otherwise a system-wide fault is asserted. Modes for single-phase models will be added to future product releases.
SplitPhMaster For split-phase models: SplitPhMaster, SplitPhSlave
Connections Select to display the Connections menu. See “Connections Menu” on page 3–26.
n/a n/a
975-0240-01-01 3–23

Configuration
Setting the Device Name
The “Dev Name” setting allows you to customize the name of the XW Inverter/Charger as it is displayed on other screens and menus.The characters available are:• A to Z• a to z• 0 to 9• space.
To customize the XW Inverter/Charger name:1. On the device setup menu, select Advanced Settings.
If “Basic Settings” appears instead of “Advanced Settings” on the device setup menu, display “Advanced Settings” by pressing Enter + Up arrow + Down arrow at the same time.
2. Select the Multi-Unit Config menu.3. Select Dev Name.4. Press Enter.
The last letter of the XW Inverter/Charger name is highlighted.5. Begin customizing the device name.
• To change the character, press the up or down arrow button. Holding down the button causes the characters to scroll more quickly.
• To delete the character, press Exit.• To add characters, press Enter.
6. When the correct character is shown, press Enter to select it.7. After pressing Enter to select the last character of your customized device
name, press Enter again to return to the menu.
Note: Increasing the number of characters in a device name may cause other text on the same line to run off the edge of the screen. Device names should be limited to 10 characters or less.
3–24 975-0240-01-01

Multi-Unit Config Menu
Setting the Device Number
Setting the device number gives a Xanbus-enabled device a unique identity when several devices of the same type are installed in the networked power system. When each identical device has a unique number, the System Control Panel can correctly identify and display status information for each device.A device number consists of two digits ranging from 00 (default) to 31.If only one of each device is installed in the networked power system, you do not need to set the device number. However, it is encouraged to set the device number to a value other than 00. 00 is a factory default value and can be used to indicate a “Restore Defaults” command was successfully performed if the value was previously different.To set the XW Inverter/Charger device number:1. On the XW Inverter/Charger Setup menu, select Advanced Settings.
If “Basic Settings” appears instead of “Advanced Settings” on the Setup menu, display “Advanced Settings” by pressing Enter + Up arrow + Down arrow simultaneously.On the Advanced Settings menu, select Multi-Unit Config and press Enter.
2. On the Multi-Unit Config menu, select Dev Number. See Figure 3-6.3. Press Enter to highlight the instance number.4. Use the up and down arrow buttons to adjust the two-digit identifier number.5. Press Enter.
Figure 3-6 Setting a Device Number
XW6048 01:Multi
Dev Number[XW1][01]
[SplitPhSlave]
975-0240-01-01 3–25
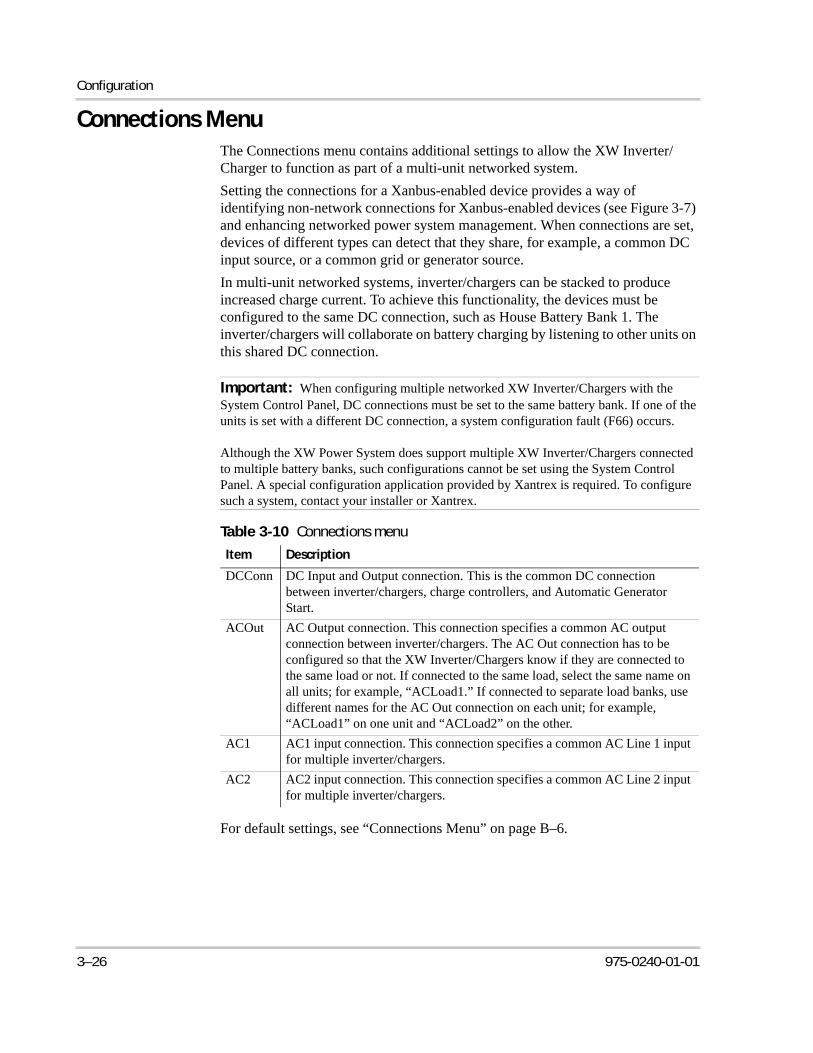
Configuration
Connections MenuThe Connections menu contains additional settings to allow the XW Inverter/Charger to function as part of a multi-unit networked system.Setting the connections for a Xanbus-enabled device provides a way of identifying non-network connections for Xanbus-enabled devices (see Figure 3-7) and enhancing networked power system management. When connections are set, devices of different types can detect that they share, for example, a common DC input source, or a common grid or generator source.In multi-unit networked systems, inverter/chargers can be stacked to produce increased charge current. To achieve this functionality, the devices must be configured to the same DC connection, such as House Battery Bank 1. The inverter/chargers will collaborate on battery charging by listening to other units on this shared DC connection.
For default settings, see “Connections Menu” on page B–6.
Important: When configuring multiple networked XW Inverter/Chargers with the System Control Panel, DC connections must be set to the same battery bank. If one of the units is set with a different DC connection, a system configuration fault (F66) occurs.
Although the XW Power System does support multiple XW Inverter/Chargers connected to multiple battery banks, such configurations cannot be set using the System Control Panel. A special configuration application provided by Xantrex is required. To configure such a system, contact your installer or Xantrex.
Table 3-10 Connections menu
Item Description
DCConn DC Input and Output connection. This is the common DC connection between inverter/chargers, charge controllers, and Automatic Generator Start.
ACOut AC Output connection. This connection specifies a common AC output connection between inverter/chargers. The AC Out connection has to be configured so that the XW Inverter/Chargers know if they are connected to the same load or not. If connected to the same load, select the same name on all units; for example, “ACLoad1.” If connected to separate load banks, use different names for the AC Out connection on each unit; for example, “ACLoad1” on one unit and “ACLoad2” on the other.
AC1 AC1 input connection. This connection specifies a common AC Line 1 input for multiple inverter/chargers.
AC2 AC2 input connection. This connection specifies a common AC Line 2 input for multiple inverter/chargers.
3–26 975-0240-01-01

Connections Menu
Operating Without Connections
AC1 and AC2 connections can be set to “None” if operating without a connection to a specific power source. Only stand-alone devices (in a system that includes only the device and an SCP) may be configured this way. Note that this is not a necessary configuration step as the system will still operate with the default settings. Using None where no AC source is used only serves as a label in this case and does not modify the behavior of a unit.
Figure 3-7 XW Inverter/Charger Connections Representation
L1 N L2 L1 N L2 L1 N L2AC
LOADGRID(AC1)
GEN(AC2)
AC OUT AC IN AC IN
DC Connection: Select House Battery 1 to 6
AC Out Connection: Select AC Load 1 to 10
AC1 Connection: Select Grid 1 to 10, Gen 1 to 10
AC2 Connection: Select Grid 1 to 10, Gen 1 to 10
975-0240-01-01 3–27

Configuration
Copying Settings From Another UnitThe “Copy from” command allows quick configuration of an XW Inverter/Charger. After selecting another XW Inverter/Charger in the system to copy settings from, common parameters are copied from the selected XW Inverter/Charger to the XW Inverter/Charger being configured.The following settings are copied from the selected unit:• Inverter Settings• Charger Settings• AC Settings• Grid Support Settings (except the Sell setting)• Gen Support Settings.The following settings are not copied between units:• Inverter Mode• Device Instance• Device Name• Auxiliary Output settings.
Resetting the XW Inverter/Charger to Default SettingsThe Restore Defaults command returns the XW Inverter/Charger to factory default settings. After using the Restore Defaults command, the XW Inverter/Charger is no longer configured for the power system.To restore XW Inverter/Charger default settings:1. On the Advanced Setup menu, select Restore Defaults.
Warning W252 appears, asking to confirm the Restore Defaults command.2. To cancel the command, press Exit. To continue with the Restore Defaults
command, press Enter.
Important: If a warning is already active in the system, selecting Restore Defaults brings up the Warning List, with warning W252 at the top. Press Enter to view W252 and continue with the Restore Defaults process.
CAUTION: Equipment damageDo not use the Restore Defaults command while the XW Inverter/Charger is operating. De-energize the power system and disconnect the XW Inverter/Charger AC input before using the Restore Defaults command. Reconfigure the XW Inverter/Charger before reconnecting the AC input and re-energizing the power system.
3–28 975-0240-01-01

4 Troubleshooting
Chapter 4, “Troubleshooting”, contains information and procedures for solving possible problems with the XW Inverter/Charger.

Troubleshooting
Troubleshooting ReferenceThis section provides you with troubleshooting tips to identify and solve most problems that can occur with the XW Inverter/Charger.This chapter is divided into the following sections:1. “General Troubleshooting Guidelines” on page 4–22. “Inverter Applications” on page 4–33. “Inverter Troubleshooting” on page 4–54. “Battery Charger Troubleshooting” on page 4–85. “Faults and Warnings” on page 4–10
General Troubleshooting GuidelinesThis section will help you narrow down the source of any problem you may encounter. Please read the following troubleshooting steps:1. Check for a Warning or Fault message on the System Control Panel or a Fault
code on the inverter information panel. If a message is displayed, record it immediately.
2. As soon as possible, record on the form, “Information About Your System” on page WA–4, the conditions at the time the problem occurred. These details should include the following as well as any other information asked for on page page WA–4:• Loads the XW Inverter/Charger was running or attempting to run• Battery condition at the time of failure (voltage or battery level, for
example), if known• Recent sequence of events (for example, charging had just finished, utility
grid had failed but the inverter didn’t come on)• Any known unusual AC input factors such as low voltage or unstable
generator output• Extreme conditions which may have existed at the time (temperature or
moisture, for example).3. Attempt the solution indicated in Table 4-2 on page 4–11 or Table 4-5 on
page 4–18.4. If your inverter information panel or System Control Panel is not displaying a
Fault light, check the following list to make sure that the present state of the installation allows proper operation of the unit. See also “Inverter Troubleshooting” on page 4–5 and “Battery Charger Troubleshooting” on page 4–8.
p Is the inverter/charger located in a clean, dry, adequately ventilated place?
p Have the AC input breakers opened? If so, your pass-through load may have exceeded the rating of one or more of the input breakers.
4–2 975-0240-01-01

Inverter Applications
p Are the battery cables adequately sized and short enough? See the XW Power System Installation Guide for more information.
p Is the battery in good condition and are all DC connections tight?
p Are the AC input and output connections and wiring in good condition?
p Are the configuration settings correct for your particular installation?
p Are the display panel and the communications cable properly connected and undamaged?
p Is the battery temperature sensor and its cable properly connected and undamaged?
5. Contact Xantrex Customer Service for further assistance. Please be prepared to describe details of your system installation and provide the model and serial number of the unit. See page WA–1 for contact information.
Inverter ApplicationsThe XW Inverter/Charger performs differently depending on the AC loads connected to it. If you are having problems with any of your loads, read this section.
Resistive Loads
These are the loads that the inverter finds the simplest and most efficient to drive. Voltage and current are in phase, which means they are in step with one another. Resistive loads usually generate heat in order to accomplish their tasks. Toasters, coffee pots, and incandescent lights are typical resistive loads. It is usually impractical to run larger resistive loads—such as electric stoves and water heaters—from an inverter due to their high current requirements. Even though the inverter may be able to accommodate the load, the size of battery bank required would be impractical if the load is to be run for long periods.
Motor Loads
Induction motors (motors without brushes) require two to six times their running current on start up. The most demanding are those that start under load (for example, compressors and pumps). Of the capacitor start motors (typical in drill presses and band saws, for example), the largest you can expect to run is 1 hp. Universal motors are generally easier to start. Check that the Locked Rotor Amps (LRA) rating of the motor load does not exceed the maximum surge current rating of the inverter. Since motor characteristics vary, only testing will determine whether a specific load can be started and how long it can be run.If a motor fails to start within a few seconds or loses power after running for a time, it should be turned off. When the inverter attempts to start a load that is greater than it can handle, the inverter may shut down from an AC Overload fault.
975-0240-01-01 4–3

Troubleshooting
Problem Loads
Very Small Loads
If the power consumed by a device is less than the threshold of the Search mode circuitry, and Search mode is enabled, the inverter will not run. Most likely the solution will be to disable the Search mode feature or lower the sense threshold. Refer to Xantrex Tech Note TN 003 (“Making Sense of Search Mode”) for more information.
Fluorescent Lights and Power Supplies
Some devices cannot be detected when scanned by Search mode circuitry. Small fluorescent lights are the most common example. Some computers and sophisticated electronics have power supplies that do not present a load until line voltage is available. When this occurs, each unit waits for the other to begin. To drive these loads, either a small companion load like a light bulb rated for more than the Search Watts setting must be used to bring the inverter out of Search mode, or the inverter may be programmed to remain on by disabling the Search feature. (See “Using Search Mode” on page 3–8.)
Clocks
You may notice that your clocks may not be accurate. Some of the clocks on your appliances may reset when the inverter/charger is in Search mode.
Searching
When the inverter is in Search mode, it may fail to start some loads even though the rated wattage on the load is more than the Search Watts setting. Apply an additional load (companion load) to make the inverter exit Search mode.
4–4 975-0240-01-01

Inverter Troubleshooting
Inverter TroubleshootingTo determine the cause of an inverter error condition, refer to the troubleshooting solutions below to resolve the situation.
Problem Possible cause Solution
Unit will not come on (no LEDs are on) and the inverter information panel is blank or off.
Unit was turned off using On/Off button on front panel.
DC voltage on the inverter’s DC terminals is incorrect.
Turn the unit on again.
Check the battery voltage, fuses or breakers and DC cable connections to the inverter. If the DC voltage on the inverter’s DC terminals is correct, have unit serviced.
Unit comes on, but goes off quickly (several attempts made).
Excessive load on output.
Unit is in over-temperature protection and needs to cool down.
Remote Power Off signal is present.
Reduce loads.
Turn inverter off and allow the unit to cool and increase ventilation.
Release or reset the Remote Power Off switch.
No AC power output.INVERT LED is on, with no Fault/Warning LED.
Open AC output breakers or fuses and bad output wire connections.
Check the Load VAC status on the System Control Panel Meters screen and check AC voltage on the inverter AC Out terminal block.
If the Meters screen shows correct AC voltage but there is no AC voltage on the inverter AC Out terminal block, check for loose connections on the inverter terminal block. If connections are not loose, the inverter may need to be serviced.
If there is correct AC voltage on the Meters screen and on the inverter AC terminal block, check for open AC output breakers or fuses and bad output wire connections.
If AC voltage on the Meters screen or inverter AC terminal block is incorrect, have unit serviced.
No AC power output.INVERT LED is flashing.
AC load too small for Search Mode circuit to detect.
Reduce Search Watts setting, increase load above Search Watts setting, or turn off Search Mode on the Setup menu.
If the AC1 LED is on, check inverter output connections and voltage.
975-0240-01-01 4–5
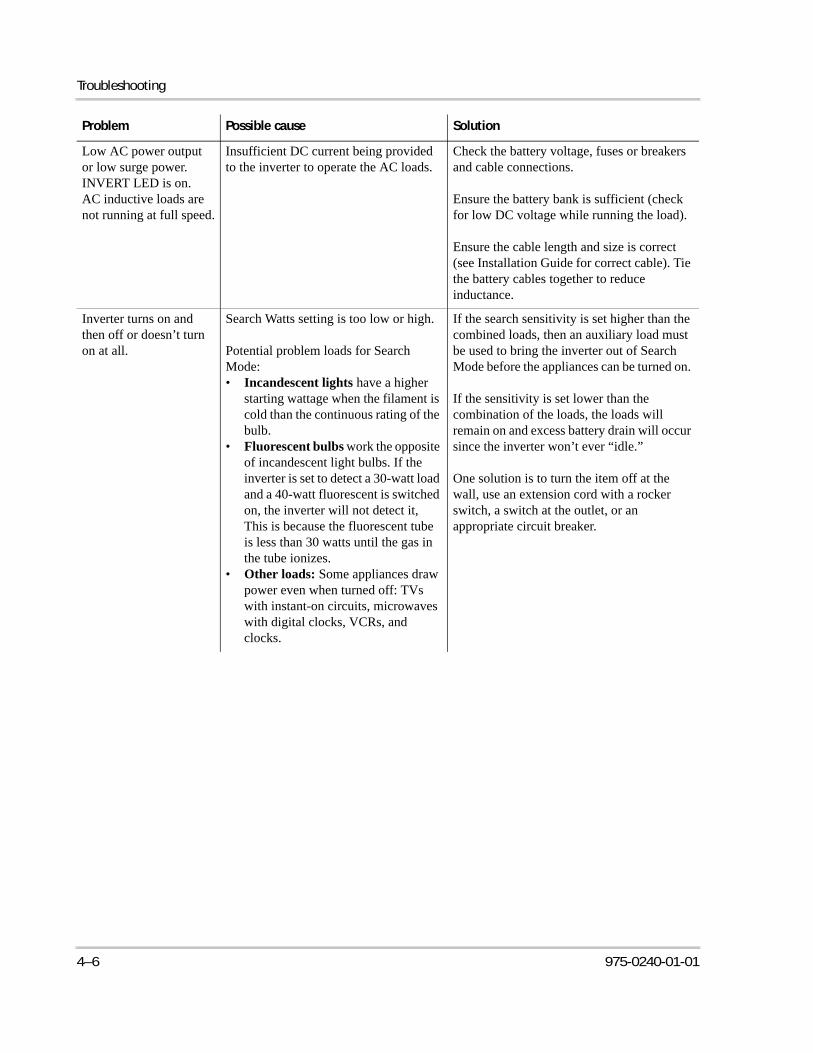
Troubleshooting
Low AC power output or low surge power. INVERT LED is on.AC inductive loads are not running at full speed.
Insufficient DC current being provided to the inverter to operate the AC loads.
Check the battery voltage, fuses or breakers and cable connections.
Ensure the battery bank is sufficient (check for low DC voltage while running the load).
Ensure the cable length and size is correct (see Installation Guide for correct cable). Tie the battery cables together to reduce inductance.
Inverter turns on and then off or doesn’t turn on at all.
Search Watts setting is too low or high.
Potential problem loads for Search Mode:• Incandescent lights have a higher
starting wattage when the filament is cold than the continuous rating of the bulb.
• Fluorescent bulbs work the opposite of incandescent light bulbs. If the inverter is set to detect a 30-watt load and a 40-watt fluorescent is switched on, the inverter will not detect it, This is because the fluorescent tube is less than 30 watts until the gas in the tube ionizes.
• Other loads: Some appliances draw power even when turned off: TVs with instant-on circuits, microwaves with digital clocks, VCRs, and clocks.
If the search sensitivity is set higher than the combined loads, then an auxiliary load must be used to bring the inverter out of Search Mode before the appliances can be turned on.
If the sensitivity is set lower than the combination of the loads, the loads will remain on and excess battery drain will occur since the inverter won’t ever “idle.”
One solution is to turn the item off at the wall, use an extension cord with a rocker switch, a switch at the outlet, or an appropriate circuit breaker.
Problem Possible cause Solution
4–6 975-0240-01-01

Inverter Troubleshooting
In a grid-interactive mode, the unit is experiencing excessive anti-islanding faults. The utility grid is not dropping out, yet the unit is disconnecting from the grid.
The unit has two sets of AC limits: adjustable AC qualification limits (as set on the AC Settings menu), and non-adjustable anti-islanding limits which are required to have a 5-minute reconnect delay before returning to grid-interactive mode (Sell Mode or Grid Support).
While in Sell Mode and in Grid Support, these two sets of limits are both active. Whichever limits are set to more restrictive values (the narrower voltage and frequency windows) will trip first when the utility grid varies from normal values.
If the AC qualification limits are set outside the fast anti-islanding limits (see F27, F30, F37 and F40), the unit will experience less frequent disconnects from the utility, but when it does disconnect there will be a 5-minute delay (minimum) before re-entering a grid-interactive mode. During this 5-minute delay, all other modes of operation will be available, assuming the grid re-enters the user-set frequency and voltage limits (see “AC Settings” on page 3–16).
If the AC qualification limits are set inside the anti-islanding limits, then the unit will experience more frequent disconnects from the utility, but when it does disconnect there will not be a 5 minute delay before entering a grid-interactive mode, assuming the grid re-enters the user-set frequency and voltage qualification limits.
The impedance of the utility grid is too high for the power being sold to the grid. The utility grid impedance may be on the high end if the installation is too far from the utility sub station.
Adjust the AC1 voltage and frequency settings (see “AC Settings” on page 3–16). Raise the high voltage and frequency settings, and lower the low voltage and frequency settings.
Reduce the Max sell current until unit disconnecting.
Problem Possible cause Solution
975-0240-01-01 4–7

Troubleshooting
Battery Charger TroubleshootingTo determine the cause of an charger error condition, refer to the troubleshooting solutions below to resolve the situation.
Problem Possible Cause Solution
AC1/AC2 LED is on, but will not start charging(allow 40 seconds to synchronize).
1) Charger is disabled on the Setup menu.
2) Charger Block is enabled and the XW Inverter/Charger is inside of the Charger Block time window.
3) The XW Inverter/Charger is load shaving.
4) Charger is set for 2-stage charging and has completed a full charge cycle.
5) Battery voltage is low and AC voltage is high; in this case XW is a passive rectifier charger. For an active charger operation the following condition should be met: battery voltage > [0.16 × Vac input].
1) Enable the charger.
2) Disable Charger Block if you need to override this feature.
3) Check the Load Shave settings. If the load draw from the grid exceeds the Load Shave Amps setting, the charger will not operate.
4) No action required. The charger comes on when the battery reaches the Exit to Bulk setting. Otherwise use the “Force Chg” setting on the device setup menu to force a bulk or float charge.
5) No action required. Wait until AC input voltage becomes qualified, or allow the secondary charger to charge the battery.
AC1 or AC2 LED is flashing, but will not start charging(allow 40 seconds to synchronize).
AC voltage and frequency at the AC input terminal are within nominal range, but the inverter output is not yet synchronized to the AC source. The unit may be already synchronized to another AC source, or the unit is unable to synchronize to the AC input frequency.
The unit is operating normally. If the unit cannot synchronize to unstable generator input, service the generator.
4–8 975-0240-01-01

Battery Charger Troubleshooting
Charger amperage drops off before full charging has finished (no Fault LED).
AC frequency at the AC input terminal may be out-of-tolerance (too high or low) or the AC voltage may be outside the Hi AC Volt or Lo AC Volt settings.
The charge settings are incorrectly configured for your battery type.
Ambient temperature may be high, causing unit to overheat and ramp down the charging.
Check the settings on the AC Settings menu. Check for the correct AC voltage or frequency at the AC input terminal. If the AC source is a generator, adjust the AC voltage or frequency accordingly.Increase the difference between the Hi AC Volt (AC1) and Lo AC Volt (AC1) settings to allow synchronization.
Select the correct battery type or configure a Custom Battery type.
Cool the unit down or check for anything preventing air flow around the unit.
Charger stops before full charging (or equalization) has finished.Fault LED flashes and AC output drops momentarily.
Cold temperature around batteries with battery temperature sensor (BTS) installed may be causing unit to reach High Batt Cut Out setting.
Disconnect BTS during charging or increase High Batt Cut Out setting.
Charger output is low. Loose or corroded battery connections.
Loose AC input connections.
Worn-out batteries.
Battery cables too small or too long.
Check and clean all connections.
Check and tighten AC wiring connections.
Replace batteries.
Refer to cable and battery recommendations in Installation Guide.
Batteries being charged above the Bulk/Float setting.
If BTS is installed, it may be in a cold area or have fallen off the batteries.
Another DC charging source may be on the batteries.
Inspect the BTS. Reduce the Batt Temp Comp setting on the Custom Battery Settings menu.
NOTE: To bring batteries that are cold to the correct state of charge may require charging at a higher voltage. This may be normal BTS operation. Unplug the BTS and determine if your voltage returns to the bulk/float voltage.
Problem Possible Cause Solution
975-0240-01-01 4–9

Troubleshooting
Faults and WarningsWhen a fault or warning message appears on the System Control Panel, you can acknowledge the message to clear the screen. To acknowledge a fault or warning message, press the Enter button. This action does not clear the fault or warning condition, so you should consult Table 4-2 and Table 4-5 for suggested actions after you have acknowledged the message. Refer to the System Control Panel Owner’s Guide for more information on faults and warnings.
Warning Messages
Warning messages appear on the XW System Control Panel to alert you to an impending system change. You can view 20 most recent warning messages using the System Control Panel Warning Log, accessible from the View Device Info menu. Each warning has a time stamp to let you know the date and time that the warning appeared.If several warning messages occur before you can acknowledge or clear them, they are displayed together on a warning list. This list contains messages from every Xanbus-enabled device, not just the XW Inverter/Charger. You can select a message and view its details from warning list.To view a message from a warning list:1. On the list, use the up arrow or down arrow button to highlight the message
you want to view.2. Press Enter.
The complete message appears.After viewing the message, you can return to the warning list by pressing Exit or continue to the menu for the device that caused the fault by pressing Enter. Each time you return to the list after viewing a complete message, the viewed message is removed from the list.If you have left the warning list, you can view them at any time from the System Settings menu.To view a fault list:1. On the Select Device menu, highlight System and press Enter.2. On the System Settings menu, highlight View Warning List.3. Press Enter.
4–10 975-0240-01-01
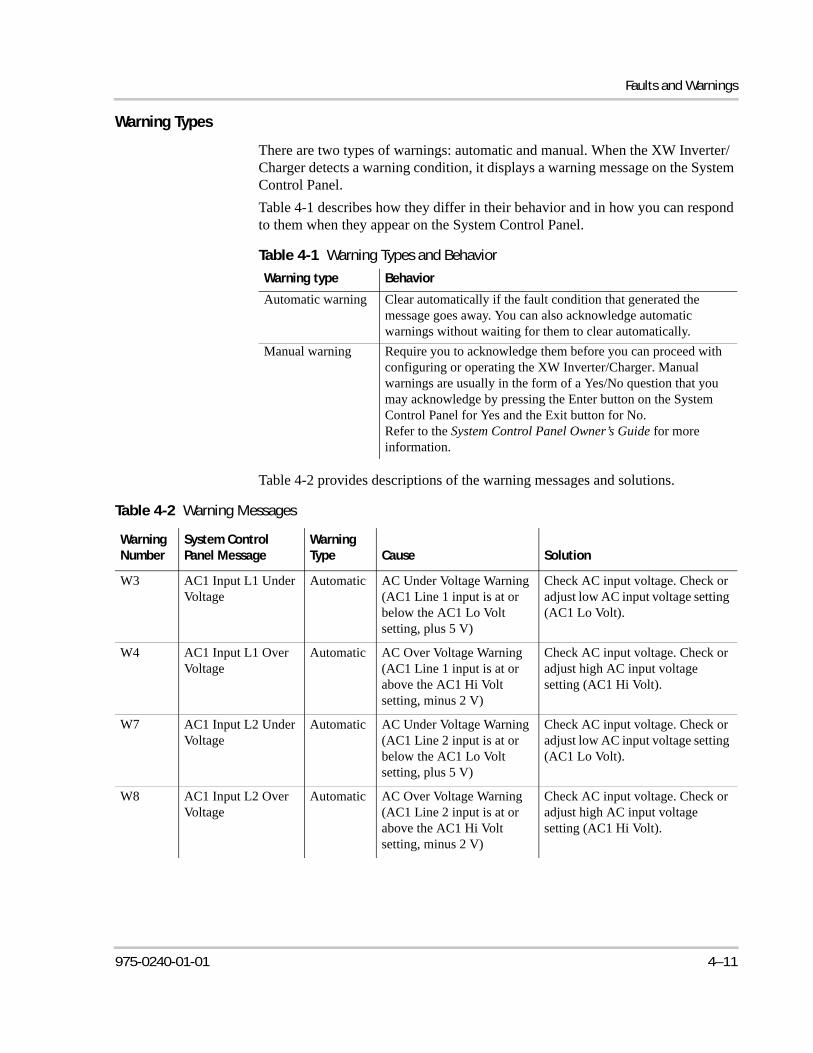
Faults and Warnings
Warning Types
There are two types of warnings: automatic and manual. When the XW Inverter/Charger detects a warning condition, it displays a warning message on the System Control Panel.Table 4-1 describes how they differ in their behavior and in how you can respond to them when they appear on the System Control Panel.
Table 4-2 provides descriptions of the warning messages and solutions.
Table 4-1 Warning Types and Behavior
Warning type Behavior
Automatic warning Clear automatically if the fault condition that generated the message goes away. You can also acknowledge automatic warnings without waiting for them to clear automatically.
Manual warning Require you to acknowledge them before you can proceed with configuring or operating the XW Inverter/Charger. Manual warnings are usually in the form of a Yes/No question that you may acknowledge by pressing the Enter button on the System Control Panel for Yes and the Exit button for No.Refer to the System Control Panel Owner’s Guide for more information.
Table 4-2 Warning Messages
Warning Number
System Control Panel Message
Warning Type Cause Solution
W3 AC1 Input L1 Under Voltage
Automatic AC Under Voltage Warning (AC1 Line 1 input is at or below the AC1 Lo Volt setting, plus 5 V)
Check AC input voltage. Check or adjust low AC input voltage setting (AC1 Lo Volt).
W4 AC1 Input L1 Over Voltage
Automatic AC Over Voltage Warning (AC1 Line 1 input is at or above the AC1 Hi Volt setting, minus 2 V)
Check AC input voltage. Check or adjust high AC input voltage setting (AC1 Hi Volt).
W7 AC1 Input L2 Under Voltage
Automatic AC Under Voltage Warning (AC1 Line 2 input is at or below the AC1 Lo Volt setting, plus 5 V)
Check AC input voltage. Check or adjust low AC input voltage setting (AC1 Lo Volt).
W8 AC1 Input L2 Over Voltage
Automatic AC Over Voltage Warning (AC1 Line 2 input is at or above the AC1 Hi Volt setting, minus 2 V)
Check AC input voltage. Check or adjust high AC input voltage setting (AC1 Hi Volt).
975-0240-01-01 4–11

Troubleshooting
W11 AC2 Input L1 Over Voltage
Automatic AC Over Voltage Warning (AC2 Line 1 input is at or above the AC2 Hi Volt setting, minus 2 V)
Check AC input voltage. Check or adjust high AC input voltage setting (AC2 Hi Volt).
W12 AC2 Input L1 Under Voltage
Automatic AC Under Voltage Warning (AC2 Line 1 input is at or below the AC2 Lo Volt setting, plus 10 V)
Check AC input voltage. Check or adjust low AC input voltage setting (AC2 Lo Volt).
W13 AC2 Input L2 Over Voltage
Automatic AC Over Voltage Warning (AC2 Line 2 input is at or above the AC2 Hi Volt setting, minus 2 V)
Check AC input voltage. Check or adjust high AC input voltage setting (AC2 Hi Volt).
W14 AC2 Input L2 Under Voltage
Automatic AC Under Voltage Warning (AC2 Line 2 input is at or below the AC2 Lo Volt setting, plus 10 V)
Check AC input voltage. Check or adjust low AC input voltage setting (AC2 Lo Volt).
W44 Battery Over Temperature
Automatic Battery Over Temperature Warning. Battery temperature is over 50 °C.
Check battery voltage and battery cable connections. Stop charging, if necessary. Check for excessive ambient temperature and adequate ventilation in the battery compartment
W45 Capacitor over temperature
Automatic DC Bulk Capacitor over temperature (100 °C)
Ensure adequate ventilation around the XW Inverter/Charger. Reduce the AC loads.
W48 DC Under Voltage Automatic Battery voltage is below 46 V.
Check for the correct battery voltage at the inverter’s DC input terminals. Check for an external DC load on the batteries. Check condition of batteries and recharge if possible or reduce your Low Batt Cut Out setting.
W49 DC Over Voltage Automatic Battery voltage is above 68 V.
Turn off or check additional charging sources to batteries. Check battery cables.Check for the correct battery voltage at the inverter’s DC input terminals. Ensure your DC source is regulated below your high battery cut out or increase your High Batt Cut Out setting.
Table 4-2 Warning Messages
Warning Number
System Control Panel Message
Warning Type Cause Solution
4–12 975-0240-01-01

Faults and Warnings
W57 FET1 Over Temperature
Automatic Internal temperature is over 85 °C.
AC input voltage may be too high while charging.
Operating too large of a load for too long while inverting.
Ambient temperature may be high.
Inverter cooling fan may have failed.
Inverter airflow intake may be blocked.
Charging setting is too high based on ambient temperature around inverter.
Check for high input AC voltage.
Remove excessive loads.
Let inverter cool down and try restarting.
Hold a piece of paper to inverter vents to check the fan. If the fan has failed, have the inverter serviced.
Increase clearance around the inverter or unclog the fan air intake.
Lower the Max Charge Rate setting.
W58 FET2 Over Temperature
Automatic See W57. See W57.
W63 AC Overload Automatic Excessive load on the AC output.
Check for loads above the inverter’s capacity. Turn off some loads if necessary.
W64 AC Overload L1 Automatic See W63. See W63.
W65 AC Overload L2 Automatic See W63. See W63.
W68 Transformer Over Temperature
Automatic See W57. See W57.
W94 Remote Power Off Automatic The unit has been turned off with a Remote Power Off switch.
No action required. The unit stops inverting or charging immediately, and shuts down after five seconds. If the unit is configured as a master, it signals other network devices to also shut down.
W95 Equalize Abort Manual Equalization terminated abnormally because of interrupted AC input.
Wait until AC input (utility grid) returns to in-tolerance condition.
Table 4-2 Warning Messages
Warning Number
System Control Panel Message
Warning Type Cause Solution
975-0240-01-01 4–13

Troubleshooting
W96 Cannot Equalize Manual The selected battery type should not be equalized.
Change battery type if your batteries should be equalized. Gel or AGM batteries should not be equalized.
W97 Battery temp sensor failure.
Automatic Battery Temperature Sensor Shorted
Replace battery temperature sensor.
W500 Lost network connection
Automatic Lost network connection Check network cables.
W501 Inv/Chg is trying to fix a memory problem
Manual Non-volatile memory warning
Normal operation may return or may go to fault. Turn inverter/charger off and on to resume normal operation.
Table 4-2 Warning Messages
Warning Number
System Control Panel Message
Warning Type Cause Solution
4–14 975-0240-01-01

Faults and Warnings
Fault Messages
When the XW Inverter/Charger detects a fault condition, the fault is displayed on the System Control Panel. The XW Inverter/Charger also illuminates the Fault light on the System Control Panel and inverter information panel. A fault affects the operation of the unit. See “Fault Types” on page 4–16 for an explanation of the different fault types.You can view the 20 most recent fault messages on the System Control Panel by selecting Fault Log from the Device Info menu in the XW Inverter/Charger Setup Menu.If several faults occur before you can acknowledge or clear them, they are displayed together on a fault list. This list contains messages from every Xanbus-enabled device, not just the XW Inverter/Charger. You can select a message and view its details from the fault list.To view a message from a fault list:1. On the list, use the up arrow or down arrow button to highlight the message
you want to view.2. Press Enter.
The complete message appears.After viewing the message, you can return to the fault list by pressing Exit or continue to the menu for the device that caused the fault by pressing Enter. Each time you return to the list after viewing a complete message, the viewed message is removed from the list.If you have left the fault list, you can view faults at any time from the System Settings menu.To view a fault list:1. On the Select Device menu, highlight System Settings and press Enter.2. On the System Settings menu, highlight View Fault List.3. Press Enter.
975-0240-01-01 4–15

Troubleshooting
Fault Types
There are three types of fault messages: automatic faults, manual faults, and escalating automatic faults. Table 4-3 describes how they differ in their behavior and how you can respond to them when they appear on the XW System Control Panel.
Inverter Operation After Faults
XW Inverter/Charger operation changes when a fault occurs. How the operation changes depends on the operating state of the unit when the fault occurred—inverting, charging, grid or generator support, AC bypass, and so on—and on which fault has occurred.
Table 4-3 Fault Types and Behaviors
Fault type Behavior
Automatic faults Clear automatically if the fault condition that generated the message goes away. You can also acknowledge automatic faults without waiting for them to clear automatically.
Manual faults Require you to clear them by:• selecting Clear Faults on the Main XW Inverter/Charger
menu or on the menu for the Xanbus-enabled device that generated the fault (if the fault condition still exists, the fault message reappears)
• correcting the condition that caused the fault.Escalating automatic faults
Clear automatically if the fault condition goes away, just like an automatic fault.However, if an escalating automatic fault occurs several times within a defined time period, the escalating automatic fault becomes a manual fault, requiring user intervention. For example, if an AC Overload fault occurs three times in five minutes, it will no longer clear itself and become a manual fault. Then you must identify the problem, correct the fault condition, and clear the fault.
Table 4-4 Inverter Operation After Faults
Faults State when Faults Occur Action After Faults
F1, F2: AC Output Inverting Unit stops inverting and waits for nominal AC output voltage level, or a manual clear from user.
F3 to F10: AC1 Input Voltage and Frequency
AC1 input is the preferred source and qualified.
Unit begins inverting (if inverter is enabled) or disengages AC1 and waits for nominal AC1 input (if inverting is disabled).
F11 to F16: AC2 Input Voltage and Frequency.
AC2 input is the preferred source and qualified.
Unit begins inverting (if inverter is enabled) or disengages AC2 and waits for nominal AC2 input (if inverting is disabled).
4–16 975-0240-01-01

Faults and Warnings
F17 to F22: Relay Welded
Inverting Unit stops inverting and waits for user to clear fault.
F23 to F40: Anti-Islanding
Grid Support (Peak Load Shaving or Selling)
Moves to AC bypass and waits for nominal grid conditions to return for a minimum of five minutes.
F41, F42: Aux power supply voltage
Unit has qualified AC input.
Unit shuts down and waits for nominal AC output voltage level, or a manual clear from user.
F44: Battery Over TempF45: Capacitor Over Temp
Any state. If inverting, the unit shuts down and waits for the temperature to return to nominal value. If in any of the AC-interactive states (charging, peak load shaving, sell, gen support), the unit goes into AC bypass mode until the temperature returns to the nominal value. If the unit is not in AC bypass, it shuts down until the temperature returns to nominal value. After these faults clear, the unit returns to its previous operating state.
F47 to F49: DC Voltage
Unit is inverting or has qualified AC input and is preparing to charge.
If inverting, the unit shuts down and waits for nominal voltage. If operating with a qualified AC source, the unit charges if charging is enabled, or remains in AC bypass if charging is disabled.
F63 to F65: AC Overload
Inverting or Grid Support Unit stops inverting and waits to qualify AC. Unit waits for user to manually clear fault.
Table 4-4 Inverter Operation After Faults
Faults State when Faults Occur Action After Faults
975-0240-01-01 4–17

Troubleshooting
Table 4-5 provides descriptions of the fault messages and solutions. If you are unable to resolve the problem after referring to this table, contact your dealer or Customer Service.
Table 4-5 Fault Messages
Fault Number Message Fault Type Cause Solution
F1 AC Output Under Voltage
Escalating Auto Fault. Must occur 3 times in 2 minutes before becoming a manual fault.
AC under-voltage shutdown at 108 V. The inverter has shut down to protect the loads.
Clear the fault and attempt restart. If problem persists, call customer service.
F2 AC Output Over Voltage
Escalating Auto Fault. Must occur 3 times in 30 seconds before becoming a manual fault.
AC over-voltage shutdown at 135 V. The inverter has shut down to protect the loads.
Clear the fault and attempt restart. If problem persists, call customer service.
F3 AC1 Input L1 Under Voltage
Automatic AC1 under-voltage shutdown at the AC1 Lo Volt setting.
Fault clears when voltage rises above the AC1 Lo Volt setting. If fault persists, check AC input voltage. Check and adjust AC input low voltage setting.
F4 AC1 Input L1 Over Voltage
Automatic AC1 over-voltage shutdown at the AC1 Hi Volt setting.
Fault clears when voltage falls below the AC1 Hi Volt setting. If fault persists, check AC input voltage. Check and adjust AC input high voltage setting.
F5 AC1 Input L1 Under Frequency
Automatic AC1 under-frequency shutdown at AC1 Lo Freq setting.
Fault clears when frequency rises above the AC1 Lo Freq setting. If fault persists, check AC input frequency. Check and adjust AC input low frequency setting.
F6 AC1 Input L1 Over Frequency
Automatic AC1 over-frequency shutdown at the AC1 Hi Freq setting.
Fault clears when frequency falls below the AC1 Hi Freq setting. If fault persists, check AC input frequency. Check and adjust AC input high frequency setting.
F7 AC1 Input L2 Under Voltage
Automatic AC1 under-voltage shutdown at the AC1 Lo Volt setting.
Fault clears when voltage rises above the AC1 Lo Volt setting. If fault persists, check AC input voltage. Check and adjust AC input low voltage setting.
4–18 975-0240-01-01

Faults and Warnings
F8 AC1 Input L2 Over Voltage
Automatic AC1 over-voltage shutdown at the AC1 Hi Volt setting.
Fault clears when voltage falls below the AC1 Hi Volt setting. If fault persists, check AC input voltage. Check and adjust AC input high voltage setting.
F9 AC1 Input L2 Under Frequency
Automatic AC1 under-frequency shutdown at the AC1 Lo Freq setting.
Fault clears when frequency rises above the AC1 Lo Freq setting. If fault persists, check AC input frequency. Check and adjust AC input low frequency setting.
F10 AC1 Input L2 Over Frequency
Automatic AC1 over-frequency shutdown at the AC1 Hi Freq setting.
Fault clears when frequency falls below the AC1 Hi Freq setting. If fault persists, check AC input frequency. Check and adjust AC input high frequency setting.
F11 AC2 Input L1 Over Voltage
Automatic AC2 over-voltage shutdown at the AC2 Hi Volt setting.
Fault clears when voltage falls below the AC2 Hi Volt setting. If fault persists, check AC input voltage. Check and adjust AC input high voltage settings.
F12 AC2 Input L1 Under Voltage
Automatic AC2 under-voltage shutdown at the AC2 Lo Volt setting.
Fault clears when voltage rises above the AC2 Lo Volt setting. If fault persists, check AC input voltage. Check and adjust AC input low voltage setting.
F13 AC2 Input L2 Over Voltage
Automatic AC2 over-voltage shutdown (AC Line 2 input) at the AC2 Hi Volt setting.
Fault clears when voltage falls below the AC2 Hi Volt setting. Check AC input voltage. Check and adjust AC input high voltage settings.
F14 AC2 Input L2 Under Voltage
Automatic AC2 under-voltage shutdown (AC Line 2 input) at the AC2 Lo Volt setting.
Fault clears when voltage rises above the AC2 Lo Volt setting. Check AC input voltage. Check and adjust AC input low voltage setting.
F15 AC2 Input L1 Over Frequency
Automatic AC2 over-frequency shutdown (AC Line 1 input) at the AC2 Hi Freq setting.
Fault clears when frequency falls below the AC2 Hi Freq setting. Check AC input frequency. Check and adjust AC input high frequency setting.
Table 4-5 Fault Messages
Fault Number Message Fault Type Cause Solution
975-0240-01-01 4–19

Troubleshooting
F16 AC2 Input L1 Under Frequency
Automatic AC2 under-frequency shutdown (AC Line 1 input) at the AC2 Lo Freq setting.
Fault clears when frequency rises above the AC2 Lo Freq setting. Check AC input frequency. Check and adjust AC input low frequency setting.
F17 Relay(s) Welded Manual The AC1 L1 transfer relay is bad or an AC source was wired directly to the AC output.
Disconnect the inverter’s output wiring. If error continues, have unit serviced.
F18 Relay(s) Welded Manual AC1 L2 transfer relay is bad or an AC source was wired directly to the AC output.
See F17.
F19 Relay(s) Welded Manual AC2 L1 transfer relay is bad or an AC source was wired directly to the AC output.
See F17.
F20 Relay(s) Welded Manual AC2 L2 transfer relay is bad or an AC source was wired directly to the AC output.
See F17.
F21 Relay(s) Welded Manual An unidentified transfer relay is bad or an AC source was wired directly to the AC output.
See F17.
F22 Relay(s) Welded Manual An unidentified L1 transfer relay is bad or an AC source was wired directly to the AC output.
See F17.
F23 AI Over Frequency Automatic Over-frequency anti-islanding, caught by the AC qualification limit.
No action required. The inverter stops selling and disconnects from the grid. When the fault clears, a five-minute timer begins counting down. The inverter does not sell again until grid voltage and frequency are within range for five minutes.
Table 4-5 Fault Messages
Fault Number Message Fault Type Cause Solution
4–20 975-0240-01-01

Faults and Warnings
F24 AI Under Frequency
Automatic Under-frequency anti-islanding, caught by the AC qualification limit.
See F23.
F25 AI Over Frequency Automatic Over-frequency anti-islanding, 60.4 Hz
See F23.
F26 AI Under Frequency
Automatic Under-frequency anti-islanding, 59.4 Hz
See F23.
F27 AI L1 Over Voltage Automatic Over-voltage anti-islanding, fast disconnect, 135 Vac.
See F23.
F28 AI L2 Over Voltage Automatic See F27. See F23.
F29 AI L1L2 Over Voltage
Automatic Over-voltage anti-islanding fault, caught by the qualification limit, voltage difference between L1 and L2.
See F23.
F30 AI L1L2 Over Voltage
Automatic Over-voltage anti-islanding, fast disconnect, 270 V.
See F23.
F31 AI L1 Over Voltage Automatic Over-voltage anti-islanding, slow disconnect, 130 V.
See F23.
F32 AI L2 Over Voltage Automatic Over-voltage anti-islanding, slow disconnect, 130 V.
See F23.
F33 AI L1L2 Over Voltage
Automatic Over-voltage anti-islanding, slow disconnect, 260 V.
See F23.
F34 AI L1 Under Voltage
Automatic Under-voltage anti-islanding, slow disconnect, 107 V.
See F23.
F35 AI L2 Under Voltage
Automatic See F34. See F23.
F36 AI L1L2 Under Voltage
Automatic See F34. See F23.
F37 AI L1 Under Voltage
Automatic Under-voltage anti-islanding, fast disconnect, 66 Vac.
See F23.
Table 4-5 Fault Messages
Fault Number Message Fault Type Cause Solution
975-0240-01-01 4–21
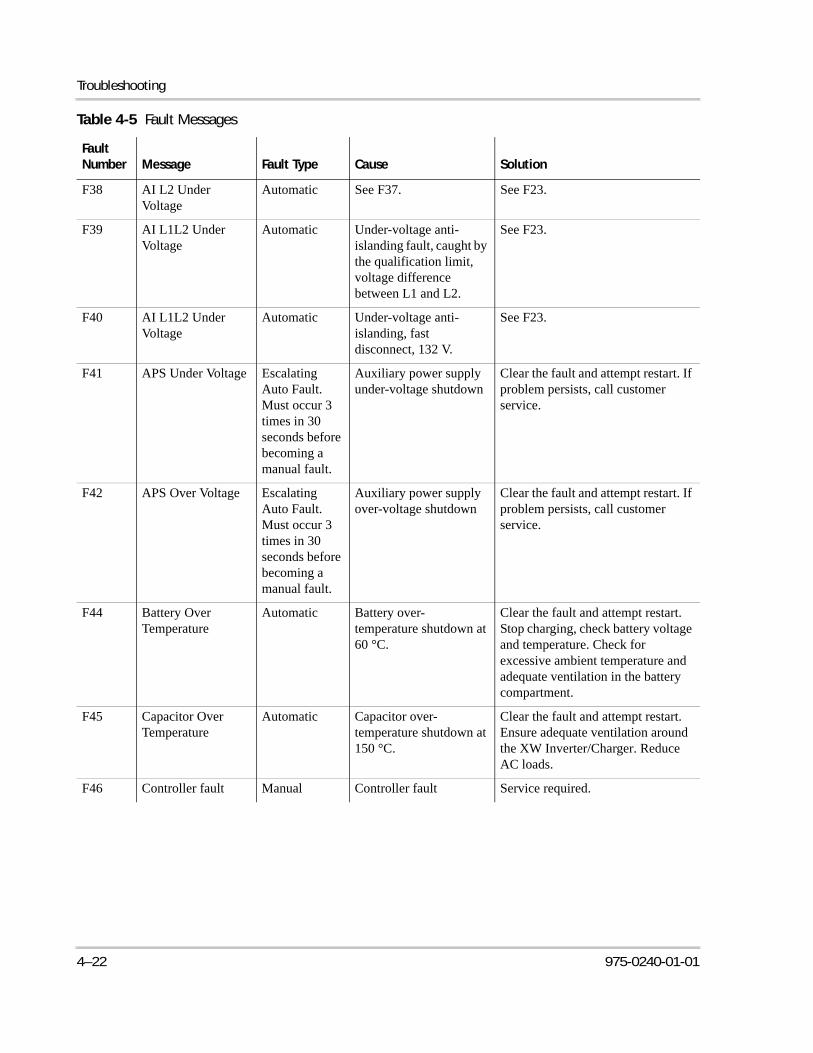
Troubleshooting
F38 AI L2 Under Voltage
Automatic See F37. See F23.
F39 AI L1L2 Under Voltage
Automatic Under-voltage anti-islanding fault, caught by the qualification limit, voltage difference between L1 and L2.
See F23.
F40 AI L1L2 Under Voltage
Automatic Under-voltage anti-islanding, fast disconnect, 132 V.
See F23.
F41 APS Under Voltage Escalating Auto Fault. Must occur 3 times in 30 seconds before becoming a manual fault.
Auxiliary power supply under-voltage shutdown
Clear the fault and attempt restart. If problem persists, call customer service.
F42 APS Over Voltage Escalating Auto Fault. Must occur 3 times in 30 seconds before becoming a manual fault.
Auxiliary power supply over-voltage shutdown
Clear the fault and attempt restart. If problem persists, call customer service.
F44 Battery Over Temperature
Automatic Battery over- temperature shutdown at 60 °C.
Clear the fault and attempt restart. Stop charging, check battery voltage and temperature. Check for excessive ambient temperature and adequate ventilation in the battery compartment.
F45 Capacitor Over Temperature
Automatic Capacitor over-temperature shutdown at 150 °C.
Clear the fault and attempt restart. Ensure adequate ventilation around the XW Inverter/Charger. Reduce AC loads.
F46 Controller fault Manual Controller fault Service required.
Table 4-5 Fault Messages
Fault Number Message Fault Type Cause Solution
4–22 975-0240-01-01

Faults and Warnings
F47 DC Under Voltage Automatic DC under-voltage shutdown (immediate) occurs if DC voltage is below 16 Vdc (24 V) or 32 Vdc (48 V)The fault clears and the inverter restarts when DC voltage reaches 23 Vdc (24 V) or 46 Vdc (48 V).
Check for the correct battery voltage at the inverter’s DC input terminals. Check for an external DC load on the batteries. Check condition of batteries and recharge if possible.
F48 DC Under Voltage Automatic DC under-voltage shutdown occurs if DC voltage is below 20 Vdc (24 V) or 44 Vdc (48 V).
See F47.
F49 DC Over Voltage Automatic DC over-voltage shutdown. Occurs if DC voltage is above 32 Vdc (24 V) or 70 Vdc (48 V).
Clear the fault and attempt restart. Ensure battery voltage is below 29 Vdc (24 V) or 58 Vdc (48 V) at XW Inverter/Charger terminals. Check all other charging source outputs, battery cables. Ensure your DC source is regulated below your high battery cut out or increase your Hi Batt Cut Out setting.
F52 EEPROM Error Manual No action. Clear fault and resume operating or configuring the unit. If the fault persists, have the unit serviced.
F53 EEPROM Error Manual See F52.
F54 EEPROM Error Manual See F52.
F55 EEPROM Error Manual See F52.
F56 EEPROM Error Manual See F52.
Table 4-5 Fault Messages
Fault Number Message Fault Type Cause Solution
975-0240-01-01 4–23

Troubleshooting
F57 FET1 Over Temperature Shutdown
Automatic Internal temperature is over 105 °C.
AC input voltage may be too high while charging.
Operating too large of a load for too long while inverting.
Ambient temperature may be high.
Inverter cooling fan may have failed.
Inverter airflow intake may be blocked.
Charging setting is too high based on ambient temperature around inverter.
Fault clears when temperature drops to 75 °C.
Check for high input AC voltage.
Remove excessive loads.
Let inverter cool down and try restarting.
Hold a piece of paper to inverter vents to check the fan. If the fan has failed, have the inverter serviced.
Increase clearance around the inverter or unclog the fan air intake.
Lower the Max Charge Rate setting.
F58 FET2 Over Temperature Shutdown
Automatic See F57. See F57.
F59 GOCFG process failed
Manual Auto-configuration process failed.
Retry the “Copy From?” procedure, or configure the unit manually.
F63 AC Overload Escalating Auto Fault. Must occur 3 times in 5 minutes before becoming a manual fault.
Excessive load on the AC output.
Check for loads above the inverter’s capacity. Turn off some loads if necessary.
F64 AC Overload L1 Escalating Auto Fault. Must occur 3 times in 5 minutes before becoming a manual fault.
Excessive load on the AC output.
See F63
Table 4-5 Fault Messages
Fault Number Message Fault Type Cause Solution
4–24 975-0240-01-01

Faults and Warnings
F65 AC Overload L2 Escalating Auto Fault. Must occur 3 times in 5 minutes before becoming a manual fault.
Excessive load on the AC output.
See F63.
F66 System Configuration Fault
Automatic Multi-Unit Configuration settings are incorrect.
Ensure only one unit is configured as the master. Ensure each unit has a unique Device Number, and that Connections have been configured correctly. See “Connections Menu” on page 3–26.
F67 Watchdog Error Manual Service required.
F68 Transformer Over Temperature
Automatic The transformer temperature is over 140 °C.
The fault clears when the transformer temperature falls to 125 °C. Ensure adequate ventilation around the XW Inverter/Charger. Reduce AC loads.
F69 External Sync Failed
Manual Check connections and cable on external AC sync port. In a single-inverter system, nothing must be plugged into the AC sync port. Clear fault and try again. If these steps fail, the unit requires service.
F500 Silicon Serial ID Failure
Manual Silicon Serial ID Failure Service required.
Table 4-5 Fault Messages
Fault Number Message Fault Type Cause Solution
975-0240-01-01 4–25

4–26

A Specifications
Appendix A, “Specifications” provides the electrical and environmental specifications for the XW Inverter/Charger.
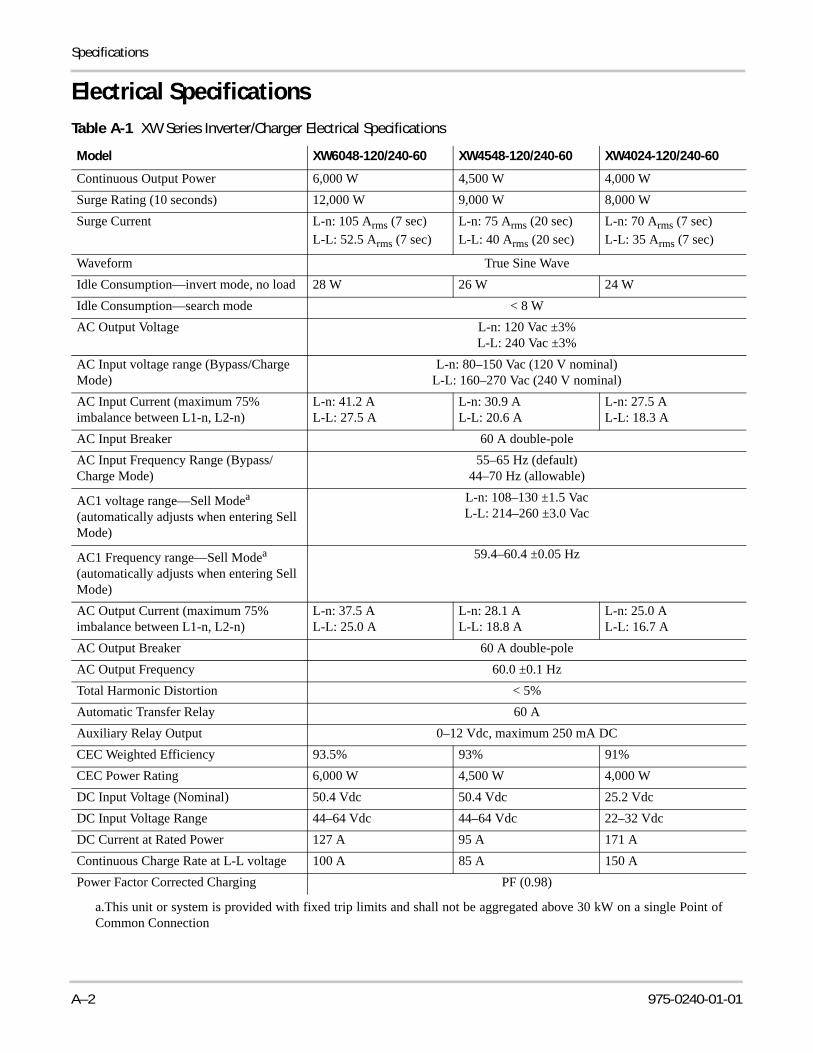
Specifications
Electrical SpecificationsTable A-1 XW Series Inverter/Charger Electrical Specifications
Model XW6048-120/240-60 XW4548-120/240-60 XW4024-120/240-60
Continuous Output Power 6,000 W 4,500 W 4,000 WSurge Rating (10 seconds) 12,000 W 9,000 W 8,000 WSurge Current L-n: 105 Arms (7 sec)
L-L: 52.5 Arms (7 sec)L-n: 75 Arms (20 sec)L-L: 40 Arms (20 sec)
L-n: 70 Arms (7 sec)L-L: 35 Arms (7 sec)
Waveform True Sine WaveIdle Consumption—invert mode, no load 28 W 26 W 24 WIdle Consumption—search mode < 8 WAC Output Voltage L-n: 120 Vac ±3%
L-L: 240 Vac ±3%AC Input voltage range (Bypass/Charge Mode)
L-n: 80–150 Vac (120 V nominal)L-L: 160–270 Vac (240 V nominal)
AC Input Current (maximum 75% imbalance between L1-n, L2-n)
L-n: 41.2 A L-L: 27.5 A
L-n: 30.9 A L-L: 20.6 A
L-n: 27.5 A L-L: 18.3 A
AC Input Breaker 60 A double-poleAC Input Frequency Range (Bypass/Charge Mode)
55–65 Hz (default)44–70 Hz (allowable)
AC1 voltage range—Sell Modea
(automatically adjusts when entering Sell Mode)
a.This unit or system is provided with fixed trip limits and shall not be aggregated above 30 kW on a single Point ofCommon Connection
L-n: 108–130 ±1.5 VacL-L: 214–260 ±3.0 Vac
AC1 Frequency range—Sell Modea
(automatically adjusts when entering Sell Mode)
59.4–60.4 ±0.05 Hz
AC Output Current (maximum 75% imbalance between L1-n, L2-n)
L-n: 37.5 AL-L: 25.0 A
L-n: 28.1 AL-L: 18.8 A
L-n: 25.0 AL-L: 16.7 A
AC Output Breaker 60 A double-poleAC Output Frequency 60.0 ±0.1 HzTotal Harmonic Distortion < 5%Automatic Transfer Relay 60 AAuxiliary Relay Output 0–12 Vdc, maximum 250 mA DCCEC Weighted Efficiency 93.5% 93% 91%CEC Power Rating 6,000 W 4,500 W 4,000 WDC Input Voltage (Nominal) 50.4 Vdc 50.4 Vdc 25.2 VdcDC Input Voltage Range 44–64 Vdc 44–64 Vdc 22–32 VdcDC Current at Rated Power 127 A 95 A 171 AContinuous Charge Rate at L-L voltage 100 A 85 A 150 APower Factor Corrected Charging PF (0.98)
A–2 975-0240-01-01
Electrical Specifications
XW Inverter/Charger Overload Capability
Loads presented to the inverter are seldom constant. Typically, large loads are operated for only short periods of time. In order to provide the maximum utility, Xantrex inverters are allowed to operate at power levels that exceed their continuous power ratings. This graph shows how loads that are larger than the inverter can sustain continuously can be operated for useful periods of time.The length of time that the inverter can operate at high power is limited by temperature. When large loads are run, the inverter’s temperature increases. At the point where more heat is created in the inverter than can be dissipated, its ability to operate becomes time limited.
Figure A-1 XW Inverter/Charger AC Overload Capability
X W 6 0 4 8 A C O v e r l o a d c a p a b i l i t y ( L 1 - L 2 ) 2 4 0 V
0
5
1 0
1 5
2 0
2 5
3 0
3 5
4 0
4 5
5 0
5 5
6 0
1 1 0 1 0 0 1 0 0 0 1 0 0 0 0
t [ S e c o n d s )
AC O
utpu
t Cur
rent
[Arm
s]
X W 6 0 4 8 A C O v e r l o a d c a p a b i l i t y ( L 1 - n ) 1 2 0 V u n b a l a n c e d A C l o a d
0
1 02 0
3 0
4 0
5 06 0
7 0
8 0
9 01 0 0
1 1 0
1 2 0
1 1 0 1 0 0 1 0 0 0 1 0 0 0 0
t [ S e c o n d s )
AC
Out
put C
urre
nt [A
rms]
975-0240-01-01 A–3

Specifications
Output Power Versus Ambient Temperature
When the internal temperature of the XW Inverter/Charger exceeds its rated range, the unit reduces it energy output to ensure maximum component ratings are not exceeded.
XW Inverter/Charger Efficiency
Inverting Efficiency (Typical)
Figure A-2 Output Power Versus Ambient Temperature
XW Series Power Derating
0
1000
2000
3000
4000
5000
6000
7000
-25 -15 -5 5 15 25 35 45 55 65 75
XW6048-Pwr_derXW4548-Pwr_derXW4024-Pwr_der
75
80
85
90
95
100
0.0 0.5 1.0 1.5 2.0 2.5 3.0 3.5 4.0 4.5 5.0 5.5 6.0 6.5
Output Power (kW)
Effic
ienc
y (%
)
A–4 975-0240-01-01

Mechanical Specifications
Charging Efficiency (Typical)
Sell Mode Efficiency (Typical)
Mechanical SpecificationsTable A-2 XW Series Inverter/Charger Mechanical Specifications
Model XW6048-120/240-60 XW4548-120/240-60 XW4024-120/240-60
Supported Battery Types Flooded (default), Gel, AGM, Custom
Battery bank size 100–2000 Ah
Non Volatile Memory Yes
Display Panel Status LEDs indicate AC In status, faults/warnings, equalize mode, battery level.Three-character display indicates output power or charge current, fault/warning codes.
On/Off and equalize button
Multiple Unit Configurations Up to 3 parallel units in 120/240 split-phase configuration
80
85
90
95
100
7 15 25 35 45 55 65 75 89 100
Battery Current (Amps)
Effic
ienc
y (%
)Power FactorEfficiency
85
88
91
94
97
100
0.0 0.5 1.0 1.5 2.0 2.5 3.0 3.5 4.0 4.5 5.0 5.5 6.0 6.5
Export Power (kW)
Effic
ienc
y (%
)
975-0240-01-01 A–5

Specifications
Accessories
System Network Xanbus (publish-subscribe network, no need for hubs or special cards)
Emissions FCC Class B
Regulatory approvals UL 1741 1st Edition: 2005 Version, CSA 107.1-01
Enclosure Type NEMA Type 1—Indoor
Rated Temperature Range (meets all specifications)
32–104 °F (0–40 °C)
Operational Temperature Range -13–158 °F (-25–70 °C)
Storage Temperature Range -40–185 °F (-40–85 °C)
Inverter Dimensions (H × W × D) 23 × 16 × 9" (580 × 410 × 230 mm)
Shipping Dimensions (H × W × D) 28 × 22 ¼ × 10 ½" (711 × 565 × 267 mm)
Inverter Weight 125 lb (57 kg) 115 lb (52 kg) 115 lb (52 kg)
Shipping Weight 132 lb (60 kg) 122 lb (55 kg) 122 lb (55 kg)
Accessory Part Number
Power Distribution Panel 865-1015Conduit Box 865-1025Inverter #2 Connection Kit 865-1020XW-MPPT60-150 Solar Charge Controller 865-1030XW System Control Panel (System Control Panel II) 865-1050XW Automatic Generator Start 865-1060Network cables 3 ft (0.9 m): 809-0935
5 ft (1.5 m): 809-09367 ft (2.0 m): 809-093710 ft (3.0 m): 809-093814 ft (4.3 m): 809-093925 ft (7.6 m): 809-094050 ft (15.2 m): 809-094175 ft (22.9 m): 809-0942
Network terminators Male (2 per pack): 809-0901Female (2 per pack): 809-0905
Table A-2 XW Series Inverter/Charger Mechanical Specifications
Model XW6048-120/240-60 XW4548-120/240-60 XW4024-120/240-60
A–6 975-0240-01-01

B Default Settings
Appendix B contains the default configuration settings and ranges for the XW Inverter/Charger. Configuration settings can be viewed and changed using the XW System Control Panel.

Default Settings
Default Settings and RangesFigure B-1 shows the XW Inverter/Charger configuration menus as they appear on the XW System Control Panel.
Figure B-1 Configuration Menu Map (Advanced)
XW6048 00:AC
XW6048 00:Inv
XW6048 00: Multi
XW6048 00:Gen
XW6048 00: Aux
XW6048 00:Grid
XW6048 00:Chg
Custom Settings
XW6048 00: Adv
Connections
[44V][10s][70V][50W][2s]
[Disabled][64.0V][57.6V][57.6V][54.0V]
[108mV/C]
[Flooded]
[440Ah][100%]
[2-Stage][Warm][50V]
[180min][12:00AM][12:00AM]
[AC1][60A]
[106V][132V][55Hz][65Hz][60A][80V]
[138V][55Hz][65Hz]
[54V][Disabled]
[28A][Disabled]
[60A][12:00AM][12:00AM]
[ManualOff][ActHi]
[LowBattV][42V][1sec][48V][1sec]
[XW6048][00]
[SplitPhMstr]
[HouseBatt1][ACLoad1][Grid1][Gen1]
[Disabled][10A]
[XW6048 01]
B–2 975-0240-01-01

Default Settings and Ranges
Inverter Menu
Charger Menu
Item
Default Setting Range
Step Size
24 V Nominal
48 V Nominal 24 V Nominal 48 V Nominal
Low Batt Cut Out 22V 44V 20–24V 40–48V 1VLBCO Delay 10s 0–600s 1sHigh Batt Cut Out 32.0V 70.0 V 29.0–36.0V 58.0–70.0V 0.1VSearch Watts 50W 25–255W 5WSearch Delay 2s 1–25s 1s
Item
Default Setting Range
Step Size24 V 48 V 24 V 48 V
Batt Type Flooded Flooded, Gel, AGM, Custom n/aBatt Capacity 440Ah 50–2000Ah 1AhMax Chg Rate 100% 10–100% 1%Charge Cycle 2-Stage 2-Stage, 3-Stage n/aDefault Batt Temp Warm Cold, Warm, Hot n/aReCharge Volts 25.0V 50.0V 20.0–27.0V 40.0–54.0V 0.1VAbsorb Time 180min 1–480min 1minChg Block Start n/a 12:00 AM–11:59 PM,
00:00–23:59n/a
Chg Block Stop n/a 12:00 AM–11:59 PM,00:00–23:59
n/a
975-0240-01-01 B–3

Default Settings
Custom Battery Menu
AC Menu
Item
Default Settinga
a.Custom battery default settings are based on the Flooded battery default settings.The Gel and AGM default settings are provided here for reference only.
Range Step Size24 V 48 V 24 V 48 V
Eqlz Support Enabled Enabled Enabled, Disabled n/aEqlz Voltage 32.0V 64.0V 27.0–32.0V 54.0–64.0V 0.1VBulk Voltage 28.8V
28.4V (Gel)28.6V (AGM)
57.6V56.8V (Gel)57.2V (AGM)
20.0–32.0V 40.0–64.0V 0.1V
Absorb Voltage
28.8V28.4V (Gel)28.6V (AGM)
57.6V56.8V (Gel)57.2V (AGM)
20.0–32.0V 40.0–64.0V 0.1V
Float Voltage 27V27.6V (Gel)26.8V (AGM)
54.0V55.2V (Gel)53.6V (AGM)
20.0–32.0V 40.0–64.0V 0.1V
Absorb Time 180min 180min 1–480min 1minBatt Temp Comp
27mV/C (Flooded, Gel)21mV/C (AGM)
108mV/C (Flooded, Gel)42mV/C (AGM)
0–180mV/C 1mV/C
Item
Default Setting Range
Step Size120 Vac 240 Vac 120 Vac 240 Vac
AC Priority AC1 AC1, AC2 n/aAC1 Breaker 60A 5–60A 1AAC1 Lo Volt 106V 212V 78–115V 156–230V 1VAC1 Hi Volt 132V 264V 125–140V 250–280V 1VAC1 Lo Freq 55Hz 52–59Hz 1HzAC1 Hi Freq 65Hz 61–68Hz 1HzAC2 Breaker 60A 5–60A 1AAC2 Lo Volt 80V 160V 78–115V 156–230V 1VAC2 Hi Volt 138V 276V 125–140V 250–280V 1VAC2 Lo Freq 55Hz 52–59Hz 1HzAC2 Hi Freq 65Hz 61–68Hz 1Hz
B–4 975-0240-01-01

Default Settings and Ranges
Grid Support Menu
Gen Support Menu
Item
Default Range
Step Size24 V 48 V 24 V 48 V
Grid Supp Volts 27.0V 54.0V 23.0–29.0V 46.0–58.0V 0.1VMax Sell Amps 27A 0–60Aa
a.This setting is restricted to the selected AC1 breaker size.
1A
Load Shave Amps 48A 0–48A 1A
Load Shave Startb
b.When Load Shaving is enabled, if Load Shave Start and Load Shave Stop areset to the same time, the XW Inverter/Charger load shaves continuously.
n/a 12:00 AM–11:59 PM,00:00–23:59
n/a
Load Shave Stop n/a 12:00 AM–11:59 PM,00:00–23:59
n/a
Setting Default Range Step Size
GenSupp Mode Disabled Enabled, Disabled n/aGenSupp Amps 10A 4–48A 1A
975-0240-01-01 B–5
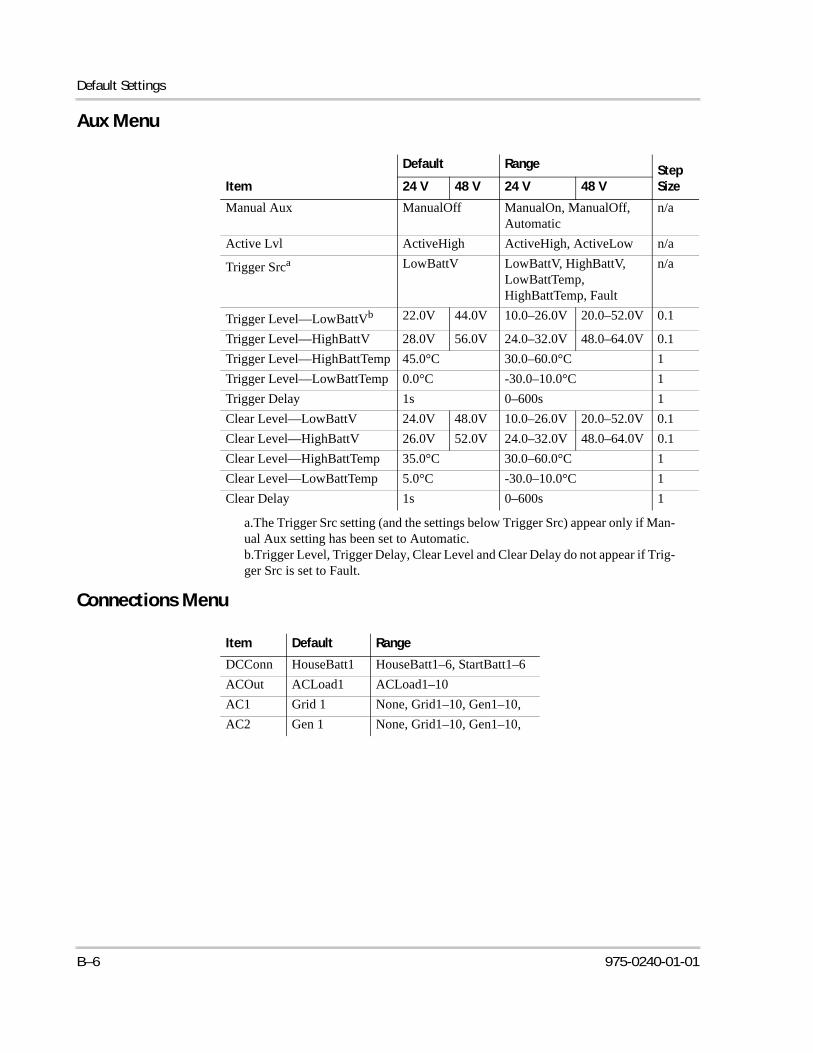
Default Settings
Aux Menu
Connections Menu
Item
Default Range Step Size24 V 48 V 24 V 48 V
Manual Aux ManualOff ManualOn, ManualOff, Automatic
n/a
Active Lvl ActiveHigh ActiveHigh, ActiveLow n/a
Trigger Srca
a.The Trigger Src setting (and the settings below Trigger Src) appear only if Man-ual Aux setting has been set to Automatic.
LowBattV LowBattV, HighBattV, LowBattTemp, HighBattTemp, Fault
n/a
Trigger Level—LowBattVb
b.Trigger Level, Trigger Delay, Clear Level and Clear Delay do not appear if Trig-ger Src is set to Fault.
22.0V 44.0V 10.0–26.0V 20.0–52.0V 0.1
Trigger Level—HighBattV 28.0V 56.0V 24.0–32.0V 48.0–64.0V 0.1Trigger Level—HighBattTemp 45.0°C 30.0–60.0°C 1Trigger Level—LowBattTemp 0.0°C -30.0–10.0°C 1Trigger Delay 1s 0–600s 1Clear Level—LowBattV 24.0V 48.0V 10.0–26.0V 20.0–52.0V 0.1Clear Level—HighBattV 26.0V 52.0V 24.0–32.0V 48.0–64.0V 0.1Clear Level—HighBattTemp 35.0°C 30.0–60.0°C 1Clear Level—LowBattTemp 5.0°C -30.0–10.0°C 1Clear Delay 1s 0–600s 1
Item Default Range
DCConn HouseBatt1 HouseBatt1–6, StartBatt1–6ACOut ACLoad1 ACLoad1–10AC1 Grid 1 None, Grid1–10, Gen1–10,AC2 Gen 1 None, Grid1–10, Gen1–10,
B–6 975-0240-01-01

Warranty and Return Information
WarrantyWhat does this warranty cover? This Limited Warranty is provided by Xantrex Technology Inc. (“Xantrex”) and covers defects in workmanship and materials in your XW Series Inverter/Charger. This warranty period lasts for five years from the date of purchase at the point of sale to you, the original end user customer. You will be required to demonstrate proof of purchase to make warranty claims.This Limited Warranty is transferable to subsequent owners but only for the unexpired portion of the Warranty Period. Subsequent owners also require original proof of purchase as described in “What proof of purchase is required?”What will Xantrex do? Xantrex will, at its option, repair or replace the defective product free of charge, provided that you notify Xantrex of the product defect within the Warranty Period, and provided that Xantrex through inspection establishes the existence of such a defect and that it is covered by this Limited Warranty. Xantrex will, at its option, use new and/or reconditioned parts in performing warranty repair and building replacement products. Xantrex reserves the right to use parts or products of original or improved design in the repair or replacement. If Xantrex repairs or replaces a product, its warranty continues for the remaining portion of the original Warranty Period or 90 days from the date of the return shipment to the customer, whichever is greater. All replaced products and all parts removed from repaired products become the property of Xantrex.Xantrex covers both parts and labor necessary to repair the product, and return shipment to the customer via a Xantrex-selected non-expedited surface freight within the contiguous United States and Canada. Alaska and Hawaii are excluded. Contact Xantrex Customer Service for details on freight policy for return shipments outside of the contiguous United States and Canada.How do you get service? If your product requires troubleshooting or warranty service, contact your merchant. If you are unable to contact your merchant, or the merchant is unable to provide service, contact Xantrex directly at:
Direct returns may be performed according to the Xantrex Return Material Authorization Policy described in your product manual. For some products, Xantrex maintains a network of regional Authorized Service Centers. Call Xantrex or check our website to see if your product can be repaired at one of these facilities.What proof of purchase is required? In any warranty claim, dated proof of purchase must accompany the product and the product must not have been disassembled or modified without prior written authorization by Xantrex. Proof of purchase may be in any one of the following forms:• The dated purchase receipt from the original purchase of the product at point of sale to the end user, or• The dated dealer invoice or purchase receipt showing original equipment manufacturer (OEM) status, or• The dated invoice or purchase receipt showing the product exchanged under warranty
Telephone: 1 800 670 0707 (toll free North America)1 360 925 5097 (direct)
Fax: 1 800 994 7828 (toll free North America)1 360 925 5143 (direct)
Email: [email protected]
975-0240-01-01 WA–1

Warranty and Return
What does this warranty not cover? This Limited Warranty does not cover normal wear and tear of the product or costs related to the removal, installation, or troubleshooting of the customer's electrical systems. This warranty does not apply to and Xantrex will not be responsible for any defect in or damage to:a) the product if it has been misused, neglected, improperly installed, physically damaged or altered, either inter-
nally or externally, or damaged from improper use or use in an unsuitable environment;b) the product if it has been subjected to fire, water, generalized corrosion, biological infestations, or input voltage
that creates operating conditions beyond the maximum or minimum limits listed in the Xantrex product specifi-cations including high input voltage from generators and lightning strikes;
c) the product if repairs have been done to it other than by Xantrex or its authorized service centers (hereafter "ASCs");
d) the product if it is used as a component part of a product expressly warranted by another manufacturer;e) the product if its original identification (trade-mark, serial number) markings have been defaced, altered, or
removed.
Disclaimer
ProductTHIS LIMITED WARRANTY IS THE SOLE AND EXCLUSIVE WARRANTY PROVIDED BY XANTREX IN CONNECTION WITH YOUR XANTREX PRODUCT AND IS, WHERE PERMITTED BY LAW, IN LIEU OF ALL OTHER WARRANTIES, CONDITIONS, GUARANTEES, REPRESENTATIONS, OBLIGATIONS AND LIABILITIES, EXPRESS OR IMPLIED, STATUTORY OR OTHERWISE IN CONNECTION WITH THE PRODUCT, HOWEVER ARISING (WHETHER BY CONTRACT, TORT, NEGLIGENCE, PRINCIPLES OF MANUFACTURER'S LIABILITY, OPERATION OF LAW, CONDUCT, STATEMENT OR OTHERWISE), INCLUDING WITHOUT RESTRICTION ANY IMPLIED WARRANTY OR CONDITION OF QUALITY, MERCHANTABILITY OR FITNESS FOR A PARTICULAR PURPOSE. ANY IMPLIED WARRANTY OF MERCHANTABILITY OR FITNESS FOR A PARTICULAR PURPOSE TO THE EXTENT REQUIRED UNDER APPLICABLE LAW TO APPLY TO THE PRODUCT SHALL BE LIMITED IN DURATION TO THE PERIOD STIPULATED UNDER THIS LIMITED WARRANTY.IN NO EVENT WILL XANTREX BE LIABLE FOR ANY SPECIAL, INDIRECT, INCIDENTAL OR CONSEQUENTIAL DAMAGES, LOSSES, COSTS OR EXPENSES HOWEVER ARISING WHETHER IN CONTRACT OR TORT INCLUDING WITHOUT RESTRICTION ANY ECONOMIC LOSSES OF ANY KIND, ANY LOSS OR DAMAGE TO PROPERTY, ANY PERSONAL INJURY, ANY DAMAGE OR INJURY ARISING FROM OR AS A RESULT OF MISUSE OR ABUSE, OR THE INCORRECT INSTALLATION, INTEGRATION OR OPERATION OF THE PRODUCT.
ExclusionsIf this product is a consumer product, federal law does not allow an exclusion of implied warranties. To the extent you are entitled to implied warranties under federal law, to the extent permitted by applicable law they are limited to the duration of this Limited Warranty. Some states and provinces do not allow limitations or exclusions on implied warranties or on the duration of an implied warranty or on the limitation or exclusion of incidental or consequential damages, so the above limitation(s) or exclusion(s) may not apply to you. This Limited Warranty gives you specific legal rights. You may have other rights which may vary from state to state or province to province.
WA–2 975-0240-01-01

Warranty and Return
Return Material Authorization PolicyBefore returning a product directly to Xantrex you must obtain a Return Material Authorization (RMA) number and the correct factory "Ship To" address. Products must also be shipped prepaid. Product shipments will be refused and returned at your expense if they are unauthorized, returned without an RMA number clearly marked on the outside of the shipping box, if they are shipped collect, or if they are shipped to the wrong location.When you contact Xantrex to obtain service, please have your instruction manual ready for reference and be prepared to supply:• The serial number of your product• Information about the installation and use of the unit• Information about the failure and/or reason for the return• A copy of your dated proof of purchaseRecord these details on page WA–4.
Return Procedure1. Package the unit safely, preferably using the original box and packing materials. Please ensure that your product
is shipped fully insured in the original packaging or equivalent. This warranty will not apply where the product is damaged due to improper packaging.
2. Include the following:• The RMA number supplied by Xantrex Technology Inc. clearly marked on the outside of the box.• A return address where the unit can be shipped. Post office boxes are not acceptable.• A contact telephone number where you can be reached during work hours.• A brief description of the problem.
3. Ship the unit prepaid to the address provided by your Xantrex customer service representative.
If you are returning a product from outside of the USA or Canada In addition to the above, you MUST include return freight funds and are fully responsible for all documents, duties, tariffs, and deposits. If you are returning a product to a Xantrex Authorized Service Center (ASC) A Xantrex return material authorization (RMA) number is not required. However, you must contact the ASC prior to returning the product or presenting the unit to verify any return procedures that may apply to that particular facility and that the ASC repairs this particular Xantrex product.
Out of Warranty ServiceIf the warranty period for your XW Series Inverter/Charger has expired, if the unit was damaged by misuse or incorrect installation, if other conditions of the warranty have not been met, or if no dated proof of purchase is available, your unit may be serviced or replaced for a flat fee.To return your XW Series Inverter/Charger for out of warranty service, contact Xantrex Customer Service for a Return Material Authorization (RMA) number and follow the other steps outlined in “Return Procedure” on page WA–3. Payment options such as credit card or money order will be explained by the Customer Service Representative. In cases where the minimum flat fee does not apply, as with incomplete units or units with excessive damage, an additional fee will be charged. If applicable, you will be contacted by Customer Service once your unit has been received.
975-0240-01-01 WA–3
Warranty and Return
Information About Your SystemAs soon as you open your XW Series Inverter/Charger package, record the following information and be sure to keep your proof of purchase.
If you need to contact Customer Service, please record the following details before calling. This information will help our representatives give you better service.
p Serial Number _________________________________
p Product Number 865-1000, 865-1005, 865-1010
p Purchased From _________________________________
p Purchase Date _________________________________
p Installation location __________________________________
p Length of time inverter has been installed __________________________________
p Battery/battery bank size __________________________________
p Battery type (e.g. flooded, sealed gel cell, AGM) __________________________________
p DC wiring size and length __________________________________
p Alarm sounding? __________________________________
p Description of indicators on front panel __________________________________
p Appliances operating when problem occurred __________________________________
p Description of problem __________________________________
______________________________________________________________________________________
______________________________________________________________________________________
WA–4 975-0240-01-01
Index
Numerics2-stage charge mode 3–123-stage charge mode 3–11
Aabsorption charging stage 3–12AC settings menu
default settings B–4description 3–16
Advanced menu 3–4automatic faults 4–16automatic generator start 3–8auxiliary output menu
default settings B–6description 3–21
Bbasic features 1–2basic operation 1–3batteries
first aid when working with viprecautions when working with vi
battery equalization 3–13battery level LEDs 2–6battery type 3–10bulk charging stage 3–11
Ccharger block 3–10, 3–14charger settings menu
default settings B–3description 3–10
charger status LED 2–3charging cycle diagram 3–11connections menu
default settings B–6description 3–26
custom battery menu 3–15default settings B–4
Customer Servicepreparing to call WA–4
Ddefault settings, restoring 3–28device home screen 2–11Down arrow button 2–7
Eenergy management features 3–18Enter button 2–7equalize button and LED 2–4equalize charging 3–13equalize mode 2–14escalating automatic faults 4–16Exit button 2–7
Ffault types 4–16fault/warning LED (inverter information panel) 2–3fault/warning LED (System Control Panel) 2–7faults and warnings 4–10FCC information to the user viifirst aid vifloat charging stage 3–12
GGen (AC2) LED 2–2generator support 2–13generator support menu
default settings B–5description 3–21
Grid (AC1) LED 2–2grid support 2–13, 3–18grid support settings menu
default settings B–5description 3–17
Hhome screen 2–11
IIEEE 1547 1–5Information About Your System form WA–4inverter
975-0240-01-01 IX-1

Index
purchase date WA–4serial number WA–4
inverter information panel 1–6, 2–2inverter settings menu
default settings B–3description 3–7
inverter status LED 2–3islanding protection 1–5
Kkeypress for system standby mode 2–8
Lload shave 2–13, 3–17, 3–19
Mmanual faults 4–16Mechanical Specifications A–5menu map 3–6, B–2meters screen 2–14multi-stage charging process 3–11
Nno float charging stage 3–12
Oon/off button 2–5
Ppassthru 2–14peak load shaving 3–19proof of purchase WA–4purchase date WA–4
Qqualifying AC 2–12
Rrecharge volts 3–10restore default settings 3–28
Ssafety instructions viSCP
device menu 2–10
features 1–7, 2–7select device menu 2–10system status screen 2–11
search mode 2–13, 3–3, 3–7, 3–8sell mode 2–13, 3–17serial number WA–4standby 2–14standby button 2–7, 2–8state of charge LEDs 2–6surge performance 1–4System Control Panel. See SCPsystem home screen 2–9system standby mode 2–8system status screen 2–11
TTime-of-Use (TOU) metering 3–19troubleshooting
fault messages 4–15general guidelines 4–2motor loads 4–3problem loads 4–4resistive loads 4–3warning messages 4–10
UUL 1741 1–5Up arrow button 2–7
Wwarning
automatic 4–11manual 4–11
warrantyout of warranty service WA–3terms and conditions WA–1
XXanbus 1–2Xantrex
web site ivXW Inverter/Charger home screen 2–11
IX–2 975-0240-01-01


Xantrex Technology Inc.
1 800 670 0707 Tel toll free NA1 360 925 5097 Tel direct1 800 994 7828 Fax toll free NA1 360 925 5143 Fax [email protected]
975-0240-01-01 Printed in China


![cosmos XW-105GK XW-205GK co XW-105GK s XW-205GK · (ÎlJñ) XW—105GK åßffiñÄ COñÄ con COñÄ fiE XW—205GK : 50ppmtffi(300ppmlàlT E y EyEyEy r3—r3— CDñ5C]513s 65'C](https://static.fdocuments.us/doc/165x107/5c0828ba09d3f24a338bd4ae/cosmos-xw-105gk-xw-205gk-co-xw-105gk-s-xw-iljn-xw105gk-assffinae-conae.jpg)

