XM-17330/27330 QUALITATIVE ANALYSIS...
71
XM-17330/27330 QUALITATIVE ANALYSIS PROGRAM For the proper use of the instrument, be sure to read this instruction manual. Even after you read it, please keep the manual on hand so that you can consult it whenever necessary. IXM-17330/27330-1QL (608001) DEC2001-03210208 Printed in Japan
-
Upload
vuongtuyen -
Category
Documents
-
view
222 -
download
2
Transcript of XM-17330/27330 QUALITATIVE ANALYSIS...

XM-1733027330
QUALITATIVE
ANALYSIS PROGRAM
For the proper use of the instrument be sure toread this instruction manual Even after youread it please keep the manual on hand so thatyou can consult it whenever necessary
IXM-1733027330-1QL (608001) DEC2001-03210208
Printed in Japan
NOTATIONAL CONVENTIONS AND GLOSSARY
General notations
WARNING A potentially hazardous situation which if not avoided could result in death or serious injury
CAUTION A potentially hazardous situation which if not avoided could result in minor injury or material damage Material damage includes but is not limited to damage to related devices and facilities and acquired data
mdash CAUTION mdash Points where great care and attention is required when operating the device to avoid damage to the device itself
Additional points to be remembered regarding the operation
A reference to another section chapter or manual
1 2 3 Numbers indicate a series of operations that achieve a task
A diamond indicates a single operation that achieves a task
File The names of menus or commands displayed on the screen and those of buttons of the instrument are denoted with bold letters
FilendashExit A command to be executed from a pulldown menu is denoted by linking the menu name and the command name with a dash (ndash) For example FilendashExit means to execute the Exit command by se-lecting it from the File menu
Mouse operation
Mouse pointer An arrow-shaped mark displayed on the screen which moves with the movement of the mouse It is used to specify a menu item command parameter value and other items Its shape changes ac-cording to the situation
Click To press and release the left mouse button
Right-click To press and release the right mouse button
Double-click To press and release the left mouse button twice quickly
Drag To hold down the left mouse button while moving the mouse
XM-1733027330-1QL
CONTENTS
1 GENERAL 1
2 SPECIFICATIONS 1
3 PROGRAM STRUCTURE 2
4 OPERATION 4 41 Preparation for Measurement 4
411 Setting group and sample names 5 412 Setting measurement conditions 7 413 Setting analysis positions 13 414 Loading measurement conditions 18 415 Storing measurement conditions 19 416 Printing measurement conditions and results 20 417 Additional Function 21
42 Measurement 21 421 Measurement under stored conditions (Preset mode) 21 422 Measurement under present instrument conditions
(Survey mode) 22 423 Realtime display 23
43 Processing 25 431 Selecting sample names and processing methods 25 432 Operation menu 28
44 Semi-Quantitative (Semi-Quant) Analysis Program 60 441 How to calculate X-ray intensities in the Semi-Quant Analysis 60 442 Using Semi-Quant Analysis results in off-line quantitative
analysis 61 443 Correcting the standard sensitivity curve 62
5 APPENDIX 67
XM-1733027330-1QL C-1
1 GENERAL
This program enables you to measure spectra of unknown samples and to identify the constituent elements by using wavelength-dispersive X-ray spectrometers (WDS) Up to 20 spectra can be acquired in a single measurement and up to eight spectra can be displayed in real time on the monitor screen during spectrum acquisition When the measurement has finished elements are automatically identified with element names attached to the peak positions based upon the knowledge base of experienced analysis specialists The program permits displaying the KLM markers manual identification of peaks semi-quantitative analysis for designated elements and printing the results of identifications
2 SPECIFICATIONS
Spectrum measurement Up to 20 spectra by asynchronous concurrent spectrometer driving measurement
Number of measurement points per spectrum 10 to 10000
Spectrometer measurement step interval 1 to 1000 m X-ray counting time 1 to 100000 ms per spectrometer step Number of preset measurement points per sample
1 to 10000 Number of accumulations 1 to 100 Realtime display during measurement Possible Automatic element identification during measurement
Possible Spectrum display functions Display of up to 8 spectra
Spectrum expansionreduction Selectable forms of spectrum display (Vec-tor Dot and Bar) Selectable units of spectrum display (mm Å and keV)
KLM markers Can be displayed Spectrum peak identification Possible Off-line element identification Possible Spectrum calculations Smoothing second differentiation
background removal additionsubtraction multiplicationdivision of constants addi-tionsubtraction of spectra spectrum shift
Chemical shift analysis Possible Trace element analysis Possible Spectrum search Discovering similar spectra is possible
XM-1733027330-1QL 1
3 PROGRAM STRUCTURE
This program has a tree structure as shown below Clicking the mouse on a menu item executes the item or displays menu items at a lower level in the hierarchy from which you can select the desired item
Analysis
Qualitative Analysis Sample Measurement
Spectrometer Condition On-line Semi-Quant EOS Condition Stage Condition Condition Load Condition Store Print-out Condition Additional Function Survey Measurement Preset Measurement
Other Analysis Menus
2 XM-1733027330-1QL
Process Qualitative Analysis
Sample Realtime Operation
Spectra Display Zooming Ymax r Normalize Select XminYmax Window Layout Mixed Spectra Display Spectrum Type Spectrum Color Draw Mesh Display Axis Kind of Assignment Display Parameter Write Text Replace Spectrum Quant Background Reset Spectra
KLM Marker Peak ID Save ID Results Off-line ID Spectra Calculation
Smoothing 2nd Derivative Background subtraction Sub (SP ndash k) Add (SP + k) Multiply (SP k) Divide (SP k) Spectrum Shift Spectra Sub (SP1 ndash SP2) Spectra Add (SP1 + SP2) Dead time Correction Result store Reset
Redraw Spectra Print-Out Spectrum Deconvolution Semi-Quant Analysis ID-Doctor Spectrum Analysis Spectra Search
Optional
XM-1733027330-1QL 3
4 OPERATION
This chapter describes the procedure for qualitative analysis The procedure is divided into three parts measurement (analysis data acquisition) real time display (monitoring during measurement) and processing (analysis data processing)
41 Preparation for Measurement This section explains the general procedure for measurement First set sample names for the data to be stored Then set Spectrometer and EOS conditions Set the point to be measured and execute measurement These conditions can be saved in files and can be recalled later for measurement Also element identification as well as determination of composition are possible if semi-quantitative analysis is specified at the time of measurement
The following procedure is used for opening the main window for measurement 1
2
Open the EPMA Main Menu on the computer display and then click on the Analysis icon to display the pull-down menu
Refer to the instruction manual of the microanalyzer main unit to learn how to open the EPMA Main Menu
Fig 1 EPMA Main Menu
Select Qualitative Analysis The Qualitative Analysis function window opens Proceed to the following sections
Fig 1a Qualitative Analysis function window
4 XM-1733027330-1QL
411 Setting group and sample names
Measurement is carried out under the specified sample name while the data processing and data backup take place after measurement for every sample Up to 10000 data can be stored for each sample name The group name is the name containing a group of samples and it will be convenient to name after the property of a series of samples or the operator name for easier arrangement and filing 1
2
Click on the Sample button of the Qualitative Analysis function window The Select Sample window opens as shown in Fig 2 This window displays the list of the sample names entered previously measurement dates and methods of analysis The methods of analysis are Qlw qualitative analysis Qnt quantitative analysis Lin line analysis Map map analysis and Eds EDS analysis The amount of disk space (KB) in use and the amount of free space at present are shown in the window
Fig 2 Select Sample window
Confirm the Group name in the top left corner of the Select Sample window If you want to select a new group or an existing group name click on the Group button to open the Select Group window then select the desired group name or after clicking on the New button enter a new group name The maximum length is 14 characters
XM-1733027330-1QL 5
Fig 3 Select Group window 3 To use a sample name entered previously click on the desired sample name
in the list of sample names and then click on the OK button To enter a new sample name click on the New button and input the new sample name in the input box The maximum length is 14 characters
The remaining buttons in the Select Sample window and the Select Group window have the following functions
Button Function
New After clicking on the New button you can enter new Group names and Sample names The maximum length is 14 characters You can use alphanumerics + ndash _ = and (the period cannot be the first character) When a new Group name is recorded a Sample name also must be recorded using New at the same time
Rename After clicking on the Rename button you can enter new Group names and Sample names
Print Click on the Print button in each window to print the list of Group names and Sample names
Delete To delete the Group names and Sample names that have been just recorded specify them in each window and click on the Delete button To delete Group names and Sample names that have been already used for measurement delete them by selecting UtilityndashFile Utility from the EPMA Main Menu
6 XM-1733027330-1QL
Button Function
Sorting Order Clicking on the Name button of Sorting Order in each window rearranges the Sample names and Group names in alphabetical order Clicking on the Date button of Sorting Order rearranges them in chronological order
OK Click on the OK button in each window to finalize the Sample name and close the window
Cancel Click on the Cancel button in each window if you want to cancel the Sample name that was input and close the window
412 Setting measurement conditions
You set the measurement conditions that you want for the spectrometers
Click on the Measurement button of the Qualitative Analysis function window
The Measurement menu opens
Fig 4 Measurement menu for Qualitative Analysis
Spectrometer Condition
To set measurement conditions click on Spectrometer Condition The Spectrometer Condition window opens as shown in Fig 5 Here you can set measurement conditions for the spectrometers You set the number of spectra to collect by using the No of Spectra button This window displays the present settings for each spectrometer You can change the desired settings displayed in the window The measurement conditions are given below The unit ldquommrdquo is used in the following explanation You can choose the unit of wavelength from mm A and nm
XM-1733027330-1QL 7
Fig 5 Spectrometer Condition window
Buttons Function
No of Spectra Input the number of spectra to be collected (up to 20 spectra possible)
Channel Select the channel number of the spectrometer
Crysrtal Specify the analyzing crystal to be used
Start Specify the measurement start position Setting is also possible in element-designation mode (Refer to the following section)
End Specify the measurement end position Setting is also possible in element-designation mode (Refer to the following section)
Step Interval between neasurement points (μm) It is normally set to the following values Approx 50 microm for general analyzing crystals such as TAP PET and LIFApprox 100 microm for analyzing crystals such as STE and LDE2 (If Step is set to an excessively large value the accuracy in element identification may deteriorate) The number of measurement points for a single spectral line is given by the equation below n = (en ndash st) 1000in + 1 where en End (mm) value st Start (mm) value in Step (microm) value
Dwell Measurement time per measurement (ms) which is to be decided taking into account the total measurement time
8 XM-1733027330-1QL
Buttons Function
Total T Total measurement time (s)
PHA gain Hifh V Base L Window
The values set in the SCA Configuration window are displayed In normal use it is not necessary to set these values
DiffInt Pulse-height analysis mode setting (Diff differential mode Int Integral mode)
With analyzing crystals for light elements such as those of the LDE series data with a high PB ratio which
is less affected by high-order X-rays can be obtained in the Diff mode However set the SCA conditions so that the primary ray will not be cut
Setting measurement startend positions with element-designation mode There are two methods for setting the measurement start and end positions One is to directly enter values of Start (mm) and End (mm) in the aforementioned Spectrometer Condition window The other is to set the values using the ele-ment-designation mode in the WDS Elements window The second method consists of the following steps 1
2
3
Click on any one of the Elem-1 -2 buttons in the Spectrometer Condition window to display the WDS Elements window (Fig 6)
Fig 6 WDS Elements window
Click on the Order button in the WDS Elements window to enter the order of lines as necessary Click on the Line button to specify the type of lines ( or both and for K L and M lines)
The colored symbols of the elements to be measured are displayed in the periodic table of the elements
XM-1733027330-1QL 9
4
5
Position the pointer on the desired element symbols and click on them
Clicking on only one element symbol is used in trace-element analysis for checking for the presence of X-ray peaks from trace elements When multiple elements are specified the measurement range will include all X-ray and background analysis positions for those elements
To specify all measurable elements click on the All Elem button
The steps so far set the Start and End values in the Spectrometer Condition window so that they include the measurement ranges for all the elements specified
Clicking on the Back (ndash) (mm) or Back (+) (mm) button lets you change the distance from the peak position at which to measure the background The default value is plusmn5 mm from the peak position
On-line Semi-Quant
You can perform semi-quantitative analysis of the identified elements after qualitative measurement
Select MeasurementmdashOn-line Semi-Quant from the Qualitative Analysis function window
The On-line Semi-Quant window opens
Fig 7 On-line Semi-Quant window
To carry out automatic semi-quantitative analysis click on the Yes button of the On-line Semi-Quant window
If you have selected the Yes button proceed to the following Step 1
If you want to perform only qualitative analysis click on the No button
10 XM-1733027330-1QL
1
2
3
Click on Metal or Oxide
If you select Oxide type the number of Oxygen in the input box for the calcula-tion of chemical formula Select Wt or K-ratio for printing If you select Wt for printing decide whether to normalize the total of mass concentrations to 100
To specify whether each element is to be included in the results select Include Exclude or If any Include The element selected is included in the result in qualitative analysis
even if it is not identified Exclude The element selected is excluded from the result in qualitative analysis
even if it is identified
If you want to set all the elements to Exclude click on the Set All button If any The element selected is included in the result in qualitative analysis if
it is identified as A-rank If you want to set all the elements to If any click on the Set All button
If you want to specify the spectrum to be used for each element click on the Check button
The Check window appears
Fig 7a Check window
If you select Default the most intense spectrum will be used for calculation When you set valence for an oxide use the Valence input box of the Check window
Qualitative analysis is performed in a normal way and then element identification is also performed If the Yes button is selected in the On-line Semi-Quant window the results of element identification and the specified element are checked and the results of the semi-quantitative analysis are calculated and displayed on the Listing window
XM-1733027330-1QL 11
EOS Condition The EOS Condition window allows you to set the conditions of the electron optical system (EOS) Clicking on the Read button reads present conditions for the EOS and displays them on the EOS Condition window in which you can input and alter items such as Probe Scan Select MeasurementmdashEOS Condition from the Qualitative Analysis function
window The EOS Condition window opens
Fig 8 EOS Condition window
Button Function
Set Sets the present conditions for the EOS
Read Reads the present conditions for the electron optical system (EOS) and displays them on the EOS Condition window
Accelerating Voltage
Sets accelerating voltage at measurement
Current Displays beam current To select the automatic current mode in which a specified current is obtained before measurement click on the Auto button then specify beam current
Magnification Sets magnification for scanning image (active only when Probe Scan is ON)
Probe Diameter Sets probe diameter (in microm ) at measurement
Probe Scan Specifies whether probe scan will be ON or OFF during measurement
Scan Conditions Clicking on the arrowhead of this button opens the window for the following four items
Scan Mode Specifies scan mode (Picture Bup Line Spot or Area) for measurement
Scan Speed Selects scan speed from S1 to S12 The larger the number the slower the speed
Focus Specifies automatic or manual focus
12 XM-1733027330-1QL
Button Function
Stabilizer Specifies whether the beam stabilizer (CLampTilt CL or Tilt) is to be used or not (OFF)
Lens Conditions Clicking on the arrowhead of this button opens the window for the following two items
Condenser Lens Specifies condenser lense settings (CoarseFine) for measurement
Object Lens Specifies objective lense settings (CoarseFine) for measurement
OK Enters measurement conditions and closes the EOS Condition window
Cancel Cancels the conditions that have been input in the EOS Condition window and closes the window
413 Setting analysis positions
You have to specify analysis positions before measurement There are two modes of specifying the analysis positions One is the Stage mode and the other is the Beam mode Select MeasurementmdashStage Condition from the Qualitative Analysis
function window The Stage Condition window opens
Fig 9 Stage Condition window When the Stage Condition window is opened the list of coordinates that were recorded previously is displayed and you can use it in common for qualitative analysis quantitative analysis and EDS qualitative analysis Therefore even when you perform qualitative analysis for the first time coordinates exist provided you have carried out some other analysis The results of analysis however are recorded separately even when you use the same coordinates
XM-1733027330-1QL 13
The columns of the list are Preset for analysis execution No for analysis position number Comment SB for Stage mode or Beam mode Acm for the number of accumulation times Stage (X Y Z) for coordinates of stage position and Qlw (qualitative analysis) Qnt (quantitative analysis) Eds (EDS qualitative analysis) marked with asterisks when they are applied One line of the list is always selected and entries made using Pos Input (for coordinate input) and One-by-One (for one-by-one analysis) affect this line
When you want to enter a new analysis point select the blank line at the bottom of the list When you want to alter one of the analysis points in the list select a set of coordinates from the list and then click on the Pos Input button When you want to perform an analysis at one specified point click on One-by-One
Button Function
Pos Input To specify an analysis position click on this button The Stage Condition window is displayed allowing you to specify analysis positions Refer to the next section ldquoStage Control Input windowrdquo
One-by-One Performs one specified analysis at the highlighted stage position
Clear Clears the highlighted line If there are any lines below the highlighted line they move up
Cancel Cancels the newly input values without entering them in the Stage Condition file The Confirmation window appears before the input line is cleared
SelectUnselect To measure at the recorded coordinates with the Preset mode ( refer to Section 421) the Preset button must be on To turn Preset on for all or some coordinates points click on Select To turn Preset off click on Unselect
Delete Deletes some or all sets of recorded coordinates If there are any lines below the deleted lines they move up
When you have deleted the analysis point values by using Clear or Delete if there
are any lines below the deleted lines they move up If you have executed the analysis at the recorded analysis point its results will remain unchanged
Table Edit Line Set and Position Correction are available in this Stage Condition window Refer to the separate instruction manual ldquoQuantitative Analysis Programrdquo
14 XM-1733027330-1QL
Stage Condition Input window You set the analysis position of the stage or beam in this window that opens when you click on the Pos Input button of the Stage Condition window
Fig 10 Stage Condition Input window with Working Area for Stage
Entering the analysis position in the Stage mode
1
2
3
Confirm that Scan Type is Stage If it is not click on the Stage button
Move the stage to the analysis position that you want to analyze observing the OM image by using the joystick of the Joystick Controller of the EPMA main unit then after focusing on the position eliminate backlash by using the TEST button of the Joystick Controller
It is especially necessary to eliminate backlash before you perform continuous analysis in the Preset mode
Click on the Read button to display the present stage position then click on the Store button to enter the coordinates of the position
XM-1733027330-1QL 15
Alternatively click on the Read amp Apply button and then this step will be exe-cuted automatically The same result will be obtained by pressing the STORE button of the Joystick Controller In this case after storing the position the coordi-nates of the next position will be indicated If the last character of the comment is a number it will be incremented automatically
4
1
2
3
4
5
To confirm and edit already-specified coordinates first select the corre-sponding analysis position in the Stage Condition window then move the stage using the Move button After confirming the coordinates of the point by using the joystick record the coordinates by carrying out Step 3
Entering the analysis position in the Beam mode
Confirm that Scan Type is Beam If it is not click on the Beam button
Display an image of the analysis position on the Viewing Display
Refer to the instruction book of the EPMA main unit Once you have decided on the analysis position set the image on the Viewing Display to the analysis mode change the cross cursors to green and then select analysis points Click on the Read button
Stage Position (X Y Z) Magnification and Beam Position (X Y) will be read To enter the analysis position click on the Store button
The items of the Stage Condition Input window are explained in the following table
Object Function
Comment You can input up to 40 characters as an explanation of the sample
Scan Type Specify the Stage mode or Beam mode
Auto Focus Click on this button to perform automatic stage focusing before measurement if the optional automatic focusing device has been installed
Magnification Specify the magnification of the EOS by clicking on the Read button This function will be effective only in the Beam mode
Accumulation You can specify up to 100 accumulations Enter values and the Coordinate Accumulation Setting window opens Select Joystick Line Grid or Fix If you select Line or Grid enter the number of steps and the scan width When you specify Accumulation confirm each coordinate point by clicking on the Confirm button
Stage Position Displays the present recorded position of the stage
Beam Position Displays the present recorded position of the beam (only in the Beam mode)
Apply You can enter analysis points in the list of coordinates by clicking on this button
Confirm Be sure to click on this button when you have specified the number of accumulations Move to the accumulation point by using the Joystick Controller then after confirming the focus press the STORE button of the Joystick Repeat this operation as many times as the accumulation number If you click on the Cancel button of the window the remaining accumulation points are neglected and the number of accumulations is reset to the number that you did prior to cancellation
16 XM-1733027330-1QL
Object Function
Read amp Apply Reads the position of the stage and also that of the beam if necessary and records them in the list of coordinates The same result can be obtained by using the STORE button of the Joystick Controller
Close Closes the Stage Condition Input window If the analysis position has been changed the Confirmation window opens
Upward and downward arrow buttons
Move to the previous or following coordinates If the analysis position has been changed the Confirmation window opens
OM Search Executes the automatic stage focusing at the present position of the stage if the optional automatic focusing device has been installed
X Y Z Displays the coordinates of the recorded stage position If you have selected Read the present position of the stage is displayed
Read Reads the present position of the stage and displays it in the the X Yand Z boxes
Store Copies the values of X Y and Z to the Stage Position box
Move Moves the stage to the position having the coordinates X Y and Z
Arrow buttons Moves the stage by the specified step width in the X or Y direction
Range Drag the scroll bar to specify the amount that the stage will move when you click on the Arrow buttons
These items are optional
XM-1733027330-1QL 17
414 Loading measurement conditions
If you load preset measurement conditions you can perform measurements by simply selecting samples and inputting stage positions Select MeasurementmdashCondition Load from the Qualitative Analysis function
window The Condition File Load window opens This window has the list of recorded measurement conditions such as file names dates recorded and comments
To call up the recorded conditions select the desired file from the list of recorded measurement conditions and click on the Load button The loaded conditions are settings of Spectrometer Condition On-line Semi-Quant EOS Condition Print-out Condition and Additional Function If you click on the Check button before loading you can check the stored condi-tions
Fig 11 Condition File Load window
18 XM-1733027330-1QL
415 Storing measurement conditions
If you set conditions in the Spectrometer Condition On-line Semi-Quant EOS Condition Print-out Condition and Additional Function windows you can store them in a file and give a new name to the file Select MeasurementmdashCondition Store from the Qualitative Analysis function
window The Condition File Store window opens
Fig 12 Condition File Store window with its sub-window
When you want to store new measurement conditions click on the New button and input a file name (14 characters maximum) and a comment (40 characters maximum) then click on the Store button When you want to write new measurement conditions in place of the existing measurement conditions recorded in a file select the desired file from the list of recorded measurement conditions and then click on the Store button You can carry out file operations such as printings (Print) changing the name (Rename) and deleting (Delete) in the Condition File Store window
XM-1733027330-1QL 19
When you want to back up recorded data to other media select UtilityndashFile Utility from the EPMA Main Menu
416 Printing measurement conditions and results
Select MeasurementmdashPrint-out Condition from the Qualitative Analysis function window
The Print-out Condition window opens and you can select items that you want to print
Refer to Fig 13
Button Function
Measurement Condition Prints measurement conditions
Summary of Identified Elements Prints names of identified elements in the A and B ranks
Peak Positions with Identified Elements Prints list of peak positions and intensities
Identified Elements with Peak Positions Prints peak position for each identified element
Semi-Quant Result Prints results of semi-quantitative analysis
Fig 13 Printout example
20 XM-1733027330-1QL
417 Additional Function
1
2
Select MeasurementmdashAdditional Function from the Qualitative Analysis function window
You can specify whether ID-Doctor will function or not for element identification at measurement By default ID-Doctor will operate
42 Measurement Two methods of measurement are available one is the Preset mode and the other is the Survey mode Preset mode Method of performing measurement by using stored measurement conditions Survey mode Method of performing measurement without changing the present instrument conditions (for the EOS and stage) Use this mode to perform analysis without specifying detailed measurement conditions
Real-time spectrum display is possible during measurement in both modes
Refer to Sect 423 ldquoRealtime displayrdquo
421 Measurement under stored conditions (Preset mode)
This section describes how to perform measurement under stored measurement conditions and positions in the Preset mode
Select MeasurementmdashPreset Measurement from the Qualitative Analysis function window
The Preset Measurement window opens
Fig 14 Preset Measurement window
Click on the Acquire button in the Preset Measurement window The preset measurement conditions and the analysis positions in the list of the Stage Condition window whose Preset check boxes are turned on will be loaded and then the measurement will be carried out at the analysis positions
XM-1733027330-1QL 21
422 Measurement under present instrument conditions (Survey mode)
This section describes how to perform measurement under present EOS conditions and at the stage position in the Survey mode 1
2
Select MeasurementmdashSurvey Measurement from the Qualitative Analysis function window
Survey Measurement will be performed The data obtained will be stored always at the stage number 99999 The data will be overwritten every time the measure-ment is performed
When you wish to store the measurement results in a file after Survey Measurement click on the Save button then enter Position No and Com-ment
The limit of stage number is one more than the number of positions that are already set During measurement the Measurement Control Window appears as shown in Fig 15 allowing you to interrupt measurement (Measurement Stop) and stop accumu-lation (Accum Stop) If you have selected Accv off the accelerating voltage will be turned off automatically after measurement
Fig 15 Measurement Control Window
22 XM-1733027330-1QL
423 Realtime display
1
2
Select ProcessmdashQualitative Analysis from the EPMA Main Menu during measurement
The Data display window opens
Fig 16 Data display window
Click on the Realtime button The Realtime Display window opens You can perform Spectra Display during measurement If you want to display KLM Marker confirm the peak position using Peak ID during realtime display or enlarge a part of spectrum click on the Stop button to stop the realtime display then you can perform these operations
For details refer to Sect 43 ldquoProcessingrdquo
Fig 16a Realtime Display window
XM-1733027330-1QL 23
Button Function
Sample Specifies the sample and displays the measured spectra Do not click on Sample during realtime display When you want to display spectra that have already been measured stop the realtime display then click on the Sample button and select the sample that you want to display
Realtime Executes realtime display Click on the Realtime button The Realtime Display window of Fig 16a opens Click on the Start button then the spectra being measured are displayed When the analysis point has moved to other coordinates the message ldquoNext Displayrdquo appears If you want the next realtime display to begin immediately select OK After apause the realtime display of the next sample begins automatically The sequence of spectrum display can be changed as follows Channel No Order
Spectra are displayed in real time in the order of the spectrometer channel beginning with channel 1 at the top
Spectrum No Order Spectra are displayed in real time in the order of measurement To select the number of spectra (1 to 8) to be displayed click on the Max Cell Number button
Operation Performs operations described below for spectra to be displayed in real time
Operation menu during realtime display
Select Operation during realtime display The Operation menu opens During realtime display some selections are unavail-able Spectra Display KLM Marker and Peak ID can be selected
Refer to Sect 43 ldquoProcessingrdquo for a description of each operation
Fig 17 Operation menu (during realtime display)
24 XM-1733027330-1QL
43 Processing This section describes how to process the data obtained from the measurements performed so far
431 Selecting sample names and processing methods
1
2
Select ProcessmdashQualitative Analysis from the EPMA Main Menu shown on the Computer Display
The Data display window opens
Fig 18 Data display window
Click on the Sample button in the Data display window The Sample window (for processing) opens
XM-1733027330-1QL 25
Fig 19 Sample window (for processing)
3
4
5
Select the spectra to be displayed from the Sample window There are two display modes One is the single-sample mode in which the spectra of one analysis point are displayed The other is the multiple-sample mode in which the spectra of different samples are displayed at the same time The latter mode is used when you perform the chemical shift and the optional waveform separation However you cannot perform the off-line element identification nor the semi-quantitative analysis using the multiple-sample mode To specify the number of spectra to be displayed click on the Max Spectra button In the Sample window the lists of Sample Name Stage Position and X-Ray Spectra are displayed In the X-Ray Spectra list thumbnail spectra are displayed If they are not displayed click on Show Icon to show them
Button Function
Make Icon Makes thumbnail spectra Normally the spectra are made automatically at measurement
Show Icon Switches on and off the display of thumbnail spectra
Dummy Displays blank spaces in place of spectra
Max Spectra Specifies the number of spectra to be displayed
Selected List Displays the list of spectra that have been selected To deselect spectra click on their names in the list
If you want to display and process data of another group click on the Group button The Group window that lists existing group names opens as shown in Fig 20 Click on the desired group name and then click on the OK button Repeat Step 3 In the single sample mode select GrouprArrSamplerArrStage Position and then select the desired spectra in X-Ray Spectra If you do not select any spectra in X-Ray Spectra all the displayed spectra
will be selected automatically
26 XM-1733027330-1QL
6
7
In the multiple sample mode every time you select a spectrum select group sample and stage position
Fig 20 Group window (for processing)
Click on the OK button Spectra will be displayed in the Data display window in the order in which you selected them in X-Ray Spectra The data corresponding to the item that was specified with Display Parameter ( Sect 432) are displayed at the right of the spectra
XM-1733027330-1QL 27
432 Operation menu
Click on the Operation button in the Data display window of Fig 18 The Operation menu opens as shown in Fig 21 Clicking on a menu item allows the operations described below The menu items that you use frequently can be selected from the pop-up menu that opens by right clicking on any position on a displayed spectrum
Fig 21 Operation menu
Fig 22 Pop-up menu
28 XM-1733027330-1QL
Spectra Display Selecting Spectra Display from the Operation menu shows the menu items related to the methods of displaying spectra allowing the following operations
Zooming
1
2
3
4
Select Spectra DisplaymdashZooming from the Operation menu The Zooming window opens and also at the same time the graph window showing the whole spectrum image opens separately as shown in Fig 23 To specify the spectrum to be processed select a spectrum number or click on any position on the spectrum that is being displayed
Position the mouse cursor near the position where you want to start to zoom and drag the cursor in the diagonal direction
An enlarged rectangular frame is formed Once you have decided the size to be zoomed in on release the mouse button and then click on the Apply button
The part of the spectrum in the specified area is enlarged in the graph window If you performed Step 2 in the graph window you need not click on the Apply button
To move the frame for enlargement drag a point near the center of the frame to the desired position If you want to change the size of the frame drag the frame line
In these operations the shape of the mouse cursor will change so that you can distinguish each operation You can perform the following operations by using the arrow and other keys of the keyboard rarr Moves the frame to the right larr Moves the frame to the left uarr Enlarges in the vertical direction darr Reduces in the vertical direction + Enlarges in the horizontal axis direction ndash Reduces in the horizontal axis direction Shift If you press one of the above keys while holding down this key the
amount of movement will increase
XM-1733027330-1QL 29
Fig 23 Zooming window and its graph window
Ymax r Normalize
You can redisplay the maximum intensity of a spectrum on display at the desired full-scale percentage by using this function 1 Select Spectra DisplaymdashYmax r Normalize from the Operation menu
The Ymax r Normalize window opens
Fig 24 Ymax r Normalize window
30 XM-1733027330-1QL
2
3
1
Click on the r [] button in the Ymax r Normalize window The r window opens as shown
Fig 24a r window
Enter the desired percentage in the input box of the r window by clicking on the number buttons in the r window then click on the Apply button of the Ymax r Normalize window
The maximum intensity of spectrum on display will be redisplayed as the percent-age of the full-scale value that you entered If the All button is selected in the Ymax r Normalize window the full-scale
percentage of all the spectra is set to the same value
Select Xmin mdash Ymax You can set the horizontal and vertical scales for spectra to the desired values The procedure is the same as for the Ymax r Normalize window
Select Spectra DisplaymdashXmin mdash Ymax from the Operation menu The Select Xmin ndash Ymax window opens
Fig 25 Select Xmin ndash Ymax window
XM-1733027330-1QL 31
2
3
Click on the Xmin Ymin Xmax or Ymax button in the Select Xmin mdash Ymax window
The Xmin Ymin Xmax or Ymax window opens Enter the desired values in the input box of the window by clicking on the number buttons in the window then click on the Apply button of the Select Xmin mdash Ymax window
The horizontal and vertical scales for spectra are set to the specified values If the All button is selected in the Select Xmin ndash Ymax window the scales of
all the spectra are set to the same values
Window Layout You can specify the layout of the Data display window by using this function
Select Spectra DisplaymdashWindow Layout from the Operation menu The Window Layout window opens
Fig 26 Window Layout window Window size Select the desired size from V Small Small Normal
and Maximum Horizontal layout Usually spectra are displayed vertically in a column If
you want to display the spectra horizontally in lines click on the Horizontal button and then enter the number of spectra to be shown horizontally in the Horizontal spc input box
Parameter display If you do not want to display parameters on the right side select Parameter OFF If you want to display them select Parameter ON
32 XM-1733027330-1QL
Fig 27 An example of the horizontal display of spectra in lines
Mixed Spectra Display
You can display spectra individually on different parts of the display or all together in one area Select Spectra DisplaymdashWindow Layout from the Operation menu
The Mixed Spectra Display window opens
Fig 28 Mixed Spectra Display window
XM-1733027330-1QL 33
If Spectrum Mode is Single spectra are displayed all together in one display area In the Single mode if you have selected Relative for Vertical Scale the full-scale value of the vertical axis becomes 100 the relative intensity of each spectrum is shown with the maximum value of each spectrum taken as 100 If you have selected Absolute for Vertical Scale spectra will be shown with the maximum value of all spectra taken as 100 The offset value of the Y-axis is displayed as the value of Base Offset when the maximum value of each spectrum is taken as 1 In the Single mode each spectrum is displayed on the same base line when the value of Base Offset is 00 However each spectrum is displayed on a different base line with the same base level when the value of Base Offset is 10
Spectrum Type
You can specify the style for displaying spectrum lines 1
2 3
Select Spectra DisplaymdashSpectrum Type from the Operation menu The Spectrum Type window opens
Fig 29 Spectrum Type and Spectrum windows
Select a spectrum number from the Spectrum Type window To specify the style for displaying spectrum lines select the desired items from the following list then click on the Apply button to display the spectra in the specified style
Style for displaying the line Vector Line Marker Symbols Bar Vertical bars Marker + Vector Symbols and line Vector + Bar Lines and vertical bars
34 XM-1733027330-1QL
Line type for Vector Solid Solid line Dash Dashed line Dot Dotted line Dash Dot Dashed line with a dot Dash Dot Dot Dashed line with two dots Long Dash Long dashed line Thickness of the line Thin Thin line Normal Normal line Thick Thick line
You can store recall and delete using the Load Save and Delete buttons
Spectrum Color You can change the color of the displayed spectra background and parameter area by using this function 1 Select Spectra DisplaymdashSpectrum Color from the Operation menu
The Spectrum Color window opens
Fig 30 Spectrum Color and Color windows
XM-1733027330-1QL 35
2 3
1
2 3
Select a spectrum number from the Spectrum Color window To specify the color for displaying spectra background and parameter areas select the desired items from the following list then click on the Apply button to display the color as desired
Items available for color display Spectrum Spectra Background Background Original Original spectra prior to calculation Parameter Fore Parameter characters Parameter Back Parameter background Buttons for operations More Lets you to specify the colors of Marker ID Element
Cursor and KLM lines You can store recall and delete by using Load Save and Delete buttons
Draw Mesh You can draw a grid as the background of spectra by using this function
Select Spectra DisplaymdashDraw Mesh from the Operation menu The Draw Mesh window opens
Fig 31 Draw Mesh window
Select a spectrum number from the Draw Mesh window To specify Scale Color and Line for the grid select the desired items from the following lists then click on the Apply button to display the grid as desired
Line type Solid Solid line Dash Dashed line Dot Dotted line Dash Dot Dashed line with a dot Dash Dot Dot Dashed line with two dots
36 XM-1733027330-1QL
Thickness of the line Thin Thin line Normal Normal line Thick Thick line Lines to draw Hor + Vert Horizontal and vertical lines Horizontal Horizontal lines Vertical Vertical lines None No lines
Display Axis
You can set the unit for the abscissa of the specified spectra by using this function The unit for the abscissa is always the same for all the spectra 1
2
1
Select Spectra DisplaymdashDisplay Axis from the Operation menu The Display Axis window opens
Fig 32 Display Axis window
To specify the desired item in the Display Axis window select Position mm Wave length A Wave length nm or Energy keV then click on the OK button
The abscissa for the spectra on the display changes as specified Wave order is useful for displaying the spectra in the original wavelength when high-order lines are displayed in such narrow range as chemical shift The function is effective only when the wavelength is specified as the abscissa
Kind of Assignment You can select the style for displaying element labels by using this function
Select Spectra DisplaymdashKind of Assignment from the Operation menu The Kind of Assignment window opens
XM-1733027330-1QL 37
Fig 33 Kind of Assignment window
2
1
Select Elements Elements X-ray Name or Elements X-ray Name Order then click on the OK button Elements Only element names are displayed Elements X-ray Name Element names and X-ray names are
displayed Elements X-ray Name Order Element names X-ray names and order
are displayed
Display Parameter You can specify which parameters to display in the parameter-display area of the Data display window by using this function
Select Spectra DisplaymdashDisplay Parameter from the Operation menu The Display Parameter window opens
Fig 34 Display Parameter window
38 XM-1733027330-1QL
2
1
2
Select the desired parameters then click on the OK button The specified parameters are displayed in the parameter-display area of the Data display window
If you select All the information of all the spectra is shown while if you select Single only the information of the specified spectrum is shown To change the size of the displayed characters select S M or L
An A-Rank Element is an element that is judged certain to exist and a B-Rank Element is an element that is judged possible though not certain to exist For the method of element identification refer to Chapter 5 ldquoAppendixrdquo of this instruction manual
Write Text
You can write text in the display area of spectra by using this function Select Spectra DisplaymdashWrite Text from the Operation menu
The Write Text window opens
Fig 35 Write Text window
Click on the spectrum on which you want to write text and then input the desired text in the input box of the Write Text window then click on the Write button
The text is displayed on the selected spectrum of the Data display window Color Selects the color of text Size Selects the character size of text from S M and L Clear Clears the input box
Shift Adjusts the position of the input text when you drag it Delete Deletes the text Click on this button and then select the text that you
want to delete from the list of texts Write Writes text on the selected spectrum
Save Saves the texts that you have written on spectra The texts will be displayed when you next open the spectra
XM-1733027330-1QL 39
Replace Spectrum You can replace the spectra that are being displayed by using this function 1
2
3
1
2
Select Spectra DisplaymdashReplace Spectrum from the Operation menu The Replace spectrum window opens
Fig 36 Replace spectrum window
Select the number of the spectrum to replace from the Replace spectrum window and then click on the Apply button
The Sample window opens
Refer to Fig 19 Sample window (for processing) Select the spectrum to replace from the Sample window
Reset Spectra
You can reset all the changes that you have made using all the items of the Spectra Display menus to their initial states if you use this function
Select Spectra DisplaymdashReset Spectra from the Operation menu The Reset Spectra window opens
Fig 37 Reset window
Select the number of the spectrum for resetting from the Reset window and then click on the Apply button
All the changes made for the selected spectrum will be cancelled
40 XM-1733027330-1QL
KLM Marker You can display identified elements in colors in the KLM Marker window 1
2
Select KLM Marker from the Operation menu The KLM Marker window opens
Element buttons
Element display
Fig 38 KLM Marker window
Click on the buttons of the desired element in the KLM Marker window
The positions and element names of the characteristic X-rays (Kα Kβ etc) for specified elements are displayed on the spectrum The following functions are available
Button Function
Element buttons Clicking on an element button displays KLM markers When you right-click another element button its KLM markers appear together with the previous ones You can specify the line type for the KLM markers in the Spectrum Type window and the color in the Spectrum Color window
Element display The name of the selected element is displayed Right-clicking on the display shows the name of the element to the right of the present one while left-clicking on the display shows the name of the element to the left of the present one
Arrow buttons
Clicking on the right arrow button selects the right element to the present one while clicking on the left arrow button selects the left element to the present one
Order Specifies the order of the X-rays You can specify from the first to the tenth
Min Int Specifies the minimum intensity of the KLM Markers The intensity to be specified is the theoretical intensity shown in the wavelength table It means the relative intensity when the intensity of the alpha line is taken as 100 When you specify 0 all the X-rays are shown
XM-1733027330-1QL 41
Button Function
Select KLM Selects the X-rays to be displayed from the K L and M lines Only highlighted X-rays are displayed It is useful for displaying specified X-rays
Lock To display the KLM Markers of multiple elements specify elements by right-clickings ( refer to the above Element buttons) You can lock the KLM Markers if you click on the Lock button then if you click on an element you can display its KLM Markers together with the locked ones To unlock the locked KLM Markers deselect Lock
Scale The scale for each X-ray height of KLM Markers is based on the theoretical intensity When an X-ray marker cannot be seen easily you can adjust the height of the KLM Markers by using the arrow-buttons to the right of the Scale button The same result can be obtained by dragging a point on the spectrum up or down
Set Adds the selected elements to the list of identification elements and displays element names at the position of each KLM Marker To label peaks use the Peak ID window
Delete Deletes the selected elements from the list of identification elements as well as all the element names When you want to delete element names one by one use the Peak ID window
Print Prints the information on the KLM Markers
Close Closes the KLM window
42 XM-1733027330-1QL
Peak ID The wavelength and intensity at the specified position of the spectrometer are displayed At the same time the possible names of characteristic X-rays near the specified position are listed 1
2
Select Peak ID from the Operation menu The Peak ID window opens
X-ray list
Wavelength display
Spectrum number
Fig 39 Peak ID window
Select any position from a spectrum in the Data display window The wavelength and intensity at the specified position of the spectrometer are displayed in the X-ray list of the Peak ID window At the same time the possible names of characteristic X-rays near the specified position are listed The identified elements and the elements corresponding to the displayed KLM Markers are displayed in different colors The following functions are available
XM-1733027330-1QL 43
Object Function
Spectrum number Specifies the desired spectrum You can also specify it by clicking on it
Wavelength display
Displays the wavelength and X-ray intensity at a position specified by clicking You can perform a fine adjustment of the cursor position by using the larr and rarr keys on the keyboard
X-ray list Displays the X-rays near the wavelength selected by clicking The information displayed is Element Name X ray Name Order Diff (distance from the selected position) and Int (theoretical X-ray intensity)
Order Specifies the order of the X-rays to be detected
Min Int Specifies the minimum theoretical intensity of the X-rays to be displayed
PrevNext ID Move the cursor to the peak positions whose elements were already identified The movement direction of Prev ID is toward lower wavelengths and that of Next ID is toward higer wavelengths The cursor jumps to the other end when it is moved beyond an end
Print Opens the Listing window and displays the data of the item selected from the X-ray list
Clear Clears the items that were specified for printing
Set After you have selected a line of an element in the X-ray list clicking on the Set button identifies the element and displays its peak label
Delete After you have selected an identified element in the X-ray list clicking on the Delete button deletes the peak label of the element
Shift ID Moves peak labels After you have clicked on the Shift ID button clicking near the label changes the shape of the cursor Then drag the label to move it To deselect this mode click on the Shift ID button once again
Any Length Measures the distance between two arbitrary points After you have clicked on the Any Length button click on two arbitrary points on a spectrum then the marker and distance between the points are displayed To deselect this mode click on the Any Length button once again
Close Closes the Peak ID window
Save ID Results
After you have changed the element name display on the spectrum by using Peak ID for example the element name can be saved as an A rank element 1
2
Select Save ID Results from the Operation menu The Save ID Results window opens
Fig 40 Save ID Results window
Click on the OK button in the Save ID Results window after you have changed the element name display on the spectrum by using Peak ID for example
44 XM-1733027330-1QL
The element name displayed on the spectrum will be saved as an A rank element in a file These data will be displayed automatically beginning with the next operation
Off-line ID
You can perform element identification once again 1
2
Select Off-line ID from the Operation menu The Off-line ID window opens
Fig 41 Off-line ID window
Specify the necessary conditions then click on the Apply button to perform element identification once again after
The ID-Doctor does not operate during off-line identification of element In element identification the specified order of X-rays is taken into account and if A rank only is selected only the labels for A rank elements are displayed after the identification If A amp B rank is selected all the labels are displayed after identification If a number other than zero is specified in the Min Int input box the labels for only the X-rays having the specified intensity or more are displayed after identi-fication
When the Close button is clicked on with the Orderndash0 button selected with Apply not selected the identified element names will not be displayed on the spectra in subsequent measurements
XM-1733027330-1QL 45
Spectra Calculation
Select Spectra Calculation from the Operation menu The Spectra Calculation window opens You can perform the arithmetic operations that are shown in the Spectra Calculation window
Fig 42 Spectra Calculation window
46 XM-1733027330-1QL
Smoothing
Select Spectra CalculationmdashSmoothing from the Operation menu The Smoothing window opens You can smooth the specified spectra using the Savitzky-Golay method
If you selected Manual you can assign a number of points to use in smoothing If you selected Result Only only the smoothed spectra are displayed whereas if you selected Original amp Result the spectra before smoothing are also displayed at the same time
Fig 43 Smoothing window
2nd Derivative
Select Spectra Calculationmdash2nd Derivative from the Operation menu The 2nd Derivative window opens You can find the second derivatives of the specified spectra using the Savitzky-Golay method
Quant Background
You can display the background position that is used in the quantitative analysis and correct the position while watching the corresponding spectra
Select Spectra CalculationmdashQuant Background from the Operation menu The Quant Background window opens
XM-1733027330-1QL 47
Fig 44 Quant Background window
The information displayed is No Elem (Crysta) Low Angle Position and High Angle You can select mm angstrom or nm as the unit If an element name is dimmed the corresponding spectra do not exist If you have selected Ignore channel you can search the spectra only by using crystal names If you have deselected the Ignore channel button you can search for spectra that match both crystal names and measuring channels If you select any of the displayed elements the background position will be shown on the spectra by markers To correct the position drag the markers to the desired positions If you want to enter the corrected items click on the Exec button and if you do not want to click on the Cancel button
48 XM-1733027330-1QL
Background Subtraction You can eliminate background components from the specified spectrum
Select Spectra CalculationmdashBackground Subtraction from the Operation menu
The Background Subtraction window opens
Fig 45 Background Subtraction window
Clicking on the Manual button performs spline interpolation for the specified points (normally multiple points) and forms a background curve Clicking on the Auto button performs background subtraction using the Sonne-veld method
Sub (SP mdash k)
You can subtract a constant (k) from the specified spectrum and display the spectra Select Spectra CalculationmdashSub (SP mdash k) from the Operation menu
The Sub (SP ndash k) window opens
Fig 46 Sub (SP ndash k) window
XM-1733027330-1QL 49
Add (SP + k)Multiply (SP k)Divide (SP k) You can add multiply or divide by a constant (k) in the specified spectrum and display the spectra
Select Spectra CalculationmdashAdd (SP + k) or Multiply (SP k) or Divide (SP k) from the Operation menu
The Add (SP + k)Multiply (SP k)Divide (SP k) window opens
Spectrum Shift You can shift spectra to the left or right
Select Spectra CalculationmdashSpectrum Shift from the Operation menu The Spectrum Shift window opens
Spectra Sub (SP1 mdash SP2)
You can subtract two spectra The result of the calculation can be displayed in another display area
Select Spectra CalculationmdashSpectra Sub (SP1 mdash SP2) from the Operation menu
The Spectra Sub (SP1 ndash SP2) window opens
Spectra Add (SP1 + SP2) You can add two spectra The result of the calculation can be displayed in another display area
Select Spectra CalculationmdashSpectra Add (SP1 + SP2) from the Operation menu
The Spectra add (SP1 + SP2) window opens
Dead-time Correction You can perform dead-time correction
Select Spectra CalculationmdashDead-time Correction from the Operation menu
The Dead-time Correction window opens
For the formulas for calculation refer to the separate instruction manual of the Quantitative Analysis Program
50 XM-1733027330-1QL
Result Store You can store displayed spectrum such as the results of a calculation in a file 1
2
Select Spectra CalculationmdashResult Store from the Operation menu The Result Store window opens
Fig 47 Result Store window
Type a crystal name in the Crystal Name input box and then click on the OK button
The spectrum that you have selected will be added to after the spectrum that was stored last At most twenty spectra can be stored If you want to delete a spectrum select it and type the slash () 8 times the
selected spectrum will be deleted
Reset You can undo arithmetic operations executed in Spectra Calculation
Select Spectra CalculationmdashReset from the Operation menu The settings will returned to their initial states
Redraw Spectra
You can display spectra again Select Redraw Spectra from the Operation menu
XM-1733027330-1QL 51
Print-out You can print conditions and results 1
2
3
Select Print-out from the Operation menu The Print-Out window opens
Select the items that you want to print and then click on the OK button The Listing window appears
Click on the Print button in the Listing window The output will be sent to the printer
Fig 48 Print-out window
52 XM-1733027330-1QL
Semi-Quant Analysis After you have obtained background intensity from an identified element and a qualitative spectrum you perform a calculation for correction based on the ratio to the X-ray intensity of a pure element (the K ratio) so as to obtain the result of a quantitative analysis Below is the method for calibrating the X-ray intensity of a pure element Select Semi-Quant Analysis from the Operation menu
The Semi-Quant Analysis window opens
Fig 49 Semi-Quant Analysis window
This window displays a list of the element names (in Element) X-ray names (in X-ray) and analyzing crystals (in Crystal) for the A-rank identified elements whose spectra show the strongest X-ray intensities
MetalOxide When the sample to be analyzed is a metal click on the Metal button When the sample is an oxide click on the Oxide button then enter values into the No of Oxygen and Valence input boxes
No of Oxygen input box You can input a value when Oxide is selected Type the number of oxygen atoms in the input box The number is to be used as the standard when the molecular formula is calculated after correction
XM-1733027330-1QL 53
Normalize Clicking on this button normalizes the mass concentration after correction the total mass concentration becomes 100 If you do not click on the Normalize button the current values are displayed as they are
Element X-ray Crystal and Valence in the list
Button Function
Element Adds and deletes arbitrary elements
X-ray Specifies the type (Kα Kβ Lα Lβ Mα and Mβ) of the X-rays in the scan range
Crystal Specifies one of the analyzing crystals displayed in the column when the characteristic X-rays span multiple spectra
Valence Specifies the valence of oxides The mass concentration of oxygen can be obtained by using the valence
Result window
You can specify where to display the results that you obtain
Button Function
New Text Opens a text window in which the results are displayed
Spectrum Displays the results in the spectrum display area if it is open
Parameter Displays the results in the parameter-display area
54 XM-1733027330-1QL
Fig 50 An example of Semi-Quant Analysis results
ID-Doctor You can perform element identification based upon the knowledge base of experienced analysis specialists If ID-Doctor is selected the element identification under ID-Doctor will be executed automatically after measurement 1
2
Select ID-Doctor from the Operation menu The ID-Doctor window opens
Fig 51 ID-Doctor window
Click on the OK button For details refer to Chapter 5 ldquoAppendixrdquo
XM-1733027330-1QL 55
Spectrum Analysis You can display on a spectrum the position height area FWHM (full width at half maximum) and height from the baseline of the specified spectrum peak You can print the spectrum after the spectrum analysis by using the Print button 1
2
3
Select Spectrum Analysis from the Operation menu The Spectrum Analysis window opens
Fig 52 Spectrum Analysis window
Specify the baseline between any two desired points by dragging the mouse from the start point and dropping it at the finish point Click on the Apply button
The results of Spectrum Analysis will be displayed on the spectrum
If you enlarge a desired part of a spectrum by using Spectra DisplayndashZooming and specify the desired baseline between two points you can obtain the baseline with greater precision You can also specify the baseline by inputting values in Baseline X Lower and X Upper input boxes You can select the following items Line color Color of lines
56 XM-1733027330-1QL
String Color Color of text Adjust Place in which text is to be printed selected from Left Center and Right Size Size of text selected from S M and L Peak Detect Peak position selected from Max Point 3 Points and 5 Points Plot Item Items to be displayed Shift String Lets you shift the text already written by dragging it
4
1
Turn on the Separation of Left Right button and then click on the Apply button
You will obtain different results on the left side and right side of the peak position
Spectra Search Spectra Search has two important functions One is a search function The other is a load function Using the search function you can display average correlation and other information about spectra judge to be similar in the Search result scroll window by using correlation coefficients from the start position to the finish position for the same crystal Using the load function you can also display the spectra that you have selected from the Search result scroll window The correlation coefficient between a spectrum and another one is 10 if the two are the same while the closer the coefficient is to 00 the less similar the two are The correlation coefficient obtained by calculation will be the same even if one or both are multiplied by a constant If the correlation coefficient is about 09 or more two spectra are similar experimentally However it is recommended that you judge similarity from the display by using the load function
Select Spectra Search from the Operation menu The Spectra Search window opens
XM-1733027330-1QL 57
Fig 53 Spectra Search window
Button Function
Search start positionndash User Group Sample Stage No
Specifies search start directory If there are many spectra for qualitative analysis specifythe start position by using the Group button to save search time Clicking on the Group button opens the Group window where you can specify group names In the same way clicking on the Sample button opens the Sample window where you can specify sample names
58 XM-1733027330-1QL
Fig 54 Group window
Button Function
Search condition ndashStageSpectra
Selecting Stage performs searches through samples Selecting Spectra performs searches through spectra
One Spectrum All spectra
When Stage is selected this function is available
L value (mm) Wave (A)Wave (nm)
Used when you specify the search range
Corr_coeff Correlation coefficient from 00 to 10
Start Pos End Pos Start position for calculation of correlation coefficient Finish position for calculation of correlation coefficient You can change the positions
Search result Scroll window to display the results of search
Search Starts search
Load Displays the spectrum selected from the Search result scroll window
Stop Stops search
Reset Resets correlation coefficient and the values of Start Pos and End Pos Clicking on this button also resets the spectrum presently displayed to the previous one
Selected List Click on this button to print the results of the search You can print only the spectra that you have selected from the Search result scroll window
Close Resets the spectra that are presently displayed and closes the Spectra Search window
XM-1733027330-1QL 59
44 Semi-Quantitative (Semi-Quant) Analysis Program In ordinary quantitative analyses quantitation results are corrected by measuring the intensities of peaks and backgrounds for each element Differing from the ordinary quantitative analyses the semi-quantitative analysis (Semi-Quant Analysis) program corrects quantitation results by using the spectral data Namely the intensities of the peaks and backgrounds for the elements identified in the qualitative analysis are obtained from the qualitative-analysis spectral data The ratio of the spectral peak intensity for each element to that of the characteristic X-rays for the pure element is calculated as the K-ratio
K-ratio = IunkIstd
where Iunk Intensity of the characteristic X-rays from an unknown sample Istd Intensity of the characteristic X-rays of a pure element
Based on this K-ratio ZAF correction is performed and the mass concentration of each element is printed together with the K-ratio This result can be used later to perform an off-line quantitative analysis (Summary) or it can also be recorrected by using the measured standard sample data The characteristic X-ray intensities of pure elements are calculated from the standard sensitivity curve obtained in advance At that time since their dependence on the accelerating voltage is also calculated the K-ratio for the qualitative analysis data measured from 5 kV to 30 kV (in 5 kV steps) can be calculated The standard sensitivity curves have been measured in our company for a large number of standard samples However there may exist slight differences in the measured curves depending on the instruments used Therefore using some standard samples measure and correct the standard sensitivity curves of some elements for each analyzing crystal and for each characteristic X-ray (Kα Lα and Mα) Once this correction has been done you need not repeat it each time you perform analysis
441 How to calculate X-ray intensities in the Semi-Quant Analysis
X-ray intensities in the Semi-Quant Analysis are calculated in the following way As the peak position the position at which the X-ray intensity is the strongest is selected after searching for it in the vicinity of the aimed characteristic X-rays As the background position the position at which the mean X-ray intensity having the lowest moving average of three points from a position a little apart from the peak position is selected These results are displayed as measurement conditions The search ranges of the peaks and backgrounds are defined for each analyzing crystal in the sqtcond file in the optepmaconfanal directory The results of the Semi-Quant Analysis are saved in the file named 1onq in the directory of the quantitative analysis
60 XM-1733027330-1QL
442 Using Semi-Quant Analysis results in off-line quantitative analysis
The results of the Semi-Quant Analysis can be utilized in the off-line quantitative analysis
Summary You can execute Summary in the Semi-Quant Analysis 1
2
3
1
2
3 4
Select ProcessmdashQuantitative AnalysismdashSummary from the EPMA Main Menu
The Function window for process opens Click on the Sample button
The Select Sample window opens Select Qnt for Semi-Quant Analysis
The remaining steps are the same as for ordinary quantitative analysis
In the Semi-Quant Analysis elements are different for each sample in many cases If you print the results of many samples it will be difficult to distinguish them since there are many elements To solve this problem use Mass order for printing If you select Qlw in place of Qnt you can obtain the list of identified elements when you have printed it
Off-line Correction
You can execute Off-line Correction of the analysis results obtained in the Semi-Quant Analysis
Select ProcessmdashQuantitative AnalysismdashOff-line Correction from the EPMA Main Menu
The Function window for off-line correction opens Click on the Sample button
The Select Sample window opens Select Qnt for Semi-Quant Analysis Set the conditions as follows
Specify the correction method and accelerating voltage used for measurement Specify the same elements as those used in the Semi-Quant Analysis Select the same X-rays channel and analyzing crystal as in the result of the Semi-Quant Analysis for the element to be measured Select appropriate standard samples if any When Cal-STD is selected as the standard sample for all elements the same result as in the Semi-Quant Analysis is obtained
For procedures for entering the conditions for the quantitative analysis refer to the separate operation manual of the Quantitative Analysis Program
After setting the above conditions click on Read Intensity amp Correction and the X-ray intensities obtained in the Semi-Quant Analysis will be displayed Then click on the Apply button and off-line correction will be executed
XM-1733027330-1QL 61
443 Correcting the standard sensitivity curve
The Semi-Quant Analysis program includes a program for correcting the standard sensitivity curve By using the standard sample installed in the microanalyzer the X-ray intensity coefficient (I) in the equation in which the atomic number is used as the variable can be obtained for each analyzing crystal and for each characteristic X-ray (Kα Lα and Mα) of each X-ray spectrometer Once this program has been executed you need not run it again
I = exp (a + bZ + cZ2 + dZ3
where I Intensity of characteristic X-rays (cps100 pA) Z Atomic number a b c d Coefficients
Combinations of the standard sample and characteristic X-rays to be used are defined in a file in the optepmacalisqt directory The coefficients obtained are saved in the sqtcoef file in the optepmacali directory together with the measured data The characteristic X-ray intensities of pure elements for each analyzing crystal and for each accelerating voltage are saved in a file in the optepmacalistd_int directory Follow the procedures in the sections below to execute correction of the standard sensitivity curve
Opening the Semi-Quant Calibration window
Select InitializemdashSemi-Quant Calibration from the EPMA Main Menu
Fig 55 Pull-down menu of the Initialize icon
The Semi-Quant Calibration window opens You can perform corrections in this window
62 XM-1733027330-1QL
Selecting analyzing crystals Select analyzing crystals whose standard sensitivity curves are to be corrected Click on the Crystal button in the Semi-Quant Calibration window
The Crystal and Channel window opens
If necessary click on the for Light elements button in the Crystal and Channel window then the Light Elements window opens
Fig 56 Crystal and Channel and Light Elements windows
Out of the analyzing crystals installed in the instrument the analyzing crystals whose standard sensitivity curves can be corrected will be displayed in the Crystal and Channel and Light Elements windows
By default all the crystals are selected If there are some analyzing crystals whose standard sensitivity curves you do not want to correct deselect their crystal buttons
XM-1733027330-1QL 63
Setting the stage positions for standard samples You have to enter the stage positions for standard samples prior to measurement 1
2
1
2
3
Click on the Stage button in the Semi-Quant Calibration window The Set Stage Stage Monitor and Memory windows open
Fig 57 Specifying the stage positions for standard samples
Specify the desired standard sample names and their stage positions
If stage positions have been already set you need not specify them
For the operating procedure refer to the instruction manual of the main unit
Executing measurements You execute measurement by using the following procedure
Click on the Measure button in the Semi-Quant Calibration window The Start Calibration window opens
Set the current to about 1 10mdash7 A in advance Although the accelerating voltage is automatically set to 20 kV but the current is not set automatically
Confirm all the conditions that you require to use then click on the OK button
Measurement begins If you click on the Cancel button the previous window will return
Measurement is performed for each analyzing crystal and the progress of the measurement is displayed on the screen
64 XM-1733027330-1QL
Stopping measurement
To stop measurement for any reason click on the Stop button To temporarily interrupt measurement click on the Pause button On completion of peak search measurement stops temporarily To restart the measurement click on the Pause button once again
Displaying measurement results
On completion of measurement with an analyzing crystal the correction coefficients and the calculated intensities of the characteristic X-rays of the pure elements are displayed The coefficients are displayed in units of cps100 pA The X-ray intensities for Kα Lα and Mα are displayed (vertical axis logarithmic scale in units of cpsμA horizontal axis atomic number)
Fig 58 Display of measurement results
XM-1733027330-1QL 65
Utility
Click on the Utility button in the Semi-Quant Calibration window The Utility pop-up window opens The following functions are included in Utility
Button Function
Reset spectra Individual spectrum windows can be enlarged or reduced by dragging the button at the lower right corner of each window Clicking on Reset spectra after enlarging or reducing the window will return it to the original size
Draw results Clicking on this item displays results of measurement on the computer display
Print results Clicking on this item prints the measured data and the intensity coefficients of the standard sensitivity curve
Check configuration Clicking on this item enables you to check the combination of the analyzing crystal and characteristic X-rays in measurement
Check pksk parameter Clicking on this item enables you to check the parameters for peak search Special care should be exercised in changing the parameters because the operation affects peak search and related operations in quantitative analysis
Smoothing Clicking on this item smoothes and displays the waveform for peak search
2nd derivative Clicking on this item displays the second derivative waveform of the peak search spectrum
Log scale Clicking on this item displays the peak search spectrum on a logarithmic scale
66 XM-1733027330-1QL
5 APPENDIX
Determining peak positions and intensities and identifying elements Using the procedures below this program detects the peaks of characteristic X-rays and identifies the elements for the detected peaks
Detecting peak positions
1 2 3
4
5
1 2
3 a
b
c
d
4
5
Smooth a spectrum by the Savitzky-Golay method Evaluate the second derivative of the smoothed spectrum Detect the peak positions from the second derivative waveform and deter-mine the background positions from the waveforms obtained after second differentiation and smoothing From the smoothed spectrum determine the peak intensity and the back-ground intensity If the difference between the peak intensity and the background intensity is too large to attribute to statistical variation judge that a peak of interest exists
Identifying elements
Detect peaks for each spectrum If any one of the Kα (1) Lα (1) and Mα (1) lines is detected assign the elements of interest to the B rank Further judge the elements of B rank as follows If ZKα min Z ZKβ min assign the elements of interest to the A rank Usually ZKα min=4 ZKβ min=17 If both a Kα (1) line and a K (1) line are found in the same spectrum assign the elements of interest to the A rank If both a Kα (1) line and a K (1) line are found in different spectra assign the elements of interest to the A rank If both an Lα (1) line and an L (1) line are found in the same spectrum assign the elements of interest to the A rank Similarly if both an Mα (1) line and an M (1) line are found in the same spectrum assign the elements of interest to the A rank
If any peaks of B-rank elements are superimposed on any peaks of charac-teristic X-rays of A-rank elements (usually of the first-order) exclude the B-rank elements from the elements to be identified If no A-rank element exists but only one B-rank element exists assign this B-rank element to the A rank
XM-1733027330-1QL 67
Expert identification of elements
This expert identification of elements is a reliable method of ratiocination based upon the knowledge base of experienced analysis specialists This method enables us to evaluate a level of confidence in the result of the element identification performed by using the above-mentioned element identifying method if it is applied for calculation The knowledge base has been created under the following conditions
Accelerating voltage 20 kV Probe current 10 to 500 nA Step 50 μm Sample time 50 ms or more Number of spectra 4 Analyzing crystal LIF PET TAP and STE Scanning range of spectrometer 65 mm to 250 mm (258 mm for TAP) Even if you cannot observe under the above conditions to some extent for some
reasons you can obtain good results since this program is created to avoid problems Of course it is best to meet the requirements as much as possible However when you specify elements to be identified set the spectrometer range to include the first-order X-rays (up to the second order if possible ) of α and of K L and M of the elements
In the results after execution of ID-Doctor the indication ID-Doctor is shown both at the area where elements are displayed in the Data Display window and just above the area where A-Rank and B-Rank elements are displayed Therefore you can easily distinguish the results obtained with the ID-Doctor from those obtained without the ID-Doctor The element identification executed by using this program is performed using the judgment method that imitates experienced analysis specialists the results are not absolutely correct Please use this ID-Doctor as a reference and keep it in mind that you the user of this program decide whether to accept the results or not
68 XM-1733027330-1QL
- XM-1733027330
-
- CONVENTIONS
- CONTENTS
- 1 GENERAL
- 2 SPECIFICATIONS
- 3 PROGRAM STRUCTURE
- 4 OPERATION
-
- 41 Preparation for Measurement
-
- 411 Setting group and sample names
- 412 Setting measurement conditions
- 413 Setting analysis positions
- 414 Loading measurement conditions
- 415 Storing measurement conditions
- 416 Printing measurement conditions and results
- 417 Additional Function
-
- 42 Measurement
-
- 421 Measurement under stored conditions (Preset mode)
- 422 Measurement under present instrument conditions (Survey mode)
- 423 Realtime display
-
- 43 Processing
-
- 431 Selecting sample names and processing methods
- 432 Operation menu
-
- 44 Semi-Quantitative (Semi-Quant) Analysis Program
-
- 441 How to calculate X-ray intensities in the Semi-Quant Analysis
- 442 Using Semi-Quant Analysis results in off-line quantitative analysis
- 443 Correcting the standard sensitivity curve
-
- 5 APPENDIX
-
- damy_tate
- damy_yoko
- fff
- instructions
- JEOL
- mekura
- CONTENTS
- contents

Button Function
Sorting Order Clicking on the Name button of Sorting Order in each window rearranges the Sample names and Group names in alphabetical order Clicking on the Date button of Sorting Order rearranges them in chronological order
OK Click on the OK button in each window to finalize the Sample name and close the window
Cancel Click on the Cancel button in each window if you want to cancel the Sample name that was input and close the window
412 Setting measurement conditions
You set the measurement conditions that you want for the spectrometers
Click on the Measurement button of the Qualitative Analysis function window
The Measurement menu opens
Fig 4 Measurement menu for Qualitative Analysis
Spectrometer Condition
To set measurement conditions click on Spectrometer Condition The Spectrometer Condition window opens as shown in Fig 5 Here you can set measurement conditions for the spectrometers You set the number of spectra to collect by using the No of Spectra button This window displays the present settings for each spectrometer You can change the desired settings displayed in the window The measurement conditions are given below The unit ldquommrdquo is used in the following explanation You can choose the unit of wavelength from mm A and nm
XM-1733027330-1QL 7
Fig 5 Spectrometer Condition window
Buttons Function
No of Spectra Input the number of spectra to be collected (up to 20 spectra possible)
Channel Select the channel number of the spectrometer
Crysrtal Specify the analyzing crystal to be used
Start Specify the measurement start position Setting is also possible in element-designation mode (Refer to the following section)
End Specify the measurement end position Setting is also possible in element-designation mode (Refer to the following section)
Step Interval between neasurement points (μm) It is normally set to the following values Approx 50 microm for general analyzing crystals such as TAP PET and LIFApprox 100 microm for analyzing crystals such as STE and LDE2 (If Step is set to an excessively large value the accuracy in element identification may deteriorate) The number of measurement points for a single spectral line is given by the equation below n = (en ndash st) 1000in + 1 where en End (mm) value st Start (mm) value in Step (microm) value
Dwell Measurement time per measurement (ms) which is to be decided taking into account the total measurement time
8 XM-1733027330-1QL
Buttons Function
Total T Total measurement time (s)
PHA gain Hifh V Base L Window
The values set in the SCA Configuration window are displayed In normal use it is not necessary to set these values
DiffInt Pulse-height analysis mode setting (Diff differential mode Int Integral mode)
With analyzing crystals for light elements such as those of the LDE series data with a high PB ratio which
is less affected by high-order X-rays can be obtained in the Diff mode However set the SCA conditions so that the primary ray will not be cut
Setting measurement startend positions with element-designation mode There are two methods for setting the measurement start and end positions One is to directly enter values of Start (mm) and End (mm) in the aforementioned Spectrometer Condition window The other is to set the values using the ele-ment-designation mode in the WDS Elements window The second method consists of the following steps 1
2
3
Click on any one of the Elem-1 -2 buttons in the Spectrometer Condition window to display the WDS Elements window (Fig 6)
Fig 6 WDS Elements window
Click on the Order button in the WDS Elements window to enter the order of lines as necessary Click on the Line button to specify the type of lines ( or both and for K L and M lines)
The colored symbols of the elements to be measured are displayed in the periodic table of the elements
XM-1733027330-1QL 9
4
5
Position the pointer on the desired element symbols and click on them
Clicking on only one element symbol is used in trace-element analysis for checking for the presence of X-ray peaks from trace elements When multiple elements are specified the measurement range will include all X-ray and background analysis positions for those elements
To specify all measurable elements click on the All Elem button
The steps so far set the Start and End values in the Spectrometer Condition window so that they include the measurement ranges for all the elements specified
Clicking on the Back (ndash) (mm) or Back (+) (mm) button lets you change the distance from the peak position at which to measure the background The default value is plusmn5 mm from the peak position
On-line Semi-Quant
You can perform semi-quantitative analysis of the identified elements after qualitative measurement
Select MeasurementmdashOn-line Semi-Quant from the Qualitative Analysis function window
The On-line Semi-Quant window opens
Fig 7 On-line Semi-Quant window
To carry out automatic semi-quantitative analysis click on the Yes button of the On-line Semi-Quant window
If you have selected the Yes button proceed to the following Step 1
If you want to perform only qualitative analysis click on the No button
10 XM-1733027330-1QL
1
2
3
Click on Metal or Oxide
If you select Oxide type the number of Oxygen in the input box for the calcula-tion of chemical formula Select Wt or K-ratio for printing If you select Wt for printing decide whether to normalize the total of mass concentrations to 100
To specify whether each element is to be included in the results select Include Exclude or If any Include The element selected is included in the result in qualitative analysis
even if it is not identified Exclude The element selected is excluded from the result in qualitative analysis
even if it is identified
If you want to set all the elements to Exclude click on the Set All button If any The element selected is included in the result in qualitative analysis if
it is identified as A-rank If you want to set all the elements to If any click on the Set All button
If you want to specify the spectrum to be used for each element click on the Check button
The Check window appears
Fig 7a Check window
If you select Default the most intense spectrum will be used for calculation When you set valence for an oxide use the Valence input box of the Check window
Qualitative analysis is performed in a normal way and then element identification is also performed If the Yes button is selected in the On-line Semi-Quant window the results of element identification and the specified element are checked and the results of the semi-quantitative analysis are calculated and displayed on the Listing window
XM-1733027330-1QL 11
EOS Condition The EOS Condition window allows you to set the conditions of the electron optical system (EOS) Clicking on the Read button reads present conditions for the EOS and displays them on the EOS Condition window in which you can input and alter items such as Probe Scan Select MeasurementmdashEOS Condition from the Qualitative Analysis function
window The EOS Condition window opens
Fig 8 EOS Condition window
Button Function
Set Sets the present conditions for the EOS
Read Reads the present conditions for the electron optical system (EOS) and displays them on the EOS Condition window
Accelerating Voltage
Sets accelerating voltage at measurement
Current Displays beam current To select the automatic current mode in which a specified current is obtained before measurement click on the Auto button then specify beam current
Magnification Sets magnification for scanning image (active only when Probe Scan is ON)
Probe Diameter Sets probe diameter (in microm ) at measurement
Probe Scan Specifies whether probe scan will be ON or OFF during measurement
Scan Conditions Clicking on the arrowhead of this button opens the window for the following four items
Scan Mode Specifies scan mode (Picture Bup Line Spot or Area) for measurement
Scan Speed Selects scan speed from S1 to S12 The larger the number the slower the speed
Focus Specifies automatic or manual focus
12 XM-1733027330-1QL
Button Function
Stabilizer Specifies whether the beam stabilizer (CLampTilt CL or Tilt) is to be used or not (OFF)
Lens Conditions Clicking on the arrowhead of this button opens the window for the following two items
Condenser Lens Specifies condenser lense settings (CoarseFine) for measurement
Object Lens Specifies objective lense settings (CoarseFine) for measurement
OK Enters measurement conditions and closes the EOS Condition window
Cancel Cancels the conditions that have been input in the EOS Condition window and closes the window
413 Setting analysis positions
You have to specify analysis positions before measurement There are two modes of specifying the analysis positions One is the Stage mode and the other is the Beam mode Select MeasurementmdashStage Condition from the Qualitative Analysis
function window The Stage Condition window opens
Fig 9 Stage Condition window When the Stage Condition window is opened the list of coordinates that were recorded previously is displayed and you can use it in common for qualitative analysis quantitative analysis and EDS qualitative analysis Therefore even when you perform qualitative analysis for the first time coordinates exist provided you have carried out some other analysis The results of analysis however are recorded separately even when you use the same coordinates
XM-1733027330-1QL 13
The columns of the list are Preset for analysis execution No for analysis position number Comment SB for Stage mode or Beam mode Acm for the number of accumulation times Stage (X Y Z) for coordinates of stage position and Qlw (qualitative analysis) Qnt (quantitative analysis) Eds (EDS qualitative analysis) marked with asterisks when they are applied One line of the list is always selected and entries made using Pos Input (for coordinate input) and One-by-One (for one-by-one analysis) affect this line
When you want to enter a new analysis point select the blank line at the bottom of the list When you want to alter one of the analysis points in the list select a set of coordinates from the list and then click on the Pos Input button When you want to perform an analysis at one specified point click on One-by-One
Button Function
Pos Input To specify an analysis position click on this button The Stage Condition window is displayed allowing you to specify analysis positions Refer to the next section ldquoStage Control Input windowrdquo
One-by-One Performs one specified analysis at the highlighted stage position
Clear Clears the highlighted line If there are any lines below the highlighted line they move up
Cancel Cancels the newly input values without entering them in the Stage Condition file The Confirmation window appears before the input line is cleared
SelectUnselect To measure at the recorded coordinates with the Preset mode ( refer to Section 421) the Preset button must be on To turn Preset on for all or some coordinates points click on Select To turn Preset off click on Unselect
Delete Deletes some or all sets of recorded coordinates If there are any lines below the deleted lines they move up
When you have deleted the analysis point values by using Clear or Delete if there
are any lines below the deleted lines they move up If you have executed the analysis at the recorded analysis point its results will remain unchanged
Table Edit Line Set and Position Correction are available in this Stage Condition window Refer to the separate instruction manual ldquoQuantitative Analysis Programrdquo
14 XM-1733027330-1QL
Stage Condition Input window You set the analysis position of the stage or beam in this window that opens when you click on the Pos Input button of the Stage Condition window
Fig 10 Stage Condition Input window with Working Area for Stage
Entering the analysis position in the Stage mode
1
2
3
Confirm that Scan Type is Stage If it is not click on the Stage button
Move the stage to the analysis position that you want to analyze observing the OM image by using the joystick of the Joystick Controller of the EPMA main unit then after focusing on the position eliminate backlash by using the TEST button of the Joystick Controller
It is especially necessary to eliminate backlash before you perform continuous analysis in the Preset mode
Click on the Read button to display the present stage position then click on the Store button to enter the coordinates of the position
XM-1733027330-1QL 15
Alternatively click on the Read amp Apply button and then this step will be exe-cuted automatically The same result will be obtained by pressing the STORE button of the Joystick Controller In this case after storing the position the coordi-nates of the next position will be indicated If the last character of the comment is a number it will be incremented automatically
4
1
2
3
4
5
To confirm and edit already-specified coordinates first select the corre-sponding analysis position in the Stage Condition window then move the stage using the Move button After confirming the coordinates of the point by using the joystick record the coordinates by carrying out Step 3
Entering the analysis position in the Beam mode
Confirm that Scan Type is Beam If it is not click on the Beam button
Display an image of the analysis position on the Viewing Display
Refer to the instruction book of the EPMA main unit Once you have decided on the analysis position set the image on the Viewing Display to the analysis mode change the cross cursors to green and then select analysis points Click on the Read button
Stage Position (X Y Z) Magnification and Beam Position (X Y) will be read To enter the analysis position click on the Store button
The items of the Stage Condition Input window are explained in the following table
Object Function
Comment You can input up to 40 characters as an explanation of the sample
Scan Type Specify the Stage mode or Beam mode
Auto Focus Click on this button to perform automatic stage focusing before measurement if the optional automatic focusing device has been installed
Magnification Specify the magnification of the EOS by clicking on the Read button This function will be effective only in the Beam mode
Accumulation You can specify up to 100 accumulations Enter values and the Coordinate Accumulation Setting window opens Select Joystick Line Grid or Fix If you select Line or Grid enter the number of steps and the scan width When you specify Accumulation confirm each coordinate point by clicking on the Confirm button
Stage Position Displays the present recorded position of the stage
Beam Position Displays the present recorded position of the beam (only in the Beam mode)
Apply You can enter analysis points in the list of coordinates by clicking on this button
Confirm Be sure to click on this button when you have specified the number of accumulations Move to the accumulation point by using the Joystick Controller then after confirming the focus press the STORE button of the Joystick Repeat this operation as many times as the accumulation number If you click on the Cancel button of the window the remaining accumulation points are neglected and the number of accumulations is reset to the number that you did prior to cancellation
16 XM-1733027330-1QL
Object Function
Read amp Apply Reads the position of the stage and also that of the beam if necessary and records them in the list of coordinates The same result can be obtained by using the STORE button of the Joystick Controller
Close Closes the Stage Condition Input window If the analysis position has been changed the Confirmation window opens
Upward and downward arrow buttons
Move to the previous or following coordinates If the analysis position has been changed the Confirmation window opens
OM Search Executes the automatic stage focusing at the present position of the stage if the optional automatic focusing device has been installed
X Y Z Displays the coordinates of the recorded stage position If you have selected Read the present position of the stage is displayed
Read Reads the present position of the stage and displays it in the the X Yand Z boxes
Store Copies the values of X Y and Z to the Stage Position box
Move Moves the stage to the position having the coordinates X Y and Z
Arrow buttons Moves the stage by the specified step width in the X or Y direction
Range Drag the scroll bar to specify the amount that the stage will move when you click on the Arrow buttons
These items are optional
XM-1733027330-1QL 17
414 Loading measurement conditions
If you load preset measurement conditions you can perform measurements by simply selecting samples and inputting stage positions Select MeasurementmdashCondition Load from the Qualitative Analysis function
window The Condition File Load window opens This window has the list of recorded measurement conditions such as file names dates recorded and comments
To call up the recorded conditions select the desired file from the list of recorded measurement conditions and click on the Load button The loaded conditions are settings of Spectrometer Condition On-line Semi-Quant EOS Condition Print-out Condition and Additional Function If you click on the Check button before loading you can check the stored condi-tions
Fig 11 Condition File Load window
18 XM-1733027330-1QL
415 Storing measurement conditions
If you set conditions in the Spectrometer Condition On-line Semi-Quant EOS Condition Print-out Condition and Additional Function windows you can store them in a file and give a new name to the file Select MeasurementmdashCondition Store from the Qualitative Analysis function
window The Condition File Store window opens
Fig 12 Condition File Store window with its sub-window
When you want to store new measurement conditions click on the New button and input a file name (14 characters maximum) and a comment (40 characters maximum) then click on the Store button When you want to write new measurement conditions in place of the existing measurement conditions recorded in a file select the desired file from the list of recorded measurement conditions and then click on the Store button You can carry out file operations such as printings (Print) changing the name (Rename) and deleting (Delete) in the Condition File Store window
XM-1733027330-1QL 19
When you want to back up recorded data to other media select UtilityndashFile Utility from the EPMA Main Menu
416 Printing measurement conditions and results
Select MeasurementmdashPrint-out Condition from the Qualitative Analysis function window
The Print-out Condition window opens and you can select items that you want to print
Refer to Fig 13
Button Function
Measurement Condition Prints measurement conditions
Summary of Identified Elements Prints names of identified elements in the A and B ranks
Peak Positions with Identified Elements Prints list of peak positions and intensities
Identified Elements with Peak Positions Prints peak position for each identified element
Semi-Quant Result Prints results of semi-quantitative analysis
Fig 13 Printout example
20 XM-1733027330-1QL
417 Additional Function
1
2
Select MeasurementmdashAdditional Function from the Qualitative Analysis function window
You can specify whether ID-Doctor will function or not for element identification at measurement By default ID-Doctor will operate
42 Measurement Two methods of measurement are available one is the Preset mode and the other is the Survey mode Preset mode Method of performing measurement by using stored measurement conditions Survey mode Method of performing measurement without changing the present instrument conditions (for the EOS and stage) Use this mode to perform analysis without specifying detailed measurement conditions
Real-time spectrum display is possible during measurement in both modes
Refer to Sect 423 ldquoRealtime displayrdquo
421 Measurement under stored conditions (Preset mode)
This section describes how to perform measurement under stored measurement conditions and positions in the Preset mode
Select MeasurementmdashPreset Measurement from the Qualitative Analysis function window
The Preset Measurement window opens
Fig 14 Preset Measurement window
Click on the Acquire button in the Preset Measurement window The preset measurement conditions and the analysis positions in the list of the Stage Condition window whose Preset check boxes are turned on will be loaded and then the measurement will be carried out at the analysis positions
XM-1733027330-1QL 21
422 Measurement under present instrument conditions (Survey mode)
This section describes how to perform measurement under present EOS conditions and at the stage position in the Survey mode 1
2
Select MeasurementmdashSurvey Measurement from the Qualitative Analysis function window
Survey Measurement will be performed The data obtained will be stored always at the stage number 99999 The data will be overwritten every time the measure-ment is performed
When you wish to store the measurement results in a file after Survey Measurement click on the Save button then enter Position No and Com-ment
The limit of stage number is one more than the number of positions that are already set During measurement the Measurement Control Window appears as shown in Fig 15 allowing you to interrupt measurement (Measurement Stop) and stop accumu-lation (Accum Stop) If you have selected Accv off the accelerating voltage will be turned off automatically after measurement
Fig 15 Measurement Control Window
22 XM-1733027330-1QL
423 Realtime display
1
2
Select ProcessmdashQualitative Analysis from the EPMA Main Menu during measurement
The Data display window opens
Fig 16 Data display window
Click on the Realtime button The Realtime Display window opens You can perform Spectra Display during measurement If you want to display KLM Marker confirm the peak position using Peak ID during realtime display or enlarge a part of spectrum click on the Stop button to stop the realtime display then you can perform these operations
For details refer to Sect 43 ldquoProcessingrdquo
Fig 16a Realtime Display window
XM-1733027330-1QL 23
Button Function
Sample Specifies the sample and displays the measured spectra Do not click on Sample during realtime display When you want to display spectra that have already been measured stop the realtime display then click on the Sample button and select the sample that you want to display
Realtime Executes realtime display Click on the Realtime button The Realtime Display window of Fig 16a opens Click on the Start button then the spectra being measured are displayed When the analysis point has moved to other coordinates the message ldquoNext Displayrdquo appears If you want the next realtime display to begin immediately select OK After apause the realtime display of the next sample begins automatically The sequence of spectrum display can be changed as follows Channel No Order
Spectra are displayed in real time in the order of the spectrometer channel beginning with channel 1 at the top
Spectrum No Order Spectra are displayed in real time in the order of measurement To select the number of spectra (1 to 8) to be displayed click on the Max Cell Number button
Operation Performs operations described below for spectra to be displayed in real time
Operation menu during realtime display
Select Operation during realtime display The Operation menu opens During realtime display some selections are unavail-able Spectra Display KLM Marker and Peak ID can be selected
Refer to Sect 43 ldquoProcessingrdquo for a description of each operation
Fig 17 Operation menu (during realtime display)
24 XM-1733027330-1QL
43 Processing This section describes how to process the data obtained from the measurements performed so far
431 Selecting sample names and processing methods
1
2
Select ProcessmdashQualitative Analysis from the EPMA Main Menu shown on the Computer Display
The Data display window opens
Fig 18 Data display window
Click on the Sample button in the Data display window The Sample window (for processing) opens
XM-1733027330-1QL 25
Fig 19 Sample window (for processing)
3
4
5
Select the spectra to be displayed from the Sample window There are two display modes One is the single-sample mode in which the spectra of one analysis point are displayed The other is the multiple-sample mode in which the spectra of different samples are displayed at the same time The latter mode is used when you perform the chemical shift and the optional waveform separation However you cannot perform the off-line element identification nor the semi-quantitative analysis using the multiple-sample mode To specify the number of spectra to be displayed click on the Max Spectra button In the Sample window the lists of Sample Name Stage Position and X-Ray Spectra are displayed In the X-Ray Spectra list thumbnail spectra are displayed If they are not displayed click on Show Icon to show them
Button Function
Make Icon Makes thumbnail spectra Normally the spectra are made automatically at measurement
Show Icon Switches on and off the display of thumbnail spectra
Dummy Displays blank spaces in place of spectra
Max Spectra Specifies the number of spectra to be displayed
Selected List Displays the list of spectra that have been selected To deselect spectra click on their names in the list
If you want to display and process data of another group click on the Group button The Group window that lists existing group names opens as shown in Fig 20 Click on the desired group name and then click on the OK button Repeat Step 3 In the single sample mode select GrouprArrSamplerArrStage Position and then select the desired spectra in X-Ray Spectra If you do not select any spectra in X-Ray Spectra all the displayed spectra
will be selected automatically
26 XM-1733027330-1QL
6
7
In the multiple sample mode every time you select a spectrum select group sample and stage position
Fig 20 Group window (for processing)
Click on the OK button Spectra will be displayed in the Data display window in the order in which you selected them in X-Ray Spectra The data corresponding to the item that was specified with Display Parameter ( Sect 432) are displayed at the right of the spectra
XM-1733027330-1QL 27
432 Operation menu
Click on the Operation button in the Data display window of Fig 18 The Operation menu opens as shown in Fig 21 Clicking on a menu item allows the operations described below The menu items that you use frequently can be selected from the pop-up menu that opens by right clicking on any position on a displayed spectrum
Fig 21 Operation menu
Fig 22 Pop-up menu
28 XM-1733027330-1QL
Spectra Display Selecting Spectra Display from the Operation menu shows the menu items related to the methods of displaying spectra allowing the following operations
Zooming
1
2
3
4
Select Spectra DisplaymdashZooming from the Operation menu The Zooming window opens and also at the same time the graph window showing the whole spectrum image opens separately as shown in Fig 23 To specify the spectrum to be processed select a spectrum number or click on any position on the spectrum that is being displayed
Position the mouse cursor near the position where you want to start to zoom and drag the cursor in the diagonal direction
An enlarged rectangular frame is formed Once you have decided the size to be zoomed in on release the mouse button and then click on the Apply button
The part of the spectrum in the specified area is enlarged in the graph window If you performed Step 2 in the graph window you need not click on the Apply button
To move the frame for enlargement drag a point near the center of the frame to the desired position If you want to change the size of the frame drag the frame line
In these operations the shape of the mouse cursor will change so that you can distinguish each operation You can perform the following operations by using the arrow and other keys of the keyboard rarr Moves the frame to the right larr Moves the frame to the left uarr Enlarges in the vertical direction darr Reduces in the vertical direction + Enlarges in the horizontal axis direction ndash Reduces in the horizontal axis direction Shift If you press one of the above keys while holding down this key the
amount of movement will increase
XM-1733027330-1QL 29
Fig 23 Zooming window and its graph window
Ymax r Normalize
You can redisplay the maximum intensity of a spectrum on display at the desired full-scale percentage by using this function 1 Select Spectra DisplaymdashYmax r Normalize from the Operation menu
The Ymax r Normalize window opens
Fig 24 Ymax r Normalize window
30 XM-1733027330-1QL
2
3
1
Click on the r [] button in the Ymax r Normalize window The r window opens as shown
Fig 24a r window
Enter the desired percentage in the input box of the r window by clicking on the number buttons in the r window then click on the Apply button of the Ymax r Normalize window
The maximum intensity of spectrum on display will be redisplayed as the percent-age of the full-scale value that you entered If the All button is selected in the Ymax r Normalize window the full-scale
percentage of all the spectra is set to the same value
Select Xmin mdash Ymax You can set the horizontal and vertical scales for spectra to the desired values The procedure is the same as for the Ymax r Normalize window
Select Spectra DisplaymdashXmin mdash Ymax from the Operation menu The Select Xmin ndash Ymax window opens
Fig 25 Select Xmin ndash Ymax window
XM-1733027330-1QL 31
2
3
Click on the Xmin Ymin Xmax or Ymax button in the Select Xmin mdash Ymax window
The Xmin Ymin Xmax or Ymax window opens Enter the desired values in the input box of the window by clicking on the number buttons in the window then click on the Apply button of the Select Xmin mdash Ymax window
The horizontal and vertical scales for spectra are set to the specified values If the All button is selected in the Select Xmin ndash Ymax window the scales of
all the spectra are set to the same values
Window Layout You can specify the layout of the Data display window by using this function
Select Spectra DisplaymdashWindow Layout from the Operation menu The Window Layout window opens
Fig 26 Window Layout window Window size Select the desired size from V Small Small Normal
and Maximum Horizontal layout Usually spectra are displayed vertically in a column If
you want to display the spectra horizontally in lines click on the Horizontal button and then enter the number of spectra to be shown horizontally in the Horizontal spc input box
Parameter display If you do not want to display parameters on the right side select Parameter OFF If you want to display them select Parameter ON
32 XM-1733027330-1QL
Fig 27 An example of the horizontal display of spectra in lines
Mixed Spectra Display
You can display spectra individually on different parts of the display or all together in one area Select Spectra DisplaymdashWindow Layout from the Operation menu
The Mixed Spectra Display window opens
Fig 28 Mixed Spectra Display window
XM-1733027330-1QL 33
If Spectrum Mode is Single spectra are displayed all together in one display area In the Single mode if you have selected Relative for Vertical Scale the full-scale value of the vertical axis becomes 100 the relative intensity of each spectrum is shown with the maximum value of each spectrum taken as 100 If you have selected Absolute for Vertical Scale spectra will be shown with the maximum value of all spectra taken as 100 The offset value of the Y-axis is displayed as the value of Base Offset when the maximum value of each spectrum is taken as 1 In the Single mode each spectrum is displayed on the same base line when the value of Base Offset is 00 However each spectrum is displayed on a different base line with the same base level when the value of Base Offset is 10
Spectrum Type
You can specify the style for displaying spectrum lines 1
2 3
Select Spectra DisplaymdashSpectrum Type from the Operation menu The Spectrum Type window opens
Fig 29 Spectrum Type and Spectrum windows
Select a spectrum number from the Spectrum Type window To specify the style for displaying spectrum lines select the desired items from the following list then click on the Apply button to display the spectra in the specified style
Style for displaying the line Vector Line Marker Symbols Bar Vertical bars Marker + Vector Symbols and line Vector + Bar Lines and vertical bars
34 XM-1733027330-1QL
Line type for Vector Solid Solid line Dash Dashed line Dot Dotted line Dash Dot Dashed line with a dot Dash Dot Dot Dashed line with two dots Long Dash Long dashed line Thickness of the line Thin Thin line Normal Normal line Thick Thick line
You can store recall and delete using the Load Save and Delete buttons
Spectrum Color You can change the color of the displayed spectra background and parameter area by using this function 1 Select Spectra DisplaymdashSpectrum Color from the Operation menu
The Spectrum Color window opens
Fig 30 Spectrum Color and Color windows
XM-1733027330-1QL 35
2 3
1
2 3
Select a spectrum number from the Spectrum Color window To specify the color for displaying spectra background and parameter areas select the desired items from the following list then click on the Apply button to display the color as desired
Items available for color display Spectrum Spectra Background Background Original Original spectra prior to calculation Parameter Fore Parameter characters Parameter Back Parameter background Buttons for operations More Lets you to specify the colors of Marker ID Element
Cursor and KLM lines You can store recall and delete by using Load Save and Delete buttons
Draw Mesh You can draw a grid as the background of spectra by using this function
Select Spectra DisplaymdashDraw Mesh from the Operation menu The Draw Mesh window opens
Fig 31 Draw Mesh window
Select a spectrum number from the Draw Mesh window To specify Scale Color and Line for the grid select the desired items from the following lists then click on the Apply button to display the grid as desired
Line type Solid Solid line Dash Dashed line Dot Dotted line Dash Dot Dashed line with a dot Dash Dot Dot Dashed line with two dots
36 XM-1733027330-1QL
Thickness of the line Thin Thin line Normal Normal line Thick Thick line Lines to draw Hor + Vert Horizontal and vertical lines Horizontal Horizontal lines Vertical Vertical lines None No lines
Display Axis
You can set the unit for the abscissa of the specified spectra by using this function The unit for the abscissa is always the same for all the spectra 1
2
1
Select Spectra DisplaymdashDisplay Axis from the Operation menu The Display Axis window opens
Fig 32 Display Axis window
To specify the desired item in the Display Axis window select Position mm Wave length A Wave length nm or Energy keV then click on the OK button
The abscissa for the spectra on the display changes as specified Wave order is useful for displaying the spectra in the original wavelength when high-order lines are displayed in such narrow range as chemical shift The function is effective only when the wavelength is specified as the abscissa
Kind of Assignment You can select the style for displaying element labels by using this function
Select Spectra DisplaymdashKind of Assignment from the Operation menu The Kind of Assignment window opens
XM-1733027330-1QL 37
Fig 33 Kind of Assignment window
2
1
Select Elements Elements X-ray Name or Elements X-ray Name Order then click on the OK button Elements Only element names are displayed Elements X-ray Name Element names and X-ray names are
displayed Elements X-ray Name Order Element names X-ray names and order
are displayed
Display Parameter You can specify which parameters to display in the parameter-display area of the Data display window by using this function
Select Spectra DisplaymdashDisplay Parameter from the Operation menu The Display Parameter window opens
Fig 34 Display Parameter window
38 XM-1733027330-1QL
2
1
2
Select the desired parameters then click on the OK button The specified parameters are displayed in the parameter-display area of the Data display window
If you select All the information of all the spectra is shown while if you select Single only the information of the specified spectrum is shown To change the size of the displayed characters select S M or L
An A-Rank Element is an element that is judged certain to exist and a B-Rank Element is an element that is judged possible though not certain to exist For the method of element identification refer to Chapter 5 ldquoAppendixrdquo of this instruction manual
Write Text
You can write text in the display area of spectra by using this function Select Spectra DisplaymdashWrite Text from the Operation menu
The Write Text window opens
Fig 35 Write Text window
Click on the spectrum on which you want to write text and then input the desired text in the input box of the Write Text window then click on the Write button
The text is displayed on the selected spectrum of the Data display window Color Selects the color of text Size Selects the character size of text from S M and L Clear Clears the input box
Shift Adjusts the position of the input text when you drag it Delete Deletes the text Click on this button and then select the text that you
want to delete from the list of texts Write Writes text on the selected spectrum
Save Saves the texts that you have written on spectra The texts will be displayed when you next open the spectra
XM-1733027330-1QL 39
Replace Spectrum You can replace the spectra that are being displayed by using this function 1
2
3
1
2
Select Spectra DisplaymdashReplace Spectrum from the Operation menu The Replace spectrum window opens
Fig 36 Replace spectrum window
Select the number of the spectrum to replace from the Replace spectrum window and then click on the Apply button
The Sample window opens
Refer to Fig 19 Sample window (for processing) Select the spectrum to replace from the Sample window
Reset Spectra
You can reset all the changes that you have made using all the items of the Spectra Display menus to their initial states if you use this function
Select Spectra DisplaymdashReset Spectra from the Operation menu The Reset Spectra window opens
Fig 37 Reset window
Select the number of the spectrum for resetting from the Reset window and then click on the Apply button
All the changes made for the selected spectrum will be cancelled
40 XM-1733027330-1QL
KLM Marker You can display identified elements in colors in the KLM Marker window 1
2
Select KLM Marker from the Operation menu The KLM Marker window opens
Element buttons
Element display
Fig 38 KLM Marker window
Click on the buttons of the desired element in the KLM Marker window
The positions and element names of the characteristic X-rays (Kα Kβ etc) for specified elements are displayed on the spectrum The following functions are available
Button Function
Element buttons Clicking on an element button displays KLM markers When you right-click another element button its KLM markers appear together with the previous ones You can specify the line type for the KLM markers in the Spectrum Type window and the color in the Spectrum Color window
Element display The name of the selected element is displayed Right-clicking on the display shows the name of the element to the right of the present one while left-clicking on the display shows the name of the element to the left of the present one
Arrow buttons
Clicking on the right arrow button selects the right element to the present one while clicking on the left arrow button selects the left element to the present one
Order Specifies the order of the X-rays You can specify from the first to the tenth
Min Int Specifies the minimum intensity of the KLM Markers The intensity to be specified is the theoretical intensity shown in the wavelength table It means the relative intensity when the intensity of the alpha line is taken as 100 When you specify 0 all the X-rays are shown
XM-1733027330-1QL 41
Button Function
Select KLM Selects the X-rays to be displayed from the K L and M lines Only highlighted X-rays are displayed It is useful for displaying specified X-rays
Lock To display the KLM Markers of multiple elements specify elements by right-clickings ( refer to the above Element buttons) You can lock the KLM Markers if you click on the Lock button then if you click on an element you can display its KLM Markers together with the locked ones To unlock the locked KLM Markers deselect Lock
Scale The scale for each X-ray height of KLM Markers is based on the theoretical intensity When an X-ray marker cannot be seen easily you can adjust the height of the KLM Markers by using the arrow-buttons to the right of the Scale button The same result can be obtained by dragging a point on the spectrum up or down
Set Adds the selected elements to the list of identification elements and displays element names at the position of each KLM Marker To label peaks use the Peak ID window
Delete Deletes the selected elements from the list of identification elements as well as all the element names When you want to delete element names one by one use the Peak ID window
Print Prints the information on the KLM Markers
Close Closes the KLM window
42 XM-1733027330-1QL
Peak ID The wavelength and intensity at the specified position of the spectrometer are displayed At the same time the possible names of characteristic X-rays near the specified position are listed 1
2
Select Peak ID from the Operation menu The Peak ID window opens
X-ray list
Wavelength display
Spectrum number
Fig 39 Peak ID window
Select any position from a spectrum in the Data display window The wavelength and intensity at the specified position of the spectrometer are displayed in the X-ray list of the Peak ID window At the same time the possible names of characteristic X-rays near the specified position are listed The identified elements and the elements corresponding to the displayed KLM Markers are displayed in different colors The following functions are available
XM-1733027330-1QL 43
Object Function
Spectrum number Specifies the desired spectrum You can also specify it by clicking on it
Wavelength display
Displays the wavelength and X-ray intensity at a position specified by clicking You can perform a fine adjustment of the cursor position by using the larr and rarr keys on the keyboard
X-ray list Displays the X-rays near the wavelength selected by clicking The information displayed is Element Name X ray Name Order Diff (distance from the selected position) and Int (theoretical X-ray intensity)
Order Specifies the order of the X-rays to be detected
Min Int Specifies the minimum theoretical intensity of the X-rays to be displayed
PrevNext ID Move the cursor to the peak positions whose elements were already identified The movement direction of Prev ID is toward lower wavelengths and that of Next ID is toward higer wavelengths The cursor jumps to the other end when it is moved beyond an end
Print Opens the Listing window and displays the data of the item selected from the X-ray list
Clear Clears the items that were specified for printing
Set After you have selected a line of an element in the X-ray list clicking on the Set button identifies the element and displays its peak label
Delete After you have selected an identified element in the X-ray list clicking on the Delete button deletes the peak label of the element
Shift ID Moves peak labels After you have clicked on the Shift ID button clicking near the label changes the shape of the cursor Then drag the label to move it To deselect this mode click on the Shift ID button once again
Any Length Measures the distance between two arbitrary points After you have clicked on the Any Length button click on two arbitrary points on a spectrum then the marker and distance between the points are displayed To deselect this mode click on the Any Length button once again
Close Closes the Peak ID window
Save ID Results
After you have changed the element name display on the spectrum by using Peak ID for example the element name can be saved as an A rank element 1
2
Select Save ID Results from the Operation menu The Save ID Results window opens
Fig 40 Save ID Results window
Click on the OK button in the Save ID Results window after you have changed the element name display on the spectrum by using Peak ID for example
44 XM-1733027330-1QL
The element name displayed on the spectrum will be saved as an A rank element in a file These data will be displayed automatically beginning with the next operation
Off-line ID
You can perform element identification once again 1
2
Select Off-line ID from the Operation menu The Off-line ID window opens
Fig 41 Off-line ID window
Specify the necessary conditions then click on the Apply button to perform element identification once again after
The ID-Doctor does not operate during off-line identification of element In element identification the specified order of X-rays is taken into account and if A rank only is selected only the labels for A rank elements are displayed after the identification If A amp B rank is selected all the labels are displayed after identification If a number other than zero is specified in the Min Int input box the labels for only the X-rays having the specified intensity or more are displayed after identi-fication
When the Close button is clicked on with the Orderndash0 button selected with Apply not selected the identified element names will not be displayed on the spectra in subsequent measurements
XM-1733027330-1QL 45
Spectra Calculation
Select Spectra Calculation from the Operation menu The Spectra Calculation window opens You can perform the arithmetic operations that are shown in the Spectra Calculation window
Fig 42 Spectra Calculation window
46 XM-1733027330-1QL
Smoothing
Select Spectra CalculationmdashSmoothing from the Operation menu The Smoothing window opens You can smooth the specified spectra using the Savitzky-Golay method
If you selected Manual you can assign a number of points to use in smoothing If you selected Result Only only the smoothed spectra are displayed whereas if you selected Original amp Result the spectra before smoothing are also displayed at the same time
Fig 43 Smoothing window
2nd Derivative
Select Spectra Calculationmdash2nd Derivative from the Operation menu The 2nd Derivative window opens You can find the second derivatives of the specified spectra using the Savitzky-Golay method
Quant Background
You can display the background position that is used in the quantitative analysis and correct the position while watching the corresponding spectra
Select Spectra CalculationmdashQuant Background from the Operation menu The Quant Background window opens
XM-1733027330-1QL 47
Fig 44 Quant Background window
The information displayed is No Elem (Crysta) Low Angle Position and High Angle You can select mm angstrom or nm as the unit If an element name is dimmed the corresponding spectra do not exist If you have selected Ignore channel you can search the spectra only by using crystal names If you have deselected the Ignore channel button you can search for spectra that match both crystal names and measuring channels If you select any of the displayed elements the background position will be shown on the spectra by markers To correct the position drag the markers to the desired positions If you want to enter the corrected items click on the Exec button and if you do not want to click on the Cancel button
48 XM-1733027330-1QL
Background Subtraction You can eliminate background components from the specified spectrum
Select Spectra CalculationmdashBackground Subtraction from the Operation menu
The Background Subtraction window opens
Fig 45 Background Subtraction window
Clicking on the Manual button performs spline interpolation for the specified points (normally multiple points) and forms a background curve Clicking on the Auto button performs background subtraction using the Sonne-veld method
Sub (SP mdash k)
You can subtract a constant (k) from the specified spectrum and display the spectra Select Spectra CalculationmdashSub (SP mdash k) from the Operation menu
The Sub (SP ndash k) window opens
Fig 46 Sub (SP ndash k) window
XM-1733027330-1QL 49
Add (SP + k)Multiply (SP k)Divide (SP k) You can add multiply or divide by a constant (k) in the specified spectrum and display the spectra
Select Spectra CalculationmdashAdd (SP + k) or Multiply (SP k) or Divide (SP k) from the Operation menu
The Add (SP + k)Multiply (SP k)Divide (SP k) window opens
Spectrum Shift You can shift spectra to the left or right
Select Spectra CalculationmdashSpectrum Shift from the Operation menu The Spectrum Shift window opens
Spectra Sub (SP1 mdash SP2)
You can subtract two spectra The result of the calculation can be displayed in another display area
Select Spectra CalculationmdashSpectra Sub (SP1 mdash SP2) from the Operation menu
The Spectra Sub (SP1 ndash SP2) window opens
Spectra Add (SP1 + SP2) You can add two spectra The result of the calculation can be displayed in another display area
Select Spectra CalculationmdashSpectra Add (SP1 + SP2) from the Operation menu
The Spectra add (SP1 + SP2) window opens
Dead-time Correction You can perform dead-time correction
Select Spectra CalculationmdashDead-time Correction from the Operation menu
The Dead-time Correction window opens
For the formulas for calculation refer to the separate instruction manual of the Quantitative Analysis Program
50 XM-1733027330-1QL
Result Store You can store displayed spectrum such as the results of a calculation in a file 1
2
Select Spectra CalculationmdashResult Store from the Operation menu The Result Store window opens
Fig 47 Result Store window
Type a crystal name in the Crystal Name input box and then click on the OK button
The spectrum that you have selected will be added to after the spectrum that was stored last At most twenty spectra can be stored If you want to delete a spectrum select it and type the slash () 8 times the
selected spectrum will be deleted
Reset You can undo arithmetic operations executed in Spectra Calculation
Select Spectra CalculationmdashReset from the Operation menu The settings will returned to their initial states
Redraw Spectra
You can display spectra again Select Redraw Spectra from the Operation menu
XM-1733027330-1QL 51
Print-out You can print conditions and results 1
2
3
Select Print-out from the Operation menu The Print-Out window opens
Select the items that you want to print and then click on the OK button The Listing window appears
Click on the Print button in the Listing window The output will be sent to the printer
Fig 48 Print-out window
52 XM-1733027330-1QL
Semi-Quant Analysis After you have obtained background intensity from an identified element and a qualitative spectrum you perform a calculation for correction based on the ratio to the X-ray intensity of a pure element (the K ratio) so as to obtain the result of a quantitative analysis Below is the method for calibrating the X-ray intensity of a pure element Select Semi-Quant Analysis from the Operation menu
The Semi-Quant Analysis window opens
Fig 49 Semi-Quant Analysis window
This window displays a list of the element names (in Element) X-ray names (in X-ray) and analyzing crystals (in Crystal) for the A-rank identified elements whose spectra show the strongest X-ray intensities
MetalOxide When the sample to be analyzed is a metal click on the Metal button When the sample is an oxide click on the Oxide button then enter values into the No of Oxygen and Valence input boxes
No of Oxygen input box You can input a value when Oxide is selected Type the number of oxygen atoms in the input box The number is to be used as the standard when the molecular formula is calculated after correction
XM-1733027330-1QL 53
Normalize Clicking on this button normalizes the mass concentration after correction the total mass concentration becomes 100 If you do not click on the Normalize button the current values are displayed as they are
Element X-ray Crystal and Valence in the list
Button Function
Element Adds and deletes arbitrary elements
X-ray Specifies the type (Kα Kβ Lα Lβ Mα and Mβ) of the X-rays in the scan range
Crystal Specifies one of the analyzing crystals displayed in the column when the characteristic X-rays span multiple spectra
Valence Specifies the valence of oxides The mass concentration of oxygen can be obtained by using the valence
Result window
You can specify where to display the results that you obtain
Button Function
New Text Opens a text window in which the results are displayed
Spectrum Displays the results in the spectrum display area if it is open
Parameter Displays the results in the parameter-display area
54 XM-1733027330-1QL
Fig 50 An example of Semi-Quant Analysis results
ID-Doctor You can perform element identification based upon the knowledge base of experienced analysis specialists If ID-Doctor is selected the element identification under ID-Doctor will be executed automatically after measurement 1
2
Select ID-Doctor from the Operation menu The ID-Doctor window opens
Fig 51 ID-Doctor window
Click on the OK button For details refer to Chapter 5 ldquoAppendixrdquo
XM-1733027330-1QL 55
Spectrum Analysis You can display on a spectrum the position height area FWHM (full width at half maximum) and height from the baseline of the specified spectrum peak You can print the spectrum after the spectrum analysis by using the Print button 1
2
3
Select Spectrum Analysis from the Operation menu The Spectrum Analysis window opens
Fig 52 Spectrum Analysis window
Specify the baseline between any two desired points by dragging the mouse from the start point and dropping it at the finish point Click on the Apply button
The results of Spectrum Analysis will be displayed on the spectrum
If you enlarge a desired part of a spectrum by using Spectra DisplayndashZooming and specify the desired baseline between two points you can obtain the baseline with greater precision You can also specify the baseline by inputting values in Baseline X Lower and X Upper input boxes You can select the following items Line color Color of lines
56 XM-1733027330-1QL
String Color Color of text Adjust Place in which text is to be printed selected from Left Center and Right Size Size of text selected from S M and L Peak Detect Peak position selected from Max Point 3 Points and 5 Points Plot Item Items to be displayed Shift String Lets you shift the text already written by dragging it
4
1
Turn on the Separation of Left Right button and then click on the Apply button
You will obtain different results on the left side and right side of the peak position
Spectra Search Spectra Search has two important functions One is a search function The other is a load function Using the search function you can display average correlation and other information about spectra judge to be similar in the Search result scroll window by using correlation coefficients from the start position to the finish position for the same crystal Using the load function you can also display the spectra that you have selected from the Search result scroll window The correlation coefficient between a spectrum and another one is 10 if the two are the same while the closer the coefficient is to 00 the less similar the two are The correlation coefficient obtained by calculation will be the same even if one or both are multiplied by a constant If the correlation coefficient is about 09 or more two spectra are similar experimentally However it is recommended that you judge similarity from the display by using the load function
Select Spectra Search from the Operation menu The Spectra Search window opens
XM-1733027330-1QL 57
Fig 53 Spectra Search window
Button Function
Search start positionndash User Group Sample Stage No
Specifies search start directory If there are many spectra for qualitative analysis specifythe start position by using the Group button to save search time Clicking on the Group button opens the Group window where you can specify group names In the same way clicking on the Sample button opens the Sample window where you can specify sample names
58 XM-1733027330-1QL
Fig 54 Group window
Button Function
Search condition ndashStageSpectra
Selecting Stage performs searches through samples Selecting Spectra performs searches through spectra
One Spectrum All spectra
When Stage is selected this function is available
L value (mm) Wave (A)Wave (nm)
Used when you specify the search range
Corr_coeff Correlation coefficient from 00 to 10
Start Pos End Pos Start position for calculation of correlation coefficient Finish position for calculation of correlation coefficient You can change the positions
Search result Scroll window to display the results of search
Search Starts search
Load Displays the spectrum selected from the Search result scroll window
Stop Stops search
Reset Resets correlation coefficient and the values of Start Pos and End Pos Clicking on this button also resets the spectrum presently displayed to the previous one
Selected List Click on this button to print the results of the search You can print only the spectra that you have selected from the Search result scroll window
Close Resets the spectra that are presently displayed and closes the Spectra Search window
XM-1733027330-1QL 59
44 Semi-Quantitative (Semi-Quant) Analysis Program In ordinary quantitative analyses quantitation results are corrected by measuring the intensities of peaks and backgrounds for each element Differing from the ordinary quantitative analyses the semi-quantitative analysis (Semi-Quant Analysis) program corrects quantitation results by using the spectral data Namely the intensities of the peaks and backgrounds for the elements identified in the qualitative analysis are obtained from the qualitative-analysis spectral data The ratio of the spectral peak intensity for each element to that of the characteristic X-rays for the pure element is calculated as the K-ratio
K-ratio = IunkIstd
where Iunk Intensity of the characteristic X-rays from an unknown sample Istd Intensity of the characteristic X-rays of a pure element
Based on this K-ratio ZAF correction is performed and the mass concentration of each element is printed together with the K-ratio This result can be used later to perform an off-line quantitative analysis (Summary) or it can also be recorrected by using the measured standard sample data The characteristic X-ray intensities of pure elements are calculated from the standard sensitivity curve obtained in advance At that time since their dependence on the accelerating voltage is also calculated the K-ratio for the qualitative analysis data measured from 5 kV to 30 kV (in 5 kV steps) can be calculated The standard sensitivity curves have been measured in our company for a large number of standard samples However there may exist slight differences in the measured curves depending on the instruments used Therefore using some standard samples measure and correct the standard sensitivity curves of some elements for each analyzing crystal and for each characteristic X-ray (Kα Lα and Mα) Once this correction has been done you need not repeat it each time you perform analysis
441 How to calculate X-ray intensities in the Semi-Quant Analysis
X-ray intensities in the Semi-Quant Analysis are calculated in the following way As the peak position the position at which the X-ray intensity is the strongest is selected after searching for it in the vicinity of the aimed characteristic X-rays As the background position the position at which the mean X-ray intensity having the lowest moving average of three points from a position a little apart from the peak position is selected These results are displayed as measurement conditions The search ranges of the peaks and backgrounds are defined for each analyzing crystal in the sqtcond file in the optepmaconfanal directory The results of the Semi-Quant Analysis are saved in the file named 1onq in the directory of the quantitative analysis
60 XM-1733027330-1QL
442 Using Semi-Quant Analysis results in off-line quantitative analysis
The results of the Semi-Quant Analysis can be utilized in the off-line quantitative analysis
Summary You can execute Summary in the Semi-Quant Analysis 1
2
3
1
2
3 4
Select ProcessmdashQuantitative AnalysismdashSummary from the EPMA Main Menu
The Function window for process opens Click on the Sample button
The Select Sample window opens Select Qnt for Semi-Quant Analysis
The remaining steps are the same as for ordinary quantitative analysis
In the Semi-Quant Analysis elements are different for each sample in many cases If you print the results of many samples it will be difficult to distinguish them since there are many elements To solve this problem use Mass order for printing If you select Qlw in place of Qnt you can obtain the list of identified elements when you have printed it
Off-line Correction
You can execute Off-line Correction of the analysis results obtained in the Semi-Quant Analysis
Select ProcessmdashQuantitative AnalysismdashOff-line Correction from the EPMA Main Menu
The Function window for off-line correction opens Click on the Sample button
The Select Sample window opens Select Qnt for Semi-Quant Analysis Set the conditions as follows
Specify the correction method and accelerating voltage used for measurement Specify the same elements as those used in the Semi-Quant Analysis Select the same X-rays channel and analyzing crystal as in the result of the Semi-Quant Analysis for the element to be measured Select appropriate standard samples if any When Cal-STD is selected as the standard sample for all elements the same result as in the Semi-Quant Analysis is obtained
For procedures for entering the conditions for the quantitative analysis refer to the separate operation manual of the Quantitative Analysis Program
After setting the above conditions click on Read Intensity amp Correction and the X-ray intensities obtained in the Semi-Quant Analysis will be displayed Then click on the Apply button and off-line correction will be executed
XM-1733027330-1QL 61
443 Correcting the standard sensitivity curve
The Semi-Quant Analysis program includes a program for correcting the standard sensitivity curve By using the standard sample installed in the microanalyzer the X-ray intensity coefficient (I) in the equation in which the atomic number is used as the variable can be obtained for each analyzing crystal and for each characteristic X-ray (Kα Lα and Mα) of each X-ray spectrometer Once this program has been executed you need not run it again
I = exp (a + bZ + cZ2 + dZ3
where I Intensity of characteristic X-rays (cps100 pA) Z Atomic number a b c d Coefficients
Combinations of the standard sample and characteristic X-rays to be used are defined in a file in the optepmacalisqt directory The coefficients obtained are saved in the sqtcoef file in the optepmacali directory together with the measured data The characteristic X-ray intensities of pure elements for each analyzing crystal and for each accelerating voltage are saved in a file in the optepmacalistd_int directory Follow the procedures in the sections below to execute correction of the standard sensitivity curve
Opening the Semi-Quant Calibration window
Select InitializemdashSemi-Quant Calibration from the EPMA Main Menu
Fig 55 Pull-down menu of the Initialize icon
The Semi-Quant Calibration window opens You can perform corrections in this window
62 XM-1733027330-1QL
Selecting analyzing crystals Select analyzing crystals whose standard sensitivity curves are to be corrected Click on the Crystal button in the Semi-Quant Calibration window
The Crystal and Channel window opens
If necessary click on the for Light elements button in the Crystal and Channel window then the Light Elements window opens
Fig 56 Crystal and Channel and Light Elements windows
Out of the analyzing crystals installed in the instrument the analyzing crystals whose standard sensitivity curves can be corrected will be displayed in the Crystal and Channel and Light Elements windows
By default all the crystals are selected If there are some analyzing crystals whose standard sensitivity curves you do not want to correct deselect their crystal buttons
XM-1733027330-1QL 63
Setting the stage positions for standard samples You have to enter the stage positions for standard samples prior to measurement 1
2
1
2
3
Click on the Stage button in the Semi-Quant Calibration window The Set Stage Stage Monitor and Memory windows open
Fig 57 Specifying the stage positions for standard samples
Specify the desired standard sample names and their stage positions
If stage positions have been already set you need not specify them
For the operating procedure refer to the instruction manual of the main unit
Executing measurements You execute measurement by using the following procedure
Click on the Measure button in the Semi-Quant Calibration window The Start Calibration window opens
Set the current to about 1 10mdash7 A in advance Although the accelerating voltage is automatically set to 20 kV but the current is not set automatically
Confirm all the conditions that you require to use then click on the OK button
Measurement begins If you click on the Cancel button the previous window will return
Measurement is performed for each analyzing crystal and the progress of the measurement is displayed on the screen
64 XM-1733027330-1QL
Stopping measurement
To stop measurement for any reason click on the Stop button To temporarily interrupt measurement click on the Pause button On completion of peak search measurement stops temporarily To restart the measurement click on the Pause button once again
Displaying measurement results
On completion of measurement with an analyzing crystal the correction coefficients and the calculated intensities of the characteristic X-rays of the pure elements are displayed The coefficients are displayed in units of cps100 pA The X-ray intensities for Kα Lα and Mα are displayed (vertical axis logarithmic scale in units of cpsμA horizontal axis atomic number)
Fig 58 Display of measurement results
XM-1733027330-1QL 65
Utility
Click on the Utility button in the Semi-Quant Calibration window The Utility pop-up window opens The following functions are included in Utility
Button Function
Reset spectra Individual spectrum windows can be enlarged or reduced by dragging the button at the lower right corner of each window Clicking on Reset spectra after enlarging or reducing the window will return it to the original size
Draw results Clicking on this item displays results of measurement on the computer display
Print results Clicking on this item prints the measured data and the intensity coefficients of the standard sensitivity curve
Check configuration Clicking on this item enables you to check the combination of the analyzing crystal and characteristic X-rays in measurement
Check pksk parameter Clicking on this item enables you to check the parameters for peak search Special care should be exercised in changing the parameters because the operation affects peak search and related operations in quantitative analysis
Smoothing Clicking on this item smoothes and displays the waveform for peak search
2nd derivative Clicking on this item displays the second derivative waveform of the peak search spectrum
Log scale Clicking on this item displays the peak search spectrum on a logarithmic scale
66 XM-1733027330-1QL
5 APPENDIX
Determining peak positions and intensities and identifying elements Using the procedures below this program detects the peaks of characteristic X-rays and identifies the elements for the detected peaks
Detecting peak positions
1 2 3
4
5
1 2
3 a
b
c
d
4
5
Smooth a spectrum by the Savitzky-Golay method Evaluate the second derivative of the smoothed spectrum Detect the peak positions from the second derivative waveform and deter-mine the background positions from the waveforms obtained after second differentiation and smoothing From the smoothed spectrum determine the peak intensity and the back-ground intensity If the difference between the peak intensity and the background intensity is too large to attribute to statistical variation judge that a peak of interest exists
Identifying elements
Detect peaks for each spectrum If any one of the Kα (1) Lα (1) and Mα (1) lines is detected assign the elements of interest to the B rank Further judge the elements of B rank as follows If ZKα min Z ZKβ min assign the elements of interest to the A rank Usually ZKα min=4 ZKβ min=17 If both a Kα (1) line and a K (1) line are found in the same spectrum assign the elements of interest to the A rank If both a Kα (1) line and a K (1) line are found in different spectra assign the elements of interest to the A rank If both an Lα (1) line and an L (1) line are found in the same spectrum assign the elements of interest to the A rank Similarly if both an Mα (1) line and an M (1) line are found in the same spectrum assign the elements of interest to the A rank
If any peaks of B-rank elements are superimposed on any peaks of charac-teristic X-rays of A-rank elements (usually of the first-order) exclude the B-rank elements from the elements to be identified If no A-rank element exists but only one B-rank element exists assign this B-rank element to the A rank
XM-1733027330-1QL 67
Expert identification of elements
This expert identification of elements is a reliable method of ratiocination based upon the knowledge base of experienced analysis specialists This method enables us to evaluate a level of confidence in the result of the element identification performed by using the above-mentioned element identifying method if it is applied for calculation The knowledge base has been created under the following conditions
Accelerating voltage 20 kV Probe current 10 to 500 nA Step 50 μm Sample time 50 ms or more Number of spectra 4 Analyzing crystal LIF PET TAP and STE Scanning range of spectrometer 65 mm to 250 mm (258 mm for TAP) Even if you cannot observe under the above conditions to some extent for some
reasons you can obtain good results since this program is created to avoid problems Of course it is best to meet the requirements as much as possible However when you specify elements to be identified set the spectrometer range to include the first-order X-rays (up to the second order if possible ) of α and of K L and M of the elements
In the results after execution of ID-Doctor the indication ID-Doctor is shown both at the area where elements are displayed in the Data Display window and just above the area where A-Rank and B-Rank elements are displayed Therefore you can easily distinguish the results obtained with the ID-Doctor from those obtained without the ID-Doctor The element identification executed by using this program is performed using the judgment method that imitates experienced analysis specialists the results are not absolutely correct Please use this ID-Doctor as a reference and keep it in mind that you the user of this program decide whether to accept the results or not
68 XM-1733027330-1QL
- XM-1733027330
-
- CONVENTIONS
- CONTENTS
- 1 GENERAL
- 2 SPECIFICATIONS
- 3 PROGRAM STRUCTURE
- 4 OPERATION
-
- 41 Preparation for Measurement
-
- 411 Setting group and sample names
- 412 Setting measurement conditions
- 413 Setting analysis positions
- 414 Loading measurement conditions
- 415 Storing measurement conditions
- 416 Printing measurement conditions and results
- 417 Additional Function
-
- 42 Measurement
-
- 421 Measurement under stored conditions (Preset mode)
- 422 Measurement under present instrument conditions (Survey mode)
- 423 Realtime display
-
- 43 Processing
-
- 431 Selecting sample names and processing methods
- 432 Operation menu
-
- 44 Semi-Quantitative (Semi-Quant) Analysis Program
-
- 441 How to calculate X-ray intensities in the Semi-Quant Analysis
- 442 Using Semi-Quant Analysis results in off-line quantitative analysis
- 443 Correcting the standard sensitivity curve
-
- 5 APPENDIX
-
- damy_tate
- damy_yoko
- fff
- instructions
- JEOL
- mekura
- CONTENTS
- contents
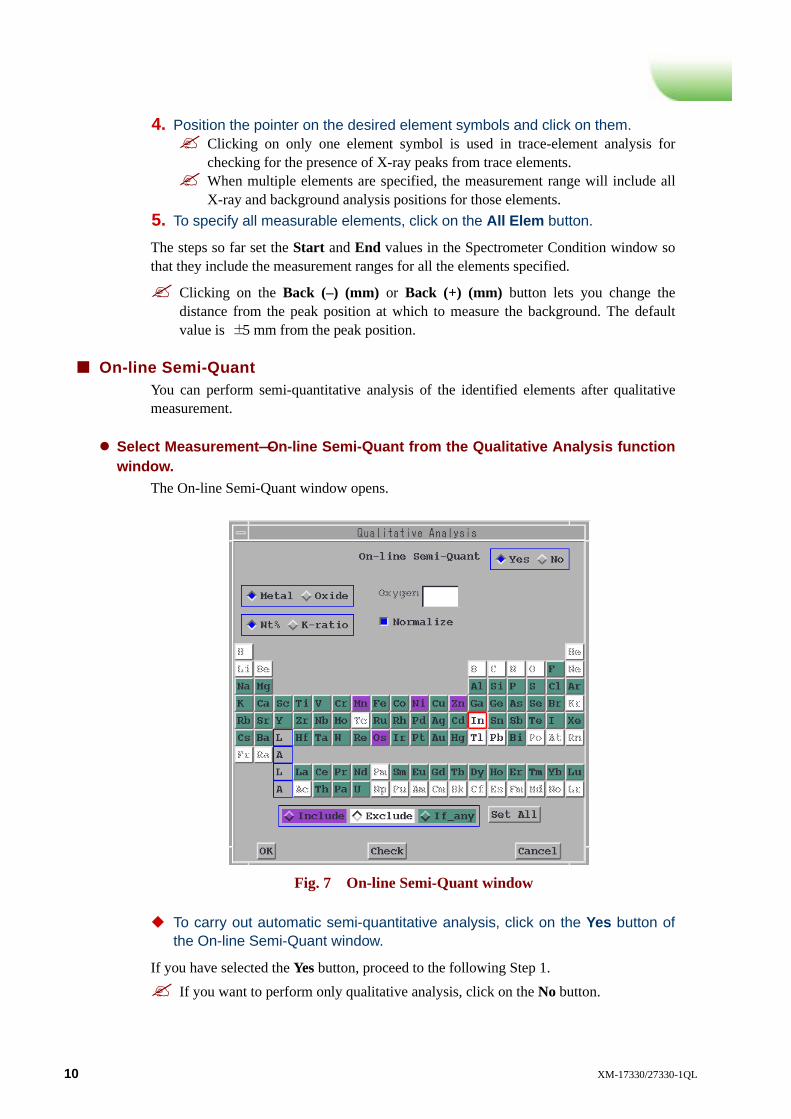
4
5
Position the pointer on the desired element symbols and click on them
Clicking on only one element symbol is used in trace-element analysis for checking for the presence of X-ray peaks from trace elements When multiple elements are specified the measurement range will include all X-ray and background analysis positions for those elements
To specify all measurable elements click on the All Elem button
The steps so far set the Start and End values in the Spectrometer Condition window so that they include the measurement ranges for all the elements specified
Clicking on the Back (ndash) (mm) or Back (+) (mm) button lets you change the distance from the peak position at which to measure the background The default value is plusmn5 mm from the peak position
On-line Semi-Quant
You can perform semi-quantitative analysis of the identified elements after qualitative measurement
Select MeasurementmdashOn-line Semi-Quant from the Qualitative Analysis function window
The On-line Semi-Quant window opens
Fig 7 On-line Semi-Quant window
To carry out automatic semi-quantitative analysis click on the Yes button of the On-line Semi-Quant window
If you have selected the Yes button proceed to the following Step 1
If you want to perform only qualitative analysis click on the No button
10 XM-1733027330-1QL
1
2
3
Click on Metal or Oxide
If you select Oxide type the number of Oxygen in the input box for the calcula-tion of chemical formula Select Wt or K-ratio for printing If you select Wt for printing decide whether to normalize the total of mass concentrations to 100
To specify whether each element is to be included in the results select Include Exclude or If any Include The element selected is included in the result in qualitative analysis
even if it is not identified Exclude The element selected is excluded from the result in qualitative analysis
even if it is identified
If you want to set all the elements to Exclude click on the Set All button If any The element selected is included in the result in qualitative analysis if
it is identified as A-rank If you want to set all the elements to If any click on the Set All button
If you want to specify the spectrum to be used for each element click on the Check button
The Check window appears
Fig 7a Check window
If you select Default the most intense spectrum will be used for calculation When you set valence for an oxide use the Valence input box of the Check window
Qualitative analysis is performed in a normal way and then element identification is also performed If the Yes button is selected in the On-line Semi-Quant window the results of element identification and the specified element are checked and the results of the semi-quantitative analysis are calculated and displayed on the Listing window
XM-1733027330-1QL 11
EOS Condition The EOS Condition window allows you to set the conditions of the electron optical system (EOS) Clicking on the Read button reads present conditions for the EOS and displays them on the EOS Condition window in which you can input and alter items such as Probe Scan Select MeasurementmdashEOS Condition from the Qualitative Analysis function
window The EOS Condition window opens
Fig 8 EOS Condition window
Button Function
Set Sets the present conditions for the EOS
Read Reads the present conditions for the electron optical system (EOS) and displays them on the EOS Condition window
Accelerating Voltage
Sets accelerating voltage at measurement
Current Displays beam current To select the automatic current mode in which a specified current is obtained before measurement click on the Auto button then specify beam current
Magnification Sets magnification for scanning image (active only when Probe Scan is ON)
Probe Diameter Sets probe diameter (in microm ) at measurement
Probe Scan Specifies whether probe scan will be ON or OFF during measurement
Scan Conditions Clicking on the arrowhead of this button opens the window for the following four items
Scan Mode Specifies scan mode (Picture Bup Line Spot or Area) for measurement
Scan Speed Selects scan speed from S1 to S12 The larger the number the slower the speed
Focus Specifies automatic or manual focus
12 XM-1733027330-1QL
Button Function
Stabilizer Specifies whether the beam stabilizer (CLampTilt CL or Tilt) is to be used or not (OFF)
Lens Conditions Clicking on the arrowhead of this button opens the window for the following two items
Condenser Lens Specifies condenser lense settings (CoarseFine) for measurement
Object Lens Specifies objective lense settings (CoarseFine) for measurement
OK Enters measurement conditions and closes the EOS Condition window
Cancel Cancels the conditions that have been input in the EOS Condition window and closes the window
413 Setting analysis positions
You have to specify analysis positions before measurement There are two modes of specifying the analysis positions One is the Stage mode and the other is the Beam mode Select MeasurementmdashStage Condition from the Qualitative Analysis
function window The Stage Condition window opens
Fig 9 Stage Condition window When the Stage Condition window is opened the list of coordinates that were recorded previously is displayed and you can use it in common for qualitative analysis quantitative analysis and EDS qualitative analysis Therefore even when you perform qualitative analysis for the first time coordinates exist provided you have carried out some other analysis The results of analysis however are recorded separately even when you use the same coordinates
XM-1733027330-1QL 13
The columns of the list are Preset for analysis execution No for analysis position number Comment SB for Stage mode or Beam mode Acm for the number of accumulation times Stage (X Y Z) for coordinates of stage position and Qlw (qualitative analysis) Qnt (quantitative analysis) Eds (EDS qualitative analysis) marked with asterisks when they are applied One line of the list is always selected and entries made using Pos Input (for coordinate input) and One-by-One (for one-by-one analysis) affect this line
When you want to enter a new analysis point select the blank line at the bottom of the list When you want to alter one of the analysis points in the list select a set of coordinates from the list and then click on the Pos Input button When you want to perform an analysis at one specified point click on One-by-One
Button Function
Pos Input To specify an analysis position click on this button The Stage Condition window is displayed allowing you to specify analysis positions Refer to the next section ldquoStage Control Input windowrdquo
One-by-One Performs one specified analysis at the highlighted stage position
Clear Clears the highlighted line If there are any lines below the highlighted line they move up
Cancel Cancels the newly input values without entering them in the Stage Condition file The Confirmation window appears before the input line is cleared
SelectUnselect To measure at the recorded coordinates with the Preset mode ( refer to Section 421) the Preset button must be on To turn Preset on for all or some coordinates points click on Select To turn Preset off click on Unselect
Delete Deletes some or all sets of recorded coordinates If there are any lines below the deleted lines they move up
When you have deleted the analysis point values by using Clear or Delete if there
are any lines below the deleted lines they move up If you have executed the analysis at the recorded analysis point its results will remain unchanged
Table Edit Line Set and Position Correction are available in this Stage Condition window Refer to the separate instruction manual ldquoQuantitative Analysis Programrdquo
14 XM-1733027330-1QL
Stage Condition Input window You set the analysis position of the stage or beam in this window that opens when you click on the Pos Input button of the Stage Condition window
Fig 10 Stage Condition Input window with Working Area for Stage
Entering the analysis position in the Stage mode
1
2
3
Confirm that Scan Type is Stage If it is not click on the Stage button
Move the stage to the analysis position that you want to analyze observing the OM image by using the joystick of the Joystick Controller of the EPMA main unit then after focusing on the position eliminate backlash by using the TEST button of the Joystick Controller
It is especially necessary to eliminate backlash before you perform continuous analysis in the Preset mode
Click on the Read button to display the present stage position then click on the Store button to enter the coordinates of the position
XM-1733027330-1QL 15
Alternatively click on the Read amp Apply button and then this step will be exe-cuted automatically The same result will be obtained by pressing the STORE button of the Joystick Controller In this case after storing the position the coordi-nates of the next position will be indicated If the last character of the comment is a number it will be incremented automatically
4
1
2
3
4
5
To confirm and edit already-specified coordinates first select the corre-sponding analysis position in the Stage Condition window then move the stage using the Move button After confirming the coordinates of the point by using the joystick record the coordinates by carrying out Step 3
Entering the analysis position in the Beam mode
Confirm that Scan Type is Beam If it is not click on the Beam button
Display an image of the analysis position on the Viewing Display
Refer to the instruction book of the EPMA main unit Once you have decided on the analysis position set the image on the Viewing Display to the analysis mode change the cross cursors to green and then select analysis points Click on the Read button
Stage Position (X Y Z) Magnification and Beam Position (X Y) will be read To enter the analysis position click on the Store button
The items of the Stage Condition Input window are explained in the following table
Object Function
Comment You can input up to 40 characters as an explanation of the sample
Scan Type Specify the Stage mode or Beam mode
Auto Focus Click on this button to perform automatic stage focusing before measurement if the optional automatic focusing device has been installed
Magnification Specify the magnification of the EOS by clicking on the Read button This function will be effective only in the Beam mode
Accumulation You can specify up to 100 accumulations Enter values and the Coordinate Accumulation Setting window opens Select Joystick Line Grid or Fix If you select Line or Grid enter the number of steps and the scan width When you specify Accumulation confirm each coordinate point by clicking on the Confirm button
Stage Position Displays the present recorded position of the stage
Beam Position Displays the present recorded position of the beam (only in the Beam mode)
Apply You can enter analysis points in the list of coordinates by clicking on this button
Confirm Be sure to click on this button when you have specified the number of accumulations Move to the accumulation point by using the Joystick Controller then after confirming the focus press the STORE button of the Joystick Repeat this operation as many times as the accumulation number If you click on the Cancel button of the window the remaining accumulation points are neglected and the number of accumulations is reset to the number that you did prior to cancellation
16 XM-1733027330-1QL
Object Function
Read amp Apply Reads the position of the stage and also that of the beam if necessary and records them in the list of coordinates The same result can be obtained by using the STORE button of the Joystick Controller
Close Closes the Stage Condition Input window If the analysis position has been changed the Confirmation window opens
Upward and downward arrow buttons
Move to the previous or following coordinates If the analysis position has been changed the Confirmation window opens
OM Search Executes the automatic stage focusing at the present position of the stage if the optional automatic focusing device has been installed
X Y Z Displays the coordinates of the recorded stage position If you have selected Read the present position of the stage is displayed
Read Reads the present position of the stage and displays it in the the X Yand Z boxes
Store Copies the values of X Y and Z to the Stage Position box
Move Moves the stage to the position having the coordinates X Y and Z
Arrow buttons Moves the stage by the specified step width in the X or Y direction
Range Drag the scroll bar to specify the amount that the stage will move when you click on the Arrow buttons
These items are optional
XM-1733027330-1QL 17
414 Loading measurement conditions
If you load preset measurement conditions you can perform measurements by simply selecting samples and inputting stage positions Select MeasurementmdashCondition Load from the Qualitative Analysis function
window The Condition File Load window opens This window has the list of recorded measurement conditions such as file names dates recorded and comments
To call up the recorded conditions select the desired file from the list of recorded measurement conditions and click on the Load button The loaded conditions are settings of Spectrometer Condition On-line Semi-Quant EOS Condition Print-out Condition and Additional Function If you click on the Check button before loading you can check the stored condi-tions
Fig 11 Condition File Load window
18 XM-1733027330-1QL
415 Storing measurement conditions
If you set conditions in the Spectrometer Condition On-line Semi-Quant EOS Condition Print-out Condition and Additional Function windows you can store them in a file and give a new name to the file Select MeasurementmdashCondition Store from the Qualitative Analysis function
window The Condition File Store window opens
Fig 12 Condition File Store window with its sub-window
When you want to store new measurement conditions click on the New button and input a file name (14 characters maximum) and a comment (40 characters maximum) then click on the Store button When you want to write new measurement conditions in place of the existing measurement conditions recorded in a file select the desired file from the list of recorded measurement conditions and then click on the Store button You can carry out file operations such as printings (Print) changing the name (Rename) and deleting (Delete) in the Condition File Store window
XM-1733027330-1QL 19
When you want to back up recorded data to other media select UtilityndashFile Utility from the EPMA Main Menu
416 Printing measurement conditions and results
Select MeasurementmdashPrint-out Condition from the Qualitative Analysis function window
The Print-out Condition window opens and you can select items that you want to print
Refer to Fig 13
Button Function
Measurement Condition Prints measurement conditions
Summary of Identified Elements Prints names of identified elements in the A and B ranks
Peak Positions with Identified Elements Prints list of peak positions and intensities
Identified Elements with Peak Positions Prints peak position for each identified element
Semi-Quant Result Prints results of semi-quantitative analysis
Fig 13 Printout example
20 XM-1733027330-1QL
417 Additional Function
1
2
Select MeasurementmdashAdditional Function from the Qualitative Analysis function window
You can specify whether ID-Doctor will function or not for element identification at measurement By default ID-Doctor will operate
42 Measurement Two methods of measurement are available one is the Preset mode and the other is the Survey mode Preset mode Method of performing measurement by using stored measurement conditions Survey mode Method of performing measurement without changing the present instrument conditions (for the EOS and stage) Use this mode to perform analysis without specifying detailed measurement conditions
Real-time spectrum display is possible during measurement in both modes
Refer to Sect 423 ldquoRealtime displayrdquo
421 Measurement under stored conditions (Preset mode)
This section describes how to perform measurement under stored measurement conditions and positions in the Preset mode
Select MeasurementmdashPreset Measurement from the Qualitative Analysis function window
The Preset Measurement window opens
Fig 14 Preset Measurement window
Click on the Acquire button in the Preset Measurement window The preset measurement conditions and the analysis positions in the list of the Stage Condition window whose Preset check boxes are turned on will be loaded and then the measurement will be carried out at the analysis positions
XM-1733027330-1QL 21
422 Measurement under present instrument conditions (Survey mode)
This section describes how to perform measurement under present EOS conditions and at the stage position in the Survey mode 1
2
Select MeasurementmdashSurvey Measurement from the Qualitative Analysis function window
Survey Measurement will be performed The data obtained will be stored always at the stage number 99999 The data will be overwritten every time the measure-ment is performed
When you wish to store the measurement results in a file after Survey Measurement click on the Save button then enter Position No and Com-ment
The limit of stage number is one more than the number of positions that are already set During measurement the Measurement Control Window appears as shown in Fig 15 allowing you to interrupt measurement (Measurement Stop) and stop accumu-lation (Accum Stop) If you have selected Accv off the accelerating voltage will be turned off automatically after measurement
Fig 15 Measurement Control Window
22 XM-1733027330-1QL
423 Realtime display
1
2
Select ProcessmdashQualitative Analysis from the EPMA Main Menu during measurement
The Data display window opens
Fig 16 Data display window
Click on the Realtime button The Realtime Display window opens You can perform Spectra Display during measurement If you want to display KLM Marker confirm the peak position using Peak ID during realtime display or enlarge a part of spectrum click on the Stop button to stop the realtime display then you can perform these operations
For details refer to Sect 43 ldquoProcessingrdquo
Fig 16a Realtime Display window
XM-1733027330-1QL 23
Button Function
Sample Specifies the sample and displays the measured spectra Do not click on Sample during realtime display When you want to display spectra that have already been measured stop the realtime display then click on the Sample button and select the sample that you want to display
Realtime Executes realtime display Click on the Realtime button The Realtime Display window of Fig 16a opens Click on the Start button then the spectra being measured are displayed When the analysis point has moved to other coordinates the message ldquoNext Displayrdquo appears If you want the next realtime display to begin immediately select OK After apause the realtime display of the next sample begins automatically The sequence of spectrum display can be changed as follows Channel No Order
Spectra are displayed in real time in the order of the spectrometer channel beginning with channel 1 at the top
Spectrum No Order Spectra are displayed in real time in the order of measurement To select the number of spectra (1 to 8) to be displayed click on the Max Cell Number button
Operation Performs operations described below for spectra to be displayed in real time
Operation menu during realtime display
Select Operation during realtime display The Operation menu opens During realtime display some selections are unavail-able Spectra Display KLM Marker and Peak ID can be selected
Refer to Sect 43 ldquoProcessingrdquo for a description of each operation
Fig 17 Operation menu (during realtime display)
24 XM-1733027330-1QL
43 Processing This section describes how to process the data obtained from the measurements performed so far
431 Selecting sample names and processing methods
1
2
Select ProcessmdashQualitative Analysis from the EPMA Main Menu shown on the Computer Display
The Data display window opens
Fig 18 Data display window
Click on the Sample button in the Data display window The Sample window (for processing) opens
XM-1733027330-1QL 25
Fig 19 Sample window (for processing)
3
4
5
Select the spectra to be displayed from the Sample window There are two display modes One is the single-sample mode in which the spectra of one analysis point are displayed The other is the multiple-sample mode in which the spectra of different samples are displayed at the same time The latter mode is used when you perform the chemical shift and the optional waveform separation However you cannot perform the off-line element identification nor the semi-quantitative analysis using the multiple-sample mode To specify the number of spectra to be displayed click on the Max Spectra button In the Sample window the lists of Sample Name Stage Position and X-Ray Spectra are displayed In the X-Ray Spectra list thumbnail spectra are displayed If they are not displayed click on Show Icon to show them
Button Function
Make Icon Makes thumbnail spectra Normally the spectra are made automatically at measurement
Show Icon Switches on and off the display of thumbnail spectra
Dummy Displays blank spaces in place of spectra
Max Spectra Specifies the number of spectra to be displayed
Selected List Displays the list of spectra that have been selected To deselect spectra click on their names in the list
If you want to display and process data of another group click on the Group button The Group window that lists existing group names opens as shown in Fig 20 Click on the desired group name and then click on the OK button Repeat Step 3 In the single sample mode select GrouprArrSamplerArrStage Position and then select the desired spectra in X-Ray Spectra If you do not select any spectra in X-Ray Spectra all the displayed spectra
will be selected automatically
26 XM-1733027330-1QL
6
7
In the multiple sample mode every time you select a spectrum select group sample and stage position
Fig 20 Group window (for processing)
Click on the OK button Spectra will be displayed in the Data display window in the order in which you selected them in X-Ray Spectra The data corresponding to the item that was specified with Display Parameter ( Sect 432) are displayed at the right of the spectra
XM-1733027330-1QL 27
432 Operation menu
Click on the Operation button in the Data display window of Fig 18 The Operation menu opens as shown in Fig 21 Clicking on a menu item allows the operations described below The menu items that you use frequently can be selected from the pop-up menu that opens by right clicking on any position on a displayed spectrum
Fig 21 Operation menu
Fig 22 Pop-up menu
28 XM-1733027330-1QL
Spectra Display Selecting Spectra Display from the Operation menu shows the menu items related to the methods of displaying spectra allowing the following operations
Zooming
1
2
3
4
Select Spectra DisplaymdashZooming from the Operation menu The Zooming window opens and also at the same time the graph window showing the whole spectrum image opens separately as shown in Fig 23 To specify the spectrum to be processed select a spectrum number or click on any position on the spectrum that is being displayed
Position the mouse cursor near the position where you want to start to zoom and drag the cursor in the diagonal direction
An enlarged rectangular frame is formed Once you have decided the size to be zoomed in on release the mouse button and then click on the Apply button
The part of the spectrum in the specified area is enlarged in the graph window If you performed Step 2 in the graph window you need not click on the Apply button
To move the frame for enlargement drag a point near the center of the frame to the desired position If you want to change the size of the frame drag the frame line
In these operations the shape of the mouse cursor will change so that you can distinguish each operation You can perform the following operations by using the arrow and other keys of the keyboard rarr Moves the frame to the right larr Moves the frame to the left uarr Enlarges in the vertical direction darr Reduces in the vertical direction + Enlarges in the horizontal axis direction ndash Reduces in the horizontal axis direction Shift If you press one of the above keys while holding down this key the
amount of movement will increase
XM-1733027330-1QL 29
Fig 23 Zooming window and its graph window
Ymax r Normalize
You can redisplay the maximum intensity of a spectrum on display at the desired full-scale percentage by using this function 1 Select Spectra DisplaymdashYmax r Normalize from the Operation menu
The Ymax r Normalize window opens
Fig 24 Ymax r Normalize window
30 XM-1733027330-1QL
2
3
1
Click on the r [] button in the Ymax r Normalize window The r window opens as shown
Fig 24a r window
Enter the desired percentage in the input box of the r window by clicking on the number buttons in the r window then click on the Apply button of the Ymax r Normalize window
The maximum intensity of spectrum on display will be redisplayed as the percent-age of the full-scale value that you entered If the All button is selected in the Ymax r Normalize window the full-scale
percentage of all the spectra is set to the same value
Select Xmin mdash Ymax You can set the horizontal and vertical scales for spectra to the desired values The procedure is the same as for the Ymax r Normalize window
Select Spectra DisplaymdashXmin mdash Ymax from the Operation menu The Select Xmin ndash Ymax window opens
Fig 25 Select Xmin ndash Ymax window
XM-1733027330-1QL 31
2
3
Click on the Xmin Ymin Xmax or Ymax button in the Select Xmin mdash Ymax window
The Xmin Ymin Xmax or Ymax window opens Enter the desired values in the input box of the window by clicking on the number buttons in the window then click on the Apply button of the Select Xmin mdash Ymax window
The horizontal and vertical scales for spectra are set to the specified values If the All button is selected in the Select Xmin ndash Ymax window the scales of
all the spectra are set to the same values
Window Layout You can specify the layout of the Data display window by using this function
Select Spectra DisplaymdashWindow Layout from the Operation menu The Window Layout window opens
Fig 26 Window Layout window Window size Select the desired size from V Small Small Normal
and Maximum Horizontal layout Usually spectra are displayed vertically in a column If
you want to display the spectra horizontally in lines click on the Horizontal button and then enter the number of spectra to be shown horizontally in the Horizontal spc input box
Parameter display If you do not want to display parameters on the right side select Parameter OFF If you want to display them select Parameter ON
32 XM-1733027330-1QL
Fig 27 An example of the horizontal display of spectra in lines
Mixed Spectra Display
You can display spectra individually on different parts of the display or all together in one area Select Spectra DisplaymdashWindow Layout from the Operation menu
The Mixed Spectra Display window opens
Fig 28 Mixed Spectra Display window
XM-1733027330-1QL 33
If Spectrum Mode is Single spectra are displayed all together in one display area In the Single mode if you have selected Relative for Vertical Scale the full-scale value of the vertical axis becomes 100 the relative intensity of each spectrum is shown with the maximum value of each spectrum taken as 100 If you have selected Absolute for Vertical Scale spectra will be shown with the maximum value of all spectra taken as 100 The offset value of the Y-axis is displayed as the value of Base Offset when the maximum value of each spectrum is taken as 1 In the Single mode each spectrum is displayed on the same base line when the value of Base Offset is 00 However each spectrum is displayed on a different base line with the same base level when the value of Base Offset is 10
Spectrum Type
You can specify the style for displaying spectrum lines 1
2 3
Select Spectra DisplaymdashSpectrum Type from the Operation menu The Spectrum Type window opens
Fig 29 Spectrum Type and Spectrum windows
Select a spectrum number from the Spectrum Type window To specify the style for displaying spectrum lines select the desired items from the following list then click on the Apply button to display the spectra in the specified style
Style for displaying the line Vector Line Marker Symbols Bar Vertical bars Marker + Vector Symbols and line Vector + Bar Lines and vertical bars
34 XM-1733027330-1QL
Line type for Vector Solid Solid line Dash Dashed line Dot Dotted line Dash Dot Dashed line with a dot Dash Dot Dot Dashed line with two dots Long Dash Long dashed line Thickness of the line Thin Thin line Normal Normal line Thick Thick line
You can store recall and delete using the Load Save and Delete buttons
Spectrum Color You can change the color of the displayed spectra background and parameter area by using this function 1 Select Spectra DisplaymdashSpectrum Color from the Operation menu
The Spectrum Color window opens
Fig 30 Spectrum Color and Color windows
XM-1733027330-1QL 35
2 3
1
2 3
Select a spectrum number from the Spectrum Color window To specify the color for displaying spectra background and parameter areas select the desired items from the following list then click on the Apply button to display the color as desired
Items available for color display Spectrum Spectra Background Background Original Original spectra prior to calculation Parameter Fore Parameter characters Parameter Back Parameter background Buttons for operations More Lets you to specify the colors of Marker ID Element
Cursor and KLM lines You can store recall and delete by using Load Save and Delete buttons
Draw Mesh You can draw a grid as the background of spectra by using this function
Select Spectra DisplaymdashDraw Mesh from the Operation menu The Draw Mesh window opens
Fig 31 Draw Mesh window
Select a spectrum number from the Draw Mesh window To specify Scale Color and Line for the grid select the desired items from the following lists then click on the Apply button to display the grid as desired
Line type Solid Solid line Dash Dashed line Dot Dotted line Dash Dot Dashed line with a dot Dash Dot Dot Dashed line with two dots
36 XM-1733027330-1QL
Thickness of the line Thin Thin line Normal Normal line Thick Thick line Lines to draw Hor + Vert Horizontal and vertical lines Horizontal Horizontal lines Vertical Vertical lines None No lines
Display Axis
You can set the unit for the abscissa of the specified spectra by using this function The unit for the abscissa is always the same for all the spectra 1
2
1
Select Spectra DisplaymdashDisplay Axis from the Operation menu The Display Axis window opens
Fig 32 Display Axis window
To specify the desired item in the Display Axis window select Position mm Wave length A Wave length nm or Energy keV then click on the OK button
The abscissa for the spectra on the display changes as specified Wave order is useful for displaying the spectra in the original wavelength when high-order lines are displayed in such narrow range as chemical shift The function is effective only when the wavelength is specified as the abscissa
Kind of Assignment You can select the style for displaying element labels by using this function
Select Spectra DisplaymdashKind of Assignment from the Operation menu The Kind of Assignment window opens
XM-1733027330-1QL 37
Fig 33 Kind of Assignment window
2
1
Select Elements Elements X-ray Name or Elements X-ray Name Order then click on the OK button Elements Only element names are displayed Elements X-ray Name Element names and X-ray names are
displayed Elements X-ray Name Order Element names X-ray names and order
are displayed
Display Parameter You can specify which parameters to display in the parameter-display area of the Data display window by using this function
Select Spectra DisplaymdashDisplay Parameter from the Operation menu The Display Parameter window opens
Fig 34 Display Parameter window
38 XM-1733027330-1QL
2
1
2
Select the desired parameters then click on the OK button The specified parameters are displayed in the parameter-display area of the Data display window
If you select All the information of all the spectra is shown while if you select Single only the information of the specified spectrum is shown To change the size of the displayed characters select S M or L
An A-Rank Element is an element that is judged certain to exist and a B-Rank Element is an element that is judged possible though not certain to exist For the method of element identification refer to Chapter 5 ldquoAppendixrdquo of this instruction manual
Write Text
You can write text in the display area of spectra by using this function Select Spectra DisplaymdashWrite Text from the Operation menu
The Write Text window opens
Fig 35 Write Text window
Click on the spectrum on which you want to write text and then input the desired text in the input box of the Write Text window then click on the Write button
The text is displayed on the selected spectrum of the Data display window Color Selects the color of text Size Selects the character size of text from S M and L Clear Clears the input box
Shift Adjusts the position of the input text when you drag it Delete Deletes the text Click on this button and then select the text that you
want to delete from the list of texts Write Writes text on the selected spectrum
Save Saves the texts that you have written on spectra The texts will be displayed when you next open the spectra
XM-1733027330-1QL 39
Replace Spectrum You can replace the spectra that are being displayed by using this function 1
2
3
1
2
Select Spectra DisplaymdashReplace Spectrum from the Operation menu The Replace spectrum window opens
Fig 36 Replace spectrum window
Select the number of the spectrum to replace from the Replace spectrum window and then click on the Apply button
The Sample window opens
Refer to Fig 19 Sample window (for processing) Select the spectrum to replace from the Sample window
Reset Spectra
You can reset all the changes that you have made using all the items of the Spectra Display menus to their initial states if you use this function
Select Spectra DisplaymdashReset Spectra from the Operation menu The Reset Spectra window opens
Fig 37 Reset window
Select the number of the spectrum for resetting from the Reset window and then click on the Apply button
All the changes made for the selected spectrum will be cancelled
40 XM-1733027330-1QL
KLM Marker You can display identified elements in colors in the KLM Marker window 1
2
Select KLM Marker from the Operation menu The KLM Marker window opens
Element buttons
Element display
Fig 38 KLM Marker window
Click on the buttons of the desired element in the KLM Marker window
The positions and element names of the characteristic X-rays (Kα Kβ etc) for specified elements are displayed on the spectrum The following functions are available
Button Function
Element buttons Clicking on an element button displays KLM markers When you right-click another element button its KLM markers appear together with the previous ones You can specify the line type for the KLM markers in the Spectrum Type window and the color in the Spectrum Color window
Element display The name of the selected element is displayed Right-clicking on the display shows the name of the element to the right of the present one while left-clicking on the display shows the name of the element to the left of the present one
Arrow buttons
Clicking on the right arrow button selects the right element to the present one while clicking on the left arrow button selects the left element to the present one
Order Specifies the order of the X-rays You can specify from the first to the tenth
Min Int Specifies the minimum intensity of the KLM Markers The intensity to be specified is the theoretical intensity shown in the wavelength table It means the relative intensity when the intensity of the alpha line is taken as 100 When you specify 0 all the X-rays are shown
XM-1733027330-1QL 41
Button Function
Select KLM Selects the X-rays to be displayed from the K L and M lines Only highlighted X-rays are displayed It is useful for displaying specified X-rays
Lock To display the KLM Markers of multiple elements specify elements by right-clickings ( refer to the above Element buttons) You can lock the KLM Markers if you click on the Lock button then if you click on an element you can display its KLM Markers together with the locked ones To unlock the locked KLM Markers deselect Lock
Scale The scale for each X-ray height of KLM Markers is based on the theoretical intensity When an X-ray marker cannot be seen easily you can adjust the height of the KLM Markers by using the arrow-buttons to the right of the Scale button The same result can be obtained by dragging a point on the spectrum up or down
Set Adds the selected elements to the list of identification elements and displays element names at the position of each KLM Marker To label peaks use the Peak ID window
Delete Deletes the selected elements from the list of identification elements as well as all the element names When you want to delete element names one by one use the Peak ID window
Print Prints the information on the KLM Markers
Close Closes the KLM window
42 XM-1733027330-1QL
Peak ID The wavelength and intensity at the specified position of the spectrometer are displayed At the same time the possible names of characteristic X-rays near the specified position are listed 1
2
Select Peak ID from the Operation menu The Peak ID window opens
X-ray list
Wavelength display
Spectrum number
Fig 39 Peak ID window
Select any position from a spectrum in the Data display window The wavelength and intensity at the specified position of the spectrometer are displayed in the X-ray list of the Peak ID window At the same time the possible names of characteristic X-rays near the specified position are listed The identified elements and the elements corresponding to the displayed KLM Markers are displayed in different colors The following functions are available
XM-1733027330-1QL 43
Object Function
Spectrum number Specifies the desired spectrum You can also specify it by clicking on it
Wavelength display
Displays the wavelength and X-ray intensity at a position specified by clicking You can perform a fine adjustment of the cursor position by using the larr and rarr keys on the keyboard
X-ray list Displays the X-rays near the wavelength selected by clicking The information displayed is Element Name X ray Name Order Diff (distance from the selected position) and Int (theoretical X-ray intensity)
Order Specifies the order of the X-rays to be detected
Min Int Specifies the minimum theoretical intensity of the X-rays to be displayed
PrevNext ID Move the cursor to the peak positions whose elements were already identified The movement direction of Prev ID is toward lower wavelengths and that of Next ID is toward higer wavelengths The cursor jumps to the other end when it is moved beyond an end
Print Opens the Listing window and displays the data of the item selected from the X-ray list
Clear Clears the items that were specified for printing
Set After you have selected a line of an element in the X-ray list clicking on the Set button identifies the element and displays its peak label
Delete After you have selected an identified element in the X-ray list clicking on the Delete button deletes the peak label of the element
Shift ID Moves peak labels After you have clicked on the Shift ID button clicking near the label changes the shape of the cursor Then drag the label to move it To deselect this mode click on the Shift ID button once again
Any Length Measures the distance between two arbitrary points After you have clicked on the Any Length button click on two arbitrary points on a spectrum then the marker and distance between the points are displayed To deselect this mode click on the Any Length button once again
Close Closes the Peak ID window
Save ID Results
After you have changed the element name display on the spectrum by using Peak ID for example the element name can be saved as an A rank element 1
2
Select Save ID Results from the Operation menu The Save ID Results window opens
Fig 40 Save ID Results window
Click on the OK button in the Save ID Results window after you have changed the element name display on the spectrum by using Peak ID for example
44 XM-1733027330-1QL
The element name displayed on the spectrum will be saved as an A rank element in a file These data will be displayed automatically beginning with the next operation
Off-line ID
You can perform element identification once again 1
2
Select Off-line ID from the Operation menu The Off-line ID window opens
Fig 41 Off-line ID window
Specify the necessary conditions then click on the Apply button to perform element identification once again after
The ID-Doctor does not operate during off-line identification of element In element identification the specified order of X-rays is taken into account and if A rank only is selected only the labels for A rank elements are displayed after the identification If A amp B rank is selected all the labels are displayed after identification If a number other than zero is specified in the Min Int input box the labels for only the X-rays having the specified intensity or more are displayed after identi-fication
When the Close button is clicked on with the Orderndash0 button selected with Apply not selected the identified element names will not be displayed on the spectra in subsequent measurements
XM-1733027330-1QL 45
Spectra Calculation
Select Spectra Calculation from the Operation menu The Spectra Calculation window opens You can perform the arithmetic operations that are shown in the Spectra Calculation window
Fig 42 Spectra Calculation window
46 XM-1733027330-1QL
Smoothing
Select Spectra CalculationmdashSmoothing from the Operation menu The Smoothing window opens You can smooth the specified spectra using the Savitzky-Golay method
If you selected Manual you can assign a number of points to use in smoothing If you selected Result Only only the smoothed spectra are displayed whereas if you selected Original amp Result the spectra before smoothing are also displayed at the same time
Fig 43 Smoothing window
2nd Derivative
Select Spectra Calculationmdash2nd Derivative from the Operation menu The 2nd Derivative window opens You can find the second derivatives of the specified spectra using the Savitzky-Golay method
Quant Background
You can display the background position that is used in the quantitative analysis and correct the position while watching the corresponding spectra
Select Spectra CalculationmdashQuant Background from the Operation menu The Quant Background window opens
XM-1733027330-1QL 47
Fig 44 Quant Background window
The information displayed is No Elem (Crysta) Low Angle Position and High Angle You can select mm angstrom or nm as the unit If an element name is dimmed the corresponding spectra do not exist If you have selected Ignore channel you can search the spectra only by using crystal names If you have deselected the Ignore channel button you can search for spectra that match both crystal names and measuring channels If you select any of the displayed elements the background position will be shown on the spectra by markers To correct the position drag the markers to the desired positions If you want to enter the corrected items click on the Exec button and if you do not want to click on the Cancel button
48 XM-1733027330-1QL
Background Subtraction You can eliminate background components from the specified spectrum
Select Spectra CalculationmdashBackground Subtraction from the Operation menu
The Background Subtraction window opens
Fig 45 Background Subtraction window
Clicking on the Manual button performs spline interpolation for the specified points (normally multiple points) and forms a background curve Clicking on the Auto button performs background subtraction using the Sonne-veld method
Sub (SP mdash k)
You can subtract a constant (k) from the specified spectrum and display the spectra Select Spectra CalculationmdashSub (SP mdash k) from the Operation menu
The Sub (SP ndash k) window opens
Fig 46 Sub (SP ndash k) window
XM-1733027330-1QL 49
Add (SP + k)Multiply (SP k)Divide (SP k) You can add multiply or divide by a constant (k) in the specified spectrum and display the spectra
Select Spectra CalculationmdashAdd (SP + k) or Multiply (SP k) or Divide (SP k) from the Operation menu
The Add (SP + k)Multiply (SP k)Divide (SP k) window opens
Spectrum Shift You can shift spectra to the left or right
Select Spectra CalculationmdashSpectrum Shift from the Operation menu The Spectrum Shift window opens
Spectra Sub (SP1 mdash SP2)
You can subtract two spectra The result of the calculation can be displayed in another display area
Select Spectra CalculationmdashSpectra Sub (SP1 mdash SP2) from the Operation menu
The Spectra Sub (SP1 ndash SP2) window opens
Spectra Add (SP1 + SP2) You can add two spectra The result of the calculation can be displayed in another display area
Select Spectra CalculationmdashSpectra Add (SP1 + SP2) from the Operation menu
The Spectra add (SP1 + SP2) window opens
Dead-time Correction You can perform dead-time correction
Select Spectra CalculationmdashDead-time Correction from the Operation menu
The Dead-time Correction window opens
For the formulas for calculation refer to the separate instruction manual of the Quantitative Analysis Program
50 XM-1733027330-1QL
Result Store You can store displayed spectrum such as the results of a calculation in a file 1
2
Select Spectra CalculationmdashResult Store from the Operation menu The Result Store window opens
Fig 47 Result Store window
Type a crystal name in the Crystal Name input box and then click on the OK button
The spectrum that you have selected will be added to after the spectrum that was stored last At most twenty spectra can be stored If you want to delete a spectrum select it and type the slash () 8 times the
selected spectrum will be deleted
Reset You can undo arithmetic operations executed in Spectra Calculation
Select Spectra CalculationmdashReset from the Operation menu The settings will returned to their initial states
Redraw Spectra
You can display spectra again Select Redraw Spectra from the Operation menu
XM-1733027330-1QL 51
Print-out You can print conditions and results 1
2
3
Select Print-out from the Operation menu The Print-Out window opens
Select the items that you want to print and then click on the OK button The Listing window appears
Click on the Print button in the Listing window The output will be sent to the printer
Fig 48 Print-out window
52 XM-1733027330-1QL
Semi-Quant Analysis After you have obtained background intensity from an identified element and a qualitative spectrum you perform a calculation for correction based on the ratio to the X-ray intensity of a pure element (the K ratio) so as to obtain the result of a quantitative analysis Below is the method for calibrating the X-ray intensity of a pure element Select Semi-Quant Analysis from the Operation menu
The Semi-Quant Analysis window opens
Fig 49 Semi-Quant Analysis window
This window displays a list of the element names (in Element) X-ray names (in X-ray) and analyzing crystals (in Crystal) for the A-rank identified elements whose spectra show the strongest X-ray intensities
MetalOxide When the sample to be analyzed is a metal click on the Metal button When the sample is an oxide click on the Oxide button then enter values into the No of Oxygen and Valence input boxes
No of Oxygen input box You can input a value when Oxide is selected Type the number of oxygen atoms in the input box The number is to be used as the standard when the molecular formula is calculated after correction
XM-1733027330-1QL 53
Normalize Clicking on this button normalizes the mass concentration after correction the total mass concentration becomes 100 If you do not click on the Normalize button the current values are displayed as they are
Element X-ray Crystal and Valence in the list
Button Function
Element Adds and deletes arbitrary elements
X-ray Specifies the type (Kα Kβ Lα Lβ Mα and Mβ) of the X-rays in the scan range
Crystal Specifies one of the analyzing crystals displayed in the column when the characteristic X-rays span multiple spectra
Valence Specifies the valence of oxides The mass concentration of oxygen can be obtained by using the valence
Result window
You can specify where to display the results that you obtain
Button Function
New Text Opens a text window in which the results are displayed
Spectrum Displays the results in the spectrum display area if it is open
Parameter Displays the results in the parameter-display area
54 XM-1733027330-1QL
Fig 50 An example of Semi-Quant Analysis results
ID-Doctor You can perform element identification based upon the knowledge base of experienced analysis specialists If ID-Doctor is selected the element identification under ID-Doctor will be executed automatically after measurement 1
2
Select ID-Doctor from the Operation menu The ID-Doctor window opens
Fig 51 ID-Doctor window
Click on the OK button For details refer to Chapter 5 ldquoAppendixrdquo
XM-1733027330-1QL 55
Spectrum Analysis You can display on a spectrum the position height area FWHM (full width at half maximum) and height from the baseline of the specified spectrum peak You can print the spectrum after the spectrum analysis by using the Print button 1
2
3
Select Spectrum Analysis from the Operation menu The Spectrum Analysis window opens
Fig 52 Spectrum Analysis window
Specify the baseline between any two desired points by dragging the mouse from the start point and dropping it at the finish point Click on the Apply button
The results of Spectrum Analysis will be displayed on the spectrum
If you enlarge a desired part of a spectrum by using Spectra DisplayndashZooming and specify the desired baseline between two points you can obtain the baseline with greater precision You can also specify the baseline by inputting values in Baseline X Lower and X Upper input boxes You can select the following items Line color Color of lines
56 XM-1733027330-1QL
String Color Color of text Adjust Place in which text is to be printed selected from Left Center and Right Size Size of text selected from S M and L Peak Detect Peak position selected from Max Point 3 Points and 5 Points Plot Item Items to be displayed Shift String Lets you shift the text already written by dragging it
4
1
Turn on the Separation of Left Right button and then click on the Apply button
You will obtain different results on the left side and right side of the peak position
Spectra Search Spectra Search has two important functions One is a search function The other is a load function Using the search function you can display average correlation and other information about spectra judge to be similar in the Search result scroll window by using correlation coefficients from the start position to the finish position for the same crystal Using the load function you can also display the spectra that you have selected from the Search result scroll window The correlation coefficient between a spectrum and another one is 10 if the two are the same while the closer the coefficient is to 00 the less similar the two are The correlation coefficient obtained by calculation will be the same even if one or both are multiplied by a constant If the correlation coefficient is about 09 or more two spectra are similar experimentally However it is recommended that you judge similarity from the display by using the load function
Select Spectra Search from the Operation menu The Spectra Search window opens
XM-1733027330-1QL 57
Fig 53 Spectra Search window
Button Function
Search start positionndash User Group Sample Stage No
Specifies search start directory If there are many spectra for qualitative analysis specifythe start position by using the Group button to save search time Clicking on the Group button opens the Group window where you can specify group names In the same way clicking on the Sample button opens the Sample window where you can specify sample names
58 XM-1733027330-1QL
Fig 54 Group window
Button Function
Search condition ndashStageSpectra
Selecting Stage performs searches through samples Selecting Spectra performs searches through spectra
One Spectrum All spectra
When Stage is selected this function is available
L value (mm) Wave (A)Wave (nm)
Used when you specify the search range
Corr_coeff Correlation coefficient from 00 to 10
Start Pos End Pos Start position for calculation of correlation coefficient Finish position for calculation of correlation coefficient You can change the positions
Search result Scroll window to display the results of search
Search Starts search
Load Displays the spectrum selected from the Search result scroll window
Stop Stops search
Reset Resets correlation coefficient and the values of Start Pos and End Pos Clicking on this button also resets the spectrum presently displayed to the previous one
Selected List Click on this button to print the results of the search You can print only the spectra that you have selected from the Search result scroll window
Close Resets the spectra that are presently displayed and closes the Spectra Search window
XM-1733027330-1QL 59
44 Semi-Quantitative (Semi-Quant) Analysis Program In ordinary quantitative analyses quantitation results are corrected by measuring the intensities of peaks and backgrounds for each element Differing from the ordinary quantitative analyses the semi-quantitative analysis (Semi-Quant Analysis) program corrects quantitation results by using the spectral data Namely the intensities of the peaks and backgrounds for the elements identified in the qualitative analysis are obtained from the qualitative-analysis spectral data The ratio of the spectral peak intensity for each element to that of the characteristic X-rays for the pure element is calculated as the K-ratio
K-ratio = IunkIstd
where Iunk Intensity of the characteristic X-rays from an unknown sample Istd Intensity of the characteristic X-rays of a pure element
Based on this K-ratio ZAF correction is performed and the mass concentration of each element is printed together with the K-ratio This result can be used later to perform an off-line quantitative analysis (Summary) or it can also be recorrected by using the measured standard sample data The characteristic X-ray intensities of pure elements are calculated from the standard sensitivity curve obtained in advance At that time since their dependence on the accelerating voltage is also calculated the K-ratio for the qualitative analysis data measured from 5 kV to 30 kV (in 5 kV steps) can be calculated The standard sensitivity curves have been measured in our company for a large number of standard samples However there may exist slight differences in the measured curves depending on the instruments used Therefore using some standard samples measure and correct the standard sensitivity curves of some elements for each analyzing crystal and for each characteristic X-ray (Kα Lα and Mα) Once this correction has been done you need not repeat it each time you perform analysis
441 How to calculate X-ray intensities in the Semi-Quant Analysis
X-ray intensities in the Semi-Quant Analysis are calculated in the following way As the peak position the position at which the X-ray intensity is the strongest is selected after searching for it in the vicinity of the aimed characteristic X-rays As the background position the position at which the mean X-ray intensity having the lowest moving average of three points from a position a little apart from the peak position is selected These results are displayed as measurement conditions The search ranges of the peaks and backgrounds are defined for each analyzing crystal in the sqtcond file in the optepmaconfanal directory The results of the Semi-Quant Analysis are saved in the file named 1onq in the directory of the quantitative analysis
60 XM-1733027330-1QL
442 Using Semi-Quant Analysis results in off-line quantitative analysis
The results of the Semi-Quant Analysis can be utilized in the off-line quantitative analysis
Summary You can execute Summary in the Semi-Quant Analysis 1
2
3
1
2
3 4
Select ProcessmdashQuantitative AnalysismdashSummary from the EPMA Main Menu
The Function window for process opens Click on the Sample button
The Select Sample window opens Select Qnt for Semi-Quant Analysis
The remaining steps are the same as for ordinary quantitative analysis
In the Semi-Quant Analysis elements are different for each sample in many cases If you print the results of many samples it will be difficult to distinguish them since there are many elements To solve this problem use Mass order for printing If you select Qlw in place of Qnt you can obtain the list of identified elements when you have printed it
Off-line Correction
You can execute Off-line Correction of the analysis results obtained in the Semi-Quant Analysis
Select ProcessmdashQuantitative AnalysismdashOff-line Correction from the EPMA Main Menu
The Function window for off-line correction opens Click on the Sample button
The Select Sample window opens Select Qnt for Semi-Quant Analysis Set the conditions as follows
Specify the correction method and accelerating voltage used for measurement Specify the same elements as those used in the Semi-Quant Analysis Select the same X-rays channel and analyzing crystal as in the result of the Semi-Quant Analysis for the element to be measured Select appropriate standard samples if any When Cal-STD is selected as the standard sample for all elements the same result as in the Semi-Quant Analysis is obtained
For procedures for entering the conditions for the quantitative analysis refer to the separate operation manual of the Quantitative Analysis Program
After setting the above conditions click on Read Intensity amp Correction and the X-ray intensities obtained in the Semi-Quant Analysis will be displayed Then click on the Apply button and off-line correction will be executed
XM-1733027330-1QL 61
443 Correcting the standard sensitivity curve
The Semi-Quant Analysis program includes a program for correcting the standard sensitivity curve By using the standard sample installed in the microanalyzer the X-ray intensity coefficient (I) in the equation in which the atomic number is used as the variable can be obtained for each analyzing crystal and for each characteristic X-ray (Kα Lα and Mα) of each X-ray spectrometer Once this program has been executed you need not run it again
I = exp (a + bZ + cZ2 + dZ3
where I Intensity of characteristic X-rays (cps100 pA) Z Atomic number a b c d Coefficients
Combinations of the standard sample and characteristic X-rays to be used are defined in a file in the optepmacalisqt directory The coefficients obtained are saved in the sqtcoef file in the optepmacali directory together with the measured data The characteristic X-ray intensities of pure elements for each analyzing crystal and for each accelerating voltage are saved in a file in the optepmacalistd_int directory Follow the procedures in the sections below to execute correction of the standard sensitivity curve
Opening the Semi-Quant Calibration window
Select InitializemdashSemi-Quant Calibration from the EPMA Main Menu
Fig 55 Pull-down menu of the Initialize icon
The Semi-Quant Calibration window opens You can perform corrections in this window
62 XM-1733027330-1QL
Selecting analyzing crystals Select analyzing crystals whose standard sensitivity curves are to be corrected Click on the Crystal button in the Semi-Quant Calibration window
The Crystal and Channel window opens
If necessary click on the for Light elements button in the Crystal and Channel window then the Light Elements window opens
Fig 56 Crystal and Channel and Light Elements windows
Out of the analyzing crystals installed in the instrument the analyzing crystals whose standard sensitivity curves can be corrected will be displayed in the Crystal and Channel and Light Elements windows
By default all the crystals are selected If there are some analyzing crystals whose standard sensitivity curves you do not want to correct deselect their crystal buttons
XM-1733027330-1QL 63
Setting the stage positions for standard samples You have to enter the stage positions for standard samples prior to measurement 1
2
1
2
3
Click on the Stage button in the Semi-Quant Calibration window The Set Stage Stage Monitor and Memory windows open
Fig 57 Specifying the stage positions for standard samples
Specify the desired standard sample names and their stage positions
If stage positions have been already set you need not specify them
For the operating procedure refer to the instruction manual of the main unit
Executing measurements You execute measurement by using the following procedure
Click on the Measure button in the Semi-Quant Calibration window The Start Calibration window opens
Set the current to about 1 10mdash7 A in advance Although the accelerating voltage is automatically set to 20 kV but the current is not set automatically
Confirm all the conditions that you require to use then click on the OK button
Measurement begins If you click on the Cancel button the previous window will return
Measurement is performed for each analyzing crystal and the progress of the measurement is displayed on the screen
64 XM-1733027330-1QL
Stopping measurement
To stop measurement for any reason click on the Stop button To temporarily interrupt measurement click on the Pause button On completion of peak search measurement stops temporarily To restart the measurement click on the Pause button once again
Displaying measurement results
On completion of measurement with an analyzing crystal the correction coefficients and the calculated intensities of the characteristic X-rays of the pure elements are displayed The coefficients are displayed in units of cps100 pA The X-ray intensities for Kα Lα and Mα are displayed (vertical axis logarithmic scale in units of cpsμA horizontal axis atomic number)
Fig 58 Display of measurement results
XM-1733027330-1QL 65
Utility
Click on the Utility button in the Semi-Quant Calibration window The Utility pop-up window opens The following functions are included in Utility
Button Function
Reset spectra Individual spectrum windows can be enlarged or reduced by dragging the button at the lower right corner of each window Clicking on Reset spectra after enlarging or reducing the window will return it to the original size
Draw results Clicking on this item displays results of measurement on the computer display
Print results Clicking on this item prints the measured data and the intensity coefficients of the standard sensitivity curve
Check configuration Clicking on this item enables you to check the combination of the analyzing crystal and characteristic X-rays in measurement
Check pksk parameter Clicking on this item enables you to check the parameters for peak search Special care should be exercised in changing the parameters because the operation affects peak search and related operations in quantitative analysis
Smoothing Clicking on this item smoothes and displays the waveform for peak search
2nd derivative Clicking on this item displays the second derivative waveform of the peak search spectrum
Log scale Clicking on this item displays the peak search spectrum on a logarithmic scale
66 XM-1733027330-1QL
5 APPENDIX
Determining peak positions and intensities and identifying elements Using the procedures below this program detects the peaks of characteristic X-rays and identifies the elements for the detected peaks
Detecting peak positions
1 2 3
4
5
1 2
3 a
b
c
d
4
5
Smooth a spectrum by the Savitzky-Golay method Evaluate the second derivative of the smoothed spectrum Detect the peak positions from the second derivative waveform and deter-mine the background positions from the waveforms obtained after second differentiation and smoothing From the smoothed spectrum determine the peak intensity and the back-ground intensity If the difference between the peak intensity and the background intensity is too large to attribute to statistical variation judge that a peak of interest exists
Identifying elements
Detect peaks for each spectrum If any one of the Kα (1) Lα (1) and Mα (1) lines is detected assign the elements of interest to the B rank Further judge the elements of B rank as follows If ZKα min Z ZKβ min assign the elements of interest to the A rank Usually ZKα min=4 ZKβ min=17 If both a Kα (1) line and a K (1) line are found in the same spectrum assign the elements of interest to the A rank If both a Kα (1) line and a K (1) line are found in different spectra assign the elements of interest to the A rank If both an Lα (1) line and an L (1) line are found in the same spectrum assign the elements of interest to the A rank Similarly if both an Mα (1) line and an M (1) line are found in the same spectrum assign the elements of interest to the A rank
If any peaks of B-rank elements are superimposed on any peaks of charac-teristic X-rays of A-rank elements (usually of the first-order) exclude the B-rank elements from the elements to be identified If no A-rank element exists but only one B-rank element exists assign this B-rank element to the A rank
XM-1733027330-1QL 67
Expert identification of elements
This expert identification of elements is a reliable method of ratiocination based upon the knowledge base of experienced analysis specialists This method enables us to evaluate a level of confidence in the result of the element identification performed by using the above-mentioned element identifying method if it is applied for calculation The knowledge base has been created under the following conditions
Accelerating voltage 20 kV Probe current 10 to 500 nA Step 50 μm Sample time 50 ms or more Number of spectra 4 Analyzing crystal LIF PET TAP and STE Scanning range of spectrometer 65 mm to 250 mm (258 mm for TAP) Even if you cannot observe under the above conditions to some extent for some
reasons you can obtain good results since this program is created to avoid problems Of course it is best to meet the requirements as much as possible However when you specify elements to be identified set the spectrometer range to include the first-order X-rays (up to the second order if possible ) of α and of K L and M of the elements
In the results after execution of ID-Doctor the indication ID-Doctor is shown both at the area where elements are displayed in the Data Display window and just above the area where A-Rank and B-Rank elements are displayed Therefore you can easily distinguish the results obtained with the ID-Doctor from those obtained without the ID-Doctor The element identification executed by using this program is performed using the judgment method that imitates experienced analysis specialists the results are not absolutely correct Please use this ID-Doctor as a reference and keep it in mind that you the user of this program decide whether to accept the results or not
68 XM-1733027330-1QL
- XM-1733027330
-
- CONVENTIONS
- CONTENTS
- 1 GENERAL
- 2 SPECIFICATIONS
- 3 PROGRAM STRUCTURE
- 4 OPERATION
-
- 41 Preparation for Measurement
-
- 411 Setting group and sample names
- 412 Setting measurement conditions
- 413 Setting analysis positions
- 414 Loading measurement conditions
- 415 Storing measurement conditions
- 416 Printing measurement conditions and results
- 417 Additional Function
-
- 42 Measurement
-
- 421 Measurement under stored conditions (Preset mode)
- 422 Measurement under present instrument conditions (Survey mode)
- 423 Realtime display
-
- 43 Processing
-
- 431 Selecting sample names and processing methods
- 432 Operation menu
-
- 44 Semi-Quantitative (Semi-Quant) Analysis Program
-
- 441 How to calculate X-ray intensities in the Semi-Quant Analysis
- 442 Using Semi-Quant Analysis results in off-line quantitative analysis
- 443 Correcting the standard sensitivity curve
-
- 5 APPENDIX
-
- damy_tate
- damy_yoko
- fff
- instructions
- JEOL
- mekura
- CONTENTS
- contents

1
2
3
Click on Metal or Oxide
If you select Oxide type the number of Oxygen in the input box for the calcula-tion of chemical formula Select Wt or K-ratio for printing If you select Wt for printing decide whether to normalize the total of mass concentrations to 100
To specify whether each element is to be included in the results select Include Exclude or If any Include The element selected is included in the result in qualitative analysis
even if it is not identified Exclude The element selected is excluded from the result in qualitative analysis
even if it is identified
If you want to set all the elements to Exclude click on the Set All button If any The element selected is included in the result in qualitative analysis if
it is identified as A-rank If you want to set all the elements to If any click on the Set All button
If you want to specify the spectrum to be used for each element click on the Check button
The Check window appears
Fig 7a Check window
If you select Default the most intense spectrum will be used for calculation When you set valence for an oxide use the Valence input box of the Check window
Qualitative analysis is performed in a normal way and then element identification is also performed If the Yes button is selected in the On-line Semi-Quant window the results of element identification and the specified element are checked and the results of the semi-quantitative analysis are calculated and displayed on the Listing window
XM-1733027330-1QL 11
EOS Condition The EOS Condition window allows you to set the conditions of the electron optical system (EOS) Clicking on the Read button reads present conditions for the EOS and displays them on the EOS Condition window in which you can input and alter items such as Probe Scan Select MeasurementmdashEOS Condition from the Qualitative Analysis function
window The EOS Condition window opens
Fig 8 EOS Condition window
Button Function
Set Sets the present conditions for the EOS
Read Reads the present conditions for the electron optical system (EOS) and displays them on the EOS Condition window
Accelerating Voltage
Sets accelerating voltage at measurement
Current Displays beam current To select the automatic current mode in which a specified current is obtained before measurement click on the Auto button then specify beam current
Magnification Sets magnification for scanning image (active only when Probe Scan is ON)
Probe Diameter Sets probe diameter (in microm ) at measurement
Probe Scan Specifies whether probe scan will be ON or OFF during measurement
Scan Conditions Clicking on the arrowhead of this button opens the window for the following four items
Scan Mode Specifies scan mode (Picture Bup Line Spot or Area) for measurement
Scan Speed Selects scan speed from S1 to S12 The larger the number the slower the speed
Focus Specifies automatic or manual focus
12 XM-1733027330-1QL
Button Function
Stabilizer Specifies whether the beam stabilizer (CLampTilt CL or Tilt) is to be used or not (OFF)
Lens Conditions Clicking on the arrowhead of this button opens the window for the following two items
Condenser Lens Specifies condenser lense settings (CoarseFine) for measurement
Object Lens Specifies objective lense settings (CoarseFine) for measurement
OK Enters measurement conditions and closes the EOS Condition window
Cancel Cancels the conditions that have been input in the EOS Condition window and closes the window
413 Setting analysis positions
You have to specify analysis positions before measurement There are two modes of specifying the analysis positions One is the Stage mode and the other is the Beam mode Select MeasurementmdashStage Condition from the Qualitative Analysis
function window The Stage Condition window opens
Fig 9 Stage Condition window When the Stage Condition window is opened the list of coordinates that were recorded previously is displayed and you can use it in common for qualitative analysis quantitative analysis and EDS qualitative analysis Therefore even when you perform qualitative analysis for the first time coordinates exist provided you have carried out some other analysis The results of analysis however are recorded separately even when you use the same coordinates
XM-1733027330-1QL 13
The columns of the list are Preset for analysis execution No for analysis position number Comment SB for Stage mode or Beam mode Acm for the number of accumulation times Stage (X Y Z) for coordinates of stage position and Qlw (qualitative analysis) Qnt (quantitative analysis) Eds (EDS qualitative analysis) marked with asterisks when they are applied One line of the list is always selected and entries made using Pos Input (for coordinate input) and One-by-One (for one-by-one analysis) affect this line
When you want to enter a new analysis point select the blank line at the bottom of the list When you want to alter one of the analysis points in the list select a set of coordinates from the list and then click on the Pos Input button When you want to perform an analysis at one specified point click on One-by-One
Button Function
Pos Input To specify an analysis position click on this button The Stage Condition window is displayed allowing you to specify analysis positions Refer to the next section ldquoStage Control Input windowrdquo
One-by-One Performs one specified analysis at the highlighted stage position
Clear Clears the highlighted line If there are any lines below the highlighted line they move up
Cancel Cancels the newly input values without entering them in the Stage Condition file The Confirmation window appears before the input line is cleared
SelectUnselect To measure at the recorded coordinates with the Preset mode ( refer to Section 421) the Preset button must be on To turn Preset on for all or some coordinates points click on Select To turn Preset off click on Unselect
Delete Deletes some or all sets of recorded coordinates If there are any lines below the deleted lines they move up
When you have deleted the analysis point values by using Clear or Delete if there
are any lines below the deleted lines they move up If you have executed the analysis at the recorded analysis point its results will remain unchanged
Table Edit Line Set and Position Correction are available in this Stage Condition window Refer to the separate instruction manual ldquoQuantitative Analysis Programrdquo
14 XM-1733027330-1QL
Stage Condition Input window You set the analysis position of the stage or beam in this window that opens when you click on the Pos Input button of the Stage Condition window
Fig 10 Stage Condition Input window with Working Area for Stage
Entering the analysis position in the Stage mode
1
2
3
Confirm that Scan Type is Stage If it is not click on the Stage button
Move the stage to the analysis position that you want to analyze observing the OM image by using the joystick of the Joystick Controller of the EPMA main unit then after focusing on the position eliminate backlash by using the TEST button of the Joystick Controller
It is especially necessary to eliminate backlash before you perform continuous analysis in the Preset mode
Click on the Read button to display the present stage position then click on the Store button to enter the coordinates of the position
XM-1733027330-1QL 15
Alternatively click on the Read amp Apply button and then this step will be exe-cuted automatically The same result will be obtained by pressing the STORE button of the Joystick Controller In this case after storing the position the coordi-nates of the next position will be indicated If the last character of the comment is a number it will be incremented automatically
4
1
2
3
4
5
To confirm and edit already-specified coordinates first select the corre-sponding analysis position in the Stage Condition window then move the stage using the Move button After confirming the coordinates of the point by using the joystick record the coordinates by carrying out Step 3
Entering the analysis position in the Beam mode
Confirm that Scan Type is Beam If it is not click on the Beam button
Display an image of the analysis position on the Viewing Display
Refer to the instruction book of the EPMA main unit Once you have decided on the analysis position set the image on the Viewing Display to the analysis mode change the cross cursors to green and then select analysis points Click on the Read button
Stage Position (X Y Z) Magnification and Beam Position (X Y) will be read To enter the analysis position click on the Store button
The items of the Stage Condition Input window are explained in the following table
Object Function
Comment You can input up to 40 characters as an explanation of the sample
Scan Type Specify the Stage mode or Beam mode
Auto Focus Click on this button to perform automatic stage focusing before measurement if the optional automatic focusing device has been installed
Magnification Specify the magnification of the EOS by clicking on the Read button This function will be effective only in the Beam mode
Accumulation You can specify up to 100 accumulations Enter values and the Coordinate Accumulation Setting window opens Select Joystick Line Grid or Fix If you select Line or Grid enter the number of steps and the scan width When you specify Accumulation confirm each coordinate point by clicking on the Confirm button
Stage Position Displays the present recorded position of the stage
Beam Position Displays the present recorded position of the beam (only in the Beam mode)
Apply You can enter analysis points in the list of coordinates by clicking on this button
Confirm Be sure to click on this button when you have specified the number of accumulations Move to the accumulation point by using the Joystick Controller then after confirming the focus press the STORE button of the Joystick Repeat this operation as many times as the accumulation number If you click on the Cancel button of the window the remaining accumulation points are neglected and the number of accumulations is reset to the number that you did prior to cancellation
16 XM-1733027330-1QL
Object Function
Read amp Apply Reads the position of the stage and also that of the beam if necessary and records them in the list of coordinates The same result can be obtained by using the STORE button of the Joystick Controller
Close Closes the Stage Condition Input window If the analysis position has been changed the Confirmation window opens
Upward and downward arrow buttons
Move to the previous or following coordinates If the analysis position has been changed the Confirmation window opens
OM Search Executes the automatic stage focusing at the present position of the stage if the optional automatic focusing device has been installed
X Y Z Displays the coordinates of the recorded stage position If you have selected Read the present position of the stage is displayed
Read Reads the present position of the stage and displays it in the the X Yand Z boxes
Store Copies the values of X Y and Z to the Stage Position box
Move Moves the stage to the position having the coordinates X Y and Z
Arrow buttons Moves the stage by the specified step width in the X or Y direction
Range Drag the scroll bar to specify the amount that the stage will move when you click on the Arrow buttons
These items are optional
XM-1733027330-1QL 17
414 Loading measurement conditions
If you load preset measurement conditions you can perform measurements by simply selecting samples and inputting stage positions Select MeasurementmdashCondition Load from the Qualitative Analysis function
window The Condition File Load window opens This window has the list of recorded measurement conditions such as file names dates recorded and comments
To call up the recorded conditions select the desired file from the list of recorded measurement conditions and click on the Load button The loaded conditions are settings of Spectrometer Condition On-line Semi-Quant EOS Condition Print-out Condition and Additional Function If you click on the Check button before loading you can check the stored condi-tions
Fig 11 Condition File Load window
18 XM-1733027330-1QL
415 Storing measurement conditions
If you set conditions in the Spectrometer Condition On-line Semi-Quant EOS Condition Print-out Condition and Additional Function windows you can store them in a file and give a new name to the file Select MeasurementmdashCondition Store from the Qualitative Analysis function
window The Condition File Store window opens
Fig 12 Condition File Store window with its sub-window
When you want to store new measurement conditions click on the New button and input a file name (14 characters maximum) and a comment (40 characters maximum) then click on the Store button When you want to write new measurement conditions in place of the existing measurement conditions recorded in a file select the desired file from the list of recorded measurement conditions and then click on the Store button You can carry out file operations such as printings (Print) changing the name (Rename) and deleting (Delete) in the Condition File Store window
XM-1733027330-1QL 19
When you want to back up recorded data to other media select UtilityndashFile Utility from the EPMA Main Menu
416 Printing measurement conditions and results
Select MeasurementmdashPrint-out Condition from the Qualitative Analysis function window
The Print-out Condition window opens and you can select items that you want to print
Refer to Fig 13
Button Function
Measurement Condition Prints measurement conditions
Summary of Identified Elements Prints names of identified elements in the A and B ranks
Peak Positions with Identified Elements Prints list of peak positions and intensities
Identified Elements with Peak Positions Prints peak position for each identified element
Semi-Quant Result Prints results of semi-quantitative analysis
Fig 13 Printout example
20 XM-1733027330-1QL
417 Additional Function
1
2
Select MeasurementmdashAdditional Function from the Qualitative Analysis function window
You can specify whether ID-Doctor will function or not for element identification at measurement By default ID-Doctor will operate
42 Measurement Two methods of measurement are available one is the Preset mode and the other is the Survey mode Preset mode Method of performing measurement by using stored measurement conditions Survey mode Method of performing measurement without changing the present instrument conditions (for the EOS and stage) Use this mode to perform analysis without specifying detailed measurement conditions
Real-time spectrum display is possible during measurement in both modes
Refer to Sect 423 ldquoRealtime displayrdquo
421 Measurement under stored conditions (Preset mode)
This section describes how to perform measurement under stored measurement conditions and positions in the Preset mode
Select MeasurementmdashPreset Measurement from the Qualitative Analysis function window
The Preset Measurement window opens
Fig 14 Preset Measurement window
Click on the Acquire button in the Preset Measurement window The preset measurement conditions and the analysis positions in the list of the Stage Condition window whose Preset check boxes are turned on will be loaded and then the measurement will be carried out at the analysis positions
XM-1733027330-1QL 21
422 Measurement under present instrument conditions (Survey mode)
This section describes how to perform measurement under present EOS conditions and at the stage position in the Survey mode 1
2
Select MeasurementmdashSurvey Measurement from the Qualitative Analysis function window
Survey Measurement will be performed The data obtained will be stored always at the stage number 99999 The data will be overwritten every time the measure-ment is performed
When you wish to store the measurement results in a file after Survey Measurement click on the Save button then enter Position No and Com-ment
The limit of stage number is one more than the number of positions that are already set During measurement the Measurement Control Window appears as shown in Fig 15 allowing you to interrupt measurement (Measurement Stop) and stop accumu-lation (Accum Stop) If you have selected Accv off the accelerating voltage will be turned off automatically after measurement
Fig 15 Measurement Control Window
22 XM-1733027330-1QL
423 Realtime display
1
2
Select ProcessmdashQualitative Analysis from the EPMA Main Menu during measurement
The Data display window opens
Fig 16 Data display window
Click on the Realtime button The Realtime Display window opens You can perform Spectra Display during measurement If you want to display KLM Marker confirm the peak position using Peak ID during realtime display or enlarge a part of spectrum click on the Stop button to stop the realtime display then you can perform these operations
For details refer to Sect 43 ldquoProcessingrdquo
Fig 16a Realtime Display window
XM-1733027330-1QL 23
Button Function
Sample Specifies the sample and displays the measured spectra Do not click on Sample during realtime display When you want to display spectra that have already been measured stop the realtime display then click on the Sample button and select the sample that you want to display
Realtime Executes realtime display Click on the Realtime button The Realtime Display window of Fig 16a opens Click on the Start button then the spectra being measured are displayed When the analysis point has moved to other coordinates the message ldquoNext Displayrdquo appears If you want the next realtime display to begin immediately select OK After apause the realtime display of the next sample begins automatically The sequence of spectrum display can be changed as follows Channel No Order
Spectra are displayed in real time in the order of the spectrometer channel beginning with channel 1 at the top
Spectrum No Order Spectra are displayed in real time in the order of measurement To select the number of spectra (1 to 8) to be displayed click on the Max Cell Number button
Operation Performs operations described below for spectra to be displayed in real time
Operation menu during realtime display
Select Operation during realtime display The Operation menu opens During realtime display some selections are unavail-able Spectra Display KLM Marker and Peak ID can be selected
Refer to Sect 43 ldquoProcessingrdquo for a description of each operation
Fig 17 Operation menu (during realtime display)
24 XM-1733027330-1QL
43 Processing This section describes how to process the data obtained from the measurements performed so far
431 Selecting sample names and processing methods
1
2
Select ProcessmdashQualitative Analysis from the EPMA Main Menu shown on the Computer Display
The Data display window opens
Fig 18 Data display window
Click on the Sample button in the Data display window The Sample window (for processing) opens
XM-1733027330-1QL 25
Fig 19 Sample window (for processing)
3
4
5
Select the spectra to be displayed from the Sample window There are two display modes One is the single-sample mode in which the spectra of one analysis point are displayed The other is the multiple-sample mode in which the spectra of different samples are displayed at the same time The latter mode is used when you perform the chemical shift and the optional waveform separation However you cannot perform the off-line element identification nor the semi-quantitative analysis using the multiple-sample mode To specify the number of spectra to be displayed click on the Max Spectra button In the Sample window the lists of Sample Name Stage Position and X-Ray Spectra are displayed In the X-Ray Spectra list thumbnail spectra are displayed If they are not displayed click on Show Icon to show them
Button Function
Make Icon Makes thumbnail spectra Normally the spectra are made automatically at measurement
Show Icon Switches on and off the display of thumbnail spectra
Dummy Displays blank spaces in place of spectra
Max Spectra Specifies the number of spectra to be displayed
Selected List Displays the list of spectra that have been selected To deselect spectra click on their names in the list
If you want to display and process data of another group click on the Group button The Group window that lists existing group names opens as shown in Fig 20 Click on the desired group name and then click on the OK button Repeat Step 3 In the single sample mode select GrouprArrSamplerArrStage Position and then select the desired spectra in X-Ray Spectra If you do not select any spectra in X-Ray Spectra all the displayed spectra
will be selected automatically
26 XM-1733027330-1QL
6
7
In the multiple sample mode every time you select a spectrum select group sample and stage position
Fig 20 Group window (for processing)
Click on the OK button Spectra will be displayed in the Data display window in the order in which you selected them in X-Ray Spectra The data corresponding to the item that was specified with Display Parameter ( Sect 432) are displayed at the right of the spectra
XM-1733027330-1QL 27
432 Operation menu
Click on the Operation button in the Data display window of Fig 18 The Operation menu opens as shown in Fig 21 Clicking on a menu item allows the operations described below The menu items that you use frequently can be selected from the pop-up menu that opens by right clicking on any position on a displayed spectrum
Fig 21 Operation menu
Fig 22 Pop-up menu
28 XM-1733027330-1QL
Spectra Display Selecting Spectra Display from the Operation menu shows the menu items related to the methods of displaying spectra allowing the following operations
Zooming
1
2
3
4
Select Spectra DisplaymdashZooming from the Operation menu The Zooming window opens and also at the same time the graph window showing the whole spectrum image opens separately as shown in Fig 23 To specify the spectrum to be processed select a spectrum number or click on any position on the spectrum that is being displayed
Position the mouse cursor near the position where you want to start to zoom and drag the cursor in the diagonal direction
An enlarged rectangular frame is formed Once you have decided the size to be zoomed in on release the mouse button and then click on the Apply button
The part of the spectrum in the specified area is enlarged in the graph window If you performed Step 2 in the graph window you need not click on the Apply button
To move the frame for enlargement drag a point near the center of the frame to the desired position If you want to change the size of the frame drag the frame line
In these operations the shape of the mouse cursor will change so that you can distinguish each operation You can perform the following operations by using the arrow and other keys of the keyboard rarr Moves the frame to the right larr Moves the frame to the left uarr Enlarges in the vertical direction darr Reduces in the vertical direction + Enlarges in the horizontal axis direction ndash Reduces in the horizontal axis direction Shift If you press one of the above keys while holding down this key the
amount of movement will increase
XM-1733027330-1QL 29
Fig 23 Zooming window and its graph window
Ymax r Normalize
You can redisplay the maximum intensity of a spectrum on display at the desired full-scale percentage by using this function 1 Select Spectra DisplaymdashYmax r Normalize from the Operation menu
The Ymax r Normalize window opens
Fig 24 Ymax r Normalize window
30 XM-1733027330-1QL
2
3
1
Click on the r [] button in the Ymax r Normalize window The r window opens as shown
Fig 24a r window
Enter the desired percentage in the input box of the r window by clicking on the number buttons in the r window then click on the Apply button of the Ymax r Normalize window
The maximum intensity of spectrum on display will be redisplayed as the percent-age of the full-scale value that you entered If the All button is selected in the Ymax r Normalize window the full-scale
percentage of all the spectra is set to the same value
Select Xmin mdash Ymax You can set the horizontal and vertical scales for spectra to the desired values The procedure is the same as for the Ymax r Normalize window
Select Spectra DisplaymdashXmin mdash Ymax from the Operation menu The Select Xmin ndash Ymax window opens
Fig 25 Select Xmin ndash Ymax window
XM-1733027330-1QL 31
2
3
Click on the Xmin Ymin Xmax or Ymax button in the Select Xmin mdash Ymax window
The Xmin Ymin Xmax or Ymax window opens Enter the desired values in the input box of the window by clicking on the number buttons in the window then click on the Apply button of the Select Xmin mdash Ymax window
The horizontal and vertical scales for spectra are set to the specified values If the All button is selected in the Select Xmin ndash Ymax window the scales of
all the spectra are set to the same values
Window Layout You can specify the layout of the Data display window by using this function
Select Spectra DisplaymdashWindow Layout from the Operation menu The Window Layout window opens
Fig 26 Window Layout window Window size Select the desired size from V Small Small Normal
and Maximum Horizontal layout Usually spectra are displayed vertically in a column If
you want to display the spectra horizontally in lines click on the Horizontal button and then enter the number of spectra to be shown horizontally in the Horizontal spc input box
Parameter display If you do not want to display parameters on the right side select Parameter OFF If you want to display them select Parameter ON
32 XM-1733027330-1QL
Fig 27 An example of the horizontal display of spectra in lines
Mixed Spectra Display
You can display spectra individually on different parts of the display or all together in one area Select Spectra DisplaymdashWindow Layout from the Operation menu
The Mixed Spectra Display window opens
Fig 28 Mixed Spectra Display window
XM-1733027330-1QL 33
If Spectrum Mode is Single spectra are displayed all together in one display area In the Single mode if you have selected Relative for Vertical Scale the full-scale value of the vertical axis becomes 100 the relative intensity of each spectrum is shown with the maximum value of each spectrum taken as 100 If you have selected Absolute for Vertical Scale spectra will be shown with the maximum value of all spectra taken as 100 The offset value of the Y-axis is displayed as the value of Base Offset when the maximum value of each spectrum is taken as 1 In the Single mode each spectrum is displayed on the same base line when the value of Base Offset is 00 However each spectrum is displayed on a different base line with the same base level when the value of Base Offset is 10
Spectrum Type
You can specify the style for displaying spectrum lines 1
2 3
Select Spectra DisplaymdashSpectrum Type from the Operation menu The Spectrum Type window opens
Fig 29 Spectrum Type and Spectrum windows
Select a spectrum number from the Spectrum Type window To specify the style for displaying spectrum lines select the desired items from the following list then click on the Apply button to display the spectra in the specified style
Style for displaying the line Vector Line Marker Symbols Bar Vertical bars Marker + Vector Symbols and line Vector + Bar Lines and vertical bars
34 XM-1733027330-1QL
Line type for Vector Solid Solid line Dash Dashed line Dot Dotted line Dash Dot Dashed line with a dot Dash Dot Dot Dashed line with two dots Long Dash Long dashed line Thickness of the line Thin Thin line Normal Normal line Thick Thick line
You can store recall and delete using the Load Save and Delete buttons
Spectrum Color You can change the color of the displayed spectra background and parameter area by using this function 1 Select Spectra DisplaymdashSpectrum Color from the Operation menu
The Spectrum Color window opens
Fig 30 Spectrum Color and Color windows
XM-1733027330-1QL 35
2 3
1
2 3
Select a spectrum number from the Spectrum Color window To specify the color for displaying spectra background and parameter areas select the desired items from the following list then click on the Apply button to display the color as desired
Items available for color display Spectrum Spectra Background Background Original Original spectra prior to calculation Parameter Fore Parameter characters Parameter Back Parameter background Buttons for operations More Lets you to specify the colors of Marker ID Element
Cursor and KLM lines You can store recall and delete by using Load Save and Delete buttons
Draw Mesh You can draw a grid as the background of spectra by using this function
Select Spectra DisplaymdashDraw Mesh from the Operation menu The Draw Mesh window opens
Fig 31 Draw Mesh window
Select a spectrum number from the Draw Mesh window To specify Scale Color and Line for the grid select the desired items from the following lists then click on the Apply button to display the grid as desired
Line type Solid Solid line Dash Dashed line Dot Dotted line Dash Dot Dashed line with a dot Dash Dot Dot Dashed line with two dots
36 XM-1733027330-1QL
Thickness of the line Thin Thin line Normal Normal line Thick Thick line Lines to draw Hor + Vert Horizontal and vertical lines Horizontal Horizontal lines Vertical Vertical lines None No lines
Display Axis
You can set the unit for the abscissa of the specified spectra by using this function The unit for the abscissa is always the same for all the spectra 1
2
1
Select Spectra DisplaymdashDisplay Axis from the Operation menu The Display Axis window opens
Fig 32 Display Axis window
To specify the desired item in the Display Axis window select Position mm Wave length A Wave length nm or Energy keV then click on the OK button
The abscissa for the spectra on the display changes as specified Wave order is useful for displaying the spectra in the original wavelength when high-order lines are displayed in such narrow range as chemical shift The function is effective only when the wavelength is specified as the abscissa
Kind of Assignment You can select the style for displaying element labels by using this function
Select Spectra DisplaymdashKind of Assignment from the Operation menu The Kind of Assignment window opens
XM-1733027330-1QL 37
Fig 33 Kind of Assignment window
2
1
Select Elements Elements X-ray Name or Elements X-ray Name Order then click on the OK button Elements Only element names are displayed Elements X-ray Name Element names and X-ray names are
displayed Elements X-ray Name Order Element names X-ray names and order
are displayed
Display Parameter You can specify which parameters to display in the parameter-display area of the Data display window by using this function
Select Spectra DisplaymdashDisplay Parameter from the Operation menu The Display Parameter window opens
Fig 34 Display Parameter window
38 XM-1733027330-1QL
2
1
2
Select the desired parameters then click on the OK button The specified parameters are displayed in the parameter-display area of the Data display window
If you select All the information of all the spectra is shown while if you select Single only the information of the specified spectrum is shown To change the size of the displayed characters select S M or L
An A-Rank Element is an element that is judged certain to exist and a B-Rank Element is an element that is judged possible though not certain to exist For the method of element identification refer to Chapter 5 ldquoAppendixrdquo of this instruction manual
Write Text
You can write text in the display area of spectra by using this function Select Spectra DisplaymdashWrite Text from the Operation menu
The Write Text window opens
Fig 35 Write Text window
Click on the spectrum on which you want to write text and then input the desired text in the input box of the Write Text window then click on the Write button
The text is displayed on the selected spectrum of the Data display window Color Selects the color of text Size Selects the character size of text from S M and L Clear Clears the input box
Shift Adjusts the position of the input text when you drag it Delete Deletes the text Click on this button and then select the text that you
want to delete from the list of texts Write Writes text on the selected spectrum
Save Saves the texts that you have written on spectra The texts will be displayed when you next open the spectra
XM-1733027330-1QL 39
Replace Spectrum You can replace the spectra that are being displayed by using this function 1
2
3
1
2
Select Spectra DisplaymdashReplace Spectrum from the Operation menu The Replace spectrum window opens
Fig 36 Replace spectrum window
Select the number of the spectrum to replace from the Replace spectrum window and then click on the Apply button
The Sample window opens
Refer to Fig 19 Sample window (for processing) Select the spectrum to replace from the Sample window
Reset Spectra
You can reset all the changes that you have made using all the items of the Spectra Display menus to their initial states if you use this function
Select Spectra DisplaymdashReset Spectra from the Operation menu The Reset Spectra window opens
Fig 37 Reset window
Select the number of the spectrum for resetting from the Reset window and then click on the Apply button
All the changes made for the selected spectrum will be cancelled
40 XM-1733027330-1QL
KLM Marker You can display identified elements in colors in the KLM Marker window 1
2
Select KLM Marker from the Operation menu The KLM Marker window opens
Element buttons
Element display
Fig 38 KLM Marker window
Click on the buttons of the desired element in the KLM Marker window
The positions and element names of the characteristic X-rays (Kα Kβ etc) for specified elements are displayed on the spectrum The following functions are available
Button Function
Element buttons Clicking on an element button displays KLM markers When you right-click another element button its KLM markers appear together with the previous ones You can specify the line type for the KLM markers in the Spectrum Type window and the color in the Spectrum Color window
Element display The name of the selected element is displayed Right-clicking on the display shows the name of the element to the right of the present one while left-clicking on the display shows the name of the element to the left of the present one
Arrow buttons
Clicking on the right arrow button selects the right element to the present one while clicking on the left arrow button selects the left element to the present one
Order Specifies the order of the X-rays You can specify from the first to the tenth
Min Int Specifies the minimum intensity of the KLM Markers The intensity to be specified is the theoretical intensity shown in the wavelength table It means the relative intensity when the intensity of the alpha line is taken as 100 When you specify 0 all the X-rays are shown
XM-1733027330-1QL 41
Button Function
Select KLM Selects the X-rays to be displayed from the K L and M lines Only highlighted X-rays are displayed It is useful for displaying specified X-rays
Lock To display the KLM Markers of multiple elements specify elements by right-clickings ( refer to the above Element buttons) You can lock the KLM Markers if you click on the Lock button then if you click on an element you can display its KLM Markers together with the locked ones To unlock the locked KLM Markers deselect Lock
Scale The scale for each X-ray height of KLM Markers is based on the theoretical intensity When an X-ray marker cannot be seen easily you can adjust the height of the KLM Markers by using the arrow-buttons to the right of the Scale button The same result can be obtained by dragging a point on the spectrum up or down
Set Adds the selected elements to the list of identification elements and displays element names at the position of each KLM Marker To label peaks use the Peak ID window
Delete Deletes the selected elements from the list of identification elements as well as all the element names When you want to delete element names one by one use the Peak ID window
Print Prints the information on the KLM Markers
Close Closes the KLM window
42 XM-1733027330-1QL
Peak ID The wavelength and intensity at the specified position of the spectrometer are displayed At the same time the possible names of characteristic X-rays near the specified position are listed 1
2
Select Peak ID from the Operation menu The Peak ID window opens
X-ray list
Wavelength display
Spectrum number
Fig 39 Peak ID window
Select any position from a spectrum in the Data display window The wavelength and intensity at the specified position of the spectrometer are displayed in the X-ray list of the Peak ID window At the same time the possible names of characteristic X-rays near the specified position are listed The identified elements and the elements corresponding to the displayed KLM Markers are displayed in different colors The following functions are available
XM-1733027330-1QL 43
Object Function
Spectrum number Specifies the desired spectrum You can also specify it by clicking on it
Wavelength display
Displays the wavelength and X-ray intensity at a position specified by clicking You can perform a fine adjustment of the cursor position by using the larr and rarr keys on the keyboard
X-ray list Displays the X-rays near the wavelength selected by clicking The information displayed is Element Name X ray Name Order Diff (distance from the selected position) and Int (theoretical X-ray intensity)
Order Specifies the order of the X-rays to be detected
Min Int Specifies the minimum theoretical intensity of the X-rays to be displayed
PrevNext ID Move the cursor to the peak positions whose elements were already identified The movement direction of Prev ID is toward lower wavelengths and that of Next ID is toward higer wavelengths The cursor jumps to the other end when it is moved beyond an end
Print Opens the Listing window and displays the data of the item selected from the X-ray list
Clear Clears the items that were specified for printing
Set After you have selected a line of an element in the X-ray list clicking on the Set button identifies the element and displays its peak label
Delete After you have selected an identified element in the X-ray list clicking on the Delete button deletes the peak label of the element
Shift ID Moves peak labels After you have clicked on the Shift ID button clicking near the label changes the shape of the cursor Then drag the label to move it To deselect this mode click on the Shift ID button once again
Any Length Measures the distance between two arbitrary points After you have clicked on the Any Length button click on two arbitrary points on a spectrum then the marker and distance between the points are displayed To deselect this mode click on the Any Length button once again
Close Closes the Peak ID window
Save ID Results
After you have changed the element name display on the spectrum by using Peak ID for example the element name can be saved as an A rank element 1
2
Select Save ID Results from the Operation menu The Save ID Results window opens
Fig 40 Save ID Results window
Click on the OK button in the Save ID Results window after you have changed the element name display on the spectrum by using Peak ID for example
44 XM-1733027330-1QL
The element name displayed on the spectrum will be saved as an A rank element in a file These data will be displayed automatically beginning with the next operation
Off-line ID
You can perform element identification once again 1
2
Select Off-line ID from the Operation menu The Off-line ID window opens
Fig 41 Off-line ID window
Specify the necessary conditions then click on the Apply button to perform element identification once again after
The ID-Doctor does not operate during off-line identification of element In element identification the specified order of X-rays is taken into account and if A rank only is selected only the labels for A rank elements are displayed after the identification If A amp B rank is selected all the labels are displayed after identification If a number other than zero is specified in the Min Int input box the labels for only the X-rays having the specified intensity or more are displayed after identi-fication
When the Close button is clicked on with the Orderndash0 button selected with Apply not selected the identified element names will not be displayed on the spectra in subsequent measurements
XM-1733027330-1QL 45
Spectra Calculation
Select Spectra Calculation from the Operation menu The Spectra Calculation window opens You can perform the arithmetic operations that are shown in the Spectra Calculation window
Fig 42 Spectra Calculation window
46 XM-1733027330-1QL
Smoothing
Select Spectra CalculationmdashSmoothing from the Operation menu The Smoothing window opens You can smooth the specified spectra using the Savitzky-Golay method
If you selected Manual you can assign a number of points to use in smoothing If you selected Result Only only the smoothed spectra are displayed whereas if you selected Original amp Result the spectra before smoothing are also displayed at the same time
Fig 43 Smoothing window
2nd Derivative
Select Spectra Calculationmdash2nd Derivative from the Operation menu The 2nd Derivative window opens You can find the second derivatives of the specified spectra using the Savitzky-Golay method
Quant Background
You can display the background position that is used in the quantitative analysis and correct the position while watching the corresponding spectra
Select Spectra CalculationmdashQuant Background from the Operation menu The Quant Background window opens
XM-1733027330-1QL 47
Fig 44 Quant Background window
The information displayed is No Elem (Crysta) Low Angle Position and High Angle You can select mm angstrom or nm as the unit If an element name is dimmed the corresponding spectra do not exist If you have selected Ignore channel you can search the spectra only by using crystal names If you have deselected the Ignore channel button you can search for spectra that match both crystal names and measuring channels If you select any of the displayed elements the background position will be shown on the spectra by markers To correct the position drag the markers to the desired positions If you want to enter the corrected items click on the Exec button and if you do not want to click on the Cancel button
48 XM-1733027330-1QL
Background Subtraction You can eliminate background components from the specified spectrum
Select Spectra CalculationmdashBackground Subtraction from the Operation menu
The Background Subtraction window opens
Fig 45 Background Subtraction window
Clicking on the Manual button performs spline interpolation for the specified points (normally multiple points) and forms a background curve Clicking on the Auto button performs background subtraction using the Sonne-veld method
Sub (SP mdash k)
You can subtract a constant (k) from the specified spectrum and display the spectra Select Spectra CalculationmdashSub (SP mdash k) from the Operation menu
The Sub (SP ndash k) window opens
Fig 46 Sub (SP ndash k) window
XM-1733027330-1QL 49
Add (SP + k)Multiply (SP k)Divide (SP k) You can add multiply or divide by a constant (k) in the specified spectrum and display the spectra
Select Spectra CalculationmdashAdd (SP + k) or Multiply (SP k) or Divide (SP k) from the Operation menu
The Add (SP + k)Multiply (SP k)Divide (SP k) window opens
Spectrum Shift You can shift spectra to the left or right
Select Spectra CalculationmdashSpectrum Shift from the Operation menu The Spectrum Shift window opens
Spectra Sub (SP1 mdash SP2)
You can subtract two spectra The result of the calculation can be displayed in another display area
Select Spectra CalculationmdashSpectra Sub (SP1 mdash SP2) from the Operation menu
The Spectra Sub (SP1 ndash SP2) window opens
Spectra Add (SP1 + SP2) You can add two spectra The result of the calculation can be displayed in another display area
Select Spectra CalculationmdashSpectra Add (SP1 + SP2) from the Operation menu
The Spectra add (SP1 + SP2) window opens
Dead-time Correction You can perform dead-time correction
Select Spectra CalculationmdashDead-time Correction from the Operation menu
The Dead-time Correction window opens
For the formulas for calculation refer to the separate instruction manual of the Quantitative Analysis Program
50 XM-1733027330-1QL
Result Store You can store displayed spectrum such as the results of a calculation in a file 1
2
Select Spectra CalculationmdashResult Store from the Operation menu The Result Store window opens
Fig 47 Result Store window
Type a crystal name in the Crystal Name input box and then click on the OK button
The spectrum that you have selected will be added to after the spectrum that was stored last At most twenty spectra can be stored If you want to delete a spectrum select it and type the slash () 8 times the
selected spectrum will be deleted
Reset You can undo arithmetic operations executed in Spectra Calculation
Select Spectra CalculationmdashReset from the Operation menu The settings will returned to their initial states
Redraw Spectra
You can display spectra again Select Redraw Spectra from the Operation menu
XM-1733027330-1QL 51
Print-out You can print conditions and results 1
2
3
Select Print-out from the Operation menu The Print-Out window opens
Select the items that you want to print and then click on the OK button The Listing window appears
Click on the Print button in the Listing window The output will be sent to the printer
Fig 48 Print-out window
52 XM-1733027330-1QL
Semi-Quant Analysis After you have obtained background intensity from an identified element and a qualitative spectrum you perform a calculation for correction based on the ratio to the X-ray intensity of a pure element (the K ratio) so as to obtain the result of a quantitative analysis Below is the method for calibrating the X-ray intensity of a pure element Select Semi-Quant Analysis from the Operation menu
The Semi-Quant Analysis window opens
Fig 49 Semi-Quant Analysis window
This window displays a list of the element names (in Element) X-ray names (in X-ray) and analyzing crystals (in Crystal) for the A-rank identified elements whose spectra show the strongest X-ray intensities
MetalOxide When the sample to be analyzed is a metal click on the Metal button When the sample is an oxide click on the Oxide button then enter values into the No of Oxygen and Valence input boxes
No of Oxygen input box You can input a value when Oxide is selected Type the number of oxygen atoms in the input box The number is to be used as the standard when the molecular formula is calculated after correction
XM-1733027330-1QL 53
Normalize Clicking on this button normalizes the mass concentration after correction the total mass concentration becomes 100 If you do not click on the Normalize button the current values are displayed as they are
Element X-ray Crystal and Valence in the list
Button Function
Element Adds and deletes arbitrary elements
X-ray Specifies the type (Kα Kβ Lα Lβ Mα and Mβ) of the X-rays in the scan range
Crystal Specifies one of the analyzing crystals displayed in the column when the characteristic X-rays span multiple spectra
Valence Specifies the valence of oxides The mass concentration of oxygen can be obtained by using the valence
Result window
You can specify where to display the results that you obtain
Button Function
New Text Opens a text window in which the results are displayed
Spectrum Displays the results in the spectrum display area if it is open
Parameter Displays the results in the parameter-display area
54 XM-1733027330-1QL
Fig 50 An example of Semi-Quant Analysis results
ID-Doctor You can perform element identification based upon the knowledge base of experienced analysis specialists If ID-Doctor is selected the element identification under ID-Doctor will be executed automatically after measurement 1
2
Select ID-Doctor from the Operation menu The ID-Doctor window opens
Fig 51 ID-Doctor window
Click on the OK button For details refer to Chapter 5 ldquoAppendixrdquo
XM-1733027330-1QL 55
Spectrum Analysis You can display on a spectrum the position height area FWHM (full width at half maximum) and height from the baseline of the specified spectrum peak You can print the spectrum after the spectrum analysis by using the Print button 1
2
3
Select Spectrum Analysis from the Operation menu The Spectrum Analysis window opens
Fig 52 Spectrum Analysis window
Specify the baseline between any two desired points by dragging the mouse from the start point and dropping it at the finish point Click on the Apply button
The results of Spectrum Analysis will be displayed on the spectrum
If you enlarge a desired part of a spectrum by using Spectra DisplayndashZooming and specify the desired baseline between two points you can obtain the baseline with greater precision You can also specify the baseline by inputting values in Baseline X Lower and X Upper input boxes You can select the following items Line color Color of lines
56 XM-1733027330-1QL
String Color Color of text Adjust Place in which text is to be printed selected from Left Center and Right Size Size of text selected from S M and L Peak Detect Peak position selected from Max Point 3 Points and 5 Points Plot Item Items to be displayed Shift String Lets you shift the text already written by dragging it
4
1
Turn on the Separation of Left Right button and then click on the Apply button
You will obtain different results on the left side and right side of the peak position
Spectra Search Spectra Search has two important functions One is a search function The other is a load function Using the search function you can display average correlation and other information about spectra judge to be similar in the Search result scroll window by using correlation coefficients from the start position to the finish position for the same crystal Using the load function you can also display the spectra that you have selected from the Search result scroll window The correlation coefficient between a spectrum and another one is 10 if the two are the same while the closer the coefficient is to 00 the less similar the two are The correlation coefficient obtained by calculation will be the same even if one or both are multiplied by a constant If the correlation coefficient is about 09 or more two spectra are similar experimentally However it is recommended that you judge similarity from the display by using the load function
Select Spectra Search from the Operation menu The Spectra Search window opens
XM-1733027330-1QL 57
Fig 53 Spectra Search window
Button Function
Search start positionndash User Group Sample Stage No
Specifies search start directory If there are many spectra for qualitative analysis specifythe start position by using the Group button to save search time Clicking on the Group button opens the Group window where you can specify group names In the same way clicking on the Sample button opens the Sample window where you can specify sample names
58 XM-1733027330-1QL
Fig 54 Group window
Button Function
Search condition ndashStageSpectra
Selecting Stage performs searches through samples Selecting Spectra performs searches through spectra
One Spectrum All spectra
When Stage is selected this function is available
L value (mm) Wave (A)Wave (nm)
Used when you specify the search range
Corr_coeff Correlation coefficient from 00 to 10
Start Pos End Pos Start position for calculation of correlation coefficient Finish position for calculation of correlation coefficient You can change the positions
Search result Scroll window to display the results of search
Search Starts search
Load Displays the spectrum selected from the Search result scroll window
Stop Stops search
Reset Resets correlation coefficient and the values of Start Pos and End Pos Clicking on this button also resets the spectrum presently displayed to the previous one
Selected List Click on this button to print the results of the search You can print only the spectra that you have selected from the Search result scroll window
Close Resets the spectra that are presently displayed and closes the Spectra Search window
XM-1733027330-1QL 59
44 Semi-Quantitative (Semi-Quant) Analysis Program In ordinary quantitative analyses quantitation results are corrected by measuring the intensities of peaks and backgrounds for each element Differing from the ordinary quantitative analyses the semi-quantitative analysis (Semi-Quant Analysis) program corrects quantitation results by using the spectral data Namely the intensities of the peaks and backgrounds for the elements identified in the qualitative analysis are obtained from the qualitative-analysis spectral data The ratio of the spectral peak intensity for each element to that of the characteristic X-rays for the pure element is calculated as the K-ratio
K-ratio = IunkIstd
where Iunk Intensity of the characteristic X-rays from an unknown sample Istd Intensity of the characteristic X-rays of a pure element
Based on this K-ratio ZAF correction is performed and the mass concentration of each element is printed together with the K-ratio This result can be used later to perform an off-line quantitative analysis (Summary) or it can also be recorrected by using the measured standard sample data The characteristic X-ray intensities of pure elements are calculated from the standard sensitivity curve obtained in advance At that time since their dependence on the accelerating voltage is also calculated the K-ratio for the qualitative analysis data measured from 5 kV to 30 kV (in 5 kV steps) can be calculated The standard sensitivity curves have been measured in our company for a large number of standard samples However there may exist slight differences in the measured curves depending on the instruments used Therefore using some standard samples measure and correct the standard sensitivity curves of some elements for each analyzing crystal and for each characteristic X-ray (Kα Lα and Mα) Once this correction has been done you need not repeat it each time you perform analysis
441 How to calculate X-ray intensities in the Semi-Quant Analysis
X-ray intensities in the Semi-Quant Analysis are calculated in the following way As the peak position the position at which the X-ray intensity is the strongest is selected after searching for it in the vicinity of the aimed characteristic X-rays As the background position the position at which the mean X-ray intensity having the lowest moving average of three points from a position a little apart from the peak position is selected These results are displayed as measurement conditions The search ranges of the peaks and backgrounds are defined for each analyzing crystal in the sqtcond file in the optepmaconfanal directory The results of the Semi-Quant Analysis are saved in the file named 1onq in the directory of the quantitative analysis
60 XM-1733027330-1QL
442 Using Semi-Quant Analysis results in off-line quantitative analysis
The results of the Semi-Quant Analysis can be utilized in the off-line quantitative analysis
Summary You can execute Summary in the Semi-Quant Analysis 1
2
3
1
2
3 4
Select ProcessmdashQuantitative AnalysismdashSummary from the EPMA Main Menu
The Function window for process opens Click on the Sample button
The Select Sample window opens Select Qnt for Semi-Quant Analysis
The remaining steps are the same as for ordinary quantitative analysis
In the Semi-Quant Analysis elements are different for each sample in many cases If you print the results of many samples it will be difficult to distinguish them since there are many elements To solve this problem use Mass order for printing If you select Qlw in place of Qnt you can obtain the list of identified elements when you have printed it
Off-line Correction
You can execute Off-line Correction of the analysis results obtained in the Semi-Quant Analysis
Select ProcessmdashQuantitative AnalysismdashOff-line Correction from the EPMA Main Menu
The Function window for off-line correction opens Click on the Sample button
The Select Sample window opens Select Qnt for Semi-Quant Analysis Set the conditions as follows
Specify the correction method and accelerating voltage used for measurement Specify the same elements as those used in the Semi-Quant Analysis Select the same X-rays channel and analyzing crystal as in the result of the Semi-Quant Analysis for the element to be measured Select appropriate standard samples if any When Cal-STD is selected as the standard sample for all elements the same result as in the Semi-Quant Analysis is obtained
For procedures for entering the conditions for the quantitative analysis refer to the separate operation manual of the Quantitative Analysis Program
After setting the above conditions click on Read Intensity amp Correction and the X-ray intensities obtained in the Semi-Quant Analysis will be displayed Then click on the Apply button and off-line correction will be executed
XM-1733027330-1QL 61
443 Correcting the standard sensitivity curve
The Semi-Quant Analysis program includes a program for correcting the standard sensitivity curve By using the standard sample installed in the microanalyzer the X-ray intensity coefficient (I) in the equation in which the atomic number is used as the variable can be obtained for each analyzing crystal and for each characteristic X-ray (Kα Lα and Mα) of each X-ray spectrometer Once this program has been executed you need not run it again
I = exp (a + bZ + cZ2 + dZ3
where I Intensity of characteristic X-rays (cps100 pA) Z Atomic number a b c d Coefficients
Combinations of the standard sample and characteristic X-rays to be used are defined in a file in the optepmacalisqt directory The coefficients obtained are saved in the sqtcoef file in the optepmacali directory together with the measured data The characteristic X-ray intensities of pure elements for each analyzing crystal and for each accelerating voltage are saved in a file in the optepmacalistd_int directory Follow the procedures in the sections below to execute correction of the standard sensitivity curve
Opening the Semi-Quant Calibration window
Select InitializemdashSemi-Quant Calibration from the EPMA Main Menu
Fig 55 Pull-down menu of the Initialize icon
The Semi-Quant Calibration window opens You can perform corrections in this window
62 XM-1733027330-1QL
Selecting analyzing crystals Select analyzing crystals whose standard sensitivity curves are to be corrected Click on the Crystal button in the Semi-Quant Calibration window
The Crystal and Channel window opens
If necessary click on the for Light elements button in the Crystal and Channel window then the Light Elements window opens
Fig 56 Crystal and Channel and Light Elements windows
Out of the analyzing crystals installed in the instrument the analyzing crystals whose standard sensitivity curves can be corrected will be displayed in the Crystal and Channel and Light Elements windows
By default all the crystals are selected If there are some analyzing crystals whose standard sensitivity curves you do not want to correct deselect their crystal buttons
XM-1733027330-1QL 63
Setting the stage positions for standard samples You have to enter the stage positions for standard samples prior to measurement 1
2
1
2
3
Click on the Stage button in the Semi-Quant Calibration window The Set Stage Stage Monitor and Memory windows open
Fig 57 Specifying the stage positions for standard samples
Specify the desired standard sample names and their stage positions
If stage positions have been already set you need not specify them
For the operating procedure refer to the instruction manual of the main unit
Executing measurements You execute measurement by using the following procedure
Click on the Measure button in the Semi-Quant Calibration window The Start Calibration window opens
Set the current to about 1 10mdash7 A in advance Although the accelerating voltage is automatically set to 20 kV but the current is not set automatically
Confirm all the conditions that you require to use then click on the OK button
Measurement begins If you click on the Cancel button the previous window will return
Measurement is performed for each analyzing crystal and the progress of the measurement is displayed on the screen
64 XM-1733027330-1QL
Stopping measurement
To stop measurement for any reason click on the Stop button To temporarily interrupt measurement click on the Pause button On completion of peak search measurement stops temporarily To restart the measurement click on the Pause button once again
Displaying measurement results
On completion of measurement with an analyzing crystal the correction coefficients and the calculated intensities of the characteristic X-rays of the pure elements are displayed The coefficients are displayed in units of cps100 pA The X-ray intensities for Kα Lα and Mα are displayed (vertical axis logarithmic scale in units of cpsμA horizontal axis atomic number)
Fig 58 Display of measurement results
XM-1733027330-1QL 65
Utility
Click on the Utility button in the Semi-Quant Calibration window The Utility pop-up window opens The following functions are included in Utility
Button Function
Reset spectra Individual spectrum windows can be enlarged or reduced by dragging the button at the lower right corner of each window Clicking on Reset spectra after enlarging or reducing the window will return it to the original size
Draw results Clicking on this item displays results of measurement on the computer display
Print results Clicking on this item prints the measured data and the intensity coefficients of the standard sensitivity curve
Check configuration Clicking on this item enables you to check the combination of the analyzing crystal and characteristic X-rays in measurement
Check pksk parameter Clicking on this item enables you to check the parameters for peak search Special care should be exercised in changing the parameters because the operation affects peak search and related operations in quantitative analysis
Smoothing Clicking on this item smoothes and displays the waveform for peak search
2nd derivative Clicking on this item displays the second derivative waveform of the peak search spectrum
Log scale Clicking on this item displays the peak search spectrum on a logarithmic scale
66 XM-1733027330-1QL
5 APPENDIX
Determining peak positions and intensities and identifying elements Using the procedures below this program detects the peaks of characteristic X-rays and identifies the elements for the detected peaks
Detecting peak positions
1 2 3
4
5
1 2
3 a
b
c
d
4
5
Smooth a spectrum by the Savitzky-Golay method Evaluate the second derivative of the smoothed spectrum Detect the peak positions from the second derivative waveform and deter-mine the background positions from the waveforms obtained after second differentiation and smoothing From the smoothed spectrum determine the peak intensity and the back-ground intensity If the difference between the peak intensity and the background intensity is too large to attribute to statistical variation judge that a peak of interest exists
Identifying elements
Detect peaks for each spectrum If any one of the Kα (1) Lα (1) and Mα (1) lines is detected assign the elements of interest to the B rank Further judge the elements of B rank as follows If ZKα min Z ZKβ min assign the elements of interest to the A rank Usually ZKα min=4 ZKβ min=17 If both a Kα (1) line and a K (1) line are found in the same spectrum assign the elements of interest to the A rank If both a Kα (1) line and a K (1) line are found in different spectra assign the elements of interest to the A rank If both an Lα (1) line and an L (1) line are found in the same spectrum assign the elements of interest to the A rank Similarly if both an Mα (1) line and an M (1) line are found in the same spectrum assign the elements of interest to the A rank
If any peaks of B-rank elements are superimposed on any peaks of charac-teristic X-rays of A-rank elements (usually of the first-order) exclude the B-rank elements from the elements to be identified If no A-rank element exists but only one B-rank element exists assign this B-rank element to the A rank
XM-1733027330-1QL 67
Expert identification of elements
This expert identification of elements is a reliable method of ratiocination based upon the knowledge base of experienced analysis specialists This method enables us to evaluate a level of confidence in the result of the element identification performed by using the above-mentioned element identifying method if it is applied for calculation The knowledge base has been created under the following conditions
Accelerating voltage 20 kV Probe current 10 to 500 nA Step 50 μm Sample time 50 ms or more Number of spectra 4 Analyzing crystal LIF PET TAP and STE Scanning range of spectrometer 65 mm to 250 mm (258 mm for TAP) Even if you cannot observe under the above conditions to some extent for some
reasons you can obtain good results since this program is created to avoid problems Of course it is best to meet the requirements as much as possible However when you specify elements to be identified set the spectrometer range to include the first-order X-rays (up to the second order if possible ) of α and of K L and M of the elements
In the results after execution of ID-Doctor the indication ID-Doctor is shown both at the area where elements are displayed in the Data Display window and just above the area where A-Rank and B-Rank elements are displayed Therefore you can easily distinguish the results obtained with the ID-Doctor from those obtained without the ID-Doctor The element identification executed by using this program is performed using the judgment method that imitates experienced analysis specialists the results are not absolutely correct Please use this ID-Doctor as a reference and keep it in mind that you the user of this program decide whether to accept the results or not
68 XM-1733027330-1QL
- XM-1733027330
-
- CONVENTIONS
- CONTENTS
- 1 GENERAL
- 2 SPECIFICATIONS
- 3 PROGRAM STRUCTURE
- 4 OPERATION
-
- 41 Preparation for Measurement
-
- 411 Setting group and sample names
- 412 Setting measurement conditions
- 413 Setting analysis positions
- 414 Loading measurement conditions
- 415 Storing measurement conditions
- 416 Printing measurement conditions and results
- 417 Additional Function
-
- 42 Measurement
-
- 421 Measurement under stored conditions (Preset mode)
- 422 Measurement under present instrument conditions (Survey mode)
- 423 Realtime display
-
- 43 Processing
-
- 431 Selecting sample names and processing methods
- 432 Operation menu
-
- 44 Semi-Quantitative (Semi-Quant) Analysis Program
-
- 441 How to calculate X-ray intensities in the Semi-Quant Analysis
- 442 Using Semi-Quant Analysis results in off-line quantitative analysis
- 443 Correcting the standard sensitivity curve
-
- 5 APPENDIX
-
- damy_tate
- damy_yoko
- fff
- instructions
- JEOL
- mekura
- CONTENTS
- contents

Button Function
Stabilizer Specifies whether the beam stabilizer (CLampTilt CL or Tilt) is to be used or not (OFF)
Lens Conditions Clicking on the arrowhead of this button opens the window for the following two items
Condenser Lens Specifies condenser lense settings (CoarseFine) for measurement
Object Lens Specifies objective lense settings (CoarseFine) for measurement
OK Enters measurement conditions and closes the EOS Condition window
Cancel Cancels the conditions that have been input in the EOS Condition window and closes the window
413 Setting analysis positions
You have to specify analysis positions before measurement There are two modes of specifying the analysis positions One is the Stage mode and the other is the Beam mode Select MeasurementmdashStage Condition from the Qualitative Analysis
function window The Stage Condition window opens
Fig 9 Stage Condition window When the Stage Condition window is opened the list of coordinates that were recorded previously is displayed and you can use it in common for qualitative analysis quantitative analysis and EDS qualitative analysis Therefore even when you perform qualitative analysis for the first time coordinates exist provided you have carried out some other analysis The results of analysis however are recorded separately even when you use the same coordinates
XM-1733027330-1QL 13
The columns of the list are Preset for analysis execution No for analysis position number Comment SB for Stage mode or Beam mode Acm for the number of accumulation times Stage (X Y Z) for coordinates of stage position and Qlw (qualitative analysis) Qnt (quantitative analysis) Eds (EDS qualitative analysis) marked with asterisks when they are applied One line of the list is always selected and entries made using Pos Input (for coordinate input) and One-by-One (for one-by-one analysis) affect this line
When you want to enter a new analysis point select the blank line at the bottom of the list When you want to alter one of the analysis points in the list select a set of coordinates from the list and then click on the Pos Input button When you want to perform an analysis at one specified point click on One-by-One
Button Function
Pos Input To specify an analysis position click on this button The Stage Condition window is displayed allowing you to specify analysis positions Refer to the next section ldquoStage Control Input windowrdquo
One-by-One Performs one specified analysis at the highlighted stage position
Clear Clears the highlighted line If there are any lines below the highlighted line they move up
Cancel Cancels the newly input values without entering them in the Stage Condition file The Confirmation window appears before the input line is cleared
SelectUnselect To measure at the recorded coordinates with the Preset mode ( refer to Section 421) the Preset button must be on To turn Preset on for all or some coordinates points click on Select To turn Preset off click on Unselect
Delete Deletes some or all sets of recorded coordinates If there are any lines below the deleted lines they move up
When you have deleted the analysis point values by using Clear or Delete if there
are any lines below the deleted lines they move up If you have executed the analysis at the recorded analysis point its results will remain unchanged
Table Edit Line Set and Position Correction are available in this Stage Condition window Refer to the separate instruction manual ldquoQuantitative Analysis Programrdquo
14 XM-1733027330-1QL
Stage Condition Input window You set the analysis position of the stage or beam in this window that opens when you click on the Pos Input button of the Stage Condition window
Fig 10 Stage Condition Input window with Working Area for Stage
Entering the analysis position in the Stage mode
1
2
3
Confirm that Scan Type is Stage If it is not click on the Stage button
Move the stage to the analysis position that you want to analyze observing the OM image by using the joystick of the Joystick Controller of the EPMA main unit then after focusing on the position eliminate backlash by using the TEST button of the Joystick Controller
It is especially necessary to eliminate backlash before you perform continuous analysis in the Preset mode
Click on the Read button to display the present stage position then click on the Store button to enter the coordinates of the position
XM-1733027330-1QL 15
Alternatively click on the Read amp Apply button and then this step will be exe-cuted automatically The same result will be obtained by pressing the STORE button of the Joystick Controller In this case after storing the position the coordi-nates of the next position will be indicated If the last character of the comment is a number it will be incremented automatically
4
1
2
3
4
5
To confirm and edit already-specified coordinates first select the corre-sponding analysis position in the Stage Condition window then move the stage using the Move button After confirming the coordinates of the point by using the joystick record the coordinates by carrying out Step 3
Entering the analysis position in the Beam mode
Confirm that Scan Type is Beam If it is not click on the Beam button
Display an image of the analysis position on the Viewing Display
Refer to the instruction book of the EPMA main unit Once you have decided on the analysis position set the image on the Viewing Display to the analysis mode change the cross cursors to green and then select analysis points Click on the Read button
Stage Position (X Y Z) Magnification and Beam Position (X Y) will be read To enter the analysis position click on the Store button
The items of the Stage Condition Input window are explained in the following table
Object Function
Comment You can input up to 40 characters as an explanation of the sample
Scan Type Specify the Stage mode or Beam mode
Auto Focus Click on this button to perform automatic stage focusing before measurement if the optional automatic focusing device has been installed
Magnification Specify the magnification of the EOS by clicking on the Read button This function will be effective only in the Beam mode
Accumulation You can specify up to 100 accumulations Enter values and the Coordinate Accumulation Setting window opens Select Joystick Line Grid or Fix If you select Line or Grid enter the number of steps and the scan width When you specify Accumulation confirm each coordinate point by clicking on the Confirm button
Stage Position Displays the present recorded position of the stage
Beam Position Displays the present recorded position of the beam (only in the Beam mode)
Apply You can enter analysis points in the list of coordinates by clicking on this button
Confirm Be sure to click on this button when you have specified the number of accumulations Move to the accumulation point by using the Joystick Controller then after confirming the focus press the STORE button of the Joystick Repeat this operation as many times as the accumulation number If you click on the Cancel button of the window the remaining accumulation points are neglected and the number of accumulations is reset to the number that you did prior to cancellation
16 XM-1733027330-1QL
Object Function
Read amp Apply Reads the position of the stage and also that of the beam if necessary and records them in the list of coordinates The same result can be obtained by using the STORE button of the Joystick Controller
Close Closes the Stage Condition Input window If the analysis position has been changed the Confirmation window opens
Upward and downward arrow buttons
Move to the previous or following coordinates If the analysis position has been changed the Confirmation window opens
OM Search Executes the automatic stage focusing at the present position of the stage if the optional automatic focusing device has been installed
X Y Z Displays the coordinates of the recorded stage position If you have selected Read the present position of the stage is displayed
Read Reads the present position of the stage and displays it in the the X Yand Z boxes
Store Copies the values of X Y and Z to the Stage Position box
Move Moves the stage to the position having the coordinates X Y and Z
Arrow buttons Moves the stage by the specified step width in the X or Y direction
Range Drag the scroll bar to specify the amount that the stage will move when you click on the Arrow buttons
These items are optional
XM-1733027330-1QL 17
414 Loading measurement conditions
If you load preset measurement conditions you can perform measurements by simply selecting samples and inputting stage positions Select MeasurementmdashCondition Load from the Qualitative Analysis function
window The Condition File Load window opens This window has the list of recorded measurement conditions such as file names dates recorded and comments
To call up the recorded conditions select the desired file from the list of recorded measurement conditions and click on the Load button The loaded conditions are settings of Spectrometer Condition On-line Semi-Quant EOS Condition Print-out Condition and Additional Function If you click on the Check button before loading you can check the stored condi-tions
Fig 11 Condition File Load window
18 XM-1733027330-1QL
415 Storing measurement conditions
If you set conditions in the Spectrometer Condition On-line Semi-Quant EOS Condition Print-out Condition and Additional Function windows you can store them in a file and give a new name to the file Select MeasurementmdashCondition Store from the Qualitative Analysis function
window The Condition File Store window opens
Fig 12 Condition File Store window with its sub-window
When you want to store new measurement conditions click on the New button and input a file name (14 characters maximum) and a comment (40 characters maximum) then click on the Store button When you want to write new measurement conditions in place of the existing measurement conditions recorded in a file select the desired file from the list of recorded measurement conditions and then click on the Store button You can carry out file operations such as printings (Print) changing the name (Rename) and deleting (Delete) in the Condition File Store window
XM-1733027330-1QL 19
When you want to back up recorded data to other media select UtilityndashFile Utility from the EPMA Main Menu
416 Printing measurement conditions and results
Select MeasurementmdashPrint-out Condition from the Qualitative Analysis function window
The Print-out Condition window opens and you can select items that you want to print
Refer to Fig 13
Button Function
Measurement Condition Prints measurement conditions
Summary of Identified Elements Prints names of identified elements in the A and B ranks
Peak Positions with Identified Elements Prints list of peak positions and intensities
Identified Elements with Peak Positions Prints peak position for each identified element
Semi-Quant Result Prints results of semi-quantitative analysis
Fig 13 Printout example
20 XM-1733027330-1QL
417 Additional Function
1
2
Select MeasurementmdashAdditional Function from the Qualitative Analysis function window
You can specify whether ID-Doctor will function or not for element identification at measurement By default ID-Doctor will operate
42 Measurement Two methods of measurement are available one is the Preset mode and the other is the Survey mode Preset mode Method of performing measurement by using stored measurement conditions Survey mode Method of performing measurement without changing the present instrument conditions (for the EOS and stage) Use this mode to perform analysis without specifying detailed measurement conditions
Real-time spectrum display is possible during measurement in both modes
Refer to Sect 423 ldquoRealtime displayrdquo
421 Measurement under stored conditions (Preset mode)
This section describes how to perform measurement under stored measurement conditions and positions in the Preset mode
Select MeasurementmdashPreset Measurement from the Qualitative Analysis function window
The Preset Measurement window opens
Fig 14 Preset Measurement window
Click on the Acquire button in the Preset Measurement window The preset measurement conditions and the analysis positions in the list of the Stage Condition window whose Preset check boxes are turned on will be loaded and then the measurement will be carried out at the analysis positions
XM-1733027330-1QL 21
422 Measurement under present instrument conditions (Survey mode)
This section describes how to perform measurement under present EOS conditions and at the stage position in the Survey mode 1
2
Select MeasurementmdashSurvey Measurement from the Qualitative Analysis function window
Survey Measurement will be performed The data obtained will be stored always at the stage number 99999 The data will be overwritten every time the measure-ment is performed
When you wish to store the measurement results in a file after Survey Measurement click on the Save button then enter Position No and Com-ment
The limit of stage number is one more than the number of positions that are already set During measurement the Measurement Control Window appears as shown in Fig 15 allowing you to interrupt measurement (Measurement Stop) and stop accumu-lation (Accum Stop) If you have selected Accv off the accelerating voltage will be turned off automatically after measurement
Fig 15 Measurement Control Window
22 XM-1733027330-1QL
423 Realtime display
1
2
Select ProcessmdashQualitative Analysis from the EPMA Main Menu during measurement
The Data display window opens
Fig 16 Data display window
Click on the Realtime button The Realtime Display window opens You can perform Spectra Display during measurement If you want to display KLM Marker confirm the peak position using Peak ID during realtime display or enlarge a part of spectrum click on the Stop button to stop the realtime display then you can perform these operations
For details refer to Sect 43 ldquoProcessingrdquo
Fig 16a Realtime Display window
XM-1733027330-1QL 23
Button Function
Sample Specifies the sample and displays the measured spectra Do not click on Sample during realtime display When you want to display spectra that have already been measured stop the realtime display then click on the Sample button and select the sample that you want to display
Realtime Executes realtime display Click on the Realtime button The Realtime Display window of Fig 16a opens Click on the Start button then the spectra being measured are displayed When the analysis point has moved to other coordinates the message ldquoNext Displayrdquo appears If you want the next realtime display to begin immediately select OK After apause the realtime display of the next sample begins automatically The sequence of spectrum display can be changed as follows Channel No Order
Spectra are displayed in real time in the order of the spectrometer channel beginning with channel 1 at the top
Spectrum No Order Spectra are displayed in real time in the order of measurement To select the number of spectra (1 to 8) to be displayed click on the Max Cell Number button
Operation Performs operations described below for spectra to be displayed in real time
Operation menu during realtime display
Select Operation during realtime display The Operation menu opens During realtime display some selections are unavail-able Spectra Display KLM Marker and Peak ID can be selected
Refer to Sect 43 ldquoProcessingrdquo for a description of each operation
Fig 17 Operation menu (during realtime display)
24 XM-1733027330-1QL
43 Processing This section describes how to process the data obtained from the measurements performed so far
431 Selecting sample names and processing methods
1
2
Select ProcessmdashQualitative Analysis from the EPMA Main Menu shown on the Computer Display
The Data display window opens
Fig 18 Data display window
Click on the Sample button in the Data display window The Sample window (for processing) opens
XM-1733027330-1QL 25
Fig 19 Sample window (for processing)
3
4
5
Select the spectra to be displayed from the Sample window There are two display modes One is the single-sample mode in which the spectra of one analysis point are displayed The other is the multiple-sample mode in which the spectra of different samples are displayed at the same time The latter mode is used when you perform the chemical shift and the optional waveform separation However you cannot perform the off-line element identification nor the semi-quantitative analysis using the multiple-sample mode To specify the number of spectra to be displayed click on the Max Spectra button In the Sample window the lists of Sample Name Stage Position and X-Ray Spectra are displayed In the X-Ray Spectra list thumbnail spectra are displayed If they are not displayed click on Show Icon to show them
Button Function
Make Icon Makes thumbnail spectra Normally the spectra are made automatically at measurement
Show Icon Switches on and off the display of thumbnail spectra
Dummy Displays blank spaces in place of spectra
Max Spectra Specifies the number of spectra to be displayed
Selected List Displays the list of spectra that have been selected To deselect spectra click on their names in the list
If you want to display and process data of another group click on the Group button The Group window that lists existing group names opens as shown in Fig 20 Click on the desired group name and then click on the OK button Repeat Step 3 In the single sample mode select GrouprArrSamplerArrStage Position and then select the desired spectra in X-Ray Spectra If you do not select any spectra in X-Ray Spectra all the displayed spectra
will be selected automatically
26 XM-1733027330-1QL
6
7
In the multiple sample mode every time you select a spectrum select group sample and stage position
Fig 20 Group window (for processing)
Click on the OK button Spectra will be displayed in the Data display window in the order in which you selected them in X-Ray Spectra The data corresponding to the item that was specified with Display Parameter ( Sect 432) are displayed at the right of the spectra
XM-1733027330-1QL 27
432 Operation menu
Click on the Operation button in the Data display window of Fig 18 The Operation menu opens as shown in Fig 21 Clicking on a menu item allows the operations described below The menu items that you use frequently can be selected from the pop-up menu that opens by right clicking on any position on a displayed spectrum
Fig 21 Operation menu
Fig 22 Pop-up menu
28 XM-1733027330-1QL
Spectra Display Selecting Spectra Display from the Operation menu shows the menu items related to the methods of displaying spectra allowing the following operations
Zooming
1
2
3
4
Select Spectra DisplaymdashZooming from the Operation menu The Zooming window opens and also at the same time the graph window showing the whole spectrum image opens separately as shown in Fig 23 To specify the spectrum to be processed select a spectrum number or click on any position on the spectrum that is being displayed
Position the mouse cursor near the position where you want to start to zoom and drag the cursor in the diagonal direction
An enlarged rectangular frame is formed Once you have decided the size to be zoomed in on release the mouse button and then click on the Apply button
The part of the spectrum in the specified area is enlarged in the graph window If you performed Step 2 in the graph window you need not click on the Apply button
To move the frame for enlargement drag a point near the center of the frame to the desired position If you want to change the size of the frame drag the frame line
In these operations the shape of the mouse cursor will change so that you can distinguish each operation You can perform the following operations by using the arrow and other keys of the keyboard rarr Moves the frame to the right larr Moves the frame to the left uarr Enlarges in the vertical direction darr Reduces in the vertical direction + Enlarges in the horizontal axis direction ndash Reduces in the horizontal axis direction Shift If you press one of the above keys while holding down this key the
amount of movement will increase
XM-1733027330-1QL 29
Fig 23 Zooming window and its graph window
Ymax r Normalize
You can redisplay the maximum intensity of a spectrum on display at the desired full-scale percentage by using this function 1 Select Spectra DisplaymdashYmax r Normalize from the Operation menu
The Ymax r Normalize window opens
Fig 24 Ymax r Normalize window
30 XM-1733027330-1QL
2
3
1
Click on the r [] button in the Ymax r Normalize window The r window opens as shown
Fig 24a r window
Enter the desired percentage in the input box of the r window by clicking on the number buttons in the r window then click on the Apply button of the Ymax r Normalize window
The maximum intensity of spectrum on display will be redisplayed as the percent-age of the full-scale value that you entered If the All button is selected in the Ymax r Normalize window the full-scale
percentage of all the spectra is set to the same value
Select Xmin mdash Ymax You can set the horizontal and vertical scales for spectra to the desired values The procedure is the same as for the Ymax r Normalize window
Select Spectra DisplaymdashXmin mdash Ymax from the Operation menu The Select Xmin ndash Ymax window opens
Fig 25 Select Xmin ndash Ymax window
XM-1733027330-1QL 31
2
3
Click on the Xmin Ymin Xmax or Ymax button in the Select Xmin mdash Ymax window
The Xmin Ymin Xmax or Ymax window opens Enter the desired values in the input box of the window by clicking on the number buttons in the window then click on the Apply button of the Select Xmin mdash Ymax window
The horizontal and vertical scales for spectra are set to the specified values If the All button is selected in the Select Xmin ndash Ymax window the scales of
all the spectra are set to the same values
Window Layout You can specify the layout of the Data display window by using this function
Select Spectra DisplaymdashWindow Layout from the Operation menu The Window Layout window opens
Fig 26 Window Layout window Window size Select the desired size from V Small Small Normal
and Maximum Horizontal layout Usually spectra are displayed vertically in a column If
you want to display the spectra horizontally in lines click on the Horizontal button and then enter the number of spectra to be shown horizontally in the Horizontal spc input box
Parameter display If you do not want to display parameters on the right side select Parameter OFF If you want to display them select Parameter ON
32 XM-1733027330-1QL
Fig 27 An example of the horizontal display of spectra in lines
Mixed Spectra Display
You can display spectra individually on different parts of the display or all together in one area Select Spectra DisplaymdashWindow Layout from the Operation menu
The Mixed Spectra Display window opens
Fig 28 Mixed Spectra Display window
XM-1733027330-1QL 33
If Spectrum Mode is Single spectra are displayed all together in one display area In the Single mode if you have selected Relative for Vertical Scale the full-scale value of the vertical axis becomes 100 the relative intensity of each spectrum is shown with the maximum value of each spectrum taken as 100 If you have selected Absolute for Vertical Scale spectra will be shown with the maximum value of all spectra taken as 100 The offset value of the Y-axis is displayed as the value of Base Offset when the maximum value of each spectrum is taken as 1 In the Single mode each spectrum is displayed on the same base line when the value of Base Offset is 00 However each spectrum is displayed on a different base line with the same base level when the value of Base Offset is 10
Spectrum Type
You can specify the style for displaying spectrum lines 1
2 3
Select Spectra DisplaymdashSpectrum Type from the Operation menu The Spectrum Type window opens
Fig 29 Spectrum Type and Spectrum windows
Select a spectrum number from the Spectrum Type window To specify the style for displaying spectrum lines select the desired items from the following list then click on the Apply button to display the spectra in the specified style
Style for displaying the line Vector Line Marker Symbols Bar Vertical bars Marker + Vector Symbols and line Vector + Bar Lines and vertical bars
34 XM-1733027330-1QL
Line type for Vector Solid Solid line Dash Dashed line Dot Dotted line Dash Dot Dashed line with a dot Dash Dot Dot Dashed line with two dots Long Dash Long dashed line Thickness of the line Thin Thin line Normal Normal line Thick Thick line
You can store recall and delete using the Load Save and Delete buttons
Spectrum Color You can change the color of the displayed spectra background and parameter area by using this function 1 Select Spectra DisplaymdashSpectrum Color from the Operation menu
The Spectrum Color window opens
Fig 30 Spectrum Color and Color windows
XM-1733027330-1QL 35
2 3
1
2 3
Select a spectrum number from the Spectrum Color window To specify the color for displaying spectra background and parameter areas select the desired items from the following list then click on the Apply button to display the color as desired
Items available for color display Spectrum Spectra Background Background Original Original spectra prior to calculation Parameter Fore Parameter characters Parameter Back Parameter background Buttons for operations More Lets you to specify the colors of Marker ID Element
Cursor and KLM lines You can store recall and delete by using Load Save and Delete buttons
Draw Mesh You can draw a grid as the background of spectra by using this function
Select Spectra DisplaymdashDraw Mesh from the Operation menu The Draw Mesh window opens
Fig 31 Draw Mesh window
Select a spectrum number from the Draw Mesh window To specify Scale Color and Line for the grid select the desired items from the following lists then click on the Apply button to display the grid as desired
Line type Solid Solid line Dash Dashed line Dot Dotted line Dash Dot Dashed line with a dot Dash Dot Dot Dashed line with two dots
36 XM-1733027330-1QL
Thickness of the line Thin Thin line Normal Normal line Thick Thick line Lines to draw Hor + Vert Horizontal and vertical lines Horizontal Horizontal lines Vertical Vertical lines None No lines
Display Axis
You can set the unit for the abscissa of the specified spectra by using this function The unit for the abscissa is always the same for all the spectra 1
2
1
Select Spectra DisplaymdashDisplay Axis from the Operation menu The Display Axis window opens
Fig 32 Display Axis window
To specify the desired item in the Display Axis window select Position mm Wave length A Wave length nm or Energy keV then click on the OK button
The abscissa for the spectra on the display changes as specified Wave order is useful for displaying the spectra in the original wavelength when high-order lines are displayed in such narrow range as chemical shift The function is effective only when the wavelength is specified as the abscissa
Kind of Assignment You can select the style for displaying element labels by using this function
Select Spectra DisplaymdashKind of Assignment from the Operation menu The Kind of Assignment window opens
XM-1733027330-1QL 37
Fig 33 Kind of Assignment window
2
1
Select Elements Elements X-ray Name or Elements X-ray Name Order then click on the OK button Elements Only element names are displayed Elements X-ray Name Element names and X-ray names are
displayed Elements X-ray Name Order Element names X-ray names and order
are displayed
Display Parameter You can specify which parameters to display in the parameter-display area of the Data display window by using this function
Select Spectra DisplaymdashDisplay Parameter from the Operation menu The Display Parameter window opens
Fig 34 Display Parameter window
38 XM-1733027330-1QL
2
1
2
Select the desired parameters then click on the OK button The specified parameters are displayed in the parameter-display area of the Data display window
If you select All the information of all the spectra is shown while if you select Single only the information of the specified spectrum is shown To change the size of the displayed characters select S M or L
An A-Rank Element is an element that is judged certain to exist and a B-Rank Element is an element that is judged possible though not certain to exist For the method of element identification refer to Chapter 5 ldquoAppendixrdquo of this instruction manual
Write Text
You can write text in the display area of spectra by using this function Select Spectra DisplaymdashWrite Text from the Operation menu
The Write Text window opens
Fig 35 Write Text window
Click on the spectrum on which you want to write text and then input the desired text in the input box of the Write Text window then click on the Write button
The text is displayed on the selected spectrum of the Data display window Color Selects the color of text Size Selects the character size of text from S M and L Clear Clears the input box
Shift Adjusts the position of the input text when you drag it Delete Deletes the text Click on this button and then select the text that you
want to delete from the list of texts Write Writes text on the selected spectrum
Save Saves the texts that you have written on spectra The texts will be displayed when you next open the spectra
XM-1733027330-1QL 39
Replace Spectrum You can replace the spectra that are being displayed by using this function 1
2
3
1
2
Select Spectra DisplaymdashReplace Spectrum from the Operation menu The Replace spectrum window opens
Fig 36 Replace spectrum window
Select the number of the spectrum to replace from the Replace spectrum window and then click on the Apply button
The Sample window opens
Refer to Fig 19 Sample window (for processing) Select the spectrum to replace from the Sample window
Reset Spectra
You can reset all the changes that you have made using all the items of the Spectra Display menus to their initial states if you use this function
Select Spectra DisplaymdashReset Spectra from the Operation menu The Reset Spectra window opens
Fig 37 Reset window
Select the number of the spectrum for resetting from the Reset window and then click on the Apply button
All the changes made for the selected spectrum will be cancelled
40 XM-1733027330-1QL
KLM Marker You can display identified elements in colors in the KLM Marker window 1
2
Select KLM Marker from the Operation menu The KLM Marker window opens
Element buttons
Element display
Fig 38 KLM Marker window
Click on the buttons of the desired element in the KLM Marker window
The positions and element names of the characteristic X-rays (Kα Kβ etc) for specified elements are displayed on the spectrum The following functions are available
Button Function
Element buttons Clicking on an element button displays KLM markers When you right-click another element button its KLM markers appear together with the previous ones You can specify the line type for the KLM markers in the Spectrum Type window and the color in the Spectrum Color window
Element display The name of the selected element is displayed Right-clicking on the display shows the name of the element to the right of the present one while left-clicking on the display shows the name of the element to the left of the present one
Arrow buttons
Clicking on the right arrow button selects the right element to the present one while clicking on the left arrow button selects the left element to the present one
Order Specifies the order of the X-rays You can specify from the first to the tenth
Min Int Specifies the minimum intensity of the KLM Markers The intensity to be specified is the theoretical intensity shown in the wavelength table It means the relative intensity when the intensity of the alpha line is taken as 100 When you specify 0 all the X-rays are shown
XM-1733027330-1QL 41
Button Function
Select KLM Selects the X-rays to be displayed from the K L and M lines Only highlighted X-rays are displayed It is useful for displaying specified X-rays
Lock To display the KLM Markers of multiple elements specify elements by right-clickings ( refer to the above Element buttons) You can lock the KLM Markers if you click on the Lock button then if you click on an element you can display its KLM Markers together with the locked ones To unlock the locked KLM Markers deselect Lock
Scale The scale for each X-ray height of KLM Markers is based on the theoretical intensity When an X-ray marker cannot be seen easily you can adjust the height of the KLM Markers by using the arrow-buttons to the right of the Scale button The same result can be obtained by dragging a point on the spectrum up or down
Set Adds the selected elements to the list of identification elements and displays element names at the position of each KLM Marker To label peaks use the Peak ID window
Delete Deletes the selected elements from the list of identification elements as well as all the element names When you want to delete element names one by one use the Peak ID window
Print Prints the information on the KLM Markers
Close Closes the KLM window
42 XM-1733027330-1QL
Peak ID The wavelength and intensity at the specified position of the spectrometer are displayed At the same time the possible names of characteristic X-rays near the specified position are listed 1
2
Select Peak ID from the Operation menu The Peak ID window opens
X-ray list
Wavelength display
Spectrum number
Fig 39 Peak ID window
Select any position from a spectrum in the Data display window The wavelength and intensity at the specified position of the spectrometer are displayed in the X-ray list of the Peak ID window At the same time the possible names of characteristic X-rays near the specified position are listed The identified elements and the elements corresponding to the displayed KLM Markers are displayed in different colors The following functions are available
XM-1733027330-1QL 43
Object Function
Spectrum number Specifies the desired spectrum You can also specify it by clicking on it
Wavelength display
Displays the wavelength and X-ray intensity at a position specified by clicking You can perform a fine adjustment of the cursor position by using the larr and rarr keys on the keyboard
X-ray list Displays the X-rays near the wavelength selected by clicking The information displayed is Element Name X ray Name Order Diff (distance from the selected position) and Int (theoretical X-ray intensity)
Order Specifies the order of the X-rays to be detected
Min Int Specifies the minimum theoretical intensity of the X-rays to be displayed
PrevNext ID Move the cursor to the peak positions whose elements were already identified The movement direction of Prev ID is toward lower wavelengths and that of Next ID is toward higer wavelengths The cursor jumps to the other end when it is moved beyond an end
Print Opens the Listing window and displays the data of the item selected from the X-ray list
Clear Clears the items that were specified for printing
Set After you have selected a line of an element in the X-ray list clicking on the Set button identifies the element and displays its peak label
Delete After you have selected an identified element in the X-ray list clicking on the Delete button deletes the peak label of the element
Shift ID Moves peak labels After you have clicked on the Shift ID button clicking near the label changes the shape of the cursor Then drag the label to move it To deselect this mode click on the Shift ID button once again
Any Length Measures the distance between two arbitrary points After you have clicked on the Any Length button click on two arbitrary points on a spectrum then the marker and distance between the points are displayed To deselect this mode click on the Any Length button once again
Close Closes the Peak ID window
Save ID Results
After you have changed the element name display on the spectrum by using Peak ID for example the element name can be saved as an A rank element 1
2
Select Save ID Results from the Operation menu The Save ID Results window opens
Fig 40 Save ID Results window
Click on the OK button in the Save ID Results window after you have changed the element name display on the spectrum by using Peak ID for example
44 XM-1733027330-1QL
The element name displayed on the spectrum will be saved as an A rank element in a file These data will be displayed automatically beginning with the next operation
Off-line ID
You can perform element identification once again 1
2
Select Off-line ID from the Operation menu The Off-line ID window opens
Fig 41 Off-line ID window
Specify the necessary conditions then click on the Apply button to perform element identification once again after
The ID-Doctor does not operate during off-line identification of element In element identification the specified order of X-rays is taken into account and if A rank only is selected only the labels for A rank elements are displayed after the identification If A amp B rank is selected all the labels are displayed after identification If a number other than zero is specified in the Min Int input box the labels for only the X-rays having the specified intensity or more are displayed after identi-fication
When the Close button is clicked on with the Orderndash0 button selected with Apply not selected the identified element names will not be displayed on the spectra in subsequent measurements
XM-1733027330-1QL 45
Spectra Calculation
Select Spectra Calculation from the Operation menu The Spectra Calculation window opens You can perform the arithmetic operations that are shown in the Spectra Calculation window
Fig 42 Spectra Calculation window
46 XM-1733027330-1QL
Smoothing
Select Spectra CalculationmdashSmoothing from the Operation menu The Smoothing window opens You can smooth the specified spectra using the Savitzky-Golay method
If you selected Manual you can assign a number of points to use in smoothing If you selected Result Only only the smoothed spectra are displayed whereas if you selected Original amp Result the spectra before smoothing are also displayed at the same time
Fig 43 Smoothing window
2nd Derivative
Select Spectra Calculationmdash2nd Derivative from the Operation menu The 2nd Derivative window opens You can find the second derivatives of the specified spectra using the Savitzky-Golay method
Quant Background
You can display the background position that is used in the quantitative analysis and correct the position while watching the corresponding spectra
Select Spectra CalculationmdashQuant Background from the Operation menu The Quant Background window opens
XM-1733027330-1QL 47
Fig 44 Quant Background window
The information displayed is No Elem (Crysta) Low Angle Position and High Angle You can select mm angstrom or nm as the unit If an element name is dimmed the corresponding spectra do not exist If you have selected Ignore channel you can search the spectra only by using crystal names If you have deselected the Ignore channel button you can search for spectra that match both crystal names and measuring channels If you select any of the displayed elements the background position will be shown on the spectra by markers To correct the position drag the markers to the desired positions If you want to enter the corrected items click on the Exec button and if you do not want to click on the Cancel button
48 XM-1733027330-1QL
Background Subtraction You can eliminate background components from the specified spectrum
Select Spectra CalculationmdashBackground Subtraction from the Operation menu
The Background Subtraction window opens
Fig 45 Background Subtraction window
Clicking on the Manual button performs spline interpolation for the specified points (normally multiple points) and forms a background curve Clicking on the Auto button performs background subtraction using the Sonne-veld method
Sub (SP mdash k)
You can subtract a constant (k) from the specified spectrum and display the spectra Select Spectra CalculationmdashSub (SP mdash k) from the Operation menu
The Sub (SP ndash k) window opens
Fig 46 Sub (SP ndash k) window
XM-1733027330-1QL 49
Add (SP + k)Multiply (SP k)Divide (SP k) You can add multiply or divide by a constant (k) in the specified spectrum and display the spectra
Select Spectra CalculationmdashAdd (SP + k) or Multiply (SP k) or Divide (SP k) from the Operation menu
The Add (SP + k)Multiply (SP k)Divide (SP k) window opens
Spectrum Shift You can shift spectra to the left or right
Select Spectra CalculationmdashSpectrum Shift from the Operation menu The Spectrum Shift window opens
Spectra Sub (SP1 mdash SP2)
You can subtract two spectra The result of the calculation can be displayed in another display area
Select Spectra CalculationmdashSpectra Sub (SP1 mdash SP2) from the Operation menu
The Spectra Sub (SP1 ndash SP2) window opens
Spectra Add (SP1 + SP2) You can add two spectra The result of the calculation can be displayed in another display area
Select Spectra CalculationmdashSpectra Add (SP1 + SP2) from the Operation menu
The Spectra add (SP1 + SP2) window opens
Dead-time Correction You can perform dead-time correction
Select Spectra CalculationmdashDead-time Correction from the Operation menu
The Dead-time Correction window opens
For the formulas for calculation refer to the separate instruction manual of the Quantitative Analysis Program
50 XM-1733027330-1QL
Result Store You can store displayed spectrum such as the results of a calculation in a file 1
2
Select Spectra CalculationmdashResult Store from the Operation menu The Result Store window opens
Fig 47 Result Store window
Type a crystal name in the Crystal Name input box and then click on the OK button
The spectrum that you have selected will be added to after the spectrum that was stored last At most twenty spectra can be stored If you want to delete a spectrum select it and type the slash () 8 times the
selected spectrum will be deleted
Reset You can undo arithmetic operations executed in Spectra Calculation
Select Spectra CalculationmdashReset from the Operation menu The settings will returned to their initial states
Redraw Spectra
You can display spectra again Select Redraw Spectra from the Operation menu
XM-1733027330-1QL 51
Print-out You can print conditions and results 1
2
3
Select Print-out from the Operation menu The Print-Out window opens
Select the items that you want to print and then click on the OK button The Listing window appears
Click on the Print button in the Listing window The output will be sent to the printer
Fig 48 Print-out window
52 XM-1733027330-1QL
Semi-Quant Analysis After you have obtained background intensity from an identified element and a qualitative spectrum you perform a calculation for correction based on the ratio to the X-ray intensity of a pure element (the K ratio) so as to obtain the result of a quantitative analysis Below is the method for calibrating the X-ray intensity of a pure element Select Semi-Quant Analysis from the Operation menu
The Semi-Quant Analysis window opens
Fig 49 Semi-Quant Analysis window
This window displays a list of the element names (in Element) X-ray names (in X-ray) and analyzing crystals (in Crystal) for the A-rank identified elements whose spectra show the strongest X-ray intensities
MetalOxide When the sample to be analyzed is a metal click on the Metal button When the sample is an oxide click on the Oxide button then enter values into the No of Oxygen and Valence input boxes
No of Oxygen input box You can input a value when Oxide is selected Type the number of oxygen atoms in the input box The number is to be used as the standard when the molecular formula is calculated after correction
XM-1733027330-1QL 53
Normalize Clicking on this button normalizes the mass concentration after correction the total mass concentration becomes 100 If you do not click on the Normalize button the current values are displayed as they are
Element X-ray Crystal and Valence in the list
Button Function
Element Adds and deletes arbitrary elements
X-ray Specifies the type (Kα Kβ Lα Lβ Mα and Mβ) of the X-rays in the scan range
Crystal Specifies one of the analyzing crystals displayed in the column when the characteristic X-rays span multiple spectra
Valence Specifies the valence of oxides The mass concentration of oxygen can be obtained by using the valence
Result window
You can specify where to display the results that you obtain
Button Function
New Text Opens a text window in which the results are displayed
Spectrum Displays the results in the spectrum display area if it is open
Parameter Displays the results in the parameter-display area
54 XM-1733027330-1QL
Fig 50 An example of Semi-Quant Analysis results
ID-Doctor You can perform element identification based upon the knowledge base of experienced analysis specialists If ID-Doctor is selected the element identification under ID-Doctor will be executed automatically after measurement 1
2
Select ID-Doctor from the Operation menu The ID-Doctor window opens
Fig 51 ID-Doctor window
Click on the OK button For details refer to Chapter 5 ldquoAppendixrdquo
XM-1733027330-1QL 55
Spectrum Analysis You can display on a spectrum the position height area FWHM (full width at half maximum) and height from the baseline of the specified spectrum peak You can print the spectrum after the spectrum analysis by using the Print button 1
2
3
Select Spectrum Analysis from the Operation menu The Spectrum Analysis window opens
Fig 52 Spectrum Analysis window
Specify the baseline between any two desired points by dragging the mouse from the start point and dropping it at the finish point Click on the Apply button
The results of Spectrum Analysis will be displayed on the spectrum
If you enlarge a desired part of a spectrum by using Spectra DisplayndashZooming and specify the desired baseline between two points you can obtain the baseline with greater precision You can also specify the baseline by inputting values in Baseline X Lower and X Upper input boxes You can select the following items Line color Color of lines
56 XM-1733027330-1QL
String Color Color of text Adjust Place in which text is to be printed selected from Left Center and Right Size Size of text selected from S M and L Peak Detect Peak position selected from Max Point 3 Points and 5 Points Plot Item Items to be displayed Shift String Lets you shift the text already written by dragging it
4
1
Turn on the Separation of Left Right button and then click on the Apply button
You will obtain different results on the left side and right side of the peak position
Spectra Search Spectra Search has two important functions One is a search function The other is a load function Using the search function you can display average correlation and other information about spectra judge to be similar in the Search result scroll window by using correlation coefficients from the start position to the finish position for the same crystal Using the load function you can also display the spectra that you have selected from the Search result scroll window The correlation coefficient between a spectrum and another one is 10 if the two are the same while the closer the coefficient is to 00 the less similar the two are The correlation coefficient obtained by calculation will be the same even if one or both are multiplied by a constant If the correlation coefficient is about 09 or more two spectra are similar experimentally However it is recommended that you judge similarity from the display by using the load function
Select Spectra Search from the Operation menu The Spectra Search window opens
XM-1733027330-1QL 57
Fig 53 Spectra Search window
Button Function
Search start positionndash User Group Sample Stage No
Specifies search start directory If there are many spectra for qualitative analysis specifythe start position by using the Group button to save search time Clicking on the Group button opens the Group window where you can specify group names In the same way clicking on the Sample button opens the Sample window where you can specify sample names
58 XM-1733027330-1QL
Fig 54 Group window
Button Function
Search condition ndashStageSpectra
Selecting Stage performs searches through samples Selecting Spectra performs searches through spectra
One Spectrum All spectra
When Stage is selected this function is available
L value (mm) Wave (A)Wave (nm)
Used when you specify the search range
Corr_coeff Correlation coefficient from 00 to 10
Start Pos End Pos Start position for calculation of correlation coefficient Finish position for calculation of correlation coefficient You can change the positions
Search result Scroll window to display the results of search
Search Starts search
Load Displays the spectrum selected from the Search result scroll window
Stop Stops search
Reset Resets correlation coefficient and the values of Start Pos and End Pos Clicking on this button also resets the spectrum presently displayed to the previous one
Selected List Click on this button to print the results of the search You can print only the spectra that you have selected from the Search result scroll window
Close Resets the spectra that are presently displayed and closes the Spectra Search window
XM-1733027330-1QL 59
44 Semi-Quantitative (Semi-Quant) Analysis Program In ordinary quantitative analyses quantitation results are corrected by measuring the intensities of peaks and backgrounds for each element Differing from the ordinary quantitative analyses the semi-quantitative analysis (Semi-Quant Analysis) program corrects quantitation results by using the spectral data Namely the intensities of the peaks and backgrounds for the elements identified in the qualitative analysis are obtained from the qualitative-analysis spectral data The ratio of the spectral peak intensity for each element to that of the characteristic X-rays for the pure element is calculated as the K-ratio
K-ratio = IunkIstd
where Iunk Intensity of the characteristic X-rays from an unknown sample Istd Intensity of the characteristic X-rays of a pure element
Based on this K-ratio ZAF correction is performed and the mass concentration of each element is printed together with the K-ratio This result can be used later to perform an off-line quantitative analysis (Summary) or it can also be recorrected by using the measured standard sample data The characteristic X-ray intensities of pure elements are calculated from the standard sensitivity curve obtained in advance At that time since their dependence on the accelerating voltage is also calculated the K-ratio for the qualitative analysis data measured from 5 kV to 30 kV (in 5 kV steps) can be calculated The standard sensitivity curves have been measured in our company for a large number of standard samples However there may exist slight differences in the measured curves depending on the instruments used Therefore using some standard samples measure and correct the standard sensitivity curves of some elements for each analyzing crystal and for each characteristic X-ray (Kα Lα and Mα) Once this correction has been done you need not repeat it each time you perform analysis
441 How to calculate X-ray intensities in the Semi-Quant Analysis
X-ray intensities in the Semi-Quant Analysis are calculated in the following way As the peak position the position at which the X-ray intensity is the strongest is selected after searching for it in the vicinity of the aimed characteristic X-rays As the background position the position at which the mean X-ray intensity having the lowest moving average of three points from a position a little apart from the peak position is selected These results are displayed as measurement conditions The search ranges of the peaks and backgrounds are defined for each analyzing crystal in the sqtcond file in the optepmaconfanal directory The results of the Semi-Quant Analysis are saved in the file named 1onq in the directory of the quantitative analysis
60 XM-1733027330-1QL
442 Using Semi-Quant Analysis results in off-line quantitative analysis
The results of the Semi-Quant Analysis can be utilized in the off-line quantitative analysis
Summary You can execute Summary in the Semi-Quant Analysis 1
2
3
1
2
3 4
Select ProcessmdashQuantitative AnalysismdashSummary from the EPMA Main Menu
The Function window for process opens Click on the Sample button
The Select Sample window opens Select Qnt for Semi-Quant Analysis
The remaining steps are the same as for ordinary quantitative analysis
In the Semi-Quant Analysis elements are different for each sample in many cases If you print the results of many samples it will be difficult to distinguish them since there are many elements To solve this problem use Mass order for printing If you select Qlw in place of Qnt you can obtain the list of identified elements when you have printed it
Off-line Correction
You can execute Off-line Correction of the analysis results obtained in the Semi-Quant Analysis
Select ProcessmdashQuantitative AnalysismdashOff-line Correction from the EPMA Main Menu
The Function window for off-line correction opens Click on the Sample button
The Select Sample window opens Select Qnt for Semi-Quant Analysis Set the conditions as follows
Specify the correction method and accelerating voltage used for measurement Specify the same elements as those used in the Semi-Quant Analysis Select the same X-rays channel and analyzing crystal as in the result of the Semi-Quant Analysis for the element to be measured Select appropriate standard samples if any When Cal-STD is selected as the standard sample for all elements the same result as in the Semi-Quant Analysis is obtained
For procedures for entering the conditions for the quantitative analysis refer to the separate operation manual of the Quantitative Analysis Program
After setting the above conditions click on Read Intensity amp Correction and the X-ray intensities obtained in the Semi-Quant Analysis will be displayed Then click on the Apply button and off-line correction will be executed
XM-1733027330-1QL 61
443 Correcting the standard sensitivity curve
The Semi-Quant Analysis program includes a program for correcting the standard sensitivity curve By using the standard sample installed in the microanalyzer the X-ray intensity coefficient (I) in the equation in which the atomic number is used as the variable can be obtained for each analyzing crystal and for each characteristic X-ray (Kα Lα and Mα) of each X-ray spectrometer Once this program has been executed you need not run it again
I = exp (a + bZ + cZ2 + dZ3
where I Intensity of characteristic X-rays (cps100 pA) Z Atomic number a b c d Coefficients
Combinations of the standard sample and characteristic X-rays to be used are defined in a file in the optepmacalisqt directory The coefficients obtained are saved in the sqtcoef file in the optepmacali directory together with the measured data The characteristic X-ray intensities of pure elements for each analyzing crystal and for each accelerating voltage are saved in a file in the optepmacalistd_int directory Follow the procedures in the sections below to execute correction of the standard sensitivity curve
Opening the Semi-Quant Calibration window
Select InitializemdashSemi-Quant Calibration from the EPMA Main Menu
Fig 55 Pull-down menu of the Initialize icon
The Semi-Quant Calibration window opens You can perform corrections in this window
62 XM-1733027330-1QL
Selecting analyzing crystals Select analyzing crystals whose standard sensitivity curves are to be corrected Click on the Crystal button in the Semi-Quant Calibration window
The Crystal and Channel window opens
If necessary click on the for Light elements button in the Crystal and Channel window then the Light Elements window opens
Fig 56 Crystal and Channel and Light Elements windows
Out of the analyzing crystals installed in the instrument the analyzing crystals whose standard sensitivity curves can be corrected will be displayed in the Crystal and Channel and Light Elements windows
By default all the crystals are selected If there are some analyzing crystals whose standard sensitivity curves you do not want to correct deselect their crystal buttons
XM-1733027330-1QL 63
Setting the stage positions for standard samples You have to enter the stage positions for standard samples prior to measurement 1
2
1
2
3
Click on the Stage button in the Semi-Quant Calibration window The Set Stage Stage Monitor and Memory windows open
Fig 57 Specifying the stage positions for standard samples
Specify the desired standard sample names and their stage positions
If stage positions have been already set you need not specify them
For the operating procedure refer to the instruction manual of the main unit
Executing measurements You execute measurement by using the following procedure
Click on the Measure button in the Semi-Quant Calibration window The Start Calibration window opens
Set the current to about 1 10mdash7 A in advance Although the accelerating voltage is automatically set to 20 kV but the current is not set automatically
Confirm all the conditions that you require to use then click on the OK button
Measurement begins If you click on the Cancel button the previous window will return
Measurement is performed for each analyzing crystal and the progress of the measurement is displayed on the screen
64 XM-1733027330-1QL
Stopping measurement
To stop measurement for any reason click on the Stop button To temporarily interrupt measurement click on the Pause button On completion of peak search measurement stops temporarily To restart the measurement click on the Pause button once again
Displaying measurement results
On completion of measurement with an analyzing crystal the correction coefficients and the calculated intensities of the characteristic X-rays of the pure elements are displayed The coefficients are displayed in units of cps100 pA The X-ray intensities for Kα Lα and Mα are displayed (vertical axis logarithmic scale in units of cpsμA horizontal axis atomic number)
Fig 58 Display of measurement results
XM-1733027330-1QL 65
Utility
Click on the Utility button in the Semi-Quant Calibration window The Utility pop-up window opens The following functions are included in Utility
Button Function
Reset spectra Individual spectrum windows can be enlarged or reduced by dragging the button at the lower right corner of each window Clicking on Reset spectra after enlarging or reducing the window will return it to the original size
Draw results Clicking on this item displays results of measurement on the computer display
Print results Clicking on this item prints the measured data and the intensity coefficients of the standard sensitivity curve
Check configuration Clicking on this item enables you to check the combination of the analyzing crystal and characteristic X-rays in measurement
Check pksk parameter Clicking on this item enables you to check the parameters for peak search Special care should be exercised in changing the parameters because the operation affects peak search and related operations in quantitative analysis
Smoothing Clicking on this item smoothes and displays the waveform for peak search
2nd derivative Clicking on this item displays the second derivative waveform of the peak search spectrum
Log scale Clicking on this item displays the peak search spectrum on a logarithmic scale
66 XM-1733027330-1QL
5 APPENDIX
Determining peak positions and intensities and identifying elements Using the procedures below this program detects the peaks of characteristic X-rays and identifies the elements for the detected peaks
Detecting peak positions
1 2 3
4
5
1 2
3 a
b
c
d
4
5
Smooth a spectrum by the Savitzky-Golay method Evaluate the second derivative of the smoothed spectrum Detect the peak positions from the second derivative waveform and deter-mine the background positions from the waveforms obtained after second differentiation and smoothing From the smoothed spectrum determine the peak intensity and the back-ground intensity If the difference between the peak intensity and the background intensity is too large to attribute to statistical variation judge that a peak of interest exists
Identifying elements
Detect peaks for each spectrum If any one of the Kα (1) Lα (1) and Mα (1) lines is detected assign the elements of interest to the B rank Further judge the elements of B rank as follows If ZKα min Z ZKβ min assign the elements of interest to the A rank Usually ZKα min=4 ZKβ min=17 If both a Kα (1) line and a K (1) line are found in the same spectrum assign the elements of interest to the A rank If both a Kα (1) line and a K (1) line are found in different spectra assign the elements of interest to the A rank If both an Lα (1) line and an L (1) line are found in the same spectrum assign the elements of interest to the A rank Similarly if both an Mα (1) line and an M (1) line are found in the same spectrum assign the elements of interest to the A rank
If any peaks of B-rank elements are superimposed on any peaks of charac-teristic X-rays of A-rank elements (usually of the first-order) exclude the B-rank elements from the elements to be identified If no A-rank element exists but only one B-rank element exists assign this B-rank element to the A rank
XM-1733027330-1QL 67
Expert identification of elements
This expert identification of elements is a reliable method of ratiocination based upon the knowledge base of experienced analysis specialists This method enables us to evaluate a level of confidence in the result of the element identification performed by using the above-mentioned element identifying method if it is applied for calculation The knowledge base has been created under the following conditions
Accelerating voltage 20 kV Probe current 10 to 500 nA Step 50 μm Sample time 50 ms or more Number of spectra 4 Analyzing crystal LIF PET TAP and STE Scanning range of spectrometer 65 mm to 250 mm (258 mm for TAP) Even if you cannot observe under the above conditions to some extent for some
reasons you can obtain good results since this program is created to avoid problems Of course it is best to meet the requirements as much as possible However when you specify elements to be identified set the spectrometer range to include the first-order X-rays (up to the second order if possible ) of α and of K L and M of the elements
In the results after execution of ID-Doctor the indication ID-Doctor is shown both at the area where elements are displayed in the Data Display window and just above the area where A-Rank and B-Rank elements are displayed Therefore you can easily distinguish the results obtained with the ID-Doctor from those obtained without the ID-Doctor The element identification executed by using this program is performed using the judgment method that imitates experienced analysis specialists the results are not absolutely correct Please use this ID-Doctor as a reference and keep it in mind that you the user of this program decide whether to accept the results or not
68 XM-1733027330-1QL
- XM-1733027330
-
- CONVENTIONS
- CONTENTS
- 1 GENERAL
- 2 SPECIFICATIONS
- 3 PROGRAM STRUCTURE
- 4 OPERATION
-
- 41 Preparation for Measurement
-
- 411 Setting group and sample names
- 412 Setting measurement conditions
- 413 Setting analysis positions
- 414 Loading measurement conditions
- 415 Storing measurement conditions
- 416 Printing measurement conditions and results
- 417 Additional Function
-
- 42 Measurement
-
- 421 Measurement under stored conditions (Preset mode)
- 422 Measurement under present instrument conditions (Survey mode)
- 423 Realtime display
-
- 43 Processing
-
- 431 Selecting sample names and processing methods
- 432 Operation menu
-
- 44 Semi-Quantitative (Semi-Quant) Analysis Program
-
- 441 How to calculate X-ray intensities in the Semi-Quant Analysis
- 442 Using Semi-Quant Analysis results in off-line quantitative analysis
- 443 Correcting the standard sensitivity curve
-
- 5 APPENDIX
-
- damy_tate
- damy_yoko
- fff
- instructions
- JEOL
- mekura
- CONTENTS
- contents

Object Function
Read amp Apply Reads the position of the stage and also that of the beam if necessary and records them in the list of coordinates The same result can be obtained by using the STORE button of the Joystick Controller
Close Closes the Stage Condition Input window If the analysis position has been changed the Confirmation window opens
Upward and downward arrow buttons
Move to the previous or following coordinates If the analysis position has been changed the Confirmation window opens
OM Search Executes the automatic stage focusing at the present position of the stage if the optional automatic focusing device has been installed
X Y Z Displays the coordinates of the recorded stage position If you have selected Read the present position of the stage is displayed
Read Reads the present position of the stage and displays it in the the X Yand Z boxes
Store Copies the values of X Y and Z to the Stage Position box
Move Moves the stage to the position having the coordinates X Y and Z
Arrow buttons Moves the stage by the specified step width in the X or Y direction
Range Drag the scroll bar to specify the amount that the stage will move when you click on the Arrow buttons
These items are optional
XM-1733027330-1QL 17
414 Loading measurement conditions
If you load preset measurement conditions you can perform measurements by simply selecting samples and inputting stage positions Select MeasurementmdashCondition Load from the Qualitative Analysis function
window The Condition File Load window opens This window has the list of recorded measurement conditions such as file names dates recorded and comments
To call up the recorded conditions select the desired file from the list of recorded measurement conditions and click on the Load button The loaded conditions are settings of Spectrometer Condition On-line Semi-Quant EOS Condition Print-out Condition and Additional Function If you click on the Check button before loading you can check the stored condi-tions
Fig 11 Condition File Load window
18 XM-1733027330-1QL
415 Storing measurement conditions
If you set conditions in the Spectrometer Condition On-line Semi-Quant EOS Condition Print-out Condition and Additional Function windows you can store them in a file and give a new name to the file Select MeasurementmdashCondition Store from the Qualitative Analysis function
window The Condition File Store window opens
Fig 12 Condition File Store window with its sub-window
When you want to store new measurement conditions click on the New button and input a file name (14 characters maximum) and a comment (40 characters maximum) then click on the Store button When you want to write new measurement conditions in place of the existing measurement conditions recorded in a file select the desired file from the list of recorded measurement conditions and then click on the Store button You can carry out file operations such as printings (Print) changing the name (Rename) and deleting (Delete) in the Condition File Store window
XM-1733027330-1QL 19
When you want to back up recorded data to other media select UtilityndashFile Utility from the EPMA Main Menu
416 Printing measurement conditions and results
Select MeasurementmdashPrint-out Condition from the Qualitative Analysis function window
The Print-out Condition window opens and you can select items that you want to print
Refer to Fig 13
Button Function
Measurement Condition Prints measurement conditions
Summary of Identified Elements Prints names of identified elements in the A and B ranks
Peak Positions with Identified Elements Prints list of peak positions and intensities
Identified Elements with Peak Positions Prints peak position for each identified element
Semi-Quant Result Prints results of semi-quantitative analysis
Fig 13 Printout example
20 XM-1733027330-1QL
417 Additional Function
1
2
Select MeasurementmdashAdditional Function from the Qualitative Analysis function window
You can specify whether ID-Doctor will function or not for element identification at measurement By default ID-Doctor will operate
42 Measurement Two methods of measurement are available one is the Preset mode and the other is the Survey mode Preset mode Method of performing measurement by using stored measurement conditions Survey mode Method of performing measurement without changing the present instrument conditions (for the EOS and stage) Use this mode to perform analysis without specifying detailed measurement conditions
Real-time spectrum display is possible during measurement in both modes
Refer to Sect 423 ldquoRealtime displayrdquo
421 Measurement under stored conditions (Preset mode)
This section describes how to perform measurement under stored measurement conditions and positions in the Preset mode
Select MeasurementmdashPreset Measurement from the Qualitative Analysis function window
The Preset Measurement window opens
Fig 14 Preset Measurement window
Click on the Acquire button in the Preset Measurement window The preset measurement conditions and the analysis positions in the list of the Stage Condition window whose Preset check boxes are turned on will be loaded and then the measurement will be carried out at the analysis positions
XM-1733027330-1QL 21
422 Measurement under present instrument conditions (Survey mode)
This section describes how to perform measurement under present EOS conditions and at the stage position in the Survey mode 1
2
Select MeasurementmdashSurvey Measurement from the Qualitative Analysis function window
Survey Measurement will be performed The data obtained will be stored always at the stage number 99999 The data will be overwritten every time the measure-ment is performed
When you wish to store the measurement results in a file after Survey Measurement click on the Save button then enter Position No and Com-ment
The limit of stage number is one more than the number of positions that are already set During measurement the Measurement Control Window appears as shown in Fig 15 allowing you to interrupt measurement (Measurement Stop) and stop accumu-lation (Accum Stop) If you have selected Accv off the accelerating voltage will be turned off automatically after measurement
Fig 15 Measurement Control Window
22 XM-1733027330-1QL
423 Realtime display
1
2
Select ProcessmdashQualitative Analysis from the EPMA Main Menu during measurement
The Data display window opens
Fig 16 Data display window
Click on the Realtime button The Realtime Display window opens You can perform Spectra Display during measurement If you want to display KLM Marker confirm the peak position using Peak ID during realtime display or enlarge a part of spectrum click on the Stop button to stop the realtime display then you can perform these operations
For details refer to Sect 43 ldquoProcessingrdquo
Fig 16a Realtime Display window
XM-1733027330-1QL 23
Button Function
Sample Specifies the sample and displays the measured spectra Do not click on Sample during realtime display When you want to display spectra that have already been measured stop the realtime display then click on the Sample button and select the sample that you want to display
Realtime Executes realtime display Click on the Realtime button The Realtime Display window of Fig 16a opens Click on the Start button then the spectra being measured are displayed When the analysis point has moved to other coordinates the message ldquoNext Displayrdquo appears If you want the next realtime display to begin immediately select OK After apause the realtime display of the next sample begins automatically The sequence of spectrum display can be changed as follows Channel No Order
Spectra are displayed in real time in the order of the spectrometer channel beginning with channel 1 at the top
Spectrum No Order Spectra are displayed in real time in the order of measurement To select the number of spectra (1 to 8) to be displayed click on the Max Cell Number button
Operation Performs operations described below for spectra to be displayed in real time
Operation menu during realtime display
Select Operation during realtime display The Operation menu opens During realtime display some selections are unavail-able Spectra Display KLM Marker and Peak ID can be selected
Refer to Sect 43 ldquoProcessingrdquo for a description of each operation
Fig 17 Operation menu (during realtime display)
24 XM-1733027330-1QL
43 Processing This section describes how to process the data obtained from the measurements performed so far
431 Selecting sample names and processing methods
1
2
Select ProcessmdashQualitative Analysis from the EPMA Main Menu shown on the Computer Display
The Data display window opens
Fig 18 Data display window
Click on the Sample button in the Data display window The Sample window (for processing) opens
XM-1733027330-1QL 25
Fig 19 Sample window (for processing)
3
4
5
Select the spectra to be displayed from the Sample window There are two display modes One is the single-sample mode in which the spectra of one analysis point are displayed The other is the multiple-sample mode in which the spectra of different samples are displayed at the same time The latter mode is used when you perform the chemical shift and the optional waveform separation However you cannot perform the off-line element identification nor the semi-quantitative analysis using the multiple-sample mode To specify the number of spectra to be displayed click on the Max Spectra button In the Sample window the lists of Sample Name Stage Position and X-Ray Spectra are displayed In the X-Ray Spectra list thumbnail spectra are displayed If they are not displayed click on Show Icon to show them
Button Function
Make Icon Makes thumbnail spectra Normally the spectra are made automatically at measurement
Show Icon Switches on and off the display of thumbnail spectra
Dummy Displays blank spaces in place of spectra
Max Spectra Specifies the number of spectra to be displayed
Selected List Displays the list of spectra that have been selected To deselect spectra click on their names in the list
If you want to display and process data of another group click on the Group button The Group window that lists existing group names opens as shown in Fig 20 Click on the desired group name and then click on the OK button Repeat Step 3 In the single sample mode select GrouprArrSamplerArrStage Position and then select the desired spectra in X-Ray Spectra If you do not select any spectra in X-Ray Spectra all the displayed spectra
will be selected automatically
26 XM-1733027330-1QL
6
7
In the multiple sample mode every time you select a spectrum select group sample and stage position
Fig 20 Group window (for processing)
Click on the OK button Spectra will be displayed in the Data display window in the order in which you selected them in X-Ray Spectra The data corresponding to the item that was specified with Display Parameter ( Sect 432) are displayed at the right of the spectra
XM-1733027330-1QL 27
432 Operation menu
Click on the Operation button in the Data display window of Fig 18 The Operation menu opens as shown in Fig 21 Clicking on a menu item allows the operations described below The menu items that you use frequently can be selected from the pop-up menu that opens by right clicking on any position on a displayed spectrum
Fig 21 Operation menu
Fig 22 Pop-up menu
28 XM-1733027330-1QL
Spectra Display Selecting Spectra Display from the Operation menu shows the menu items related to the methods of displaying spectra allowing the following operations
Zooming
1
2
3
4
Select Spectra DisplaymdashZooming from the Operation menu The Zooming window opens and also at the same time the graph window showing the whole spectrum image opens separately as shown in Fig 23 To specify the spectrum to be processed select a spectrum number or click on any position on the spectrum that is being displayed
Position the mouse cursor near the position where you want to start to zoom and drag the cursor in the diagonal direction
An enlarged rectangular frame is formed Once you have decided the size to be zoomed in on release the mouse button and then click on the Apply button
The part of the spectrum in the specified area is enlarged in the graph window If you performed Step 2 in the graph window you need not click on the Apply button
To move the frame for enlargement drag a point near the center of the frame to the desired position If you want to change the size of the frame drag the frame line
In these operations the shape of the mouse cursor will change so that you can distinguish each operation You can perform the following operations by using the arrow and other keys of the keyboard rarr Moves the frame to the right larr Moves the frame to the left uarr Enlarges in the vertical direction darr Reduces in the vertical direction + Enlarges in the horizontal axis direction ndash Reduces in the horizontal axis direction Shift If you press one of the above keys while holding down this key the
amount of movement will increase
XM-1733027330-1QL 29
Fig 23 Zooming window and its graph window
Ymax r Normalize
You can redisplay the maximum intensity of a spectrum on display at the desired full-scale percentage by using this function 1 Select Spectra DisplaymdashYmax r Normalize from the Operation menu
The Ymax r Normalize window opens
Fig 24 Ymax r Normalize window
30 XM-1733027330-1QL
2
3
1
Click on the r [] button in the Ymax r Normalize window The r window opens as shown
Fig 24a r window
Enter the desired percentage in the input box of the r window by clicking on the number buttons in the r window then click on the Apply button of the Ymax r Normalize window
The maximum intensity of spectrum on display will be redisplayed as the percent-age of the full-scale value that you entered If the All button is selected in the Ymax r Normalize window the full-scale
percentage of all the spectra is set to the same value
Select Xmin mdash Ymax You can set the horizontal and vertical scales for spectra to the desired values The procedure is the same as for the Ymax r Normalize window
Select Spectra DisplaymdashXmin mdash Ymax from the Operation menu The Select Xmin ndash Ymax window opens
Fig 25 Select Xmin ndash Ymax window
XM-1733027330-1QL 31
2
3
Click on the Xmin Ymin Xmax or Ymax button in the Select Xmin mdash Ymax window
The Xmin Ymin Xmax or Ymax window opens Enter the desired values in the input box of the window by clicking on the number buttons in the window then click on the Apply button of the Select Xmin mdash Ymax window
The horizontal and vertical scales for spectra are set to the specified values If the All button is selected in the Select Xmin ndash Ymax window the scales of
all the spectra are set to the same values
Window Layout You can specify the layout of the Data display window by using this function
Select Spectra DisplaymdashWindow Layout from the Operation menu The Window Layout window opens
Fig 26 Window Layout window Window size Select the desired size from V Small Small Normal
and Maximum Horizontal layout Usually spectra are displayed vertically in a column If
you want to display the spectra horizontally in lines click on the Horizontal button and then enter the number of spectra to be shown horizontally in the Horizontal spc input box
Parameter display If you do not want to display parameters on the right side select Parameter OFF If you want to display them select Parameter ON
32 XM-1733027330-1QL
Fig 27 An example of the horizontal display of spectra in lines
Mixed Spectra Display
You can display spectra individually on different parts of the display or all together in one area Select Spectra DisplaymdashWindow Layout from the Operation menu
The Mixed Spectra Display window opens
Fig 28 Mixed Spectra Display window
XM-1733027330-1QL 33
If Spectrum Mode is Single spectra are displayed all together in one display area In the Single mode if you have selected Relative for Vertical Scale the full-scale value of the vertical axis becomes 100 the relative intensity of each spectrum is shown with the maximum value of each spectrum taken as 100 If you have selected Absolute for Vertical Scale spectra will be shown with the maximum value of all spectra taken as 100 The offset value of the Y-axis is displayed as the value of Base Offset when the maximum value of each spectrum is taken as 1 In the Single mode each spectrum is displayed on the same base line when the value of Base Offset is 00 However each spectrum is displayed on a different base line with the same base level when the value of Base Offset is 10
Spectrum Type
You can specify the style for displaying spectrum lines 1
2 3
Select Spectra DisplaymdashSpectrum Type from the Operation menu The Spectrum Type window opens
Fig 29 Spectrum Type and Spectrum windows
Select a spectrum number from the Spectrum Type window To specify the style for displaying spectrum lines select the desired items from the following list then click on the Apply button to display the spectra in the specified style
Style for displaying the line Vector Line Marker Symbols Bar Vertical bars Marker + Vector Symbols and line Vector + Bar Lines and vertical bars
34 XM-1733027330-1QL
Line type for Vector Solid Solid line Dash Dashed line Dot Dotted line Dash Dot Dashed line with a dot Dash Dot Dot Dashed line with two dots Long Dash Long dashed line Thickness of the line Thin Thin line Normal Normal line Thick Thick line
You can store recall and delete using the Load Save and Delete buttons
Spectrum Color You can change the color of the displayed spectra background and parameter area by using this function 1 Select Spectra DisplaymdashSpectrum Color from the Operation menu
The Spectrum Color window opens
Fig 30 Spectrum Color and Color windows
XM-1733027330-1QL 35
2 3
1
2 3
Select a spectrum number from the Spectrum Color window To specify the color for displaying spectra background and parameter areas select the desired items from the following list then click on the Apply button to display the color as desired
Items available for color display Spectrum Spectra Background Background Original Original spectra prior to calculation Parameter Fore Parameter characters Parameter Back Parameter background Buttons for operations More Lets you to specify the colors of Marker ID Element
Cursor and KLM lines You can store recall and delete by using Load Save and Delete buttons
Draw Mesh You can draw a grid as the background of spectra by using this function
Select Spectra DisplaymdashDraw Mesh from the Operation menu The Draw Mesh window opens
Fig 31 Draw Mesh window
Select a spectrum number from the Draw Mesh window To specify Scale Color and Line for the grid select the desired items from the following lists then click on the Apply button to display the grid as desired
Line type Solid Solid line Dash Dashed line Dot Dotted line Dash Dot Dashed line with a dot Dash Dot Dot Dashed line with two dots
36 XM-1733027330-1QL
Thickness of the line Thin Thin line Normal Normal line Thick Thick line Lines to draw Hor + Vert Horizontal and vertical lines Horizontal Horizontal lines Vertical Vertical lines None No lines
Display Axis
You can set the unit for the abscissa of the specified spectra by using this function The unit for the abscissa is always the same for all the spectra 1
2
1
Select Spectra DisplaymdashDisplay Axis from the Operation menu The Display Axis window opens
Fig 32 Display Axis window
To specify the desired item in the Display Axis window select Position mm Wave length A Wave length nm or Energy keV then click on the OK button
The abscissa for the spectra on the display changes as specified Wave order is useful for displaying the spectra in the original wavelength when high-order lines are displayed in such narrow range as chemical shift The function is effective only when the wavelength is specified as the abscissa
Kind of Assignment You can select the style for displaying element labels by using this function
Select Spectra DisplaymdashKind of Assignment from the Operation menu The Kind of Assignment window opens
XM-1733027330-1QL 37
Fig 33 Kind of Assignment window
2
1
Select Elements Elements X-ray Name or Elements X-ray Name Order then click on the OK button Elements Only element names are displayed Elements X-ray Name Element names and X-ray names are
displayed Elements X-ray Name Order Element names X-ray names and order
are displayed
Display Parameter You can specify which parameters to display in the parameter-display area of the Data display window by using this function
Select Spectra DisplaymdashDisplay Parameter from the Operation menu The Display Parameter window opens
Fig 34 Display Parameter window
38 XM-1733027330-1QL
2
1
2
Select the desired parameters then click on the OK button The specified parameters are displayed in the parameter-display area of the Data display window
If you select All the information of all the spectra is shown while if you select Single only the information of the specified spectrum is shown To change the size of the displayed characters select S M or L
An A-Rank Element is an element that is judged certain to exist and a B-Rank Element is an element that is judged possible though not certain to exist For the method of element identification refer to Chapter 5 ldquoAppendixrdquo of this instruction manual
Write Text
You can write text in the display area of spectra by using this function Select Spectra DisplaymdashWrite Text from the Operation menu
The Write Text window opens
Fig 35 Write Text window
Click on the spectrum on which you want to write text and then input the desired text in the input box of the Write Text window then click on the Write button
The text is displayed on the selected spectrum of the Data display window Color Selects the color of text Size Selects the character size of text from S M and L Clear Clears the input box
Shift Adjusts the position of the input text when you drag it Delete Deletes the text Click on this button and then select the text that you
want to delete from the list of texts Write Writes text on the selected spectrum
Save Saves the texts that you have written on spectra The texts will be displayed when you next open the spectra
XM-1733027330-1QL 39
Replace Spectrum You can replace the spectra that are being displayed by using this function 1
2
3
1
2
Select Spectra DisplaymdashReplace Spectrum from the Operation menu The Replace spectrum window opens
Fig 36 Replace spectrum window
Select the number of the spectrum to replace from the Replace spectrum window and then click on the Apply button
The Sample window opens
Refer to Fig 19 Sample window (for processing) Select the spectrum to replace from the Sample window
Reset Spectra
You can reset all the changes that you have made using all the items of the Spectra Display menus to their initial states if you use this function
Select Spectra DisplaymdashReset Spectra from the Operation menu The Reset Spectra window opens
Fig 37 Reset window
Select the number of the spectrum for resetting from the Reset window and then click on the Apply button
All the changes made for the selected spectrum will be cancelled
40 XM-1733027330-1QL
KLM Marker You can display identified elements in colors in the KLM Marker window 1
2
Select KLM Marker from the Operation menu The KLM Marker window opens
Element buttons
Element display
Fig 38 KLM Marker window
Click on the buttons of the desired element in the KLM Marker window
The positions and element names of the characteristic X-rays (Kα Kβ etc) for specified elements are displayed on the spectrum The following functions are available
Button Function
Element buttons Clicking on an element button displays KLM markers When you right-click another element button its KLM markers appear together with the previous ones You can specify the line type for the KLM markers in the Spectrum Type window and the color in the Spectrum Color window
Element display The name of the selected element is displayed Right-clicking on the display shows the name of the element to the right of the present one while left-clicking on the display shows the name of the element to the left of the present one
Arrow buttons
Clicking on the right arrow button selects the right element to the present one while clicking on the left arrow button selects the left element to the present one
Order Specifies the order of the X-rays You can specify from the first to the tenth
Min Int Specifies the minimum intensity of the KLM Markers The intensity to be specified is the theoretical intensity shown in the wavelength table It means the relative intensity when the intensity of the alpha line is taken as 100 When you specify 0 all the X-rays are shown
XM-1733027330-1QL 41
Button Function
Select KLM Selects the X-rays to be displayed from the K L and M lines Only highlighted X-rays are displayed It is useful for displaying specified X-rays
Lock To display the KLM Markers of multiple elements specify elements by right-clickings ( refer to the above Element buttons) You can lock the KLM Markers if you click on the Lock button then if you click on an element you can display its KLM Markers together with the locked ones To unlock the locked KLM Markers deselect Lock
Scale The scale for each X-ray height of KLM Markers is based on the theoretical intensity When an X-ray marker cannot be seen easily you can adjust the height of the KLM Markers by using the arrow-buttons to the right of the Scale button The same result can be obtained by dragging a point on the spectrum up or down
Set Adds the selected elements to the list of identification elements and displays element names at the position of each KLM Marker To label peaks use the Peak ID window
Delete Deletes the selected elements from the list of identification elements as well as all the element names When you want to delete element names one by one use the Peak ID window
Print Prints the information on the KLM Markers
Close Closes the KLM window
42 XM-1733027330-1QL
Peak ID The wavelength and intensity at the specified position of the spectrometer are displayed At the same time the possible names of characteristic X-rays near the specified position are listed 1
2
Select Peak ID from the Operation menu The Peak ID window opens
X-ray list
Wavelength display
Spectrum number
Fig 39 Peak ID window
Select any position from a spectrum in the Data display window The wavelength and intensity at the specified position of the spectrometer are displayed in the X-ray list of the Peak ID window At the same time the possible names of characteristic X-rays near the specified position are listed The identified elements and the elements corresponding to the displayed KLM Markers are displayed in different colors The following functions are available
XM-1733027330-1QL 43
Object Function
Spectrum number Specifies the desired spectrum You can also specify it by clicking on it
Wavelength display
Displays the wavelength and X-ray intensity at a position specified by clicking You can perform a fine adjustment of the cursor position by using the larr and rarr keys on the keyboard
X-ray list Displays the X-rays near the wavelength selected by clicking The information displayed is Element Name X ray Name Order Diff (distance from the selected position) and Int (theoretical X-ray intensity)
Order Specifies the order of the X-rays to be detected
Min Int Specifies the minimum theoretical intensity of the X-rays to be displayed
PrevNext ID Move the cursor to the peak positions whose elements were already identified The movement direction of Prev ID is toward lower wavelengths and that of Next ID is toward higer wavelengths The cursor jumps to the other end when it is moved beyond an end
Print Opens the Listing window and displays the data of the item selected from the X-ray list
Clear Clears the items that were specified for printing
Set After you have selected a line of an element in the X-ray list clicking on the Set button identifies the element and displays its peak label
Delete After you have selected an identified element in the X-ray list clicking on the Delete button deletes the peak label of the element
Shift ID Moves peak labels After you have clicked on the Shift ID button clicking near the label changes the shape of the cursor Then drag the label to move it To deselect this mode click on the Shift ID button once again
Any Length Measures the distance between two arbitrary points After you have clicked on the Any Length button click on two arbitrary points on a spectrum then the marker and distance between the points are displayed To deselect this mode click on the Any Length button once again
Close Closes the Peak ID window
Save ID Results
After you have changed the element name display on the spectrum by using Peak ID for example the element name can be saved as an A rank element 1
2
Select Save ID Results from the Operation menu The Save ID Results window opens
Fig 40 Save ID Results window
Click on the OK button in the Save ID Results window after you have changed the element name display on the spectrum by using Peak ID for example
44 XM-1733027330-1QL
The element name displayed on the spectrum will be saved as an A rank element in a file These data will be displayed automatically beginning with the next operation
Off-line ID
You can perform element identification once again 1
2
Select Off-line ID from the Operation menu The Off-line ID window opens
Fig 41 Off-line ID window
Specify the necessary conditions then click on the Apply button to perform element identification once again after
The ID-Doctor does not operate during off-line identification of element In element identification the specified order of X-rays is taken into account and if A rank only is selected only the labels for A rank elements are displayed after the identification If A amp B rank is selected all the labels are displayed after identification If a number other than zero is specified in the Min Int input box the labels for only the X-rays having the specified intensity or more are displayed after identi-fication
When the Close button is clicked on with the Orderndash0 button selected with Apply not selected the identified element names will not be displayed on the spectra in subsequent measurements
XM-1733027330-1QL 45
Spectra Calculation
Select Spectra Calculation from the Operation menu The Spectra Calculation window opens You can perform the arithmetic operations that are shown in the Spectra Calculation window
Fig 42 Spectra Calculation window
46 XM-1733027330-1QL
Smoothing
Select Spectra CalculationmdashSmoothing from the Operation menu The Smoothing window opens You can smooth the specified spectra using the Savitzky-Golay method
If you selected Manual you can assign a number of points to use in smoothing If you selected Result Only only the smoothed spectra are displayed whereas if you selected Original amp Result the spectra before smoothing are also displayed at the same time
Fig 43 Smoothing window
2nd Derivative
Select Spectra Calculationmdash2nd Derivative from the Operation menu The 2nd Derivative window opens You can find the second derivatives of the specified spectra using the Savitzky-Golay method
Quant Background
You can display the background position that is used in the quantitative analysis and correct the position while watching the corresponding spectra
Select Spectra CalculationmdashQuant Background from the Operation menu The Quant Background window opens
XM-1733027330-1QL 47
Fig 44 Quant Background window
The information displayed is No Elem (Crysta) Low Angle Position and High Angle You can select mm angstrom or nm as the unit If an element name is dimmed the corresponding spectra do not exist If you have selected Ignore channel you can search the spectra only by using crystal names If you have deselected the Ignore channel button you can search for spectra that match both crystal names and measuring channels If you select any of the displayed elements the background position will be shown on the spectra by markers To correct the position drag the markers to the desired positions If you want to enter the corrected items click on the Exec button and if you do not want to click on the Cancel button
48 XM-1733027330-1QL
Background Subtraction You can eliminate background components from the specified spectrum
Select Spectra CalculationmdashBackground Subtraction from the Operation menu
The Background Subtraction window opens
Fig 45 Background Subtraction window
Clicking on the Manual button performs spline interpolation for the specified points (normally multiple points) and forms a background curve Clicking on the Auto button performs background subtraction using the Sonne-veld method
Sub (SP mdash k)
You can subtract a constant (k) from the specified spectrum and display the spectra Select Spectra CalculationmdashSub (SP mdash k) from the Operation menu
The Sub (SP ndash k) window opens
Fig 46 Sub (SP ndash k) window
XM-1733027330-1QL 49
Add (SP + k)Multiply (SP k)Divide (SP k) You can add multiply or divide by a constant (k) in the specified spectrum and display the spectra
Select Spectra CalculationmdashAdd (SP + k) or Multiply (SP k) or Divide (SP k) from the Operation menu
The Add (SP + k)Multiply (SP k)Divide (SP k) window opens
Spectrum Shift You can shift spectra to the left or right
Select Spectra CalculationmdashSpectrum Shift from the Operation menu The Spectrum Shift window opens
Spectra Sub (SP1 mdash SP2)
You can subtract two spectra The result of the calculation can be displayed in another display area
Select Spectra CalculationmdashSpectra Sub (SP1 mdash SP2) from the Operation menu
The Spectra Sub (SP1 ndash SP2) window opens
Spectra Add (SP1 + SP2) You can add two spectra The result of the calculation can be displayed in another display area
Select Spectra CalculationmdashSpectra Add (SP1 + SP2) from the Operation menu
The Spectra add (SP1 + SP2) window opens
Dead-time Correction You can perform dead-time correction
Select Spectra CalculationmdashDead-time Correction from the Operation menu
The Dead-time Correction window opens
For the formulas for calculation refer to the separate instruction manual of the Quantitative Analysis Program
50 XM-1733027330-1QL
Result Store You can store displayed spectrum such as the results of a calculation in a file 1
2
Select Spectra CalculationmdashResult Store from the Operation menu The Result Store window opens
Fig 47 Result Store window
Type a crystal name in the Crystal Name input box and then click on the OK button
The spectrum that you have selected will be added to after the spectrum that was stored last At most twenty spectra can be stored If you want to delete a spectrum select it and type the slash () 8 times the
selected spectrum will be deleted
Reset You can undo arithmetic operations executed in Spectra Calculation
Select Spectra CalculationmdashReset from the Operation menu The settings will returned to their initial states
Redraw Spectra
You can display spectra again Select Redraw Spectra from the Operation menu
XM-1733027330-1QL 51
Print-out You can print conditions and results 1
2
3
Select Print-out from the Operation menu The Print-Out window opens
Select the items that you want to print and then click on the OK button The Listing window appears
Click on the Print button in the Listing window The output will be sent to the printer
Fig 48 Print-out window
52 XM-1733027330-1QL
Semi-Quant Analysis After you have obtained background intensity from an identified element and a qualitative spectrum you perform a calculation for correction based on the ratio to the X-ray intensity of a pure element (the K ratio) so as to obtain the result of a quantitative analysis Below is the method for calibrating the X-ray intensity of a pure element Select Semi-Quant Analysis from the Operation menu
The Semi-Quant Analysis window opens
Fig 49 Semi-Quant Analysis window
This window displays a list of the element names (in Element) X-ray names (in X-ray) and analyzing crystals (in Crystal) for the A-rank identified elements whose spectra show the strongest X-ray intensities
MetalOxide When the sample to be analyzed is a metal click on the Metal button When the sample is an oxide click on the Oxide button then enter values into the No of Oxygen and Valence input boxes
No of Oxygen input box You can input a value when Oxide is selected Type the number of oxygen atoms in the input box The number is to be used as the standard when the molecular formula is calculated after correction
XM-1733027330-1QL 53
Normalize Clicking on this button normalizes the mass concentration after correction the total mass concentration becomes 100 If you do not click on the Normalize button the current values are displayed as they are
Element X-ray Crystal and Valence in the list
Button Function
Element Adds and deletes arbitrary elements
X-ray Specifies the type (Kα Kβ Lα Lβ Mα and Mβ) of the X-rays in the scan range
Crystal Specifies one of the analyzing crystals displayed in the column when the characteristic X-rays span multiple spectra
Valence Specifies the valence of oxides The mass concentration of oxygen can be obtained by using the valence
Result window
You can specify where to display the results that you obtain
Button Function
New Text Opens a text window in which the results are displayed
Spectrum Displays the results in the spectrum display area if it is open
Parameter Displays the results in the parameter-display area
54 XM-1733027330-1QL
Fig 50 An example of Semi-Quant Analysis results
ID-Doctor You can perform element identification based upon the knowledge base of experienced analysis specialists If ID-Doctor is selected the element identification under ID-Doctor will be executed automatically after measurement 1
2
Select ID-Doctor from the Operation menu The ID-Doctor window opens
Fig 51 ID-Doctor window
Click on the OK button For details refer to Chapter 5 ldquoAppendixrdquo
XM-1733027330-1QL 55
Spectrum Analysis You can display on a spectrum the position height area FWHM (full width at half maximum) and height from the baseline of the specified spectrum peak You can print the spectrum after the spectrum analysis by using the Print button 1
2
3
Select Spectrum Analysis from the Operation menu The Spectrum Analysis window opens
Fig 52 Spectrum Analysis window
Specify the baseline between any two desired points by dragging the mouse from the start point and dropping it at the finish point Click on the Apply button
The results of Spectrum Analysis will be displayed on the spectrum
If you enlarge a desired part of a spectrum by using Spectra DisplayndashZooming and specify the desired baseline between two points you can obtain the baseline with greater precision You can also specify the baseline by inputting values in Baseline X Lower and X Upper input boxes You can select the following items Line color Color of lines
56 XM-1733027330-1QL
String Color Color of text Adjust Place in which text is to be printed selected from Left Center and Right Size Size of text selected from S M and L Peak Detect Peak position selected from Max Point 3 Points and 5 Points Plot Item Items to be displayed Shift String Lets you shift the text already written by dragging it
4
1
Turn on the Separation of Left Right button and then click on the Apply button
You will obtain different results on the left side and right side of the peak position
Spectra Search Spectra Search has two important functions One is a search function The other is a load function Using the search function you can display average correlation and other information about spectra judge to be similar in the Search result scroll window by using correlation coefficients from the start position to the finish position for the same crystal Using the load function you can also display the spectra that you have selected from the Search result scroll window The correlation coefficient between a spectrum and another one is 10 if the two are the same while the closer the coefficient is to 00 the less similar the two are The correlation coefficient obtained by calculation will be the same even if one or both are multiplied by a constant If the correlation coefficient is about 09 or more two spectra are similar experimentally However it is recommended that you judge similarity from the display by using the load function
Select Spectra Search from the Operation menu The Spectra Search window opens
XM-1733027330-1QL 57
Fig 53 Spectra Search window
Button Function
Search start positionndash User Group Sample Stage No
Specifies search start directory If there are many spectra for qualitative analysis specifythe start position by using the Group button to save search time Clicking on the Group button opens the Group window where you can specify group names In the same way clicking on the Sample button opens the Sample window where you can specify sample names
58 XM-1733027330-1QL
Fig 54 Group window
Button Function
Search condition ndashStageSpectra
Selecting Stage performs searches through samples Selecting Spectra performs searches through spectra
One Spectrum All spectra
When Stage is selected this function is available
L value (mm) Wave (A)Wave (nm)
Used when you specify the search range
Corr_coeff Correlation coefficient from 00 to 10
Start Pos End Pos Start position for calculation of correlation coefficient Finish position for calculation of correlation coefficient You can change the positions
Search result Scroll window to display the results of search
Search Starts search
Load Displays the spectrum selected from the Search result scroll window
Stop Stops search
Reset Resets correlation coefficient and the values of Start Pos and End Pos Clicking on this button also resets the spectrum presently displayed to the previous one
Selected List Click on this button to print the results of the search You can print only the spectra that you have selected from the Search result scroll window
Close Resets the spectra that are presently displayed and closes the Spectra Search window
XM-1733027330-1QL 59
44 Semi-Quantitative (Semi-Quant) Analysis Program In ordinary quantitative analyses quantitation results are corrected by measuring the intensities of peaks and backgrounds for each element Differing from the ordinary quantitative analyses the semi-quantitative analysis (Semi-Quant Analysis) program corrects quantitation results by using the spectral data Namely the intensities of the peaks and backgrounds for the elements identified in the qualitative analysis are obtained from the qualitative-analysis spectral data The ratio of the spectral peak intensity for each element to that of the characteristic X-rays for the pure element is calculated as the K-ratio
K-ratio = IunkIstd
where Iunk Intensity of the characteristic X-rays from an unknown sample Istd Intensity of the characteristic X-rays of a pure element
Based on this K-ratio ZAF correction is performed and the mass concentration of each element is printed together with the K-ratio This result can be used later to perform an off-line quantitative analysis (Summary) or it can also be recorrected by using the measured standard sample data The characteristic X-ray intensities of pure elements are calculated from the standard sensitivity curve obtained in advance At that time since their dependence on the accelerating voltage is also calculated the K-ratio for the qualitative analysis data measured from 5 kV to 30 kV (in 5 kV steps) can be calculated The standard sensitivity curves have been measured in our company for a large number of standard samples However there may exist slight differences in the measured curves depending on the instruments used Therefore using some standard samples measure and correct the standard sensitivity curves of some elements for each analyzing crystal and for each characteristic X-ray (Kα Lα and Mα) Once this correction has been done you need not repeat it each time you perform analysis
441 How to calculate X-ray intensities in the Semi-Quant Analysis
X-ray intensities in the Semi-Quant Analysis are calculated in the following way As the peak position the position at which the X-ray intensity is the strongest is selected after searching for it in the vicinity of the aimed characteristic X-rays As the background position the position at which the mean X-ray intensity having the lowest moving average of three points from a position a little apart from the peak position is selected These results are displayed as measurement conditions The search ranges of the peaks and backgrounds are defined for each analyzing crystal in the sqtcond file in the optepmaconfanal directory The results of the Semi-Quant Analysis are saved in the file named 1onq in the directory of the quantitative analysis
60 XM-1733027330-1QL
442 Using Semi-Quant Analysis results in off-line quantitative analysis
The results of the Semi-Quant Analysis can be utilized in the off-line quantitative analysis
Summary You can execute Summary in the Semi-Quant Analysis 1
2
3
1
2
3 4
Select ProcessmdashQuantitative AnalysismdashSummary from the EPMA Main Menu
The Function window for process opens Click on the Sample button
The Select Sample window opens Select Qnt for Semi-Quant Analysis
The remaining steps are the same as for ordinary quantitative analysis
In the Semi-Quant Analysis elements are different for each sample in many cases If you print the results of many samples it will be difficult to distinguish them since there are many elements To solve this problem use Mass order for printing If you select Qlw in place of Qnt you can obtain the list of identified elements when you have printed it
Off-line Correction
You can execute Off-line Correction of the analysis results obtained in the Semi-Quant Analysis
Select ProcessmdashQuantitative AnalysismdashOff-line Correction from the EPMA Main Menu
The Function window for off-line correction opens Click on the Sample button
The Select Sample window opens Select Qnt for Semi-Quant Analysis Set the conditions as follows
Specify the correction method and accelerating voltage used for measurement Specify the same elements as those used in the Semi-Quant Analysis Select the same X-rays channel and analyzing crystal as in the result of the Semi-Quant Analysis for the element to be measured Select appropriate standard samples if any When Cal-STD is selected as the standard sample for all elements the same result as in the Semi-Quant Analysis is obtained
For procedures for entering the conditions for the quantitative analysis refer to the separate operation manual of the Quantitative Analysis Program
After setting the above conditions click on Read Intensity amp Correction and the X-ray intensities obtained in the Semi-Quant Analysis will be displayed Then click on the Apply button and off-line correction will be executed
XM-1733027330-1QL 61
443 Correcting the standard sensitivity curve
The Semi-Quant Analysis program includes a program for correcting the standard sensitivity curve By using the standard sample installed in the microanalyzer the X-ray intensity coefficient (I) in the equation in which the atomic number is used as the variable can be obtained for each analyzing crystal and for each characteristic X-ray (Kα Lα and Mα) of each X-ray spectrometer Once this program has been executed you need not run it again
I = exp (a + bZ + cZ2 + dZ3
where I Intensity of characteristic X-rays (cps100 pA) Z Atomic number a b c d Coefficients
Combinations of the standard sample and characteristic X-rays to be used are defined in a file in the optepmacalisqt directory The coefficients obtained are saved in the sqtcoef file in the optepmacali directory together with the measured data The characteristic X-ray intensities of pure elements for each analyzing crystal and for each accelerating voltage are saved in a file in the optepmacalistd_int directory Follow the procedures in the sections below to execute correction of the standard sensitivity curve
Opening the Semi-Quant Calibration window
Select InitializemdashSemi-Quant Calibration from the EPMA Main Menu
Fig 55 Pull-down menu of the Initialize icon
The Semi-Quant Calibration window opens You can perform corrections in this window
62 XM-1733027330-1QL
Selecting analyzing crystals Select analyzing crystals whose standard sensitivity curves are to be corrected Click on the Crystal button in the Semi-Quant Calibration window
The Crystal and Channel window opens
If necessary click on the for Light elements button in the Crystal and Channel window then the Light Elements window opens
Fig 56 Crystal and Channel and Light Elements windows
Out of the analyzing crystals installed in the instrument the analyzing crystals whose standard sensitivity curves can be corrected will be displayed in the Crystal and Channel and Light Elements windows
By default all the crystals are selected If there are some analyzing crystals whose standard sensitivity curves you do not want to correct deselect their crystal buttons
XM-1733027330-1QL 63
Setting the stage positions for standard samples You have to enter the stage positions for standard samples prior to measurement 1
2
1
2
3
Click on the Stage button in the Semi-Quant Calibration window The Set Stage Stage Monitor and Memory windows open
Fig 57 Specifying the stage positions for standard samples
Specify the desired standard sample names and their stage positions
If stage positions have been already set you need not specify them
For the operating procedure refer to the instruction manual of the main unit
Executing measurements You execute measurement by using the following procedure
Click on the Measure button in the Semi-Quant Calibration window The Start Calibration window opens
Set the current to about 1 10mdash7 A in advance Although the accelerating voltage is automatically set to 20 kV but the current is not set automatically
Confirm all the conditions that you require to use then click on the OK button
Measurement begins If you click on the Cancel button the previous window will return
Measurement is performed for each analyzing crystal and the progress of the measurement is displayed on the screen
64 XM-1733027330-1QL
Stopping measurement
To stop measurement for any reason click on the Stop button To temporarily interrupt measurement click on the Pause button On completion of peak search measurement stops temporarily To restart the measurement click on the Pause button once again
Displaying measurement results
On completion of measurement with an analyzing crystal the correction coefficients and the calculated intensities of the characteristic X-rays of the pure elements are displayed The coefficients are displayed in units of cps100 pA The X-ray intensities for Kα Lα and Mα are displayed (vertical axis logarithmic scale in units of cpsμA horizontal axis atomic number)
Fig 58 Display of measurement results
XM-1733027330-1QL 65
Utility
Click on the Utility button in the Semi-Quant Calibration window The Utility pop-up window opens The following functions are included in Utility
Button Function
Reset spectra Individual spectrum windows can be enlarged or reduced by dragging the button at the lower right corner of each window Clicking on Reset spectra after enlarging or reducing the window will return it to the original size
Draw results Clicking on this item displays results of measurement on the computer display
Print results Clicking on this item prints the measured data and the intensity coefficients of the standard sensitivity curve
Check configuration Clicking on this item enables you to check the combination of the analyzing crystal and characteristic X-rays in measurement
Check pksk parameter Clicking on this item enables you to check the parameters for peak search Special care should be exercised in changing the parameters because the operation affects peak search and related operations in quantitative analysis
Smoothing Clicking on this item smoothes and displays the waveform for peak search
2nd derivative Clicking on this item displays the second derivative waveform of the peak search spectrum
Log scale Clicking on this item displays the peak search spectrum on a logarithmic scale
66 XM-1733027330-1QL
5 APPENDIX
Determining peak positions and intensities and identifying elements Using the procedures below this program detects the peaks of characteristic X-rays and identifies the elements for the detected peaks
Detecting peak positions
1 2 3
4
5
1 2
3 a
b
c
d
4
5
Smooth a spectrum by the Savitzky-Golay method Evaluate the second derivative of the smoothed spectrum Detect the peak positions from the second derivative waveform and deter-mine the background positions from the waveforms obtained after second differentiation and smoothing From the smoothed spectrum determine the peak intensity and the back-ground intensity If the difference between the peak intensity and the background intensity is too large to attribute to statistical variation judge that a peak of interest exists
Identifying elements
Detect peaks for each spectrum If any one of the Kα (1) Lα (1) and Mα (1) lines is detected assign the elements of interest to the B rank Further judge the elements of B rank as follows If ZKα min Z ZKβ min assign the elements of interest to the A rank Usually ZKα min=4 ZKβ min=17 If both a Kα (1) line and a K (1) line are found in the same spectrum assign the elements of interest to the A rank If both a Kα (1) line and a K (1) line are found in different spectra assign the elements of interest to the A rank If both an Lα (1) line and an L (1) line are found in the same spectrum assign the elements of interest to the A rank Similarly if both an Mα (1) line and an M (1) line are found in the same spectrum assign the elements of interest to the A rank
If any peaks of B-rank elements are superimposed on any peaks of charac-teristic X-rays of A-rank elements (usually of the first-order) exclude the B-rank elements from the elements to be identified If no A-rank element exists but only one B-rank element exists assign this B-rank element to the A rank
XM-1733027330-1QL 67
Expert identification of elements
This expert identification of elements is a reliable method of ratiocination based upon the knowledge base of experienced analysis specialists This method enables us to evaluate a level of confidence in the result of the element identification performed by using the above-mentioned element identifying method if it is applied for calculation The knowledge base has been created under the following conditions
Accelerating voltage 20 kV Probe current 10 to 500 nA Step 50 μm Sample time 50 ms or more Number of spectra 4 Analyzing crystal LIF PET TAP and STE Scanning range of spectrometer 65 mm to 250 mm (258 mm for TAP) Even if you cannot observe under the above conditions to some extent for some
reasons you can obtain good results since this program is created to avoid problems Of course it is best to meet the requirements as much as possible However when you specify elements to be identified set the spectrometer range to include the first-order X-rays (up to the second order if possible ) of α and of K L and M of the elements
In the results after execution of ID-Doctor the indication ID-Doctor is shown both at the area where elements are displayed in the Data Display window and just above the area where A-Rank and B-Rank elements are displayed Therefore you can easily distinguish the results obtained with the ID-Doctor from those obtained without the ID-Doctor The element identification executed by using this program is performed using the judgment method that imitates experienced analysis specialists the results are not absolutely correct Please use this ID-Doctor as a reference and keep it in mind that you the user of this program decide whether to accept the results or not
68 XM-1733027330-1QL
- XM-1733027330
-
- CONVENTIONS
- CONTENTS
- 1 GENERAL
- 2 SPECIFICATIONS
- 3 PROGRAM STRUCTURE
- 4 OPERATION
-
- 41 Preparation for Measurement
-
- 411 Setting group and sample names
- 412 Setting measurement conditions
- 413 Setting analysis positions
- 414 Loading measurement conditions
- 415 Storing measurement conditions
- 416 Printing measurement conditions and results
- 417 Additional Function
-
- 42 Measurement
-
- 421 Measurement under stored conditions (Preset mode)
- 422 Measurement under present instrument conditions (Survey mode)
- 423 Realtime display
-
- 43 Processing
-
- 431 Selecting sample names and processing methods
- 432 Operation menu
-
- 44 Semi-Quantitative (Semi-Quant) Analysis Program
-
- 441 How to calculate X-ray intensities in the Semi-Quant Analysis
- 442 Using Semi-Quant Analysis results in off-line quantitative analysis
- 443 Correcting the standard sensitivity curve
-
- 5 APPENDIX
-
- damy_tate
- damy_yoko
- fff
- instructions
- JEOL
- mekura
- CONTENTS
- contents
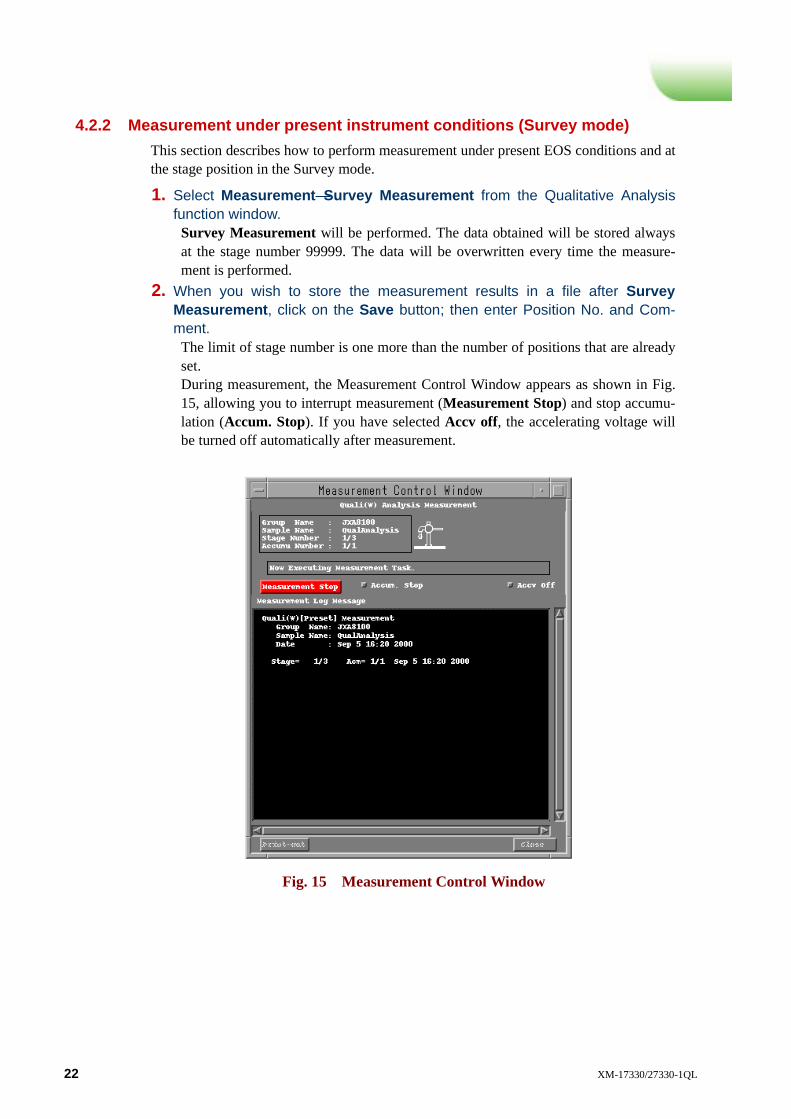

Button Function
Sample Specifies the sample and displays the measured spectra Do not click on Sample during realtime display When you want to display spectra that have already been measured stop the realtime display then click on the Sample button and select the sample that you want to display
Realtime Executes realtime display Click on the Realtime button The Realtime Display window of Fig 16a opens Click on the Start button then the spectra being measured are displayed When the analysis point has moved to other coordinates the message ldquoNext Displayrdquo appears If you want the next realtime display to begin immediately select OK After apause the realtime display of the next sample begins automatically The sequence of spectrum display can be changed as follows Channel No Order
Spectra are displayed in real time in the order of the spectrometer channel beginning with channel 1 at the top
Spectrum No Order Spectra are displayed in real time in the order of measurement To select the number of spectra (1 to 8) to be displayed click on the Max Cell Number button
Operation Performs operations described below for spectra to be displayed in real time
Operation menu during realtime display
Select Operation during realtime display The Operation menu opens During realtime display some selections are unavail-able Spectra Display KLM Marker and Peak ID can be selected
Refer to Sect 43 ldquoProcessingrdquo for a description of each operation
Fig 17 Operation menu (during realtime display)
24 XM-1733027330-1QL
43 Processing This section describes how to process the data obtained from the measurements performed so far
431 Selecting sample names and processing methods
1
2
Select ProcessmdashQualitative Analysis from the EPMA Main Menu shown on the Computer Display
The Data display window opens
Fig 18 Data display window
Click on the Sample button in the Data display window The Sample window (for processing) opens
XM-1733027330-1QL 25
Fig 19 Sample window (for processing)
3
4
5
Select the spectra to be displayed from the Sample window There are two display modes One is the single-sample mode in which the spectra of one analysis point are displayed The other is the multiple-sample mode in which the spectra of different samples are displayed at the same time The latter mode is used when you perform the chemical shift and the optional waveform separation However you cannot perform the off-line element identification nor the semi-quantitative analysis using the multiple-sample mode To specify the number of spectra to be displayed click on the Max Spectra button In the Sample window the lists of Sample Name Stage Position and X-Ray Spectra are displayed In the X-Ray Spectra list thumbnail spectra are displayed If they are not displayed click on Show Icon to show them
Button Function
Make Icon Makes thumbnail spectra Normally the spectra are made automatically at measurement
Show Icon Switches on and off the display of thumbnail spectra
Dummy Displays blank spaces in place of spectra
Max Spectra Specifies the number of spectra to be displayed
Selected List Displays the list of spectra that have been selected To deselect spectra click on their names in the list
If you want to display and process data of another group click on the Group button The Group window that lists existing group names opens as shown in Fig 20 Click on the desired group name and then click on the OK button Repeat Step 3 In the single sample mode select GrouprArrSamplerArrStage Position and then select the desired spectra in X-Ray Spectra If you do not select any spectra in X-Ray Spectra all the displayed spectra
will be selected automatically
26 XM-1733027330-1QL
6
7
In the multiple sample mode every time you select a spectrum select group sample and stage position
Fig 20 Group window (for processing)
Click on the OK button Spectra will be displayed in the Data display window in the order in which you selected them in X-Ray Spectra The data corresponding to the item that was specified with Display Parameter ( Sect 432) are displayed at the right of the spectra
XM-1733027330-1QL 27
432 Operation menu
Click on the Operation button in the Data display window of Fig 18 The Operation menu opens as shown in Fig 21 Clicking on a menu item allows the operations described below The menu items that you use frequently can be selected from the pop-up menu that opens by right clicking on any position on a displayed spectrum
Fig 21 Operation menu
Fig 22 Pop-up menu
28 XM-1733027330-1QL
Spectra Display Selecting Spectra Display from the Operation menu shows the menu items related to the methods of displaying spectra allowing the following operations
Zooming
1
2
3
4
Select Spectra DisplaymdashZooming from the Operation menu The Zooming window opens and also at the same time the graph window showing the whole spectrum image opens separately as shown in Fig 23 To specify the spectrum to be processed select a spectrum number or click on any position on the spectrum that is being displayed
Position the mouse cursor near the position where you want to start to zoom and drag the cursor in the diagonal direction
An enlarged rectangular frame is formed Once you have decided the size to be zoomed in on release the mouse button and then click on the Apply button
The part of the spectrum in the specified area is enlarged in the graph window If you performed Step 2 in the graph window you need not click on the Apply button
To move the frame for enlargement drag a point near the center of the frame to the desired position If you want to change the size of the frame drag the frame line
In these operations the shape of the mouse cursor will change so that you can distinguish each operation You can perform the following operations by using the arrow and other keys of the keyboard rarr Moves the frame to the right larr Moves the frame to the left uarr Enlarges in the vertical direction darr Reduces in the vertical direction + Enlarges in the horizontal axis direction ndash Reduces in the horizontal axis direction Shift If you press one of the above keys while holding down this key the
amount of movement will increase
XM-1733027330-1QL 29
Fig 23 Zooming window and its graph window
Ymax r Normalize
You can redisplay the maximum intensity of a spectrum on display at the desired full-scale percentage by using this function 1 Select Spectra DisplaymdashYmax r Normalize from the Operation menu
The Ymax r Normalize window opens
Fig 24 Ymax r Normalize window
30 XM-1733027330-1QL
2
3
1
Click on the r [] button in the Ymax r Normalize window The r window opens as shown
Fig 24a r window
Enter the desired percentage in the input box of the r window by clicking on the number buttons in the r window then click on the Apply button of the Ymax r Normalize window
The maximum intensity of spectrum on display will be redisplayed as the percent-age of the full-scale value that you entered If the All button is selected in the Ymax r Normalize window the full-scale
percentage of all the spectra is set to the same value
Select Xmin mdash Ymax You can set the horizontal and vertical scales for spectra to the desired values The procedure is the same as for the Ymax r Normalize window
Select Spectra DisplaymdashXmin mdash Ymax from the Operation menu The Select Xmin ndash Ymax window opens
Fig 25 Select Xmin ndash Ymax window
XM-1733027330-1QL 31
2
3
Click on the Xmin Ymin Xmax or Ymax button in the Select Xmin mdash Ymax window
The Xmin Ymin Xmax or Ymax window opens Enter the desired values in the input box of the window by clicking on the number buttons in the window then click on the Apply button of the Select Xmin mdash Ymax window
The horizontal and vertical scales for spectra are set to the specified values If the All button is selected in the Select Xmin ndash Ymax window the scales of
all the spectra are set to the same values
Window Layout You can specify the layout of the Data display window by using this function
Select Spectra DisplaymdashWindow Layout from the Operation menu The Window Layout window opens
Fig 26 Window Layout window Window size Select the desired size from V Small Small Normal
and Maximum Horizontal layout Usually spectra are displayed vertically in a column If
you want to display the spectra horizontally in lines click on the Horizontal button and then enter the number of spectra to be shown horizontally in the Horizontal spc input box
Parameter display If you do not want to display parameters on the right side select Parameter OFF If you want to display them select Parameter ON
32 XM-1733027330-1QL
Fig 27 An example of the horizontal display of spectra in lines
Mixed Spectra Display
You can display spectra individually on different parts of the display or all together in one area Select Spectra DisplaymdashWindow Layout from the Operation menu
The Mixed Spectra Display window opens
Fig 28 Mixed Spectra Display window
XM-1733027330-1QL 33
If Spectrum Mode is Single spectra are displayed all together in one display area In the Single mode if you have selected Relative for Vertical Scale the full-scale value of the vertical axis becomes 100 the relative intensity of each spectrum is shown with the maximum value of each spectrum taken as 100 If you have selected Absolute for Vertical Scale spectra will be shown with the maximum value of all spectra taken as 100 The offset value of the Y-axis is displayed as the value of Base Offset when the maximum value of each spectrum is taken as 1 In the Single mode each spectrum is displayed on the same base line when the value of Base Offset is 00 However each spectrum is displayed on a different base line with the same base level when the value of Base Offset is 10
Spectrum Type
You can specify the style for displaying spectrum lines 1
2 3
Select Spectra DisplaymdashSpectrum Type from the Operation menu The Spectrum Type window opens
Fig 29 Spectrum Type and Spectrum windows
Select a spectrum number from the Spectrum Type window To specify the style for displaying spectrum lines select the desired items from the following list then click on the Apply button to display the spectra in the specified style
Style for displaying the line Vector Line Marker Symbols Bar Vertical bars Marker + Vector Symbols and line Vector + Bar Lines and vertical bars
34 XM-1733027330-1QL
Line type for Vector Solid Solid line Dash Dashed line Dot Dotted line Dash Dot Dashed line with a dot Dash Dot Dot Dashed line with two dots Long Dash Long dashed line Thickness of the line Thin Thin line Normal Normal line Thick Thick line
You can store recall and delete using the Load Save and Delete buttons
Spectrum Color You can change the color of the displayed spectra background and parameter area by using this function 1 Select Spectra DisplaymdashSpectrum Color from the Operation menu
The Spectrum Color window opens
Fig 30 Spectrum Color and Color windows
XM-1733027330-1QL 35
2 3
1
2 3
Select a spectrum number from the Spectrum Color window To specify the color for displaying spectra background and parameter areas select the desired items from the following list then click on the Apply button to display the color as desired
Items available for color display Spectrum Spectra Background Background Original Original spectra prior to calculation Parameter Fore Parameter characters Parameter Back Parameter background Buttons for operations More Lets you to specify the colors of Marker ID Element
Cursor and KLM lines You can store recall and delete by using Load Save and Delete buttons
Draw Mesh You can draw a grid as the background of spectra by using this function
Select Spectra DisplaymdashDraw Mesh from the Operation menu The Draw Mesh window opens
Fig 31 Draw Mesh window
Select a spectrum number from the Draw Mesh window To specify Scale Color and Line for the grid select the desired items from the following lists then click on the Apply button to display the grid as desired
Line type Solid Solid line Dash Dashed line Dot Dotted line Dash Dot Dashed line with a dot Dash Dot Dot Dashed line with two dots
36 XM-1733027330-1QL
Thickness of the line Thin Thin line Normal Normal line Thick Thick line Lines to draw Hor + Vert Horizontal and vertical lines Horizontal Horizontal lines Vertical Vertical lines None No lines
Display Axis
You can set the unit for the abscissa of the specified spectra by using this function The unit for the abscissa is always the same for all the spectra 1
2
1
Select Spectra DisplaymdashDisplay Axis from the Operation menu The Display Axis window opens
Fig 32 Display Axis window
To specify the desired item in the Display Axis window select Position mm Wave length A Wave length nm or Energy keV then click on the OK button
The abscissa for the spectra on the display changes as specified Wave order is useful for displaying the spectra in the original wavelength when high-order lines are displayed in such narrow range as chemical shift The function is effective only when the wavelength is specified as the abscissa
Kind of Assignment You can select the style for displaying element labels by using this function
Select Spectra DisplaymdashKind of Assignment from the Operation menu The Kind of Assignment window opens
XM-1733027330-1QL 37
Fig 33 Kind of Assignment window
2
1
Select Elements Elements X-ray Name or Elements X-ray Name Order then click on the OK button Elements Only element names are displayed Elements X-ray Name Element names and X-ray names are
displayed Elements X-ray Name Order Element names X-ray names and order
are displayed
Display Parameter You can specify which parameters to display in the parameter-display area of the Data display window by using this function
Select Spectra DisplaymdashDisplay Parameter from the Operation menu The Display Parameter window opens
Fig 34 Display Parameter window
38 XM-1733027330-1QL
2
1
2
Select the desired parameters then click on the OK button The specified parameters are displayed in the parameter-display area of the Data display window
If you select All the information of all the spectra is shown while if you select Single only the information of the specified spectrum is shown To change the size of the displayed characters select S M or L
An A-Rank Element is an element that is judged certain to exist and a B-Rank Element is an element that is judged possible though not certain to exist For the method of element identification refer to Chapter 5 ldquoAppendixrdquo of this instruction manual
Write Text
You can write text in the display area of spectra by using this function Select Spectra DisplaymdashWrite Text from the Operation menu
The Write Text window opens
Fig 35 Write Text window
Click on the spectrum on which you want to write text and then input the desired text in the input box of the Write Text window then click on the Write button
The text is displayed on the selected spectrum of the Data display window Color Selects the color of text Size Selects the character size of text from S M and L Clear Clears the input box
Shift Adjusts the position of the input text when you drag it Delete Deletes the text Click on this button and then select the text that you
want to delete from the list of texts Write Writes text on the selected spectrum
Save Saves the texts that you have written on spectra The texts will be displayed when you next open the spectra
XM-1733027330-1QL 39
Replace Spectrum You can replace the spectra that are being displayed by using this function 1
2
3
1
2
Select Spectra DisplaymdashReplace Spectrum from the Operation menu The Replace spectrum window opens
Fig 36 Replace spectrum window
Select the number of the spectrum to replace from the Replace spectrum window and then click on the Apply button
The Sample window opens
Refer to Fig 19 Sample window (for processing) Select the spectrum to replace from the Sample window
Reset Spectra
You can reset all the changes that you have made using all the items of the Spectra Display menus to their initial states if you use this function
Select Spectra DisplaymdashReset Spectra from the Operation menu The Reset Spectra window opens
Fig 37 Reset window
Select the number of the spectrum for resetting from the Reset window and then click on the Apply button
All the changes made for the selected spectrum will be cancelled
40 XM-1733027330-1QL
KLM Marker You can display identified elements in colors in the KLM Marker window 1
2
Select KLM Marker from the Operation menu The KLM Marker window opens
Element buttons
Element display
Fig 38 KLM Marker window
Click on the buttons of the desired element in the KLM Marker window
The positions and element names of the characteristic X-rays (Kα Kβ etc) for specified elements are displayed on the spectrum The following functions are available
Button Function
Element buttons Clicking on an element button displays KLM markers When you right-click another element button its KLM markers appear together with the previous ones You can specify the line type for the KLM markers in the Spectrum Type window and the color in the Spectrum Color window
Element display The name of the selected element is displayed Right-clicking on the display shows the name of the element to the right of the present one while left-clicking on the display shows the name of the element to the left of the present one
Arrow buttons
Clicking on the right arrow button selects the right element to the present one while clicking on the left arrow button selects the left element to the present one
Order Specifies the order of the X-rays You can specify from the first to the tenth
Min Int Specifies the minimum intensity of the KLM Markers The intensity to be specified is the theoretical intensity shown in the wavelength table It means the relative intensity when the intensity of the alpha line is taken as 100 When you specify 0 all the X-rays are shown
XM-1733027330-1QL 41
Button Function
Select KLM Selects the X-rays to be displayed from the K L and M lines Only highlighted X-rays are displayed It is useful for displaying specified X-rays
Lock To display the KLM Markers of multiple elements specify elements by right-clickings ( refer to the above Element buttons) You can lock the KLM Markers if you click on the Lock button then if you click on an element you can display its KLM Markers together with the locked ones To unlock the locked KLM Markers deselect Lock
Scale The scale for each X-ray height of KLM Markers is based on the theoretical intensity When an X-ray marker cannot be seen easily you can adjust the height of the KLM Markers by using the arrow-buttons to the right of the Scale button The same result can be obtained by dragging a point on the spectrum up or down
Set Adds the selected elements to the list of identification elements and displays element names at the position of each KLM Marker To label peaks use the Peak ID window
Delete Deletes the selected elements from the list of identification elements as well as all the element names When you want to delete element names one by one use the Peak ID window
Print Prints the information on the KLM Markers
Close Closes the KLM window
42 XM-1733027330-1QL
Peak ID The wavelength and intensity at the specified position of the spectrometer are displayed At the same time the possible names of characteristic X-rays near the specified position are listed 1
2
Select Peak ID from the Operation menu The Peak ID window opens
X-ray list
Wavelength display
Spectrum number
Fig 39 Peak ID window
Select any position from a spectrum in the Data display window The wavelength and intensity at the specified position of the spectrometer are displayed in the X-ray list of the Peak ID window At the same time the possible names of characteristic X-rays near the specified position are listed The identified elements and the elements corresponding to the displayed KLM Markers are displayed in different colors The following functions are available
XM-1733027330-1QL 43
Object Function
Spectrum number Specifies the desired spectrum You can also specify it by clicking on it
Wavelength display
Displays the wavelength and X-ray intensity at a position specified by clicking You can perform a fine adjustment of the cursor position by using the larr and rarr keys on the keyboard
X-ray list Displays the X-rays near the wavelength selected by clicking The information displayed is Element Name X ray Name Order Diff (distance from the selected position) and Int (theoretical X-ray intensity)
Order Specifies the order of the X-rays to be detected
Min Int Specifies the minimum theoretical intensity of the X-rays to be displayed
PrevNext ID Move the cursor to the peak positions whose elements were already identified The movement direction of Prev ID is toward lower wavelengths and that of Next ID is toward higer wavelengths The cursor jumps to the other end when it is moved beyond an end
Print Opens the Listing window and displays the data of the item selected from the X-ray list
Clear Clears the items that were specified for printing
Set After you have selected a line of an element in the X-ray list clicking on the Set button identifies the element and displays its peak label
Delete After you have selected an identified element in the X-ray list clicking on the Delete button deletes the peak label of the element
Shift ID Moves peak labels After you have clicked on the Shift ID button clicking near the label changes the shape of the cursor Then drag the label to move it To deselect this mode click on the Shift ID button once again
Any Length Measures the distance between two arbitrary points After you have clicked on the Any Length button click on two arbitrary points on a spectrum then the marker and distance between the points are displayed To deselect this mode click on the Any Length button once again
Close Closes the Peak ID window
Save ID Results
After you have changed the element name display on the spectrum by using Peak ID for example the element name can be saved as an A rank element 1
2
Select Save ID Results from the Operation menu The Save ID Results window opens
Fig 40 Save ID Results window
Click on the OK button in the Save ID Results window after you have changed the element name display on the spectrum by using Peak ID for example
44 XM-1733027330-1QL
The element name displayed on the spectrum will be saved as an A rank element in a file These data will be displayed automatically beginning with the next operation
Off-line ID
You can perform element identification once again 1
2
Select Off-line ID from the Operation menu The Off-line ID window opens
Fig 41 Off-line ID window
Specify the necessary conditions then click on the Apply button to perform element identification once again after
The ID-Doctor does not operate during off-line identification of element In element identification the specified order of X-rays is taken into account and if A rank only is selected only the labels for A rank elements are displayed after the identification If A amp B rank is selected all the labels are displayed after identification If a number other than zero is specified in the Min Int input box the labels for only the X-rays having the specified intensity or more are displayed after identi-fication
When the Close button is clicked on with the Orderndash0 button selected with Apply not selected the identified element names will not be displayed on the spectra in subsequent measurements
XM-1733027330-1QL 45
Spectra Calculation
Select Spectra Calculation from the Operation menu The Spectra Calculation window opens You can perform the arithmetic operations that are shown in the Spectra Calculation window
Fig 42 Spectra Calculation window
46 XM-1733027330-1QL
Smoothing
Select Spectra CalculationmdashSmoothing from the Operation menu The Smoothing window opens You can smooth the specified spectra using the Savitzky-Golay method
If you selected Manual you can assign a number of points to use in smoothing If you selected Result Only only the smoothed spectra are displayed whereas if you selected Original amp Result the spectra before smoothing are also displayed at the same time
Fig 43 Smoothing window
2nd Derivative
Select Spectra Calculationmdash2nd Derivative from the Operation menu The 2nd Derivative window opens You can find the second derivatives of the specified spectra using the Savitzky-Golay method
Quant Background
You can display the background position that is used in the quantitative analysis and correct the position while watching the corresponding spectra
Select Spectra CalculationmdashQuant Background from the Operation menu The Quant Background window opens
XM-1733027330-1QL 47
Fig 44 Quant Background window
The information displayed is No Elem (Crysta) Low Angle Position and High Angle You can select mm angstrom or nm as the unit If an element name is dimmed the corresponding spectra do not exist If you have selected Ignore channel you can search the spectra only by using crystal names If you have deselected the Ignore channel button you can search for spectra that match both crystal names and measuring channels If you select any of the displayed elements the background position will be shown on the spectra by markers To correct the position drag the markers to the desired positions If you want to enter the corrected items click on the Exec button and if you do not want to click on the Cancel button
48 XM-1733027330-1QL
Background Subtraction You can eliminate background components from the specified spectrum
Select Spectra CalculationmdashBackground Subtraction from the Operation menu
The Background Subtraction window opens
Fig 45 Background Subtraction window
Clicking on the Manual button performs spline interpolation for the specified points (normally multiple points) and forms a background curve Clicking on the Auto button performs background subtraction using the Sonne-veld method
Sub (SP mdash k)
You can subtract a constant (k) from the specified spectrum and display the spectra Select Spectra CalculationmdashSub (SP mdash k) from the Operation menu
The Sub (SP ndash k) window opens
Fig 46 Sub (SP ndash k) window
XM-1733027330-1QL 49
Add (SP + k)Multiply (SP k)Divide (SP k) You can add multiply or divide by a constant (k) in the specified spectrum and display the spectra
Select Spectra CalculationmdashAdd (SP + k) or Multiply (SP k) or Divide (SP k) from the Operation menu
The Add (SP + k)Multiply (SP k)Divide (SP k) window opens
Spectrum Shift You can shift spectra to the left or right
Select Spectra CalculationmdashSpectrum Shift from the Operation menu The Spectrum Shift window opens
Spectra Sub (SP1 mdash SP2)
You can subtract two spectra The result of the calculation can be displayed in another display area
Select Spectra CalculationmdashSpectra Sub (SP1 mdash SP2) from the Operation menu
The Spectra Sub (SP1 ndash SP2) window opens
Spectra Add (SP1 + SP2) You can add two spectra The result of the calculation can be displayed in another display area
Select Spectra CalculationmdashSpectra Add (SP1 + SP2) from the Operation menu
The Spectra add (SP1 + SP2) window opens
Dead-time Correction You can perform dead-time correction
Select Spectra CalculationmdashDead-time Correction from the Operation menu
The Dead-time Correction window opens
For the formulas for calculation refer to the separate instruction manual of the Quantitative Analysis Program
50 XM-1733027330-1QL
Result Store You can store displayed spectrum such as the results of a calculation in a file 1
2
Select Spectra CalculationmdashResult Store from the Operation menu The Result Store window opens
Fig 47 Result Store window
Type a crystal name in the Crystal Name input box and then click on the OK button
The spectrum that you have selected will be added to after the spectrum that was stored last At most twenty spectra can be stored If you want to delete a spectrum select it and type the slash () 8 times the
selected spectrum will be deleted
Reset You can undo arithmetic operations executed in Spectra Calculation
Select Spectra CalculationmdashReset from the Operation menu The settings will returned to their initial states
Redraw Spectra
You can display spectra again Select Redraw Spectra from the Operation menu
XM-1733027330-1QL 51
Print-out You can print conditions and results 1
2
3
Select Print-out from the Operation menu The Print-Out window opens
Select the items that you want to print and then click on the OK button The Listing window appears
Click on the Print button in the Listing window The output will be sent to the printer
Fig 48 Print-out window
52 XM-1733027330-1QL
Semi-Quant Analysis After you have obtained background intensity from an identified element and a qualitative spectrum you perform a calculation for correction based on the ratio to the X-ray intensity of a pure element (the K ratio) so as to obtain the result of a quantitative analysis Below is the method for calibrating the X-ray intensity of a pure element Select Semi-Quant Analysis from the Operation menu
The Semi-Quant Analysis window opens
Fig 49 Semi-Quant Analysis window
This window displays a list of the element names (in Element) X-ray names (in X-ray) and analyzing crystals (in Crystal) for the A-rank identified elements whose spectra show the strongest X-ray intensities
MetalOxide When the sample to be analyzed is a metal click on the Metal button When the sample is an oxide click on the Oxide button then enter values into the No of Oxygen and Valence input boxes
No of Oxygen input box You can input a value when Oxide is selected Type the number of oxygen atoms in the input box The number is to be used as the standard when the molecular formula is calculated after correction
XM-1733027330-1QL 53
Normalize Clicking on this button normalizes the mass concentration after correction the total mass concentration becomes 100 If you do not click on the Normalize button the current values are displayed as they are
Element X-ray Crystal and Valence in the list
Button Function
Element Adds and deletes arbitrary elements
X-ray Specifies the type (Kα Kβ Lα Lβ Mα and Mβ) of the X-rays in the scan range
Crystal Specifies one of the analyzing crystals displayed in the column when the characteristic X-rays span multiple spectra
Valence Specifies the valence of oxides The mass concentration of oxygen can be obtained by using the valence
Result window
You can specify where to display the results that you obtain
Button Function
New Text Opens a text window in which the results are displayed
Spectrum Displays the results in the spectrum display area if it is open
Parameter Displays the results in the parameter-display area
54 XM-1733027330-1QL
Fig 50 An example of Semi-Quant Analysis results
ID-Doctor You can perform element identification based upon the knowledge base of experienced analysis specialists If ID-Doctor is selected the element identification under ID-Doctor will be executed automatically after measurement 1
2
Select ID-Doctor from the Operation menu The ID-Doctor window opens
Fig 51 ID-Doctor window
Click on the OK button For details refer to Chapter 5 ldquoAppendixrdquo
XM-1733027330-1QL 55
Spectrum Analysis You can display on a spectrum the position height area FWHM (full width at half maximum) and height from the baseline of the specified spectrum peak You can print the spectrum after the spectrum analysis by using the Print button 1
2
3
Select Spectrum Analysis from the Operation menu The Spectrum Analysis window opens
Fig 52 Spectrum Analysis window
Specify the baseline between any two desired points by dragging the mouse from the start point and dropping it at the finish point Click on the Apply button
The results of Spectrum Analysis will be displayed on the spectrum
If you enlarge a desired part of a spectrum by using Spectra DisplayndashZooming and specify the desired baseline between two points you can obtain the baseline with greater precision You can also specify the baseline by inputting values in Baseline X Lower and X Upper input boxes You can select the following items Line color Color of lines
56 XM-1733027330-1QL
String Color Color of text Adjust Place in which text is to be printed selected from Left Center and Right Size Size of text selected from S M and L Peak Detect Peak position selected from Max Point 3 Points and 5 Points Plot Item Items to be displayed Shift String Lets you shift the text already written by dragging it
4
1
Turn on the Separation of Left Right button and then click on the Apply button
You will obtain different results on the left side and right side of the peak position
Spectra Search Spectra Search has two important functions One is a search function The other is a load function Using the search function you can display average correlation and other information about spectra judge to be similar in the Search result scroll window by using correlation coefficients from the start position to the finish position for the same crystal Using the load function you can also display the spectra that you have selected from the Search result scroll window The correlation coefficient between a spectrum and another one is 10 if the two are the same while the closer the coefficient is to 00 the less similar the two are The correlation coefficient obtained by calculation will be the same even if one or both are multiplied by a constant If the correlation coefficient is about 09 or more two spectra are similar experimentally However it is recommended that you judge similarity from the display by using the load function
Select Spectra Search from the Operation menu The Spectra Search window opens
XM-1733027330-1QL 57
Fig 53 Spectra Search window
Button Function
Search start positionndash User Group Sample Stage No
Specifies search start directory If there are many spectra for qualitative analysis specifythe start position by using the Group button to save search time Clicking on the Group button opens the Group window where you can specify group names In the same way clicking on the Sample button opens the Sample window where you can specify sample names
58 XM-1733027330-1QL
Fig 54 Group window
Button Function
Search condition ndashStageSpectra
Selecting Stage performs searches through samples Selecting Spectra performs searches through spectra
One Spectrum All spectra
When Stage is selected this function is available
L value (mm) Wave (A)Wave (nm)
Used when you specify the search range
Corr_coeff Correlation coefficient from 00 to 10
Start Pos End Pos Start position for calculation of correlation coefficient Finish position for calculation of correlation coefficient You can change the positions
Search result Scroll window to display the results of search
Search Starts search
Load Displays the spectrum selected from the Search result scroll window
Stop Stops search
Reset Resets correlation coefficient and the values of Start Pos and End Pos Clicking on this button also resets the spectrum presently displayed to the previous one
Selected List Click on this button to print the results of the search You can print only the spectra that you have selected from the Search result scroll window
Close Resets the spectra that are presently displayed and closes the Spectra Search window
XM-1733027330-1QL 59
44 Semi-Quantitative (Semi-Quant) Analysis Program In ordinary quantitative analyses quantitation results are corrected by measuring the intensities of peaks and backgrounds for each element Differing from the ordinary quantitative analyses the semi-quantitative analysis (Semi-Quant Analysis) program corrects quantitation results by using the spectral data Namely the intensities of the peaks and backgrounds for the elements identified in the qualitative analysis are obtained from the qualitative-analysis spectral data The ratio of the spectral peak intensity for each element to that of the characteristic X-rays for the pure element is calculated as the K-ratio
K-ratio = IunkIstd
where Iunk Intensity of the characteristic X-rays from an unknown sample Istd Intensity of the characteristic X-rays of a pure element
Based on this K-ratio ZAF correction is performed and the mass concentration of each element is printed together with the K-ratio This result can be used later to perform an off-line quantitative analysis (Summary) or it can also be recorrected by using the measured standard sample data The characteristic X-ray intensities of pure elements are calculated from the standard sensitivity curve obtained in advance At that time since their dependence on the accelerating voltage is also calculated the K-ratio for the qualitative analysis data measured from 5 kV to 30 kV (in 5 kV steps) can be calculated The standard sensitivity curves have been measured in our company for a large number of standard samples However there may exist slight differences in the measured curves depending on the instruments used Therefore using some standard samples measure and correct the standard sensitivity curves of some elements for each analyzing crystal and for each characteristic X-ray (Kα Lα and Mα) Once this correction has been done you need not repeat it each time you perform analysis
441 How to calculate X-ray intensities in the Semi-Quant Analysis
X-ray intensities in the Semi-Quant Analysis are calculated in the following way As the peak position the position at which the X-ray intensity is the strongest is selected after searching for it in the vicinity of the aimed characteristic X-rays As the background position the position at which the mean X-ray intensity having the lowest moving average of three points from a position a little apart from the peak position is selected These results are displayed as measurement conditions The search ranges of the peaks and backgrounds are defined for each analyzing crystal in the sqtcond file in the optepmaconfanal directory The results of the Semi-Quant Analysis are saved in the file named 1onq in the directory of the quantitative analysis
60 XM-1733027330-1QL
442 Using Semi-Quant Analysis results in off-line quantitative analysis
The results of the Semi-Quant Analysis can be utilized in the off-line quantitative analysis
Summary You can execute Summary in the Semi-Quant Analysis 1
2
3
1
2
3 4
Select ProcessmdashQuantitative AnalysismdashSummary from the EPMA Main Menu
The Function window for process opens Click on the Sample button
The Select Sample window opens Select Qnt for Semi-Quant Analysis
The remaining steps are the same as for ordinary quantitative analysis
In the Semi-Quant Analysis elements are different for each sample in many cases If you print the results of many samples it will be difficult to distinguish them since there are many elements To solve this problem use Mass order for printing If you select Qlw in place of Qnt you can obtain the list of identified elements when you have printed it
Off-line Correction
You can execute Off-line Correction of the analysis results obtained in the Semi-Quant Analysis
Select ProcessmdashQuantitative AnalysismdashOff-line Correction from the EPMA Main Menu
The Function window for off-line correction opens Click on the Sample button
The Select Sample window opens Select Qnt for Semi-Quant Analysis Set the conditions as follows
Specify the correction method and accelerating voltage used for measurement Specify the same elements as those used in the Semi-Quant Analysis Select the same X-rays channel and analyzing crystal as in the result of the Semi-Quant Analysis for the element to be measured Select appropriate standard samples if any When Cal-STD is selected as the standard sample for all elements the same result as in the Semi-Quant Analysis is obtained
For procedures for entering the conditions for the quantitative analysis refer to the separate operation manual of the Quantitative Analysis Program
After setting the above conditions click on Read Intensity amp Correction and the X-ray intensities obtained in the Semi-Quant Analysis will be displayed Then click on the Apply button and off-line correction will be executed
XM-1733027330-1QL 61
443 Correcting the standard sensitivity curve
The Semi-Quant Analysis program includes a program for correcting the standard sensitivity curve By using the standard sample installed in the microanalyzer the X-ray intensity coefficient (I) in the equation in which the atomic number is used as the variable can be obtained for each analyzing crystal and for each characteristic X-ray (Kα Lα and Mα) of each X-ray spectrometer Once this program has been executed you need not run it again
I = exp (a + bZ + cZ2 + dZ3
where I Intensity of characteristic X-rays (cps100 pA) Z Atomic number a b c d Coefficients
Combinations of the standard sample and characteristic X-rays to be used are defined in a file in the optepmacalisqt directory The coefficients obtained are saved in the sqtcoef file in the optepmacali directory together with the measured data The characteristic X-ray intensities of pure elements for each analyzing crystal and for each accelerating voltage are saved in a file in the optepmacalistd_int directory Follow the procedures in the sections below to execute correction of the standard sensitivity curve
Opening the Semi-Quant Calibration window
Select InitializemdashSemi-Quant Calibration from the EPMA Main Menu
Fig 55 Pull-down menu of the Initialize icon
The Semi-Quant Calibration window opens You can perform corrections in this window
62 XM-1733027330-1QL
Selecting analyzing crystals Select analyzing crystals whose standard sensitivity curves are to be corrected Click on the Crystal button in the Semi-Quant Calibration window
The Crystal and Channel window opens
If necessary click on the for Light elements button in the Crystal and Channel window then the Light Elements window opens
Fig 56 Crystal and Channel and Light Elements windows
Out of the analyzing crystals installed in the instrument the analyzing crystals whose standard sensitivity curves can be corrected will be displayed in the Crystal and Channel and Light Elements windows
By default all the crystals are selected If there are some analyzing crystals whose standard sensitivity curves you do not want to correct deselect their crystal buttons
XM-1733027330-1QL 63
Setting the stage positions for standard samples You have to enter the stage positions for standard samples prior to measurement 1
2
1
2
3
Click on the Stage button in the Semi-Quant Calibration window The Set Stage Stage Monitor and Memory windows open
Fig 57 Specifying the stage positions for standard samples
Specify the desired standard sample names and their stage positions
If stage positions have been already set you need not specify them
For the operating procedure refer to the instruction manual of the main unit
Executing measurements You execute measurement by using the following procedure
Click on the Measure button in the Semi-Quant Calibration window The Start Calibration window opens
Set the current to about 1 10mdash7 A in advance Although the accelerating voltage is automatically set to 20 kV but the current is not set automatically
Confirm all the conditions that you require to use then click on the OK button
Measurement begins If you click on the Cancel button the previous window will return
Measurement is performed for each analyzing crystal and the progress of the measurement is displayed on the screen
64 XM-1733027330-1QL
Stopping measurement
To stop measurement for any reason click on the Stop button To temporarily interrupt measurement click on the Pause button On completion of peak search measurement stops temporarily To restart the measurement click on the Pause button once again
Displaying measurement results
On completion of measurement with an analyzing crystal the correction coefficients and the calculated intensities of the characteristic X-rays of the pure elements are displayed The coefficients are displayed in units of cps100 pA The X-ray intensities for Kα Lα and Mα are displayed (vertical axis logarithmic scale in units of cpsμA horizontal axis atomic number)
Fig 58 Display of measurement results
XM-1733027330-1QL 65
Utility
Click on the Utility button in the Semi-Quant Calibration window The Utility pop-up window opens The following functions are included in Utility
Button Function
Reset spectra Individual spectrum windows can be enlarged or reduced by dragging the button at the lower right corner of each window Clicking on Reset spectra after enlarging or reducing the window will return it to the original size
Draw results Clicking on this item displays results of measurement on the computer display
Print results Clicking on this item prints the measured data and the intensity coefficients of the standard sensitivity curve
Check configuration Clicking on this item enables you to check the combination of the analyzing crystal and characteristic X-rays in measurement
Check pksk parameter Clicking on this item enables you to check the parameters for peak search Special care should be exercised in changing the parameters because the operation affects peak search and related operations in quantitative analysis
Smoothing Clicking on this item smoothes and displays the waveform for peak search
2nd derivative Clicking on this item displays the second derivative waveform of the peak search spectrum
Log scale Clicking on this item displays the peak search spectrum on a logarithmic scale
66 XM-1733027330-1QL
5 APPENDIX
Determining peak positions and intensities and identifying elements Using the procedures below this program detects the peaks of characteristic X-rays and identifies the elements for the detected peaks
Detecting peak positions
1 2 3
4
5
1 2
3 a
b
c
d
4
5
Smooth a spectrum by the Savitzky-Golay method Evaluate the second derivative of the smoothed spectrum Detect the peak positions from the second derivative waveform and deter-mine the background positions from the waveforms obtained after second differentiation and smoothing From the smoothed spectrum determine the peak intensity and the back-ground intensity If the difference between the peak intensity and the background intensity is too large to attribute to statistical variation judge that a peak of interest exists
Identifying elements
Detect peaks for each spectrum If any one of the Kα (1) Lα (1) and Mα (1) lines is detected assign the elements of interest to the B rank Further judge the elements of B rank as follows If ZKα min Z ZKβ min assign the elements of interest to the A rank Usually ZKα min=4 ZKβ min=17 If both a Kα (1) line and a K (1) line are found in the same spectrum assign the elements of interest to the A rank If both a Kα (1) line and a K (1) line are found in different spectra assign the elements of interest to the A rank If both an Lα (1) line and an L (1) line are found in the same spectrum assign the elements of interest to the A rank Similarly if both an Mα (1) line and an M (1) line are found in the same spectrum assign the elements of interest to the A rank
If any peaks of B-rank elements are superimposed on any peaks of charac-teristic X-rays of A-rank elements (usually of the first-order) exclude the B-rank elements from the elements to be identified If no A-rank element exists but only one B-rank element exists assign this B-rank element to the A rank
XM-1733027330-1QL 67
Expert identification of elements
This expert identification of elements is a reliable method of ratiocination based upon the knowledge base of experienced analysis specialists This method enables us to evaluate a level of confidence in the result of the element identification performed by using the above-mentioned element identifying method if it is applied for calculation The knowledge base has been created under the following conditions
Accelerating voltage 20 kV Probe current 10 to 500 nA Step 50 μm Sample time 50 ms or more Number of spectra 4 Analyzing crystal LIF PET TAP and STE Scanning range of spectrometer 65 mm to 250 mm (258 mm for TAP) Even if you cannot observe under the above conditions to some extent for some
reasons you can obtain good results since this program is created to avoid problems Of course it is best to meet the requirements as much as possible However when you specify elements to be identified set the spectrometer range to include the first-order X-rays (up to the second order if possible ) of α and of K L and M of the elements
In the results after execution of ID-Doctor the indication ID-Doctor is shown both at the area where elements are displayed in the Data Display window and just above the area where A-Rank and B-Rank elements are displayed Therefore you can easily distinguish the results obtained with the ID-Doctor from those obtained without the ID-Doctor The element identification executed by using this program is performed using the judgment method that imitates experienced analysis specialists the results are not absolutely correct Please use this ID-Doctor as a reference and keep it in mind that you the user of this program decide whether to accept the results or not
68 XM-1733027330-1QL
- XM-1733027330
-
- CONVENTIONS
- CONTENTS
- 1 GENERAL
- 2 SPECIFICATIONS
- 3 PROGRAM STRUCTURE
- 4 OPERATION
-
- 41 Preparation for Measurement
-
- 411 Setting group and sample names
- 412 Setting measurement conditions
- 413 Setting analysis positions
- 414 Loading measurement conditions
- 415 Storing measurement conditions
- 416 Printing measurement conditions and results
- 417 Additional Function
-
- 42 Measurement
-
- 421 Measurement under stored conditions (Preset mode)
- 422 Measurement under present instrument conditions (Survey mode)
- 423 Realtime display
-
- 43 Processing
-
- 431 Selecting sample names and processing methods
- 432 Operation menu
-
- 44 Semi-Quantitative (Semi-Quant) Analysis Program
-
- 441 How to calculate X-ray intensities in the Semi-Quant Analysis
- 442 Using Semi-Quant Analysis results in off-line quantitative analysis
- 443 Correcting the standard sensitivity curve
-
- 5 APPENDIX
-
- damy_tate
- damy_yoko
- fff
- instructions
- JEOL
- mekura
- CONTENTS
- contents

2
3
1
Click on the r [] button in the Ymax r Normalize window The r window opens as shown
Fig 24a r window
Enter the desired percentage in the input box of the r window by clicking on the number buttons in the r window then click on the Apply button of the Ymax r Normalize window
The maximum intensity of spectrum on display will be redisplayed as the percent-age of the full-scale value that you entered If the All button is selected in the Ymax r Normalize window the full-scale
percentage of all the spectra is set to the same value
Select Xmin mdash Ymax You can set the horizontal and vertical scales for spectra to the desired values The procedure is the same as for the Ymax r Normalize window
Select Spectra DisplaymdashXmin mdash Ymax from the Operation menu The Select Xmin ndash Ymax window opens
Fig 25 Select Xmin ndash Ymax window
XM-1733027330-1QL 31
2
3
Click on the Xmin Ymin Xmax or Ymax button in the Select Xmin mdash Ymax window
The Xmin Ymin Xmax or Ymax window opens Enter the desired values in the input box of the window by clicking on the number buttons in the window then click on the Apply button of the Select Xmin mdash Ymax window
The horizontal and vertical scales for spectra are set to the specified values If the All button is selected in the Select Xmin ndash Ymax window the scales of
all the spectra are set to the same values
Window Layout You can specify the layout of the Data display window by using this function
Select Spectra DisplaymdashWindow Layout from the Operation menu The Window Layout window opens
Fig 26 Window Layout window Window size Select the desired size from V Small Small Normal
and Maximum Horizontal layout Usually spectra are displayed vertically in a column If
you want to display the spectra horizontally in lines click on the Horizontal button and then enter the number of spectra to be shown horizontally in the Horizontal spc input box
Parameter display If you do not want to display parameters on the right side select Parameter OFF If you want to display them select Parameter ON
32 XM-1733027330-1QL
Fig 27 An example of the horizontal display of spectra in lines
Mixed Spectra Display
You can display spectra individually on different parts of the display or all together in one area Select Spectra DisplaymdashWindow Layout from the Operation menu
The Mixed Spectra Display window opens
Fig 28 Mixed Spectra Display window
XM-1733027330-1QL 33
If Spectrum Mode is Single spectra are displayed all together in one display area In the Single mode if you have selected Relative for Vertical Scale the full-scale value of the vertical axis becomes 100 the relative intensity of each spectrum is shown with the maximum value of each spectrum taken as 100 If you have selected Absolute for Vertical Scale spectra will be shown with the maximum value of all spectra taken as 100 The offset value of the Y-axis is displayed as the value of Base Offset when the maximum value of each spectrum is taken as 1 In the Single mode each spectrum is displayed on the same base line when the value of Base Offset is 00 However each spectrum is displayed on a different base line with the same base level when the value of Base Offset is 10
Spectrum Type
You can specify the style for displaying spectrum lines 1
2 3
Select Spectra DisplaymdashSpectrum Type from the Operation menu The Spectrum Type window opens
Fig 29 Spectrum Type and Spectrum windows
Select a spectrum number from the Spectrum Type window To specify the style for displaying spectrum lines select the desired items from the following list then click on the Apply button to display the spectra in the specified style
Style for displaying the line Vector Line Marker Symbols Bar Vertical bars Marker + Vector Symbols and line Vector + Bar Lines and vertical bars
34 XM-1733027330-1QL
Line type for Vector Solid Solid line Dash Dashed line Dot Dotted line Dash Dot Dashed line with a dot Dash Dot Dot Dashed line with two dots Long Dash Long dashed line Thickness of the line Thin Thin line Normal Normal line Thick Thick line
You can store recall and delete using the Load Save and Delete buttons
Spectrum Color You can change the color of the displayed spectra background and parameter area by using this function 1 Select Spectra DisplaymdashSpectrum Color from the Operation menu
The Spectrum Color window opens
Fig 30 Spectrum Color and Color windows
XM-1733027330-1QL 35
2 3
1
2 3
Select a spectrum number from the Spectrum Color window To specify the color for displaying spectra background and parameter areas select the desired items from the following list then click on the Apply button to display the color as desired
Items available for color display Spectrum Spectra Background Background Original Original spectra prior to calculation Parameter Fore Parameter characters Parameter Back Parameter background Buttons for operations More Lets you to specify the colors of Marker ID Element
Cursor and KLM lines You can store recall and delete by using Load Save and Delete buttons
Draw Mesh You can draw a grid as the background of spectra by using this function
Select Spectra DisplaymdashDraw Mesh from the Operation menu The Draw Mesh window opens
Fig 31 Draw Mesh window
Select a spectrum number from the Draw Mesh window To specify Scale Color and Line for the grid select the desired items from the following lists then click on the Apply button to display the grid as desired
Line type Solid Solid line Dash Dashed line Dot Dotted line Dash Dot Dashed line with a dot Dash Dot Dot Dashed line with two dots
36 XM-1733027330-1QL
Thickness of the line Thin Thin line Normal Normal line Thick Thick line Lines to draw Hor + Vert Horizontal and vertical lines Horizontal Horizontal lines Vertical Vertical lines None No lines
Display Axis
You can set the unit for the abscissa of the specified spectra by using this function The unit for the abscissa is always the same for all the spectra 1
2
1
Select Spectra DisplaymdashDisplay Axis from the Operation menu The Display Axis window opens
Fig 32 Display Axis window
To specify the desired item in the Display Axis window select Position mm Wave length A Wave length nm or Energy keV then click on the OK button
The abscissa for the spectra on the display changes as specified Wave order is useful for displaying the spectra in the original wavelength when high-order lines are displayed in such narrow range as chemical shift The function is effective only when the wavelength is specified as the abscissa
Kind of Assignment You can select the style for displaying element labels by using this function
Select Spectra DisplaymdashKind of Assignment from the Operation menu The Kind of Assignment window opens
XM-1733027330-1QL 37
Fig 33 Kind of Assignment window
2
1
Select Elements Elements X-ray Name or Elements X-ray Name Order then click on the OK button Elements Only element names are displayed Elements X-ray Name Element names and X-ray names are
displayed Elements X-ray Name Order Element names X-ray names and order
are displayed
Display Parameter You can specify which parameters to display in the parameter-display area of the Data display window by using this function
Select Spectra DisplaymdashDisplay Parameter from the Operation menu The Display Parameter window opens
Fig 34 Display Parameter window
38 XM-1733027330-1QL
2
1
2
Select the desired parameters then click on the OK button The specified parameters are displayed in the parameter-display area of the Data display window
If you select All the information of all the spectra is shown while if you select Single only the information of the specified spectrum is shown To change the size of the displayed characters select S M or L
An A-Rank Element is an element that is judged certain to exist and a B-Rank Element is an element that is judged possible though not certain to exist For the method of element identification refer to Chapter 5 ldquoAppendixrdquo of this instruction manual
Write Text
You can write text in the display area of spectra by using this function Select Spectra DisplaymdashWrite Text from the Operation menu
The Write Text window opens
Fig 35 Write Text window
Click on the spectrum on which you want to write text and then input the desired text in the input box of the Write Text window then click on the Write button
The text is displayed on the selected spectrum of the Data display window Color Selects the color of text Size Selects the character size of text from S M and L Clear Clears the input box
Shift Adjusts the position of the input text when you drag it Delete Deletes the text Click on this button and then select the text that you
want to delete from the list of texts Write Writes text on the selected spectrum
Save Saves the texts that you have written on spectra The texts will be displayed when you next open the spectra
XM-1733027330-1QL 39
Replace Spectrum You can replace the spectra that are being displayed by using this function 1
2
3
1
2
Select Spectra DisplaymdashReplace Spectrum from the Operation menu The Replace spectrum window opens
Fig 36 Replace spectrum window
Select the number of the spectrum to replace from the Replace spectrum window and then click on the Apply button
The Sample window opens
Refer to Fig 19 Sample window (for processing) Select the spectrum to replace from the Sample window
Reset Spectra
You can reset all the changes that you have made using all the items of the Spectra Display menus to their initial states if you use this function
Select Spectra DisplaymdashReset Spectra from the Operation menu The Reset Spectra window opens
Fig 37 Reset window
Select the number of the spectrum for resetting from the Reset window and then click on the Apply button
All the changes made for the selected spectrum will be cancelled
40 XM-1733027330-1QL
KLM Marker You can display identified elements in colors in the KLM Marker window 1
2
Select KLM Marker from the Operation menu The KLM Marker window opens
Element buttons
Element display
Fig 38 KLM Marker window
Click on the buttons of the desired element in the KLM Marker window
The positions and element names of the characteristic X-rays (Kα Kβ etc) for specified elements are displayed on the spectrum The following functions are available
Button Function
Element buttons Clicking on an element button displays KLM markers When you right-click another element button its KLM markers appear together with the previous ones You can specify the line type for the KLM markers in the Spectrum Type window and the color in the Spectrum Color window
Element display The name of the selected element is displayed Right-clicking on the display shows the name of the element to the right of the present one while left-clicking on the display shows the name of the element to the left of the present one
Arrow buttons
Clicking on the right arrow button selects the right element to the present one while clicking on the left arrow button selects the left element to the present one
Order Specifies the order of the X-rays You can specify from the first to the tenth
Min Int Specifies the minimum intensity of the KLM Markers The intensity to be specified is the theoretical intensity shown in the wavelength table It means the relative intensity when the intensity of the alpha line is taken as 100 When you specify 0 all the X-rays are shown
XM-1733027330-1QL 41
Button Function
Select KLM Selects the X-rays to be displayed from the K L and M lines Only highlighted X-rays are displayed It is useful for displaying specified X-rays
Lock To display the KLM Markers of multiple elements specify elements by right-clickings ( refer to the above Element buttons) You can lock the KLM Markers if you click on the Lock button then if you click on an element you can display its KLM Markers together with the locked ones To unlock the locked KLM Markers deselect Lock
Scale The scale for each X-ray height of KLM Markers is based on the theoretical intensity When an X-ray marker cannot be seen easily you can adjust the height of the KLM Markers by using the arrow-buttons to the right of the Scale button The same result can be obtained by dragging a point on the spectrum up or down
Set Adds the selected elements to the list of identification elements and displays element names at the position of each KLM Marker To label peaks use the Peak ID window
Delete Deletes the selected elements from the list of identification elements as well as all the element names When you want to delete element names one by one use the Peak ID window
Print Prints the information on the KLM Markers
Close Closes the KLM window
42 XM-1733027330-1QL
Peak ID The wavelength and intensity at the specified position of the spectrometer are displayed At the same time the possible names of characteristic X-rays near the specified position are listed 1
2
Select Peak ID from the Operation menu The Peak ID window opens
X-ray list
Wavelength display
Spectrum number
Fig 39 Peak ID window
Select any position from a spectrum in the Data display window The wavelength and intensity at the specified position of the spectrometer are displayed in the X-ray list of the Peak ID window At the same time the possible names of characteristic X-rays near the specified position are listed The identified elements and the elements corresponding to the displayed KLM Markers are displayed in different colors The following functions are available
XM-1733027330-1QL 43
Object Function
Spectrum number Specifies the desired spectrum You can also specify it by clicking on it
Wavelength display
Displays the wavelength and X-ray intensity at a position specified by clicking You can perform a fine adjustment of the cursor position by using the larr and rarr keys on the keyboard
X-ray list Displays the X-rays near the wavelength selected by clicking The information displayed is Element Name X ray Name Order Diff (distance from the selected position) and Int (theoretical X-ray intensity)
Order Specifies the order of the X-rays to be detected
Min Int Specifies the minimum theoretical intensity of the X-rays to be displayed
PrevNext ID Move the cursor to the peak positions whose elements were already identified The movement direction of Prev ID is toward lower wavelengths and that of Next ID is toward higer wavelengths The cursor jumps to the other end when it is moved beyond an end
Print Opens the Listing window and displays the data of the item selected from the X-ray list
Clear Clears the items that were specified for printing
Set After you have selected a line of an element in the X-ray list clicking on the Set button identifies the element and displays its peak label
Delete After you have selected an identified element in the X-ray list clicking on the Delete button deletes the peak label of the element
Shift ID Moves peak labels After you have clicked on the Shift ID button clicking near the label changes the shape of the cursor Then drag the label to move it To deselect this mode click on the Shift ID button once again
Any Length Measures the distance between two arbitrary points After you have clicked on the Any Length button click on two arbitrary points on a spectrum then the marker and distance between the points are displayed To deselect this mode click on the Any Length button once again
Close Closes the Peak ID window
Save ID Results
After you have changed the element name display on the spectrum by using Peak ID for example the element name can be saved as an A rank element 1
2
Select Save ID Results from the Operation menu The Save ID Results window opens
Fig 40 Save ID Results window
Click on the OK button in the Save ID Results window after you have changed the element name display on the spectrum by using Peak ID for example
44 XM-1733027330-1QL
The element name displayed on the spectrum will be saved as an A rank element in a file These data will be displayed automatically beginning with the next operation
Off-line ID
You can perform element identification once again 1
2
Select Off-line ID from the Operation menu The Off-line ID window opens
Fig 41 Off-line ID window
Specify the necessary conditions then click on the Apply button to perform element identification once again after
The ID-Doctor does not operate during off-line identification of element In element identification the specified order of X-rays is taken into account and if A rank only is selected only the labels for A rank elements are displayed after the identification If A amp B rank is selected all the labels are displayed after identification If a number other than zero is specified in the Min Int input box the labels for only the X-rays having the specified intensity or more are displayed after identi-fication
When the Close button is clicked on with the Orderndash0 button selected with Apply not selected the identified element names will not be displayed on the spectra in subsequent measurements
XM-1733027330-1QL 45
Spectra Calculation
Select Spectra Calculation from the Operation menu The Spectra Calculation window opens You can perform the arithmetic operations that are shown in the Spectra Calculation window
Fig 42 Spectra Calculation window
46 XM-1733027330-1QL
Smoothing
Select Spectra CalculationmdashSmoothing from the Operation menu The Smoothing window opens You can smooth the specified spectra using the Savitzky-Golay method
If you selected Manual you can assign a number of points to use in smoothing If you selected Result Only only the smoothed spectra are displayed whereas if you selected Original amp Result the spectra before smoothing are also displayed at the same time
Fig 43 Smoothing window
2nd Derivative
Select Spectra Calculationmdash2nd Derivative from the Operation menu The 2nd Derivative window opens You can find the second derivatives of the specified spectra using the Savitzky-Golay method
Quant Background
You can display the background position that is used in the quantitative analysis and correct the position while watching the corresponding spectra
Select Spectra CalculationmdashQuant Background from the Operation menu The Quant Background window opens
XM-1733027330-1QL 47
Fig 44 Quant Background window
The information displayed is No Elem (Crysta) Low Angle Position and High Angle You can select mm angstrom or nm as the unit If an element name is dimmed the corresponding spectra do not exist If you have selected Ignore channel you can search the spectra only by using crystal names If you have deselected the Ignore channel button you can search for spectra that match both crystal names and measuring channels If you select any of the displayed elements the background position will be shown on the spectra by markers To correct the position drag the markers to the desired positions If you want to enter the corrected items click on the Exec button and if you do not want to click on the Cancel button
48 XM-1733027330-1QL
Background Subtraction You can eliminate background components from the specified spectrum
Select Spectra CalculationmdashBackground Subtraction from the Operation menu
The Background Subtraction window opens
Fig 45 Background Subtraction window
Clicking on the Manual button performs spline interpolation for the specified points (normally multiple points) and forms a background curve Clicking on the Auto button performs background subtraction using the Sonne-veld method
Sub (SP mdash k)
You can subtract a constant (k) from the specified spectrum and display the spectra Select Spectra CalculationmdashSub (SP mdash k) from the Operation menu
The Sub (SP ndash k) window opens
Fig 46 Sub (SP ndash k) window
XM-1733027330-1QL 49
Add (SP + k)Multiply (SP k)Divide (SP k) You can add multiply or divide by a constant (k) in the specified spectrum and display the spectra
Select Spectra CalculationmdashAdd (SP + k) or Multiply (SP k) or Divide (SP k) from the Operation menu
The Add (SP + k)Multiply (SP k)Divide (SP k) window opens
Spectrum Shift You can shift spectra to the left or right
Select Spectra CalculationmdashSpectrum Shift from the Operation menu The Spectrum Shift window opens
Spectra Sub (SP1 mdash SP2)
You can subtract two spectra The result of the calculation can be displayed in another display area
Select Spectra CalculationmdashSpectra Sub (SP1 mdash SP2) from the Operation menu
The Spectra Sub (SP1 ndash SP2) window opens
Spectra Add (SP1 + SP2) You can add two spectra The result of the calculation can be displayed in another display area
Select Spectra CalculationmdashSpectra Add (SP1 + SP2) from the Operation menu
The Spectra add (SP1 + SP2) window opens
Dead-time Correction You can perform dead-time correction
Select Spectra CalculationmdashDead-time Correction from the Operation menu
The Dead-time Correction window opens
For the formulas for calculation refer to the separate instruction manual of the Quantitative Analysis Program
50 XM-1733027330-1QL
Result Store You can store displayed spectrum such as the results of a calculation in a file 1
2
Select Spectra CalculationmdashResult Store from the Operation menu The Result Store window opens
Fig 47 Result Store window
Type a crystal name in the Crystal Name input box and then click on the OK button
The spectrum that you have selected will be added to after the spectrum that was stored last At most twenty spectra can be stored If you want to delete a spectrum select it and type the slash () 8 times the
selected spectrum will be deleted
Reset You can undo arithmetic operations executed in Spectra Calculation
Select Spectra CalculationmdashReset from the Operation menu The settings will returned to their initial states
Redraw Spectra
You can display spectra again Select Redraw Spectra from the Operation menu
XM-1733027330-1QL 51
Print-out You can print conditions and results 1
2
3
Select Print-out from the Operation menu The Print-Out window opens
Select the items that you want to print and then click on the OK button The Listing window appears
Click on the Print button in the Listing window The output will be sent to the printer
Fig 48 Print-out window
52 XM-1733027330-1QL
Semi-Quant Analysis After you have obtained background intensity from an identified element and a qualitative spectrum you perform a calculation for correction based on the ratio to the X-ray intensity of a pure element (the K ratio) so as to obtain the result of a quantitative analysis Below is the method for calibrating the X-ray intensity of a pure element Select Semi-Quant Analysis from the Operation menu
The Semi-Quant Analysis window opens
Fig 49 Semi-Quant Analysis window
This window displays a list of the element names (in Element) X-ray names (in X-ray) and analyzing crystals (in Crystal) for the A-rank identified elements whose spectra show the strongest X-ray intensities
MetalOxide When the sample to be analyzed is a metal click on the Metal button When the sample is an oxide click on the Oxide button then enter values into the No of Oxygen and Valence input boxes
No of Oxygen input box You can input a value when Oxide is selected Type the number of oxygen atoms in the input box The number is to be used as the standard when the molecular formula is calculated after correction
XM-1733027330-1QL 53
Normalize Clicking on this button normalizes the mass concentration after correction the total mass concentration becomes 100 If you do not click on the Normalize button the current values are displayed as they are
Element X-ray Crystal and Valence in the list
Button Function
Element Adds and deletes arbitrary elements
X-ray Specifies the type (Kα Kβ Lα Lβ Mα and Mβ) of the X-rays in the scan range
Crystal Specifies one of the analyzing crystals displayed in the column when the characteristic X-rays span multiple spectra
Valence Specifies the valence of oxides The mass concentration of oxygen can be obtained by using the valence
Result window
You can specify where to display the results that you obtain
Button Function
New Text Opens a text window in which the results are displayed
Spectrum Displays the results in the spectrum display area if it is open
Parameter Displays the results in the parameter-display area
54 XM-1733027330-1QL
Fig 50 An example of Semi-Quant Analysis results
ID-Doctor You can perform element identification based upon the knowledge base of experienced analysis specialists If ID-Doctor is selected the element identification under ID-Doctor will be executed automatically after measurement 1
2
Select ID-Doctor from the Operation menu The ID-Doctor window opens
Fig 51 ID-Doctor window
Click on the OK button For details refer to Chapter 5 ldquoAppendixrdquo
XM-1733027330-1QL 55
Spectrum Analysis You can display on a spectrum the position height area FWHM (full width at half maximum) and height from the baseline of the specified spectrum peak You can print the spectrum after the spectrum analysis by using the Print button 1
2
3
Select Spectrum Analysis from the Operation menu The Spectrum Analysis window opens
Fig 52 Spectrum Analysis window
Specify the baseline between any two desired points by dragging the mouse from the start point and dropping it at the finish point Click on the Apply button
The results of Spectrum Analysis will be displayed on the spectrum
If you enlarge a desired part of a spectrum by using Spectra DisplayndashZooming and specify the desired baseline between two points you can obtain the baseline with greater precision You can also specify the baseline by inputting values in Baseline X Lower and X Upper input boxes You can select the following items Line color Color of lines
56 XM-1733027330-1QL
String Color Color of text Adjust Place in which text is to be printed selected from Left Center and Right Size Size of text selected from S M and L Peak Detect Peak position selected from Max Point 3 Points and 5 Points Plot Item Items to be displayed Shift String Lets you shift the text already written by dragging it
4
1
Turn on the Separation of Left Right button and then click on the Apply button
You will obtain different results on the left side and right side of the peak position
Spectra Search Spectra Search has two important functions One is a search function The other is a load function Using the search function you can display average correlation and other information about spectra judge to be similar in the Search result scroll window by using correlation coefficients from the start position to the finish position for the same crystal Using the load function you can also display the spectra that you have selected from the Search result scroll window The correlation coefficient between a spectrum and another one is 10 if the two are the same while the closer the coefficient is to 00 the less similar the two are The correlation coefficient obtained by calculation will be the same even if one or both are multiplied by a constant If the correlation coefficient is about 09 or more two spectra are similar experimentally However it is recommended that you judge similarity from the display by using the load function
Select Spectra Search from the Operation menu The Spectra Search window opens
XM-1733027330-1QL 57
Fig 53 Spectra Search window
Button Function
Search start positionndash User Group Sample Stage No
Specifies search start directory If there are many spectra for qualitative analysis specifythe start position by using the Group button to save search time Clicking on the Group button opens the Group window where you can specify group names In the same way clicking on the Sample button opens the Sample window where you can specify sample names
58 XM-1733027330-1QL
Fig 54 Group window
Button Function
Search condition ndashStageSpectra
Selecting Stage performs searches through samples Selecting Spectra performs searches through spectra
One Spectrum All spectra
When Stage is selected this function is available
L value (mm) Wave (A)Wave (nm)
Used when you specify the search range
Corr_coeff Correlation coefficient from 00 to 10
Start Pos End Pos Start position for calculation of correlation coefficient Finish position for calculation of correlation coefficient You can change the positions
Search result Scroll window to display the results of search
Search Starts search
Load Displays the spectrum selected from the Search result scroll window
Stop Stops search
Reset Resets correlation coefficient and the values of Start Pos and End Pos Clicking on this button also resets the spectrum presently displayed to the previous one
Selected List Click on this button to print the results of the search You can print only the spectra that you have selected from the Search result scroll window
Close Resets the spectra that are presently displayed and closes the Spectra Search window
XM-1733027330-1QL 59
44 Semi-Quantitative (Semi-Quant) Analysis Program In ordinary quantitative analyses quantitation results are corrected by measuring the intensities of peaks and backgrounds for each element Differing from the ordinary quantitative analyses the semi-quantitative analysis (Semi-Quant Analysis) program corrects quantitation results by using the spectral data Namely the intensities of the peaks and backgrounds for the elements identified in the qualitative analysis are obtained from the qualitative-analysis spectral data The ratio of the spectral peak intensity for each element to that of the characteristic X-rays for the pure element is calculated as the K-ratio
K-ratio = IunkIstd
where Iunk Intensity of the characteristic X-rays from an unknown sample Istd Intensity of the characteristic X-rays of a pure element
Based on this K-ratio ZAF correction is performed and the mass concentration of each element is printed together with the K-ratio This result can be used later to perform an off-line quantitative analysis (Summary) or it can also be recorrected by using the measured standard sample data The characteristic X-ray intensities of pure elements are calculated from the standard sensitivity curve obtained in advance At that time since their dependence on the accelerating voltage is also calculated the K-ratio for the qualitative analysis data measured from 5 kV to 30 kV (in 5 kV steps) can be calculated The standard sensitivity curves have been measured in our company for a large number of standard samples However there may exist slight differences in the measured curves depending on the instruments used Therefore using some standard samples measure and correct the standard sensitivity curves of some elements for each analyzing crystal and for each characteristic X-ray (Kα Lα and Mα) Once this correction has been done you need not repeat it each time you perform analysis
441 How to calculate X-ray intensities in the Semi-Quant Analysis
X-ray intensities in the Semi-Quant Analysis are calculated in the following way As the peak position the position at which the X-ray intensity is the strongest is selected after searching for it in the vicinity of the aimed characteristic X-rays As the background position the position at which the mean X-ray intensity having the lowest moving average of three points from a position a little apart from the peak position is selected These results are displayed as measurement conditions The search ranges of the peaks and backgrounds are defined for each analyzing crystal in the sqtcond file in the optepmaconfanal directory The results of the Semi-Quant Analysis are saved in the file named 1onq in the directory of the quantitative analysis
60 XM-1733027330-1QL
442 Using Semi-Quant Analysis results in off-line quantitative analysis
The results of the Semi-Quant Analysis can be utilized in the off-line quantitative analysis
Summary You can execute Summary in the Semi-Quant Analysis 1
2
3
1
2
3 4
Select ProcessmdashQuantitative AnalysismdashSummary from the EPMA Main Menu
The Function window for process opens Click on the Sample button
The Select Sample window opens Select Qnt for Semi-Quant Analysis
The remaining steps are the same as for ordinary quantitative analysis
In the Semi-Quant Analysis elements are different for each sample in many cases If you print the results of many samples it will be difficult to distinguish them since there are many elements To solve this problem use Mass order for printing If you select Qlw in place of Qnt you can obtain the list of identified elements when you have printed it
Off-line Correction
You can execute Off-line Correction of the analysis results obtained in the Semi-Quant Analysis
Select ProcessmdashQuantitative AnalysismdashOff-line Correction from the EPMA Main Menu
The Function window for off-line correction opens Click on the Sample button
The Select Sample window opens Select Qnt for Semi-Quant Analysis Set the conditions as follows
Specify the correction method and accelerating voltage used for measurement Specify the same elements as those used in the Semi-Quant Analysis Select the same X-rays channel and analyzing crystal as in the result of the Semi-Quant Analysis for the element to be measured Select appropriate standard samples if any When Cal-STD is selected as the standard sample for all elements the same result as in the Semi-Quant Analysis is obtained
For procedures for entering the conditions for the quantitative analysis refer to the separate operation manual of the Quantitative Analysis Program
After setting the above conditions click on Read Intensity amp Correction and the X-ray intensities obtained in the Semi-Quant Analysis will be displayed Then click on the Apply button and off-line correction will be executed
XM-1733027330-1QL 61
443 Correcting the standard sensitivity curve
The Semi-Quant Analysis program includes a program for correcting the standard sensitivity curve By using the standard sample installed in the microanalyzer the X-ray intensity coefficient (I) in the equation in which the atomic number is used as the variable can be obtained for each analyzing crystal and for each characteristic X-ray (Kα Lα and Mα) of each X-ray spectrometer Once this program has been executed you need not run it again
I = exp (a + bZ + cZ2 + dZ3
where I Intensity of characteristic X-rays (cps100 pA) Z Atomic number a b c d Coefficients
Combinations of the standard sample and characteristic X-rays to be used are defined in a file in the optepmacalisqt directory The coefficients obtained are saved in the sqtcoef file in the optepmacali directory together with the measured data The characteristic X-ray intensities of pure elements for each analyzing crystal and for each accelerating voltage are saved in a file in the optepmacalistd_int directory Follow the procedures in the sections below to execute correction of the standard sensitivity curve
Opening the Semi-Quant Calibration window
Select InitializemdashSemi-Quant Calibration from the EPMA Main Menu
Fig 55 Pull-down menu of the Initialize icon
The Semi-Quant Calibration window opens You can perform corrections in this window
62 XM-1733027330-1QL
Selecting analyzing crystals Select analyzing crystals whose standard sensitivity curves are to be corrected Click on the Crystal button in the Semi-Quant Calibration window
The Crystal and Channel window opens
If necessary click on the for Light elements button in the Crystal and Channel window then the Light Elements window opens
Fig 56 Crystal and Channel and Light Elements windows
Out of the analyzing crystals installed in the instrument the analyzing crystals whose standard sensitivity curves can be corrected will be displayed in the Crystal and Channel and Light Elements windows
By default all the crystals are selected If there are some analyzing crystals whose standard sensitivity curves you do not want to correct deselect their crystal buttons
XM-1733027330-1QL 63
Setting the stage positions for standard samples You have to enter the stage positions for standard samples prior to measurement 1
2
1
2
3
Click on the Stage button in the Semi-Quant Calibration window The Set Stage Stage Monitor and Memory windows open
Fig 57 Specifying the stage positions for standard samples
Specify the desired standard sample names and their stage positions
If stage positions have been already set you need not specify them
For the operating procedure refer to the instruction manual of the main unit
Executing measurements You execute measurement by using the following procedure
Click on the Measure button in the Semi-Quant Calibration window The Start Calibration window opens
Set the current to about 1 10mdash7 A in advance Although the accelerating voltage is automatically set to 20 kV but the current is not set automatically
Confirm all the conditions that you require to use then click on the OK button
Measurement begins If you click on the Cancel button the previous window will return
Measurement is performed for each analyzing crystal and the progress of the measurement is displayed on the screen
64 XM-1733027330-1QL
Stopping measurement
To stop measurement for any reason click on the Stop button To temporarily interrupt measurement click on the Pause button On completion of peak search measurement stops temporarily To restart the measurement click on the Pause button once again
Displaying measurement results
On completion of measurement with an analyzing crystal the correction coefficients and the calculated intensities of the characteristic X-rays of the pure elements are displayed The coefficients are displayed in units of cps100 pA The X-ray intensities for Kα Lα and Mα are displayed (vertical axis logarithmic scale in units of cpsμA horizontal axis atomic number)
Fig 58 Display of measurement results
XM-1733027330-1QL 65
Utility
Click on the Utility button in the Semi-Quant Calibration window The Utility pop-up window opens The following functions are included in Utility
Button Function
Reset spectra Individual spectrum windows can be enlarged or reduced by dragging the button at the lower right corner of each window Clicking on Reset spectra after enlarging or reducing the window will return it to the original size
Draw results Clicking on this item displays results of measurement on the computer display
Print results Clicking on this item prints the measured data and the intensity coefficients of the standard sensitivity curve
Check configuration Clicking on this item enables you to check the combination of the analyzing crystal and characteristic X-rays in measurement
Check pksk parameter Clicking on this item enables you to check the parameters for peak search Special care should be exercised in changing the parameters because the operation affects peak search and related operations in quantitative analysis
Smoothing Clicking on this item smoothes and displays the waveform for peak search
2nd derivative Clicking on this item displays the second derivative waveform of the peak search spectrum
Log scale Clicking on this item displays the peak search spectrum on a logarithmic scale
66 XM-1733027330-1QL
5 APPENDIX
Determining peak positions and intensities and identifying elements Using the procedures below this program detects the peaks of characteristic X-rays and identifies the elements for the detected peaks
Detecting peak positions
1 2 3
4
5
1 2
3 a
b
c
d
4
5
Smooth a spectrum by the Savitzky-Golay method Evaluate the second derivative of the smoothed spectrum Detect the peak positions from the second derivative waveform and deter-mine the background positions from the waveforms obtained after second differentiation and smoothing From the smoothed spectrum determine the peak intensity and the back-ground intensity If the difference between the peak intensity and the background intensity is too large to attribute to statistical variation judge that a peak of interest exists
Identifying elements
Detect peaks for each spectrum If any one of the Kα (1) Lα (1) and Mα (1) lines is detected assign the elements of interest to the B rank Further judge the elements of B rank as follows If ZKα min Z ZKβ min assign the elements of interest to the A rank Usually ZKα min=4 ZKβ min=17 If both a Kα (1) line and a K (1) line are found in the same spectrum assign the elements of interest to the A rank If both a Kα (1) line and a K (1) line are found in different spectra assign the elements of interest to the A rank If both an Lα (1) line and an L (1) line are found in the same spectrum assign the elements of interest to the A rank Similarly if both an Mα (1) line and an M (1) line are found in the same spectrum assign the elements of interest to the A rank
If any peaks of B-rank elements are superimposed on any peaks of charac-teristic X-rays of A-rank elements (usually of the first-order) exclude the B-rank elements from the elements to be identified If no A-rank element exists but only one B-rank element exists assign this B-rank element to the A rank
XM-1733027330-1QL 67
Expert identification of elements
This expert identification of elements is a reliable method of ratiocination based upon the knowledge base of experienced analysis specialists This method enables us to evaluate a level of confidence in the result of the element identification performed by using the above-mentioned element identifying method if it is applied for calculation The knowledge base has been created under the following conditions
Accelerating voltage 20 kV Probe current 10 to 500 nA Step 50 μm Sample time 50 ms or more Number of spectra 4 Analyzing crystal LIF PET TAP and STE Scanning range of spectrometer 65 mm to 250 mm (258 mm for TAP) Even if you cannot observe under the above conditions to some extent for some
reasons you can obtain good results since this program is created to avoid problems Of course it is best to meet the requirements as much as possible However when you specify elements to be identified set the spectrometer range to include the first-order X-rays (up to the second order if possible ) of α and of K L and M of the elements
In the results after execution of ID-Doctor the indication ID-Doctor is shown both at the area where elements are displayed in the Data Display window and just above the area where A-Rank and B-Rank elements are displayed Therefore you can easily distinguish the results obtained with the ID-Doctor from those obtained without the ID-Doctor The element identification executed by using this program is performed using the judgment method that imitates experienced analysis specialists the results are not absolutely correct Please use this ID-Doctor as a reference and keep it in mind that you the user of this program decide whether to accept the results or not
68 XM-1733027330-1QL
- XM-1733027330
-
- CONVENTIONS
- CONTENTS
- 1 GENERAL
- 2 SPECIFICATIONS
- 3 PROGRAM STRUCTURE
- 4 OPERATION
-
- 41 Preparation for Measurement
-
- 411 Setting group and sample names
- 412 Setting measurement conditions
- 413 Setting analysis positions
- 414 Loading measurement conditions
- 415 Storing measurement conditions
- 416 Printing measurement conditions and results
- 417 Additional Function
-
- 42 Measurement
-
- 421 Measurement under stored conditions (Preset mode)
- 422 Measurement under present instrument conditions (Survey mode)
- 423 Realtime display
-
- 43 Processing
-
- 431 Selecting sample names and processing methods
- 432 Operation menu
-
- 44 Semi-Quantitative (Semi-Quant) Analysis Program
-
- 441 How to calculate X-ray intensities in the Semi-Quant Analysis
- 442 Using Semi-Quant Analysis results in off-line quantitative analysis
- 443 Correcting the standard sensitivity curve
-
- 5 APPENDIX
-
- damy_tate
- damy_yoko
- fff
- instructions
- JEOL
- mekura
- CONTENTS
- contents

2
3
Click on the Xmin Ymin Xmax or Ymax button in the Select Xmin mdash Ymax window
The Xmin Ymin Xmax or Ymax window opens Enter the desired values in the input box of the window by clicking on the number buttons in the window then click on the Apply button of the Select Xmin mdash Ymax window
The horizontal and vertical scales for spectra are set to the specified values If the All button is selected in the Select Xmin ndash Ymax window the scales of
all the spectra are set to the same values
Window Layout You can specify the layout of the Data display window by using this function
Select Spectra DisplaymdashWindow Layout from the Operation menu The Window Layout window opens
Fig 26 Window Layout window Window size Select the desired size from V Small Small Normal
and Maximum Horizontal layout Usually spectra are displayed vertically in a column If
you want to display the spectra horizontally in lines click on the Horizontal button and then enter the number of spectra to be shown horizontally in the Horizontal spc input box
Parameter display If you do not want to display parameters on the right side select Parameter OFF If you want to display them select Parameter ON
32 XM-1733027330-1QL
Fig 27 An example of the horizontal display of spectra in lines
Mixed Spectra Display
You can display spectra individually on different parts of the display or all together in one area Select Spectra DisplaymdashWindow Layout from the Operation menu
The Mixed Spectra Display window opens
Fig 28 Mixed Spectra Display window
XM-1733027330-1QL 33
If Spectrum Mode is Single spectra are displayed all together in one display area In the Single mode if you have selected Relative for Vertical Scale the full-scale value of the vertical axis becomes 100 the relative intensity of each spectrum is shown with the maximum value of each spectrum taken as 100 If you have selected Absolute for Vertical Scale spectra will be shown with the maximum value of all spectra taken as 100 The offset value of the Y-axis is displayed as the value of Base Offset when the maximum value of each spectrum is taken as 1 In the Single mode each spectrum is displayed on the same base line when the value of Base Offset is 00 However each spectrum is displayed on a different base line with the same base level when the value of Base Offset is 10
Spectrum Type
You can specify the style for displaying spectrum lines 1
2 3
Select Spectra DisplaymdashSpectrum Type from the Operation menu The Spectrum Type window opens
Fig 29 Spectrum Type and Spectrum windows
Select a spectrum number from the Spectrum Type window To specify the style for displaying spectrum lines select the desired items from the following list then click on the Apply button to display the spectra in the specified style
Style for displaying the line Vector Line Marker Symbols Bar Vertical bars Marker + Vector Symbols and line Vector + Bar Lines and vertical bars
34 XM-1733027330-1QL
Line type for Vector Solid Solid line Dash Dashed line Dot Dotted line Dash Dot Dashed line with a dot Dash Dot Dot Dashed line with two dots Long Dash Long dashed line Thickness of the line Thin Thin line Normal Normal line Thick Thick line
You can store recall and delete using the Load Save and Delete buttons
Spectrum Color You can change the color of the displayed spectra background and parameter area by using this function 1 Select Spectra DisplaymdashSpectrum Color from the Operation menu
The Spectrum Color window opens
Fig 30 Spectrum Color and Color windows
XM-1733027330-1QL 35
2 3
1
2 3
Select a spectrum number from the Spectrum Color window To specify the color for displaying spectra background and parameter areas select the desired items from the following list then click on the Apply button to display the color as desired
Items available for color display Spectrum Spectra Background Background Original Original spectra prior to calculation Parameter Fore Parameter characters Parameter Back Parameter background Buttons for operations More Lets you to specify the colors of Marker ID Element
Cursor and KLM lines You can store recall and delete by using Load Save and Delete buttons
Draw Mesh You can draw a grid as the background of spectra by using this function
Select Spectra DisplaymdashDraw Mesh from the Operation menu The Draw Mesh window opens
Fig 31 Draw Mesh window
Select a spectrum number from the Draw Mesh window To specify Scale Color and Line for the grid select the desired items from the following lists then click on the Apply button to display the grid as desired
Line type Solid Solid line Dash Dashed line Dot Dotted line Dash Dot Dashed line with a dot Dash Dot Dot Dashed line with two dots
36 XM-1733027330-1QL
Thickness of the line Thin Thin line Normal Normal line Thick Thick line Lines to draw Hor + Vert Horizontal and vertical lines Horizontal Horizontal lines Vertical Vertical lines None No lines
Display Axis
You can set the unit for the abscissa of the specified spectra by using this function The unit for the abscissa is always the same for all the spectra 1
2
1
Select Spectra DisplaymdashDisplay Axis from the Operation menu The Display Axis window opens
Fig 32 Display Axis window
To specify the desired item in the Display Axis window select Position mm Wave length A Wave length nm or Energy keV then click on the OK button
The abscissa for the spectra on the display changes as specified Wave order is useful for displaying the spectra in the original wavelength when high-order lines are displayed in such narrow range as chemical shift The function is effective only when the wavelength is specified as the abscissa
Kind of Assignment You can select the style for displaying element labels by using this function
Select Spectra DisplaymdashKind of Assignment from the Operation menu The Kind of Assignment window opens
XM-1733027330-1QL 37
Fig 33 Kind of Assignment window
2
1
Select Elements Elements X-ray Name or Elements X-ray Name Order then click on the OK button Elements Only element names are displayed Elements X-ray Name Element names and X-ray names are
displayed Elements X-ray Name Order Element names X-ray names and order
are displayed
Display Parameter You can specify which parameters to display in the parameter-display area of the Data display window by using this function
Select Spectra DisplaymdashDisplay Parameter from the Operation menu The Display Parameter window opens
Fig 34 Display Parameter window
38 XM-1733027330-1QL
2
1
2
Select the desired parameters then click on the OK button The specified parameters are displayed in the parameter-display area of the Data display window
If you select All the information of all the spectra is shown while if you select Single only the information of the specified spectrum is shown To change the size of the displayed characters select S M or L
An A-Rank Element is an element that is judged certain to exist and a B-Rank Element is an element that is judged possible though not certain to exist For the method of element identification refer to Chapter 5 ldquoAppendixrdquo of this instruction manual
Write Text
You can write text in the display area of spectra by using this function Select Spectra DisplaymdashWrite Text from the Operation menu
The Write Text window opens
Fig 35 Write Text window
Click on the spectrum on which you want to write text and then input the desired text in the input box of the Write Text window then click on the Write button
The text is displayed on the selected spectrum of the Data display window Color Selects the color of text Size Selects the character size of text from S M and L Clear Clears the input box
Shift Adjusts the position of the input text when you drag it Delete Deletes the text Click on this button and then select the text that you
want to delete from the list of texts Write Writes text on the selected spectrum
Save Saves the texts that you have written on spectra The texts will be displayed when you next open the spectra
XM-1733027330-1QL 39
Replace Spectrum You can replace the spectra that are being displayed by using this function 1
2
3
1
2
Select Spectra DisplaymdashReplace Spectrum from the Operation menu The Replace spectrum window opens
Fig 36 Replace spectrum window
Select the number of the spectrum to replace from the Replace spectrum window and then click on the Apply button
The Sample window opens
Refer to Fig 19 Sample window (for processing) Select the spectrum to replace from the Sample window
Reset Spectra
You can reset all the changes that you have made using all the items of the Spectra Display menus to their initial states if you use this function
Select Spectra DisplaymdashReset Spectra from the Operation menu The Reset Spectra window opens
Fig 37 Reset window
Select the number of the spectrum for resetting from the Reset window and then click on the Apply button
All the changes made for the selected spectrum will be cancelled
40 XM-1733027330-1QL
KLM Marker You can display identified elements in colors in the KLM Marker window 1
2
Select KLM Marker from the Operation menu The KLM Marker window opens
Element buttons
Element display
Fig 38 KLM Marker window
Click on the buttons of the desired element in the KLM Marker window
The positions and element names of the characteristic X-rays (Kα Kβ etc) for specified elements are displayed on the spectrum The following functions are available
Button Function
Element buttons Clicking on an element button displays KLM markers When you right-click another element button its KLM markers appear together with the previous ones You can specify the line type for the KLM markers in the Spectrum Type window and the color in the Spectrum Color window
Element display The name of the selected element is displayed Right-clicking on the display shows the name of the element to the right of the present one while left-clicking on the display shows the name of the element to the left of the present one
Arrow buttons
Clicking on the right arrow button selects the right element to the present one while clicking on the left arrow button selects the left element to the present one
Order Specifies the order of the X-rays You can specify from the first to the tenth
Min Int Specifies the minimum intensity of the KLM Markers The intensity to be specified is the theoretical intensity shown in the wavelength table It means the relative intensity when the intensity of the alpha line is taken as 100 When you specify 0 all the X-rays are shown
XM-1733027330-1QL 41
Button Function
Select KLM Selects the X-rays to be displayed from the K L and M lines Only highlighted X-rays are displayed It is useful for displaying specified X-rays
Lock To display the KLM Markers of multiple elements specify elements by right-clickings ( refer to the above Element buttons) You can lock the KLM Markers if you click on the Lock button then if you click on an element you can display its KLM Markers together with the locked ones To unlock the locked KLM Markers deselect Lock
Scale The scale for each X-ray height of KLM Markers is based on the theoretical intensity When an X-ray marker cannot be seen easily you can adjust the height of the KLM Markers by using the arrow-buttons to the right of the Scale button The same result can be obtained by dragging a point on the spectrum up or down
Set Adds the selected elements to the list of identification elements and displays element names at the position of each KLM Marker To label peaks use the Peak ID window
Delete Deletes the selected elements from the list of identification elements as well as all the element names When you want to delete element names one by one use the Peak ID window
Print Prints the information on the KLM Markers
Close Closes the KLM window
42 XM-1733027330-1QL
Peak ID The wavelength and intensity at the specified position of the spectrometer are displayed At the same time the possible names of characteristic X-rays near the specified position are listed 1
2
Select Peak ID from the Operation menu The Peak ID window opens
X-ray list
Wavelength display
Spectrum number
Fig 39 Peak ID window
Select any position from a spectrum in the Data display window The wavelength and intensity at the specified position of the spectrometer are displayed in the X-ray list of the Peak ID window At the same time the possible names of characteristic X-rays near the specified position are listed The identified elements and the elements corresponding to the displayed KLM Markers are displayed in different colors The following functions are available
XM-1733027330-1QL 43
Object Function
Spectrum number Specifies the desired spectrum You can also specify it by clicking on it
Wavelength display
Displays the wavelength and X-ray intensity at a position specified by clicking You can perform a fine adjustment of the cursor position by using the larr and rarr keys on the keyboard
X-ray list Displays the X-rays near the wavelength selected by clicking The information displayed is Element Name X ray Name Order Diff (distance from the selected position) and Int (theoretical X-ray intensity)
Order Specifies the order of the X-rays to be detected
Min Int Specifies the minimum theoretical intensity of the X-rays to be displayed
PrevNext ID Move the cursor to the peak positions whose elements were already identified The movement direction of Prev ID is toward lower wavelengths and that of Next ID is toward higer wavelengths The cursor jumps to the other end when it is moved beyond an end
Print Opens the Listing window and displays the data of the item selected from the X-ray list
Clear Clears the items that were specified for printing
Set After you have selected a line of an element in the X-ray list clicking on the Set button identifies the element and displays its peak label
Delete After you have selected an identified element in the X-ray list clicking on the Delete button deletes the peak label of the element
Shift ID Moves peak labels After you have clicked on the Shift ID button clicking near the label changes the shape of the cursor Then drag the label to move it To deselect this mode click on the Shift ID button once again
Any Length Measures the distance between two arbitrary points After you have clicked on the Any Length button click on two arbitrary points on a spectrum then the marker and distance between the points are displayed To deselect this mode click on the Any Length button once again
Close Closes the Peak ID window
Save ID Results
After you have changed the element name display on the spectrum by using Peak ID for example the element name can be saved as an A rank element 1
2
Select Save ID Results from the Operation menu The Save ID Results window opens
Fig 40 Save ID Results window
Click on the OK button in the Save ID Results window after you have changed the element name display on the spectrum by using Peak ID for example
44 XM-1733027330-1QL
The element name displayed on the spectrum will be saved as an A rank element in a file These data will be displayed automatically beginning with the next operation
Off-line ID
You can perform element identification once again 1
2
Select Off-line ID from the Operation menu The Off-line ID window opens
Fig 41 Off-line ID window
Specify the necessary conditions then click on the Apply button to perform element identification once again after
The ID-Doctor does not operate during off-line identification of element In element identification the specified order of X-rays is taken into account and if A rank only is selected only the labels for A rank elements are displayed after the identification If A amp B rank is selected all the labels are displayed after identification If a number other than zero is specified in the Min Int input box the labels for only the X-rays having the specified intensity or more are displayed after identi-fication
When the Close button is clicked on with the Orderndash0 button selected with Apply not selected the identified element names will not be displayed on the spectra in subsequent measurements
XM-1733027330-1QL 45
Spectra Calculation
Select Spectra Calculation from the Operation menu The Spectra Calculation window opens You can perform the arithmetic operations that are shown in the Spectra Calculation window
Fig 42 Spectra Calculation window
46 XM-1733027330-1QL
Smoothing
Select Spectra CalculationmdashSmoothing from the Operation menu The Smoothing window opens You can smooth the specified spectra using the Savitzky-Golay method
If you selected Manual you can assign a number of points to use in smoothing If you selected Result Only only the smoothed spectra are displayed whereas if you selected Original amp Result the spectra before smoothing are also displayed at the same time
Fig 43 Smoothing window
2nd Derivative
Select Spectra Calculationmdash2nd Derivative from the Operation menu The 2nd Derivative window opens You can find the second derivatives of the specified spectra using the Savitzky-Golay method
Quant Background
You can display the background position that is used in the quantitative analysis and correct the position while watching the corresponding spectra
Select Spectra CalculationmdashQuant Background from the Operation menu The Quant Background window opens
XM-1733027330-1QL 47
Fig 44 Quant Background window
The information displayed is No Elem (Crysta) Low Angle Position and High Angle You can select mm angstrom or nm as the unit If an element name is dimmed the corresponding spectra do not exist If you have selected Ignore channel you can search the spectra only by using crystal names If you have deselected the Ignore channel button you can search for spectra that match both crystal names and measuring channels If you select any of the displayed elements the background position will be shown on the spectra by markers To correct the position drag the markers to the desired positions If you want to enter the corrected items click on the Exec button and if you do not want to click on the Cancel button
48 XM-1733027330-1QL
Background Subtraction You can eliminate background components from the specified spectrum
Select Spectra CalculationmdashBackground Subtraction from the Operation menu
The Background Subtraction window opens
Fig 45 Background Subtraction window
Clicking on the Manual button performs spline interpolation for the specified points (normally multiple points) and forms a background curve Clicking on the Auto button performs background subtraction using the Sonne-veld method
Sub (SP mdash k)
You can subtract a constant (k) from the specified spectrum and display the spectra Select Spectra CalculationmdashSub (SP mdash k) from the Operation menu
The Sub (SP ndash k) window opens
Fig 46 Sub (SP ndash k) window
XM-1733027330-1QL 49
Add (SP + k)Multiply (SP k)Divide (SP k) You can add multiply or divide by a constant (k) in the specified spectrum and display the spectra
Select Spectra CalculationmdashAdd (SP + k) or Multiply (SP k) or Divide (SP k) from the Operation menu
The Add (SP + k)Multiply (SP k)Divide (SP k) window opens
Spectrum Shift You can shift spectra to the left or right
Select Spectra CalculationmdashSpectrum Shift from the Operation menu The Spectrum Shift window opens
Spectra Sub (SP1 mdash SP2)
You can subtract two spectra The result of the calculation can be displayed in another display area
Select Spectra CalculationmdashSpectra Sub (SP1 mdash SP2) from the Operation menu
The Spectra Sub (SP1 ndash SP2) window opens
Spectra Add (SP1 + SP2) You can add two spectra The result of the calculation can be displayed in another display area
Select Spectra CalculationmdashSpectra Add (SP1 + SP2) from the Operation menu
The Spectra add (SP1 + SP2) window opens
Dead-time Correction You can perform dead-time correction
Select Spectra CalculationmdashDead-time Correction from the Operation menu
The Dead-time Correction window opens
For the formulas for calculation refer to the separate instruction manual of the Quantitative Analysis Program
50 XM-1733027330-1QL
Result Store You can store displayed spectrum such as the results of a calculation in a file 1
2
Select Spectra CalculationmdashResult Store from the Operation menu The Result Store window opens
Fig 47 Result Store window
Type a crystal name in the Crystal Name input box and then click on the OK button
The spectrum that you have selected will be added to after the spectrum that was stored last At most twenty spectra can be stored If you want to delete a spectrum select it and type the slash () 8 times the
selected spectrum will be deleted
Reset You can undo arithmetic operations executed in Spectra Calculation
Select Spectra CalculationmdashReset from the Operation menu The settings will returned to their initial states
Redraw Spectra
You can display spectra again Select Redraw Spectra from the Operation menu
XM-1733027330-1QL 51
Print-out You can print conditions and results 1
2
3
Select Print-out from the Operation menu The Print-Out window opens
Select the items that you want to print and then click on the OK button The Listing window appears
Click on the Print button in the Listing window The output will be sent to the printer
Fig 48 Print-out window
52 XM-1733027330-1QL
Semi-Quant Analysis After you have obtained background intensity from an identified element and a qualitative spectrum you perform a calculation for correction based on the ratio to the X-ray intensity of a pure element (the K ratio) so as to obtain the result of a quantitative analysis Below is the method for calibrating the X-ray intensity of a pure element Select Semi-Quant Analysis from the Operation menu
The Semi-Quant Analysis window opens
Fig 49 Semi-Quant Analysis window
This window displays a list of the element names (in Element) X-ray names (in X-ray) and analyzing crystals (in Crystal) for the A-rank identified elements whose spectra show the strongest X-ray intensities
MetalOxide When the sample to be analyzed is a metal click on the Metal button When the sample is an oxide click on the Oxide button then enter values into the No of Oxygen and Valence input boxes
No of Oxygen input box You can input a value when Oxide is selected Type the number of oxygen atoms in the input box The number is to be used as the standard when the molecular formula is calculated after correction
XM-1733027330-1QL 53
Normalize Clicking on this button normalizes the mass concentration after correction the total mass concentration becomes 100 If you do not click on the Normalize button the current values are displayed as they are
Element X-ray Crystal and Valence in the list
Button Function
Element Adds and deletes arbitrary elements
X-ray Specifies the type (Kα Kβ Lα Lβ Mα and Mβ) of the X-rays in the scan range
Crystal Specifies one of the analyzing crystals displayed in the column when the characteristic X-rays span multiple spectra
Valence Specifies the valence of oxides The mass concentration of oxygen can be obtained by using the valence
Result window
You can specify where to display the results that you obtain
Button Function
New Text Opens a text window in which the results are displayed
Spectrum Displays the results in the spectrum display area if it is open
Parameter Displays the results in the parameter-display area
54 XM-1733027330-1QL
Fig 50 An example of Semi-Quant Analysis results
ID-Doctor You can perform element identification based upon the knowledge base of experienced analysis specialists If ID-Doctor is selected the element identification under ID-Doctor will be executed automatically after measurement 1
2
Select ID-Doctor from the Operation menu The ID-Doctor window opens
Fig 51 ID-Doctor window
Click on the OK button For details refer to Chapter 5 ldquoAppendixrdquo
XM-1733027330-1QL 55
Spectrum Analysis You can display on a spectrum the position height area FWHM (full width at half maximum) and height from the baseline of the specified spectrum peak You can print the spectrum after the spectrum analysis by using the Print button 1
2
3
Select Spectrum Analysis from the Operation menu The Spectrum Analysis window opens
Fig 52 Spectrum Analysis window
Specify the baseline between any two desired points by dragging the mouse from the start point and dropping it at the finish point Click on the Apply button
The results of Spectrum Analysis will be displayed on the spectrum
If you enlarge a desired part of a spectrum by using Spectra DisplayndashZooming and specify the desired baseline between two points you can obtain the baseline with greater precision You can also specify the baseline by inputting values in Baseline X Lower and X Upper input boxes You can select the following items Line color Color of lines
56 XM-1733027330-1QL
String Color Color of text Adjust Place in which text is to be printed selected from Left Center and Right Size Size of text selected from S M and L Peak Detect Peak position selected from Max Point 3 Points and 5 Points Plot Item Items to be displayed Shift String Lets you shift the text already written by dragging it
4
1
Turn on the Separation of Left Right button and then click on the Apply button
You will obtain different results on the left side and right side of the peak position
Spectra Search Spectra Search has two important functions One is a search function The other is a load function Using the search function you can display average correlation and other information about spectra judge to be similar in the Search result scroll window by using correlation coefficients from the start position to the finish position for the same crystal Using the load function you can also display the spectra that you have selected from the Search result scroll window The correlation coefficient between a spectrum and another one is 10 if the two are the same while the closer the coefficient is to 00 the less similar the two are The correlation coefficient obtained by calculation will be the same even if one or both are multiplied by a constant If the correlation coefficient is about 09 or more two spectra are similar experimentally However it is recommended that you judge similarity from the display by using the load function
Select Spectra Search from the Operation menu The Spectra Search window opens
XM-1733027330-1QL 57
Fig 53 Spectra Search window
Button Function
Search start positionndash User Group Sample Stage No
Specifies search start directory If there are many spectra for qualitative analysis specifythe start position by using the Group button to save search time Clicking on the Group button opens the Group window where you can specify group names In the same way clicking on the Sample button opens the Sample window where you can specify sample names
58 XM-1733027330-1QL
Fig 54 Group window
Button Function
Search condition ndashStageSpectra
Selecting Stage performs searches through samples Selecting Spectra performs searches through spectra
One Spectrum All spectra
When Stage is selected this function is available
L value (mm) Wave (A)Wave (nm)
Used when you specify the search range
Corr_coeff Correlation coefficient from 00 to 10
Start Pos End Pos Start position for calculation of correlation coefficient Finish position for calculation of correlation coefficient You can change the positions
Search result Scroll window to display the results of search
Search Starts search
Load Displays the spectrum selected from the Search result scroll window
Stop Stops search
Reset Resets correlation coefficient and the values of Start Pos and End Pos Clicking on this button also resets the spectrum presently displayed to the previous one
Selected List Click on this button to print the results of the search You can print only the spectra that you have selected from the Search result scroll window
Close Resets the spectra that are presently displayed and closes the Spectra Search window
XM-1733027330-1QL 59
44 Semi-Quantitative (Semi-Quant) Analysis Program In ordinary quantitative analyses quantitation results are corrected by measuring the intensities of peaks and backgrounds for each element Differing from the ordinary quantitative analyses the semi-quantitative analysis (Semi-Quant Analysis) program corrects quantitation results by using the spectral data Namely the intensities of the peaks and backgrounds for the elements identified in the qualitative analysis are obtained from the qualitative-analysis spectral data The ratio of the spectral peak intensity for each element to that of the characteristic X-rays for the pure element is calculated as the K-ratio
K-ratio = IunkIstd
where Iunk Intensity of the characteristic X-rays from an unknown sample Istd Intensity of the characteristic X-rays of a pure element
Based on this K-ratio ZAF correction is performed and the mass concentration of each element is printed together with the K-ratio This result can be used later to perform an off-line quantitative analysis (Summary) or it can also be recorrected by using the measured standard sample data The characteristic X-ray intensities of pure elements are calculated from the standard sensitivity curve obtained in advance At that time since their dependence on the accelerating voltage is also calculated the K-ratio for the qualitative analysis data measured from 5 kV to 30 kV (in 5 kV steps) can be calculated The standard sensitivity curves have been measured in our company for a large number of standard samples However there may exist slight differences in the measured curves depending on the instruments used Therefore using some standard samples measure and correct the standard sensitivity curves of some elements for each analyzing crystal and for each characteristic X-ray (Kα Lα and Mα) Once this correction has been done you need not repeat it each time you perform analysis
441 How to calculate X-ray intensities in the Semi-Quant Analysis
X-ray intensities in the Semi-Quant Analysis are calculated in the following way As the peak position the position at which the X-ray intensity is the strongest is selected after searching for it in the vicinity of the aimed characteristic X-rays As the background position the position at which the mean X-ray intensity having the lowest moving average of three points from a position a little apart from the peak position is selected These results are displayed as measurement conditions The search ranges of the peaks and backgrounds are defined for each analyzing crystal in the sqtcond file in the optepmaconfanal directory The results of the Semi-Quant Analysis are saved in the file named 1onq in the directory of the quantitative analysis
60 XM-1733027330-1QL
442 Using Semi-Quant Analysis results in off-line quantitative analysis
The results of the Semi-Quant Analysis can be utilized in the off-line quantitative analysis
Summary You can execute Summary in the Semi-Quant Analysis 1
2
3
1
2
3 4
Select ProcessmdashQuantitative AnalysismdashSummary from the EPMA Main Menu
The Function window for process opens Click on the Sample button
The Select Sample window opens Select Qnt for Semi-Quant Analysis
The remaining steps are the same as for ordinary quantitative analysis
In the Semi-Quant Analysis elements are different for each sample in many cases If you print the results of many samples it will be difficult to distinguish them since there are many elements To solve this problem use Mass order for printing If you select Qlw in place of Qnt you can obtain the list of identified elements when you have printed it
Off-line Correction
You can execute Off-line Correction of the analysis results obtained in the Semi-Quant Analysis
Select ProcessmdashQuantitative AnalysismdashOff-line Correction from the EPMA Main Menu
The Function window for off-line correction opens Click on the Sample button
The Select Sample window opens Select Qnt for Semi-Quant Analysis Set the conditions as follows
Specify the correction method and accelerating voltage used for measurement Specify the same elements as those used in the Semi-Quant Analysis Select the same X-rays channel and analyzing crystal as in the result of the Semi-Quant Analysis for the element to be measured Select appropriate standard samples if any When Cal-STD is selected as the standard sample for all elements the same result as in the Semi-Quant Analysis is obtained
For procedures for entering the conditions for the quantitative analysis refer to the separate operation manual of the Quantitative Analysis Program
After setting the above conditions click on Read Intensity amp Correction and the X-ray intensities obtained in the Semi-Quant Analysis will be displayed Then click on the Apply button and off-line correction will be executed
XM-1733027330-1QL 61
443 Correcting the standard sensitivity curve
The Semi-Quant Analysis program includes a program for correcting the standard sensitivity curve By using the standard sample installed in the microanalyzer the X-ray intensity coefficient (I) in the equation in which the atomic number is used as the variable can be obtained for each analyzing crystal and for each characteristic X-ray (Kα Lα and Mα) of each X-ray spectrometer Once this program has been executed you need not run it again
I = exp (a + bZ + cZ2 + dZ3
where I Intensity of characteristic X-rays (cps100 pA) Z Atomic number a b c d Coefficients
Combinations of the standard sample and characteristic X-rays to be used are defined in a file in the optepmacalisqt directory The coefficients obtained are saved in the sqtcoef file in the optepmacali directory together with the measured data The characteristic X-ray intensities of pure elements for each analyzing crystal and for each accelerating voltage are saved in a file in the optepmacalistd_int directory Follow the procedures in the sections below to execute correction of the standard sensitivity curve
Opening the Semi-Quant Calibration window
Select InitializemdashSemi-Quant Calibration from the EPMA Main Menu
Fig 55 Pull-down menu of the Initialize icon
The Semi-Quant Calibration window opens You can perform corrections in this window
62 XM-1733027330-1QL
Selecting analyzing crystals Select analyzing crystals whose standard sensitivity curves are to be corrected Click on the Crystal button in the Semi-Quant Calibration window
The Crystal and Channel window opens
If necessary click on the for Light elements button in the Crystal and Channel window then the Light Elements window opens
Fig 56 Crystal and Channel and Light Elements windows
Out of the analyzing crystals installed in the instrument the analyzing crystals whose standard sensitivity curves can be corrected will be displayed in the Crystal and Channel and Light Elements windows
By default all the crystals are selected If there are some analyzing crystals whose standard sensitivity curves you do not want to correct deselect their crystal buttons
XM-1733027330-1QL 63
Setting the stage positions for standard samples You have to enter the stage positions for standard samples prior to measurement 1
2
1
2
3
Click on the Stage button in the Semi-Quant Calibration window The Set Stage Stage Monitor and Memory windows open
Fig 57 Specifying the stage positions for standard samples
Specify the desired standard sample names and their stage positions
If stage positions have been already set you need not specify them
For the operating procedure refer to the instruction manual of the main unit
Executing measurements You execute measurement by using the following procedure
Click on the Measure button in the Semi-Quant Calibration window The Start Calibration window opens
Set the current to about 1 10mdash7 A in advance Although the accelerating voltage is automatically set to 20 kV but the current is not set automatically
Confirm all the conditions that you require to use then click on the OK button
Measurement begins If you click on the Cancel button the previous window will return
Measurement is performed for each analyzing crystal and the progress of the measurement is displayed on the screen
64 XM-1733027330-1QL
Stopping measurement
To stop measurement for any reason click on the Stop button To temporarily interrupt measurement click on the Pause button On completion of peak search measurement stops temporarily To restart the measurement click on the Pause button once again
Displaying measurement results
On completion of measurement with an analyzing crystal the correction coefficients and the calculated intensities of the characteristic X-rays of the pure elements are displayed The coefficients are displayed in units of cps100 pA The X-ray intensities for Kα Lα and Mα are displayed (vertical axis logarithmic scale in units of cpsμA horizontal axis atomic number)
Fig 58 Display of measurement results
XM-1733027330-1QL 65
Utility
Click on the Utility button in the Semi-Quant Calibration window The Utility pop-up window opens The following functions are included in Utility
Button Function
Reset spectra Individual spectrum windows can be enlarged or reduced by dragging the button at the lower right corner of each window Clicking on Reset spectra after enlarging or reducing the window will return it to the original size
Draw results Clicking on this item displays results of measurement on the computer display
Print results Clicking on this item prints the measured data and the intensity coefficients of the standard sensitivity curve
Check configuration Clicking on this item enables you to check the combination of the analyzing crystal and characteristic X-rays in measurement
Check pksk parameter Clicking on this item enables you to check the parameters for peak search Special care should be exercised in changing the parameters because the operation affects peak search and related operations in quantitative analysis
Smoothing Clicking on this item smoothes and displays the waveform for peak search
2nd derivative Clicking on this item displays the second derivative waveform of the peak search spectrum
Log scale Clicking on this item displays the peak search spectrum on a logarithmic scale
66 XM-1733027330-1QL
5 APPENDIX
Determining peak positions and intensities and identifying elements Using the procedures below this program detects the peaks of characteristic X-rays and identifies the elements for the detected peaks
Detecting peak positions
1 2 3
4
5
1 2
3 a
b
c
d
4
5
Smooth a spectrum by the Savitzky-Golay method Evaluate the second derivative of the smoothed spectrum Detect the peak positions from the second derivative waveform and deter-mine the background positions from the waveforms obtained after second differentiation and smoothing From the smoothed spectrum determine the peak intensity and the back-ground intensity If the difference between the peak intensity and the background intensity is too large to attribute to statistical variation judge that a peak of interest exists
Identifying elements
Detect peaks for each spectrum If any one of the Kα (1) Lα (1) and Mα (1) lines is detected assign the elements of interest to the B rank Further judge the elements of B rank as follows If ZKα min Z ZKβ min assign the elements of interest to the A rank Usually ZKα min=4 ZKβ min=17 If both a Kα (1) line and a K (1) line are found in the same spectrum assign the elements of interest to the A rank If both a Kα (1) line and a K (1) line are found in different spectra assign the elements of interest to the A rank If both an Lα (1) line and an L (1) line are found in the same spectrum assign the elements of interest to the A rank Similarly if both an Mα (1) line and an M (1) line are found in the same spectrum assign the elements of interest to the A rank
If any peaks of B-rank elements are superimposed on any peaks of charac-teristic X-rays of A-rank elements (usually of the first-order) exclude the B-rank elements from the elements to be identified If no A-rank element exists but only one B-rank element exists assign this B-rank element to the A rank
XM-1733027330-1QL 67
Expert identification of elements
This expert identification of elements is a reliable method of ratiocination based upon the knowledge base of experienced analysis specialists This method enables us to evaluate a level of confidence in the result of the element identification performed by using the above-mentioned element identifying method if it is applied for calculation The knowledge base has been created under the following conditions
Accelerating voltage 20 kV Probe current 10 to 500 nA Step 50 μm Sample time 50 ms or more Number of spectra 4 Analyzing crystal LIF PET TAP and STE Scanning range of spectrometer 65 mm to 250 mm (258 mm for TAP) Even if you cannot observe under the above conditions to some extent for some
reasons you can obtain good results since this program is created to avoid problems Of course it is best to meet the requirements as much as possible However when you specify elements to be identified set the spectrometer range to include the first-order X-rays (up to the second order if possible ) of α and of K L and M of the elements
In the results after execution of ID-Doctor the indication ID-Doctor is shown both at the area where elements are displayed in the Data Display window and just above the area where A-Rank and B-Rank elements are displayed Therefore you can easily distinguish the results obtained with the ID-Doctor from those obtained without the ID-Doctor The element identification executed by using this program is performed using the judgment method that imitates experienced analysis specialists the results are not absolutely correct Please use this ID-Doctor as a reference and keep it in mind that you the user of this program decide whether to accept the results or not
68 XM-1733027330-1QL
- XM-1733027330
-
- CONVENTIONS
- CONTENTS
- 1 GENERAL
- 2 SPECIFICATIONS
- 3 PROGRAM STRUCTURE
- 4 OPERATION
-
- 41 Preparation for Measurement
-
- 411 Setting group and sample names
- 412 Setting measurement conditions
- 413 Setting analysis positions
- 414 Loading measurement conditions
- 415 Storing measurement conditions
- 416 Printing measurement conditions and results
- 417 Additional Function
-
- 42 Measurement
-
- 421 Measurement under stored conditions (Preset mode)
- 422 Measurement under present instrument conditions (Survey mode)
- 423 Realtime display
-
- 43 Processing
-
- 431 Selecting sample names and processing methods
- 432 Operation menu
-
- 44 Semi-Quantitative (Semi-Quant) Analysis Program
-
- 441 How to calculate X-ray intensities in the Semi-Quant Analysis
- 442 Using Semi-Quant Analysis results in off-line quantitative analysis
- 443 Correcting the standard sensitivity curve
-
- 5 APPENDIX
-
- damy_tate
- damy_yoko
- fff
- instructions
- JEOL
- mekura
- CONTENTS
- contents

2 3
1
2 3
Select a spectrum number from the Spectrum Color window To specify the color for displaying spectra background and parameter areas select the desired items from the following list then click on the Apply button to display the color as desired
Items available for color display Spectrum Spectra Background Background Original Original spectra prior to calculation Parameter Fore Parameter characters Parameter Back Parameter background Buttons for operations More Lets you to specify the colors of Marker ID Element
Cursor and KLM lines You can store recall and delete by using Load Save and Delete buttons
Draw Mesh You can draw a grid as the background of spectra by using this function
Select Spectra DisplaymdashDraw Mesh from the Operation menu The Draw Mesh window opens
Fig 31 Draw Mesh window
Select a spectrum number from the Draw Mesh window To specify Scale Color and Line for the grid select the desired items from the following lists then click on the Apply button to display the grid as desired
Line type Solid Solid line Dash Dashed line Dot Dotted line Dash Dot Dashed line with a dot Dash Dot Dot Dashed line with two dots
36 XM-1733027330-1QL
Thickness of the line Thin Thin line Normal Normal line Thick Thick line Lines to draw Hor + Vert Horizontal and vertical lines Horizontal Horizontal lines Vertical Vertical lines None No lines
Display Axis
You can set the unit for the abscissa of the specified spectra by using this function The unit for the abscissa is always the same for all the spectra 1
2
1
Select Spectra DisplaymdashDisplay Axis from the Operation menu The Display Axis window opens
Fig 32 Display Axis window
To specify the desired item in the Display Axis window select Position mm Wave length A Wave length nm or Energy keV then click on the OK button
The abscissa for the spectra on the display changes as specified Wave order is useful for displaying the spectra in the original wavelength when high-order lines are displayed in such narrow range as chemical shift The function is effective only when the wavelength is specified as the abscissa
Kind of Assignment You can select the style for displaying element labels by using this function
Select Spectra DisplaymdashKind of Assignment from the Operation menu The Kind of Assignment window opens
XM-1733027330-1QL 37
Fig 33 Kind of Assignment window
2
1
Select Elements Elements X-ray Name or Elements X-ray Name Order then click on the OK button Elements Only element names are displayed Elements X-ray Name Element names and X-ray names are
displayed Elements X-ray Name Order Element names X-ray names and order
are displayed
Display Parameter You can specify which parameters to display in the parameter-display area of the Data display window by using this function
Select Spectra DisplaymdashDisplay Parameter from the Operation menu The Display Parameter window opens
Fig 34 Display Parameter window
38 XM-1733027330-1QL
2
1
2
Select the desired parameters then click on the OK button The specified parameters are displayed in the parameter-display area of the Data display window
If you select All the information of all the spectra is shown while if you select Single only the information of the specified spectrum is shown To change the size of the displayed characters select S M or L
An A-Rank Element is an element that is judged certain to exist and a B-Rank Element is an element that is judged possible though not certain to exist For the method of element identification refer to Chapter 5 ldquoAppendixrdquo of this instruction manual
Write Text
You can write text in the display area of spectra by using this function Select Spectra DisplaymdashWrite Text from the Operation menu
The Write Text window opens
Fig 35 Write Text window
Click on the spectrum on which you want to write text and then input the desired text in the input box of the Write Text window then click on the Write button
The text is displayed on the selected spectrum of the Data display window Color Selects the color of text Size Selects the character size of text from S M and L Clear Clears the input box
Shift Adjusts the position of the input text when you drag it Delete Deletes the text Click on this button and then select the text that you
want to delete from the list of texts Write Writes text on the selected spectrum
Save Saves the texts that you have written on spectra The texts will be displayed when you next open the spectra
XM-1733027330-1QL 39
Replace Spectrum You can replace the spectra that are being displayed by using this function 1
2
3
1
2
Select Spectra DisplaymdashReplace Spectrum from the Operation menu The Replace spectrum window opens
Fig 36 Replace spectrum window
Select the number of the spectrum to replace from the Replace spectrum window and then click on the Apply button
The Sample window opens
Refer to Fig 19 Sample window (for processing) Select the spectrum to replace from the Sample window
Reset Spectra
You can reset all the changes that you have made using all the items of the Spectra Display menus to their initial states if you use this function
Select Spectra DisplaymdashReset Spectra from the Operation menu The Reset Spectra window opens
Fig 37 Reset window
Select the number of the spectrum for resetting from the Reset window and then click on the Apply button
All the changes made for the selected spectrum will be cancelled
40 XM-1733027330-1QL
KLM Marker You can display identified elements in colors in the KLM Marker window 1
2
Select KLM Marker from the Operation menu The KLM Marker window opens
Element buttons
Element display
Fig 38 KLM Marker window
Click on the buttons of the desired element in the KLM Marker window
The positions and element names of the characteristic X-rays (Kα Kβ etc) for specified elements are displayed on the spectrum The following functions are available
Button Function
Element buttons Clicking on an element button displays KLM markers When you right-click another element button its KLM markers appear together with the previous ones You can specify the line type for the KLM markers in the Spectrum Type window and the color in the Spectrum Color window
Element display The name of the selected element is displayed Right-clicking on the display shows the name of the element to the right of the present one while left-clicking on the display shows the name of the element to the left of the present one
Arrow buttons
Clicking on the right arrow button selects the right element to the present one while clicking on the left arrow button selects the left element to the present one
Order Specifies the order of the X-rays You can specify from the first to the tenth
Min Int Specifies the minimum intensity of the KLM Markers The intensity to be specified is the theoretical intensity shown in the wavelength table It means the relative intensity when the intensity of the alpha line is taken as 100 When you specify 0 all the X-rays are shown
XM-1733027330-1QL 41
Button Function
Select KLM Selects the X-rays to be displayed from the K L and M lines Only highlighted X-rays are displayed It is useful for displaying specified X-rays
Lock To display the KLM Markers of multiple elements specify elements by right-clickings ( refer to the above Element buttons) You can lock the KLM Markers if you click on the Lock button then if you click on an element you can display its KLM Markers together with the locked ones To unlock the locked KLM Markers deselect Lock
Scale The scale for each X-ray height of KLM Markers is based on the theoretical intensity When an X-ray marker cannot be seen easily you can adjust the height of the KLM Markers by using the arrow-buttons to the right of the Scale button The same result can be obtained by dragging a point on the spectrum up or down
Set Adds the selected elements to the list of identification elements and displays element names at the position of each KLM Marker To label peaks use the Peak ID window
Delete Deletes the selected elements from the list of identification elements as well as all the element names When you want to delete element names one by one use the Peak ID window
Print Prints the information on the KLM Markers
Close Closes the KLM window
42 XM-1733027330-1QL
Peak ID The wavelength and intensity at the specified position of the spectrometer are displayed At the same time the possible names of characteristic X-rays near the specified position are listed 1
2
Select Peak ID from the Operation menu The Peak ID window opens
X-ray list
Wavelength display
Spectrum number
Fig 39 Peak ID window
Select any position from a spectrum in the Data display window The wavelength and intensity at the specified position of the spectrometer are displayed in the X-ray list of the Peak ID window At the same time the possible names of characteristic X-rays near the specified position are listed The identified elements and the elements corresponding to the displayed KLM Markers are displayed in different colors The following functions are available
XM-1733027330-1QL 43
Object Function
Spectrum number Specifies the desired spectrum You can also specify it by clicking on it
Wavelength display
Displays the wavelength and X-ray intensity at a position specified by clicking You can perform a fine adjustment of the cursor position by using the larr and rarr keys on the keyboard
X-ray list Displays the X-rays near the wavelength selected by clicking The information displayed is Element Name X ray Name Order Diff (distance from the selected position) and Int (theoretical X-ray intensity)
Order Specifies the order of the X-rays to be detected
Min Int Specifies the minimum theoretical intensity of the X-rays to be displayed
PrevNext ID Move the cursor to the peak positions whose elements were already identified The movement direction of Prev ID is toward lower wavelengths and that of Next ID is toward higer wavelengths The cursor jumps to the other end when it is moved beyond an end
Print Opens the Listing window and displays the data of the item selected from the X-ray list
Clear Clears the items that were specified for printing
Set After you have selected a line of an element in the X-ray list clicking on the Set button identifies the element and displays its peak label
Delete After you have selected an identified element in the X-ray list clicking on the Delete button deletes the peak label of the element
Shift ID Moves peak labels After you have clicked on the Shift ID button clicking near the label changes the shape of the cursor Then drag the label to move it To deselect this mode click on the Shift ID button once again
Any Length Measures the distance between two arbitrary points After you have clicked on the Any Length button click on two arbitrary points on a spectrum then the marker and distance between the points are displayed To deselect this mode click on the Any Length button once again
Close Closes the Peak ID window
Save ID Results
After you have changed the element name display on the spectrum by using Peak ID for example the element name can be saved as an A rank element 1
2
Select Save ID Results from the Operation menu The Save ID Results window opens
Fig 40 Save ID Results window
Click on the OK button in the Save ID Results window after you have changed the element name display on the spectrum by using Peak ID for example
44 XM-1733027330-1QL
The element name displayed on the spectrum will be saved as an A rank element in a file These data will be displayed automatically beginning with the next operation
Off-line ID
You can perform element identification once again 1
2
Select Off-line ID from the Operation menu The Off-line ID window opens
Fig 41 Off-line ID window
Specify the necessary conditions then click on the Apply button to perform element identification once again after
The ID-Doctor does not operate during off-line identification of element In element identification the specified order of X-rays is taken into account and if A rank only is selected only the labels for A rank elements are displayed after the identification If A amp B rank is selected all the labels are displayed after identification If a number other than zero is specified in the Min Int input box the labels for only the X-rays having the specified intensity or more are displayed after identi-fication
When the Close button is clicked on with the Orderndash0 button selected with Apply not selected the identified element names will not be displayed on the spectra in subsequent measurements
XM-1733027330-1QL 45
Spectra Calculation
Select Spectra Calculation from the Operation menu The Spectra Calculation window opens You can perform the arithmetic operations that are shown in the Spectra Calculation window
Fig 42 Spectra Calculation window
46 XM-1733027330-1QL
Smoothing
Select Spectra CalculationmdashSmoothing from the Operation menu The Smoothing window opens You can smooth the specified spectra using the Savitzky-Golay method
If you selected Manual you can assign a number of points to use in smoothing If you selected Result Only only the smoothed spectra are displayed whereas if you selected Original amp Result the spectra before smoothing are also displayed at the same time
Fig 43 Smoothing window
2nd Derivative
Select Spectra Calculationmdash2nd Derivative from the Operation menu The 2nd Derivative window opens You can find the second derivatives of the specified spectra using the Savitzky-Golay method
Quant Background
You can display the background position that is used in the quantitative analysis and correct the position while watching the corresponding spectra
Select Spectra CalculationmdashQuant Background from the Operation menu The Quant Background window opens
XM-1733027330-1QL 47
Fig 44 Quant Background window
The information displayed is No Elem (Crysta) Low Angle Position and High Angle You can select mm angstrom or nm as the unit If an element name is dimmed the corresponding spectra do not exist If you have selected Ignore channel you can search the spectra only by using crystal names If you have deselected the Ignore channel button you can search for spectra that match both crystal names and measuring channels If you select any of the displayed elements the background position will be shown on the spectra by markers To correct the position drag the markers to the desired positions If you want to enter the corrected items click on the Exec button and if you do not want to click on the Cancel button
48 XM-1733027330-1QL
Background Subtraction You can eliminate background components from the specified spectrum
Select Spectra CalculationmdashBackground Subtraction from the Operation menu
The Background Subtraction window opens
Fig 45 Background Subtraction window
Clicking on the Manual button performs spline interpolation for the specified points (normally multiple points) and forms a background curve Clicking on the Auto button performs background subtraction using the Sonne-veld method
Sub (SP mdash k)
You can subtract a constant (k) from the specified spectrum and display the spectra Select Spectra CalculationmdashSub (SP mdash k) from the Operation menu
The Sub (SP ndash k) window opens
Fig 46 Sub (SP ndash k) window
XM-1733027330-1QL 49
Add (SP + k)Multiply (SP k)Divide (SP k) You can add multiply or divide by a constant (k) in the specified spectrum and display the spectra
Select Spectra CalculationmdashAdd (SP + k) or Multiply (SP k) or Divide (SP k) from the Operation menu
The Add (SP + k)Multiply (SP k)Divide (SP k) window opens
Spectrum Shift You can shift spectra to the left or right
Select Spectra CalculationmdashSpectrum Shift from the Operation menu The Spectrum Shift window opens
Spectra Sub (SP1 mdash SP2)
You can subtract two spectra The result of the calculation can be displayed in another display area
Select Spectra CalculationmdashSpectra Sub (SP1 mdash SP2) from the Operation menu
The Spectra Sub (SP1 ndash SP2) window opens
Spectra Add (SP1 + SP2) You can add two spectra The result of the calculation can be displayed in another display area
Select Spectra CalculationmdashSpectra Add (SP1 + SP2) from the Operation menu
The Spectra add (SP1 + SP2) window opens
Dead-time Correction You can perform dead-time correction
Select Spectra CalculationmdashDead-time Correction from the Operation menu
The Dead-time Correction window opens
For the formulas for calculation refer to the separate instruction manual of the Quantitative Analysis Program
50 XM-1733027330-1QL
Result Store You can store displayed spectrum such as the results of a calculation in a file 1
2
Select Spectra CalculationmdashResult Store from the Operation menu The Result Store window opens
Fig 47 Result Store window
Type a crystal name in the Crystal Name input box and then click on the OK button
The spectrum that you have selected will be added to after the spectrum that was stored last At most twenty spectra can be stored If you want to delete a spectrum select it and type the slash () 8 times the
selected spectrum will be deleted
Reset You can undo arithmetic operations executed in Spectra Calculation
Select Spectra CalculationmdashReset from the Operation menu The settings will returned to their initial states
Redraw Spectra
You can display spectra again Select Redraw Spectra from the Operation menu
XM-1733027330-1QL 51
Print-out You can print conditions and results 1
2
3
Select Print-out from the Operation menu The Print-Out window opens
Select the items that you want to print and then click on the OK button The Listing window appears
Click on the Print button in the Listing window The output will be sent to the printer
Fig 48 Print-out window
52 XM-1733027330-1QL
Semi-Quant Analysis After you have obtained background intensity from an identified element and a qualitative spectrum you perform a calculation for correction based on the ratio to the X-ray intensity of a pure element (the K ratio) so as to obtain the result of a quantitative analysis Below is the method for calibrating the X-ray intensity of a pure element Select Semi-Quant Analysis from the Operation menu
The Semi-Quant Analysis window opens
Fig 49 Semi-Quant Analysis window
This window displays a list of the element names (in Element) X-ray names (in X-ray) and analyzing crystals (in Crystal) for the A-rank identified elements whose spectra show the strongest X-ray intensities
MetalOxide When the sample to be analyzed is a metal click on the Metal button When the sample is an oxide click on the Oxide button then enter values into the No of Oxygen and Valence input boxes
No of Oxygen input box You can input a value when Oxide is selected Type the number of oxygen atoms in the input box The number is to be used as the standard when the molecular formula is calculated after correction
XM-1733027330-1QL 53
Normalize Clicking on this button normalizes the mass concentration after correction the total mass concentration becomes 100 If you do not click on the Normalize button the current values are displayed as they are
Element X-ray Crystal and Valence in the list
Button Function
Element Adds and deletes arbitrary elements
X-ray Specifies the type (Kα Kβ Lα Lβ Mα and Mβ) of the X-rays in the scan range
Crystal Specifies one of the analyzing crystals displayed in the column when the characteristic X-rays span multiple spectra
Valence Specifies the valence of oxides The mass concentration of oxygen can be obtained by using the valence
Result window
You can specify where to display the results that you obtain
Button Function
New Text Opens a text window in which the results are displayed
Spectrum Displays the results in the spectrum display area if it is open
Parameter Displays the results in the parameter-display area
54 XM-1733027330-1QL
Fig 50 An example of Semi-Quant Analysis results
ID-Doctor You can perform element identification based upon the knowledge base of experienced analysis specialists If ID-Doctor is selected the element identification under ID-Doctor will be executed automatically after measurement 1
2
Select ID-Doctor from the Operation menu The ID-Doctor window opens
Fig 51 ID-Doctor window
Click on the OK button For details refer to Chapter 5 ldquoAppendixrdquo
XM-1733027330-1QL 55
Spectrum Analysis You can display on a spectrum the position height area FWHM (full width at half maximum) and height from the baseline of the specified spectrum peak You can print the spectrum after the spectrum analysis by using the Print button 1
2
3
Select Spectrum Analysis from the Operation menu The Spectrum Analysis window opens
Fig 52 Spectrum Analysis window
Specify the baseline between any two desired points by dragging the mouse from the start point and dropping it at the finish point Click on the Apply button
The results of Spectrum Analysis will be displayed on the spectrum
If you enlarge a desired part of a spectrum by using Spectra DisplayndashZooming and specify the desired baseline between two points you can obtain the baseline with greater precision You can also specify the baseline by inputting values in Baseline X Lower and X Upper input boxes You can select the following items Line color Color of lines
56 XM-1733027330-1QL
String Color Color of text Adjust Place in which text is to be printed selected from Left Center and Right Size Size of text selected from S M and L Peak Detect Peak position selected from Max Point 3 Points and 5 Points Plot Item Items to be displayed Shift String Lets you shift the text already written by dragging it
4
1
Turn on the Separation of Left Right button and then click on the Apply button
You will obtain different results on the left side and right side of the peak position
Spectra Search Spectra Search has two important functions One is a search function The other is a load function Using the search function you can display average correlation and other information about spectra judge to be similar in the Search result scroll window by using correlation coefficients from the start position to the finish position for the same crystal Using the load function you can also display the spectra that you have selected from the Search result scroll window The correlation coefficient between a spectrum and another one is 10 if the two are the same while the closer the coefficient is to 00 the less similar the two are The correlation coefficient obtained by calculation will be the same even if one or both are multiplied by a constant If the correlation coefficient is about 09 or more two spectra are similar experimentally However it is recommended that you judge similarity from the display by using the load function
Select Spectra Search from the Operation menu The Spectra Search window opens
XM-1733027330-1QL 57
Fig 53 Spectra Search window
Button Function
Search start positionndash User Group Sample Stage No
Specifies search start directory If there are many spectra for qualitative analysis specifythe start position by using the Group button to save search time Clicking on the Group button opens the Group window where you can specify group names In the same way clicking on the Sample button opens the Sample window where you can specify sample names
58 XM-1733027330-1QL
Fig 54 Group window
Button Function
Search condition ndashStageSpectra
Selecting Stage performs searches through samples Selecting Spectra performs searches through spectra
One Spectrum All spectra
When Stage is selected this function is available
L value (mm) Wave (A)Wave (nm)
Used when you specify the search range
Corr_coeff Correlation coefficient from 00 to 10
Start Pos End Pos Start position for calculation of correlation coefficient Finish position for calculation of correlation coefficient You can change the positions
Search result Scroll window to display the results of search
Search Starts search
Load Displays the spectrum selected from the Search result scroll window
Stop Stops search
Reset Resets correlation coefficient and the values of Start Pos and End Pos Clicking on this button also resets the spectrum presently displayed to the previous one
Selected List Click on this button to print the results of the search You can print only the spectra that you have selected from the Search result scroll window
Close Resets the spectra that are presently displayed and closes the Spectra Search window
XM-1733027330-1QL 59
44 Semi-Quantitative (Semi-Quant) Analysis Program In ordinary quantitative analyses quantitation results are corrected by measuring the intensities of peaks and backgrounds for each element Differing from the ordinary quantitative analyses the semi-quantitative analysis (Semi-Quant Analysis) program corrects quantitation results by using the spectral data Namely the intensities of the peaks and backgrounds for the elements identified in the qualitative analysis are obtained from the qualitative-analysis spectral data The ratio of the spectral peak intensity for each element to that of the characteristic X-rays for the pure element is calculated as the K-ratio
K-ratio = IunkIstd
where Iunk Intensity of the characteristic X-rays from an unknown sample Istd Intensity of the characteristic X-rays of a pure element
Based on this K-ratio ZAF correction is performed and the mass concentration of each element is printed together with the K-ratio This result can be used later to perform an off-line quantitative analysis (Summary) or it can also be recorrected by using the measured standard sample data The characteristic X-ray intensities of pure elements are calculated from the standard sensitivity curve obtained in advance At that time since their dependence on the accelerating voltage is also calculated the K-ratio for the qualitative analysis data measured from 5 kV to 30 kV (in 5 kV steps) can be calculated The standard sensitivity curves have been measured in our company for a large number of standard samples However there may exist slight differences in the measured curves depending on the instruments used Therefore using some standard samples measure and correct the standard sensitivity curves of some elements for each analyzing crystal and for each characteristic X-ray (Kα Lα and Mα) Once this correction has been done you need not repeat it each time you perform analysis
441 How to calculate X-ray intensities in the Semi-Quant Analysis
X-ray intensities in the Semi-Quant Analysis are calculated in the following way As the peak position the position at which the X-ray intensity is the strongest is selected after searching for it in the vicinity of the aimed characteristic X-rays As the background position the position at which the mean X-ray intensity having the lowest moving average of three points from a position a little apart from the peak position is selected These results are displayed as measurement conditions The search ranges of the peaks and backgrounds are defined for each analyzing crystal in the sqtcond file in the optepmaconfanal directory The results of the Semi-Quant Analysis are saved in the file named 1onq in the directory of the quantitative analysis
60 XM-1733027330-1QL
442 Using Semi-Quant Analysis results in off-line quantitative analysis
The results of the Semi-Quant Analysis can be utilized in the off-line quantitative analysis
Summary You can execute Summary in the Semi-Quant Analysis 1
2
3
1
2
3 4
Select ProcessmdashQuantitative AnalysismdashSummary from the EPMA Main Menu
The Function window for process opens Click on the Sample button
The Select Sample window opens Select Qnt for Semi-Quant Analysis
The remaining steps are the same as for ordinary quantitative analysis
In the Semi-Quant Analysis elements are different for each sample in many cases If you print the results of many samples it will be difficult to distinguish them since there are many elements To solve this problem use Mass order for printing If you select Qlw in place of Qnt you can obtain the list of identified elements when you have printed it
Off-line Correction
You can execute Off-line Correction of the analysis results obtained in the Semi-Quant Analysis
Select ProcessmdashQuantitative AnalysismdashOff-line Correction from the EPMA Main Menu
The Function window for off-line correction opens Click on the Sample button
The Select Sample window opens Select Qnt for Semi-Quant Analysis Set the conditions as follows
Specify the correction method and accelerating voltage used for measurement Specify the same elements as those used in the Semi-Quant Analysis Select the same X-rays channel and analyzing crystal as in the result of the Semi-Quant Analysis for the element to be measured Select appropriate standard samples if any When Cal-STD is selected as the standard sample for all elements the same result as in the Semi-Quant Analysis is obtained
For procedures for entering the conditions for the quantitative analysis refer to the separate operation manual of the Quantitative Analysis Program
After setting the above conditions click on Read Intensity amp Correction and the X-ray intensities obtained in the Semi-Quant Analysis will be displayed Then click on the Apply button and off-line correction will be executed
XM-1733027330-1QL 61
443 Correcting the standard sensitivity curve
The Semi-Quant Analysis program includes a program for correcting the standard sensitivity curve By using the standard sample installed in the microanalyzer the X-ray intensity coefficient (I) in the equation in which the atomic number is used as the variable can be obtained for each analyzing crystal and for each characteristic X-ray (Kα Lα and Mα) of each X-ray spectrometer Once this program has been executed you need not run it again
I = exp (a + bZ + cZ2 + dZ3
where I Intensity of characteristic X-rays (cps100 pA) Z Atomic number a b c d Coefficients
Combinations of the standard sample and characteristic X-rays to be used are defined in a file in the optepmacalisqt directory The coefficients obtained are saved in the sqtcoef file in the optepmacali directory together with the measured data The characteristic X-ray intensities of pure elements for each analyzing crystal and for each accelerating voltage are saved in a file in the optepmacalistd_int directory Follow the procedures in the sections below to execute correction of the standard sensitivity curve
Opening the Semi-Quant Calibration window
Select InitializemdashSemi-Quant Calibration from the EPMA Main Menu
Fig 55 Pull-down menu of the Initialize icon
The Semi-Quant Calibration window opens You can perform corrections in this window
62 XM-1733027330-1QL
Selecting analyzing crystals Select analyzing crystals whose standard sensitivity curves are to be corrected Click on the Crystal button in the Semi-Quant Calibration window
The Crystal and Channel window opens
If necessary click on the for Light elements button in the Crystal and Channel window then the Light Elements window opens
Fig 56 Crystal and Channel and Light Elements windows
Out of the analyzing crystals installed in the instrument the analyzing crystals whose standard sensitivity curves can be corrected will be displayed in the Crystal and Channel and Light Elements windows
By default all the crystals are selected If there are some analyzing crystals whose standard sensitivity curves you do not want to correct deselect their crystal buttons
XM-1733027330-1QL 63
Setting the stage positions for standard samples You have to enter the stage positions for standard samples prior to measurement 1
2
1
2
3
Click on the Stage button in the Semi-Quant Calibration window The Set Stage Stage Monitor and Memory windows open
Fig 57 Specifying the stage positions for standard samples
Specify the desired standard sample names and their stage positions
If stage positions have been already set you need not specify them
For the operating procedure refer to the instruction manual of the main unit
Executing measurements You execute measurement by using the following procedure
Click on the Measure button in the Semi-Quant Calibration window The Start Calibration window opens
Set the current to about 1 10mdash7 A in advance Although the accelerating voltage is automatically set to 20 kV but the current is not set automatically
Confirm all the conditions that you require to use then click on the OK button
Measurement begins If you click on the Cancel button the previous window will return
Measurement is performed for each analyzing crystal and the progress of the measurement is displayed on the screen
64 XM-1733027330-1QL
Stopping measurement
To stop measurement for any reason click on the Stop button To temporarily interrupt measurement click on the Pause button On completion of peak search measurement stops temporarily To restart the measurement click on the Pause button once again
Displaying measurement results
On completion of measurement with an analyzing crystal the correction coefficients and the calculated intensities of the characteristic X-rays of the pure elements are displayed The coefficients are displayed in units of cps100 pA The X-ray intensities for Kα Lα and Mα are displayed (vertical axis logarithmic scale in units of cpsμA horizontal axis atomic number)
Fig 58 Display of measurement results
XM-1733027330-1QL 65
Utility
Click on the Utility button in the Semi-Quant Calibration window The Utility pop-up window opens The following functions are included in Utility
Button Function
Reset spectra Individual spectrum windows can be enlarged or reduced by dragging the button at the lower right corner of each window Clicking on Reset spectra after enlarging or reducing the window will return it to the original size
Draw results Clicking on this item displays results of measurement on the computer display
Print results Clicking on this item prints the measured data and the intensity coefficients of the standard sensitivity curve
Check configuration Clicking on this item enables you to check the combination of the analyzing crystal and characteristic X-rays in measurement
Check pksk parameter Clicking on this item enables you to check the parameters for peak search Special care should be exercised in changing the parameters because the operation affects peak search and related operations in quantitative analysis
Smoothing Clicking on this item smoothes and displays the waveform for peak search
2nd derivative Clicking on this item displays the second derivative waveform of the peak search spectrum
Log scale Clicking on this item displays the peak search spectrum on a logarithmic scale
66 XM-1733027330-1QL
5 APPENDIX
Determining peak positions and intensities and identifying elements Using the procedures below this program detects the peaks of characteristic X-rays and identifies the elements for the detected peaks
Detecting peak positions
1 2 3
4
5
1 2
3 a
b
c
d
4
5
Smooth a spectrum by the Savitzky-Golay method Evaluate the second derivative of the smoothed spectrum Detect the peak positions from the second derivative waveform and deter-mine the background positions from the waveforms obtained after second differentiation and smoothing From the smoothed spectrum determine the peak intensity and the back-ground intensity If the difference between the peak intensity and the background intensity is too large to attribute to statistical variation judge that a peak of interest exists
Identifying elements
Detect peaks for each spectrum If any one of the Kα (1) Lα (1) and Mα (1) lines is detected assign the elements of interest to the B rank Further judge the elements of B rank as follows If ZKα min Z ZKβ min assign the elements of interest to the A rank Usually ZKα min=4 ZKβ min=17 If both a Kα (1) line and a K (1) line are found in the same spectrum assign the elements of interest to the A rank If both a Kα (1) line and a K (1) line are found in different spectra assign the elements of interest to the A rank If both an Lα (1) line and an L (1) line are found in the same spectrum assign the elements of interest to the A rank Similarly if both an Mα (1) line and an M (1) line are found in the same spectrum assign the elements of interest to the A rank
If any peaks of B-rank elements are superimposed on any peaks of charac-teristic X-rays of A-rank elements (usually of the first-order) exclude the B-rank elements from the elements to be identified If no A-rank element exists but only one B-rank element exists assign this B-rank element to the A rank
XM-1733027330-1QL 67
Expert identification of elements
This expert identification of elements is a reliable method of ratiocination based upon the knowledge base of experienced analysis specialists This method enables us to evaluate a level of confidence in the result of the element identification performed by using the above-mentioned element identifying method if it is applied for calculation The knowledge base has been created under the following conditions
Accelerating voltage 20 kV Probe current 10 to 500 nA Step 50 μm Sample time 50 ms or more Number of spectra 4 Analyzing crystal LIF PET TAP and STE Scanning range of spectrometer 65 mm to 250 mm (258 mm for TAP) Even if you cannot observe under the above conditions to some extent for some
reasons you can obtain good results since this program is created to avoid problems Of course it is best to meet the requirements as much as possible However when you specify elements to be identified set the spectrometer range to include the first-order X-rays (up to the second order if possible ) of α and of K L and M of the elements
In the results after execution of ID-Doctor the indication ID-Doctor is shown both at the area where elements are displayed in the Data Display window and just above the area where A-Rank and B-Rank elements are displayed Therefore you can easily distinguish the results obtained with the ID-Doctor from those obtained without the ID-Doctor The element identification executed by using this program is performed using the judgment method that imitates experienced analysis specialists the results are not absolutely correct Please use this ID-Doctor as a reference and keep it in mind that you the user of this program decide whether to accept the results or not
68 XM-1733027330-1QL
- XM-1733027330
-
- CONVENTIONS
- CONTENTS
- 1 GENERAL
- 2 SPECIFICATIONS
- 3 PROGRAM STRUCTURE
- 4 OPERATION
-
- 41 Preparation for Measurement
-
- 411 Setting group and sample names
- 412 Setting measurement conditions
- 413 Setting analysis positions
- 414 Loading measurement conditions
- 415 Storing measurement conditions
- 416 Printing measurement conditions and results
- 417 Additional Function
-
- 42 Measurement
-
- 421 Measurement under stored conditions (Preset mode)
- 422 Measurement under present instrument conditions (Survey mode)
- 423 Realtime display
-
- 43 Processing
-
- 431 Selecting sample names and processing methods
- 432 Operation menu
-
- 44 Semi-Quantitative (Semi-Quant) Analysis Program
-
- 441 How to calculate X-ray intensities in the Semi-Quant Analysis
- 442 Using Semi-Quant Analysis results in off-line quantitative analysis
- 443 Correcting the standard sensitivity curve
-
- 5 APPENDIX
-
- damy_tate
- damy_yoko
- fff
- instructions
- JEOL
- mekura
- CONTENTS
- contents

2
1
2
Select the desired parameters then click on the OK button The specified parameters are displayed in the parameter-display area of the Data display window
If you select All the information of all the spectra is shown while if you select Single only the information of the specified spectrum is shown To change the size of the displayed characters select S M or L
An A-Rank Element is an element that is judged certain to exist and a B-Rank Element is an element that is judged possible though not certain to exist For the method of element identification refer to Chapter 5 ldquoAppendixrdquo of this instruction manual
Write Text
You can write text in the display area of spectra by using this function Select Spectra DisplaymdashWrite Text from the Operation menu
The Write Text window opens
Fig 35 Write Text window
Click on the spectrum on which you want to write text and then input the desired text in the input box of the Write Text window then click on the Write button
The text is displayed on the selected spectrum of the Data display window Color Selects the color of text Size Selects the character size of text from S M and L Clear Clears the input box
Shift Adjusts the position of the input text when you drag it Delete Deletes the text Click on this button and then select the text that you
want to delete from the list of texts Write Writes text on the selected spectrum
Save Saves the texts that you have written on spectra The texts will be displayed when you next open the spectra
XM-1733027330-1QL 39
Replace Spectrum You can replace the spectra that are being displayed by using this function 1
2
3
1
2
Select Spectra DisplaymdashReplace Spectrum from the Operation menu The Replace spectrum window opens
Fig 36 Replace spectrum window
Select the number of the spectrum to replace from the Replace spectrum window and then click on the Apply button
The Sample window opens
Refer to Fig 19 Sample window (for processing) Select the spectrum to replace from the Sample window
Reset Spectra
You can reset all the changes that you have made using all the items of the Spectra Display menus to their initial states if you use this function
Select Spectra DisplaymdashReset Spectra from the Operation menu The Reset Spectra window opens
Fig 37 Reset window
Select the number of the spectrum for resetting from the Reset window and then click on the Apply button
All the changes made for the selected spectrum will be cancelled
40 XM-1733027330-1QL
KLM Marker You can display identified elements in colors in the KLM Marker window 1
2
Select KLM Marker from the Operation menu The KLM Marker window opens
Element buttons
Element display
Fig 38 KLM Marker window
Click on the buttons of the desired element in the KLM Marker window
The positions and element names of the characteristic X-rays (Kα Kβ etc) for specified elements are displayed on the spectrum The following functions are available
Button Function
Element buttons Clicking on an element button displays KLM markers When you right-click another element button its KLM markers appear together with the previous ones You can specify the line type for the KLM markers in the Spectrum Type window and the color in the Spectrum Color window
Element display The name of the selected element is displayed Right-clicking on the display shows the name of the element to the right of the present one while left-clicking on the display shows the name of the element to the left of the present one
Arrow buttons
Clicking on the right arrow button selects the right element to the present one while clicking on the left arrow button selects the left element to the present one
Order Specifies the order of the X-rays You can specify from the first to the tenth
Min Int Specifies the minimum intensity of the KLM Markers The intensity to be specified is the theoretical intensity shown in the wavelength table It means the relative intensity when the intensity of the alpha line is taken as 100 When you specify 0 all the X-rays are shown
XM-1733027330-1QL 41
Button Function
Select KLM Selects the X-rays to be displayed from the K L and M lines Only highlighted X-rays are displayed It is useful for displaying specified X-rays
Lock To display the KLM Markers of multiple elements specify elements by right-clickings ( refer to the above Element buttons) You can lock the KLM Markers if you click on the Lock button then if you click on an element you can display its KLM Markers together with the locked ones To unlock the locked KLM Markers deselect Lock
Scale The scale for each X-ray height of KLM Markers is based on the theoretical intensity When an X-ray marker cannot be seen easily you can adjust the height of the KLM Markers by using the arrow-buttons to the right of the Scale button The same result can be obtained by dragging a point on the spectrum up or down
Set Adds the selected elements to the list of identification elements and displays element names at the position of each KLM Marker To label peaks use the Peak ID window
Delete Deletes the selected elements from the list of identification elements as well as all the element names When you want to delete element names one by one use the Peak ID window
Print Prints the information on the KLM Markers
Close Closes the KLM window
42 XM-1733027330-1QL
Peak ID The wavelength and intensity at the specified position of the spectrometer are displayed At the same time the possible names of characteristic X-rays near the specified position are listed 1
2
Select Peak ID from the Operation menu The Peak ID window opens
X-ray list
Wavelength display
Spectrum number
Fig 39 Peak ID window
Select any position from a spectrum in the Data display window The wavelength and intensity at the specified position of the spectrometer are displayed in the X-ray list of the Peak ID window At the same time the possible names of characteristic X-rays near the specified position are listed The identified elements and the elements corresponding to the displayed KLM Markers are displayed in different colors The following functions are available
XM-1733027330-1QL 43
Object Function
Spectrum number Specifies the desired spectrum You can also specify it by clicking on it
Wavelength display
Displays the wavelength and X-ray intensity at a position specified by clicking You can perform a fine adjustment of the cursor position by using the larr and rarr keys on the keyboard
X-ray list Displays the X-rays near the wavelength selected by clicking The information displayed is Element Name X ray Name Order Diff (distance from the selected position) and Int (theoretical X-ray intensity)
Order Specifies the order of the X-rays to be detected
Min Int Specifies the minimum theoretical intensity of the X-rays to be displayed
PrevNext ID Move the cursor to the peak positions whose elements were already identified The movement direction of Prev ID is toward lower wavelengths and that of Next ID is toward higer wavelengths The cursor jumps to the other end when it is moved beyond an end
Print Opens the Listing window and displays the data of the item selected from the X-ray list
Clear Clears the items that were specified for printing
Set After you have selected a line of an element in the X-ray list clicking on the Set button identifies the element and displays its peak label
Delete After you have selected an identified element in the X-ray list clicking on the Delete button deletes the peak label of the element
Shift ID Moves peak labels After you have clicked on the Shift ID button clicking near the label changes the shape of the cursor Then drag the label to move it To deselect this mode click on the Shift ID button once again
Any Length Measures the distance between two arbitrary points After you have clicked on the Any Length button click on two arbitrary points on a spectrum then the marker and distance between the points are displayed To deselect this mode click on the Any Length button once again
Close Closes the Peak ID window
Save ID Results
After you have changed the element name display on the spectrum by using Peak ID for example the element name can be saved as an A rank element 1
2
Select Save ID Results from the Operation menu The Save ID Results window opens
Fig 40 Save ID Results window
Click on the OK button in the Save ID Results window after you have changed the element name display on the spectrum by using Peak ID for example
44 XM-1733027330-1QL
The element name displayed on the spectrum will be saved as an A rank element in a file These data will be displayed automatically beginning with the next operation
Off-line ID
You can perform element identification once again 1
2
Select Off-line ID from the Operation menu The Off-line ID window opens
Fig 41 Off-line ID window
Specify the necessary conditions then click on the Apply button to perform element identification once again after
The ID-Doctor does not operate during off-line identification of element In element identification the specified order of X-rays is taken into account and if A rank only is selected only the labels for A rank elements are displayed after the identification If A amp B rank is selected all the labels are displayed after identification If a number other than zero is specified in the Min Int input box the labels for only the X-rays having the specified intensity or more are displayed after identi-fication
When the Close button is clicked on with the Orderndash0 button selected with Apply not selected the identified element names will not be displayed on the spectra in subsequent measurements
XM-1733027330-1QL 45
Spectra Calculation
Select Spectra Calculation from the Operation menu The Spectra Calculation window opens You can perform the arithmetic operations that are shown in the Spectra Calculation window
Fig 42 Spectra Calculation window
46 XM-1733027330-1QL
Smoothing
Select Spectra CalculationmdashSmoothing from the Operation menu The Smoothing window opens You can smooth the specified spectra using the Savitzky-Golay method
If you selected Manual you can assign a number of points to use in smoothing If you selected Result Only only the smoothed spectra are displayed whereas if you selected Original amp Result the spectra before smoothing are also displayed at the same time
Fig 43 Smoothing window
2nd Derivative
Select Spectra Calculationmdash2nd Derivative from the Operation menu The 2nd Derivative window opens You can find the second derivatives of the specified spectra using the Savitzky-Golay method
Quant Background
You can display the background position that is used in the quantitative analysis and correct the position while watching the corresponding spectra
Select Spectra CalculationmdashQuant Background from the Operation menu The Quant Background window opens
XM-1733027330-1QL 47
Fig 44 Quant Background window
The information displayed is No Elem (Crysta) Low Angle Position and High Angle You can select mm angstrom or nm as the unit If an element name is dimmed the corresponding spectra do not exist If you have selected Ignore channel you can search the spectra only by using crystal names If you have deselected the Ignore channel button you can search for spectra that match both crystal names and measuring channels If you select any of the displayed elements the background position will be shown on the spectra by markers To correct the position drag the markers to the desired positions If you want to enter the corrected items click on the Exec button and if you do not want to click on the Cancel button
48 XM-1733027330-1QL
Background Subtraction You can eliminate background components from the specified spectrum
Select Spectra CalculationmdashBackground Subtraction from the Operation menu
The Background Subtraction window opens
Fig 45 Background Subtraction window
Clicking on the Manual button performs spline interpolation for the specified points (normally multiple points) and forms a background curve Clicking on the Auto button performs background subtraction using the Sonne-veld method
Sub (SP mdash k)
You can subtract a constant (k) from the specified spectrum and display the spectra Select Spectra CalculationmdashSub (SP mdash k) from the Operation menu
The Sub (SP ndash k) window opens
Fig 46 Sub (SP ndash k) window
XM-1733027330-1QL 49
Add (SP + k)Multiply (SP k)Divide (SP k) You can add multiply or divide by a constant (k) in the specified spectrum and display the spectra
Select Spectra CalculationmdashAdd (SP + k) or Multiply (SP k) or Divide (SP k) from the Operation menu
The Add (SP + k)Multiply (SP k)Divide (SP k) window opens
Spectrum Shift You can shift spectra to the left or right
Select Spectra CalculationmdashSpectrum Shift from the Operation menu The Spectrum Shift window opens
Spectra Sub (SP1 mdash SP2)
You can subtract two spectra The result of the calculation can be displayed in another display area
Select Spectra CalculationmdashSpectra Sub (SP1 mdash SP2) from the Operation menu
The Spectra Sub (SP1 ndash SP2) window opens
Spectra Add (SP1 + SP2) You can add two spectra The result of the calculation can be displayed in another display area
Select Spectra CalculationmdashSpectra Add (SP1 + SP2) from the Operation menu
The Spectra add (SP1 + SP2) window opens
Dead-time Correction You can perform dead-time correction
Select Spectra CalculationmdashDead-time Correction from the Operation menu
The Dead-time Correction window opens
For the formulas for calculation refer to the separate instruction manual of the Quantitative Analysis Program
50 XM-1733027330-1QL
Result Store You can store displayed spectrum such as the results of a calculation in a file 1
2
Select Spectra CalculationmdashResult Store from the Operation menu The Result Store window opens
Fig 47 Result Store window
Type a crystal name in the Crystal Name input box and then click on the OK button
The spectrum that you have selected will be added to after the spectrum that was stored last At most twenty spectra can be stored If you want to delete a spectrum select it and type the slash () 8 times the
selected spectrum will be deleted
Reset You can undo arithmetic operations executed in Spectra Calculation
Select Spectra CalculationmdashReset from the Operation menu The settings will returned to their initial states
Redraw Spectra
You can display spectra again Select Redraw Spectra from the Operation menu
XM-1733027330-1QL 51
Print-out You can print conditions and results 1
2
3
Select Print-out from the Operation menu The Print-Out window opens
Select the items that you want to print and then click on the OK button The Listing window appears
Click on the Print button in the Listing window The output will be sent to the printer
Fig 48 Print-out window
52 XM-1733027330-1QL
Semi-Quant Analysis After you have obtained background intensity from an identified element and a qualitative spectrum you perform a calculation for correction based on the ratio to the X-ray intensity of a pure element (the K ratio) so as to obtain the result of a quantitative analysis Below is the method for calibrating the X-ray intensity of a pure element Select Semi-Quant Analysis from the Operation menu
The Semi-Quant Analysis window opens
Fig 49 Semi-Quant Analysis window
This window displays a list of the element names (in Element) X-ray names (in X-ray) and analyzing crystals (in Crystal) for the A-rank identified elements whose spectra show the strongest X-ray intensities
MetalOxide When the sample to be analyzed is a metal click on the Metal button When the sample is an oxide click on the Oxide button then enter values into the No of Oxygen and Valence input boxes
No of Oxygen input box You can input a value when Oxide is selected Type the number of oxygen atoms in the input box The number is to be used as the standard when the molecular formula is calculated after correction
XM-1733027330-1QL 53
Normalize Clicking on this button normalizes the mass concentration after correction the total mass concentration becomes 100 If you do not click on the Normalize button the current values are displayed as they are
Element X-ray Crystal and Valence in the list
Button Function
Element Adds and deletes arbitrary elements
X-ray Specifies the type (Kα Kβ Lα Lβ Mα and Mβ) of the X-rays in the scan range
Crystal Specifies one of the analyzing crystals displayed in the column when the characteristic X-rays span multiple spectra
Valence Specifies the valence of oxides The mass concentration of oxygen can be obtained by using the valence
Result window
You can specify where to display the results that you obtain
Button Function
New Text Opens a text window in which the results are displayed
Spectrum Displays the results in the spectrum display area if it is open
Parameter Displays the results in the parameter-display area
54 XM-1733027330-1QL
Fig 50 An example of Semi-Quant Analysis results
ID-Doctor You can perform element identification based upon the knowledge base of experienced analysis specialists If ID-Doctor is selected the element identification under ID-Doctor will be executed automatically after measurement 1
2
Select ID-Doctor from the Operation menu The ID-Doctor window opens
Fig 51 ID-Doctor window
Click on the OK button For details refer to Chapter 5 ldquoAppendixrdquo
XM-1733027330-1QL 55
Spectrum Analysis You can display on a spectrum the position height area FWHM (full width at half maximum) and height from the baseline of the specified spectrum peak You can print the spectrum after the spectrum analysis by using the Print button 1
2
3
Select Spectrum Analysis from the Operation menu The Spectrum Analysis window opens
Fig 52 Spectrum Analysis window
Specify the baseline between any two desired points by dragging the mouse from the start point and dropping it at the finish point Click on the Apply button
The results of Spectrum Analysis will be displayed on the spectrum
If you enlarge a desired part of a spectrum by using Spectra DisplayndashZooming and specify the desired baseline between two points you can obtain the baseline with greater precision You can also specify the baseline by inputting values in Baseline X Lower and X Upper input boxes You can select the following items Line color Color of lines
56 XM-1733027330-1QL
String Color Color of text Adjust Place in which text is to be printed selected from Left Center and Right Size Size of text selected from S M and L Peak Detect Peak position selected from Max Point 3 Points and 5 Points Plot Item Items to be displayed Shift String Lets you shift the text already written by dragging it
4
1
Turn on the Separation of Left Right button and then click on the Apply button
You will obtain different results on the left side and right side of the peak position
Spectra Search Spectra Search has two important functions One is a search function The other is a load function Using the search function you can display average correlation and other information about spectra judge to be similar in the Search result scroll window by using correlation coefficients from the start position to the finish position for the same crystal Using the load function you can also display the spectra that you have selected from the Search result scroll window The correlation coefficient between a spectrum and another one is 10 if the two are the same while the closer the coefficient is to 00 the less similar the two are The correlation coefficient obtained by calculation will be the same even if one or both are multiplied by a constant If the correlation coefficient is about 09 or more two spectra are similar experimentally However it is recommended that you judge similarity from the display by using the load function
Select Spectra Search from the Operation menu The Spectra Search window opens
XM-1733027330-1QL 57
Fig 53 Spectra Search window
Button Function
Search start positionndash User Group Sample Stage No
Specifies search start directory If there are many spectra for qualitative analysis specifythe start position by using the Group button to save search time Clicking on the Group button opens the Group window where you can specify group names In the same way clicking on the Sample button opens the Sample window where you can specify sample names
58 XM-1733027330-1QL
Fig 54 Group window
Button Function
Search condition ndashStageSpectra
Selecting Stage performs searches through samples Selecting Spectra performs searches through spectra
One Spectrum All spectra
When Stage is selected this function is available
L value (mm) Wave (A)Wave (nm)
Used when you specify the search range
Corr_coeff Correlation coefficient from 00 to 10
Start Pos End Pos Start position for calculation of correlation coefficient Finish position for calculation of correlation coefficient You can change the positions
Search result Scroll window to display the results of search
Search Starts search
Load Displays the spectrum selected from the Search result scroll window
Stop Stops search
Reset Resets correlation coefficient and the values of Start Pos and End Pos Clicking on this button also resets the spectrum presently displayed to the previous one
Selected List Click on this button to print the results of the search You can print only the spectra that you have selected from the Search result scroll window
Close Resets the spectra that are presently displayed and closes the Spectra Search window
XM-1733027330-1QL 59
44 Semi-Quantitative (Semi-Quant) Analysis Program In ordinary quantitative analyses quantitation results are corrected by measuring the intensities of peaks and backgrounds for each element Differing from the ordinary quantitative analyses the semi-quantitative analysis (Semi-Quant Analysis) program corrects quantitation results by using the spectral data Namely the intensities of the peaks and backgrounds for the elements identified in the qualitative analysis are obtained from the qualitative-analysis spectral data The ratio of the spectral peak intensity for each element to that of the characteristic X-rays for the pure element is calculated as the K-ratio
K-ratio = IunkIstd
where Iunk Intensity of the characteristic X-rays from an unknown sample Istd Intensity of the characteristic X-rays of a pure element
Based on this K-ratio ZAF correction is performed and the mass concentration of each element is printed together with the K-ratio This result can be used later to perform an off-line quantitative analysis (Summary) or it can also be recorrected by using the measured standard sample data The characteristic X-ray intensities of pure elements are calculated from the standard sensitivity curve obtained in advance At that time since their dependence on the accelerating voltage is also calculated the K-ratio for the qualitative analysis data measured from 5 kV to 30 kV (in 5 kV steps) can be calculated The standard sensitivity curves have been measured in our company for a large number of standard samples However there may exist slight differences in the measured curves depending on the instruments used Therefore using some standard samples measure and correct the standard sensitivity curves of some elements for each analyzing crystal and for each characteristic X-ray (Kα Lα and Mα) Once this correction has been done you need not repeat it each time you perform analysis
441 How to calculate X-ray intensities in the Semi-Quant Analysis
X-ray intensities in the Semi-Quant Analysis are calculated in the following way As the peak position the position at which the X-ray intensity is the strongest is selected after searching for it in the vicinity of the aimed characteristic X-rays As the background position the position at which the mean X-ray intensity having the lowest moving average of three points from a position a little apart from the peak position is selected These results are displayed as measurement conditions The search ranges of the peaks and backgrounds are defined for each analyzing crystal in the sqtcond file in the optepmaconfanal directory The results of the Semi-Quant Analysis are saved in the file named 1onq in the directory of the quantitative analysis
60 XM-1733027330-1QL
442 Using Semi-Quant Analysis results in off-line quantitative analysis
The results of the Semi-Quant Analysis can be utilized in the off-line quantitative analysis
Summary You can execute Summary in the Semi-Quant Analysis 1
2
3
1
2
3 4
Select ProcessmdashQuantitative AnalysismdashSummary from the EPMA Main Menu
The Function window for process opens Click on the Sample button
The Select Sample window opens Select Qnt for Semi-Quant Analysis
The remaining steps are the same as for ordinary quantitative analysis
In the Semi-Quant Analysis elements are different for each sample in many cases If you print the results of many samples it will be difficult to distinguish them since there are many elements To solve this problem use Mass order for printing If you select Qlw in place of Qnt you can obtain the list of identified elements when you have printed it
Off-line Correction
You can execute Off-line Correction of the analysis results obtained in the Semi-Quant Analysis
Select ProcessmdashQuantitative AnalysismdashOff-line Correction from the EPMA Main Menu
The Function window for off-line correction opens Click on the Sample button
The Select Sample window opens Select Qnt for Semi-Quant Analysis Set the conditions as follows
Specify the correction method and accelerating voltage used for measurement Specify the same elements as those used in the Semi-Quant Analysis Select the same X-rays channel and analyzing crystal as in the result of the Semi-Quant Analysis for the element to be measured Select appropriate standard samples if any When Cal-STD is selected as the standard sample for all elements the same result as in the Semi-Quant Analysis is obtained
For procedures for entering the conditions for the quantitative analysis refer to the separate operation manual of the Quantitative Analysis Program
After setting the above conditions click on Read Intensity amp Correction and the X-ray intensities obtained in the Semi-Quant Analysis will be displayed Then click on the Apply button and off-line correction will be executed
XM-1733027330-1QL 61
443 Correcting the standard sensitivity curve
The Semi-Quant Analysis program includes a program for correcting the standard sensitivity curve By using the standard sample installed in the microanalyzer the X-ray intensity coefficient (I) in the equation in which the atomic number is used as the variable can be obtained for each analyzing crystal and for each characteristic X-ray (Kα Lα and Mα) of each X-ray spectrometer Once this program has been executed you need not run it again
I = exp (a + bZ + cZ2 + dZ3
where I Intensity of characteristic X-rays (cps100 pA) Z Atomic number a b c d Coefficients
Combinations of the standard sample and characteristic X-rays to be used are defined in a file in the optepmacalisqt directory The coefficients obtained are saved in the sqtcoef file in the optepmacali directory together with the measured data The characteristic X-ray intensities of pure elements for each analyzing crystal and for each accelerating voltage are saved in a file in the optepmacalistd_int directory Follow the procedures in the sections below to execute correction of the standard sensitivity curve
Opening the Semi-Quant Calibration window
Select InitializemdashSemi-Quant Calibration from the EPMA Main Menu
Fig 55 Pull-down menu of the Initialize icon
The Semi-Quant Calibration window opens You can perform corrections in this window
62 XM-1733027330-1QL
Selecting analyzing crystals Select analyzing crystals whose standard sensitivity curves are to be corrected Click on the Crystal button in the Semi-Quant Calibration window
The Crystal and Channel window opens
If necessary click on the for Light elements button in the Crystal and Channel window then the Light Elements window opens
Fig 56 Crystal and Channel and Light Elements windows
Out of the analyzing crystals installed in the instrument the analyzing crystals whose standard sensitivity curves can be corrected will be displayed in the Crystal and Channel and Light Elements windows
By default all the crystals are selected If there are some analyzing crystals whose standard sensitivity curves you do not want to correct deselect their crystal buttons
XM-1733027330-1QL 63
Setting the stage positions for standard samples You have to enter the stage positions for standard samples prior to measurement 1
2
1
2
3
Click on the Stage button in the Semi-Quant Calibration window The Set Stage Stage Monitor and Memory windows open
Fig 57 Specifying the stage positions for standard samples
Specify the desired standard sample names and their stage positions
If stage positions have been already set you need not specify them
For the operating procedure refer to the instruction manual of the main unit
Executing measurements You execute measurement by using the following procedure
Click on the Measure button in the Semi-Quant Calibration window The Start Calibration window opens
Set the current to about 1 10mdash7 A in advance Although the accelerating voltage is automatically set to 20 kV but the current is not set automatically
Confirm all the conditions that you require to use then click on the OK button
Measurement begins If you click on the Cancel button the previous window will return
Measurement is performed for each analyzing crystal and the progress of the measurement is displayed on the screen
64 XM-1733027330-1QL
Stopping measurement
To stop measurement for any reason click on the Stop button To temporarily interrupt measurement click on the Pause button On completion of peak search measurement stops temporarily To restart the measurement click on the Pause button once again
Displaying measurement results
On completion of measurement with an analyzing crystal the correction coefficients and the calculated intensities of the characteristic X-rays of the pure elements are displayed The coefficients are displayed in units of cps100 pA The X-ray intensities for Kα Lα and Mα are displayed (vertical axis logarithmic scale in units of cpsμA horizontal axis atomic number)
Fig 58 Display of measurement results
XM-1733027330-1QL 65
Utility
Click on the Utility button in the Semi-Quant Calibration window The Utility pop-up window opens The following functions are included in Utility
Button Function
Reset spectra Individual spectrum windows can be enlarged or reduced by dragging the button at the lower right corner of each window Clicking on Reset spectra after enlarging or reducing the window will return it to the original size
Draw results Clicking on this item displays results of measurement on the computer display
Print results Clicking on this item prints the measured data and the intensity coefficients of the standard sensitivity curve
Check configuration Clicking on this item enables you to check the combination of the analyzing crystal and characteristic X-rays in measurement
Check pksk parameter Clicking on this item enables you to check the parameters for peak search Special care should be exercised in changing the parameters because the operation affects peak search and related operations in quantitative analysis
Smoothing Clicking on this item smoothes and displays the waveform for peak search
2nd derivative Clicking on this item displays the second derivative waveform of the peak search spectrum
Log scale Clicking on this item displays the peak search spectrum on a logarithmic scale
66 XM-1733027330-1QL
5 APPENDIX
Determining peak positions and intensities and identifying elements Using the procedures below this program detects the peaks of characteristic X-rays and identifies the elements for the detected peaks
Detecting peak positions
1 2 3
4
5
1 2
3 a
b
c
d
4
5
Smooth a spectrum by the Savitzky-Golay method Evaluate the second derivative of the smoothed spectrum Detect the peak positions from the second derivative waveform and deter-mine the background positions from the waveforms obtained after second differentiation and smoothing From the smoothed spectrum determine the peak intensity and the back-ground intensity If the difference between the peak intensity and the background intensity is too large to attribute to statistical variation judge that a peak of interest exists
Identifying elements
Detect peaks for each spectrum If any one of the Kα (1) Lα (1) and Mα (1) lines is detected assign the elements of interest to the B rank Further judge the elements of B rank as follows If ZKα min Z ZKβ min assign the elements of interest to the A rank Usually ZKα min=4 ZKβ min=17 If both a Kα (1) line and a K (1) line are found in the same spectrum assign the elements of interest to the A rank If both a Kα (1) line and a K (1) line are found in different spectra assign the elements of interest to the A rank If both an Lα (1) line and an L (1) line are found in the same spectrum assign the elements of interest to the A rank Similarly if both an Mα (1) line and an M (1) line are found in the same spectrum assign the elements of interest to the A rank
If any peaks of B-rank elements are superimposed on any peaks of charac-teristic X-rays of A-rank elements (usually of the first-order) exclude the B-rank elements from the elements to be identified If no A-rank element exists but only one B-rank element exists assign this B-rank element to the A rank
XM-1733027330-1QL 67
Expert identification of elements
This expert identification of elements is a reliable method of ratiocination based upon the knowledge base of experienced analysis specialists This method enables us to evaluate a level of confidence in the result of the element identification performed by using the above-mentioned element identifying method if it is applied for calculation The knowledge base has been created under the following conditions
Accelerating voltage 20 kV Probe current 10 to 500 nA Step 50 μm Sample time 50 ms or more Number of spectra 4 Analyzing crystal LIF PET TAP and STE Scanning range of spectrometer 65 mm to 250 mm (258 mm for TAP) Even if you cannot observe under the above conditions to some extent for some
reasons you can obtain good results since this program is created to avoid problems Of course it is best to meet the requirements as much as possible However when you specify elements to be identified set the spectrometer range to include the first-order X-rays (up to the second order if possible ) of α and of K L and M of the elements
In the results after execution of ID-Doctor the indication ID-Doctor is shown both at the area where elements are displayed in the Data Display window and just above the area where A-Rank and B-Rank elements are displayed Therefore you can easily distinguish the results obtained with the ID-Doctor from those obtained without the ID-Doctor The element identification executed by using this program is performed using the judgment method that imitates experienced analysis specialists the results are not absolutely correct Please use this ID-Doctor as a reference and keep it in mind that you the user of this program decide whether to accept the results or not
68 XM-1733027330-1QL
- XM-1733027330
-
- CONVENTIONS
- CONTENTS
- 1 GENERAL
- 2 SPECIFICATIONS
- 3 PROGRAM STRUCTURE
- 4 OPERATION
-
- 41 Preparation for Measurement
-
- 411 Setting group and sample names
- 412 Setting measurement conditions
- 413 Setting analysis positions
- 414 Loading measurement conditions
- 415 Storing measurement conditions
- 416 Printing measurement conditions and results
- 417 Additional Function
-
- 42 Measurement
-
- 421 Measurement under stored conditions (Preset mode)
- 422 Measurement under present instrument conditions (Survey mode)
- 423 Realtime display
-
- 43 Processing
-
- 431 Selecting sample names and processing methods
- 432 Operation menu
-
- 44 Semi-Quantitative (Semi-Quant) Analysis Program
-
- 441 How to calculate X-ray intensities in the Semi-Quant Analysis
- 442 Using Semi-Quant Analysis results in off-line quantitative analysis
- 443 Correcting the standard sensitivity curve
-
- 5 APPENDIX
-
- damy_tate
- damy_yoko
- fff
- instructions
- JEOL
- mekura
- CONTENTS
- contents

Button Function
Select KLM Selects the X-rays to be displayed from the K L and M lines Only highlighted X-rays are displayed It is useful for displaying specified X-rays
Lock To display the KLM Markers of multiple elements specify elements by right-clickings ( refer to the above Element buttons) You can lock the KLM Markers if you click on the Lock button then if you click on an element you can display its KLM Markers together with the locked ones To unlock the locked KLM Markers deselect Lock
Scale The scale for each X-ray height of KLM Markers is based on the theoretical intensity When an X-ray marker cannot be seen easily you can adjust the height of the KLM Markers by using the arrow-buttons to the right of the Scale button The same result can be obtained by dragging a point on the spectrum up or down
Set Adds the selected elements to the list of identification elements and displays element names at the position of each KLM Marker To label peaks use the Peak ID window
Delete Deletes the selected elements from the list of identification elements as well as all the element names When you want to delete element names one by one use the Peak ID window
Print Prints the information on the KLM Markers
Close Closes the KLM window
42 XM-1733027330-1QL
Peak ID The wavelength and intensity at the specified position of the spectrometer are displayed At the same time the possible names of characteristic X-rays near the specified position are listed 1
2
Select Peak ID from the Operation menu The Peak ID window opens
X-ray list
Wavelength display
Spectrum number
Fig 39 Peak ID window
Select any position from a spectrum in the Data display window The wavelength and intensity at the specified position of the spectrometer are displayed in the X-ray list of the Peak ID window At the same time the possible names of characteristic X-rays near the specified position are listed The identified elements and the elements corresponding to the displayed KLM Markers are displayed in different colors The following functions are available
XM-1733027330-1QL 43
Object Function
Spectrum number Specifies the desired spectrum You can also specify it by clicking on it
Wavelength display
Displays the wavelength and X-ray intensity at a position specified by clicking You can perform a fine adjustment of the cursor position by using the larr and rarr keys on the keyboard
X-ray list Displays the X-rays near the wavelength selected by clicking The information displayed is Element Name X ray Name Order Diff (distance from the selected position) and Int (theoretical X-ray intensity)
Order Specifies the order of the X-rays to be detected
Min Int Specifies the minimum theoretical intensity of the X-rays to be displayed
PrevNext ID Move the cursor to the peak positions whose elements were already identified The movement direction of Prev ID is toward lower wavelengths and that of Next ID is toward higer wavelengths The cursor jumps to the other end when it is moved beyond an end
Print Opens the Listing window and displays the data of the item selected from the X-ray list
Clear Clears the items that were specified for printing
Set After you have selected a line of an element in the X-ray list clicking on the Set button identifies the element and displays its peak label
Delete After you have selected an identified element in the X-ray list clicking on the Delete button deletes the peak label of the element
Shift ID Moves peak labels After you have clicked on the Shift ID button clicking near the label changes the shape of the cursor Then drag the label to move it To deselect this mode click on the Shift ID button once again
Any Length Measures the distance between two arbitrary points After you have clicked on the Any Length button click on two arbitrary points on a spectrum then the marker and distance between the points are displayed To deselect this mode click on the Any Length button once again
Close Closes the Peak ID window
Save ID Results
After you have changed the element name display on the spectrum by using Peak ID for example the element name can be saved as an A rank element 1
2
Select Save ID Results from the Operation menu The Save ID Results window opens
Fig 40 Save ID Results window
Click on the OK button in the Save ID Results window after you have changed the element name display on the spectrum by using Peak ID for example
44 XM-1733027330-1QL
The element name displayed on the spectrum will be saved as an A rank element in a file These data will be displayed automatically beginning with the next operation
Off-line ID
You can perform element identification once again 1
2
Select Off-line ID from the Operation menu The Off-line ID window opens
Fig 41 Off-line ID window
Specify the necessary conditions then click on the Apply button to perform element identification once again after
The ID-Doctor does not operate during off-line identification of element In element identification the specified order of X-rays is taken into account and if A rank only is selected only the labels for A rank elements are displayed after the identification If A amp B rank is selected all the labels are displayed after identification If a number other than zero is specified in the Min Int input box the labels for only the X-rays having the specified intensity or more are displayed after identi-fication
When the Close button is clicked on with the Orderndash0 button selected with Apply not selected the identified element names will not be displayed on the spectra in subsequent measurements
XM-1733027330-1QL 45
Spectra Calculation
Select Spectra Calculation from the Operation menu The Spectra Calculation window opens You can perform the arithmetic operations that are shown in the Spectra Calculation window
Fig 42 Spectra Calculation window
46 XM-1733027330-1QL
Smoothing
Select Spectra CalculationmdashSmoothing from the Operation menu The Smoothing window opens You can smooth the specified spectra using the Savitzky-Golay method
If you selected Manual you can assign a number of points to use in smoothing If you selected Result Only only the smoothed spectra are displayed whereas if you selected Original amp Result the spectra before smoothing are also displayed at the same time
Fig 43 Smoothing window
2nd Derivative
Select Spectra Calculationmdash2nd Derivative from the Operation menu The 2nd Derivative window opens You can find the second derivatives of the specified spectra using the Savitzky-Golay method
Quant Background
You can display the background position that is used in the quantitative analysis and correct the position while watching the corresponding spectra
Select Spectra CalculationmdashQuant Background from the Operation menu The Quant Background window opens
XM-1733027330-1QL 47
Fig 44 Quant Background window
The information displayed is No Elem (Crysta) Low Angle Position and High Angle You can select mm angstrom or nm as the unit If an element name is dimmed the corresponding spectra do not exist If you have selected Ignore channel you can search the spectra only by using crystal names If you have deselected the Ignore channel button you can search for spectra that match both crystal names and measuring channels If you select any of the displayed elements the background position will be shown on the spectra by markers To correct the position drag the markers to the desired positions If you want to enter the corrected items click on the Exec button and if you do not want to click on the Cancel button
48 XM-1733027330-1QL
Background Subtraction You can eliminate background components from the specified spectrum
Select Spectra CalculationmdashBackground Subtraction from the Operation menu
The Background Subtraction window opens
Fig 45 Background Subtraction window
Clicking on the Manual button performs spline interpolation for the specified points (normally multiple points) and forms a background curve Clicking on the Auto button performs background subtraction using the Sonne-veld method
Sub (SP mdash k)
You can subtract a constant (k) from the specified spectrum and display the spectra Select Spectra CalculationmdashSub (SP mdash k) from the Operation menu
The Sub (SP ndash k) window opens
Fig 46 Sub (SP ndash k) window
XM-1733027330-1QL 49
Add (SP + k)Multiply (SP k)Divide (SP k) You can add multiply or divide by a constant (k) in the specified spectrum and display the spectra
Select Spectra CalculationmdashAdd (SP + k) or Multiply (SP k) or Divide (SP k) from the Operation menu
The Add (SP + k)Multiply (SP k)Divide (SP k) window opens
Spectrum Shift You can shift spectra to the left or right
Select Spectra CalculationmdashSpectrum Shift from the Operation menu The Spectrum Shift window opens
Spectra Sub (SP1 mdash SP2)
You can subtract two spectra The result of the calculation can be displayed in another display area
Select Spectra CalculationmdashSpectra Sub (SP1 mdash SP2) from the Operation menu
The Spectra Sub (SP1 ndash SP2) window opens
Spectra Add (SP1 + SP2) You can add two spectra The result of the calculation can be displayed in another display area
Select Spectra CalculationmdashSpectra Add (SP1 + SP2) from the Operation menu
The Spectra add (SP1 + SP2) window opens
Dead-time Correction You can perform dead-time correction
Select Spectra CalculationmdashDead-time Correction from the Operation menu
The Dead-time Correction window opens
For the formulas for calculation refer to the separate instruction manual of the Quantitative Analysis Program
50 XM-1733027330-1QL
Result Store You can store displayed spectrum such as the results of a calculation in a file 1
2
Select Spectra CalculationmdashResult Store from the Operation menu The Result Store window opens
Fig 47 Result Store window
Type a crystal name in the Crystal Name input box and then click on the OK button
The spectrum that you have selected will be added to after the spectrum that was stored last At most twenty spectra can be stored If you want to delete a spectrum select it and type the slash () 8 times the
selected spectrum will be deleted
Reset You can undo arithmetic operations executed in Spectra Calculation
Select Spectra CalculationmdashReset from the Operation menu The settings will returned to their initial states
Redraw Spectra
You can display spectra again Select Redraw Spectra from the Operation menu
XM-1733027330-1QL 51
Print-out You can print conditions and results 1
2
3
Select Print-out from the Operation menu The Print-Out window opens
Select the items that you want to print and then click on the OK button The Listing window appears
Click on the Print button in the Listing window The output will be sent to the printer
Fig 48 Print-out window
52 XM-1733027330-1QL
Semi-Quant Analysis After you have obtained background intensity from an identified element and a qualitative spectrum you perform a calculation for correction based on the ratio to the X-ray intensity of a pure element (the K ratio) so as to obtain the result of a quantitative analysis Below is the method for calibrating the X-ray intensity of a pure element Select Semi-Quant Analysis from the Operation menu
The Semi-Quant Analysis window opens
Fig 49 Semi-Quant Analysis window
This window displays a list of the element names (in Element) X-ray names (in X-ray) and analyzing crystals (in Crystal) for the A-rank identified elements whose spectra show the strongest X-ray intensities
MetalOxide When the sample to be analyzed is a metal click on the Metal button When the sample is an oxide click on the Oxide button then enter values into the No of Oxygen and Valence input boxes
No of Oxygen input box You can input a value when Oxide is selected Type the number of oxygen atoms in the input box The number is to be used as the standard when the molecular formula is calculated after correction
XM-1733027330-1QL 53
Normalize Clicking on this button normalizes the mass concentration after correction the total mass concentration becomes 100 If you do not click on the Normalize button the current values are displayed as they are
Element X-ray Crystal and Valence in the list
Button Function
Element Adds and deletes arbitrary elements
X-ray Specifies the type (Kα Kβ Lα Lβ Mα and Mβ) of the X-rays in the scan range
Crystal Specifies one of the analyzing crystals displayed in the column when the characteristic X-rays span multiple spectra
Valence Specifies the valence of oxides The mass concentration of oxygen can be obtained by using the valence
Result window
You can specify where to display the results that you obtain
Button Function
New Text Opens a text window in which the results are displayed
Spectrum Displays the results in the spectrum display area if it is open
Parameter Displays the results in the parameter-display area
54 XM-1733027330-1QL
Fig 50 An example of Semi-Quant Analysis results
ID-Doctor You can perform element identification based upon the knowledge base of experienced analysis specialists If ID-Doctor is selected the element identification under ID-Doctor will be executed automatically after measurement 1
2
Select ID-Doctor from the Operation menu The ID-Doctor window opens
Fig 51 ID-Doctor window
Click on the OK button For details refer to Chapter 5 ldquoAppendixrdquo
XM-1733027330-1QL 55
Spectrum Analysis You can display on a spectrum the position height area FWHM (full width at half maximum) and height from the baseline of the specified spectrum peak You can print the spectrum after the spectrum analysis by using the Print button 1
2
3
Select Spectrum Analysis from the Operation menu The Spectrum Analysis window opens
Fig 52 Spectrum Analysis window
Specify the baseline between any two desired points by dragging the mouse from the start point and dropping it at the finish point Click on the Apply button
The results of Spectrum Analysis will be displayed on the spectrum
If you enlarge a desired part of a spectrum by using Spectra DisplayndashZooming and specify the desired baseline between two points you can obtain the baseline with greater precision You can also specify the baseline by inputting values in Baseline X Lower and X Upper input boxes You can select the following items Line color Color of lines
56 XM-1733027330-1QL
String Color Color of text Adjust Place in which text is to be printed selected from Left Center and Right Size Size of text selected from S M and L Peak Detect Peak position selected from Max Point 3 Points and 5 Points Plot Item Items to be displayed Shift String Lets you shift the text already written by dragging it
4
1
Turn on the Separation of Left Right button and then click on the Apply button
You will obtain different results on the left side and right side of the peak position
Spectra Search Spectra Search has two important functions One is a search function The other is a load function Using the search function you can display average correlation and other information about spectra judge to be similar in the Search result scroll window by using correlation coefficients from the start position to the finish position for the same crystal Using the load function you can also display the spectra that you have selected from the Search result scroll window The correlation coefficient between a spectrum and another one is 10 if the two are the same while the closer the coefficient is to 00 the less similar the two are The correlation coefficient obtained by calculation will be the same even if one or both are multiplied by a constant If the correlation coefficient is about 09 or more two spectra are similar experimentally However it is recommended that you judge similarity from the display by using the load function
Select Spectra Search from the Operation menu The Spectra Search window opens
XM-1733027330-1QL 57
Fig 53 Spectra Search window
Button Function
Search start positionndash User Group Sample Stage No
Specifies search start directory If there are many spectra for qualitative analysis specifythe start position by using the Group button to save search time Clicking on the Group button opens the Group window where you can specify group names In the same way clicking on the Sample button opens the Sample window where you can specify sample names
58 XM-1733027330-1QL
Fig 54 Group window
Button Function
Search condition ndashStageSpectra
Selecting Stage performs searches through samples Selecting Spectra performs searches through spectra
One Spectrum All spectra
When Stage is selected this function is available
L value (mm) Wave (A)Wave (nm)
Used when you specify the search range
Corr_coeff Correlation coefficient from 00 to 10
Start Pos End Pos Start position for calculation of correlation coefficient Finish position for calculation of correlation coefficient You can change the positions
Search result Scroll window to display the results of search
Search Starts search
Load Displays the spectrum selected from the Search result scroll window
Stop Stops search
Reset Resets correlation coefficient and the values of Start Pos and End Pos Clicking on this button also resets the spectrum presently displayed to the previous one
Selected List Click on this button to print the results of the search You can print only the spectra that you have selected from the Search result scroll window
Close Resets the spectra that are presently displayed and closes the Spectra Search window
XM-1733027330-1QL 59
44 Semi-Quantitative (Semi-Quant) Analysis Program In ordinary quantitative analyses quantitation results are corrected by measuring the intensities of peaks and backgrounds for each element Differing from the ordinary quantitative analyses the semi-quantitative analysis (Semi-Quant Analysis) program corrects quantitation results by using the spectral data Namely the intensities of the peaks and backgrounds for the elements identified in the qualitative analysis are obtained from the qualitative-analysis spectral data The ratio of the spectral peak intensity for each element to that of the characteristic X-rays for the pure element is calculated as the K-ratio
K-ratio = IunkIstd
where Iunk Intensity of the characteristic X-rays from an unknown sample Istd Intensity of the characteristic X-rays of a pure element
Based on this K-ratio ZAF correction is performed and the mass concentration of each element is printed together with the K-ratio This result can be used later to perform an off-line quantitative analysis (Summary) or it can also be recorrected by using the measured standard sample data The characteristic X-ray intensities of pure elements are calculated from the standard sensitivity curve obtained in advance At that time since their dependence on the accelerating voltage is also calculated the K-ratio for the qualitative analysis data measured from 5 kV to 30 kV (in 5 kV steps) can be calculated The standard sensitivity curves have been measured in our company for a large number of standard samples However there may exist slight differences in the measured curves depending on the instruments used Therefore using some standard samples measure and correct the standard sensitivity curves of some elements for each analyzing crystal and for each characteristic X-ray (Kα Lα and Mα) Once this correction has been done you need not repeat it each time you perform analysis
441 How to calculate X-ray intensities in the Semi-Quant Analysis
X-ray intensities in the Semi-Quant Analysis are calculated in the following way As the peak position the position at which the X-ray intensity is the strongest is selected after searching for it in the vicinity of the aimed characteristic X-rays As the background position the position at which the mean X-ray intensity having the lowest moving average of three points from a position a little apart from the peak position is selected These results are displayed as measurement conditions The search ranges of the peaks and backgrounds are defined for each analyzing crystal in the sqtcond file in the optepmaconfanal directory The results of the Semi-Quant Analysis are saved in the file named 1onq in the directory of the quantitative analysis
60 XM-1733027330-1QL
442 Using Semi-Quant Analysis results in off-line quantitative analysis
The results of the Semi-Quant Analysis can be utilized in the off-line quantitative analysis
Summary You can execute Summary in the Semi-Quant Analysis 1
2
3
1
2
3 4
Select ProcessmdashQuantitative AnalysismdashSummary from the EPMA Main Menu
The Function window for process opens Click on the Sample button
The Select Sample window opens Select Qnt for Semi-Quant Analysis
The remaining steps are the same as for ordinary quantitative analysis
In the Semi-Quant Analysis elements are different for each sample in many cases If you print the results of many samples it will be difficult to distinguish them since there are many elements To solve this problem use Mass order for printing If you select Qlw in place of Qnt you can obtain the list of identified elements when you have printed it
Off-line Correction
You can execute Off-line Correction of the analysis results obtained in the Semi-Quant Analysis
Select ProcessmdashQuantitative AnalysismdashOff-line Correction from the EPMA Main Menu
The Function window for off-line correction opens Click on the Sample button
The Select Sample window opens Select Qnt for Semi-Quant Analysis Set the conditions as follows
Specify the correction method and accelerating voltage used for measurement Specify the same elements as those used in the Semi-Quant Analysis Select the same X-rays channel and analyzing crystal as in the result of the Semi-Quant Analysis for the element to be measured Select appropriate standard samples if any When Cal-STD is selected as the standard sample for all elements the same result as in the Semi-Quant Analysis is obtained
For procedures for entering the conditions for the quantitative analysis refer to the separate operation manual of the Quantitative Analysis Program
After setting the above conditions click on Read Intensity amp Correction and the X-ray intensities obtained in the Semi-Quant Analysis will be displayed Then click on the Apply button and off-line correction will be executed
XM-1733027330-1QL 61
443 Correcting the standard sensitivity curve
The Semi-Quant Analysis program includes a program for correcting the standard sensitivity curve By using the standard sample installed in the microanalyzer the X-ray intensity coefficient (I) in the equation in which the atomic number is used as the variable can be obtained for each analyzing crystal and for each characteristic X-ray (Kα Lα and Mα) of each X-ray spectrometer Once this program has been executed you need not run it again
I = exp (a + bZ + cZ2 + dZ3
where I Intensity of characteristic X-rays (cps100 pA) Z Atomic number a b c d Coefficients
Combinations of the standard sample and characteristic X-rays to be used are defined in a file in the optepmacalisqt directory The coefficients obtained are saved in the sqtcoef file in the optepmacali directory together with the measured data The characteristic X-ray intensities of pure elements for each analyzing crystal and for each accelerating voltage are saved in a file in the optepmacalistd_int directory Follow the procedures in the sections below to execute correction of the standard sensitivity curve
Opening the Semi-Quant Calibration window
Select InitializemdashSemi-Quant Calibration from the EPMA Main Menu
Fig 55 Pull-down menu of the Initialize icon
The Semi-Quant Calibration window opens You can perform corrections in this window
62 XM-1733027330-1QL
Selecting analyzing crystals Select analyzing crystals whose standard sensitivity curves are to be corrected Click on the Crystal button in the Semi-Quant Calibration window
The Crystal and Channel window opens
If necessary click on the for Light elements button in the Crystal and Channel window then the Light Elements window opens
Fig 56 Crystal and Channel and Light Elements windows
Out of the analyzing crystals installed in the instrument the analyzing crystals whose standard sensitivity curves can be corrected will be displayed in the Crystal and Channel and Light Elements windows
By default all the crystals are selected If there are some analyzing crystals whose standard sensitivity curves you do not want to correct deselect their crystal buttons
XM-1733027330-1QL 63
Setting the stage positions for standard samples You have to enter the stage positions for standard samples prior to measurement 1
2
1
2
3
Click on the Stage button in the Semi-Quant Calibration window The Set Stage Stage Monitor and Memory windows open
Fig 57 Specifying the stage positions for standard samples
Specify the desired standard sample names and their stage positions
If stage positions have been already set you need not specify them
For the operating procedure refer to the instruction manual of the main unit
Executing measurements You execute measurement by using the following procedure
Click on the Measure button in the Semi-Quant Calibration window The Start Calibration window opens
Set the current to about 1 10mdash7 A in advance Although the accelerating voltage is automatically set to 20 kV but the current is not set automatically
Confirm all the conditions that you require to use then click on the OK button
Measurement begins If you click on the Cancel button the previous window will return
Measurement is performed for each analyzing crystal and the progress of the measurement is displayed on the screen
64 XM-1733027330-1QL
Stopping measurement
To stop measurement for any reason click on the Stop button To temporarily interrupt measurement click on the Pause button On completion of peak search measurement stops temporarily To restart the measurement click on the Pause button once again
Displaying measurement results
On completion of measurement with an analyzing crystal the correction coefficients and the calculated intensities of the characteristic X-rays of the pure elements are displayed The coefficients are displayed in units of cps100 pA The X-ray intensities for Kα Lα and Mα are displayed (vertical axis logarithmic scale in units of cpsμA horizontal axis atomic number)
Fig 58 Display of measurement results
XM-1733027330-1QL 65
Utility
Click on the Utility button in the Semi-Quant Calibration window The Utility pop-up window opens The following functions are included in Utility
Button Function
Reset spectra Individual spectrum windows can be enlarged or reduced by dragging the button at the lower right corner of each window Clicking on Reset spectra after enlarging or reducing the window will return it to the original size
Draw results Clicking on this item displays results of measurement on the computer display
Print results Clicking on this item prints the measured data and the intensity coefficients of the standard sensitivity curve
Check configuration Clicking on this item enables you to check the combination of the analyzing crystal and characteristic X-rays in measurement
Check pksk parameter Clicking on this item enables you to check the parameters for peak search Special care should be exercised in changing the parameters because the operation affects peak search and related operations in quantitative analysis
Smoothing Clicking on this item smoothes and displays the waveform for peak search
2nd derivative Clicking on this item displays the second derivative waveform of the peak search spectrum
Log scale Clicking on this item displays the peak search spectrum on a logarithmic scale
66 XM-1733027330-1QL
5 APPENDIX
Determining peak positions and intensities and identifying elements Using the procedures below this program detects the peaks of characteristic X-rays and identifies the elements for the detected peaks
Detecting peak positions
1 2 3
4
5
1 2
3 a
b
c
d
4
5
Smooth a spectrum by the Savitzky-Golay method Evaluate the second derivative of the smoothed spectrum Detect the peak positions from the second derivative waveform and deter-mine the background positions from the waveforms obtained after second differentiation and smoothing From the smoothed spectrum determine the peak intensity and the back-ground intensity If the difference between the peak intensity and the background intensity is too large to attribute to statistical variation judge that a peak of interest exists
Identifying elements
Detect peaks for each spectrum If any one of the Kα (1) Lα (1) and Mα (1) lines is detected assign the elements of interest to the B rank Further judge the elements of B rank as follows If ZKα min Z ZKβ min assign the elements of interest to the A rank Usually ZKα min=4 ZKβ min=17 If both a Kα (1) line and a K (1) line are found in the same spectrum assign the elements of interest to the A rank If both a Kα (1) line and a K (1) line are found in different spectra assign the elements of interest to the A rank If both an Lα (1) line and an L (1) line are found in the same spectrum assign the elements of interest to the A rank Similarly if both an Mα (1) line and an M (1) line are found in the same spectrum assign the elements of interest to the A rank
If any peaks of B-rank elements are superimposed on any peaks of charac-teristic X-rays of A-rank elements (usually of the first-order) exclude the B-rank elements from the elements to be identified If no A-rank element exists but only one B-rank element exists assign this B-rank element to the A rank
XM-1733027330-1QL 67
Expert identification of elements
This expert identification of elements is a reliable method of ratiocination based upon the knowledge base of experienced analysis specialists This method enables us to evaluate a level of confidence in the result of the element identification performed by using the above-mentioned element identifying method if it is applied for calculation The knowledge base has been created under the following conditions
Accelerating voltage 20 kV Probe current 10 to 500 nA Step 50 μm Sample time 50 ms or more Number of spectra 4 Analyzing crystal LIF PET TAP and STE Scanning range of spectrometer 65 mm to 250 mm (258 mm for TAP) Even if you cannot observe under the above conditions to some extent for some
reasons you can obtain good results since this program is created to avoid problems Of course it is best to meet the requirements as much as possible However when you specify elements to be identified set the spectrometer range to include the first-order X-rays (up to the second order if possible ) of α and of K L and M of the elements
In the results after execution of ID-Doctor the indication ID-Doctor is shown both at the area where elements are displayed in the Data Display window and just above the area where A-Rank and B-Rank elements are displayed Therefore you can easily distinguish the results obtained with the ID-Doctor from those obtained without the ID-Doctor The element identification executed by using this program is performed using the judgment method that imitates experienced analysis specialists the results are not absolutely correct Please use this ID-Doctor as a reference and keep it in mind that you the user of this program decide whether to accept the results or not
68 XM-1733027330-1QL
- XM-1733027330
-
- CONVENTIONS
- CONTENTS
- 1 GENERAL
- 2 SPECIFICATIONS
- 3 PROGRAM STRUCTURE
- 4 OPERATION
-
- 41 Preparation for Measurement
-
- 411 Setting group and sample names
- 412 Setting measurement conditions
- 413 Setting analysis positions
- 414 Loading measurement conditions
- 415 Storing measurement conditions
- 416 Printing measurement conditions and results
- 417 Additional Function
-
- 42 Measurement
-
- 421 Measurement under stored conditions (Preset mode)
- 422 Measurement under present instrument conditions (Survey mode)
- 423 Realtime display
-
- 43 Processing
-
- 431 Selecting sample names and processing methods
- 432 Operation menu
-
- 44 Semi-Quantitative (Semi-Quant) Analysis Program
-
- 441 How to calculate X-ray intensities in the Semi-Quant Analysis
- 442 Using Semi-Quant Analysis results in off-line quantitative analysis
- 443 Correcting the standard sensitivity curve
-
- 5 APPENDIX
-
- damy_tate
- damy_yoko
- fff
- instructions
- JEOL
- mekura
- CONTENTS
- contents
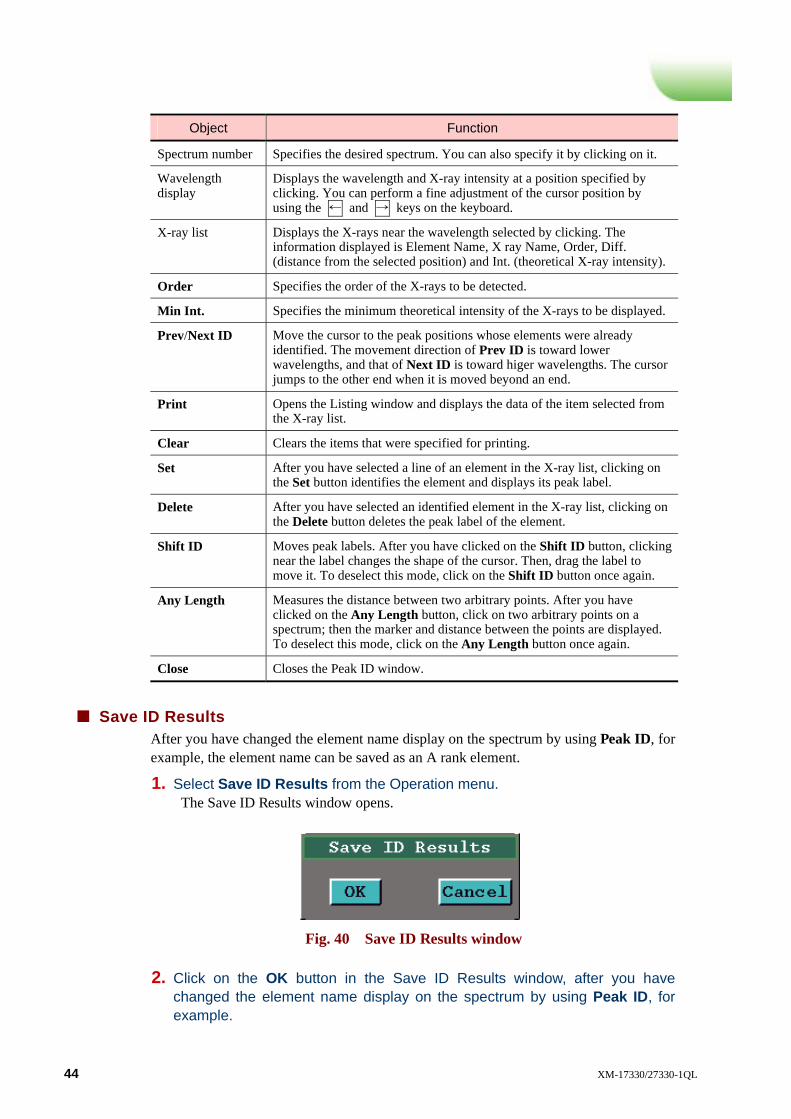
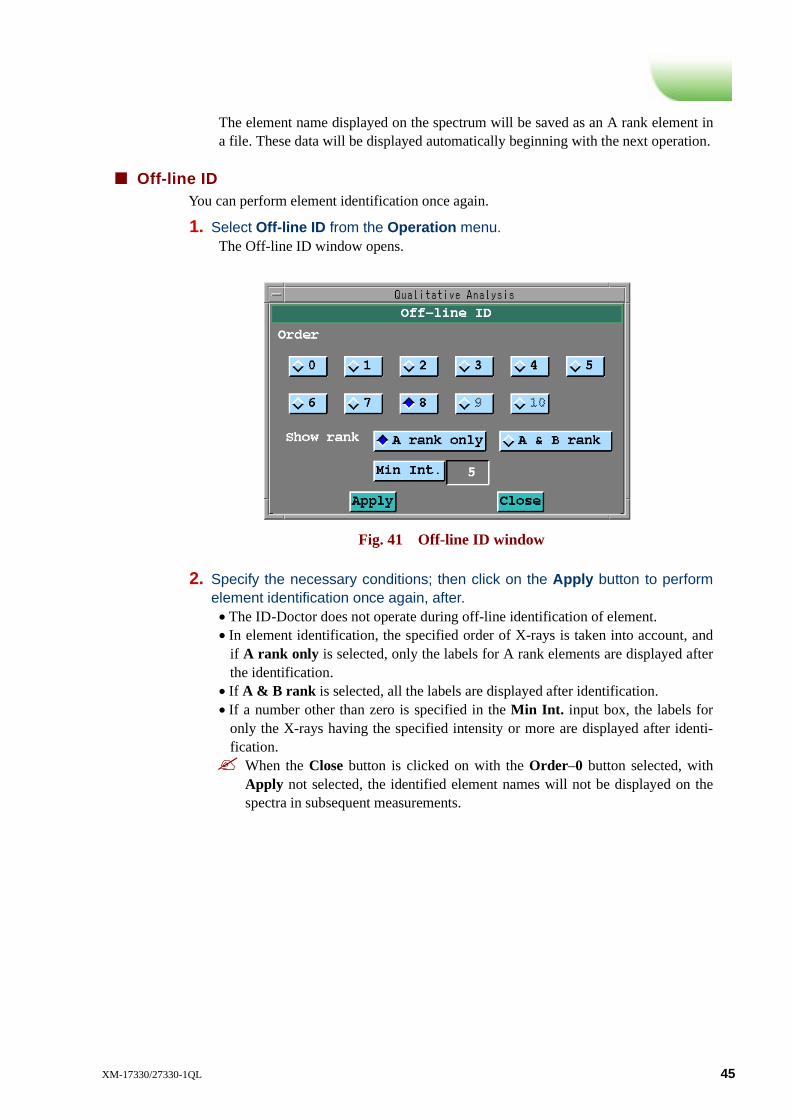
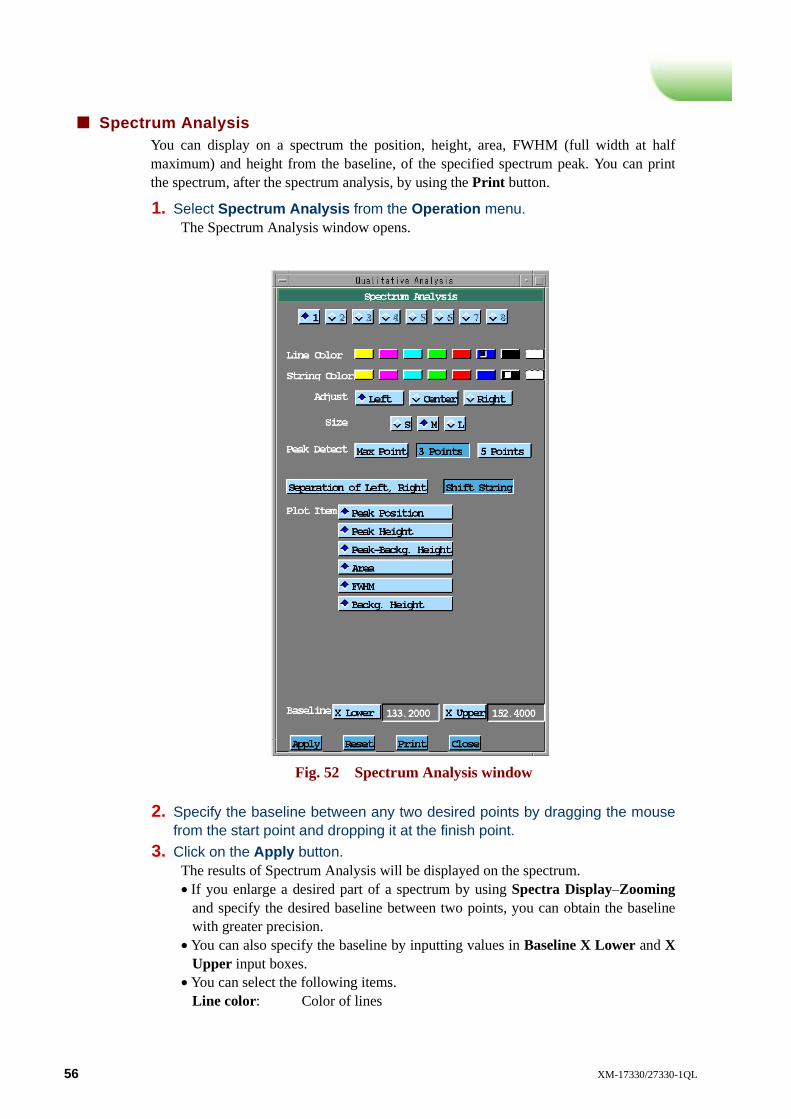