X10 Manual ver1 - Cocktail Audio
51
Rev1.0
Transcript of X10 Manual ver1 - Cocktail Audio

Rev1.0

Contents
Important safety instructions ……………………………………………………………………………………………………… 5
1. Product overview …………………………………………………………………………………………………………. 7
1-1. Top view ………………………………………………………………………………………………………………………………. 7
1-2. Front and right side view ……………………………………………………………………………………………………. 7
1-3. Rear view ……………………………………………………………………………………….................................................. 8
1-4. View of Remote controller and each key’s function …………………………………………………………… 9
2. Prepare …………………………………………………………………………………………………………………….…… 10
2-1. Check the contents of X10 package …………………………………………………………………….. 10
2-2. Install AAA batteries into the remote controller ………………….………………………………. 10
2-3. Optional items …………………………………..…………………................................................................ 11
2-3-1. Passive speaker(CAP10) ………………………………………………………………………………. 11
2-3-2. WiFi USB dongle …………………………………………………………………………………………. 11
2-4. Purchased X10 without hard disk …………………………………………………….……………………. 12
2-5. Purchased X10 including hard disk …………………………………………………….…………………. 12
2-6. Hard disk partition and format ………………………………………………………………………..……. 12
3. Connection ……………………………………………………………………………………………………………………. 14
3-1. Necessary connection ……………………………………………………………………............................... 14
3-2. The specification of X10 Amplifier ………………………………………………………………………… 15
3-3. Passive loudspeaker & Active loudspeaker …………………………………………………………… 15
3-4. Extra connection ……………………………………………………………………………………………………. 15
4. Turn ON and Start ………………………………………………………………………………………………………. 16
5. SETUP ……………………………………………………………………………………………………………………………. 16
5-1. CD Ripping ……………………………………………………………………………………………………………. 17
5-1-1. Bit Rate and Quality …………………………………………………………………………………….. 17
5-1-2. FreeDB TextCode ………………………………………………………………………………………….. 18
5-1-3. FreeDB Install ……………………………………………………………………………………………….. 18
5-1-4. FreeDB Update ……………………………………………………………………………………………… 18
5-2. Audio ……………………………………………………………………………………………………………………… 19
5-3. Network …………………………………………………………………………………………………………………. 19
5-3-1. Wired Setup ………………………………………………………………………………………………….. 19
5-3-1-1. DHCP(Auto IP) ………………………………………………………………………………….. 19
5-3-1-2. Static IP ………………………………………………………………………………………..…… 20
5-3-2. Wireless Setup ……………………………………………………………………………………………. 20

5-4. Samba Server ……………………………………………………………………………………………………… 21
5-5. System …………………………………………………………………………………………………………………. 21
5-5-1. OSD Language …………………………………………………………………………………………… 21
5-5-2. Auto Play ………………………………………………………………………………………………….... 21
5-5-3. Firmware Version ……………………………………………………………………………………….. 21
5-5-4. Firmware Update ……………………………………………………………………………………….. 21
5-5-6. Factory Reset ……………………………………………………………………………………………… 22
5-6. Time …………………………………………………………….………………………………………………………. 22
5-6-1. Time Set(Internet) ………………………………………………………………………………………. 22
5-6-2. Time Set(Manual) ……………………………………………………………………………………….. 23
5-6-3. Time Format ……………………………………………………………………………………………….. 23
6. CD Database(Music DB) ……………………………………………………………….…………………………… 23
6-1. What is CD Database(Music DB) ? ……………………………………………..……………………….. 23
6-2. What is freedb ? …………………………………………………………………………..……………………… 24
7. CD Loading(Ripping) …………………………………………………………………………..…………………….. 24
7-1. In case that the X10 is connected to network(Internet) ……………….……………………. 24
7-1-1. Ripping All …………………………………………………………………………………………………… 25
7-1-2. Ripping Track ………………………………………………………………………………………………. 26
7-2. In case that X10 is NOT connected to network(Internet) ………………..………………… 27
7-2-1. Ripping All ………………………………………………………………………………………………….. 28
7-2-2. Ripping Track ……………………………………………………………………………………………… 29
7-3. In case that you installed FreeDB data into the hard disk of X10 …………………….. 29
7-4. Function to get information on the result of CD ripping and converting………….. 29
8. How to use Music DB(CD database) ………………………………………………………..……………… 30
8-1. Play music loaded(ripped) into X10 …………………………………………………………………….. 30
8-2. SEARCH function ………………………………………………………………………………………………….. 32
8-3. How to manage Music DB …………………………………………………………………………………… 32
8-3-1. Delete or rename music in Music DB …………………………………………………………. 32
8-3-2. How to export music in Music DB to other storage(HDD or USB) ……………. 33
9. Edit TAG info of music in Music DB ……………………………………..……………..…………….…….. 34
10. Audio CD direct play ……………………………………………………….……………..………………………….. 35
10-1. In case that X10 is connected to network(Internet)…………………………..………………. 35
10-2. In case that X10 is NOT connected to network(Internet) ……………………….………… 36
10-3. In case that you installed FreeDB data into the hard disk of X10 ……………………. 36

11. Data CD direct play ………………………………………………………………….……………………………………. 37
12. Playlist …………………………………………………………………….…………………….……………………..………….. 37
12-1. How to make Playlist …………………………………………………………..…………………………………. 37
12-2. How to play Playlist ……………………………………………………………….………………….…………… 39
12-3. How to edit Playlist ……………………………………………………………………..…………………………. 39
13. Music Streaming …………………………………………………………………………………….………..………….…. 40
14. Internet Radio …………………………………………………………………………………………….…..…….……..…. 40
14-1. How to play Internet Radio …………………………………………………………..………..……….……. 40
14-2. How to put your favorite stations into My Favorites ……………..….………………..………. 41
14-3. How to play My Favorites …………………………………………………………………………………….. 41
14-4. How to run search function in Internet Radio …………………………………………………….. 42
15. USB host port for USB devices ……………………………………….………………….……………................ 42
16. External USB mass storage ……………………………….…………………………….………..…………………... 42
17. Browser …………………………………………………………………………………………………………………………… 43
17-1. Play data CD ………………………………………………………………………..………………….…………..… 43
17-2. File Management ………………………………………………………………………………………………….. 43
17-2-1. To get information on HDD, USB, folder or file ………………………………………… 43
17-2-2. TAG Edit ……………………………………………………………………………………………………… 44
17-2-3. Copy to DB ……………………………………………………………………………….………………… 44
17-2-4. Copy Files …………………………………………………………………………………………………… 45
17-2-5. Move Files ……………………………………………………………………………….………………….. 46
17-2-6. Delete Files …………………………………………………………………………….…………………… 46
18. Extra function …………………………………………………………………………………………………..…..………… 47
18-1. Bookmark …………………………………………………………………………………………………....…………. 47
18-2. E.Q.(Equalizer) ……………………………………………………………………………………………....……..…. 47
18-3. Standby …………………………………………………………………………….………………………..….…….... 48
18-4. Change of play mode ………………………………………………………………………………..….…..…. 48
18-5. Alarm set ……………………………………………………………………………………………………….…..….. 48
18-6. Sleep mode ………………………………………………………………………..………………………..…..……. 49
18-7. Auto Play ……………………………………………………………………………..…………………………….….. 49
19. Specification ……………………………………………………………………….………..…………………………….... 50
20. Troubleshooting …………………………………………………………….……………………….…………….….….. 51

Important safety instructions
For your own safety, please read the following important safety instructions carefully before
attempting to connect this unit to the main power supply. They will enable you to get the best
performance from the unit and prolong the life of the unit:
1.Read the instructions.
2.Keep the instructions.
3.Heed all warnings.
4.Follow all instructions.
5.Do not use this product near water.
6.Clean only with dry cloth.
7.Do not block any ventilation openings. Install in accordance with the manufacturer’s instructions.
8.Do not remove the casing of this product.
9.Only use this product indoors. Do not expose the product to dripping/splashing water, rain or
high humidity.
10.Keep this product away from direct sunlight, naked flames or heat.
11.Do not install near any heat sources such as radiators, heat registers, stoves, or other electrical
equipment(including amplifiers) that produce much heat.
12.Do not place any other electrical equipment on the product.
13.Do not place any sources of danger on the product(e.g. objects containing liquid, burning
candles)
14.This product includes batteries. Please refer to safety and disposal instructions for batteries in
this user manual.
15.Unplug this product during lightning storms or when unused for long period of time.
16.Refer all servicing to qualified service personnel. Servicing is required when the product has
been damaged, such as the power supply cord, damaged plug, liquid spillage, objects dropped on
the unit, exposure to rain or moisture, does not operate properly, or has been dropped.
WARNING
- Using headphones at a high volume can impair your hearing. This product can produce
sounds in decibel ranges that may cause hearing loss for a normal person, even for
exposure less than a minute. The higher decibel ranges are offered for those that may be
experiencing some hearing loss. Over time your hearing ‘comfort level’ adapts to higher
volumes of sound, so after prolonged listening, what sounds ‘normal’ can actually be loud
and harmful to your hearing. To guard against this, set your volume to a safe level.
- Loudspeakers : Before making any connections to loudspeakers, make sure all power is
turned off and only use suitable interconnects.
- Only use attachments/accessories specified and supplied by the manufacturer.

FCC regulations
NOTE: THE MANUFACTURER IS NOT RESPONSIBLE FOR ANY RADIO OR TV INTERFERENCE
CAUSED BY UNAUTHORIZED MODIFICATIONS TO THIS EQUIPMENT. SUCH MODIFICATIONS
COULD VOID THE USER AUTHORITY TO OPERATE THE EQUIPMENT.
This equipment has been tested and found to comply with the limits for a Class B
digital device, pursuant to Part 15 of the FCC Rules. These limits are designed to provide
reasonable protection against harmful interference in a residential installation. This equipment
generates, uses and can radiate radio frequency energy. If not installed and used in accordance
with the instructions, may cause harmful interference to radio communications. However, there is
no guarantee that interference will not occur in a particular installation. If this equipment does
cause harmful interference to radio or television reception, which can be determined by turning
the equipment off and on, the user is encouraged to try to correct the interference by one or
more of the following measures.
- Re-orient or relocate the receiving antenna.
- Increase the separation between the equipment and receiver.
- Connect the equipment into an outlet on a circuit different from that to which the
receiver is connected.
- Consult the dealer or an experienced radio/TV technician for help.
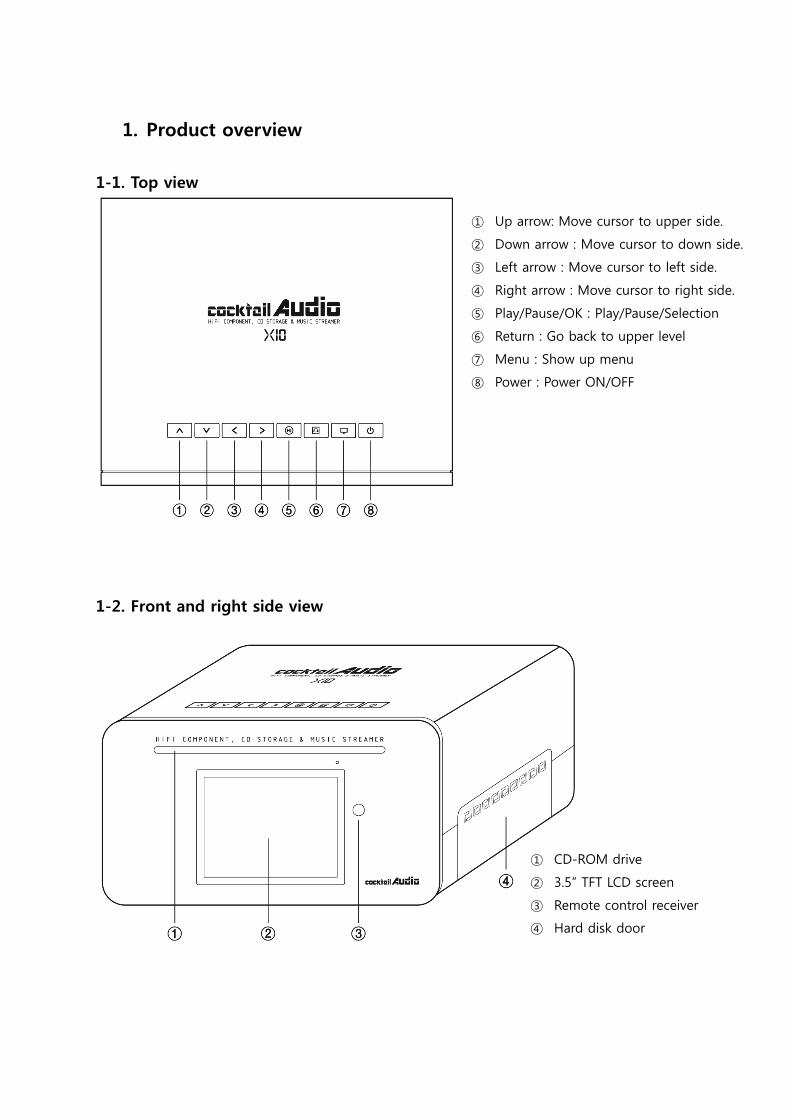
1. Product overview
1-1. Top view
1-2. Front and right side view
① Up arrow: Move cursor to upper side.
② Down arrow : Move cursor to down side.
③ Left arrow : Move cursor to left side.
④ Right arrow : Move cursor to right side.
⑤ Play/Pause/OK : Play/Pause/Selection
⑥ Return : Go back to upper level
⑦ Menu : Show up menu
⑧ Power : Power ON/OFF
① CD-ROM drive
② 3.5” TFT LCD screen
③ Remote control receiver
④ Hard disk door

1-3. Rear view
① Power(24V/3.5A) : AC adapter socket
② Speaker connector : Connect a passive speaker
③ Headphone : Connect headphone
④ Line Out : Connect to amplifier with a good quality interconnect cable.
⑤ Line In(AUX In) : Connect to tuner or turntable with a good quality cable
⑥ USB Host : Connect to USB devices
⑦ USB Target for PC : Connect to PC with the supplied USB cable
⑧ Ethernet LAN : Connect to LAN cable
⑨ SPDIF(Optical Out) : Connect to decoder with good quality optical audio
cable
⑩ Power Switch : After connecting AC adapter, switch to ON.
1-4. View of Remote Controller and each key’s function
1. POWER : Power ON/OFF
2. HOME : Go to home screen
3. SEARCH : Pop up search menu
4. Alphanumeric : Enter number & alphabet
5. NOW PLAYING : Go to Playing Screen
6. STOP : Stop playing
7. MENU : Popup menu
8. ARROW : Move cursor to upper side
9. ARROW : Move cursor to left side
10. OK : Confirmation
11. RETURN : Go back to upper level
12. PREVIOUS : Play previous music
13. NEXT : Play next music
14. RIP : Pop up ripping menu
15. REC : Pop up recording menu
16. SORT : Sort file list
17. BOOK MARK : Make bookmark
18. E.Q. : Pop up equalizer menu
19. TAG EDIT : Edit MP3 ID3 TAG info
20. AUX : Select external source
21. STANDBY : Go to standby mode.
22. SETUP : Go to setup
23. MUTE : Mute/unmute sound
24. CAP/NUM : Toggle numeric key and alphabet
key
25. PLAY/PAUSE : Toggle Play and Pause
26. VOL+ : Volume up
27. VOL- : Volume down
28. ARROW : Move cursor to right side
29. ARROW : Move cursor to down side
30. INFO : Get more detailed information of
current music
31. SEEK/-15 : Seek backward by 15 seconds.
32. SEEK/+15 : Seek forward by 15 seconds.
33. PLAYLIST : Go to playlist screen
34. i-RADIO : Go to i-radio screen
35. FAVORITE : Go to favorite list of i-radio
36. SHUFFLE : Change play mode.
37. ALARM SET : Alarm setting
38. SLEEP : Go to sleep mode
39. EJECT : Eject CD
40. Not applicable

2. Prepare
2-1. Check the contents of X10 package
2-2. Install AAA batteries into the remote controller.
Open the battery door and put the batteries.
①Remote controller + AAA batteries x 2EA
②USB cable
③AC adapter
④Power cord
⑤Manual
⑥FreeDB data DVD

2-3. Optional items
If you purchased optional items like passive loudspeaker(CAP10) and WiFi USB dongle, please
check below contents
2-3-1. Passive speaker(CAP10)
.
1 Speaker units
2 Speaker cable
3 Manual
2-3-2. WiFi USB dongle
801.11b/g/n WiFi USB dongle

2-4. Purchased X10 without hard disk.
You need a 3.5” SATA hard disk and install it into the X10 like below picture and format it.
【 TIP ① 】 We strongly recommend NTFS file system when you do format hard disk.
【 TIP ② 】 X10 supports 3.5” SATA(1/2) hard disk and up to two(2) TeraBytes
2-5. Purchased X10 with an internal hard disk installed.
Check whether HDD is formatted, or not.
Go to set 3. Connection.
2-6. Hard disk partition and format.
With the computer under Windows 2000/XP/Vista/7, you can make partitions and do format hard
disk by using the Disk Manager Utility.
【 TIP ③ 】 X10 supports up to two(2) partitions.
① Connect X10 to your computer via USB
cable just like an external hard disk. Wait until
the computer recognizes it.
② Place mouse point on My Computer and
right click choose Manager.
③ Select Disk Manger and click it. Then, X10
hard disk will be listed like left picture.
④ Select the X10 hard disk and click right
button and select New Partition and click it.

⑤ Press Next when the New Partition
Wizard appears.
⑥ Select Primary partition and click next.
⑦ Select partition size. If you want one
partition, press Next.
【 TIP ④ 】 For FAT32 file system, the size is
limited to Max. 32000MB.
⑧ Click Next.

3. Connection
3-1. Necessary connection
Connect a loudspeaker to the speaker connectors, and then connect AC adapter to the X10 like
the picture below and switch ON the X10.
【 TIP ① 】 When you connect to a loudspeaker, make sure the X10 is NOT powered.
⑨ Select File system and click Next.
【 TIP ⑤ 】 We strongly recommend NTFS file
system. If you choose FAT32 file system,
maximum size of hard disk will be limited to
32GB only.
【 TIP ⑥ 】 Don’t check Enable file and folder
When completed, the detailed information will
be shown like the left.
⑩ Click Finish.

3-2. The specification of X10 Amplifier
Rated Output of speaker out : 30W + 30W @ 1KHz, 8 ohm, 1% THD
X10 is designed for 8 ohm loudspeaker.
Head phone out : 100mW + 10mW @ 1KHz, 16 ohm, 0.1% THD
Line Out : 2Vrms @ 1KHz, 0.1% THD
Input sensitivity of Line(AUX) In : Max 1Vrms
3-3. Passive loudspeaker & Active loudspeaker
What’s a passive loudspeaker? : Passive loudspeaker does not have a power amplifier
inside. This must be connected via the speaker connector of X10.
What’s an active loudspeaker? : Active loudspeaker has a power amplifier inside. This
must be connected via the LINE-out of X10.
3-4. Extra Connection
Various devices such as headphone, professional amplifier, decoder, turntable, USB devices,
computers, routers can be connected to the X10 due to the different connectors at rear panel.

4. Turn On and Start
Switch on first with the dip switch at the rear of X10 and power it on with the remote controller
or the power button on the top of X10 – should take about 25 seconds to boot up.
【 TIP ① 】 After you press power on button, it will take around 20 seconds until booting-up logo
shows up on the screen.
After X10 is powered ON, the below screen will show up in sequence.
① As soon as powered ON. ② 20 seconds after power ON. ③ 25 seconds after power ON
5. SETUP
Go into SETUP menu with remote controller.
Music DB : Play loaded(ripped) music in DB folder of X10.
Playlist : Make Playlist and play it.
I-Radio : Play internet radio stored on X10.
CD Play/Rip : Load(rip) CD and play it directly.
Browser : See all storages such as hard disk of X10, USB host and networked storages.
Setup : Change the settings.

5-1. CD Ripping
5-1-1. Bit Rate and Quality
You can select bit rate and quality level for ripping to MP3 file
There are two(2) items.(This is for ripping CD into MP3 file)
Compressed Rate : 128K / 192K / 320K [default] 192K
Quality level : Excellent / Best / Good / Fast / Very fast [default] Very fast
Select one of them and confirm it with the OK button of remote control.
【 TIP ① 】 The time required to rip CD into MP3 format based on each quality level option.
Option of quality level Normal playing time Required time to convert to MP3
Excellent
The time required to
play music in CD
normally.
X 1.5 (150%)
Best X 1.08 (108%)
Good X 1 (100%)
Fast X 3/4 (75%)
Very fast[Default] X 1/3 (33.3%)
【 TIP ② 】Reference table of possible CD number for each ripping option
CD Ripping option 500GB HDD 1 TB HDD 2 TB HDD
WAV(uncompressed) 650 CDs 1,300 CDs 2,600 CDs
MP3 / OGG
Compressed Rate
128K 7,500 CDs 15,000 CDs 30,000 CDs
192K 5,000 CDs 10,000 CDs 20,000 CDs
320K 3,000 CDs 6,000 CDs 12,000 CDs
Select CD Ripping and confirm it with OK button.

5-1-2. FreeDB TextCode
In case that freeDB text is broken, you may try changing FreeDB TextCode like below.
5-1-3. FreeDB Install
You can install FreeDB data into the hard disk of X10 as FreeDB data(DVD) is supplied by
manufacturer. Once you install FreeDB data into X10, CD information can be displayed without
network connection.
How to install FreeDB data into X10 hard disk is that, insert freeDB data DVD into the ODD of X10
and go to SETUP and select FreeDB Install. You will see the CD, then select it and confirm it with
OK button. It starts. It will take around 10 minutes to finalize it.
5-1-4. FreeDB Update
You can get freeDB update data from website(www.cocktailaudio.com) or where you bought X10.
How to update it is that, copy the freeDB update file into memory stick and insert the memory
stick into the USB host port of X10. And, go to SETUP and select FreeDB Update. Press it with OK
button. You can see USB memory and select it with OK button to find the freeDB update file.
Confirm it with OK button. It will start.

5-2. Audio
① Select Audio and press OK button.
DRC Mode : ON / OFF [Default] ON
SPDIF : OFF / PCM 2ch / Pass through [Default] PCM 2ch
② Select and confirm it with OK button.
5-3. Network
Make sure your Ethernet cable or a USB WiFi dongle is connected.
Select Network and press OK button.
5-3-1. Wired Setup
5-3-1-1. DHCP(Auto IP)
③ Select DHCP(Auto IP) and confirm it with OK button.
No need to enter any values.
④ Select OK and confirm it with OK button.
⑤ Left screen will be shown if network is connected
successfully.
① Select Network and confirm it with OK button.
② Select Wired Setup or Wireless Setup and confirm it with OK
button.
【 TIP 】 To check network information, press Network Info.

5-3-1-2. Static IP
5-3-2. Wireless Setup.
① Select Wireless Setup and confirm it with OK button. The available AP will be displayed like
below.
② Select proper AP and confirm it with OK button. ③ If the AP has password, enter it and select
OK and confirm it with OK button.
① Select Static IP and confirm it with OK button.
② Enter proper values like IP Address, Subnet mask, etc.
③ Select OK and confirm it with OK button
④ Left screen will be shown if network is connected
successfully.

5-4. Samba Server
① Select Samba Server and confirm it with OK button.
② Select Host Name and Workgroup. ③ Enter host name and workgroup name and select OK
and confirm it with OK button.
5-5. System
5-5-1. OSD Language.
5-5-2. Auto Play
Select Auto Play and confirm it with OK button. You can set ON or OFF.
[Default] OFF.
【 TIP ⑥ 】 For Auto Play function, refer to 20-7 Auto Play
5-5-3. Firmware Version
To check the current firmware version installed on the X10 - Select Firmware Version and confirm
it with OK button.
5-5-4. Firmware Update
① Obtain the new firmware first, put the new firmware onto a USB memory stick or on the HDD
of X10. ② Plug the USB memory stick into the USB host port of the X10.
② Select OSD Language and confirm it with OK button.
Supported languages will be displayed.
③ Select your preferred language and confirm it with OK
button.
① Select System and confirm it with OK button.

③ Select Firmware Update and confirm it with OK button. ④ Select the storage where you put
new firmware. ⑤ Select xxxxxxx.pkg file and confirm it with OK button.
Select OK and confirm it with OK button. The X10 will reboot automatically to update the X10.
5-5-5. Factory Reset
To restore changed values of setup, select Factory Reset and confirm it with OK button. Select OK
and confirm it with OK button - factory reset will be complete.
To Exit setup menu, press the RETURN button and all changes will be saved.
5-6. Time
5-6-1. Time Set(Internet)
① Select Time Set(Internet) and
confirm it with OK button. All
time lists will be displayed like
below.

【 TIP ④ 】 Make sure that the X10 is connected to network (internet) before you try time setting
by internet connection.
5-6-2. Time Set(Manual)
Without network(internet) connection, you can set time freely.
6. CD Database(Music DB)
6-1. What is CD database(Music DB) of X10 ?
To load(rip) your CDs with the X10(onto HDD), you can edit the CD information of each track such
as the title, album, artist, year and genre, that are stored on the X10, just like a music database.
You can search any of your music with easy by title, album, artist, year or genre.
When the X10 is connected to the internet/network the CD information can be retrieved from the
freedb database. A USB keyboard or the supplied remote control, can be used to edit the
information of the CD you may find incorrect or incomplete from the freedb server – that will
eventually be stored on the X10 music DB.
【 TIP ① 】 If you want to use an USB keyboard, ensure it’s connected to the X10 before the
device is powered ON.
② Select your preferred time and confirm it with OK button.
【 TIP ⑤ 】 Default : GMT+00 London
① Select Time Set(Manual) like above picture and confirm it
with OK button.
② Input your time properly by manual and select OK to
confirm it with OK button.
5-6-3. Time Format
X10 displays time during internet radio playing and
standby mode.
X10 can display one of two types, AM/PM or 25Hours. You
can select it here.
6-2. What is freedb ?
Freedb is a database to look up CD information using the network(internet). This is done by a
client(a freedb aware application) that calculates a (nearly) unique disc ID for a CD inserted into
your optical drive. As a result, the client displays the artist, album, track list and some additional
information. Since all information is submitted by freedb users, there are likely to be several
different information for the same CD or no information for a certain CD.
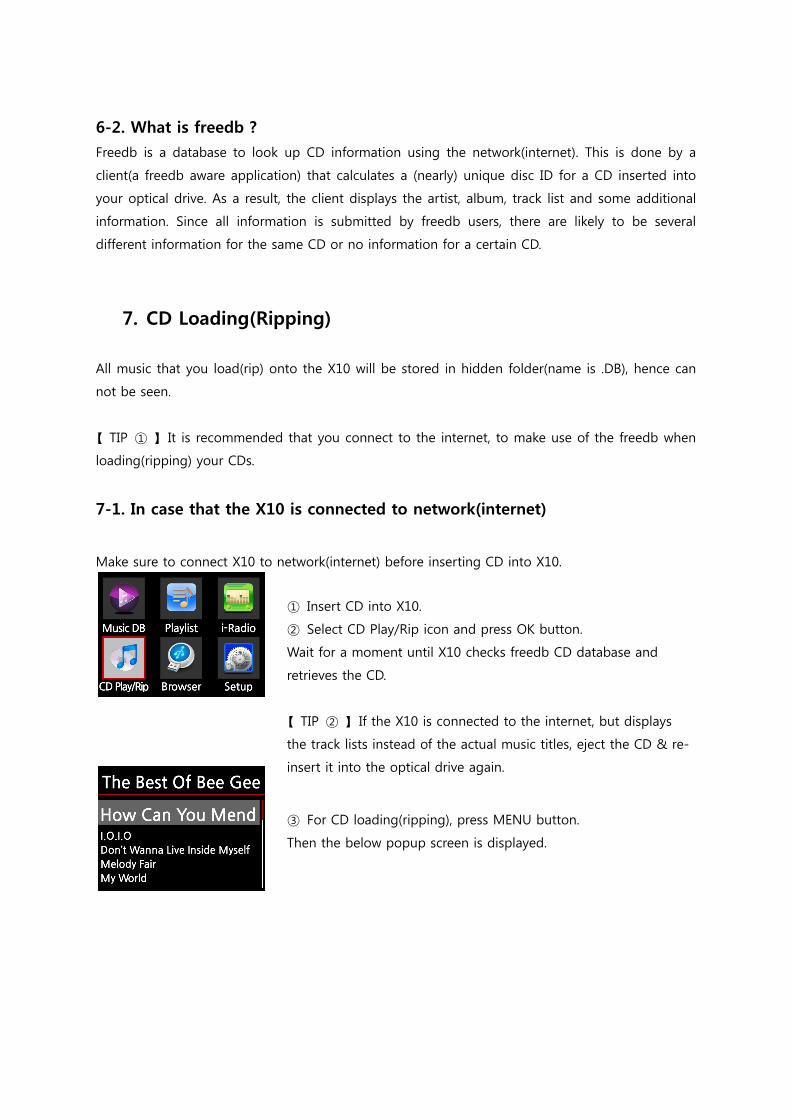
7. CD Loading(Ripping)
All music that you load(rip) onto the X10 will be stored in hidden folder(name is .DB), hence can
not be seen.
【 TIP ① 】 It is recommended that you connect to the internet, to make use of the freedb when
loading(ripping) your CDs.
7-1. In case that the X10 is connected to network(internet)
Make sure to connect X10 to network(internet) before inserting CD into X10.
③ For CD loading(ripping), press MENU button.
Then the below popup screen is displayed.
① Insert CD into X10.
② Select CD Play/Rip icon and press OK button.
Wait for a moment until X10 checks freedb CD database and
retrieves the CD.
【 TIP ② 】 If the X10 is connected to the internet, but displays
the track lists instead of the actual music titles, eject the CD & re-
insert it into the optical drive again.
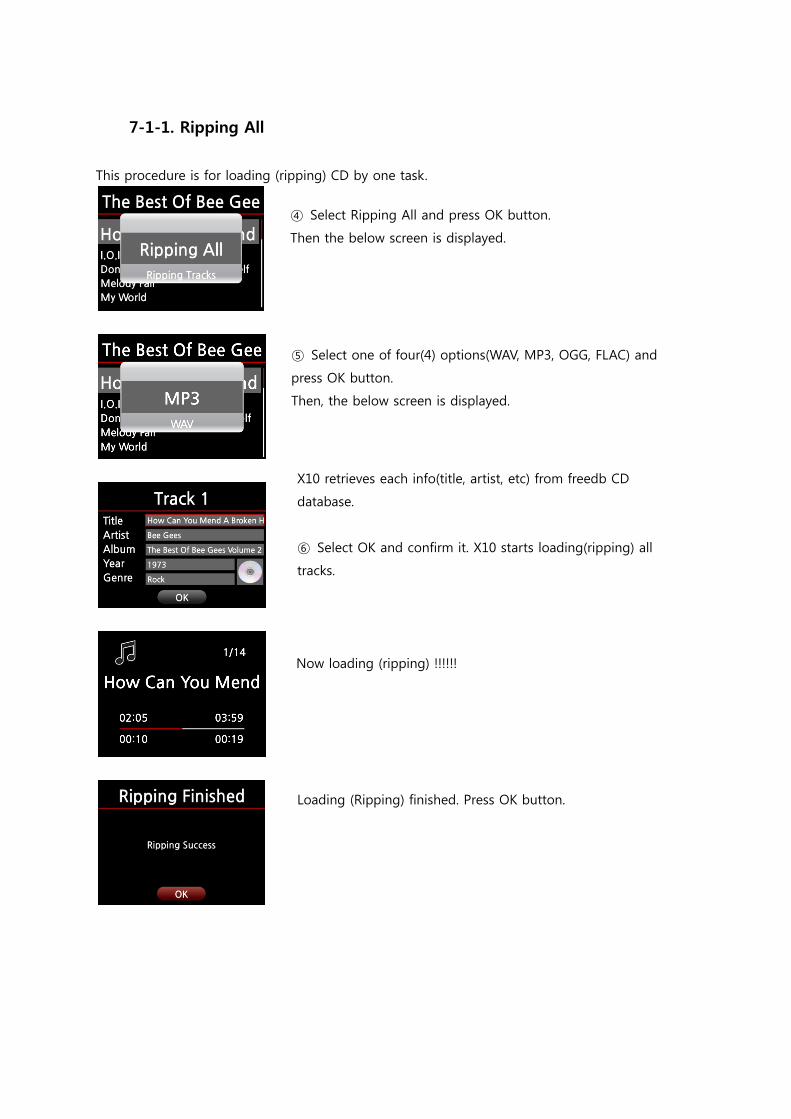
7-1-1. Ripping All
This procedure is for loading (ripping) CD by one task.
④ Select Ripping All and press OK button.
Then the below screen is displayed.
⑤ Select one of four(4) options(WAV, MP3, OGG, FLAC) and
press OK button.
Then, the below screen is displayed.
X10 retrieves each info(title, artist, etc) from freedb CD
database.
⑥ Select OK and confirm it. X10 starts loading(ripping) all
tracks.
Now loading (ripping) !!!!!!
Loading (Ripping) finished. Press OK button.
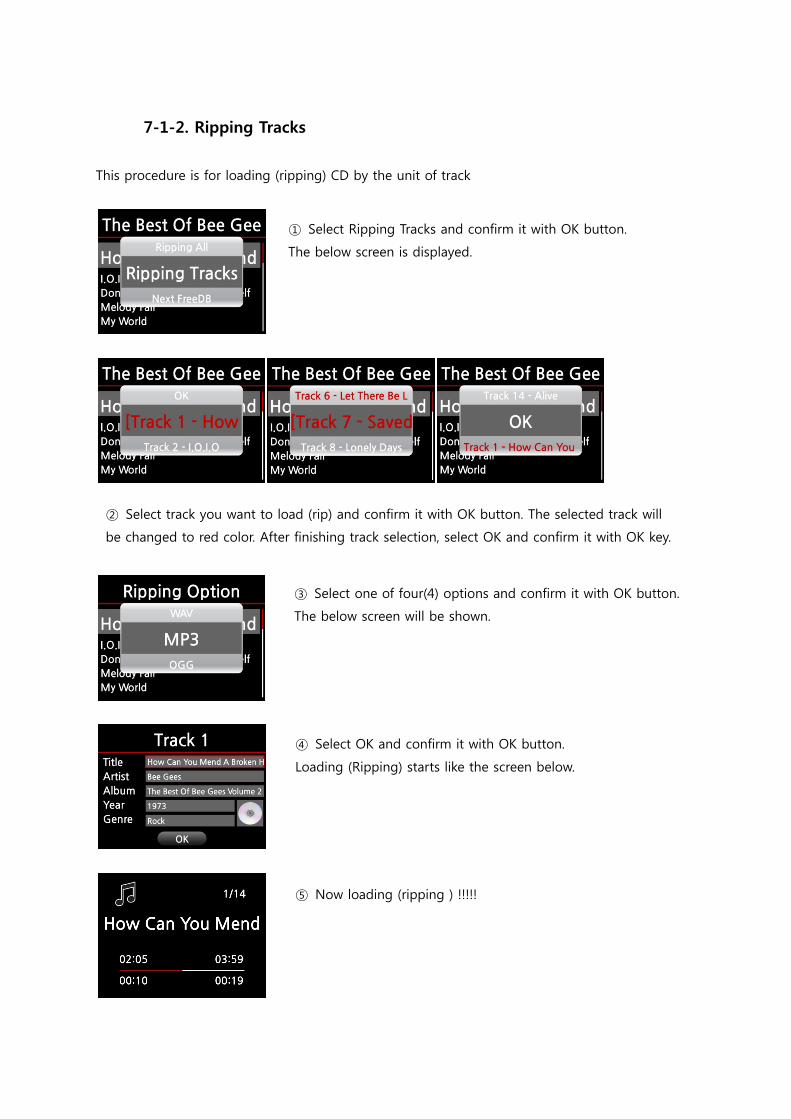
7-1-2. Ripping Tracks
This procedure is for loading (ripping) CD by the unit of track
① Select Ripping Tracks and confirm it with OK button.
The below screen is displayed.
② Select track you want to load (rip) and confirm it with OK button. The selected track will
be changed to red color. After finishing track selection, select OK and confirm it with OK key.
③ Select one of four(4) options and confirm it with OK button.
The below screen will be shown.
④ Select OK and confirm it with OK button.
Loading (Ripping) starts like the screen below.
⑤ Now loading (ripping ) !!!!!

【 TIP ③ 】 When a CD is inserted into the optical drive, the X10 loads(rips) CD with a WAV
format first even if an MP3 option was chosen. The X10 then converts WAV into MP3 format later
by itself. X10 continues to do converting procedure by itself if it’s powered on. X10 stops the
conversion process during ripping.
【 TIP ④ 】 Explanation of each item on the ripping screen.
【 TIP ⑤ 】 You can make album art and put it into each album.
7-2. In case that the X10 is NOT connected to any network(internet).
If you prepare an album art(JPG, GIF or PNG file)
and put it into hard disk of X10, you can add the
album art during CD loading(ripping) by pressing
this icon.
① Number of ripping track / total track
number in CD.
② Title of ripping track
③ Total time for playing
④ Total time for ripping
⑤ Ripped time
⑥ Played time
① Insert CD into X10.
② Select CD Play/Rip icon and press OK.
Track list is displayed like the screen below.
⑥ Loading (Ripping) finished. Press OK button.

7-2-1. Ripping All
This procedure is for loading (ripping) CD by one task.
③ For loading (ripping), press MENU button.
The below screen is displayed.
⑥ Enter info with remote controller or USB keyboard.
You must enter Album name to go to next step.
【 TIP ⑥ 】 To use USB keyboard, ensure to connect a USB
keyboard into the X10 before you boot the unit.
⑦ Select OK and confirm it. Then, loading(ripping) starts
like below picture.
Now loading(ripping) !!!!!!
④ Select Ripping All and confirm it with OK button.
⑤ Select one of four(4) options and confirm it with OK
button. The below screen will be shown.

7-2-2. Ripping Tracks
This procedure is almost same except the process for selecting track you want to load (rip).
7-3. In case that you installed FreeDB data into the hard disk of X10
If you installed FreeDB data into the hard disk of X10, it works just like that X10 is connected to
network(internet). X10 displays CD information from the FreeDB data installed into the hard disk.
7-4. Function to get information on the result of CD ripping and converting.
After ripping, go to the Music DB and place cursor on the Album. Press INFO button. You can see
the result of the CD ripping and file converting progress.
⑧ Loading (ripping) finished. Select OK and confirm it with
OK button. The below screen will be displayed.
⑨ If you did not enter info for title, artist, year or genre on
the previous step, you can enter all info here.
⑩ After entering info, select OK and confirm it with OK
button. All finished.

8. How to use Music DB(database)
8-1. Play music loaded(ripped) into X10.
【 TIP ① 】 As soon as you finish CD loading(ripping) with MP3 format, go to Music DB and select
loaded music and play it. You can see the loaded music format is still WAV not MP3. For
understanding of reason for this, refer to the 【 TIP ③ 】 of 7 CD Loading(Ripping).
Music DB contains loaded(ripped) music in the Music DB.
① Select Music DB icon, confirm it with OK button.
The album list is displayed like below screen.
② Select the album you want and confirm it with OK button.
All the music in the album are displayed like below screen.
③ Select one of the music list and confirm it with OK
button, then the music starts.
Now playing !!!!!!
【 TIP ② 】 Press INFO button on this screen, to see detailed
info of current music.

【 TIP ③ 】 On album list screen, press MENU button, to show other category such as artist list or
genre list like below screen.
【 TIP ④ 】 Playing screen ------- press INFO button ------- Detailed info of current music
①Title of current music
②Title of previous music
③Title of current music
④Title of next music
⑤Play mode
⑥# of music playing / Total music #
⑦Total time of current music
⑧Play icon
⑨Played time of current music
⑩Album art of current music
①Title of current music. ②Artist
③Album ④Genre ⑤Year
⑥File format
⑦Play mode
⑧# of music playing / Total music#
⑨Total time of current music
⑩Play icon
⑪Played time of current music
⑫Album art of current music

8-2. SEARCH function.
In case there are many album lists in Music DB, the search feature can be useful.
SEARCH function
【 TIP ⑤ 】 You can run SEARCH function by artist on the artist list screen, by genre on the genre
list screen or by title on the title list screen like below picture.
8-3. How to manage Music DB
X10 provides the function to manage Music DB. You can delete or rename album, artists and
genre. You can copy music in other storages(USB memory or other space of X10 hard disk) to
Music DB folder.
8-3-1. Delete or rename music in Music DB.
① On album list screen, press SEARCH button, then the above screen is displayed.
② Enter album name into the album name area with remote control.
① Open album list, artist list or genre list you want to run this
function.
② Place cursor on the list you want to run this function.
③ Press MENU button. Then the menu screen is displayed like
below.

8-3-2. How to export music in Music DB to other storage(HDD or USB).
You can export music in Music DB to other storage like HDD or USB.
④ Select the destination storage HDD or USB and confirm it
with OK key. Then the below screen is displayed.
⑤ Select OK and confirm it with OK button.
【 TIP ⑥ 】 You can also run this function for artist list and
genre list by the same procedure.
① Go into Music DB with remote controller. You can see Album
list. Select folder(Album) or music that you want to export.
② Press MENU key and select Export Songs like left screen.
③ Confirm it with OK key, then below screen is displayed.
④ Select Delete or Rename and confirm it with OK button.
⑤ Select New Folder and confirm it with OK button to make
new folder. The below screen is displayed.

9. Edit TAG info of music in Music DB
You can edit TAG info of music such as title, artist, album, year or genre.
① Place cursor on the music you want to edit.
② Press MENU button and select TAG Edit and confirm it with
OK button. The below screen is displayed.
⑥ Input folder name as you like and select OK and confirm it
with OK key
⑦ Example, if you input Eminem and confirm it. The below
screen is displayed.
⑧ Place cursor on the Eminem and press it with OK button.
The below screen is displayed.
⑨ Select Export Start and confirm it with OK key, then it starts
like below screen.
Now exporting music !!!

10. Audio CD direct play
10-1. In case that X10 is connected to network(internet)
③ With remote control or USB keyboard, you can edit info.
④ Select OK and confirm it with OK button.
① Insert CD into X10.
② Select CD Play/Rip icon and press OK button.
【 TIP ② 】If X10 is connected to freedb CD database through
network, the below screen is displayed.
③ Select the music you want to play and press OK button.
Below is playing screen.
Now playing !!!!!!!
【 TIP ① 】
X10 uses CD drive designed for notebook computers. X10 can play CD directly but the CD drive
for notebook computer spins at high speed. It is slow to get up to speed and quite loud. Please
note that X10’s actual job is to load(rip) CDs not play them directly.

【 TIP ③ 】 If you press INFO button on the above Playing Screen, you can see the detailed info
of current music like below.
10-2. In case that X10 is NOT connected to any network(internet)
10-3. In case that you installed FreeDB data into the hard disk of X10
If you installed FreeDB data into the hard disk of X10, it works just like that X10 is connected to
network(internet). X10 displays CD information from the FreeDB data installed into the hard disk.
① Insert CD and select CD Play/Rip icon and confirm it with
OK button.
The track list is displayed like screen below:
② Select the track you want to play and confirm it with the OK
button. The track starts playing
Now playing !!!!!!!!!

11. Data CD direct play X10 can support music file data CD that was burned with CD R/RW or DVD R/RW.
① Inter data CD into X10 and go into the Browser with remote controller. ② You will see
CDROM. ③ Select it and confirm it with OK button and select the music and play it.
【 TIP 】 If you want, you can copy(transfer) the music in the CD to Music DB. Press MENU button
on the music list and select Copy to DB and confirm it with OK button.
12. Playlist
12-1. How to make a Playlist
Make sure that there are music files on the Music DB space of the X10 before making a Playlist.
① Select the Playlist icon and press OK.
The below screen is displayed.
【 TIP ① 】 Auto Play folder is created automatically and it can
not be removed by the user.
② On left screen, press MENU button.
The popup menu is displayed like below screen.
③ Select New PLS and confirm it with OK button.
The below screen is displayed.

Playlist making is completed.
④ Enter a preferred playlist name and select OK and confirm it
with OK button.
The album list in Music DB is displayed like below screen.
【 TIP ② 】 You can put music in the playlist by unit of music
only.
⑤ Press the OK button to go the music list of the selected
album. The below screen is displayed.
⑥ Select the music you want to add to the playlist. You will see
the plus(+) mark at the end of cursor.
⑦ Press OK button, then the plus marked music disappears.
(This means the track is added to the playlist.)
⑧ You can add more music by the above procedure.
⑨ If you finished adding music, press RETURN button one or
two times until the left screen is displayed.
⑩ Select OK and confirm it with OK button.
Then, the Play List is displayed like below screen.

12-2. How to play Playlist.
12-3. How to edit Playlist.
Go to the Playlist screen. Press MENU button. You can delete existing playlist, add music to
existing playlist or clear music from existing playlist.
① Confirm Playlist icon with remote control or press hotkey
PLAY LIST of remote control.
The below screen is displayed.
② Select Playlist you want to play and confirm it with OK
button.
Then, you can see music in the playlist like below screen.
③ Select the music you want to play and confirm it with OK
button to play the selected music.
【 TIP ③ 】 If you set play mode as Repeat All, all music in the
selected playlist will be played continuously in sequence.

13. Music Streaming
X10 can play the music directly from a remote computer which is connected to X10 through
network.
14. Internet Radio
Make sure to connect the X10 to network(internet) before using the i-Radio.
【 TIP ① 】 There might be a slight delay when tuning into the radio stations (buffering). This also
depends on the network(internet) connection.
14-1.How to play Internet Radio.
You can enjoy millions of internet radio stations. X10 internet radio is based on Reciva server. It
provides many stations by genre and country.
【 TIP 】 If X10 is not connected to network(internet), you
can not select i-Radio icon
① Connect X10 and the computer to the network.
② Make the music folder of the computer as ‘shared’.
③ Go to the Browser of X10, select the shared folder on the screen.
④ Select the music and press OK button with remote control.
【 TIP 】 i-Radio icon is highlighted. This means network is
connected.
① Select i-Radio icon and confirm it with OK key. The
below screen is displayed.

14-2.How to put your favorite stations into My Favorites.
【 TIP 】 If you put your favorite playable stations into My Favorite folder, you can enjoy it with
ease.
During playing a station, just press FAVORITE button of remote control, then it is listed to My
Favorite folder like below picture.
14-3.How to play My Favorites.
Once you made My Favorites list, pressing FAVORITE key anywhere takes you into My Favorites list.
Otherwise, press MENU button on Internet Radio screen like below picture, and you can get My
Favorites list also.
② Here, you can select Genre or country as you want
Now playing !!!

14-4.How to run search function in Internet Radio
① You can run search function in Internet Radio. On the Internet Radio screen, press SEARCH
button of remote control, the below screen is displayed. Input alphabet that you remember and
select OK and confirm it with OK key. Similar name stations are displayed.
15.USB host port for USB devices
You can use various USB devices like USB memory stick, MP3 Player, USB external hard disk, etc
through USB host port of X10. ① Plug the USB device into the USB host port of X10. ② Go into
the Browser screen. The USB appears in the browser screen like below picture.
16.External USB mass storage
If you connect the X10 to your computer with USB cable, the X10 works as an external mass
storage on your computer. The screen of X10 shows ‘In USB mode’ like below. Remote control
does not work in this mode. If you disconnect X10 from PC with safety removal, the X10 returns
to normal mode within 3~5 seconds.

【 Warning 】 If you connect X10 to your computer through USB cable, you can see the hard disk
of X10 on your PC monitor. There is .DB folder. This is Music DB folder. Don’t delete this folder. If
you delete it, big problem will happen !!!!!
17. Browser
If you go the Browser icon, you can run the below functions.
17-1. Play audio file data CD
X10 supports data CD in which audio files are contained. X10 supports various audio files such as
MP3, FLAC, WAV, M4A, AAC, Ogg Vorbis, PCM, PLS, M3U, etc.
① Insert data CD into X10. ② Select Browser icon and confirm it with OK button. You will see
the data CD. Select the music you want and play it with OK button.
17-2. File Management function
17-2-1. To get information on HDD, USB, folder or file.
Place cursor on each drive and press INFO key to check it. Information is displayed like below.

To check information on folder, place cursor on the folder and press INFO key.
To check information on a file, place cursor on the file and press INFO key.
17-2-2. TAG Edit
This function is valid for file only, not for folder or disk.
Place cursor on the file you want to edit and press MENU key. Select Edit Tag, then editable
screen is displayed like below.
17-2-3. Copy to DB
You can copy(import) folder or file in HDD, USB or CD to Music DB.
To copy(import) folder to Music DB
① Place cursor on the folder you want to copy(import) to
Music DB
② Press MENU key and select Copy to DB and confirm it with
OK key. It starts copying like below picture.
【 Warning 】 To copy all music in the folder to one same
folder in Music DB, the album name of all music in the folder
should be same.

To copy(import) file to Music DB
17-2-4. Copy Files
You can copy files or folder like below procedure.
① Place cursor on the file or folder you want to copy
② Press MENU key and select Copy Files. The below screen
is displayed.
Now copying to Music DB !!!!
① Place cursor on the file you want to copy(import) to
Music DB
② Press MENU key and select Copy to DB and confirm it
with OK button. The editable screen is displayed like below.
③ After editing as you want, select OK to confirm it with
OK button. It starts like below picture.
【 Warning 】 The album name of the file should be same
as that of the folder in Music DB where you want to
copy(import) the file.
Now copying(importing) to Music DB !!!

17-2-5. Move Files
You can move files or folder like below procedure.
17-2-6. Delete Files
You can delete file or folder like below procedure
From here, refer to 8-3-2. How to export music in Music DB
to other storage. The procedure is exactly same as that.
③ Place cursor on the file or folder you want to copy
④ Press MENU key and select Copy Files. The below screen
is displayed.
From here, refer to 8-3-2. How to export music in Music DB
to other storage. The procedure is exactly same as that.
⑤ Place cursor on the file or folder you want to delete
⑥ Press MENU key and select Delete Files. Confirm it with
OK button. It starts

18.Extra Function
18-1.BOOKMARK
Files can be bookmarked while playing them. This function is useful for long files like story files.
18-2.E.Q(Equalizer)
During music playing, you can change equalizer mode by pressing E.Q. button. Default is Normal.
Normal → Classic→ Live → Pop → Rock → Jazz → Dance → Vocal → Soft → Bass →
Normal
① Press BOOKMARK button on the playing screen.
Then, the bookmarked music or story is stored in the
Bookmark list like below screen.
② If you want to play the bookmarked music or story, press
BOOKMARK button on any screen (except playing screen).
The left screen is displayed.
④ If you want to delete bookmarked music or story, press
MENU key on the Book Mark list screen like left.
⑤ Select Delete and confirm it with OK button.

18-3.Standby
During playing, press STANDBY button. The digital clock will be displayed like the screen below.
This function is useful to enjoy music in the night when you don’t like the light from the screen.
The X10 is restored from Standby mode if you press any button of remote control.
18-4.Change of play mode
18-5.Alarm set
You can set six(6) alarm settings into the X10.
① Normal : Play all music in an album or in a folder once in
sequence.
② Shuffle : Play music in an album or in a folder at random.
③ Once : Play the current music once only.
④ Repeat One : Play the current music repeatedly
⑤ Repeat All : Play all music in an album or in a folder in
sequence and repeatedly
① Press the MENU button on the playing screen. To change it.
② Otherwise, press SHUFFLE button to change it without
popup menu.
① Press ALARM SET button on any screen (except setup
screen). Then, the left screen is displayed.
② Select one line you want and press OK button.
Then, the below screen is displayed.

18-6.Sleep mode
18-7.Auto Play
What’s Auto Play function ?
Auto Play allows the X10 to boot up and play automatically without pressing power button(with
the exception of a power supply).
① Press SLEEP button on any screen (except setup), then the
popup like Sleep Off/Sleep 10Min/Sleep 20Min/Sleep
30Min/Sleep 1Hour/Sleep 2Hour/Sleep 3Hour is displayed.
② X10 is set as last popup.
【 TIP 】 Default : Sleep Off
① Go into the Playlist. There is Auto Play.
② Place cursor on the Auto Play and press MENU button.
③ Select Add Song and press OK button.
④ Place cursor on the music you want to put to Auto Play.
⑤ You can see plus(+) mark at the end of cursor. Press OK
button. The music will disappear and be added to the Auto
Play.
⑥ Go to Setup and set Auto Play ON.
【 TIP 】 Default of Auto Play in Setup : OFF
③ Set time, cycle and sound source.
④ Set Snooze ON.
⑤ Select OK and confirm it with OK button.
① Selecting time with up/down button.
② Selecting cycle with OK button
③ Selecting sound source from Playlist
④ Selecting snooze ON/OFF

19.Specification
Brand name cocktailAudio
Model name X10
CD Player Type Front loading
Supported media CD, CD-DA, CD-R, CD-RW, DVD-R/RW
Supported audio codec
& format
MP3, FLAC, WAV, WMA, M4A, AAC, Ogg Vorbis,
PCM, PLS, M3U
Amplifier(built-in) Rated output(8Ω) of
speaker out
30W + 30W @ 1KHz, 8 ohm, 1% THD
Head phone out 100mW + 10mW @ 1KHz, 16 ohm, 0.1% THD
Line Out 2Vrms @ 1KHz, 0.1% THD
Input sensitivity of
Line(AUX) In
Max 1Vrms
Display 3.5 inch color TFT LCD for various menu with vivid high quality graphic user
interface(GUI)
Input Line(AUX)- in
Output Line-out, Speaker out, headphone out, SPDIF(Optical out)
Connective Network Wired Ethernet(10/100) LAN
Wireless(Optional) 801.11b/g/n WiFi USB dongle
USB Host x 2 ea High speed 2.0 host port
Target x 1 ea High speed 2.0 target for PC
Supported audio
codec & format
MP3, FLAC, WAV, WMA, M4A, AAC, Ogg Vorbis, PCM,
Playlist(PLS, M3U)
Supported
Storage
Type 3.5 inch SATA(1/2) hard disk
** support up to 2 Terabytes
File system NTFS and FAT32
** NTFS recommended
Supported OSD
Languages
English, French, German, Korean, Spanish, Russian, Portuguese, Turkish,
Greek, Czech, Polish, Hebrew
Power AC adaptor(24V/3.5A)
Dimension 18(W) x 9.8(H) x 14.7(D) Cm
※ Specification may be changed without notification
20.Troubleshooting
1. There is no power.
1-1. Make sure the AC power cord is connected.
1-2. Check the X10 is switched ON at the rear panel.
1-3. Make sure the plug is fully inserted into the wall socket.
2. X10 does not respond to the remote control.
2-1. Replace remote batteries
2-2. Check interference from other IR sources
2-3. Reduce the distance between the remote control and the X10.
3. X10 does not display the network-shared folder on your PC
3-1. Check network connection status between X10 and your PC
3-2. According to network environment, there may be a time delay in network connecting.
3-3. Try rebooting the X10 and configure the network setup again.
4. No sound from speaker during music file play back
4-1. Check if MUTE function in ON
4-2. Check speaker cable connection status.
4-3. Check volume level
5. X10 does not read the disc.
5-1. Check if you put the disc upside down.
5-2. Check that the disc is scratched or dirty too much.
6. The disc is skipping
6-1. Check for scratches or dirty.
6-2. Make sure that the X10 is on a firm surface and not subject to vibrations.
7. There is a hum coming from speaker.
Make sure that all cable connections are secure.