Written By: Kristin · Skullcandy Air Raid Battery Replacement This guide will show you how to...
10
Skullcandy Air Raid Battery Replacement This guide will show you how to replace a battery for the Skullcandy Air Raid Written By: Kristin Skullcandy Air Raid Battery Replacement Draft: 2015-06-16 Guide ID: 37044 - This document was generated on 2019-09-16 07:50:37 PM (MST). © iFixit — CC BY-NC-SA www.iFixit.com Page 1 of 10
Transcript of Written By: Kristin · Skullcandy Air Raid Battery Replacement This guide will show you how to...

Skullcandy Air Raid Battery ReplacementThis guide will show you how to replace a battery for the Skullcandy Air Raid
Written By: Kristin
Skullcandy Air Raid Battery Replacement Draft: 2015-06-16Guide ID: 37044 -
This document was generated on 2019-09-16 07:50:37 PM (MST).
© iFixit — CC BY-NC-SA www.iFixit.com Page 1 of 10

INTRODUCTION
If your Skullcandy Air Raid will not maintain power even after charging, it may be time to replace thebattery.
TOOLS:iFixit Opening Tools (1)Phillips #00 Screwdriver (1)Phillips #000 Screwdriver (1)T6 Torx Screwdriver (1)
Skullcandy Air Raid Battery Replacement Draft: 2015-06-16Guide ID: 37044 -
This document was generated on 2019-09-16 07:50:37 PM (MST).
© iFixit — CC BY-NC-SA www.iFixit.com Page 2 of 10
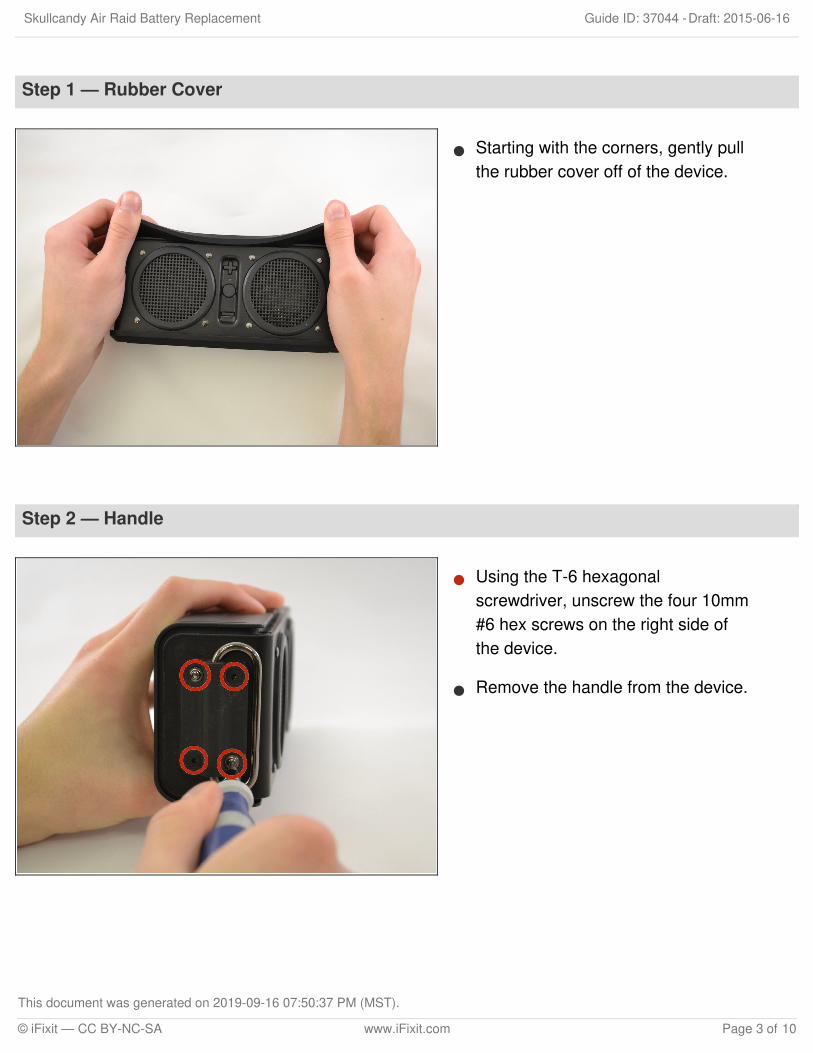
Step 1 — Rubber Cover
Starting with the corners, gently pullthe rubber cover off of the device.
Step 2 — Handle
Using the T-6 hexagonalscrewdriver, unscrew the four 10mm#6 hex screws on the right side ofthe device.
Remove the handle from the device.
Skullcandy Air Raid Battery Replacement Draft: 2015-06-16Guide ID: 37044 -
This document was generated on 2019-09-16 07:50:37 PM (MST).
© iFixit — CC BY-NC-SA www.iFixit.com Page 3 of 10

Step 3 — Front Plate
Unscrew the two screws on the leftside of the device using the phillips#00 screwdriver.
One 5mm Phillips screw.
One 8mm Phillips screw.
Step 4
Gently pull the sides of the frontplate outwards from the device.
Pull up on the front plate to removeit from the device.
Skullcandy Air Raid Battery Replacement Draft: 2015-06-16Guide ID: 37044 -
This document was generated on 2019-09-16 07:50:37 PM (MST).
© iFixit — CC BY-NC-SA www.iFixit.com Page 4 of 10

Step 5 — Speakers
Using a #000 Philips Screwdriver,unscrew the four 8 mm Philipsscrews from each corner of bothspeakers (eight 8 mm Philips screwstotal).
Step 6
Using the plastic opening tool, pryaround edges of the speaker toloosen glue contact with front plate.
If you are unable to loosen gluecontact using the plastic openingtool, use a heat gun to assist inremoval.
Skullcandy Air Raid Battery Replacement Draft: 2015-06-16Guide ID: 37044 -
This document was generated on 2019-09-16 07:50:37 PM (MST).
© iFixit — CC BY-NC-SA www.iFixit.com Page 5 of 10
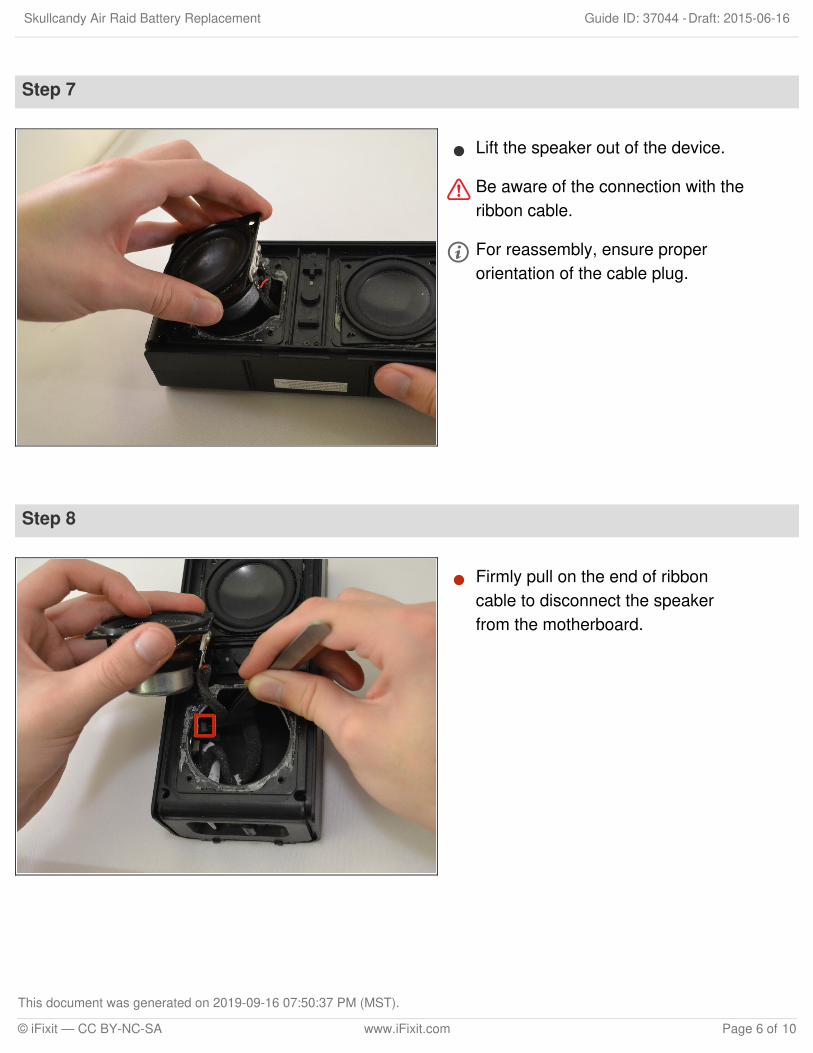
Step 7
Lift the speaker out of the device.
Be aware of the connection with theribbon cable.
For reassembly, ensure properorientation of the cable plug.
Step 8
Firmly pull on the end of ribboncable to disconnect the speakerfrom the motherboard.
Skullcandy Air Raid Battery Replacement Draft: 2015-06-16Guide ID: 37044 -
This document was generated on 2019-09-16 07:50:37 PM (MST).
© iFixit — CC BY-NC-SA www.iFixit.com Page 6 of 10

Step 9 — Control Buttons
Using a Phillips #00 PrecisionScrewdriver, unscrew two 6 mmscrews from the middle of the panel,above and below volume buttons.
Step 10
Lift the button panel.
Skullcandy Air Raid Battery Replacement Draft: 2015-06-16Guide ID: 37044 -
This document was generated on 2019-09-16 07:50:37 PM (MST).
© iFixit — CC BY-NC-SA www.iFixit.com Page 7 of 10

Step 11 — Button Motherboard
Using a Phillips #00 PrecisionScrewdriver, unscrew two 6 mmscrews from the buttonmotherboard.
Step 12
Using a plastic opening tool, pry thebutton motherboard to detach it fromthe device.
The button motherboard isconnected to a ribbon cable insidethe device.
Skullcandy Air Raid Battery Replacement Draft: 2015-06-16Guide ID: 37044 -
This document was generated on 2019-09-16 07:50:37 PM (MST).
© iFixit — CC BY-NC-SA www.iFixit.com Page 8 of 10
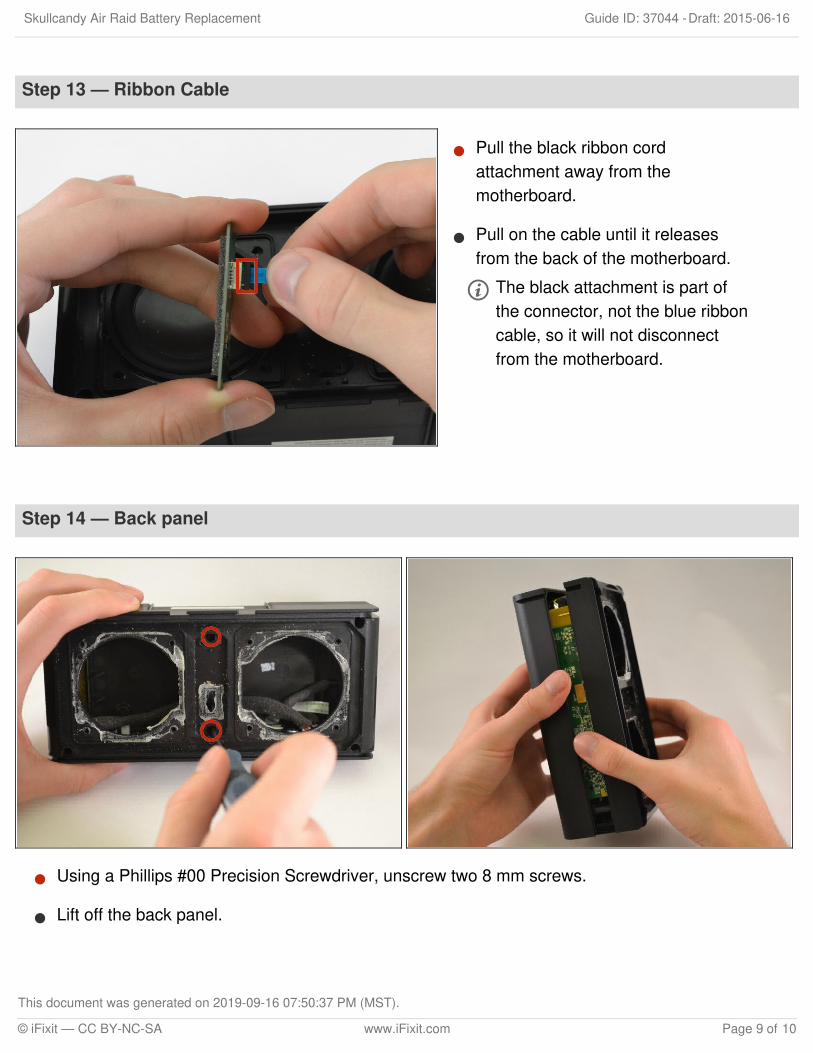
Step 13 — Ribbon Cable
Pull the black ribbon cordattachment away from themotherboard.
Pull on the cable until it releasesfrom the back of the motherboard.
The black attachment is part ofthe connector, not the blue ribboncable, so it will not disconnectfrom the motherboard.
Step 14 — Back panel
Using a Phillips #00 Precision Screwdriver, unscrew two 8 mm screws.
Lift off the back panel.
Skullcandy Air Raid Battery Replacement Draft: 2015-06-16Guide ID: 37044 -
This document was generated on 2019-09-16 07:50:37 PM (MST).
© iFixit — CC BY-NC-SA www.iFixit.com Page 9 of 10

To reassemble your device, follow these instructions in reverse order.
Step 15 — Battery
Pull on the ribbon cable thatconnects the battery to themotherboard until the connectorreleases.
Step 16 — Removing Battery
Pull battery straight out until it iscompletely out of device.
If you are unable to loosen gluecontact, use a heat gun to assist inremoval.
Skullcandy Air Raid Battery Replacement Draft: 2015-06-16Guide ID: 37044 -
This document was generated on 2019-09-16 07:50:37 PM (MST).
© iFixit — CC BY-NC-SA www.iFixit.com Page 10 of 10