Working with Grader - MCCC · Working with Grader Grader Projects – Select the Grader project in...
8
Working with Grader Grader Projects – Select the Grader project in the appropriate myitlab folder. When you select the Grader Project you will be taken to a screen displaying a 3 Step Process: Grader Project Step 1 – Download your Files
Transcript of Working with Grader - MCCC · Working with Grader Grader Projects – Select the Grader project in...
Working with Grader
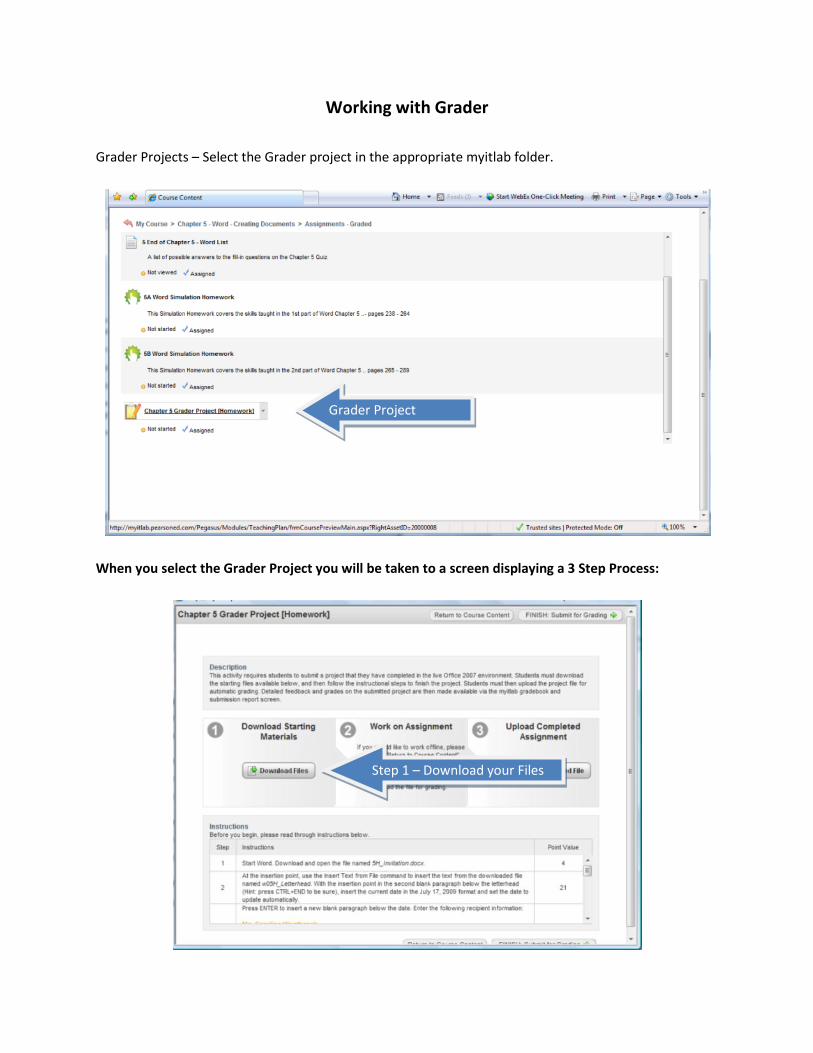
Grader Projects – Select the Grader project in the appropriate myitlab folder.
When you select the Grader Project you will be taken to a screen displaying a 3 Step Process:
Grader Project
Step 1 – Download your Files
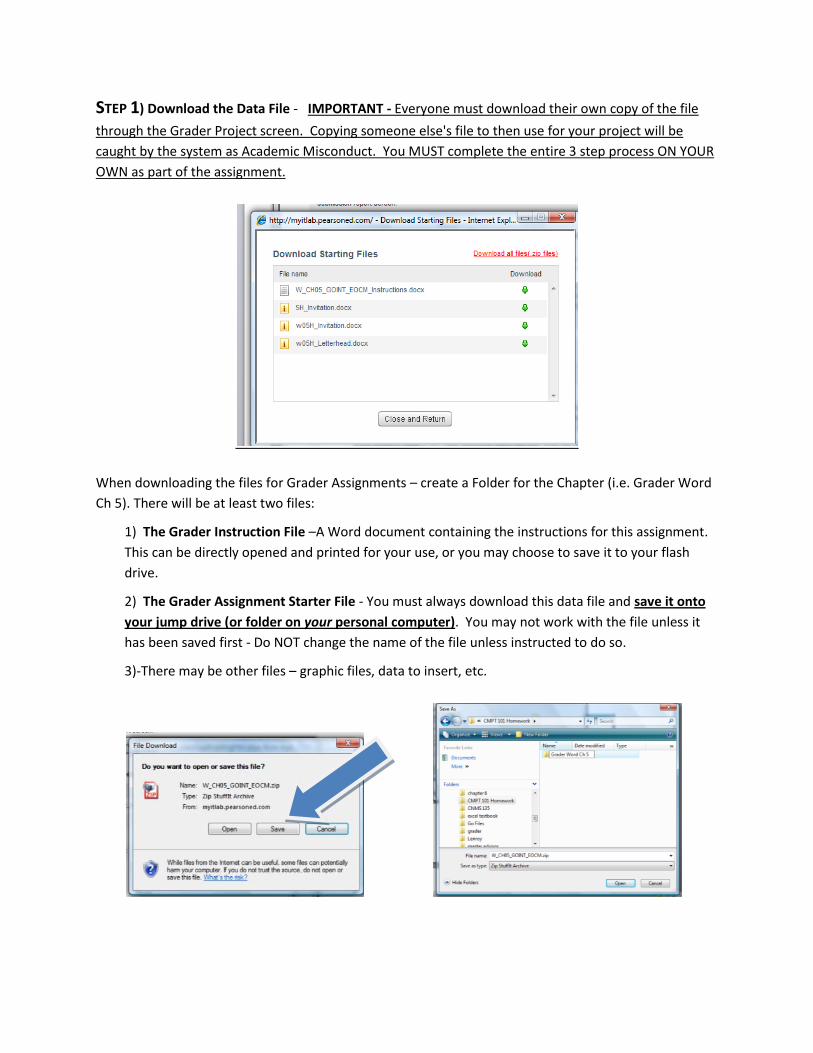
STEP 1) Download the Data File - IMPORTANT - Everyone must download their own copy of the file
through the Grader Project screen. Copying someone else's file to then use for your project will be
caught by the system as Academic Misconduct. You MUST complete the entire 3 step process ON YOUR
OWN as part of the assignment.
When downloading the files for Grader Assignments – create a Folder for the Chapter (i.e. Grader Word
Ch 5). There will be at least two files:
1) The Grader Instruction File –A Word document containing the instructions for this assignment.
This can be directly opened and printed for your use, or you may choose to save it to your flash
drive.
2) The Grader Assignment Starter File - You must always download this data file and save it onto
your jump drive (or folder on your personal computer). You may not work with the file unless it
has been saved first - Do NOT change the name of the file unless instructed to do so.
3)-There may be other files – graphic files, data to insert, etc.

You must save this file to your some drive (jump drive or C: on your personal computer). DO NOT open
it here – if you do you will not be able to save changes made to this file as it is stored on the publisher’s
web server.
If you have downloaded as a zip file extract the file. When completing the download of the file, make
sure you do not change the name of the file. If you have downloaded it before, the downloader may try
to insert a [1] at the end of the file name – this will cause you to lose points on your assignment. The
name must match exactly with what is displayed in the download dialog box – including the complete
file extension (.docx, .xlsx, .pptx, etc.)
STEP 2) Complete the Assignment in a "live" version of the Office Software (Word 2007, Excel 2007,
PowerPoint 2007, or Access 2007). Select the “Return to Course Content” button to exit Grader without
submitting a file to be graded.
Check file name CLOSELY
Return to Course Content
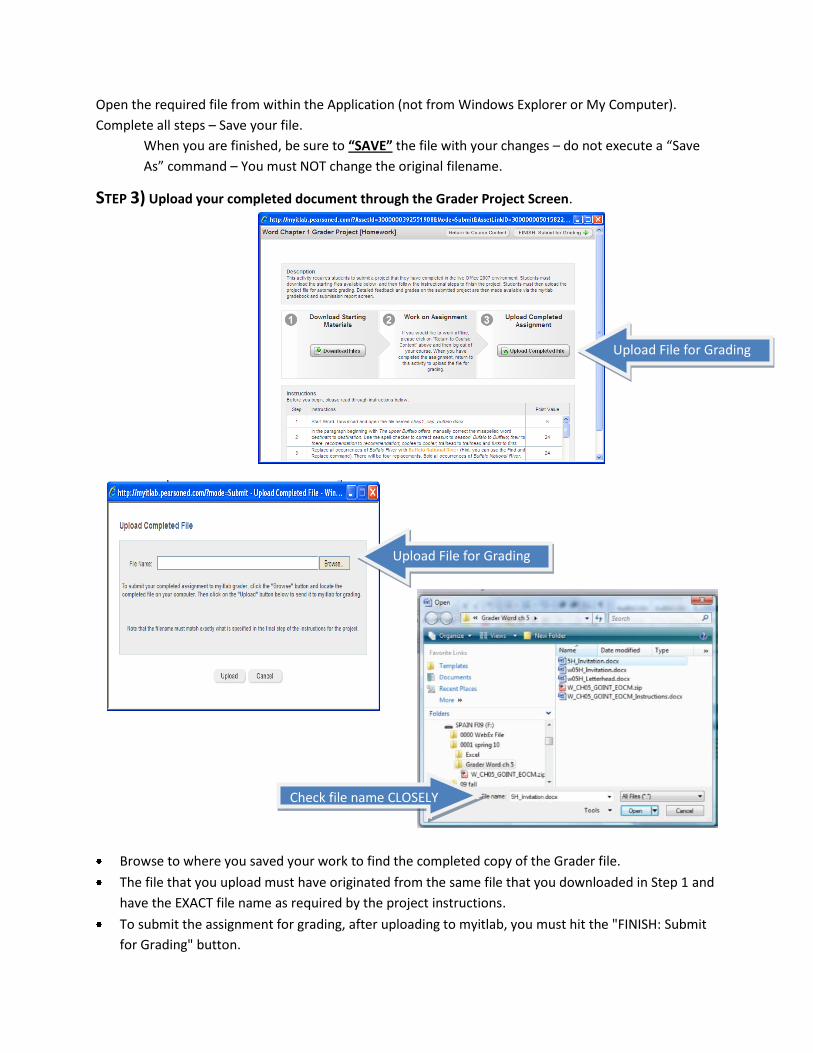
Open the required file from within the Application (not from Windows Explorer or My Computer).
Complete all steps – Save your file.
When you are finished, be sure to “SAVE” the file with your changes – do not execute a “Save
As” command – You must NOT change the original filename.
STEP 3) Upload your completed document through the Grader Project Screen.
Browse to where you saved your work to find the completed copy of the Grader file.
The file that you upload must have originated from the same file that you downloaded in Step 1 and
have the EXACT file name as required by the project instructions.
To submit the assignment for grading, after uploading to myitlab, you must hit the "FINISH: Submit
for Grading" button.
Upload File for Grading
Upload File for Grading
Check file name CLOSELY
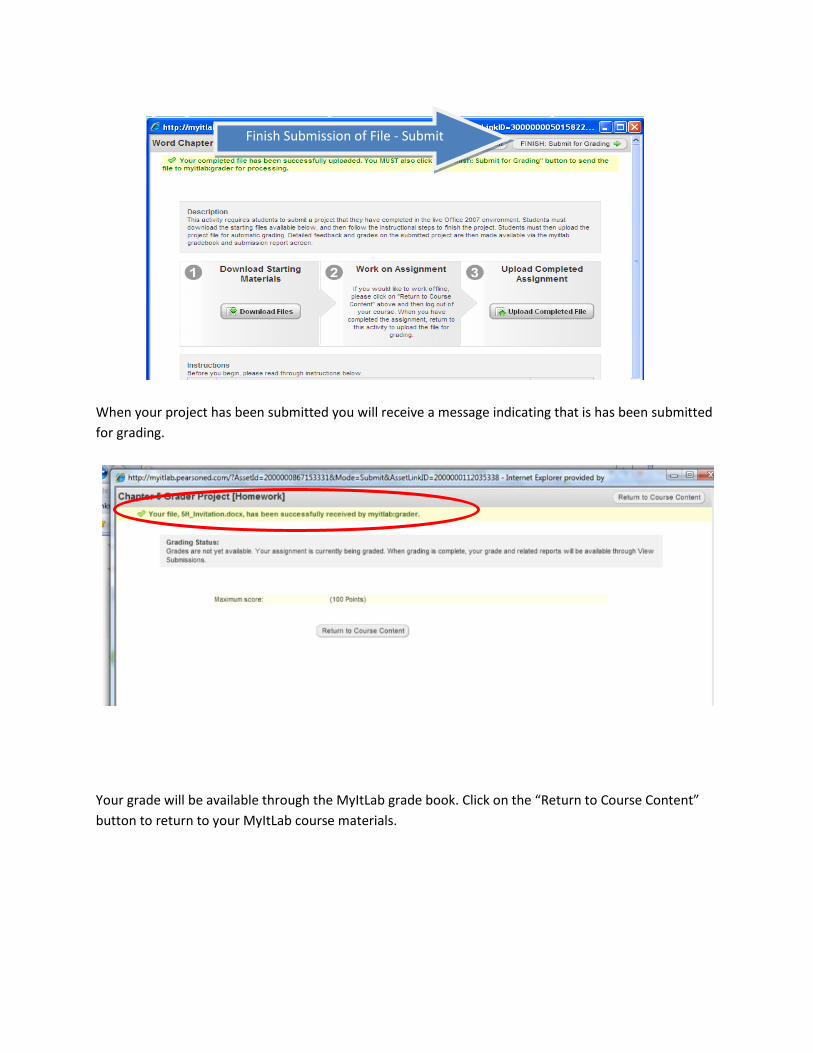
When your project has been submitted you will receive a message indicating that is has been submitted
for grading.
Your grade will be available through the MyItLab grade book. Click on the “Return to Course Content”
button to return to your MyItLab course materials.
Finish Submission of File - Submit
Viewing your Grader Results:
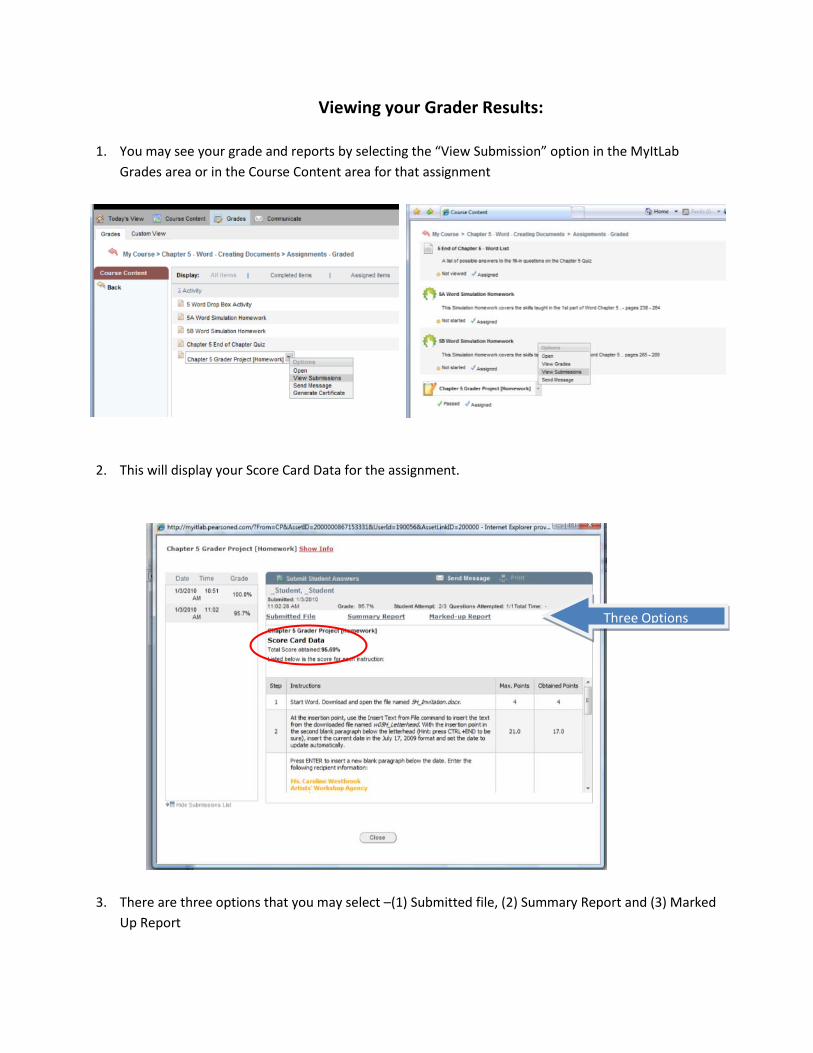
1. You may see your grade and reports by selecting the “View Submission” option in the MyItLab
Grades area or in the Course Content area for that assignment
2. This will display your Score Card Data for the assignment.
3. There are three options that you may select –(1) Submitted file, (2) Summary Report and (3) Marked
Up Report
Three Options
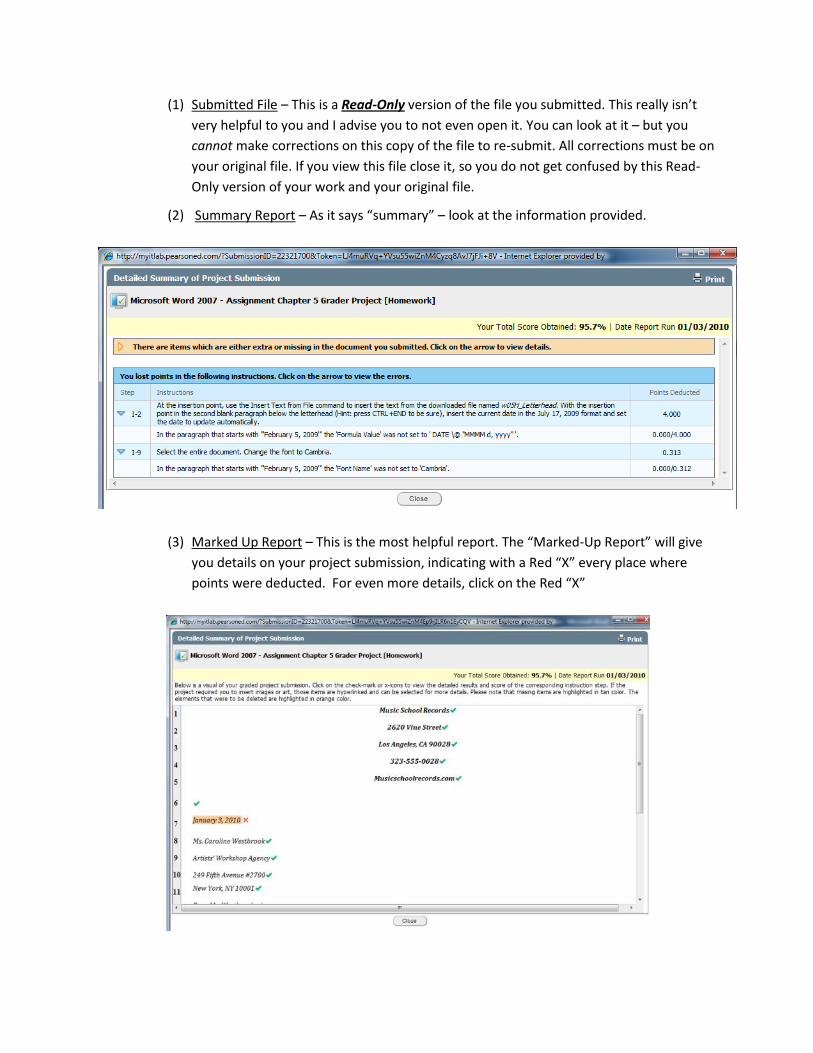
(1) Submitted File – This is a Read-Only version of the file you submitted. This really isn’t
very helpful to you and I advise you to not even open it. You can look at it – but you
cannot make corrections on this copy of the file to re-submit. All corrections must be on
your original file. If you view this file close it, so you do not get confused by this Read-
Only version of your work and your original file.
(2) Summary Report – As it says “summary” – look at the information provided.
(3) Marked Up Report – This is the most helpful report. The “Marked-Up Report” will give
you details on your project submission, indicating with a Red “X” every place where
points were deducted. For even more details, click on the Red “X”
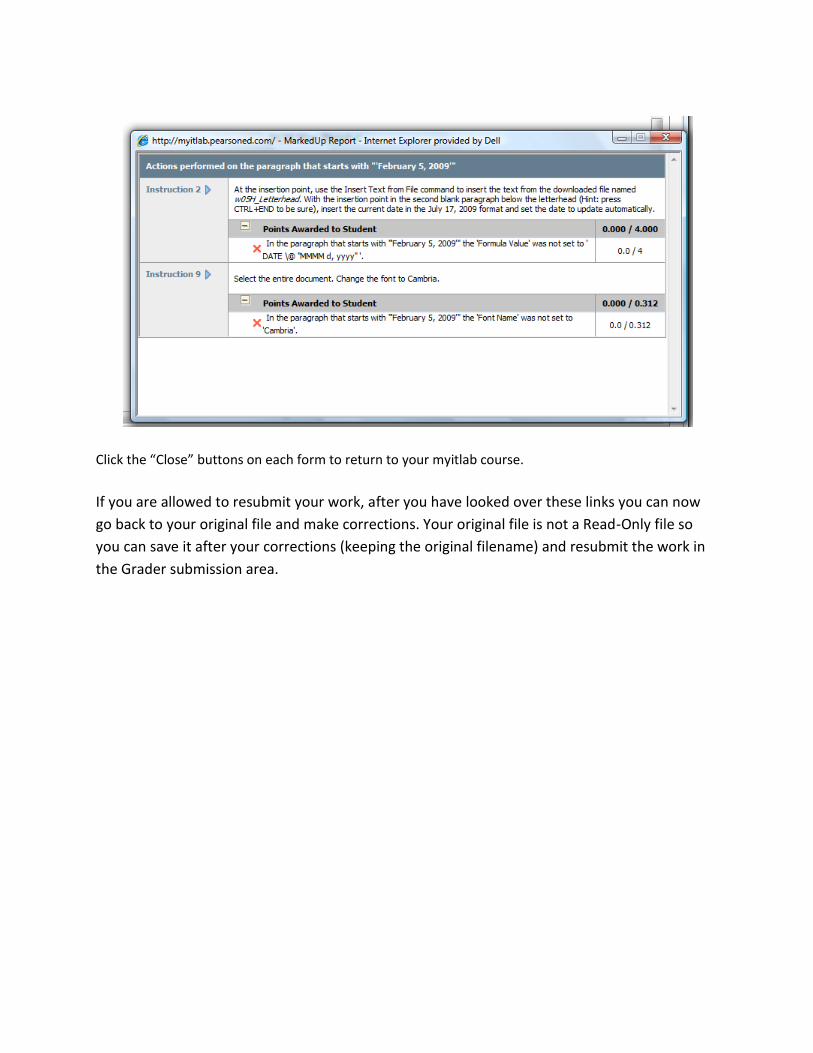
Click the “Close” buttons on each form to return to your myitlab course.
If you are allowed to resubmit your work, after you have looked over these links you can now
go back to your original file and make corrections. Your original file is not a Read-Only file so
you can save it after your corrections (keeping the original filename) and resubmit the work in
the Grader submission area.