Workbook Training - Polk · Training Workbook Help with Enrich . Users can access product and...
109
Enrich® IEP | Training Workbook Q1 2012 v. 7.24.2.xxxx (Florida)
Transcript of Workbook Training - Polk · Training Workbook Help with Enrich . Users can access product and...
Enric
h® IE
P | T
rain
ing
Wor
kboo
k Q
1 20
12 v
. 7.2
4.2.
xxxx
(Flo
rida)

2 All content is Copyright © 1986-2012 Excent® All rights reserved.
Training Workbook
All content is Copyright © 1986-2012 Excent® All rights reserved.
No portion of the content may be reproduced, stored or transmitted in any form, or by any means, without prior written permission from Excent. The trademarks, logos and service marks ("Marks") displayed are the property of Excent or other third parties. Users are not permitted to use these Marks without the prior written consent of Excent or such third party. "Excent" is a registered trademark of Excent. Product functionality is subject to change without notice.

3 All content is Copyright © 1986-2012 Excent® All rights reserved.
Training Workbook
Table of Contents Introduction ................................................................................................................................................................................. 6 Enrich IEP Training ..................................................................................................................................................................... 6 System Configuration .............................................................................................................................................................. 7
Help with Enrich ......................................................................................................................................................................... 8 SIS Updates .................................................................................................................................................................................. 9 Support Guidelines ................................................................................................................................................................... 9
Navigation ................................................................................................................................................................................. 11 Teacher Dashboard ................................................................................................................................................................ 12
To Do Grid and Filtering .................................................................................................................................................. 13
Meetings ............................................................................................................................................................................... 14 Student Groups .................................................................................................................................................................. 15 My Classes............................................................................................................................................................................. 16
Reports ................................................................................................................................................................................... 16 Admin Dashboard .................................................................................................................................................................. 17 Review 1 – Introduction and Navigation ....................................................................................................................... 18
Search Functionality .............................................................................................................................................................. 19 Review 2 – Search Functionality ........................................................................................................................................ 23 Student Data Screens ............................................................................................................................................................ 24
Profile Tab ............................................................................................................................................................................. 24 Test Score Tab ..................................................................................................................................................................... 26 Transcript Tab...................................................................................................................................................................... 29
Attachments Tab ................................................................................................................................................................ 31 Programs Tab ...................................................................................................................................................................... 31
Review 3 – Student Data Screens ..................................................................................................................................... 33
Managing Student Groups .................................................................................................................................................. 35 View a Student Group ...................................................................................................................................................... 36 Create a Student Group from the Teacher Dashboard ........................................................................................ 36
Create a Student Group from the Student Profile Screen ................................................................................... 38 Rename a Student Group ............................................................................................................................................... 38 Delete a Student Group ................................................................................................................................................... 39
Add Students to a Group ................................................................................................................................................ 40 Remove Students from a Group ................................................................................................................................... 41
Review 4 – Managing Student Groups ........................................................................................................................... 42
IEP Process Flow ...................................................................................................................................................................... 44 Data Entry ............................................................................................................................................................................. 45
Programs Tab ...................................................................................................................................................................... 46 Manage a Team .................................................................................................................................................................. 48

4 All content is Copyright © 1986-2012 Excent® All rights reserved.
Training Workbook
Attachments ........................................................................................................................................................................ 49
Finalize ................................................................................................................................................................................... 50 Printing .................................................................................................................................................................................. 52
Text Assistant ...................................................................................................................................................................... 52 Administrative Edit ............................................................................................................................................................ 53
Area 1 – IEP Referral and Meeting Notice ...................................................................................................................... 54
Review 5 – IEP Meeting Notice and Referral ................................................................................................................. 61 Area 2 - Consent for Evaluation and Evaluation Report ........................................................................................... 62 Review 6 – Consent for Evaluation and Evaluation Report ..................................................................................... 69
Area 3 - Eligibility Determination ...................................................................................................................................... 70 Review 7 – Eligibility Determination ................................................................................................................................ 76 Area 4 - IEP ................................................................................................................................................................................. 77
Transition Requirements ................................................................................................................................................. 77 Transition IEP ....................................................................................................................................................................... 78 IEP ............................................................................................................................................................................................ 80
Creating an IEP Meeting .................................................................................................................................................. 80 Demographics ..................................................................................................................................................................... 82 Dates ....................................................................................................................................................................................... 82
Team Member Excusal ..................................................................................................................................................... 83 Procedural Safeguards ..................................................................................................................................................... 83 Desired Outcomes ............................................................................................................................................................. 84
Consideration of Special Factors .................................................................................................................................. 84 Extended School Year ...................................................................................................................................................... 85 Secondary Transition ........................................................................................................................................................ 86
Goal Areas ............................................................................................................................................................................. 88 Assessment Participation ................................................................................................................................................ 91 Accommodations & Modifications .............................................................................................................................. 91
Services .................................................................................................................................................................................. 93 Least Restrictive Environment (LRE) ............................................................................................................................ 94 Student Participation ....................................................................................................................................................... 95
IEP Finalized ......................................................................................................................................................................... 96 Meeting Notes..................................................................................................................................................................... 96 Compliance Checks ........................................................................................................................................................... 96
Area 5 - Consent for Placement ........................................................................................................................................ 97 Matrix of Services ............................................................................................................................................................... 98
Review 8– IEP, Consent for Placement, Matrix of Services ..................................................................................... 100
Additional Processes ........................................................................................................................................................... 101 IEP Admin Review ............................................................................................................................................................ 101

5 All content is Copyright © 1986-2012 Excent® All rights reserved.
Training Workbook
Amend an IEP .................................................................................................................................................................... 101
Copy an IEP Forward ....................................................................................................................................................... 102 Convert an IEP ................................................................................................................................................................... 102
Progress Monitoring ....................................................................................................................................................... 103 Progress Reporting .......................................................................................................................................................... 104
Appendix 1 Create an Excent Support Account ...................................................................................................... 107
Appendix 2 Copying and Pasting from MS Word .................................................................................................... 109

6 All content is Copyright © 1986-2012 Excent® All rights reserved.
Training Workbook
Introduction Enrich® IEP enables teachers to consistently monitor progress and achievement in order to ensure student success. Developed with participation and input from teachers and school administrators, Enrich IEP allows teachers to quickly and easily get information they can use to tailor their lessons to their students’ needs. It also helps school districts measure the progress of all schools across the district. Enrich Assess provides access to standardized test results, attendance and discipline data, and transcript and grade details for teachers and school administrators. It consists of a searchable database of student records that is integrated with the district Student Information System (SIS). Information integrated into Enrich allows teachers to customize instruction and provides a tool to automate the development of academic plans for students generating a wide range of valuable reports for use in data-driven decision making. While Special Education case management is fundamentally the same from state-to-state and district- to- district, each district has unique interpretations and requirements. The Enrich IEP solution is built around a combination of core database elements dictated by state and federal requirements and the forms, reports, and processes specific to each district. Enrich IEP coupled with Enrich Assess is a comprehensive solution for managing and monitoring Special Education student needs and compliance requirements.
Enrich IEP Training Enrich training sessions are customized to empower participants with the skills necessary to support users throughout the various phases and cycles of student records. Topics covered in this manual include: system navigation and functionality, creating referrals, consent for evaluation, eligibility determination, consent for eligibility, creating a transition IEP, and reporting. System Admin tasks are normally performed by technical system administrators or other IT staff personnel and deal with user security and roles, system settings, and management of SIS imports. The screen shots in this document have been captured from a generic database. Because one of the most powerful features of Enrich is the capacity for district-level customization, district screens may not match exactly those depicted; however, the general navigation and function will be consistent throughout all versions of Enrich. Also, the limited data available in a demo database may result in limited report results.

7 All content is Copyright © 1986-2012 Excent® All rights reserved.
Training Workbook
System Configuration
The diagram below outlines the relationship and flow of information between Enrich applications and district resources:
This integration scheme:
• Simplifies user management tasks by using the LDAP directory to authenticate username and password and profile management.
• Leverages SIS information by allowing faculty and staff to manage student data in the way that is most familiar to them.
®
Excent®

8 All content is Copyright © 1986-2012 Excent® All rights reserved.
Training Workbook
Help with Enrich
Users can access product and process support by using the help screens throughout Enrich. A Help link at the top of every screen provides a link to the searchable Knowledge Base.
IEP section Help links display District, State, and Federal Guidelines related to IDEA and Special Education. Video links highlight IDEA requirements on 25 different subjects.
9 All content is Copyright © 1986-2012 Excent® All rights reserved.
Training Workbook
SIS Updates Enrich updates student, teacher, school, class roster, grades, and transcript data from the district’s Student Information System (SIS) on a nightly basis, unless configured otherwise by the district. As a result, information updated in the SIS will be reflected in Enrich the following day.
Support Guidelines Each school district has its own way of handling software support inquiries. The Enrich Support Desk is available to registered districts. Designated district staff personnel can direct questions and unresolved issues to the Customer Support Desk or visit the Support link at www.excent.com. Recommended strategies for district administrators providing support beyond implementation include: • Developing an internal support system that includes Enrich Customer Support, and assistance
from district process specialists and super users working at various school locations. • Establishing a tutoring program utilizing one-on-one coaching for end users. • Conducting follow-up training sessions to address specific questions or review system functions.

Getting Started

11 All content is Copyright © 1986-2012 Excent® All rights reserved.
Training Workbook
Navigation The Enrich sign in screen displays three input fields for validation and access to the system. Begin a session in Enrich by signing in with district username and password. This is the same information used to sign in to the district network.
1. School – The drop-down list displays campus options. The user must select his/her
assigned campus or sign in will not be successful.
2. Username – Usernames are the same as for district network login. Upon sign in, usernames will authenticate to users’ network accounts.
3. Password – The same as for district network account
4. Confidentiality Statement – Statement of FERPA compliance
5. I Agree - Users agree to the confidentiality statement.
6. Reminder – The text is customizable by a district system administrator and may be used for reminders and updates.
1
2
3 4
5
6

12 All content is Copyright © 1986-2012 Excent® All rights reserved.
Training Workbook
Teacher Dashboard
Depending upon the type of role access a user has been assigned, the Teacher Dashboard or the Admin Dashboard displays. Note: What a user can view, add, edit, and delete is associated with role permissions which are assigned by the district System Administrator.
The Teacher Dashboard is composed of icons and sections that provide quick and efficient access to all program areas routinely used by teachers. All sections provide links to essential data as described:
• Breadcrumbs – Provide links back to each previous page the user navigated through to get to the current page
• To Do Grid – Manage Plans, Actions and Compliance Timelines for all special programs
• Meetings - List of upcoming meetings filtered by type and date •
Student Groups – Rosters for system-generated and manually-generated student groups
• My Classes – Rosters of all classes to which the user is assigned through the SIS • Reports – Access to personal and shared reports with the ability to develop and run new
report templates
13 All content is Copyright © 1986-2012 Excent® All rights reserved.
Training Workbook
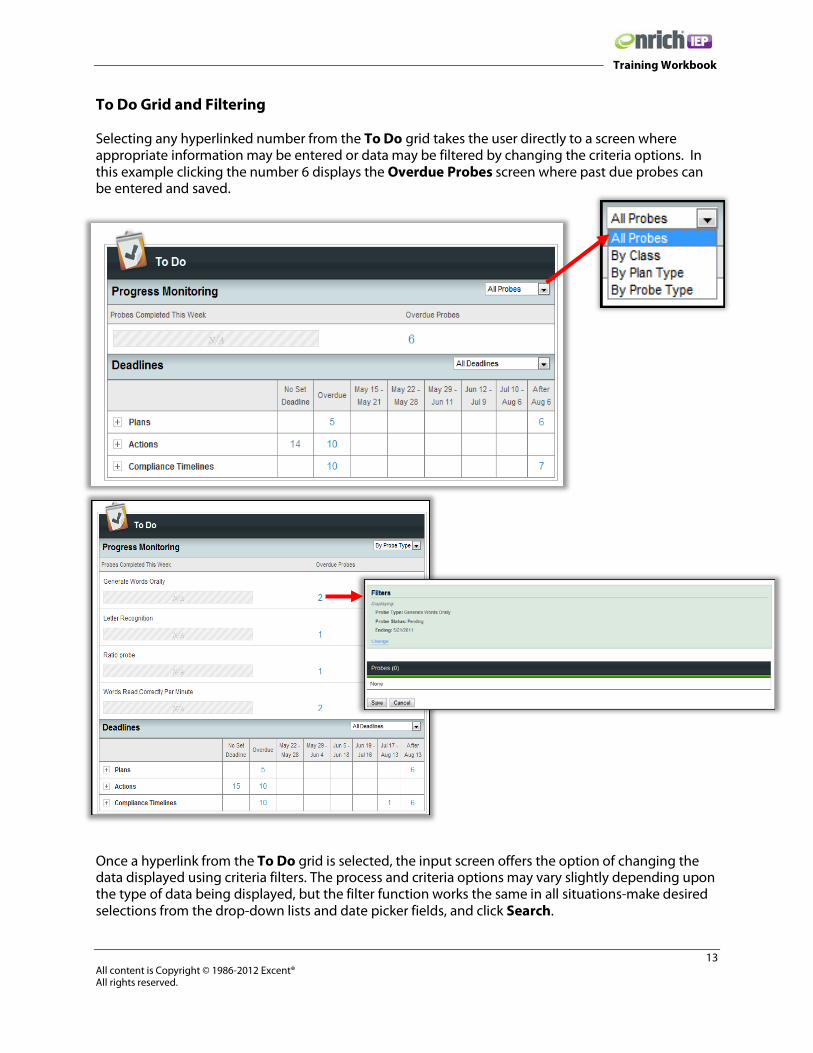
To Do Grid and Filtering Selecting any hyperlinked number from the To Do grid takes the user directly to a screen where appropriate information may be entered or data may be filtered by changing the criteria options. In this example clicking the number 6 displays the Overdue Probes screen where past due probes can be entered and saved.
3.
Once a hyperlink from the To Do grid is selected, the input screen offers the option of changing the data displayed using criteria filters. The process and criteria options may vary slightly depending upon the type of data being displayed, but the filter function works the same in all situations-make desired selections from the drop-down lists and date picker fields, and click Search.

14 All content is Copyright © 1986-2012 Excent® All rights reserved.
Training Workbook
Start and Planned End Date information can be selected from the date picker.
Meetings
The Meetings section provides two filtering options: • Type of Meetings • Date of Upcoming Meetings
15 All content is Copyright © 1986-2012 Excent® All rights reserved.
Training Workbook
Student Groups
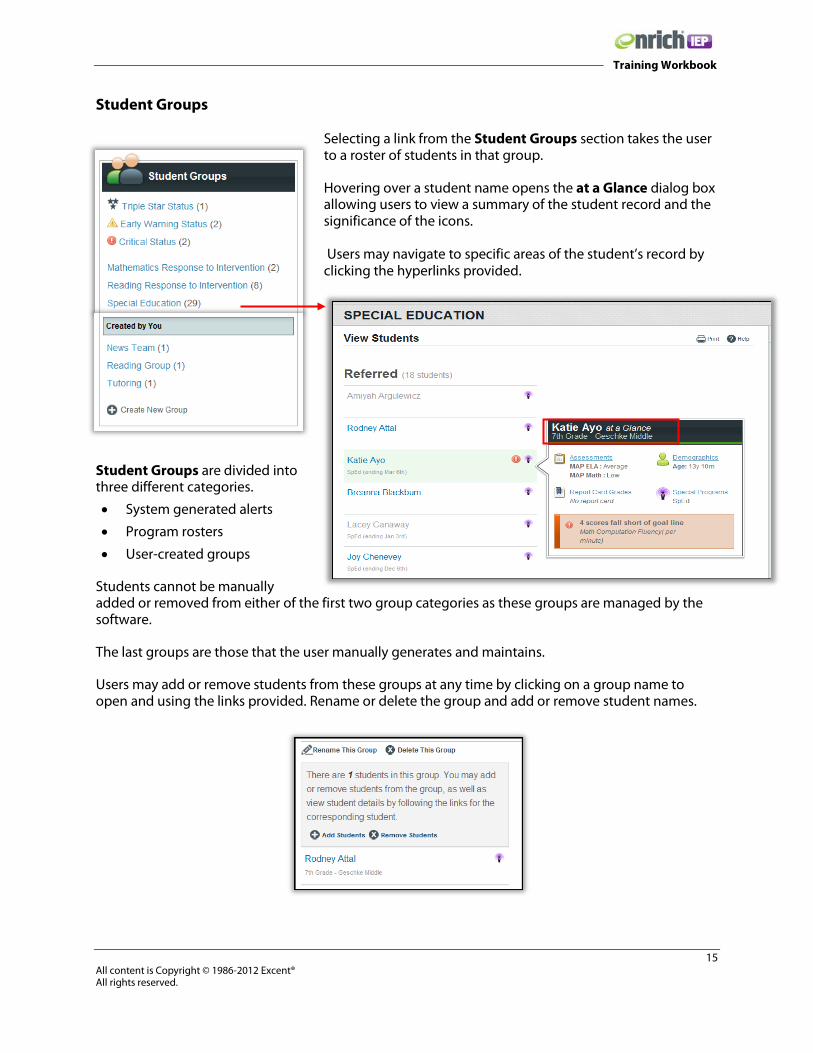
Selecting a link from the Student Groups section takes the user to a roster of students in that group.
Hovering over a student name opens the at a Glance dialog box allowing users to view a summary of the student record and the significance of the icons.
Users may navigate to specific areas of the student’s record by clicking the hyperlinks provided.
Student Groups are divided into three different categories.
• System generated alerts
• Program rosters
• User-created groups
Students cannot be manually added or removed from either of the first two group categories as these groups are managed by the software.
The last groups are those that the user manually generates and maintains.
Users may add or remove students from these groups at any time by clicking on a group name to open and using the links provided. Rename or delete the group and add or remove student names.
Using the Create New Group link, users may start new groups at me. 3. Manually Managing Student Groups
Student Groups is provided in another section of this guide.

16 All content is Copyright © 1986-2012 Excent® All rights reserved.
Training Workbook
My Classes
Reports The Reports section of the Teacher Dashboard provides several options including:
• Filter report lists by Favorites, Personal, and Received • Create original report templates for Assessments, RTI, and Special Education • Run and edit reports from existing templates • View summary of a report template when mouse hovers over the title
As in the Student Groups section, selecting a link from the My Classes section takes the user to a roster of students in that class.
The navigation functionality provided in the roster listing is the same as in Student Groups.
Course lists can be filtered by previous years based on availability in the drop-down list, and all course information is maintained in and integrated from the district SIS.

17 All content is Copyright © 1986-2012 Excent® All rights reserved.
Training Workbook
Admin Dashboard The Admin Dashboard provides much of the same navigation access to program areas as the Teacher Dashboard. See previous pages for details related to Meetings, Reports, and Student Groups. There are two additional sections that provide administrative functionality assigned to users with the Admin role.
School Listing
Admin users will see a list of district campuses on their dashboards allowing for the selection of all schools, individual schools by name, or groups of schools by category: High Schools, Middle Schools, and Elementary Schools.
When a selection is made from the schools list, an additional link appears to access Courses and the Setup Team link allows for the creation of a standard team for each campus. In addition, Reports from the special programs categories in the District section reflect only the data from the selected campus(es). These Reports are described below in the District section.
19. Dist
Note: See Administrator’s Guide for additional information and functionality related to the role.

18 All content is Copyright © 1986-2012 Excent® All rights reserved.
Training Workbook
Review 1 – Introduction and Navigation 1. How will you know your Enrich username and password?
2. What is the purpose of breadcrumbs?
3. What is your district process for obtaining help with Enrich?
4. What is the source of the student demographic data found in Enrich?
5. List at least three special programs that can be managed using Enrich.
6. Name at least two areas of the Teacher Dashboard.
7. Give two reasons why the screens in this document may not look identical to those on your
computer screen.
8. Name a feature of the Admin Dashboard not seen on the Teacher Dashboard.

19 All content is Copyright © 1986-2012 Excent® All rights reserved.
Training Workbook
Search Functionality • The Search link appears on every screen. • A simple search is initiated using the drop-down list and selecting Students, Classes, or Users. • The search field is dynamic and returns matches as the user begins typing. • When there is a checkmark in the include historical data field, students who are no longer
enrolled will also be returned.
The search feature is dynamic and begins to return results as soon as the user starts typing a student name. When the correct student record appears in the list, click the name and the student Profile screen displays providing tab navigation to the different areas of student information. Verify selection by cross checking student grade and school located below student name. Note: If a student is withdrawn (s)he becomes inactive. Once inactive, visibility of the record is lost. Select the “include historical students” checkbox to locate the student record if it does not display in the current roster view.
20 All content is Copyright © 1986-2012 Excent® All rights reserved.
Training Workbook
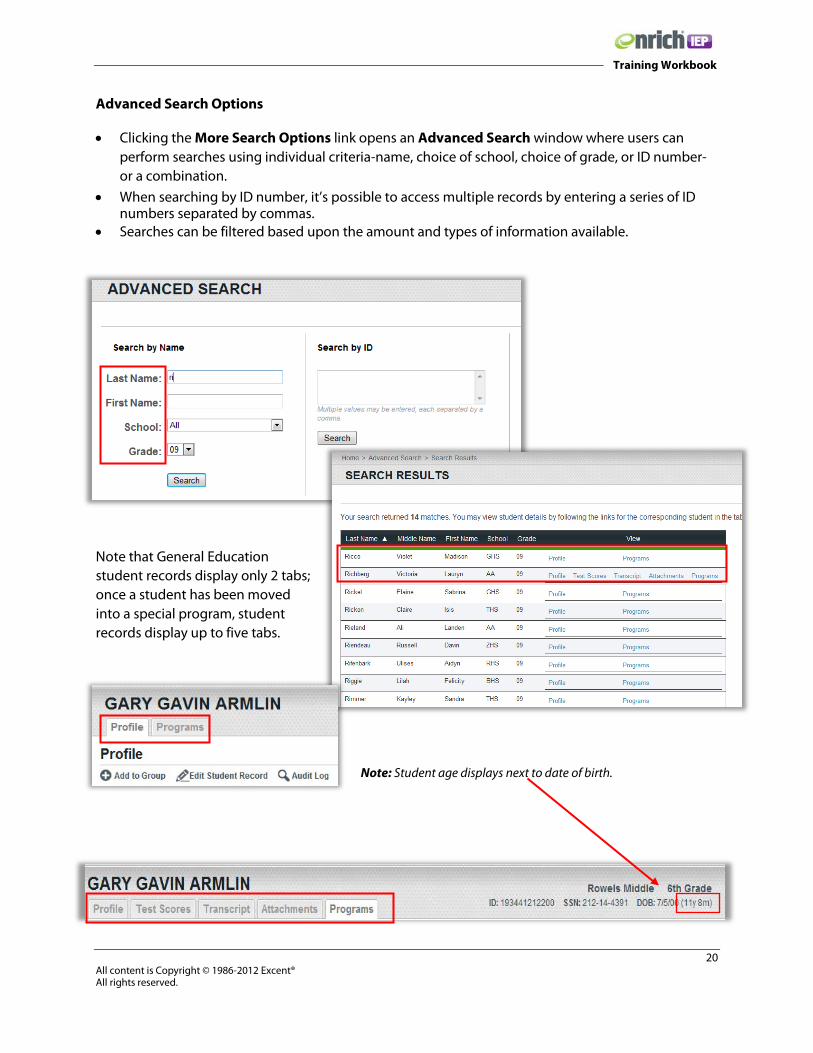
Advanced Search Options
• Clicking the More Search Options link opens an Advanced Search window where users can perform searches using individual criteria-name, choice of school, choice of grade, or ID number-or a combination.
• When searching by ID number, it’s possible to access multiple records by entering a series of ID numbers separated by commas.
• Searches can be filtered based upon the amount and types of information available.
Note that General Education student records display only 2 tabs; once a student has been moved into a special program, student records display up to five tabs.
Note: Student age displays next to date of birth.
21 All content is Copyright © 1986-2012 Excent® All rights reserved.
Training Workbook
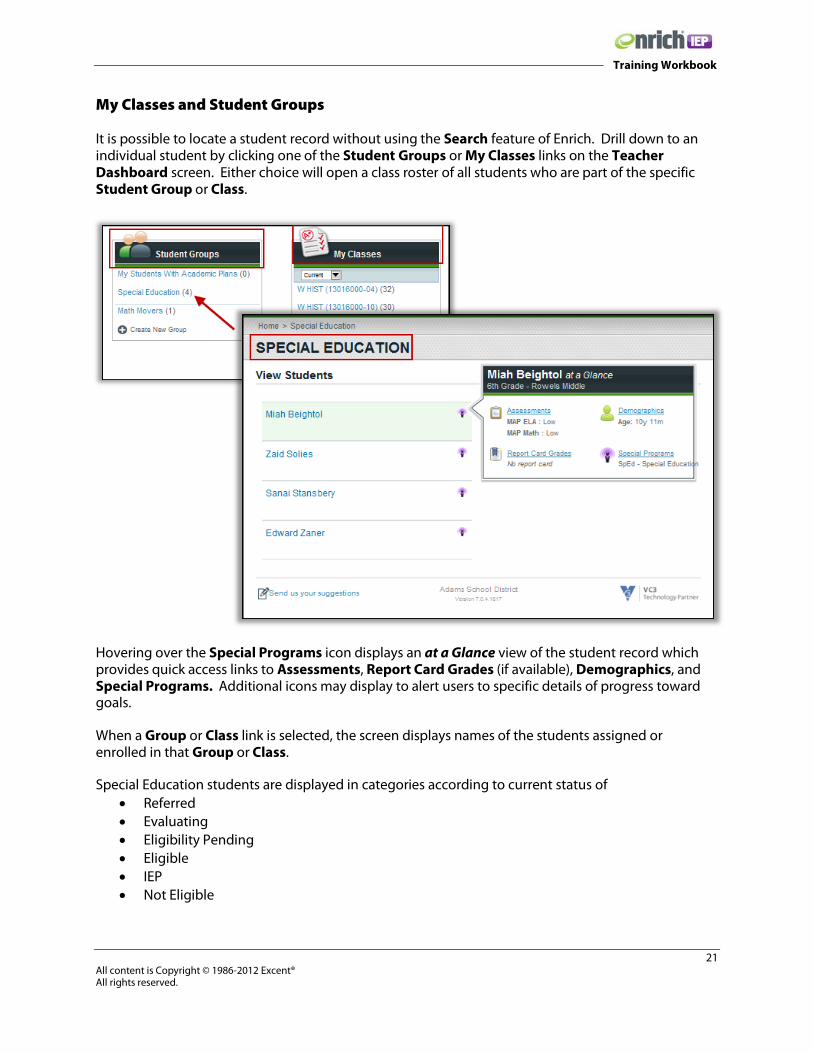
My Classes and Student Groups It is possible to locate a student record without using the Search feature of Enrich. Drill down to an individual student by clicking one of the Student Groups or My Classes links on the Teacher Dashboard screen. Either choice will open a class roster of all students who are part of the specific Student Group or Class.
Hovering over the Special Programs icon displays an at a Glance view of the student record which provides quick access links to Assessments, Report Card Grades (if available), Demographics, and Special Programs. Additional icons may display to alert users to specific details of progress toward goals.
When a Group or Class link is selected, the screen displays names of the students assigned or enrolled in that Group or Class.
Special Education students are displayed in categories according to current status of • Referred • Evaluating • Eligibility Pending • Eligible • IEP • Not Eligible

22 All content is Copyright © 1986-2012 Excent® All rights reserved.
Training Workbook
If the selected student is involved in a special program, the student Programs screen displays with tab navigation options to additional student information. In these examples, the Programs screen indicates the students are involved in Response to Intervention and Special Education.
The Programs tab for a student not involved in any special programs is shown below.

23 All content is Copyright © 1986-2012 Excent® All rights reserved.
Training Workbook
Review 2 – Search Functionality 1. List three different criteria that can be used to develop a student search.
2. It is necessary to go to the home screen to perform a student search. (True or False)
3. What will happen if include historical data field is checked during a student search?
4. Explain the process of searching for multiple students by ID number.
5. It is possible to search by partial names. (True or False)
6. Describe two ways to locate a student record.
7. Which two sections on the Teacher Dashboard provide class rosters?
8. Which student tab displays information about student involvement in special programs?

24 All content is Copyright © 1986-2012 Excent® All rights reserved.
Training Workbook
Student Data Screens
Profile Tab Once a student record has been located in Enrich, data is accessed by using the navigation tabs at the top of the screen. The screen is populated with data that has been imported from district files and updated from the district Student Information System. The Profile Tab always shows the date and time of the most recent data exchange with the SIS. A student’s Profile information is used primarily for viewing only; some details may be edited by admin users, but changes are only effective until the next SIS upload occurs. Any permanent changes must be made directly to the source application which is the district SIS. After an overnight transfer of data to Enrich, new information is available the following day. If data does not populate in a field, it’s likely that the data is not available in the district SIS.
If student demographic data is edited, the student record is paused which means no updates from the SIS system occur for this student until the record is unpaused. Note: This functionality is described more completely in the System Admin Guide. Data displayed in the Additional Information area varies by school district and by student. Information will be displayed for a student if a value is specified in the SIS (that is, if the field is not empty). If the student is a member of a group, the name(s) will be displayed on the right side of the screen. You can view the members of the group by clicking on the group name, or you may add this student to another group by clicking Add to Group. Progress monitoring information for those students with Intervention Plans also displays on the Profile screen.
25 All content is Copyright © 1986-2012 Excent® All rights reserved.
Training Workbook
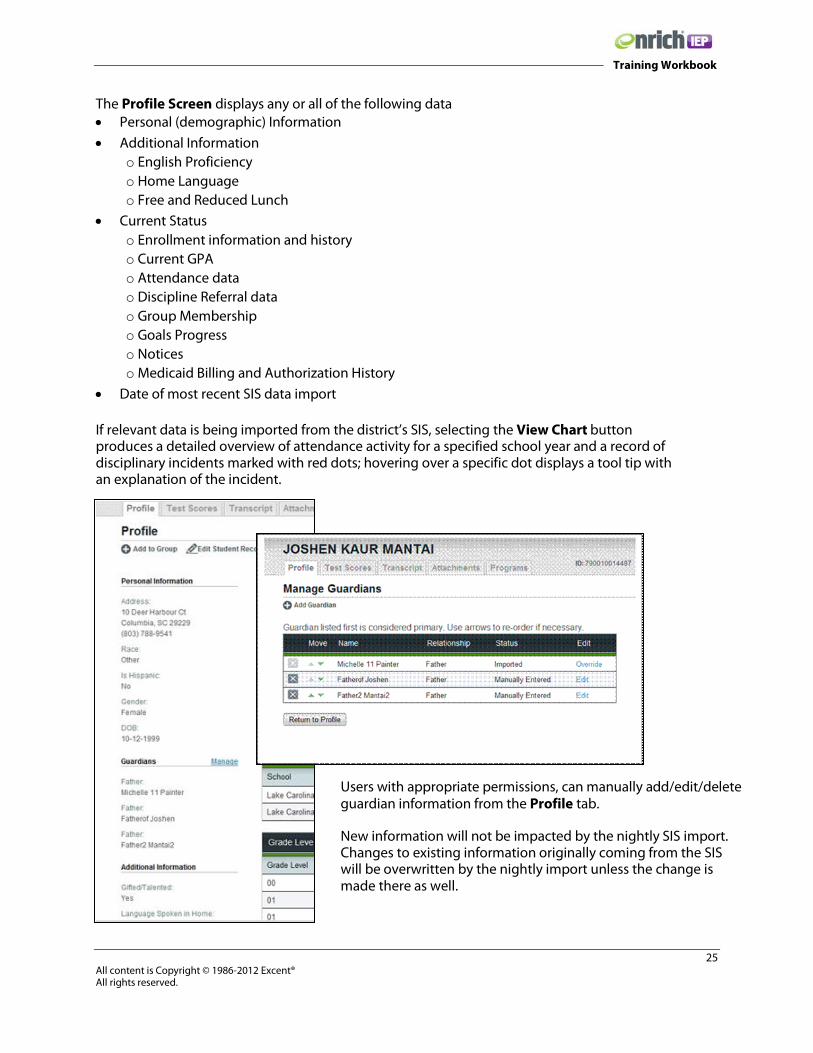
The Profile Screen displays any or all of the following data • Personal (demographic) Information
• Additional Information o English Proficiency o Home Language o Free and Reduced Lunch
• Current Status o Enrollment information and history o Current GPA o Attendance data o Discipline Referral data o Group Membership o Goals Progress o Notices o Medicaid Billing and Authorization History
• Date of most recent SIS data import
If relevant data is being imported from the district’s SIS, selecting the View Chart button produces a detailed overview of attendance activity for a specified school year and a record of disciplinary incidents marked with red dots; hovering over a specific dot displays a tool tip with an explanation of the incident.
Users with appropriate permissions, can manually add/edit/delete guardian information from the Profile tab.
New information will not be impacted by the nightly SIS import. Changes to existing information originally coming from the SIS will be overwritten by the nightly import unless the change is made there as well.

26 All content is Copyright © 1986-2012 Excent® All rights reserved.
Training Workbook
Test Score Tab The Test Scores tab provides access to Enrich Assess, the module which displays student test scores. Scores for standardized tests are grouped by test type and imported from district files; the import task must be performed by someone with District Admin access to the software. If a user has the appropriate system permissions, it is possible to edit scores and delete tests, however, in most districts, teacher users are not able to edit and/or delete test scores. These actions are normally completed by District Admin users. Users can view test score detail by clicking on the test date link under the Administration column header. In this example, the student has available test records for three tests – InView, MAP, and Terra Nova.

27 All content is Copyright © 1986-2012 Excent® All rights reserved.
Training Workbook
Click the 2009 Fall Administration link to open the screen which displays details of the Reading and Math components along with charts of the scores indicating how the student performed when compared to the school and district averages. The chart also indicates the PASS cut scores using the horizontal dotted lines.
The icons at the top of the Test Scores screen facilitate editing, deleting, or reading about test scores. Remember that the Edit and Delete actions may not be available for some district users.
Selecting the Edit Test link allows the user to manually change a test score or other data from the Test Scores Detail screen if the system permissions allow it. When changes are complete, click Save to complete the operation or Cancel to quit without changing the test information.
Selecting the Delete Test link allows those users with appropriate permissions to delete the specified test and scores from a student’s list. Click OK if you are sure you want to permanently delete the test, or click Cancel to quit without deleting this test.

28 All content is Copyright © 1986-2012 Excent® All rights reserved.
Training Workbook
Descriptions of each test are available by clicking on the question mark beside the test name in the table heading.
On the top of the Test Scores screen, users may see an Add New Test icon. Results of individual assessments can be entered here for later use in student Evaluation Reports. Click the Add New Test link.
Select the test to be added from the district-defined test list and click the Next button. The data-entry template specific to the selected test displays. Complete all fields as needed; fields will vary depending upon the type of test that is selected. Use Save to complete the operation or Cancel to quit without adding the test information. When completing the Evaluation Report,
users will have the option of printing the test score data to the report document by responding ‘yes’ to the question ‘Are the results of this assessment contained in the Diagnostic Library?’

29 All content is Copyright © 1986-2012 Excent® All rights reserved.
Training Workbook
Transcript Tab The Student Transcript screen displays the current year’s transcript; if available, previous transcripts can be viewed by scrolling down the screen. This information is available for viewing only and may not be edited.

30 All content is Copyright © 1986-2012 Excent® All rights reserved.
Training Workbook
The right side of the screen visually displays student achievement by class or grading period.
Clicking any of the listed courses opens a class roster screen.
From the View Class screen, users can select from one of two tabs – Students and Teachers. The Students tab lists students enrolled in the class; mouse over a student name to see at a Glance student information.

31 All content is Copyright © 1986-2012 Excent® All rights reserved.
Training Workbook
The Teachers tab lists the teachers assigned to the selected class.
Attachments Tab
The Attachments tab displays a list of all electronic attachments that have been added to a student record. The attachment process uses the Upload Attachment link the process is described later in this guide.
Programs Tab Users select the Programs tab to create, develop, and monitor Intervention Plans, Individual Literacy Plans, Special Education actions and other special programs that may be available in the drop-down list.

32 All content is Copyright © 1986-2012 Excent® All rights reserved.
Training Workbook
Selecting the Start Program link displays a list of program options based upon the district’s licensing agreement.
From the Programs tab, it is also possible to view a history of all programs with which a student has been involved by clicking the View History link.
33 All content is Copyright © 1986-2012 Excent® All rights reserved.
Training Workbook
Review 3 – Student Data Screens 1. Search and find a student who is not currently involved in any special programs and write his/her
name here. 2. Provide the following information about your student.
• Date of birth
• Days absent last year
• Number of discipline referrals
• School of attendance 3. List the time and date of the last data exchange from the SIS.
4. Where does a user locate details of a student’s GPA?
5. Explain the process of locating attendance information for a student. 6. Where does a user locate details of prior involvement in special programs?
7. Which tests have information available for your selected student?
8. How many years of student transcripts does the system display?

Managing Student Groups
35 All content is Copyright © 1986-2012 Excent® All rights reserved.
Training Workbook
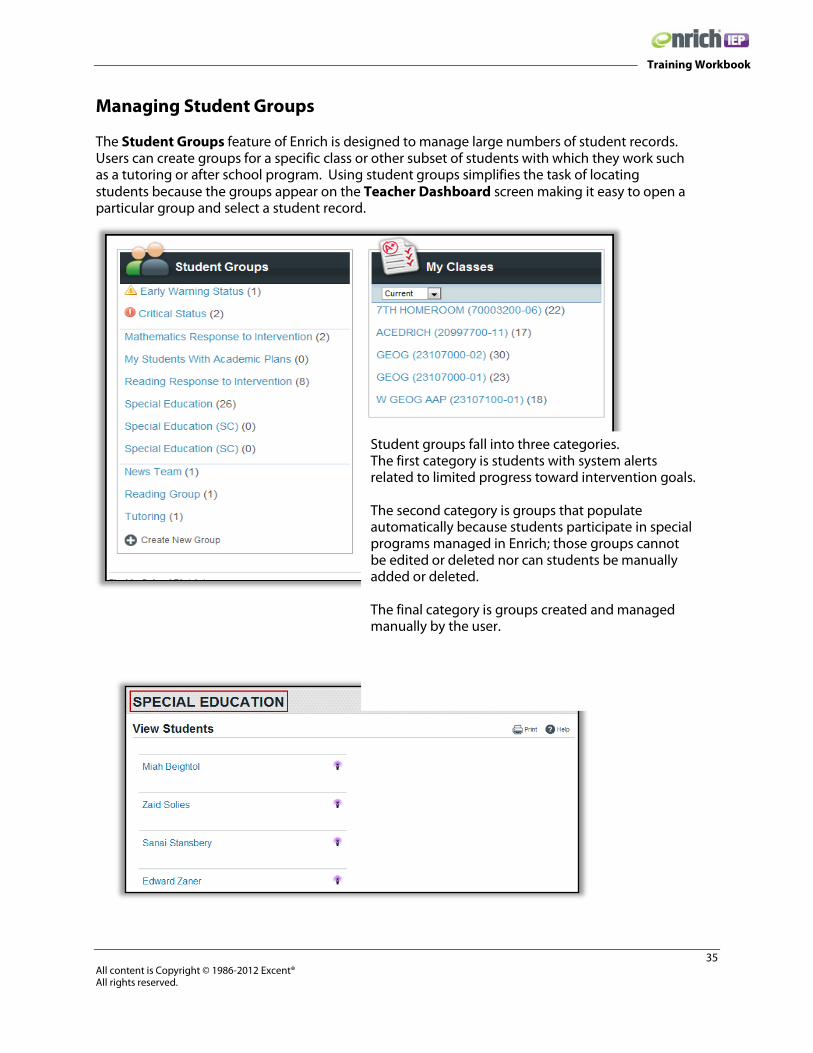
Managing Student Groups The Student Groups feature of Enrich is designed to manage large numbers of student records. Users can create groups for a specific class or other subset of students with which they work such as a tutoring or after school program. Using student groups simplifies the task of locating students because the groups appear on the Teacher Dashboard screen making it easy to open a particular group and select a student record.
Student groups fall into three categories. The first category is students with system alerts related to limited progress toward intervention goals. The second category is groups that populate automatically because students participate in special programs managed in Enrich; those groups cannot be edited or deleted nor can students be manually added or deleted. The final category is groups created and managed manually by the user.
36 All content is Copyright © 1986-2012 Excent® All rights reserved.
Training Workbook
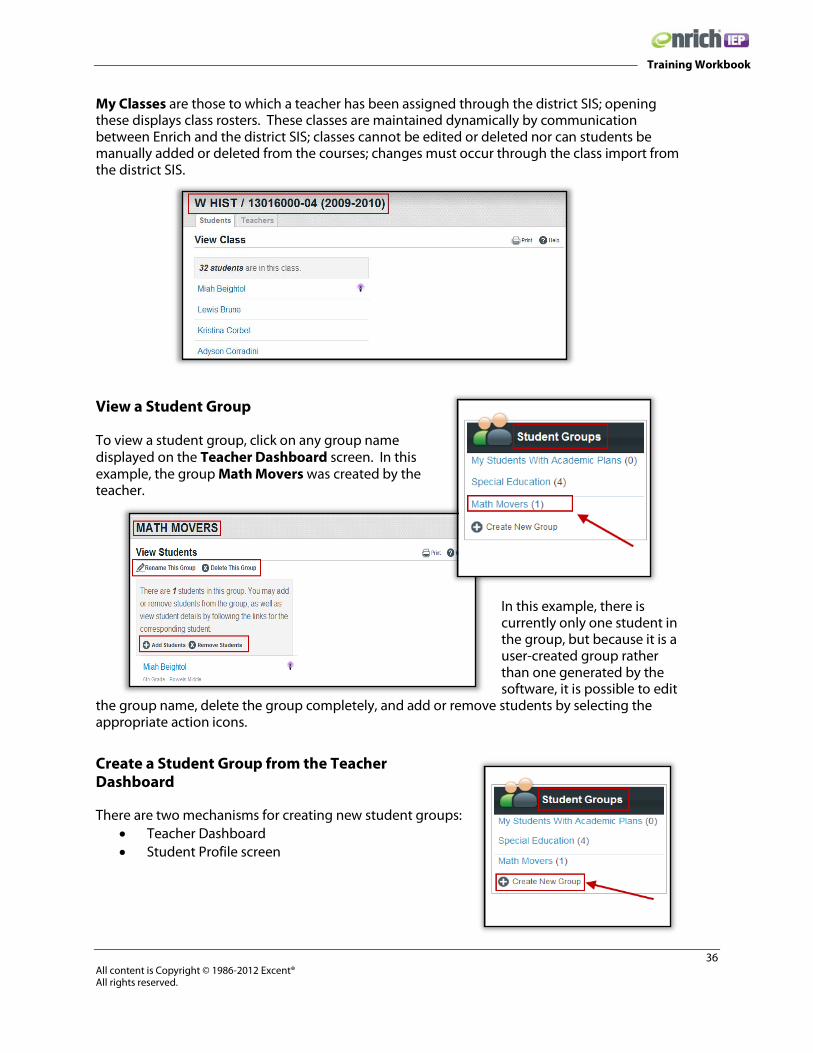
My Classes are those to which a teacher has been assigned through the district SIS; opening these displays class rosters. These classes are maintained dynamically by communication between Enrich and the district SIS; classes cannot be edited or deleted nor can students be manually added or deleted from the courses; changes must occur through the class import from the district SIS.
View a Student Group
To view a student group, click on any group name displayed on the Teacher Dashboard screen. In this example, the group Math Movers was created by the teacher.
In this example, there is currently only one student in the group, but because it is a user-created group rather than one generated by the software, it is possible to edit
the group name, delete the group completely, and add or remove students by selecting the appropriate action icons.
Create a Student Group from the Teacher Dashboard
There are two mechanisms for creating new student groups: • Teacher Dashboard • Student Profile screen
37 All content is Copyright © 1986-2012 Excent® All rights reserved.
Training Workbook
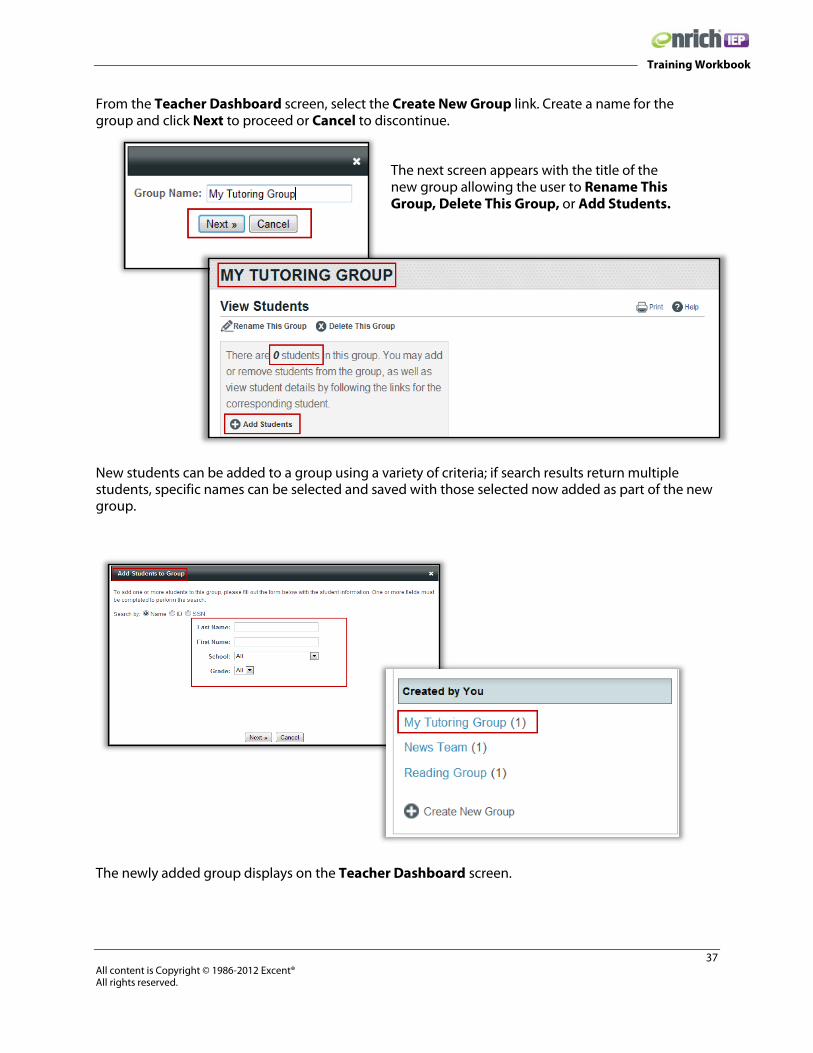
From the Teacher Dashboard screen, select the Create New Group link. Create a name for the group and click Next to proceed or Cancel to discontinue.
The next screen appears with the title of the new group allowing the user to Rename This Group, Delete This Group, or Add Students.
New students can be added to a group using a variety of criteria; if search results return multiple students, specific names can be selected and saved with those selected now added as part of the new group.
The newly added group displays on the Teacher Dashboard screen.

38 All content is Copyright © 1986-2012 Excent® All rights reserved.
Training Workbook
Create a Student Group from the Student Profile Screen A student group can be added from a student Profile screen where current group membership information is available. Navigate to the Profile screen of a specific student and click the Add to Group link. Add the student to an existing group using the drop-down list of all existing groups, or select the new group option and type a group name; click Add.
The new group screen appears with the student listed as the first group member and the option of adding additional students.
Rename a Student Group To rename a student group, open the group you wish to edit. Select the Rename this Group link. Type in the new name and click Save. The new group name displays on the My Afternoon Tutoring Group screen and the Teacher Dashboard screen.

39 All content is Copyright © 1986-2012 Excent® All rights reserved.
Training Workbook
Delete a Student Group
To delete a student group, open the group you wish to edit. Select the Delete This Group link. Click OK to confirm or Cancel to retain the group. The deleted group no longer displays in the list of Student Groups on the Teacher Dashboard.

40 All content is Copyright © 1986-2012 Excent® All rights reserved.
Training Workbook
Add Students to a Group
From the Teacher Dashboard, select the group to which students should be added. Select the Add Students link. Complete as many search criteria fields as necessary and click Next.
If multiple results display, use the checkboxes to select those students who are to be part of the group. It is possible to choose all students by placing a check in the box marked All at the head of the column. Click the hyperlink text to navigate directly to a student’s Profile, Test Scores, Transcript, and Programs.
Once selection is complete, click Done.
41 All content is Copyright © 1986-2012 Excent® All rights reserved.
Training Workbook
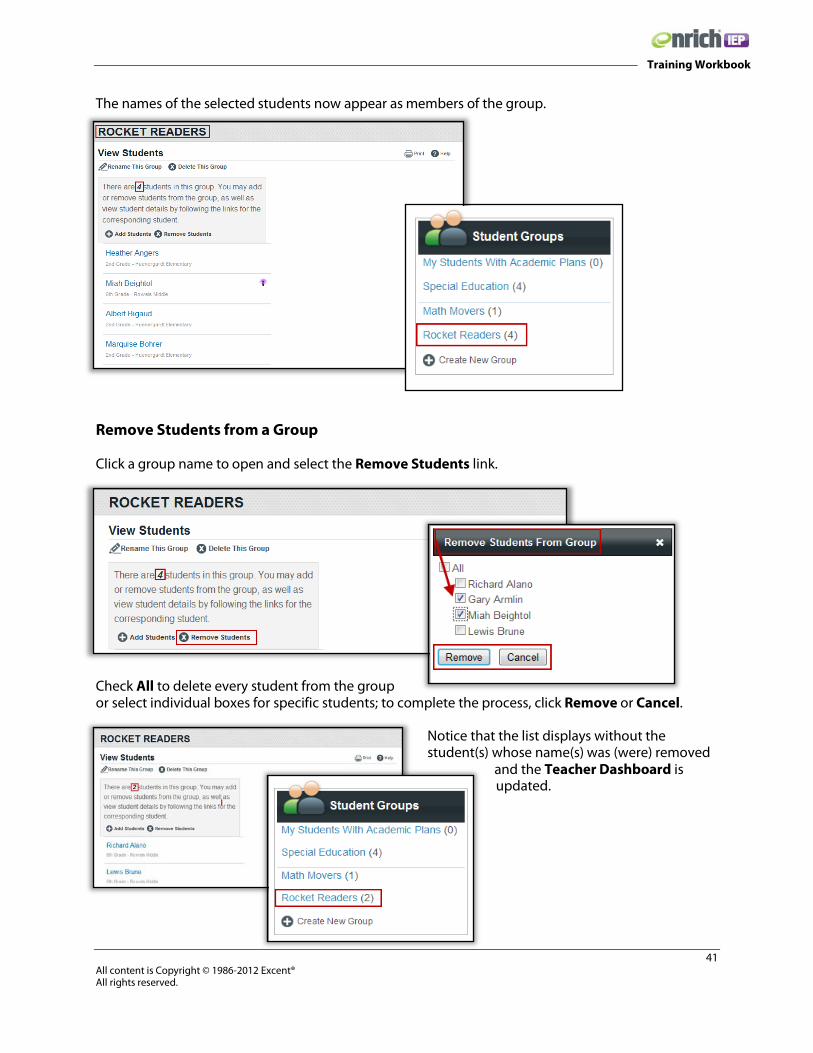
The names of the selected students now appear as members of the group.
Remove Students from a Group
Click a group name to open and select the Remove Students link.
Check All to delete every student from the group or select individual boxes for specific students; to complete the process, click Remove or Cancel.
Notice that the list displays without the student(s) whose name(s) was (were) removed
and the Teacher Dashboard is updated.

42 All content is Copyright © 1986-2012 Excent® All rights reserved.
Training Workbook
Review 4 – Managing Student Groups 1. Create a new math group and add five students to the group including the student you selected
in the previous section.
2. Name two types of groups that cannot be deleted from Enrich and explain why. 3. User-created groups can be deleted from Enrich. (True or False) 4. Where does a user find a list of his/her student groups? 5. Name two screens that provide the functionality to add student groups. 6. Student groups are limited to a maximum of 30 students. (True or False) 7. Explain the process of adding multiple students at one time to a student group. 8. A student group cannot be renamed; the original group must be deleted and
a new group created with a new name. (True or False)

Individualized Education Plan (IEP)
44 All content is Copyright © 1986-2012 Excent® All rights reserved.
Training Workbook
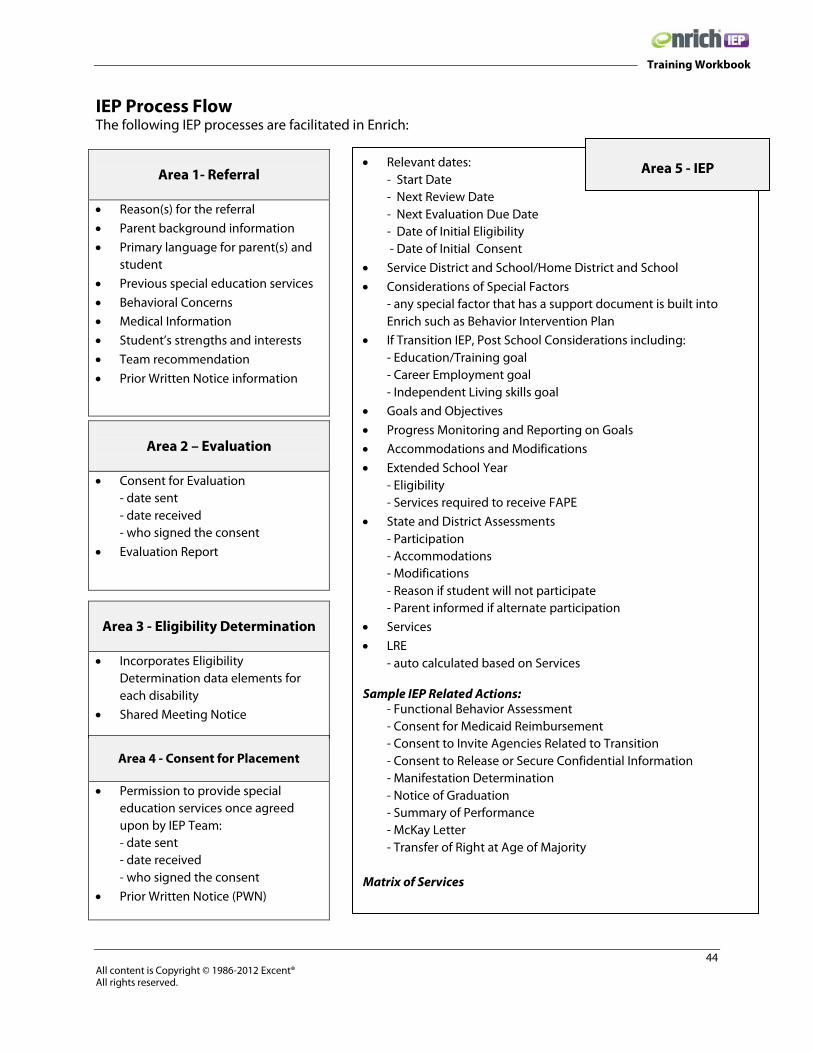
IEP Process Flow The following IEP processes are facilitated in Enrich:
Area 1- Referral
• Reason(s) for the referral
• Parent background information
• Primary language for parent(s) and student
• Previous special education services
• Behavioral Concerns
• Medical Information
• Student’s strengths and interests
• Team recommendation
• Prior Written Notice information
Area 2 – Evaluation
• Consent for Evaluation
- date sent - date received - who signed the consent
• Evaluation Report
Area 3 - Eligibility Determination
• Incorporates Eligibility
Determination data elements for each disability
• Shared Meeting Notice
Area 4 - Consent for Placement
• Permission to provide special
education services once agreed upon by IEP Team: - date sent - date received - who signed the consent
• Prior Written Notice (PWN)
• Relevant dates: - Start Date - Next Review Date - Next Evaluation Due Date - Date of Initial Eligibility - Date of Initial Consent
• Service District and School/Home District and School
• Considerations of Special Factors - any special factor that has a support document is built into Enrich such as Behavior Intervention Plan
• If Transition IEP, Post School Considerations including: - Education/Training goal - Career Employment goal - Independent Living skills goal
• Goals and Objectives
• Progress Monitoring and Reporting on Goals
• Accommodations and Modifications
• Extended School Year - Eligibility - Services required to receive FAPE
• State and District Assessments - Participation - Accommodations - Modifications - Reason if student will not participate - Parent informed if alternate participation
• Services
• LRE - auto calculated based on Services
Sample IEP Related Actions: - Functional Behavior Assessment - Consent for Medicaid Reimbursement - Consent to Invite Agencies Related to Transition - Consent to Release or Secure Confidential Information - Manifestation Determination - Notice of Graduation - Summary of Performance - McKay Letter - Transfer of Right at Age of Majority
Matrix of Services
Area 5 - IEP
45 All content is Copyright © 1986-2012 Excent® All rights reserved.
Training Workbook
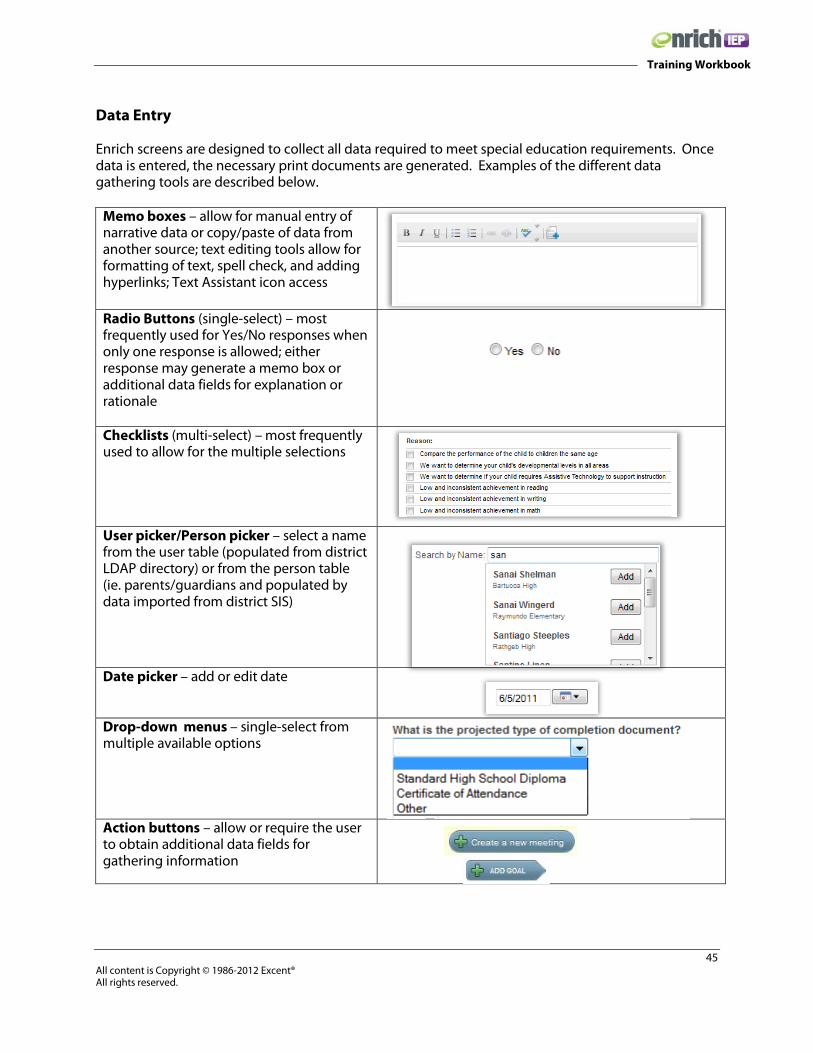
Data Entry Enrich screens are designed to collect all data required to meet special education requirements. Once data is entered, the necessary print documents are generated. Examples of the different data gathering tools are described below.
Memo boxes – allow for manual entry of narrative data or copy/paste of data from another source; text editing tools allow for formatting of text, spell check, and adding hyperlinks; Text Assistant icon access
Radio Buttons (single-select) – most frequently used for Yes/No responses when only one response is allowed; either response may generate a memo box or additional data fields for explanation or rationale
Checklists (multi-select) – most frequently used to allow for the multiple selections
User picker/Person picker – select a name from the user table (populated from district LDAP directory) or from the person table (ie. parents/guardians and populated by data imported from district SIS)
Date picker – add or edit date
Drop-down menus – single-select from multiple available options Action buttons – allow or require the user to obtain additional data fields for gathering information

46 All content is Copyright © 1986-2012 Excent® All rights reserved.
Training Workbook
Programs Tab Much of the work of managing student special education records is done from the Programs tab.
1) Timeline Ribbon – A color-coded date record (comprised of individual chevrons) shows when
special education status changes occurred and the due date of future required actions in order to stay compliant with federal and state regulations.
2) Add Meetings – Meetings can be scheduled from the Programs tab or from within an action. Clicking the Add button displays the same fields (Date & Time, Location, Purpose, Agenda, and Participants) as when scheduling the meeting from within an action; allows for printing the Notice of Meeting; and provides a place to document Record of Parent Contact. Meetings created here can be associated with any action that may require a meeting.
3) Active Programs – Each action that is currently in process appears with a quick access link to
open. a. The process of finalizing an action places a pending action on the Active Programs
screen. Use the Create link to open and begin work. b. Actions in draft form can be opened and edited by using the Edit Draft link.
4) Manage Team – The Manage Team link enables users to associate specific individuals and their
roles with a student. This team can be created after the first Special Education action is created and saved but can be modified at any time by returning to the Manage Team link. Each team member will be listed as someone to include as a meeting participant; to invite the individual, the user merely selects the checkbox associated with the name. Any upcoming action or due date for a student appears on the Teacher Dashboard of all team members.
2
5
1
3
4
6
7
9
8
47 All content is Copyright © 1986-2012 Excent® All rights reserved.
Training Workbook
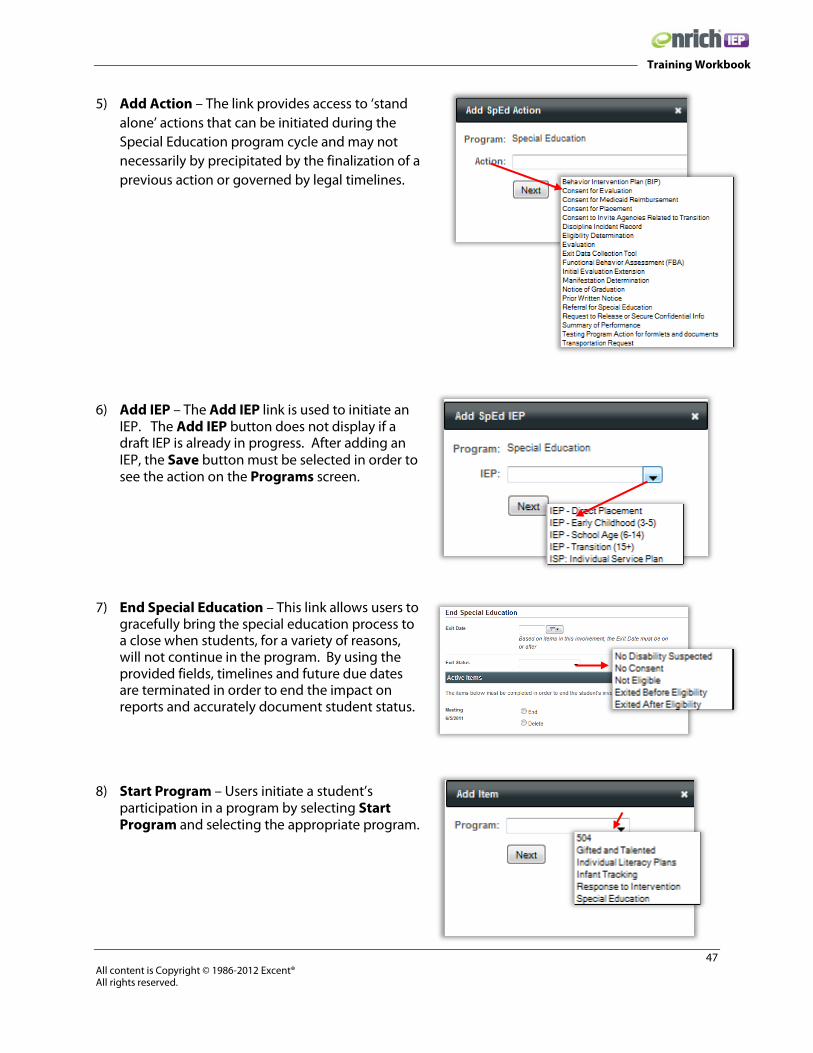
5) Add Action – The link provides access to ‘stand alone’ actions that can be initiated during the Special Education program cycle and may not necessarily by precipitated by the finalization of a previous action or governed by legal timelines.
6) Add IEP – The Add IEP link is used to initiate an IEP. The Add IEP button does not display if a draft IEP is already in progress. After adding an IEP, the Save button must be selected in order to see the action on the Programs screen.
7) End Special Education – This link allows users to gracefully bring the special education process to a close when students, for a variety of reasons, will not continue in the program. By using the provided fields, timelines and future due dates are terminated in order to end the impact on reports and accurately document student status.
8) Start Program – Users initiate a student’s
participation in a program by selecting Start Program and selecting the appropriate program.

48 All content is Copyright © 1986-2012 Excent® All rights reserved.
Training Workbook
9) View History – This link provides a view all previous program involvement (not just Special Education). Actions that are complete and have been finalized will show here with Start/End Dates, Recommendations (Outcomes), and the Program name. A filter feature allows users to limit what they see as the record of program involvement grows. Use the View Active Programs link to return to the current programs view.
Manage a Team Once a student is placed in Special Education through the addition of a Referral, an ISP, or an IEP Direct Placement, the Add Team Members link displays on the Programs tab.
Begin typing in the Team Lead field and names that match begin to display. Select the desired name to fill the field. Continue the same process using the Add Person field to complete the team. For each member of the team, add a Role from the drop-down list. Once the list is complete, select Save. Role names are configurable by the district.

49 All content is Copyright © 1986-2012 Excent® All rights reserved.
Training Workbook
Note: People must be listed as users in the software in order to appear as a choice. If the name you need is not available, contact the District Helpdesk for assistance.
Attachments
Once the File is located, add a Label describing the attachment in click the Upload button. The labeled attachment now displays on the Navigation Pane where it can opened and viewed by clicking the file title or deleted by using the ‘x.’
A Team Lead cannot be listed on the team using another role. If the same person is added to the team, his/her name is removed from the Lead position.
The Attachment feature is available on the Navigation Pane of any action and enables users to attach additional documentation appropriate to the specific action, for example, an evaluation from a private source or a physician’s report. Much like email, begin the process by selecting the Upload link and Browse your computer to locate the appropriate electronic file.
50 All content is Copyright © 1986-2012 Excent® All rights reserved.
Training Workbook
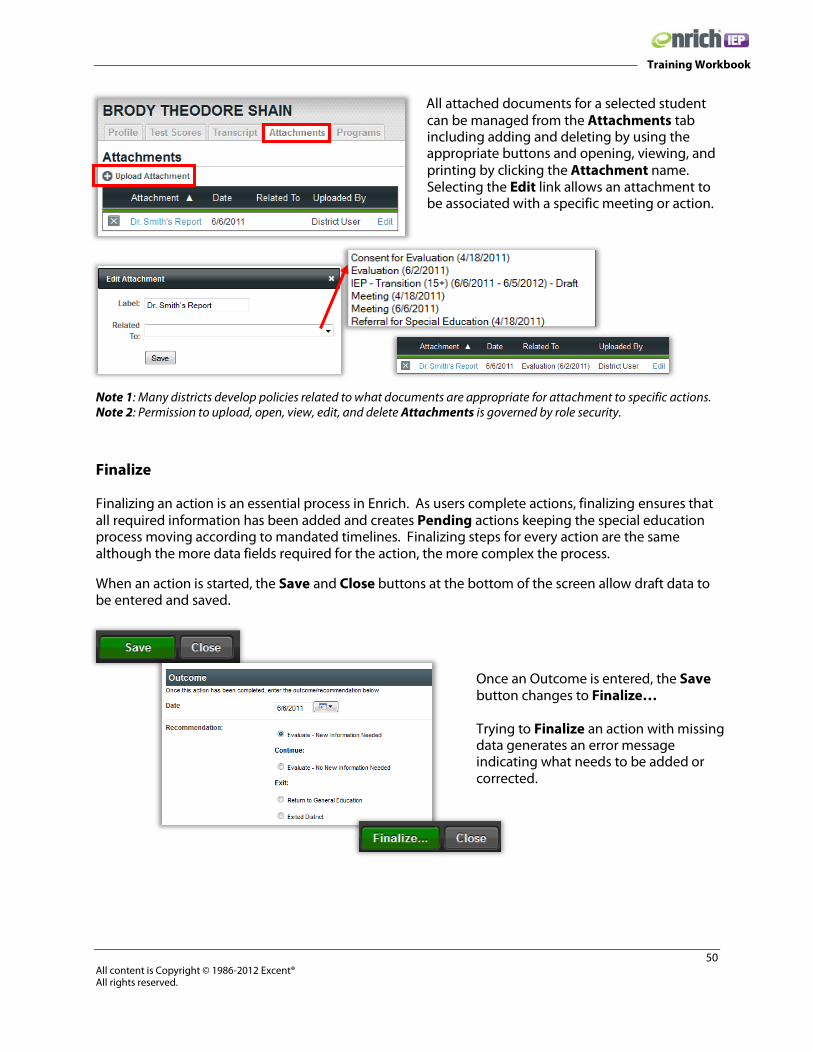
All attached documents for a selected student can be managed from the Attachments tab including adding and deleting by using the appropriate buttons and opening, viewing, and printing by clicking the Attachment name. Selecting the Edit link allows an attachment to be associated with a specific meeting or action.
Note 1: Many districts develop policies related to what documents are appropriate for attachment to specific actions. Note 2: Permission to upload, open, view, edit, and delete Attachments is governed by role security.
Finalize Finalizing an action is an essential process in Enrich. As users complete actions, finalizing ensures that all required information has been added and creates Pending actions keeping the special education process moving according to mandated timelines. Finalizing steps for every action are the same although the more data fields required for the action, the more complex the process.
When an action is started, the Save and Close buttons at the bottom of the screen allow draft data to be entered and saved.
Once an Outcome is entered, the Save button changes to Finalize… Trying to Finalize an action with missing data generates an error message indicating what needs to be added or corrected.
51 All content is Copyright © 1986-2012 Excent® All rights reserved.
Training Workbook
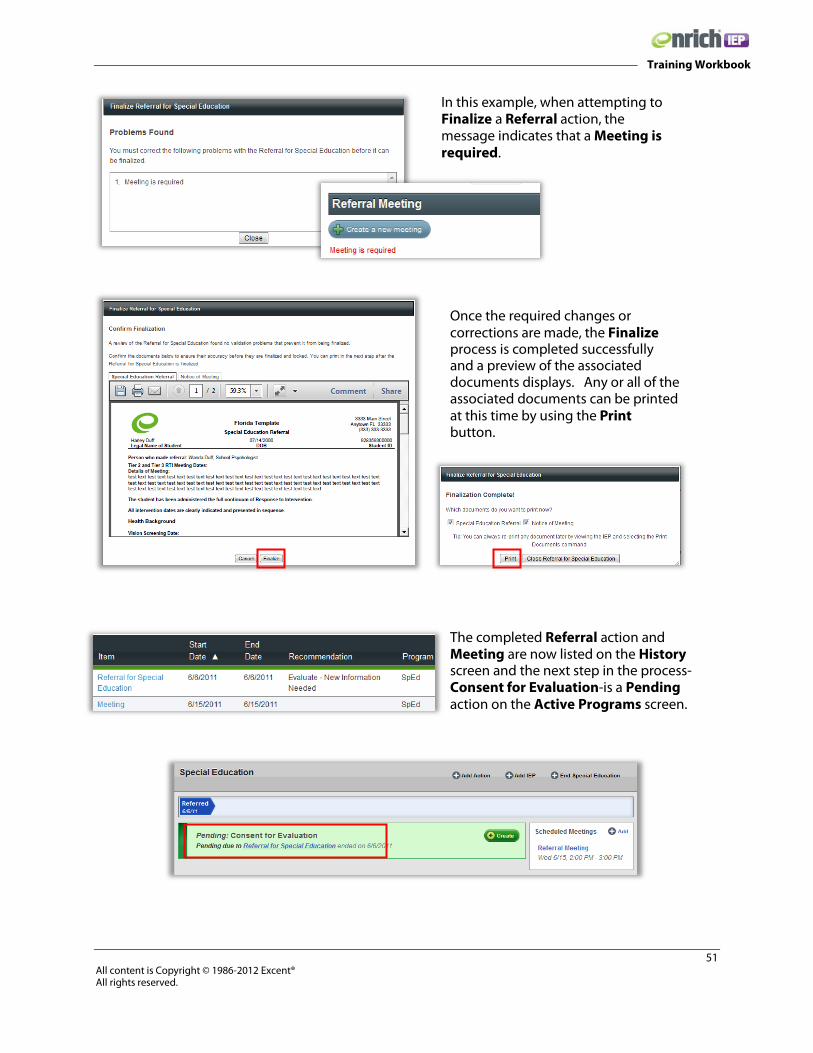
The completed Referral action and Meeting are now listed on the History screen and the next step in the process-Consent for Evaluation-is a Pending action on the Active Programs screen.
In this example, when attempting to Finalize a Referral action, the message indicates that a Meeting is required.
Once the required changes or corrections are made, the Finalize process is completed successfully and a preview of the associated documents displays. Any or all of the associated documents can be printed at this time by using the Print button.

52 All content is Copyright © 1986-2012 Excent® All rights reserved.
Training Workbook
Printing
From the Documents section of the navigation pane, select the link to either view and print a specific document; or, select the Print icon to view a list of available documents that are to be routed directly to the printer without preview. Print options default to print all documents in list. Deselect by clicking the checkbox those items not desired for printing.
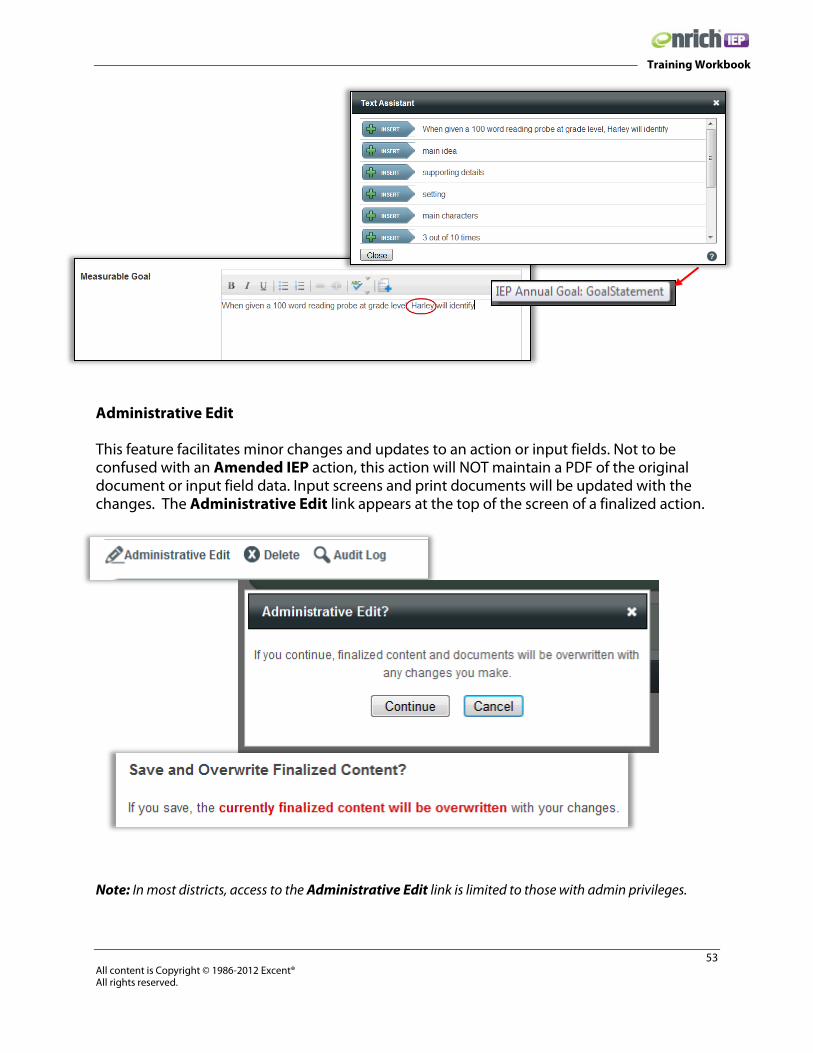
Text Assistant This feature allows users to manually add district-specific language to text fields that can then be customized for the individual student. Text snippets provide ‘starter’ statements (Lookups) or legal language to address a specific section. As new sections are added to the action, these fields will automatically appear in the Text Assistant set up. Each text field has an icon that indicates the text assist Click the icon on the memo box toolbar and insert the desired snippet (repeat the process to add multiple snippets), and edit the narrative as necessary. Selecting the question mark displays the program area with which the selections are associated.
53 All content is Copyright © 1986-2012 Excent® All rights reserved.
Training Workbook
Administrative Edit This feature facilitates minor changes and updates to an action or input fields. Not to be confused with an Amended IEP action, this action will NOT maintain a PDF of the original document or input field data. Input screens and print documents will be updated with the changes. The Administrative Edit link appears at the top of the screen of a finalized action.
Note: In most districts, access to the Administrative Edit link is limited to those with admin privileges.
54 All content is Copyright © 1986-2012 Excent® All rights reserved.
Training Workbook
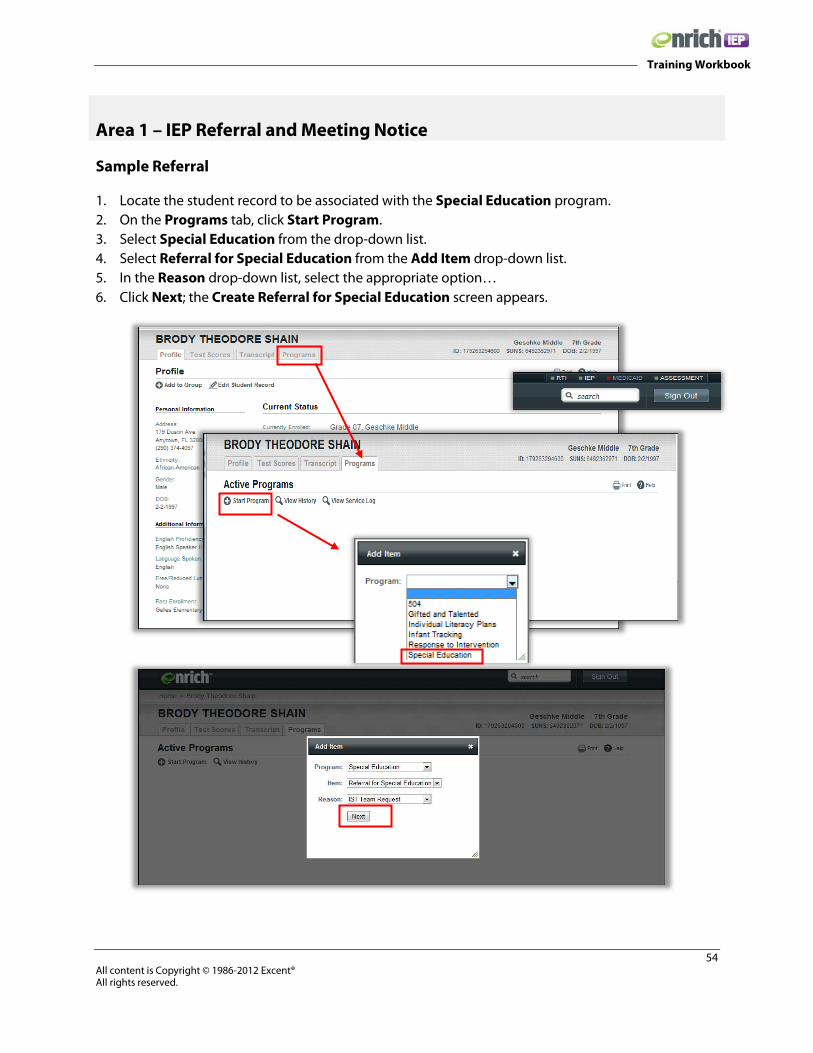
Area 1 – IEP Referral and Meeting Notice Sample Referral 1. Locate the student record to be associated with the Special Education program. 2. On the Programs tab, click Start Program. 3. Select Special Education from the drop-down list. 4. Select Referral for Special Education from the Add Item drop-down list. 5. In the Reason drop-down list, select the appropriate option… 6. Click Next; the Create Referral for Special Education screen appears.

55 All content is Copyright © 1986-2012 Excent® All rights reserved.
Training Workbook
The Navigation Pane links located on the left of the screen correspond to the input sections on the right. At the bottom of the screen are Save and Close options. Begin the Referral request by completing the Meeting Notice.
1. Select Create a new meeting button to expand the screen fields and initiate a meeting request.
2. Enter Date, Time, and Location; the date defaults to current date; time defaults to the top of the next hour; location defaults to school of enrollment; all fields are editable
3. Participants a. Names and titles of people who have previously been involved with the selected
student and those personnel designated as part of the campus team display on the Participants list.
b. If a name is not needed, delete using the adjacent . c. Select the Add Person link to enter additional names not listed using either the user-
picker or by entering details for a new contact. Titles of new participants are selected from the Role drop-down list.
d. Indicate whether or not the student should attend the meeting; the answer defaults to ‘yes’ if the student has reached transition age, but the option can be changed by the user; if ‘yes’ is the response, a copy of the Meeting Notice addressed to the student is available to print.
1 2
3

56 All content is Copyright © 1986-2012 Excent® All rights reserved.
Training Workbook
Note: In most districts, only the Roles will print on the document, not participant names. 4. Notice of Meeting
a. Check the Invite all guardians with a single meeting notice box, to print just one meeting notice for a household.
b. Select the date the original notice was sent to the parent/guardian c. When a Meeting Notice is associated to a specific action-in this case a Referral- the
print document indicates that is the purpose of the meeting; additional Discussion Items can be selected from the district-specific list, if needed; some districts provide an Add New Option button for user-defined reasons; other districts require users to select from the pre-configured list.
5. District Contact Information a. Add two district/school contacts by selecting names with the user-picker b. Associate contact information by selecting School, District Office, or Other; the
system will automatically print appropriate District and School information to the document from the data stored in the software; when Other is selected, the user is prompted to enter contact details
c. Use the Show Details link to confirm that Title, Work Phone, and Email Address are documented in the software as these details transfer to the print document.
d. Indicate whether or not Procedural Safeguards are enclosed with the Meeting Notice.
4
5
57 All content is Copyright © 1986-2012 Excent® All rights reserved.
Training Workbook
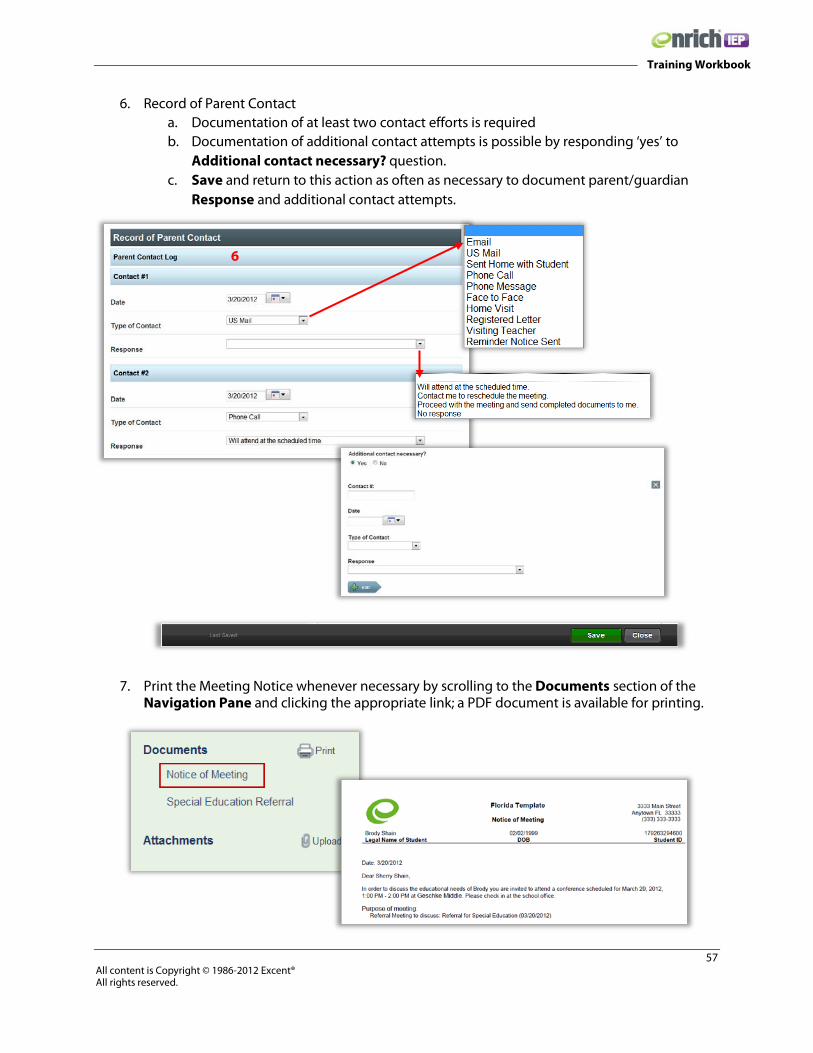
6. Record of Parent Contact a. Documentation of at least two contact efforts is required b. Documentation of additional contact attempts is possible by responding ‘yes’ to
Additional contact necessary? question. c. Save and return to this action as often as necessary to document parent/guardian
Response and additional contact attempts.
7. Print the Meeting Notice whenever necessary by scrolling to the Documents section of the Navigation Pane and clicking the appropriate link; a PDF document is available for printing.
6
58 All content is Copyright © 1986-2012 Excent® All rights reserved.
Training Workbook
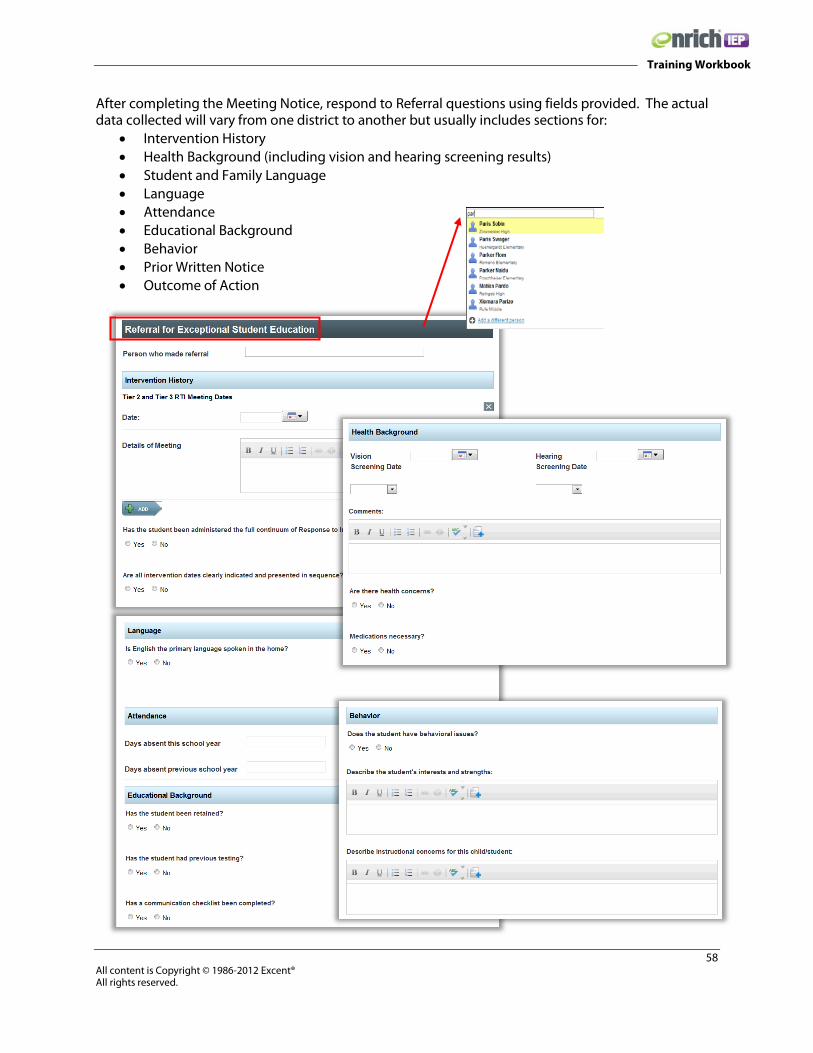
After completing the Meeting Notice, respond to Referral questions using fields provided. The actual data collected will vary from one district to another but usually includes sections for:
• Intervention History • Health Background (including vision and hearing screening results) • Student and Family Language • Language • Attendance • Educational Background • Behavior • Prior Written Notice • Outcome of Action

59 All content is Copyright © 1986-2012 Excent® All rights reserved.
Training Workbook
Leaving the Outcome blank creates an open referral; data can be saved at any time using the Save button. The Saved link displays with a checkmark to indicate data is saved and a time stamp on the left shows when the data was last saved. Close the screen to return to the Programs tab. Notice that the Scheduled Meetings box shows the Referral Meeting with date and time, the blue Referral status indicator flag displays on the Timeline Ribbon with the date, and the Referral action is in draft status and can be reopened and edited by clicking Edit Details.
60 All content is Copyright © 1986-2012 Excent® All rights reserved.
Training Workbook
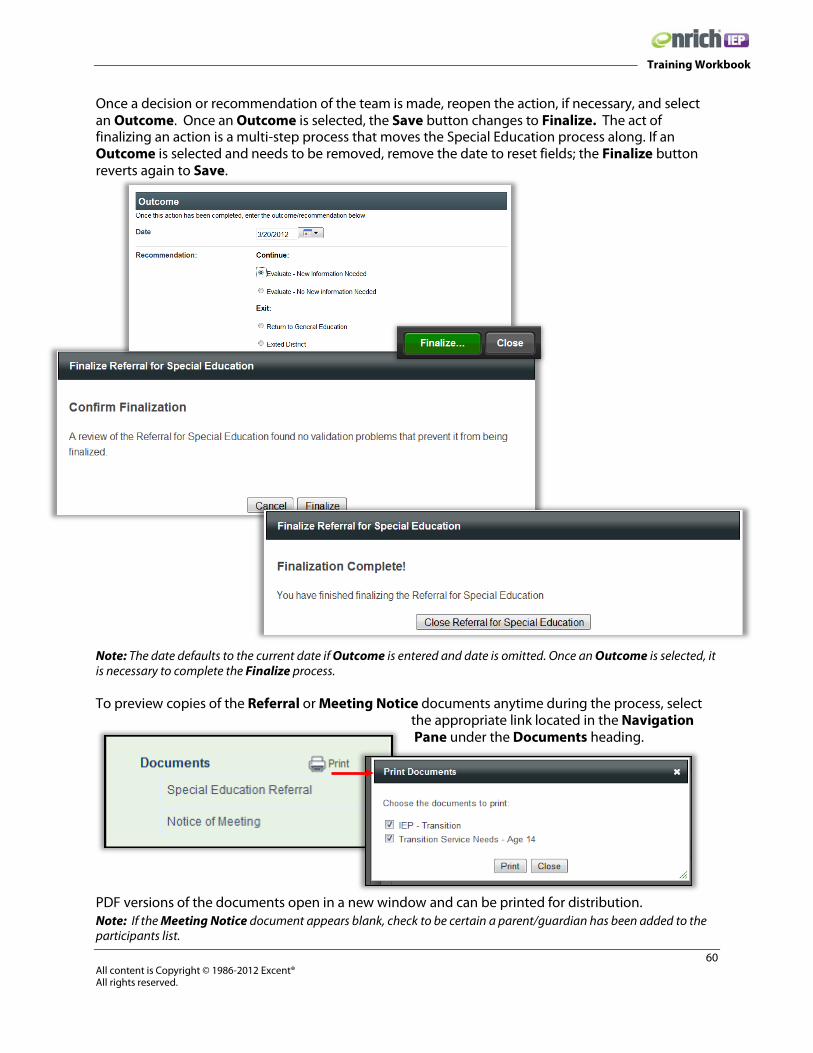
Once a decision or recommendation of the team is made, reopen the action, if necessary, and select an Outcome. Once an Outcome is selected, the Save button changes to Finalize. The act of finalizing an action is a multi-step process that moves the Special Education process along. If an Outcome is selected and needs to be removed, remove the date to reset fields; the Finalize button reverts again to Save.
Note: The date defaults to the current date if Outcome is entered and date is omitted. Once an Outcome is selected, it is necessary to complete the Finalize process. To preview copies of the Referral or Meeting Notice documents anytime during the process, select
the appropriate link located in the Navigation Pane under the Documents heading.
PDF versions of the documents open in a new window and can be printed for distribution. Note: If the Meeting Notice document appears blank, check to be certain a parent/guardian has been added to the participants list.
61 All content is Copyright © 1986-2012 Excent® All rights reserved.
Training Workbook
Review 5 – IEP Meeting Notice and Referral 1. How is a Referral Meeting scheduled?
2. What section/field must be entered to finalize the Referral in Enrich?
3. If the Meeting Notice is blank, what piece of information is missing?
4. What documents are available to print in the Referral process?
5. What occurs if the primary language in the home is not English?
6. When working in a previously saved Referral, what link must be selected in order to edit the fields
or add an Outcome?
7. How can an Outcome be cleared if it was inadvertently added?
8. Locate your general education student and create a Referral action using a today’s date. Indicate that an evaluation is necessary and Finalize the action.
62 All content is Copyright © 1986-2012 Excent® All rights reserved.
Training Workbook
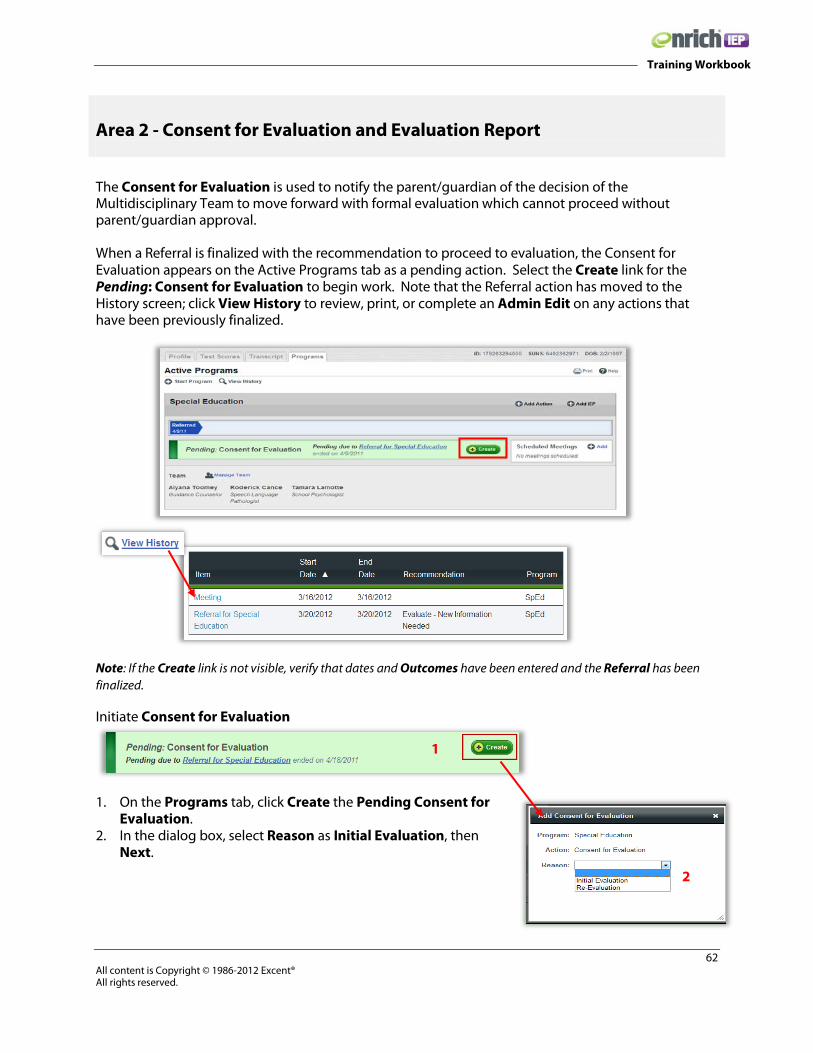
Area 2 - Consent for Evaluation and Evaluation Report The Consent for Evaluation is used to notify the parent/guardian of the decision of the Multidisciplinary Team to move forward with formal evaluation which cannot proceed without parent/guardian approval. When a Referral is finalized with the recommendation to proceed to evaluation, the Consent for Evaluation appears on the Active Programs tab as a pending action. Select the Create link for the Pending: Consent for Evaluation to begin work. Note that the Referral action has moved to the History screen; click View History to review, print, or complete an Admin Edit on any actions that have been previously finalized.
Note: If the Create link is not visible, verify that dates and Outcomes have been entered and the Referral has been finalized.
Initiate Consent for Evaluation
1. On the Programs tab, click Create the Pending Consent for Evaluation.
2. In the dialog box, select Reason as Initial Evaluation, then Next.
2
1

63 All content is Copyright © 1986-2012 Excent® All rights reserved.
Training Workbook
3. Use the Navigation links to access specific areas of the Consent for Evaluation just as for the Meeting Notice and Referral.
4. Start Date defaults to the current date but is editable. 5. Use the person picker to indicate the name of parent/guardian. 6. Indicate the date the Consent was provided to the parent/guardian. 7. A Yes or No response to any of the Areas to be Evaluated presents an additional layer of
responses. (Language of specific evaluation areas may vary slightly among districts.)
3
4
5
6
7
64 All content is Copyright © 1986-2012 Excent® All rights reserved.
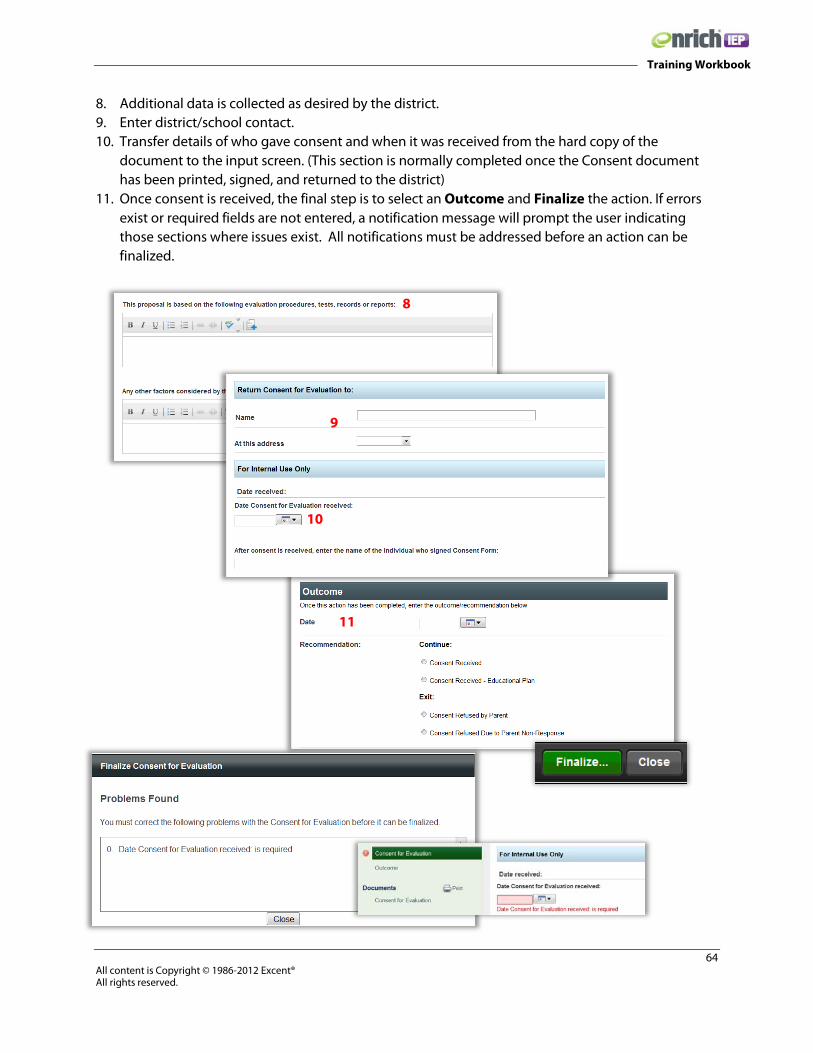
Training Workbook
8. Additional data is collected as desired by the district. 9. Enter district/school contact. 10. Transfer details of who gave consent and when it was received from the hard copy of the
document to the input screen. (This section is normally completed once the Consent document has been printed, signed, and returned to the district)
11. Once consent is received, the final step is to select an Outcome and Finalize the action. If errors exist or required fields are not entered, a notification message will prompt the user indicating those sections where issues exist. All notifications must be addressed before an action can be finalized.
8
9
10
11

65 All content is Copyright © 1986-2012 Excent® All rights reserved.
Training Workbook
Verify the results on the Programs tab; if the Outcome is Consent received, the Evaluation Report, Eligibility Determination, IEP, and Consent for Services should all be pending actions allowing users to begin working in any action as needed. Select the View History link and to view and/or print any previously finalized actions.
If the Outcome is Consent Refused, the Active Programs tab displays no future actions; users can continue to view all previous history by selecting the View History link.
Return to the Teacher Dashboard and note the student status on the Special Education group roster has moved from Referred category to Evaluating category.
66 All content is Copyright © 1986-2012 Excent® All rights reserved.
Training Workbook
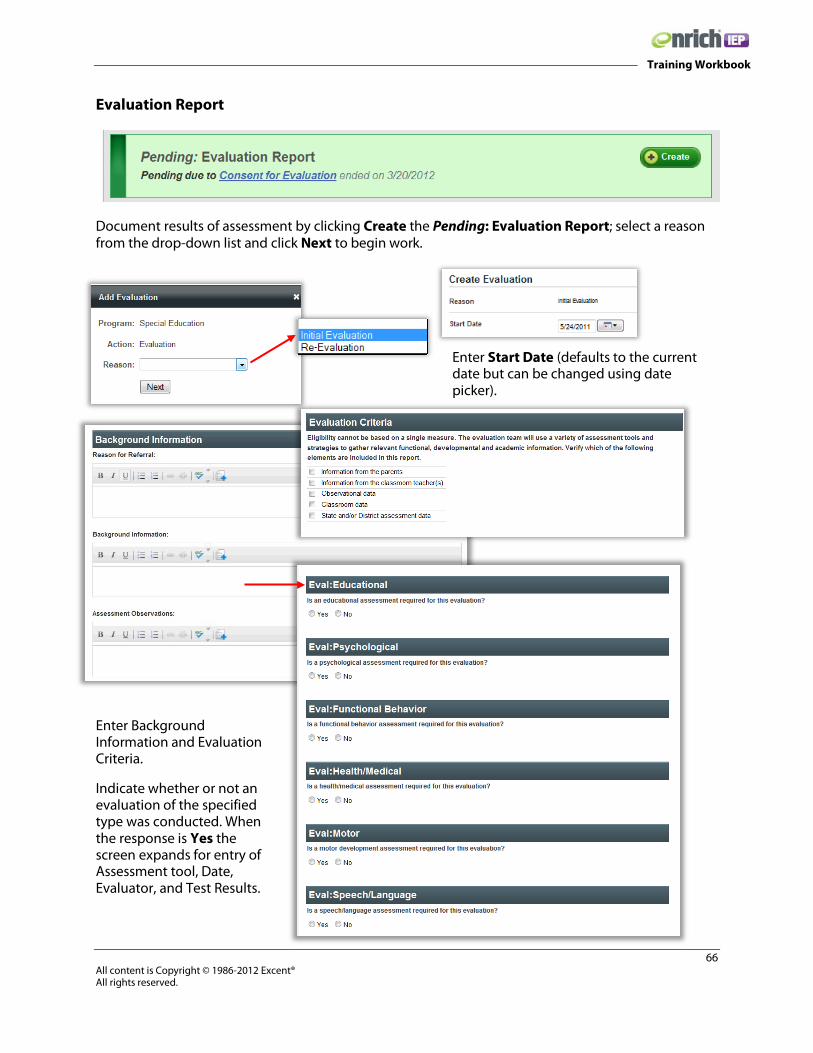
Evaluation Report
Document results of assessment by clicking Create the Pending: Evaluation Report; select a reason from the drop-down list and click Next to begin work.
Enter Background Information and Evaluation Criteria.
Indicate whether or not an evaluation of the specified type was conducted. When the response is Yes the screen expands for entry of Assessment tool, Date, Evaluator, and Test Results.
Enter Start Date (defaults to the current date but can be changed using date picker).

67 All content is Copyright © 1986-2012 Excent® All rights reserved.
Training Workbook
Select the Assessment Tool used from the drop-down list. Test lists will vary by district and evaluation area. Use the Add button to document results from additional testing instruments.
Add Date and Evaluator using the date and user pickers.
If test scores have been entered using a template on the Test Scores tab. Indicate that by selecting Yes, and the latest results will populate on the print document. If No is selected, then a textbox appears where results data can be entered. The process of documenting test scores using Enrich templates is described earlier in this document.
Complete the Evaluation Summary fields using the memo boxes provided. Once all work is complete, select the appropriate Outcome and Finalize.
68 All content is Copyright © 1986-2012 Excent® All rights reserved.
Training Workbook
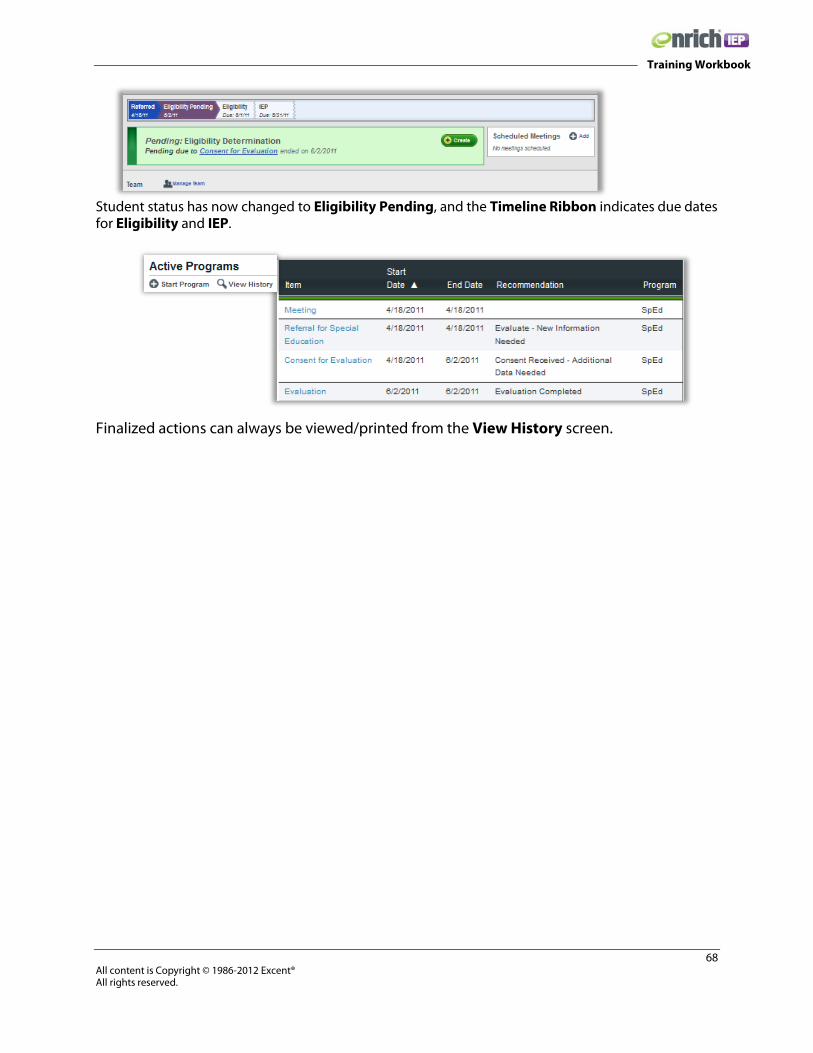
Student status has now changed to Eligibility Pending, and the Timeline Ribbon indicates due dates for Eligibility and IEP.
Finalized actions can always be viewed/printed from the View History screen.
69 All content is Copyright © 1986-2012 Excent® All rights reserved.
Training Workbook
Review 6 – Consent for Evaluation and Evaluation Report 1. What occurs when a Yes response is selected for an area of potential evaluation?
2. What occurs when Other is selected as the address option for the district contact?
3. What Special Education status does a student have once the Consent for Evaluation is finalized?
4. When is the Finalize option initiated?
5. How is the return date of the Consent document entered in Enrich?
6. What Special Education status does a student have once the Evaluation report is finalized?
7. Where can a user find the due date for Eligibility and IEP?
8. Complete a Consent for Evaluation action and an Evaluation for your student.

70 All content is Copyright © 1986-2012 Excent® All rights reserved.
Training Workbook
Area 3 - Eligibility Determination Determination of Eligibility Criteria states that to qualify for special education services, a child must have at least one of the 13 disabilities as defined by IDEA and the impact of the disability must create a need for services. In some states, additional exceptionalities such as Gifted may also be considered when determining appropriate placement.
Categories of special education defined by the Individuals with Disabilities Education Act (IDEA)
Examples of adverse impacts include: A discrepancy between performance and ability Limited progress, or deficiency in cognitive areas Evidence of emotional or behavioral disturbances Problems with fine or gross motor skills
Upon completing tests and evaluations, the IEP Team meets to interpret the data. The results are reviewed along with input from a variety of sources. The Eligibility Determination ensures that the information from all sources is documented and considered and that, if necessary, a psychological evaluation has been conducted. Steps to initiate the Eligibility Determination 1. Access student record by searching the Special Education group from the Teacher Dashboard
or the Search function. 2. Select Create Pending: Eligibility Determination, add a Reason from the drop-down list if
prompted, and click Next.
Autism Blindness Deafness Emotional Disturbance Hearing Impairment Mental Retardation Multiple Disabilities
Orthopedic Impairment Other Health Impaired Specific Learning Disability Speech or Language Impairment Traumatic Brain Injury Visual Impairment

71 All content is Copyright © 1986-2012 Excent® All rights reserved.
Training Workbook
There are two options for initiating a meeting; select an existing meeting from the list shown or use the Create a new meeting button. In this case, 4/18/2011 was the date of the original Referral Meeting, so a new meeting will be created.
Complete all sections as described in the Meeting Notice and Referral section of this guide. A copy of the Meeting Notice will print for each participant who is not part of the district staff. If multiple copies of the notice are needed to accommodate parent(s)/guardian(s), each name needs to be added to the Participants list.
Note: Only the Role titles will print on the Meeting Notice, not participant names.
Enter Start Date (defaults to the current date but can be changed using date picker).
72 All content is Copyright © 1986-2012 Excent® All rights reserved.
Training Workbook
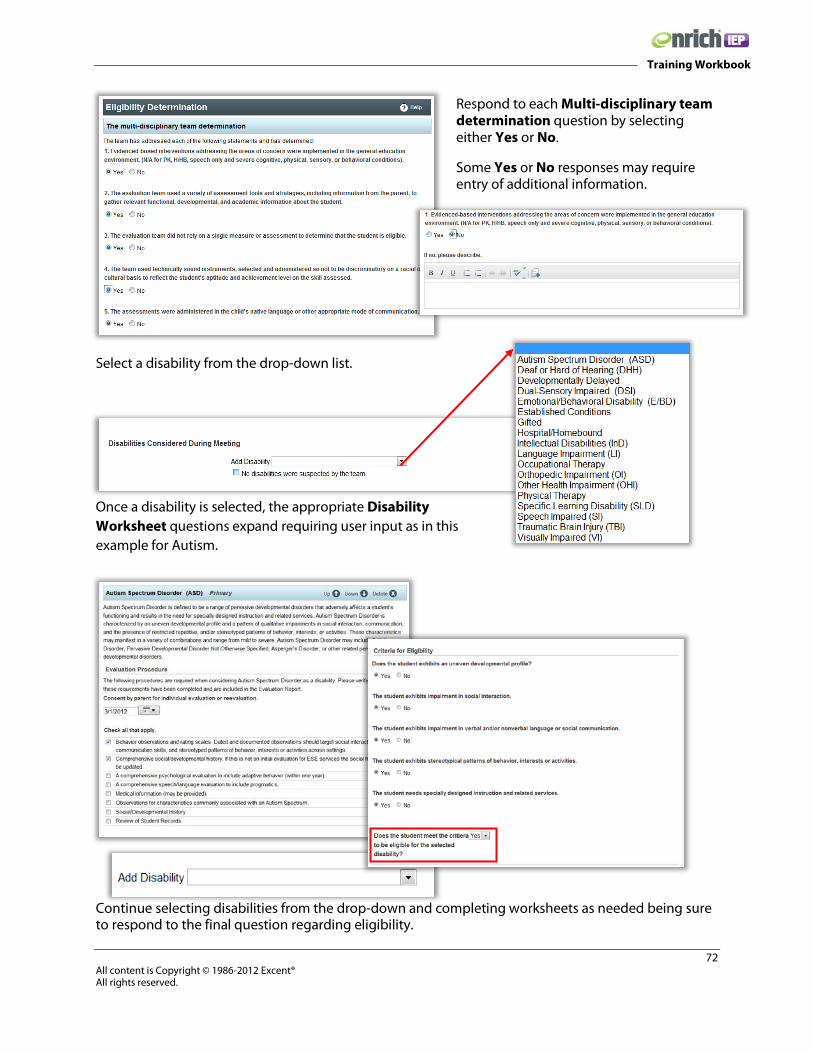
Respond to each Multi-disciplinary team determination question by selecting either Yes or No.
Some Yes or No responses may require entry of additional information.
Select a disability from the drop-down list.
Once a disability is selected, the appropriate Disability Worksheet questions expand requiring user input as in this example for Autism.
Continue selecting disabilities from the drop-down and completing worksheets as needed being sure to respond to the final question regarding eligibility.
73 All content is Copyright © 1986-2012 Excent® All rights reserved.
Training Workbook
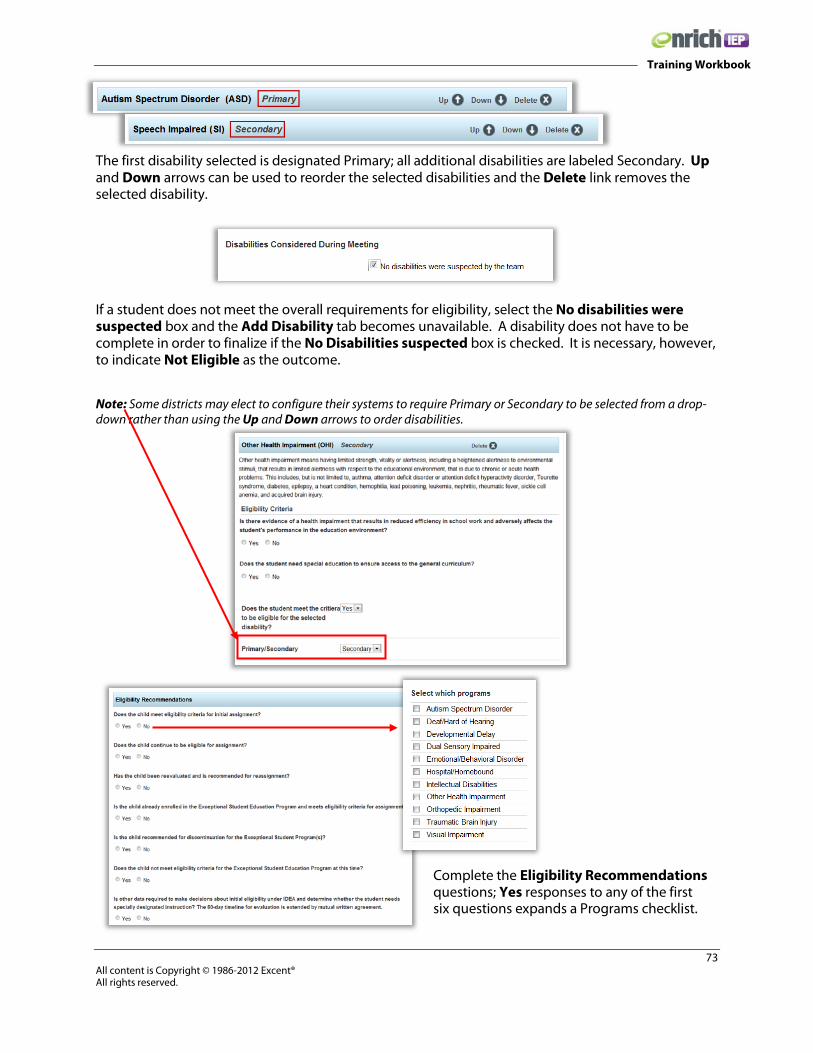
The first disability selected is designated Primary; all additional disabilities are labeled Secondary. Up and Down arrows can be used to reorder the selected disabilities and the Delete link removes the selected disability.
If a student does not meet the overall requirements for eligibility, select the No disabilities were suspected box and the Add Disability tab becomes unavailable. A disability does not have to be complete in order to finalize if the No Disabilities suspected box is checked. It is necessary, however, to indicate Not Eligible as the outcome.
Note: Some districts may elect to configure their systems to require Primary or Secondary to be selected from a drop-down rather than using the Up and Down arrows to order disabilities.
Complete the Eligibility Recommendations questions; Yes responses to any of the first six questions expands a Programs checklist.

74 All content is Copyright © 1986-2012 Excent® All rights reserved.
Training Workbook
Complete Parent Notification information and Save all input prior to closing. Because eligibility is usually determined at the IEP Meeting, the process of selecting an Outcome and finalizing the Eligibility Determination will likely occur at that time.
When ready to finalize, open the draft action and complete all remaining information. If the student attended the meeting, a signature line will be placed on the document for him/her, and a checkmark indicating that the Eligibility Meeting has been held transfers names from the Meeting Notice to the signature area of the final document.
The Compliance Checks icon indicates whether or not the action was completed within the district-configured timelines. If timeline is met, a green checkbox displays; if past timelines, a red alert flag appears and the user is prompted to enter a delay reason.
75 All content is Copyright © 1986-2012 Excent® All rights reserved.
Training Workbook
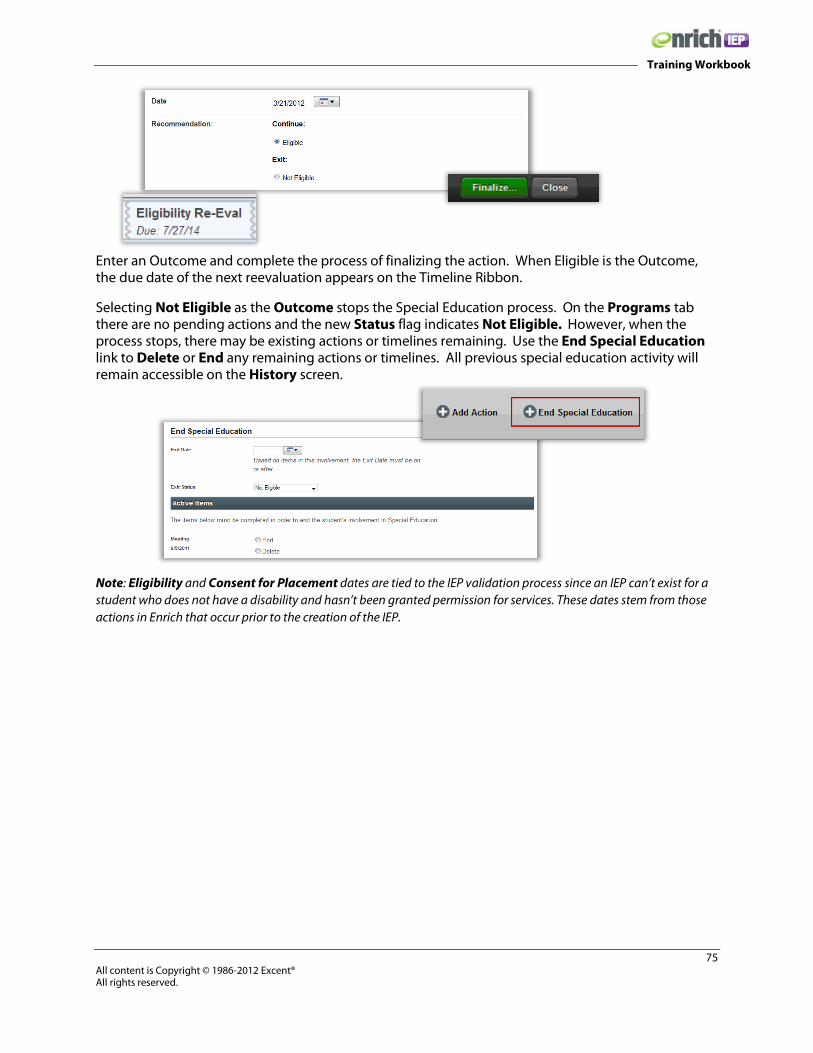
Enter an Outcome and complete the process of finalizing the action. When Eligible is the Outcome, the due date of the next reevaluation appears on the Timeline Ribbon.
Selecting Not Eligible as the Outcome stops the Special Education process. On the Programs tab there are no pending actions and the new Status flag indicates Not Eligible. However, when the process stops, there may be existing actions or timelines remaining. Use the End Special Education link to Delete or End any remaining actions or timelines. All previous special education activity will remain accessible on the History screen.
Note: Eligibility and Consent for Placement dates are tied to the IEP validation process since an IEP can’t exist for a student who does not have a disability and hasn’t been granted permission for services. These dates stem from those actions in Enrich that occur prior to the creation of the IEP.
76 All content is Copyright © 1986-2012 Excent® All rights reserved.
Training Workbook
Review 7 – Eligibility Determination
1. How many disabilities can one student have? 2. What is the compliance timeline from date of receiving Consent for Evaluation to the
Determination of Eligibility?
3. What happens if a student is found Not Eligible for Special Education?
4. When is the Eligibility Determination action normally finalized?
5. Describe the two methods of scheduling a meeting for Eligibility Determination.
6. How does Enrich know which disabilities should be considered primary?
7. How does the user document know whether or not the parent/guardian responded to the Meeting Notice?
8. Complete the Eligibility Determination action for your student selecting just one disability; Save
the input but do not choose an Outcome or Finalize.
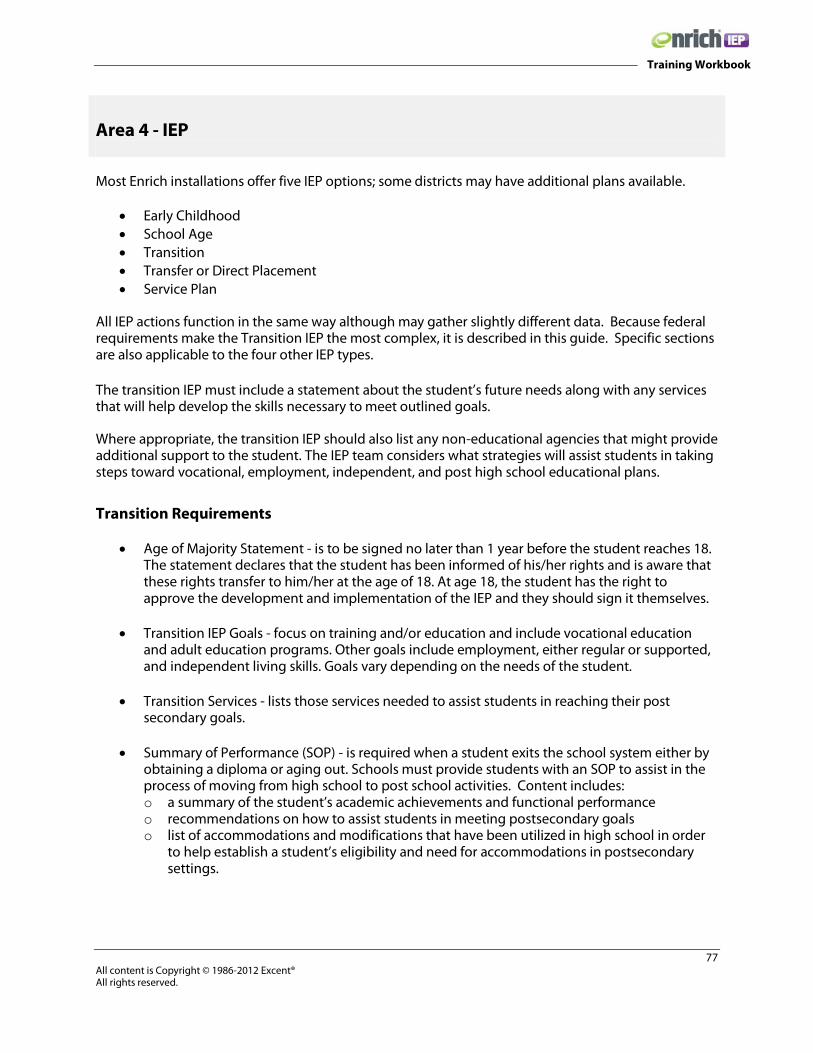
77 All content is Copyright © 1986-2012 Excent® All rights reserved.
Training Workbook
Area 4 - IEP
Most Enrich installations offer five IEP options; some districts may have additional plans available.
• Early Childhood • School Age • Transition • Transfer or Direct Placement • Service Plan
All IEP actions function in the same way although may gather slightly different data. Because federal requirements make the Transition IEP the most complex, it is described in this guide. Specific sections are also applicable to the four other IEP types.
The transition IEP must include a statement about the student’s future needs along with any services that will help develop the skills necessary to meet outlined goals.
Where appropriate, the transition IEP should also list any non-educational agencies that might provide additional support to the student. The IEP team considers what strategies will assist students in taking steps toward vocational, employment, independent, and post high school educational plans.
Transition Requirements
• Age of Majority Statement - is to be signed no later than 1 year before the student reaches 18. The statement declares that the student has been informed of his/her rights and is aware that these rights transfer to him/her at the age of 18. At age 18, the student has the right to approve the development and implementation of the IEP and they should sign it themselves.
• Transition IEP Goals - focus on training and/or education and include vocational education
and adult education programs. Other goals include employment, either regular or supported, and independent living skills. Goals vary depending on the needs of the student.
• Transition Services - lists those services needed to assist students in reaching their post secondary goals.
• Summary of Performance (SOP) - is required when a student exits the school system either by obtaining a diploma or aging out. Schools must provide students with an SOP to assist in the process of moving from high school to post school activities. Content includes: o a summary of the student’s academic achievements and functional performance o recommendations on how to assist students in meeting postsecondary goals o list of accommodations and modifications that have been utilized in high school in order
to help establish a student’s eligibility and need for accommodations in postsecondary settings.

78 All content is Copyright © 1986-2012 Excent® All rights reserved.
Training Workbook
Transition IEP To create a Transition IEP, locate the student record using the search lookup or select the record from the Student Groups link on the Teacher Dashboard. If an IEP Action is not already pending on the Programs tab, click the Add IEP link at the top of the Programs screen. The selection choice defaults to the correct IEP based on age; when a non-applicable IEP is selected, the user is alerted to issues that may arise with the selection of this IEP type.
When the IEP screen opens, a scrollable Navigation Pane displays on the left providing links that correspond to the data input fields on the right. Although this tool is available for every action, it is especially valuable for navigating the IEP due to the length and complexity of the screens.
The menu is dynamic with additional entries displaying as the user responds to questions by adding data to the IEP.
At the bottom of the pane is a link to print the documents that are part of the IEP action. This section will also change based on data entry, for example, once a meeting is scheduled, the Meeting Notice appears as an available document.
The final link allows a user to attach electronic copies of additional data much as one attaches documents to an email. Details of this process are described in another section of this guide.

79 All content is Copyright © 1986-2012 Excent® All rights reserved.
Training Workbook
Tools at the bottom of the screen provide options for saving, closing, validating, and finalizing the IEP action as well as indicating when the action was last saved and if another user is working in the action at the same time.
Convert provides the option for users to change IEP type without data loss after the initial IEP type is selected; details on using the Convert feature are provided later in this guide.
To work in a section of the IEP, select the desired link on the Navigation Pane. To save a draft copy of data input select Save and Close.
Validate allows users to determine what required data is missing from the IEP and can be used at any time during the IEP process. A list of issues that must be resolved prior to finalization is presented and highlighted on the Navigation Pane and input screen. As issues are resolved, highlighting disappears.
Finalize is used at the conclusion of all data input and once the meeting is concluded. If a district has elected to print the word Draft in the document footers, this designation will no longer appear on print documents once an IEP is finalized.

80 All content is Copyright © 1986-2012 Excent® All rights reserved.
Training Workbook
IEP In the case of an Initial IEP, finalizing the Consent for Evaluation action will automatically generate the age-appropriate IEP along with the other actions necessary to move through the Special Education Process. The programs tab does not display a specific age category classification. If the IEP is an annual review, the user will add it using the Add IEP link. If an IEP is selected that is not recommended the screen will provide a prompt and warning.
Creating an IEP Meeting The IEP Meeting link corresponds to the IEP Meeting section of the input screen. The user has the option of scheduling a new meeting or associating the IEP to a meeting that’s already been scheduled. In this example an Eligibility Meeting is already scheduled. Rather than create a new meeting, this IEP action is going to be attached to that meeting by clicking the Select button. Details of the scheduled meeting display.

81 All content is Copyright © 1986-2012 Excent® All rights reserved.
Training Workbook
Fields may be edited and a new Meeting Notice printed, if needed. All Parent Contact attempts are documented on the printed notice.

82 All content is Copyright © 1986-2012 Excent® All rights reserved.
Training Workbook
Demographics All of the referenced fields auto-populate based on SIS information. By selecting the drop-down list arrow a list of districts and campuses displays allowing the user to edit the values. A configuration setting in Enrich offers a district two options when displaying the Service/Home District and School as shown below. If the option to show Prior To and After Meeting is selected, the first list shows the student’s current assignment and is not editable; the second list allows for selection of different options as a result of the meeting.
The printed IEP document may show additional student demographic information based on district requests.
Dates Start Date defaults to the current date but is editable. The remaining date fields populate based on timelines and actions previously finalized in Enrich or converted data from legacy systems. Most dates are editable using the date picker tool. Planned End Date automatically defaults to 364 days from the Meeting Date.
Next Review Due By defaults to one year minus one day from the date of the current IEP. Latest Evaluation Date, Next Evaluation Due By, Eligibility Date, and Date of Consent for Services will all populate once the Eligibility Determination and Consent for Placement are finalized.
The Eligibility Date and Date of Consent for Placement cannot be entered manually but rather must auto populate from previously finalized actions.
An IEP cannot be successfully validated and finalized without these dates, so if an error message appears when trying to complete the validation process, check to be sure all previous actions have been finalized.
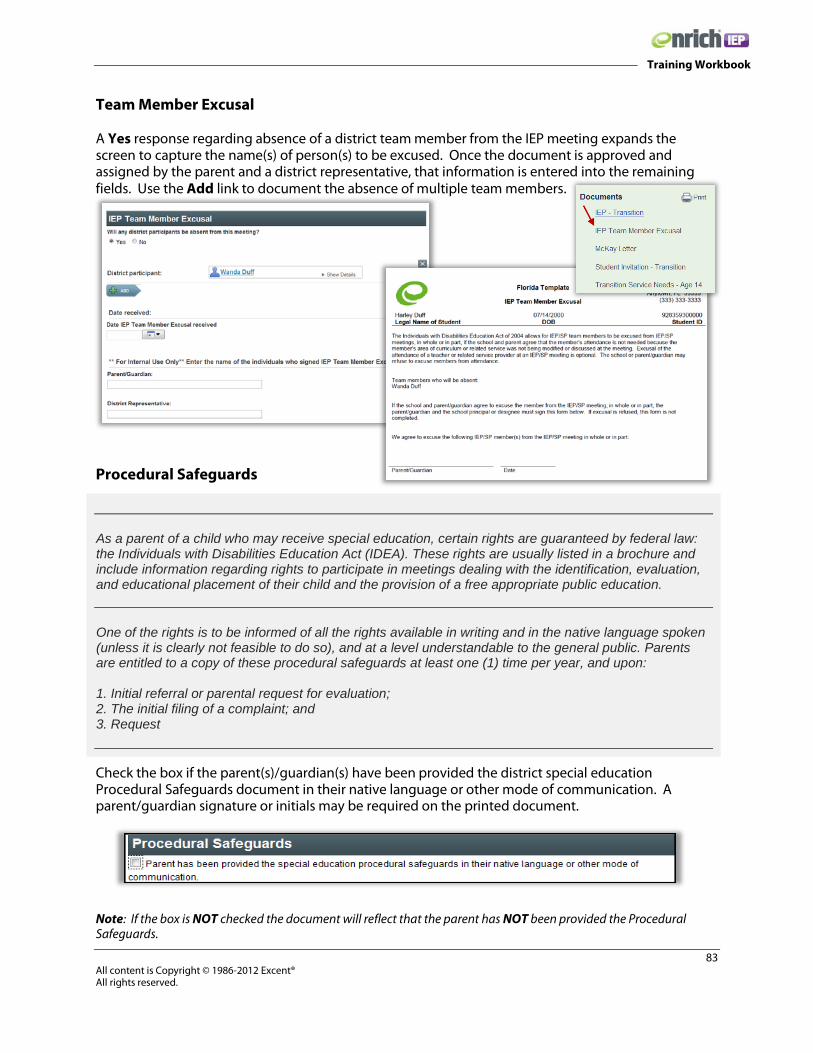
83 All content is Copyright © 1986-2012 Excent® All rights reserved.
Training Workbook
Team Member Excusal A Yes response regarding absence of a district team member from the IEP meeting expands the screen to capture the name(s) of person(s) to be excused. Once the document is approved and assigned by the parent and a district representative, that information is entered into the remaining fields. Use the Add link to document the absence of multiple team members.
Procedural Safeguards
Check the box if the parent(s)/guardian(s) have been provided the district special education Procedural Safeguards document in their native language or other mode of communication. A parent/guardian signature or initials may be required on the printed document.
Note: If the box is NOT checked the document will reflect that the parent has NOT been provided the Procedural Safeguards.
As a parent of a child who may receive special education, certain rights are guaranteed by federal law: the Individuals with Disabilities Education Act (IDEA). These rights are usually listed in a brochure and include information regarding rights to participate in meetings dealing with the identification, evaluation, and educational placement of their child and the provision of a free appropriate public education. One of the rights is to be informed of all the rights available in writing and in the native language spoken (unless it is clearly not feasible to do so), and at a level understandable to the general public. Parents are entitled to a copy of these procedural safeguards at least one (1) time per year, and upon: 1. Initial referral or parental request for evaluation; 2. The initial filing of a complaint; and 3. Request
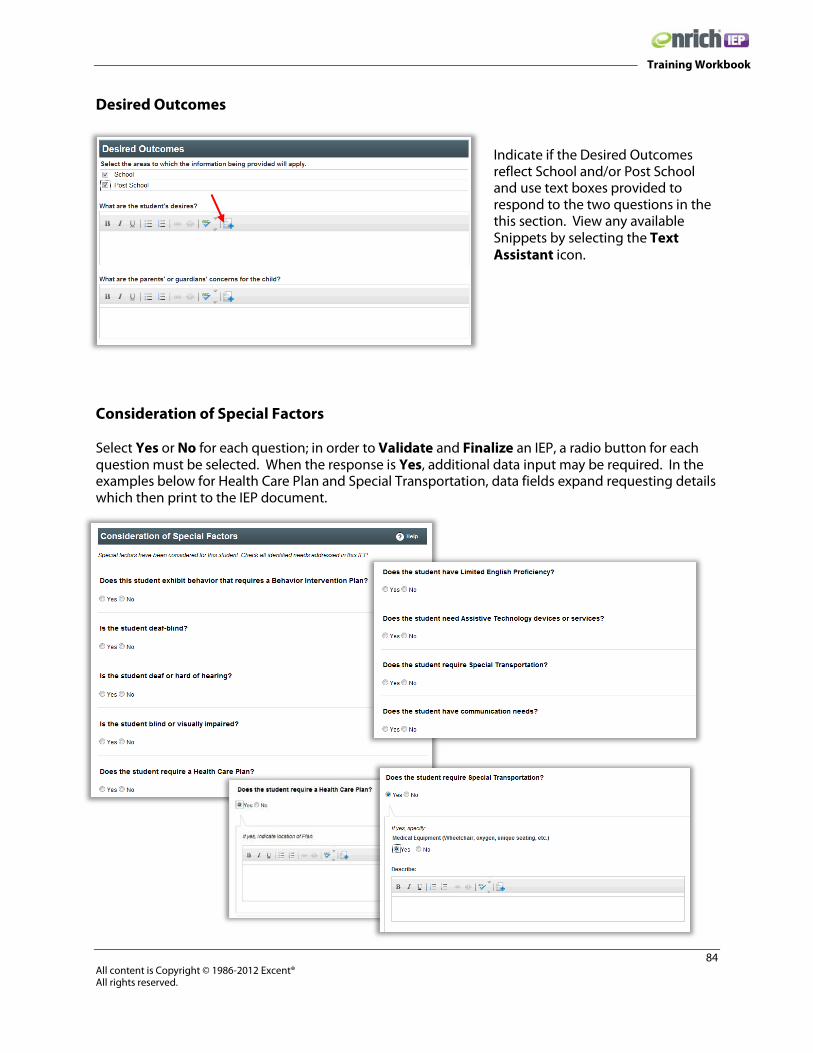
84 All content is Copyright © 1986-2012 Excent® All rights reserved.
Training Workbook
Desired Outcomes
Indicate if the Desired Outcomes reflect School and/or Post School and use text boxes provided to respond to the two questions in the this section. View any available Snippets by selecting the Text Assistant icon.
Consideration of Special Factors Select Yes or No for each question; in order to Validate and Finalize an IEP, a radio button for each question must be selected. When the response is Yes, additional data input may be required. In the examples below for Health Care Plan and Special Transportation, data fields expand requesting details which then print to the IEP document.

85 All content is Copyright © 1986-2012 Excent® All rights reserved.
Training Workbook
In some cases, the additional data gathered results in a separate document as in the case of the Behavior Intervention Plan.
Note: Questions related to Consideration of Special Factors may vary by district with additional options such as Adapted PE.
Extended School Year
A series of questions related to the student’s academic and social regression and recoupment allow the IEP team to determine if Extended School Year Services are recommended. Yes responses expand text boxes for rationale and justification.
If districts elect to use the To Be Determined option in the Decision drop-down, the user is prompted to indicate the date when the question of ESY will be revisited in order to make a decision.
Note: The option to indicate that goals and services will be addressed as a part of ESY will not appear unless Yes is the selected decision. More information is available in the next sections of this guide.
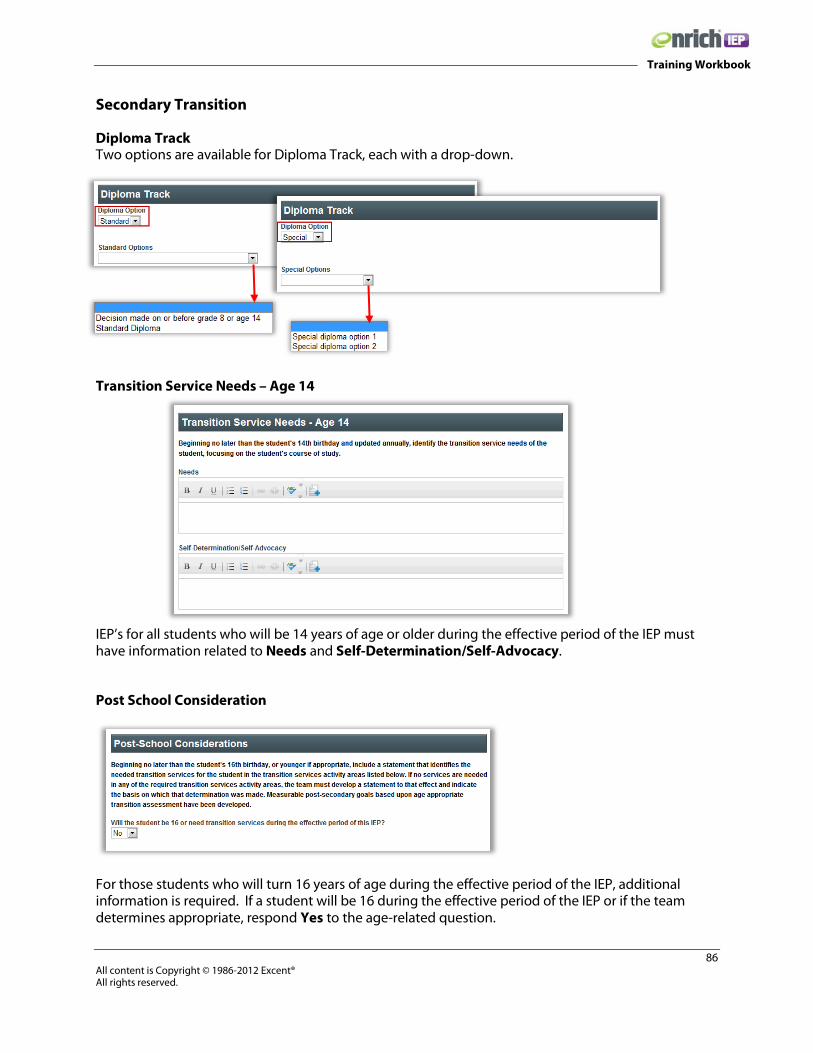
86 All content is Copyright © 1986-2012 Excent® All rights reserved.
Training Workbook
Secondary Transition
Diploma Track Two options are available for Diploma Track, each with a drop-down.
Transition Service Needs – Age 14 IEP’s for all students who will be 14 years of age or older during the effective period of the IEP must have information related to Needs and Self-Determination/Self-Advocacy.
Post School Consideration For those students who will turn 16 years of age during the effective period of the IEP, additional information is required. If a student will be 16 during the effective period of the IEP or if the team determines appropriate, respond Yes to the age-related question.

87 All content is Copyright © 1986-2012 Excent® All rights reserved.
Training Workbook
Complete all fields including those for Daily Living Skills and/or Functional Vocational Evaluation if appropriate.
Responsibilities/Linkages for Transition Services If there is a need for Agency participation, select Yes and complete additional fields; use the Add button if necessary to capture all information. Transfer of Rights at Age of Majority
If the student has been notified of his/her rights at age of majority, indicate with a Yes; the date of majority calculates on the print document.

88 All content is Copyright © 1986-2012 Excent® All rights reserved.
Training Workbook
Goal Areas
Depending upon a district’s choice of configuration settings, users will select from a list of five or eight goal areas or domains. Present Levels of Academic Achievement and Functional Performance are written at the domain level; the same series of questions are completed for each domain selected. In the case of a Transition IEP, users will also indicate with which transition service activities the Present Level information will be associated. Frequency of Progress Reporting to parents/guardian is selected from the drop-down. The option to report Quarterly is always available; however districts may add other frequencies through the configuration settings.

89 All content is Copyright © 1986-2012 Excent® All rights reserved.
Training Workbook
Once Present Levels are complete for a specific domain, begin the process of creating goals associated to each domain. Some districts may enable the feature allowing association of Secondary Domains to each goal without addressing the Present Levels questions. • Projected Achievement Date defaults to a year minus one day from the Meeting Date or the
effective period of the IEP, however this date can be edited using the date picker tool. • As noted in a previous section of this guide, the ESY Decision must be Yes in order to display the
option of addressing a goal during ESY. • Add text in the Goal memo box. Districts may configure Text Assistant snippets to aid in the
creation of measurable goals.
• Use the Add Objective button if objectives are needed for the goal; add appropriate text in the memo box, and use the tools provided to reorder or delete objectives.
• Check the providers who will
be responsible for assisting the student in meeting the goal. In some districts users have the option of adding titles to the list.
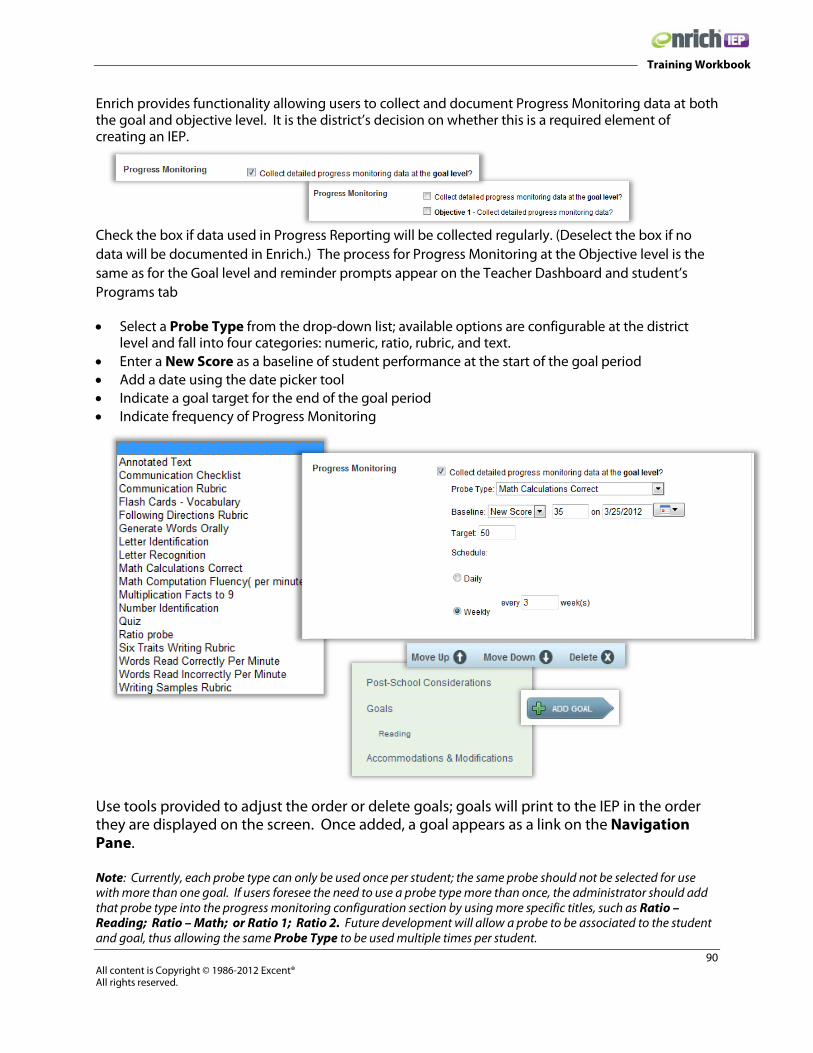
90 All content is Copyright © 1986-2012 Excent® All rights reserved.
Training Workbook
Enrich provides functionality allowing users to collect and document Progress Monitoring data at both the goal and objective level. It is the district’s decision on whether this is a required element of creating an IEP.
Check the box if data used in Progress Reporting will be collected regularly. (Deselect the box if no data will be documented in Enrich.) The process for Progress Monitoring at the Objective level is the same as for the Goal level and reminder prompts appear on the Teacher Dashboard and student’s Programs tab
• Select a Probe Type from the drop-down list; available options are configurable at the district level and fall into four categories: numeric, ratio, rubric, and text.
• Enter a New Score as a baseline of student performance at the start of the goal period • Add a date using the date picker tool • Indicate a goal target for the end of the goal period • Indicate frequency of Progress Monitoring
Use tools provided to adjust the order or delete goals; goals will print to the IEP in the order they are displayed on the screen. Once added, a goal appears as a link on the Navigation Pane. Note: Currently, each probe type can only be used once per student; the same probe should not be selected for use with more than one goal. If users foresee the need to use a probe type more than once, the administrator should add that probe type into the progress monitoring configuration section by using more specific titles, such as Ratio – Reading; Ratio – Math; or Ratio 1; Ratio 2. Future development will allow a probe to be associated to the student and goal, thus allowing the same Probe Type to be used multiple times per student.

91 All content is Copyright © 1986-2012 Excent® All rights reserved.
Training Workbook
Assessment Participation Assessment options display on the screen based on a student’s grade; only those tests appropriate for the student’s grade level(s) during the effective period of the IEP display. If Florida Alternate Assessment is selected, respond to the four standard qualification questions and indicate whether or not the parent has been informed.
Accommodations & Modifications The Accommodations and Modifications section of the IEP is tied closely to Assessment Participation. Districts obtain agreement from parents that certain accommodations used in the classroom setting may not be allowable on state and district standardized testing.
If no accommodations or modifications are deemed necessary by the team, place a check in the box provided.
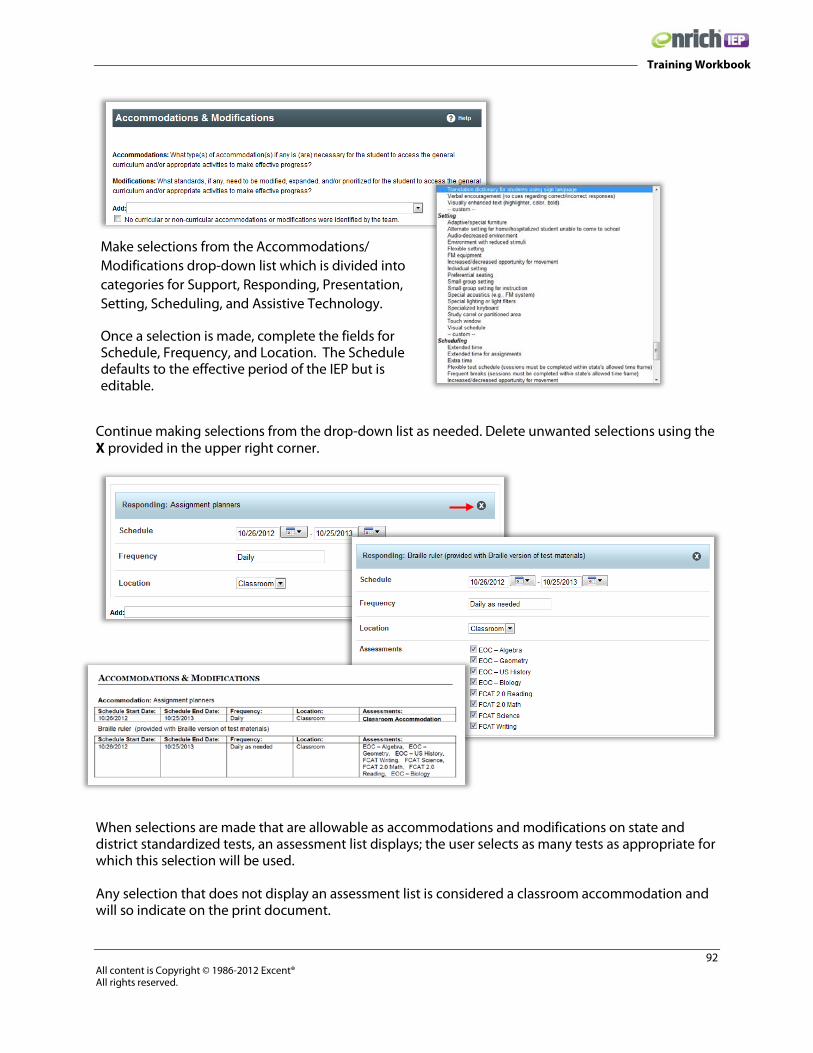
92 All content is Copyright © 1986-2012 Excent® All rights reserved.
Training Workbook
Continue making selections from the drop-down list as needed. Delete unwanted selections using the X provided in the upper right corner.
When selections are made that are allowable as accommodations and modifications on state and district standardized tests, an assessment list displays; the user selects as many tests as appropriate for which this selection will be used. Any selection that does not display an assessment list is considered a classroom accommodation and will so indicate on the print document.
Make selections from the Accommodations/ Modifications drop-down list which is divided into categories for Support, Responding, Presentation, Setting, Scheduling, and Assistive Technology.
Once a selection is made, complete the fields for Schedule, Frequency, and Location. The Schedule defaults to the effective period of the IEP but is editable.
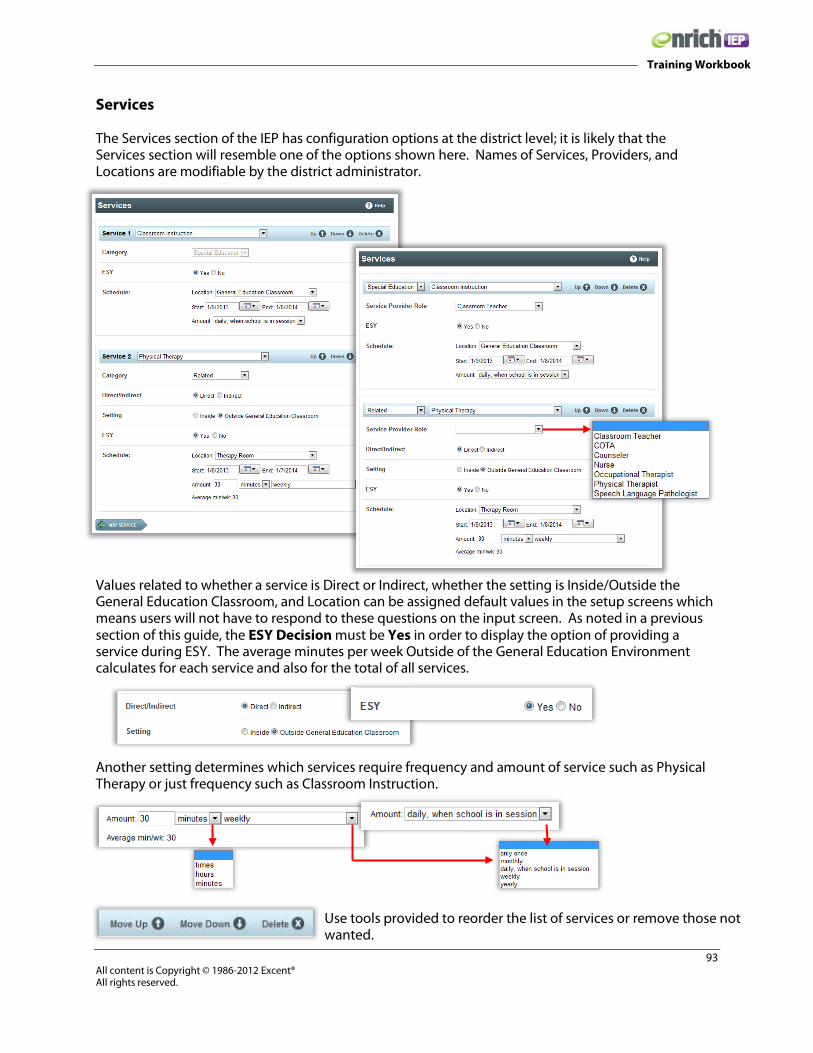
93 All content is Copyright © 1986-2012 Excent® All rights reserved.
Training Workbook
Services The Services section of the IEP has configuration options at the district level; it is likely that the Services section will resemble one of the options shown here. Names of Services, Providers, and Locations are modifiable by the district administrator. Values related to whether a service is Direct or Indirect, whether the setting is Inside/Outside the General Education Classroom, and Location can be assigned default values in the setup screens which means users will not have to respond to these questions on the input screen. As noted in a previous section of this guide, the ESY Decision must be Yes in order to display the option of providing a service during ESY. The average minutes per week Outside of the General Education Environment calculates for each service and also for the total of all services. Another setting determines which services require frequency and amount of service such as Physical Therapy or just frequency such as Classroom Instruction.
Use tools provided to reorder the list of services or remove those not wanted.

94 All content is Copyright © 1986-2012 Excent® All rights reserved.
Training Workbook
Least Restrictive Environment (LRE) Complete all fields related to Regular/Vocational Education using drop-down values where provided. Use the Add button as needed. Select a Placement Option based on the team’s decision. If an Early Childhood student will turn 6 during the effective period of the IEP being developed, two Placement Options are selected-one for ages 3-5 and another for 6-21. Complete the LRE section using the memo box provide to explain the extent that the student will not participate with nondisabled peers in both the general education classroom and in extracurricular, non-academic activities. Note: Currently, only one Placement selection may be selected unless the student will turn 6 during the IEP. Future product functionality will allow for the selection of additional Placement options to meet the needs of students transitioning from one campus or academic environment to another.

95 All content is Copyright © 1986-2012 Excent® All rights reserved.
Training Workbook
LRE Calculator Based on the Services selected, Enrich can automatically calculate the average time outside of general education, and display the Percent of time in general education setting. This calculation is based on Total instructional time per week for the student’s campus. It is possible to use the override link and enter a number other than the default. The Percent of time in general education setting is recalculated based on the new instructional minutes per week number. This information can be used to make the final Placement determination. In order to provide an accurate calculation, all services must be defined using both time and frequency. Because the state of Florida does not require that time be specified for all services, the LRE calculator is feature is disabled in most district configurations.
Student Participation If the student attended the IEP meeting, so indicate by selecting the Yes radio button, and a line becomes available on the document for him/her to sign.
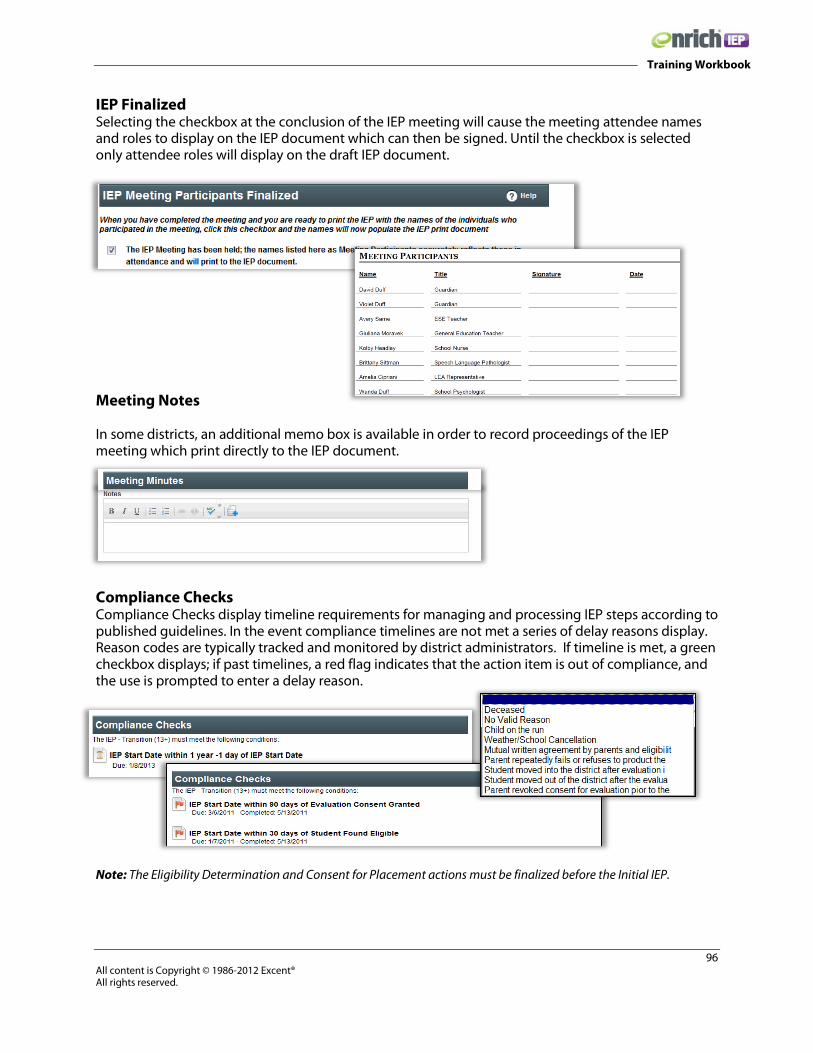
96 All content is Copyright © 1986-2012 Excent® All rights reserved.
Training Workbook
IEP Finalized Selecting the checkbox at the conclusion of the IEP meeting will cause the meeting attendee names and roles to display on the IEP document which can then be signed. Until the checkbox is selected only attendee roles will display on the draft IEP document.
Meeting Notes In some districts, an additional memo box is available in order to record proceedings of the IEP meeting which print directly to the IEP document.
Compliance Checks Compliance Checks display timeline requirements for managing and processing IEP steps according to published guidelines. In the event compliance timelines are not met a series of delay reasons display. Reason codes are typically tracked and monitored by district administrators. If timeline is met, a green checkbox displays; if past timelines, a red flag indicates that the action item is out of compliance, and the use is prompted to enter a delay reason.
Note: The Eligibility Determination and Consent for Placement actions must be finalized before the Initial IEP.

97 All content is Copyright © 1986-2012 Excent® All rights reserved.
Training Workbook
Area 5 - Consent for Placement Click the Pending Consent for Placement on the Programs tab or use the Add Action link if no pending action exists. If prompted, select a reason for the action and click Next. Enter all necessary data in the fields provided. The narrative questions act as Prior Written Notice to parents about the district’s decision related to Special Education placement and services.
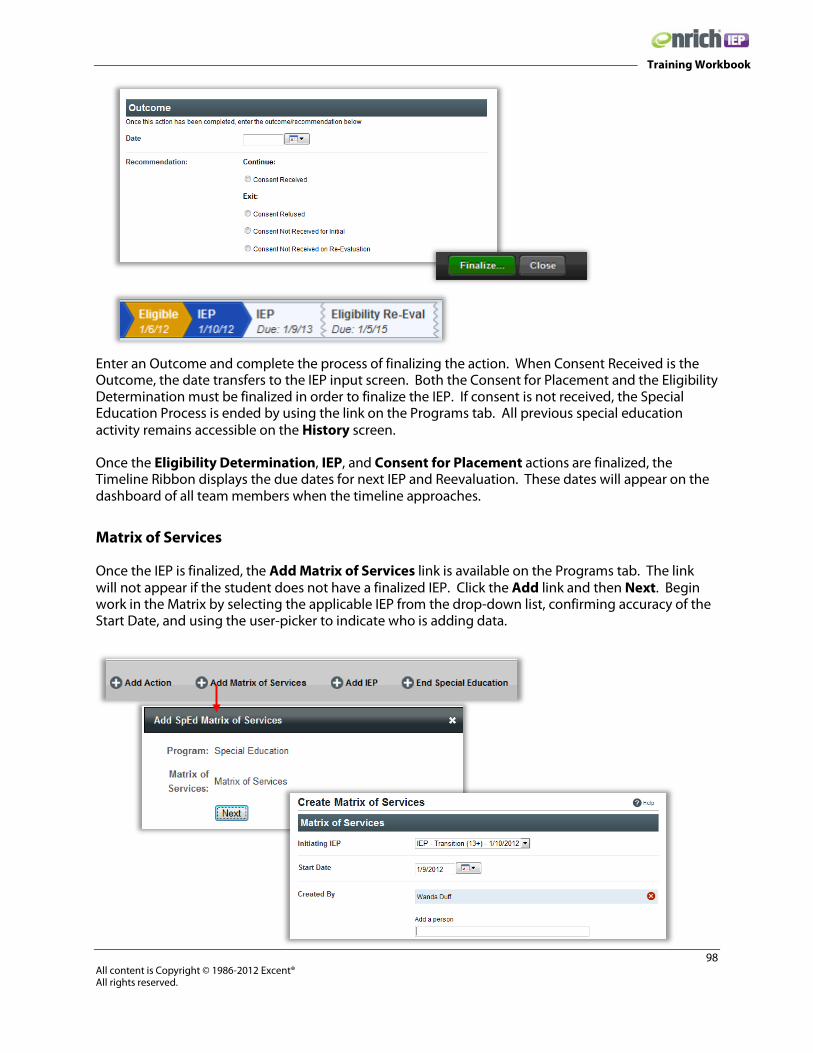
98 All content is Copyright © 1986-2012 Excent® All rights reserved.
Training Workbook
Enter an Outcome and complete the process of finalizing the action. When Consent Received is the Outcome, the date transfers to the IEP input screen. Both the Consent for Placement and the Eligibility Determination must be finalized in order to finalize the IEP. If consent is not received, the Special Education Process is ended by using the link on the Programs tab. All previous special education activity remains accessible on the History screen.
Once the Eligibility Determination, IEP, and Consent for Placement actions are finalized, the Timeline Ribbon displays the due dates for next IEP and Reevaluation. These dates will appear on the dashboard of all team members when the timeline approaches.
Matrix of Services
Once the IEP is finalized, the Add Matrix of Services link is available on the Programs tab. The link will not appear if the student does not have a finalized IEP. Click the Add link and then Next. Begin work in the Matrix by selecting the applicable IEP from the drop-down list, confirming accuracy of the Start Date, and using the user-picker to indicate who is adding data.

99 All content is Copyright © 1986-2012 Excent® All rights reserved.
Training Workbook
All domains default to a value of one; allowable domains populate automatically from the finalized IEP. Users select the Add Service button to make level of service selections; once the selections are saved, they display on the screen along with calculated Cost Factor. Once all service levels have been adjusted, Save the Matrix.

100 All content is Copyright © 1986-2012 Excent® All rights reserved.
Training Workbook
Review 8– IEP, Consent for Placement, Matrix of Services
1. Explain the process for populating the signature area to the IEP. 2. Why would there be no Matrix of Services link on a student’s Programs screen?
3. What two actions must be finalized prior to finalizing an Initial IEP?
4. True or False: It is possible to Progress Monitor at the objective level.
5. Explain the difference between Validate and Finalize.
6. Once actions are finalized, how can they be viewed?
7. Explain the purpose and functionality of Text Assistant.
8. If a Compliance Check indicates an action is past timeline, what additional information must be
entered?

101 All content is Copyright © 1986-2012 Excent® All rights reserved.
Training Workbook
Additional Processes
IEP Admin Review Some districts maintain a process of Administrative Edit before an IEP is finalized where the IEP is reviewed and approved by an administrator. If this feature is enabled, when an IEP is opened from the Programs tab the Administrative approval is pending message appears at the top of the screen. Users with appropriate permissions enter their names and click Approve once the IEP is reviewed. After approval, when a finalized IEP is viewed, the name of the person approving the IEP and the date appear at the top of the screen.
Note: If districts do not enable the Admin Review function none of the above screens display.
Amend an IEP The Amend IEP feature is only available after an IEP has been finalized. The Amend link displays at the top of the screen when a finalized IEP is viewed. This action is typically used when a Goal or Service is added or changed or other minor adjustments are made to an IEP that is currently in effect. An IEP Amendment does not change the timelines of the original IEP; it does generate a new PDF document; the original IEP is maintained. Amendment dates are documented at the top of the IEP screen.
The sections of the IEP that can be edited are determined by the district during configuration setup.
Note: It is possible for admin users with appropriate permissions to edit finalized plans and actions by clicking the Administrative Edit link. Changes will be recorded in the Audit Log.
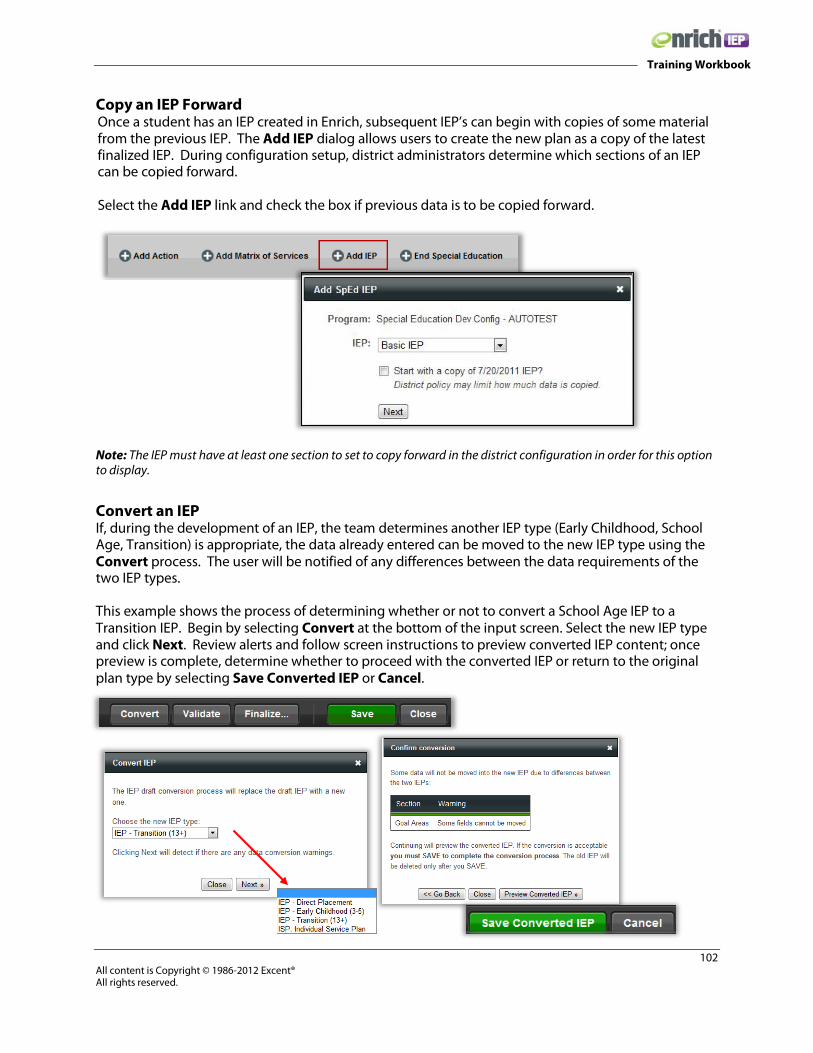
102 All content is Copyright © 1986-2012 Excent® All rights reserved.
Training Workbook
Copy an IEP Forward Once a student has an IEP created in Enrich, subsequent IEP’s can begin with copies of some material from the previous IEP. The Add IEP dialog allows users to create the new plan as a copy of the latest finalized IEP. During configuration setup, district administrators determine which sections of an IEP can be copied forward. Select the Add IEP link and check the box if previous data is to be copied forward.
Note: The IEP must have at least one section to set to copy forward in the district configuration in order for this option to display.
Convert an IEP If, during the development of an IEP, the team determines another IEP type (Early Childhood, School Age, Transition) is appropriate, the data already entered can be moved to the new IEP type using the Convert process. The user will be notified of any differences between the data requirements of the two IEP types. This example shows the process of determining whether or not to convert a School Age IEP to a Transition IEP. Begin by selecting Convert at the bottom of the input screen. Select the new IEP type and click Next. Review alerts and follow screen instructions to preview converted IEP content; once preview is complete, determine whether to proceed with the converted IEP or return to the original plan type by selecting Save Converted IEP or Cancel.
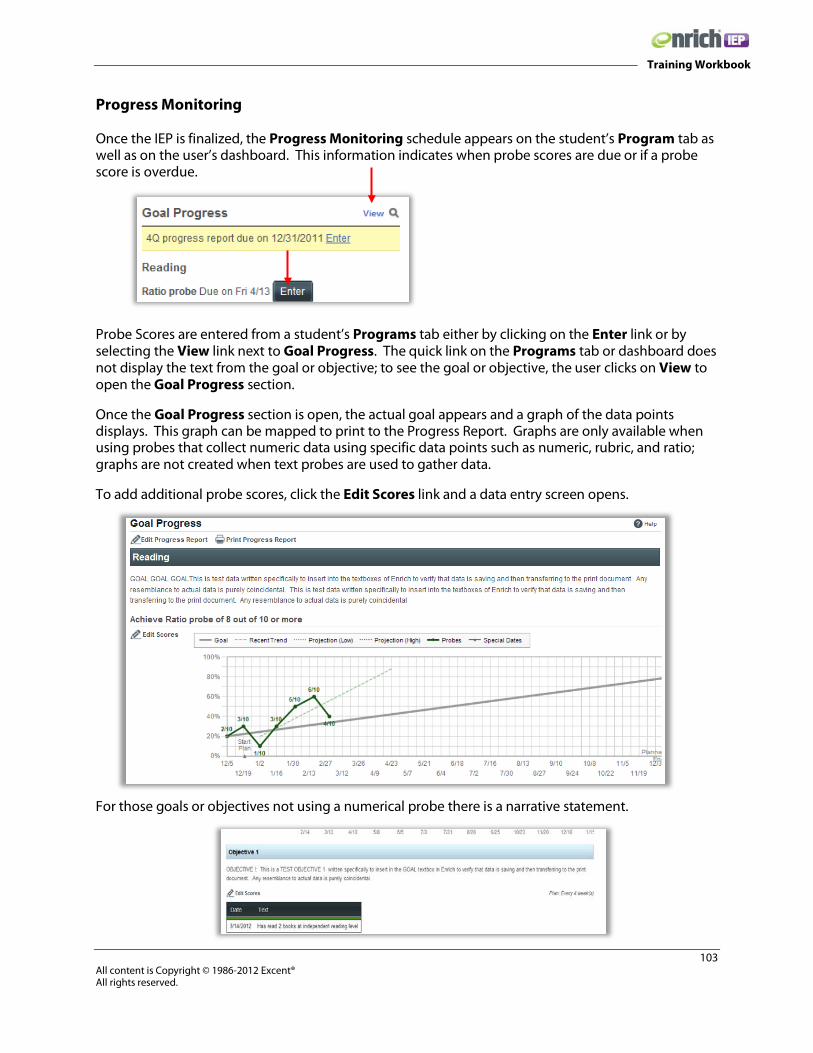
103 All content is Copyright © 1986-2012 Excent® All rights reserved.
Training Workbook
Progress Monitoring Once the IEP is finalized, the Progress Monitoring schedule appears on the student’s Program tab as well as on the user’s dashboard. This information indicates when probe scores are due or if a probe score is overdue.
Probe Scores are entered from a student’s Programs tab either by clicking on the Enter link or by selecting the View link next to Goal Progress. The quick link on the Programs tab or dashboard does not display the text from the goal or objective; to see the goal or objective, the user clicks on View to open the Goal Progress section.
Once the Goal Progress section is open, the actual goal appears and a graph of the data points displays. This graph can be mapped to print to the Progress Report. Graphs are only available when using probes that collect numeric data using specific data points such as numeric, rubric, and ratio; graphs are not created when text probes are used to gather data.
To add additional probe scores, click the Edit Scores link and a data entry screen opens.
For those goals or objectives not using a numerical probe there is a narrative statement.

104 All content is Copyright © 1986-2012 Excent® All rights reserved.
Training Workbook
To update Goal Progress select the Enter button and insert new information. Formats vary based upon Probe selection. Select the View link to preview and print Goal Progress Reports as well as edit probe scores.
Progress Reporting When preparing to enter information on the actual Progress Report, the user must open the Progress Report then click on Edit Progress Report.
Within the Progress Report, the goal (or objective) appears. Progress Reporting periods are established by the district and the options display when working in the IEP. If multiple options are created (i.e. quarterly or monthly) the user will select the option that most appropriately meets the needs of that particular student. Once the frequency of Progress Reporting is determined, that schedule will drive how frequently the Progress Report must be completed and sent to parents. The first progress reporting period defaults to the first scheduled reporting date after the IEP Start Date.
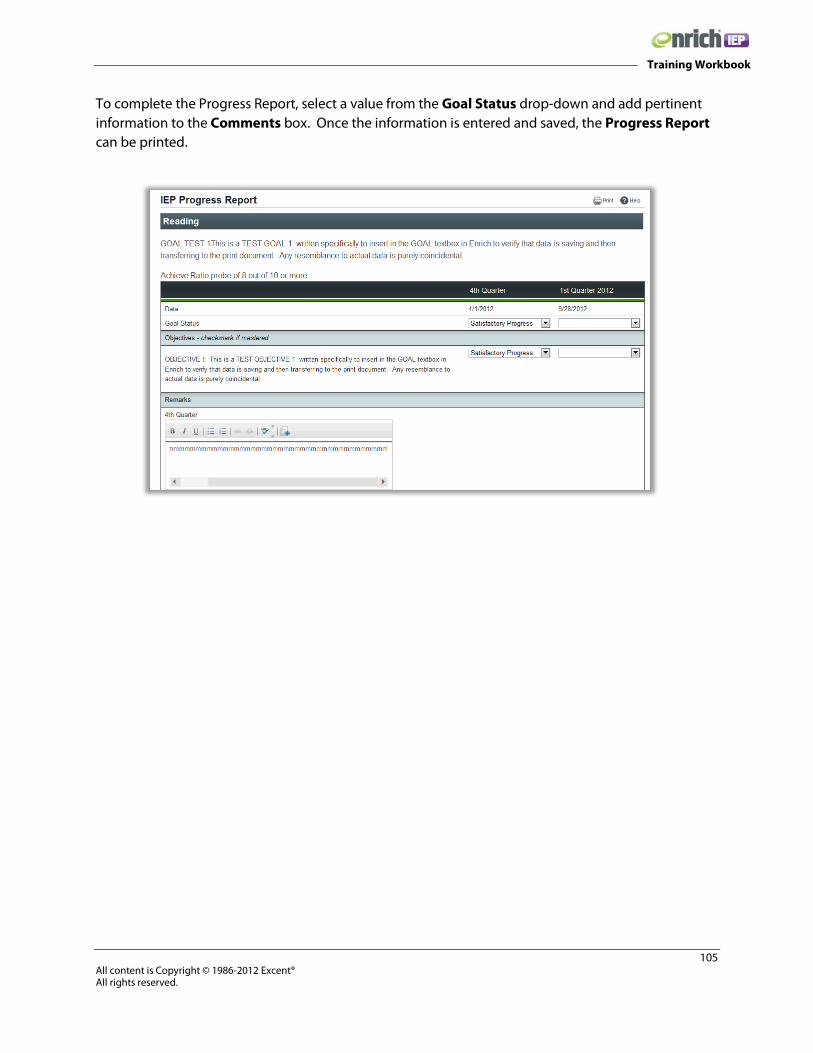
105 All content is Copyright © 1986-2012 Excent® All rights reserved.
Training Workbook
To complete the Progress Report, select a value from the Goal Status drop-down and add pertinent information to the Comments box. Once the information is entered and saved, the Progress Report can be printed.

Appendices
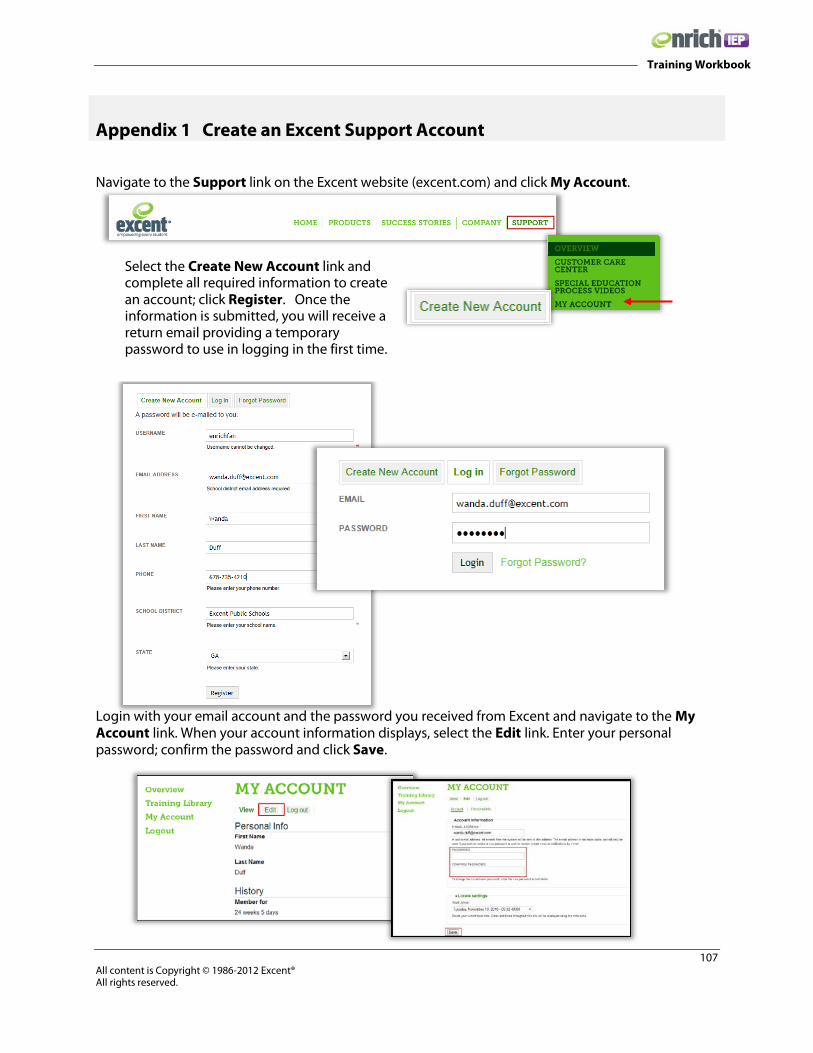
107 All content is Copyright © 1986-2012 Excent® All rights reserved.
Training Workbook
Appendix 1 Create an Excent Support Account Navigate to the Support link on the Excent website (excent.com) and click My Account.
Login with your email account and the password you received from Excent and navigate to the My Account link. When your account information displays, select the Edit link. Enter your personal password; confirm the password and click Save.
Select the Create New Account link and complete all required information to create an account; click Register. Once the information is submitted, you will receive a return email providing a temporary password to use in logging in the first time.

108 All content is Copyright © 1986-2012 Excent® All rights reserved.
Training Workbook
Once this process is complete, you will always use your personal email and password to access the support site. If you are the only user on your computer, it will often remember your login and password and when you access the website, you may find your account is already available. In the near future, the Videos and Training link will provide access to Enrich training clips; print resources are accessed using the Documentation/User Help link. Log in often to view newly posted material.

109 All content is Copyright © 1986-2012 Excent® All rights reserved.
Training Workbook
Appendix 2 Copying and Pasting from MS Word Narrative data and spreadsheet charts can be copied into Enrich fields and will then print to documents; images, however will not copy to text fields correctly and may cause errors in the program when trying to print. Copying and pasting text from a Word document can be done using the right mouse button or using keyboard shortcuts. The first step in using either process is to highlight the desired text by clicking at the beginning of the section to be copied with the left mouse button and while holding the button down, dragging through the text to the end of selection. When the mouse button is released, the area is highlighted. • Right Mouse Button
o Click the right mouse button anywhere in the highlighted section and select o Copy from the menu list that appears. o The highlighted text has been copied to the Word clipboard. o Click the left mouse button where the new text should appear. o Click the right mouse button and select Paste from the menu list that appears. o All copied text is now in the new location and can be edited as desired.
• Keyboard Shortcuts
o Once text is highlighted, hold down the Control key on the keyboard and press letter C (Ctrl+C); this transfers the selected text to the Word clipboard.
o Click the left mouse button where the new text should appear. o Hold down the Control key on the keyboard and press V (Ctrl+V); this copies
the selected text to the new location. o All copied text is now in the new location and can be edited as desired.