Work Package 3 Deliverable (D3.1) - establish-fp7.eu · Work Package 3 Deliverable (D3 ... This...
194
Project No.: 244749 Project Acronym: ESTABLISH Project Title: European Science and Technology in Action: Building Links with Industry, Schools and Home WP2| D2.1 Work Package 3 Deliverable (D3.1) Piloted, culturally adapted, teaching and learning IBSE units - Part I Deliverable No.: D3.1 Due date of deliverable: December 2010 Actual submission date: 30/06/2011 Start date of project: 01/01/2010 Duration: 48 months Name of Coordinator: Dr. Eilish McLoughlin Name of lead partner for this deliverable: C.M.A. Dissemination Level: Public Thematic Priority: Science in Society Funding Scheme: Coordination and Support Actions
Transcript of Work Package 3 Deliverable (D3.1) - establish-fp7.eu · Work Package 3 Deliverable (D3 ... This...

Project No.: 244749
Project Acronym: ESTABLISH
Project Title: European Science and Technology in Action: Building Links
with Industry, Schools and Home
WP
2|
D2
.1
Work Package 3 Deliverable (D3.1)
Piloted, culturally adapted, teaching and learning IBSE
units - Part I
Deliverable No.: D3.1
Due date of deliverable: December 2010
Actual submission date: 30/06/2011
Start date of project: 01/01/2010 Duration: 48 months
Name of Coordinator: Dr. Eilish McLoughlin
Name of lead partner for this deliverable: C.M.A.
Dissemination Level: Public
Thematic Priority: Science in Society
Funding Scheme: Coordination and Support Actions

Project No: 244749 ESTABLISH Science in Society / CSA
Page iii of v
WP3 Deliverable 3.1
A. Background to this report
This report is a deliverable of Work Package 3 (WP3) of the European FP7-funded project
“European Science and Technology in Action: Building Links with Industry, Schools and Home”
(ESTABLISH; 244749, 2010-2013). It meets the requirements of the Deliverable 3.1 by presenting
the piloted, culturally adapted, teaching and learning IBSE units - Part I as developed by the
beneficiaries of ESTABLISH. (See Table 1 below for beneficiary list).
This document, published in June 2011, has been produced within the scope of the ESTABLISH
Project. The utilisation and release of this document is subject to the conditions of the contract
within the Seventh
Framework Programme, project reference FP7-SIS-2009-1-244749.
For further information regarding ESTABLISH please contact:
Dr. Sarah Brady (ESTABLISH project manager)
Email: [email protected]
ESTABLISH website: http://www.establish-fp7.eu

Project No: 244749 ESTABLISH Science in Society / CSA
Page iv of v
WP3 Deliverable 3.1.
B. The ESTABLISH consortium
Beneficiary
short name Beneficiary name Country Abbreviation
DCU DUBLIN CITY UNIVERSITY Ireland IE
AGES AG EDUCATION SERVICES Ireland IE
UCY UNIVERSITY OF CYPRUS Cyprus CY
UmU UMEA UNIVERSITET Sweden SE
JU UNIWERSYTET JAGIELLONSKI Poland PL
CUNI UNIVERZITA KARLOVA V
PRAZE Czech Republic CZ
AL ACROSSLIMITS LIMITED Malta MT
UPJS UNIVERZITA PAVLA JOZEFA
ŠAFÁRIKA V KOŠICIACH Slovakia SK
COUO CARL VON OSSIETZKY
UNIVERSITAET OLDENBURG Germany DE
UTARTU TARTU ULIKOOL Estonia EE
UNIPA UNIVERSITA DEGLI STUDI DI
PALERMO Italy IT
MaH MALMÖ UNIVERSITY Sweden SE
IPN
LEIBNIZ-INSTITUT FUER DIE
PAEDAGOGIK DER
NATURWISSENSCHAFTEN UND
MATHEMATIK AN DER
UNIVERSITAT KIEL
Germany DE
CMA
CENTRE FOR
MICROCOMPUTER
APPLICATIONS
Netherlands NL
MLU
MARTIN LUTHER
UNIVERSITAET HALLE-
WITTENBERG
Germany DE
Project No: 244749 ESTABLISH Science in Society / CSA
Page v of v
WP3 Deliverable 3.1
Table of Contents
ESTABLISH Unit Sound Teacher Information
ESTABLISH Unit Sound Classroom Materials
ESTABLISH Unit Disability Teacher Information
ESTABLISH Unit Disability Classroom Materials
ESTABLISH Unit Exploring Holes Teacher Information
ESTABLISH Unit Exploring Holes Classroom Materials

Lead partner for Unit: C.M.A.
European Science and Technology in Action Building Links with Industry, Schools and Home
Work Package 3
UNIT SOUND Teacher Information
The ESTABLISH project has received funding form the European Community‟s Seventh Programme [FP7/2007-2013] under grant agreement n
o 244749
Start Date: 1st January 2010 Duration: 48 months
WP
3
Un
it S
OU
ND

SOUND TEACHER INFORMATION
Page 2 of 35
ESTABLISH
A. Teacher Information
I. Unit description
The unit Sound is divided into 3 subunits, which can be used independently or sequentially. Each subunit can take different directions and emphasis depending on the curriculum and particular learning aims of the teacher. The subunits 1 and 2 can also be used in a spiral type curriculum with subunit 1 focussed at an introductory level and subunit 2 at the higher stages of secondary school level. The subunit 3 offers an extension for higher secondary school level and introduces students to the fascinating area of human speech. The Sound unit is enriched with many ICT activities in which a sound sensor, an interface and software are used to record sound and to analyse the resulting sound waveforms. Subunit 1: Exploring sound
In this subunit students study the basics of physics of sound. They learn that sound is caused by vibrations, and they explore how sound travels. They learn about the relationship of loudness and pitch to the amplitude and frequency of vibrations. They investigate the sounds of the human vocal cords. They also learn about the anatomy and functioning of the human ear and sound protection. Student level: Lower secondary school level, students of age 11-15 Discipline involved: Physics Estimated duration: 5-6 class periods Subunit 2: String instruments and wind instruments
This subunit starts with an experiment of resonance in a model of a swing. Students can feel that a minor influence can give a great effect. Further on, students perform experiments with strings, including double bass, guitar and the Melde‟s experiment on standing waves. After experiments involving sound in air columns follow. At the end of this subunit, some open inquiries are described that students can choose from. The knowledge build in activities 1 to 7 is a good basis to start to work on each of the activities 9 – 11. Student level: Higher secondary school level, students of age 15-17 Discipline involved: Physics Estimated duration: 5-7 class periods and 2 class periods of independent working time
Subunit 3: Human speech In this subunit students study the principles of human speech, speech analysis and synthesis. They learn fundamentals of human speech production, they record different sound signals and learn how to read and interpret a time signal and a spectrogram. They study how the human speech can be artificially produced. Student level: Higher secondary school level, students of age 16-19. Discipline involved: Biophysics (Physics, Biology). Estimated duration: 3 class periods
SOUND TEACHER INFORMATION
Page 3 of 35
ESTABLISH
II. IBSE character
Subunit 1
To introduce a new subject like sound, the teacher should address the student‟s curiosity with questions involving both known, or seemingly known, concepts and unexpected holes in their understanding. This approach is therefore a form of the inquiry-based method of „teaching by questioning‟. The main problem here for most teachers is the delicate balance between not saying too much and not answering too soon while at the same time keeping track of time and not letting the students go astray into unrealistic and unprofitable directions. Having said that, it should be emphasized that not every scientifically unacceptable scenario or solution is necessarily unprofitable. A proposed explanation may at the one hand be incorrect but may at the other hand contain nice elements of scientific thinking and motivation to solve the problem. Being introductory at an elementary level, the main IBSE approaches employed here are reflective discourse, interactive demonstration, guided discovery and guided inquiry. Through the activities in this subunit students develop basic abilities to do and understand scientific inquiry.
Asking and answering questions.
Planning and conducting simple investigations.
Employing tools to gather data.
Using data to construct reasonable explanations.
Communicating investigations and explanations.
Understanding that scientists use different kinds of investigations and tools to develop explanations using evidence and knowledge.
Some activities are ICT activities in which a computer with sound sensor is used to record sound waveforms. Subunit 2
The context of a guitar or other string instrument will trigger the student to do their own investigations. What knowledge is required to build a guitar? Which physical laws are there to keep in mind when building a guitar? To get to know this, students analyse the playing of a double bass and the frets on a guitar. The knowledge gathered in these activities is applied to the new context of air columns in wind instruments. The main IBSE approach in this subunit are guided discovery and open inquiry. Inquiry based skills developed in this unit are amongst others:
Performing experiments.
Analyzing results obtained with experiments (or presented by the teacher).
Communicating results with the use of graphs.
Using results from one experiment (double bass) to analyze the results of another experiment (frets of a guitar).
Using knowledge from one field of acoustics (strings) in another field of acoustics (air columns).
In some activities the computer is used to record sound and to analyse the data. Subunit 3 The speech analysis and speech synthesis activities in this subunit are open inquiry assignments. In this activities students have to formulate their own research questions. This type of assignment is generally considered to be the highest level of inquiry-based learning. In these activities student develop many fundamental skills of inquiry-based science education like diagnosing problems, critiquing experiments, planning
SOUND TEACHER INFORMATION
Page 4 of 35
ESTABLISH
investigations, searching for information, constructing models, debating with peers, forming coherent arguments. Afterwards, students should express their understanding in a discussion with their peer students and the teacher, and or share their reports with another group for peer reviewing. In this way, they confront and share their preliminary (group) conclusions with others and come to final conclusions and explanations they construed themselves. It is expected that students gain a deeper understanding of the phenomena in this approach and will probably remember the “new” knowledge longer through the process of internalization.
III. Science Content Knowledge
Subunit 1.
In this subunit, students are not supposed to have any (formal) prior knowledge of the subject but some understanding of the concepts from their everyday life. The activities in this subunit introduce students to the following concepts and ideas:
Sounds are produced by vibrating objects and vibrating columns of air.
Pitch and loudness are two characteristics of sound.
Changing the way an object vibrates can change the pitch or volume of the sound produced
Pitch is determined by the frequency and loudness by the amplitude of vibrations.
Sound is produced by human vocal folds as air moves through the tightened folds.
Sound requires a medium (for example, air, glass, metal, wood) to travel through.
Speed of sound is less than the speed of light.
The human ear has a membrane that vibrates when sound reaches it; the ear and the brain translate these vibrations into sensation of sound. Exposure to very loud sounds can cause damage to hearing.
Subunit 2 As pre-requisite knowledge, students are supposed to be familiar with the concepts: wavelength, amplitude, frequency, period, sine function. Of course these concepts should be repeated in this subunit but a basic understanding is required to build new knowledge. The activities in this subunit introduce the students to the following concepts and ideas:
Resonance
Fundamental frequency
Harmonics
Standing waves
Relation between the frequency and length of string/air column
Timbre. As a source for the teacher, the available physics courses should be appropriate. There are also numerous books that describe the relation between physics and music. A recommended source, focusing on the physics of musical instruments is the book “Measured tones, the interplay of physics and music” by Ian Johnston (ISBN-10: 0750307625 ISBN-13: 978-0750307628).
SOUND TEACHER INFORMATION
Page 5 of 35
ESTABLISH
Subunit 3
The activities in this subunit introduce students to the human speech production mechanism, human speech analysis and synthesis. The content is both about biology and physics. For biology students learn about the human vocal system and how the human speech is produced. In physics they create a model to describe how the human speech is produced, they analyse the human sounds and learn how human sounds can be created artificially.
As pre-requisite knowledge, students are supposed to know the concepts frequency, amplitude, standing waves, resonance, fundamental frequency and harmonics, and should be able to handle those both qualitatively and quantitatively. Since this unit goes beyond a traditional school curriculum a model of human speech production is given as reading text for students in the Worksheet: Model of human speech production. The text is based on an article of Johan Sundberg “The acoustics of the singing voice”, Sci. Am. 236, 82 (March 1977). Some useful resources; 1. Johan Sundberg “The acoustics of the singing voice”, Sci. Am. 236, 82 (March 1977)
(see http://www.zainea.com/voices.htm)
2. Timothy Moran, “Application of sound spectrum analysis”, Phys. Teach. 45, 94 (2007)
3. Klaus Fellbaum, Jorg Richer, „Human speech production based on a linear predictive vocoder”, ESCA/Socrate workshop on Method and Tool Innovations for Speech Science Education (1999), see http://www2.spsc.tugraz.at/add_material/courses/scl/vocoder/.
The Java simulation „Model of the Human Speech Production‟ allowing sound analysis and
synthesis is available at:
http://www2.spsc.tugraz.at/add_material/courses/scl/vocoder/simulation.html
IV. Pedagogical Content Knowledge General common students‟ difficulties identified by Science Education Research around Sound are:
Sounds can be produced without using any material objects.
Hitting an object harder changes the pitch of the sound produced.
Loudness and pitch of sounds are the same things.
The pitch of a tuning fork will change as it "slows down", (i.e. "runs" out of energy)
Frequency is connected to loudness for all amplitudes.
Human voice sounds are produced by a large number of vocal cords that all produce different sounds.
Sounds can travel through empty space (a vacuum).
Sounds cannot travel through liquids and solids.
Sound moves faster in air than in solids (air is "thinner" and forms less of a barrier).
Sound moves between particles of matter (in empty space) rather than matter.
You can see and hear a distinct event at the same moment.
Music is strictly an art form; it has nothing to do with science.
In wind instruments, the instrument itself vibrates (not the internal air column).
Sound waves are transverse waves (like water and light waves).
Waves transport matter.

SOUND TEACHER INFORMATION
Page 6 of 35
ESTABLISH
Waves do not have energy.
All waves travel the same way.
Big waves travel faster than small waves in the same medium.
When waves interact with a solid surface, the waves are destroyed.
Ultrasounds are extremely loud sounds.
Noise pollution is annoying, but it is essentially harmless.
Sounds made by vehicles (like the whistle of a train) change as the vehicles move past the listener because something (like the train engineer) purposely changes the pitch of the sound.
In actual telephones, sounds (rather than electrical impulses) are carried through the wires.
Students have to apply their knowledge in new situations and this might reveal misconceptions. The teacher should be aware of this, with asking questions to the student the teacher can make the student reflect on their pre-knowledge. By giving answers or presenting data the students can work with, the character of the activity can become more closed. For example, without the graph or the demo on YouTube, the activity about harmonics in the subunit 2 is bounded inquiry. The question asked is „in what ways might a string vibrate?’ and the students have to find their own way to answer this question. If students have enough prior knowledge and endurance, they are able to come up with the preferred answers. If not, the teacher has to decide how much he wants to help them (by doing a demo, presenting the graph or showing the YouTube movie). An unpredictable variety of alternative or even misconceptions in the understanding of the content of the Human speech subunit is to be anticipated, as speech is such an everyday phenomenon that probably everyone has created his own model or mental picture of it. Special attention has to be devoted to common frequently felt obscurities like:
How can it be that the same vowel pronounced by different persons may sound completely different, yet one is able to recognise the vowel as such immediately?
What are formants and in what way do they differ by age and gender?
Is the recorded spectral sound-pattern reproducible and recognizable?
It is here that the IBSE approach comes into play to provide a more tangible picture of the phenomenon of speech to the students. One may expect that the understanding achieved by own discoveries is less superficial and more concrete, as it is more linked to reality.
V. Industrial Content Knowledge
Subunit 1
To start illustrating the relevance of sound to industry at this introductory stage, finding and mentioning professions (rather than the industries themselves) may be more effective. With sound the industrial applications are clear almost immediately f.i. through professions like musician, sound technician (TV broadcast), sound mixer (concert), audiometrist (selling hearing aids), audiologist (making audiograms), acoustic engineer, speech-trainer. For example an audiologist can be invited to visit the class during activities about sound hearing and sound protection to answer questions prepared by students. To engage students in technological design they could design and build their own simple models of the human eardrum or vocal cords.

SOUND TEACHER INFORMATION
Page 7 of 35
ESTABLISH
Subunit 2 There is a lot of physics involved in designing and producing musical instruments. For an existing instrument, one can make adjustments to change the sound of it. There are differences between guitars and students can do research on which instrument sounds better. How is better defined, can you do scientific measurements to find out which instrument is better? How well tuned is a guitar, what are the right positions for the frets on the fret board? What is meant with the timbre of an instrument? The basic knowledge to start answering these questions is implemented in the activities. In an open inquiry students will be able to answer (some of) the above questions. Examples of industry links for activities in this subunit are: 2.1. Resonance – constructions of buildings or bridges; 2.2. Fundamental frequency; double bass – designing musical instruments;
2.3. Fundamental frequency; guitar – designing musical instruments;
2.4. Melde‟s experiment – constructions of buildings or bridges;. 2.7. Standing waves in air, soprano saxofone – differences and similarieties of wind
instruments: clarinet, saxofone and oboe. Subunit 3
The first speech recognizer appeared in 1952 and consisted of a device for the recognition of single spoken digits. There are many domains for the commercial application of speech recognition for example:
Health care – for converting voice-recorded reports as dictated by physicians and/or other healthcare professionals, into text format; medical analysis of voice problems.
Military - speech recognizers have been operated successfully in fighter aircraft, with applications including: setting radio frequencies, commanding an autopilot system, setting steer-point coordinates and weapons release parameters, and controlling flight displays.
Telephony - speech recognition is used mostly as a part of the user interface, for creating pre-defined or custom speech commands.
Scientists have attempted to simulate human speech since the late 1700s, when Wolfgang von Kempelen built a “speaking machine”. By the 1970s digital computing enabled the first generation of modern teach-to-speech systems with fairly wide use. Speech synthesis is now an assistive technology tool which use is significant and widespread. The use of it includes delivery of up-to-the-minute news, reading machines for handicapped, automotive voice controls and retrieving email over the phone – or any systems where the vocabulary is large, the content changes frequently or unpredictable, and a visual display isn‟t practical. Speech synthesis techniques are also used in entertainment productions such as games and animations.
VI. Learning paths The topic of sound as outlined in this unit is made up of a series of subunits with a series of activities. Each subunit can take different directions and emphasis depending on the curriculum and particular learning aims of the teacher. The activities could be formulated in various different combinations to achieve the overall learning outcomes envisioned for the subunit. However in this section we outline one possibility of the order and flow of the activities.

SOUND TEACHER INFORMATION
Page 8 of 35
ESTABLISH
Subunit 1
This subunit consists of 9 activities. The exemplary sequence of activities, in which all activities are used, is given in the table below sequence.
Activity Inquiry Type E-emphasis
1.1. Introduction to sound Interactive discussion Engagement
1.2. How sounds are made? Guided inquiry Engagement/Exploration/ Explanation//Elaborate
1.3. Make sound visible Guided inquiry Exploration/Explanation /Elaborate
1.4. Analysis of voice sounds Guided discovery Engagement/Exploration /Explanation
1.5. How sound travels? Interactive demonstration/ Bounded inquiry
Engagement/Exploration /Explanation/Elaborate
1.6. How fast sound travel? Guided discovery Engagement/Exploration/ Explanation//Elaborate
1.7. Hearing sound Guided inquiry Explanation/Evaluate
1.8. How loud is too loud? Guided inquiry Explanation/Evaluate
1.9. What have you learned about sound
Interactive discussion Elaborate/Evaluate
Subunit 2 In the table below, the activities are stated in the advised order. The activities 1-7 are mandatory and required to build the knowledge on sound. The activities 8, 9 and 10 are meant to test and evaluate the knowledge built in this subunit. These activities can be done independent from each another. Students can choose one or two activities and for instance present these to the rest of the class.
Activity Inquiry Type E-emphasis
2.1. Resonance Guided discovery Engagement
2.2. Fundamental frequency, double bass
Guided discovery Exploration
2.3. Fundamental frequency, guitar
Guided inquiry Explanation
2.4. Melde‟s experiment Interactive demonstration Extend/Exploration
2.5. Harmonics of the guitar Bounded inquiry Exploration/Evaluate

SOUND TEACHER INFORMATION
Page 9 of 35
ESTABLISH
2.6. Standing waves in air; air column
Bounded inquiry Evaluate
2.7. Standing waves in air; soprano saxophone
Guided inquiry -> Open inquiry
Elaborate
2.8. Timbre Open inquiry Elaborate/Evaluate
2.9. Beats Open inquiry Elaborate/Evaluate
2.10.Tuning the guitar Bounded inquiry Elaborate/Evaluate
Subunit 3
This subunit consists of 5 activities. The following sequence of activities is recommended. Activities 4 and 5 are similar open-inquiry assignments. Half of the class could perform Activity 4 and half Activity 5.
Activity Inquiry Type E-emphasis
3.1. Sound graphs Guided inquiry Engagement
3.2. Model of human speech production
Interactive discussion Exploration/Explanation
3.3. Sound signal analysis Guided inquiry Exploration/Explanation
3.4. Human speech analysis Open inquiry Extend/Elaborate
3.5. Human speech synthesis Open inquiry Extend/Elaborate
VII. Assessment Subunit 1
Preferable, the students‟ assessment includes both a theoretical test (understanding basic concepts, understanding of sound waveforms) as a practical assignment.
Subunit 2
The assessment might include both a theoretical test and a presentation about an experiment or literature research. These presentations can differ for the (groups of) students.
Subunit 3
Preferably, the student‟s assessment includes both a theoretical test and a practical assignment. The theory of speech analysis may be tested as part of a school exam on waves and oscillations. Students can write a report on the findings of their practical assignment (open inquiry activity) and present their results to the rest of the class. In addition, they share the data acquisition/analysis part in digital form.

SOUND TEACHER INFORMATION
Page 10 of 35
ESTABLISH
VIII. Student learning activities Subunit 1 – EXPLORING SOUND
Activity 1.1. Introduction to sound
Learning aims:
Developing a concept map to realize the richness of sound as well in terms of physics as well in terms of everyday life
Triggering student‟s‟ interest and curiosity about sound
Materials:
Laptop/data projector, or Overhead projector/acetate, or Whiteboard/marker
Suggestions for use:
Let students shut their eyes and be still and silent for 3 minutes. Tell them to concentrate on what they hear. Have students open their eyes and list the sounds they heard.
Then, together with the students, develop a concept map to ascertain student‟s prior knowledge and to gain information regarding preconceptions students may have in relation to the topic of sound.
While doing this allow students to collectively give their opinions on what they know about sound, each time writing up the ideas onto the concept map. Try to group similar terms or ideas together so that by the end of the class discussion you have a concept map with a structure, which will relate to the series of lessons that you will teach on this topic. Allow students, as a group, to tell you all they know about sound. There may be some idea‟s missing from your concept map that you intend to cover in the lessons, or ideas that you feel students may have just forgotten about. Ask probing and guiding questions to get students to think about and come up with the ideas that relate to content but are missing in the concept map.
Possible questions:
What do you know about sound?
What makes a sound loud/soft?
What was the loudest sound ever heard?
What makes a sound pleasant/unpleasant?
What makes a sound high/low?
How do you think sound travels?
How do we hear sounds?
How do blind people use sounds “to see”?
How do music and noise differ?
How do musical instruments make their sounds?

SOUND TEACHER INFORMATION
Page 11 of 35
ESTABLISH
Activity 1.2. How sounds are made?
Learning aims:
Understanding that sounds are produced by vibrations of objects or columns of air
Understanding that sound is a form of energy
Materials:
An elastic ruler (metal, wooden), a rubber band, tuning fork, a drum, a pipe, other musical instruments e.g. guitar, violin, flute etc.
Suggestions for use:
Divide the class into small groups and hand out tuning forks, drums, rulers, and musical instruments. Ask students to produce sounds with given objects.
Then hand out Worksheet: How sounds are made? (Part I) and let students do investigations. They have to answer a set of questions for each, investigated object. While the students are carrying out the investigations walk around the room asking each group questions to probe student‟s understanding. Once they have completed their investigations discuss with them: - how sounds are produced (providing energy), - what is the object doing as it produces the sound (vibrating), - how long does the sound last (as long as the object vibrates), - how the sound can be stopped (by “damping” vibrations), - how to change the properties of the sound (e.g. by changing the characteristics of the vibrating object).
Hand out Worksheet: How sounds are made? (Part II). Let students identify what vibrates to make the sound of instruments showed on the pictures. Ask them to come up with other examples of creating sounds.
Possible questions:
How does the object produce sound?
How energy was provided to the object to produce the sound?
What is the object doing as it produces the sound?
How long does the sound last?
How can you stop the sound?
How can you make the sound higher or lower and softer or louder?
Do you see the ends of the tuning fork vibrating? Why or why not?
How sound is produced by an organ pipe or flute? What vibrates there?
How sound is produced by a guitar or violin? What vibrates there?
Activity 1.3. Make sound visible
Learning aims:
Learning how to record sound with a sound sensor
Interpreting the recorded sound waveform graphs
Understanding that the sound signal is changing periodically
Introducing concepts of frequency, pitch and loudness
Exploring how the sound waveform is changing by changing loudness and pitch
SOUND TEACHER INFORMATION
Page 12 of 35
ESTABLISH
Materials:
A sound sensor, interface and software that displays sound waveforms (e.g. CMA Coach 6)
Suggestions for use:
Start the activity by asking students: „What do you think a sound would look like if we could see it?‟ Have student volunteers come up to the board to illustrate.
Divide the class into groups, hand out Worksheet: Make sound visible (Part I) and let students do their own investigations with a sound sensor and tuning forks. If needed, help students to set up the experiment and perform measurements with the computer.
Hand out Worksheet: Make sound visible (Part II), discuss the recorded sound waveform and let students calculate the frequency of the recorded sound signal. Then let them perform Investigation 1 and 2 and summarize their findings by defining the properties of sound: loudness (defined by sound amplitude), pitch (defined by sound frequency).
Possible questions:
How sounds can be made visible?
What is the frequency of vibrations?
Determine the frequencies of the tuning forks used in your experiments? How did you figure this out?
Can you notice any relationship between the tuning forks appearance and the sound they produce?
What determines pitch?
What determines loudness?
Activity 1.4. Analysis of voice sounds
Learning aims:
Understanding that the vibration of vocal cords creates our voice
Interpreting sound waveforms of a variety of voice sounds
Understanding differences between sound waveforms of different voice sounds
Materials:
A sound sensor, interface and software that displays sound waveforms (e.g. CMA Coach 6)
Suggestions for use:
Divide the class into small groups, hand out Worksheet: Analysis of voice sounds (Part 1) and let students do activities described under Observation and Investigation. Then discuss with them how voice sounds are made.
Then divide students to work with computers, hand out Worksheet: Analysis of voice sounds (Part II). Let them do their own investigations with a sound sensor. If needed help students to set up the experiment and perform measurements with the computer.
Once students have completed their investigations summarize the results of their investigation by discussing the results of their experiments.

SOUND TEACHER INFORMATION
Page 13 of 35
ESTABLISH
Possible questions:
How voice sounds are made?
How the vocal cords work?
What is the difference in waveforms of tuning fork and voice sounds?
What is the difference in waveforms of different vowels?
Activity 1.5. How sound travels?
Learning aims:
Recognising that the sound needs a medium to travel
Understanding that sound travels through different mediums, including solids, liquids, and gases
Materials:
Sound source, bell jar, vacuum, a string telephone, balloon with water, water, different medium for example wood, metal, glass, plastic, ceramic etc.
Suggestions for use:
Hand out Worksheet: How sounds travel (Part I), let students read and answer questions.
Then show them the following demonstrations:
1. Place five coins, in a line next to each other, flat on the table. Flick a sixth coin so that it hits the first coin in the line. Last coin in the line will move.
2. Place an alarm clock or an electric bell in a large bottle. Let the bell ring in air. Then pomp the air out of the bottle and let the bell ring in a vacuum.
3. Place a candle in front of a speaker. Turn on the speaker (frequency 5 – 10 Hz). The flame flickers indicating air movement. (Instead of the demonstration the included video can be displayed).
4. Use a coiled spring (slinky); send pushes and pulls along the spring.
Discuss with students their observations and help them to construct the following ideas:
1. Energy can be transmitted through the particle of a substance.
2. Sound needs a medium to travel through; it cannot be transmitted in the absence of particles.
3. Sounds waves are alternate compressions and expansions caused by the back-forth motion of the particles of a medium.
Divide the class into groups and hand out Worksheet: How sounds travel (Part II). Give each group a sound source and materials to investigate. These can be two cans (or paper cups) connected with a string, a balloon with water, book, and different medium like wood, metal, glass, plastic, ceramic, etc. In this activity students are asked to design their own investigation to find out if sound can travel through different materials and through which material(s) sound travels the best. Walk around and give students some tips if necessary. Ask them about the designs of their (fair) investigations.
Finally let each group present their conclusions, allow students to debate their reasoning.

SOUND TEACHER INFORMATION
Page 14 of 35
ESTABLISH
Possible questions:
How sound energy is transmitted?
Why can you not hear the bell ringing in the jar?
Can you hear the sound from a sound source when it is held in the air?
What medium was the sound travelling through in this case?
Does sound travel through string?
Can you hear your partner better when the string is wet or dry?
Does sound travel through glass? Wood? Etc?
Do sounds get weaker with distance?
Activity 1.6. How fast sound travels?
Learning aims:
Understanding the speed of sound is lower then the speed of light
Determining the speed of sound in air by using the echo method
Understanding that the speed of sound depends on the medium
Materials:
A sound sensor, interface and software that displays sound waveforms (e.g. CMA Coach 6), 1-m long cardboard or plastic tube
Suggestions for use:
Show a video clip of lightening in the sky. Hand out Worksheet: How fast sound travels? (Part I) and ask students to answer question 1. Discuss with students why we see the light before we hear the sound.
Then divide students into groups to work with computers. Hand out Worksheet: How fast sound travels? (Part II) and let students perform computer measurements to determine the speed of sound in air. If needed help students to set up the experiment and perform measurements with the computer.
Once students have completed their investigations compare the sound speed values determined by students with the theoretical value. Here you can also discuss more examples of the use of echoes (ships navigation, animals using “echolocation” etc.)
Let students find out the speed of sound in other materials. Discuss whether sound travels better in liquids, gases, or solids?
Possible questions:
Why do you see lightning before you hear thunder?
What is the measurement method used to calculate the speed of sound in air?
How do you calculate the speed?
What do you think can influence the speed of sound?
In which materials the speed of sound is the highest?
In which materials the speed of sound is the lowest?

SOUND TEACHER INFORMATION
Page 15 of 35
ESTABLISH
Activity 1.7. Hearing sound
Learning aims:
Understanding that the ear detects sound vibrations
Understanding how the human ear works
Understanding that human hearing range lays between 20 and 20000 vibrations per second
Materials:
A sound sensor, interface and software that displays sound waveforms (e.g. CMA Coach 6), a model of the human ear
Suggestions for use:
Hand out Worksheet: Hearing sound and let students read and answer questions 1 to 3. Then discuss how the human ear works. To visualize it you can use an animation, for example: http://www.sciencekids.co.nz/videos/humanbody/ear.html.
There is a possibility for cross-curricular links here. It would be a good opportunity to link to the biology topic of the ear.
Here students also could be engaged in technological design as they could design and build their own simple models of the human eardrum.
As the last activity let students read question 4. Start a discussion about what they can hear and what they cannot hear – and lead onto hearing ranges of humans and animals.
Possible questions:
When a compression in a sound wave in the air hits the eardrum, in which direction does the eardrum move?
In which direction does the eardrum moves when an expansion of a sound wave arises?
If you hear a bird sing with a frequency of 2000 vibrations per second, how many times per second does the eardrum vibrates?
How does the ear response to a loud sound differ from its response to a soft sound?
How does the ear response to a high sound differ from its response to a low sound?
Why sounds aren't as loud when you cover your ear?
How does the ear strengthen the sound waves so that they will be strong enough to affect the liquid of the inner ear?
Why you do not hear a dog whistle while your dog does?
Activity 1.8. How loud is too loud?
Learning aims:
Understanding that sound intensity (loudness) is measured in decibels
Understanding that exposure to very loud sounds can cause damage to hearing
Materials:
A sound sensor, interface and software that displays sound waveforms (e.g. CMA Coach 6), a sound source, a shoe box, different isolation materials like cotton wool,
SOUND TEACHER INFORMATION
Page 16 of 35
ESTABLISH
fabrics, egg boxes, foam, newspaper, etc.
Suggestions for use:
Divide the class into small groups to work with computers, hand out Worksheet: Sound protection (Part I). Let students perform computer investigations to determine the sound intensity of different sound sources and to determine the best sound insulator. Once students completed their investigations discuss their results.
Then hand out Worksheet: Sound protection (Part II). Have students research the effects of sound on their health (Research assignment: How loud is too loud?). In their investigation they can use a nice interactive animation – „Interactive sound ruler‟ available via http://www.nidcd.nih.gov/health/education/decibel/decibel.asp.
Then use protective earmuffs to show students and have a class discussion on why different professions might need to use these, and what would be the effects for these people if the ear protection is not worn. Discuss the possible damages loud sounds can have on human hearing.
This lesson would be an excellent time to invite an audiologist to visit the class. Have students write questions for the speaker on slips beforehand. In this students should be encouraged to relate their question with the research assignment.
Possible questions:
Why do you think construction workers wear earmuffs?
Can you think of any other profession who need to wear ear protection?
What might happen if these people don‟t wear ear protection?
Which material is the best at stopping sound?
Which material is useless at stopping sound?
Does the twice the thickness of the material stop the sounds any better?
Activity 1.9. What have you learned about sound?
Learning aims:
Elaborating concepts learned throughout the subunit
Materials:
Whiteboard/marker, or Laptop/data projector, or Overhead projector/acetate
Suggestions for use:
Use the concept map generated in the first activity to have an interactive group discussion on what students have learned about sound. Students need to revisit their original ideas. The final concept map should show a schematic summary what was learned.

SOUND TEACHER INFORMATION
Page 17 of 35
ESTABLISH
Subunit 2 – SOUND IN STRING INSTRUMENTS AND WIND INSTRUMENTS
Activity 2.1. Resonance
Learning aims:
Recapture prior knowledge about oscillations
Trigger curiosity about resonance
Realize that small forces can cause a huge effect
Introduce the concepts of resonance and natural frequency
Materials:
Heavy object (approx. 5 kg – 10 kg) and double rope (to stabilize the motion)
Suggestions for use:
In this activity students try to get a heavy object to oscillate by blowing and answer the question: how can it be that such a small force results in such strong effect?
See for a demonstration of this experiment: http://youtu.be/zqhF7NEOStY
It should be enough to do this experiment two or three times, with different teams of two- three students. Try to see how the students work together and check if the team that has a student on each side of the swinging object gets larger amplitude.
This experiment is also available as Coach data video activity. Students that are not able to do the experiment might want to work with this activity.
The figure below shows the graph of a heavy bag oscillating (5 kg). A graph like this might be used as a basis for assessment questions. If students are familiar with the theory (and the relation between length of the rope and the frequency), they might want to calculate the length of the ropes used.
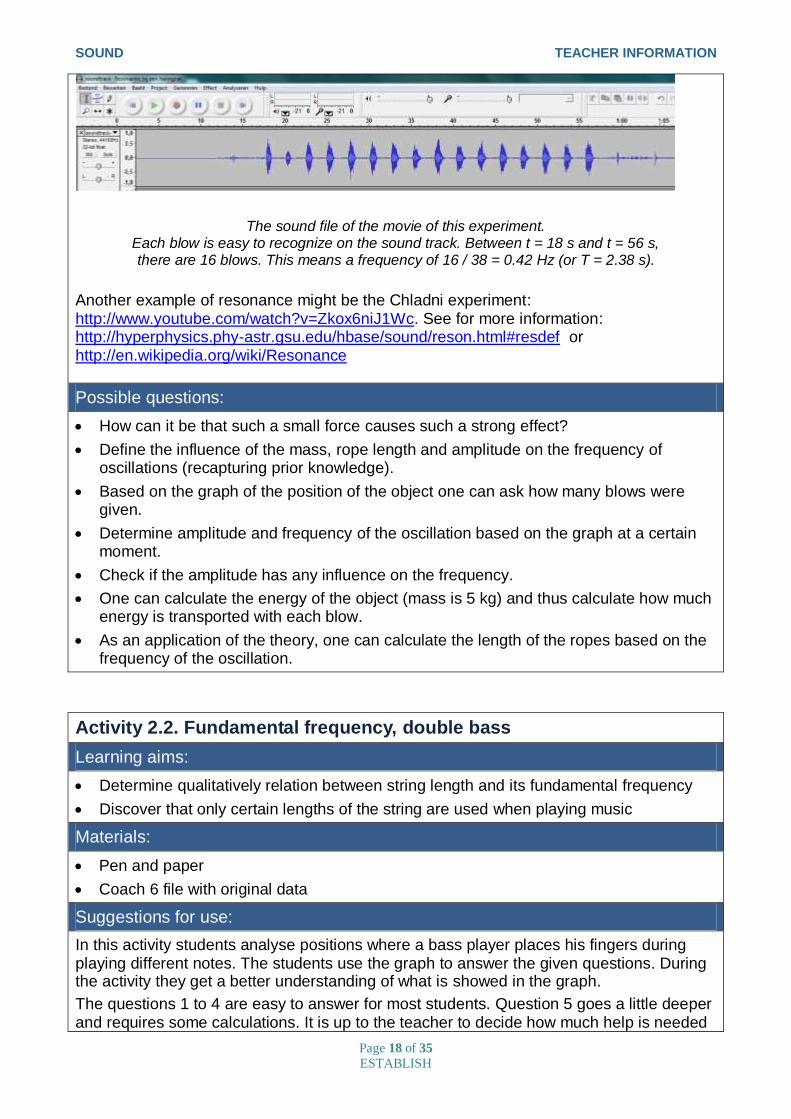
Position of the heavy object oscillating. The measurement lasts 60 s, one can see that the blowing stops around t = 40 s.
Another way to determine the frequency of the movement is by analysing the sound file of the YouTube movie. Every blow is easy to recognize and since the blows are in the right frequency, the frequency of the vibration can be derived from this sound file.
SOUND TEACHER INFORMATION
Page 18 of 35
ESTABLISH
The sound file of the movie of this experiment. Each blow is easy to recognize on the sound track. Between t = 18 s and t = 56 s, there are 16 blows. This means a frequency of 16 / 38 = 0.42 Hz (or T = 2.38 s).
Another example of resonance might be the Chladni experiment: http://www.youtube.com/watch?v=Zkox6niJ1Wc. See for more information: http://hyperphysics.phy-astr.gsu.edu/hbase/sound/reson.html#resdef or http://en.wikipedia.org/wiki/Resonance
Possible questions:
How can it be that such a small force causes such a strong effect?
Define the influence of the mass, rope length and amplitude on the frequency of oscillations (recapturing prior knowledge).
Based on the graph of the position of the object one can ask how many blows were given.
Determine amplitude and frequency of the oscillation based on the graph at a certain moment.
Check if the amplitude has any influence on the frequency.
One can calculate the energy of the object (mass is 5 kg) and thus calculate how much energy is transported with each blow.
As an application of the theory, one can calculate the length of the ropes based on the frequency of the oscillation.
Activity 2.2. Fundamental frequency, double bass
Learning aims:
Determine qualitatively relation between string length and its fundamental frequency
Discover that only certain lengths of the string are used when playing music
Materials:
Pen and paper
Coach 6 file with original data
Suggestions for use:
In this activity students analyse positions where a bass player places his fingers during playing different notes. The students use the graph to answer the given questions. During the activity they get a better understanding of what is showed in the graph.
The questions 1 to 4 are easy to answer for most students. Question 5 goes a little deeper and requires some calculations. It is up to the teacher to decide how much help is needed

SOUND TEACHER INFORMATION
Page 19 of 35
ESTABLISH
here.
Depending on the spirit in the class and the skills in music, the teacher can decide how much time is spend on question 6 (let the students guess which tune is played). Even make a contest out of it (be sure to remove the link to the answer in the worksheet) or let the students draw a graph for another simple tune.
Answers to the questions in the worksheet:
There are six different notes played (question 1) and the first time the A is played, the finger is a bit too high (question 2). When the finger is too high, the string is too long and the tone is too low (question 3). The semitone (question 4) between F# and G is also clear from this picture.
In the picture below the graph of position of the finger of the bass player against time is combined with a picture of a guitar. The positions match the positions of frets of the guitar. The names of the tones played are also indicated.
Question 5: Going from the first notes (D) to the third note played (an A at t= 2 s) the frequency is multiplied by 1.5. This means that the remaining length of the string is 66,7 % of the original length. Thus, a difference of 33,3 % of string length is 32 cm (90-58). This means that the string has a length of 96 cm. In reality this length is a bit more, the data are a bit disturbed because the bass is moved during the video recording. However, the differences between theory and measurement are not that big (less than 10%).
Possible questions:
Which are the lengths used on double bass? Is this comparable to other stringed instruments like guitar?
Explain if a graph like this would be different for a guitar or violin.
Make a similar for another simple tune (a suitable question for students with a bit of experience in music).
Compare the graph in the worksheet with a tablature for guitar or bass (see for example http://www.bassmasta.net/charts.php?chan=popular-bass-tabs or
http://www.ultimate-guitar.com/top/top100.htm )

SOUND TEACHER INFORMATION
Page 20 of 35
ESTABLISH
Activity 2.3. Fundamental frequency, guitar
Learning aims:
Determine relation between fundamental frequency f if the string and its string length L.
Materials:
Guitar
Measuring ruler
A computer with a sound sensor and Sound analysis program.
Suggestions for use:
In this activity students measure the length of the string shorted by using guitar frets and the corresponding natural frequency of the shorted string. Based on the measurements they determine the relation between the natural frequency of the string and its length (f ≈ 1/L).
It is highly recommended to do measurements with a real guitar and to have one guitar for 3 or 4 students. Try to get some guitars from the music teacher or let the students bring their own guitar. A bass guitar or any other fretted instrument (ukulele, banjo, mandolin) will do as well.
It also might be useful to know some parts of the guitar by name, see the picture below.

SOUND TEACHER INFORMATION
Page 21 of 35
ESTABLISH
If there is no guitar available, the following data can be used:
or other data can be found on the internet: http://entertainment.howstuffworks.com/guitar3.htm or http://www.physics247.com/physics-tutorial/guitar-string-harmonics.shtml
Hand out the Worksheet: Fundamental frequency, guitar.
Let the students do their measurements and check these data during the measurements. There might be small differences between the different types of guitar but in general the values measured will be similar. The diagrams should all have the same shape, similar to the one showed below.
The relation between f and L is f = v / 2L. Here, f is frequency in Hertz, v is the wave speed in a certain string, L is the length of the string that is able to vibrate.
Besides this measurement, students might want to check the ratio between two string lengths with just one fret between them. If we define the length from the string, measured from the bridge to the n-th fret as Ln, then the ratio Ln / Ln+1 is a constant.
This is supposed to be Ln / Ln+1 = 1.06 (start to number n at the machine head).
SOUND TEACHER INFORMATION
Page 22 of 35
ESTABLISH
There is a lot of material about the physics of a guitar available on the internet. You might want to check these sources:
http://www.physics247.com/physics-tutorial/guitar-string-harmonics.shtml
http://www.cs.helsinki.fi/u/wikla/mus/Calcs/wwwscalc.html
Teachers who have access to Physics Teacher Online might want to read „Experimenting with Guitar Strings‟ by Michael C. LoPresto:
http://tpt.aapt.org/resource/1/phteah/v44/i8/p509_s1?isAuthorized=no
Possible questions:
Does the relation f = v/2L corresponds with the information given in the previous activity about the bass string (if frequency is multiplied by 1.5 than the string length is divided by 1.5)?
What do you think how your resulting graph would look like if the tension of the string would be higher?
What do you think how your resulting graph would look like if the string would be thicker?
What do you think what the effect will be for the frequency if the temperature is higher or lower?
Why has a guitar six strings?
Activity 2.4. Melde’s experiment
Learning aims:
Study the relation between the frequencies and standing waves in a vibrating string
Understanding concept of fundamental frequency and harmonics
Materials:
Function generator and mechanical vibrator
String
Pulley and weights to adjust the tension in the string
Suggestions for use:
In this activity students perform „Melde‟s experiment‟ in which one end of a stretched string is attached to a vibrating support and the other end passes over a pulley to a hanging weight, which produces tension in a string. The stretched string is set in motion by the vibrating support, but if the frequency of vibration is not one of the natural frequencies (fundamental or harmonics) of the string the vibrational amplitude of the string is very small. However when the frequency of the vibrating support is the same as one of the natural frequencies the amplitude will be large and will clearly show patters (nodes and antinodes) of standing waves.
During the experiment the vibration frequency is changed and different patterns of resonant standing waves in a string are observed. The experiment is repeated for a different string tension.

SOUND TEACHER INFORMATION
Page 23 of 35
ESTABLISH
Standing waves in a vibrating string, fundamental frequency and for 1st. 2
nd and 3
rd harmonics.
Here, λ is a wavelength of standing wave, L is the length of the string, and υ is frequency of vibrations.
The harmonics are multiples of the fundamental frequency. So, a string of length L can vibrate with the fundamental frequency: f0 = v/2L and also with frequencies: f1 = 2 f0; f2 = 3 f0; f3 = 4f0 ; f4 =5f0 ; etc.
This experiment can be done as a demo for a class or in groups. Each group might use a different string tension. The students discover the similar standing wave patterns but for different frequencies. If there is time one might do this experiment with strings of different thickness. If it is not possible to do this experiment in a classroom the different internet demo‟s can be used, for example: http://youtu.be/_S7-PDF6Vzc or http://youtu.be/MT7EpS4OX3k .
Possible questions:
Draw different modes of vibrations for other sources (a string has both ends fixed but there are also musical instruments with one fixed end).
Are these different modes of vibrations also possible in a guitar?

SOUND TEACHER INFORMATION
Page 24 of 35
ESTABLISH
Activity 2.5. Harmonics of a guitar string
Learning aims:
Understanding how to manipulate a string in order to get the required mode of vibration
Materials:
Guitar or other string instrument to check
Suggestions for use:
In this activity, students apply the knowledge about fundamental frequency and its harmonics to a guitar string. Harmonics are used to tune the string instrument. The understanding of harmonics is necessary to understand the concept of timbre.
Students watch YouTube video (http://youtu.be/4NFljc5mi-s?hd=1) to understand how to produce harmonics on a guitar string.
In similar way they have to produce harmonics on the real guitar.
In the figure above, some harmonics are represented.

SOUND TEACHER INFORMATION
Page 25 of 35
ESTABLISH
Possible questions:
Define other possible positions to touch the string slightly to get the same harmonics as presented here.
For the situation in the graphic, at which positions could a frequency of 660 Hz be produced?
Can you hear these different modes of vibrations?
Which mode of vibration is used in guitar?
Is this true for any type of musical instruments?
Activity 2.6. Standing waves in air, closed-end air column
Learning aims:
Understanding standing waves in closed-end air column
Investigate the resonance frequencies of standing waves
Materials:
Sound generator
Tube,
Stand material
Suggestions for use:
In activity students examine the resonance frequencies of a closed-end column.
By changing the frequency of the signal generator the frequency at which air inside of the tube is also changing. When the frequency of signal generator is closed the natural frequency of the air column then resonance occurs and a loud sound results.
It is up to the teacher to what extent the students are supported in this experiment.
Possible questions:
How can you, for a certain length of the tube, be sure to have the lowest frequency required for resonance?
Draw the standing wave patterns for the fundamental frequency and the first three harmonics.
What would happen with length of the air column or frequency if the speed of sound is changed?
Predict what the effect will be for the frequency if the temperature is changed.
Activity 2.7. Standing waves in air: soprano saxophone
Learning aims:
Determine relation between the air column L and frequency f for conical tube
Materials:
Pen and paper (and a worksheet)

SOUND TEACHER INFORMATION
Page 26 of 35
ESTABLISH
Coach file with original data
Suggestions for use:
This activity is similar to the one with the guitar and will result in a similar graph. However, the relation between frequency and length is not that simple for a conical tube. Students will find out (and can check this with theory) that the length of the conical tube has to be raised a constant to get a simple relation.
The results based on the original data.
The theoretical value for a cylindrical tube, the measured value and the difference in one diagram.
It appears that this difference is indeed a constant.
SOUND TEACHER INFORMATION
Page 27 of 35
ESTABLISH
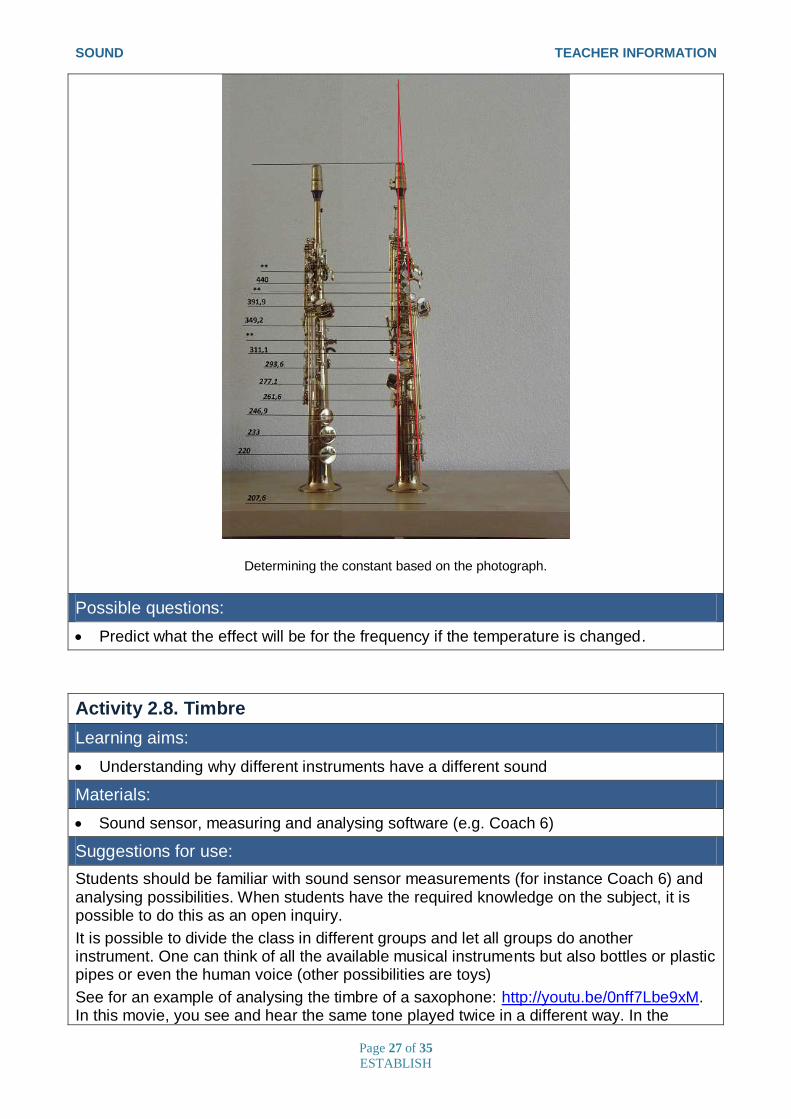
Determining the constant based on the photograph.
Possible questions:
Predict what the effect will be for the frequency if the temperature is changed.
Activity 2.8. Timbre
Learning aims:
Understanding why different instruments have a different sound
Materials:
Sound sensor, measuring and analysing software (e.g. Coach 6)
Suggestions for use:
Students should be familiar with sound sensor measurements (for instance Coach 6) and analysing possibilities. When students have the required knowledge on the subject, it is possible to do this as an open inquiry.
It is possible to divide the class in different groups and let all groups do another instrument. One can think of all the available musical instruments but also bottles or plastic pipes or even the human voice (other possibilities are toys)
See for an example of analysing the timbre of a saxophone: http://youtu.be/0nff7Lbe9xM. In this movie, you see and hear the same tone played twice in a different way. In the
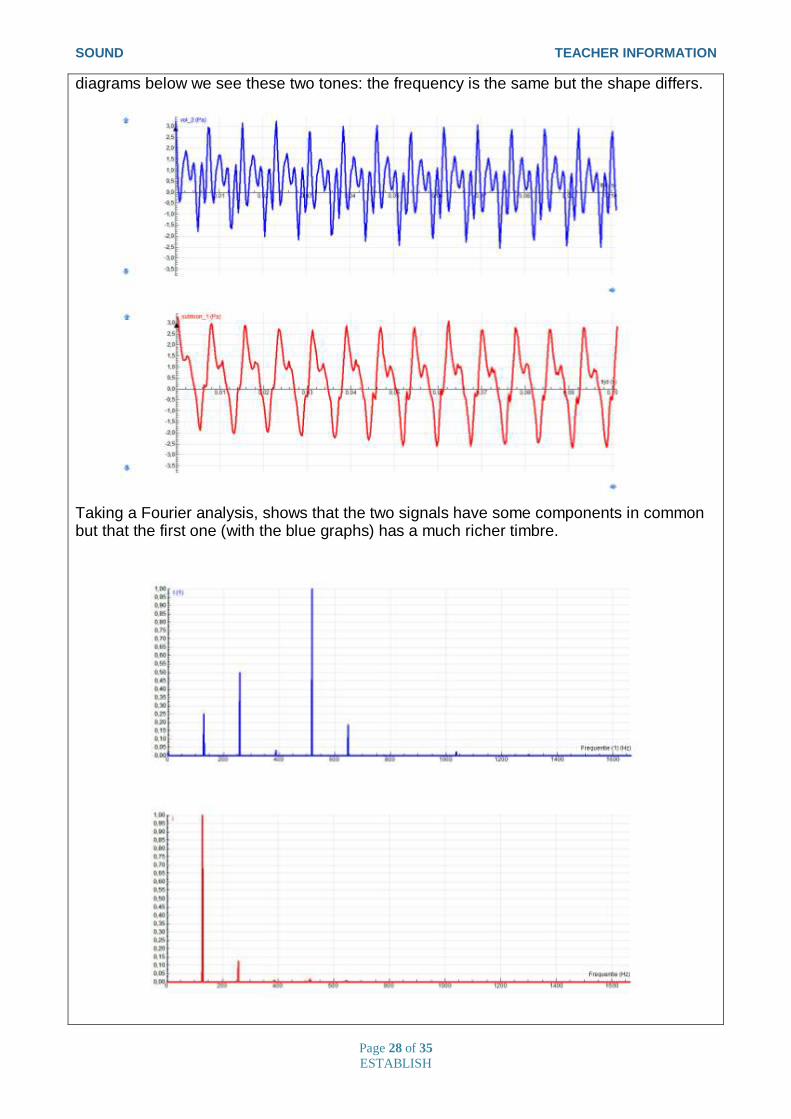
SOUND TEACHER INFORMATION
Page 28 of 35
ESTABLISH
diagrams below we see these two tones: the frequency is the same but the shape differs.
Taking a Fourier analysis, shows that the two signals have some components in common but that the first one (with the blue graphs) has a much richer timbre.

SOUND TEACHER INFORMATION
Page 29 of 35
ESTABLISH
Possible questions:
Predict which harmonics are expected, based on the properties of the instrument.
Check similarities and differences between the sound of instruments and relate this to the type of instrument (why does a trombone and trumpet have sounds that are closely related and why does a violin sounds very different)
Try to make „families‟ of instruments and define the characteristics of sound for each family
Activity 2.9. Beats
Learning aims:
Understanding beats
Materials:
Pen, paper, internet, tuning forks or musical instruments
Suggestions for use:
Though the concept of beats is on itself not very hard to understand, it requires some pre- knowledge and in many situations it is no part of the standard curriculum. However, when students have the basic knowledge on sound they should be able to understand the concept of beats. Students can find their own ways and sources to gather information.
Possible questions:
Find examples of beats occurring in daily life.
Are there musical instruments that use beats?
Develop an experiment where you demonstrate beats (may be related to music but that is not obliged).
Activity 2.10. Tuning the guitar
Learning aims:
Apply gathered knowledge in a new situation
Evaluate knowledge
Materials:
Guitar, tuning fork
Suggestions for use:
Let the students tune a guitar in different ways. Let them find information on internet about the different tuning methods. Perhaps the students know other ways as well. The ways to tune the guitar are:
Using of beats
One way is to play the same tone on different strings (by shortening one of the strings).
Play these tones together, when the two strings are slightly out of tune, beats will
occur. When the strings are well tuned, there will be no beat.

SOUND TEACHER INFORMATION
Page 30 of 35
ESTABLISH
See (and hear) for an example of beats on the double bass:
http://youtu.be/a0VWWbr6O1I In this movie you see the double bass (starting out of
tune) and you can hear the sound of it. This sound is recorded with Coach and you see
the beats occurring in the pattern (Around t=32 s in the movie) When the tuning of the
strings is changed, you see less beats in the same time (t = 56 s): the strings are more
in tune then before. At the end of the movie there are almost no beats ( t = 1 m 30 s ).
Take notice that the graphs showed in this movie are all given for a measure time of
three seconds.
Using harmonics
By playing harmonics on different strings, the same tone should occur. Let the students
find out which frets are used for this.
Using resonance
When a string that produces a low tone, is shortened, there is a position where this
string produces the same tone as the string next to this. Find this position and play the
shortened string. When both strings are well tuned, the not-shortened string will
resonate.
See for an example of resonance with strings the next movie of a double bass:
http://youtu.be/d8uH7SeAtZA.
Possible questions:
Ask fellow students who play the guitar, which method they prefer to tune their guitar
Which way of tuning the guitar would you prefer?

SOUND TEACHER INFORMATION
Page 31 of 35
ESTABLISH
Subunit 3 – HUMAN SPEECH
Activity 1.1. Sound graphs
Learning aims:
Introducing of sound graphs (sound amplitude versus time)
Understand that sound graphs can be used for speech recognition
Materials:
A computer to play MP3 file and files: mama_papa.mp3.
Or
A computer with microphone, sound card and Sound analysis program. For example Audacity is a free, open source, sound recorder and editor program. Free to download at http://audacity.sourceforge.net/download/.
Suggestions for use:
In this activity students are introduced to speech analysis. They analyse simple sound graphs and try to recognise the sound waveforms of certain syllables and words. The students‟ tasks are given in Worksheet: Sound graphs. Let students perform these tasks. If possible let them work in groups. The given mp3 files can be played on the computer, if possible in the Audacity program.
Once students have completed their tasks discuss with them what speech analysis is, how it can be used, what possibilities and difficulties of speech analysis are, etc.
This activity should arise students‟ interest in speech analysis.
Possible questions:
Do you know what speech analysis is?
Do you see any examples or applications of it?
What do you think of the present and future level of technology in this field?
Can you think of societal use and abuse of this technology?
Would you as a judge admit evidence based on speech analysis in court?
Could voice recognition be abused?
Can you come up with commercial applications in the field of advertisement and security?
Activity 3.2. Model of human speech production
Learning aims:
Understanding the model of the human speech production
Understanding of physics concepts (sound spectrum resonance, formants)
Materials:
Text about model of human speech production is given in the worksheet
Other internet resources concerning modelling human speech
Suggestions for use:

SOUND TEACHER INFORMATION
Page 32 of 35
ESTABLISH
In this activity students focus on a model of the human vocal system and physics concepts related to this model.
Hand out Worksheet: Model of human speech production and let students read the text. Then discuss with them the given bio-physics model and mechanism of speech production.
Show them the animation of vocal folds at:
http://www.humnet.ucla.edu/humnet/linguistics/faciliti/demos/vocalfolds/vocalfolds.htm
Show them X-ray sample movies of human speech:
http://psyc.queensu.ca/~munhallk/05_database.htm
Extend the discussion by asking the questions given below.
Possible questions:
Does temperature influence the pitch of your voice or the pitch of your musical instrument, respectively? In what way? Can you explain the underlying mechanism of this phenomenon?
Donald Duck is known for his high-pitched speech. Breathing helium will give you temporarily a similar voice. Could you explain this? What property of the intermediating gas is responsible?
What are the voice differences between man/female, loud/soft, sung/spoken?
How could we recognize a vowel from its formants?
Activity 3.3. Sound signal analysis
Learning aims:
Interpreting the recorded speech waveforms
Determining formants of the recorded speech waveforms by using sound signal analysis tools (e.g. Fast Fourier Transform or Liner Prediction)
Understanding a spectrogram
Materials:
A sound sensor, interface and software that displays sound waveforms and allows to perform sound analysis (e.g. CMA Coach 6 or Raven Lite program which also produce Sound spectrogram)
Suggestions for use:
In this activity students use a sound sensor to record the human voice sounds. Software for recording and analyzing sound is required. It can be for example:
Coach 6 software together with a sound sensor and interface, or
Raven Lite program, an application originally developed for use by ornithologists
studying bird sounds, can be downloaded at:
http://store.birds.cornell.edu/Raven_Lite_p/ravenlite.htm and used for free, or
Java simulation: Model of the Human Speech Production, which includes as well sound
analysis as sound synthesis, available at:
http://www2.spsc.tugraz.at/add_material/courses/scl/vocoder/simulation.html
By using Signal analysis tools like Fourier Transform or Linear Prediction students can
SOUND TEACHER INFORMATION
Page 33 of 35
ESTABLISH
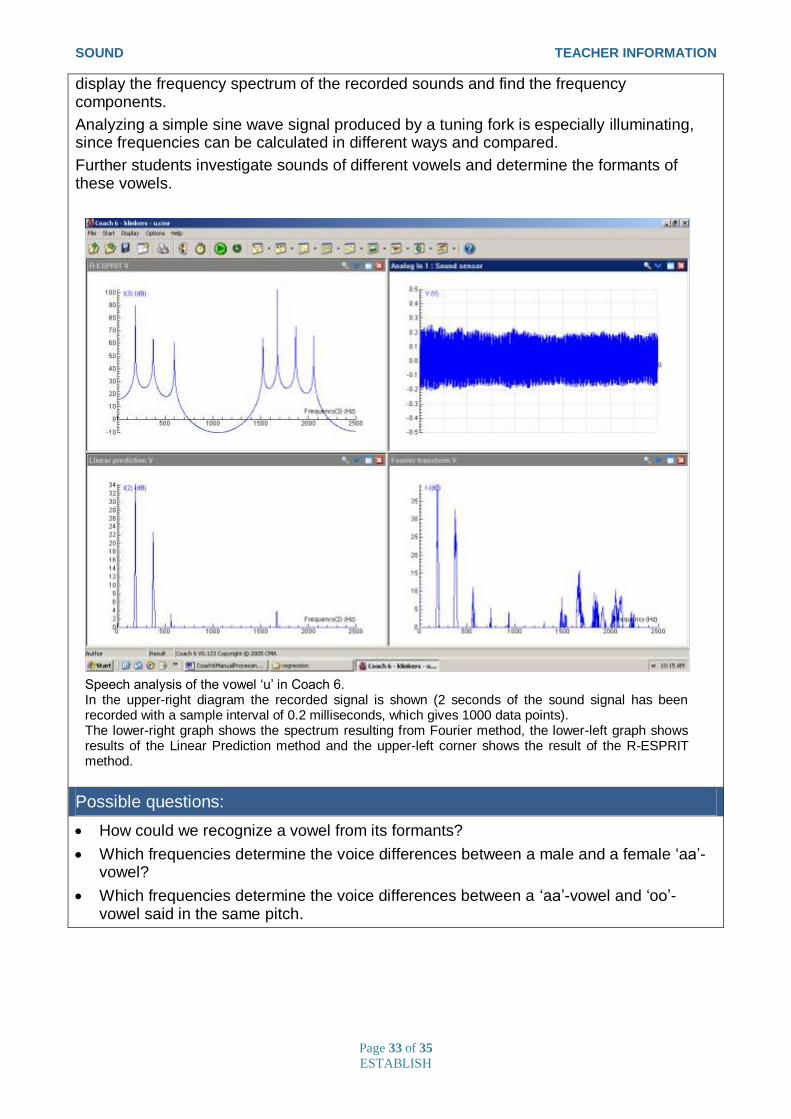
display the frequency spectrum of the recorded sounds and find the frequency components.
Analyzing a simple sine wave signal produced by a tuning fork is especially illuminating, since frequencies can be calculated in different ways and compared.
Further students investigate sounds of different vowels and determine the formants of these vowels.
Speech analysis of the vowel „u‟ in Coach 6. In the upper-right diagram the recorded signal is shown (2 seconds of the sound signal has been recorded with a sample interval of 0.2 milliseconds, which gives 1000 data points). The lower-right graph shows the spectrum resulting from Fourier method, the lower-left graph shows results of the Linear Prediction method and the upper-left corner shows the result of the R-ESPRIT method.
Possible questions:
How could we recognize a vowel from its formants?
Which frequencies determine the voice differences between a male and a female „aa‟-vowel?
Which frequencies determine the voice differences between a „aa‟-vowel and „oo‟-vowel said in the same pitch.
SOUND TEACHER INFORMATION
Page 34 of 35
ESTABLISH
Activity 3.4. Human speech analysis
Learning aims:
Investigating the formants of various vowels
Finding and formulating a research question concerning the human speech analysis
Materials:
A sound sensor, interface and software that displays sound waveforms (e.g. CMA Coach 6, Ravel Lite or Java simulation Model of the Human Speech Production http://www2.spsc.tugraz.at/add_material/courses/scl/vocoder/simulation.html
Suggestions for use:
In this activity students investigate the human speech analysis. This is an open inquiry in which students learn to find and formulate their own research question without strict guidance of their teacher. They learn to setup and successfully finish (possibly adjust along the way) their own practical experiment. With their conclusions, they practice critical thinking. Finally, they get a good picture of the content and (societal, industrial) applications of speech analysis. The research questions given below give an idea of the scope of possibilities in this subject, they are not meant to share with the students beforehand, as finding their own research question is an important element of this assignment.
Possible research questions:
Below, a number of the research questions are listed:
What, if any, is the difference in amplitude and frequency between vowels „a‟ , „e‟, „o‟, and „u‟? Which property can be used best to distinguish them?
How to approach orally the sound of a tuning fork?
Analysis and recognition of the sound pattern of the word Earth.
How do we recognize gender in the same vowels „a‟, „e‟ and „u‟? Man versus woman!
Is there a difference (if so, which?) between the various ways of pronouncing the vowel „a‟: with a pinched nose, behind a cloth, singing, whispering etc.
Comparison of the spectrum of a flute and a singing voice, producing the same note.
Which (of the lowest five) formant is typical for the sound or the voice, and which for the pitch (height of the tone)?
What feature is the most characteristic for a given vowel produced by different people: the relations between the formant frequencies and/or their amplitudes or the absolute differences between them?
Activity 3.5. Human speech synthesis
Learning aims:
Investigating which parameters and how influence the quality of artificial created human speech
Finding and formulating a research question concerning the human speech synthesis
Materials:
Software that is able to synthesis recorder sound waveforms (e.g. Java simulation Model of the Human Speech Production

SOUND TEACHER INFORMATION
Page 35 of 35
ESTABLISH
http://www2.spsc.tugraz.at/add_material/courses/scl/vocoder/simulation.html)
Suggestions for use:
In this activity students investigate the human speech synthesis.
This is an open inquiry in which students learn to find and formulate their own research question without strict guidance of their teacher. They learn to setup and successfully finish (possibly adjust along the way) their own practical experiment. With their conclusions, they practice critical thinking. Finally, they get a good picture of the content and (societal, industrial) applications of speech analysis. The research questions given below give an idea of the scope of possibilities in this subject, they are not meant to share with the students beforehand, as finding their own research question is an important element of this assignment.
Possible research questions:
Below, a number of the research questions are listed:
How to make a computer or a robots talk?
What parameters influence the quality of synthetic speech system?
What are applications of the human speech synthesis technology?

Lead partner for Unit: C.M.A.
European Science and Technology in Action Building Links with Industry, Schools and Home
Work Package 3
UNIT SOUND Classroom Materials
The ESTABLISH project has received funding form the European Community’s Seventh Programme [FP7/2007-2013] under grant agreement no 244749
Start Date: 1st January 2010 Duration: 48 months
WP
3
Un
it S
OU
ND

SOUND CLASSROOM MATERIALS
Page 2 of 42
ESTABLISH
B. Classroom Materials
Table of content
SUBUNIT 1 - EXPLORING SOUND 3 Worksheet: How sounds are made? (Part I) 4 Worksheet: How sounds are made? (Part II) 5 Worksheet: Make sound visible (Part I) 6 Worksheet: Make sound visible (Part II) 7 Worksheet: Analysis of voice sounds (Part I) 8 Worksheet: Analysis of voice sounds (Part II) 9 Worksheet: How sound travels? (Part I) 10 Worksheet: How sound travels? (Part II) 11 Worksheet: How fast sound travels? (Part I) 12 Worksheet: How fast sound travels? (Part II) 13 Worksheet: Hearing sound 14 Worksheet: How loud is too loud? (Part I) 16 Worksheet: How loud is too loud? (Part II) 18
SUBUNIT 2 - STRING INSTRUMENTS AND WIND INSTRUMENTS 19 Worksheet: Resonance 19 Worksheet: Fundamental frequency, double bass 21 Worksheet: Fundamental frequency, guitar 23 Worksheet: Melde's experiment 24 Worksheet: Harmonics of a guitar string 26 Worksheet: Standi ng waves in air, closed-end air column 27 Worksheet: Standing waves in air, soprano saxophone 28 Worksheet: Timbre 30 Worksheet: Beats 31 Worksheet: Tuning the guitar Error! Bookmark not defined.
SUBUNIT 3 - HUMAN SPEECH 33 Worksheet: Sound graphs 34 Worksheet: Model of human speech production 37 Worksheet: Sound signal analysis 40 Worksheet: Human speech analysis 41 Worksheet: Human speech synthesis 42
SOUND CLASSROOM MATERIALS
Page 3 of 42
ESTABLISH
WORKSHEETS
SUBUNIT 1 - EXPLORING SOUND

SOUND CLASSROOM MATERIALS
Page 4 of 42
ESTABLISH
Worksheet: How sounds are made? (Part I)
It is not difficult to make sounds but sometimes difficult to see what is happening when sounds are made. Use the objects you have got from your teacher to produce
sounds. For each object record answers to the following questions:
How do I make the object produce the sound?
What is the object doing as it produces the sound?
How long does the sound last?
How can I stop the sound?
Can I change any characteristics of the sound , such as loudness and a pitch? How?
Below you see get some investigation hints for some objects. DRUM SOUNDS
Tiny pieces of paper may be put on the drum. What happens after the drum is hit? What makes the pieces move?
TUNING FORK SOUNDS Hit the tuning fork with a small stick. You can hear the sound. Touch the ends of fork lightly with your fingers. What do you feel?
Now hit the tuning fork once more and put the ends of the fork into a
glass with water. What do you observe? Explain it.
RULER SOUNDS Hold one end of a ruler on the edge of a table. Push down on the other end, and let it go. Try this several times, with various lengths
of the ruler extending over the table. What do you observe?
RUBBER-BAND SOUNDS Pluck a rubber that has been stretched across a box.
Listen carefully and observe what happens? Put a pencil across the top of the box (the short way), under the
rubber band, and pluck again. Do you hear or see any differences? Why or why not?

SOUND CLASSROOM MATERIALS
Page 5 of 42
ESTABLISH
Worksheet: How sounds are made? (Part II)
Here are pictures of several musical instruments. Identify what vibrates to make the
sound.
SOUND CLASSROOM MATERIALS
Page 6 of 42
ESTABLISH
Worksheet: Make sound visible (Part I)
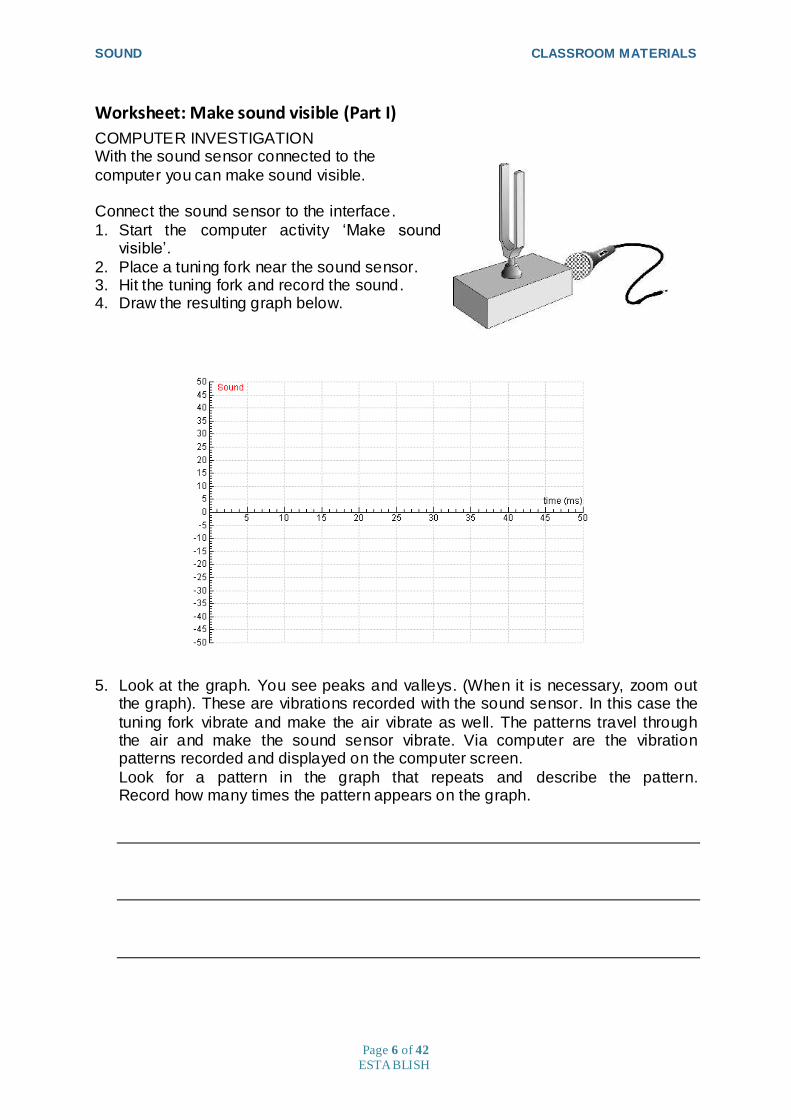
COMPUTER INVESTIGATION With the sound sensor connected to the
computer you can make sound visible. Connect the sound sensor to the interface.
1. Start the computer activity „Make sound visible‟.
2. Place a tuning fork near the sound sensor. 3. Hit the tuning fork and record the sound. 4. Draw the resulting graph below.
5. Look at the graph. You see peaks and valleys. (When it is necessary, zoom out
the graph). These are vibrations recorded with the sound sensor. In this case the
tuning fork vibrate and make the air vibrate as well. The patterns travel through the air and make the sound sensor vibrate. Via computer are the vibration patterns recorded and displayed on the computer screen.
Look for a pattern in the graph that repeats and describe the pattern. Record how many times the pattern appears on the graph.

SOUND CLASSROOM MATERIALS
Page 7 of 42
ESTABLISH
Worksheet: Make sound visible (Part II)
On the graph here one vibration is selected. The time of one vibration is called the period of vibrating.
How frequently a vibration occurs is described by its frequency.
frequency =1
period
The unit of frequency is Hertz (Hz). This indicates the number of vibrations per second. The frequency of 1 Hz means one vibration per second.
With the help of the computer, scan the time for several vibrations and calculate the period of one vibration:
Period of vibration = ______ s (remember, the computer shows time in milliseconds)
Frequency = __________ Hz
INVESTIGATION 1. Hit the tuning fork softly and record the sound graph. Then hit the fork harder and record the sound again. What feature in the graph shows you how loud the sound is?
Check your hypothesis by changing the loudness of the sound.
INVESTIGATION 2.
Take a tuning fork with another tone (pitch). Hit the fork, keep the same loudness and record the sound again. What feature in the graphs shows the different pitch of the
sound?
Check your hypothesis by recording the sound of the tuning fork with another pitch. Compare the frequencies for each pitch. For higher-pitched sounds the frequency is:

SOUND CLASSROOM MATERIALS
Page 8 of 42
ESTABLISH
Worksheet: Analysis of voice sounds (Part I)
OBSERVATION Keep your fingers against your throat and
make a vowel sound. What do you feel?
Now put earplugs in your ears and stand
behind your classmate. Keep your fingers pressed softly against his or her throat. Have your partner make different sounds
while you investigate the feelings of the sounds.
Describe how do you feel the sounds are made.
INVESTIGATION 1. Stretch two rubber bands around a box as shown
below. 2. Pluck the rubber band. You can see it vibrate.
Describe the sound that it makes.
3. Investigate the sound of the rubber band when it is
made looser or tighter. Which pitch is higher the tighter rubber band or the looser rubber band?
4. Your throat muscles pull on your vocal cords, like your fingers pulling on the rubber bands.
The muscles pull less hard on them when you sing a low note,
and pull harder when you sing a high note. Here is a picture of your vocal cords. The yellow part
is your windpipe, which carries air from your lungs to your mouth.

SOUND CLASSROOM MATERIALS
Page 9 of 42
ESTABLISH
Worksheet: Analysis of voice sounds (Part II)
COMPUTER INVESTIGATION Now you are going to record voice sounds with sound sensor and computer.
1. Connect the sound sensor to the interface. 2. Start the computer activity „Analysis of voice sounds‟. 3. Say AAAAA (from word „are‟) and start your measurement while you are making
the sound. 4. Look at the graph. You see a pattern, but it is shaped differently then the pattern
recorded for a tuning fork. (When it is necessary zoom out the graph). Can you see which pattern in the graphs repeats again and again? A tuning fork gives a pure tone, while the voice sounds give a more complicated
vibration pattern. Draw one vibration pattern of your measurement.
5. Investigate different voice sounds:
different vowels sounds, for example: say aaaaaa (from the word „are‟), or say oooo (from word „or‟), eeeee (from „see‟) or other vowels.
high and low sounds,
boy and girl sounds, etc.
Compare the resulting graphs. How are the same and how are they different? Write down your findings below.
(To make fair comparisons always keep the sound sensor at the same distance from your mouth.)

SOUND CLASSROOM MATERIALS
Page 10 of 42
ESTABLISH
Worksheet: How sound travels? (Part I)
How does sound energy travel from the sound source to you ear? Do you have a theory that might explain this process? What evidence do you have for your theory?
The experiments in this lesson will provide evidence to help you build a theory of sound travel.
OBSERVATIONS
1. Can you explain how the sound from outside gets to your ears?
2. Can you hear through walls?
3. Knock at one end of a table while your classmate listens with an ear against the
other end of the table. Can your classmate hear you knocking? Why?
4. If all air in the classroom were replaced with water, could you sti ll hear?

SOUND CLASSROOM MATERIALS
Page 11 of 42
ESTABLISH
Worksheet: How sound travels? (Part II)
INVESTIGATION Your discovery questions are:
Do sounds travel through different materials?
Through which material sound travels the best? Design and describe a fair investigation, which help you to answer these questions.
You can use materials, which you have got from your teacher but you can also use materials and objects in your classroom.
Below describe your investigation, what are you going to measure and how.
Your data sheet:
Answer your discovery questions and explain your reasoning.

SOUND CLASSROOM MATERIALS
Page 12 of 42
ESTABLISH
Worksheet: How fast sound travels? (Part I)
OBSERVATION
Sound takes time to travel from one place to
another. You can see this with lightning or fireworks. First you see a flash of lightning far off in the distance and a little later you hear thunder. But both of them start at the
same moment. Try to explain why you hear the sound later.

SOUND CLASSROOM MATERIALS
Page 13 of 42
ESTABLISH
Worksheet: How fast sound travels? (Part II) COMPUTER INVESTIGATION
In this activity you will measure how fast sound travels. You need a sound sensor
and a 1-m long cardboard or plastic tube. In this measurement you are going to use
so-called „echo‟ method. You make a sound by snapping fingers next to the tube opening. Sound travels in
the tube, reflect off the opposite end of the tube and comes back to the opening
of the tube. The sound sensor first detects the initial sound and then the reflected sound. The round trip traveling time can be read from the graph on the computer screen. From the known distance and traveling
time the speed of sound can be calculated.
1. Connect the sound sensors to the interface. 2. Start the computer activity „How fast sound travels‟. 3. Place the sound sensor at the opening of a tube in a way shown on picture.
4. Start a measurement by clicking Start button. The recording will be started automatically.
5. Snap your fingers near the tube opening. 6. The graph should appear on the computer screen. The first peak is the initial sound;
the second peak is the reflected sound. Read the time of the reflected sound.
Time is: ___________ s (remember computer shows time in milliseconds)
Distance between sound sensors is: ___________ m.
7. Calculate the speed of sound by using the formula: Speed = distance/time
The sound speed in air is ___________ m/s.
You have found the sound speed in air.
Find out by using Internet of other resources the speed of sound in other materials. For example:
Aluminum _____________________________
Iron _____________________________
Glass _____________________________
Water (sea) _____________________________
Water (distilled) _____________________________
Alcohol Methanol _____________________________
Gas Helium _____________________________
Gas Oxygen _____________________________
…. _____________________________
…. _____________________________

SOUND CLASSROOM MATERIALS
Page 14 of 42
ESTABLISH
Worksheet: Hearing sound
You know that sounds start with vibrating objects, which start sound waves in a medium (such as water, wood, or air). But to complete the sound story you need to
know how do you hear the sound? OBSERVATIONS
1. Look at the picture and explain how you can hear sound.
2. What do you think is the purpose of your outer ear?
3. Your eardrum is a piece of skin just like a stretched balloon. It vibrates when sounds reach your ear. Bones that touch the eardrum carry the vibrations to your
inner ear, where they are detected and translated into signals to the brain. Here is a diagram of the ear.
Questions to think about

SOUND CLASSROOM MATERIALS
Page 15 of 42
ESTABLISH
When a compression in a sound wave in the air hits the eardrum, in which direction does the eardrum move?
In which direction does the eardrum moves when an expansion of a sound waves arises?
If you hear a bird sing with a frequency of 2000 vibrations per second, how many times per second does the eardrum vibrates?
How does the ear response to a loud sound differ from its response to a soft sound?
How does the ear response to a high sound differ from its response to a low
sound?
Why sounds aren't as loud when you cover your ear?
How does the ear strengthen the sound waves so that they will be strong enough to affect the liquid of the inner ear?
4. Can we hear all sounds?
If you blow a dog whistle can you hear it? Do you know why?
The human ear typically can hear sounds from sources that vibrate as slowly as 20 vibrations per second (20 Hz) and rapidly as 20 000 vibrations per second. Any sound with frequency below the range of human hearing is known as infrasound; any
sound with frequency above human hearing range is known as ultrasound. Many animals can hear frequencies of sound outside the range of human hearing, see the
table below.
Animal Hearing range
Dog 40 Hz to 46 000 Hz
Rabbit 360 Hz to 42 000 Hz
Cat 45 Hz to 64 000 Hz
Cow 23 Hz to 35 000 Hz
Mouse 1000 Hz to 91 000 Hz
Bat 2000 Hz to 110 000 Hz
Dolphin 70 Hz to 150 000 Hz
Elephant 16 Hz and 12 000 Hz
Which animal(s) can hear higher sounds that people can?
Which animal can hear the widest range of vibrations?
Write down why do you not hear a dog whistle?

SOUND CLASSROOM MATERIALS
Page 16 of 42
ESTABLISH
Worksheet: How loud is too loud? (Part I)
COMPUTER INVESTIGATION In this activity you will use the sound sensor to measure the loudness of the sound.
Such measurement is done with a sound meter. The sound sensor in this activity is calibrated as a sound meter and measures the sound level in decibels.
1. Connect the sound sensor to the interface. 2. Start the computer activity „How loud‟. 3. Measure the sound level of different sound sources. 4. Write down the measurement results in the table below.
Sound source Sound level (dB)
5. Now you are going to investigate what is the best way to stop sound.
6. Open the computer activity „What is the best way to stop sound‟ 7. First you are going to perform the control measurement. You will compare all
other measurement to this one. 8. Place the sound source inside a shoe-box and start a measurement. Be very
silent during the measurements!
9. Cover the sound source with different materials (like cotton wool, different fabrics, egg cartons,
newspaper etc.) and each time record the sound that is coming to the sound sensor. Record the results of your measurements in the table.

SOUND CLASSROOM MATERIALS
Page 17 of 42
ESTABLISH
Insulators Sound level (dB)
Without insulator
10. What happens when you use insulating materials?
11. Which material stops sound most effectively?
12. Which material is the worst at stopping sound?
13. Get two sound source: one should make a high-pitched sound and the other should make a lower sound. Which kind of sound (high or low) is easier to stop?

SOUND CLASSROOM MATERIALS
Page 18 of 42
ESTABLISH
Worksheet: How loud is too loud? (Part II)
Can sounds be dangerous to you? When can sounds be dangerous?
How can people protect themselves
against loud noises?
Research assignment: How loud is too loud?
Loud sounds and loud music can permanently damage your hearing. Find out which
sounds and how can damage your hearing. Write your findings below.

SOUND CLASSROOM MATERIALS
Page 19 of 42
ESTABLISH
WORKSHEETS SUBUNIT 2 - STRING INSTRUMENTS AND WIND
INSTRUMENTS
Worksheet: Resonance
A bucket filled with sand (or another heavy object) is hanging on the ceiling (as shown on the photo).

SOUND CLASSROOM MATERIALS
Page 20 of 42
ESTABLISH
With your team, try to make the hanging object swinging as much as possible. You are not allowed to touch the object and you have one-minute time to make the
vibrations.
1. Try to make the object oscillating with amplitude as large as possible. 2. Determine at which frequency the heavy object is oscillating. This frequency is
called the natural frequency of an object and it is the frequency at which an object oscillates when it is disturbed.
3. What do you think would happen if you blow against the object with the following
frequencies:
f = 0.5 fnatural f = 1.5 fnatural
f = 2 fnatural f = 0.834 fnatural
Explain your reasoning for each given frequency.
4. During your experiment you noticed that a certain way of your blowing is more
effective at making the object swinging. The phenomenon, in which an object oscillates with its natural frequency due to a small force, is called resonance. You can think of resonance as having the natural frequency of the object
oscillations exactly in tune with the frequency of your blowing. 5. The concepts of resonance apply to a huge range of natural and human-made
systems. Find three other examples of resonance and describe these.

SOUND CLASSROOM MATERIALS
Page 21 of 42
ESTABLISH
Worksheet: Fundamental frequency, double bass
In music, certain frequencies are used and other frequencies are avoided. Some instruments can only
produce the preferred frequencies (like a well tuned piano or guitar). Using other instruments (like a violin or double bass), it is still possible to produce all the
frequencies. The bass player has to be sure to only play the specified notes. This means that a bass
player has to put his fingers only on certain parts of the string to produce the right tones.
Using a video of a bass player who plays a simple tune, the position of the left finger of the bass player
is being tracked. With this left finger, the bass player shortens the string and in this way determines the frequency of the tone produced with this finger. The
part of the string below this finger is able to vibrate when plucked. This means that a high position in the diagram corresponds to a long part of the string that
is able to vibrate. In the diagram below only positions of the left finger, at the moments when the right finger
is plucking the string is displayed. This means that each cross in the diagram below corresponds to a tone produced.
Diagram shows the position of the left hand (y-axis) in time (x-axis); each cross
represents a tone produced. The y-coordinate is related to the frequency of the note. 1. Most of the notes are played several times. How many different notes are used in
this song?
2. One tone used is slightly out of tune. The bass player hears this and moves his
finger to adjust his intonation. The next time he plays this tone, it is in tune.
At which moment is the wrong tone played?
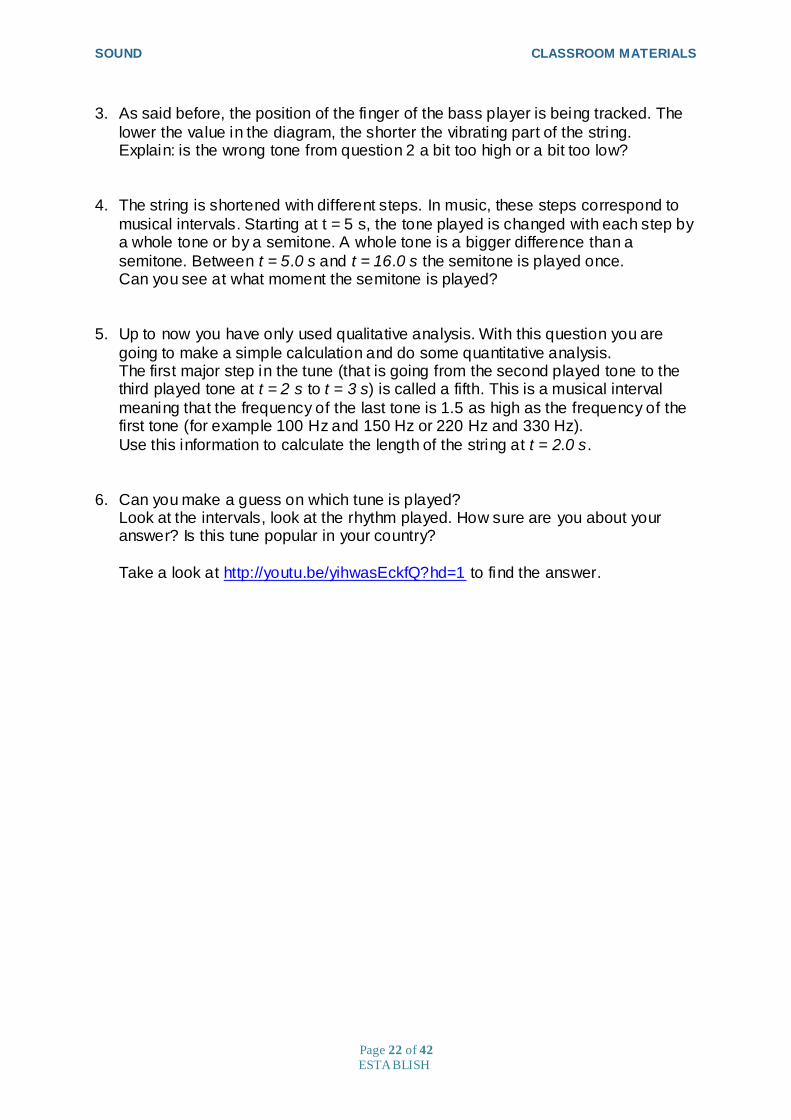
SOUND CLASSROOM MATERIALS
Page 22 of 42
ESTABLISH
3. As said before, the position of the finger of the bass player is being tracked. The
lower the value in the diagram, the shorter the vibrating part of the string. Explain: is the wrong tone from question 2 a bit too high or a bit too low?
4. The string is shortened with different steps. In music, these steps correspond to
musical intervals. Starting at t = 5 s, the tone played is changed with each step by a whole tone or by a semitone. A whole tone is a bigger difference than a
semitone. Between t = 5.0 s and t = 16.0 s the semitone is played once. Can you see at what moment the semitone is played?
5. Up to now you have only used qualitative analysis. With this question you are
going to make a simple calculation and do some quantitative analysis. The first major step in the tune (that is going from the second played tone to the third played tone at t = 2 s to t = 3 s) is called a fifth. This is a musical interval
meaning that the frequency of the last tone is 1.5 as high as the frequency of the first tone (for example 100 Hz and 150 Hz or 220 Hz and 330 Hz).
Use this information to calculate the length of the string at t = 2.0 s.
6. Can you make a guess on which tune is played? Look at the intervals, look at the rhythm played. How sure are you about your answer? Is this tune popular in your country?
Take a look at http://youtu.be/yihwasEckfQ?hd=1 to find the answer.
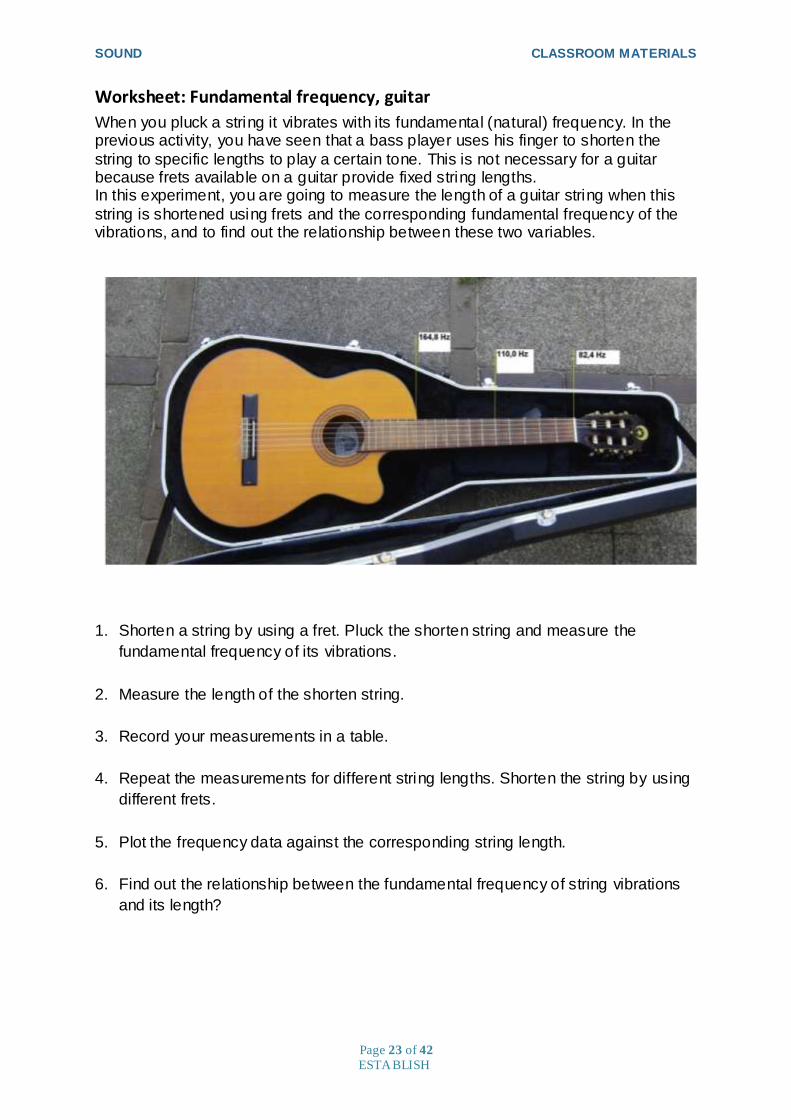
SOUND CLASSROOM MATERIALS
Page 23 of 42
ESTABLISH
Worksheet: Fundamental frequency, guitar
When you pluck a string it vibrates with its fundamental (natural) frequency. In the previous activity, you have seen that a bass player uses his finger to shorten the
string to specific lengths to play a certain tone. This is not necessary for a guitar because frets available on a guitar provide fixed string lengths. In this experiment, you are going to measure the length of a guitar string when this
string is shortened using frets and the corresponding fundamental frequency of the vibrations, and to find out the relationship between these two variables.
1. Shorten a string by using a fret. Pluck the shorten string and measure the
fundamental frequency of its vibrations.
2. Measure the length of the shorten string.
3. Record your measurements in a table.
4. Repeat the measurements for different string lengths. Shorten the string by using
different frets.
5. Plot the frequency data against the corresponding string length.
6. Find out the relationship between the fundamental frequency of string vibrations
and its length?

SOUND CLASSROOM MATERIALS
Page 24 of 42
ESTABLISH
Worksheet: Melde’s experiment
In the previous experiments, you have discovered that each object has its own fundamental frequency. With the double bass and the guitar you have seen that the
fundamental frequency of a string depends on the length of the string. But can the string vibrates with other than fundamental frequencies? In this activity you are going to observe a string, which vibrates with different
frequencies. In your experiment you will use the apparatus shown below.
The function generator drives a mechanical vibrator. A string is attached to the
vibrator at one end and a weight hanger at the other end, stretching over the pulley clamped to the table. The string, which is fixed at both ends, is driven with the same
frequency as the frequency of the function generator. This experiment is called Melde‟s experiment because it was first carried out by the German physicist Franz Melde.
1. Set-up your experiment. Turn the generator and the mechanical vibrator on.
2. Gradually increase the frequency of the vibrations and observe the vibrational
patterns of the string.
3. For some frequencies the vibrational patterns are really stable and have well-
defined segments. These are called resonant standing waves. What do you think
how these waves are created?
4. Determine the frequencies necessary for generating four different vibrational
patterns. Draw the resulting vibrational patterns – resonant standing waves of the
string and write down their corresponding frequency values.
5. Change the tension in the string and repeat the experiment. Again determine the
frequencies necessary to obtain four different vibrational patterns. Compare the
results of these two experiments.
SOUND CLASSROOM MATERIALS
Page 25 of 42
ESTABLISH
The lowest frequency of vibration of a standing wave is the fundamental frequency, (also called the first harmonic). The higher frequencies of vibrations of standing
waves are called harmonics (second, third, forth harmonic).
1. Which of your drawn vibrational patterns represent the pattern for a standing wave with fundamental frequency?
2. Indicate the nodes and antinodes in this standing wave. What is the distance on the standing wave between two nodes?
3. Determine the relation between the length of the string L and the wavelength λ of
the vibration for this standing wave.
4. Which of your drawn vibrational patterns represents the pattern for standing wave
with second, third and forth harmonics? Indicate the nodes and antinodes in each standing wave pattern.
5. For each standing wave determine the relation between the length of the string L and the wavelength λ of the vibration.
6. For each harmonics determine the ratio of its frequency f and the fundamental
frequency f0. How would you describe the relation between these frequencies?

SOUND CLASSROOM MATERIALS
Page 26 of 42
ESTABLISH
Worksheet: Harmonics of a guitar string
When a guitar player presses down on a guitar string at any points, that point
becomes a node and only a portion of the string vibrates. As a result, a single string vibrates with its fundamental frequency and all harmonics of that frequency.
1. Assume that the speed of waves in a particular guitar string is 425 m/s. Determine
the fundamental frequency and the frequency of the 2nd, 3rd and 4th harmonics if
its length is 76.5 cm.
2. Draw the associated standing wave patterns. 3. Watch the following YouTube video: http://youtu.be/4NFljc5mi-s?hd=1.
Observe and explain how the guitar player plays different harmonics.
4. In the similar way produce a couple of harmonics with a guitar by slightly touching the string at the right position.

SOUND CLASSROOM MATERIALS
Page 27 of 42
ESTABLISH
Worksheet: Standing waves in air, closed-end air column
With the Melde‟s experiment you have looked at resonance in strings and found different possible modes of oscillations. In this activity you are going to examine the
resonance frequencies of an air column. The set-up of the experiment is shown on the photo below. A speaker is connected to a function generator which is placed above a tube. The tube is connected to a bottle
and both are filled with water.
1. Explain how the level of water in the tube can be changed.
2. Investigate at which frequencies resonance occurs for a certain air
column length (a certain water level).
3. Record the air column length and
frequencies at which the resonance of the air column can be heard.
4. What is the fundamental frequency and what are the harmonics?
5. Sketch a series of patterns showing
the resonant standing waves that
can be set up in in the air column. This you need to imagine!
6. For each pattern derive expression
for the length of the air column L and
the wavelength λ of the standing wave.
7. For each harmonics determine the ratio of its frequency f and the fundamental
frequency f0. How would you describe the relation between these frequencies?
7. Compare these ratios with the ratios calculated for the string in Melde‟s
experiment. Are these ratios different or similar?
8. Change the length of the air column and find out if the new occurring resonance
frequencies have the same ratio.
1.

SOUND CLASSROOM MATERIALS
Page 28 of 42
ESTABLISH
Worksheet: Standing waves in air, soprano saxophone
Most wind instruments are highly sophisticated tubes which length can be varied. The varying of the length happens with valves, slides or keys.
For these wind instruments, there is a relation between the length of the tube and the frequency that is produced when one blows this instrument. In this activity you are going to take a look at the soprano saxophone.
In the picture below you see a soprano saxophone. The tube is about 72 cm long, when all the keys are closed, the air can only leave the instrument when it passes
these 72 cm1.
1 As you can see in the picture, the line indicating the end of the tube is a little below the
saxophone. This is because the effective length of the tube may be lengthened by 0.5 d where d is the diameter of the tube. You might compare this with the holes. We measure the distance between the mouthpiece and the middle of the hole (and not the upper part of the hole where strictly spoken the air can leave the instrument as soonest).

SOUND CLASSROOM MATERIALS
Page 29 of 42
ESTABLISH
When a key is opened, the air can leave the instrument after a shorter distance. We call this the effective length of the tube. The effective length of a tube is the length
between the point where the air gets in the tube and where the air can leave the tube. In the picture the keys are marked and you can read the frequency (in Hertz)
that corresponds to the effective length of the tube (when the marked key is the first one that is opened). The saxophone is showed twice, from different angles in order to get a good view on the keys.
1. Read the frequency values from the given photo and measure the distance
between the key and the mouthpiece.
2. Record your data in a table.
3. In a third column of your table calculate the effective length of the saxophone
tube. Notice that the distance between the mouthpiece and the end of the
saxophone is 72 cm.
4. Plot a graph showing the relation between effective length and frequency.
5. This effective length may not be as you expect. This is because the soprano saxophone is a conical tube and not a cylindrical one.
Find in literature the relation between effective length and frequency for conical tubes.
6. Check if the data in the photograph can be explained from the theory on conical
tubes.
SOUND CLASSROOM MATERIALS
Page 30 of 42
ESTABLISH
Worksheet: Timbre
When you produce a note on a musical instrument – the string or air column vibrates at its fundamental frequency but the same time there will be several harmonics
(called also overtones) present. The resulting sound wave is a superposition of waves with all these frequencies, and it is the mix that gives the note its particular „quality‟. The combination of fundamental and harmonics, each at different intensities,
determines the sound of a musical instrument called „timbre‟. That is why a trumpet sounds different than a cello.
1. Examine the fundamental frequency and the harmonics occurring in the sound of
a musical instrument.
2. Explain the different harmonics found in the signal.

SOUND CLASSROOM MATERIALS
Page 31 of 42
ESTABLISH
Worksheet: Beats
When two tones of slightly different frequency are sounding together, beats might occur.
1. Explain what beats are, based on literature.
2. Demonstrate the occurring of beats with an experiment using musical
instruments.
3. Find examples of beats that are not related directly to musical instruments.

SOUND CLASSROOM MATERIALS
Page 32 of 42
ESTABLISH
Worksheet: Tuning the guitar
There are different ways to tune the guitar. One way is to use harmonics of strings that are next to each other. Another way is to use resonance between an open string
and a string that is shortened. 1. Describe these different ways of tuning the guitar.
2. Present this to your classmates. Use video or photographs to demonstrate this.

SOUND CLASSROOM MATERIALS
Page 33 of 42
ESTABLISH
WORKSHEETS
SUBUNIT 3 - HUMAN SPEECH

SOUND CLASSROOM MATERIALS
Page 34 of 42
ESTABLISH
Worksheet: Sound graphs
1. It seems that the words 'mama' and 'papa' are the first words we learn to speak. Below you can see a graph of the sound that is produced by a person who
speaks these words. Notice that along the vertical axis of the graph the amplitude of the sound signal is displayed and along the horizontal axis time. As you can see, there are five words spoken.
Can you tell which words are the same? How do you know?
Can you tell when the word 'mama' and when the word 'papa' is spoken?
Listen to the sound file „sound1.mp3‟ to check your answer.
2. With these two syllables, other words can be formed. How many different words
can be made when you use two syllables: 'pa' and 'ma'?
In the graph below, the new words are spoken (perhaps some words are spoken twice).
Name the six words that are spoken here (in the right order).
Listen to the sound file „sound2.mp3 to check your answer.

SOUND CLASSROOM MATERIALS
Page 35 of 42
ESTABLISH
3. Make your own recording of the words 'papa' and 'mama' and analyse this with the use of Audacity software. Mix this with the combinations 'pama' and 'mapa'.
4. Try to think of two other words that might be easy to analyse. Record these words and check if it is indeed possible to identify these two words.
5. Zoom few times a part of your sound graph. How would you describe it?
6. Below you see the graph of four recordings. In each recording, three known
words are spoken. Above the graph, you can read which words but these words are not necessarily in the given order. It is up to you to name the right order for
these three words. Write the three words given at the right place under the graph.
Huey, Dewy, Louie
Knife, Fork, Spoon
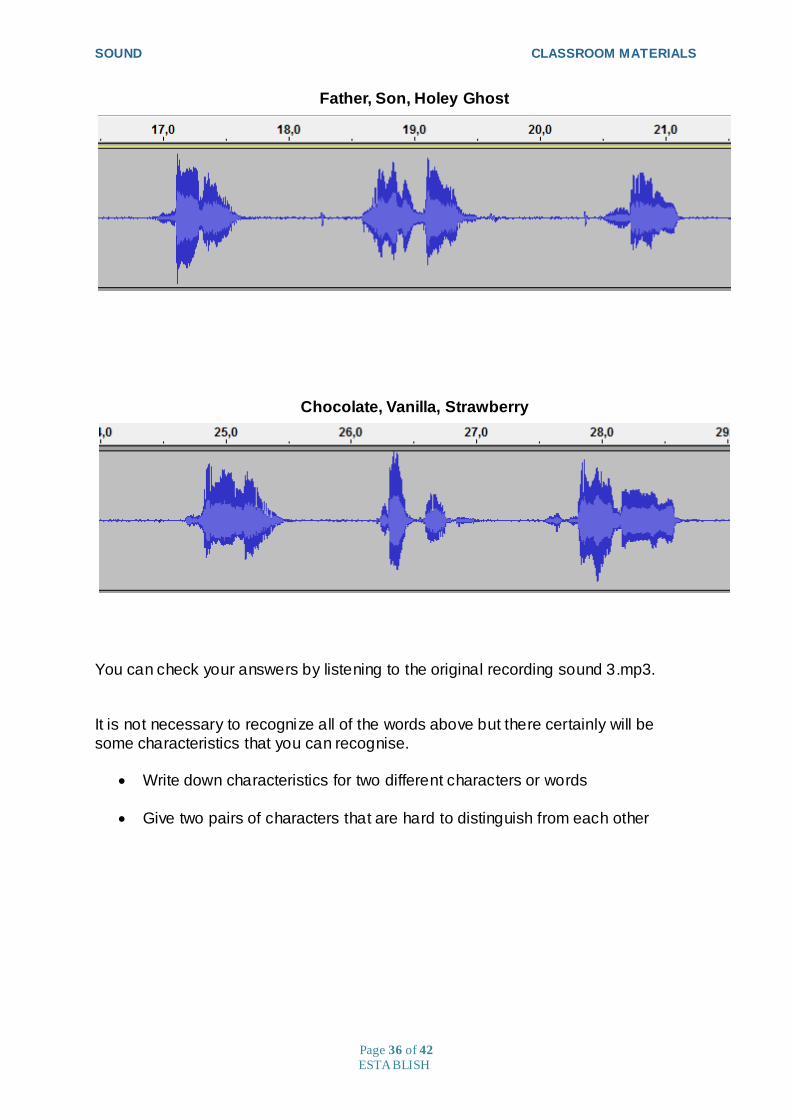
SOUND CLASSROOM MATERIALS
Page 36 of 42
ESTABLISH
Father, Son, Holey Ghost
Chocolate, Vanilla, Strawberry
You can check your answers by listening to the original recording sound 3.mp3.
It is not necessary to recognize all of the words above but there certainly will be
some characteristics that you can recognise.
Write down characteristics for two different characters or words
Give two pairs of characters that are hard to distinguish from each other

SOUND CLASSROOM MATERIALS
Page 37 of 42
ESTABLISH
Worksheet: Model of human speech production
The voice organ is an “instrument” consisting of:
a power supply (the lungs),
an oscillator (the vocal folds), and
a resonator (the vocal track).
The main function of lungs is to produce an excess of air pressure,
thereby generating air stream. The air passes through the larynx, producing a vibration of the vocal
folds (which are often called vocal cords). The frequency of the
vibration is determined by the air pressure in the lungs and by the tension in the muscles that control
the vocal folds (high tension makes the frequency and
therefore the pitch high) and by the mass of the tissue (males usually have larger folds and
therefore deeper voices).2
The vocal folds vibration releases
pulses of air which produce a rapidly oscillation air pressure in
the vocal track (the larynx, the pharynx and the mouth together), in other words sound. It is complex
tone composed of a fundamental frequency (determined by the
vibratory frequency of the vocal folds) and a large number of higher harmonics.
The vocal track is a resonant chamber which acoustics is
determined by the shape of the vocal track, positions of the
articulators: the lips, the jaw, the tongue and the larynx. For a certain shape of the vocal track,
only certain resonant frequencies are amplified and other
2 In an adult male, the vocal folds are usually 17-23 mm long, and 12.5 -17 mm in an adult female.
They may be stretched 3 or 4 mm by action of the muscles in the larynx. The male speaking voice averages about 125 Hz, while the female voice averages about 210 Hz. Children's voices average over 300 Hz.
Figure 2. The vocal folds.
Figure 1. Voice organ

SOUND CLASSROOM MATERIALS
Page 38 of 42
ESTABLISH
frequencies are suppressed. These frequencies are called formants (graph b).
The simplest model of the vocal tract would be to picture it as a single cylindrical tube with one closed end, at the glottis, and one open end, at the mouth. Such a tube can
support standing waves. In such model, the formant frequencies correspond to the
standing wave frequencies in the tube. Below the first four formants are shown as standing waves in cylindrical tubes together with the schematic equivalent of the
vocal track.

SOUND CLASSROOM MATERIALS
Page 39 of 42
ESTABLISH
Formant frequencies manifest themselves in the spectrum of sound signal projected at mouth as peaks in the envelope, and those peaks are characteristics of particular
vowel sound.
a) frequency spectrum of the voice
b) resonance frequencies of the vocal track – formants (A,B,C)
c) the final sound signal projected at the mouth (vowel spectrum).

SOUND CLASSROOM MATERIALS
Page 40 of 42
ESTABLISH
Worksheet: Sound signal analysis
In this investigation you are going to analyse human voice. You need a sound sensor, an interface and software that displays sound waveforms and performs
sound analysis. 1. Start the measurement and hum an “ahhh” sound into the microphone.
2. Do you think the sound wave you produce with your humming has a definite
frequency associated with it? What evidence do you have for your opinion?
3. Now record the sound signal of a tuning fork. How does the sine wave shape
compare with the humming sound wave shape?
A mathematical procedures like the Fourier transform or Linear Prediction can give information about the frequencies present in a periodic signal. Find out how you can
use the Fourier transform and/or Linear Prediction procedure to analyse the sound signals. Find out how you can use the Fourier analyse and Linear prediction to analyse the
sound signals.
4. By using signal analysis tools find out what frequencies are present in the signal of the tuning fork?
5. In similar way find out what frequencies are strong in your "ahhh" sound?
6. Start humming again and without changing the pitch of your voice, change the sound from "ahhh" to "eee" and record “eee”. What happens to the frequencies?
7. Record sounds of different vowels and by using the tools of signal analysis
determine formants of these vowels.
8. How the vowels can be recognized?
9. Using available materials, try out your ideas. Describe the results.
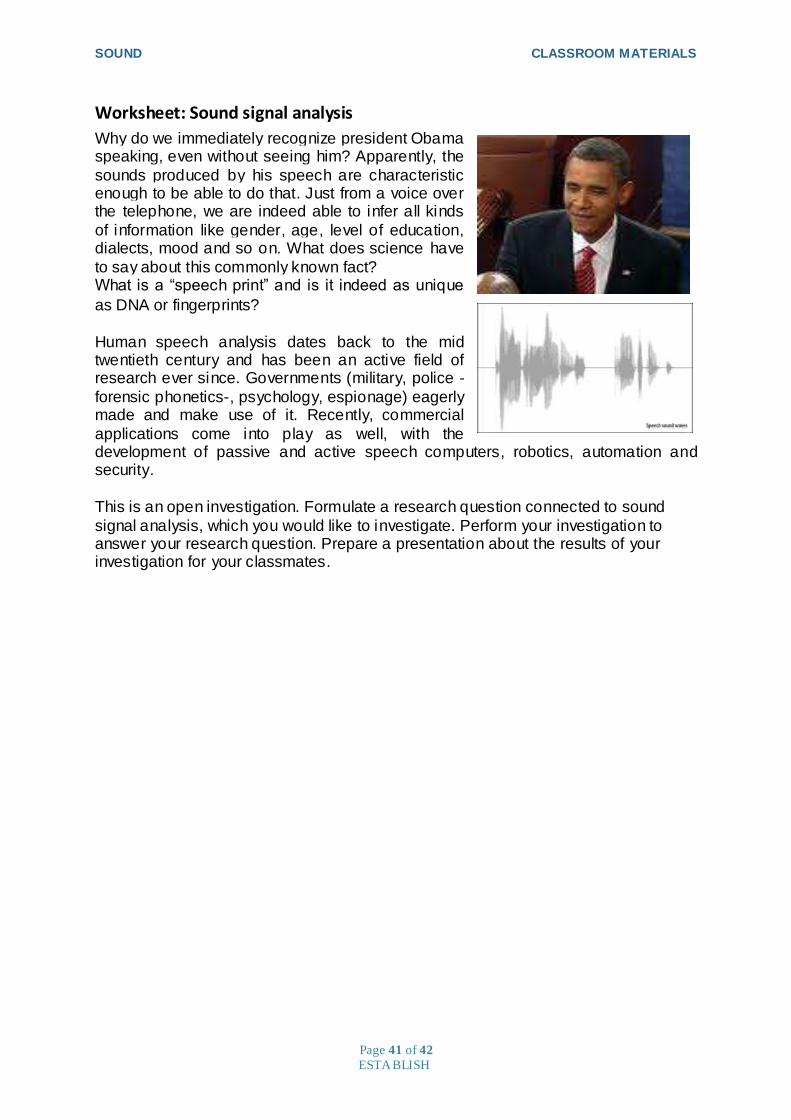
SOUND CLASSROOM MATERIALS
Page 41 of 42
ESTABLISH
Worksheet: Sound signal analysis
Why do we immediately recognize president Obama speaking, even without seeing him? Apparently, the
sounds produced by his speech are characteristic enough to be able to do that. Just from a voice over the telephone, we are indeed able to infer all kinds
of information like gender, age, level of education, dialects, mood and so on. What does science have
to say about this commonly known fact? What is a “speech print” and is it indeed as unique
as DNA or fingerprints?
Human speech analysis dates back to the mid twentieth century and has been an active field of research ever since. Governments (military, police -
forensic phonetics-, psychology, espionage) eagerly made and make use of it. Recently, commercial
applications come into play as well, with the development of passive and active speech computers, robotics, automation and security.
This is an open investigation. Formulate a research question connected to sound
signal analysis, which you would like to investigate. Perform your investigation to answer your research question. Prepare a presentation about the results of your investigation for your classmates.

SOUND CLASSROOM MATERIALS
Page 42 of 42
ESTABLISH
Worksheet: Sound signal synthesis
“… Scientists have attempted to simulate human speech since the late 1700s, when Wolfgang von
Kempelen bui lt a “Speaking Machine”, that used an elaborate series of bellows, reeds, whistles and resonant chambers to produce rudimentary words.
By the 1970s digital computing enables the first generation of modern text-to-speech systems to
reach fairly wide use. Makers of these systems attempted to model the entire speech production process directly, using a relatively small number of
parameters. The result was intelligible, though somewhat robotic-sounding, speech. The advent of
faster computers and inexpensive data storage in the late 1990s made today‟s most advanced synthetic speech possible …”
(“Making Computer Talk”, by A. Aaron, E. Eide, J. Pitrelli, Scientific American, March 2003).
This is an open investigation. Formulate a research
question connected to sound signal synthesis, which you would like to investigate. Perform your investigation to answer your research question. Prepare a presentation about the results of your investigation for your classmates.
Stephen Hawkins is one of the most famous people using speech synthesis to communicate.

Lead partner for Unit: UMEA UNIVERSITET (UMU)
European Science and Technology in Action Building Links with Industry, Schools and Home
Work Package 3 UNIT DISABILITY
Teacher Information
The ESTABLISH project has received funding form the European Community’s Seventh Programme [FP7/2007-2013] under grant agreement n
o 244749
Start Date: 1st January 2010 Duration: 48 months
WP
3
Un
it D
ISA
BIL
ITY

DISABILITY TEACHER INFORMATION
Page 2 of 30
ESTABLISH
Malmö University Margareta Ekborg, [email protected] Maria Sandström, [email protected] Umeå Universitet Christina Ottander, [email protected] Helena Näs, [email protected] Annika Kjellsson – Lind, [email protected]

DISABILITY TEACHER INFORMATION
Page 3 of 30
ESTABLISH
UNIT TITLE: DISABILITY I. Unit description When it is working correctly, we can do the most amazing things with our bodies. We can see birds high in the sky, we can recognize the sound of a fly buzzing in the next room and we can climb, run and jump and pick up small things from the ground with our fingers. We can think of clever ideas, invent fantastic stories, sing and make music. We breathe, our hearts beat, we smell, feel and taste. But sometimes there is a part that does not work perfectly; sometimes not at all. This unit is about the human body when it works and when it does not work perfectly, and what aids there are. The aim is for the students to gain knowledge about the human body and have the chance to learn about, reflect upon and discuss disability.
Photo: Scanpix
Student level: Secondary school Discipline level: Biology, Physics and Technology Estimated duration: 10 – 15 lessons

DISABILITY TEACHER INFORMATION
Page 4 of 30
ESTABLISH
Aim Through working on disabilities related to muscles and movement, pupils are given the opportunity to meet people who work professionally with the natural sciences and technology in this field. During the course of the work, the pupils will acquire knowledge of human biology, physics and technology, as well as of the nature and practice of science. Learning objectives We suggest the following learning objectives, if this unit is to be carried through in its entirety. There are also specific learning outcomes specified for each individual Activity.
At the completion of this unit, pupils should be able to
Formulate their own questions and be able to indicate if they can be answered by carrying out an investigation
Plan, carry out and report on a simple investigation
Reflect on the relationship between disability and handicap, as well as on the opportunities and obstacles presented by a disability
Evaluate the school environment and/or its immediate environs with respect to wheelchair access, and suggest ideas for improvements
Discuss disability in an open manner that is free from prejudice
Identify some areas of relevance to the unit where technicians and scientists work and be able to describe their work and what educational prerequisites there are for this work
Describe and explain how one moves: muscles, skeleton, circulation and nerve impulses
Describe and explain strength and endurance in muscles
Explain respiration, fitness training and aerobic and anaerobic activity
Give physiological explanations for some examples of disabilities
Use competently and correctly the terms lever and torque
Explain how some aids for disability function physiologically and/or physically
Develop a simple aid to solve a given problem using their own ideas It is not the intention that pupils should work on each learning objective in turn, but that the pupils should develop their basic skills in science by carrying out an inquiry-based project. Human rights § 27: Everyone has the right freely to participate in the cultural life of the community, to enjoy the arts and to share in scientific advancement and its benefits.
II. IBSE-Inquiry-Based Science Education
Inquiry-based education, or IBSE, means to identify questions, propose hypotheses, plan investigations, collect data, interpret data and draw conclusions. After this, results are reported and evaluated. All these steps of IBSE are not, perhaps, included in each activity, but rather one or other aspect of IBSE is focused upon. In some Activities, the pupils identify questions and make suggestions/propose hypotheses. In some Activities, they are asked to

DISABILITY TEACHER INFORMATION
Page 5 of 30
ESTABLISH
work in groups to plan, carry out and evaluate investigations of various types. Most Activities include a problem that is to be solved, and in most cases a number of solutions are possible. Several Activities are rather simple and will lead to a short discussion, while others will lead to more or less independent investigations that are to be reported both verbally and in writing. In order to stimulate interest and engagement, we work with illustrations and with problem-solving. It is possible that new questions can arise in the course of the work on these Activities, which gives further opportunities to widen and develop the unit. Working with IBSE is ideal for the use of laptop computers and other digital resources connected with IKT.
III. Pedagogical Content Knowledge As research has revealed that many pupils do not find that science education in schools has relevance for their lives, we have chosen to work with a unit that elicits an emotional response and that has clear connection to life in our society. This has proven to be a way of increasing the pupils’ interest. It is also important to be able to talk about disability and handicap in an open manner and that we are conscious of the fact that conditions in the local environment can make a disability more or less disabling. Most pupils have met people with disabilities – in school, their family or where they live. And many pupils themselves have some kind of disability. The biology content concerns movement – muscles, skeleton and nervous system. It is possible to broaden the content to include more organic systems as, in principle, all of them are involved in movement. To be able perform movement, at a cellular level glucose and oxygen is required. Multi-cellular organisms have organic systems developed to a greater or lesser extent, which can be seen to provide the logistics of supplying the cells with what they need, as well as disposal of waste products. The physics component concerns energy, strength, torque and rest. The technology component concerns rehabilitation. Causes for muscular disability can be - Rheumatism - Spinal injury (various) - Neurological illness such as multiple sclerosis and Parkinson’s disease - Inflammation Common difficulties with concepts that pupils have Any event in the body can be explained on various levels, ranging from individual to organic systems, on organic, tissue, cellular and molecular levels. Pupils often have difficulty in differentiating between and moving between these levels in thought and explanation. Many pupils do not have a holistic view of the incredibly complex coordination that occurs on various levels. Organic systems in multi-cellular organisms do not work independently of each other. It is common to conceptualize the body as a machine and boys in particular tend to see a disability as a fault in the machinery that can/should be repaired1. 1 Reiss, M. J., Tunnicliffe, S. D., Möller Andersen, A. M., Bartoszeck, A.,
Carvalho, G. S., Chen, S.-Y., Jarman, R., Jonsson, S., Manokore, V.,Marchenko, N., Mulemwa, J., Novikova, T., Otuka, J., Teppa, S.& Van

DISABILITY TEACHER INFORMATION
Page 6 of 30
ESTABLISH
The pictures below show how some children at the middle level of the compulsory school have drawn what is inside themselves. What do you think your own pupils’ drawings would look like?
IV. Industrial Content Knowledge We define the industry and commercial sectors in broad terms. They include industries, businesses, research and educational institutions as well as the activities of municipal and county government. One can approach the work with these on two levels. On the local level, one can contact centres that work with disability aids and adaptation of these, which have been developed by scientists and technicians. We therefore recommend a study visit at an aid centre or rehabilitation centre – if possible, one concerned with helping children as we believe it is easier for teenagers to relate to children than to old people. The next level is to make contact with those engaged in developing these aids. Although disability aids centres exist in most municipalities, it can be more difficult to organize a study visit to a factory or development research institution. But it is possible to work with both. At aids centres, disabled people can be assisted with suitable aids for their disability and the individual adaptation of these. A study visit and work in the classroom will probably give rise to many questions. Some of these can be answered by doing internet searches and email contact with various businesses. Another alternative is to invite a person working in this field to talk to the class. How do you go about developing a disability aid? What is necessary? If there are chances for the pupils to test and contribute their ideas, this is ideal.
Rooy, W. (2002). An international study of young people's drawings of what is inside themselves. Journal of Biological Education, Vol. 36:2, 58-64. Knippels, M.C.P.J. (2002). Coping with the abstract and complex nature of genetics in biology education. The yo-yo learning and teaching strategy. Utrecht, The Netherlands: CDβ-Press. Knippels, M.C.P.J., Waarlo, A.J., & Boersma, K. Th. (2005). Design criteria for learning and teaching genetics. Journal of Biological Education, 39, 108–112.
DISABILITY TEACHER INFORMATION
Page 7 of 30
ESTABLISH
V. Learning paths
The table below shows the tasks for pupils that are included in this unit. They are published in the unit document Classroom Materials. Instructions to pupils are included, and we assume that the pupils will write up their activities in their own notebooks.
Activity Subject Connection to the syllabus and main contents
1. Discussion about body fixation, disabilities and handicaps
2. Disability aids Biology Physics Technology
3. Study visit to disability aid centre
Biology Physics Technology
4. Technical aids Technology
5. How do muscles work? Biology
6. The strength and function of muscles
Biology Physics
7. Receptors, nerves and nerve impulses
Biology Physics
8. Why do we breathe? Biology
9. How is the pulse and respiratory rate affected by different activities?
Biology
10. Fitness training Biology
11. Can you cope with a wheelchair at your school?
Biology Physics Technology
12. What does the future hold for the development of disability aids?
Biology Physics Technology
The unit begins with a discussion – Activity 1 – to engage the students in the subject matter and to encourage them to reflect on and discuss a number of important questions. This Activity is designed to make them aware that we are all different and that “handicap” is not a defined concept, but one that is dependent upon how we see ourselves as people, how we define what is “normal” and how we organize our society including our homes, schools and workplaces. This Activity introduces the unit. Questions about disabilities are then present as a continuing theme through the unit. After this introduction, the discussion focuses on disability and movement.

DISABILITY TEACHER INFORMATION
Page 8 of 30
ESTABLISH
After Activity 1, the work can be continued in a number of ways. Activity 2 is a good one
to stimulate thinking about how to alleviate the situation of people with reduced muscle
strength. One alternative can be to prepare the study visit (Activity 3) by encouraging the
pupils to write the questions they wish to ask. Activity 4 can also function to develop the
pupils’ questions and their curiosity. Perhaps they know someone who has personal
experience of technology and restricted movement? If it is possible, a number of pupils can
interview someone who uses the aids described in Activities 2 and 4, about their daily life.
After that, the unit continues with activities that concern the body – Activities 5 – 10. It is also possible to include here some activities or experiments that are usually included in human biology, but please ensure that the exercises are as investigative as possible. The pupils need to formulate questions, investigate, research and read independently. The concept behind Activity 11 is that the pupils should use their knowledge of movement and technology in order to analyze a situation and present their ideas for improvements. In Activity 12, the pupils are to find out about future developmental work. It is possible to link this section with commercial interests/other institutions through the pupils’ internet searches and contact with researchers/developers to ask questions.
VI. Assessment When working with a unit of this type, it is important that its associated assessment is in line with the stated learning objectives, and of course also with relevant policies. It is also important that the pupils are informed at the beginning of the unit about how they are to report on their work and how they are to be assessed.

DISABILITY TEACHER INFORMATION
Page 9 of 30
ESTABLISH
VII. Student learning activities
Activity 1. Discussion about body fixation, disabilities and handicaps Stages of learning cycle Activity
Engagement X
Exploration
Explanation
Extend - Elaborate X
Learning aim: The pupils are to become conscious that body fixation is a cultural construction. They are also to become aware that there are no distinguishable borders between a healthy body, disability and handicap, and that the experience to which a handicap is disabling depends upon the existing circumstances and the values held by people. A disability is not necessarily visible. It is also not necessarily permanent, but can be temporary. Materials: A number of cards with pictures of people who have clear disabilities, who have
disabilities that are not easily seen, and of people without visible disabilities. The pictures are chosen so that it is not clear what the problem is, or if there is a problem. They are contained in a pdf-file. Print the file, laminate it and cut out the pictures so that each group of pupils can have their own set. Naturally you may replace a picture with another if you have a good example. The people in the pictures illustrate the following: 1. Woman in a motor-driven wheelchair 2. Skier with an artificial leg 3. Woman with an artificial brain-controlled right arm 4. Football player with artificial leg 5. Young man with contact lenses, but these are not visible in the picture. He could also
have a psychological handicap or no handicap at all 6. Woman with a hearing-aid 7. Mother and son who have both injured their arms and therefore both in plaster 8. Woman in a wheelchair competing in a race for handicapped athletes 9. Crownprincess Victoria of Sweden testing weelchair basketball 10. Girl with glasses 11. Swimmer. The picture does not show if he has any disabilities Suggestions for use: Begin by asking the following questions of the pupils. Do you know anyone who is perfect? What does it mean to be perfect? You can discuss these questions with the whole class or ask the pupils to talk together in groups of 2 – 3. While discussing the concept of a perfect body, the pupils will almost certainly bring up body fixation. This is not the aim of the exercise, but it is alright to begin in this way so as to challenge their opinions. What is perfect? Who decides? What criteria to you use? What if you wear glasses? A hearing-aid? After that, you can distribute the cards showing people with various degrees of disability. The pictures are chosen to show variation. Ask the following question: When do you have a disability? A handicap?

DISABILITY TEACHER INFORMATION
Page 10 of 30
ESTABLISH
Think about and discuss who of the people on the various cards have disabilities. How do you know? What problems do you think they have? How do they cope with their everyday lives? Do they face difficult situations? Are there any disabilities that are not visible? What disability aids do you know about? These are to be seen as examples of questions that can be asked. Choose then one or two of the pictures to discuss with the pupils. Discuss which disability the person has, what can be difficult or problematic and when this can be the case. What is it like to go for a walk in town, in the forest, to go to the cinema? etc. Are there solutions? (Disability aids, adaptation and accessibility) The questions are to be seen as suggestions, and the discussion can take a number of different courses.

DISABILITY TEACHER INFORMATION
Page 11 of 30
ESTABLISH
Photo: Scanpix
Photo: Scanpix
Photo: Scanpix
Photo: Scanpix

DISABILITY TEACHER INFORMATION
Page 12 of 30
ESTABLISH
Activity 2. Disability Aids
Stages of learning cycle Activity
Engagement X
Exploration X
Explanation X
Extend - Elaborate X
Learning aim: Using their knowledge of physics, the pupils should be able to explain
how/why some disability aids function and which movements are made easier or possible. Subjects: Biology, physics and technology Materials: Everyday aids for disabled people. Products of various types to assist in everyday tasks such as eating and drinking, getting dressed or opening packages; these can be bought in a shop or on the internet. Make available too some different packages that can be difficult to open, for example plastic bottles, glass jars or tins of food and some paper cartons. It is important to use real packages so that the pupils can test them and understand for themselves the functions and describe the physics behind the activity with their own words. Suggestions for use: Divide the class in groups of 3-4 pupils. The task is in three parts.
The first part is about the disability aids
The second part is about opening a common package
The third part is about describing the underlying physical principles Distribute to each group some aids for people with decreased motor skills. The pictures show examples of some aids that can be used:
Ask the pupils to explain what they are and what they are to be used for. What functions do they have? Explain how movement occurs!

DISABILITY TEACHER INFORMATION
Page 13 of 30
ESTABLISH
After this, each group is given a common package to open. The task is to discover how a person with reduced hand strength can open the package with the help of one or other of the objects. Examples of the packages that can be used are:
To conclude the Activity, the pupils are asked to explain and demonstrate the principles for increased hand strength. Theoretically, most cases concern turning around a fixed point. What is to be noticed is that the force used does not work directly at the point at which the result is desired but at some distance from it. The result is dependent upon the degree of force and the distance between the force and the point where the result takes place. This distance is called torque or leverage and is measured at right angles to the force. Note that torque also has a direction – one can turn clockwise or anti-clockwise. This is, therefore, the same principle one uses when a pole or bar is used to lift a stone from a hollow in the ground. The pole functions as a lever; see picture.
Note that the lever always has a fixed point around which the turn occurs . Using a lever is a discovery made in ancient times and is counted – together with the sloping plane, the wedge, the screw and the wheel – amongst the most simple machines. It can be interesting to know that scientists and philosophers in ancient times speculated a great deal about the properties of these simple machines and their use in increasing force.
In order to demonstrate the idea of a lever, you can do the following: Open a door only about 10cm wide and try pressing against the door close to the hinge. Note the amount of force required to open the door further. Then try pressing against the edge of the door and compare how much force is required in these two situations. When is least force required? The correct answer is, that least force is required when one presses against the edge of the door. The lever in this case is the complete breadth of the door.
Force Increased force

DISABILITY TEACHER INFORMATION
Page 14 of 30
ESTABLISH
Activity 3. Study visit to a disability aids centre Stages of learning cycle Activity
Engagement X
Exploration X
Explanation X
Extend - Elaborate X
Learning aim: The pupils are to learn what reduced motor function can mean and
understand and discuss the relationship between reduced movement and handicap. The pupils should also acquire knowledge about which professions are represented at the workplace, what one does within various professions and what educational training is required. They are also to become familiar with some disability aids and be able to explain how these work. Subjects: Biology, physics and technology Suggestions for use: The study visit can be carried out with the whole class or in smaller groups. Ideally, try to find more than one place to visit or carry out the visit at various times. Introduce the visit to the class by discussing what the pupils think about, what expectations they have, what disability aids they think they will see and test, what people they think they will meet and what work activities they think these people have. Give the pupils the task of finding out more by doing a search on the internet or by speaking to someone they know who is well-informed on the subject. Ask the pupils to formulate questions to ask during the visit. After the study visit, the pupils are to report using text, pictures or film. Choose a suitable computer program for this work, such as PowerPoint or Photo Story. Suggestions for content:
- What disability aids did I try and how do these help the patients? - What new things did I learn? - I would like to know more about…
Hopefully, the pupils will have seen and tried out a wheelchair during their study visit. Present this Activity to the pupils: Adam is a teenage boy confined to a wheelchair. He has a congenital spine injury and cannot move from the waist down. He wants his school and home life to be fun, to be able to play basketball, compete in wheelchair races, etc. Activity: Imagine that you work at a disability aids centre and have been given the task of developing a suitable wheelchair for Adam. What do you suggest, based on what you have seen, to help Adam as much as possible? Is one wheelchair enough, or does he need more than one? This task can be reported on in text and in pictures, together with the report on the study visit.
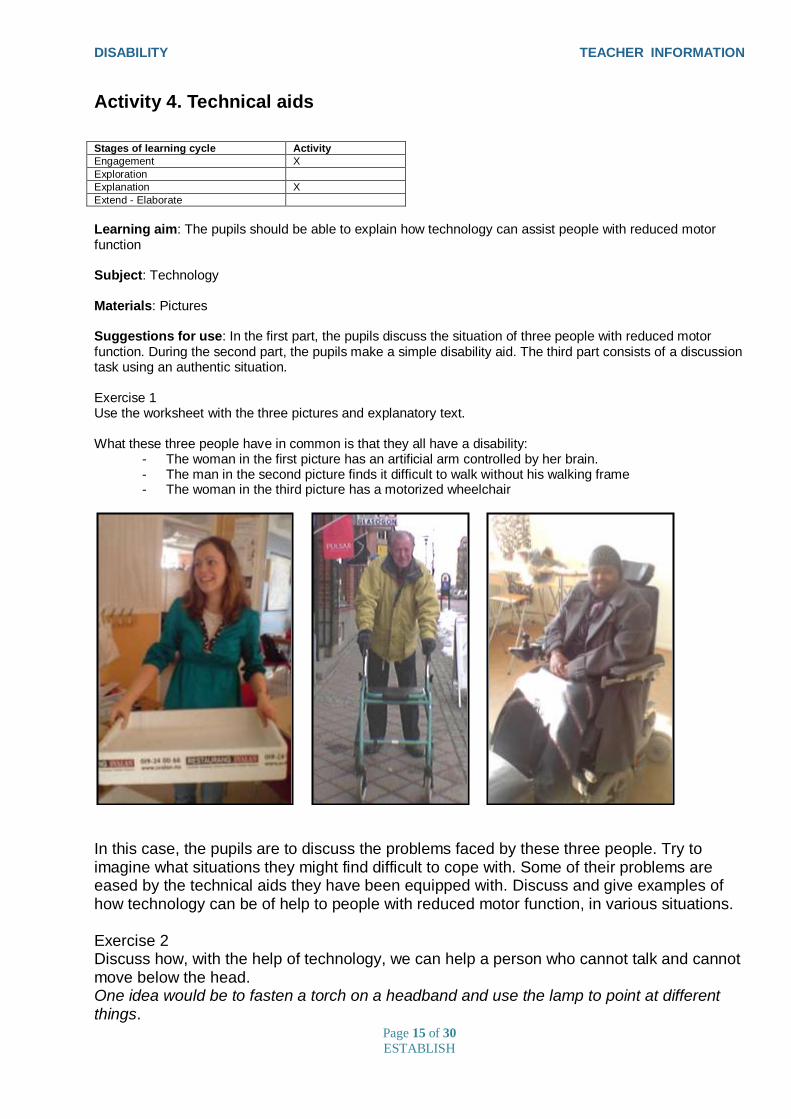
DISABILITY TEACHER INFORMATION
Page 15 of 30
ESTABLISH
Activity 4. Technical aids
Stages of learning cycle Activity
Engagement X
Exploration
Explanation X
Extend - Elaborate
Learning aim: The pupils should be able to explain how technology can assist people with reduced motor function Subject: Technology Materials: Pictures Suggestions for use: In the first part, the pupils discuss the situation of three people with reduced motor function. During the second part, the pupils make a simple disability aid. The third part consists of a discussion task using an authentic situation. Exercise 1 Use the worksheet with the three pictures and explanatory text. What these three people have in common is that they all have a disability:
- The woman in the first picture has an artificial arm controlled by her brain. - The man in the second picture finds it difficult to walk without his walking frame - The woman in the third picture has a motorized wheelchair
In this case, the pupils are to discuss the problems faced by these three people. Try to imagine what situations they might find difficult to cope with. Some of their problems are eased by the technical aids they have been equipped with. Discuss and give examples of how technology can be of help to people with reduced motor function, in various situations. Exercise 2 Discuss how, with the help of technology, we can help a person who cannot talk and cannot move below the head. One idea would be to fasten a torch on a headband and use the lamp to point at different things.
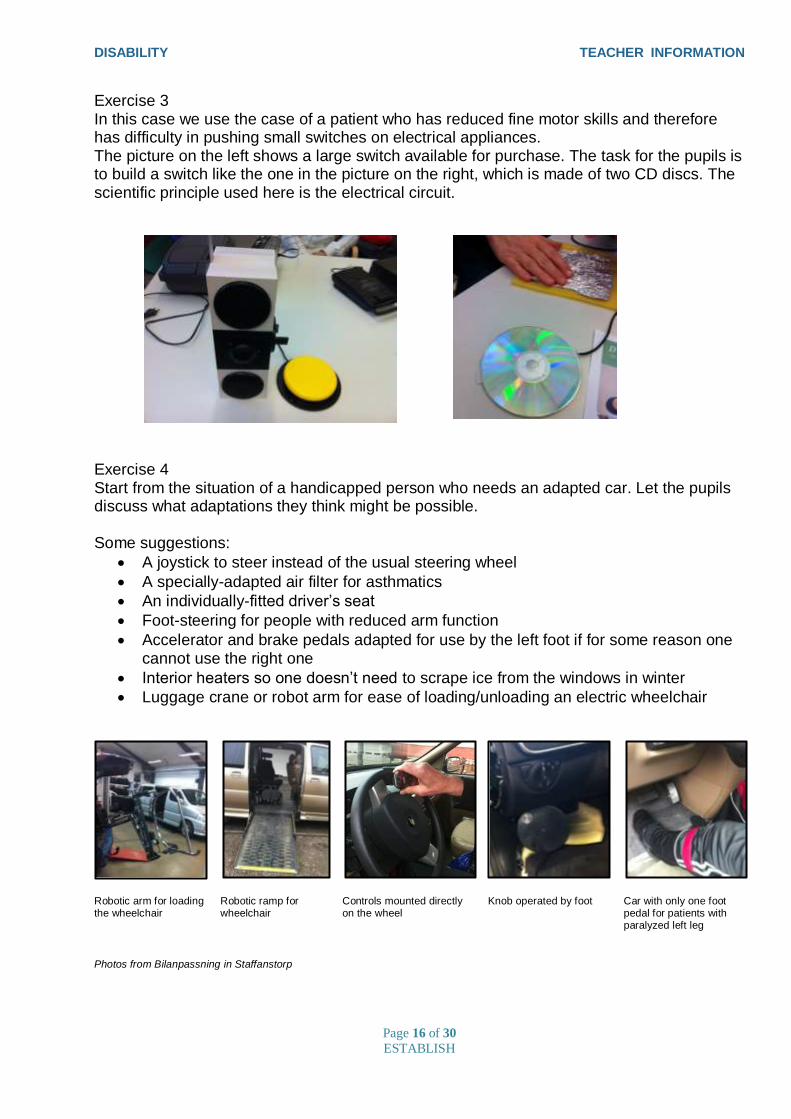
DISABILITY TEACHER INFORMATION
Page 16 of 30
ESTABLISH
Exercise 3 In this case we use the case of a patient who has reduced fine motor skills and therefore has difficulty in pushing small switches on electrical appliances. The picture on the left shows a large switch available for purchase. The task for the pupils is to build a switch like the one in the picture on the right, which is made of two CD discs. The scientific principle used here is the electrical circuit.
Exercise 4 Start from the situation of a handicapped person who needs an adapted car. Let the pupils discuss what adaptations they think might be possible. Some suggestions:
A joystick to steer instead of the usual steering wheel
A specially-adapted air filter for asthmatics
An individually-fitted driver’s seat
Foot-steering for people with reduced arm function
Accelerator and brake pedals adapted for use by the left foot if for some reason one cannot use the right one
Interior heaters so one doesn’t need to scrape ice from the windows in winter
Luggage crane or robot arm for ease of loading/unloading an electric wheelchair
Robotic arm for loading the wheelchair
Robotic ramp for wheelchair
Controls mounted directly on the wheel
Knob operated by foot
Car with only one foot pedal for patients with paralyzed left leg
Photos from Bilanpassning in Staffanstorp

DISABILITY TEACHER INFORMATION
Page 17 of 30
ESTABLISH
Technological developments take place all the time and it is easy to find newspaper
articles, television reports and films on www.youtube.com (search tips: artificial hand,
artificial arm, etc.)
Other recommended links:
Bilanpassning in Staffanstorp http://www.bilanpassning.com/
Life without limitations www.ossur.se/
Ortopedteknik www.teamortopedteknik.se/
Dahjm/Dumle/Datatek www.dahjm.se
Sveriges provnings- och forskningsinstitur http://www.sp.se/en/Sidor/default.aspx
Certec www.certec.lth.se/
Paralympic movement http://www.paralympic.org/index.html
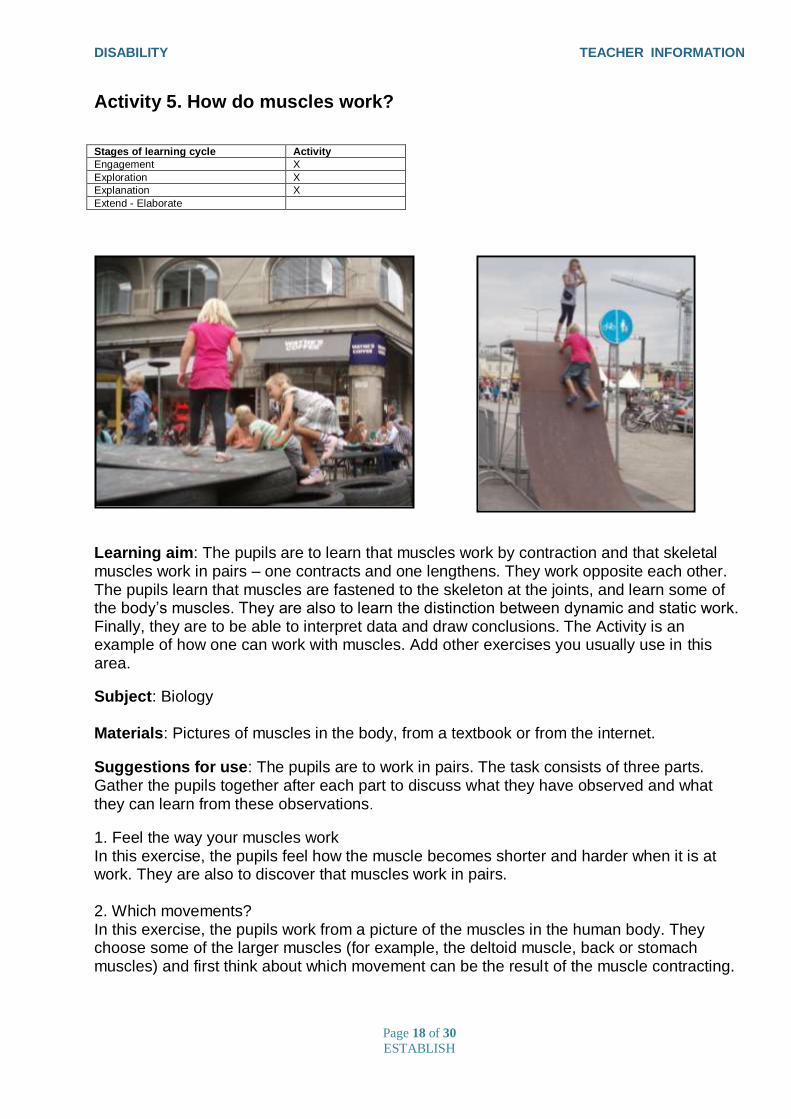
DISABILITY TEACHER INFORMATION
Page 18 of 30
ESTABLISH
Activity 5. How do muscles work?
Stages of learning cycle Activity
Engagement X
Exploration X
Explanation X
Extend - Elaborate
Learning aim: The pupils are to learn that muscles work by contraction and that skeletal muscles work in pairs – one contracts and one lengthens. They work opposite each other. The pupils learn that muscles are fastened to the skeleton at the joints, and learn some of the body’s muscles. They are also to learn the distinction between dynamic and static work. Finally, they are to be able to interpret data and draw conclusions. The Activity is an example of how one can work with muscles. Add other exercises you usually use in this area.
Subject: Biology
Materials: Pictures of muscles in the body, from a textbook or from the internet.
Suggestions for use: The pupils are to work in pairs. The task consists of three parts. Gather the pupils together after each part to discuss what they have observed and what they can learn from these observations.
1. Feel the way your muscles work In this exercise, the pupils feel how the muscle becomes shorter and harder when it is at work. They are also to discover that muscles work in pairs. 2. Which movements? In this exercise, the pupils work from a picture of the muscles in the human body. They choose some of the larger muscles (for example, the deltoid muscle, back or stomach muscles) and first think about which movement can be the result of the muscle contracting.
DISABILITY TEACHER INFORMATION
Page 19 of 30
ESTABLISH
The idea is that the pupils are to use their own bodies to be more conscious about it and learn how it works. They work in pairs so that they can discuss their observations. The task is not to investigate each other’s bodies. Gather all the pupils together after 15 minutes and discuss the results all together. Ask them to explain how it feels when the muscles are at work. They have almost certainly observed the movement of the tendons in the arm when they move their fingers. Compare how it feels when a muscle works statically and when it works dynamically. Discuss explanations for this. What is happening to the muscle? (There are more investigations about muscles in Activity 7) 3. Stretching Discuss stretching with the pupils and ask them if they can think of any exercises one usually does when stretching. Such exercises can be found on the internet. An example: http://www.musclesprod.com/bodybuilding/bodybuilding-stretching-exercises-for-strength-training/ When muscles are at work, they are thicker and shorter. This is why it is said to be important to stretch after training. Short muscles can lead to deformities in the body. It is also said that stretching prevents muscle pain after training. Both these ideas are disputable and there is no evidence to show that this is truly the case. The best way to avoid muscle pain after training is to warm up properly before the activity, and when finishing exercise, to stop gradually rather than stop suddenly.

DISABILITY TEACHER INFORMATION
Page 20 of 30
ESTABLISH
Activity 6. The strength and function of muscles Stages of learning cycle Activity
Engagement X
Exploration X
Explanation X
Extend - Elaborate X
Learning aim: The pupils are to learn that the skeletal muscles work in pairs with one that contracts and one that relaxes or lengthens. Muscles are fastened to the skeleton on different sides of the joint. Their strength depends on the size of the muscle and the distance between the joint and the point at which the muscle is attached.
Subjects: Biology and physics
Materials: Diagrams of a muscle, Meccano (or similar) and a dynamometer or steel spring.
Suggestions for use: During the course of this activity, it is highly likely that questions
about building up muscles will arise. In that case, it is appropriate to discuss types of training for strength - if one wants to build large, strong muscles or to build up more endurance. To achieve large, strong muscles, one must load the muscles to engage more muscle cells in the exercise. To build big muscles, all the cells in the muscle must become larger. If the goal is to build up more endurance, the muscles must loaded more moderately, but over many exercises. While one is still growing, the best thing is simply to work with one’s own body as the load.

DISABILITY TEACHER INFORMATION
Page 21 of 30
ESTABLISH
Ask the pupils to discuss each of the pictures in terms of strength and function. Which muscle is the strongest? What are the advantages and disadvantages of each of these possible examples?
Muscles work according to the principle of leverage. In figure A, the muscle doesn’t work at all, as it is connected to the same bone at both ends. There is no leverage. In principle, Figure C shows the strongest muscle, as the distance between the point of connection and the joint is the greatest. On the other hand, with arm muscles like this, one would be so clumsily built it would be difficult to move with ease.
In order to demonstrate the physics explanations, one can work with Meccano either in metal or in wood. Ask the pupils to construct a model of an arm with the muscles attached according to the picture on the left. Use a dynamometer and compare which of the three examples A – C gives the strongest muscle: that which performs the most work.
A B C

DISABILITY TEACHER INFORMATION
Page 22 of 30
ESTABLISH
Activity 7. Receptors, nerves and nerve impulses
Stages of learning cycle Activity
Engagement X
Exploration X
Explanation X
Extend - Elaborate X
Learning aim: The pupils are to learn to describe how the nervous system works, and how it reacts to both outer and inner stimuli. They are also to learn that certain disabilities are caused by neurological disorders. The pupils are to understand the difference between the central and the peripheral nervous systems. The pupils should also be able to plan an investigation where both sensory neurons and motor neurons are studied. The pupils should also learn to appreciate that different materials feel differently, even if they have the same temperature, because of the varying heat transferring capacity. The investigations are to include the formulation and testing of hypotheses, the collection of relevant data and the evaluation of its validity, and the drawing of conclusions from the investigation. Subjects: Biology and physics Materials: Time-piece (watch, mobile telephone), ice water, warm water, paper clips, ice cubes. Suggestions for use: This Activity consists of four exercises. The two first exercises
concern receptors and the sense of touch, but also the capacity of heat transfer in various materials. The picture of the conversation in the sauna can be used as an introduction to “How does the sense of touch work?”, about receptors in exercise 1. Judging temperature using touch is difficult. Exercise 2 describes an attempt to show that judging temperature is relative. Exercise 2b is included as an example of how one can integrate a task in physics to illustrate further why the feel of temperature is relative. There are advantages in doing this, as some neurological disorders can be compared to the capacity of different materials to transfer heat, ie that certain disorders cause nerve impulses to be transported at a slower rate (and with decreased accuracy). The two last exercises concern nerve impulses and how these and the central nervous system can cause phantom pain, amongst other things.
1. In the first exercise, the pupils plan an investigation where they study various types of sensory cells and if these are evenly distributed on the hand. In order to help the pupils initiate their work, the teacher can ask questions such as:
- Are there different types of receptors to feel heat and cold? - Where are the sensory cells on the hand? - Are there areas where sensory cells are more densely situated?
To investigate the distribution of receptors that feel cold and heat, the following can be tried: use a sharp object that is warmed in hot water or chilled in iced water, and draw the object along a line on the hand. Mark where the receptors are found. It is important that the hot/cold object is dry when it is used.

DISABILITY TEACHER INFORMATION
Page 23 of 30
ESTABLISH
2. The sauna - How does the sense of temperature work?
The picture above is an example of how difficult it is to judge temperature using touch. We have all been puzzled from time to time about how different it feels to touch objects with different heat transferring capacity. Wood has a lower heat transfer capacity than the metal in the nails. Another way of showing this is to compare the time it takes for ice to melt on a metal tray or on a piece of wood. The different construction of materials and the varying properties this gives them can affect our receptors in different ways. 3. In Activity 3, the pupils are to carry out an investigation where they calculate how fast a nerve impulse is. We suggest here that the groups are given various ways of how to go about their work. For example, groups with varying numbers of students can stand in a ring or in a row at arm’s length from each other, each with a hand on the shoulder of the pupil in front. A reaction chain is built by squeezing the shoulder of the person in front as soon as it is felt from behind. Ways of varying this are possible. The pupils carry out this investigation, and in order to practice evaluating their results and arguing for alternatives, they present their results to other groups, or similar. They can discuss reasons why the results differ and what might cause this. How much concentration is necessary? Is it better to close your eyes? Each group is to agree on how the investigation can be improved, considering the length of the chain, the number of investigations carried out, the calculations, concentration, etc. Questions that can be asked of the pupils are:
- Did you get similar results?
- Have the groups carried out the investigation in the same way? - Which investigation worked best? - Why?
Allow the students to plan a new investigation where they take advantage of their experience of the first one. 4. In the fourth exercise, the pupils work with phantom pain. Phantom pain is pain that seems to come from an amputated limb. The pain is real and arises from stimulus to the nerves that have been severed. That the pain is incorrectly attributed to an absent limb is caused by the signals from the remaining fragments of the nerves being interpreted by the central nervous system – i.e. the spinal cord and finally the brain – as coming from the amputated limb. It is not always so that the pain is experienced as common pain, but can present as an irritating itch, heat or cold and can vary between individuals. Allow the students to investigate how phantom pain can occur and how it feels by asking them to put their elbow in a bucket of ice water for some minutes. Ask the pupils to read an article on the internet or from a journal where the latest research findings on phantom pain are described.
Yes, I know, they are really hot.
Watch out for the nails on the sauna bench!
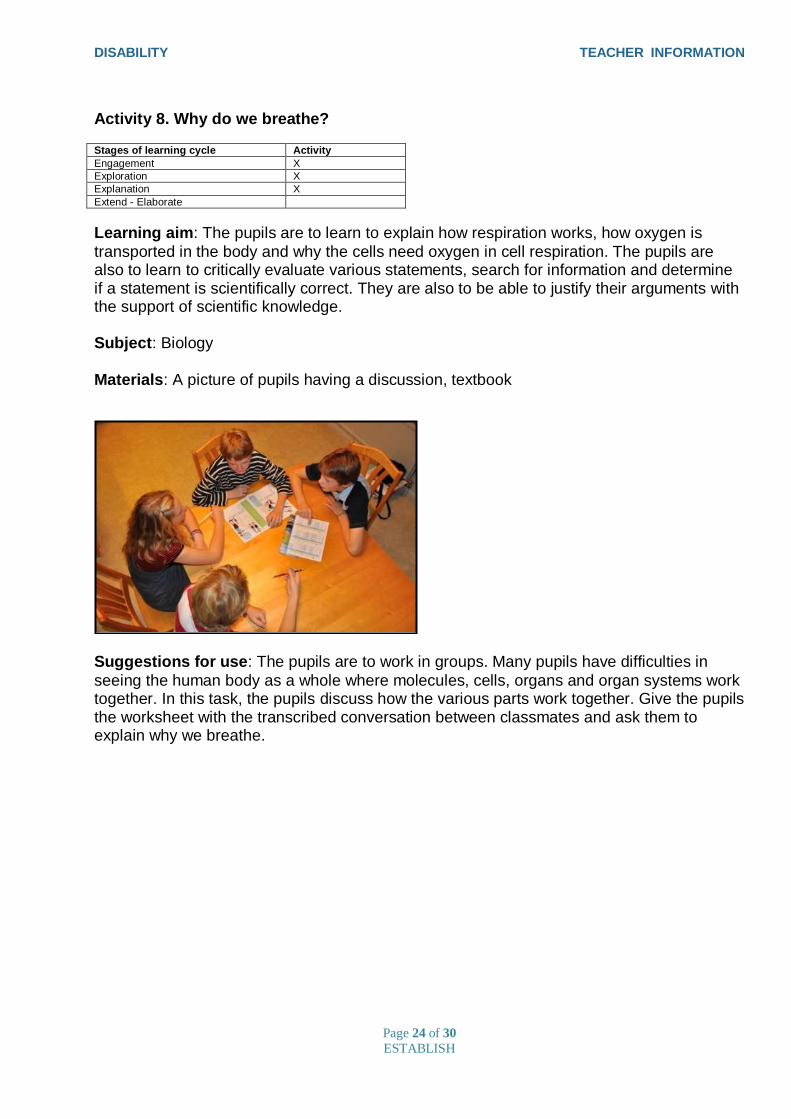
DISABILITY TEACHER INFORMATION
Page 24 of 30
ESTABLISH
Activity 8. Why do we breathe? Stages of learning cycle Activity
Engagement X
Exploration X
Explanation X
Extend - Elaborate
Learning aim: The pupils are to learn to explain how respiration works, how oxygen is
transported in the body and why the cells need oxygen in cell respiration. The pupils are also to learn to critically evaluate various statements, search for information and determine if a statement is scientifically correct. They are also to be able to justify their arguments with the support of scientific knowledge. Subject: Biology
Materials: A picture of pupils having a discussion, textbook
Suggestions for use: The pupils are to work in groups. Many pupils have difficulties in
seeing the human body as a whole where molecules, cells, organs and organ systems work together. In this task, the pupils discuss how the various parts work together. Give the pupils the worksheet with the transcribed conversation between classmates and ask them to explain why we breathe.

DISABILITY TEACHER INFORMATION
Page 25 of 30
ESTABLISH
Activity 9. How is the pulse and respiratory rate affected by different activities? Stages of learning cycle Activity
Engagement X
Exploration X
Explanation X
Extend - Elaborate X
Learning aim: The pupils are to be able to investigate how the pulse and breathing vary during different activities and to be able to report these results graphically. The pupils are to explain why we need oxygen and realize that we need more oxygen the more work we undertake. They are also to be able to explain the difference between aerobic and anaerobic respiration, and to explain the connection between pulse rate and rate of breathing during and after physical activity. Subject: Biology
Materials: Timepiece (watch, mobile telephone), stairs, computer or graph paper. Suggestions for use: This task gives the pupils the opportunity to plan an investigation and present the data from their experiment graphically. The task is to identify how the pulse and breathing rate vary during different activities, as well as to explain their results. It would be advantageous to carry out this task with the cooperation of the physical education teacher. The pupils work in pairs. It can be a good idea to introduce the exercise in a broader context in order to make it more stimulating and to motivate the pupils. For example, one can use a particular sport as a starting point or ask the question “What makes you breathe faster?” The task consists of several parts: 1. Begin by asking the pupils to consider what they think will happen to breathing and the
pulse rate during various activities. Is it just the frequency of breathing which changes under stress? The size of each breath? How quickly does one recover after an activity?
2. Discuss how one can measure pulse and the breathing rate. How should one collect data? How long should one keep measuring? How can one present the results so that they are easy to compare?
3. Plan and carry out an investigation. 4. Let the pupils compare each other’s results and discuss these with the whole class. Why
is there some variation? Discuss the advantages and disadvantages of doing the investigation with a number of participants.
The pupils are to plan and carry out an investigation where they study the connection between pulse and breathing during static muscle activity and dynamic muscle activity and subsequent rest. Dynamic activity is aerobic as the blood circulates through the muscles. Static activity is anaerobic as one hinders the blood supply and the muscles have to work anaerobically when the oxygen supply has expired. Compare, for example, the exercise “step up” with “sit against the wall”. In the diagram below, an example is given of how some pupils have reported the results of the aerobic activity. The diagram shows that the pulse rate and breathing rate changes over time when various activities are carried out. If the heart beats more times per minute, we also take more breaths. This is because the heart pumps the oxygen into the body and when it pumps more oxygen we also need to breathe in more oxygen. This is the case in
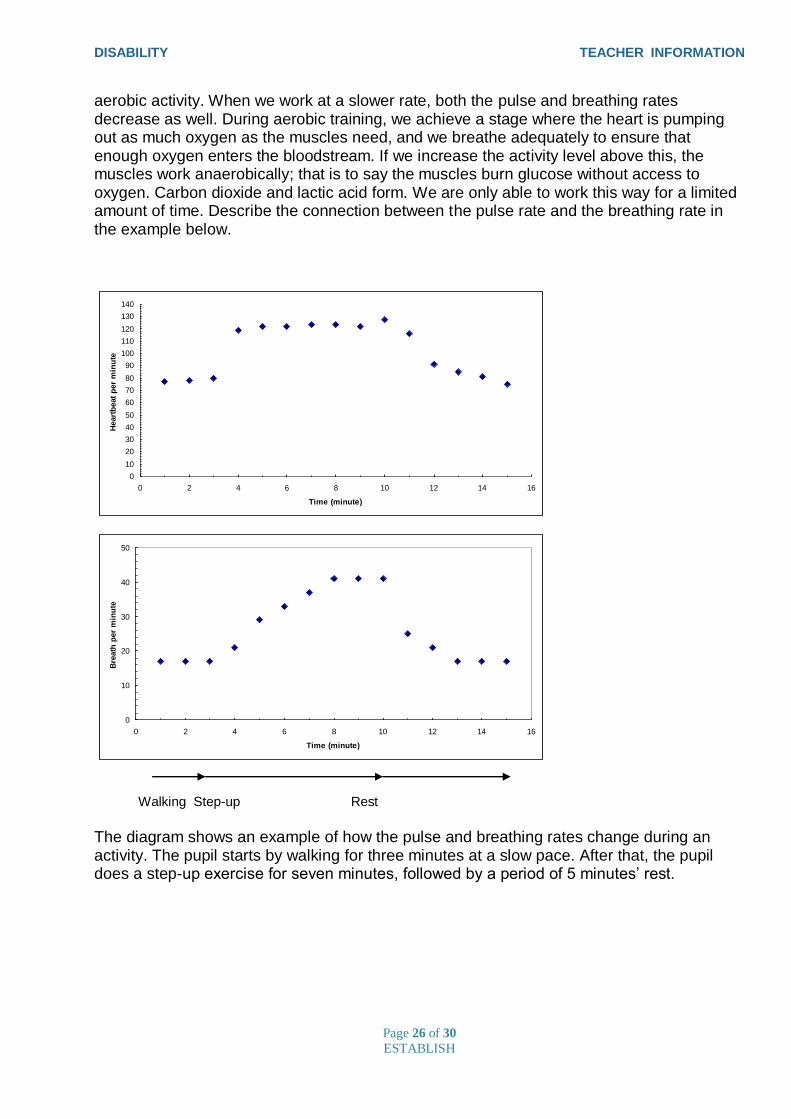
DISABILITY TEACHER INFORMATION
Page 26 of 30
ESTABLISH
aerobic activity. When we work at a slower rate, both the pulse and breathing rates decrease as well. During aerobic training, we achieve a stage where the heart is pumping out as much oxygen as the muscles need, and we breathe adequately to ensure that enough oxygen enters the bloodstream. If we increase the activity level above this, the muscles work anaerobically; that is to say the muscles burn glucose without access to oxygen. Carbon dioxide and lactic acid form. We are only able to work this way for a limited amount of time. Describe the connection between the pulse rate and the breathing rate in the example below.
Walking Step-up Rest
The diagram shows an example of how the pulse and breathing rates change during an activity. The pupil starts by walking for three minutes at a slow pace. After that, the pupil does a step-up exercise for seven minutes, followed by a period of 5 minutes’ rest.
0
10
20
30
40
50
60
70
80
90
100
110
120
130
140
0 2 4 6 8 10 12 14 16
Time (minute)
Heart
beat
per
min
ute
0
10
20
30
40
50
0 2 4 6 8 10 12 14 16
Time (minute)
Bre
ath
per
min
ute
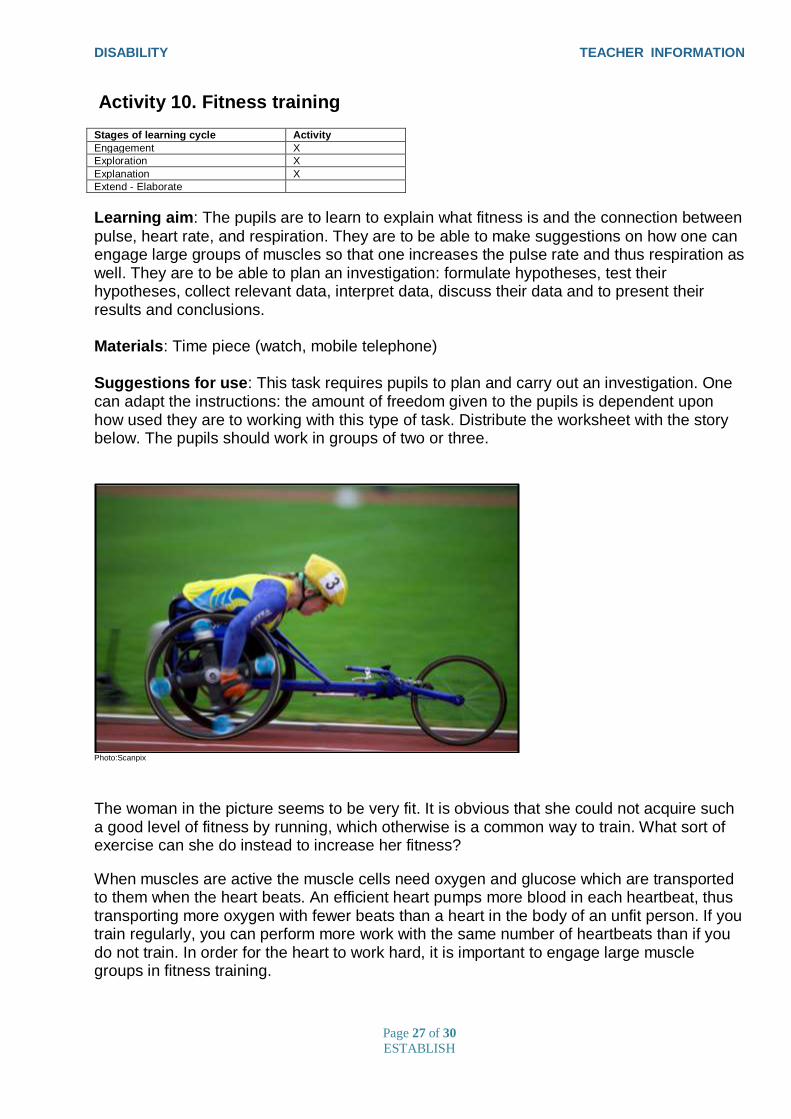
DISABILITY TEACHER INFORMATION
Page 27 of 30
ESTABLISH
Activity 10. Fitness training Stages of learning cycle Activity
Engagement X
Exploration X
Explanation X
Extend - Elaborate
Learning aim: The pupils are to learn to explain what fitness is and the connection between
pulse, heart rate, and respiration. They are to be able to make suggestions on how one can engage large groups of muscles so that one increases the pulse rate and thus respiration as well. They are to be able to plan an investigation: formulate hypotheses, test their hypotheses, collect relevant data, interpret data, discuss their data and to present their results and conclusions. Materials: Time piece (watch, mobile telephone) Suggestions for use: This task requires pupils to plan and carry out an investigation. One can adapt the instructions: the amount of freedom given to the pupils is dependent upon how used they are to working with this type of task. Distribute the worksheet with the story below. The pupils should work in groups of two or three.
Photo:Scanpix
The woman in the picture seems to be very fit. It is obvious that she could not acquire such a good level of fitness by running, which otherwise is a common way to train. What sort of exercise can she do instead to increase her fitness?
When muscles are active the muscle cells need oxygen and glucose which are transported to them when the heart beats. An efficient heart pumps more blood in each heartbeat, thus transporting more oxygen with fewer beats than a heart in the body of an unfit person. If you train regularly, you can perform more work with the same number of heartbeats than if you do not train. In order for the heart to work hard, it is important to engage large muscle groups in fitness training.

DISABILITY TEACHER INFORMATION
Page 28 of 30
ESTABLISH
1. Firstly, discuss with the pupils what fitness and fitness training is. What is a normal pulse at rest, and how high can the pulse rise? Then discuss what one can do to increase the heartbeat rate - and therefore respiration – without using the muscles in the legs.
2. Hypothesis The pupils write down their hypotheses
3. Planning an investigation Divide the pupils into groups. Now they need to agree on testing some of their hypotheses. The pupils must decide which activities they are to do, what they are to measure (pulse), how they are to measure it, whereabouts on the body and how many times. It is more interesting if the groups do different types of investigations. Should they do a series of measurements on one person, or should several people do the same thing? It is important that the pupils test only one variable at a time.
4. Data collection The pupils carry out the measurements they have planned, and record their results
5. Interpreting and discussing the data Give the pupils sufficient time to discuss their data and the way it has been collected. What did they measure? What differences did they observe and what can have caused these? Where the pulse was measured? The differences between individuals? The differences between the various series of measurements? Differences between the activities? Did they measure the right thing? Did they measure carefully enough? It is also important to discuss source errors and consider what is and what is not comparable.
6. Reporting of data Ask the pupils to record their results in the form of tables, graphs, diagrams etc.
7. Conclusions What is fitness training? What happens to the body in fitness training? What activities do the pupils suggest that the woman in the wheelchair should perform?
8. Divide the pupils into new groups so that they can cross-reference their investigations and results, and in this way practise communicating and explaining their results.
Additional task: Find out how handicapped athletes actually train. www.youtube.com

DISABILITY TEACHER INFORMATION
Page 29 of 30
ESTABLISH
Activity 11. Can you cope with a wheelchair at your school? Stages of learning cycle Activity
Engagement X
Exploration X
Explanation X
Extend - Elaborate X
Learning aim: The pupils are to be able to apply their knowledge in order to identify hinders
in the school environment for a person confined to a wheelchair. They are to plan and carry out an investigation, draw conclusions from the results and suggest improvements.
Materials: The pupils must themselves think about what materials they need to carry out their investigation.
Suggestions for use: The pupils are to work in groups. The task is to investigate the school’s accessibility to a person in a wheelchair. Start with the worksheet containing the description below. Ask the pupils to formulate criteria for good accessibility. Ask them then to describe how they will investigate if these criteria are fulfilled. Discuss this with the whole class, and then allow the groups to carry out their individual investigations. They can investigate various sections of the school and its environs – the classrooms, the sports hall, a nearby shopping centre, bus stop etc. They are to write a report. In connection with reporting, they are to suggest improvements. A good way to investigate the situation is to borrow one or more wheelchairs and let the pupils test life at their school in a wheelchair for a whole day. Sara has finished primary school and needs to change school to start at secondary level. She’s a little worried because she uses a wheelchair. Her parents contact the principal and ask about wheelchair access at the new school. This is the first time a pupil in a wheelchair is to enrol at the school, so the principal is unsure, and asks to call back later after investigating the matter.
Discussion Assignment: To be young and live with a disability Many people are forced to live with serious illnesses throughout life. An example of such a disease can be CP, cerebral palsy, an umbrella term for various disorders of muscle control caused during fetal development, during childbirth or during early childhood. CP is the leading cause of disability in children and adolescents. Symptoms vary, but usually the patient in the spastic limbs. Many people believe that people with cerebral palsy are mentally retarded, but only 25 percent are - and these people usually have two diagnoses. CP is not in the head but in the body! Here the teacher can inspire a discussion based on the story of Alex: Alex has cerebral palsy and is 23 years old. She is a happy and lively girl, who absolutely do not want her disability to prevent her from living a normal life. She lives in an apartment and has personal assistance around the clock. Alex says that people she meets often talk over her head and turns to the assistant rather than directly to her. Once they talk to her they scream to make sure that the message gets through. - Why do you think it is this way?
DISABILITY TEACHER INFORMATION
Page 30 of 30
ESTABLISH
Alex wants us all to treat a person in a wheelchair the same way as we treat everybody else. You can quickly tell if the person you talk to does not understand.
At school, Alex had a problem, particularly in practical subjects, crafts and home economics. Her teacher felt she did not learn anything because she just watched as assistants did the work. They did not understand that despite the handicap she learned and was interested in learning how to cook and sew. She does need skills of her own to communicate knowledge with her assistants. - How will she explain this to their teachers? When it was outdoor activities Alex was liberated and did not participate because the teachers saw all the obstacles her wheelchair could bring. - What opportunities do you see? What activities could Alex have participated in? - How would the obstacles be overcome?
The text of the task inspired by article in Biologist 4, 2010: To not only see the wheelchair - to live with disability
Activity 12. What does the future hold for the development of disability
aids?
Stages of learning cycle Activity
Engagement X
Exploration X
Explanation X
Extend - Elaborate X
Learning aim: The pupils are to be able to talk about some of the development work going on in the area of disability aids. They are also to be able to talk about what education people who work in this field have and what their workplaces look like. The pupils are to be able to explain how one can know which websites give relevant information.
Suggestions for use: Following the work with the body, study visit and their own investigations, the pupils are able to pose their own questions about which development projects are underway and how one goes about producing new disability aids. They can find information on the internet. The class can also work together on asking questions before a study visit that the class carries out, or invite someone who works in the field of developing these aids to visit the class to talk about their work and answer questions. In this way the pupils are given the opportunity to discuss their own ideas for development, and to make models. This task can be given different emphasis, depending on time and interest. It is possible for the pupils to do this as a somewhat larger group task where they formulate questions, describe how they will find answers – for example from literature, the internet, contact with businesses and from interviews – which then form the basis of a report.

Lead partner for Unit: UMEA UNIVERSITET (UMU)
European Science and Technology in Action Building Links with Industry, Schools and Home
Work Package 3 UNIT DISABILITY
Classroom Materials
The ESTABLISH project has received funding form the European Community’s Seventh Programme [FP7/2007-2013] under grant agreement n
o 244749
Start Date: 1st January 2010 Duration: 48 months
WP
3
Un
it D
ISA
BIL
ITY

DISABILITY CLASSROOM MATERIALS
Page 2 of 15
ESTABLISH
Malmö högskola Margareta Ekborg, [email protected] Maria Sandström, [email protected] Umeå Universitet Christina Ottander, [email protected] Helena Näs, [email protected] Annika Kjellsson – Lind, [email protected]

DISABILITY CLASSROOM MATERIALS
Page 3 of 15
ESTABLISH
Student learning activities
Activity Subject Connection to the syllabus and main contents
1. Discussion about body fixation, disabilities and handicaps
2. Disability aids Biology Physics Technology
3. Study visit to disability aid centre
Biology Physics Technology
4. Technical aids Technology
5. How do muscles work? Biology
6. The strength and function of muscles
Biology Physics
7. Receptors, nerves and nerve impulses
Biology Physics
8. Why do we breathe? Biology
9. How is the pulse and respiratory rate affected by different activities?
Biology
10. Fitness training Biology
11. Can you cope with a wheelchair at your school?
Biology Physics Technology
12. What does the future hold for the development of disability aids?
Biology Physics Technology

DISABILITY CLASSROOM MATERIALS
Page 4 of 15
ESTABLISH
Activity 1. A discussion about the ideal body, disabilities and handicaps
Photo: Scanpix
Photo: Scanpix
Photo: Scanpix
Photo: Scanpix

DISABILITY CLASSROOM MATERIALS
Page 5 of 15
ESTABLISH
Activity 2. Disability Aids
This activity is for group work. The activity consists of three parts: The first part is about disability aids The second is about opening an ordinary package The third part is about explaining the physical principles behind these things. 1. Begin by looking at and testing the objects lying on the table. They might be the objects shown in the pictures. What do you think they are? What are these objects used for? What functions do they have? Explain how they move.
2. Imagine that you have weak muscles in your hands and try to open the packages with the help of one or other of these objects!
3. Explain and demonstrate the physical principles of the aids you have used.

DISABILITY CLASSROOM MATERIALS
Page 6 of 15
ESTABLISH
Activity 3. A visit to a disability aid centre
You are going to visit a disability aid centre. Start by planning the visit. In your group, discuss:
- What aids do you think you will be able to see and test? - What people do you think work there? - What work do you think they do? - How can you get more information? Do a search on the internet or talk to someone who
knows about this. - What questions should you ask on this visit?
Report on your visit using text and pictures, or with a film sequence. Suggested content: Which aids did I try, and how do they help the patients? What new things did I learn? I would like to know more about ...

DISABILITY CLASSROOM MATERIALS
Page 7 of 15
ESTABLISH
Activity 4. Technical aids What these three people have in common is that they all have a disability:
- The woman in the first picture has an artificial arm controlled by her brain. - The man in the second picture finds it difficult to walk without his walking frame - The woman in the third picture has a motorized wheelchair.
1. Discuss their problems. Try to imagine what situations are difficult for them to cope with. Some of their problems are eased by the technical aids they are equipped with. Discuss and give examples of how technology can help disabled people in various situations.
- Look up films that show how the artificial arm works on www.youtube.com. Search hints: artificial hand, artificial arm
- Useful and interesting facts can be found on the website of the company Össur, an Icelandic company that develops and manufactures artificial arms and legs www.ossur.se
- Another company in this branch is Team Ortopedteknik www.teamortopedteknik.se 2. Discuss how technology can help a person who cannot speak and who cannot move his body
below his head.
3. The picture shows a radio with circuit-breaker for a
patient with reduced fine motor skills and who therefore has difficulty pushing small buttons on electrical appliances. Your task is to build a circuit-breaker like the one in the picture.
4. Discuss how you can adapt a car so that it is suitable for a handicapped person in an electric wheelchair.

DISABILITY CLASSROOM MATERIALS
Page 8 of 15
ESTABLISH
Activity 5. How do muscles work?
1. Feel the way your muscles work. Move different parts of your body and feel which muscles are working. Some suggestions:
- Lift your leg straight up, and then lower it down again! - Bend your arm, and stretch it straight! - Wiggle your fingers! - Put one hand underneath a tabletop and pull upwards. With your other hand, feel your
upper arm. Try to lift the table. In what part of the arm are the muscles working hardest?
2. Which movements? Look at the picture of the human muscles and pick some of the larger muscles such as the deltoid muscle, the back or stomach muscles, the thigh or calf muscles. Think about which movements occur when the muscles you chose are working. Test if your hypotheses are correct. 3. Stretching
Which stretching exercises do you know? Try some of these and feel which muscles are being stretched in the different exercises. Note down your observations. Think about the results of these three tasks and summarize what you have learned about how muscles work.
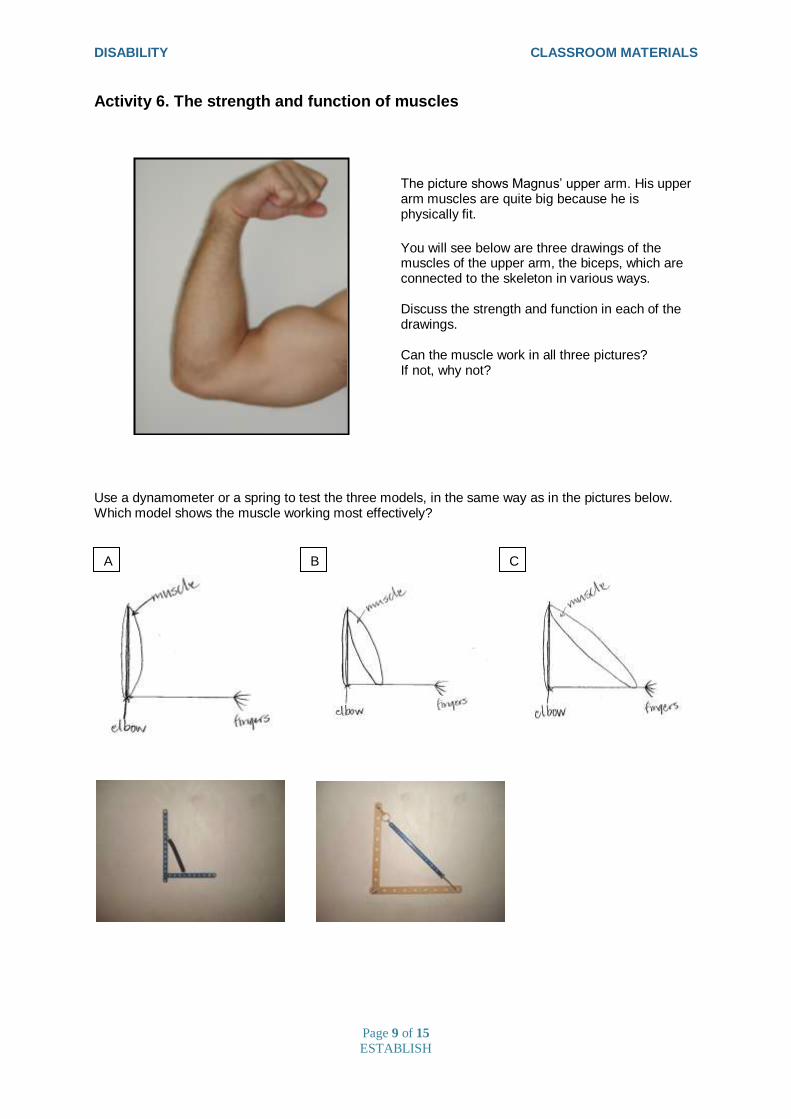
DISABILITY CLASSROOM MATERIALS
Page 9 of 15
ESTABLISH
Activity 6. The strength and function of muscles
The picture shows Magnus’ upper arm. His upper arm muscles are quite big because he is physically fit.
You will see below are three drawings of the muscles of the upper arm, the biceps, which are connected to the skeleton in various ways. Discuss the strength and function in each of the drawings. Can the muscle work in all three pictures? If not, why not?
Use a dynamometer or a spring to test the three models, in the same way as in the pictures below. Which model shows the muscle working most effectively?
A B C

DISABILITY CLASSROOM MATERIALS
Page 10 of 15
ESTABLISH
Activity 7. Receptors, nerves and nerve impulses Some functional disabilities are caused by a fault in the nervous system. This task is about nerves and nerve impulses, and gives an explanation of some neurological illnesses.
1. The sauna What are the men in the sauna talking about? Are the nails really warmer than the wooden bench itself? Why do we feel different temperatures in different materials? 2. Receptors Plan an investigation that will show the differences and similarities between various sensory cells. Are the same receptors used for cold and heat? Find some receptors on the upper side of your hand. Try to find places on your body where the skin’s sensors are placed closely together and other places where they are further apart. 3. Nerve impulse How fast do the signals in our nervous system travel? Find out experiments to find out how fast a nerve impulse travels. Report your results to the class and compare your results with the ones other groups reported. Did everyone get the same result? Did everyone do the experiment in the same way? Which method was best? Why? 4. Phantom pain People who have had a limb amputated can experience extreme pain in the limb that is no longer there. This phenomenon is called phantom pain and can be a very debilitating handicap, with a strange burning, hot feeling, often interspersed with cold, itching or a pricking sensation. Phantom pain is caused by the nerves still being stimulated, despite the fact that the limb they once led to has been amputated. Do you want to know what phantom pain feels like? Put your elbow in a dish of ice-cold water for 5-10 minutes. Where do you feel the pain?
Yes, I know! They’re really hot!
Watch out for the nails in the seat in the sauna!

DISABILITY CLASSROOM MATERIALS
Page 11 of 15
ESTABLISH
Activity 8. Why do we breathe?
Anna Victor, Oscar and James are doing their homework and are discussing why we breathe.
What do you think? Help these pupils to give a better explanation about why we have to breathe.
Have you thought about
why we breathe?
Your lungs need
oxygen!
If you don’t breathe, you die.
But so do your toes!
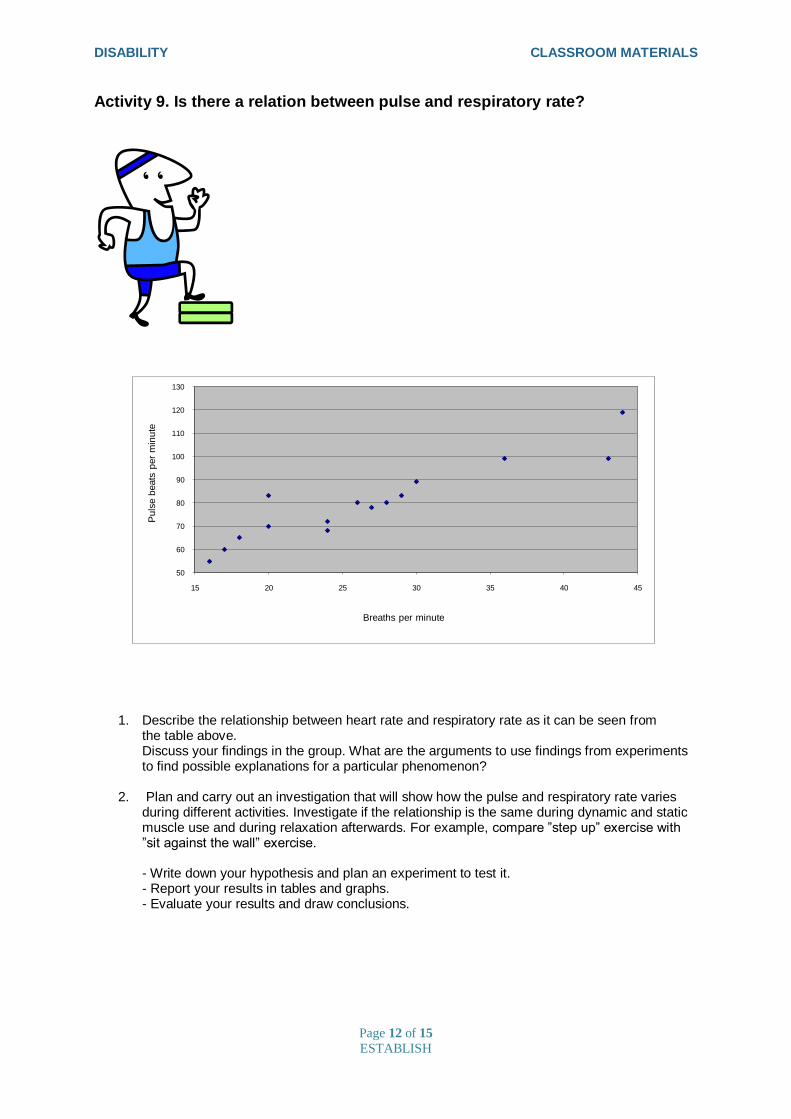
DISABILITY CLASSROOM MATERIALS
Page 12 of 15
ESTABLISH
Activity 9. Is there a relation between pulse and respiratory rate?
1. Describe the relationship between heart rate and respiratory rate as it can be seen from the table above. Discuss your findings in the group. What are the arguments to use findings from experiments to find possible explanations for a particular phenomenon?
2. Plan and carry out an investigation that will show how the pulse and respiratory rate varies during different activities. Investigate if the relationship is the same during dynamic and static muscle use and during relaxation afterwards. For example, compare ”step up” exercise with ”sit against the wall” exercise. - Write down your hypothesis and plan an experiment to test it. - Report your results in tables and graphs. - Evaluate your results and draw conclusions.
50
60
70
80
90
100
110
120
130
15 20 25 30 35 40 45
Pu
lse b
eats
per
min
ute
Breaths per minute

DISABILITY CLASSROOM MATERIALS
Page 13 of 15
ESTABLISH
Activity 10. Fitness training
Photo:Scanpix
The woman in the picture seems to be very fit. It is obvious that she could not acquire such a good level of fitness by running, which otherwise is a common way to train. What sort of exercise can she do instead to increase her fitness?
1. Write a hypothesis 2. Plan an experiment 3. What is it you are going to measure? 4. How will you measure it? 5. Report your results in a way that is easily understood. 6. Evaluate your results: did you get different results using different methods of measuring?
Using different groups? Any other differences? 7. What conclusions can you draw?

DISABILITY CLASSROOM MATERIALS
Page 14 of 15
ESTABLISH
Activity 11. Can you cope with a wheelchair at your school?
Sara has finished primary school and needs to change school to start at secondary level. She’s a little worried because she uses a wheelchair. Her parents contact the principal and ask about wheelchair access at the new school. This is the first time a pupil in a wheelchair is to enrol at the school, so the principal is unsure, and asks to call back later after investigating the matter.
What are things like at your school? What problems can a pupil in a wheelchair encounter, and how can wheelchair access be improved? In your group and together with your teacher, decide which areas of the school or its immediate vicinity you are to investigate. To carry out this task, you need:
- to formulate the criteria for accessibility - plan your investigation - suggest improvements

DISABILITY CLASSROOM MATERIALS
Page 15 of 15
ESTABLISH
Activity 12. What does the future hold for the development of disability aids?
All over the world there is a great deal of research and development work going on to devise new aids for disabled people. New, exciting possibilities are opened up as our technology moves forward. Ask your own questions and look for information. For example, your questions might be:
- How do you go about developing new aids? - What development projects are there? - Which professions are involved in the development of new products? - Does your group have any ideas? Would it be possible to develop them?
Be careful to evaluate how reliable your sources are. Who or what is responsible for ensuring that all the information is correct?
.

you
Lead partner for Unit: Dublin City University (DCU)
The ESTABLISH project has received funding form the European Community‟s Seventh Programme [FP7/2007-2013] under grant agreement n
o 244749
Start Date: 1st January 2010 Duration: 48 months
WP
3
Un
it E
xp
loring
Hole
s
European Science and Technology in Action Building Links with Industry, Schools and Home
Work Package 3
UNIT EXPLORING HOLES Teacher Information

EXPLORING HOLES TEACHER INFORMATION
Page 2 of 33 ESTABLISH
This document has been generated following discussions by the Chemistry sub group, namely:
Odilla Finlayson, Ilka Parchmann, Iwona Maciejowska, Hana Čtrnáctová, Paweł Bernard, Paweł Bros, Małgorzata Krzeczkowska, Jack Holbrook Rory Geoghegan Wolfgang Graeber, Alison Graham, Stefanie Herzog, Petr Šmejkal, Mária Ganajjvá, Elzbeieta Szostak, Anna Bialas, Loukia Anastasiadou, Michael Nicolaou, Nicos Valanides
Activities have been based on information from:
Mareike Wilms, Martin Fach, Jens Friedrich Dr., Marco Oetken Prof. Dr, Molekulares Sieben: Mit
Einmachfolie ins Diskontinuum, Chemkon, Volume 11, Issue 3, pages 127-130, July 2004
James Chapman, Laura Barron and Susan Ryan, Dublin City University.
Activity 3.2: A. Koehler in Chemie im Kontext: Superabsorbierende Kunststoffe. Cornelsen, 2007. Activity 3.3: Universität Gießen: Cyclodextrine – molekulare Zuckertüten, http://fss.plone.uni-giessen.de/fss/fbz/fb08/chemie/Chemiedidaktik/mat/dat/cyc.pdf/file/Cyclodextrine.pdf
The research leading to these results has received funding from the European Community’s Seventh Framework Programme [FP7/2007-2013]
DISSEMINATION LEVEL
PU Public
PP Restricted to other programme participants (including the Commission Services)
RE Restricted to a group specified by the consortium (including the Commission Services)
CO Confidential, only for members of the consortium (including the Commission Services)
√
Document History
ISSUE DATE VERSION CHANGES MADE / REASON FOR THIS ISSUE
12/10/2010 1.0
18/11/10 2.0
2/12/10 3.0
16/12/10 4.0
27/06/11 5.0 Additional material with classroom resources
30/06/11 6.0 Final amendments

EXPLORING HOLES TEACHER INFORMATION
Page 3 of 33 ESTABLISH
A. Teacher Information
I. Unit description
In this unit, the links between chemical structure, properties and use/application will be made. It can also be used to address the representation of materials at macro, sub-micro and symbolic levels. The unit is built around the theme of „holes‟ and that not all holes are visible to the naked eye. Various materials will be tested to determine if they can be effectively used as filters (therefore have holes) and also if different filters have different sized holes. Polymer films are interesting materials here as their structure can be altered by the addition of plastisisers and therefore the size, shape and extent of the holes can be varied. In addition, polymers can be synthesised as required. This can develop for applications such as dialysis, separations, osmosis etc. Also, the use of polymers films with controllable holes in particularly useful applications such as in drug release (as in hydrogels) and in environmental protection (as antimicrobial coatings). The unit is divided into 3 subunits which can be used independently at different levels. Each subunit can take different directions and emphasis depending on the curriculum and particular learning aims of the teacher. The subunits can also be used in a spiral type curriculum with subunit 1 focussed at an introductory chemistry level, subunit 2 at intermediate level and subunit 3 at the higher stages of second-level school. The activities are designed in such a way that they could be used in different areas of chemistry and biology – e.g. in dialysis or food contamination. Throughout the unit, the emphasis should be on developing understanding of molecular size and shape and particularly on linking molecular properties to structure to macro properties. Sub unit Student level Topic
Subunit 1: Early second level (11-13) Visible holes Subunit 2: Mid second level (13-15) Invisible holes Subunit 3: Upper second level (15-17) Interesting holes Involved disciplines:
Chemistry Estimated duration: Each subunit is flexible as they are designed to fit into a topic already taught through the curriculum. A time estimate has been given for each of the activities within the subunits.
II. IBSE character
This unit can be used to develop the students‟ ability to plan investigations, develop hypothesis, distinguish alternatives, searching for information, constructing models and
EXPLORING HOLES TEACHER INFORMATION
Page 4 of 33 ESTABLISH
debating with peers. As each teacher will implement the unit in different manners, the emphasis can be placed on different sections and hence different elements of inquiry. Each of the subunits can be used for each aspect of inquiry. In each subunit, the teacher may start with either a series of questions or with an interactive demonstration e.g. in subunit 2, the initial demonstration may be of iodine passing through cling film which then leads to questions for further investigations such as to the reproducibility, does this always happen, does this effect depend on the film used, does this effect depend on the particular molecules used, and determination of the film characteristics. These activities may be guided, bounded or lead into open inquiry activities. Alternatively, the sub unit could be introduced by discussing examples of polymers we use every day, such as cling film, and addressing common misconceptions about its properties in keeping elements of the environment from spoiling food. Another application is in rain coats where the layer is impervious to water in one direction but permeable to water vapour in the other direction. The focus of this unit is to provide ideas and activities that can be implemented in an inquiry based series of lessons. The initial activities given in this unit will form the background for further more open inquiry activities by the students.
The activities given are not developed to be performed in a linear order. Particular activities can be selected for use in various types of inquiry. The series of activities should be aligned to students‟ ideas and questions so that creativity, imagination and flexibility are always an integral part of the inquiry based teaching and learning.
III. Science Content Knowledge For subunits 1 and 2 the required science knowledge is a basic understanding of the particulate nature of matter and particle movement based on diffusion and osmosis. Subunit 3 applies more specific knowledge on different polymers such as superabsorbers, cyclodextrines or PVC. Polymers belong to the group of macromolecular substances. They are compounds with
the number of atoms bound by covalent bonds in a macromolecule reaching hundreds to millions. Polymers are divided into natural and synthetic. Synthetic polymers can be prepared by a set of chemical reactions of the type of polycondensation, polyaddition or polymerization. Special superabsorbing polymers (SAP) – so-called superabsorbents
can be included in the group of special polymers. What is a superabsorbing polymer
Polymer that is able under a load to absorb liquid of at least 10 g relating to every 1 g of the dry polymer. It swells in water solutions and gel is produced. Superabsorbents are polymers with a significant ability to absorb liquids which is manifested by increasing their volume, so-called swelling. They absorb aquatic liquid solutions and make granular gels of permanent consistency with them. The amount of absorbed liquid is significantly dependent on the content of ions and pH of the given absorbed solution.

EXPLORING HOLES TEACHER INFORMATION
Page 5 of 33 ESTABLISH
Some superabsorbents are able to absorb as much as 2000 multiple of their weight. When using 0,9 % solution of table salt 50 multiple of its own weigt is absorbed by the polymer – it is similar in the absorption of human urine into nappies. Superabsorbent polymers have become an integral part of hygiene products (for example in nappies, ladies hygiene, hygiene goods for incontinent patients) in the last decade. They are also used as a protection of undersea cables from moisture, textile mats under frozen food, for preserving moisture in the soil, etc.
Using polymers based on SAP, however, brings along certain problems. First of all, they are for single use. Thus they are not environmentally friendly as they are not biogradable and are difficult to recycle. Development of a new generation of superabsorbent is therefore based on renewable material (polysaccharides – pectins, starch, cellulose), which are biogradable.
N,N-methylen-bis-acrylamid polyacrylic acid
Scheme of the superabsorbent structure before and after water absorption

EXPLORING HOLES TEACHER INFORMATION
Page 6 of 33 ESTABLISH
Chemical structure of superabsorbent - networked sodium salt of polyacrylic acid before and after water absorption
Above figures from Bilek, M., Opatrny O.: Superabsorpèní polymery ve výuce chemie (Superabsorption polymers in chemistry education), online, cit: 2011-06-30, date: 2008-01-21, available from: http://stary.rvp.cz/clanek/393/1875
Hydrogels have many important applications. For example in tissue engineering
(hydrogels can contain human cells for repairing tissues), in administration of medicines, in biosensors (gels reacting with specific molecules, such as glucose or antigens), contact lenses (silicone hydrogels, poly acrylamides) and healing gels. Cyclodextrines are polycarbohydrates
-Cyclodextrin (CyD), which is a cyclic oligosaccharide of six (1→4) linked -D-glucopyranoside units, can be topologically represented as toroids (figure below). -D-
glucopyranoside units in CyD are usually in the most stable chair conformation.
CyD
Image taken from the IChO, Japan 2009
Membrane films have different polymeric composition – comparison between cellulose, parafilm, Teflon, clingfilm (polyvinylchloride), polypropylene, dialysis membranes. Need to be careful here in translation that particular household films may have local / brand names that may not be recognisable in other countries. Composition of some of the common polymers are given below.
Fig. 1
CyD
Fig. 1 Space filling model of α-CyD. Left: view through the
hole. Right: side view.

EXPLORING HOLES TEACHER INFORMATION
Page 7 of 33 ESTABLISH
Polyvinyl Chloride (PVC)
PVC is a flexible plastic consisting of long chains. Each chain consists of repeating units where every second carbon atom has a chlorine atom attached.
The polymerisation of vinyl chloride produces mainly atactic polymer molecules. This means that Cl are orientated randomly along the chain.
Because of the way the chlorine atoms stick out from the chain at random, and because of their large size, it is difficult for the chains to lie close together. Therefore, atactic PVC is mainly amorphous with only small areas of crystallinity.
However PVC polymer chains can also be isotactic, with Cl atoms in the same orientation along the chain. (Syndiotactic is where the Cl atoms are in opposite orientation)
When PVC plastic is bent it becomes opaque where the bend occurs. This is due to the chlorine groups being forced into the same orientation along the chain (isotactic). The polymer chains can then move closer together and become more crystalline. Properties and uses You normally expect amorphous polymers to be more flexible than crystalline ones because the forces of attraction between the chains tend to be weaker. However, pure PVC tends to be rather hard and rigid.
This is because of the presence of additional dipole-dipole interactions due to the polarity of the carbon-chlorine bonds. Chlorine is more electronegative than carbon, and so attracts the electrons in the bond towards itself. That makes the chlorine atoms slightly negative and the carbons slightly positive. These permanent dipoles add to the attractions due to the temporary dipoles and hence hold the chains closer together.
Plasticisers Plasticisers are added to polymers to make the material softer, flexible and therefore more workable. PVC is the most widely plasticised polymer due to its excellent plasticiser compatibility characteristics. Molecules which contain both polar and non-polar groups act as good plasticizers, as the polar group helps retain the molecule within the polymer chains and the non-polar part separates the chains, hence increasing flexibility. Dibutyl sebacate is a commonly used plasticiser in polymers used in food packaging and in the pharmaceutical industry in polymer coatings for tablets and granules.

EXPLORING HOLES TEACHER INFORMATION
Page 8 of 33 ESTABLISH
The dibutyl sebacate molecule works by bonding to the polymer chain through the oxygen atom on the plasticiser. The bulky plasticiser wedges itself between the polymer chains and pushes them further apart from each other. This causes the plastic to become more flexible.
Dibutyl Sebacate
Another compound used as plasticizer is sodium lauryl sulphate. Resources:
Polymer Website; (Macrogalleria – teaching materials); http://pslc.ws/mactest/maindir.htm - accessed 17 DEC 2010
Overview of Dialysis; Thermo Fischer Scientific Inc; http://www.piercenet.com/files/TR0020-Dialysis-overview.pdf - accessed: 17 DEC 2010
Overview of Plasticisers; AZoM.com - the A to Z of Materials online resource; http://www.azom.com/Details.asp?ArticleID=1224 - accessed 17 DEC 2010
Molekulares Sieben: Mit Einmachfolie ins Diskontinuum (Molecular Sieves experiment); CHEMKON, 2004, Vol 11,(3); http://onlinelibrary.wiley.com/doi/10.1002/ckon.200410011/pdf - accessed 17 DEC 2010
Overview of Silver nanoparticles (project report - N344); Aalborg university, Faculty of Physics and Nanotechnology, http://repetit.dk/files/projects/p3.pdf - accessed 17 DEC 2010

EXPLORING HOLES TEACHER INFORMATION
Page 9 of 33 ESTABLISH
Figure below shows building unit of some common polymers, plasticizers and other molecules used in this unit.
IV. Pedagogical Content Knowledge
Students can find the particulate state of matter difficult to conceptualise and model. Later on, they have to draw conclusions from structure-properties to microscopic properties, which they also find difficult. It is well known from the literature that many students expect air or water to be between particles rather than nothing between particles. So the perspective on holes in this unit particularly highlights the emptiness in between matter and confronts them with the “horror vacui”. It is also well documented that students transfer microscopic properties onto particles. When a coloured solution is seen – what is causing the colour? Linking colour to the molecule can therefore be difficult for students. Possible arguments to explain observations will be based on „colour‟, imperfections in the membrane, density, mass of particles. Discussion (and further experiments) will counter these arguments.
Polyvinyl Chloride (PVC): (CH2CHCl)n
Cellulose: (C6H5O10)n
Dibutyl sebacate: C18H3404
Polyvinyl Alcohol (PVA): (C4H6O2)n
Poly(acrylic) Acid (PAA): (C3H4O2)n
Acetylsalicylic Acid: C6H4(OCOCH3)CO2H
Sodium Lauryl Sulfate (SLS) aka Fairy Liquid:
NaC12H25SO4
Red Food Dye (E124): C20H11N2Na3O10S3
Polytetrafluoroethylene aka Teflon:
CnF2n+2
Tetrahydrofuran (THF): C4H8O

EXPLORING HOLES TEACHER INFORMATION
Page 10 of 33 ESTABLISH
Linking molecular structure to macro properties can be difficult for students. Subunit 2 and 3 can therefore be helpful as properties of polymer films are changed, e.g. to be dependent on the amount of plasticizers added or the pH of a solution added to a superabsorber. Hence, the structure of the polymer must be different. By analyzing structure-property-relations, students also have to combine experimental observations with model-based explanations. The role of models as essential addition to experiments could be highlighted to form a better understanding of the nature of science and inquiry-based approaches.
V. Industrial Content Knowledge
By pointing out the use of the same polymers in completely different contexts, the interaction between research, societal developments and industry becomes more obvious to the students. The use of polymers in medical applications is extensive. Dialysis machines use a semi-permeable tubing in the treatment of toxic waste material thus alleviating the problems associated with kidney failure. Gas permeable contact lenses allow more oxygen to reach the cornea thus preventing swelling of the eye. Polymeric membranes incorporated with silver nanoparticles can be used in the treatment of wounds and infections. Hydrogels which in the process of swelling in water have the ability to release compounds from their matrix can act as efficient drug delivery systems. Sensor research uses semi-permeable polymer membranes in monitoring air quality and detection of certain gases like carbon monoxide. Both impermeable and semi-permeable polymeric membranes are also used in the food industry e.g. in food packaging, meat packaging (e.g. Western Plastics in Ireland (www.westernplastics.ie). Many clothes are based on polymers, and those which are most relevant to this unit include waterproof breathable jackets that display resistance to rain passing through the membrane but allow water vapour to be transported outwards using solid state diffusion e.g. Gore-Tex (http://www.gore-tex.com/remote/Satellite/home).
www.packagingtoday.com (manufacturers)
http://www.membrane-mfpi.com/
http://www.foodplast.com/index.asp?page=29
VI. Learning path Sub Unit 1: Visible Holes
This subunit introduces the idea of “holes” in materials which we can see and use on a daily basis. These holes are used in sieves, as a means of separation e.g. large stones from sand, coffee filters, muslin in cheese production etc. The idea that there is a lack of holes in some materials should also be discussed as well as their uses. The learning outcome of this sub unit is that students recognise that holes exist in many materials, and can be used to separate substances. However, the separation depends on both the size of the holes and the sizes of the substances to be separated. This subunit can also be used to introduce the concept of osmosis and diffusion.

EXPLORING HOLES TEACHER INFORMATION
Page 11 of 33 ESTABLISH
Sub Unit 2: Invisible Holes
This sub unit develops on what the student has learned from Visible Holes and focuses on Invisible Holes. To understand the existence of invisible holes and processes of substances being able to pass these holes, students have to enter the world of particles. To introduce them to this “new world”, surprising and fascinating phenomena are used, such as the “sieving of different dyes”. Following this, the students are invited to develop a series of experiments to investigate properties of sieves, particles and diffusion processes. This can be followed by questions whether all membranes (plastics) are the same (Activity 2.1). Different polymer films can be investigated and polymer films can be made with different levels of plasticizer and retested (Activity 2.5). Do they all have the same structure? Additionally, different compounds can be used on the same films to determine the pore size (Activity 2.2). As an application, the leaching of plasticisers from packaging will be explored and can link to food packaging and possible hazards (Activity 2.5). Leading questions throughout the unit allow the students to progress from activity to activity as well as develop activities of their own. Students can examine the uses of holes in dialysis membranes, in polymers used for absorbance, and in other polymer packaging materials. Sub Unit 3: Interesting Holes
This unit deals with the idea of Interesting Holes which can be used in many medical and environmental technologies. Students can investigate different functional polymers such as superabsorbers and cyclodextrines to find out and explain why these polymers absorb solutions, such as water, or smells. The properties of hydrogels, as drug delivery systems, are investigated. Nanotechnology can be applied to both medicine and environmental science using silver nanoparticles as an example. These can be incorporated into polymeric membranes which can then be used to treat wounds, burns and infections as the silver ions migrate from the membrane and attack any bacterial or fungal cells. They can also be used to coat different materials to enhance sterility.

EXPLORING HOLES TEACHER INFORMATION
Page 12 of 33 ESTABLISH
Activity Inquiry Type E-emphasis
1.1 Making sieves Open inquiry Exploration
1.2 Observation and explanation of filters
Guided Inquiry Elaboration
1.3 Use of filters in industry Bounded Inquiry Evaluation
1.4 Separation challenge Open Inquiry Extend
1.5 Assessment activity Open Inquiry E-Assessment
1.6 Transfer: Air filters Guided Inquiry Extend
2.1 Membranes with invisible holes Guided Inquiry Exploration
2.2 Set of activities on diffusion, particles and holes
Guided Inquiry/open Elaboration
2.3 Transfer and Extension/Assessment: Dialysis
Bounded Inquiry E-Assessment
2.4 What is the best wrapping material?
Open Inquiry Exploration
2.5 Extra Activities
3.1 Investigating the development of particular polymer products
Open Inquiry Exploration
3.2 Investigations of properties and factors affecting SAP
Guided/Open Inquiry Elaboration/Exploration
3.3 Properties and applications of cyclodextrines
Bounded Inquiry Elaboration
3.4 Extra Activities
VII. Assessment Assessment can take several different forms depending on the age level of the students. The focus can be on prediction and associated reasoning e.g. questions predicting properties of „fictional‟ polymers with various plasticizers. Generation of concept maps to link main ideas may also be useful. Specific activities have been suggested that can be used for assessment (Activity 1.5 and 2.3)

EXPLORING HOLES TEACHER INFORMATION
Page 13 of 33 ESTABLISH
VIII. Student learning activities SUB UNIT 1. VISIBLE HOLES
Activity 1.1 Making sieves Learning aims: This sub-unit will illustrate how different materials can be used as sieves. Separation depends on the hole size in the „sieve‟ as well as the particle size of the compounds/materials to be separated. Hence this subunit focuses on the microscopic properties and structures.
to recognize the need for holes to separate materials
to recognize the need for particular size of holes matching the size of the materials to be separated
to construct a model and debate with peers Materials:
Mixture of different sized seeds (or the like), filter paper, scissors, containers, “distractors”, such as magnet, glue…
Suggestions for use: Present students with the challenge to separate the seeds without touching the seeds using some of the materials provided. We expect at least some students to come up with the idea of sieves. Of course they can also discuss other methods of separation. If the idea of preparing a sieve from the paper does not arise, discussion can be directed towards the use of sieves in everyday applications. Possible Questions:
Why did you create your technique as you did?
What are the advantages and disadvantages of your technique compared to others?
What do you already know about separation procedures in every-day life?

EXPLORING HOLES TEACHER INFORMATION
Page 14 of 33 ESTABLISH
Activity 1.2 Observation and explanation of filters
Learning aims:
to observe carefully and describe observations
to use models
to distinguish alternative (models) Materials:
coffee filter, empty tea bags as filters, different mixture such as tea, coffee, orange juice, mud in water…
pictures of particle models of different sizes Suggestions for use: Start by showing the class the coffee filter paper and asking them what they think it is or what it can do. Ask the students why they think the coffee granules do not pass through the filter paper but the water can? Why has the water in the cup now turned brown? Ask the students to discuss whether the sieve from the previous activity could be used to make coffee. Students carry out tests on the mixtures provided and work out which can be separated by filtration and which can‟t and why. Possible questions: Why do mud, coffee granules, … do not pass through the filter paper but the water can? How could you use the models in the picture to explain your observation? What is the difference between tea and mud in water?

EXPLORING HOLES TEACHER INFORMATION
Page 15 of 33 ESTABLISH
Activity 1.3 Use of filters in industry Learning aims:
to recognize the importance of filters for industry and society Materials:
sour milk, gauze or muslin Suggestions for use: Pupils should work out that the mixture that is produced this way can be separated by pouring it through gauze, thus separating curd from whey. Sieves can have important uses within the food industry. Muslin is used in cheese making to separate the liquid whey from the solid curd. It is also used in wine making to remove sediments. Possible questions: Why are sieves used in food industry? What are important sieves to consider when choosing sieves for the food industry? Activity 1.4 Separation challenge Learning aims:
to differentiate between solutions and mixtures
to recognize the importance of different solubilities
to identify possibilities of recovering salts from solutions Materials:
salt, water, dirt, beaker Suggestions for use: Tell the students that you have spilled your salt on the floor where it has mixed with small dirt particles and other impurities on the floor. Ask the students to come up with an experiment using the idea of sieves to obtain a pure sample of salt from the mixture. Advise students to think about the previous activities when devising their experiment. Students should use the idea from the coffee filter that if the salt is dissolved in the water is can fit through the filter paper and the water can then be evaporated off. Possible questions:
Why can you not separate salt from dirt using a sieve (without water)?
Why can you not separate salt from water using a filter paper?
What other techniques could you use to regain the salt from the water

EXPLORING HOLES TEACHER INFORMATION
Page 16 of 33 ESTABLISH
Activity 1.5: Assessment: Crime story
Learning aims:
Students have to use separation techniques they have learned to solve the murder mystery.
Materials: See Worksheet Suggestions for use: See Worksheet Possible questions: See Worksheet
Activity 1.6: Transfer: Air filters in car engines
Learning aims:
to transfer the knowledge developed from solids and liquids to gases Materials:
salt, water, dirt, beaker Suggestions for use: Students read stimulus material about car engine air filters and answer questions about how it works, what happens if it is not there and why racing cars have only a thin filter. Possible questions: See Worksheet

EXPLORING HOLES TEACHER INFORMATION
Page 17 of 33 ESTABLISH
SUB UNIT 2. INVISIBLE HOLES
Overall learning aims: In this subunit the students will transfer their macroscopic knowledge onto the invisible level of atoms and molecules. They will develop a better understanding of the particulate nature of matter. The activities can be used to show the existence of molecules and that they have different sizes. Students can investigate different pore sizes within plastics/polymers Underlying experiment: Invisible sieves
The sequence of activities is based on one central experiment which is described in the following paragraphs. Chemicals:
Red food dye solution
Iodine-Starch Solution
Potassium Permanganate Solution
Iodine-Dextrin solution
Iodine Solution (Just for Part 2) Apparatus: 4 Rubber bands, 5x50ml beakers, 4 lengths of visking tubing, 5 sheets of cling film, 10ml plastic dropper. Procedure (Part 1):
Prepare a 1% starch solution with water at 70°C
Add iodine and leave iodine and starch solution to one side (Turns blue)
Add 0.5g of dextrin to 100ml of water and then add a few drops of iodine (Turns red)
Open the visking tubing lengths by holding it under running water for a few minutes. Tie one end with an elastic band tightly. Ensure the elastic band is stretched very tightly so that no liquid leaks out.
Add a different solution (from list of chemicals above) into each of the four lengths carefully using a dropper. Stick the dropper to the bottom of the visking tubing and release the solution. Make sure none of the solutions touch the outside membrane. Tie off the other end of the visking tubing firmly with an elastic band.
Submerge each tube into different beakers of water.
Record what is observed over 10 minutes.
Wash all glassware and dispose of visking tubing.
Procedure (Part 2):
Repeat this experiment using cling film instead of visking tubing as follows:
Fill 5 beakers with water and loosely place strips of cling film over the top allowing the cling film to touch the water. Try not to stretch the cling film. Secure the edges of the cling film around the side of the beaker.
Add a different solution onto each of the five cling film strips resting on the beakers. Make sure the solutions do not overflow the sides of the beakers.
Leave overnight and record your observations the following day.
Compare and contrast the results from part one and two and suggest reasons for your findings.
EXPLORING HOLES TEACHER INFORMATION
Page 18 of 33 ESTABLISH
Activity 2.1. Membranes with invisible holes
Learning aims:
to draw conclusions from observations
to explain the phenomenon through the existence of invisible holes and the movement of particles
to distinguish alternative explanations and debate with peers Materials:
worksheet 2.1 or underlying experiment Suggestions for use: The teacher could either demonstrate the phenomenon as shown in the underlying experiment and let the students develop questions or start with a context of wrapping food. Worksheet 2.1 offers a possibility to investigate different plastic wrappings. Examples of investigations could be:
1. Iodine diffusing into a soluble starch solution (i) No membrane (ii) Jam pot cover (iii) Plastic bag/cling film (iv) Latex glove
2. Vinegar diffusing into water with Universal indicator (i) No membrane (ii) Jam pot cover (iii) Cling film/ roasting bag (iv) Latex glove/plastic bag (v)
Students match results to models of particles. Teacher should encourage a discussion of possible reasons and let the students deal with and encourage the development of the idea of particles of different sizes or membranes with holes of different sizes as one explanation. Possible questions: See worksheet

EXPLORING HOLES TEACHER INFORMATION
Page 19 of 33 ESTABLISH
Activity 2.2. Set of activities on diffusion, particles, and holes Learning aims:
to develop the concepts of particles moving, of particles in solution moving
to introduce diffusion and osmosis
to develop and apply mental models
to control variables
to be able to predict, observe and explain processes Materials:
see worksheets 2.2a-2.2e Suggestions for use: The activities can be carried out in a learning cycles in small groups. The teacher can decide whether there should be a particular sequence to the activities or a free combination. Station 1 focuses on diffusion which can be explain by the Brownian motion. Station 2 focuses on the permeability of polymer membranes. Stations 3 and 4 extend the concept of particles and holes to different sizes of particles and explain it through molecular models. Station 5 develops visual models for the invisible structures and processes. Possible questions: See worksheets Activity 2.3 Transfer and extension: Dialysis Learning aims:
to apply knowledge to an important/medical process
to assess the capability to transfer understanding to an authentic context Materials:
worksheet 2.3 Suggestions for use: This activity can be used either as a kind of transfer or as an assessment. Possible questions: See worksheet
EXPLORING HOLES TEACHER INFORMATION
Page 20 of 33 ESTABLISH
Activity 2.4. What is the best wrapping material? Learning aims:
to develop criteria for wrapping material
to develop mental models Materials:
none Suggestions for use: This activity is a thinking exercise that leads to the aspect of producing polymer films. The starting question could be: When preparing a sandwich, what‟s the best material to use to wrap it? What criteria would you apply? Below are possible factors that pupils might suggest: availability, cost, environmental impact (biodegradable, combustible, ...), insoluble in water, impermeable to fat and water, non-reactive (e.g. with acids in various foods), odorless and tasteless, keeps odours in (or out), ..., breathable or not? The students should then rank the criteria they have named in order of importance and find out if there were materials that have the properties of higher ranked criteria. This ranking and questioning will lead to the suggestion of a plastic (cling film). Analyse what properties plastics have from the list of criteria. Water will not pass through it; therefore it is impermeable, maybe inferring that there are ‘no holes’. To get students to start thinking at a deeper level get them to draw what a sheet of cling film looks like. Ask them about the size and the number of atoms. Invite the students to imagine to shrink themselves down to the size of an atom and ask them what the plastic will look like. Experimentally - show briefly that cling film will hold water. Show Cling Film as an example of a polymer, made up of monomer units, each monomer is long chain. The students could be invited to think again about the size of the chains, the polymers, the atoms, etc. A following question could be on the making of films and if it was possible to make films without holes (see extra activities 2.5). The following questions could then lead to further investigations:
Will anything else pass through holes e.g. oxygen?
Can we make films with different sized holes?
When a sandwich is wrapped, lots of other compounds present – e.g. fat, oil, ketchup etc. What are these compounds?
If you are wrapping a hot dog, then temperature is important. So how does temperature affect the film?
Can bacteria pass through?

EXPLORING HOLES TEACHER INFORMATION
Page 21 of 33 ESTABLISH
Extra Activity 2.5 Syntheses and testing of products Making polymer films often involves hazardous chemicals. It depends on the facilities and regulations whether these experiments can be carried out. Making Polyvinyl Chloride film Polyvinyl chloride (PVC) is a cheap and durable plastic that is often used in pipes, signs and clothing. Plasticisers are often added to PVC to make it more flexible and easier to manipulate. This activity details how to make a film of PVC from powder PVC with and without a plasticiser. Students can then compare both the physical and chemical properties of each sample. Chemicals: Tetrahydrofuran (THF) or Toluene (solvent), Polyvinyl chloride powder, di-butyl sebacate or other plasticizer Apparatus: Hotplate, magnetic stirrer, beaker, glass substrate (e.g. beaker, clockglass, glass slide)
All steps in this procedure are to be completed under the fume hood Making PVC (without a plasticiser):
Using a hotplate and a magnetic stirrer, heat 20mLs of the solvent.
Weigh out 1.5g of the polyvinyl chloride powder and add it slowly to the heated solvent.
After 10 minutes the solution will become more viscous, at which point the beaker should be removed from the heat.
Remove the magnetic stirrer and spread the PVC as thinly and as evenly as possible over a glass slide/clockglass/inside or outside a beaker. It is important here to spread the polymer thinly by moving the glass substrate while the solution is still hot.
Leave the PVC in the fume hood to allow the THF to evaporate off (takes about 15 mins). The PVC film can then be removed easily from the glass substrate.
Making PVC (With a plasticiser):
A number of samples of PVC can be made by repeating the steps above, each time adding different volumes of the plasticiser, di-butyl sebacate to the heated solvent.
Follow the remaining steps as above and pour the solution onto the glass substrate trying to get as good a spread as possible.
Sample No. PVC (g) Toluene(mL) Di-butyl sebacate (mL)
1 1.5 20 0.5
2 1.5 20 1
3 1.5 20 2
4 1.5 20 3

EXPLORING HOLES TEACHER INFORMATION
Page 22 of 33 ESTABLISH
The PVC samples prepared can then be used in Activity 3.
Discussion:
What affect did the plasticiser have on the plastic?
What do you think happens to the plastic when more plasticiser is added?
The following are SEM images of PVC films prepared as above with different quantities of
plasticizer. Holes are clearly visible in sample C.
SEM images of A) un-plasticised PVC, B) PVC with 0.5 mL plasticiser with dimples or rough surface and C) PVC with 2ml plasticiser displaying clear holes.
A B
C

EXPLORING HOLES TEACHER INFORMATION
Page 23 of 33 ESTABLISH
Testing the Pore Size of Plasticised and Un-Plasticised PVC
The PVC films (with and without plasticizer, i.e. films with different sized holes) can be used to separate different compounds or the compounds can be used to determine the pore size (i.e. larger or smaller than the molecular size). Materials: Test tubes, test tube stand, black marker, retort stands, 25 mL beakers, elastic bands, parafilm, plastic Pasteur pipettes, number of readymade PVC samples with varying plasticiser from activity 2.2. Chemicals: Water, Iodine Solution, Potassium Permanganate solution
Procedure: Devise a suitable procedure using material available and previous experiments. Discussion:
Rank each PVC film in terms of permeability, starting from non permeable to permeable.
Differentiate between the structure and size of iodine molecules and potassium permanganate molecules in solution.
At what point does the plasticiser allow the PVC to become permeable to iodine? Explain what happens on a molecular level.
Why was parafilm used as well as PVC?
Give examples of other polymers you think may be permeable / impermeable and construct an experiment to test this.
Removing Plasticiser from PVC Clingfilm
Plasticizers are added to plastics such as PVC to make them more flexible and durable. They are often based on esters of polycarboxylic acids with linear or branched aliphatic alcohols of moderate chain length. Plasticizers embed themselves between the chains of polymers, spacing them apart. For plastics such as PVC, the more plasticiser added the more flexible it will be although its strength and hardness will decrease as a result of it. In this activity, the plasticizer is removed from the PVC, leaving an inflexible glob of PVC. Chemicals: PVC cling film (or PVC with plasticiser produced in activity 2), diethyl ether, hot water. Apparatus: 250 cm3 conical flask, 250 cm3 beaker(s), graduated cylinder, hot plate, spatula, balance. Procedure:
Weigh out approximately 1 g of PVC cling film/plastic
Measure out 75 cm3 of diethyl ether into a 250 cm3 conical flask.

EXPLORING HOLES TEACHER INFORMATION
Page 24 of 33 ESTABLISH
Warm up the flask for 5-10 minutes in a water bath at 50°C in a fume cupboard. If a hot plate is not available then an unheated beaker of hot water can be used instead as diethyl ether boils at 35°C.
Decant the diethyl ether from the conical flask into a 250 cm3 waste beaker. Add fresh ether and repeat the process.
Remove the cling film/plastic from the beaker using a spatula after it has undergone two runs of diethyl ether and allow it to dry off in a fume cupboard.
Weigh the cling film/plastic again and note the difference. Calculate the percentage weight loss (which should be over 20%).
To collect the sample of the plasticiser, distill off the ether in the waste beaker and you will obtain a viscous oil.
Discussion:
Compare and contrast the appearance and texture of the plastic before and after the experiment.
On a molecular level, what occurred to the polymer chains on removal of the plasticiser?
Design an experiment whereby you could test the size of pores in polymers using a plastic containing plasticiser and one without.

EXPLORING HOLES TEACHER INFORMATION
Page 25 of 33 ESTABLISH
SUB UNIT 3. INTERESTING HOLES
Overall learning aims:
Subunit 3 specifies the students‟ understanding of particles through a systematic look at molecular structures, forces and interactions. As examples, functional polymers such as superabsorbers, cyclodextrines or hydrogels, etc. can be used. The aim of the IBSE investigations is to find out effects of changing conditions on the properties.
Activity 3.1: Investigating the development of particular polymer products
Learning aims:
to find out about particular products, including the people, who came up with it, the industry and the societal impact
to use different sources of information systematically
to make a short presentation Materials:
access to resources Suggestions for use: Let the students form groups and provide them with suggestions on products, e.g. contact lenses, nappies and hydrogels for plants. Activity 3.2: Investigation of properties and factors affecting SAP function Learning aims:
to develop experimental series including control of variables
to explain the absorption of water by using structures and intermolecular forces (“functional holes”)
to present findings in the forms of texts and graphs Materials:
Baby nappy or superabsorber bought in the store
Sodium chloride solution ( = 0,01 mol/l, 0,1 mol/l, 1 mol/l)
Distilled water
Apparatus: 4 beakers (250 ml), 4 paper tea filter-each with 2 paperclips to close it, crucible tongs, graduated cylinder, weighing scale, plastic bag
c
EXPLORING HOLES TEACHER INFORMATION
Page 26 of 33 ESTABLISH
Suggestions for use: To start the investigation, the teacher could demonstrate how much water a small amount of SAP can take up. This could even be done in a fun way by pretending to spill a cup of coffee which does not come out of its cup when turned over... Referring to upper secondary level students, the investigation of properties and factors affecting them could be developed by the students themselves. In case this is not possible, the following activities can be suggested:
Examine the layered assembly of a baby nappy and find out which layer contains the superabsorbing polymer.
Pull apart the fibrous web with the pellets of superabsorber in a plastic bag. Blow into the bag and separate the pellets from the fibrous web by shaking the (closed) bag vigorously.
Add 200 ml of different concentrations of sodium chloride solution to each of three beakers and add 200 ml of distilled water to a fourth beaker.
Fill each of the 4 tea filters with 2 g of the superabsorber, close with the paper clips and hang one in each beaker.
Remove the filter after 45 minutes and allow excess liquid to drip off over the beakers for about 5 minutes (might have to use a funnel).
Weigh the expanded tea filters and record the volume of the liquid remaining in the beakers.
Repeat steps 3-6 with the aim to find out how the pH affects the retaining properties.
Possible questions: How could you explain the absorption of water with a simple model? How can you explain that the water does not get out again? How can you explain the influence of pH and concentration of ions on the structure-property relation? Compare the properties of SAP to other absorbing substances you could find at home. How could you explain the different properties through the different structures? Looking at nappies, how do the properties of urine differ from pure water? How could that influence the properties of SAP?

EXPLORING HOLES TEACHER INFORMATION
Page 27 of 33 ESTABLISH
If the facilities and regulations allow for it, the following synthesis could be carried out: Chemicals:
distilled water
acrylic acid
N,N‟-methylenebisacrylamid solution (MBA, w= 1%) (Xn)
Ascorbic acid solution (w= 1,9%)
H2O2 solution (w=0,6%) (C)
Sodium hydroxide solution (c=0,5 mol/l) (C)
Ethanol (T, F+) Apparatus: Beakers, syringes (1ml, 2ml, 5ml), temperature sensor, spatula, glass stirrers, 2 pointed tweezers, spoon, crystallizing dish, graduated cylinders (50ml, 100ml)
Safety: Wear protective gloves and goggles. Work in the fume hood. Procedure:
a) In a beaker, add the following solutions in the given order (use the syringes for
measuring the liquids):
2.7 ml distilled water 2.0 ml acrylic acid 0.2 ml MBA-solution (w=1%) 1.4 ml ascorbic acid solution (w=1.9%) 0.7 ml H2O2 solution (w=0.6%)
Mix the contents of the beaker by gently swirling it. Let the beaker sit at room temperature. Record the temperature change during the reaction. The next part (part b) can follow right after cooling or the following day.
b) Transfer the product obtained to an evaporating dish. Pour 40 ml of sodium
hydroxide solution c=0.5 mol/l) over the product.
With the help of the tweezers, separate the polymer into little pieces (be sure to wear protective gloves and goggles). After complete absorption of the liquid by the gel (about 30 minutes), add 100 ml of ethanol (do so in the fume hood). The content of the evaporating dish needs to be swirled around carefully from time to time (do not stir with a utensil because the gel is very sticky). After about 10 minutes, remove the remaining liquid (make sure to dispose of this as organic solvent) and add 60 ml of ethanol. Repeat the last step twice (after waiting 10 minutes each time). Depending on the consistency of the polymer pieces, they might have to be separated from each other or the container with the help of the tweezers. After the last removal of the liquid, leave the product sit under the fume hood overnight (or put into the oven for 1 hour at 80°C).

EXPLORING HOLES TEACHER INFORMATION
Page 28 of 33 ESTABLISH
Activity 3.3. Properties and applications of cyclodextrines Learning aims:
to develop experimental series including control of variables
to explain the absorption of substances
to identify applications of cyclodextrines
The cyclodextrine needed in the following experiments can either be isolated as described later or be bought. 3.3a) Removal of Phenolphthalein Chemicals:
alkaline Phenolphthalein solution [C] (made from 20 ml distilled water, 3 ml sodium hydroxide solution (5 M) [C] and 4 ml Phenolphthalein solution (0.1%) [F]),
cyclodextrine
Materials: 2 pieces of cloth, pipette, spatula Procedure:
Spread a thin layer of the cyclodextrine onto a piece of cloth. Add a few drops of the alkaline Phenolphthalein solution to both pieces of cloth. 3.3b) Removal of Maggi ® Chemicals:
cyclodextrine
Maggi ® food seasoning, liquid Materials:
2 pieces of cloth,spatula, piece of white cardboard
Procedure:
Spread a thin layer of the cyclodextrines onto a piece of cloth. Add a drop of Maggi ® food
seasoning to both pieces of cloth.

EXPLORING HOLES TEACHER INFORMATION
Page 29 of 33 ESTABLISH
3.3c) Removal of cigarette smoke Apparatus:
Gas syringe, Erlenmeyer flask (250 ml) with stopper, short piece of tubing, funnel, evaporating dish, pipette, tweezers, 2 pieces of cloth Chemicals:
cyclodextrine (product from activity 3.3a)
cigarette
Procedure: Spread a thin layer of the gel-like precipitate (product from activity 3.3a) onto a piece of cloth. Place both pieces of cloth side by side into the Erlenmeyer flask. Mount a funnel to the gas syringe via the piece of tubing. Fit a cigarette without filter into the funnel. Keep a evaporating dish ready for the cigarette ashes. Collect the cigarette fumes in the gas syringe. Pour the smoke into the Erlenmeyer flask and close the flask tightly right away. After about 1 minute, retrieve the pieces of cloth from the Erlenmeyer flask and dampen them. Suggestions for use:
To start the investigation, the teacher could show an advertisement showing a product that promises to remove smells from fabric. The students need information on the structure of cyclodextrines. The students could make predictions about the forces at play. Before carrying out the investigations, the cyclodextrines could be extracted from Febreze® in the following way: Note:
The reduction of the water takes about 1 hour and that of the alcohol about 15 minutes.
Chemicals: Febrèze®, ethanol [F], ice
Apparatus: Magnetic stirrer with stirring bar, beaker (100 ml), graduated cylinder (50 ml), beaker (400
ml) for cooling
Safety: Beware of possible boiling delays. Procedure:
Pour 40 ml of Febrèze® into the small beaker and, while stirring, reduce the liquid
almost until dry with the heatable magnetic stirrer.
After letting the beaker cool, add 20 ml of ethanol and again, reduce the liquid almost
until dry.
Let the beaker cool and put into larger beaker filled with ice water for a few minutes.
Save the resulting gel-like perticipate for further investigations.

EXPLORING HOLES TEACHER INFORMATION
Page 30 of 33 ESTABLISH
Extra activities:
Activity a: Testing sorption properties of hydrogel Learning aims: Examination of changing physical properties of dried and hydrated hydrogel Materials: sodium polyacrylate or another hydrogel, distilled water, ceramic evaporator and spoon, beaker (150 cm3) Procedure: Put one spoon of sodium polyacrylate into the evaporator and then add ca. 100 cm3 of water. Observe any changes. Activity b: Testing volume phase transition in sodium polyacryte. Materials: obtained in the previous experiment hydrated sodium polyacrylate, phosphorus(V) oxide (P4O10), a desiccator, Petri dishes, porcelain spoon Procedure: Pour spoonful of P4O10 onto Petri dishes and place it in the dessicator or a big jar with a tight cover. Place a few particles of hydrated hydrogel Into another Petri dish and put it into the dessicator. Observe the changes. Suggested Questions:
Does the volume of the used substance change during the experiment?
What could happen with water used in the experiment?
How could you explain decreasing the size of hydrated hydrogel particles and the state change of P4O10?
Are there other factors which could cause the observed effect?
Which phenomena are observed in these experiments?
What are the possible applications of the tested materials?
Preparation of Ag hydrosol: The Ag hydrosol preparation was carried out by a chemical reduction of silver nitrate by sodium citrate. An aliquot of 3.0 or 4.5mL of an aqueous solution of sodium citrate (10 mg/mL) was added drop-wise into 150 mL of a bowling and stirred aqueous solution of silver nitrate of 0.18 mg/mL concentration. After addition, the resulting hydrosol was further boiled for 10–15 min. The hydrosol was stirred for more than 15 min and, after that, diluted with water to get a total volume of 126 mL.
EXPLORING HOLES TEACHER INFORMATION
Page 31 of 33 ESTABLISH
Making Hydrogels using PVA and PAA
Hydrogels have been applied as intelligent carriers in controlled drug -delivery systems. In the dry state, they are usually hard and glossy and can protect the active ingredients from the influence of oxygen, UV light and other possible degradation. Once swollen in water or bodily fluids, they allow the passage of drug molecules out of the body of the hydrogel. The practical use of hydrogels is mainly limited to applications of high water absorption because gels have low mechanical strength. However, hydrogels with high water content, strength and elasticity can be synthesized easily by repeatedly freezing and thawing the hydrogel. Hydrogels are made of three dimensional semi-crystals held together by hydrogen bonds. The amount of time the gel is frozen does not affect the strength of the gel. However, the slower the frozen gel is allowed to thaw the stronger the hydrogels become (crystallization of the 3-D semi-crystals is promoted by slow thawing). Application: Hydrogels can be used to deliver drugs to the body, in dressings to heal
wounds as they create and maintain a moist environment and in sensors due to their flexibility and strength. In this activity, acetylsalicyclic acid is held within a hydrogel and then the release of the acetylsalicyclic acid can be followed either by titration or by UV. Materials: PVA, PAA, acetyl salicylic acid, deionised water, weigh boat(s), spatula, magnetic stirrer, hot plate and stirrer, fridge. Procedure:
Heat 40mL of deionised water to 60C
Weigh out 1.0g of PVA and slowly add to the hot water over 1 hour. The solution should be constantly stirred by a magnetic stirrer.
Weigh out 0.2g of PAA and slowly add to the beaker and stir for a further half hour.
Add 1 g of acetylsalicylic acid to the mixture and allow to mix for 5-10 minutes.
A thick gel will have formed. Pour the gel into a mould (e.g. an empty weigh boat)
Freeze the hydrogel for 4 hours at approx -20C.
Allow the gel to thaw slowly in a fridge and repeat the freezing and thawing process once more.
Place the hydrogel in 500mls of water and leave to one side.
Note any changes in shape to the hydrogel and if the water level has decreased/increased/stayed the same.
Test the aqueous solution after 1 hour, 2 hours, 5 hours etc. to determine the release of the acetylsalicylic acid from the hydogel. This can be done either by UV analysis or by titrimetric analysis. The release rate can be determined by plotting the acetylsalicyclic acid concentration released versus time.

EXPLORING HOLES TEACHER INFORMATION
Page 32 of 33 ESTABLISH
Antibacterial PVC
Incorporating silver nanoparticles / microparticles into polymers forms antimicrobial films that can be used in many medical technologies. Silver ions are released from elemental silver in the presence of oxygen and water. These silver ions can break down cells walls, inhibit cell reproduction and disturb metabolism within a microbe. This property can be utilised to treat wounds and burns as well as infections like MRSA and E.Coli. To prepare a PVC film with small silver particles, silver nitrate is added in the preparation of the PVC film. A film with large holes is required so plasticizer must be added. The silver nitrate is then reduced using sodium citrate, leaving dispersed silver particles throughout the film. Chemicals: Tetrahydrofuran (THF) or Toluene (solvent), Polyvinyl chloride powder, di-butyl sebacate, silver nitrate, sodium citrate
Apparatus:
Hotplate, magnetic stirrer, 75ml beaker(s), graduated cylinder, Pasteur pipette, spatula. Procedure:
Prepare 20ml solution of PVC (see Activity 2.5) with 2.5 mL of the plasticiser di-butyl sebacate.
While the PVC is still in solution, add 2.5 mL of 10mM silver nitrate (AgNO3) and stir with the magnetic stirrer for 1-2 minutes.
Divide the solution over two 75ml beakers. Quickly rotate each beaker so that the whole inside of the beaker is coated with the solution creating a film in the shape of a beaker. Ensure that there are no gaps as the film must be capable of holding water. Allow the solvent to evaporate off and when dry, carefully remove the film from the beaker.
Make up a 5mM solution of sodium citrate and pour this into the beaker shaped membrane, allowing it to pass through the membrane and react with the silver nitrate to form silver nano/microparticles.
Note the colour changes to the membrane.
Allow the film to dry off in a fume hood and analyse it under a SEM to see if any elemental silver has formed.
The SEM images below show the Ag particles dispersed in the PVC membrane. The antimicrobial properties of this film can be tested by placing a piece on an agar plate and leaving the plate in good conditions for microbial growth. An area of no growth will be observed close to the film. Potential applications of these films can be discussed in environmental and medical areas.

EXPLORING HOLES TEACHER INFORMATION
Page 33 of 33 ESTABLISH
SEM image of PVC membrane
with silver microparticles and nanoparticles (bright white clusters).
FigFour different spectra of
the PVC membrane from the SEM image (Figure 1) showing elemental silver present in the polymer sample.
AgAg
ClNa
Ag
Cl
O
Cl
Ag
C
0.5 1 1.5 2 2.5 3 3.5 4 4.5 5 5.5
keVFull Scale 1639 cts Cursor: 5.922 (23 cts)
Spectrum 1
CaCa
SiAg
Cl
Ag
Cl
Na
O
Ag
Cl
AgC
Ca
0.5 1 1.5 2 2.5 3 3.5 4 4.5 5 5.5
keVFull Scale 1639 cts Cursor: 5.922 (33 cts)
Spectrum 2
Ag
ClSi
AgNa
Cl
O
Ag
Cl
Ag
C
0.5 1 1.5 2 2.5 3 3.5 4 4.5 5 5.5
keVFull Scale 1639 cts Cursor: 5.922 (28 cts)
Spectrum 3
Ag
Cl
SiNa
Cl
O
Ag
Cl
Ag
Ag
C
0.5 1 1.5 2 2.5 3 3.5 4 4.5 5 5.5
keVFull Scale 1639 cts Cursor: 5.922 (34 cts)
Spectrum 4
Silver microparticles
(µm)
Silver nanoparticles
(nm)

you
Lead partner for Unit: Dublin City University (DCU)
European Science and Technology in Action Building Links with Industry, Schools and Home
Work Package 3
UNIT EXPLORING HOLES Classroom Materials
The ESTABLISH project has received funding form the European Community‟s Seventh Programme [FP7/2007-2013] under grant agreement n
o 244749
Start Date: 1st January 2010 Duration: 48 months
WP
3
Un
it E
xp
loring
Hole
s
EXPLORING HOLES CLASSROOM MATERIALS
Page 2 of 35 ESTABLISH
This document has been generated following discussions by the Chemistry sub group, namely:
Odilla Finlayson, Ilka Parchmann, Iwona Maciejowska, Hana Čtrnáctová, Paweł Bernard, Paweł Bros, Małgorzata Krzeczkowska, Jack Holbrook Rory Geoghegan Wolfgang Graeber, Alison Graham, Stefanie Herzog, Petr Šmejkal, Mária Ganajjvá, Elzbeieta Szostak, Anna Bialas, Loukia Anastasiadou, Michael Nicolaou, Nicos Valanides
Activities have been based on information from:
Mareike Wilms, Martin Fach, Jens Friedrich Dr., Marco Oetken Prof. Dr, Molekulares Sieben: Mit
Einmachfolie ins Diskontinuum, Chemkon, Volume 11, Issue 3, pages 127-130, July 2004
James Chapman, Laura Barron and Susan Ryan, Dublin City University.
Activity 3.2: A. Koehler in Chemie im Kontext: Superabsorbierende Kunststoffe. Cornelsen, 2007. Activity 3.3: Universität Gießen: Cyclodextrine – molekulare Zuckertüten, http://fss.plone.uni-giessen.de/fss/fbz/fb08/chemie/Chemiedidaktik/mat/dat/cyc.pdf/file/Cyclodextrine.pdf
The research leading to these results has received funding from the European Community’s Seventh Framework Programme [FP7/2007-2013]
DISSEMINATION LEVEL
PU Public
PP Restricted to other programme participants (including the Commission Services)
RE Restricted to a group specified by the consortium (including the Commission Services)
CO Confidential, only for members of the consortium (including the Commission Services)
√
Document History
ISSUE DATE VERSION CHANGES MADE / REASON FOR THIS ISSUE
12/10/2010 1.0
18/11/10 2.0
2/12/10 3.0
16/12/10 4.0
27/06/11 5.0 Additional material with classroom resources
30/06/11 6.0 Final amendments
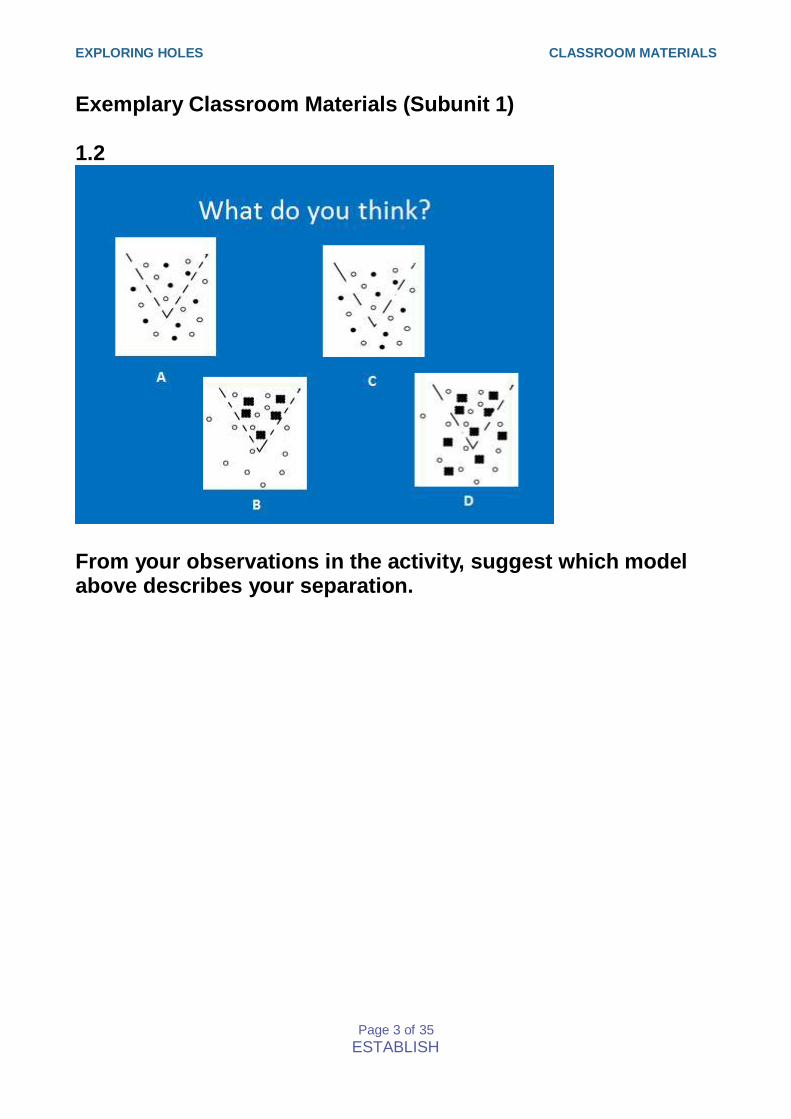
EXPLORING HOLES CLASSROOM MATERIALS
Page 3 of 35 ESTABLISH
Exemplary Classroom Materials (Subunit 1) 1.2
From your observations in the activity, suggest which model above describes your separation.

EXPLORING HOLES CLASSROOM MATERIALS
Page 4 of 35 ESTABLISH
Activity 1.5 Teachers notes
The case of Liam Johnson
Using separating techniques to solve a crime
________________________
Equipment required: Per group: Bunsen burner, gauze, pyrex beaker/evaporating dish Beaker, stirrer, filter funnel, filter paper Chromatography paper, beaker, wooden splint to support paper This activity works well in groups of 3- each person does one of the tests and they pool their results to come up with the answer
What you need to do in advance: Photocopy sheets needed Lung water sample: tap water Tea sample: some cold tea Sugar sample: some dark brown sugar with powdered carbon/ iron filings added
Expected results: Lung water sample: heating does not give salt Tea sample: chromatography does not show visible contamination Sugar sample: shows another substance when sugar dissolves
Suggested answers to questions: 1. Lung sample is not salt water so Liam was not drowned at sea- but may have drowned in
swimming pool. (Discussion point: Negative results can be very important in giving information!)
2. Tea sample shows no contamination (Discussion point: limitations of this method, visible contaminants revealed only- in Forensic labs separation of components of the mixture is followed by chemical detection)
3. Sugar sample does show contamination. 4. It is important that the students realise that there are often several ways to interpret results
and it is important that scientists are able to think laterally of possible explanations! The evidence suggests that Liam was poisoned and/or drowned in the pool but then moved to the sea .
5. What is the contamination in the sugar? Who else was in the house at the time? etc etc
The Case of Liam Johnson

EXPLORING HOLES CLASSROOM MATERIALS
Page 5 of 35 ESTABLISH
6. Student worksheet
The Case of Liam Johnson
The crime This is a newspaper cutting about the discovery of a body at Howth Head.
Although initially it looks like a tragic drowning accident the Gardai are not convinced that all is as it seems.
BODY FOUND AT HOWTH HEAD The body of Liam Johnson was pulled from the sea yesterday evening at Howth Head. Forensic scientists have placed time of death as sometime between 6 and 9 pm the previous evening. His grieving wife and daughters were too distraught to talk to the press but it is believed that his once booming business was now in some financial difficulties
Irish Independent, May 7th 2009
Fromhttp://www.google.ie/imgres?imgurl=http://static.guim.co.uk/sys-
images/Guardian/Pix/pictures/2009/2/16/1234791621085/migrants-Spain-canary-isl-
001.jpg&imgrefurl=http://www.guardian.co.uk/world/2009/feb/16/spain-migrant-
surfers&usg
The Case of Liam Johnson

EXPLORING HOLES CLASSROOM MATERIALS
Page 6 of 35 ESTABLISH
http://www.google.ie/imgres?imgurl=http://www.plantnj.com/
images/layout/featured_projects/elfers/custom-swimming-pool.
http://wwwdelivery.superstock.com/WI/223/1802/PreviewCo
mp/SuperStock_1802R-17104.jpg
The Forensic team have collected samples at the post mortem and at the home of Liam Johnson where they found his towel near the pool …… …and a table with a used tea cup, tea pot and brown sugar.
You are the Forensic Scientist appointed to investigate the samples collected which are
(a) a sample of water from the lungs of Liam Johnson
(b) a sample of tea from the teapot (c) a sample of sugar from the sugar bowl
What you need to know!
You have learnt a number of separating techniques which will be very useful to you here! You will have
to think carefully about which ones you need to use.
evaporation
filtration
chromatography
distillation magnetism
The Case of Liam Johnson

EXPLORING HOLES CLASSROOM MATERIALS
Page 7 of 35 ESTABLISH
What you need to do to solve the crime! Decide what tests to carry out on your samples to find out
1. Did Liam Johnson die from drowning in the sea? 2. Is there any evidence that the tea is contaminated with another substance? 3. Is there any evidence that the sugar is contaminated with another substance?
Record your findings carefully on the chart below
Sample Method used Results Conclusions
(a) water from
the lungs of
Liam Johnson
(b) the tea in
the teapot
(c) the sugar in
the sugar bowl
The Case of Liam Johnson

EXPLORING HOLES CLASSROOM MATERIALS
Page 8 of 35 ESTABLISH
What have you found out?
1. Did Liam Johnson drown in the sea? Outline the evidence for your answer.
…………………………………………………………………………………………………………………………
…………………………………………………………………………………………………………………………
…………………………………………………………………………………………………………………………
2. Is there any evidence for contamination of the tea by another substance. Outline the evidence for
your answer.
…………………………………………………………………………………………………………………………
…………………………………………………………………………………………………………………………
…………………………………………………………………………………………………………………………
3. Is there any evidence that the sugar was contaminated by another substance. Outline the evidence
to support your answer.
…………………………………………………………………………………………………………………………
…………………………………………………………………………………………………………………………
…………………………………………………………………………………………………………………………
4. What do you think happened in this case?
…………………………………………………………………………………………………………………………
…………………………………………………………………………………………………………………………
…………………………………………………………………………………………………………………………
…………………………………………………………………………………………………………………………
5. What further evidence or tests would need to be collected to prove that your ideas are correct?
…………………………………………………………………………………………………………………………
…………………………………………………………………………………………………………………………
…………………………………………………………………………………………………………………………
The Case of Liam Johnson
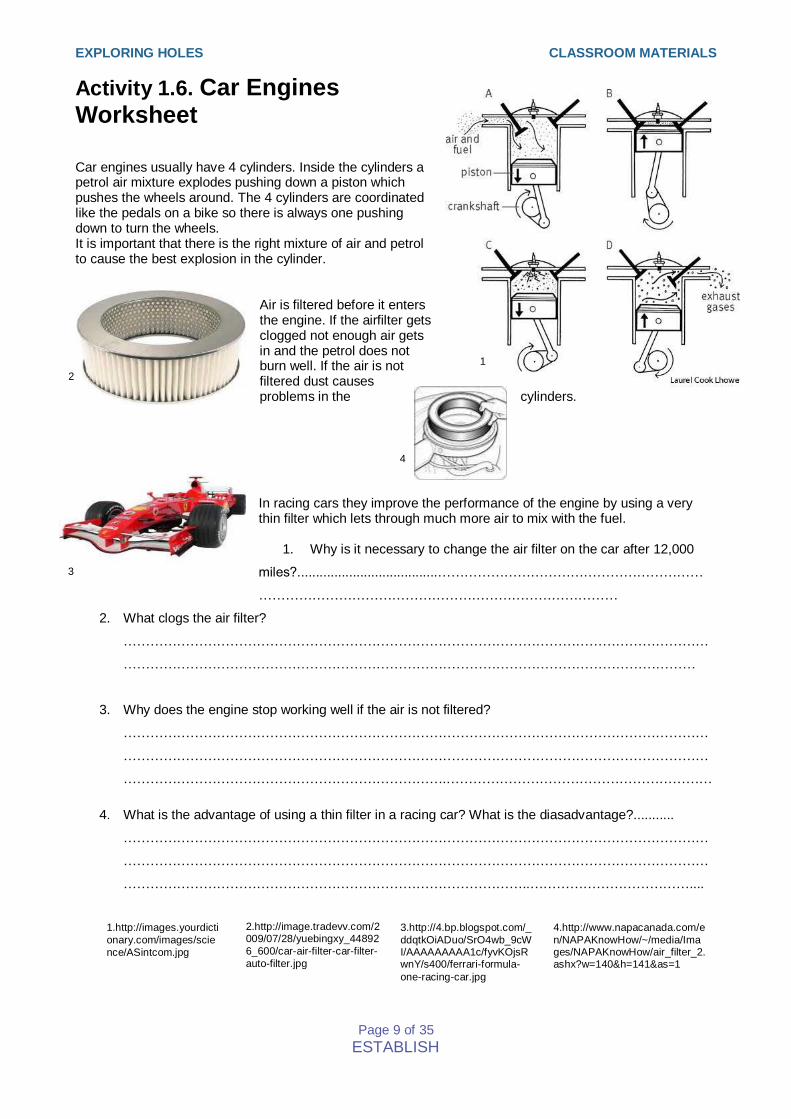
EXPLORING HOLES CLASSROOM MATERIALS
Page 9 of 35 ESTABLISH
Activity 1.6. Car Engines Worksheet Car engines usually have 4 cylinders. Inside the cylinders a petrol air mixture explodes pushing down a piston which pushes the wheels around. The 4 cylinders are coordinated like the pedals on a bike so there is always one pushing down to turn the wheels. It is important that there is the right mixture of air and petrol to cause the best explosion in the cylinder.
Air is filtered before it enters the engine. If the airfilter gets clogged not enough air gets in and the petrol does not burn well. If the air is not filtered dust causes problems in the cylinders.
In racing cars they improve the performance of the engine by using a very thin filter which lets through much more air to mix with the fuel.
1. Why is it necessary to change the air filter on the car after 12,000
miles?......................................……………………………………………………
………………………………………………………………………
2. What clogs the air filter?
……………………………………………………………………………………………………………………
…………………………………………………………………………………………………………………
3. Why does the engine stop working well if the air is not filtered?
……………………………………………………………………………………………………………………
……………………………………………………………………………………………………………………
……………………………………………………………….……………………………………………………
4. What is the advantage of using a thin filter in a racing car? What is the diasadvantage?...........
……………………………………………………………………………………………………………………
……………………………………………………………………………………………………………………
………………………………………………………………………………..………………………………....
1.http://images.yourdicti
onary.com/images/scie
nce/ASintcom.jpg
2.http://image.tradevv.com/2009/07/28/yuebingxy_44892
6_600/car-air-filter-car-filter-
auto-filter.jpg
3.http://4.bp.blogspot.com/_
ddqtkOiADuo/SrO4wb_9cWI/AAAAAAAAA1c/fyvKOjsRwnY/s400/ferrari-formula-
one-racing-car.jpg
3
.
2.
1
.
4.
3
.
4.http://www.napacanada.com/e
n/NAPAKnowHow/~/media/Images/NAPAKnowHow/air_filter_2.ashx?w=140&h=141&as=1
3
.

EXPLORING HOLES CLASSROOM MATERIALS
Page 10 of 35 ESTABLISH
1
2 3 4
Activity 2.1 Membranes with invisible holes - worksheet Page 1of 2
1. Set up the experiment as advised. Put in the labels on each tube.
Observations:
1 2 3 4
Colour at start
In small bag
In tube
Colour at end
In small bag
In tube
2. Can you explain what is happening?
………………………………………………………………………………………………………………………………………………………………………
………………………………………………………………………………………………………………………………………………………………………
………………………………………………………………………………………………………………………………………………………………………
………

EXPLORING HOLES CLASSROOM MATERIALS
Page 11 of 35 ESTABLISH
Activity 2.1 Membranes with invisible holes - worksheet Page 2
of 2
3. Can you match each tube of your experiment to one of these diagrams?
4. What would happen in each tube if the solutions were reversed- if the solution of smaller molecules was
in the tube and the solution of larger molecules in the membrane at the start?
D
C
B
A
A

EXPLORING HOLES CLASSROOM MATERIALS
Page 12 of 35 ESTABLISH
Activity 2.2A: Station 1: Colored Chemical Substances in Water Worksheet 1: Discuss in your group and then perform the following activities Experiment 1-Indicative Procedure
1. i. Pour 120 mL of distilled water into a 150mL beaker. If you placed one drop of red food colouring at the centre of the bottom of the beaker, what changes do you predict will occur; try to briefly explain your predictions. _________________________________________________________________ ii. Pour distilled water into a Petri dish (up to approximately 1 cm height). If you placed a few crystals of potassium permanganate in the centre of the Petri dish, what changes do you predict will occur; try to briefly explain your predictions. _________________________________________________________________
Imagine that you wear magic magnifying glasses, so that you can clearly see the
content of the Petri dish, what kind of changes do you expect to observe in the Petri
dish; Draw your expectations and observations after 1 min, after two minutes and after
10 minutes, in the following diagrams:
After 1 min after 2 mins after 10 minutes
2. Conduct the following experiments: i. Using a plastic dropper, put 3-4 drops of red food colouring in the center of the bottom of a beaker (A) containing 120 mL of distilled water. ii. Using a plastic dropper, put 3-4 drops of red food colouring in the center of the surface of a beaker (B) containing 120 mL of distilled water. iii. Put 2-3 crystals of Potassium permanganate on the center of a Petri dish using forceps.
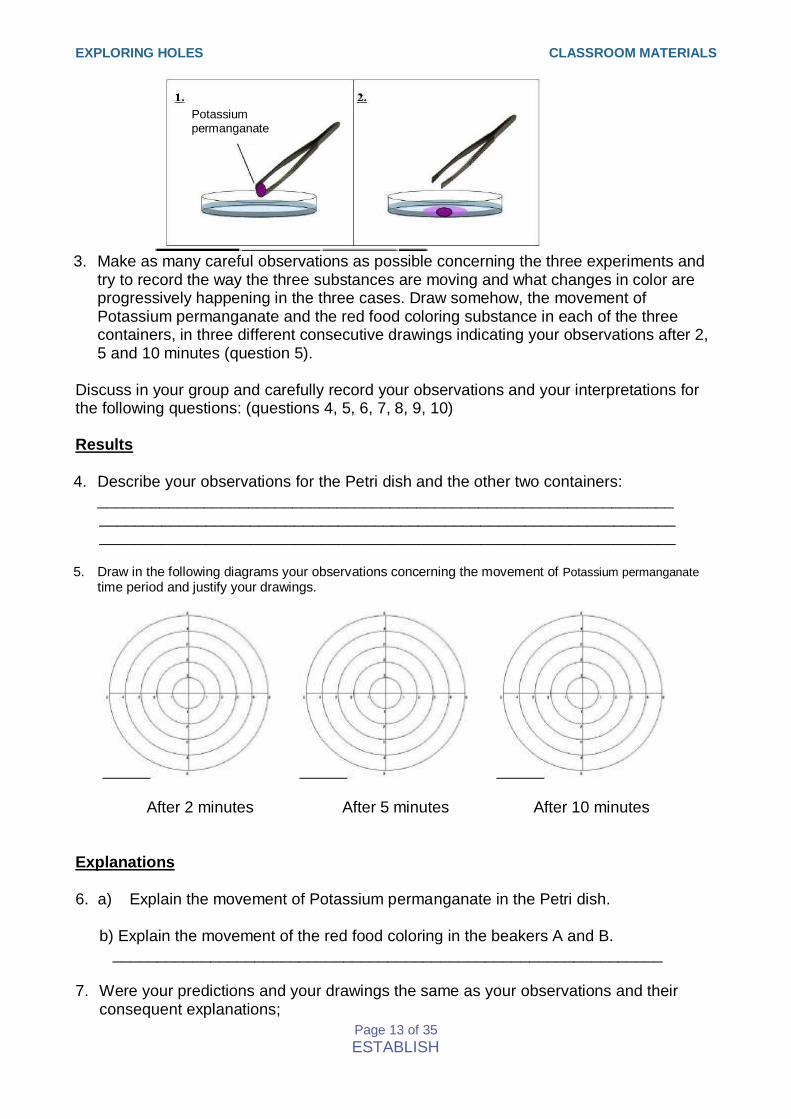
EXPLORING HOLES CLASSROOM MATERIALS
Page 13 of 35 ESTABLISH
3. Make as many careful observations as possible concerning the three experiments and
try to record the way the three substances are moving and what changes in color are progressively happening in the three cases. Draw somehow, the movement of Potassium permanganate and the red food coloring substance in each of the three containers, in three different consecutive drawings indicating your observations after 2, 5 and 10 minutes (question 5).
Discuss in your group and carefully record your observations and your interpretations for the following questions: (questions 4, 5, 6, 7, 8, 9, 10) Results 4. Describe your observations for the Petri dish and the other two containers:
_________________________________________________________________ _________________________________________________________________ _________________________________________________________________
5. Draw in the following diagrams your observations concerning the movement of Potassium permanganate
time period and justify your drawings.
After 2 minutes After 5 minutes After 10 minutes Explanations
6. a) Explain the movement of Potassium permanganate in the Petri dish.
b) Explain the movement of the red food coloring in the beakers A and B. ______________________________________________________________
7. Were your predictions and your drawings the same as your observations and their consequent explanations;
Potassium permanganate

EXPLORING HOLES CLASSROOM MATERIALS
Page 14 of 35 ESTABLISH
_________________________________________________________________
_________________________________________________________________
_________________________________________________________________
_________________________________________________________________
8. Imagine that you wear magic magnifying glasses. In such a case, draw the contents of the beaker before and after pouring the drops of the red food colouring
1 2
9. What kind of changes occur in the Petri dish and in the two beakers after adding either
potassium permanganate and the red food coloring: How do you justify your answers;
_______________________________________________________________
_______________________________________________________________
10. Describe briefly your observations in the beaker where the red food coloring was added. In your description, please use the following terminology: particles, movement, water, distributed, homogeneously, diffusion. _______________________________________________________________
_______________________________________________________________
_______________________________________________________________
_______________________________________________________________
11. At the corner of your classroom, the chemistry teacher put an open small bottle containing pure alcohol, but she did not mention anything to her students. John smelled the alcohol after a minute, but Jack smelled it after several minutes.

EXPLORING HOLES CLASSROOM MATERIALS
Page 15 of 35 ESTABLISH
i. Why do you think the two students smelled the alcohol at different times and why. ii. What is the relation of the smell of the alcohol with the experiments that you have performed earlier; _______________________________________________________________
_______________________________________________________________
_______________________________________________________________
_______________________________________________________________
Homework
1. How many particles are included in a tiny crystal of potassium permanganate;
A. 100 000 000 000 000 000 000 000 Β. 1 000
C. 100 000 000 D. 100 000
2. Describe the phenomenon of diffusion that is presented in the following drawings. (White spheres represent particles of water and the other spheres represent particles of potassium permanganate.)
3. Do you expect that the particles of a gas behave the same way as the particles of
potassium permanganate and the particles of the red food coloring substance;
Justify your answer.
_____________________________________________________________
_____________________________________________________________
4. Is the following statement true or false; explain why. “The same experiment can be performed using cooking salt instead of potassium permanganate. The only difference relates to the fact that we will not be able to observe the movement of the particles, because the cooking salt does not have any color.” __________
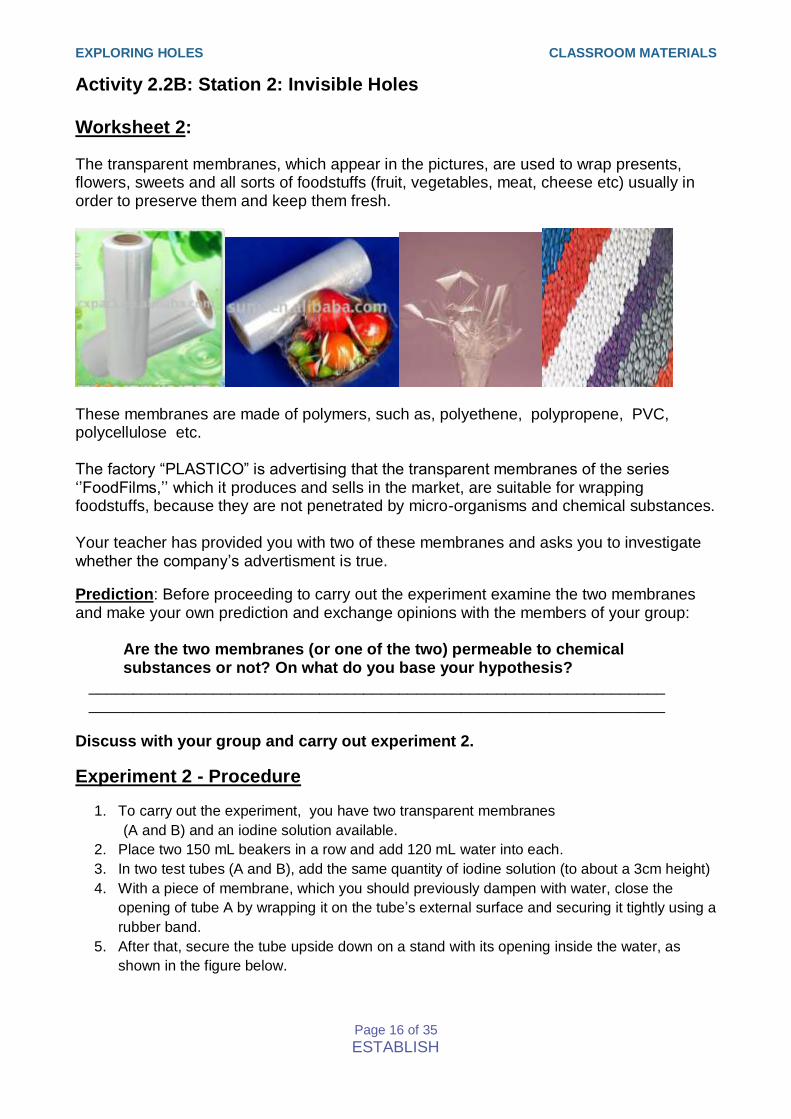
EXPLORING HOLES CLASSROOM MATERIALS
Page 16 of 35 ESTABLISH
Activity 2.2B: Station 2: Invisible Holes Worksheet 2:
The transparent membranes, which appear in the pictures, are used to wrap presents, flowers, sweets and all sorts of foodstuffs (fruit, vegetables, meat, cheese etc) usually in order to preserve them and keep them fresh.
These membranes are made of polymers, such as, polyethene, polypropene, PVC, polycellulose etc. The factory “PLASTICO” is advertising that the transparent membranes of the series „‟FoodFilms,‟‟ which it produces and sells in the market, are suitable for wrapping foodstuffs, because they are not penetrated by micro-organisms and chemical substances. Your teacher has provided you with two of these membranes and asks you to investigate whether the company‟s advertisment is true.
Prediction: Before proceeding to carry out the experiment examine the two membranes and make your own prediction and exchange opinions with the members of your group:
Are the two membranes (or one of the two) permeable to chemical substances or not? On what do you base your hypothesis?
_________________________________________________________________ _________________________________________________________________ Discuss with your group and carry out experiment 2.
Experiment 2 - Procedure
1. To carry out the experiment, you have two transparent membranes
(A and B) and an iodine solution available.
2. Place two 150 mL beakers in a row and add 120 mL water into each.
3. In two test tubes (A and B), add the same quantity of iodine solution (to about a 3cm height)
4. With a piece of membrane, which you should previously dampen with water, close the
opening of tube A by wrapping it on the tube‟s external surface and securing it tightly using a
rubber band.
5. After that, secure the tube upside down on a stand with its opening inside the water, as
shown in the figure below.

EXPLORING HOLES CLASSROOM MATERIALS
Page 17 of 35 ESTABLISH
6. In the same way, work with membrane B.
If one of the membranes is permeable to the iodine solution, what observations do you predict in the beaker with the water and why? _____________________________________________________________________________________
_____________________________________________________________________________________
_____________________________________________________________________________________
7. Leave the two solutions to stand for 7-8 minutes attentively observing all the changes in the two
beakers.
Discuss with your group and write down the results and the interpretation of the results (questions 9,10,11,12,13,14,15)
Results
8. Write down your observations of the two beakers:
Beaker Α: _______________________________________________________
Beaker Β: _______________________________________________________
Interpretation of Results
9. What do you conclude from the above experiment?
_______________________________________________________________
_______________________________________________________________
10. Draw your observations of the two membranes in the figures below. Correct the size of the
pores in each membrane if needed.
Iodine solution
Water

EXPLORING HOLES CLASSROOM MATERIALS
Page 18 of 35 ESTABLISH
Α
Α Β
11. Is the prediction you made in question 7 concerning the changes in the beakers with the water right or wrong? If there is a need, amend your explanation accordingly.
______________________________________________________________ ______________________________________________________________
12. Is the advertisment of the “PLASTICO” factory justified? Is the claim of the company that the „‟FoodFilms‟‟ membranes are not permeable true or false? ______________________________________________________________
_______________________________________________________________
_______________________________________________________________
13. Is your prediction concerning the membranes‟ permeability correct or not?
_______________________________________________________________
14. The factors (variables), which influence the experiment, are the following:
membrane (pores of the membrane), permeability, dissolved substance (size of its
particles), liquid in the beaker, quantity of solution in the test tube.
Which of the above variables are:
a. Controlled variables (factors which I keep constant): __________________
___________________________________________________________
b. Independent variable (a factor which I can alter): ____________________
c. Dependent variable (a factor which I can measure/observe): ____________

EXPLORING HOLES CLASSROOM MATERIALS
Page 19 of 35 ESTABLISH
Answer questions 15 and 16 individually
15. Which one of the membranes would you use to wrap your sandwich? Support your answer. ______________________________________________________________ ______________________________________________________________
______________________________________________________________
16. If you used salt water instead of iodine solution in the above experiment, what would happen? Explain your answer. ______________________________________________________________ ______________________________________________________________
Homework
1. Which one of the membranes would you use to wrap flowers? Explain your choice. ______________________________________________________________ ______________________________________________________________ ______________________________________________________________
2. Do you think that the particle (molecule) of iodine is larger than a cell of a microorganism? ________________________________________________ Are there particles that are smaller than the particle of iodine? ___________
Are there particles that are larger than the particle of iodine? ____________
3. Search the internet for more information on transparent membranes and mention their different uses. For every example, explain the relationship between the permeability of the membrane and its use.
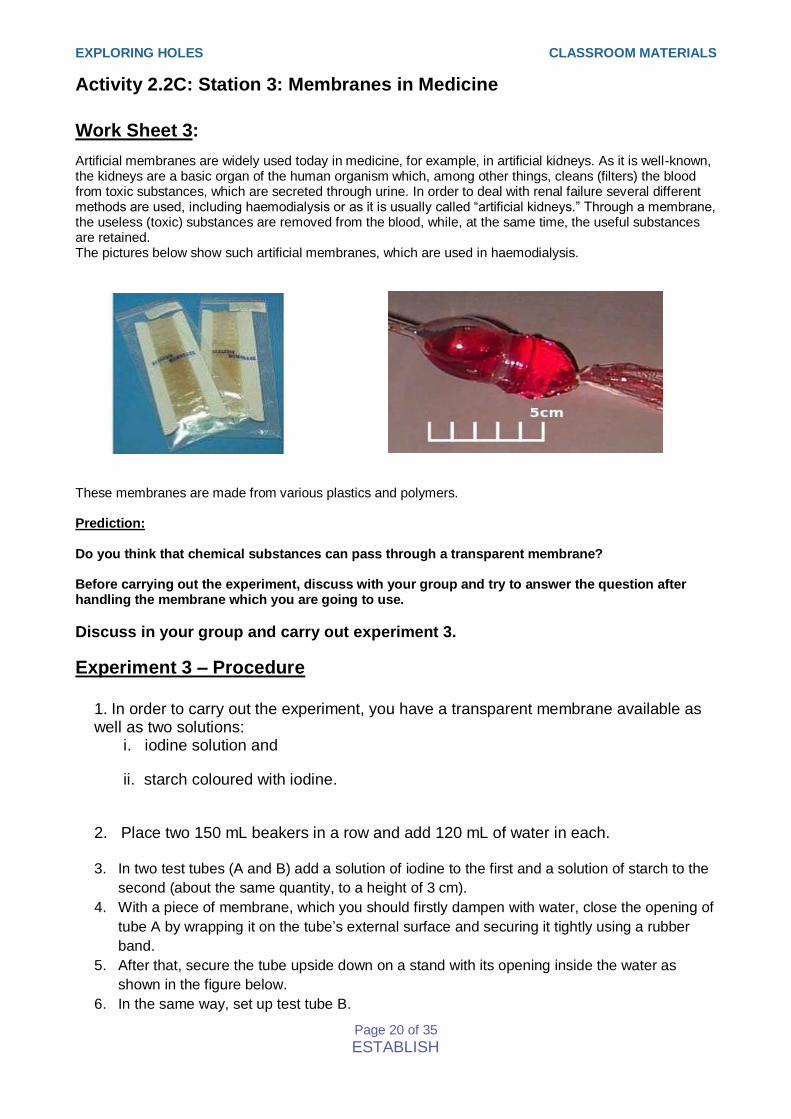
EXPLORING HOLES CLASSROOM MATERIALS
Page 20 of 35 ESTABLISH
Activity 2.2C: Station 3: Membranes in Medicine
Work Sheet 3:
Artificial membranes are widely used today in medicine, for example, in artificial kidneys. As it is well-known, the kidneys are a basic organ of the human organism which, among other things, cleans (filters) the blood from toxic substances, which are secreted through urine. In order to deal with renal failure several different methods are used, including haemodialysis or as it is usually called “artificial kidneys.” Through a membrane, the useless (toxic) substances are removed from the blood, while, at the same time, the useful substances are retained. The pictures below show such artificial membranes, which are used in haemodialysis.
These membranes are made from various plastics and polymers. Prediction: Do you think that chemical substances can pass through a transparent membrane? Before carrying out the experiment, discuss with your group and try to answer the question after handling the membrane which you are going to use.
Discuss in your group and carry out experiment 3.
Experiment 3 – Procedure
1. In order to carry out the experiment, you have a transparent membrane available as well as two solutions:
i. iodine solution and
ii. starch coloured with iodine.
2. Place two 150 mL beakers in a row and add 120 mL of water in each.
3. In two test tubes (A and B) add a solution of iodine to the first and a solution of starch to the
second (about the same quantity, to a height of 3 cm).
4. With a piece of membrane, which you should firstly dampen with water, close the opening of
tube A by wrapping it on the tube‟s external surface and securing it tightly using a rubber
band.
5. After that, secure the tube upside down on a stand with its opening inside the water as
shown in the figure below.
6. In the same way, set up test tube B.
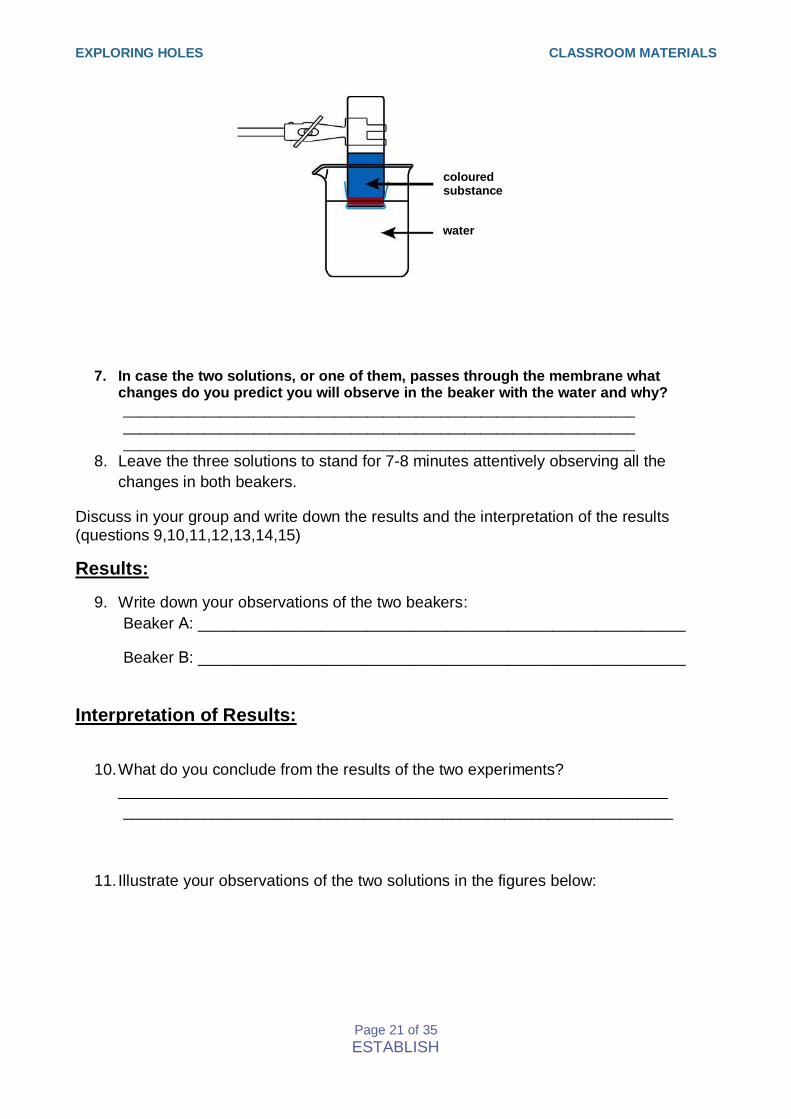
EXPLORING HOLES CLASSROOM MATERIALS
Page 21 of 35 ESTABLISH
7. In case the two solutions, or one of them, passes through the membrane what changes do you predict you will observe in the beaker with the water and why?
_______________________________________________________________ _______________________________________________________________ _______________________________________________________________
8. Leave the three solutions to stand for 7-8 minutes attentively observing all the
changes in both beakers.
Discuss in your group and write down the results and the interpretation of the results (questions 9,10,11,12,13,14,15)
Results:
9. Write down your observations of the two beakers:
Beaker Α: _______________________________________________________
Beaker Β: _______________________________________________________
Interpretation of Results:
10. What do you conclude from the results of the two experiments?
______________________________________________________________
______________________________________________________________
11. Illustrate your observations of the two solutions in the figures below:
coloured substance
water
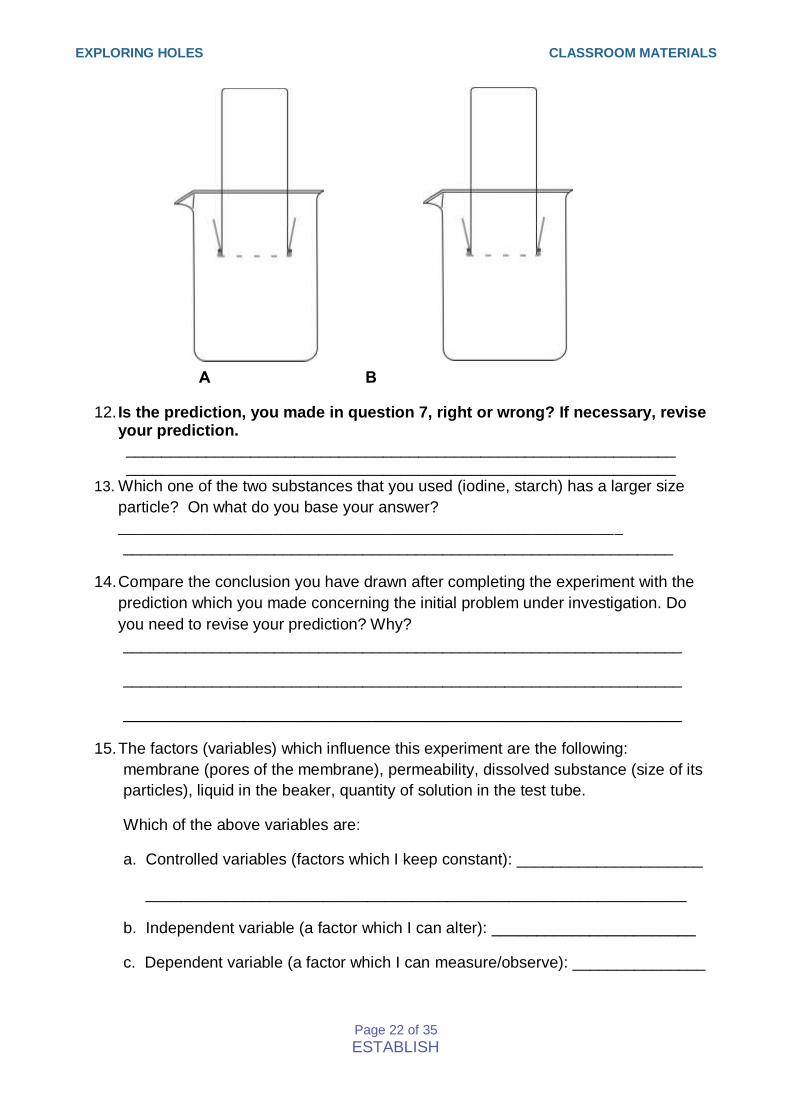
EXPLORING HOLES CLASSROOM MATERIALS
Page 22 of 35 ESTABLISH
Α Β
12. Is the prediction, you made in question 7, right or wrong? If necessary, revise your prediction.
______________________________________________________________ ______________________________________________________________
13. Which one of the two substances that you used (iodine, starch) has a larger size
particle? On what do you base your answer?
______________________________________________________________
______________________________________________________________
14. Compare the conclusion you have drawn after completing the experiment with the
prediction which you made concerning the initial problem under investigation. Do
you need to revise your prediction? Why?
_______________________________________________________________
_______________________________________________________________
_______________________________________________________________
15. The factors (variables) which influence this experiment are the following:
membrane (pores of the membrane), permeability, dissolved substance (size of its
particles), liquid in the beaker, quantity of solution in the test tube.
Which of the above variables are:
a. Controlled variables (factors which I keep constant): _____________________
_____________________________________________________________
b. Independent variable (a factor which I can alter): _______________________
c. Dependent variable (a factor which I can measure/observe): _______________

EXPLORING HOLES CLASSROOM MATERIALS
Page 23 of 35 ESTABLISH
Answer questions 16 and 17 individually
16. Why do you think the starch solution, which you used, has been previously coloured?
______________________________________________________________
______________________________________________________________
17. Do you believe that hydrogen gas can pass through the membrane which you used in the
previous experiment? On what do you base your opinion? ______________________________________________________________ ______________________________________________________________ ______________________________________________________________
Homework 1. Why should the membrane be dampened before being applied to the opening of the test
tube? ______________________________________________________________
______________________________________________________________
2. It is well known that polymers (starch, cellulose, natural rubber, nylon, etc) comparatively have very large molecules. The image below presents the starch molecule coloured with iodine.
Explain why the polymers have large molecules.
______________________________________________________________
______________________________________________________________
3. Could the membrane that you examined be used in haemodialysis? On what do you base
your answer?
______________________________________________________________
______________________________________________________________
4. Search the internet and collect information concerning renal failure and haemodialysis or
“artificial kidneys”.

EXPLORING HOLES CLASSROOM MATERIALS
Page 24 of 35 ESTABLISH
Activity 2.2D: Station 4: Chemical Substances through membranes Work Sheet 4: The transparent membranes which appear in the pictures are used to wrap presents, flowers, sweets and all sorts of foodstuffs (fruit, vegetables, meat, cheese etc) usually in order to preserve them and keep them fresh.
In the experiment that you are going to carry out in this station, you will investigate whether different chemical substances such as food colouring substances pass through a transparent membrane. Before carrying out the experiment described below, make your own prediction as to whether chemical substances can pass through the transparent membrane which you have. Justify your prediction. Discuss in your group and carry out experiment 4
Experiment 4 – Procedure
1.In order to carry out the experiment you should have a type of transparent membrane as well as the following solutions:
ι. Potassium permanganate
ιι. red food colouring substance
ιιι. green food colouring substance
2.Place three 150 mL beakers in a row and add 120 mL of water in each. 3.In three test tubes (A, B and C) add three solutions in the order they are stated in 1. (about the same quantity to a height of 3 cm). 4. With a piece of membrane which you should first dampen with water, close the
opening of tube A by wrapping it on the tube‟s external surface and securing it
tightly using a rubber band.
5. After that secure the tube upside down on a stand with its opening inside the water
as shown in the figure below.
6. In the same way, set up test tubes B and C.

EXPLORING HOLES CLASSROOM MATERIALS
Page 25 of 35 ESTABLISH
7. Leave the three solutions to stand for 7-8 minutes attentively observing all the changes in
all three beakers.
Discuss in your group and write down the results and the interpretation of the results (questions 8,9,10,11,12,13)
Results
8. What common physical property is common to all the solutions that you used?
_______________________________________________________________
9. Write down your observations of the three beakers:
Beaker Α: _______________________________________________________
Beaker Β: _______________________________________________________
Beaker C: _______________________________________________________
Interpretation of Results
10. What can you conclude from the above experiment?
______________________________________________________________
______________________________________________________________
11. Compare your conclusions with the prediction you made of the initial problem under
investigation .
______________________________________________________________
______________________________________________________________
12. Which comparative conclusions can be justified based on the results of the previous
experiment?
______________________________________________________________
______________________________________________________________
13. The factors (variables) which influence the above mentioned experiment are the following:
colouring substance
water
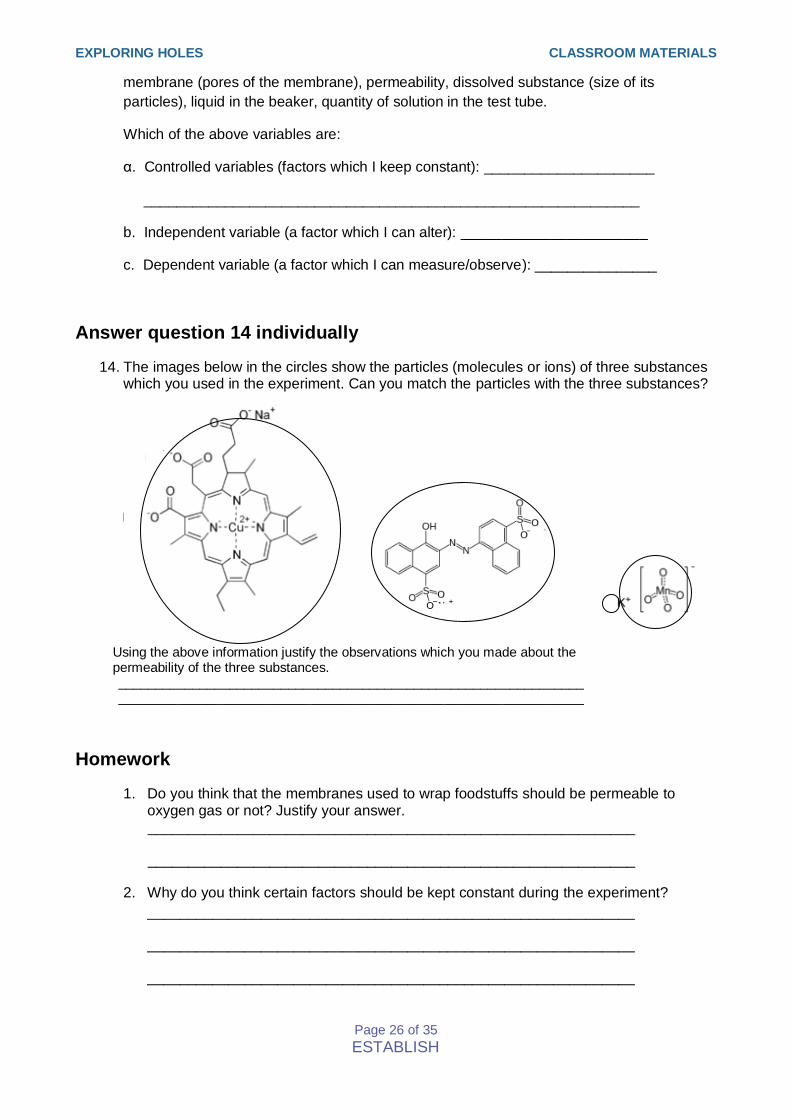
EXPLORING HOLES CLASSROOM MATERIALS
Page 26 of 35 ESTABLISH
membrane (pores of the membrane), permeability, dissolved substance (size of its
particles), liquid in the beaker, quantity of solution in the test tube.
Which of the above variables are:
α. Controlled variables (factors which I keep constant): _____________________
_____________________________________________________________
b. Independent variable (a factor which I can alter): _______________________
c. Dependent variable (a factor which I can measure/observe): _______________
Answer question 14 individually
14. The images below in the circles show the particles (molecules or ions) of three substances which you used in the experiment. Can you match the particles with the three substances?
Using the above information justify the observations which you made about the permeability of the three substances.
_______________________________________________________________ _______________________________________________________________
Homework
1. Do you think that the membranes used to wrap foodstuffs should be permeable to oxygen gas or not? Justify your answer.
____________________________________________________________
____________________________________________________________
2. Why do you think certain factors should be kept constant during the experiment?
____________________________________________________________
____________________________________________________________
____________________________________________________________

EXPLORING HOLES CLASSROOM MATERIALS
Page 27 of 35 ESTABLISH
Activity 2.2E
Note: These activities should be performed by all groups and should be linked to the previous activities where the groups were rotating from one station to the other. Obviously, teachers should be randomly or otherwise divided into four groups and they should be instructed to perform all the activities concerning the four stations by moving from one station to the other.
A model for the separation of mixtures Separation of mixtures, using sieves or filters, is frequently applied in all the human activities: at home (kitchen), in the industry, research and medicine. There are plenty of sieves and filters available for different uses. In the Chemistry laboratory, we usually use filter papers for the separation of mixtures which consist of a liquid and un-dissolved solids.
Procedure Experiment a: Separating of mixtures with sieves – Separation model At your work place you will find:
a. Sieve A (with bigger holes) b. Sieve B (with smaller holes)
Furthermore you will find:
i. mixture A (Soya Beans – Tapioca) ii. mixture B (Tapioca – Alfalfa Seeds) iii. mixture C (Soya Beans – Tapioca - Alfalfa Seeds)
Discuss in your group and plan an appropriate procedure for separating the above mixtures in their components. Purpose of the activity is to compare the visible components of these mixtures with the invisible particles (molecules – ions) of chemical substances in mixtures.
Procedure Plan and carry out the following trials:
(a) Try to separate the three mixtures with sieve A. (b) Try to separate the three mixtures with sieve B. (c) Try to separate the three mixtures using both sieves A and B, if you consider this necessary.
Results
1. Carefully record your observations
EXPLORING HOLES CLASSROOM MATERIALS
Page 28 of 35 ESTABLISH
Interpretation of results
2. Summarising your results, explain which sieve or sieves you used to separate each of the
three mixtures?
Mixture A: ______________________________________________
Mixture B: ______________________________________________
Mixture C: ______________________________________________
3. Which factors (variables) affect the trials you carried out?
____________________________________________________________
4. Which factor did you decide to keep constant (controlled variable)?
____________________________________________________________
5. Which factor did you decide to change (dependent variable)?
____________________________________________________________
6. Which factor did you decide to use for recording your observations (independent variable)?
____________________________________________________________
7. Represent your observations for each one of the above trials using the following symbols:
Particles for separation:
Soya Beans Tapioca Alfalfa Seeds
Screens: (Use the sheets with the screen models you will find at your working place)
Screen A

EXPLORING HOLES CLASSROOM MATERIALS
Page 29 of 35 ESTABLISH
Screen B

EXPLORING HOLES CLASSROOM MATERIALS
Page 30 of 35 ESTABLISH
Experiment b You have to investigate whether the samples of the inks you have been given by your teacher permeate transparent membranes. Prediction: Before you proceed to carry out this activity, discuss in your group and make together a prediction regarding the permeability of the two samples through the membranes. Which observation are you going to record in the experiments you plan?
Procedure
1. At your work place you will find:
ι. two transparent membranes A and two transparent membranes B
ιι. two samples of ink: black ink and blue ink ιιι. all the necessary instruments and glassware
2. Plan an experiment to investigate the permeability of the inks through the transparent
membranes.
During the planning of the experiment determine the different kind of variables:
Controlled variables, dependent variable and independent variable.
3. Now:
3.1 Carry out the experiment, as you have planned it. 3.2 Record your observations. 3.3 Discuss in the group your results. Was your initial prediction correct or incorrect? Comment on it. 3.4 Explain the results, comparing the two kinds of ink with the mixtures used in the experiment a‟ and according to the model you have suggested. Draw a model, using for the components of ink small cycles of different sizes and for the membranes holes of different spaces. 3.5 Suggest a title for the above activity;
Home work 3. Based on the model you developed and after some information you will get from the
internet explain how haemodialysis is working.
REPRESENTATIONS OF THE EXPERIMENTS

EXPLORING HOLES CLASSROOM MATERIALS
Page 31 of 35 ESTABLISH

EXPLORING HOLES CLASSROOM MATERIALS
Page 32 of 35 ESTABLISH

EXPLORING HOLES CLASSROOM MATERIALS
Page 33 of 35 ESTABLISH
Activity 2.3 Dialysis worksheet page 1 of 2
Dialysis Machines
The human kidney is an amazing organ. It has two essential functions, the excretion of urea, salts and water and the maintenance of water balance in the body. Each day the kidneys filter 180l of fluid out of the blood. Most of the fluid is reabsorbed with all the useful nutrients which the body needs such as glucose and amino acids. About 2l of urine is made and excreted via the bladder. This contains waste products such as urea which is toxic to the body.
1. Why do you think there are not normally plasma proteins in the urine even though they are in
solution in the blood plasma?
…………………………………………………………………………………………………………………………………………………………
………………………………………………………………………………………………………………………………………………
2. In the case of certain injuries or diseases blood cells appear in the urine. What may have happened
to allow this to occur?
……………………………………………………………………………………………………………………………………………………
……………………………………………………………………………………………………………………………………………………
Filtration takes place in 3 million nephrons. Blood arrives at the capillaries of the kidney under pressure. Through holes in the wall of the Bowman‟s capsule small molecules and water are filtered from the blood. In other parts of the nephron the molecules the body needs are reabsorbed.
Bowman‟s capsule
nephron
Bowman‟s capsule
1
2
3

EXPLORING HOLES CLASSROOM MATERIALS
Page 34 of 35 ESTABLISH
2.3 Dialysis worksheet page 2 of 2 If kidneys fail death follows in about 4 days due to build up of urea and lack of control of water balance in the body. This can be prevented by the patient attending hospital 3 times a week for dialysis. Blood travels in a tube from the body and flows into the machine, where it passes next to a filter called the dialysis membrane. A specialized dialysis solution flows on the other side of the membrane. This is designed so that urea passes from the blood through the membrane into the dialysis fluid but glucose and amino acids do not. The blood is then returned to the body.
1. Explain why the red blood cells and plasma proteins are not removed from the blood in dialysis?
…………………………………………………………………………………………………………………………………………………………
……………………………………………………………………………………………………………………………………………..
2. Urea, glucose and amino acids are similar sized molecules. Explain why urea passes across the
dialysis membrane but glucose and amino acids do not.
…………………………………………………………………………………………………………………………………………………………
………………………………………………………………………………………………………………………………………………
3. What would happen if water was used as the dialysis fluid?
…………………………………………………………………………………………………………………………………………………………
……………………………………………………………………………………………………………………………………………..
4. How can dialysis be used to remove excess salts?
…………………………………………………………………………………………………………………………………………………………
………………………………………………………………………………………………………………………………………………
5.http://healthsciences.merlo
t.org/images/18loop.gif
4.http://upload.wikimedi
a.org/wikipedia
3.http://cache2.allposter
simages.com/p/LRG/3
2.http://3.bp.blogspot.
com/_7MhVC-
1.http://www.yoursurg
ery.com/procedures/
5
4

EXPLORING HOLES CLASSROOM MATERIALS
Page 35 of 35 ESTABLISH
END OF DOCUMENT