Blogs - From SharePoint to WordPress Tom Resing, Microsoft MVP, MCM.

Check out
our website!
www.nvcc.edu/woodbr
idge/computer-lab
Contact Us
Location: Open Computer Lab
Seefeldt Building #336
NOVA Woodbridge Campus
Hussna Azamy
(OCL Supervisor)
Phone: 703-878-5714
E-mail: [email protected]
Hamna Chaudhri
(OCL Trainer)
Phone: 703-878-5713
E-mail: [email protected]
WordPress
© Copyright 2014: Northern Virginia Community College - Woodbridge Open Computer Lab

2
Disclaimer: All screenshots in this document are taken from the
following website: www.wordpress.com

3
Introduction: WordPress is a web application used for creating and managing websites and
blogs. WordPress is free; however, paid versions are also available offering more features and
interactivity to the user.
Creating a WordPress Account:
Visit: http://wordpress.com/ to create a new account or to login to your account
Creating a Blog/Website:
Sign in to your WordPress account and click on My Sites| Create Another WordPress
Fill out the required fields and click on Create Blog
Selecting a Theme:
After creating your new website, click on Change Your Theme
Select your desired theme and click on Activate
Dashboard: Dashboard includes all the options needed to manage your website. It allows you to change your
theme, add and view your webpages, insert media to you website and more.

4
To access Dashboard, click on your website name and select Dashboard from the drop
down menu
Adding Media to your Website: Click on Media (located on the left navigation menu of Dashboard) to access the library of your
website where your website’s files, images, videos, documents, and other media are stored.

5
Click on Add new to add a new media to your website library
Next, click the “Select files” button to browse to your file, or drag and drop the desired
file to the designated area
Click on the Media on the left hand side of your Dashboard to view your uploaded files.
6
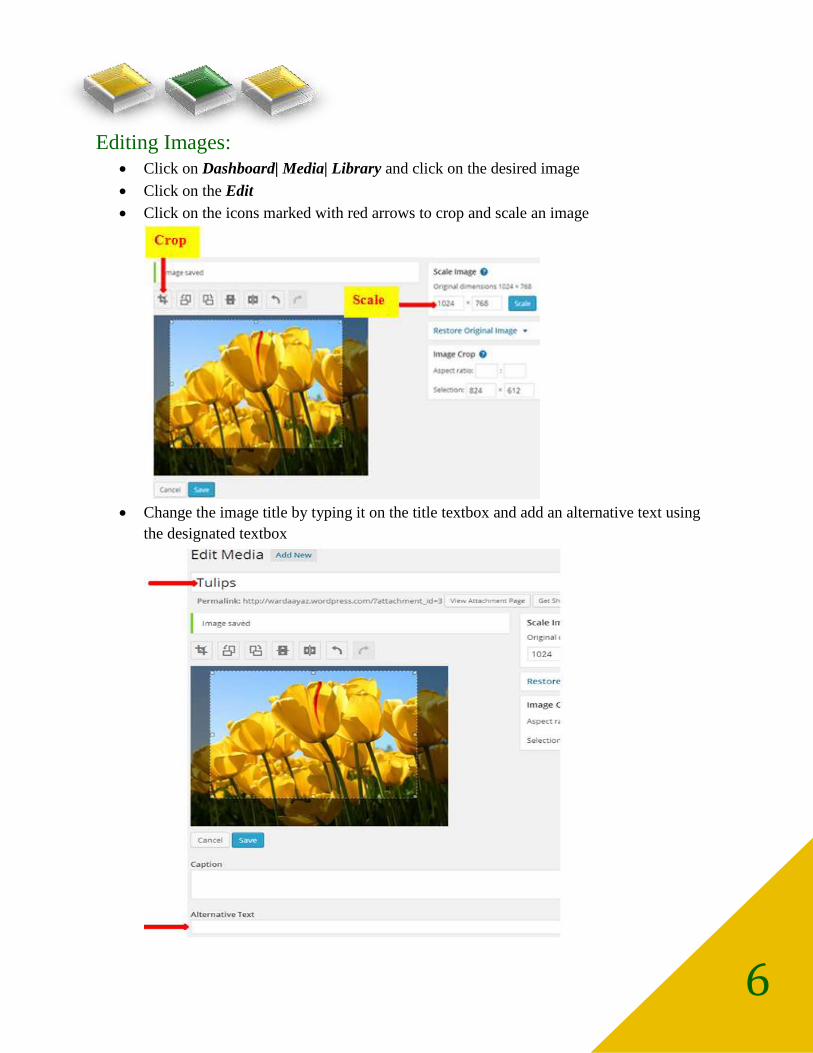
Editing Images:
Click on Dashboard| Media| Library and click on the desired image
Click on the Edit
Click on the icons marked with red arrows to crop and scale an image
Change the image title by typing it on the title textbox and add an alternative text using
the designated textbox

7
ALWAYS Update: Click on Update button to save any changes made to an image, page,
or any other settings of your website.
Working with Webpages: Click on Dashboard| Pages
All Pages: Allows you to view a list of all the webpages
Add New: Allows you to create a new webpage
Copy a Page: Allows you to duplicate a webpage
Adding Content to a Page:
Type a name for your webpage
Type your text on the text box (use the text formatting icons to change the color, style,
and alignment of your text)

8
Click on Add Media to add an image or other media files to your webpage
Click Preview (1) to preview your webpage content (NOTE: Previewing does not mean
that the changes are saved – to save your page, click the Publish button)
Click Save Draft (2) to save a draft of your page. Use this option if you are still working
on a webpage and it is not ready to be published yet.
Click Publish (3) to make a webpage live
Click Move to Trash (4) to delete the page

9
Editing a Page:
Click on Dashboard |Pages then click on edit link located at the bottom of the desired
page name to edit the page
Make the desired changes and click on update to save the changes
Comments: Click on Comments on Dashboard menu to view all comments posted on your website
If you don’t want the comments to appear on your website click on Pages| Quick Edit

10
Uncheck the Allow Comments box and click Update
Appearance
Themes: Click on Dashboard| Appearance| Themes to change your website theme, then
choose the desired theme
Customize: Use this option to customize your website’s current theme

11
o Banner: Click on header to change your site’s banner
o Title: Click on site title to change your website title
o Tag Line: Click on site title to change your site’s Tag line
o Front Page: Click on Front to change your site homepage
o Color scheme: Click on Colors to change your Color scheme

12
Widgets: This option allows you to add interactive widgets to your website
Menus: This option allows you to manage the navigation menus of your website
o To create a new menu click on Create a new menu at the top of the page, enter a
name for your new menu in the Menu Name box, and click on Create Menu button
o To add/remove items from a menu, click on Menus

13
1. Select View All tab to bring up a list of all currently published Pages on your site
2. Select the pages that you want to add by clicking the checkbox next to each page title
3. Click the Add to Menu button then save button
Mobile: This option allows you to manage the settings of your website for mobile
devices