
Word Template - community.checkpoint.com · Web viewA project logically organizes all your GCP...
32
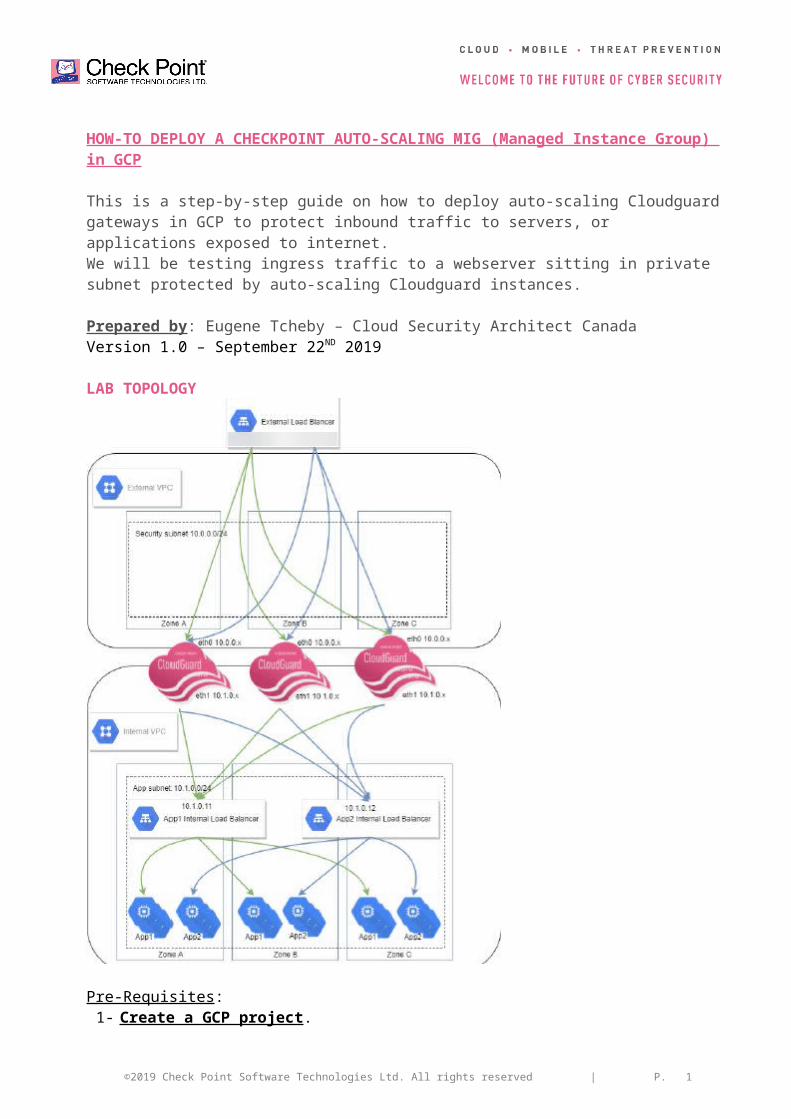
HOW-TO DEPLOY A CHECKPOINT AUTO-SCALING MIG (Managed Instance Group) in GCP This is a step-by-step guide on how to deploy auto-scaling Cloudguard gateways in GCP to protect inbound traffic to servers, or applications exposed to internet. We will be testing ingress traffic to a webserver sitting in private subnet protected by auto-scaling Cloudguard instances. Prepared by : Eugene Tcheby – Cloud Security Architect Canada Version 1.0 – September 22 ND 2019 LAB TOPOLOGY Pre-Requisites : 1- Create a GCP project . ©2019 Check Point Software Technologies Ltd. All rights reserved | P. 1
Transcript of Word Template - community.checkpoint.com · Web viewA project logically organizes all your GCP...
HOW-TO DEPLOY A CHECKPOINT AUTO-SCALING MIG (Managed Instance Group) in GCP
This is a step-by-step guide on how to deploy auto-scaling Cloudguard gateways in GCP to protect inbound traffic to servers, or applications exposed to internet. We will be testing ingress traffic to a webserver sitting in private subnet protected by auto-scaling Cloudguard instances.
Prepared by: Eugene Tcheby – Cloud Security Architect CanadaVersion 1.0 – September 22ND 2019
LAB TOPOLOGY
Pre-Requisites:1- Create a GCP project .
A project logically organizes all your GCP resources such as users, APIs, permissions, service accounts, virtual machines, monitoring setttings, etc… This will be useful while configuring our auto provisioning service to define template parameters of our MIG. Log into console.cloud.google.com, select drop down arrow, and click “New Project”
©2019 Check Point Software Technologies Ltd. All rights reserved | P. 1

Enter project name of your choice. Click “Create”
2- SSH Key to login to all project-wide virtual machines. a. If you already have a key pair (public-private key), select Compute Engine --> Metadata
--> SSH Keys --> Edit --> Add ItemPaste your public key.
b. If you don’t have one, using Putty Key Generator, generate a private/public key pair. Click on Generate Once key pair generated, save both public and private key.
©2019 Check Point Software Technologies Ltd. All rights reserved | P. 2
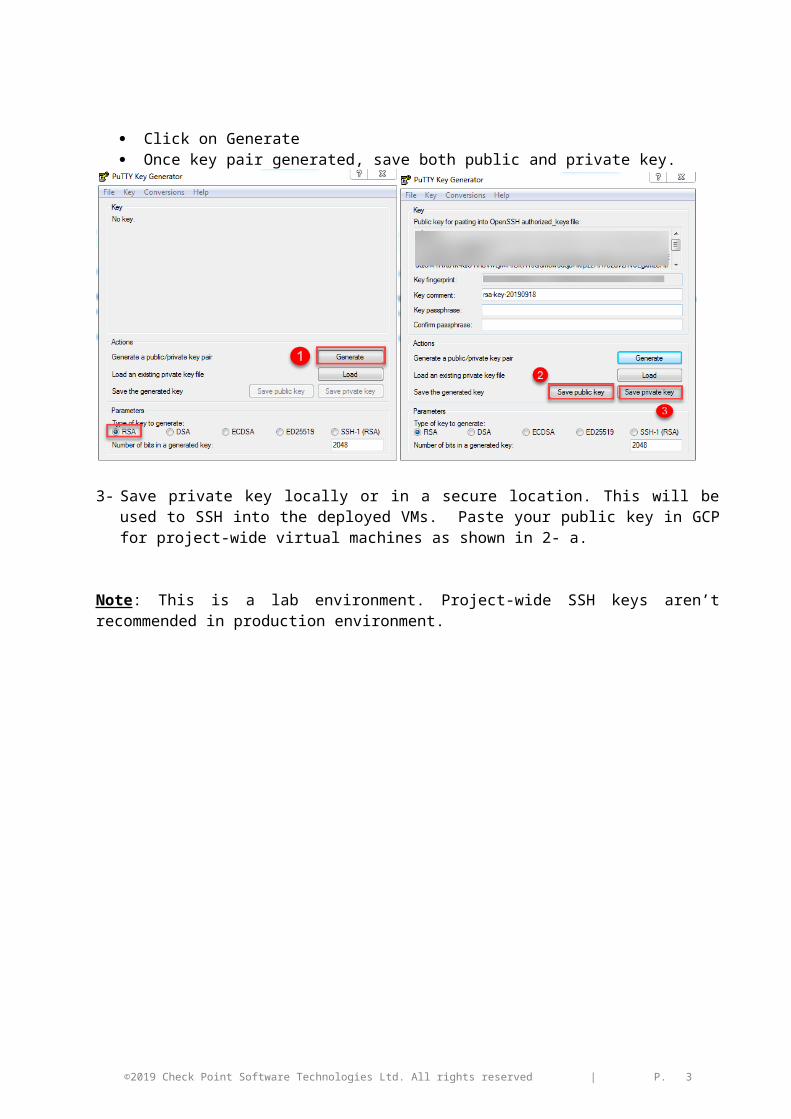
3- Save private key locally or in a secure location. This will be used to SSH into the deployed VMs. Paste your public key in GCP for project-wide virtual machines as shown in 2- a.
Note: This is a lab environment. Project-wide SSH keys aren’t recommended in production environment.
©2019 Check Point Software Technologies Ltd. All rights reserved | P. 3

Exercise 1: Create an External VPC with Frontend Subnet
In this exercise we will create an external VPC with a public subnet . Feel free to use your naming convention, CIDR space and region. The below is strictly not mandatory, and use for lab purpose only.
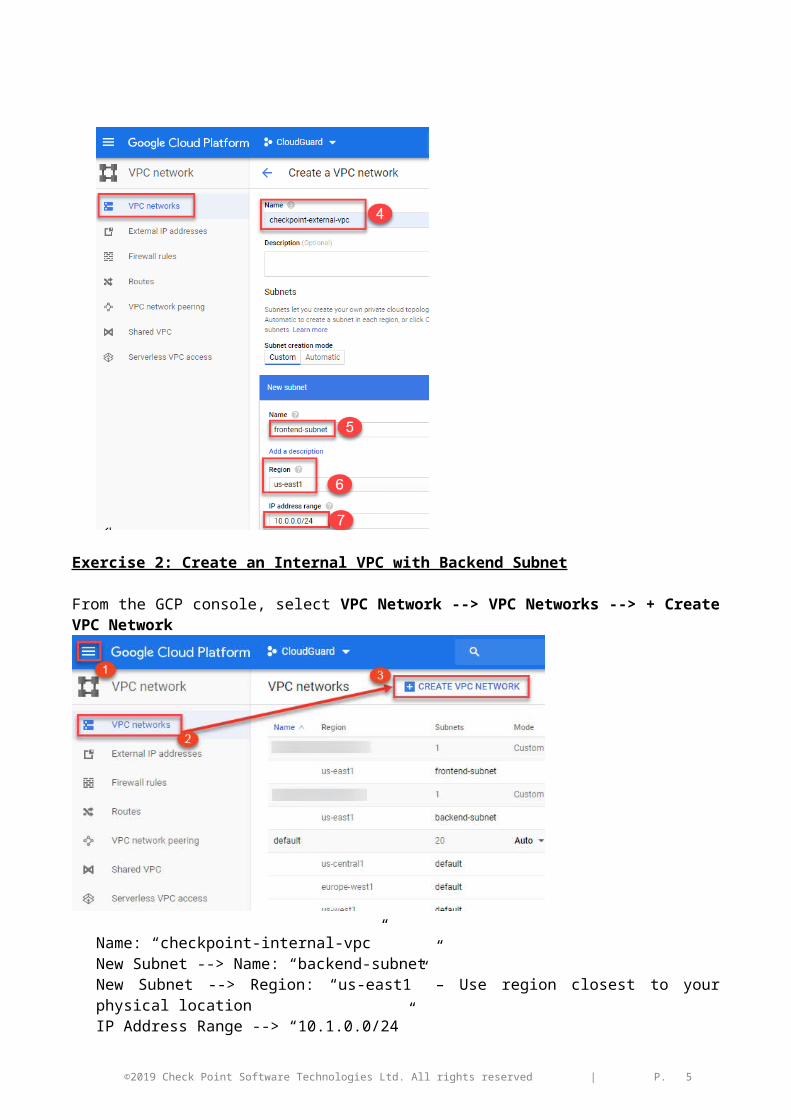
From the GCP console, select VPC Network --> VPC Networks --> + Create VPC Network.
Name: “checkpoint-external-vpc”New Subnet --> Name: “frontend-subnet”New Subnet --> Region: “us-east1” – Use region closest to your physical locationIP Address Range --> “10.0.0.0/24”Click “Create”
©2019 Check Point Software Technologies Ltd. All rights reserved | P. 4
Exercise 2: Create an Internal VPC with Backend Subnet
From the GCP console, select VPC Network --> VPC Networks --> + Create VPC Network
Name: “checkpoint-internal-vpc”New Subnet --> Name: “backend-subnet”New Subnet --> Region: “us-east1” – Use region closest to your physical locationIP Address Range --> “10.1.0.0/24”Click “Create”
To recap exercises 1 & 2, ensure your VPC configuration is similar to below.
©2019 Check Point Software Technologies Ltd. All rights reserved | P. 5

Exercise 3: Deploy R80.30 Security Management Server
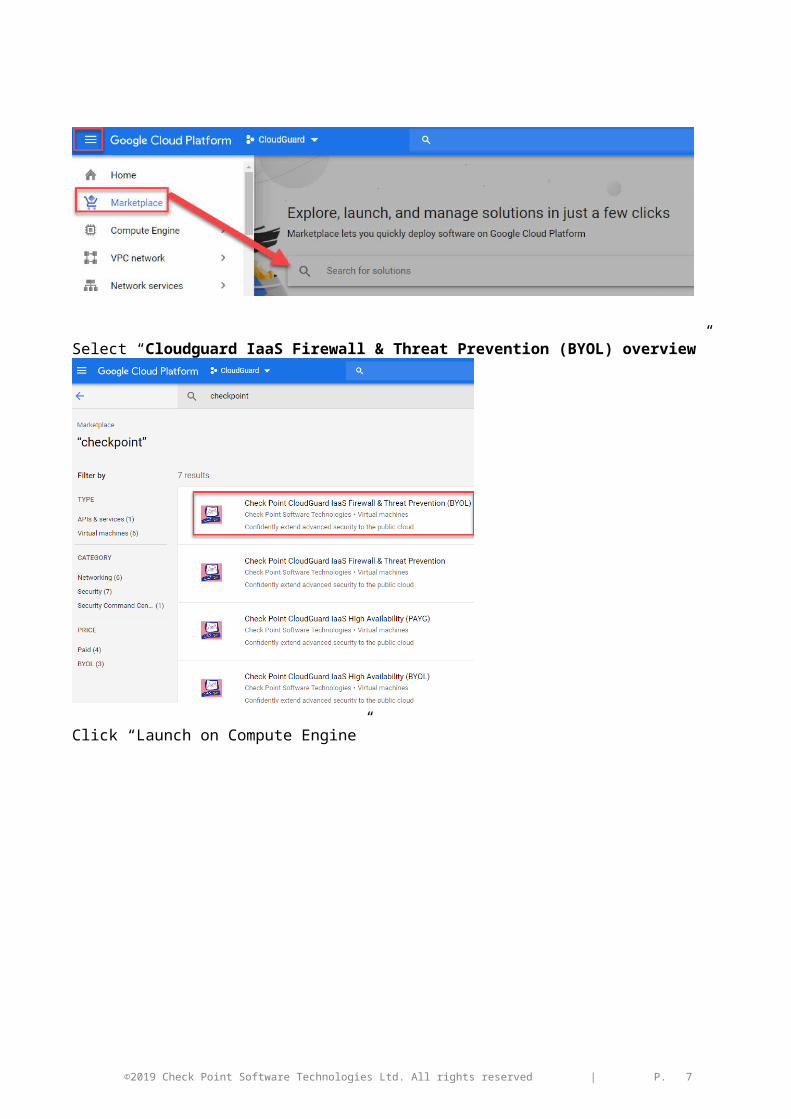
From the GCP console, select Marketplace, search key word “checkpoint”
Select “Cloudguard IaaS Firewall & Threat Prevention (BYOL) overview”
Click “Launch on Compute Engine”
©2019 Check Point Software Technologies Ltd. All rights reserved | P. 6
Deployment name: “cpmgmt”Zone (availability zone): us-east1-b; you can select any other zone within region “external VPC”Network: “checkpoint-external-vpc”Subnetwork: “frontend-subnet”Installation type: R80.30 Management onlyScroll down and select “More” --> admin shell --> /bin/bashSIC key: Leave empty. This will be auto-generated upon deployment of cloudguard MIG.
Leave everything else as is and click “Deploy”Please note deployment will take a few minutes. Once completed, validate the virtual machine under Compute Engine --> VM instances.
©2019 Check Point Software Technologies Ltd. All rights reserved | P. 7

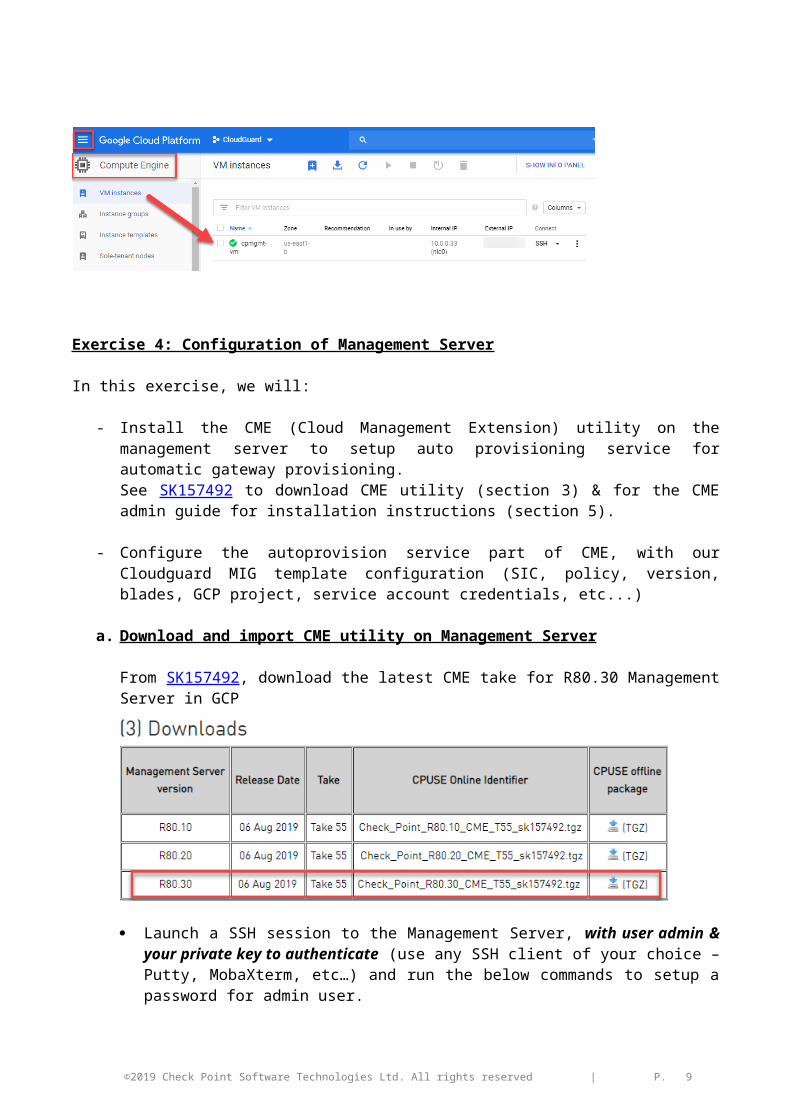
Exercise 4: Configuration of Management Server
In this exercise, we will:
- Install the CME (Cloud Management Extension) utility on the management server to setup auto provisioning service for automatic gateway provisioning. See SK157492 to download CME utility (section 3) & for the CME admin guide for installation instructions (section 5).
- Configure the autoprovision service part of CME, with our Cloudguard MIG template configuration (SIC, policy, version, blades, GCP project, service account credentials, etc...)
a. Download and import CME utility on Management Server
From SK157492, download the latest CME take for R80.30 Management Server in GCP
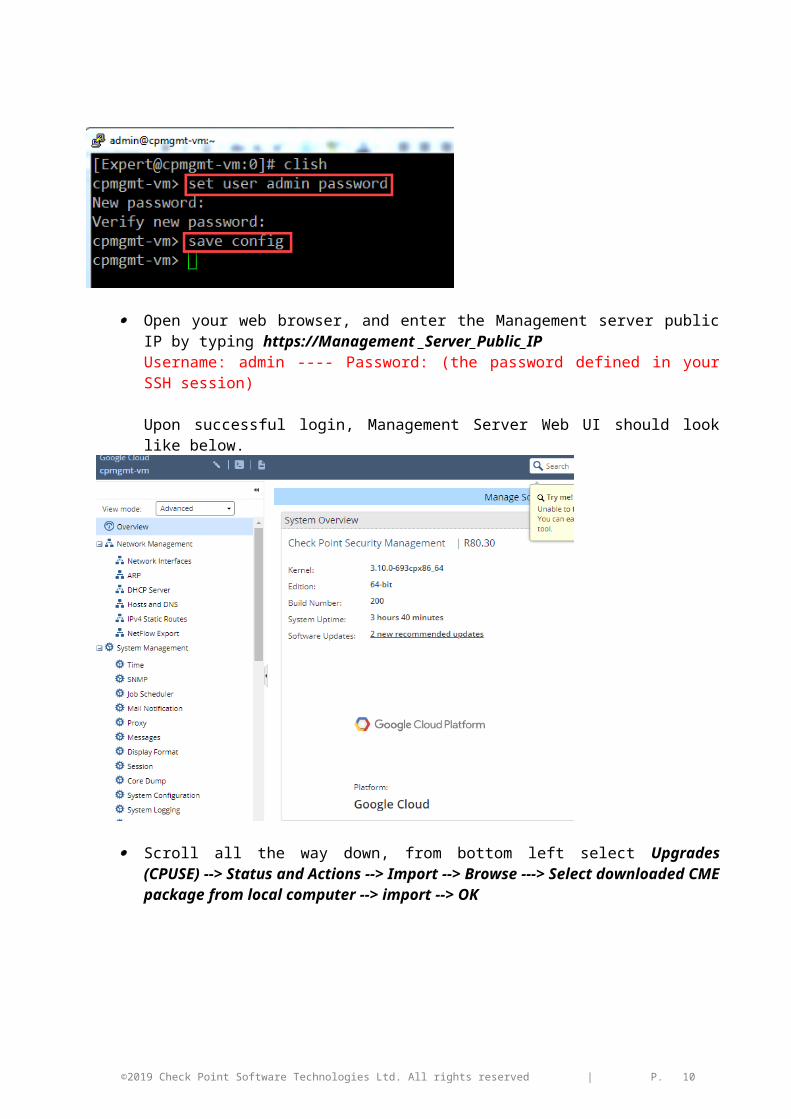
Launch a SSH session to the Management Server, with user admin & your private key to authenticate (use any SSH client of your choice – Putty, MobaXterm, etc…) and run the below commands to setup a password for admin user.
Open your web browser, and enter the Management server public IP by typing https://Management _Server_Public_IP Username: admin ---- Password: (the password defined in your SSH session)
Upon successful login, Management Server Web UI should look like below.
©2019 Check Point Software Technologies Ltd. All rights reserved | P. 8
Scroll all the way down, from bottom left select Upgrades (CPUSE) --> Status and Actions --> Import --> Browse ---> Select downloaded CME package from local computer --> import --> OK
Once import of CME package completed, select the package from list and click “Install Update”
©2019 Check Point Software Technologies Ltd. All rights reserved | P. 9
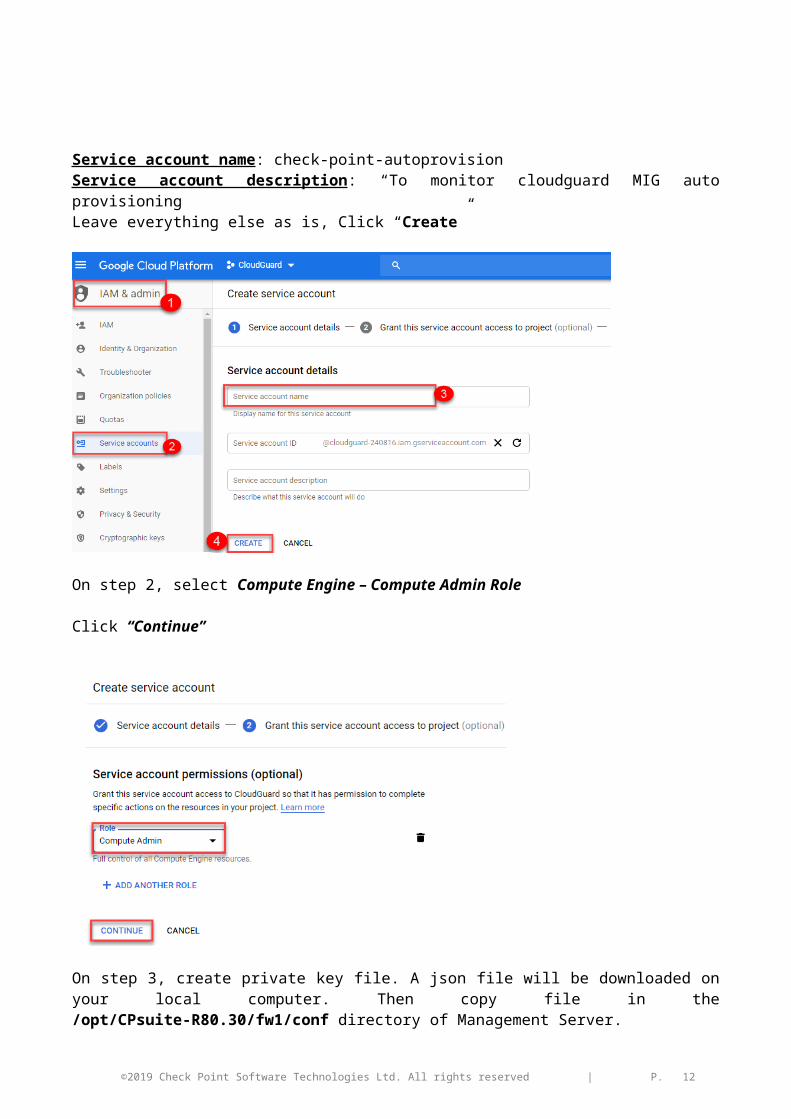
Create a service account. The GCP Service account is used by the Check Point Security Management Server to monitor the creation and state of the autoscaling Managed Instance Group. This allows the Management Server to complete the provisioning of these gateways.
From GCP console, select IAM & Admin --> Service Accounts --> Create Service Account
Service account name: check-point-autoprovisionService account description: “To monitor cloudguard MIG auto provisioning”Leave everything else as is, Click “Create”
On step 2, select Compute Engine – Compute Admin Role
Click “Continue”
©2019 Check Point Software Technologies Ltd. All rights reserved | P. 10

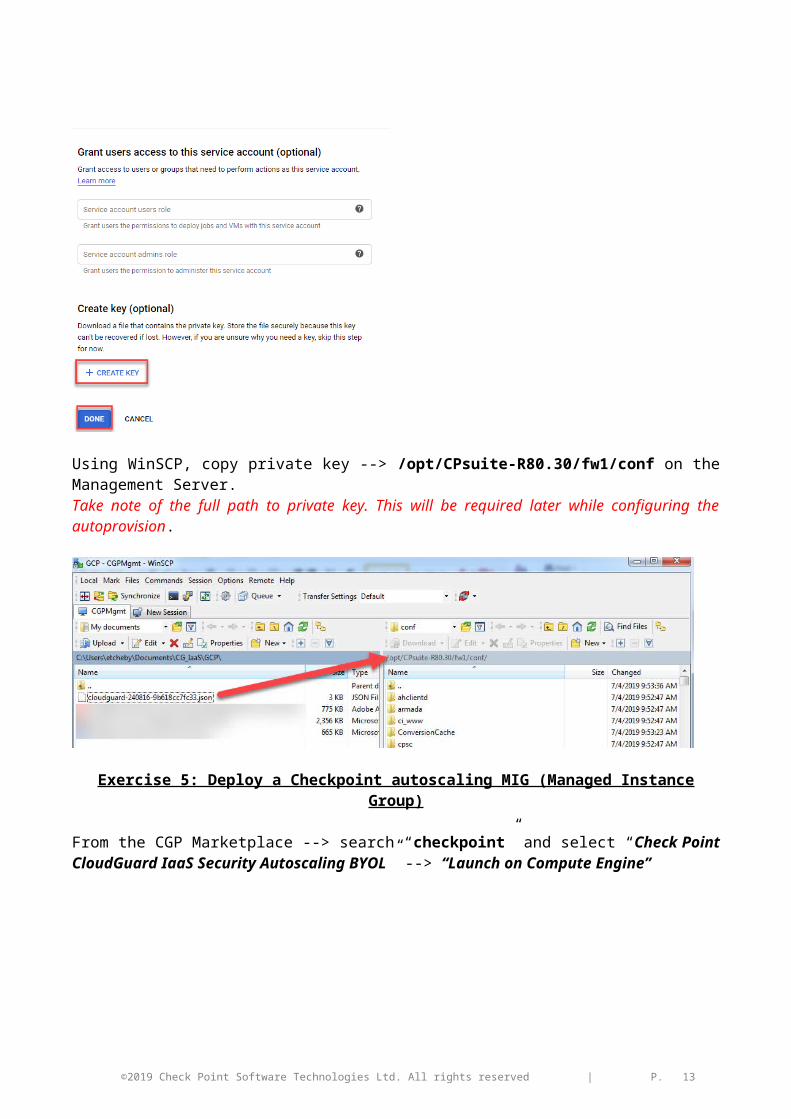
On step 3, create private key file. A json file will be downloaded on your local computer. Then copy file in the /opt/CPsuite-R80.30/fw1/conf directory of Management Server.
Using WinSCP, copy private key --> /opt/CPsuite-R80.30/fw1/conf on the Management Server.Take note of the full path to private key. This will be required later while configuring the autoprovision.
©2019 Check Point Software Technologies Ltd. All rights reserved | P. 11
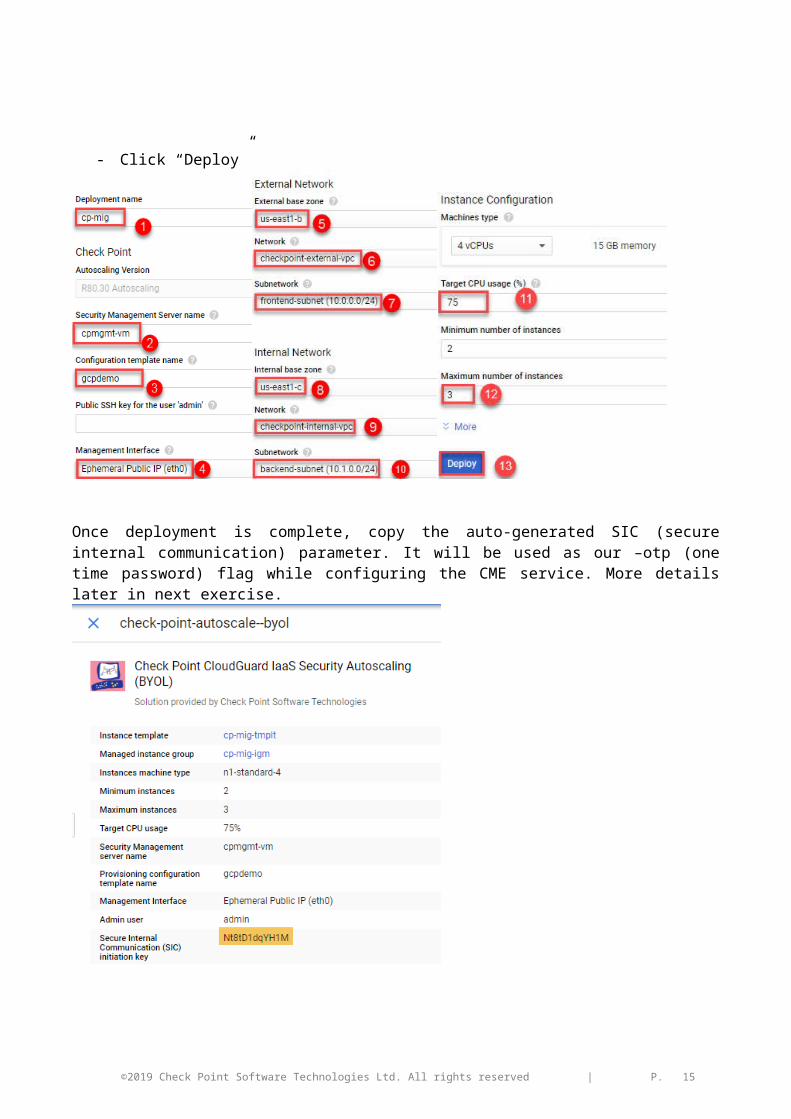
Exercise 5: Deploy a Checkpoint autoscaling MIG (Managed Instance Group)
From the CGP Marketplace --> search “checkpoint” and select “Check Point CloudGuard IaaS Security Autoscaling BYOL” --> “Launch on Compute Engine”
Fill in the below parameters to
- Deployment Name : “cp-mig”. Or any other name that suits your convention.- Management Server Name : “cpmgmt-vm”. Ensure the name matches Mgmt VM name. We will
be using the same name on our - Configuration Template Name : “gcpdemo”- Management Interface : Public IP “eth0”, we chose this option because we want the
communication between Mgmt and Gateways to be done via public IP. It’s also possible to use Private IP “eth1” if the Mgmt server resides in private subnets of the MIG VPC, or in a VPC peered with MIG VPC.
External Network- External Base Zone : “us-east-1-b”. This is a base zone from the external VPC region. - Network : “checkpoint-external-vpc”- Subnetwork : “frontend-subnet” The MIG will be deployed across all available zones of the
subnet
Internal Network- Internal Base Zone : “us-east1-b” This is a base zone from the internal VPC region- Network : “checkpoint-internal-vpc”- Subnetwork : “backend-subnet” The MIG will be deployed across all available zones of the
subnet
- Click “Deploy”
©2019 Check Point Software Technologies Ltd. All rights reserved | P. 12
Once deployment is complete, copy the auto-generated SIC (secure internal communication) parameter. It will be used as our –otp (one time password) flag while configuring the CME service. More details later in next exercise.
©2019 Check Point Software Technologies Ltd. All rights reserved | P. 13

Exercice 6: Configure CME service on Management Server
Open SmartConsole client, and connect to Management server using Public IP.
Under Gateways& Servers, select management server object. Change the private IP address with its public IP address --> Click OK
SSH into the Management server, and ensure CME service is running.
©2019 Check Point Software Technologies Ltd. All rights reserved | P. 14
Prior to running the GCP initialization parameters on Mgmt server, run “autoprov-cfg init GCP –help” command to see required parameters.
Example of command:
Using the above example, we will run CME initialization command to autoprovision our gateways using the required parameters. As you’ll notice below the values for –mn –tn –otp and –cr are from the previously completed exercises.
Note: For the –proj flag, make sure you use the project ID and not the project name.
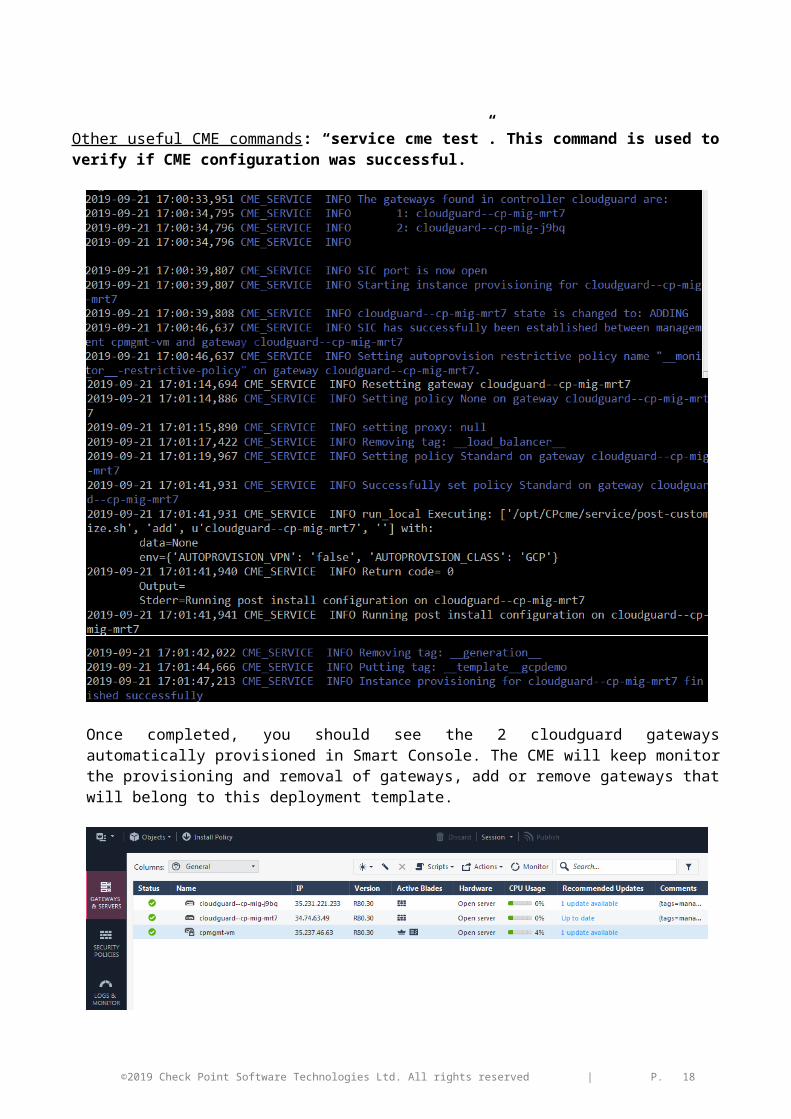
If CME service is successfully run, the autoprovision scripts will make calls to GCP & automatically discover the MIG instances, establish SIC and push policy. And to see the autoprovision mechanism in action run “tail –f /var/log/CPcme/cme.log”
Other useful CME commands: “service cme test”. This command is used to verify if CME configuration was successful.
©2019 Check Point Software Technologies Ltd. All rights reserved | P. 15

Once completed, you should see the 2 cloudguard gateways automatically provisioned in Smart Console. The CME will keep monitor the provisioning and removal of gateways, add or remove gateways that will belong to this deployment template.
©2019 Check Point Software Technologies Ltd. All rights reserved | P. 16

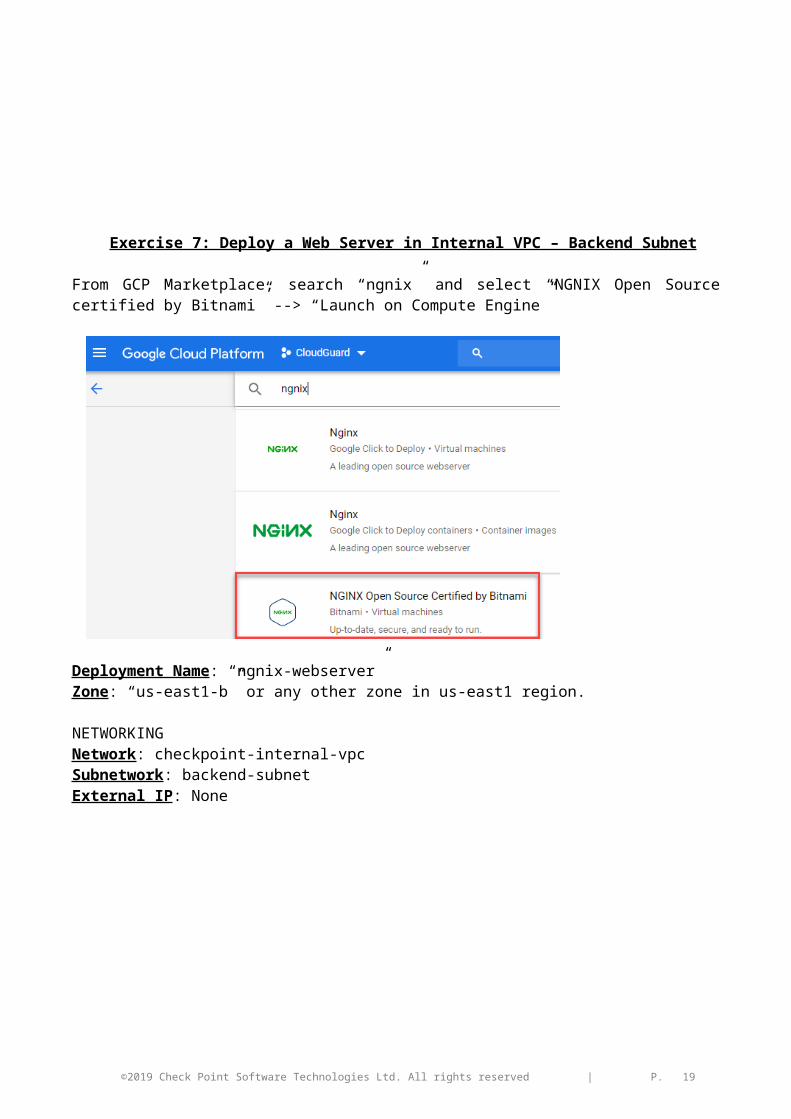
Exercise 7: Deploy a Web Server in Internal VPC – Backend Subnet
From GCP Marketplace, search “ngnix” and select “NGNIX Open Source certified by Bitnami” --> “Launch on Compute Engine”
Deployment Name: “ngnix-webserver”Zone: “us-east1-b” or any other zone in us-east1 region.
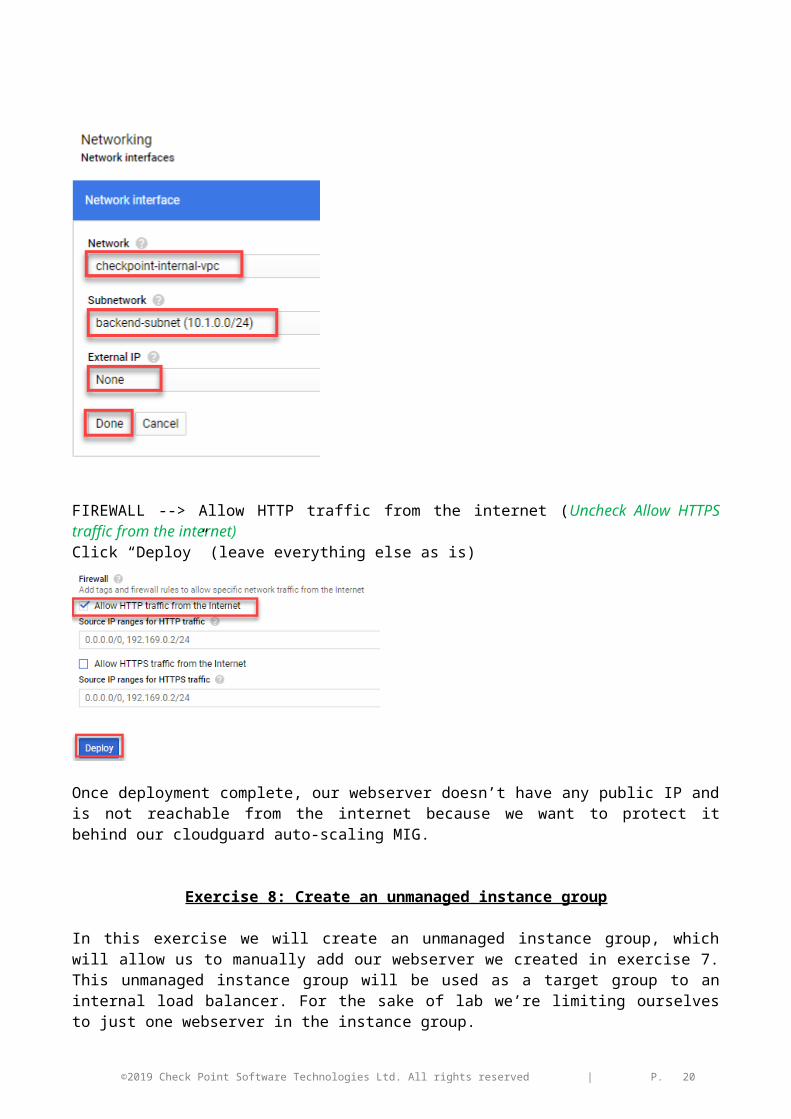
NETWORKINGNetwork: checkpoint-internal-vpcSubnetwork: backend-subnetExternal IP: None
©2019 Check Point Software Technologies Ltd. All rights reserved | P. 17
FIREWALL --> Allow HTTP traffic from the internet (Uncheck Allow HTTPS traffic from the internet)Click “Deploy” (leave everything else as is)
Once deployment complete, our webserver doesn’t have any public IP and is not reachable from the internet because we want to protect it behind our cloudguard auto-scaling MIG.
Exercise 8: Create an unmanaged instance group
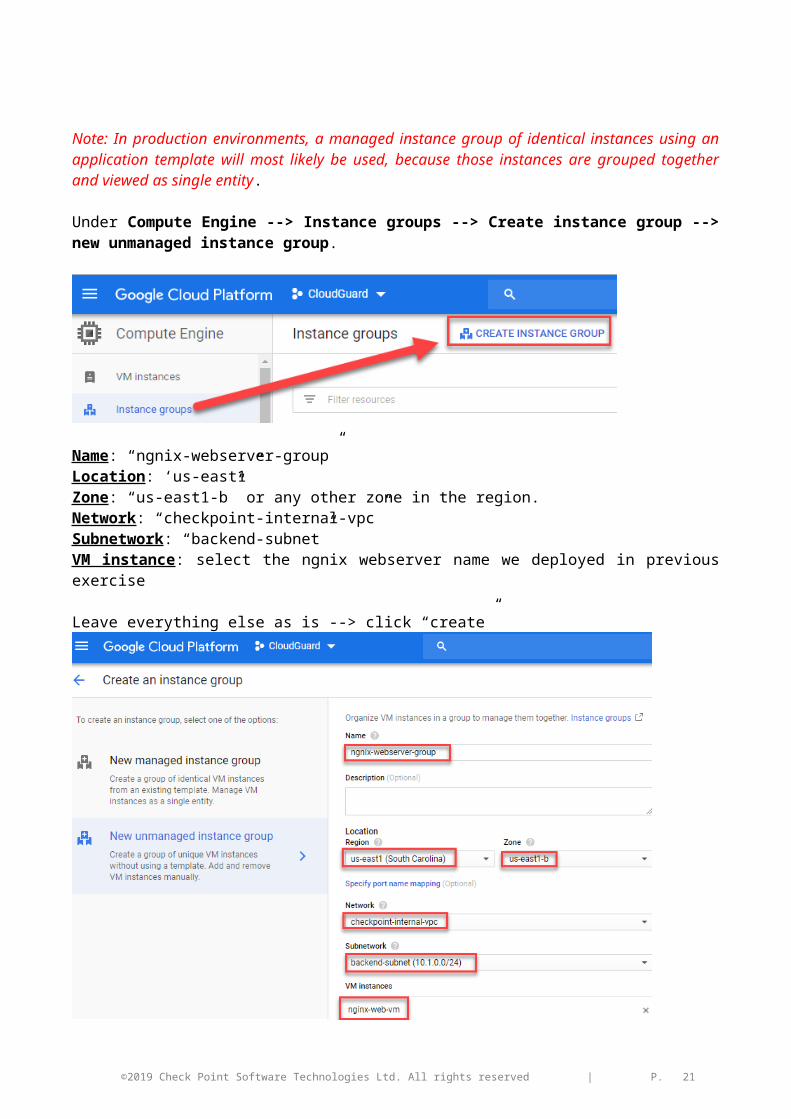
In this exercise we will create an unmanaged instance group, which will allow us to manually add our webserver we created in exercise 7. This unmanaged instance group will be used as a target group to an internal load balancer. For the sake of lab we’re limiting ourselves to just one webserver in the instance group. Note: In production environments, a managed instance group of identical instances using an application template will most likely be used, because those instances are grouped together and viewed as single entity.
Under Compute Engine --> Instance groups --> Create instance group --> new unmanaged instance group.
Name: “ngnix-webserver-group”Location: ‘us-east1”Zone: “us-east1-b” or any other zone in the region. Network: “checkpoint-internal-vpc”Subnetwork: “backend-subnet”VM instance: select the ngnix webserver name we deployed in previous exercise
Leave everything else as is --> click “create”
©2019 Check Point Software Technologies Ltd. All rights reserved | P. 18
Exercise 9: Create an Internal Load Balancer
From the GCP console, select Network Services --> Load Balancing --> Create load balancer
Select TCP load balancing --> only between my VMs --> single region only.
©2019 Check Point Software Technologies Ltd. All rights reserved | P. 19
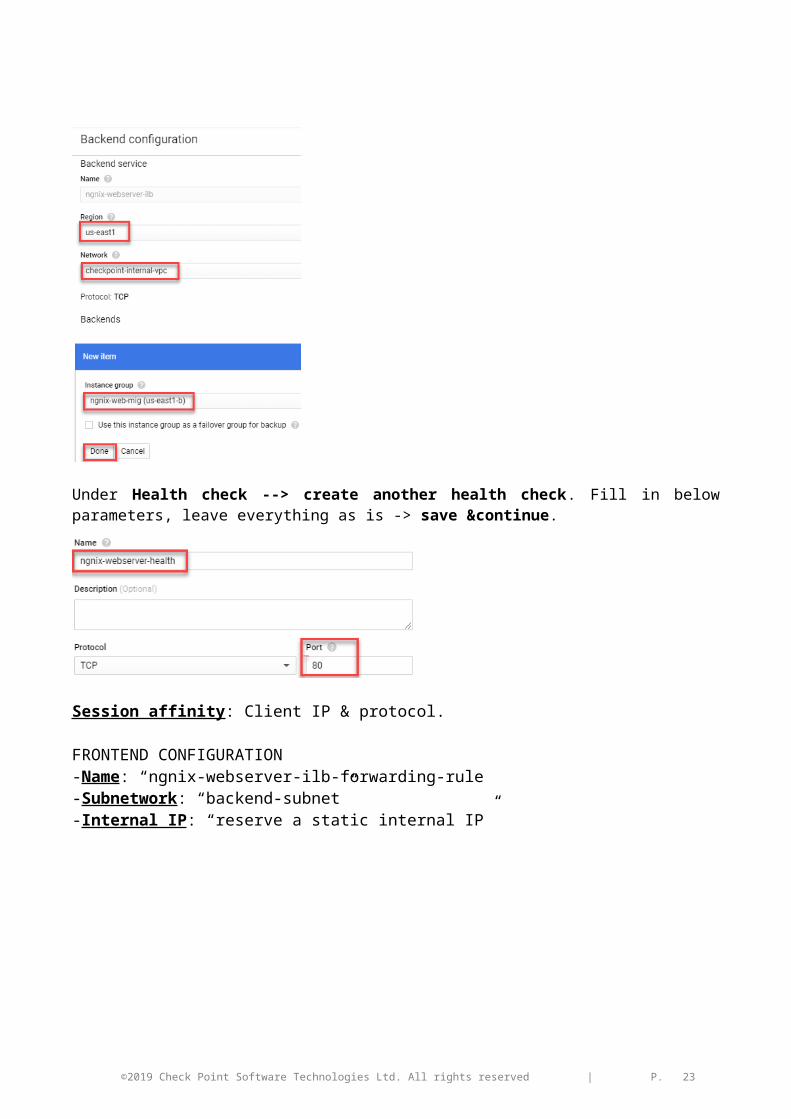
BACKEND CONFIGURATION- Name: “ngnix-webserver-ilb”, or any other name as per your naming convention. - Region: “us-east1”- Network: “checkpoint-internal-vpc”- Instance group: select the ngnix unmanaged instance group created in exercise 8
Under Health check --> create another health check. Fill in below parameters, leave everything as is -> save &continue.
Session affinity: Client IP & protocol.
FRONTEND CONFIGURATION-Name: “ngnix-webserver-ilb-forwarding-rule-Subnetwork: “backend-subnet”-Internal IP: “reserve a static internal IP”
©2019 Check Point Software Technologies Ltd. All rights reserved | P. 20
-Port: “Single”-Port Number: “80”-Click “done”
A summary of the internal load balancer parameters should be similar to below.
©2019 Check Point Software Technologies Ltd. All rights reserved | P. 21

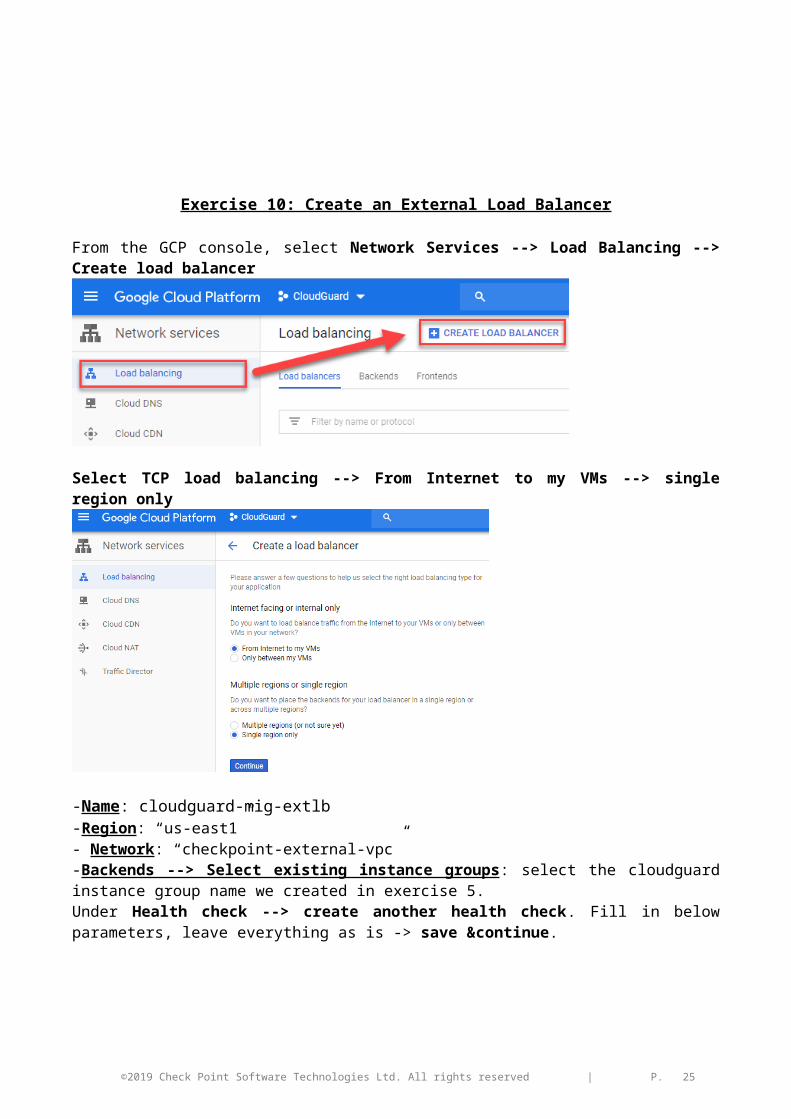
Exercise 10: Create an External Load Balancer
From the GCP console, select Network Services --> Load Balancing --> Create load balancer
Select TCP load balancing --> From Internet to my VMs --> single region only
-Name: cloudguard-mig-extlb-Region: “us-east1”- Network: “checkpoint-external-vpc”-Backends --> Select existing instance groups: select the cloudguard instance group name we created in exercise 5. Under Health check --> create another health check. Fill in below parameters, leave everything as is -> save &continue.
©2019 Check Point Software Technologies Ltd. All rights reserved | P. 22
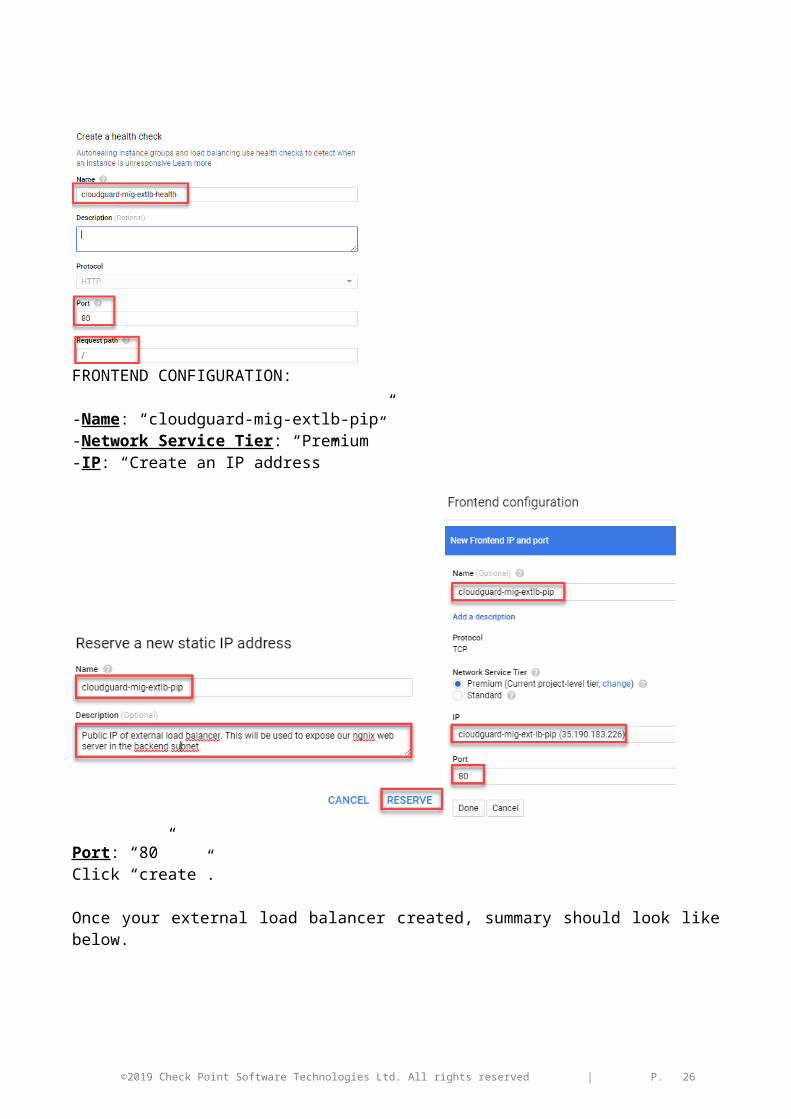
FRONTEND CONFIGURATION:
-Name: “cloudguard-mig-extlb-pip”-Network Service Tier: “Premium”-IP: “Create an IP address”
Port: “80”Click “create”.
Once your external load balancer created, summary should look like below.
©2019 Check Point Software Technologies Ltd. All rights reserved | P. 23

Exercise 10: Creating firewall and NAT rules.
Prior to creating firewall and NAT rules, we need to create a few network and host objects.
a. Dynamic objects (LocalGatewayExternal – LocalGatewayInternal)Dynamic objects represent eth0 (external) and eth1 (internal) interfaces of our autoscaling cloudguard gateways. SSH into the management server and run “dynamic_objects –l” to see the actual objects names.
From the Objects Pane, click on “New” and follow below steps to create dynamic objects LocalGatewayExternal and LocalGatewayInternal
©2019 Check Point Software Technologies Ltd. All rights reserved | P. 24
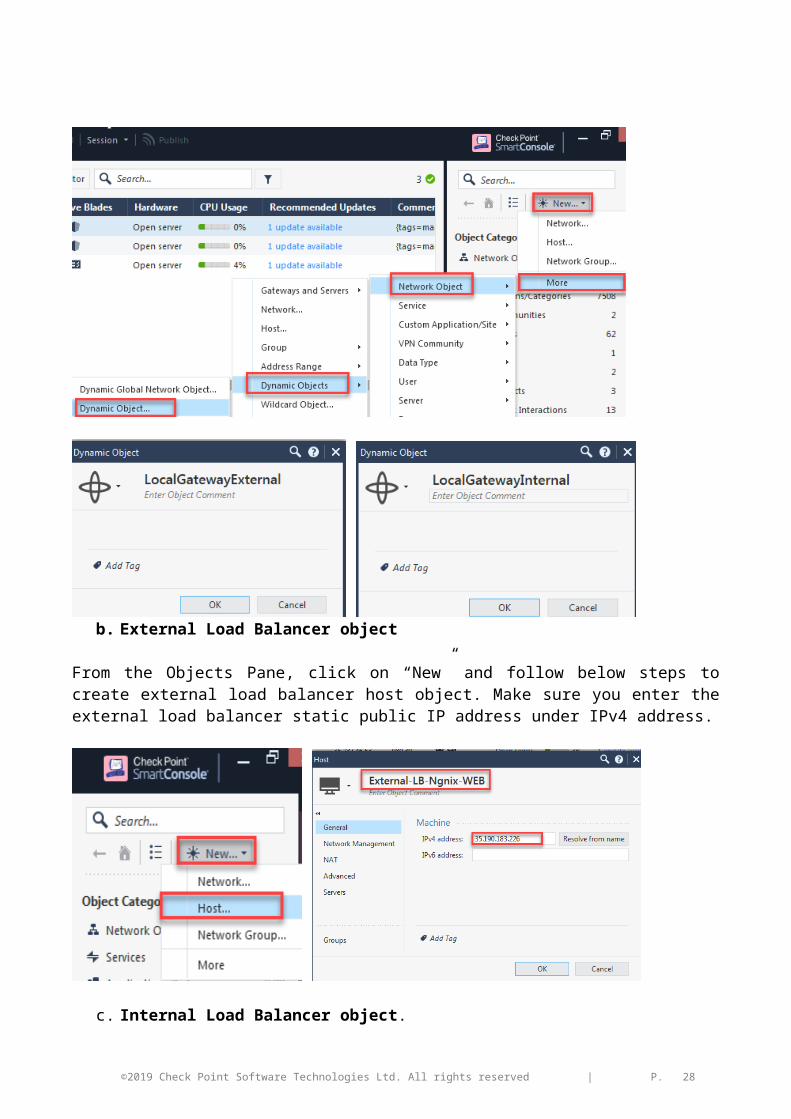
b. External Load Balancer object
From the Objects Pane, click on “New” and follow below steps to create external load balancer host object. Make sure you enter the external load balancer static public IP address under IPv4 address.
c. Internal Load Balancer object.
From the Objects Pane, click on “New” and follow below steps to create internal load balancer host object. Make sure you enter the internal load balancer static private IP address under IPv4 address
.
Firewall Rule:
©2019 Check Point Software Technologies Ltd. All rights reserved | P. 25
ACCESS RULE FROM SMART CONSOLE
NAT RULE FROM SMART CONSOLE
Note: Translated source LocalGatewayInternal dynamic object should be Hide-NAT’ed.
©2019 Check Point Software Technologies Ltd. All rights reserved | P. 26

TEST OF NGNIX WEBSERVER ACCESS --> http://External-LB-PUBLIC-IP
ACCESS RULE LOGS
LOGS FILTERED BY SOURCE IP
©2019 Check Point Software Technologies Ltd. All rights reserved | P. 27
LOG DETAILS
DOCUMENT ROADMAP:The next version 1.1 of the document will include the following tests.
Testing Scale Out- Scale in Events, (page 26 of admin guide). Testing of outbound inspection (pages 20-23 of admin guide).
https://sc1.checkpoint.com/documents/R80.30/WebAdminGuides/EN/CP_R80.30_and_Above_CG_Autoscaling_Managed_Instance_Group_for_GCP/AdminGuide/Content/Overview.htm?tocpath=_____3
©2019 Check Point Software Technologies Ltd. All rights reserved | P. 28


