Word ch11
61
Chapter 11 Enhancing an Online Form and Using Macros Microsoft Word 2013
-
Upload
kristin-harrison -
Category
Education
-
view
41 -
download
0
Transcript of Word ch11

Chapter 11
Enhancing an Online Form and Using Macros
Microsoft
Word 2013
• Unprotect a document
• Specify macro settings
• Convert a table to text
• Insert and edit a field
• Create a character style
• Apply and modify fill effects
• Change a shape
Enhancing an Online Form and Using Macros 2
Objectives
• Remove a background from a graphic
• Apply an artistic effect to a graphic
• Insert and format a text box
• Group objects
• Record and execute a macro
• Customize the Quick Access Toolbar
• Edit a macro’s VBA code
Enhancing an Online Form and Using Macros 3
Objectives
Enhancing an Online Form and Using Macros 4
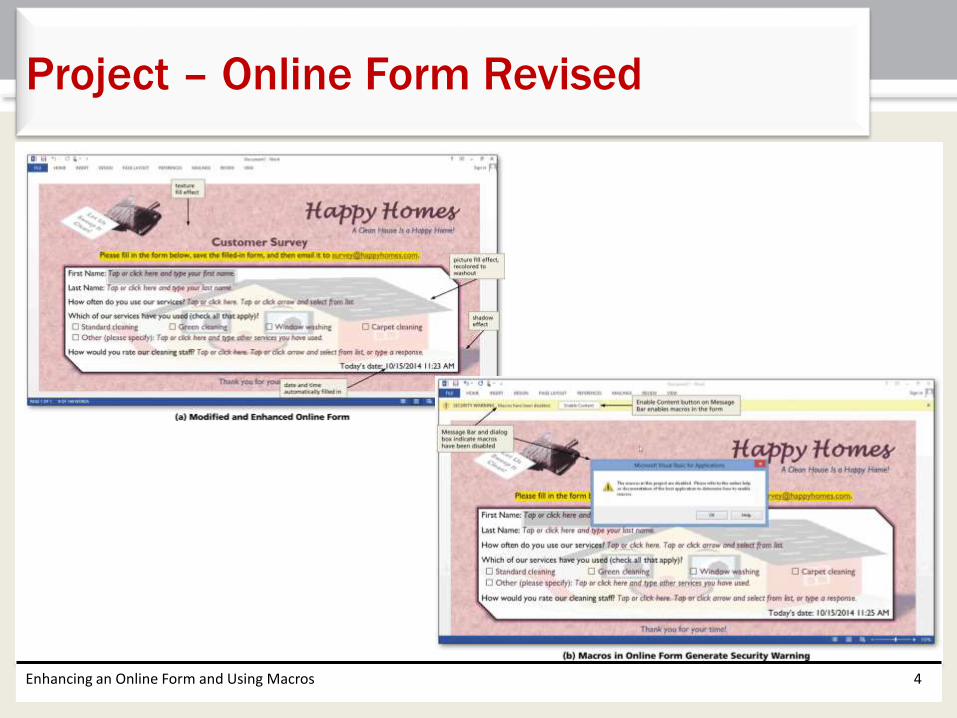
Project – Online Form Revised

• Save a document as a macro-enabled template
• Modify the text and form content controls
• Enhance the form’s visual appeal
• Create macros to automate tasks in the form
Enhancing an Online Form and Using Macros 5
Roadmap
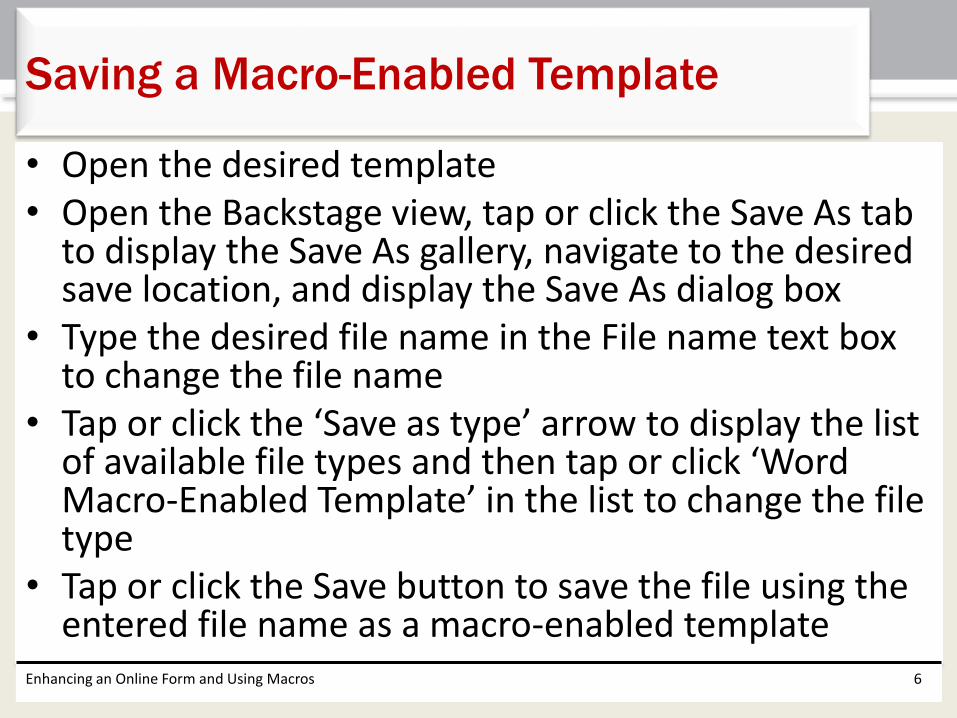
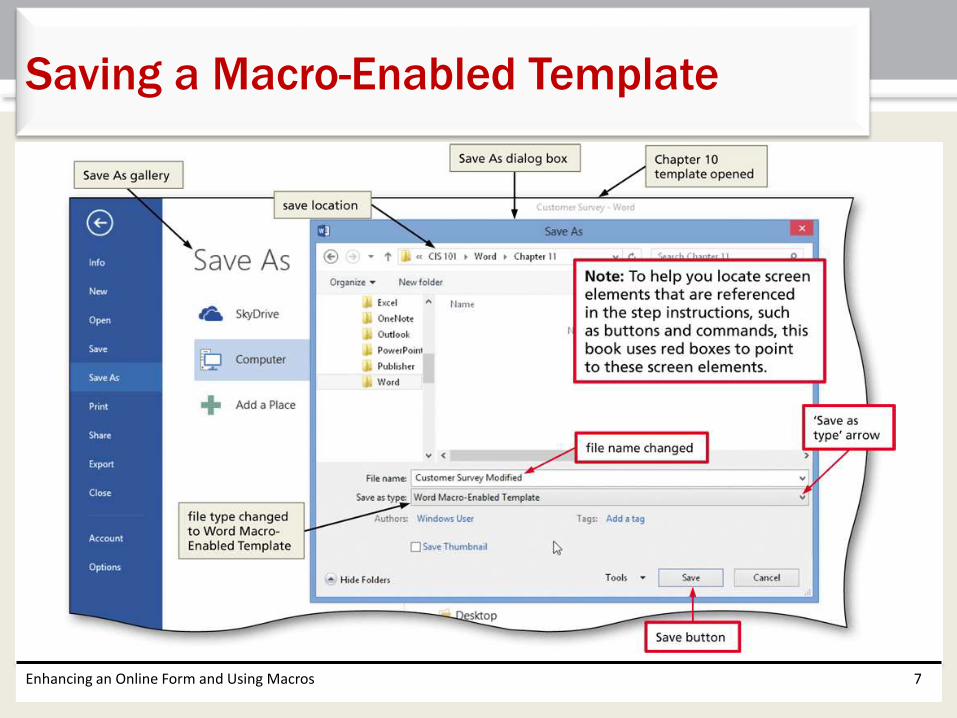
• Open the desired template• Open the Backstage view, tap or click the Save As tab
to display the Save As gallery, navigate to the desired save location, and display the Save As dialog box
• Type the desired file name in the File name text box to change the file name
• Tap or click the ‘Save as type’ arrow to display the list of available file types and then tap or click ‘Word Macro-Enabled Template’ in the list to change the file type
• Tap or click the Save button to save the file using the entered file name as a macro-enabled template
Enhancing an Online Form and Using Macros 6
Saving a Macro-Enabled Template
Enhancing an Online Form and Using Macros 7
Saving a Macro-Enabled Template

• Tap or click the Restrict Editing button (DEVELOPER tab | Protect group) to display the Restrict Editing task pane
• Tap or click the Stop Protection button in the Restrict Editing task pane to unprotect the form
• Tap or click the Close button in the Restrict Editing task pane to close the task pane
Enhancing an Online Form and Using Macros 8
Unprotecting a Document
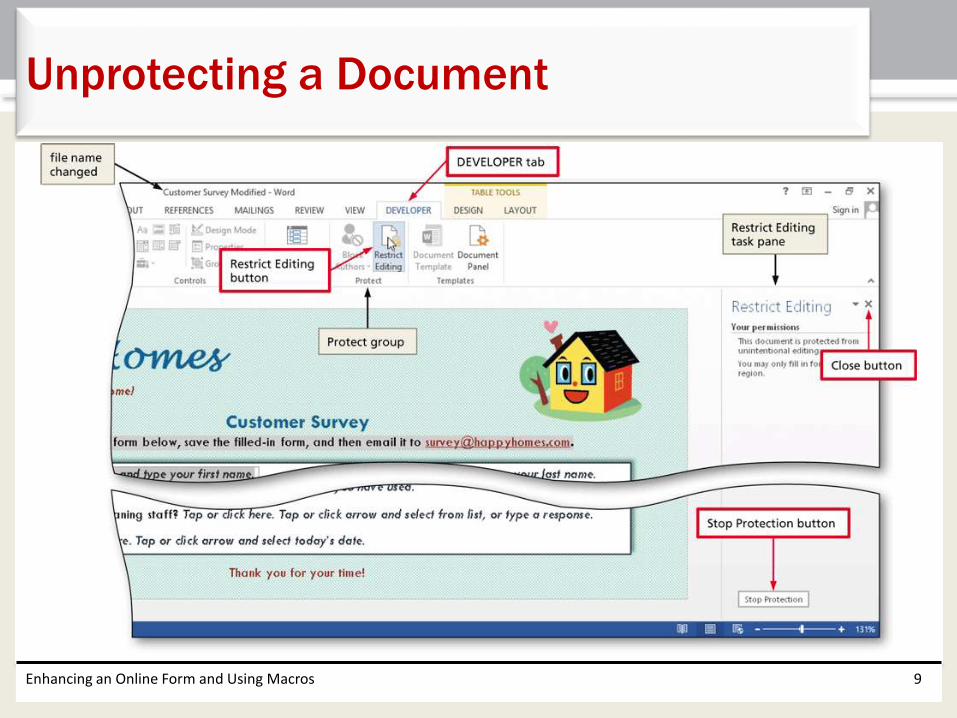
Enhancing an Online Form and Using Macros 9
Unprotecting a Document
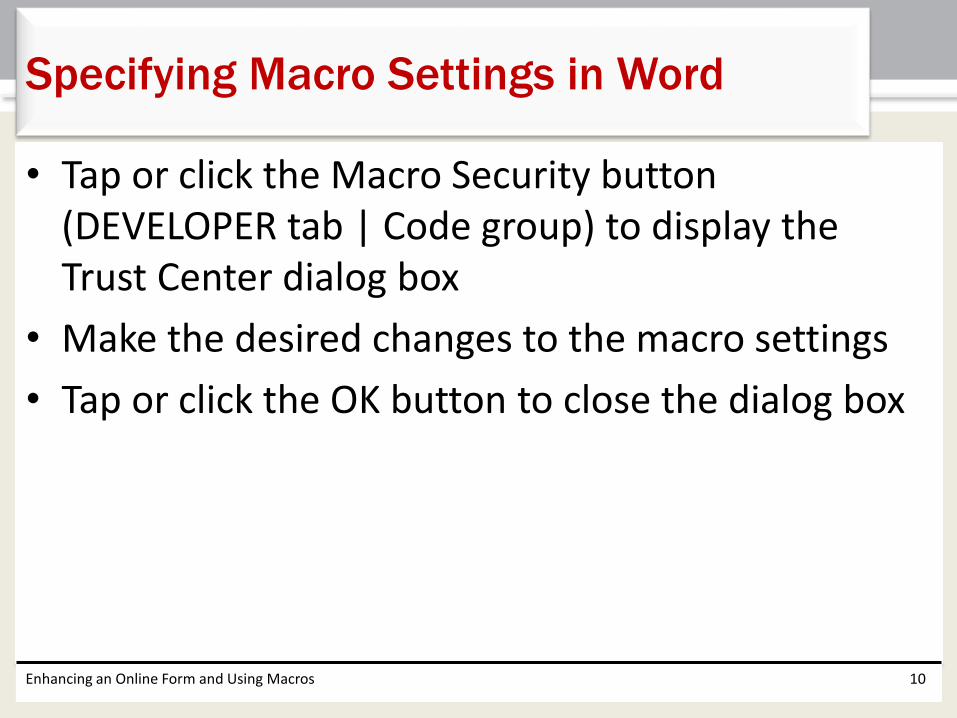
• Tap or click the Macro Security button (DEVELOPER tab | Code group) to display the Trust Center dialog box
• Make the desired changes to the macro settings
• Tap or click the OK button to close the dialog box
Enhancing an Online Form and Using Macros 10
Specifying Macro Settings in Word
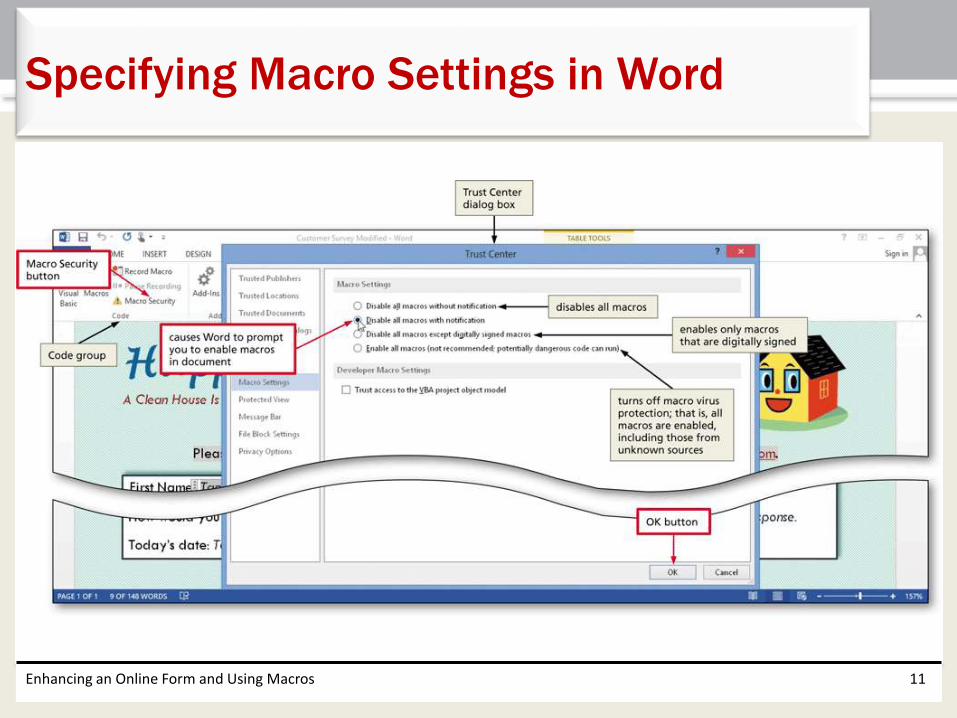
Enhancing an Online Form and Using Macros 11
Specifying Macro Settings in Word
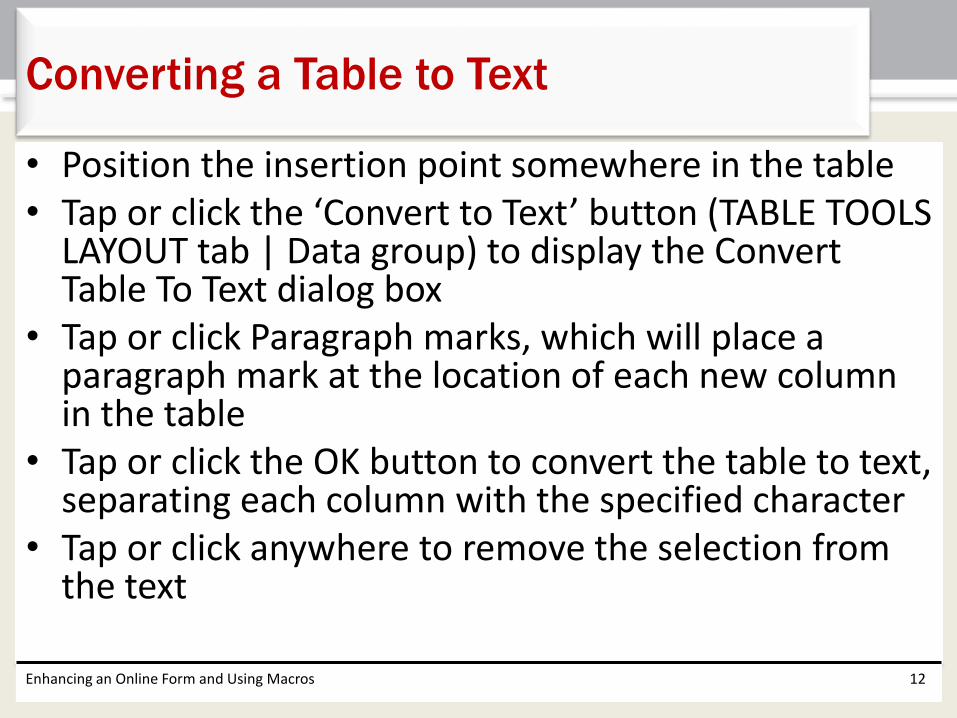
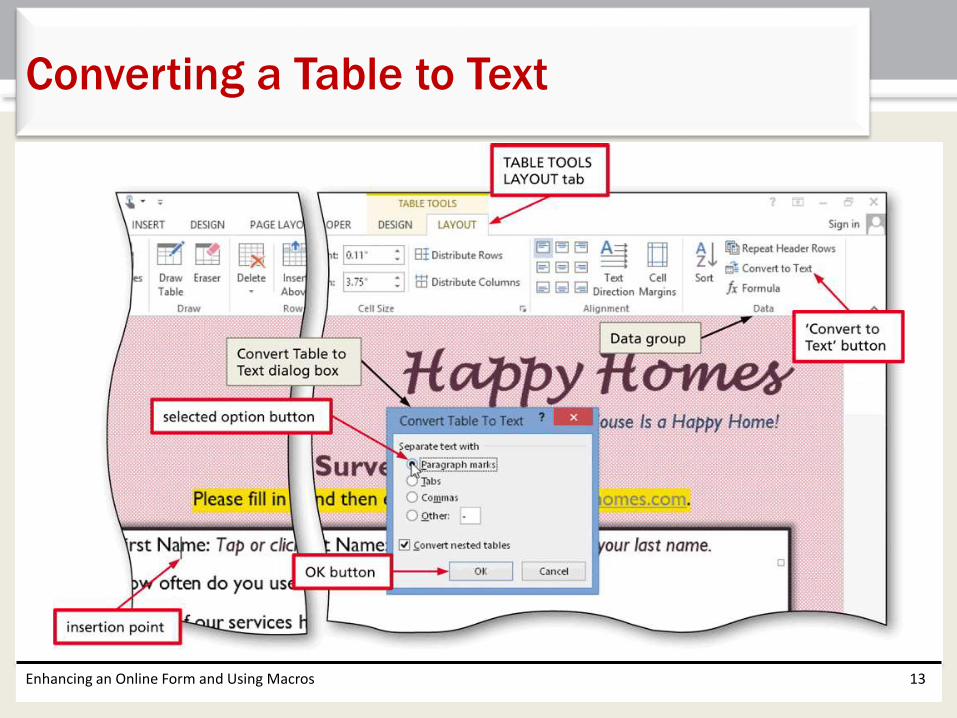
• Position the insertion point somewhere in the table• Tap or click the ‘Convert to Text’ button (TABLE TOOLS
LAYOUT tab | Data group) to display the Convert Table To Text dialog box
• Tap or click Paragraph marks, which will place a paragraph mark at the location of each new column in the table
• Tap or click the OK button to convert the table to text, separating each column with the specified character
• Tap or click anywhere to remove the selection from the text
Enhancing an Online Form and Using Macros 12
Converting a Table to Text
Enhancing an Online Form and Using Macros 13
Converting a Table to Text

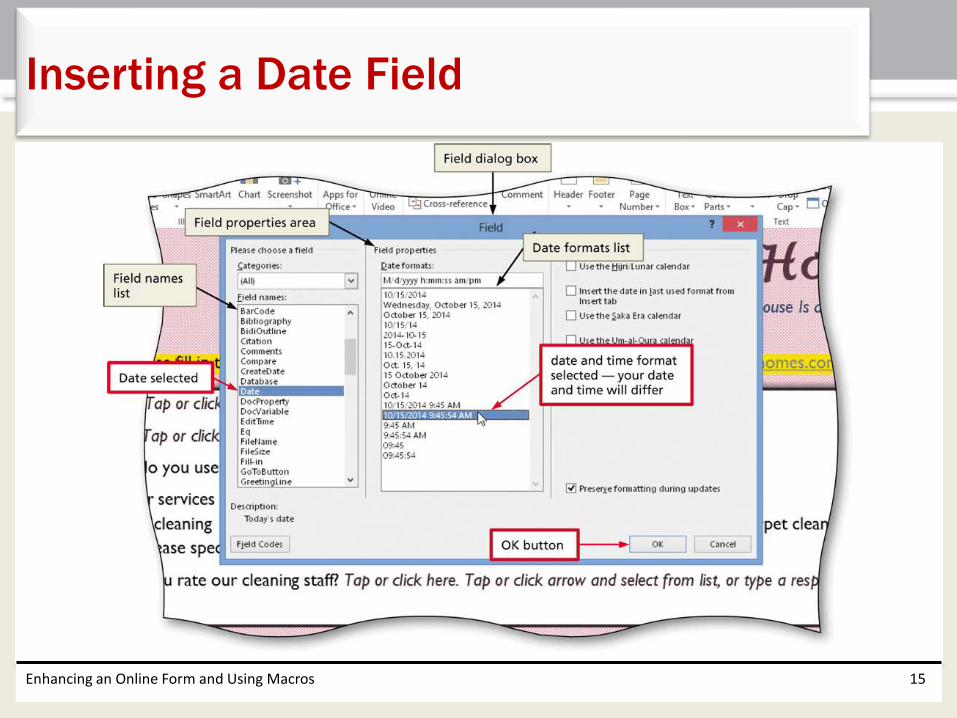
• With the insertion point positioned at the location for the date and time, tap or click the ‘Explore Quick Parts’ button (INSERT tab | Text group) to display the Explore Quick Parts menu
• Tap or click Field on the Quick Parts menu to display the Field dialog box
• Scroll through the Field names list, and then tap or click Date
• Tap or click the desired date format in the Date formats list
• Tap or click the OK button to insert the current date and time at the location of the insertion point
Enhancing an Online Form and Using Macros 14
Inserting a Date Field
Enhancing an Online Form and Using Macros 15
Inserting a Date Field
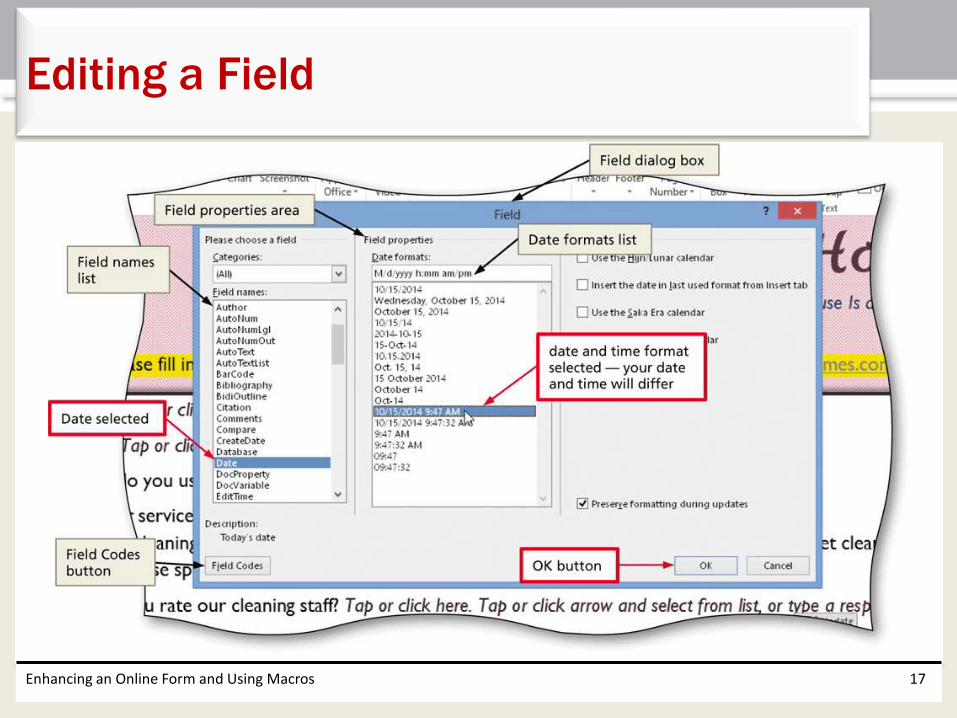
• Press and hold or right-click the field to display a shortcut menu
• Tap or click Edit Field on the shortcut menu to display the Field dialog box
• Make the desired changes in the Field dialog box
• Tap or click the OK button to insert the edited field at the location of the insertion point
Enhancing an Online Form and Using Macros 16
Editing a Field
Enhancing an Online Form and Using Macros 17
Editing a Field
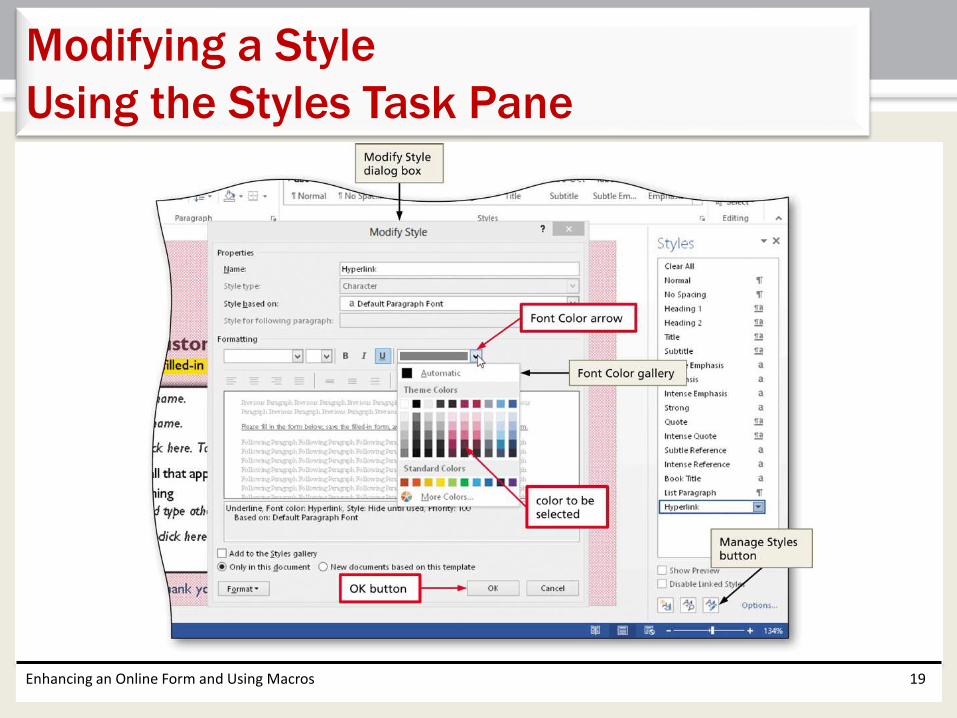
• Position the insertion point in the text containing the style you wish to modify
• Tap or click the Styles Dialog Box Launcher (HOME tab | Styles group) to display the Styles task pane
• Tap or click the style to modify in the Styles task pane, and then tap or click the style’s arrow to display the menu
• Tap or click Modify on the menu to display the Modify Style dialog box
• Make the desired style changes
• Tap or click the OK button to close the dialog box. Close the Styles task pane
Enhancing an Online Form and Using Macros 18
Modifying a Style
Using the Styles Task Pane
Enhancing an Online Form and Using Macros 19
Modifying a Style
Using the Styles Task Pane
• Tap or click the Styles Dialog Box Launcher (HOME tab | Styles group) to display the Styles task pane
• Tap or click the Manage Styles button in the Styles task pane to display the Manage Styles dialog box
• Tap or click the New Style button to display the Create New Style from Formatting dialog box
• Type the desired style name in the Name text box• Tap or click the Style type arrow and then tap or click
Character so that the new style does not contain any paragraph formats
• Make the desired changes to the style• Tap or click the OK button in each open dialog box to create
the new character styleEnhancing an Online Form and Using Macros 20
Creating a Character Style

Enhancing an Online Form and Using Macros 21
Creating a Character Style
• Tap or click the Page Color button (DESIGN tab | Page Background group) to display the Page Color gallery
• Tap or click Fill Effects in the Page Color gallery to display the Fill Effects dialog box
• Tap or click the Texture tab to display the Texture sheet
• Tap or click the desired texture in the Texture gallery to select the texture
• Tap or click the OK button to apply the selected texture as the page color in the document
Enhancing an Online Form and Using Macros 22
Using a Fill Effect for the Page Color

Enhancing an Online Form and Using Macros 23
Using a Fill Effect for the Page Color
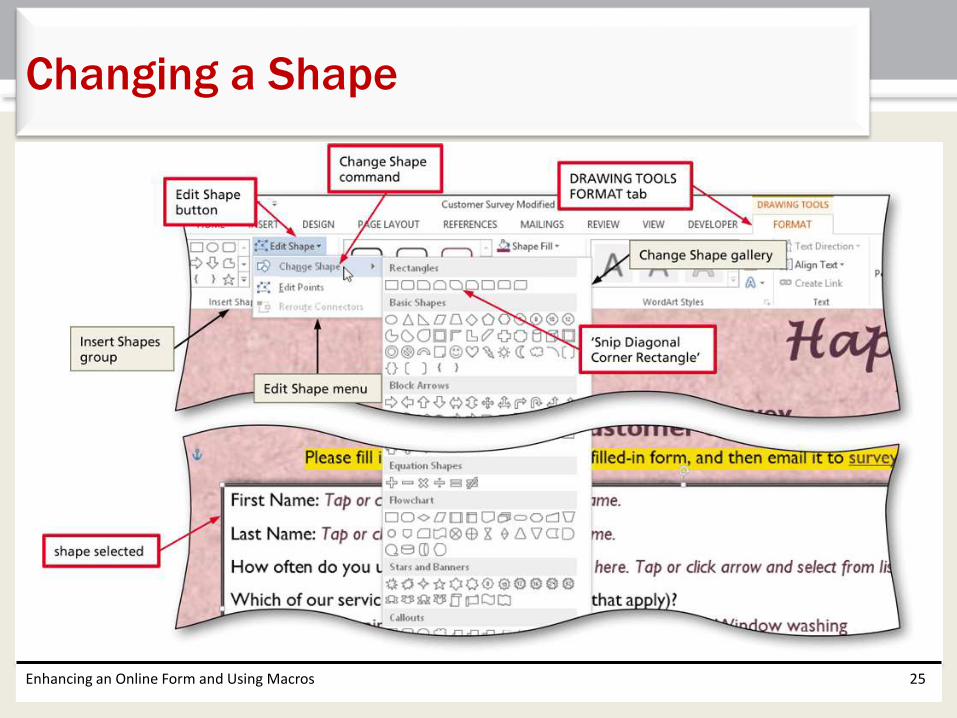
• Tap or click the shape to change
• Tap or click the Edit Shape button (DRAWING TOOLS FORMAT tab | Insert Shapes group) to display the Edit Shape menu
• Tap or point to Change Shape on the Edit Shape menu to display the Change Shape gallery
• Tap or click the desired shape in the Change Shape gallery to change the selected shape
Enhancing an Online Form and Using Macros 24
Changing a Shape
Enhancing an Online Form and Using Macros 25
Changing a Shape
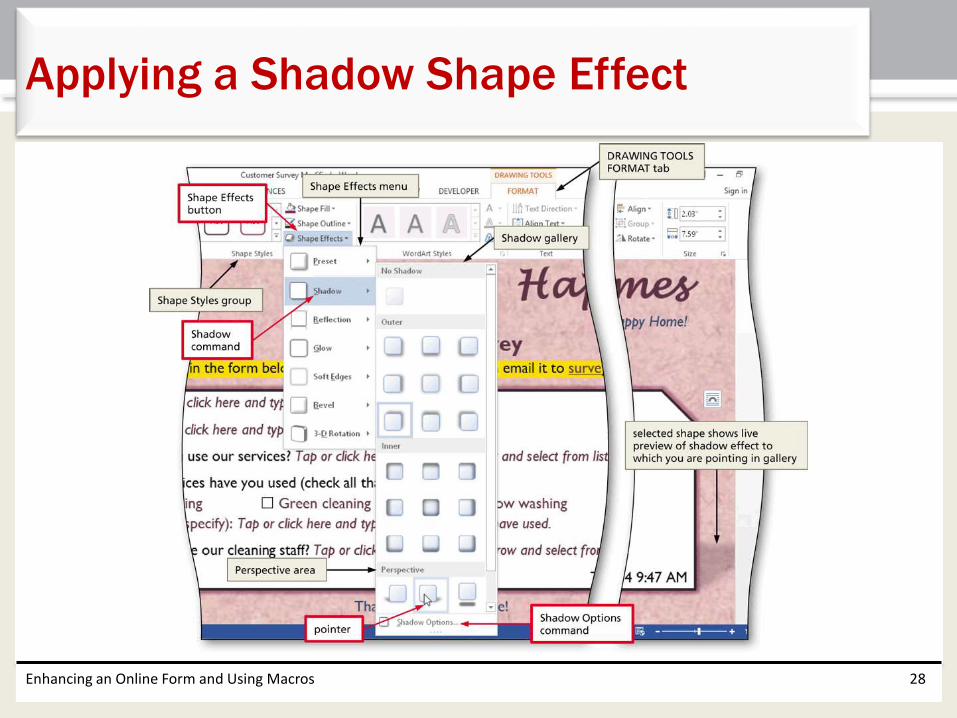
• With the shape selected, tap or click the Shape Effects button (DRAWING TOOLS FORMAT tab | Shape Styles group) again to display the Shape Effects menu
• Tap or point to Shadow in the Shape Effects menu to display the Shadow gallery
• Tap or click the desired shadow to apply the selected shadow to the selected shape
• Tap or click the Shape Effects button (DRAWING TOOLS FORMAT tab | Shape Styles group) again to display the Shape Effects menu
Enhancing an Online Form and Using Macros 26
Applying a Shadow Shape Effect
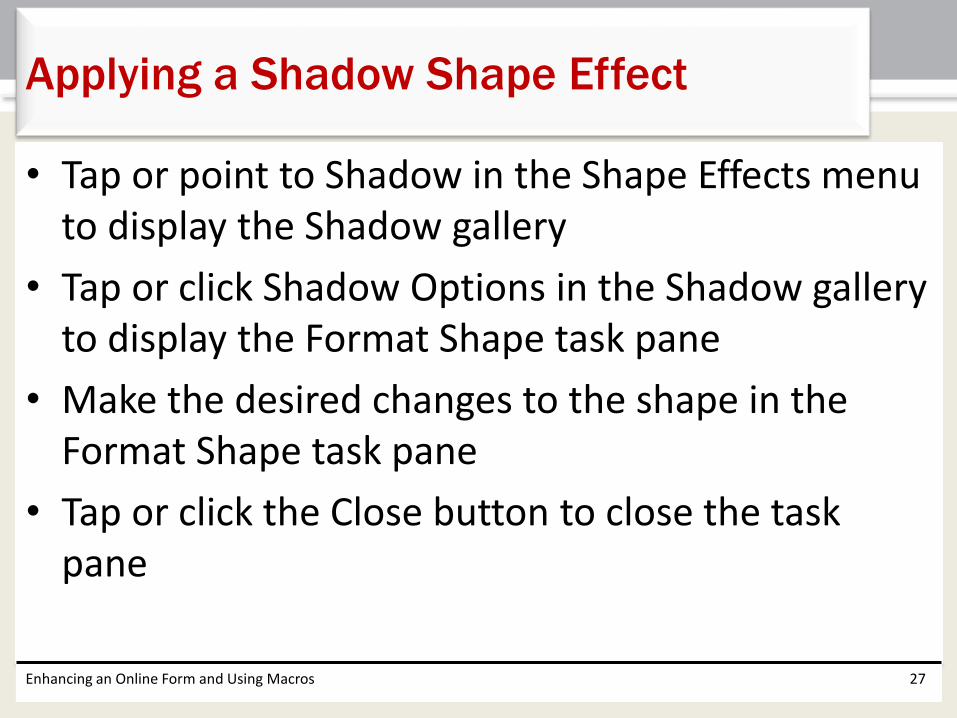
• Tap or point to Shadow in the Shape Effects menu to display the Shadow gallery
• Tap or click Shadow Options in the Shadow gallery to display the Format Shape task pane
• Make the desired changes to the shape in the Format Shape task pane
• Tap or click the Close button to close the task pane
Enhancing an Online Form and Using Macros 27
Applying a Shadow Shape Effect
Enhancing an Online Form and Using Macros 28
Applying a Shadow Shape Effect

Enhancing an Online Form and Using Macros 29
Applying a Shadow Shape Effect
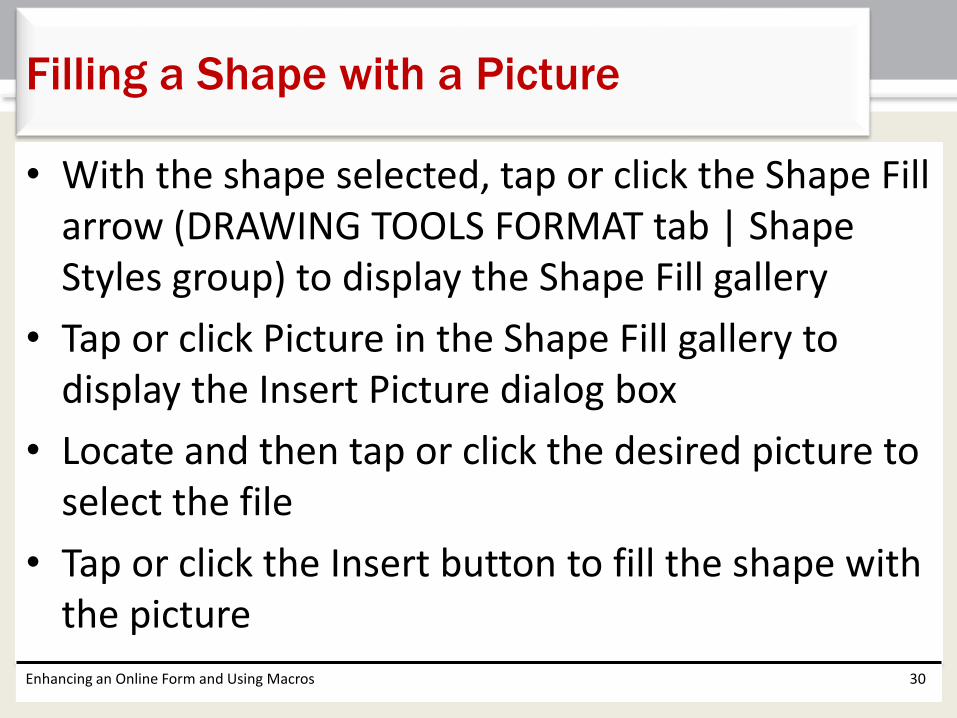
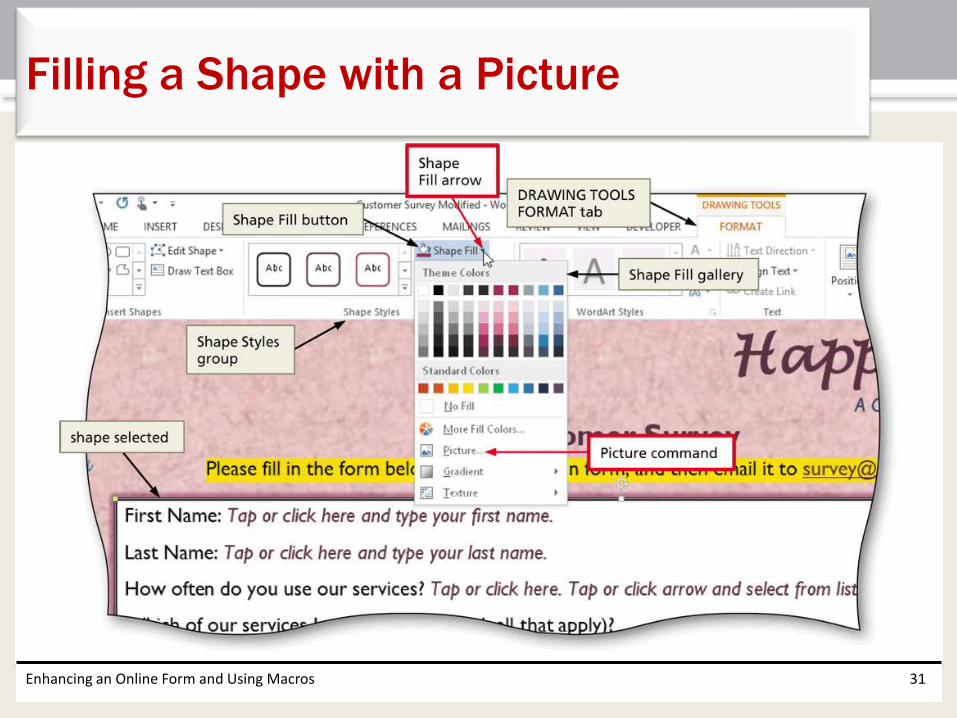
• With the shape selected, tap or click the Shape Fill arrow (DRAWING TOOLS FORMAT tab | Shape Styles group) to display the Shape Fill gallery
• Tap or click Picture in the Shape Fill gallery to display the Insert Picture dialog box
• Locate and then tap or click the desired picture to select the file
• Tap or click the Insert button to fill the shape with the picture
Enhancing an Online Form and Using Macros 30
Filling a Shape with a Picture
Enhancing an Online Form and Using Macros 31
Filling a Shape with a Picture
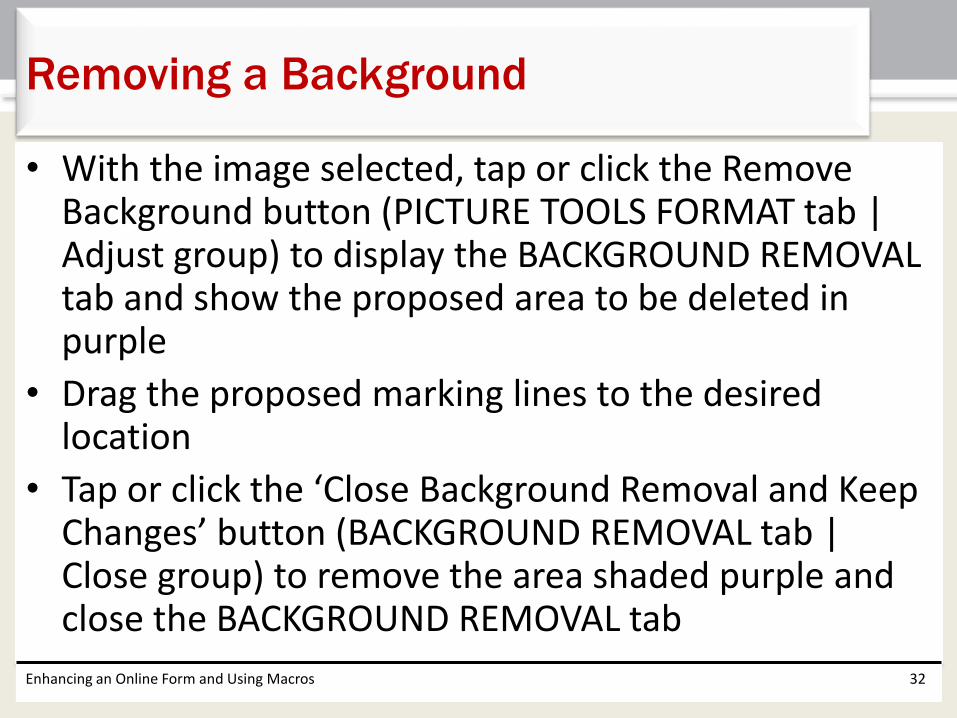
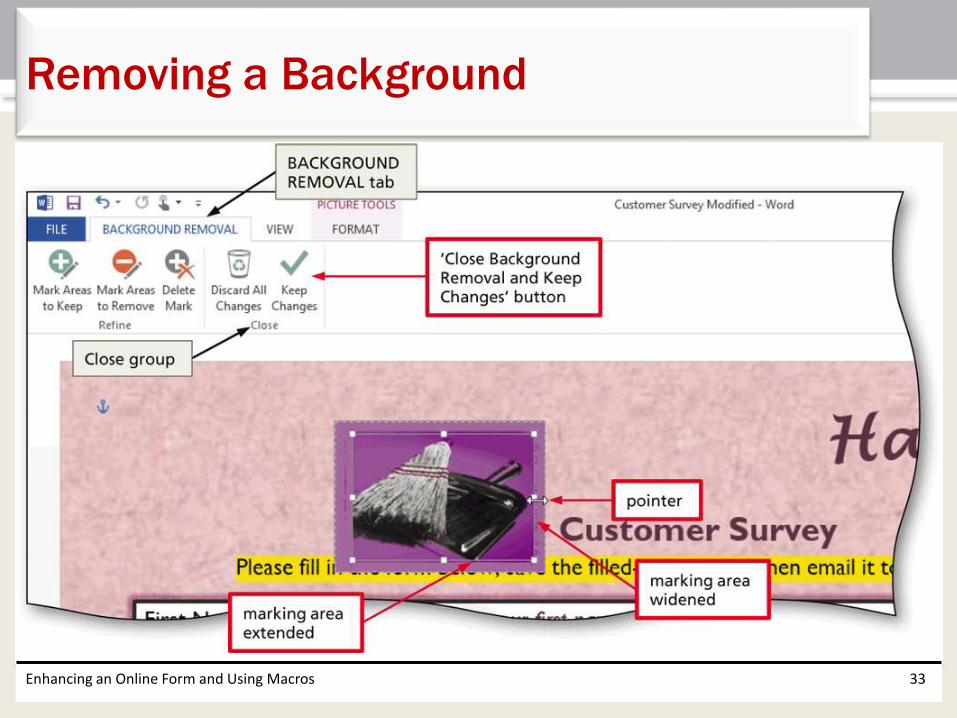
• With the image selected, tap or click the Remove Background button (PICTURE TOOLS FORMAT tab | Adjust group) to display the BACKGROUND REMOVAL tab and show the proposed area to be deleted in purple
• Drag the proposed marking lines to the desired location
• Tap or click the ‘Close Background Removal and Keep Changes’ button (BACKGROUND REMOVAL tab | Close group) to remove the area shaded purple and close the BACKGROUND REMOVAL tab
Enhancing an Online Form and Using Macros 32
Removing a Background
Enhancing an Online Form and Using Macros 33
Removing a Background
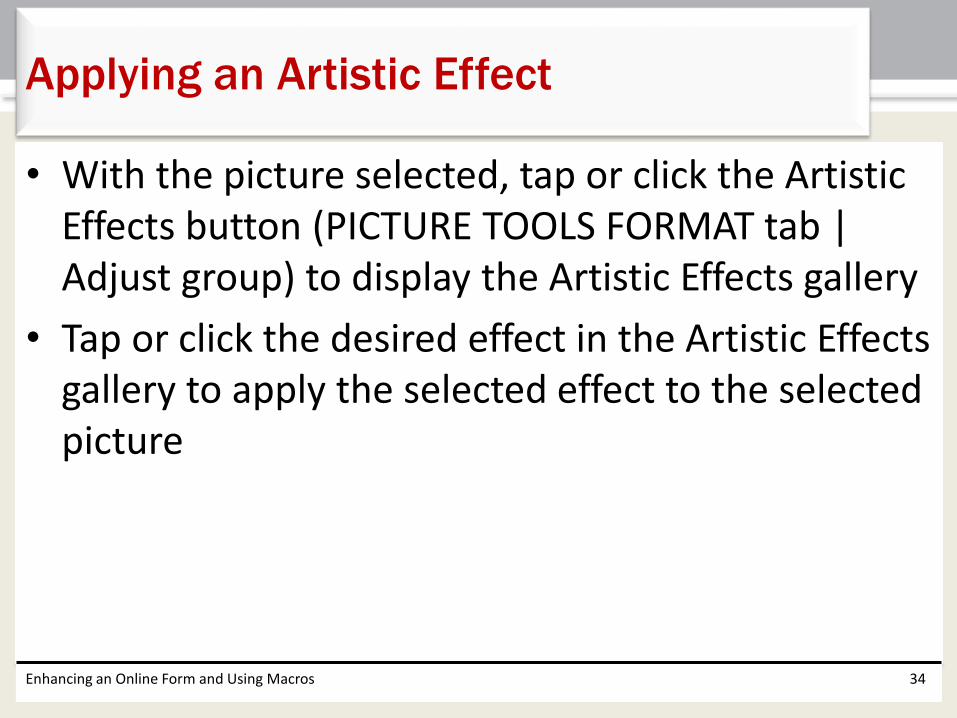
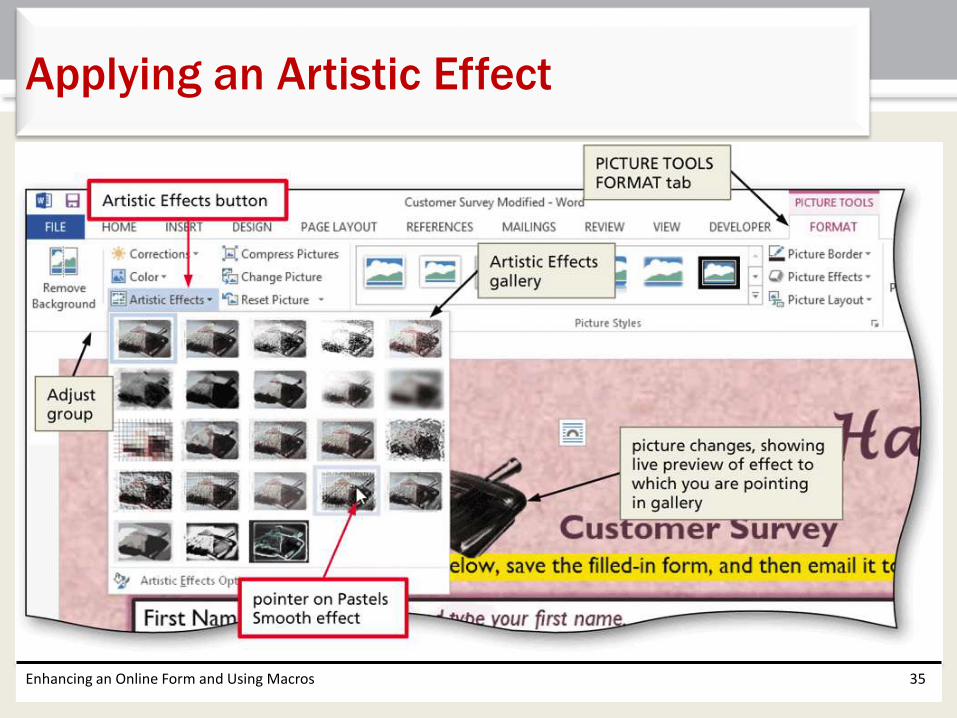
• With the picture selected, tap or click the Artistic Effects button (PICTURE TOOLS FORMAT tab | Adjust group) to display the Artistic Effects gallery
• Tap or click the desired effect in the Artistic Effects gallery to apply the selected effect to the selected picture
Enhancing an Online Form and Using Macros 34
Applying an Artistic Effect
Enhancing an Online Form and Using Macros 35
Applying an Artistic Effect
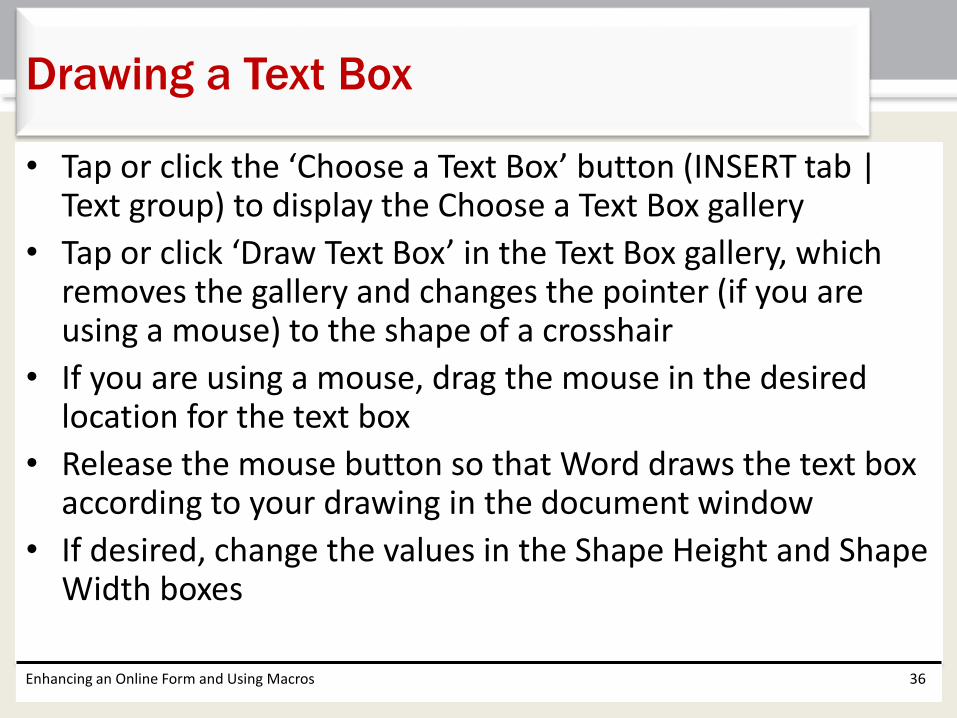
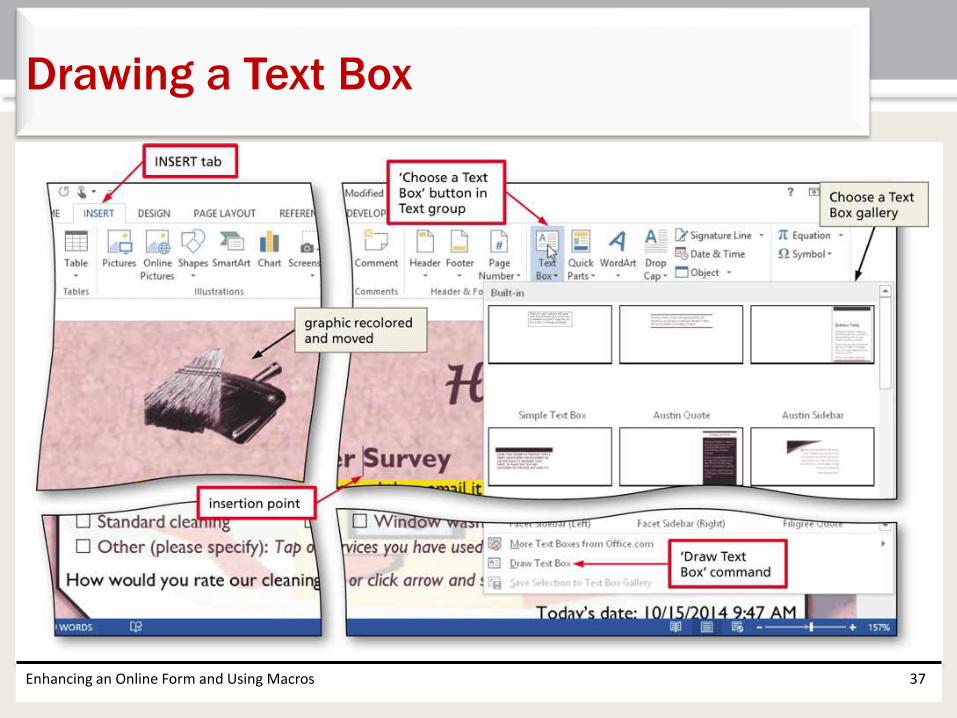
• Tap or click the ‘Choose a Text Box’ button (INSERT tab | Text group) to display the Choose a Text Box gallery
• Tap or click ‘Draw Text Box’ in the Text Box gallery, which removes the gallery and changes the pointer (if you are using a mouse) to the shape of a crosshair
• If you are using a mouse, drag the mouse in the desired location for the text box
• Release the mouse button so that Word draws the text box according to your drawing in the document window
• If desired, change the values in the Shape Height and Shape Width boxes
Enhancing an Online Form and Using Macros 36
Drawing a Text Box
Enhancing an Online Form and Using Macros 37
Drawing a Text Box
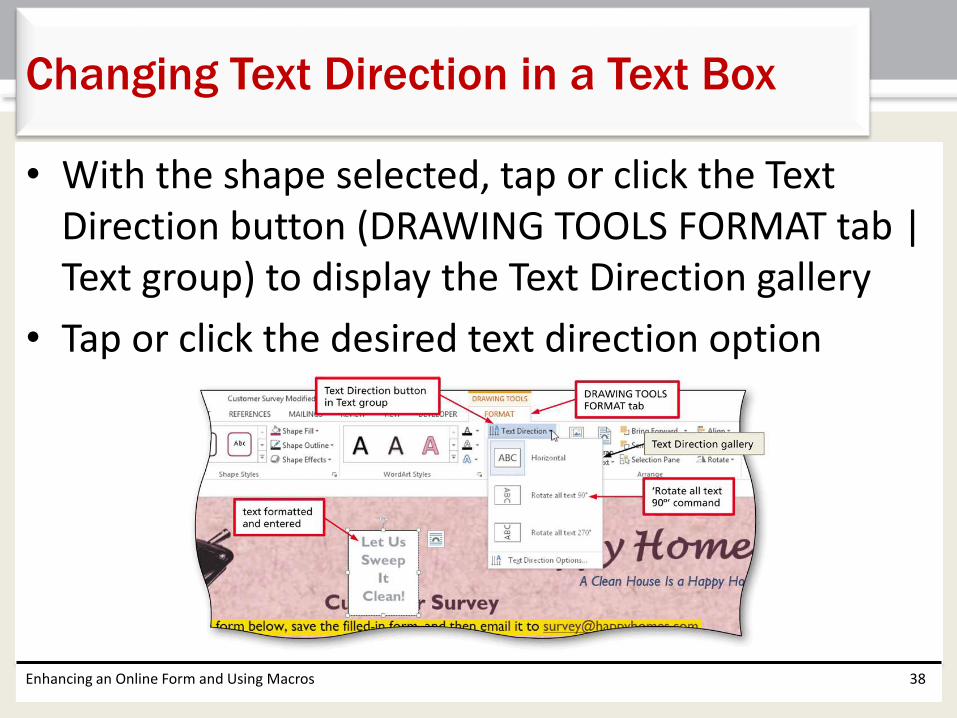
• With the shape selected, tap or click the Text Direction button (DRAWING TOOLS FORMAT tab | Text group) to display the Text Direction gallery
• Tap or click the desired text direction option
Enhancing an Online Form and Using Macros 38
Changing Text Direction in a Text Box

• With the text box selected, tap or click the Shape outline arrow (DRAWING TOOLS FORMAT tab | Shape Styles group) to display the Shape Outline gallery
• Tap or click the desired option
Enhancing an Online Form and Using Macros 39
Changing a Shape Outline of a Text Box

Enhancing an Online Form and Using Macros 40
Changing a Shape Outline of a Text Box
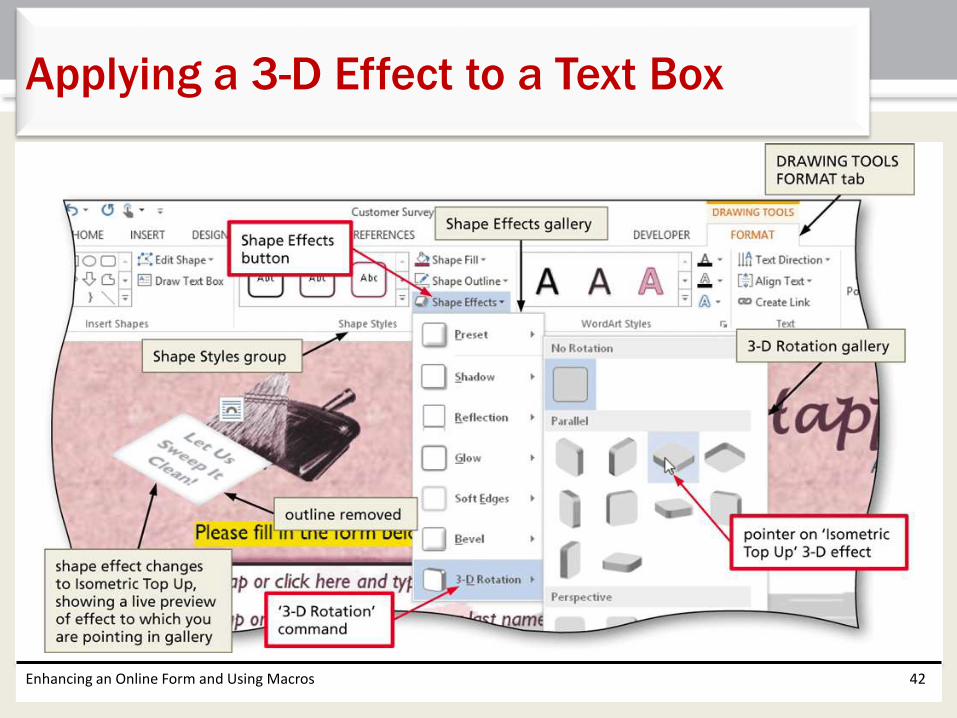
• With the text box selected, tap or click the Shape Effects button (DRAWING TOOLS FORMAT tab | Shape Styles group) to display the Shape Effects gallery
• Tap or point to 3-D Rotation in the Shape Effects gallery to display the 3-D Rotation gallery
• Tap or click the desired effect in the 3-D Rotation gallery to apply the selected 3-D effect
Enhancing an Online Form and Using Macros 41
Applying a 3-D Effect to a Text Box
Enhancing an Online Form and Using Macros 42
Applying a 3-D Effect to a Text Box

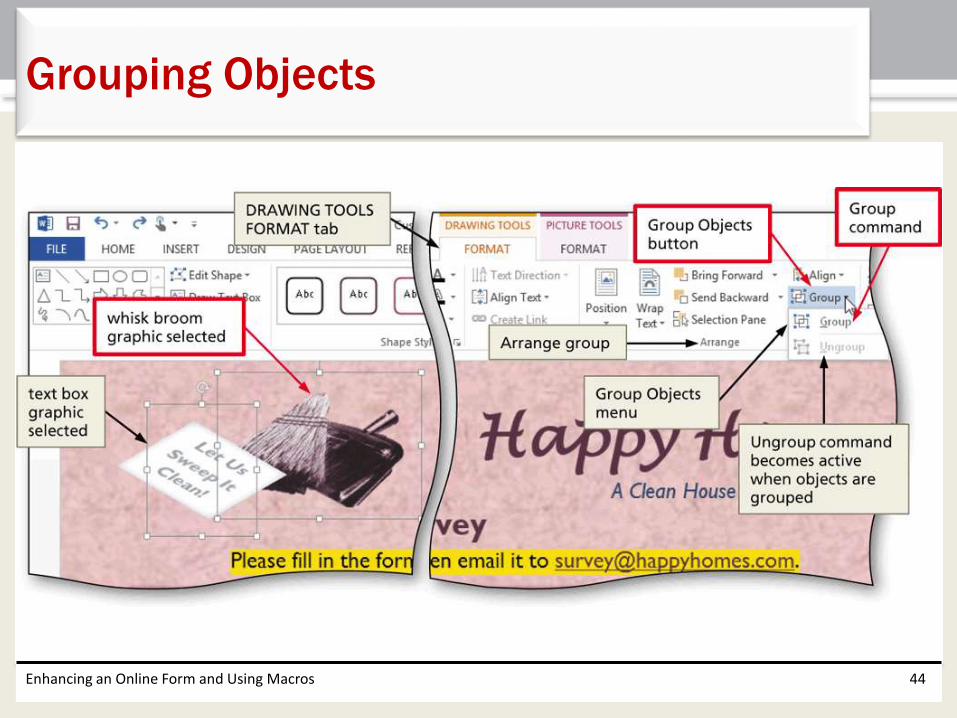
• Hold down the CTRL key while tapping or clicking each object to group
• Tap or click the Group Objects button (DRAWING TOOLS FORMAT tab | Arrange group) to display the Group Objects menu
• Tap or click Group on the Group menu to group the selected objects into a single selected object
Enhancing an Online Form and Using Macros 43
Grouping Objects
Enhancing an Online Form and Using Macros 44
Grouping Objects
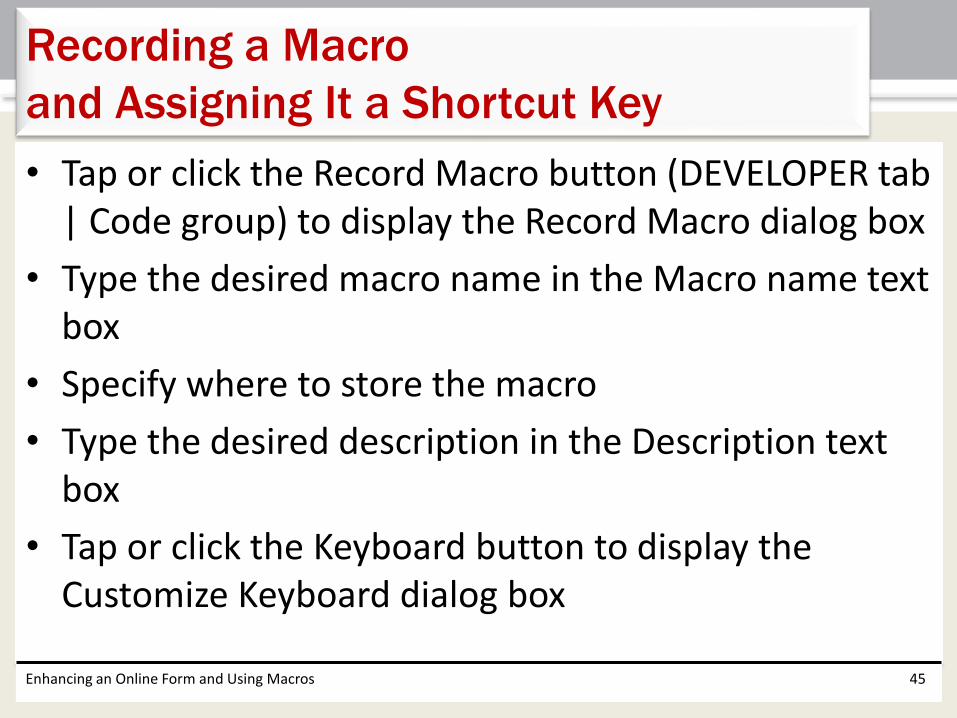
• Tap or click the Record Macro button (DEVELOPER tab | Code group) to display the Record Macro dialog box
• Type the desired macro name in the Macro name text box
• Specify where to store the macro
• Type the desired description in the Description text box
• Tap or click the Keyboard button to display the Customize Keyboard dialog box
Enhancing an Online Form and Using Macros 45
Recording a Macro
and Assigning It a Shortcut Key
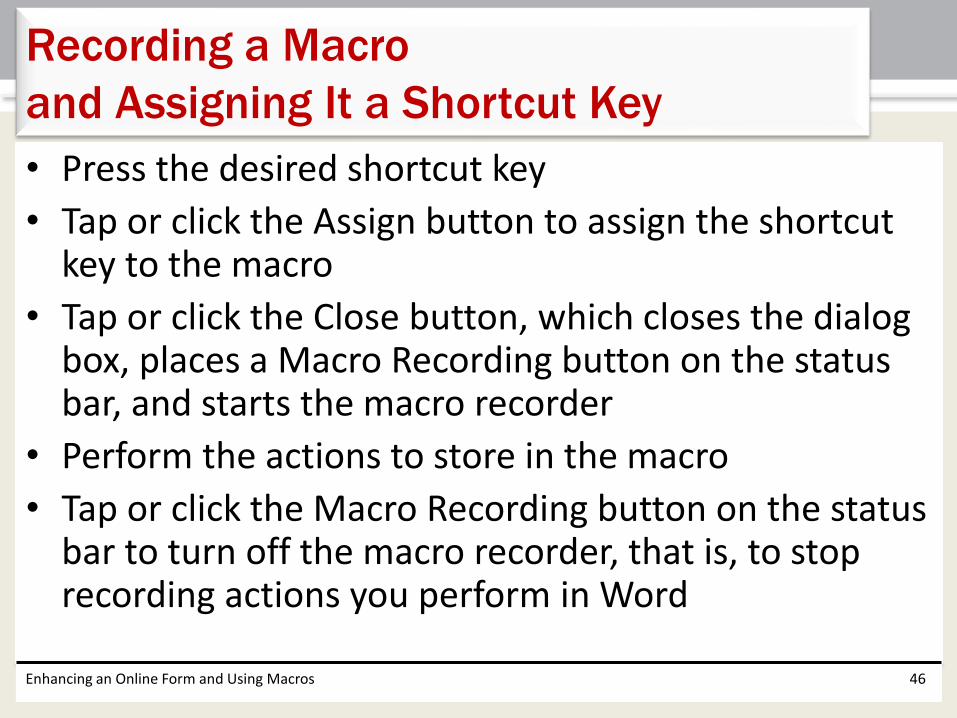
• Press the desired shortcut key
• Tap or click the Assign button to assign the shortcut key to the macro
• Tap or click the Close button, which closes the dialog box, places a Macro Recording button on the status bar, and starts the macro recorder
• Perform the actions to store in the macro
• Tap or click the Macro Recording button on the status bar to turn off the macro recorder, that is, to stop recording actions you perform in Word
Enhancing an Online Form and Using Macros 46
Recording a Macro
and Assigning It a Shortcut Key

Enhancing an Online Form and Using Macros 47
Recording a Macro
and Assigning It a Shortcut Key

• Tap or click the ‘Customize Quick Access Toolbar’ button on the Quick Access Toolbar to display the Customize Quick Access Toolbar menu
• Tap or click More Commands on the Customize Quick Access Toolbar menu to display the Word Options dialog box with Quick Access Toolbar selected in the left pane
• Scroll through the list of popular commands, tap or click the desired command, and then tap or click the Add button to add the selected command to the Customize Quick Access Toolbar list
Enhancing an Online Form and Using Macros 48
Adding a Command and a Macro as
Buttons on the Quick Access Toolbar
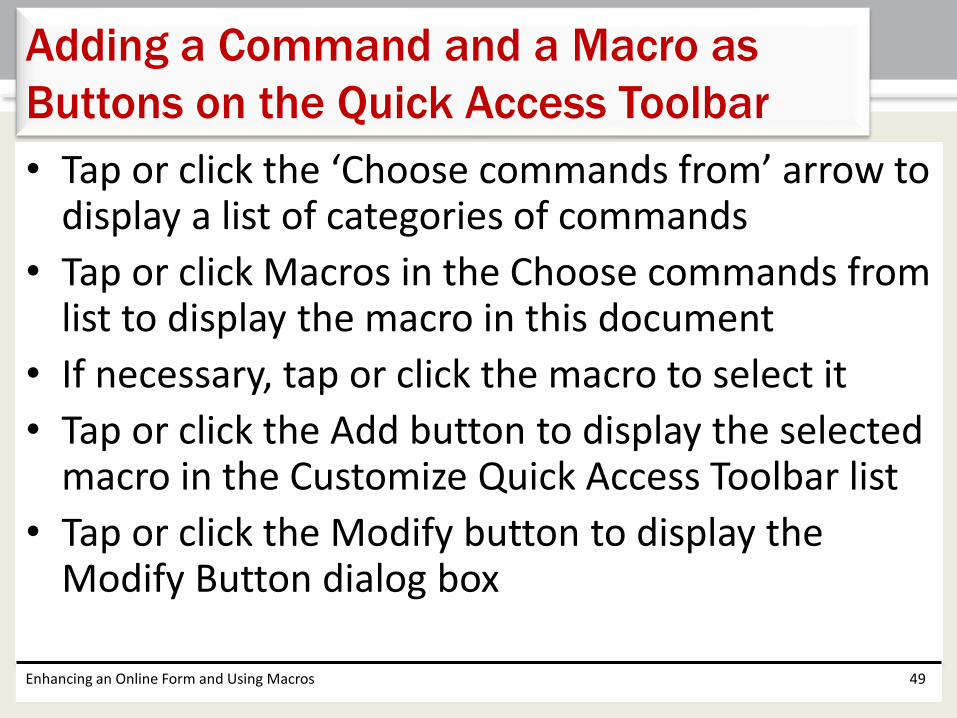
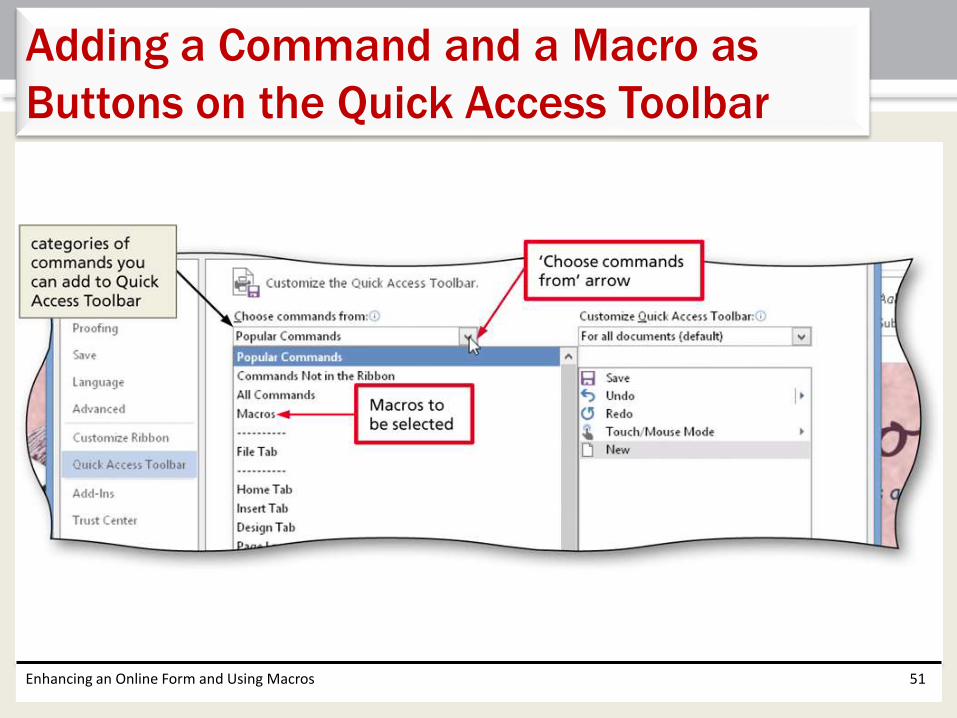
• Tap or click the ‘Choose commands from’ arrow to display a list of categories of commands
• Tap or click Macros in the Choose commands from list to display the macro in this document
• If necessary, tap or click the macro to select it
• Tap or click the Add button to display the selected macro in the Customize Quick Access Toolbar list
• Tap or click the Modify button to display the Modify Button dialog box
Enhancing an Online Form and Using Macros 49
Adding a Command and a Macro as
Buttons on the Quick Access Toolbar

• Change the name as desired in the Display name text box, which will be the text that appears in the ScreenTip for the button
• In the list of symbols, tap or click the desired symbol
• Tap or click the OK button to change the button characteristics in the Customize Quick Access Toolbar list
• Tap or click the OK button to add the button to the Quick Access toolbar
Enhancing an Online Form and Using Macros 50
Adding a Command and a Macro as
Buttons on the Quick Access Toolbar
Enhancing an Online Form and Using Macros 51
Adding a Command and a Macro as
Buttons on the Quick Access Toolbar
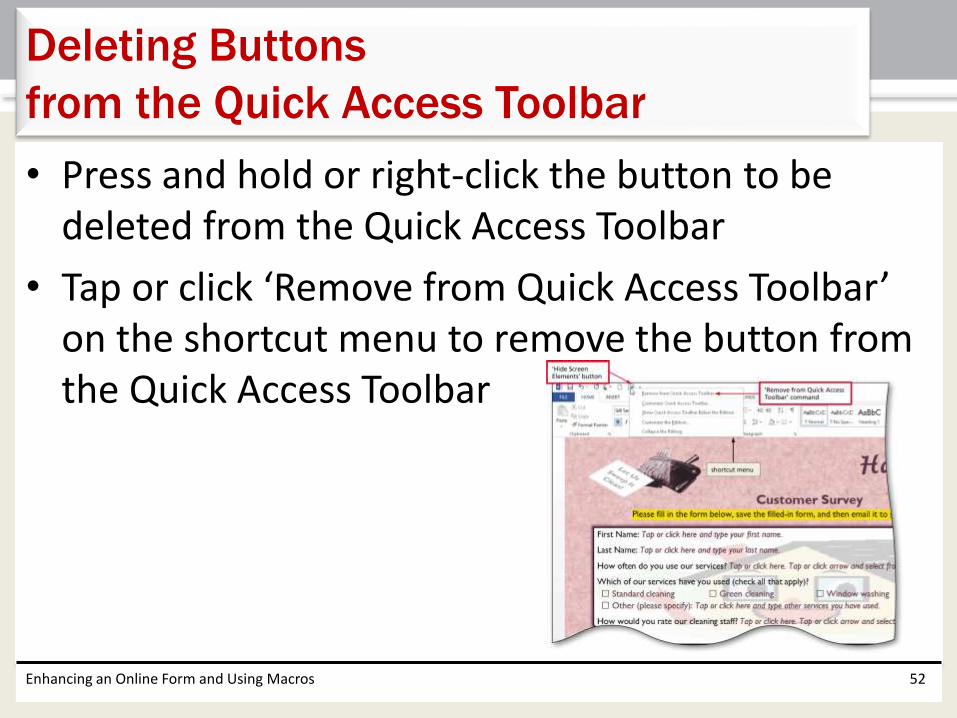
• Press and hold or right-click the button to be deleted from the Quick Access Toolbar
• Tap or click ‘Remove from Quick Access Toolbar’ on the shortcut menu to remove the button from the Quick Access Toolbar
Enhancing an Online Form and Using Macros 52
Deleting Buttons
from the Quick Access Toolbar
Enhancing an Online Form and Using Macros 53
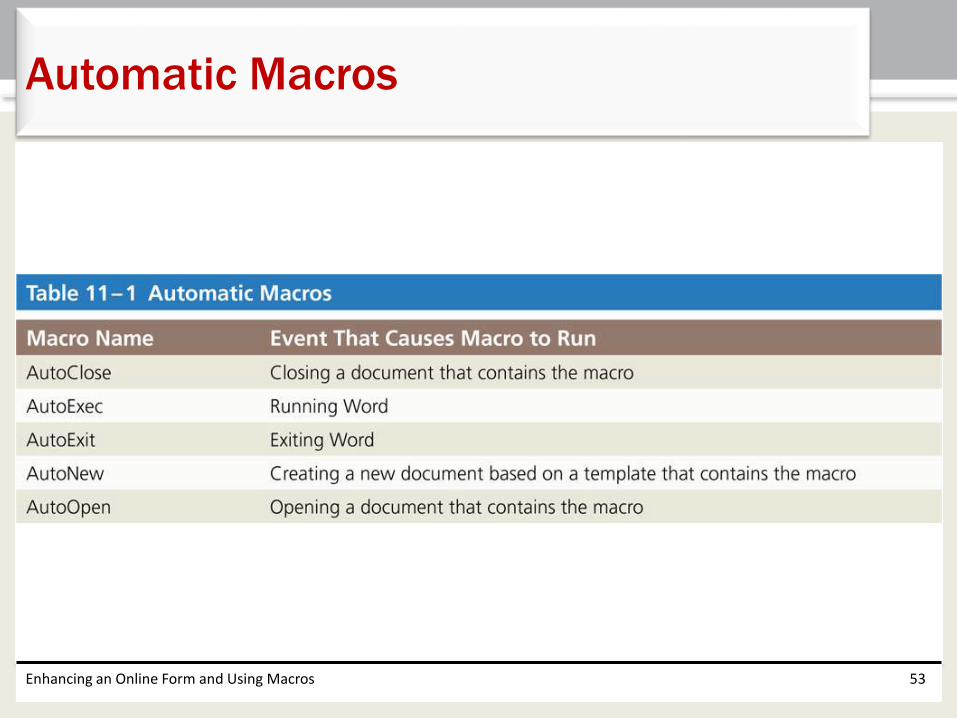
Automatic Macros

• Tap or click the Record Macro button (DEVELOPER tab | Code group) to display the Record Macro dialog box
• Type the name of the automatic macro in the Macro name text box
• Specify where to store the macro• Type the desired description in the Description text box• Tap or click the OK button to close the Record Macro dialog
box and start the macro recorder• Perform the desired actions to store in the macro• Tap or click the Macro Recording button on the status bar
to turn off the macro recorder, that is, stop recording actions you perform in Word
Enhancing an Online Form and Using Macros 54
Creating an Automatic Macro

Enhancing an Online Form and Using Macros 55
Creating an Automatic Macro
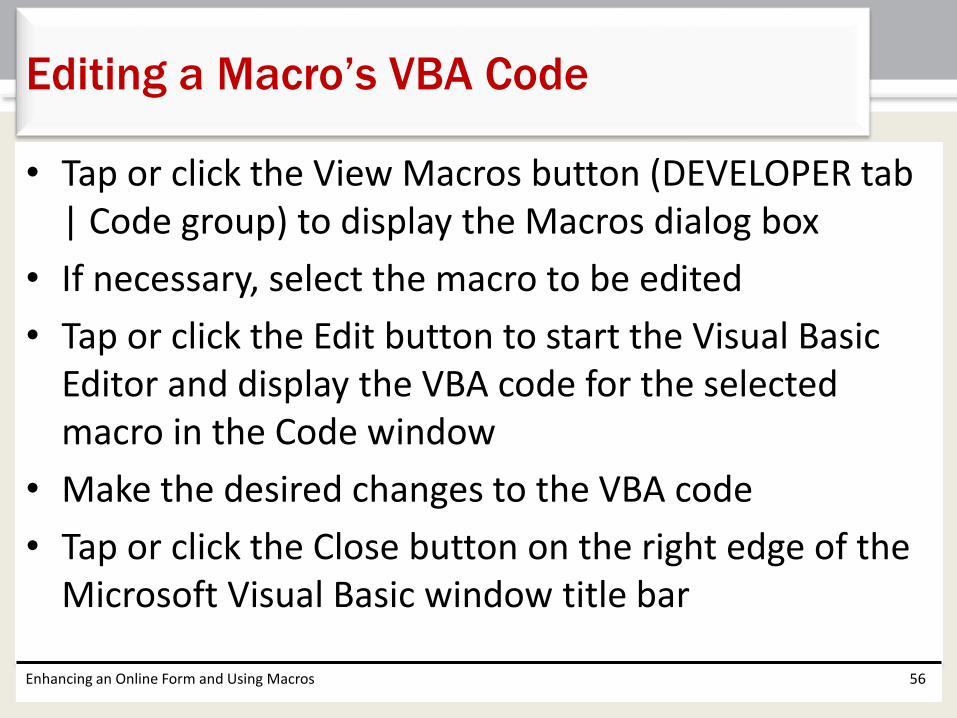
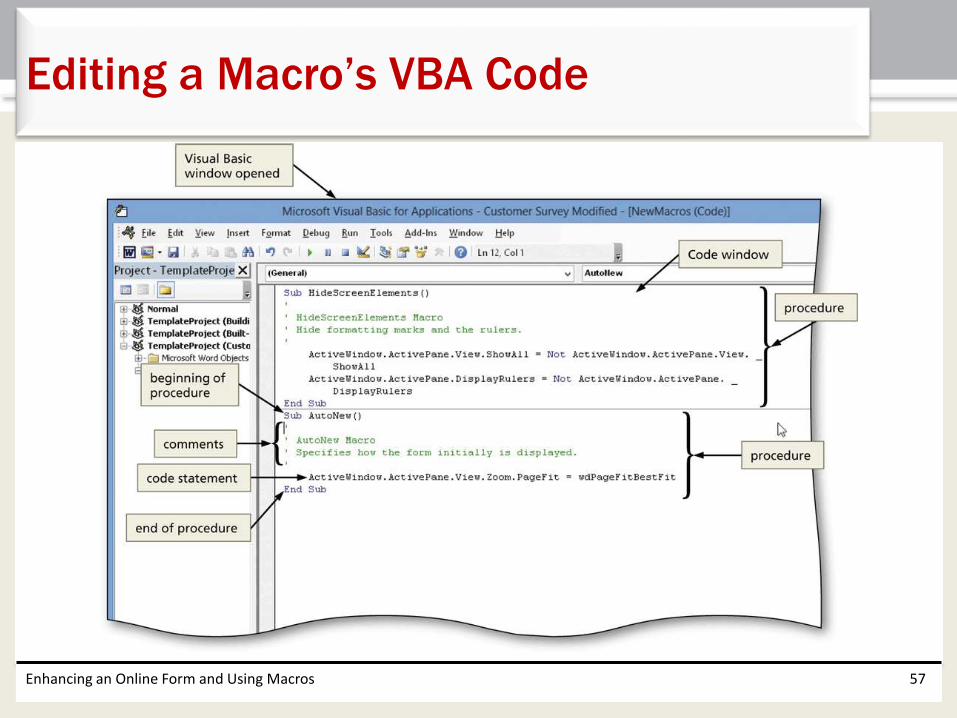
• Tap or click the View Macros button (DEVELOPER tab | Code group) to display the Macros dialog box
• If necessary, select the macro to be edited
• Tap or click the Edit button to start the Visual Basic Editor and display the VBA code for the selected macro in the Code window
• Make the desired changes to the VBA code
• Tap or click the Close button on the right edge of the Microsoft Visual Basic window title bar
Enhancing an Online Form and Using Macros 56
Editing a Macro’s VBA Code
Enhancing an Online Form and Using Macros 57
Editing a Macro’s VBA Code

Enhancing an Online Form and Using Macros 58
VBA
• Unprotect a document
• Specify macro settings
• Convert a table to text
• Insert and edit a field
• Create a character style
• Apply and modify fill effects
• Change a shape
Enhancing an Online Form and Using Macros 59
Chapter Summary
• Remove a background from a graphic
• Apply an artistic effect to a graphic
• Insert and format a text box
• Group objects
• Record and execute a macro
• Customize the Quick Access Toolbar
• Edit a macro’s VBA code
Enhancing an Online Form and Using Macros 60
Chapter Summary
Chapter 11 Complete
Microsoft
Word 2013