Word 2002: Mail Merge - Stockton Universityintraweb.stockton.edu/eyos/computer_services... ·...
33
The Richard Stockton College of New Jersey Microsoft ® W W o o r r d d 2 2 0 0 0 0 2 2 : : M M a a i i l l M M e e r r g g e e Student Edition Computer Courseware
Transcript of Word 2002: Mail Merge - Stockton Universityintraweb.stockton.edu/eyos/computer_services... ·...

The Richard Stockton College of New Jersey
Microsoft®
WWoorrdd 22000022:: MMaaiill MMeerrggee Student Edition
Computer Courseware

© 2002 by CustomGuide, Inc. 1502 Nicollet Avenue South, Suite 1; Minneapolis, MN 55403
This material is copyrighted and all rights are reserved by CustomGuide, Inc. No part of this publication may be reproduced, transmitted, transcribed, stored in a retrieval system, or translated into any language or computer language, in any form or by any means, electronic, mechanical, magnetic, optical, chemical, manual, or otherwise, without the prior written permission of CustomGuide, Inc.
We make a sincere effort to ensure the accuracy of the material described herein; however, CustomGuide makes no warranty, expressed or implied, with respect to the quality, correctness, reliability, accuracy, or freedom from error of this document or the products it describes. Data used in examples and sample data files are intended to be fictional. Any resemblance to real persons or companies is entirely coincidental.
The names of software products referred to in this manual are claimed as trademarks of their respective companies. CustomGuide is a registered trademark of CustomGuide, Inc.
CustomGuide.com granted to Computer and Telecommunication Services a license agreement to print an unlimited number of copies of the CustomGuide Courseware materials within Stockton College of New Jersey for training staff, faculty and students. End users who receive this handout may not reproduce or distribute these materials without permission. Please refer to the copyright notice below for more information.

Table of Contents Chapter One: Performing a Mail Merge .......................................................................... 5
Lesson 1-1: An Overview of the Mail Merge Process ...........................................................6 Lesson 1-2: Selecting the Document Type ............................................................................8 Lesson 1-3: Selecting the Starting Document......................................................................10 Lesson 1-4: Selecting the Recipients ...................................................................................12 Lesson 1-5: Adding Records to the Data Source .................................................................14 Lesson 1-6: Writing Your Letter ..........................................................................................16 Lesson 1-7: Previewing a Mail Merge.................................................................................18 Lesson 1-8: Complete a Merge............................................................................................20 Lesson 1-9: Creating and Working with Labels...................................................................22 Lesson 1-10: Using IF… THEN… ELSE Fields.................................................................24 Lesson 1-11: Using an Existing Data Source.......................................................................26 Chapter One Review............................................................................................................28


Chapter One: Performing a Mail
Merge Chapter Objectives:
• Creating and working with a mail merged Main Document
• Creating a data source for the mail merge
• Entering records to the data source
• Inserting merge fields to the Main Document
• Selecting specific records to merge
• Creating and working with labels
• Using an existing database as the data source
• Creating and working with envelopes
Chapter Task: Create a mail merge form letter
Here’s a secret for you: your dentist probably didn’t have someone manually type that bi-annual check-up letter you received this month. And no one manually typed your weekly Publisher’s Clearing House sweepstakes letter addressed to you either. A process known as mail merge has created these “personalized” letters. Mail merge letters are used to send the same or similar documents to many different people at once. Since they contain the recipient’s name, address, and other information, mail merge letters feel more personal—just like Publisher’s Clearing House’s If you have the winning number, Bob Boyarksi, you are the winner of $10 Million Dollars!!
Performing a mail merge isn’t a very difficult process, but it is a rather lengthy one with many steps. This chapter will take you step-by-step through the mail merge process. When you’ve completed this chapter, you will be able to send “personal” mail merge letters to all your friends and relatives during the holidays in one-tenth the time, and no one will know the difference!
Prerequisites • How to open and save
a document • How to use menus,
toolbars, and dialog boxes
• How to work with tables

6 Microsoft Word 2002
© 2001 CustomGuide, Inc.
Lesson 1-1: An Overview of the Mail Merge Process
Figure 1-1
An overview of the mail merge process
Step 2: Select a Starting DocumentThe main document contains the text that is the same in all of the merged documents. You can create a new main document or use any existing document as the main document.
David Meche 200 Park Drive Le Sueur, MN 56058 Dear David, Thanks for your wonderful graduation gift of $10 I am going
First Last AJoe Smith 2Sam Nelson FJill Peck 8Tracy Olden 3Brad Potts 2
Step 3: Select the Recipients All mail merges require two files—the main document file and the data source file. The data source file is the list of names or information you want to appear on the main document. You can create a new data source, use an existing data source, or even use a database as the data source.
<<First>> <<Last>><<Address>> <<City, State, Zip>> Dear <<First>>
Thanks for your wonderful graduation gift of <<Gift>> I
Step 5: Preview Your Letters Preview how your main document will appear when combined with the information in the data source.
<<First>> <<Last>><<Address>> <<City, State, Zip>> Dear <<First>>
Thanks for your wonderful graduation ift f <<Gift>> I
First Last AJoe Smith 2Sam Nelson FJill Peck 8Tracy Olden 3Brad Potts 2Jim Lewis 1
Joe Smith 2014 Pleasant Ave. Chaska, MN 55437 Dear Joe,
Thank for your wonderful graduation gift of $25 I will use
Sam Nelson Far Pine Drive Chaska, MN 55437 Dear Sam,
Thanks for your wonderful graduation ift f $25 I ill
++ ==
Step 6: Complete the Mail Merge!Merge the data from the data source into the merge fields in the main document, creating a unique individual document for each record in the data source.
Step 1: Select the Document TypeSelect the type of document you want to create. You can create letters, e-mails, envelopes, labels, and directories.
Step 4: Write Your Letter Write and/or edit the main document and specify where you want to insert the information from your data source into your main document.
Sam NelsonFar Pine Drive Chaska, MN 55437 Dear Sam,
Thanks for your wonderful graduation gift of <<Gift>> I

Chapter One: Performing a Mail Merge 7
The Richard Stockton College of New Jersey
Quick Reference To Perform a Mail Merge you Need Two Files: 1. A main document, which
contains the text that appears in all of the merged documents.
2. A data source file or address list which contains the information you want to insert into the merged documents.
There’s no getting around it—performing a mail merge is a long, multi-stepped, and (the first time you try it) complicated process. So long, in fact, that we’ll be spending the next several lessons on it! This lesson is an overview of what needs to happen during a mail merge, as shown in Figure 1-1. If you become confused during one of the next lessons about what you’re doing and why, come back here to see where and how the step you’re on fits into the mail merge process.
Microsoft has done just about everything they can to make performing mail merges on Word user-friendly. For example, all of the required mail merge steps listed in Figure 1-1 are laid out for you in Word’s mail merge helper.
Since you’re going to be working on mail merges this entire chapter, you may want to take a look at Table 1-1: Mail Merge Definitions. You will be seeing these terms frequently in the upcoming lessons, so you may as well become familiar with them.
Table 1-1: Mail Merge Definitions Term Definition Main Document A document that contains the information that is the same for each
merged document. The main document contains the field names for the variable information, like the names and addresses that will be inserted.
Data Source or Address List A document that contains the information, or records, to be inserted into the main document during a mail merge. For example, it has records containing the names and address of the people a mail merge letter is addressed to.
Data Field A field that stores a specific piece of information. For example, the field LastName would only contain people’s last names.
Record A record is an entire set of data fields that relate to a single thing or person. For example, a single record might include information in various fields about a person’s first and last names, address, phone number, and date of birth.
Merge Field A merge field is where you want to insert the information from a data source into a main document. Merge fields appear with chevrons («») around them. An example would be: Dear «FirstName».
Address Block A group of merge fields that make up the address block of a mail merge document. Word 2002 can automatically insert all the appropriate address fields at once, so that you don’t have to insert the five or six merge fields yourself.
Greeting Line A group of merge fields that make up the greeting line of a mail merge document, such as “Dear Mr. McDonald”. Word 2002 can automatically insert all the appropriate greeting text and fields at once, so that you don’t have to insert the text and required merge fields yourself.
Header Row Data source information is stored in a table. The first row of the table is the header row and contains the field names for the data source. For example, FirstName, LastName, Address.

8 Microsoft Word 2002
© 2001 CustomGuide, Inc.
Lesson 1-2: Selecting the Document Type
All mail merges in Word require two files: a main document and a data source. The main document contains the text that is the same in all of the merged documents. This text that never changes in a mail merge is sometimes called boilerplate text. The first step in the mail merge process is specifying which type of main document you want to create—and this lesson will walk you through this step. Let’s get started!
11.. Start a new blank document Microsoft Word. Let’s send this letter to all of North Shore Travel’s clients that have visited Canada in the past 2 years.
22.. Select Tools → Letters and Mailings → Mail Merge Wizard from the menu. The Mail Merge task pane appears, as shown in Figure 1-2. The Mail Merge Wizard walks you through the mail merge process and provides helpful instructions on performing a mail merge. First, specify which type of mail merge document you want to create. You have five choices: Letters, E-mail Messages, Envelopes, Labels, or Directories. See Table 1-2: Mail Merge Document Types for more information on each of the document types.
33.. Ensure that the Letters option is selected in the Mail Merge task pane. Letters are the default document type for a mail merge.
Figure 1-2
Word 2002’s new Mail Merge task pane steps you through the procedure of creating a mail merge.
Step 1: Select the Document Type
Specify the type of mail merge main document that you want to create.
Figure 1-2

Chapter One: Performing a Mail Merge 9
The Richard Stockton College of New Jersey
Quick Reference
To Specify a Mail Merge Document Type: 1. Select Tools → Letters
and Mailings → Mail Merge Wizard from the menu.
2. Select the document type in the Mail Merge task pane.
That’s all there is to specifying the document type for a mail merge. If it seems like this lesson is ending in midstream, you’re right—creating a Main Document is only the first step in performing a mail merge. We’ll walk through the rest of the steps in the next few lessons.
Table 1-2: Mail Merge Document Types Document Type Description Letters Each record is printed on a separate document.
E-mail messages Each e-mail is personalized for each record.
Envelopes Each record is printed on a single envelope.
Labels Each record is printed on a single label on a sheet of labels. Use labels when you want to create mailing labels, nametags, or filing labels.
Directory All the records in the data source are printed on a catalog single merged document. Any standard text you add to the main document is repeated for each set of data. Use directories as your Main Document when you want to create a membership directory, parts list, or similar document.

10 Microsoft Word 2002
© 2001 CustomGuide, Inc.
Lesson 1-3: Selecting the Starting Document
Once you have determined the type of main document you want to create, the next step in the mail merge process is specifying how you want to create the main document (or starting document, as it’s called in Word 2002). You have several options for setting up the main document. You can: • Use the current document: You can use any of your Word documents as a main
document. For example, you could open a letter to a client and delete any specific information in the document, such as the client’s name and address. If the current document is a new, blank document, you can create the main document from scratch as you would any other document.
• Start from a template: Create a main document by using a ready-made mail merge template that you can edit and customize to meet your needs.
• Start from an existing document: Open an existing mail merge document and make changes to the content and recipients as needed.
In this lesson, we’ll be using the first method—opening an existing document and using it as the main document.
11.. Click Next: Starting document at the bottom of the Mail Merge task pane. The next step of the Mail Merge Wizard appears in the task pane, as shown in Figure 1-3. For this exercise, we will open an existing document and use it as the starting document.
Figure 1-3
Word asks if you want to use the active document as the mail merge main document, or if you want to create a new document from scratch.
Figure 1-3
Step 2: Select the Starting Document
Select the main document, or starting document, that you want to use for your mail merge.

Chapter One: Performing a Mail Merge 11
The Richard Stockton College of New Jersey
Quick Reference
To Select the Starting Document: 1. Complete Step 1 of the
mail merge process: Selecting the document type.
2. Click Next: Starting document in the Mail Merge task pane.
3. Specify how you want to setup the starting document, or main document, you want to use in your mail merge.
4. Depending on your selection, you can do one of several things for the starting document:
• Use the current document: You will need to either create a new, blank document from scratch or open an existing document and edit it as needed.
• Start from a template: You will need to specify the template you want to use for your main document and edit it as needed.
• Start from an existing document: You will need to open the existing mail merge document and edit it as needed.
22.. Select the Start from existing document option from the Mail Merge task pane and click the Open button in the Mail Merge task pane.
33.. Open the file Lesson 8 and save it as Mail Merge Letter. You want to send this letter to all of North Shore Travel’s clients that have visited Canada in the past 2 years.
44.. Ensure the Use the current document option is selected in the Mail Merge task pane. This will use the current Mail Merge Letter document as the main document for our mail merge.
So much for step 2 of the mail merge process. Move on to the next lesson and we’ll start step 3.

12 Microsoft Word 2002
© 2001 CustomGuide, Inc.
Lesson 1-4: Selecting the Recipients
One thing that is unusual about mail merge is that the main document and the data source are saved in separate files. For example, the main document for a mail merge might be in file named Marketing Letter, while the data source for the mail merge might be in a file named Marketing Data. Creating a mail merge list or a data source is a little more difficult than creating the main document—but it’s still not very complicated.
11.. Click Next: Select recipients in the Mail Merge task pane. The next step of the Mail Merge Wizard appears in the task pane. You have several options for selecting the recipients of a mail merge. You can:
Figure 1-4
The Create Data Source dialog box
Figure 1-5
The Customize Address List dialog box
Field names used in the data source file. Word automatically adds common fields to a new data source unless you remove or rename them
Add a new field Delete the selected field Rename the selected field
Figure 1-5
Figure 1-4
Add a new record
Delete this record
Specify criteria to find a specific record
Use advanced options to filter and sort mail recipient records
Add, rename, or delete mail merge fields
Go to first record
Go to next record
Go to previous record
Go to last record
These are the fields that appear in the mail merge list or data source.
Step 3: Select the Recipients

Chapter One: Performing a Mail Merge 13
The Richard Stockton College of New Jersey
Quick Reference To Select the Recipients of a Mail Merge: 1. Complete Steps 1 and 2
of the mail merge process.
2. Click Next: Select recipients in the Mail Merge task pane.
3. Select from one of the following options in the Mail Merge task pane: • Use an existing list • Select from Outlook contacts • Type a new list …then continue by following the steps listed below.
To Revise the Field Names in the Address List: 1. In the Mail Merge task
pane, select Type a new list and click Create.
2. Click Customize to add, delete, and/or edit the default fields.
3. Select a field in the Field Name list and click Delete to delete a field.
4. Click Add and enter the new field. Repeat as necessary, until you have entered all the fields you need in the Field Name list.
• Use an existing list: If you’ve already created and saved a data source file for another mail merge, you can use that. You can also use a list saved in a Microsoft Access database, Excel worksheet, or a comma delimited text file.
• Select from Outlook contacts: If you use Microsoft Outlook, you can select the names and addresses from your Contacts List and use them as the data source for your mail merge.
• Type a new list: You can create a new data source from scratch by creating field names for each specific type of information you want to enter. For example, a field called LastName could be used to store people’s last names and a field called Address would store their addresses. Once you’ve entered the field names, you will have to enter the records—such as a list of names and addresses.
For this exercise, we will type a new list for the mail merge recipients. 22.. Click the Type a new list option, and click Create in the Mail Merge
task pane. The New Address List dialog box appears, as shown in Figure 1-4. The New Address List dialog box already has several common field names, such as First Name, Last Name, and Address. You can create your own field names, as well. Click the Customize button to add, edit, or change a field name.
33.. Click the Customize button. The Customize Address List dialog box appears, as shown in Figure 1-5. Here, you can add your own fields to the list, edit a field name, or delete a field.
44.. In the Field Names list, select Company Name, click Delete, and click Yes to confirm the deletion. The Company Name field is removed from the list and will not be used in the data source. Now remove the other fields you don’t need.
55.. Repeat Step 4 to remove the following field names: Address Line 2, Country, Home Phone, Work Phone, and E-mail Address. Now that you have removed all the unnecessary fields, try adding a field of your own.
66.. Click the Add button, type Travel Date, then click OK. The field “Travel Date” is added to the Field Names list. You’re done creating the Field Name list, so you can close the Customize Address List dialog box.
77.. Click OK. Now that you’ve customized the data source or address list, it’s time to enter the individual records. We’ll cover that topic in the next lesson.
88.. Leave the New Address List dialog box open and proceed to the next lesson when you’re ready.
Now that you know how to create a data source for a mail merge, turn the page to go on to the next step: Entering records to the data source.
14 Microsoft Word 2002
© 2001 CustomGuide, Inc.
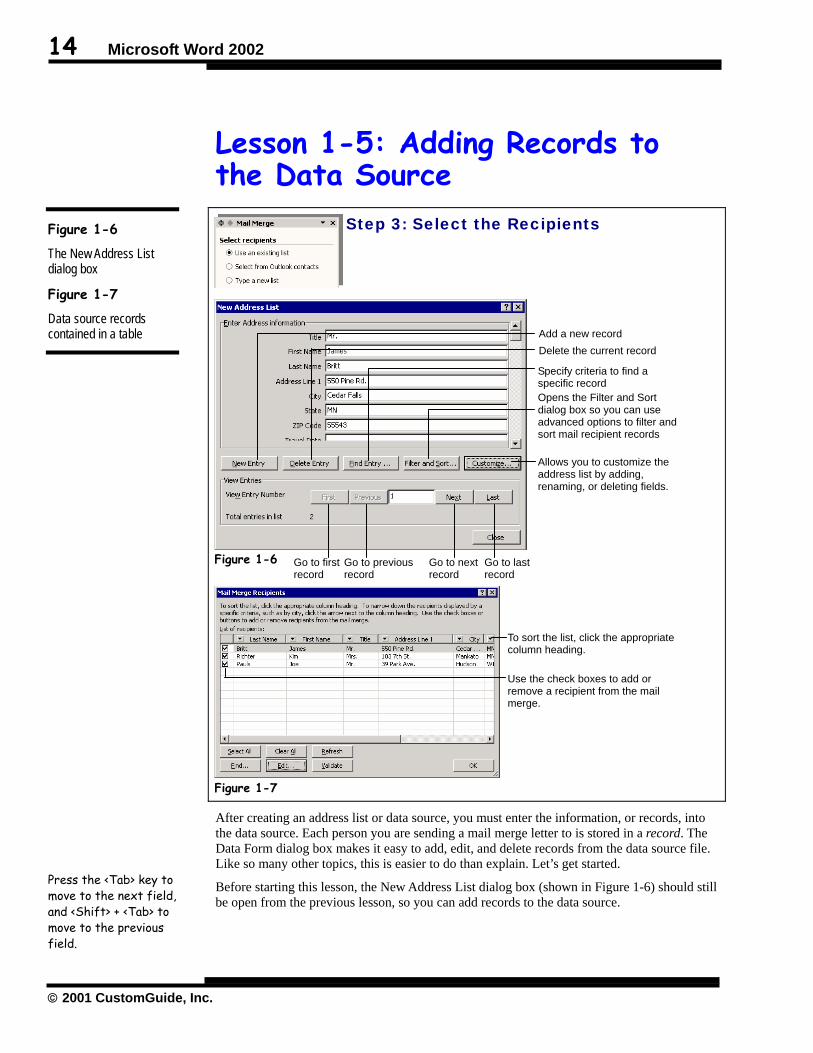
Lesson 1-5: Adding Records to the Data Source
After creating an address list or data source, you must enter the information, or records, into the data source. Each person you are sending a mail merge letter to is stored in a record. The Data Form dialog box makes it easy to add, edit, and delete records from the data source file. Like so many other topics, this is easier to do than explain. Let’s get started.
Before starting this lesson, the New Address List dialog box (shown in Figure 1-6) should still be open from the previous lesson, so you can add records to the data source.
Figure 1-6
The New Address List dialog box
Figure 1-7
Data source records contained in a table
Press the <Tab> key to move to the next field, and <Shift> + <Tab> to move to the previous field.
Step 3: Select the Recipients
Add a new record Delete the current record
Specify criteria to find a specific record Opens the Filter and Sort dialog box so you can use advanced options to filter and sort mail recipient records
Figure 1-6 Go to first record
Go to next record
Go to previous record
Go to last record
Allows you to customize the address list by adding, renaming, or deleting fields.
Figure 1-7
To sort the list, click the appropriate column heading.
Use the check boxes to add or remove a recipient from the mail merge.

Chapter One: Performing a Mail Merge 15
The Richard Stockton College of New Jersey
Quick Reference To Enter Records to the Data Source with the Data Form: 1. In the Mail Merge task
pane, select Type a new list and click Create.
• Press <Tab> to move to the next field and <Shift> + <Tab> to move to the previous field.
• Click New Entry to add a new record.
• Click Delete Entry to delete a record.
2. Click Close when you’re finished entering and/or modifying records.
3. Click the column heading you want to sort the address list by (optional).
4. Check or uncheck the check boxes to the left of recipients to add or remove a recipient from the mail merge (optional).
5. Click OK.
11.. Make sure the insertion point is in the Title field and type Mr., then press <Tab>. The text “Mr.” appears in the Title field and the insertion point moves to the next field, FirstName.
22.. Type James in the FirstName field and press <Tab>. Go ahead and add the rest of the record.
33.. Enter the following information in the fields: Title First Name Last Name Address Line 1 Mr. James Britt 550 Pine Rd.
City State Zip Code Travel Date Cedar Falls MN 55543 7/8/01
Remember to press <Tab>after each entry to move to the next field. Add a few more records to the data source.
44.. Click New Entry and enter the following records. Make sure you click New Entry after completing the data for the first record to add the next record.
Title First Name Last Name Address Line 1 Mrs. Mr.
Kim Joe
Richter Pauls
103 7th St. 39 Park Ave.
City State Zip Code Travel Date Mankato Hudson
MN WI
56001 55318
4/5/01 6/9/01
Don’t worry if your data source isn’t spaced the same as the illustration, or if the text you’re entering doesn’t fit on a single line—it only matters what the text says in the Data Source, not how it looks.
55.. Click Close after you’ve completed entering the records. The Save Address List dialog box appears. You must give your data source a name and save it.
66.. Type Mail Merge Letter Data in the File name box and click Save. Word saves the data source information in the Mail Merge Letter Data file and displays the Mail Merge Recipients dialog box, as shown in Figure 1-7. Here, you can sort the list in ascending or descending order by clicking the appropriate column heading.
77.. Click the Last Name column heading to sort the list by the Last Name. You can also include or exclude recipients from a mail merge by checking or unchecking the box next to their names.
88.. Uncheck the box next to the Joe Pauls recipient. Although Joe Pauls still appears in the address list, he no longer will be included in the mail merge.
99.. Click OK. The Mail Merge Recipients dialog box closes.
Although we added records to a new data source file in this lesson, you can follow the same procedures to edit an existing data source file.

16 Microsoft Word 2002
© 2001 CustomGuide, Inc.
Lesson 1-6: Writing Your Letter
Okay! You’ve created your main document, you’ve created your data source, and you’ve entered the records you want included in your main document. There’s just one more step before you’re ready to actually merge the records from your data source into your main document: you have to specify where you want to insert information into your main document. You do this by inserting merge fields.
11.. Click Next: Write your letter in the Mail Merge task pane. The next step of the Mail Merge Wizard appears in the task pane. At this point, you can make changes to your mail merge letter and specify which fields from the data source you want to include.
Figure 1-8
The Mail Merge toolbar
Figure 1-9
The Insert Address Block dialog box
Figure 1-10
The Insert Merge Field dialog box
Insert Address Block button
Select and insert special information fields
Displays the actual recipients instead of <<merge fields>>
Find Entry
Check for errors
Merge to a new document
Figure 1-8
Go to first record
Go to next record
Go to previous record
Go to last record
Current record number (if displayed)
Merge to the printer
Open the data source
Main document setup
Mail merge recipients
Insert address block
Insert greeting line
Insert merge fields
Highlight merge fields
Match fields
Propagate labels
Merge to e-mail
Merge to fax
Step 4: Write Your Letter
Figure 1-9
Figure 1-10
Select the address format you want to insert into your document.
This area displays a preview of the selected address format.

Chapter One: Performing a Mail Merge 17
The Richard Stockton College of New Jersey
Quick Reference To Insert an Address: 1. Place the insertion point
where you want to insert the address block.
2. Click the Address block option in the Mail Merge task pane.
3. Specify the format and elements you want to appear in the address and click OK.
To Insert a Greeting Line: 1. Place the insertion point
where you want to insert a merge field.
2. Click the Greeting line option in the Mail Merge task pane.
3. Specify what you want to appear in the greeting line and click OK.
To Insert Merge Fields into the Main Document: 1. Place the insertion point
where you want to insert a merge field.
2. Click the More items option on the Mail Merge task pane, select the field you want to insert, and click Insert.
22.. In the mail merge document, place the insertion point at the end of the May 1, 1998 date line and press <Enter> twice. This is where you will place the address block.
33.. Click the Address block option on the Mail Merge task pane. The Insert Address Block dialog box appears, as shown in Figure 1-9. Here, you can select which elements you want to include in the address block and how the address block is formatted.
44.. Select several of the address formats from the list and see how they appear in the preview area at the bottom of the dialog box. When you’re finished, select the Mr. Josh Randell Jr. format and click OK. The address block is inserted in the document. You may have noticed that chevrons surround the address block («»). The chevrons differentiate the merge fields from other text in the document.
55.. Press <Enter> twice. Next, we need to insert a greeting…
66.. Click the Greeting line option on the Mail Merge task pane. The Greeting Line dialog box appears. Here, you can specify the type of greeting to insert. For this lesson, we will accept the default settings.
77.. Click OK to accept and insert the default greeting option. Word inserts a greeting line into the document. Only one more merge field to go. Give your letter a more personal touch by adding the Travel Date in the letter.
88.. Place the insertion point immediately before the X in the sentence, beginning with Since you used North Shore Travel on X. This is where we will insert the Travel Date.
99.. Click the More Items option on the Mail Merge task pane. The Insert Merge Field dialog box appears, as shown in Figure 1-10. You simply have to select the field you want to add to your mail merge document, and click Insert.
1100.. Select Travel Date from the field list, click Insert, and click Close. The Travel Date field is inserted in the document.
1111.. Delete the X in the sentence and save your work.
Insert Merge Fields button
Insert Greeting
Line button

18 Microsoft Word 2002
© 2001 CustomGuide, Inc.
Lesson 1-7: Previewing a Mail Merge
Sometimes it is helpful to see what the data will look like once it has been inserted into a document, instead of only viewing the obscure merge field names.
11.. Click Next: Preview your letters in the Mail Merge task pane. The next step of the Mail Merge Wizard appears in the task pane, and the main document already shows a preview of the first record!
22.. Click the Next Record button in the Mail Merge task pane to display the next record. The next record in the data source is displayed. You can use the buttons to scroll through and preview all the recpients or records in your data source.
Figure 1-11
An example of how the record is converted into the letter.
Figure 1-12
A preview of the merged main document. <<First>> <<Last>>
<<Address>> <<City, State, Zip>> Dear <<First>>
Thanks for your wonderful graduation ift f <<Gift>> I
First Last AJoe Smith 2Sam Nelson FJill Peck 8Tracy Olden 3Brad Potts 2Jim Lewis 1
Joe Smith2014 Pleasant Ave. Chaska, MN 55437 Dear Joe,
Thank for your wonderful graduation gift of $25 I will use
Sam NelsonFar Pine Drive Chaska, MN 55437 Dear Sam,
Thanks for your wonderful graduation ift f $25 I ill
++ ==
Step 5: Preview the Mail Merge
Figure 1-12
Next Record button
Figure 1-11

Chapter One: Performing a Mail Merge 19
The Richard Stockton College of New Jersey
Quick Reference To View Merged Data in the Main Document’s Merge Fields: • Click Next: Preview your
letters in the Mail Merge task pane and click the
buttons to preview the records.
To Edit the Recipient List: • Click the Exclude
Recipient button in the Mail Merge task pane.
• Or… • Click the Edit recipient
list option in the Mail Merge task pane.
If you see a recipient who you don’t want to include in the mail merge, simply click the “Exclude this recipient” button in the task pane. Likewise, if the list is missing a recipient, click the “Edit recipient list” option in the task pane, and the Mail Merge Recipients dialog box appears.
In a way, this is the point of no return; this is the last time you can make changes to the mail merge before completing it. So, make sure you preview the records, and make sure the main document includes all the fields you need.
The next lesson covers what you’ve been waiting for—performing an actual mail merge.

20 Microsoft Word 2002
© 2001 CustomGuide, Inc.
Lesson 1-8: Complete a Merge
You’ve made it! This is the lesson where, after all your sweat and toil, you finally get to merge the information you entered from a data source into the main document.
For all the work that goes behind a mail merge, performing the actual mail merge takes only a second.
11.. Click Next: Complete the merge in the Mail Merge task pane. The final pane of the Mail Merge task pane offers two options: • Print: You can print out a merged main document for every record in the
recipient list. • Edit individual letters: Word creates a merged main document for every
record in the recipient list so you can edit the letter even more.
Figure 1-13 The Merge to New Document dialog box Figure 1-14
The merged records in the new document.
Merge to New Document button
Figure 1-13
Step 6: Complete the Merge
Figure 1-14

Chapter One: Performing a Mail Merge 21
The Richard Stockton College of New Jersey
Quick Reference
To Merge a Document: • Click on the option in the
Mail Merge task pane that is most suitable for the purposes of your mail merge.
Depending on the type of main document you choose in the first step, the final step, completing the merge, will offer different options. Refer to Table 1-3: Mail Merge Options for more information on the different options available in mail merge. For this lesson, we’ll edit individual letters.
22.. Click the Edit individual letters option on the Mail Merge task pane. The Merge to New Document dialog box appears. You can tell Word to merge all the records in your data source (except for those records that you excluded), to merge only the current record, or to merge the record numbers that you specify. For example, you could merge only records 5 to 10.
33.. Ensure All is selected and click OK. Word merges the main document “Mail Merge Letter” and the data source “Mail Merge Letter Data” into a new document called “Letters1.” The new merged document contains three letters—one letter for each record in the data source—that are separated with a page break.
44.. Move to the next page of the document to view the second letter. Notice that this letter uses data from the second record in the data source. If you want, go ahead and print the merged letter. Save the merged document.
55.. Click the Save button on the Standard toolbar. The Save As dialog box appears.
66.. In the File name box, type Merged Letter and click Save. Word saves all the merged letters in the document “Merged Letter.”
Congratulations! You’ve preformed your first mail merge—a task many people consider to be the most difficult procedure in word-processing.
Table 1-3: Mail Merge Options Option Description
Merge to New Document:
Merges the data source with the main document and places the results in a single, new document. Each record in the data source will appear on a separate page. You can then save the new merged document.
Merge to Printer:
Merges the data source with the main document and prints the results.
Merge to E-mail:
Merges the data source with the main document and sends each recipient an e-mail containing the text of the main document. One of the fields in your data source must contain the recipient’s e-mail address.
Merge to FAX: Merges the data source with the main document and faxes the results to your recipients. One of the fields in your data source must contain the recipient’s fax number.

22 Microsoft Word 2002
© 2001 CustomGuide, Inc.
Lesson 1-9: Creating and Working with Labels
So far we’ve been using the Mail Merge feature to create form letters, but you can also use it to create professional-looking mail labels or envelopes. Word can print on a variety of brand-name mailing labels—just make sure you know the product label (such as Avery 5150).
11.. If you don’t have the Mail Merge Letter document open, find and open Lesson 8B and save it as Mailing Labels. If the Mail Merge task pane isn’t already displayed, you will have to summon it in the next step.
22.. If necessary, select Tools → Letters and Mailings → Mail Merge Wizard from the menu to display the Mail Merge task pane. First of all, we need to change the type of mail merge document to labels—we have to start from the beginning of the mail merge process in order to do this.
33.. If necessary, click Previous at the bottom of the Mail Merge task pane until you reach Step 1: Select document type. Next, we have to tell Word that we want to use labels as the main mail merge document.
Figure 1-15
The Label Options dialog box
Figure 1-16
The merged label document
Mailing label
Figure 1-15
Select the type of label you want to use.
Change the dimensions of the label that is selected in the Product number list. If you change any settings in the Details dialog box, you modify the definition for that label. If you want to create a new, custom sized label, click New Label instead.
Select the type of printer you have.
Figure 1-16

Chapter One: Performing a Mail Merge 23
The Richard Stockton College of New Jersey
Quick Reference To Create Mailing Labels from a Mail Merge: 1. Display the Mail Merge
task pane by selecting Tools → Letters and Mailings → Mail Merge Wizard from the menu.
2. Click Change document layout and click Label options. Click Next.
3. Select the type of label you want to use and click OK. Click Next.
4. Locate the source of your records in Step 3: Select Recipients. Click Next.
5. Enter the text and/or merge fields you want to appear in your labels. Usually, you will want to click the Address Block option on the Mail Merge task pane.
6. Click the Update all labels button to copy the first label to the remaining labels.
7. Click Next to complete the merge, and choose to either print the labels, or edit them individually.
44.. Select the Labels option and click Next: Starting document in the Mail Merge task pane. Now, we need to set up the mailing labels.
55.. Select the Change document layout option and click Label options. The Label Options dialog box appears, as shown in Figure 1-15. Here you need to tell Word the exact type of label you are using. The default label, Avery standard, appears in the Label Product box. Select the product number for the label.
66.. In the Product number box, scroll to and click 5160 – Address, then click OK. A dialog box informs you that in order to change document types, Word must delete the contents of the current document.
77.. Click OK. Word deletes the contents of the original mail merge document and changes the mail merge document type to mailing labels.
88.. Click Next at the bottom of the Mail Merge task pane, and click the Use an existing list option. Click Next to reach Step 4: Arrange your labels. Now specify what you want to appear in your labels. Most the time, this will be a simple address block.
NOTE: If the Select Data Source dialog box appears in Step 3, choose the mail merge option from the dialog box.
99.. Ensure that the insertion point appears in the first mailing label and click the Address block option on the Mail Merge task pane. The Insert Address Block dialog box appears. Here, you can select which elements you want to include in the address block and how the address block is formatted. We will use the default address block format for this lesson.
1100.. Click OK to insert the selected address block. Word inserts an address block in the first label. You can copy the layout of the first label by clicking the Update all labels button.
1111.. Click the Update all labels button on the Mail Merge task pane. Word copies the address block field from the first label to the remaining labels on the page.
1122.. Click the Next: Preview your labels option on the Mail Merge task pane. The records from the data source appear as labels on the screen.
1133.. Click Next: Complete the merge option, and click the Edit individual labels option on the Mail Merge task pane. Click All, and click OK. Word merges the labels and the data source into a new document. The labels are arranged in a table, where each label appears in a separate cell, as shown in Figure 1-16.
1144.. Close the merged document and the source document without saving them.

24 Microsoft Word 2002
© 2001 CustomGuide, Inc.
Lesson 1-10: Using IF… THEN… ELSE Fields .
In addition to merge fields, you can insert fields into the main document to customize your mail merge documents even more. In this lesson, you’ll learn how to insert one of the most common fields: the IF…THEN…ELSE statement. An IF…THEN…ELSE field compares the information in the data source to a specific value. It then inserts one piece of text if the comparison is true, and another piece of text if the comparison is false.
You’ll probably want to skip this lesson unless you’re really into mail merges; most people will never really need to use it.
11.. Find and open Lesson 8B and save it as If-Then Merge. If necessary, select Tools → Letters and Mailings → Mail Merge Wizard from the menu to display the Mail Merge task pane. Let’s try inserting an If Then statement in this document.
22.. Place the insertion point on the blank line immediately after the last body paragraph in the letter and press <Enter>. This is where you want to insert the If…Then…Else… Word field.
Figure 1-17
The Insert Word Field: IF dialog box
Figure 1-18
You can use the If…Then…Else Word field in a mail merge.
Figure 1-17
Figure 1-18
Specify what you want to test for.
Insert this text if the test is true…
…otherwise insert this text.
…this text is inserted.
Since this field name is equal to “Mankato”…

Chapter One: Performing a Mail Merge 25
The Richard Stockton College of New Jersey
Quick Reference • Fields are used as
placeholders for data that might change in a document or mail merge.
To Insert a Field: • Select the field from the
Insert Word Field button on the Mail Merge toolbar.
To Insert an IF… THEN…ELSE Statement: 1. Click the Insert Word
Field button on the Mail Merge toolbar and select the If…Then…Else… option.
2. Select the Field name you want to use and enter the logical test using the Comparison and Compare to lists.
3. Enter the text if the logical test is true in the first text box and the text if the logical text is false in the second text box.
4. Click OK.
33.. Click the Insert Word Field button on the Mail Merge toolbar and select the If…Then…Else… option from the list. The Insert Word Field: IF dialog box appears, as shown in Figure 1-17. This is where Word will enter the text that meets the specific criteria.
44.. Select City from the Field Name box, verify that the Comparison text box says Equal to, and type Mankato in the Compare to box. Next, you need to type the text that will be inserted if a record’s city equals Mankato.
55.. In the Insert this text box, type: Also, it may interest you to know that North Shore Travel just opened a branch in Mankato last month at 1345 Park Glen Blvd. Suite #4. Now we can help you with all your travel arrangements locally.
If the specified condition isn’t met, you can insert a different block of text by typing it in the “Otherwise insert this” text box. If you leave the “Otherwise insert this” text box blank, Word won’t insert anything when the specified condition isn’t met.
66.. In the “Otherwise insert this” text box type Thank you for your business. This message will appear on records that are not from Mankato.
77.. Click OK and press <Enter> to add a blank paragraph beneath the Word field. Word inserts the If…Then…Else field. Now see how Word inserts the conditional text if a client is from Mankato.
88.. Click the View Merged Data button on the Mail Merge toolbar so that it is depressed. Click the Next Record button several times to view the different records in the data source. Notice how the message changes if the client is from the city of Mankato.
Table 1-4: Commonly Used Word Field Descriptions gives a brief description of some other Word Fields you might use when performing a mail merge.
Table 1-4: Commonly Used Word Field Descriptions Term Definition Ask… Prompts for information from the user as Word merges each data record with
the main document. The response is printed in the specific form letter.
If…Then…Else… Prints information only if a specified condition is met
Merge Record # Prints the number of the merged data record in the merged document
Merge Sequence # Counts the number of data records that were successfully merged with the main document
Next Record Instructs Word to merge the next data record into the current resulting merged document, rather than starting a new merged document. Often used with labels and catalogs
Next Record If… Compares two expressions. If the comparison is true, Word merges the next data record into the current merge document.
Inserting a Word
Field

26 Microsoft Word 2002
© 2001 CustomGuide, Inc.
Lesson 1-11: Using an Existing Data Source
If you have a database that contains the information that you want to use for a mail merge document, you don’t have to retype all that existing information into a new data source—Word can use many different types of databases as data sources for a mail merge main document. Word can use Microsoft Access, dBase, FoxPro, Excel, and text file databases as data sources. Using a database created with an external program may sound complicated, but actually it’s almost as easy as working with the data sources you’ve already created.
11.. If you don’t have the Mail Merge Letter document open, find and open Lesson 8B. If the Mail Merge task pane isn’t already displayed, you will have to summon it by following the next step.
22.. If necessary, select Tools → Letters and Mailings → Mail Merge Wizard from the menu to display the Mail Merge task pane. First of all, we need to select the recipients—we have to go to Step 3 of the mail merge process in order to do this.
33.. Navigate through the Mail Merge task pane until you reach Step 3: Select recipients. Now you need to open the existing data source, a Microsoft Access database.
Figure 1-19
A Microsoft Access database in the Select Data Source dialog box
Figure 1-20
The Select Table dialog box
Figure 1-19
Figure 1-20

Chapter One: Performing a Mail Merge 27
The Richard Stockton College of New Jersey
Quick Reference To Use an Existing Data Source in a Mail Merge: 1. Make sure the Mail Merge
Helper dialog box is open—if not select Tools → Mail Merge from the menu.
2. Under the Data Source section, click Get Data and select Open Data Source.
3. Select the file you want to use as a data source.
• If the data source is a relational database you will need to select the table that contains the data you want to use.
Quick Reference To Use an Existing Data Source: 1. Display the Mail Merge
task pane by selecting Tools → Letters and Mailings → Mail Merge Wizard from the menu.
2. Click Previous at the bottom of the Mail Merge task pane until you reach Step 3: Select recipients.
3. In the Open Data Source dialog box, click the Files of type list arrow, and select the type of database you want to use. Click OK.
4. Click Next at the bottom of the Mail Merge task pane until you reach Step 6: Complete the merge, and choose the option that is most appropriate for your needs.
44.. In the Mail Merge task pane, select the Use an existing list option and click Select a different list. The Open Data Source dialog box appears.
55.. Click the Files of type list arrow, and then select Access Databases. Only Microsoft Access database files now appear in the Select Data Source dialog box.
66.. Navigate to your practice folder, find and select the Canada Tourists file, and click Open. A Microsoft Access dialog box appears that shows the names of the tables in the database, as shown in Figure 1-20. Information is stored in tables within a database. You need to specify what table contains the data you want to use. If you’re not sure of which table contains the information you want, speak to someone who is knowledgeable about the database.
77.. Since the table you want, Clients, is selected, you can click OK. Click Next in the Mail Merge task pane until you reach Step 6: Complete the merge. The Microsoft Access database is attached to the main document, Mail Merge Letter. You are returned to the Mail Merge task pane.
88.. Click the Edit individual documents option on the Mail Merge task pane. The Merge to New Document dialog box appears.
99.. Ensure that All is selected and click OK. Word merges the main document and the Microsoft Access database information into a new document.
1100.. Close the merged document and the source document without saving them.
That’s all there is to using an existing database as a data source for a mail merge—it’s not much different from working with a data source created in Word. Word can import information from the following types of files, as long as you have the right conversion files installed:
Table 1-5: Types of Data Sources Data File Notes Spreadsheet Files Microsoft Excel Lotus 1-2-3
You will need to specify the cell range or the entire file
Database Files dBase Fox Pro Microsoft Access Microsoft Outlook
If the database contains more than one table, you will have to select the table you want to use.
Word Processing Files Microsoft Word WordPerfect
Records must be stored in a table or in a tab-delimited list.
Text Files Must be a tab or comma delimited text file

28 Microsoft Word 2002
© 2001 CustomGuide, Inc.
Chapter One Review
Lesson Summary
An Overview of the Mail Merge Process • Performing a Mail Merge is a Six Step Process:
Step 1: Select the Document Type Select the type of document you want to create. You can create letters, e-mails, envelopes, labels, and directories.
Step 2: Select a Starting Document The main document contains the text that is the same in all of the merged documents. You can create a new main document or use any existing document as the main document.
Step 3: Select the Recipients All mail merges require two files—the main document file and the data source file. The data source file is the list of names or information you want to appear on the main document. You can create a new data source, use an existing data source, or even use a database as the data source.
Step 4: Write Your Document Write and/or edit the main document and specify where you want to insert the information from your data source into your main document.
Step 5: Preview Your Document Preview how your main document will appear when combined with the information in the data source.
Step 6: Complete the Merge Merge the data from the data source into the merge fields in the main document, creating a unique individual document for each record in the data source.
Step 1: Select the Document Type • Mail merges can be created in five different document types: Letters, E-mail messages, Envelopes,
Labels, Directory. Select the type that is best suited for your needs.
Step 2: Select a Starting Document • To Select the Starting Document: Complete Step 1 of the mail merge process: Selecting the
document type. Click Next: Starting document in the Mail Merge task pane. Specify how you want to setup the starting document, or main document, you want to use in your mail merge. Depending on your selection, you can do one of several things for the starting document:
• Use the current document: You will need to either create a new, blank document from scratch or open an existing document and edit it as needed.
• Start from a template: You will need to specify the template you want to use for your main document and edit it as needed.
• Start from an existing document: You will need to open the existing mail merge document and edit it as needed.

Chapter One: Performing a Mail Merge 29
The Richard Stockton College of New Jersey
Step 3: Select the Recipients • To Select the Recipients of a Mail Merge: Complete Steps 1 and 2 of the mail merge process.
Click Next: Select recipients in the Mail Merge task pane. Select from one of the following options in the Mail Merge task pane: • Use an existing list • Select from Outlook contacts • Type a new list …then continue by following the steps listed below.
• To Revise the Field Names in the Address List: In the Mail Merge task pane, select Type a new list and click Create. Click Customize to add, delete, and/or edit the default fields. Select a field in the Field Name list and click Delete to delete a field. Click Add and enter the new field. Repeat as necessary, until you have entered all the fields you need in the Field Name list.
Step 4: Write Your Document • To Insert an Address: Place the insertion point where you want to insert the address block. Click
the Address block option in the Mail Merge task pane. Specify the format and elements you want to appear in the address and click OK.
• To Insert a Greeting Line: Place the insertion point where you want to insert a merge field. Click the Greeting line option in the Mail Merge task pane. Specify what you want to appear in the greeting line and click OK.
• To Insert Merge Fields into the Main Document: Place the insertion point where you want to insert a merge field. Click the More items option on the Mail Merge task pane, select the field you want to insert, and click Insert.
Step 5: Preview Your Document • To View Merged Data in the Main Document’s Merge Fields: Click Next: Preview your letters
in the Mail Merge task pane and click the buttons to preview the records. • To Edit the Recipient List: Click the Exclude Recipient button in the Mail Merge task pane. Or,
click the Edit recipient list option in the Mail Merge task pane.
Step 6: Complete the Merge • To Merge a Document: Click on the option in the Mail Merge task pane that is most suitable for
the purposes of your mail merge.
• You can merge information directly to the printer or to a new document.
• Printer: Click the Printer option on the Mail Merge task pane.
• Edit individual document: Click the Edit individual document on the Mail Merge task pane.
Creating and Working with Labels • To Create Mailing Labels: Display the Mail Merge task pane by selecting Tools → Letters and
Mailings → Mail Merge Wizard from the menu. Click Change document layout and click the Label option. Click Next. Select the type of label you want to use and click OK. Click Next. Locate the source of your records in Step 3: Select Recipients. Click Next. Enter the text and/or merge fields you want to appear in your labels. Usually, you will want to click the Address Block option on the Mail Merge task pane. Click the Update all labels button to copy the first label to the remaining labels. Click Next to complete the merge, and choose to either print the labels, or edit them individually.

30 Microsoft Word 2002
© 2001 CustomGuide, Inc.
Using IF… THEN… ELSE Fields • To Insert a Field: Select the field from the Insert Word Field button on the Mail Merge toolbar.
Fields are used as placeholders for data that might change in a document or mail merge.
• An IF field prints information only if a specified condition is met. For example, adding a company line if a record contains a company field, and skipping the company line if a record does not contain a company field.
• To Insert an IF… THEN…ELSE Statement: Click the Insert Word Field button on the Mail Merge toolbar and select the If…Then…Else… option. Select the Field name you want to use and enter the logical test using the Comparison and Compare to lists. Enter the text if the logical test is true in the first text box and the text if the logical text is false in the second text box and click OK.
Using an Existing Data Source • You can use Word documents, Microsoft Access databases, Excel Worksheets, and other
database files as the mail merge data source.
• To Use an Existing Data Source in a Mail Merge: Display the Mail Merge task pane by selecting Tools → Letters and Mailings → Mail Merge Wizard from the menu. Click Previous at the bottom of the Mail Merge task pane until you reach Step 3: Select recipients. In the Open Data Source dialog box, click the Files of type list arrow, and select the type of database you want to use. Click OK. Click Next at the bottom of the Mail Merge task pane until you reach Step 6: Complete the merge, and choose the option that is most appropriate for your needs.
• If the data source is a relational database, you will need to select the table that contains the data you want to use.
Quiz 1. To perform a mail merge you need to either create or open these two files:
A. A main document and a data source. B. A main document and a merge document. C. A mail merge form and a merge document. D. A data source and a merge field source.
2. You can convert an existing document to a Main Document for mail merge. (True or False?)
3. What file contains the information, or records, to be inserted in a mail merge? A. The main document. B. The data source. C. The merge document. D. The data field.
4. You can open the Mail Merge task pane by: (Select all that apply)
A. Selecting Table → Mail Merge Helper from the menu. B. Clicking the Mail Merge Helper button on the Standard toolbar. C. Selecting Tools → Letters and Mailings → Mail Merge Wizard from the menu. D. Clicking the Mail Merge Helper button on the Mail Merge toolbar.

Chapter One: Performing a Mail Merge 31
The Richard Stockton College of New Jersey
5. Which of the following is NOT a type of document that you can create using mail merge? A. Form letters. B. Envelopes. C. Web pages. D. Directories.
6. You can specify which records you want to include in a mail merge by clicking the Query Options button in the Mail Merge task pane. (True or False?)
7. Word saves the records for a data source file in:
A. A comma delimited text format. B. A tab delimited text format. C. A rich text file format. D. A table.
8. You want to add several more addresses to a data source. To do this: (Select all that apply.) A. Click the Add Record button on the Mail Merge toolbar. B. Select Tools → Letters and Mailings → Mail Merge Wizard from the menu and click
Edit Data Source. C. Select Tools → Mail Merge → Add Records from the menu. D. Open the data source document and add the record.
9. Instead of confusing Merge Fields, you want to see the actual records that will appear in the main document. How can you do this?
A. You can’t. B. Select Tools → Mail Merge from the menu and click View Records. C. Select Tools → Mail Merge → View Records from the menu. D. Click the View Merged Data button on the Mail Merge toolbar.
10. When you perform a mail merge, you can directly send the results to: (Select all that apply.)
A. A printer. B. A Microsoft Access database. C. A Microsoft Excel spreadsheet. D. A new document.
11. Which of the following files can you use for the data source for a mail merge? (Select all that apply.)
A. A Microsoft Access database. B. A Microsoft Excel spreadsheet. C. A Microsoft Word document. D. A comma delimited text file.
Homework 1. Open the document “Homework 8” and save it as “Cover Letter.”
2. Select Tools → Letters and Mailings → Mail Merge Wizard from the menu.

32 Microsoft Word 2002
© 2001 CustomGuide, Inc.
3. Select Letters and click Next: Starting document.
4. Select Use the current document and click Next: Select recipients.
5. Enter the following records: Name Company Address City State PostalCode Product
Ms. Cleary McDonald's McDonald's Plaza Oak Brook IL 60521 hamburgers Mr. Olson Wrigley's 410 N. Michigan
Avenue Chicago IL 60611 gum
Mr. Edwards Ford 8031 Ford Parkway Detroit MI 49001 automobiles Mr. Jones Camel 501 Brookdale
Plaza Tulsa OK 74102 cigarettes
Click Close when you’re finished, save the data source as Cover Letter Data, and don’t specify any sorting options.
6. Click Next: Write your letter.
7. Return to the Main document and enter the field codes as shown:
John Lerner 9051 Hiawatha Avenue Minneapolis, MN 55417 (Date Field) <<Name>> <<Company>> <<Address>> <<City>>, <<State>> <<PostalCode>> Dear <<Name>>: It’s true—I love <<Product>>. I have always loved <<Product>> and, darn it, I always will love <<Product>>! There is nothing in the world better than several <<Company>> <<Product>>. Nothing. Congratulations on an absolutely superb product! Since I was very young, <<Product>> has always been a very important part of my life. My family didn’t have a lot of money when I was growing up, so, like so many other ambitious young boys, I took a job delivering papers. Payday was every Friday, and I would diligently put 50% of my earnings in the bank for my future college fund, faithfully give 10% to the local church, and the remaining 40% was used for… Can you guess? <<Product>>!! Every other week I would bike downtown and spend my hard-earned money on my life’s passion—<<Product>>! It is for this reason, after four years of college (with a 4.0 GPA) that I am delighted to submit my résumé to <<Company>> corporation. Are you currently hiring? I am would be ecstatic to work in any upper management position. I am confident that my life-long enthusiasm and dedication to <<Product>> will make me an invaluable asset to <<Company>> corporation. I look forward to your reply. A most loyal fan of <<Company>> and <<Product>>,
John Lerner
Make sure you delete the document’s existing prompt text (i.e. COMPANY and PRODUCT).
8. Click Next: Preview your letters when you have finished adding the field codes to your letter.
9. Click Next: Complete the merge and merge the document to individual documents.
10. Exit Microsoft Word.

Chapter One: Performing a Mail Merge 33
The Richard Stockton College of New Jersey
Quiz Answers 1. A. You need a main document and a data source to perform a mail merge.
2. True. You can convert any existing document into a Main document.
3. B. The data source contains the records used in a mail merge.
4. C.
5. C.
6. False.
7. D. Word saves the records for a data source file in a table.
8. D.
9. D. Click the View Merged Data button on the Mail Merge toolbar to view the actual records that will be included in the mail merge.
10. A and D.
11. A, B, C, and D. You can use any of these files as the data source for a mail merge.