Color Guide - Woodworking Plans & Tools | Fine Woodworking Project
Upload
hoangthuanCategory
view
221download
1
WOODWORKING SAFETY MANUAL
AND TEST
Woodworking Manufacturing Technologies Department (WMT)
Cerritos College Norwalk, California
August 2017

This page is blank

Table of Contents
WOOD LAB SAFETY MANUAL ......................................................................................... 1
INTRODUCTION ................................................................................................................................ 1
TECHNICAL STANDARDS .................................................................................................. 3
SAFETY POLICIES ............................................................................................................... 9
WMT S1: GENERAL LAB SAFETY ................................................................................................. 9
WMT S2: TABLE SAW ..................................................................................................................... 12
WMT S3: JOINTER ........................................................................................................................... 16
WMT S4: PLANER ............................................................................................................................ 18
WMT S5: RADIAL ARM SAW ........................................................................................................ 20
WMT S6: MITER SAW ..................................................................................................................... 22
WMT S7: BAND SAW ....................................................................................................................... 24
WMT S8: DRILL PRESS .................................................................................................................. 26
WMT S9: HAND-HELD ROUTER .................................................................................................. 28
WMT S10: ROUTER TABLE ........................................................................................................... 30
WMT S11: DISC and DISC/BELT (COMBINATION) SANDER ................................................ 31
WMT S12: OSCILLATING SPINDLE SANDER ........................................................................... 32
WMT S13: HORIZONTAL SLOT MORTISER ............................................................................. 33
WMT S14: HOLLOW CHISEL MORTISER ................................................................................. 34
WMT S15: 15” WIDE BELT SANDER ........................................................................................... 36
WMT S16: EDGE SANDER .............................................................................................................. 37
WMT S17: PNEUMATIC NAIL GUNS and STAPLERS .............................................................. 38
WMT S18: SHAPER .......................................................................................................................... 39
WMT S19: HORIZONTAL BORING MACHINE ......................................................................... 41
WMT S20: VERTICAL PANEL SAW ............................................................................................. 42
WMT S21: SLIDING PANEL SAW ................................................................................................. 44
WMT S22: POCKET-HOLE MACHINE ........................................................................................ 46
WMT S23: 32mm LINE BORING MACHINE ............................................................................... 47
WMT S24: HINGE BORING MACHINE ....................................................................................... 48
WMT S25: CNC MACHINES ........................................................................................................... 49
WMT S26: LATHE ............................................................................................................................ 50
GLOSSARY ........................................................................................................................... 53
WOOD LAB SAFETY EXAM ............................................................................................. 57

This page is blank
1
WOOD LAB SAFETY MANUAL
INTRODUCTION Hand tools and power-driven machine tools have been developed to save time and perform accurate, repeatable work. Hand and power tools consistently perform the same operation hundreds of times if they are properly used, cared for, and understood. In nearly all cases, mistakes and/or injuries are due to operator error, not the machine. Whether the tools are helpful or harmful depends on you. A study made by the National Safety Council on school lab accidents show that more accidents happen Saturday before noon than any other time and day of the week, except days just before or following vacations. Of course, this does not mean you can relax your safety habits during other days. In addition, the most dangerous school lab is the wood lab. In the wood lab, the tools that are involved in most accidents are listed below (the most dangerous in each category is listed first): HAND TOOLS POWER TOOLS 1. Chisels 1. Shaper 7. Grinder 2. Saws 2. Table Saw 8. Sander (Disc) 3. Knives 3. Jointer 9. Band Saw 4. Planes 4. Radial Arm Saw 10. Jig Saw 5. Hammers 5. Wood Lathe 11. Drill Press 6. Miter Saw 12. Planer GENERAL CAUSES OF ACCIDENTS 1. Ignorance 2. Carelessness 3. Lack of judgment 4. Rushing a job 5. Making too heavy a cut 6. Overconfidence 7. Talking while working 8. Inadequately guarded machinery 9. Using a dull tool 10. Using an improperly set or adjusted tool
11. Fatigue 12. Using the wrong material 13. Absent-mindedness 14. Working in a disorderly lab 15. Improper position of feet and body while
working on a machine 16. Improper clothing 17. Using unsafe material (with checks, knots,
etc.) 18. Eyestrain
SPECIFIC CAUSES OF ACCIDENTS 1. Startling a person while he or she is working at a machine 2. Crowding or hurrying a person at a machine 3. Failing to stop machinery for adjustments 4. Not replacing a guard after it has been removed

2
5. Moving or dropping fingers into moving parts of cutters 6. Failing to stop machinery for measurements 7. Students not starting and stopping their own machines 8. Operating machinery without receiving instruction on its proper use 9. Operating machinery while the instructor is out of the room 10. Showing off while operating machinery 11. Using the wrong machine for a given procedure A NOTE ABOUT THIS MANUAL 1. The term “instructor” in this manual means the class instructor or the instructional aide.
2. The term “special setup” is a machine operation which exposes the operator to greater than average risk; a special setup requires instructor or aide approval prior to operating the machine.

3
TECHNICAL STANDARDS

4

5

6
7

8
This page is blank

9
SAFETY POLICIES WMT S1: GENERAL LAB SAFETY 1. In any level of the woodworking program, you are under no obligation to use power tools
or machinery. Hand tool operations can be substituted for any and/or all machine operations.
2. Wear safety glasses and/or a face shield at all times in the lab to prevent flying particles or corrosive substances from entering your eyes.
3. All work to be done in the lab must have the instructor’s approval.
4. The instructor must approve all special setups before any machine is turned on.
5. All accidents and injuries, no matter how slight, must be reported to the instructor immediately.
6. If you feel ill or are on any medication that may affect your ability to operate machinery, inform your instructor.
7. With the exception of special, instructor-approved special setups, only the operator may start and stop a machine. After the machine is turned off, he or she should control the material and stand by until the machine has come to a complete stop.
8. Wear safe clothing when working in the lab. Fasten or remove loose clothing before you operate any machine. Roll long sleeves above the elbows. Apron fastenings should be made such that they will break if the apron becomes entangled in a machine.
9. Long, loose hair can easily be caught in revolving machinery and ripped out, causing serious scalp laceration. Your hair must be tied back or tightly covered when working with machines.
10. Wearing gloves is forbidden while working with machines within the wood lab. Gloves hinder your dexterity and may get caught in moving machinery.
11. Before operating machinery remove jewelry (bracelets, rings, chains, and beads) and other accessories that, in the judgment of the instructor, may be hazardous.
12. Keep machine guards in proper position at all times, unless the instructor has approved their removal for a special setup.
13. Report all breakage or damage to tools or machinery to the instructor immediately.
14. Overloading or forcing any machine is dangerous and is not permitted.
15. Use only material furnished or approved by your instructor.
16. Keep rags away from machines that are in operation.
17. Rags that have absorbed any amount of linseed oil, solvents, or oil-based finishing products must be disposed of in an approved covered metal container as a precaution against spontaneous combustion.
18. Hang nothing on fire extinguishers. The area around them should be kept clear so that they may be reached without delay if fire breaks out.

10
19. If a machine makes an unusual sound, is out of adjustment, or is in need of repair, shut off the power at the machine and report it to your instructor immediately. Only machines in good repair may be operated.
20. Never talk to or distract a student using a machine; likewise, do not allow your attention to be diverted while you are using a machine. Such distractions can cause the operator to make serious mistakes and may lead to injuries.
21. Machines must come to a full stop with the power turned off before cleaning or adjusting.
22. If you see oil, grease, or any other liquid on the floor, wipe it up immediately; you may prevent someone from slipping.
23. Floors, aisles, and passageways should be kept clear of pieces of wood, tools, and materials. Objects on the floor may cause someone to slip or fall.
24. Do not use used materials of any kind in any milling process. They may contain metal or other particles that could cause injury or damage machines.
25. Do not use green or treated lumber in any milling process.
26. Always sweep scraps from your workbench or table with a brush or piece of wood rather than with your hands, as there may be sharp or jagged particles among the scraps.
27. Always carry long objects, such as metal rods and long boards, with the front-end high enough to avoid striking someone.
28. Report to your instructor any odor of gas in the room. Gas fumes may make you ill or cause an explosion.
29. All portable electric tools and appliances must be disconnected when not in use, making adjustments, when inserting cutters or bits, or when changing sandpaper.
30. When unplugging an electric tool, pull on the plug instead of the cord.
31. Be sure your hands are dry before touching electrical switches, plugs, or receptacles. If your hands are wet, you may receive a severe shock and serious burns.
32. If it is necessary to use an extension cord, ensure that it lies flat on the floor.
33. When using air under pressure, make sure the air stream is not directed toward you or any other person.
34. Use the proper tool for the job.
35. It is good safety practice to be courteous and considerate of others.
36. If you have prescription eyeglasses, wear them; eyestrain is a frequent cause of accidents.
37. Notify the instructor if a violation of safety instructions is observed. You may save yourself or someone else from serious injury.
38. If you are in doubt about the use of any tool or machine, or about any lab procedure, ask your instructor for help.

11
39. Sharp tools are safest: use them whenever possible. Dull tools are dangerous because they are hard to control and require excess pressure by the operator.
40. CO2 extinguishers should be used on gasoline fires and most chemical and electrical fires. Use water, not CO² extinguishers, on wood or wood product fires.
41. Sharp edges or points of tools should be directed down and/or away from the body.
42. Students must be instructed in the correct and safe use of any machine before they can operate that machine.
43. Do not lift anything in the lab that is too heavy for you; seek help. Use more personnel or employ mechanical help such as a lever, dolly, jack, forklift, wheels, or rollers.
44. When lifting, keep your back straight and lift with your legs. Do not strain yourself; injury can occur easily.
45. Vises or other work-holding devices should not be overtightened. Use only enough force to hold the workpiece.
46. Bench vises not in use should be left loose with the handle in a vertical orientation. This will prevent injury to those walking past the workbench.
47. The following tools are never to be used by students without direct instructor supervision: • Portable circular saw • 52” wide belt sander • Shaper • CNC machines • Laser cutter/engraver
12
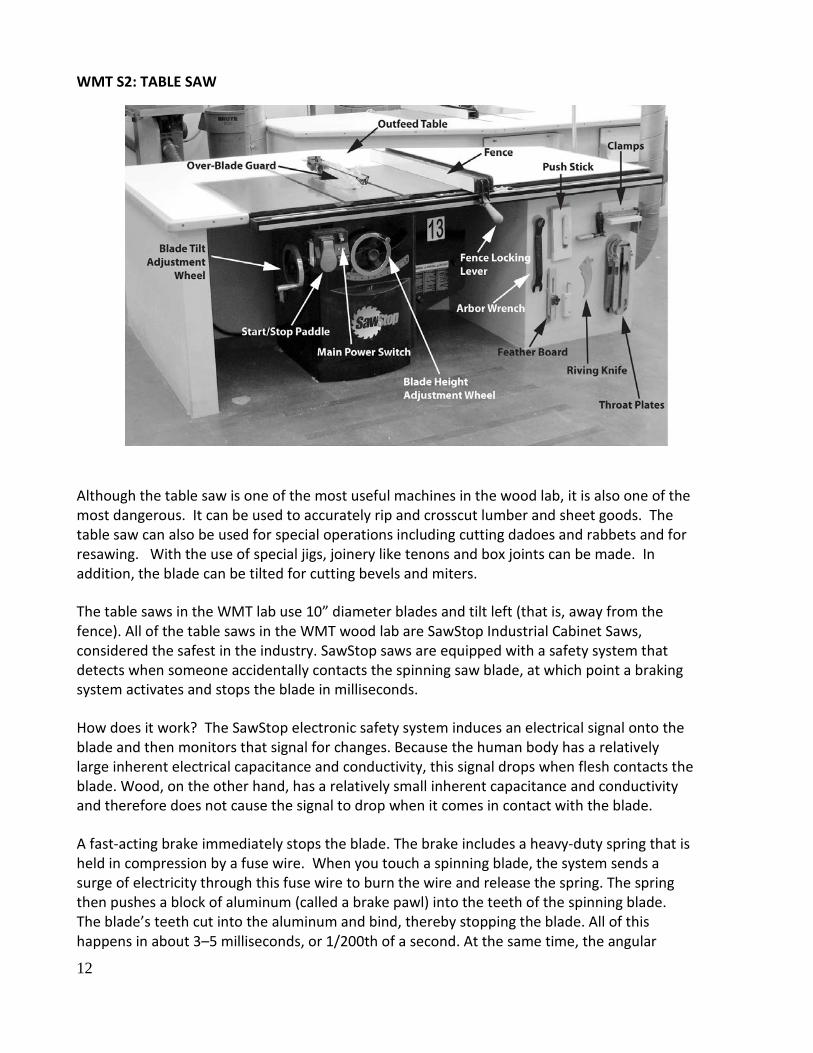
WMT S2: TABLE SAW
Although the table saw is one of the most useful machines in the wood lab, it is also one of the most dangerous. It can be used to accurately rip and crosscut lumber and sheet goods. The table saw can also be used for special operations including cutting dadoes and rabbets and for resawing. With the use of special jigs, joinery like tenons and box joints can be made. In addition, the blade can be tilted for cutting bevels and miters.
The table saws in the WMT lab use 10” diameter blades and tilt left (that is, away from the fence). All of the table saws in the WMT wood lab are SawStop Industrial Cabinet Saws, considered the safest in the industry. SawStop saws are equipped with a safety system that detects when someone accidentally contacts the spinning saw blade, at which point a braking system activates and stops the blade in milliseconds.
How does it work? The SawStop electronic safety system induces an electrical signal onto the blade and then monitors that signal for changes. Because the human body has a relatively large inherent electrical capacitance and conductivity, this signal drops when flesh contacts the blade. Wood, on the other hand, has a relatively small inherent capacitance and conductivity and therefore does not cause the signal to drop when it comes in contact with the blade.
A fast-acting brake immediately stops the blade. The brake includes a heavy-duty spring that is held in compression by a fuse wire. When you touch a spinning blade, the system sends a surge of electricity through this fuse wire to burn the wire and release the spring. The spring then pushes a block of aluminum (called a brake pawl) into the teeth of the spinning blade. The blade’s teeth cut into the aluminum and bind, thereby stopping the blade. All of this happens in about 3–5 milliseconds, or 1/200th of a second. At the same time, the angular

13
momentum of the blade causes the blade to retract below the table and the power to the motor is shut off.
Both the standard brake cartridges and the dado brake cartridges are single-use components that must be replaced if the brake is ever activated. Changing a brake cartridge is fast and easy—no more complicated than changing the blade. The brake cartridge must be installed properly, approximately 1/8” away from the blade, and should be checked by the Instructor.
The SawStop has a built-in MAIN POWER SWITCH. When you flip the switch on, red and green lights flash for approximately 20 seconds as the system runs through a safety check. When the red light turns off and the green light remains on, the saw is ready. If the green light does not come on, then something is wrong. Typical issues are an open access door, improperly installed or adjusted cartridge, or the cartridge locking pin is not set.
To start the blade, pull the red START/STOP PADDLE at the bottom. Push it in to stop the saw; the saw can also be turned off by gently bumping the paddle with your knee.
Do not use the table saw until you have been through the WMT table saw safety presentation and are personally checked out in its use by your instructor. You must be checked out each semester regardless of whether you have been checked out earlier. 1. The number one cause of injuries on the table saw is kickback. Kickback occurs when the
operator loses control of the material being cut and it is thrown from the machine with great force.
2. When cutting, the saw blade should project ¼ - ⅜” above the stock or enough to clear the common gullets.
3. The fence is used to guide ripping operations. The miter gauge or sled is used to guide crosscut operations. Always hold the work firmly against the fence, sled, or miter gauge.
4. During a rip cut, once the material has moved away from your left hand, move your left off the table. Do not drag your hand across the table and never reach over the blade.
5. You must use a push stick when ripping pieces that are 6” or less in width.
6. Cutting workpieces shorter than 10” in length is a special setup; get permission from the instructor or aide prior to cutting.
7. Performing on-edge resawing is a special setup. You must get specific instruction and special permission from your instructor. The resaw fence should be used when resawing material wider than the height of the rip fence.
8. When ripping stock, the piece between the fence and blade must be controlled and pushed past the blade and riving knife all the way off the throat plate. Failure to do so may result in a kickback.
9. When you are ripping stock, the scrap must fall to the outside (non-bound side) of the blade (not between the blade and fence).

14
10. Lowering stock directly down over the saw blade is dangerous and is never allowed.
11. Procedures involving raising the blade into the work are special setups. Permission and instructions must be obtained from your instructor prior to performing this type of work.
12. The riving knife must always be in place behind the blade except when the instructor has authorized its removal for special set-ups.
13. The over-arm saw guard is available if deemed necessary for a particular operation. The over-arm guards are stored near or on each saw.
14. Make adjustments or measurements at the blade only when the power switch is off and the blade is at a complete stop.
15. The main power switch should be placed in the off position when you leave the saw.
16. Freehand cutting, ripping, or crosscutting without using the fence, sled, or miter gauge is ABSOLUTELY FORBIDDEN in all circumstances.
17. Do not reach or pass wood over the saw blade any time the blade is spinning.
18. When helping someone to tail-off (supporting the work hanging off the back of the saw table), your only purpose is to support the stock from below. Only the operator pushes the stock through the saw.
19. Make sure the blade is stopped and completely lowered when clearing scraps from the table.
20. The instructor must approve all special setups and dado blade installations before the power is turned on.
21. Use a special setup with V-block or sled when cutting cylindrical stock to help keep it from spinning.
22. If you need to stop the saw in the middle of a cut, stop what you are doing without moving your hands and turn off the saw by gently bumping the red START/STOP PADDLE with your knee.
23. Backing the stock away from the blade while the saw is running is forbidden. If it is necessary to remove a workpiece, always stop the saw first.
24. The piece between the blade and the fence or a stop must always be under the operator’s control. If uncontrolled, it can bind and cause a serious kickback.
25. If the fence is used at the same time as the miter gauge, the miter gauge must be between the fence and the blade. This is a special setup.
26. When you are crosscutting a number of pieces to the same length using the miter gauge, clamp a clearance block to the rip fence well ahead of the saw blade to prevent the cut piece from being pinched between the blade and fence.
27. Stock edges or faces that contact the table, miter gauge or fence, must be straight and flat.
28. Seek assistance and direction from your instructor before milling materials with defects such as splits, warps and knots.

15
29. Changing the saw blade for non-standard operations is a special setup. After installing any blade, the brake cartridge must be installed properly and adjusted approximately 3/32 - 1/8” away from the blade, and checked by the instructor.
30. Using the dado set is a special setup. The dado blades and dado brake cartridge must be installed and properly adjusted. If the dado stack is over ½” thick, the arbor washer should not be used.

16
WMT S3: JOINTER
The jointer is primarily used for flattening the face of a board and straightening and squaring the edges of a board. In special circumstances, it may also be used for rabbeting, beveling and tapering. The stock is placed on the infeed table and pushed, with the aid of a pushstick or pushblock, over the cutterhead and onto the outfeed table. The fence is used to help guide the stock. The length of the cutterhead, which defines the size of a jointer, indicates the widest board that can be surfaced. 1. Ensure that the guard is over the knives at all times while the jointer is being operated.
2. The most stable side of the stock should be toward the table, often it is the most concave face.
3. Adjust the depth of cut before turning on the power. For most cuts, the jointer should be set for 1/32”.
4. The maximum depth of cut is 1/16”.
5. The minimum length of stock for jointing is 14”.
6. Keep all body parts at least 6” from the cutterhead. Never place your hand directly on the piece being jointed within 6” of the cutterhead.
7. Use a pushstick or pushblock when face-jointing flat pieces of stock or for edge-jointing any piece lower than the height of the fence.
8. Never joint the face of stock less than ¼” thick.
9. Push the stock clear of the cutterhead and make sure the guard has returned over the throat and knives before picking up stock.
10. To avoid rocking of the stock during cutting, always place the concave or most stable side of the stock on the table.

17
11. The outfeed table must be at the same level as the knives and is NEVER to be adjusted by a student.
12. Never joint end grain. It is a dangerous practice, especially on narrow pieces, and the jointer tends to splinter the work at the end of the cut.
13. Examine stock for loose knots and splits and avoid cutting these if possible.
14. Operations involving “stop cuts” or “drop cuts” require that the stock be held in place by a stop or clamp. The instructor must approve these special setups.
15. Never attempt to run a piece of wood across the jointer until the machine is running at full speed.
16. Your instructor must check special setups on the jointer for special operations such as rabbeting, beveling, chamfering, or tapering.
17. Use only clean, dry lumber on the jointer.
18. On stock that is severely warped, rough rip using the band saw to make the material narrower and/or rough crosscut using the radial arm saw to make the material shorter. This eliminates much of the warp. Then joint the faces as usual.
19. Material must be pushed through the jointer and never pulled.
18
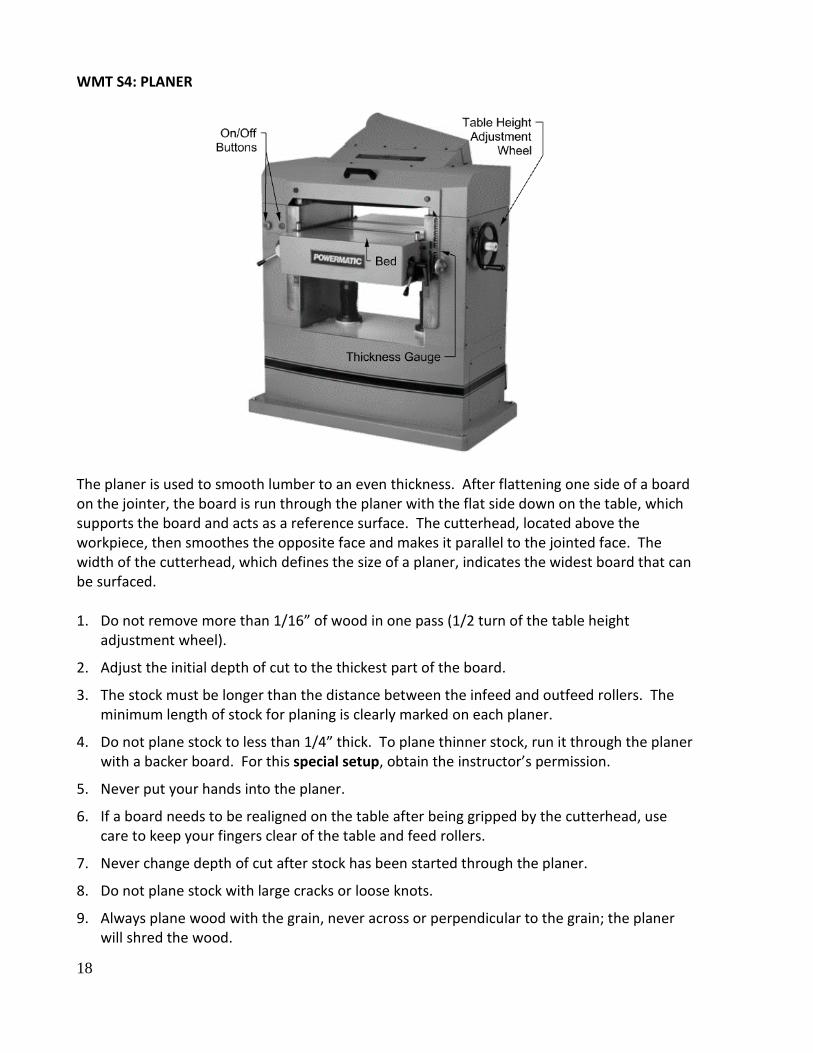
WMT S4: PLANER
The planer is used to smooth lumber to an even thickness. After flattening one side of a board on the jointer, the board is run through the planer with the flat side down on the table, which supports the board and acts as a reference surface. The cutterhead, located above the workpiece, then smoothes the opposite face and makes it parallel to the jointed face. The width of the cutterhead, which defines the size of a planer, indicates the widest board that can be surfaced. 1. Do not remove more than 1/16” of wood in one pass (1/2 turn of the table height
adjustment wheel).
2. Adjust the initial depth of cut to the thickest part of the board.
3. The stock must be longer than the distance between the infeed and outfeed rollers. The minimum length of stock for planing is clearly marked on each planer.
4. Do not plane stock to less than 1/4” thick. To plane thinner stock, run it through the planer with a backer board. For this special setup, obtain the instructor’s permission.
5. Never put your hands into the planer.
6. If a board needs to be realigned on the table after being gripped by the cutterhead, use care to keep your fingers clear of the table and feed rollers.
7. Never change depth of cut after stock has been started through the planer.
8. Do not plane stock with large cracks or loose knots.
9. Always plane wood with the grain, never across or perpendicular to the grain; the planer will shred the wood.

19
10. Always ensure that the machine has reached full speed before inserting the wood in the machine.
11. Plane pieces of varying thickness in progressive order, starting with the thickest first.
12. Because of the possibility of flying particles, do not look into the planer while the machine is running. Stand in an upright position and to one side while you are operating this machine.
13. The maximum length of stock which can be surfaced or planed is limited only by the location of walls and other equipment surrounding the planer.
14. A planer will produce two flat, parallel faces only when the surface which was put on the table was flat and smooth to begin with. Planing a warped board will only produce a warped board of even thickness.
15. Kickbacks are infrequent but possible on a planer.
16. Only the instructor may adjust the speed of the planer’s feed rollers.
17. If the stock gets stuck in the planer, do the following, in this order:
a. Gently push the stock into the planer; do not overly force the material. b. If that doesn’t work, shift the stock at a slight angle while keeping your fingers clear
of the table. c. If that doesn’t work, lower the table 1/8 turn of the adjustment wheel and repeat
steps a and b until the stock starts feeding again. If the stock still will not proceed through the planer repeat steps a, b, and c until the stock starts feeding again. Do not turn the wheel more than 1/8 turn at a time; the feed rollers could lose contact with the stock and a kickback could occur.
d. Note: Do not turn the power off while stock is in the planer; you could damage the cutterhead.

20
WMT S5: RADIAL ARM SAW
The radial arm saw is used to cut lumber to rough length. It consists of a trunnion assembly, which includes the motor, bracket, and blade, and a cantilevered support arm. The trunnion assembly rolls on bearings along the support arm. The wood remains stationary on the table against a fence and the trunnion assembly is pulled towards the operator. Due to the nature of the machine, it is typically not very accurate, but does an excellent job for rough work. It is possible to raise, lower, and rotate the support arm and to rotate the trunnion assembly for certain operations, but those operations are forbidden in the WMT lab.
1. When making a cut on the saw, hold the stock firmly against the fence.
2. Maintain a minimum safe distance of 6” between the line of the blade and your fingers and hands.
3. Never hold the stock being cut with your thumb sticking out along the edge of the board.
4. Make sure there is no gap between the stock and the fence at the cut line. A gap can usually be avoided by turning the board over.
5. Use your upper body to control the speed of the cut by keeping your arm relatively straight and rotating at the waist. Using only your arm makes it difficult to control the saw.
6. Do not force the saw into the material any faster than it can cut with ease. Because of the direction of rotation of the saw blade, it has a tendency to “climb” into the wood. Control the rate of cut.

21
7. When cutting thicker stock, make sure the blade clears the back, upper corner of the stock prior to cutting. A spacer block between the stock and fence may be necessary to ensure this. This is a special setup.
8. Because it is hard to hold two or more pieces securely at the same time, cut only one piece at a time.
9. Use the saw for rough crosscutting only and never for ripping.
10. Do not use the saw for cutting short lengths of stock; your hands could be drawn into the blade. Minimum length is 12”.
11. Use extreme care in cutting warped stock since there is a tendency for the kerf to close and pinch the blade in this type of defect. To avoid this difficulty, make a partial cut, back the saw out of the cut, and start again. This process should be repeated as long as a tendency to bind is observed.
12. Let the blade reach full speed before making a cut.
13. Always return the saw to the rear of the support arm after completing a cut. Never remove stock from the table until the saw has been returned.
14. Any unusual noise or vibration should be brought to the immediate attention of your instructor. A noise or vibration could be caused by a blade with the wrong size arbor hole and/or a blade which is out of round.

22
WMT S6: MITER SAW
The miter or chop saw is the best tool in the lab for accurately crosscutting surfaced lumber to length. It is extremely useful for making all cuts from 90° to ±45°. The miter saw is one of the most dangerous machines in the lab. Use care in its operation. 1. Keep protective guards in place at all times.
2. Remove scraps and other foreign items from the machine before operating the saw.
3. Make sure the piece to be cut is firmly against the table and fence before cutting.
4. Allow the blade to reach full speed before cutting.
5. Do not force the tool into the work.
6. Never hold the piece to be cut in a manner that causes your arms to cross. The majority of all cuts are made on the miter saw with the material held with the left hand on the left side of the saw while the right hand operates the machine.
7. Do not leave the area of the machine until the blade has come to a full and complete stop.
8. Always maintain a 6” margin of safety between all body parts and the blade.
9. Remove chips, scraps and cutoffs only after the blade is at a complete stop.
10. After placing the stock securely on the saw table and aligning the cut, pull the trigger. After the blade comes to full speed, lower the blade into the work at a moderate speed. When the cut is complete release the trigger and allow the blade to come to a complete stop before returning it to the upright position.

23
11. Use a stick or other hold down device when needed to secure short material without putting your hand in danger.
12. The workpiece should be held in place, rather than the off-fall, by the operator for all cuts.
13. NEVER use the chop saw to cut rough material.

24
WMT S7: BAND SAW
The band saw is almost indispensable for making curved cuts and resawing (cutting wood to make it thinner). The blade is a thin loop of steel, typically ¼ to ½ inch wide. The blade runs over wheels above and below a table, allowing wood to be cut where blade is traveling downward through the table. The size of a band saw is determined by the diameter of the wheels, which roughly indicates the largest piece that can fit between the blade and the body of the saw. The band saw is the fastest cutting saw in the woodworking lab. It is a rough cutting and shaping tool not intended for finish cuts. 1. Adjust the upper guide and guard to about ¼” above the stock with the machine at a full
stop. 2. Allow the saw to reach full speed before starting to feed your work. 3. Plan cuts carefully; lay out and make relief cuts before cutting long curves and curves of
small radii. Turning holes should be made where required. Plan work so that all cuts will be made in the forward direction.
4. If the stock binds or pinches the blade, do not attempt to back the stock out. Shut the power off and remove the stock after the machine stops. Backing the material out while the machine is running could pull the blade off the wheels.
5. When removing scrap material from the band saw table, always be aware of the blade. Use a piece of scrap stock to remove scrap pieces; do not use your hands.

25
6. Keep the floor areas surrounding the saw clear of scraps. 7. If the blade breaks, stand clear and shut off the power if possible. Keep others clear until
the machine stops completely and notify the instructor. 8. Never make adjustments to the saw while it is running. 9. Do not place your fingers close to the saw blade when cutting stock. Always maintain a
4” margin of safety. 10. If it is necessary to back the material out of a long cut, turn the power off and wait for
the blade to stop. Seek assistance from the instructor if the material does not freely come out.
11. To stop the band saw make sure the power is off then apply gentle pressure on the brake pedal until the blade stops. Leave the machine only after the blade has stopped moving completely.
12. Your instructor should approve all resawing and other special setups. 13. Use a pushstick when resawing. 14. When resawing, the edge of the stock on the table must be straight and the face of the
stock against the resaw fence must be flat. 15. Keep upper and lower doors closed and all guards in place. 16. Use a pushstick or guide for cuts that would place your hands near the saw blade. 17. Cutting cylindrical or irregular stock on the band saw may be done only with a special jig,
such as a V-block (special setup). 18. Never stand or allow others to stand to the right of the band saw when it is running. 19. If you hear a clicking noise, turn off the saw at once. This indicates a crack or kink in the
blade as it passes through the guide.

26
WMT S8: DRILL PRESS
The drill press is an excellent machine for drilling accurate holes and is invaluable when drilling large holes. It consists of a motor/head assembly, chuck, and work table. Any uses other than drilling holes are special setups and must be approved by the instructor. 1. The procedure of changing spindle speed varies from drill press to drill press. Check with
your instructor prior to making speed adjustments.
2. Be certain that the table and head of the drill press are secure.
3. Select the proper drill bit for the job and avoid dull bits.
4. Insert the drill bit in the chuck properly and tighten it securely before starting the drill press.
5. Remove the chuck key before turning on the power and before leaving the area of the drill press. If the chuck key is not removed it will be thrown out from the chuck at a tremendous speed when the power is turned on.
6. Use clamps or a drill vise whenever necessary to secure small or odd shaped work firmly.
7. Larger bits should be run at slower speeds and smaller bits at higher speeds. This keeps the cutting edge of the bit at a reasonable speed.

27
8. Use a backer board under the work or be sure the bit is over the center hole in the table when boring completely through your work.
9. Keep hands away from the rotating spindle.
10. Operate the feed lever so that drill cuts at a consistent feed rate into work.
11. Ease up on feed pressure when the bit begins to break through the work.
12. Back the bit out often to clear chips from the hole.
13. When boring to a given depth, use the depth adjustment nut or feature.
14. Stop the drill press before removing your work.
15. If work comes loose and is seized by the drill press, shut off the power immediately if you can do so without endangering yourself. If it is impossible to shut off the power, move away from the machine and move others away. Notify the instructor immediately.

28
WMT S9: HAND-HELD ROUTER
The router is a simple, relatively safe, portable electric tool. It is extremely versatile; its use is limited only by the imagination of the operator. The router consists mainly of two parts; a motor with a collet mounted on one end of the motor shaft and a base which holds the motor. A bit or cutter is mounted in the collet and protrudes below the surface of the base to do the cutting. The depth of the cut can be adjusted by moving the motor up or down inside the base and locking it at the desired depth setting. Routers run at speeds up to about 22,000 rpm. There are two basic types of routers, fixed-base and plunge. With a fixed base router, the motor is adjusted in the base for a given depth of cut and locked in place. With a plunge router, the motor can be slid up and down within the base while the motor is running. 1. Use only bits that are specially designed for operation in high speed routers.
2. Always unplug the router before changing bits or making adjustments other than the depth of cut.
3. Do not bottom out the shank of the router bit in the collet. When possible, insert the bit to its maximum depth, and then withdraw it about 1/8” before tightening the collet.
4. Make sure the bit is firmly secured in the collet before starting work. A loose bit will work its way out of the collet, damaging your work and/or injuring you.
5. Make sure the router motor is tight in the router base before power is turned on.
6. When starting the router, make sure the bit is not in contact with anything and the base is down on the material to be cut.
7. Do not start routers while holding them up in the air.

29
8. Hold the router firmly when turning on the power to withstand the starting torque of the router motor.
9. Keep hands and loose clothing away from revolving bits and cutters.
10. Operate the router in the proper direction. If only one side of the bit is being used, move the work against cutter rotation. If the bit is cutting on both sides, feed the router so that the bit pushes the work towards the fence (when applicable).
11. Use slower speeds for larger bits.
12. Do not overload or bog down the speed of the motor.
13. Several light cuts are better than one heavy cut.
14. Always make sure the bit is sharp; if unsure, check with the instructor.
15. Always secure or clamp the work so that it cannot move during routing.
16. When using multi-piece router bits, ensure all nuts and bearings are tightened properly.
17. Large panel-cutting bits should not be used in a hand-held router.
18. Due to the physics of routing, dados and rabbets in solid wood are best achieved using a table saw. Dados and rabbets in manufactured material such as plywood, particle board, and MDF are better achieved using a router.
Router bit
Router direction
Workpiece surface
30
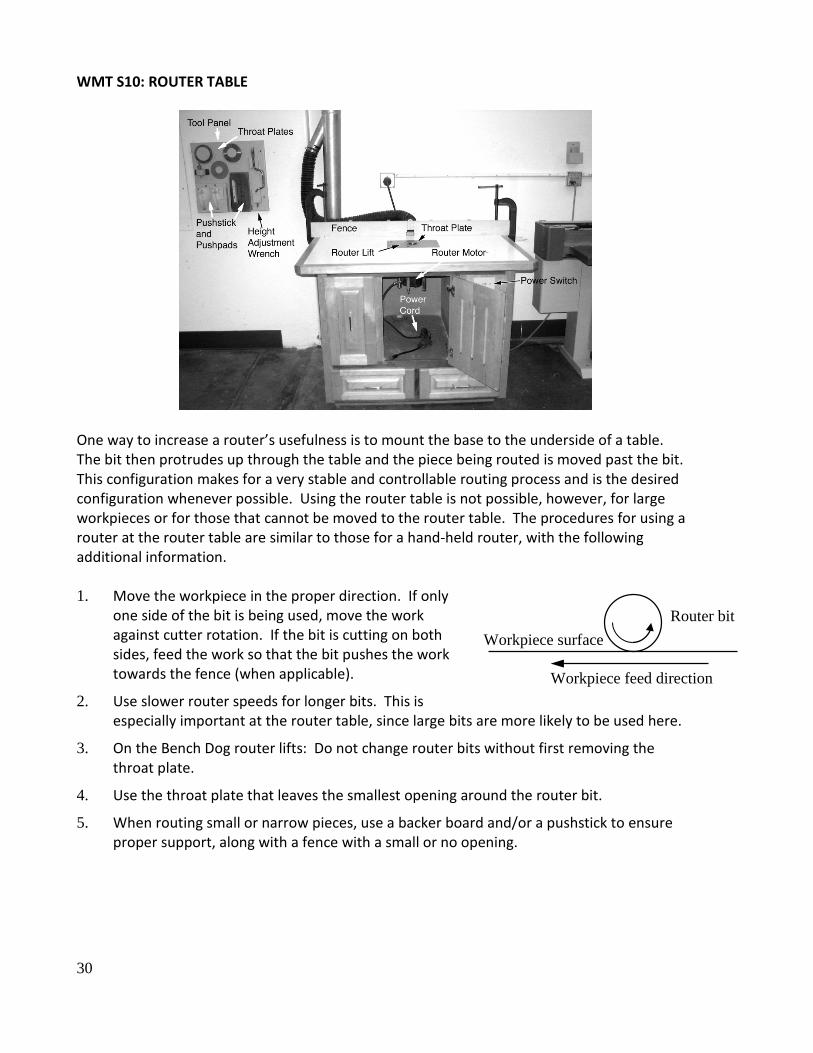
WMT S10: ROUTER TABLE
One way to increase a router’s usefulness is to mount the base to the underside of a table. The bit then protrudes up through the table and the piece being routed is moved past the bit. This configuration makes for a very stable and controllable routing process and is the desired configuration whenever possible. Using the router table is not possible, however, for large workpieces or for those that cannot be moved to the router table. The procedures for using a router at the router table are similar to those for a hand-held router, with the following additional information. 1. Move the workpiece in the proper direction. If only
one side of the bit is being used, move the work against cutter rotation. If the bit is cutting on both sides, feed the work so that the bit pushes the work towards the fence (when applicable).
2. Use slower router speeds for longer bits. This is especially important at the router table, since large bits are more likely to be used here.
3. On the Bench Dog router lifts: Do not change router bits without first removing the throat plate.
4. Use the throat plate that leaves the smallest opening around the router bit.
5. When routing small or narrow pieces, use a backer board and/or a pushstick to ensure proper support, along with a fence with a small or no opening.
Router bit
Workpiece feed direction
Workpiece surface

31
WMT S11: DISC and DISC/BELT (COMBINATION) SANDER
The disc sander consists of a reference table and a circular plate mounted to a motor shaft. A cloth or paper-backed abrasive disc is cemented to the plate. The diameter of the disc indicates the size of the machine, commonly 12”. The combination sander includes a vertical belt sander as part of the machine. 1. Hold the work securely.
2. On the disc sander, always sand on the downward-traveling side of the disc.
3. Do not sand stock that puts your fingers within 2” of the abrasive.
4. Apply moderate pressure to the stock against the abrasive and keep it moving. Excessive pressure can overheat and damage the abrasive.
5. Keep the stock moving to avoid overheating the abrasive material.
6. Be sure the work is held firmly against the table.
7. Use the disc/belt sanders only for sanding straight edges or outside (convex) curves.
8. Do not use the sanders for joinery, squaring stock, or other similar applications.
9. On the disc sander, make sure the disc is secured properly. Notify the instructor if the disc is loose or worn.
10. On the belt sander, make sure the belt is tracking properly. Notify the instructor if the belt is loose or worn.

32
WMT S12: OSCILLATING SPINDLE SANDER
The spindle sander is used to sand inside (concave) curves. The spindle rotates while simultaneously oscillating up and down. This helps keep the abrasive from loading up and overheating, which would happen if the spindle did not move up and down. Various spindle sizes can be used on the machine to accommodate different work radii. 1. Always use the largest spindle possible for the radius being sanded. Using a smaller
spindle makes it more difficult to get a smooth curve, takes longer, and results in excessive abrasive wear.
2. Always feed against or into the direction of the spindle rotation.
3. Avoid excessive pressure on the spindle. Too much pressure generates heat and will quickly damage the abrasive.
4. Use the throat plate that leaves the smallest opening around the spindle.
5. Hand-tighten the spindles only. Do not use wrenches to tighten spindles; this can result in the spindle becoming stuck in the collet.
6. Every component of the spindle sander has a home on the tool rack. Do not leave spindles, throat plates, or wrenches lying around; return them to their proper location in the tool rack.
7. Notify the instructor if the spindle abrasives are excessively worn.
Spindle Wood
Direction of feed

33
WMT S13: HORIZONTAL SLOT MORTISER
The slot mortiser is used for making slots or mortises. It is made up of a horizontally mounted motor/chuck assembly and an adjustable table. The table can be moved vertically and horizontally and the motor can be moved in and out relative to the base, making the mortiser very versatile for machining mortises. 1. The space between the pneumatic hold-down and the stock must not exceed ¼” prior to
the pneumatics being actuated. This will help avoid placing your fingers under the hold-down when it is operated.
2. Do not bottom out the shank of the bit in the chuck. When possible, insert the bit to its maximum depth, and then withdraw it about 1/8” before tightening the chuck.
3. Ensure the chuck is tightened and the chuck key is removed before turning on the machine.
4. Never leave the chuck key in the machine when you leave. If left in the chuck it can be thrown out from the chuck at a tremendous speed when the power is turned on.
5. Take light cuts, no more than 1/8” at a time.
6. Move the table at a reasonable speed when cutting; do not overfeed. Excessive speed will result in chattering, excessive wear on the cutter, and a poor cut. Listen for unusual noises and feel for excess vibration.

34
WMT S14: HOLLOW CHISEL MORTISER
The hollow chisel mortiser is uniquely capable of making a square hole. It does so by forcing a hollow, four-sided chisel into the wood, and removing the encircled waste with a special drill bit. Due to the forces involved, a lot of heat is generated. Setup of this machine is critical; improper positioning of the chisel and bit can ruin the tool or the workpiece. 1. You must be checked out on this machine before using it. Check with the instructor or
aide for detailed instructions prior to using the hollow chisel mortiser.
2. Ensure the chisel and drill bit are sharp prior to installation.
3. The bit should be positioned about .020” below the chisel. This is approximately the thickness of a non-flexible 6” scale, or a dime. The spacing can be accomplished by installing the chisel with a .020” spacer between the chisel shoulder and the upper bushing. Then, install the drill bit with the bit tight against the mouth of the chisel; tighten the chuck. Remove the .020” spacer, slide the chisel up tight against the bushing,

35
and tighten with the appropriate wrench. Ensure the chisel is square to the fence when it is tightened.
4. When the machine is turned on, some squeaking is normal. It is caused by the bit rubbing against the chisel. If the noise is excessive, check your setup.
5. If using the depth stop or other stops, make sure lock bolts are securely tightened.
6. Ensure the work is securely clamped in place.
7. Always use a backer board to prevent damage to the bit and minimize tearout on through mortises.
8. Do not cut more than about 1/2" deep at a time. Deeper cuts may result in the chisel getting stuck in the workpiece. If a deeper cut is desired, make a 1/2" cut, move the workpiece over and make an overlapping cut of greater depth. Continue this back-and-forth process until the desired depth is achieved.
9. Harder woods will require shallower cuts and greater care in drilling.
10. Do not apply excessive force. If excessive force is required, check your setup and/or have the instructor check it.

36
WMT S15: 15” WIDE BELT SANDER
Wide belt sanders excel at smoothing lumber. A planer can be used for the same purpose, but planers can cause tearout on difficult grain. A wide belt sander will never cause tearout. Special precautions must be taken with the wide belt sander, however, as the machine is not as robust as a planer. 1. You must be checked out on this machine before using it. Check with the instructor or
aide for detailed instructions prior to using the sander.
2. The wide belt sander is for finish smoothing only. It should not be used for removing more than 1/16” of material TOTAL, by making several light passes through the sander. Each pass should be about the thickness of a notebook paper. If you must remove more than 1/16” of material, use the planer first.
3. Before use, check to ensure the compressed air valve is on and the thickness setting is correct.
4. Adjust the depth of cut only 1/16 of a turn of the table height adjuster at a time.

37
WMT S16: EDGE SANDER
The edge sander is basically a large belt sander laid on its side. It is extremely useful for sanding long edges like face frames and frame-and-panel doors. Care must be taken to use it correctly, as abuse can ruin the belt, destroy your work, and injure you. Like the disc sander, it is a relatively safe machine, but can result in painfully skinned fingers if the operator is not careful. 1. The edge sander is used for sanding edge grain only, never face or end grain.
2. Make adjustments only when the sander is at a complete stop.
3. Keep fingers away from the abrasive surface of the sander. Touching the moving abrasive will cause injury.
4. Maintain a 4” margin of safety at all times.
5. Move material against the direction of belt travel.
6. Avoid excessive pressure on the belt. Too much pressure generates heat and will quickly damage the belt or cause a kickback.
7. When sanding thin edges, lift the front end to sand the work at a diagonal. This will distribute the heat load across the belt instead of concentrating it along one small strip.
8. Hold the work being sanded with your hands close to the belt, but no closer than 4”. Holding the work too far back gives you less control and can result in the leading edge digging into the belt, causing a kickback.
9. If the belt is loose, notify the instructor. A loose belt will allow a wave to develop at the leading edge of the part, resulting in deformation of the part and increased likelihood of tearing the belt.
10. Do not sand pieces shorter than 10” long without the permission of the instructor.
11. When possible, make a pencil mark on the edge to be sanded, and then sand to, or parallel to, the mark. This helps you avoid sanding too much on one or the other end.

38
WMT S17: PNEUMATIC NAIL GUNS and STAPLERS
Pneumatic nail guns and staplers are compressed-air-operated devices used to drive nails or staples quickly and efficiently. They also increase accuracy over using a hammer, since the gun does not require pounding on the workpiece. Nail guns and staplers are made in a variety of sizes. In the Cerritos wood lab, finish nailers, brad nailers, and several varieties of staplers are available. Each shoots a specific diameter of nail or width of staple in a range of lengths. Operating a nail gun or stapler requires the user to press the gun against the workpiece, thereby depressing the nose guard. The gun is then actuated by pulling the trigger. 1. Safety glasses must be worn when operating a nail gun or stapler.
2. Always point the nail gun or stapler away from any person or body parts.
3. Except when ready to actuate the nail gun or stapler, keep your finger off the trigger.
4. Always disconnect the air supply when loading or unloading the magazine, or when making adjustments.
5. Ensure the nose guard is working properly, and if it is not, report the problem to the instructor.
6. When operating the nail gun or stapler, make sure your hand or other body parts are not in front of or to the side of the fastener’s path. Nails have been especially known to hit hard objects, like knots or difficult grain, and shoot out the side of a workpiece.
7. Use extra caution when driving a fastener close to an edge to prevent the fastener from splitting the work, flying away, or hitting your hand.
8. Do not attempt to angle a nail or staple into the work surface more than about 10°; more than that may cause the fastener to ricochet off the work.
9. Pull the trigger lightly. A heavy pull may result in the gun driving two nails.
10. Before loading or unloading nails into the magazine, make sure the magazine is completely empty, then load the fasteners. Failure to do so may result in misfire, damage to the tool, or a fastener too long for the job.

39
WMT S18: SHAPER
THIS IS A SPECIAL SETUP MACHINE; instructor approval is required
for all operations.
The shaper is designed to quickly and efficiently produce moldings and other shapes. It is like a large, high-powered, table-mounted router. The spindle speed can be varied from 2000 to 10,000 rpm and is reversible. Cutter heads can be stacked to produce a variety of shapes.
The shaper can, if all safety procedures are not carefully followed, become the most dangerous machine in the lab. Proper setup and use is essential. Always remember that a shaper is only as safe as its operator! 1. Do not turn on the shaper without direct permission from your instructor. Never run the
shaper unless your instructor is present and/or has specifically authorized you to proceed.
2. Whenever making any adjustments, unplug the shaper.
3. Before starting the shaper be sure to check the following: a. No foreign matter on the table b. No spindle damage c. No spindle nut damage d. Spindle nut tight and double-nutted e. Cutters sharp f. Cutter(s) tight under the nut
40
g. Cutter carbide is in correctly h. Spindle rotation correct i. Spindle turns freely with cutters in position and tightened. Manually turn the
spindle with cutters and fence in position to ensure proper clearance alignment before plugging the shaper in.
j. Split fences are parallel or in plane k. All adjustment locking mechanisms are tight l. All guards are in position.
4. As you feed material into the cutter, stand towards the front of the machine; not on the side (where a kickback is most likely to occur).
5. Keep your working area clutter-free and clean at all times. Good housekeeping is essential for safety.
6. Use only stock that is sound and free of knots, splits, warps, and other defects.
7. Make a trial cut on scrap stock after setup approval from the instructor
8. Do not run stock shorter than 12” through the shaper without an approved hold-down jig.
9. Never back stock out when using the shaper.
10. Never engage the shaper's spindle lock when operating the machine.
11. Verify the spindle speed selection with your instructor.
12. When doing spindle or rub collar spindle work, always use a starting pin or an extended template jig.
13. Use a holding device or jig when doing rub collar or spindle shaping.
14. All setups, jigs and guards must be double-checked, first by the student and then by the instructor.
15. Do not leave the shaper until it is completely stopped.
16. Use ring guards, hold-down devices, featherboards and other guards whenever possible.
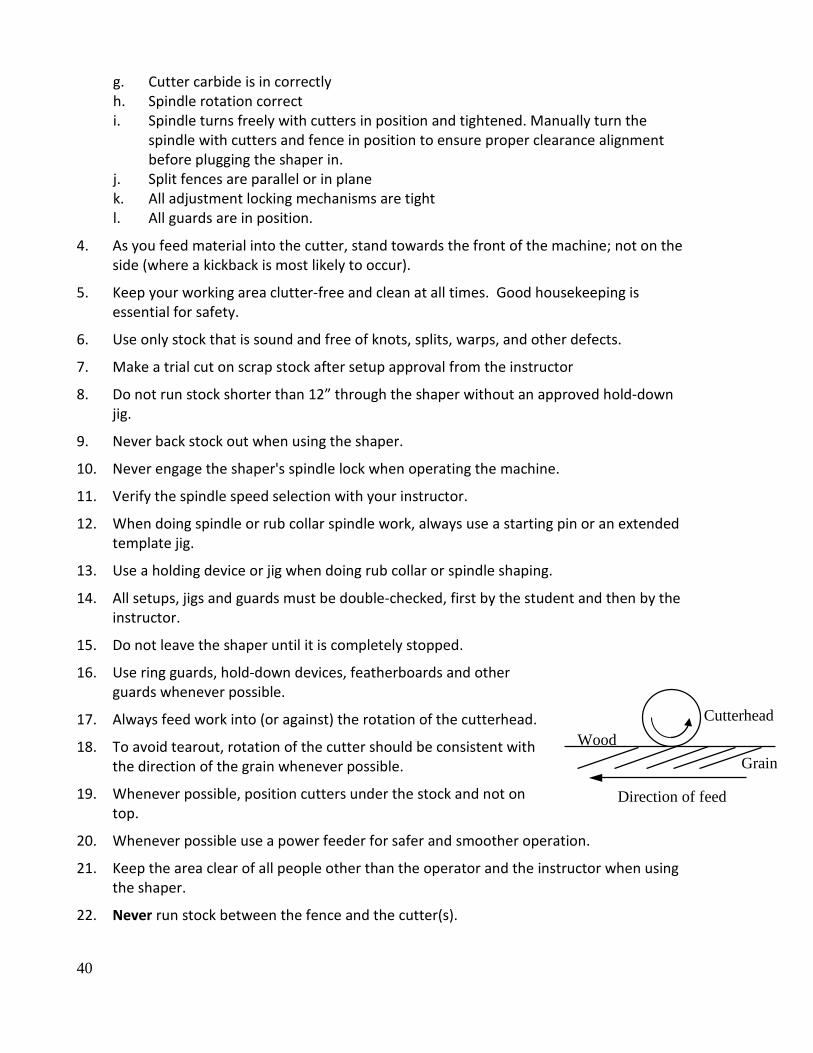
17. Always feed work into (or against) the rotation of the cutterhead.
18. To avoid tearout, rotation of the cutter should be consistent with the direction of the grain whenever possible.
19. Whenever possible, position cutters under the stock and not on top.
20. Whenever possible use a power feeder for safer and smoother operation.
21. Keep the area clear of all people other than the operator and the instructor when using the shaper.
22. Never run stock between the fence and the cutter(s).
Cutterhead
Grain
Direction of feed
Wood
41
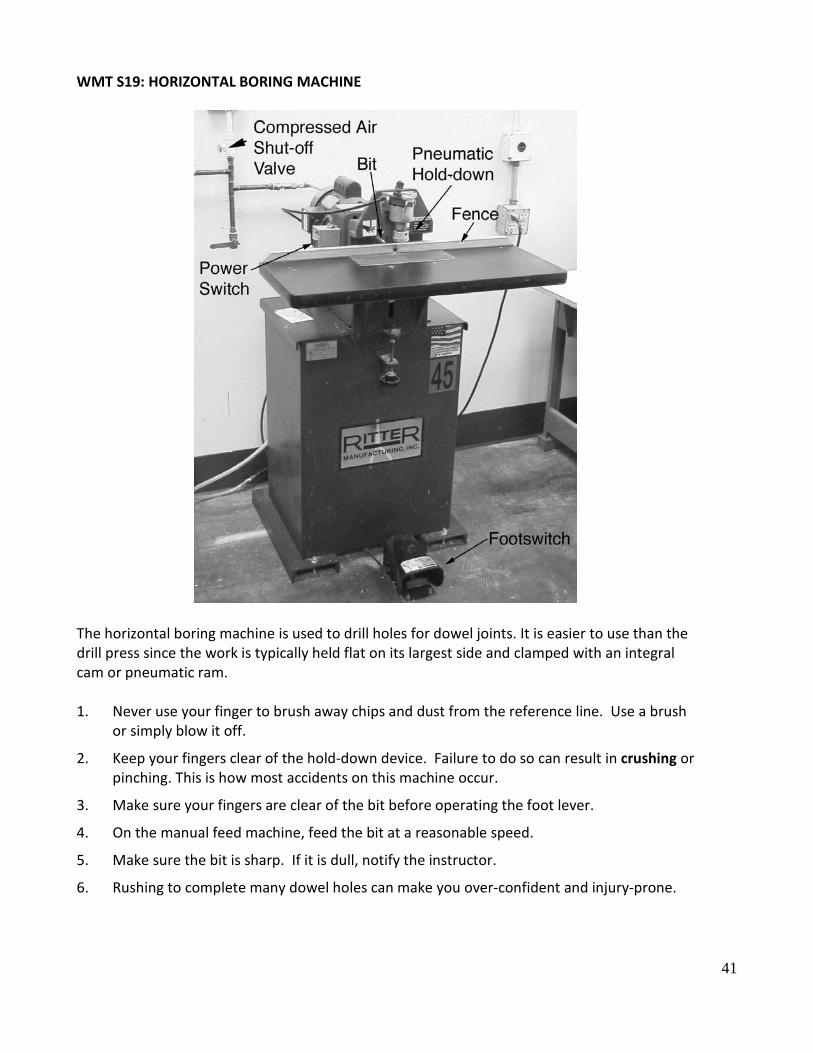
WMT S19: HORIZONTAL BORING MACHINE
The horizontal boring machine is used to drill holes for dowel joints. It is easier to use than the drill press since the work is typically held flat on its largest side and clamped with an integral cam or pneumatic ram. 1. Never use your finger to brush away chips and dust from the reference line. Use a brush
or simply blow it off.
2. Keep your fingers clear of the hold-down device. Failure to do so can result in crushing or pinching. This is how most accidents on this machine occur.
3. Make sure your fingers are clear of the bit before operating the foot lever.
4. On the manual feed machine, feed the bit at a reasonable speed.
5. Make sure the bit is sharp. If it is dull, notify the instructor.
6. Rushing to complete many dowel holes can make you over-confident and injury-prone.

42
WMT S20: VERTICAL PANEL SAW
The vertical panel saw is unlike any saw in the woodshop. It is designed to dimension a wide variety of panel materials, especially plywood, melamine, and MDF. Generally, the gantry is locked in a central location as pictured, material is loaded onto the machine, and the saw carriage cuts moving from the top down. It is also possible to rip pieces on this machine by rotating the saw carriage, locking it at the desired height, and moving the entire gantry along the length of the panel. The built-in rulers allows for repeatable and accurate cuts for both crosscutting and ripping operations. This saw supports large material on rollers located near the bottom of the machine. These rollers are locked and unlocked using the foot pedal near the center of the machine. Smaller work can be held using the supports that extend out at just above knee level. Aside from cross-cutting a glued-up tabletop, this machine is not used for solid lumber. 1. For best results, cut material with the back side facing the operator. This will provide
the smoothest possible cut on the face side of the panel.
2. Use the on/off buttons to start/stop this machine’s motor. The emergency stop button should be used only in case of emergency.
3. Never leave the saw running unattended.
4. The thickest material this machine can safely cut is 2.5”.
5. Never rip lumber on the vertical panel saw.
6. Sheet material measuring as 4’ x 8’ or 5’ x 5’ easily fits onto this machine.

43
7. Never cut materials that contain screws, nails or staples. They may eject from the material or damage the blade. Pay special attention to the ends of panels as often labels are stapled there.
8. Never cut more than one piece at one time.
9. Small/narrow pieces can be cut with the help of aluminum supports. See an instructor or an instructional aide for this, as it is a special setup.
10. Do not place your hands on or under the saw carriage, or in the path of the blade. Keep your hands on the clearly designated handles where they will be safe.
11. Do not try to retrieve a piece of cut material while the blade is rotating.
12. Do not force the tool. Let the saw do the work. A saw is more easily controlled and will do a better job when used in the manner for which it is designed.
13. Crosscutting (vertical cutting) must always be done from the top down.
14. Ripping (horizontal cutting) must always be done against the direction of the spinning blade. Consult an instructor or an instructional aide, as this is a special setup.
15. Raise the saw carriage to the uppermost position on the guides whenever the tool is not in use.
16. If abnormal noise or vibration occurs, turn the tool off immediately and have the problem corrected before further use.
17. If the saw binds, shut the machine off and check how the material is supported. Warped, bowed or other misshaped pieces might pinch on the blade causing this to happen. Ask an instructor for guidance if necessary.
18. Thin material (less than 1/8”, like plastic laminate) should be cut with the help of the instructor or instructional aide because this is a special setup.
19. Once your material is small enough to be cut on smaller saws, it is safer and more efficient to utilize those machines. The vertical panel saw should generally be used for dimensioning larger pieces.
44
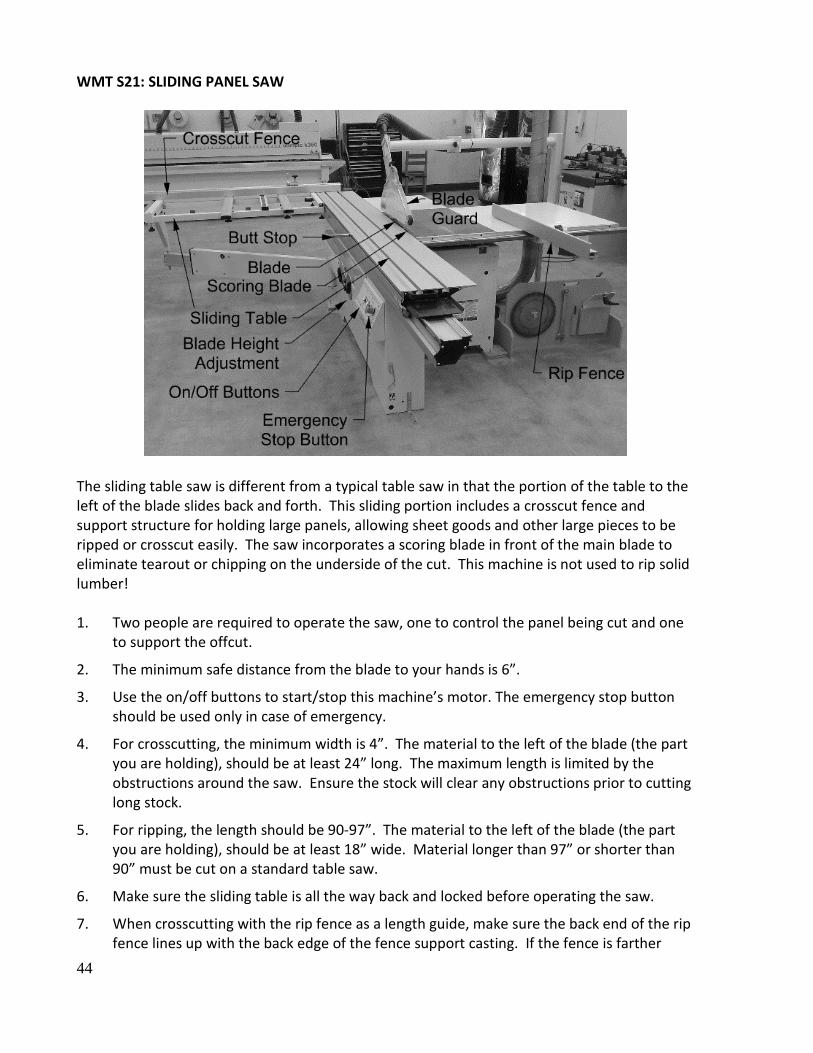
WMT S21: SLIDING PANEL SAW
The sliding table saw is different from a typical table saw in that the portion of the table to the left of the blade slides back and forth. This sliding portion includes a crosscut fence and support structure for holding large panels, allowing sheet goods and other large pieces to be ripped or crosscut easily. The saw incorporates a scoring blade in front of the main blade to eliminate tearout or chipping on the underside of the cut. This machine is not used to rip solid lumber! 1. Two people are required to operate the saw, one to control the panel being cut and one
to support the offcut.
2. The minimum safe distance from the blade to your hands is 6”.
3. Use the on/off buttons to start/stop this machine’s motor. The emergency stop button should be used only in case of emergency.
4. For crosscutting, the minimum width is 4”. The material to the left of the blade (the part you are holding), should be at least 24” long. The maximum length is limited by the obstructions around the saw. Ensure the stock will clear any obstructions prior to cutting long stock.
5. For ripping, the length should be 90-97”. The material to the left of the blade (the part you are holding), should be at least 18” wide. Material longer than 97” or shorter than 90” must be cut on a standard table saw.
6. Make sure the sliding table is all the way back and locked before operating the saw.
7. When crosscutting with the rip fence as a length guide, make sure the back end of the rip fence lines up with the back edge of the fence support casting. If the fence is farther

45
back, the material being cut may get trapped between the blade and fence and cause a kickback.
8. For ¾” stock, raise the main blade about 1½”. Lower the guard over the blade.
9. The scoring blade, when necessary, should be up about 3/32”. Do not use the scoring blade for solid lumber.
10. Two people are required to load the workpiece and adjust the support arm. The larger portion of the piece should be on the sliding table side.
11. Adjust and lock the butt stop so that it comfortably wedges the body between the stop and the part, with the workpiece against the front fence.
12. The helper may assist with supporting the sheet and catching the outfall only after the cut is made and the piece leaves the blade. Remove small pieces only with a stick.
13. After the cut, the helper, at the direction of the operator, may shut off the motor(s).
14. The sliding panel saw should be used for cutting large panels only.

46
WMT S22: POCKET-HOLE MACHINE
Pocket-hole joinery involves drilling a hole at an angle into one workpiece, and then joining it to a second workpiece with a self-tapping screw. This machine clamps the workpiece, cuts a mortised pocket, drills a clearance hole for a screw, and releases the part with one press of the foot switch. This is referred to as a pocket cycle. Unlike other machines with foot switches in the shop where the operator needs to hold the foot switch down during operation, this machine will perform the pocket cycle by only pressing the switch once. This machine is designed for maximum efficiency in creating pocket-hole joinery. 1. The compressed air valve must be open in order to operate machine.
2. The on/off switch must be in “on” position for machine to function.
3. The visible face of the part should be up with center of pocket hole marked. The machine will cut the pocket on the table side of part.
4. Keep hands and fingers clear of drill and router.
5. Keep hands and fingers clear of air cylinder clamp.
6. Keep two hands on the work piece when initiating the pocket cycle.
7. Turn off machine if there is any need to put hand or fingers near cutters or clamp.
8. Push the part firmly against the fence in order to depress the safety buttons. The safety buttons are two silver button-head screws that sense if a workpiece is in place for pocketing. The machine will not perform a pocket cycle unless these are depressed when the foot switch is pressed.
9. Material should be no smaller than 3/4” in thickness, 1” in width, and 5” in length.
10. It is safe to use this machine on solid wood, plywood, MDF, and melamine.

47
WMT S23: 32mm LINE BORING MACHINE
THIS IS A SPECIAL SETUP MACHINE; instructor approval is required
for all operations.
The line boring machine is used to drill multiple holes simultaneously for European 32mm frameless cabinetry. It accurately drills two rows of 5mm diameter holes on 32mm centers, which is a standard specification for frameless cabinets. 1. Two people are required to operate the line boring machine. The second person
supports the material and assists in the setup.
2. Make all possible adjustments with the power disconnected.
3. Keep hands and fingers clear of the drills.
4. Put both hands flat on the table and push the material against the fence before operating the machine.
5. The operator must communicate with the helper by stating “Clear” before operating the machine.

48
WMT S24: HINGE BORING MACHINE
The hinge boring machine makes drilling holes for euro-style cup hinges a straightforward task. It drills the 35mm diameter cup and corresponding screw holes in one operation. Setup and operation is simple. 1. Hold-down clamps or another means of securing the stock must be used during the
operation of this machine.
2. MDF, solid wood, melamine, and plywood can be used on this machine.
3. Material must be no thinner than 18mm or 11/16”.
4. Keep hands and fingers clear of hold-down clamps and drill bits during operation.
5. Do not adjust the hinge boring machine without the permission of the instructor or instructional aide.

49
WMT S25: CNC MACHINES
THESE ARE SPECIAL SETUP MACHINES; instructor approval is required for all operations. The CNC machines can perform a variety of different tasks for cabinetmakers and furniture makers alike. The shop has several small 3-axis “benchtop” machines, several large 3-axis machines, and one large 5-axis machine. Students interested in using these machines must take the courses on how to operate them. 1. Never, under any circumstances, leave machine unattended while it is in operation.
2. Never reach into the working envelope of the machine while it is running.
3. Machine operators and onlookers must stand outside of the clearly marked lines on the floor around machines while machine is running. The machine runs according to its programing and will move quickly within these marked boundaries. Persons standing inside the boundaries are at risk of being injured.
4. Objects of any kind, including shop carts, material, woodworking projects, etc., may never be stored around or on top of CNC machines, especially within the red lines designating the machines movement zone.
5. Visually ensure that all tools and bits are completely stopped before removing guards or performing any clean-up or maintenance.
6. Only students currently enrolled in CNC courses or labs may utilize the machines.
50
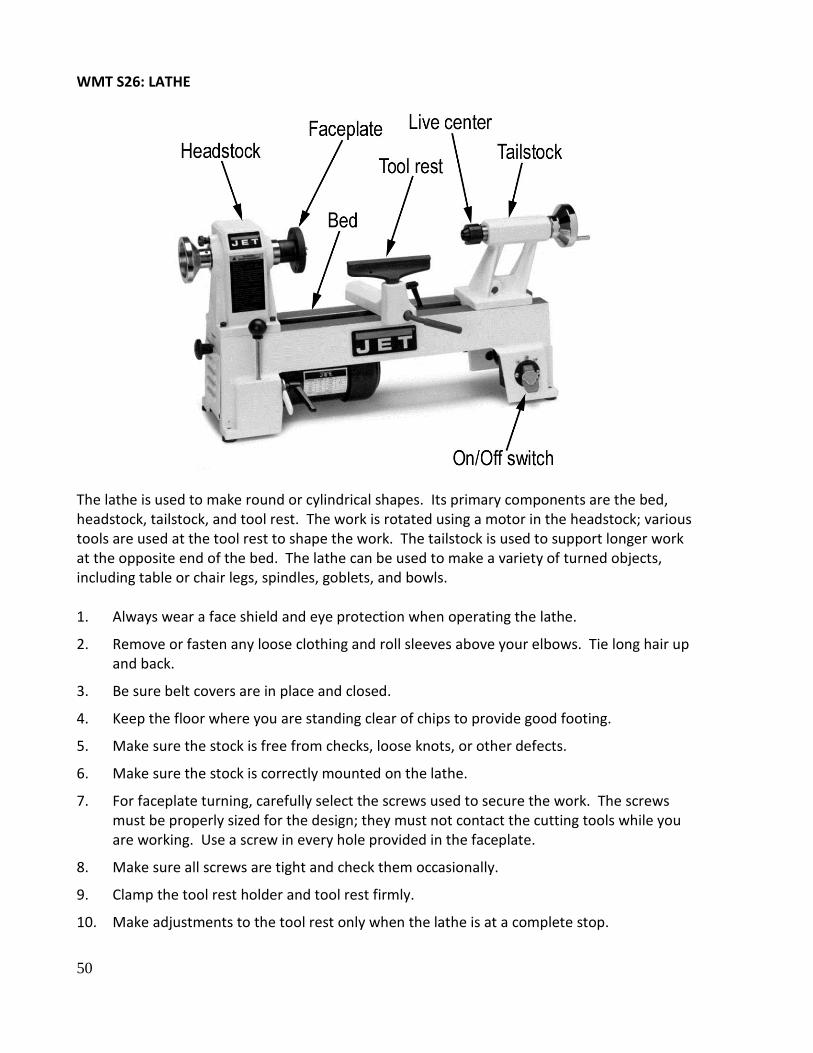
WMT S26: LATHE
The lathe is used to make round or cylindrical shapes. Its primary components are the bed, headstock, tailstock, and tool rest. The work is rotated using a motor in the headstock; various tools are used at the tool rest to shape the work. The tailstock is used to support longer work at the opposite end of the bed. The lathe can be used to make a variety of turned objects, including table or chair legs, spindles, goblets, and bowls. 1. Always wear a face shield and eye protection when operating the lathe.
2. Remove or fasten any loose clothing and roll sleeves above your elbows. Tie long hair up and back.
3. Be sure belt covers are in place and closed.
4. Keep the floor where you are standing clear of chips to provide good footing.
5. Make sure the stock is free from checks, loose knots, or other defects.
6. Make sure the stock is correctly mounted on the lathe.
7. For faceplate turning, carefully select the screws used to secure the work. The screws must be properly sized for the design; they must not contact the cutting tools while you are working. Use a screw in every hole provided in the faceplate.
8. Make sure all screws are tight and check them occasionally.
9. Clamp the tool rest holder and tool rest firmly.
10. Make adjustments to the tool rest only when the lathe is at a complete stop.
51
11. Keep the tool rest as close as reasonably possible to the stock by frequently stopping the lathe and adjusting the tool rest.
12. Adjust the tool rest height so the cutting edge of the tool is at or just below the center of the workpiece.
13. Before turning on the lathe, rotate the stock at least one full revolution by hand to make sure it clears the tool rest and all parts of the lathe.
14. Always hold the turning tool firmly against the tool rest.
15. Remove the tool rest when sanding, polishing, or finishing the workpiece.
16. Use a tailstock with a bearing center (live center) whenever possible.
17. Adjust the tailstock center so that the point is firmly embedded in the stock without impeding free rotation.
18. Run the lathe at slow speed when beginning any turning operation. When the stock is balanced and does not vibrate the speed may be increased.
19. If the lathe vibrates, it is running too fast or the stock is not properly secured. Stop the lathe and correct the problem.
20. The speed selector on a variable speed lathe must be operated only while the lathe is turning. A variable speed lathe does not have a belt which is moved between different sized pulleys to change the speed; it typically has a knob or handle on the front that can be rotated.
21. Stand to the side when starting the lathe.
22. Keep your hands away from the stock while it is rotating.
23. Keep your tools sharp since dull tools are harder to control and leave a rough surface on the work.
24. Stop the lathe to make measurements with calipers.
25. When polishing use a small rag folded in a pad, not wrapped around your finger.
26. Sand and polish only on the underside of the work.
27. A dust mask is recommended when sanding, especially with exotic or spalted woods.
28. Cut faceplate stock round on the band saw before mounting on the faceplate.
29. Allow glued stock or mounting blocks to cure at least 24 hours before using.
30. On faceplate turnings keep an accurate check on cutting depth to avoid striking the mounting screws.

52
This page is blank
53
GLOSSARY Note that the following terms are defined in the context of the woodworking lab and
may be different from definitions found elsewhere. Backer board a piece of wood or plywood placed on the back side of a workpiece in
order to provide support or minimize tearout Bevel an angled edge or end, where the entire surface of the edge or end is
angled (different from a chamfer) Chamfer an angled surface on the edge or end of a board that spans from the
edge or end to the face (different from a bevel) Chuck a device (usually on a drill or drill press) used to clamp a bit in place,
capable of gripping a large range of bit or shank sizes and often utilizing a key to operate
Collet a device (usually on a router) that clamps a bit in place, sized for a
specific bit or shank diameter, e.g. ¼” or ½”, and utilizing one or two wrenches to operate
Crosscut to cut across the grain Cutterhead a cylindrical block with knives or cutters positioned around its perimeter Dado a groove running across the grain Dado head a set of blades stacked side-by-side for use on the table saw, used for
making dadoes or grooves Edge the smaller pair of surfaces (relative to the face) on a board that exhibit
long grain End the pair of surfaces of a board that exhibits end grain End grain wood fibers that are oriented perpendicular to the surface of a piece of
lumber (as seen on the ends of a board) Face the largest pair of long-grain surfaces of a board Fence a beam or board used to guide a workpiece past a blade or bit Green a term used to describe lumber that has not been dried

54
Joint to flatten and smooth the face or edge of a board using the jointer (see the Jointer section in this manual)
Long grain wood fibers that are oriented parallel to the surface of a piece of lumber
(as seen on the faces and edges of a board) Lumber a solid wood board Grain the cylindrical fibers (like soda straws) which make up lumber, oriented
along the vertical axis of a tree Kerf the slot created by a blade or bit Kickback a dangerous situation in which a workpiece is forcibly ejected from a
machine, often at tremendous speed Margin of Safety the minimum distance the operator’s hands, fingers, or other body parts
should be from a cutter, blade, or bit MDF medium-density fiberboard; a man-made sheet material made of fine
particles glued together to make a smooth-faced, stable product Melamine a man-made sheet material made from particle board with a thin layer
of plastic on one or both faces, often used for cabinet construction Mortise a hole or slot with at least two flat sides into which another part is
inserted (typically a tenon) Offcut the part of a piece being cut that is on the far side of a blade and is
therefore not typically held or controlled by the operator Particle board a man-made sheet material made from medium-sized particles glued
together to make a moderately smooth-faced, stable product (coarser than MDF)
Plane (v.) to flatten and smooth the face or edge of a board using a plane or planer
(see the following entries) Plane (n.) a hand tool used to smooth and flatten a surface (also referred to as a
hand plane) Planer the stationary machine described in this document used to make the
face of a board smooth and parallel to the opposite face
55
Platen a flat reference surface, typically the surface on which a belt-sander belt runs
Pushblock a safety device with a broad base and handle used to guide a workpiece
past a cutter, blade, or bit, thereby keeping the operator’s hands at a safe distance
Pushpad a safety device with a broad soft base and handle used to guide a
workpiece past a cutter, blade, or bit, thereby keeping the operator’s hands at a safe distance.
Pushstick a safety device used to guide a workpiece past a cutter, blade, or bit,
thereby keeping the operator’s hands at a safe distance Rabbet a stepped surface on the edge or end of a board Resaw to cut a piece of wood in order to make it thinner Rough a term used to describe lumber that has not been surfaced (smoothed)
on its faces or edges Rip to cut with the grain Sheet good man-made sheet material, like plywood, melamine, or MDF Sled a carrier consisting of a base and fence for controlling a workpiece
during a cutting operation, typically guided in some way (by runners or an external, stationary fence)
Special setup a machine operation that exposes the operator to greater than average
risk; a special setup requires instructor or aide approval prior to operating the machine
Stock the piece being worked Tearout torn or damaged fibers, typically caused by a blade or bit exiting the
workpiece Track on a belt sander, to adjust the belt to run true on the machine and not
off to one side Trigger lock the button on some hand-held power tools that locks the trigger in the
ON position V-block a block with a V-shaped channel along its length

56
Warp a lumber defect describing stock that is not flat; the four types of warp
are cup, bow, crook, and twist

57
WOOD LAB SAFETY EXAM GENERAL LAB SAFETY. Multiple Choice 1. Eye protection must be used to:
a. improve your vision. b. prevent eyestrain. c. prevent flying particles, sawdust, foreign objects or corrosive substances from entering
your eyes. d. magnify small objects.
2. Floors, aisles, and passageways must be kept clear of wood, tools, material, oil or
grease spots, and other objects: a. because they may cause someone to slip or trip and fall. b. unless you are in a hurry. c. because they are unsightly. d. because they cause more work for the custodians.
3. Rags wet with linseed oil, solvents, or oil-based finishing products must always be:
a. folded neatly and placed on a shelf. b. discarded in an approved metal waste container with a lid, to prevent spontaneous
combustion. c. wadded up and thrown in the trash. d. left on the floor.
4. Loose clothing, jewelry and long hair must be securely fastened or removed:
a. before operating any machine. b. before the end of class. c. only when you are assisting the instructor. d. only when it will not affect your fashion look.
5. You must not talk to, or distract the attention of, a person operating a machine
because: a. conversation slows down the flow of work. b. it is not polite. c. the distracted operator or others may be injured. d. it is too noisy for conversation in the lab.
6. All accidents and injuries, no matter how slight, must be:
a. ignored. b. reported to health services immediately. c. reported to the instructor immediately. d. None of the above.

58
7. Wearing gloves when operating machinery is: a. considered a safe practice on a cold day. b. safe, provided the gloves are not made of leather. c. permissible if the machine is dirty. d. not a safe practice because the gloves may get caught in moving parts and pull your
hand into the machine. 8. All special setups must be:
a. checked by another student. b. approved by the instructor or instructional aide. c. need not be approved if you know what you are doing. d. done quickly while no one is watching.
9. When sweeping scraps from a machine or workbench:
a. use your hands to show how tough you are. b. use a piece of wood or a brush since there may be sharp or jagged particles among the
scraps. c. use compressed air. d. leave the scraps to show how hard you are working.
10. When lifting a heavy object you should:
a. get help. b. keep your back straight and lift with your legs. c. use a lever, dolly, jack, forklift, wheels, or rollers. d. do one or more of the above, depending on the situation.
11. When you are done using a vise on a workbench,
a. loosen the vise and leave the handle in any orientation. b. loosen the vise and leave the handle in a vertical orientation. c. loosen the vise and leave the handle in a horizontal orientation. d. tighten the vise as tightly as possible.
12. The following are causes of accidents in the wood lab:
a. Rushing or hurrying b. Overconfidence c. Fatigue d. Ignorance e. All of the above
13. Sharp edge tools are
a. a pipe dream. b. scary. c. more dangerous than dull edge tools. d. safer to use than dull edge tools.

59
14. Compressed air may be used to dust yourself off under the following circumstances: a. never. b. on Mondays and Wednesdays only. c. if no one is looking. d. if you’re wearing pants.
TABLE SAW. Multiple Choice 15. All students must be checked out on the table saw:
a. at the beginning of each semester. b. only if you are in the Intro to Woodworking class. c. only if you haven’t used it before. d. every time you use it.
16. The riving knife must be in place on the saw except:
a. when you are cutting large stock. b. when you are cutting thin stock. c. when you are ripping narrow stock. d. when the instructor has authorized its removal for special setups.
17. Adjustments are to be made while:
a. the saw is shut off and the blade is coasting. b. the saw is running, providing you have the instructor’s permission. c. the blade is lowered below the table. d. the blade is at a complete stop and the main power switch is off.
18. A pushstick must be used when you are:
a. ripping pieces less than 6” wide (narrow pieces). b. adjusting the saw. c. turning on the saw. d. crosscutting with a sled.
19. The shortest piece you may rip cut without special permission is:
a. 6”. b. 8”. c. 10”. d. 12”.
20. Freehand cutting without the aid of the fence or crosscut guide is:
a. permitted when stock is too large for the table. b. okay if permission is received from the instructor. c. never permitted because of the danger. d. permitted if the operator has help.
60
21. You must never back the wood away from the blade: a. without first rolling up your sleeves. b. while the saw is running, due to the danger of a kickback. c. without giving a signal. d. except when sawdust or scraps are on the table.
22. If you are in the middle of a cut and the workpiece gets stuck:
a. back the piece away from the blade and then fix the problem. b. back the piece out and try again. c. force it. d. turn off the saw by gently bumping the red Start/Stop paddle with your knee.
23. Reaching over the saw blade or passing wood over the saw blade when it is running:
a. speeds up the operation. b. is dangerous and forbidden. c. shows you are handy with machines. d. lets you feed wood into the saw faster.
24. When ripping stock, you should push the piece that is against the fence clear of the saw
blade, past the riving knife/off of the throat plate. Failure to do so may result in: a. damage to the blade. b. pinching the board. c. a kickback. d. None of the above.
JOINTER. True or False 25. Wood less than ¼" thickness must not be jointed on its face. 26. End grain may not be jointed on the jointer. 27. A pushstick is necessary when edge jointing stock lower than the height of the fence. 28. The depth of cut should be 1/32” for most jointer cuts. 29. The maximum depth of cut is 1/16”. 30. Operations involving rabbeting, beveling, chamfering, tapering, “stop cuts” or “drop
cuts” need not be approved by the instructor. 31. The most stable side of the stock should be toward the table. 32. You must push the stock past the knives so the guard can close and cover the knives
before picking up the stock. PLANER. True or False 33. The length of the stock must be longer than the distance between the in-feed and out-
feed rollers. 34. After the in-feed rollers grip the stock, it is safe to look directly into the planer. 35. The thickness setting should be set for the thickest part of the board.

61
36. Wood may not be safely planed across the grain. 37. It is not possible to get a kickback on the planer. 38. The maximum amount of material to be removed in one pass is 1/16”. RADIAL ARM SAW. Multiple Choice 39. When crosscutting on the radial arm saw, the operator should:
a. control the rate at which the blade passes through the stock. b. let the blade feed itself through the stock at its own rate. c. pull the blade through the stock as quickly as possible. d. talk to a fellow student.
40. When crosscutting on the radial arm saw the blade should be returned:
a. after the stock has been cleared away. b. slowly, but without moving the stock that has been cut. c. as quickly as possible. d. by letting go of the handle so the auto return can pull the saw back.
41. When crosscutting on the radial arm saw the stock should:
a. be firmly held against the fence. b. be in contact with the fence at the point of cut. c. not be allowed to pinch the blade. d. All of the above.
42. If a thick piece of lumber, when against the fence, touches the blade of the saw,
a. it can’t be cut on this saw. b. turn the stock over. c. this is a special setup; use a spacer block between the fence and the stock and check
with the instructor prior to making the cut. d. ignore it.
MITER SAW. Multiple Choice 43. The margin of safety for the miter saw is:
a. 2 inches. b. 3 inches. c. 4 inches. d. 6 inches.
44. When using a stop to cut a workpiece to a set length,
a. it doesn’t matter how the workpiece is positioned relative to the stop. b. the offcut must be held in place by the operator c. the piece between the stop and blade must be held in place by the operator. d. stops are for wimps; never use them.

62
BAND SAW. Multiple Choice 45. Adjust the upper guide and guard:
a. when the power is shut off but the saw is coasting. b. within ¾” of the stock while cutting if the blade is not tracking properly. c. to the exact thickness of the stock before the power is turned on. d. to about ¼” above the stock when the machine is at a full stop.
46. Cuts made on the band saw should be planned so that:
a. small curves can be cut by twisting the blade. b. relief cuts are used to minimize back-out on long cuts and small radii. c. the final cut is made while the saw is coasting to a stop. d. All of the above.
47. Stock with a round or otherwise irregular base:
a. may be cut provided that the operator has adjusted the tilting table. b. requires a special band saw. c. may be cut only with a special setup cutting jig such as a v-block. d. should be cut fast while the instructor is not looking.
48. If it becomes necessary to back out of a long cut, you should:
a. yell for help. b. turn off the motor. Bring the blade to a complete stop and then back the stock out
carefully. c. try to turn the stock on the blade. d. rapidly back the stock out.
49. When you are finished using the band saw you should:
a. turn it off and walk away; the blade will stop eventually on its own. b. turn it off and step on the brake with all your weight to stop the saw. c. turn it off and gently apply the brake until the blade is stopped. d. take a short break.
50. Should the band saw blade break while the machine is in motion:
a. run for your life. b. shut off the power if possible, keeping yourself and others clear. Notify your instructor. c. back your stock away from the blade immediately to avoid damage to the stock. d. continue cutting until the blade comes to a stop.

63
DRILL PRESS. Multiple Choice 51. Small work should be held on the drill press:
a. in your hands. b. in a vise or firmly clamped. c. by an assistant. d. never; it should be cut with a hand-held drill.
52. Remove the chuck key from the chuck to prevent:
a. the chuck from being damaged. b. breaking the chuck key. c. the chuck key from being thrown out at a tremendous speed. d. the chuck from becoming unbalanced.
53. Large bits should be run at:
a. faster speeds. b. slower speeds. c. it doesn’t matter. d. none of the above.
HAND-HELD ROUTER. True or False 54. The router should be unplugged when installing or changing bits. 55. The bit should be bottomed out in the collet. 56. The router should be moved in a direction such that the cut is made against the cutter
rotation. 57. It is a good idea to make several light cuts rather than one heavy cut. 58. When using a hand-held router, the workpiece should be clamped or otherwise held in
place. 59. When turning a hand-held router on or off during a cutting operation, the base should
be on the work piece with the bit not engaged in the material to be cut. ROUTER TABLE. Multiple Choice 60. The workpiece should be moved in a direction:
a. that is oriented closest to due north. b. away from the operator. c. such that the cut is made against the cutter rotation. d. such that the cut is made with the cutter rotation.
61. When routing small or narrow pieces,
a. use a push stick. b. use a backer board. c. use a fence with a small or no opening. d. any or all of the above, depending on the circumstances.

64
DISC and COMBINATION SANDER. Multiple Choice 62. When using the disk sander, you should hold your work against the:
a. rim. b. center. c. upward motion side. d. downward motion side.
63. You should feed stock into the abrasive material of the sander:
a. as fast as possible. b. with light to moderate pressure. c. with heavy pressure. d. only with your right hand.
OSCILLATING SPINDLE SANDER. True or False 64. Use the biggest spindle possible for the radius being sanded. 65. Feed stock in the same direction as the spindle rotation. 66. Secure spindles tightly with wrenches. HORIZONTAL SLOT MORTISER. True or False 67. Cutting depth should be limited to 1/8” per pass. 68. The space between the pneumatic hold down and the stock should be no more than ¼”
prior to actuation. HOLLOW CHISEL MORTISER. Multiple Choice 69. The drill bit should be positioned:
a. in no particular location. b. tight against the chisel. c. about the thickness of a dime below the chisel. d. about 1/8” below the chisel.
70. If excessive force is required to make a cut:
a. check your setup. b. quit and go home. c. force the tool by pushing harder. d. use your other hand.

65
15” WIDE BELT SANDER. Multiple Choice 71. The wide belt sander is used for:
a. removing large amounts of material. b. fixing your mistakes. c. removing small amount of material about the thickness of notebook paper. d. sanding melamine.
72. Before turning on the sander, make sure that:
a. you are familiar with the machine and how to use it. b. the thickness is accurately set. c. you have previously surfaced your material so you have no more than 1/16” to remove. d. all of the above.
73. The maximum depth of cut adjustment between passes should be:
a. 1/16 turn of the height adjuster. b. 1/8 turn of the height adjuster. c. 1/4 turn of the height adjuster. d. 1/2 turn of the height adjuster.
EDGE SANDER. True or False 74. Sanding pieces shorter than 10” requires instructor permission. 75. The table height may be adjusted with the machine running. PNEUMATIC NAIL GUNS and STAPLERS. Multiple Choice 76. When using a nail gun or stapler:
a. safety glasses are optional. b. safety glasses must always be worn. c. close your eyes tight and hold on for your life. d. safety glasses should be dark sunglasses to look cool.
77. When using a nail gun or stapler, your free hand should be:
a. holding the workpiece wherever it gives you the most control. b. holding air hose to keep it out of the path of the fastener. c. holding the workpiece such that the fastener can’t deflect and hit your hand. d. behind your back.
78. Check magazine before loading fasteners to:
a. ensure proper length of nail or staple. b. help prevent gun from jamming. c. prevent blowout. d. all of the above.

66
SHAPER. True or False 79. The shaper may never be operated without the direct permission and supervision of
the instructor. HORIZONTAL BORING MACHINE. True or False 80. Use your index finger to clear dust and chips away from the reference line. 81. Make sure hands are clear of the cam lever, air ram or other hold down. 82. Double check the position of your hands before engaging the foot feed. VERTICAL PANEL SAW. True or False
83. Cutting two pieces at one time is an acceptable operation. 84. The saw carriage should be returned to the uppermost position when done using the
saw. 85. Using the emergency button to turn off the machine is an acceptable operation. SLIDING PANEL SAW. True or False 86. The scoring blade should protrude ¾” when in use. 87. The sliding table should be all the way back and locked before operating the saw. 88. The emergency stop button should be used only in case of emergency. The “off” button
is the best way to shut this machine off.
POCKET-HOLE MACHINE. True or False 89. The pocket cycle can only happen if the safety buttons are depressed when the foot
switch is pressed. 90. A 1/2” thick, 2” wide, and 10” long piece can be pocketed on the machine without
trouble. 32mm LINE BORING MACHINE. True or False 91. A person may operate this machine without assistance. 92. Make sure hands are clear of drills before operating the machine. HINGE BORING MACHINE. True or False 93. Making adjustments to the hinge boring machine without instructor approval is an
acceptable practice. 94. Material should be no thinner than 18mm or 11/16”.

67
CNC MACHINES. True or False 95. Objects of any kind, including shop carts, material, woodworking projects, may never
be stored around or on top of CNC machines, especially within the red lines designating the machines movement zone.
96. It is okay to leave a CNC machine unattended for just a second in order to use the restroom.
97. Students not in the CNC classes or labs can use the machines as long as they have permission.
98. Operators and onlookers of the CNC must stand outside of the lines marked on the floor around them while the machine is running.
LATHE. Multiple Choice 99. While operating the lathe the operator should:
a. wear eye protection (safety glasses). b. wear a face shield. c. fasten any loose clothing. d. All of the above.
100. When adjusting the tool rest, you should:
a. stop the lathe. b. make sure it is firmly clamped to the tool rest holder and to the lathe bed. c. turn the stock by hand at least one full rotation to check clearances. d. All of the above.
101. When cutting on the lathe you should:
a. hold the tool above the tool rest to show your strength. b. hold the tool firmly against the tool rest, which is placed close to the stock. c. place the tool rest 2” away from the stock. d. talk to your classmate.
102. When using the tailstock center it should be:
a. barely touching the stock. b. embedded in the stock firmly but allowing the stock to rotate freely. c. forced in until the wood starts to split. d. None of the above.
103. When the lathe vibrates:
a. it may be running too fast. b. the stock may be loose. c. you must stop the lathe and correct the problem. d. All of the above.

68
104. When sanding or polishing do not:
a. wrap the rag or sandpaper around your fingers. b. remove the tool rest. c. work on the underside of the stock. d. wear a dust mask.
105. Work mounted on the lathe should be initially turned at slow speed until it is well
balanced; if this is not done, the: a. wood will take on a poor finish. b. tools will dull quickly. c. stock may vibrate and fly off the lathe. d. None of the above.
106. Dull lathe tools are dangerous to use because they:
a. are hard to control. b. stick to the tool rest. c. create static electricity, which causes sparks. d. All of the above.