WOODEN FLOOR EN BOIS CONCRETE FLOOR EN … · WOODEN FLOOR EN BOIS CONCRETE FLOOR EN CIMENT Using a...
2
IMPORTANT Please insure that the colour and size of tray are as per your order before installation. You must inspect the product thoroughly before installation. Fitting the product is acceptance of quality. This tray is hand made from all natural materials. It is possible it may not be perfectly flat. It is extremely fragile and if not fitted immediately should be stored as the warning label states. The tray must be fitted strictly in accordance to the fitting instructions. If not or if any other unspecified materials is used in the installation of this tray could result in the tray to fail, invalidating the warranty. IMPORTANT Veuillez assurer que la couleur et la taille du receveur correspondent à la commande avant l’installation Veuillez inspecter le produit avant l’installation. L’installation du produit est considérée comme l’acceptation de la qualité. Le receveur est fabriqué à la main avec des matériaux naturels. Il est possible qu’il ne soit pas absolument à plat. C’est très fragile et s’il n’est pas installé immédiatement, il faut le stocker comme indiqué sur l’étiquette. Le receveur doit être monté selon des instructions des montages. Si on ne suit pas les instructions et si on n’utilise pas les matériaux spécifiés, il est possible que les résultats ne soient pas bons. La garantie ne sera plus valide. Truestone Fitting Instruction Lay a weak 5:1 sand and cement mix to the floor with a min of 15mm depth. Placez un mélange de sable et de ciment au sol (5 :1 ) avec une profondeur au minimum de 15mm. Run a large bead of anti-fungal silicone sealant just below the edge of the tray at each wall. Mettez un grand cordon antifongique de silicone juste en dessous du bord du receveur à tous les murs. Step Etape1a Step Etape 2a Step Etape 3 Step Etape 6 Step Etape 7 Step Etape1b Step Etape 2b Step Etape 4 Step Etape 5 CONCRETE FLOOR EN CIMENT WOODEN FLOOR EN BOIS Using a sheet of rigid MARINE PLY cut the waste position and secure the plywood to the Joists ensuring there is no movement. Utilisant une nappe de CONTREPLAQUÉ MARINE, découpez la position de la bonde et assurez qu’il n’y a pas de mouvements entre des solives et le contreplaque. www.merlynshowering.com
Transcript of WOODEN FLOOR EN BOIS CONCRETE FLOOR EN … · WOODEN FLOOR EN BOIS CONCRETE FLOOR EN CIMENT Using a...
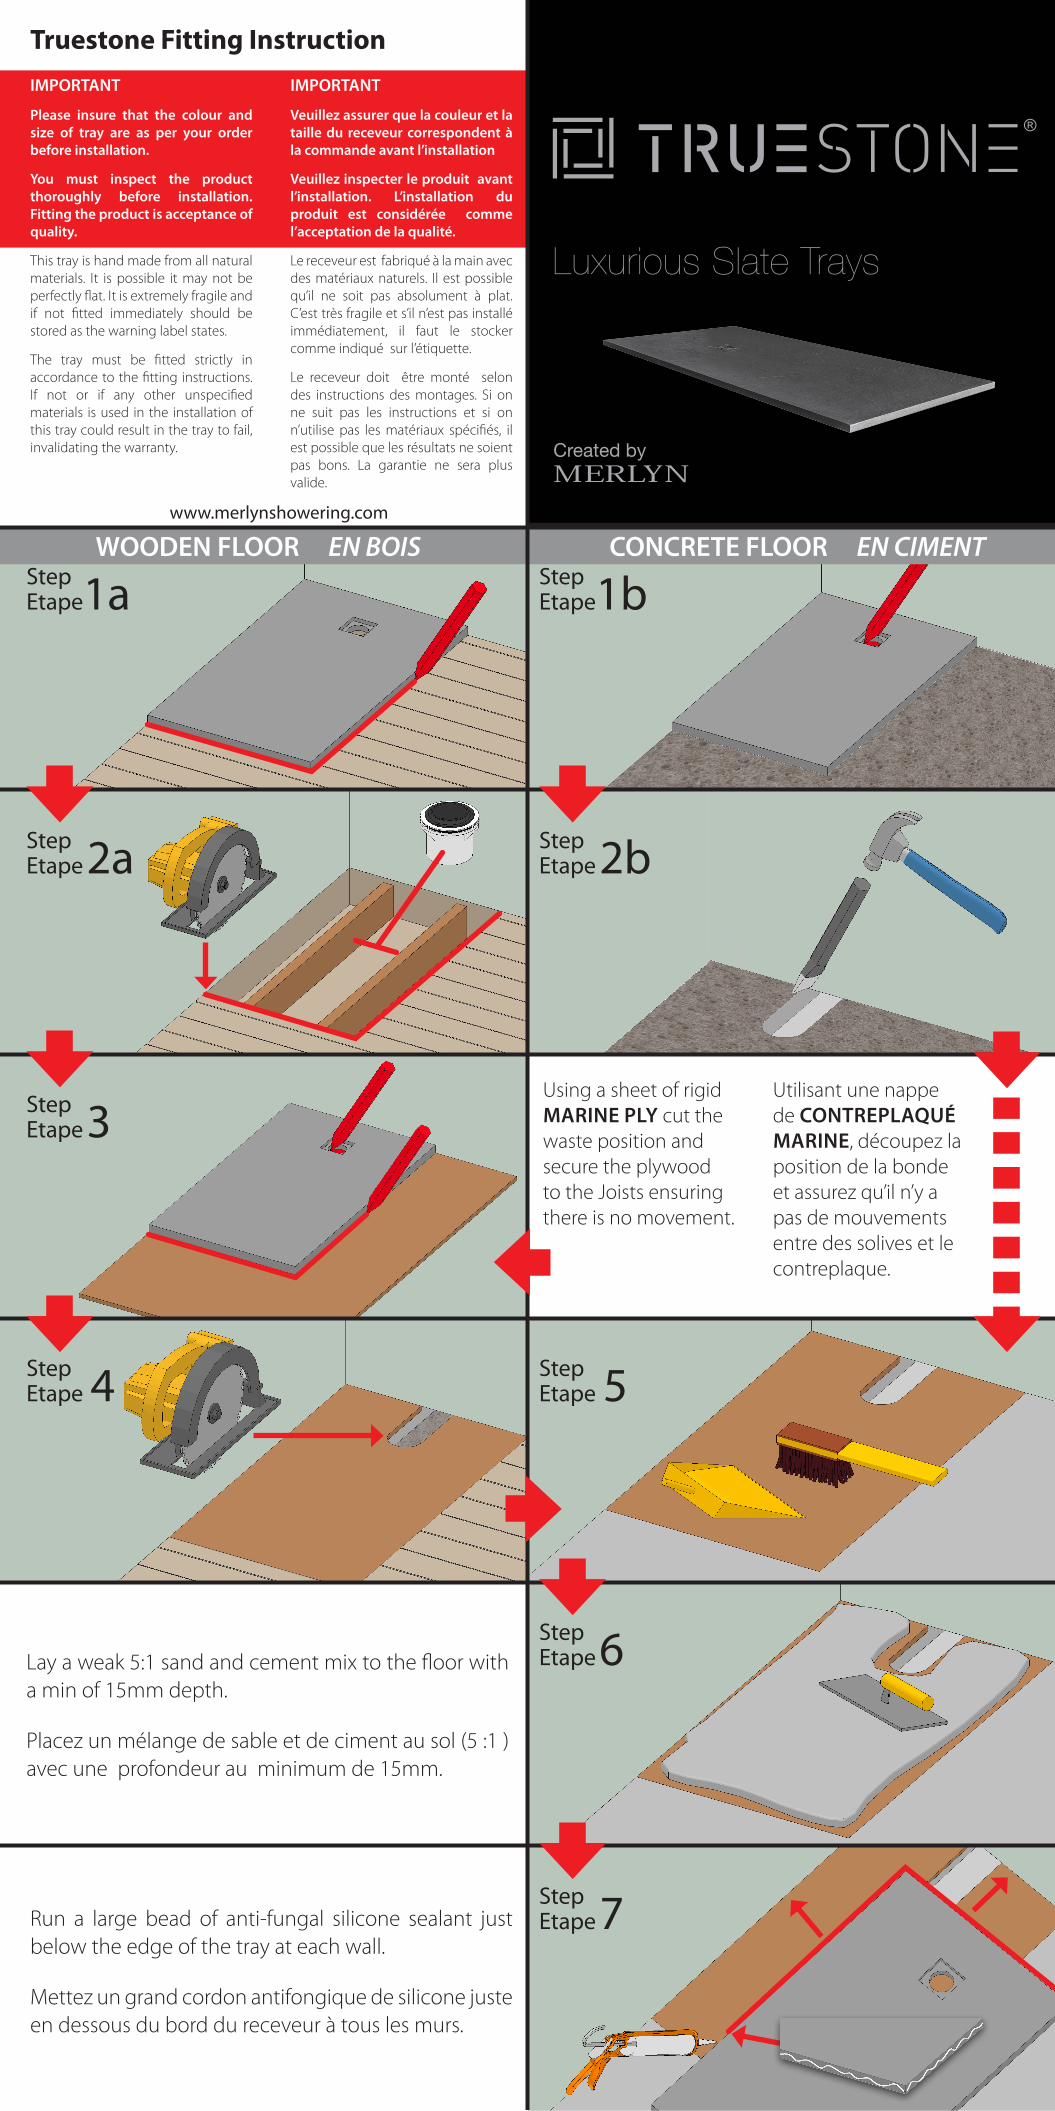
IMPORTANT
Please insure that the colour and size of tray are as per your order before installation.
You must inspect the product thoroughly before installation. Fitting the product is acceptance of quality.
This tray is hand made from all natural materials. It is possible it may not be perfectly flat. It is extremely fragile and if not fitted immediately should be stored as the warning label states.
The tray must be fitted strictly in accordance to the fitting instructions. If not or if any other unspecified materials is used in the installation of this tray could result in the tray to fail, invalidating the warranty.
IMPORTANT
Veuillez assurer que la couleur et la taille du receveur correspondent à la commande avant l’installation
Veuillez inspecter le produit avant l’installation. L’installation du produit est considérée comme l’acceptation de la qualité.
Le receveur est fabriqué à la main avec des matériaux naturels. Il est possible qu’il ne soit pas absolument à plat. C’est très fragile et s’il n’est pas installé immédiatement, il faut le stocker comme indiqué sur l’étiquette.
Le receveur doit être monté selon des instructions des montages. Si on ne suit pas les instructions et si on n’utilise pas les matériaux spécifiés, il est possible que les résultats ne soient pas bons. La garantie ne sera plus valide.
Truestone Fitting Instruction
Lay a weak 5:1 sand and cement mix to the floor with a min of 15mm depth.
Placez un mélange de sable et de ciment au sol (5 :1 ) avec une profondeur au minimum de 15mm.
Run a large bead of anti-fungal silicone sealant just below the edge of the tray at each wall.
Mettez un grand cordon antifongique de silicone juste en dessous du bord du receveur à tous les murs.
StepEtape1a
StepEtape2a
StepEtape3
StepEtape6
StepEtape7
StepEtape1b
StepEtape2b
StepEtape 4 Step
Etape 5
CONCRETE FLOOR EN CIMENTWOODEN FLOOR EN BOIS
Using a sheet of rigid MARINE PLY cut the waste position and secure the plywood to the Joists ensuring there is no movement.
Utilisant une nappe de CONTREPLAQUÉ MARINE, découpez la position de la bonde et assurez qu’il n’y a pas de mouvements entre des solives et le contreplaque.
www.merlynshowering.com
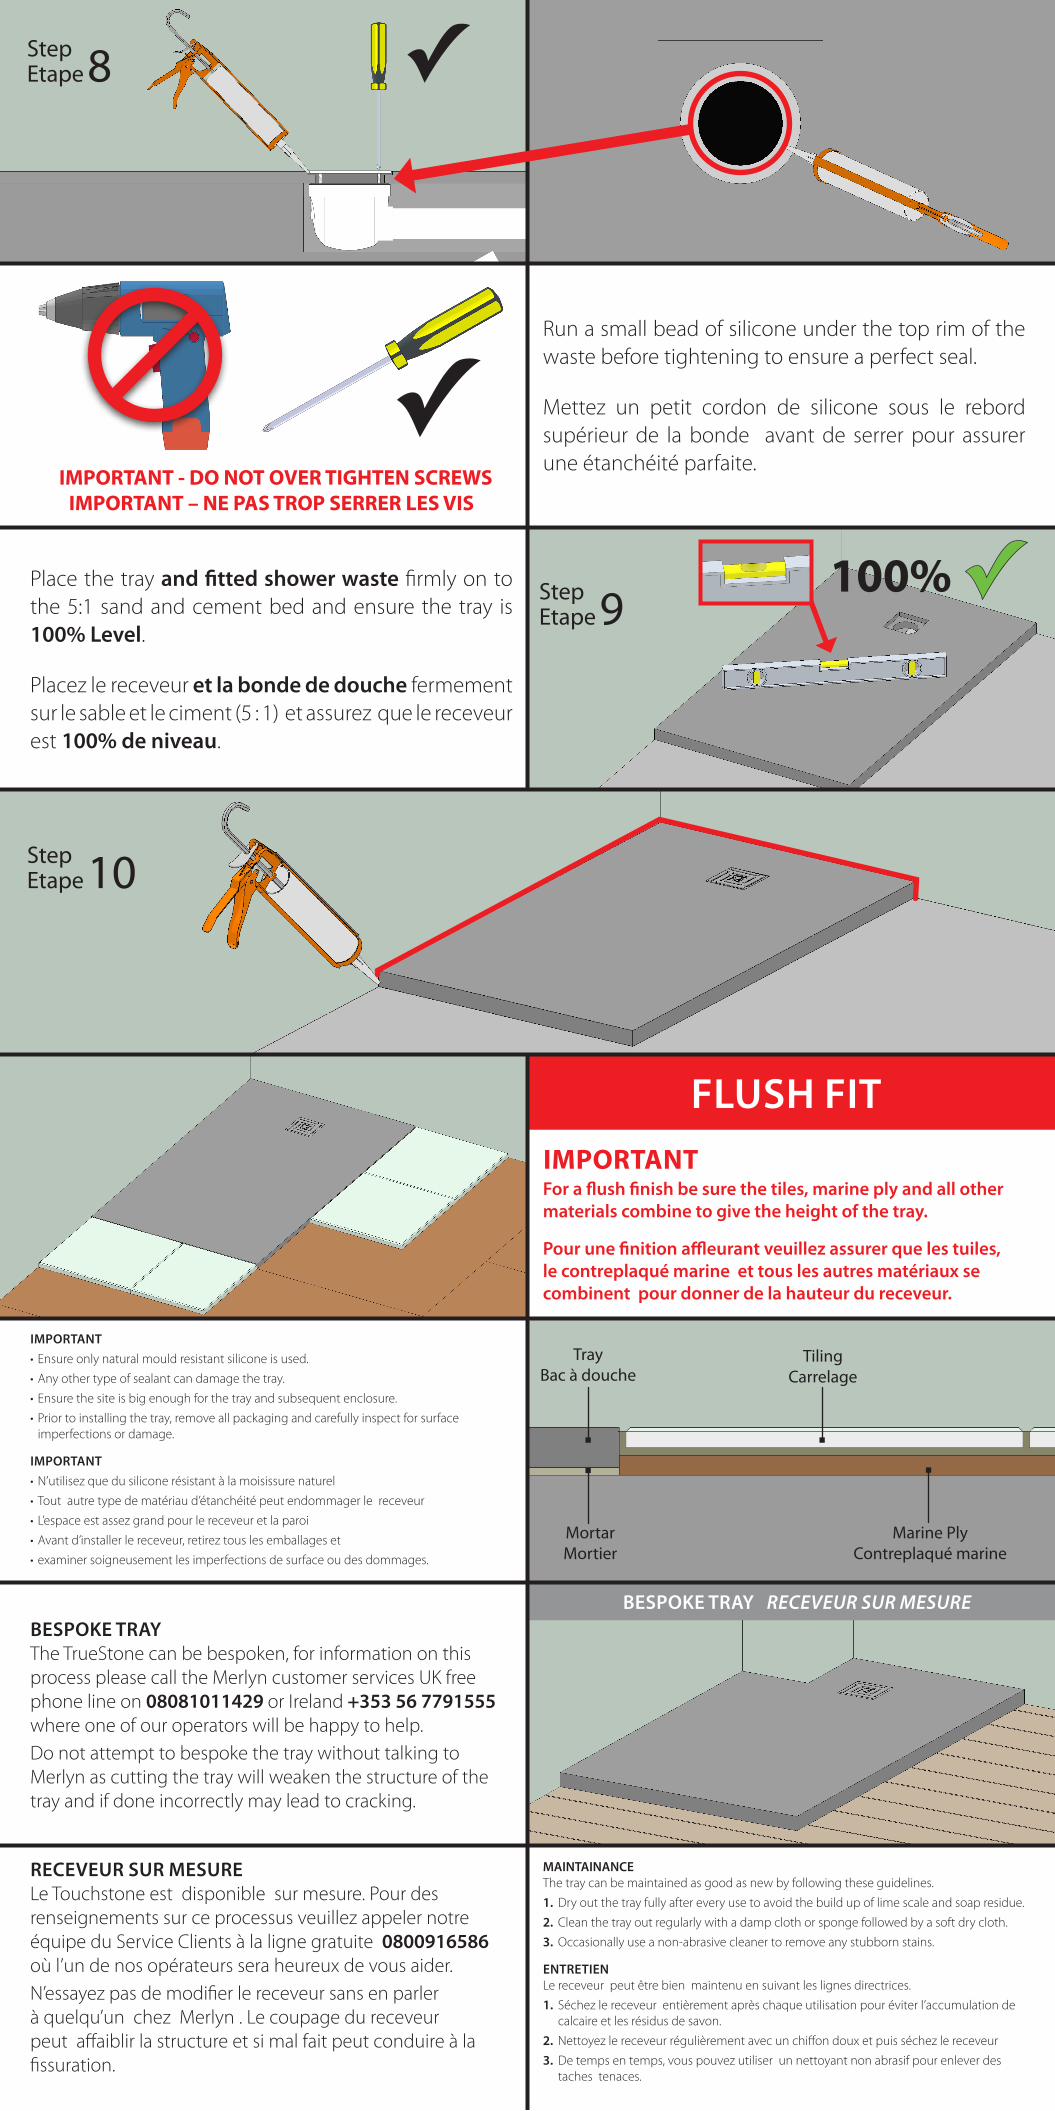
IMPORTANT - DO NOT OVER TIGHTEN SCREWSIMPORTANT – NE PAS TROP SERRER LES VIS
FLUSH FITIMPORTANTFor a flush finish be sure the tiles, marine ply and all other materials combine to give the height of the tray.
Pour une finition affleurant veuillez assurer que les tuiles, le contreplaqué marine et tous les autres matériaux se combinent pour donner de la hauteur du receveur.
MAINTAINANCEThe tray can be maintained as good as new by following these guidelines.
1. Dry out the tray fully after every use to avoid the build up of lime scale and soap residue.
2. Clean the tray out regularly with a damp cloth or sponge followed by a soft dry cloth.
3. Occasionally use a non-abrasive cleaner to remove any stubborn stains.
ENTRETIENLe receveur peut être bien maintenu en suivant les lignes directrices.
1. Séchez le receveur entièrement après chaque utilisation pour éviter l’accumulation de calcaire et les résidus de savon.
2. Nettoyez le receveur régulièrement avec un chiffon doux et puis séchez le receveur
3. De temps en temps, vous pouvez utiliser un nettoyant non abrasif pour enlever des taches tenaces.
IMPORTANT• Ensure only natural mould resistant silicone is used.
• Any other type of sealant can damage the tray.
• Ensure the site is big enough for the tray and subsequent enclosure.
• Prior to installing the tray, remove all packaging and carefully inspect for surface imperfections or damage.
IMPORTANT• N’utilisez que du silicone résistant à la moisissure naturel
• Tout autre type de matériau d’étanchéité peut endommager le receveur
• L’espace est assez grand pour le receveur et la paroi
• Avant d’installer le receveur, retirez tous les emballages et
• examiner soigneusement les imperfections de surface ou des dommages.
Place the tray and fitted shower waste firmly on to the 5:1 sand and cement bed and ensure the tray is 100% Level.
Placez le receveur et la bonde de douche fermement sur le sable et le ciment (5 : 1) et assurez que le receveur est 100% de niveau.
Run a small bead of silicone under the top rim of the waste before tightening to ensure a perfect seal.
Mettez un petit cordon de silicone sous le rebord supérieur de la bonde avant de serrer pour assurer une étanchéité parfaite.
BESPOKE TRAY The TrueStone can be bespoken, for information on this process please call the Merlyn customer services UK free phone line on 08081011429 or Ireland +353 56 7791555 where one of our operators will be happy to help.Do not attempt to bespoke the tray without talking to Merlyn as cutting the tray will weaken the structure of the tray and if done incorrectly may lead to cracking.
RECEVEUR SUR MESURE Le Touchstone est disponible sur mesure. Pour des renseignements sur ce processus veuillez appeler notre équipe du Service Clients à la ligne gratuite 0800916586 où l’un de nos opérateurs sera heureux de vous aider.N’essayez pas de modifier le receveur sans en parler à quelqu’un chez Merlyn . Le coupage du receveur peut affaiblir la structure et si mal fait peut conduire à la fissuration.
StepEtape9
StepEtape10
StepEtape8
100%
TrayBac à douche
TilingCarrelage
Marine PlyContreplaqué marine
MortarMortier
BESPOKE TRAY RECEVEUR SUR MESURE