WITS Computing Services For Staff Page 1 of...
40
WITS Computing Services For Staff Page 1 of 40 CNS Service Desk, 1 st Floor, West Wing, Senate House Building, East Campus Tel: 011 717 1717 E-mail: [email protected]
Transcript of WITS Computing Services For Staff Page 1 of...
WITS Computing Services For Staff Page 1 of 40 CNS Service Desk, 1
st Floor, West Wing, Senate House Building, East Campus
Tel: 011 717 1717 E-mail: [email protected]
WITS Computing Services For Staff Page 2 of 40 CNS Service Desk, 1
st Floor, West Wing, Senate House Building, East Campus
Tel: 011 717 1717 E-mail: [email protected]
Table of Contents Table of Contents ...................................................................................................................................................................................2 1. INTRODUCTION .......................................................................................................................................................................3 2. ICT ACCEPTABLE USE POLICY .............................................................................................................................................3 3. COMPUTER SKILLS / TRAINING .............................................................................................................................................3 4. THE CNS STAFF SERVICE DESK ...........................................................................................................................................3
1. Remote Support: ............................................................................................................................. 3
2. Staff Service Desk Contact Details: ............................................................................................. 4 5. NEW USER CONFIGURATION .................................................................................................................................................4 6. RESETTING YOUR PASSWORD .............................................................................................................................................4 7. HARDWARE .............................................................................................................................................................................5
1. Hardware Purchasing / Procurement ........................................................................................... 5
2. Faulty Hardware .............................................................................................................................. 5
3. End-Oflife Hardware Salvaging .................................................................................................... 6
4. Securing Desktop PCs ................................................................................................................... 6 8. DIALUP FACILITIES .................................................................................................................................................................6 9. EMAIL .......................................................................................................................................................................................6
1. Email Distribution List ..................................................................................................................... 7
2. Calendar Access ............................................................................................................................. 8
3. Email Software ................................................................................................................................ 8
4. Email Mailbox Access .................................................................................................................... 8
5. Email Mailbox Size Increase ......................................................................................................... 8
6. Email Spam .......................................................................................................................................... 10 10. ANTIVIRUS ............................................................................................................................................................................. 10
1. Procedure for checking for viruses on Memory Sticks (Flash Drives) ................................................. 10
2. Checking Virus Software (NOD32) Signature Version & Performing an Updates ............................... 11
3. Performing a Manual Scan .................................................................................................................. 12 11. VIRTUAL PRIVATE NETWORK (VPN) FOR WINDOWS 7 ..................................................................................................... 14 12. VIRTUAL PRIVATE NETWORK (VPN) FOR WINDOWS XP .................................................................................................. 18 13. WIRELESS ACCESS .............................................................................................................................................................. 22 14. VIRTUAL PRIVATE NETWORK (VPN) FOR LINUX (UBUNTU) ............................................................................................. 25
1. Install Pptp (Peer-To-Peer-Tunnelling-Protocol) ...................................................................... 25
2. PPTP Configuration For Vpn ..................................................................................................... 28
3. Connecting To The Wits Network ............................................................................................... 30 15. SETTINGS FOR MAC OS X. ................................................................................................................................................... 30
1. VPN Setup For Mac ............................................................................................................................. 30
2. MAC OS X Version 10.3.X: Proxy Server Setup ............................................................................. 33
3. Firefox Proxy Setup ............................................................................................................................. 35 16. OTHER NETWORKS SERVICES ............................................................................................................................................ 36
1. Physical Network Points ...................................................................................................................... 36
2. Firewall Rule Exceptions ...................................................................................................................... 36
3. Static IP Addresses ............................................................................................................................... 36 17. i-WITS (Oracle HR, Finance & Student System) ................................................................................................................... 37
1. Requesting Additional Access .................................................................................................... 37
2. Technical Problems ...................................................................................................................... 37
3. Setting Your Office Telephone Number .................................................................................... 37 17. E-SERVICES ........................................................................................................................................................................... 37
1. New Web Site ................................................................................................................................ 37
4. Document Portal (Sharepoint) .................................................................................................... 38
5. Fax2email ....................................................................................................................................... 39 18. VIDEO CONFERENCING EQUIPMENT .................................................................................................................................. 40
WITS Computing Services For Staff Page 3 of 40 CNS Service Desk, 1
st Floor, West Wing, Senate House Building, East Campus
Tel: 011 717 1717 E-mail: [email protected]
1. INTRODUCTION CNS (Computer & Network Services) provides a range of IT related services to the general WITS staff community, including PCs (Personal Computers) and printers fully networked and Internet enabled. A CNS Service Desk Consultant is also on hand at the CNS Staff Service Desk on 011 717 1717 or email [email protected] to help you with your computer related questions. The aim of this guide is to provide information about these services to you, as staff member in order for you to make the most effective and efficient use of the computer facilities available to you.
Please note this guide is a reflection of staff ICT services at the time of going to print. As a result of ongoing improvements and enhancements to the University ICT infrastructure some parts of this brochure may become outdated during the course of the academic year. If in doubt, ask the CNS Staff Service Desk.
2. ICT ACCEPTABLE USE POLICY All users must abide by the Acceptable Use Policy when making use of any Wits University Computer Facilities. A copy of the policy is on website address: http://intranet.wits.ac.za/Academic/RegistrarsHelpdesk/helphome.html or at www.wits.ac.za/Access
3. COMPUTER SKILLS / TRAINING To use the electronic research facilities and prepare your written documents competently, you need to have basic knowledge of a word-processing package and familiarity with e-mail and Internet use. A selection of courses is available to staff. These include beginner to advanced training in Word Processing, Spreadsheet, Graphics, Databases and Desktop Publishing to name a few. Detailed information about the courses can be provided by CLTD (Centre for Learning, Teaching & Development). Bookings for courses may be made by contacting CLTD.
4. THE CNS STAFF SERVICE DESK The Staff Service Desk is the central point of contact between the user and Computer & Network Services. Call the Service Desk if you have problems with logging on, with your e-mail box or with using Internet or standard software programs. If the Service Desk cannot help you with advice over the telephone, the call will be logged for and you will be provided with a reference number for the problem. Keep a note of this Ticket Number (reference number), and always refer to the Ticket Number for tracking the status of the problem resolution.
1. Remote Support: In order to more speedily address your query the staff at the Service Desk may want to connect to your PC remotely and support you while you‟re still on the line.
Only accept remote connections when: 1. You are expecting the connection from the Service Desk. 2. Only if you know the person requesting the connection to your PC is from the Service Desk.
WITS Computing Services For Staff Page 4 of 40 CNS Service Desk, 1
st Floor, West Wing, Senate House Building, East Campus
Tel: 011 717 1717 E-mail: [email protected]
2. Staff Service Desk Contact Details: CNS Staff Service Desk 1st Floor, West Wing, Senate House Building, East Campus Tel: 011 717 1717 E-mail: [email protected]
5. NEW USER CONFIGURATION Ensure that you have a newly issued unique „staff number’ from HR. If the user does not have one, please let them know that CNS do not add staff to the system, it is done by HR by means of an Oracle profile setup. If the user is a Wits staff member, he/she can approach their own HR office to get this. If the user is a Non-Wits staff member, then he/she can fill out this form also found on the Wits intranet:
http://intranet.wits.ac.za/NR/rdonlyres/90F971BD-37BD-47A0-BAA6-2FF5106F596A/0/OracleAccessDocfeb08.doc
This document must be sent to central HR at Senate House. Once you have the staff number, the new user can be added to Call Logging profile database as well when the call is logged for the set up of the new user on the pc. You will receive:
1. An AD (Active Directory) account 2. Email account (email format is [email protected]) 3. i-Wits Employee Self Service 4. An inbound fax number.
6. RESETTING YOUR PASSWORD Passwords can be reset via Password Self Service which you can do on the Wits Intranet home page (http://intranet.wits.ac.za).
The link to Password Self Service is at: www.wits.ac.za/Access
Alternatively, you can contact the CNS Service Desk on (011) 717-1717 or E-mail [email protected]
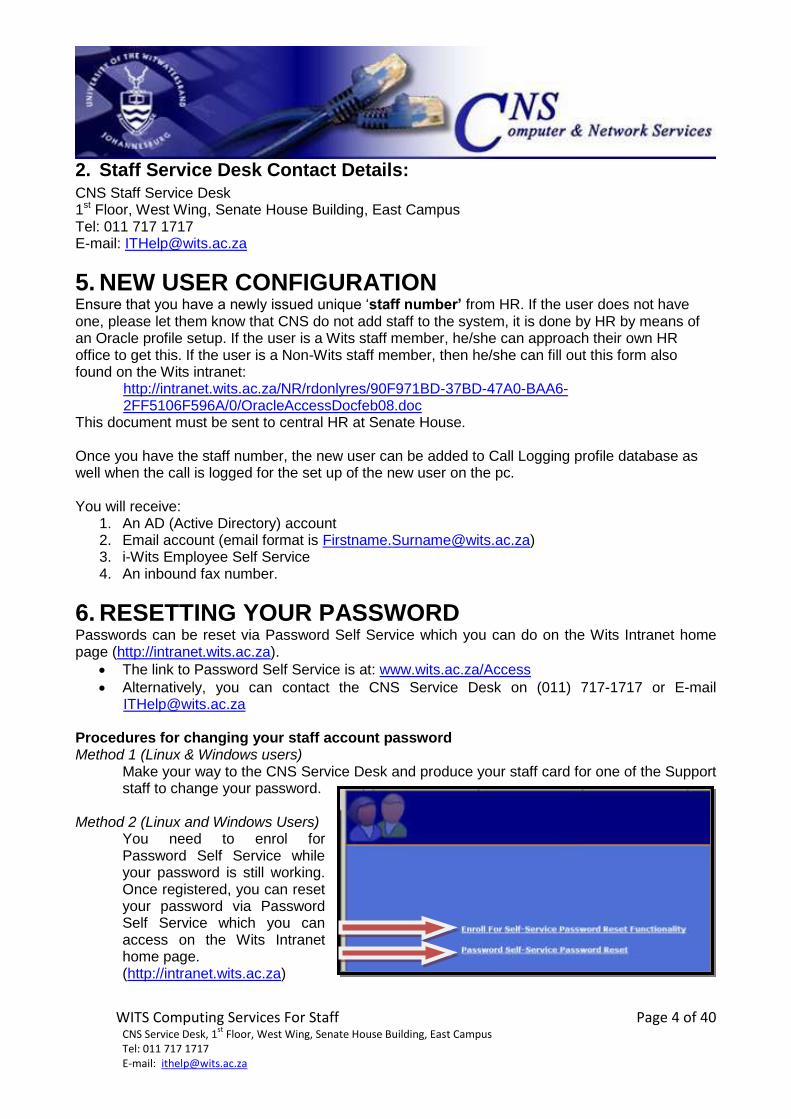
Procedures for changing your staff account password Method 1 (Linux & Windows users)
Make your way to the CNS Service Desk and produce your staff card for one of the Support staff to change your password.
Method 2 (Linux and Windows Users)
You need to enrol for Password Self Service while your password is still working. Once registered, you can reset your password via Password Self Service which you can access on the Wits Intranet home page. (http://intranet.wits.ac.za)
WITS Computing Services For Staff Page 5 of 40 CNS Service Desk, 1
st Floor, West Wing, Senate House Building, East Campus
Tel: 011 717 1717 E-mail: [email protected]
The following link will take you directly to Password Self Service to register or reset your password: www.wits.ac.za/Access
If your password has already expired, you can access Password Self Service from any PC (such as the PC of a colleague) that has access to the Wits Staff Intranet.
In order to make use of this service you have to register on the Password Self Service web site first at a time when your password is still valid
Method 3 (Linux and Windows Users)
Go to the Web Address: www.wits.ac.za/Access to change your password at any time. Method 4 (Windows users only)
If you are logged on the WITS network and would like to change your password at any time,
Press Ctrl+Alt+Delete and the Windows security screen will appear.
Select the Change password option
Type in your current password
Type in your new password
Confirm new password by retyping it.
Click ok
7. HARDWARE
1. Hardware Purchasing / Procurement The University has certain policies for the procurement of hardware. For desktop and laptops there are approved brands and models as well as certain approved vendors from which desktops and laptops can be purchased. For a full list of current approved hardware brands and models, refer to the CNS Intranet (http://intranet.wits.ac.za), under the About “About Our ... “-section. For quotations or ordering new desktops or laptops, email #[email protected] or #[email protected] or phone 011 717 1603
2. Faulty Hardware Under Warranty
WITS Computing Services For Staff Page 6 of 40 CNS Service Desk, 1
st Floor, West Wing, Senate House Building, East Campus
Tel: 011 717 1717 E-mail: [email protected]
CNS will provide assistance in logging the repair with the approved vendor and guiding the faulty hardware through the repair cycle. Not under Warranty CNS will provide the contact details for the approved vendors where out-of-warranty support can be provided. This support is for the cost centre of the area that owns the hardware.
3. End-Oflife Hardware Salvaging CNS provides a service for end-of-life hardware to assist in disposing of such equipment in an eco-friendly manner. If the hardware is still usable the School/Department should consider donating it to the student community. Such equipment can also be purchased by staff at the same value as the trade-in value that CNS could get for the hardware. Any funds recovered from the salvaged hardware would be for the cost centre that owns the equipment.Hardware is collected from the user and an audit performed on the hardware as a part of this service.
4. Securing Desktop PCs In some instances an office area of computer lab needs to be secured. For staff desktops CNS will secure the PCs at the cost of the security cabling. For computer labs the School would pay for the time of the Student Assistant that performs the task as well as the cost of the security cabling.
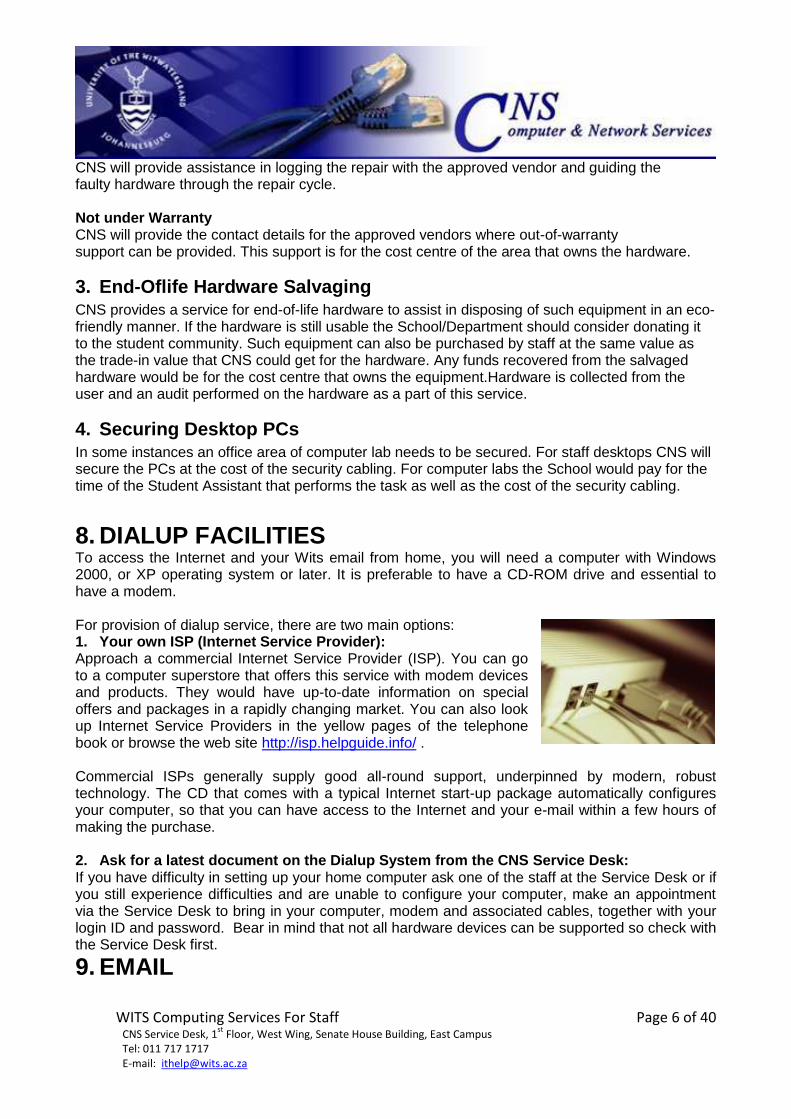
8. DIALUP FACILITIES To access the Internet and your Wits email from home, you will need a computer with Windows 2000, or XP operating system or later. It is preferable to have a CD-ROM drive and essential to have a modem. For provision of dialup service, there are two main options: 1. Your own ISP (Internet Service Provider): Approach a commercial Internet Service Provider (ISP). You can go to a computer superstore that offers this service with modem devices and products. They would have up-to-date information on special offers and packages in a rapidly changing market. You can also look up Internet Service Providers in the yellow pages of the telephone book or browse the web site http://isp.helpguide.info/ . Commercial ISPs generally supply good all-round support, underpinned by modern, robust technology. The CD that comes with a typical Internet start-up package automatically configures your computer, so that you can have access to the Internet and your e-mail within a few hours of making the purchase. 2. Ask for a latest document on the Dialup System from the CNS Service Desk: If you have difficulty in setting up your home computer ask one of the staff at the Service Desk or if you still experience difficulties and are unable to configure your computer, make an appointment via the Service Desk to bring in your computer, modem and associated cables, together with your login ID and password. Bear in mind that not all hardware devices can be supported so check with the Service Desk first.
9. EMAIL
WITS Computing Services For Staff Page 7 of 40 CNS Service Desk, 1
st Floor, West Wing, Senate House Building, East Campus
Tel: 011 717 1717 E-mail: [email protected]
1. Email Distribution List There are a number of options available to you when you require a non-person or “function/service”- related email addresses.
1. Internal Email Distribution Group There are two options for Internet Email Distribution Groups that can be selected for this type of Email Group:
1) (Receive Only - Mailbox) Each member of the email group receives a copy of the email in their Inbox.
i. You can file the email automatically and always have access to it (online or offline) Or ... You can view all your email (including these group emails) in your central Inbox nad file your email manually.
ii. You can access the email to this group through the Internet using your normal Webmail, since the email arrives in your Inbox anyway.
iii. You would always know if an email has been replied to avoid multiple email replies by agreeing as a group that when replying to emails, you would include the group email address as well.
iv. You would always know if an email has been deleted as there are multiple copies (one per group member)
2) (Send and Receive - Mailbox) With this option a central Mailbox is created for the group on the server, to which every member of the email group creates a connection with their Email Client or accesses through the web. With this service you can:
i. You can send/receive as this email address instead of yourself personally. ii. On the downside if anyone in the team deletes an email from this mailbox no
else in the group would know about it. iii. You can connect to the mailbox through the Internet Webmail Interface, but
you have to the account specific login/password (You can‟t login to the account using your own login/password
2. “Internet Email List” (List Server List) This list allows for internal and external to WITS users This list has the following criteria:
a. This list is moderated by a nominated custodian (typically the requestor) b. Any person with access to the Internet can subscribe/unsubscribe to the list.
3. Marketing Email Shot (Email blast) to a select group of users a. You could need to communicate to a select group of people both internet and/or
external to WITS and selectively send communications to such groups b. Marketing provides a service subscribed to called RocketSeed which allows you to
send an “email blast”/”email shot” to a list of recipient email addresses. c. You would need to supply the list of email addresses for the email shot to Marketing.
4. Student Email Shot to a select group of students a. Refer to AISU to send the communication
5. Select Email Shot to a select group of staff a. Refer to AISU to send the communication

WITS Computing Services For Staff Page 8 of 40 CNS Service Desk, 1
st Floor, West Wing, Senate House Building, East Campus
Tel: 011 717 1717 E-mail: [email protected]
2. Calendar Access CNS provides an integrated email and calendaring environment. Managers can share their calendaer, and email and/or email rights with their secretary or teams can share their calendars. Even without calenda sharing Free/Busy times for staff are shown in the calendaring system. You can block out portions of your disry using recurring entries, for example booking lunchtimes for the whole year in one calendar definition. Lecturers can book tutorials in the CNS labs through the Global Address List (GAL). The format on the GAL for such lab calendars is: #dept-CNS-Labname
3. Email Software CNS provides enterprise level email to all staff. Currently the main email client that is supported is Outlook2007. Users can also connect to the email server using IMAP, though this is more advised for Linux and Apple Mac users. You can access your email through the web anywhere in the world, by going to: https://email.wits.ac.za/exchange
4. Email Mailbox Access To gain access to another user‟s mailbox you are required to log a call with the Staff Service Desk or email [email protected] You will be guided through the relevant procedure.
5. Email Mailbox Size Increase The default emailbox size allocated to you as the user on the email server is 256MB. Thought this could be increased to 1GB (Max) this doesn‟t mean that all users (or even most) should have such large email boxes. To check your email box size in Outlook:

WITS Computing Services For Staff Page 9 of 40 CNS Service Desk, 1
st Floor, West Wing, Senate House Building, East Campus
Tel: 011 717 1717 E-mail: [email protected]
Regardless of the size of the emailbox, you would still need to archive your email to your local PC to the “C:\My Mail” folder.
For assistance to archive your email effectively log a call with the CNS Staff Service Desk.

WITS Computing Services For Staff Page 10 of 40 CNS Service Desk, 1
st Floor, West Wing, Senate House Building, East Campus
Tel: 011 717 1717 E-mail: [email protected]
6. Email Spam CNS‟s email gateway blocks tens of thousands of spam email on a daily basis. Some emails cannot be confirmed as spam and therefore is allowed to be delivered to your mailbox. Should you receive too much spam here are some guidelines to follow to help you manage spam email:
1. Never reply to spam email. The email will allow you to unsubscribe, but determined spammers use this as a sign of encouragement. So instead of being removed from the list, you receive even more spam.
2. Your “Out-of-Office” email notice that is sent as an automated reply when you are on leave also acts as a signal to the spammers that your email account is active and can therefore be spammed successfully. This raises the debatable point of using Out of Office notices, but it is often difficult to avoid using the Out-of-Office notice.
3. If you receive spam email, forward it to [email protected] . The spammer will be added to a black list and not be able to send emails to you anymore.
4. You can also allow your own blacklist. Any email you receive that you want to block in future, you can simply right-click and select to block the sender, which will add them to your blacklist.
5. Should your spam be so unmanageable that the steps above doesn‟t help you can resort to white listing. The concept is all email to will be blocked, unless you have specified the email address or the domain of the address (wits.ac.za is the domain for WITS) As long as you know who emails you and you have built your list this could work very well, even if it requires a bit of effort to setup initially.
10. ANTIVIRUS
1. Procedure for checking for viruses on Memory Sticks (Flash Drives) 1. You can insert the memory stick into your computer, and scan it for viruses using the Wits
antivirus software. 2. You can bring your memory sticks to the CNS Staff Service Desk where the memory stick
will be scanned for computer viruses. 3. Alternatively you could seek outside assistance or reformat the USB but in the latter case,
you would loose all information on the USB.
Formatting your memory stick will result in the loss of all information on the memory stick. Consider carefully before formatting your memory stick.
WITS Computing Services For Staff Page 11 of 40 CNS Service Desk, 1
st Floor, West Wing, Senate House Building, East Campus
Tel: 011 717 1717 E-mail: [email protected]
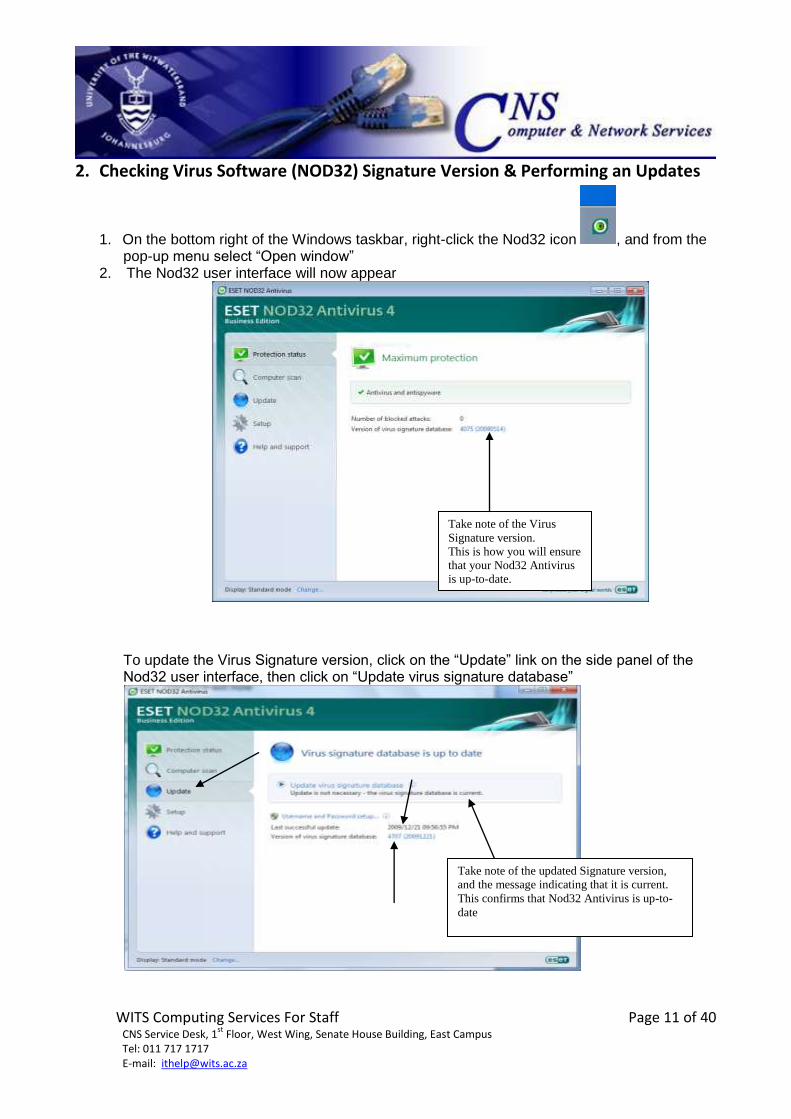
2. Checking Virus Software (NOD32) Signature Version & Performing an Updates
1. On the bottom right of the Windows taskbar, right-click the Nod32 icon , and from the pop-up menu select “Open window”
2. The Nod32 user interface will now appear To update the Virus Signature version, click on the “Update” link on the side panel of the Nod32 user interface, then click on “Update virus signature database”
Take note of the Virus
Signature version.
This is how you will ensure
that your Nod32 Antivirus
is up-to-date.
Take note of the updated Signature version,
and the message indicating that it is current.
This confirms that Nod32 Antivirus is up-to-
date
WITS Computing Services For Staff Page 12 of 40 CNS Service Desk, 1
st Floor, West Wing, Senate House Building, East Campus
Tel: 011 717 1717 E-mail: [email protected]
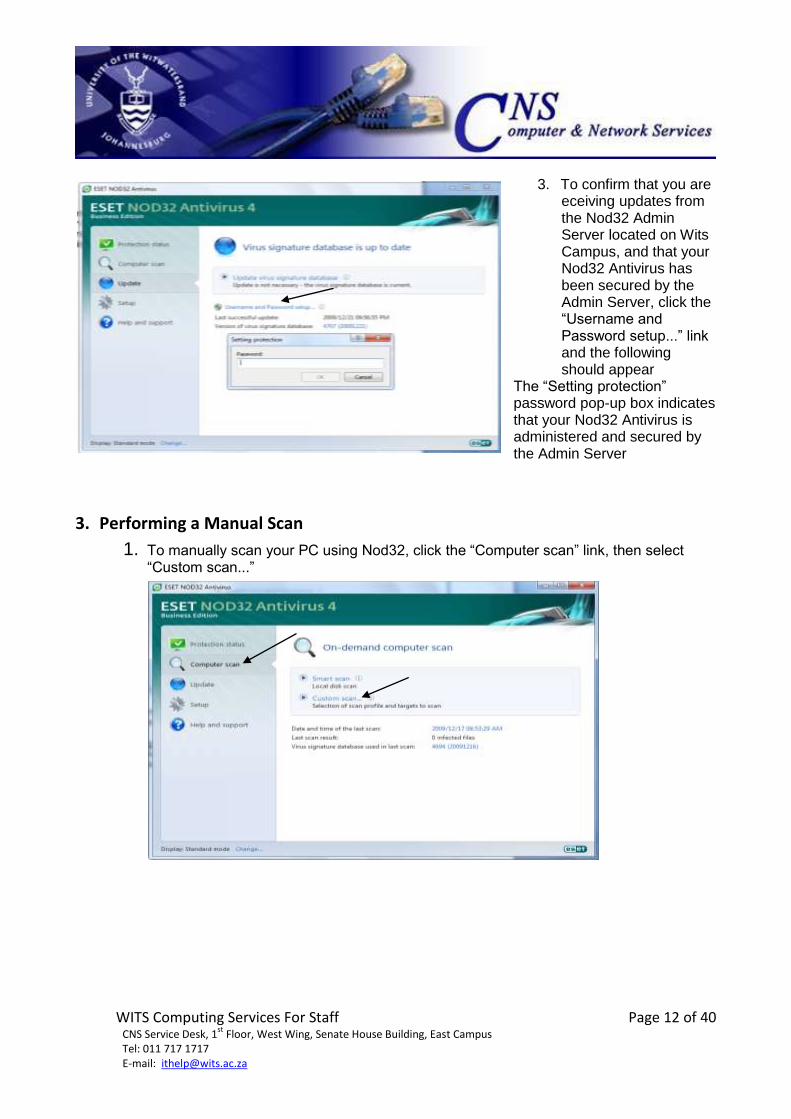
3. To confirm that you are
eceiving updates from the Nod32 Admin Server located on Wits Campus, and that your Nod32 Antivirus has been secured by the Admin Server, click the “Username and Password setup...” link and the following should appear
The “Setting protection” password pop-up box indicates that your Nod32 Antivirus is administered and secured by the Admin Server
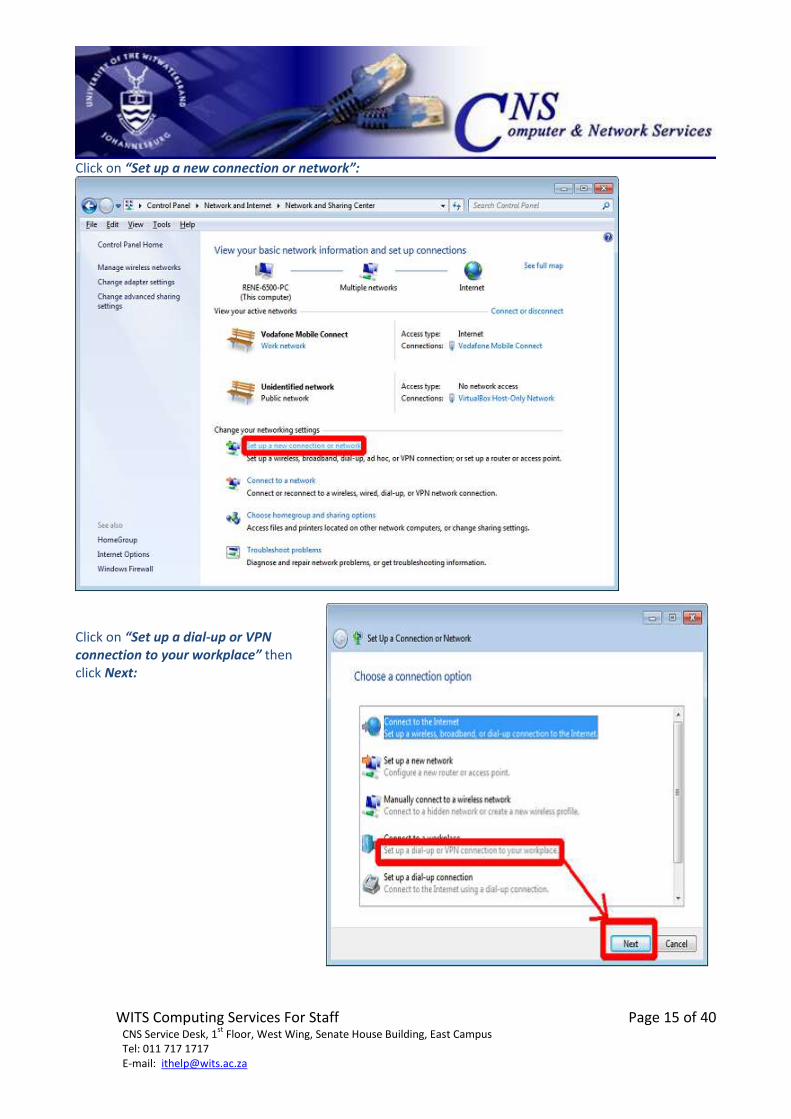
3. Performing a Manual Scan
1. To manually scan your PC using Nod32, click the “Computer scan” link, then select “Custom scan...”

WITS Computing Services For Staff Page 13 of 40 CNS Service Desk, 1
st Floor, West Wing, Senate House Building, East Campus
Tel: 011 717 1717 E-mail: [email protected]
2. In the “Custom Scan” settings, select the “Operating Memory”, all local hard drives and partitions, as well as any usb and external disks that are attached to your PC
Then click on “Scan” to commence scanning and cleaning process Once again, to confirm that your Nod32 Antivirus is being administered by the Nod32 Admin Server located on Wits Campus, click on “Setup” and the following should appear Again, the “Setting protection” password pop-up box indicates that your Nod32 Antivirus is administered and secured by the Admin Server
Leave the Scan profile set to
In-depth scan
DO NOT TICK “Scan without cleaning!!!”

WITS Computing Services For Staff Page 14 of 40 CNS Service Desk, 1
st Floor, West Wing, Senate House Building, East Campus
Tel: 011 717 1717 E-mail: [email protected]
11. VIRTUAL PRIVATE NETWORK (VPN) FOR WINDOWS 7 In your Control Panel
Select “Network and Internet”:
Click on “Network & Sharing Center”:
WITS Computing Services For Staff Page 15 of 40 CNS Service Desk, 1
st Floor, West Wing, Senate House Building, East Campus
Tel: 011 717 1717 E-mail: [email protected]
Click on “Set up a new connection or network”:
Click on “Set up a dial-up or VPN connection to your workplace” then click Next:

WITS Computing Services For Staff Page 16 of 40 CNS Service Desk, 1
st Floor, West Wing, Senate House Building, East Campus
Tel: 011 717 1717 E-mail: [email protected]
Click on “No, create new connection”:
Click on “Use my Internet connection (VPN)”:
Enter your "Internet Address" as: contivity.wits.ac.za Enter your "Destination name" as: WITS Click on the "Next" button

WITS Computing Services For Staff Page 17 of 40 CNS Service Desk, 1
st Floor, West Wing, Senate House Building, East Campus
Tel: 011 717 1717 E-mail: [email protected]
Enter your Wits student number in the “User name” box Enter your Wits student password in the “Password” box Enter Students in the “Domain” box
WITS Computing Services For Staff Page 18 of 40 CNS Service Desk, 1
st Floor, West Wing, Senate House Building, East Campus
Tel: 011 717 1717 E-mail: [email protected]
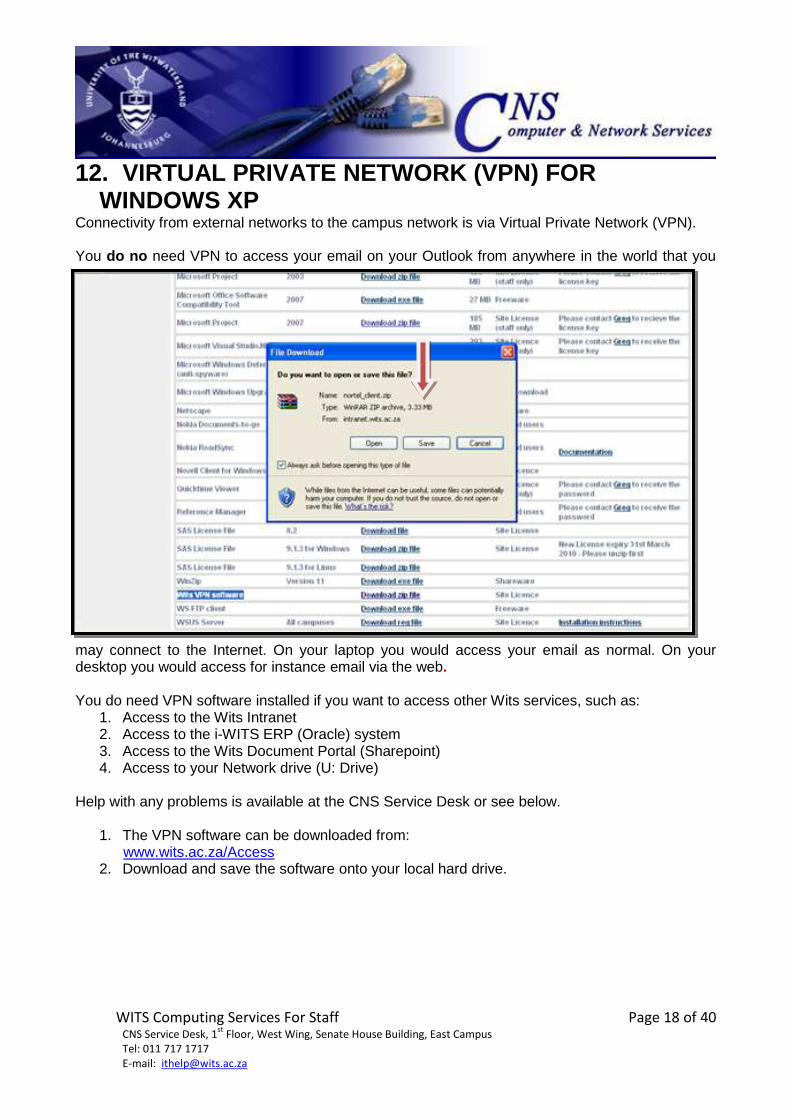
12. VIRTUAL PRIVATE NETWORK (VPN) FOR WINDOWS XP
Connectivity from external networks to the campus network is via Virtual Private Network (VPN). You do no need VPN to access your email on your Outlook from anywhere in the world that you
may connect to the Internet. On your laptop you would access your email as normal. On your desktop you would access for instance email via the web. You do need VPN software installed if you want to access other Wits services, such as:
1. Access to the Wits Intranet 2. Access to the i-WITS ERP (Oracle) system 3. Access to the Wits Document Portal (Sharepoint) 4. Access to your Network drive (U: Drive)
Help with any problems is available at the CNS Service Desk or see below.
1. The VPN software can be downloaded from: www.wits.ac.za/Access
2. Download and save the software onto your local hard drive.
WITS Computing Services For Staff Page 19 of 40 CNS Service Desk, 1
st Floor, West Wing, Senate House Building, East Campus
Tel: 011 717 1717 E-mail: [email protected]
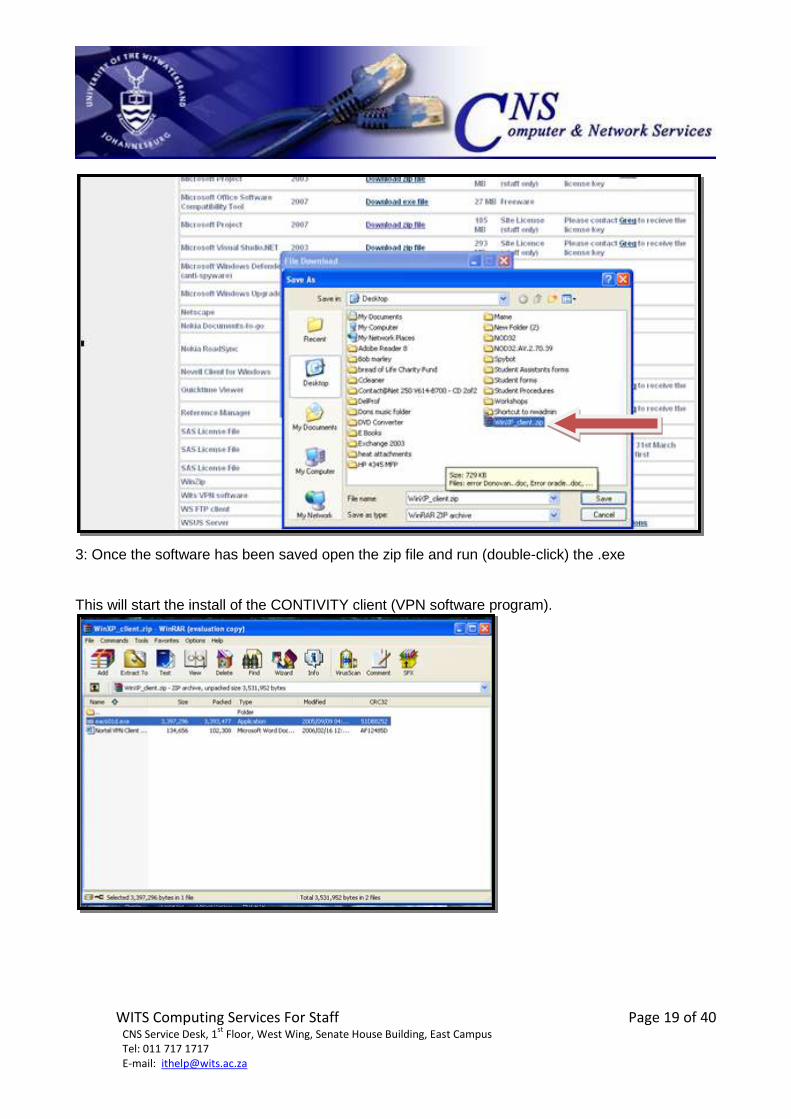
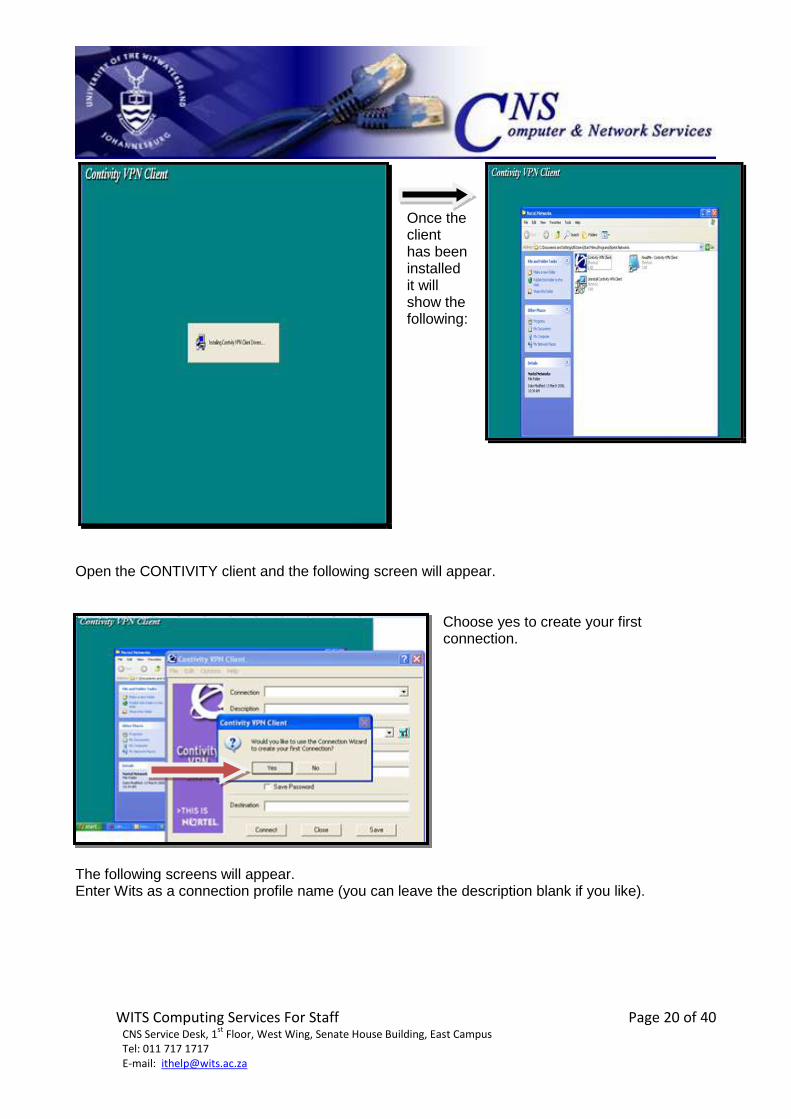
3: Once the software has been saved open the zip file and run (double-click) the .exe This will start the install of the CONTIVITY client (VPN software program).
WITS Computing Services For Staff Page 20 of 40 CNS Service Desk, 1
st Floor, West Wing, Senate House Building, East Campus
Tel: 011 717 1717 E-mail: [email protected]
Once the client has been installed it will show the following:
Open the CONTIVITY client and the following screen will appear.
Choose yes to create your first connection.
The following screens will appear. Enter Wits as a connection profile name (you can leave the description blank if you like).

WITS Computing Services For Staff Page 21 of 40 CNS Service Desk, 1
st Floor, West Wing, Senate House Building, East Campus
Tel: 011 717 1717 E-mail: [email protected]
Click on “Next”. Select "Username and Password" radio button for Authentication Type.
Click on “Next”.
Enter the Username and password as given and check the Save Password box if you like. The Username will be your Active Directory username i.e. ds\YourStaffNumber. Your password will be the same password as your Wits email password. Click on “Next”.
Select the "Yes, I have a Group ID and Group Password" radio button. Under “Enter your Group ID:” enter: contivity100 Under “Enter your Group Password:” enter: VPN%pass100 Click on “Next”.
WITS Computing Services For Staff Page 22 of 40 CNS Service Desk, 1
st Floor, West Wing, Senate House Building, East Campus
Tel: 011 717 1717 E-mail: [email protected]
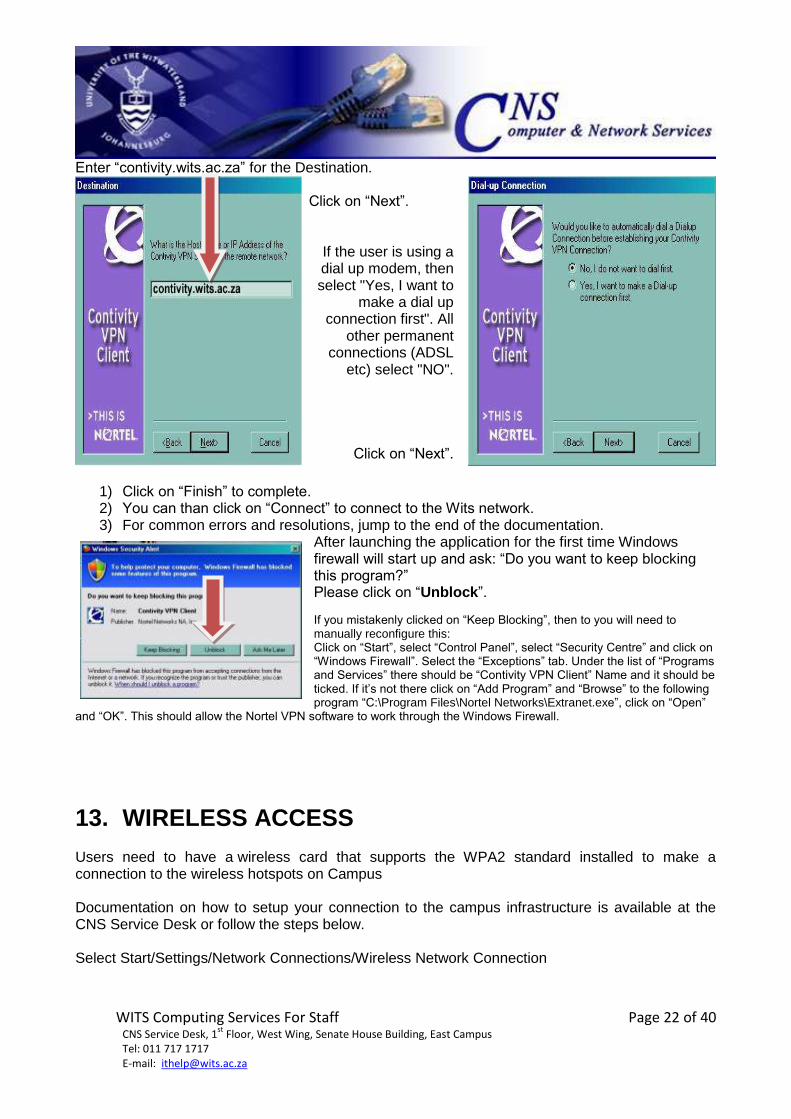
Enter “contivity.wits.ac.za” for the Destination.
Click on “Next”.
If the user is using a dial up modem, then select "Yes, I want to
make a dial up connection first". All
other permanent connections (ADSL
etc) select "NO".
Click on “Next”.
1) Click on “Finish” to complete. 2) You can than click on “Connect” to connect to the Wits network. 3) For common errors and resolutions, jump to the end of the documentation.
After launching the application for the first time Windows firewall will start up and ask: “Do you want to keep blocking this program?” Please click on “Unblock”.
If you mistakenly clicked on “Keep Blocking”, then to you will need to manually reconfigure this: Click on “Start”, select “Control Panel”, select “Security Centre” and click on “Windows Firewall”. Select the “Exceptions” tab. Under the list of “Programs and Services” there should be “Contivity VPN Client” Name and it should be ticked. If it‟s not there click on “Add Program” and “Browse” to the following program “C:\Program Files\Nortel Networks\Extranet.exe”, click on “Open”
and “OK”. This should allow the Nortel VPN software to work through the Windows Firewall.
13. WIRELESS ACCESS Users need to have a wireless card that supports the WPA2 standard installed to make a connection to the wireless hotspots on Campus Documentation on how to setup your connection to the campus infrastructure is available at the CNS Service Desk or follow the steps below. Select Start/Settings/Network Connections/Wireless Network Connection
WITS Computing Services For Staff Page 23 of 40 CNS Service Desk, 1
st Floor, West Wing, Senate House Building, East Campus
Tel: 011 717 1717 E-mail: [email protected]
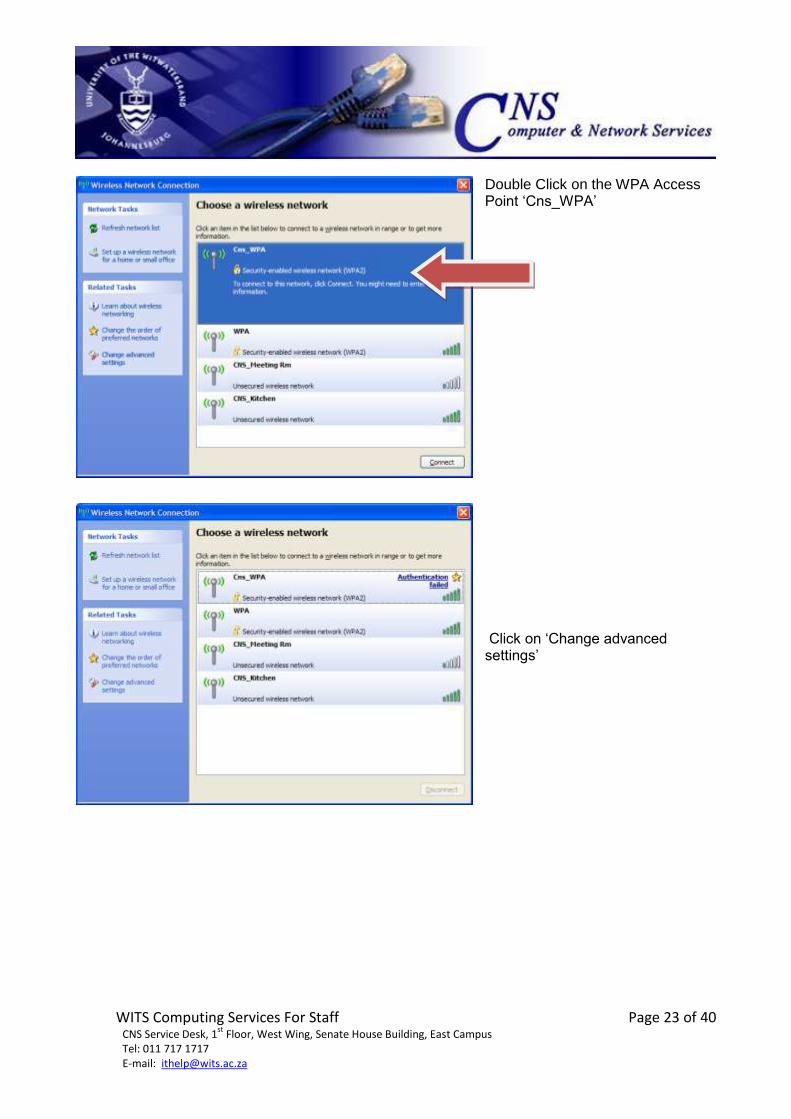
Double Click on the WPA Access Point „Cns_WPA‟
Click on „Change advanced settings‟

WITS Computing Services For Staff Page 24 of 40 CNS Service Desk, 1
st Floor, West Wing, Senate House Building, East Campus
Tel: 011 717 1717 E-mail: [email protected]
Select the „Wireless Networks‟ tab on the top of the dialog
Select the network and click on the Properties
button
Select the „Authentication‟ tab, change the EAP type to „Protected EAP (PEAP)‟, disable the two authentication options below that and click on „Properties‟
Disable „Validate server certificate‟ and
click on the „Configure‟
button
WITS Computing Services For Staff Page 25 of 40 CNS Service Desk, 1
st Floor, West Wing, Senate House Building, East Campus
Tel: 011 717 1717 E-mail: [email protected]
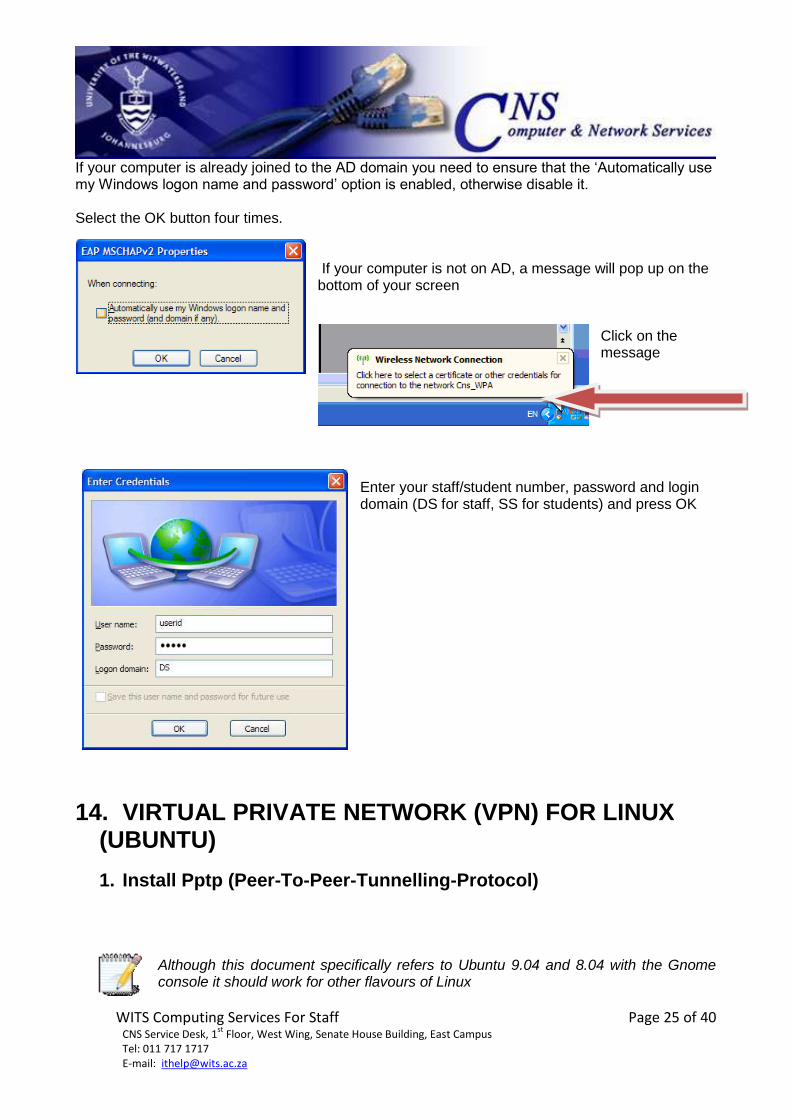
If your computer is already joined to the AD domain you need to ensure that the „Automatically use my Windows logon name and password‟ option is enabled, otherwise disable it. Select the OK button four times.
If your computer is not on AD, a message will pop up on the bottom of your screen
Click on the message
Enter your staff/student number, password and login domain (DS for staff, SS for students) and press OK
14. VIRTUAL PRIVATE NETWORK (VPN) FOR LINUX (UBUNTU)
1. Install Pptp (Peer-To-Peer-Tunnelling-Protocol)
Although this document specifically refers to Ubuntu 9.04 and 8.04 with the Gnome console it should work for other flavours of Linux
WITS Computing Services For Staff Page 26 of 40 CNS Service Desk, 1
st Floor, West Wing, Senate House Building, East Campus
Tel: 011 717 1717 E-mail: [email protected]
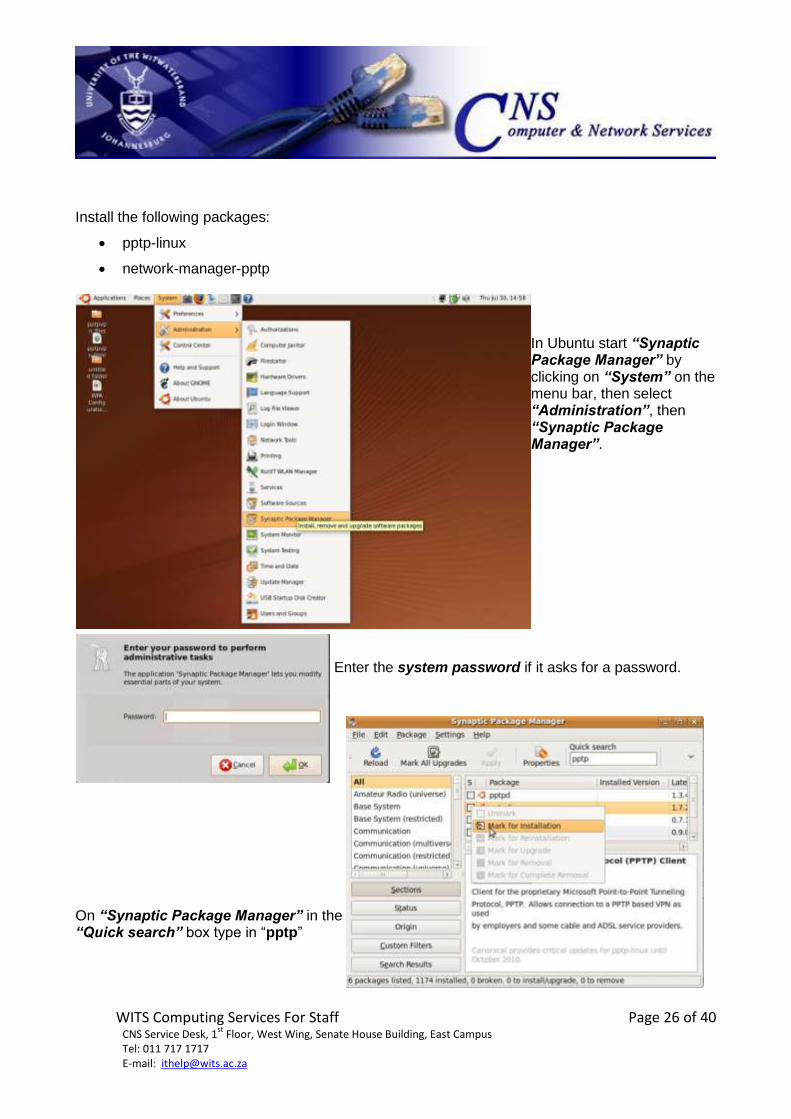
Install the following packages:
pptp-linux
network-manager-pptp
In Ubuntu start “Synaptic Package Manager” by clicking on “System” on the menu bar, then select “Administration”, then “Synaptic Package Manager”.
Enter the system password if it asks for a password.
On “Synaptic Package Manager” in the “Quick search” box type in “pptp”
WITS Computing Services For Staff Page 27 of 40 CNS Service Desk, 1
st Floor, West Wing, Senate House Building, East Campus
Tel: 011 717 1717 E-mail: [email protected]
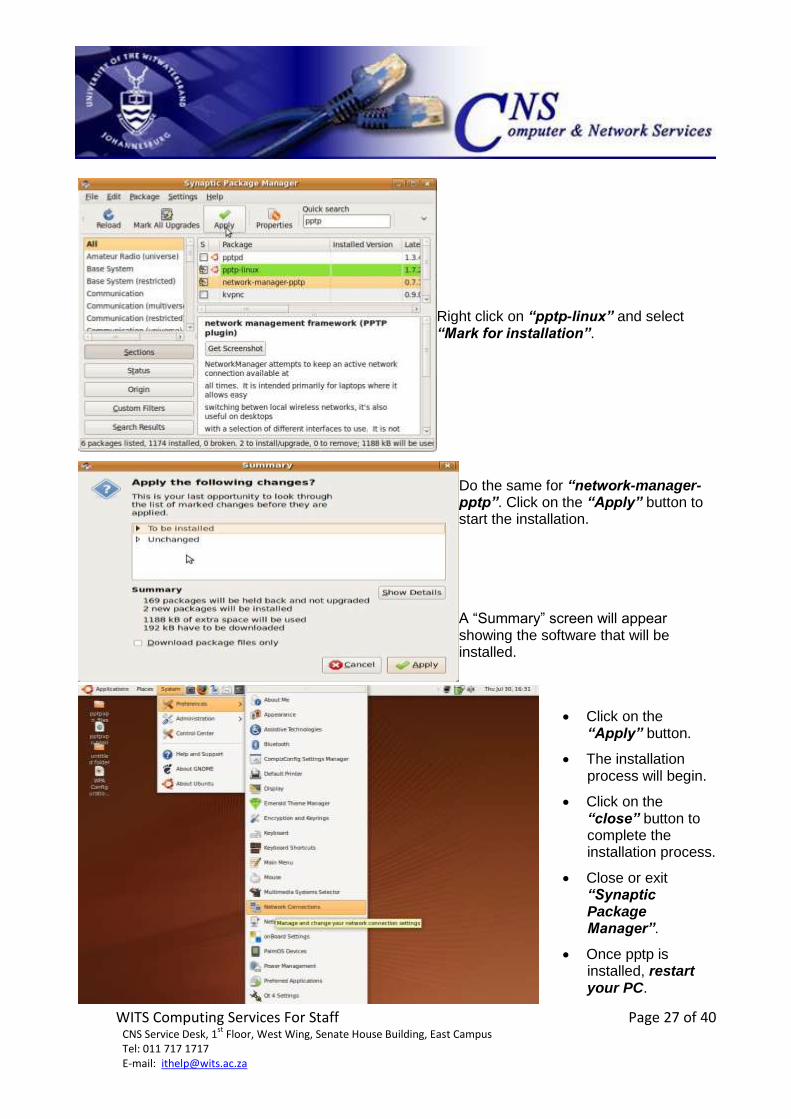
Right click on “pptp-linux” and select “Mark for installation”.
Do the same for “network-manager-pptp”. Click on the “Apply” button to start the installation.
A “Summary” screen will appear showing the software that will be installed.
Click on the “Apply” button.
The installation process will begin.
Click on the “close” button to complete the installation process.
Close or exit “Synaptic Package Manager”.
Once pptp is installed, restart your PC.
WITS Computing Services For Staff Page 28 of 40 CNS Service Desk, 1
st Floor, West Wing, Senate House Building, East Campus
Tel: 011 717 1717 E-mail: [email protected]
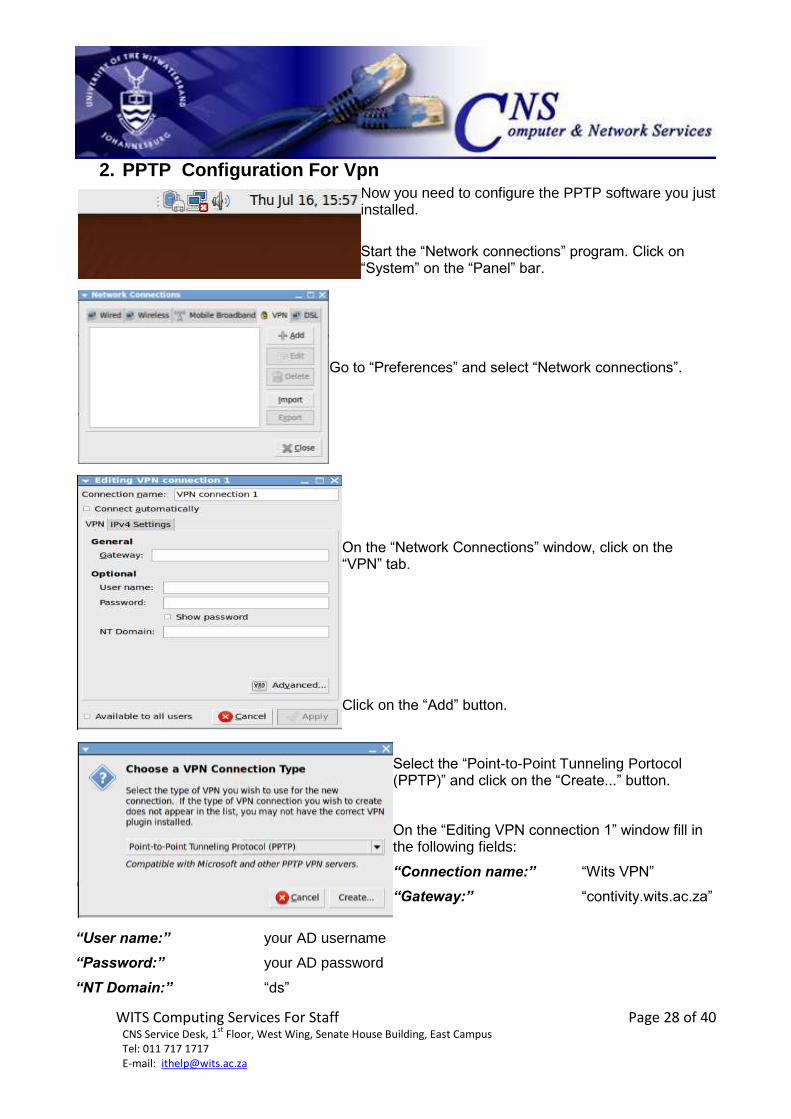
2. PPTP Configuration For Vpn Now you need to configure the PPTP software you just installed.
Start the “Network connections” program. Click on “System” on the “Panel” bar.
Go to “Preferences” and select “Network connections”.
On the “Network Connections” window, click on the “VPN” tab.
Click on the “Add” button.
Select the “Point-to-Point Tunneling Portocol (PPTP)” and click on the “Create...” button.
On the “Editing VPN connection 1” window fill in the following fields:
“Connection name:” “Wits VPN”
“Gateway:” “contivity.wits.ac.za”
“User name:” your AD username
“Password:” your AD password
“NT Domain:” “ds”
WITS Computing Services For Staff Page 29 of 40 CNS Service Desk, 1
st Floor, West Wing, Senate House Building, East Campus
Tel: 011 717 1717 E-mail: [email protected]
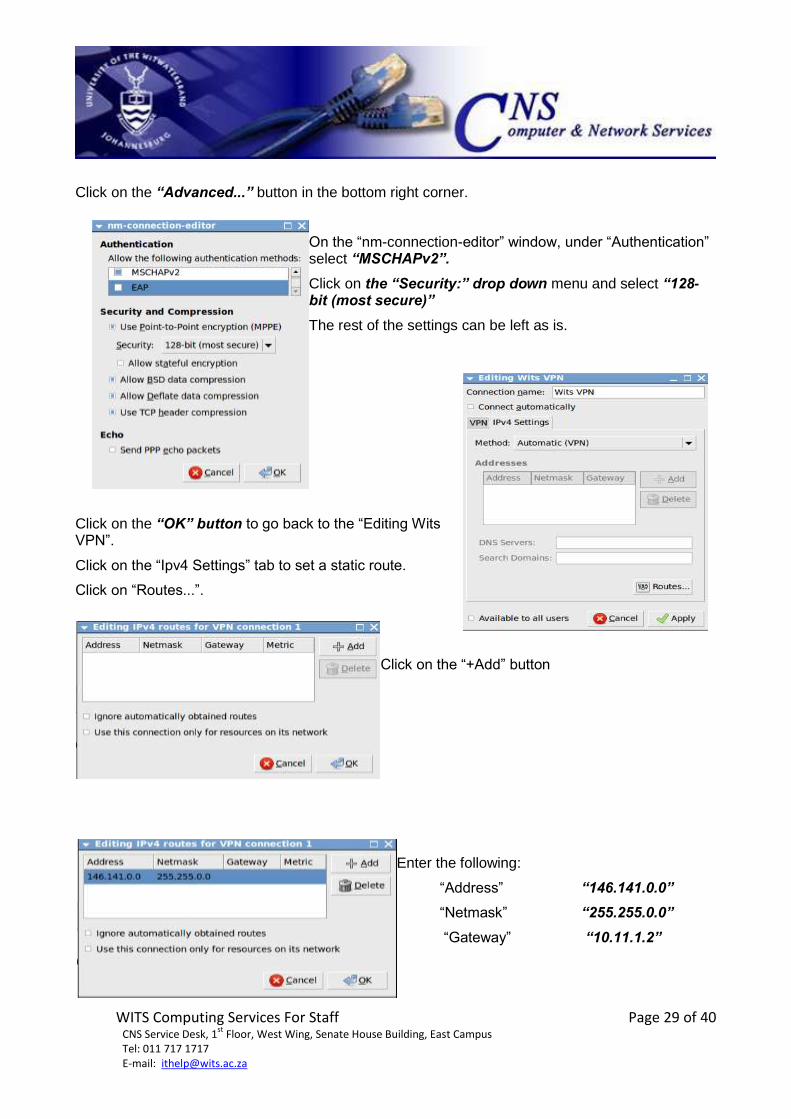
Click on the “Advanced...” button in the bottom right corner.
On the “nm-connection-editor” window, under “Authentication” select “MSCHAPv2”.
Click on the “Security:” drop down menu and select “128-bit (most secure)”
The rest of the settings can be left as is.
Click on the “OK” button to go back to the “Editing Wits VPN”.
Click on the “Ipv4 Settings” tab to set a static route.
Click on “Routes...”.
Click on the “+Add” button
Enter the following:
“Address” “146.141.0.0”
“Netmask” “255.255.0.0”
“Gateway” “10.11.1.2”
WITS Computing Services For Staff Page 30 of 40 CNS Service Desk, 1
st Floor, West Wing, Senate House Building, East Campus
Tel: 011 717 1717 E-mail: [email protected]
Click on the “OK” button.
Click on the “Apply” button of the “Editing Wits VPN” window to apply all settings.
Click on the “close” button of the “Network Connections” window to close the window.
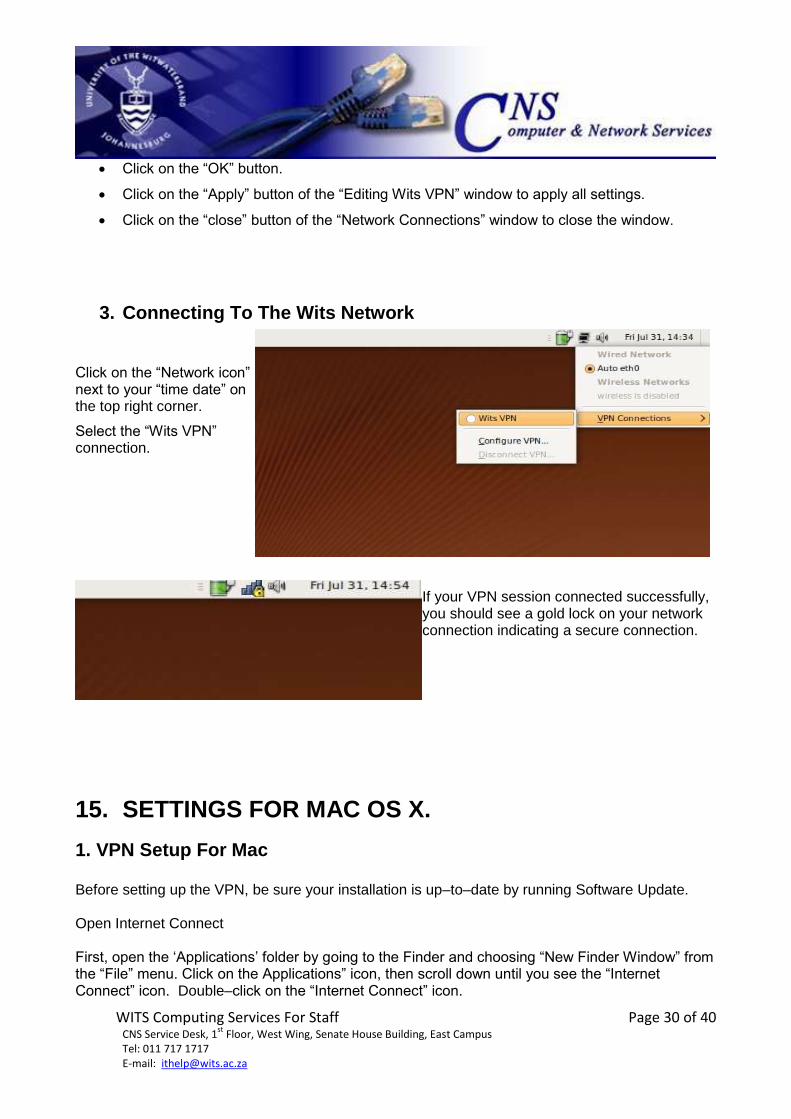
3. Connecting To The Wits Network
Click on the “Network icon” next to your “time date” on the top right corner.
Select the “Wits VPN” connection.
If your VPN session connected successfully, you should see a gold lock on your network connection indicating a secure connection.
15. SETTINGS FOR MAC OS X.
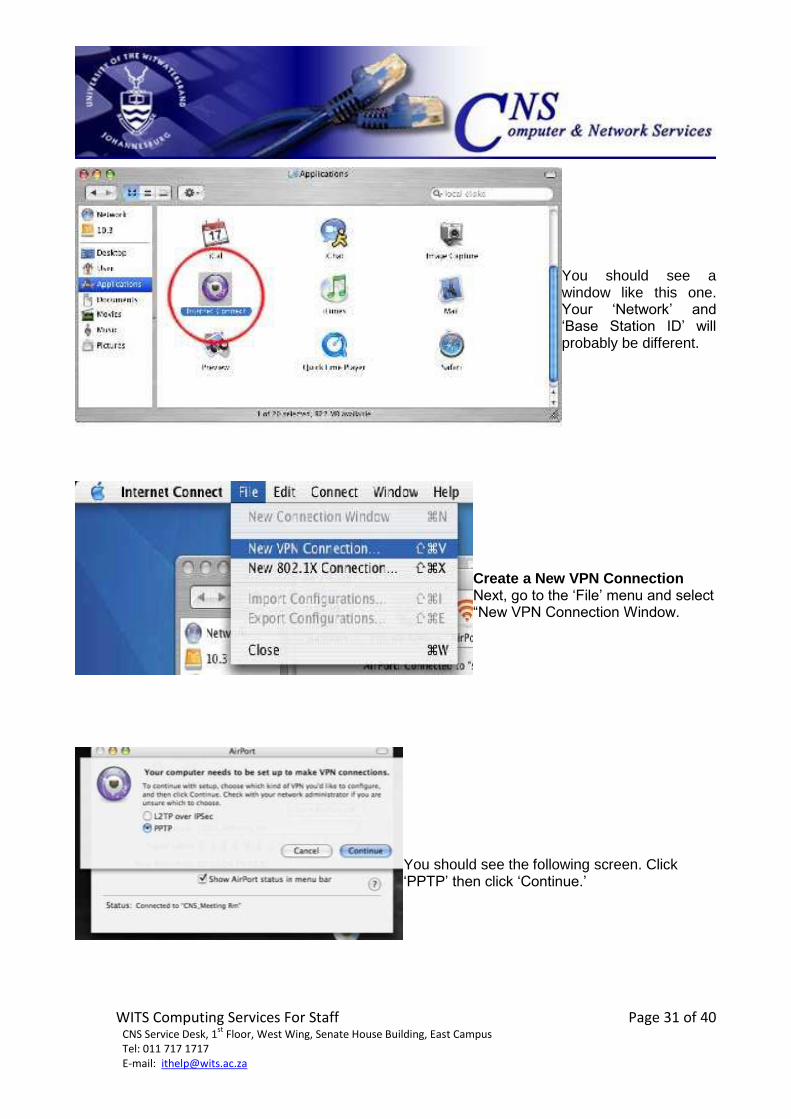
1. VPN Setup For Mac Before setting up the VPN, be sure your installation is up–to–date by running Software Update. Open Internet Connect First, open the „Applications‟ folder by going to the Finder and choosing “New Finder Window” from the “File” menu. Click on the Applications” icon, then scroll down until you see the “Internet Connect” icon. Double–click on the “Internet Connect” icon.
WITS Computing Services For Staff Page 31 of 40 CNS Service Desk, 1
st Floor, West Wing, Senate House Building, East Campus
Tel: 011 717 1717 E-mail: [email protected]
You should see a window like this one. Your „Network‟ and „Base Station ID‟ will probably be different.
Create a New VPN Connection Next, go to the „File‟ menu and select “New VPN Connection Window.
You should see the following screen. Click „PPTP‟ then click „Continue.‟
WITS Computing Services For Staff Page 32 of 40 CNS Service Desk, 1
st Floor, West Wing, Senate House Building, East Campus
Tel: 011 717 1717 E-mail: [email protected]
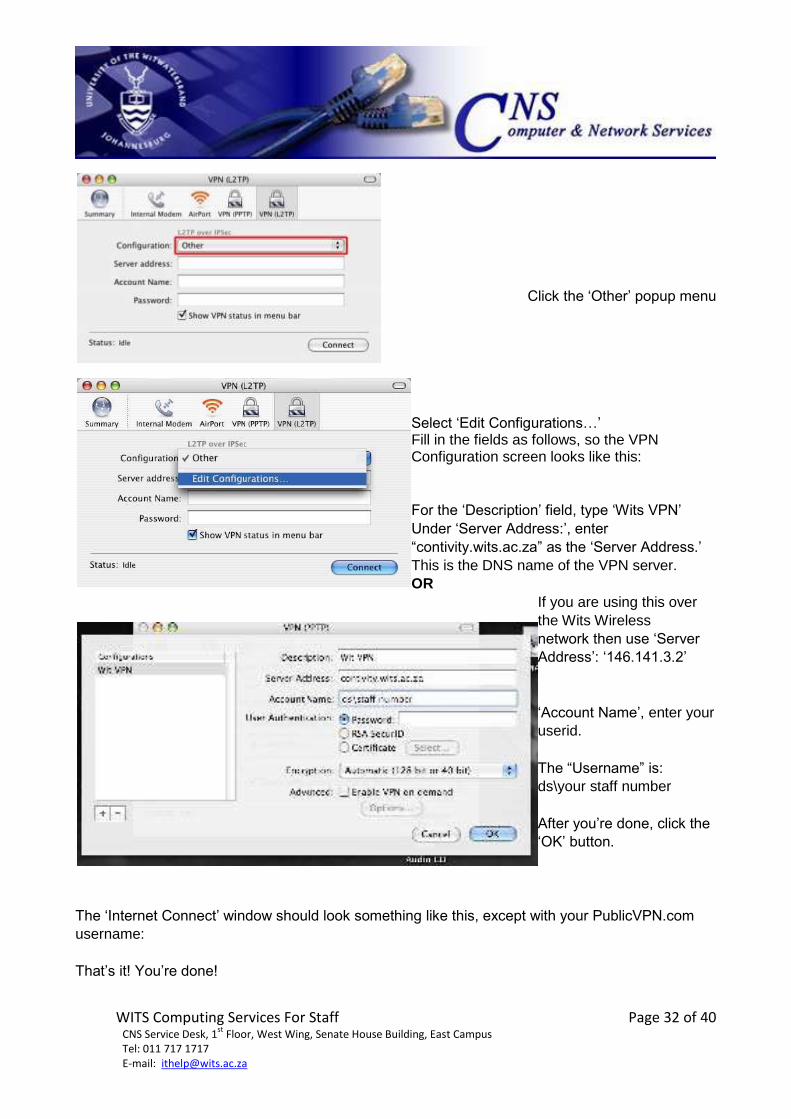
Click the „Other‟ popup menu
Select „Edit Configurations…‟ Fill in the fields as follows, so the VPN Configuration screen looks like this:
For the „Description‟ field, type „Wits VPN‟
Under „Server Address:‟, enter
“contivity.wits.ac.za” as the „Server Address.‟
This is the DNS name of the VPN server.
OR
If you are using this over
the Wits Wireless
network then use „Server
Address‟: „146.141.3.2‟
„Account Name‟, enter your
userid.
The “Username” is:
ds\your staff number
After you‟re done, click the
„OK‟ button.
The „Internet Connect‟ window should look something like this, except with your PublicVPN.com
username:
That‟s it! You‟re done!
WITS Computing Services For Staff Page 33 of 40 CNS Service Desk, 1
st Floor, West Wing, Senate House Building, East Campus
Tel: 011 717 1717 E-mail: [email protected]
When you want to connect to the Wits VPN, double–click on “Internet Connect,” click on “Wits
VPN”, and then click the „Connect‟ button.
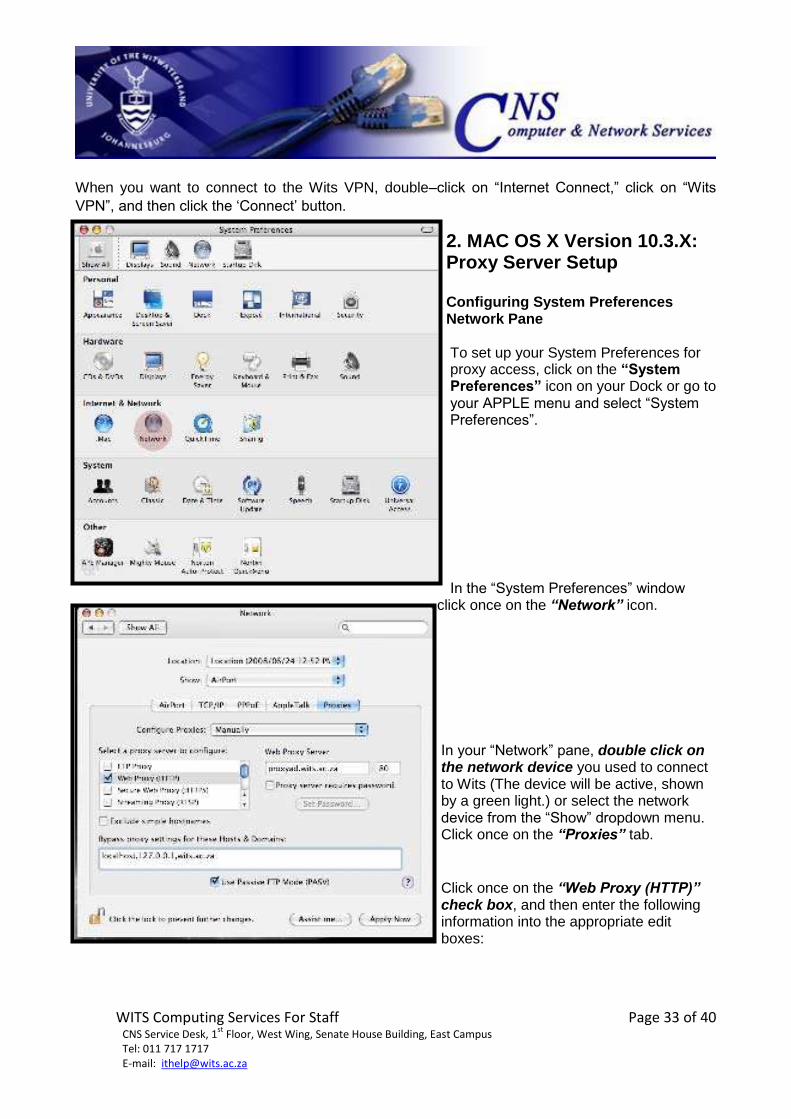
2. MAC OS X Version 10.3.X: Proxy Server Setup Configuring System Preferences Network Pane To set up your System Preferences for proxy access, click on the “System Preferences” icon on your Dock or go to your APPLE menu and select “System Preferences”. In the “System Preferences” window
click once on the “Network” icon.
In your “Network” pane, double click on the network device you used to connect to Wits (The device will be active, shown by a green light.) or select the network device from the “Show” dropdown menu. Click once on the “Proxies” tab.
Click once on the “Web Proxy (HTTP)” check box, and then enter the following information into the appropriate edit boxes:

WITS Computing Services For Staff Page 34 of 40 CNS Service Desk, 1
st Floor, West Wing, Senate House Building, East Campus
Tel: 011 717 1717 E-mail: [email protected]
Proxy settings in Internet Explorer Click on the “Explorer” button and select “Preferences”.
In the “Internet Explorer Preferences”
window, in the left pane select “Proxies”.
Click on the “Settings” tab next to the “Web Proxy:” box.

WITS Computing Services For Staff Page 35 of 40 CNS Service Desk, 1
st Floor, West Wing, Senate House Building, East Campus
Tel: 011 717 1717 E-mail: [email protected]
Under the “Use Proxy Servers” tick the “Web Proxy:” box. Also tick the “Use Web Proxy for all” box.
For Staff members: Set Web Proxy Server address to “proxyad.wits.ac.za” and the “Port:” to “80”.
Click on “Ok”, “Ok”
3. Firefox Proxy Setup Open Firefox.
Click on “Firefox” and select “Preferences”. In the “Preferences” window click on “Advanced” and then click on the “Network” tab. Click on “Settings”. Under the “Advanced” window select the “Manual proxy configuration:” button. In the “Address:” field add the following: For Staff members: “proxyad.wits.ac.za” and the “Port:” to “80”.
Click on “Use this proxy server for all protocols”.

WITS Computing Services For Staff Page 36 of 40 CNS Service Desk, 1
st Floor, West Wing, Senate House Building, East Campus
Tel: 011 717 1717 E-mail: [email protected]
Under the “No Proxy for:” enter “.wits.ac.za”.
Once this is set click on the “Ok” button. Then “Ok” and “Ok” again.
When you start browsing a popup box will appear asking for your username and password. The “Username” would be: For staff: ds\your staff number here The password should be your password you use to access your Email.
16. OTHER NETWORKS SERVICES
1. Physical Network Points For the installation of additional network points in offices or existing classrooms or computer labs simply contact the CNS Staff Service Desk on ext. 71717 or email [email protected]. If required a site visit will be scheduled afterwhich you will be provided wit quotation for the additional network connectivity.
2. Firewall Rule Exceptions In some cases you may find access to certain web sites or web content restricted by the Wits network firewall. The firewall is maintained through a set of rules that can be changed to accommodate your academic and business needs. To request exceptions to the firewall rules to be added you can contact the CNS Staff Service Desk on ext. 71717 or email [email protected]. You will be required to complete a web form on the CNS Intranet site. The direct link to the form is: http://intranet.wits.ac.za/Support/CNS/ServiceForms/FirewallRuleRequestForm.htm
3. Static IP Addresses Some network devices such as network servers or network printers are required to have a static network IP address. This static IP address will help to uniquely identify the device on the Wits network, and function correctly. To request a static IP address you can contact the CNS Staff Service Desk on ext. 71717 or email [email protected] You will be required to complete a web form on the CNS Intranet site. The direct link to the form is: http://intranet.wits.ac.za/Support/CNS/ServiceForms/StaticIPRegistrationForm.htm
WITS Computing Services For Staff Page 37 of 40 CNS Service Desk, 1
st Floor, West Wing, Senate House Building, East Campus
Tel: 011 717 1717 E-mail: [email protected]
17. i-WITS (Oracle HR, Finance & Student System)
1. Requesting Additional Access For all i-Wits related calls you are advised to phone the CNS Staff Service Desk on 011 717 1717. Due to the large variety of requests you could have you will also be requested to complete the appropriate web form to which you will be directed.
2. Technical Problems For all i-Wits related calls you are advised to phone the CNS Staff Service Desk on 011 717 1717. Due to the large variety of requests you could have you will also be requested to complete the appropriate web form to which you will be directed.
3. Setting Your Office Telephone Number For all i-Wits related calls you are advised to phone the CNS Staff Service Desk on 011 717 1717. Due to the large variety of requests you could have you will also be requested to complete the appropriate web form to which you will be directed.
17. E-SERVICES
1. New Web Site The user should navigate to website to fill in and submit application form for a new website from the address: http://intranet.wits.ac.za/Support/CNS/EmailAndInternet/NewWebsiteRequest.htm On receipt of the application form the Webteam will contact the user with regards the application.

WITS Computing Services For Staff Page 38 of 40 CNS Service Desk, 1
st Floor, West Wing, Senate House Building, East Campus
Tel: 011 717 1717 E-mail: [email protected]
4. Document Portal (Sharepoint) A common document sharing and collaboration portal is available to staff at Wits.You can have one or more document libraries depending on the group (team, department, School, Faculty, etc.) that requires access to the library. You can upload/download any type of document up to 40MB in size per file. Different levels of access rights can protect the library from unauthorized access or the library can be opened for general viewing to any user with access to the Wits Intranet. Common uses for the libraries include sharing official forms, and policy/procedure documents, which multiple members of the library could access and update. Version control is automated, and checking out and checking in of documents facilitates the user‟s from updating the same document simultaneously. Access rights to the document library is updated by the owner of the library, which is typically someone in the team, department, School, etc.

WITS Computing Services For Staff Page 39 of 40 CNS Service Desk, 1
st Floor, West Wing, Senate House Building, East Campus
Tel: 011 717 1717 E-mail: [email protected]
The structure of the Document Portal is easy to navigate as it follows the same structure of the University Oranisational structure. Personal training in the use of the libraries is available from CNS. To access the Document Portal you can go to the Wits Intranet, and from “Quick links and logons”, select “Document Portal – Sharepoint (SPS)”
Or directly via http://share.ds.wits.ac.za To apply for a library complete the relevant web form, available from the “Quick links and logons” drop down box in the picture above.
5. Fax2email CNS offers efficient Inbound & Outbound fax services incorporated with Outlook. By default, all Wits user receives his/her own personal fax number (inbound, receiving of faxes). This is as secure and functions the same as an email address, faxes will be delivered to the connected email address only. Outbound faxing means that a fax can be sent from your pc, in an email message. Applications and approval is required for the Outbound fax option, since the HOD/HOS‟s approval is required because of the costs of fax sending that are involved. The application form for an Outbound fax account can be found on this link: http://intranet.wits.ac.za/Support/CNS/ServiceForms/FaxEmailFormOutboundFacility.htm . Or go to the Wits Intranet, Quick links and logons and select CNS-Service forms. Refer to screenshot in point 3 on the previous page to see where to find the CNS Service Forms.
WITS Computing Services For Staff Page 40 of 40 CNS Service Desk, 1
st Floor, West Wing, Senate House Building, East Campus
Tel: 011 717 1717 E-mail: [email protected]
18. VIDEO CONFERENCING EQUIPMENT Videoconferencing is a communication tool which is used for meetings, conferences and teaching. It connects groups of people in different locations and allows audio and visual interaction. Our video conference room is a venue equipped and maintained by CNS. For further information, please contact Greg Sulej on 011 717 1684 or email [email protected].
With thanks to the following individuals/teams for their contribution in creation of this guide: Ms. R.C. Schutte
Mr J. Parsad SCS Service Desk
CIS