With mobile devices and tablets becoming popular for ... · Responsive web design is becoming...
45
With mobile devices and tablets becoming popular for browsing the web, an increasing number of websites are turning to responsive designs to seamlessly adapt to any screen resolution.
Transcript of With mobile devices and tablets becoming popular for ... · Responsive web design is becoming...

With mobile devices and tablets becoming popular for browsing the web, an increasing number of
websites are turning to responsive designs to seamlessly adapt to any screen resolution.
Page 1
Introduction ................................................................................................................................................................... 2
What is a responsive web design? ............................................................................................................................. 3
Creating a Responsive Web Page ................................................................................................................................ 5
Getting Started ........................................................................................................................................................... 6
Introducing Media Queries ......................................................................................................................................... 10
Web Browser Support .............................................................................................................................................. 11
Creating a simple rule .............................................................................................................................................. 12
Testing Your Responsive Web Page .......................................................................................................................... 15
Use a Website .......................................................................................................................................................... 15
Use an Add-on ......................................................................................................................................................... 15
Use an Emulator ...................................................................................................................................................... 17
Check Your Site on a Mobile Device ........................................................................................................................ 17
The Page Header and Navigation ............................................................................................................................... 18
Creating the Header ................................................................................................................................................. 18
Creating the Navigation ............................................................................................................................................ 21
The Page Body and Footer ......................................................................................................................................... 35
Appendix A: Common Mobile Device Screen Sizes .................................................................................................. 37
Tablets ..................................................................................................................................................................... 37
Phones ..................................................................................................................................................................... 37
Appendix B: Responsive Websites ............................................................................................................................ 38
Appendix C: The Source Code ................................................................................................................................... 39
Fasthosts MasterClass Range ................................................................................................................................... 44

Page 2
Over the last two years, we have noticed a growing trend with visitors to our support websites.
Back in June 2011, when we started recording mobile visits, the vast majority of our customers
visited using a desktop PC or laptop. Just 2.5% of all sessions were from a mobile device. That
figure has steadily grown and, as of February 2013, is now sitting at around 6%. That figure
may not sound impressive, but with over 50,000 total visits in February, it’s still over 3,000
mobile visits for the month, or around 107 per day.
We have studied the results from our two support sites – our main support site for our
personal and business users, and our Reseller support site – and compared these to our
corporate website at http://www.fasthosts.co.uk. The percentage of visits from mobile devices
and tablets across these three sites are shown in the graph below.
There are a few different methods of displaying your website on mobile devices. A common
method is to have a separate mobile website, and then either switch your mobile users to that
interface automatically, or offer them a separate URL (such as http;//m.<your domain>). In
fact, our goMobi Mobile Website Builder is the easiest way to get a mobile site online in as
little time as possible.
However, if you choose to use this method and need to make an update to your website, you
face the task of updating two sites. If you plan on keeping the content of your site fresh with
regular updates, this could become a chore. To overcome this more and more sites are opting
for a responsive approach.
0
2
4
6
8
10
12
14
Personal / Business %
Reseller %
fasthosts.co.uk %

Page 3
In a nutshell, a responsive web site responds to different display sizes by resizing dynamically
to fit the screen. The main advantage is that your mobile visitors will receive virtually the same
experience of your website as your desktop visitors. Using a combination of Cascading Style
Sheets (CSS) and JavaScript to adjust the layout of your page you can create an optimal
experience for the display size of your visitor’s computer or device.
Responsive web design is becoming increasingly popular, and many large companies have
started to take this approach. Towards the end of 2012 Microsoft released a redesign of their
corporate website.
The website makes good use of the whole screen, with the logo and navigation menu at the
top on the left, and a search box on the right.
Page 4
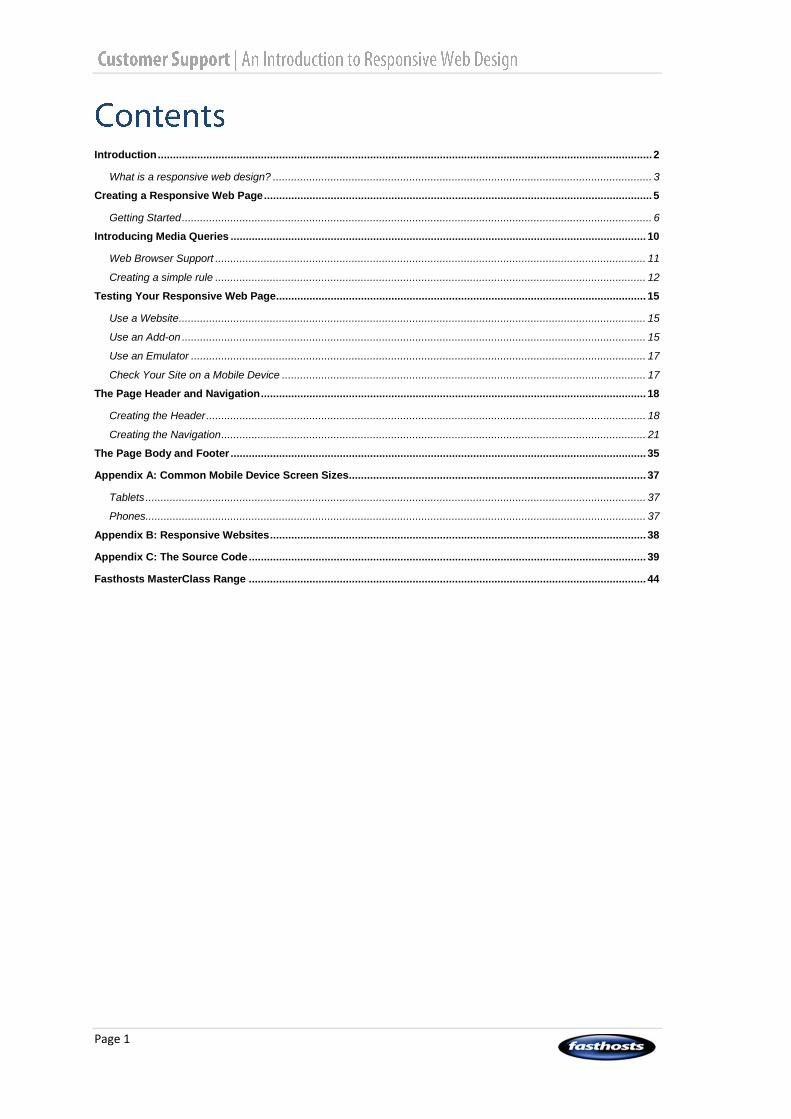
Here is the same page on a smaller screen.
Microsoft is still making the most of the screen
size, but with a lot less space to play with they
have made some changes. The search box has
disappeared, replaced instead with a search
button.
The same has occurred with the navigation
menu; it’s hidden but can be displayed with the
touch of a button when needed.
Other elements on the page, such as images and
titles, also resize to take up less space on smaller
screens.
There are hundreds of other examples of great
responsive websites, and if you need inspiration you can find a list in the Appendix on page 38.
Creating a responsive website is easier than you may think, but you will need to be familiar
with Cascading Style Sheets (CSS), which are used to layout and style your page. They are
introduced in another Master Class guide,
Introducing HTML and CSS.
Page 5
The best way to learn some responsive web design techniques is to dive straight in! Let’s
create a typical web page that can dynamically resize on smaller screens. We’ll build the design
initially for larger desktop screens, because we want much of the look to be the same or very
similar for any device. We can then add some rules to modify any necessary segments of the
design to optimise them for smaller screens.
Smaller screen sizes present a problem that we must overcome: there is very little room to
display our main page content. Our navigation links must be large enough to be easily pressed
with a finger, but we can’t afford to grant much screen space to a large menu. Most sites
tackle this problem by hiding the navigation by default, opting instead to display a navigation
button to show the navigation when pressed.
We will create a sample web page with the following elements:
A logo – No site is complete without one!
A navigation menu – This will be shown by default, but hidden on smaller screen sizes.
A menu button – This will be hidden by default, and displayed on smaller screen sizes.
Pressing the button will display the navigation menu.
The main page content
A footer – Can be used to display copyright information, links to a site map or cookie
policy
In order to create this we will need to use three different web technologies. We will use HTML
to create the page and set the content and CSS to create the layout styles. On smaller screens
we will need to display and hide the navigation at the press of a button, and we’ll need to use
some very simple JavaScript to achieve this. Our page will consist of the following files.
index.html – This will contain the content of the page.
layout.css – This style sheet will contain the main layout styles for the page.
resize.css – This style sheet will contain the style changes for the mobile optimised
version of the page.
responsive.js – This JavaScript file will contain a function to display or hide the
navigation menu. We’ll call the function when the responsive menu button is pressed.
Page 6
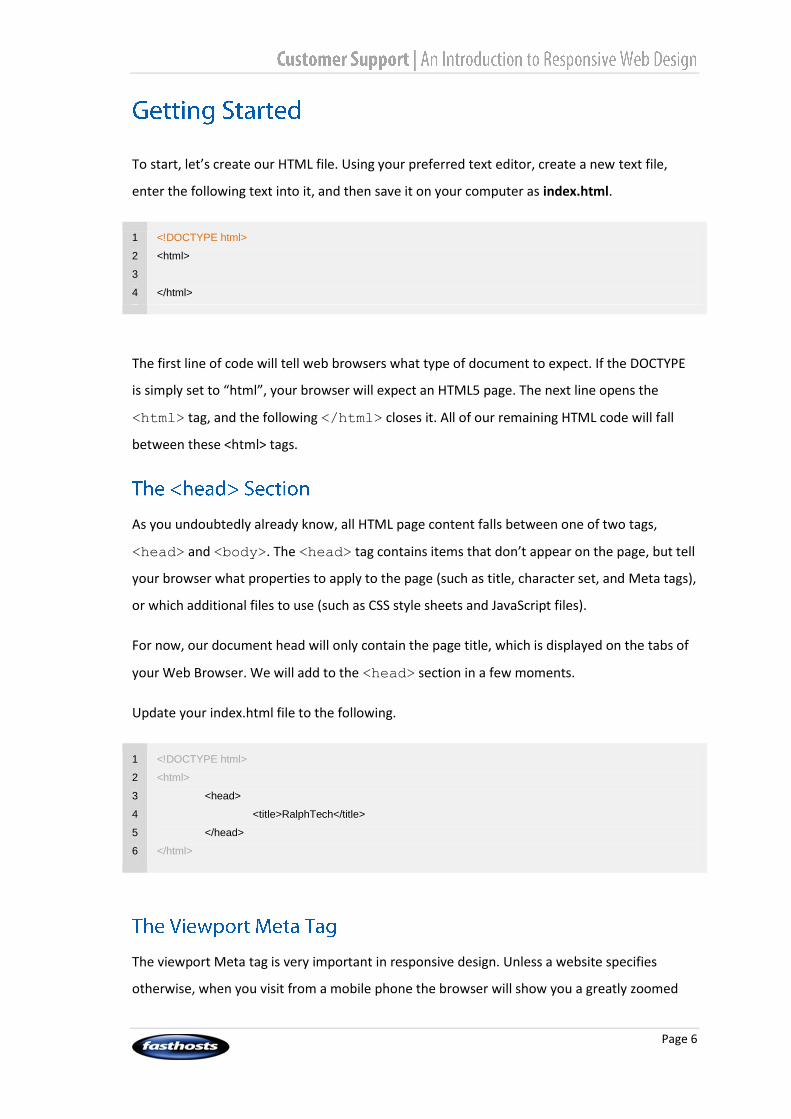
To start, let’s create our HTML file. Using your preferred text editor, create a new text file,
enter the following text into it, and then save it on your computer as index.html.
1
2
3
4
<!DOCTYPE html>
<html>
</html>
The first line of code will tell web browsers what type of document to expect. If the DOCTYPE
is simply set to “html”, your browser will expect an HTML5 page. The next line opens the
<html> tag, and the following </html> closes it. All of our remaining HTML code will fall
between these <html> tags.
As you undoubtedly already know, all HTML page content falls between one of two tags,
<head> and <body>. The <head> tag contains items that don’t appear on the page, but tell
your browser what properties to apply to the page (such as title, character set, and Meta tags),
or which additional files to use (such as CSS style sheets and JavaScript files).
For now, our document head will only contain the page title, which is displayed on the tabs of
your Web Browser. We will add to the <head> section in a few moments.
Update your index.html file to the following.
1
2
3
4
5
6
<!DOCTYPE html>
<html>
<head>
<title>RalphTech</title>
</head>
</html>
The viewport Meta tag is very important in responsive design. Unless a website specifies
otherwise, when you visit from a mobile phone the browser will show you a greatly zoomed

Page 7
out page. This is because the mobile web browser must assume that you are viewing a website
that has been designed for a larger screen.
The viewport Meta tag can be used to instruct the mobile browser that it should display the
page at a scale of 1:1 – actual size. Add the following code to the <head> section of your
page.
<meta name="viewport" content="width=device-width, initial-scale=1, maximum-scale=1" />
Your HTML document should now look similar to this.
1
2
3
4
5
6
7
<!DOCTYPE html>
<html>
<head>
<title>RalphTech</title>
<meta name="viewport" content="width=device-width, initial-scale=1, maximum-scale=1" />
</head>
</html>
In order to style our page, and to resize and adjust the styling of HTML elements for smaller
screens, we will need to use Cascading Style Sheets (CSS). We will create two style sheets, one
called layout.css which will contain our page layout and general styling, and another called
resize.css which will be used to adjust elements for smaller screens.
In your web browser create a new document, and enter the following text.
1
2
3
4
5
6
7
/* General page layout styles */
body {
margin: 0px;
background: #ffffff;
font-family: Arial, sans-serif;
font-size: 13px;
}
Page 8
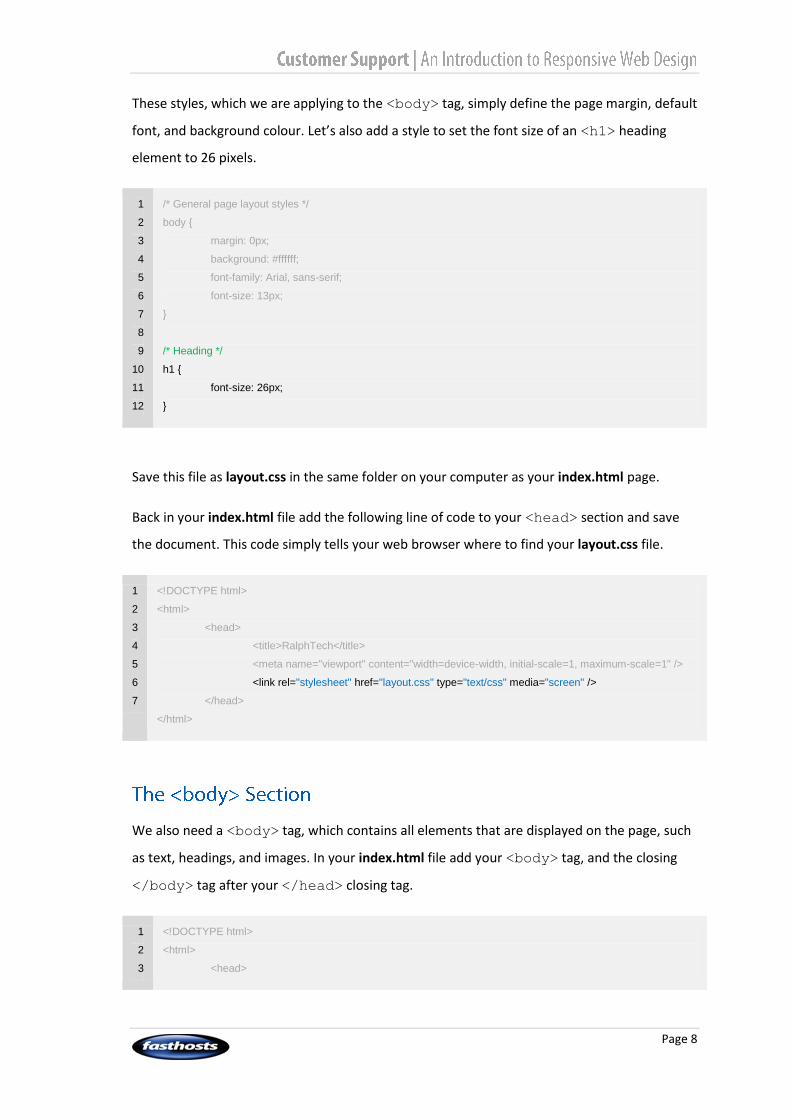
These styles, which we are applying to the <body> tag, simply define the page margin, default
font, and background colour. Let’s also add a style to set the font size of an <h1> heading
element to 26 pixels.
1
2
3
4
5
6
7
8
9
10
11
12
/* General page layout styles */
body {
margin: 0px;
background: #ffffff;
font-family: Arial, sans-serif;
font-size: 13px;
}
/* Heading */
h1 {
font-size: 26px;
}
Save this file as layout.css in the same folder on your computer as your index.html page.
Back in your index.html file add the following line of code to your <head> section and save
the document. This code simply tells your web browser where to find your layout.css file.
1
2
3
4
5
6
7
<!DOCTYPE html>
<html>
<head>
<title>RalphTech</title>
<meta name="viewport" content="width=device-width, initial-scale=1, maximum-scale=1" />
<link rel="stylesheet" href="layout.css" type="text/css" media="screen" />
</head>
</html>
We also need a <body> tag, which contains all elements that are displayed on the page, such
as text, headings, and images. In your index.html file add your <body> tag, and the closing
</body> tag after your </head> closing tag.
1
2
3
<!DOCTYPE html>
<html>
<head>
Page 9
4
5
6
7
8
9
10
<title>RalphTech</title>
<meta name="viewport" content="width=device-width, initial-scale=1, maximum-scale=1" />
</head>
<body>
<h1>Welcome to RalphTech</h1>
</body>
</html>
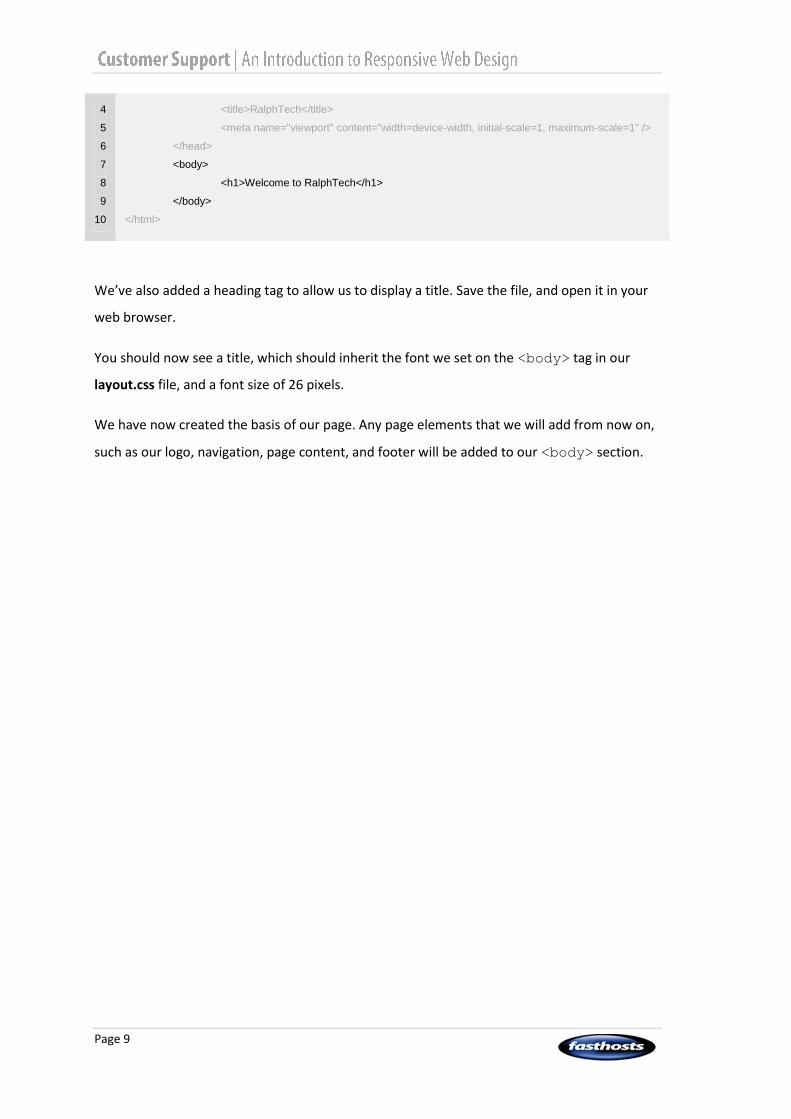
We’ve also added a heading tag to allow us to display a title. Save the file, and open it in your
web browser.
You should now see a title, which should inherit the font we set on the <body> tag in our
layout.css file, and a font size of 26 pixels.
We have now created the basis of our page. Any page elements that we will add from now on,
such as our logo, navigation, page content, and footer will be added to our <body> section.

Page 10
Cascading Style Sheets (CSS) were first used in 1996, and since then their use has become
more and more widespread. They are managed and developed by the World Wide Web
Consortium (W3C), which constantly adapts and improves their specification. In the early days
of the Internet, web browsers were updated infrequently and standards such as CSS were slow
to develop. Generally new CSS features that became standardised were slow to be added to
web browsers, due to the length of time between software updates.
More recently, competition between browsers such as Microsoft Internet Explorer, Mozilla
Firefox, and Google Chrome has become fierce, resulting in more frequent software updates.
As a result new CSS features take less time from conception to becoming fully supported
features in modern browsers, leading to faster innovation.
Other technologies are having a large effect on the way Internet technologies are developing,
in particular the uptake of Smart phones and tablets. Most website administrators are seeing
an increase in visitors from, particularly, mobile phones but also tablets and many are
investing extra time and resources into making touch-friendly interfaces. With a growing
desire to address the increases in the use of mobile devices, the W3C introduced a method of
creating conditional rules within CSS style sheets.
These conditions, called Media Queries, allow website developers to apply different styles,
based on the size of the web browser window. It is now possible to create a web page that
adapts, or responds, to the width of the screen.
Page 11
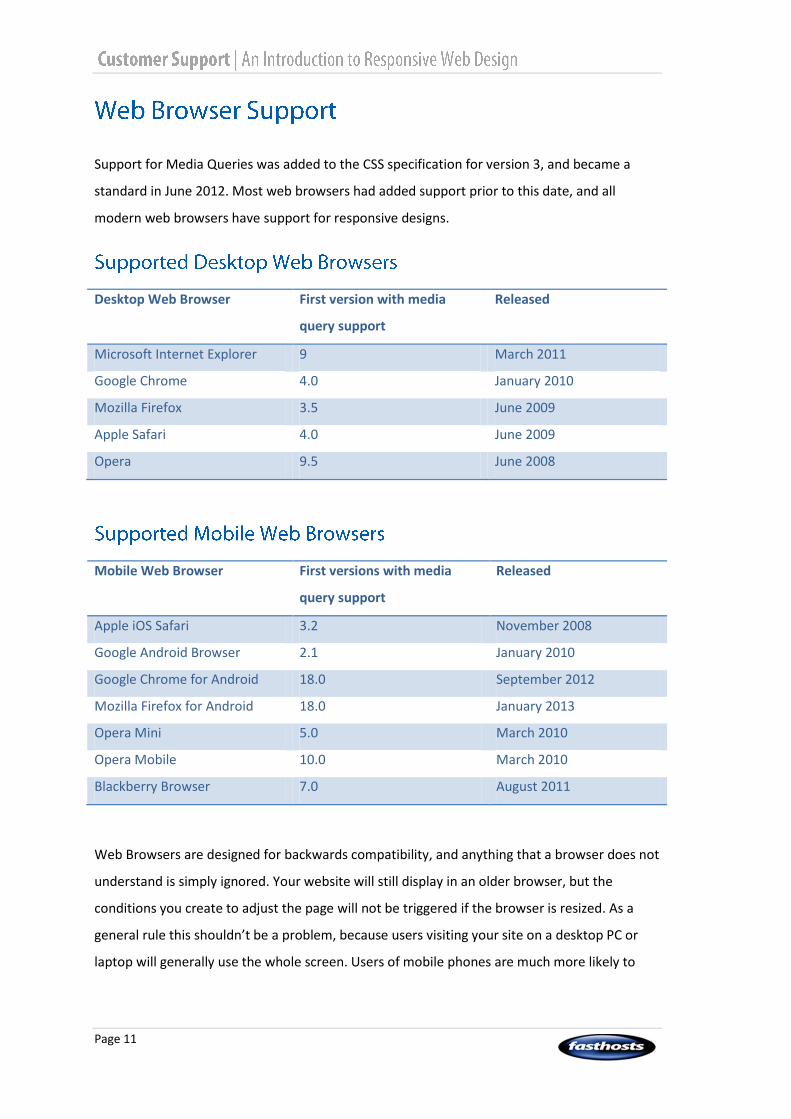
Support for Media Queries was added to the CSS specification for version 3, and became a
standard in June 2012. Most web browsers had added support prior to this date, and all
modern web browsers have support for responsive designs.
Desktop Web Browser First version with media
query support
Released
Microsoft Internet Explorer 9 March 2011
Google Chrome 4.0 January 2010
Mozilla Firefox 3.5 June 2009
Apple Safari 4.0 June 2009
Opera 9.5 June 2008
Mobile Web Browser First versions with media
query support
Released
Apple iOS Safari 3.2 November 2008
Google Android Browser 2.1 January 2010
Google Chrome for Android 18.0 September 2012
Mozilla Firefox for Android 18.0 January 2013
Opera Mini 5.0 March 2010
Opera Mobile 10.0 March 2010
Blackberry Browser 7.0 August 2011
Web Browsers are designed for backwards compatibility, and anything that a browser does not
understand is simply ignored. Your website will still display in an older browser, but the
conditions you create to adjust the page will not be triggered if the browser is resized. As a
general rule this shouldn’t be a problem, because users visiting your site on a desktop PC or
laptop will generally use the whole screen. Users of mobile phones are much more likely to
Page 12
have a compatible browser, and even if they don’t they will be presented with your desktop
page design.
When you created your layout.css file you defined a style for an h1 heading, specifying a font
size of 26 pixels. However, on a mobile device this font size is probably far too large and would
take up a great deal of the screen, particularly for longer titles.
We can use a Media Query to create a CSS style for h1 tags that will only apply if the screen
width is less than a given number of pixels.
We want this rule to take effect on mobile screens and smaller tablets. Many small tablets
have a screen width of 600 pixels or less.
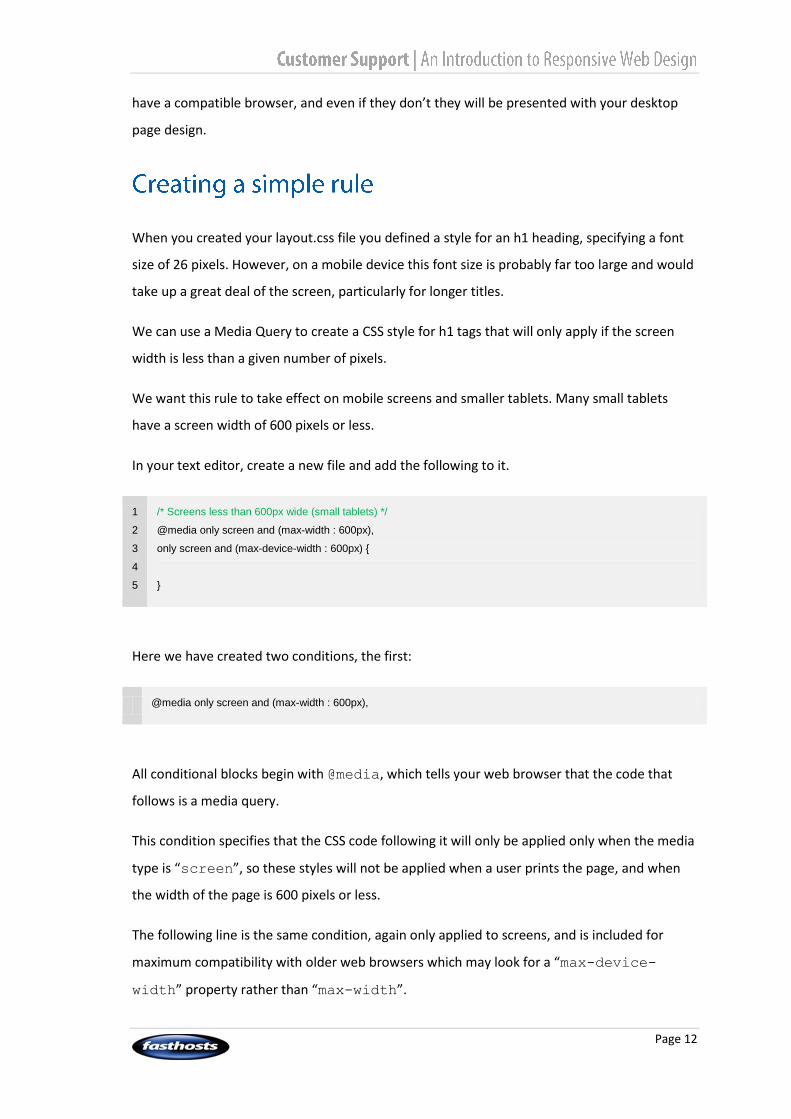
In your text editor, create a new file and add the following to it.
1
2
3
4
5
/* Screens less than 600px wide (small tablets) */
@media only screen and (max-width : 600px),
only screen and (max-device-width : 600px) {
}
Here we have created two conditions, the first:
@media only screen and (max-width : 600px),
All conditional blocks begin with @media, which tells your web browser that the code that
follows is a media query.
This condition specifies that the CSS code following it will only be applied only when the media
type is “screen”, so these styles will not be applied when a user prints the page, and when
the width of the page is 600 pixels or less.
The following line is the same condition, again only applied to screens, and is included for
maximum compatibility with older web browsers which may look for a “max-device-
width” property rather than “max-width”.

Page 13
only screen and (max-device-width : 600px) {
It is important to remember that any CSS rules that you want to apply to your web page if
these conditions are met must appear between the curly brackets { and }, which are
highlighted below in red.
1
2
3
4
5
/* Screens less than 600px wide (small tablets) */
@media only screen and (max-width : 600px),
only screen and (max-device-width : 600px) {
}
Let’s create a CSS rule to reduce the font size of our <h1> heading tags on screens that meet
our conditions.
1
2
3
4
5
6
7
8
/* Screens less than 600px wide (small tablets) */
@media only screen and (max-width : 600px),
only screen and (max-device-width : 600px) {
/* Reduce heading font size */
h1 {
font-size: 20px;
}
}
Here is a very simple rule that sets the font size of any <h1> elements to 20 pixels. We have
not saved this file yet, so save it to the same folder as your index.html and layout.css files. Call
it resize.css. We now need to link to this CSS style sheet from our HTML document, so open
index.html in your text editor.

Page 14
We want this rule to overrule our existing h1 rule from the layout.css file, so we must make
sure the link to this file follows the link to layout.css file. Add the code below to the <head>
section of your HTML file.
3
4
5
6
7
8
<head>
<title>RalphTech</title>
<meta name="viewport" content="width=device-width, initial-scale=1, maximum-scale=1" />
<link rel="stylesheet" href="layout.css" type="text/css" media="screen" />
<link rel="stylesheet" href="resize.css" type="text/css" media="screen" />
</head>
You’ve just created your first responsive website!
Page 15
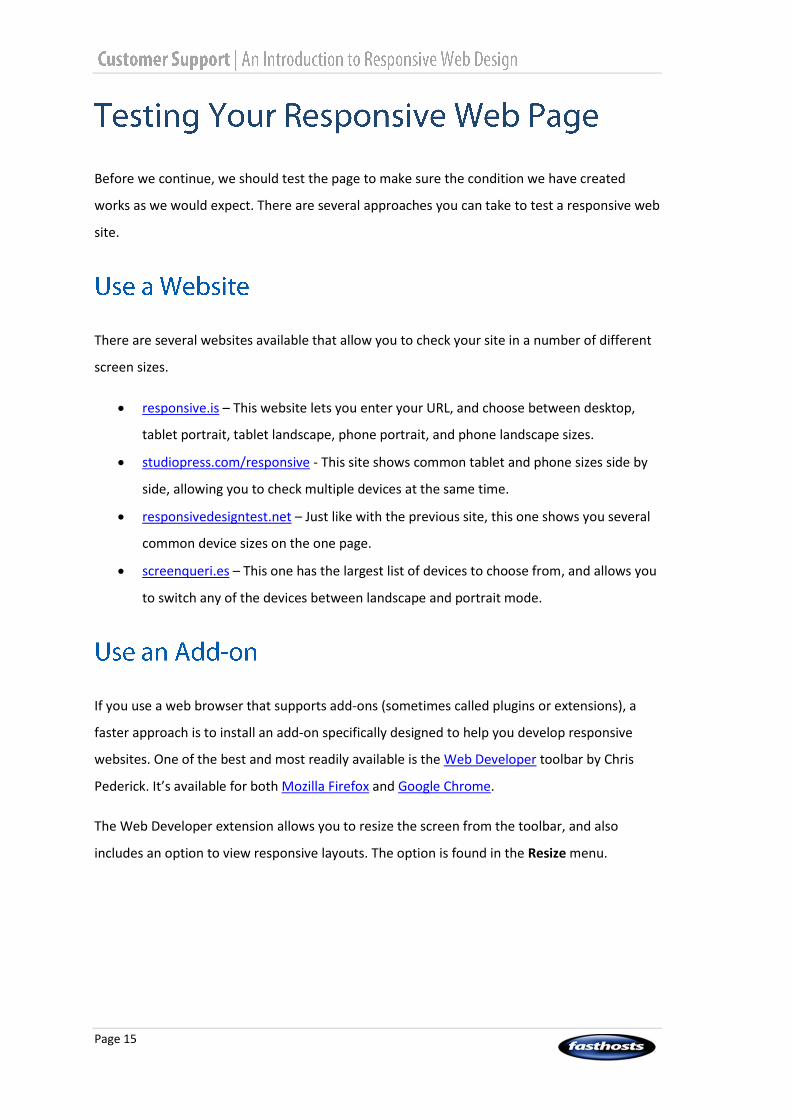
Before we continue, we should test the page to make sure the condition we have created
works as we would expect. There are several approaches you can take to test a responsive web
site.
There are several websites available that allow you to check your site in a number of different
screen sizes.
responsive.is – This website lets you enter your URL, and choose between desktop,
tablet portrait, tablet landscape, phone portrait, and phone landscape sizes.
studiopress.com/responsive - This site shows common tablet and phone sizes side by
side, allowing you to check multiple devices at the same time.
responsivedesigntest.net – Just like with the previous site, this one shows you several
common device sizes on the one page.
screenqueri.es – This one has the largest list of devices to choose from, and allows you
to switch any of the devices between landscape and portrait mode.
If you use a web browser that supports add-ons (sometimes called plugins or extensions), a
faster approach is to install an add-on specifically designed to help you develop responsive
websites. One of the best and most readily available is the Web Developer toolbar by Chris
Pederick. It’s available for both Mozilla Firefox and Google Chrome.
The Web Developer extension allows you to resize the screen from the toolbar, and also
includes an option to view responsive layouts. The option is found in the Resize menu.
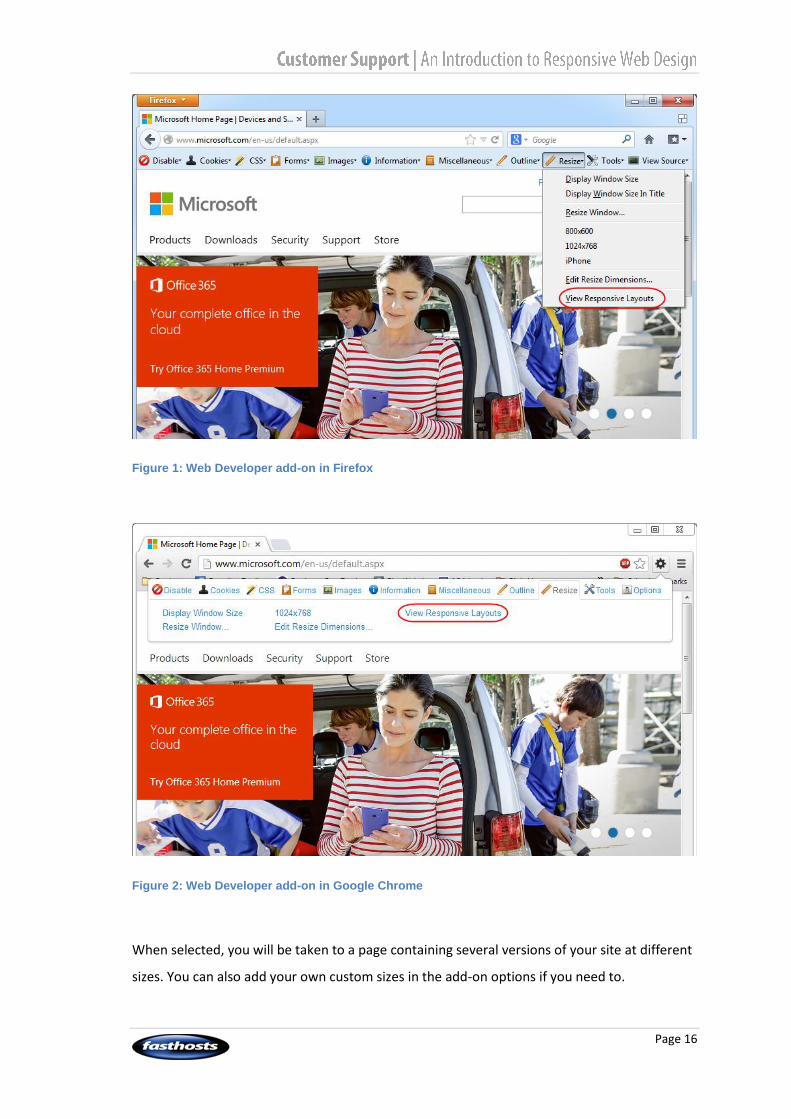
Page 16
Figure 1: Web Developer add-on in Firefox
Figure 2: Web Developer add-on in Google Chrome
When selected, you will be taken to a page containing several versions of your site at different
sizes. You can also add your own custom sizes in the add-on options if you need to.

Page 17
When designing a web site it makes sense to use a web site or an add-on to preview your site
at different sizes to check how your site resizes. However, it is important to remember that
these methods will still use your web browser’s rendering engine. It is always a good idea to
check your web site in a range of web browsers, and the same should be said of mobile
devices.
Most mobile phone operating system manufacturers offer tools to help developers create apps
or websites for their browser, and these tools undoubtedly include an emulator. An emulator
allows you to view your web pages on your desktop PC as though you were using a mobile
device itself, which can be useful for testing devices that are not accessible to you. They also
give a better idea of how your page will look because they use the same page rendering
technologies employed on the devices themselves.
However because they come as part of a larger set of development tools they can take up a
great deal of disk space, and can be complex to set up. Another disadvantage is that there are
several mobile operating systems, and you may need to install a different emulator for each.
If you have access to one or more mobile devices, you simply can’t beat testing your site on it.
While an emulator will give you an accurate idea of how the page will turn out, it is still only a
simulation of the real thing.
Before launching a new site, you should find family members, friends, or colleagues with
different phones to test your site for you. Make a note of the phones tested, along with their
operating system and version, and web browser. If any issues are raised you can log the issue
against the phone, and test again when you have resolved the issue.

Page 18
We have created the files that will make our web page, and introduced our first media query.
At this stage our web page is looking very bare, so let’s start by creating a header for our logo,
and then a navigation system to help our visitors browse our site.
The first thing we need to do is create our header in our HTML page. We can then style the
header, and when we’re happy with it we can create our responsive styles to restyle and resize
it for smaller screens.
Open the index.html file in your text editor. The header for our example site is going to be
very simple, and contain one image – our site logo. In our example we are going to use an
image file called “logo.png”, and this file will be saved to the same folder as our index.html
file.
Add the following code to the <body> section.
1
2
3
4
5
6
7
8
9
10
11
12
13
14
15
<!DOCTYPE html>
<html>
<head>
<title>RalphTech</title>
<meta name="viewport" content="width=device-width, initial-scale=1, maximum-scale=1" />
<link rel="stylesheet" href="layout.css" type="text/css" media="screen" />
<link rel="stylesheet" href="resize.css" type="text/css" media="screen" />
</head>
<body>
<!-- Header -->
<div class="header">
<img class="logo" src="logo.png" alt="RalphTech" />
</div>
</body>
</html>
This code is nice and simple; we’ve created a <div> division with the CSS class name of
“header”. We’ve given it the “header” class so that we can refer to this element in our CSS
code shortly when we need to set its style and position properties.
Page 19
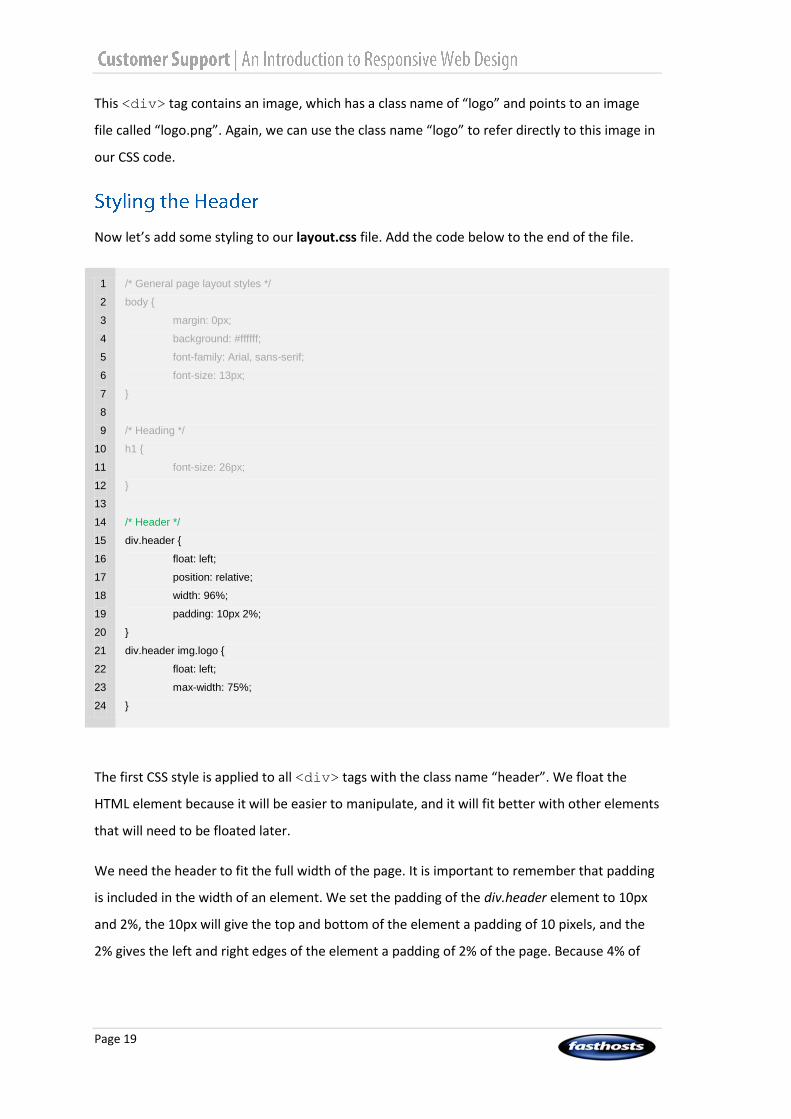
This <div> tag contains an image, which has a class name of “logo” and points to an image
file called “logo.png”. Again, we can use the class name “logo” to refer directly to this image in
our CSS code.
Now let’s add some styling to our layout.css file. Add the code below to the end of the file.
1
2
3
4
5
6
7
8
9
10
11
12
13
14
15
16
17
18
19
20
21
22
23
24
/* General page layout styles */
body {
margin: 0px;
background: #ffffff;
font-family: Arial, sans-serif;
font-size: 13px;
}
/* Heading */
h1 {
font-size: 26px;
}
/* Header */
div.header {
float: left;
position: relative;
width: 96%;
padding: 10px 2%;
}
div.header img.logo {
float: left;
max-width: 75%;
}
The first CSS style is applied to all <div> tags with the class name “header”. We float the
HTML element because it will be easier to manipulate, and it will fit better with other elements
that will need to be floated later.
We need the header to fit the full width of the page. It is important to remember that padding
is included in the width of an element. We set the padding of the div.header element to 10px
and 2%, the 10px will give the top and bottom of the element a padding of 10 pixels, and the
2% gives the left and right edges of the element a padding of 2% of the page. Because 4% of
Page 20
the width of the element is now taken by the padding, we set the width to the remaining 96%
of the page.
You may also notice that we set the position of the header to “relative”. This will allow us to
position child elements within this tag later on.
Following this rule is another rule, which we apply to an image with the class name “logo”
within the “header” div element. We float the image left, and set a maximum width of 75%.
This property ensures that the width of the logo image can never take up more than 75% of
the full width of the screen, so the logo will be reduced in size to fit smaller screens
automatically.
We have selected a maximum width of the image for a reason – we need to use the right-hand
side of the page, next to the logo, for a menu button. However, if you did not want to display
anything other elements in the header you could easily set the maximum size to 100%.
Don’t forget that the web browser will need to download the full image before it can resize it,
so always make sure you have optimised any images with specialised image manipulation
software, such as PhotoShop or Paint Shop Pro, to reduce their file to the smallest possible
size. If you don’t have access to image manipulation software, the online Web Photo Resizer at
http://webresizer.com/ is a useful alternative for reducing your image sizes.
Because we are using a very simple header and the logo image is already styled to resize
gracefully to within 75% of the page width, there are no specific styles that we need to add to
modify the header for smaller screens. If you preview the page in a web browser, and try
resizing the screen you should see the image starts to resize automatically when you drag the
width of the browser window close to the right-edge of the image.
Important: http://webresizer.com is a third party website with no affiliation with
Fasthosts. We are unable to provide assurances upon the use of security of this
website and do not recommend this site over any other image re-sizing tools that
are available.
Page 21
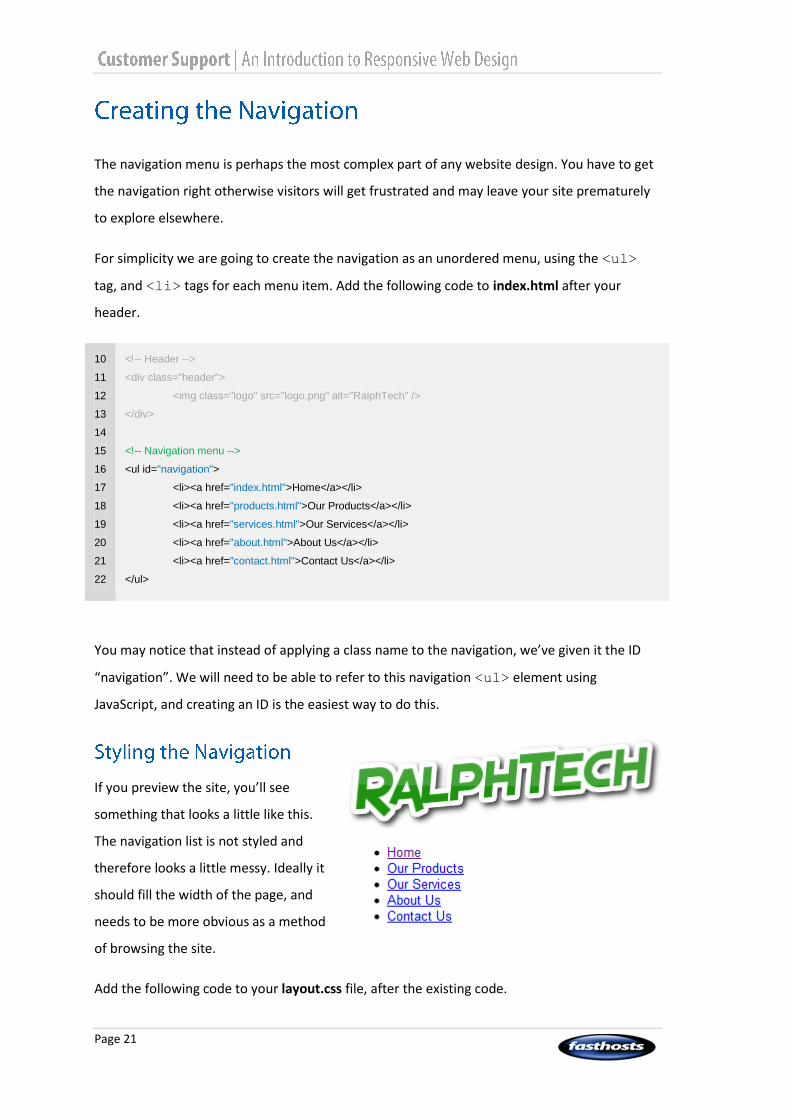
The navigation menu is perhaps the most complex part of any website design. You have to get
the navigation right otherwise visitors will get frustrated and may leave your site prematurely
to explore elsewhere.
For simplicity we are going to create the navigation as an unordered menu, using the <ul>
tag, and <li> tags for each menu item. Add the following code to index.html after your
header.
10
11
12
13
14
15
16
17
18
19
20
21
22
<!-- Header -->
<div class="header">
<img class="logo" src="logo.png" alt="RalphTech" />
</div>
<!-- Navigation menu -->
<ul id="navigation">
<li><a href="index.html">Home</a></li>
<li><a href="products.html">Our Products</a></li>
<li><a href="services.html">Our Services</a></li>
<li><a href="about.html">About Us</a></li>
<li><a href="contact.html">Contact Us</a></li>
</ul>
You may notice that instead of applying a class name to the navigation, we’ve given it the ID
“navigation”. We will need to be able to refer to this navigation <ul> element using
JavaScript, and creating an ID is the easiest way to do this.
If you preview the site, you’ll see
something that looks a little like this.
The navigation list is not styled and
therefore looks a little messy. Ideally it
should fill the width of the page, and
needs to be more obvious as a method
of browsing the site.
Add the following code to your layout.css file, after the existing code.
Page 22
26
27
28
29
30
31
32
33
34
35
36
37
38
39
40
41
42
43
44
45
46
47
48
49
50
51
52
53
54
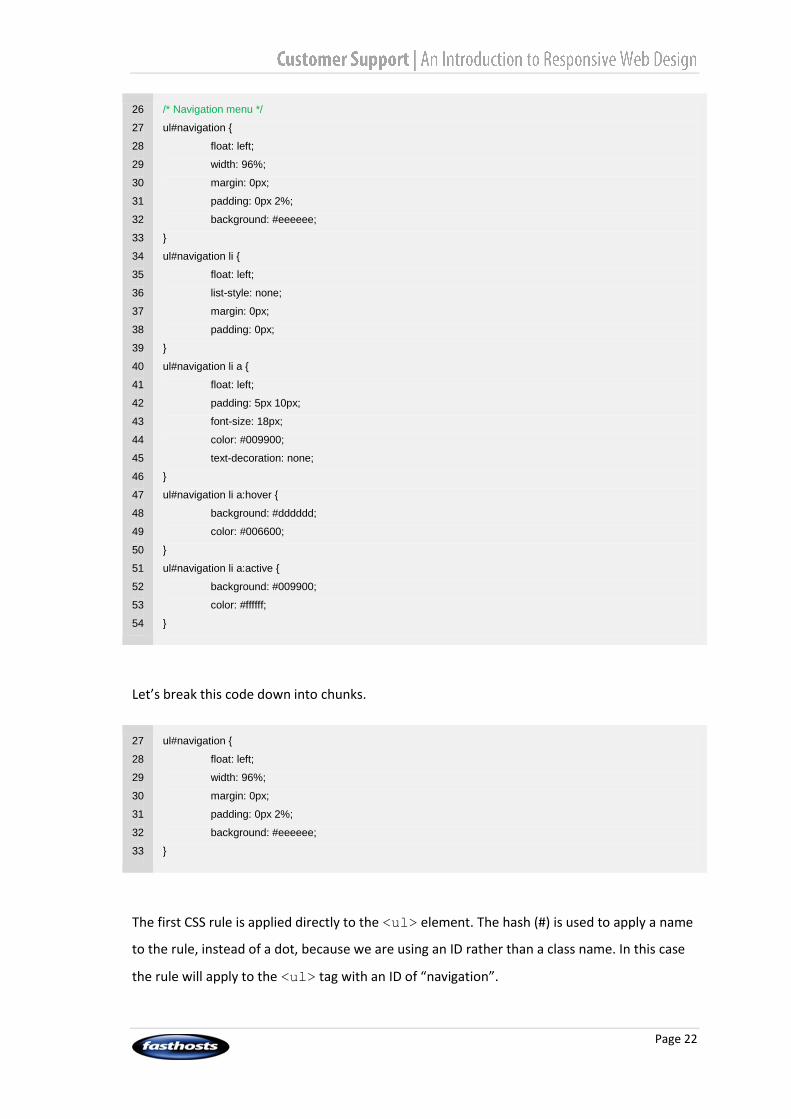
/* Navigation menu */
ul#navigation {
float: left;
width: 96%;
margin: 0px;
padding: 0px 2%;
background: #eeeeee;
}
ul#navigation li {
float: left;
list-style: none;
margin: 0px;
padding: 0px;
}
ul#navigation li a {
float: left;
padding: 5px 10px;
font-size: 18px;
color: #009900;
text-decoration: none;
}
ul#navigation li a:hover {
background: #dddddd;
color: #006600;
}
ul#navigation li a:active {
background: #009900;
color: #ffffff;
}
Let’s break this code down into chunks.
27
28
29
30
31
32
33
ul#navigation {
float: left;
width: 96%;
margin: 0px;
padding: 0px 2%;
background: #eeeeee;
}
The first CSS rule is applied directly to the <ul> element. The hash (#) is used to apply a name
to the rule, instead of a dot, because we are using an ID rather than a class name. In this case
the rule will apply to the <ul> tag with an ID of “navigation”.
Page 23
We float the navigation left, and set the width to 96%. This is because we are setting padding:
left and right padding is set to 2%, making a total of 100% width. Unordered lists have a top
and bottom margin by default, so we set the margin to 0 pixels to ensure these are removed,
and set a background colour (#eeeeee is the hexadecimal code for light grey).
34
35
36
37
38
39
ul#navigation li {
float: left;
list-style: none;
margin: 0px;
padding: 0px;
}
The second rule is applied to the individual list <li> elements within the navigation list.
Again, we float them left to ensure they appear side by side, rather than vertically, and ensure
there is no margin or padding. We also set the list-style property to “none” to ensure
there are no list bullets.
40
41
42
43
44
45
46
ul#navigation li a {
float: left;
padding: 5px 10px;
font-size: 18px;
color: #009900;
text-decoration: none;
}
We then set the properties for link elements (<a> tags) that are contained within the <li>
elements within the navigation <ul>. For the links to display correctly we must float them
left, because their parent <li> element is floated left. We also set some padding to ensure
the text for each link is adequately spaced apart, and change the font size and text colour
(#009900 is the hexadecimal value for green). The text-decoration is set to none to remove the
underlining.
47
48
49
50
51
52
ul#navigation li a:hover {
background: #dddddd;
color: #006600;
}
ul#navigation li a:active {
background: #009900;

Page 24
53
54
color: #ffffff;
}
Finally we set the link properties for the hover and active states. We are simply changing the
background colour when the mouse is hovered to a slightly darker grey (#dddddd), and the
text to a darker green (#006600). When the link is clicked the active state is triggered, and our
rule above changes the link background to green (#009900) and the text to white (#ffffff).
Save the file and preview it in your web browser. You should see something similar to the
image below.
Feel free to play around with the styles, changing the colours to match your logo. When you
are happy with the look, let’s create the styles that will modify our navigation for smaller
screens.
The navigation we’ve created is great for desktop computers, laptops, and maybe even larger
tablets. However, the text is large and on smaller screens may wrap onto several lines. This not
only looks confusing, but takes up a lot of space on a screen where space is hard to come by.
We’ll combat this by creating a media query that will restyle the navigation on screens with a
width less than 480 pixels. 480 pixels is a good width because this is a fairly standard size for
mobile devices in landscape view.
Start by opening your resize.css file and copying or pasting the following into it after the
existing code.
1
2
3
4
/* Screens less than 600px wide (small tablets) */
@media only screen and (max-width : 600px),
only screen and (max-device-width : 600px) {
/* Reduce heading font size */

Page 25
5
6
7
8
9
10
11
12
13
14
15
16
17
18
19
20
21
22
23
24
25
26
27
h1 {
font-size: 20px;
}
}
/* Screens less than 480px wide (landscape mobile) */
@media only screen and (max-width : 480px),
only screen and (max-device-width : 480px) {
ul#navigation {
padding: 0px;
width: 100%;
}
ul#navigation li {
width: 100%;
}
ul#navigation li a {
width: 100%;
padding: 10px 0px;
text-align: center;
border-top: solid 1px #ffffff;
border-bottom: solid 1px #dddddd;
}
}
Let’s break the code we’ve just added down into chunks.
11
12
…
27
@media only screen and (max-width : 480px),
only screen and (max-device-width : 480px) {
…
}
Here we have created a second media query. The CSS rules contained within the curly brackets
{ and } will execute only when the page width is less than 480 pixels.
13
14
15
16
17
18
19
ul#navigation {
padding: 0px;
width: 100%;
}
ul#navigation li {
width: 100%;
}

Page 26
We have re-styled the navigation menu and list items contained within to fit a width of 100%.
Because there is a high likelihood that this version of our navigation menu will be displayed on
a touch screen device, we need to consider the size of each link and how easy it will be to
press with a finger. Our navigation list has a left and right padding of 2% when displayed on a
larger screen, but on a touch screen we want to remove this to maximise the width of the
links.
20
21
22
23
24
25
26
ul#navigation li a {
width: 100%;
padding: 10px 0px;
text-align: center;
border-top: solid 1px #ffffff;
border-bottom: solid 1px #dddddd;
}
Finally we resize the <a> tags contained within each list <li> element to again fit the full
width of the page, and provide a top and bottom padding of 10 pixels. We also centre the text
using the text-align property (note the American spelling of “center”), and add a white
border to the top of the link (#ffffff) and a darker grey border to the bottom (#dddddd). This
gives a nice bevel effect and helps distinguish between the links. Remember that on a touch
screen device, there is no mouse
and therefore any hover styles
you create will not get triggered,
so it’s important to present clear
links.
If you load your web page in your
browser and resize the window
to a width of 480 pixels or less,
you should see something similar
to the image on the right.
You may notice, however, that
before you get to 480 pixels your navigation may drop down to a second line on the menu bar.

Page 27
We don’t want our web page to do this, because it looks messy. One way to combat this would
be to add another rule to resize this navigation text. We’ve already got a media query in our
resize.css file for pages with a width less than 600 pixels. Our navigation menu is not large, so
we could add our CSS rule to this. If your navigation menu has more entries in it, you may need
to add another Media Query for a more appropriate page width.
Add the following code within the first media query you created, for a page width of 600
pixels.
1
2
3
4
5
6
7
8
9
10
11
12
13
14
/* Screens less than 600px wide (small tablets) */
@media only screen and (max-width : 600px),
only screen and (max-device-width : 600px) {
/* Reduce heading font size */
h1 {
font-size: 20px;
}
/* Reduce the navigation menu text size */
ul#navigation li a {
font-size: 13px;
font-weight: bold;
}
}
This will resize the navigation menu text to a font size of 13 pixels, preventing our navigation
menu from wrapping onto a second line.

Page 28
We’ve styled our navigation, and it resizes gracefully for mobile devices. However, when we
resize our page to 320x480 pixels, a common mobile phone screen size, you can see that the
header and navigation takes up well over half of the screen, leaving very little available for the
page without having to scroll down.
Ideally we want to tuck the navigation menu
out of the way until the user needs it. A
common method adopted by websites is to hide
the navigation by default, and present the user
instead with a menu button. Tapping the button
will display the navigation menu.
In order to achieve this, we will need to adjust
our existing CSS code slightly to hide the
navigation on smaller screens. We’ll need to
add a link to our header for the button, and
we’ll need to add some JavaScript to show and
hide the navigation menu.
First, let’s add some CSS code to our resize.css
file to hide our navigation menu. Add the
following line of code to the existing CSS rule
ul#navigation.
20
21
22
23
24
div.header a#menu_button {
display: block;
}
ul#navigation {
display: none;

Page 29
25
26
27
28
29
30
padding: 0px;
width: 100%;
}
ul#navigation.visible {
display: block;
}
If you save the file and load index.html in your web browser, you will see that the navigation
menu now disappears when the page width is resized to 480 pixels or less.
Now let’s add a link to show or hide the menu. Open index.html in your text editor, and add
the following line of code within the header <div>, just after the logo image.
10
11
12
13
14
<!-- Header -->
<div class="header">
<img class="logo" src="logo.png" alt="RalphTech" />
<a href="sitemap.html" id="menu_button">Menu</a>
</div>
We’ve simply created an <a> link tag with the ID “menu_button”. We have set the link to
point to “sitemap.html”. However, our JavaScript code will show or hide the navigation menu
and force the web browser to ignore this link, because we want visitors to stay on the page
while they peruse the menu. We’ve added it because there is a small chance that a visitor may
have disabled JavaScript in their web browser. If this is the case the link will work as any other
link, and visitors will still be able to browse your site via the sitemap.html page. If you are not
planning to include a site map, you could set the “href” attribute to point to the URL of your
home page.
Now let’s style this link. Open your layout.css file in your text editor, and add the following to
it. It doesn’t matter where you add this code, but we’ve added it after the header rules as this
seems a logical place for it to go, as the button will appear next to the logo on the page.
21
22
23
24
25
26
div.header img.logo {
float: left;
max-width: 75%;
}
/* Menu button */

Page 30
27
28
29
30
31
32
33
34
35
36
37
38
39
40
41
42
43
44
45
div.header a#menu_button {
display: none;
position: absolute;
right: 2%;
border: solid 1px #009900;
color: #009900;
padding: 10px 5px;
font-weight: bold;
text-decoration: none;
}
/* Navigation menu */
ul#navigation {
float: left;
width: 96%;
margin: 0px;
padding: 0px 2%;
background: #eeeeee;
}
We have added a rule to style an <a> tag with the ID “menu_button” contained within a
<div> tag with a class name of “header”. We’re setting the display to none to hide the
button; we’ll create a rule in our resize.css file shortly to display the button when necessary.
We also set the position to absolute, which takes the element out of the flow of the page, and
allows us to position it where we would like. In this case we set the value for “right” to 2%,
which positions the link from its right edge with a gap, 2% of the width of the page, from the
right hand border.
Do you remember when we were styling the navigation that we set the position of the <div>
tag with class name “header” to relative? Generally if you position an element absolutely on
the page, any positioning will be set relatively to the page itself. For example, setting the value
of “top” to “10px” will position the element 10 pixels from the top of the page. However, the
parent element has been positioned relatively; any positioning will be set relative to the
parent, not the page. So in our example, setting the height of an element to 10px will position
it 10 pixels from the top of its parent element, not the page.
The other rules add padding, border, set the text colour to green (#009900), make the text
bold, and remove the underlining.
Page 31
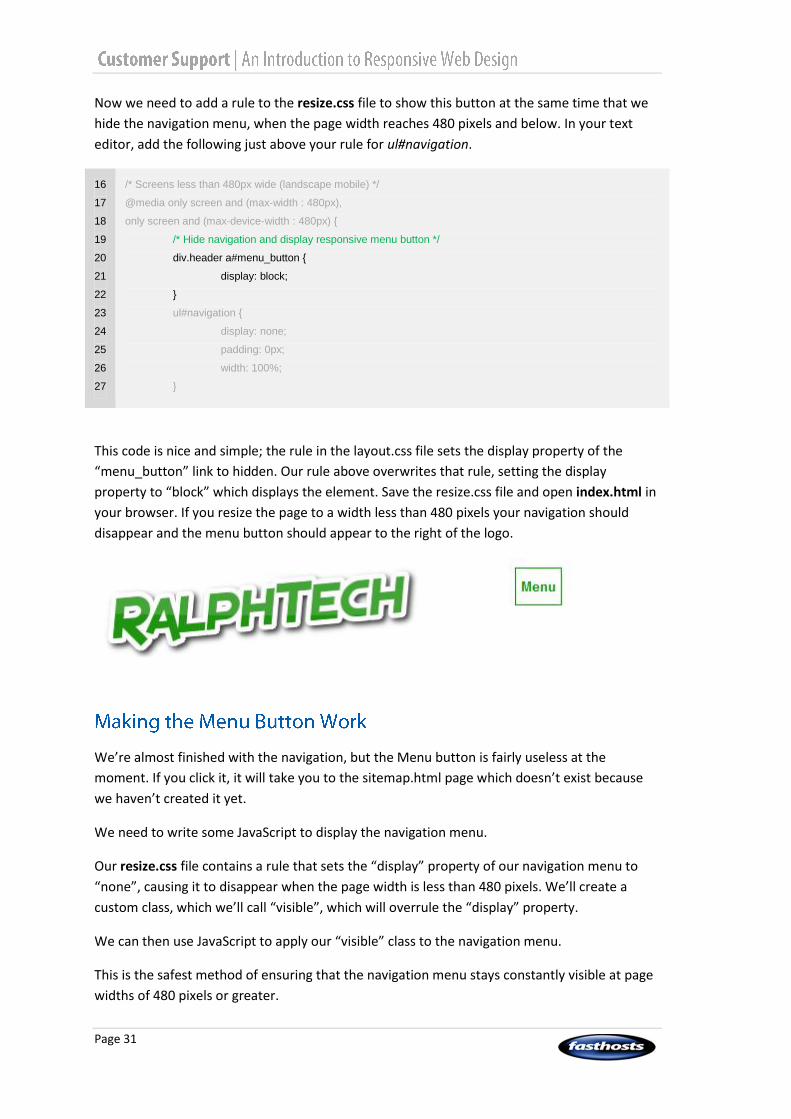
Now we need to add a rule to the resize.css file to show this button at the same time that we
hide the navigation menu, when the page width reaches 480 pixels and below. In your text
editor, add the following just above your rule for ul#navigation.
16
17
18
19
20
21
22
23
24
25
26
27
/* Screens less than 480px wide (landscape mobile) */
@media only screen and (max-width : 480px),
only screen and (max-device-width : 480px) {
/* Hide navigation and display responsive menu button */
div.header a#menu_button {
display: block;
}
ul#navigation {
display: none;
padding: 0px;
width: 100%;
}
This code is nice and simple; the rule in the layout.css file sets the display property of the
“menu_button” link to hidden. Our rule above overwrites that rule, setting the display
property to “block” which displays the element. Save the resize.css file and open index.html in
your browser. If you resize the page to a width less than 480 pixels your navigation should
disappear and the menu button should appear to the right of the logo.
We’re almost finished with the navigation, but the Menu button is fairly useless at the
moment. If you click it, it will take you to the sitemap.html page which doesn’t exist because
we haven’t created it yet.
We need to write some JavaScript to display the navigation menu.
Our resize.css file contains a rule that sets the “display” property of our navigation menu to
“none”, causing it to disappear when the page width is less than 480 pixels. We’ll create a
custom class, which we’ll call “visible”, which will overrule the “display” property.
We can then use JavaScript to apply our “visible” class to the navigation menu.
This is the safest method of ensuring that the navigation menu stays constantly visible at page
widths of 480 pixels or greater.

Page 32
Let’s create the CSS class first, so open resize.css in your text editor and add the following rule
23
24
25
26
27
28
29
30
31
32
33
ul#navigation {
display: none;
padding: 0px;
width: 100%;
}
ul#navigation.visible {
display: block;
}
ul#navigation li {
width: 100%;
}
The rule above sets the display property to “block” for the <ul> element with an id of
“navigation”, and a class name of “visible”.
Now we need to create our JavaScript file. In your text editor create a new file and save it as
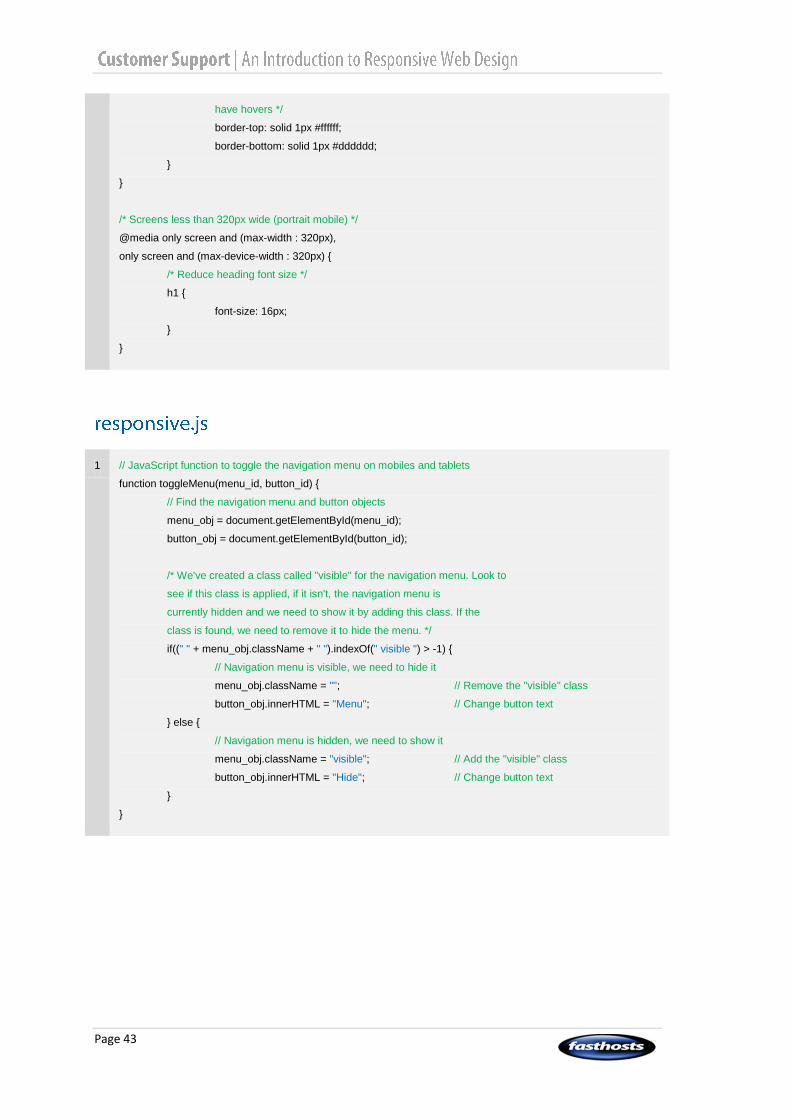
responsive.js. Make sure you save it to the same folder as your index.html file.
We will write a function, called toggleMenu, which we will call when our Menu button is
pressed. Enter the following code into your responsive.js file.
1
2
3
4
// JavaScript function to toggle the navigation menu on mobiles and tablets
function toggleMenu(menu_id, button_id) {
}
This function asks for two parameters to be passed to it when it’s called. The first, menu_id,
will be the ID value of the navigation menu. We’ve given our navigation <ul> tag the ID
“navigation”. The second will contain the ID attribute of the button link, which we’ve set to
“menu_button”. We’ll pass these parameters when we call the function.
Next we need to find the HTML elements that the supplied ID parameters refer to.
1
2
3
4
// JavaScript function to toggle the navigation menu on mobiles and tablets
function toggleMenu(menu_id, button_id) {
// Find the navigation menu and button objects
menu_obj = document.getElementById(menu_id);
button_obj = document.getElementById(button_id);
}
The code above uses JavaScript’s built in function getElementById() to locate the HTML
elements and assigns them each to a variable, which we can use to manipulate them.
Page 33
We’ll keep our function simple. First we need to check to see if the navigation <ul> tag has
been assigned the class we have just created, “visible”. This will allow us to determine whether
we need to show the navigation list, by applying the “visible” class, or hide it by removing the
class. Enter the following into your function.
1
2
3
4
5
6
7
8
9
10
11
12
13
14
15
16
17
// JavaScript function to toggle the navigation menu on mobiles and tablets
function toggleMenu(menu_id, button_id) {
// Find the navigation menu and button objects
menu_obj = document.getElementById(menu_id);
button_obj = document.getElementById(button_id);
// Check for visible class
if((" " + menu_obj.className + " ").indexOf(" visible ") > -1) {
// Navigation menu is visible, we need to hide it
menu_obj.className = ""; // Remove the "visible" class
button_obj.innerHTML = "Menu";
} else {
// Navigation menu is hidden, we need to show it
menu_obj.className = "visible"; // Add the "visible" class
button_obj.innerHTML = "Hide";
}
}
The function now contains a simple if() statement, which uses JavaScript’s indexOf()
function to search for the presence of the word “visible” within the className property of
our menu_obj object.
If the word “visible” is found, then the navigation menu is visible, in which case we remove the
class by setting the className property for menu_obj to an empty string. We also set the
innerHTML property of our button_obj property to “Menu”, which adjusts the link text.
If the word “visible” is not found, we do the opposite in the else statement. We set the
className property for our menu_obj object to “visible”, and change the innerHTML
property for our button_obj link object to “Hide”.
Right, now we have written our function we need to do two more things. First, we must
include the JavaScript code in the page, and secondly we must call our function when the
menu link is pressed.
Open your index.html file in your text editor. In the <head> section we need to tell your web
browser where to find the responsive.js file you have just created, so add the following code.
3
4
5
6
<head>
<title>RalphTech</title>
<meta name="viewport" content="width=device-width, initial-scale=1, maximum-scale=1" />
<link rel="stylesheet" href="layout.css" type="text/css" media="screen" />
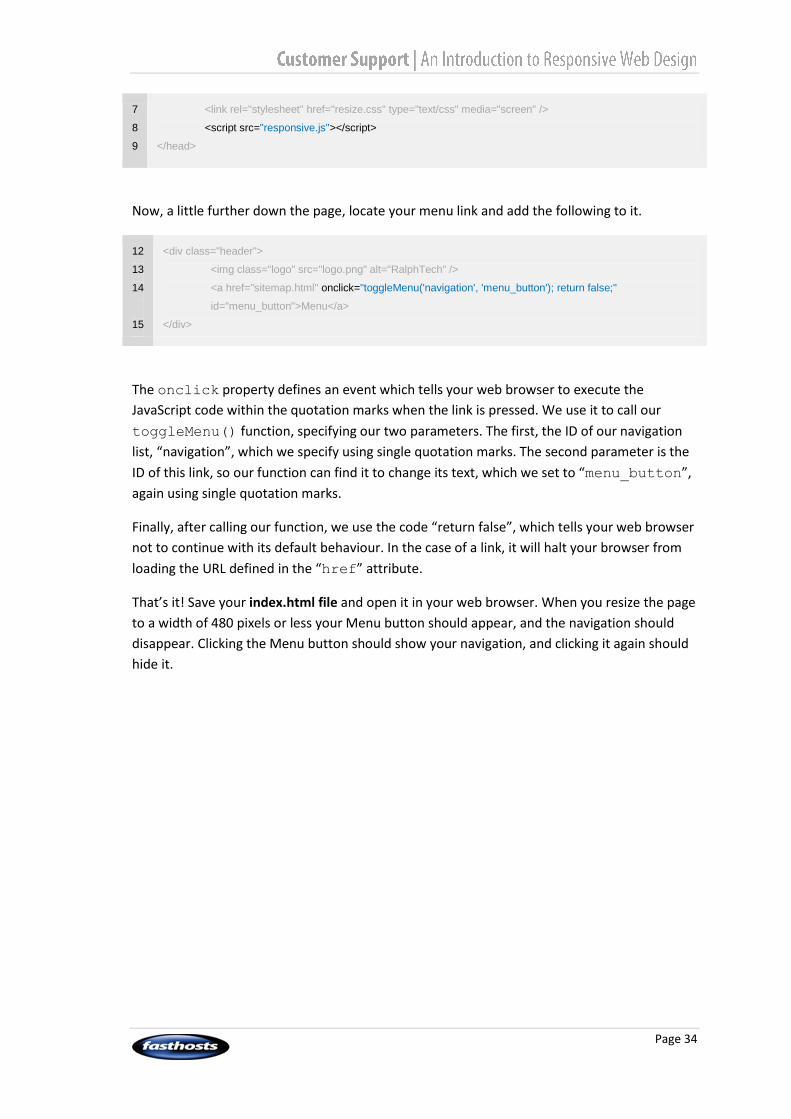
Page 34
7
8
9
<link rel="stylesheet" href="resize.css" type="text/css" media="screen" />
<script src="responsive.js"></script>
</head>
Now, a little further down the page, locate your menu link and add the following to it.
12
13
14
15
<div class="header">
<img class="logo" src="logo.png" alt="RalphTech" />
<a href="sitemap.html" onclick="toggleMenu('navigation', 'menu_button'); return false;"
id="menu_button">Menu</a>
</div>
The onclick property defines an event which tells your web browser to execute the
JavaScript code within the quotation marks when the link is pressed. We use it to call our
toggleMenu() function, specifying our two parameters. The first, the ID of our navigation
list, “navigation”, which we specify using single quotation marks. The second parameter is the
ID of this link, so our function can find it to change its text, which we set to “menu_button”,
again using single quotation marks.
Finally, after calling our function, we use the code “return false”, which tells your web browser
not to continue with its default behaviour. In the case of a link, it will halt your browser from
loading the URL defined in the “href” attribute.
That’s it! Save your index.html file and open it in your web browser. When you resize the page
to a width of 480 pixels or less your Menu button should appear, and the navigation should
disappear. Clicking the Menu button should show your navigation, and clicking it again should
hide it.

Page 35
With the hardest part of our page - the navigation – complete, the rest of the page should be
easy. All we now need is to create a footer and an area for our page content.
In your index.html file, enter the following code to the <body> section, after your navigation.
17
18
19
20
21
22
23
24
25
26
27
28
29
30
31
32
33
34
35
36
<!-- Navigation menu -->
<ul id="navigation">
<li><a href="index.html">Home</a></li>
<li><a href="products.html">Our Products</a></li>
<li><a href="services.html">Our Services</a></li>
<li><a href="about.html">About Us</a></li>
<li><a href="contact.html">Contact Us</a></li>
</ul>
<!-- Page content -->
<div class="page">
<h1>Welcome to RalphTech</h1>
<p>Page content.</p>
</div>
<!-- Footer -->
<div class="footer">
Copyright 2013 RalphTech Ltd. All Rights Reserved.
</div>
</body>
This HTML code should be very straightforward. We are separating our page content and
footer into individual division <div> sections. This helps us separate them, and will make
styling elements within these sections easier.
The CSS code for them will be very simple as well. We need to add padding to match the
header; otherwise they won’t line up and will look untidy. Add the following to your
layout.css file, after the existing code.
68
69
70
71
72
73
74
75
/* Page content */
div.page {
float: left;
width: 96%;
padding: 20px 2%;
}
/* Footer */

Page 36
76
77
78
79
80
81
82
83
div.footer {
float: left;
width: 96%;
padding: 10px 2%;
font-size: 12px;
color: #999999;
border-top: solid 3px #eeeeee;
}
We’ve added a few additional styles to the footer, such a top border to separate it from the
page content, and we’ve made the font size slightly smaller and a shade of grey (#999999).
That’s it, a responsive webpage!
Page 37
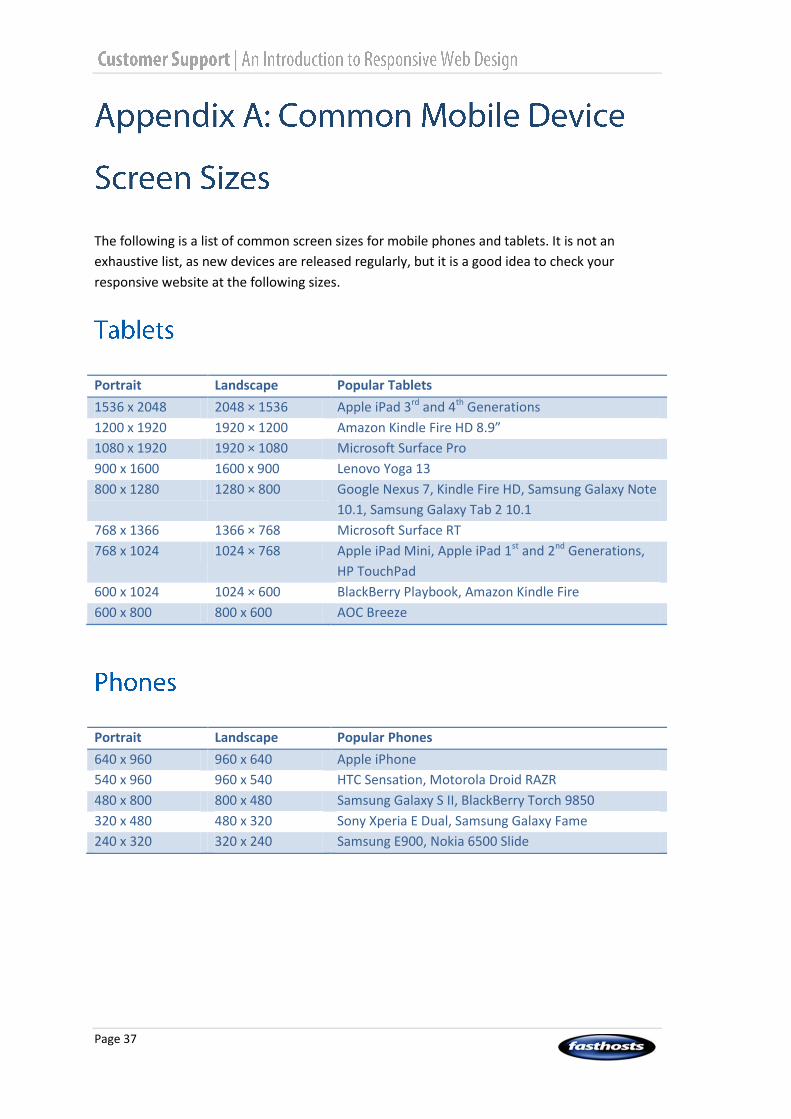
The following is a list of common screen sizes for mobile phones and tablets. It is not an
exhaustive list, as new devices are released regularly, but it is a good idea to check your
responsive website at the following sizes.
Portrait Landscape Popular Tablets
1536 x 2048 2048 × 1536 Apple iPad 3rd and 4th Generations
1200 x 1920 1920 × 1200 Amazon Kindle Fire HD 8.9”
1080 x 1920 1920 × 1080 Microsoft Surface Pro
900 x 1600 1600 x 900 Lenovo Yoga 13
800 x 1280 1280 × 800 Google Nexus 7, Kindle Fire HD, Samsung Galaxy Note
10.1, Samsung Galaxy Tab 2 10.1
768 x 1366 1366 × 768 Microsoft Surface RT
768 x 1024 1024 × 768 Apple iPad Mini, Apple iPad 1st and 2nd Generations,
HP TouchPad
600 x 1024 1024 × 600 BlackBerry Playbook, Amazon Kindle Fire
600 x 800 800 x 600 AOC Breeze
Portrait Landscape Popular Phones
640 x 960 960 x 640 Apple iPhone
540 x 960 960 x 540 HTC Sensation, Motorola Droid RAZR
480 x 800 800 x 480 Samsung Galaxy S II, BlackBerry Torch 9850
320 x 480 480 x 320 Sony Xperia E Dual, Samsung Galaxy Fame
240 x 320 320 x 240 Samsung E900, Nokia 6500 Slide
Page 38
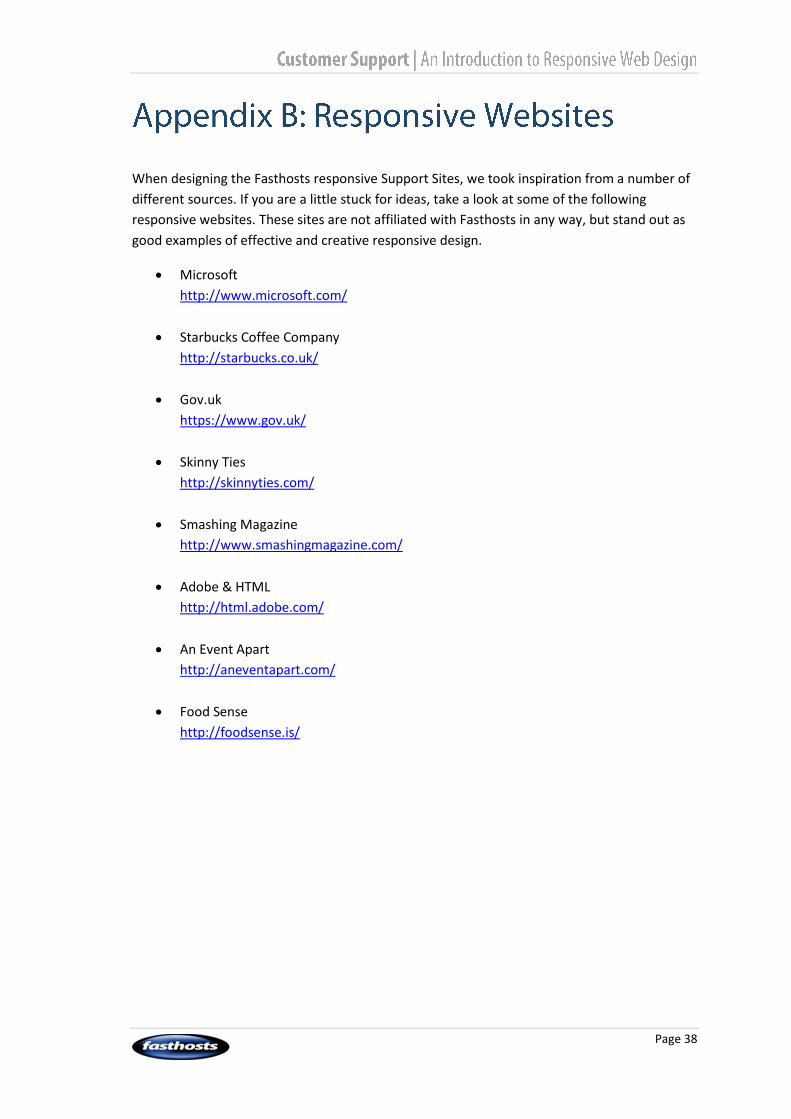
When designing the Fasthosts responsive Support Sites, we took inspiration from a number of
different sources. If you are a little stuck for ideas, take a look at some of the following
responsive websites. These sites are not affiliated with Fasthosts in any way, but stand out as
good examples of effective and creative responsive design.
Microsoft
http://www.microsoft.com/
Starbucks Coffee Company
http://starbucks.co.uk/
Gov.uk
https://www.gov.uk/
Skinny Ties
http://skinnyties.com/
Smashing Magazine
http://www.smashingmagazine.com/
Adobe & HTML
http://html.adobe.com/
An Event Apart
http://aneventapart.com/
Food Sense
http://foodsense.is/
Page 39
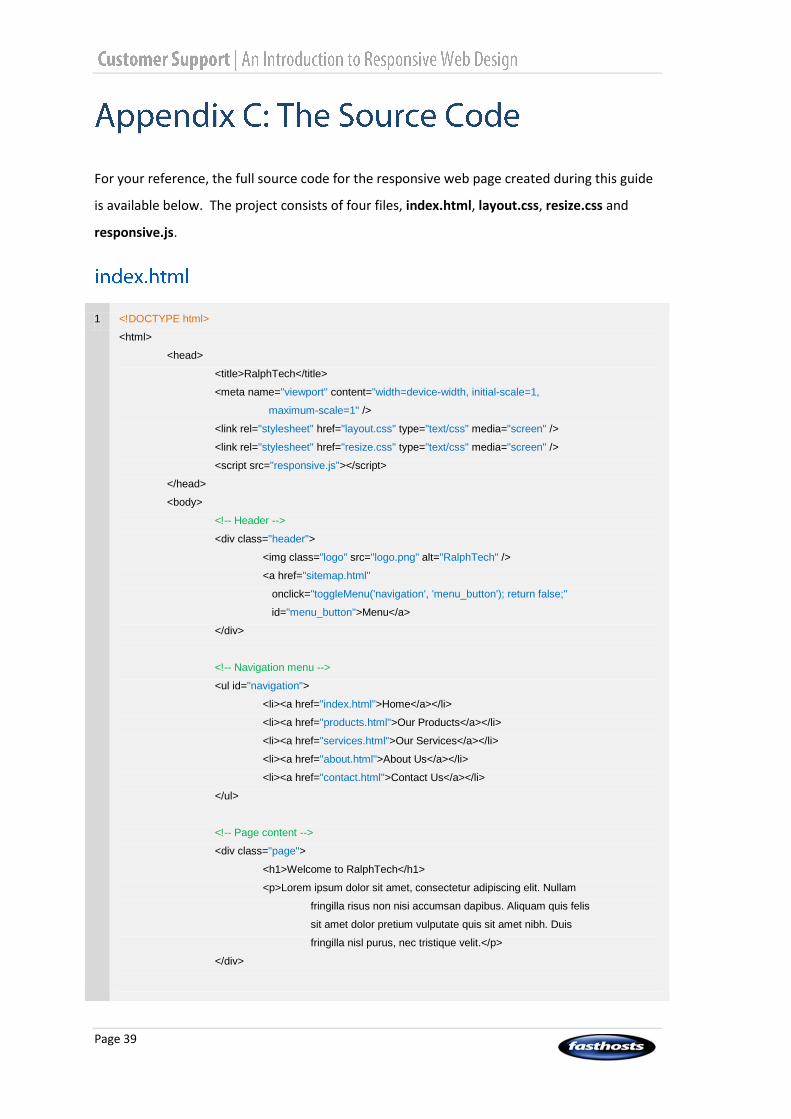
For your reference, the full source code for the responsive web page created during this guide
is available below. The project consists of four files, index.html, layout.css, resize.css and
responsive.js.
1 <!DOCTYPE html>
<html>
<head>
<title>RalphTech</title>
<meta name="viewport" content="width=device-width, initial-scale=1,
maximum-scale=1" />
<link rel="stylesheet" href="layout.css" type="text/css" media="screen" />
<link rel="stylesheet" href="resize.css" type="text/css" media="screen" />
<script src="responsive.js"></script>
</head>
<body>
<!-- Header -->
<div class="header">
<img class="logo" src="logo.png" alt="RalphTech" />
<a href="sitemap.html"
onclick="toggleMenu('navigation', 'menu_button'); return false;"
id="menu_button">Menu</a>
</div>
<!-- Navigation menu -->
<ul id="navigation">
<li><a href="index.html">Home</a></li>
<li><a href="products.html">Our Products</a></li>
<li><a href="services.html">Our Services</a></li>
<li><a href="about.html">About Us</a></li>
<li><a href="contact.html">Contact Us</a></li>
</ul>
<!-- Page content -->
<div class="page">
<h1>Welcome to RalphTech</h1>
<p>Lorem ipsum dolor sit amet, consectetur adipiscing elit. Nullam
fringilla risus non nisi accumsan dapibus. Aliquam quis felis
sit amet dolor pretium vulputate quis sit amet nibh. Duis
fringilla nisl purus, nec tristique velit.</p>
</div>
Page 40
<!-- Footer -->
<div class="footer">
Copyright 2013 RalphTech Ltd. All Rights Reserved.
</div>
</body>
</html>
1 /* General page layout styles */
body {
margin: 0px;
background: #ffffff;
font-family: Arial, sans-serif;
font-size: 13px;
}
/* Heading */
h1 {
font-size: 26px;
}
/* Header */
div.header {
float: left;
position: relative;
width: 96%;
padding: 10px 2%;
}
div.header img.logo {
float: left;
max-width: 75%;
}
/* Menu button */
div.header a#menu_button {
display: none;
position: absolute;
right: 2%;
border: solid 1px #009900;
color: #009900;
padding: 10px 5px;
font-weight: bold;
text-decoration: none;
}
Page 41
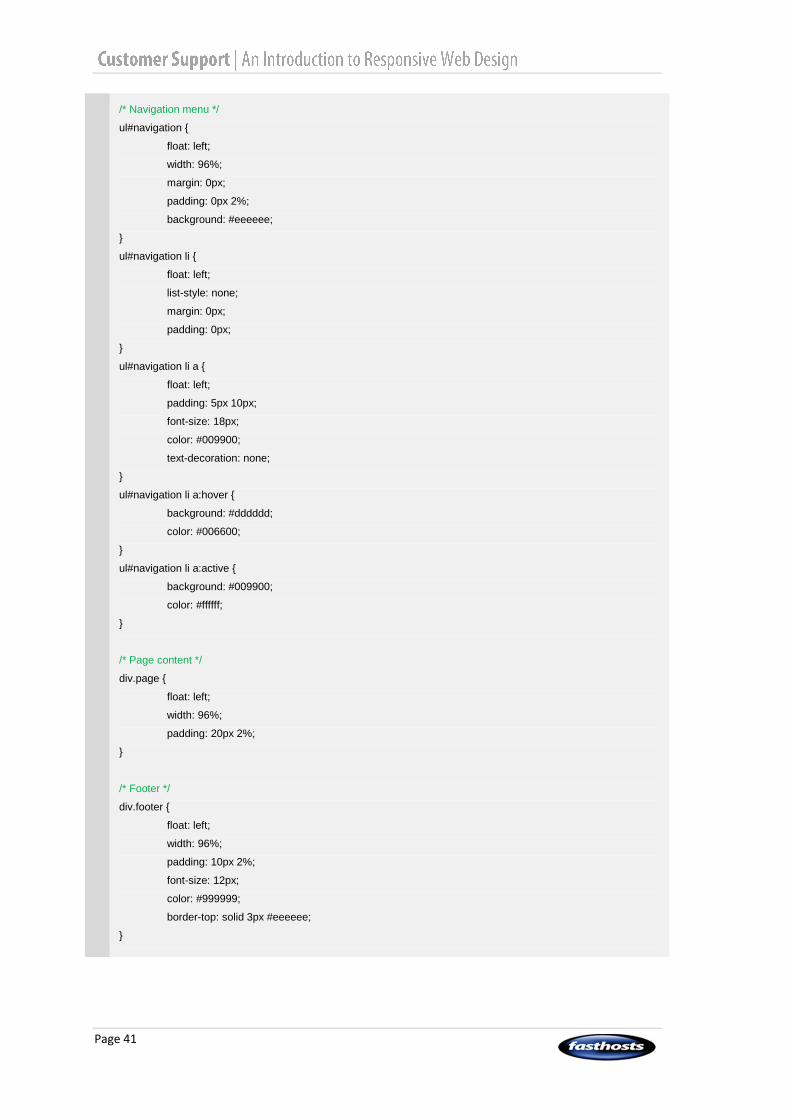
/* Navigation menu */
ul#navigation {
float: left;
width: 96%;
margin: 0px;
padding: 0px 2%;
background: #eeeeee;
}
ul#navigation li {
float: left;
list-style: none;
margin: 0px;
padding: 0px;
}
ul#navigation li a {
float: left;
padding: 5px 10px;
font-size: 18px;
color: #009900;
text-decoration: none;
}
ul#navigation li a:hover {
background: #dddddd;
color: #006600;
}
ul#navigation li a:active {
background: #009900;
color: #ffffff;
}
/* Page content */
div.page {
float: left;
width: 96%;
padding: 20px 2%;
}
/* Footer */
div.footer {
float: left;
width: 96%;
padding: 10px 2%;
font-size: 12px;
color: #999999;
border-top: solid 3px #eeeeee;
}
Page 42
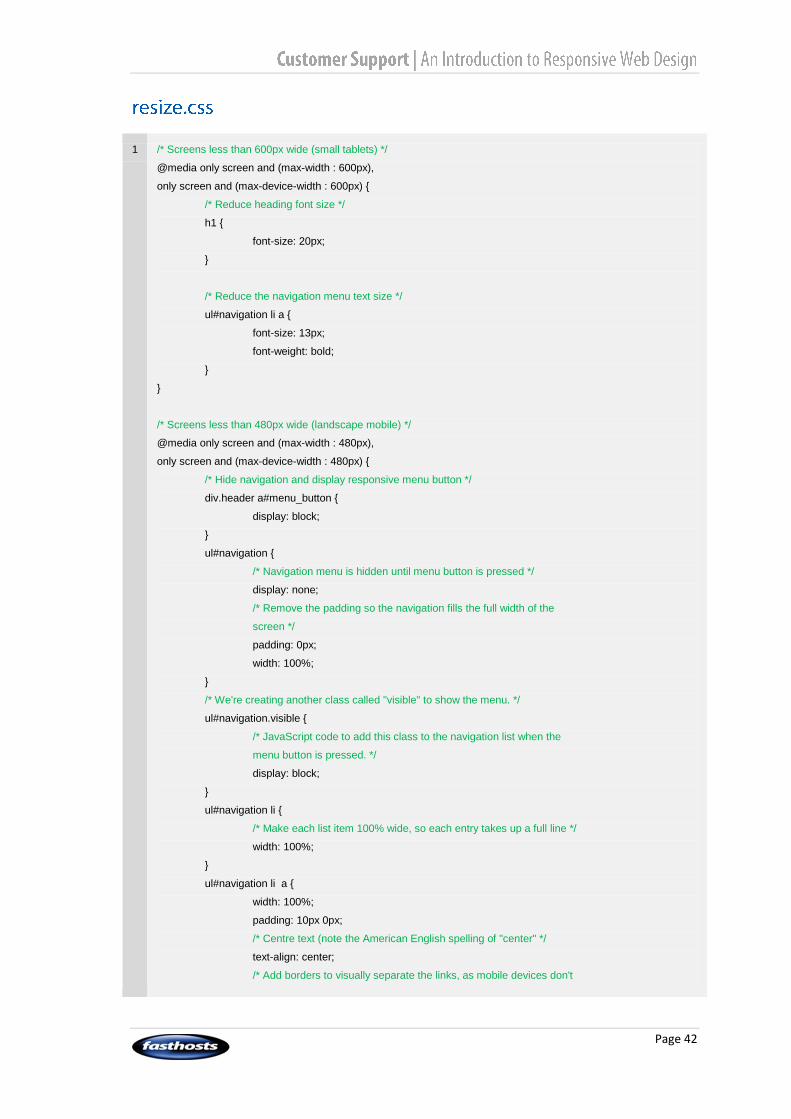
1 /* Screens less than 600px wide (small tablets) */
@media only screen and (max-width : 600px),
only screen and (max-device-width : 600px) {
/* Reduce heading font size */
h1 {
font-size: 20px;
}
/* Reduce the navigation menu text size */
ul#navigation li a {
font-size: 13px;
font-weight: bold;
}
}
/* Screens less than 480px wide (landscape mobile) */
@media only screen and (max-width : 480px),
only screen and (max-device-width : 480px) {
/* Hide navigation and display responsive menu button */
div.header a#menu_button {
display: block;
}
ul#navigation {
/* Navigation menu is hidden until menu button is pressed */
display: none;
/* Remove the padding so the navigation fills the full width of the
screen */
padding: 0px;
width: 100%;
}
/* We're creating another class called "visible" to show the menu. */
ul#navigation.visible {
/* JavaScript code to add this class to the navigation list when the
menu button is pressed. */
display: block;
}
ul#navigation li {
/* Make each list item 100% wide, so each entry takes up a full line */
width: 100%;
}
ul#navigation li a {
width: 100%;
padding: 10px 0px;
/* Centre text (note the American English spelling of "center" */
text-align: center;
/* Add borders to visually separate the links, as mobile devices don't
Page 43
have hovers */
border-top: solid 1px #ffffff;
border-bottom: solid 1px #dddddd;
}
}
/* Screens less than 320px wide (portrait mobile) */
@media only screen and (max-width : 320px),
only screen and (max-device-width : 320px) {
/* Reduce heading font size */
h1 {
font-size: 16px;
}
}
1 // JavaScript function to toggle the navigation menu on mobiles and tablets
function toggleMenu(menu_id, button_id) {
// Find the navigation menu and button objects
menu_obj = document.getElementById(menu_id);
button_obj = document.getElementById(button_id);
/* We've created a class called "visible" for the navigation menu. Look to
see if this class is applied, if it isn't, the navigation menu is
currently hidden and we need to show it by adding this class. If the
class is found, we need to remove it to hide the menu. */
if((" " + menu_obj.className + " ").indexOf(" visible ") > -1) {
// Navigation menu is visible, we need to hide it
menu_obj.className = ""; // Remove the "visible" class
button_obj.innerHTML = "Menu"; // Change button text
} else {
// Navigation menu is hidden, we need to show it
menu_obj.className = "visible"; // Add the "visible" class
button_obj.innerHTML = "Hide"; // Change button text
}
}
Page 44
Introducing HTML and CSS This guide will show you how to download and use all the tools needed to upload a business card website from scratch costing you a couple of evenings of your time. At the end of the guide you should know all about hosting websites and be confident in most aspects of web hosting. Download guide
Introducing domain names and DNS
This guide is designed to give you a broad introduction into how Domain names operate and how the Domain Name system works.
Download Guide
Introducing FTP
This guide is designed to show you the different ways of uploading
your site using ftp, including the basic principles of understanding
and troubleshooting ftp issues.
Download Guide
An Introduction to MySQL Databases
This guide will introduce MySQL, a powerful and popular free
relational database system.
Download Guide
Troubleshooting with the command line
The command line contains a powerful suite of tools that can be
utilised in a variety of ways. This guide will show you how to use
common tools to diagnose issues with websites, domain names and
DNS.
Download Guide