WIRING DIAGRAM - SeaSea Installation-Guide-20150420.pdf · THE KIT BOX CONTAINS SYSTEM OVERVIEW...
2
INSTALLATION GUIDE DYNAMIC TRIM CONTROL SYSTEM SERIES S THE KIT BOX CONTAINS SYSTEM OVERVIEW TOOLS Antifouling Utility knife Hacksaw Sealant Wrench Flat screwdriver Bits screwdriver Drill bits Hole saw Power drill Screw bits Ø 2 mm (5/64”) Ø 3 mm (1/8”) Ø 3,5 mm (9/64”) Ø 5 mm (3/16”) Ø 19 mm (3/4’’) Ø 76 mm (3’’) T10 T20 T25 T30 WIRING DIAGRAM Model Part No. Description CP-S 2011238 CONTROL PANEL S WITH STANDARD CABLE 7 M DU-S 2011239 DISTRIBUTION UNIT S WITH POWER CABLE 4 M IT 300-S 2011232 INTERCEPTOR 300 S WITH CABLE 3 M & CABLE COVERS IT 450-S 2011233 INTERCEPTOR 450 S WITH CABLE 3 M & CABLE COVERS IT 600-S 2011234 INTERCEPTOR 600 S WITH CABLE 3 M & CABLE COVERS IT750-S 2011235 INTERCEPTOR 750 S WITH CABLE 3 M & CABLE COVERS EC1.5-M12 2011258 M12 EXTENSION CABLE 1.5 M EC3-M12 2011259 M12 EXTENSION CABLE 3 M EC5-M12 2011260 M12 EXTENSION CABLE 5 M EC10-M12 2011261 M12 EXTENSION CABLE 10 M SC7-M12 2011257 M12 STANDARD CABLE 7 M CP-S ALU FRAME 2011281 CONTROL PANEL S ALU FRAME CC-S 2011071 CABLE COVER S SU-S 2011230 SERVO UNIT S WITH CABLE 3 M IT300-S FRONT 2011252 INTERCEPTOR 300 S FRONT IT450-S FRONT 2011253 INTERCEPTOR 450 S FRONT IT600-S FRONT 2011254 INTERCEPTOR 600 S FRONT IT750-S FRONT 2011255 INTERCEPTOR 750 S FRONT GPU 2011240 GLOBAL POSITIONING UNIT WITH CABLE 5 M & MOUNT KIT SERIES S ACCESSORIES AND SPARE PARTS EXTERNAL GPS (GPU) POWER SUPPLY (12-32 V DC) DISTRIBUTION UNIT (DU-S) INTERCEPTOR DISTRIBUTION UNIT CONTROL PANEL SIKA 13 mm (33/64”) 27 mm (11/16”) EXTRA CONTROL PANEL (CP-S) MAIN CONTROL PANEL (CP-S) To NMEA 2000 backbone (optional GPS source) Ignition switch Battery Max total cable length (6 m) (standard + extension cable) 15(b) Connect to Key sense input on the Control panel Ignition switch 15(b) Connect to Key sense input on the Control panel Main switch 15A Fuse STARBOARD PORT Port Interceptor 1 Port Interceptor 2 Starboard Interceptor 2 Port Interceptor 3 Starboard Interceptor 3 Starboard Interceptor 1 The external GPS can be connected to any Control panel Transom inside view Extension cable (optional) Extension cable (optional) Extension cable (optional) Standard cable (7 m) Extension cable (optional) (1,5 m) (3 m) (5 m) (10 m) (1,5 m) (3 m) (5 m) (10 m) (1,5 m) (3 m) (5 m) (10 m) (1,5 m) (3 m) (5 m) Extension cable (optional) (1,5 m) (3 m) Standard cable (7 m) GPS cable (5 m) Power cable (4 m) (3 m) (3 m) (3 m) (3 m) (3 m) (3 m) Ignition switch Distribution unit External GPS NMEA 2000 network Extra Control panel Copyright © 2015 Zipwake AB, Sweden. All rights reserved. P1A, April 2015, English
-
Upload
hoangduong -
Category
Documents
-
view
217 -
download
0
Transcript of WIRING DIAGRAM - SeaSea Installation-Guide-20150420.pdf · THE KIT BOX CONTAINS SYSTEM OVERVIEW...

INSTALLATION GUIDEDYNAMIC TRIM CONTROL SYSTEMSERIES S
THE KIT BOX CONTAINS
SYSTEM OVERVIEW
TOOLS
AntifoulingUtility knife Hacksaw
Sealant WrenchFlat screwdriver
Bits screwdriver
Drill bits Hole saw
Power drill
Screw bitsØ 2 mm (5/64”)
Ø 3 mm (1/8”)
Ø 3,5 mm (9/64”)
Ø 5 mm (3/16”)
Ø 19 mm (3/4’’)
Ø 76 mm (3’’)
T10
T20
T25
T30
WIRING DIAGRAM
Model Part No. Description
CP-S 2011238 CONTROL PANEL S WITH STANDARD CABLE 7 M
DU-S 2011239 DISTRIBUTION UNIT S WITH POWER CABLE 4 M
IT 300-S 2011232 INTERCEPTOR 300 S WITH CABLE 3 M & CABLE COVERS
IT 450-S 2011233 INTERCEPTOR 450 S WITH CABLE 3 M & CABLE COVERS
IT 600-S 2011234 INTERCEPTOR 600 S WITH CABLE 3 M & CABLE COVERS
IT750-S 2011235 INTERCEPTOR 750 S WITH CABLE 3 M & CABLE COVERS
EC1.5-M12 2011258 M12 EXTENSION CABLE 1.5 M
EC3-M12 2011259 M12 EXTENSION CABLE 3 M
EC5-M12 2011260 M12 EXTENSION CABLE 5 M
EC10-M12 2011261 M12 EXTENSION CABLE 10 M
SC7-M12 2011257 M12 STANDARD CABLE 7 M
CP-S ALU FRAME 2011281 CONTROL PANEL S ALU FRAME
CC-S 2011071 CABLE COVER S
SU-S 2011230 SERVO UNIT S WITH CABLE 3 M
IT300-S FRONT 2011252 INTERCEPTOR 300 S FRONT
IT450-S FRONT 2011253 INTERCEPTOR 450 S FRONT
IT600-S FRONT 2011254 INTERCEPTOR 600 S FRONT
IT750-S FRONT 2011255 INTERCEPTOR 750 S FRONT
GPU 2011240 GLOBAL POSITIONING UNIT WITH CABLE 5 M & MOUNT KIT
SERIES S ACCESSORIES AND SPARE PARTS
EXTERNAL GPS (GPU)
POWER SUPPLY (12-32 V DC)DISTRIBUTION UNIT (DU-S)
INTERCEPTOR DISTRIBUTION UNIT
CONTROL PANEL
SIKA
13 mm (33/64”)
27 mm (11/16”)
EXTRA CONTROL PANEL (CP-S)MAIN CONTROL PANEL (CP-S)
To NMEA 2000 backbone(optional GPS source)
Ignitionswitch
Battery
Max total cable length (6 m)(standard + extension cable)
15(b)
Connect to Key sense inputon the Control panel
Ignitionswitch
15(b)
Connect to Key sense inputon the Control panel
Mainswitch
15A Fuse
STARBOARD PORT
PortInterceptor 1
PortInterceptor 2
StarboardInterceptor 2
PortInterceptor 3
StarboardInterceptor 3
StarboardInterceptor 1
The external GPScan be connectedto any Control panel
Transom inside view
Extension cable(optional)
Extension cable(optional)
Extension cable(optional)
Standard cable (7 m)
Extension cable(optional)
(1,5 m)(3 m)(5 m)(10 m)
(1,5 m)(3 m)(5 m)(10 m)
(1,5 m)(3 m)(5 m)(10 m)
(1,5 m)(3 m)(5 m)
Extension cable(optional)
(1,5 m)(3 m)
Standard cable (7 m)
GPS cable (5 m)
Power cable(4 m)
(3 m)
(3 m)
(3 m) (3 m)
(3 m)
(3 m)
Ignition switch
Distribution unit External GPS
NMEA 2000 networkExtra Control panel
Copyright © 2015 Zipwake AB, Sweden. All rights reserved. P1A, April 2015, English
Hold:13 mm (33/64”) wrench
Tighten:27 mm (1 1/16”) wrench15 Nm (11 lb-ft)Hold:
13 mm (33/64”) wrenchPlace the cablein the clip
Tighten:27 mm (1 1/16”) wrench15 Nm (11 lb-ft)
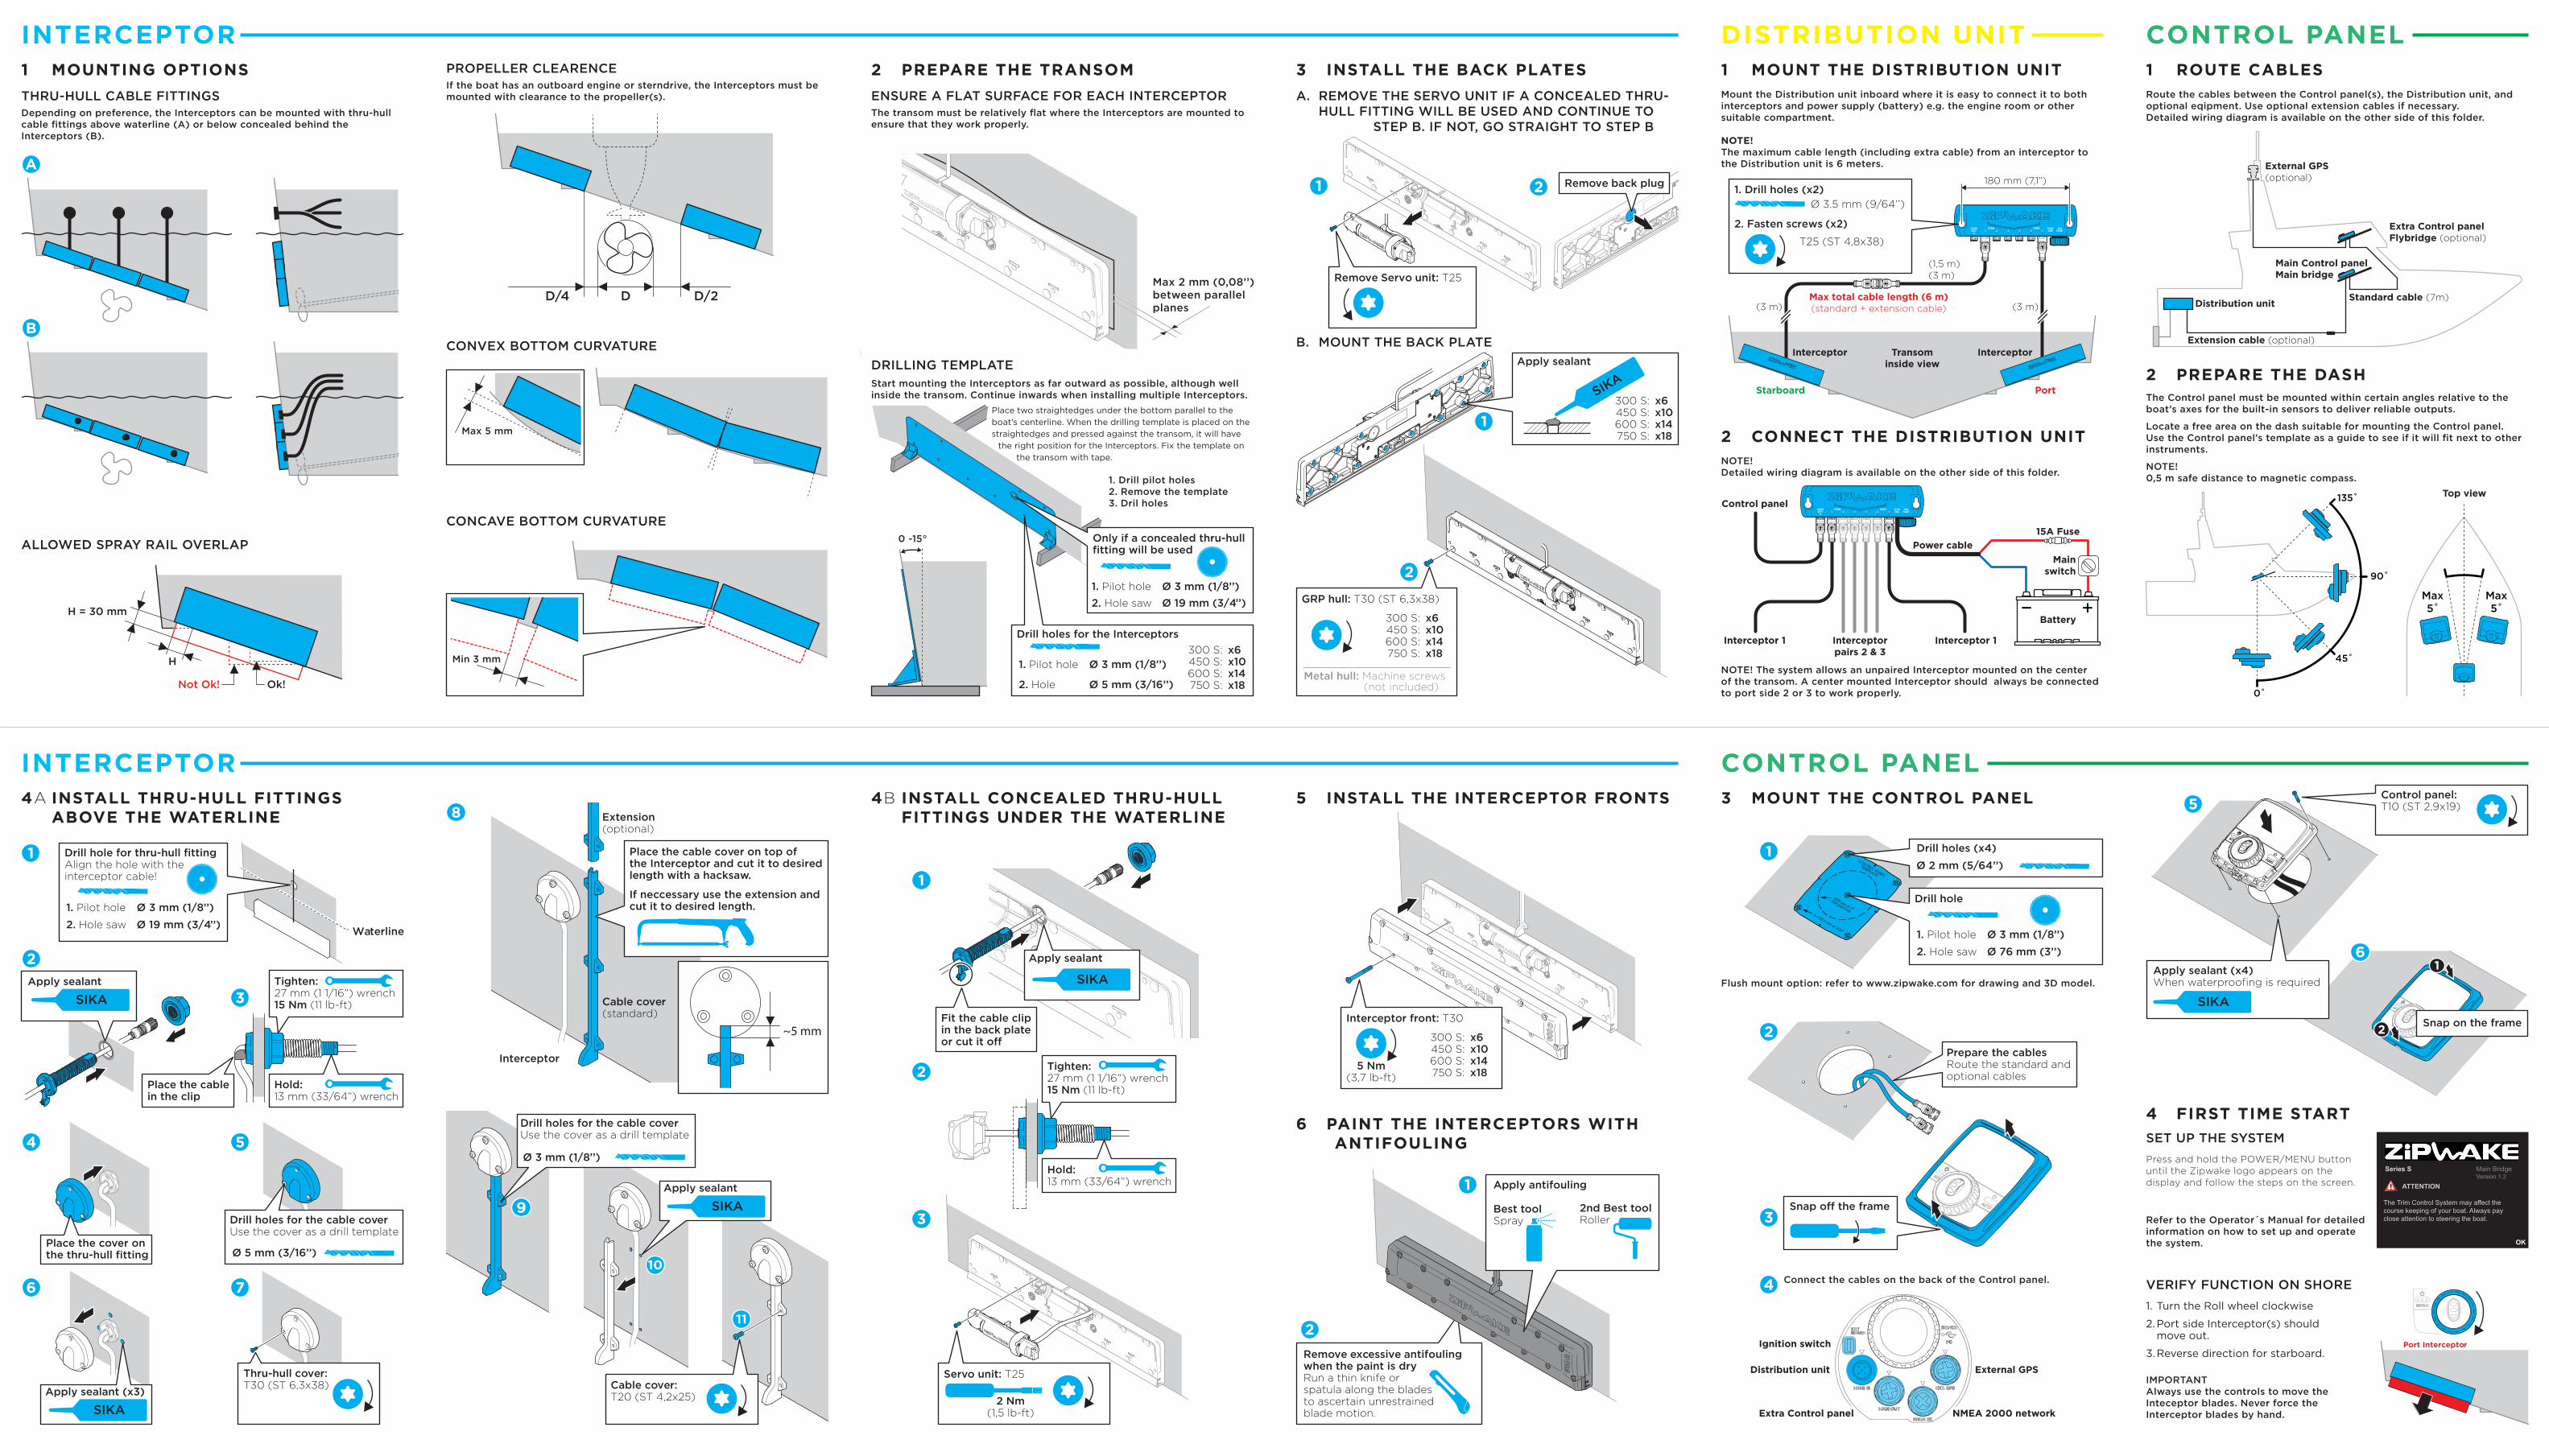
1 MOUNTING OPTIONS 2 PREPARE THE TRANSOM 3 INSTALL THE BACK PLATES 1 ROUTE CABLES
2 PREPARE THE DASH
1 MOUNT THE DISTRIBUTION UNIT
2 CONNECT THE DISTRIBUTION UNIT
PROPELLER CLEARENCE
THRU-HULL CABLE FITTINGS ENSURE A FLAT SURFACE FOR EACH INTERCEPTOR
DRILLING TEMPLATE
A. REMOVE THE SERVO UNIT IF A CONCEALED THRU- HULL FITTING WILL BE USED AND CONTINUE TO STEP B. IF NOT, GO STRAIGHT TO STEP B
Extra Control panelFlybridge (optional)
External GPS(optional)
Distribution unit Standard cable (7m)
Extension cable (optional)
Main Control panel Main bridge
Ignition switch
Distribution unit External GPS
NMEA 2000 networkExtra Control panel
B. MOUNT THE BACK PLATE
ALLOWED SPRAY RAIL OVERLAP
CONVEX BOTTOM CURVATURE
CONCAVE BOTTOM CURVATURE
DD/4
Min 3 mm
Max 5 mm
D/2
Depending on preference, the Interceptors can be mounted with thru-hull cable fittings above waterline (A) or below concealed behind the Interceptors (B).
If the boat has an outboard engine or sterndrive, the Interceptors must be mounted with clearance to the propeller(s).
The transom must be relatively flat where the Interceptors are mounted to ensure that they work properly.
Place two straightedges under the bottom parallel to the boat’s centerline. When the drilling template is placed on the straightedges and pressed against the transom, it will have
the right position for the Interceptors. Fix the template on the transom with tape.
Start mounting the Interceptors as far outward as possible, although well inside the transom. Continue inwards when installing multiple Interceptors.
0 -15°
Max 2 mm (0,08’’)between parallel planes
INTERCEPTOR
INTERCEPTOR
CONTROL PANEL
CONTROL PANEL
DISTRIBUTION UNIT
4B INSTALL CONCEALED THRU-HULL FITTINGS UNDER THE WATERLINE
5 INSTALL THE INTERCEPTOR FRONTS
6 PAINT THE INTERCEPTORS WITH ANTIFOULING
4 FIRST TIME START
3 MOUNT THE CONTROL PANEL
Press and hold the POWER/MENU button until the Zipwake logo appears on the display and follow the steps on the screen.
The Trim Control System may affect thecourse keeping of your boat. Always payclose attention to steering the boat.
ATTENTION
OK
Main BridgeVersion 1.2
Series S
1. Drill pilot holes2. Remove the template3. Dril holes
1. Pilot hole Ø 3 mm (1/8’’)2. Hole saw Ø 19 mm (3/4’’)
1. Pilot hole Ø 3 mm (1/8’’)
2. Hole Ø 5 mm (3/16’’)
Mount the Distribution unit inboard where it is easy to connect it to both interceptors and power supply (battery) e.g. the engine room or other suitable compartment.
NOTE!The maximum cable length (including extra cable) from an interceptor to the Distribution unit is 6 meters.
NOTE!Detailed wiring diagram is available on the other side of this folder.
Refer to the Operator´s Manual for detailed information on how to set up and operate the system.
1. Turn the Roll wheel clockwise
2. Port side Interceptor(s) should move out.
3. Reverse direction for starboard.
IMPORTANTAlways use the controls to move the Inteceptor blades. Never force the Interceptor blades by hand.
The Control panel must be mounted within certain angles relative to the boat’s axes for the built-in sensors to deliver reliable outputs.
Locate a free area on the dash suitable for mounting the Control panel. Use the Control panel’s template as a guide to see if it will fit next to other instruments.
NOTE!0,5 m safe distance to magnetic compass.
Connect the cables on the back of the Control panel.
SET UP THE SYSTEM
VERIFY FUNCTION ON SHORE
Route the cables between the Control panel(s), the Distribution unit, and optional eqipment. Use optional extension cables if necessary. Detailed wiring diagram is available on the other side of this folder.
Ø 2 mm (5/64’’)
1. Pilot hole Ø 3 mm (1/8’’)2. Hole saw Ø 76 mm (3’’)
T25 (ST 4,8x38)
Ø 3.5 mm (9/64’’)
Port Interceptor
SIKA
Interceptor
Interceptor 1
Control panel
Power cable
Interceptor 1Interceptor pairs 2 & 3
NOTE! The system allows an unpaired Interceptor mounted on the center of the transom. A center mounted Interceptor should always be connected to port side 2 or 3 to work properly.
InterceptorTransominside view
Starboard Port
Snap on the frame
1
1
1
2
2
1
1
5
6
2
4
3
2
2
3
A
B
1
2
Waterline
4A INSTALL THRU-HULL FITTINGS ABOVE THE WATERLINE
1. Pilot hole Ø 3 mm (1/8’’)2. Hole saw Ø 19 mm (3/4’’)
Ø 5 mm (3/16’’)
1
2
3
8
4
6
5
7
Cable cover:T20 (ST 4,2x25)
9
10
11
SIKA300 S:450 S:600 S:750 S:
x6x10x14x18
Apply sealant
300 S:450 S:600 S:750 S:
x6x10x14x18
GRP hull: T30 (ST 6,3x38)
Metal hull: Machine screws (not included)
Apply antifouling
Best toolSpray
2nd Best toolRoller
Remove excessive antifoulingwhen the paint is dryRun a thin knife orspatula along the bladesto ascertain unrestrainedblade motion.
SIKA
Apply sealant
Drill holes for the cable coverUse the cover as a drill template
Ø 3 mm (1/8’’)
Drill holes for the cable coverUse the cover as a drill template
SIKAApply sealant
Extension(optional)
Cable cover(standard)
Interceptor
Place the cable cover on top ofthe Interceptor and cut it to desiredlength with a hacksaw.
If neccessary use the extension andcut it to desired length.
~5 mm
SIKAApply sealant
SIKAApply sealant (x3)
Flush mount option: refer to www.zipwake.com for drawing and 3D model.
Drill holes (x4)
Drill hole
Drill holes for the Interceptors
Max total cable length (6 m)(standard + extension cable)(3 m) (3 m)
(1,5 m)(3 m)
180 mm (7,1”)
Battery
Top view
Mainswitch
15A Fuse
1. Drill holes (x2)
2. Fasten screws (x2)
Max5˚
Max5˚
90˚
135˚
45˚
0˚
300 S:450 S:600 S:750 S:
x6x10x14x18
Control panel:T10 (ST 2,9x19)
Prepare the cablesRoute the standard andoptional cables
Interceptor front: T30
5 Nm(3,7 lb-ft)
300 S:450 S:600 S:750 S:
x6x10x14x18
Thru-hull cover:T30 (ST 6,3x38)
Remove back plug
Remove Servo unit: T25
Servo unit: T25
2 Nm(1,5 lb-ft)
H = 30 mm
H
Not Ok! Ok!