Wireless Undercabinet TV/DVD/Music...
16
Wireless Undercabinet TV/DVD/Music System User’s Guide for Model IKTD1016 v1620-01 For the most up-to-date version of this User’s Guide, go to www.iLiveElectronics.com
Transcript of Wireless Undercabinet TV/DVD/Music...

Wireless Undercabinet TV/DVD/Music SystemUser’s Guide for Model IKTD1016 v1620-01For the most up-to-date version of this User’s Guide, go to www.iLiveElectronics.com


3
Safety Instructions & WarningsWARNING: To reduce the risk of electric shock, do not remove cover (or back). No user-serviceable parts inside. Refer servicing to qualified service personnel.
ATTENTIONRISQUE D' ÉLECTROCUTION
NE PAS OUVRIR
CAUTIONRISK OF ELECTRIC SHOCK
DO NOT OPEN
The exclamation point within an equilateral triangle is intended to alert the user to the presence of important operating and mainte-nance (servicing) instructions in the literature accompanying the appliance.
This symbol indicates that this product incor-porates double insulation between hazardous mains voltage and user accessible parts.
The lightning flash with arrowhead symbol, within an equilateral triangle, is intended to alert the user to the presence of uninsulated “dangerous voltage” within the product’s en-closure that may be of sufficient magnitude to constitute a risk of electric shock to persons.
WARNING: DO NOT INGEST BATTERY, CHEMICAL BURN HAZARD.
FCC WARNINGS Warning: Changes or modifications to this unit not expressly approved by the party responsible for compliance could void the user’s authority to operate the equipment.NOTE: This equipment has been tested and found to comply with the limits for a Class B digital device, pursuant to Part 15 of the FCC Rules. These limits are designed to provide reasonable protection against harmful interference in a residential installation. This equipment generates, uses, and can radiate radio frequency energy and, if not installed and used in accordance with the instructions, may cause harmful interference to radio communications. However, there is no guarantee that interference will not occur in a particular installation. If this equipment does cause harmful interference to radio or television reception, which can be determined by turning the equipment off and on, the user is encouraged to try to correct the interference by one or more of the following measures:• Reorient or relocate the receiving antenna.• Increase the separation between the equipment and receiver.• Connect the equipment into an outlet on a circuit different
from that to which the receiver is connected.• Consult the dealer or an experienced radio/TV technician for
help.
ADDITIONAL WARNINGS • CAUTION: TO PREVENT ELECTRIC SHOCK, MATCH
WIDE BLADE OF PLUG TO WIDE SLOT, FULLY INSERT.• Mains plug is used as disconnect device and it should remain
readily operable during intended use. In order to disconnect the apparatus from the mains completely, the mains plug should be disconnected form the mains socket outlet completely.
• WARNING: Shock hazard - Do Not Open.• Caution and marking information is located at the rear or
bottom of the apparatus.• Objects filled with liquids, such as vases, shall not be placed
on the apparatus.• WARNING: To reduce the risk of fire or electric shock, do not
expose this apparatus to rain, moisture, dripping, or splashing.• CAUTION: Use of controls or adjustments or performance of
procedures other than those specified may result in hazardous radiation exposure.
• WARNING: Changes or modifications to this unit not expressly approved by the party responsible for compliance could void the user’s authority to operate the equipment.
• WARNING: Use of this unit near fluorescent lighting may cause interference regarding use of the remote. If the unit is displaying erratic behavior move away from any fluorescent lighting, as it may be the cause.
• CAUTION: Danger of explosion if battery is incorrectly replaced. Replace only with the same or equivalent type.
• WARNING: The remote control’s button cell battery contains mercury. Do not put in the trash, instead recycle or dispose of as hazardous waste.
• This product is supplied with a coin/button cell battery. If the coin/button cell battery is swallowed, it can cause severe internal burns and can lead to death.
• Battery shall not be exposed to excessive heat such as sunshine, fire or the like.
• Keep new and used batteries away from children. If the battery compartment does not close securely, stop using the product and keep it away from children.
• If you think batteries might have been swallowed or placed inside any part of the body, seek immediate medical attention.
• Do not mix old and new batteries. • Completely replace all old batteries with new ones.• Do not mix alkaline, standard (carbon-zinc), or rechargeable
(ni-cad, ni-mh, etc) batteries.• Batteries should be recycled or disposed of as per state and
local guidelines.• WARNING: This product may contain chemicals known to the
State of California to cause birth defects, or other reproductive harm (California Prop 65). Wash hands after handling.
• This product meets and complies with all Federal regulations.
This product utilizes a Class 1 laser to read Compact Discs. This laser Compact Disc Player is equipped with safety switches to avoid exposure when the CD door is open and the safety interlocks are defeated. Invisible laser radiation is present when the CD Player’s lid is open and the system’s interlock has failed or been defeated. It is very important that you avoid direct exposure to the laser beam at all times. Please do not attempt to defeat or bypass the safety switches.

4
Table of ContentsSetup � � � � � � � � � � � � � � � � � � � � � � � � � � � � � � � � � � � � � � � � � � � � � � � � � � � � � � � � � � � � � � � � � � � � � � � � � � � � � � � � � � � � � � � � � � � � � � � � � � 5
Features & SpecificationsIncludes PowerBattery Backup
Orientation � � � � � � � � � � � � � � � � � � � � � � � � � � � � � � � � � � � � � � � � � � � � � � � � � � � � � � � � � � � � � � � � � � � � � � � � � � � � � � � � � � � � � � � � � � � � 6Front ControlsSide Inputs
Remote � � � � � � � � � � � � � � � � � � � � � � � � � � � � � � � � � � � � � � � � � � � � � � � � � � � � � � � � � � � � � � � � � � � � � � � � � � � � � � � � � � � � � � � � � � � � � � � � 7Remote FunctionsRemote Batteries
Audio Inputs � � � � � � � � � � � � � � � � � � � � � � � � � � � � � � � � � � � � � � � � � � � � � � � � � � � � � � � � � � � � � � � � � � � � � � � � � � � � � � � � � � � � � � � � � � � 8Connecting Cable/TV Antenna Composite Video (Aux In) Connecting HDMI
Other Devices � � � � � � � � � � � � � � � � � � � � � � � � � � � � � � � � � � � � � � � � � � � � � � � � � � � � � � � � � � � � � � � � � � � � � � � � � � � � � � � � � � � � � � � � � 10Using a USB Drive Line In (3.5mm Audio Input)
Bluetooth Wireless � � � � � � � � � � � � � � � � � � � � � � � � � � � � � � � � � � � � � � � � � � � � � � � � � � � � � � � � � � � � � � � � � � � � � � � � � � � � � � � � � � � � 12Pairing to a Device & Playing Audio Using the Speakerphone
Radio � � � � � � � � � � � � � � � � � � � � � � � � � � � � � � � � � � � � � � � � � � � � � � � � � � � � � � � � � � � � � � � � � � � � � � � � � � � � � � � � � � � � � � � � � � � � � � � � � 13Radio Reception Tuning the FM Radio Saving and Playing a Station as a Preset
DVD & CD � � � � � � � � � � � � � � � � � � � � � � � � � � � � � � � � � � � � � � � � � � � � � � � � � � � � � � � � � � � � � � � � � � � � � � � � � � � � � � � � � � � � � � � � � � � � � 14Loading and Playing a DVD/CD Programming a DVD or CD
Clock & Timer � � � � � � � � � � � � � � � � � � � � � � � � � � � � � � � � � � � � � � � � � � � � � � � � � � � � � � � � � � � � � � � � � � � � � � � � � � � � � � � � � � � � � � � � � 15Setting the Clock Setting the Timer Disabling the Timer
Company Information � � � � � � � � � � � � � � � � � � � � � � � � � � � � � � � � � � � � � � � � � � � � � � � � � � � � � � � � � � � � � � � � � � � � � � � � � � � � � � � � � 16Contact Information Warranty International Support
5
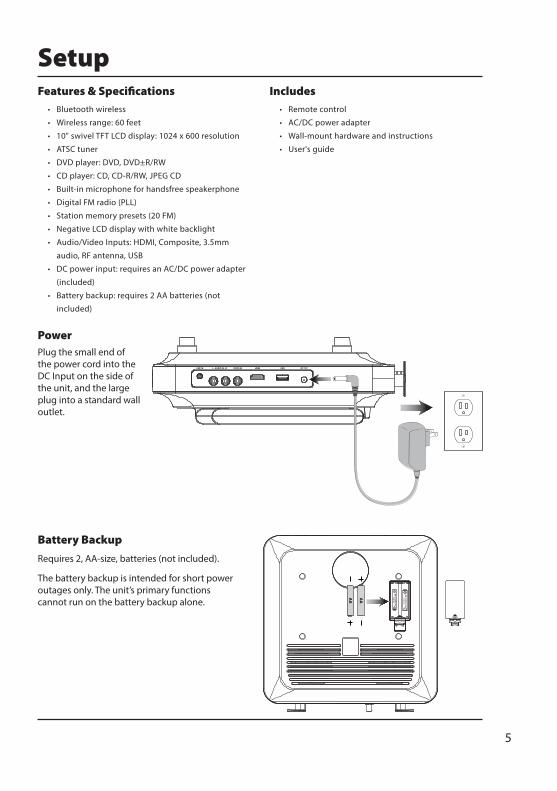
Features & Specifications• Bluetooth wireless
• Wireless range: 60 feet
• 10" swivel TFT LCD display: 1024 x 600 resolution
• ATSC tuner
• DVD player: DVD, DVD±R/RW
• CD player: CD, CD-R/RW, JPEG CD
• Built-in microphone for handsfree speakerphone
• Digital FM radio (PLL)
• Station memory presets (20 FM)
• Negative LCD display with white backlight
• Audio/Video Inputs: HDMI, Composite, 3.5mm
audio, RF antenna, USB
• DC power input: requires an AC/DC power adapter
(included)
• Battery backup: requires 2 AA batteries (not
included)
AA
AA
Plug the small end of the power cord into the DC Input on the side of the unit, and the large plug into a standard wall outlet.
SetupIncludes
• Remote control
• AC/DC power adapter
• Wall-mount hardware and instructions
• User's guide
Battery Backup
Power
Requires 2, AA-size, batteries (not included).
The battery backup is intended for short power outages only. The unit’s primary functions cannot run on the battery backup alone.

6
Front Controls
Side Inputs
Orientation
Open/Close
Disc Tray
Source
Remote Sensor
Microphone
Volume ±Channel ±/Memory Presets
Pair/Play/Pause/Speakerphone
DC Power InputHDMI Input
USB PortLine In Composite Video Input
Screen Latch
Stereo Inputs
Disc Tray
DisplayPower Skip/Tune
Memory
Timer
Stop/USB/End Call
7
AAA
AAA
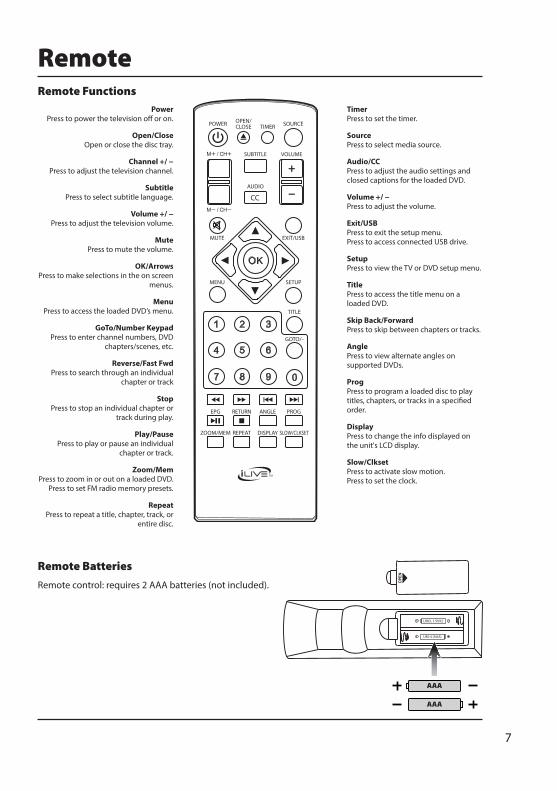
Remote control: requires 2 AAA batteries (not included).
Remote Batteries
Remote Functions
Remote
Power Press to power the television off or on.
Open/Close Open or close the disc tray.
Channel +/ − Press to adjust the television channel.
Subtitle Press to select subtitle language.
Volume +/ − Press to adjust the television volume.
Mute Press to mute the volume.
OK/Arrows Press to make selections in the on screen
menus.
Menu Press to access the loaded DVD’s menu.
GoTo/Number Keypad Press to enter channel numbers, DVD
chapters/scenes, etc.
Reverse/Fast Fwd Press to search through an individual
chapter or track
Stop Press to stop an individual chapter or
track during play.
Play/Pause Press to play or pause an individual
chapter or track.
Zoom/Mem Press to zoom in or out on a loaded DVD.
Press to set FM radio memory presets.
Repeat Press to repeat a title, chapter, track, or
entire disc.
Timer Press to set the timer.
Source Press to select media source.
Audio/CC Press to adjust the audio settings and closed captions for the loaded DVD.
Volume +/ − Press to adjust the volume.
Exit/USB Press to exit the setup menu. Press to access connected USB drive.
Setup Press to view the TV or DVD setup menu.
Title Press to access the title menu on a loaded DVD.
Skip Back/Forward Press to skip between chapters or tracks.
Angle Press to view alternate angles on supported DVDs.
Prog Press to program a loaded disc to play titles, chapters, or tracks in a specified order.
Display Press to change the info displayed on the unit's LCD display.
Slow/Clkset Press to activate slow motion. Press to set the clock.

8
Audio Inputs
Composite Video (Aux In) You will need composite video (yellow) and RCA stereo (red,white) cables (not included).
1. Connect the video output on your media device to the corresponding color coded video inputs on the television with a Composite Video cable.
2. Connect the audio output on your media device to the corresponding color coded audio input on the television with stereo RCA cables.
3. Press the Source button to switch to the connected input AU (Aux In).
Connecting Cable/TV Antenna You will need a cable/antenna wire (not included).
1. Connect the Cable/Antenna wire to the input on the rear of the unit.
2. Press the Source button to switch to tV.
3. Press the Setup button to access the setup menu.
4. Using the Arrow Keys on the remote, select Search and press OK.
5. Select Auto Search to begin scanning for available channels.
Connecting HDMI HDMI offers superior sound and picture quality when compared to Composite or other connection types, and is the easiest way to connect your media devices to the television.
You will need a device that supports HDMI and a HDMI cable (not included).
1. Connect the device’s HDMI output to the HDMI input on the side of the unit.
2. Press the Source button to switch to the connected input Hd (HDMI).

9
Connecting Cable/TV Antenna - Detail
Stereo RCA Inputs (Aux In) - Detail
HDMI
Connecting HDMI - Detail

10
Other DevicesUsing a USB Drive
1. Load a USB drive into the USB Port on the side of the unit.
2. Press the Source button to switch to DVD.
3. Press and hold the USB button on the unit or press the USB button on the remote to switch to USB.
4. Use the Arrow/OK buttons to select and play content from the connected USB drive.
Line In (3.5mm Audio Input) You will need a 3.5 mm audio input cable (not included).
1. Connect a 3.5mm audio cable to the Line In Input on the side of the unit and the audio output/headphone jack on an audio device.
2. Power the unit on and press the Source button to switch to Line In.
3. Use the native controls on the connected device to play your audio through the unit.

11
Line In - Detail
Using a USB Drive - Detail

12
Bluetooth Wireless
Using the Speakerphone 1. When a call is received, a ringtone will sound through the unit.
2. Press the button to accept the call, or accept the call using the controls on the connected phone.
3. The incoming call received through the device will now be heard through the speaker.
4. To end the call, press the button or end the call using the controls on the connected device.
Pairing to a Device & Playing Audio After initial pairing, the unit will stay paired unless unpaired manually by the user or erased due to a reset of the device. If your device should become unpaired or you find it is unable to connect, repeat the steps listed here.
1. Power the unit on and press the Source button to select (Bluetooth). The pairing indicator on the display will begin flashing slowly.
2. Hold the Pair button to begin pairing. The pairing indicator will begin quickly flashing blue. When pairing, remain within 3 feet of the unit.
3. Using the controls on your Bluetooth device, scan for and select IKTD1016 in your Bluetooth settings to pair. If your device requests a password, enter the default password 0 0 0 0 . Refer to the user’s manual for your specific device for instructions on pairing and connecting Bluetooth devices.
4. When successfully paired, the pairing indicator will turn solid and an audible chime will sound from the speaker.
5. Use the controls on the connected device to select and begin playing audio. Audio played through the connected Bluetooth device will now be heard through the speaker.
6. Use the controls on the unit or the connected device to play, pause, and adjust volume.
13
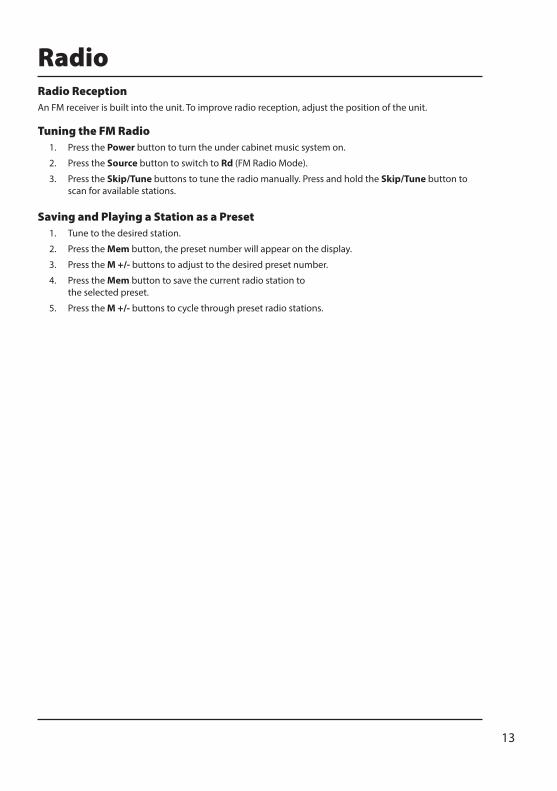
Tuning the FM Radio 1. Press the Power button to turn the under cabinet music system on.
2. Press the Source button to switch to Rd (FM Radio Mode).
3. Press the Skip/Tune buttons to tune the radio manually. Press and hold the Skip/Tune button to scan for available stations.
Radio
Saving and Playing a Station as a Preset 1. Tune to the desired station.
2. Press the Mem button, the preset number will appear on the display.
3. Press the M +/- buttons to adjust to the desired preset number.
4. Press the Mem button to save the current radio station to the selected preset.
5. Press the M +/- buttons to cycle through preset radio stations.
Radio Reception An FM receiver is built into the unit. To improve radio reception, adjust the position of the unit.

14
Note: This unit is not compatible with MP3 CDs.
Loading and Playing a DVD/CD 1. Press the Source button to select DVD.
2. Press the open/close button to open the Disc Tray and place a disc into the tray, label side facing up.
3. Press the open/close button to close the Disc Tray
4. Use the controls on the remote or the unit to play, pause, adjust volume, etc.
DVD & CD
Programming a DVD or CD 1. While a DVD or CD is playing, press the Program button on the remote.
2. Using the Number Keypad enter in the chapters or tracks in the order you want them to play.
3. Highlight the on-screen Play button using the Arrow buttons and press OK.
4. The programmed chapters and tracks will now play in the designated order.
5. To cancel a program, press the Stop button twice.

15
Setting the Clock 1. With the power off, press and hold the Clk Set/Mem button. The hour on the display will begin
flashing.
2. Press the Skip/Tune buttons to set the hour.
3. Press the Clk Set button again, the minutes on the display will begin flashing.
4. Press the Skip/Tune buttons to set the minutes.
5. Press the Clk Set button to finish setting the time, or wait for the display to stop flashing.
Disabling the Timer To cancel the alarm after it has sounded, press the Power button.
To cancel the timer before the alarm has sounded, press the Timer button until the display reads 00 and the timer light is no longer lit.
Setting the Timer 1. Press the Timer buttons to adjust the timer in increments of 10 min.
2. Wait for the display to stop flashing.
3. After the set time has expired, the under cabinet music system will sound an alarm.
Clock & Timer

16
International Support To download this User’s Guide in English, Spanish, and French, or to get answers to frequently asked questions, visit the support section at: www.iLiveElectronics.com
Para descargar este Manual del Usuario en inglés, español y francés, o para obtener respuestas a preguntas frecuentes, visite la sección de apoyo en: www.iLiveElectronics.com
Pour télécharger ce guide de l’utilisateur en anglais, espagnol ou français, ou pour obtenir des réponses à des questions fréquemment posées, consultez la rubrique d’assistance sur: www.iLiveElectronics.com
Contact Information Website: www.iLiveElectronics.com
Email Support: [email protected]
Email Parts: [email protected]
Phone Support: 1-888-999-4215
Warranty For Warranty Information and the most up-to-date version of this User’s Guide, go to: www.iLiveElectronics.com
Company Information
Copyright © 2016 Digital Products International (DPI, Inc.) All other trademarks appearing herein are the property of their respective owners. Specifications are subject to change without notice.


![SERVICE MANUAL 15” TV+DVD COMBO - Diagramas dediagramasde.com/diagramas/televisores/MEMOREX mod[1][1]. MVD140… · service manual 15” tv+dvd combo (model:mvd1402) model](https://static.fdocuments.us/doc/165x107/5bb6037109d3f2b4158d77c7/service-manual-15-tvdvd-combo-diagramas-mod11-mvd140-service-manual.jpg)


