Wireless Professional Weather Station - La Crosse Technology · Wireless Professional Weather...
28
Model: 328-2314 Instructional Manual DC: 020416 Wireless Professional Weather Station ALERTS W/CHILL TEMP SET RAIN WIND LIGHT + -
Transcript of Wireless Professional Weather Station - La Crosse Technology · Wireless Professional Weather...
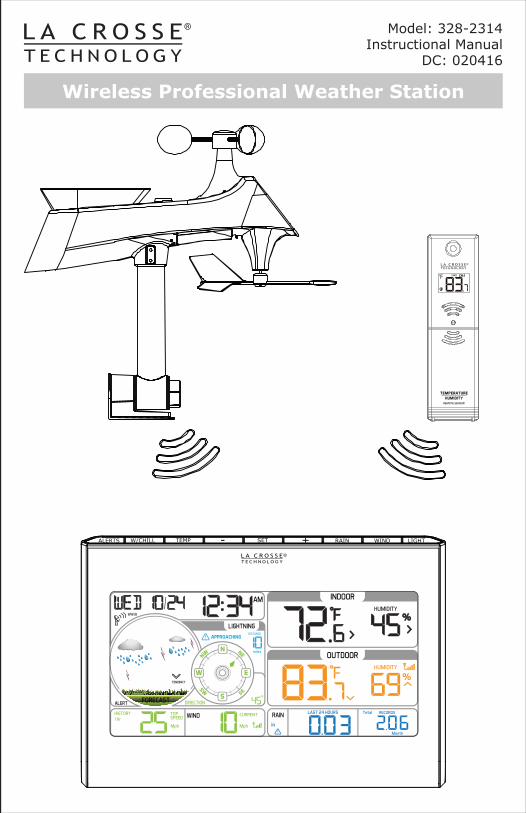
Model: 328-2314Instructional Manual
DC: 020416
Wireless Professional Weather Station
ALERTS W/CHILL TEMP SET RAIN WIND LIGHT+-

Table of Contents
Page | 1 www.lacrossetechnology.com/support 328-2314
Setup Preparation .................................................................. Search for Temperature/Humidity Sensor ..................................Search for Multi-sensor ..........................................................Initial Setup and Assembly .....................................................Mounting Instructions ............................................................Mounting Continued ...............................................................LCD Features ........................................................................LCD Features Continued .........................................................Button Functions ...................................................................Settings: Time, Date, Units .....................................................Wind Speed Readings ............................................................Reset Wind Speed History .......................................................Wind Direction Readings .........................................................Lightning Detection Readings ..................................................Rainfall Readings ...................................................................Reset Rainfall History .............................................................HIGH/LOW Temperature and Humidity Readings ........................Reset HIGH/LOW Temperature and Humidity Readings ...............Wind Chill, Heat Index, Dew Point Readings ..............................Ice Alert ...............................................................................Set Weather Alerts ................................................................Temperature/Humidity Trend Arrows ........................................Color Weather Forecast ..........................................................Forecast Tendency Arrows ......................................................WWVB Atomic Time Signal Search ...........................................Replace Windcups ..................................................................Replace Directional Vane ........................................................Multi-sensor Solar Panel .........................................................Factory Reset/Clear Memory ...................................................Care and Maintenance ............................................................Warranty and Support ............................................................Specifications .......................................................................FCC Statement ......................................................................Canada Statement .................................................................
27262525242423232222
2121
18171716
15
1414
13111098763222
27
13
1516
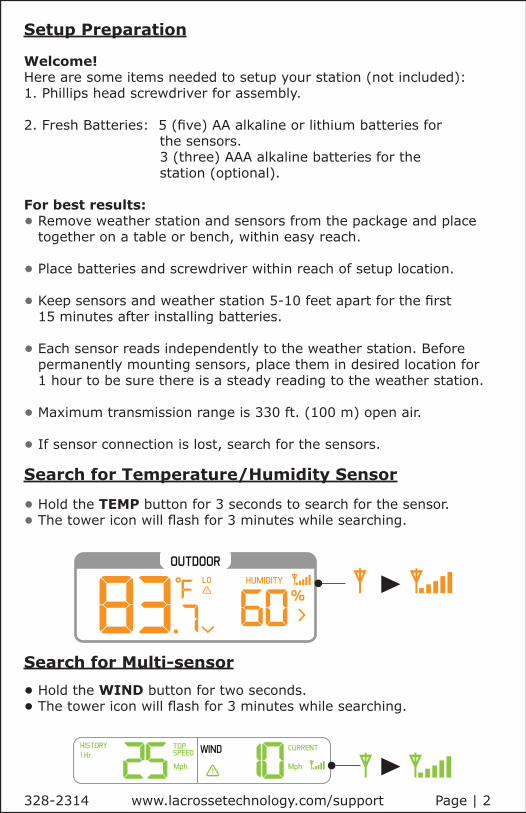
Setup Preparation
Welcome! Here are some items needed to setup your station (not included):1. Phillips head screwdriver for assembly.
2. Fresh Batteries: 5 (five) AA alkaline or lithium batteries for the sensors. 3 (three) AAA alkaline batteries for the station (optional).
For best results: • Remove weather station and sensors from the package and place together on a table or bench, within easy reach.
• Place batteries and screwdriver within reach of setup location.
• Keep sensors and weather station 5-10 feet apart for the first 15 minutes after installing batteries.
• Each sensor reads independently to the weather station. Before permanently mounting sensors, place them in desired location for 1 hour to be sure there is a steady reading to the weather station.
• Maximum transmission range is 330 ft. (100 m) open air.
• If sensor connection is lost, search for the sensors.
Search for Temperature/Humidity Sensor
• Hold the TEMP button for 3 seconds to search for the sensor. • The tower icon will flash for 3 minutes while searching.
Search for Multi-sensor• Hold the WIND button for two seconds.• The tower icon will flash for 3 minutes while searching.
328-2314 www.lacrossetechnology.com/support Page | 2

Initial Setup and Assembly
3. Insert pole into the bottom of sensor and secure with two screws.
Note: Your own mounting pole (1.2 inches, 3.1 cm, not included) may be inserted into the sensor, instead of using the mounting bracket and pole included.
AA
AAAA
TX231RW Multi-Sensor
Wind Cups
Bubble Levelfor Mounting
Rain Gauge
Direction VanePole
Mounting Bracket
Solar Panel
1. Install 3 AA batteries into the bottom of the Multi-sensor.
2. The red LED light on the bottom, will flash every 30 seconds when transmitting.
Red LEDDrain Vents
for Rain
Page | 3 www.lacrossetechnology.com/support 328-2314

4. The mounting bracket has a square connection to prevent the sensor from tipping.
5. Turn the knob to tighten the bracket to the pole.
Turn knob to tight. Do not over tighten
TX232TH Sensor
AA
AA
Fahrenheit/Celsius
Transmission Icon
Temperature & Humidity Alternate
1. Insert 2 AA batteries into the temperature/humidity sensor.
2. The red LED light will flash every 58 seconds when transmitting.
3. The transmission icon will show briefly when transmitting.
4. You can select a different channel on the sensor if you suspect interference.
328-2314 www.lacrossetechnology.com/support Page | 4
TX °C/°F1 2 3
F/C for Sensor
ChannelSelector
TX button(Transmission
LED
ChannelIndicator
TX °C/°F1 2 3
Note: Two hours after initial setup, the temperature/humidity sensor will search for the Atomic time signal.
Note: At temperatures below 14°F (-10°C) the sensor display will turn off to protect the LCD. Sensor will still transmit data.

1. Insert the 5.0 volt AC adapter into the back of the weather station.
2. Insert 3 AAA batteries into the weather station (optional).
3. Keep both sensors and the weather station together for 15 minutes to lock in the sensor signals.
4. (Optional)-Spin the wind cups to simulate wind speed. Take the Multi-sensor to the sink and slowly drip water into the rain bucket to simulate rain.
5. After 15 minutes, follow the mounting instructions for proper placement of each sensor.
Weather Station
Note: Your weather station should have readings in all sections. Wind and Rain will show 0’s (connected) until wind or rain occur or are simulated.
Page | 5 www.lacrossetechnology.com/support 328-2314
ALERTS W/CHILL TEMP SET RAIN WIND LIGHT+-
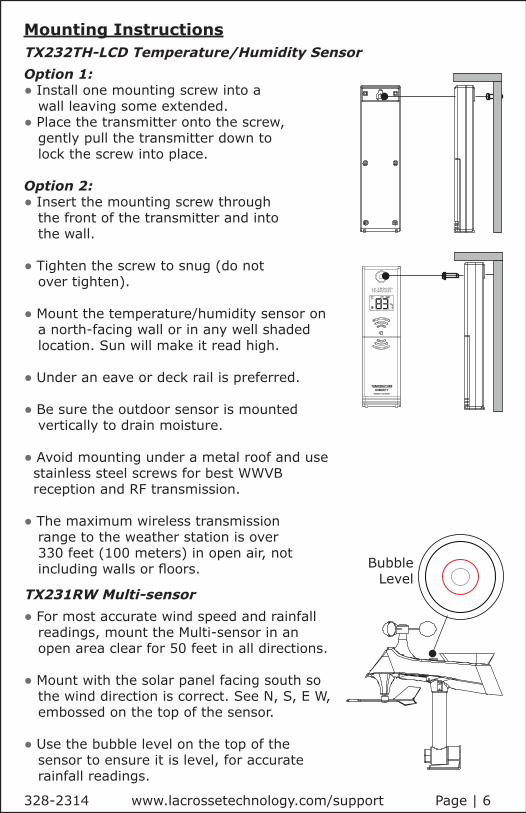
Mounting Instructions
Option 1:• Install one mounting screw into a wall leaving some extended.• Place the transmitter onto the screw, gently pull the transmitter down to lock the screw into place.
Option 2: • Insert the mounting screw through the front of the transmitter and into the wall.
• Tighten the screw to snug (do not over tighten).
• Mount the temperature/humidity sensor on a north-facing wall or in any well shaded location. Sun will make it read high.
• Under an eave or deck rail is preferred.
• Be sure the outdoor sensor is mounted vertically to drain moisture.
• Avoid mounting under a metal roof and use stainless steel screws for best WWVB reception and RF transmission.
• The maximum wireless transmission range to the weather station is over 330 feet (100 meters) in open air, not including walls or floors.
TX232TH-LCD Temperature/Humidity Sensor
• For most accurate wind speed and rainfall readings, mount the Multi-sensor in an open area clear for 50 feet in all directions.
• Mount with the solar panel facing south so the wind direction is correct. See N, S, E W, embossed on the top of the sensor.
• Use the bubble level on the top of the sensor to ensure it is level, for accurate rainfall readings.
TX231RW Multi-sensor
BubbleLevel
328-2314 www.lacrossetechnology.com/support Page | 6
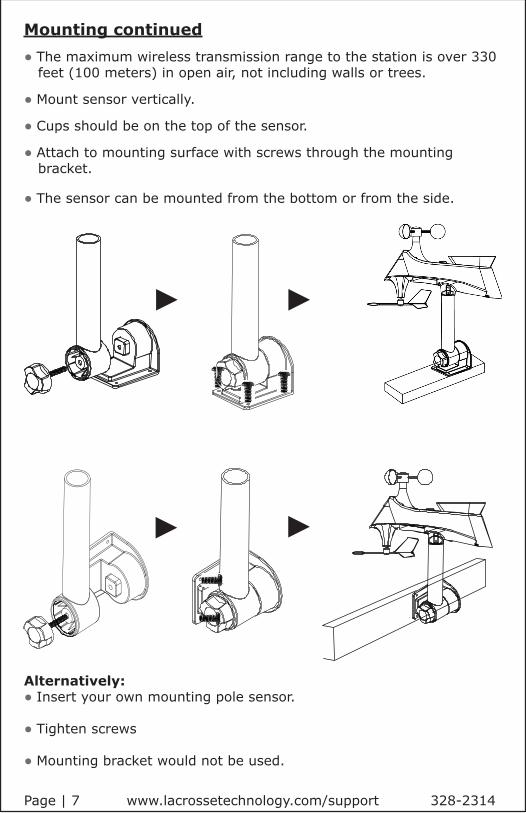
• The maximum wireless transmission range to the station is over 330 feet (100 meters) in open air, not including walls or trees.
• Mount sensor vertically.
• Cups should be on the top of the sensor.
• Attach to mounting surface with screws through the mounting bracket.
• The sensor can be mounted from the bottom or from the side.
Mounting continued
Page | 7 www.lacrossetechnology.com/support 328-2314
Alternatively:• Insert your own mounting pole sensor. • Tighten screws
• Mounting bracket would not be used.

LCD FeaturesA AACB
D
A
B
AAC
D
Weekday
Month/Date
Hours/Minutes
Atomic Time Signal Icon
A
AAC D
F
F
E
E
A
B
AAC
D Animated Forecast
Lightning Detection
Forecast Tendency Arrow
Wind Direction Compass Rose
Frost Alert Icon
Multi-sensor Reception
Wind Direction Degrees/Letters
A
B
AAC
D
Wind History (1 Hour Default)
Top Speed (Last 60 minutes)
Wind Speed Alert Icon
Current Speed (30 Second Average)
A B AAC D
Time/Date
Forecast, Lightning, Wind Direction
Wind Speed/History
E
E
328-2314 www.lacrossetechnology.com/support Page | 8
B
A
B
AAC
D
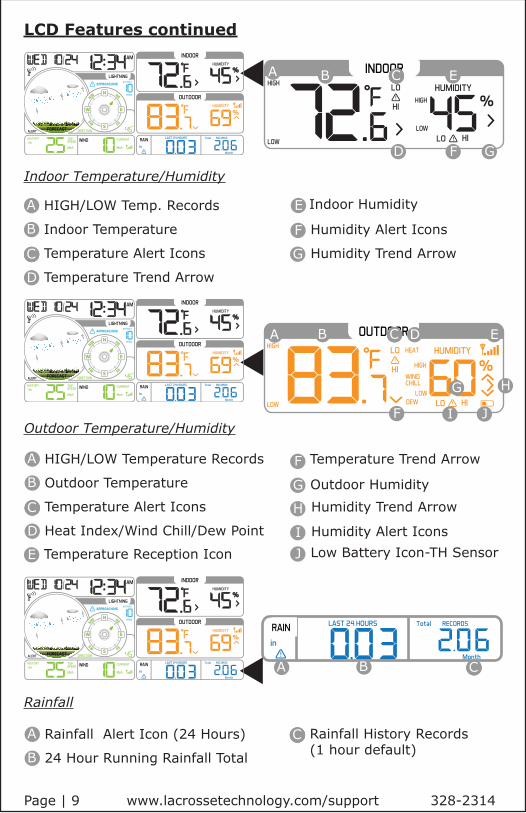
HIGH/LOW Temp. Records
Indoor Temperature
Temperature Alert Icons
Temperature Trend Arrow
LCD Features continued
A B AAC
D
F
E
G
Indoor Humidity
Humidity Alert Icons
Humidity Trend Arrow
E
F G
A
B
AAC
D
HIGH/LOW Temperature Records
Outdoor Temperature
Temperature Alert Icons
Heat Index/Wind Chill/Dew Point
F
E
G
Temperature Trend Arrow
Humidity Alert Icons
Humidity Trend ArrowH
Low Battery Icon-TH Sensor
A B AAC D E
F
G H
JI
IJ Temperature Reception Icon
Outdoor Humidity
A
B
AAC Rainfall Alert Icon (24 Hours)
24 Hour Running Rainfall Total
Rainfall History Records (1 hour default)
A B AAC
Indoor Temperature/Humidity
Outdoor Temperature/Humidity
Rainfall
Page | 9 www.lacrossetechnology.com/support 328-2314
Rainfall History Records (1 hour default)
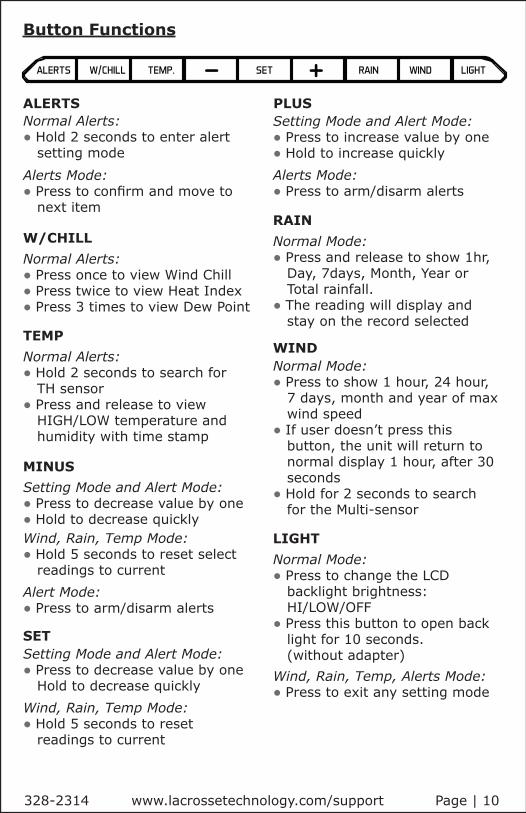
Button Functions
ALERTSNormal Alerts:• Hold 2 seconds to enter alert setting modeAlerts Mode:• Press to confirm and move to next item
W/CHILLNormal Alerts:• Press once to view Wind Chill• Press twice to view Heat Index• Press 3 times to view Dew Point
TEMPNormal Alerts:• Hold 2 seconds to search for TH sensor• Press and release to view HIGH/LOW temperature and humidity with time stamp
MINUSSetting Mode and Alert Mode:• Press to decrease value by one• Hold to decrease quicklyWind, Rain, Temp Mode:• Hold 5 seconds to reset select readings to current
SETSetting Mode and Alert Mode:• Press to decrease value by one Hold to decrease quicklyWind, Rain, Temp Mode:• Hold 5 seconds to reset readings to current
Alert Mode:• Press to arm/disarm alerts
PLUSSetting Mode and Alert Mode:• Press to increase value by one• Hold to increase quicklyAlerts Mode:• Press to arm/disarm alerts
RAINNormal Mode:• Press and release to show 1hr, Day, 7days, Month, Year or Total rainfall.• The reading will display and stay on the record selected
WINDNormal Mode:• Press to show 1 hour, 24 hour, 7 days, month and year of max wind speed• If user doesn’t press this button, the unit will return to normal display 1 hour, after 30 seconds• Hold for 2 seconds to search for the Multi-sensor
LIGHTNormal Mode:• Press to change the LCD backlight brightness: HI/LOW/OFF• Press this button to open back light for 10 seconds. (without adapter)Wind, Rain, Temp, Alerts Mode:• Press to exit any setting mode
328-2314 www.lacrossetechnology.com/support Page | 10
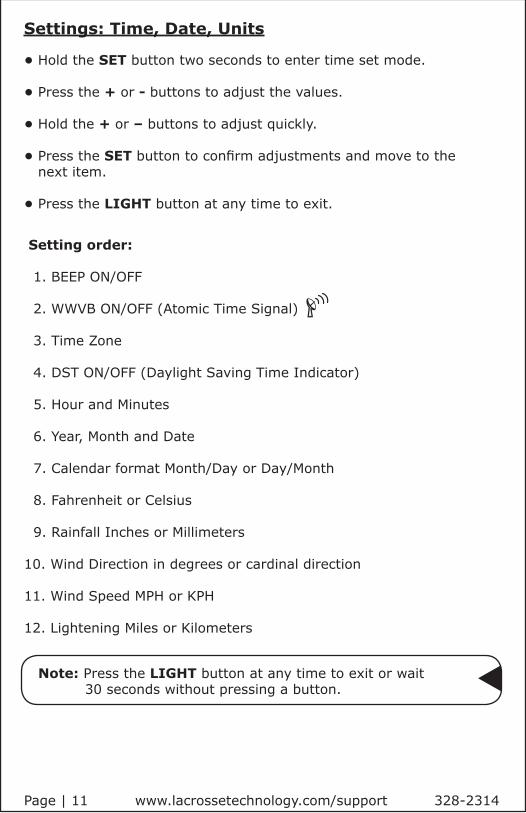
Settings: Time, Date, Units
• Hold the SET button two seconds to enter time set mode.
• Press the + or - buttons to adjust the values.
• Hold the + or – buttons to adjust quickly.
• Press the SET button to confirm adjustments and move to the next item.
• Press the LIGHT button at any time to exit.
Setting order:
1. BEEP ON/OFF
2. WWVB ON/OFF (Atomic Time Signal)
3. Time Zone
4. DST ON/OFF (Daylight Saving Time Indicator)
5. Hour and Minutes
6. Year, Month and Date
7. Calendar format Month/Day or Day/Month
8. Fahrenheit or Celsius
9. Rainfall Inches or Millimeters
10. Wind Direction in degrees or cardinal direction
11. Wind Speed MPH or KPH
12. Lightening Miles or Kilometers
Note: Press the LIGHT button at any time to exit or wait 30 seconds without pressing a button.
Page | 11 www.lacrossetechnology.com/support 328-2314
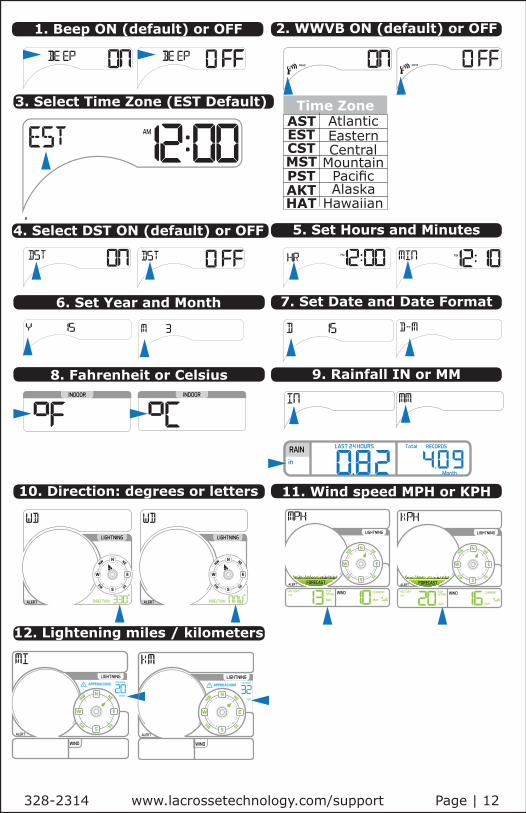
1. Beep ON (default) or OFF 2. WWVB ON (default) or OFF
4. Select DST ON (default) or OFF 5. Set Hours and Minutes
7. Set Date and Date Format
9. Rainfall IN or MM
6. Set Year and Month
8. Fahrenheit or Celsius
328-2314 www.lacrossetechnology.com/support Page | 12
10. Direction: degrees or letters
12. Lightening miles / kilometers
11. Wind speed MPH or KPH
3. Select Time Zone (EST Default)
CSTMST
Time ZoneAtlanticEasternCentral
MountainPacificAlaska
Hawaiian
ASTEST
PSTAKTHAT

Current Speed: 30 second average of the wind speed.
Top Speed: Highest instantaneous reading in the past 60 minutes. Updates, when a higher wind speed has occurred.
Wind History: Press and release the WIND button to view the maximum wind history values.• One Hour: past 60 minute period (default record)• 24-hour: Past 24 hour period, from last record• 7 Days: Past 7-day period, from last record• Month: Defined by Calendar Month i.e. January 1 - January 31 • Year: Defined by Calendar Year i.e. January 1 - December 31
Wind Speed Readings-Updates Every 30 seconds
Page | 13 www.lacrossetechnology.com/support 328-2314
Month Year
24 Hour 7 Days
Reset Wind Speed History: • While viewing individual values, hold the MINUS button for five seconds to reset the value. • Wind Speed, time and date stamp will reset to current.

Wind Direction ReadingsCompass Rose:• The Compass Rose displays the cardinal directions in usable format.
• The large diamond on the rose indicates the wind direction.
Degrees or Letters:• Below the rose the wind direction is displayed in degrees.
• In the settings section, you can choose the direction to display in letters. EX: 40° would read as NNE.
Lightning Detection ReadingsThe lightning detection sensor tracks the EMP (Electro Magnetic Pulse) emitted by a discharge up to 25 miles away.
• Indicates the closest discharge discharge (miles or kilometers) to your sensor.
• This sensor is not designed to count the number of Cloud-to-Ground or Cloud-to-Cloud discharges.
• When a closer discharge occurs the number will update.
• After 60 minutes of no closer discharge, NO will be displayed.
• If additional discharges are farther away, the number displayed remains the closest discharge.
• In the settings menu you can select to display approaching distance in miles or kilometers.
328-2314 www.lacrossetechnology.com/support Page | 14
Note: On occasion, turning on florescent lights, magnetic switches, or other electrical discharges may provide a false lightning reading.
No Lightning
Lightning Detected 10 miles from your sensor in the past 60 minutes

Last 24 Hours: Total rain that occurred from now, back 24 hours. 24 hour rainfall is constantly displayed.
Press and release the RAIN button to view rain history:• One Hour: past 60 minute periods (default record)• Day: 24 hr period from 12:00am - 11:59pm. • 7 Days: Past 7-day period, from last record• Month: Defined by Calendar Month i.e. January 1 - January 31• Year: Defined by Calendar Year i.e. January 1 - December 31• Total: running total since station was powered up.
Reset Rainfall History: • While viewing individual values, hold the MINUS button for five seconds to reset the value. • Rainfall, time and date stamp will reset to current.
Rainfall Readings
Page | 15 www.lacrossetechnology.com/support 328-2314
Day 12:00am - 11:59pm 7-day
Month Year
Total (since setup)

High/Low Temperature/Humidity ReadingsView: Press and release the TEMP button to view indoor and outdoor temperature/humidity values with time and date.
Reset High/LOW Temperature/Humidity Records: • While viewing individual values, hold the MINUS button for five seconds to reset the value. • Temperature, humidity, time and date stamp will reset to current.
Indoor Temperature HIGH
• Indoor temperature HIGH • Indoor temperature LOW
• Indoor humidity HIGH • Indoor humidity LOW
• Outdoor temperature HIGH • Outdoor temperature LOW
• Outdoor humidity HIGH • Outdoor humidity LOW
Indoor Humidity HIGH
Outdoor Temperature HIGH
Outdoor Humidity HIGH
328-2314 www.lacrossetechnology.com/support Page | 16
Indoor Temperature LOW
Indoor Humidity LOW
Outdoor Temperature LOW
Outdoor Humidity LOW
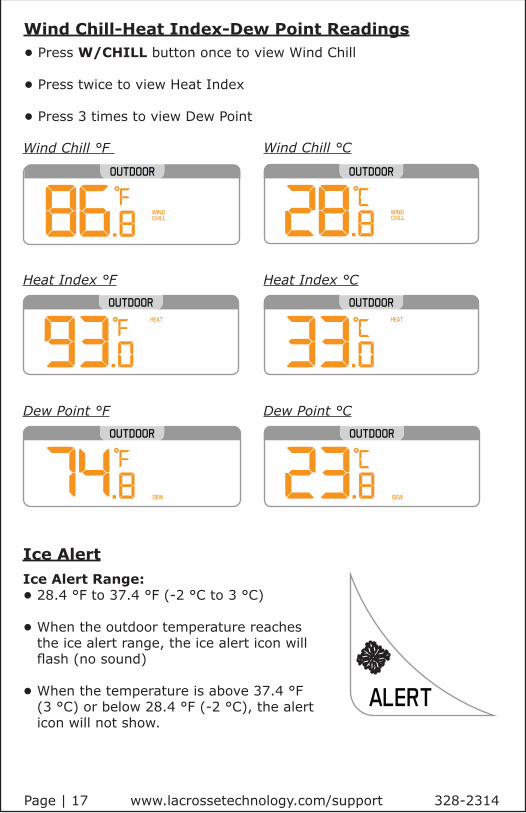
Wind Chill-Heat Index-Dew Point Readings• Press W/CHILL button once to view Wind Chill
• Press twice to view Heat Index
• Press 3 times to view Dew Point
Wind Chill °F Wind Chill °C
Heat Index °F Heat Index °C
Dew Point °F Dew Point °C
Page | 17 www.lacrossetechnology.com/support 328-2314
Ice AlertIce Alert Range: • 28.4 °F to 37.4 °F (-2 °C to 3 °C)
• When the outdoor temperature reaches the ice alert range, the ice alert icon will flash (no sound)
• When the temperature is above 37.4 °F (3 °C) or below 28.4 °F (-2 °C), the alert icon will not show.
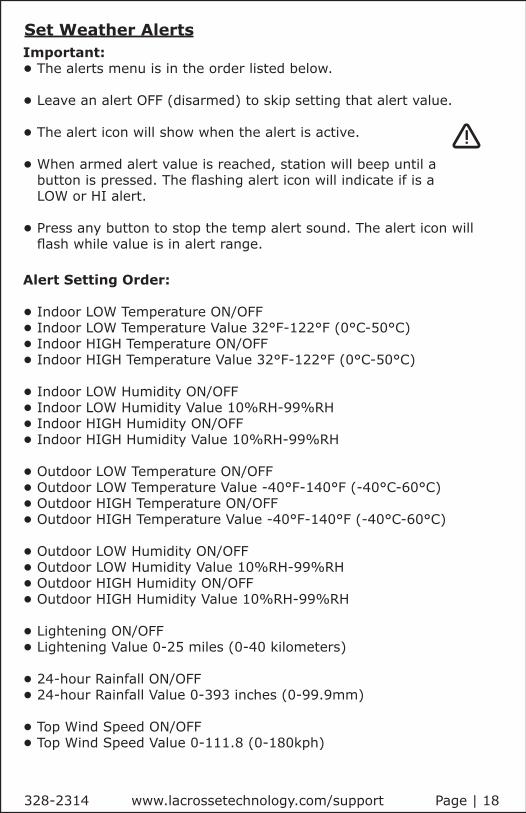
Set Weather AlertsImportant:• The alerts menu is in the order listed below.
• Leave an alert OFF (disarmed) to skip setting that alert value.
• The alert icon will show when the alert is active.
• When armed alert value is reached, station will beep until a button is pressed. The flashing alert icon will indicate if is a LOW or HI alert.
• Press any button to stop the temp alert sound. The alert icon will flash while value is in alert range.
Alert Setting Order:
• Indoor LOW Temperature ON/OFF • Indoor LOW Temperature Value 32°F-122°F (0°C-50°C)• Indoor HIGH Temperature ON/OFF• Indoor HIGH Temperature Value 32°F-122°F (0°C-50°C)
• Indoor LOW Humidity ON/OFF• Indoor LOW Humidity Value 10%RH-99%RH• Indoor HIGH Humidity ON/OFF• Indoor HIGH Humidity Value 10%RH-99%RH
• Outdoor LOW Temperature ON/OFF• Outdoor LOW Temperature Value -40°F-140°F (-40°C-60°C)• Outdoor HIGH Temperature ON/OFF• Outdoor HIGH Temperature Value -40°F-140°F (-40°C-60°C)
• Outdoor LOW Humidity ON/OFF• Outdoor LOW Humidity Value 10%RH-99%RH• Outdoor HIGH Humidity ON/OFF• Outdoor HIGH Humidity Value 10%RH-99%RH
• Lightening ON/OFF• Lightening Value 0-25 miles (0-40 kilometers)
• 24-hour Rainfall ON/OFF• 24-hour Rainfall Value 0-393 inches (0-99.9mm)
• Top Wind Speed ON/OFF• Top Wind Speed Value 0-111.8 (0-180kph)
328-2314 www.lacrossetechnology.com/support Page | 18
Page | 19 www.lacrossetechnology.com/support 328-2314
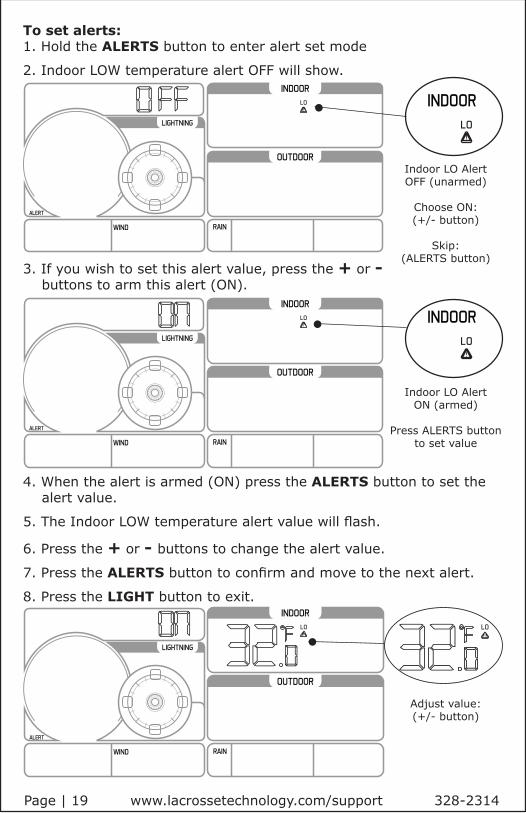
4. When the alert is armed (ON) press the ALERTS button to set the alert value.
5. The Indoor LOW temperature alert value will flash.
6. Press the + or - buttons to change the alert value.
7. Press the ALERTS button to confirm and move to the next alert.
8. Press the LIGHT button to exit.
To set alerts:1. Hold the ALERTS button to enter alert set mode
2. Indoor LOW temperature alert OFF will show.
3. If you wish to set this alert value, press the + or - buttons to arm this alert (ON).
Indoor LO Alert OFF (unarmed)
Choose ON: (+/- button)
Skip: (ALERTS button)
Indoor LO AlertON (armed)
Press ALERTS button to set value
Adjust value:(+/- button)

328-2314 www.lacrossetechnology.com/support Page | 20
12. To set the alert, first press the + or - buttons to turn the alert ON. 13. When the alert is armed (ON), press the ALERTS button to set the alert value. The alert value will flash.
14. Press the + or - buttons to change the alert value.
15. Press the ALERTS button to confirm and move to the next alert. Or press the LIGHT button to exit.
9. If you do not wish to set an alert, press the ALERTS button again to move to the next alert.
10. If you do not wish to set an alert, press the ALERTS button again to move to the next alert.
11. Press and release the ALERTS button until you get to the alert you wish to set.
Indoor HI Alert OFF (unarmed)
Skip: (ALERTS button)
Wind Alert ON (armed)
Press ALERTS to set value
Adjust value:(+/- button
Indoor LO Alert OFF (unarmed)
Skip: (ALERTS button)
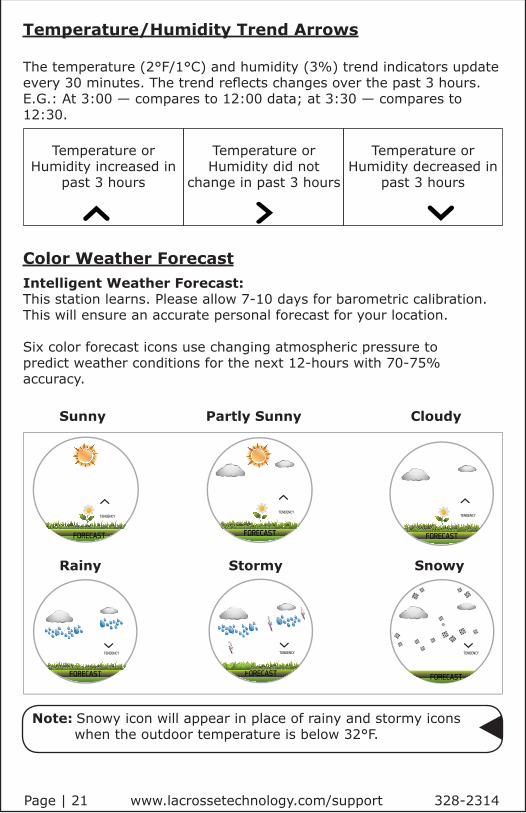
Color Weather ForecastIntelligent Weather Forecast:This station learns. Please allow 7-10 days for barometric calibration. This will ensure an accurate personal forecast for your location.
Six color forecast icons use changing atmospheric pressure to predict weather conditions for the next 12-hours with 70-75% accuracy.
Note: Snowy icon will appear in place of rainy and stormy icons when the outdoor temperature is below 32°F.
Sunny Partly Sunny Cloudy
Rainy Stormy Snowy
Temperature/Humidity Trend Arrows
The temperature (2°F/1°C) and humidity (3%) trend indicators update every 30 minutes. The trend reflects changes over the past 3 hours.E.G.: At 3:00 — compares to 12:00 data; at 3:30 — compares to 12:30.
Temperature or Humidity increased in
past 3 hours
Temperature or Humidity did not
change in past 3 hours
Temperature or Humidity decreased in
past 3 hours
Page | 21 www.lacrossetechnology.com/support 328-2314
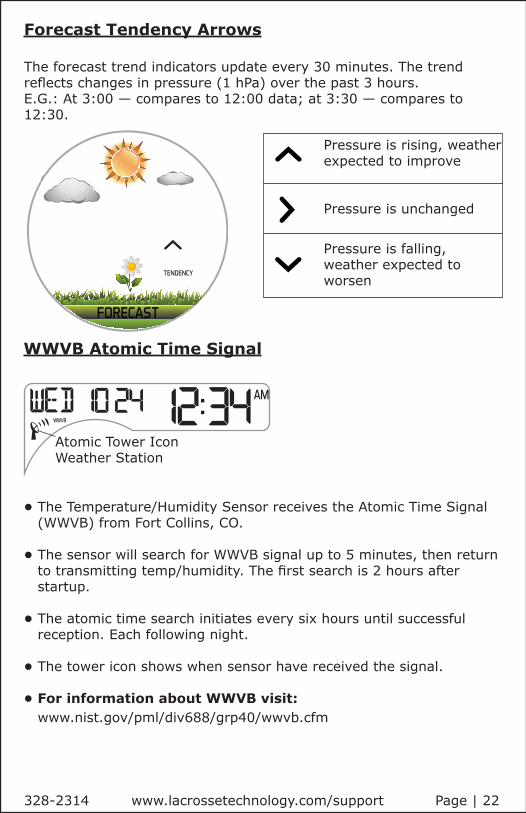
Forecast Tendency Arrows
The forecast trend indicators update every 30 minutes. The trend reflects changes in pressure (1 hPa) over the past 3 hours.E.G.: At 3:00 — compares to 12:00 data; at 3:30 — compares to 12:30.
Pressure is rising, weather expected to improve
Pressure is unchanged
Pressure is falling, weather expected to worsen
328-2314 www.lacrossetechnology.com/support Page | 22
WWVB Atomic Time Signal
• The Temperature/Humidity Sensor receives the Atomic Time Signal (WWVB) from Fort Collins, CO.
• The sensor will search for WWVB signal up to 5 minutes, then return to transmitting temp/humidity. The first search is 2 hours after startup.
• The atomic time search initiates every six hours until successful reception. Each following night.
• The tower icon shows when sensor have received the signal.
• For information about WWVB visit: www.nist.gov/pml/div688/grp40/wwvb.cfm
Atomic Tower Icon Weather Station
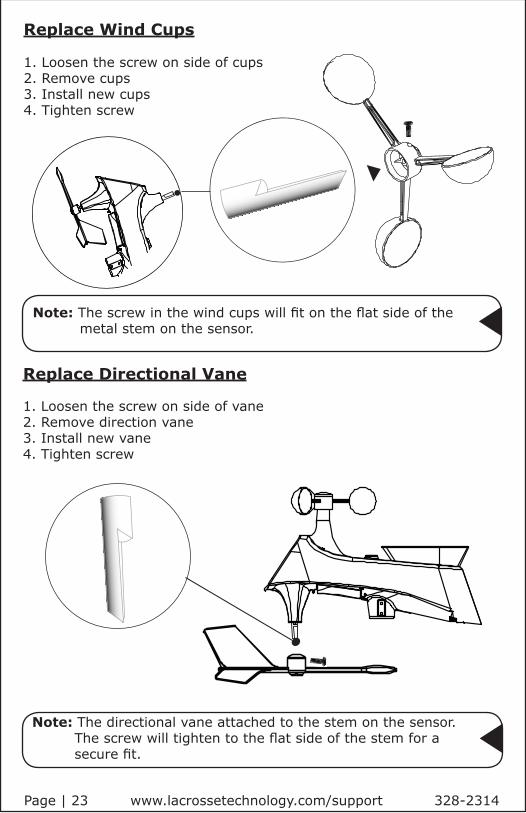
Replace Directional Vane
1. Loosen the screw on side of vane2. Remove direction vane3. Install new vane4. Tighten screw
Note: The directional vane attached to the stem on the sensor. The screw will tighten to the flat side of the stem for a secure fit.
Replace Wind Cups
1. Loosen the screw on side of cups2. Remove cups3. Install new cups4. Tighten screw
Note: The screw in the wind cups will fit on the flat side of the metal stem on the sensor.
Page | 23 www.lacrossetechnology.com/support 328-2314

Factory Reset/Clear Memory
The factory reset will return the weather station to its default settings. This will clear all previous recorded history, so you may want to write down data before taking this step.
1. Hold the LIGHT and ALERTS buttons together for 5 seconds to reset the weather station, clear all records, and return all settings to default.
2. The weather station will fully populate, then return to a normal display and search for outdoor sensors.
3. While searching for the outdoor sensors the Wind Speed, Outdoor Temperature/Humidity and Rainfall totals will show dashes.
4. Once connected to the outdoor sensors (allow 3 minutes) the Wind Speed, Outdoor Temperature/Humidity, and Rainfall will show current readings.
Note: In the absence or wind or rain, these readings will show 0’s, indicating sensor connection.
Multi-sensor Solar Panel
• The solar panel will operate the sensor with sufficient sunlight.
• Batteries are required to operate the sensor at night or days without sufficient sunlight.
• The solar panel extends the battery life.SolarPanel
328-2314 www.lacrossetechnology.com/support Page | 24
B
C
D

Care and Maintenance
• Do not mix old and new batteries• Do not mix Alkaline, Standard, Lithium or Rechargeable Batteries• Always purchase the correct size and grade of battery most suitable for the intended use.• Replace all batteries of a set at the same time.• Clean the battery contacts and also those of the device prior to battery installation.• Ensure the batteries are installed correctly with regard to polarity (+ and -).• Remove batteries from equipment which is not to be used for an extended period of time.• Remove expired batteries promptly.• Improper use or unauthorized opening of housing voids warranty.• If the product is not working properly, change the batteries and/or check the AC adapter connection.
La Crosse Technology, Ltd. provides a 1-year limited time warranty (from date of purchase) on this product relating to manufacturing defects in materials & workmanship.
Before returning a product, please contact our friendly customer support with questions or visit our online help (FAQS):
Phone: 1-608-782-1610 Online Product Support: www.lacrossetechnology.com/support
Product Registration: www.lacrossetechnology.com/support/register
View full warranty details online at: www.lacrossetechnology.com/warranty_info.pdf
Warranty Address: La Crosse Technology, Ltd 2830 S. 26th St.La Crosse, WI 54601
Protected under U.S. Patents: 5,978,738 | 6,076,044 | RE43903
Warranty and Support Information
Page | 25 www.lacrossetechnology.com/support 328-2314

328-2314 www.lacrossetechnology.com/support Page | 26
Specifications: Indoor: • Temperature Range: 32°F to 122°F (0°C to 50°C) • Humidity Range: 10% to 99% RH • Update interval: About every 30 seconds
TH Sensor: • Temperature Range: -40°F to 140°F (-40°C to 60°C) • Humidity Range: 10% to 99% RH
• Update interval: About every 58 seconds • Transmission Range: 330 ft (100 m) RF 915MHz open air
Multi-sensor: • Wind Speed Range: 0-111.8 mph (0-180 kMh) • Wind Direction: 0-359 degrees
• Rainfall: 0-393.7 inches (0-9999.9 mm) • Lightning Range: 0-25 miles (0-40 km)
• Update interval: About every 30 seconds • Transmission Range: 330 ft (100 m) RF 915MHz open air
Power: • Weather Station: 5.0 Volt 150mA adapter included (Primary) • Adapter Number: GPU280500150WA00 • Optional Battery: 3-AAA, IEC, LR3 batteries (not included)
• TX231RW Multi-sensor: 3-AA, IEC, LR6 batteries (not included)
• TX232TH-LCD TH Sensor: 2-AA, IEC, LR6 batteries (not included)
Battery Life: • Weather Station: 60 to 48 months when using adapter. • Multi-sensor/TH sensor: over 24 month with reputable batteries
Dimensions: • 328-2314 Weather Station: 7.60” W x 5.24” H x 0.90” D in (193.04 W x 133.10 H x 22.86 D mm)
• TX231RW Multi-sensor: 13.62” W x 13” H x 5.16” D in (345.95 x 330.20 x 131.06 mm)
• TX232TH-LCD TH sensor: 1.67” W x 6.14” H x 0.83” D (42.42 W x 155.96 H x 21.02 D mm)

This equipment has been tested and found to comply with the limits for a Class B digital device, pursuant to part 15 of the FCC Rules. These limits are designed to provide reasonable protection against harmful interference in a resi-dential installation. This equipment generates, uses and can radiate radio frequency energy and, if not installed and used in accordance with the instructions, may cause harmful interference to radio communications. However, there is no guarantee that interference will not occur in a particular installation. If this equipment does cause harmful interference to radio or television reception, which can be determined by turning the equipment off and on, the user is encouraged to try to correct the interference by one or more of the following measures: • Reorient or relocate the receiving antenna.• Increase the separation between the equipment and receiver. • Connect the equipment into an outlet on a circuit different from that to which the receiver is connected. • Consult the dealer or an experienced radio/TV technician for help.
This device must not be co-located or operating in conjunction with any other antenna or transmitter. Operation is subject to the following two conditions: (1) This device may not cause harmful interference, and (2) This device must accept any interference received, including interference that may cause undesired operation.
Caution! The manufacturer is not responsible for any radio or TV interference caused by unauthorized changes or modifications to this equipment. Such changes or modifications could void the user authority to operate the equipment.
All rights reserved. This manual may not be reproduced in any form, even in part, or duplicated or processed using electronic, mechanical or chemical process without the written permission of the publisher.This booklet may contain errors or misprints. The information it contains is regularly checked and corrections are included in subsequent editions. We disclaim any responsibility for any technical error or printing error, or their consequences.All trademarks and patents are recognized.
Canada Statement This device complies with Industry Canada’s licence-exempt RSSs. Operation is subject to the following two conditions: (1) This device may not cause interference; and (2) This device must accept any interference, including interference that may cause undesired operation of the device.
Le présent appareil est conforme aux CNR d’Industrie Canada applicables aux appareils radio exempts de licence. L’exploitation est autorisée aux deux conditions suivantes : (1) l’appareil ne doit pas produire de brouillage; (2) l’utilisateur de l’appareil doit accepter tout brouillage radioélectrique subi, même si le brouillage est susceptible d’en compromettre le fonctionnement.
FCC Statement
Page | 27 www.lacrossetechnology.com/support 328-2314