Wireless HD IP Camera PRO
2
QUICK INSTALLATION LAN: Local Area Network: Your home network, which includes your internet modem and all the equipment in the house that is connected to the network via cable or wifi. WAN: Wide Area Network: The internet, if you have an Internet connecon at home or anywhere else. HARDWARE INSTALLATION 1. Take the mr Safe IP camera out of the box and aach the wifi antenna. 2. Plug one end of the supplied power adapter in the DC5V port at the back of the camera and plug the other end into the wall socket. 3. Connect one end of the supplied network cable to the camera and the other end to your internet router / modem. SETTING THE WIFI CONNECTION OF THE CAMERA USING THE WINDOWS SOFTWARE 1. Download the soſtware from www.mrsafe.eu to install the PC soſtware. Start the PC soſtware. Important! Make sure that the PC is connected to the same network as the IP camera. 2. Go to the “LAN” tab. You will see a camera icon and the name of the camera. 3. Right-click the camera icon and select “Set wifi connecon”. 4. Check “Start wifi seng” and click “Scan” to search for available networks. 5. Select your wifi network and enter the password of your wifi. 6. Aſter confirmaon, the IP camera will restart (this will take about 2 minutes), and you can remove the network cable. You can now place the IP camera wherever you want, within the range of your wifi modem. USING THE MAC SOFTWARE 1. Download the soſtware from www.mrsafe.eu to install the Mac soſtware. Start the Mac soſtware. Important! Make sure that the Mac computer is connected to the same network as the IP camera. 2. Go to the “LAN” tab. You will see a camera live preview and the name of the camera. 3. Press CTRL buon and simultaneously click the camera preview, then select “Configuring Network”. 4. Go to the “Wi-Fi” tab” and click “Scan” to search for available networks. 5. Select your wifi network and enter the password of your wifi. 6. Aſter confirmaon, the IP camera will restart (this will take about 2 minutes), and you can remove the network cable. You can now place the IP camera wherever you want, within the range of your wifi modem. USING THE APPLE APP 1. Go to iTunes and install the mr Safe IP Camera soſtware. 2. Start the App aſter installaon. 3. Connect your Apple device via wifi to the same network as the camera. 4. In the App, go to “LAN” (boom). You will now see the camera. Click on the symbol next to the camera icon and select "Wireless Sengs". 5. Click on “SSID” to display the available networks. Select your network and enter your password. 6. Aſter confirmaon, the IP camera will restart (this will take about 2 minutes), and you can remove the network cable. You can now place the IP camera wherever you want, within the range of your wifi modem. USING THE ANDROID APP 1. Download the soſtware from www.mrsafe.eu to your Android device. 2. Install the App and start it aſter installaon. 3. Connect your Android device via wifi to the same network as the camera. 4. In the App, go to “LAN” (boom). You will now see the camera. Click on the arrow next to the camera icon and select “Wi-Fi”. 5. Click on “Search” to display the available networks. Select your network and enter your password. 6. Aſter confirmaon, the IP camera will restart (this will take about 2 minutes), and you can remove the network cable. You can now place the IP camera wherever you want, within the range of your wifi modem. USE OF THE IP CAMERA 1. For use in your local area network (LAN), you do not have to log in. 2. For use over the Internet (WAN), you will be asked to log in. You can find the login details at the boom of the IP Camera. → Windows/Mac computer: Enter the user name (CAM ID) and Password (Login Password) as listed at the boom of the camera in the tab “WAN”. → Mobile device such as a smartphone (Apple or Android) : There is a QR code displayed at the boom of the unit. You just need to scan the code using the App to set all login informaon. In the App, go to “WAN” (at the boom) and click “Scan QR Code” (Android) or the QR code icon (Apple). The login data is entered automacally aſter scanning. Click “Login” to login. 3. You can now watch the images from the camera via the Internet (WAN) or at home on your own network (LAN) using your smartphone, tablet or computer. Remarks: • PC soſtware: The color of the camera icon next to the name of the camera (CAM ID) will change depending on the status of the camera: • Gray: Camera not available (offline) • Blue: Camera available (online) • Red: Camera is acvated and viewed • We recommend you to change the password of your IP camera. • PC soſtware : Connect the camera and then click on the padlock at the top to change the password. • Apple / Android App: Aſter logging into the IP camera via the internet, click the symbol next to the camera icon and select "Set access password". You can now enter the new password. Remember your new password! The next me you will try to log in, you need to enter the new password yourself (once). You can then make sure that the soſtware will remember the password for you. • The Safe mr IP camera can be reset to factory defaults by pressing the reset buon at the boom of the unit for 10 seconds. Aſterwards, wait for 5 minutes. USE OF THE MICRO SD CARD PLACING THE MICRO SD CARD Important: The SD card should be a Class 10 SD card with a maximum capacity of 32 GB ! 1. Power off the IP Camera. 2. Insert the micro SD card. 3. Power ON the IP Camera. CONFIGURATION OF THE CAMERA FOR USE WITH MICRO SD CARD USING WINDOWS SOFTWARE A. CONFIGURATION 1. Connect your PC to the same network as the camera. 2. Start the mr Safe PC soſtware. 3. Go to the tab “LAN”. 4. Right-click on the camera icon and select “SD Card Configuraon”. 5. Format the micro SD card and wait a minute unl the formang is done. 6. Select the sengs for the micro SD card, for example similar to the ones indicated in the above image and click “Apply” to confirm the sengs. 7. Click “Quit” to finish the configuraon of the micro SD Card. The camera will now record on the SD Card. Important: When the card memory is full, the oldest files will be deleted and the newer files will be added. B. DOWNLOAD AND VIEW FILES FROM THE MICRO SD CARD 1. Connect your PC to the same network as the camera. 2. Start the mr Safe PC soſtware. 3. Connect to the camera from the “WAN” or “LAN” tab. In case of WAN, you have to enter the password. 4. Right-click the camera icon and select “SD File Download”. 5. Click on “Search”. In the list you will see the available files. 6. One file is in use, the one that is currently being recorded. You can only download the files that are finished. Double-click the file that you want to download, based on the me / date. It will be downloaded to your PC. 7. Click on “Open Download Directory”. 8. You will now see the files that have been downloaded to your PC. Double-clicking the file starts the PLAY soſtware and the video. 9. The PLAY soſtware can show mulple recordings. Click on the picture of your video, and use the keys for play, pause, etc. USING THE MAC SOFTWARE CONFIGURATION 1. Connect your Mac computer to the same network as the camera. 2. Start the mr Safe Mac soſtware. 3. Go to the tab “LAN”. 4. Press CTRL buon and simultanuously click on the camera preview, then select “SD Card Configuraon”. 5. Format the micro SD card and wait a minute unl the formang is done. 6. Select the sengs for the micro SD card, for example similar to the ones indicated in the above image and click “Apply” to confirm the sengs. USING APPLE APP A. CONFIGURATION 1. Start the App. 2. Connect to the camera from the WAN or LAN tab. In case of WAN, you have to enter the password. 3. Click on the icon next to the camera name and select “Micro SD Card sengs”. 4. Select the sengs for the micro SD card, for example similar to the ones indicated in the above image and click “Done” to confirm the sengs. The camera will now record on the SD Card. Important: When the card memory is full, the oldest files will be deleted and the newer files will be added. B. DOWNLOAD AND VIEW FILES FROM THE MICRO SD CARD 1. Start the App. 2. Go to “LAN”. 3. Click on “Micro SD Card Query”. 4. Select the file that you want to download / view. USING ANDROID APP A. CONFIGURATION 1. Start the App. 2. Connect to the camera from the “WAN” or ”LAN” tab. In case of WAN, you have to enter the password. 3. Click on the arrow next to the camera name and select “SD-Card sengs”. 4. Format the SD card. 5. Select the sengs for the micro SD card, for example similar to the ones indicated in the above image and click “OK” to confirm the sengs. The camera will now record on the SD Card. Important: When the card memory is full, the oldest files will be deleted and the newer files will be added. B. DOWNLOAD AND VIEW FILES FROM THE MICRO SD CARD 1. Start the App. 2. Connect to the camera from the WAN or LAN tab. In case of WAN, you have to enter the password. 3. Click on the arrow next to the camera name and select “SD-Card Query”. 4. Select the file that you want to download / view. CUSTOMER SUPPORT For all quesons and addional informaon concerning this product, please contact [email protected]. GUARANTEE Copyright © mr Safe®. mr Safe® is a registered trademark of TE-Group NV. The mr Safe® brand stands for superior quality products and excellent customer service. Therefore mr Safe® warrants this product to be free from defects in materials and workmanship for a period of two (2) years from the original purchase date of the product. GB DECLARATION OF CONFORMITY We, the undersigned Company: TE-GROUP nv Address: Kapelsestraat 61, 2950 Kapellen - BELGIUM declare, that the following equipment: Product Name: MR SAFE WIRELESS HD IP CAMERA PRO Product Type: Wireless HD IP Camera Complies with the essenal requirements, which are specified in the direcve 2004/108/EC, 99/5/EC, 2006/95/EC, 2011/65/EC on the approximaon of the laws on the Member States relang to electromagnec compability. This product has been tested against following standards and specificaons, applying versions valid on December 2013: EN60950-1 EN300 328 V1.8.1 (2012-6) EN301 489-17 V2.2.1 EN301 489-1 V1.9.2 Joseph Van Oosterum, CEO TE-Group NV SNELLE INSTALLATIE LAN: Local Area Network: Uw thuisnetwerk, dat is uw internetmodem en alle apparatuur die in huis daarop is aangesloten via kabel of wifi. WAN: Wide Area Network: Het hele internet, als u thuis of ergens anders een internetverbinding heeſt. HARDWARE INSTALLATIE 1. Neem de mr Safe IP camera uit de doos en maak de Wifi antenne er aan vast. 2. Steek een uiteinde van de bijgeleverde adapter in de DC5V aansluing aan de achterkant van de camera en het andere uiteinde in het stopcontact. 3. Sluit een uiteinde van de bijgeleverde netwerkkabel aan op de camera en het andere uiteinde op uw internet router/ modem. DE WIFI VERBINDING VAN DE CAMERA INSTELLEN MET DE WINDOWS SOFTWARE 1. Download de soſtware van www.mrsafe.eu om de PC soſtware te installeren. Start de PC soſtware. Belangrijk! Zorg dat de PC aangesloten is op hetzelfde netwerk als de IP camera. 2. Ga naar het tabblad “LAN”. U ziet nu een camera-icoon staan met daarnaast de naam van de camera. 3. Klik met uw rechtermuisknop op de camera en selecteer “Set wifi connecon”. 4. Vink “Start wifi seng” aan en klik op “Scan” om beschikbare netwerken te zoeken. 5. Selecteer uw wifi netwerk en geef het wachtwoord van uw wifi in. 6. Na bevesging start de IP camera opnieuw op (ca. 2 min.), en kunt u de netwerkkabel losklikken. U kunt de IP camera nu plaatsen waar u wilt, binnen het wifi bereik van uw modem. MET DE MAC SOFTWARE 1. Download de soſtware van www.mrsafe.eu om de Mac soſtware te installeren. Start de Mac soſtware. Belangrijk! Zorg dat de Mac computer aangesloten is op hetzelfde netwerk als de IP camera. 2. Ga naar het tabblad “LAN”. U ziet nu een camera-preview met daarnaast de naam van de camera. 3. Houd CTRL toets ingedrukt en klik tegelijkerjd op de camera-preview en selecteer “Configuring network”. 4. Ga naar het tabblad “Wi-Fi” en klik op “Scan” om beschikbare netwerken te zoeken. 5. Selecteer uw wifi netwerk en geef het wachtwoord van uw wifi in. 6. Na bevesging start de IP camera opnieuw op (ca. 2 min.), en kunt u de netwerkkabel losklikken. U kunt de IP camera nu plaatsen waar u wilt, binnen het wifi bereik van uw modem. MET DE APPLE APP 1. Ga naar iTunes en installeer de Mr Safe IP Camera soſtware. 2. Start de App na installae. 3. Meld uw Apple apparaat via wifi aan op hetzelfde netwerk als waar de camera op aangesloten is. 4. Ga in de App naar “LAN” (onderaan). U ziet nu de camera. Klik op het symbool achter de camera, en selecteer “Wireless Seng”. 5. Klik op “SSID”om de beschikbare netwerken te tonen. Kies uw netwerk en geef uw paswoord in. 6. Na bevesging start de IP camera opnieuw op (ca. 2 min.), en kunt u de netwerkkabel losklikken. U kunt de IP camera nu plaatsen waar u wilt, binnen het wifi bereik van uw modem. MET DE ANDROID APP 1. Download de soſtware vanaf www.mrsafe.eu naar uw Android toestel. 2. Installeer de App en start deze na installae. 3. Meld uw Android apparaat via wifi aan op hetzelfde netwerk als waar de camera op aangesloten is. 4. Ga in de App naar “LAN” (onderaan). U ziet nu de camera. Klik op het pijltje achter de camera, en selecteer “Wi-Fi”. 5. Klik op “Search”om de beschikbare netwerken te tonen. Kies uw netwerk en geef uw paswoord in. 6. Na bevesging start de IP camera opnieuw op (ca. 2 min.), en kunt u de netwerkkabel losklikken. U kunt de IP camera nu plaatsen waar u wilt, binnen het wifi bereik van uw modem. DE CAMERA GEBRUIKEN 1. Voor gebruik in uw lokaal netwerk (LAN) hoeſt u niet in te loggen. 2. Voor gebruik via Internet (WAN) dient u wel in te loggen. De inloggegevens staan aan de onderkant van de IP Camera. Windows/Mac computer: Typ de user name (CAM ID) en paswoord (Login Password) in te typen, zoals deze op de onderkant van de camera staan. Mobiel apparaat zoals een smartphone (Apple of Android): Er staat ook een QR code afgebeeld aan de onderkant van het toestel. U hoeſt deze enkel maar vanuit de App te scannen om de inloggegevens in te stellen. Ga in de App naar “WAN” (onderaan) en klik op “Scan QR Code” (Android) of het QR code icoon (Apple). De inloggegevens worden automasch ingevuld na het scannen. Klik op “Login” om in te loggen. 3. U kunt nu de beelden van de camera bekijken via internet (WAN) of thuis op uw eigen netwerk (LAN), vanaf uw Smartphone, Tablet of computer. Opmerkingen: • PC soſtware: Het camera-icoon naast de naam van de camera (CAM ID) verandert van kleur naargelang de status van de camera: o Grijs: Camera niet beschikbaar (offline) o Blauw: Camera beschikbaar (online) o Rood: Camera is geacveerd en wordt bekeken • We raden u aan om het wachtwoord van uw IP camera aan te passen. o PC soſtware: Maak verbinding met de camera en klik daarna op het hangslotje bovenaan om het wachtwoord aan te passen. o Apple/Android App: Nadat u via internet in de IP camera bent ingelogd, drukt u op het symbool achter de camera en kiest u “Set access password”. Nu geeſt u het nieuwe password in. Onthoud uw nieuwe wachtwoord goed ! Als u de volgende keer weer wilt inloggen zult u zelf (eenmalig) dit nieuwe wachtwoord moeten ingeven. U kunt daarna instellen dat de soſtware het wachtwoord voor u mag onthouden. • De mr Safe IP camera kan worden gereset naar fabrieksinstellingen door de reset-knop onderaan het toestel in te drukken gedurende 10 seconden en daarna 5 minuten te wachten. GEBRUIK VAN DE MICRO SD-KAART DE MICRO SD-KAART PLAATSEN Belangrijk: De SD-kaart moet een Class 10 SD-kaart met een maximale capaciteit van 32 GB zijn! 1. Schakel de IP camera uit. 2. Plaats de micro SD-kaart. 3. Schakel de IP camera aan. CONFIGURATIE VAN DE CAMERA VOOR GEBRUIK MET MICRO SD-KAART MET DE WINDOWS SOFTWARE A. CONFIGURATIE 1. Sluit uw PC aan op hetzelfde netwerk als de camera. 2. Start de mr Safe PC soſtware. 3. Ga naar het tabblad “LAN”. 4. Klik met de rechtermuisknop op het camera symbool en selecteer “SD Card Configuraon”. 5. Formaeer de micro SD-kaart en wacht to het formaeren afgelopen is. 6. Selecteer de instellingen voor de micro SD-kaart, bijvoorbeeld vergelijkbaar met die in de bovenstaande aeelding en klik op “Apply” om de instellingen te bevesgen. 7. Klik op “Quit” om de configurae van de micro SD-kaart te beëindigen. De camera zal nu opnemen op de SD-kaart. Belangrijk: Wanneer de kaart vol is, worden de oudste bestanden verwijderd en de nieuwere bestanden worden toegevoegd. B. BESTANDEN DOWNLOADEN EN BEKIJKEN VIA DE MICRO SD-KAART 1. Sluit uw PC aan op hetzelfde netwerk als de camera. 2. Start de mr Safe PC soſtware. 3. Maak verbinding met de camera via het tabblad “WAN” of “LAN”. In het geval van WAN, dient u het wachtwoord in te voeren. 4. Klik met de rechtermuisknop op het camera-icoon en selecteer “SD File Download”. 5. Klik op “Search”. In de lijst vindt u alle beschikbare bestanden. 6. Een van de bestanden wordt gebruikt, de opname die momenteel wordt opgenomen. U kunt enkel bestanden downloaden die zijn afgewerkt. Dubbelklik op het bestand dat u wilt downloaden, gebaseerd op de jd / datum. Het bestand zal worden gedownload naar uw PC. 7. Klik op “Open Download Directory”. 8. U ziet nu de bestanden die zijn gedownload naar uw PC. Dubbelklik op het bestand: de PLAY-soſtware start op en de video wordt afgespeeld. 9. De PLAY soſtware kan meerdere opnamen tonen. Klik op de foto van uw video, en gebruik de toetsen voor afspelen, pauzeren, etc. MET DE MAC SOFTWARE CONFIGURATIE 1. Sluit uw Mac computer aan op hetzelfde netwerk als de camera. 2. Start de mr Safe Mac soſtware. 3. Ga naar het tabblad “LAN”. 4. Houd CTRL toets ingedrukt en klik tegelijkerjd op de camera-preview en selecteer “SD Card Configuraon”. 5. Formaeer de micro SD-kaart en wacht tot het formaeren afgelopen is. 6. Selecteer de instellingen voor de micro SD-kaart, bijvoorbeeld vergelijkbaar met die in de bovenstaande aeelding en klik op “Apply” om de instellingen te bevesgen. MET DE APPLE APP A. CONFIGURATIE 1. Start de App. 2. Maak verbinding met de camera via het tabblad “WAN” of “LAN”. In het geval van WAN, dient u het wachtwoord in te voeren. 3. Klik op het icoon naast de naam van de camera en selecteer “Micro SD Card sengs”. 4. Selecteer de instellingen voor de micro SD-kaart, bijvoorbeeld vergelijkbaar met die in de bovenstaande aeelding en klik op “Done” om de instellingen te bevesgen. De camera zal nu opnemen op de SD-kaart. Belangrijk: Wanneer de kaart vol is, worden de oudste bestanden verwijderd en de nieuwere bestanden worden toegevoegd. B. BESTANDEN DOWNLOADEN EN BEKIJKEN VIA DE MICRO SD-KAART 1. Start de App 2. Ga naar „LAN“ 3. Klik op ‚Micro SD card query“ 4. Selecteer het bestand dat je wil downloaden / zien. MET DE ANDROID APP A. CONFIGURATIE 1. Start de App. 2. Maak verbinding met de camera via het tabblad “WAN” of “LAN”. In het geval van WAN, dient u het wachtwoord in te voeren. 3. Klik op het pijltje naast de naam van de camera en selecteer “SD-Card sengs”. 4. Formaeer de SD-kaart. 5. Selecteer de instellingen voor de micro SD-kaart, bijvoorbeeld vergelijkbaar met die in de bovenstaande aeelding en klik op “OK” om de instellingen te bevesgen. De camera zal nu opnemen op de SD-kaart. Belangrijk: Wanneer de kaart vol is, worden de oudste bestanden verwijderd en de nieuwere bestanden worden toegevoegd. B. BESTANDEN DOWNLOADEN EN BEKIJKEN VIA DE MICRO SD-KAART 1. Start de App. 2. Maak verbinding met de camera via het tabblad “WAN” of “LAN”. In het geval van WAN, dient u het wachtwoord in te voeren. 3. Klik op het pijltje naast de naam van de camera en selecteer “SD-Card Query”. 4. Selecteer het bestand dat u wilt downloaden / bekijken. KLANTENONDERSTEUNING Voor alle vragen in verband met dit product kunt u contact opnemen met [email protected]. GARANTIE Copyright © mr Safe®. Mr Safe® is een gedeponeerd handelsmerk van TE-Group NV. Het merk mr Safe® staat voor producten van superieure kwaliteit en een uitstekende klantenservice. Daarom garandeert mr Safe® dat dit product vrij is van materiaal- en fabricagefouten gedurende een periode van twee (2) jaar na de oorspronkelijke aankoopdatum van het product. NL -------------------------------------mr Safe Wireless HD IP Camera PRO/03-16/V01--------------------------------- Copyright © mr Safe Wireless HD IP Camera PRO User’s Manual GB NL FR D GB: The complete & detailed manual can be downloaded from the website www.mrsafe.eu. NL: de volledige en gedetaillerde handleiding kan ge- download worden van de website www.mrsafe.eu. FR: Le manuel complet et détaillé peut être téléchargé sur le site www.mrsafe.eu. D: Die komplee und ausführliche Anleitung können von der Website www.mrsafe.eu heruntergeladen werden.
Transcript of Wireless HD IP Camera PRO
QUICK INSTALLATION
LAN: Local Area Network: Your home network, which includes your internet modem and all the equipment in the house that is connected to the network via cable or wifi.WAN: Wide Area Network: The internet, if you have an Internet connection at home or anywhere else.
HARDWARE INSTALLATION
1. Take the mr Safe IP camera out of the box and attach the wifi antenna.2. Plug one end of the supplied power adapter in the DC5V port at the back of the camera and plug the other end into the
wall socket.3. Connect one end of the supplied network cable to the camera and the other end to your internet router / modem.
SETTING THE WIFI CONNECTION OF THE CAMERA
USING THE WINDOWS SOFTWARE
1. Download the software from www.mrsafe.eu to install the PC software. Start the PC software.Important! Make sure that the PC is connected to the same network as the IP camera.
2. Go to the “LAN” tab. You will see a camera icon and the name of the camera.
3. Right-click the camera icon and select “Set wifi connection”.4. Check “Start wifi setting” and click “Scan” to search for available networks.5. Select your wifi network and enter the password of your wifi.6. After confirmation, the IP camera will restart (this will take about 2 minutes), and you can remove the network cable.
You can now place the IP camera wherever you want, within the range of your wifi modem.
USING THE MAC SOFTWARE
1. Download the software from www.mrsafe.eu to install the Mac software. Start the Mac software. Important! Make sure that the Mac computer is connected to the same network as the IP camera. 2. Go to the “LAN” tab. You will see a camera live preview and the name of the camera.
3. Press CTRL button and simultaneously click the camera preview, then select “Configuring Network”. 4. Go to the “Wi-Fi” tab” and click “Scan” to search for available networks. 5. Select your wifi network and enter the password of your wifi. 6. After confirmation, the IP camera will restart (this will take about 2 minutes), and you can remove the network cable.
You can now place the IP camera wherever you want, within the range of your wifi modem.
USING THE APPLE APP
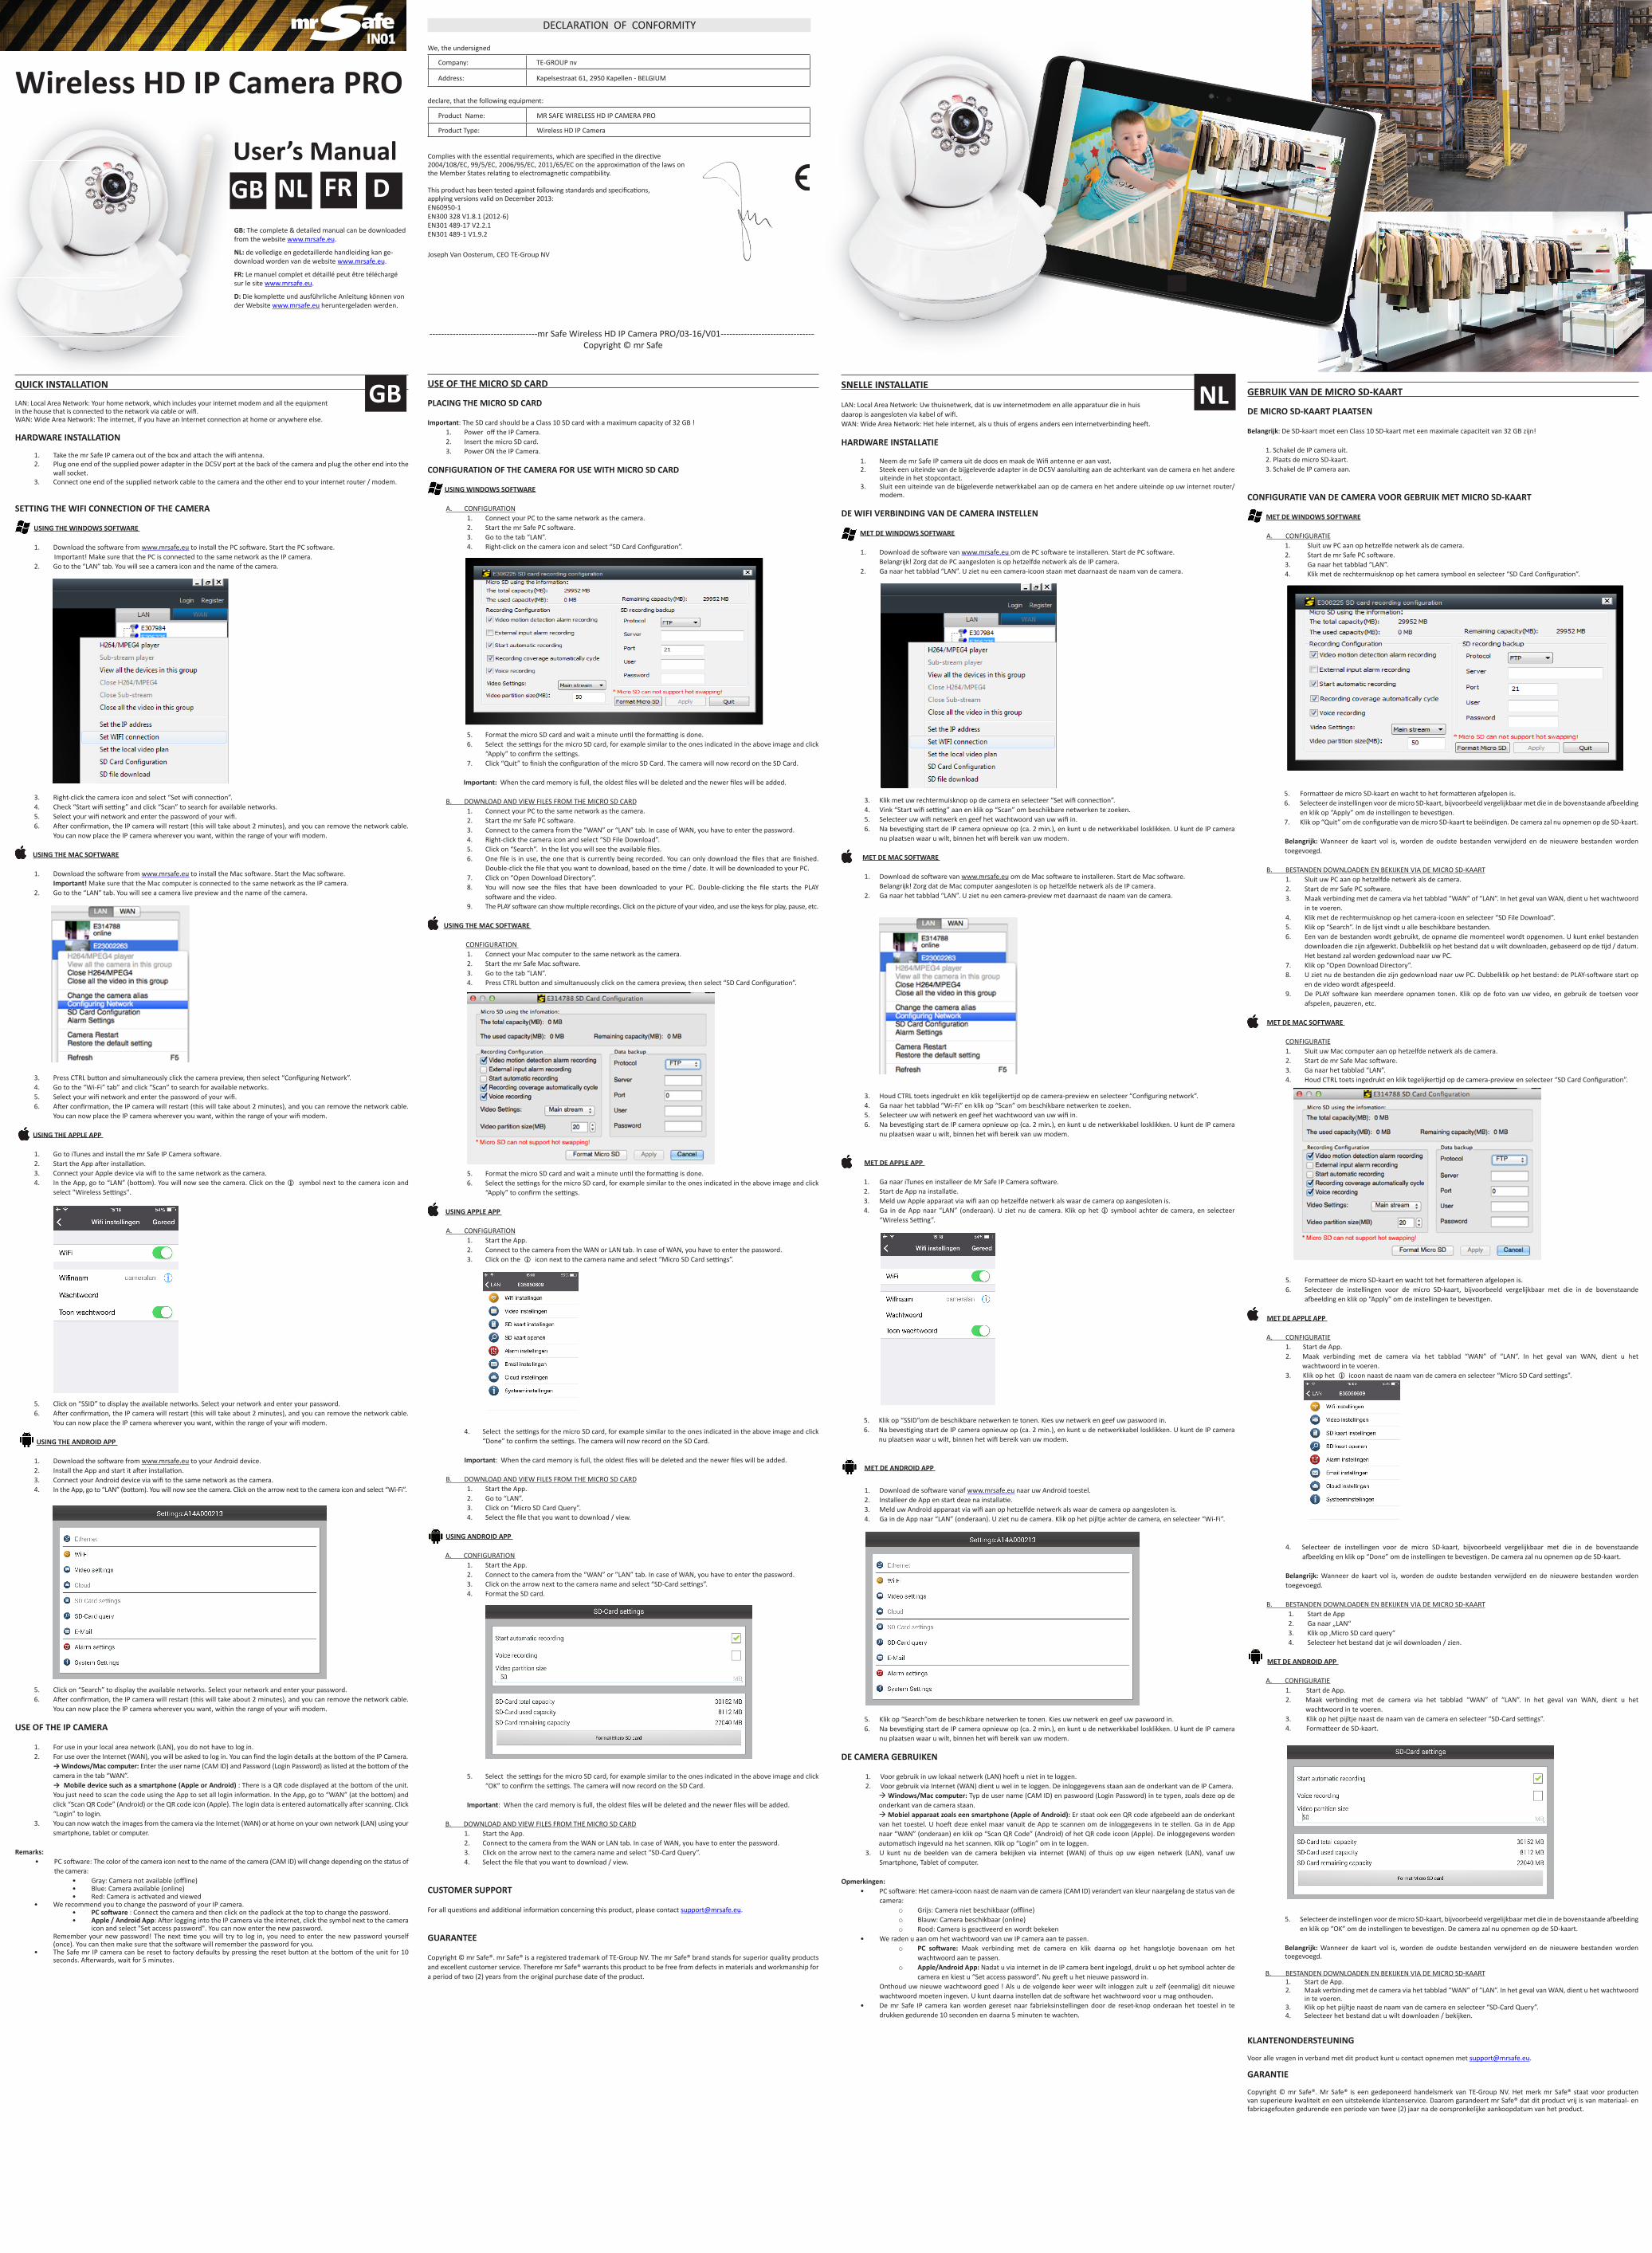
1. Go to iTunes and install the mr Safe IP Camera software.2. Start the App after installation.3. Connect your Apple device via wifi to the same network as the camera.4. In the App, go to “LAN” (bottom). You will now see the camera. Click on the symbol next to the camera icon and
select "Wireless Settings".
5. Click on “SSID” to display the available networks. Select your network and enter your password.6. After confirmation, the IP camera will restart (this will take about 2 minutes), and you can remove the network cable.
You can now place the IP camera wherever you want, within the range of your wifi modem.
USING THE ANDROID APP
1. Download the software from www.mrsafe.eu to your Android device.2. Install the App and start it after installation.3. Connect your Android device via wifi to the same network as the camera.4. In the App, go to “LAN” (bottom). You will now see the camera. Click on the arrow next to the camera icon and select “Wi-Fi”.
5. Click on “Search” to display the available networks. Select your network and enter your password.6. After confirmation, the IP camera will restart (this will take about 2 minutes), and you can remove the network cable.
You can now place the IP camera wherever you want, within the range of your wifi modem.
USE OF THE IP CAMERA
1. For use in your local area network (LAN), you do not have to log in.2. For use over the Internet (WAN), you will be asked to log in. You can find the login details at the bottom of the IP Camera.
→ Windows/Mac computer: Enter the user name (CAM ID) and Password (Login Password) as listed at the bottom of the camera in the tab “WAN”. → Mobile device such as a smartphone (Apple or Android) : There is a QR code displayed at the bottom of the unit. You just need to scan the code using the App to set all login information. In the App, go to “WAN” (at the bottom) and click “Scan QR Code” (Android) or the QR code icon (Apple). The login data is entered automatically after scanning. Click “Login” to login.
3. You can now watch the images from the camera via the Internet (WAN) or at home on your own network (LAN) using your smartphone, tablet or computer.
Remarks:• PC software: The color of the camera icon next to the name of the camera (CAM ID) will change depending on the status of
the camera:• Gray: Camera not available (offline)• Blue: Camera available (online)• Red: Camera is activated and viewed
• We recommend you to change the password of your IP camera.• PC software : Connect the camera and then click on the padlock at the top to change the password.• Apple / Android App: After logging into the IP camera via the internet, click the symbol next to the camera
icon and select "Set access password". You can now enter the new password.Remember your new password! The next time you will try to log in, you need to enter the new password yourself (once). You can then make sure that the software will remember the password for you.
• The Safe mr IP camera can be reset to factory defaults by pressing the reset button at the bottom of the unit for 10 seconds. Afterwards, wait for 5 minutes.
USE OF THE MICRO SD CARD
PLACING THE MICRO SD CARD
Important: The SD card should be a Class 10 SD card with a maximum capacity of 32 GB !1. Power off the IP Camera.2. Insert the micro SD card.3. Power ON the IP Camera.
CONFIGURATION OF THE CAMERA FOR USE WITH MICRO SD CARD
USING WINDOWS SOFTWARE
A. CONFIGURATION1. Connect your PC to the same network as the camera.2. Start the mr Safe PC software.3. Go to the tab “LAN”. 4. Right-click on the camera icon and select “SD Card Configuration”.
5. Format the micro SD card and wait a minute until the formatting is done.6. Select the settings for the micro SD card, for example similar to the ones indicated in the above image and click
“Apply” to confirm the settings.7. Click “Quit” to finish the configuration of the micro SD Card. The camera will now record on the SD Card.
Important: When the card memory is full, the oldest files will be deleted and the newer files will be added.
B. DOWNLOAD AND VIEW FILES FROM THE MICRO SD CARD1. Connect your PC to the same network as the camera.2. Start the mr Safe PC software.3. Connect to the camera from the “WAN” or “LAN” tab. In case of WAN, you have to enter the password.4. Right-click the camera icon and select “SD File Download”. 5. Click on “Search”. In the list you will see the available files.6. One file is in use, the one that is currently being recorded. You can only download the files that are finished.
Double-click the file that you want to download, based on the time / date. It will be downloaded to your PC.7. Click on “Open Download Directory”. 8. You will now see the files that have been downloaded to your PC. Double-clicking the file starts the PLAY
software and the video.9. The PLAY software can show multiple recordings. Click on the picture of your video, and use the keys for play, pause, etc.
USING THE MAC SOFTWARE
CONFIGURATION 1. Connect your Mac computer to the same network as the camera. 2. Start the mr Safe Mac software. 3. Go to the tab “LAN”. 4. Press CTRL button and simultanuously click on the camera preview, then select “SD Card Configuration”.
5. Format the micro SD card and wait a minute until the formatting is done. 6. Select the settings for the micro SD card, for example similar to the ones indicated in the above image and click
“Apply” to confirm the settings.
USING APPLE APP
A. CONFIGURATION1. Start the App.2. Connect to the camera from the WAN or LAN tab. In case of WAN, you have to enter the password.3. Click on the icon next to the camera name and select “Micro SD Card settings”.
4. Select the settings for the micro SD card, for example similar to the ones indicated in the above image and click “Done” to confirm the settings. The camera will now record on the SD Card.
Important: When the card memory is full, the oldest files will be deleted and the newer files will be added.
B. DOWNLOAD AND VIEW FILES FROM THE MICRO SD CARD1. Start the App. 2. Go to “LAN”.3. Click on “Micro SD Card Query”.4. Select the file that you want to download / view.
USING ANDROID APP
A. CONFIGURATION1. Start the App.2. Connect to the camera from the “WAN” or ”LAN” tab. In case of WAN, you have to enter the password.3. Click on the arrow next to the camera name and select “SD-Card settings”.4. Format the SD card.
5. Select the settings for the micro SD card, for example similar to the ones indicated in the above image and click “OK” to confirm the settings. The camera will now record on the SD Card.
Important: When the card memory is full, the oldest files will be deleted and the newer files will be added.
B. DOWNLOAD AND VIEW FILES FROM THE MICRO SD CARD1. Start the App.2. Connect to the camera from the WAN or LAN tab. In case of WAN, you have to enter the password.3. Click on the arrow next to the camera name and select “SD-Card Query”.4. Select the file that you want to download / view.
CUSTOMER SUPPORT
For all questions and additional information concerning this product, please contact [email protected].
GUARANTEE
Copyright © mr Safe®. mr Safe® is a registered trademark of TE-Group NV. The mr Safe® brand stands for superior quality products and excellent customer service. Therefore mr Safe® warrants this product to be free from defects in materials and workmanship for a period of two (2) years from the original purchase date of the product.
GB
DECLARATION OF CONFORMITY
We, the undersigned
Company: TE-GROUP nv
Address: Kapelsestraat 61, 2950 Kapellen - BELGIUM
declare, that the following equipment:
Product Name: MR SAFE WIRELESS HD IP CAMERA PRO
Product Type: Wireless HD IP Camera
Complies with the essential requirements, which are specified in the directive 2004/108/EC, 99/5/EC, 2006/95/EC, 2011/65/EC on the approximation of the laws on the Member States relating to electromagnetic compatibility.
This product has been tested against following standards and specifications, applying versions valid on December 2013:EN60950-1EN300 328 V1.8.1 (2012-6)EN301 489-17 V2.2.1EN301 489-1 V1.9.2
Joseph Van Oosterum, CEO TE-Group NV
SNELLE INSTALLATIE
LAN: Local Area Network: Uw thuisnetwerk, dat is uw internetmodem en alle apparatuur die in huis daarop is aangesloten via kabel of wifi.WAN: Wide Area Network: Het hele internet, als u thuis of ergens anders een internetverbinding heeft.
HARDWARE INSTALLATIE
1. Neem de mr Safe IP camera uit de doos en maak de Wifi antenne er aan vast.2. Steek een uiteinde van de bijgeleverde adapter in de DC5V aansluiting aan de achterkant van de camera en het andere
uiteinde in het stopcontact.3. Sluit een uiteinde van de bijgeleverde netwerkkabel aan op de camera en het andere uiteinde op uw internet router/
modem.
DE WIFI VERBINDING VAN DE CAMERA INSTELLEN
MET DE WINDOWS SOFTWARE
1. Download de software van www.mrsafe.eu om de PC software te installeren. Start de PC software.Belangrijk! Zorg dat de PC aangesloten is op hetzelfde netwerk als de IP camera.
2. Ga naar het tabblad “LAN”. U ziet nu een camera-icoon staan met daarnaast de naam van de camera.
3. Klik met uw rechtermuisknop op de camera en selecteer “Set wifi connection”.4. Vink “Start wifi setting” aan en klik op “Scan” om beschikbare netwerken te zoeken.5. Selecteer uw wifi netwerk en geef het wachtwoord van uw wifi in.6. Na bevestiging start de IP camera opnieuw op (ca. 2 min.), en kunt u de netwerkkabel losklikken. U kunt de IP camera
nu plaatsen waar u wilt, binnen het wifi bereik van uw modem.
MET DE MAC SOFTWARE
1. Download de software van www.mrsafe.eu om de Mac software te installeren. Start de Mac software. Belangrijk! Zorg dat de Mac computer aangesloten is op hetzelfde netwerk als de IP camera. 2. Ga naar het tabblad “LAN”. U ziet nu een camera-preview met daarnaast de naam van de camera.
3. Houd CTRL toets ingedrukt en klik tegelijkertijd op de camera-preview en selecteer “Configuring network”. 4. Ga naar het tabblad “Wi-Fi” en klik op “Scan” om beschikbare netwerken te zoeken. 5. Selecteer uw wifi netwerk en geef het wachtwoord van uw wifi in. 6. Na bevestiging start de IP camera opnieuw op (ca. 2 min.), en kunt u de netwerkkabel losklikken. U kunt de IP camera
nu plaatsen waar u wilt, binnen het wifi bereik van uw modem.
MET DE APPLE APP
1. Ga naar iTunes en installeer de Mr Safe IP Camera software.2. Start de App na installatie.3. Meld uw Apple apparaat via wifi aan op hetzelfde netwerk als waar de camera op aangesloten is.4. Ga in de App naar “LAN” (onderaan). U ziet nu de camera. Klik op het symbool achter de camera, en selecteer
“Wireless Setting”.
5. Klik op “SSID”om de beschikbare netwerken te tonen. Kies uw netwerk en geef uw paswoord in.6. Na bevestiging start de IP camera opnieuw op (ca. 2 min.), en kunt u de netwerkkabel losklikken. U kunt de IP camera
nu plaatsen waar u wilt, binnen het wifi bereik van uw modem.
MET DE ANDROID APP
1. Download de software vanaf www.mrsafe.eu naar uw Android toestel.2. Installeer de App en start deze na installatie. 3. Meld uw Android apparaat via wifi aan op hetzelfde netwerk als waar de camera op aangesloten is.4. Ga in de App naar “LAN” (onderaan). U ziet nu de camera. Klik op het pijltje achter de camera, en selecteer “Wi-Fi”.
5. Klik op “Search”om de beschikbare netwerken te tonen. Kies uw netwerk en geef uw paswoord in.6. Na bevestiging start de IP camera opnieuw op (ca. 2 min.), en kunt u de netwerkkabel losklikken. U kunt de IP camera
nu plaatsen waar u wilt, binnen het wifi bereik van uw modem. DE CAMERA GEBRUIKEN
1. Voor gebruik in uw lokaal netwerk (LAN) hoeft u niet in te loggen. 2. Voor gebruik via Internet (WAN) dient u wel in te loggen. De inloggegevens staan aan de onderkant van de IP Camera. Windows/Mac computer: Typ de user name (CAM ID) en paswoord (Login Password) in te typen, zoals deze op de
onderkant van de camera staan. Mobiel apparaat zoals een smartphone (Apple of Android): Er staat ook een QR code afgebeeld aan de onderkant
van het toestel. U hoeft deze enkel maar vanuit de App te scannen om de inloggegevens in te stellen. Ga in de App naar “WAN” (onderaan) en klik op “Scan QR Code” (Android) of het QR code icoon (Apple). De inloggegevens worden automatisch ingevuld na het scannen. Klik op “Login” om in te loggen.
3. U kunt nu de beelden van de camera bekijken via internet (WAN) of thuis op uw eigen netwerk (LAN), vanaf uw Smartphone, Tablet of computer.
Opmerkingen:• PC software: Het camera-icoon naast de naam van de camera (CAM ID) verandert van kleur naargelang de status van de
camera:o Grijs: Camera niet beschikbaar (offline)o Blauw: Camera beschikbaar (online)o Rood: Camera is geactiveerd en wordt bekeken
• We raden u aan om het wachtwoord van uw IP camera aan te passen.o PC software: Maak verbinding met de camera en klik daarna op het hangslotje bovenaan om het
wachtwoord aan te passen.o Apple/Android App: Nadat u via internet in de IP camera bent ingelogd, drukt u op het symbool achter de
camera en kiest u “Set access password”. Nu geeft u het nieuwe password in. Onthoud uw nieuwe wachtwoord goed ! Als u de volgende keer weer wilt inloggen zult u zelf (eenmalig) dit nieuwe wachtwoord moeten ingeven. U kunt daarna instellen dat de software het wachtwoord voor u mag onthouden.
• De mr Safe IP camera kan worden gereset naar fabrieksinstellingen door de reset-knop onderaan het toestel in te drukken gedurende 10 seconden en daarna 5 minuten te wachten.
GEBRUIK VAN DE MICRO SD-KAART
DE MICRO SD-KAART PLAATSEN
Belangrijk: De SD-kaart moet een Class 10 SD-kaart met een maximale capaciteit van 32 GB zijn!
1. Schakel de IP camera uit.2. Plaats de micro SD-kaart.3. Schakel de IP camera aan.
CONFIGURATIE VAN DE CAMERA VOOR GEBRUIK MET MICRO SD-KAART
MET DE WINDOWS SOFTWARE
A. CONFIGURATIE1. Sluit uw PC aan op hetzelfde netwerk als de camera.2. Start de mr Safe PC software.3. Ga naar het tabblad “LAN”.4. Klik met de rechtermuisknop op het camera symbool en selecteer “SD Card Configuration”.
5. Formatteer de micro SD-kaart en wacht to het formatteren afgelopen is. 6. Selecteer de instellingen voor de micro SD-kaart, bijvoorbeeld vergelijkbaar met die in de bovenstaande afbeelding
en klik op “Apply” om de instellingen te bevestigen. 7. Klik op “Quit” om de configuratie van de micro SD-kaart te beëindigen. De camera zal nu opnemen op de SD-kaart.
Belangrijk: Wanneer de kaart vol is, worden de oudste bestanden verwijderd en de nieuwere bestanden worden toegevoegd.
B. BESTANDEN DOWNLOADEN EN BEKIJKEN VIA DE MICRO SD-KAART1. Sluit uw PC aan op hetzelfde netwerk als de camera.2. Start de mr Safe PC software.3. Maak verbinding met de camera via het tabblad “WAN” of “LAN”. In het geval van WAN, dient u het wachtwoord
in te voeren.4. Klik met de rechtermuisknop op het camera-icoon en selecteer “SD File Download”.5. Klik op “Search”. In de lijst vindt u alle beschikbare bestanden.6. Een van de bestanden wordt gebruikt, de opname die momenteel wordt opgenomen. U kunt enkel bestanden
downloaden die zijn afgewerkt. Dubbelklik op het bestand dat u wilt downloaden, gebaseerd op de tijd / datum. Het bestand zal worden gedownload naar uw PC.
7. Klik op “Open Download Directory”.8. U ziet nu de bestanden die zijn gedownload naar uw PC. Dubbelklik op het bestand: de PLAY-software start op
en de video wordt afgespeeld.9. De PLAY software kan meerdere opnamen tonen. Klik op de foto van uw video, en gebruik de toetsen voor
afspelen, pauzeren, etc.
MET DE MAC SOFTWARE
CONFIGURATIE 1. Sluit uw Mac computer aan op hetzelfde netwerk als de camera. 2. Start de mr Safe Mac software. 3. Ga naar het tabblad “LAN”. 4. Houd CTRL toets ingedrukt en klik tegelijkertijd op de camera-preview en selecteer “SD Card Configuration”.
5. Formatteer de micro SD-kaart en wacht tot het formatteren afgelopen is. 6. Selecteer de instellingen voor de micro SD-kaart, bijvoorbeeld vergelijkbaar met die in de bovenstaande
afbeelding en klik op “Apply” om de instellingen te bevestigen.
MET DE APPLE APP
A. CONFIGURATIE 1. Start de App. 2. Maak verbinding met de camera via het tabblad “WAN” of “LAN”. In het geval van WAN, dient u het wachtwoord in te voeren. 3. Klik op het icoon naast de naam van de camera en selecteer “Micro SD Card settings”.
4. Selecteer de instellingen voor de micro SD-kaart, bijvoorbeeld vergelijkbaar met die in de bovenstaande afbeelding en klik op “Done” om de instellingen te bevestigen. De camera zal nu opnemen op de SD-kaart.
Belangrijk: Wanneer de kaart vol is, worden de oudste bestanden verwijderd en de nieuwere bestanden worden toegevoegd.
B. BESTANDEN DOWNLOADEN EN BEKIJKEN VIA DE MICRO SD-KAART1. Start de App2. Ga naar „LAN“3. Klik op ‚Micro SD card query“4. Selecteer het bestand dat je wil downloaden / zien.
MET DE ANDROID APP
A. CONFIGURATIE 1. Start de App. 2. Maak verbinding met de camera via het tabblad “WAN” of “LAN”. In het geval van WAN, dient u het
wachtwoord in te voeren. 3. Klik op het pijltje naast de naam van de camera en selecteer “SD-Card settings”. 4. Formatteer de SD-kaart.
5. Selecteer de instellingen voor de micro SD-kaart, bijvoorbeeld vergelijkbaar met die in de bovenstaande afbeelding en klik op “OK” om de instellingen te bevestigen. De camera zal nu opnemen op de SD-kaart.
Belangrijk: Wanneer de kaart vol is, worden de oudste bestanden verwijderd en de nieuwere bestanden worden toegevoegd.
B. BESTANDEN DOWNLOADEN EN BEKIJKEN VIA DE MICRO SD-KAART 1. Start de App.2. Maak verbinding met de camera via het tabblad “WAN” of “LAN”. In het geval van WAN, dient u het wachtwoord
in te voeren.3. Klik op het pijltje naast de naam van de camera en selecteer “SD-Card Query”.4. Selecteer het bestand dat u wilt downloaden / bekijken.
KLANTENONDERSTEUNING
Voor alle vragen in verband met dit product kunt u contact opnemen met [email protected].
GARANTIE
Copyright © mr Safe®. Mr Safe® is een gedeponeerd handelsmerk van TE-Group NV. Het merk mr Safe® staat voor producten van superieure kwaliteit en een uitstekende klantenservice. Daarom garandeert mr Safe® dat dit product vrij is van materiaal- en fabricagefouten gedurende een periode van twee (2) jaar na de oorspronkelijke aankoopdatum van het product.
NL
-------------------------------------mr Safe Wireless HD IP Camera PRO/03-16/V01---------------------------------Copyright © mr Safe
Wireless HD IP Camera PRO
User’s ManualGB NL FR DGB: The complete & detailed manual can be downloaded from the website www.mrsafe.eu.
NL: de volledige en gedetaillerde handleiding kan ge-download worden van de website www.mrsafe.eu.
FR: Le manuel complet et détaillé peut être téléchargé sur le site www.mrsafe.eu.
D: Die komplette und ausführliche Anleitung können von der Website www.mrsafe.eu heruntergeladen werden.
INSTALLATION RAPIDE
LAN: Local Area Network: Votre réseau domestique, ce qui inclut votre modem internet et tout l’équipement de la maison connecté à ce réseau par câble ou WiFi.WAN: Wide Area Network: L’internet, si vous disposez d’une connexion Internet à la maison ou n’importe où.
INSTALLATION DU MATÉRIEL
1. Prenez la caméra IP de la boîte et vissez l’antenne Wifi à l’arrière de la caméra.2. Branchez une extrémité de l’adaptateur d’alimentation fourni dans le port DC5V à l’arrière de l’appareil et branchez l’autre extrémité dans la prise murale.3. Connectez une extrémité du câble réseau fourni à la caméra et l’autre extrémité à votre routeur Internet / modem.
ETABLIR LA CONNEXION WIFI DE LA CAMERA
EN UTILISANT LE LOGICIEL WINDOWS
1. Téléchargez le logiciel à partir de www.mrsafe.eu et installez-le. Démarrez le logiciel PC.Important! Assurez-vous que le PC est connecté au même réseau que la caméra IP.
2. Sélectionnez l’onglet «LAN». Vous verrez l’icône de la caméra et le nom de la caméra.
3. Cliquez avec le bouton droit sur l’icône de la caméra et sélectionnez « Set wifi connection ».4. Cochez la case « Start wifi setting » et cliquez sur « Scan » pour rechercher les réseaux disponibles.5. Sélectionnez votre réseau Wifi et entrez le mot de passe de votre wifi.6. Après confirmation, la caméra IP redémarre (cela prendra environ 2 minutes), et vous pouvez retirer le câble réseau.
Vous pouvez maintenant placer la caméra IP où vous voulez, dans la portée de votre modem Wifi.
EN UTILISANT LE LOGICIEL MAC
1. Téléchargez le logiciel à partir de www.mrsafe.eu et installez-le. Démarrez le logiciel Mac. Important! Assurez-vous que le Mac est connecté au même réseau que la caméra IP.2. Sélectionnez l’onglet «LAN». Vous verrez un preview de la caméra et le nom de la caméra.
3. Pressez CTRL et cliquez en même temps sur le preview de la caméra et sélectionnez « Configuring network ».4. Sélectionnez l’onglet «LAN» et cliquez sur « Scan » pour rechercher les réseaux disponibles.5. Sélectionnez votre réseau Wifi et entrez le mot de passe de votre wifi.6. Après confirmation, la caméra IP redémarre (cela prendra environ 2 minutes), et vous pouvez retirer le câble réseau.
Vous pouvez maintenant placer la caméra IP où vous voulez, dans la portée de votre modem Wifi.
EN UTILISANT L’APPLICATION APPLE
1. Lancez iTunes et installez le logiciel de la caméra.2. Démarrez l’application après l’installation.3. Connectez votre appareil Apple via wifi sur le même réseau que la caméra.4. Dans l’application, allez vers «LAN» (en bas). Vous verrez alors la caméra. Cliquez sur le symbole à côté de l’icône de
la caméra et sélectionnez «Wireless settings».
5. Cliquez sur «SSID» pour afficher les réseaux disponibles. Sélectionnez votre réseau et entrez votre mot de passe.6. Après confirmation, la caméra IP redémarre (cela prendra environ 2 minutes), et vous pouvez retirer le câble réseau.
Vous pouvez maintenant placer la caméra IP où vous voulez, dans la gamme de votre modem WiFi.
EN UTILISANT L’APPLICATION ANDROID
1. Téléchargez le logiciel à partir de www.mrsafe.eu sur votre appareil Android.2. Installez l’application et démarrez-la après l’installation.3. Connectez votre appareil Android via wifi sur le même réseau que la caméra.4. Dans l’application, allez vers «LAN» (en bas). Vous verrez alors la caméra. Cliquez sur la flèche à côté de l’icône de la
caméra et sélectionnez «Wi-Fi».
5. Cliquez sur «Search» pour afficher les réseaux disponibles. Sélectionnez votre réseau et entrez votre mot de passe.6. Après confirmation, la caméra IP redémarre (cela prendra environ 2 minutes), et vous pouvez retirer le câble réseau.
Vous pouvez maintenant placer la caméra IP où vous voulez, dans la portée de votre modem Wifi.
UTILISATION DE LA CAMERA IP
1. Pour une utilisation dans votre réseau local (LAN), il ne faut pas se connecter.2. Pour une utilisation sur Internet (WAN), vous serez invité à vous connecter. Vous pouvez trouver les coordonnées
d’accès sur le dessous de la caméra IP. Ordinateur Windows/Mac: Vous devez entrer le nom d’utilisateur (CAM ID) et le mot de passe (Login Password) comme indiqué sur le dessous de la caméra dans l’onglet «WAN». Dispositif mobile comme un smartphone (Apple ou Android): Il y a un code QR sur le dessous de l’appareil. Vous avez juste besoin de scanner le code en utilisant l’application afin de définir toutes les coordonnées d’accès. Dans l’application, allez vers «WAN» (en bas) et cliquez sur «Scan QR Code» (Android) ou sur l’icône du code QR (Apple). Les coordonnées d’accès sont automatiquement inscrites après la numérisation. Cliquez sur «Login» pour vous identifier.
3. Vous pouvez maintenant regarder les images de la caméra via Internet (WAN) ou à la maison sur votre propre réseau (LAN) en utilisant votre smartphone, tablette ou PC.
Remarques:• Logiciel PC: La couleur de l’icône de la caméra à côté du nom de la caméra (CAM ID) change en fonction de l’état de la
caméra:o Gris: Appareil non disponible (hors ligne)o Bleu: Caméra disponible (en ligne)o Rouge: Caméra est activé et consulté
• Nous vous recommandons de changer le mot de passe de votre caméra IP.o Logiciel PC: Branchez la caméra, puis cliquez sur le cadenas en haut pour modifier le mot de passe.o Application Apple/Android: Après avoir accédé à la caméra IP via Internet, cliquez sur le symbole à côté
de l’icône de la caméra et sélectionnez «Set access password». Vous pouvez maintenant entrer le nouveau mot de passe.
N’oubliez pas votre nouveau mot de passe! La prochaine fois que vous essayez de vous connecter, vous devez entrer le nouveau mot de passe vous-même (une fois). Vous pouvez ensuite indiquer que le logiciel doit mémoriser le mot de passe pour vous.
• La caméra IP peut être réinitialisé aux paramètres par défaut en appuyant sur le bouton de réinitialisation au bas de l’appareil pendant 10 secondes. Ensuite, attendez 5 minutes.
UTILISATION DE LA CARTE MICRO SD INSTALLATION DE LA CARTE MICRO SD Important: La carte SD doit être une carte SD Classe 10 avec une capacité maximale de 32 Go!
1. Éteignez la caméra IP.2. Insérez la carte micro SD.3. Allumez la caméra IP.
CONFIGURATION DE LA CAMERA POUR L’UTILISATION AVEC CARTE MICRO SD
EN UTILISANT LE LOGICIEL PC
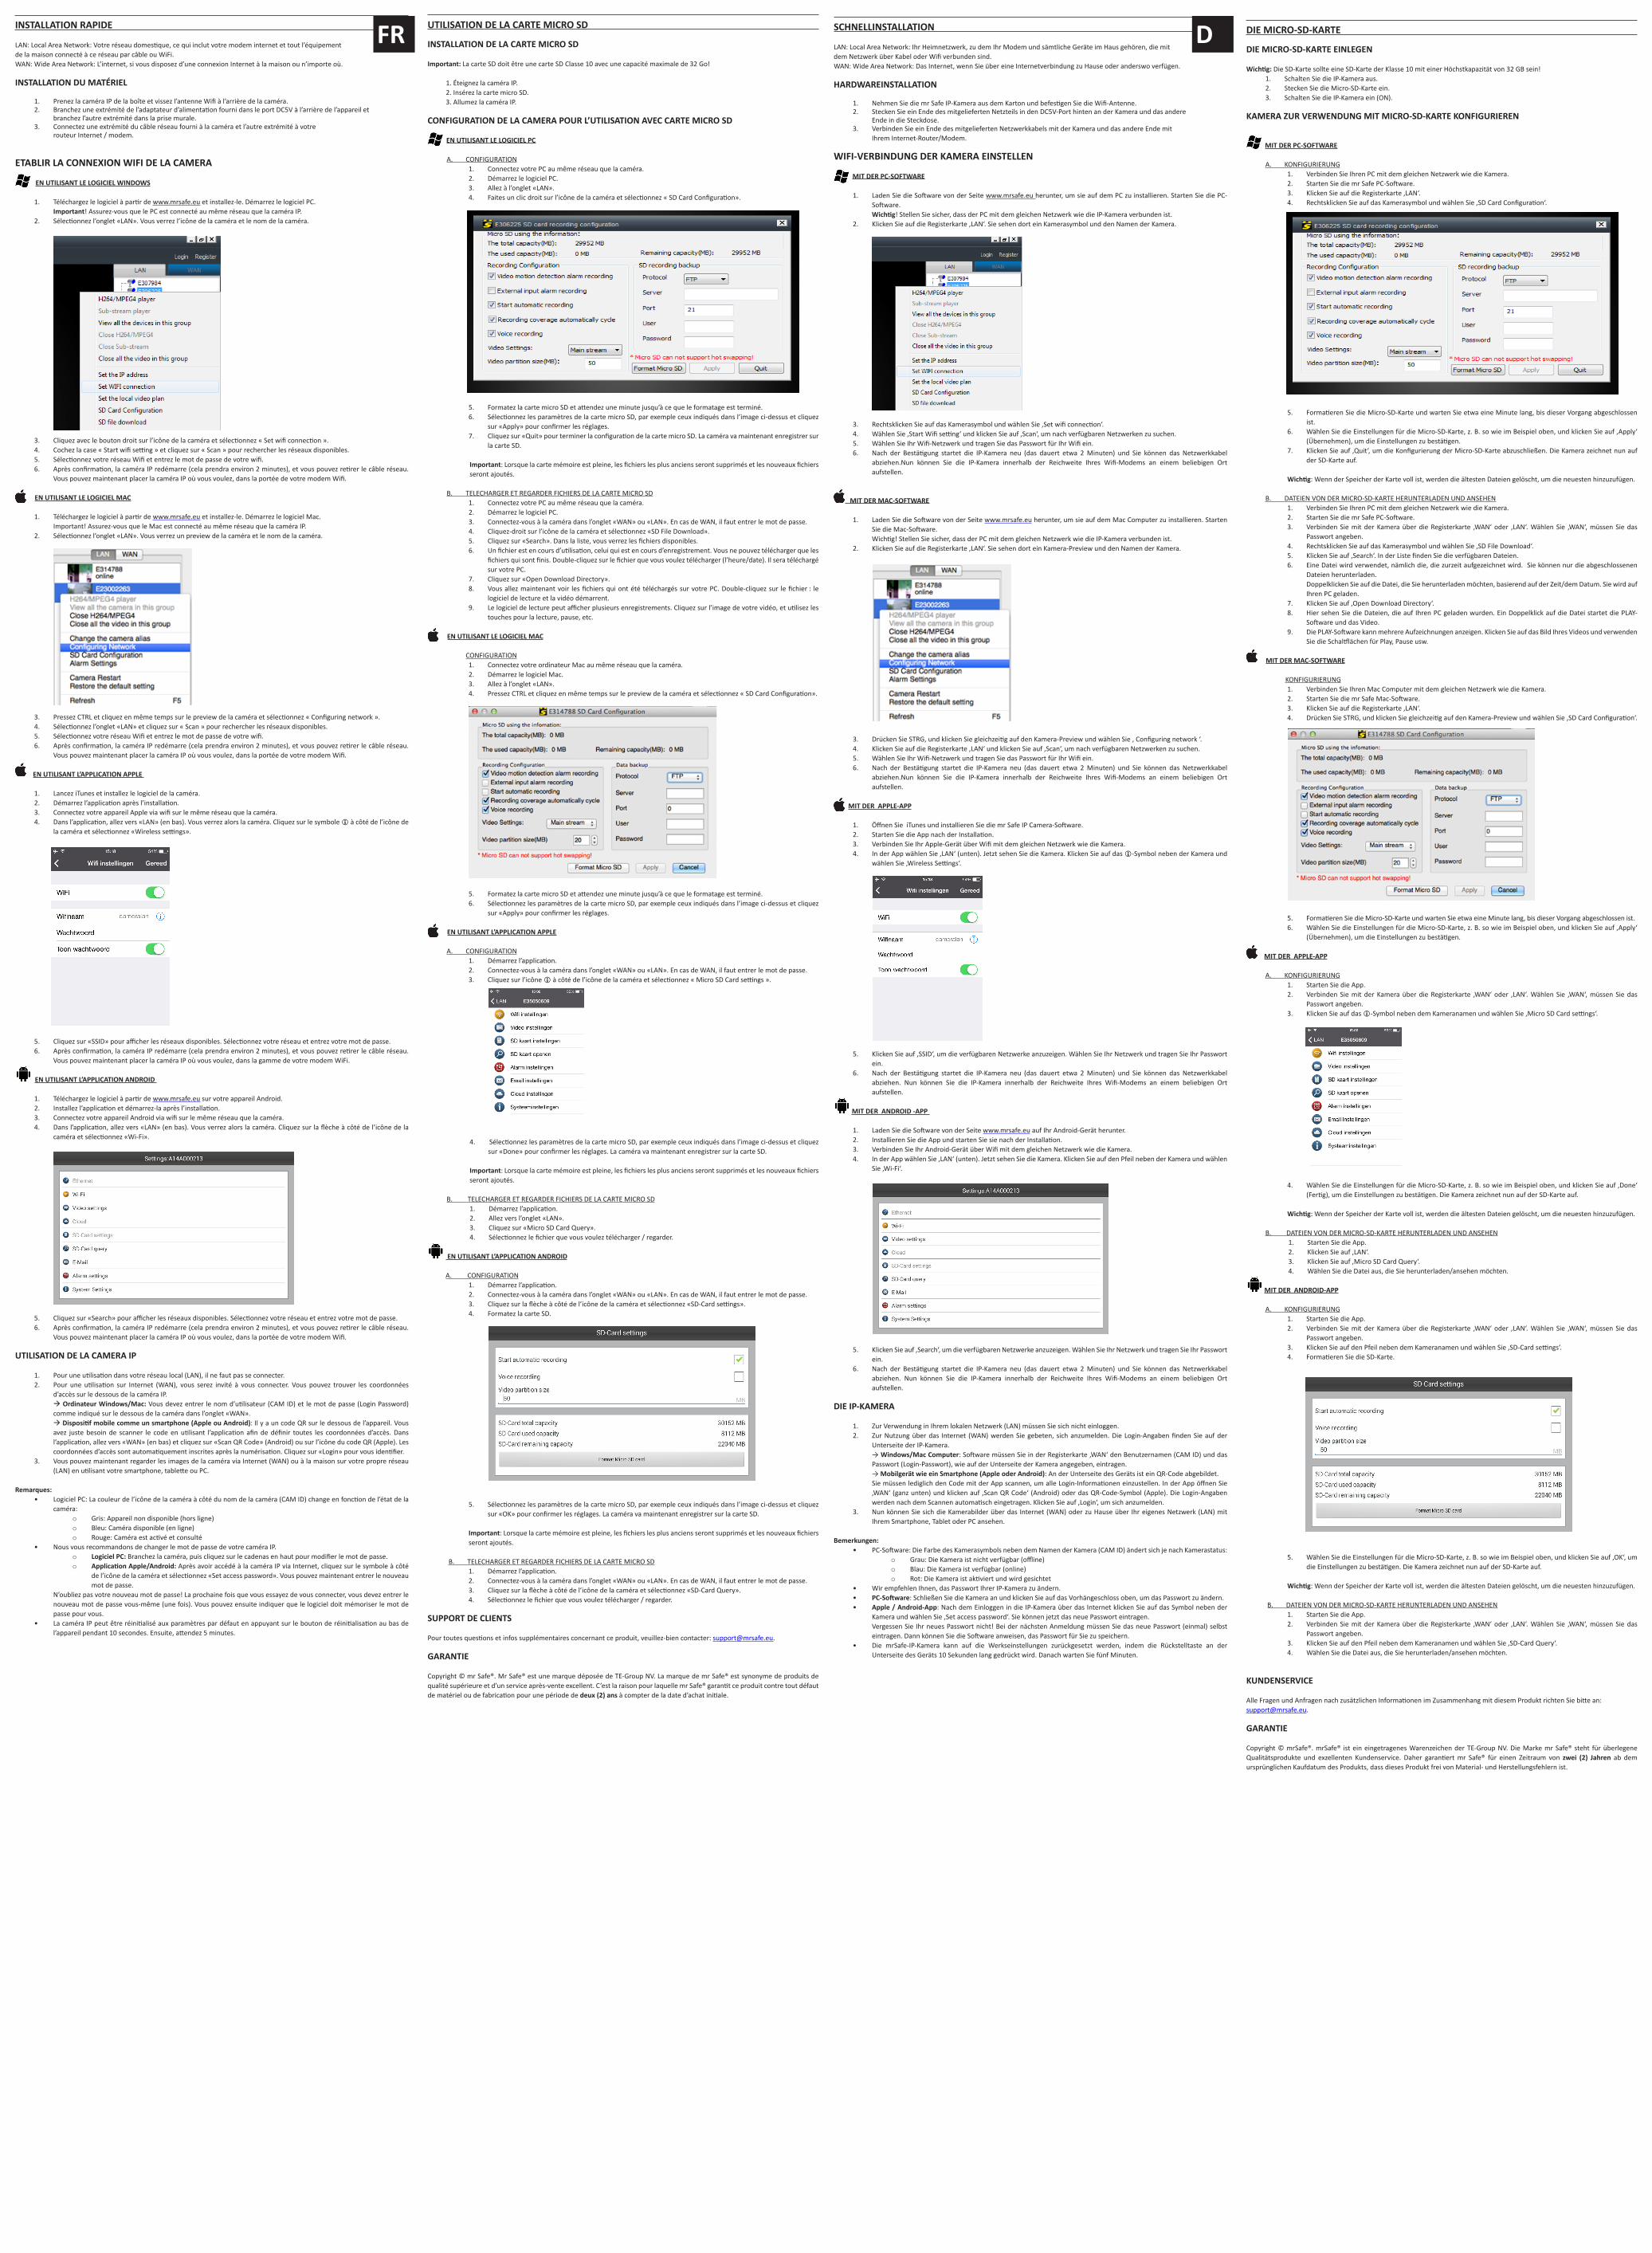
A. CONFIGURATION1. Connectez votre PC au même réseau que la caméra.2. Démarrez le logiciel PC.3. Allez à l’onglet «LAN».4. Faites un clic droit sur l’icône de la caméra et sélectionnez « SD Card Configuration».
5. Formatez la carte micro SD et attendez une minute jusqu’à ce que le formatage est terminé.6. Sélectionnez les paramètres de la carte micro SD, par exemple ceux indiqués dans l’image ci-dessus et cliquez
sur «Apply» pour confirmer les réglages.7. Cliquez sur «Quit» pour terminer la configuration de la carte micro SD. La caméra va maintenant enregistrer sur
la carte SD. Important: Lorsque la carte mémoire est pleine, les fichiers les plus anciens seront supprimés et les nouveaux fichiers seront ajoutés.
B. TELECHARGER ET REGARDER FICHIERS DE LA CARTE MICRO SD1. Connectez votre PC au même réseau que la caméra.2. Démarrez le logiciel PC.3. Connectez-vous à la caméra dans l’onglet «WAN» ou «LAN». En cas de WAN, il faut entrer le mot de passe.4. Cliquez-droit sur l’icône de la caméra et sélectionnez «SD File Download».5. Cliquez sur «Search». Dans la liste, vous verrez les fichiers disponibles.6. Un fichier est en cours d’utilisation, celui qui est en cours d’enregistrement. Vous ne pouvez télécharger que les
fichiers qui sont finis. Double-cliquez sur le fichier que vous voulez télécharger (l’heure/date). Il sera téléchargé sur votre PC.
7. Cliquez sur «Open Download Directory».8. Vous allez maintenant voir les fichiers qui ont été téléchargés sur votre PC. Double-cliquez sur le fichier : le
logiciel de lecture et la vidéo démarrent.9. Le logiciel de lecture peut afficher plusieurs enregistrements. Cliquez sur l’image de votre vidéo, et utilisez les
touches pour la lecture, pause, etc.
EN UTILISANT LE LOGICIEL MAC
CONFIGURATION1. Connectez votre ordinateur Mac au même réseau que la caméra.2. Démarrez le logiciel Mac.3. Allez à l’onglet «LAN».4. Pressez CTRL et cliquez en même temps sur le preview de la caméra et sélectionnez « SD Card Configuration».
5. Formatez la carte micro SD et attendez une minute jusqu’à ce que le formatage est terminé.6. Sélectionnez les paramètres de la carte micro SD, par exemple ceux indiqués dans l’image ci-dessus et cliquez
sur «Apply» pour confirmer les réglages.
EN UTILISANT L’APPLICATION APPLE
A. CONFIGURATION1. Démarrez l’application.2. Connectez-vous à la caméra dans l’onglet «WAN» ou «LAN». En cas de WAN, il faut entrer le mot de passe.3. Cliquez sur l’icône à côté de l’icône de la caméra et sélectionnez « Micro SD Card settings ».
4. Sélectionnez les paramètres de la carte micro SD, par exemple ceux indiqués dans l’image ci-dessus et cliquez sur «Done» pour confirmer les réglages. La caméra va maintenant enregistrer sur la carte SD.
Important: Lorsque la carte mémoire est pleine, les fichiers les plus anciens seront supprimés et les nouveaux fichiers seront ajoutés.
B. TELECHARGER ET REGARDER FICHIERS DE LA CARTE MICRO SD1. Démarrez l’application.2. Allez vers l’onglet «LAN».3. Cliquez sur «Micro SD Card Query».4. Sélectionnez le fichier que vous voulez télécharger / regarder.
EN UTILISANT L’APPLICATION ANDROID
A. CONFIGURATION1. Démarrez l’application.2. Connectez-vous à la caméra dans l’onglet «WAN» ou «LAN». En cas de WAN, il faut entrer le mot de passe.3. Cliquez sur la flèche à côté de l’icône de la caméra et sélectionnez «SD-Card settings».4. Formatez la carte SD.
5. Sélectionnez les paramètres de la carte micro SD, par exemple ceux indiqués dans l’image ci-dessus et cliquez sur «OK» pour confirmer les réglages. La caméra va maintenant enregistrer sur la carte SD.
Important: Lorsque la carte mémoire est pleine, les fichiers les plus anciens seront supprimés et les nouveaux fichiers seront ajoutés.
B. TELECHARGER ET REGARDER FICHIERS DE LA CARTE MICRO SD1. Démarrez l’application.2. Connectez-vous à la caméra dans l’onglet «WAN» ou «LAN». En cas de WAN, il faut entrer le mot de passe.3. Cliquez sur la flèche à côté de l’icône de la caméra et sélectionnez «SD-Card Query».4. Sélectionnez le fichier que vous voulez télécharger / regarder.
SUPPORT DE CLIENTS
Pour toutes questions et infos supplémentaires concernant ce produit, veuillez-bien contacter: [email protected].
GARANTIE
Copyright © mr Safe®. Mr Safe® est une marque déposée de TE-Group NV. La marque de mr Safe® est synonyme de produits de qualité supérieure et d’un service après-vente excellent. C’est la raison pour laquelle mr Safe® garantit ce produit contre tout défaut de matériel ou de fabrication pour une période de deux (2) ans à compter de la date d’achat initiale.
FR SCHNELLINSTALLATION
LAN: Local Area Network: Ihr Heimnetzwerk, zu dem Ihr Modem und sämtliche Geräte im Haus gehören, die mit dem Netzwerk über Kabel oder Wifi verbunden sind.WAN: Wide Area Network: Das Internet, wenn Sie über eine Internetverbindung zu Hause oder anderswo verfügen.
HARDWAREINSTALLATION
1. Nehmen Sie die mr Safe IP-Kamera aus dem Karton und befestigen Sie die Wifi-Antenne.2. Stecken Sie ein Ende des mitgelieferten Netzteils in den DC5V-Port hinten an der Kamera und das andere
Ende in die Steckdose.3. Verbinden Sie ein Ende des mitgelieferten Netzwerkkabels mit der Kamera und das andere Ende mit
Ihrem Internet-Router/Modem.
WIFI-VERBINDUNG DER KAMERA EINSTELLEN
MIT DER PC-SOFTWARE
1. Laden Sie die Software von der Seite www.mrsafe.eu herunter, um sie auf dem PC zu installieren. Starten Sie die PC-Software.
Wichtig! Stellen Sie sicher, dass der PC mit dem gleichen Netzwerk wie die IP-Kamera verbunden ist.2. Klicken Sie auf die Registerkarte ‚LAN‘. Sie sehen dort ein Kamerasymbol und den Namen der Kamera.
3. Rechtsklicken Sie auf das Kamerasymbol und wählen Sie ‚Set wifi connection‘.4. Wählen Sie ‚Start Wifi setting‘ und klicken Sie auf ‚Scan‘, um nach verfügbaren Netzwerken zu suchen.5. Wählen Sie Ihr Wifi-Netzwerk und tragen Sie das Passwort für Ihr Wifi ein.6. Nach der Bestätigung startet die IP-Kamera neu (das dauert etwa 2 Minuten) und Sie können das Netzwerkkabel
abziehen.Nun können Sie die IP-Kamera innerhalb der Reichweite Ihres Wifi-Modems an einem beliebigen Ort aufstellen.
MIT DER MAC-SOFTWARE
1. Laden Sie die Software von der Seite www.mrsafe.eu herunter, um sie auf dem Mac Computer zu installieren. Starten Sie die Mac-Software.
Wichtig! Stellen Sie sicher, dass der PC mit dem gleichen Netzwerk wie die IP-Kamera verbunden ist.2. Klicken Sie auf die Registerkarte ‚LAN‘. Sie sehen dort ein Kamera-Preview und den Namen der Kamera.
3. Drücken Sie STRG, und klicken Sie gleichzeitig auf den Kamera-Preview und wählen Sie ‚ Configuring network ‘.4. Klicken Sie auf die Registerkarte ‚LAN‘ und klicken Sie auf ‚Scan‘, um nach verfügbaren Netzwerken zu suchen.5. Wählen Sie Ihr Wifi-Netzwerk und tragen Sie das Passwort für Ihr Wifi ein.6. Nach der Bestätigung startet die IP-Kamera neu (das dauert etwa 2 Minuten) und Sie können das Netzwerkkabel
abziehen.Nun können Sie die IP-Kamera innerhalb der Reichweite Ihres Wifi-Modems an einem beliebigen Ort aufstellen.
MIT DER APPLE-APP
1. Öffnen Sie iTunes und installieren Sie die mr Safe IP Camera-Software.2. Starten Sie die App nach der Installation.3. Verbinden Sie Ihr Apple-Gerät über Wifi mit dem gleichen Netzwerk wie die Kamera.4. In der App wählen Sie ‚LAN‘ (unten). Jetzt sehen Sie die Kamera. Klicken Sie auf das -Symbol neben der Kamera und
wählen Sie ‚Wireless Settings‘.
5. Klicken Sie auf ‚SSID‘, um die verfügbaren Netzwerke anzuzeigen. Wählen Sie Ihr Netzwerk und tragen Sie Ihr Passwort ein.
6. Nach der Bestätigung startet die IP-Kamera neu (das dauert etwa 2 Minuten) und Sie können das Netzwerkkabel abziehen. Nun können Sie die IP-Kamera innerhalb der Reichweite Ihres Wifi-Modems an einem beliebigen Ort aufstellen.
MIT DER ANDROID -APP
1. Laden Sie die Software von der Seite www.mrsafe.eu auf Ihr Android-Gerät herunter.2. Installieren Sie die App und starten Sie sie nach der Installation.3. Verbinden Sie Ihr Android-Gerät über Wifi mit dem gleichen Netzwerk wie die Kamera.4. In der App wählen Sie ‚LAN‘ (unten). Jetzt sehen Sie die Kamera. Klicken Sie auf den Pfeil neben der Kamera und wählen
Sie ‚Wi-Fi‘.
5. Klicken Sie auf ‚Search‘, um die verfügbaren Netzwerke anzuzeigen. Wählen Sie Ihr Netzwerk und tragen Sie Ihr Passwort ein.
6. Nach der Bestätigung startet die IP-Kamera neu (das dauert etwa 2 Minuten) und Sie können das Netzwerkkabel abziehen. Nun können Sie die IP-Kamera innerhalb der Reichweite Ihres Wifi-Modems an einem beliebigen Ort aufstellen.
DIE IP-KAMERA
1. Zur Verwendung in Ihrem lokalen Netzwerk (LAN) müssen Sie sich nicht einloggen.2. Zur Nutzung über das Internet (WAN) werden Sie gebeten, sich anzumelden. Die Login-Angaben finden Sie auf der
Unterseite der IP-Kamera.→ Windows/Mac Computer: Software müssen Sie in der Registerkarte ‚WAN‘ den Benutzernamen (CAM ID) und das Passwort (Login-Passwort), wie auf der Unterseite der Kamera angegeben, eintragen. → Mobilgerät wie ein Smartphone (Apple oder Android): An der Unterseite des Geräts ist ein QR-Code abgebildet.Sie müssen lediglich den Code mit der App scannen, um alle Login-Informationen einzustellen. In der App öffnen Sie ‚WAN‘ (ganz unten) und klicken auf ‚Scan QR Code‘ (Android) oder das QR-Code-Symbol (Apple). Die Login-Angaben werden nach dem Scannen automatisch eingetragen. Klicken Sie auf ‚Login‘, um sich anzumelden.
3. Nun können Sie sich die Kamerabilder über das Internet (WAN) oder zu Hause über Ihr eigenes Netzwerk (LAN) mit Ihrem Smartphone, Tablet oder PC ansehen.
Bemerkungen:• PC-Software: Die Farbe des Kamerasymbols neben dem Namen der Kamera (CAM ID) ändert sich je nach Kamerastatus:
o Grau: Die Kamera ist nicht verfügbar (offline)o Blau: Die Kamera ist verfügbar (online)o Rot: Die Kamera ist aktiviert und wird gesichtet
• Wir empfehlen Ihnen, das Passwort Ihrer IP-Kamera zu ändern.• PC-Software: Schließen Sie die Kamera an und klicken Sie auf das Vorhängeschloss oben, um das Passwort zu ändern.• Apple / Android-App: Nach dem Einloggen in die IP-Kamera über das Internet klicken Sie auf das Symbol neben der
Kamera und wählen Sie ‚Set access password‘. Sie können jetzt das neue Passwort eintragen. Vergessen Sie Ihr neues Passwort nicht! Bei der nächsten Anmeldung müssen Sie das neue Passwort (einmal) selbst
eintragen. Dann können Sie die Software anweisen, das Passwort für Sie zu speichern.• Die mrSafe-IP-Kamera kann auf die Werkseinstellungen zurückgesetzt werden, indem die Rückstelltaste an der
Unterseite des Geräts 10 Sekunden lang gedrückt wird. Danach warten Sie fünf Minuten.
DIE MICRO-SD-KARTE DIE MICRO-SD-KARTE EINLEGEN Wichtig: Die SD-Karte sollte eine SD-Karte der Klasse 10 mit einer Höchstkapazität von 32 GB sein!
1. Schalten Sie die IP-Kamera aus.2. Stecken Sie die Micro-SD-Karte ein.3. Schalten Sie die IP-Kamera ein (ON).
KAMERA ZUR VERWENDUNG MIT MICRO-SD-KARTE KONFIGURIEREN
MIT DER PC-SOFTWARE
A. KONFIGURIERUNG1. Verbinden Sie Ihren PC mit dem gleichen Netzwerk wie die Kamera.2. Starten Sie die mr Safe PC-Software.3. Klicken Sie auf die Registerkarte ‚LAN‘.4. Rechtsklicken Sie auf das Kamerasymbol und wählen Sie ‚SD Card Configuration‘.
5. Formatieren Sie die Micro-SD-Karte und warten Sie etwa eine Minute lang, bis dieser Vorgang abgeschlossen ist.
6. Wählen Sie die Einstellungen für die Micro-SD-Karte, z. B. so wie im Beispiel oben, und klicken Sie auf ‚Apply‘ (Übernehmen), um die Einstellungen zu bestätigen.
7. Klicken Sie auf ‚Quit‘, um die Konfigurierung der Micro-SD-Karte abzuschließen. Die Kamera zeichnet nun auf der SD-Karte auf.
Wichtig: Wenn der Speicher der Karte voll ist, werden die ältesten Dateien gelöscht, um die neuesten hinzuzufügen.
B. DATEIEN VON DER MICRO-SD-KARTE HERUNTERLADEN UND ANSEHEN1. Verbinden Sie Ihren PC mit dem gleichen Netzwerk wie die Kamera.2. Starten Sie die mr Safe PC-Software.3. Verbinden Sie mit der Kamera über die Registerkarte ‚WAN‘ oder ‚LAN‘. Wählen Sie ‚WAN‘, müssen Sie das
Passwort angeben.4. Rechtsklicken Sie auf das Kamerasymbol und wählen Sie ‚SD File Download‘.5. Klicken Sie auf ‚Search‘. In der Liste finden Sie die verfügbaren Dateien.6. Eine Datei wird verwendet, nämlich die, die zurzeit aufgezeichnet wird. Sie können nur die abgeschlossenen
Dateien herunterladen. Doppelklicken Sie auf die Datei, die Sie herunterladen möchten, basierend auf der Zeit/dem Datum. Sie wird auf
Ihren PC geladen.7. Klicken Sie auf ‚Open Download Directory‘.8. Hier sehen Sie die Dateien, die auf Ihren PC geladen wurden. Ein Doppelklick auf die Datei startet die PLAY-
Software und das Video.9. Die PLAY-Software kann mehrere Aufzeichnungen anzeigen. Klicken Sie auf das Bild Ihres Videos und verwenden
Sie die Schaltflächen für Play, Pause usw.
MIT DER MAC-SOFTWARE
KONFIGURIERUNG1. Verbinden Sie Ihren Mac Computer mit dem gleichen Netzwerk wie die Kamera.2. Starten Sie die mr Safe Mac-Software.3. Klicken Sie auf die Registerkarte ‚LAN‘.4. Drücken Sie STRG, und klicken Sie gleichzeitig auf den Kamera-Preview und wählen Sie ‚SD Card Configuration‘.
5. Formatieren Sie die Micro-SD-Karte und warten Sie etwa eine Minute lang, bis dieser Vorgang abgeschlossen ist.6. Wählen Sie die Einstellungen für die Micro-SD-Karte, z. B. so wie im Beispiel oben, und klicken Sie auf ‚Apply‘
(Übernehmen), um die Einstellungen zu bestätigen.
MIT DER APPLE-APP
A. KONFIGURIERUNG1. Starten Sie die App.2. Verbinden Sie mit der Kamera über die Registerkarte ‚WAN‘ oder ‚LAN‘. Wählen Sie ‚WAN‘, müssen Sie das
Passwort angeben.3. Klicken Sie auf das -Symbol neben dem Kameranamen und wählen Sie ‚Micro SD Card settings‘.
4. Wählen Sie die Einstellungen für die Micro-SD-Karte, z. B. so wie im Beispiel oben, und klicken Sie auf ‚Done‘ (Fertig), um die Einstellungen zu bestätigen. Die Kamera zeichnet nun auf der SD-Karte auf.
Wichtig: Wenn der Speicher der Karte voll ist, werden die ältesten Dateien gelöscht, um die neuesten hinzuzufügen.
B. DATEIEN VON DER MICRO-SD-KARTE HERUNTERLADEN UND ANSEHEN1. Starten Sie die App.2. Klicken Sie auf ‚LAN‘.3. Klicken Sie auf ‚Micro SD Card Query‘.4. Wählen Sie die Datei aus, die Sie herunterladen/ansehen möchten.
MIT DER ANDROID-APP
A. KONFIGURIERUNG1. Starten Sie die App.2. Verbinden Sie mit der Kamera über die Registerkarte ‚WAN‘ oder ‚LAN‘. Wählen Sie ‚WAN‘, müssen Sie das
Passwort angeben.3. Klicken Sie auf den Pfeil neben dem Kameranamen und wählen Sie ‚SD-Card settings‘.4. Formatieren Sie die SD-Karte.
5. Wählen Sie die Einstellungen für die Micro-SD-Karte, z. B. so wie im Beispiel oben, und klicken Sie auf ‚OK‘, um die Einstellungen zu bestätigen. Die Kamera zeichnet nun auf der SD-Karte auf.
Wichtig: Wenn der Speicher der Karte voll ist, werden die ältesten Dateien gelöscht, um die neuesten hinzuzufügen.
B. DATEIEN VON DER MICRO-SD-KARTE HERUNTERLADEN UND ANSEHEN1. Starten Sie die App.2. Verbinden Sie mit der Kamera über die Registerkarte ‚WAN‘ oder ‚LAN‘. Wählen Sie ‚WAN‘, müssen Sie das
Passwort angeben.3. Klicken Sie auf den Pfeil neben dem Kameranamen und wählen Sie ‚SD-Card Query‘.4. Wählen Sie die Datei aus, die Sie herunterladen/ansehen möchten.
KUNDENSERVICE
Alle Fragen und Anfragen nach zusätzlichen Informationen im Zusammenhang mit diesem Produkt richten Sie bitte an: [email protected].
GARANTIE
Copyright © mrSafe®. mrSafe® ist ein eingetragenes Warenzeichen der TE-Group NV. Die Marke mr Safe® steht für überlegene Qualitätsprodukte und exzellenten Kundenservice. Daher garantiert mr Safe® für einen Zeitraum von zwei (2) Jahren ab dem ursprünglichen Kaufdatum des Produkts, dass dieses Produkt frei von Material- und Herstellungsfehlern ist.
D