
WINTER FUN FOR EVERYONE! - Magic Igloo Makermagicigloomaker.com/mim_instructions_web.pdf · GIC...
7
WINTER FUN FOR EVERYONE! INSTRUCTIONAL BOOKLET
Transcript of WINTER FUN FOR EVERYONE! - Magic Igloo Makermagicigloomaker.com/mim_instructions_web.pdf · GIC...
WINTER FUN FOR EVERYONE!
INSTRUCTIONAL
BOOKLET
Congratulations! Now that you have a Magic Igloo MakerTM you can have a great time building a real full-sized igloo with your family and friends!
HOW LONG DOES IT TAKE?With 4 people and 2 Magic Igloo Makers, it takes about 4 hours. With more people, your igloo goes up much faster.
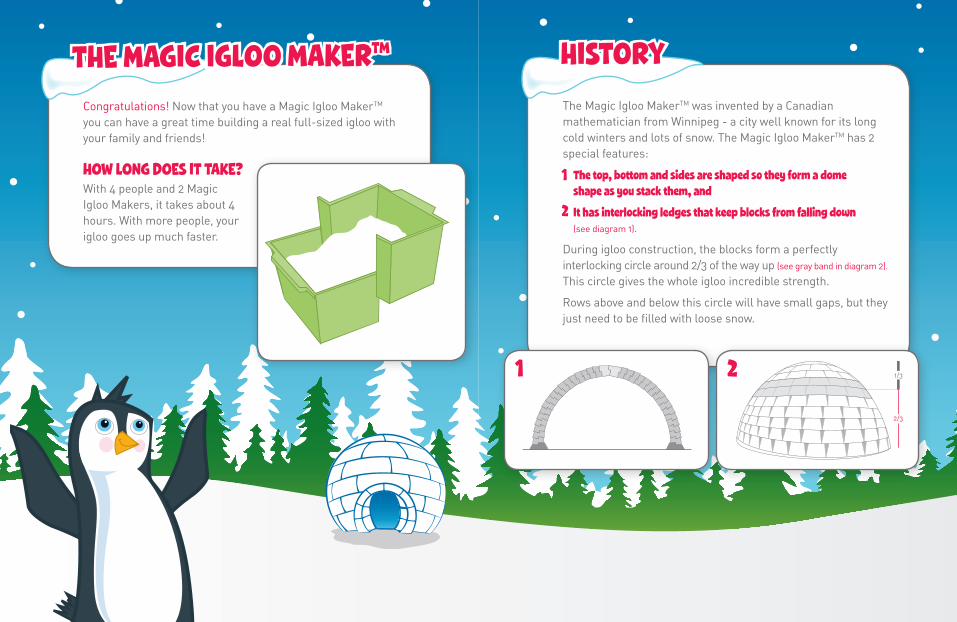
THE mAGIC IGLOO mAKERTm HISTORYThe Magic Igloo MakerTM was invented by a Canadian mathematician from Winnipeg - a city well known for its long cold winters and lots of snow. The Magic Igloo MakerTM has 2 special features:
The top, bottom and sides are shaped so they form a dome shape as you stack them, and
It has interlocking ledges that keep blocks from falling down (see diagram 1).
During igloo construction, the blocks form a perfectly interlocking circle around 2/3 of the way up (see gray band in diagram 2). This circle gives the whole igloo incredible strength.
Rows above and below this circle will have small gaps, but they just need to be filled with loose snow.
1
2
1/3
2/3
1 2
If anyone is inside an igloo:
• Do not climb on top of the igloo,• Do not kick, hit or damage the igloo, and• Do not close or bury the doorway.
If you plan to sleep overnight in your igloo, make sure you are prepared for the cold temperatures and that your igloo is NOT completely airtight so that there is adequate ventilation.
Failure to follow these guidelines may lead to serious injury.
SAFETY
READY TO mAKE YOUR IGLOO?You can make an igloo with only 2 people, but it’s easier and more fun with lots of people.
With 3 people, one person acts as the Builder and 2 as Packers. The Builder stands in the center of the igloo and places the blocks. The Packers:
get the snow ready,
load and pack snow into the Magic Igloo Makers ,
flatten the top and ledge, and
pass the snow-packed moulds to the Builder.
With additional people, you decide how to divide up these tasks, however there should always be only one Builder at a time.
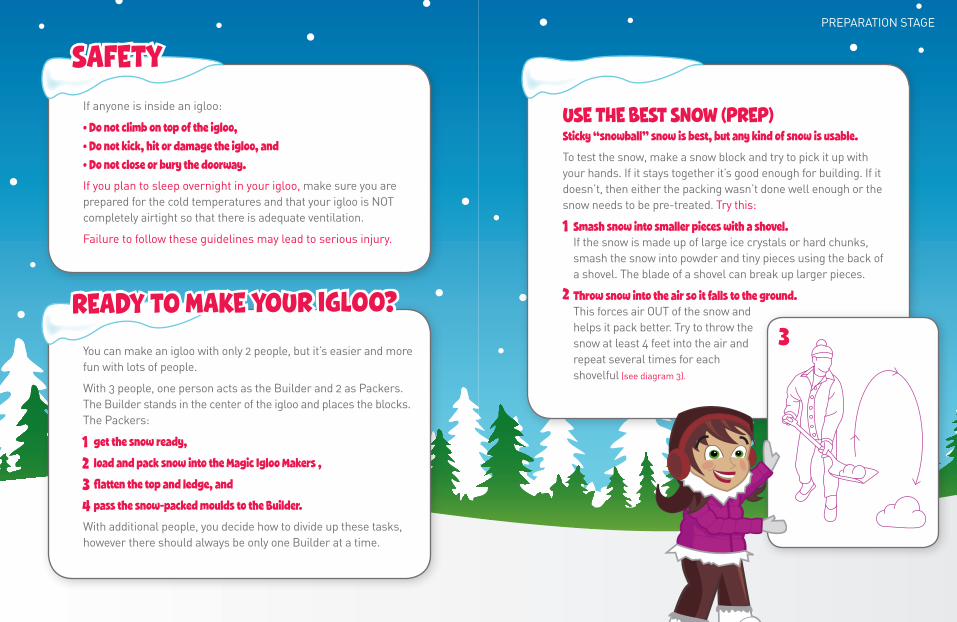
USE THE BEST SNOW (PREP)Sticky “snowball” snow is best, but any kind of snow is usable.
To test the snow, make a snow block and try to pick it up with your hands. If it stays together it’s good enough for building. If it doesn’t, then either the packing wasn’t done well enough or the snow needs to be pre-treated. Try this:
Smash snow into smaller pieces with a shovel. If the snow is made up of large ice crystals or hard chunks, smash the snow into powder and tiny pieces using the back of a shovel. The blade of a shovel can break up larger pieces.
Throw snow into the air so it falls to the ground. This forces air OUT of the snow and helps it pack better. Try to throw the snow at least 4 feet into the air and repeat several times for each shovelful (see diagram 3).
1234
1
2
PREPARATION STAGE
HOW TO PACK SNOW (PREP)With good, sticky snow, a light packing with your hand or foot is usually good enough; but if the snow is too cold or too dry, it may not stick together very well.
When this happens, pack smaller amounts by hand. Take each clump of snow and pack it down for a few seconds. You’ll feel it shift slightly this means the snow has bonded. Continue packing small amounts this way until the block is full.
Another way to improve block strength is to let all blocks ‘set’ for 2 to 5 minutes before using them. A tarp is ideal for storing them as the blocks are waiting.
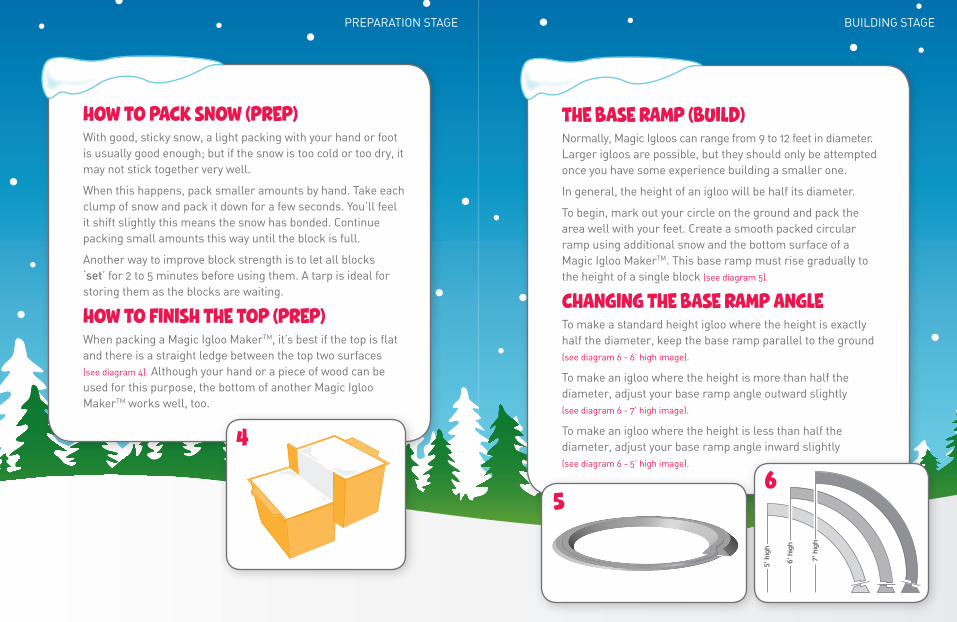
HOW TO FINISH THE TOP (PREP)When packing a Magic Igloo MakerTM, it’s best if the top is flat and there is a straight ledge between the top two surfaces (see diagram 4). Although your hand or a piece of wood can be used for this purpose, the bottom of another Magic Igloo MakerTM works well, too.
THE BASE RAmP (BUILD)Normally, Magic Igloos can range from 9 to 12 feet in diameter. Larger igloos are possible, but they should only be attempted once you have some experience building a smaller one.
In general, the height of an igloo will be half its diameter.
To begin, mark out your circle on the ground and pack the area well with your feet. Create a smooth packed circular ramp using additional snow and the bottom surface of a Magic Igloo MakerTM. This base ramp must rise gradually to the height of a single block (see diagram 5).
CHANGING THE BASE RAmP ANGLETo make a standard height igloo where the height is exactly half the diameter, keep the base ramp parallel to the ground (see diagram 6 - 6’ high image).
To make an igloo where the height is more than half the diameter, adjust your base ramp angle outward slightly (see diagram 6 - 7’ high image).
To make an igloo where the height is less than half the diameter, adjust your base ramp angle inward slightly (see diagram 6 - 5’ high image).
4
56
BUILDING STAGEPREPARATION STAGE
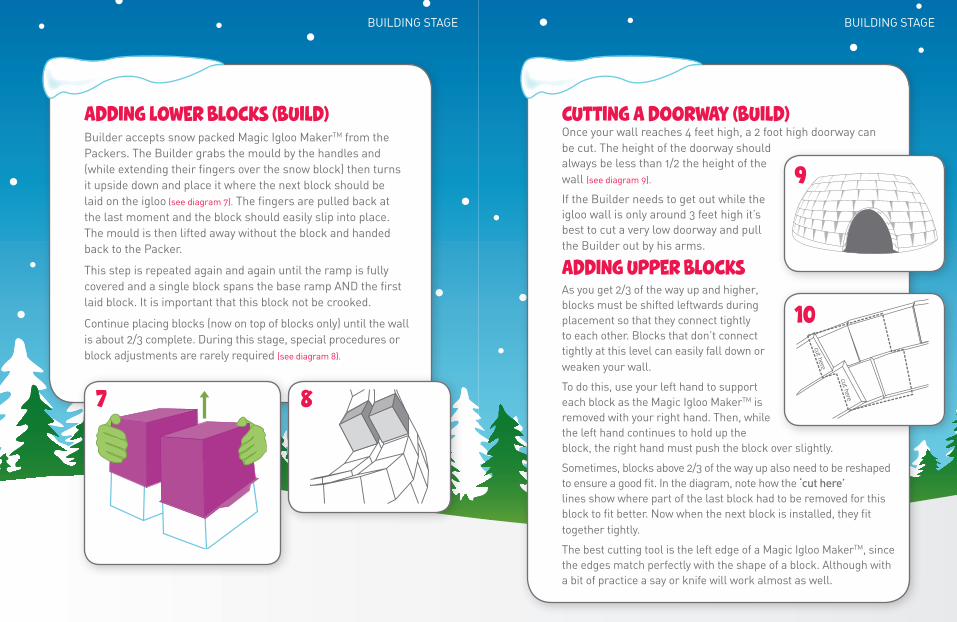
ADDING LOWER BLOCKS (BUILD)Builder accepts snow packed Magic Igloo MakerTM from the Packers. The Builder grabs the mould by the handles and (while extending their fingers over the snow block) then turns it upside down and place it where the next block should be laid on the igloo (see diagram 7). The fingers are pulled back at the last moment and the block should easily slip into place. The mould is then lifted away without the block and handed back to the Packer.
This step is repeated again and again until the ramp is fully covered and a single block spans the base ramp AND the first laid block. It is important that this block not be crooked.
Continue placing blocks (now on top of blocks only) until the wall is about 2/3 complete. During this stage, special procedures or block adjustments are rarely required (see diagram 8).
CUTTING A DOORWAY (BUILD)Once your wall reaches 4 feet high, a 2 foot high doorway can be cut. The height of the doorway should always be less than 1/2 the height of the wall (see diagram 9).
If the Builder needs to get out while the igloo wall is only around 3 feet high it’s best to cut a very low doorway and pull the Builder out by his arms.
ADDING UPPER BLOCKS As you get 2/3 of the way up and higher, blocks must be shifted leftwards during placement so that they connect tightly to each other. Blocks that don’t connect tightly at this level can easily fall down or weaken your wall.
To do this, use your left hand to support each block as the Magic Igloo MakerTM is removed with your right hand. Then, while the left hand continues to hold up the block, the right hand must push the block over slightly.
Sometimes, blocks above 2/3 of the way up also need to be reshaped to ensure a good fit. In the diagram, note how the ‘cut here’lines show where part of the last block had to be removed for this block to fit better. Now when the next block is installed, they fit together tightly.
The best cutting tool is the left edge of a Magic Igloo MakerTM, since the edges match perfectly with the shape of a block. Although with a bit of practice a say or knife will work almost as well.
7 8
BUILDING STAGEBUILDING STAGE
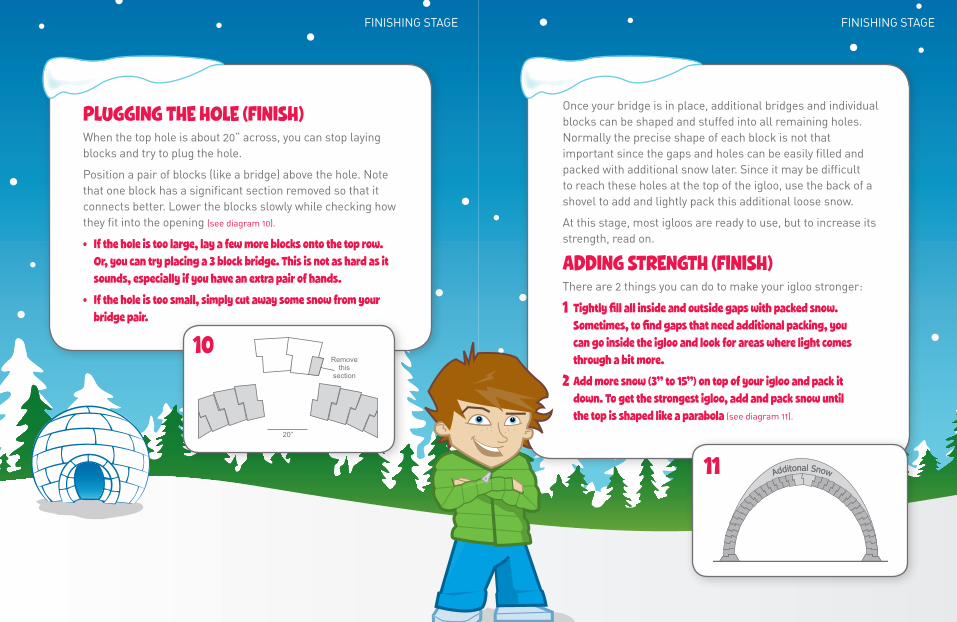
PLUGGING THE HOLE (FINISH)When the top hole is about 20” across, you can stop laying blocks and try to plug the hole.
Position a pair of blocks (like a bridge) above the hole. Note that one block has a significant section removed so that it connects better. Lower the blocks slowly while checking how they fit into the opening (see diagram 10).
• If the hole is too large, lay a few more blocks onto the top row. Or, you can try placing a 3 block bridge. This is not as hard as it sounds, especially if you have an extra pair of hands.
• If the hole is too small, simply cut away some snow from your bridge pair.
Once your bridge is in place, additional bridges and individual blocks can be shaped and stuffed into all remaining holes. Normally the precise shape of each block is not that important since the gaps and holes can be easily filled and packed with additional snow later. Since it may be difficult to reach these holes at the top of the igloo, use the back of a shovel to add and lightly pack this additional loose snow.
At this stage, most igloos are ready to use, but to increase its strength, read on.
ADDING STRENGTH (FINISH)There are 2 things you can do to make your igloo stronger:
Tightly fill all inside and outside gaps with packed snow. Sometimes, to find gaps that need additional packing, you can go inside the igloo and look for areas where light comes through a bit more.
Add more snow (3” to 15”) on top of your igloo and pack it down. To get the strongest igloo, add and pack snow until the top is shaped like a parabola (see diagram 11).
11
1
2
FINISHING STAGEFINISHING STAGE
The Magic Igloo MakerTM is excellent for winter camping because it: builds an igloo with modest effort and time, takes a lot less energy than building a quinsy, can be used as a table, chair, or to hold melt-water, is light-weight and easy to carry, and costs a lot less than other igloo making tools.
WINTER CAmPING USE
SPECIFICATIONS
For in-depth descriptions of how to build an igloo, including special snowtreatment options, photos and much more, visit us at www.magicigloomaker.com [email protected]
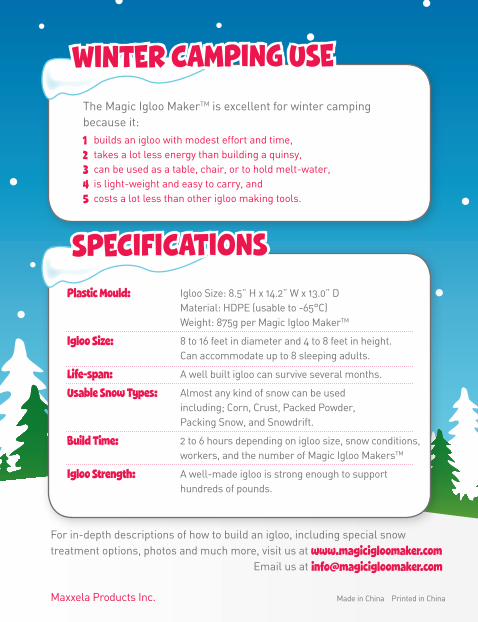
Plastic Mould: Igloo Size: 8.5” H x 14.2” W x 13.0” D Material: HDPE (usable to -65°C) Weight: 875g per Magic Igloo MakerTM
Igloo Size: 8 to 16 feet in diameter and 4 to 8 feet in height. Can accommodate up to 8 sleeping adults.
Life-span: A well built igloo can survive several months.
Usable Snow Types: Almost any kind of snow can be used including; Corn, Crust, Packed Powder, Packing Snow, and Snowdrift.
Build Time: 2 to 6 hours depending on igloo size, snow conditions, workers, and the number of Magic Igloo MakersTM
Igloo Strength: A well-made igloo is strong enough to support hundreds of pounds.
Maxxela Products Inc.
1
Made in China Printed in China
2345
Email us at