WineEasy - Blichmann · PDF file · 2017-07-18other components, will need to be...
13
WineEasy tm Combined Fermentor and Press Operation, Assembly & Maintenance Manual This new product takes a fresh look at how wine on-the-skins are fermented and pressed. Traditional techniques of transferring the wine to a mechanical/bladder press after alcoholic fermentation is messy (particularly for the home wine maker) and rife with opportunities for microbial contamination. The combined features of pressing in the same vessel in which you ferment eliminates this step altogether. And the use of a vacuum pump and a false bottom on the tank allows the pomace to be gently pressed with atmospheric pressure and pumped into the secondary maturation vessel (carboy or conical etc.) via a closed hose. This significantly reduces the mess and contamination potential. Lastly, the vacuum pump will allow the wine maker to vacuum degas their wine prior to bottling to remove excess CO 2 . **** PLEASE READ THOROUGHLY PRIOR TO USE FOR IMPORTANT SAFETY INFORMATION **** IMPORTANT !! Warning: Sections labeled “Warning” can lead to serious injury if not followed. Please read these thoroughly and understand them completely before use. If you do not understand them or have any questions, contact your retailer or Blichmann Engineering (www.BlichmannEngineering.com) before use. Caution: Sections labeled “Caution” can lead to equipment damage or unsatisfactory performance of the equipment. Please read these sections thoroughly. If you have any questions, contact your retailer or Blichmann Engineering (www.BlichmannEngineering.com) before use. Assembly & Installation: WineEasy System Introduction The WineEasy tm system is sold in three basic systems to allow you maximum versatility of the equipment without having to buy duplicate or unnecessary parts:
-
Upload
trinhhuong -
Category
Documents
-
view
217 -
download
3
Transcript of WineEasy - Blichmann · PDF file · 2017-07-18other components, will need to be...

WineEasytm Combined Fermentor and Press
Operation, Assembly & Maintenance Manual
This new product takes a fresh look at how wine on-the-skins are fermented and pressed. Traditional techniques of transferring the wine to a mechanical/bladder press after alcoholic fermentation is messy (particularly for the home wine maker) and rife with opportunities for microbial contamination. The combined features of pressing in the same vessel in which you ferment eliminates this step altogether. And the use of a vacuum pump and a false bottom on the tank allows the pomace to be gently pressed with atmospheric pressure and pumped into the secondary maturation vessel (carboy or conical etc.) via a closed hose. This significantly reduces the mess and contamination potential. Lastly, the vacuum pump will allow the wine maker to vacuum degas their wine prior to bottling to remove excess CO2. **** PLEASE READ THOROUGHLY PRIOR TO USE FOR IMPORTANT SAFETY INFORMATION ****
IMPORTANT !! Warning: Sections labeled “Warning” can lead to serious injury if not followed. Please read these
thoroughly and understand them completely before use. If you do not understand them or have any questions, contact your retailer or Blichmann Engineering (www.BlichmannEngineering.com) before use.
Caution: Sections labeled “Caution” can lead to equipment damage or unsatisfactory performance
of the equipment. Please read these sections thoroughly. If you have any questions, contact your retailer or Blichmann Engineering (www.BlichmannEngineering.com) before use.
Assembly & Installation: WineEasy System Introduction The WineEasytm system is sold in three basic systems to allow you maximum versatility of the equipment without having to buy duplicate or unnecessary parts:

2
Base fermenting tank - Select the size or sizes that meet your needs: either
one unit or multiple units of the same size. Or even a combination of different sizes to suit your needs. See our web page for a guide to select fermentor sizes that best fit the needs of your home winery. Each fermenting tank comes equipped with a fermenting tank with lid, ring stand, bottom valve assembly, false bottom, and pressure plate.
Piston assembly - You will need ONE piston assembly
(right) for each different size fermentor you have in your winery. If you have multiple fermentors of ONE size you only need ONE piston. Each piston assembly comes equipped with a piston plate, four guide plates, four guide bars, and a silicone wiper seal.
Vacuum press kit - You will only need ONE
vacuum press kit (right) for your winery no matter what quantity or size fermentors you have. The vacuum press kit can also be used to degas your wine. Each vacuum press kit includes a vacuum pump, vacuum hoses, fittings, drilled stopper, solid stopper, stainless racking tube, stainless vacuum tube and a check valve assembly.
Cut-away view for clarity
3
IMPORTANT - Check your shipment to ensure there are no missing parts!! Please contact your retailer if you believe you are missing anything. A complete list of parts is at the end of this manual.
Product Assembly: Sanitation: Caution: do NOT use any cleaner or sanitizer containing chlorine such as bleach on stainless steel.
Over time, this will pit and erode stainless steel. Never soak parts overnight of extended periods in sanitizer as this may lead to galvanic corrosion of the parts.
Any other non-chlorine sanitizer is acceptable to use. Sanitizers: A sulfite/citric acid solution is the traditional choice. Another option is StarSantm from Five Star Chemicals. This food grade no-rinse phosphoric acid based product is very popular in the food and brewing industry. It contains a surfactant which will penetrate crevices better than other sanitizers, and works outstanding in a spray application. Contact your home wine making store for availability. Cleaners: Caustic (soda ash) is the traditional cleaner for stainless in the home and commercial wine making industry, and may be used on any of the fittings and parts of the WineEasytm. A safer option to caustic is another product from Five Star Chemicals - PBW (powdered brewery wash). This product is an environmentally friendly alkaline cleaner with a surfactant to lift heavy soils. A hot water rinse is all that’s needed after cleaning.
Warning: Caustic is a hazardous chemical and will dissolve skin! It is particularly dangerous if it
enters the eye. Always use safety glasses and protective gloves when using caustic, and always follow the manufacturer’s recommendations when using their product!
Initial Cleaning: Prior to the first use, and after each subsequent use, scour the lid and tank with caustic (or PBW) and a Scotch-briteTM type green scouring pad or a sponge to remove any remaining manufacturing residues and oil. Do not use a steel wool scouring pad as the metal particles will rust on the surface of the parts. Rinse well and allow to dry thoroughly. Drying thoroughly allows a protective layer to naturally re-form on the surface of the stainless steel as the oxygen in the atmosphere naturally reacts with the chromium in the stainless to form CrO2 – a highly corrosion resistant compound. This reaction is what makes stainless steel stainless! Scrub the fittings with a nylon brush and caustic or hot PBW and rinse with hot water then into your sanitizer. If you are not going to immediately use the fermentor, dry the fittings and seals thoroughly, and store them in a new plastic zip-lock bag inside your fermentor.
Before each use: Remove nut to
disassemble
4
Fittings: After washing, soak all fittings, valves, o-rings and lid seal in a sanitizing solution. We recommend disassembling the valve completely for cleaning and sanitizing. Simply remove the nut from the top of the handle with a wrench and loosen the tri-clamp thumb screw and the valve will easily disassemble into individual parts. Assembly is the reverse. Do take care when removing the silicone seal so you don’t tear it.
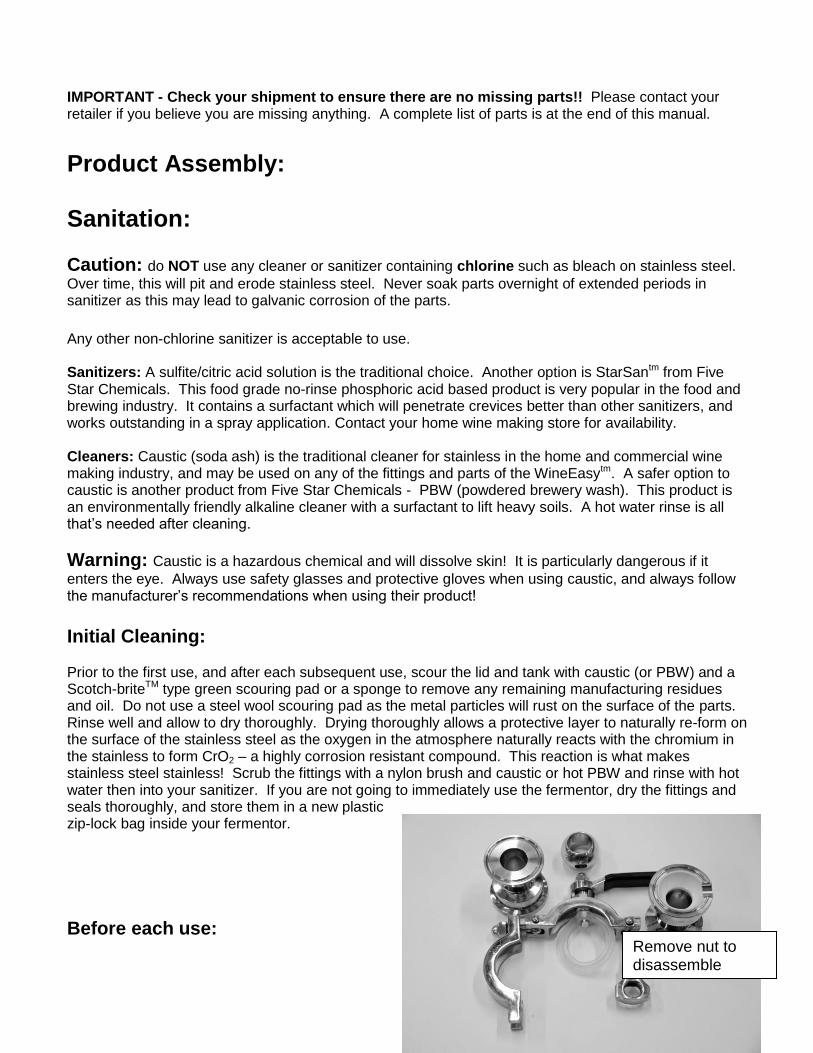
Assembling the WineEasytm fermentor: The ring stand below is pre-assembled. The fittings at the bottom of the fermenting tank, as well as the other components, will need to be assembled. IMPORTANT: We recommend that you assemble the product well in advance of first use to ensure you are familiar with the product and are not missing any parts.
IMPORTANT: Prior to assembling the fermentor it is important to ensure that the tank has not been bent from shipping. Use a tape measure to check for circularity – the difference in inside diameter all around the tank should be less than 1/8”. If it is slightly out of round, simple lay the fermentor on its side and push gently to reshape it. Otherwise contact your retailer.
The first step of assembly is placing the stand (ring) on a level floor. Placing a tarp under it is recommended if you do not have stain proof flooring.
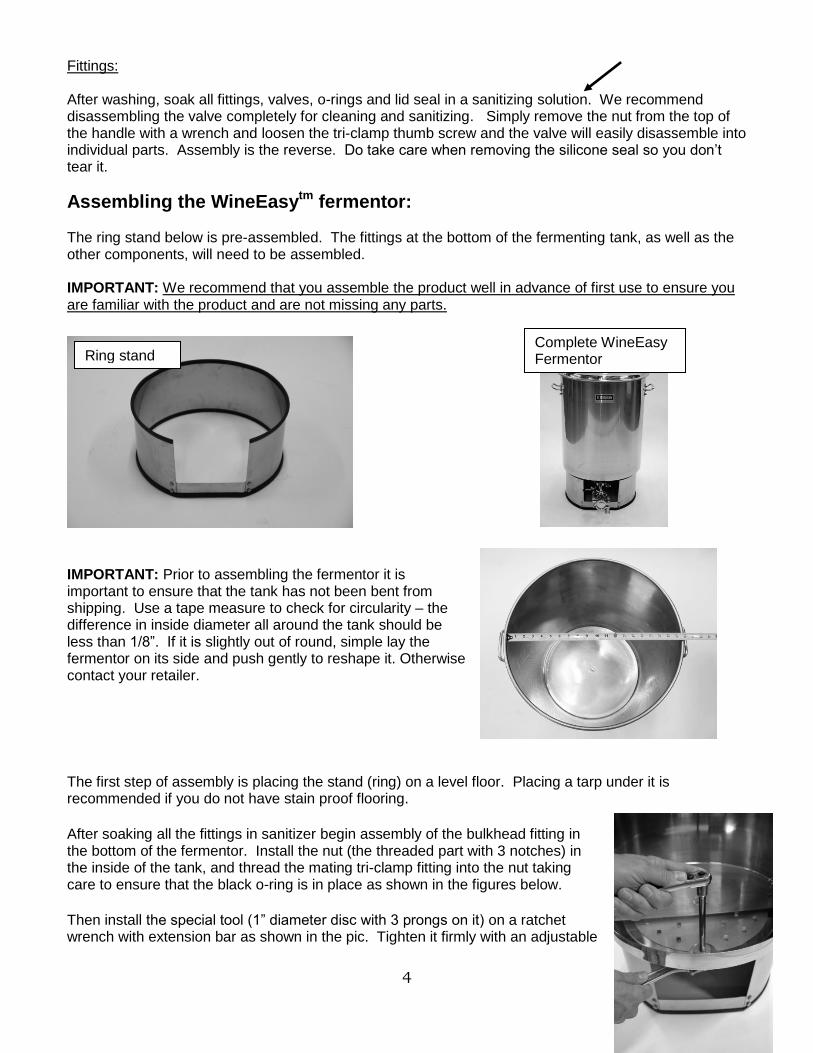
After soaking all the fittings in sanitizer begin assembly of the bulkhead fitting in the bottom of the fermentor. Install the nut (the threaded part with 3 notches) in the inside of the tank, and thread the mating tri-clamp fitting into the nut taking care to ensure that the black o-ring is in place as shown in the figures below.
Then install the special tool (1” diameter disc with 3 prongs on it) on a ratchet wrench with extension bar as shown in the pic. Tighten it firmly with an adjustable
Ring stand Complete WineEasy Fermentor

5
wrench on the outside. Do NOT use Teflon tape on these threads! Note that the wrenches are not supplied.
Next, assemble the bottom drain assembly as shown. Be sure to use a black gasket between each set of tri-clamp flanges. Important: Be sure that the valve handle rotates away from the elbow or you will not be able to operate the valve in use! Then, install the assembly on the bottom of the fermentor on the bulkhead fitting using a gasket. This is easier if you tilt the fermentor on the stand as shown.
Place the tank back on the stand and center the valve and tank on the stand. Then fill the tank about ¼ full with a sulfite/citric acid sanitizing solution. Using a pump and hose, or a sauce pan, flood the walls of the tank and the lid with sanitizer for a few minutes. If using StarSantm, simply spray the walls and lid and wait 2-3 min and spray the walls one last time. Place the pressure plate (disc with tabs) on the bottom of the tank making sure it is clear of the drain fitting and sits flat on the bottom.
Important: The tabs must face upward! Installing the tabs downward will block off most of the perforated screen causing the press to malfunction!
Install the screw-eye in the false bottom as shown. This is used as a handle to remove the false bottom after use, and then place it on the bottom of the fermentor. Use the large fender washer and wing nut to secure it to the bottom of the fermentor. Finger tight is plenty – do not over tighten.
If using StarSantm spray sanitizer, simply spray all surfaces of the pressure plate and false bottom before installing them in the tank.
Special tool
Bulkhead fitting
6
After assembly, flood the surfaces one last time with sanitizer, then place a pan under the drain valve and open it allowing the sanitizer to drain.
If you have used StarSantm we recommend that you rinse with a ½ gal pail of sulfite solution (a 2L flask works great too). Close the valves and you’re done!
At this point the fermentor can be filled with must (crushed fruit). If you do not have access to a crusher/Destemmer, you can place whole clusters in the tank and crush them with a device such as a punchdown tool or a commercial grade potato smasher.
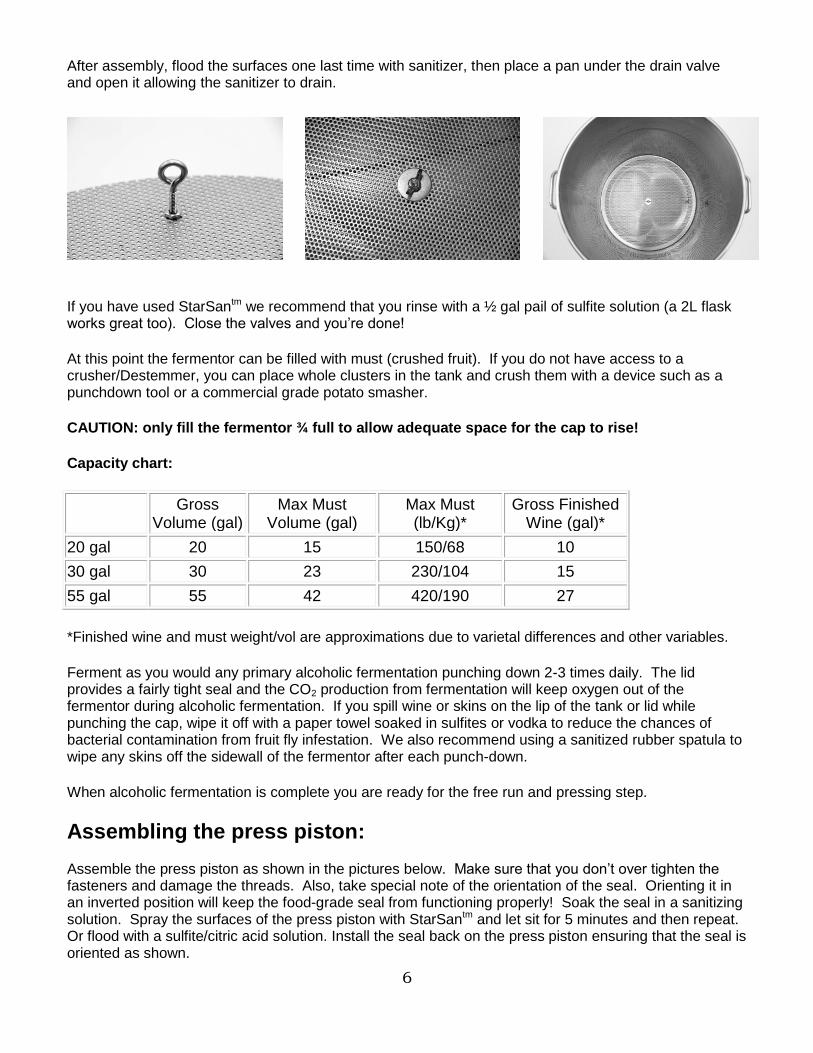
CAUTION: only fill the fermentor ¾ full to allow adequate space for the cap to rise!
Capacity chart:
Gross
Volume (gal) Max Must
Volume (gal) Max Must (lb/Kg)*
Gross Finished Wine (gal)*
20 gal 20 15 150/68 10
30 gal 30 23 230/104 15
55 gal 55 42 420/190 27
*Finished wine and must weight/vol are approximations due to varietal differences and other variables.
Ferment as you would any primary alcoholic fermentation punching down 2-3 times daily. The lid provides a fairly tight seal and the CO2 production from fermentation will keep oxygen out of the fermentor during alcoholic fermentation. If you spill wine or skins on the lip of the tank or lid while punching the cap, wipe it off with a paper towel soaked in sulfites or vodka to reduce the chances of bacterial contamination from fruit fly infestation. We also recommend using a sanitized rubber spatula to wipe any skins off the sidewall of the fermentor after each punch-down.
When alcoholic fermentation is complete you are ready for the free run and pressing step.
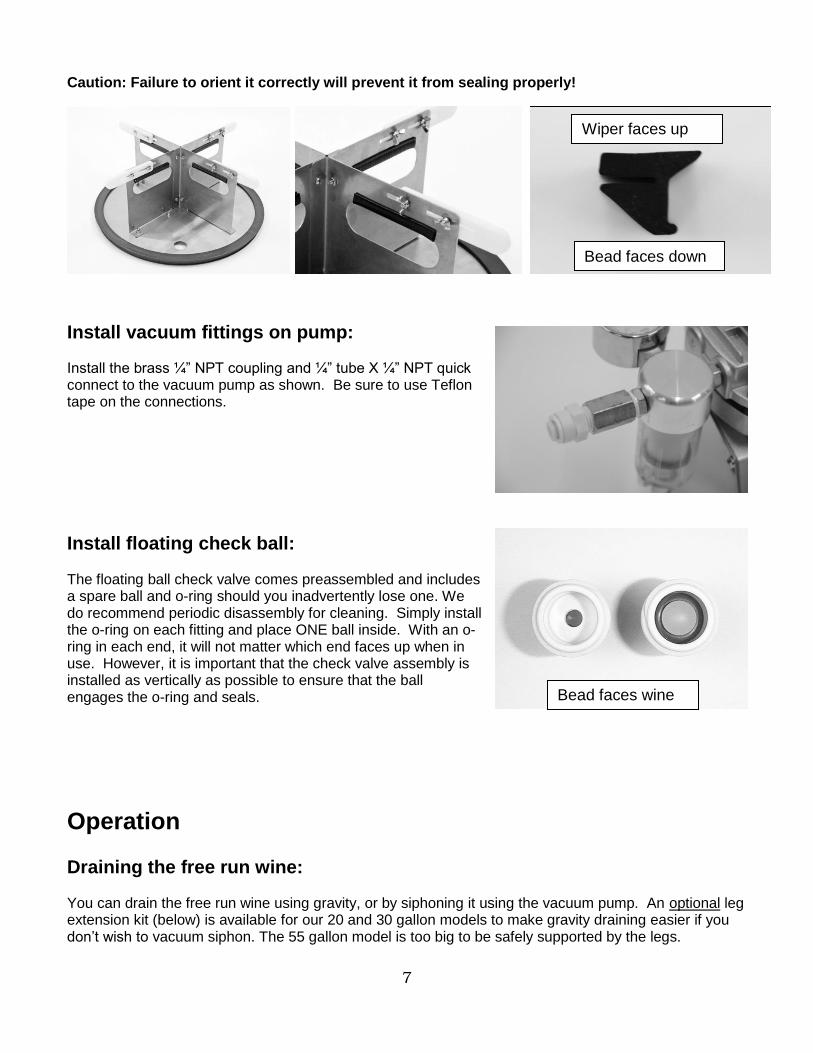
Assembling the press piston: Assemble the press piston as shown in the pictures below. Make sure that you don’t over tighten the fasteners and damage the threads. Also, take special note of the orientation of the seal. Orienting it in an inverted position will keep the food-grade seal from functioning properly! Soak the seal in a sanitizing solution. Spray the surfaces of the press piston with StarSantm and let sit for 5 minutes and then repeat. Or flood with a sulfite/citric acid solution. Install the seal back on the press piston ensuring that the seal is oriented as shown.
7
Caution: Failure to orient it correctly will prevent it from sealing properly!
Install vacuum fittings on pump: Install the brass ¼” NPT coupling and ¼” tube X ¼” NPT quick connect to the vacuum pump as shown. Be sure to use Teflon tape on the connections.
Install floating check ball: The floating ball check valve comes preassembled and includes a spare ball and o-ring should you inadvertently lose one. We do recommend periodic disassembly for cleaning. Simply install the o-ring on each fitting and place ONE ball inside. With an o-ring in each end, it will not matter which end faces up when in use. However, it is important that the check valve assembly is installed as vertically as possible to ensure that the ball engages the o-ring and seals.
Operation Draining the free run wine: You can drain the free run wine using gravity, or by siphoning it using the vacuum pump. An optional leg extension kit (below) is available for our 20 and 30 gallon models to make gravity draining easier if you don’t wish to vacuum siphon. The 55 gallon model is too big to be safely supported by the legs.
Wiper faces up
Bead faces wine
Bead faces down

8
Gravity draining your free run wine: Use the ½” hose, racking tube, and tri-clamp barb fitting provided in the vacuum press kit and then connect to the drain valve as shown below. You will need to elevate the fermentor above the carboy for the flow to begin. Be sure to sanitize all parts before assembly. Run the free run wine directly into a carboy or other fermentor until the level of the wine in the fermentor is about ½ way down making sure that you do not drain out all the wine. Please note that the picture below shows the vacuum pump and hoses installed – leave these fittings disconnected for gravity draining. Vacuum siphoning your free run wine: This is our recommended method. Please note that this is no different than simply elevating your fermentor. Connect the vacuum pump system as shown in the pictures below. Open the valve on the fermentor and then turn on the vacuum pump. Wine will begin to flow from the fermentor, through the racking tube and into the carboy. Caution: The floating ball check valve is intended to be an emergency backup only to prevent wine from getting sucked into and damaging the vacuum pump! Be ready to close the valve on the tank when the carboy is full and BEFORE the wine reaches the ¼” stainless vacuum tube. If you have accidentally activated the check valve, immediately close the valve on the fermentor and turn off the vacuum pump. Remove the ¼” vacuum hose and check valve. Disassemble the valve and hose and clean thoroughly. You can then re-install them and continue siphoning after opening the valve on the fermentor. Be careful not to lose the little white ball, although a spare has been included.
Warning! Risk of personal injury or equipment damage! Always ensure that your carboys have no
scratches nicks or cracks prior to applying vacuum to them. A defective carboy can implode (collapse inward). If you are unsure, fill a carboy with water first and apply the vacuum. To add a measure of protection and minimize accidental mess always place your carboy in a plastic bucket and wear safety glasses and protective gloves! Keep all children and unnecessary people away from the carboy. For metallic, plastic, or other containers always contact the manufacturer to confirm if a full vacuum is allowable with their equipment. Blichmann Engineering, LLC is not responsible for the collapse of any equipment! Important: Do not run all of the free run wine out of the pot prior to installing the press piston as some wine is needed to initiate the pressing process.
9
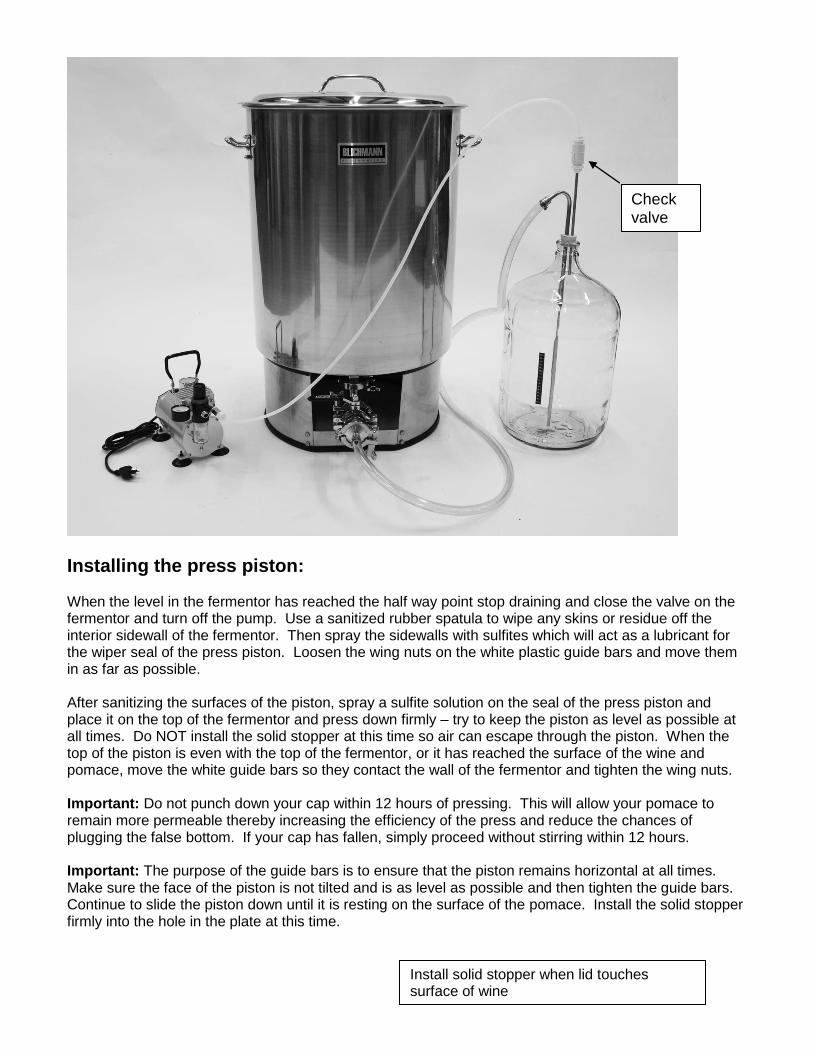
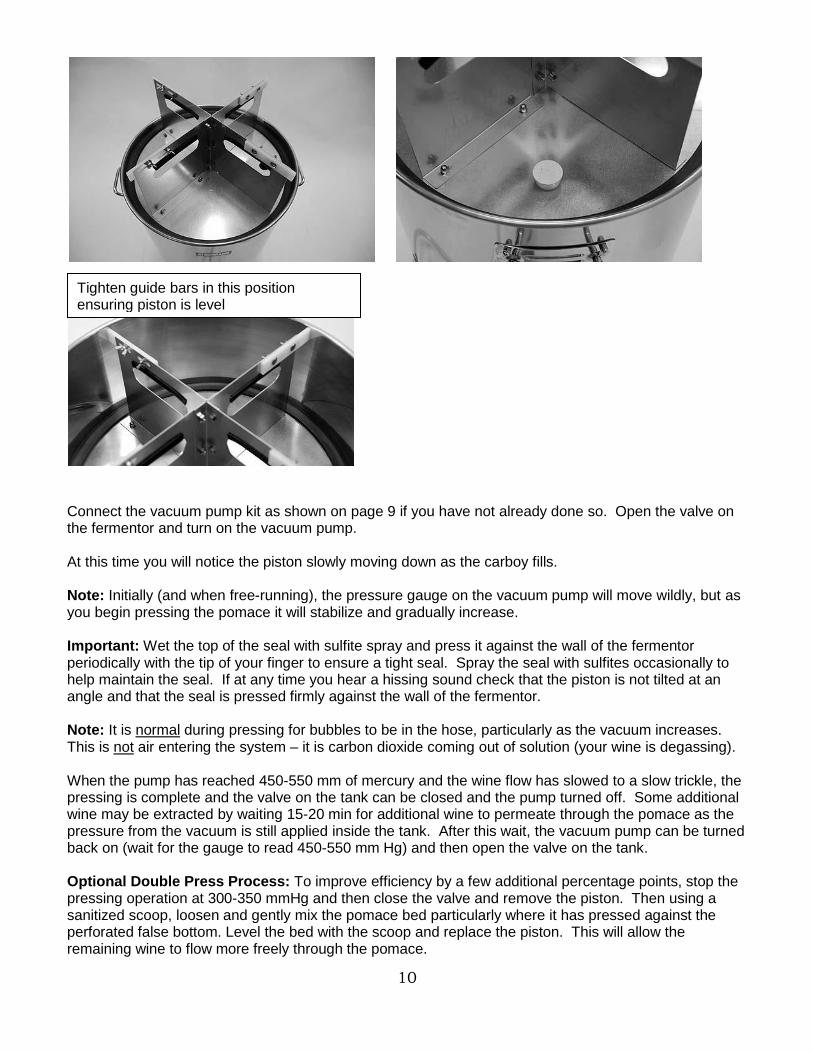
Installing the press piston: When the level in the fermentor has reached the half way point stop draining and close the valve on the fermentor and turn off the pump. Use a sanitized rubber spatula to wipe any skins or residue off the interior sidewall of the fermentor. Then spray the sidewalls with sulfites which will act as a lubricant for the wiper seal of the press piston. Loosen the wing nuts on the white plastic guide bars and move them in as far as possible. After sanitizing the surfaces of the piston, spray a sulfite solution on the seal of the press piston and place it on the top of the fermentor and press down firmly – try to keep the piston as level as possible at all times. Do NOT install the solid stopper at this time so air can escape through the piston. When the top of the piston is even with the top of the fermentor, or it has reached the surface of the wine and pomace, move the white guide bars so they contact the wall of the fermentor and tighten the wing nuts. Important: Do not punch down your cap within 12 hours of pressing. This will allow your pomace to remain more permeable thereby increasing the efficiency of the press and reduce the chances of plugging the false bottom. If your cap has fallen, simply proceed without stirring within 12 hours. Important: The purpose of the guide bars is to ensure that the piston remains horizontal at all times. Make sure the face of the piston is not tilted and is as level as possible and then tighten the guide bars. Continue to slide the piston down until it is resting on the surface of the pomace. Install the solid stopper firmly into the hole in the plate at this time.
Check valve
Install solid stopper when lid touches surface of wine
10
Connect the vacuum pump kit as shown on page 9 if you have not already done so. Open the valve on the fermentor and turn on the vacuum pump. At this time you will notice the piston slowly moving down as the carboy fills. Note: Initially (and when free-running), the pressure gauge on the vacuum pump will move wildly, but as you begin pressing the pomace it will stabilize and gradually increase. Important: Wet the top of the seal with sulfite spray and press it against the wall of the fermentor periodically with the tip of your finger to ensure a tight seal. Spray the seal with sulfites occasionally to help maintain the seal. If at any time you hear a hissing sound check that the piston is not tilted at an angle and that the seal is pressed firmly against the wall of the fermentor. Note: It is normal during pressing for bubbles to be in the hose, particularly as the vacuum increases. This is not air entering the system – it is carbon dioxide coming out of solution (your wine is degassing). When the pump has reached 450-550 mm of mercury and the wine flow has slowed to a slow trickle, the pressing is complete and the valve on the tank can be closed and the pump turned off. Some additional wine may be extracted by waiting 15-20 min for additional wine to permeate through the pomace as the pressure from the vacuum is still applied inside the tank. After this wait, the vacuum pump can be turned back on (wait for the gauge to read 450-550 mm Hg) and then open the valve on the tank. Optional Double Press Process: To improve efficiency by a few additional percentage points, stop the pressing operation at 300-350 mmHg and then close the valve and remove the piston. Then using a sanitized scoop, loosen and gently mix the pomace bed particularly where it has pressed against the perforated false bottom. Level the bed with the scoop and replace the piston. This will allow the remaining wine to flow more freely through the pomace.
Tighten guide bars in this position ensuring piston is level
11
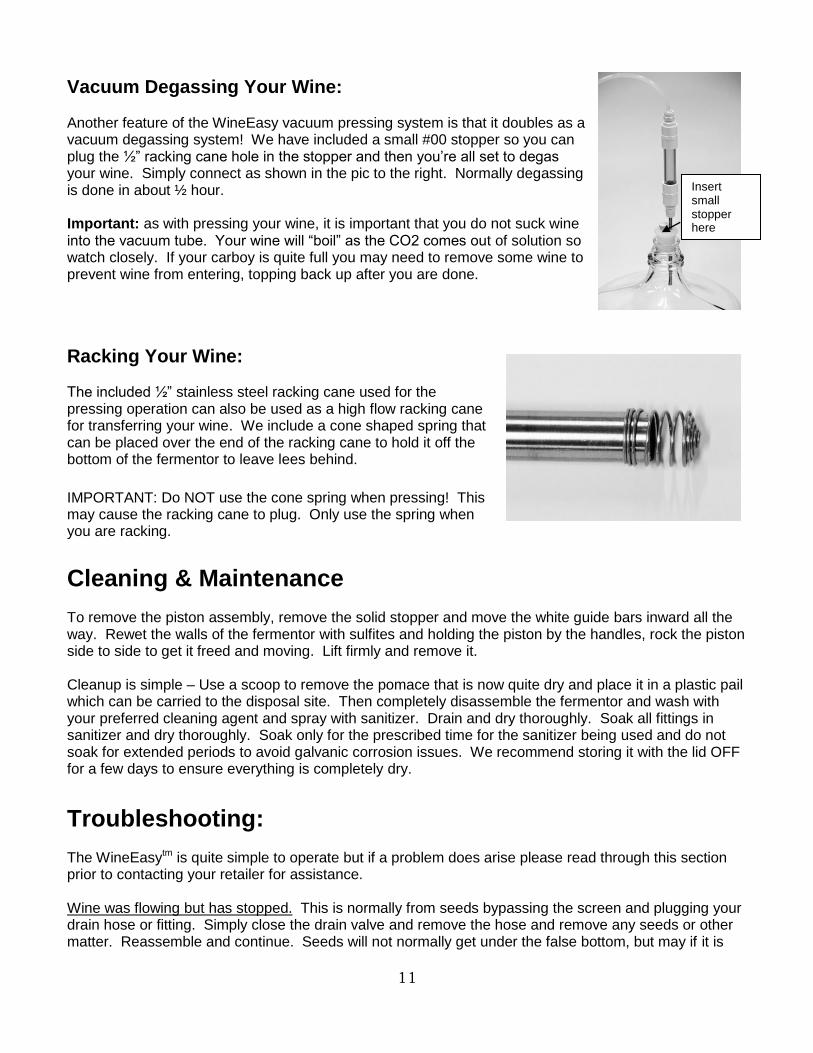
Vacuum Degassing Your Wine: Another feature of the WineEasy vacuum pressing system is that it doubles as a vacuum degassing system! We have included a small #00 stopper so you can plug the ½” racking cane hole in the stopper and then you’re all set to degas your wine. Simply connect as shown in the pic to the right. Normally degassing is done in about ½ hour. Important: as with pressing your wine, it is important that you do not suck wine into the vacuum tube. Your wine will “boil” as the CO2 comes out of solution so watch closely. If your carboy is quite full you may need to remove some wine to prevent wine from entering, topping back up after you are done.
Racking Your Wine: The included ½” stainless steel racking cane used for the pressing operation can also be used as a high flow racking cane for transferring your wine. We include a cone shaped spring that can be placed over the end of the racking cane to hold it off the bottom of the fermentor to leave lees behind.
IMPORTANT: Do NOT use the cone spring when pressing! This may cause the racking cane to plug. Only use the spring when you are racking.
Cleaning & Maintenance To remove the piston assembly, remove the solid stopper and move the white guide bars inward all the way. Rewet the walls of the fermentor with sulfites and holding the piston by the handles, rock the piston side to side to get it freed and moving. Lift firmly and remove it. Cleanup is simple – Use a scoop to remove the pomace that is now quite dry and place it in a plastic pail which can be carried to the disposal site. Then completely disassemble the fermentor and wash with your preferred cleaning agent and spray with sanitizer. Drain and dry thoroughly. Soak all fittings in sanitizer and dry thoroughly. Soak only for the prescribed time for the sanitizer being used and do not soak for extended periods to avoid galvanic corrosion issues. We recommend storing it with the lid OFF for a few days to ensure everything is completely dry.
Troubleshooting: The WineEasytm is quite simple to operate but if a problem does arise please read through this section prior to contacting your retailer for assistance. Wine was flowing but has stopped. This is normally from seeds bypassing the screen and plugging your drain hose or fitting. Simply close the drain valve and remove the hose and remove any seeds or other matter. Reassemble and continue. Seeds will not normally get under the false bottom, but may if it is
Insert small stopper here

12
not pressed firmly against the ledge of the pot. Always ensure, at time of assembly, that the wing nut is fully tightened and the false bottom is sitting completely flat across the ledge on the tank.
Warranty The WineEasy
tm is warranted to be free of defects in materials and workmanship for a period of 1(one) year from
the date of purchase (proof of purchase required). Specifically EXCLUDED from this warranty is normal wear and tear, damage from abuse, misuse, failure to follow cleaning and maintenance procedures, and thread galling or breakage from over tightening. As these pots are a welded product, it is to be expected that they will exhibit some markings from the weld seam, grinding, handling, and other small surface imperfections. Since these present no detrimental issues to the life of the product, or contamination of the wine, they are not warrantable imperfections. Blichmann Engineering is not responsible for incidental or consequential damages, or injuries arising from use or misuse of this product. This product is intended for home use only. No warranty or guarantee of suitability (express or implied) is given for commercial use of this product. Blichmann Engineering must be notified within 7 days of the delivery date of any hidden shipping damage. Owner is responsible for shipping damage outside of this time period. Customer is responsible to keep all original packing material for warranty returns – Blichmann Engineering, LLC is not responsible for damage from improperly packaged warrantee returns and these repair costs will be the responsibility of the customer. Resolution of warranty claims will be by repair or replacement and will be the decision solely of Blichmann Engineering. Shipping costs for warrantee returns are covered only for the contiguous United States. User is responsible for packaging costs and shipping damage if not returned in original packing. Approval for return must be provided by Blichmann Engineering prior to any return.

13
Parts List The WineEasytm system comes with the following parts:
Base Fermentor 1 - 20, 30 or 55 gal fermenting tank assembly with lid 1 – stainless steel pressure plate in 20, 30 or 55 gal size (disc with tabs) 1 – stainless steel perforated false bottom in 20, 30 or 55 gal size 1 – ¼-20 stainless wing nut and large washer 1 – tri-clamp bulkhead fitting with o-ring (2ps – nut and fitting) 1 – tri-clamp tightening tool (1” dia disc with 3 small tabs) 1 – tri-clamp ball valve (1”) 1 – tri-clamp 90 deg elbow (1”) 1 – tri-clamp cover cap 3 – tri-clamp clamps (1”) 3 – tri-clamp gaskets (1”) 1 – 20, 30 or 55 gal ring stand assembly
Press Piston 1 – 20, 30 or 55 gal disc with (8) 10-32 studs and acorn nuts installed 1 - 20, 30 or 55 gal silicone wiper seal 4 – stainless steel guide plates 4 – white plastic guide bars 8 – 10-32 carriage bolts and wing nuts 8 – 10-24 Phillips head machine screws and nuts 4 – short pieces of black protective edge trim
Vacuum press kit (same for 20, 30 and 55 gal sizes) 1 – vacuum pump 1 – ¼” NPT X ¼” tube connector (white plastic) 1 - ¼” NPT X ¼” NPT brass hex coupling 2 – hose clamps 1 – ½” barb X 1” tri-clamp fitting 1 – 6 ft piece of ½” ID vinyl hose 1 – 5 ft piece of 1/4” OD hard plastic vacuum tube 1 – ½” stainless steel racking cane 1 – ¼” X 6” stainless steel vacuum tube 1 – #7 two-hole silicone stopper 1 – #7 solid silicone stopper 1 - #00 solid tan rubber stopper (used to plug the racking tube hole for degassing) 1 – check valve assembly 1 – spare check ball (white 3/8” dia plastic ball) 1 – spare #31 o-ring check ball seat 1 – cone spring for racking cane