Developing Games for Windows Phone 7 with XNA Game Studio 4.0 Your Name Here.
Upload
truongcongCategory
view
236download
0
Windows Phone 7 XNA
Cookbook
Zheng Yang
Chapter No. 4
"Heads Up Display (HUD)—Your Phone
Game User Interface"
In this package, you will find: A Biography of the author of the book
A preview chapter from the book, Chapter NO.4 "Heads Up Display (HUD)—Your
Phone Game User Interface"
A synopsis of the book’s content
Information on where to buy this book
About the Author Zheng Yang is a hands-on Technical Leader with five years combined professional
experience providing core development engineering for global Microsoft
Consumer-Facing Applications and as an independent Game Developer. He is a dynamic,
results-oriented developer with a proven history of providing innovative solutions to
complex technical problems. When he was a student, he achieved recognition from
Microsoft Research Asia and Microsoft Imagine Cup Team. Zheng Yang has advanced
technical knowledge of key development technologies including C#, the .NET
framework, C++, Visual Studio, DirectX, and SQL Server. He has solid expertise
across the full life cycles of both Software Development and Game Production.
For More Information:
www.packtpub.com/windows-phone-7-xna-game-cookbook/book
Windows Phone 7 XNA
Cookbook Windows Phone certainly held the hot spot at the world-class consumer electronics event,
the International CES in January 2012. Microsoft CEO Steve Ballmer said, ―The past
year has really been about the whole push to build what can clearly be the strong third
ecosystem in the smartphone market, with a very differentiated point of view."
In fact, Windows Phone has many strong and compelling specialties in mobile
markets—People Hub, Live Tiles, Marketplace, and Xbox Live. We believe 2012–2013
will be a remarkable year for Microsoft and Windows Phone.
As a developer, everyone hopes to rock the world by using their creativity. How do we
do it? We could write an application, but what kind of application? Games? Why? Well,
games are the most dazzling way to grab the attention of, and also to entertain people.
Why Windows Phone? Windows Phone provides seamless access to your Xbox Live
space and is equipped with handy development tool set to make your game global. How?
Read this book!
Windows Phone 7 XNA Cookbook is a unique choice covering everything you need to
know to develop games on the Windows Phone. It explains all the core areas of XNA
game development for Windows Phone, such as controlling sensors, gestures, and
different kinds of cameras. The 2D game development recipes will introduce you to the
techniques of sprite animation, texture rendering, and graphical user interface creation.
After that, the book moves on to more cutting edge topics, with recipes covering 3D
graphic rendering, animation and collision detection, and key methods of improving
loading efficiency. As a game development book, you will also find throughout
discussions and hands-on examples about performance optimization to make your games
run faster. Finally, the book presents all of the steps you need to take to make your games
show up in the Marketplace—the world stage of game development. It's your time!
What This Book Covers Chapter 1, Jump into Windows Phone Developer Tools and XNA Game Studio 4.0, tells
you the background of Windows Phone and how to set up the development environment
for building your first Windows Phone game.
Chapter 2, Playing with Windows Phone Touch and Sensors, shows you how to use the
basic gestures including tapping, swiping, and dragging. You will also learn the
techniques for using the accelerometer.
For More Information:
www.packtpub.com/windows-phone-7-xna-game-cookbook/book
Chapter 3, Coordinates and View—Your First Step into XNA Game Development on
Windows Phone 7, explains how 2D and 3D coordinates work in Windows Phone XNA
development and how different types of cameras can be used as view.
Chapter 4, Heads Up Display (HUD)—Your Phone Game User Interface, explains how
to work with 2D graphics rendering and demonstrates the essential techniques to make
GUI controls, such as buttons, list controls, and so on.
Chapter 5, Content Processing, explains Content Pipeline, which is a very unique
technology in XNA. It preprocesses the assets including images, 3D models, audios,
and so on; also, you can customize different formats for pre-loading. Content Pipeline
accelerates the game asset loading speed and gives you flexibility to define your own
content model.
Chapter 6, Entering the Exciting World of 3D Models dives into the mystery 3D world in
Windows Phone XNA. You will learn a lot of interesting topics on 3D with examples
from model viewing to animation.
Chapter 7, Collision Detection, explains an eternal topic in game development. In this
chapter, you will get the core ideas of collision detection for 2D and 3D objects, a little
harder but useful, the corresponding examples will make your life easier.
Chapter 8, Embedding Audio in your Game, shows you the methods for adding the audio,
music, and sound effects into your game. It also demonstrates how to use the XNA
framework to add stereo sound to your game.
Chapter 9, Special Effects, teaches you how to work on the built-in effects such as
dual-texture effects and environment mapping. Moreover, you will discover how to
render the current screen display onto a texture and use it to make screen transition.
Chapter 10, Performance Optimization—Fast! Faster!, specifically shows you how to
make your Windows Phone game run faster. It provides you with hands-on examples
and tips you can employ to make sure your game gives the user a seamless experience.
Chapter 11, Launching to the Marketplace, focuses on the process of submitting your
application to the Microsoft Marketplace, so that everybody using Windows Phone can
download your work. It covers all of the steps required, from preparation to submission.
For More Information:
www.packtpub.com/windows-phone-7-xna-game-cookbook/book
4Heads Up Display
(HUD)—Your Phone Game User Interface
In this chapter, we will cover:
Scaling an image
Creating a simple sprite sheet animation in a 2D game
Creating a complex sprite sheet animation in a 2D game
Creating a text animation in adventure genre (AVG) game
Creating a text-based menu—the easiest menu to create
Creating an image-based menu
Creating a 3D model-based menu
Creating a progress bar for game contents loading and value status
Creating buttons in your game
Creating a listbox to speed up your information management in a game
Creating a text input control to communicate with others in a game
Introduction Head Up Display (HUD) or Graphic User Interface (GUI) is the core part of games. Players can navigate the different game screens using the menu, click the button to trigger game events, or use the textbox to type messages to other players. In StarCraft 2, you can click a building symbol to create a unit. In Diablo 2, you can change your equipment by selecting the staffs in the bag list panel. A powerful and rich GUI system will make your game more affable and fascinating.
For More Information:
www.packtpub.com/windows-phone-7-xna-game-cookbook/book
Heads Up Display (HUD)—Your Phone Game User Interface
96
Actually, Windows Phone 7 XNA framework does not support a built-in GUI system such as Silverlight. This means you should implement your own. Fortunately, if you do not hope to do the radical work while focusing on the game logic and the rendering technique, some third-party GUI packages using XNA, such as Neoforce Controls (http://neoforce.codeplex.com/) or Nuclex.UserInterface (http://nuclexframework.codeplex.com/) will do you a favor. Both the third-party XNA GUI libraries are free, and it is convenient for you to download them including the source code from http://neoforce.codeplex.com/ or http://nuclexframework.codeplex.com/.
As a learner, studying from the source code with basic and essential knowledge should be the fastest way to master a new technique. As guidance, you can write and learn on your own from an existing third-party GUI library. In this chapter, you will master how to create the typical HUD elements: buttons, text animation presentation, menu, listbox, and text control in Windows Phone 7 based on XNA framework.
Scaling an image Controlling the size of images is a basic technique in Windows Phone 7 XNA programming. Mastering this technique will help you implement many special visual effects in 2D. In this recipe, you will learn how to zoom an image in and out for a special visual effect. As an example, the image will jump up to you and go back. In the jumping phase, the image will fade out gradually. When the image becomes transparent, it will fall back with fading in.
How to do it...The following mandatory steps will lead you to complete the recipe:
1. Create a Windows Phone Game in Visual Studio 2010 named ImageZoomInOut, change Game1.cs to ImageZoomGame.cs. Then add the Next.png fi le from the code bundle to the content project. After the preparation work, insert the following code to the fi eld of the ImageZoomGame class:
// Image texture objectTexture2D texImage;
// Image positionVector2 Position;
// The scale factorfloat scale = 1;
// The rotate factorfloat rotate = 0;
// Alpha value for controlling the image transparency
For More Information:
www.packtpub.com/windows-phone-7-xna-game-cookbook/book
Chapter 4
97
float alpha = 255;
// The color of imageColor color;
// Timer object float timer;
// Bool value for zooming out or in.bool ZoomOut = true;
2. In the Initialize() method , we defi ne the image centered in the middle of the screen and the color:
Position = new Vector2(GraphicsDevice.Viewport.Width / 2, GraphicsDevice.Viewport.Height / 2);color = Color.White;
3. Load the Next.png fi le in the LoadContent() method with the following code:
texImage = Content.Load<Texture2D>(“Next”);
4. Add the code to the Update() method to control the size transparency and rotation of the image:
// Accumulates the game elapsed timetimer += (float)gameTime.ElapsedGameTime.TotalMilliseconds;
// Zoom outif (ZoomOut && alpha >= 0 && timer > 50){ // If alpha equals 0, zoom the image in if (alpha == 0.0f) { ZoomOut = false; }
// Amplify the image scale += 0.1f;
// Rotate the image in clockwise rotate += 0.1f;
// Fade the image out if (alpha > 0) {
For More Information:
www.packtpub.com/windows-phone-7-xna-game-cookbook/book
Heads Up Display (HUD)—Your Phone Game User Interface
98
alpha -= 5; }
color.A = (byte)alpha;
// Reset the timer to 0 for the next interval timer = 0;}
// Zoom inelse if (!ZoomOut && timer > 50){ // If alpha equals 255, zoom the image out if (alpha == 255) { ZoomOut = true; }
// Scale down the image scale -= 0.1f;
// Rotate the image counter-clockwise rotate -= 0.2f;
// Fade the image in
if (alpha < 255) { alpha += 5; }
color.A = (byte)alpha;
// Reset the timer to 0 for the next interval timer = 0;}
5. To draw the image and effects on the Windows Phone 7 screen, add the code to the Draw() method :
spriteBatch.Begin(SpriteSortMode.Immediate, BlendState.NonPremultiplied);
spriteBatch.Draw(texImage, Position, null, color, rotate, new Vector2(texImage.Width / 2, texImage.Height / 2), scale, SpriteEffects.None, 0f);
spriteBatch.End();
For More Information:
www.packtpub.com/windows-phone-7-xna-game-cookbook/book
Chapter 4
99
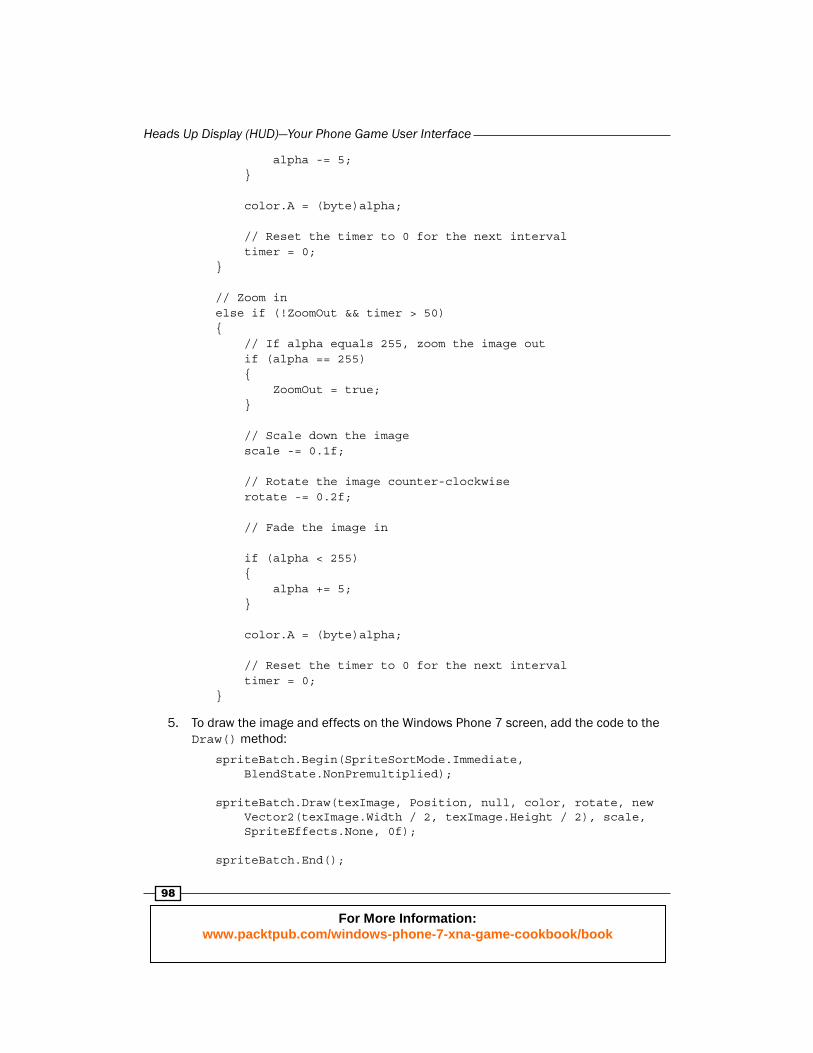
6. Now, build and run the application. The application runs as shown in the following screenshots:
How it works... In step 1, texImage holds the image for controlling; the Position variable represents the image position; scale will be used to control the image size; as the rotation factor, the rotate variable will store the value for rotation; alpha in color controls the image transparency degree; timer accumulates the game elapse milliseconds; the last variable ZoomOut determines whether to zoom the image out.
In step 2, we defi ne the Position of the image in the center of the screen and set the color to white.
In step 4, the accumulated timer is used to control the period of time between the two frames. The next part is to check the direction of scale. If ZoomOut is true, we will increase the image size, decrease the alpha value and rotate the image in a clockwise direction, then reset the timer. Otherwise, the behavior is opposite.
In step 5, we set the BlendState in SpritBatch.Begin() to NonPremultiplied because we change the alpha value of color linearly, then draw the images with scale and rotation factors around the image center.
For More Information:
www.packtpub.com/windows-phone-7-xna-game-cookbook/book

Heads Up Display (HUD)—Your Phone Game User Interface
100
Creating a Simple Sprite Sheet animation in a 2D game
In Windows Phone 7 game programming, it is an obvious performance cost if you wanted to render a number of images. You need to allocate the same quantity of texture objects for the images in your game. If this happens in the game initialization phase, the time could be very long. Considering these reasons, the talented game programmers in the early days of the game industry found the solution through the Sprite Sheet technique, using a big image to contain a set of smaller images. It is very convenient for 2D game programming, especially for the sprite animation. The big advantage of using the Sprite Sheet is the ability to create character animation, complex effects, explosions, and so on. Applying the technique will be performance sweet for game content loading.
The Sprite Sheet has two types:
Simple Sprite Sheet, where all the smaller images have the same dimensions
Complex Sprite Sheet, where all the images in the sheet have different dimensions
In this recipe, you will learn how to create the Simple Sprite Sheet and use it in your Windows Phone 7 game.
In Simple Sprite Sheet, every subimage has the same size, the dimension could be defi ned when the Sprite Sheet was initiated. To locate the designated sub-image, you should know the X and Y coordinates, along with the width and height, and the offset for the row and column. For Simple Sprite Sheet, the following equation will help you complete the work:
Position = (X * Offset, Y * Offset)
For convenience, you can defi ne the size of the subimage in digital image processing software, such as Adobe Photoshop, Microsoft Expression Design, Paint.Net, GIMP, and so on.
In this recipe, you will learn how to use the Sprite Sheet in your own Windows Phone 7 Game.
Getting readyIn the image processing tool, we create a Sprite Sheet as the next screenshot. In the image, every subimage is surrounded by a rectangle 50 pixels wide and 58 pixels high, as shown in the left-hand image in the following screenshot.
In a real Windows Phone Game, I am sure you do not want to see the border of the rectangle. As part of the exportation process, we will make the rectangles transparent, you just need to change the alpha value from 100 to 0 in code, and the latest Sprite Sheet should look similar to the right-hand image in the following screenshot:
For More Information:
www.packtpub.com/windows-phone-7-xna-game-cookbook/book

Chapter 4
101
We name the Sprite Sheet used in our example SimpleSpriteSheet.png.
Now the Sprite Sheet is ready, the next part is to animate the Sprite Sheet in our Windows Phone 7 game.
How to do it...The following steps will give you a complete guidance to animate a Simple Sprite Sheet:
1. Create a Windows Phone Game project in Visual Studio 2010 named SimpleSpriteSheetAnimation, change Game1.cs to SimpleSpirteSheetGame.cs, adding the lines to the fi eld of the SimpleSpriteSheetGame class:
// Sprite TextureTexture2D sprite;
// A Timer variablefloat timer = 0f;
// The intervalfloat interval = 200;
// Frame Countint FrameCount = 4;
// Animation Countint AnimationCount = 2;
// Current frame holderint currentFrame = 0;
// Width of a single sprite image, not the whole Sprite int spriteWidth = 50;
For More Information:
www.packtpub.com/windows-phone-7-xna-game-cookbook/book
Heads Up Display (HUD)—Your Phone Game User Interface
102
// Height of a single sprite image, not the whole Sprite int spriteHeight = 58;
// A rectangle to store which ‘frame’ is currently being Rectangle sourceRect;
// The center of the current ‘frame’Vector2 origin;
// Index of Rowint row = 0;
// Position CenterVector2 screenCenter;
2. Load the Sprite Sheet image. Put the code into the LoadContent() method :
sprite = Content.Load<Texture2D>(“SpriteSheet”);
screenCenter = new Vector2(GraphicsDevice.Viewport.Width / 2, GraphicsDevice.Viewport.Height / 2);
3. This step is to animate the Simple Sprite Sheet. Insert the code in to the Update() method:
// Increase the timer by the number of milliseconds since // update was last calledtimer += (float)gameTime.ElapsedGameTime.TotalMilliseconds;
// Check the timer is more than the chosen intervalif (timer > interval){ //Show the next frame currentFrame++;
//Reset the timer timer = 0f;}
// If reached the last frame, reset the current frame back to // the one before the first frameif (currentFrame == FrameCount){ currentFrame = 0;}
For More Information:
www.packtpub.com/windows-phone-7-xna-game-cookbook/book
Chapter 4
103
// React to the tap gestureTouchCollection touches = TouchPanel.GetState();if (touches.Count > 0 && touches[0].State == TouchLocationState.Pressed){ // Change the sprite sheet animation row = (row + 1) % AnimationCount;}
// Compute which subimage will be renderedsourceRect = new Rectangle(currentFrame * spriteWidth, row * spriteHeight, spriteWidth, spriteHeight);
// Compute the origin position for image rotation and scale.origin = new Vector2(sourceRect.Width / 2, sourceRect.Height / 2);
4. Draw the Sprite Sheet on the screen. Add the code in the Draw() method :
spriteBatch.Begin();
//Draw the sprite in the center of an 800x600 screenspriteBatch.Draw(sprite, screenCenter, sourceRect, Color.White, 0f, origin, 3.0f, SpriteEffects.None, 0);
spriteBatch.End();
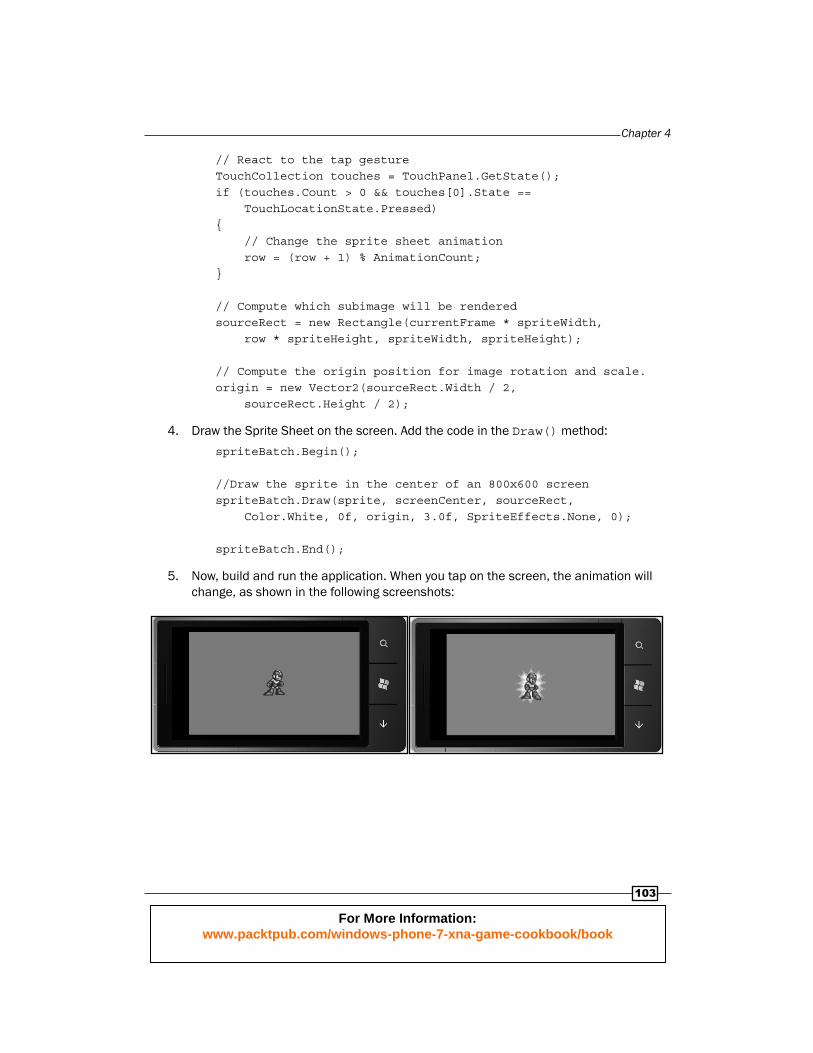
5. Now, build and run the application. When you tap on the screen, the animation will change, as shown in the following screenshots:
For More Information:
www.packtpub.com/windows-phone-7-xna-game-cookbook/book
Heads Up Display (HUD)—Your Phone Game User Interface
104
How it works...In step 1, the sprite object will hold the Sprite Sheet image; the timer variable will accumulate the game elapsed time; the interval variable defi nes the period of time between two frames in milliseconds; AnimationCount shows the number of animations that will be played; currentFrame indicates the playing frame, and also presents the column in Sprite Sheet image; spriteWidth and spriteHeight defi ne the width and height of the currently rendering subimage. In this example the width and height of the Sprite subimage is 50 and 58 pixels respectively; the sourceRectangle lets the SpriteBatch.Draw() know which part of the Sprite Sheet image will be drawn; the row variable shows which animation will be rendered, 0 means the animation starts from the fi rst.
In step 3, we accumulate the game elapsed time. If the accumulated time on the timer is greater than the interval, the current frame goes to the next frame, and then sets the timer to 0 for the next interval. We then check whether the current frame is equal to the FrameCount. If yes, it means that the animation ended, then we set the currentFrame to 0 to replay the animation. Actually, the currentFrame represents the current column of the Sprite Sheet image. Next, we should make sure which animation we want to render, here, the react to the tap gesture to set the row value within the AnimationCount to change the animation. When the currentFrame for the column and the row are ready, you can use them to locate the sub-image with the rectangle object sourceRect; the last line in this code will compute the origin position for the image rotation and scale, here we set it to the center of the Sprite Sheet subimage.
In step 4, the Draw() method receives the texture parameter; position of texture drawn on screen; the rectangle for defi ning the part of texture that will be drawn; the color White means render the texture in its original color; rotation angle set to 0 stands for no rotation; the scale factor will let the rendering device know how big the texture will be, 3 here means the fi nal texture size will be three times larger than the original; SpriteEffects means the effects will be applied to render the texture, SpriteEffects.None tells the application not to use any effect for the texture; the fi nal parameter layerDepth illustrates the texture drawing order.
For More Information:
www.packtpub.com/windows-phone-7-xna-game-cookbook/book
Chapter 4
105
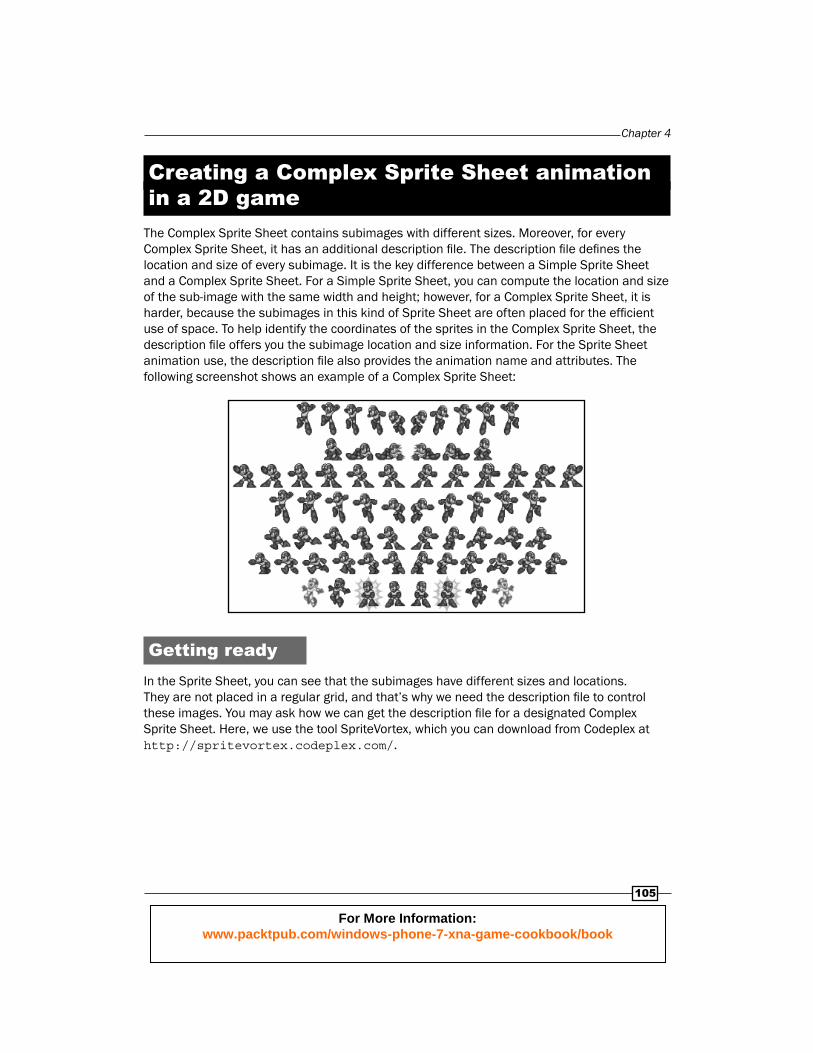
Creating a Complex Sprite Sheet animation in a 2D game
The Complex Sprite Sheet contains subimages with different sizes. Moreover, for every Complex Sprite Sheet, it has an additional description fi le. The description fi le defi nes the location and size of every subimage. It is the key difference between a Simple Sprite Sheet and a Complex Sprite Sheet. For a Simple Sprite Sheet, you can compute the location and size of the sub-image with the same width and height; however, for a Complex Sprite Sheet, it is harder, because the subimages in this kind of Sprite Sheet are often placed for the effi cient use of space. To help identify the coordinates of the sprites in the Complex Sprite Sheet, the description fi le offers you the subimage location and size information. For the Sprite Sheet animation use, the description fi le also provides the animation name and attributes. The following screenshot shows an example of a Complex Sprite Sheet:
Getting readyIn the Sprite Sheet, you can see that the subimages have different sizes and locations. They are not placed in a regular grid, and that’s why we need the description fi le to control these images. You may ask how we can get the description fi le for a designated Complex Sprite Sheet. Here, we use the tool SpriteVortex, which you can download from Codeplex at http://spritevortex.codeplex.com/.
For More Information:
www.packtpub.com/windows-phone-7-xna-game-cookbook/book

Heads Up Display (HUD)—Your Phone Game User Interface
106
The following steps show you how to process a Complex Sprite Sheet using SpriteVortex:
1. When you run SpriteVortex, click Import Spritesheet Image, at the top-left, as shown in the following screenshot:
2. After choosing MegaManSheet.png from the image folder of this chapter, click on Alpha Cut, at the top bar of the main working area. You will see the subimages in the Complex Sprite Sheet individually surrounded by yellow rectangles, as shown in the following screenshot:
For More Information:
www.packtpub.com/windows-phone-7-xna-game-cookbook/book
Chapter 4
107
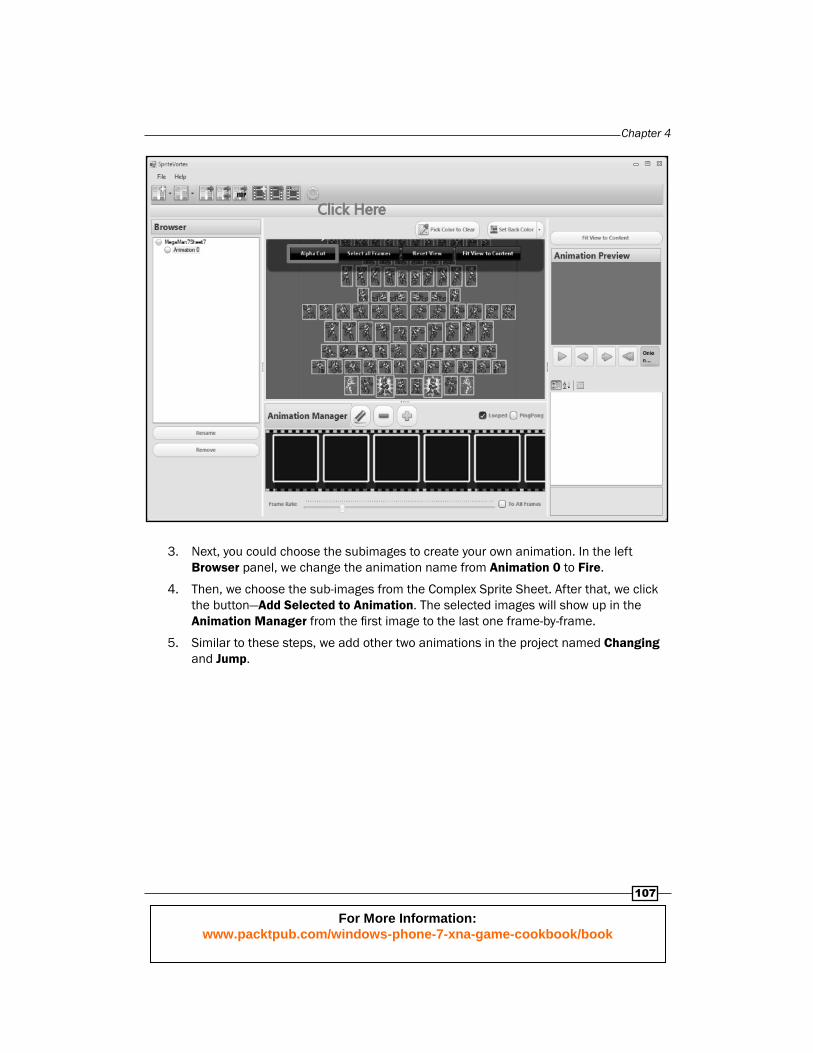
3. Next, you could choose the subimages to create your own animation. In the left Browser panel, we change the animation name from Animation 0 to Fire.
4. Then, we choose the sub-images from the Complex Sprite Sheet. After that, we click the button—Add Selected to Animation. The selected images will show up in the Animation Manager from the fi rst image to the last one frame-by-frame.
5. Similar to these steps, we add other two animations in the project named Changing and Jump.
For More Information:
www.packtpub.com/windows-phone-7-xna-game-cookbook/book
Heads Up Display (HUD)—Your Phone Game User Interface
108
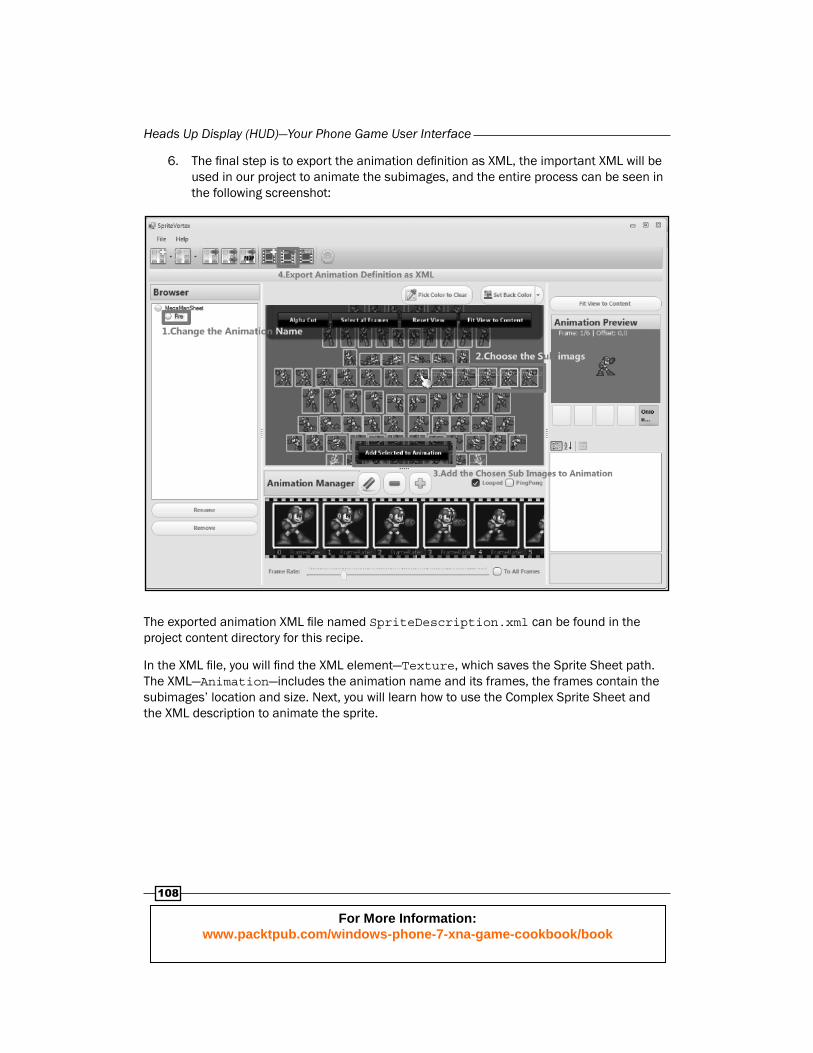
6. The fi nal step is to export the animation defi nition as XML, the important XML will be used in our project to animate the subimages, and the entire process can be seen in the following screenshot:
The exported animation XML fi le named SpriteDescription.xml can be found in the project content directory for this recipe.
In the XML fi le, you will fi nd the XML element—Texture, which saves the Sprite Sheet path. The XML—Animation—includes the animation name and its frames, the frames contain the subimages’ location and size. Next, you will learn how to use the Complex Sprite Sheet and the XML description to animate the sprite.
For More Information:
www.packtpub.com/windows-phone-7-xna-game-cookbook/book
Chapter 4
109
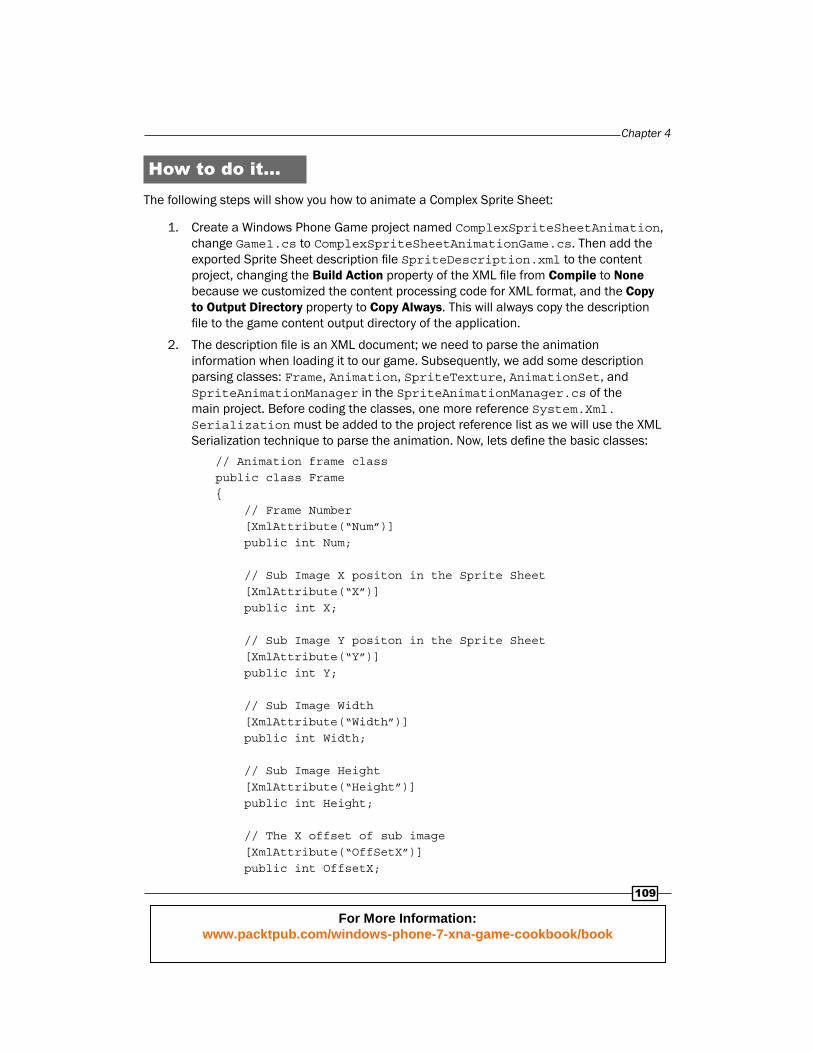
How to do it… The following steps will show you how to animate a Complex Sprite Sheet:
1. Create a Windows Phone Game project named ComplexSpriteSheetAnimation, change Game1.cs to ComplexSpriteSheetAnimationGame.cs. Then add the exported Sprite Sheet description fi le SpriteDescription.xml to the content project, changing the Build Action property of the XML fi le from Compile to None because we customized the content processing code for XML format, and the Copy to Output Directory property to Copy Always. This will always copy the description fi le to the game content output directory of the application.
2. The description fi le is an XML document; we need to parse the animation information when loading it to our game. Subsequently, we add some description parsing classes: Frame, Animation, SpriteTexture, AnimationSet, and SpriteAnimationManager in the SpriteAnimationManager.cs of the main project. Before coding the classes, one more reference System.Xml.Serialization must be added to the project reference list as we will use the XML Serialization technique to parse the animation. Now, lets defi ne the basic classes:
// Animation frame classpublic class Frame{ // Frame Number [XmlAttribute(“Num”)] public int Num; // Sub Image X positon in the Sprite Sheet [XmlAttribute(“X”)] public int X;
// Sub Image Y positon in the Sprite Sheet [XmlAttribute(“Y”)] public int Y;
// Sub Image Width [XmlAttribute(“Width”)] public int Width;
// Sub Image Height [XmlAttribute(“Height”)] public int Height;
// The X offset of sub image [XmlAttribute(“OffSetX”)] public int OffsetX;
For More Information:
www.packtpub.com/windows-phone-7-xna-game-cookbook/book
Heads Up Display (HUD)—Your Phone Game User Interface
110
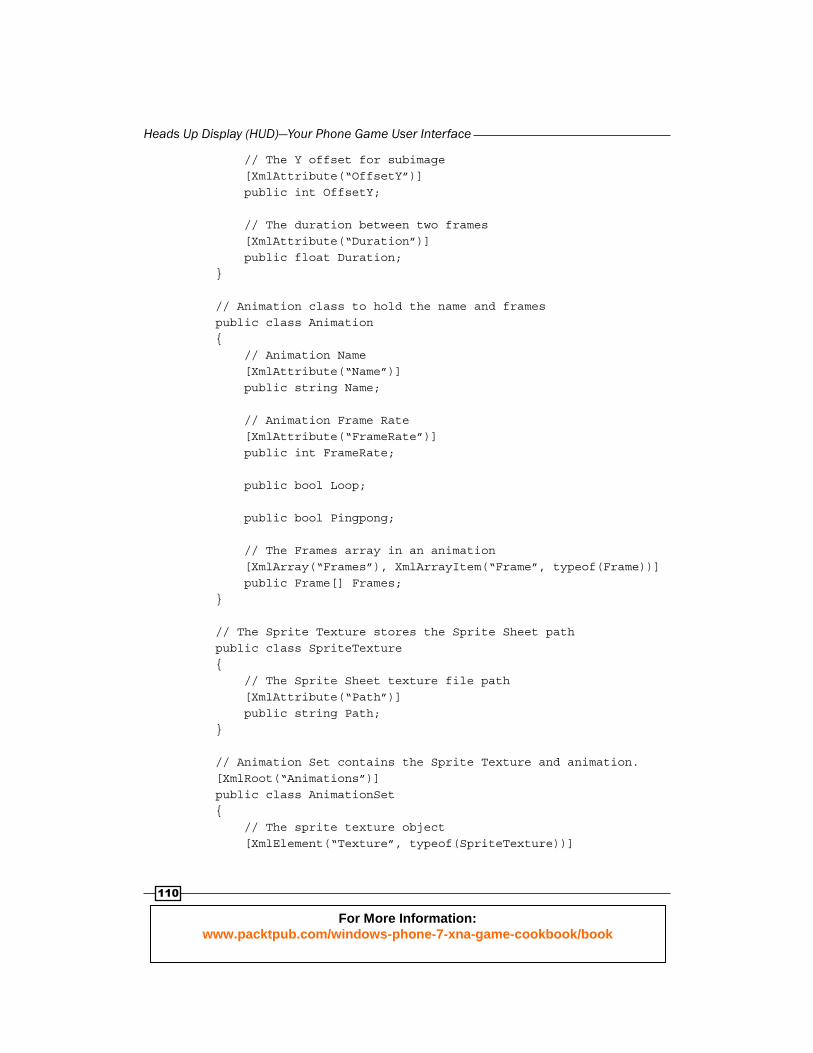
// The Y offset for subimage [XmlAttribute(“OffsetY”)] public int OffsetY;
// The duration between two frames [XmlAttribute(“Duration”)] public float Duration;} // Animation class to hold the name and framespublic class Animation{ // Animation Name [XmlAttribute(“Name”)] public string Name;
// Animation Frame Rate [XmlAttribute(“FrameRate”)] public int FrameRate;
public bool Loop;
public bool Pingpong;
// The Frames array in an animation [XmlArray(“Frames”), XmlArrayItem(“Frame”, typeof(Frame))] public Frame[] Frames;}
// The Sprite Texture stores the Sprite Sheet pathpublic class SpriteTexture{ // The Sprite Sheet texture file path [XmlAttribute(“Path”)] public string Path;}
// Animation Set contains the Sprite Texture and animation.[XmlRoot(“Animations”)]public class AnimationSet{ // The sprite texture object [XmlElement(“Texture”, typeof(SpriteTexture))]
For More Information:
www.packtpub.com/windows-phone-7-xna-game-cookbook/book
Chapter 4
111
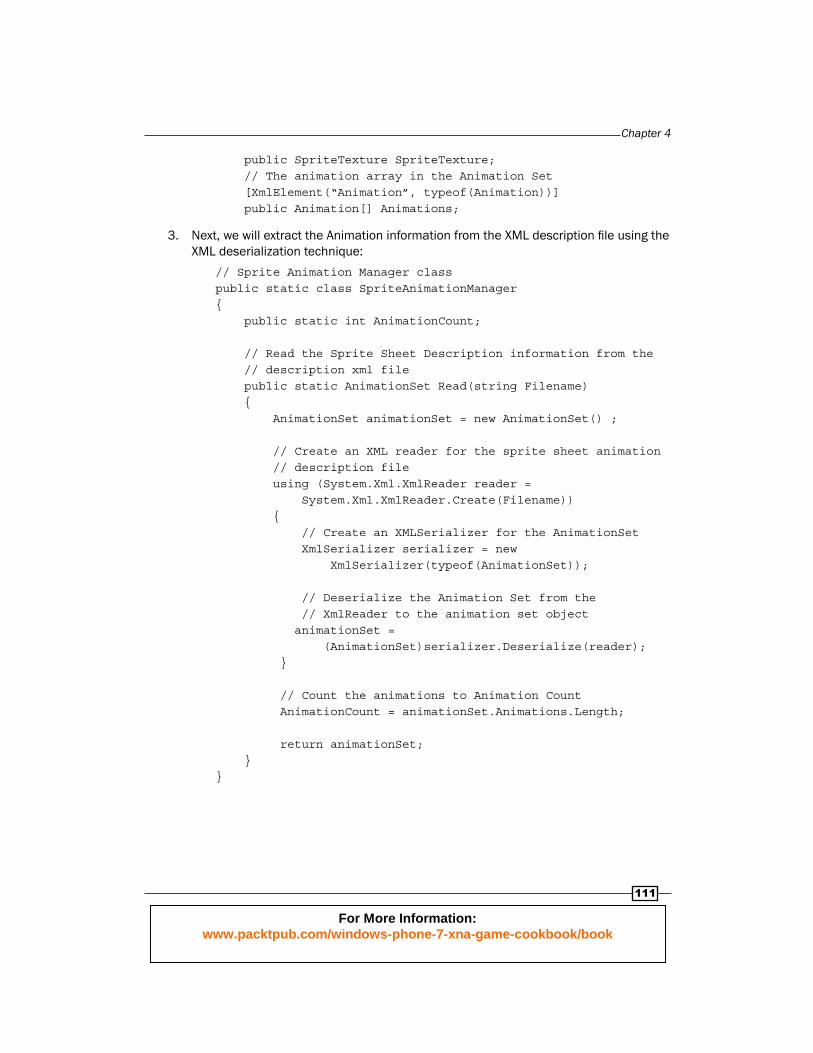
public SpriteTexture SpriteTexture; // The animation array in the Animation Set [XmlElement(“Animation”, typeof(Animation))] public Animation[] Animations;
3. Next, we will extract the Animation information from the XML description fi le using the XML deserialization technique:
// Sprite Animation Manager classpublic static class SpriteAnimationManager{ public static int AnimationCount;
// Read the Sprite Sheet Description information from the // description xml file public static AnimationSet Read(string Filename) { AnimationSet animationSet = new AnimationSet() ;
// Create an XML reader for the sprite sheet animation // description file using (System.Xml.XmlReader reader = System.Xml.XmlReader.Create(Filename)) { // Create an XMLSerializer for the AnimationSet XmlSerializer serializer = new XmlSerializer(typeof(AnimationSet));
// Deserialize the Animation Set from the // XmlReader to the animation set object animationSet = (AnimationSet)serializer.Deserialize(reader); }
// Count the animations to Animation Count AnimationCount = animationSet.Animations.Length;
return animationSet; }}
For More Information:
www.packtpub.com/windows-phone-7-xna-game-cookbook/book
Heads Up Display (HUD)—Your Phone Game User Interface
112
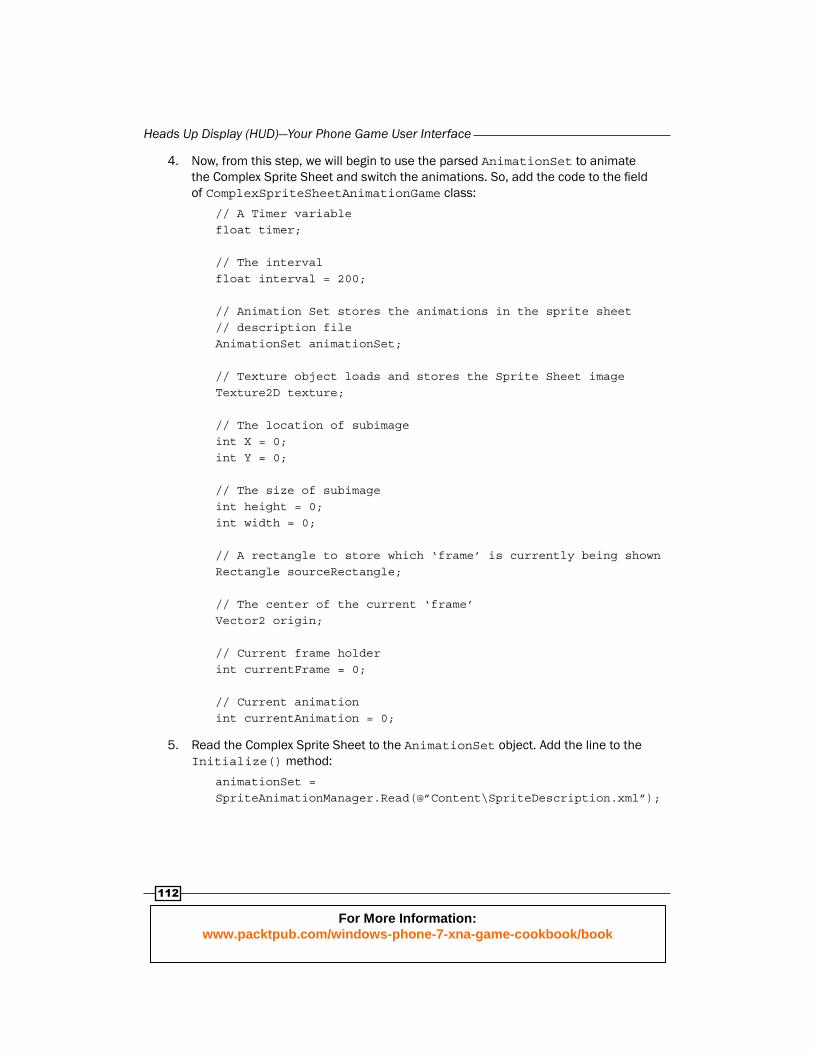
4. Now, from this step, we will begin to use the parsed AnimationSet to animate the Complex Sprite Sheet and switch the animations. So, add the code to the fi eld of ComplexSpriteSheetAnimationGame class :
// A Timer variablefloat timer;
// The interval float interval = 200;
// Animation Set stores the animations in the sprite sheet // description fileAnimationSet animationSet;
// Texture object loads and stores the Sprite Sheet imageTexture2D texture;
// The location of subimageint X = 0;int Y = 0;
// The size of subimageint height = 0;int width = 0;
// A rectangle to store which ‘frame’ is currently being shownRectangle sourceRectangle;
// The center of the current ‘frame’Vector2 origin;
// Current frame holderint currentFrame = 0;
// Current animationint currentAnimation = 0;
5. Read the Complex Sprite Sheet to the AnimationSet object . Add the line to the Initialize() method:
animationSet = SpriteAnimationManager.Read(@”Content\SpriteDescription.xml”);
For More Information:
www.packtpub.com/windows-phone-7-xna-game-cookbook/book
Chapter 4
113
6. In this step, we animate the Complex Sprite Sheet using the parsed animation set. Add the following lines to the Update() method :
// Change the animation when tap the Touch screenTouchCollection touches = TouchPanel.GetState();if (touches.Count > 0 && touches[0].State == TouchLocationState.Pressed){ // make the animation index vary within the total // animation count currentAnimation = (currentAnimation + 1) % SpriteAnimationManager.AnimationCount;}
// Accumulate the game elapsed timetimer += (float)gameTime.ElapsedGameTime.TotalMilliseconds;
// If the current frame is equal to the length of the current // animation frames, reset the current frame to the beginningif (currentFrame == animationSet.Animations[currentAnimation].Frames.Length - 1){ currentFrame = 0;}
// Check the timer is more than the chosen intervalif (timer > interval && currentFrame <= animationSet.Animations[currentAnimation].Frames.Length - 1){ // Get the location of current subimage height = animationSet.Animations[currentAnimation]. Frames[currentFrame].Height; width = animationSet.Animations[currentAnimation]. Frames[currentFrame].Width;
// Get the size of the current subimage X = animationSet.Animations[currentAnimation]. Frames[currentFrame].X; Y = animationSet.Animations[currentAnimation]. Frames[currentFrame].Y;
// Create the rectangle for drawing the part of the //sprite sheet on the screen sourceRectangle = new Rectangle(X, Y, width, height);
For More Information:
www.packtpub.com/windows-phone-7-xna-game-cookbook/book
Heads Up Display (HUD)—Your Phone Game User Interface
114
// Show the next frame currentFrame++;
// Reset the timer timer = 0f;}
// Compute the origin position for image rotation and scale.origin = new Vector2(sourceRectangle.Width / 2, sourceRectangle.Height / 2);
7. Draw the animation on the Windows Phone 7 Touch screen, add the code to the Draw() method :
spriteBatch.Begin();spriteBatch.Draw(texture, new Vector2(400, 240), sourceRectangle, Color.White, 0f, origin, 2.0f, SpriteEffects.None, 0);spriteBatch.End();
8. Now, build and run the application. When you tap on the Touch screen, the animation will change as shown in the following screenshots:
How it works…In step 2, the Frame class corresponds to the XML element: Frame and its attributes in the XML fi le. The same applies for the Animation class , SpriteTexture class , and the AnimationSet class. The XmlSerializer can recognize the XmlElement and XmlAttribute for every member variable unless the XmlAttribute or XmlElement attribute is defi ned above it. If the class type is customized, we also need to use the typeof() method to let the serializer know the object size. For identifying the array member variables—Frames and Animations—we should use the XmlArray attribute with array root name in the XML fi le and the XmlArrayItem with its element name. Additionally, the XmlRoot will help the XmlSerializer to locate the root of the whole XML fi le, here, it is Animations.
For More Information:
www.packtpub.com/windows-phone-7-xna-game-cookbook/book
Chapter 4
115
In step 3, since the loading of this data occurs independently of the instance of the manager class (in this case it deserializes an instance of a class from XML), we can declare it static to simplify our code, as an instance of the manager is not necessary as it contains no instance data. The Read() method creates an XmlReader object to read the Sprite Sheet XML description fi le. The XmlReader class supports reading XML data from a stream or fi le. It allows you to read the contents of a node. When the XmlReader for the description fi le is created, we instance the XmlSerializer object to read the AnimationSet type data. We use the XmlSerializer.Deserialize() method to decode the description XML fi le to meet the XML attributes we defi ned for the AnimationSet class, then the XmlSerializer will recursively read the subclasses with the XML attributes. After the XML deserialization, the code will set the count of the parsed animations to the AnimationCount variable . We will use the AnimationCount to control the index of animations for animation playing in the game.
In step 4, the timer variable will accumulate the game elapsed time; the interval variable defi nes the period of time between two frames; the animationSet variable will store the animations from the Sprite Sheet description fi le; the texture object holds the Complex Sprite Sheet image, with X,Y for the location and height, width for the size. The sourceRectangle variable will read the location and size information of the to create the region for drawing the subimage on screen; currentFrame defi nes the current animation playing frame; currentAnimation indicates the currently playing animation.
In step 6, the fi rst part of the code is to react to the tap gesture for changing the current playing animation. The second part is to increase the currently playing frame, if the current frame reaches the maximum frame count of current animation, we will replay the current animation. The last part will get the location and size of the current subimage according to the current frame and use the location and size information to build the region of the current subimage for playing. Then, increase the frame to next before resetting the timer to 0 for a new frame. This information is controlled by the XML fi le that was generated from the Codeplex tool we exported in step 1.
Creating a text animation in Adventure Genre (AVG) game
Adventure Genre (AVG) game uses the text or dialog to describe game plots. With different branches, you will experience different directions in game underplaying. In most AVG games, text presentation is the key part, if you have ever played one or more of the games, you might have found the text was rendered character-by-character or word-by-word. In this recipe, you will learn how to work with sprite font and how to manipulate the font-related methods to compute the font and properly adjust the character and word positions in real time.
For More Information:
www.packtpub.com/windows-phone-7-xna-game-cookbook/book
Heads Up Display (HUD)—Your Phone Game User Interface
116
How to do it...The following steps will lead you to complete text animation effect in Windows Phone 7:
1. Create a Windows Phone Game in Visual Studio 2010 named AVGText, change Game1.cs to AVGTextGame.cs, and add the following code to the AVGTextGame class as fi eld:
// SpriteFont objectSpriteFont font;
// Game textstring text = “”;
// The text showed on the screenstring showedText = “”;
// The bound for the showedTextconst int TextBound = 20;
// Game timerfloat timer = 0;
// Interval timefloat interval = 100;
// Index for interate the whole original textint index = 0;
2. Initialize the original text and process it for wrapped showing. Add the initialization and processing code to the Initialize() method:
// The original texttext = “This is an AVG game text, you will find the text is + “showed character by character, I hope “ + “this recipe is useful for you.”;
// Split the original string to a string arraystring[] strArray = text.Split(‘ ‘);
// Declare the temp string for each row, aheadstring for // looking ahead one word in this rowstring tempStr = strArray[0];string aheadString = “”;
For More Information:
www.packtpub.com/windows-phone-7-xna-game-cookbook/book
Chapter 4
117
// Declare the StringBuilder object for holding the sliced // lineStringBuilder stringBuild = new StringBuilder();
// Iterate the word array, i for current word, j for next wordfor (int i = 0 ,j = i ; j < strArray.Length; j++){ // i is before j i = j - 1;
// Check the temp string length whether less than the // TextBound if (aheadString.Length <= TextBound) { // If yes, check the string looks ahead one more word // whether less than the TextBound if ((aheadString = tempStr + “ “ + strArray[j]).Length <= TextBound) { // If yes, set the look-ahead string to the temp // string tempStr = aheadString; } } else { // If not, add the temp string as a row // to the StringBuilder object stringBuild.Append(tempStr.Trim() + “\n”); // Set the current word to the temp string tempStr = strArray[i];
aheadString = tempStr; j = i; }}
3. Load the SpriteFont content in the LoadContent() method :
font = Content.Load<SpriteFont>(“gameFont”);
For More Information:
www.packtpub.com/windows-phone-7-xna-game-cookbook/book
Heads Up Display (HUD)—Your Phone Game User Interface
118
4. Update for drawing the showedText character-by-character . Add the lines to the Update() method:
// Accumulate the game elapsed timer += (float)gameTime.ElapsedGameTime.TotalMilliseconds;
// Show the text character by characterif (timer > interval && index < text.Length){ // Every interval add the current index character to the // showedText. showedText += text.Substring(index, 1); // Increse the index index++; // Set the timer to 0 for the next interval timer = 0;}
5. Draw the AVG text effect on the Windows Phone 7 Touch screen. Add the code to the Draw() method:
// Draw the string on screenspriteBatch.Begin();spriteBatch.DrawString(font, showedText, new Vector2(0, 0), Color.White);spriteBatch.End();
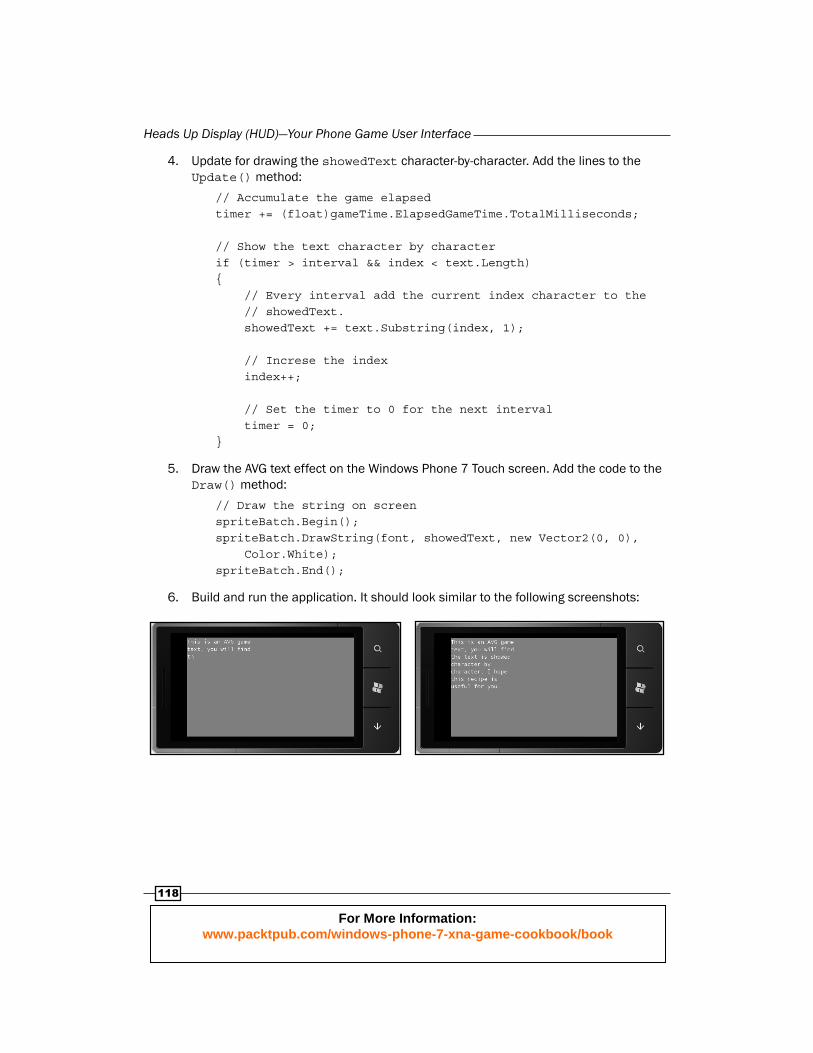
6. Build and run the application. It should look similar to the following screenshots:
For More Information:
www.packtpub.com/windows-phone-7-xna-game-cookbook/book
Chapter 4
119
How it works...In step 1, the font object will be used to render the AVG game text; the text variable holds the original text for processing; the showedText stores the latest showing text; TextBound limits the bound for the showing text; the timer is used to count the game elapsed time; the interval variable represents the period of time between two frames; the index variable indicates the current position when showing the original text.
In step 2, we use the text.Split() method to split the original text to a word array, then declare three objects tempStr, aheadString, and stringBuild. tempStr stores the current row, composed of the words from the original text, aheadString saves one more word ahead of the tempStr for preventing the actual length of tempStr from becoming greater than the TextBound. In the for loop, we declare two iterating indices i and j: i is the index from the beginning of the original text, j goes after i. In the loop step, if the length of aheadString is less than the TextBound, one more word following the tempStr will be added to it. If the new look-ahead string length is still less than the Textbound, we will assign the aheadString to tempStr. On the other hand, if the length of aheadString is greater than Textbound, we will do line breaking. At this moment, the tempStr is appended to the stringBuild object as a row with a line breaking symbol—\n. Then we set the current word to the tempStr and aheadString, and also set the current i to j for the next row.
In step 4, the fi rst line accumulates the game elapsed milliseconds. If the elapsed time is greater than the interval, and the index is less than the processed text length, we will append the current character to showedText, after that, move the index pointer to the next character and set the timer to zero for the next interval.
Creating a text-based menu—the easiest menu to create
Menu plays the key role of a complete game; the player could use the menu to navigate to different parts of the game. As guidance to the game, the menu has a lot of appearances depending on the game type, animated or static, and so on. In this chapter, you will learn how to work with three kinds of menu, text-based, image-based, and model-based. As a beginning, this recipe shows you the text-based menu.
Getting readyThe text-based menu is made up of texts. Every menu item is an independent string. In this example, when you tap the item, the reaction will be triggered with the text color changing and text visual effects popping up. OK, let’s begin!
For More Information:
www.packtpub.com/windows-phone-7-xna-game-cookbook/book
Heads Up Display (HUD)—Your Phone Game User Interface
120
How to do it...The following steps will show you how to create a simple text-based menu:
1. Create a Windows Phone Game project named TextMenu, change Game1.cs to TextMenuGame.cs, and add gameFont.spriteFont to content project. Then add TextMenuItem.cs to the main project.
2. Open TextMenuItem.cs fi le, in the fi eld of the TextMenuItem class, add the following lines:
// SpriteBatch SpriteBatch spriteBatch;
// Menu item text fontSpriteFont font;
// Menu item textpublic string Text;
// Menu Item positionpublic Vector2 Position;public Vector2 textOrigin;
// Menu Item sizepublic Vector2 Size;
// Bool tap value shows whether tap on the screenpublic bool Tap;
// Tap event handlerpublic event EventHandler OnTap;
// Timer objectfloat timer = 0;
// Alpha value of text colorfloat alpha = 1;Color color;
// The scale of textfloat scale = 1;
For More Information:
www.packtpub.com/windows-phone-7-xna-game-cookbook/book
Chapter 4
121
3. Next, we defi ne the Bound property of the text menu item:
// The Bound of menu itempublic Rectangle Bound{ get { return new Rectangle((int)Position.X, (int)Position.Y, (int)Size.X, (int)Size.Y); }}
4. Defi ne the constructor of the TextMenuItem class:
// Text menu item constructorpublic TextMenuItem(Vector2 position, string text, SpriteFont font, SpriteBatch spriteBatch){ Position = position; Text = text; this.font = font; this.spriteBatch = spriteBatch; // Compute the text size Size = font.MeasureString(Text); textOrigin = new Vector2(Size.X / 2, Size.Y / 2); color = Color.White;}
5. Then, we implement the Update() method:
// Text menu item update method, get the tapped position on screenpublic void Update(Vector2 tapPosition){ // if the tapped position within the text menu item bound, // set Tap to true and trigger // the OnTap event if (Bound.Contains((int)tapPosition.X,(int)tapPosition.Y)) { Tap = true; OnTap(this, null); } else { Tap = false; }}
For More Information:
www.packtpub.com/windows-phone-7-xna-game-cookbook/book
Heads Up Display (HUD)—Your Phone Game User Interface
122
6. The last method in the TextMenuItem class is the Draw() method, let’s add the code:
public void Draw(GameTime gameTime){ timer += (float)gameTime.ElapsedGameTime.TotalMilliseconds; // Draw the text menu item if (Tap) { // Draw text visual effect if (alpha >= 0 && timer > 100) { // Decrease alpha value of effect text alpha -= 0.1f; color *= alpha;
// Increase the effect text scale scale++; // Draw the first layer of effect text spriteBatch.DrawString(font, Text, Position, color, 0, new Vector2(Size.X / 2, Size.Y / 2), scale, SpriteEffects.None, 0); // Draw the second layer of effect text spriteBatch.DrawString(font, Text, Position, color, 0, new Vector2(Size.X / 2, Size.Y / 2), scale / 2, SpriteEffects.None, 0);
// Reset the timer for the next interval timer = 0; }
// Draw the original text spriteBatch.DrawString(font, Text, Position, Color.Red);
} else { // Reset the scale, alpha and color value of original // text scale = 1; alpha = 1;
For More Information:
www.packtpub.com/windows-phone-7-xna-game-cookbook/book
Chapter 4
123
color = Color.White;
// Draw the original text spriteBatch.DrawString(font, Text, Position, Color.White);
}}
7. When the TextMenuItem class is done, the following work is about using the class in our game class. Add the code to the TextMenuGame fi eld:
// SpriteFont object for text menu itemSpriteFont font;
// Menu collection of text menu itemList<TextMenuItem> Menu;
// Random color for backgroundRandom random;Color backgroundColor;
8. This step is to initialize the variables—Menu, random, and backgroundColor; add the code to the Initialize() method:
Menu = new List<TextMenuItem>();random = new Random();backgroundColor = Color.CornflowerBlue;
9. Load the game sprite font and text menu items in Menu, and add the following code to the LoadContent() method :
font = Content.Load<SpriteFont>(“gameFont”);
// Initialize the text menu items in Menuint X = 100;int Y = 100;
for (int i = 0; i < 5; i++){ TextMenuItem item = new TextMenuItem( new Vector2(X, Y + 60 * i), “TextMenuItem”, font, spriteBatch); item.OnTap += new EventHandler(item_OnTap); Menu.Add(item);}
For More Information:
www.packtpub.com/windows-phone-7-xna-game-cookbook/book
Heads Up Display (HUD)—Your Phone Game User Interface
124
10. Defi ne the text menu item event reaction method item_OnTap():
void item_OnTap(object sender, EventArgs e){ // Set random color for back in every valid tap backgroundColor.R = (byte)random.Next(0, 256); backgroundColor.G = (byte)random.Next(0, 256); backgroundColor.B = (byte)random.Next(0, 256);}
11. Get the tapped position and pass it to the text menu items for valid tap checking. Insert the code to the Update() method:
// Get the tapped positionVector2 tapPosition = new Vector2();TouchCollection touches = TouchPanel.GetState();if (touches.Count > 0 && touches[0].State == TouchLocationState.Pressed){ tapPosition = touches[0].Position;
// Check the tapped positon whether inside one of the text // menu items foreach (TextMenuItem item in Menu) { item.Update(tapPosition); }}
12. Draw the Menu, paste the code into the Draw() method :
// Replace the existing Clear code with this to // simulate the effect of the menu item selectionGraphicsDevice.Clear(backgroundColor);
// Draw the MenuspriteBatch.Begin(SpriteSortMode.Immediate, BlendState.AlphaBlend);
foreach (TextMenuItem item in Menu){ item.Draw(gameTime);}spriteBatch.End();
For More Information:
www.packtpub.com/windows-phone-7-xna-game-cookbook/book
Chapter 4
125
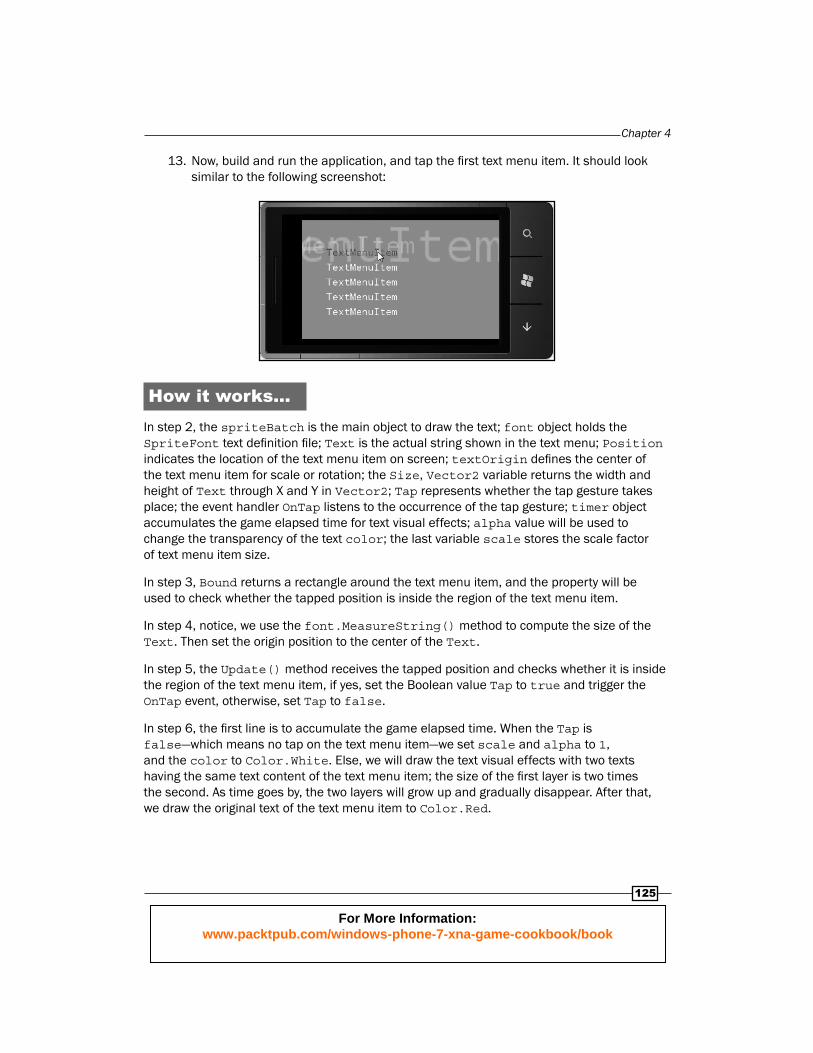
13. Now, build and run the application, and tap the fi rst text menu item. It should look similar to the following screenshot:
How it works...In step 2, the spriteBatch is the main object to draw the text; font object holds the SpriteFont text defi nition fi le; Text is the actual string shown in the text menu; Position indicates the location of the text menu item on screen; textOrigin defi nes the center of the text menu item for scale or rotation; the Size, Vector2 variable returns the width and height of Text through X and Y in Vector2; Tap represents whether the tap gesture takes place; the event handler OnTap listens to the occurrence of the tap gesture; timer object accumulates the game elapsed time for text visual effects; alpha value will be used to change the transparency of the text color; the last variable scale stores the scale factor of text menu item size.
In step 3, Bound returns a rectangle around the text menu item, and the property will be used to check whether the tapped position is inside the region of the text menu item.
In step 4, notice, we use the font.MeasureString() method to compute the size of the Text. Then set the origin position to the center of the Text.
In step 5, the Update() method receives the tapped position and checks whether it is inside the region of the text menu item, if yes, set the Boolean value Tap to true and trigger the OnTap event, otherwise, set Tap to false.
In step 6, the fi rst line is to accumulate the game elapsed time. When the Tap is false—which means no tap on the text menu item—we set scale and alpha to 1, and the color to Color.White. Else, we will draw the text visual effects with two texts having the same text content of the text menu item; the size of the fi rst layer is two times the second. As time goes by, the two layers will grow up and gradually disappear. After that, we draw the original text of the text menu item to Color.Red.
For More Information:
www.packtpub.com/windows-phone-7-xna-game-cookbook/book
Heads Up Display (HUD)—Your Phone Game User Interface
126
In step 7, the font object holds the game sprite font for rendering the Text of the text menu item; Menu is the collection of text menu items; the random variable will be used to generates random number for creating random backgroundColor.
In step 10, because the range for red, green, and blue factors of Color is from 0 to 255, the random numbers generated for them also meet the rule. With the random number, every valid text menu item tap will change the background color randomly.
Creating an image-based menuThe image-based menu is another menu-presentation approach. Unlike the text-based menu, the image-based menu uses 2D picture as the content of every menu item and makes the game navigation user interface more attractive and innovative. It gives graphic designers a much bigger space for conceiving ideas for a game. An image-based menu easily stimulates the designers’ and programmers’ creativities. The image menu item can swipe in and swipe out, jump in and jump out, or fade in and fade out. In this recipe, you will learn how to create an image-based menu system and use it in your own Windows Phone 7 game.
Getting readyAs an example, the image menu items are placed horizontally on the screen. When you tap one of them, it will grow up and the current item index shows at the top-left of the screen; once the tapped position is outside of its bound, the menu will restore to the initial state. Now, let’s build the application.
How to do it...Follow these steps to create your own image-based menu:
1. Create a Windows Phone Game project in Visual Studio 2010 named ImageMenu, change Game1.cs to ImageMenuGame.cs, and add the ImageMenuItem.cs in the main project. Then add Imageitem.png and gameFont.spriteFont to the content project.
2. Create the ImageMenuItem class in the ImageMenuItem.cs fi le. First, add the code to the ImageMenuItem class fi eld:
// SpriteBatch objectSpriteBatch spriteBatch;
// Menu item text fontTexture2D texture;
// Menu Item positionpublic Vector2 Position;
For More Information:
www.packtpub.com/windows-phone-7-xna-game-cookbook/book
Chapter 4
127
// Menu Item origin position for translation and rotationpublic Vector2 Origin;
// Bool tap value shows whether tap on the screenpublic bool Tap;
// Timer objectfloat timer = 0;
// The scale range from MinScale to MaxScaleconst float MinScale = 0.8f;const float MaxScale = 1;
// The scale of textfloat scale = 0.8f;
// Image menu item indexpublic int Index = 0;
3. Next, add the Bound property:
// The Bound of menu itempublic Rectangle Bound{ get { return new Rectangle( (int)(Position.X - Origin.X * scale), (int)(Position.Y - Origin.Y * scale), (int)(texture.Width * scale), (int)(texture.Height * scale)); }}
4. Then, defi ne the constructor of the ImageMenuItem class:
// Text menu item constructorpublic ImageMenuItem(Vector2 Location,Texture2D Texture, SpriteBatch SpriteBatch){ Position = Location; texture = Texture; spriteBatch = SpriteBatch;
Origin = new Vector2(texture.Width / 2, texture.Height / 2);}
For More Information:
www.packtpub.com/windows-phone-7-xna-game-cookbook/book
Heads Up Display (HUD)—Your Phone Game User Interface
128
5. The following method is the Update() method of the ImageMenuItem class , so let's add its implementation code:
// Text menu item update method, get the tapped position on // screenpublic void Update(GameTime gameTime, Vector2 tapPosition){ // if the tapped position within the text menu item bound, // set Tap to true and trigger the OnTap event Tap = Bound.Contains((int)tapPosition.X, (int)tapPosition.Y); // Accumulate the game elapsed time timer += (float)gameTime.ElapsedGameTime.TotalMilliseconds;
}
6. The last method of the ImageMenuItem class is the Draw() method , so let's add its implementation code:
public void Draw(GameTime gameTime){ // Draw the text menu item if (Tap) { // if tap gesture is valid, gradually scale to // MaxScale in if (scale <= MaxScale && timer > 200) { scale += 0.1f; } spriteBatch.Draw(texture, Position, null, Color.Red, 0f, Origin, scale, SpriteEffects.None, 0f);
} else { // If no valid tap, gradually restore scale to // MinScale in every frame if (scale > MinScale && timer > 200) { scale -= 0.1f; } spriteBatch.Draw(texture, Position, null, Color.White, 0f, Origin, scale, SpriteEffects.None, 0f); }}
For More Information:
www.packtpub.com/windows-phone-7-xna-game-cookbook/book
Chapter 4
129
7. So far, we have seen the ImageMenuItem class. Our next job is to use the class in the main class. Add the code to the ImageMenuGame class :
// SpriteFont object for the current index valueSpriteFont font;
// The image menu item textureTexture2D texImageMenuItem;
// The collection of image menu itemsList<ImageMenuItem> Menu;
// The count of image menu items int TotalMenuItems = 4;
// The index for every image menu itemint index = 0;
// Current index of tapped image menu itemint currentIndex;
8. Initialize the Menu object in the Initialize() method :
// Initialize MenuMenu = new List<ImageMenuItem>();
9. Load the SpriteFont and ImageMenuItem texture, and initialize the ImageMenuItem in Menu. Next, insert the code to the LoadContent() method :
texImageMenuItem = Content.Load<Texture2D>(“ImageItem”);font = Content.Load<SpriteFont>(“gameFont”);
// Initialize the image menu itemsint X = 150;int Y = 240;
// Instance the image menu items horizontallyfor (int i = 0; i < TotalMenuItems; i++){ ImageMenuItem item = new ImageMenuItem( new Vector2( X + i * (texImageMenuItem.Width + 20), Y), texImageMenuItem, spriteBatch); item.Index = index++; Menu.Add(item);}
For More Information:
www.packtpub.com/windows-phone-7-xna-game-cookbook/book
Heads Up Display (HUD)—Your Phone Game User Interface
130
10. In this step, we will check the valid tapped position and get the index of the tapped image menu item, paste the code to the Update() method:
// Get the tapped positionVector2 tapPosition = new Vector2();TouchCollection touches = TouchPanel.GetState();if (touches.Count > 0 && touches[0].State == TouchLocationState.Pressed){ tapPosition = touches[0].Position;
// Check the tapped positon whether inside one of the // image menu items foreach (ImageMenuItem item in Menu) { item.Update(gameTime, tapPosition);
// Get the current index of tapped image menu item if (item.Tap) { currentIndex = item.Index; } }}
11. Draw the menu and the current index value on the screen, and insert the lines to the Draw() method:
spriteBatch.Begin();
// Draw the Menuforeach (ImageMenuItem item in Menu){ item.Draw(gameTime);}
// Draw the current index on the top-left of screenspriteBatch.DrawString(font, “Current Index: “ + currentIndex.ToString(), new Vector2(0, 0), Color.White);
spriteBatch.End();
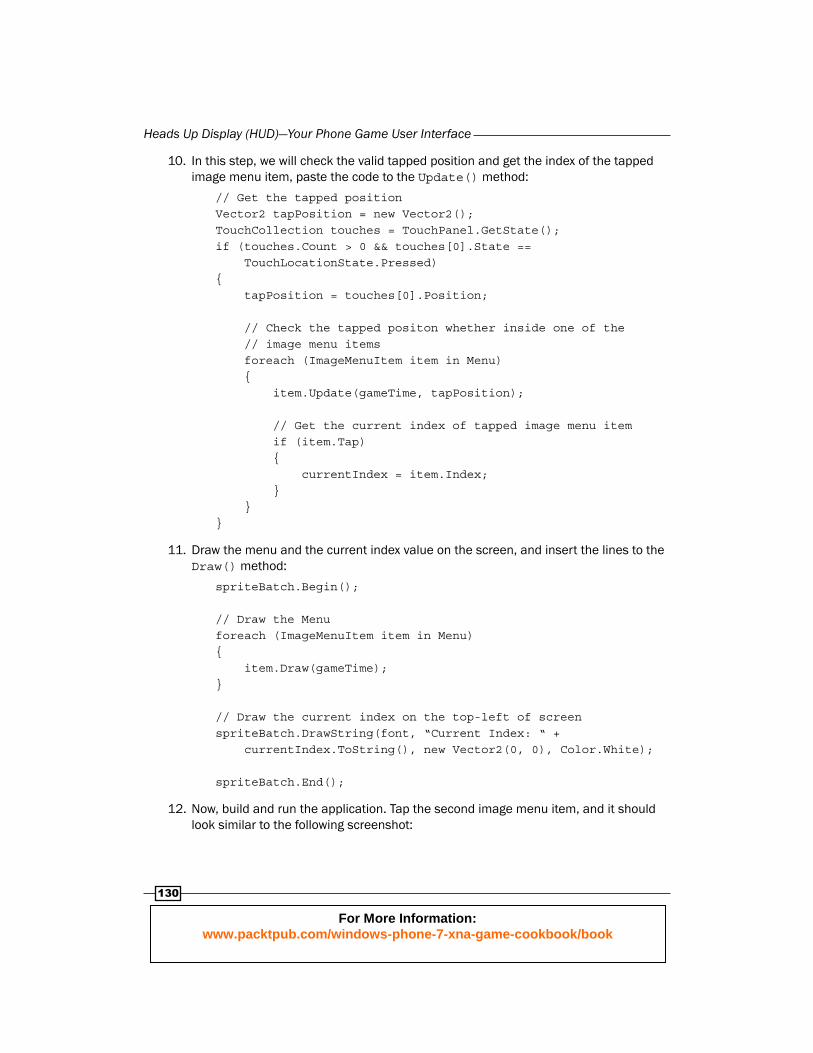
12. Now, build and run the application. Tap the second image menu item, and it should look similar to the following screenshot:
For More Information:
www.packtpub.com/windows-phone-7-xna-game-cookbook/book
Chapter 4
131
How it works... In step 2, spriteBatch renders the image of the menu item on screen; texture loads the graphic content of the image menu item; Position represents the position of every image menu item; Origin defi nes the center for menu item rotation and translation; Tap is the mark for valid menu item tapping; the timer variable accumulates the game elapsed time for changing the scale of the image menu item. The following two objects MinScale and MaxScale limit the range of scale changing; the scale variable indicates the current scale value of the menu item; index holds the sequential position of a menu.
In step 3, the Bound property returns a rectangle around the image of the menu item according to the menu item position and the image size.
In step 6, we will draw the visual effect for the menu item with image zoom in and zoom out. The fi rst line accumulates the game elapsed time for changing the menu item scale. If the tapped position is inside the image menu item, the item will grow up gradually along with the increasing scale value until MaxScale; otherwise, it will restore to the initial state.
In step 7, the font object will render the current index of the image menu item on the top-left of the screen; texImageMenuItem holds the image of the menu item; Menu is the collection of ImageMenuItem; TotalMenuItems declares the total number of image menu items in Menu; index is used to mark the index of every menu item in Menu; the currentValue variable saves the index of the tapped image menu item.
In step 9, we instance the image menu items horizontally and defi ne the gap between each of the items at about 20 pixels wide.
In step 10, after calling the ImageMenuItem.Update() method , you can get the current index of the menu item when its Tap value is true.
For More Information:
www.packtpub.com/windows-phone-7-xna-game-cookbook/book
Heads Up Display (HUD)—Your Phone Game User Interface
132
Creating a 3D model-based menu Text- or image-based menus are very common in games. As you know, they are both in 2D, but sometimes you want some exceptional effects for menus in 3D, such as rotating. 3D menus render the model as a menu item for any 3D transformation. They offer a way to implement your own innovative menu presentation in 3D. This recipe will specify the interesting technique in Windows Phone 7.
Getting readyProgramming the 3D model-based menu is an amazing adventure. You can use the 3D model rendering and transformation techniques to control the menu items and control the camera at different positions, getting closer or looking like a bird. As a demo, the model menu item of menu will pop up when selected. I hope this recipe will impress you. Let’s look into the code.
How to do it...The following steps will lead you to build an impressive 3D model-based menu:
1. Create the Windows Phone Game project named ModelMenu3D, change Game1.cs to ModelMenuGame.cs. Add a ModelMenuItem.cs to the project; gameFont.spriteFont and ModelMenuItem3D.FBX to the content project.
2. Create the ModelMenuItem class in ModelMenuItem.cs. Add the code to its fi eld:
// Model of menu itemModel modelItem;
// Translation of model menu itempublic Vector3 Translation;
// The view and projection of camera for model view itempublic Matrix View;public Matrix Projection;
// The index of model menu itempublic int Index;
// The mark for selectionpublic bool Selected;
// The offset from menu item original position when selectedpublic int Offset;
For More Information:
www.packtpub.com/windows-phone-7-xna-game-cookbook/book
Chapter 4
133
3. Next, defi ne the constructor of the ModelMenuItem class and set the default offset of the selected model menu item.
// Constructorpublic ModelMenuItem(Model model, Matrix view, Matrix projection){ modelItem = model; View = view; Projection = projection; Offset = 5;}
4. This step is to give the defi nition of the Draw() method of the ModelMenuItem class:
// Draw the model menu itempublic void Draw(){ Matrix[] modelTransforms = new Matrix[modelItem.Bones.Count]; modelItem.CopyAbsoluteBoneTransformsTo(modelTransforms);
foreach (ModelMesh mesh in modelItem.Meshes) { foreach (BasicEffect effect in mesh.Effects) { // Enable lighting effect.EnableDefaultLighting();
// Set the ambient light color to white effect.AmbientLightColor = Color.White.ToVector3();
if (Selected) { // If the item is not selected, it restores // to the original state effect.World = modelTransforms[mesh.ParentBone.Index] * Matrix.CreateTranslation(Translation + new Vector3(0,0, Offset)); } else { // If the item is selected, it stands out effect.World = modelTransforms[mesh.ParentBone.Index]
For More Information:
www.packtpub.com/windows-phone-7-xna-game-cookbook/book
Heads Up Display (HUD)—Your Phone Game User Interface
134
* Matrix.CreateTranslation(Translation); } effect.View = View; effect.Projection = Projection; } mesh.Draw(); }}
5. Use the ModelMenuItem class in our game. Add the code to the fi eld of the ModelMenuGame class:
// Sprite font objectSpriteFont font;
// Model of menu ItemModel menuItemModel;
// Camera positionVector3 cameraPositon;
// Camera view and projection matricesMatrix view;Matrix projection;
// The collection of Model Menu itemsList<ModelMenuItem> Menu;
// The count of model menu items in Menuint TotalMenuItems = 4;
// The left and right hit regions for menu item selectionRectangle LeftRegion;Rectangle RightRegion;
// Current index of model menu item in Menuint currentIndex = 0;
// Event handler of hit regionspublic event EventHandler OnTap;
6. Initialize the camera, menu, and hit regions. Insert the code to the Initialize() method:
// Define the camera positioncameraPositon = new Vector3(-40, 10, 40);
For More Information:
www.packtpub.com/windows-phone-7-xna-game-cookbook/book
Chapter 4
135
// Define the camera view and projection matricesview = Matrix.CreateLookAt(cameraPositon, Vector3.Zero, Vector3.Up);projection = Matrix.CreatePerspectiveFieldOfView(MathHelper.PiOver4, GraphicsDevice.Viewport.AspectRatio, 1.0f, 1000.0f);
// Initialize the Menu objectMenu = new List<ModelMenuItem>();
// Left hit region occupies the left half of screenLeftRegion = new Rectangle( 0, 0, GraphicsDevice.Viewport.Width / 2, GraphicsDevice.Viewport.Height);
// Right hit region occupies the right half of screenRightRegion = new Rectangle(GraphicsDevice.Viewport.Width / 2, 0, GraphicsDevice.Viewport.Width / 2, GraphicsDevice.Viewport.Height); // Define the event handler OnTap with the delegate methodOnTap = new EventHandler(item_OnTap);
7. Next, defi ne the reaction method item_OnTap of the OnTap event:
// Make the current index value change within the range of // total menu itemscurrentIndex = currentIndex % TotalMenuItems;
// If the current index is less than 0, set it to the last itemif (currentIndex < 0){ // From the last item currentIndex = TotalMenuItems - 1;}
// if the current index is greater than the last index, set it to the // first item else if (currentIndex > TotalMenuItems - 1){ // From the beginning item; currentIndex = 0;}
For More Information:
www.packtpub.com/windows-phone-7-xna-game-cookbook/book
Heads Up Display (HUD)—Your Phone Game User Interface
136
// Select the menu item, of which the index equals the // current index foreach (ModelMenuItem item in Menu){ if (item.Index == currentIndex) { item.Selected = true; } else { item.Selected = false; }}
8. Load the game content and initialize the menu items of Menu. Insert the code in the Initialize() method:
// Load and initialize the model and font objectsmenuItemModel = Content.Load<Model>(“ModelMenuItem3D”);font = Content.Load<SpriteFont>(“gameFont”);
// Initialize the model menu items in Menu horizontallyfor (int i = 0; i < TotalMenuItems; i++){ int X = -20;
ModelMenuItem item = new ModelMenuItem( menuItemModel, view, projection); item.Translation = new Vector3(X + (i * 20), 0, 0); // Set the index of menu item item.Index = i; Menu.Add(item);}
// Setting the first menu item to be selected by defaultMenu[0].Selected = true;
9. In this step, we make the current index value react to the tap on the hit regions. Paste the code to the Update() method:
// Get the tapped positionVector2 tapPosition = new Vector2();TouchCollection touches = TouchPanel.GetState();if (touches.Count > 0 && touches[0].State ==
For More Information:
www.packtpub.com/windows-phone-7-xna-game-cookbook/book
Chapter 4
137
TouchLocationState.Pressed){ tapPosition = touches[0].Position; Point point = new Point((int)tapPosition.X, (int)tapPosition.Y); // Check the tapped position whether in the left region if (LeftRegion.Contains(point)) { // If yes, decrease the current index --currentIndex; OnTap(this, null); } // Check the tapped position whether in the right region else if (RightRegion.Contains(point)) { // If yes, increase the current index ++currentIndex; OnTap(this, null); }}
10. The last step is to draw the menu on screen. Insert the code to the Draw() method:
// The following three lines are to ensure that the models are // drawn correctly GraphicsDevice.DepthStencilState = DepthStencilState.Default;GraphicsDevice.BlendState = BlendState.AlphaBlend;
// Draw the Menuforeach (ModelMenuItem item in Menu){ item.Draw();}
// Draw the current index on the top-left of screenspriteBatch.Begin();spriteBatch.DrawString(font, “Current Index: “ + currentIndex.ToString(), new Vector2(0, 0), Color.White);spriteBatch.End();
For More Information:
www.packtpub.com/windows-phone-7-xna-game-cookbook/book
Heads Up Display (HUD)—Your Phone Game User Interface
138
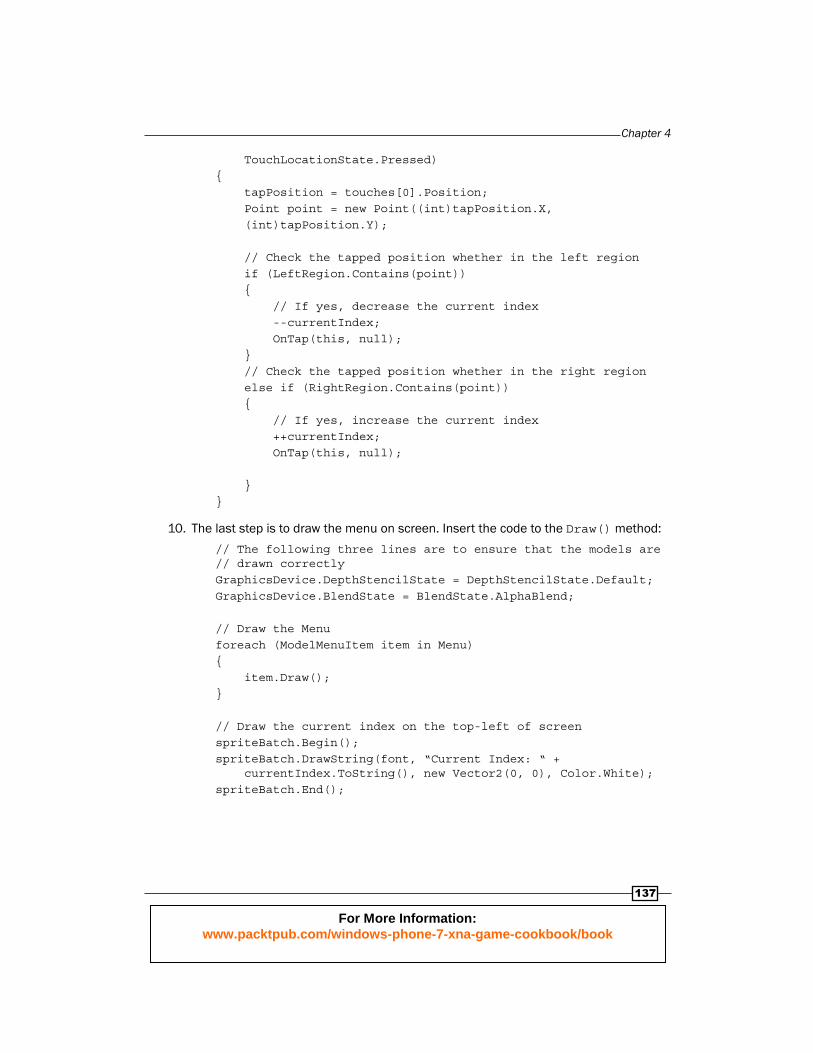
11. Now, build and run the application. When you tap the right region, the second model menu will pop up, as shown in the following screenshot:
How it works... In step 2, the modelitem holds the model object of the menu item; Translation stores the world position of the model menu item; View and Projection stand for the view and projection matrices of the camera respectively; index saves the index of the menu item in the menu; Selected indicates the selection state of the model menu item; Offset is the offset value from the model menu item’s original position.
In step 4 and in the iteration of Mesh.Effects, we enable the light through calling the Effect.EnableDefaultLighting() method and set the Effect.AmbientLightColor to Color.White.ToVector3(). Notice, for popping up the model menu item, we create the translation matrix with positive 5 units offset at the Z-axis from the original position. If a menu is selected, it will pop up, otherwise, it will go back or remain in the initial state.
In step 5, font object will be used to draw the current index value on the top-left on screen; menuModel stores the model object for model menu item; cameraPosition defi nes the position of the camera; view and projection are the matrices for camera view and projection respectively; Menu is the collection of model menu items; TotalMenuItems indicates the total number of menu items; LeftRegion and RightRegion are the areas for item choosing.
In step 6, the fi rst part of the code before is to defi ne the camera; the second part is about initializing the left and right hit regions. LeftRegion takes up the left half of the screen; RightRegion occupies the other half.
For More Information:
www.packtpub.com/windows-phone-7-xna-game-cookbook/book
Chapter 4
139
In step 7, the fi rst line is responsible for making the currentIndex value not less than -1 and greater than TotalMenuItems. Next, if the current index is less than 0, the last menu item will be selected; otherwise, if the current index is greater than TotalMenuItems minus 1, the fi rst item will pop up. The following foreach loop checks which item is currently selected when its index is equal to the current index.
In step 8, the fi rst two lines are to load the menu item model and the font for presenting the current index. The following for loop initializes the menu items of Menu horizontally and assigns i value to the item index. The last line sets the fi rst selected item.
In step 9, this block of code fi rst gets the tapped position on screen. If the tapped position is in the left region, the current index decreases by 1, else, current index increases by 1. Any valid tap on the regions will trigger the OnTap event.
Creating a progress bar for game content loading and value status
When playing a game, especially for some big games, at the initialization phase, a progress bar will show you the game object loading status and percents. As a time-based game, the progress bar represents the remaining time. Moreover, a Role Playing Game (RPG) often uses the progress bar to present the current life value. A progress bar is a very common control in game development and is easy to use. In this recipe, you will fi nd the inner code for creating a progress bar.
Getting readyIn Windows Phone 7 XNA programming, two methods will let you create the progress bar. One is using the rectangle for drawing the background and forefront. This is simple but not fl exible and stylish. If you want to make some innovative and unusual visual effects, the primitives will not meet your needs. The second method will give you much more space to realize your idea for the progress bar. You can use graphic design tool to draw the background and forefront images as you like, then render these images and change the size of the forefront image to comply with the on going percents; even the round or other shapes can be used for presenting the progress status. In this example, we will use the rectangle images (second method) for implementing the progress bar in Windows Phone 7.
For More Information:
www.packtpub.com/windows-phone-7-xna-game-cookbook/book
Heads Up Display (HUD)—Your Phone Game User Interface
140
How to do it...The following steps give you a complete guidance to develop a progress bar in your Windows Phone 7 game:
1. Create a Windows Phone Game project in Visual Studio 2010 named ProgressBar, change Game1.cs to ProgressBarGame.cs and insert a ProgressBar.cs in the project. Then add ProgressBarBackground.png and ProgressBarForefront.png to the content project.
2. Add a ProgressBar class in ProgressBar.cs to the main project. Add the code to the ProgressBar class fi elds:
// SpriteBatch for drawing 2D imageSpriteBatch spriteBatch;
// ProgressBar forefront and background imagesTexture2D texForefront;Texture2D texBackground;
// The background and forefront positon Vector2 backgroundPosition;Vector2 forefrontPosition;
// The offset of forefront image from the background.float forefrontStartOffSetX;float forefrontStartOffSetY;
// Current value of progressbarpublic int Value;
// The Min and Max values of progressbarpublic int Min;public int Max;
// Percent of current value around 100float percent;
// the actual rendering width of forefront imagefloat actualWidth;
// The direction of progress.bool increase = false;
For More Information:
www.packtpub.com/windows-phone-7-xna-game-cookbook/book
Chapter 4
141
3. Next, we defi ne the Increase property:
// The increasing directionpublic bool Increase{ get { return increase; } set { // When increasing, the Value begins from Min if (value) { increase = value; Value = Min; } // When decreasing, the Value begins from Max else { increase = value; Value = Max; }
}}
4. The next step is to defi ne the constructor of the ProgressBar class:
public ProgressBar(Vector2 position, Texture2D forefront, Texture2D background, SpriteBatch spriteBatch){ this.spriteBatch = spriteBatch; texForefront = forefront; texBackground = background; backgroundPosition = position;
// Calculate the offset for forefront image forefrontStartOffSetX = (texBackground.Width - texForefront.Width) / 2; forefrontStartOffSetY = (texBackground.Height - texForefront.Height) / 2; // Create the forefront image position forefrontPosition = new Vector2(backgroundPosition.X + forefrontStartOffSetX,
For More Information:
www.packtpub.com/windows-phone-7-xna-game-cookbook/book
Heads Up Display (HUD)—Your Phone Game User Interface
142
backgroundPosition.Y + forefrontStartOffSetY); // Intitialize the Min and Max Min = 0; Max = 100;
// Set the increasing direction from high to low. Increase = false;}
5. After the constructor, the following method defi nition is the Update(), so add the method to the ProgressBar class :
public void Update(GameTime gameTime){ // If decreasing and Value greater than Min, minus the // Value by one if (Increase && Value < Max) { Value++; } else if (Value > Min) { Value--; }
// Compute the actual forefront image for drawing percent = (float)Value / 100; actualWidth = percent * texForefront.Width;
}
6. The fi nal step of creating the ProgressBar class is to defi ne the Draw() method:
public void Draw(){ spriteBatch.Draw(texBackground, backgroundPosition, Color.White); spriteBatch.Draw(texForefront, forefrontPosition, new Rectangle(0, 0, (int)actualWidth, texForefront.Height), Color.White);}
For More Information:
www.packtpub.com/windows-phone-7-xna-game-cookbook/book

Chapter 4
143
7. Use the ProgressBar class in our game. First, add the code to the class fi eld:
// Texture objects for background and forefront imagesTexture2D texForefront;Texture2D texBackground;
// The background image positionVector2 position;
// Progress bar objectProgressBar progressBar;
8. Then insert the initialization code to the LoadContent() method :
// Load the background and forefront imagestexForefront = Content.Load<Texture2D>(“ProgressBarForefront”);texBackground = Content.Load<Texture2D>(“ProgressBarBackground”);
// Initialize the progress barposition = new Vector2(200, 240);progressBar = new ProgressBar(position, texForefront, texBackground, spriteBatch);
9. Next, insert the code to the Update() method:
// Update the progress barprogressBar.Update(gameTime);
10. Finally, put the code in the Draw() method:
// draw the progress barspriteBatch.Begin();progressBar.Draw();spriteBatch.End();
11. Now, build and run the application, and it will run as shown in the following screenshots:
For More Information:
www.packtpub.com/windows-phone-7-xna-game-cookbook/book
Heads Up Display (HUD)—Your Phone Game User Interface
144
How it works...In step 2, the texForefront and texBackground are the Texture2D objects that hold the progressBar forefront and background images. The next two variables forefrontStartOffSetX and forefrontStartOffSetY indicate the offset position of forefront from the background; Value stores the progressBar current value; the Min and Max defi nes the range of the progressBar; percent and actualWidth will be used to calculate and store the current width of the forefront image respectively; the last variable increase represents the direction of the progressBar value increasing.
In step 3, if the Increase value is false, which means it is decreasing, the Value begins from the right with Max. Otherwise, the Value will begin from the left.
In step 4, notice the computation for forefront image offset, we use the background image width minus the width of the forefront image, get the gap between the left sides of the two images, then use the gap value and divide it by 2, get the offset on the X-axis from the background for the forefront image. The offset on the Y-axis is similar. After getting the offset of the forefront image, we set Min to 0 and Max to 100—the value range of progressBar. The last line is to defi ne the increasing direction. False, here, stands for the progress value that will decrease from 100 to 0, right to left.
In step 5, the fi rst part of the Update() method is to change Value by one, according to the increasing direction. The second part is about computing the actual width of the forefront image for rendering.
In step 6, this code draws the background image and forefront image on screen. Notice the third parameter in the Drawing() method for the forefront image. This is a Rectangle parameter, which represents the part of the forefront image for rendering in every frame; it helps you to adjust the size of the forefront image for presenting the value variation of the progress bar.
In step 7, the texForefront stands for the forefront image of the progress bar; the texBackground represents the background image of the progress bar; position defi nes the progress bar position on the Windows Phone 7 screen; the last variable progressBar is the progress bar object which will perform the different progress behaviors.
Creating buttons in your game In any type of game, button control is always the most basic and important part. In a GUI system, button control often plays a role in linking different parts of other controls. When you input some text in a text control, you click the button to send the message or confi rm it as a command. When you are using a listbox, the up and down buttons help you look up special information that you need in the game, such as choosing weapons. In the development phase, programmers can defi ne specifi c behaviors of the button events to implement the game logic or effects. To implement a button in the Windows Phone 7 XNA framework is not a hard mission. In this recipe, you will learn how to build your own button in Windows Phone 7.
For More Information:
www.packtpub.com/windows-phone-7-xna-game-cookbook/book
Chapter 4
145
How to do it...The following steps will show you the working code for creating the buttons for your Windows Phone 7 game:
1. Create a Windows Phone Game project named Button, change Game1.cs to ButtonGame.cs. Then add the Button.cs to the main project and button_image.png and gameFont.spriteFont to the content project.
2. Create the Button class in the Button.cs fi le. Add the line to the class as a fi eld:
// Button textureTexture2D texButton;
// SpriteBatch for drawing the button imageSpriteBatch spriteBatch;
// Button position on the screenpublic Vector2 Position;
// Color alpha valuepublic int Alpha = 255;
// Button colorColor color;
// Timer for game elapsed time accumulationfloat timer;
// The Tapped bool value indicates whether tap in the button regionpublic bool Tapped;
// Event handler OnTapped to react with tap gesturepublic event EventHandler OnTapped;
3. Then, defi ne the HitRegion property of the Button class:
// Get the hit regionpublic Rectangle HitRegion{ get { return new Rectangle((int)Position.X, (int)Position.Y, texButton.Width, texButton.Height); }}
For More Information:
www.packtpub.com/windows-phone-7-xna-game-cookbook/book
Heads Up Display (HUD)—Your Phone Game User Interface
146
4. Next, give the class constructor Button() of the Button class :
// Initialize the button without textpublic Button(Texture2D texture, Vector2 position, SpriteBatch spriteBatch){ this.texButton = texture; this.Position = position; this.spriteBatch = spriteBatch; color = Color.White;}
5. After the class constructor, the important Update() method that reacts to the tap gesture looks similar to the following code:
// Update the buttonpublic void Update(GameTime gameTime, Vector2 touchPosition){ // React to the tap gesture Point point = new Point((int)touchPosition.X, (int)touchPosition.Y); // If tapped button, set the Hovered to true and trigger // the OnClick event if (HitRegion.Contains(point)) { Tapped = true; OnTapped(this, null);
} else { Tapped = false; }}
6. The fi nal step to build the Button class is to defi ne the Draw() method:
// Draw the buttonpublic virtual void Draw(GameTime gameTime){
timer += (float)gameTime.ElapsedGameTime.TotalMilliseconds;
// Draw the button texture if (Tapped)
For More Information:
www.packtpub.com/windows-phone-7-xna-game-cookbook/book

Chapter 4
147
{ // Flash the button through the alpha value changing if (timer > 100) { // If the Alpha is 255, set it to 0 if (Alpha == 255) { Alpha = 0; } // If the Alpha value is 0, set it to 255 else if (Alpha == 0) { Alpha= 255; }
// Set the color alpha value color.A = (byte)Alpha;
// Set the timer to 0 for next frame timer = 0; }
// Draw the button image spriteBatch.Draw(texButton, HitRegion, null, color, 0, Vector2.Zero, SpriteEffects.None, 0); } else { spriteBatch.Draw(texButton, HitRegion, null,Color.White, 0, Vector2.Zero, SpriteEffects.None, 0); }}
7. Use the Button class in our main game class. Insert code to the ButtonGame class fi eld:
// Sprite Font for showing the textSpriteFont font;
// Text objectstring textTapState = “Random Color Text”;
// Text color;
For More Information:
www.packtpub.com/windows-phone-7-xna-game-cookbook/book
Heads Up Display (HUD)—Your Phone Game User Interface
148
Color textColor = Color.White;
// Random object for showing the random colorRandom random;
// Button objectButton button;
// Button texture;Texture2D buttonTexture;
8. Initialize the random variable in the Initialize() method, and add the following code to the method:
random = new Random();
9. Load the button image and initialize the button object. Add the code to the LoadContent() method:
font = Content.Load<SpriteFont>(“gameFont”);
buttonTexture = Content.Load<Texture2D>(“button_image”);Vector2 position = new Vector2( GraphicsDevice.Viewport.Width / 2 – buttonTexture.Width / 2, GraphicsDevice.Viewport.Height/2 – buttonTexture.Height / 2);button = new Button(buttonTexture, position, spriteBatch);button.OnTapped += new EventHandler(button_OnTapped);
10. Next is the reaction method for the button OnTapped event:
void button_OnTapped(object sender, EventArgs e){ textColor.R = (byte)random.Next(0, 256); textColor.G = (byte)random.Next(0, 256); textColor.B = (byte)random.Next(0, 256);}
11. Get the tapped position and pass it to the Button.Update() method, paste the code in to the Update() method:
TouchCollection touches = TouchPanel.GetState();if(touches.Count > 0 && touches[0].State == TouchLocationState.Pressed){ Vector2 tappostion = touches[0].Position; button.Update(gameTime, tappostion);}
For More Information:
www.packtpub.com/windows-phone-7-xna-game-cookbook/book
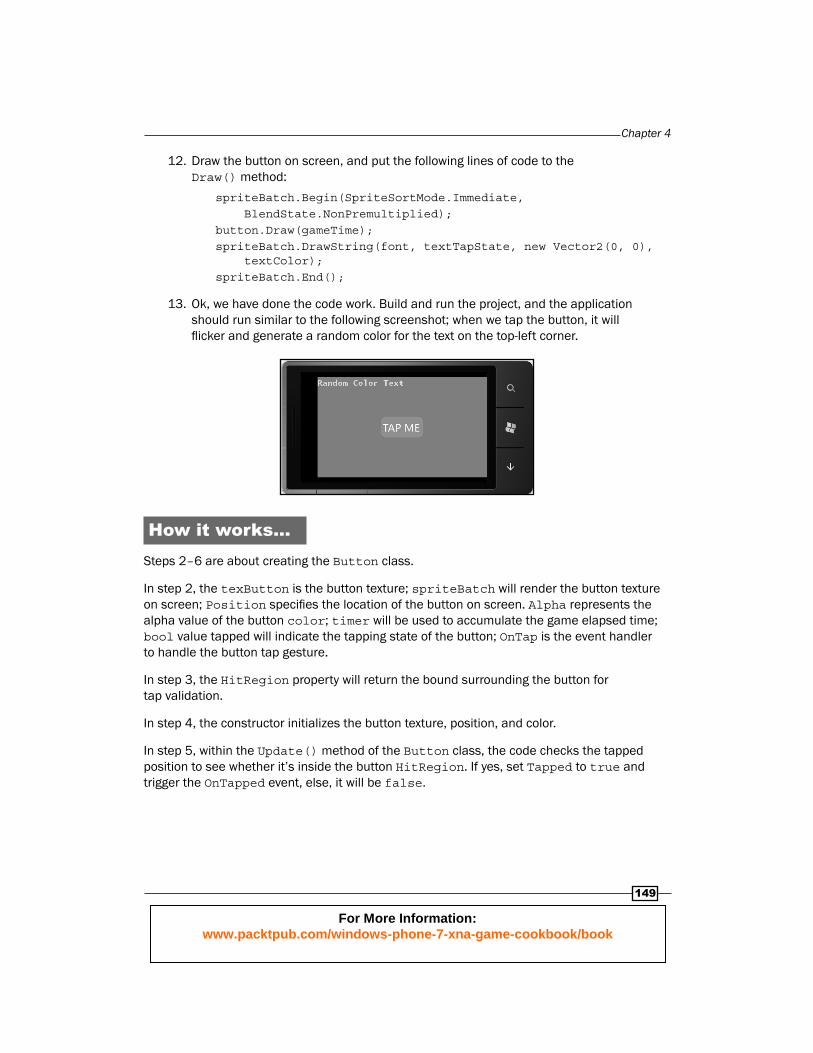
Chapter 4
149
12. Draw the button on screen, and put the following lines of code to the Draw() method:
spriteBatch.Begin(SpriteSortMode.Immediate, BlendState.NonPremultiplied);button.Draw(gameTime);spriteBatch.DrawString(font, textTapState, new Vector2(0, 0), textColor);spriteBatch.End();
13. Ok, we have done the code work. Build and run the project, and the application should run similar to the following screenshot; when we tap the button, it will fl icker and generate a random color for the text on the top-left corner.
How it works...Steps 2–6 are about creating the Button class.
In step 2, the texButton is the button texture; spriteBatch will render the button texture on screen; Position specifi es the location of the button on screen. Alpha represents the alpha value of the button color; timer will be used to accumulate the game elapsed time; bool value tapped will indicate the tapping state of the button; OnTap is the event handler to handle the button tap gesture.
In step 3, the HitRegion property will return the bound surrounding the button for tap validation.
In step 4, the constructor initializes the button texture, position, and color.
In step 5, within the Update() method of the Button class, the code checks the tapped position to see whether it’s inside the button HitRegion. If yes, set Tapped to true and trigger the OnTapped event, else, it will be false.
For More Information:
www.packtpub.com/windows-phone-7-xna-game-cookbook/book
Heads Up Display (HUD)—Your Phone Game User Interface
150
In step 6, the fi rst line is to accumulate the game elapsed time in milliseconds. The following code draws the button image. If the button is tapped and the elapsed time is greater than 100, it will fl icker. The effect is implemented by setting the Alpha value of button color. If the Alpha value equals 255 (Opaque), we set it to 0 (Transparent). Otherwise, the value will be set from 0 to 255. After that, the latest alpha value will be assigned to Color.A , the alpha factor of Color. Then, reset the timer for the next frame. The last line will render the fl ickering effect on screen.
Steps 7–11 are about using the Button class in the main game class.
In step 7, the font object will render the text on screen; the textTapState stores the text to be displayed; textColor specifi es the text color; random will be used to generate a random color for the text; the button variable represents the Button class instance; the buttonTexture loads the button image.
In step 9, the button_OnTapped() method will run if the OnTapped event happens. In the event reaction method, we set the R, G, and B factors of text color randomly, because the RGB value is from 0 to 255, so the random value for each of them must be inside the range.
In step 10, we get the tapped position for the button hit region validation.
In step 11, notice we must set the BlendState.NonPremultiplied because we change the button image Alpha value linearly.
Creating a listbox to speed up your information management in a game
Listbox is a list-style control, which collects the information in the list. For games, list control often plays a role in information management. The items in the listbox are presented one-by-one vertically or horizontally. You can choose the information entry through the control. In this recipe, you will master the technique of building your own listbox.
Getting readyThe example will create a listbox in Windows Phone 7. When you click the scrollbar down or the down button, the listbox will show the list items from the latest index. Once you tap one of the items, the text of the item will be presented at the top-left of the screen. Now, let’s begin with building the Button class .
For More Information:
www.packtpub.com/windows-phone-7-xna-game-cookbook/book
Chapter 4
151
How to do it...The following steps will show you the complete process of creating the GUI listbox control:
1. Create the Windows Phone Game project named ListBoxControl, change Game1.cs to ListBoxControlGame.cs. Add the Button.cs, ScrollBar.cs, and ListBox.cs fi les to the main project, and add gameFont.spriteFont, ListBoxBackground.png, ScrollBarDown.png, and ScrollBarUp.png to the content project.
2. Create the Button class in Button.cs. First, insert the lines as the fi eld of the Button class:
// Button textureTexture2D texButton;
// SpriteBatch for drawing the button imageSpriteBatch spriteBatch;
// Button position on the screenpublic Vector2 Position;
// Button colorColor color;
// The Tapped bool value indicates whether tap in the button regionpublic bool Tapped;
// Event handler OnTap to react with tap gesturepublic event EventHandler OnTapped;
3. The next part is the HitRegion property :
// Get the hit regionpublic Rectangle HitRegion{ get { return new Rectangle((int)Position.X, (int)Position.Y, texButton.Width, texButton.Height); }}
For More Information:
www.packtpub.com/windows-phone-7-xna-game-cookbook/book
Heads Up Display (HUD)—Your Phone Game User Interface
152
4. After the property defi nition, the constructor will be:
// Initialize the button without textpublic Button(Texture2D texture, Vector2 position, SpriteBatch spriteBatch){ this.texButton = texture; this.Position = position; this.spriteBatch = spriteBatch; color = Color.White;}
5. Then, we defi ne the Update() method:
// Update the buttonpublic void Update(GameTime gameTime, Vector2 touchPosition){ // React to the tap gesture Point point = new Point((int)touchPosition.X, (int)touchPosition.Y); // If tapped button, set the Hovered to true and trigger // the OnClick event if (HitRegion.Contains(point)) { Tapped = true; OnTapped(this, null); } else { Tapped = false; }}
6. The fi nal method in the Button class is the Draw() method :
// Draw the buttonpublic virtual void Draw(GameTime gameTime){ // Draw the button texture if (Tapped) { spriteBatch.Draw(texButton, HitRegion, null, Color.Red, 0, Vector2.Zero, SpriteEffects.None, 0);
}
For More Information:
www.packtpub.com/windows-phone-7-xna-game-cookbook/book
Chapter 4
153
else { spriteBatch.Draw(texButton, HitRegion, null,Color.White, 0, Vector2.Zero, SpriteEffects.None, 0); }}
7. Create the ScrollBar class in ScrollBar.cs. As the class fi eld, we use the following code:
// SpriteBatch for drawing the scrollbarSpriteBatch spriteBatch;
// ScrollBar up and down buttonsButton scrollUp;Button scrollDown;
// Textures for scrollbar up and down buttonsTexture2D texScrollUp;Texture2D texScrollDown;
// The position of scrollbarpublic Vector2 Position;
// The positions of scrollbar up and down buttonspublic Vector2 scrollUpPosition;public Vector2 scrollDownPosition;
// Event handler when scrollbar up button tappedpublic event EventHandler OnScrollUpTapped;
// Event handler when scrollbar down button tappedpublic event EventHandler OnScrollDownTapped;
// The ScrollBar Height and Widthpublic int ScrollBarHeight;public int ScrollBarWidth;
8. The following code is the ScrollDownBound and ScrollUpBound property of the ScrollBar class:
// The Bound of Scrollbar down button public Rectangle ScrollDownBound{
For More Information:
www.packtpub.com/windows-phone-7-xna-game-cookbook/book
Heads Up Display (HUD)—Your Phone Game User Interface
154
get { return new Rectangle((int)scrollDownPosition.X, (int)scrollDownPosition.Y, (int)texScrollDown.Width, (int)texScrollDown.Height); }}
// The Bound of Scrollbar up button public Rectangle ScrollUpBound{ get { return new Rectangle((int)scrollUpPosition.X, (int)scrollUpPosition.Y, (int)texScrollDown.Width, (int)texScrollDown.Height); }}
9. After the properties, the constructor of the ScrollBar class should be as follows:
// ScrollBar constructorpublic ScrollBar(Vector2 position, int scrollbarHeight, ContentManager content, SpriteBatch spriteBatch){ // Load the textures of scroll bar up and down button texScrollDown = content.Load<Texture2D>(“ScrollBarDown”); texScrollUp = content.Load<Texture2D>(“ScrollBarUp”);
Position = position; this.spriteBatch = spriteBatch;
// Get the scrollbar width and height this.ScrollBarWidth = texScrollDown.Width; this.ScrollBarHeight = scrollbarHeight;
// The position of scrollbar up button this.scrollUpPosition = new Vector2( Position.X - ScrollBarWidth / 2, Position.Y); // The position of scrollbar down button this.scrollDownPosition = new Vector2( Position.X - ScrollBarWidth / 2,
For More Information:
www.packtpub.com/windows-phone-7-xna-game-cookbook/book

Chapter 4
155
Position.Y + ScrollBarHeight - texScrollDown.Height);
// Instance the scrollbar up and down buttons scrollUp = new Button(texScrollUp, scrollUpPosition, spriteBatch); scrollDown = new Button(texScrollDown, scrollDownPosition, spriteBatch);}
10. Next, we defi ne the Update() method of the Scrollbar class:
// Scrollbar Update methodpublic void Update(GameTime gameTime, Vector2 tappedPosition){ // Check whether the tapped position is in the bound of // scrollbar up button if (ScrollDownBound.Contains((int)tappedPosition.X, (int)tappedPosition.Y)) { // If yes, set the Tapped property of scrollbar down // button to true scrollDown.Tapped = true; // Set the Tapped property of scrollbar up button to // false scrollUp.Tapped = false;
// Trigger the scrollbar down button event OnScrollDownTapped(this, null); } else if(ScrollUpBound.Contains((int)tappedPosition.X, (int)tappedPosition.Y)) { // If yes, set the Tapped property of scrollbar up // button to true scrollUp.Tapped = true;
// Set the Tapped property of scrollbar down button to // false scrollDown.Tapped = false;
// Trigger the scrollbar up button event OnScrollUpTapped(this, null); }}
For More Information:
www.packtpub.com/windows-phone-7-xna-game-cookbook/book
Heads Up Display (HUD)—Your Phone Game User Interface
156
11. Then, draw the scrollbar on screen by using the Draw() method:
// Draw the scrollbarpublic void Draw(GameTime gameTime){ // Draw the scrollbar down and up buttons scrollDown.Draw(gameTime); scrollUp.Draw(gameTime);}
12. Create the ListBox class in the ListBox.cs fi le. We add the following code as the class fi eld:
// Game object holds the listbox Game game;
// SpriteBatch for drawing listboxSpriteBatch spriteBatch;
// SpriteFont object for showing the listbox text itemsSpriteFont font;
// The listbox background textureTexture2D texBackground;
// The collection of listbox text itemspublic List<string> list;
// The position of listbox on screenpublic Vector2 Position;
// The count of the listbox text itemspublic int Count;
// Scrollbar object to control the text items for showingScrollBar scrollBar;
// The Index for locating the specified item in listboxpublic int Index = 0;
// The bounds of showed itemsList<Rectangle> listItemBounds;
// The index of selected items public int SelectedIndex = 0;
For More Information:
www.packtpub.com/windows-phone-7-xna-game-cookbook/book
Chapter 4
157
// The selected itempublic string SelectedItem = “”;
// The selected area for highlighting the selected itemTexture2D SelectedArea;
// The offset from the position of listbox as the beginning of // drawing the text itemsVector2 Offset;
// The width and height of listboxint ListBoxWidth;int ListBoxHeight;
// The total number of items presenting in listboxint ShowedItemCount = 0;
13. As properties, the CharacterHeight and Bound look similar to the following:
// Get the character height o text itempublic float CharacterHeight{ get { if (font != null && list.Count > 0) { // The Y value represents the character height in // the returned Vector2 value // of SpriteFont.MeasureString() return font.MeasureString(list[0]).Y; } else { throw new Exception(); } }}
// Get the bound of listboxpublic Rectangle Bound{ get { return new Rectangle((int)Position.X, (int)Position.Y, texBackground.Width, texBackground.Height); }}
For More Information:
www.packtpub.com/windows-phone-7-xna-game-cookbook/book
Heads Up Display (HUD)—Your Phone Game User Interface
158
14. The next block of code is the constructor of the ListBox class:
// Listbox constructorpublic ListBox(Vector2 position, ContentManager content, SpriteBatch spriteBatch, Game game){ this.game = game; this.spriteBatch = spriteBatch;
listItemBounds = new List<Rectangle>();
list = new List<string>(); Position = position; font = content.Load<SpriteFont>(“gameFont”); texBackground = content.Load<Texture2D>(“ListBoxBackground”);
ListBoxWidth = texBackground.Width; ListBoxHeight = texBackground.Height;
// Define the scrollbar position relative to the position // of listbox Vector2 scrollBarPosition = new Vector2( Position.X + ListBoxWidth + 40, Position.Y); // Instance the scrollbar scrollBar = new ScrollBar(scrollBarPosition, ListBoxHeight, content, spriteBatch);
scrollBar.OnScrollUpTapped += new EventHandler(scrollBar_OnScrollUpTapped); scrollBar.OnScrollDownTapped += new EventHandler(scrollBar_OnScrollDownTapped);
// Define the offset for drawing the text items Offset = new Vector2(20, 4);}
15. Now, we defi ne the reaction method of the tap event of the scrollbar’s up and down buttons:
// The reaction method of scrollbar down button tapping eventvoid scrollBar_OnScrollDownTapped(object sender, EventArgs e){ // If the current item index plus the ShowedItemCount // is less
For More Information:
www.packtpub.com/windows-phone-7-xna-game-cookbook/book
Chapter 4
159
// than count of list items, increase the Index if (Index + ShowedItemCount < Count) { Index++; }}
// The reaction method of scrollbar up button tapping eventvoid scrollBar_OnScrollUpTapped(object sender, EventArgs e){ // If the current item index is greater than 0, decrease the // Index if (Index > 0) { Index--; }}
16. The following important method in the ListBox class is the Update() method:
// Check the tapping state of scrollbar and the selection of // listbox itemspublic void Update(GameTime gameTime, Vector2 tapposition){ scrollBar.Update(gameTime, tapposition); CheckSelected(tapposition);}
17. The defi nition of CheckSelected() is as follows:
// Get the selected index and item in listboxprivate void CheckSelected(Vector2 tappedPosition){ for (int i = 0; i < ShowedItemCount; i++) { // Check whether the tapped position is in the region of // listbox and in which one of the item bounds. if (Bound.Contains( (int)tappedPosition.X, (int)tappedPosition.Y) && tappedPosition.Y < listItemBounds[i].Y + CharacterHeight) { SelectedIndex = i; SelectedItem = list[Index + i]; break; } }}
For More Information:
www.packtpub.com/windows-phone-7-xna-game-cookbook/book
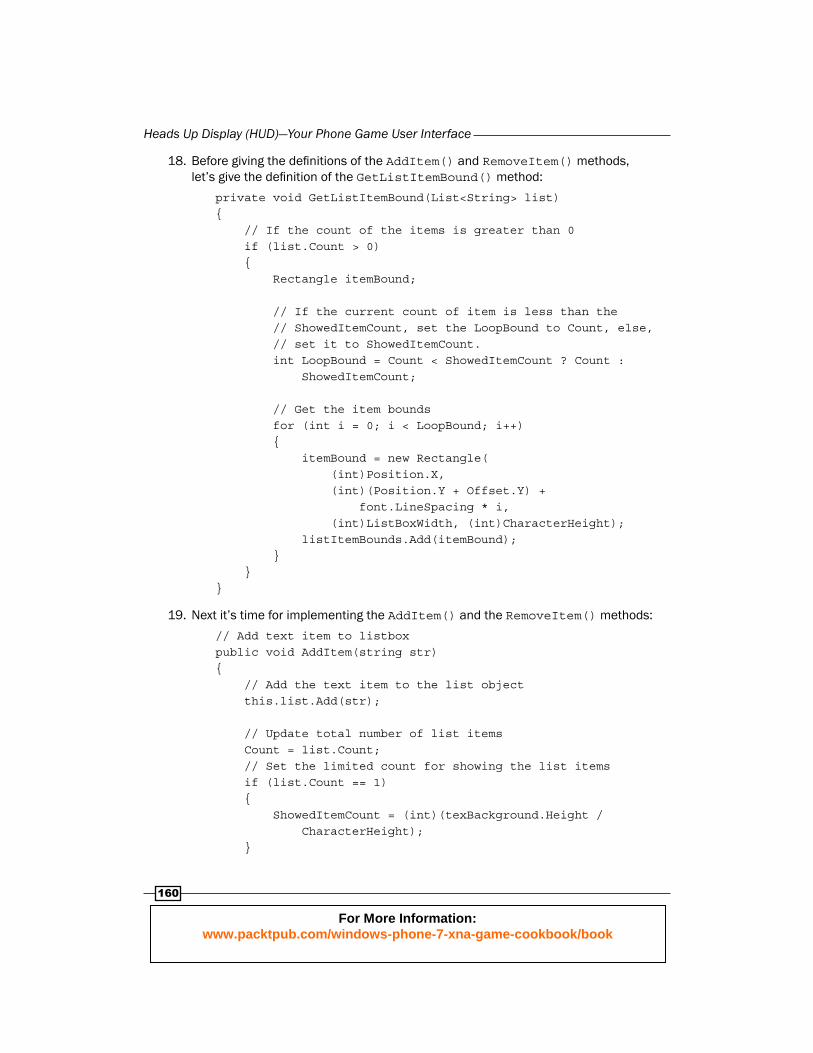
Heads Up Display (HUD)—Your Phone Game User Interface
160
18. Before giving the defi nitions of the AddItem() and RemoveItem() method s, let’s give the defi nition of the GetListItemBound() method:
private void GetListItemBound(List<String> list){ // If the count of the items is greater than 0 if (list.Count > 0) { Rectangle itemBound;
// If the current count of item is less than the // ShowedItemCount, set the LoopBound to Count, else, // set it to ShowedItemCount. int LoopBound = Count < ShowedItemCount ? Count : ShowedItemCount;
// Get the item bounds for (int i = 0; i < LoopBound; i++) { itemBound = new Rectangle( (int)Position.X, (int)(Position.Y + Offset.Y) + font.LineSpacing * i, (int)ListBoxWidth, (int)CharacterHeight); listItemBounds.Add(itemBound); } }}
19. Next it’s time for implementing the AddItem() and the RemoveItem() methods:
// Add text item to listbox public void AddItem(string str){ // Add the text item to the list object this.list.Add(str);
// Update total number of list items Count = list.Count; // Set the limited count for showing the list items if (list.Count == 1) { ShowedItemCount = (int)(texBackground.Height / CharacterHeight); }
For More Information:
www.packtpub.com/windows-phone-7-xna-game-cookbook/book
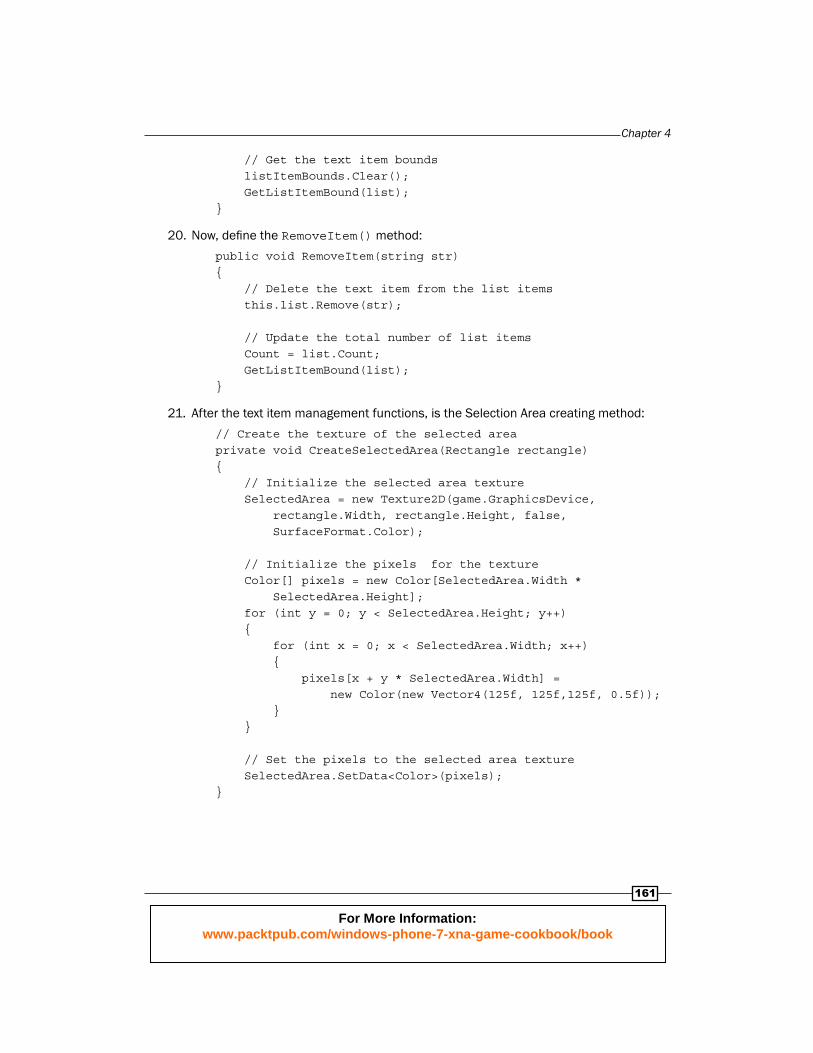
Chapter 4
161
// Get the text item bounds listItemBounds.Clear(); GetListItemBound(list);}
20. Now, defi ne the RemoveItem() method:
public void RemoveItem(string str){ // Delete the text item from the list items this.list.Remove(str);
// Update the total number of list items Count = list.Count; GetListItemBound(list);}
21. After the text item management functions, is the Selection Area creating method:
// Create the texture of the selected areaprivate void CreateSelectedArea(Rectangle rectangle){ // Initialize the selected area texture SelectedArea = new Texture2D(game.GraphicsDevice, rectangle.Width, rectangle.Height, false, SurfaceFormat.Color); // Initialize the pixels for the texture Color[] pixels = new Color[SelectedArea.Width * SelectedArea.Height]; for (int y = 0; y < SelectedArea.Height; y++) { for (int x = 0; x < SelectedArea.Width; x++) { pixels[x + y * SelectedArea.Width] = new Color(new Vector4(125f, 125f,125f, 0.5f)); } }
// Set the pixels to the selected area texture SelectedArea.SetData<Color>(pixels);}
For More Information:
www.packtpub.com/windows-phone-7-xna-game-cookbook/book
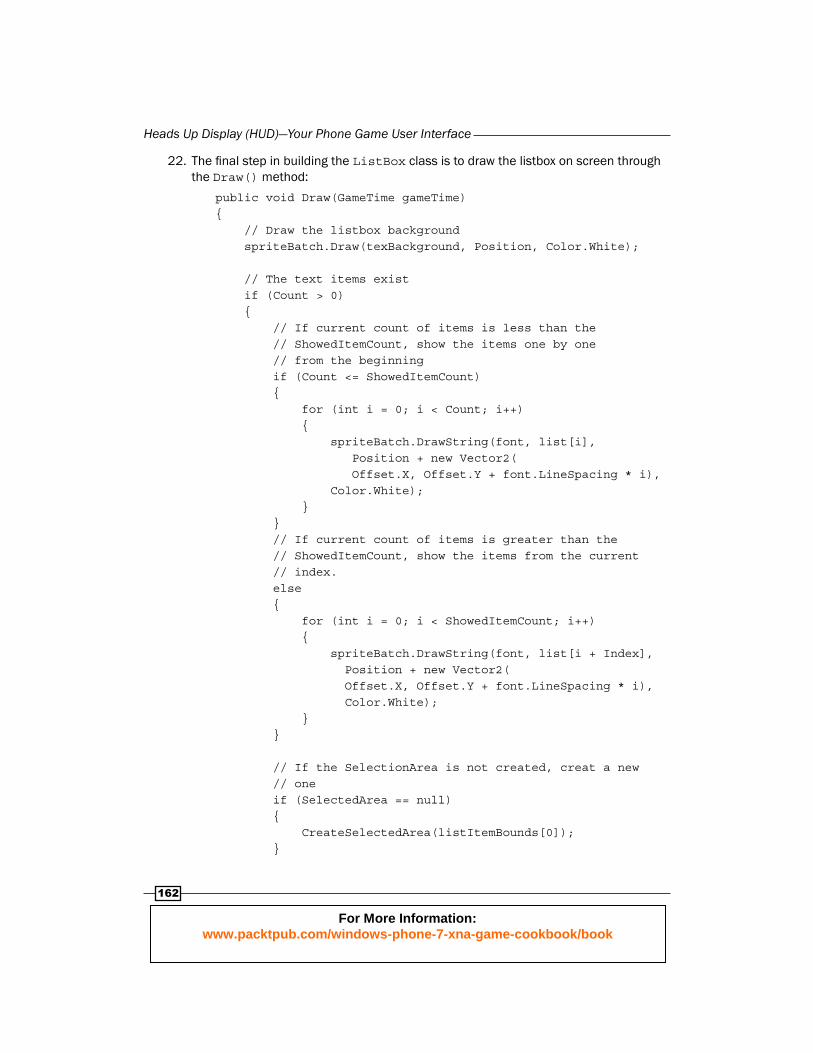
Heads Up Display (HUD)—Your Phone Game User Interface
162
22. The fi nal step in building the ListBox class is to draw the listbox on screen through the Draw() method:
public void Draw(GameTime gameTime){ // Draw the listbox background spriteBatch.Draw(texBackground, Position, Color.White);
// The text items exist if (Count > 0) { // If current count of items is less than the // ShowedItemCount, show the items one by one // from the beginning if (Count <= ShowedItemCount) { for (int i = 0; i < Count; i++) { spriteBatch.DrawString(font, list[i], Position + new Vector2( Offset.X, Offset.Y + font.LineSpacing * i), Color.White); } } // If current count of items is greater than the // ShowedItemCount, show the items from the current // index. else { for (int i = 0; i < ShowedItemCount; i++) { spriteBatch.DrawString(font, list[i + Index], Position + new Vector2( Offset.X, Offset.Y + font.LineSpacing * i), Color.White); } }
// If the SelectionArea is not created, creat a new // one if (SelectedArea == null) { CreateSelectedArea(listItemBounds[0]); }
For More Information:
www.packtpub.com/windows-phone-7-xna-game-cookbook/book
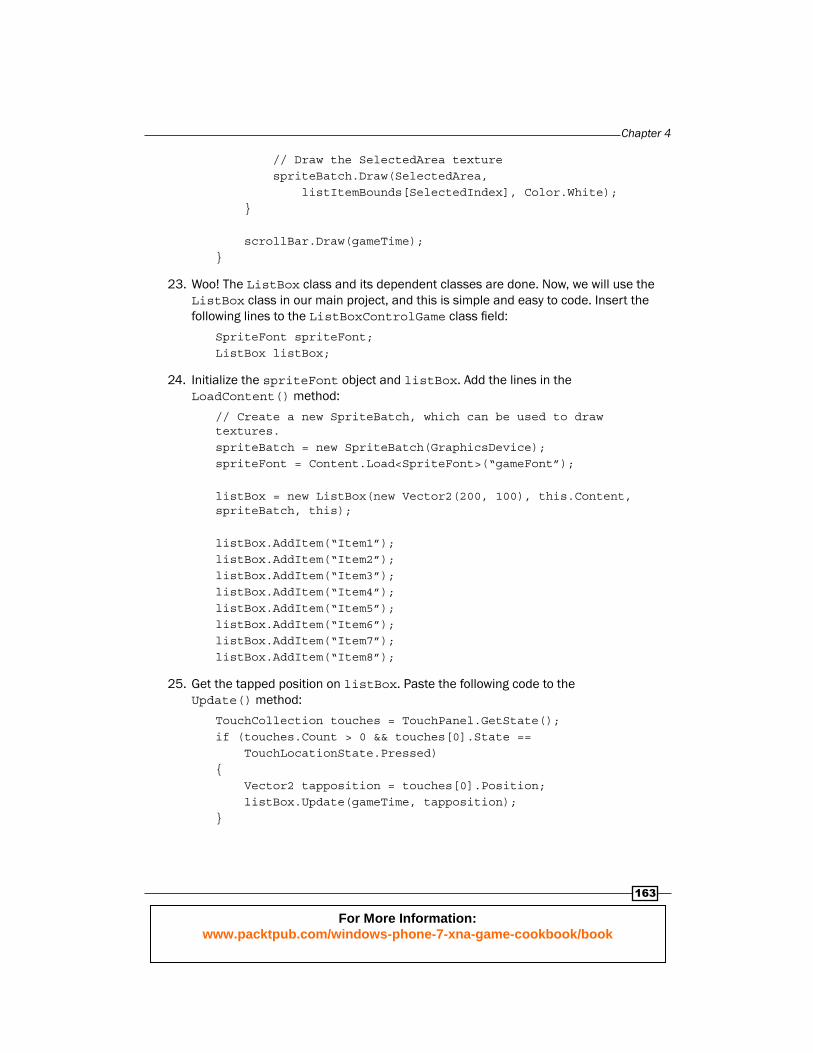
Chapter 4
163
// Draw the SelectedArea texture spriteBatch.Draw(SelectedArea, listItemBounds[SelectedIndex], Color.White); }
scrollBar.Draw(gameTime);}
23. Woo! The ListBox class and its dependent classes are done. Now, we will use the ListBox class in our main project, and this is simple and easy to code. Insert the following lines to the ListBoxControlGame class fi eld:
SpriteFont spriteFont;ListBox listBox;
24. Initialize the spriteFont object and listBox. Add the lines in the LoadContent() method:
// Create a new SpriteBatch, which can be used to draw textures.spriteBatch = new SpriteBatch(GraphicsDevice);spriteFont = Content.Load<SpriteFont>(“gameFont”);
listBox = new ListBox(new Vector2(200, 100), this.Content, spriteBatch, this);
listBox.AddItem(“Item1”);listBox.AddItem(“Item2”);listBox.AddItem(“Item3”);listBox.AddItem(“Item4”);listBox.AddItem(“Item5”);listBox.AddItem(“Item6”);listBox.AddItem(“Item7”);listBox.AddItem(“Item8”);
25. Get the tapped position on listBox. Paste the following code to the Update() method:
TouchCollection touches = TouchPanel.GetState();if (touches.Count > 0 && touches[0].State == TouchLocationState.Pressed){ Vector2 tapposition = touches[0].Position; listBox.Update(gameTime, tapposition);}
For More Information:
www.packtpub.com/windows-phone-7-xna-game-cookbook/book
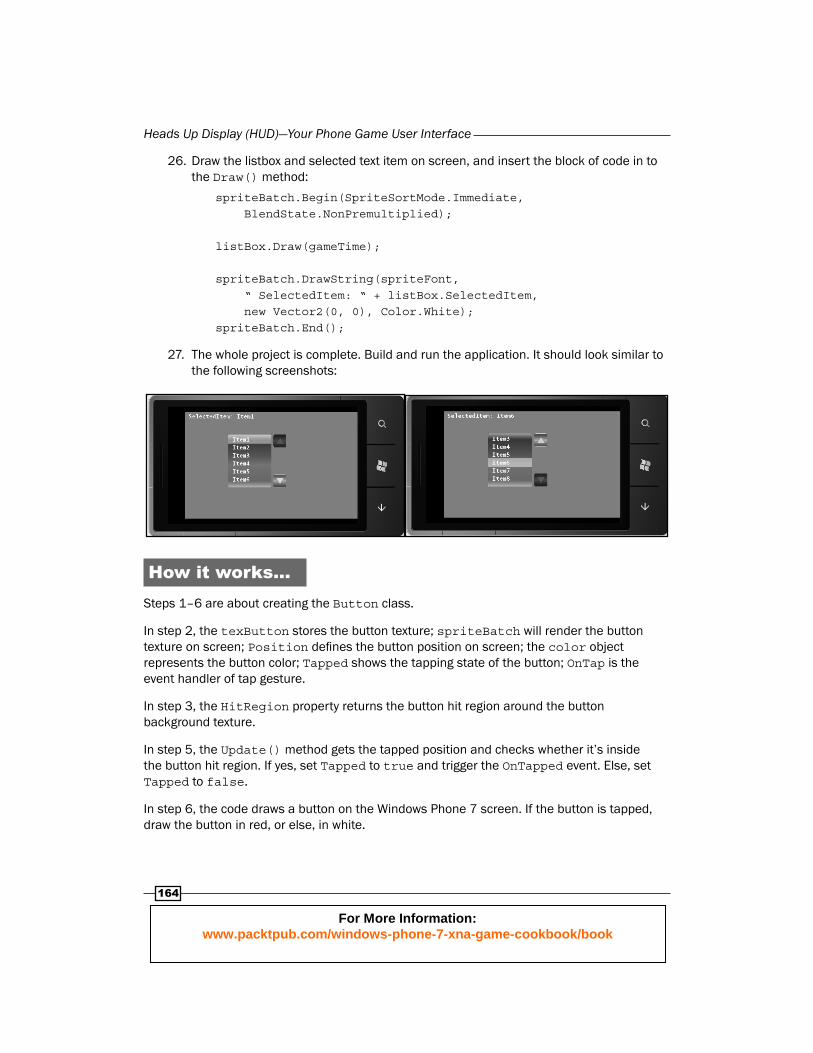
Heads Up Display (HUD)—Your Phone Game User Interface
164
26. Draw the listbox and selected text item on screen, and insert the block of code in to the Draw() method:
spriteBatch.Begin(SpriteSortMode.Immediate, BlendState.NonPremultiplied); listBox.Draw(gameTime);
spriteBatch.DrawString(spriteFont, “ SelectedItem: “ + listBox.SelectedItem, new Vector2(0, 0), Color.White);spriteBatch.End();
27. The whole project is complete. Build and run the application. It should look similar to the following screenshots:
How it works...Steps 1–6 are about creating the Button class.
In step 2, the texButton stores the button texture; spriteBatch will render the button texture on screen; Position defi nes the button position on screen; the color object represents the button color; Tapped shows the tapping state of the button; OnTap is the event handler of tap gesture.
In step 3, the HitRegion property returns the button hit region around the button background texture.
In step 5, the Update() method gets the tapped position and checks whether it’s inside the button hit region. If yes, set Tapped to true and trigger the OnTapped event. Else, set Tapped to false.
In step 6, the code draws a button on the Windows Phone 7 screen. If the button is tapped, draw the button in red, or else, in white.
For More Information:
www.packtpub.com/windows-phone-7-xna-game-cookbook/book
Chapter 4
165
Steps 7–11 are about implementing the Scrollbar class.
In step 7, the spriteBatch will render the scrollbar background texture on screen; the scrollUp and scrollDown buttons will be used to increase or decrease the index of listbox items; Position stores the position of the scrollbar; scrollUpPosition and scrollDownPosition maintain the positions of the scrollUp and scrollDown buttons; the following two event handlers specify the tap events of the two scroll buttons when they are tapped. The two variables ScrollBarHeight and ScrollBarWidth defi ne the height and width of the scrollbar buttons.
In step 8, the ScrollDownBound property returns the bound around the scrollDown button, similar to the ScrollUpBound property .
In step 9, the constructor initializes the two scrollbar buttons and gets the scrollbar width and height.
In step 10, the Update() method checks the tapped position to see whether it’s in the ScrollDownBound, if yes, set the Tapped of scrollDown to true and the property of scrollUp to false, then trigger the OnScrollDownTapped event; otherwise, do similar things for ScrollUpBound.
Steps 12–22 are to build the ListBox class using Button and Scrollbar classes.
In step 12, the game is the object of Game that supplies the GraphicDevice for drawing the selection area texture; spriteBatch will draw the listbox on screen; font will be used to draw the text of the listbox items; texBackground holds the listbox background texture; list is the collection of listbox text items; Position specifi es the position of the listbox; Count shows the current total number of listbox items; scrollbar is the object of ScrollBar used to explore the listbox items; Index shows the current beginning index in listbox items; listItemBounds is the collection the bounds of list items. The following two variables indicate the index of the selected item in the listbox; if the item is selected, the SelectedArea will present a rectangle texture around the item; Offset is the position for drawing the text item relative to the position of the listbox; ShowedItemCount saves the maximum limitation of the number for rendering listbox items.
In step 13, the CharacterHeight returns the character height of the listbox text item. The Bound property gets the rectangle surrounding the listbox.
In step 15, when the scrollUp button is tapped, the Index will increase by 1 if the sum of Index plus ShowedItemCount is less than the amount of listbox items. While the scrollDown button is tapped and the Index is greater than 0, we will decrease the Index by one.
In step 16, fi rst the Update() method checks the tapped position, to see whether it’s inside the buttons of the scrollbar. Then, use the CheckSelected() method to check the listbox item selection.
For More Information:
www.packtpub.com/windows-phone-7-xna-game-cookbook/book
Heads Up Display (HUD)—Your Phone Game User Interface
166
In step 17, because the ShowedItemCount limits the number for showing items, we just need to do the same steps for the loop. In the body of the for loop, fi rst we check the tapped position to see whether it’s in the bound of the listbox, then we examine the lower-side of the current item bound to see whether it is greater than the Y factor of the tapped position. If so, it means the tapped position is in the region of the current item bound that is selected. Now, we set the current i to the SelectedIndex and the content of the current item to SelectedItem. The break here is important, as we only need the fi rst selected one.
In step 18, we implement the GetListItemBound() method. When the list.Count is greater than 0 and if the current count of listbox item is less than ShowedItemCount, the loop will be equal to the Count; otherwise, the ShowedCount should be the LoopBound. In the loop, the code generates the item bound with the CharacterHeight and ListBoxWidth.
In step 19, once every new listbox item is added to the list, we will update the Count. This stands for the total number of listbox items. We get the ShowedItemCount when there is an item in the listbox. After that, we obtain the bounds of items through the GetListItemBound() method defi ned in step 18.
In step 21, the CreateSelectedArea() method fi rst creates a new texture—SelectedArea which has the same size as the method parameter—rectangle. The second line defi nes the dimension of pixels equal to the SelectedArea. In the for loop, we set the actual color to each pixel of the new texture. Finally, the SetData() method copies the pixels to the SelectedArea for texture drawing.
In step 22, the fi rst line of the Draw() method draws the listbox background texture. When the Count is greater than 0 and is equal to, or less than, the ShowedItemCount, the list item will be drawn one by one from the beginning of the list. Otherwise, we draw the items from the current index. After that, if one of the list items is selected, the SelectionArea will also be rendered around the selected item.
Steps 23–26 are for drawing the listbox on screen in the main game class ListBoxControlGame.
Creating a text input control to communicate with others in a game
Textbox is a very common and useful control in applications, reading the input and displaying the symbols in the main area. For multiplayer games, players love to use the control to communicate with each other for exchanging their thoughts. A textbox control can also act like a command line for controlling the game settings. With textbox control and corresponding functions, you can do a lot of things. In this recipe, you will learn how to make your own textbox control in Windows Phone 7.
For More Information:
www.packtpub.com/windows-phone-7-xna-game-cookbook/book

Chapter 4
167
How to do it...The following steps will help you to implement a text input control for communicating in your own Windows Phone 7 game:
1. Create a Windows Phone Game project in Visual Studio 2010 named TextBox, and change Game1.cs to TextBoxGame.cs. Then, add cursor.png, button.png, backspace.png, TextboxBackground.png, and gameFont.spriteFont to the content project.
2. Now, let’s develop a button class for input. First of all, in the Button.cs fi le we declare the class fi eld and property:
// Button textureTexture2D texButton;
// SpriteBatch for drawing the button imageSpriteBatch spriteBatch;
// SpriteFont for drawing the button textSpriteFont font;
// Button textpublic String Text = “”;
// Button text position on the screenpublic Vector2 TextPosition;
// Button text sizepublic Vector2 TextSize;
// Button position on the screenpublic Vector2 Position;
// The Clicked bool value indicates whether tap in the button public bool Clicked;
// Event handler when tap on the buttonpublic event EventHandler OnClicked;
// Get the hit regionpublic Rectangle HitRegion{ get { return new Rectangle((int)Position.X, (int)Position.Y, texButton.Width, texButton.Height); }}
For More Information:
www.packtpub.com/windows-phone-7-xna-game-cookbook/book

Heads Up Display (HUD)—Your Phone Game User Interface
168
3. Next, we defi ne two overload constructors of the Button class:
// Initialize the button without textpublic Button(Texture2D texture, Vector2 position, SpriteFont font, SpriteBatch spriteBatch){ this.texButton = texture; this.Position = position; this.spriteBatch = spriteBatch; this.font = font;}
// Initialize the button with textpublic Button(Texture2D texture, Vector2 position, String text, SpriteFont font, SpriteBatch spriteBatch){ this.texButton = texture; this.Position = position; this.spriteBatch = spriteBatch; this.Text = text;
// Compute the text size and place the text in the center // of the button TextSize = font.MeasureString(Text); this.TextPosition = new Vector2(position.X + texture.Width / 2 - TextSize.X / 2, position.Y); this.font = font;}
4. In the following step, we will make the button react to the tap gesture. Add the Update() code as follows:
// Update the buttonpublic void Update(GameTime gameTime, Vector2 touchPosition){ // React to the tap gesture Point point = new Point((int)touchPosition.X, (int)touchPosition.Y);
// If tapped button, set the Hovered to true and trigger // the OnClick event if (HitRegion.Contains(point)) { Clicked = true; OnClicked(this, null); }
For More Information:
www.packtpub.com/windows-phone-7-xna-game-cookbook/book
Chapter 4
169
else { Clicked = false; }}
5. The fi nal step for the Button class is to draw it on the screen. To do this, we use this block of code:
// Draw the buttonpublic virtual void Draw(){ // Draw the button texture if (!Clicked) { spriteBatch.Draw(texButton, HitRegion, Color.White); } else { spriteBatch.Draw(texButton, HitRegion, Color.Red); }
// Draw the button text spriteBatch.DrawString(font, Text, TextPosition, Color.White);}
6. In this step, we begin to write the TextBoxControl class. In TextBoxControl.cs, add the lines to the TextBoxControl class as fi elds:
// SpriteBatch for drawing the textbox textureSpriteBatch spriteBatch;
// SpriteFont for drawing the textbox fontSpriteFont spriteFont;
// Textbox background textureTexture2D texBackGround;
// Textbox cursor textureTexture2D texCursor;
// Textbox Bound for showing the textpublic Rectangle Bound;
// Textbox position
For More Information:
www.packtpub.com/windows-phone-7-xna-game-cookbook/book
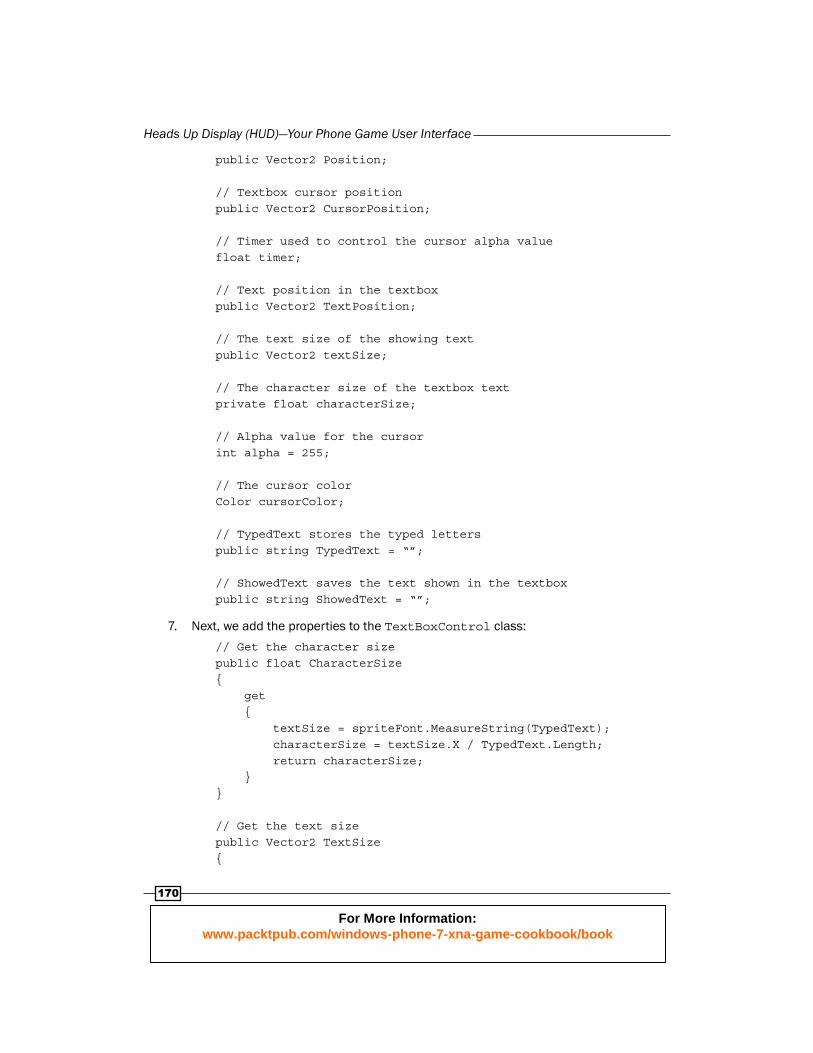
Heads Up Display (HUD)—Your Phone Game User Interface
170
public Vector2 Position;
// Textbox cursor positionpublic Vector2 CursorPosition;
// Timer used to control the cursor alpha valuefloat timer;
// Text position in the textboxpublic Vector2 TextPosition;
// The text size of the showing textpublic Vector2 textSize;
// The character size of the textbox textprivate float characterSize;
// Alpha value for the cursorint alpha = 255;
// The cursor colorColor cursorColor;
// TypedText stores the typed letterspublic string TypedText = “”;
// ShowedText saves the text shown in the textboxpublic string ShowedText = “”;
7. Next, we add the properties to the TextBoxControl class:
// Get the character sizepublic float CharacterSize{ get { textSize = spriteFont.MeasureString(TypedText); characterSize = textSize.X / TypedText.Length; return characterSize; }}
// Get the text sizepublic Vector2 TextSize{
For More Information:
www.packtpub.com/windows-phone-7-xna-game-cookbook/book
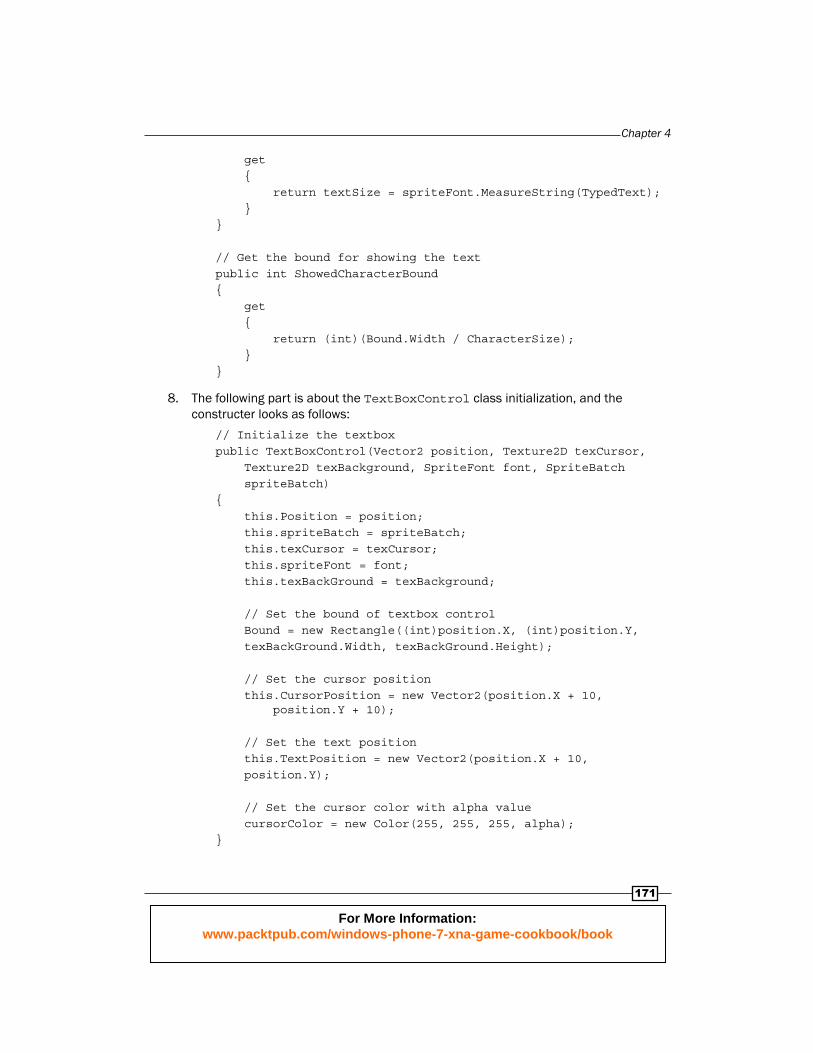
Chapter 4
171
get { return textSize = spriteFont.MeasureString(TypedText); }}
// Get the bound for showing the textpublic int ShowedCharacterBound{ get { return (int)(Bound.Width / CharacterSize); }}
8. The following part is about the TextBoxControl class initialization, and the constructer looks as follows:
// Initialize the textbox public TextBoxControl(Vector2 position, Texture2D texCursor, Texture2D texBackground, SpriteFont font, SpriteBatch spriteBatch){ this.Position = position; this.spriteBatch = spriteBatch; this.texCursor = texCursor; this.spriteFont = font; this.texBackGround = texBackground;
// Set the bound of textbox control Bound = new Rectangle((int)position.X, (int)position.Y, texBackGround.Width, texBackGround.Height);
// Set the cursor position this.CursorPosition = new Vector2(position.X + 10, position.Y + 10);
// Set the text position this.TextPosition = new Vector2(position.X + 10, position.Y);
// Set the cursor color with alpha value cursorColor = new Color(255, 255, 255, alpha);}
For More Information:
www.packtpub.com/windows-phone-7-xna-game-cookbook/book
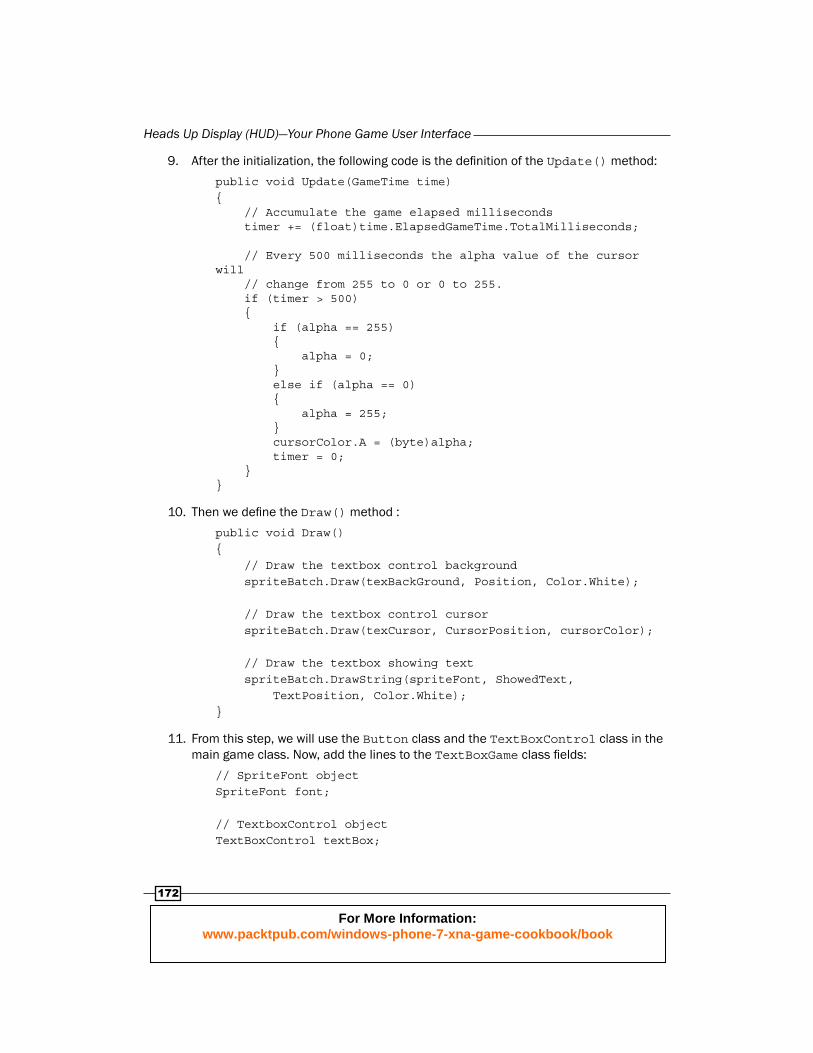
Heads Up Display (HUD)—Your Phone Game User Interface
172
9. After the initialization, the following code is the defi nition of the Update() method:
public void Update(GameTime time){ // Accumulate the game elapsed milliseconds timer += (float)time.ElapsedGameTime.TotalMilliseconds;
// Every 500 milliseconds the alpha value of the cursor will // change from 255 to 0 or 0 to 255. if (timer > 500) { if (alpha == 255) { alpha = 0; } else if (alpha == 0) { alpha = 255; } cursorColor.A = (byte)alpha; timer = 0; }}
10. Then we defi ne the Draw() method :
public void Draw(){ // Draw the textbox control background spriteBatch.Draw(texBackGround, Position, Color.White);
// Draw the textbox control cursor spriteBatch.Draw(texCursor, CursorPosition, cursorColor);
// Draw the textbox showing text spriteBatch.DrawString(spriteFont, ShowedText, TextPosition, Color.White);}
11. From this step, we will use the Button class and the TextBoxControl class in the main game class. Now, add the lines to the TextBoxGame class fi elds:
// SpriteFont objectSpriteFont font;
// TextboxControl objectTextBoxControl textBox;
For More Information:
www.packtpub.com/windows-phone-7-xna-game-cookbook/book
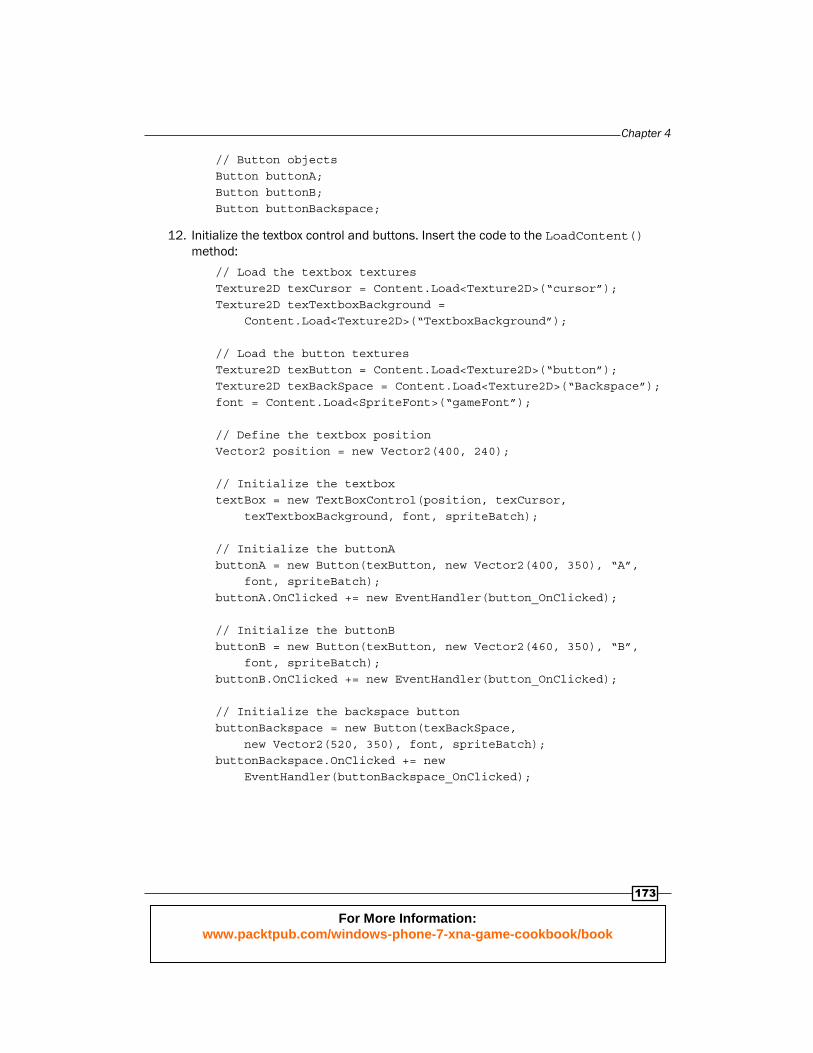
Chapter 4
173
// Button objectsButton buttonA;Button buttonB;Button buttonBackspace;
12. Initialize the textbox control and buttons. Insert the code to the LoadContent() method:
// Load the textbox texturesTexture2D texCursor = Content.Load<Texture2D>(“cursor”);Texture2D texTextboxBackground = Content.Load<Texture2D>(“TextboxBackground”);
// Load the button texturesTexture2D texButton = Content.Load<Texture2D>(“button”);Texture2D texBackSpace = Content.Load<Texture2D>(“Backspace”);font = Content.Load<SpriteFont>(“gameFont”); // Define the textbox positionVector2 position = new Vector2(400, 240);
// Initialize the textboxtextBox = new TextBoxControl(position, texCursor, texTextboxBackground, font, spriteBatch); // Initialize the buttonAbuttonA = new Button(texButton, new Vector2(400, 350), “A”, font, spriteBatch);buttonA.OnClicked += new EventHandler(button_OnClicked);
// Initialize the buttonBbuttonB = new Button(texButton, new Vector2(460, 350), “B”, font, spriteBatch);buttonB.OnClicked += new EventHandler(button_OnClicked);
// Initialize the backspace buttonbuttonBackspace = new Button(texBackSpace, new Vector2(520, 350), font, spriteBatch);buttonBackspace.OnClicked += new EventHandler(buttonBackspace_OnClicked);
For More Information:
www.packtpub.com/windows-phone-7-xna-game-cookbook/book
Heads Up Display (HUD)—Your Phone Game User Interface
174
13. Defi ne the event handling code for buttonA and button, which is same for both:
void button_OnClicked(object sender, EventArgs e){ // Add the button text to the textbox TypedText
// Update the position of textbox cursor textBox.CursorPosition.X = textBox.TextPosition.X + textBox.TypedText += ((Button)sender).Text;
textBox.TextSize.X;
// Get the textbox showed character bound int showedCharacterBound = textBox.ShowedCharacterBound;
// check whether the textbox cursor goes outside of the // textbox bound if (textBox.CursorPosition.X > textBox.Bound.X + textBox.Bound.Width) { // If yes, set cursor positon at the right side of // the textbox textBox.CursorPosition.X = textBox.TextPosition.X + textBox.CharacterSize * showedCharacterBound; // Show the TypedText from end to the left in // the range for showing characters of textbox textBox.ShowedText = textBox.TypedText.Substring(textBox.TypedText.Length - showedCharacterBound - 1, showedCharacterBound); } else { // If not, just set the current TypedText to the // showedText textBox.ShowedText = textBox.TypedText; }}
14. The next block of code is the handling code for the backspace button:
void buttonBackspace_OnClicked(object sender, EventArgs e){ // Get the length of TypedText int textLength = textBox.TypedText.Length;
// Check whether the TypedText is greater than 0 if (textLength > 0)
For More Information:
www.packtpub.com/windows-phone-7-xna-game-cookbook/book
Chapter 4
175
{ // If yes, delete the last character textBox.TypedText = textBox.TypedText.Substring(0, textLength - 1) ;
// Get the current showed character count. int showedCharacterCount = (int)(textBox.TextSize.X / textBox.CharacterSize);
// Check whether the current showed character count is less than // the textbox showed character bound if (showedCharacterCount <= textBox.ShowedCharacterBound) { // If yes, just update the cursor position with // current text size and the showedText with // current text textBox.CursorPosition.X = textBox.TextPosition.X + textBox.TextSize.X; textBox.ShowedText = textBox.TypedText; } else { // If not, show the TypedText from end to the // left in the range for showing characters // of textbox textBox.ShowedText = textBox.TypedText.Substring( textBox.TypedText.Length - textBox.ShowedCharacterBound, textBox.ShowedCharacterBound); } }}
15. Trigger the button event. Add the code to the Update() method:
TouchCollection touches = TouchPanel.GetState();if(touches.Count > 0 && touches[0].State == TouchLocationState.Pressed){ buttonA.Update(gameTime, touches[0].Position); buttonB.Update(gameTime, touches[0].Position); buttonBackspace.Update(gameTime, touches[0].Position);}
textBox.Update(gameTime);
For More Information:
www.packtpub.com/windows-phone-7-xna-game-cookbook/book
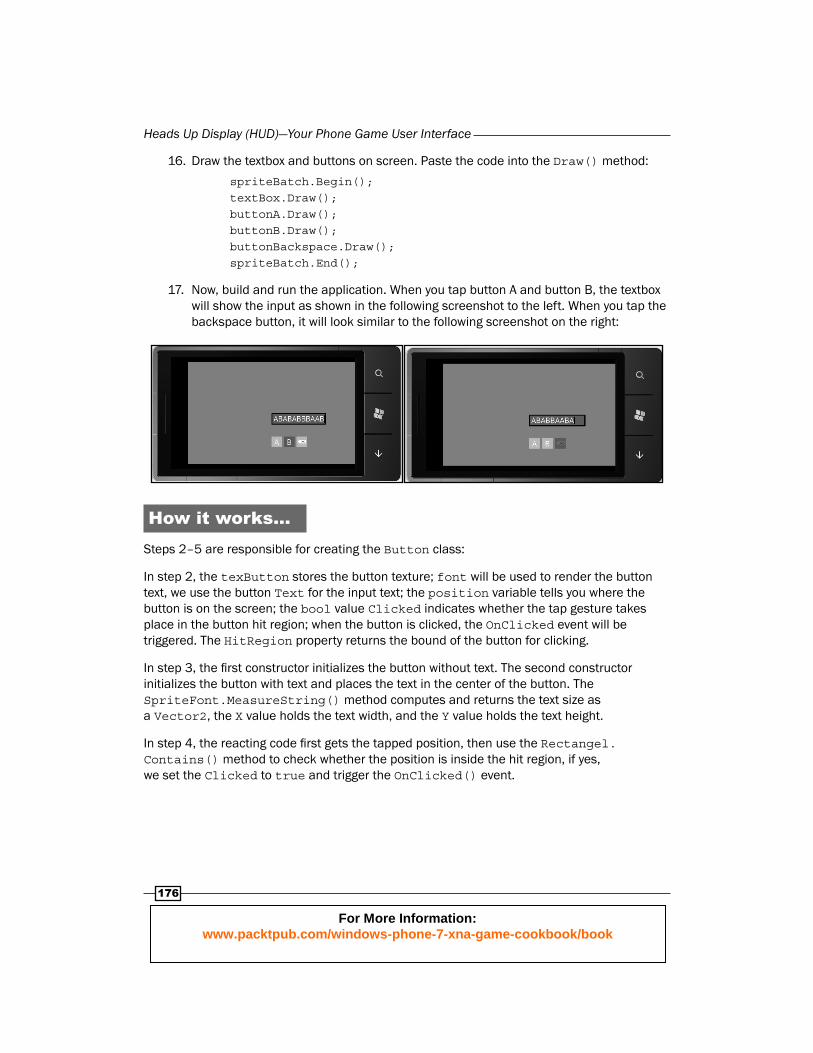
Heads Up Display (HUD)—Your Phone Game User Interface
176
16. Draw the textbox and buttons on screen. Paste the code into the Draw() method:
spriteBatch.Begin(); textBox.Draw(); buttonA.Draw(); buttonB.Draw(); buttonBackspace.Draw(); spriteBatch.End();
17. Now, build and run the application. When you tap button A and button B, the textbox will show the input as shown in the following screenshot to the left. When you tap the backspace button, it will look similar to the following screenshot on the right:
How it works...Steps 2–5 are responsible for creating the Button class:
In step 2, the texButton stores the button texture; font will be used to render the button text, we use the button Text for the input text; the position variable tells you where the button is on the screen; the bool value Clicked indicates whether the tap gesture takes place in the button hit region; when the button is clicked, the OnClicked event will be triggered. The HitRegion property returns the bound of the button for clicking.
In step 3, the fi rst constructor initializes the button without text. The second constructor initializes the button with text and places the text in the center of the button. The SpriteFont.MeasureString() method computes and returns the text size as a Vector2, the X value holds the text width, and the Y value holds the text height.
In step 4, the reacting code fi rst gets the tapped position, then use the Rectangel.Contains() method to check whether the position is inside the hit region, if yes, we set the Clicked to true and trigger the OnClicked() event.
For More Information:
www.packtpub.com/windows-phone-7-xna-game-cookbook/book
Chapter 4
177
Steps 6–10 are about creating the TextBoxControl class:
In step 6, the fi rst four variables deal with the textbox texture and font; the following Bound variable stores the textbox bound for showing text; Position indicates the location of the textbox control on the screen; the CursorPosition represents the cursor place within the textbox control bound; the timer variable will be used to control the alpha value of the cursor for the fl ashing effect; the TextPosition shows the text position inside the textbox control; textSize represents the size of the TypedText; the characterSize defi nes the size of a single character of the TypedText; the ShowedText stores the text that will be presented in the textbox.
In step 7, the CharacterSize returns the size of a single character in the TypedText, we use SpriteFont.MeasureString() to compute the size of the TypedText, then use the X value of the textSize and divide the TypedText length to get the unit character length; the TextSize returns the size of TypedText; ShowedCharacterBound returns the region for showing the TypedText.
In step 9, the Update() method checks whether the accumulated milliseconds are greater than 500 or not. If yes and the alpha value is equal to 255 (opaque), it will be set to 0 (transparent), and vice versa. After setting the latest alpha value to alpha factor of cursor color—cursorColor.A, we reset the timer for the next interval.
Steps 11–16 are about using the Button and TextBoxControl class in the main class. We will draw the button and textbox control on the Windows Phone 7 screen and perform the reactions for text input and delete.
In step 11, the textBox stands for the TextBoxControl; buttonA represents the button for input character A; buttonB is used to input character B; the buttonBackspace will delete the character of the TypedText from the end to the beginning.
In step 12, the code loads the textures for the textbox and buttons fi rst. Then, it initializes their event handling code.
In step 13, the code reacts to the event triggered from buttonA or buttonB. The fi rst line casts the sender to Button. Then add the Text value to the TextBoxControl.TypedText. After getting the text, the cursor position is updated following the new TypedText. The rest of the code deals with the situation when the length of the TypedText is greater than the textbox bound. If this happens, the cursor will still stay at the right-side of the textbox, the showedText will be the substring of the TypedText from the end to the left in the range for showing characters of the textbox. On the other hand, the entire TypedText will be drawn.
In step 14, as the reaction code for the backspace button, at the beginning, we get the length of the TypedText. Then check whether it is greater than 0. If yes, we delete the last character. The rest of the code works with the state when the deleted TypedText length is greater or less than the textbox bound. If greater, the showedText will range from the end of the deleted TypedText to the left about the showed character count of the textbox. Otherwise, the cursor will follow the current TypedText, which will be completely rendered on the screen.
For More Information:
www.packtpub.com/windows-phone-7-xna-game-cookbook/book
Where to buy this book You can buy Windows Phone 7 XNA Cookbook from the Packt Publishing website:
http://www.packtpub.com/windows-phone-7-xna-game-cookbook/book.
Free shipping to the US, UK, Europe and selected Asian countries. For more information, please
read our shipping policy.
Alternatively, you can buy the book from Amazon, BN.com, Computer Manuals and
most internet book retailers.
www.PacktPub.com
For More Information:
www.packtpub.com/windows-phone-7-xna-game-cookbook/book