Windows compatibility overview Mutoh devicesmutoh.com/pdf/Windows compatibility overview Mutoh...
21
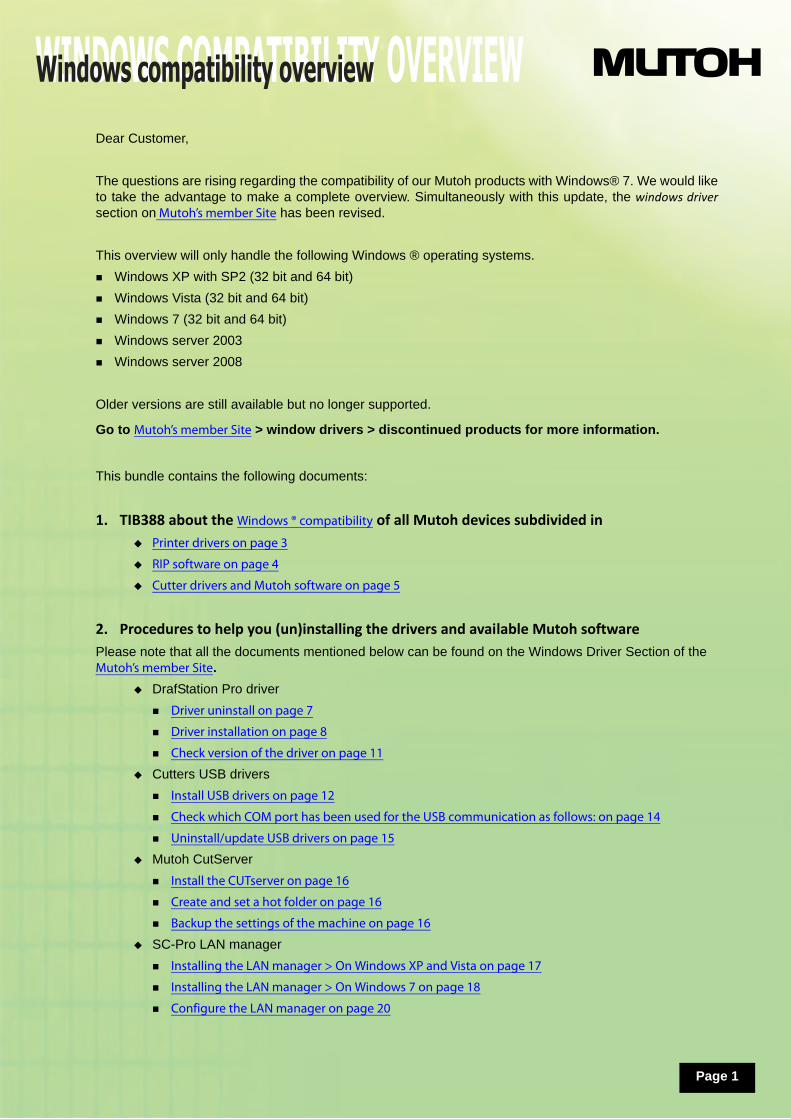
WINDOWS COMPATIBILITY OVERVIEW Windows compatibility overview Page 1 Dear Customer, The questions are rising regarding the compatibility of our Mutoh products with Windows® 7. We would like to take the advantage to make a complete overview. Simultaneously with this update, the windows driver section on Mutoh’s member Site has been revised. This overview will only handle the following Windows ® operating systems. Windows XP with SP2 (32 bit and 64 bit) Windows Vista (32 bit and 64 bit) Windows 7 (32 bit and 64 bit) Windows server 2003 Windows server 2008 Older versions are still available but no longer supported. Go to Mutoh’s member Site > window drivers > discontinued products for more information. This bundle contains the following documents: 1. TIB388 about the Windows ® compatibility of all Mutoh devices subdivided in Printer drivers on page 3 RIP software on page 4 Cutter drivers and Mutoh software on page 5 2. Procedures to help you (un)installing the drivers and available Mutoh software Please note that all the documents mentioned below can be found on the Windows Driver Section of the Mutoh’s member Site . DrafStation Pro driver Driver uninstall on page 7 Driver installation on page 8 Check version of the driver on page 11 Cutters USB drivers Install USB drivers on page 12 Check which COM port has been used for the USB communication as follows: on page 14 Uninstall/update USB drivers on page 15 Mutoh CutServer Install the CUTserver on page 16 Create and set a hot folder on page 16 Backup the settings of the machine on page 16 SC-Pro LAN manager Installing the LAN manager > On Windows XP and Vista on page 17 Installing the LAN manager > On Windows 7 on page 18 Configure the LAN manager on page 20
-
Upload
dinhnguyet -
Category
Documents
-
view
256 -
download
0
Transcript of Windows compatibility overview Mutoh devicesmutoh.com/pdf/Windows compatibility overview Mutoh...
WINDOWS COMPATIBILITY OVERVIEWWindows compatibility overview
Page 1
Dear Customer,
The questions are rising regarding the compatibility of our Mutoh products with Windows® 7. We would like to take the advantage to make a complete overview. Simultaneously with this update, the windows driversection on Mutoh’s member Site has been revised.
This overview will only handle the following Windows ® operating systems.
Windows XP with SP2 (32 bit and 64 bit)
Windows Vista (32 bit and 64 bit)
Windows 7 (32 bit and 64 bit)
Windows server 2003
Windows server 2008
Older versions are still available but no longer supported.
Go to Mutoh’s member Site > window drivers > discontinued products for more information.
This bundle contains the following documents:
1. TIB388 about the Windows ® compatibility of all Mutoh devices subdivided in
Printer drivers on page 3
RIP software on page 4
Cutter drivers and Mutoh software on page 5
2. Procedures to help you (un)installing the drivers and available Mutoh software
Please note that all the documents mentioned below can be found on the Windows Driver Section of the Mutoh’s member Site.
DrafStation Pro driver
Driver uninstall on page 7
Driver installation on page 8
Check version of the driver on page 11
Cutters USB drivers
Install USB drivers on page 12
Check which COM port has been used for the USB communication as follows: on page 14
Uninstall/update USB drivers on page 15
Mutoh CutServer
Install the CUTserver on page 16
Create and set a hot folder on page 16
Backup the settings of the machine on page 16
SC-Pro LAN manager
Installing the LAN manager > On Windows XP and Vista on page 17
Installing the LAN manager > On Windows 7 on page 18
Configure the LAN manager on page 20
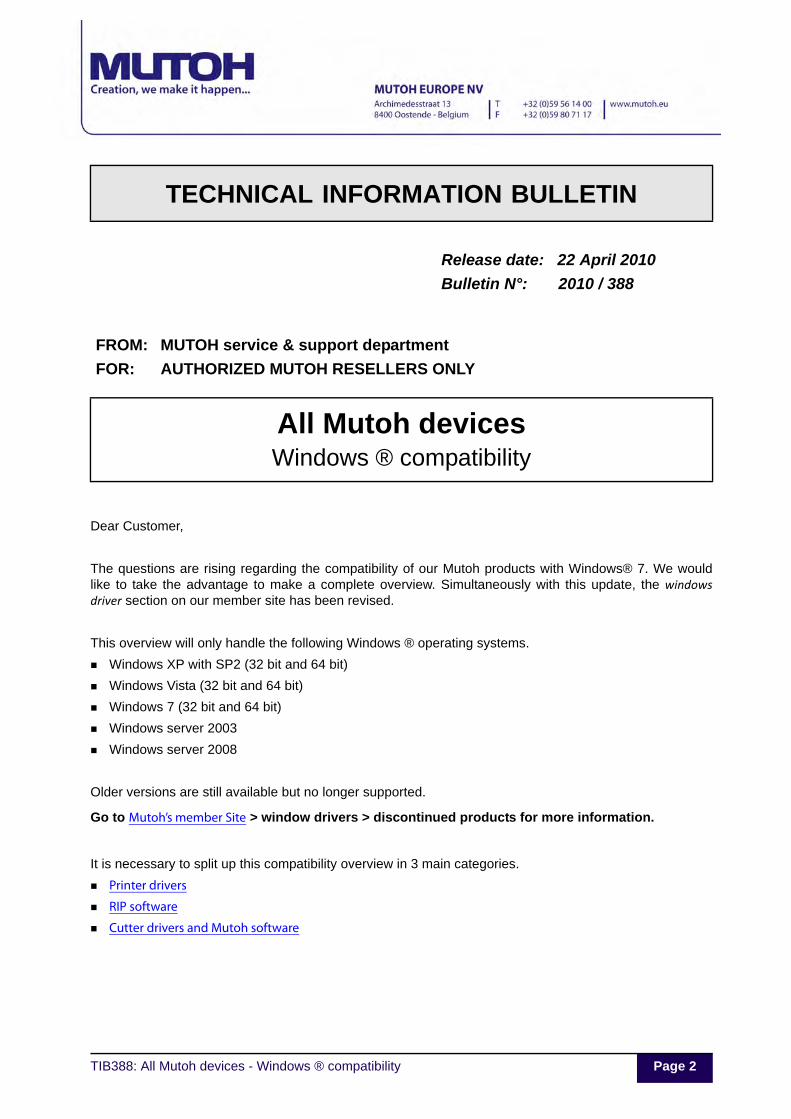
TECHNICAL INFORMATION BULLETIN
Release date: 22 April 2010
Bulletin N°: 2010 / 388
FROM: MUTOH service & support department
FOR: AUTHORIZED MUTOH RESELLERS ONLY
Dear Customer,
The questions are rising regarding the compatibility of our Mutoh products with Windows® 7. We would like to take the advantage to make a complete overview. Simultaneously with this update, the windows driver section on our member site has been revised.
This overview will only handle the following Windows ® operating systems.
Windows XP with SP2 (32 bit and 64 bit)
Windows Vista (32 bit and 64 bit)
Windows 7 (32 bit and 64 bit)
Windows server 2003
Windows server 2008
Older versions are still available but no longer supported.
Go to Mutoh’s member Site > window drivers > discontinued products for more information.
It is necessary to split up this compatibility overview in 3 main categories.
Printer drivers
RIP software
Cutter drivers and Mutoh software
All Mutoh devicesWindows ® compatibility
TIB388: All Mutoh devices - Windows ® compatibility Page 2
Page 3
old with a RIP software which will take care of the direct r, these RIP software are not for free.
Compatible with ...
Server 2003 - 32 bit
Server 2008 - 32 bit
XP - 32 bit
Vista - 32 bit
7 - 32 bit
Server 2003 - 64 bit
Server 2008 - 64 bit
XP - 64 bit
Vista - 64 bit
7 - 64 bit
TIB388: All Mutoh devices - Windows ® compatibility
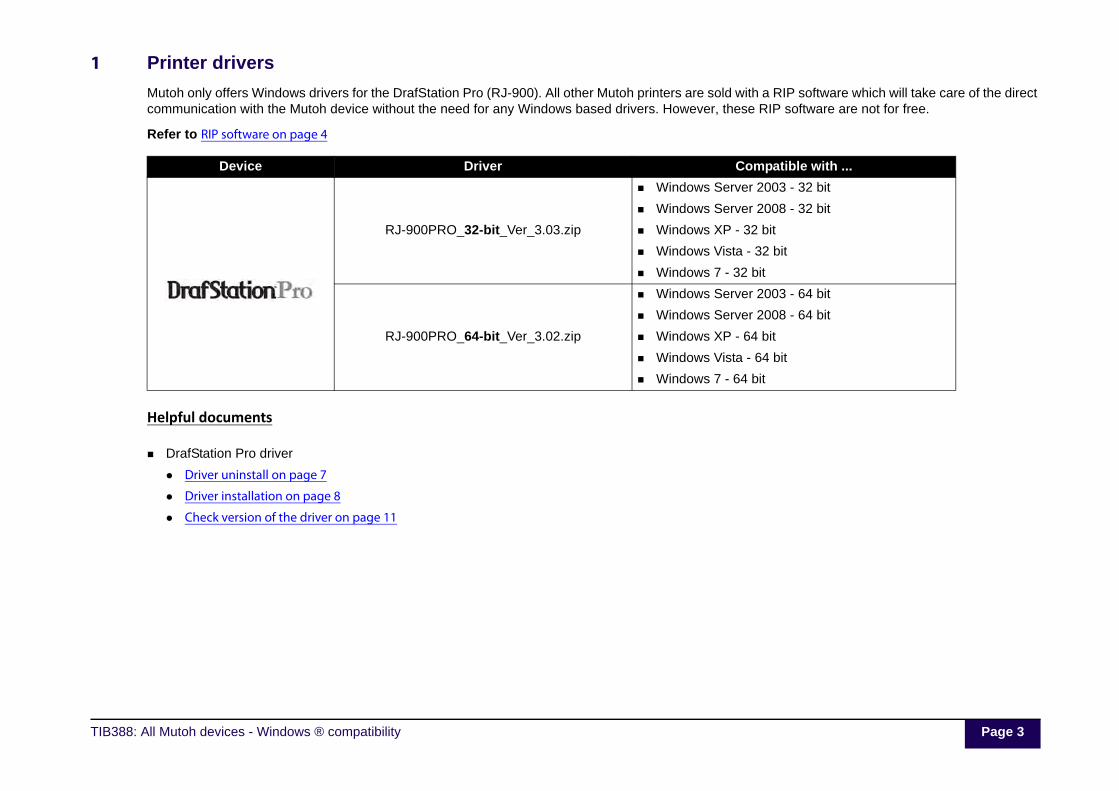
1 Printer drivers
Mutoh only offers Windows drivers for the DrafStation Pro (RJ-900). All other Mutoh printers are scommunication with the Mutoh device without the need for any Windows based drivers. Howeve
Refer to RIP software on page 4
Helpful documents
DrafStation Pro driver
Driver uninstall on page 7
Driver installation on page 8
Check version of the driver on page 11
Device Driver
RJ-900PRO_32-bit_Ver_3.03.zip
Windows
Windows
Windows
Windows
Windows
RJ-900PRO_64-bit_Ver_3.02.zip
Windows
Windows
Windows
Windows
Windows
Page 4
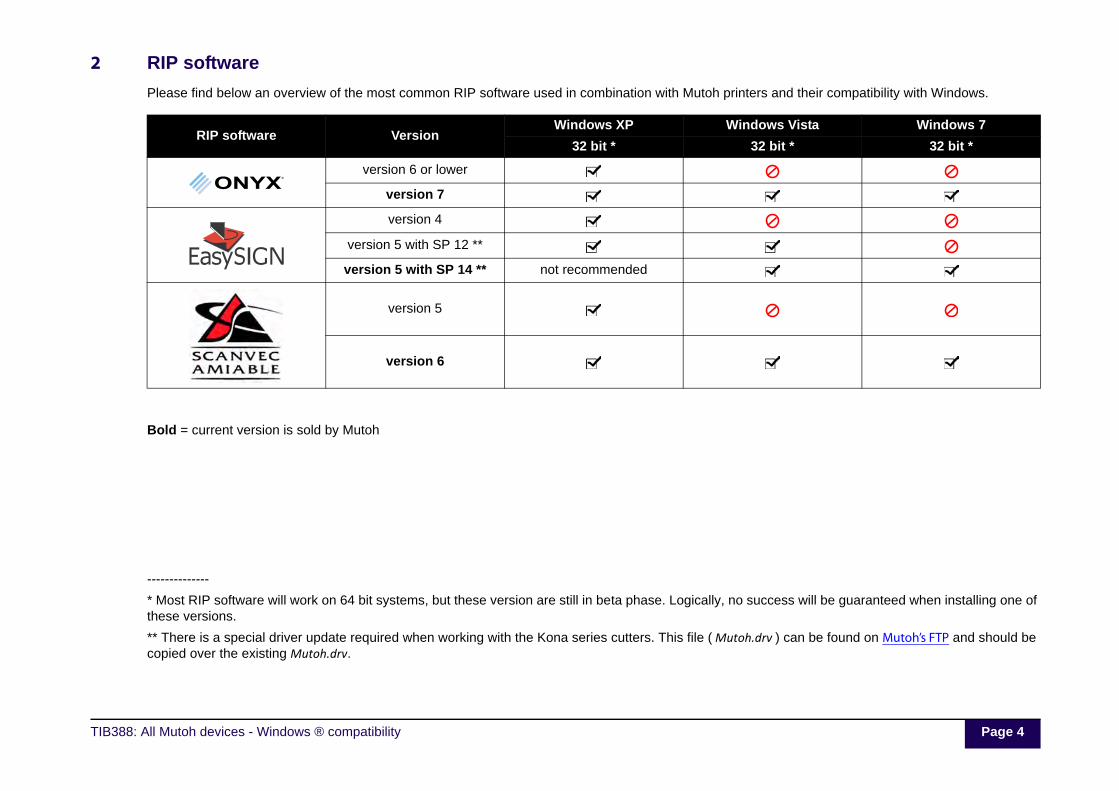
h printers and their compatibility with Windows.
ly, no success will be guaranteed when installing one of
Mutoh.drv ) can be found on Mutoh’s FTP and should be
Windows Vista Windows 7
32 bit * 32 bit *
TIB388: All Mutoh devices - Windows ® compatibility
2 RIP software
Please find below an overview of the most common RIP software used in combination with Muto
Bold = current version is sold by Mutoh
--------------
* Most RIP software will work on 64 bit systems, but these version are still in beta phase. Logicalthese versions.
** There is a special driver update required when working with the Kona series cutters. This file (copied over the existing Mutoh.drv.
RIP software VersionWindows XP
32 bit *
version 6 or lower
version 7
version 4
version 5 with SP 12 **
version 5 with SP 14 ** not recommended
version 5
version 6
Page 5
ers.
impossible and incompatible. However, there is a work
Mutoh.drv ) can be found on Mutoh’s FTP and should be
Operating system
Windows XP with SP2 Windows Vista Windows 7
32 bit 64 bit 32 bit 64 bit 32 bit 64 bit
TIB388: All Mutoh devices - Windows ® compatibility
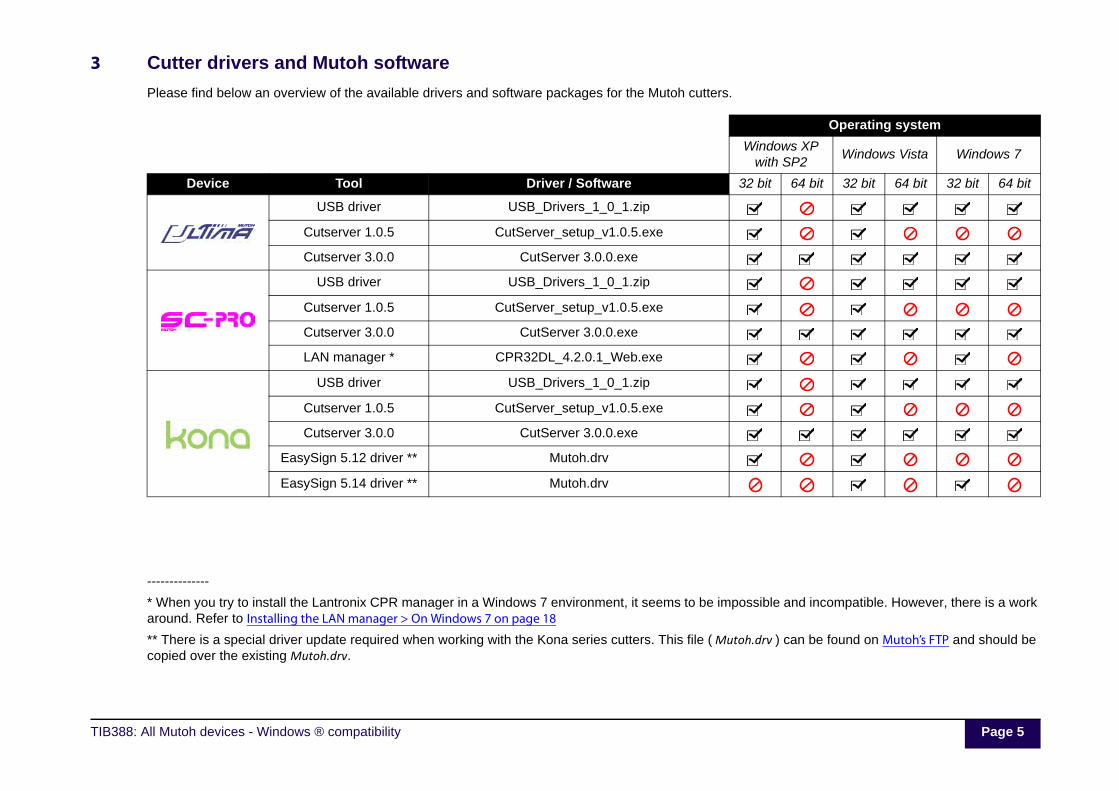
3 Cutter drivers and Mutoh software
Please find below an overview of the available drivers and software packages for the Mutoh cutt
--------------
* When you try to install the Lantronix CPR manager in a Windows 7 environment, it seems to bearound. Refer to Installing the LAN manager > On Windows 7 on page 18
** There is a special driver update required when working with the Kona series cutters. This file (copied over the existing Mutoh.drv.
Device Tool Driver / Software
USB driver USB_Drivers_1_0_1.zip
Cutserver 1.0.5 CutServer_setup_v1.0.5.exe
Cutserver 3.0.0 CutServer 3.0.0.exe
USB driver USB_Drivers_1_0_1.zip
Cutserver 1.0.5 CutServer_setup_v1.0.5.exe
Cutserver 3.0.0 CutServer 3.0.0.exe
LAN manager * CPR32DL_4.2.0.1_Web.exe
USB driver USB_Drivers_1_0_1.zip
Cutserver 1.0.5 CutServer_setup_v1.0.5.exe
Cutserver 3.0.0 CutServer 3.0.0.exe
EasySign 5.12 driver ** Mutoh.drv
EasySign 5.14 driver ** Mutoh.drv
Page 6
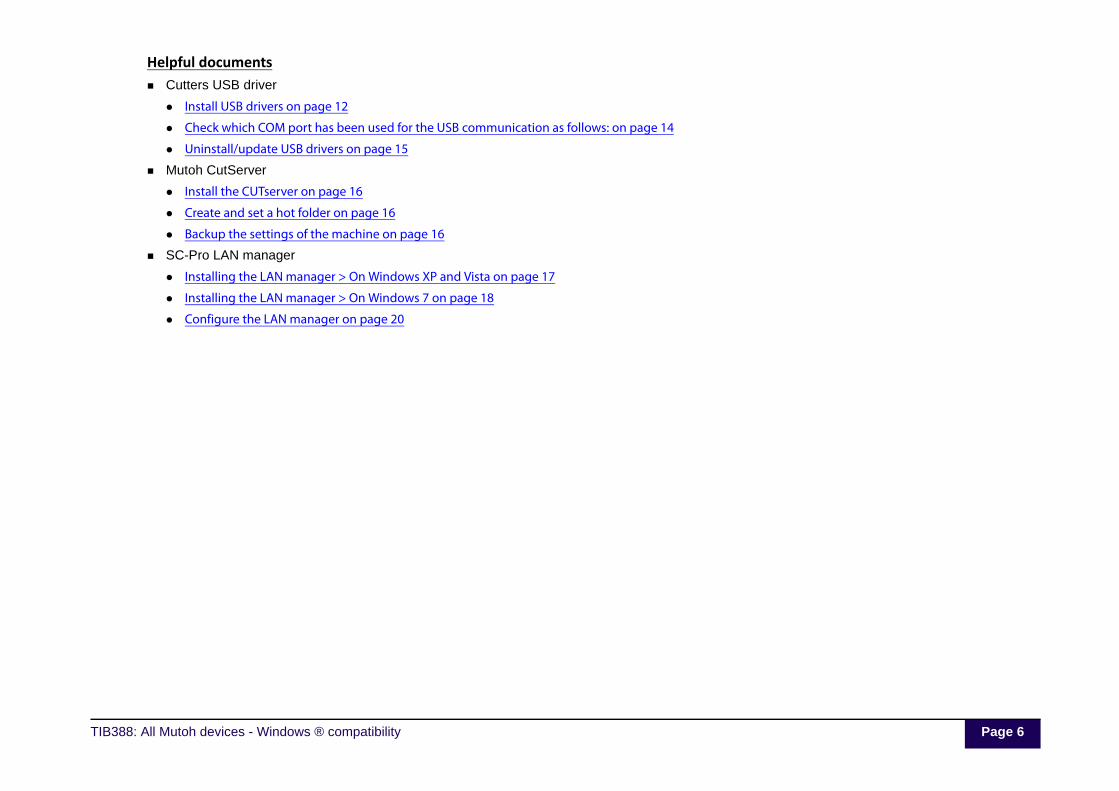
Helpful documents
TIB388: All Mutoh devices - Windows ® compatibility
Cutters USB driver
Install USB drivers on page 12
Check which COM port has been used for the USB communication as follows: on page 14
Uninstall/update USB drivers on page 15
Mutoh CutServer
Install the CUTserver on page 16
Create and set a hot folder on page 16
Backup the settings of the machine on page 16
SC-Pro LAN manager
Installing the LAN manager > On Windows XP and Vista on page 17
Installing the LAN manager > On Windows 7 on page 18
Configure the LAN manager on page 20
DRIVER (UN)INSTALLDriver (un)install
e 7
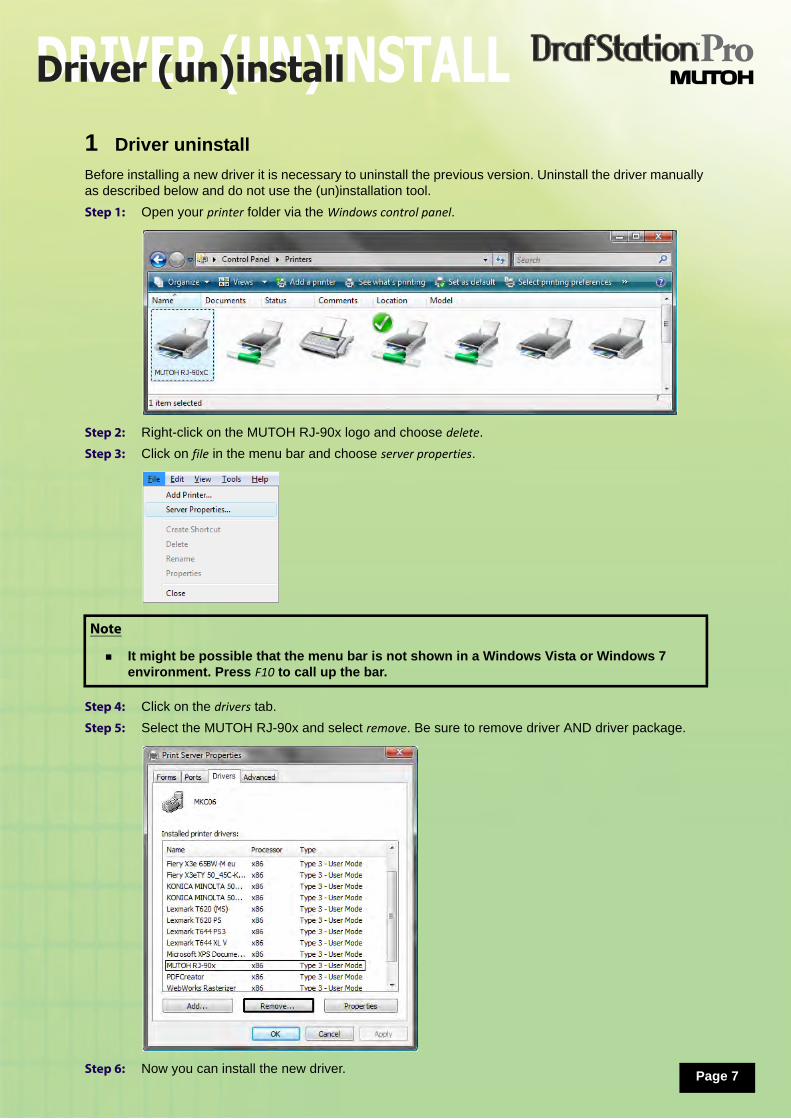
Pag1 Driver uninstall
Before installing a new driver it is necessary to uninstall the previous version. Uninstall the driver manually as described below and do not use the (un)installation tool.
Step 1: Open your printer folder via the Windows control panel.
Step 2: Right-click on the MUTOH RJ-90x logo and choose delete.
Step 3: Click on file in the menu bar and choose server properties.
Step 4: Click on the drivers tab.
Step 5: Select the MUTOH RJ-90x and select remove. Be sure to remove driver AND driver package.
Step 6: Now you can install the new driver.
Note
It might be possible that the menu bar is not shown in a Windows Vista or Windows 7 environment. Press F10 to call up the bar.
DRIVER (UN)INSTALLDriver (un)install
e 8
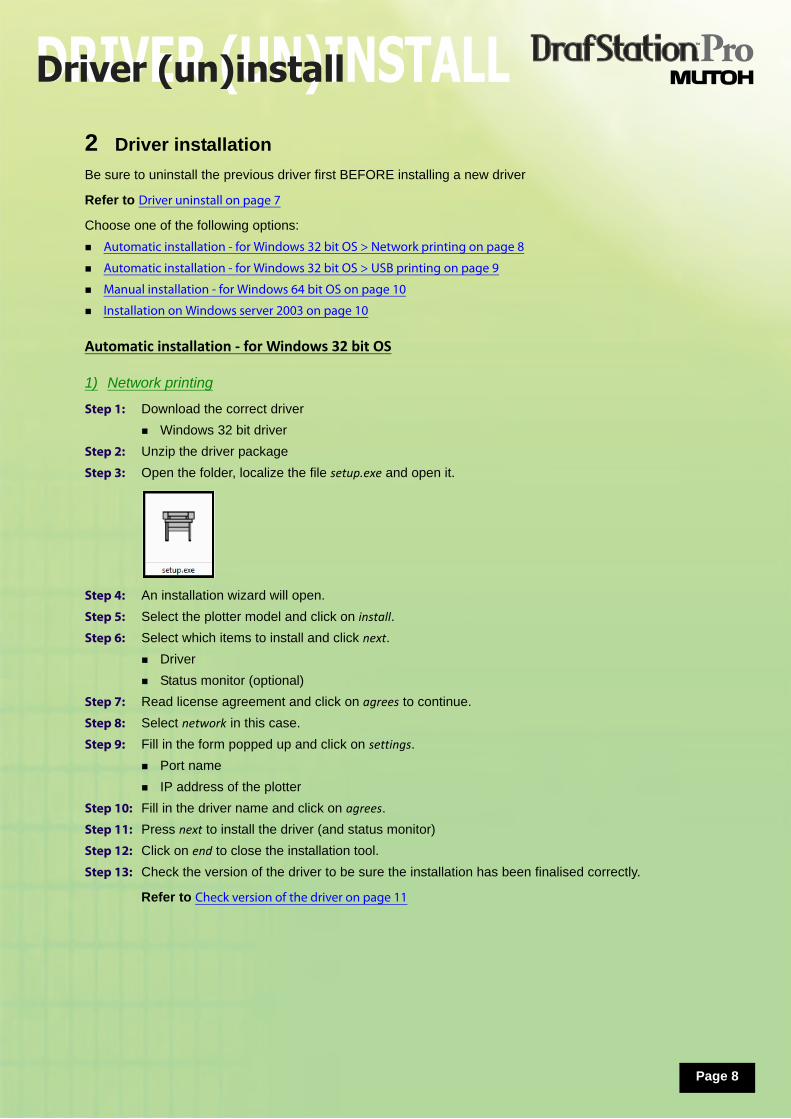
Pag2 Driver installation
Be sure to uninstall the previous driver first BEFORE installing a new driver
Refer to Driver uninstall on page 7
Choose one of the following options:
Automatic installation - for Windows 32 bit OS > Network printing on page 8
Automatic installation - for Windows 32 bit OS > USB printing on page 9
Manual installation - for Windows 64 bit OS on page 10
Installation on Windows server 2003 on page 10
Automatic installation - for Windows 32 bit OS
1) Network printing
Step 1: Download the correct driver
Windows 32 bit driver
Step 2: Unzip the driver package
Step 3: Open the folder, localize the file setup.exe and open it.
Step 4: An installation wizard will open.
Step 5: Select the plotter model and click on install.
Step 6: Select which items to install and click next.
Driver
Status monitor (optional)
Step 7: Read license agreement and click on agrees to continue.
Step 8: Select network in this case.
Step 9: Fill in the form popped up and click on settings.
Port name
IP address of the plotter
Step 10: Fill in the driver name and click on agrees.
Step 11: Press next to install the driver (and status monitor)
Step 12: Click on end to close the installation tool.
Step 13: Check the version of the driver to be sure the installation has been finalised correctly.
Refer to Check version of the driver on page 11

DRIVER (UN)INSTALLDriver (un)install
e 9
Pag2) USB printing
Step 1: Download the correct driver
Windows 32 bit driver
Step 2: Unzip the driver package
Step 3: Open the folder, localize the file setup.exe and open it.
Step 4: An installation wizard will open.
Step 5: Select the plotter model and click on install.
Step 6: Select which items to install and click next.
Driver
Status monitor (optional)
Step 7: Read license agreement and click on agrees to continue.
Step 8: Select USB in this case.
Step 9: Press next to install the driver (and status monitor)
Step 10: Click on end to close the installation tool.
Step 11: Power ON the plotter and connect it to the computer via USB.
Step 12: The USB printing support driver will be installed automatically.
Step 13: Check the version of the driver to be sure the installation has been finalised correctly.
Refer to Check version of the driver on page 11
DRIVER (UN)INSTALLDriver (un)install
10
PageManual installation - for Windows 64 bit OS
There is no installation wizard available for the Windows 64 bit operating systems. Therefore, the driver should be installed manually as follows:
Step 1: Download the correct driver
Windows 64 bit driver
Step 2: Unzip the driver package
Step 3: Power ON the printer and be sure that it is connected via a network cable.
Step 4: Open your printer folder via the Windows control panel.
Step 5: Select add printer.
Step 6: Select add a local printer.
Step 7: Select create a new port - standard TCP/IP port.
Step 8: Set the following and click next:
Device type: TCP/IP Device.
Hostname or IP address: Set the internet protocol address of the plotter.
Port name: will be automatically filled in.
Clear the checkbox query the printer and automatically select the driver to use.
Step 9: Select custom and click on settings when the additional port information window is displayed
Step 10: Fill in the port settings and click ok.
Port name: IP address of the plotter
Printer name or IP address: IP address of the plotter
Protocol: RAW
Port number: 9100
Step 11: The additional port information window will be displayed again, click next this time.
Step 12: The add printer wizard will open. Select have disk...
Step 13: Browse to the folder to where you have unpacked the driver package.
Step 14: Select the correct inf-file.
Step 15: Click on ok.
Step 16: Type a printer name and click next.
Step 17: The driver will now be installed.
Step 18: It is possible that Windows Vista cannot verify the publisher of this driver software. If this screen appears, click on Install this driver software anyway.
Step 19: Check the version of the driver to be sure the installation has been finalised correctly.
Refer to Check version of the driver on page 11
Installation on Windows server 2003
Step 1: Log on to the server as administrator.
Step 2: Start the group policy editor (in command line, type gpedit.msc).
Step 3: Disable the policy Disallow Installation of printers using kernel-mode drivers in the group policy editor.
Step 4: Install the driver via the normal procedure.
Refer to Driver installation on page 8
Step 5: Reboot the server.
Step 6: Check the version of the driver to be sure the installation has been finalised correctly.
Refer to Check version of the driver on page 11
DRIVER (UN)INSTALLDriver (un)install
11
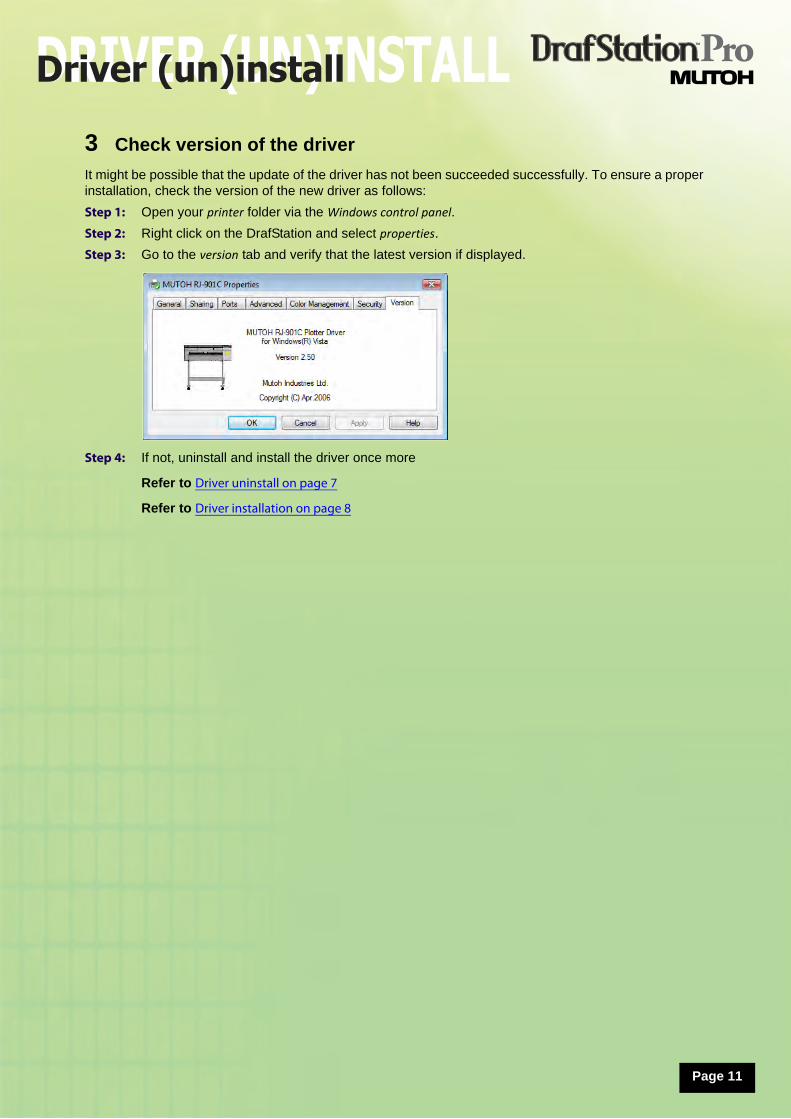
Page3 Check version of the driver
It might be possible that the update of the driver has not been succeeded successfully. To ensure a proper installation, check the version of the new driver as follows:
Step 1: Open your printer folder via the Windows control panel.
Step 2: Right click on the DrafStation and select properties.
Step 3: Go to the version tab and verify that the latest version if displayed.
Step 4: If not, uninstall and install the driver once more
Refer to Driver uninstall on page 7
Refer to Driver installation on page 8
USB DRIVER (UN)INSTALLUSB Driver (un)install
1 Install USB drivers
Step 1: Download the drivers from Mutoh’s member Site > window drivers.
Step 2: Unpack the driver package.
Step 3: Make a connection between the cutter and your computer using a USB cable.
Step 4: Power ON the cutter and computer.
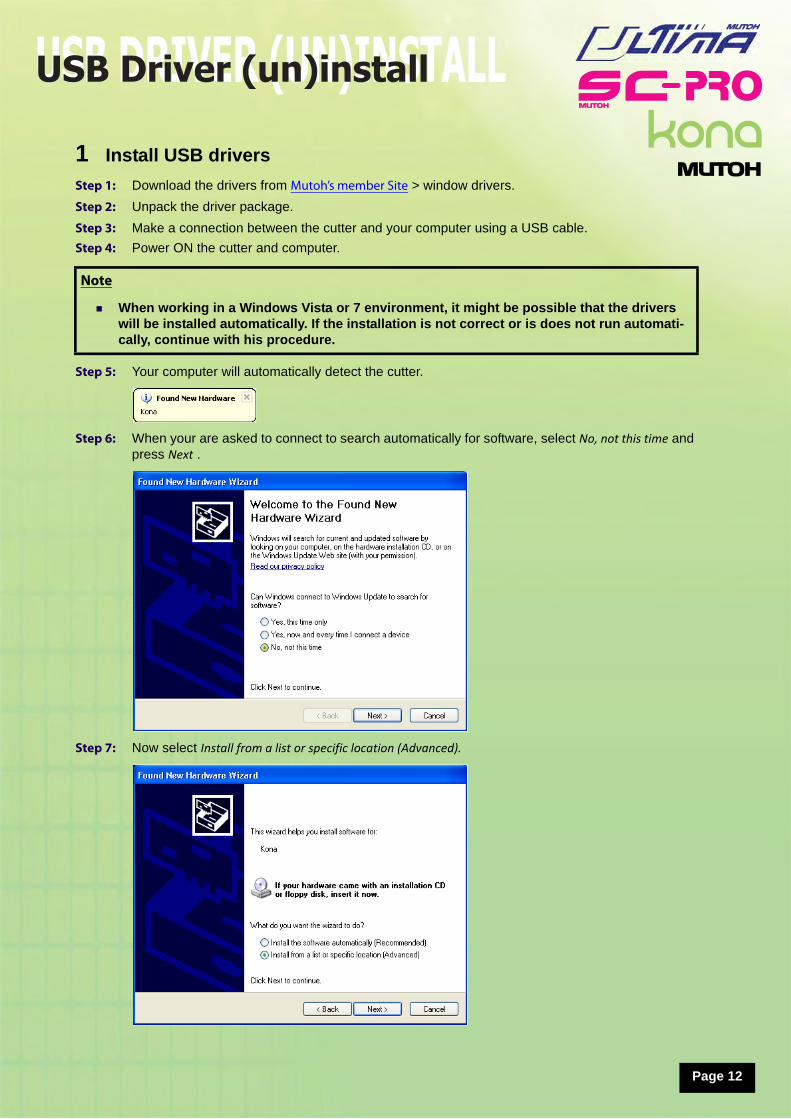
Step 5: Your computer will automatically detect the cutter.
Step 6: When your are asked to connect to search automatically for software, select No, not this time and press Next .
Step 7: Now select Install from a list or specific location (Advanced).
Note
When working in a Windows Vista or 7 environment, it might be possible that the drivers will be installed automatically. If the installation is not correct or is does not run automati-cally, continue with his procedure.
Page 12
USB DRIVER (UN)INSTALLUSB Driver (un)install
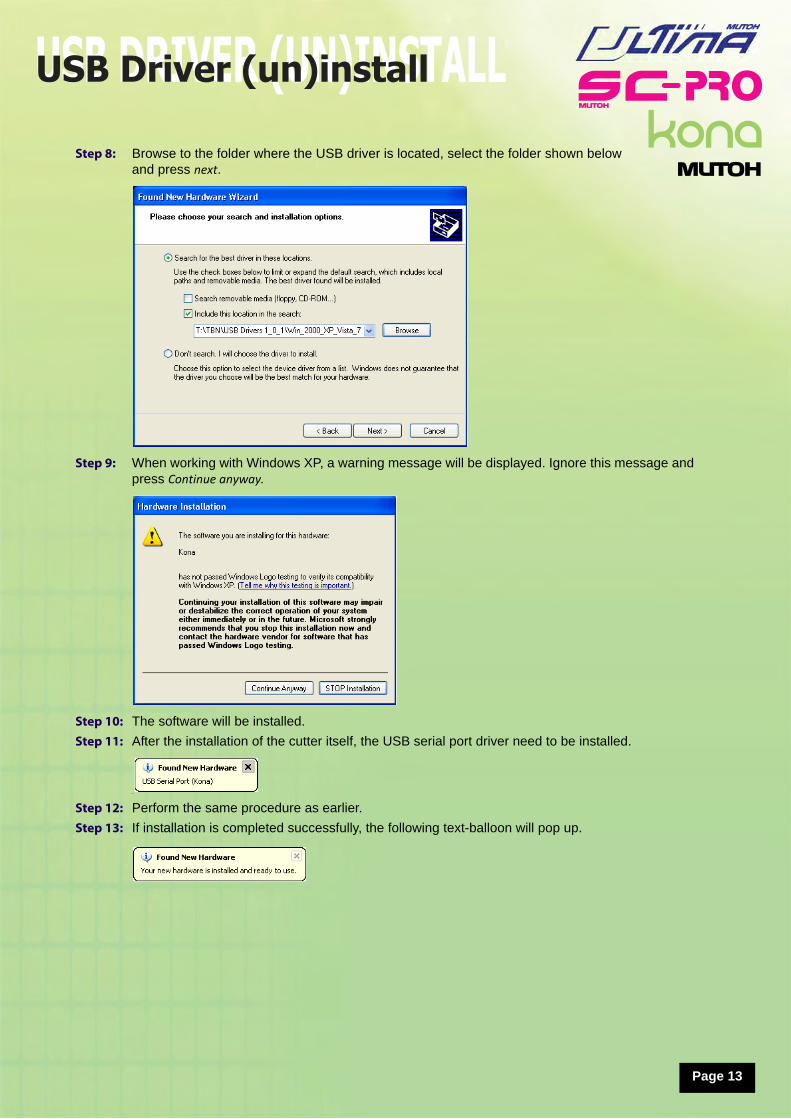
Step 8: Browse to the folder where the USB driver is located, select the folder shown below and press next.
Step 9: When working with Windows XP, a warning message will be displayed. Ignore this message and press Continue anyway.
Step 10: The software will be installed.
Step 11: After the installation of the cutter itself, the USB serial port driver need to be installed.
_
Step 12: Perform the same procedure as earlier.
Step 13: If installation is completed successfully, the following text-balloon will pop up.
Page 13
USB DRIVER (UN)INSTALLUSB Driver (un)install
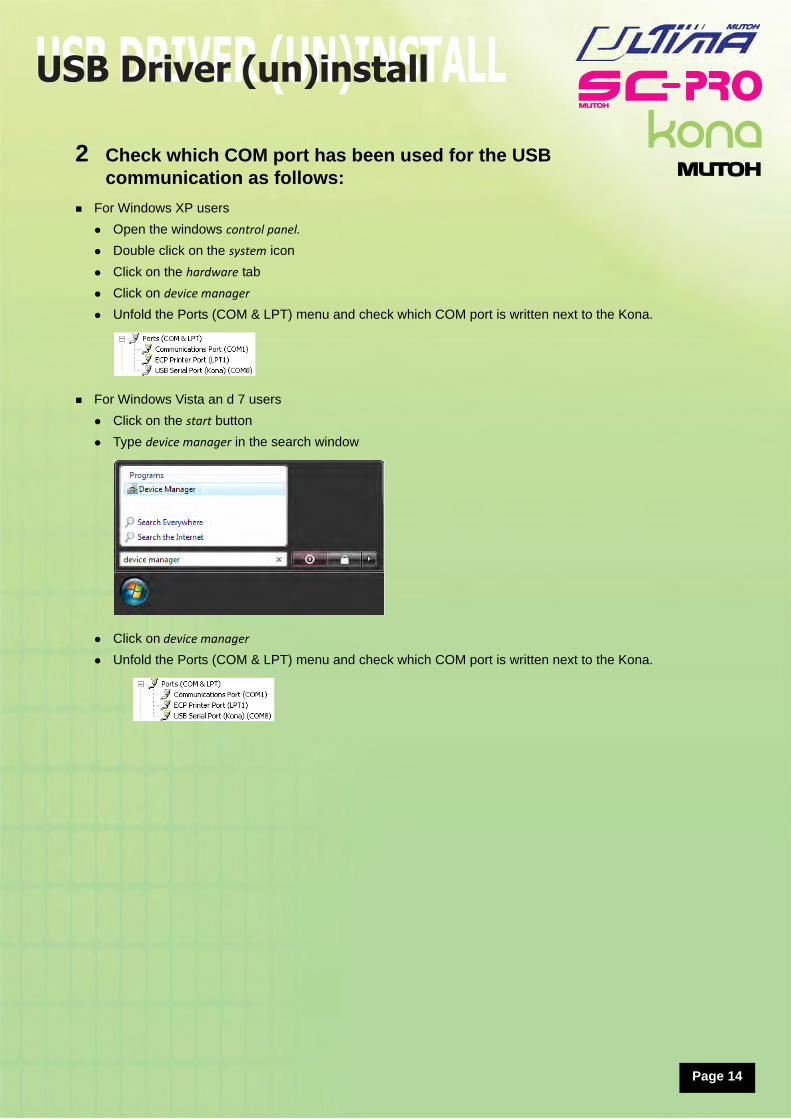
2 Check which COM port has been used for the USB communication as follows:
For Windows XP users
Open the windows control panel.
Double click on the system icon
Click on the hardware tab
Click on device manager
Unfold the Ports (COM & LPT) menu and check which COM port is written next to the Kona.
For Windows Vista an d 7 users
Click on the start button
Type device manager in the search window
Click on device manager
Unfold the Ports (COM & LPT) menu and check which COM port is written next to the Kona.
Page 14
USB DRIVER (UN)INSTALLUSB Driver (un)install
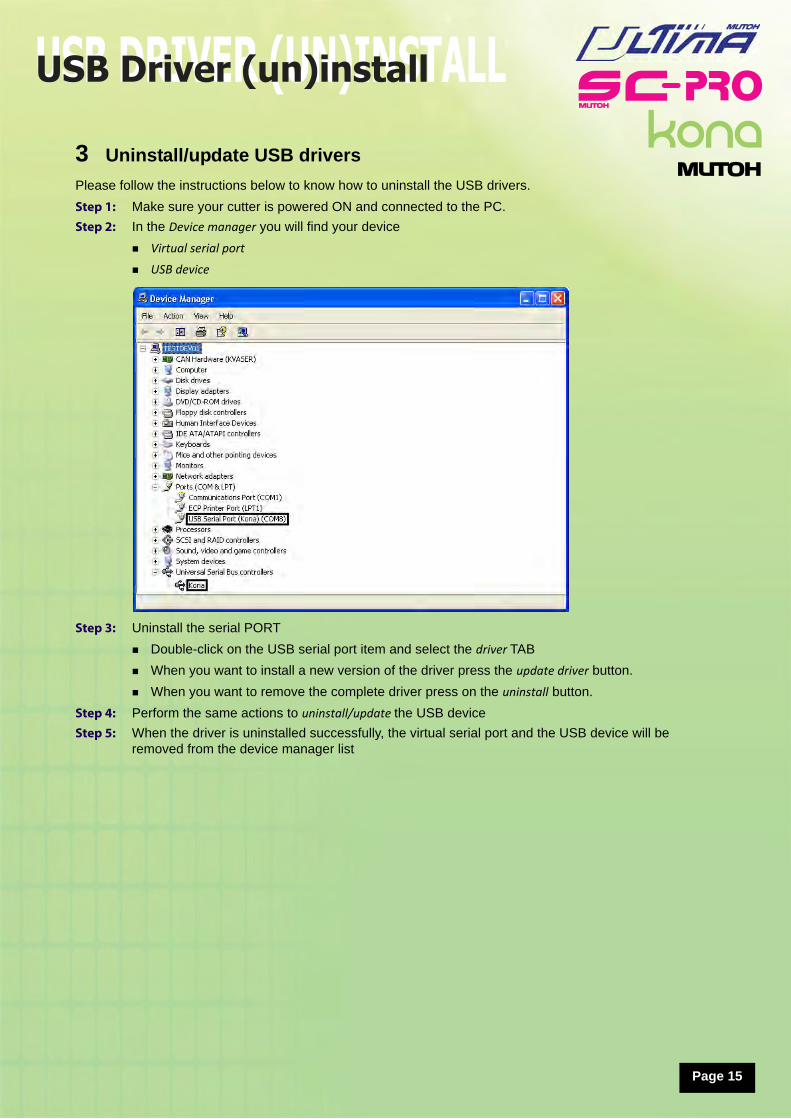
3 Uninstall/update USB drivers
Please follow the instructions below to know how to uninstall the USB drivers.
Step 1: Make sure your cutter is powered ON and connected to the PC.
Step 2: In the Device manager you will find your device
Virtual serial port
USB device
Step 3: Uninstall the serial PORT
Double-click on the USB serial port item and select the driver TAB
When you want to install a new version of the driver press the update driver button.
When you want to remove the complete driver press on the uninstall button.
Step 4: Perform the same actions to uninstall/update the USB device
Step 5: When the driver is uninstalled successfully, the virtual serial port and the USB device will be removed from the device manager list
Page 15
CUTSERVER INSTALLATIONCUTserver installation
Page 16
In order to use the Automated Barcode workflow, an exclusive CutServer tool has been developed by Mutoh to pass on all generated alignment plot files from your software to the cutter. All print and cut plot files will be gathered into a hot folder, linked to the CutServer queue, in which the scanning command can be given to read the ID number of your printout.
1 Install the CutServer
Step 1: Download the CutServer from Mutoh’s member Site > window drivers.
Step 2: Install the Mutoh CutServer by double clicking on the exe installation file.
Step 3: Follow the instructions of the program.
Select Destination Location.
Select Start Menu Folder.
Decide whether to create a desktop icon or not.
Install the software.
Step 4: Open the Mutoh CutServer and set a hot folder as described below
2 Create and set a hot folder
To be able to display all the jobs in the queue of the CutServer, a folder need to be made on your local harddisk. This folder should be linked to the CutServer.
Step 1: Using your windows explorer, create a new empty folder on your HardDisk. (Any name will do, for the example we will call the folder CutServer and place it directly under C:\) or use the default folder C:\Program Files\Mutoh Europe Nv\CutServer.
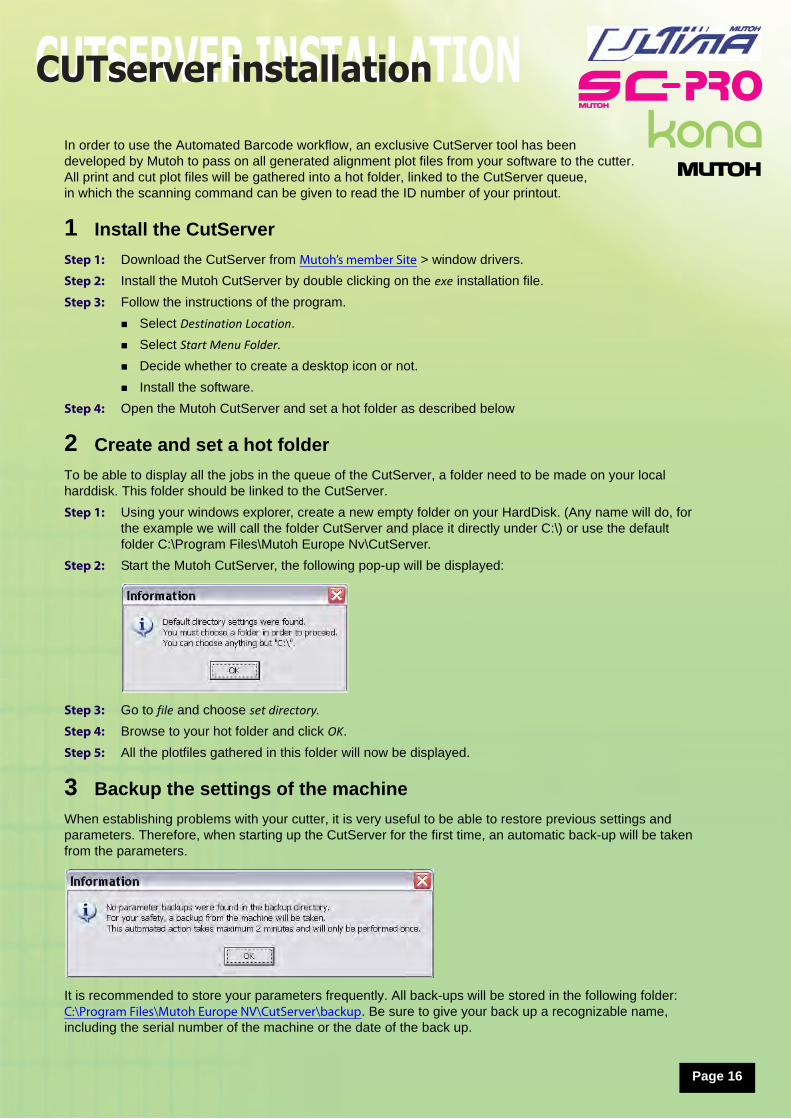
Step 2: Start the Mutoh CutServer, the following pop-up will be displayed:
Step 3: Go to file and choose set directory.
Step 4: Browse to your hot folder and click OK.
Step 5: All the plotfiles gathered in this folder will now be displayed.
3 Backup the settings of the machine
When establishing problems with your cutter, it is very useful to be able to restore previous settings and parameters. Therefore, when starting up the CutServer for the first time, an automatic back-up will be taken from the parameters.
It is recommended to store your parameters frequently. All back-ups will be stored in the following folder: C:\Program Files\Mutoh Europe NV\CutServer\backup. Be sure to give your back up a recognizable name, including the serial number of the machine or the date of the back up.
ETHERNET DRIVER INSTALLATIONEthernet driver installation
17
PageTo be able to communicate with the SC Pro via network, the Ethernet driver needs to be installed. This program will generate a virtual com port.
Please find below the procedure to install and configure the CPR manager.
1 Installing the LAN manager
On Windows XP and Vista
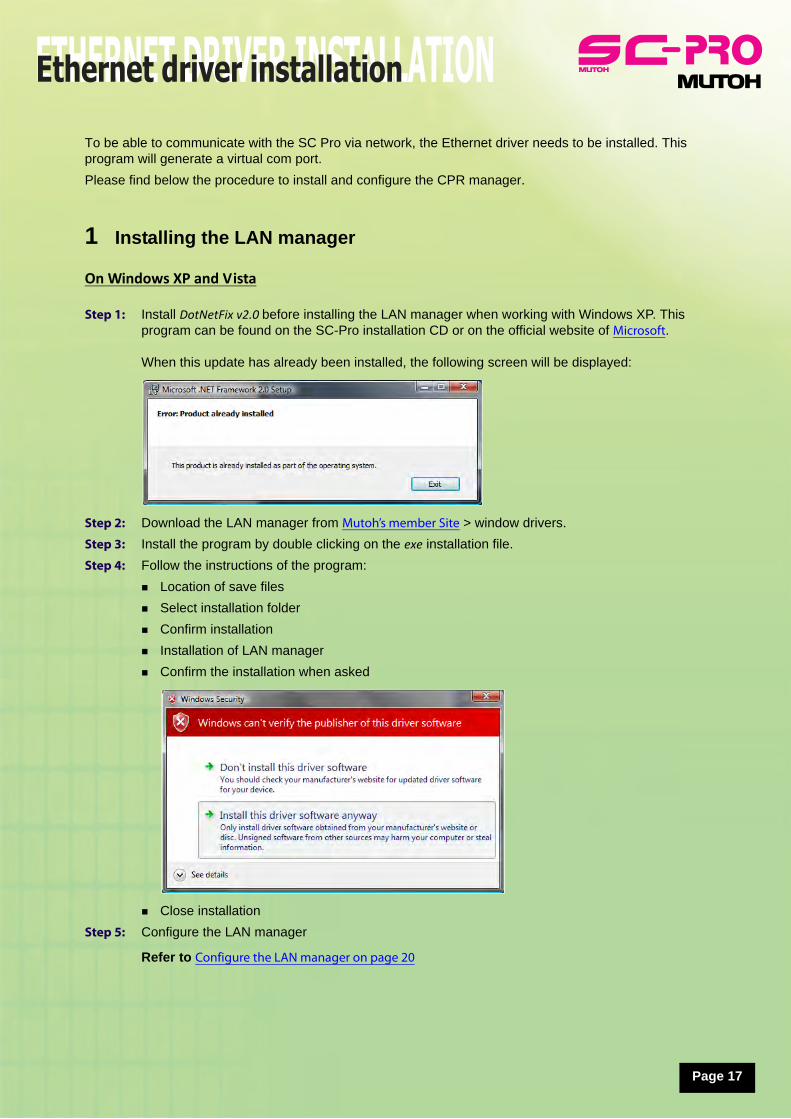
Step 1: Install DotNetFix v2.0 before installing the LAN manager when working with Windows XP. This program can be found on the SC-Pro installation CD or on the official website of Microsoft.When this update has already been installed, the following screen will be displayed:
Step 2: Download the LAN manager from Mutoh’s member Site > window drivers.
Step 3: Install the program by double clicking on the exe installation file.
Step 4: Follow the instructions of the program:
Location of save files
Select installation folder
Confirm installation
Installation of LAN manager
Confirm the installation when asked
Close installation
Step 5: Configure the LAN manager
Refer to Configure the LAN manager on page 20
ETHERNET DRIVER INSTALLATIONEthernet driver installation
18
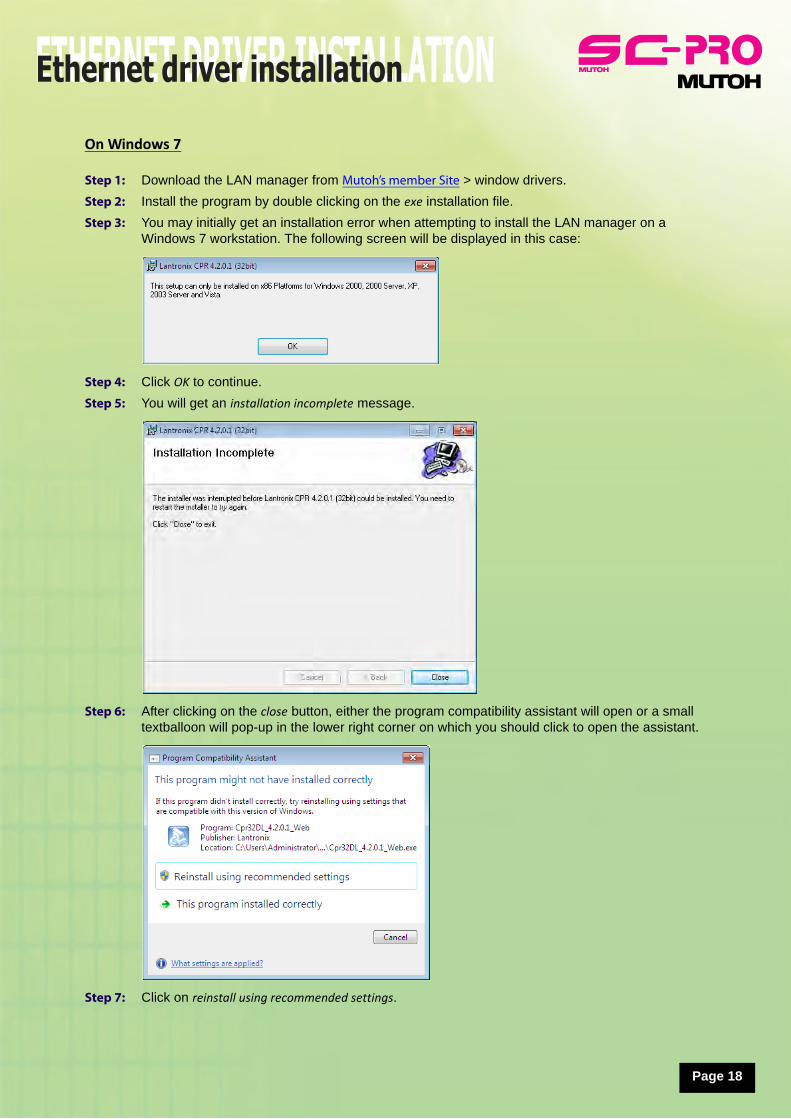
PageOn Windows 7
Step 1: Download the LAN manager from Mutoh’s member Site > window drivers.
Step 2: Install the program by double clicking on the exe installation file.
Step 3: You may initially get an installation error when attempting to install the LAN manager on a Windows 7 workstation. The following screen will be displayed in this case:
Step 4: Click OK to continue.
Step 5: You will get an installation incomplete message.
Step 6: After clicking on the close button, either the program compatibility assistant will open or a small textballoon will pop-up in the lower right corner on which you should click to open the assistant.
Step 7: Click on reinstall using recommended settings.
ETHERNET DRIVER INSTALLATIONEthernet driver installation
19
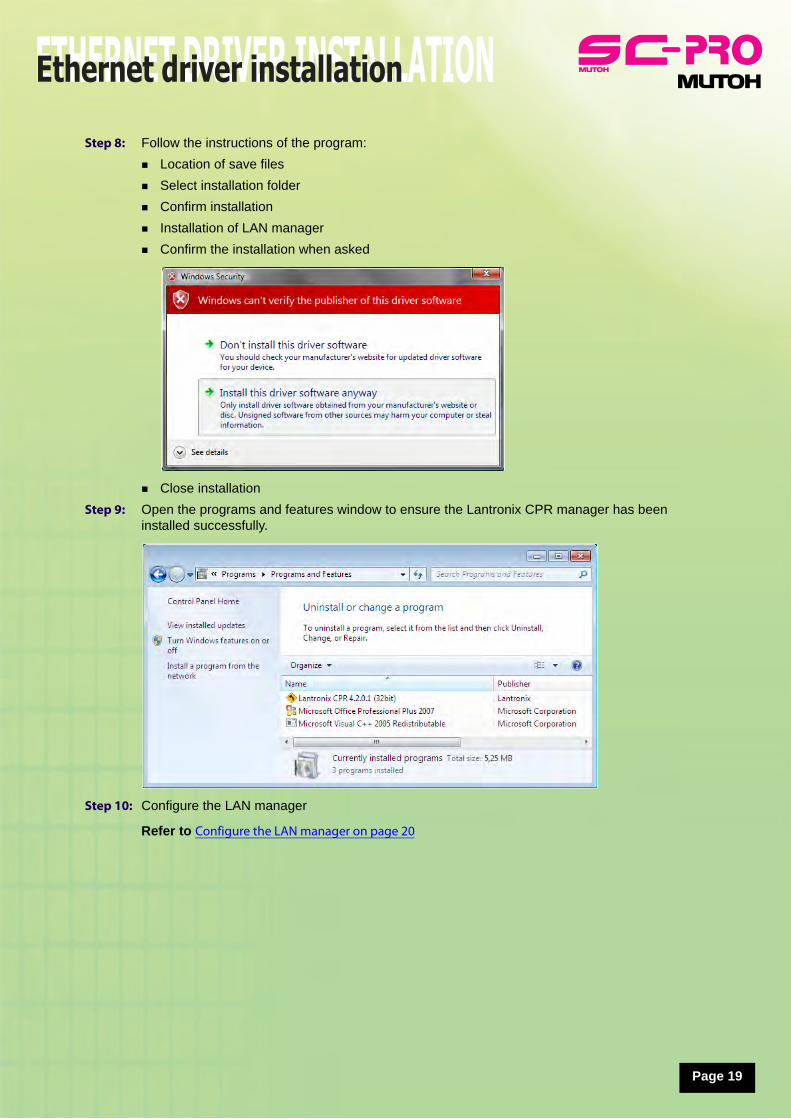
PageStep 8: Follow the instructions of the program:
Location of save files
Select installation folder
Confirm installation
Installation of LAN manager
Confirm the installation when asked
Close installation
Step 9: Open the programs and features window to ensure the Lantronix CPR manager has been installed successfully.
Step 10: Configure the LAN manager
Refer to Configure the LAN manager on page 20
ETHERNET DRIVER INSTALLATIONEthernet driver installation
20
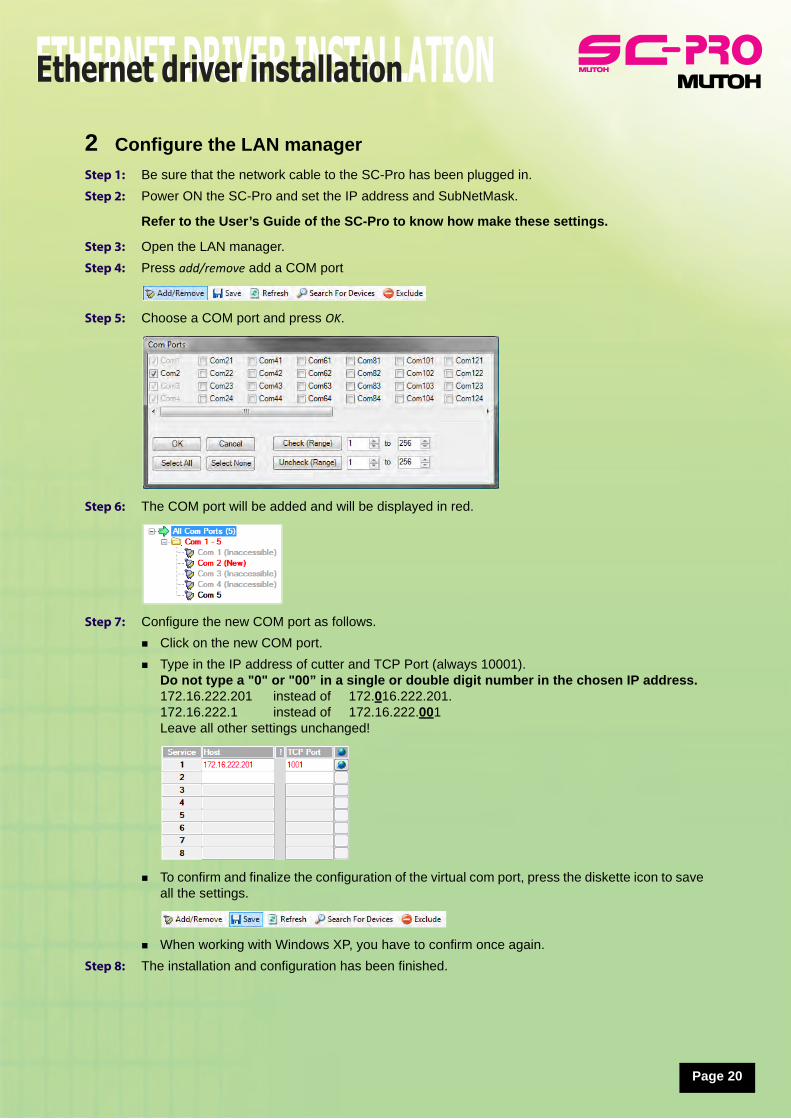
Page2 Configure the LAN manager
Step 1: Be sure that the network cable to the SC-Pro has been plugged in.
Step 2: Power ON the SC-Pro and set the IP address and SubNetMask.
Refer to the User’s Guide of the SC-Pro to know how make these settings.
Step 3: Open the LAN manager.
Step 4: Press add/remove add a COM port
Step 5: Choose a COM port and press OK.
Step 6: The COM port will be added and will be displayed in red.
Step 7: Configure the new COM port as follows.
Click on the new COM port.
Type in the IP address of cutter and TCP Port (always 10001).Do not type a "0" or "00” in a single or double digit number in the chosen IP address. 172.16.222.201 instead of 172.016.222.201.172.16.222.1 instead of 172.16.222.001Leave all other settings unchanged!
To confirm and finalize the configuration of the virtual com port, press the diskette icon to save all the settings.
When working with Windows XP, you have to confirm once again.
Step 8: The installation and configuration has been finished.
ETHERNET DRIVER INSTALLATIONEthernet driver installation
21
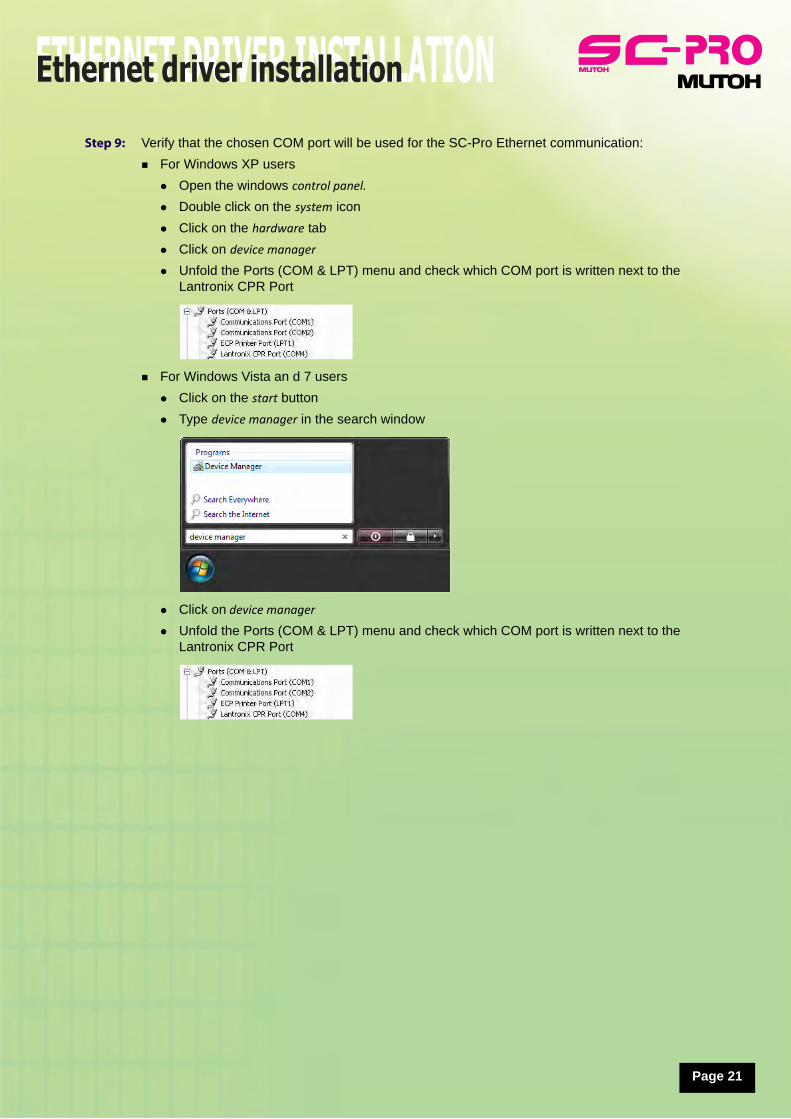
PageStep 9: Verify that the chosen COM port will be used for the SC-Pro Ethernet communication:
For Windows XP users
Open the windows control panel.
Double click on the system icon
Click on the hardware tab
Click on device manager
Unfold the Ports (COM & LPT) menu and check which COM port is written next to the Lantronix CPR Port
For Windows Vista an d 7 users
Click on the start button
Type device manager in the search window
Click on device manager
Unfold the Ports (COM & LPT) menu and check which COM port is written next to the Lantronix CPR Port