Windows® 7 for EducatorsStep-by-stepWindows® 7 for...
21
Introducing Windows 7 You strive to make new and exciting things possible for your students and for yourself. Meanwhile, you’re limited on time and want everyday, and not so everyday, tasks to be simpler and easier. This is where Windows ® 7 comes in. Windows 7 is ultimately about the things you told us you care about. We set out to streamline and simplify common tasks and designed new features to be intuitive and familiar. Get things done faster, easier, and better than ever before. Take a Windows 7 tour, and watch videos about Windows 7 features here: http://www.microsoft.com/windows/windows-7/videos-tours.aspx . Get Windows 7 For more information about getting Windows 7—either for a PC you already own or on a new PC you’d like to purchase—visit http://www.microsoft.com/windows/windows-7/get/default.aspx . There you will find information about system requirements, upgrade considerations, installation instructions, and more. Windows ® 7 for teachers and faculty Step-by-step Windows ® 7 for Educators Step-by-step
Transcript of Windows® 7 for EducatorsStep-by-stepWindows® 7 for...

Introducing Windows 7You strive to make new and exciting things possible for your students and for yourself. Meanwhile, you’re limited on time and want everyday, and not so everyday, tasks to be simpler and easier. This is where Windows® 7 comes in. Windows 7 is ultimately about the things you told us you care about. We set out to streamline and simplify common tasks and designed new features to be intuitive and familiar. Get things done faster, easier, and better than ever before.
Take a Windows 7 tour, and watch videos about Windows 7 features here: http://www.microsoft.com/windows/windows-7/videos-tours.aspx.
Get Windows 7For more information about getting Windows 7—either for a PC you already own or on a new PC you’d like to purchase—visit http://www.microsoft.com/windows/windows-7/get/default.aspx. There you will find information about system requirements, upgrade considerations, installation instructions, and more.
Get what you need in an instantAccessing frequently used programs and filesMany of us have a fairly small group of programs and files we use often. So it makes sense to keep them handy all the time. The Start menu is essentially a blank slate that you can organize and customize to suit your preferences.
Click the Start button . If you don’t see the
program you want, simply type it into the search box.
Windows® 7 for teachers and facultyStep-by-step
Windows® 7 for EducatorsStep-by-step

You can then pin your favorite programs to the Start menu for easy access by right-clicking the program and clicking Pin to Start Menu.
You can also pin your favorite programs to the taskbar by right-clicking the program and selecting Pin to Taskbar, or by dragging the program from the Start menu or the desktop to the taskbar. You can rearrange the buttons on the taskbar any way you like by dragging them.
In this example, Calculator is selected to be pinned to the taskbar.
The taskbar, the horizontal bar at the bottom of the screen , gives you a quick way to access the programs and files you have open. With this new feature in Windows 7, called Peek, you can point to a taskbar button to preview open files or programs. Point to the thumbnail to preview the window full-screen. Click the thumbnail to open the window, or click the x in the upper-right corner of the thumbnail to quickly close the window.
Peek allows you to point to a taskbar button and preview open files or programs.
2

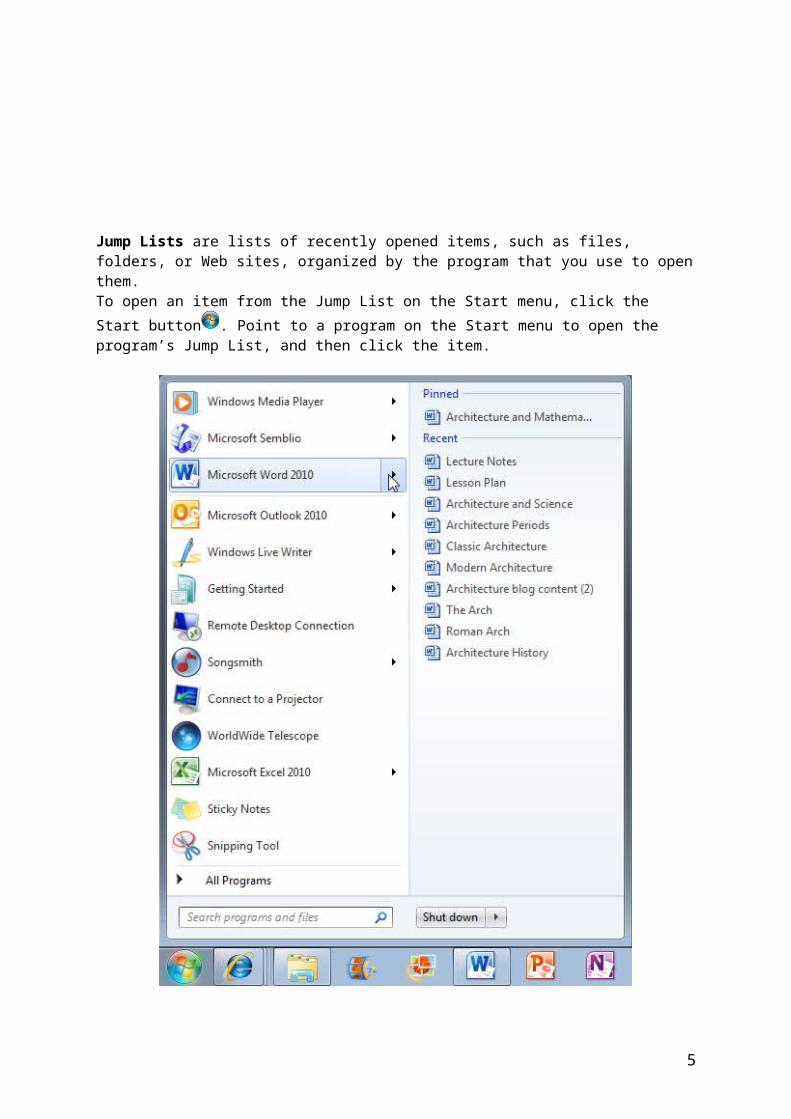
Jump Lists are lists of recently opened items, such as files, folders, or Web sites, organized by the program that you use to open them. To open an item from the Jump List on the Start menu, click the Start button . Point to a program on the Start menu to open the program’s Jump List, and then click the item.
In this example, point to Microsoft Word in the Start menu and the Jump List for Microsoft Word appears.
3

To pin your favorite files to the Jump List, point to the file in the Jump List, and click the push-pin. The item then appears at the top of the Jump List. To unpin an item from a Jump List, point to the item, and click the pushpin. (Notice that the push-pin has a different tooltip, “Unpin from this list.”) The item is no longer pinned to the top of the Jump List.
Jump lists make your documents and programs accessible from the taskbar.
Desktop gadgets for teachersWindows contains mini-programs called gadgets, which offer information at a glance and provide easy access to frequently used tools.
Right-click anywhere on your desktop and then click Gadgets. Double-click a gadget to add it to your desktop. You can also add additional gadgets by clicking Get more gadgets online in the lower-right corner. To remove gadgets you already have, right-click the gadget, and click Close gadget.
4
Many of the available gadgets are really handy for teachers, including gadgets for a dictionary/thesaurus, Wikipedia, multilingual vocabulary, periodic table, unit converter, currency converter, moon phases, astronomy center, a to-do list, and more. You can even watch NASA TV Live or listen to radio stations from around the world.
You can customize a gadget by moving it, resizing it, and making other changes: To move a gadget, drag it wherever you want it. To change a gadget’s options, right-click the gadget, and then click Options. Change
the options and then click OK. To resize a gadget, right-click it, point to Size, and click the size you want the gadget
to be. To keep a gadget on top of your other windows so it’s always visible, right-click the
gadget, and click Always on top.
Watch a video on how to customize desktop gadgets here: http://windows.microsoft.com/en-us/windows7/customize-desktop-gadgets.
5

The Windows 7 teacher toolboxCalculatorIn Windows 7, we gave Calculator a fresh look and new features, including new modes, unit conversion, and helpful worksheets.Click the Start button and type calculator in the search box. Click Calculator in the Programs section at the top of the Start menu. You can perform calculations by clicking the calculator buttons or by using the numeric keypad on your keyboard.
Calculator starts in standard mode. Click the View menu to change modes. Standard, scientific, programmer, and statistic modes are available. Note that when you switch modes, the current calculation is cleared.
In scientific mode, Calculator is precise to 32 significant digits, and honors operator precedence (that is, in the absence of parentheses or other grouping symbols, it performs operations in this order: exponents and roots, then multiplication and division, then addition and subtraction). To access inverse functions click the Inv key.
In programmer mode, Calculator is precise up to 64 bits, depending on the word size that you've selected, and honors operator precedence. Programmer mode is an integer-only mode. Decimal portions are discarded.
In statistics mode, you can enter the data that you want to calculate statistics for and then perform the calculations. When you enter the data, it's displayed in the history area and the number of values you have entered is displayed in the calculation area. Type or click your first piece of data, and then click Add to add the data to the dataset. Click the button for the statistical calculation you want to perform:
Button FunctionAverage of the valuesAverage of the square of the valuesSum of the valuesSum of the square of the valuesStandard deviationStandard deviation of population
Unit conversion automatically converts angle, area, energy, length, power, pressure, temperature, time, velocity, volume, and weight/mass units of measurement.
6
You can use the View menu to change modes and access history, worksheets, and more.

The unit conversion worksheet allows you to easily convert units of measurement, in this case, pounds to kilograms.
Date calculation calculates the difference between two dates or allows you to add or subtract days from a specified date.
Use worksheets to calculate mortgage, vehicle lease payments, and fuel economy (mpg or L/100 km). On the View menu, click Worksheets, and then choose the worksheet you want.
Calculation history keeps track of all the calculations performed in a session, and is available in standard and scientific modes. On the View menu, click History. You can even edit the calculation by selecting a digit or operator and changing it.
Then press ENTER to recalculate.
SnapYou can use Snap to arrange windows side by side, which can be especially helpful when you want to compare two documents or Web pages for class discussion or when you move files from one place to another.
To arrange windows side by side, drag the title bar of a window to the left or right side of the screen until an outline of the window at half the width of your screen appears. Release the mouse to Snap, or dock, the window to the side of the screen. Repeat these steps with another window to arrange the windows side by side. To return the window to its original size, drag the title bar away from the top of the desktop and then release.
7

Drag the title bar of the window to the left of the screen until an outline of the expanded window appears.
Or, to snap an active window to the side of the desktop using the keyboard, press either Windows logo key + Left Arrow or Windows logo key + Right Arrow.
Snipping ToolSnipping Tool captures a screen shot of any object on your screen, like a paragraph in a document, a picture you’re editing, or a section of a Web page. When you want to share an idea or ask a question, it’s a great way to show your students what you’re talking about.
Click the Start button and type snip in the search box. Click Snipping Tool in the Programs section at the top of the Start menu.
On the New menu, select the type of snip you want:
Free-form Snip. Draw a free-form shape around an object.
Rectangular Snip. Drag the cursor around an object to form a rectangle.
Window Snip. Select a window, such as a browser window or dialog box, that you want to capture.
Full-screen Snip. Capture the entire screen.
8

Then select the area of your screen that you want to capture. It's automatically copied to the Clipboard and the Snipping Tool mark-up window. From the mark-up window, you can write on, draw on, highlight, save, or e-mail the snip.
Snipping Tool is available only in the Home Premium, Professional, and Ultimate editions of Windows 7.
9

Sticky NotesSticky Notes are colorful reminder notes you can stick on your desktop. They are even handier in Windows 7. You can format the text, and speedily resize, collapse, and flip through notes.
To create a sticky note, click the Start button and type sticky in the search box. Click Sticky Notes in the Programs section at the top of the Start menu. To create additional notes, click the New Note button. You can also open a new note by pressing CTRL+N.
To resize a note, drag an edge or corner of the note to make it larger or smaller.
To delete a note, click the Delete Note button. You can also delete a note by pressing CTRL+D.
To change the color of a sticky note, right-click the note and then choose a color.
To format text in a sticky note, select the text you want to change. Use the following keyboard shortcuts to format the text on your note:
Type of formatting Keyboard shortcutBold text CTRL+BItalic text CTRL+IUnderlined text CTRL+UStrikethrough CTRL+TBulleted list CTRL+SHIFT+L
(Press this keyboard shortcut again to switch to a numbered list.)
Increased text size CTRL+SHIFT+>Decreased text size CTRL+SHIFT+<
Sticky Notes is available only in the Home Premium, Professional, and Ultimate editions of Windows 7.
10

11

Beyond the classroomConnect to a wireless networkTo open Connect to a Network, click the network icon ( or ) in the notification area in the lower-right corner of your screen. In the list of available wireless networks, click a network, and then click Connect. If prompted, type the network security key, and then click OK. Now you’re connected to the network.
Location-Aware PrintingIf you’ve got Windows 7 Professional or Ultimate on your laptop, you can automatically switch default printers for each network you use—at home and at school. Then you won’t have to manually switch printers when you move between locations. So when you print at school, Windows 7 will automatically print to your school printer. When you print at home, Windows 7 will automatically select and use your home printer.
First, be sure that your computer is connected to the printer you need. You can add a local printer or add a network, wireless, or Bluetooth printer.
To add a local printer that is directly connected to your PC: First, connect the printer to your computer following the manufacturer's instructions. Windows attempts to automatically install the printer. If Windows can't automatically install it or if you've removed the printer and want to add it again, follow these steps:
1. Click the Start button , and then click Devices and Printers.
2. Click Add a printer.3. In the Add Printer wizard, select Add a local printer.
12

4. On the Choose a printer port page, make sure that Use an existing port and the recommended printer port are selected, and then click Next.
5. On the Install the printer driver page, select the printer manufacturer and model, and then click Next. Note, if your printer is not listed, click Windows Update, and then wait while Windows checks for additional drivers. If none are available and you have the manufacturer's installation CD, click Have disk, and then browse to the folder where the printer driver is stored. For additional help, refer to the manufacturer's instructions.
6. Complete the additional steps in the wizard, and then click Finish.
To add a network, wireless, or Bluetooth printer: Make sure you know the name of the printer that you want to add before you begin. Sometimes the name is displayed on the printer itself. If the name is not on the printer, contact the printer owner or your network administrator to find out the printer's name before you follow the steps below.
1. Click the Start button , and then click Devices and Printers.
2. Click Add a printer.3. In the Add Printer wizard, select Add a network, wireless or Bluetooth printer.4. In the list of available printers, select the one you want to use, and then click Next. If
your computer is connected to a network, only printers listed in Active Directory for your domain are displayed in the list.
5. If prompted, install the printer driver on your computer. If you are prompted for an administrator password or confirmation, type the password or provide confirmation.
6. Complete the additional steps in the wizard, and then click Finish.
To change a default printer:1. Click the Start button , and then click Devices and Printers. 2. Right-click a printer, and then click Set as default printer.
To manage Location-Aware Printing settings:1. Click the Start button , and then click Devices and Printers.2. Click a printer, and then click Manage default printers on the toolbar.3. Click Change my default printer when I change networks. 4. In the Select network list, click a network.5. In the Select printer list, click a corresponding default printer.6. Click Add. 7. Repeat steps 4, 5, and 6 to select printers for any other networks you connect to.
When you're finished, click OK.
13

With Location-Aware Printing, you can automatically switch your laptop's default printer when it detects that you've moved from one network to another—from home to school, for example. All you need to do is click
Print.
More information on Windows 7 for EducatorsFor teachers, visit http://www.microsoft.com/uk/education/teachers/teacher-tools
For faculty, visit http://www.microsoft.com/win7
To purchase Windows 7, visit http://store.microsoft.com/
For more videos and information about Windows 7, visit http://www.microsoft.com/windows
© 2009 Microsoft Corporation. All rights reserved.
14

This document is for informational purposes only. MICROSOFT MAKES NO WARRANTIES, EXPRESS, IMPLIED OR STATUTORY, AS TO THE INFORMATION IN THIS DOCUMENT.
Microsoft, Windows, Aero, BitLocker, BitLocker To Go, DirectX, Internet Explorer, OneNote, PowerPoint, SmartScreen, and Windows Live are trademarks of the Microsoft group of companies. The names of actual companies and products mentioned herein may be the trademarks of their respective owners.
15