Windows 2008 R2 and Hyper-V - downloads.dell.com€¦ · 6 Windows Server 2008 R2 and Hyper-V 2008...
20
Windows Server 2008 R2 and Hyper-V 2008 Host Configuration Rapid EqualLogic Configuration Series Implementation Guide January 2015
Transcript of Windows 2008 R2 and Hyper-V - downloads.dell.com€¦ · 6 Windows Server 2008 R2 and Hyper-V 2008...
Windows Server 2008 R2 and Hyper-V 2008 Host Configuration Rapid EqualLogic Configuration Series Implementation Guide
January 2015
2 Windows Server 2008 R2 and Hyper-V 2008 Host Configuration | Rapid EqualLogic Configuration Series |
Implementation Guide
Revisions
Date Status
April 2012 Initial release
May 2012 Updated the Intel NIC driver version and EQL host installation kit for Windows version 4.0.0
December 2012 Combined part 1 and part 2 into single guide
March 2013 Added Hyper-V 2008 content
January 2015 Minor updates
© 2013 Dell Inc. All rights reserved. Dell, the Dell logo, and other Dell names and marks are trademarks of Dell Inc. in
the US and worldwide.
All trademarks and registered trademarks mentioned herein are the property of their respective owners.

3 Windows Server 2008 R2 and Hyper-V 2008 Host Configuration | Rapid EqualLogic Configuration Series |
Implementation Guide
This document is one part of a complete installation guide series from the Rapid EqualLogic
Configuration Portal. Please make sure that you have the complete set for your configuration before
proceeding.
Full link to document site:
http://en.community.dell.com/techcenter/storage/w/wiki/3615.rapid-equallogic-configuration-portal-
by-sis.aspx
Note: For instructions on enabling the Hyper-V role for a Windows 2008 Server, go to:
http://technet.microsoft.com/en-us/library/cc794929(v=ws.10).aspx
Note: To enable Hyper-V to use volumes located on the EqualLogic iSCSI SAN, you must first complete
the configuration instructions provided in this guide.
4 Windows Server 2008 R2 and Hyper-V 2008 Host Configuration | Rapid EqualLogic Configuration Series |
Implementation Guide
1 NIC device driver update and installation This configuration is for Windows Server® 2008 R2 hosts.
1.1 Download the latest driver update for the Intel NICs
Note: The following procedure is for an Intel 1G or 10G NIC. If you are using Broadcom® network
adapters (NICS) for SAN connectivity, proceed to “Download the latest driver update for Broadcom NICs”.
1. Go to http://support.dell.com and click Start Here under Support for Small Business.
2. In the Drivers and Downloads menu, select Drivers Home.
If the support site has detected a product to support, click Change Your Product.
3. In the Choose a Model section, click Select a Model.
4. Select Servers, Storage, Networking from the Select Your Product Family list, and PowerEdge
Server from the Select Your Product Line list.
5. Select your host server platform (i.e. Dell™ PowerEdge™ R610, etc.) from the Select Your Product
Model list, and then click Confirm.
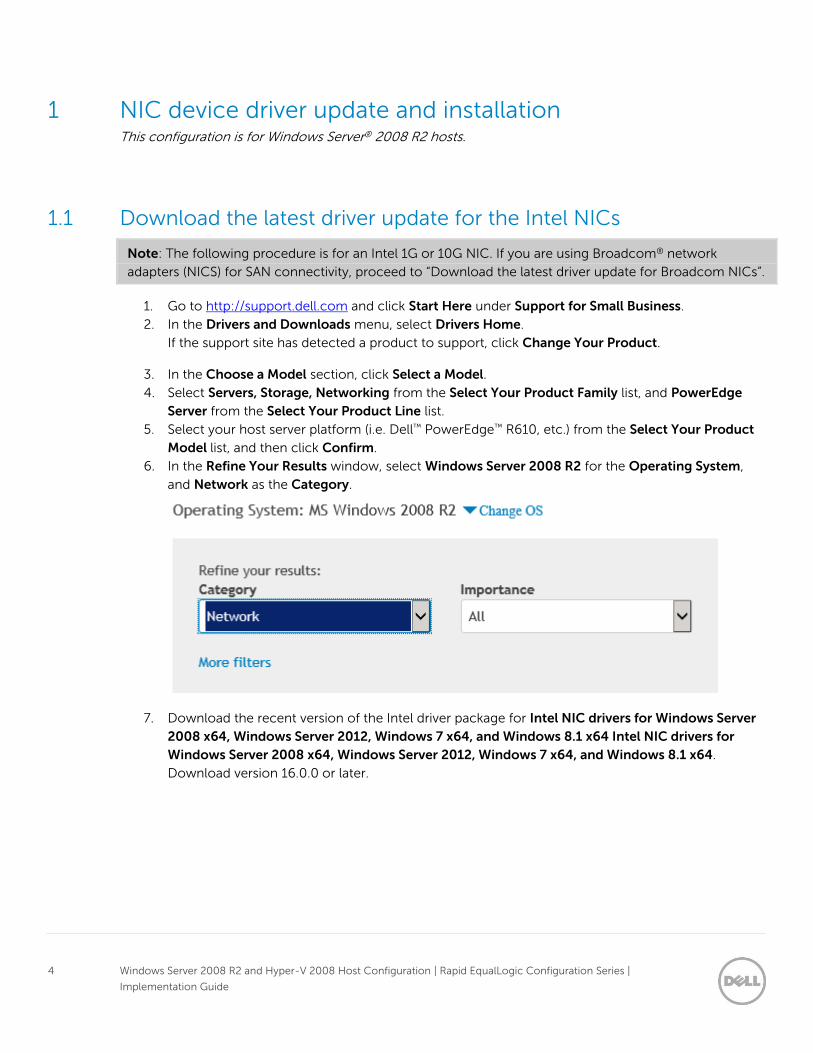
6. In the Refine Your Results window, select Windows Server 2008 R2 for the Operating System,
and Network as the Category.
7. Download the recent version of the Intel driver package for Intel NIC drivers for Windows Server
2008 x64, Windows Server 2012, Windows 7 x64, and Windows 8.1 x64 Intel NIC drivers for
Windows Server 2008 x64, Windows Server 2012, Windows 7 x64, and Windows 8.1 x64.
Download version 16.0.0 or later.

5 Windows Server 2008 R2 and Hyper-V 2008 Host Configuration | Rapid EqualLogic Configuration Series |
Implementation Guide
1.2 Install the Intel driver update 1. Click Install to start, and then click Next.
2. After accepting the license, make sure that only Drivers, Intel(R) PROset, and Advanced Network
Services are selected as shown and click Next.
3. Click Next and then Install to complete the installation.

6 Windows Server 2008 R2 and Hyper-V 2008 Host Configuration | Rapid EqualLogic Configuration Series |
Implementation Guide
1.3 Configure the Intel network adapters (NICS) After installation of the Intel driver, launch the Windows device manager and expand Network adapters.
You should see the Intel NICs listed, as shown.
For each Intel NIC that will be connected to the SAN, you need to change the following settings:
1. In Device Manager, double click the Intel NIC used for SAN traffic.
2. In the Properties dialog box, click the Advanced tab to configure the NIC settings.
3. Set the Jumbo Packet value to 9014 Bytes and click OK.
Repeat these steps for all the NICs used for SAN traffic.
1.4 Download the latest driver update for Broadcom NICs
Note: The following procedure is for a Broadcom NIC. If you are using Intel Network Adapters (NICs),
refer to the previous section titled, “Downloading the latest driver update for the Intel NICs”.
1. Go to http://support.dell.com and click Start Here under Support for Small Business.
2. In the Drivers and Downloads menu, select Drivers Home.
If the support site has detected a product to support, click Change Your Product.
3. In the Choose a Model section, click Select a Model.
4. Select Servers, Storage, Networking from the Select Your Product Family list, and PowerEdge
Server from the Select Your Product Line list.
5. Select your host server platform (i.e. Dell PowerEdge R610, etc.) from the Select Your Product
Model list, and then click Confirm.

7 Windows Server 2008 R2 and Hyper-V 2008 Host Configuration | Rapid EqualLogic Configuration Series |
Implementation Guide
6. In the Refine Your Results window, select Windows Server 2008 R2 for the Operating System,
and Network as the Category.
7. Download the most recent version of the Broadcom driver package for “NetXtreme II Family of
Adapters”. Download version 16.2.1 or later.
1.5 Install the Broadcom driver update 1. Launch the Broadcom driver installation update.
2. At the custom setup screen, select the Control Suite and BASP features as shown, and click Next.
3. If the installation procedure prompts to enable System TCP Chimney Offload, select No.

8 Windows Server 2008 R2 and Hyper-V 2008 Host Configuration | Rapid EqualLogic Configuration Series |
Implementation Guide
1.6 Configure Broadcom NIC device settings using BACS Launch the Broadcom Advanced Configuration Suite (BACS) tool by going to Start > All Programs >
Broadcom.
1. On the left pane, click on the NIC port.
2. On the right pane, click the Configurations tab.
3. Perform the following steps on each NIC port connected to the SAN network.

9 Windows Server 2008 R2 and Hyper-V 2008 Host Configuration | Rapid EqualLogic Configuration Series |
Implementation Guide
a. Leave all values at default except for the following:
Option Value
Flow control Rx & Tx Enabled
Jumbo MTU 9014
b. Click Apply to save the changes.
c. Exit Broadcom Advanced Control Suite.
10 Windows Server 2008 R2 and Hyper-V 2008 Host Configuration | Rapid EqualLogic Configuration Series |
Implementation Guide
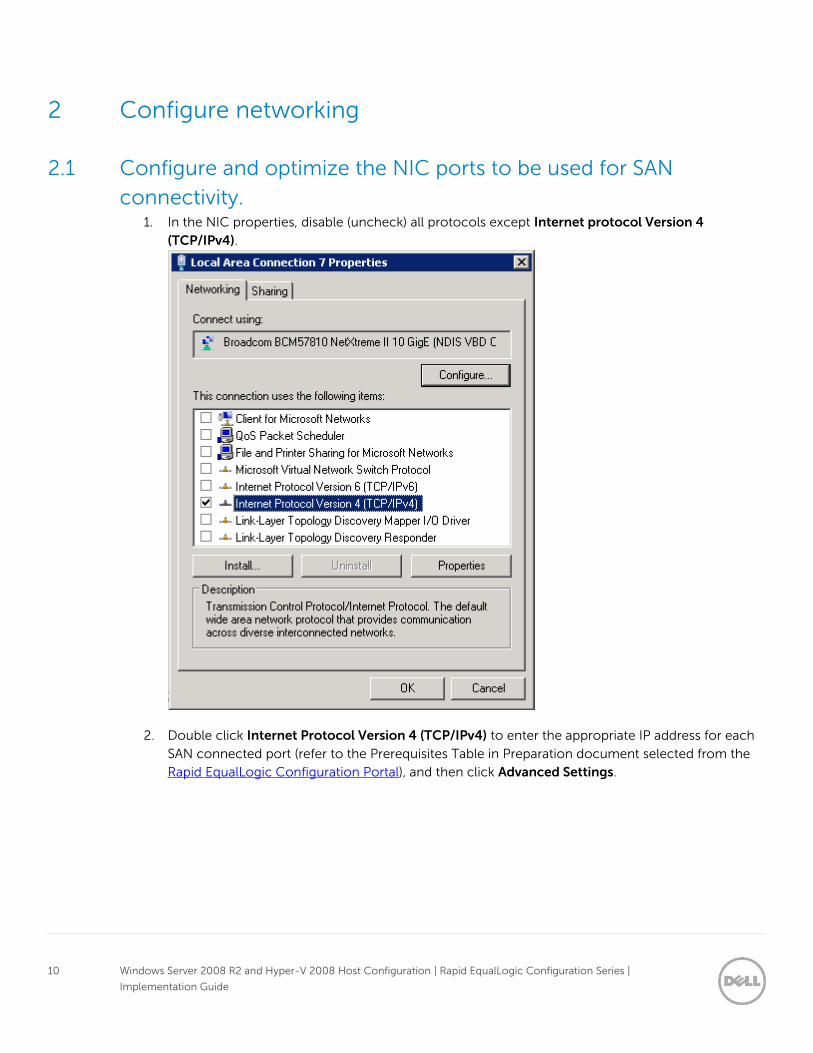
2 Configure networking
2.1 Configure and optimize the NIC ports to be used for SAN
connectivity. 1. In the NIC properties, disable (uncheck) all protocols except Internet protocol Version 4
(TCP/IPv4).
2. Double click Internet Protocol Version 4 (TCP/IPv4) to enter the appropriate IP address for each
SAN connected port (refer to the Prerequisites Table in Preparation document selected from the
Rapid EqualLogic Configuration Portal), and then click Advanced Settings.

11 Windows Server 2008 R2 and Hyper-V 2008 Host Configuration | Rapid EqualLogic Configuration Series |
Implementation Guide
3. In the advanced settings properties, open the WINS tab and uncheck Enable LMHOSTS lookup
and choose Disable NetBIOS over TCP/IP as the NetBIOS setting.
4. Repeat the steps above to configure and optimize each NIC port to be used for SAN connectivity.

12 Windows Server 2008 R2 and Hyper-V 2008 Host Configuration | Rapid EqualLogic Configuration Series |
Implementation Guide
3 Install EQL HIT kit Download the latest Host Integration Tools kit from https://support.equallogic.com/secure/login.aspx. In
Windows Explorer, double click the downloaded file to run the setup.
1. Select the complete installation option, and then click Next.
2. At the Installation Complete screen, uncheck the Launch Remote Setup Wizard checkbox and
then click Finish.
3. When the following message is displayed, click Yes to restart the system.
13 Windows Server 2008 R2 and Hyper-V 2008 Host Configuration | Rapid EqualLogic Configuration Series |
Implementation Guide
4 Configure the SAN switch fabric If you have already configured your SAN switches, continue to the next section. If not, refer to the specific
instructions for configuring each switch model in the Rapid EqualLogic Configuration Portal.
5 Configure the storage
5.1 Configure the array If you have already configured the storage array, continue to section 5.2. If you have not completed the
array configuration, then complete the steps for array configuration using the instructions in the
Rapid EqualLogic Configuration Portal.
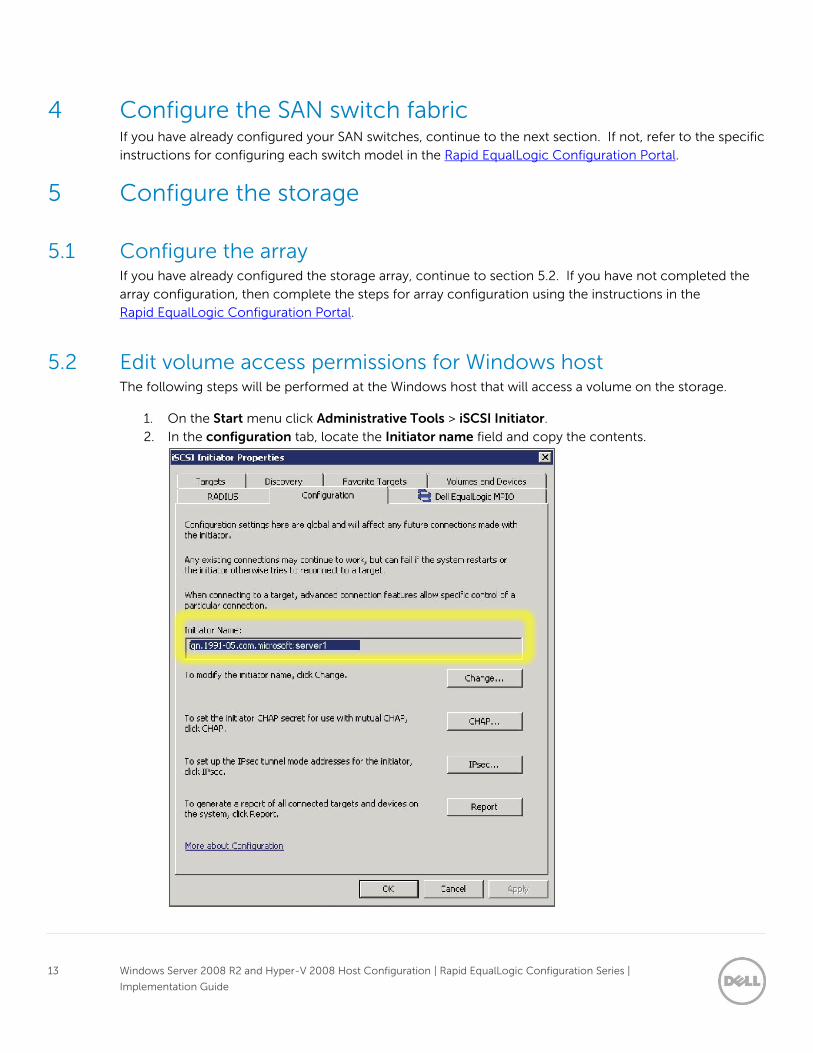
5.2 Edit volume access permissions for Windows host The following steps will be performed at the Windows host that will access a volume on the storage.
1. On the Start menu click Administrative Tools > iSCSI Initiator.
2. In the configuration tab, locate the Initiator name field and copy the contents.
14 Windows Server 2008 R2 and Hyper-V 2008 Host Configuration | Rapid EqualLogic Configuration Series |
Implementation Guide
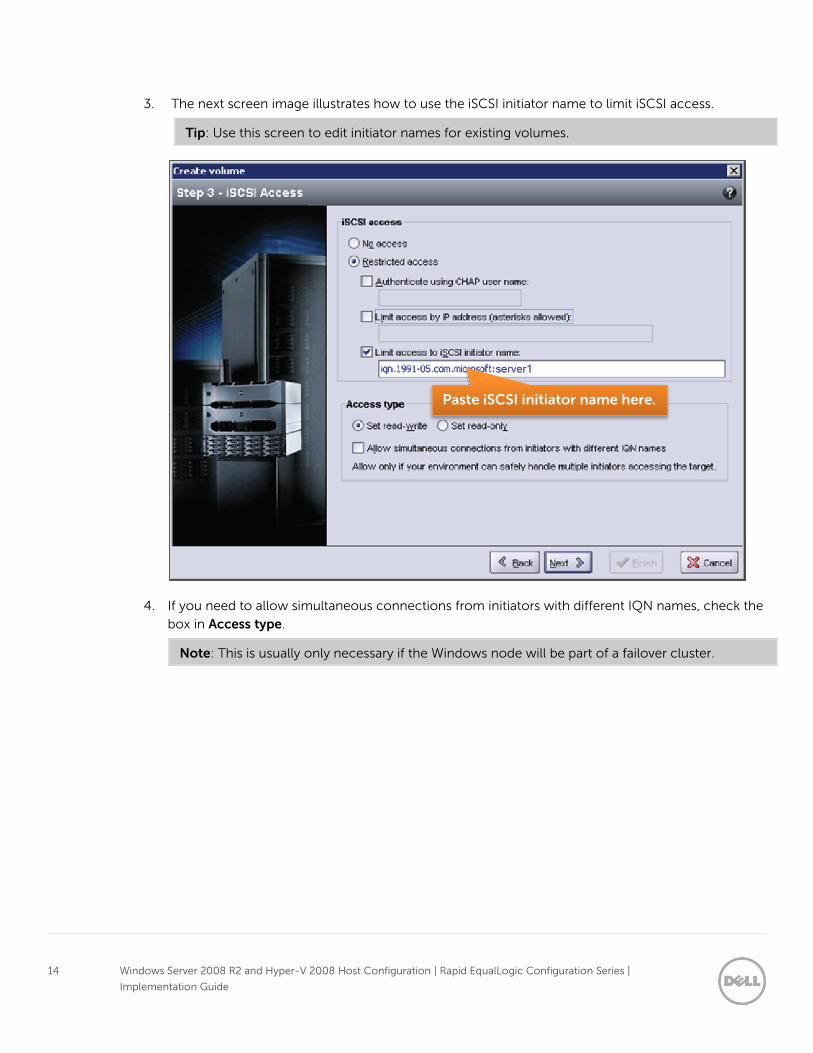
3. The next screen image illustrates how to use the iSCSI initiator name to limit iSCSI access.
Tip: Use this screen to edit initiator names for existing volumes.
4. If you need to allow simultaneous connections from initiators with different IQN names, check the
box in Access type.
Note: This is usually only necessary if the Windows node will be part of a failover cluster.
Paste iSCSI initiator name here.

15 Windows Server 2008 R2 and Hyper-V 2008 Host Configuration | Rapid EqualLogic Configuration Series |
Implementation Guide
6 Configure iSCSI – target discovery To configure the host for iSCSI and target discovery, use the remote setup wizard as described in this
section.
1. Open the remote setup wizard by clicking Start > All Programs > EqualLogic > Remote Setup
Wizard.
2. Chose Configure this computer to access a PS Series SAN, as shown, and then click Next.
3. Click Add Group.
16 Windows Server 2008 R2 and Hyper-V 2008 Host Configuration | Rapid EqualLogic Configuration Series |
Implementation Guide
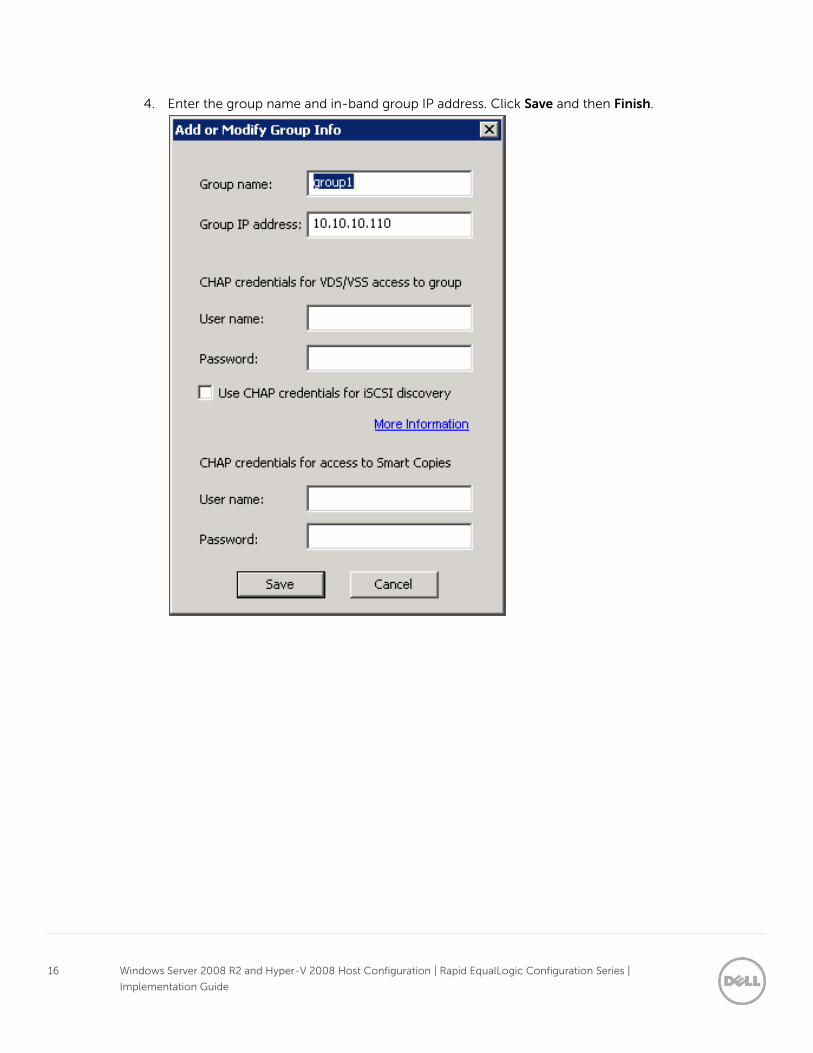
4. Enter the group name and in-band group IP address. Click Save and then Finish.
17 Windows Server 2008 R2 and Hyper-V 2008 Host Configuration | Rapid EqualLogic Configuration Series |
Implementation Guide
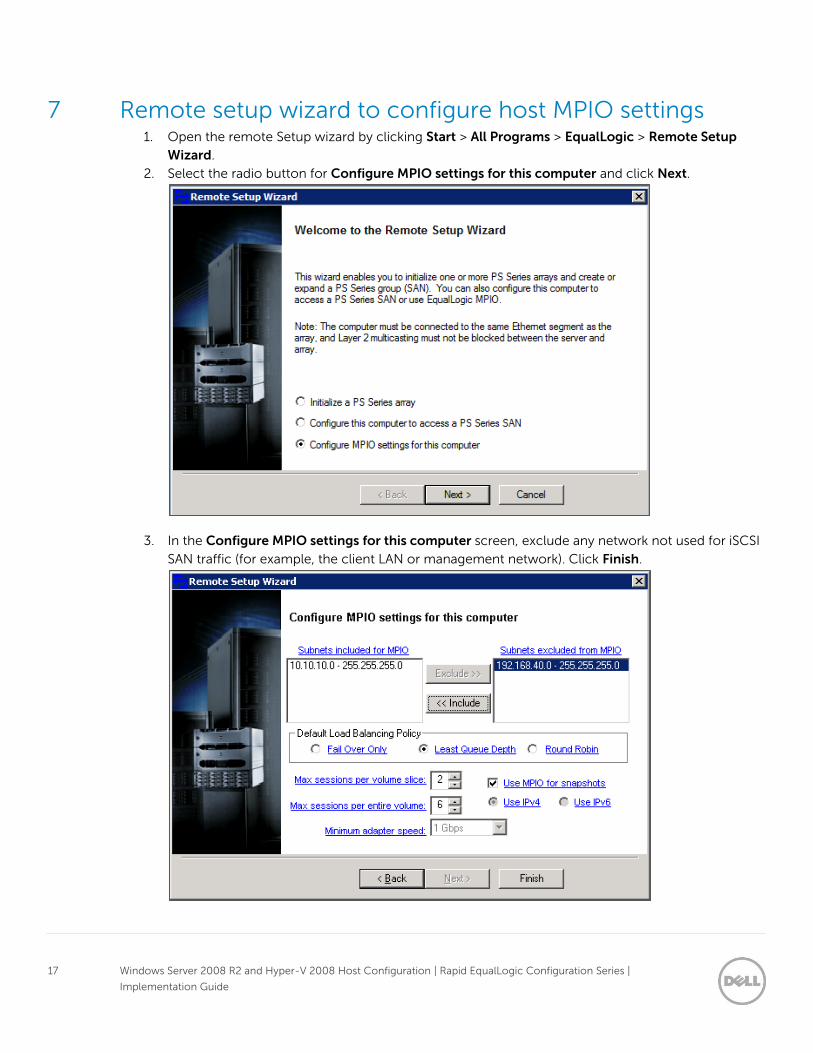
7 Remote setup wizard to configure host MPIO settings 1. Open the remote Setup wizard by clicking Start > All Programs > EqualLogic > Remote Setup
Wizard.
2. Select the radio button for Configure MPIO settings for this computer and click Next.
3. In the Configure MPIO settings for this computer screen, exclude any network not used for iSCSI
SAN traffic (for example, the client LAN or management network). Click Finish.

18 Windows Server 2008 R2 and Hyper-V 2008 Host Configuration | Rapid EqualLogic Configuration Series |
Implementation Guide
8 Volume access 1. Open the iSCSI Initiator on a Windows host machine by clicking Start > Administrative Tools >
iSCSI Initiator.
2. Click the Targets tab to view the iSCSI target for the volume created on the array member.
3. Click Refresh to rescan the ISCSI targets.
4. Select a target to connect to and click Connect.

19 Windows Server 2008 R2 and Hyper-V 2008 Host Configuration | Rapid EqualLogic Configuration Series |
Implementation Guide
5. Click OK to confirm the connection.
Repeat steps 4 and 5 of “Volume access” for the remaining volumes.
6. Click OK to close the iSCSI initiator properties.
7. Open Start > Administrative Tools > Server Manager.
8. Click Storage > disk management.
9. Right click the new (unknown) disk and choose online.

20 Windows Server 2008 R2 and Hyper-V 2008 Host Configuration | Rapid EqualLogic Configuration Series |
Implementation Guide
10. Right click the new (uninitialized) disk and choose Initialize Disk.
11. Choose MBR or GPT (for volumes greater than 2TB in size) and then click OK.
12. Right click on the unallocated volume and choose Simple Volume.
Follow the steps in the wizard to create a partition and format the volume for Windows.