Window Shadings - · PDF fileAttach the Back Cover (Optional) ... use medium to heavy-duty...
20
Transcript of Window Shadings - · PDF fileAttach the Back Cover (Optional) ... use medium to heavy-duty...

Window Shadings
Standard Rectangular Shadings
Installation • Operation • Care

CONTENTS
© 2010
Getting Started:Product View ................................................................ 1Tools and Fasteners Needed .......................................... 2
Installation:Installation Overview ..................................................... 3Mount the Installation Brackets — Inside Mount ............. 4Mount the Installation Brackets — Outside Mount .......... 5Mount the Installation Brackets — End Mount ................ 7Attach the Back Cover (Optional) .................................... 7Install the Shading ........................................................ 8Attach the Universal Cord Tensioner (UCT) ..................... 8Attach the Magnetic Hold-Down Brackets (Optional) ....... 9Attach the Dust Cover (Optional for Outside Mounts) ..... 10
Operation:Operate the Shading ................................................... 11Troubleshooting .......................................................... 12
Care:Removing the Shading................................................. 14Cleaning Procedures ................................................... 15
Safety:Warning ..................................................................... 16Cord Loop Shadings .................................................... 16
GETTING STARTED
1
Product View
Back/Dust Cover
Headrail
Standard Shading
HeadrailEnd Cap
End Cap
Cord Loopand Tensioner
MagneticHold-Down
Bracket(Optional)
InstallationBracket
Top Limit
Headrail
HeadrailEnd Cap
Cord Loop
Cord Loop
InstallationBracketDual Rotator
Support BracketTop Limit
Two-On-One Headrail Shading

2
GETTING STARTED
Thank you for purchasing this product. With proper installation, operation, and care, your new shadings will provide years of beauty and performance.
Please thoroughly review this instruction booklet before beginning the installation. If your shading has a protective plastic cover on the fabric-covered headrail, keep the plastic in place until the shading is installed.
Tools and Fasteners Needed � Flat blade and Phillips screwdriver � Level
� Measuring tape and pencil � Pliers
� Power drill, 3∕32" drill bit, and a 1∕4" hex driver
� Scissors (heavy-duty)
In addition, you will need fasteners designed to work with your specific mounting surface(s).
� #6 Hex Head Screws (Provided). Two 11∕2" screws are provided per installation bracket.
� Longer #6 Hex Head Screws (Not Provided). If using spacer blocks, use #6 screws long enough for a secure attachment.
� Speed Nuts and Screws (Provided). Extension brackets come with screws and speed nuts.
� Drywall Anchors (Not Provided). Use drywall anchors when mounting into drywall.
Speed Nut and Screw
(Provided with Each Extension Bracket)
#6 x 1½"Hex Head Screw
(Provided)
Longer #6 Hex Head Screw for Use with Spacer Blocks
(Not Provided)

INSTALLATION
3
Installation Overview
� Your order will include installation brackets specific to your shading.
� The number of installation brackets required varies with shading width, as shown in the table.
� Dual rotator support brackets are required only on Two-On-One Headrail shadings for center support.
Mounting Types and Window Terminology
If the installation brackets are mounted correctly, the rest of the installation process follows very easily. To prepare for this important first step, review the mounting types and basic window terminology illustrated below.
� Refer to the appropriate page below based on your order:
� Inside Mount, see page 4.
� Outside Mount, see page 5.
� End Mount, see page 7.
InstallationBracket
Two-On-One Headrail Shadings
Width Brackets Required
12" – 36" 2
361/8" – 79" 3
791/8" – 108" 4
1081/8" – 144" 5
Single Panel Shadings
Width Brackets Required
12" – 36" 2
361/8" – 79" 3
791/8" – 96" 4
961/8" – 120" 5
Dual RotatorSupportBracket
Outside Mount
Shading mounts outside window
opening.
Inside Mount
Shading fits withinwindow opening.
Collectively, the sill andjambs are called the“window casement.”
Molding
Head Jamb
Sill
Jamb Jamb

INSTALLATION
4
Mount the Installation Brackets — Inside Mount
� Mark 2" – 3" from each jamb for bracket location.
� Use pliers to break off the top tab of each installation bracket. Save this tab once removed. It may be used as a shim, as described later in these instructions. Remove the bottom tab on each installation bracket only if it interferes with the bracket installation.
� If more than two installation brackets came with your order, space additional bracket(s) evenly between the two end brackets and mark their location. Mount into wood whenever possible.
� Two-On-One Headrail Shadings. A dual rotator support bracket is required and it needs to be centered on the panel split. Place the middle installation brackets 3" away from the dual rotator support bracket, as shown in the illustration below.
� Decide whether the front or back set of holes works best in your application. Mark the location of the screw holes.
� The depth required for minimum mounting or fully recessed mounting will vary depending on the type of headrail and vane size. Refer to the chart above for depth requirements.
Top limits should be equal distance from the ends of headrail.
Space Evenly Space Evenly2" – 3" 2" – 3"
Jamb Jamb
TopTab
Lever
BottomTab
Space Evenly2" – 3" 2" – 3"3"
Jamb JambTop Limits
Space Evenly3"
Dual RotatorSupport Bracket
Centered on Panel Split
MinimumDepth
See Chart
2" – 3"Depth Chart for Bracket Placement
Headrail Type Minimum Fully Recessed
Standard 1" 31/16"
Oversized 1" 31/4"
INSTALLATION
5
� Use a level to check that the mounting surface is level. Shim the brackets using the top tab that was removed from the bracket, if necessary.
� Use a 3∕32" drill bit to drill holes for the mounting screws.
IMPORTANT: Use drywall anchors when mounting into drywall. Drywall anchors are not provided.
� Attach the installation brackets using the screws provided.
IMPORTANT: Do not over tighten the screws. Check to ensure the lever can be moved easily side to side. If the lever is not moving easily, loosen the screws in 1/8 of a turn increments until it can be moved easily.
IMPORTANT: The front edges of the installation brackets must be level and aligned to each other.
� Proceed to Attach the Back Cover if you ordered the optional back cover, on page 7. Otherwise, proceed to Install the Shading on page 8.
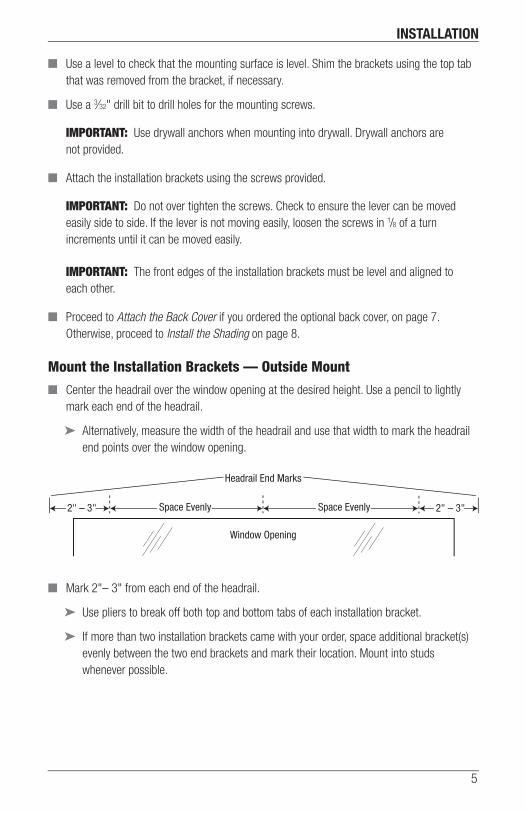
Mount the Installation Brackets — Outside Mount
� Center the headrail over the window opening at the desired height. Use a pencil to lightly mark each end of the headrail.
� Alternatively, measure the width of the headrail and use that width to mark the headrail end points over the window opening.
� Mark 2"– 3" from each end of the headrail.
� Use pliers to break off both top and bottom tabs of each installation bracket.
� If more than two installation brackets came with your order, space additional bracket(s) evenly between the two end brackets and mark their location. Mount into studs whenever possible.
Headrail End Marks
Window Opening
Space EvenlySpace Evenly2" – 3" 2" – 3"

INSTALLATION
6
� Center each installation bracket on the previously made marks and mark the location of the screw holes.
CAUTION: The rear of the blocks/brackets must be flush against a flat mounting surface. Do not mount brackets on curved molding.
� A minimum 11/8" flat vertical height is required to mount the installation brackets.
� The top of the installation brackets should be at the desired height. The brackets should be level and aligned.
� Use a 3∕32" drill bit to drill holes for the mounting screws.
IMPORTANT: Use drywall anchors when mounting into drywall. Drywall anchors are not provided.
� Attach the installation brackets using the screws provided.
IMPORTANT: The front edges of the installation brackets must be level and aligned to each other.
� If using ¼" or ½" spacer blocks, attach the spacer block(s) and installation bracket to a flat vertical mounting surface with #6 screws long enough for a secure installation. Longer screws are not provided.
IMPORTANT: The maximum spacer block allowance is 1½".
� Attach the extension bracket to a flat vertical mounting surface with two screws long enough for a secure installation. Longer screws are not provided.
� Attach an installation bracket to the underside of each extension bracket using the provided screws and speed nuts.
� Proceed to Attach the Back Cover if you ordered the optional back cover, on page 7. Otherwise, proceed to Install the Shading on page 8.
SpacerBlocks
11/2"
Maximum
Speed Nuts
ExtensionBracket

INSTALLATION
7
Mount the Installation Brackets — End Mount
End mount the headrail when conventional mounting techniques will not work — for example, in an arched window opening.
� Mount the extension brackets on a surface at least 1¼" wide.
� Add ¼" to the minimum depth if using the optional back cover. See Attach the Back Cover below.
� Attach the installation brackets to the extension brackets using the hex head screws and speed nuts provided.
CAUTION: To end mount shadings into a surface other than a secure wall stud, use medium to heavy-duty wall anchors (not provided) matched to the wall thickness. Failure to mount the brackets securely may result in injury or property damage.
Attach the Back Cover (Optional)
� If using the back cover, use heavy-duty scissors to cut off the top tabs on the back cover brackets and both tabs on the installation brackets.
� Snap the prongs on the back cover brackets into the holes on the back of the installation brackets.
� After bracket installation, install the cover into the back cover brackets, as shown. If necessary, trim the back cover with scissors to the desired width.
� Proceed to Install the Shading on page 8.
ExtensionBracket
11/4"MinimumDepth
InstallationBracket
RemoveTop Tab
BackCover
Bracket
BackCover

INSTALLATION
8
Install the Shading
� Peel back the protective covering from the top of the fabric covered headrail. Leave the rest of the protective covering on the front of the headrail.
� Position the shading so that the front (colored fabric) faces you.
� Slide the headrail into the installation brackets so the edge of the headrail is between the lever and the bracket, as shown.
� Firmly push the headrail into each bracket until it clicks and the lever snaps to the right side of the bracket.
IMPORTANT: Carefully pull on the headrail at each bracket to ensure it is installed securely.
� Completely remove the protective covering from the fabric covered headrail.
Attach the Universal Cord Tensioner (UCT)
Before you proceed, you must first slide the cord tensioner to the bottom of the cord loop.
� Insert a small screwdriver, punch, or awl through the screw hole at the bottom of the cord tensioner.
� Move the screw hole down to the indicator line to release the safety mechanism.
� Slide the cord tensioner down to the bottom of the cord loop.
WARNING: It is imperative that the cord tensioner be properly secured to the wall or window frame to reduce children’s access to the cord loop. Young children can strangle in cord loops. They can also wrap cords around their necks and strangle.
CAUTION: The shading will not operate properly unless the cord tensioner is secured. A cord tensioner installation kit has been included with your shading. Follow the instructions in the kit to correctly secure the cord tensioner.
Headrail
InstallationBracket
Lever
Slide the HeadrailBetween the Lever and the Bracket
IndicatorLine
Universal Cord
Tensioner

INSTALLATION
9
Attach the Magnetic Hold-Down Brackets (Optional)
� Lower the shading keeping the vanes closed.
� Place the magnetic hold-down bracket onto the bottom rail just inside the end cap, oriented as shown.
� Hold the bracket while opening and closing the vanes (it may be necessary to have someone else assist you). Adjust the bracket to the best overall position.
� Mark the screw location using the mounting options shown below.
� The screw should be placed in the middle of the channel. This will allow for adjustment.
� Drill the screw holes using a 3/32" drill bit.
IMPORTANT: Use drywall anchors when mounting into drywall. Drywall anchors are not provided.
� Attach the hold-down brackets to the mounting surface using the screws provided.
� Adjust the bracket location using the channel for best operation, if necessary.
Hold-DownBracket
BottomRail
Outside Mount
Preferred Alternate
Inside Mount
Preferred Alternate
Adjust the bracket
using the channel.

INSTALLATION
10
Attach the Dust Cover (Optional for Outside Mounts)
The dust cover is used to protect the top of the headrail from exposure to dust on outside mounted shadings.
� Cut the dust cover to desired width.
� Remove the paper backing on one side of the hook and loop fastener dots.
� Apply the dots to the installation brackets on each end of the shading.
� Remove the remaining paper backing from the dots.
� Center the dust cover over the top of the shading, above the previously placed dots.
� Press the dust cover down onto the dots.
RemovePaperBacking
Overhead ViewNo Dust Cover
Dots
Dust Cover Installed

OPERATION
11
Operate the Shading
To Lower the Shading and Open the Vanes
� Pull the rear cord of the cord loop to lower the shading.
� With the shading fully lowered, continue to pull the rear cord to tilt the bottom rail and open the vanes.
To Close the Vanes and Raise the Shading
� Pull the front cord of the cord loop to close the vanes and raise the shading.
� If the cord tensioner moves up the cord, you have not secured it to the wall or window frame. You must do so for the shading to operate properly.
IMPORTANT: If the shading raises or lowers unevenly, the fabric rubs against one end of the headrail, or the bottom rail is uneven when fully raised, to adjust see Adjust the Bottom Weight on page 13.
Front Side of Shading
Lower and Open the Vanes of the Shading
CordTensioner
and Bracket
Front Side of Shading
Close Vanes andRaise the Shading
CordTensioner
and Bracket

OPERATION
12
Troubleshooting
Problem Solution
Vanes do not align on side-by-side shadings.
� Vane alignment is only guaranteed within 1/4" when shadings are ordered at the same time, at the same height, with the same color and fabric, and when specified on the order form.
� Check that the windows are square and the same height.
The shading is hard to raise or lower, or will not raise or lower.
� Shadings cannot be forced into tight inside mount window openings. If an inside mount, check that the shading is installed correctly. Make sure there is clearance between the ends of the shading and the window casement.
� Check that the universal cord tensioner is mounted correctly.
� Pull down on the spring to relieve tension and pull the universal cord tensioner to the bottom of the cord loop. Properly mount the cord tensioner. See the Universal Cord Tensioner Installation Instructions included with your shading.
� Check that the installation brackets are level. Shim to level, if necessary.
� Make sure the fabric is not caught.
Two-On-One Headrail Shadings Only
The center gap is not even from the top to the bottom of the shading, interfering with the function of the shading.
� Ensure the dual rotator support bracket is centered on the panel split. See Two-On-One Headrail Shadings on page 4.
� Ensure the entire length of the headrail is straight and level. If the center portion of the headrail is higher than the ends, the center gap will close together. If the center portion of the headrail is lower than the ends, the center gap increases. If necessary, adjust the height of each bracket by moving it within the slots or by using shims.
The shading will not snap into the installation brackets.
� Check that the installation brackets are aligned and level.
� Check that the locking tab on the installation bracket slides over the headrail.

OPERATION
13
Problem Solution
The shading raises or lowers unevenly or the bottom rail is uneven when fully raised.
� Check that the window is square by measuring the diagonals.
� Check that the installation brackets are level. Shim to level, if necessary.
� Adjust the bottom rail weight. See next solution.
The shading raises or lowers unevenly, the fabric rubs against one end of the headrail, or the bottom rail is uneven when fully raised.
Adjust the Bottom Weight
� Check that the installation brackets are level. Shim to level, if necessary.
� To release the weight clip, insert a flat blade screwdriver into the weight clip and turn clockwise.
� Move the weight in 1" increments toward the side where the fabric is gathering.
� Secure the weight clips in position by turning them counterclockwise after making the adjustment.
� Test and if necessary, adjust again.
The universal cord tensioner has climbed to the headrail.
� Pull down on the spring to relieve tension and pull the universal cord tensioner to the bottom of the cord loop. Properly mount the cord tensioner. See the Universal Cord Tensioner Installation Instructions included with your shading.
The universal cord tensioner grabs onto the cord upon operation.
� Check that the universal cord tensioner is mounted properly. Reinstall, if necessary.
WeightWeight
ClipWeight
Clip
Fabric Roll
Move Weight

CARE
14
Removing the Shading
� Move each lever of the installation brackets to the left to release the shading.
CAUTION: A flat blade screwdriver can be used to move the lever. Be very careful to not tear or damage any of the fabric.
� If the lever is inaccessible or inoperable, lower the shading until you can see the underside of the bracket. Carefully reach a small flat blade screwdriver behind the shading to the tab on bottom of the bracket between the screw holes.
� Push the tab away from the shading and pull the headrail to release it from the bracket.
� Carefully pull the shading to remove it from the brackets.
Cleaning Procedures
This product is made of 100% polyester, which means they are inherently durable and resilient. However, care must be taken to avoid wrinkling the fabric, particularly where the vanes meet the facings.
Fabric-Covered Headrail
Spot-clean the headrail using a sponge or delicate cloth, cool distilled water and a mild soap solution; handle with care as you would any fine fabric.
Dusting
Regular light dusting with a feather duster is all the cleaning that is needed in most circumstances.
Vacuuming
Use a low suction, hand-held vacuum for more thorough dust removal.
Forced Air
Blow away dirt and debris between the vanes using clean compressed air.
Move the leverto the left to release the
shading.
Top View
Tab
Installation Bracket
Underside ofBracket
End Cap

CARE
15
Spot-Cleaning
Do not spot-clean anything other than the Fabric-Covered Headrail on the window shadings.
Ultrasonic Cleaning
This product can be ultrasonically cleaned by a professional, light dimming fabrics.
� Specify that a mild detergent solution be used.
� Never immerse the headrail in the solution.
� Dry the shading completely in the lowered position.
Injection/Extraction
This product can be professionally cleaned using the injection/extraction method.
� A dry method of injection/extraction is required for light dimming fabrics.
� Never immerse the headrail in the solution.
Electrostatic Cleaning
Do not use electrostatic cleaning wipes on this product.
A Note About Fabrics
As with all textiles, this product is subject to some variations. Slight wrinkling, puckering, or bowing is inherent to this textile product and should be considered normal, acceptable quality. These characteristics are not usually visible from the front or rear but may be visible from a side angle.
Precautions should be taken to reduce exposure to harsh environmental elements, such as salt air. Continuous exposure through open windows and doors will accelerate the fabric deterioration.

CHILD SAFETY
16
Warning
Young children can STRANGLE in cord loops. They can also wrap cords around their necks and STRANGLE.
� Always keep cords out of the reach of children.
� Move cribs, playpens and other furniture away from cords. Children can climb furniture to get to cords.
Cord Loop Shadings
� Attach the cord tensioner on the cord loop to the wall or window casement. See Attach the Universal Cord Tensioner (UCT) on page 8. This can prevent children from pulling cord loops around their necks.
� A cord tensioner installation kit with instructions has been provided for attaching the cord tensioner. For the shading to operate properly, the cord tensioner must be correctly mounted and secured.
� Only supplied cord tensioners and hardware should be used. Replacement parts may be obtained by contacting the Customer Information Center at 1-888-501-8364.
For more safety information call 1-888-501-8364 in the U.S. or 1-866-662-0666 in Canada.
WARNING


5107372000 6/13