Wind Sensor Analogue and NMEA 2000 - vdo.com · VDO Wind Sensor Preliminary Remarks In purchasing...
18
Installation Instructions V1.1 2016 Wind Sensor Analogue and NMEA 2000
Transcript of Wind Sensor Analogue and NMEA 2000 - vdo.com · VDO Wind Sensor Preliminary Remarks In purchasing...
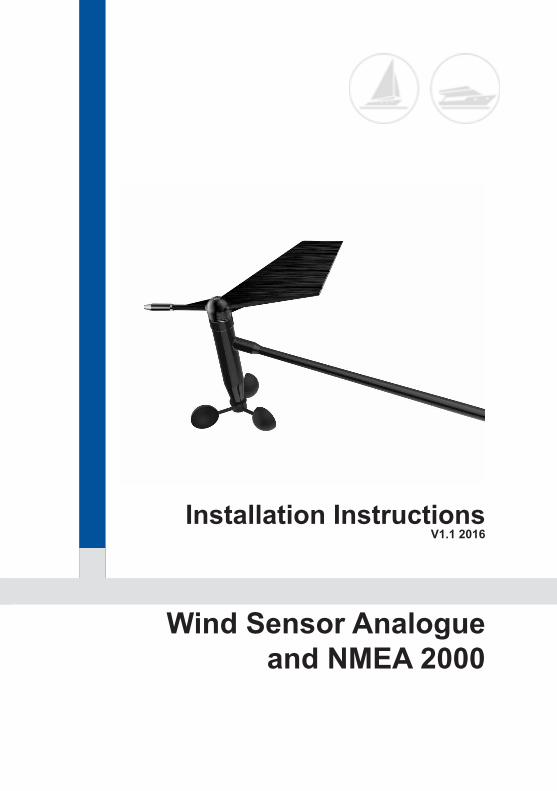
Installation InstructionsV1.1 2016
Wind Sensor Analogue and NMEA 2000

2

Content
Preliminary Remarks 4Safety Instructions for Installation 4Safety Instructions for Maintenance 6The VDO Windensor 7Components 7Versions 8Functions 8Calibration 8The NMEA 2000 Wind Sensor Interface 8Installation of the VDO Wind Sensor 9Installation at the Mast 10Installing the Mast Cable 11Analogue Wind Sensor Installation 11Replacing a Legacy VDO Wind Sensor 12NMEA 2000 Wind Sensor Installation 13Hardware Specification 14Technical Data 15Accessory and Part Numbers 16
3

VDO Wind Sensor
Preliminary Remarks
In purchasing an sensor from the VDO marine range you have decided on a high value product, which has been manufactured according to acknowledged technical standards. Modern production processes and compliance with currently applicable quality assur ance standards guarantee that our products leave the works in perfect condition.We thank you for making a good choice, and we are convinced that this instrument will be of great help to you and keep you safe at sea.
In order to ensure easy and safe handling of your VDO sensor, you should familiarize yourself with all the features and functions.Please take the time to read these instructions carefully and com pletely.
Safety Instructions for Installation
This product has been developed, manufactured and tested in accordance with the basic safety requirements of EC, UL and FCC directives and the acknowledged state of the art.
Please follow all the instructions given in this handbook exactly.
Please pay attention to all text passages labeled with this symbol. These are very important hints for operating and security of the instruments.
The installation of VDO Wind Sensor should be done by your shipyard or by a specialized expert.
4

Before beginning work the minus pole of the
battery should be disconnected.
Use of information provided by the VDO Wind Sensor does not release you from the responsibility over your ship and demands good seamanship. Always use your nautical experience in interpreting the displayed values.
If you carry out this work yourself, wear suitable working clothes. Do not wear wide fitting clothes. If you have long hair, wear a hairnet. Clothes and hair can get caught in moving and rotating parts.
Wearing of metallic or conductive jewelry, such as necklaces, bracelets, rings etc. is not allowed when working on the electrical installation on board.
Before beginning work, the minus pole of the battery should be disconnected, because of danger of short circuit. Short circuits can cause cable fires, battery explosions and damage to other electronic systems.
Please note that with disconnection of battery, all volatile electronic memories lose their inputted values and must be reprogrammed.
Explosion hazard! Before beginning work on the engine compartment of petrol engines,
switch on the ventilator of the engine compartment.
Ensure that necessary clearance is provided behind the cable opening, at the position where the sensor is to be installed.
When selecting the installation position for the sensor, take care that no stringers are drilled. Be careful also of furniture, floorboards, superstructure boxes, cables etc.
When carrying out installation work with a sealing compound, solvent vapours can be formed. Make sure of adequate ventilation and follow the instructions for use of the sealing compound manufacturer.
5

Necessary work without voltage cutoff must be carried out only using insulated tools.
For the installation only use VDO or NMEA approved cables.
If you don’t use standard cables, the wires used should be adequately insulated or should have sufficient electrical strength, and the contact point should be protected against electrical shock hazard. The electrical conducting components of the connected consuming devices should also be protected against direct contact trough suitable measures. Installation of bare metallic wires and contacts is not allowed.
Take account of the wire cross section. A reduction of the wire cross section results in a higher current density. This can cause the wire to heat up.Connect the wires only in accordance with the wiring diagram.
Safety Instructions for Maintenance
The sensor display unit is maintenance-free. Do not use cleaning agents. Repairs on the sensor should be carried out only by VDO authorized specialists.
6

The VDO WindensorThe wind vane turns in the direction of the wind and steers the windin the direction of the gauge. The rotor records the relative wind speed which in turn is displayed on a wind speed gauge.The Wind Sensor is available in two versions. One version is NMEA 2000 certified and delivers NMEA 2000 wind data to an existing NMEA 2000 network. The second Wind Sensor version has an analogue data output. It can be used with the AcquaLink Nav Box system, or as replacement for legacy VDO Logic or Standard sensors.
Components
In the box:- Wind Sensor- Mast mount bracket- Installation instruction
Installation accessory (must be purchased seperately)NMEA 2000 Installation Kit - 30m NMEA 2000 mast cable- NMEA 2000 inline terminator- NMEA 2000 field installable connector
Analogue Wind Sensor Installation Kit- 30m mast cable- Field installable connector
7

VersionsWind Sensor analogue (A2C59501983) NMEA 2000 Wind Sensor (A2C59501984)
Functions The Wind Sensor provides following information via analogue or NMEA 2000 signal:- Wind speed- Wind direction
CalibrationThe Wind Sensor is pre programmed at the factory. When using the AcquaLink Nav Box system please refer to the product manual in order to set damping, offset etc.
Receiving PGNs
The NMEA 2000 Wind Sensor Interface
The NMEA 2000 Wind Sensor version is a NMEA certified sensor. It sends NMEA 2000 data to an existing NMEA 2000 networkThe parameter group numbers (PGN) of the data which the sensor sends are given in the table below. More information about NMEA can be found under www.nmea.org
Transmitting PGNs
Message Name PGNISO Address Claim 60928ISO Acknowledge 59392ISO Request Message 59904NMEA2K RCA Group 126208
Message Name PGNISO_AddrClaim 60928ISO_Acknowledge 59392NMEA2K RCA Group 126208NMEA2K HeartBeat 126993
8

Installation of the VDO Wind Sensor
Before beginning, disconnect the negative terminal on the battery, other-wise you risk a short circuit. If the craft is supplied by auxiliary batteries, you must also disconnect the negative terminals on these batteries! Short circuits can cause fires, battery explosions and damages to other electronic systems. Please note that when you disconnect the battery, all volatile electronic memories lose their input values and must be repro-grammed.
Message Name PGNNMEA2K Configuration 126998NMEA2K Information 126996NMEA2K PGN List 126464NMEA2K WindData 130306
NMEA 2000 LEN: 1
First, remove the base plate of the wind sensor. Proceed as following:
0.3m
9

Base plate
When mounting the base plate, the sensor mounting position should be pointing ahead (0°). If other mounting angles are used, please refer to your gauge setup manual.Please refer to the mounting templete to determine the right screw place-ment.
Installation at the Mast
Depending on the structure of the mast, fix the base plate on the mast top, using suitable screws. Rotate the base plate over to oblong holes so that its center axis is parallel to the longitudinal ship axis, either to port or starboard. Inclinations of the mast top can be compensated with the sensor footplate. Lateral mast mounting of the sensor is also possible.
Loosen the spring clip by pushing it down and inwards (1), (2), then remove the wind sensor (3).
10

Install the sensor on the base plate. Sensor inclinations can be compen-sated by changing pin and nut (A). In case of lateral mast mounting loos-en the nut (A) and (B) and turn the sensor so it is vertical to the midship axis.
Installing the Mast Cable
Do not sharply bend the mast cable. Avoid chafing.Shorten the length of the mast cable to the length of the mast plus 2 meters.Use existing empty tubes if possible (e.g. from chafing the rakes), and install it with the mast down if possible.
Analogue Wind Sensor Installation
To connect the Wind Sensor to the VDO AcquaLink Nav Box following components are necessary:- 30m mast cable (A2C99793400)- Field installable connector (A2C59501953)- Deck cable (A2C99792900)
1. Push the mast cable (starting at the top of the mast) through the mast. 2. Use an already availble through-deck access, or drill a 15mm dia. hole through the deck near the foot of the mast in order to push the mast cable into the cabin of the boat.
11

4. Use the deck cable to connect the field installable connector and the Nav Box. Use the WMA labeled Nav Box connection.
5. Connect the mast cable to the sensor (2).
Connector pinout (cable view)
Push and turn the collards in opposite directions
Replacing a Legacy VDO Wind Sensor
If you want to replace an existing VDO Standard or Logic Wind Sensor, you can keep all mounting and cables and just replace the sensor itself. The new analogue Wind Sensor is equipped with the legacy connector.
Do not cause damage to the cable or surface of the vessel.
3. Connect the open wires to the field installa ble connector.
PIN Function Color
1 Sensor PWR red
2 empty grey3 COS green4 GND blue5 SIN yellow
6 WIND Speed white
7 empty8 empty
Analogue Pinout
12
uidq6608
Sticky Note
remove gray - left the box empty
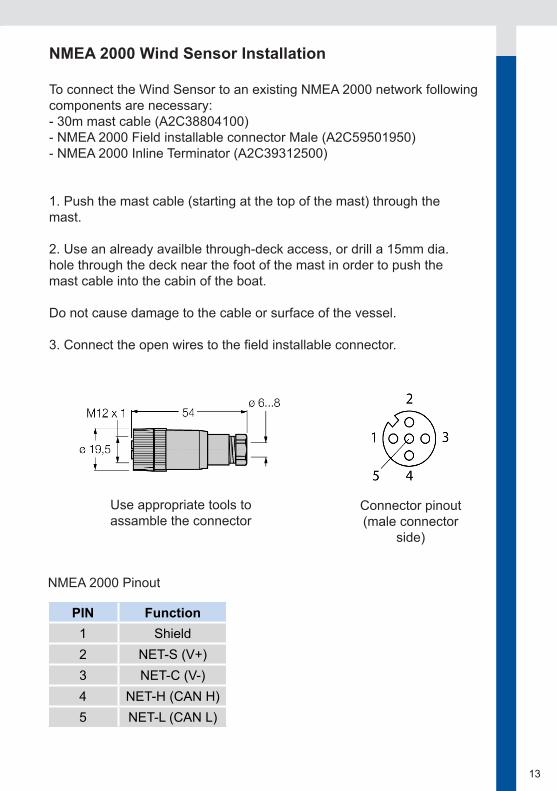
NMEA 2000 Wind Sensor Installation
To connect the Wind Sensor to an existing NMEA 2000 network following components are necessary:- 30m mast cable (A2C38804100)- NMEA 2000 Field installable connector Male (A2C59501950)- NMEA 2000 Inline Terminator (A2C39312500)
1. Push the mast cable (starting at the top of the mast) through the mast.
2. Use an already availble through-deck access, or drill a 15mm dia. hole through the deck near the foot of the mast in order to push the mast cable into the cabin of the boat.
Do not cause damage to the cable or surface of the vessel.
3. Connect the open wires to the field installable connector.
Use appropriate tools to assamble the connector
Connector pinout (male connector
side)
NMEA 2000 Pinout
PIN Function1 Shield2 NET-S (V+)3 NET-C (V-)4 NET-H (CAN H)5 NET-L (CAN L)
13

4. Connect the Male NMEA 2000 field installable connector to an existing NMEA 2000 BACKBONE.
Warning: Please follow the NMEA 2000 rules for building the network. The mast cabel has to function as backbone cable. A drop cable may only be 6m long.
5. Connect the female NMEA 2000 plug at the top of the mast to a NMEA 2000 inline terminator. You can also use a NMEA 2000 T-connector and Male NMEA 2000 terminator instead of using the inline terminator.
Note: Always install second NMEA 2000 terminator at the other end of the backbone.
6. Connect the wind sensor to the NMEA 2000 inline terminator or to the drop connection of a T-connector.
Hardware SpecificationSensor
14

Bracket
Technical Data
Measuring principle (wind direction) Wind vane with contactless inductive sensor
Measuring principle (wind speed) impeller with hallchip
Accuracy (direction) +/-1°
Reading (direction) 1°
Operating range (direction) +/-180°
Accuracy (speed) +/-1knReading (speed) 0.1 < 20 (kn, m/s, km/h); 1.0 > 20bft (kn,
m/s, km/h)Operation range (speed) 1.0-68kn; 0.5m/s-35m/s; 1.8-126km/s;
1-12bftOutput range 1 value/sec.
Damping 3 step (No/Lo/Hi)
Power supply 10-15V (NMEA 2000); 10-32V through Nav Box (analogue version)
Current consumption 30mA
Operating temperature -10° to +65°C
Approval CE, NMEA 2000 (only NMEA 2000 version)
15

Accessory and Part NumbersA2C Numbers DescriptionA2C38804900 Infield Installation Connector WINDA2C96243700 NMEA 2000 Cable 0,5mA2C96243800 NMEA 2000 Cable 2mA2C39308500 NMEA 2000 Infield Installation Connector FemaleA2C39310500 NMEA 2000 Infield Installation Connector MaleA2C39312700 T Splitter NMEA 2000A2C39310600 NMEA 2000 Terminator FemaleA2C39311000 NMEA 2000 Terminator MaleA2C39312500 NMEA 2000 Inline Terminator A2C39312900 NMEA 2000 Power cable A2C59501948 NMEA 2000 Cable 6mA2C59501949 NMEA 2000 Cable 10mA2C96244200 NMEA 2000 Cable 30mA2C59501952 WIND (analog) Cable 10mA2C99792900 WIND (analog) Cable 30mN05-800-356 Wind Vane for New Type Masthead 8/93on N05-801-448 ANEMOMETER CUP ROTOR, NEW
TBD NMEA 2000 Installation Kit (30m cable, terminator, Con-nector)
TBD Analogue Installation Kit (30m cable, connector)
16

17

Continental Automotive Switzerland AG Industriestrasse 18 9464 Rüthi Switzerland
www.marine.vdo.com VDO – A Trademark of the Continental Corporation
The information provided in this brochure contains only general descriptions or performance characteristics, which do not always apply as described in case of actual use or which may change as a result of further development of the products. This information is merely a technical description of the product. It is not meant or intendedto be a special guarantee for a particular quality or particular durability. An obligation to provide the respective characteristics shall only exist if expressly agreed in the terms of contract. We reserve the right to make changes in availability as well as technical changes without prior notice.A2C99835000 I Continental Automotive Switzerland AG I English © 2016