Where's The Party At: 2
12
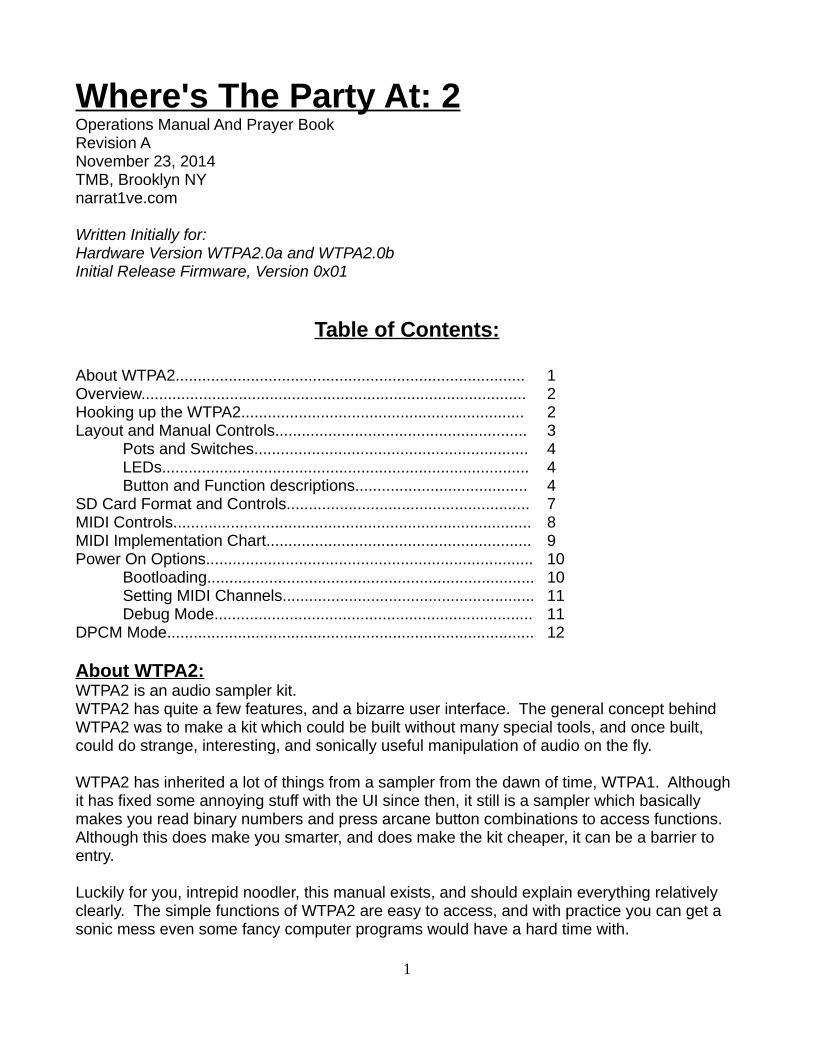
Where's The Party At: 2 Operations Manual And Prayer Book Revision A November 23, 2014 TMB, Brooklyn NY narrat1ve.com Written Initially for: Hardware Version WTPA2.0a and WTPA2.0b Initial Release Firmware, Version 0x01 Table of Contents: About WTPA2............................................................................... 1 Overview....................................................................................... 2 Hooking up the WTPA2................................................................ 2 Layout and Manual Controls......................................................... 3 Pots and Switches.............................................................. 4 LEDs................................................................................... 4 Button and Function descriptions....................................... 4 SD Card Format and Controls....................................................... 7 MIDI Controls................................................................................. 8 MIDI Implementation Chart............................................................ 9 Power On Options.......................................................................... 10 Bootloading.......................................................................... 10 Setting MIDI Channels......................................................... 11 Debug Mode........................................................................ 11 DPCM Mode................................................................................... 12 About WTPA2: WTPA2 is an audio sampler kit. WTPA2 has quite a few features, and a bizarre user interface. The general concept behind WTPA2 was to make a kit which could be built without many special tools, and once built, could do strange, interesting, and sonically useful manipulation of audio on the fly. WTPA2 has inherited a lot of things from a sampler from the dawn of time, WTPA1. Although it has fixed some annoying stuff with the UI since then, it still is a sampler which basically makes you read binary numbers and press arcane button combinations to access functions. Although this does make you smarter, and does make the kit cheaper, it can be a barrier to entry. Luckily for you, intrepid noodler, this manual exists, and should explain everything relatively clearly. The simple functions of WTPA2 are easy to access, and with practice you can get a sonic mess even some fancy computer programs would have a hard time with. 1
Transcript of Where's The Party At: 2
Where's The Party At: 2Operations Manual And Prayer BookRevision ANovember 23, 2014TMB, Brooklyn NYnarrat1ve.com
Written Initially for:Hardware Version WTPA2.0a and WTPA2.0bInitial Release Firmware, Version 0x01
Table of Contents:
About WTPA2............................................................................... 1Overview....................................................................................... 2Hooking up the WTPA2................................................................ 2Layout and Manual Controls......................................................... 3
Pots and Switches.............................................................. 4LEDs................................................................................... 4Button and Function descriptions....................................... 4
SD Card Format and Controls....................................................... 7MIDI Controls................................................................................. 8MIDI Implementation Chart............................................................ 9Power On Options.......................................................................... 10
Bootloading.......................................................................... 10Setting MIDI Channels......................................................... 11Debug Mode........................................................................ 11
DPCM Mode................................................................................... 12
About WTPA2:WTPA2 is an audio sampler kit.WTPA2 has quite a few features, and a bizarre user interface. The general concept behind WTPA2 was to make a kit which could be built without many special tools, and once built, could do strange, interesting, and sonically useful manipulation of audio on the fly.
WTPA2 has inherited a lot of things from a sampler from the dawn of time, WTPA1. Although it has fixed some annoying stuff with the UI since then, it still is a sampler which basically makes you read binary numbers and press arcane button combinations to access functions. Although this does make you smarter, and does make the kit cheaper, it can be a barrier to entry.
Luckily for you, intrepid noodler, this manual exists, and should explain everything relatively clearly. The simple functions of WTPA2 are easy to access, and with practice you can get a sonic mess even some fancy computer programs would have a hard time with.
1

Overview:WTPA2 (usually) stores samples as 8-bit, monophonic, uncompressed audio. When used for live sampling, it initially stores samples to RAM. WTPA2 has 512k of RAM. WTPA2's sampling rate is anywhere you tell it to be, usually somewhere from ~30kHz to ~8kHz (or less). This means that WTPA2 can sample anywhere from ~17 seconds to more than a minute of consecutive audio. WTPA2's maximum bit depth (8 bits) is not high by modern standards, but it isn't terrible either. It sounds great for a thing that sounds crusty.
WTPA2 can also save and load samples from an optional micro-SD card interface. Each SD card can hold up to 512 samples. Samples can be converted to AIFFs and stored on a computer, and vice versa.
WTPA2 can also play Nintendo Entertainment System DPCM samples from a properly formatted micro-SD card.
WTPA2 has three independent playback channels: Bank 0, Bank 1, and the SD-card stream. Bank 0 and Bank 1 work out of RAM, and can freely manipulate samples in all kinds of ways. The SD card stream is pulled directly from the card, and plays samples in a vanilla way at a fixed sample rate. NOTE-- samples may be loaded and saved from RAM to the SD card.
WTPA2 has two general styles of user interface. Front panel buttons and knobs (Caveman) and a MIDI input (Fancy 80's Disco Style). WTPA2 can also take a control voltage input for the master sample rate VCO, and can be interfaced to modular synthesizers (Fancy 2013 Disco Style).
Hooking up WTPA2:
WTPA2 is happy with anywhere from 8-15V DC power, and requires anything above 200mA to be on the safe side (you might get by with less). A 9v battery will work fine but will not last a wildly long time. You might get 8 hours out of a decent alkaline. A 9V AC to DC adapter (aka, a “wall-wart”) is probably your best bet. NOTE: Not all wall warts are created equal. Some are quite noisy, and depending on your WTPA2's internal wiring (it's a kit, don't blame me) you may get some buzz with some wall warts. Try changing wall warts if this happens or going to a battery just to see if the noise goes away.
2

WTPA2 has one audio input, one audio output, one MIDI input, one MIDI output, and a controlvoltage input for the master sample rate oscillator. Audio input levels can be anything from line level to low level guitar inputs; input impedance is roughly 200kohms. Output level is roughly “line level” – about a volt peak to peak. Control Voltage range will be dependent on how you built your kit, but is easily set to 0-5v.
Layout / Manual Controls
WTPA2 tells you what it is doing and takes direction from the controls and lights on the top surface.
3

Red = Analog Controls Pots (4)From left to right they are:
Input signal gain (VR1)Throughput Level (VR2)DAC Output Level (VR4)Master Volume (VR3)
Blue = User Pushbuttons (8)From left to right they are numbered S0-S7, and their function may change based on the current operating mode.
Pink = Coarse and Fine Oscillator Control Pots (2)These are analog controls which control the external clock based sampling frequency for BANK 0 and sometimes BANK 1.
Orange = Alternate Oscillator Control Pot (1)Can be used to independently control the sample rate for BANK 1.
Green = Parameter Control Encoder (1)This encoder is used to control the input parameters to various WTPA functions, like choosing and effect or amount of effect, or picking a sample to load from a micro-SD card.
Yellow = Indicator LEDs (8)From top to bottom these are numbered LED0-LED7, and they are used to convey data about what WTPA is currently doing.
Teal = Power Indicator (1)Should be shining bright when the power is on.
Normal Indicator LED Legend (top to bottom):
LED0 = Indicates the current bank is RECORDING.
LED1 = Indicates the current bank is OVERDUBBING (recording / playing simultaneously).
LED2 = Indicates the current bank is PLAYING BACK.
LED3 = Indicates the sampler has run OUT OF RAM (ie – sample memory is full).
LED4 = Indicates the CURRENT BANK (OFF=Bank 0, ON=Bank 1)
LED5-7 = Indicates the value being set by the encoder (in binary. The bottom LED is the Lsb.Learn binary). WTPA2 will read this value when you hit certain button combos and use it to set various effects and parameters.
Normal “Caveman Mode” Operation (using the buttons and knobs):
WTPA2 is designed to operate simultaneously listening to the buttons and control knob and also the MIDI channels. Most people will find it useful to rock the buttons at some point. I do
4

it all the time, even though I'm the kind of Mimosa-sipping dandy who generally likes a big MIDI controller with a lot of buttons. The biggest argument for using MIDI is that WTPA2 is better at doing weird sampler stuff than it is at telling the user what it is currently doing, although if you commit the following tableto memory you will be able to get WTPA2 to access just about all functions instantaneously. An explanation follows.
Table 1: Normal WTPA2 Caveman ControlsButton 0 1 2 3 4 5 6 (Shift 1) 7 (Shift 2)
No Shift RecordStart/Stop
OverdubStart/Stop
Re-startSample
Playback
One-ShotPlayback
Pause /UnpausePlayback
ToggleSample
Bank
(NotPressed)
(NotPressed)
Shift 1 Set BitDepth
ToggleHalf Time
ToggleRealtime
SetGranularity
OutputSum Mode
ToggleBackwardsPlayback
Pressed (NotPressed)
Shift 2Edit
SampleStart
EditSample
End
EditSampleWindow
PlayCurrent
SDSample
(x) (x) (NotPressed) Pressed
Shift1+2
Enter SDCard Menu
(x) (x) (x) (x) PANIC Pressed Pressed
WTPA2 has eight tactile switches (buttons, normal people call them). From left to right, the first six buttons all make things happen. The last two buttons are “shift” keys which do nothing when pressed on their own, but rather change the function of the first six buttons.
The simplest functions require pressing one of the first six buttons by themselves. Holding either or both shift keys and pressing one of the first six buttons allows you to access the more esoteric functions.
The functions are:
RECORD: This begins recording a sample from the audio input into the currently selected sample bank. This will overwrite any sample previously in the bank. This records at the clockspeed set by one of the onboard sample oscillators. Pressing it again stops recording and
5

begins the sample playing back as a loop.
OVERDUB: This requires that a sample is already in RAM and playing back. This begins adding the audio to from the input to the currently selected bank at the point in the previously recorded sample when the button is pressed. Overdub will happily continue as long as you want it to, for as many loops as you want. Overdub is “destructive” – there's no undo. Once you press it, you change the original sample. Pressing overdub again stops recording, and the sample continues to playback.
PLAY / PAUSE / ONE-SHOT: These three buttons are different ways to play samples back. “Restart” begins a recorded sample from the beginning, and loops it when it reaches the end (like a loop pedal). One-Shot restarts the sample but does not loop (like a drum machine pad). “Pause” stops the sample where ever it is, pressing it again resumes the sample playback. If the sample was previously looping it will continue to loop, if it wasn't it won't.
BIT DEPTH: When pressed, will reduce the number of bits of the current sample by the valueset by the encoder and displayed by the bottom LEDs. Normal bit depth is 8. Reducing it by 7 gives you a truly crusty experience.
HALF TIME: Toggles cutting playback tempo in half. RIP DJ Skrew.
REALTIME: Enters a mode where the audio input is passed directly through WTPA2's electronics and back out again. This still applies the sample clock (allows aliasing errors to be introduced) and you can adjust bit reduction during this mode sample, but you obviously can't play anything backwards. Record, Overdub, and Playback light turn on to indicate you are both taking in data and also spitting it out.
SET GRANULARITY: This divides the current sample into a number of slices set by the encoder, then shuffles those slices randomly. If you divide the sample into 4 and shuffle it it's like a random remix, if you slice it into 256 pieces it's more like a synthesis effect. 256 slices is the current max. For now, the shuffle is always random. Setting 0 or 1 grains returns you to normal playback.
OUTPUT SUM MODE: Since WTPA2 is a digital sampler it has no need to add the two sample banks together. It can combine them in any weird way it wants. This allows you to set the way it sticks the two samples together. You can pass this a value from 0-4. NOTE: This effect can really kill the party, since some combinations result in no output. DON'T LET THE BEAT DROP. Values do the following:
0 = Sum the banks during output. This makes normal audio.1 = Multiply the two banks together for output. Modulates and saturates, and
requires two samples to be playing back (ie, multiplying by 0 is always silence).
2 = Bitwise AND banks during output. Crusty. Requires valid samples in A&B.3 = Bitwise XOR the banks. Doesn't sound weird with only one sample, sounds
crusty with two.4 = Subtract Bank 1 from Bank 0. Sounds weird with phasey sounds, otheriwse
is not that strange.
6

BACKWARDS PLAYBACK: Buy the pre-loaded Black Sabbath micro-SD card and tell Ba'al I say hi.
EDIT SAMPLE START: Changes the starting point of the sample in real time.
EDIT SAMPLE END: Changes the endpoint of a sample in real time.
EDIT SAMPLE WINDOW: Sweeps edited start and endpoints together.
[Example: with a 16-bar phrase, you can edit the sample to the first bar with START and END, then sweep it to any other bar using WINDOW][Fun Note: You can sweep the endpoint BEFORE the beginning! This reverses the sample and is some Richard D James sounding biz. It was hard to write.]
PLAY CURRENT SD SAMPLE: If you have an SD card with recordings on it, this will stream the currently selected SD card sample. SD card samples are their own voice independent of BANK 0 or BANK 1 and you can't change their parameters unless you load them into RAM first. But you can play them.
ENTER SD CARD MENU: Changes the display and controls to allow you to transfer samplesbetween the SD card and sample banks. NOTE: Requires you have an SD card.
Table 2: WTPA2 SD Card Menu ControlsButton 0 1 2 3 4 5 6 (Shift 1) 7 (Shift 2)
No Shift
PlayCurrentSD SlotSample
Load SDSample to
RAM
Save RAMSample to
SD
DeleteCurrentSD SlotSample
Exit SDCard Menu
Exit SDCard Menu
Exit SDCard Menu
Exit SDCard Menu
When you enter the SD Card Menu, the buttons and lights do something different than normal. Each SD card stores up to 512 samples. You can only access the first 128 of them from this mode (MIDI can access all 512).
In this mode, the top LEDs indicate the currently selected sample slot on the card (0-127). Selection is made via the encoder. The bottom-most LED (LED 7) will flash if a sample is present in the slot. The buttons can be used to play the sample in the slot, load the sample inthe SD slot into the current RAM bank, load the sample in the current RAM bank into the selected sample slot, or delete the sample in the currently selected SD card slot.
Any other button exits the SD card menu and returns you to the “normal” menu.
Micro SD Card Formats:WTPA2 can optionally use micro-SD cards if you ponied up for the extra hardware.
7

WTPA2 only likes (as of now) STANDARD DENSITY micro-SD cards. That means any SD card of 2GB or less, and nothing labeled SDHC or SDXC. The SD cards WTPA2 likes are theones that cost a dollar on eBay.
WTPA2 also uses its own file format. Normally SD cards use a crappy Microsoft file format called FAT16. WTPA2 is too cool for this*. So when an SD card is inserted into WTPA2, WTPA2 will check to see if it is in “WTPA” format. If it is, WTPA2 will check to see if the card holds samples or something else (WTPA2 formatted cards can also hold Nintendo DPCM samples as of now). If the card is not in WTPA format, WTPA2 will give you the option to format the card.
If you insert a card, and WTPA2 starts flashing the top and bottom most lights, that card is un-formatted. You can either pull the card if you get cold feet, or press the two outside buttons on WTPA2. WTPA2 will then format the card. When it is done, it will turn LED1 on. You can press any button to return to normal operation (or pull the card).
If you insert a card and nothing seems to happen it was already a normal sample card. If you insert it and the thing goes nuts it probably holds Nintendo DPCM data. That's explained later.
There are free (free as in beer) software tools on the Narrat1ve site for transferring WTPA2 formatted audio between SD cards and host computer in AIFF format, so fret not, you can totally put your samples on Instagram or whatever.
*(WTPA2 is actually not only too cool for FAT16, it also cannot be bothered to learn it. WTPA2 told ME that it heard that FAT formatting was actually a pain in the neck to manage onan 8-bit microcontroller with not much memory and only one kind of file it needs to store anyway and like an order of magnitude more memory than it will ever need anyway and no problems with fragmentation).
MIDI Control of WTPA2:MIDI operation of WTPA has one very big fundamental difference from Caveman in that it uses the internal (crystal-derived) clock to do sample timing as opposed to the relaxation oscillator. This means that MIDI works a little bit more like proper MPC-style sampler and less like a loop pedal. Using MIDI, the MCU can handle changing samples by proper pitch relationships, and generally thinks this way – IE, playing WTPA2 with a MIDI keyboard resultsin a sample being played back pitched along an equal-temperament scale. This further means that when using MIDI, WTPA can play the two sample banks at independent pitches from one another. Finally, because it makes the math easier, it's possible to introduce clock jitter as an effect when using the internal clock.
MIDI and Caveman modes are not exclusive. It is entirely possible (and fun) to wank on the knobs and buttons on one channel and sequence the other.
Because WTPA is multi-timbral (it has two independent banks and the SD card) it responds on three MIDI channels (BANK 0, BANK 1, and Streaming SD Playback). Setting those
8

channels must be done on power up, and is detailed in the “On Powerup” section of the manual.
WTPA is fully capable of handling and generating running status messages (and interpreting NOTE ON messages with a velocity of 0 correctly as NOTE OFFs).
When recording in MIDI mode, WTPA2 has a “default note” that sets the sample rate at whichit records. This is one of the low C notes by default. This is the note at which the recorded sample will play back at its “normal” pitch. Notes above and below this will pitch the sample up and down accordingly.
WTPA responds to NOTE ON and NOTE OFF messages by playing and stopping samples at the passed pitch. Currently WTPA2 doesn't care about velocity or aftertouch.
Although multi-timbral, WTPA's channels are each monophonic, and a NOTE OFF will only turn off the currently playing note. The PITCH BEND wheel also does pretty much what you expect it should do. The MOD WHEEL doesn't do anything. Yet.
Everything else in WTPA responds to Control Change Messages, and all that magic is laid outin the following exciting table:
Table 3: WTPA2 MIDI Commands
Command or Effect: Control Change # Value: Start/Stop Recording 3 0 = Stop, >0 = StartStart/Stop Overdub 9 0 = Stop, >0 = StartStart/Stop Realtime 14 0 = Stop, >0 = StartLoop Continuously/Once 15 0 = Once, >0 = Cont.Half Speed Playback 16 0 = Stop, >0 = StartBackwards Playback 17 0 = Stop, >0 = StartCancel All Effects 18 AnyBit Reduction 19 0-7Granularize Sample 20 0-127Introduce Jitter Errors 21 0-127Change Output Combination Math 22 0-3Store Default Record Note 23 AnyAdjust Sample Start RESOLUTE 24 0-127Adjust Sample End RESOLUTE 25 0-127Adjust Sample Window RESOLUTE 26 0-127Revert Sample to Unadjusted 27 0-127Adjust Sample Start WIDE 28 0-127Adjust Sample End WIDE 29 0-127Adjust Sample Window WIDE 30 0-127Change SD Card Bank 52 0-3
Most of the above are either self-explanatory or the same as Caveman mode. JITTER is
9

different, and will introduce an increasing amount of random clock jitter into sample playback. Jitter is processor intensive and sounds hissy. I might take it out later. STORE DEFAULT RECORD NOTE is detailed above. It will command WTPA to record samples at the clock value corresponding to the last NOTE ON message it got, and save this value to permanent memory. A higher pitch note makes for cleaner samples by default, and vice versa.
WTPA sends MIDI as well as receiving it. For instance, if you tell WTPA to BIT REDUCE to 7 bits using the switches, WTPA will send a Control Change 0 on the current channel, with a value of 7. This feature is the least well-tested of any on WTPA and any suggestions are welcome. The idea is that the MIDI out would be useful for setting up programs like Ableton Live to automate WTPA controls – meaning you could just twiddle a knob on WTPA and Ableton would be able to track it. This feature would also be useful for sequencing WTPA in real time. Since I don't use those programs much, this is poorly tested. I know the MIDI output works correctly, but that's about it. “Modern” synthesizers and whatnot do this stuff all the time and I'm not sure how bizarre my implementation is compared to theirs.
NOTE: WTPA always sends WIDE sample editing commands.
On Power Up:Upon power up, you can command WTPA2 to enter some utility modes by holding special button combinations. These allow you to set and store the MIDI channels used by WTPA2, bootload WTPA2 with new firmware, and enter a debugging mode useful for finding hardware problems.
Bootloading:Bootloading is the process by which the program that runs in the microcontroller on WTPA2 ischanged. This provides an easy way to add new features, and it allows curious users to writetheir own programs for WTPA2 without any special hardware. And, although it is HIGHLY UNLIKELY THAT I WOULD WRITE A BUG it would allow bug fixes to be deployed to WTPA2safter they have been shipped.
WTPA2 has an “audio bootloader” which allows you to put code on WTPA2 by using the audiooutput on a computer (or phone or whatever) to play a specially formatted AIFF audio file which WTPA2 can recognize as data. This works kind of like an old audio modem for those ofyou long in the tooth.
Here's a brief technical description (from the bootloader code):On power-up, WTPA2 checks first to see if the user is hitting a special button combo. If so, it then checks for the presence of a square wave of the right frequency (the bootloader "lead in") at the audio input. (Really, it counts transitions [logic state transitions] -- absolute waveshape is not important). If the carrier is valid, we will start collecting bytes. The first few are the boot header, which we will check for correctness. If the header starts correctly we'll record byte count and CRC and start recording the bytes passed in into SRAM. Once the data is transmitted entirely, we will look for a lead out, and check the byte count and CRC. If everything is correct, we will program the stored image from SRAM into application flash.
10

Bootloading works like this:Power off WTPA2.Make sure the audio is connected from your bootloading computer to WTPA2's audio in.Crank the volume out of the computer to max, and the input gain on WTPA2 to max.Start playing the boot file. It is VERY LOUD and the beginning of it sounds like a high pitch.Within a few seconds:Press and hold both S0 and S7.Turn on WTPA2.
WTPA2 will begin bootloading. Indicator lights will march along during the boot process (these are progress and debug lights – if you have trouble, report it to the forum and I'll get more specific). At the end of the audio file, WTPA2 should reboot. If the boot process stops and WTPA2 reboots before the file has stopped playing, something went wrong. The new firmware will NOT be written. (WTPA2 is generally quite picky about what it bootloads. You can TRY to load it with a fart sound, but good luck).
Setting MIDI Channels:Holding down S5 during boot up will allow you to change the default MIDI channels WTPA responds to. Because WTPA is multi-timbral it uses one MIDI channel for each sample bank. The defaults are the first two MIDI channels (0 and 1 if you count like a programmer, 1 and 2 if you count like a dirty dirty music person – refer to Anderton's “MIDI For Musicians” for a refresher). Immediately after the power on light chase, the LEDs will come on and display the two MIDI channel numbers. The top nybble (top four lights) correspond to WTPA's first sample bank (they default to channel 0 (or 1 depending on how you count) which is ALL OFF) and the bottom nybble (the bottom four LEDs) correspond to the channel the second sample bank responds to. This defaults to channel 1 (2 for guitar players). The numbers are displayed in binary, with the topmost light being the LSb. THIS MEANS THAT UNTIL YOU MESS WITH IT, you should see LED4 lit up, and that's it.
To change the MIDI channel for sample bank A (BANK 0), use S0. This will increment through all 16 MIDI channels and loop back to zero at the end. To change the channel for Sample Bank B, use S1. It works the same way. Sample Bank C is the channel on which WTPA2 will respond to SD Card Playback commands – use S2 to change that channel. NOTE – pressing S2 will cause the SD card MIDI channel to be displayed on the four Lsbs. Pressing S0 or S1 will change the display back to the first two sample channels.
When you are done setting the midi channels, press S2. This will store the channels to permanent memory and reboot WTPA.
Debug Mode:Pressing S0 while powering on jumps into “debug mode”. This puts you in a state where the switches will result in corresponding LEDs being toggled, encoder changes should do a similar thing, and a sample-clock rate related sawtooth wave will be output. This “self test” should help you identify broken hardware on your WTPA2. See the forum for more on “debugmode”.
11

(--Special Bonus-)
DPCM Mode:DUDE SWEET TRIFORCE TATTOO.Inserting a properly formatted card into the micro-SD slot of a WTPA2 will drop it into Nintendo DPCM playback mode. In this mode, WTPA2 is a four-voice “drum machine” style sampler which can play NES samples. All samples are loaded into RAM from the SD card when the mode is entered.
Switches S0-S6 are tied to a sample. The encoder scrolls through samples. A sample can beprogrammed to a switch by pressing S7, then the switch to be programmed. The sample currently selected by the encoder will be stored to that switch. These switch states are not stored across power cycles.
MIDI notes 0-127 will play the corresponding sample when a NOTE ON is sent. In DPCM mode, WTPA2 will respond to ANY of the three programmed MIDI channels (Bank 0, Bank 1, or the SD Card Channel) .
Pressing S5, S6, and S7 will bail out of DPCM mode and return to normal sampler mode. So will putting a sample card in the slot with regular WTPA2 samples on it.
NOTE: It's a lot easier to play DPCM mode with MIDI – I think it was mostly coneceived of as a drum kit.
NOTE 2: DPCM mode was written by Andy “Batsly Adams” Reitano, and he rules. Check outhis other stuff: http://www.batslyadams.com/
Thanks for reading this.Now go sample something cool.TMBBrooklyn, December 2014
12