What's New - Edilportaleimg.edilportale.com/catalogs/prodotti-graitec-211514-cata855a6ca.pdf · 1:...
28
What's New 2017
Transcript of What's New - Edilportaleimg.edilportale.com/catalogs/prodotti-graitec-211514-cata855a6ca.pdf · 1:...

What's New 2017


What's New in GRAITEC Advance PowerPack 2017
3
Table of Contents
WELCOME TO GRAITEC ADVANCE POWERPACK FOR REVIT® 2017 ........................................................ 5
NEWS ..................................................................................................................................................... 6
1: Compliancy with Revit® 2016 and Revit® 2017 .............................................................................................. 6
2: Numbering ...................................................................................................................................................... 6
3: BIM Data Link to Excel ................................................................................................................................... 9
4: Impacts Views Management ........................................................................................................................ 11
5: Pipe Openings .............................................................................................................................................. 15
6: Pipe Description ............................................................................................................................................ 17
7: Additional Shared Parameters ...................................................................................................................... 19
8: Coordinates and Level .................................................................................................................................. 21
9: New Localized Content Provided ................................................................................................................. 23
IMPROVEMENTS ..................................................................................................................................... 24
1: Approval of Selection via Enter Key ............................................................................................................. 24
2: Text Case ..................................................................................................................................................... 24
3: Family Manager ............................................................................................................................................ 25
4: Quick Dimension ........................................................................................................................................... 25
5: Bending Detail .............................................................................................................................................. 25
6: 3D View for Each Level ................................................................................................................................ 25
7: Join Openings ............................................................................................................................................... 26
8: BIM Connect ................................................................................................................................................. 26


What's New in GRAITEC Advance PowerPack 2017
5
Welcome to GRAITEC Advance PowerPack for Revit® 2017
The Graitec Advance PowerPack for Revit is a comprehensive suite of productivity tools, utilities and templates that are essential for Revit users from all industries. Designed to be the can’t-live-without companion for Revit, the PowerPack comes with over 60 unique tools covering everything from Family Management and file sharing to BIM coordination and links with Excel. The new version of the PowerPack for Revit 2017 covers requests from our users of all disciplines and now offers advanced BIM links with Excel, the ability to reveal hidden elements in a view and configure how they are displayed with new Impact Views, and, for those MEP pros, the ability to add and control openings around all to your MEP elements in the project to avoid clashing.
Another impressive tool, requested by 99.9% of our users, is the new numbering wizard which can pretty much number or renumber anything in the current project and comes with advanced controls for adding prefixes, suffixes, creating numbering groups and utilizing family parameters and even offers context sensitive numbering-logic.
The PowerPack for Revit was initially provided to Graitec customers with an active Revit product subscription as a complimentary loyalty benefit to help our users go further. This still remains the case but it is also now available to purchase as a low-cost subscription making these unique, must-have every day tools available to every Revit user around the world.
The ribbon, which is easily customized, has been re-organized to accommodate the new tools in a user-friendly way:
Revit users already familiar with the PowerPack ribbon will quickly detect the new tools embedded among the existing tools.

What's New in GRAITEC Advance PowerPack 2017
6
News
1: Compliancy with Revit® 2016 and Revit® 2017 The 2017 version of GRAITEC PowerPack for Revit® is compatible with both 2016 and 2017 versions of Autodesk Revit®. This also includes the BIM Connect plug-in which can be installed separately from the PowerPack. All commands are available and fully functional on both versions of Revit®, and so is the content provided at installation.
2: Numbering One of the most requested and highly anticipated functions of the 2017 version is the generic “Numbering” wizard. Its major advantage is that users can apply, re-organize or remove any numbering sequence for ANY loaded category from the project, all with one tool. The complexity of the numbering wizard results from its vast flexibility to be applied to any category and is balanced by an intuitive, user friendly interface with context sensitive intelligence.
The “Category” dropdown list displays either the visible categories from the active view (when numbering is launched for the current view), or all categories from the document (when numbering is applied for the whole project).
Depending on the category for which the numbering will be applied, a list of relative parameters will be loaded. The fields defined will be affected by the numbering operation (if the selected parameter already has assigned values, then, by default, they will be replaced by the newly created values).
For every category, users can decide the settings that will be applied for the numbering sequence. This section refers to multiple possibilities, such as assigning a prefix or a suffix to an imposed number, placing separators, deciding on the number type and the sequence style, creating numbering by group or using dynamic parameters for the final result.
Note: A live preview shows the result of preferences applied by the user in real time.
What's New in GRAITEC Advance PowerPack 2016
7
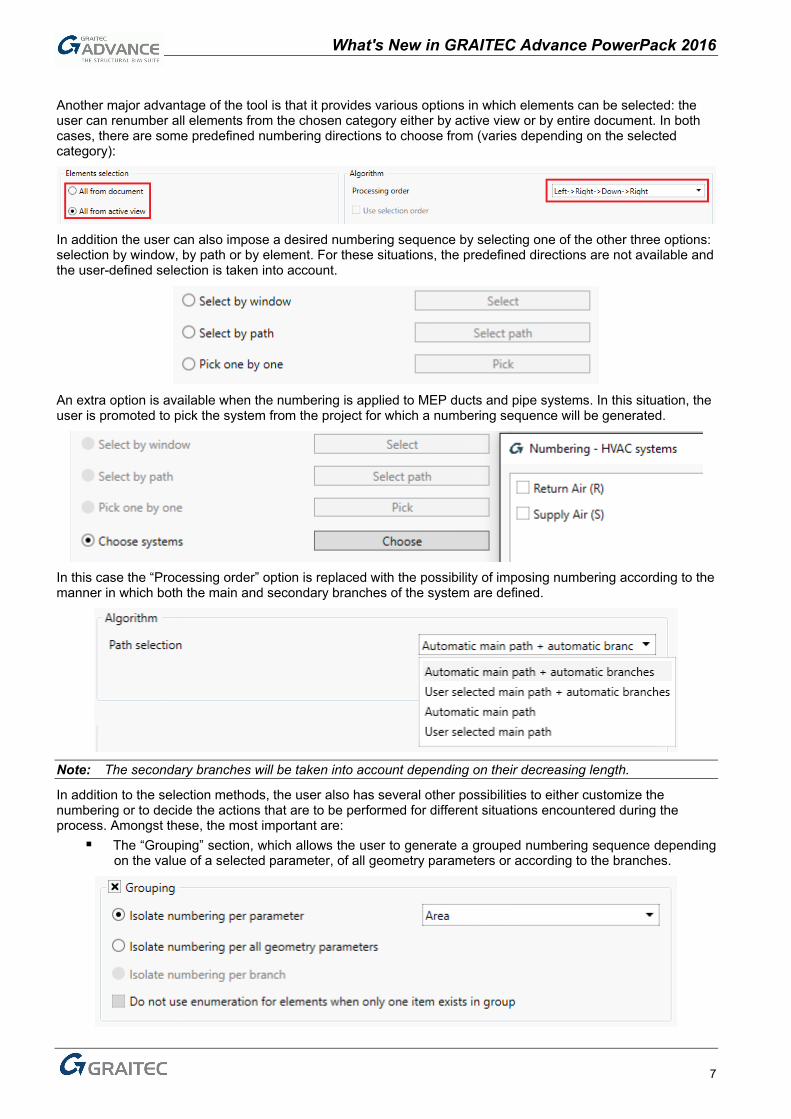
Another major advantage of the tool is that it provides various options in which elements can be selected: the user can renumber all elements from the chosen category either by active view or by entire document. In both cases, there are some predefined numbering directions to choose from (varies depending on the selected category):
In addition the user can also impose a desired numbering sequence by selecting one of the other three options: selection by window, by path or by element. For these situations, the predefined directions are not available and the user-defined selection is taken into account.
An extra option is available when the numbering is applied to MEP ducts and pipe systems. In this situation, the user is promoted to pick the system from the project for which a numbering sequence will be generated.
In this case the “Processing order” option is replaced with the possibility of imposing numbering according to the manner in which both the main and secondary branches of the system are defined.
Note: The secondary branches will be taken into account depending on their decreasing length.
In addition to the selection methods, the user also has several other possibilities to either customize the numbering or to decide the actions that are to be performed for different situations encountered during the process. Amongst these, the most important are:
The “Grouping” section, which allows the user to generate a grouped numbering sequence depending on the value of a selected parameter, of all geometry parameters or according to the branches.

What's New in GRAITEC Advance PowerPack 2017
8
The “Exclude from sequence” option is useful when the selected parameter on which the renumbering will be performed already has certain values for one or more elements. In this case, the process can ignore them and re-assign the element with new values, or it can skip the detected elements.
A mini family browser offers the possibility to exclude one or more objects of a certain family and/or type.
For certain categories, Revit allows elements to have identical marks values, in which case the
“Duplicate Control” area helps the user decide if the numbering process will take duplicates into account or not. There is also an option to check for and correct or resolve any duplicates which may already exist.

What's New in GRAITEC Advance PowerPack 2016
9
3: BIM Data Link to Excel Another major advantage of the GRAITEC PowerPack for Revit® 2017 is the possibility to synchronize data using a bi-directional link between Autodesk Revit® and Microsoft Excel, through the new, powerful “Link to Excel” tool.
Users can export Revit schedules or compose a list of parameters to be treated as a table, in order to manage them in Excel. Once modified, the tool can import the data back into Revit and the schedules or parameter values will be updated according to the changes.
Note: If the schedule in Revit is customized in terms of appearance and merging, then the resulting Excel
table will preserve the desired format from Revit.
The most impressive aspect of this new tool is that it offers a powerful and strong link between the Revit project and the managing of data in Microsoft Excel. Also, the time taken to handle modifications and updates in either of the two platforms is reduced to minimum, since the process of organizing project documentation in Revit is accurately performed.
There are several methods through which users can create a link between a Revit project and an Excel spreadsheet:

What's New in GRAITEC Advance PowerPack 2017
10
Empty: A new link can be created from scratch, meaning that the user will select one or more categories, pick from the available parameters, and generate an Excel file with several spreadsheets, one for each selected category.
From existing link: A new link can be established by creating a duplicate of an existing one which can be edited. The advantage is that there is no need to start the whole process for similar links from scratch.
From current schedule: If the command is applied in an active schedule, then the resulting Excel table will contain the rows and columns as they were created in the Revit Schedule. Modifying the data in the Excel file and importing it back into Revit will update both the information in the schedule and the elements from the model.
From multiple schedules: This option can be used to create an Excel file with multiple sheets that contain the information from several schedules included in the current project.
From current selection in Revit: The category/categories for which Excel tables will be created can be a direct result of a selection of elements in Revit.
From entire project: For each category loaded in the project, a spreadsheet will be created in Excel, with the possibility to exclude some categories or to customize the list of loaded parameters.
After the structure of the link is decided, the “Export” operation generates the Excel file, which can be opened directly from the “Synchronization” dialog:
Users also have the possibility to save links as templates to be reused in other projects. The template is saved as an *.xls file containing the fields that form the header of the table, which can also be used to create a new link.
Note: If the source schedule from Revit has one of the following applied: filters, sorting, grouping, the resulting
appearance will be preserved for the Excel spreadsheet which is generated.
What's New in GRAITEC Advance PowerPack 2016
11
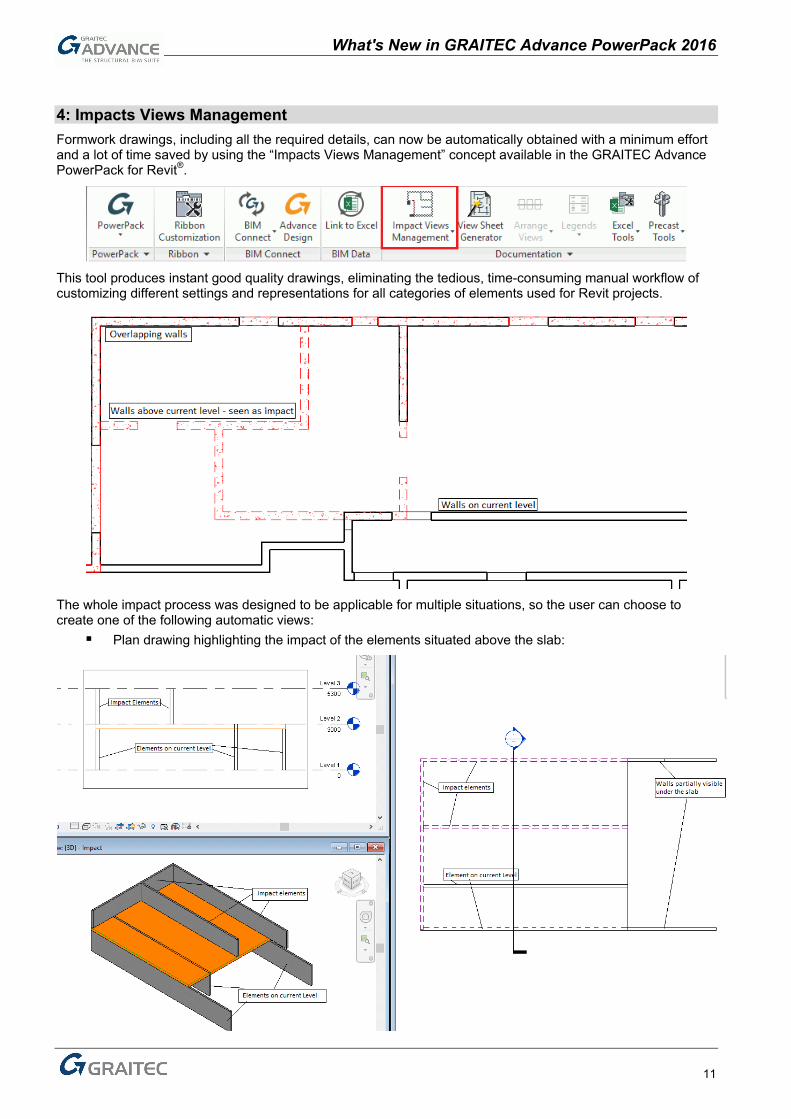
4: Impacts Views Management Formwork drawings, including all the required details, can now be automatically obtained with a minimum effort and a lot of time saved by using the “Impacts Views Management” concept available in the GRAITEC Advance PowerPack for Revit®.
This tool produces instant good quality drawings, eliminating the tedious, time-consuming manual workflow of customizing different settings and representations for all categories of elements used for Revit projects.
The whole impact process was designed to be applicable for multiple situations, so the user can choose to create one of the following automatic views:
Plan drawing highlighting the impact of the elements situated above the slab:
What's New in GRAITEC Advance PowerPack 2017
12
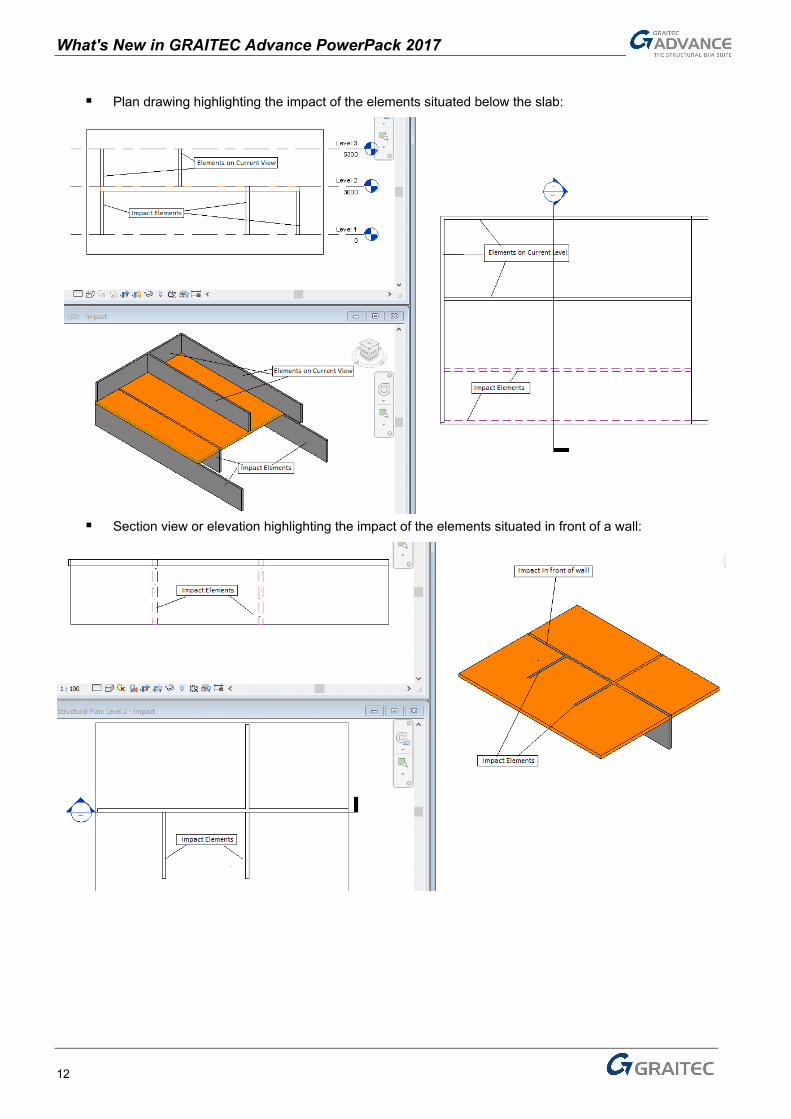
Plan drawing highlighting the impact of the elements situated below the slab:
Section view or elevation highlighting the impact of the elements situated in front of a wall:
What's New in GRAITEC Advance PowerPack 2016
13
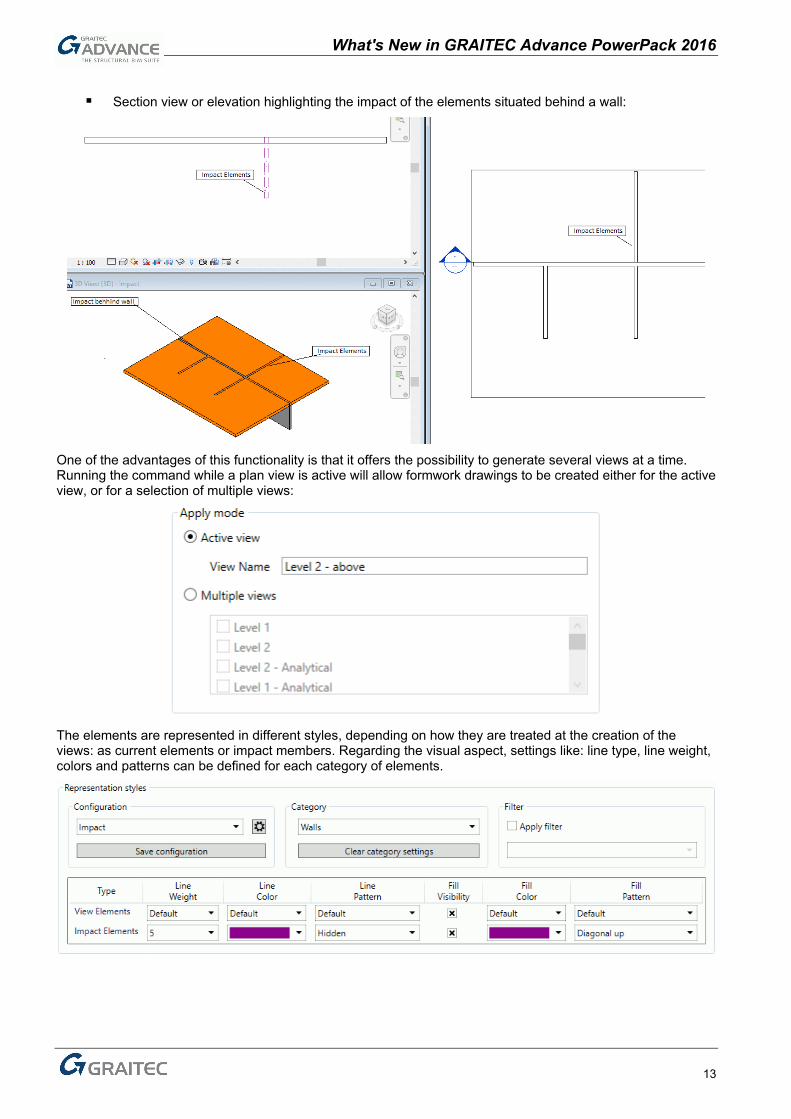
Section view or elevation highlighting the impact of the elements situated behind a wall:
One of the advantages of this functionality is that it offers the possibility to generate several views at a time. Running the command while a plan view is active will allow formwork drawings to be created either for the active view, or for a selection of multiple views:
The elements are represented in different styles, depending on how they are treated at the creation of the views: as current elements or impact members. Regarding the visual aspect, settings like: line type, line weight, colors and patterns can be defined for each category of elements.
What's New in GRAITEC Advance PowerPack 2017
14
In order to optimize the time needed to fully detail the resulting drawings, the “Duplicate with details” option generates views keeping all the information of the original drawing. The functionality also offers the chance to save or export configurations, once they are customized, so that they can be used in other projects.
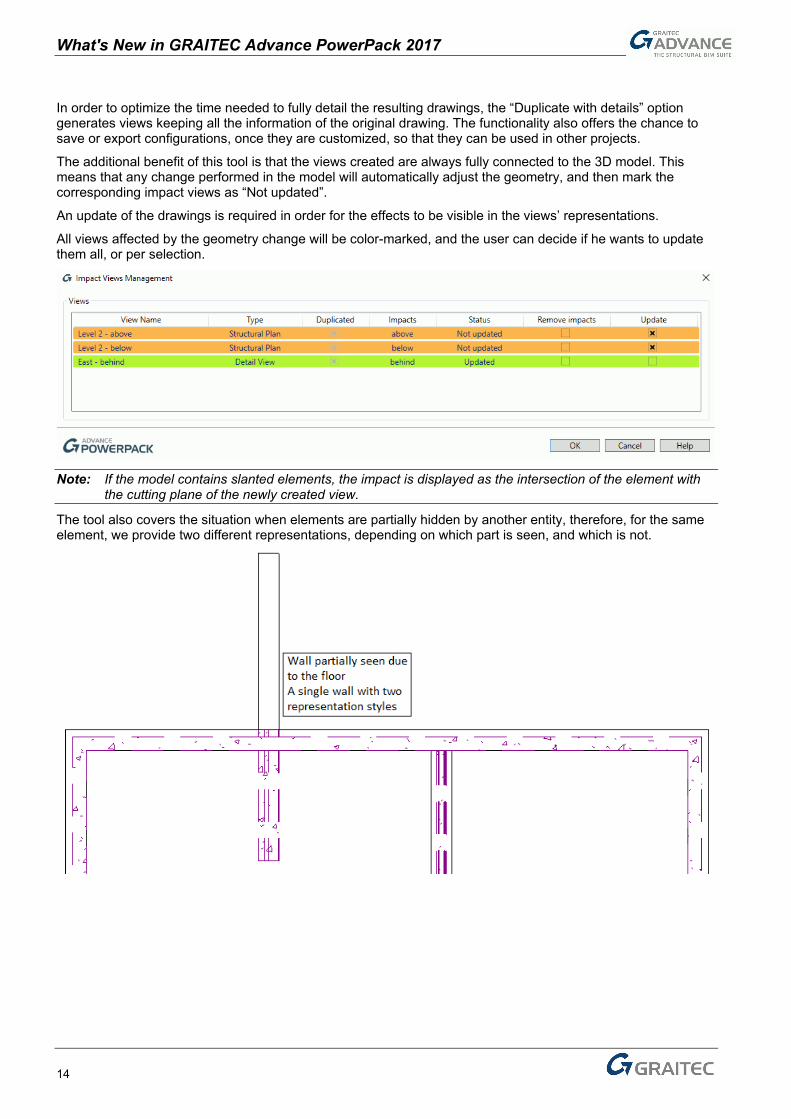
The additional benefit of this tool is that the views created are always fully connected to the 3D model. This means that any change performed in the model will automatically adjust the geometry, and then mark the corresponding impact views as “Not updated”.
An update of the drawings is required in order for the effects to be visible in the views’ representations.
All views affected by the geometry change will be color-marked, and the user can decide if he wants to update them all, or per selection.
Note: If the model contains slanted elements, the impact is displayed as the intersection of the element with
the cutting plane of the newly created view.
The tool also covers the situation when elements are partially hidden by another entity, therefore, for the same element, we provide two different representations, depending on which part is seen, and which is not.
What's New in GRAITEC Advance PowerPack 2016
15
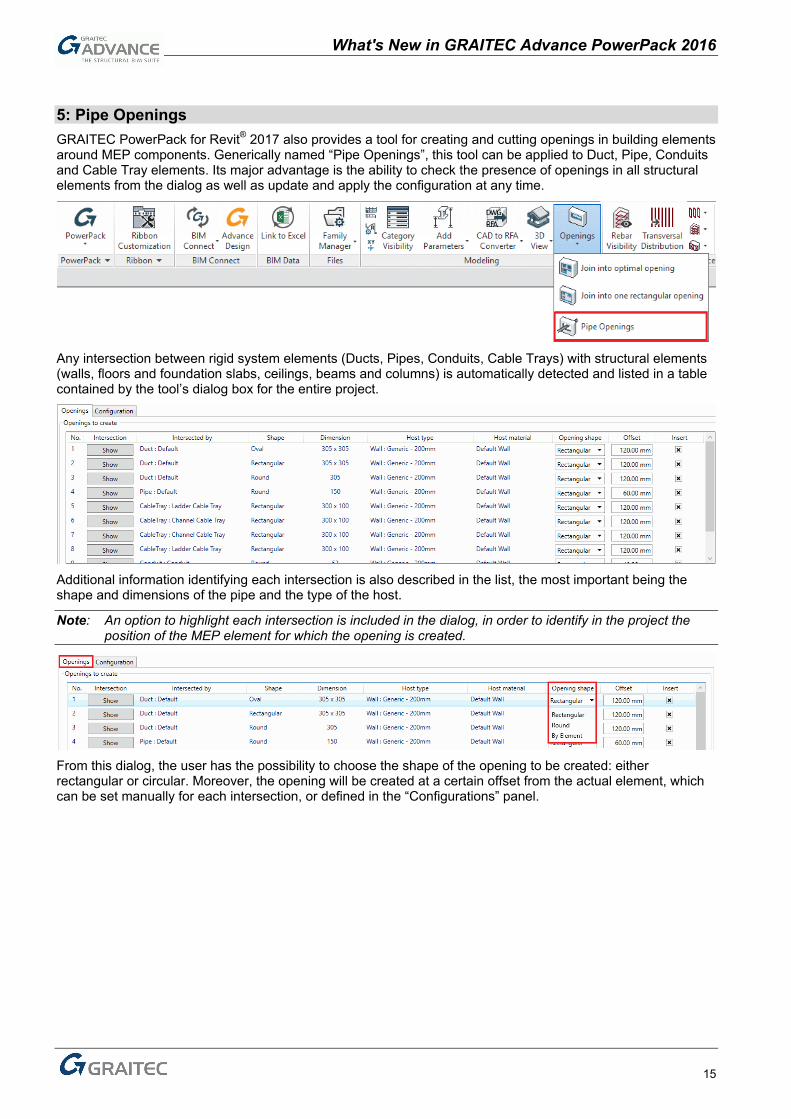
5: Pipe Openings GRAITEC PowerPack for Revit® 2017 also provides a tool for creating and cutting openings in building elements around MEP components. Generically named “Pipe Openings”, this tool can be applied to Duct, Pipe, Conduits and Cable Tray elements. Its major advantage is the ability to check the presence of openings in all structural elements from the dialog as well as update and apply the configuration at any time.
Any intersection between rigid system elements (Ducts, Pipes, Conduits, Cable Trays) with structural elements (walls, floors and foundation slabs, ceilings, beams and columns) is automatically detected and listed in a table contained by the tool’s dialog box for the entire project.
Additional information identifying each intersection is also described in the list, the most important being the shape and dimensions of the pipe and the type of the host.
Note: An option to highlight each intersection is included in the dialog, in order to identify in the project the position of the MEP element for which the opening is created.
From this dialog, the user has the possibility to choose the shape of the opening to be created: either rectangular or circular. Moreover, the opening will be created at a certain offset from the actual element, which can be set manually for each intersection, or defined in the “Configurations” panel.

What's New in GRAITEC Advance PowerPack 2017
16
Note: Users can choose default offset values for each category of intersecting element based on a dimension range.
Note: The units displayed in the Pipe Openings dialog are the ones set in Revit for the “Pipe Dimension” from
the Piping discipline in the Units tab.
Any change performed in the model (adding/deleting system entities, changing the positions or the dimensions of the pipes/host element, or the need to adjust offsets and shapes) can be updated in the project by rerunning the command. Any modifications will be automatically detected and color coded, giving the user the possibility to decide the action that is to be performed.
Note: Deleted or modified elements are highlighted in orange, whilst those created, but do not require an
update are highlighted in green.
The command is also applicable if the pipes intersect the host element at an angle other than 90 degrees, or if they are rotated from the perpendicular position. The intersection is detected in a similar manner and the opening is created accordingly.
Note: Detecting intersections can be done either for the whole project or only for the MEP elements included in selection.

What's New in GRAITEC Advance PowerPack 2016
17
The openings created are family instance-based, meaning that the openings are created as Generic Model families which are included in the setup, and can be edited at any time.
Note: The tool will work with linked MEP and Architecture Revit files.
6: Pipe Description Other developments applicable for MEP projects available in this version of the PowerPack include the possibility to automatically add tags and annotations for Duct and Pipe categories.
The “Pipes Description” tool automatically detects the systems in the project and, with minimum effort and settings from the user, annotations can be generated keeping a fixed position or spacing between them in order to obtain a clean and organized final view.
Note: This tool is only available in 2D views: plan views, sections and elevations.

What's New in GRAITEC Advance PowerPack 2017
18
In order to better manage the systems of large projects, the user has the possibility to choose which elements to generate annotations for and highlight them in the view.
The tool is applicable for pipes and ducts, regardless of whether they are rigid or flexible. Both categories have tabs where the user can decide the configuration of the tags that are to be inserted independently.
Additionally a unique option to control the actual placement of the tags is included. For each category, the user has the possibility to choose to place the tags either at a fixed distance or at a fixed point (start, middle, or end of the segment).
The position of the tag will be the same for all selected elements, meaning that running the command several times with different settings applied can generate different results for different elements belonging to the same project.

What's New in GRAITEC Advance PowerPack 2016
19
7: Additional Shared Parameters This version of the PowerPack includes new shared parameters to ease the process of documenting projects with all necessary information. The new parameters include: Slab Thickness, Room Finishes and Pipe Thickness.
The “Slab Thickness” parameter completes the suite of structural element parameters to obtain all desired dimensions for use in tags and schedules and for filtering information. The command adds the G. Slab Thickness parameter, which interrogates the thickness of a slab. The new parameter can be found in the properties of any slab from the project.
The “Room Finishes” tool is another unique tool and offers the possibility to detect the floor type present in a specific room and add the G. Floor Type parameter. It applies for both floors and ceilings and can be separately assigned to each room whilst multiple selection of rooms is allowed when a floor type can be detected in all rooms selected.

What's New in GRAITEC Advance PowerPack 2017
20
The parameter is added as a property of the room, therefore it will be present in any situation when the properties of a selected room are interrogated.
The “Pipe Thickness” tool creates a shared parameter G.Thickness, which determines the pipe wall thickness. This parameter can be used for labeling certain pipe types (plastic, all steel grades, copper and multi-layer pipes).
The parameter can be found in the properties of any pipe from the project, and its value is calculated as the difference between the Exterior and the Interior diameters of the pipe, divided by 2.

What's New in GRAITEC Advance PowerPack 2016
21
8: Coordinates and Level
The “Coordinates and Level” tool brings a suite of new shared parameters for the structural elements: foundations, columns, beams, walls and floors.
The newly added parameters are grouped under the “Geometric position” section, which can be found in the properties of each element.

What's New in GRAITEC Advance PowerPack 2017
22
Note: The G.Coord X, G.Coord Y, G.Coord Z values are detected in relation to the Survey Point, whilst the G.TopoCoord X, G.TopoCoord Y, G.TopoCoord Z are calculated referring to the Project Base Point.
For foundations and columns, the additions include six coordinate parameters together with “Level” information, whilst for all other elements, only the “Level” parameter is displayed.

What's New in GRAITEC Advance PowerPack 2016
23
9: New Localized Content Provided In this version of the PowerPack the content libraries provided have been updated with more families for UK, France and Czech Republic.
All families are watermarked and renamed using new, intuitive names.
The PowerPack provides a total of 1131 families, structured for each country in different categories: Annotations, Structural Elements, Detail Items, etc.
What's New in GRAITEC Advance PowerPack 2017
24
Improvements The 2017 version of the PowerPack comes with a series of improvements applied to the existing tools and commands, in order to optimize their behavior and meet the requests and expectations of users.
1: Approval of Selection via Enter Key The PowerPack for Revit includes several commands that require multiple selection at some point (“View Sheet Generator”, “Copy Rebar”, “Delete Rebar”, “Room Finishes”, etc). In the previous versions, the approval of the selection had to be done by clicking the “Finish” button in the status bar of the command.
This can now be avoided with the additional possibility to finish the selection by just hitting the Enter key from the keyboard.
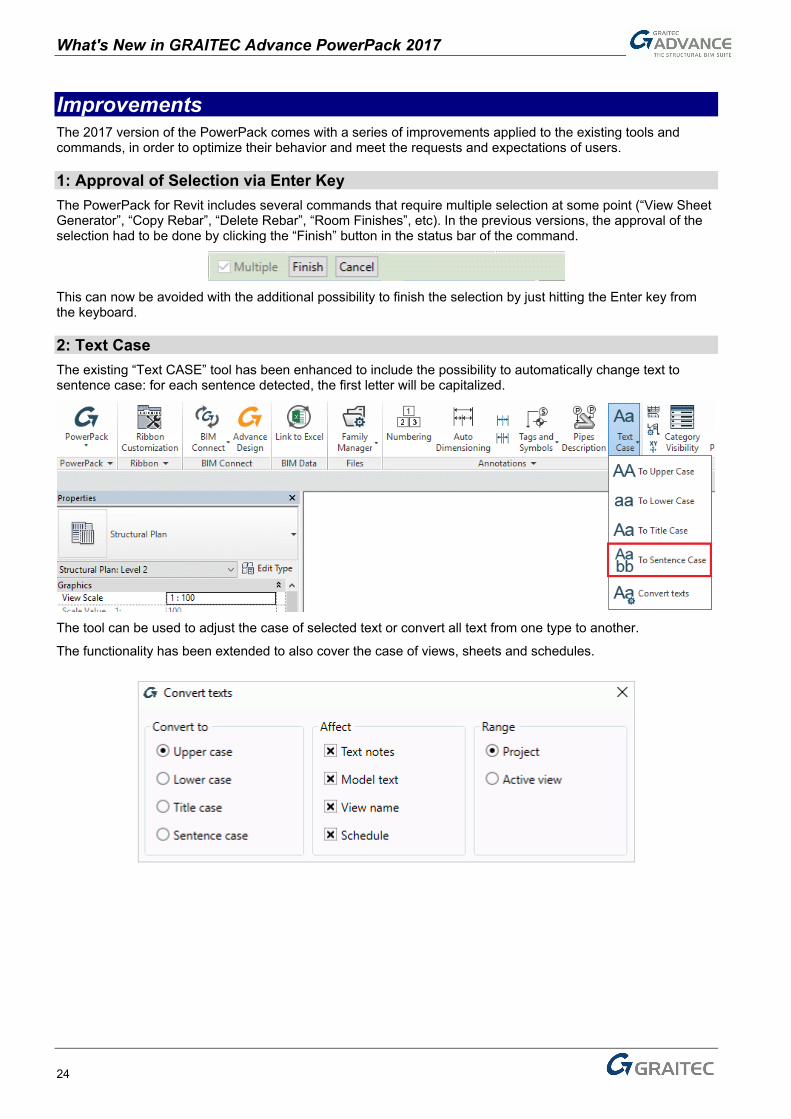
2: Text Case The existing “Text CASE” tool has been enhanced to include the possibility to automatically change text to sentence case: for each sentence detected, the first letter will be capitalized.
The tool can be used to adjust the case of selected text or convert all text from one type to another.
The functionality has been extended to also cover the case of views, sheets and schedules.

What's New in GRAITEC Advance PowerPack 2016
25
3: Family Manager The “Family Manager” has been enhanced to read Family Type Catalogues. This strategy helps decrease project size and minimizes the length of the “Type Selector” list when selecting family types.
Another major improvement is the support for network locations enabling Family Manager to browse network shared families.
Additionally, the family editor can now be loaded directly from the “Family Manager” dialog.
4: Quick Dimension This tool’s behavior has been upgraded to support multiple selections. Users can now choose several detail lines and then approve to apply the command. The dimensions will be created for all lines included in selection.
5: Bending Detail In the previous version of the PowerPack it was possible to automatically generate bending details for rebar. However, in addition to the shape and the dimensions created, in this version, the bending detail is accompanied with a customizable tag.
The bending detail can be generated for both single and multiple selection of rebar.
In addition to this, the tool generates detail for reinforcement included in systems (such as area or path reinforcement), WITHOUT removing the system.
6: 3D View for Each Level Previously this tool created views for all the levels in the project at once. This behavior has been extended to enable the users to select one or more levels that should have a 3D view created.
What's New in GRAITEC Advance PowerPack 2017
26
7: Join Openings The “Join Openings” tool has been extended to support also openings created with family instances. Therefore, it became applicable for the entities created using the Pipe Openings feature, for example.
The workflow of the functionality can now be applied for 2 or more native Revit openings, 2 or more family instance openings, or o combination of the two situations.
Note: For the newly added situations, “Join into Optimal Opening” returns the same result as “Join into One Rectangular Opening”, since the families included in the install only support rectangular or round shapes.
8: BIM Connect
Synchronization enhancements There were some issues with the linear elements which were NOT vertical (within an angle tolerance):
they were considered as beams and not as columns. Starting with this version, the structural type of the element to synchronize is reconsidered, based on its corresponding element from the Revit project. This improvement applies ONLY for the synchronization command.
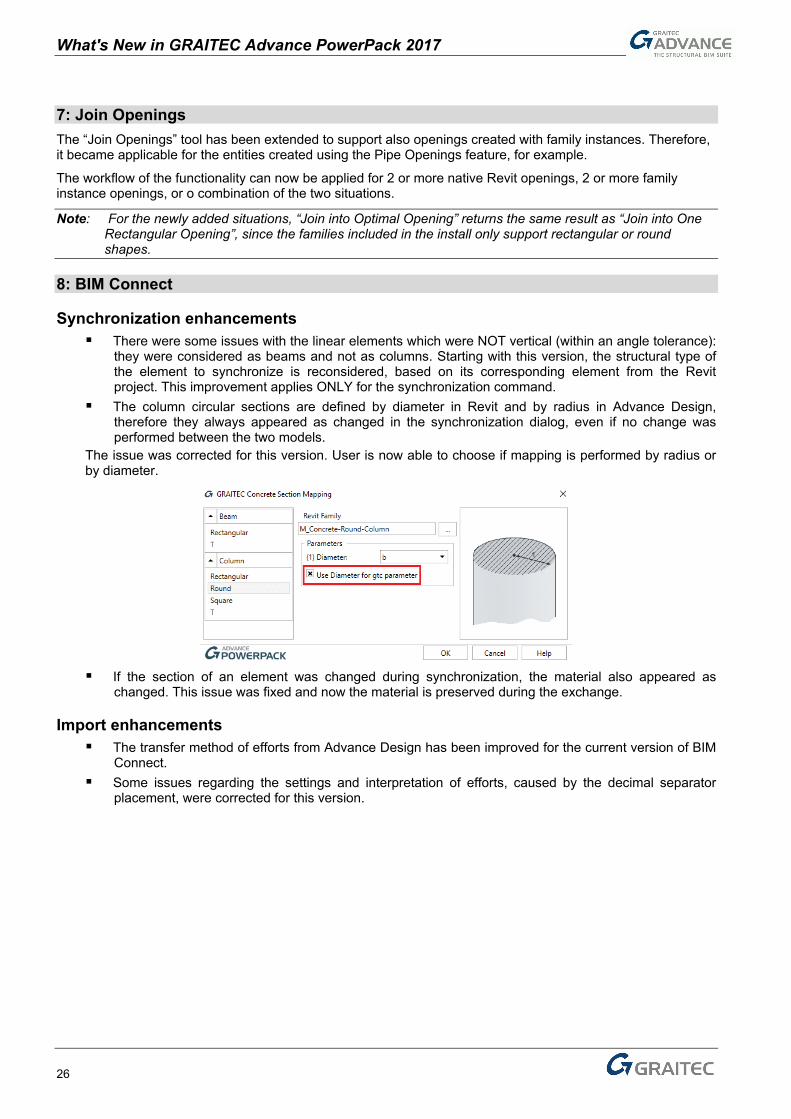
The column circular sections are defined by diameter in Revit and by radius in Advance Design, therefore they always appeared as changed in the synchronization dialog, even if no change was performed between the two models.
The issue was corrected for this version. User is now able to choose if mapping is performed by radius or by diameter.
If the section of an element was changed during synchronization, the material also appeared as
changed. This issue was fixed and now the material is preserved during the exchange.
Import enhancements The transfer method of efforts from Advance Design has been improved for the current version of BIM
Connect. Some issues regarding the settings and interpretation of efforts, caused by the decimal separator
placement, were corrected for this version.