Westfarthing Woodworks · 2016-06-17 · and Jigs is a reference guide for many aspects of acoustic...
25
1 Westfarthing Woodworks 50 Woodworking Tips Copyright Westfarthing Woodworks LLC 2014 This work may be printed, handed out, linked to, and freely distributed as long as it re- mains in original form without any deletions, additions, or omissions. Please reference the source when linking and distributing, and best of luck in all your woodworking ad- ventures. This booklet and others can be found at westfarthingwoodworks.com
Transcript of Westfarthing Woodworks · 2016-06-17 · and Jigs is a reference guide for many aspects of acoustic...

1
Westfarthing Woodworks50 Woodworking Tips
CopyrightWestfarthing Woodworks LLC 2014
This work may be printed, handed out, linked to, and freely distributed as long as it re-mains in original form without any deletions, additions, or omissions. Please reference the source when linking and distributing, and best of luck in all your woodworking ad-ventures. This booklet and others can be found at westfarthingwoodworks.com

2
My Books Are On Amazon
Acoustic Guitar Making: How to Make Tools Templates and Jigs is a reference guide for many aspects of acoustic guitar making. The book covers making blanks, making tools instead of buying them, how small changes affect tone, and a thorough finishing section. This is a 508 page monster of a book, and it can be used as a reference for the guitar maker. This is not an ABC book, but a companion that teaches many of the things that the other step by step books leave out, or do not cover as thoroughly. For the be-ginning and the intermediate guitar maker, this book can be quite a resource. Click on the book cover and you can see more information and reviews on Amazon.
Wooden Rings: How to Make Wooden Rings by Hand is my second book, and it has step by step instructions and photo examples of over 50 rings that even those with lim-ited woodworking experience can make. The instructions are written for basic tools which anyone can afford, though power tools can also be used if available. Everything from basic single species rings, complex laminations, and even wood/metal and inlaid rings are covered in an easy to fol-low, step by step manner. Wooden rings are very popu-lar, and following this book they are very easy to make with only a few basic tools. Click on the book cover and you can see more information and reviews on Amazon.
If you like this guide...

3
Table Of Contents
Introduction and Disclaimer50 Woodworking TipsAbout The AuthorUseful Resources
Page 4Page 5 - Page 23Page 24Page 25

4
IntroductionWoodworking is an interesting hobby for a number of reasons. The one that stands
out for me is how easy it is to pick up, but how there is still always a new aspect or tech-nique to learn. It is easy for someone to learn one part of woodworking, or to learn how to make a single project. This is the attraction. Anyone with a little patience and the willingness to learn can pick up the hobby quickly. However, woodworking has so many different fields of study, and so many different project styles that there is never a short-age of information to learn.
One way that I ramped up my woodworking ability very quickly was to study as many different disciplines as possible by making different projects. Each of these projects has its own tricks associated with it, and these little pieces of knowledge can be applied to other areas. Learning the little tricks that make things easier, and learning some of the lessons that only time and failure can teach, makes a big difference in how a woodworker progresses. I hope that this guide teaches you many of these lessons, and you walk away a stronger woodworker.
DisclaimerThis booklet is intended for informational purposes only, and if you choose to do
or perform any of the activities listed within, you are doing so under your own free will and are responsible for any consequences. Woodworking and wood finishing have some dangers associated with them, and it is important to learn about and anticipate these dangers before participating in the activity. I make no assumptions about your abilities, and I recommend that all beginners do some research on safety precautions and protec-tive equipment before trying out any aspect of woodworking or wood finishing.
Basic safety precautions include but are not limited to: Safety glasses to protect the eyes, ear protection for loud noises, a respirator to protect the lungs from harmful chem-icals, proper clothing that is protective but not restricting or in danger of being caught in moving machine parts, and having a clean and organized workshop free of slipping and tripping hazards.
Safety in the shop is your responsibility and yours alone. If you think something is not safe, do not do it. If you require more education on a piece of equipment, seek it out and learn before you make a mistake that can cause an injury. Above all be careful and confident in what you are doing, and treat every tool with respect. I hope you have many long years enjoying woodworking as a hobby and even a profession. It is my belief that this can be a lifelong hobby as long as all safety precautions are taken, and awareness is maintained at all times while in the shop.

5
No. 1To find the center of any square or rectangular sur-
face, draw lines that connect the corners on a diagonal, which places two lines on the surface. The intersection of these lines is the center of the board, and this is a quick way to place things like drawer pulls, find the centers for wood turning, or any other time the middle of a surface needs to be found. Use a ruler to connect the two diago-nal corners, and draw a line that goes the whole length of the piece. Then, move the ruler to the other diagonal corners and do the same thing. The intersection will be the center, and can be marked with an awl or sharp nail before drilling or mounting to a lathe center.
No. 2Test fit glue joints dry before adding glue and clamp-
ing them together. This way, problems can be identified before they become glue covered problems, which are far more sticky, and harder to deal with. A test run only takes a few minutes, and any issues can be corrected be-fore gluing and clamping. Perform the same steps in the same way that the final glue up will be done, this way nothing can sneak up and become a surprise. After all the clamps are in place, and everything worked well, re-move them and begin the same process again with glue.
No. 3The best way to get good at woodworking is to just
keep on making things. In the beginning, they may not be very good, and this is to be expected. Keep working on the basics and keep making projects. Over time, the skill level will increase, and the what was once difficult will become second nature. There are no substitutes for doing the work. No magic bullet, no DVD course, noth-ing but hard work.
“Glue covered problems are
harder to solve.”

6
No. 4Plan the project well in advance of making it, especial-
ly in the beginning. Seasoned woodworkers have a better chance of winging it and having the project be successful, but even they make a plan first. Planning helps eliminate many if not all of the pitfalls and potential problems that can arise, because they are identified while they are still on paper. A problem on paper doesn’t waste materials, time, or resources, which is why this is the best place to work everything out. Also, once the bugs are all worked out, it becomes far easier to be confident in going though with the project, knowing that most of the hurdles have been passed.
No. 5A large compass can be made from a pencil and a
string, and this can be used to mark out large circles for things like table tops or round windows. It is better to make a custom compass by putting a nail in one end of a long skinny piece of wood, and drilling for a pencil on the other. If a certain diameter table is needed, the nail and the pencil need to be half that distance apart. Also, a cus-tom folding compass can be made with two thin pieces of wood that are bolted at the top, where one end has a pencil attached and the other has a nail point.
No. 6The Radius of a circle is half as long as the Diameter,
and the Circumference is the Diameter multiplied by Pi, or 3.142. The Area of a Circle is the Radius squared and then multiplied by Pi. Many of these simple arithmetic formulas will become important in woodworking, espe-cially when working with circles. It is worth the time to get familiar with them, so they don’t have to be looked up when they are needed.

7
No. 7Brad nails from an air nailer are not there to provide
any structural support, they are simply used to clamp the pieces in place while the glue dries. Even a hundred brads in a butt joint between two boards will be easier to pull apart than a few brads and completely cured wood glue. It is the glue that provides the strength of the joint, not the brads. Be sure to always use wood glue when stitching something together, unless screws are going to be used afterwards.
No. 8A true rectangle is half the size of a square, meaning
that the long sides are twice the length of the short sides, and all angles are 90 degrees. Any four sided shape with all 90 degree angles is also a called rectangle, and if the angles are not all 90 degrees then it is a quadrilateral. A quadrilateral will always have four corners, and the sum of the angles will always be 360, no matter what form the polygon takes. This can be used to plan the angles for miters when making non square or rectangle shapes that do not use the basic 45 degree miter.
No. 9Use Aliphatic Resin glue for all wood to wood joints,
and be leery of newer and less thoroughly tested glues until they show more of a track record. Titebond AR glue in the red bottle is the standard for woodworking glue, and it has been in use for a very long time. This is a superior glue to PVA or white glues, and bonds faster, sets quicker, and has enough open time to get the clamps set and locked into position. There are other glues for wood to wood joints, but there is a reason that the major-ity of woodworkers and cabinet shops in the world use Titebond. Don’t take chances, use what works and has a proven track record.
“The sum of the angles in a
quadrilateral will always be
360.”

8
No. 10For non-wood joints, or for when the wood is very
oily like Cocobolo or Rosewood, use a nice two part ep-oxy for the joint. Many times oily woods can be tough to glue, because the oils repel or prevent the glue form getting into the surface and setting. In the case of these kinds of woods, there are a couple solutions. The easi-est for smaller projects is to use epoxy for the adhesive, which doesn’t have as many issues attaching to the oily surfaces.
No. 11If wood glue has to be used for an oily joint like Co-
cobolo, leach the surface first with denatured alcohol or acetone to remove the oil. This has to be done fairly quickly, and the joint needs to be glued and clamped im-mediately after removing the oil. The process is simple, just wipe the surfaces to be glued with an acetone or al-cohol soaked rag, and keep wiping until the rag comes off fairly clean. Fold over the rag to expose new fabric every few wipes, and once the rag looks clear, the top layer of oil has been removed. Glue and clamp the boards once the solvent evaporates in a few minutes, and the joint will hold.
No. 12Dispose of solvent rags carefully, because they can
catch fire if left in a trash can or another area with very limited air circulation. Solvents evaporate fairly quickly from rags and brushes, though if contained they can gen-erate heat and catch fire. This happens most commonly in a trash can, which will most likely also be filled with papers, wood shavings, scraps, and lots of other highly flammable materials. This is a recipe for disaster. Dry out all solvent rags before disposing of them, and make sure to follow all safety precautions on the solvent can.

9
No. 13Do not store finishing supplies in the garage, or any-
where else that does not have climate control. In areas of the world that get very hot in the summer or very cold in the winter, these temperature extremes can destroy fin-ishes in their containers. The look of the product may not change at all, but old finishes or weather worn finish-es can have problems drying when applied. This means a finish that is always soft, and never really cures. Find a safe place inside the house like a locked cabinet, and store all finishing products there. Keep the cans clean and there will be no smell, and be sure to keep pets and children away from this area too. A locked cabinet is best, but even an inside closet can have a lock added.
No. 14Wear a respirator when finishing, as well as dispos-
able gloves. Even with finishes that do not smell par-ticularly bad, the solvents are still there in many cases, and they can cause harm over time. The respirator pro-tects the lungs from these chemicals, and keeps the over-whelming majority of them out of the body. Gloves on the hands are a simple purchase, and they only cost a few pennies each. A new pair is used every time, and they keep the chemicals in the finish from entering the body through the skin. These two items are a must when fin-ishing, and can be used with other personal protective equipment for safety.
No. 15Don’t be afraid to try something. Many times, simply
trying something new or working on something different can broaden the skills that are already known, and even strengthen unrelated skills. If a good idea strikes, it is usually worth giving it a try in the shop with some scrap wood.

10
No. 16Keeping a small journal or notebook for woodwork-
ing ideas and notes can be a very useful tool. It doesn’t have to be anything fancy, though a really cheap booklet will tend to be treated like something really cheap, which it should not be. The ideas inside are where the value is, so invest in a small journal like a Moleskine, which is du-rable, and a nice piece to store ideas in. When a though occurs about woodworking, or a new idea, place it inside the book. This can be a reference for the woodworker for years and years, and a very valuable tool.
No. 17Find scrap wood in the local hardwood store for a frac-
tion of the cost. Many if not all hardwood stores will have a cutoff bin where they keep their pieces that drop from milling the lumber into sellable pieces. These smaller pieces cannot be used to make a dresser or desk, but they are great for smaller projects, and to use as test pieces. If a new species is going to be used for the first time, it is worth the effort to acquire a scrap piece to test finishes, or even the working properties of the wood itself. If you make rings, small boxes, or other small things, this bin can save you hundreds of dollars in wood cost every year.
No. 18When drilling a pilot hole to join two boards, the first
pilot needs to be large enough that the screw can pass through the hole without needing to be turned with a screw driver. The purpose of this pilot is to allow the screw to grab the lower board, and pull the two pieces together. If the threads are grabbing on both pieces, they will move as one, and not draw together. The lower pilot needs to be as large as the inside of the threads, which allows the center of the screw to pass easily while the threads grip and hold the wood. This prevents splitting.

11
No. 19
No. 20
Take pictures. Digital cameras have made picture taking almost free, because the images can be viewed on a computer instead of printed out. Take as many pic-tures as possible and from several different angles when making a project, and it will be easy to refer back to those images when they are needed. Also, having a wealth of pictures makes it fun to look back upon past projects.
Sharp tools are safer and more effective than dull tools, and make woodworking easier. A very sharp chisel or hand plane iron is a wonder to work with. I think many people make the mistake of buying an edged tool off the shelf and wonder why it is so difficult to work with when they get it into the shop. The reason for this is that the irons are not honed to a very sharp edge when they are sold. In many cases, these tools end up on a shelf, never to be used again. Invest in a double sided water stone, which has a coarse abrasive on one side (800-1000 grit) and a polishing grit (4000-8000 grit) on the other. A few quick strokes on the coarse side followed by a few dozen on the fine side will leave a chisel or plane iron so sharp that it can be used to shave with. These tools cut better, smoother, and easier, and are a pleasure to work with.
No. 21Instead of buying a new tool, research what the tools
in the shop currently are capable of. For example, a rout-er can be used as a jointer, and a circle can be cut on a table saw. A jointer can be used as a planer for stock that is not too wide, and a chute can be made for a planer that makes it work as a jointer. Lots of tools have hidden abil-ities beyond what they are typically sold for, and knowing the true depth of a tool opens up more opportunities for woodworking without the expense of buying new tools.
“Research what your tools are
capable of before buying
new tools.”

12
No. 22
No. 23
No. 24
The Router is the wood shop magician, and can liter-ally be used to do almost anything that other shop tools can. Invest in a book on the versatility of a router as well as a nice router based on what is read in the book, and this combination will open doors in woodworking that many people don’t even know are there. In the begin-ning, all I had was a router and a band saw, and I made several electric guitars with only these two main power tools. The router is truly one of the most versatile tools in the shop.
After the router is purchased, pick up a small rout-er table or make one in the shop. The advantage of the router table is that it frees up both hands while working with a piece, and this allows for safer operation and more control in many cases. A router table can be made from scrap plywood, and a fence from the same. The fence can be clamped into position where it is needed, or threaded knobs and bolts can be fitted into slots for the clamping action.
Spend some time on the internet and on YouTube looking at what other people are making as well as for shop tool tutorials. There are a wonderfully large num-ber of people on the internet who love nothing more than to share their information with you. These people may be selling their books, like I am, but they are also part of the culture that wants to share woodworking skills and teach others about the craft. I give away far more infor-mation between my online articles and videos than I sell in my books, and this is because I am truly passionate about woodworking and teaching others about a hobby that has made such a difference in my life.
“People online want to share
their knowledge with you.”

13
No. 25
No. 26
No. 27
Use a scissors to cut veneer. A very sharp scissor like a Fiskars or other nice scissor is a great tool for cutting veneer into shapes for marquetry or inlay. The tool does not require learning a new skill, because almost everyone has used scissors before, and the control is easy to pick up when working with veneer.
If lots of different colors of veneer are needed, like for marquetry or wooden ring making, purchase a veneer va-riety pack or wood species identification pack. These ve-neer bundles have close to 50 different veneers in them, across the same number of species. This is a great way to get several colors of wood to work with, and allows more choice for projects. The pieces are smaller in size, around 4” x 9” and the price is very low for all the veneer that comes in the pack.
Invest in a thickness planer if making cabinets, case goods, laminating wood, or doing any similar style of project. A thickness planer can be found used for a very low price, and even a small 12” planer is a great tool to have in the shop. When a planer is available, boards can be purchased at standard thicknesses, and then altered in the shop based on need. Purchasing pieces like this al-ready thinned is more expensive per piece, because part of the price is the cost of the machine and the labor for the wood seller. Buying wood rough sawn is also less ex-pensive, and the boards can be sent through the planer to clean up the faces. When gluing boards together, a quick run through the planer leaves the surface completely flat, and makes for a far better glue joint. My planer was the best $200 I ever spent in my shop without exception.
“Scissors are a great tool for
cutting veneer.”

14
No. 28
No. 29
No. 30
Pallets can provide a large amount of free wood, but be careful what they look like. Many pallets are treated with chemicals and pesticides to make them last longer in the outdoors. Look for pallets that do not show evi-dence of treatment, are light in color (typically meaning they are newer) and do not have any foul smell. These are some of the best sources of wood if a retailer throw-ing them away allows them to be taken. Oak, Maple, and other nicer woods are commonly found on these pallets.
Join a woodworking club or organization that meets at least monthly. There are a number of nice woodwork-ing clubs around the world, and they can teach a new woodworker plenty about getting going. They are made up of people who enjoy woodworking, and in many cases have spent decades or more perfecting what they enjoy doing. Most of these people will love nothing more than to share their talents with anyone interested in learning, and the membership fees are typically very low.
If going somewhere doesn’t sound like fun, look on-line for a woodworking forum that deals in general wood-working or a specific aspect that sounds interesting. For example, there are forums on instrument making, cabi-net making, tobacco pipe making, and many other spe-cific woodworking disciplines. People go online and have written conversations about any and every topic that they can imagine, and just reading through these forum pages can reveal quite a lot of free information and techniques.
“Oak, Maple and other nicer
woods are commonly found
on pallets.”

15
No. 31
No. 32
No. 33
Go online to a place like Craigslist or another online person to person selling source, and find a cheap version of the item you intend to make. Buy it, bring it to the shop, and take it apart. This is a sure fire way of learning how the piece was made, as well as how to learn elements of construction and technique. Dressers and cabinets are easy to find for next to nothing on sites like this, and just make sure to find one that was made using classic joinery and glue, not cam locks and dowels.
A little glue goes a long way. As long as both surfaces to be joined are completely covered from edge to edge and end to end with a thin layer of wet glue, the joint will adhere very well. Too much glue and it squeezes out all over the place, and too little means a weak joint or poor coverage under the joint. This can take a little time to get the hang of, but as long as a little squeeze out happens, and there are not puddles of glue left over, the amount of glue used is most likely in the correct range.
Flat surfaces make the best joints. Pieces of wood that are going to be glued together need to mate well, which means the surfaces need to touch on the entire face, rather than in only a few places. A lumpy board glued to a flat board will only adhere where there is con-tact between the two pieces. I really bad board will only contact on 25% or less of the surface, which is a joint that will be very weak and most likely fail over time. Spend the time it takes to create a surface that is completely flat, and mates perfectly with the other surface. This way, the glue coverage is 100%, the contact is 100% and the strength of the joint will be as strong as it possibly can.
“Bring a piece to the shop and take it apart.”

16
When buying wood, look for pieces that are already dried. Wet wood will bend, warp, and twist as the mois-ture escapes, leaving a difficult to work board. Dried lum-ber has already gone through this process, meaning that it will stay very close to that same shape even as years go by. Also, dry wood can be worked with immediately, where wet wood needs to be seasoned before it can be used, and this can take time.
Hardwood and Softwood have to do with the shape of the leaves more than the actual density of the wood it-self, though most hardwoods are more dense. Trees that have large broad leaves are called hardwoods, while those with narrow needle shaped leaves are called softwoods. Pine, Spruce, and Fir are all softwoods. Oak, Mahogany, and Maple are all hardwoods. In the case of these six mentioned, the density and the category make sense, be-cause the hardwoods are in fact harder and denser than the softwoods listed. Balsa on the other hand is the least dense species of wood, and it is actually classified as a hardwood, because of the broad leaves on the tree.
Making an instrument and making a coffee table would be the exact same thing if the coffee table had to sound good in the end. Instruments offer a unique chal-lenge to a woodworker, because they not only have to work with structure, they also have to create something that can move and flex to produce vibrations. Try making an instrument for a side project, for example and electric guitar, cigar box guitar, or instrument kit. They can tach quite a bit about woodworking, as well as paying atten-tion to more than one detail at a time.
No. 34
No. 35
No. 36
“Hardwood and Softwood have to do with the shape of the
leaves, not the density.”

17
No. 37
No. 38
No. 39
Use hand applied finishes. Finishes that go on by hand make an expert finisher out of anyone. These in-clude oils, shellacs, varnishes, waxes, and mixtures of the four. Hand finishes go on with a soft clean cloth, and since they are rubbed on, they leave a flat surface, which is easy to build upon. The finishes have a classic look to them, because they have been used for centuries, and they are available everywhere.
Select one finish and become a master at it before buying dozens of different types. Spend some time fin-ishing scraps or other cheap sources of wood, and really get to know what happens when the finish is applied, as well as how it dries. Oils are the easiest to start with, and boiled linseed oil, and Tru-Oil are some of the best and most forgiving to work with.
As a general rule, almost any type of finish will adhere to almost any other as long as the first layer is completely cured. Even though this is the case most of the time, it is still wise to use products that are designed to go together when finishing. If an oil base stain was used on the piece, use an oil base top coating to protect it. If water base was used, pick out a water base clear for the final look. As finishing manufacturers get better at what they produce, the type and amount of different finishes available keeps on getting bigger and bigger. Stick to the basics and keep products of the same type together. This ensures that the results will be consistent and that the finish will have the best chance of lasting a very long time.
“Master one finish before
buying dozens of them.”

18
Save money by re-sawing blanks in the shop rath-er than buying them already sawn to thickness. Oddly enough, pieces that are thin tend to cost almost twice as much per board foot than standard dimensional lumber from a bin. Save money by buying standard lumber and sawing it down on a table saw or band saw in the shop. If the tools are already there, use them and save the money over paying a premium for someone else to do it.
Where possible, make a jig. There is an old joke about woodworkers, and how it only takes a seasoned professional a couple seconds to make a perfect cut, but it takes him several hours to make the jig for that cut. It almost always makes sense to make a jig when making several pieces or making several of the same cuts. A jig is simply a setup that helps make accurate and consistent woodworking possible by making the process repeatable every time. Jigs are worth ten fold the amount of time it takes to make them, as they ensure predictable and ac-curate results.
Make a template. Templates are great for the same reason that jigs are great. They provide consistency and repeatability. A template will only produce as good of a piece as the template itself, so spend the time it takes to produce a great looking and perfectly functioning tem-plate. This will ensure that all the pieces made from it have the best chance of being perfect as well. For projects where a shape needs to be created, or a pattern needs to be transferred, having a template really cuts down on the time it takes to transfer the drawing to the wood. Also, once a template is made, it stays for life. Invest a little time now, and the returns will be far greater over time.
No. 40
No. 41
No. 42
19
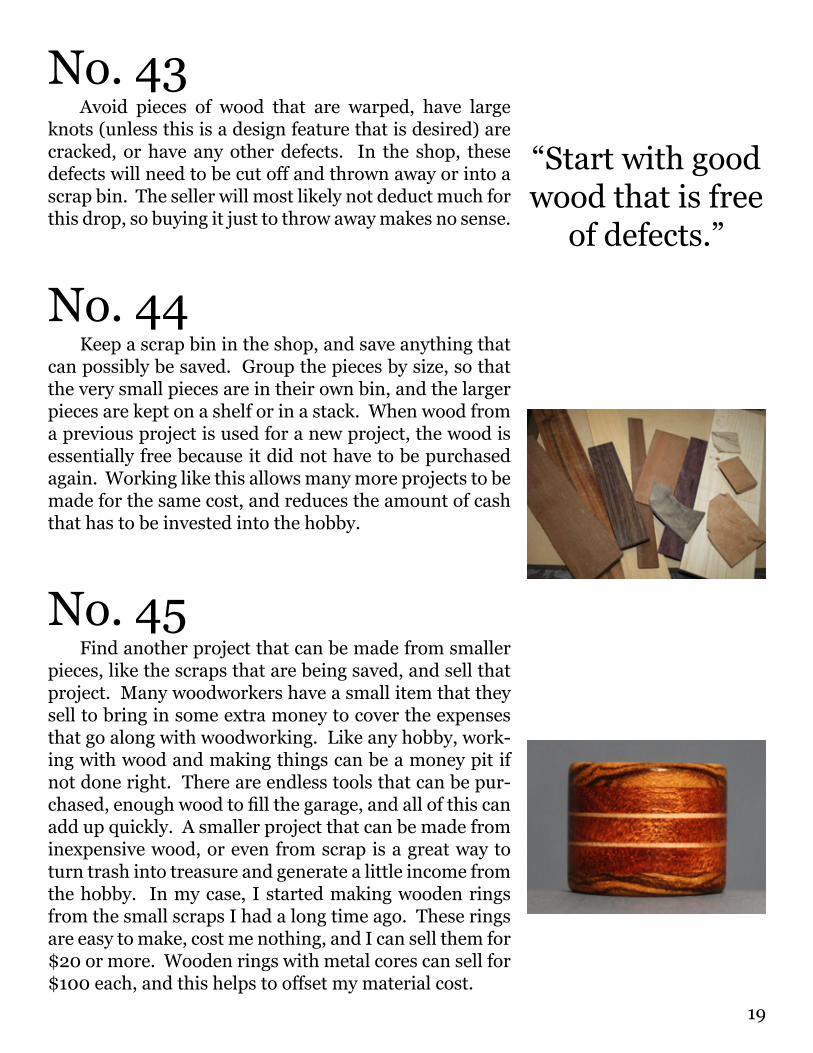
No. 43
No. 44
No. 45
Avoid pieces of wood that are warped, have large knots (unless this is a design feature that is desired) are cracked, or have any other defects. In the shop, these defects will need to be cut off and thrown away or into a scrap bin. The seller will most likely not deduct much for this drop, so buying it just to throw away makes no sense.
Keep a scrap bin in the shop, and save anything that can possibly be saved. Group the pieces by size, so that the very small pieces are in their own bin, and the larger pieces are kept on a shelf or in a stack. When wood from a previous project is used for a new project, the wood is essentially free because it did not have to be purchased again. Working like this allows many more projects to be made for the same cost, and reduces the amount of cash that has to be invested into the hobby.
Find another project that can be made from smaller pieces, like the scraps that are being saved, and sell that project. Many woodworkers have a small item that they sell to bring in some extra money to cover the expenses that go along with woodworking. Like any hobby, work-ing with wood and making things can be a money pit if not done right. There are endless tools that can be pur-chased, enough wood to fill the garage, and all of this can add up quickly. A smaller project that can be made from inexpensive wood, or even from scrap is a great way to turn trash into treasure and generate a little income from the hobby. In my case, I started making wooden rings from the small scraps I had a long time ago. These rings are easy to make, cost me nothing, and I can sell them for $20 or more. Wooden rings with metal cores can sell for $100 each, and this helps to offset my material cost.
“Start with good wood that is free
of defects.”

20
No. 46
No. 47
No. 48
Buy the best tool you can for the amount of money you want to spend, but do not necessarily buy the most expensive tool. This goes for new as well as used items, and can help get the best bang for the buck. For example, it is better to shop around and pick up a slightly used ta-ble saw for half the price of new than to spend that same money on a new saw, which will be at full price. Also, getting something in the middle of the road now, helps ensure that a new one will not be needed right away, ef-fectively making the first investment a complete waste.
Name brand doesn’t mean as much as it used to any-more. With a few notable exceptions, most tool manu-facturers are tied to the same parent company, and get many of their parts from the same places. A little inter-net search will reveal how many high end and low end tool companies are ran by the same people, and often get their materials from the same sources. When it comes to a few pet tools, go for the name brand if it has what you are looking for. However, the rest can be anything middle of the road and they will be more than adequate.
Square up all stock first before trying to build any-thing from it. Joints work the best will great fitting piec-es of wood, and this is not possible with stock that is out of square. Spend a little time on the front end making sure the pieces are square and ready to build with, and the building phase will go far more smoothly. This can be as simple as a run through the jointer or table saw to square up the edges, and a pass or two on the planer to smooth out the faces.
“Buy the best tool you can
with your budget, not
necessarily the most expensive tool available.”

21
No. 49
No. 50
Have patience. Great woodworkers all have one thing in common. They do not rush through the job, and they take their time to make sure it is perfect. Over time, the tendency to rush will become reduced, as long as you make an effort. Woodworkers like to play with their cre-ations as quickly as possible sometimes, but it has to wait until the job is done. Work intelligently, go slowly, and the piece will be done when it is done, not before.
The last and one of the most important tips I can share is to practice. Whether it is making a small project, or building a built in book case that fills a 30 foot wall, take some time and practice the methods before commit-ting to the actual project. For small things, this can be as simple as making a prototype, or building a version of the piece from inexpensive wood. This practice helps identi-fy problems, and mistakes are less costly than with a one of a kind board, or an expensive wood species. For larger projects, building a model is impractical, but practicing the joinery methods or veneering methods is worth do-ing on a smaller scale. If the book case will have shelves with a dado to hold their ends, practice a few dados on the table saw or with a router before working on the ac-tual piece. For a large piece, get a handle on the size and figure out how it is going to break down to get into the house. Get familiar with the techniques, and then just apply those same teachings to the actual item. Don’t be afraid to destroy some scraps and waste a little wood learning something. It is far easier to destroy something cheap than to build a 30 foot book case in the shop and wonder how the heck you are going to get it through the door and into the living room. At this point, even the best looking piece of woodworking was a failure, because it will never do what it was intended to do.
“Practice as much as you
can, there is no substitute for it.”

22
Bonus TipAbove all else, the best way to become a better wood-
worker is to combine learning with action. Become a stu-dent of the craft, learning as much as possible about it, and then put those lessons into practice in the shop. A few minutes a day spent reading and researching can add up to quite a bit over time, and a true student of wood-working will learn and practice all they can.
In the world we live in, information is available every-where, and lots of times that information does not cost anything. The internet and the library are great resourc-es for free information about woodworking, and a person reading and watching videos 24 hours a day could spend their whole lifetime doing so, and not ever get through it all. The scope and the depth of woodworking is enor-mous, because at one time or another almost everything in the known world was made from wood. Try looking at resources from a long time ago, like older books, and they will show techniques that are still great, but no lon-ger in use because of technological changes. Sometimes they are gone for a reason, but many times they are bet-ter, just not convenient and easy to sell for woodworking stores.
Also, start building a library of books on woodwork-ing and wood finishing. These two topics go hand in hand because almost every piece that you will make will also have some type of a finish on it. Begin buying one book a month, or one book every other month, and actually spend the time reading them. Its a crazy idea, but books on the shelf mean nothing if they are not read. Look for places where books are available for less than full price, like used book stores, garage sales, and books on Amazon for a discount. These are great places to begin building a library, and eventually you will have a book that address-es almost every major focus in the woodworking world.
I know this sounds like a lot of work, and on the face of it, there really is quite a bit that has to be done in order to become an expert. However, if you break it down into smaller pieces, over time it is less imposing. For exam-ple, if you read for one hour a day, every day for a year, you will have 365 hours of research and study under your
“The best way to become a better
woodworker is to combine learning with
action.”

23
belt. In most fields, it requires far less than that before you are released as fully qualified to do the job. Think about the impact that 365 hours of research and study can do for your woodworking ability. If you can team this up with a good amount of practice in the shop, af-ter a year you will be a very capable and very intelligent woodworker. When it is broken down like that, the task is not as daunting, nor is the idea of becoming a good woodworker out of reach.
I hope you enjoyed these tips, and hope they help you become a better woodworker. Remember to practice and study, and over time you can look forward to getting to the point where there is nothing you cannot figure out how to make from wood. It is a fun feeling knowing that you can make just about anything, and it does not take long to get there if you put in the time each day.
“Become a student of woodworking, and put those lessons into practice in the shop. Absorb as much material as you possibly can, and every little thing you learn will be another tool that you can use to
produce better and better work.”

24
About The AuthorMy name is Brian Forbes, and I have been a woodworker and instrument maker for
over fifteen years. My small shop is in Arizona, and I enjoy making acoustic and elec-tric guitars, tobacco pipes, wooden rings, and many other projects. I have published two books on woodworking, one on making acoustic guitars, and the other on making wooden rings. Both of these books are filled with great information, and I encourage you to take a look for them on Amazon.
In addition to my personal projects, my formal education comes from the furniture repair, refinishing, and restoration field, where I have taught the craft to several people during my time as instructor. Many of these craftsmen have gone on to have very suc-cessful careers in furniture repair. My love of teaching people about woodworking and finishing led me to publish my books, as well as the encouragement and positive words from those who I help on a daily basis with woodworking questions via e-mail. If you ever have a question that you can’t find an answer to, please feel free to e-mail me, and I will do my very best to help. My e-mail is [email protected]

25
Useful InformationMy web site is www.westfarthingwoodworks.com
My books can be found on Amazon by clicking on the pictures on page 2, they cover acoustic guitar making and wooden ring making.
One of the best places to purchase fine woodworking tools and ma-terials is Woodcraft, and their web site is www.woodcraft.com
Follow me on Pintrest, www.pintrest.com/wfww
Thank you very much. I hope you enjoy reading this booklet as much as I have enjoyed writing it.