Western Michigan University · Western Michigan University ... Travel Authorization and Expense...
23
Western Michigan University PeopleSoft Financials Version 9.2 Travel Authorization and Expense System Creating a Travel Authorization Payroll and Disbursements
Transcript of Western Michigan University · Western Michigan University ... Travel Authorization and Expense...
Western Michigan University
PeopleSoft Financials Version 9.2
Travel Authorization and Expense System
Creating a Travel Authorization
Payroll and Disbursements
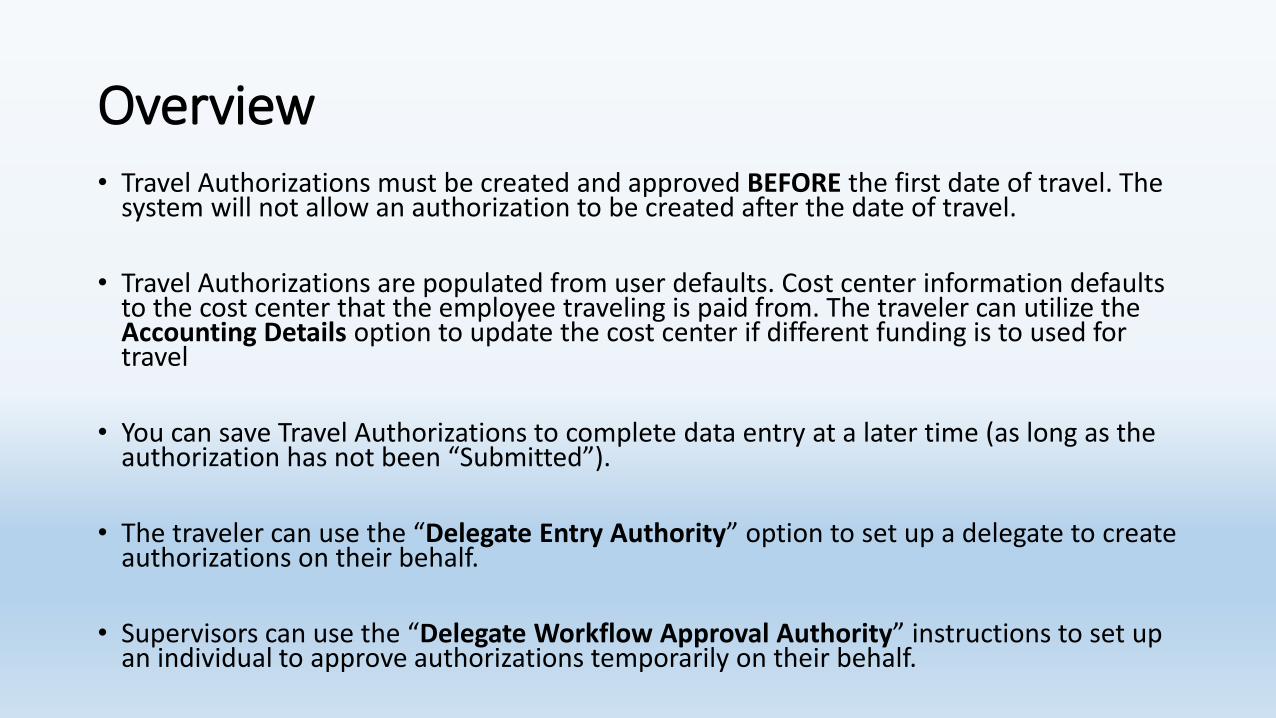
Overview• Travel Authorizations must be created and approved BEFORE the first date of travel. The
system will not allow an authorization to be created after the date of travel.
• Travel Authorizations are populated from user defaults. Cost center information defaults to the cost center that the employee traveling is paid from. The traveler can utilize the Accounting Details option to update the cost center if different funding is to used for travel
• You can save Travel Authorizations to complete data entry at a later time (as long as the authorization has not been “Submitted”).
• The traveler can use the “Delegate Entry Authority” option to set up a delegate to create authorizations on their behalf.
• Supervisors can use the “Delegate Workflow Approval Authority” instructions to set up an individual to approve authorizations temporarily on their behalf.
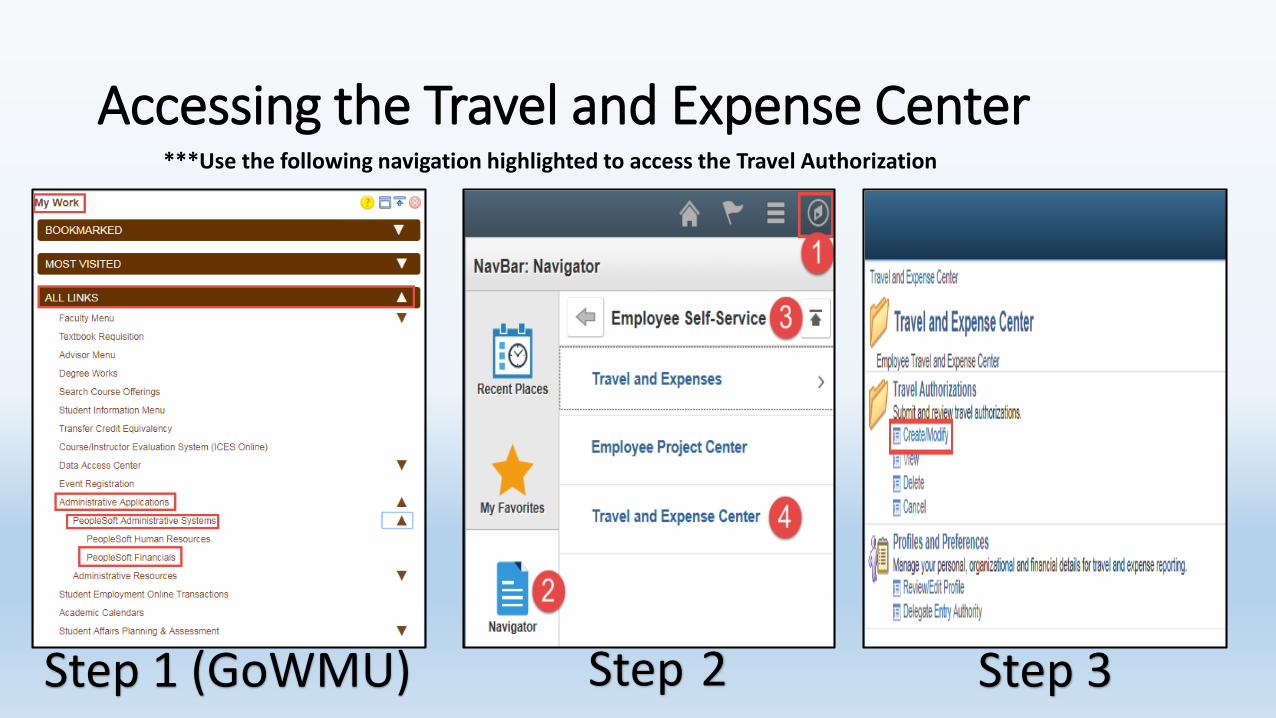
Accessing the Travel and Expense Center
Step 1 (GoWMU) Step 2 Step 3
***Use the following navigation highlighted to access the Travel Authorization
Creating Travel Authorizations
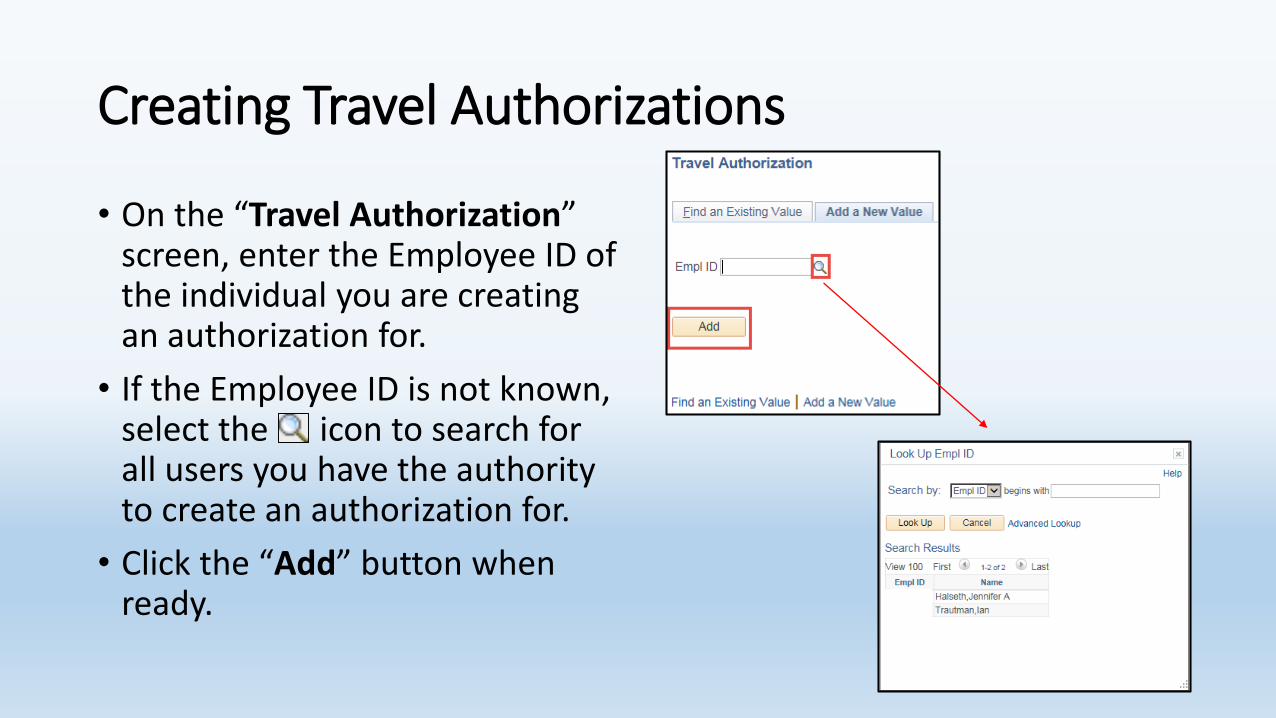
• On the “Travel Authorization” screen, enter the Employee ID of the individual you are creating an authorization for.
• If the Employee ID is not known, select the icon to search for all users you have the authority to create an authorization for.
• Click the “Add” button when ready.
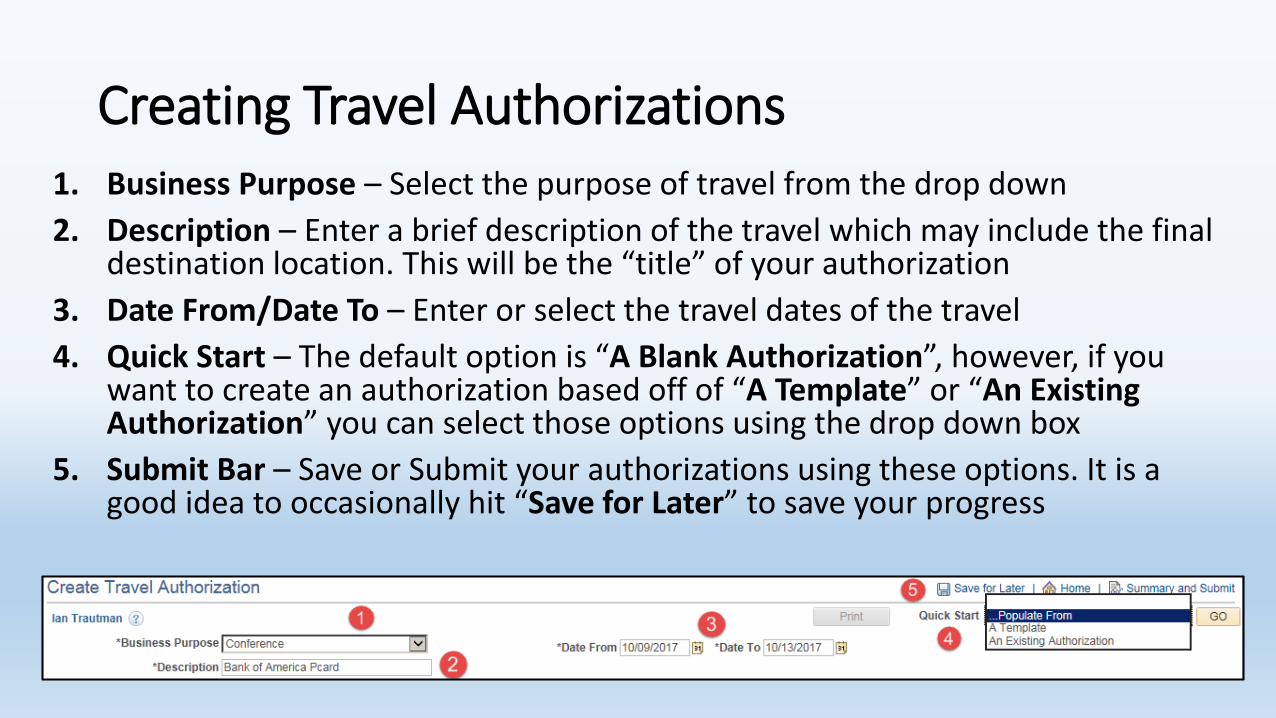
Creating Travel Authorizations1. Business Purpose – Select the purpose of travel from the drop down
2. Description – Enter a brief description of the travel which may include the final destination location. This will be the “title” of your authorization
3. Date From/Date To – Enter or select the travel dates of the travel
4. Quick Start – The default option is “A Blank Authorization”, however, if you want to create an authorization based off of “A Template” or “An Existing Authorization” you can select those options using the drop down box
5. Submit Bar – Save or Submit your authorizations using these options. It is a good idea to occasionally hit “Save for Later” to save your progress
Creating Travel Authorizations
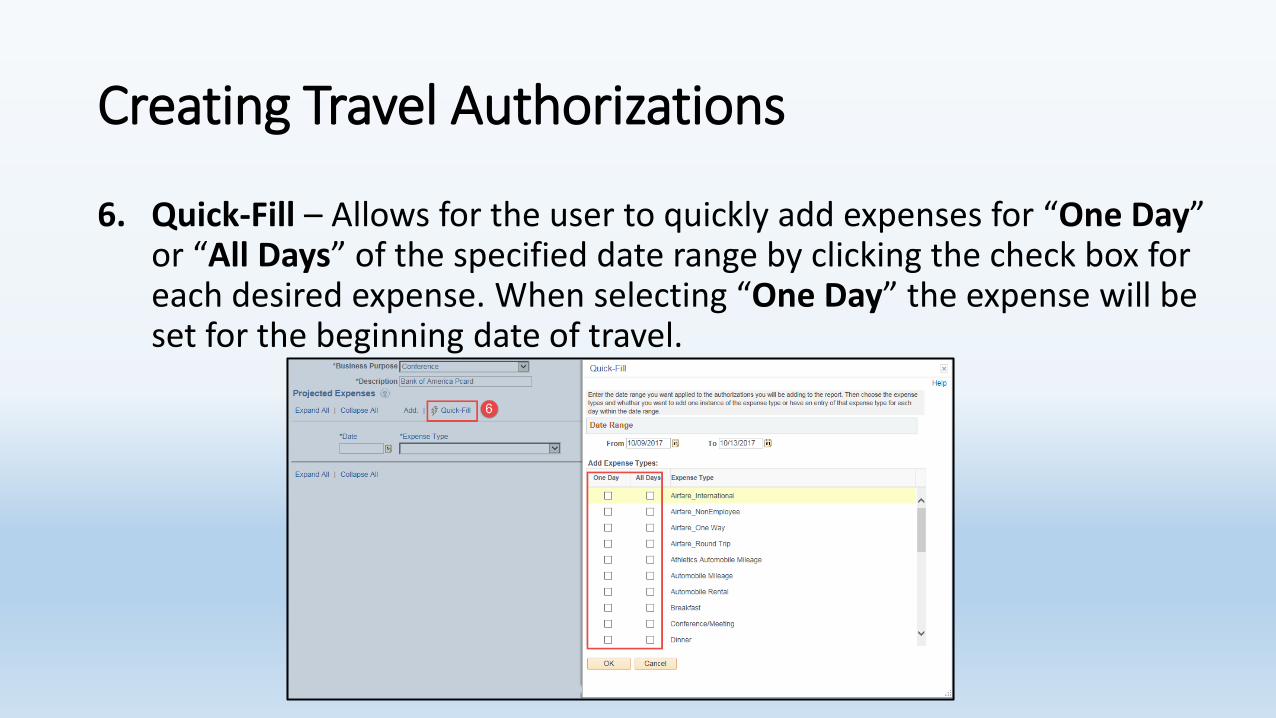
6. Quick-Fill – Allows for the user to quickly add expenses for “One Day” or “All Days” of the specified date range by clicking the check box for each desired expense. When selecting “One Day” the expense will be set for the beginning date of travel.
Creating Travel Authorizations
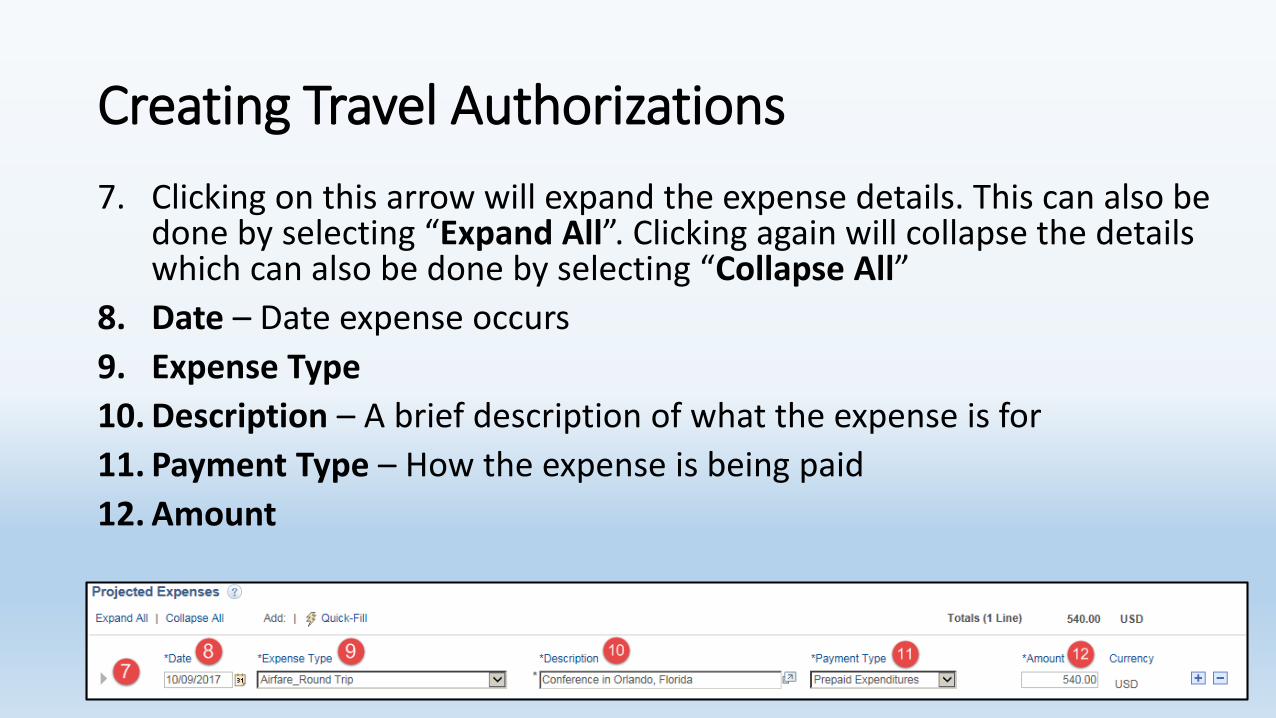
7. Clicking on this arrow will expand the expense details. This can also be done by selecting “Expand All”. Clicking again will collapse the details which can also be done by selecting “Collapse All”
8. Date – Date expense occurs
9. Expense Type
10. Description – A brief description of what the expense is for
11. Payment Type – How the expense is being paid
12. Amount
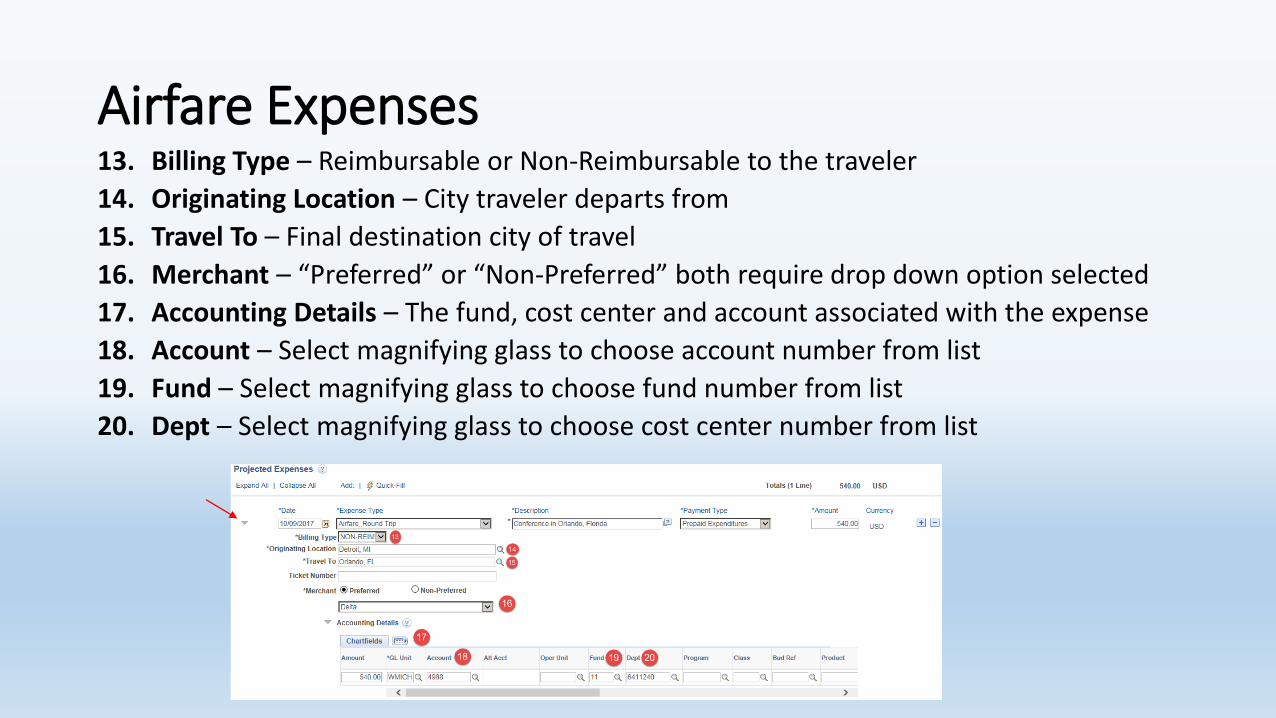
Airfare Expenses13. Billing Type – Reimbursable or Non-Reimbursable to the traveler
14. Originating Location – City traveler departs from
15. Travel To – Final destination city of travel
16. Merchant – “Preferred” or “Non-Preferred” both require drop down option selected
17. Accounting Details – The fund, cost center and account associated with the expense
18. Account – Select magnifying glass to choose account number from list
19. Fund – Select magnifying glass to choose fund number from list
20. Dept – Select magnifying glass to choose cost center number from list
Creating Travel Authorizations
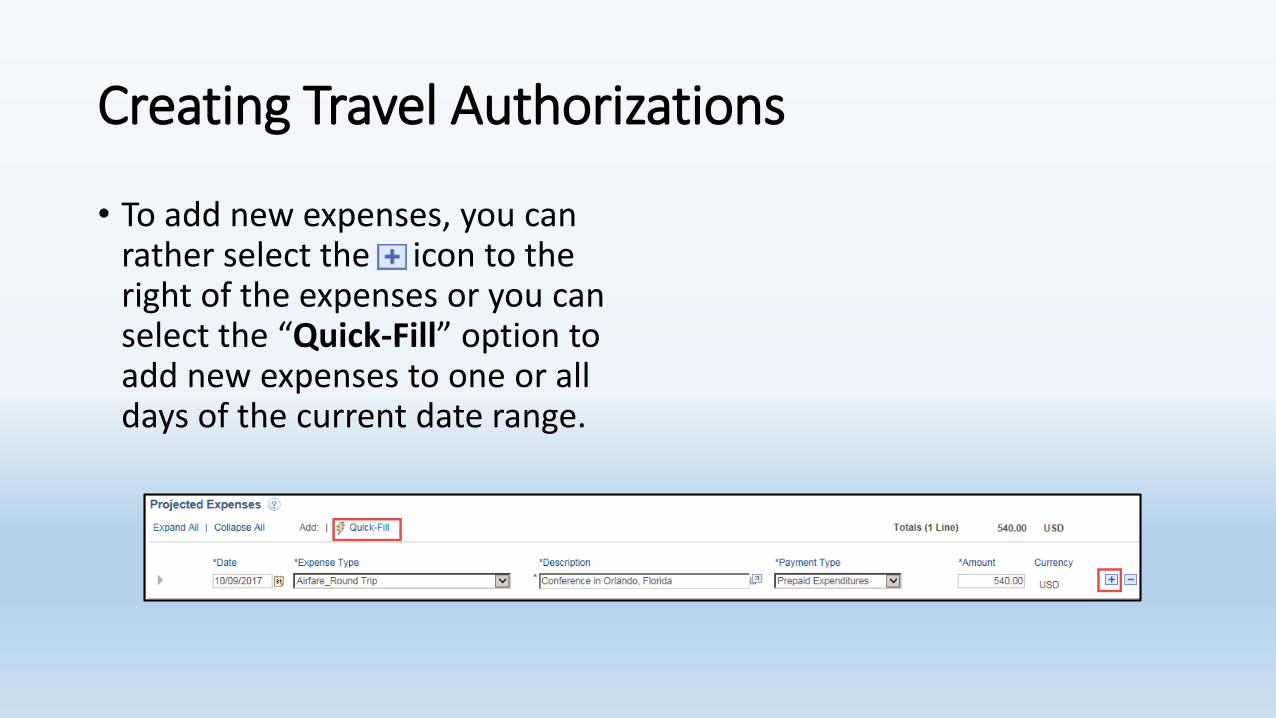
• To add new expenses, you can rather select the icon to the right of the expenses or you can select the “Quick-Fill” option to add new expenses to one or all days of the current date range.
Hotel Expenses
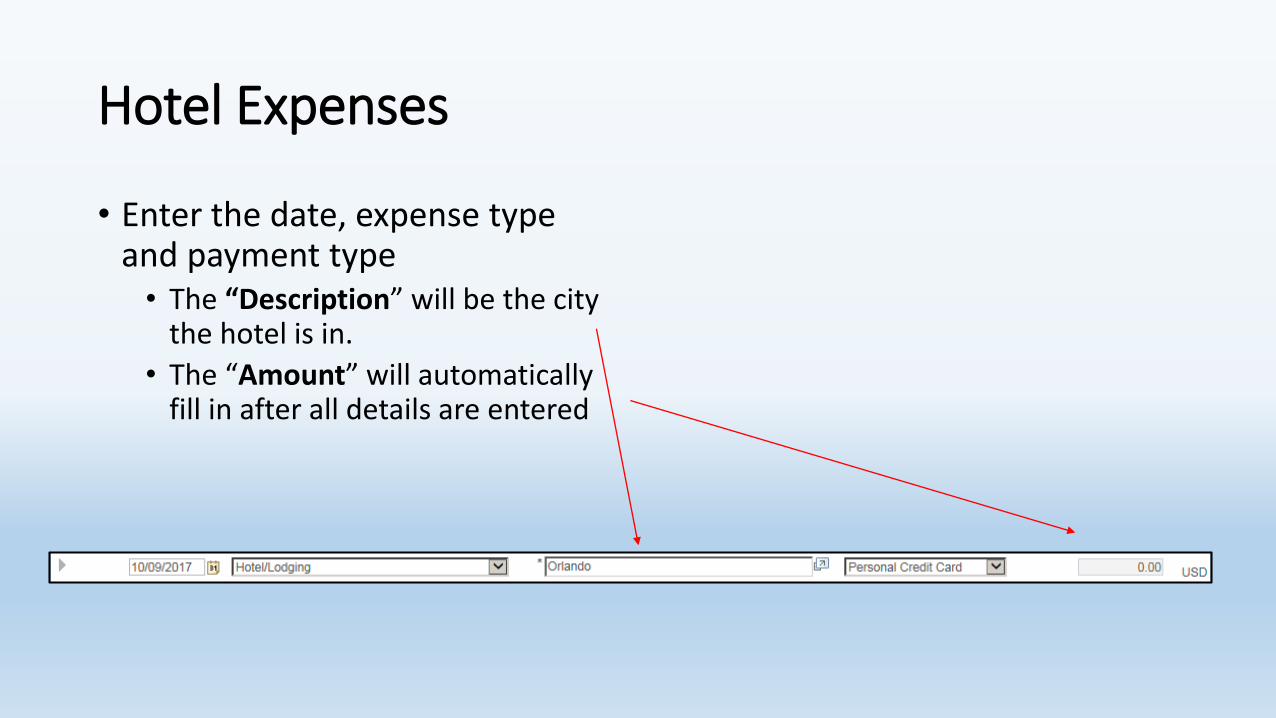
• Enter the date, expense type and payment type• The “Description” will be the city
the hotel is in.
• The “Amount” will automatically fill in after all details are entered
Hotel Expenses
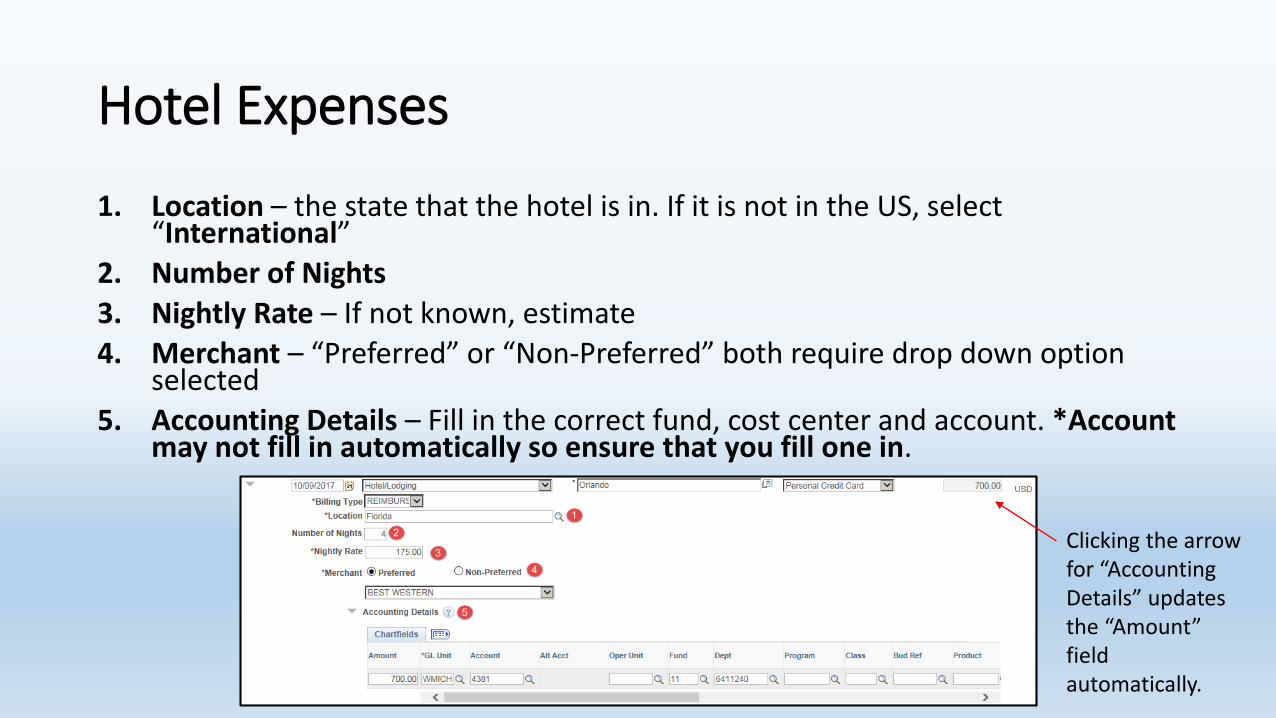
1. Location – the state that the hotel is in. If it is not in the US, select “International”
2. Number of Nights
3. Nightly Rate – If not known, estimate
4. Merchant – “Preferred” or “Non-Preferred” both require drop down option selected
5. Accounting Details – Fill in the correct fund, cost center and account. *Account may not fill in automatically so ensure that you fill one in.
Clicking the arrow for “Accounting Details” updates the “Amount” field automatically.
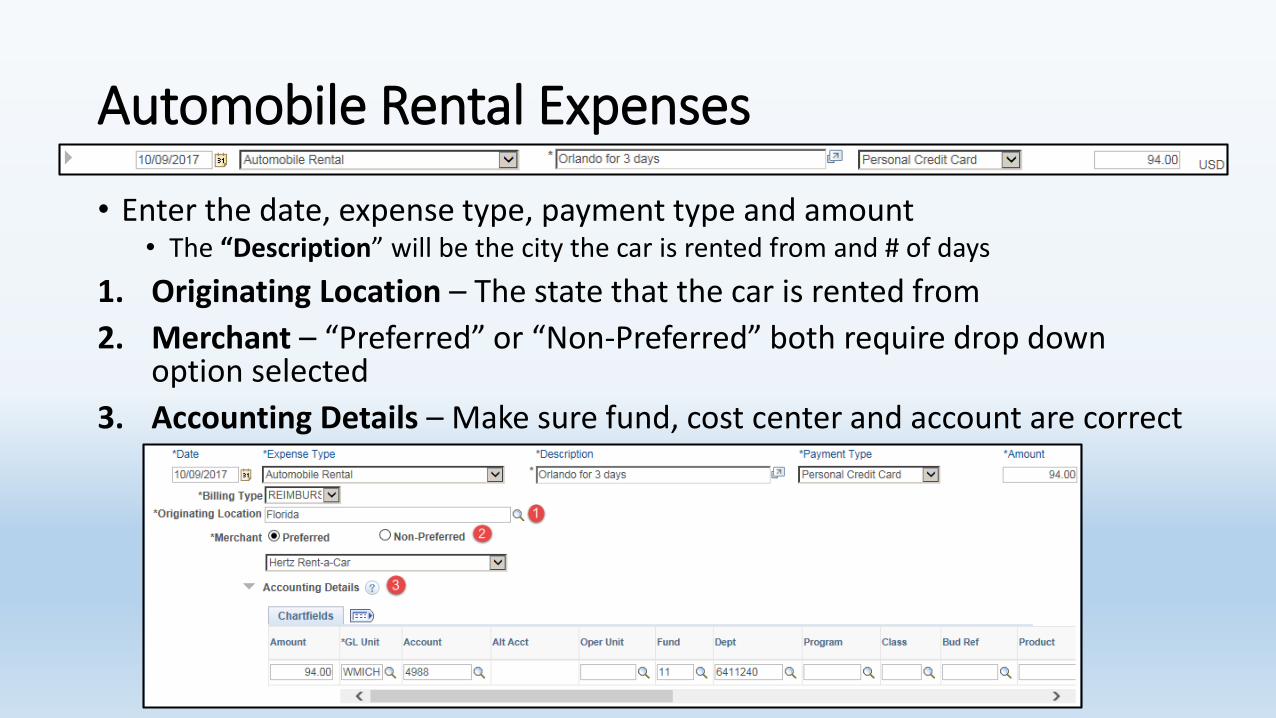
Automobile Rental Expenses
• Enter the date, expense type, payment type and amount• The “Description” will be the city the car is rented from and # of days
1. Originating Location – The state that the car is rented from
2. Merchant – “Preferred” or “Non-Preferred” both require drop down option selected
3. Accounting Details – Make sure fund, cost center and account are correct
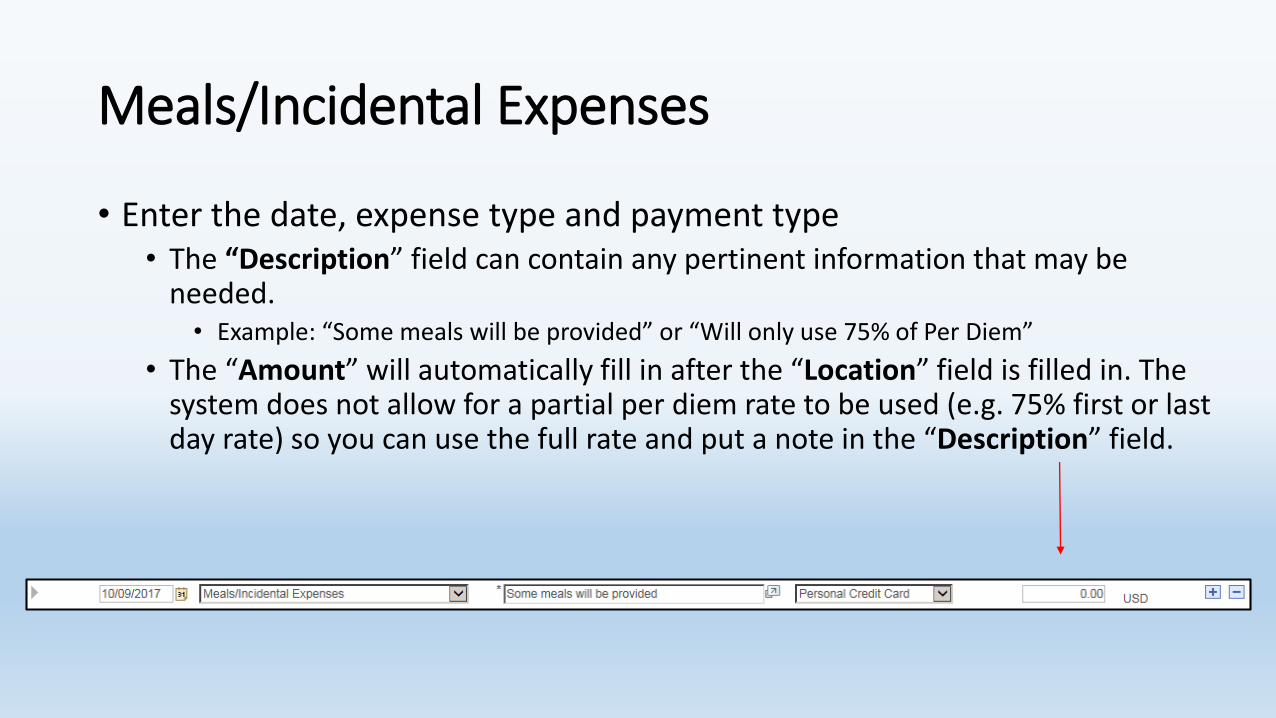
Meals/Incidental Expenses
• Enter the date, expense type and payment type• The “Description” field can contain any pertinent information that may be
needed. • Example: “Some meals will be provided” or “Will only use 75% of Per Diem”
• The “Amount” will automatically fill in after the “Location” field is filled in. The system does not allow for a partial per diem rate to be used (e.g. 75% first or last day rate) so you can use the full rate and put a note in the “Description” field.
Meals/Incidental Expenses
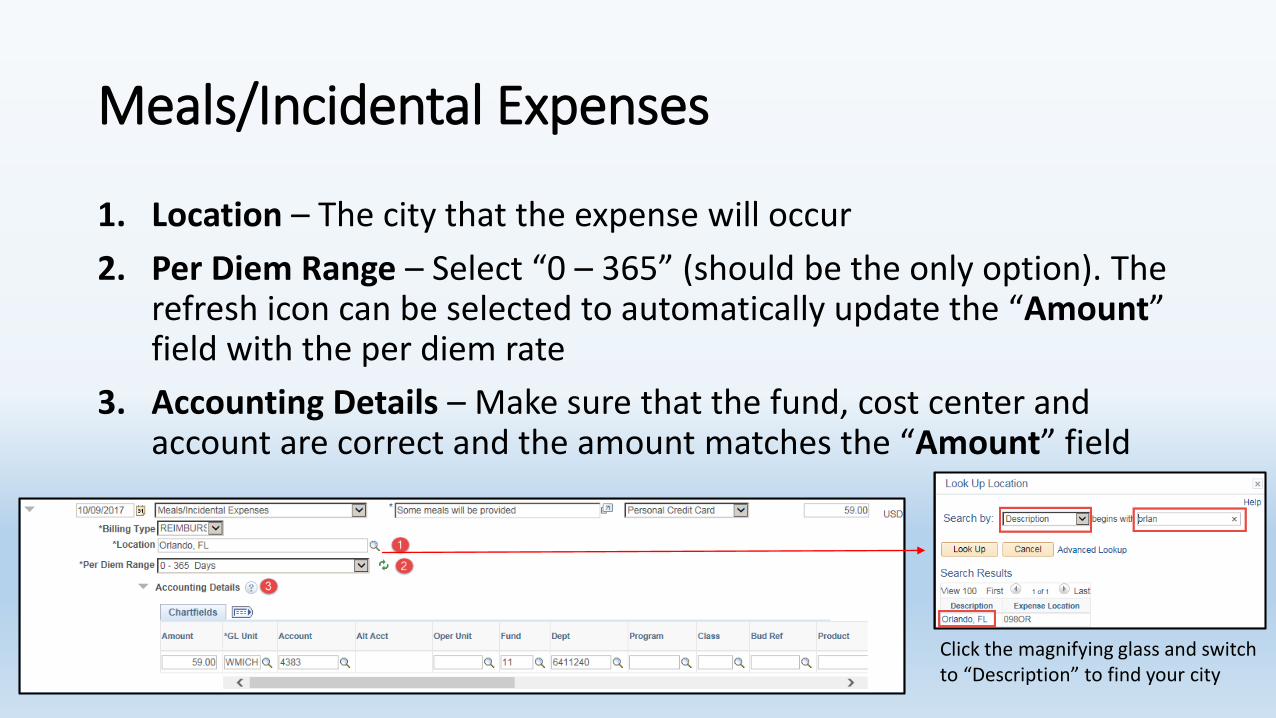
1. Location – The city that the expense will occur
2. Per Diem Range – Select “0 – 365” (should be the only option). The refresh icon can be selected to automatically update the “Amount” field with the per diem rate
3. Accounting Details – Make sure that the fund, cost center and account are correct and the amount matches the “Amount” field
Click the magnifying glass and switch to “Description” to find your city
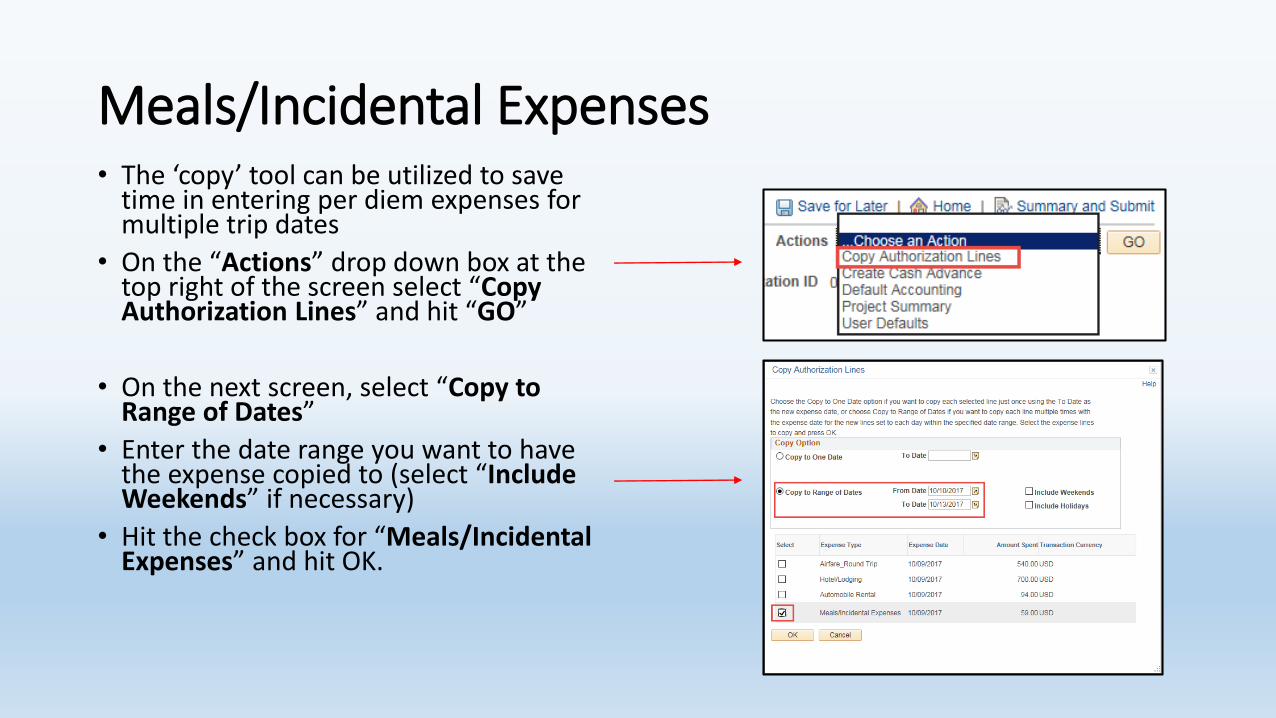
Meals/Incidental Expenses• The ‘copy’ tool can be utilized to save
time in entering per diem expenses for multiple trip dates
• On the “Actions” drop down box at the top right of the screen select “Copy Authorization Lines” and hit “GO”
• On the next screen, select “Copy to Range of Dates”
• Enter the date range you want to have the expense copied to (select “Include Weekends” if necessary)
• Hit the check box for “Meals/Incidental Expenses” and hit OK.
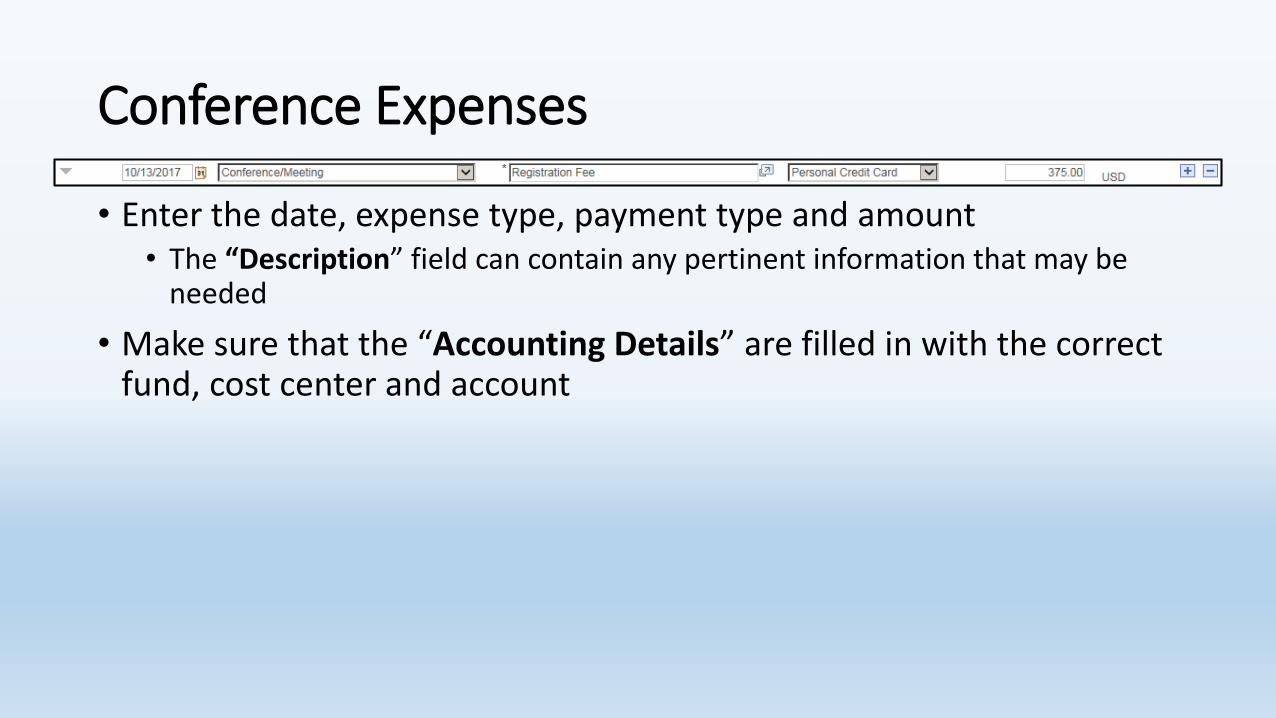
Conference Expenses
• Enter the date, expense type, payment type and amount• The “Description” field can contain any pertinent information that may be
needed
• Make sure that the “Accounting Details” are filled in with the correct fund, cost center and account
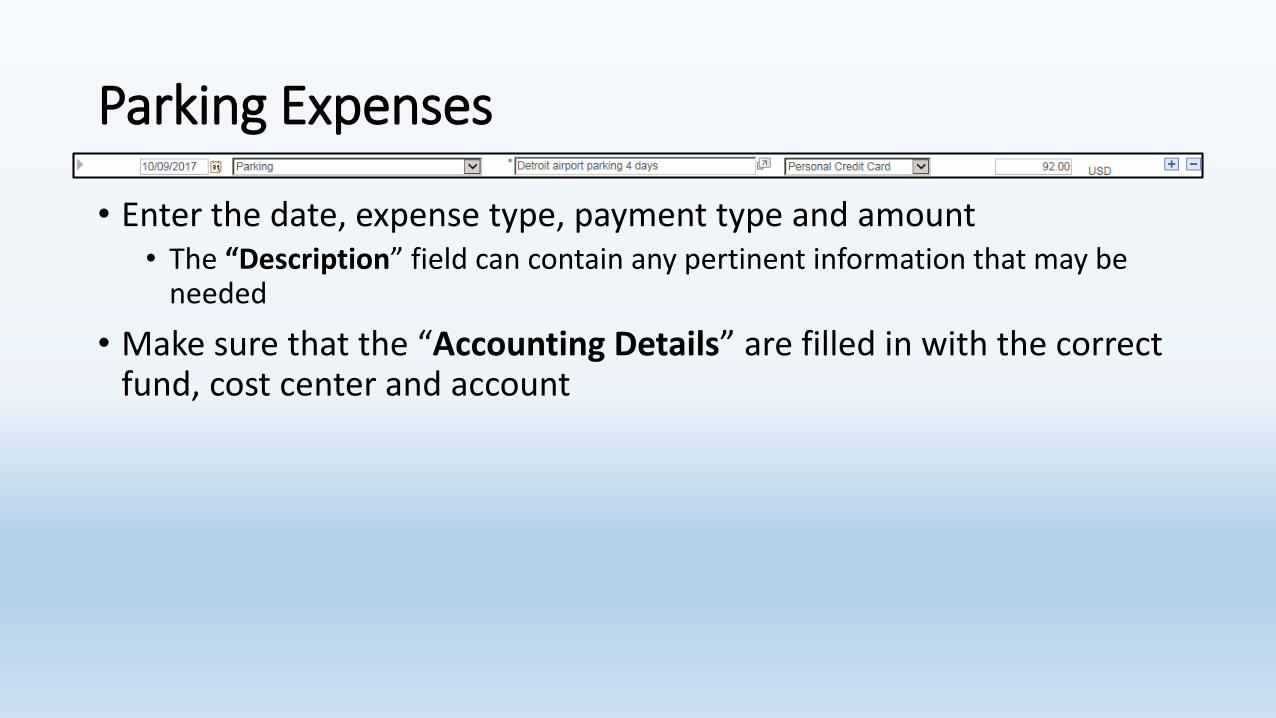
Parking Expenses
• Enter the date, expense type, payment type and amount• The “Description” field can contain any pertinent information that may be
needed
• Make sure that the “Accounting Details” are filled in with the correct fund, cost center and account
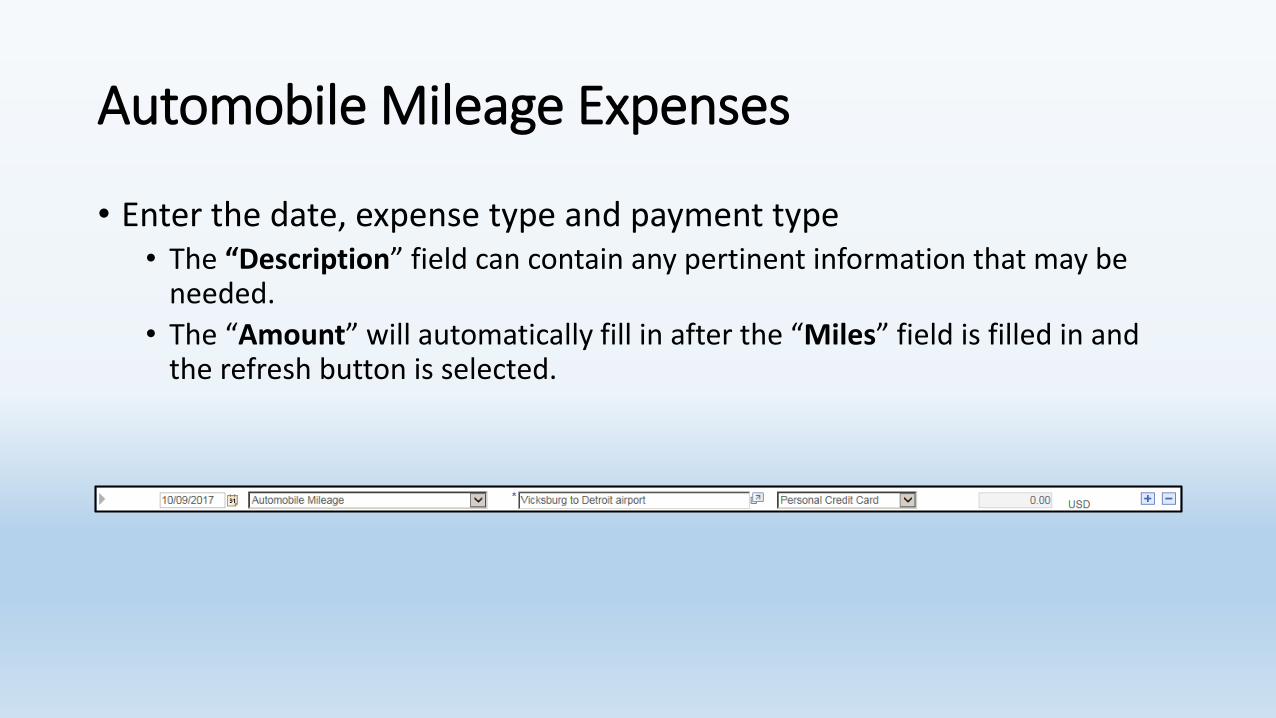
Automobile Mileage Expenses
• Enter the date, expense type and payment type• The “Description” field can contain any pertinent information that may be
needed.
• The “Amount” will automatically fill in after the “Miles” field is filled in and the refresh button is selected.
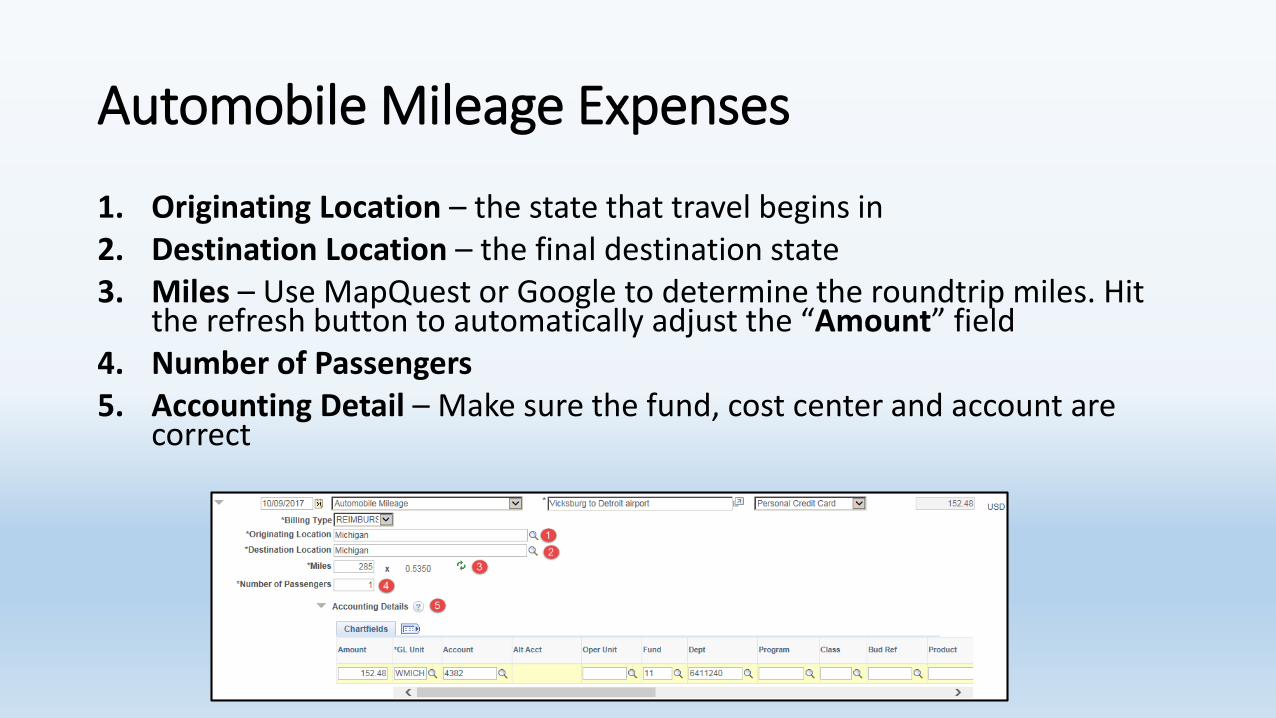
Automobile Mileage Expenses
1. Originating Location – the state that travel begins in2. Destination Location – the final destination state3. Miles – Use MapQuest or Google to determine the roundtrip miles. Hit
the refresh button to automatically adjust the “Amount” field4. Number of Passengers5. Accounting Detail – Make sure the fund, cost center and account are
correct

Submitting the Travel Authorization
• When all expenses have been entered, make sure to hit the “Save for Later” button to save your progress. By hitting this button or the “Summary and Submit” button, the system will assign an Authorization ID number to the authorization. This number will need to be referenced when booking travel with the travel agent.
• If there are any errors in the travel authorization, a red flag icon will pop up next to the expense(s) that contains errors. Make sure to check that all accounting detail information is correct, the location fields have valid options selected and that you didn’t miss a mandatory (*) field.
• Once all errors have been fixed, hit the “Summary and Submit” button.
The system will identify the fields that contain errors once you click away from the expense

Submitting the Travel Authorization
1. Travel Authorization Details – select this option to return to edit the authorization expense details
2. Notes – Selecting this option allows the traveler to add additional notes for review. This option is to be used in the same capacity that the “Comments” box was used in the previous version.
3. When the authorization is ready to be submitted, check the box and hit the “Submit Travel Authorization” button. Hit “OK” on the confirmation screen and the authorization will begin the workflow
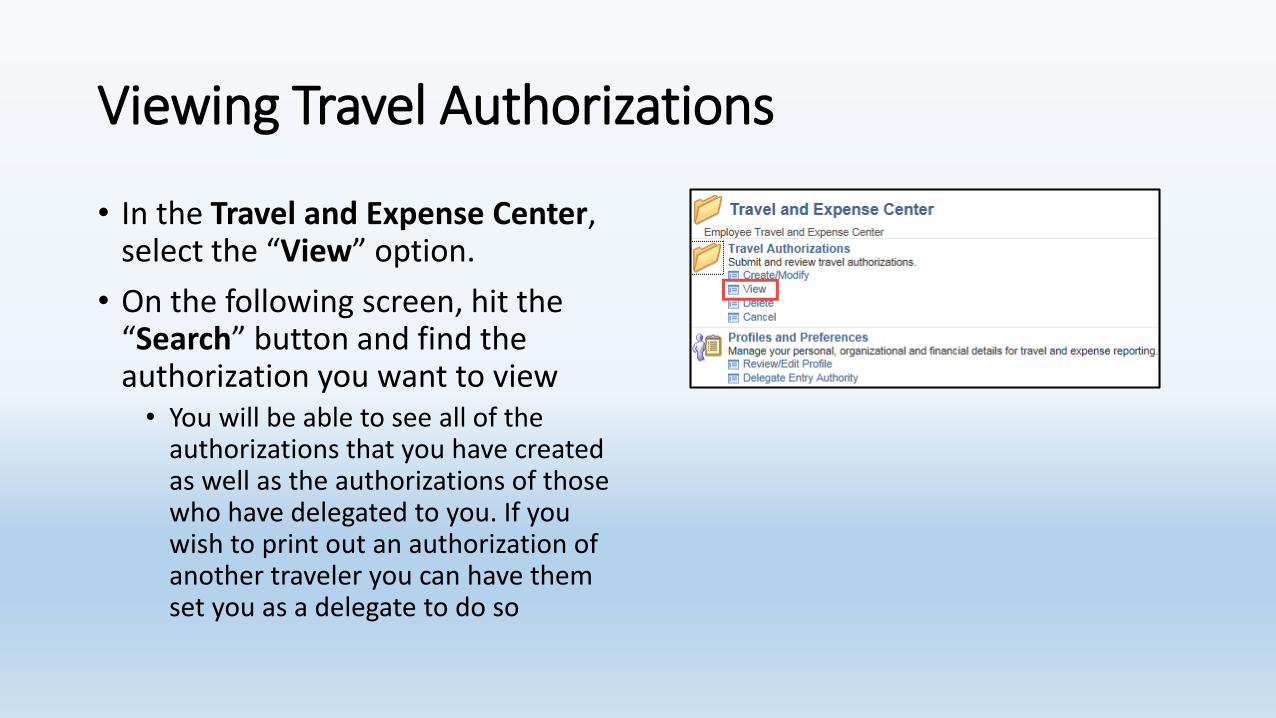
Viewing Travel Authorizations
• In the Travel and Expense Center, select the “View” option.
• On the following screen, hit the “Search” button and find the authorization you want to view• You will be able to see all of the
authorizations that you have created as well as the authorizations of those who have delegated to you. If you wish to print out an authorization of another traveler you can have them set you as a delegate to do so
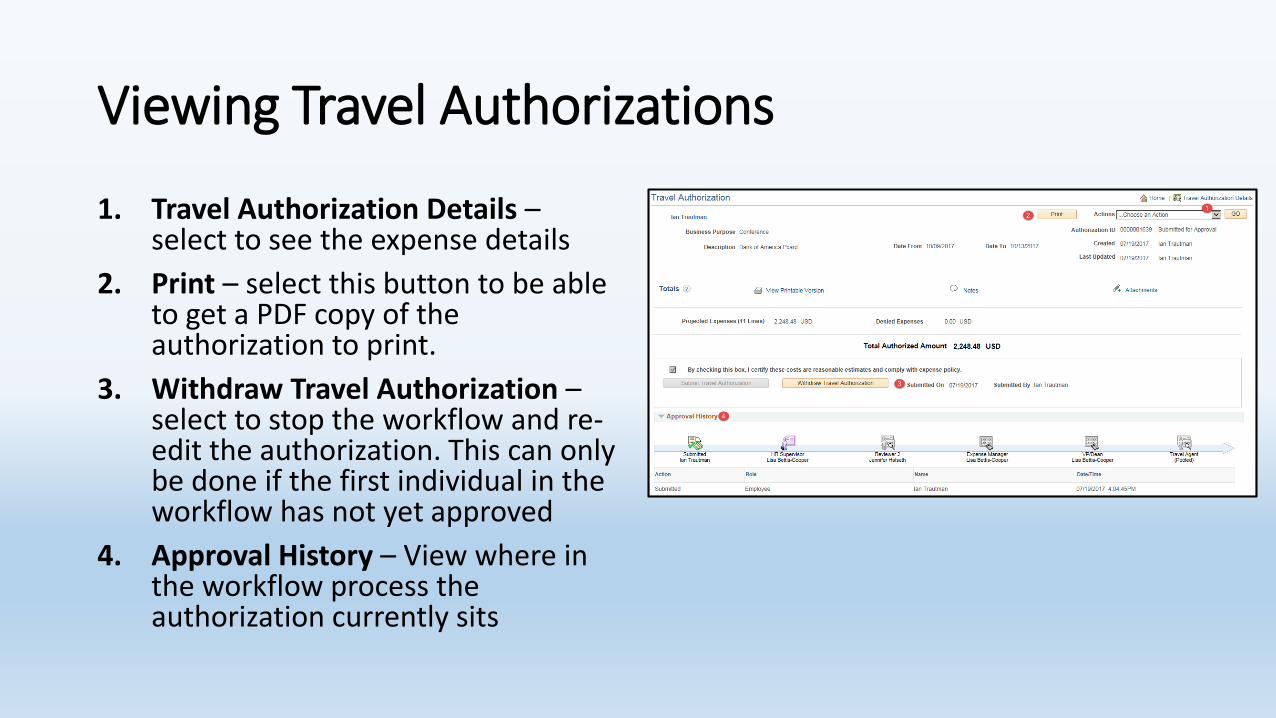
Viewing Travel Authorizations
1. Travel Authorization Details –select to see the expense details
2. Print – select this button to be able to get a PDF copy of the authorization to print.
3. Withdraw Travel Authorization –select to stop the workflow and re-edit the authorization. This can only be done if the first individual in the workflow has not yet approved
4. Approval History – View where in the workflow process the authorization currently sits