Welcome, foolish mortal, to The Phantom Manor Paper Model Kit! · PDF fileWelcome, foolish...
31
Welcome, foolish mortal, to The Phantom Manor Paper Model Kit! Ray Keim, at Haunted Dimensions, has created this free project solely for entertainment. It is not to be repackaged or resold. KEEP IT FREE! When completed, the model is approximately 12 inches (30 cm) high, 11 inches (27.5 cm) wide and 13 inches (33.5 cm) deep. Much time and effort has gone into the creation of this model of the Phantom Manor. The architectural, and artistic details are extremely accurate, however some artistic license was taken, in order to translate the mansion to paper. Please note that this project is not recommended for children. It requires a moderate degree of skill, and the use of an X-acto blade, which is extremely dangerous. I HIGHLY recommend wearing protective eyewear when using an X-acto blade! Tips can snap and fly! When printing the model, be sure that your printer is set to print at 100%. Each sheet has a logo, and page number graphic, which can be compared with other sheets, to ensure that all of your pieces are printed at a uniform size. Color printing is recommended. There are many pages to print, so be sure you have enough paper and ink! This model was designed to be printed on EPSON Matte Paper Heavyweight. Using plain paper is not recommended. The files are in .pdf format, so you will need a computer with Adobe Acrobat Reader installed. I recommend using white glue, and applying it with a toothpick. Don’t use too much glue! Needle-nose tweezers are also very useful. Become acquainted with the various pieces, and study the directions before you begin. The text instructions that accompany the illustra- tions are limited, so you will need a keen eye and a good sense of spatial orientation to assemble the Phantom Manor. There are many folds in the model, and it is recommended that you score the fold first, using a dull X-acto, or other fine, blunt tipped instrument. Black dashed lines represent a mountain fold (a fold which point upward), and orange dashed lines represent a valley fold (the fold points downward). The orange dashed lines are accompanied by a red “+” at each end. These are to be used as pin guides to poke small holes at the “+” , flip the sheet over, and score between the holes for a clean valley fold. To avoid confusion, after cutting out a part, lightly write the part numbers on the back with a pencil. I created this model for my own enjoyment, but choose to share it with others. By downloading this model, you agree that the success of the final product is primarily determined by the patience and skill of the builder. Have fun building your Phantom Manor, and good luck! Bonne Chance! There’s no turning back now! http://www.haunteddimensions.raykeim.com/
Transcript of Welcome, foolish mortal, to The Phantom Manor Paper Model Kit! · PDF fileWelcome, foolish...

Welcome, foolish mortal, to The Phantom Manor Paper Model Kit!Ray Keim, at Haunted Dimensions, has created this free project solely for entertainment.
It is not to be repackaged or resold.
KEEP IT FREE!
When completed, the model is approximately 12 inches (30 cm) high, 11 inches (27.5 cm) wide and 13 inches (33.5 cm) deep.
Much time and effort has gone into the creation of this model of the Phantom Manor. The architectural, and artistic details are extremely accurate, however some artistic license was taken, in order to translate the mansion to paper.
Please note that this project is not recommended for children. It requires a moderate degree of skill, and the use of an X-acto blade, which is extremely dangerous. I HIGHLY recommend wearing protective eyewear when using an X-acto blade! Tips can snap and fly!
When printing the model, be sure that your printer is set to print at 100%. Each sheet has a logo, and page number graphic, which can be compared with other sheets, to ensure that all of your pieces are printed at a uniform size. Color printing is recommended.
There are many pages to print, so be sure you have enough paper and ink! This model was designed to be printed on EPSON Matte Paper
Heavyweight. Using plain paper is not recommended.
The files are in .pdf format, so you will need a computer with Adobe Acrobat Reader installed.
I recommend using white glue, and applying it with a toothpick. Don’t use too much glue! Needle-nose tweezers are also very useful.
Become acquainted with the various pieces, and study the directions before you begin. The text instructions that accompany the illustra-tions are limited, so you will need a keen eye and a good sense of spatial orientation to assemble the Phantom Manor.
There are many folds in the model, and it is recommended that you score the fold first, using a dull X-acto, or other fine, blunt tipped instrument. Black dashed lines represent a mountain fold (a fold which point upward), and orange dashed lines represent a valley fold (the
fold points downward). The orange dashed lines are accompanied by a red “+” at each end. These are to be used as pin guides to poke small
holes at the “+”, flip the sheet over, and score between the holes for a clean valley fold.
To avoid confusion, after cutting out a part, lightly write the part numbers on the back with a pencil.
I created this model for my own enjoyment, but choose to share it with others. By downloading this model, you agree that the success of the final product is primarily determined by the patience and skill of the builder.
Have fun building your Phantom Manor, and good luck!Bonne Chance!
There’s no turning back now!http://www.haunteddimensions.raykeim.com/

Do
no
t re
pac
kag
e o
r res
ell
© R
ay K
eim
200
8
PAGE
A
1 of 7A free project from http://www.haunteddimensions.raykeim.com
To make a valley folduse a pin to poke a holeat each red +
Fold indicators: = mountain fold (points to you)
= valley fold (points away from you)
Score and assemble the mansion walls. Be sure to cut all slots wide enoughto allow easy tab insertions (a single cut may not be wide enough).
If you choose to cut out the windows, be sure to attach the second floor shutters BEFORE gluing the window inserts.
1st - Attach Shutters 2nd - Attach OptionalWindow Inserts
14ATower

Do
no
t re
pac
kag
e o
r res
ell
© R
ay K
eim
200
8
PAGE
B
2 of 7A free project from http://www.haunteddimensions.raykeim.com
Attach top and bottom supports.6A (top) and 5A (bottom)
Glue close to edges.
6ATop
5ABottom
8AFront Porch Floor
7ALeft Side Porch Floor
15DRear Walkway
8ARear Walk & Steps

Do
no
t re
pac
kag
e o
r res
ell
© R
ay K
eim
200
8
PAGE
C
3 of 7A free project from http://www.haunteddimensions.raykeim.com
19HRight Side Steps
15CFront Left Steps
15CFront Left Steps
15BFront Right Steps
15BFront Right Steps
20DRear Corner Steps
15AFront Center Steps
15AFront Cenyer Steps
10BFront Steps Wall
10BFront Steps Wall
10DLeft Front Steps Wall
10DLeft Front Steps Wall
10CRight Front Steps Wall
10CRight Front Steps Wall
10ERight Side Steps Wall
7ALeft Side Porch Floor
15DRear Walkway
10FFront Tower Balcony
Middle Slot
Attach 7A first, then attach8A and 15D.
8AFront Porch Floor

Do
no
t re
pac
kag
e o
r res
ell
© R
ay K
eim
200
8
PAGE
D
4 of 7A free project from http://www.haunteddimensions.raykeim.com
9ARight Side Porch
16ARear Walk and Steps
20DRear Corner Steps
9BRear Shed
10ERight Side Steps Wall
11CRight Side Balcony
14CRight Side Balcony Pillars
11DRight Side Balcony Roof
19HRight Side Steps
14BRight Side Porch Pillars

Do
no
t re
pac
kag
e o
r res
ell
© R
ay K
eim
200
8
PAGE
E
5 of 7A free project from http://www.haunteddimensions.raykeim.com
13BFront Porch Roof
17BSupport Strut 17A
Main Roof
17AMain Roof
18C
18C
18A
18B
18D
18D
Bend roof side piecesbefore attaching to 17A
Attach all roof sides using tabs as shown.
Glue support 17Bacross 17A as shown
12APorch Pillars
11BFront Porch Pillars
11AFront Porch Pillars
13AFront Porch Roof
Do
no
t re
pac
kag
e o
r res
ell
© R
ay K
eim
200
8
PAGE
F
6 of 7A free project from http://www.haunteddimensions.raykeim.com
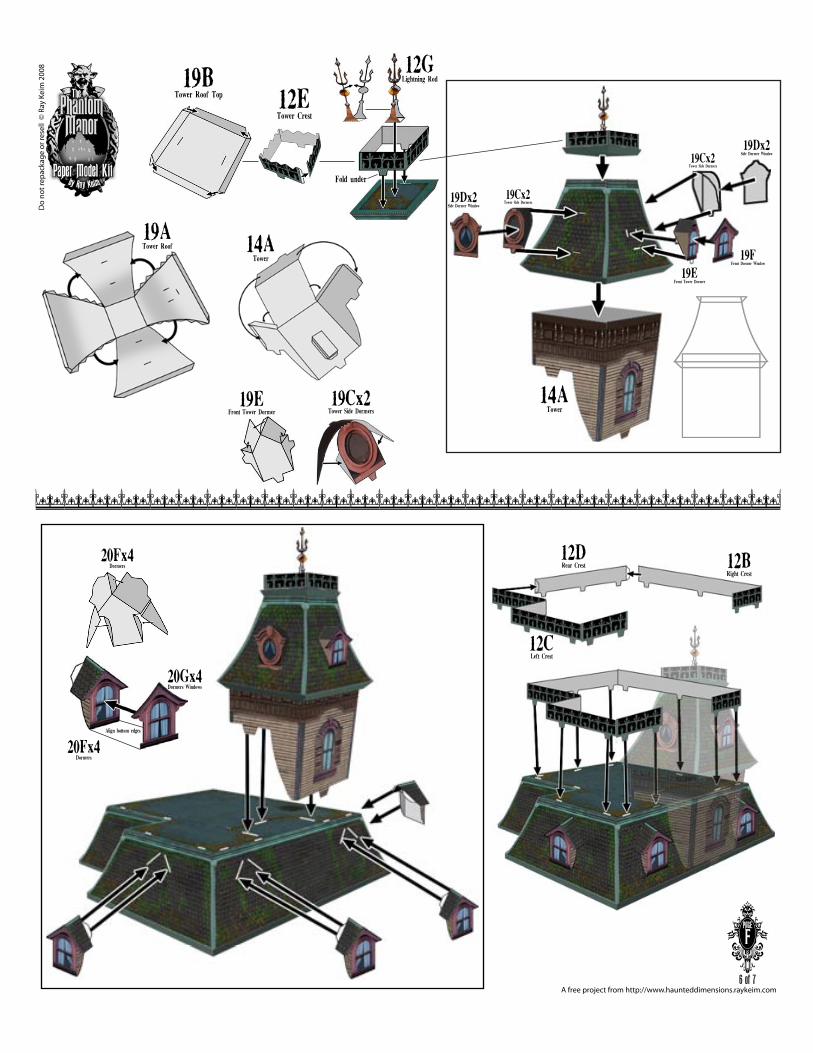
19ATower Roof 14A
Tower
14ATower
12GLightning Rod19B
Tower Roof Top
20Fx4Dormers
20Fx4Dormers
20Gx4Dormers Windows
Align bottom edges
19EFront Tower Dormer
12DRear Crest 12B
Right Crest
12CLeft Crest
19EFront Tower Dormer
19FFront Dormer Window
19Dx2Side Dormer Window
19Dx2Side Dormer Window
19Cx2Tower Side Dormers
19Cx2Tower Side Dormers
19Cx2Tower Side Dormers
12ETower Crest
Fold under

20BThin Chimney
Top View
20BThin Chimney
20BThin Chimney
20CFat Chimney
20CFat Chimney
20CFat Chimney
20AShort Chimney
20AShort Chimney
20AShort Chimney
13CPorch Roof Rail 13D
Front Porch Roof Rail
12FFront Tower Balcony Rail
Rear slot Front slot
Congratulations!Welcome to your Phantom Manor!
Bienvenuea votre Phantom Manor!
Do
no
t re
pac
kag
e o
r res
ell
© R
ay K
eim
200
8
PAGE
G
7 of 7A free project from http://www.haunteddimensions.raykeim.com

PAGE
1
of 23A free project from http://www.haunteddimensions.raykeim.com
Do
no
t re
pac
kag
e o
r res
ell
© R
ay K
eim
200
8
<slot
<slot
<slot
<slots
slot>
slot>
slot>
slots>
slot>
Glue to 3A
1AFront Wall
1Bx4Shutters

PAGE
2
of 23A free project from http://www.haunteddimensions.raykeim.com
Do
no
t re
pac
kag
e o
r res
ell
© R
ay K
eim
200
8
<slot
<slot<slot
<slot
<slot
<slot
<slot
<slots
2ALeft Wall
Glue to 4A
Glue to 1A
1Bx6Shutters

PAGE
3
of 23A free project from http://www.haunteddimensions.raykeim.com
Do
no
t re
pac
kag
e o
r res
ell
© R
ay K
eim
200
8
<slots
<slot
<slots
3ARight W
all
Glue to 4A

PAGE
4
of 23A free project from http://www.haunteddimensions.raykeim.com
Do
no
t re
pac
kag
e o
r res
ell
© R
ay K
eim
200
8
slot>
slot>
4ARearW
all

PAGE
5
of 23A free project from http://www.haunteddimensions.raykeim.com
Do
no
t re
pac
kag
e o
r res
ell
© R
ay K
eim
200
8
5ABottom

PAGE
6
of 23A free project from http://www.haunteddimensions.raykeim.com
Do
no
t re
pac
kag
e o
r res
ell
© R
ay K
eim
200
8
6ATop

PAGE
7
of 23A free project from http://www.haunteddimensions.raykeim.com
Do
no
t re
pac
kag
e o
r res
ell
© R
ay K
eim
200
8
slot>
slot>
slot>
slot>
>> cut
7ALeft Side Porch Floor

PAGE
8
of 23A free project from http://www.haunteddimensions.raykeim.com
Do
no
t re
pac
kag
e o
r res
ell
© R
ay K
eim
200
8
<slot
<slot
<slot
<slot
8AFront Porch Floor

PAGE
9
of 23A free project from http://www.haunteddimensions.raykeim.com
Do
no
t re
pac
kag
e o
r res
ell
© R
ay K
eim
200
8
slot>
slot> 9ARight Side Porch
9BRear Shed

PAGE
10
of 22A free project from http://www.haunteddimensions.raykeim.com
Do
no
t re
pac
kag
e o
r res
ell
© R
ay K
eim
200
8
<slots
<slot
10AFront Tower
10BFront Steps Wall
10DLeft Front Steps Wall
10CRight Front Steps Wall
10ERight Side Steps Wall
10FFront Tower Balcony

PAGE
11
of 23A free project from http://www.haunteddimensions.raykeim.com
Do
no
t re
pac
kag
e o
r res
ell
© R
ay K
eim
200
8
slot>
slot>
11AFront Porch Pillars
11BFront Porch Pillars
11CRight Side Balcony
11DRight Side Balcony Roof

PAGE
12
of 23A free project from http://www.haunteddimensions.raykeim.com
Do
no
t re
pac
kag
e o
r res
ell
© R
ay K
eim
200
8
12APorch Pillars
12ETower Crest
12DRear Crest
12BRight Crest
12CLeft Crest
12FFront Tower Balcony Rail
For Transparency versionsee page 21

PAGE
13
of 23A free project from http://www.haunteddimensions.raykeim.com
Do
no
t re
pac
kag
e o
r res
ell
© R
ay K
eim
200
8
13AFront Porch Roof
13BFront Porch Roof
13CPorch Roof Rail
13DFront Porch Roof Rail
Glue to
13A
For Transparency versionsof rails, see page 22

PAGE
14
of 23 A free project from http://www.haunteddimensions.raykeim.com
Do
no
t re
pac
kag
e o
r res
ell
© R
ay K
eim
200
8
<slots
For Transparency versionsof pillars, see page 22
For Transparency versionsof pillars, see page 22
14ATower
14BRight Side Porch Pillars
14CRight Side Balcony Pillars
1BShutters

PAGE
15
of 23A free project from http://www.haunteddimensions.raykeim.com
Do
no
t re
pac
kag
e o
r res
ell
© R
ay K
eim
200
8
15AFront Center Steps
15BFront Right Steps
15CFront Left Steps
15DRear Walkway

PAGE
16
of 23A free project from http://www.haunteddimensions.raykeim.com
Do
no
t re
pac
kag
e o
r res
ell
© R
ay K
eim
200
8
<slot
<slot
16ARear Walk and Steps

PAGE
17
of 23
A free project from http://www.haunteddimensions.raykeim.com
Do
no
t re
pac
kag
e o
r res
ell
© R
ay K
eim
200
8
<slots
<slots
<slots
<slot
<slot
<slot
<slot
<slot
<slot
<slots
17AMain Roof
17B Support Strut

PAGE
18
of 23A free project from http://www.haunteddimensions.raykeim.com
Do
no
t re
pac
kag
e o
r res
ell
© R
ay K
eim
200
8
<slo
t
<slo
t
<slo
t
<slo
t
<slo
t
18ARight Side Roof
18BRear Roof
18DLeft Side Roof
18C

PAGE
19
of 23A free project from http://www.haunteddimensions.raykeim.com
Do
no
t re
pac
kag
e o
r res
ell
© R
ay K
eim
200
8
<slot
<slot
<slot
<slots
<slo
t
<slo
t
<slo
t<slo
t
19ATower Roof
19BTower Roof Top
12GLightning Rod
19Cx2Tower Side Dormers
19EFront Tower Dormer
19HRight Side Steps
19Dx2Tower Dormer Windows
19FTower Dormer Window

PAGE
20
of 23A free project from http://www.haunteddimensions.raykeim.com
Do
no
t re
pac
kag
e o
r res
ell
© R
ay K
eim
200
8
20AShort Chimney
20BThin Chimney
20CFat Chimney
20DRear Corner Steps
20Fx4Dormers
20Gx4Dormer Windows
PAGE
21
of 23A free project from http://www.haunteddimensions.raykeim.com
Do
no
t re
pac
kag
e o
r res
ell
© R
ay K
eim
200
8
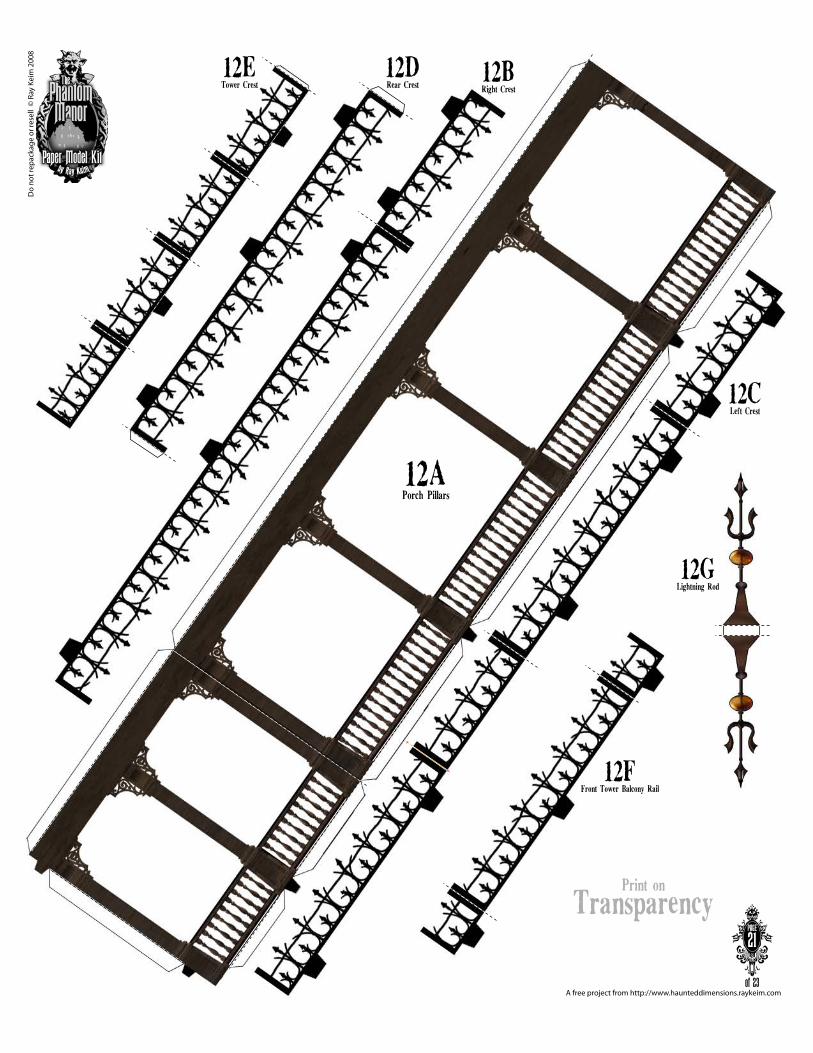
12APorch Pillars
12ETower Crest
12DRear Crest
12BRight Crest
12CLeft Crest
12GLightning Rod
12FFront Tower Balcony Rail
Print on
Transparency

PAGE
22
of 23A free project from http://www.haunteddimensions.raykeim.com
Do
no
t re
pac
kag
e o
r res
ell
© R
ay K
eim
200
8
13CPorch Roof Rail
13DFront Porch Roof Rail
Print on
Transparency
14CRight Side Balcony Pillars
14BRight Side Porch Pillars
11AFront Porch Pillars
11BFront Porch Pillars

PAGE
23
of 23A free project from http://www.haunteddimensions.raykeim.com
Do
no
t re
pac
kag
e o
r res
ell
© R
ay K
eim
200
8
23Ax12Optional Window Inserts
23BOptional Window Insert
for wall 3A
23COptional Window Insert
Tower
23DOptional Window Insert
Tower
23DOptional Window Insert
Tower