Webmaker for Android
90
-
Upload
umesh-agarwal -
Category
Education
-
view
556 -
download
0
Transcript of Webmaker for Android


Mozilla’s efforts to empower Web users around the globe are taking an exciting step forward: we’re debuting Webmaker for Android in the Google Play Store.
The app makes creating original content in your local language simple — you can drag, drop and personalize photos, text and more to build unique projects like interactive scrapbooks, comic strips, games and memes.
You can download the beta version for free at mzl.la/webmaker.
Know more about it here.
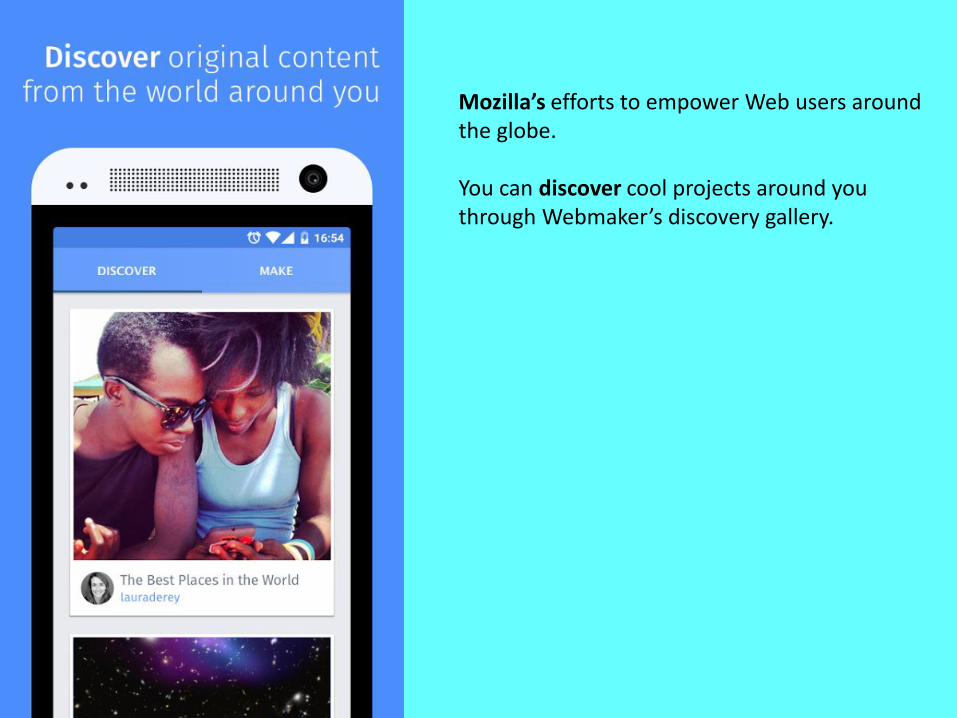
Mozilla’s efforts to empower Web users around the globe.
You can discover cool projects around you through Webmaker’s discovery gallery.
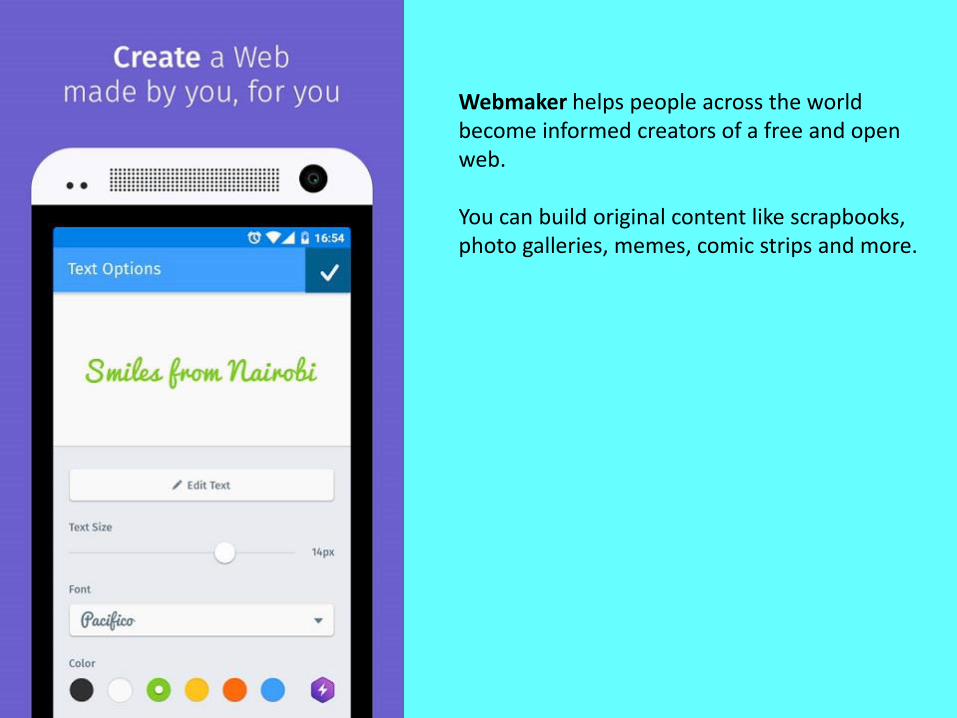
Webmaker helps people across the world become informed creators of a free and open web.
You can build original content like scrapbooks, photo galleries, memes, comic strips and more.
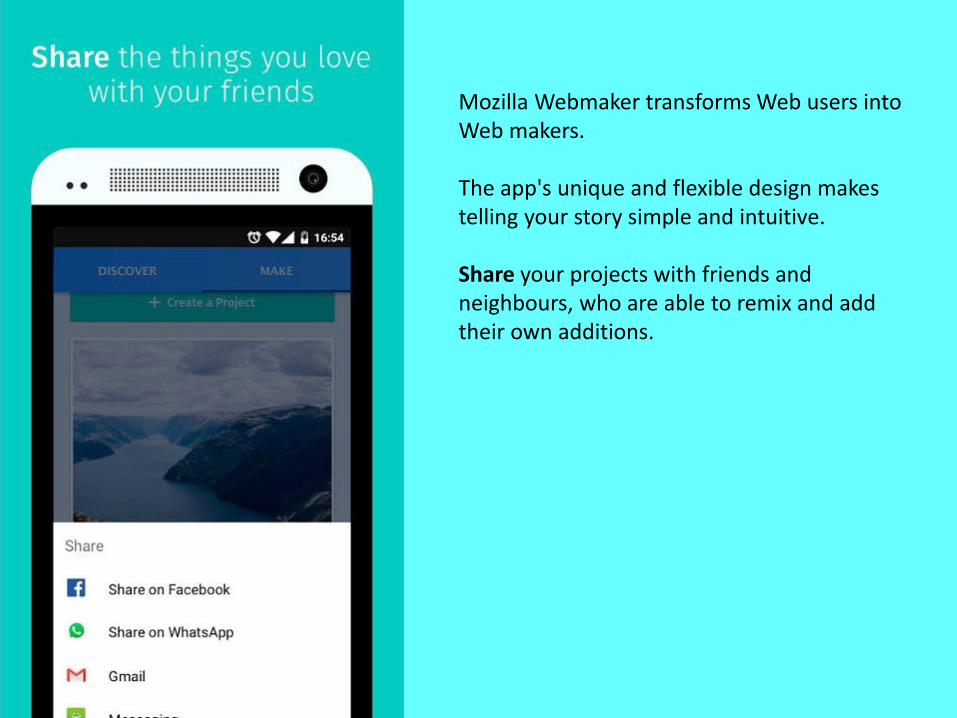
Mozilla Webmaker transforms Web users into Web makers.
The app's unique and flexible design makes telling your story simple and intuitive.
Share your projects with friends and neighbours, who are able to remix and add their own additions.
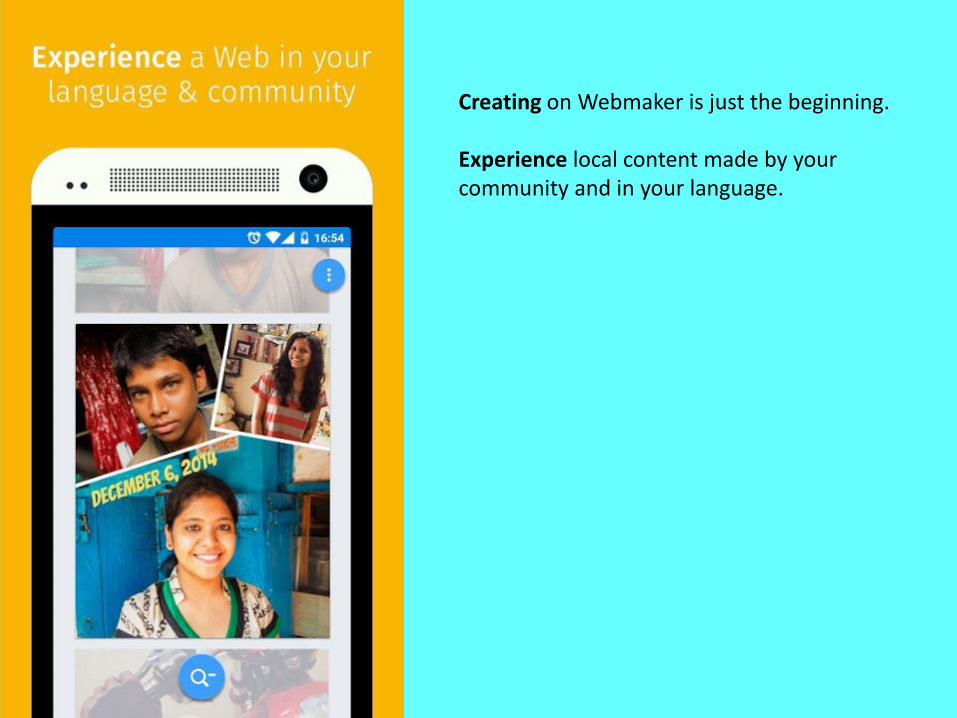
Creating on Webmaker is just the beginning.
Experience local content made by your community and in your language.
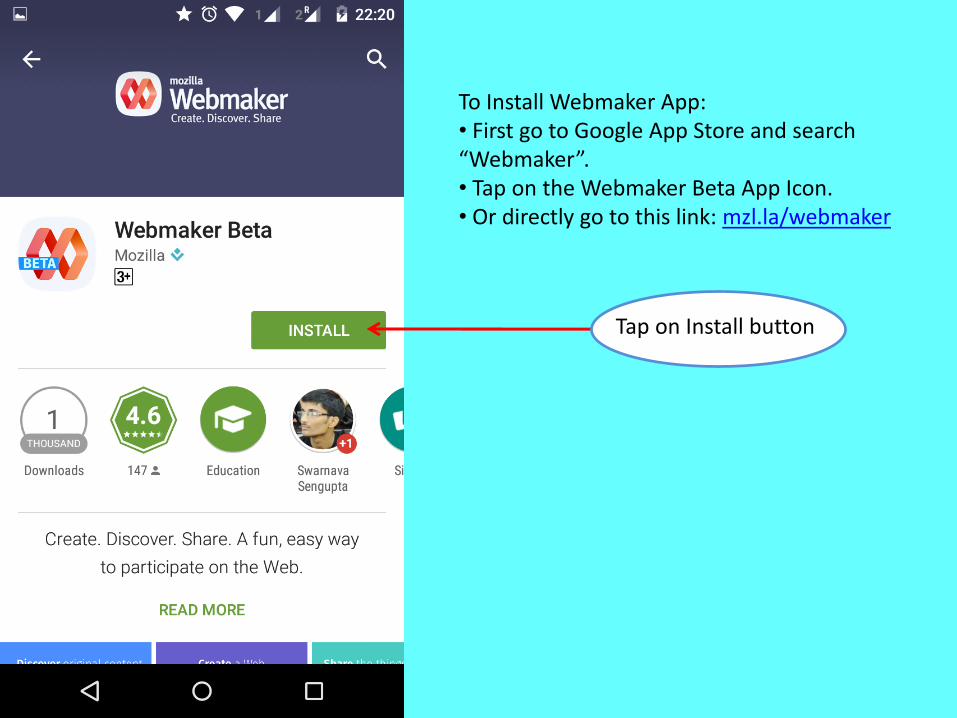
To Install Webmaker App:• First go to Google App Store and search “Webmaker”.• Tap on the Webmaker Beta App Icon.• Or directly go to this link: mzl.la/webmaker
Tap on Install button

Tap on Open button
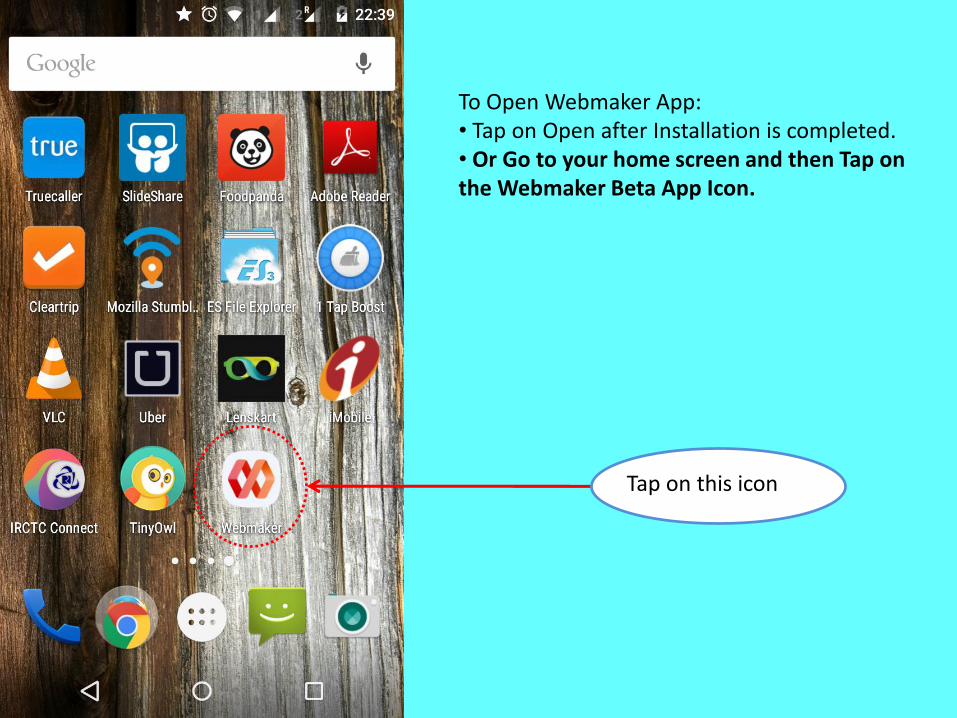
To Open Webmaker App:• Tap on Open after Installation is completed.• Or Go to your home screen and then Tap on the Webmaker Beta App Icon.
To Open Webmaker App:• Tap on Open after Installation is completed.• Or Go to your home screen and then Tap on the Webmaker Beta App Icon.
Tap on this icon
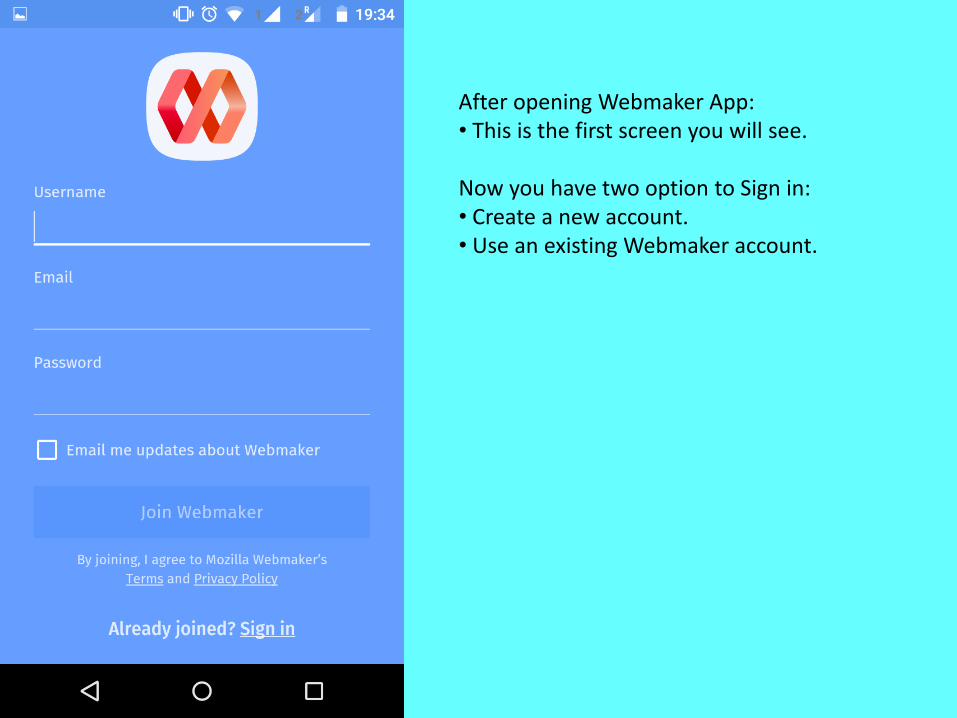
After opening Webmaker App:• This is the first screen you will see.
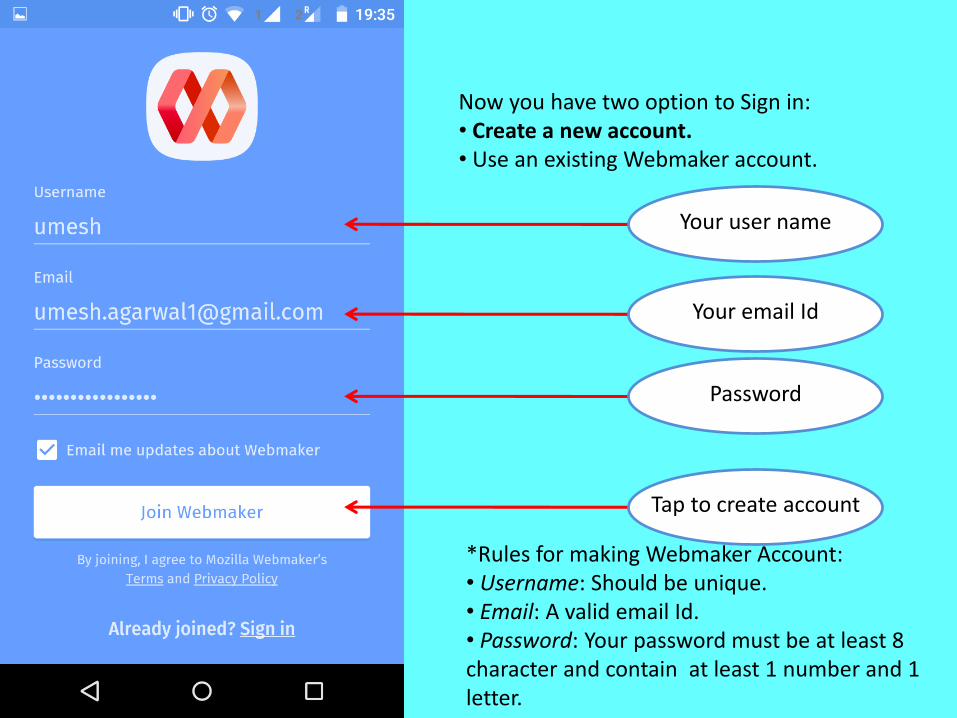
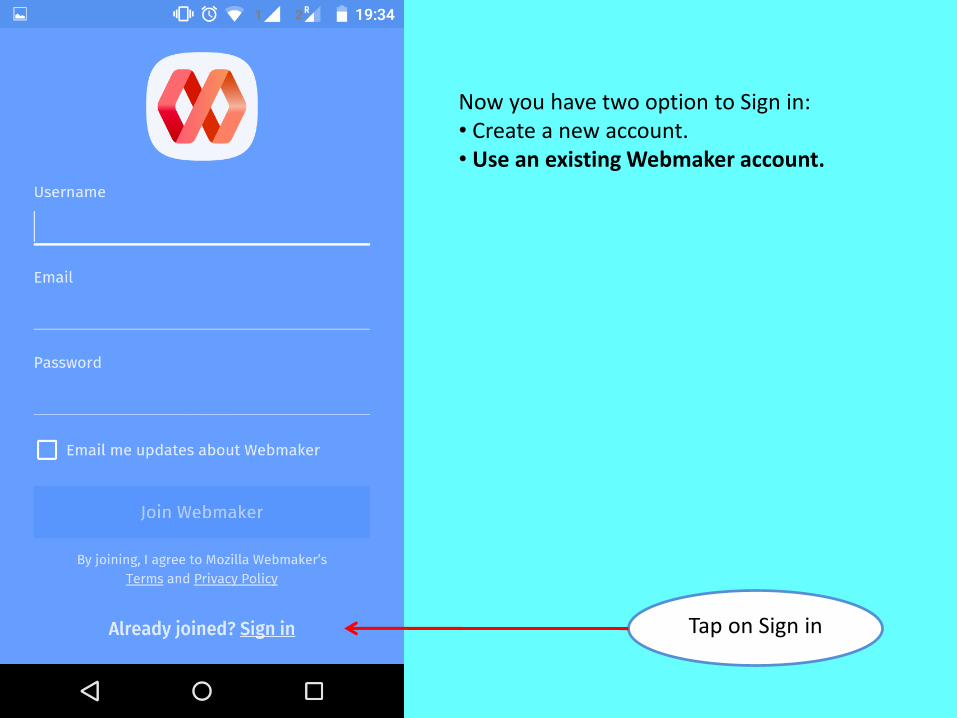
Now you have two option to Sign in:• Create a new account.• Use an existing Webmaker account.
Now you have two option to Sign in:• Create a new account.• Use an existing Webmaker account.
Password
Your email Id
*Rules for making Webmaker Account:• Username: Should be unique.• Email: A valid email Id.• Password: Your password must be at least 8 character and contain at least 1 number and 1 letter.
Your user name
Tap to create account
Now you have two option to Sign in:• Create a new account.• Use an existing Webmaker account.
Tap on Sign in
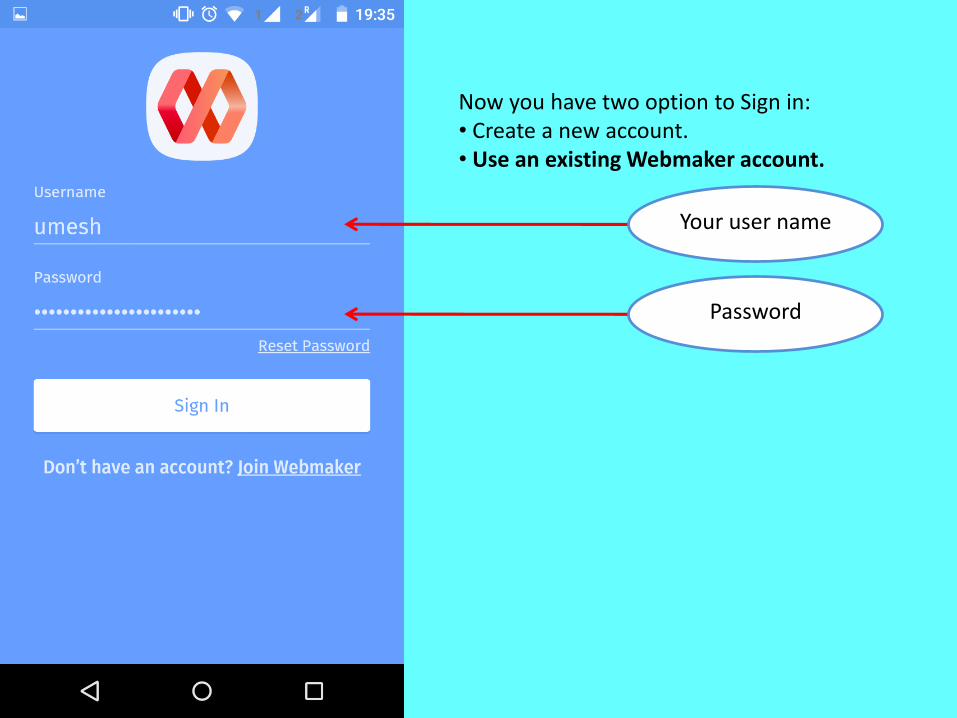
Now you have two option to Sign in:• Create a new account.• Use an existing Webmaker account.
Password
Your user name
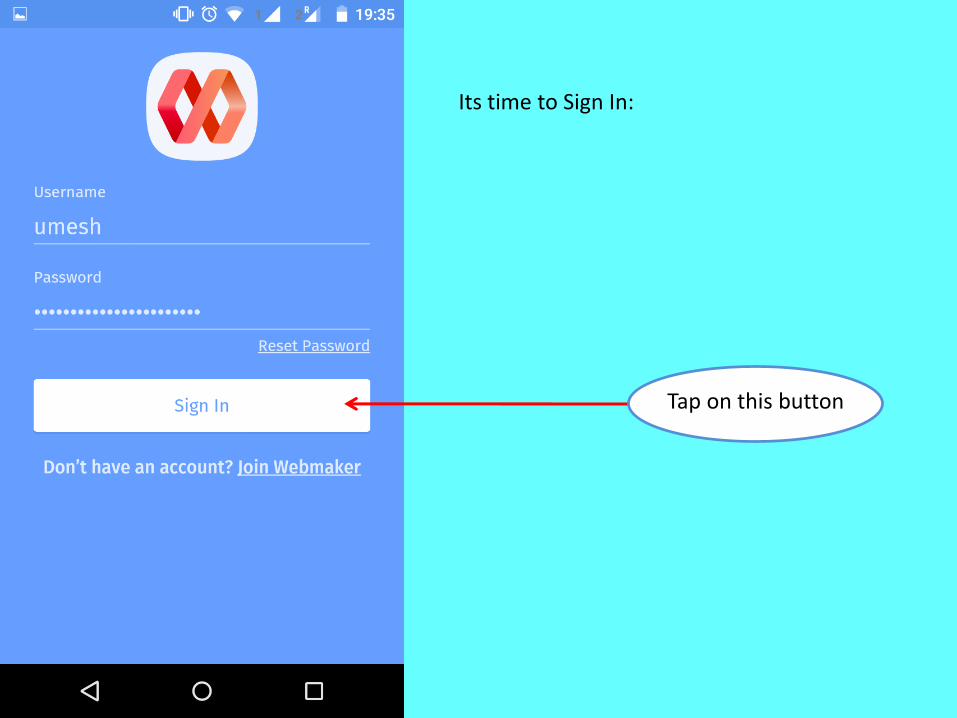
Tap on this button
Its time to Sign In:
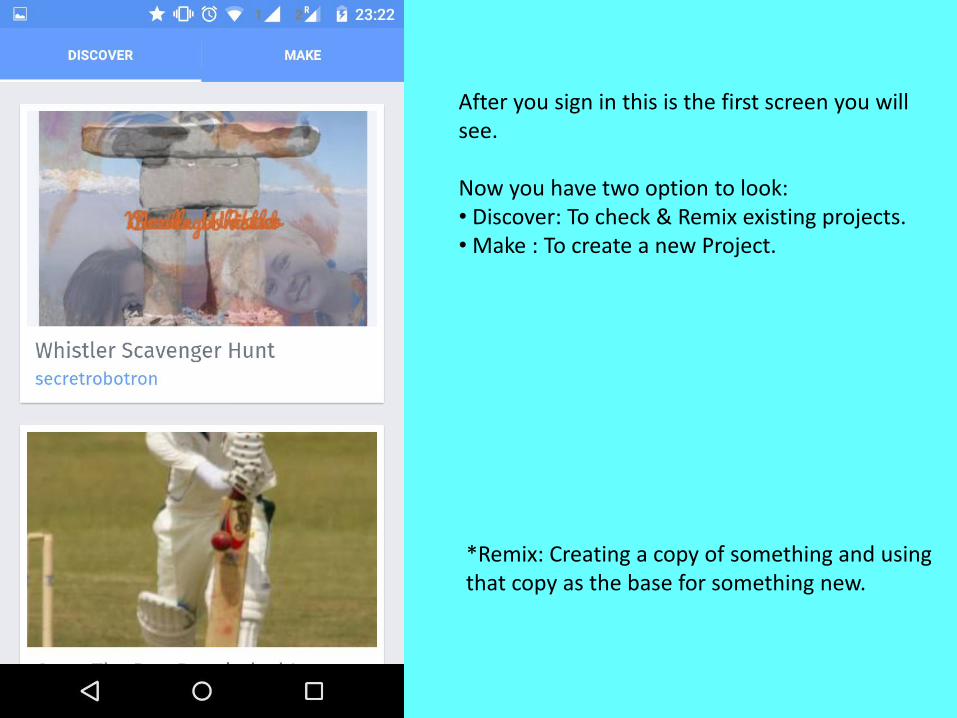
After you sign in this is the first screen you will see.
Now you have two option to look:• Discover: To check & Remix existing projects.• Make : To create a new Project.
*Remix: Creating a copy of something and using that copy as the base for something new.
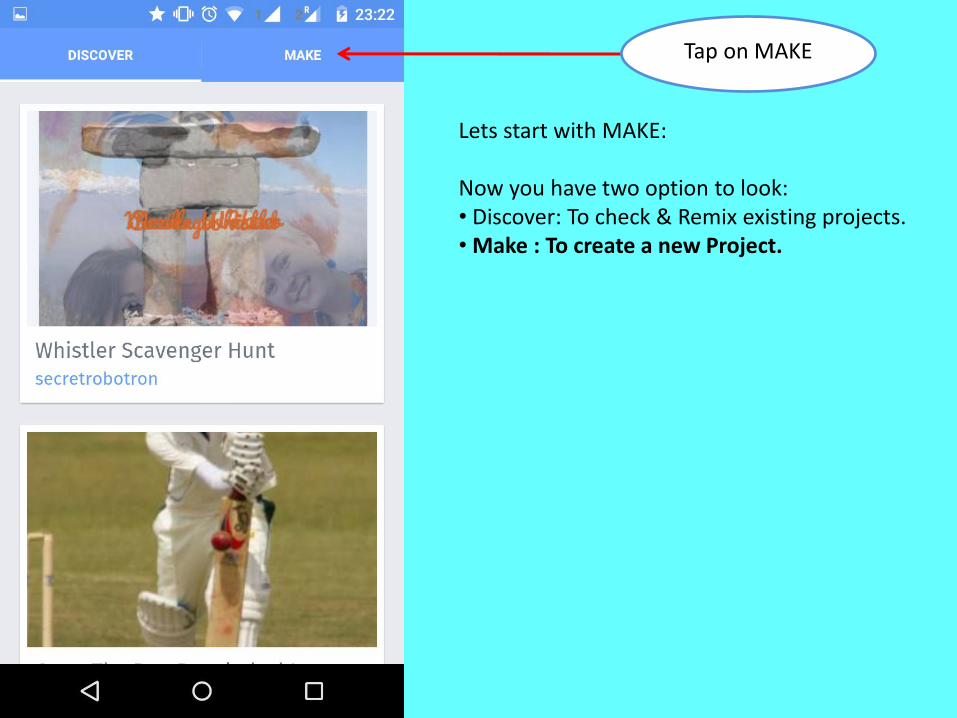
Tap on MAKE
Lets start with MAKE:
Now you have two option to look:• Discover: To check & Remix existing projects.• Make : To create a new Project.
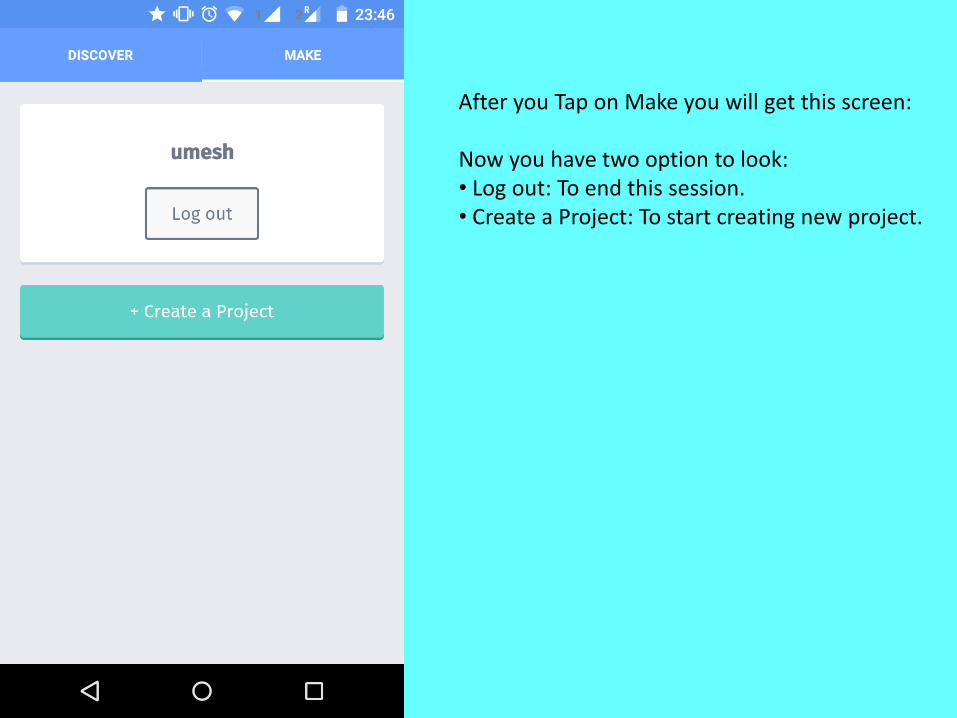
After you Tap on Make you will get this screen:
Now you have two option to look:• Log out: To end this session.• Create a Project: To start creating new project.
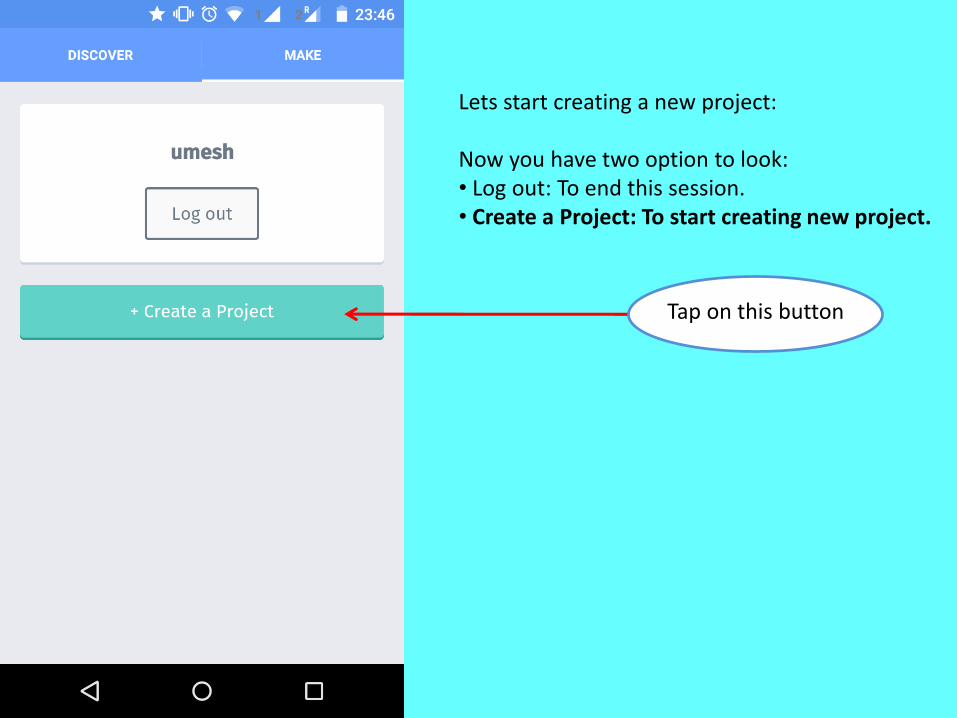
Lets start creating a new project:
Now you have two option to look:• Log out: To end this session.• Create a Project: To start creating new project.
Tap on this button
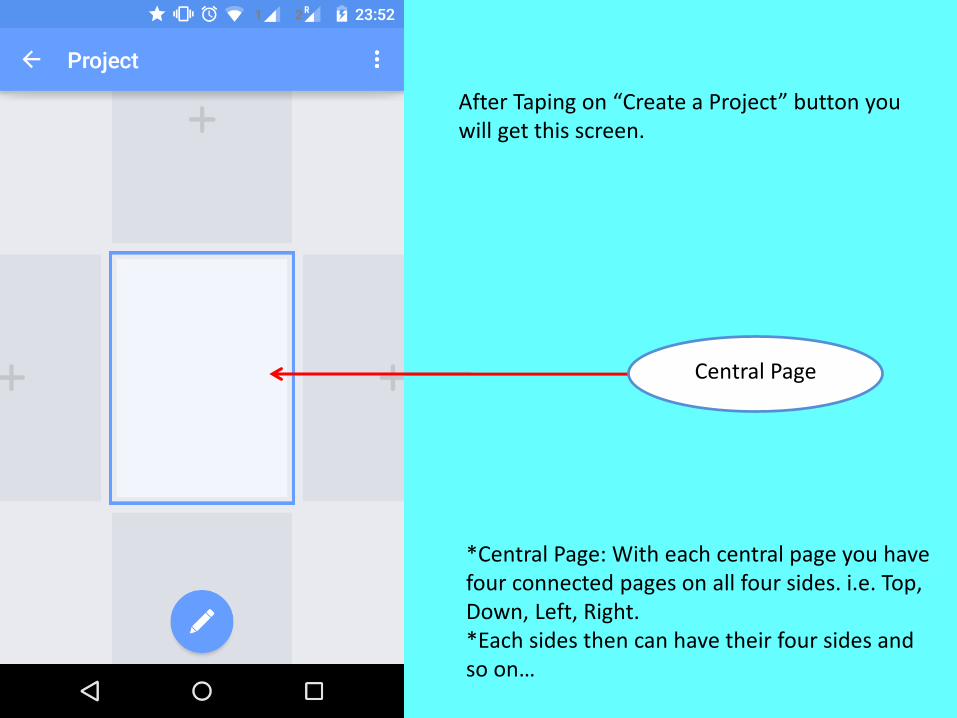
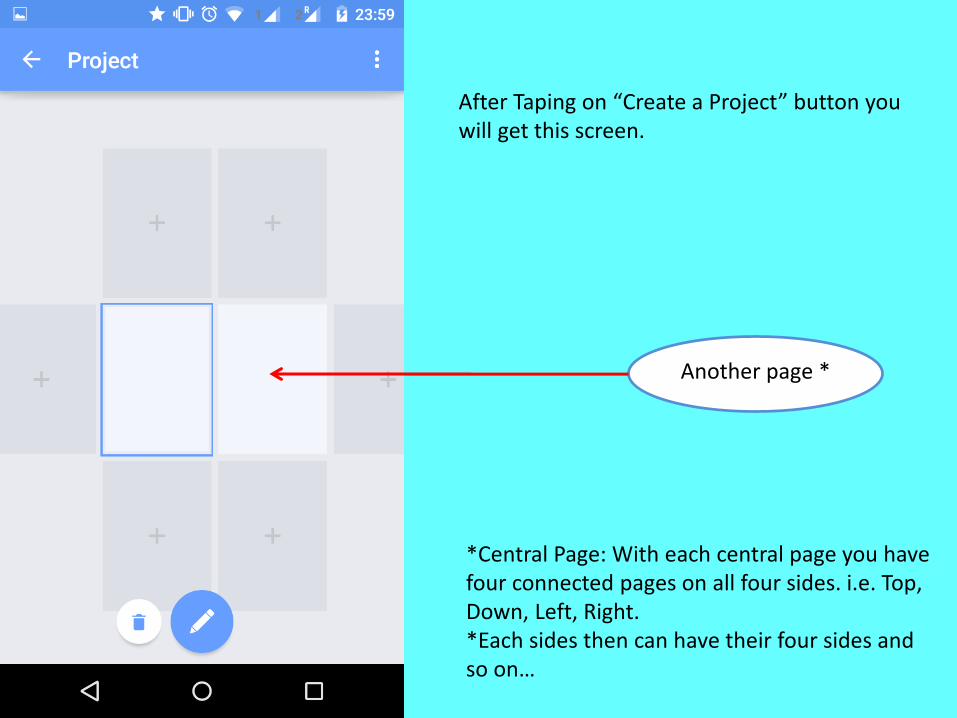
After Taping on “Create a Project” button you will get this screen.
Central Page
*Central Page: With each central page you have four connected pages on all four sides. i.e. Top, Down, Left, Right.*Each sides then can have their four sides and so on…
After Taping on “Create a Project” button you will get this screen.
Another page *
*Central Page: With each central page you have four connected pages on all four sides. i.e. Top, Down, Left, Right.*Each sides then can have their four sides and so on…
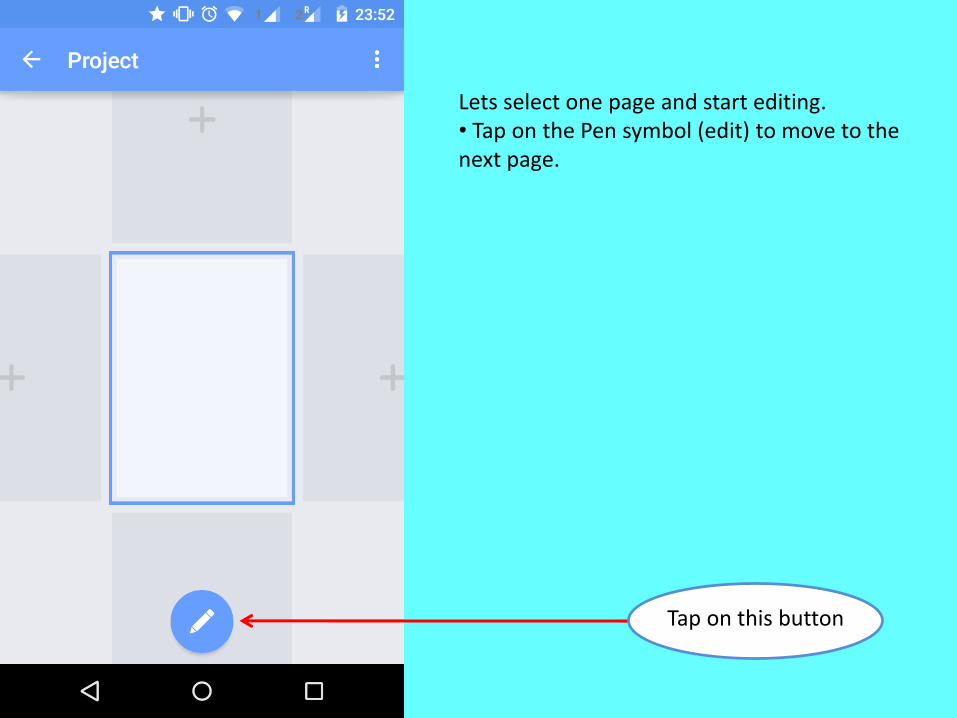
Lets select one page and start editing.• Tap on the Pen symbol (edit) to move to the next page.
Tap on this button
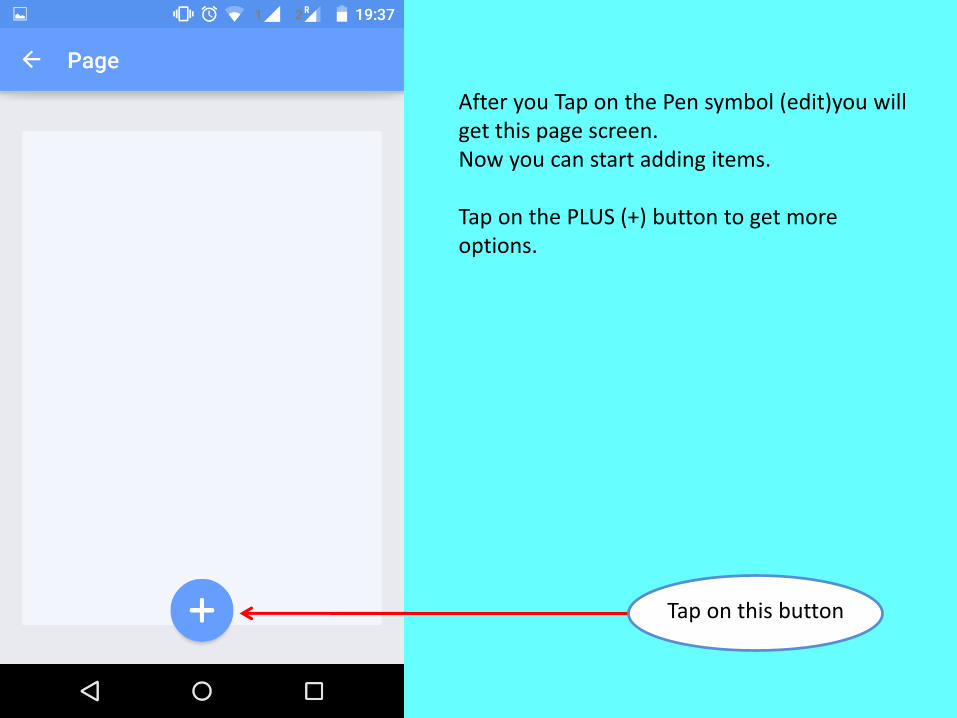
After you Tap on the Pen symbol (edit)you will get this page screen.Now you can start adding items.
Tap on the PLUS (+) button to get more options.
Tap on this button
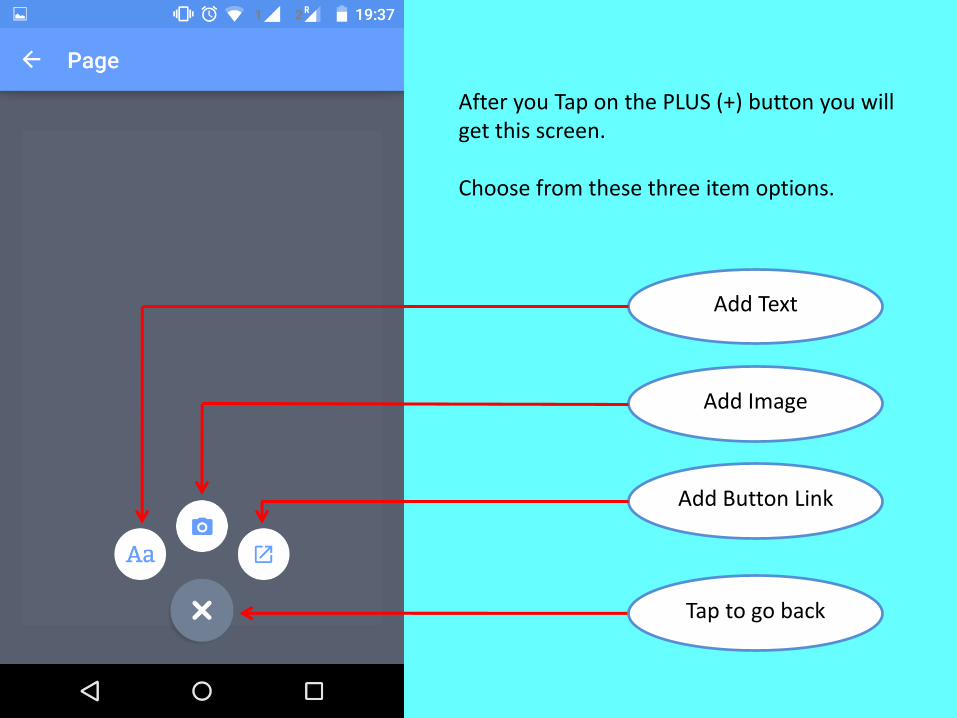
Add Image
Tap to go back
Add Text
Add Button Link
After you Tap on the PLUS (+) button you will get this screen.
Choose from these three item options.
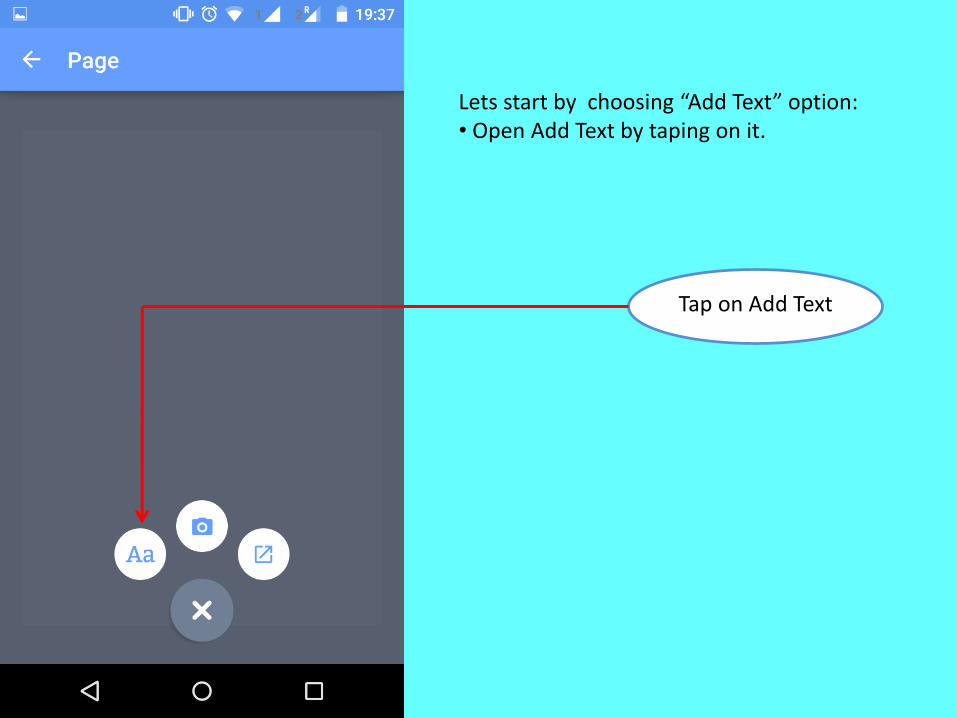
Tap on Add Text
Lets start by choosing “Add Text” option:• Open Add Text by taping on it.
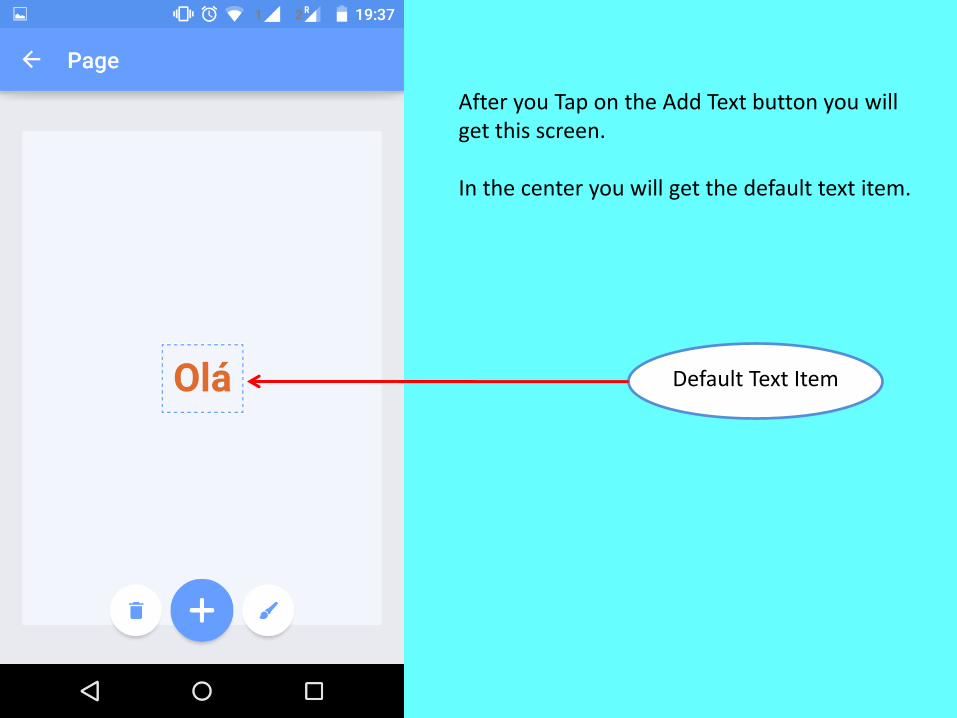
After you Tap on the Add Text button you will get this screen.
In the center you will get the default text item.
Default Text Item
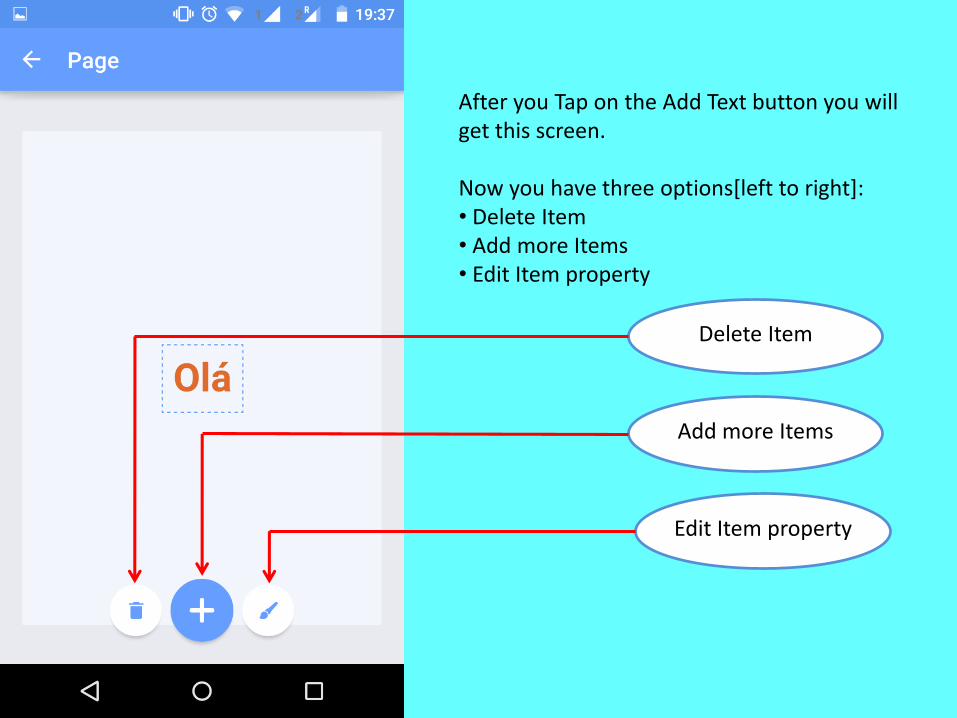
After you Tap on the Add Text button you will get this screen.
Now you have three options[left to right]:• Delete Item• Add more Items• Edit Item property
Add more Items
Delete Item
Edit Item property
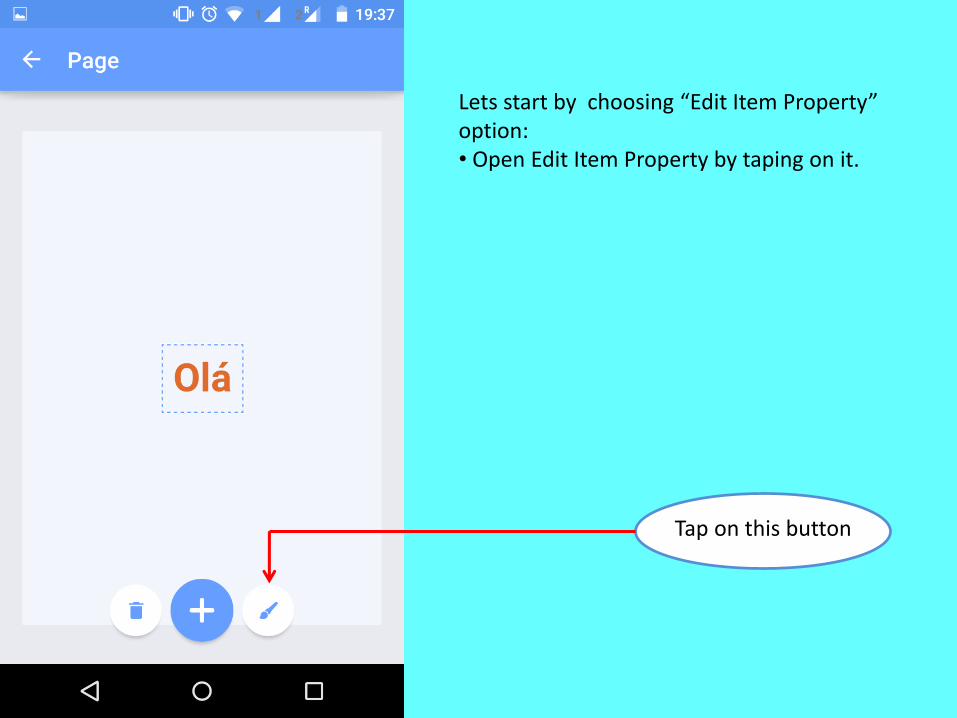
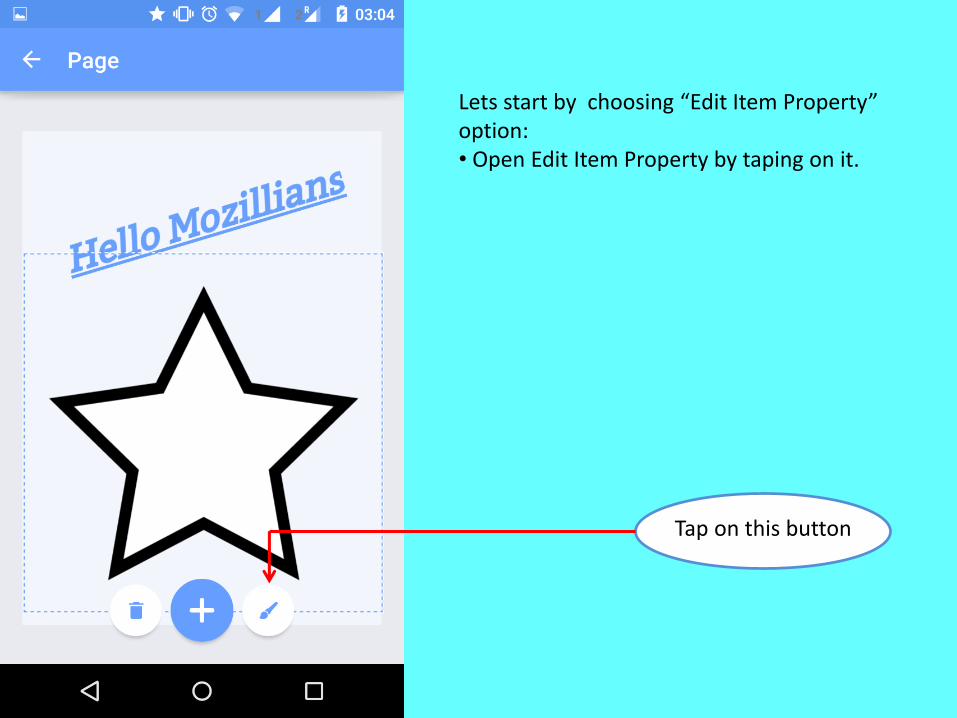
Tap on this button
Lets start by choosing “Edit Item Property” option:• Open Edit Item Property by taping on it.
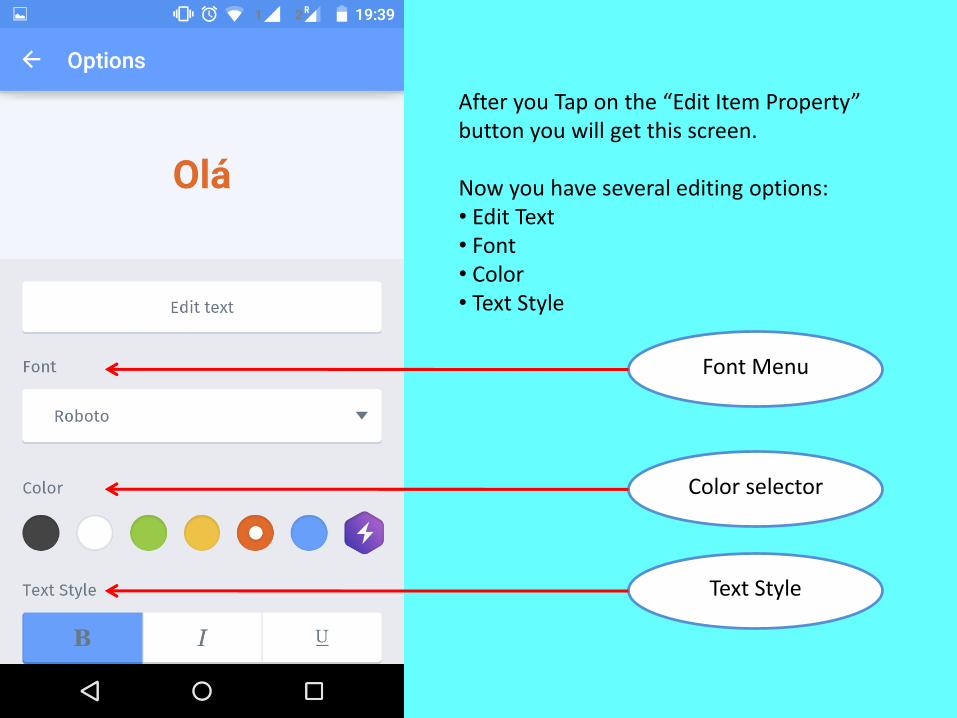
After you Tap on the “Edit Item Property” button you will get this screen.
Now you have several editing options:• Edit Text• Font• Color• Text Style
Text Style
Color selector
Font Menu
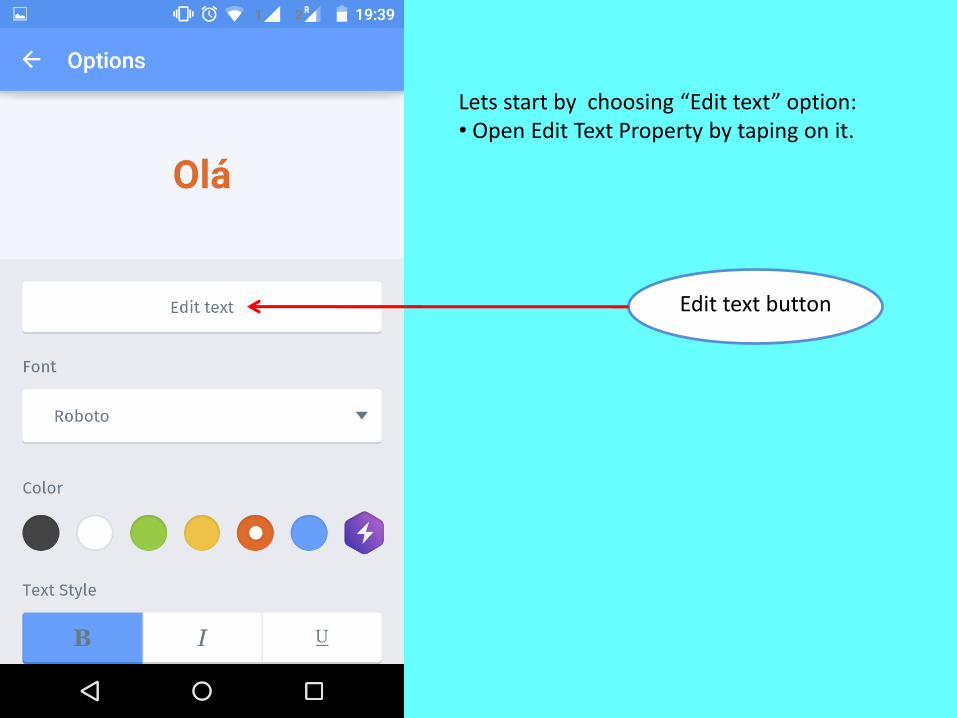
Edit text button
Lets start by choosing “Edit text” option:• Open Edit Text Property by taping on it.
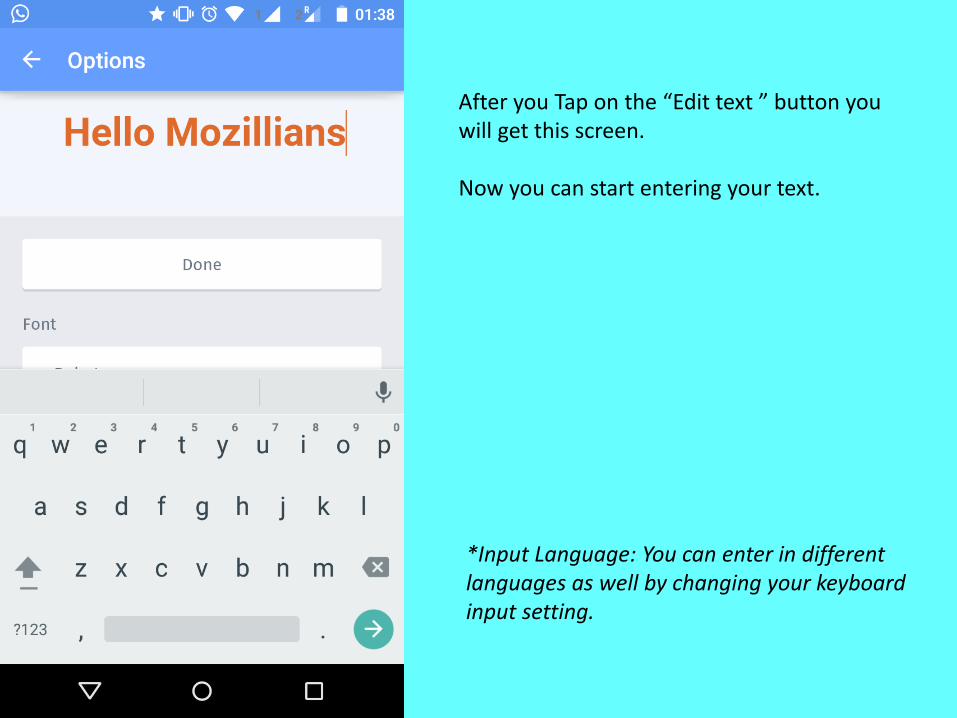
After you Tap on the “Edit text ” button you will get this screen.
Now you can start entering your text.
*Input Language: You can enter in different languages as well by changing your keyboard input setting.
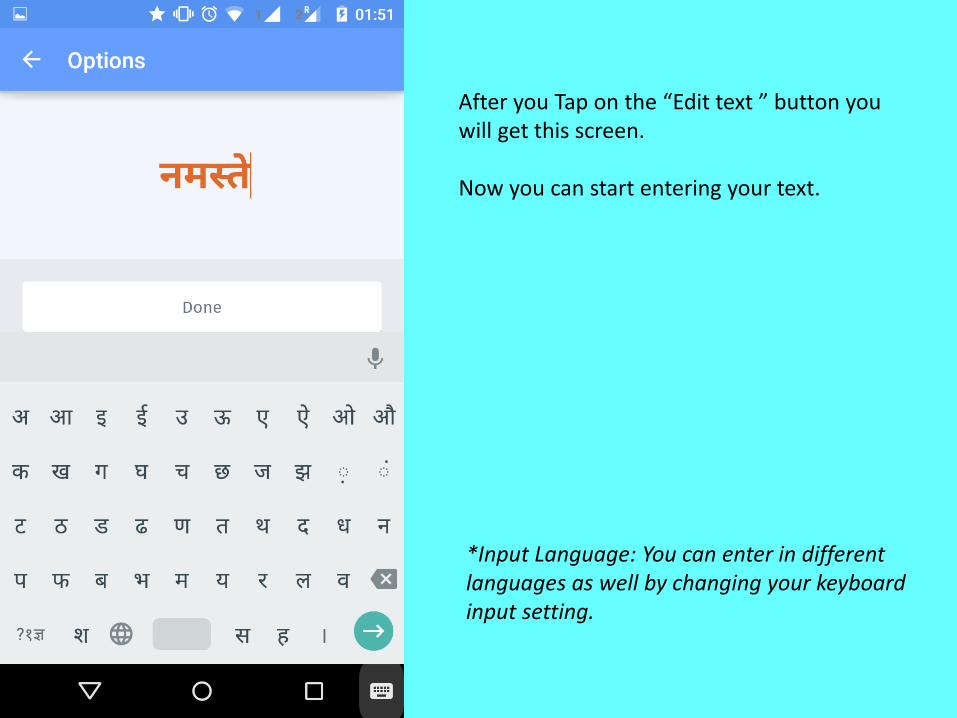
After you Tap on the “Edit text ” button you will get this screen.
Now you can start entering your text.
*Input Language: You can enter in different languages as well by changing your keyboard input setting.
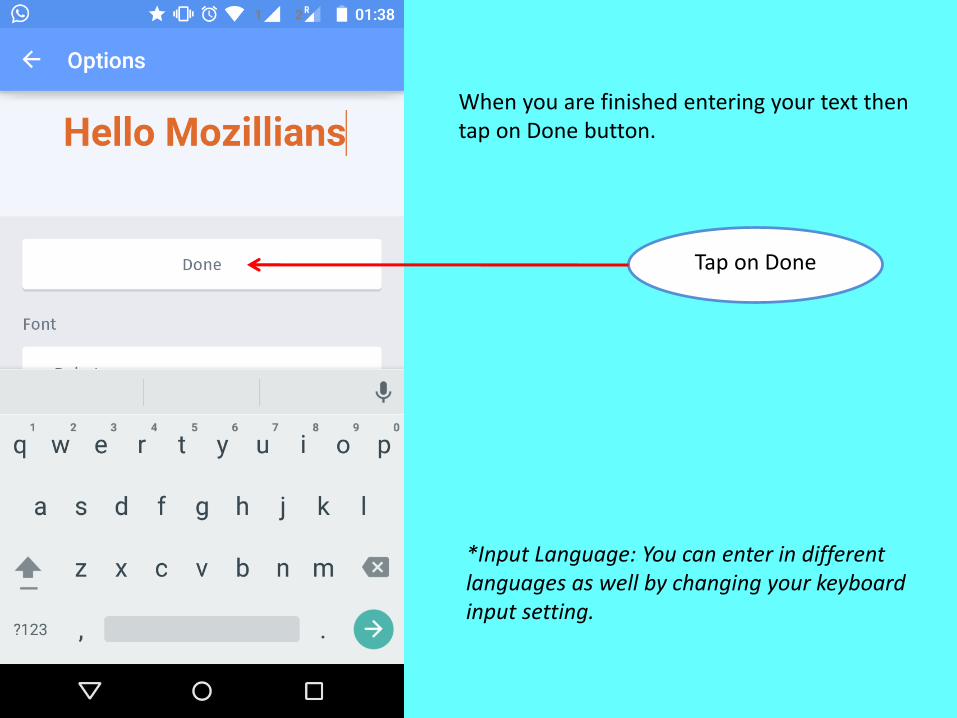
When you are finished entering your text then tap on Done button.
*Input Language: You can enter in different languages as well by changing your keyboard input setting.
Tap on Done
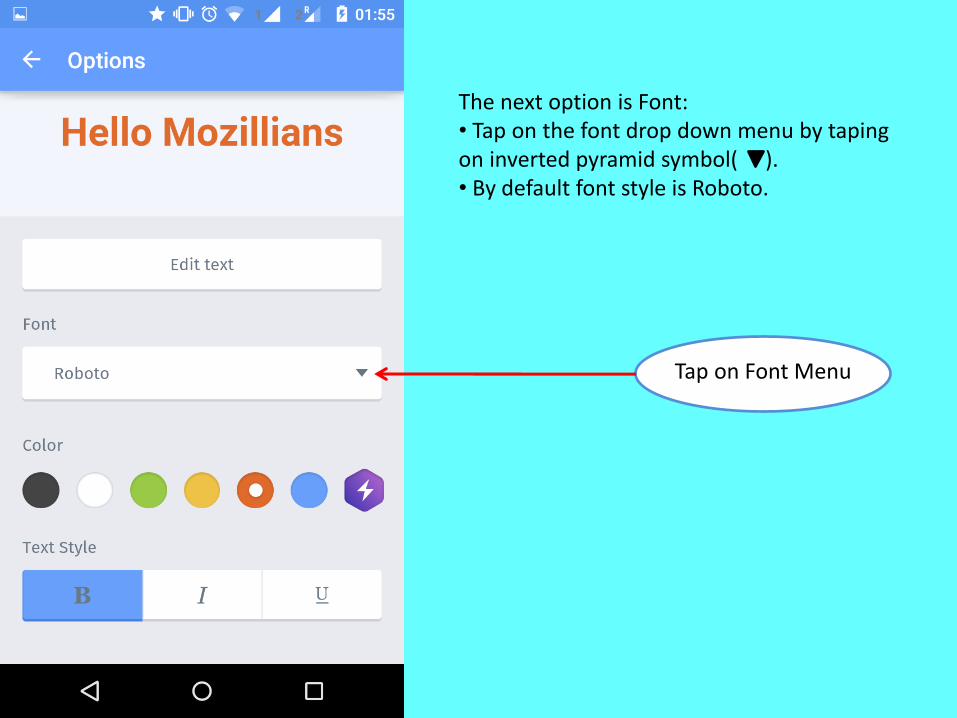
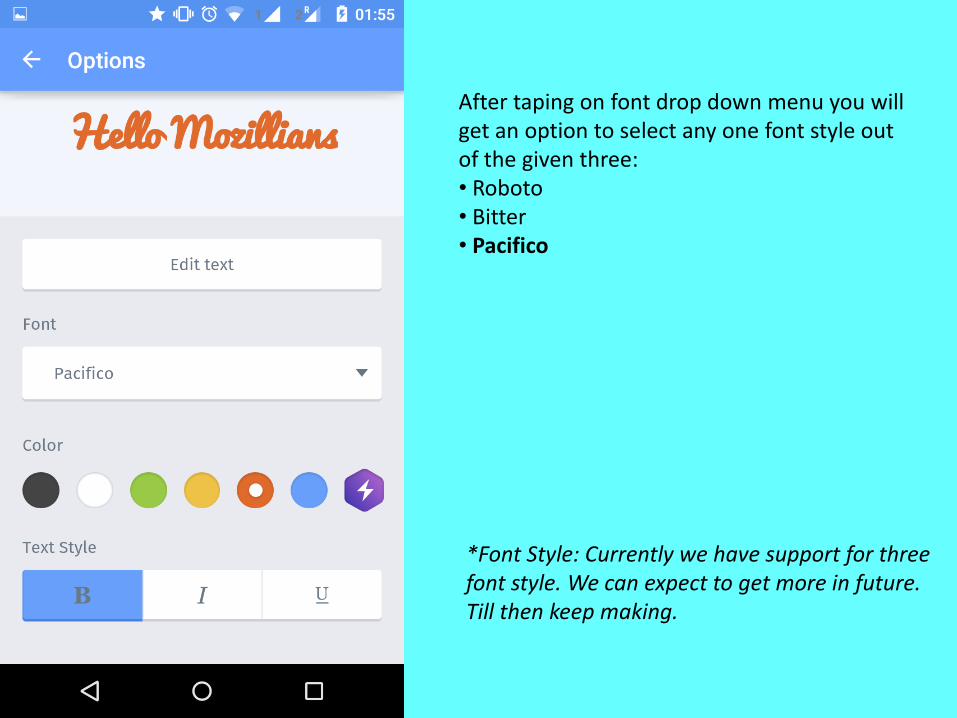
Tap on Font Menu
The next option is Font:• Tap on the font drop down menu by taping on inverted pyramid symbol( ).• By default font style is Roboto.
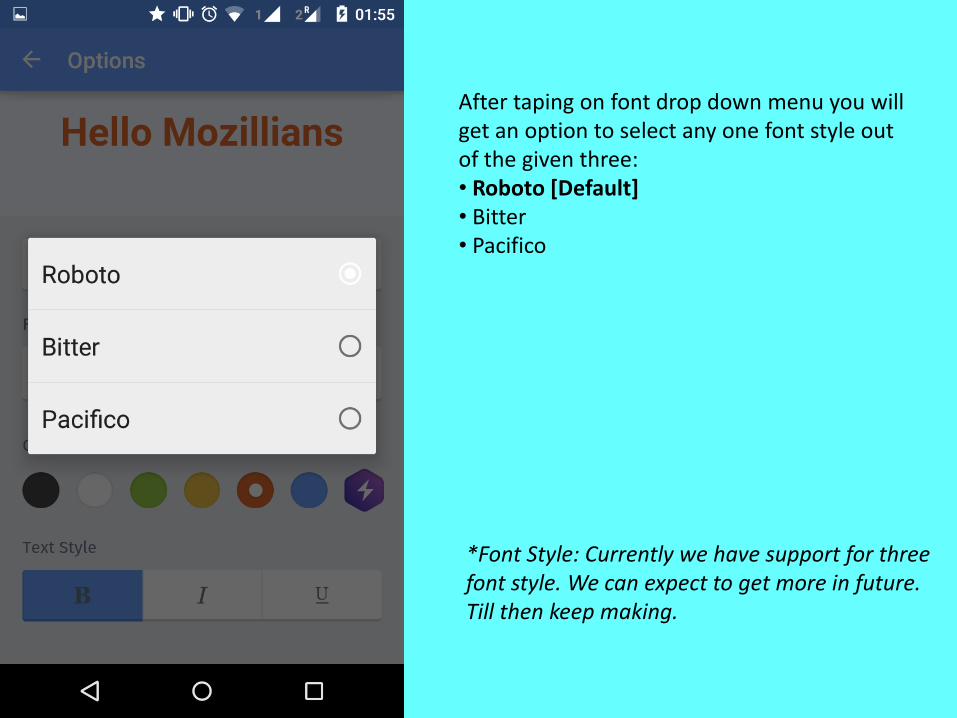
After taping on font drop down menu you will get an option to select any one font style out of the given three:• Roboto [Default]• Bitter• Pacifico
*Font Style: Currently we have support for three font style. We can expect to get more in future. Till then keep making.
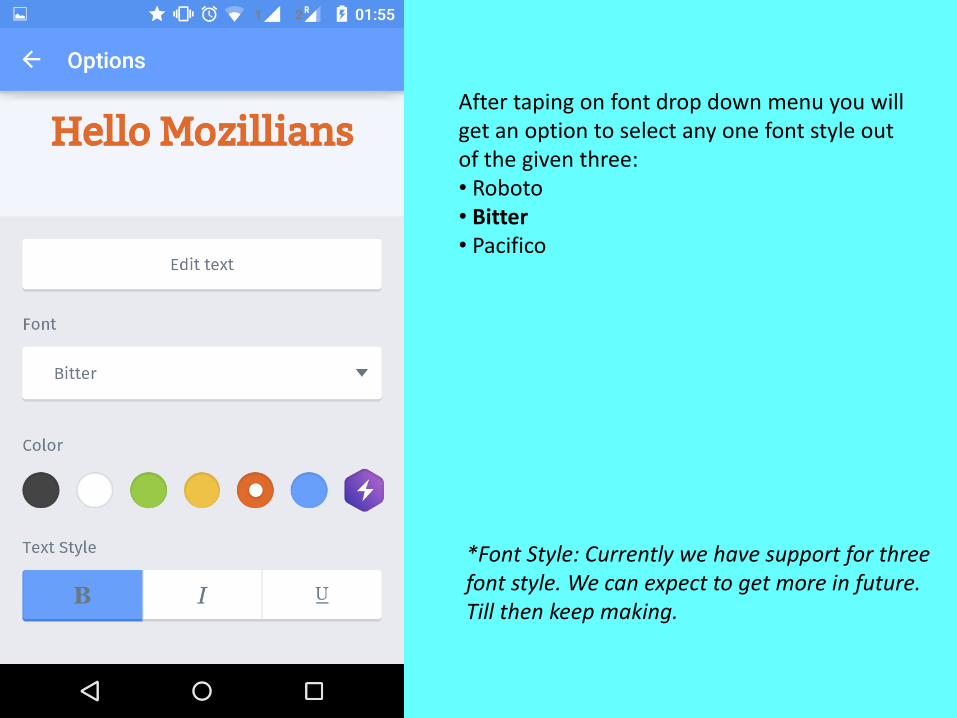
After taping on font drop down menu you will get an option to select any one font style out of the given three:• Roboto• Bitter• Pacifico
*Font Style: Currently we have support for three font style. We can expect to get more in future. Till then keep making.
After taping on font drop down menu you will get an option to select any one font style out of the given three:• Roboto• Bitter• Pacifico
*Font Style: Currently we have support for three font style. We can expect to get more in future. Till then keep making.
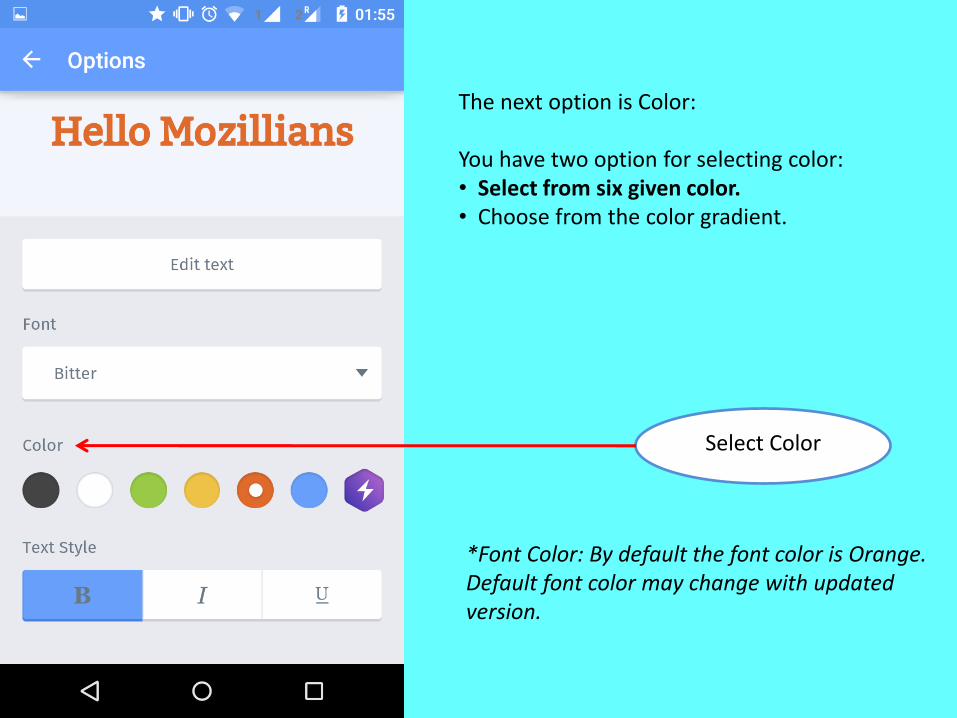
The next option is Color:
You have two option for selecting color:• Select from six given color. • Choose from the color gradient.
*Font Color: By default the font color is Orange.Default font color may change with updated version.
Select Color

The next option is Color:
You have two option for selecting color:• Select from six given color. • Choose from the color gradient.
*Font Color: By default the font color is Orange.Default font color may change with updated version.
Select Color

The next option is Color:
You have two option for selecting color:• Select from six given color. • Choose from the color gradient.
*Font Color: By default the font color is Orange.Default font color may change with updated version.
Select Color
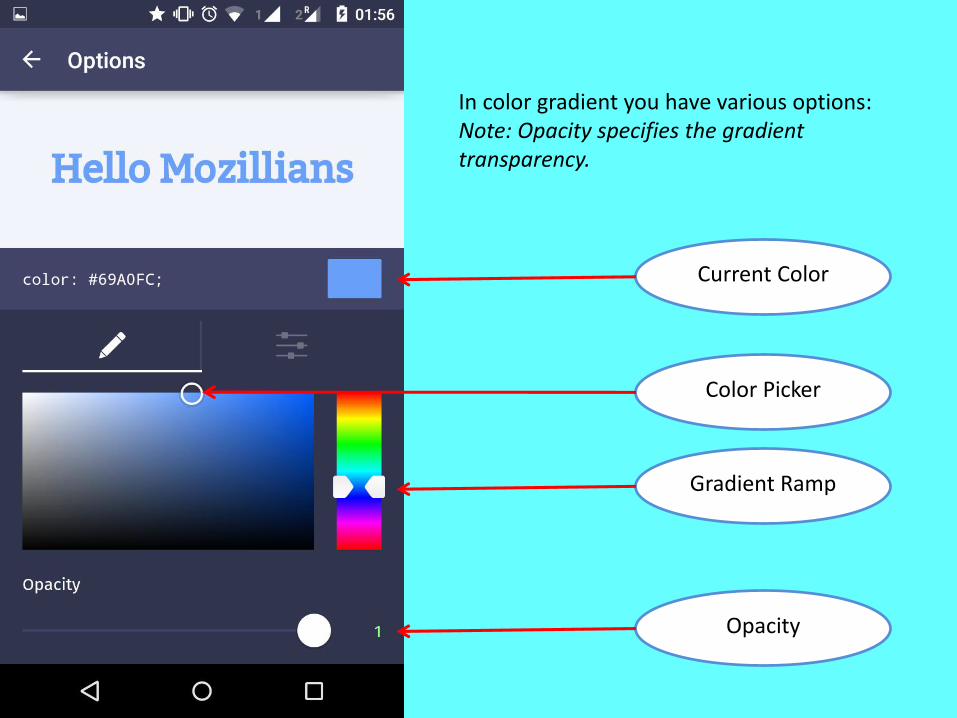
In color gradient you have various options:Note: Opacity specifies the gradient transparency.
Gradient Ramp
Current Color
Color Picker
Opacity
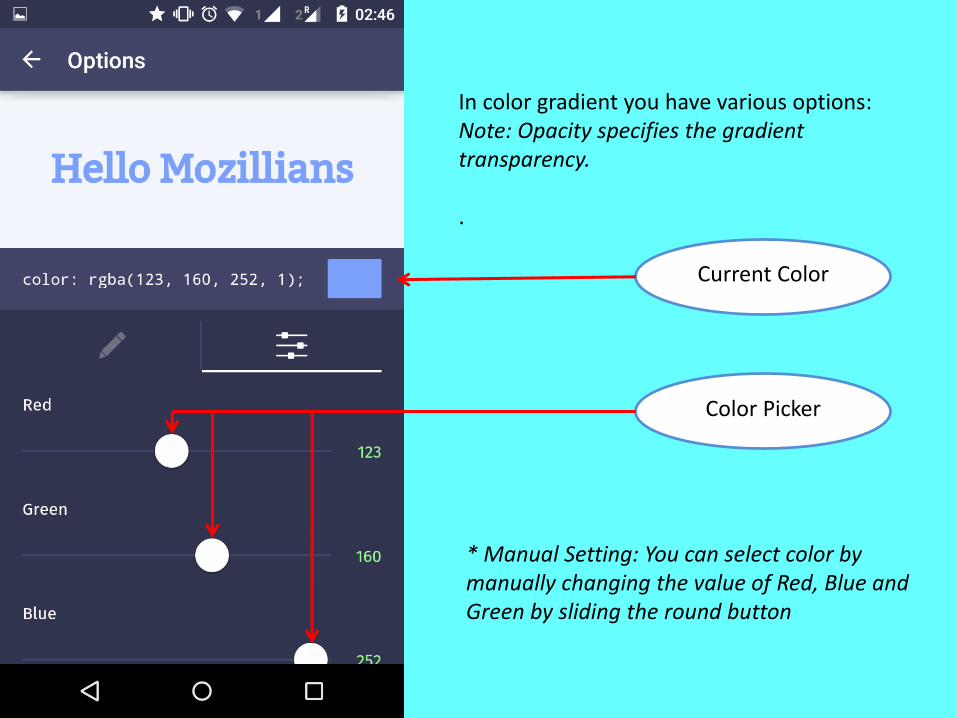
In color gradient you have various options:Note: Opacity specifies the gradient transparency.
.
* Manual Setting: You can select color by manually changing the value of Red, Blue and Green by sliding the round button
Current Color
Color Picker
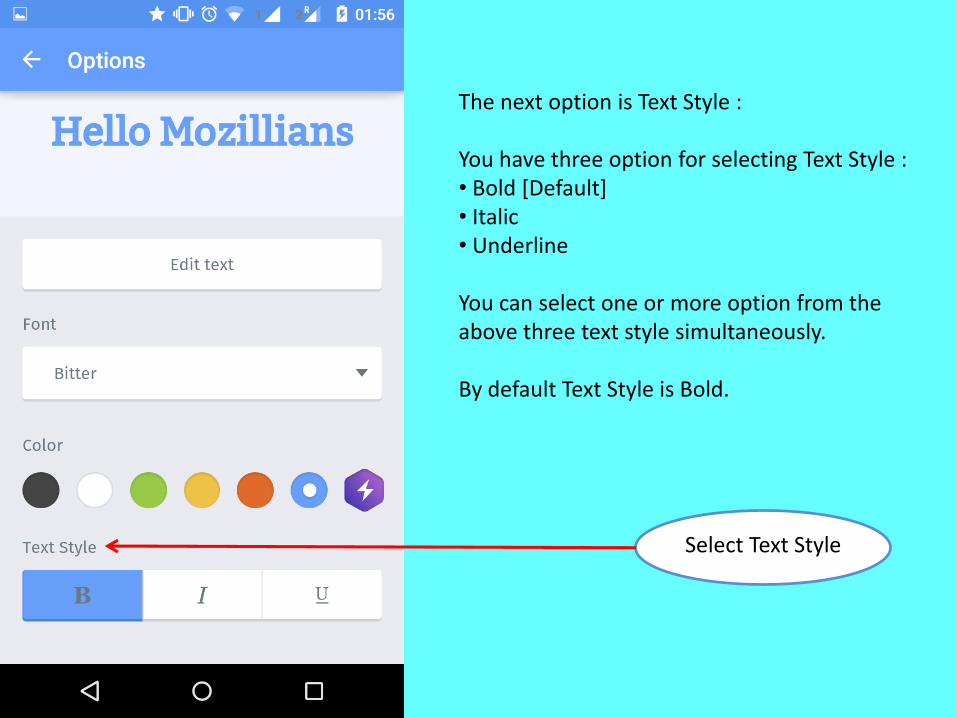
The next option is Text Style :
You have three option for selecting Text Style :• Bold [Default]• Italic• Underline
You can select one or more option from the above three text style simultaneously.
By default Text Style is Bold.
Select Text Style
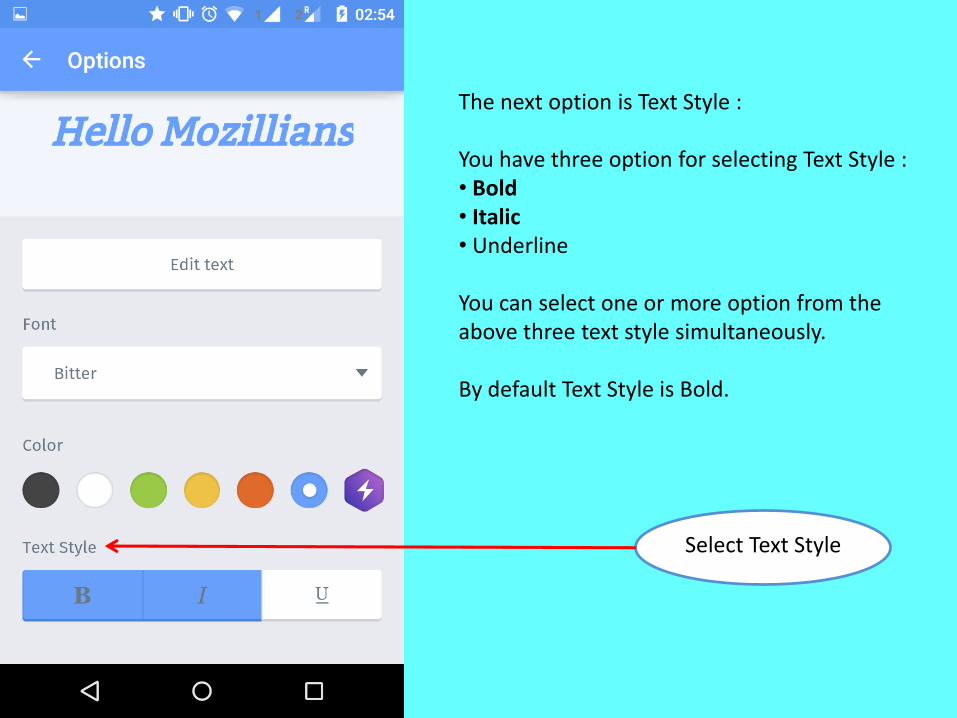
The next option is Text Style :
You have three option for selecting Text Style :• Bold • Italic• Underline
You can select one or more option from the above three text style simultaneously.
By default Text Style is Bold.
Select Text Style
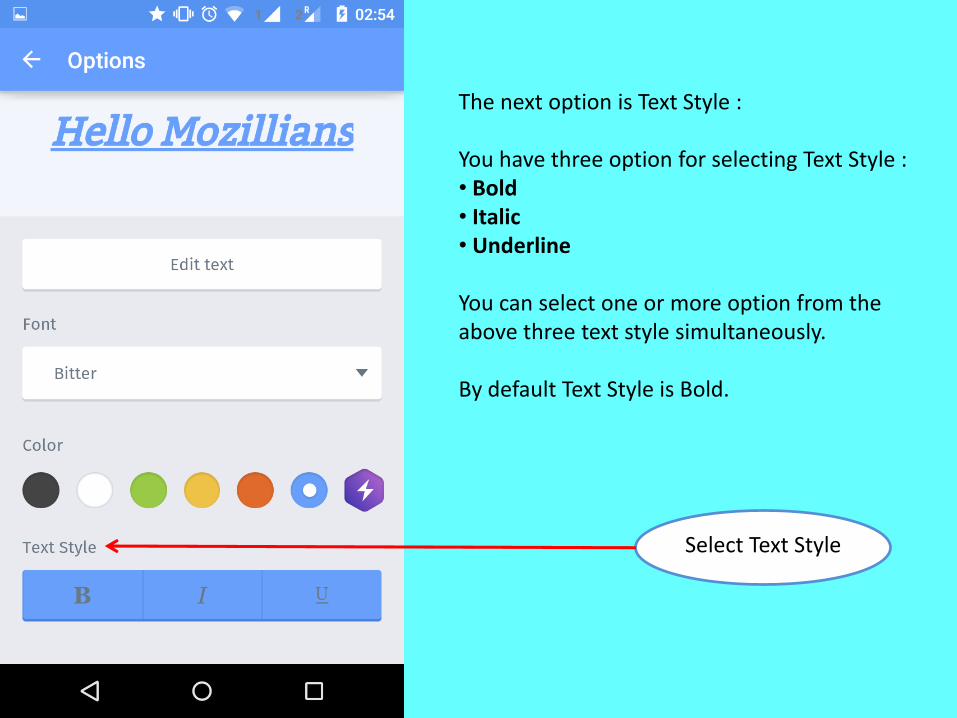
The next option is Text Style :
You have three option for selecting Text Style :• Bold • Italic• Underline
You can select one or more option from the above three text style simultaneously.
By default Text Style is Bold.
Select Text Style
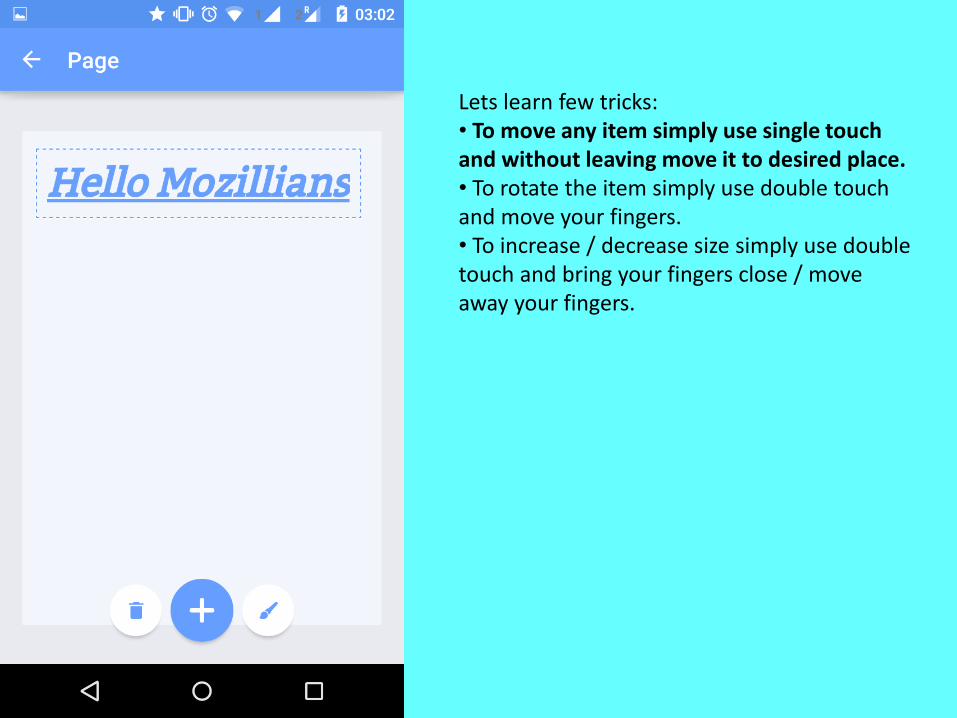
Lets learn few tricks:• To move any item simply use single touch and without leaving move it to desired place.• To rotate the item simply use double touch and move your fingers.• To increase / decrease size simply use double touch and bring your fingers close / move away your fingers.
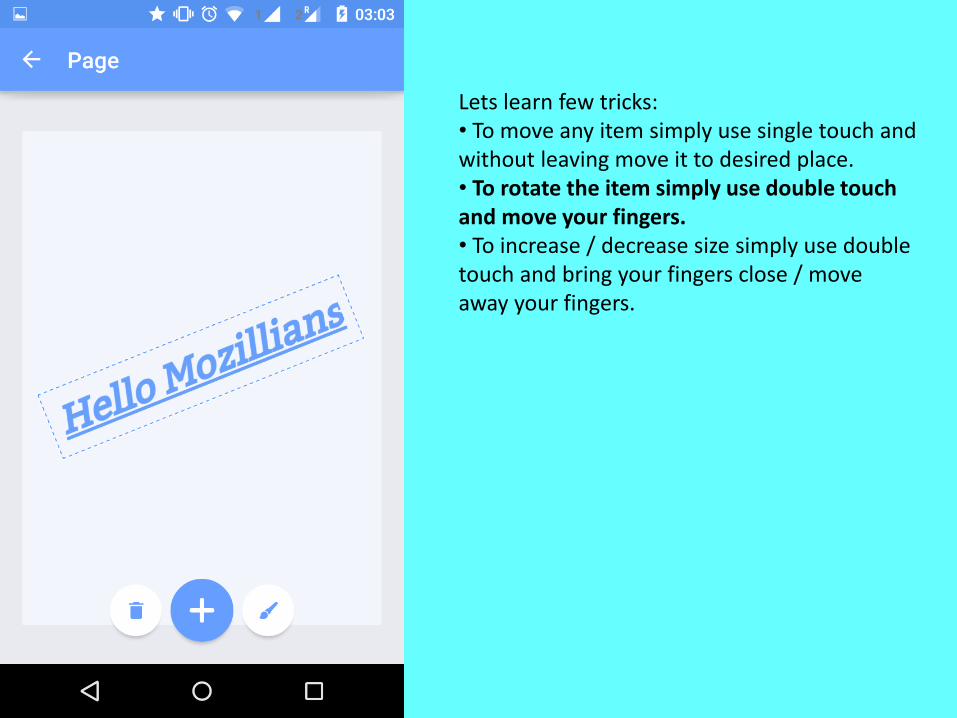
Lets learn few tricks:• To move any item simply use single touch and without leaving move it to desired place.• To rotate the item simply use double touch and move your fingers.• To increase / decrease size simply use double touch and bring your fingers close / move away your fingers.
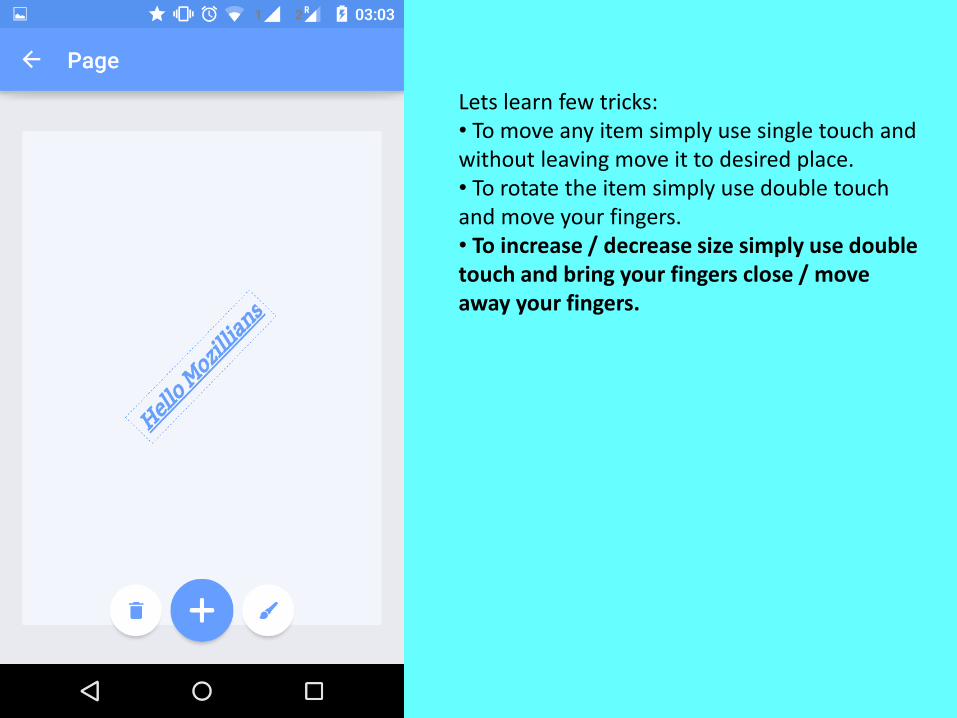
Lets learn few tricks:• To move any item simply use single touch and without leaving move it to desired place.• To rotate the item simply use double touch and move your fingers.• To increase / decrease size simply use double touch and bring your fingers close / move away your fingers.
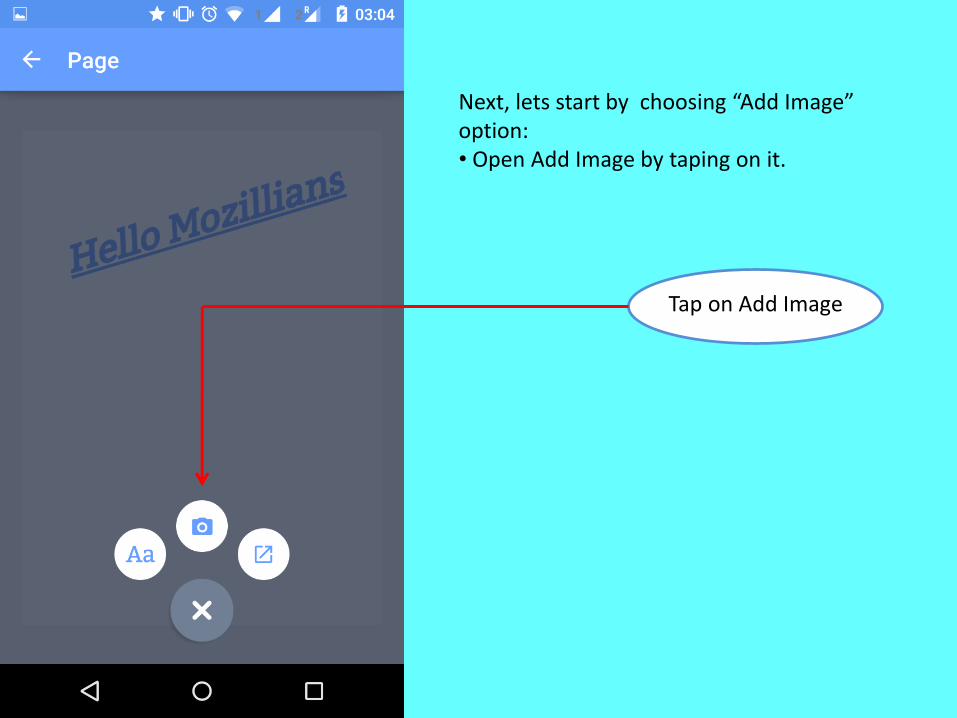
Tap on Add Image
Next, lets start by choosing “Add Image” option:• Open Add Image by taping on it.
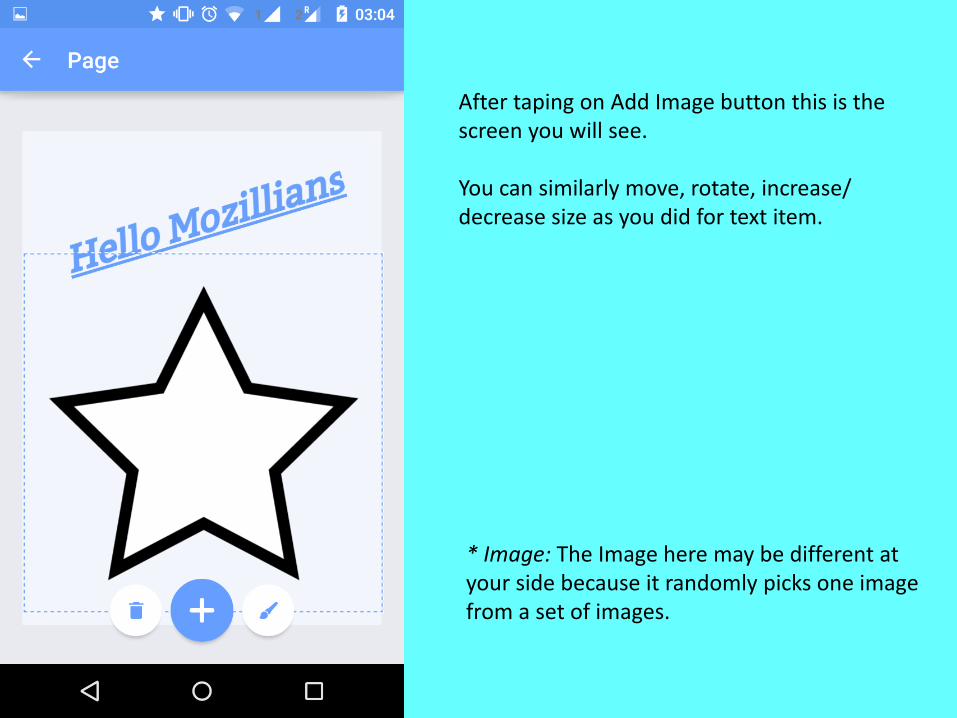
After taping on Add Image button this is the screen you will see.
You can similarly move, rotate, increase/ decrease size as you did for text item.
* Image: The Image here may be different at your side because it randomly picks one image from a set of images.
Tap on this button
Lets start by choosing “Edit Item Property” option:• Open Edit Item Property by taping on it.
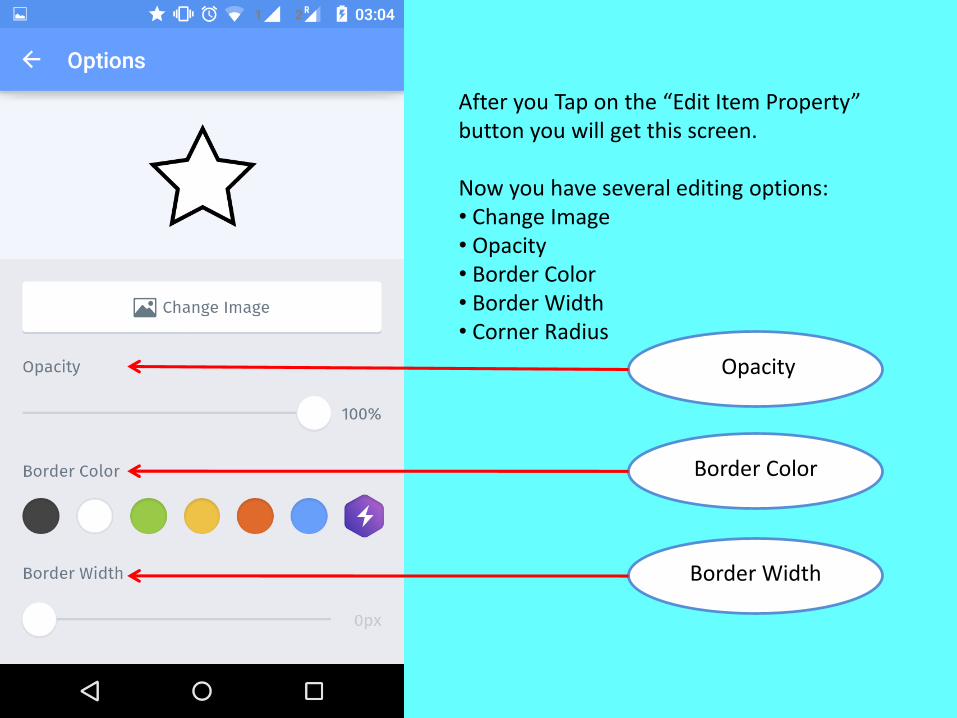
After you Tap on the “Edit Item Property” button you will get this screen.
Now you have several editing options:• Change Image• Opacity• Border Color• Border Width• Corner Radius
Border Width
Border Color
Opacity

After you Tap on the “Edit Item Property” button you will get this screen.
Now you have several editing options:• Change Image• Opacity• Border Color• Border Width• Corner Radius
Tap on this button
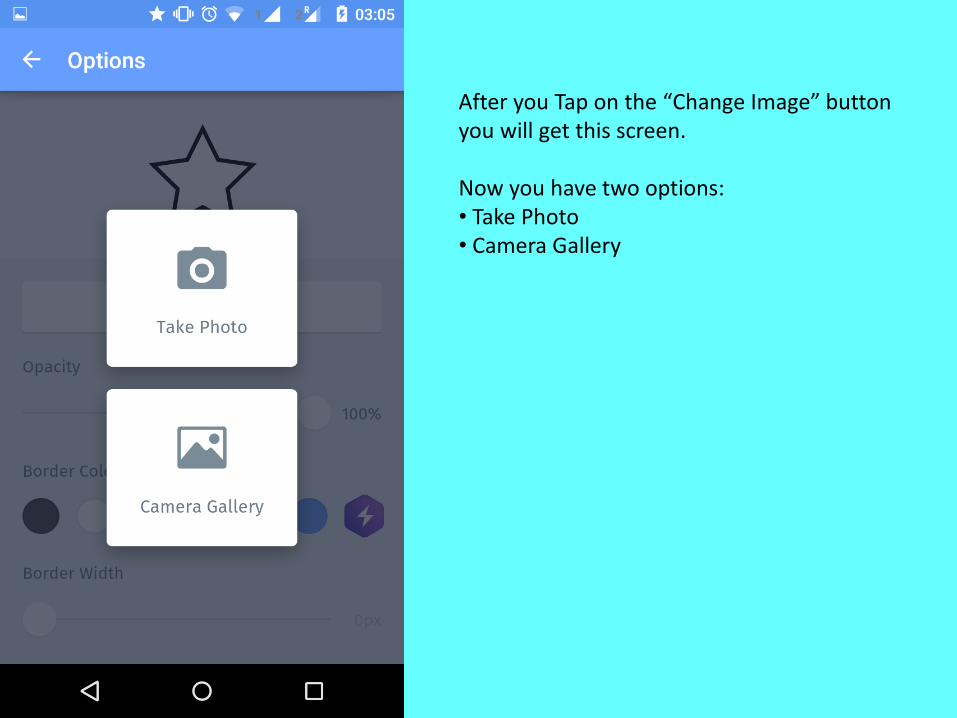
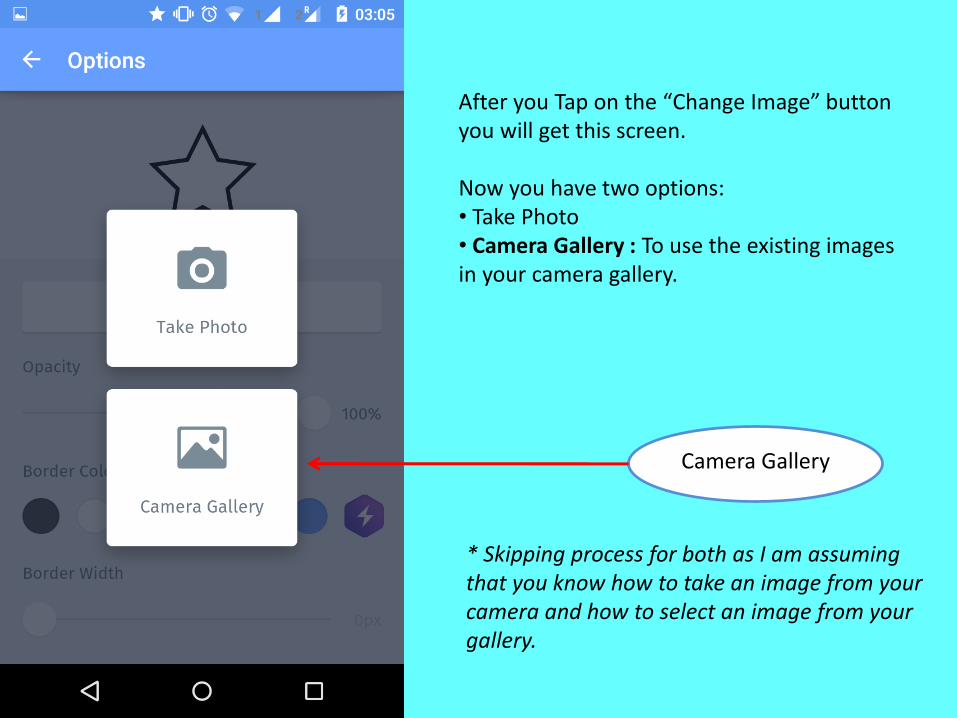
After you Tap on the “Change Image” button you will get this screen.
Now you have two options:• Take Photo• Camera Gallery
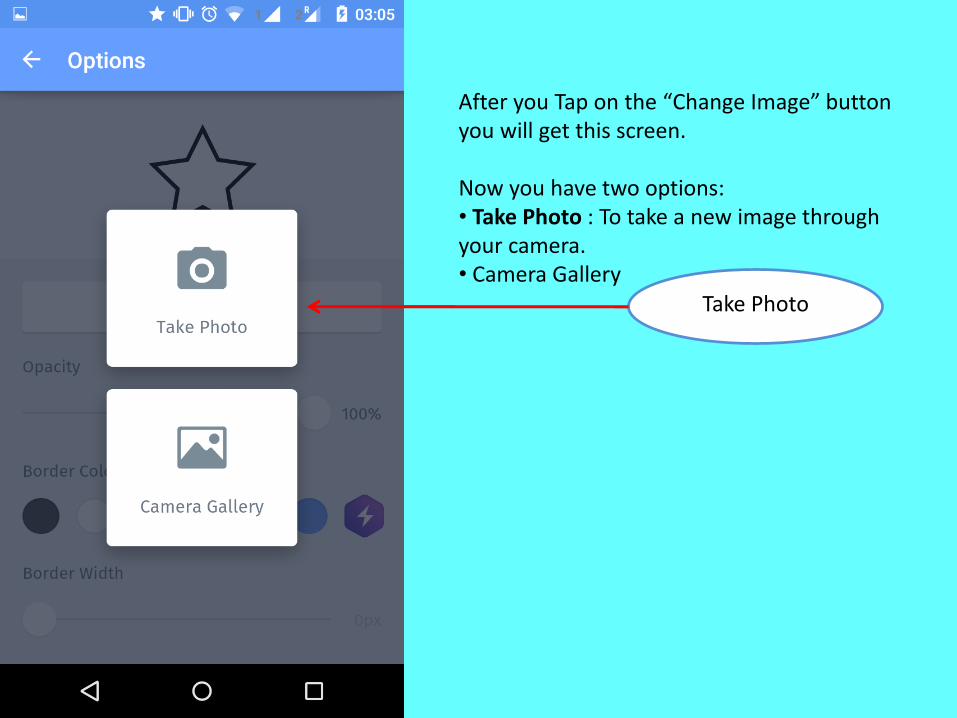
After you Tap on the “Change Image” button you will get this screen.
Now you have two options:• Take Photo : To take a new image through your camera.• Camera Gallery
Take Photo
After you Tap on the “Change Image” button you will get this screen.
Now you have two options:• Take Photo• Camera Gallery : To use the existing images in your camera gallery.
Camera Gallery
* Skipping process for both as I am assuming that you know how to take an image from your camera and how to select an image from your gallery.
Opacity
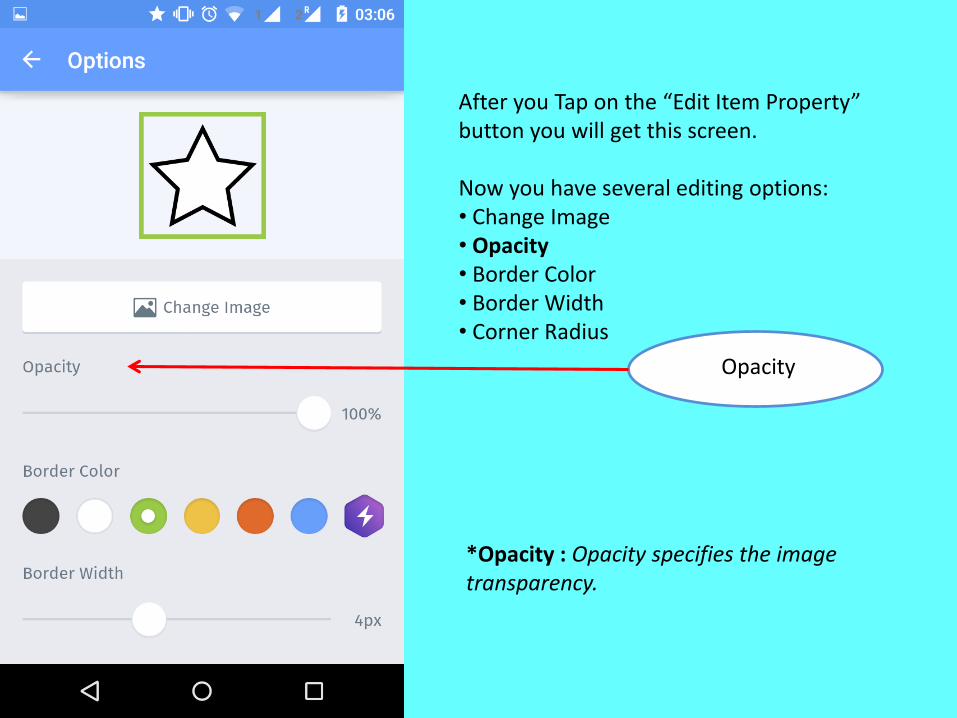
After you Tap on the “Edit Item Property” button you will get this screen.
Now you have several editing options:• Change Image• Opacity • Border Color• Border Width• Corner Radius
*Opacity : Opacity specifies the image transparency.
Border Color
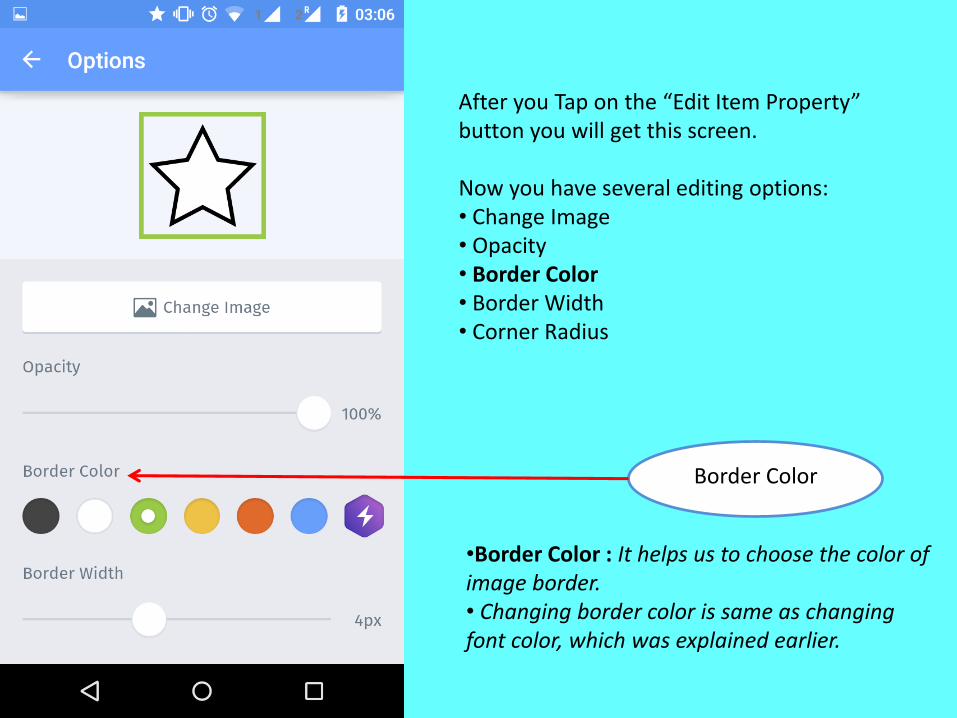
After you Tap on the “Edit Item Property” button you will get this screen.
Now you have several editing options:• Change Image• Opacity • Border Color• Border Width• Corner Radius
•Border Color : It helps us to choose the color of image border.• Changing border color is same as changing font color, which was explained earlier.
Border Width
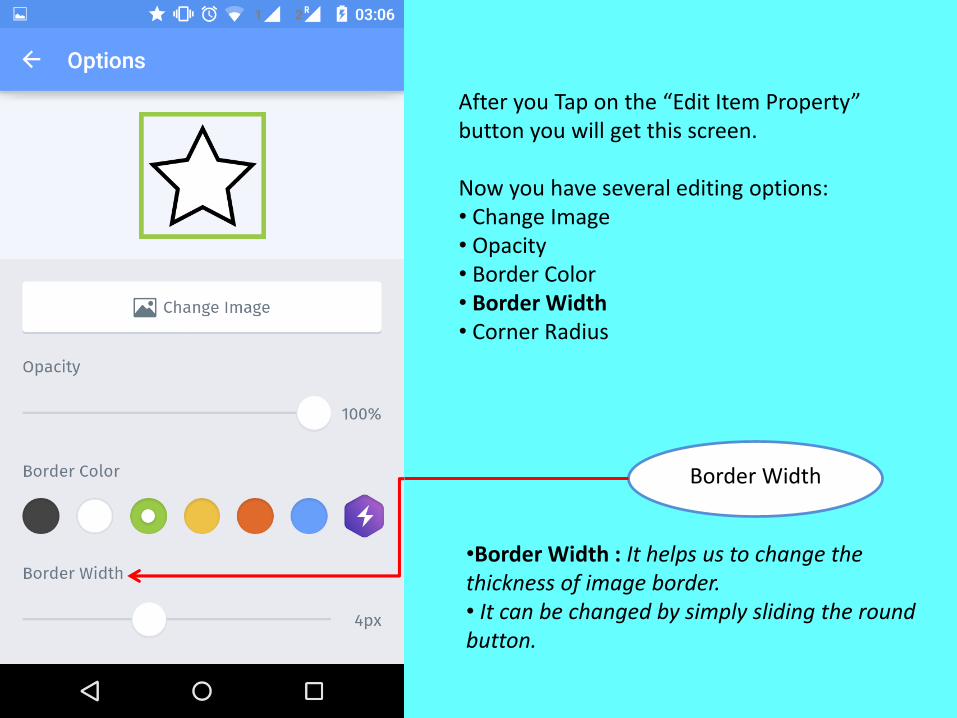
After you Tap on the “Edit Item Property” button you will get this screen.
Now you have several editing options:• Change Image• Opacity • Border Color• Border Width• Corner Radius
•Border Width : It helps us to change the thickness of image border.• It can be changed by simply sliding the round button.
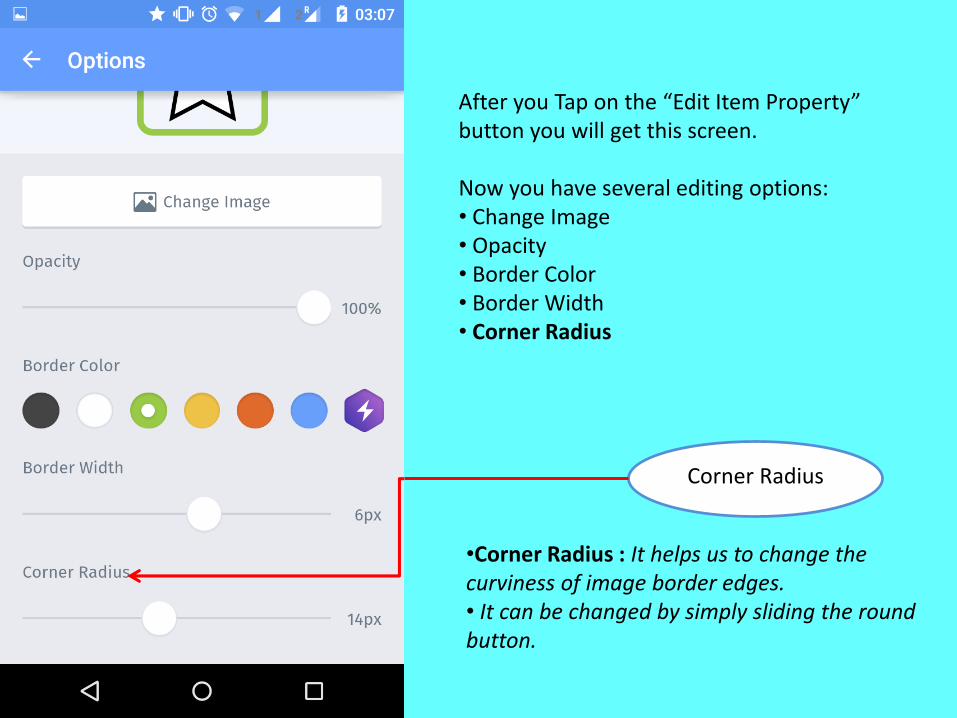
Corner Radius
After you Tap on the “Edit Item Property” button you will get this screen.
Now you have several editing options:• Change Image• Opacity • Border Color• Border Width• Corner Radius
•Corner Radius : It helps us to change the curviness of image border edges. • It can be changed by simply sliding the round button.
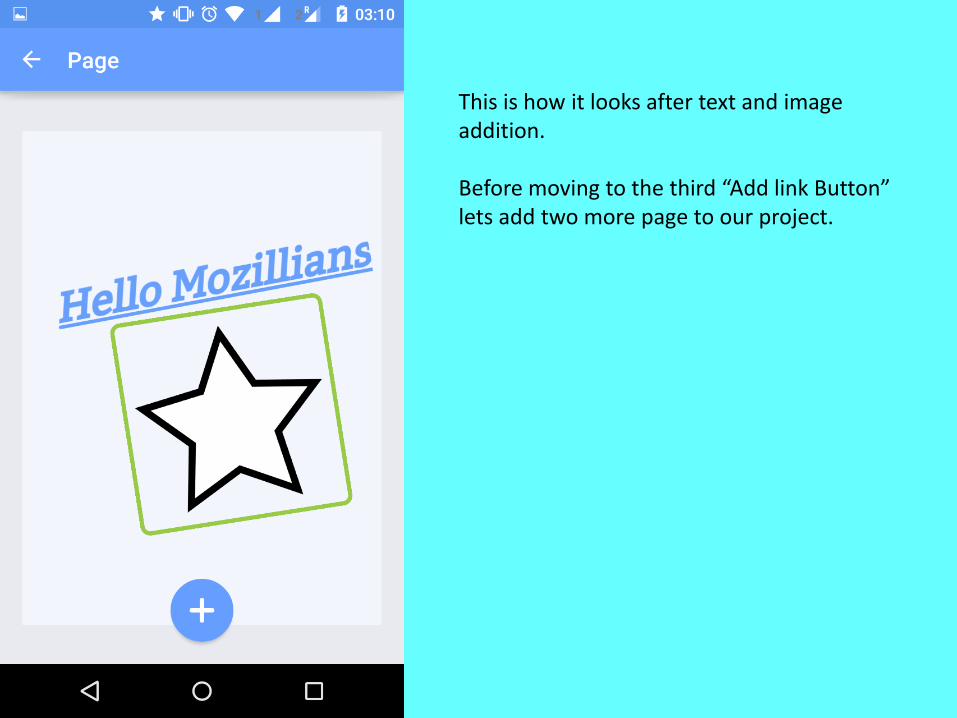
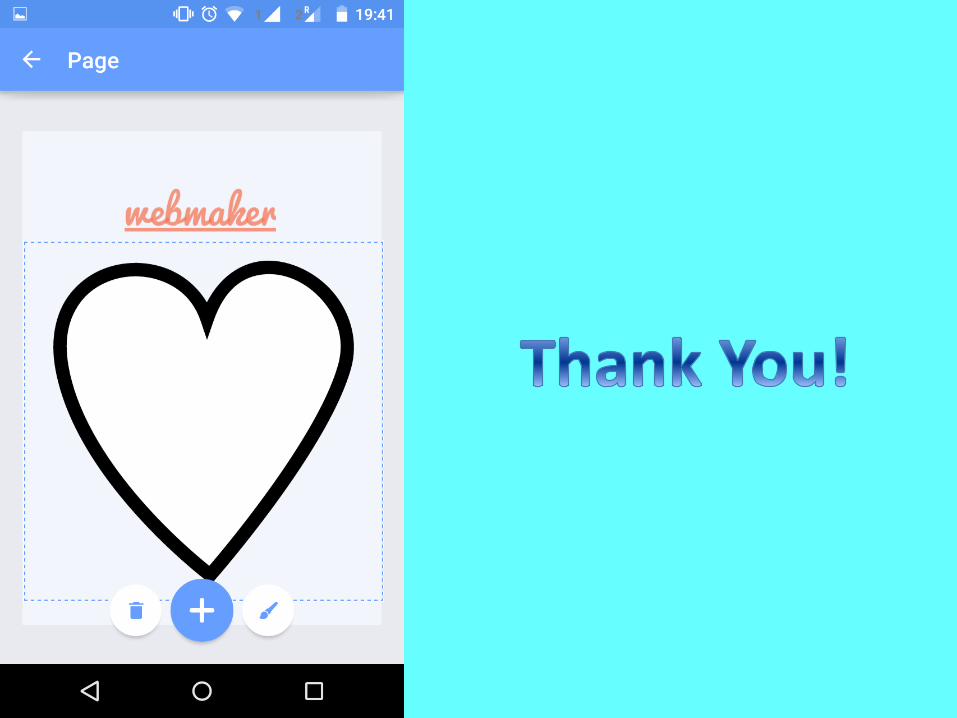
This is how it looks after text and image addition.
Before moving to the third “Add link Button” lets add two more page to our project.
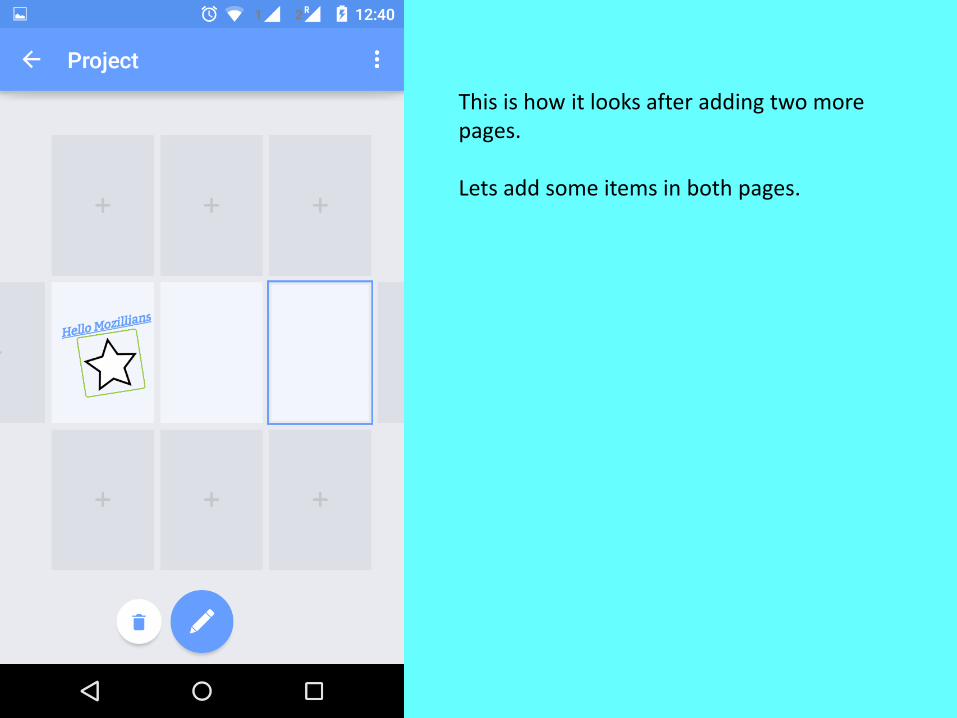
This is how it looks after adding two more pages.
Lets add some items in both pages.
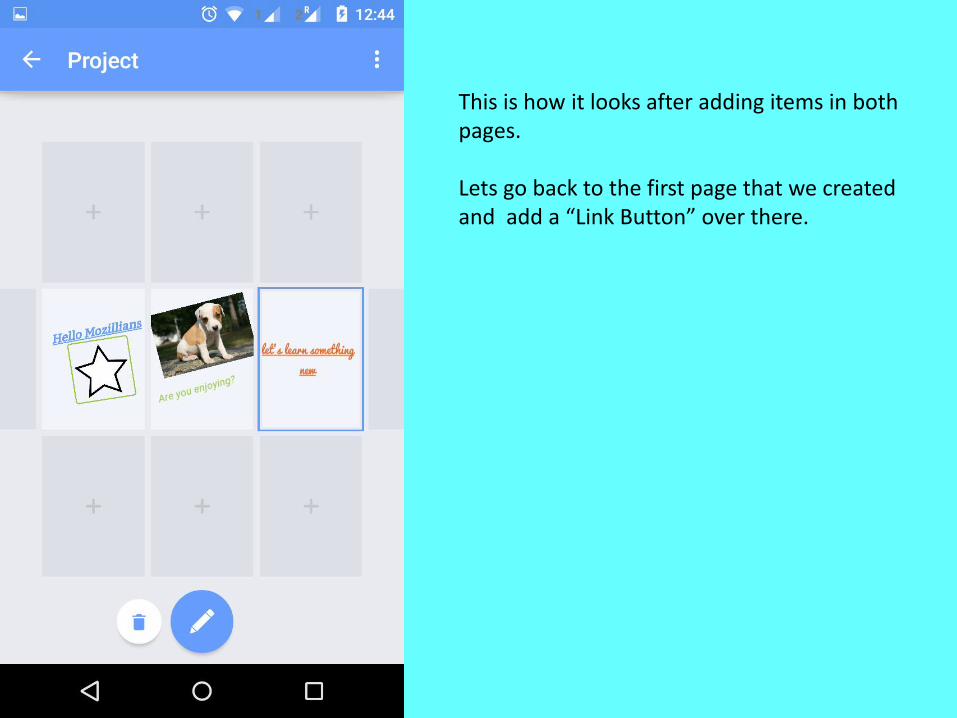
This is how it looks after adding items in both pages.
Lets go back to the first page that we created and add a “Link Button” over there.
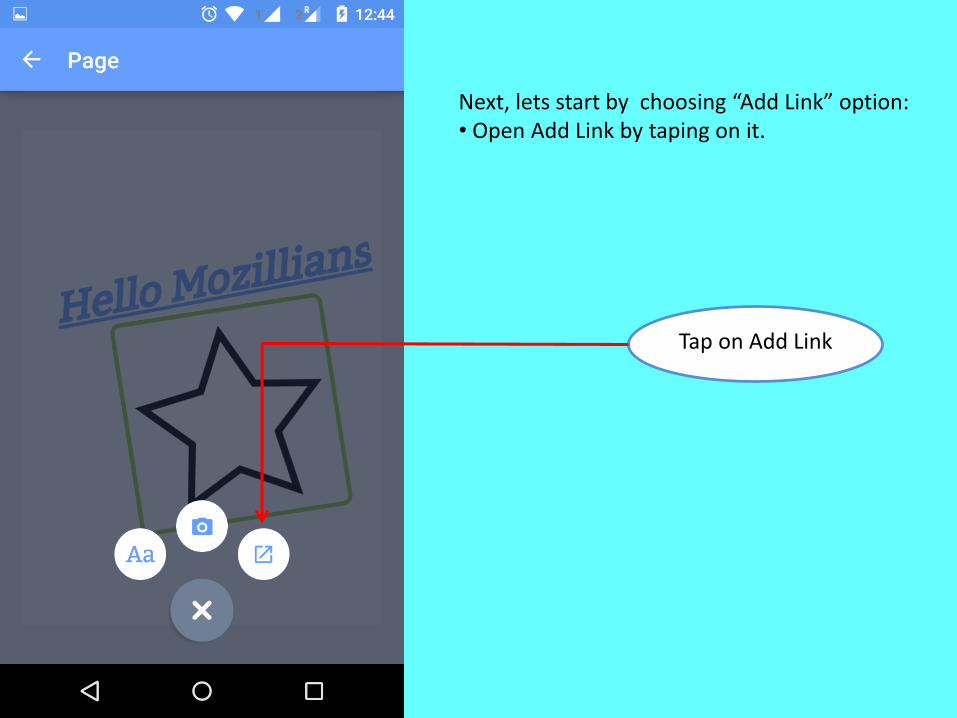
Tap on Add Link
Next, lets start by choosing “Add Link” option:• Open Add Link by taping on it.
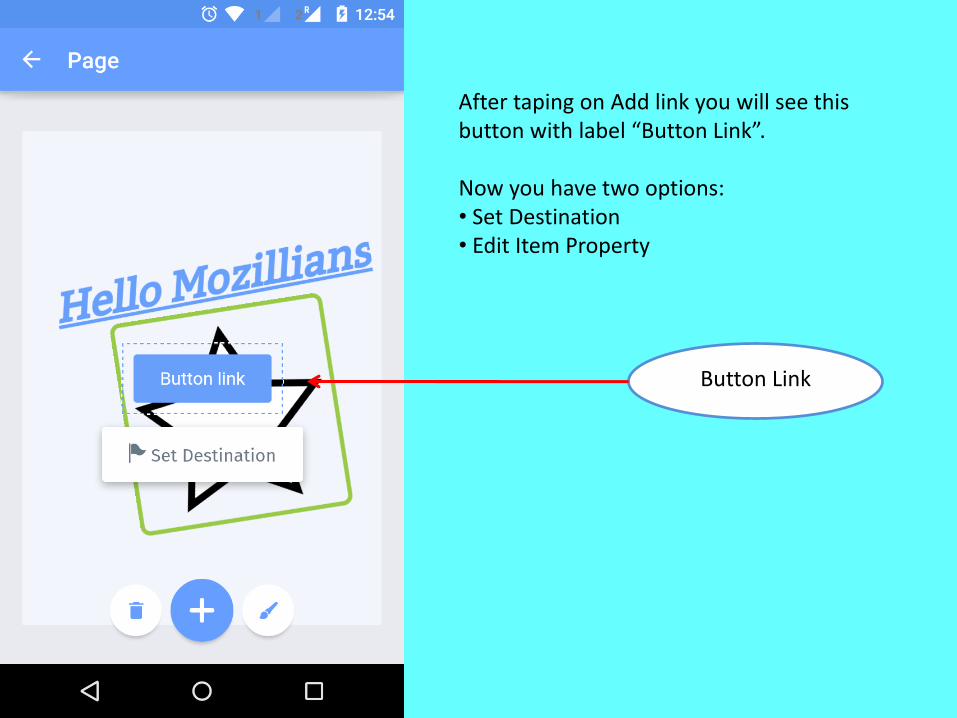
After taping on Add link you will see this button with label “Button Link”.
Now you have two options:• Set Destination• Edit Item Property
Button Link
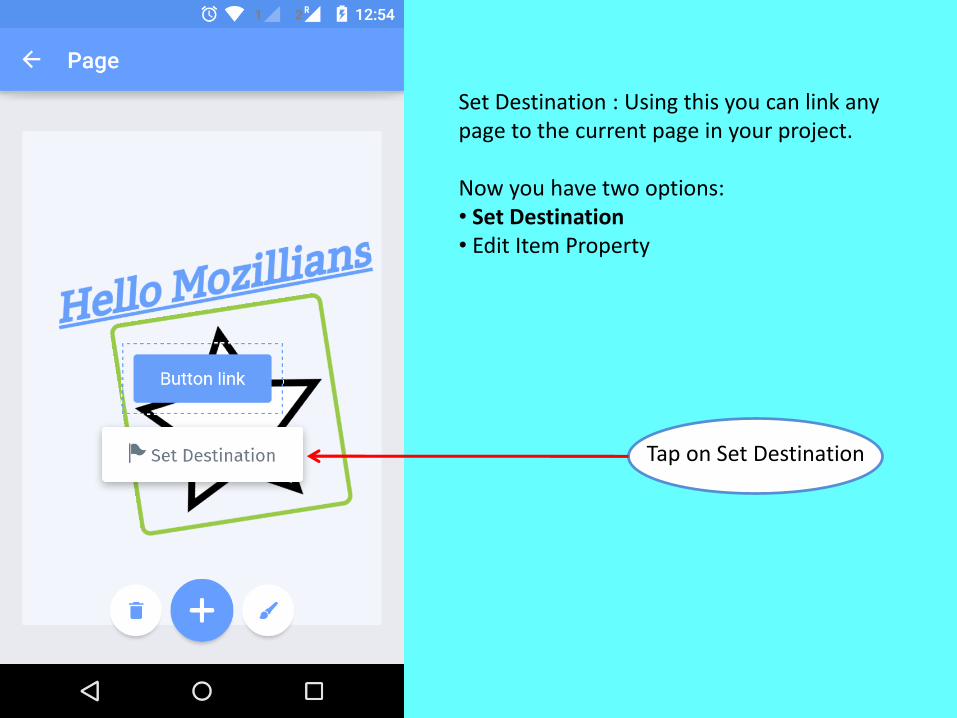
Set Destination : Using this you can link any page to the current page in your project.
Now you have two options:• Set Destination• Edit Item Property
Tap on Set Destination
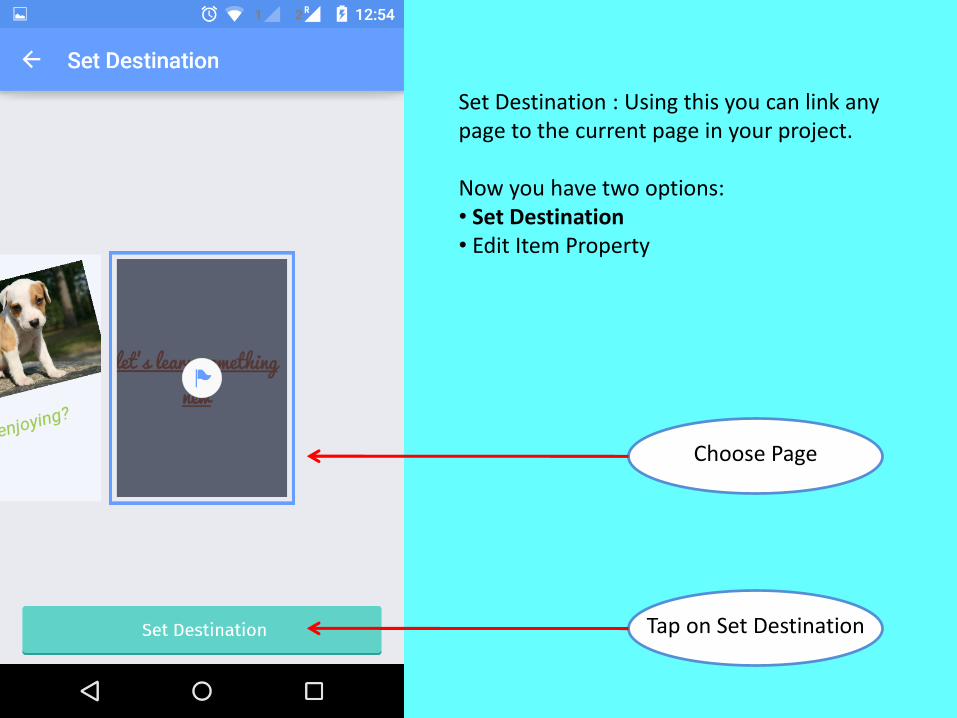
Choose Page
Tap on Set Destination
Set Destination : Using this you can link any page to the current page in your project.
Now you have two options:• Set Destination• Edit Item Property
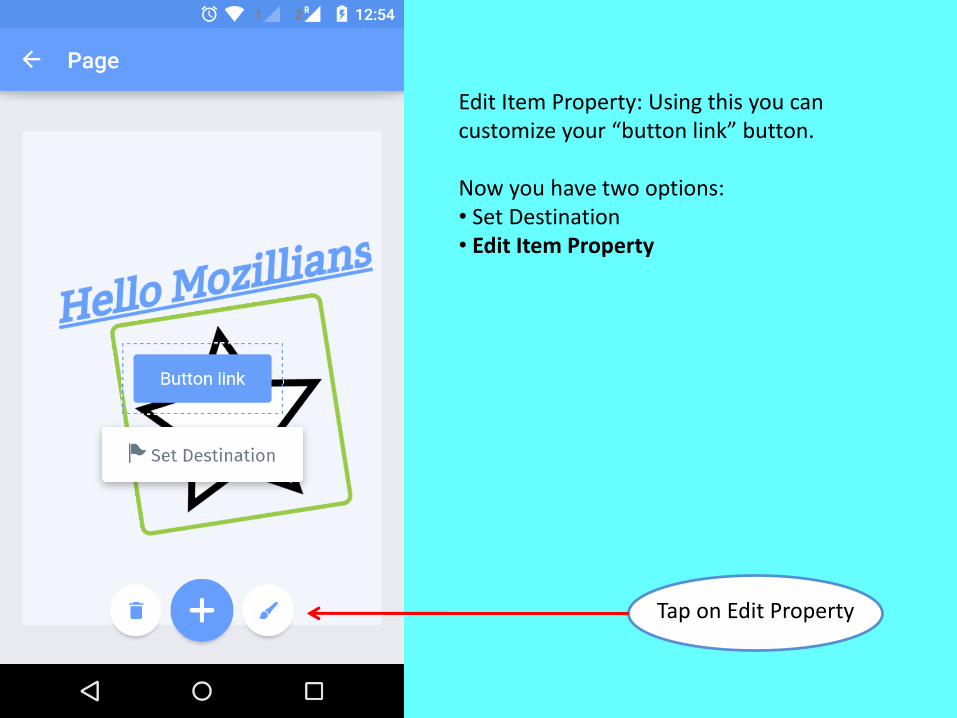
Edit Item Property: Using this you can customize your “button link” button.
Now you have two options:• Set Destination• Edit Item Property
Tap on Edit Property
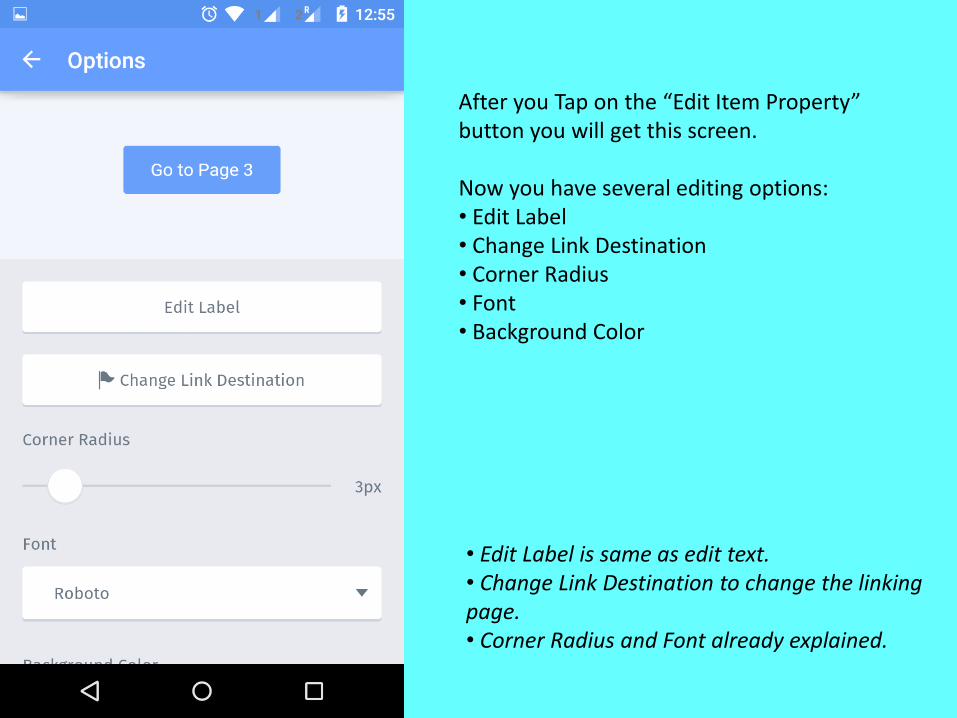
After you Tap on the “Edit Item Property” button you will get this screen.
Now you have several editing options:• Edit Label• Change Link Destination• Corner Radius• Font • Background Color
• Edit Label is same as edit text.• Change Link Destination to change the linking page.• Corner Radius and Font already explained.
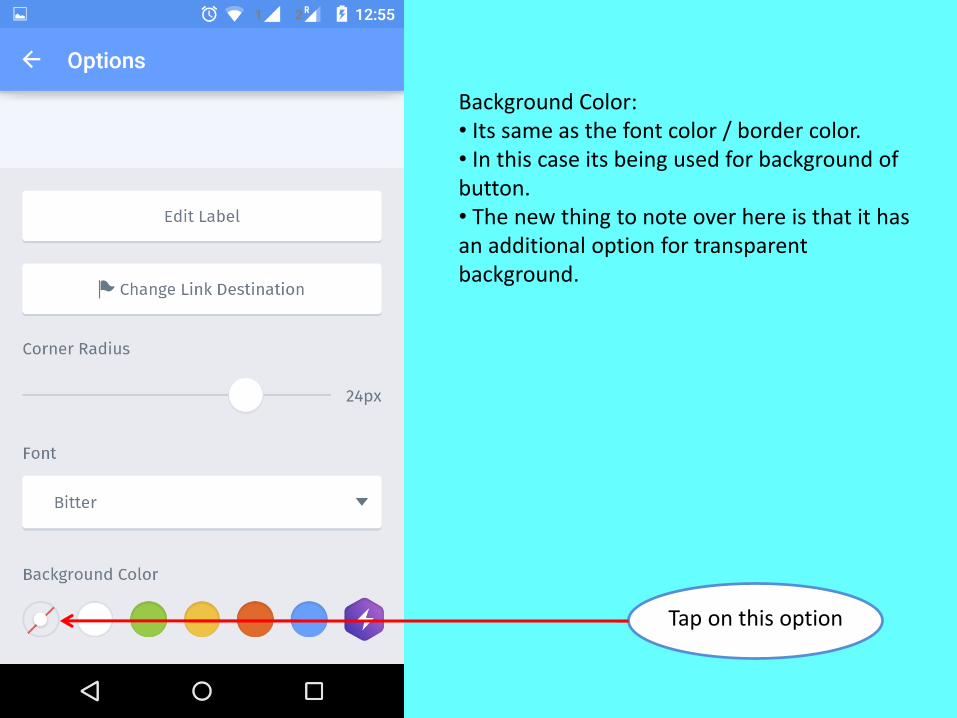
Background Color: • Its same as the font color / border color. • In this case its being used for background of button.• The new thing to note over here is that it has an additional option for transparent background.
Tap on this option
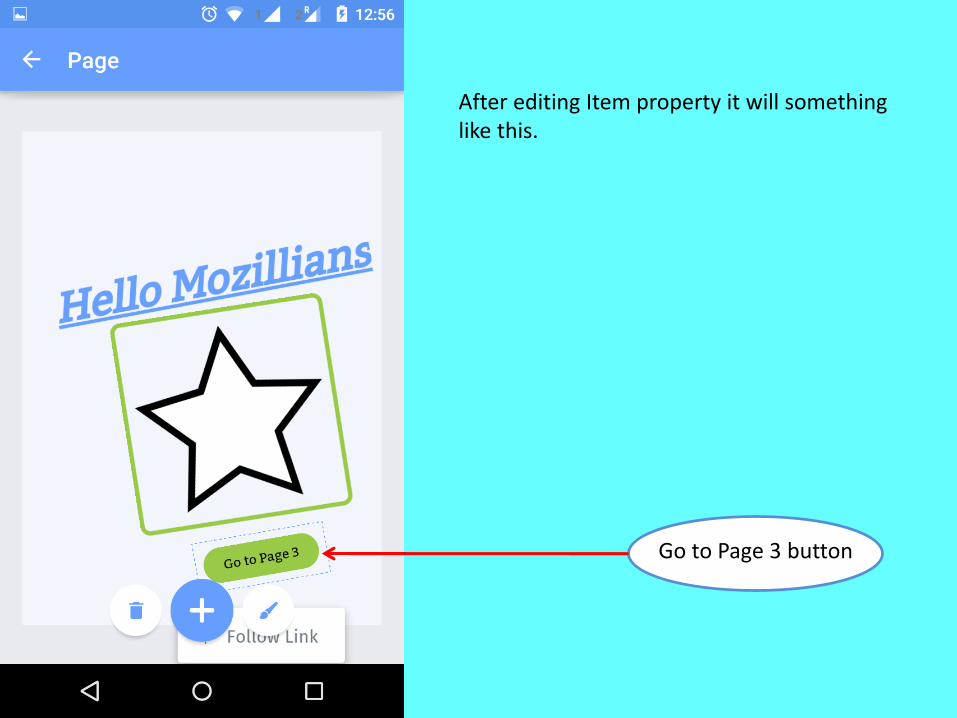
After editing Item property it will something like this.
Go to Page 3 button
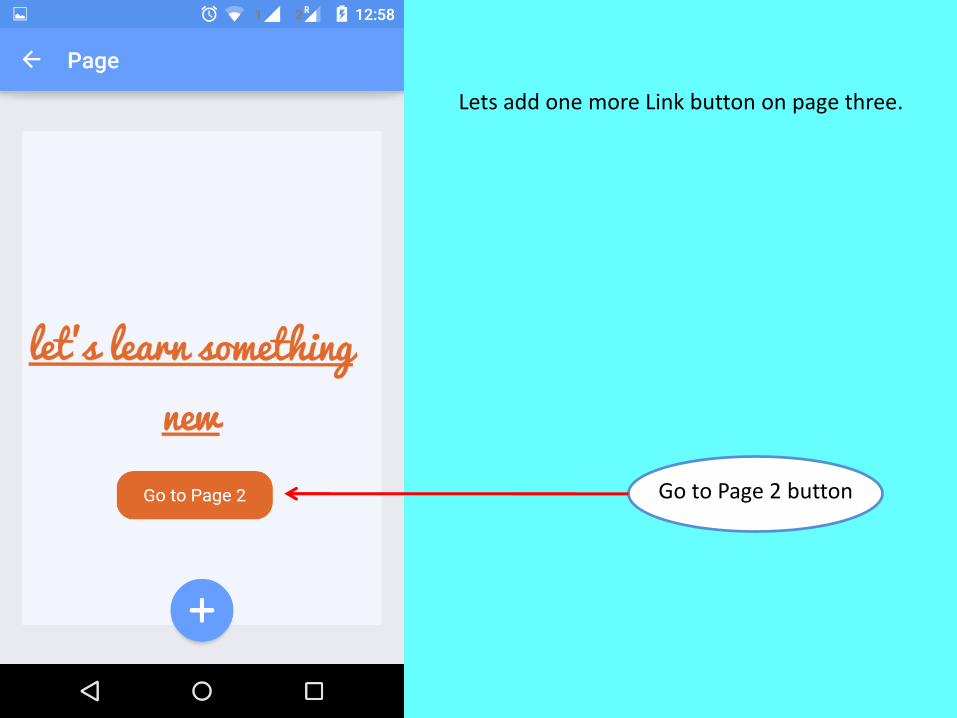
Lets add one more Link button on page three.
Go to Page 2 button

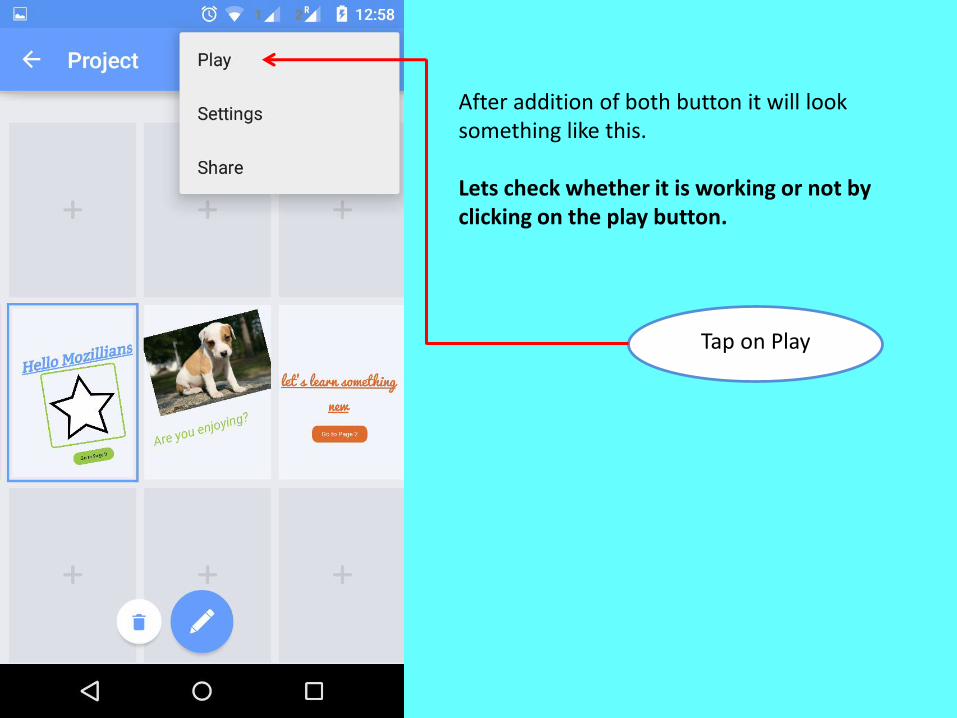
After addition of both button it will look something like this.
Lets check whether it is working or not by clicking on the play button.
Tap for more option
After addition of both button it will look something like this.
Lets check whether it is working or not by clicking on the play button.
Tap on Play
Tap on this button
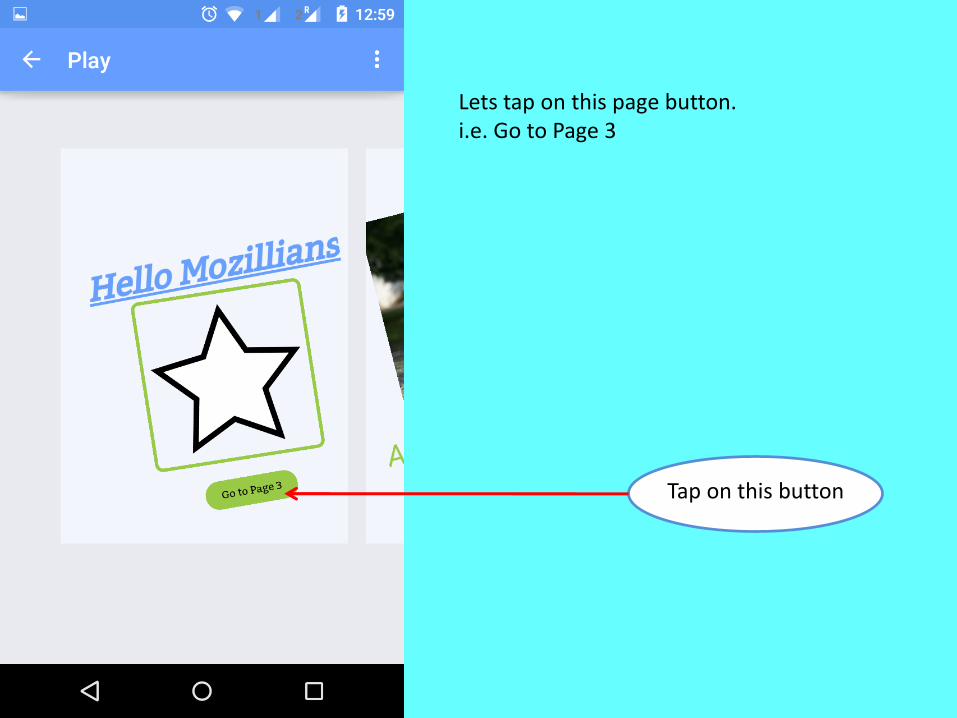
Lets tap on this page button. i.e. Go to Page 3
Tap on this button
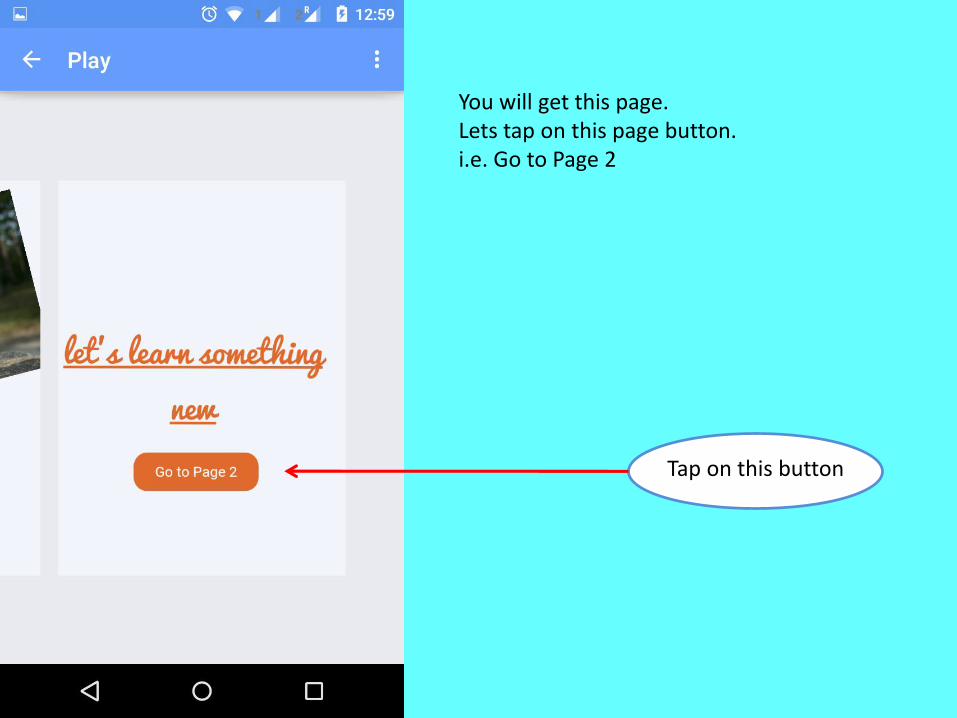
You will get this page.Lets tap on this page button. i.e. Go to Page 2
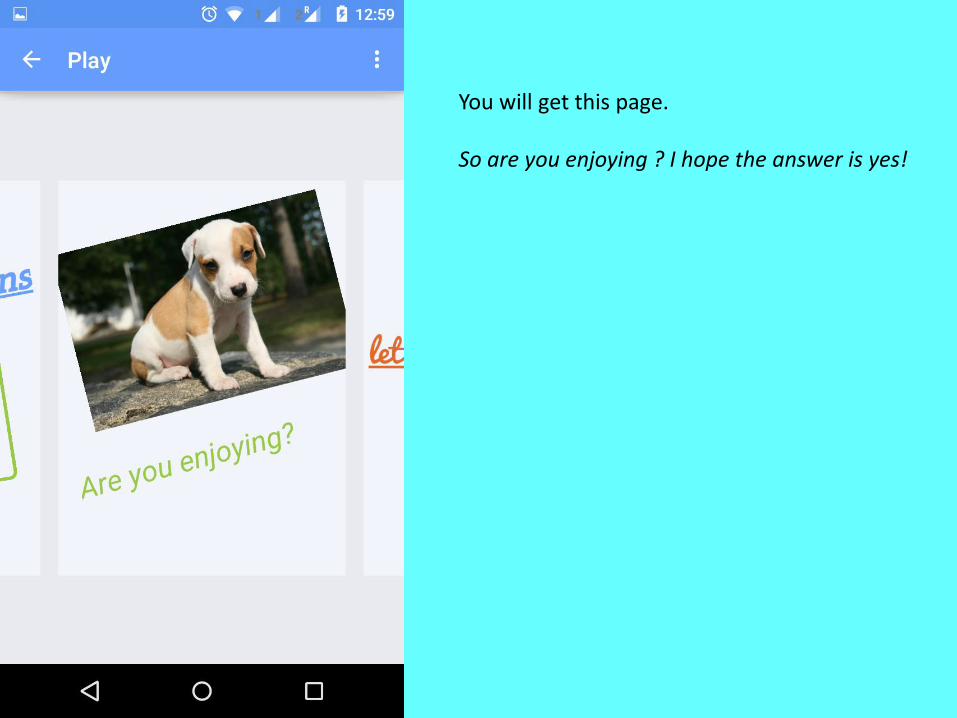
You will get this page.
So are you enjoying ? I hope the answer is yes!
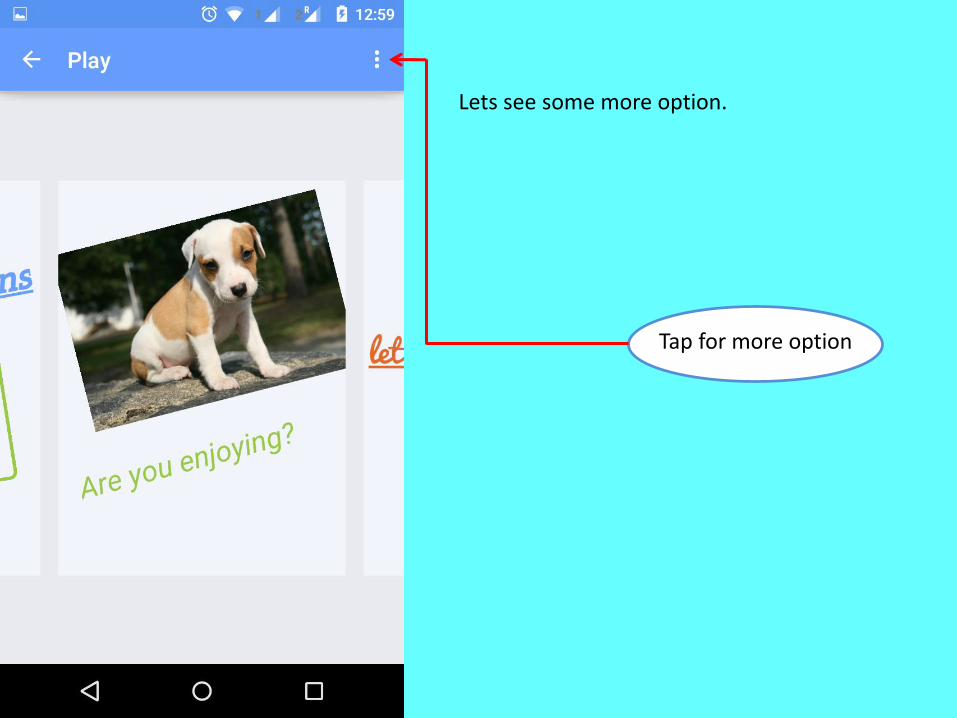
Lets see some more option.
Tap for more option
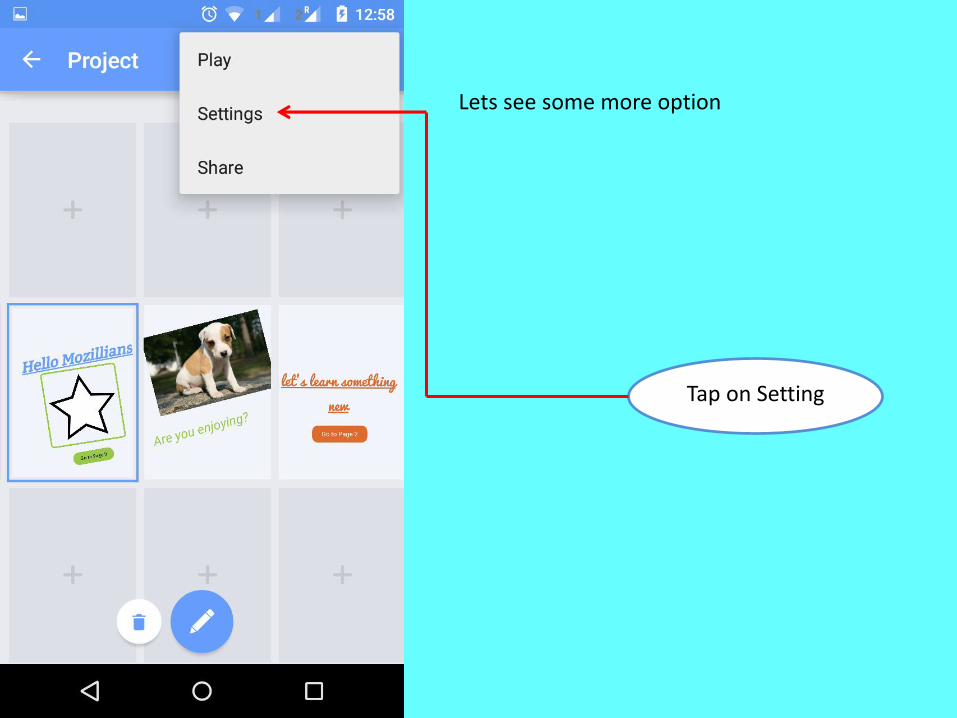
Tap on Setting
Lets see some more option
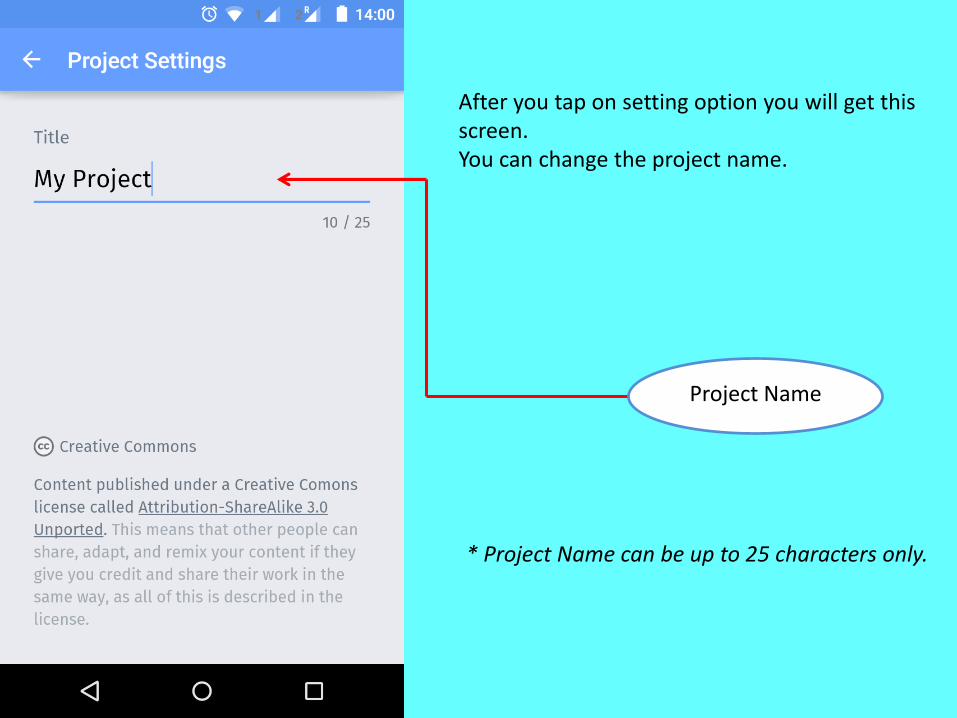
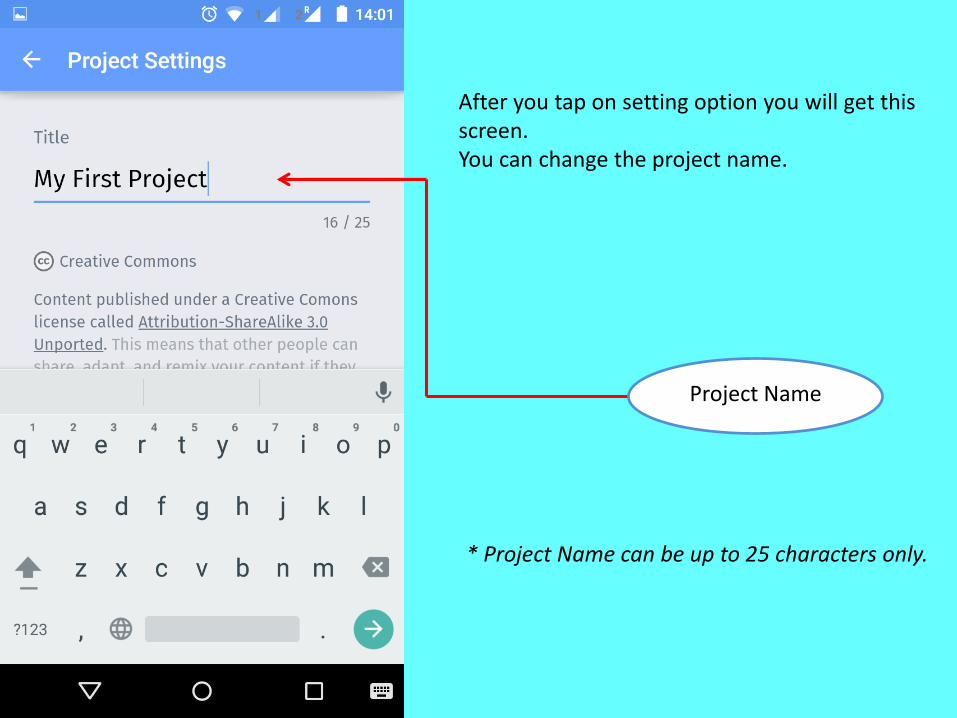
After you tap on setting option you will get this screen.You can change the project name.
Project Name
* Project Name can be up to 25 characters only.
After you tap on setting option you will get this screen.You can change the project name.
Project Name
* Project Name can be up to 25 characters only.
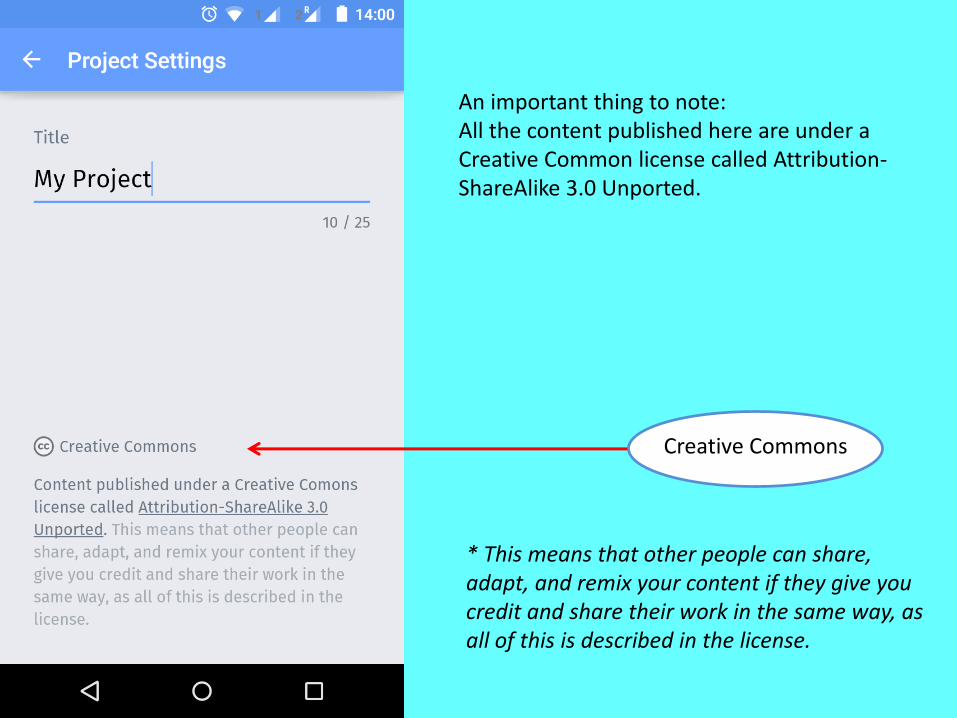
An important thing to note:All the content published here are under a Creative Common license called Attribution-ShareAlike 3.0 Unported.
Creative Commons
* This means that other people can share, adapt, and remix your content if they give you credit and share their work in the same way, as all of this is described in the license.
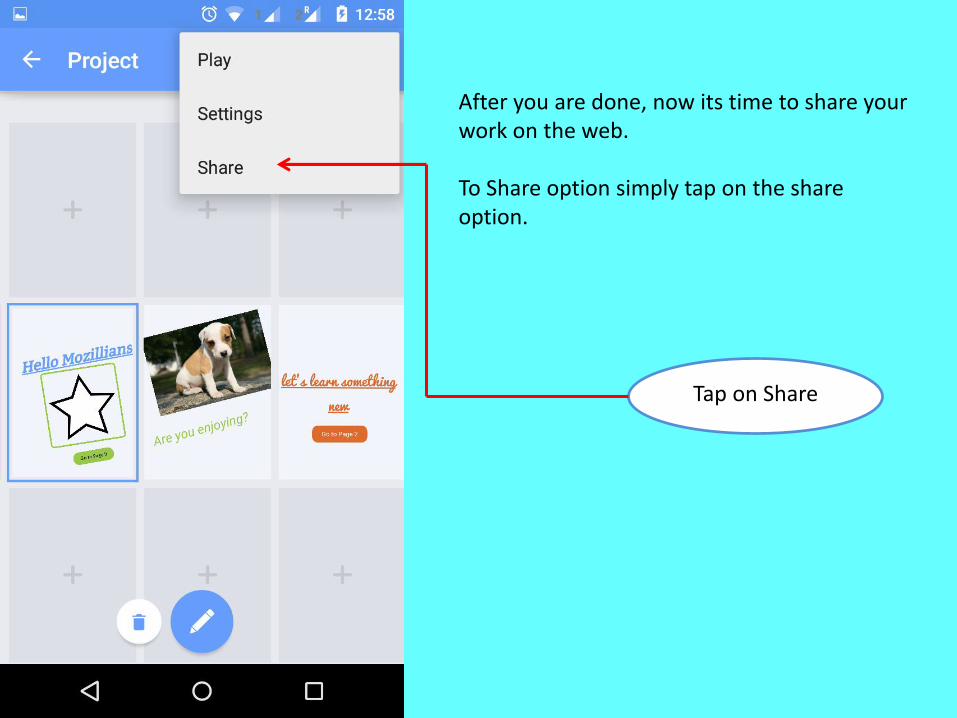
Tap on Share
After you are done, now its time to share your work on the web.
To Share option simply tap on the share option.
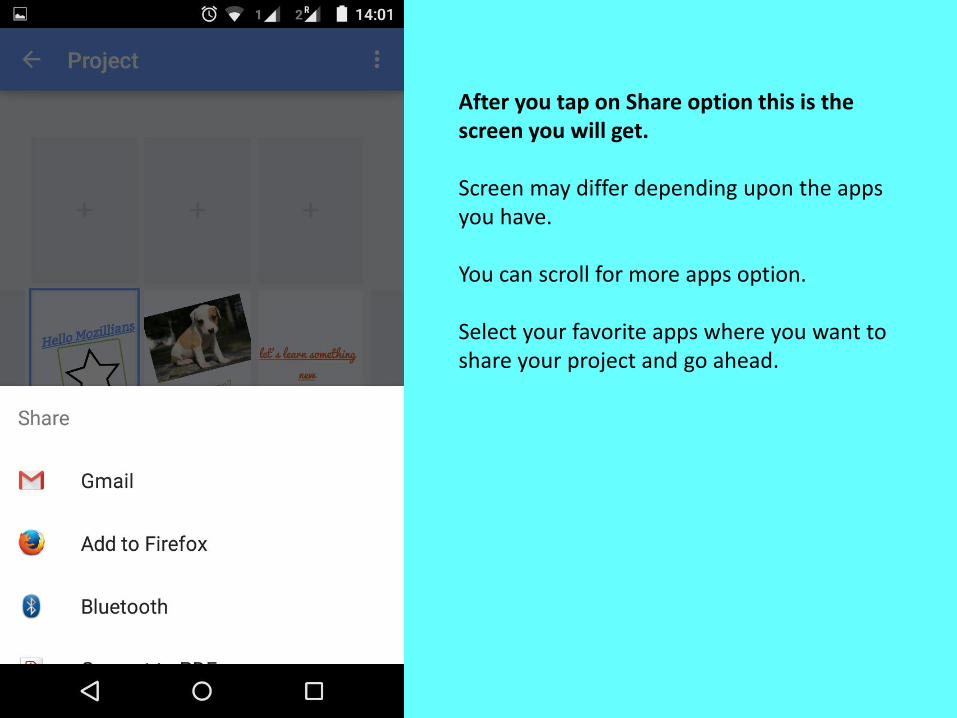
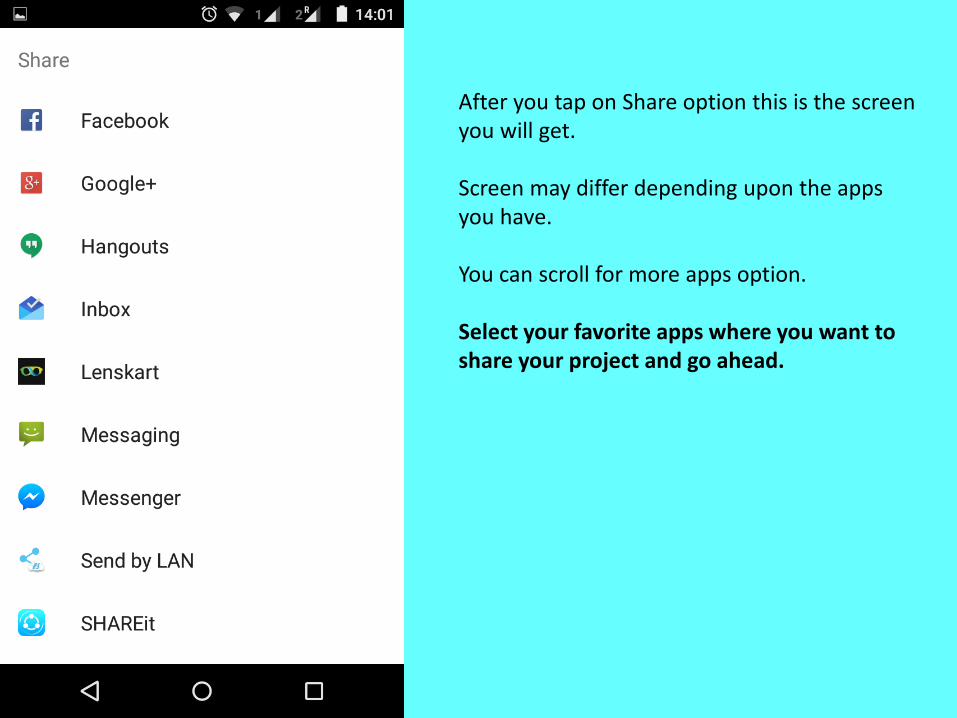
After you tap on Share option this is the screen you will get.
Screen may differ depending upon the apps you have.
You can scroll for more apps option.
Select your favorite apps where you want to share your project and go ahead.
After you tap on Share option this is the screen you will get.
Screen may differ depending upon the apps you have.
You can scroll for more apps option.
Select your favorite apps where you want to share your project and go ahead.
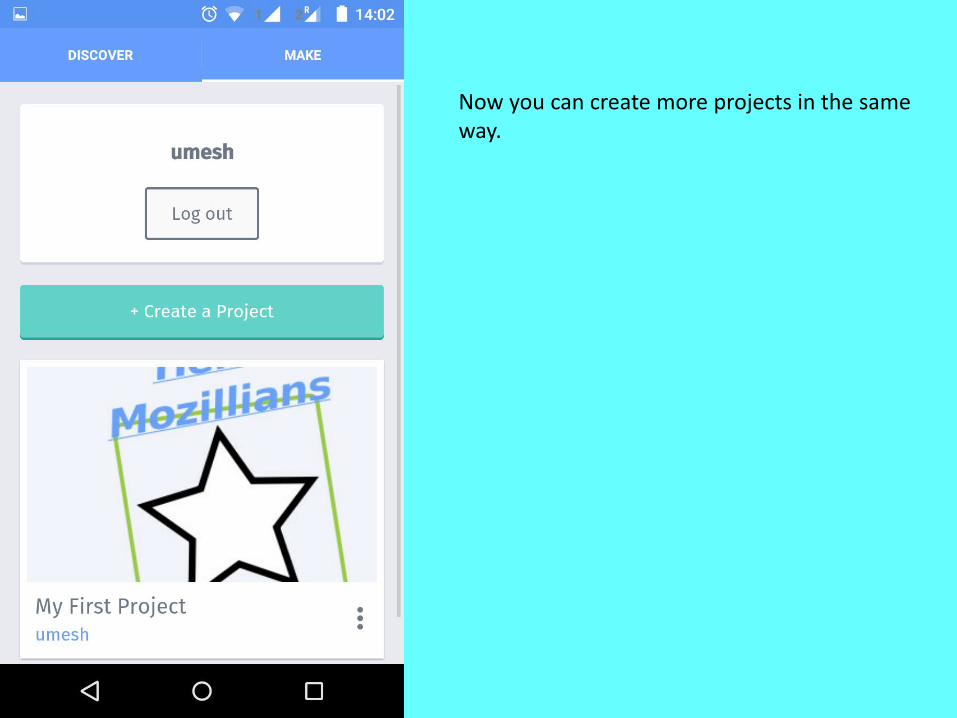
Now you can create more projects in the same way.
We built Webmaker with the hopes of creating a fun, hands-on tool for helping individuals move beyond a read-only version of the Web.
Our community played a vital role in this process: volunteers in Bangladesh, Kenya, Brazil, India and elsewhere pitched in to help.
When you have a minute, try out Webmaker Beta and share your experiences — we’d love to hear what you think. Reach us at [email protected] or @Webmaker.
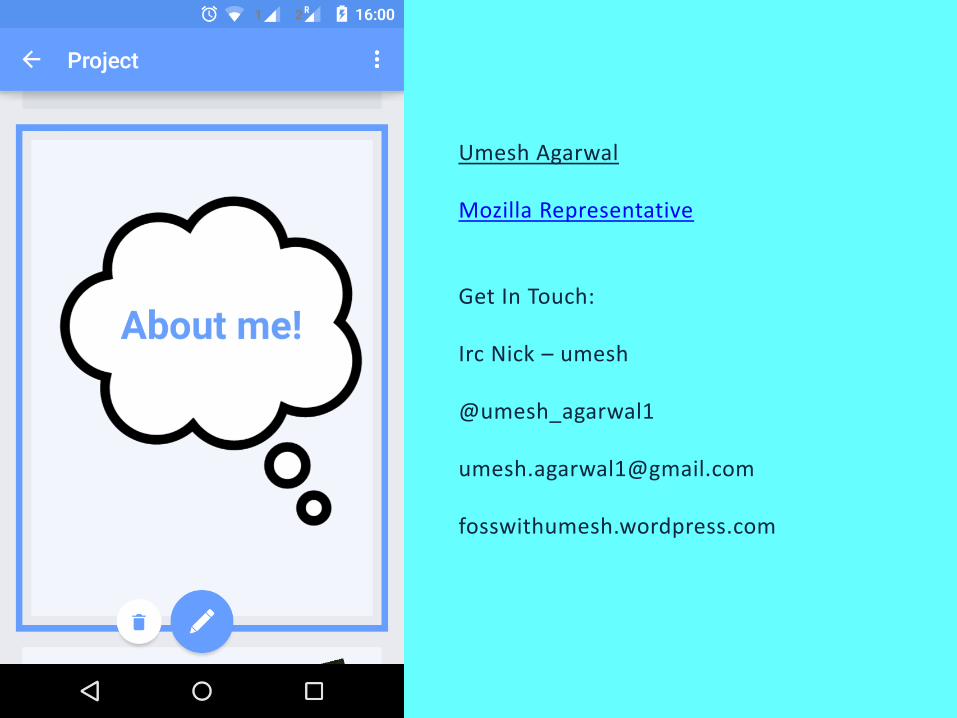
Umesh Agarwal
Mozilla Representative
Get In Touch:
Irc Nick – umesh
@umesh_agarwal1
fosswithumesh.wordpress.com