
Web viewIn addition, there is a list of recent files opened and in the lower right corner you can...
7
Introduction to Word 2007 1. Ribbons: i. In older versions of Office, Word and Excel used Menus and Toolbars. ii. In the 2007 Office suite (Word, Excel and more) use Ribbons. Ribbons contain groups of buttons. iii. The buttons are a combination of icons and words. 1. In Figure 1 you can see an example of the Bold button in the Font Group on the Home Ribbon iv. IMPORTANT NOTE: Depending on the screen resolution settings or the wideness of your screen, your Ribbon may look wider or less wide than the pictures seen here. v. If you look at the top of Figure 1, you can see the Title Bar vi. Below the Title Bar in Figure 1, you can see there are seven standard Ribbons. 1. The last Ribbon in Figure 1 is named the Developer Ribbon: this extra Ribbon was added in the Options area of Word. Figure 1 vii. Besides the seven standard Ribbons, there are other “Context- sensitive Ribbons” that show up when you have items highlighted. We will see many of these as we continue our studies of Office 2007. 2. Orb “Office button”: i. As seen in Figure 2, after you click on the Orb, a drop-down menu appears with items such as New and Save As. In addition, there is a list of recent files opened and in the lower right corner you can see the Word Options button. Page 1 of 7 Bold icon button in Font Group on Home Ribbon Title Home, Insert, Page Layout, Reference, Mailings, Review and View Ribbons are seven standard Ribbons
-
Upload
nguyenhanh -
Category
Documents
-
view
215 -
download
2
Transcript of Web viewIn addition, there is a list of recent files opened and in the lower right corner you can...

Introduction to Word 20071. Ribbons:
i. In older versions of Office, Word and Excel used Menus and Toolbars.ii. In the 2007 Office suite (Word, Excel and more) use Ribbons. Ribbons contain groups of buttons.iii. The buttons are a combination of icons and words.
1. In Figure 1 you can see an example of the Bold button in the Font Group on the Home Ribboniv. IMPORTANT NOTE: Depending on the screen resolution settings or the wideness of your screen, your
Ribbon may look wider or less wide than the pictures seen here.v. If you look at the top of Figure 1, you can see the Title Barvi. Below the Title Bar in Figure 1, you can see there are seven standard Ribbons.
1. The last Ribbon in Figure 1 is named the Developer Ribbon: this extra Ribbon was added in the Options area of Word.
Figure 1
vii. Besides the seven standard Ribbons, there are other “Context-sensitive Ribbons” that show up when you have items highlighted. We will see many of these as we continue our studies of Office 2007.
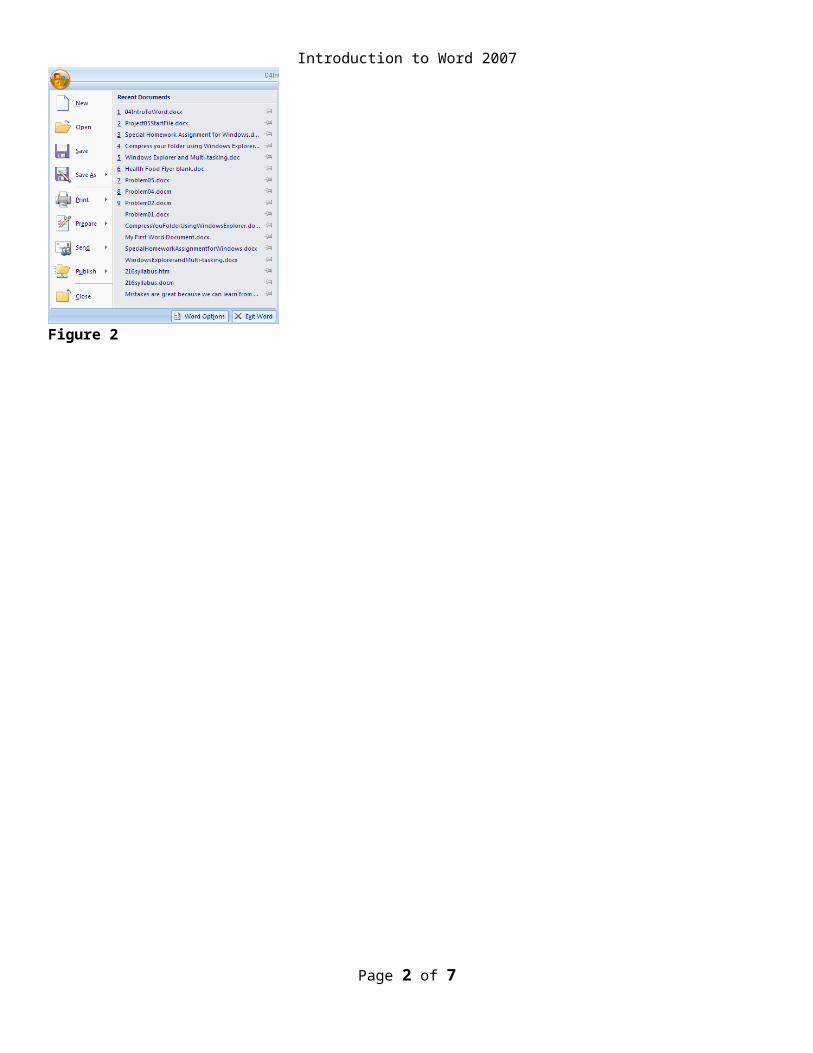
2. Orb “Office button”:i. As seen in Figure 2, after you click on the Orb, a drop-down menu appears with items such as New and
Save As. In addition, there is a list of recent files opened and in the lower right corner you can see the Word Options button.
Figure 2
Page 1 of 4
Bold icon button in Font Group on Home Ribbon
Title BarHome, Insert, Page Layout, Reference, Mailings, Review and View Ribbons are seven standard Ribbons
Introduction to Word 20073. Quick Access Toolbar (QAT):
i. The QAT shows icon buttons regardless of which Ribbon you have showing. The advantage to this is that you can add your most commonly used icon buttons to the QAT for easy access. To add a button, right-click any Ribbon item and point to “Add To Quick Access Toolbar”.
ii. In Figure 3, you can see the first three icon buttons: Save, Undo, and Redo (these are the default icon buttons). The other buttons have been added to the QAT. The trick is that you should only add the buttons that you use most frequently.
Figure 3
4. Typing:i. Open a new Word document by using the keyboard shortcut Ctrl + N, or click on the Orb, then click on
New icon button, then click on Blank Document in the New Document window.ii. Then type the sentence: “This class is hard, but fun!” and then hit Enter (Figure 4):
Figure 4
5. Non-printing characters (formatting symbols) (Ctrl + Shift + 8, or Ctrl + *)i. Click the Show/Hide button in the Paragraph group on the Home Ribbon (Figure 5):
Figure 5
Page 2 of 4
QAT shows icon buttons regardless of which Ribbon you have showing.
Show/Hide button in the Paragraph group on the Home Ribbon.
The Show/Hide icon button turns on the non-printing characters. These provide good information
to the document creator

Introduction to Word 20076. Task Panes
i. Highlight the word fun. Then copy that word by using the keyboard shortcut for Copy, Ctrl + Cii. Next, point to the launcher in the Clipboard group to open the Clipboard. See Figure 6 below.iii. You can use the Clipboard to copy and paste multiple items.
Figure 6
7. Mini Toolbarsi. As seen in Figure 7, when you highlight a word and move your cursor slowly up and to the right, a mini-
toolbar appears with various icon buttons for formatting. It takes a little getting used to the slow and upward-right movement, but once you get the hang of it, it is easy.
ii.Figure 7
Page 3 of 4
Clipboard launcher
Clipboard Task Pane
Close x-button

Introduction to Word 20078. Keyboard Shortcuts
i. Using the Alt key you can open almost all of the items in the Ribbons. For Example, in Figure 8 , you can see that after you tap the alt key once, “ToolTips” appear with letters
Figure 8i. After you have tapped the Alt key, to open the Page Layout Ribbon you would tap the letter “P” key (Figure 9):
Figure 9
ii. As you can see in Figure 9, new Toll Tips appear with the options for the Page Layout Ribbon. To get to the launcher for the Page Setup dialog box you would tap the letter keys “S” and then “P”.
iii. In conclusion, the keyboard short cut for the Page Setup dialog box is:1. Tap the keys in succession: Alt, P, S, P (Alt + P + S + P). You would then see the Page Setup dialog
box as seen in :
iv.Figure 10
9. Status Bar is at the bottom of the Word window (Figure 11). It shows information such as Number of pages and Number of Words in document.
Figure 11
Page 4 of 4
The Tool Tip for Page Layout Ribbon is “P”
To get to the Page Setup dialog box you would tap
the letter keys “S” and then “P”.
Status Bar


