Web viewCaterpillar Espiritu Bracelet, ... There is a spring’y and stretch’y quality to...
30
Caterpillar Espiritu Bracelet with Warren Feld A LearnToBead.Net Class www.LearnToBead.net [email protected] Caterpillar Espiritu Bracelet Instructor: Warren Feld “Venus” Palette Beginner Level BW1-SOM-08-Fringe Capture an aspiring, spiritual essence! Learn to create an expressive fringe bracelet using a very large palette of colors and shapes. This set of instructions is organized as a series of Jewelry Design Choices: This set of instructions is organized as a series of Jewelry Design Choices: SUPPLIES LIST, p. 3 I. Planning Your Project , p. 7 ABOUT FRINGE, p. 7 IA. Conceptualizing Your Piece , p. 8 WORKING WITH A LARGE COLOR PALETTE, p.9 IB. Measurements , p. 10 IC. Selecting Materials , p. 11 ID. Sketching a Pattern or Graph , p. 11 IE. Identifying Potential Areas of Weakness within Your Piece , p. 12 IF. Managing Support Systems , p. 12 Copyright © 2014 by Warren Feld, LearnToBead.net. This handout is available for purchase at www.LearnToBead.net , www.BeDazzledBeads.com , or www.LandOfOdds.com , and is intended for personal use only. Reproduction of this handout by or for any persons other than personal use is strictly prohibited. Kits, Supplies, Tools available for purchase at www.LandOfOdds.com , www.BeDazzledBeads.com , or www.LearnToBead.net . 1
Transcript of Web viewCaterpillar Espiritu Bracelet, ... There is a spring’y and stretch’y quality to...
Caterpillar Espiritu Bracelet with Warren Feld A LearnToBead.Net Class
www.LearnToBead.net [email protected]
Caterpillar Espiritu BraceletInstructor: Warren Feld“Venus” PaletteBeginner Level BW1-SOM-08-Fringe
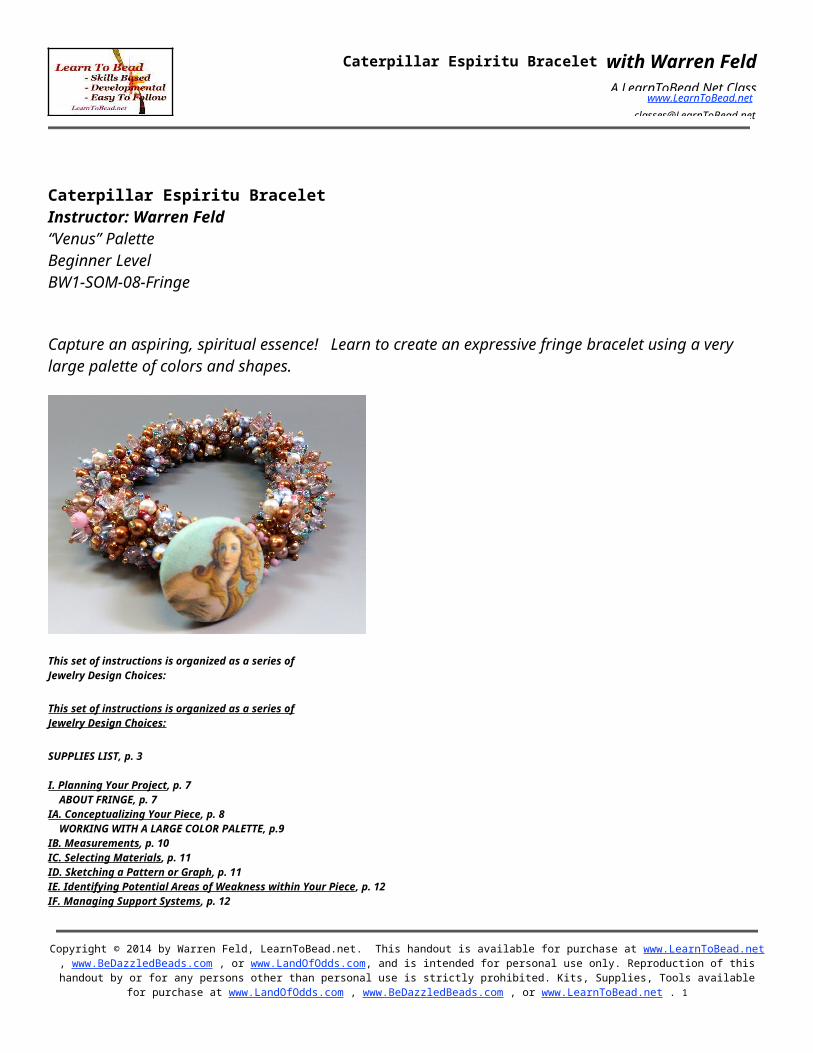
Capture an aspiring, spiritual essence! Learn to create an expressive fringe bracelet using a very large palette of colors and shapes.
This set of instructions is organized as a series of Jewelry Design Choices:
This set of instructions is organized as a series ofJewelry Design Choices:
SUPPLIES LIST, p. 3
I. Planning Your Project, p. 7 ABOUT FRINGE, p. 7IA. Conceptualizing Your Piece, p. 8 WORKING WITH A LARGE COLOR PALETTE, p.9IB. Measurements, p. 10IC. Selecting Materials, p. 11 ID. Sketching a Pattern or Graph, p. 11IE. Identifying Potential Areas of Weakness within Your Piece, p. 12IF. Managing Support Systems, p. 12IG. Visualizing Your Process, p. 13IH. Organizing Your Work Space, p. 14
II. Beginning Your Project, p. 15IIA. Basic Steps, p. 151) Attach Button To Workable Length of Thread, p.152) String on your “Train” of core beads, p. 16
Copyright © 2014 by Warren Feld, LearnToBead.net. This handout is available for purchase at www.LearnToBead.net , www.BeDazzledBeads.com , or www.LandOfOdds.com, and is intended for personal use only. Reproduction of this handout by or for
any persons other than personal use is strictly prohibited. Kits, Supplies, Tools available for purchase at www.LandOfOdds.com , www.BeDazzledBeads.com , or www.LearnToBead.net . 1
Caterpillar Espiritu Bracelet with Warren Feld A LearnToBead.Net Class
www.LearnToBead.net [email protected]
3) Make Your Loop For Button Closure, p.16 -Making a Turn-Around, p. 184) Adding Fringe: First Pass, p. 18 -About Adding Thread, p. 205) Adding Fringe: Second Pass, p 21.6) Adding Fringe: Third Pass, p. 227) Finishing Off, p. 22
IIB. Dealing with Contingencies, p. 22
IIC. Finishing Touches, p. 23
III. Summary of Learning Objectives You Have Met,After Accomplishing This Project, p. 24
IV. Next Steps, p. 26IVA. Suggested Readings, p. 26
What You Will Learn:- Basic Fringing Technique for embellishment- Managing Thread Tension- Reading simple diagrams- Attaching a button clasp- Embellishing a button loop- Working with a very large palette of colors, shapes and sizes
Prerequisites:- Orientation To Beads & Jewelry Findings
TimeFrame:This bracelet takes about 12 hours to complete
These Instructions are written from what is called The Design Perspective.
They first guide you through the kinds of choices to be made, when designing this particular piece. This gives you a sense of how the artist thought through the development of the project. This provides you with a better understanding and some insights about what kinds of things you would need to consider, when designing a similar piece, or adding personal touches to this project.
Then step-by-step, easy-to-follow instructions for completing this project are presented.
Finally, the skills learned by doing this project are summarized.
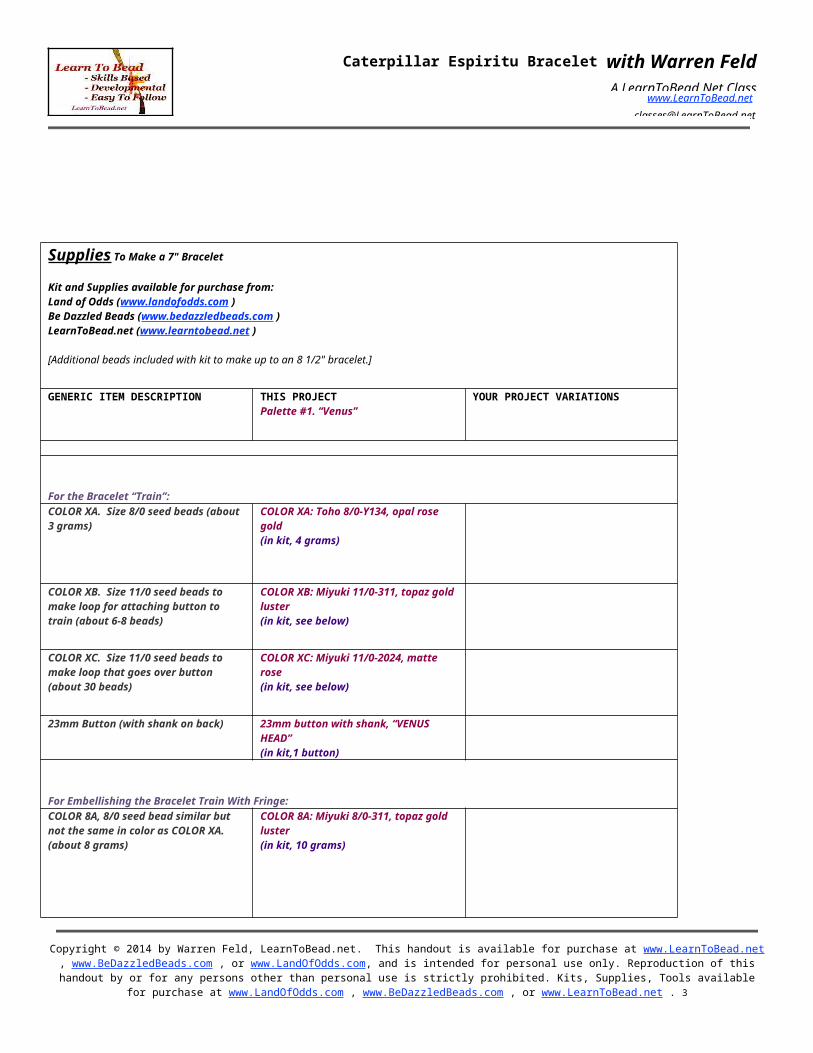
Supplies To Make a 7" Bracelet
Kit and Supplies available for purchase from:Land of Odds (www.landofodds.com )Be Dazzled Beads (www.bedazzledbeads.com )
Copyright © 2014 by Warren Feld, LearnToBead.net. This handout is available for purchase at www.LearnToBead.net , www.BeDazzledBeads.com , or www.LandOfOdds.com, and is intended for personal use only. Reproduction of this handout by or for
any persons other than personal use is strictly prohibited. Kits, Supplies, Tools available for purchase at www.LandOfOdds.com , www.BeDazzledBeads.com , or www.LearnToBead.net . 2
Caterpillar Espiritu Bracelet with Warren Feld A LearnToBead.Net Class
www.LearnToBead.net [email protected]
LearnToBead.net (www.learntobead.net )
[Additional beads included with kit to make up to an 8 1/2" bracelet.]
GENERIC ITEM DESCRIPTION THIS PROJECTPalette #1. “Venus”
YOUR PROJECT VARIATIONS
For the Bracelet “Train”:COLOR XA. Size 8/0 seed beads (about 3 grams)
COLOR XA: Toho 8/0-Y134, opal rose gold(in kit, 4 grams)
COLOR XB. Size 11/0 seed beads to make loop for attaching button to train (about 6-8 beads)
COLOR XB: Miyuki 11/0-311, topaz gold luster(in kit, see below)
COLOR XC. Size 11/0 seed beads to make loop that goes over button (about 30 beads)
COLOR XC: Miyuki 11/0-2024, matte rose (in kit, see below)
23mm Button (with shank on back) 23mm button with shank, “VENUS HEAD”(in kit,1 button)
For Embellishing the Bracelet Train With Fringe:COLOR 8A, 8/0 seed bead similar but not the same in color as COLOR XA. (about 8 grams)
COLOR 8A: Miyuki 8/0-311, topaz gold luster (in kit, 10 grams)
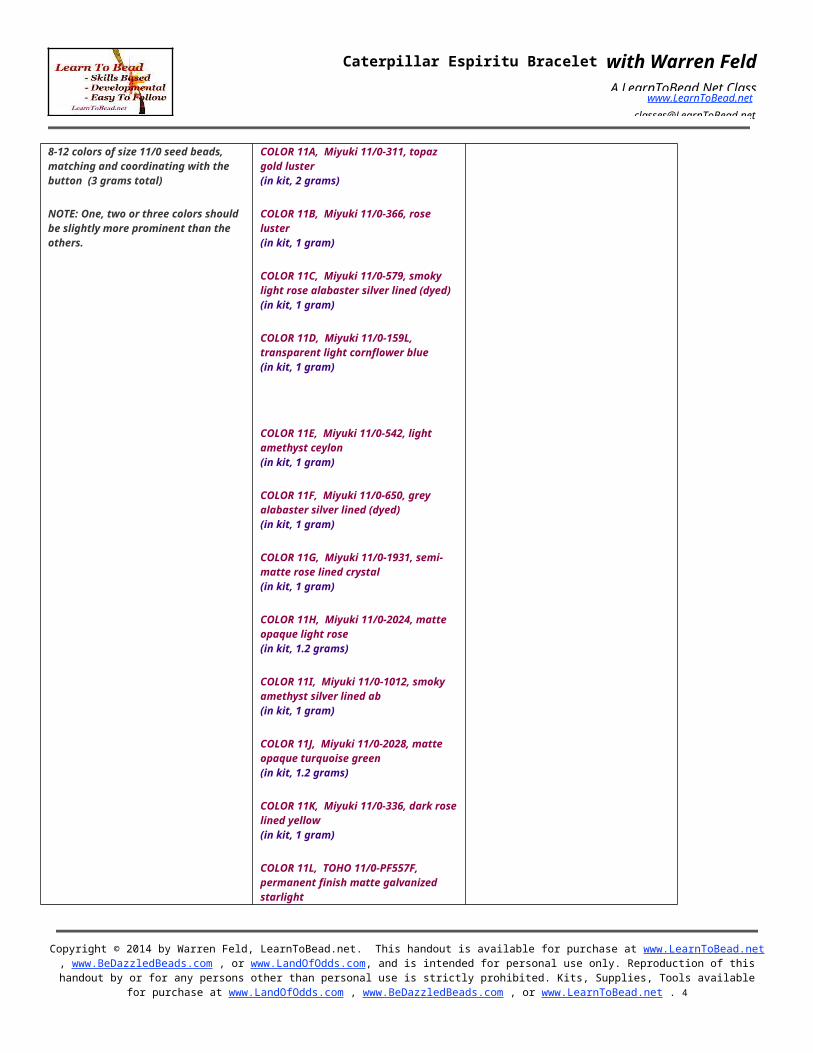
8-12 colors of size 11/0 seed beads, matching and coordinating with the button (3 grams total)
NOTE: One, two or three colors should be slightly more prominent than the others.
COLOR 11A, Miyuki 11/0-311, topaz gold luster(in kit, 2 grams)
COLOR 11B, Miyuki 11/0-366, rose luster(in kit, 1 gram)
COLOR 11C, Miyuki 11/0-579, smoky light rose alabaster silver lined (dyed) (in kit, 1 gram)
COLOR 11D, Miyuki 11/0-159L, transparent light cornflower blue(in kit, 1 gram)
COLOR 11E, Miyuki 11/0-542, light
Copyright © 2014 by Warren Feld, LearnToBead.net. This handout is available for purchase at www.LearnToBead.net , www.BeDazzledBeads.com , or www.LandOfOdds.com, and is intended for personal use only. Reproduction of this handout by or for
any persons other than personal use is strictly prohibited. Kits, Supplies, Tools available for purchase at www.LandOfOdds.com , www.BeDazzledBeads.com , or www.LearnToBead.net . 3
Caterpillar Espiritu Bracelet with Warren Feld A LearnToBead.Net Class
www.LearnToBead.net [email protected]
amethyst ceylon (in kit, 1 gram)
COLOR 11F, Miyuki 11/0-650, grey alabaster silver lined (dyed)(in kit, 1 gram)
COLOR 11G, Miyuki 11/0-1931, semi-matte rose lined crystal(in kit, 1 gram)
COLOR 11H, Miyuki 11/0-2024, matte opaque light rose (in kit, 1.2 grams)
COLOR 11I, Miyuki 11/0-1012, smoky amethyst silver lined ab (in kit, 1 gram)
COLOR 11J, Miyuki 11/0-2028, matte opaque turquoise green (in kit, 1.2 grams)
COLOR 11K, Miyuki 11/0-336, dark rose lined yellow (in kit, 1 gram)
COLOR 11L, TOHO 11/0-PF557F, permanent finish matte galvanized starlight (in kit, 1.2 grams)
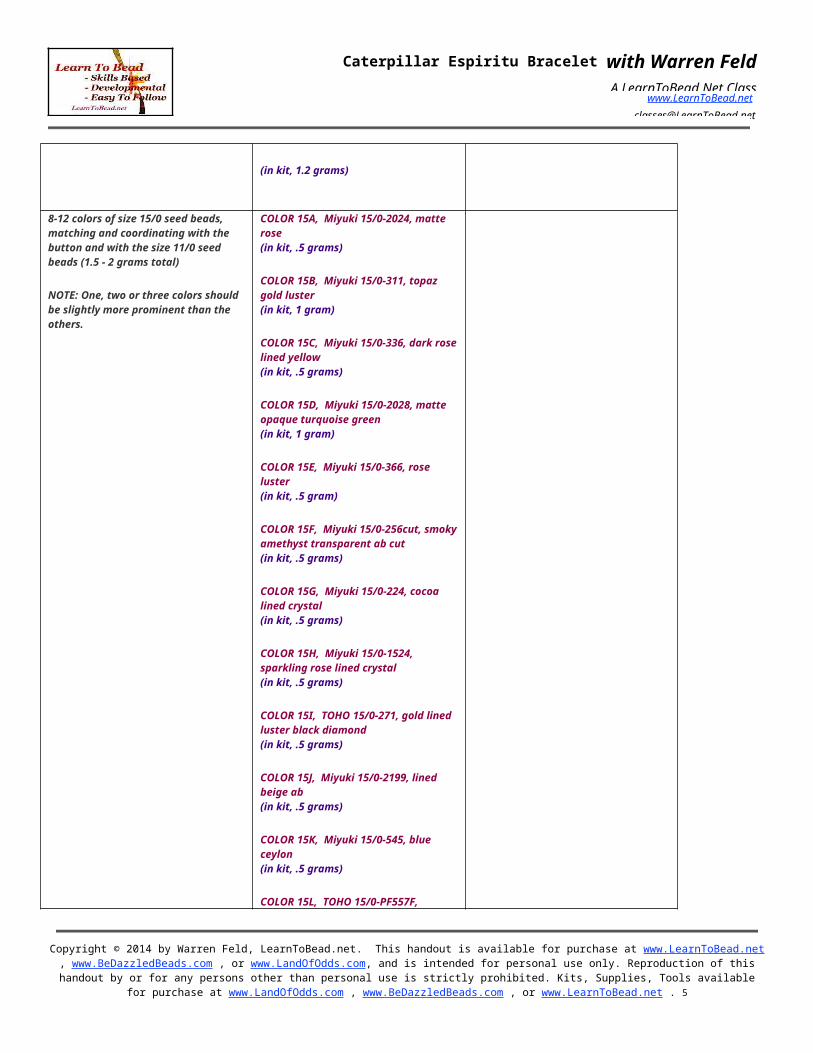
8-12 colors of size 15/0 seed beads, matching and coordinating with the button and with the size 11/0 seed beads (1.5 - 2 grams total)
NOTE: One, two or three colors should be slightly more prominent than the others.
COLOR 15A, Miyuki 15/0-2024, matte rose(in kit, .5 grams)
COLOR 15B, Miyuki 15/0-311, topaz gold luster (in kit, 1 gram)
COLOR 15C, Miyuki 15/0-336, dark rose lined yellow(in kit, .5 grams)
COLOR 15D, Miyuki 15/0-2028, matte opaque turquoise green(in kit, 1 gram)
COLOR 15E, Miyuki 15/0-366, rose luster(in kit, .5 gram)
COLOR 15F, Miyuki 15/0-256cut, smoky amethyst transparent ab cut
Copyright © 2014 by Warren Feld, LearnToBead.net. This handout is available for purchase at www.LearnToBead.net , www.BeDazzledBeads.com , or www.LandOfOdds.com, and is intended for personal use only. Reproduction of this handout by or for
any persons other than personal use is strictly prohibited. Kits, Supplies, Tools available for purchase at www.LandOfOdds.com , www.BeDazzledBeads.com , or www.LearnToBead.net . 4
Caterpillar Espiritu Bracelet with Warren Feld A LearnToBead.Net Class
www.LearnToBead.net [email protected]
(in kit, .5 grams)
COLOR 15G, Miyuki 15/0-224, cocoa lined crystal(in kit, .5 grams)
COLOR 15H, Miyuki 15/0-1524, sparkling rose lined crystal(in kit, .5 grams)
COLOR 15I, TOHO 15/0-271, gold lined luster black diamond (in kit, .5 grams)
COLOR 15J, Miyuki 15/0-2199, lined beige ab (in kit, .5 grams)
COLOR 15K, Miyuki 15/0-545, blue ceylon (in kit, .5 grams)
COLOR 15L, TOHO 15/0-PF557F, permanent finish matte galvanized starlight (in kit, 1 gram)
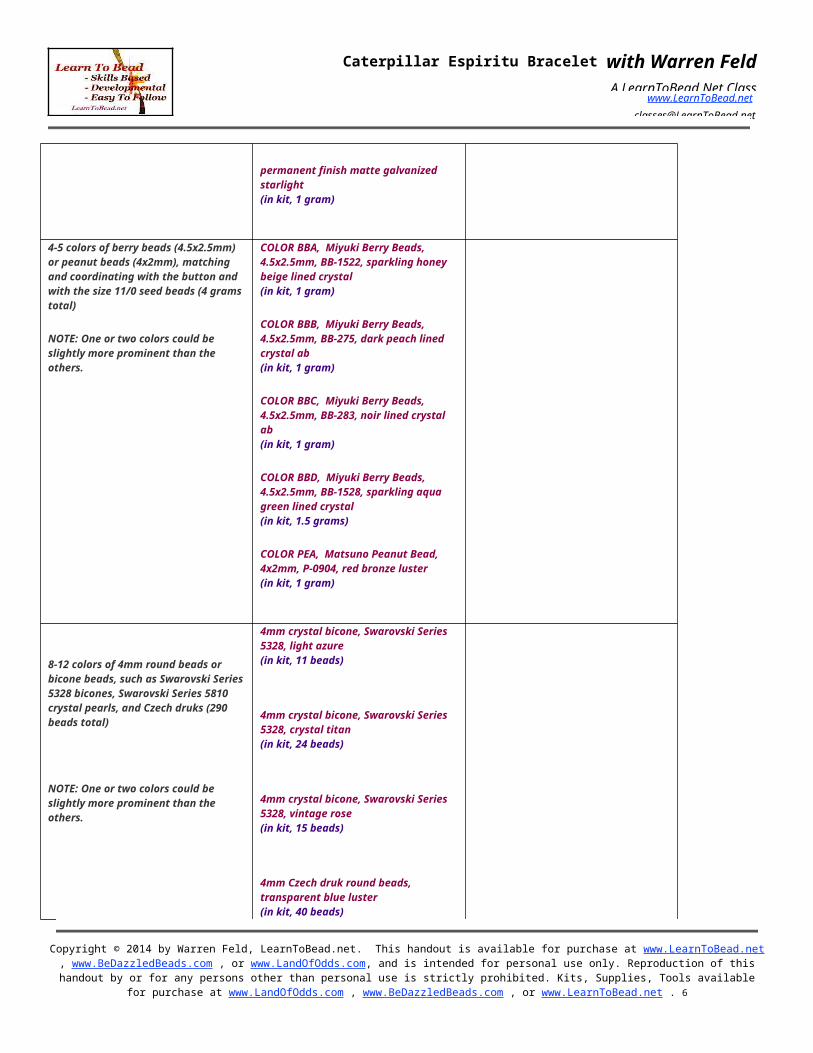
4-5 colors of berry beads (4.5x2.5mm) or peanut beads (4x2mm), matching and coordinating with the button and with the size 11/0 seed beads (4 grams total)
NOTE: One or two colors could be slightly more prominent than the others.
COLOR BBA, Miyuki Berry Beads, 4.5x2.5mm, BB-1522, sparkling honey beige lined crystal (in kit, 1 gram)
COLOR BBB, Miyuki Berry Beads, 4.5x2.5mm, BB-275, dark peach lined crystal ab (in kit, 1 gram)
COLOR BBC, Miyuki Berry Beads, 4.5x2.5mm, BB-283, noir lined crystal ab (in kit, 1 gram)
COLOR BBD, Miyuki Berry Beads, 4.5x2.5mm, BB-1528, sparkling aqua green lined crystal (in kit, 1.5 grams)
COLOR PEA, Matsuno Peanut Bead, 4x2mm, P-0904, red bronze luster (in kit, 1 gram)
4mm crystal bicone, Swarovski Series 5328, light azure (in kit, 11 beads)
Copyright © 2014 by Warren Feld, LearnToBead.net. This handout is available for purchase at www.LearnToBead.net , www.BeDazzledBeads.com , or www.LandOfOdds.com, and is intended for personal use only. Reproduction of this handout by or for
any persons other than personal use is strictly prohibited. Kits, Supplies, Tools available for purchase at www.LandOfOdds.com , www.BeDazzledBeads.com , or www.LearnToBead.net . 5
Caterpillar Espiritu Bracelet with Warren Feld A LearnToBead.Net Class
www.LearnToBead.net [email protected]
8-12 colors of 4mm round beads or bicone beads, such as Swarovski Series 5328 bicones, Swarovski Series 5810 crystal pearls, and Czech druks (290 beads total)
NOTE: One or two colors could be slightly more prominent than the others.
4mm crystal bicone, Swarovski Series 5328, crystal titan(in kit, 24 beads)
4mm crystal bicone, Swarovski Series 5328, vintage rose(in kit, 15 beads)
4mm Czech druk round beads, transparent blue luster(in kit, 40 beads)
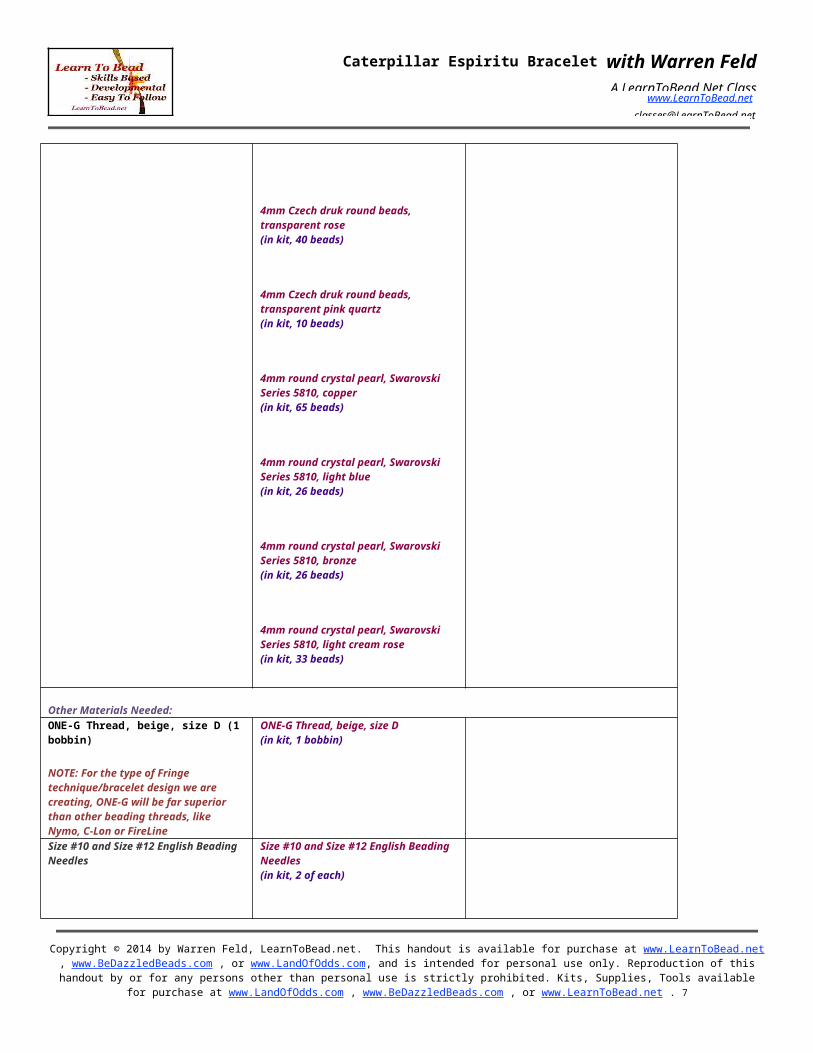
4mm Czech druk round beads, transparent rose (in kit, 40 beads)
4mm Czech druk round beads, transparent pink quartz(in kit, 10 beads)
4mm round crystal pearl, Swarovski Series 5810, copper(in kit, 65 beads)
4mm round crystal pearl, Swarovski Series 5810, light blue(in kit, 26 beads)
4mm round crystal pearl, Swarovski Series 5810, bronze(in kit, 26 beads)
4mm round crystal pearl, Swarovski Series 5810, light cream rose(in kit, 33 beads)
Other Materials Needed:ONE-G Thread, beige, size D (1 bobbin)
NOTE: For the type of Fringe technique/bracelet design we are
ONE-G Thread, beige, size D(in kit, 1 bobbin)
Copyright © 2014 by Warren Feld, LearnToBead.net. This handout is available for purchase at www.LearnToBead.net , www.BeDazzledBeads.com , or www.LandOfOdds.com, and is intended for personal use only. Reproduction of this handout by or for
any persons other than personal use is strictly prohibited. Kits, Supplies, Tools available for purchase at www.LandOfOdds.com , www.BeDazzledBeads.com , or www.LearnToBead.net . 6
Caterpillar Espiritu Bracelet with Warren Feld A LearnToBead.Net Class
www.LearnToBead.net [email protected]
creating, ONE-G will be far superior than other beading threads, like Nymo, C-Lon or FireLineSize #10 and Size #12 English Beading Needles
Size #10 and Size #12 English Beading Needles(in kit, 2 of each)
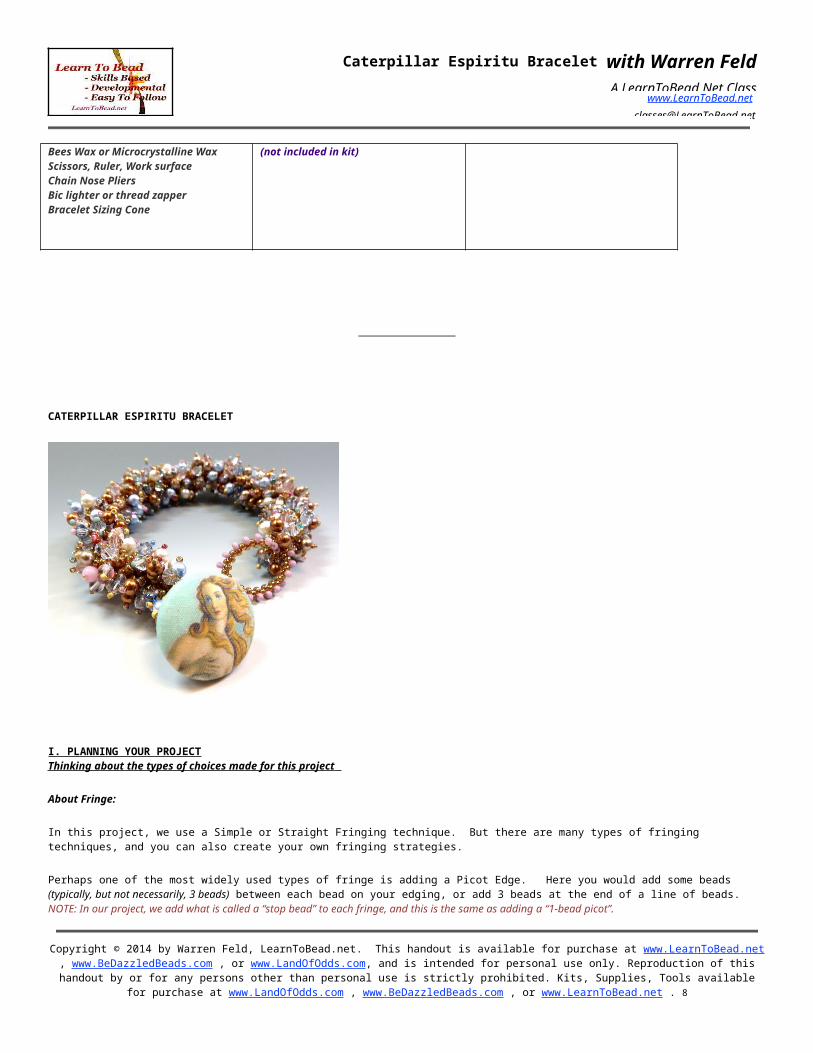
Bees Wax or Microcrystalline WaxScissors, Ruler, Work surface Chain Nose PliersBic lighter or thread zapper Bracelet Sizing Cone
(not included in kit)
CATERPILLAR ESPIRITU BRACELET
I. PLANNING YOUR PROJECTThinking about the types of choices made for this project
About Fringe:
Copyright © 2014 by Warren Feld, LearnToBead.net. This handout is available for purchase at www.LearnToBead.net , www.BeDazzledBeads.com , or www.LandOfOdds.com, and is intended for personal use only. Reproduction of this handout by or for
any persons other than personal use is strictly prohibited. Kits, Supplies, Tools available for purchase at www.LandOfOdds.com , www.BeDazzledBeads.com , or www.LearnToBead.net . 7
Caterpillar Espiritu Bracelet with Warren Feld A LearnToBead.Net Class
www.LearnToBead.net [email protected]
In this project, we use a Simple or Straight Fringing technique. But there are many types of fringing techniques, and you can also create your own fringing strategies.
Perhaps one of the most widely used types of fringe is adding a Picot Edge. Here you would add some beads (typically, but not necessarily, 3 beads) between each bead on your edging, or add 3 beads at the end of a line of beads. NOTE: In our project, we add what is called a “stop bead” to each fringe, and this is the same as adding a “1-bead picot”.
Other types of fringe include Netting, Branching, Looping, Creating Leaves or Petals, Twisting or Spiraling, or Kinky.
Fringes can be the same length, or different lengths, or graduated lengths. They can be composed of the same beads, or different beads.
How you do your fringe will depend on the piece to which are you attaching it.
There may be odds/evens issues with your fringe, such as when graduating your fringe so that there is a clear middle-point. You may have to coordinate the numbers of your fringes with the numbers of rows in your piece.
The technique is easy to do, and offers many possibilities, only limited by your imagination.Fringe projects are good projects for using up your bead stash.
In the Caterpillar Espiritu Bracelet, the fringe pattern and colors are supposed to capture the essence of the image on the button – the focal point of the bracelet -- , without overwhelming that image.
There is an unfortunately tendency of many bead artists to overdo their fringe and thus, over-embellish their pieces.
IA. Conceptualizing Your Piece
Ask yourself these questions:Purpose? Is this to be for a Woman (6 ½ - 7 ½”) or man (7 ½ - 8 ½”)?What is the Context/Setting the bracelet might be worn in?
Sizing?Size of wrist? How loosely should it fit -- very loose, somewhat loose, tight?What width should the bracelet be? 1/2", 3/4", 1", more?
Materials?What types and materials of beads do I want to use? glass, gemstone, metal, mix? What size(s) and shape(s) of beads do I want to use?What kinds of stringing materials do I want to use, and do I want to wax the cord?What will the clasp assembly look like, and where and how will I attach the clasp?
Design and Color Issues?Do I want to use an odd number or an even number of beads in my fringes?How long do I want my fringes to be? Do I want to vary the length from fringe to fringe?How complex or embellished do I want my fringes to be?How dense do I want the fringe to be?Do I want to create fringes all along the length, or only in some sections?Do I want to create any kind of color or textural pattern with my fringe?The fringing might shrink my bracelet core? How long should I make my bracelet core, given the possibility of shrinkage?What colors do I want to use? Metal colors? Glass bead colors?
Copyright © 2014 by Warren Feld, LearnToBead.net. This handout is available for purchase at www.LearnToBead.net , www.BeDazzledBeads.com , or www.LandOfOdds.com, and is intended for personal use only. Reproduction of this handout by or for
any persons other than personal use is strictly prohibited. Kits, Supplies, Tools available for purchase at www.LandOfOdds.com , www.BeDazzledBeads.com , or www.LearnToBead.net . 8
Caterpillar Espiritu Bracelet with Warren Feld A LearnToBead.Net Class
www.LearnToBead.net [email protected]
Wearability?How easily will the woven beads, once the project is finished, conform to and feelcomfortable on the wrist?
This bracelet involves creating a line of beads, called a “Train”, and then adding fringe between each of the beads in this Train.
The button is the focal point, so its choice is critical. Begin by choosing your button, and then find colors that coordinate well with the button.
I wanted to use a mix of sizes and shapes of glass beads, including sizes 8/0, 11/0 and 15/0 seed beads, berry beads, peanut beads, and 4mm round crystal pearls and druks, as well as 4mm crystal bicone beads.
I decided to use over 40 colors/shapes/sizes of beads to create a high level of interest and wonder. It’s very exciting for a viewer to interact with so many well-coordinated colors – and much unexpected. I wanted to pick up on the stronger colors in the button, but not in a “strong” way – “subtlety” was my mantra. The stronger colors in the button needed to be present and repeated and well-distributed throughout the entire bracelet. – but not necessarily call your attention to them. I didn’t want any of the 4mm size beads to be in one of the stronger colors – the 4mm area of these beads would take up too much area and volume, and if in a stronger color, would divert the viewer’s attention away from the button.
All the fringes are the same length. I thought if I built in more variations into the bracelet, such as varying fringe design or length, this would actually detract from the piece. The large color palette provides sufficient variation for the piece.
Fringing will actually shrink the length of our train, requiring our Train to be about ¼” longer than for a typical bracelet without shrinkage. The bulk-width of our fringe requires that the bracelet be at least another 3/4” to 1” longer, since it makes the bracelet sit further out from the wrist than a bracelet which is flat.
It is important to use ONE-G thread. ONE –G has a spring’y-ness to it. This allows the fringe to pull out, and then spring back towards the Train. Other beading threads – Nymo, C-Lon or FireLine – do not have this spring’y-ness. Once the fringes pull out, they stay out. This makes the fringes get very limp and causes their connecting threads show.
MANAGING A LARGE COLOR PALETTE
This project uses a very large color palette – 44 colors plus the colors in the button and the color of your thread. Management is key here.
Colors were selected that matched or coordinated with the colors in the button. I wanted the colors to complement the button, not compete with it. The button is the primary focal or center point. This button is cloth-covered, with pastel colors and a Victorian feel to it. So I selected many colors that were also pastel, pearlized, lustered, light, muted or transparent.
The Train is made up of 8/0 seed beads, and the first bead in each fringe is an 8/0 seed bead. I wanted these to be similar colors, but not the same. I wanted these beads in the Train to be slightly darker than those in the fringe.
First, I lay out all the colors individually, grouping all the 11/0’s together and all the 15/0’s together, the berry and peanut beads together, and the 4mm sized beads (druks, pearls and crystal bicones) together. I have a reserved spot for my 8/0 seed bead color. I put each color in a very small container.
Next, on my work surface, I begin to make a mix – mixing my 11/0’s, 4mm beads, berry/peanut beads, and 15/0’s. I work from this mix. I want my mix to be pleasing, and I frequently double-check my fringes as they develop up and down my bracelet, to decide whether I want to increase or decrease any color(s) in my mix.
I can approach my “mix” in four different ways:a. Equal Proportionsb. Mostly Equal Proportions With Exceptionsc. Unequal Proportions – Letting One Color or Tone Predominated. Mathematical Formula, or Complete Randomization
Copyright © 2014 by Warren Feld, LearnToBead.net. This handout is available for purchase at www.LearnToBead.net , www.BeDazzledBeads.com , or www.LandOfOdds.com, and is intended for personal use only. Reproduction of this handout by or for
any persons other than personal use is strictly prohibited. Kits, Supplies, Tools available for purchase at www.LandOfOdds.com , www.BeDazzledBeads.com , or www.LearnToBead.net . 9

Caterpillar Espiritu Bracelet with Warren Feld A LearnToBead.Net Class
www.LearnToBead.net [email protected]
For this project, I chose mix strategy “b” – Mostly Equal Proportions With Exceptions.
I used a little more of these colors, and I made sure these colors were clearly distributed through the bracelet. Miyuki 311 (COLORS XB, 8A, 11A, 15B)Miyuki 2028 (COLORS 11J, 15D)TOHO PF557F (COLORS 11L, 15L)TOHO 271 (COLORS 15I)Miyuki Berry Bead 1528 (COLORS BBD)
NOTE: We don’t want any of these colors taking up too big an area on our bracelet, thus diverting the viewer’s attention from our button center piece. So we distribute these through-out the bracelet, using a little bit more of them than the other colors.
With the 4mm round beads, I used a little less of these colors:Pink Quartz Druk (Czech druk)Vintage rose crystal bicone (Swarovski Series 5328 crystal bicones)
IB. Measurements
Ask yourself these questions:What length and width bracelet do I want to end up with? The bracelet will be bulky – how does this affect my planning for the length?How long do I want each fringe to be? Do I want to vary the lengths?Will there be any variation in the actual sizes of the beads, from bead to bead? How much more length will clasp attachment create?What size/shape beads or buttons do I want to use, when creating my clasp?
For this project, I wanted to make a bracelet to fit a 7” (175mm) wrist.
Whatever wrist size your bracelet is for, you will be adding another 1” of length – 1/4" additional to Train for shrinkage that comes when adding fringe, and 3/4" for the clasp assembly, which in our case, is a button toggle with loop.
MEASUREMENTSDescription This Project Your Project VariationsFor what size wrist 7”Length of Train w/out clasp for 7” bracelet(so, excluding button and loop)
7 ¼”
Length of Train w/clasp for 7” bracelet
8”
Expected shrinkage of Train after fringing completed
1/4"
Clasp (button secured by loop) adds how much length
3/4"
# of fringes Approx. 290 fringes# of fringe passes 3Length of fringe 4 beads (8/0 (3mm), 11/0
(2mm), 4mm bead, and 15/0 (1.5mm)
Patterning? No
Copyright © 2014 by Warren Feld, LearnToBead.net. This handout is available for purchase at www.LearnToBead.net , www.BeDazzledBeads.com , or www.LandOfOdds.com, and is intended for personal use only. Reproduction of this handout by or for
any persons other than personal use is strictly prohibited. Kits, Supplies, Tools available for purchase at www.LandOfOdds.com , www.BeDazzledBeads.com , or www.LearnToBead.net . 10
Caterpillar Espiritu Bracelet with Warren Feld A LearnToBead.Net Class
www.LearnToBead.net [email protected]
NOTE: There are 25mm in an inch. Rulers are marked in inches on one side and millimeters on the other.
IC. Selecting Materials
Ask yourself these questions:Types of beads? Glass, metal, other?Sizes of beads?What mix of sizes/shapes within any fringe?Stringing material? beading thread, cable thread?Clasp? Make my own or use a manufactured clasp?
For this project, I chose Japanese seed beads, berry and peanut beads, and 4mm round and bicone glass and crystal beads. I fashioned my clasp from a button and an added loop of seed beads. My goal was “coordinated variety”. Within that goal, I could have chosen any number of materials, shapes and sizes.
It is important to use ONE-G thread. ONE –G has a spring’y-ness to it. This allows the fringe to pull out, and then spring back towards the Train. Other beading threads – Nymo, C-Lon or FireLine – do not have this spring’y-ness. Once the fringes pull out, they stay out. This makes the fringes get very limp and causes their connecting threads show.
ID. Sketching a Pattern or Graph
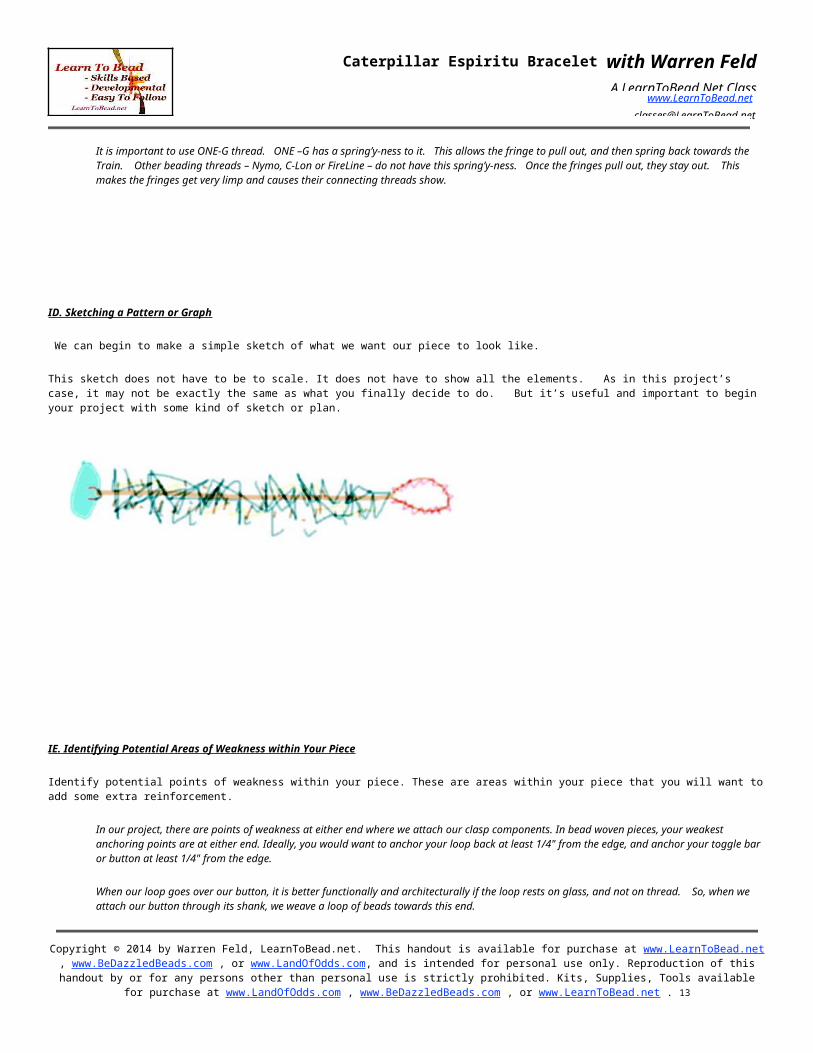
We can begin to make a simple sketch of what we want our piece to look like.
This sketch does not have to be to scale. It does not have to show all the elements. As in this project’s case, it may not be exactly the same as what you finally decide to do. But it’s useful and important to begin your project with some kind of sketch or plan.
Copyright © 2014 by Warren Feld, LearnToBead.net. This handout is available for purchase at www.LearnToBead.net , www.BeDazzledBeads.com , or www.LandOfOdds.com, and is intended for personal use only. Reproduction of this handout by or for
any persons other than personal use is strictly prohibited. Kits, Supplies, Tools available for purchase at www.LandOfOdds.com , www.BeDazzledBeads.com , or www.LearnToBead.net . 11

Caterpillar Espiritu Bracelet with Warren Feld A LearnToBead.Net Class
www.LearnToBead.net [email protected]
IE. Identifying Potential Areas of Weakness within Your Piece
Identify potential points of weakness within your piece. These are areas within your piece that you will want to add some extra reinforcement.
In our project, there are points of weakness at either end where we attach our clasp components. In bead woven pieces, your weakest anchoring points are at either end. Ideally, you would want to anchor your loop back at least 1/4" from the edge, and anchor your toggle bar or button at least 1/4" from the edge.
When our loop goes over our button, it is better functionally and architecturally if the loop rests on glass, and not on thread. So, when we attach our button through its shank, we weave a loop of beads towards this end.
Each fringe is a potential area of weakness, in that they may break, as well as pull out somewhat, and stayed pulled out, from the core-train, after a few wearings. To minimize these problems, I have used ONE-G beading thread, and we wax our thread. This thread is very strong. Unlike other beading threads, It has a springiness to it, so as the fringes pull out with movement and wear, they spring back into place, because of this thread. Waxing keeps the threads from fraying, waterproofs the thread a bit, and allows you to achieve a tighter tension on your beaded fringe.
IF. Managing Support Systems
Support systems are things you build into a piece to allow better movement, drape, flow and durability. These can be as simple as adding rings and loops, or more involved with such things as stitching, knotting or braiding techniques, hinges and rivets.
With most fringe, the “support” comes from the qualities of the stringing material.
So you need to know how you want the fringe to function.
In this project, we want our fringe to:- move freely and easily- move in any direction with minimum consequences- feel soft- look and feel flow’y- keep its shape and bead tension over time- not pull away from our core beads and droop
Again, our key choice here is our thread.
Cable threads, like FireLine, would be too stiff.Beading threads like nymo or c-lon would be better, but still create some level of resistance to the freedom of movement we want.A beading thread like ONE-G would be our best choice. There is a spring’y and stretch’y quality to the thread that allows the fringe to move and keep it shape, without ultimately drooping. When the fringe is pulled on and then let go, it springs back to the core.
Copyright © 2014 by Warren Feld, LearnToBead.net. This handout is available for purchase at www.LearnToBead.net , www.BeDazzledBeads.com , or www.LandOfOdds.com, and is intended for personal use only. Reproduction of this handout by or for
any persons other than personal use is strictly prohibited. Kits, Supplies, Tools available for purchase at www.LandOfOdds.com , www.BeDazzledBeads.com , or www.LearnToBead.net . 12
Caterpillar Espiritu Bracelet with Warren Feld A LearnToBead.Net Class
www.LearnToBead.net [email protected]
We have another support issue that arises because we are using Austrian crystal beads. Crystal beads have very sharp holes, so they pose a risk to the beading thread. To minimize this risk, we use 15/0 seed beads as stopper beads at the top of each of our fringes, and thus as the point of “inflection” or pressure.
IG. Visualizing Your Process
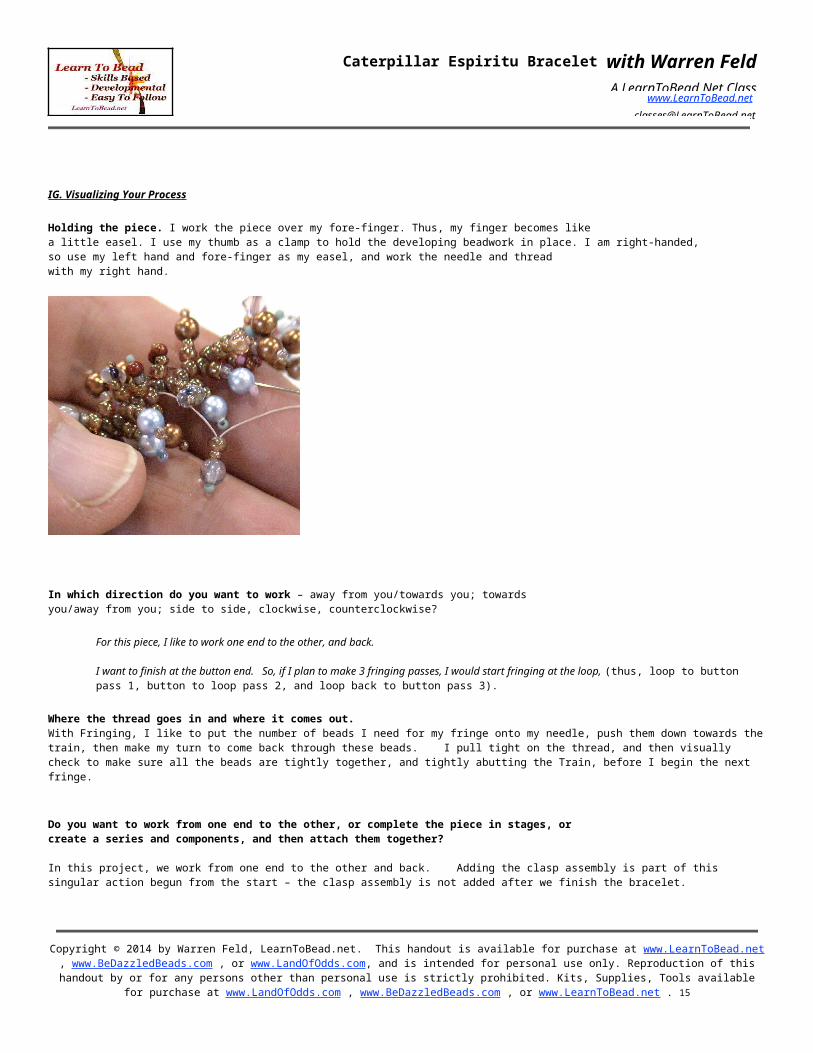
Holding the piece. I work the piece over my fore-finger. Thus, my finger becomes likea little easel. I use my thumb as a clamp to hold the developing beadwork in place. I am right-handed,so use my left hand and fore-finger as my easel, and work the needle and threadwith my right hand.
In which direction do you want to work – away from you/towards you; towardsyou/away from you; side to side, clockwise, counterclockwise?
For this piece, I like to work one end to the other, and back.
I want to finish at the button end. So, if I plan to make 3 fringing passes, I would start fringing at the loop, (thus, loop to button pass 1, button to loop pass 2, and loop back to button pass 3).
Where the thread goes in and where it comes out.With Fringing, I like to put the number of beads I need for my fringe onto my needle, push them down towards the train, then make my turn to come back through these beads. I pull tight on the thread, and then visually check to make sure all the beads are tightly together, and tightly abutting the Train, before I begin the next fringe.
Do you want to work from one end to the other, or complete the piece in stages, orcreate a series and components, and then attach them together?
Copyright © 2014 by Warren Feld, LearnToBead.net. This handout is available for purchase at www.LearnToBead.net , www.BeDazzledBeads.com , or www.LandOfOdds.com, and is intended for personal use only. Reproduction of this handout by or for
any persons other than personal use is strictly prohibited. Kits, Supplies, Tools available for purchase at www.LandOfOdds.com , www.BeDazzledBeads.com , or www.LearnToBead.net . 13
Caterpillar Espiritu Bracelet with Warren Feld A LearnToBead.Net Class
www.LearnToBead.net [email protected]
In this project, we work from one end to the other and back. Adding the clasp assembly is part of this singular action begun from the start – the clasp assembly is not added after we finish the bracelet.
Create a short Train with some fringes. This gives you a chance to pre-test your ideas and strategies,before barging in to the full task. This lets your body/mind feel/understand the control you need over the thread's tension.
Set your mantra going.Organize the “flow” of your work in your mind. Create a pattern and rhythm in yourhead, utilizing such things as shapes, sizes, and colors, and noting where thread goes inand where thread comes out, and whether you are working clock-wise, counter-clockwiseor in a figure 8 motion.
IH. Organizing Your Work Space
Get your beads, stringing materials, tools, ruler, wax, work surface, handy pen and paper, and thelike, altogether in one place.
In this project, I like to have all my beads out at once. I put each color into a very tiny container (1” stack jars), and keep all the 11/0 colors together, and the 15/0 colors together, and the berry/peanuts together and the 4mm round and bicones together, and the 8/0 beads together.
On a work surface, I create a loose mix of these beads, and I work from that loose mix on this work surface. This set-up allows me to adjust the color proportions, which I occasionally will need to do, and it allows me to pick up specific colors, where I feel I need to place the particular color of somehow control for the distribution of a particular color throughout the piece.
Copyright © 2014 by Warren Feld, LearnToBead.net. This handout is available for purchase at www.LearnToBead.net , www.BeDazzledBeads.com , or www.LandOfOdds.com, and is intended for personal use only. Reproduction of this handout by or for
any persons other than personal use is strictly prohibited. Kits, Supplies, Tools available for purchase at www.LandOfOdds.com , www.BeDazzledBeads.com , or www.LearnToBead.net . 14
Caterpillar Espiritu Bracelet with Warren Feld A LearnToBead.Net Class
www.LearnToBead.net [email protected]
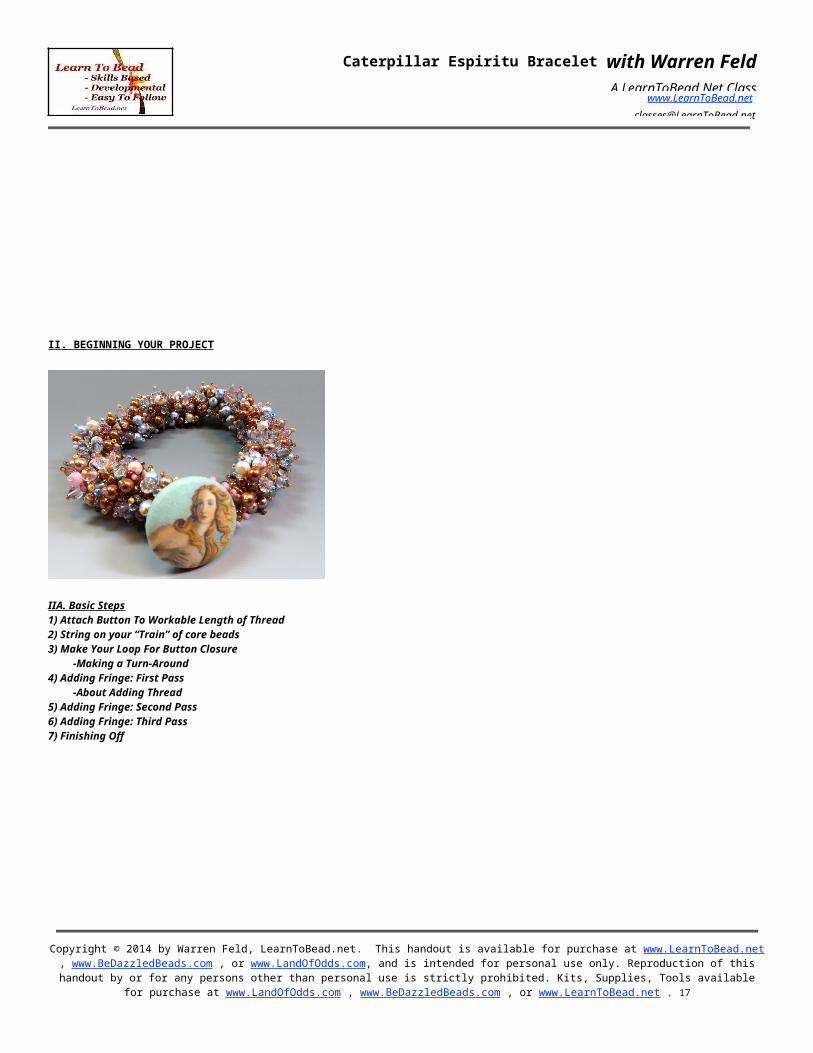
II. BEGINNING YOUR PROJECT
IIA. Basic Steps1) Attach Button To Workable Length of Thread2) String on your “Train” of core beads3) Make Your Loop For Button Closure -Making a Turn-Around4) Adding Fringe: First Pass -About Adding Thread5) Adding Fringe: Second Pass6) Adding Fringe: Third Pass7) Finishing Off
1) Attach Button To Workable Length of Thread
Copyright © 2014 by Warren Feld, LearnToBead.net. This handout is available for purchase at www.LearnToBead.net , www.BeDazzledBeads.com , or www.LandOfOdds.com, and is intended for personal use only. Reproduction of this handout by or for
any persons other than personal use is strictly prohibited. Kits, Supplies, Tools available for purchase at www.LandOfOdds.com , www.BeDazzledBeads.com , or www.LearnToBead.net . 15

Caterpillar Espiritu Bracelet with Warren Feld A LearnToBead.Net Class
www.LearnToBead.net [email protected]
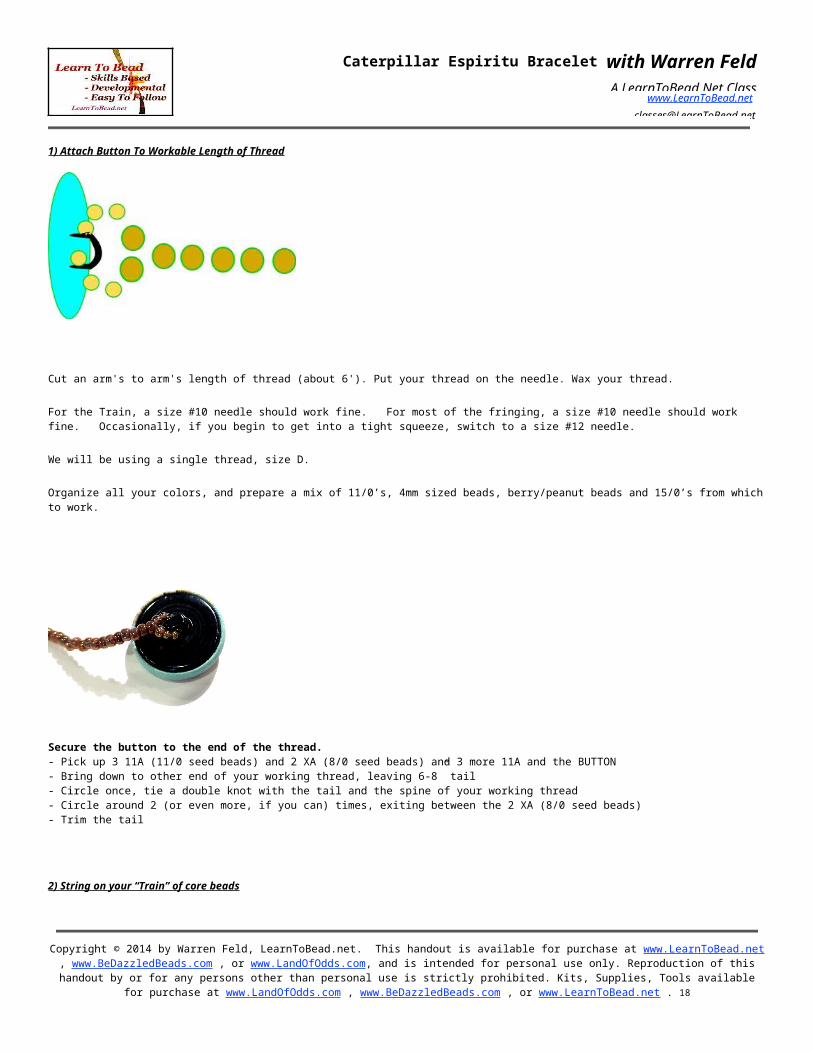
Cut an arm's to arm's length of thread (about 6'). Put your thread on the needle. Wax your thread.
For the Train, a size #10 needle should work fine. For most of the fringing, a size #10 needle should work fine. Occasionally, if you begin to get into a tight squeeze, switch to a size #12 needle.
We will be using a single thread, size D.
Organize all your colors, and prepare a mix of 11/0’s, 4mm sized beads, berry/peanut beads and 15/0’s from which to work.
Secure the button to the end of the thread.- Pick up 3 11A (11/0 seed beads) and 2 XA (8/0 seed beads) and 3 more 11A and the BUTTON- Bring down to other end of your working thread, leaving 6-8” tail- Circle once, tie a double knot with the tail and the spine of your working thread- Circle around 2 (or even more, if you can) times, exiting between the 2 XA (8/0 seed beads)- Trim the tail
2) String on your “Train” of core beads
For bracelet to fit a 7” wrist, pick up 7 ¼” long of COLOR XA (8/0 seed beads). This should be about 94 beads.
NOTE: After all the fringing, you final bracelet will shrink about ¼”, so you want to begin with a train approximately ¼” bigger than the length you want to end up with.
NOTE: For a bracelet to fit a 7” wrist, you will have the 7 ¼” long train plus the length added by the clasp, in this project, about 3/4”. Here we accommodate the shrinkage in the train, plus the bulkiness/width of the fringe.
3) Make Your Loop For Button Closure
Copyright © 2014 by Warren Feld, LearnToBead.net. This handout is available for purchase at www.LearnToBead.net , www.BeDazzledBeads.com , or www.LandOfOdds.com, and is intended for personal use only. Reproduction of this handout by or for
any persons other than personal use is strictly prohibited. Kits, Supplies, Tools available for purchase at www.LandOfOdds.com , www.BeDazzledBeads.com , or www.LearnToBead.net . 16
Caterpillar Espiritu Bracelet with Warren Feld A LearnToBead.Net Class
www.LearnToBead.net [email protected]
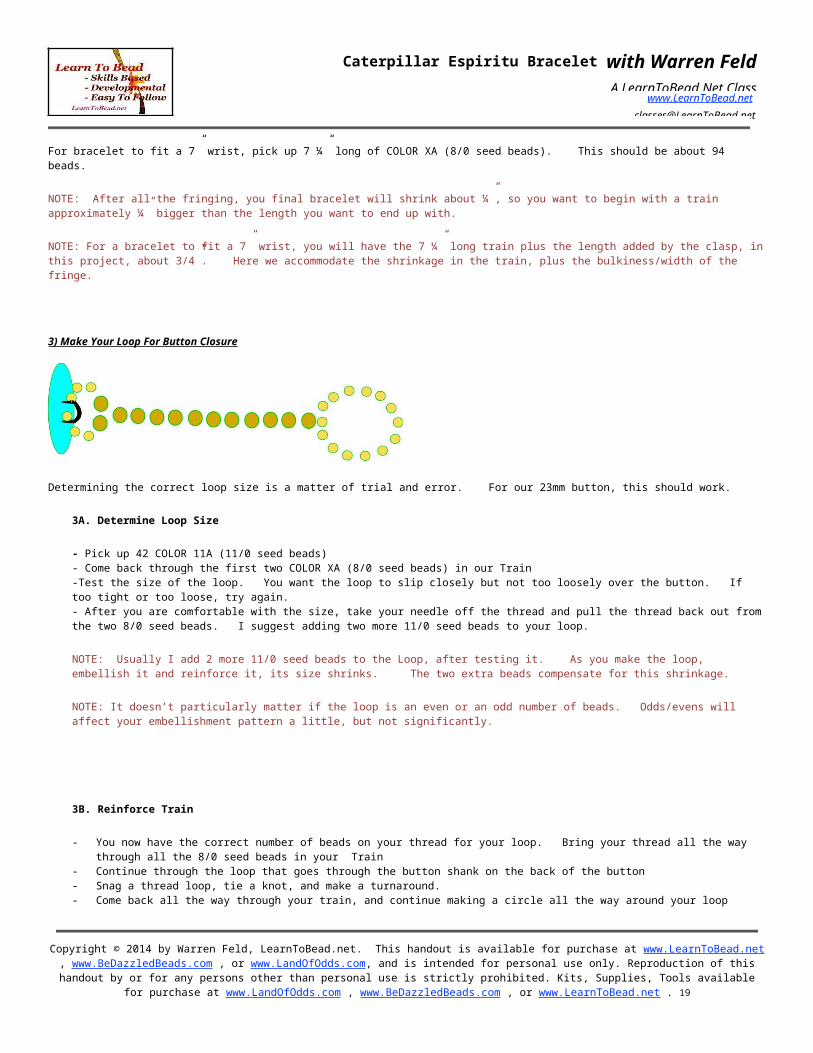
Determining the correct loop size is a matter of trial and error. For our 23mm button, this should work.
3A. Determine Loop Size
- Pick up 42 COLOR 11A (11/0 seed beads)- Come back through the first two COLOR XA (8/0 seed beads) in our Train-Test the size of the loop. You want the loop to slip closely but not too loosely over the button. If too tight or too loose, try again.- After you are comfortable with the size, take your needle off the thread and pull the thread back out from the two 8/0 seed beads. I suggest adding two more 11/0 seed beads to your loop.
NOTE: Usually I add 2 more 11/0 seed beads to the Loop, after testing it. As you make the loop, embellish it and reinforce it, its size shrinks. The two extra beads compensate for this shrinkage.
NOTE: It doesn’t particularly matter if the loop is an even or an odd number of beads. Odds/evens will affect your embellishment pattern a little, but not significantly.
3B. Reinforce Train
- You now have the correct number of beads on your thread for your loop. Bring your thread all the way through all the 8/0 seed beads in your Train
- Continue through the loop that goes through the button shank on the back of the button- Snag a thread loop, tie a knot, and make a turnaround.- Come back all the way through your train, and continue making a circle all the way around your loop
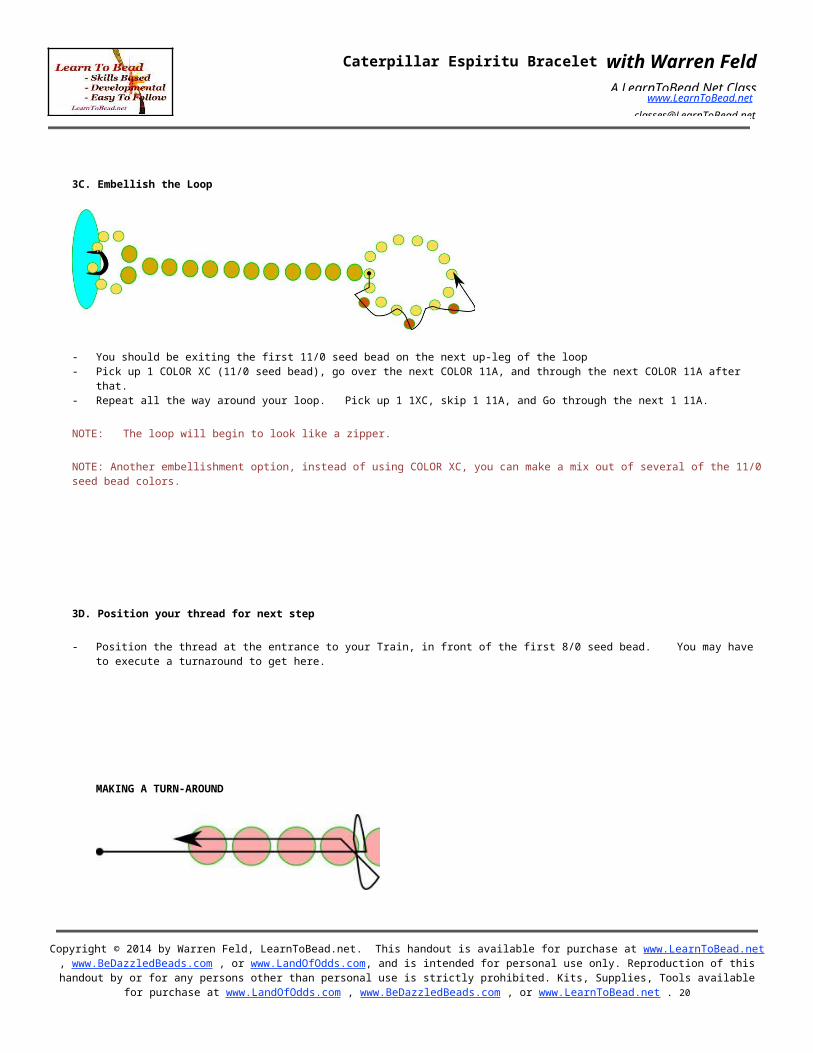
3C. Embellish the Loop
- You should be exiting the first 11/0 seed bead on the next up-leg of the loop- Pick up 1 COLOR XC (11/0 seed bead), go over the next COLOR 11A, and through the next COLOR 11A after that.- Repeat all the way around your loop. Pick up 1 1XC, skip 1 11A, and Go through the next 1 11A.
NOTE: The loop will begin to look like a zipper.
NOTE: Another embellishment option, instead of using COLOR XC, you can make a mix out of several of the 11/0 seed bead colors.
Copyright © 2014 by Warren Feld, LearnToBead.net. This handout is available for purchase at www.LearnToBead.net , www.BeDazzledBeads.com , or www.LandOfOdds.com, and is intended for personal use only. Reproduction of this handout by or for
any persons other than personal use is strictly prohibited. Kits, Supplies, Tools available for purchase at www.LandOfOdds.com , www.BeDazzledBeads.com , or www.LearnToBead.net . 17
Caterpillar Espiritu Bracelet with Warren Feld A LearnToBead.Net Class
www.LearnToBead.net [email protected]
3D. Position your thread for next step
- Position the thread at the entrance to your Train, in front of the first 8/0 seed bead. You may have to execute a turnaround to get here.
MAKING A TURN-AROUND
Manytimes in bead weaving, we want to switch directions. We will be going in one direction, and need to “turn around” and go in the opposite direction. This is easy to do.
Say you were passing through 4 beads along a line of beads from left to right, and wanted to reverse course, and go right to left.
At the point, or near the point, you want to turn around, you would loop over and around the working thread, and go back in the new direction.
3E. Re-test your loop sizing
- If too tight or too loose, must cut it up and start again.
4) Adding Fringe: First Pass
Copyright © 2014 by Warren Feld, LearnToBead.net. This handout is available for purchase at www.LearnToBead.net , www.BeDazzledBeads.com , or www.LandOfOdds.com, and is intended for personal use only. Reproduction of this handout by or for
any persons other than personal use is strictly prohibited. Kits, Supplies, Tools available for purchase at www.LandOfOdds.com , www.BeDazzledBeads.com , or www.LearnToBead.net . 18
Caterpillar Espiritu Bracelet with Warren Feld A LearnToBead.Net Class
www.LearnToBead.net [email protected]
We will be creating a fringe in between each of the 8/0 seed beads along our train.
We will be going down the train, adding one fringe in between every two 8/0 seed beads – this is Pass 1.We will come back up the train, adding a 2nd fringe between each 8/0 seed beads, for Pass 2And back down the train, adding a 3rd fringe, for Pass 3
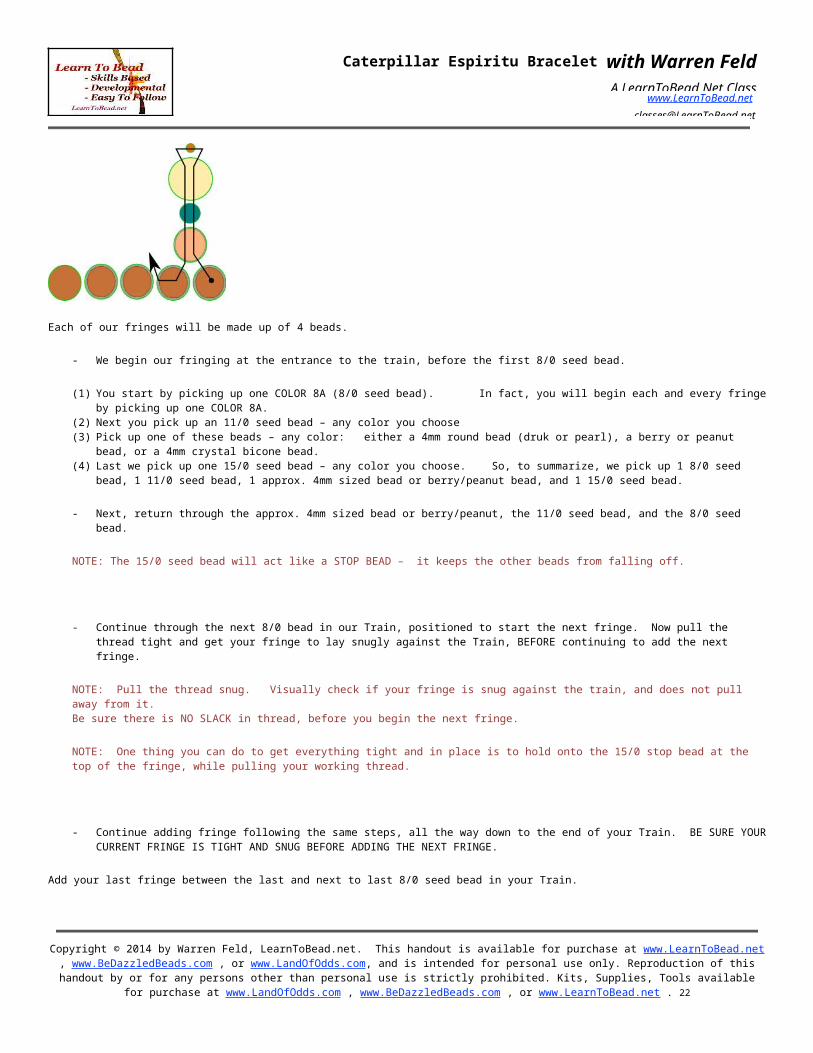
Each of our fringes will be made up of 4 beads.
- We begin our fringing at the entrance to the train, before the first 8/0 seed bead.
(1) You start by picking up one COLOR 8A (8/0 seed bead). In fact, you will begin each and every fringe by picking up one COLOR 8A.(2) Next you pick up an 11/0 seed bead – any color you choose(3) Pick up one of these beads – any color: either a 4mm round bead (druk or pearl), a berry or peanut bead, or a 4mm crystal bicone bead.(4) Last we pick up one 15/0 seed bead – any color you choose. So, to summarize, we pick up 1 8/0 seed bead, 1 11/0 seed bead, 1 approx.
4mm sized bead or berry/peanut bead, and 1 15/0 seed bead.
- Next, return through the approx. 4mm sized bead or berry/peanut, the 11/0 seed bead, and the 8/0 seed bead.
NOTE: The 15/0 seed bead will act like a STOP BEAD – it keeps the other beads from falling off.
- Continue through the next 8/0 bead in our Train, positioned to start the next fringe. Now pull the thread tight and get your fringe to lay snugly against the Train, BEFORE continuing to add the next fringe.
NOTE: Pull the thread snug. Visually check if your fringe is snug against the train, and does not pull away from it. Be sure there is NO SLACK in thread, before you begin the next fringe.
Copyright © 2014 by Warren Feld, LearnToBead.net. This handout is available for purchase at www.LearnToBead.net , www.BeDazzledBeads.com , or www.LandOfOdds.com, and is intended for personal use only. Reproduction of this handout by or for
any persons other than personal use is strictly prohibited. Kits, Supplies, Tools available for purchase at www.LandOfOdds.com , www.BeDazzledBeads.com , or www.LearnToBead.net . 19
Caterpillar Espiritu Bracelet with Warren Feld A LearnToBead.Net Class
www.LearnToBead.net [email protected]
NOTE: One thing you can do to get everything tight and in place is to hold onto the 15/0 stop bead at the top of the fringe, while pulling your working thread.
- Continue adding fringe following the same steps, all the way down to the end of your Train. BE SURE YOUR CURRENT FRINGE IS TIGHT AND SNUG BEFORE ADDING THE NEXT FRINGE.
Add your last fringe between the last and next to last 8/0 seed bead in your Train.
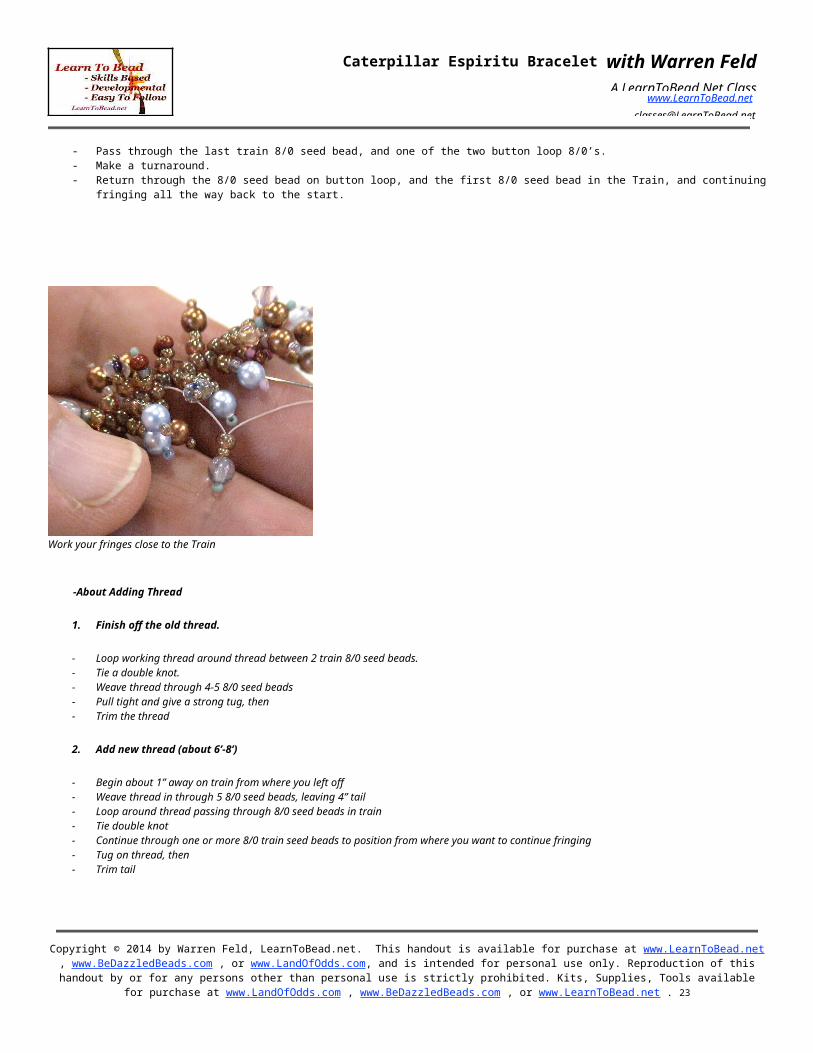
- Pass through the last train 8/0 seed bead, and one of the two button loop 8/0’s.- Make a turnaround.- Return through the 8/0 seed bead on button loop, and the first 8/0 seed bead in the Train, and continuing fringing all the way back to the start.
Work your fringes close to the Train
-About Adding Thread
1. Finish off the old thread.
- Loop working thread around thread between 2 train 8/0 seed beads.- Tie a double knot.- Weave thread through 4-5 8/0 seed beads- Pull tight and give a strong tug, then- Trim the thread
2. Add new thread (about 6’-8’)
- Begin about 1” away on train from where you left off- Weave thread in through 5 8/0 seed beads, leaving 4” tail- Loop around thread passing through 8/0 seed beads in train- Tie double knot
Copyright © 2014 by Warren Feld, LearnToBead.net. This handout is available for purchase at www.LearnToBead.net , www.BeDazzledBeads.com , or www.LandOfOdds.com, and is intended for personal use only. Reproduction of this handout by or for
any persons other than personal use is strictly prohibited. Kits, Supplies, Tools available for purchase at www.LandOfOdds.com , www.BeDazzledBeads.com , or www.LearnToBead.net . 20

Caterpillar Espiritu Bracelet with Warren Feld A LearnToBead.Net Class
www.LearnToBead.net [email protected]
- Continue through one or more 8/0 train seed beads to position from where you want to continue fringing- Tug on thread, then- Trim tail
5) Adding Fringe: Second Pass
Push previous fringe to the side, to make it easier to add the new fringe
Make a second fringe-adding pass (going from button side to loop side), in a similar way to the first pass.
When you get to point where the Train meets the loop, you want to add several more fringes at this point. I suggest adding 8 more fringes. Work your way back and forth through the first 8/0 on the Train, adding a fringe with each pass.
NOTE: These extra fringes allow for a bit of camouflage of that part of the loop that is showing, after it is slipped over the button.
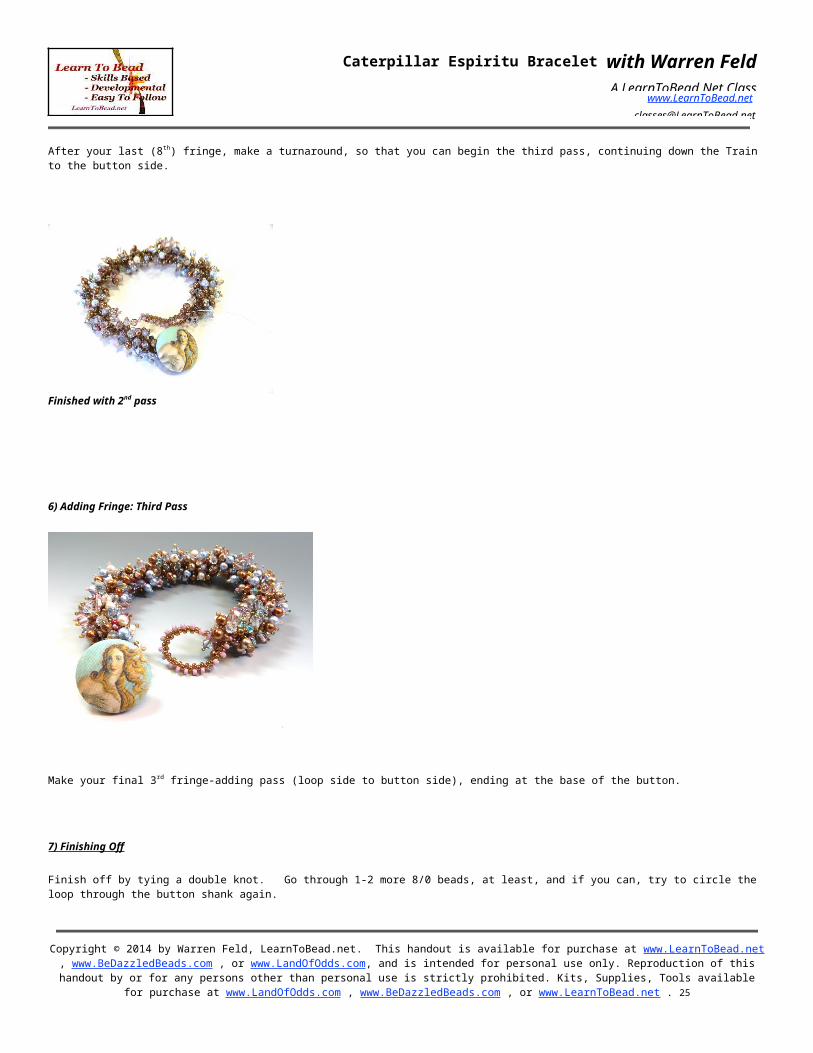
After your last (8th) fringe, make a turnaround, so that you can begin the third pass, continuing down the Train to the button side.
Copyright © 2014 by Warren Feld, LearnToBead.net. This handout is available for purchase at www.LearnToBead.net , www.BeDazzledBeads.com , or www.LandOfOdds.com, and is intended for personal use only. Reproduction of this handout by or for
any persons other than personal use is strictly prohibited. Kits, Supplies, Tools available for purchase at www.LandOfOdds.com , www.BeDazzledBeads.com , or www.LearnToBead.net . 21
Caterpillar Espiritu Bracelet with Warren Feld A LearnToBead.Net Class
www.LearnToBead.net [email protected]
Finished with 2nd pass
6) Adding Fringe: Third Pass
Make your final 3rd fringe-adding pass (loop side to button side), ending at the base of the button.
7) Finishing Off
Finish off by tying a double knot. Go through 1-2 more 8/0 beads, at least, and if you can, try to circle the loop through the button shank again.
Trim your thread.
Copyright © 2014 by Warren Feld, LearnToBead.net. This handout is available for purchase at www.LearnToBead.net , www.BeDazzledBeads.com , or www.LandOfOdds.com, and is intended for personal use only. Reproduction of this handout by or for
any persons other than personal use is strictly prohibited. Kits, Supplies, Tools available for purchase at www.LandOfOdds.com , www.BeDazzledBeads.com , or www.LearnToBead.net . 22
Caterpillar Espiritu Bracelet with Warren Feld A LearnToBead.Net Class
www.LearnToBead.net [email protected]
Give It The Once Over...
Once your bracelet is done, look it over carefully. Now is the time to get out your thread zapper or lighter. All of those tiny threads that peak out from between beads will scream sloppy! Zap them all! or bring the flame on your lighter close to, but not touching, the threads, so that they shrivel and ball up.
IIB. Dealing with Contingencies
1. Running out of thread – Adding Thread -- Finishing Off The End Of Your Thread
When it looks like there is about 12” of thread left, I start to plan to tie it off and beginanother thread, if I am not at the end of my project.
To tie off the old thread, I snag a thread-loop between any two 8/0 seed beads on the Train, tie an overhand knot, go through a few 8/0 beads, snag another thread-loop between two 8/0 Train beads, and tie another knot, go through a few more 8/0 beads, and trim the tail of the thread.
To add a new thread, I start back a few 8/0 beads on the Train. I go through 2-3 beads, then snag a thread-loop between two 8/0 beads, tie a knot whileleaving an 8-10” tail, and go up to where I want the thread to come out, and continue where I left off.
Usually after I’ve added 2 or 3 fringes, I trim the tail.
NEVER cut the thread at the point you have tied a knot.
2. Some areas of your piece feel too loose, or are pulling apart
I snag a thread-loop and tie off a new thread a few 8/0 seed beads on the Train below where the problem is. Iwork my way up to the problem area, and reinforce it, by weaving around and aroundand in and out, or up and down.
3. Your piece is too short or too long
With this project, it is difficult to adjust the length, either shorter or longer, once you begin fringing.
IIC. Finishing Touches
IIC1. Signature bead or embellishment
I think it is always a good idea to use a signature bead in your projects. This might be a uniquebead added near the beginning or end of the piece, or incorporated within each link, or anengraved tag added as part of the clasp assembly. You want your signature bead to identify thepiece as your own, but you don’t want your signature bead to compete with or detract from yourpiece.
The general structure of this Fringed Bracelet was created by Warren Feld.
Copyright © 2014 by Warren Feld, LearnToBead.net. This handout is available for purchase at www.LearnToBead.net , www.BeDazzledBeads.com , or www.LandOfOdds.com, and is intended for personal use only. Reproduction of this handout by or for
any persons other than personal use is strictly prohibited. Kits, Supplies, Tools available for purchase at www.LandOfOdds.com , www.BeDazzledBeads.com , or www.LearnToBead.net . 23

Caterpillar Espiritu Bracelet with Warren Feld A LearnToBead.Net Class
www.LearnToBead.net [email protected]
Any personalization you might do – choice of beads, choice of netted loop construction, choice of patterns, choice of stringingmaterial, choice of clasp, choice of color scheme, choice of embellishments – are your owntouches, and deserve your signature.
III. Learning Objectives MetAfter Accomplishing This Project
LEARNING OBJECTIVES CATERPILLAR ESPIRITU BRACELETFRINGE STITCH BW1-SOM-8-Fringe
BEGINNER INTERMEDIATE ADVANCED
TECHNICAL MECHANICS
1. Managing Thread Tension BEGINNER
2. Holding Your Piece To Work It BEGINNER
3. Reading Simple Pattern, Figure and/or Graph BEGINNER
4. Selecting Materials BEGINNER
5. Identifying Areas of Potential Weakness, and Strategies for Dealing With These
BEGINNER
6. Determining Measurements, including Width and Length of a Piece, Especially In Relationship To Bead Sizes
BEGINNER
7. Finishing Off Threads in Piece or Extending by Adding Threads
BEGINNER
UNDERSTANDING CRAFT BASIS OF STITCH
1. Starting the Stitch BEGINNER
2. Implementing the Basic Stitch BEGINNER
3. Finishing Off Your Piece With A Clasp Assembly BEGINNER
Copyright © 2014 by Warren Feld, LearnToBead.net. This handout is available for purchase at www.LearnToBead.net , www.BeDazzledBeads.com , or www.LandOfOdds.com, and is intended for personal use only. Reproduction of this handout by or for
any persons other than personal use is strictly prohibited. Kits, Supplies, Tools available for purchase at www.LandOfOdds.com , www.BeDazzledBeads.com , or www.LearnToBead.net . 24
Caterpillar Espiritu Bracelet with Warren Feld A LearnToBead.Net Class
www.LearnToBead.net [email protected]
4. Creating Simple Surface Embellishment
5. Creating a Simple Edging or Fringe BEGINNER
6. Working Stitch in Flat Form BEGINNER
7. Increasing and Decreasing
8. Working Stitch in Tubular Form
9. Working Stitch To Create Open (Negative Spaces), and Split Forms
10. Elaborately Embellishing the Stitch, including Fringes, Edge Treatments, Bails, Straps and Connectors
11. Working Stitch in Circular Form
12. Working Stitch in Spiral Form
13. Working Stitch in Diagonal Form
14. Working Stitch in 3-Dimensions (sculptural)
UNDERSTANDING ART & DESIGN BASIS OF STITCH
1. Learning Implications When Choosing Different Sizes/Shapes of Beads, or Using Different Stringing Materials
2. Understanding Relationship of this Stitch in Comparison to Other Types of Bead Weaving Stitches
3. Understanding How Bead Asserts Its Need For Color, Using This Stitch
BEGINNER
4. Creating Your Own Design with This Stitch, in Reference to Design Elements and Jewelry Design Principles of Composition
5. Creating Shapes, Components and Forms with This Stitch, and Establishing Themes
6. Building in Structural Supports, and Other Support Elements, into the Design
BECOMING BEAD WEAVING ARTIST
1. Developing A Personal Style
2. Valuing or Pricing Your Work
3. Teaching Others The Stitch
4. Promoting Yourself and Your Work
5. Advocating for Jewelry as "Art" and as "Design"
Copyright © 2014 by Warren Feld, LearnToBead.net. This handout is available for purchase at www.LearnToBead.net , www.BeDazzledBeads.com , or www.LandOfOdds.com, and is intended for personal use only. Reproduction of this handout by or for
any persons other than personal use is strictly prohibited. Kits, Supplies, Tools available for purchase at www.LandOfOdds.com , www.BeDazzledBeads.com , or www.LearnToBead.net . 25
Caterpillar Espiritu Bracelet with Warren Feld A LearnToBead.Net Class
www.LearnToBead.net [email protected]
IV. Next Steps
IVA. Suggested Readings:
Creative Bead Weaving, (Carol Wilcox-Wells), Lark Books, 1996Beyond Beading Basics, (Carole Rodgers)The Complete Guide to Beading Techniques, (Jane Davis), Krause Publications, 2001 Netted Beadwork, (Diane Fitzgerald)Zulu Inspired Bead Weaving Techniques, (Diane Fitzgerald)Embellished Bead Weaving, (Laura McCabe)Bead Net: New Ideas For Netted Beadwork, (Heather Kingsley-Heath)Wikipedia of Netting: Needlework http://encyclopediaofneedlework.com/chapter_12.htmlTeach Yourself Visually: Jewelry Making and Beading, (Chris Franchetti Michaels)Teach Yourself Visually: Beadwork, (Chris Franchetti Michaels)
Copyright © 2014 by Warren Feld, LearnToBead.net. This handout is available for purchase at www.LearnToBead.net , www.BeDazzledBeads.com , or www.LandOfOdds.com, and is intended for personal use only. Reproduction of this handout by or for
any persons other than personal use is strictly prohibited. Kits, Supplies, Tools available for purchase at www.LandOfOdds.com , www.BeDazzledBeads.com , or www.LearnToBead.net . 26