Web Navigator Getting Started SIMATIC HMI WinCC … HMI WinCC Web Navigator V1.1 Manual Order...
178
SIMATIC HMI WinCC Web Navigator V1.1 Manual Order Number: 6AV6392-1DC01-1AB0 Edition April 2001 C79000-G8276-C522-01 (A5E00109903) Web Navigator 1 Getting Started 2
Transcript of Web Navigator Getting Started SIMATIC HMI WinCC … HMI WinCC Web Navigator V1.1 Manual Order...
SIMATIC HMI
WinCCWeb Navigator V1.1
Manual
Order Number: 6AV6392-1DC01-1AB0
Edition April 2001
C79000-G8276-C522-01 (A5E00109903)
Web Navigator 1
Getting Started 2
WinCC®, SIMATIC®, SIMATIC NET®, SINEC® and STEP® are Siemens registered trademarks.
All other product and system names in this manual are (registered) trademarks of their respective owners andmust be treated accordingly.
(The reproduction, transmission or use of this document or itscontents is not permitted without express written authority.Offenders will be liable for damages. All rights, including rightscreated by patent grant or registration of a utility model ordesign, are reserved.)
(We have checked the contents of this manual for agreementwith the hardware and software described. Since deviationscannot be precluded entirely, we cannot guarantee fullagreement. However, the data in this manual are reviewedregularly and any necessary corrections included in subsequenteditions. Suggestions for improvement are welcomed.)
Siemens AG 1994 - 2001 All rights reserved Technical data subject to change
C79000-G8276-C522Printed in the Federal Republic of Germany Siemens Aktiengesellschaft
이 기기는 업무용(A급) 전자파 적합기기로서 판매자 또는 사용자는 이 점을 주의하시기 바라며 가정 외의 지역에서 사용하는 것을 목적으로 합니다.
04.01 Preface
WinCC Web Navigator iC79000-G8276-C522-01
Preface
PurposeThe WinCC Web Navigator user manual describes:
• the structure and operation of the WinCC Web Navigator
• the WinCC Web Navigator Server
• the WinCC Web Navigator Client
• Getting Started
The User Guide is for WinCC Web Navigator V1.1
Position within the Information Environment
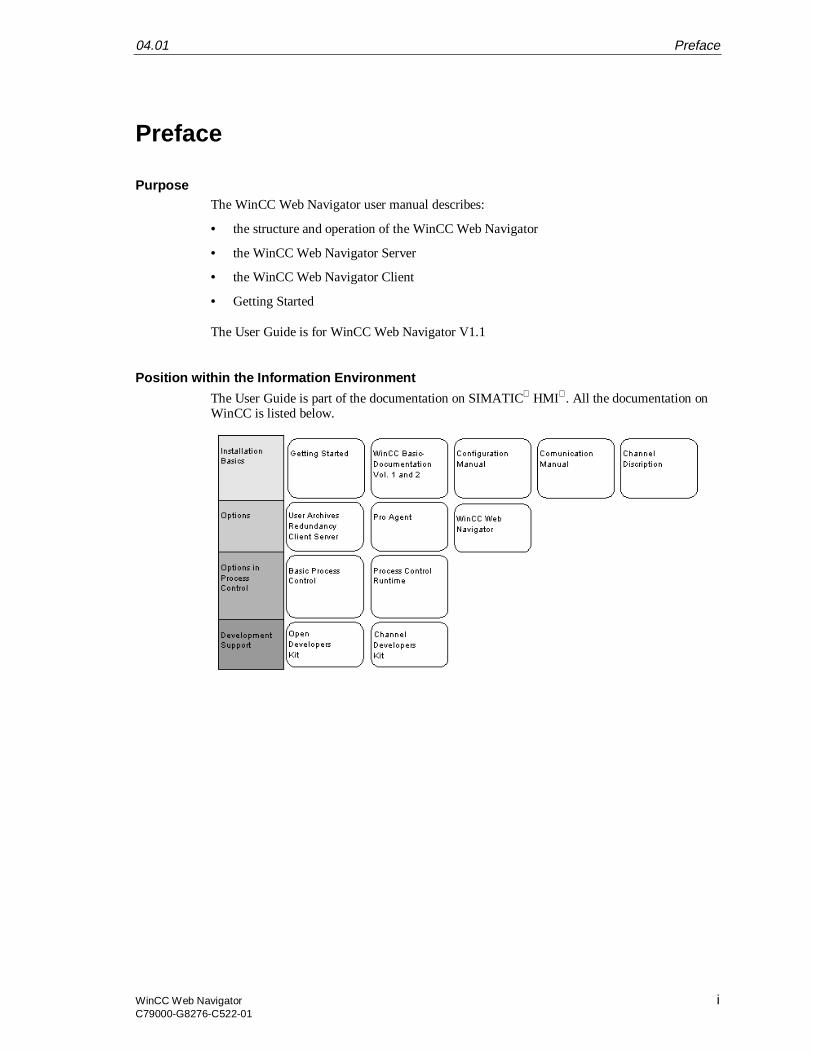
The User Guide is part of the documentation on SIMATIC HMI. All the documentation onWinCC is listed below.
Preface 04.01
ii WinCC Web NavigatorC79000-G8276-C522-01
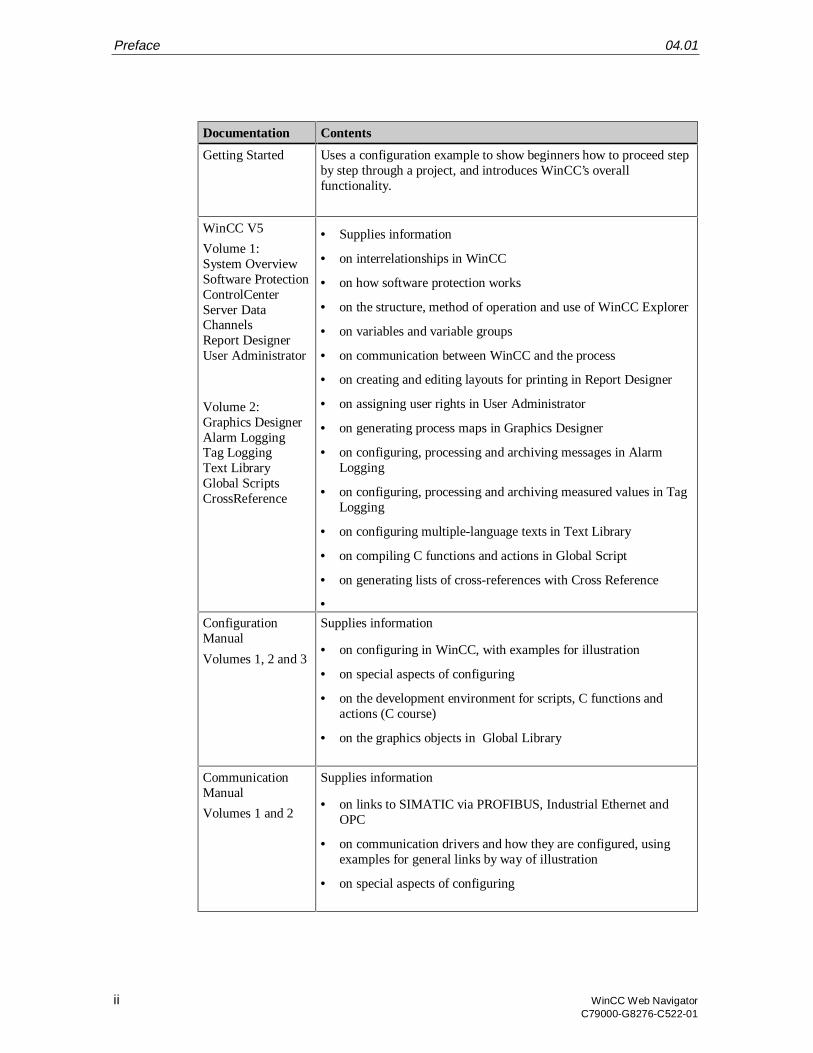
Documentation Contents
Getting Started Uses a configuration example to show beginners how to proceed stepby step through a project, and introduces WinCC’s overallfunctionality.
WinCC V5
Volume 1:System OverviewSoftware ProtectionControlCenterServer DataChannelsReport DesignerUser Administrator
Volume 2:Graphics DesignerAlarm LoggingTag LoggingText LibraryGlobal ScriptsCrossReference
• Supplies information
• on interrelationships in WinCC
• on how software protection works
• on the structure, method of operation and use of WinCC Explorer
• on variables and variable groups
• on communication between WinCC and the process
• on creating and editing layouts for printing in Report Designer
• on assigning user rights in User Administrator
• on generating process maps in Graphics Designer
• on configuring, processing and archiving messages in AlarmLogging
• on configuring, processing and archiving measured values in TagLogging
• on configuring multiple-language texts in Text Library
• on compiling C functions and actions in Global Script
• on generating lists of cross-references with Cross Reference
• ConfigurationManual
Volumes 1, 2 and 3
Supplies information
• on configuring in WinCC, with examples for illustration
• on special aspects of configuring
• on the development environment for scripts, C functions andactions (C course)
• on the graphics objects in Global Library
CommunicationManual
Volumes 1 and 2
Supplies information
• on links to SIMATIC via PROFIBUS, Industrial Ethernet andOPC
• on communication drivers and how they are configured, usingexamples for general links by way of illustration
• on special aspects of configuring
04.01 Preface
WinCC Web Navigator iiiC79000-G8276-C522-01
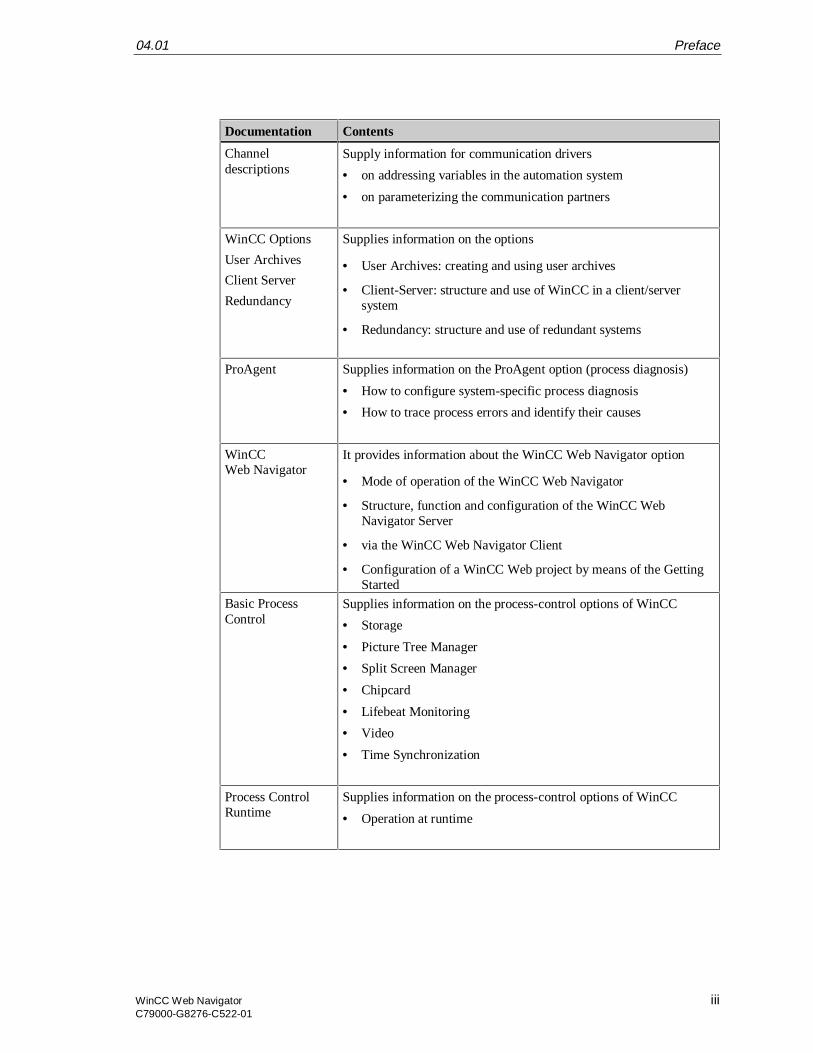
Documentation Contents
Channeldescriptions
Supply information for communication drivers
• on addressing variables in the automation system
• on parameterizing the communication partners
WinCC Options
User Archives
Client Server
Redundancy
Supplies information on the options
• User Archives: creating and using user archives
• Client-Server: structure and use of WinCC in a client/serversystem
• Redundancy: structure and use of redundant systems
ProAgent Supplies information on the ProAgent option (process diagnosis)
• How to configure system-specific process diagnosis
• How to trace process errors and identify their causes
WinCCWeb Navigator
It provides information about the WinCC Web Navigator option
• Mode of operation of the WinCC Web Navigator
• Structure, function and configuration of the WinCC WebNavigator Server
• via the WinCC Web Navigator Client
• Configuration of a WinCC Web project by means of the GettingStarted
Basic ProcessControl
Supplies information on the process-control options of WinCC
• Storage
• Picture Tree Manager
• Split Screen Manager
• Chipcard
• Lifebeat Monitoring
• Video
• Time Synchronization
Process ControlRuntime
Supplies information on the process-control options of WinCC
• Operation at runtime
Preface 04.01
iv WinCC Web NavigatorC79000-G8276-C522-01
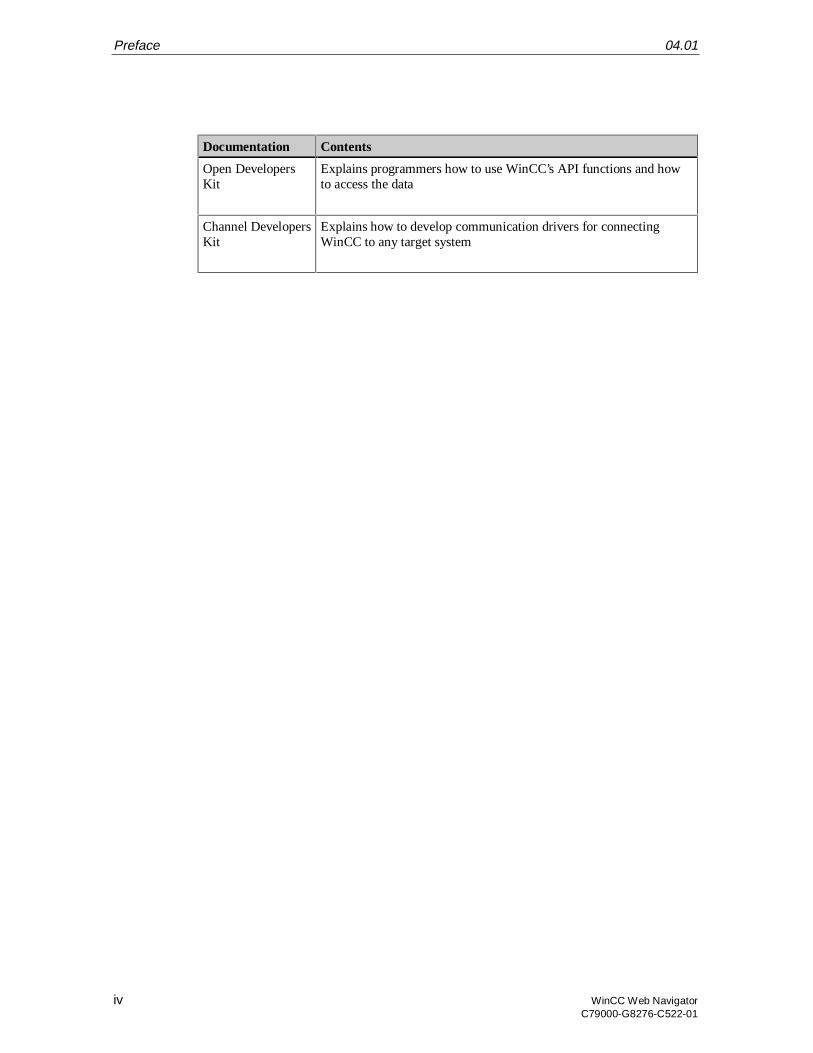
Documentation Contents
Open DevelopersKit
Explains programmers how to use WinCC’s API functions and howto access the data
Channel DevelopersKit
Explains how to develop communication drivers for connectingWinCC to any target system
04.01 Preface
WinCC Web Navigator vC79000-G8276-C522-01
Additional SupportPlease do not hesitate to contact use if you encounter problems in operation. Call + 49 911895-7000 if you need assistance in solving problems. Remember to have the software IDnumber at hand to streamline the process: this number is on the software product card.
Lost or defective authorization can be "repaired" on the phone by our Customer Support. Thenumber to dial is + 49 911 895-7200.
Information about SIMATIC ProductsSIMATIC Customer Support offers you wide-ranging additional information on SIMATICproducts by way of its online services:
• You can obtain general up-to-date information- on the Internet at http://www.ad.siemens.com/wincc- from the fax polling no. + 49 8765 93 02 77 95 00
• Up-to-date product information and downloads which may be of assistance duringoperation:- on the Internet at http://www.ad.siemens.de/support/html-00/Index.shtml- from the Bulletin Board System in Nuremberg (SIMATIC Customer Support
Mailbox): the number to dial is + 49 911 895-7100.
To dial into our mailbox, use a modem with a maximum baud rate that does not exceed28,800 bps (i.e. up to V.34) and set its parameters to 8, N, 1, ANSI or dial yourself invia ISDN (x.75, 64 Kbit).

Preface 04.01
vi WinCC Web NavigatorC79000-G8276-C522-01
SIMATIC HMI
WinCCWeb Navigator V1.1
Manual
Order Number: 6AV6392-1DC01-1AB0
Edition April 2001
C79000-G8276-C522-01 (A5E00109903)
Web Navigator 1
Getting Started 2
WinCC®, SIMATIC®, SIMATIC NET®, SINEC® and STEP® are Siemens registered trademarks.
All other product and system names in this manual are (registered) trademarks of their respective owners andmust be treated accordingly.
(The reproduction, transmission or use of this document or itscontents is not permitted without express written authority.Offenders will be liable for damages. All rights, including rightscreated by patent grant or registration of a utility model ordesign, are reserved.)
(We have checked the contents of this manual for agreementwith the hardware and software described. Since deviationscannot be precluded entirely, we cannot guarantee fullagreement. However, the data in this manual are reviewedregularly and any necessary corrections included in subsequenteditions. Suggestions for improvement are welcomed.)
Siemens AG 1994 - 2001 All rights reserved Technical data subject to change
C79000-G8276-C522Printed in the Federal Republic of Germany Siemens Aktiengesellschaft
WinCC Web Navigator iC79000-G8276-C522-01
Contents
1 Requirements ................................................................................................... 11.1 Hardware and Software.........................................................................................11.2 License .................................................................................................................3
2 Installation of the WinCC Web Navigator Server ........................................... 52.1 Procedure .............................................................................................................52.2 Windows NT 4.0 Option Pack................................................................................62.3 Installation of the Internet Information Server (IIS) with Windows 2000
Professional ........................................................................................................102.4 WinCC Web Navigator Server .............................................................................11
3 Wizard-supported Web setup: WinCC Web Configurator........................... 153.1 Use .....................................................................................................................153.2 Web Folder Setup ...............................................................................................193.2.1 Creating a new Standard Web Site (stand-alone) ................................................193.2.2 Creating a virtual Folder ......................................................................................213.2.3 Checking the activated Web Site .........................................................................23
4 WinCC Web Navigator Security..................................................................... 254.1 Overview.............................................................................................................254.2 SSL.....................................................................................................................264.3 HTTPS................................................................................................................264.4 WinCC Web Administrator...................................................................................274.5 Secure ID Card ...................................................................................................274.6 Firewall ...............................................................................................................284.6.1 General Information.............................................................................................284.6.2 Principle of Operation..........................................................................................284.6.3 Firewall Types.....................................................................................................28
5 Establishing a Connection with the WinCC Web Navigator Server ........... 315.1 Island solution .....................................................................................................315.2 Navigator Server on the WinCC Server ...............................................................325.3 Separation of WinCC Server and WinCC Web Navigator Server..........................33
6 Installing the WinCC Web Navigator Client.................................................. 356.1 Installation from CD.............................................................................................356.2 Installation over the Internet ................................................................................366.3 Internet Explorer Settings ....................................................................................37
7 Deinstallation.................................................................................................. 41
8 Configuration of the User Administration .................................................... 438.1 WinCC Web Administrator...................................................................................438.2 Structure .............................................................................................................458.3 Menu Bar ............................................................................................................478.3.1 "User" Menu........................................................................................................478.3.1.1 Adding a User .....................................................................................................478.3.1.2 Copying a User ...................................................................................................48
Contents 04.01
ii WinCC Web NavigatorC79000-G8276-C522-01
8.3.1.3 Deleting a User ................................................................................................... 498.3.2 "Tools" Menu ...................................................................................................... 508.3.2.1 Languages.......................................................................................................... 50
9 Configuration of a Web Project..................................................................... 519.1 Transfer of WinCC Pictures: Web View Publisher................................................ 519.2 Transfer, Adaptation of existing Projects.............................................................. 569.3 Limitations........................................................................................................... 579.4 Using Scripts....................................................................................................... 589.5 The "PdlPad" Tool............................................................................................... 599.6 Differences to the WinCC Base System .............................................................. 609.6.1 Script Execution.................................................................................................. 609.6.2 Opening a Picture ............................................................................................... 609.6.3 Scripting.............................................................................................................. 609.6.4 Addressing of Objects in other Pictures ............................................................... 619.6.5 Synchronous Script Functions............................................................................. 629.6.6 Defining Script Tags local to a Picture ................................................................. 63
10 Using the WinCC Web Navigator Client ....................................................... 65
11 WinCC Web Navigator Diagnostic Client ..................................................... 6711.1 Requirements ..................................................................................................... 6811.2 License ............................................................................................................... 6911.3 Installation of the WinCC Web Navigator Diagnostic Client.................................. 70
12 Diagnosis of the Connections with "Status.html"....................................... 71
13 WinCC Web Navigator and WinCC Guardian............................................... 73
14 Using the Terminal Services for the WinCC Web Navigator....................... 7514.1 Requirements for Using the Terminal Services .................................................... 7714.2 Terminal Services Setup ..................................................................................... 7814.2.1 Activation of the Terminal Services on Windows 2000 Server.............................. 7914.2.2 Creation of the Client Data Carrier on the Windows 2000 Server ......................... 8114.2.3 User Setup for the Access to the Terminal Services Server ................................. 8214.2.4 Installation of a Terminal Services Client on the Client Computer ........................ 8314.2.5 Configuration of the Connection .......................................................................... 8414.2.6 Starting the Application of the Terminal Services Server on the Client Computer . 8514.2.7 Configuring the "Auto Logon" Function for the Terminal Services Client............... 8614.2.8 Starting Applications on the Terminal Services Client in Full Screen Mode .......... 90
04.01 Contents
WinCC Web Navigator iiiC79000-G8276-C522-01
15 Appendix ........................................................................................................ 9115.1 Internet Information Server ..................................................................................9115.1.1 An overview of the highlights ...............................................................................9115.1.2 Reliability ............................................................................................................9115.1.3 Settings on the Internet Information Server..........................................................9215.1.4 Web Folder Setup ...............................................................................................9315.1.4.1 Creating a new Standard Web Site......................................................................9315.1.4.2 Virtual Folder.......................................................................................................9515.1.5 Setting the Start Page .........................................................................................9615.1.6 Adding an ISAPI Filter .........................................................................................9715.1.7 Setting the Default Authentication........................................................................9815.1.8 Application Settings.............................................................................................9915.2 Troubleshooting and Error Correction ................................................................ 10015.3 Tested Components .......................................................................................... 103

Contents 04.01
iv WinCC Web NavigatorC79000-G8276-C522-01

04.01 Introduction
WinCC Web Navigator vC79000-G8276-C522-01
Introduction
Safety Warnings
This documentation contains safety instructions that must be followed to avoidpersonal injury and damage to property. These instructions are highlighted by awarning triangle - shown below - depending on the degree of danger:
Danger
Will cause death, serious bodily injury or considerable property damage, if theproper precautionary measures are not taken.
Warning
Can cause death, serious bodily injury or considerable property damage, if theproper precautionary measures are not taken.
Caution
Can cause slight bodily injury or minor property damage, if the properprecautionary measures are not taken.
Caution
means that property damage may occur, if the proper precautionary measures arenot taken.
Warning
Important information about the product, the handling of the product or theparticular section in the documentation to which special attention should be paid.
Qualified Personnel
Startup and operation of this software must only be carried out by qualifiedpersonnel. Qualified personnel as defined by the safety instructions of thisdocument are persons that have the qualification to apply safety standards tosystems employing this software.
Introduction 04.01
vi WinCC Web NavigatorC79000-G8276-C522-01
The names WinCC®, SIMATIC®, SIMATIC NET®, SINEC® and STEP® areregistered trademarks of the Siemens AG.
All other names mentioned in this document are registered trademarks of theirrespective owners and must be treated accordingly.
The reproduction, distribution or use ofthis document or its contents is notpermitted without express writtenconsent. Violators will be liable fordamages. All rights reserved,especially in the case of granting apatent or registering a utility model.
We have thoroughly checked the contentsof this publication for agreement with thedescribed hardware and software.However, since deviations cannot beruled out entirely, we cannot guaranteefull agreement. The information in thisdescription is reviewed regularly and anynecessary corrections are included infuture editions. We welcome anysuggestions for improvement.
Siemens AGAutomation & DrivesSIMATIC Human Machine InterfaceP.O. Box 4848, D-90327 Nuremberg
© Siemens AG 1994 - 2001Subject to Technical Change
04.01 Introduction
WinCC Web Navigator viiC79000-G8276-C522-01
Function Overview
The enormous growth of the Internet in recent years has had and is having a largeimpact on industrial development. One of the key factors responsible for theInternet boom was the development of the World Wide Web (WWW) Internetservice.
Browser applications with graphical user interfaces make accessing and navigatingthe Web easy: clicking a mouse button is all that is needed to cross geographicalborders.
The "WinCC Web Navigator" option package to the WinCC basic system (V5.0SP2 or higher) enables you to develop a solution for controlling and monitoringprocesses via the Intranet/Internet. With this option package and the standard toolsof WinCC, a new way of distributing the HMI functions of your plant - that employthe Intranet/Internet - can be implemented quickly and easily. The WinCC WebNavigator supports all current Internet security measures and provides Wizards tohelp you with the configuration.
The communication mechanisms used by the WinCC Web Navigator utilize apowerful and optimized event-driven transmission of data, which delivers the bestperformance via the Intranet/Internet.
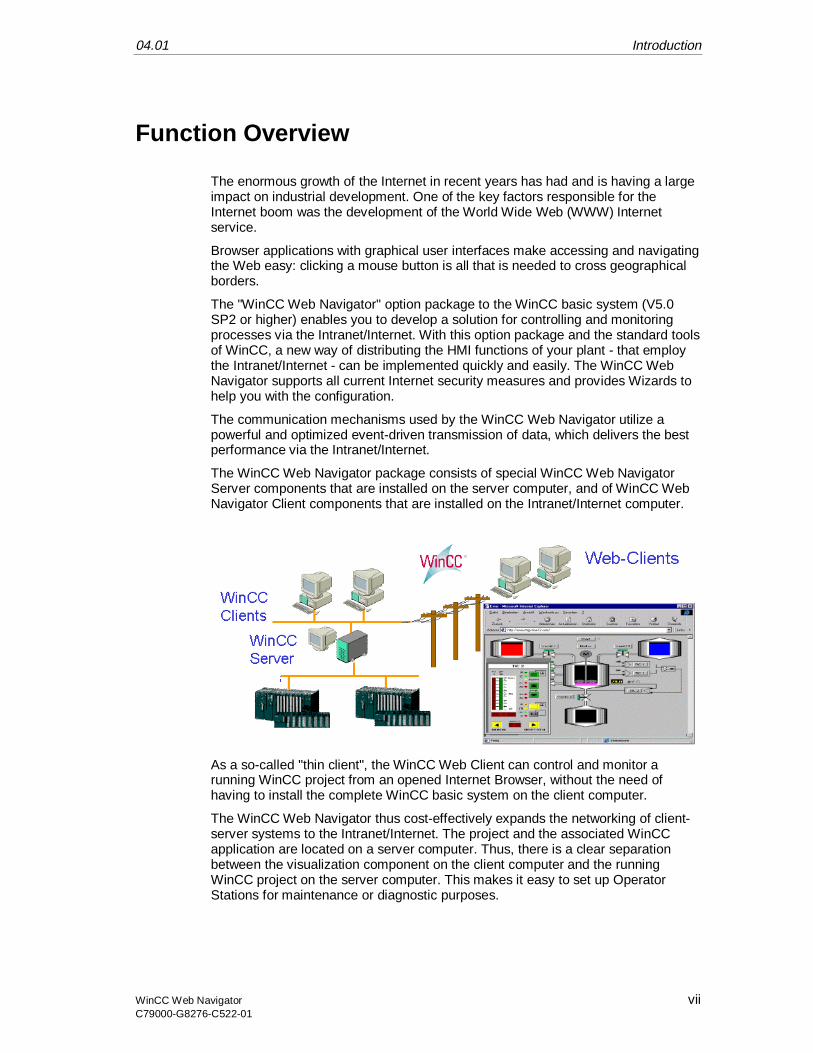
The WinCC Web Navigator package consists of special WinCC Web NavigatorServer components that are installed on the server computer, and of WinCC WebNavigator Client components that are installed on the Intranet/Internet computer.
As a so-called "thin client", the WinCC Web Client can control and monitor arunning WinCC project from an opened Internet Browser, without the need ofhaving to install the complete WinCC basic system on the client computer.
The WinCC Web Navigator thus cost-effectively expands the networking of client-server systems to the Intranet/Internet. The project and the associated WinCCapplication are located on a server computer. Thus, there is a clear separationbetween the visualization component on the client computer and the runningWinCC project on the server computer. This makes it easy to set up OperatorStations for maintenance or diagnostic purposes.
Introduction 04.01
viii WinCC Web NavigatorC79000-G8276-C522-01
The WinCC Web Navigator Client software runs under Windows 98, Windows ME,Windows 2000 and Windows NT 4.0 or higher. The visualization takes place in anyInternet Browser that support the ActiveX technology by Microsoft such as theInternet Explorer 5.01 or higher.
The WinCC Web Navigator Client software can be installed in various ways: asusual via the CD-ROM or as a self-extracting file via the Intranet/Internet. In otherwords, when accessing the WinCC Web Navigator Server, it will be checkedwhether the client software has been installed. If the client software is missing, theuser will be asked to download the file to his computer and to perform theinstallation. This scenario provides the WinCC Web Navigator user with a highdegree of flexibility and mobility.
Another interesting and valuable aspect is the user-specific assignment of startpictures and languages. This assignment makes it possible to give different usersimmediate access to different areas of a project.
The pictures displayed on the WinCC Web Navigator Client can be controlled justlike in a normal WinCC system. In this way, the project running on the servercomputer can be influenced from any point on earth.
Security is an essential aspect when controlling and monitoring via the Internet.Thus, the WinCC Web Navigator supports all currently known security standards(used in the banking and insurance industry) ranging from user-specific logins andpasswords, firewalls, secure ID cards with PINs to RAS (Remote Access Service)and the SSL technology.
For the communication to its clients, the WinCC Web Navigator Server requires theMicrosoft Internet Information Server or the Personal Web Server that is integratedinto Windows 2000 or has to be installed from the supplied CD-ROM for WindowsNT. For setting up the WinCC Web Navigator Server, the WinCC Web Configuratoris provided, which makes the configuration easy and convenient for the user.
The Wizard is ideal for users without Internet server knowledge - after only a fewinputs, the Web Server is correctly configured.
In order for a WinCC project to run on the WinCC Web Navigator, its WinCCpictures have to be adapted and converted. As before, the WinCC pictures arecreated and edited with the WinCC Graphics Designer.
The Web View Publisher automatically makes the necessary changes to theproject data (conversion of WinCC pictures, scripts) so that they can run on theWinCC Web Navigator Client. In order to achieve the best possible performance,the Wizard limits itself to information that is necessary for the Web.
In connection with the "WinCC Guardian" option package, live video images can beshown via the Internet. The WinCC Guardian components are used to, amongother things, display live video images of your plant within WinCC pictures.

04.01 Introduction
WinCC Web Navigator ixC79000-G8276-C522-01
Upgrading of the WinCC Web Navigator V1.0 toV1.1
Web Navigator Server
At the server, the deinstallation of Version 1.0 is necessary.
Following that, Version 1.1 of the Web Navigator Server can be installed.
Web Navigator Client
At the client, the so-called "Zero Administration" exists: the Web server checks theversion compatibility between server and client and downloads the clientcomponent if necessary. This takes place when upgrading or downgrading.
• If a Web Navigator Client V1.0 meets a Web Navigator Server V1.1, Version1.1 will automatically be installed on the client.
• If a "new" Web Navigator Client V1.1 meets an "old" Web Navigator ServerV1.0, the communication will only operate with the functionality of Version 1.0.

Introduction 04.01
x WinCC Web NavigatorC79000-G8276-C522-01
04.01 Requirements
WinCC Web Navigator 1C79000-G8276-C522-01
1 Requirements
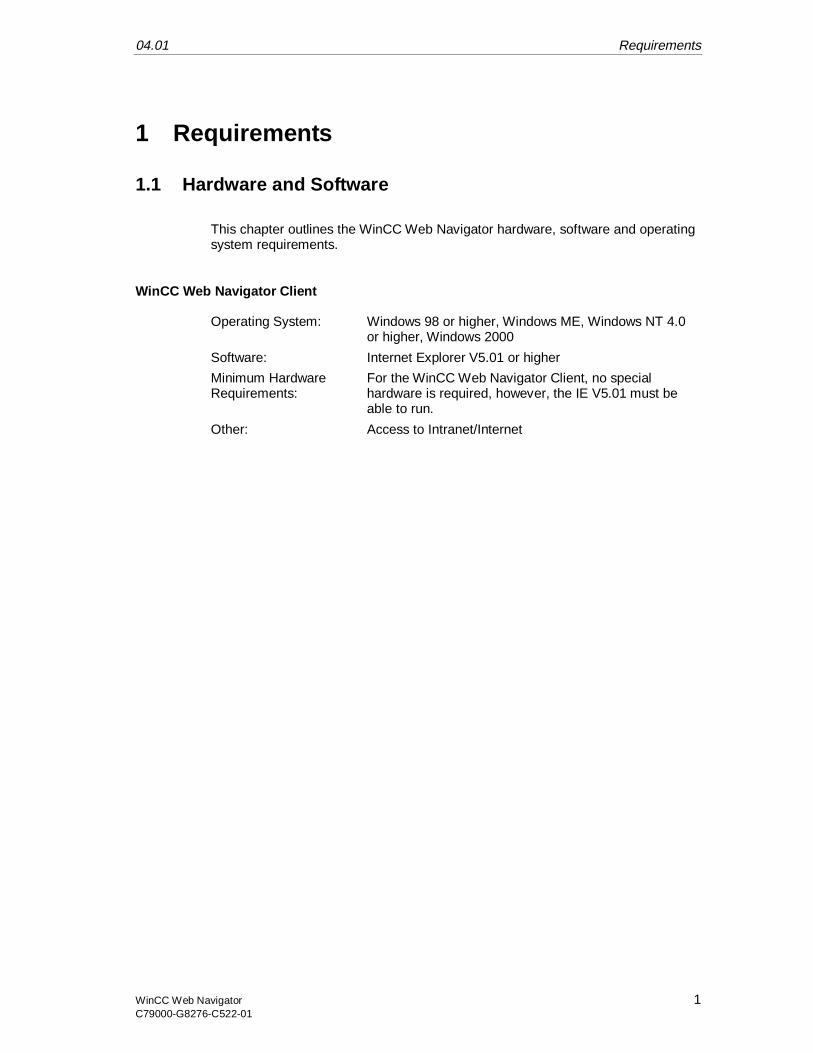
1.1 Hardware and Software
This chapter outlines the WinCC Web Navigator hardware, software and operatingsystem requirements.
WinCC Web Navigator Client
Operating System: Windows 98 or higher, Windows ME, Windows NT 4.0or higher, Windows 2000
Software: Internet Explorer V5.01 or higher
Minimum HardwareRequirements:
For the WinCC Web Navigator Client, no specialhardware is required, however, the IE V5.01 must beable to run.
Other: Access to Intranet/Internet
Requirements 04.01
2 WinCC Web NavigatorC79000-G8276-C522-01
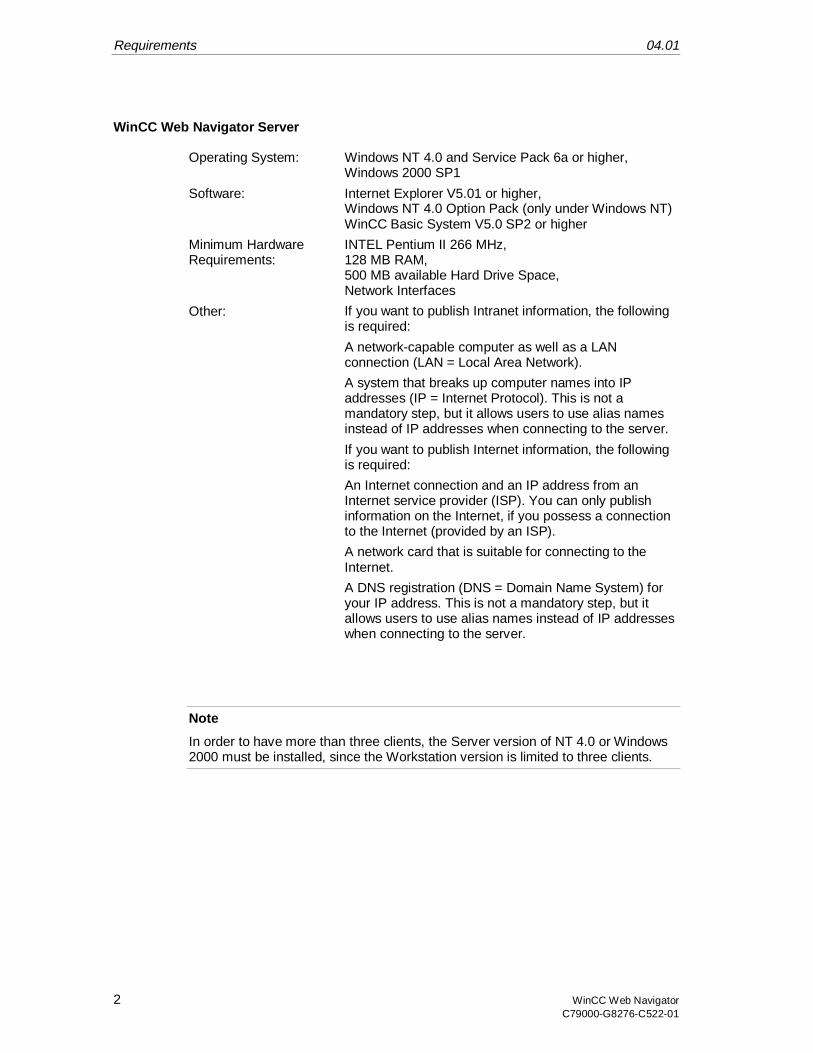
WinCC Web Navigator Server
Operating System: Windows NT 4.0 and Service Pack 6a or higher,Windows 2000 SP1
Software: Internet Explorer V5.01 or higher,Windows NT 4.0 Option Pack (only under Windows NT)WinCC Basic System V5.0 SP2 or higher
Minimum HardwareRequirements:
INTEL Pentium II 266 MHz,128 MB RAM,500 MB available Hard Drive Space,Network Interfaces
Other: If you want to publish Intranet information, the followingis required:
A network-capable computer as well as a LANconnection (LAN = Local Area Network).
A system that breaks up computer names into IPaddresses (IP = Internet Protocol). This is not amandatory step, but it allows users to use alias namesinstead of IP addresses when connecting to the server.
If you want to publish Internet information, the followingis required:
An Internet connection and an IP address from anInternet service provider (ISP). You can only publishinformation on the Internet, if you possess a connectionto the Internet (provided by an ISP).
A network card that is suitable for connecting to theInternet.
A DNS registration (DNS = Domain Name System) foryour IP address. This is not a mandatory step, but itallows users to use alias names instead of IP addresseswhen connecting to the server.
Note
In order to have more than three clients, the Server version of NT 4.0 or Windows2000 must be installed, since the Workstation version is limited to three clients.
04.01 Requirements
WinCC Web Navigator 3C79000-G8276-C522-01
1.2 License
WinCC Web Navigator Client
No license is required for the WinCC Web Navigator Client.
WinCC Web Navigator Server
As a prerequisite for the WinCC basic system, the WinCC RT basic license isrequired. No WinCC server license is required, if no local WinCC clients areoperated.
Without a license, the WinCC Web Navigator Server will run in demo mode for 30days. For the permanent use of the WinCC Web Navigator Server, a license isrequired. Licenses are available for 3, 10, 25 or 50 clients that can simultaneouslyaccess the Web Server.
A message box will be displayed, if the number of licensed clients is exceeded.
Note
There are different licenses neccessary for the functions of the Web NavigatorDiagnostic Client. For further information see "Web Navigator Diagnostic Client".
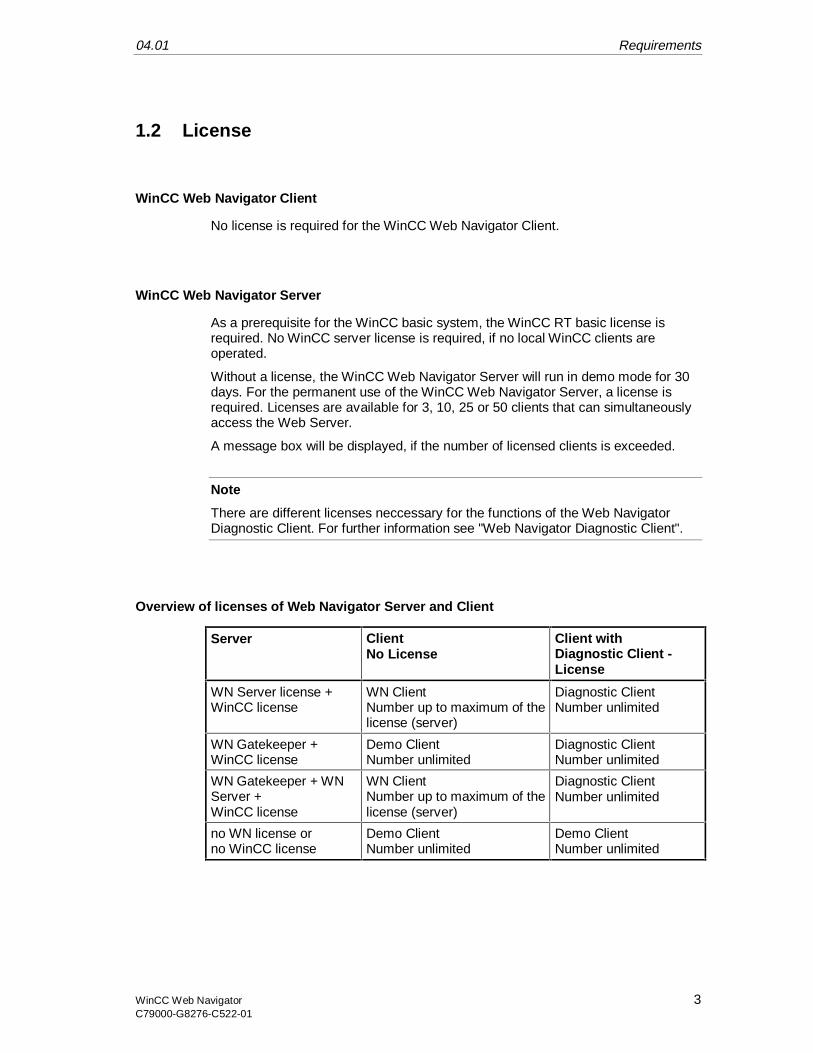
Overview of licenses of Web Navigator Server and Client
Server ClientNo License
Client withDiagnostic Client -License
WN Server license +WinCC license
WN ClientNumber up to maximum of thelicense (server)
Diagnostic ClientNumber unlimited
WN Gatekeeper +WinCC license
Demo ClientNumber unlimited
Diagnostic ClientNumber unlimited
WN Gatekeeper + WNServer +WinCC license
WN ClientNumber up to maximum of thelicense (server)
Diagnostic ClientNumber unlimited
no WN license orno WinCC license
Demo ClientNumber unlimited
Demo ClientNumber unlimited

Requirements 04.01
4 WinCC Web NavigatorC79000-G8276-C522-01
04.01 Installation of the WinCC Web Navigator Server
WinCC Web Navigator 5C79000-G8276-C522-01
2 Installation of the WinCC Web NavigatorServer
2.1 Procedure
The WinCC Web Navigator Server requires the Windows NT Service Pack 6a (orhigher) or Windows 2000 SP1 to be installed as well as WinCC V5.0 SP2 and theWindows NT 4.0 Option Pack.
Please refer to the WinCC documentation for details regarding the WinCCinstallation. The following description assumes that WinCC has already beeninstalled.
Installation of the WinCC Web Navigator Server under Windows NT 4.0:
1. Installation of the Windows NT 4.0 Option Pack
2. Do not restart computer
3. Installation of the Windows NT 4.0 Service Pack 6a or higher
4. Restart computer
5. Installation of the WinCC Web Navigator Server
Installation of the WinCC Web Navigator Server under Windows 2000:
1. Only with Windows 2000 Professional: Installation of the Internet InformationServer (IIS)
2. Installation of the WinCC Web Navigator Server
Note
In order to install the server component of the WinCC Web Navigator underWindows NT, write permissions to the registry database are required, i.e. you mustpossess administrator rights.
The Windows NT Option Pack has to be installed prior to the WinCC WebNavigator Server. The Windows NT Option Pack replaces a number of files, whichcould lead to problems.
Following the installation of the Windows NT Option Pack, the Windows NT ServicePack has to be installed again to ensure proper communication to the Internet.
Installation of the WinCC Web Navigator Server 04.01
6 WinCC Web NavigatorC79000-G8276-C522-01
2.2 Windows NT 4.0 Option Pack
Software Requirements:
• Windows NT 4.0 or higher
• Internet Explorer 5.01
If one of these components is missing, the setup will not be carried out.
The Windows NT Option Pack offers expanded Web and application services forWindows NT.
The Option Pack for NT Workstation comes with the Microsoft Personal WebServer (PWS) as the Internet Server, the Option Pack for NT Server with theInternet Information Server (IIS).
Note
Administrator rights are required to install the Internet Server under Windows NT.
You will be guided through the entire installation of the Windows NT Option Pack.Please follow the on-screen instructions.
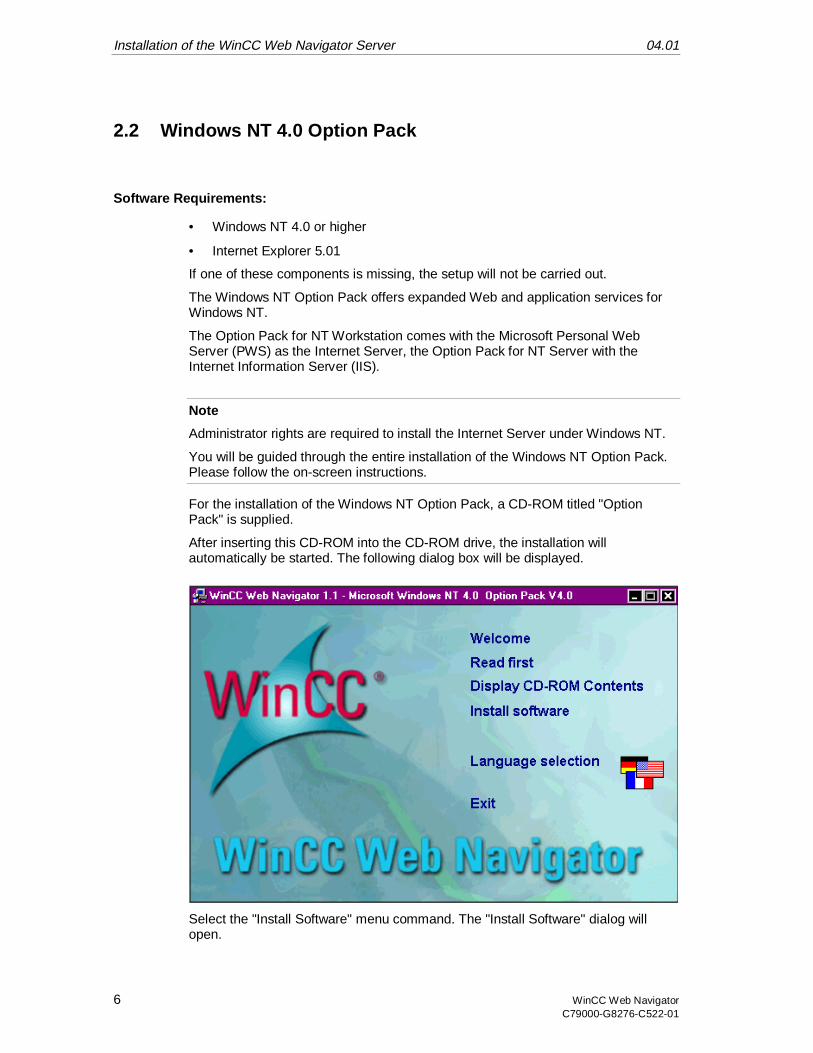
For the installation of the Windows NT Option Pack, a CD-ROM titled "OptionPack" is supplied.
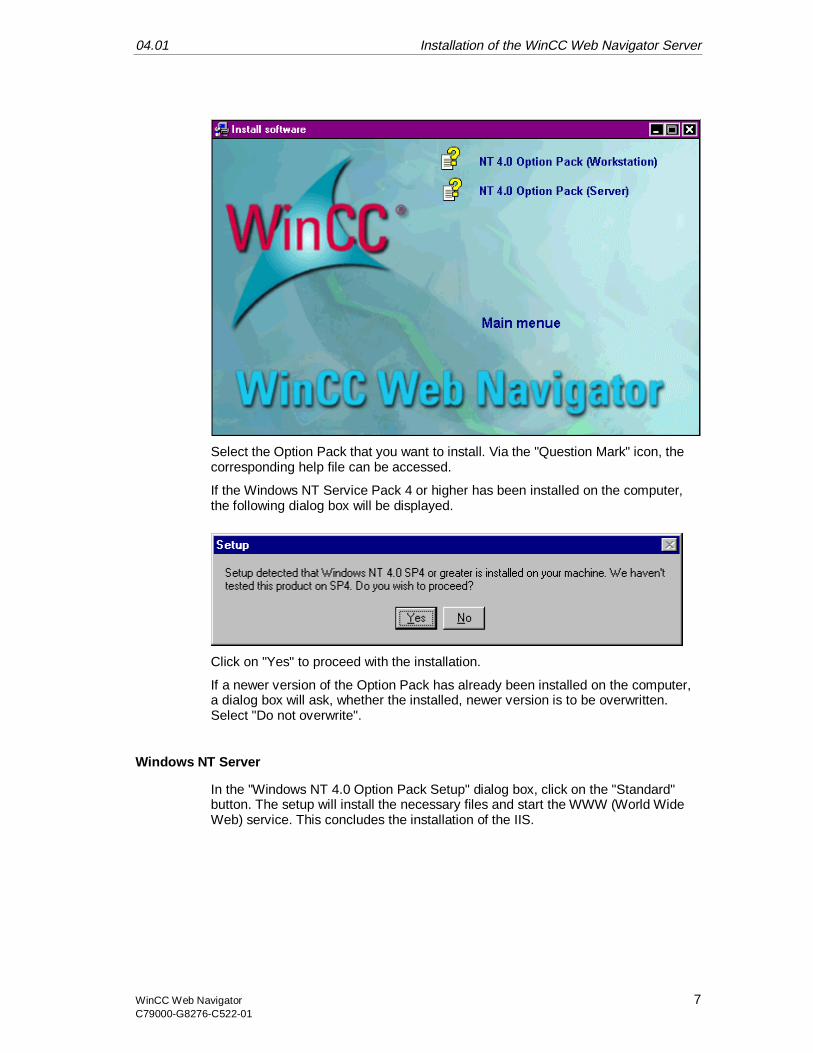
After inserting this CD-ROM into the CD-ROM drive, the installation willautomatically be started. The following dialog box will be displayed.
Select the "Install Software" menu command. The "Install Software" dialog willopen.
04.01 Installation of the WinCC Web Navigator Server
WinCC Web Navigator 7C79000-G8276-C522-01
Select the Option Pack that you want to install. Via the "Question Mark" icon, thecorresponding help file can be accessed.
If the Windows NT Service Pack 4 or higher has been installed on the computer,the following dialog box will be displayed.
Click on "Yes" to proceed with the installation.
If a newer version of the Option Pack has already been installed on the computer,a dialog box will ask, whether the installed, newer version is to be overwritten.Select "Do not overwrite".
Windows NT Server
In the "Windows NT 4.0 Option Pack Setup" dialog box, click on the "Standard"button. The setup will install the necessary files and start the WWW (World WideWeb) service. This concludes the installation of the IIS.
Installation of the WinCC Web Navigator Server 04.01
8 WinCC Web NavigatorC79000-G8276-C522-01
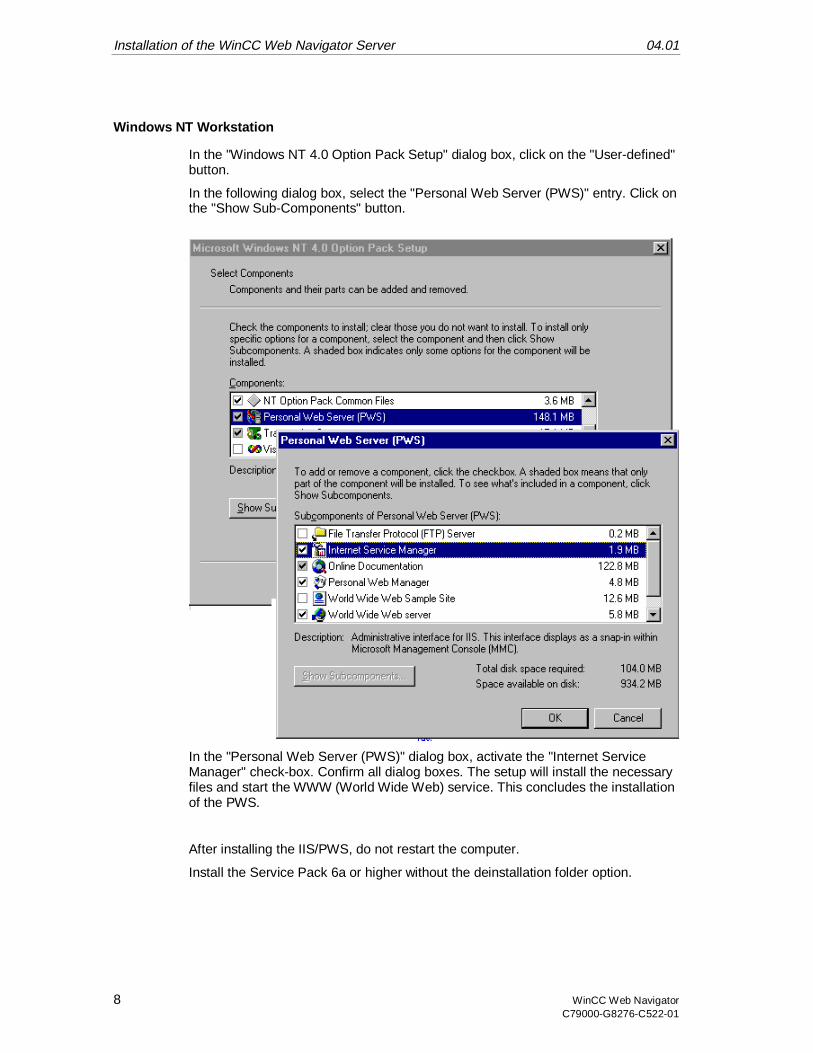
Windows NT Workstation
In the "Windows NT 4.0 Option Pack Setup" dialog box, click on the "User-defined"button.
In the following dialog box, select the "Personal Web Server (PWS)" entry. Click onthe "Show Sub-Components" button.
In the "Personal Web Server (PWS)" dialog box, activate the "Internet ServiceManager" check-box. Confirm all dialog boxes. The setup will install the necessaryfiles and start the WWW (World Wide Web) service. This concludes the installationof the PWS.
After installing the IIS/PWS, do not restart the computer.
Install the Service Pack 6a or higher without the deinstallation folder option.

04.01 Installation of the WinCC Web Navigator Server
WinCC Web Navigator 9C79000-G8276-C522-01
Restart the computer.
Detailed help pertaining to the individual components of the Windows NT OptionPack can be found in the accompanying documentation. In the appendix to theInternet Information Server, you will find information about the Reliability and anOverview of the Highlights.
Installation of the WinCC Web Navigator Server 04.01
10 WinCC Web NavigatorC79000-G8276-C522-01
2.3 Installation of the Internet Information Server (IIS) withWindows 2000 Professional
When using Windows 2000 Professional, the Internet Information Server (IIS) mustbe installed prior to the WinCC Web Navigator Server. When using Windows 2000Server, this manual installation is not necessary.
Note
In order to install the Internet Information Server under Windows 2000Professional, write permissions to the registry database are required, i.e. you mustpossess administrator rights.
• Insert the Windows 2000 CD-ROM into the CD-ROM drive.
• From the Windows 2000 start menu, select the "Settings" "Control Panel"entries and then click on the "Add/Remove Programs" icon.
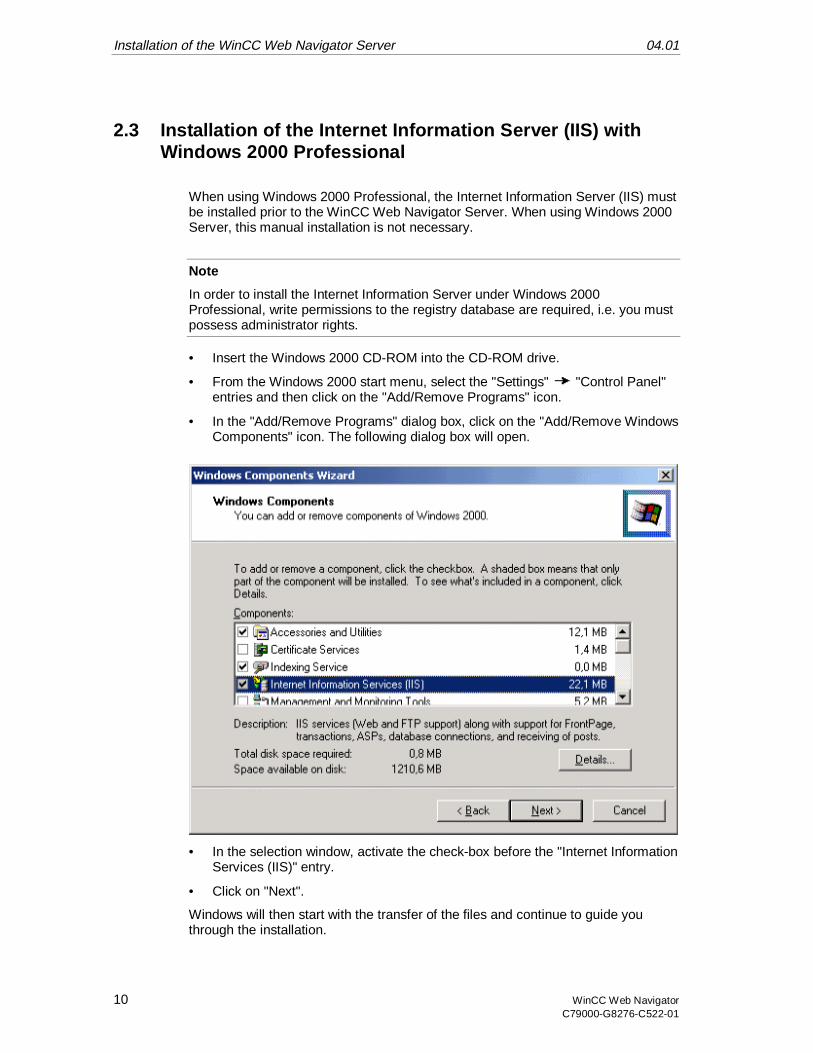
• In the "Add/Remove Programs" dialog box, click on the "Add/Remove WindowsComponents" icon. The following dialog box will open.
• In the selection window, activate the check-box before the "Internet InformationServices (IIS)" entry.
• Click on "Next".
Windows will then start with the transfer of the files and continue to guide youthrough the installation.
04.01 Installation of the WinCC Web Navigator Server
WinCC Web Navigator 11C79000-G8276-C522-01
2.4 WinCC Web Navigator Server
Note
In order to install the server component of the WinCC Web Navigator underWindows NT, write permissions to the registry database are required, i.e. you mustpossess administrator rights.
Prior to installing the WinCC Web Navigator Server, the Windows NT 4.0 OptionPack has to be installed. Following the installation of the Windows NT Option Pack,the Windows NT Service Pack has to be installed again to ensure propercommunication to the Internet.
• Insert the WinCC Web Navigator CD-ROM into the CD-ROM drive.
• The setup program will start automatically after a few seconds, provided thatthe autorun functionality has not been deactivated.
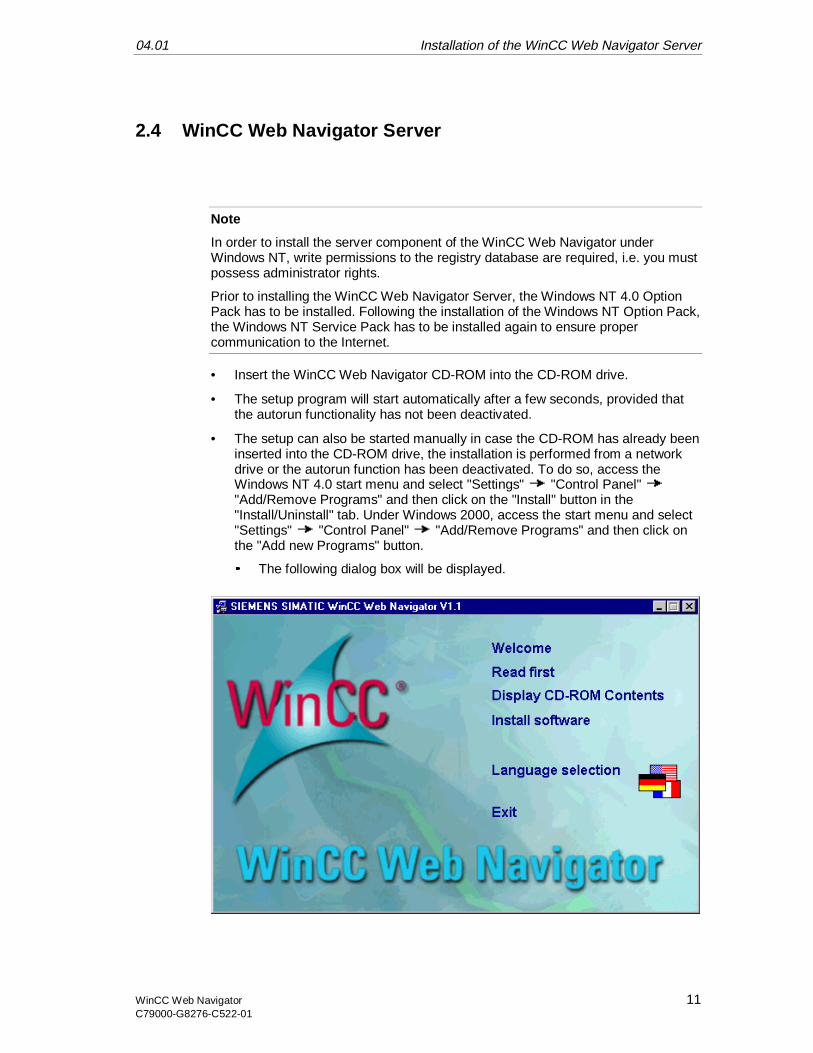
• The setup can also be started manually in case the CD-ROM has already beeninserted into the CD-ROM drive, the installation is performed from a networkdrive or the autorun function has been deactivated. To do so, access theWindows NT 4.0 start menu and select "Settings" "Control Panel""Add/Remove Programs" and then click on the "Install" button in the"Install/Uninstall" tab. Under Windows 2000, access the start menu and select"Settings" "Control Panel" "Add/Remove Programs" and then click onthe "Add new Programs" button.
é The following dialog box will be displayed.

Installation of the WinCC Web Navigator Server 04.01
12 WinCC Web NavigatorC79000-G8276-C522-01
To view additional information about the WinCC Web Navigator, click on the"Welcome", "Read first", "Display CD-ROM Contents", "Install Software" and"Language Selection" entries.
To install the WinCC Web Navigator, click on the "Install Software" entry.
In the following dialog box, select the "Server" component.
• Click on the "Next" button.
• Confirm your inputs in the next dialog box by clicking on the "Next" button.
• The "Authorization" dialog box will display a list of the required authorizationsbased on the components selected. Select the "Yes, the authorization shouldbe performed during the installation" radio-button and insert the authorizationfloppy disk into drive "A:".
The WinCC Web Navigator Server will then begin with the transfer of the files.Following the installation, you can read the "Setting up an IIS Example Web Site"file.
If older versions of system files were located on your computer, the setup programmay ask you to restart your computer.
04.01 Installation of the WinCC Web Navigator Server
WinCC Web Navigator 13C79000-G8276-C522-01
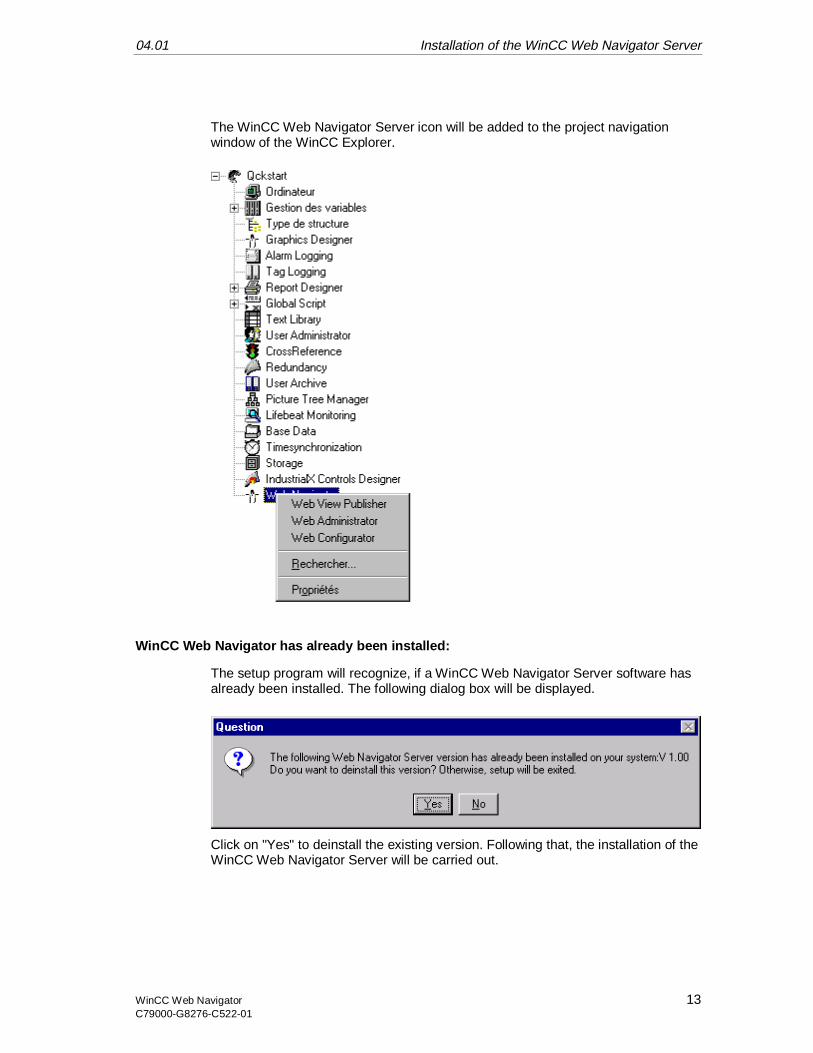
The WinCC Web Navigator Server icon will be added to the project navigationwindow of the WinCC Explorer.
WinCC Web Navigator has already been installed:
The setup program will recognize, if a WinCC Web Navigator Server software hasalready been installed. The following dialog box will be displayed.
Click on "Yes" to deinstall the existing version. Following that, the installation of theWinCC Web Navigator Server will be carried out.

Installation of the WinCC Web Navigator Server 04.01
14 WinCC Web NavigatorC79000-G8276-C522-01
04.01 Wizard-supported Web setup: WinCC Web Configurator
WinCC Web Navigator 15C79000-G8276-C522-01
3 Wizard-supported Web setup: WinCC WebConfigurator
3.1 Use
The WinCC Web Configurator guides you through the management and setup ofthe Microsoft Internet Information Server/Personal Web Server in anuncomplicated and easy-to-follow manner. The Configurator is, thus, ideal for allusers who have no knowledge of Web servers. This setup and configuration isnecessary in order to make the WinCC Server accessible over the intra-/Internet.Additional information on the Microsoft Internet Information Server can be obtainedfrom Microsoft.
Notice
The Internet Information Server/Personal Web Server and the WinCC WebNavigator Server must be installed. The wizard will otherwise not be executed.
Wizard-supported Web setup: WinCC Web Configurator 04.01
16 WinCC Web NavigatorC79000-G8276-C522-01
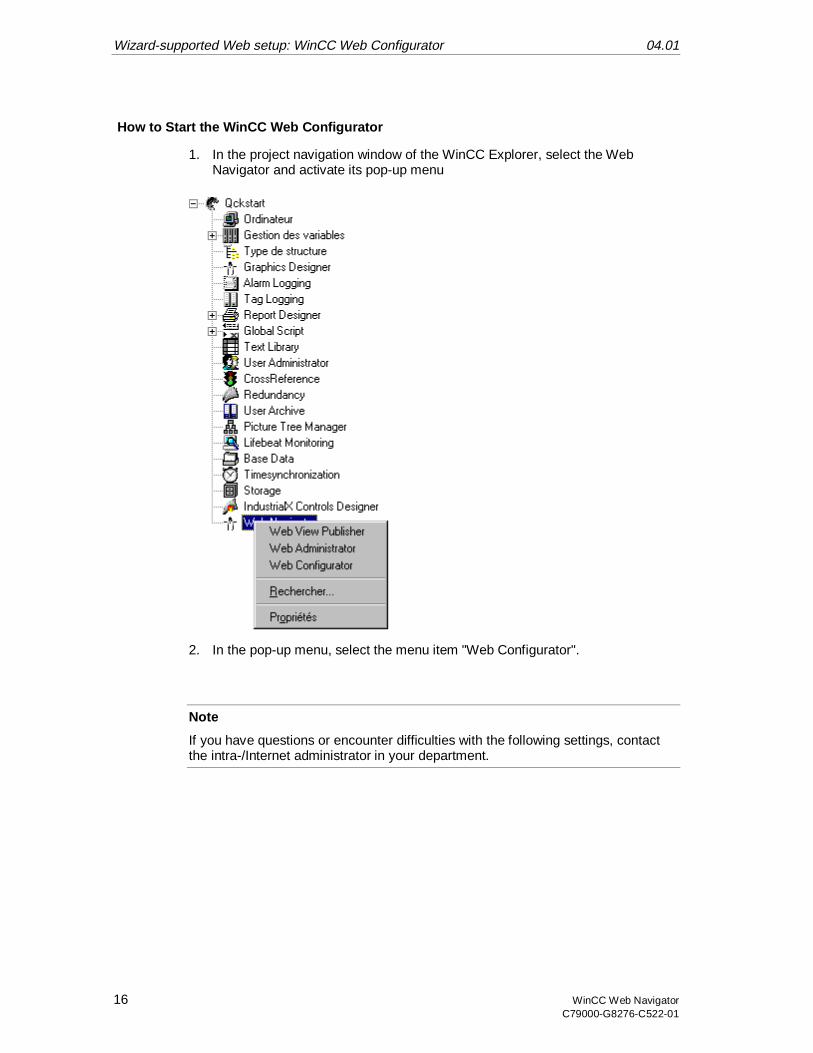
How to Start the WinCC Web Configurator
1. In the project navigation window of the WinCC Explorer, select the WebNavigator and activate its pop-up menu
2. In the pop-up menu, select the menu item "Web Configurator".
Note
If you have questions or encounter difficulties with the following settings, contactthe intra-/Internet administrator in your department.
04.01 Wizard-supported Web setup: WinCC Web Configurator
WinCC Web Navigator 17C79000-G8276-C522-01
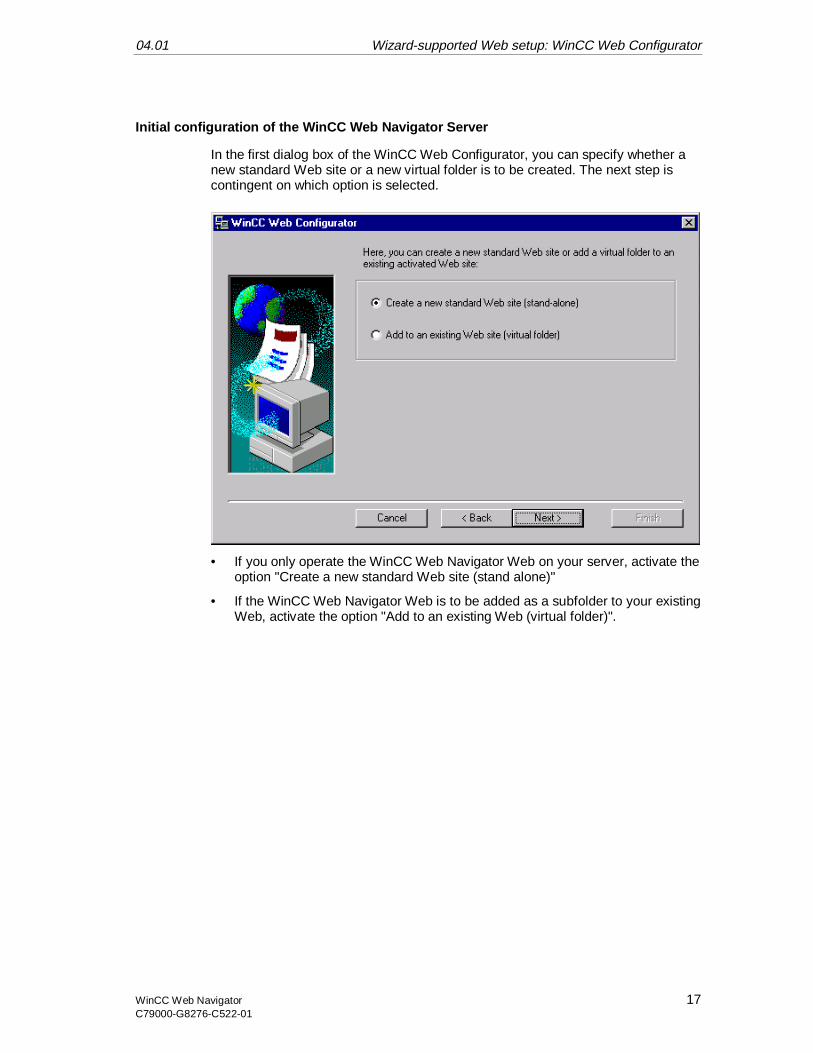
Initial configuration of the WinCC Web Navigator Server
In the first dialog box of the WinCC Web Configurator, you can specify whether anew standard Web site or a new virtual folder is to be created. The next step iscontingent on which option is selected.
• If you only operate the WinCC Web Navigator Web on your server, activate theoption "Create a new standard Web site (stand alone)"
• If the WinCC Web Navigator Web is to be added as a subfolder to your existingWeb, activate the option "Add to an existing Web (virtual folder)".
Wizard-supported Web setup: WinCC Web Configurator 04.01
18 WinCC Web NavigatorC79000-G8276-C522-01
Editing the configuration
If the IIS/PWS has already been configured, you can use the WinCC WebConfigurator to change the settings of the existing Web server or of the virtualfolder.
Option "Add to an existing Web (virtual folder)"
Note
Included in the Appendix are the settings which are performed by the WinCC WebConfigurator.
If you accidentally delete the Web for the Web Navigator, restart your computerbefore creating a new Web with WinCC Web Configurator.
Please note, that when you perform manual changes to this Web and afterwardsyou are unable to communicate with your Web, the Web Configurator willautomatically attempt to correctly reset these settings.
If this method does not succeed, delete the Web from the IIS, reboot yourcomputer and use the Web Configurator to again create a new Web.
While operating the WinCC Web Navigator Server, only one Web project can beactive per computer, since the Web filter is loaded to the storage of the active Web.
04.01 Wizard-supported Web setup: WinCC Web Configurator
WinCC Web Navigator 19C79000-G8276-C522-01
3.2 Web Folder Setup
3.2.1 Creating a new Standard Web Site (stand-alone)
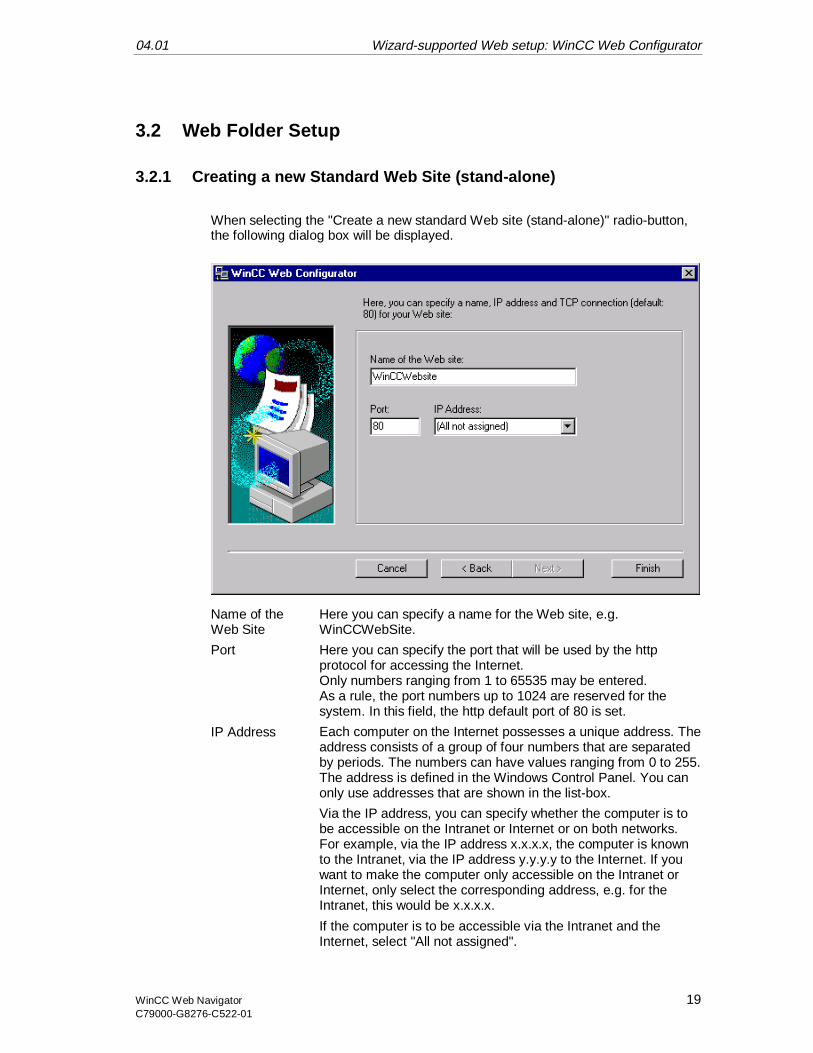
When selecting the "Create a new standard Web site (stand-alone)" radio-button,the following dialog box will be displayed.
Name of theWeb Site
Here you can specify a name for the Web site, e.g.WinCCWebSite.
Port Here you can specify the port that will be used by the httpprotocol for accessing the Internet.Only numbers ranging from 1 to 65535 may be entered.As a rule, the port numbers up to 1024 are reserved for thesystem. In this field, the http default port of 80 is set.
IP Address Each computer on the Internet possesses a unique address. Theaddress consists of a group of four numbers that are separatedby periods. The numbers can have values ranging from 0 to 255.The address is defined in the Windows Control Panel. You canonly use addresses that are shown in the list-box.
Via the IP address, you can specify whether the computer is tobe accessible on the Intranet or Internet or on both networks.For example, via the IP address x.x.x.x, the computer is knownto the Intranet, via the IP address y.y.y.y to the Internet. If youwant to make the computer only accessible on the Intranet orInternet, only select the corresponding address, e.g. for theIntranet, this would be x.x.x.x.
If the computer is to be accessible via the Intranet and theInternet, select "All not assigned".
Wizard-supported Web setup: WinCC Web Configurator 04.01
20 WinCC Web NavigatorC79000-G8276-C522-01
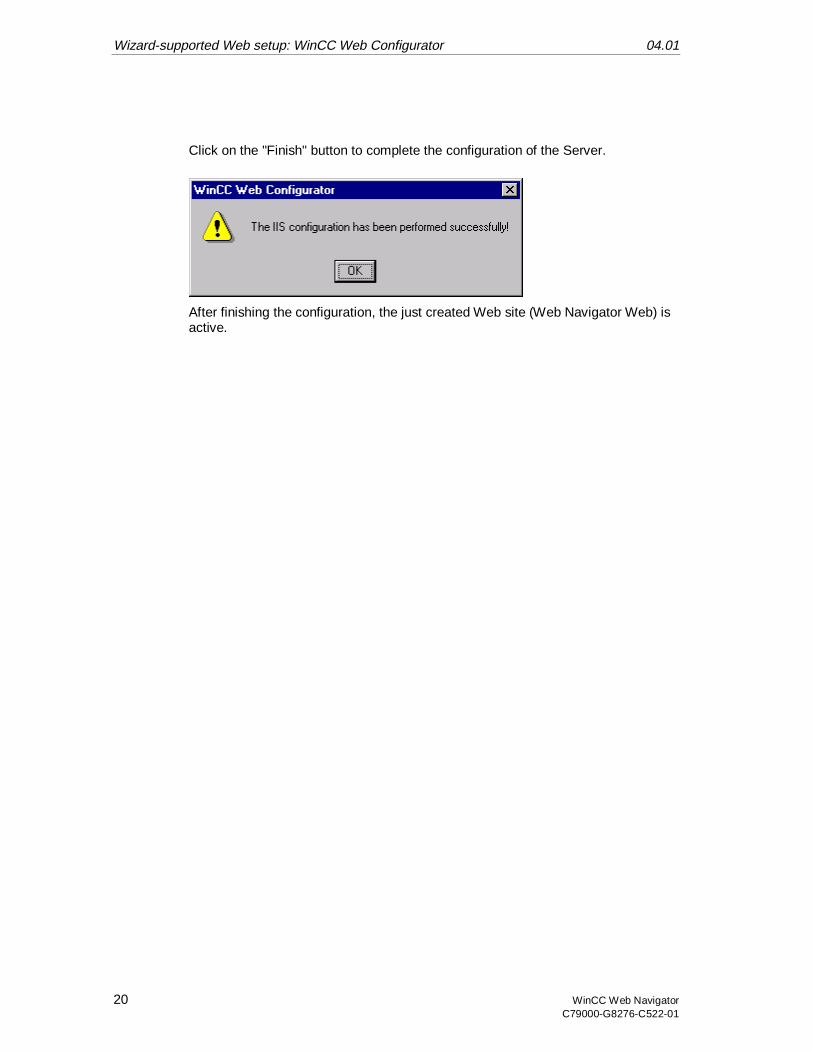
Click on the "Finish" button to complete the configuration of the Server.
After finishing the configuration, the just created Web site (Web Navigator Web) isactive.
04.01 Wizard-supported Web setup: WinCC Web Configurator
WinCC Web Navigator 21C79000-G8276-C522-01
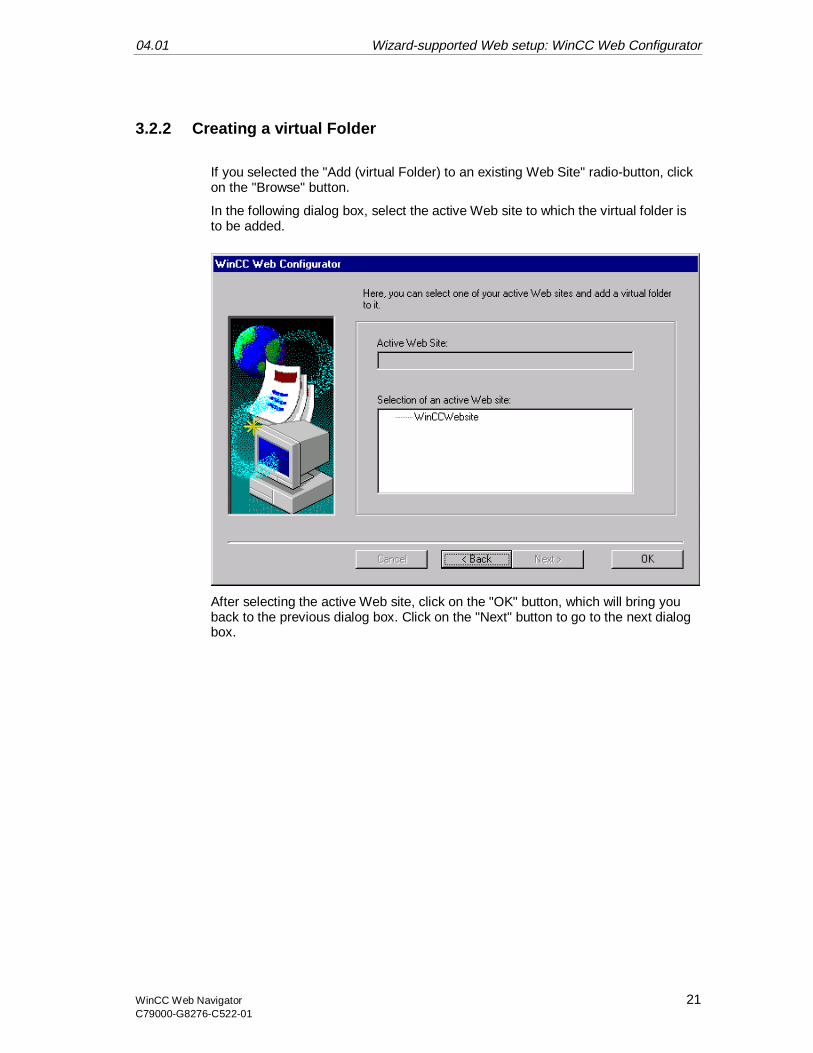
3.2.2 Creating a virtual Folder
If you selected the "Add (virtual Folder) to an existing Web Site" radio-button, clickon the "Browse" button.
In the following dialog box, select the active Web site to which the virtual folder isto be added.
After selecting the active Web site, click on the "OK" button, which will bring youback to the previous dialog box. Click on the "Next" button to go to the next dialogbox.
Wizard-supported Web setup: WinCC Web Configurator 04.01
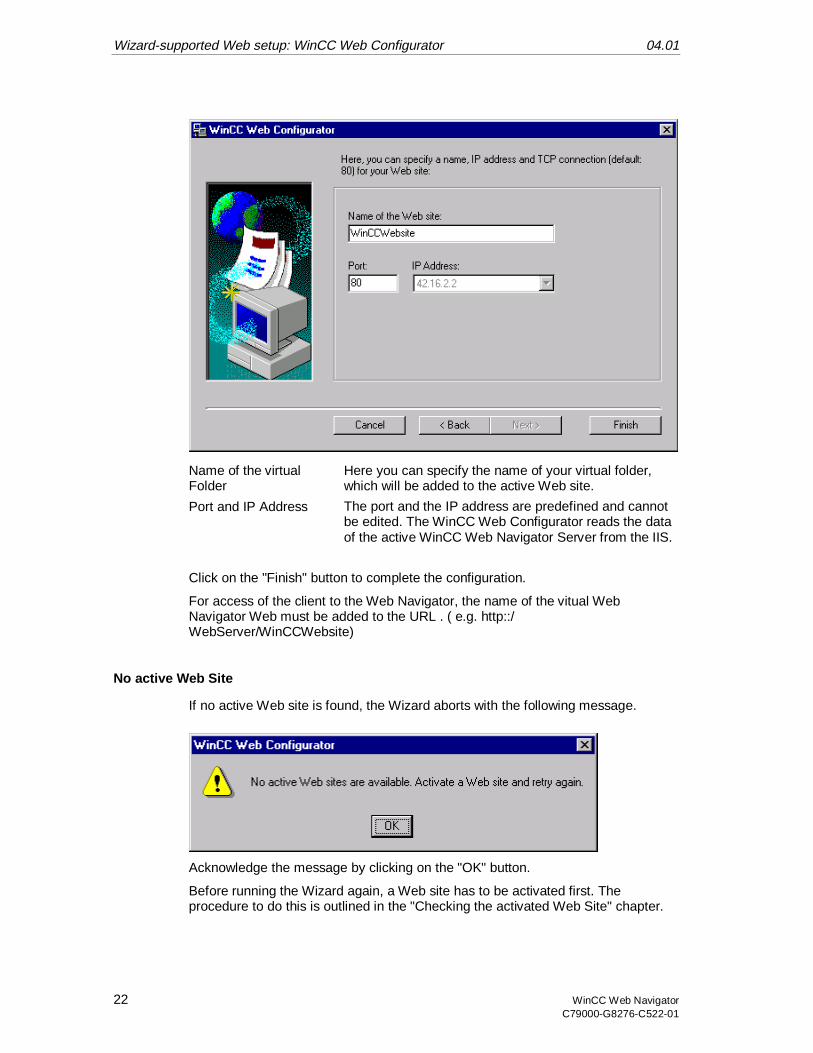
22 WinCC Web NavigatorC79000-G8276-C522-01
Name of the virtualFolder
Here you can specify the name of your virtual folder,which will be added to the active Web site.
Port and IP Address The port and the IP address are predefined and cannotbe edited. The WinCC Web Configurator reads the dataof the active WinCC Web Navigator Server from the IIS.
Click on the "Finish" button to complete the configuration.
For access of the client to the Web Navigator, the name of the vitual WebNavigator Web must be added to the URL . ( e.g. http::/WebServer/WinCCWebsite)
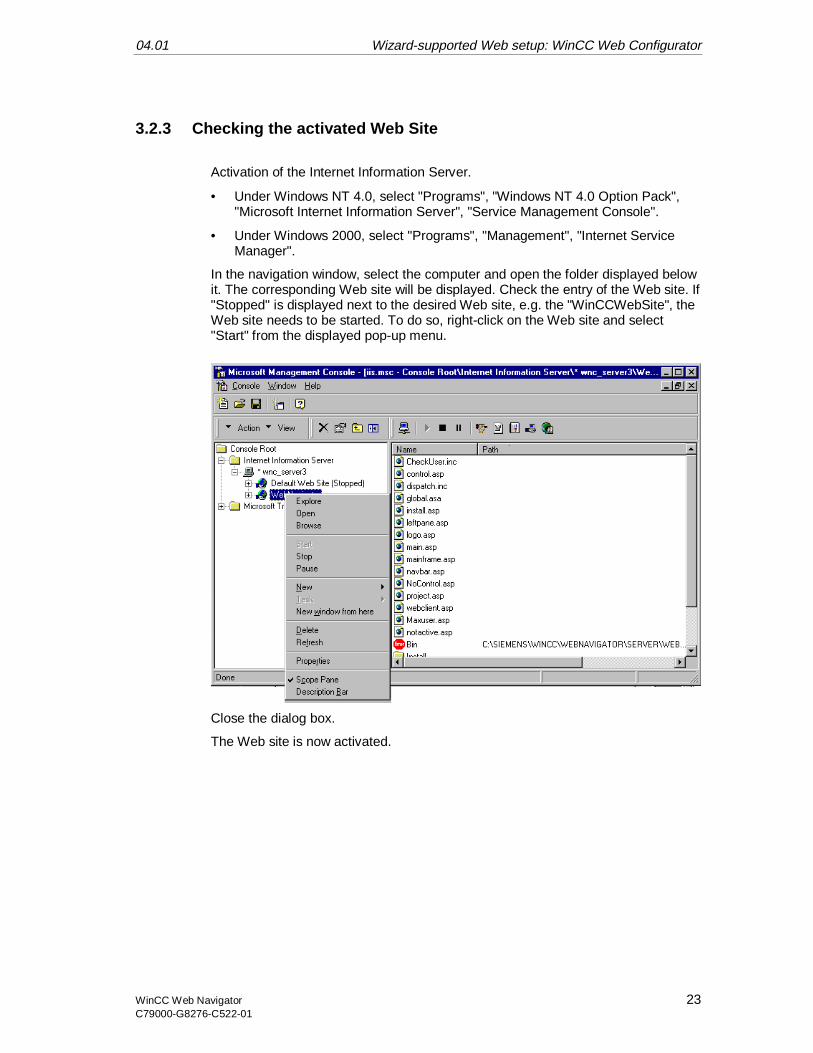
No active Web Site
If no active Web site is found, the Wizard aborts with the following message.
Acknowledge the message by clicking on the "OK" button.
Before running the Wizard again, a Web site has to be activated first. Theprocedure to do this is outlined in the "Checking the activated Web Site" chapter.
04.01 Wizard-supported Web setup: WinCC Web Configurator
WinCC Web Navigator 23C79000-G8276-C522-01
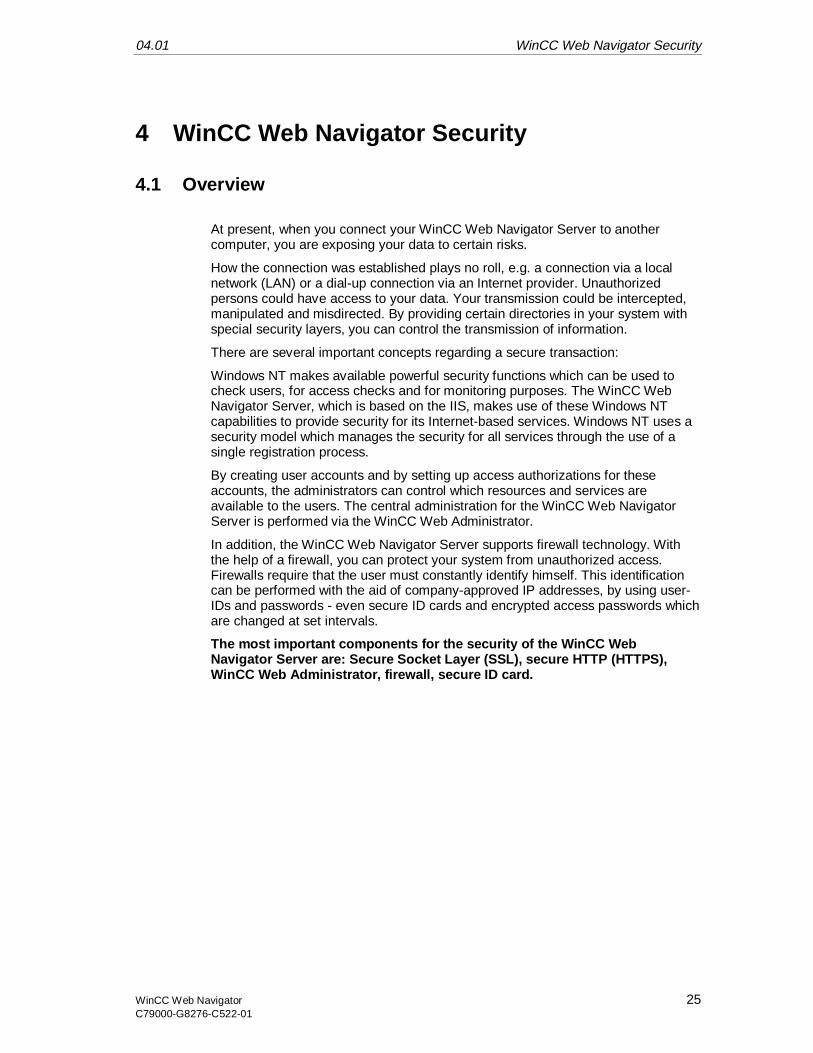
3.2.3 Checking the activated Web Site
Activation of the Internet Information Server.
• Under Windows NT 4.0, select "Programs", "Windows NT 4.0 Option Pack","Microsoft Internet Information Server", "Service Management Console".
• Under Windows 2000, select "Programs", "Management", "Internet ServiceManager".
In the navigation window, select the computer and open the folder displayed belowit. The corresponding Web site will be displayed. Check the entry of the Web site. If"Stopped" is displayed next to the desired Web site, e.g. the "WinCCWebSite", theWeb site needs to be started. To do so, right-click on the Web site and select"Start" from the displayed pop-up menu.
Close the dialog box.
The Web site is now activated.

Wizard-supported Web setup: WinCC Web Configurator 04.01
24 WinCC Web NavigatorC79000-G8276-C522-01
04.01 WinCC Web Navigator Security
WinCC Web Navigator 25C79000-G8276-C522-01
4 WinCC Web Navigator Security
4.1 Overview
At present, when you connect your WinCC Web Navigator Server to anothercomputer, you are exposing your data to certain risks.
How the connection was established plays no roll, e.g. a connection via a localnetwork (LAN) or a dial-up connection via an Internet provider. Unauthorizedpersons could have access to your data. Your transmission could be intercepted,manipulated and misdirected. By providing certain directories in your system withspecial security layers, you can control the transmission of information.
There are several important concepts regarding a secure transaction:
Windows NT makes available powerful security functions which can be used tocheck users, for access checks and for monitoring purposes. The WinCC WebNavigator Server, which is based on the IIS, makes use of these Windows NTcapabilities to provide security for its Internet-based services. Windows NT uses asecurity model which manages the security for all services through the use of asingle registration process.
By creating user accounts and by setting up access authorizations for theseaccounts, the administrators can control which resources and services areavailable to the users. The central administration for the WinCC Web NavigatorServer is performed via the WinCC Web Administrator.
In addition, the WinCC Web Navigator Server supports firewall technology. Withthe help of a firewall, you can protect your system from unauthorized access.Firewalls require that the user must constantly identify himself. This identificationcan be performed with the aid of company-approved IP addresses, by using user-IDs and passwords - even secure ID cards and encrypted access passwords whichare changed at set intervals.
The most important components for the security of the WinCC WebNavigator Server are: Secure Socket Layer (SSL), secure HTTP (HTTPS),WinCC Web Administrator, firewall, secure ID card.
WinCC Web Navigator Security 04.01
26 WinCC Web NavigatorC79000-G8276-C522-01
4.2 SSL
SSL is a protocol which guarantees the data security between HTTP and TCP/IP.The standard for the security of WWW browsers and servers is defined by the W3C(World Wide Web Consortium). The W3C was established to create standardnormatives for the WWW. Additional information can be found in the Internet underhttp://www.w3c.org.
The SSL performs a security check before a TCP/IP connection is established.This check determines the security level on which the client and the server agreeand over it, the necessary authenticity operations for the connection are performed.
SSL performs the encryption and decryption of the data stream of the usedprotocol (e.g. HTTP = Hyper Text Transfer Protocol) as long as the connectionexists. All information, requests as well as responses, are encrypted. This includesthe information used for the authenticity check of the HTTP access (username/password) as well as all data transferred from the server to the client.
In order to use SSL, you require as system operator a certificate from a certificationprovider, e.g. VeriSign
Requests for a VeriSign certificate for the Microsoft Server can be found athttp://www.verisign.com.
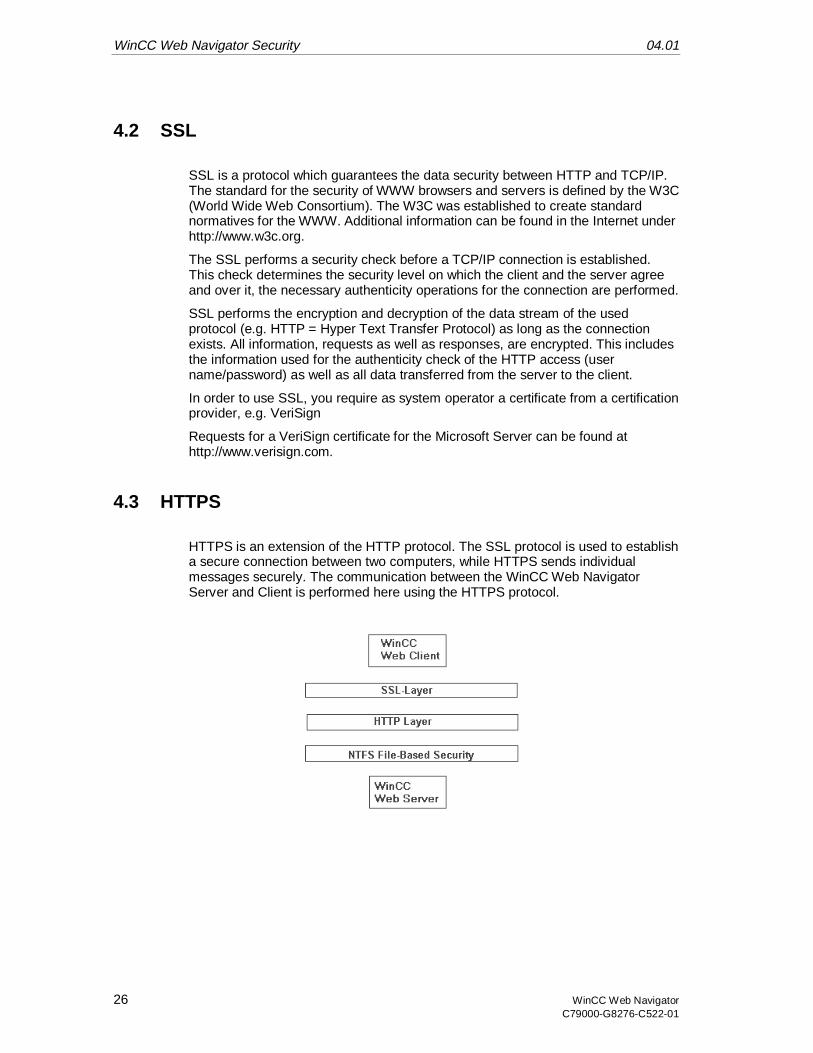
4.3 HTTPS
HTTPS is an extension of the HTTP protocol. The SSL protocol is used to establisha secure connection between two computers, while HTTPS sends individualmessages securely. The communication between the WinCC Web NavigatorServer and Client is performed here using the HTTPS protocol.
04.01 WinCC Web Navigator Security
WinCC Web Navigator 27C79000-G8276-C522-01
4.4 WinCC Web Administrator
The WinCC Web Administrator allocates and controls access privileges for theusers of the Web site. This is achieved by assigning access privileges during usersetup
When a user logs into the system, the WinCC Web Navigator Server checkswhether the user is registered and whether the maximum number of WebNavigator Clients has been reached.
4.5 Secure ID Card
Remote Access Service (RAS) is a service which can be used, for example, to loginto a network directly from home. This is performed via the remotecommunications network. You are prompted to enter your card ID and PIN numberby the RAS server. The RAS server checks the entries and, if necessary, calls youback. This method ensures that only users with valid access information are able toaccess the server.
WinCC Web Navigator Security 04.01
28 WinCC Web NavigatorC79000-G8276-C522-01
4.6 Firewall
4.6.1 General Information
A firewall is a system consisting of hardware and software that is installed at apoint between two networks and only lets authorized communication traffic passthrough. Improper actions are rejected and detected unauthorized use attemptscan be recorded. Thus, firewall systems are suitable to enforce defined rules withregard to security (security policy). Firewalls are often used when connecting to theInternet, protecting the internal network from the dangers of the Internet.
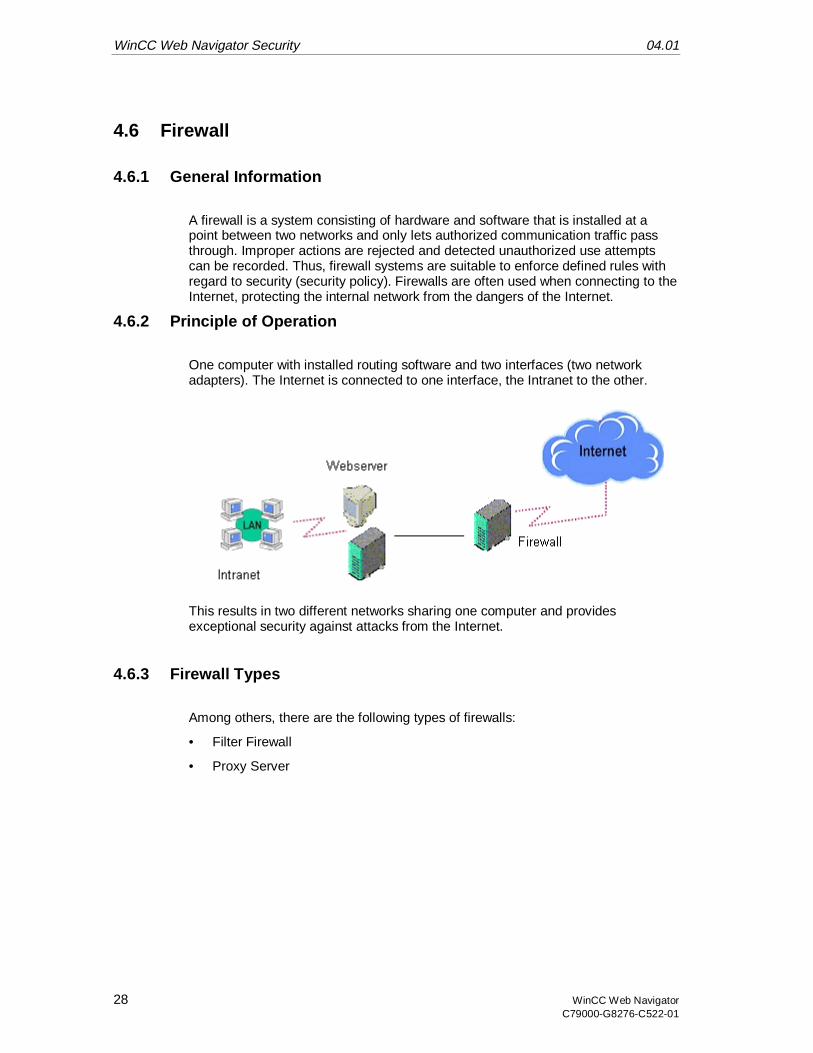
4.6.2 Principle of Operation
One computer with installed routing software and two interfaces (two networkadapters). The Internet is connected to one interface, the Intranet to the other.
This results in two different networks sharing one computer and providesexceptional security against attacks from the Internet.
4.6.3 Firewall Types
Among others, there are the following types of firewalls:
• Filter Firewall
• Proxy Server
04.01 WinCC Web Navigator Security
WinCC Web Navigator 29C79000-G8276-C522-01
Filter Firewall
A filter firewall controls the data stream based on a data package’s origin,destination, port and package type information. This information is contained inevery data package. Only selected network traffic can pass through the firewall.
Package filters are IT systems (Information Technology Systems) with specialsoftware that filter the information (IP packages) on the transport layer, i.e. theyeither let the information pass through or intercept it according to defined rules.The rules can operate by means of the source or target address as well as thesource or destination port that is typical for the respective Internet service. Manyrouters can also be employed as package filters. Unlike static package filters,dynamic package filters do not possess a defined set of rules, instead, the firewallmodifies the filter in response to certain events.
Proxy Server
Proxy servers permit indirect access to the Internet through the firewall. A proxy isan application for network services that is executed depending on thecommunication of the service and from system to system. The service program ofthe user does not communicate directly with the target system, but with the proxyserver of the firewall. The proxy evaluates the request and determines whether toestablish or deny the connection.
Proxy servers provide user authentication and integrity during the transfer of databetween client and server. The hypertext transfer protocol (http) proxy interceptsconnections from every Web Browser and directs the requests to the configuredWeb Server.
Proxy servers support content filtering. With content filtering, only certain contentsof HTML pages are permitted. In this case, the communication is rerouted via adefined port to an IP address such as the address of the WinCC server. If contentfiltering is active, the Web Navigator communication will no longer function. In thiscase, the use of SSL is recommended.

WinCC Web Navigator Security 04.01
30 WinCC Web NavigatorC79000-G8276-C522-01
04.01 Establishing a Connection with the WinCC Web Navigator Server
WinCC Web Navigator 31C79000-G8276-C522-01
5 Establishing a Connection with the WinCCWeb Navigator Server
Before you connect your WinCC Web Server to the intranet or Internet, you mustestablish a concept which takes into consideration relevant security and systemissues.
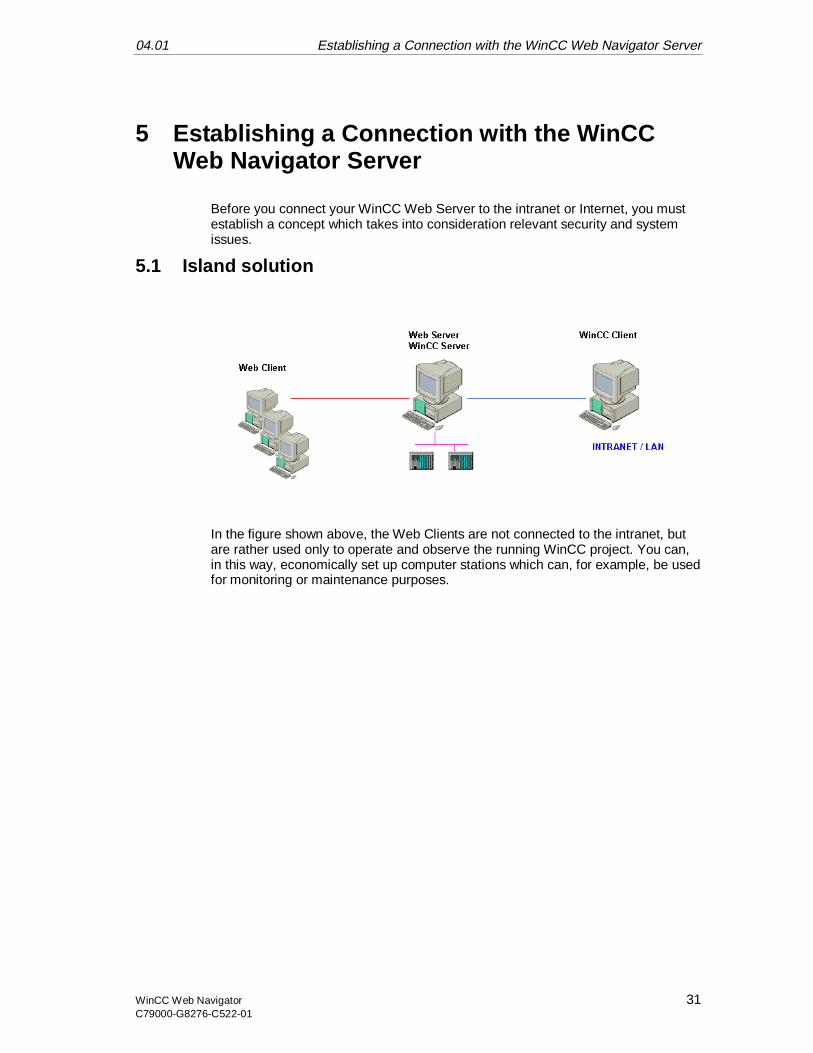
5.1 Island solution
In the figure shown above, the Web Clients are not connected to the intranet, butare rather used only to operate and observe the running WinCC project. You can,in this way, economically set up computer stations which can, for example, be usedfor monitoring or maintenance purposes.
Establishing a Connection with the WinCC Web Navigator Server 04.01
32 WinCC Web NavigatorC79000-G8276-C522-01
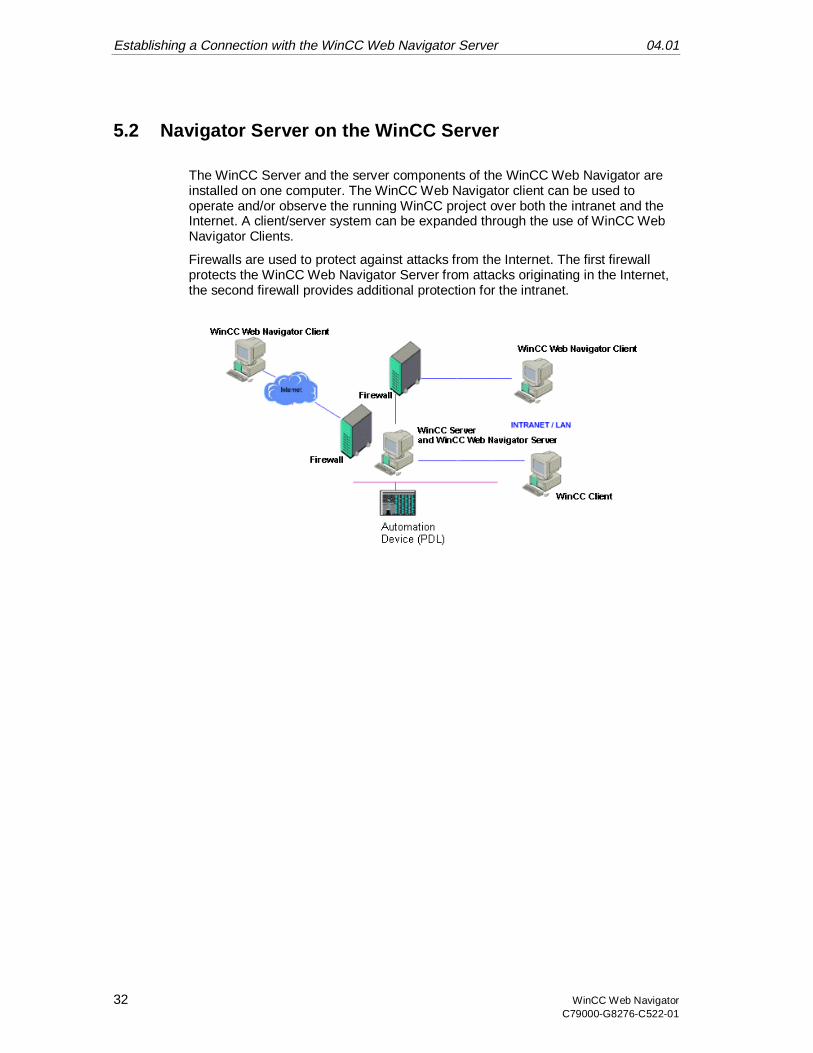
5.2 Navigator Server on the WinCC Server
The WinCC Server and the server components of the WinCC Web Navigator areinstalled on one computer. The WinCC Web Navigator client can be used tooperate and/or observe the running WinCC project over both the intranet and theInternet. A client/server system can be expanded through the use of WinCC WebNavigator Clients.
Firewalls are used to protect against attacks from the Internet. The first firewallprotects the WinCC Web Navigator Server from attacks originating in the Internet,the second firewall provides additional protection for the intranet.

04.01 Establishing a Connection with the WinCC Web Navigator Server
WinCC Web Navigator 33C79000-G8276-C522-01
5.3 Separation of WinCC Server and WinCC Web NavigatorServer
Communication via a channel
The WinCC Server is assigned a group of automation devices. The project iscomposed of all data, including programs, configuration data and other settings.The WinCC project is mirrored 1:1 on the computer with the WinCC Server andWinCC Web Navigator Server and is not connected to the automation devices.
The data matching is performed via the OPC channel (OPC = OLE ProcessControl). The WinCC Web Navigator Server requires for this purpose a license forthe number of OPC tags.
Two firewalls are used here as well to protect the system from unauthorizedaccess. The first firewall protects the WinCC Web Navigator server from attacksoriginating in the Internet, the second firewall provides additional protection for theintranet.
Establishing a Connection with the WinCC Web Navigator Server 04.01
34 WinCC Web NavigatorC79000-G8276-C522-01
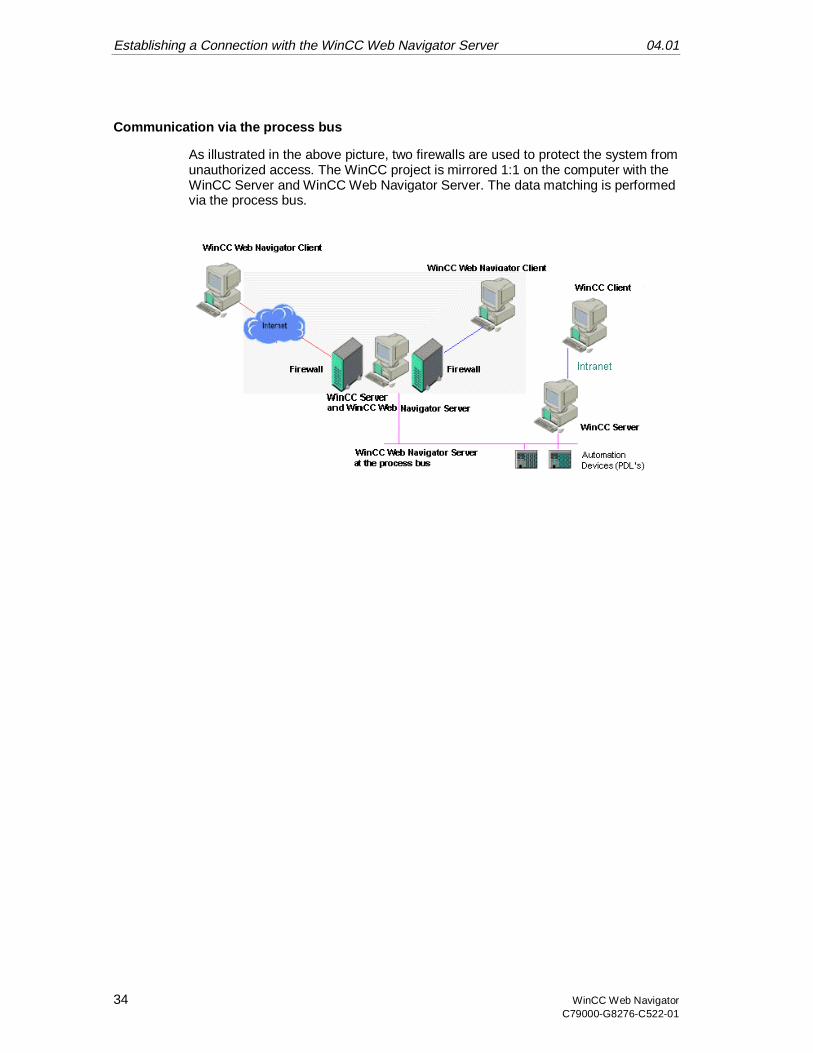
Communication via the process bus
As illustrated in the above picture, two firewalls are used to protect the system fromunauthorized access. The WinCC project is mirrored 1:1 on the computer with theWinCC Server and WinCC Web Navigator Server. The data matching is performedvia the process bus.
04.01 Installing the WinCC Web Navigator Client
WinCC Web Navigator 35C79000-G8276-C522-01
6 Installing the WinCC Web Navigator Client
The WinCC Web Navigator Client software can be installed not only from CD, but itcan also be installed over the intra-/Internet. This allows you to flexibly and quicklyinstall any number of clients. In order to perform the installation over the intra-/Internet, you must be registered as a user in the WinCC Web Administrator.
6.1 Installation from CD
Insert the CD-ROM with the WinCC Web Navigator in the CD-ROM drive.
The setup program automatically starts within a few seconds, provided that theautomatic execution of autorun file has not been disabled.
If a CD is already in your drive, you are installing from a network or autorun hasbeen disabled, you can also start the setup manually. To do this, select in theWindows Start Menu, "Settings" "Control Panel" "Add/Remove Programs"and in the tab "Add/Remove", click on "Install".
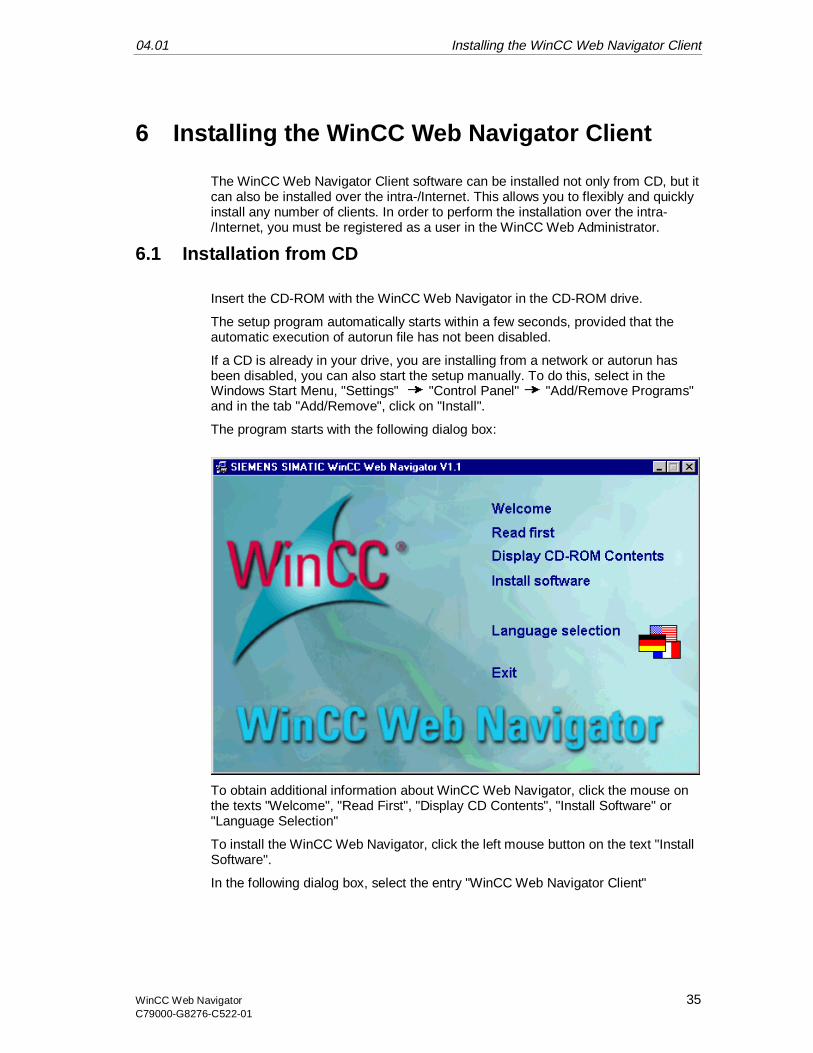
The program starts with the following dialog box:
To obtain additional information about WinCC Web Navigator, click the mouse onthe texts "Welcome", "Read First", "Display CD Contents", "Install Software" or"Language Selection"
To install the WinCC Web Navigator, click the left mouse button on the text "InstallSoftware".
In the following dialog box, select the entry "WinCC Web Navigator Client"
Installing the WinCC Web Navigator Client 04.01
36 WinCC Web NavigatorC79000-G8276-C522-01
6.2 Installation over the Internet
1. Before you dial into the Internet, make the following settings in the InternetExplorer.
2. Dial into the Internet via your Internet service provider.
3. Enter the address of the WinCC Web Navigator Server in the address bar, e.g."http://www.name_of_ server.de". If installing in a virtual folder, the addressmay have the following form: "http://www.name_of_server.de/WinCCWebsite/"
4. Log into the WinCC Web Navigator Server with your user name and password.
5. If you are accessing the WinCC Web Navigator Server for the first time, youwill be prompted to install the WinCC Web Navigator Client. Follow theinstructions on the screen.
Note
If a version of the WinCC Web Navigator Client is already located on your system,you can overwrite this software.
You are guided through the entire WinCC Web Navigator Client installation. Pleasefollow the instructions on the screen.
04.01 Installing the WinCC Web Navigator Client
WinCC Web Navigator 37C79000-G8276-C522-01
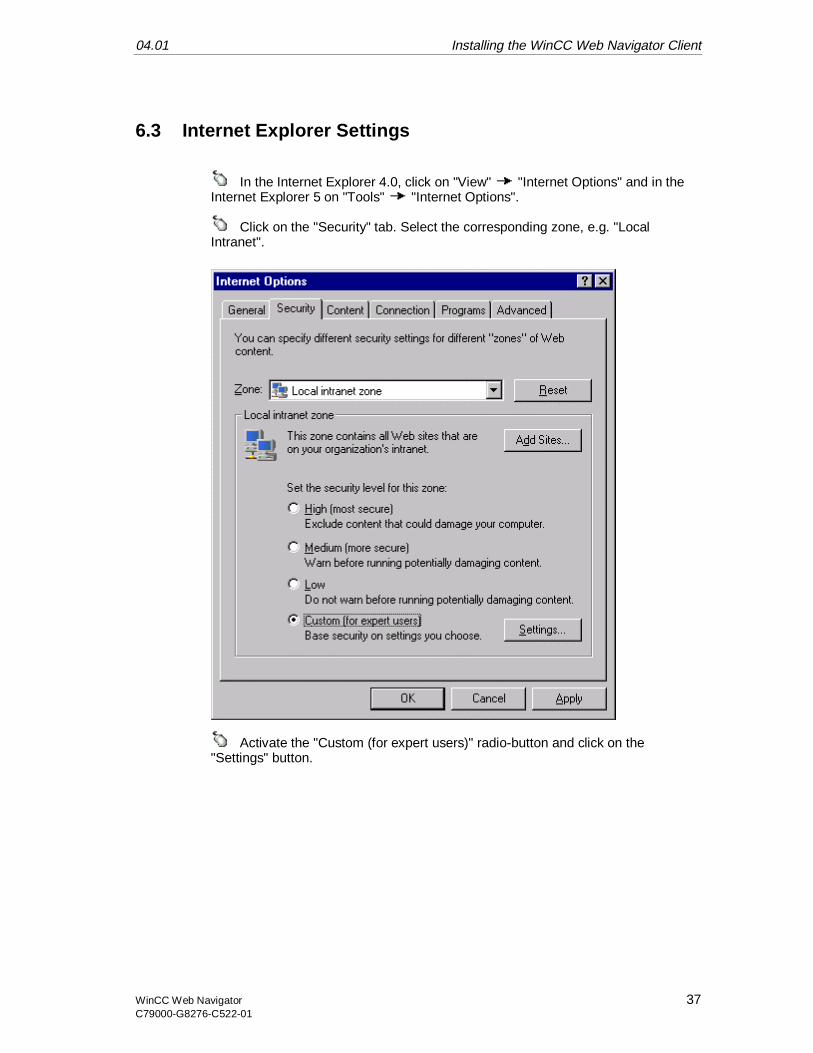
6.3 Internet Explorer Settings
In the Internet Explorer 4.0, click on "View" "Internet Options" and in theInternet Explorer 5 on "Tools" "Internet Options".
Click on the "Security" tab. Select the corresponding zone, e.g. "LocalIntranet".
Activate the "Custom (for expert users)" radio-button and click on the"Settings" button.
Installing the WinCC Web Navigator Client 04.01
38 WinCC Web NavigatorC79000-G8276-C522-01
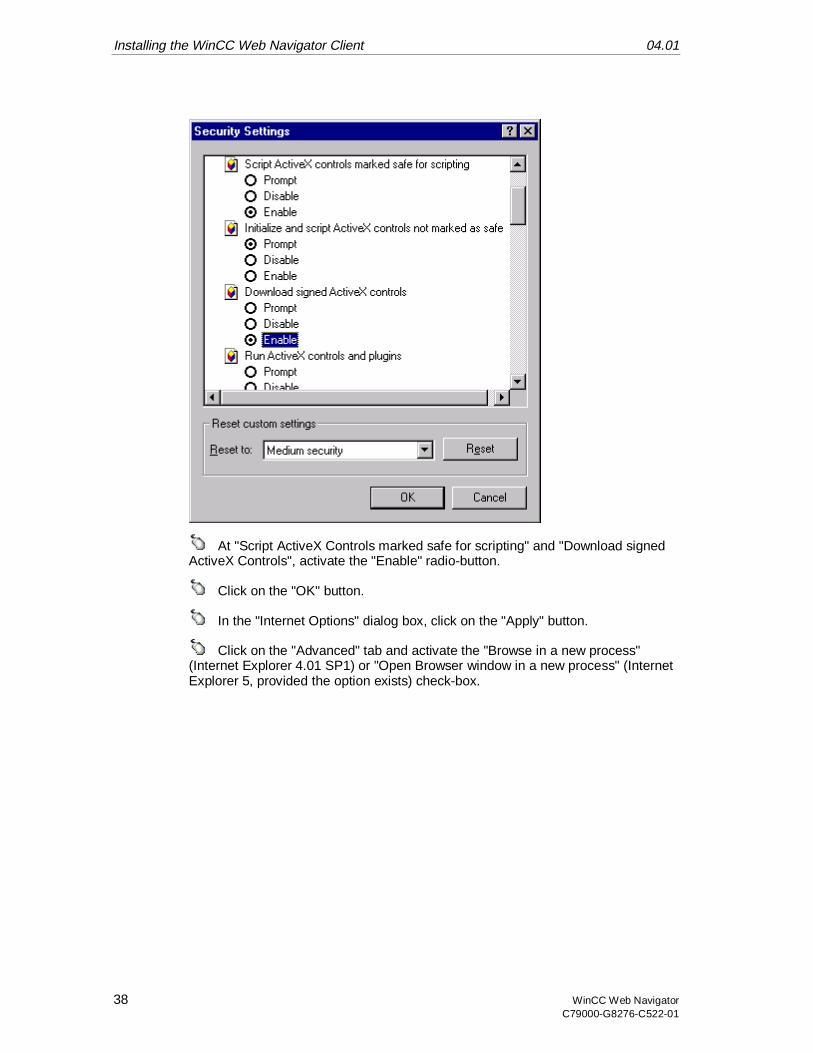
At "Script ActiveX Controls marked safe for scripting" and "Download signedActiveX Controls", activate the "Enable" radio-button.
Click on the "OK" button.
In the "Internet Options" dialog box, click on the "Apply" button.
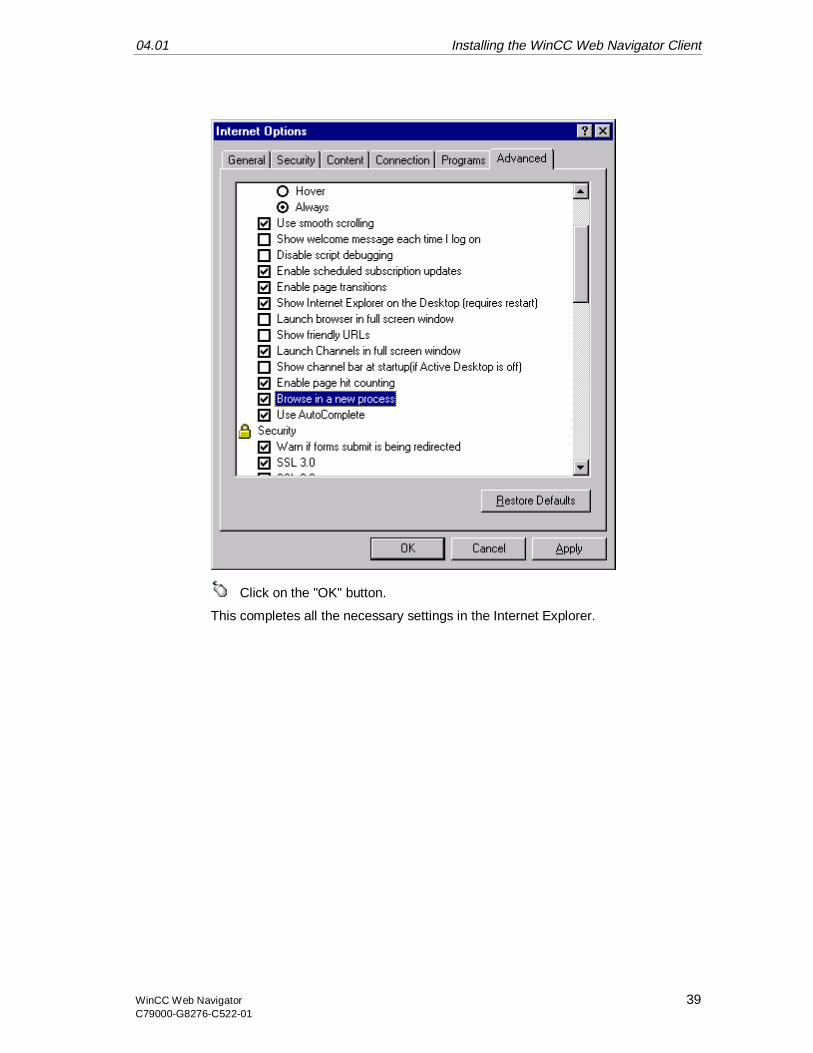
Click on the "Advanced" tab and activate the "Browse in a new process"(Internet Explorer 4.01 SP1) or "Open Browser window in a new process" (InternetExplorer 5, provided the option exists) check-box.
04.01 Installing the WinCC Web Navigator Client
WinCC Web Navigator 39C79000-G8276-C522-01
Click on the "OK" button.
This completes all the necessary settings in the Internet Explorer.

Installing the WinCC Web Navigator Client 04.01
40 WinCC Web NavigatorC79000-G8276-C522-01
04.01 Deinstallation
WinCC Web Navigator 41C79000-G8276-C522-01
7 Deinstallation
The WinCC Web Navigator Server and the WinCC Web Navigator Client can bedeinstalled as usual from Windows. Access the Windows "Control Panel" anddouble-click on the "Add/Remove Programs" icon.
• Under Windows NT 4.0, highlight the "WinCC Web Navigator Server/Client"entry in the "Install/Uninstall" tab and then click on the "Add/Remove" button.Follow the displayed instructions.
• Under Windows 2000, double-click on the "Add/Remove Programs" icon.Follow the displayed instructions.
This will remove the WinCC Web Navigator Server/Client from your system.
Note
If you deinstall the WinCC Web Navigator Server, the corresponding authorizationshould also be deinstalled using the "AuthorsW.exe" application. The authorizationcan then be reused at a later time. Additional information about authorizations canbe found in the WinCC software protection documentation.

Deinstallation 04.01
42 WinCC Web NavigatorC79000-G8276-C522-01
04.01 Configuration of the User Administration
WinCC Web Navigator 43C79000-G8276-C522-01
8 Configuration of the User Administration
8.1 WinCC Web Administrator
The WinCC Web Administrator is used to give your Intranet/Internet users accessto your WinCC project and to assign user-specific start pictures and languages. Inaddition, user-specific rights for controlling and monitoring the process can beassigned. The WinCC Web Administrator allows you to quickly and easily set up asecure and clear Intranet/Internet user administration for WinCC.
If a user logs on to the system, the Web Navigator Server will check, whether theuser is registered and whether the maximum number of licensed Web NavigatorClients has been reached.
The tasks of the Web Navigator Administrator include:
• Creation and editing of users
• Assignment and administration of access rights
• Assignment and administration of start pictures and languages
The following access rights can be assigned to a Web Navigator Client:
None
The user rights assigned in the "User Administrator" editor will be evaluated for theuser. If no authorization has been assigned in the "User Administrator" editor, theuser will be able to perform this operation in runtime.
Unlimited Control and Monitoring (All)
The user is assigned the right to control and monitor the process in runtime.
How to start the WinCC Web Administrator:
1. In the project navigation window of the WinCC Explorer, right-click on the "WebNavigator" entry.
2. In the pop-up menu displayed, click on the "Web Administrator" menucommand.
Configuration of the User Administration 04.01
44 WinCC Web NavigatorC79000-G8276-C522-01
Warning
If your computer is a primary domain controller (PDC), only administrators can logon.
Thus, the user of the WinCC Web Navigator must receive administrator rights inthe NT domain administration.
Example of a user name: WNUSR_PCNAME, where PCNAME stands for therespective PCNAME, e.g. with PC4000: WNUSR_PC4000. Due to security issues,this entry must be made manually in the NT user administration.
04.01 Configuration of the User Administration
WinCC Web Navigator 45C79000-G8276-C522-01
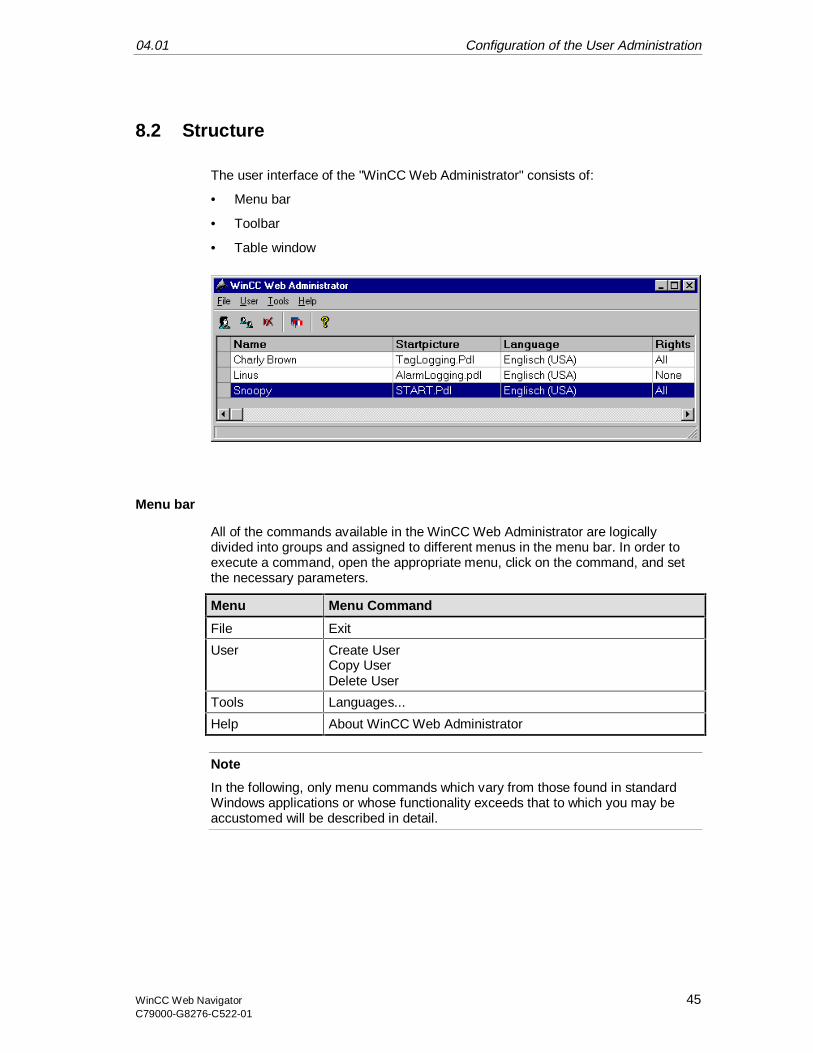
8.2 Structure
The user interface of the "WinCC Web Administrator" consists of:
• Menu bar
• Toolbar
• Table window
Menu bar
All of the commands available in the WinCC Web Administrator are logicallydivided into groups and assigned to different menus in the menu bar. In order toexecute a command, open the appropriate menu, click on the command, and setthe necessary parameters.
Menu Menu Command
File Exit
User Create UserCopy UserDelete User
Tools Languages...
Help About WinCC Web Administrator
Note
In the following, only menu commands which vary from those found in standardWindows applications or whose functionality exceeds that to which you may beaccustomed will be described in detail.

Configuration of the User Administration 04.01
46 WinCC Web NavigatorC79000-G8276-C522-01
Toolbar
These icons allow you to execute actions more rapidly. You do not have to makeseveral selections through the menus until you reach the required function.
"User" "Create User"
"User" "Copy User"
"User" "Delete User"
"Tools" "Languages"
Table window
The Table window contains information about user name, start picture, languageand access privileges for the WinCC Navigator clients.
04.01 Configuration of the User Administration
WinCC Web Navigator 47C79000-G8276-C522-01
8.3 Menu Bar
8.3.1 "User" Menu
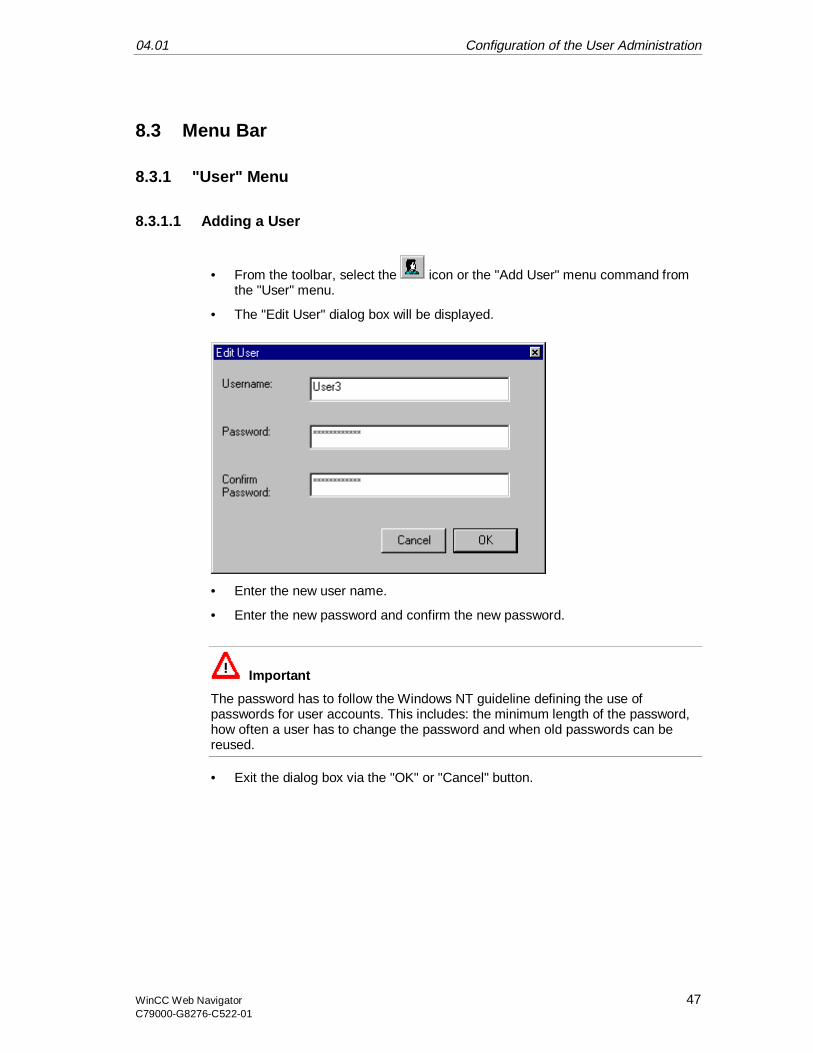
8.3.1.1 Adding a User
• From the toolbar, select the icon or the "Add User" menu command fromthe "User" menu.
• The "Edit User" dialog box will be displayed.
• Enter the new user name.
• Enter the new password and confirm the new password.
Important
The password has to follow the Windows NT guideline defining the use ofpasswords for user accounts. This includes: the minimum length of the password,how often a user has to change the password and when old passwords can bereused.
• Exit the dialog box via the "OK" or "Cancel" button.
Configuration of the User Administration 04.01
48 WinCC Web NavigatorC79000-G8276-C522-01
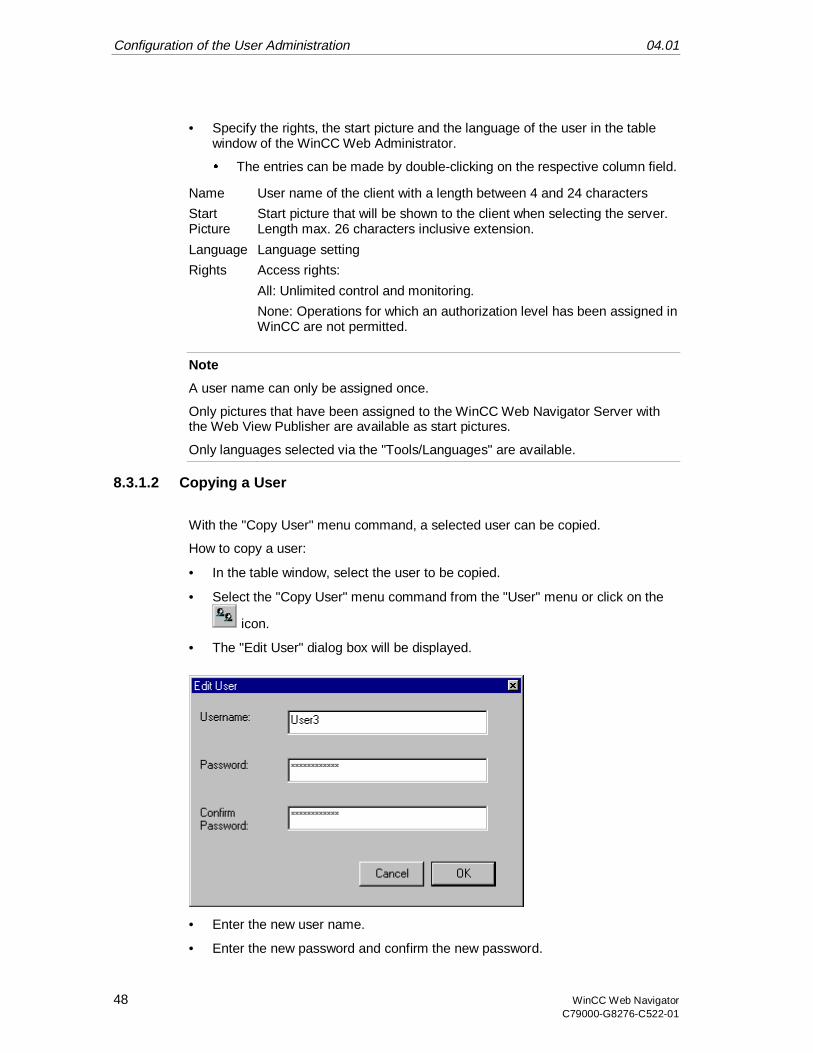
• Specify the rights, the start picture and the language of the user in the tablewindow of the WinCC Web Administrator.
é The entries can be made by double-clicking on the respective column field.
Name User name of the client with a length between 4 and 24 characters
StartPicture
Start picture that will be shown to the client when selecting the server.Length max. 26 characters inclusive extension.
Language Language setting
Rights Access rights:
All: Unlimited control and monitoring.
None: Operations for which an authorization level has been assigned inWinCC are not permitted.
Note
A user name can only be assigned once.
Only pictures that have been assigned to the WinCC Web Navigator Server withthe Web View Publisher are available as start pictures.
Only languages selected via the "Tools/Languages" are available.
8.3.1.2 Copying a User
With the "Copy User" menu command, a selected user can be copied.
How to copy a user:
• In the table window, select the user to be copied.
• Select the "Copy User" menu command from the "User" menu or click on the
icon.
• The "Edit User" dialog box will be displayed.
• Enter the new user name.
• Enter the new password and confirm the new password.
04.01 Configuration of the User Administration
WinCC Web Navigator 49C79000-G8276-C522-01
• Exit the dialog box via the "OK" or "Cancel" button.
• The remaining settings such as start picture, rights and language will be takenfrom the copied user.
8.3.1.3 Deleting a User
With the "Delete User" menu command, a selected user can be deleted.
• In the table window, select the user to be deleted.
• Select the "Delete User" menu command from the "User" menu or click on the
icon.
• The selected user will be removed.
Configuration of the User Administration 04.01
50 WinCC Web NavigatorC79000-G8276-C522-01
8.3.2 "Tools" Menu
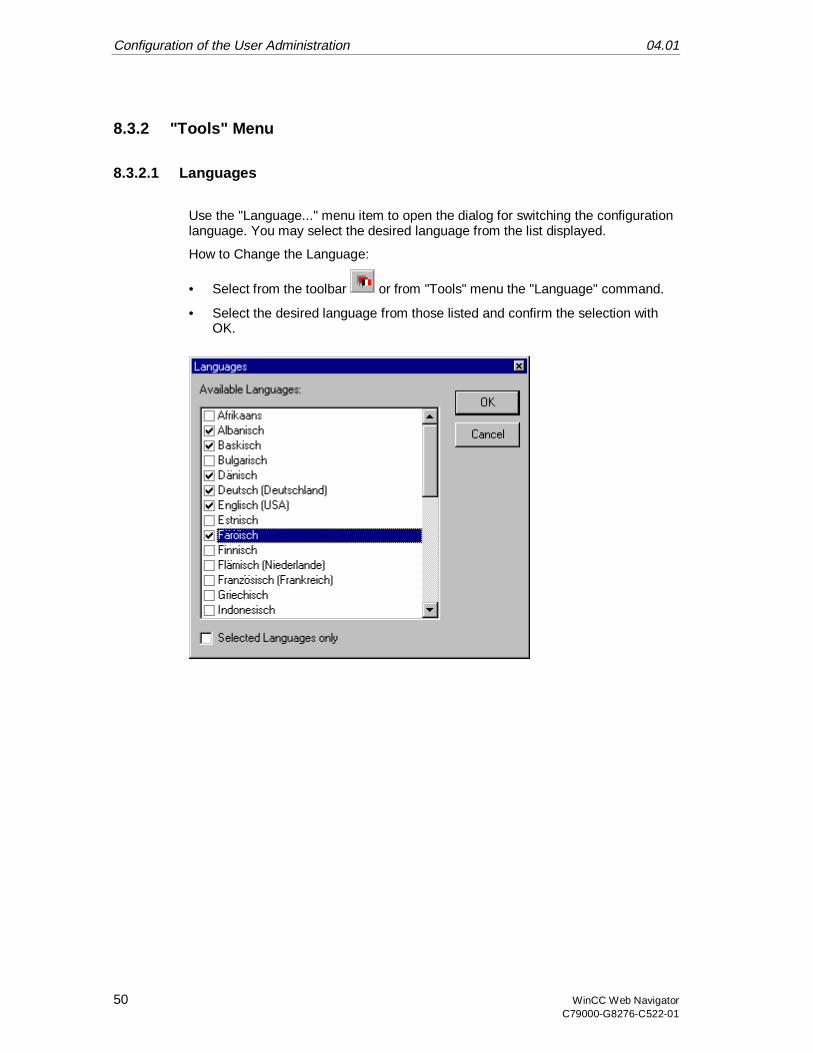
8.3.2.1 Languages
Use the "Language..." menu item to open the dialog for switching the configurationlanguage. You may select the desired language from the list displayed.
How to Change the Language:
• Select from the toolbar or from "Tools" menu the "Language" command.
• Select the desired language from those listed and confirm the selection withOK.
04.01 Configuration of a Web Project
WinCC Web Navigator 51C79000-G8276-C522-01
9 Configuration of a Web Project
9.1 Transfer of WinCC Pictures: Web View Publisher
To run your WinCC project on the Intranet/Internet, you can create pictures withstandard WinCC tools or use already created ones.
Note
Only use the WinCC Web View Publisher for projects that have been created withWinCC V 5.0 SP1 or higher.
Problems may occur with projects that have been converted from WinCC V4.02and V4.02 SP1 to WinCC V5.0 SP1 / SP2.
Please read the corresponding chapters with regard to limitations, when usingcomplex functions or scripts. If the project and the pictures were created with theWinCC Graphics Designer, a Wizard is available to make the pictures run on theInternet.
The Web View Publisher automatically makes the necessary changes to theproject data (conversion of WinCC pictures, scripts) so that they can run on theWinCC Web Navigator Client via the Intranet/Internet.
The following conversions will be performed:
• Compression of the data to achieve the best possible performance on theInternet
• Removal of project-specific data that is unnecessary for the operation
• Conversion of picture windows into ActiveX components
• Conversion of scripts so that they can run on the WinCC Web Navigator Client
How to start the Web View Publisher:
1. In the project navigation window of the WinCC Explorer, right-click on the "WebNavigator" entry.
2. In the pop-up menu displayed, click on the "Web View Publisher" menucommand.
Configuration of a Web Project 04.01
52 WinCC Web NavigatorC79000-G8276-C522-01
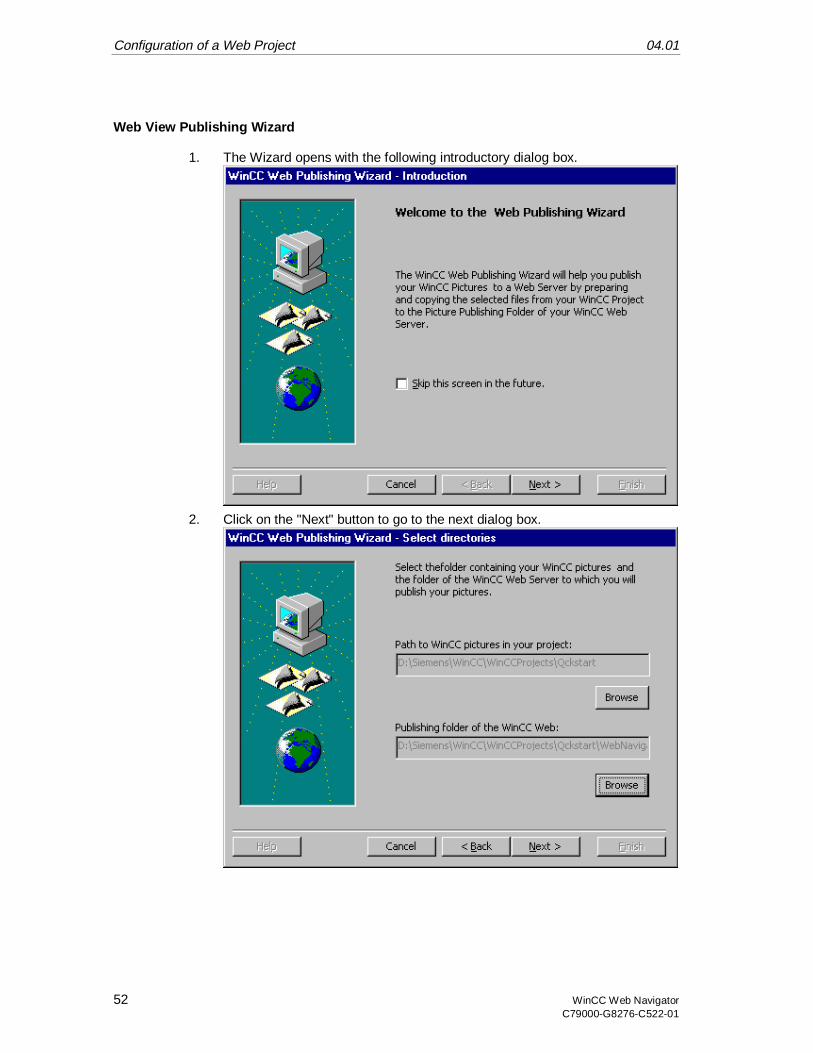
Web View Publishing Wizard
1. The Wizard opens with the following introductory dialog box.
2. Click on the "Next" button to go to the next dialog box.
04.01 Configuration of a Web Project
WinCC Web Navigator 53C79000-G8276-C522-01
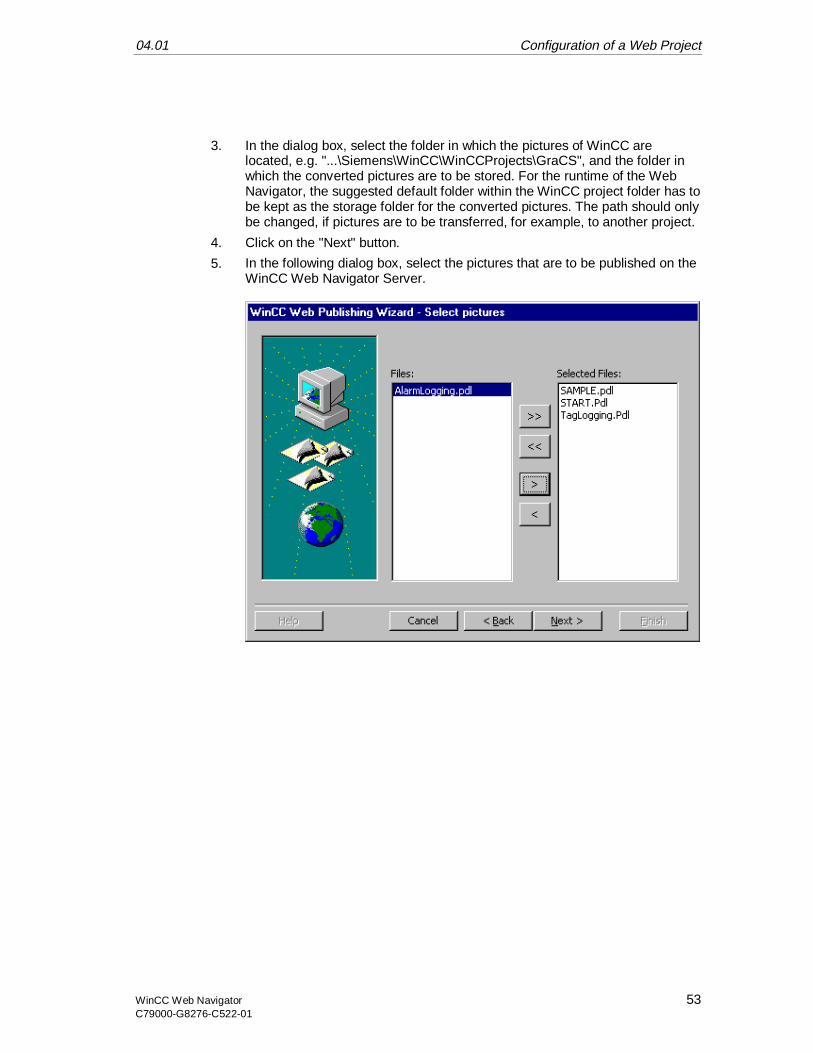
3. In the dialog box, select the folder in which the pictures of WinCC arelocated, e.g. "...\Siemens\WinCC\WinCCProjects\GraCS", and the folder inwhich the converted pictures are to be stored. For the runtime of the WebNavigator, the suggested default folder within the WinCC project folder has tobe kept as the storage folder for the converted pictures. The path should onlybe changed, if pictures are to be transferred, for example, to another project.
4. Click on the "Next" button.
5. In the following dialog box, select the pictures that are to be published on theWinCC Web Navigator Server.
Configuration of a Web Project 04.01
54 WinCC Web NavigatorC79000-G8276-C522-01
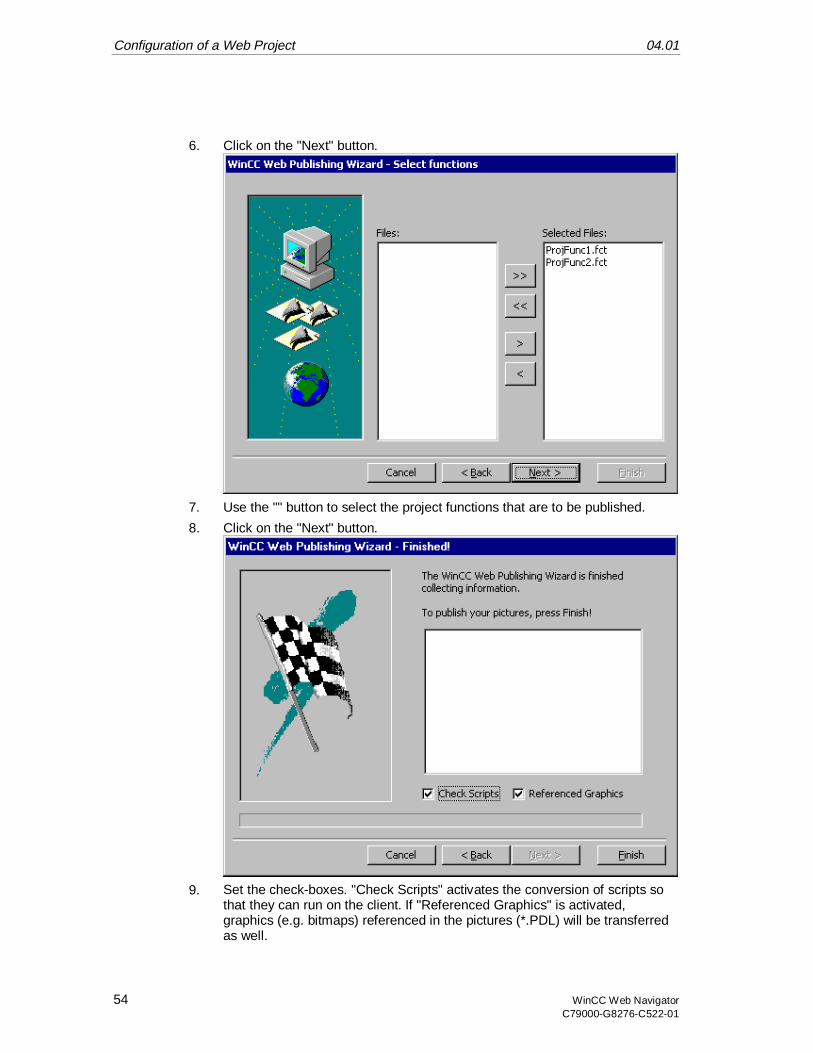
6. Click on the "Next" button.
7. Use the "" button to select the project functions that are to be published.
8. Click on the "Next" button.
9. Set the check-boxes. "Check Scripts" activates the conversion of scripts sothat they can run on the client. If "Referenced Graphics" is activated,graphics (e.g. bitmaps) referenced in the pictures (*.PDL) will be transferredas well.
04.01 Configuration of a Web Project
WinCC Web Navigator 55C79000-G8276-C522-01
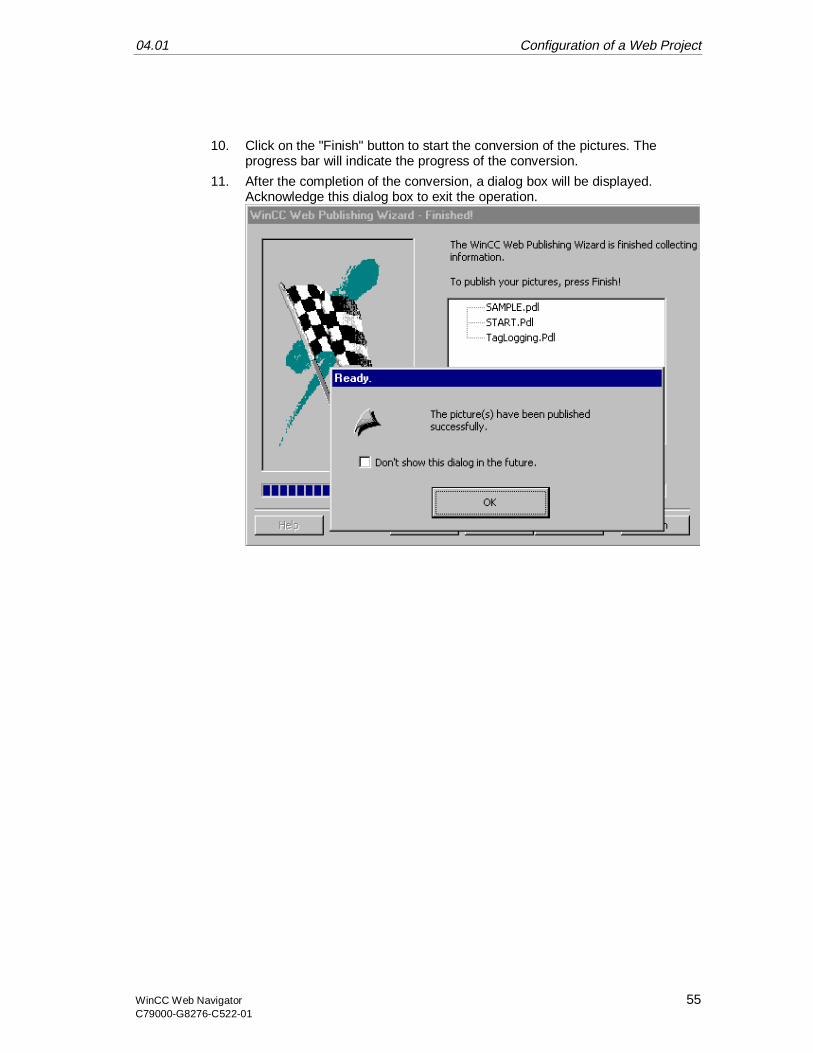
10. Click on the "Finish" button to start the conversion of the pictures. Theprogress bar will indicate the progress of the conversion.
11. After the completion of the conversion, a dialog box will be displayed.Acknowledge this dialog box to exit the operation.
Configuration of a Web Project 04.01
56 WinCC Web NavigatorC79000-G8276-C522-01
9.2 Transfer, Adaptation of existing Projects
You can use already existing projects that have been created with WinCC andmake the accessible via the Internet or Intranet.
Essentially, this requires the conversion of the already created WinCC pictures withthe WinCC Web View Publisher into the WinCC Web folder and the setup of theWeb users with the WinCC Web Administrator.
Note
Only use the WinCC Web View Publisher for projects that have been created withWinCC V 5.0 SP1 or higher.
Problems may occur with projects that have been converted from WinCC V4.02and V4.02 SP1 to WinCC V5.0 SP1 / SP2.
Version 1.1 of the WinCC Web Navigator has some functionality limitations and asa "thin client" solution does not support all functions that are offered by thestandard WinCC basic system.
Thus, check your existing WinCC configuration with regard to the following pointsand limitations, and adapt it if necessary.
If scripts are used in pictures, objects addressed by scripts must not contain blankspaces or special characters in their names.
For example: The object named "Button 1" is to change its background color, if acertain value changes. If this is implemented via a script, the object name must bechanged from "Button 1" to "Button1" (no blank space). The reason for this is thatthe script interpreter software used by the Web Navigator Client does not supportblank spaces and special characters in object names.
Warning
In V1.1 of the WinCC Web Navigator, the available functions and standardfunctions that can be used on the WinCC Web Navigator Client are limited toapproximately 600. A list of functions supported/not supported by the WinCC WebNavigator Client can be found in the appendix.
04.01 Configuration of a Web Project
WinCC Web Navigator 57C79000-G8276-C522-01
9.3 Limitations
When transferring the comprehensive WinCC runtime functionality to the minimalruntime environment of the WinCC Web Navigator Client, limitations areunavoidable.
Among others, the following WinCC options or functions are not available on theWinCC Web Navigator V1.1 via the Intranet/Internet:
• The WinCC Web Navigator Client only offers the view of a running WinCCproject. A configuration of the WinCC Server projects via the Web Client is notpossible.
• Only those WinCC option packages/add-ons can run on the WinCC WebNavigator, whose documentation expressly states that.
• ODK functions are not supported on the WinCC Web Navigator Client. A list offunctions supported/not supported by the WinCC Web Navigator Client can befound in the appendix.
• The PCS7 options do not support the current version of the WinCC WebNavigator Client.
• The WinCC Report Designer is an integrated reporting system for the time- orevent-triggered documentation of alarm messages, operations and archivecontents. The reporting system is not supported via the Intranet/Internet. Thus,the output of reports is not possible on the Web Client.
• WinCC User Archives are not available via the Intranet/Internet.
• Operator messages are not supported by the current version of the WinCCWeb Navigator Client.
• No separate archive system is running on the WinCC Web Navigator Client.The message archive or message system can only be controlled andmonitored.
• If scripts are used in pictures, objects addressed by scripts must not containblank spaces or special characters in their names. This is especially importantfor projects that have been converted from WinCC V4.02 and V4.02 SP1 toWinCC V5.0 SP1 /SP2. The following special character in object names issupported: "_". The object name "Tank 1" must be changed to "Tank_1"("_Tank1" needs not to be changed, "Tank.1" is not supported).
• The indirect addressing of tags is not supported.
• Global Scripts running locally on the client are not supported. Global Scriptsrunning on the server are supported.
• The redundancy switch is not supported.
When using functions that are not supported, the user will be informed about this inruntime via clear text messages.

Configuration of a Web Project 04.01
58 WinCC Web NavigatorC79000-G8276-C522-01
9.4 Using Scripts
Global Script
The WinCC Web Navigator Client only provides a view to the project. Theconfiguration of scripts takes place in the server project of the WinCC server. Forthis reason, the "Global Script" editor is not offered on the WinCC Web Navigator.
Unlike in WinCC, all scripts on the WinCC Web Navigator Client are integrated inthe same name space. This makes possible function calls between scripts that areimplemented in different objects. Global tags are known to all scripts. For thisreason, "defines" - such as "#define Motor 1 100" - that are stored in scripts of thisfile may only occur once across all scripts.
If multiple occurrences are required due to configuration reasons, "define" needs tobe deactivated first by a "#undef".
Example:
#undef Motor1
#define Motor1 200
Actions
Actions are scripts that respond to operations and events. The appendix of theOnline Help contains the functions that are supported.
Warning
Since the CISS compiler used for the interpretation of scripts/functions in picturesis conforming to ANSI-C, no anonymous structures and unions are used. In theVARIANT2 structure compatible to VARIANT, the stored union is named "vdata".
VARIANT2 vTest;
VariantInit((VARIANT*) &vTest);
vTest.vt=VT_I4;
vTest.vdata.lVal=1024;
VariantClear((VARIANT*) &vTest);
The names of objects used in WinCC pictures and addressed by scripts must notcontain blank spaces or special characters. Also, object names are case-sensitive.
04.01 Configuration of a Web Project
WinCC Web Navigator 59C79000-G8276-C522-01
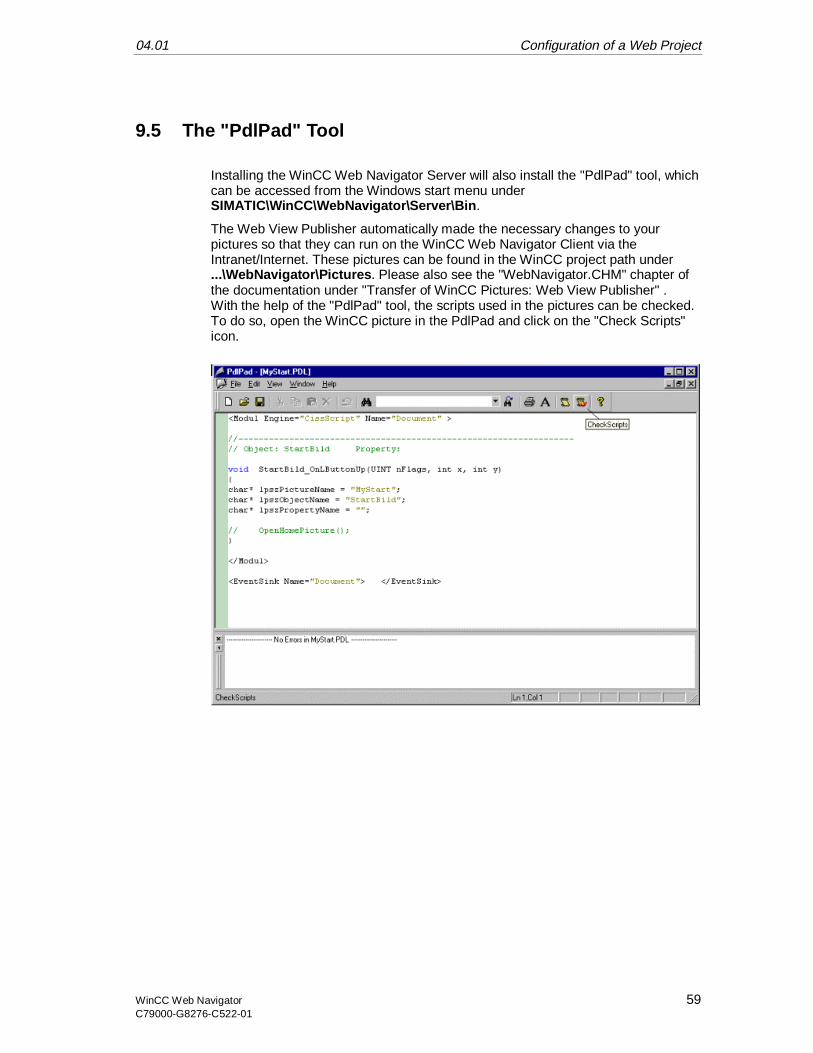
9.5 The "PdlPad" Tool
Installing the WinCC Web Navigator Server will also install the "PdlPad" tool, whichcan be accessed from the Windows start menu underSIMATIC\WinCC\WebNavigator\Server\Bin.
The Web View Publisher automatically made the necessary changes to yourpictures so that they can run on the WinCC Web Navigator Client via theIntranet/Internet. These pictures can be found in the WinCC project path under...\WebNavigator\Pictures. Please also see the "WebNavigator.CHM" chapter ofthe documentation under "Transfer of WinCC Pictures: Web View Publisher" .With the help of the "PdlPad" tool, the scripts used in the pictures can be checked.To do so, open the WinCC picture in the PdlPad and click on the "Check Scripts"icon.
Configuration of a Web Project 04.01
60 WinCC Web NavigatorC79000-G8276-C522-01
9.6 Differences to the WinCC Base System
9.6.1 Script Execution
Contrary to the WinCC base system, event-triggered scripts (OnClick, etc.) areexecuted in the same process space as the picture display, namely in the contextof the Internet Explorer.
Consider this, when working with delays in scripts (e.g. Sleep(3000)). In this case,the displayed picture will not be operational for the time period set.
9.6.2 Opening a Picture
The Web Navigator downloads a WinCC picture from the Internet in anasynchronous manner. Because of this, a picture change is not performedsynchronously as in the base system, but asynchronously. This fact has to beconsidered in scripts that trigger a picture change.
The following applies:
If a picture window is selected within a script, then the same script will not be ableto access the objects of the new picture, since the picture is not yet loaded at thetime. In this case, a delay (e.g. Sleep(2000)) will not help either, since the scriptand with it the Internet Explorer as well are waiting.
A better solution is to execute the subsequent script sections at the "OpenPicture"event, which is triggered once the picture has been loaded.
9.6.3 Scripting
Preprocessor Definition:
Especially for the Web Navigator, the scripting possesses a preprocessordefinition:
RUN_ON_WEBNAVIGATOR
The code that follows this preprocessor definition will be executed by the WebNavigator. Thus, it is possible to write scripts that behave differently under the WebNavigator than under the base system.

04.01 Configuration of a Web Project
WinCC Web Navigator 61C79000-G8276-C522-01
Example:
void OnOpenPicture (char* lpszPictureName, char*lpszObjectName, char* lpszPropertyName)
{
#ifdef RUN_ON_WEBNAVIGATOR
// add the code applying to the Web Navigator only
}
#else
// add the code applying to the base system only
#endif
}
9.6.4 Addressing of Objects in other Pictures
If the objects of a picture are to be accessed from another picture via a script (e.g.objects in a parent picture or a picture window), this can only be achieved byemploying relative addressing (unlike in the base system).
All C-script functions that access the objects of a picture, request the picture nameas the first parameter.
For example: SetPropChar ("Start Picture", "Text1", "Text","Hello, here is a text");
When accessing objects that are not located in the same picture, the WebNavigator provides specially defined picture names that specify the addressing ofthe pictures relative to the current picture.
Addressing of an Object in the Basic Picture
If there is no ambiguity, specifying the picture name suffices (just like in the basesystem):
SetPropChar ("Start Picture", "Text1", "Text", "Hello, hereis a text");
Otherwise, the addressing can be performed independent of the picture nameeither with an empty string or lpszPictureName = "/".
Example:
SetPropChar ("", "Text1", "Text", "Hello, here is a text");
or
SetPropChar ("/", "Text1", "Text", "Hello, here is a text");
Configuration of a Web Project 04.01
62 WinCC Web NavigatorC79000-G8276-C522-01
Addressing of an Object in the Parent Picture
If there is no ambiguity, specifying the parent picture name suffices (just like in thebase system):
SetPropChar ("Picture1", "Text1", "Text", "Hello, here is atext");
Otherwise, the addressing can be performed independent of the picture name withlpszPictureName = "../".
Example:
SetPropChar ("../", "Text1", "Text", "Hello, here is atext");
Picture in a Picture Window
If the object to be addressed is located in the picture of a picture window ("PictureWindow1"), it can be addressed relative to the current picture as follows:
SetPropChar ("./Picture Window1", "Text1", "Text", "Hello,here is a text");
or, if the Picture Window1 is located in the parent picture:
SetPropChar ("../Picture Window1", "Text1", "Text", "Hello,here is a text");
or, if the Picture Window1 is located in the basic picture:
SetPropChar ("/Picture Window1", "Text1", "Text", "Hello,here is a text");
9.6.5 Synchronous Script Functions
Exercise caution when dealing with synchronous script functions such as"SetTagCharStateWait" that synchronously write a tag and then wait for the result.Since these calls go to the server in a synchronous manner, frequently callingthese script functions negatively impacts the performance of the client. Through anInternet connection, such a call may even take several seconds.
Script functions that manipulate objects in the displayed picture are safe, since around trip to the server does not take place.
04.01 Configuration of a Web Project
WinCC Web Navigator 63C79000-G8276-C522-01
9.6.6 Defining Script Tags local to a Picture
To store picture-specific data in scripts, you should refrain from using datamanager tags in the Web Navigator. These tags - when read or written in scripts -always cause a round trip to the server, which is costly in the Internet.
There are several ways to store picture-specific data:
Configuring "invisible" Graphic Objects
By creating invisible graphic objects, you will be able to use the properties of theseinvisible objects as picture-specific tags.
An additional advantage is that actions can be performed upon the change of thesestored values.
Example:
Creation of an invisible Text Field
In this case, any text can be conveniently stored in the text property, which canthen be read or written to by any script handler.
In the color properties of the text field, for example, colors can be stored, which areread or written to by scripts and thus can influence the status of the picture withoutrequiring a round trip to the server.

Configuration of a Web Project 04.01
64 WinCC Web NavigatorC79000-G8276-C522-01
04.01 Using the WinCC Web Navigator Client
WinCC Web Navigator 65C79000-G8276-C522-01
10 Using the WinCC Web Navigator Client
With the WinCC Web Navigator Client, a WinCC project which is running on theWinCC Server can be viewed, operated and observed. For this reason, it is notpossible to configure the server project
The following functions are available on the WinCC Web Navigator Client:
Displaying WinCC pictures over the intra-/Internet
The Graphics Designer is used to create process images in WinCC. The Web ViewPublisher automatically performs the necessary adaptation of the project data(conversion of WinCC pictures, scripts). The pictures are then capable of runningin the WinCC Web Navigator Client.
The communication between the WinCC Web Navigator Server and Client ispossible here using the HTTPS protocol. In order to protect the system fromunauthorized access, HTTPS should be used.
Accessing Process Tags
Process Tags can be read and written as in WinCC. The process image is suppliedwith tag values via the WinCC Explorer. Depending on the user’s access privilegesin the WinCC Web Administrator, he can either observe or both operate andobserve.
Displaying messages
The existing WinCC message archive and/or message system of the WinCCServer can be operated and observed on the WinCC Web Navigator Client via theWinCC Alarm Control. It is not possible to execute the "Loop in Alarm" function.
Displaying process values in trends and tables
It is possible to display the process values in trends and tables via the WinCCOnline Trend Control and WinCC Online Table Control from the WinCC WebNavigator Client. Changes, with regard to the Trend and Table windows, arepossible. It is, however, not possible to configure an individual archive on the WebNavigator Client as the process value data come exclusively from the archivesystem on the WinCC Server.

Using the WinCC Web Navigator Client 04.01
66 WinCC Web NavigatorC79000-G8276-C522-01
Language switch
It is possible to switch languages on the WinCC Web Navigator Client as well.
If a text from the text library is changed on the WinCC Server while in runtime, itmay, under certain circumstances, not automatically be detected by the WinCCWeb Navigator Client. The Internet Explorer stores the pictures in its cache. Thecache is a special memory area in which the contents of frequently used objects,e.g. Internet pages, are stored. In order to update the displayed pictures, thepicture must be reloaded by using the Reload icon.
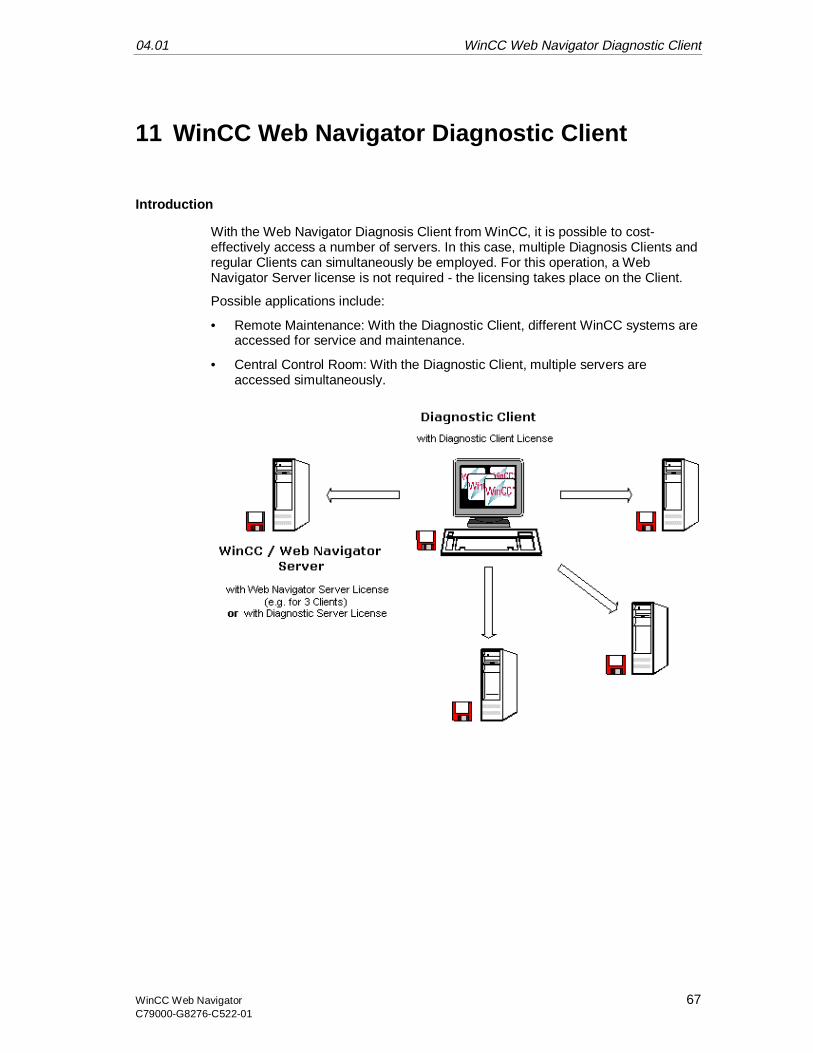
04.01 WinCC Web Navigator Diagnostic Client
WinCC Web Navigator 67C79000-G8276-C522-01
11 WinCC Web Navigator Diagnostic Client
Introduction
With the Web Navigator Diagnosis Client from WinCC, it is possible to cost-effectively access a number of servers. In this case, multiple Diagnosis Clients andregular Clients can simultaneously be employed. For this operation, a WebNavigator Server license is not required - the licensing takes place on the Client.
Possible applications include:
• Remote Maintenance: With the Diagnostic Client, different WinCC systems areaccessed for service and maintenance.
• Central Control Room: With the Diagnostic Client, multiple servers areaccessed simultaneously.

WinCC Web Navigator Diagnostic Client 04.01
68 WinCC Web NavigatorC79000-G8276-C522-01
11.1 Requirements
This chapter outlines the hardware, software and operating system requirementsfor the application of the Web Navigator Diagnostic Client.
Operating System: Windows NT 4.0 or higher, Windows 2000
Software: Internet Explorer 5.01 or higher
Other: Access to Intranet/Internet

04.01 WinCC Web Navigator Diagnostic Client
WinCC Web Navigator 69C79000-G8276-C522-01
11.2 License
WinCC Web Navigator Diagnostic Client
For the Diagnostic Client, a license on the client computer is required.
If a Web Navigator Server or Web Navigator Diagnostic Server license is installedon the server computer, the Diagnostic Client will have access even if themaximum number of clients has been exceeded (guaranteed access).
WinCC Web Navigator Diagnostic Server
This license gives Web Navigator Diagnostic Clients access to the server.
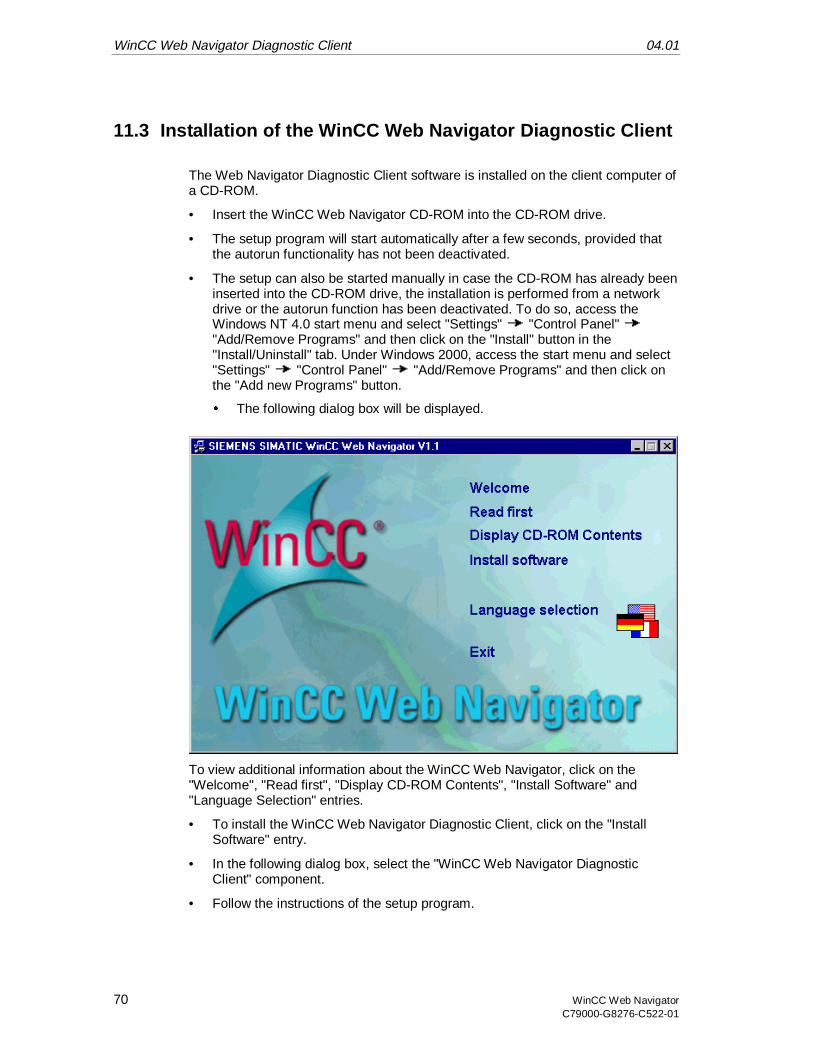
WinCC Web Navigator Diagnostic Client 04.01
70 WinCC Web NavigatorC79000-G8276-C522-01
11.3 Installation of the WinCC Web Navigator Diagnostic Client
The Web Navigator Diagnostic Client software is installed on the client computer ofa CD-ROM.
• Insert the WinCC Web Navigator CD-ROM into the CD-ROM drive.
• The setup program will start automatically after a few seconds, provided thatthe autorun functionality has not been deactivated.
• The setup can also be started manually in case the CD-ROM has already beeninserted into the CD-ROM drive, the installation is performed from a networkdrive or the autorun function has been deactivated. To do so, access theWindows NT 4.0 start menu and select "Settings" "Control Panel""Add/Remove Programs" and then click on the "Install" button in the"Install/Uninstall" tab. Under Windows 2000, access the start menu and select"Settings" "Control Panel" "Add/Remove Programs" and then click onthe "Add new Programs" button.
é The following dialog box will be displayed.
To view additional information about the WinCC Web Navigator, click on the"Welcome", "Read first", "Display CD-ROM Contents", "Install Software" and"Language Selection" entries.
• To install the WinCC Web Navigator Diagnostic Client, click on the "InstallSoftware" entry.
• In the following dialog box, select the "WinCC Web Navigator DiagnosticClient" component.
• Follow the instructions of the setup program.
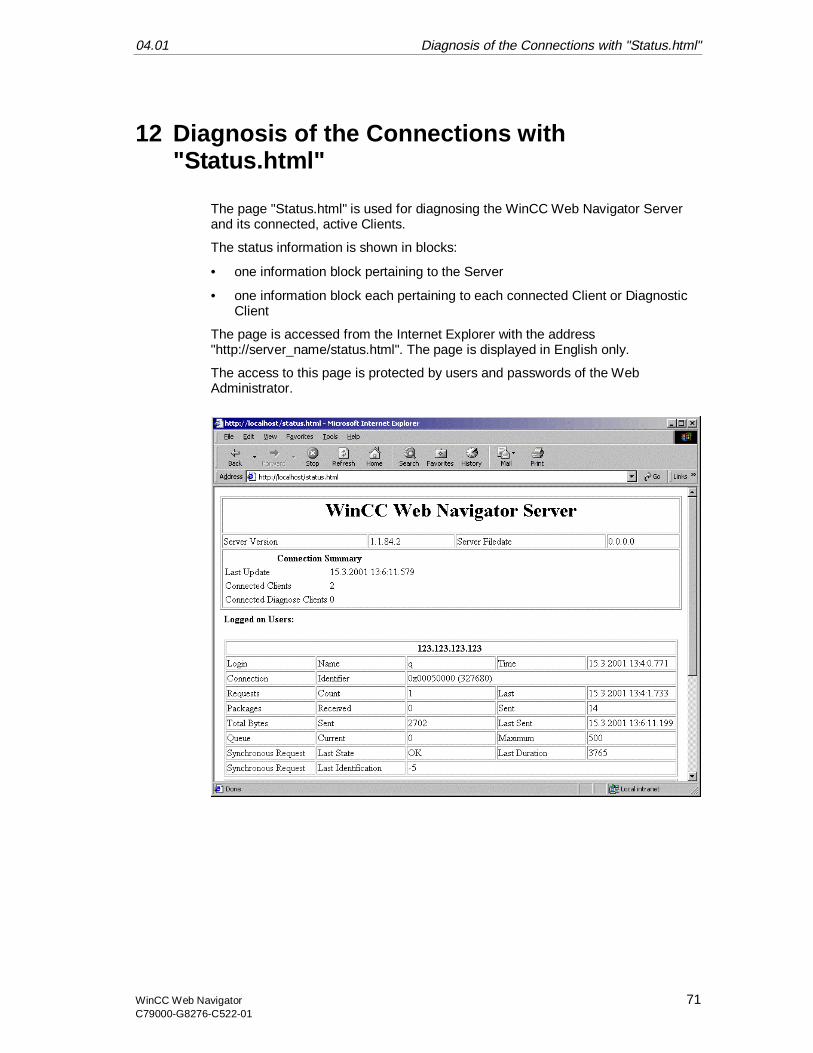
04.01 Diagnosis of the Connections with "Status.html"
WinCC Web Navigator 71C79000-G8276-C522-01
12 Diagnosis of the Connections with"Status.html"
The page "Status.html" is used for diagnosing the WinCC Web Navigator Serverand its connected, active Clients.
The status information is shown in blocks:
• one information block pertaining to the Server
• one information block each pertaining to each connected Client or DiagnosticClient
The page is accessed from the Internet Explorer with the address"http://server_name/status.html". The page is displayed in English only.
The access to this page is protected by users and passwords of the WebAdministrator.
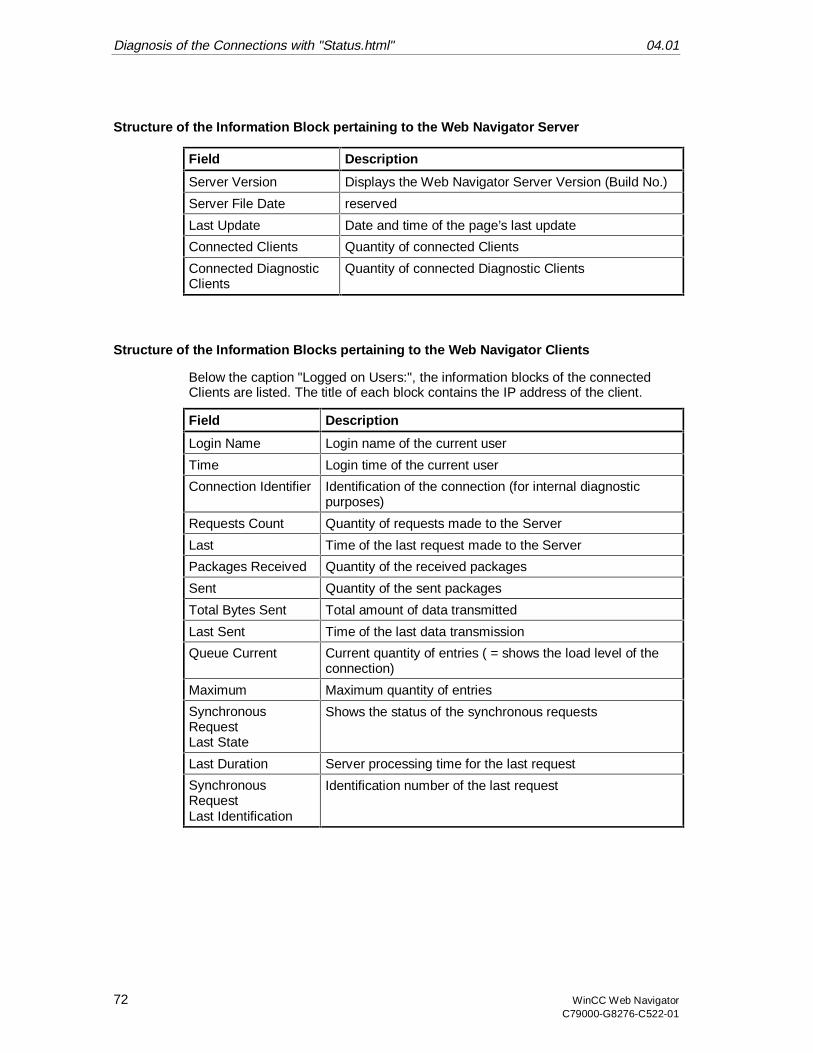
Diagnosis of the Connections with "Status.html" 04.01
72 WinCC Web NavigatorC79000-G8276-C522-01
Structure of the Information Block pertaining to the Web Navigator Server
Field Description
Server Version Displays the Web Navigator Server Version (Build No.)
Server File Date reserved
Last Update Date and time of the page’s last update
Connected Clients Quantity of connected Clients
Connected DiagnosticClients
Quantity of connected Diagnostic Clients
Structure of the Information Blocks pertaining to the Web Navigator Clients
Below the caption "Logged on Users:", the information blocks of the connectedClients are listed. The title of each block contains the IP address of the client.
Field Description
Login Name Login name of the current user
Time Login time of the current user
Connection Identifier Identification of the connection (for internal diagnosticpurposes)
Requests Count Quantity of requests made to the Server
Last Time of the last request made to the Server
Packages Received Quantity of the received packages
Sent Quantity of the sent packages
Total Bytes Sent Total amount of data transmitted
Last Sent Time of the last data transmission
Queue Current Current quantity of entries ( = shows the load level of theconnection)
Maximum Maximum quantity of entries
SynchronousRequestLast State
Shows the status of the synchronous requests
Last Duration Server processing time for the last request
SynchronousRequestLast Identification
Identification number of the last request
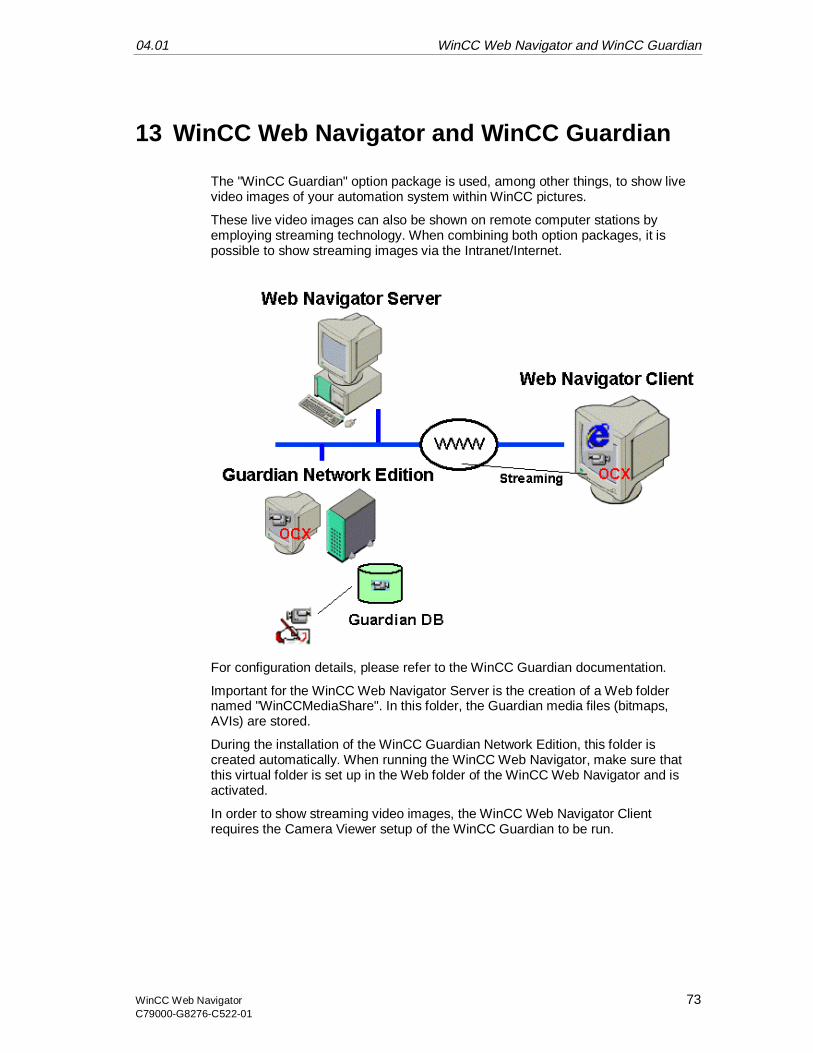
04.01 WinCC Web Navigator and WinCC Guardian
WinCC Web Navigator 73C79000-G8276-C522-01
13 WinCC Web Navigator and WinCC Guardian
The "WinCC Guardian" option package is used, among other things, to show livevideo images of your automation system within WinCC pictures.
These live video images can also be shown on remote computer stations byemploying streaming technology. When combining both option packages, it ispossible to show streaming images via the Intranet/Internet.
For configuration details, please refer to the WinCC Guardian documentation.
Important for the WinCC Web Navigator Server is the creation of a Web foldernamed "WinCCMediaShare". In this folder, the Guardian media files (bitmaps,AVIs) are stored.
During the installation of the WinCC Guardian Network Edition, this folder iscreated automatically. When running the WinCC Web Navigator, make sure thatthis virtual folder is set up in the Web folder of the WinCC Web Navigator and isactivated.
In order to show streaming video images, the WinCC Web Navigator Clientrequires the Camera Viewer setup of the WinCC Guardian to be run.

WinCC Web Navigator and WinCC Guardian 04.01
74 WinCC Web NavigatorC79000-G8276-C522-01
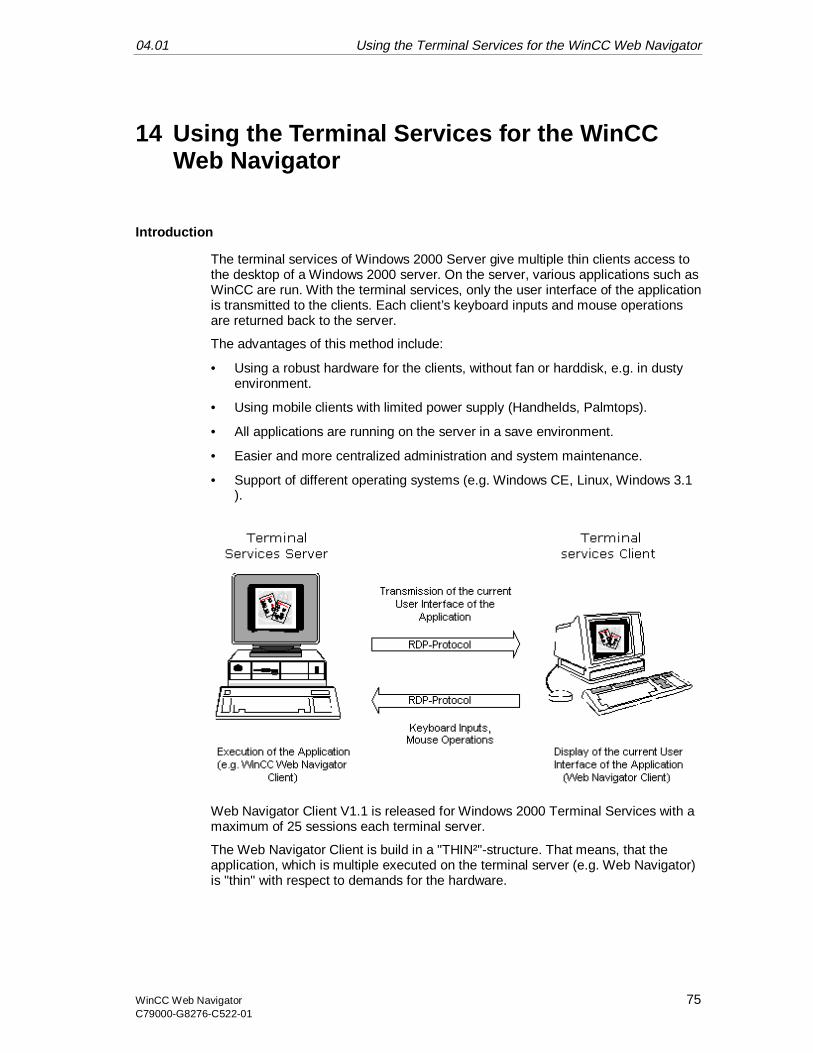
04.01 Using the Terminal Services for the WinCC Web Navigator
WinCC Web Navigator 75C79000-G8276-C522-01
14 Using the Terminal Services for the WinCCWeb Navigator
Introduction
The terminal services of Windows 2000 Server give multiple thin clients access tothe desktop of a Windows 2000 server. On the server, various applications such asWinCC are run. With the terminal services, only the user interface of the applicationis transmitted to the clients. Each client’s keyboard inputs and mouse operationsare returned back to the server.
The advantages of this method include:
• Using a robust hardware for the clients, without fan or harddisk, e.g. in dustyenvironment.
• Using mobile clients with limited power supply (Handhelds, Palmtops).
• All applications are running on the server in a save environment.
• Easier and more centralized administration and system maintenance.
• Support of different operating systems (e.g. Windows CE, Linux, Windows 3.1).
Web Navigator Client V1.1 is released for Windows 2000 Terminal Services with amaximum of 25 sessions each terminal server.
The Web Navigator Client is build in a "THIN²"-structure. That means, that theapplication, which is multiple executed on the terminal server (e.g. Web Navigator)is "thin" with respect to demands for the hardware.
Using the Terminal Services for the WinCC Web Navigator 04.01
76 WinCC Web NavigatorC79000-G8276-C522-01
Terminal services are performed on the server in two modes:
• In the application server mode, the terminal services are used to forwardWindows programs and the desktop to a network server. In this case, theterminal services can also transmit desktop applications to computers thatnormally do not run Windows.
• In the remote administration mode, the terminal services allow a server to bemanaged from any location on the network.
04.01 Using the Terminal Services for the WinCC Web Navigator
WinCC Web Navigator 77C79000-G8276-C522-01
14.1 Requirements for Using the Terminal Services
This chapter outlines the hardware, software and operating system requirementsfor using the terminal services and the WinCC Web Navigator.
Terminal Server
OperatingSystem/Software:
Windows 2000 ServerApplications that are to be carried out on the clientshave to be callable and executable in multiple instances.
Minimum HardwareRequirements:
min. 700 Mhz Pentium III256 MB RAM plus additional RAM for each clientThe processor and memory requirements grow linearly,i.e. when using twice the number of clients, the numberof processors (max. 4) and the amount of memory(approx. 40 MB per client) need to be doubled as well.
Other: If many users access the server, a high-performancenetwork card should be employed.ISA bus systems should not be used, but instead EIDEor PCI.
Terminal Services Clients
Client minimumRequirements:
Network Card with TCP/IPTerminal Client RDP 5.0Display/MonitorPointing Device
Recommended for use as clients are MOBIC T8 (Industrial Handheld) or MP370Thin Client (12" TFT Touch Panel).
Note
For clients not running on Windows 2000 computers, the Terminal Client Accesslicenses by Microsoft are required. Additional information pertaining to terminalclient licensing can be found under://www.microsoft.com/GERMANY/ms/serversuiten/lizenzierung/w2k_tsfaq.htm
Using the Terminal Services for the WinCC Web Navigator 04.01
78 WinCC Web NavigatorC79000-G8276-C522-01
14.2 Terminal Services Setup
In the following chapters, the setup of the terminal services for a simple example inconnection with the WinCC Web Navigator Client is shown.
1. Activation of the terminal services (terminal services server).
2. Installation of the application, e.g. WinCC Web Navigator Client (terminalservices server). This point will not be described. Information pertaining to theinstallation can be found in the corresponding documentation and the OnlineHelp.
3. Creation of the client data carrier (terminal services server).
4. User setup for the access via the terminal services (terminal services server).
5. Installation of a client (client computer).
6. Configuration of the terminal services connections (client computer).
7. Start of the application on the client.
Additional information can be found under "Terminal Services" in the Online Help ofWindows 2000 Server.
04.01 Using the Terminal Services for the WinCC Web Navigator
WinCC Web Navigator 79C79000-G8276-C522-01
14.2.1 Activation of the Terminal Services on Windows 2000 Server
The terminal services can be activated in two different modes.
1. Remote Administration Mode: In this mode, the terminal services allow aremote access to a server from any location on the network. In this mode, theprograms to be used can be installed before or after activating the terminalservices. The terminal services licensing needs not to be activated.
2. Application Server Mode: In this mode, Windows programs can be distributedsafely and effectively using a network server. The programs to be used withthe terminal services should be installed after activating the terminal services,since the terminal services register these programs for multi-user access andprovide improved management.
For this example, the application server mode is required, which is activated asfollows:
• Insert the "Windows 2000 Server" CD-ROM into the CD-ROM drive of theserver.
• From the Windows 2000 start menu, select the "Settings" "Control Panel"entries and then click on the "Add/Remove Programs" icon.
• In the "Add/Remove Programs" dialog box, click on the "Add/Remove WindowsComponents" icon. The "Windows Components Wizard" dialog box will open.
• In the components selection window, activate the check-boxes of the "TerminalServices" and "Terminal Services Licensing" options and then click on the"Next" button.
• Select the "Application Server Mode" option.
• Click on the "Next" button.
• In the "Setup of the Terminal Services" dialog box, activate the "With Windows2000 users compatible rights" check-box and then click on the "Next" button.
• In the dialog box showing the applications, click on the "Next" button.
Note
This dialog box may show applications that cannot be executed properly upon theactivation of the terminal services. These applications have to be reinstalled via theControl Panel’s "Add/Remove Programs" dialog box after activating the terminalservices.
• In the "Terminal Services Licensing - Setup" dialog box, select the "Yourdomain or workgroup" option and specify the folder for the licensing databaseof the server.
• Click on the "Next" button and then on "Finish".
The files will then be copied. After a restart of the computer, the copied serversoftware will become available.

Using the Terminal Services for the WinCC Web Navigator 04.01
80 WinCC Web NavigatorC79000-G8276-C522-01
Note
The terminal services have to be installed on the server before the installation ofthe actual applications. The installation of the applications on the server has to beperformed via the "Add/Remove Programs" dialog box of the Control Panel. Sincethis dialog box uses the server installation mode, the configuration of theapplications is later possible for all users and not just for the user, who installed theapplication.
04.01 Using the Terminal Services for the WinCC Web Navigator
WinCC Web Navigator 81C79000-G8276-C522-01
14.2.2 Creation of the Client Data Carrier on the Windows 2000 Server
To set up a terminal services client, a client data carrier is first created on theWindows 2000 Server. With the help of this data carrier, the terminal services clientis then installed on the computer intended as the client.
• From the Windows start menu, select the "Programs" "Administration"entries and then click on the "Terminal Services - Client Installation" icon.
• In the "Create Installation Disks" dialog box, select the 32-Bit version as theterminal services client type to be created. Check the target drive setting andcorrect it if necessary.
• The dialog will indicate the number of needed data carriers. Keep this numberat hand. Insert one data carrier and then click on the "OK" button .
• Follow the displayed instructions.
• Close the dialog box after the copy process has completed.
Note
The "16-Bit" client data carrier type is needed for client computers running 16-Bitoperating systems.
Using the Terminal Services for the WinCC Web Navigator 04.01
82 WinCC Web NavigatorC79000-G8276-C522-01
14.2.3 User Setup for the Access to the Terminal Services Server
For the access to the terminal services server, a user has to be created on theserver. The user administration and the settings of Windows 2000 also apply to theterminal services.
• From the Windows 2000 start menu, select the "Settings" "Control Panel"entries and then click on the "Administrative Tools" icon. Click on the"Computer Management" icon.
• In the "Computer Management" dialog box, click on the "System Tools""Local Users and Groups" folders.
• Right-click on the "Users" folder and select the "New User" menu commandfrom the displayed pop-up menu.
• In the "New User" dialog box, enter a user name and a password.
• Activate the "Password never expires" check-box.
• Click on the "Create" button.
• Close the dialog box.
Note
The user created here on the terminal services server is also needed for theconfiguration of the connection on the terminal services client. Additionalinformation can be found under "Configuration of the Connection".
04.01 Using the Terminal Services for the WinCC Web Navigator
WinCC Web Navigator 83C79000-G8276-C522-01
14.2.4 Installation of a Terminal Services Client on the Client Computer
After creating a client data carrier on the Windows 2000 Server, the data carrier willbe used to install the terminal services client on the computer intended as theclient.
• Insert the client data carrier into the drive and enter "[Drive Name]:SETUP" inthe input dialog box. Start the setup program by hitting the "Enter" key.
• In the "Welcome" dialog box, click on the "Next" button.
• Fill in the "Name" and "Organization" fields. Click on the "OK" button.
• In the "License Agreement" dialog box, read the displayed agreement and clickon the "I agree" button.
• In the "Terminal Services Client - Setup" dialog box, start the installation byclicking on the application button.
• In the "Select Program Group" dialog box, click on the "Next" button.
• Follow the displayed instructions.
• Click on the "OK" button to finish the installation.
Using the Terminal Services for the WinCC Web Navigator 04.01
84 WinCC Web NavigatorC79000-G8276-C522-01
14.2.5 Configuration of the Connection
After installing the terminal services client on the client computer, the properties ofthe connection need to be configured.
• From the Windows 2000 start menu, select the "Programs" "TerminalServices Client" "Client Connection Manager" entries.
• In the "Client Connection Manager" dialog box, select the "New Connection"menu command from the "File" menu. This will start the Connection Wizard.
• In the "Welcome" dialog box, click on the "Next" button.
• In the "Create a Connection" dialog box, enter a connection name and thename of the terminal services server. Click on the "Next" button.
• In the "Activate automatically" dialog box, activate the "Log on automaticallywith this Information" check-box.
• Enter the user name and the corresponding password that has been assignedon the terminal services server.
• In the "Domain" field, enter the name of the terminal services server, if theterminal services server and the terminal services client are located in thesame domain. If they are not located in the same domain, enter the domainname of the terminal services servers.
• Click on the "Next" button.
• In the "Display Options" dialog box, set the resolution for the client, e.g. "800 x600", and then click on the "Next" button.
• In the "Connection Properties" dialog box, click on the "Next" button.
• In the "Start Program" dialog box, click on the "Next" button.
• In the "Icon and Program Group" dialog box, click on the "Next" button.
• In the final dialog box, click on the "Finish" button.
• Close the "Client Connection Manager".
04.01 Using the Terminal Services for the WinCC Web Navigator
WinCC Web Navigator 85C79000-G8276-C522-01
14.2.6 Starting the Application of the Terminal Services Server on theClient Computer
After installing the terminal services client on the client computer and creating aconnection file, an application of the terminal services server can be started on theterminal services client.
• From the Windows 2000 start menu, select the "Programs" "TerminalServices Client" "Client Connection Manager" entries.
• Click on the connection that has been assigned to the terminal services server.
• In the "Log On" dialog box, enter the password and confirm it by clicking on the"OK" button.
• The connection will then be established. Following the display of the terminalservices server’s desktop, its applications can be started, e.g. the WebNavigator Client via the Internet Explorer.
Using the Terminal Services for the WinCC Web Navigator 04.01
86 WinCC Web NavigatorC79000-G8276-C522-01
14.2.7 Configuring the "Auto Logon" Function for the Terminal ServicesClient
With the terminal services it is possible to automatically establish the connectionand start the Web Navigator Client when starting up the client. This requires thefollowing configurations on the terminal services server and client.
Note
The following description of the configurations on the client computer applies to aWindows 2000 system.
The language setting in the dialog boxes is "English". Thus, the names of menucommands, dialogs, etc. used in this description may differ, depending on thelanguage used by the actual computer.
• From the Windows 2000 "Start" menu of the terminal services server, selectthe menu entries "Programs" "Administrative Tools" "Terminal ServicesConfiguration".
• In the navigation window, select the folder "Connections". The data window tothe right will display all associated connections. Select the entry "RDP-TCP".From its pop-up menu, select the menu command "Properties".
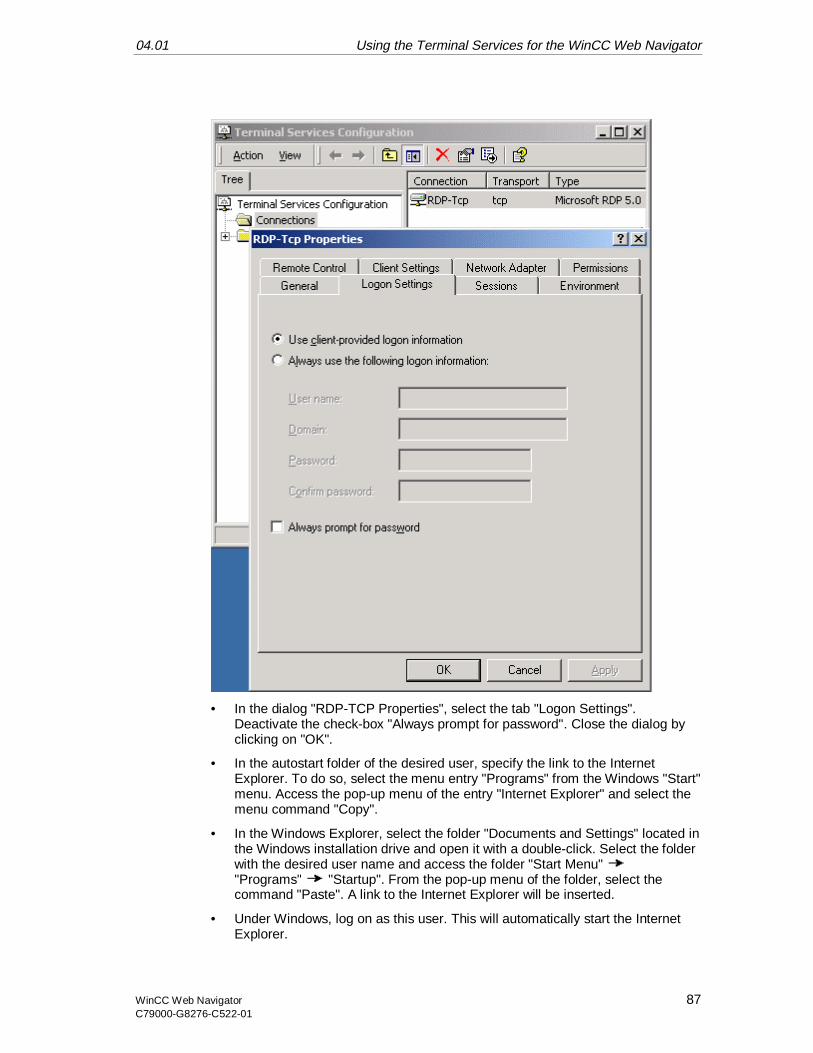
04.01 Using the Terminal Services for the WinCC Web Navigator
WinCC Web Navigator 87C79000-G8276-C522-01
• In the dialog "RDP-TCP Properties", select the tab "Logon Settings".Deactivate the check-box "Always prompt for password". Close the dialog byclicking on "OK".
• In the autostart folder of the desired user, specify the link to the InternetExplorer. To do so, select the menu entry "Programs" from the Windows "Start"menu. Access the pop-up menu of the entry "Internet Explorer" and select themenu command "Copy".
• In the Windows Explorer, select the folder "Documents and Settings" located inthe Windows installation drive and open it with a double-click. Select the folderwith the desired user name and access the folder "Start Menu""Programs" "Startup". From the pop-up menu of the folder, select thecommand "Paste". A link to the Internet Explorer will be inserted.
• Under Windows, log on as this user. This will automatically start the InternetExplorer.

Using the Terminal Services for the WinCC Web Navigator 04.01
88 WinCC Web NavigatorC79000-G8276-C522-01
• Specify the start page for the Internet Explorer. From the menu "Tools", selectthe entry "Internet Options". In the field "Address" of the tab "General", enterthe desired start page. Close the dialog.
• From the Windows 2000 "Start" menu of the terminal services client, select themenu entries "Programs" "Terminal Services Client" "Client ConnectionManager".
• Select an existing connection to the above configured server or create a newone. Additional information can be found under "Configuring the Connection".When using an existing connection, select the menu command "Properties"from the pop-up menu.
• In the tab "General", check the name of the user. This name has to be identicalto the user name assigned on the terminal services server. If necessary,change the name and enter the associated password.
• In the field "Domain", enter the name of the terminal services server, if theterminal services server and client are located in the same domain. If they arenot located in the same domain, enter the domain name of the terminalservices server.
• In the tab "Connection Options", select the resolution for the client (e.g. "1024 x768"). Activate the radio-button "Full Screen". Close the dialog by clicking on"OK".
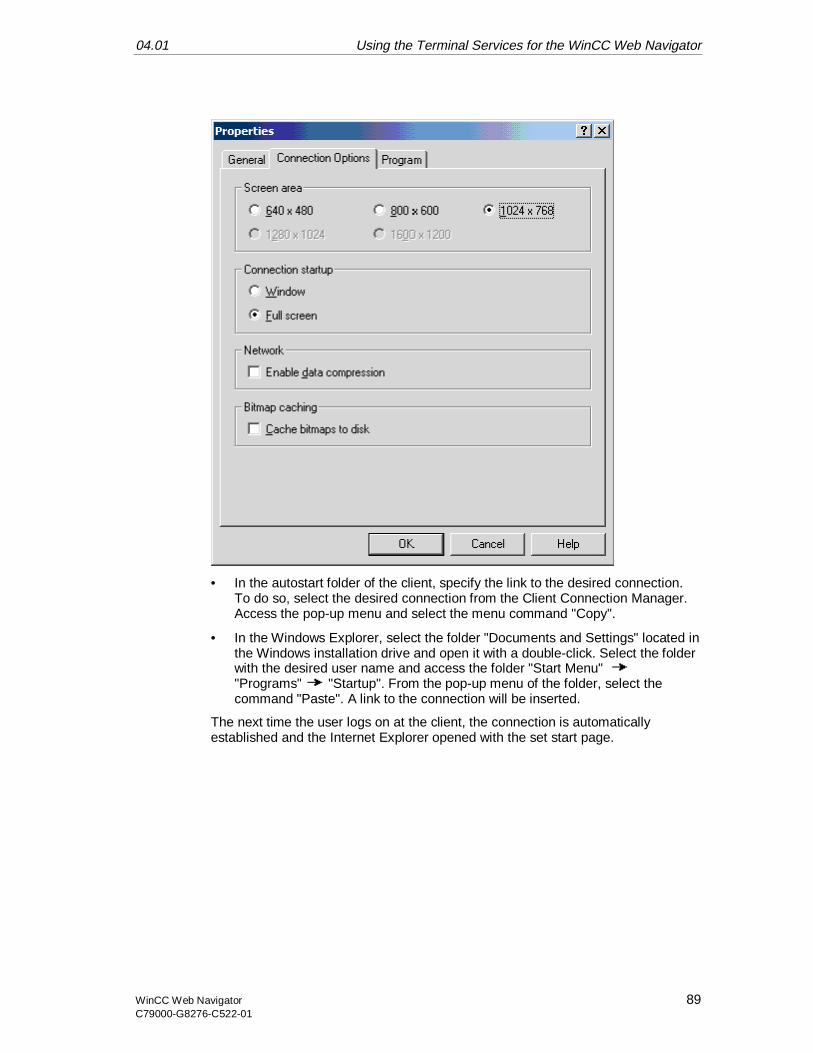
04.01 Using the Terminal Services for the WinCC Web Navigator
WinCC Web Navigator 89C79000-G8276-C522-01
• In the autostart folder of the client, specify the link to the desired connection.To do so, select the desired connection from the Client Connection Manager.Access the pop-up menu and select the menu command "Copy".
• In the Windows Explorer, select the folder "Documents and Settings" located inthe Windows installation drive and open it with a double-click. Select the folderwith the desired user name and access the folder "Start Menu" "Programs" "Startup". From the pop-up menu of the folder, select thecommand "Paste". A link to the connection will be inserted.
The next time the user logs on at the client, the connection is automaticallyestablished and the Internet Explorer opened with the set start page.
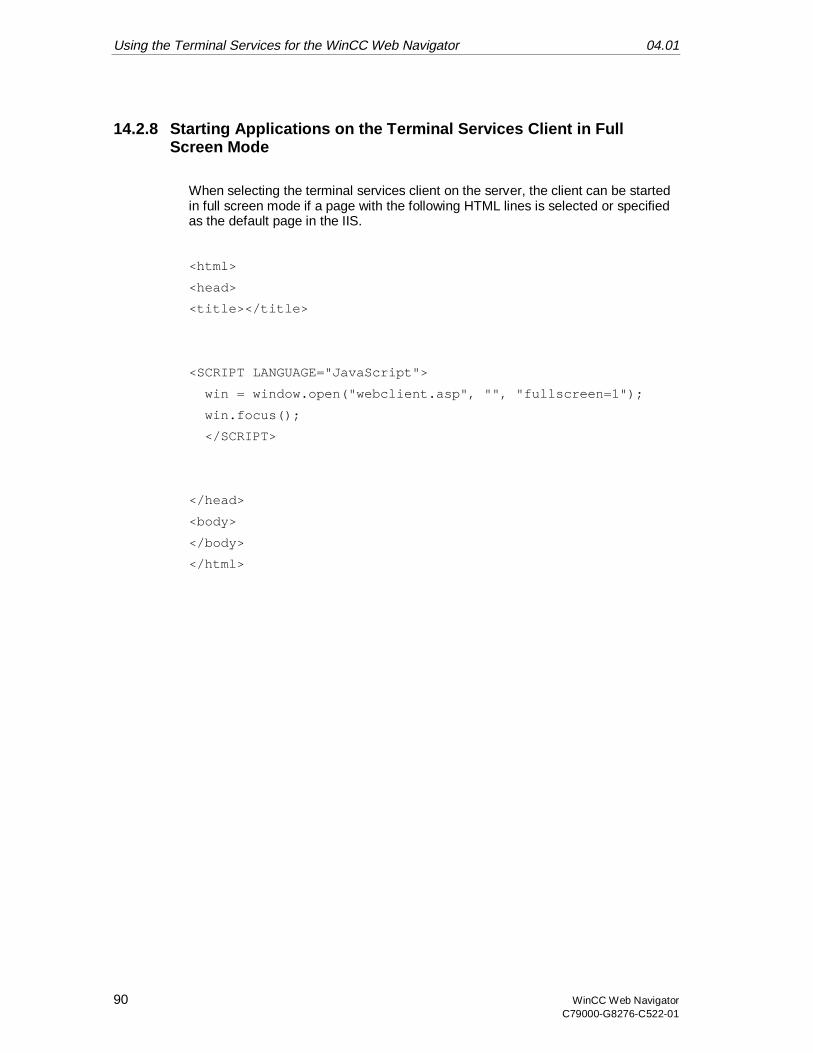
Using the Terminal Services for the WinCC Web Navigator 04.01
90 WinCC Web NavigatorC79000-G8276-C522-01
14.2.8 Starting Applications on the Terminal Services Client in FullScreen Mode
When selecting the terminal services client on the server, the client can be startedin full screen mode if a page with the following HTML lines is selected or specifiedas the default page in the IIS.
<html>
<head>
<title></title>
<SCRIPT LANGUAGE="JavaScript">
win = window.open("webclient.asp", "", "fullscreen=1");
win.focus();
</SCRIPT>
</head>
<body>
</body>
</html>
04.01 Appendix
WinCC Web Navigator 91C79000-G8276-C522-01
15 Appendix
15.1 Internet Information Server
15.1.1 An overview of the highlights
• Optimized system availability through failure safety (24/7/365)
• Transacted Active Server Pages (ASP) ensure that processes running inparallel do not mutually interfere with one another. Script debugging simplifiesthe development of such applications
• Flexible configuration
• Low operating costs through optimized administration tools
• Ensured compatibility through strict adherence to common Internet standards
• Secure information exchange through effective encryption mechanisms
• Individually configurable search functionality
15.1.2 Reliability
Reliability is a key term in modern IT management. It is one of the fundamentalrequirements for successful implementation of IT technologies. The possibility tointegrate the Microsoft Transaction Servers into the Microsoft Internet InformationServer 4.0 makes the Windows NT Server the most comprehensive platform for thedevelopment and expansion of dependable and simultaneously scalable Webapplications. The Transaction Server ensures very efficient processing of all datastreams between server and back-end system in a client/server environment.
The Microsoft Internet Information Server guarantees stability through 3 key points:
• System security: Various applications can run simultaneously on the WebServer. If applications from third parties (or even "homemade" applications) arebeing run, they may cause problems through incompatibility and may evenresult in a system crash. The Internet Information Server makes certain thatsuch events affect neither other applications nor the system as a whole. If oneof the described applications should crash, it is exited and, if necessary,restarted.
• Transacted Active Server Pages: This new development allows thedeveloper to design applications which can simultaneously perform multipleactions. These actions can work towards a common cause or run entirelyindependently from one another. In any event, it is ensured that they do notinterfere with one another and cause instability in the system operation. Inparticular, this can play a role in database applications.
• Script debugging: A special function which makes the programming ofapplications using Active Server Pages easier for the developer.
Appendix 04.01
92 WinCC Web NavigatorC79000-G8276-C522-01
15.1.3 Settings on the Internet Information Server
The WinCC Web Configurator made the following settings:
• Setting up the Web folder
• Creating a new standard Web site
• Creating a virtual folder
• Setting the start page
• ISAPI filter added
• Setting the basic authentication and folder privileges
• Creating an application
Note
If you have questions or encounter difficulties with the following settings, contactthe intra-/Internet administrator in your department.
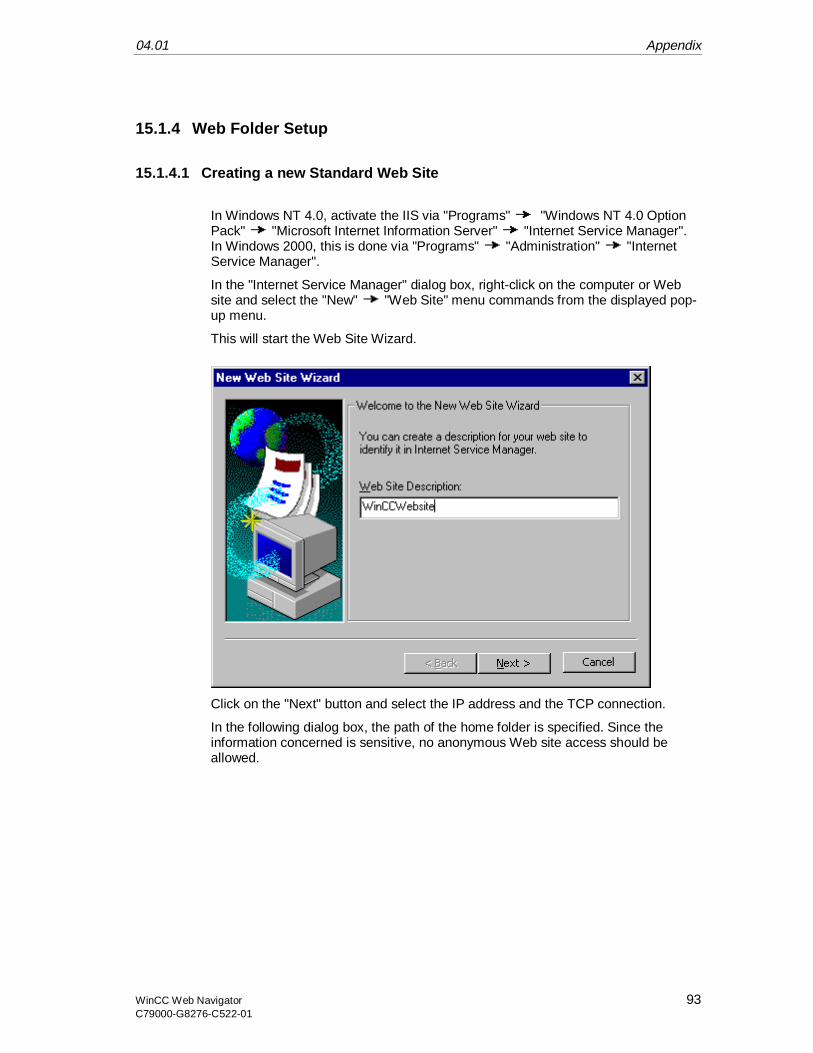
04.01 Appendix
WinCC Web Navigator 93C79000-G8276-C522-01
15.1.4 Web Folder Setup
15.1.4.1 Creating a new Standard Web Site
In Windows NT 4.0, activate the IIS via "Programs" "Windows NT 4.0 OptionPack" "Microsoft Internet Information Server" "Internet Service Manager".In Windows 2000, this is done via "Programs" "Administration" "InternetService Manager".
In the "Internet Service Manager" dialog box, right-click on the computer or Website and select the "New" "Web Site" menu commands from the displayed pop-up menu.
This will start the Web Site Wizard.
Click on the "Next" button and select the IP address and the TCP connection.
In the following dialog box, the path of the home folder is specified. Since theinformation concerned is sensitive, no anonymous Web site access should beallowed.
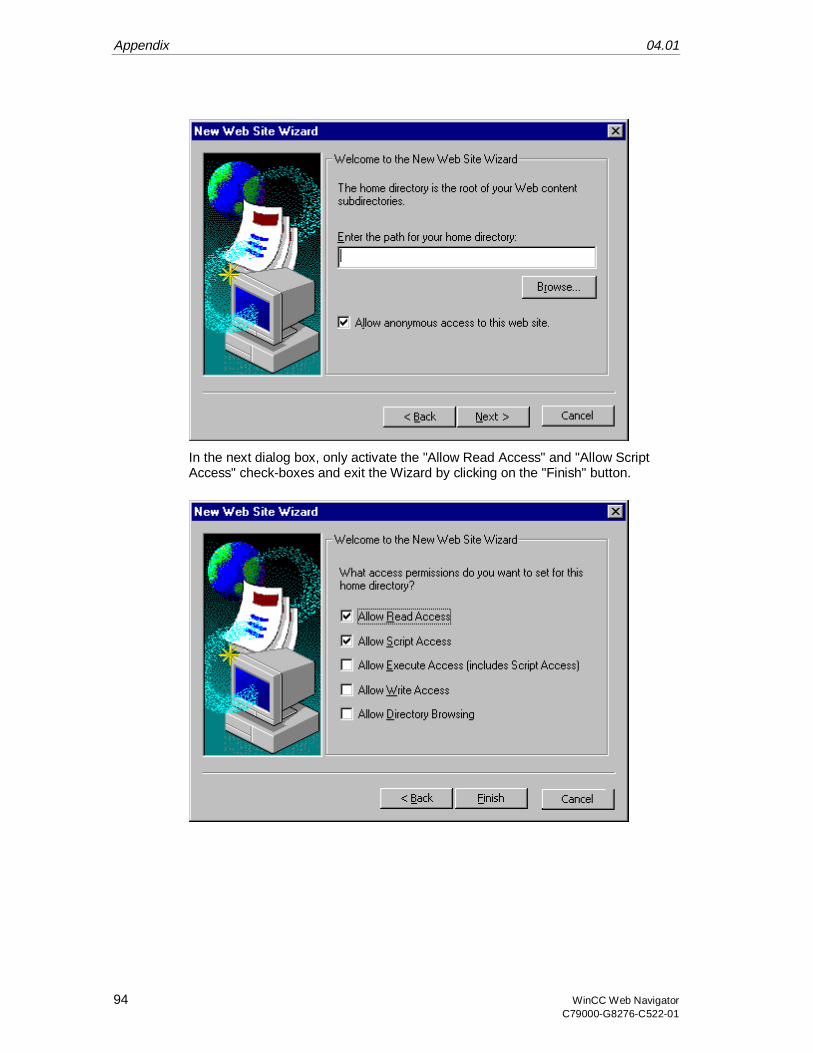
Appendix 04.01
94 WinCC Web NavigatorC79000-G8276-C522-01
In the next dialog box, only activate the "Allow Read Access" and "Allow ScriptAccess" check-boxes and exit the Wizard by clicking on the "Finish" button.
04.01 Appendix
WinCC Web Navigator 95C79000-G8276-C522-01
15.1.4.2 Virtual Folder
If your Web site includes files which are either not on the same drive as the rootdirectory or are not on the same computer and are to be executed on the InternetInformation Server, you must create a virtual folder to accommodate these files inyour Web site. Such a folder can be located on a local drive or on anothercomputer in the network. If you would like to use a folder on another computer, youneed to specify the UNC name (UNC = Universal Naming Convention) of the folderand provide a user name and password for access authorization. An overview of allvirtual folders can be found under Virtual Folders.
How to Create a Virtual Folder
1. In the Internet Services Manager, select the Web site which you would like toadd to the folder.
2. Click on the Action button, point to New and then select Virtual Folder.
3. Make the actual settings for new virtual folders with the help of the wizard.
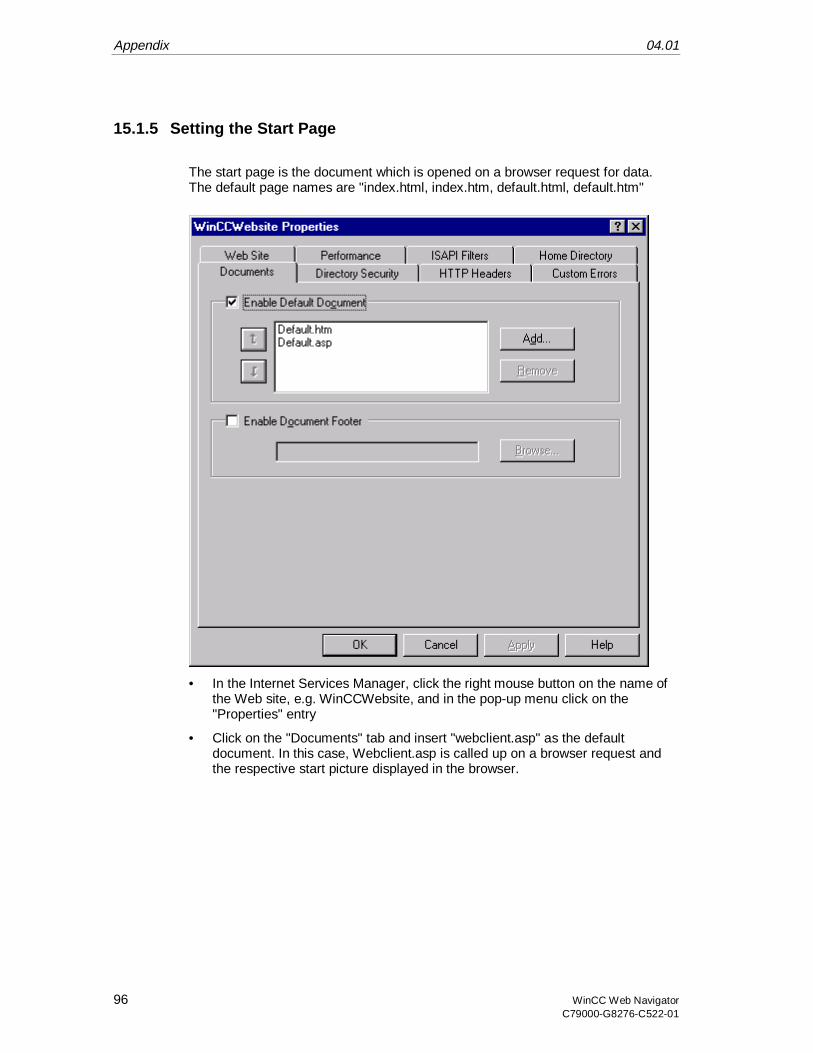
Appendix 04.01
96 WinCC Web NavigatorC79000-G8276-C522-01
15.1.5 Setting the Start Page
The start page is the document which is opened on a browser request for data.The default page names are "index.html, index.htm, default.html, default.htm"
• In the Internet Services Manager, click the right mouse button on the name ofthe Web site, e.g. WinCCWebsite, and in the pop-up menu click on the"Properties" entry
• Click on the "Documents" tab and insert "webclient.asp" as the defaultdocument. In this case, Webclient.asp is called up on a browser request andthe respective start picture displayed in the browser.

04.01 Appendix
WinCC Web Navigator 97C79000-G8276-C522-01
15.1.6 Adding an ISAPI Filter
An ISAPI filter is a program which reacts to events which occur during theprocessing of an HTTP request.
• In the Properties dialog box of the "WinCCWebsite" Web site, click on theISAPI Filters tab.
• This table lists the states, names and priority levels of the filter.
• Click on "Add" to activate the filter of the Web Navigator (Webfilter.dll). Theprogram is located in the installation folder(..\Siemens\WinCC\WebNavigator\Server\Web\bin\..) of the WinCC WebNavigator.
• If the ISAPI filter has been changed (deleted and then relinked), the PC mustbe restarted or, as the case may be, the WWW Publishing Service must beexited and restarted.
Note
While operating the WinCC Web Navigator Server, only one Web project can beactive per computer, since the Web filter is loaded to the storage of the active Web.
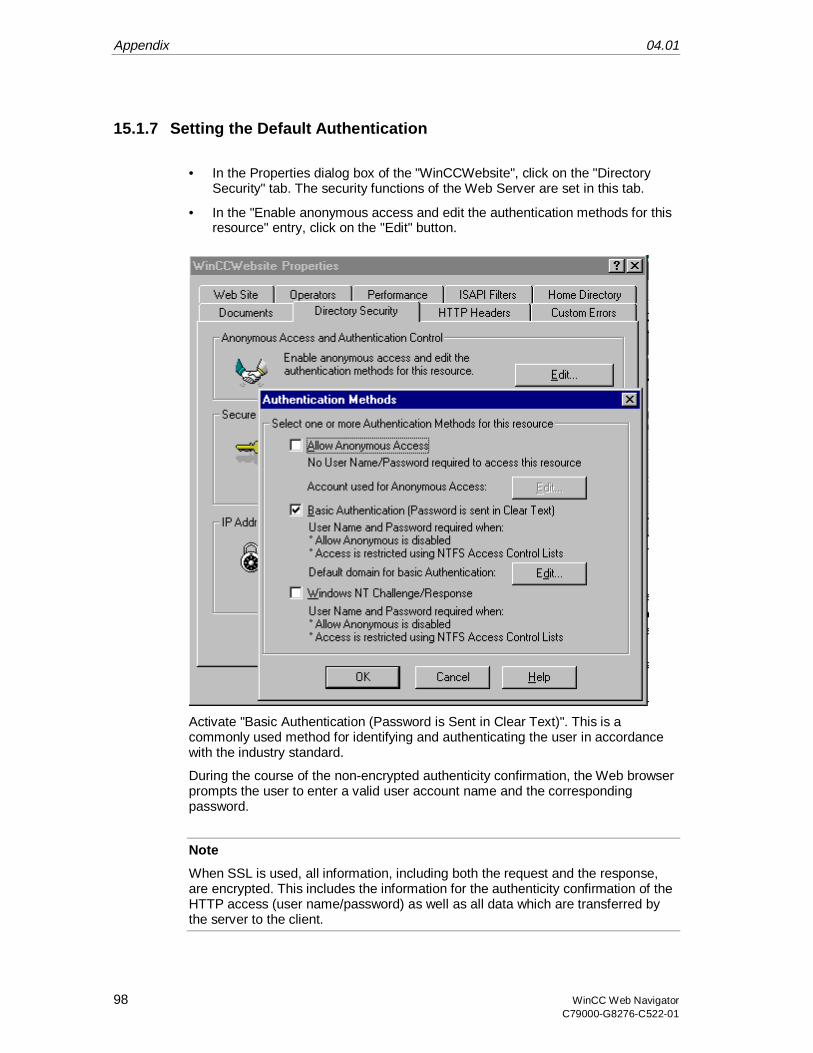
Appendix 04.01
98 WinCC Web NavigatorC79000-G8276-C522-01
15.1.7 Setting the Default Authentication
• In the Properties dialog box of the "WinCCWebsite", click on the "DirectorySecurity" tab. The security functions of the Web Server are set in this tab.
• In the "Enable anonymous access and edit the authentication methods for thisresource" entry, click on the "Edit" button.
Activate "Basic Authentication (Password is Sent in Clear Text)". This is acommonly used method for identifying and authenticating the user in accordancewith the industry standard.
During the course of the non-encrypted authenticity confirmation, the Web browserprompts the user to enter a valid user account name and the correspondingpassword.
Note
When SSL is used, all information, including both the request and the response,are encrypted. This includes the information for the authenticity confirmation of theHTTP access (user name/password) as well as all data which are transferred bythe server to the client.
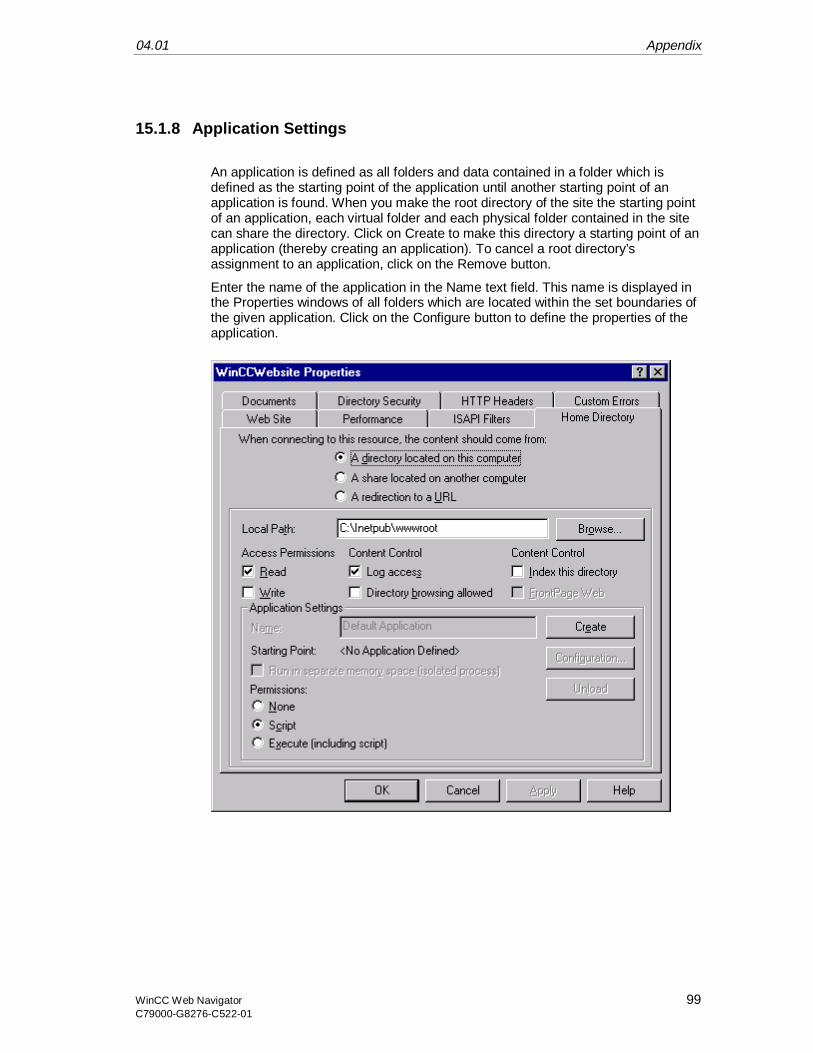
04.01 Appendix
WinCC Web Navigator 99C79000-G8276-C522-01
15.1.8 Application Settings
An application is defined as all folders and data contained in a folder which isdefined as the starting point of the application until another starting point of anapplication is found. When you make the root directory of the site the starting pointof an application, each virtual folder and each physical folder contained in the sitecan share the directory. Click on Create to make this directory a starting point of anapplication (thereby creating an application). To cancel a root directory’sassignment to an application, click on the Remove button.
Enter the name of the application in the Name text field. This name is displayed inthe Properties windows of all folders which are located within the set boundaries ofthe given application. Click on the Configure button to define the properties of theapplication.
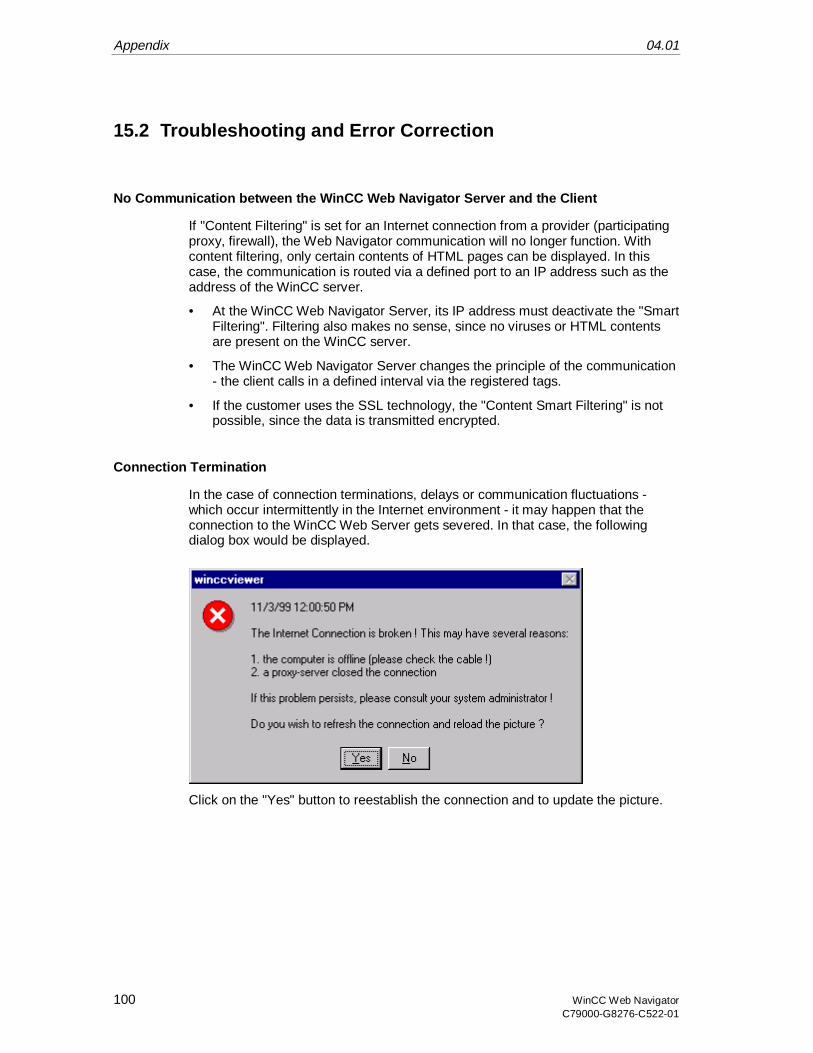
Appendix 04.01
100 WinCC Web NavigatorC79000-G8276-C522-01
15.2 Troubleshooting and Error Correction
No Communication between the WinCC Web Navigator Server and the Client
If "Content Filtering" is set for an Internet connection from a provider (participatingproxy, firewall), the Web Navigator communication will no longer function. Withcontent filtering, only certain contents of HTML pages can be displayed. In thiscase, the communication is routed via a defined port to an IP address such as theaddress of the WinCC server.
• At the WinCC Web Navigator Server, its IP address must deactivate the "SmartFiltering". Filtering also makes no sense, since no viruses or HTML contentsare present on the WinCC server.
• The WinCC Web Navigator Server changes the principle of the communication- the client calls in a defined interval via the registered tags.
• If the customer uses the SSL technology, the "Content Smart Filtering" is notpossible, since the data is transmitted encrypted.
Connection Termination
In the case of connection terminations, delays or communication fluctuations -which occur intermittently in the Internet environment - it may happen that theconnection to the WinCC Web Server gets severed. In that case, the followingdialog box would be displayed.
Click on the "Yes" button to reestablish the connection and to update the picture.
04.01 Appendix
WinCC Web Navigator 101C79000-G8276-C522-01
No pictures are being displayed
In the Internet Explorer, check whether the following setting has been activated:
• Internet Explorer 4.0: Menu commands "View"/"Internet Options", tab:"Advanced"/"Browse in a new process"
• Internet Explorer 5: Menu commands "Tools"/"Internet Options", tab:"Advanced"/"Open Browser window in a new process" (provided that the optionis available)
On the WinCC Web Navigator Server computer, check whether the correct Website has been activated. Additional information can be found in the "Checking theactivated Web Site" chapter.
Incorrect Start Picture
The start picture displayed by the Internet Explorer does not match the picture youhave just edited.
• Start the Web View Publisher to make the new picture available to the Internet.
• Delete the temporary Internet files. Internet Explorer 4.0: under "View"/"InternetOptions"; Internet Explorer 5.0: under "Tools"/"Internet Options".
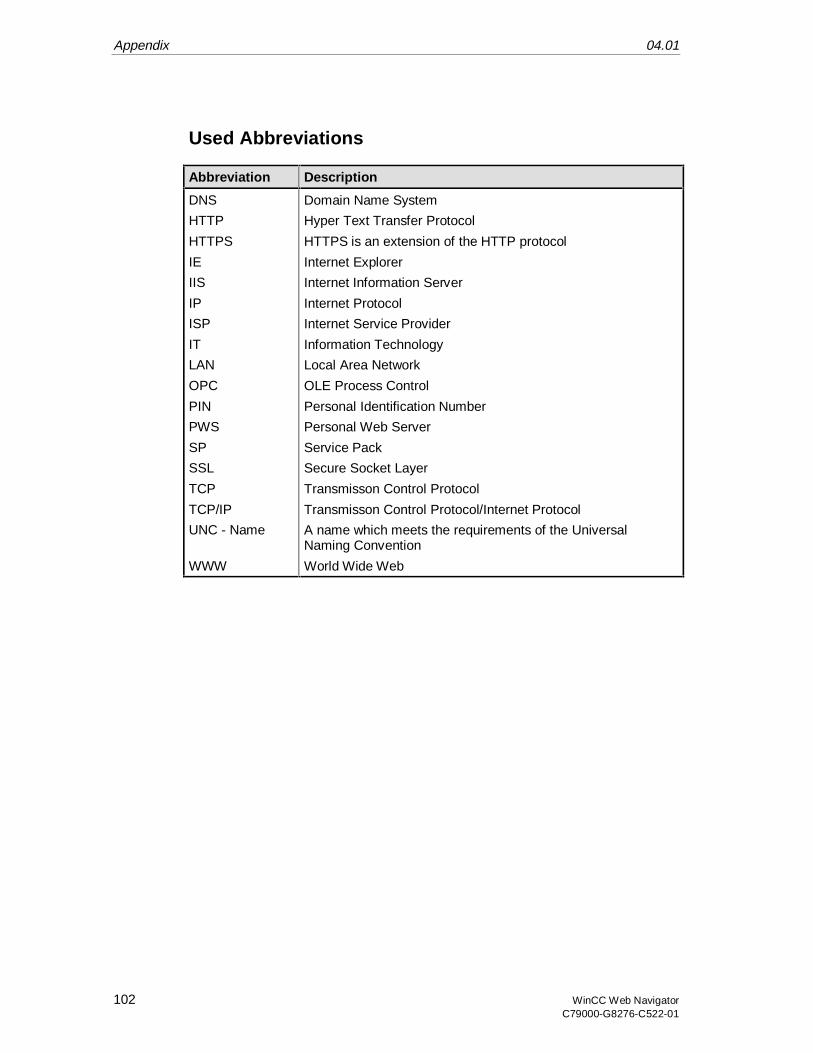
Appendix 04.01
102 WinCC Web NavigatorC79000-G8276-C522-01
Used Abbreviations
Abbreviation Description
DNS
HTTP
HTTPS
IE
IIS
IP
ISP
IT
LAN
OPC
PIN
PWS
SP
SSL
TCP
TCP/IP
UNC - Name
WWW
Domain Name System
Hyper Text Transfer Protocol
HTTPS is an extension of the HTTP protocol
Internet Explorer
Internet Information Server
Internet Protocol
Internet Service Provider
Information Technology
Local Area Network
OLE Process Control
Personal Identification Number
Personal Web Server
Service Pack
Secure Socket Layer
Transmisson Control Protocol
Transmisson Control Protocol/Internet Protocol
A name which meets the requirements of the UniversalNaming Convention
World Wide Web
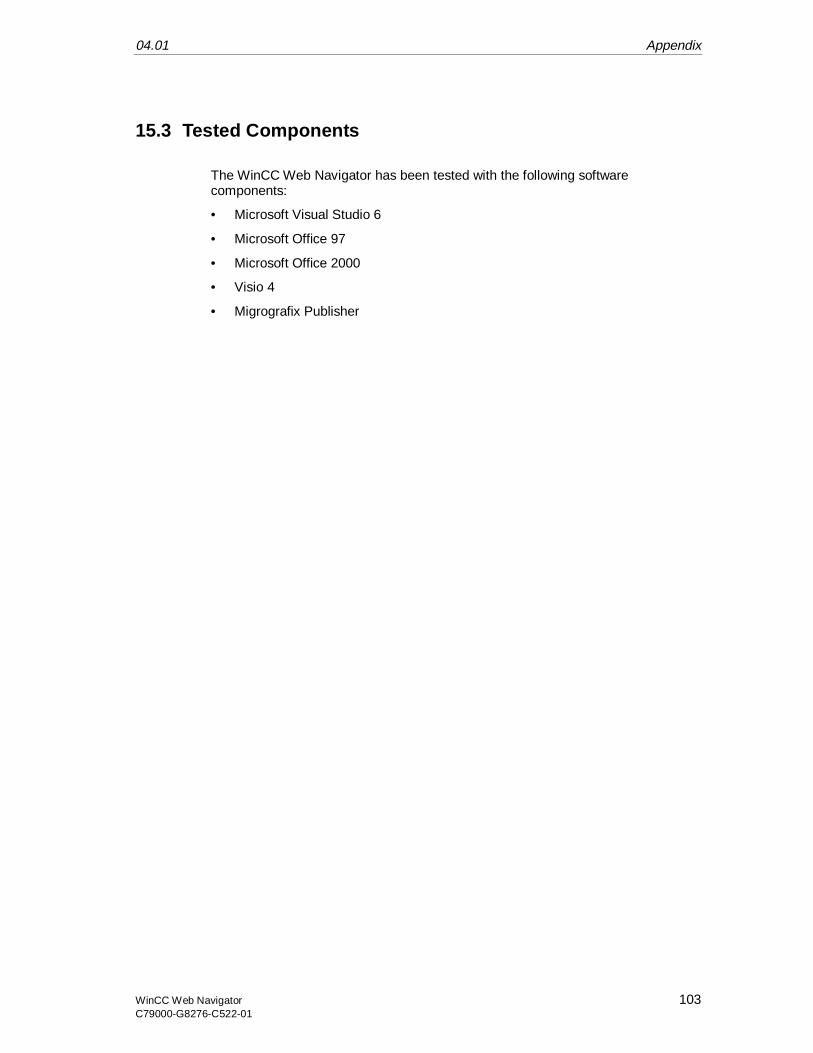
04.01 Appendix
WinCC Web Navigator 103C79000-G8276-C522-01
15.3 Tested Components
The WinCC Web Navigator has been tested with the following softwarecomponents:
• Microsoft Visual Studio 6
• Microsoft Office 97
• Microsoft Office 2000
• Visio 4
• Migrografix Publisher

Appendix 04.01
104 WinCC Web NavigatorC79000-G8276-C522-01
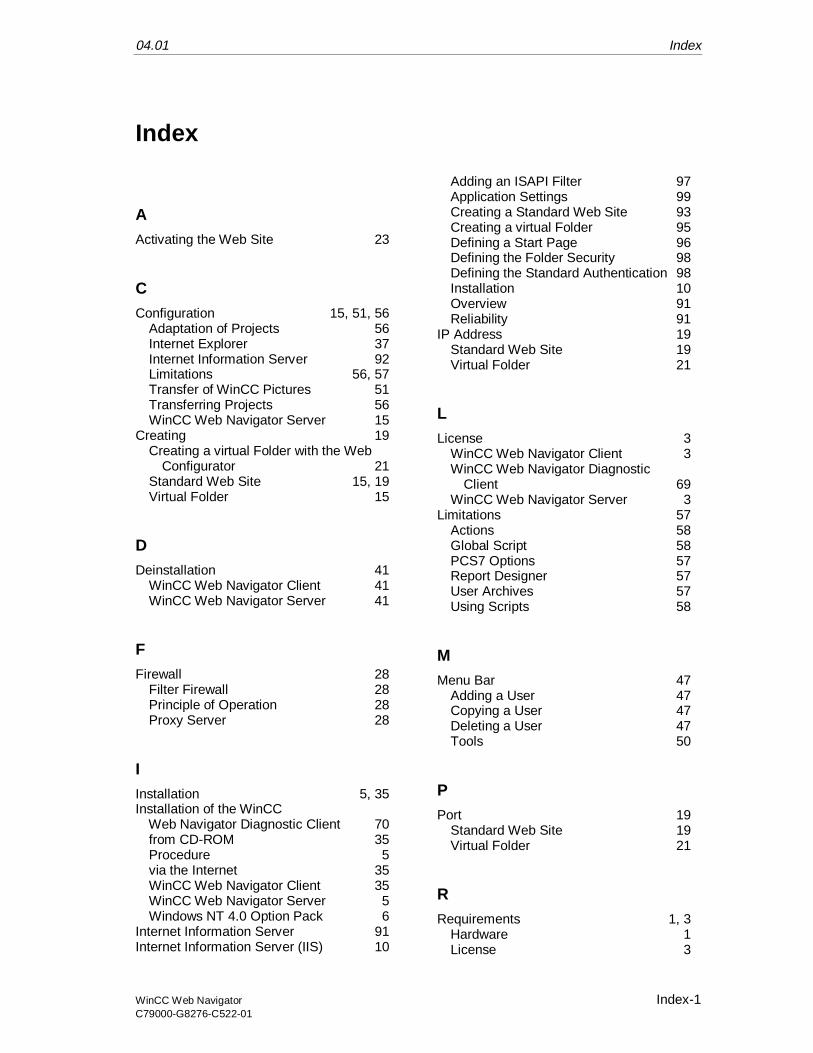
04.01 Index
WinCC Web Navigator Index-1C79000-G8276-C522-01
Index
A
Activating the Web Site 23
C
Configuration 15, 51, 56Adaptation of Projects 56Internet Explorer 37Internet Information Server 92Limitations 56, 57Transfer of WinCC Pictures 51Transferring Projects 56WinCC Web Navigator Server 15
Creating 19Creating a virtual Folder with the Web
Configurator 21Standard Web Site 15, 19Virtual Folder 15
D
Deinstallation 41WinCC Web Navigator Client 41WinCC Web Navigator Server 41
F
Firewall 28Filter Firewall 28Principle of Operation 28Proxy Server 28
I
Installation 5, 35Installation of the WinCC
Web Navigator Diagnostic Client 70from CD-ROM 35Procedure 5via the Internet 35WinCC Web Navigator Client 35WinCC Web Navigator Server 5Windows NT 4.0 Option Pack 6
Internet Information Server 91Internet Information Server (IIS) 10
Adding an ISAPI Filter 97Application Settings 99Creating a Standard Web Site 93Creating a virtual Folder 95Defining a Start Page 96Defining the Folder Security 98Defining the Standard Authentication 98Installation 10Overview 91Reliability 91
IP Address 19Standard Web Site 19Virtual Folder 21
L
License 3WinCC Web Navigator Client 3WinCC Web Navigator Diagnostic
Client 69WinCC Web Navigator Server 3
Limitations 57Actions 58Global Script 58PCS7 Options 57Report Designer 57User Archives 57Using Scripts 58
M
Menu Bar 47Adding a User 47Copying a User 47Deleting a User 47Tools 50
P
Port 19Standard Web Site 19Virtual Folder 21
R
Requirements 1, 3Hardware 1License 3
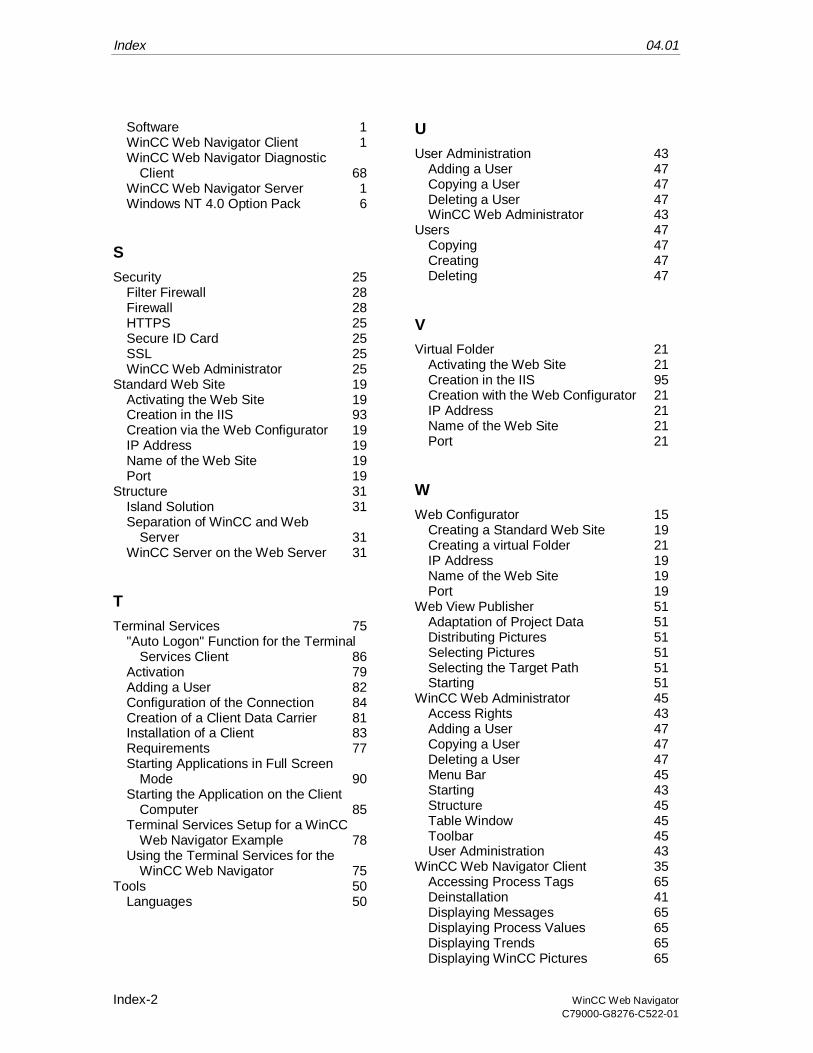
Index 04.01
Index-2 WinCC Web NavigatorC79000-G8276-C522-01
Software 1WinCC Web Navigator Client 1WinCC Web Navigator Diagnostic
Client 68WinCC Web Navigator Server 1Windows NT 4.0 Option Pack 6
S
Security 25Filter Firewall 28Firewall 28HTTPS 25Secure ID Card 25SSL 25WinCC Web Administrator 25
Standard Web Site 19Activating the Web Site 19Creation in the IIS 93Creation via the Web Configurator 19IP Address 19Name of the Web Site 19Port 19
Structure 31Island Solution 31Separation of WinCC and Web
Server 31WinCC Server on the Web Server 31
T
Terminal Services 75"Auto Logon" Function for the Terminal
Services Client 86Activation 79Adding a User 82Configuration of the Connection 84Creation of a Client Data Carrier 81Installation of a Client 83Requirements 77Starting Applications in Full Screen
Mode 90Starting the Application on the Client
Computer 85Terminal Services Setup for a WinCC
Web Navigator Example 78Using the Terminal Services for the
WinCC Web Navigator 75Tools 50
Languages 50
U
User Administration 43Adding a User 47Copying a User 47Deleting a User 47WinCC Web Administrator 43
Users 47Copying 47Creating 47Deleting 47
VVirtual Folder 21
Activating the Web Site 21Creation in the IIS 95Creation with the Web Configurator 21IP Address 21Name of the Web Site 21Port 21
W
Web Configurator 15Creating a Standard Web Site 19Creating a virtual Folder 21IP Address 19Name of the Web Site 19Port 19
Web View Publisher 51Adaptation of Project Data 51Distributing Pictures 51Selecting Pictures 51Selecting the Target Path 51Starting 51
WinCC Web Administrator 45Access Rights 43Adding a User 47Copying a User 47Deleting a User 47Menu Bar 45Starting 43Structure 45Table Window 45Toolbar 45User Administration 43
WinCC Web Navigator Client 35Accessing Process Tags 65Deinstallation 41Displaying Messages 65Displaying Process Values 65Displaying Trends 65Displaying WinCC Pictures 65

04.01 Index
WinCC Web Navigator Index-3C79000-G8276-C522-01
Hardware Requirements 1Installation 35Internet Explorer Settings 37Language Switch 65License Requirements 3Software Requirements 1Upgrading ixWinCC Guardian 73
WinCC Web Navigator DiagnosticClient 67Installation 70License 69Requirements 68
WinCC Web Navigator Server 11Configuration 15Deinstallation 41Diagnosis of the Connections 71Hardware Requirements 1Installation 11Installation of the Internet Information
Server (IIS) 10License Requirements 3Software Requirements 1Upgrading ixWinCC Guardian 73
Windows NT 4.0 Option Pack 6Installation 6

Index 04.01
Index-4 WinCC Web NavigatorC79000-G8276-C522-01

SIMATIC HMI
WinCCWeb Navigator V1.1
Manual
Order Number: 6AV6392-1DC01-1AB0
Edition April 2001
C79000-G8276-C522-01 (A5E00109903)
Web Navigator 1
Getting Started 2

WinCC®, SIMATIC®, SIMATIC NET®, SINEC® and STEP® are Siemens registered trademarks.
All other product and system names in this manual are (registered) trademarks of their respective owners andmust be treated accordingly.
(The reproduction, transmission or use of this document or itscontents is not permitted without express written authority.Offenders will be liable for damages. All rights, including rightscreated by patent grant or registration of a utility model ordesign, are reserved.)
(We have checked the contents of this manual for agreementwith the hardware and software described. Since deviationscannot be precluded entirely, we cannot guarantee fullagreement. However, the data in this manual are reviewedregularly and any necessary corrections included in subsequenteditions. Suggestions for improvement are welcomed.)
Siemens AG 1994 - 2001 All rights reserved Technical data subject to change
C79000-G8276-C522Printed in the Federal Republic of Germany Siemens Aktiengesellschaft
WinCC Web Navigator iC79000-G8276-C522-01
Contents
1 Installation and Deinstallation......................................................................... 11.1 Installation.............................................................................................................31.1.1 Procedure .............................................................................................................31.1.2 Installation of the Windows NT 4.0 Option Pack.....................................................41.1.3 Installation of the Internet Information Server (IIS) with Windows 2000
Professional ..........................................................................................................81.1.4 Installation of the WinCC Web Navigator Server ....................................................91.2 Deinstallation ......................................................................................................14
2 The first Web Project ..................................................................................... 152.1 Configuration of the WinCC Web Navigator Server ..............................................162.1.1 Step 1: Starting the "Qckstart" Project .................................................................162.1.2 Step 2: WinCC Web Configurator ........................................................................182.1.3 Step 3: Defining the Standard Web Site...............................................................192.1.4 Step 4: Checking the activated Web Site (Web)...................................................212.2 Conversion of Process Pictures...........................................................................222.2.1 Step 5: Starting the Web View Publisher..............................................................222.2.2 Step 6: Publishing Pictures..................................................................................232.2.3 Step 7: WinCC Web Administrator.......................................................................272.3 Client Access to the Web Project.........................................................................292.3.1 Step 8: Installation of the WinCC Web Navigator Client .......................................292.3.2 Step 9: Internet Explorer Settings ........................................................................322.3.3 Step 10: The Web Project....................................................................................352.4 New Process Picture ...........................................................................................362.4.1 Step 11: Creating a new Process Picture.............................................................362.4.2 Step 12: Publishing a Process Picture .................................................................382.4.3 Step 13: Process Picture on the Web Client.........................................................392.5 Troubleshooting and Error Correction ..................................................................41

Contents 04.01
ii WinCC Web NavigatorC79000-G8276-C522-01
04.01 Introduction
WinCC Web Navigator iiiC79000-G8276-C522-01
Introduction
Welcome to the WinCC Web Navigator.
WinCC is the first HMI (Integrated Human Machine Interface) software on themarket that truly integrates your system control software with your automationprocess. The user-friendly components of WinCC make the integration to new orexisting applications trouble-free.
The Web Navigator package consists of special WinCC Web Navigator Servercomponents that are installed on the server computer, and of WinCC WebNavigator Client components that run on the Internet computer.
The pictures displayed on the WinCC Web Navigator Client can be controlled justlike in a normal WinCC system. This makes it possible to control and monitor theproject running on the server computer from any location on earth.
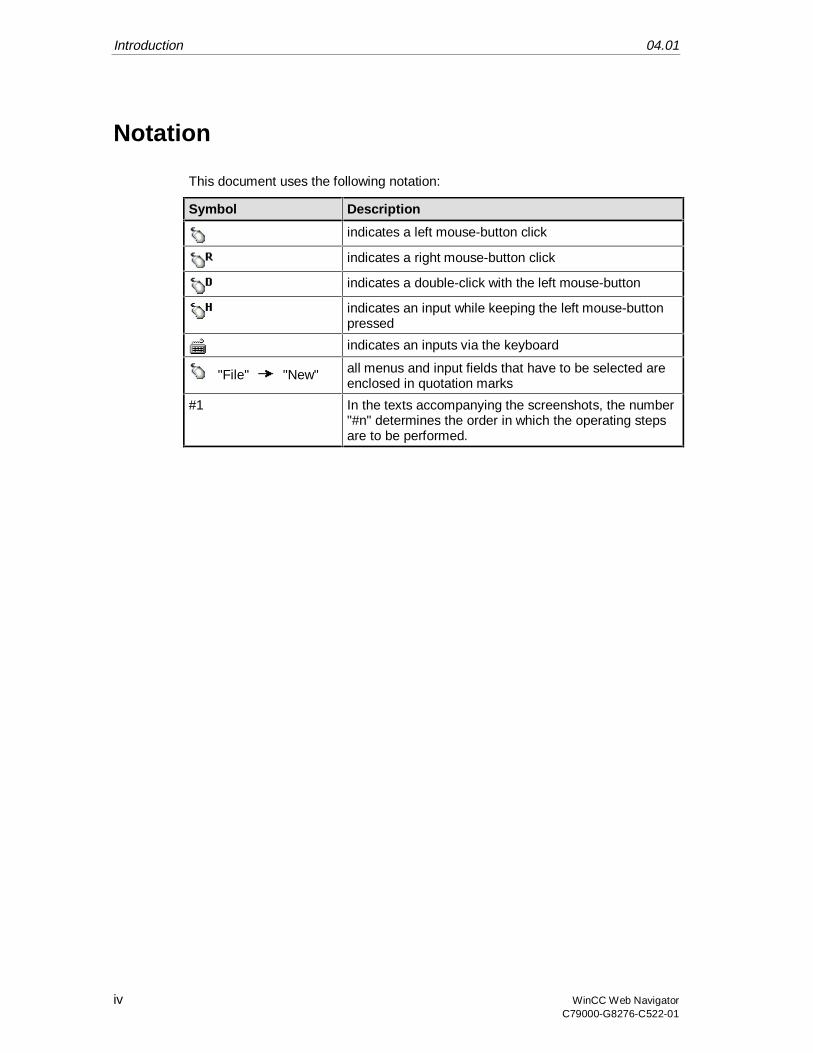
Introduction 04.01
iv WinCC Web NavigatorC79000-G8276-C522-01
Notation
This document uses the following notation:
Symbol Description
indicates a left mouse-button click
indicates a right mouse-button click
indicates a double-click with the left mouse-button
indicates an input while keeping the left mouse-buttonpressed
indicates an inputs via the keyboard
"File" "New" all menus and input fields that have to be selected areenclosed in quotation marks
#1 In the texts accompanying the screenshots, the number"#n" determines the order in which the operating stepsare to be performed.
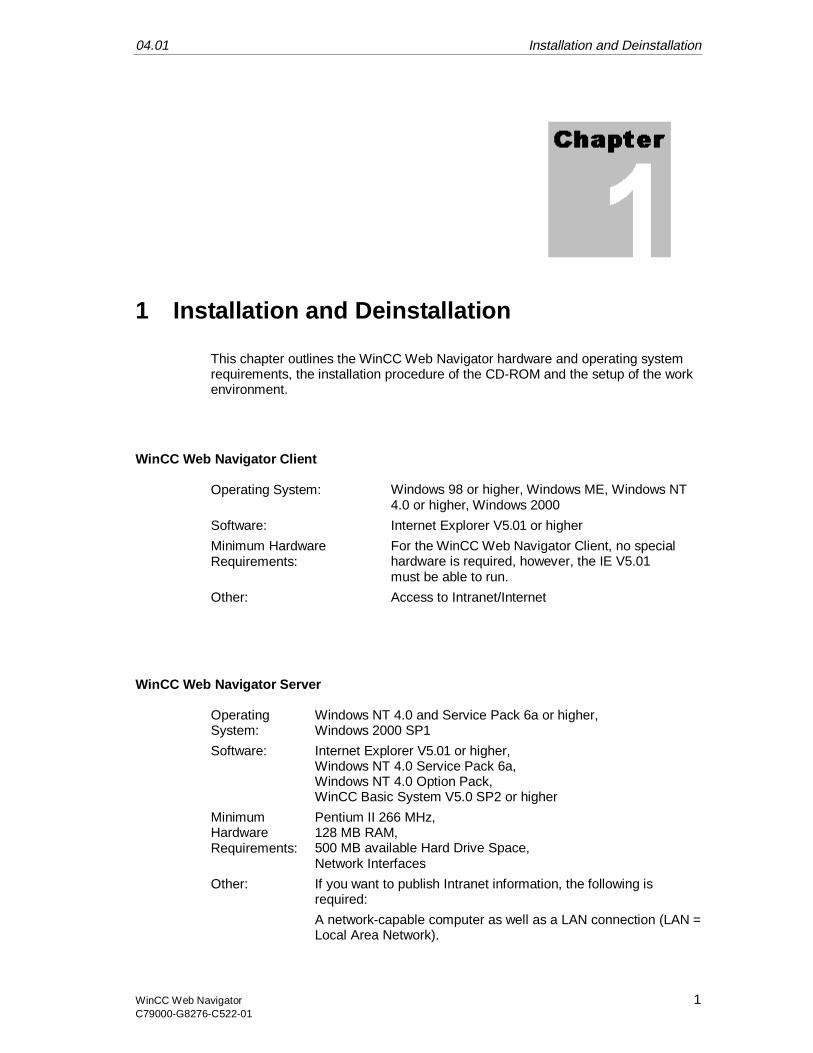
04.01 Installation and Deinstallation
WinCC Web Navigator 1C79000-G8276-C522-01
1 Installation and Deinstallation
This chapter outlines the WinCC Web Navigator hardware and operating systemrequirements, the installation procedure of the CD-ROM and the setup of the workenvironment.
WinCC Web Navigator Client
Operating System: Windows 98 or higher, Windows ME, Windows NT4.0 or higher, Windows 2000
Software: Internet Explorer V5.01 or higher
Minimum HardwareRequirements:
For the WinCC Web Navigator Client, no specialhardware is required, however, the IE V5.01must be able to run.
Other: Access to Intranet/Internet
WinCC Web Navigator Server
OperatingSystem:
Windows NT 4.0 and Service Pack 6a or higher,Windows 2000 SP1
Software: Internet Explorer V5.01 or higher,Windows NT 4.0 Service Pack 6a,Windows NT 4.0 Option Pack, WinCC Basic System V5.0 SP2 or higher
MinimumHardwareRequirements:
Pentium II 266 MHz,128 MB RAM,500 MB available Hard Drive Space,Network Interfaces
Other: If you want to publish Intranet information, the following isrequired:
A network-capable computer as well as a LAN connection (LAN =Local Area Network).
Installation and Deinstallation 04.01
2 WinCC Web NavigatorC79000-G8276-C522-01
A system that breaks up computer names into IP addresses (IP =Internet Protocol). This is not a mandatory step, but it allowsusers to use alias names instead of IP addresses whenconnecting to the server.
If you want to publish Internet information, the following isrequired:
An Internet connection and an IP address from an Internetservice provider (ISP). You can only publish information on theInternet, if you possess a connection to the Internet (provided byan ISP).
A network card that is suitable for connecting to the Internet.
A DNS registration (DNS = Domain Name System) for your IPaddress. This is not a mandatory step, but it allows users to usealias names instead of IP addresses when connecting to theserver.
Note
In order to have more than three clients, the Server version of NT 4.0 or Windows 2000 must be installed, since the Workstation version is limited to three clients.
04.01 Installation and Deinstallation
WinCC Web Navigator 3C79000-G8276-C522-01
1.1 Installation
1.1.1 Procedure
The WinCC Web Navigator Server requires the Windows NT Service Pack 6a (orhigher) or Windows 2000 SP1 to be installed as well as WinCC V5.0 SP2 and theWindows NT 4.0 Option Pack.
Please refer to the WinCC documentation for details regarding the WinCCinstallation. The following description assumes that WinCC has already beeninstalled.
Installation of the WinCC Web Navigator Server under Windows NT 4.0:
1. Installation of the Windows NT 4.0 Option Pack
2. Do not restart computer
3. Installation of the Windows NT 4.0 Service Pack 6a or higher
4. Restart computer
5. Installation of the WinCC Web Navigator Server
Installation of the WinCC Web Navigator Server under Windows 2000:
1. Only with Windows 2000 Professional: Installation of the Internet InformationServer (IIS)
2. Installation of the WinCC Web Navigator Server
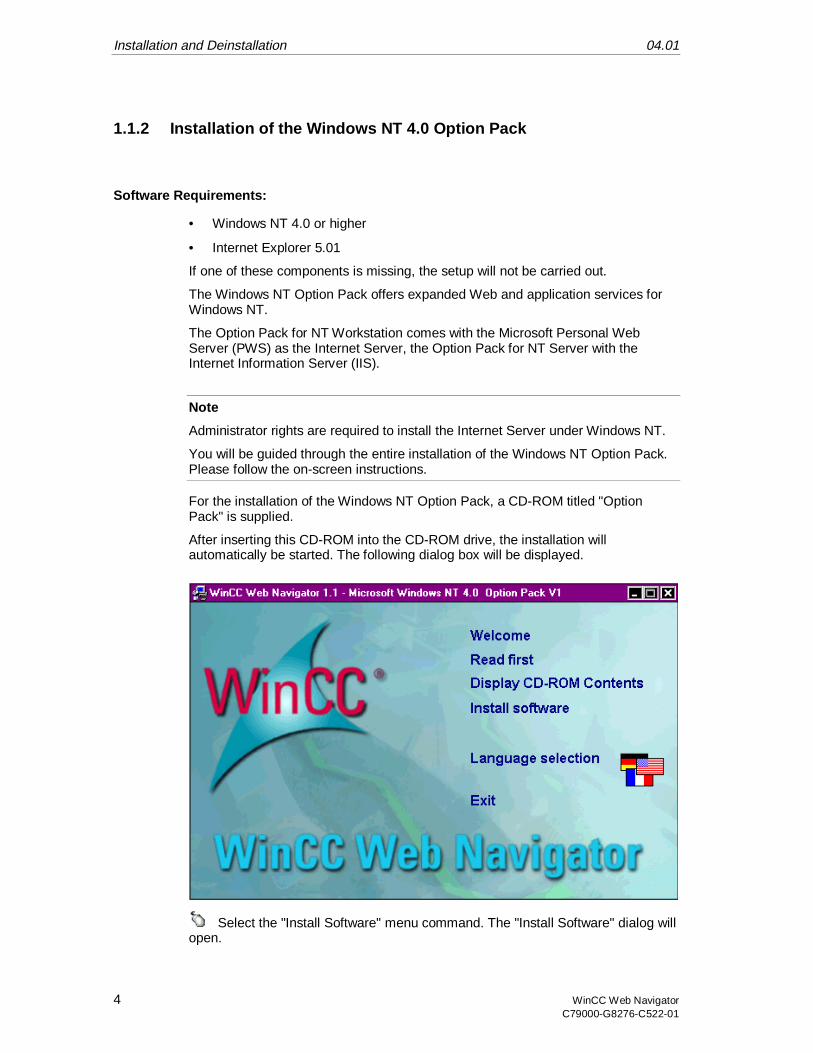
Installation and Deinstallation 04.01
4 WinCC Web NavigatorC79000-G8276-C522-01
1.1.2 Installation of the Windows NT 4.0 Option Pack
Software Requirements:
• Windows NT 4.0 or higher
• Internet Explorer 5.01
If one of these components is missing, the setup will not be carried out.
The Windows NT Option Pack offers expanded Web and application services forWindows NT.
The Option Pack for NT Workstation comes with the Microsoft Personal WebServer (PWS) as the Internet Server, the Option Pack for NT Server with theInternet Information Server (IIS).
Note
Administrator rights are required to install the Internet Server under Windows NT.
You will be guided through the entire installation of the Windows NT Option Pack.Please follow the on-screen instructions.
For the installation of the Windows NT Option Pack, a CD-ROM titled "OptionPack" is supplied.
After inserting this CD-ROM into the CD-ROM drive, the installation willautomatically be started. The following dialog box will be displayed.
Select the "Install Software" menu command. The "Install Software" dialog willopen.

04.01 Installation and Deinstallation
WinCC Web Navigator 5C79000-G8276-C522-01
Select the Option Pack that you want to install. Via the "Question Mark" icon,the corresponding help file can be accessed.
If the Windows NT Service Pack 4 or higher has been installed on thecomputer, the following dialog box will be displayed.
Click on "Yes" to proceed with the installation.
If a newer version of the Option Pack has already been installed on thecomputer, a dialog box will ask, whether the installed, newer version is to beoverwritten. Select "Do not overwrite".
Windows NT Server
In the "Windows NT 4.0 Option Pack Setup" dialog box, click on the"Standard" button. The setup will install the necessary files and start the WWW(World Wide Web) service. This concludes the installation of the IIS.

Installation and Deinstallation 04.01
6 WinCC Web NavigatorC79000-G8276-C522-01
Windows NT Workstation
In the "Windows NT 4.0 Option Pack Setup" dialog box, click on the "User-defined" button.
In the following dialog box, select the "Personal Web Server (PWS)" entry.Click on "Show Sub-Components" button.
In the "Personal Web Server (PWS)" dialog box, activate the "Internet ServiceManager" check-box. Confirm all dialog boxes. The setup will install the necessaryfiles and start the WWW (World Wide Web) service. This concludes the installationof the PWS.
After installing the IIS/PWS, do not restart the computer.

04.01 Installation and Deinstallation
WinCC Web Navigator 7C79000-G8276-C522-01
Install the Service Pack 6a or higher without the deinstallation folder option.
Restart the computer.
Detailed help pertaining to the individual components of the Windows NT OptionPack can be found in the accompanying documentation.

Installation and Deinstallation 04.01
8 WinCC Web NavigatorC79000-G8276-C522-01
1.1.3 Installation of the Internet Information Server (IIS) with Windows2000 Professional
When using Windows 2000 Professional, the Internet Information Server (IIS) mustbe installed prior to the WinCC Web Navigator Server. When using Windows 2000Server, this manual installation is not necessary.
Note
In order to install the Internet Information Server under Windows 2000Professional, write permissions to the registry database are required, i.e. you mustpossess administrator rights.
• Insert the Windows 2000 CD-ROM into the CD-ROM drive.
• From the Windows 2000 start menu, select the "Settings" "Control Panel"entries and then click on the "Add/Remove Programs" icon.
• In the "Add/Remove Programs" dialog box, click on the "Add/Remove WindowsComponents" icon. The following dialog box will open.
• In the selection window, activate the check-box before the "Internet InformationServices (IIS)" entry.
• Click on "Next".
Windows will then start with the transfer of the files and continue to guide youthrough the installation.

04.01 Installation and Deinstallation
WinCC Web Navigator 9C79000-G8276-C522-01
1.1.4 Installation of the WinCC Web Navigator Server
Note
In order to install the server component of the WinCC Web Navigator underWindows NT, write permissions to the registry database are required, i.e. you mustpossess administrator rights.
Prior to installing the WinCC Web Navigator Server, the Windows NT 4.0 OptionPack has to be installed. Following the installation of the Windows NT OptionPack, the Windows NT Service Pack has to be installed again to ensure propercommunication to the Internet.
• Insert the WinCC Web Navigator CD-ROM into the CD-ROM drive.
• The setup program will start automatically after a few seconds, provided thatthe autorun functionality has not been deactivated.
• The setup can also be started manually in case the CD-ROM has already beeninserted into the CD-ROM drive, the installation is performed from a networkdrive or the autorun function has been deactivated. To do so, access theWindows NT 4.0 start menu and select "Settings" "Control Panel""Add/Remove Programs" and then click on the "Install" button in the"Install/Uninstall" tab. Under Windows 2000, access the start menu and select"Settings" "Control Panel" "Add/Remove Programs".
• The following installation dialog box will be displayed.
To view additional information about the WinCC Web Navigator, click on the"Welcome", "Read first", "Display CD-ROM Contents", "Install Software" and"Language Selection" entries.

Installation and Deinstallation 04.01
10 WinCC Web NavigatorC79000-G8276-C522-01
To install the WinCC Web Navigator Server, click on the "Install Software"entry. You will be guided step-by-step through the installation.

04.01 Installation and Deinstallation
WinCC Web Navigator 11C79000-G8276-C522-01
Installation: User Registration
Read and accept the license conditions by clicking on the "Yes" button.
In the "User Information" dialog window, enter the required data.
Click on the "Next" button.
Confirm your inputs in the "Registration Confirmation" dialog by clicking on the"Yes" button.
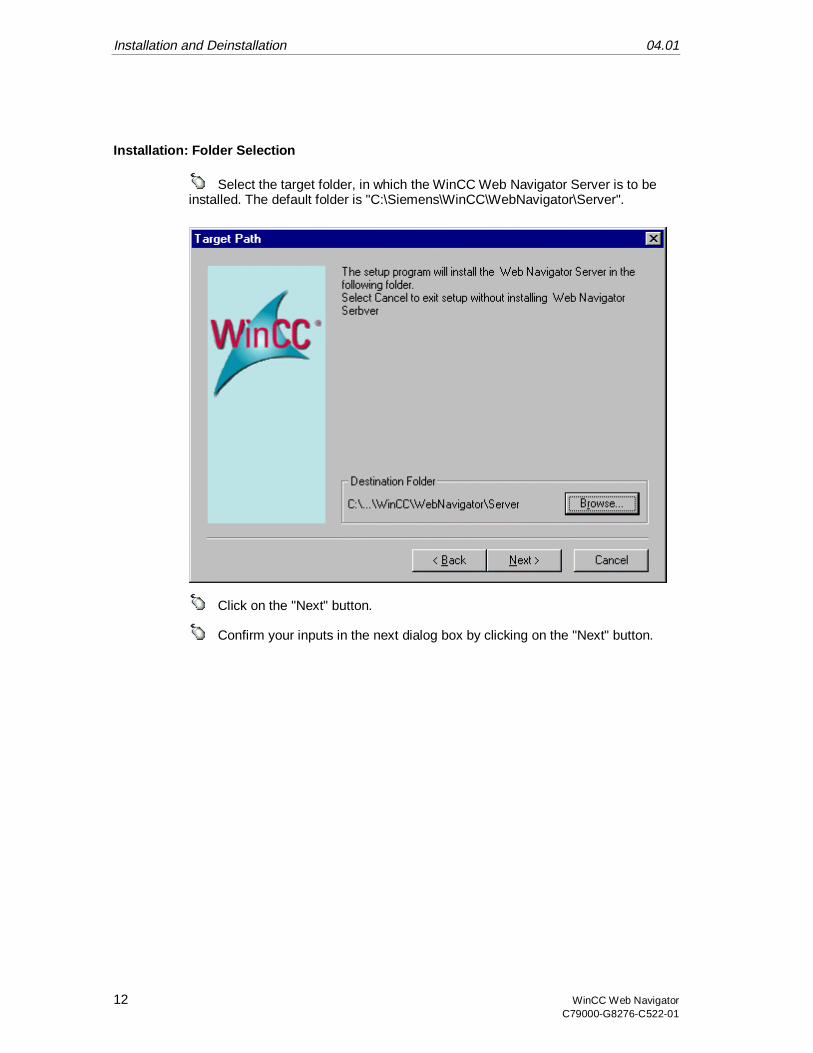
Installation and Deinstallation 04.01
12 WinCC Web NavigatorC79000-G8276-C522-01
Installation: Folder Selection
Select the target folder, in which the WinCC Web Navigator Server is to beinstalled. The default folder is "C:\Siemens\WinCC\WebNavigator\Server".
Click on the "Next" button.
Confirm your inputs in the next dialog box by clicking on the "Next" button.
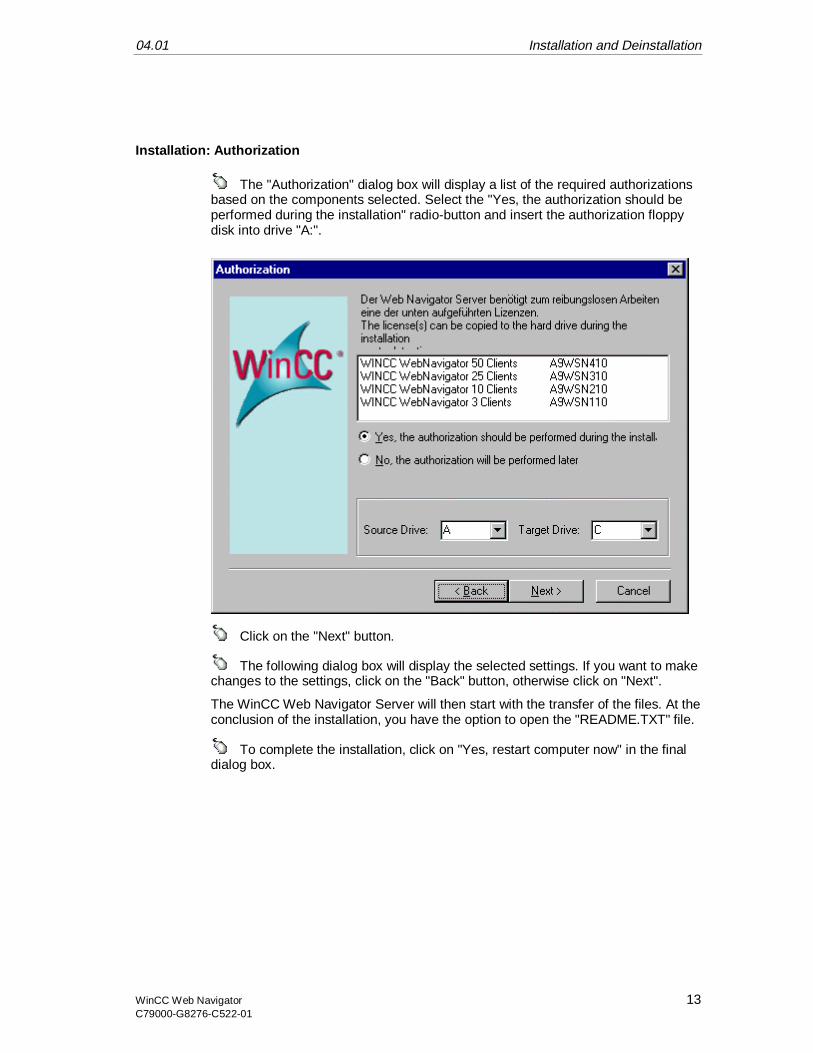
04.01 Installation and Deinstallation
WinCC Web Navigator 13C79000-G8276-C522-01
Installation: Authorization
The "Authorization" dialog box will display a list of the required authorizationsbased on the components selected. Select the "Yes, the authorization should beperformed during the installation" radio-button and insert the authorization floppydisk into drive "A:".
Click on the "Next" button.
The following dialog box will display the selected settings. If you want to makechanges to the settings, click on the "Back" button, otherwise click on "Next".
The WinCC Web Navigator Server will then start with the transfer of the files. At theconclusion of the installation, you have the option to open the "README.TXT" file.
To complete the installation, click on "Yes, restart computer now" in the finaldialog box.
Installation and Deinstallation 04.01
14 WinCC Web NavigatorC79000-G8276-C522-01
1.2 Deinstallation
The WinCC Web Navigator Server and the WinCC Web Navigator Client can bedeinstalled as usual from Windows. Access the Windows "Control Panel" anddouble-click on the "Add/Remove Programs" icon.
• Under Windows NT 4.0, highlight the "WinCC Web Navigator Server/Client"entry in the "Install/Uninstall" tab and then click on the "Add/Remove" button.Follow the displayed instructions.
• Under Windows 2000, double-click on the "Add/Remove Programs" icon.Follow the displayed instructions.
This will remove the WinCC Web Navigator Server/Client from your system.
Note
If you deinstall the WinCC Web Navigator Server, the corresponding authorizationshould also be deinstalled using the "AuthorsW.exe" application. The authorizationcan then be reused at a later time. Additional information about authorizations canbe found in the WinCC software protection documentation.
04.01 The first Web Project
WinCC Web Navigator 15C79000-G8276-C522-01
2 The first Web Project
This chapter is based on the "Qckstart" project that was outlined in the "GettingStarted" manual of the WinCC basic system.
For this example project, the WinCC Web Navigator Server, WinCC and WinCCWeb Navigator Client are installed on the same computer. When making changesto the WinCC project, you will work with the server components (WinCC andWinCC Web Navigator Server). The client component (WinCC Web NavigatorClient) access the project via the Internet Explorer.
The following steps will be described:
• Configuration of the Web Navigator Server
• Conversion of Process Pictures so that they can run on the WinCC WebNavigator Client
• Web Site Administration
• Installation of the WinCC Web Navigator Client
• Internet Explorer Settings
• Creation of a new Process Picture
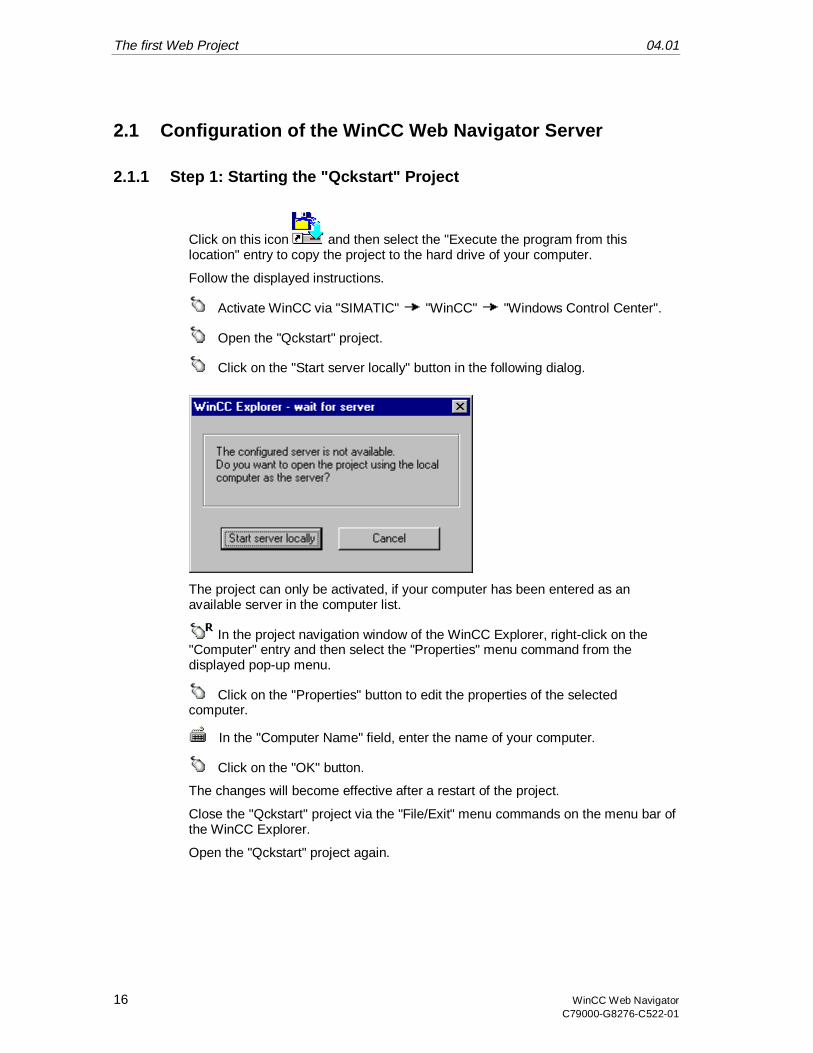
The first Web Project 04.01
16 WinCC Web NavigatorC79000-G8276-C522-01
2.1 Configuration of the WinCC Web Navigator Server
2.1.1 Step 1: Starting the "Qckstart" Project
Click on this icon and then select the "Execute the program from thislocation" entry to copy the project to the hard drive of your computer.
Follow the displayed instructions.
Activate WinCC via "SIMATIC" "WinCC" "Windows Control Center".
Open the "Qckstart" project.
Click on the "Start server locally" button in the following dialog.
The project can only be activated, if your computer has been entered as anavailable server in the computer list.
In the project navigation window of the WinCC Explorer, right-click on the"Computer" entry and then select the "Properties" menu command from thedisplayed pop-up menu.
Click on the "Properties" button to edit the properties of the selectedcomputer.
In the "Computer Name" field, enter the name of your computer.
Click on the "OK" button.
The changes will become effective after a restart of the project.
Close the "Qckstart" project via the "File/Exit" menu commands on the menu bar ofthe WinCC Explorer.
Open the "Qckstart" project again.
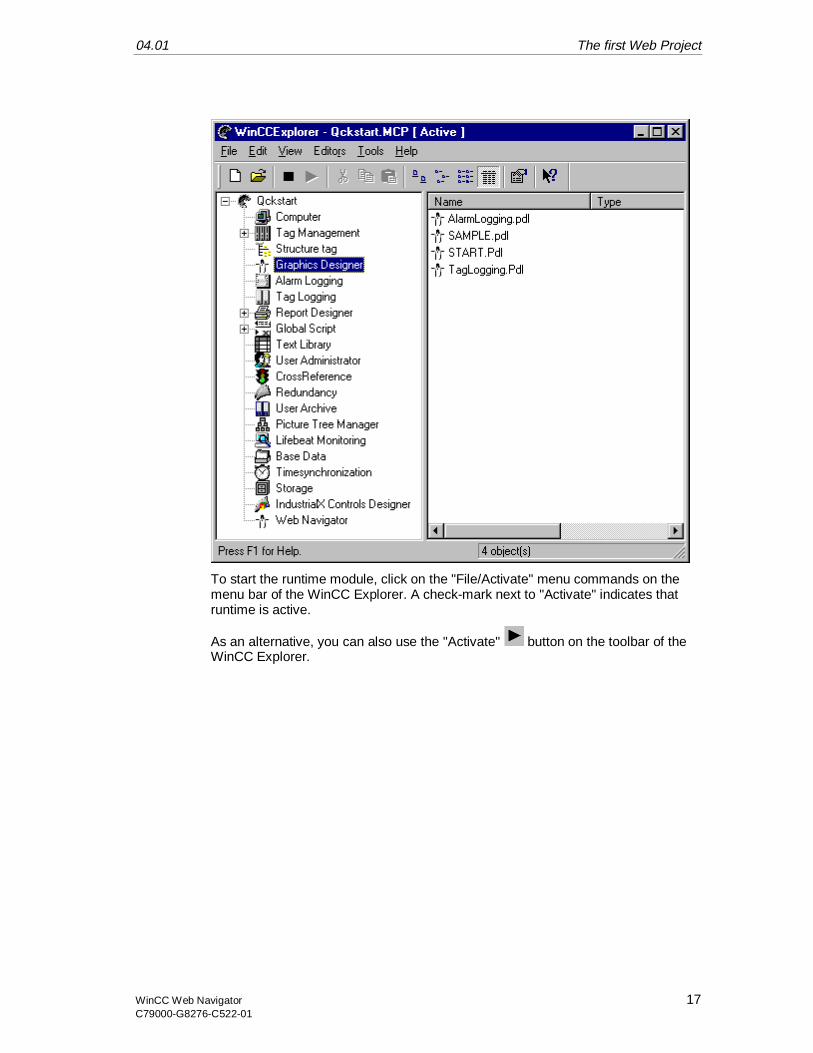
04.01 The first Web Project
WinCC Web Navigator 17C79000-G8276-C522-01
To start the runtime module, click on the "File/Activate" menu commands on themenu bar of the WinCC Explorer. A check-mark next to "Activate" indicates thatruntime is active.
As an alternative, you can also use the "Activate" button on the toolbar of theWinCC Explorer.
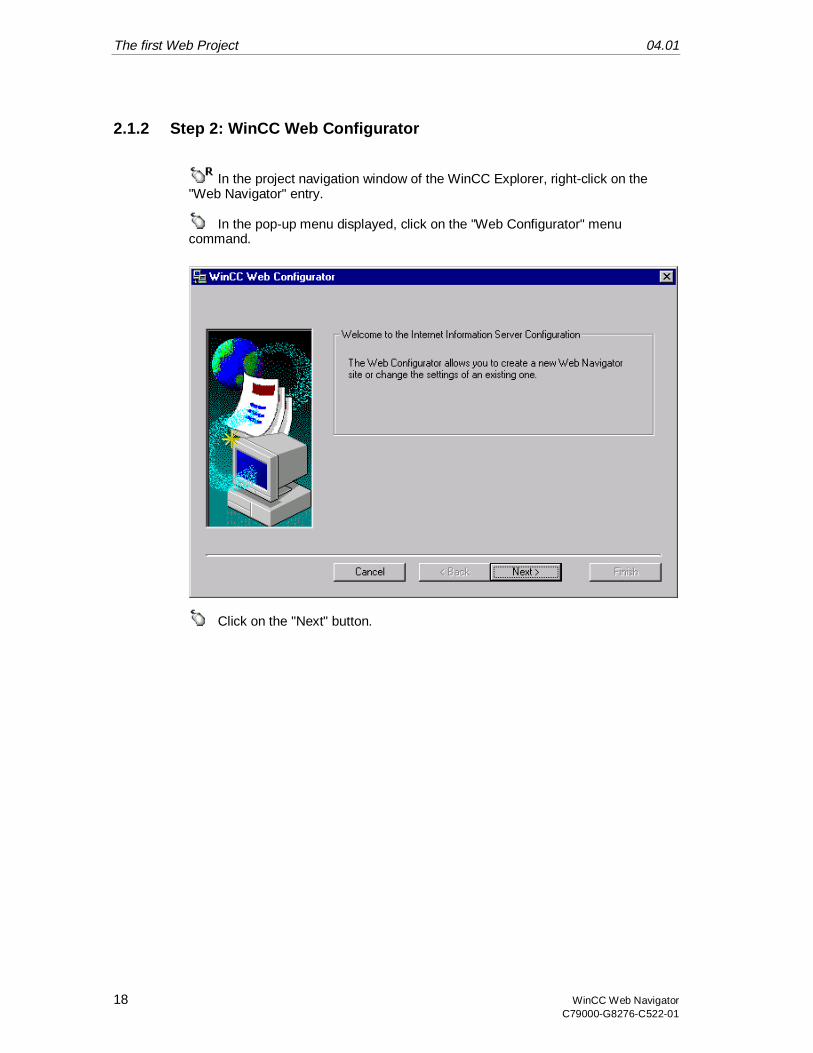
The first Web Project 04.01
18 WinCC Web NavigatorC79000-G8276-C522-01
2.1.2 Step 2: WinCC Web Configurator
In the project navigation window of the WinCC Explorer, right-click on the"Web Navigator" entry.
In the pop-up menu displayed, click on the "Web Configurator" menucommand.
Click on the "Next" button.
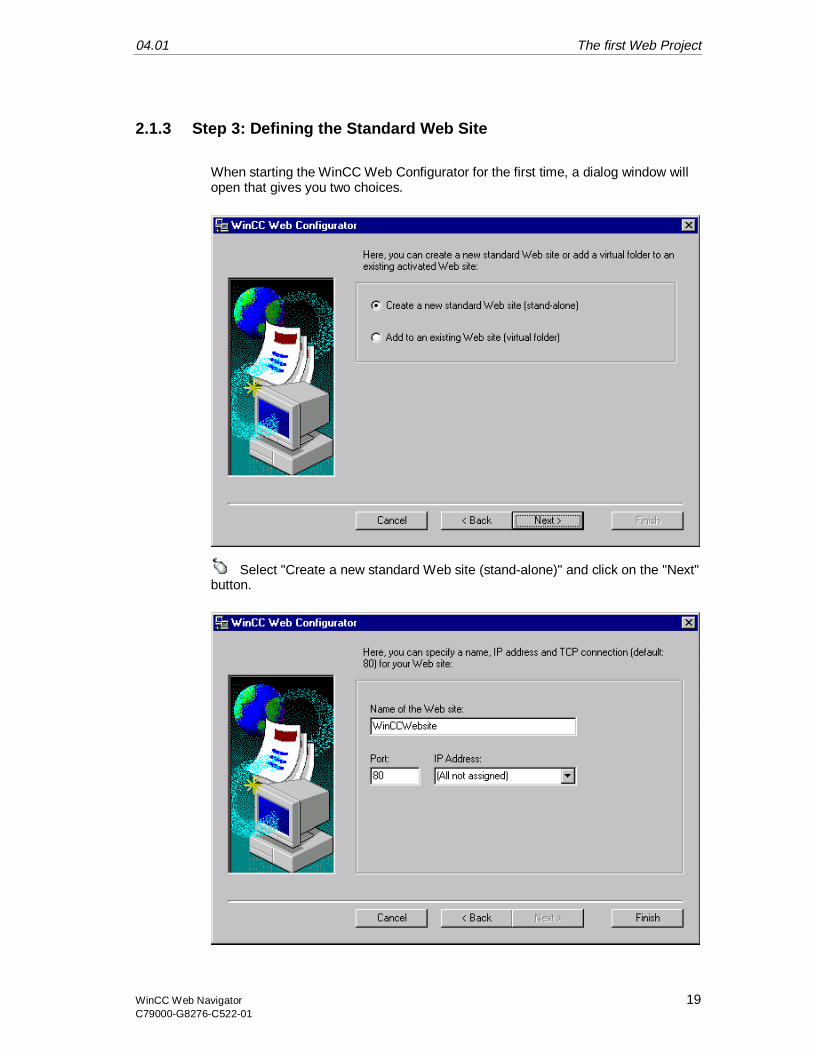
04.01 The first Web Project
WinCC Web Navigator 19C79000-G8276-C522-01
2.1.3 Step 3: Defining the Standard Web Site
When starting the WinCC Web Configurator for the first time, a dialog window willopen that gives you two choices.
Select "Create a new standard Web site (stand-alone)" and click on the "Next"button.

The first Web Project 04.01
20 WinCC Web NavigatorC79000-G8276-C522-01
As the name of the Web site, enter "WinCCWebSite". Select an IP addressfrom the selection field.
Click on the "Finish" button to complete the configuration of the server.
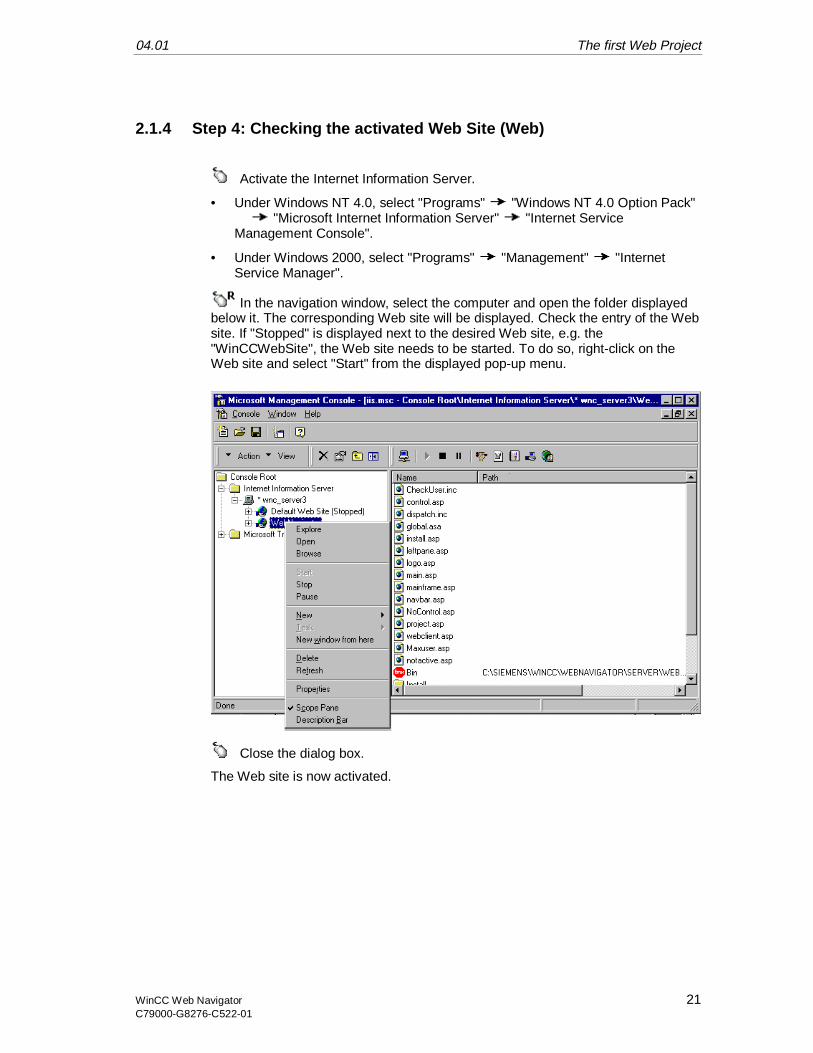
04.01 The first Web Project
WinCC Web Navigator 21C79000-G8276-C522-01
2.1.4 Step 4: Checking the activated Web Site (Web)
Activate the Internet Information Server.
• Under Windows NT 4.0, select "Programs" "Windows NT 4.0 Option Pack" "Microsoft Internet Information Server" "Internet ServiceManagement Console".
• Under Windows 2000, select "Programs" "Management" "InternetService Manager".
In the navigation window, select the computer and open the folder displayedbelow it. The corresponding Web site will be displayed. Check the entry of the Website. If "Stopped" is displayed next to the desired Web site, e.g. the"WinCCWebSite", the Web site needs to be started. To do so, right-click on theWeb site and select "Start" from the displayed pop-up menu.
Close the dialog box.
The Web site is now activated.
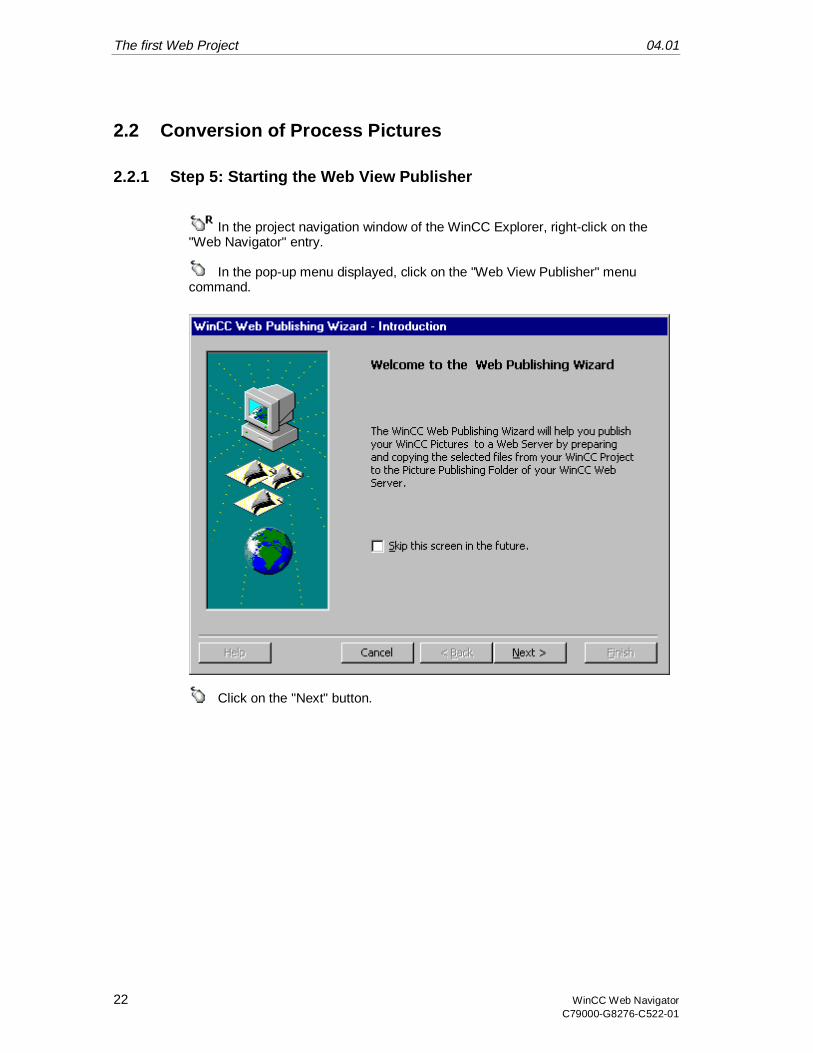
The first Web Project 04.01
22 WinCC Web NavigatorC79000-G8276-C522-01
2.2 Conversion of Process Pictures
2.2.1 Step 5: Starting the Web View Publisher
In the project navigation window of the WinCC Explorer, right-click on the"Web Navigator" entry.
In the pop-up menu displayed, click on the "Web View Publisher" menucommand.
Click on the "Next" button.
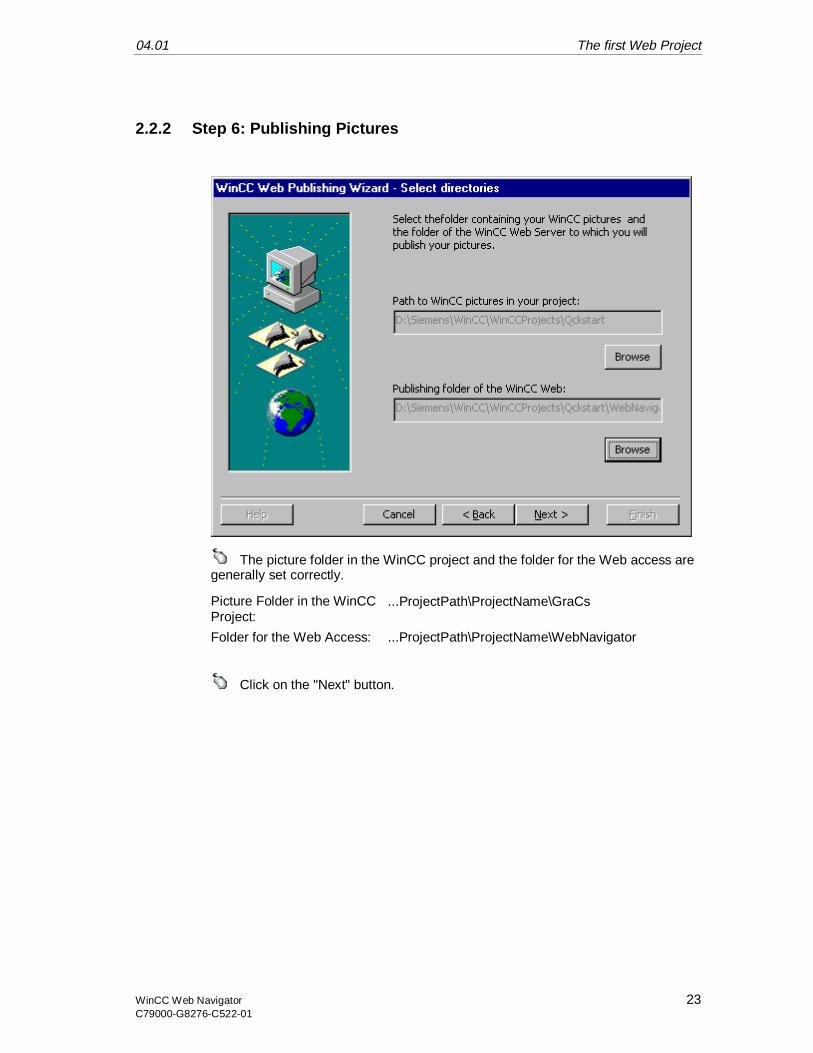
04.01 The first Web Project
WinCC Web Navigator 23C79000-G8276-C522-01
2.2.2 Step 6: Publishing Pictures
The picture folder in the WinCC project and the folder for the Web access aregenerally set correctly.
Picture Folder in the WinCCProject:
...ProjectPath\ProjectName\GraCs
Folder for the Web Access: ...ProjectPath\ProjectName\WebNavigator
Click on the "Next" button.
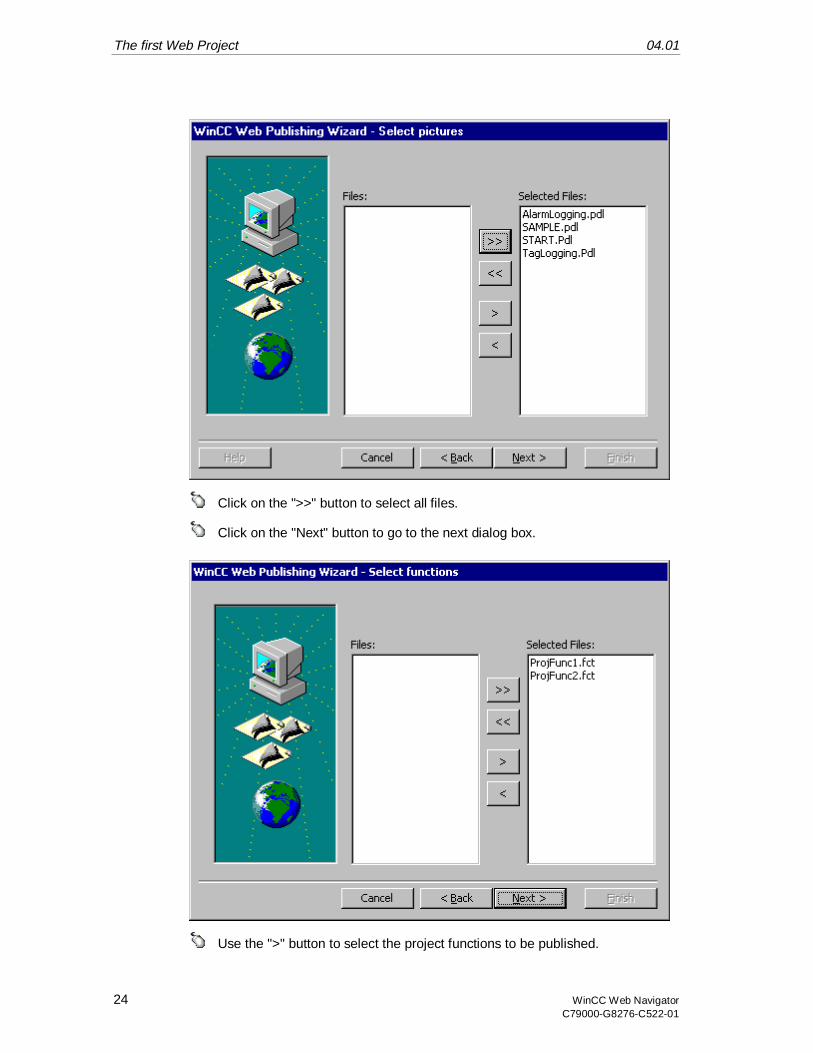
The first Web Project 04.01
24 WinCC Web NavigatorC79000-G8276-C522-01
Click on the ">>" button to select all files.
Click on the "Next" button to go to the next dialog box.
Use the ">" button to select the project functions to be published.

04.01 The first Web Project
WinCC Web Navigator 25C79000-G8276-C522-01
Click on the "Next" button to go to the next dialog box.
Set the check-boxes. "Check Scripts" activates the conversion of scripts sothat they can run on the client. If "Referenced Graphics" is activated, graphics (e.g.bitmaps) referenced in the pictures (*.PDL) will be transferred as well.
Click on the "Finish" button to publish the pictures on the Web site.
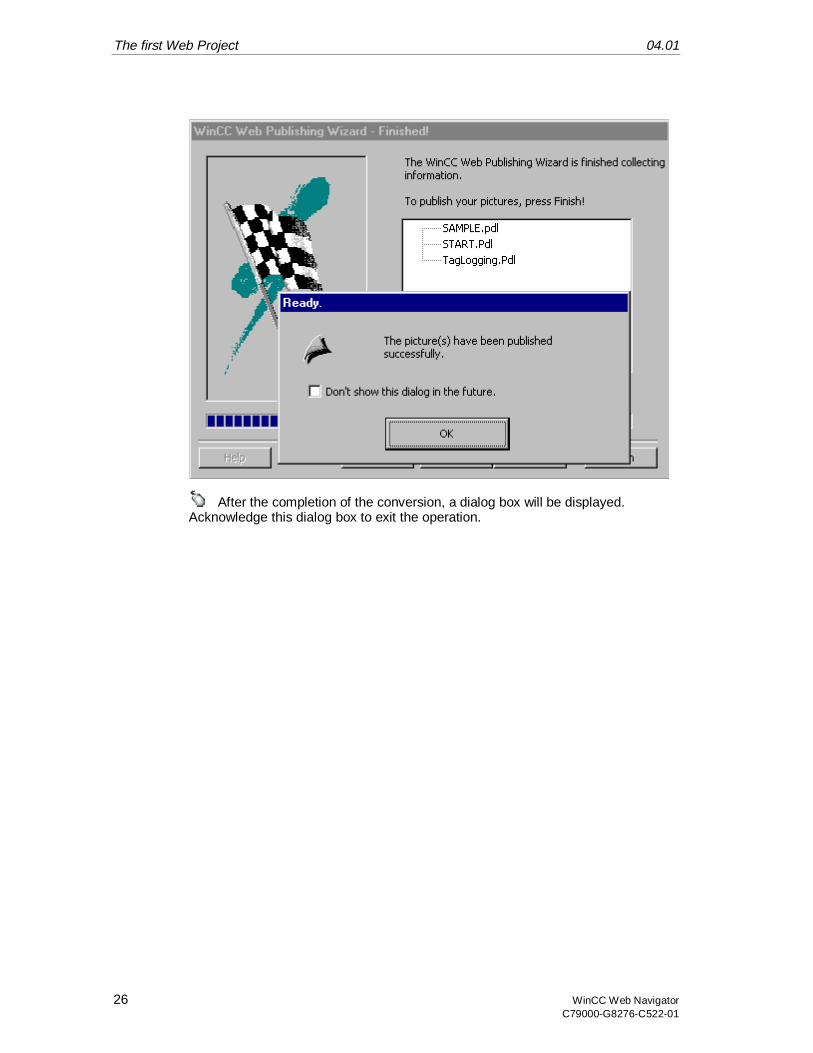
The first Web Project 04.01
26 WinCC Web NavigatorC79000-G8276-C522-01
After the completion of the conversion, a dialog box will be displayed.Acknowledge this dialog box to exit the operation.
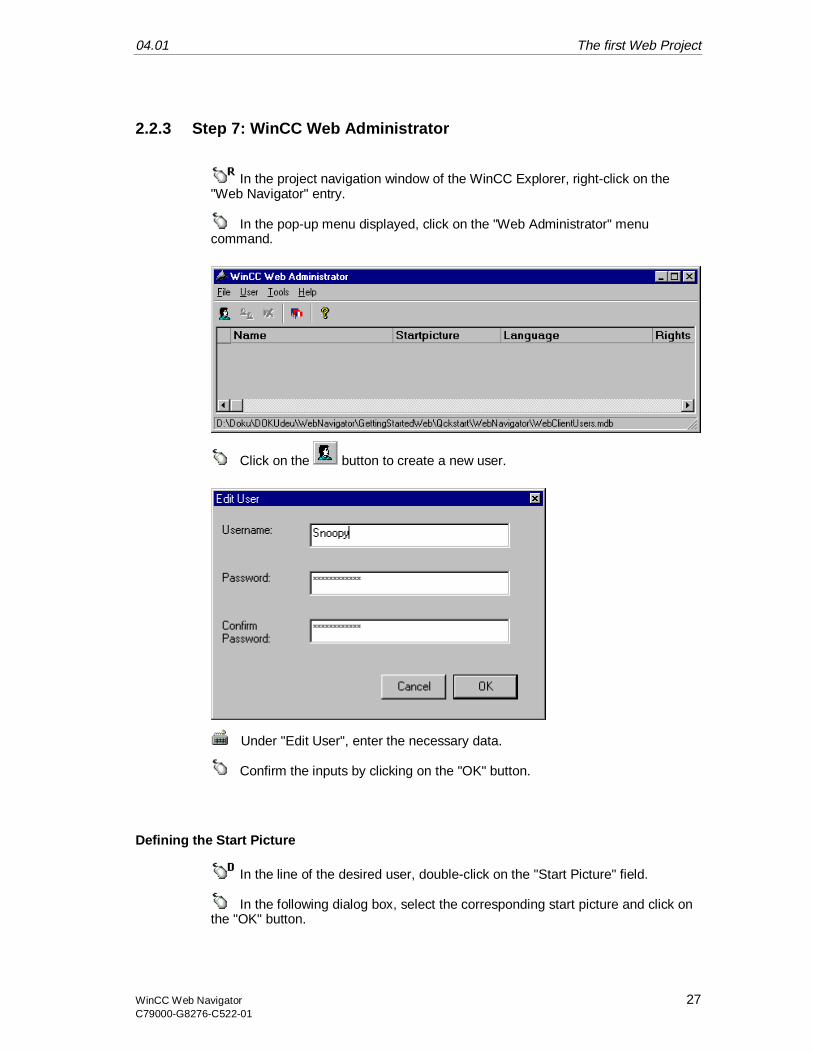
04.01 The first Web Project
WinCC Web Navigator 27C79000-G8276-C522-01
2.2.3 Step 7: WinCC Web Administrator
In the project navigation window of the WinCC Explorer, right-click on the"Web Navigator" entry.
In the pop-up menu displayed, click on the "Web Administrator" menucommand.
Click on the button to create a new user.
Under "Edit User", enter the necessary data.
Confirm the inputs by clicking on the "OK" button.
Defining the Start Picture
In the line of the desired user, double-click on the "Start Picture" field.
In the following dialog box, select the corresponding start picture and click onthe "OK" button.
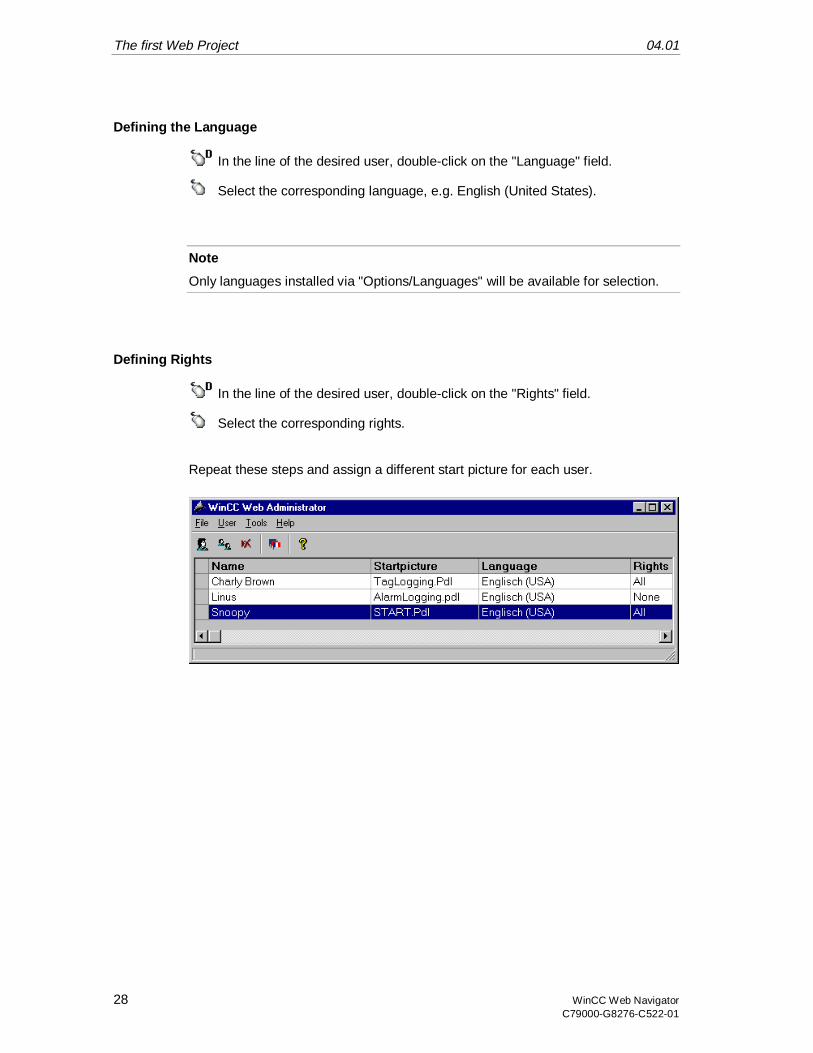
The first Web Project 04.01
28 WinCC Web NavigatorC79000-G8276-C522-01
Defining the Language
In the line of the desired user, double-click on the "Language" field.
Select the corresponding language, e.g. English (United States).
Note
Only languages installed via "Options/Languages" will be available for selection.
Defining Rights
In the line of the desired user, double-click on the "Rights" field.
Select the corresponding rights.
Repeat these steps and assign a different start picture for each user.
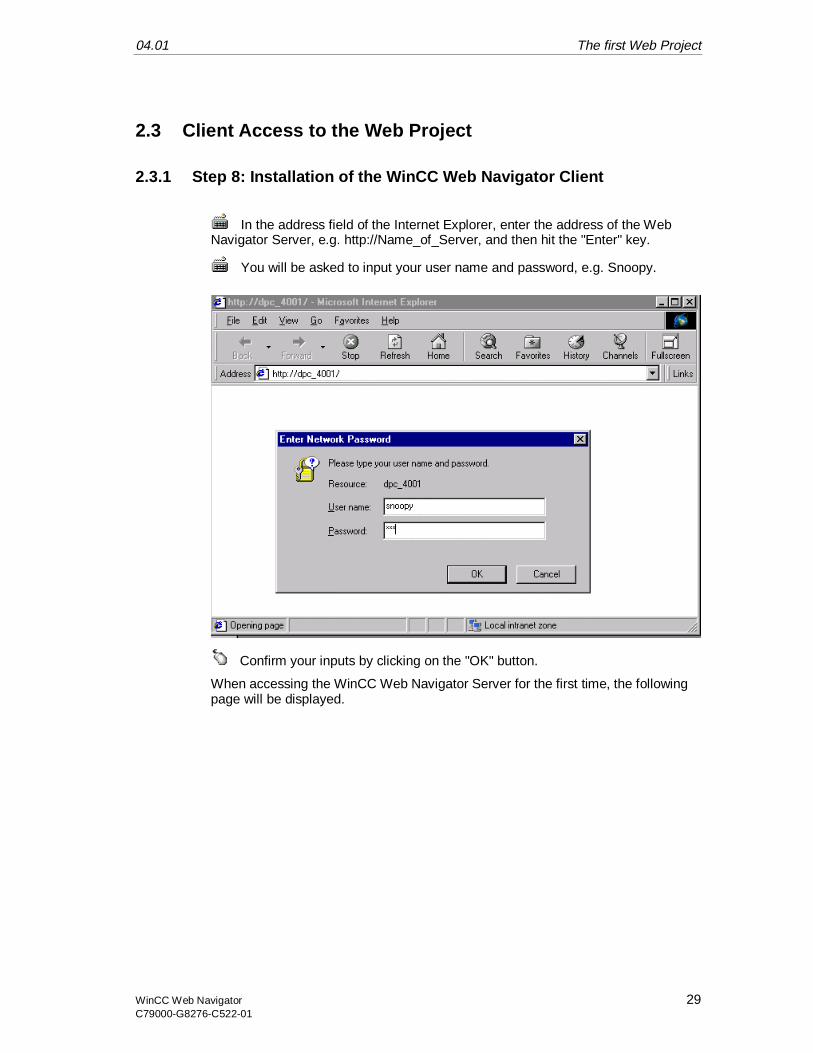
04.01 The first Web Project
WinCC Web Navigator 29C79000-G8276-C522-01
2.3 Client Access to the Web Project
2.3.1 Step 8: Installation of the WinCC Web Navigator Client
In the address field of the Internet Explorer, enter the address of the WebNavigator Server, e.g. http://Name_of_Server, and then hit the "Enter" key.
You will be asked to input your user name and password, e.g. Snoopy.
Confirm your inputs by clicking on the "OK" button.
When accessing the WinCC Web Navigator Server for the first time, the followingpage will be displayed.
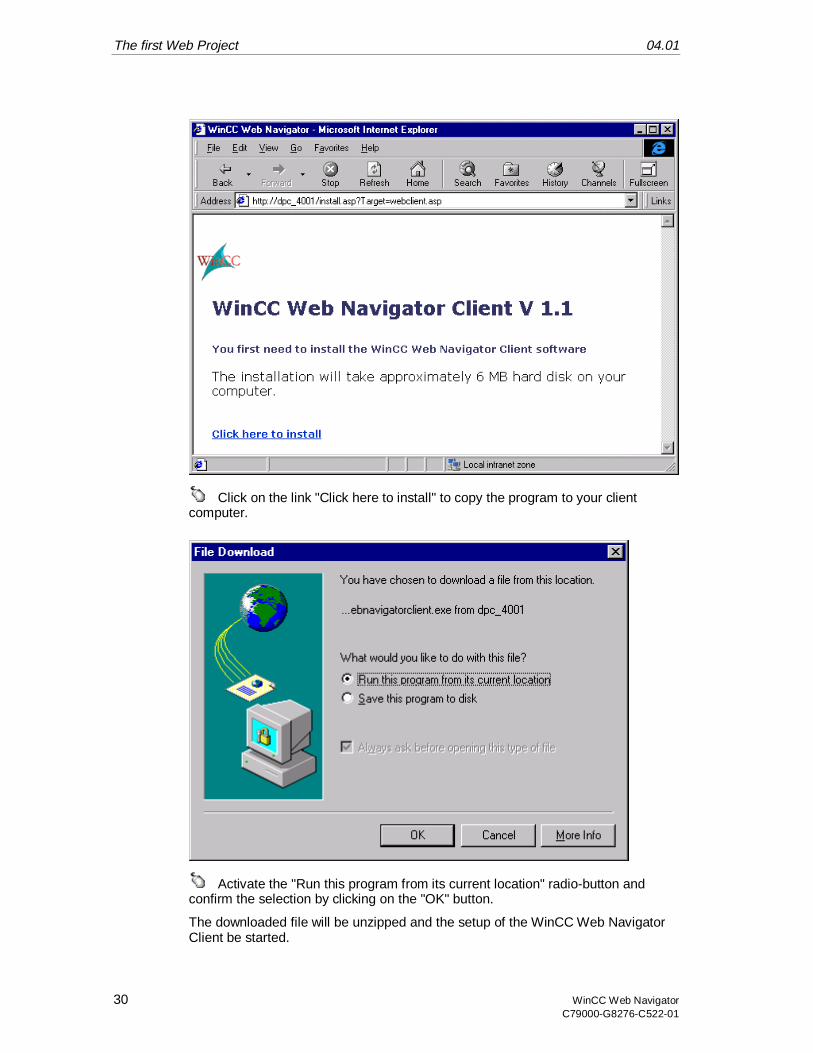
The first Web Project 04.01
30 WinCC Web NavigatorC79000-G8276-C522-01
Click on the link "Click here to install" to copy the program to your clientcomputer.
Activate the "Run this program from its current location" radio-button andconfirm the selection by clicking on the "OK" button.
The downloaded file will be unzipped and the setup of the WinCC Web NavigatorClient be started.
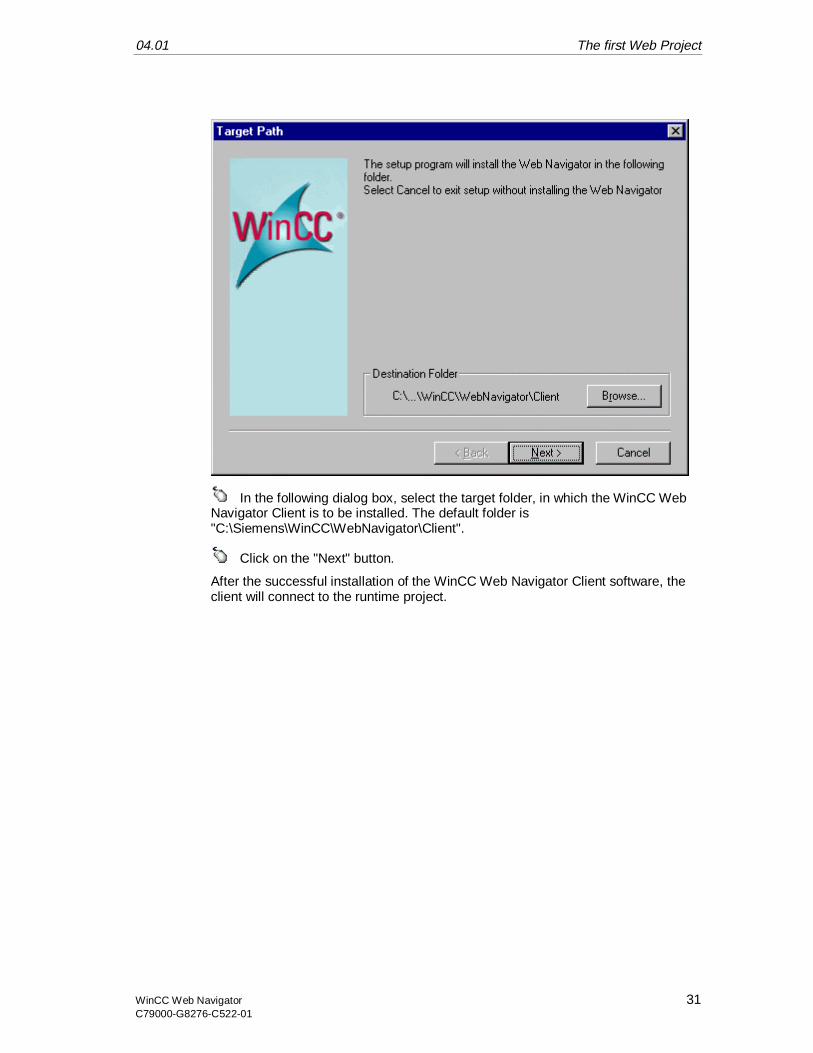
04.01 The first Web Project
WinCC Web Navigator 31C79000-G8276-C522-01
In the following dialog box, select the target folder, in which the WinCC WebNavigator Client is to be installed. The default folder is"C:\Siemens\WinCC\WebNavigator\Client".
Click on the "Next" button.
After the successful installation of the WinCC Web Navigator Client software, theclient will connect to the runtime project.
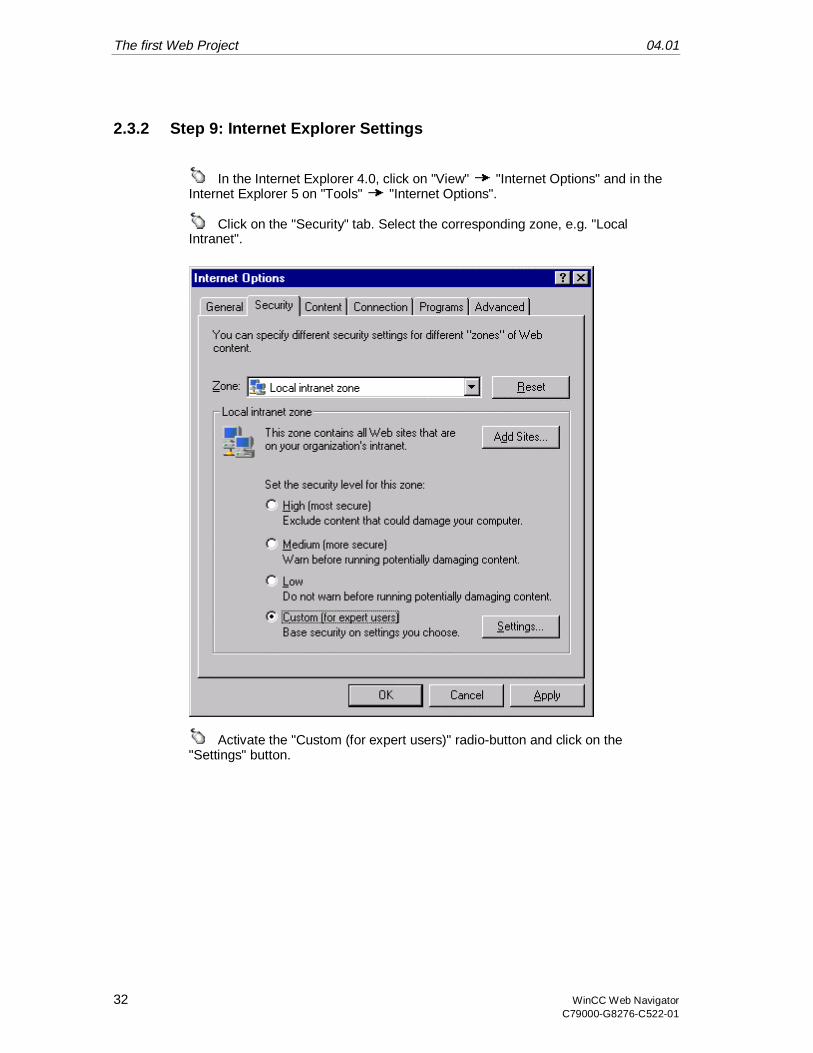
The first Web Project 04.01
32 WinCC Web NavigatorC79000-G8276-C522-01
2.3.2 Step 9: Internet Explorer Settings
In the Internet Explorer 4.0, click on "View" "Internet Options" and in theInternet Explorer 5 on "Tools" "Internet Options".
Click on the "Security" tab. Select the corresponding zone, e.g. "LocalIntranet".
Activate the "Custom (for expert users)" radio-button and click on the"Settings" button.
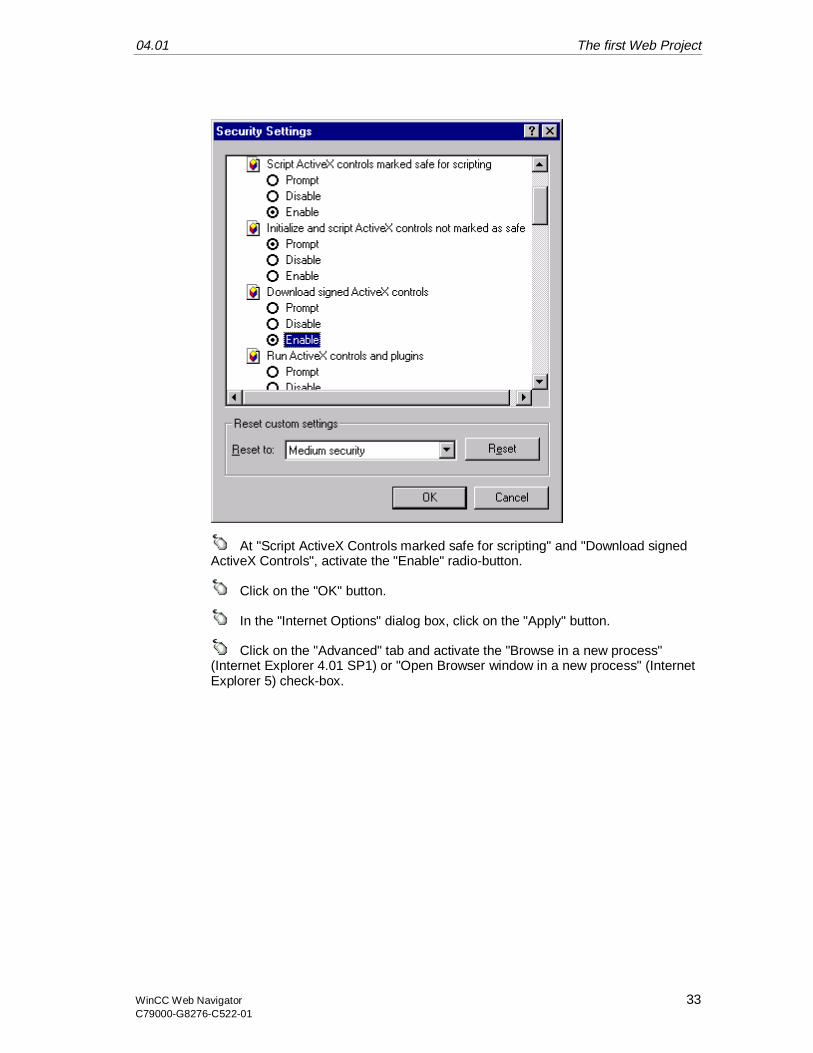
04.01 The first Web Project
WinCC Web Navigator 33C79000-G8276-C522-01
At "Script ActiveX Controls marked safe for scripting" and "Download signedActiveX Controls", activate the "Enable" radio-button.
Click on the "OK" button.
In the "Internet Options" dialog box, click on the "Apply" button.
Click on the "Advanced" tab and activate the "Browse in a new process"(Internet Explorer 4.01 SP1) or "Open Browser window in a new process" (InternetExplorer 5) check-box.

The first Web Project 04.01
34 WinCC Web NavigatorC79000-G8276-C522-01
Click on the "OK" button.
This completes all the necessary settings in the Internet Explorer.
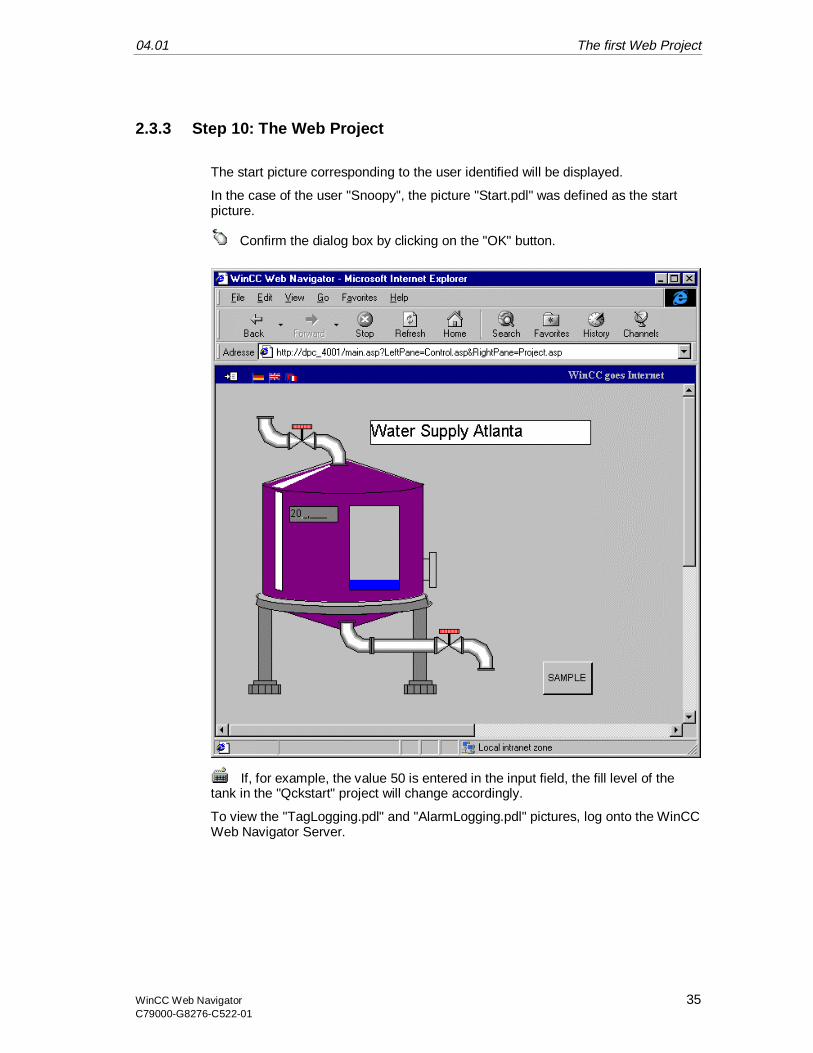
04.01 The first Web Project
WinCC Web Navigator 35C79000-G8276-C522-01
2.3.3 Step 10: The Web Project
The start picture corresponding to the user identified will be displayed.
In the case of the user "Snoopy", the picture "Start.pdl" was defined as the startpicture.
Confirm the dialog box by clicking on the "OK" button.
If, for example, the value 50 is entered in the input field, the fill level of thetank in the "Qckstart" project will change accordingly.
To view the "TagLogging.pdl" and "AlarmLogging.pdl" pictures, log onto the WinCCWeb Navigator Server.
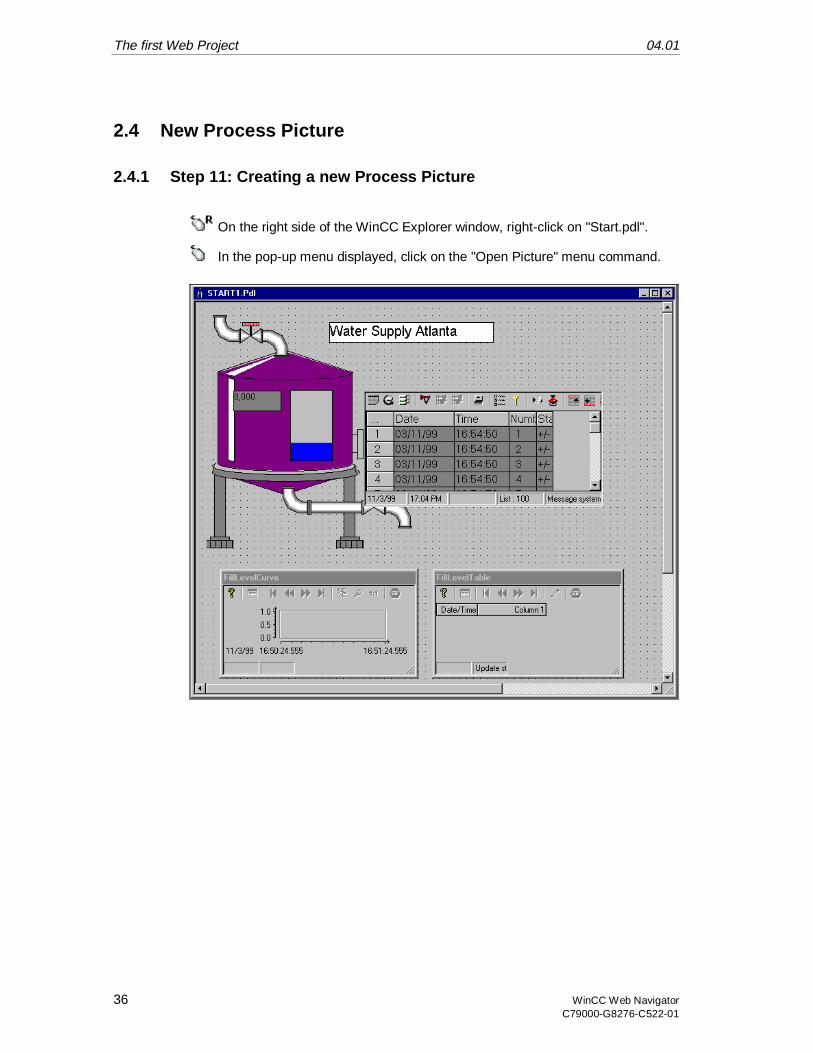
The first Web Project 04.01
36 WinCC Web NavigatorC79000-G8276-C522-01
2.4 New Process Picture
2.4.1 Step 11: Creating a new Process Picture
On the right side of the WinCC Explorer window, right-click on "Start.pdl".
In the pop-up menu displayed, click on the "Open Picture" menu command.
04.01 The first Web Project
WinCC Web Navigator 37C79000-G8276-C522-01
Creating a Trend Window
From the object palette, select the "Controls" tab and from it the "WinCCOnline Trend Control" entry.
In the "General" tab of the quick configuration dialog box, enter "Tank Level -Trend" as the title of the trend window.
Select the "Trends" tab.
Enter "Tank Level" as the name of the trend.
Click on the "Selection" button.
On the right side of the "Selection of Archives/Tags" dialog box, double-clickon the "TankLevelArchive" archive.
On the left side of the "Selection of Archives/Tags" dialog box, click on the"TankLevelArchive" tag.
Confirm your inputs by clicking on the "OK" button.
Creating a Table Window
From the object palette, select the "Controls" tab and from it the "WinCCOnline Table Control" entry.
Enter "Tank Level -Table" as the title of the table window.
Repeat the steps carried out for the "Trends" tab in the "Columns" tab of theWinCC Online Table Control.
Confirm your inputs by clicking on the "OK" button.
Creating an Alarm Message Window
From the object palette, select the "Controls" tab and from it the "WinCCAlarm Control" entry.
In the "Display" tab of the quick configuration dialog box, enter "Water SupplyAtlanta" as the title of the message window.
Activate the "Display" check-box.
Confirm your inputs by clicking on the "OK" button.
Save the picture under the name "Start1.pdl" and exit the Graphics Designer.

The first Web Project 04.01
38 WinCC Web NavigatorC79000-G8276-C522-01
2.4.2 Step 12: Publishing a Process Picture
In the project navigation window of the WinCC Explorer, right-click on the"Web Navigator" entry.
In the pop-up menu displayed, click on the "Web View Publisher" menucommand.
In the "Select Pictures" dialog box, select the "Start1.pdl" file.
Click on the "Finish" button to complete the operation.
Note
Each picture changed must again be converted using the "Web View Publisher".
Open the "WinCC Web Administrator" and - for example - set the picture"Start1.pdl" as the new start picture for the user "Snoopy".
Via the "View" "Refresh" menu commands on the menu bar of the WinCCExplorer, the project window can be refreshed.
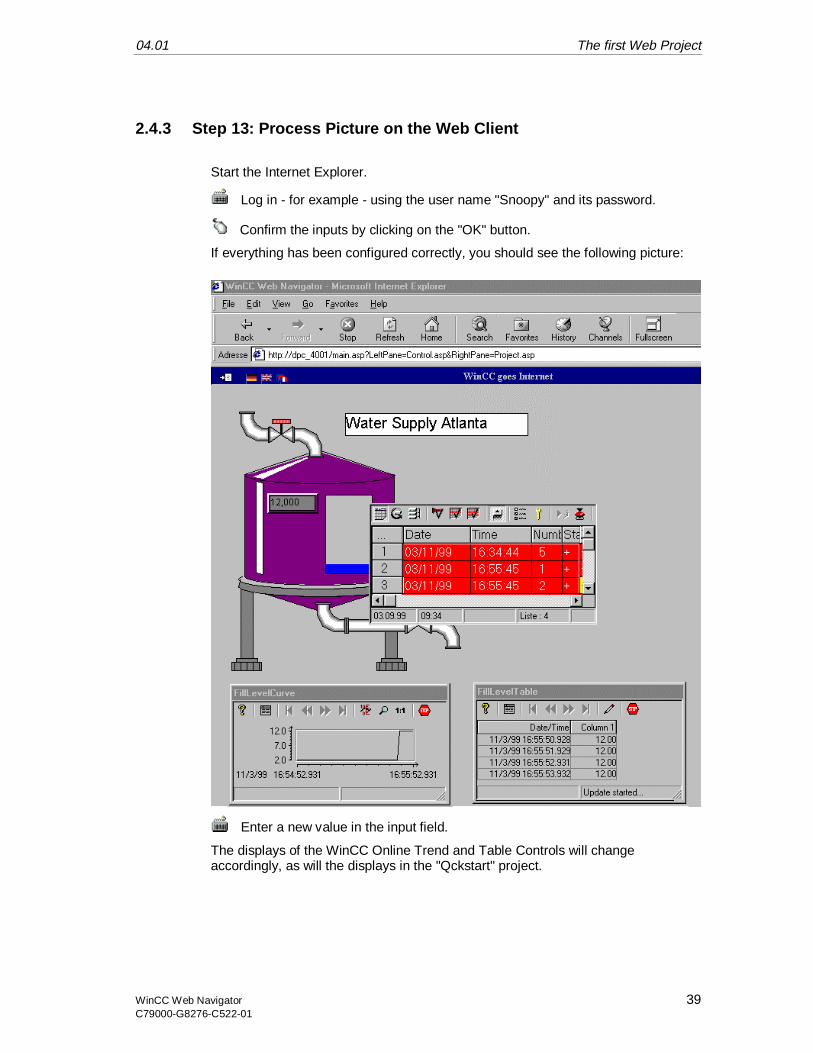
04.01 The first Web Project
WinCC Web Navigator 39C79000-G8276-C522-01
2.4.3 Step 13: Process Picture on the Web Client
Start the Internet Explorer.
Log in - for example - using the user name "Snoopy" and its password.
Confirm the inputs by clicking on the "OK" button.
If everything has been configured correctly, you should see the following picture:
Enter a new value in the input field.
The displays of the WinCC Online Trend and Table Controls will changeaccordingly, as will the displays in the "Qckstart" project.

The first Web Project 04.01
40 WinCC Web NavigatorC79000-G8276-C522-01
Note
When using more complex functions or scripts in your project, please keep in mindthe limitations outlined in the corresponding chapters of the WinCC Web Navigatordocumentation.
04.01 The first Web Project
WinCC Web Navigator 41C79000-G8276-C522-01
2.5 Troubleshooting and Error Correction
No pictures are being displayed
In the Internet Explorer, check whether the following setting has been activated:
• Internet Explorer 4.0: Menu commands "View" "Internet Options", tab:"Advanced" "Browse in a new process"
• Internet Explorer 5.0: Menu commands "Tools" "Internet Options", tab:"Advanced" "Open Browser window in a new process" (provided that theoption is available)
On the WinCC Web Navigator Server computer, check whether the"WinCCWebSite" has been activated:
• Activate the Internet Information Server via "Programs" "Windows NT 4.0Option Pack" "Microsoft Internet Information Server" "Internet ServiceManagement Console". Check the entry at "WinCCWebSite". If "Stopped" isdisplayed, the Web site needs to be started. To do so, right-click on"WinCCWebSite" and select "Start" from the displayed pop-up menu.
Start picture is not being updated
The start picture displayed by the Internet Explorer does not match the picture youhave just edited, since the Internet Explorer has saved the previous start picture inits temporary storage.
• Start the Web View Publisher to make the new picture available to the Internet.
• Delete the temporary Internet files. Internet Explorer 4.0: under "View""Internet Options"; Internet Explorer 5.0: under "Tools" "Internet Options".

The first Web Project 04.01
42 WinCC Web NavigatorC79000-G8276-C522-01
04.01 Index
WinCC Web Navigator Index-1C79000-G8276-C522-01
Index
A
Activating the Web Site 21Internet Service Management
Console 21Authorization 13
C
Configuration of the WinCC WebServer 18Defining the Standard Web Site 19Web Configurator 18
Creating a User 27WinCC Web Administrator 27
DDefining the Standard Web Site 19
WinCC Web Configurator 19Deinstallation 14
WinCC Web Navigator Client 14WinCC Web Navigator Server 14
F
Folder Selection 12Installation 12
I
Installation 9Authorization 13Folder Selection 12Internet Information Server (IIS) with
Windows 2000 Professional 8Procedure 3User Registration 11WinCC Web Navigator Client 29WinCC Web Navigator Server 9Windows NT Option Pack 4
Internet Explorer 32Settings 32
Internet Service Management Console 21Activating the Web Site 21
P
Process Picture 36Creating 36On the WinCC Web Navigator Client 39Publishing 38
Publishing Pictures 23Web View Publisher 23
R
Requirements 1WinCC Web Navigator Client 1WinCC Web Navigator Server 1
S
Starting a Project 16
T
Troubleshooting 41
U
User Registration 11Installation 11
W
Web View Publisher 22, 23WinCC Web Administrator 27
Creating a User 27Password 27
WinCC Web Configurator 18, 19Defining the Standard Web Site 19Starting 18
WinCC Web Navigator Client 29Deinstallation 14Installation 29
WinCC Web Navigator Server 9Deinstallation 14Installation 9
Windows NT Option Pack 4Windows NT Server 4

Index 04.01
Index-2 WinCC Web NavigatorC79000-G8276-C522-01
Windows NT Workstation 4