Web Content Reeds Book 8.5 x 5.5 2 Final1
44
A GUIDE TO THE ART OF ADJUSTING SAXOPHONE REEDS JAMES RÖTTER
-
Upload
maikel-morelli -
Category
Documents
-
view
19 -
download
0
description
Web Content Reeds Book 8.5 x 5.5 2 Final1
Transcript of Web Content Reeds Book 8.5 x 5.5 2 Final1

A G U I D E TO T H E A R T O F A D J U S T I N G S AXO P H O N E R E E D S
J A M E S R Ö T T E R

For over forty years James Rötter has enjoyed a multi-faceted international career, including performances as soloist, recitalist, chamber musician, and orchestral saxophonist throughout the U.S., Canada, Europe, Asia, Mexico, and South America. Mr. Rötter is the principal “on call” saxophonist with the Los Angeles Philharmonic Orchestra, a position he also holds with the Paci!c Symphony Orchestra. As such he has concertized, toured, and recorded with many, if not most, of the world’s leading conductors, including Leonard Bernstein, Zubin Mehta, Carlo-Maria Giulini, Andre Previn, Lorin Maazel, Pierre Boulez, Esa-Pekka Salonen, Gustavo Dudamel, John Williams, Erich Leinsdorf, Eugene Ormandy, Michael Tilson Thomas, Simon Rattle, Valery Gergiev, Stéphane Denève, John Mauceri, Yuri Temirkanov, Mariss Jansens, Leonard Slatkin, Lawrence Foster, Carl St. Claire, Jorge Mester, Kent Nagano, David Robertson, James Conlon, Edo de Waart, Charles Dutoit, JoAnn Faletta, Giselle Ben-Dor, Lukas Foss, Luciano Berio, Bramwell Tovey, and Myung Wung Chung,
to name but a few. He is also a frequent performer with the Hollywood Bowl Orchestra and with the Pasadena, Long Beach, New West, and Santa Barbara Symphony Orchestras, as well as the Pasadena Pops and the Santa Barbara Chamber Orchestra. In addition, he has performed as a guest artist with the Rotterdam, St. Petersburg, and Montreal Symphony Orchestras, as well as the State Symphony of Russia, China Philharmonic, and the Opera Orchestra of Lyon, on their American tours. He further has performed with the Pittsburgh Symphony Orchestra on one domestic and three international tours, and with the American Ballet Theater, the San Francisco Ballet, the Royal Swedish Ballet, the Bolshoi Ballet, the Stuttgart Ballet, and Los Angeles Opera. Mr. Rötter may be heard in recordings on the London, Deutsche Grammophon, CBS, Sony Classics, Telarc, Harmonia Mundi, Ondine, Orion, Crystal, Newport Classics, Varese-Sarabande, WIM, Harojama, Euterpe, and GSC labels.
Alan Rich of LA Weekly wrote of one of his performances, “The most beautiful sound I have yet heard in Disney Hall was the dark-blue/violet invocation from James Rötter’s alto saxophone that began Darius Milhaud’s La Creation du Monde at last week’s Philharmonic program: throbbing, mysterious, hall-!lling, yet seeming to rise from far reaches,” and Chris Pasles of the Los Angeles Times called his solo performance in Rachmanino" ’s Symphonic Dances “luminous” and “exquisitely played.”
From 1978 to 1991 Mr. Rötter was a founding member and toured internationally as the alto saxophonist with the highly acclaimed Harvey Pittel Saxophone Quartet, performing approximately sixty concerts annually under the management of Columbia Artists Festivals. A versatile performer, he has appeared with jazz greats Sarah Vaughan, Stan Kenton, Doc Severinsen, Don Ellis, and Mel Torme.
Mr. Rötter has performed on many of the world’s most prestigious concert series and music festivals, including the Salzburg Festival, the Tanglewood Festival, the Promenade Concerts in London’s Royal Albert Hall, the Edinburgh Festival, the International Music Festival in Lucerne, Switzerland, the Finlandia Festival in Helsinki, the Gewandhaus in Leipzig, the Tivoli Concert Hall in Copenhagen, New York’s Lincoln Center and 92nd St. “Y,” the Kennedy Center, the Ojai Festival, the San Antonio Festival of the Arts, the Monday Evening Concerts and the Green Umbrella Series in Los Angeles, the Lively Arts at Stanford University, the San Luis Obispo Mozart Festival, and literally hundreds of community and university concert series throughout the nation.
Mr. Rötter is also active in the performing and commissioning of new works for saxophone. He has given premiere performances in the United States and Europe of solo and chamber works at concerts of the International Society of Contemporary Music, the World Saxophone Congress, the North American Saxophone Alliance, the American Society of University

Composers, and the Independent Composers Association, as well as with the Los Angeles Philharmonic New Music Group. Composers such as Darius Milhaud, Pierre Boulez, John Harbison, George Crumb, Edward Applebaum, and Pulitzer Prize-winning composers John Adams, Karel Husa and David del Tredici have praised his performances of their works.
Though retired now from full-time teaching, James Rötter is the Emeritus Professor of Saxophone at the University of Southern California and California State University, Fullerton, and is an active clinician and presenter of masterclasses and seminars on all aspects of saxophone performance and pedagogy.
PRELUDE I began my adventures adjusting saxophone reeds as a high school student in the early 1960’s, when my teacher, Dr. Norman Rost, taught me a few basic reed-working techniques using reed rush (aka Dutch rush). I continued my reed education for the next few years by reading what I could about reeds in such books as Kalman Opperman’s wonderful Handbook for Making and Adjusting Single Reeds, and the chapter on reeds in Larry Teal’s The Art of Saxophone Playing.
My reed working exploits advanced to a whole new level of knowledge and re!nement, however, in my junior year of college, when my teacher at that time, Dr. Lawrence Maxey, held weekly reed-working and reed-making classes as part of our training. That training was continued in my lessons with Harvey Pittel in my senior year and during two years of graduate school. Those reed-working lessons focused on his own techniques and those taught him by Joe Allard.
This pamphlet is a selective summation and distillation of the knowledge acquired in that training and in over forty years of professional performing and teaching experience, adjusting my own reeds, as well as those of countless students to whom I have taught the art of reed working. My goal in presenting this information here is to give the novice reed-worker the basic skills necessary to adjust, and thereby improve, his/her reeds, and to give the more advanced student or professional, with more reed-working experience and knowledge, a concise reference source for additional ideas or as a refresher course.
Just remember, anyone can learn to work on reeds! It is not mysterious or particularly di#cult. However, it is a learning process. That process will require patience and a commitment to spending time daily on reed working, just as you spend time working on the fundamentals of playing the saxophone, scales, etudes and repertoire. You will destroy a few reeds in the learning period, and maybe even a few others later on if you get impatient and rush the process. The information in this guide should enable you to make many more reeds play better, if not perfectly, and allow you to customize your best reeds to better create the sound, response, articulation and other sonic attributes that you imagine in your mind’s ear.
Finally, I would like to o"er my sincerest thanks to Saul Friedgood, Roger Greenberg, Ralph Torres, Ari Baron, and Rolando Gonzalez of the Andreas Eastman Company for their support, encouragement, and assistance in the preparation of this project, and to my wife, Ann, for her patience during the long hours I sequestered myself to write, and for her invaluable assistance proof-reading the manuscript. Use it well and enjoy the results!


Using This Guide 1
Arundo donax and the Saxophone Reed:From Plant to Finished Reed
2
Why Work on Reeds? 5
Equipment 7
Some Optional or Additional Equipment 11
Using the Reed Knife 12
Sharpening the Reed Knife 15
Purchasing and Selecting Reeds 17
The Conditioning Process 19
Balancing the Reed 22
Reed Warping 25
Adjusting and Customizing Techniques 29
Additional Adjusting and Customizing Suggestions 33
Caring for Your Reeds 36
Coda 38
Table of Contents

1
The information in this guide is organized into sections corresponding to various aspects of the art of reed working. Accompanying many of these sections are photographs and illustrations to help you clarify and visualize the concepts and techniques presented in the text. If you are new to reed working and unfamiliar with the vocabulary associated with the various parts of a reed (vamp, stock, rail, heart, etc.), those words are illustrated in the “Parts of the Saxophone Reed” diagram. Using this diagram also may be helpful if the vocabulary you normally have used is di"erent from mine.
In many sections of the guide, such as “Adjusting and Customizing Techniques,” the numbers, letters, and instructions in the text (“Thin T, Scrape 4 and 5, Balance 2, etc.) refer to the illustration labeled “Reed Adjustment Diagram.” To use this illustration, locate the area on the diagram with the same number or letter as in the instruction, and perform the desired task on the corresponding area of your reed.
Most of the reed-working tasks presented herein are performed during “The Conditioning Process.” I have presented them in sections that essentially are arranged to correspond to the order in which those tasks normally would be performed. Of course, you may !nd that a slightly di"erent sequence works better for you. Certainly some of these tasks also may need to be repeated after the normal conditioning period has ended to accommodate unforeseen changes that may occur to the reed.
I suggest reading the entire guide before actually starting to work on reeds. Also, if you’ve not used a reed knife before, spend some signi!cant time practicing with the knife before attempting to work on a reed you would want to keep and use in a performance or important rehearsal. At the very least, you should get to a point where using the reed knife feels comfortable and natural to you. Of course, at some point you need to “take the plunge” and try adjusting and playing on a reed in those critical situations. Just remember, learning reed adjusting is a process. Be patient, don’t get discouraged, and keep working at mastering the skills involved. Mastering this art will make you a much better saxophonist!
Using This Guide

2
The reed, as the producer of the vibration that makes the saxophone sound, plays a pivotal role, not only in the tone quality we produce on the instrument, but also in tone color variation, the evenness of that tone throughout di"erent registers of the instrument, response, the ease and clarity of articulation, intonation, and vibrato, to name just a few attributes. To be sure, what we do physically with the embouchure, tongue and oral cavity, laryngeal area, and breathing mechanism all have an e"ect on these attributes, as do the mouthpiece, ligature, and the instrument itself. However, a great, properly functioning reed can make the process of creating these attributes much easier, and a bad one can make them almost impossible to achieve.
Naturally grown woodwind instrument reeds (as opposed to synthetic ones) are made from a plant known botanically as Arundo donax L. It is a member of the grass family and is indigenous to areas bordering the Mediterranean Sea, but it has been dispersed to many warm-temperate or sub-tropical climates of the world. I live in Southern California and have seen Arundo donax growing wild in a number of locations throughout the area. In fact, Arundo donax will grow in many parts of the United States. It also is found, of course, in France (more on this later), as well as in parts of Asia, Mexico, South America, North Africa, Italy, Spain, and elsewhere, where soil and climatic conditions allow its growth.
Arundo donax and the Saxophone Reed:From Plant to Finished Reed
(L-R) Tube Cane, Split, Reed Blank, Finished ReedArundo donax

3
Historical research tells us that the use of Arundo donax for instruments themselves dates to the Stone Age. Double and single reed instruments made of cane were developed thousands of years ago in the areas of Mesopotamia and Egypt. Many of these early instruments had a reed mechanism (single or double) that was fashioned directly from the body of the cane instrument itself. Obviously, even then, the makers of these ancient instruments recognized the excellent vibrational characteristics of Arundo donax.
The development and perfection of modern woodwind instruments, including the saxophone, in the 18th and 19th centuries was centered heavily in Paris, France. Coincidentally, the Var district in southeastern France possesses all of the ideal climatic and soil conditions necessary for the growing of Arundo donax that is suitable for the manufacture of woodwind reeds: low atmospheric humidity, a su#ciently warm growing season, a winter season capable of making the plant dormant for about two to three months, and nitrogen-rich, light soil. Thus began a tradition of cane growing for woodwind instrument reeds that exists to this day.
Every saxophone reed begins its life as a part of a stalk (pole) of Arundo donax, which is part of a larger plant system with numerous other stalks and with a vast root network. Each stalk is a hollow tube that is divided into segments, which can be from a few inches to about a foot in length, and which are separated from one another by partitions or nodes. The diameter of each stalk and the thickness of the wall of each tube vary. Only stalks of certain diameters and wall thicknesses are suitable for reed making. The size depends on the size (soprano saxophone, alto saxophone, clarinet, oboe, etc.), and in some cases, the style, of reed being made.
The outside of the stalk consists of a hard, waxy shell, also called the cuticle or bark. The stalks grow rapidly and can attain heights of twenty to thirty feet. A sheath, or husk, grows from each node and wraps tightly around the stalk up to the next node. It gradually decays as the plant matures, usually around the second or third year of growth. The brown discolorations found on the cuticle of many reeds are stains caused by a fungus that grows between the husk and cuticle as the husk decays.
Since the husk decays around the second or third growth year of the plant and the optimal harvest time for reed cane is in the second to third year of growth, some feel that the presence of the discoloration is an indicator that the cane was harvested at the proper time, and its absence indicates cane harvested too early. However, the discoloration is not uniformly present on all parts of the stalk, so there is no real correlation that I can !nd between the presence of the discoloration and the maturity of the reed cane. In addition to the husk, there is a bushy mass of palm-like foliage at the top of the plant.
Reeds are made from the material that forms the wall of the cane stalk. There are several characteristics of Arundo donax and its growth that give it the superior vibrational characteristics necessary to make !ne cane reeds. First is the actual structure of the !bers found in the plant’s wall. Second is its growth environment,

4
which I described earlier. Third is the plant’s age at harvest (usually around two years). Last is its dormant state during its wintertime harvest.
The internal structure of the material of the wall of the stalk consists of hollow tubes (called vascular ducts or vascular bundles), running parallel to the length of the stalk, which are surrounded by rows of !brous material for protection. The function of these vascular bundles is to allow the passage of sap (food) for the plant throughout its structure.
One can see these vascular bundles by holding a reed up to a light source. The tubes appear as darkish lines running length-wise through the reed. The ends of the bundles can be viewed by looking at the wetted end of the heel of the reed (the end opposite the tip). They appear as dark dots when viewed this way.
Another way to experience the function of these vascular bundles is to wet the vamp of the reed (see “Parts of the Saxophone Reed” illustration) enough to leave water or saliva standing on the vamp’s surface. Next, blow through the heel of the reed vigorously while holding the heel !rmly between your lips. You often will see bubbles appear on the surface of the vamp, caused by air passing through the vascular bundles. Note: if the reed vamp has been polished heavily in the manufacturing process and the ends of the bundles crushed closed, the bubbles will not appear.
To be suitable for reed making, the cane plant needs to be harvested in a winter environment cold enough that the plant will be dormant (not growing), and thus, have no nutrients (sap) moving through the vascular bundles. The presence of the sap in the plant at harvest will cause a brownish discoloration to the reed !bers, swelling and enlargement of the vascular ducts, and a soft, porous cane, which lacks both elasticity and resistance. None of these characteristics is desirable in a good reed.
The following description of the harvesting and curing of the cane and the actual reed-manufacturing process may di"er from manufacturer to manufacturer, but the essential description is generally accurate for the major reed producers.
Harvesting the cane is a selective process in which only poles of the proper diameter and age are cut. These poles are then subjected to a curing process that can last from several months to around two years, depending on the grower. This process can involve removing any last vestiges of the husk that haven’t fallen o" naturally, drying the tubes in direct sunlight to remove any remnant of the natural greenish color of the plants, and a !nal curing indoors to remove any moisture still left in the plant. Some growers or manufacturers also use kilns (ovens) in the drying/curing process.
After curing the poles are cut into shorter tubes at each node, removing the node itself in the process. These tubes are sent to the manufacturer, where they are split length-wise into sections or “splits.” The splits are cut into yet shorter sections

5
corresponding to the approximate length of a reed (plus some extra length and width) and then put through another process to make “reed blanks.” The blanks are then put through other cutting processes to shape the reed, cut the vamp of the reed to the appropriate pro!le, and shape the tip. During these processes additional $attening of the reed table (the part that contacts the mouthpiece) and polishing of the vamp and table often occur. The !nished reed is then tested for strength in a machine that gently bends the tip area of the vamp, essentially measuring its resistance to bending; the more resistance, the harder the strength of the reed. It is a common practice for all of the reeds of a particular model in a manufacturer’s line (i.e. Eastman Esperto Alto Saxophone Reeds) to have the same pro!le dimensions. The di"erences in the strength of the reeds (3, 3.5, 4, etc.) with the same pro!le result from the density of the cane and, thus, its resistance to bending as measured on the testing device.
For each reed strength (3, 4, 5, etc.) there usually is a range of resistance readings from the testing device that is used to designate reeds of a particular strength. To use only one particular resistance reading for each reed strength would result in an unacceptable number of rejected reeds, and thus waste, dramatically increasing the cost of the reeds for the consumer. This is why, when one buys a box of reeds of a certain make and model and of a particular strength (for example, 4’s), one may !nd some reeds in the box slightly softer or harder than the others.
The only way around this is to make one’s own reeds from tube cane, a time- consuming process without the millions of dollars in precision automated machinery used by virtually all reed manufacturers. Even when hand-making reeds, the only way to determine accurately the strength of the !nished reed is to play it. Thus, even then there still will be some di"erences in cane density from reed to reed.
After strength testing, the reeds are sorted by strength, placed in their plastic sleeves, and packed in boxes for shipment and eventual sale.
The modern mass-produced, commercially-made saxophone reed is the product of vast amounts of research, interviews with highly-respected saxophone artists regarding their needs and desires concerning the reed, trial tests of various reed designs with numerous performers, and the development of highly sophisticated, accurate, and incredibly expensive automated machinery that is capable of making reeds to dimensional tolerances within the thickness of a human hair. That said, if you ask just about any reed instrumentalist what the most di#cult and frustrating aspect of playing that instrument is, “the reed” would be at, or near, the top of that list!
Why Work on Reeds?
6
As we’ve seen earlier, the cane saxophone reed is a product made from a complex, naturally occurring plant that requires very careful cultivation, harvesting, curing, and incredibly precise manufacturing techniques and tolerances. Even if all of those human and mechanical interactions with Arundo donax are carried out $awlessly, every plant, and thus every reed, is, to some degree, unique. Also, since what constitutes “the perfect reed” (if it even exists) varies between individual performers and their di"ering physical characteristics, playing techniques, sonic desires, and instrument, mouthpiece and ligature con!gurations, it is virtually impossible for reed manufacturers to provide a product that will please all saxophonists, all the time, when simply pulled from the box, wetted, and strapped to the mouthpiece.
Thus, saxophonists are faced with three choices in their quest for that perfect reed (assuming you don’t want to use synthetic ones):
1) Learn to adjust commercial, mass-manufactured reeds in order to get a more consistent and personalized product for your use.
2) Make your own reeds from tube cane or reed blanks. This is a good option, but one that requires the purchase of a fair amount of equipment to do it e#ciently, as well as a greater time commitment.
3) Buy numerous boxes of reeds and keep trying them until you !nd some that work. Repeat this again when those reeds wear out and stop working.
I have used option one for decades, and it is the one on which this guide will focus. The advantages I have found to working on my reeds in this manner are as follows:
1) Artistic: You can customize more reeds to create better your sonic preferences or to improve articulation and response, to adjust for di"erent performance situations, repertoire, and environments, to adjust reeds for your particular mouthpiece and instrument con!guration, and to adjust for environmental considerations, such as altitude or humidity changes.
2) Consistency: You can make more reeds play the same, or nearly so, to avoid the frustrations of having to adjust your physical playing mechanism to a di"erent reed con!guration each time you change reeds. Also, you can correct small $aws or inconsistencies that occur that might make some reeds less desirable.
3) Economy: You can make far more reeds work well . . . or well enough, and your best reeds will be far better, thus saving money on reed purchases.
4) Flexibility: You will have the ability to make changes/adjustments to a reed in situations where you might previously have had to change reeds or discard a reed altogether. This also results in better “peace of mind” in otherwise tense performance or rehearsal situations.

7
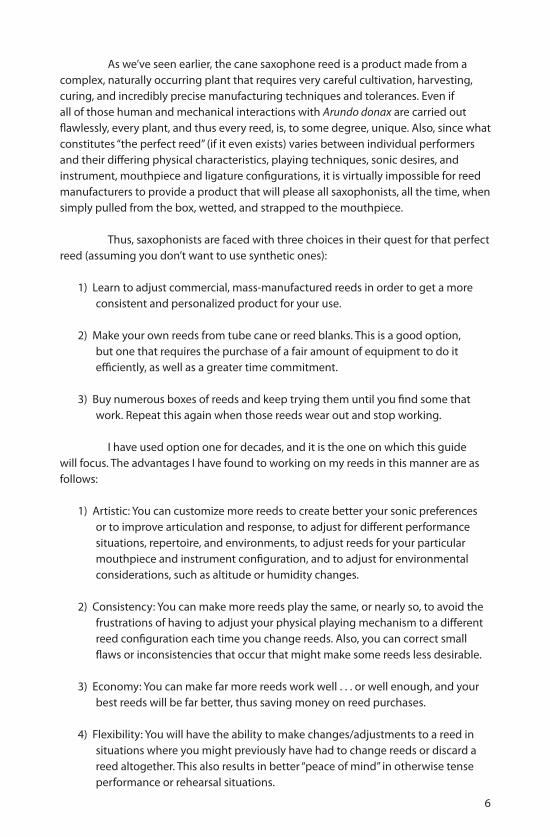
Following is a list of basic reed-working equipment necessary for adjusting saxophone reeds (more elaborate discussions of each tool will follow below and other speci!cs of their use will be found elsewhere in this guide):
Equipment
Basic Equipment (L-R lower): Mill File, Taper File, Reed Clipper, Reeds, Reed Cases; L-R (middle and upper): Double-bevel Folding Reed Knife, Sharpening Stone, #600 Sandpaper, Single-bevel
Reed Knife, Small Plexiglas Work Surface
1. Reed knife
2. A sharpening stone for the reed knife
3. Several sheets of 400 and 600 grit wet-or-dry sandpaper
4. Reed clipper (one for each size of reed on which you will be working)
5. Reed storage device(s)
6. A $at work surface, such as a 9”x12”x%” (or larger) piece of glass or Plexiglas
7. An 8” or 10” mill !le (single or double cut)
Reed knife: This is the most important reed-working tool you will own. Reed knives come in two basic styles: the single-beveled-edge knife and the double-beveled-edge (or straight razor style) knife. The one I prefer is the single-beveled-

8
edge style. This has one side of the blade that is $at. This is the side of the knife’s edge that does the scraping. The other side of the blade has a bevel cut on it. This is a very common design, used by countless professionals, and is an excellent knife for scraping material from the reed, which is what you’ll be doing with it most of the time.
When holding this style of knife, the beveled side of the blade faces the user during use. Thus, this knife is hand-speci!c, and you must order a right or left-handed knife when purchasing one. Most single-beveled-edge reed knives made today have similar dimensions. My knife is a Prestini that I’ve had for 40 years and has a blade that is 3-1/8” (7.9 cm) long by 9/16” (1.4 cm) wide by 1/8” (3mm) thick. The handle of my knife is made of wood (Grenadilla) and is about 3-7/8” (9.9 cm) long. More modern reed knives have similar dimensions but normally now have plastic/synthetic handles. Trying to use a reed knife with dimensions radically larger or smaller than these may prove to be di#cult, but get a knife with which you feel comfortable; you’ll be spending a lot of time with it.
Reed knives are made by a number of companies, including Prestini, Bhosys, Fox, Pisoni, Rigotti, and Vitry. A good reed knife should cost somewhere around $25.00 to $50.00, though some can fetch $100.00 or more. Please don’t attempt to save money by using a pocket or kitchen knife for this work. Their blades are designed for cutting and slicing, not scraping. Get the right tool for the job!
Most knives come with a sheath in which to store the knife, protect the blade, and protect you from an accidental cut. A serviceable sheath also can be made from one of the heavy plastic sleeves in which reeds are commonly shipped today for protection. A tenor saxophone reed sleeve works well as a makeshift sheath for most reed knives. Just slide the sharp edge of the blade into it, as you would a reed.
Sharpening stone: To be e"ective the reed knife must be kept sharp. It should be sharp enough that you do not need to use heavy pressure when scraping material from the reed. The best way to sharpen a single-beveled-edge reed knife is with a sharpening stone; this works for the double-beveled knives as well. Sharpening stones come usually in round or rectangular shapes and in various sizes. Some have two sharpening surfaces, one coarse, and the other !ne. Others have only a single, !ne surface. In most cases I use only the !ne sharpening surface. Also, some are “wet stones” which require moistening with “honing oil” before use, and others are “dry stones,” requiring no oiling. There even are a few “wet-or-dry” stones. For ease and convenience of carrying and use, I use a dry stone. Sharpening stones usually can be purchased at hardware or cutlery stores.
400 & 600 grit wet-or-dry sandpaper: These are very !ne abrasives that can be used for certain operations on the tip area of the reed, in lieu of the reed knife or in addition to it. A sheet of sandpaper also can be placed on a $at surface and used to $atten the table of the reed. The non-abrasive side of the sheet can be used to polish the table and vamp of the reed. It comes in approximately 9”x12” sheets and can

9
be purchased in most hardware stores. Get several sheets of each grit.
Reed clipper(s): These are precision devices that work similarly to a !ngernail clipper and are used to clip the tip end of the reed. They come in various sizes corresponding to the size of reed to be clipped (soprano, alto, tenor, etc.). In reed working they are used to increase the thickness of the tip by clipping it back toward a thicker part of the vamp, making the tip itself thicker, and thus, increasing blowing resistance. When making reeds from blanks or tube cane, clippers are used also to provide the shape of the tip of the reed. Generally, they consist of a blade that is shaped to match the curvature of the reed’s tip, which is mounted in a device to secure the reed and adjust the amount of reed tip exposed to the cutting blade. Also, there usually is some sort of lever to activate the cutting blade and a strap for holding the reed in place.
When you purchase a reed clipper, you should take several old reeds with you to test clip. You should purchase a clipper that matches the shape of your mouthpiece’s tip as closely as possible. If you do that, you also can use the reed clipper to reshape the reed tip to match that of your mouthpiece, but you may then have to remove cane from the tip area if the reed then becomes too resistant. You also may need to remove cane from behind the shoulder at the score line (!le line) to compensate for the decrease in the length of the vamp caused by clipping the tip. Since I tend to start with a commercial reed that is much harder than my “!nished reed,” I seldom use reed clippers today to increase reed resistance, but they’re still worth owning. As with the reed knife, reed clippers must be purchased at music retailers.
Reed storage devices: These come in many con!gurations and sizes, from simple plastic or metal containers that hold one or two reeds, to very elaborate wood, plastic, metal, or leather containers holding four to as many as a dozen reeds.
The most important general characteristics of a good reed case are a $at, rigid, smooth surface on which the tables ($at sides) of the reeds are placed, a secure mechanism for holding the reeds on that surface, and a su#ciently rigid container to protect the reeds while in storage.
A number of cases available today contain a mechanism for regulating the relative humidity inside the case, either by keeping the interior of the case at a !xed relative humidity, often around 60% to70%, via a hygrostat, or allowing the user to regulate humidity by adding or reducing the moisture inside the case. I have found some of these humidity-controlling cases to be quite e"ective in preventing/reducing reed warping and extending the life of the reed somewhat by keeping the interior of the reed partially moist and thus reducing the stress on the reed !bers caused by repeated total wetting and drying cycles. A byproduct of this stable humidity is that the reed often reaches “playing condition” with less wetting before a playing session.

10
In the hygrostat cases, like the ReedMate™, moisture is re-introduced into the case by placing a damp reed(s) into the case. The reed should be moist to the touch, but not have any standing moisture on its surface. This can be achieved by “squeegeeing” the reed between your thumb and index !nger before inserting it into the case. Too much moisture in these cases can cause reeds to mold or mildew.
I know some saxophonists and clarinetists who have made their own humidi!er reed storage devices simply by keeping their reeds in the plastic sleeves in which they are shipped and storing them in a zip-lock bag with a cigar humidi!er placed inside it to regulate humidity, while others keep their normal reed cases in such a bag-plus-cigar-humidi!er container. Whatever your choice, you should give a good deal of thought to how you will store your reeds.
Work surface: A 9”x 12”x %” (or larger) piece of glass or Plexiglas can be used as a work surface for laying out reeds while trying them during the conditioning (break-in) process, or as a $at surface for holding a piece of #600 grit sandpaper for sanding the table of the reed to $atten it. In addition, some people prefer also to use a smaller piece of glass or Plexiglas, slightly larger than a reed, as a work surface while scraping with the reed knife, instead of supporting the reed solely with their !ngers.
Be sure to cover the edges of the glass with tape, or have the edges polished smooth, to protect against being cut by them. Also, tempered glass, like that found in automobile windows, is more expensive, but it is safer when broken. In addition, the glass should be %” thick for added durability. You may need to purchase glass like this at a glass specialty shop and have it cut to the size you want.
8” and/or 10” mill !le (single or double cut): This type of !le is used normally for !ling metal but works well, as a substitute for #600 grit sandpaper, to $atten the table of the reed. The 8” size will accommodate easily reed widths of sopranino through tenor. Baritone and bass players will need a 10” mill !le. These !les can be purchased at hardware or tool stores. Get one with a !ne enough abrasive surface that it will not gouge the reed table. Take along some old reeds to test the surfaces. The “single cut” !le cuts in only one direction as you slide the reed back and forth on the !le; the “double cut” !le cuts in both directions of travel, which means that one is removing material more quickly with the double cut type.
You also will need to purchase a device called a !le card, a very sti" brush with angled bristles, which is designed speci!cally to clean the abrasive surface grooves of a !le. In a pinch you can use a heavy bristle brush to clean the !le.

Some Optional or Additional Equipment
11
A small, !ne taper or “rat-tail” !le: These !les can be purchased at hardware or tool stores and can be used in addition to a reed knife, or in lieu of it, when working on the reed. I have known some performers who simply aren’t comfortable using a reed knife and prefer using !les and sandpaper to work on their reeds. Most of the operations described in this pamphlet can be done with these tools, though I personally prefer using a reed knife most of the time. The !les should be !ne enough that they don’t gouge the reed or break the tip when scraping with them. Taper !les usually are triangular in shape; “rat-tail” !les are round, like . . . well . . . a rat’s tail. Certain types of jeweler’s !les also work well.
PerfectaReed™ device: This is a dial-indicator mounted on a stand that is used for measuring the thickness of a reed at virtually any point on its vamp. It was developed by Ben Armato and is useful for very precisely balancing a single reed and for transferring the dimension (pro!le) measurements of one reed to another. Uhl Technik also makes a similar device.
Reed pro!ling machine: Most of these devices work on the principle of a key-duplicating machine, in that they use a model reed (or an exact metal, plastic or !berglass duplicate of your favorite reed pro!le) to transfer that pro!le to another reed or a reed blank. These devices are especially useful if one wishes to make one’s own reeds from blanks or tube cane. Some use a metal blade to cut the new reed vamp, while others use a sanding disk. Most of these machines were initially designed for clarinet reeds and thus will !t soprano saxophone reeds without modi!cation. Some manufacturers will provide (for an additional cost) modi!cations to allow the duplication of alto and tenor saxophone reeds. These devices are included here as options for general reed working, though they are e#cient and virtually invaluable for making reeds from reed blanks. Clarinetist, Robert DiLutis, and the German company, Uhl Technik, make the most widely known ones. The Reeduall™ is another possibility, but uses a sanding disk to shape the reed pro!le, as opposed to a metal blade.

Using the Reed Knife
12
Learning to use a reed knife is not particularly di#cult, but it does take practice and patience. It’s usually best to learn basic scraping techniques by practicing on old reeds that you can a"ord to ruin, because you will ruin a few reeds during the learning process.
Refer to the accompanying photo to see the proper way, which is described below, to hold the knife and reed during scraping.
The knife is held in your dominant hand. Remember that the single-beveled-edge knife is hand speci!c, because the bevel must face you during use, with the $at side of the blade facing away from you (toward the reed tip). Hold the knife by the handle lightly at the point where your !ngers connect to your palm. The knife handle is held mostly with the !ngers, not in the palm. Place the thumb of your dominant hand on top of the blade. Depending on your hand size, the thumb should rest slightly forward of where the knife blade joins the handle. Your thumb will help balance the knife and will apply downward pressure to the blade to regulate the amount of material you remove while scraping. Note: if the knife is properly sharpened, you should not have to use excessive pressure to scrape. Be sure to sharpen your knife regularly.
Holding the Reed and Reed Knife (Right-handed Individual)

13
Hold the reed with the thumb and !rst three !ngers of the other (non-dominant) hand. The reed is held most often with the vamp up, the table resting somewhat diagonally across the !rst three !ngers, and with the reed tip pointing away from you and resting on the “pad” of the index !nger. There is one exception to this, which will be discussed later in the section on reed warping.
The non-dominant hand’s thumb rests on top of the reed, pad down, near the point at which you intend to scrape and is used as a “back stop” for the beveled side of the reed knife. The beveled side of the knife is placed against the tip of the thumb, usually perpendicular to the vamp, at the point where you want to scrape.
Some people, especially novice reed workers, are more comfortable placing the reed on a small piece of glass or Plexiglas, slightly larger than the reed itself, instead of supporting the reed solely with the !ngers. Whichever method you use, be certain to support the part of the reed on which you are working with either the index !nger or the glass. This is especially critical when working on the reed tip. If the tip is left unsupported, you easily can break it when scraping with the knife. Note: if you choose to use a piece of glass or Plexiglas to support the reed, you still will use essentially the same holding and scraping methods described later. However, you will have a piece of glass or Plexiglas between your !ngers and the reed table.
Remember, material is removed from the reed vamp with a scraping motion of the knife, not by cutting or whittling. This scraping is always done with the grain and from back to front (from toward the heel to toward the tip), never across the grain or front to back. Hold the reed in the non-dominant hand and the knife in the dominant hand, as described above and seen in the accompanying photo.
To scrape place the knife vertically perpendicular to the reed vamp, as well as at a right angle to the rails of the reed and resting against the tip of the non-dominant hand’s thumb. For now, put any part of the sharp edge of the blade that feels comfortable in contact with the reed. It’s also probably best to start your practice scraping on a thicker part of the reed vamp, rather than at the tip. That said, with no pressure from the thumb on the knife blade, rotate your knife hand and forearm slightly clockwise, allowing the sharp edge of the blade to pivot against the thumb holding the reed and move slightly behind perpendicular to the reed (toward the heel). Next, apply slight pressure to the top of the blade with the dominant thumb, rotate the wrist and forearm of the dominant hand counterclockwise and return the blade to the starting position, which is with the blade perpendicular to the reed, and not beyond perpendicular. You now should have removed a small scraping of material from the reed vamp.
Do the above exercise several times on a thicker part of the practice reed and on the same part of the knife blade, until you begin to feel more comfortable holding the knife and reed and using the scraping motion. After a few such scrapes, try scraping on di"erent parts of the reed vamp and using di"erent parts of the knife

14
blade (further toward the tip or closer to the handle). Be sure to back up the point of the reed at which you’re scraping with the pad of the index !nger of the hand holding the reed.
Once you feel comfortable with these initial exercises, you can practice more precise scraping by lightly drawing lines with a pencil on various parts of the vamp, both parallel and perpendicular to the rails of the reed, and then “removing” those lines from the reed by scraping with the knife. You will !nd that you have to use di"erent amounts of pressure on di"erent parts of the reed, as well as use di"erent hand positions and blade angles relative to the reed surface. Again, the point of all this is to get comfortable with, and perfect, your scraping BEFORE you begin working on reeds you want to keep. Just remember, “Rome wasn’t built in a day,” and you won’t become a virtuoso performer, or reed adjuster, overnight!
Following are some “scraping cautions” to consider, especially when working on a reed you actually want to keep:
1. Touch and Blow: This is my mantra whenever I’m working on reeds. You always can remove more cane from a reed, but you can’t put it back once it’s removed. Therefore, remove a LITTLE cane from the vamp to BEGIN accomplishing what it is that you’re attempting to do, and then play test the reed to check the result to determine if you’re moving in the right direction. Don’t get impatient and remove lots of cane in one scraping frenzy. You’ll often be sorry if you do!
2. Right-handed individuals tend to remove too much cane when working on the left rail area of the reed vamp. Left-handed individuals do the same on the right rail area. This is because those sides are the “blind” side of the reed, respectively, for those individuals. Just go slowly and check your results frequently, both visually and by play testing. “Touch and Blow!”
3. Keep your knife sharp! A dull knife makes for gouged, rutted and/or damaged reeds, di#culty with !ne adjustments, and slow going when removing cane. See the discussion on sharpening your knife following this section.
4. Do not scrape too long in one place. In many scraping scenarios, you will be removing cane in an area of the reed, not in one small place the size of a pencil dot. Scraping too long in one small place before moving on tends to result in a reed with a rutted, gouged appearance and can create adverse playing characteristics for the reed. One technique for preventing this involves pushing the reed knife forward with the non-dominant thumb, while slowly pulling the reed rearwards with the !ngers of that hand, all the while continuously scraping the reed with the knife. As you can imagine, this takes A LOT of practice, but perfecting this technique results in a much smoother scraping technique. Practice this technique by drawing a pencil line about %” to &” in length parallel to the rails of the reed and attempting to remove it in a

15
“non-stop” scrape while moving the reed as described above. Increase the length of the line as you become more pro!cient. Be patient. This is a tough one!
5. When working near the reed’s rails, attempt to keep a gradually sloping pro!le from shoulder to tip, rather than one that looks like a series of hills and valleys. See caution #4 above.
As stated above, in order to prevent gouging and chipping of the reed vamp and a rough, uneven appearance, it is imperative to keep the reed knife sharp. Sharpen the knife using the sharpening stone described in the “Equipment” section in the following manner:
Sharpening the Reed Knife
Sharpening the Reed Knife
1. If you have a sharpening stone with both a coarse and !ne surface, use the !ne surface unless the knife is unusually dull.
2. Hold the knife in your dominant hand and the sharpening stone in your non-dominant hand.
3. Assuming you have a single-beveled-edge knife, place the beveled part of the blade $at against the stone’s surface, using moderate !nger pressure with the

16
index !nger of your dominant hand to keep the bevel $at and secure against the stone.
4. While keeping the bevel $at against the stone, push the blade away from you, while simultaneously moving the blade diagonally across the stone, so that the entire bevel contacts the stone in one pass over it. Repeat this several times and test for sharpness.
5. If the technique in No. 4 above proves di#cult, you also can use a circular motion (clockwise for right-handers; counterclockwise for left-handers) to sharpen the blade, instead of a diagonal, pushing one.
6. Make certain that the bevel remains !rmly $at on the stone and does not rock back and forth when moving it. This actually can dull the knife, instead of sharpening it.
7. One technique I use for testing knife sharpness, if I don’t have an old reed handy, is to lightly scrape my thumb nail with the knife, using a back and forth motion of the blade and without putting any downward pressure with my thumb on it. I just allow the weight of the knife to do the scraping. If this removes a small amount of !ngernail material, the knife de!nitely is sharp enough to work on reeds.
Sharpen your reed knife whenever you feel that you need to use too much pressure to scrape.

17
Since this pamphlet is about working on commercially made, mass-manufactured saxophone reeds, I will focus here on some aspects of these reeds one should consider when purchasing reeds on which to work.
Your !rst decision when purchasing reeds is to decide on a make, type (model/pro!le), and strength of reed to purchase as your “raw material.” There are numerous manufacturers of reeds on the scene today. Each manufacturer has a particular idea of what the “best” design for a saxophone reed is. The design decisions are in$uenced by numerous factors, including acoustical and sonic studies of reed vibration and performance, opinions of selected performers, individual trial tests and “focus group” studies, decisions based on the segment of the musical community to which the reeds will be marketed (classical, jazz, pop, beginning or intermediate students, and so on), manufacturing costs, etc.
Many reed manufacturers have multiple styles of reeds designed for di"erent musical situations or artist preferences. Each reed style has a di"erent pro!le shape and may be made from cane of di"erent density, blanks of di"erent thicknesses, etc. Each manufacturer also has a unique scale for determining relative reed strength within a particular style of reed. Thus, though most reed manufacturers today use a numerical system (2, 3, 4, 5, often including half or even quarter strengths) to indicate reed strength, that system is not uniform between di"erent reed manufacturers, or even between di"erent styles of reeds by the same manufacturer.
Purchasing and Selecting Reeds
Parts of the Saxophone Reed
HEART
HEEL
VAMP
STOCK
SHOULDER
SCORE(FILE) LINE
TIP
RAILS

18
As we discussed earlier, usually every reed of a particular make (manufacturer), model, and instrument designation (alto saxophone, tenor saxophone, etc.) has the identical pro!le dimensions, regardless of strength, or at least that is the goal of the manufacturer. The relative strength of the reeds within a particular model designation is determined at the end of the manufacturing process by measuring each reed’s resistance to bending, and thus the cane’s density, on a machine. For example, every Eastman Esperto alto saxophone reed has the same pro!le dimensions, regardless of indicated reed strength. The reed’s numerical strength designation is determined by measuring the reed’s resistance to bending, which is determined by that piece of cane’s density.
Thus, it is our job, as performers, to !nd a reed make, model, and strength that provide us with the basic sonic and other musical characteristics we are seeking in a reed. We then can use that reed make, model, and strength as a point of departure for conditioning and further adjustment and customization.
To summarize, here are a few points to consider when selecting reeds for working:
1. Find a reed model (pro!le) and strength that approaches as closely as possible your sonic and musical needs and goals.
2. Pick a reed strength that is harder than you want your !nished product to be. In general, reeds will tend to get softer during the conditioning and adjusting process.
I prefer cane that is denser. Thus, I tend to start with a reed that is considerably harder than I want my !nished product to be. These reeds tend to take more adjustment to “perfect,” but they also tend to last longer and give me more $exibility in the adjustment process than a softer (less dense) reed does. If this doesn’t work for you, start at least with a reed that is one strength level higher than your goal.
3. I also, therefore, prefer cane in which the vascular bundles are smaller in diameter, regularly spaced, and spaced closer together. Generally, the larger the reed, the larger the diameter of the cane tube from which it is made, and thus, the larger the diameter of the vascular bundles, relative to a smaller reed. Take this fact into consideration when selecting reeds in this manner. Also, I have found that the only sure way to select a reed is to play test it; visual impressions can be deceiving.
4. Remember that each indicated reed strength represents a range of measurements that the manufacturer determined to represent that particular strength. Thus, you may !nd some reeds of a particular strength designation that are slightly harder or softer than others.

19
5. Buy commercial reeds ONLY by the box, never as individual reeds.
6. I prefer a reed with a well-developed heart area that is shaped like an inverted U, rather that a narrower V shape, and extends to within 3 to 5 mm of the tip (on an alto saxophone reed). Your ideal basic pro!le, of course, may di"er.
7. Look for reeds that have bark (cuticle) of a rich, golden color. Any hint of green means that the cane was not properly cured prior to manufacture. It is sometimes possible to correct this by placing the reed in direct sunlight (on a window sill, perhaps?) for a week or more.
The above said, play test every reed in a box; don’t make decisions solely based on appearance. You may be surprised.
Most reed instrumentalists will agree that some sort of conditioning (or breaking-in) process is necessary for new reeds. This procedure varies in length and speci!cs from individual to individual. However, it ultimately involves some sort of routine for gradually letting the reed become accustomed to the rigors of wetting and playing, and allowing it to stabilize, while the performer makes adjustments to the reed to help it play better and customize it to his/her individual preferences.
This is necessary because we are dealing with a product that was once a living plant, that has been harvested, cured, dried, seasoned, and shaped into something else, and is now being wetted and subjected to the physical stresses of rapid vibration, wetting and drying cycles, and embouchure pressure. Some of these stresses can cause the reed !bers to swell and contract repeatedly, causing them to distort and warp. Other stresses cause the reed !bers to break down slightly (and eventually, a great deal), again changing the reed’s playing characteristics.
Most reed instrument performers have experienced having a new reed that initially played pretty well become less playable, or nearly unplayable, a day or two later. This is part of the break-in process and is normal. This is the cane reacting to its new role and environment. The goal is to have the reed begin to stabilize as we gradually adjust it. The reed !bers, being rather resilient and sti" in a good, new reed need time to break down slightly in order to be more responsive to the subtle pressures of the embouchure and airstream. Along the way, we correct perceived $aws in the reed and customize it to our own preferences. Actually, this gradual breakdown of the reed !bers characterizes the entire life of the reed. Initially, it’s a positive process, which allows for more responsiveness and $exibility. Ultimately, it leads to the demise of the reed.
The Conditioning Process

20
All of this conditioning takes a certain amount of time. How much time it takes is the oft-debated issue. However much time you use, you need to work slowly and carefully. Rushing the process very often leads to undesirable results, including ruined reeds. You also must be $exible enough to allow for di"erences between individual reeds, concerning how much time they need to break-in properly.
My reed conditioning process lasts usually between seven and ten days and is outlined below (some performers I know take much longer):
at the tip, grossly imbalanced rails, cuticle [bark] not removed completely from the vamp area, etc.). Brie$y (2-3 minutes only) play-test each reed after wetting the entire reed (vamp and stock) for a minute or so in a glass of water (I use water to save time at this stage). Make note of your initial impression of each reed. I use a code that I write on the table of the reed, near the heel. That code is explained at the end of this section. Place the reeds on your work surface, with the table ($at side) UP, to allow even drying. Note: potentially good reeds should be somewhat harder than you want the !nished product to be. They usually will get softer with adjustment and playing. DO NOT MAKE ANY ADJUSTMENTS TO THE REEDS AT THIS TIME!
longer period than on day one, evaluating (re-evaluating) their quality, and assessing what adjustments may be necessary. This may necessitate changing what you wrote initially on the reed table. Continue to dry them table UP on your work surface. MAKE NO ADJUSTMENTS YET!
making small, gradual adjustments ($attening the table, balancing, customizing, etc.), checking progress frequently by playing the reed (TOUCH AND BLOW!). Also, increase slightly the playing time of the reed if possible. DO NOT ATTEMPT TO MAKE A FINISHED REED YET! Leave the reed harder than you would like. Continue to dry the reeds table up. Be patient!
day. Store the reed on the work surface table DOWN from now on.
to reach their potential. Also, you may have eliminated some of the reeds with which you started because they have proven unsatisfactory for some reason. This is normal. No matter how good you are at reed adjusting, you never will be able to make every reed into a great one, or one that ideally suits your needs and

21
artistic preferences. You now should begin storing the better reeds in your reed storage devices, so that they remain stable and protected from damage. Note: this conditioning process can be extended to suit the needs of individual reeds if you wish.
Earlier I mentioned a code that I use to write my evaluation of the reed on the reed table, near the heel. Here it is:
P- Potential. Used for a reed that appears to have potential as a good reed.
H- Hard
S- Soft
P, H, and S above may be modi!ed with plus (+) or minus (-) signs to indicate degrees of potentiality, hardness, or softness.
P, H, and S also may be combined, for example PH means a reed that has potential but is currently too hard.
U- Unbalanced, meaning that one side of the vamp appears to be harder than the other. Usually modi!ed with L and R for left and right side respectively.
C- Used to indicate cuticle (bark) present on the vamp of the reed.. This needs to be removed for the reed to play properly.
V- Very. VH= very hard, VS= very soft, etc.
Feel free to use this code or make up your own. Using a code like this, and writing it on the reed itself, saves a great deal of time in the conditioning process when one is working on between ten and thirty (or more) reeds simultaneously. It’s really quite impossible to remember one’s evaluation of even a few reeds during this process, and it seems more convenient to me than writing that evaluation on a piece of paper or a 3” x 5” note card, which is what I did 48 years ago when I !rst started seriously working on reeds. Try it!
As you can see, this type of conditioning process takes time. All reeds, no matter how good they are, eventually cease to play well. There is no de!nitive lifespan for a reed. There simply are too many variables involved to make generalizations about this. These variables include cane density, the type of playing situation(s) for which the reed is used, how long and how frequently it is played, the volume at which it is played, the tessitura in which it is played, the humidity of the performance environment in which it is played, the environment in which it is stored, the chemistry of the player’s saliva, etc.
Thus, new reeds constantly should be brought into the conditioning process to replace those that are past their prime, deceased, or about to be so. Also, su#cient

22
concert-quality reeds (4-6 for me) always should be on hand for any contingency, as well as so-called “practice reeds.” These, for me, are reeds that perhaps are not quite at the level of quality of a performance reed, or are performance reeds that are slightly past their prime, but are still decent. This replenishing should be done regularly, so that there are reeds at each stage of development BEFORE your best reeds cease to function. Otherwise, you may be forced to rush the conditioning process, with potentially disastrous results.
Remember Murphy’s Law: “If something CAN go wrong, it WILL!” Thus, if you have a major performance or rehearsal coming up in a day or so and you only have one or two good reeds available for it, those reeds, especially if they are on the “down-slope” of their useful life, WILL die the morning/evening of that rehearsal/performance, leaving you scrambling for a replacement if one isn’t readily available. -OR- If you attempt to play that performance/rehearsal on a new, unconditioned reed, fresh out of the box, or on one that has been rushed through a greatly abbreviated conditioning process (like one day or a few hours), that reed WILL cease to play well at some critical point, creating massive amounts of personal embarrassment and tension and possibly costing you future employment with that employer, personnel manager, or presenter.
Keep up with your reed working and enjoy the bene!ts and peace of mind that brings!
It is imperative for good response and tone quality that both sides of the reed tip and side rails be balanced in thickness. In other words, if you draw a line down the center of the reed vamp, from tip to score line, and then pick a point on one side of that line, the corresponding point on the other side of that line should be the same thickness. This generally should be true for all points along the entire length of the vamp.
The only way to do this with absolute accuracy is to use a measuring device, like the PerfectaReed™ dial indicator, to measure selected points for balancing. Fortunately, discrepancies of .001” or even a bit more aren’t really felt or heard. Thus, usually play testing the reed, as described below, and $exing the reed tip and bendable parts of the side rails with a !nger are all that is necessary to achieve acceptable balance, at least of the top third, or so, of the vamp, nearest the tip. Of course, if you want to invest in a dial indicator (or make one yourself ), you can be even more exact, but it’s really more important how the reed plays than how its measurements look on a machine.
Balancing the Reed

23
Today’s very precise manufacturing processes, and better quality control, by the best reed manufacturers make severe imbalances more rare than in the past. However, again, we are dealing with tubes of cane that may not be exactly round, resulting in misshapen blanks and unbalanced reeds. In addition, even a small manufacturing error in shaping the vamp pro!le can create an imbalance in a reed. Knowing how to correct such $aws ultimately will save a substantial number of reeds from !nding their way into a land!ll.
A reed that is unbalanced tends to play with poor response and a stu"y or noisy sound, generally mimicking the characteristics of a reed that is too hard. This is because the unbalanced sides of the reed are attempting to vibrate at di"erent frequencies. Thus, I prefer to balance my reeds BEFORE I do other customizing of the reed. If I scrape on BOTH sides of the reed, correcting for what appears to be excessive overall hardness, I may end up with a reed that is too soft if I then correct the balance issue later inthe process. This is due to the fact that when balancing a reed, we are balancing the hard side of the reed to the softer one.
I use four methods for determining the balance of a reed, though the !rst one is the one I prefer and use most. The next two are used to reinforce impressions obtained from method number one. While method four is the most precise, I still prefer playing the reed to determine balance.
1. With the instrument in playing position and the mouthpiece in your mouth, rotate the mouthpiece in a clockwise direction so that the right side of the reed is against the lower lip, and thus mu'ed, and the left side is free to vibrate. Play a fairly non-resistant pitch, such as b1, c2, or c#2, and note the resistance to blowing and tone quality. Next rotate the mouthpiece in a counter-clockwise direction so that the left side of the reed is dampened with the lip and the right side is free to vibrate. Play and assess this side as before. Compare the two impressions. The side that is the most resistant to blowing is thicker. Scrape the thicker side to match the perceived resistance of the softer side. Do this slowly and gradually (touch and blow). Note: this method is most reliable testing the area from the tip to about the middle of the vamp’s length, but this is the most critical part of the reed in terms of balance. The only way to balance precisely areas 5, 6, and 7 on the “Reed Adjustment Diagram” is with a dial indicator. However, you can get an idea of the balance here by using this method to play lower register notes, comparing resistance on the di"erent sides of the reed in that register.
2. Flex the tip and the bendable side rails (areas T, 2, and 4) of a wet reed with your index !nger. The more the reed resists bending, the thicker and harder it is. Compare the two points on the di"erent sides of the reed and scrape the harder side until it matches the softer one. It may take a while to “educate” your !nger, especially to slight di"erences in reed thickness. Try to bend the reed with the same part of the index !nger, and in the same location on each side of

24
the reed, each time that you bend it. Don’t just “roll” the reed tip against a hard surface or against your thumbnail.
3. Examine the reed against a light source. Darker areas may be thicker and, thus, harder. However, some imperfections in the cane appear as darkened areas but are not actually thicker. This is the major disadvantage to this method.
4. Use a dial indicator, like the PerfectaReed™, to measure the exact thickness of individual points along both sides of the reed centerline and scrape accordingly. This method is very time-consuming, though very accurate, and thus, I tend to rely on method number 1 most often.
In all cases balance the thicker side to the thinner one by removing cane from the thicker side until balance is achieved. Work slowly (touch and blow), so as not to remove too much cane from the thicker side and end up “chasing” the point of balance until the reed simply becomes too soft!
Most balancing operations will occur in areas T, 2, and 4, mostly between the rails and the heart (H), though achieving balances in areas 5, 6, and 7 also is important for a properly functioning reed.
Try to avoid scraping in the heart (H) area unless the reed is unusually hard and unresponsive in general.
Unfortunately, some reeds will end up too soft after balancing, especially if the soft side is excessively soft at the beginning of the process. Little can be done to save these reeds, but if they’re otherwise good, try saving them for a time, such as a performance at high altitude, where a little softer reed is needed.
25
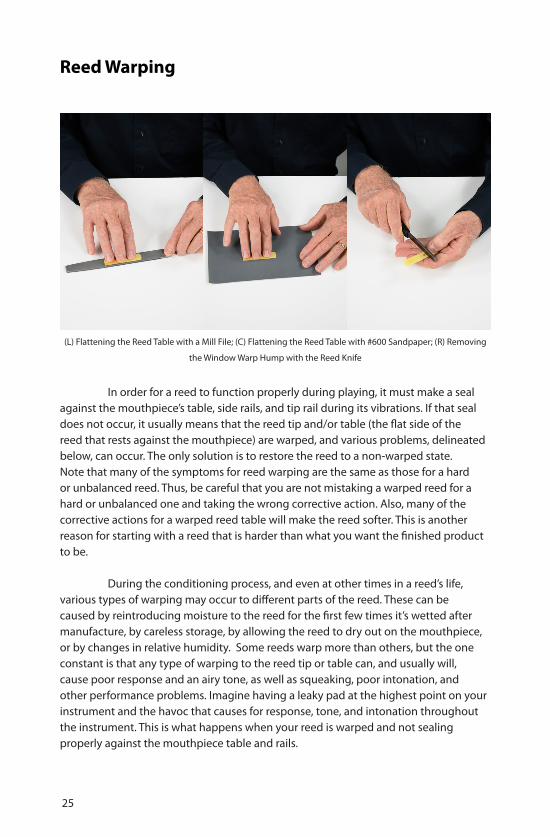
In order for a reed to function properly during playing, it must make a seal against the mouthpiece’s table, side rails, and tip rail during its vibrations. If that seal does not occur, it usually means that the reed tip and/or table (the $at side of the reed that rests against the mouthpiece) are warped, and various problems, delineated below, can occur. The only solution is to restore the reed to a non-warped state. Note that many of the symptoms for reed warping are the same as those for a hard or unbalanced reed. Thus, be careful that you are not mistaking a warped reed for a hard or unbalanced one and taking the wrong corrective action. Also, many of the corrective actions for a warped reed table will make the reed softer. This is another reason for starting with a reed that is harder than what you want the !nished product to be.
During the conditioning process, and even at other times in a reed’s life, various types of warping may occur to di"erent parts of the reed. These can be caused by reintroducing moisture to the reed for the !rst few times it’s wetted after manufacture, by careless storage, by allowing the reed to dry out on the mouthpiece, or by changes in relative humidity. Some reeds warp more than others, but the one constant is that any type of warping to the reed tip or table can, and usually will, cause poor response and an airy tone, as well as squeaking, poor intonation, and other performance problems. Imagine having a leaky pad at the highest point on your instrument and the havoc that causes for response, tone, and intonation throughout the instrument. This is what happens when your reed is warped and not sealing properly against the mouthpiece table and rails.
Reed Warping
(L) Flattening the Reed Table with a Mill File; (C) Flattening the Reed Table with #600 Sandpaper; (R) Removing
the Window Warp Hump with the Reed Knife
26
To test for reed warping that may not be readily apparent visibly, attach a wetted reed to the mouthpiece with normal ligature pressure, and place the palm of one hand over the opening at the end of the mouthpiece opposite the tip (the shank where the mouthpiece attaches to the neck cork) to seal it o". Next, place the mouthpiece in normal playing position in the mouth, while making a seal with the lips around the mouthpiece. Finally, while simultaneously using lip pressure to push the reed against the mouthpiece lay, attempt quickly to suck as much air as possible out of the mouthpiece chamber and withdraw the mouthpiece from your mouth. This “suction test” takes a bit of practice.
If you are successful at this, and if the reed tip and table are $at and sealing properly against the mouthpiece, the reed tip and side rails should stay closed against the mouthpiece for at least a second or two, and hopefully, for a little longer, and then make a “popping” sound when they do release. If they don’t, it is a pretty safe assumption that the reed table is warped. Of course, this also assumes correct technique evacuating the air from the mouthpiece AND a mouthpiece that has an undamaged, and properly shaped, table, tip rail, and side rails. Once you have determined that warping is a possibility, determine the type of the warp and take corrective measures as described below. There are three common types of warping. Each is presented below with corrective measures:
1. Tip Warp: This is fairly common, especially during dry weather, and also is the easiest to spot and to !x. It is characterized by a wrinkling of the reed tip, with a wave-like undulation of the tip running across the tip from one rail to the other. This is caused, most commonly, by allowing the reed to dry out completely while attached to the mouthpiece or by failing to store the reed with the table pressed against a $at surface, as in a good reed storage device. Allowing the reed to dry out completely in a reed case where the humidity is not controlled also can cause tip warp to occur when the reed is wetted again.
Tip warp is corrected by wetting the reed thoroughly and pressing the tip against a $at surface, such as a piece of glass, or by holding it with the tip pressed !rmly against the mouthpiece table and at a right angle to it. I usually place my thumb on top of the reed tip to hold it in place against the mouthpiece table. After !fteen or twenty seconds, check the tip. If it’s still warped, wet the reed again and repeat the above. Keep repeating until the wrinkling is gone.
2. Window Warp: This type of warping, which is actually a more localized type of table warp, is caused by moisture, which collects in normal playing on the portion of the reed table underneath the reed vamp that rests above the mouthpiece’s window. This causes these reed !bers to swell at this point, while the portion of the reed table opposite the stock remains dry and $at.

27
Since the vascular bundles will “wick” some of this moisture slightly beyond the boundaries of the window, a leak will occur at those points. Window warp also can be caused by excessive ligature pressure. Don’t tighten the ligature excessively; only snug enough to secure the reed from moving on the mouthpiece during normal playing.
Window warping usually manifests itself as a U (or crescent)-shaped bump or hump at, or near, the point where the bottom, U-shaped, inside edge of the mouthpiece window and the reed table make contact. You actually can feel the bump with your index !nger if you move your !nger slowly and lightly over this area.
The hump may be removed in one of three ways: by scraping the area of the hump with the reed knife, by $atteninig the reed table by sanding on #600 grit sandpaper placed on your glass work surface, or by sanding the table on the mill !le.
To remove the hump with the reed knife, place the reed knife both vertically and horizontally perpendicular to the reed table just below the hump (toward the reed’s heel). Using a back-and-forth scraping motion, not the rotating motion described earlier, scrape the area of the hump until you no longer can feel it and/or until the reed successfully passes the “suction test” described earlier. As with all operations, scrape prudently and test often (touch and blow). In this case it also is best to scrape using light pressure. Allow the weight of the knife itself to provide the pressure for this operation; don’t apply downward pressure with your thumb on top of the knife.
To remove the hump with sandpaper, place a sheet of #600 grit sandpaper on your glass work-surface. Place the reed table on the sandpaper, while pressing the vamp and stock lightly downward with three !ngers. Do not place a !nger too near the reed’s tip, as it is very easy to sand through the tip during this operation. Using a back-and-forth sanding motion, sand the vamp until the hump is gone and the reed can pass the “suction test.” It is also helpful to place a small piece of very thin paper underneath the tip and heart area of the reed table to prevent removing too much material from this area.
You may substitute the 8” or 10” mill !le for sandpaper in the $attening process just described. Use the same cautions to prevent sanding the tip too excessively. The other sanding techniques are essentially the same as well. I !nd using the mill !le for $attening the table works better than sandpaper when the reed is wet, since the wet reed tends to “stick” or “catch” more on the sandpaper.
3. Table warp: This is a more generalized type of warping to the reed table than described above. Here the entire table warps, usually with the side rails warping

28
away from the mouthpiece facing. This is the severest type of warping and the most di#cult to treat successfully without making the reed far too soft.
Use the “suction test” in conjunction with the following method to test for table warping. If the reed fails the “suction test,” place a sheet of plain white paper, or a sheet of sandpaper, with the non-abrasive side UP on your glass work-surface. Place the reed, table down, on the paper and, using a back-and-forth motion, “bu"” the reed table on the paper. Hold the reed in your !ngers, table up, and examine the table’s surface while holding the reed in the direction of a light source and angling the reed until you see light re$ecting o" of the table.
If the reed table is $at, you should see a uniformly shiny surface on the table. If you see some areas that appear dull, while others are shiny, the reed table is warped and needs to be $attened.
You can $atten the reed table in the same manner as described in No. 2 above using either #600 grit sandpaper placed on the $at work surface or using the mill !le. As before, work slowly and check the reed table for $atness FREQUENTLY, using the “suction test” and checking for a uniform re$ectivity of light from the table.
Sand only as much as you absolutely need to! This process WILL make the reed softer, sometimes to the point of being unplayable, especially if you have started with a reed that is nearly the same strength as your target strength following adjusting.
Modern reed manufacturers have gone to great lengths to $atten and polish their reed tables to be certain they are $at when we purchase them, and to prevent, or at least minimize, warping. However, these e"orts can do only so much to eliminate this debilitating problem. As players we can undertake a few additional measures to minimize warping, but be warned, even with all of these precautions, reed warping still may occur:
using a back-and-forth motion, on a piece of white paper (or on the non-abrasive side of a piece of sandpaper) that has been placed on your glass work-surface. This will seal (or re-seal) any exposed vascular bundle ends and help prevent excessive moisture from entering the reed’s interior. However, just like a piece of lumber left out in the rain, a reed that is repeatedly exposed to moisture, as all reeds are, will be prone to warping to some degree.
the non-abrasive side of a piece of sandpaper, wrapped around the end of your index !nger, to rub the vamp’s surface. Rub with the grain, from shoulder to tip. This will polish the vamp and seal the ends of the vascular bundles exposed during

29
manufacture. Store your reeds in a quality reed storage device with a good, $at storage surface,
a means of keeping the reeds in place and pressed !rmly on that surface, and preferably with a way of controlling the relative humidity. This may be accomplished either inside the case itself or by putting the case inside a bag in which the humidity is controlled. After years of storing my reeds in a humidity-controlled environment, I am convinced that this method de!nitely DOES reduce reed warping. Also, since the reeds stored that way never completely dry out internally, it MAY help slightly with reed longevity by reducing the mechanical stresses to the reed caused by repeated full wetting/drying cycles.
When wetting your reeds, wet the entire reed (vamp and stock). This helps delay window warping by keeping the part of the reed table that rests on the mouthpiece table wet a little longer.
If you live in a hot, dry climate (or are visiting one to perform), take some extra time to wet your reeds prior to playing.
Adjusting and Customizing Techniques
To adjust and customize the reed proceed as below, referring to the accompanying illustration (‘Reed Adjustment Diagram’) as needed.
(L) Shaping the Reed Tip with #600 Sandpaper; (R) Working on the Reed Vamp with #600 Sandpaper and the
Plexiglas Work Surface

30
Problem Remedy
Reed too soft (thin tone, $at pitch “chokes” on crescendi)
Clip T with a reed clipper or sand back the tip with #600 sandpaper (see illustration)
Note: if the reed is too soft due to extended use, an undeveloped heart, or cane that is not dense enough, clipping the tip will do little to help. Also, if you clip the tip, you may need to remove bark from the stock, behind the score line, to restore the correct length of the vamp (equal to the length of the mouthpiece window).
Move the reed slightly higher on the mouthpiece, extending the tip slightly beyond the top edge of the mouthpiece tip rail.
Use a harder reed or a pro!le with a thicker tip or more heart.
Reed Adjustment Diagram
T 3 3T
HHHH
T
6
6
6
7 7
5 5
4 4
2 2

31
Buzzy tone Balance T and/or 2
Strengthen T by clipping (see previous notes)
Start with a harder reed with denser cane.
Reed not vibrating freely Scrape 2, 3, & 4 lightly and carefully
Reed slightly hard overall Scrape all areas, except the heart, lightly.
Scrape 3 lightly
Move the reed slightly lower on the mouthpiece, so that the tip is slightly below the top edge of the mouthpiece’s tip rail.
Problem Remedy
Upper register unresponsive and stu"y Balance T and 2 (see “Balancing the Reed”)
Scrape T and/or 2
Middle register unresponsive, airy, resistant, & stu"y
Balance 4 and/or 5
Scrape 4 and/or 5
Lower register unresponsive resistant, and lacking resonance
Balance 6 and/or 7
Scrape 6 and/or 7
Taper the stock, near the heel, to match the taper of the mouthpiece table. Allowing the stock rail to hang over the edge of the mouthpiece table increases lower register resistance.
Tone breaks Clip T to strengthen. See notes above on adjusting vamp length after clipping.
If this is a consistent problem, start with a harder reed: one with denser cane and/or a pro!le with a thicker tip area.

32
Problem Remedy
Reed squeaks T is too soft: strengthen by clipping T and adjust vamp length accordingly.
Reed tip is unbalanced: balance T.
T is split at a critical point: if the split is very small, clip it out with a reed clipper and readjust tip thickness and vamp length accordingly.
Reed table is warped: $atten.
Reed is too old or cane is too hard: discard.
Mouthpiece chipped or warped: if defects are slight, try having the mouthpiece refaced. If damage is severe, replace the mouthpiece.
Cuticle left on the vamp, causing balance or response problems
Remove carefully with the reed knife or or taper !le. This may be di#cult if the bark extends all the way to the tip. If you can’t see the cuticle along the rail of the reed, slide your !ngernail along the top edge of the rail. Any cuticle left there will feel “slick” to the touch.
Reed tip does not match the shape of mouthpiece tip, causing balance or response problems.
Clip the tip with a reed clipper that matches the shape of the mouthpiece tip. Adjust vamp length and tip strength as necessary.
Sand the tip’s leading edge with #600 sandpaper to match the shape of the mouthpiece tip. Adjust vamp length, tip strength, and tip balance as necessary.

33
heart of the reed (H), and if you must remove cane from this area, do so carefully and slowly, play testing the reed frequently (touch and blow).
If a reed is stu"y overall, try removing a small amount of cane from area 3 before thinning the heart. Removing too much cane from area 3, however, can “kill” a reed quickly, so be careful! (Again, touch and blow!)
vamp (areas 2, 4, and 5), I generally con!ne my scraping to an area that extends from the top edge of each rail to no more that 3 or 4 mm inward (toward the center of the vamp) from either rail. This keeps me from thinning the heart (H) accidentally. This is less true for areas 6 and 7, since these extend into the center of the shoulder area anyway. I de!ne the tip (T) as the area extending from the leading edge of the tip across its width to 2-3 mm rearward of that edge. The above measurements are for an alto saxophone reed and will di"er somewhat for larger or smaller reeds.
pro!le along the rails of the reed vamp from shoulder to tip. Thus, I try to avoid creating “hills and valleys” (high and low points) along the pro!le, when viewed from the sides, a pro!le that suddenly becomes much thinner at some point, or an excessively $at pro!le from shoulder to tip. However, each person has to !nd the pro!le that works best for his/her needs and artistic concepts.
of a reed equally, count the number of scraping strokes you make with the knife and make the same number of scrapes at that point on each side. This will help maintain balance.
T and 2, especially regarding balance. This is the most critical area of the reed, and problems here can a"ect response and tone in all registers. HOWEVER, do not attempt to !x all issues solely by making adjustments in these areas. It is very easy to remove too much material from these areas and “kill” the reed. Once the upper register is responding well and sounds good, begin working in areas 4 and 5, and 6 and 7 to correct any lingering problems in the middle and lower registers respectively.
areas of the mouthpiece facing: each of the two side rails, and the $at area that extends across the mouthpiece tip from each of the side rails (the tip rail). The reed should be placed so that the rails of the reed are parallel to the outside edges of the mouthpiece rails and table, and the tip of the reed is lined up correctly and evenly
Additional Adjusting and Customizing Suggestions

34
with the top edge of the mouthpiece tip rail.
It is quite easy to see if the reed’s rails are parallel with the edges of the mouthpiece’s side rails. To check accurately the placement of the reed tip relative to the mouthpiece tip rail, close the reed tip against the mouthpiece tip with !nger (thumb) pressure. Hold the mouthpiece at eye level and check to see that the reed tip is exactly even with the top edge of the mouthpiece tip rail. The reed tip should cover the entire tip rail equally, but the reed should not extend beyond it, nor should it be appreciably below it. Adjust accordingly.
It is critical that the reed be placed on the mouthpiece so that it is not tilted to one side or the other. A reed that is crooked on the mouthpiece can exhibit the same characteristics as a reed that is not balanced or too hard. Ignoring the reed’s proper placement on the mouthpiece can result in one making incorrect adjustments to the reed to “!x” the perceived problem.
Earlier I suggested that adjusting the vertical placement of the reed on the mouthpiece could be used to adjust the resistance of the reed to blowing and, thus, its perceived “hardness.” I much prefer to make adjustments to the reed itself to accomplish this, and I use the placement of the reed on the mouthpiece only as a temporary “stop-gap” measure. If you do raise the reed tip above the top of the mouthpiece tip rail to increase resistance, do so only very slightly. Doing so excessively can lead quickly to an excessively dull sound, poor response, and sluggish articulation. Conversely, placing the reed tip more than very slightly below the top edge of the mouthpiece tip rail can lead quickly to a buzzy and overly bright sound and possibly to squeaking or chirping.
Where to place the reed on the mouthpiece may seem like a very elementary issue and one covered in the !rst few lessons we took as beginners. However, when one is working on reeds and removing and replacing the reed on the mouthpiece hurriedly numerous times in the process, it is easy to get the placement wrong. I have had numerous advanced students come into their lessons complaining of bad reeds, only to !nd that their reeds were installed incorrectly on their mouthpieces.
discussion assumes that the reed tip exactly matches the shape of the mouthpiece tip. If it doesn’t, the reed tip’s shape should be altered to !t that of the mouthpiece. As previously mentioned this is done by either clipping the tip with a reed clipper that does match the shape of the mouthpiece tip OR by reshaping the reed tip by sanding its leading edge with #600 grit sandpaper.
To alter the reed tip’s shape with sand paper, remove the reed from the mouthpiece and let it dry thoroughly. Attempting to sand the edge of a wet reed’s tip will cause the tip to grab on the sandpaper, making it too rough or actually tearing or breaking it. Hold a half sheet of #600 grit sandpaper in one hand, cupping it into a slightly concave shape. Lightly stroke the leading edge of the reed tip against the sandpaper, using an up-and-down motion and following the concave contour of the sandpaper

35
(see illustration). Carefully try to duplicate the shape of the mouthpiece tip on that of the reed. Compare the two frequently and work slowly. You may need to adjust the vamp length and tip thickness following this procedure.
particular mouthpiece in order to create the sound, response, articulation, and other performance characteristics we desire. There are hundreds of di"erent mouthpieces available today, each with di"erent chamber designs, ba'e heights, tip openings, lay lengths, rail and tip thicknesses, etc. It is impossible for reed manufacturers to produce enough di"erent reed con!gurations to match ideally and exactly all of those di"erent mouthpieces and the sonic concepts of the artists who play them.
When “auditioning” a mouthpiece it is advantageous, therefore, to have a number of reeds with di"erent playing characteristics at hand or to be prepared to adjust a reed to !t the mouthpiece. It would be a shame to reject a perfectly good mouthpiece because you didn’t have a reed available that allowed it to perform well.
Also, mouthpieces DO wear out or become damaged. Sometimes the damage is readily visible, as with a chip, gouge, or scratch. Obviously, avoiding these problems often is a matter of storing and taking care of the mouthpiece properly. However, accidents do happen. In other instances the damage can be nearly invisible to the naked eye. The repeated vibration of the reed against the mouthpiece tip and side rails, especially on a hard rubber or plastic mouthpiece, can cause those surfaces to wear, altering the way the mouthpiece plays. This may manifest itself as poor response, degradation of the tone quality, apparent “reed balance” issues that seemingly can’t be resolved, or simply a general feeling by the performer that, “I just can’t seem ever to !nd a good reed these days!”
If the above scenario sounds a bit too personal, it might be worth a visit to a trained mouthpiece maker or technician. They should be able to spot such wear easily and perhaps “re-face” the mouthpiece to a playable condition. If they can’t, then it’s time to get a new mouthpiece.
If !nances permit I also would suggest having a “backup” mouthpiece with the same performance characteristics as your regular one. Keep this mouthpiece locked away and in as pristine condition as possible. That way, if something does happen to your favorite, or you suspect something has happened, you will have a replacement quickly at hand, or at least have one with which you can make an accurate comparison to assess potential damage to the original.
There are nearly as many di"erent designs of ligatures as there are mouthpieces available today. They virtually all make various claims about enhanced tone quality, response, and articulation. Which one you choose is a very subjective decision. Try several and pick the one you like.

36
Now that you’ve spent time conditioning, adjusting, and customizing your reeds to the point where they play exactly as you desire, you need to store and care for them in such a manner that they will work for you as long as possible. All reeds, no matter how carefully you prepare and care for them, have a !nite life span. This will not be the same for each reed, and there is no “magic number” that indicates how long a reed will, or should, last. Longevity is determined by a number of factors discussed earlier in our discussion of the conditioning process. Generally, though, the lifespan of a reed is measured in playing hours, which can vary considerably.
Here are some suggestions on caring properly for your reeds to get the most out of their longevity and their playability while being used:
1. Store your reeds in a high-quality reed case. While my own preference is to store my reeds in a case that has a means of controlling the relative humidity inside the case, it is perfectly acceptable to place a traditional case inside a sealed zip-lock bag containing a cigar humidi!er or some other method of controlling humidity. See the section on equipment for a discussion of these cases.
2. Rotate the use of your reeds, especially your best ones, so that you are not
playing on the same reed daily. Most likely, this will not lengthen appreciably
Caring for Your Reeds
One factor, about which you should be aware, regardless of the ligature you use, is the amount of pressure that is exerted against the reed by the mechanism used to tighten the ligature around the mouthpiece. Excessive ligature pressure against the reed can cause degradation of tone production, due to restricted vibrations, and reed warping. However, the ligature should be tight enough to keep the reed from moving around on the mouthpiece during playing and to create the seal between the reed and mouthpiece table that was mentioned earlier in the section on reed warping. Again, try several ligatures and see which works best.
E"ects of humidity and altitude: Changes in relative humidity and altitude often will alter the way in which a reed performs. These changes can be somewhat predictable with experience. However, just as soon as you think you have all the answers, a situation will arise to prove you wrong. Generally, I !nd that my reeds tend to play softer with increased humidity and harder with decreased humidity. Also, they tend to play softer at sea level than they do at higher altitudes. In addition there is a humidity issue factored into this latter change, as well as simply the change in altitude itself.
It is usually best, when traveling to perform, to carry some reeds that are both harder AND softer than what you normally use, especially if you won’t have much time to adjust reeds when you arrive at your destination or are on a tour that will encompass di"erent climatic or altitude conditions.

37
the total number of hours of the reed’s lifespan, though there is anecdotal evidence that rotating reeds does (can) increase their overall longevity somewhat. However, it will, at the very least, spread those hours of life out over a longer period of time. It can’t hurt to rotate your practice reeds in this manner as well. Number the storage slots in your reed case(s) and use that as a guide for organizing the rotation. Obviously, as reeds cease to play well, they will (should) be replaced in the rotation by new, properly conditioned and adjusted ones.
3. Save your best “concert-quality” reeds for concerts and important rehearsals, not for daily practice. This is really an extension of #2 above, and would seem to be a “no-brainer,” but I know that psychologically we always want to sound our best. Thus, it’s tempting to use our best reeds all the time. That said, you should play those best reeds occasionally in practice to ascertain that they still are performing at a high level. Also, if storing them in a humidity-controlling case, they should be wetted regularly to re-introduce moisture into the case to preserve the optimal relative humidity.
4. Keep a mouthpiece cap on your mouthpiece when a reed is installed and you’re not playing for an appreciable length of time. Again, this seems like a “no-brainer,” but it’s worth mentioning. This not only protects the reed (and mouthpiece) from damage, but it also slows evaporation of moisture from the reed, keeping it from drying out on the mouthpiece as quickly. When I’m taking a really long break during practicing or am on a longer rehearsal or concert intermission, I usually remove my reed from my mouthpiece and return it to the reed case.
5. Consider using water, instead of saliva, to wet your reeds before playing. Some performers would never dream of wetting their reeds with saliva. They claim that the bacteria and acid in saliva will shorten the life of a reed appreciably by hastening the breakdown and weakening of the reed’s !bers. I have not found this to be true, but I know that my own saliva is not particularly acidic. Also, using a means of humidity control allows me to be able to wet the reeds (with saliva or water) for a shorter period of time in order to make them playable. I do use water to wet my reeds during the conditioning period to save time, since I can wet a reed or two while play testing another reed. Using water regularly means that you’ll have to carry a container with you to rehearsals and concerts, but if you fear that your saliva is overly acidic, or you just want to experiment, give water a try.
6. Brush your teeth before playing, especially after eating a meal. It’s not only good oral hygiene, but also good reed and mouthpiece care, to brush one’s teeth (and even $oss and use mouthwash) before playing. Also, there’s nothing more embarrassing than having your instrument stop playing in a rehearsal or concert because part of the meal you just ate is now lodged between your reed and mouthpiece tip.

38
Thank you for taking the time to read this pamphlet on the art of saxophone reed adjusting. I sincerely hope you have learned some techniques that will improve your success, skill, and enjoyment as a saxophonist. I have included here the essence of what I have learned in nearly 50 years of adjusting saxophone reeds. Remember, though, that I didn’t learn to do this, at the skill level I now have attained, in a few days, or even a few weeks. Be patient, be persistent, and practice the techniques you’ve learned here. The acquisition of the knowledge won’t get you very far without daily application, but that knowledge and application will make you a better saxophonist.
If I can be of assistance to you on your reed-working journey or help you better understand any concepts put forth here, please don’t hesitate to contact me at [email protected]. I also am available for master classes, clinics, seminars, or workshops on reed working or any other aspect of saxophone performance, as well as concerts and recitals.
Be well, practice diligently and long, and most of all, enjoy and embrace the incredible art of making music on a truly fabulous instrument. Of course, always do it with a great reed!
Coda

www.AndreasEastman.com
Eastman Music Company2158 Pomona Blvd. Pomona, CA 91768
tel: 909.868.1777 | fax: 909.868.1773