Web-based EI Reporting Instructions (PDF) - Texas Commission on
33
DRAFT Version 3.1 12/29/2016 Web-based EI Reporting Instructions Instructions for Submitting an Annual Emissions Inventory Online
Transcript of Web-based EI Reporting Instructions (PDF) - Texas Commission on

DRAFT
Version 3.1
12/29/2016
Web-based EI Reporting Instructions
Instructions for Submitting an Annual Emissions Inventory Online

1 version 3.1 12/29/2016

2 version 3.1 12/29/2016
Table of Contents
What’s New (Updated 12/29/2016) .................................................................................. 3 Previous System Updates ................................................................................................ 3 Overview: The Annual Emissions Inventory Report (AEIR) System ......................... 3 Getting Started .................................................................................................................. 4
STEERS Access .............................................................................................................. 5
Navigating in the STEERS and AEIR Systems .......................................................... 6 Select RN/Air Account Number ..................................................................................... 7
Edit or Add Contact Information.................................................................................... 7 Create or Update Process for the Emissions Inventory ................................................ 8
Step 1: Enter Data into the Work Area ......................................................................... 9 Option 1, EIQ Entry: Using a Web Browser to Create or Update an EI ...................... 10
Update Account-Site Information ............................................................................. 11
Update FINs, EPNs, and CINs .................................................................................. 12
Update Emissions...................................................................................................... 15 Creating an Initial EI or Adding New FINs, EPNs, and CINs to an Existing EI ..... 18 Deleting New FINs, EPNs, or CINs ......................................................................... 19
How to Create or Delete a New Path ........................................................................ 19 How to Add CINs to Existing Paths ......................................................................... 20
Completing Online Entry of an EI ............................................................................ 21 Clearing the Work Area ............................................................................................ 21
Option 2, Upload File: Using a Single Text File to Submit an Updated EI ................. 21
Step 2: Attach Supporting Documentation ................................................................. 22 Step 3: Submitting Data from the Work Area ............................................................ 24
Emissions Events Certification for the Site .................................................................. 25 Submit Work Area Emissions Inventory Records .................................................... 25
EI File Status in STEERS-AEIR and 30 TAC §101.10 ................................................ 28
Final EI Data Upload into STARS ................................................................................ 28
Quick-reference for EI File Status ................................................................................ 28 EI Update Tips ................................................................................................................ 29
Contact Us ....................................................................................................................... 30 Acronyms ......................................................................................................................... 31 Glossary ........................................................................................................................... 31
3 version 3.1 12/29/2016
What’s New (Updated 12/29/2016) The section on STEERS Access (starting on page 5) has been updated to clarify the
appropriate use of the SUBMIT access level within STEERS as it applies to the AEIR
system.
Previous System Updates 2/2/2015: The Texas Commission on Environmental Quality (TCEQ) has implemented
improvements to the Web-based Emissions Inventory (EI) reporting system. The
improvements include changes to the layout of certain screens to better convey the data
contained on them and a document attachment function has also been added to the Web-
EI system.
The document attachment function will allow non-confidential supporting documentation
and sample calculations to be included with the Web-EI submission. Such documents
will no longer need to be mailed or e-mailed to the TCEQ. See page 22 for more details
2/26/2014: Significant enhancements were seen by users that select the File Upload
option. The File Upload option is detailed below starting on page 21.
The updates to the File Upload option moved the data checks previously done after file
submission to the initial process of importing the data file into the Annual Emissions
Inventory Report (AEIR) system. This enhancement helped to ensure that all file errors
were identified and corrected before the data could be submitted to the TCEQ. Importing
the file may take several attempts before all errors are corrected, however any errors are
reported to the user importing the file immediately after completion of the import checks.
This improvement has reduced the amount of time it takes to receive feedback and has
eliminated the situation where the user with submit authority has to make multiple
official submissions.
Overview: The Annual Emissions Inventory Report (AEIR) System A regulated entity (RE) can submit an initial or annual emissions inventory online to the
TCEQ through the Web-based AEIR program area within State of Texas Electronic
Emissions Reporting System (STEERS). The STEERS-AEIR submission system is also
referred to as AERI and Web-EI. User can submit initial EIs and annual EI updates
through this system per the requirements of 30 Texas Administrative Code (TAC)
§101.10 (Emissions Inventory Requirements).
This document discusses how to use STEERS-AEIR to submit an EI, however please
refer to the Emissions Inventory Guidelines for details on the terminology used in this
document and the EI process itself, including information required to be reported.

4 version 3.1 12/29/2016
Three steps are required for completing an AEIR web-EI update. The user must
successfully:
1. Create or Update the EI using the AEIR system.
The user can select one of two available options for updating data through the
AEIR system:
Option 1 EIQ Entry: Also referred to as manual entry, this method allows the
user to add new data or update existing data using a Web browser. Each
facility identification number (FIN), emissions point number (EPN), control
identification number (CIN), and emissions record is updated in a manner
similar to submitting an emissions inventory questionnaire (EIQ) printed on
paper. The user can create or update portions of the EI over multiple days
until complete. Limited validation routines help the user enter updates of the
required information in the proper format.
Option 2 Upload File: Import a single text file (delta file) that contains all EI
data into the AEIR Work Area. The file is loaded from the user’s workstation
into the Work Area. Delta files for loading into AEIR are created off-line by
the user and are not needed if option 1 is used. For more information on delta
files please refer to the series of electronic reporting documents on the
TCEQ’s point source emissions inventory Web page:
http://www.tceq.texas.gov/airquality/point-source-ei/psei.html
2. Attach non-confidential sample calculations and supporting documentation.
30 TAC §101.10 requires sample calculations and supporting documentation,
such as sample calculations, be submitted to the TCEQ. Non-confidential
documents may be mailed or e-mailed, however attaching documents as part of
the AEIR submission is the preferred method for delivery. Confidential
documents should only be submitted by mail.
3. Submit a complete EI from the Work Area.
After the user completes manual entry or successfully loads a delta file, the user
submits the data to the TCEQ for upload into the State of Texas Air Reporting
System (STARS) database.
Additionally, the user can view and save a copy of the data sent to the TCEQ, track file
activities, and view and save any error logs. The user can also update the EI contact
information.
More details about this process are presented below, beginning with obtaining access to
STEERS.
Getting Started STEERS accounts are issued to individuals, not organizations. Each person accessing the
AEIR system will need to create his/her own STEERS account. After successfully

5 version 3.1 12/29/2016
creating a STEERS account, the user configures access to AEIR by specifying which
RNs the user needs to access and the level of access needed. Creating a STEERS account
and configuring access to the AEIR system are one-time operations and do not need to be
redone annually.
Multiple STEERS users can obtain AEIR access for the same RN. Obtaining AEIR
access for an RN allows each user to view and edit all entered EI data. Therefore,
multiple users can enter EI data versus a single user, which speeds data entry for larger
emissions inventories.
STEERS Access
The user must have a STEERS account and password to update and/or submit an EI
through the Web. Obtaining access to STEERS and/or the AEIR program area within
STEERS is a multi-step process. General instructions are provided below. Please refer
to the STEERS home page and user help documentation for more information:
https://www3.tceq.texas.gov/steers/.
Opening the STEERS home page (using the link above) and clicking on the to create a
new account link will take new users through the process of creating their STEERS
account. Follow the onscreen instructions to create a new account. For any questions at
this point in the process refer to the STEERS help link at the top of the STEERS Web
page or contact STEERS at (512) 239-6925.
Note: The STEERS help link is context-specific and will open the help document at
a point relevant to the current Web page.
After creating a STEERS account or logging in with an existing STEERS account, the
user will need to obtain AEIR system access for each RN required to update and/or
submit EIs.
1. From the STEERS home page, click the My Account button at the top of the
page.
2. Select AEIR from the drop down list located in the STEERS Access block and
click Go.
3. Click Add IDs.
4. At this point the user must select their access type. There are three levels of
access:
Read Only – View data in the AEIR system but cannot update or submit (this
role is not very useful for the AEIR system and probably should not be
selected).
Edit – Edit data on screen or upload delta files, but cannot certify and submit.
Submit – Same as Edit but can certify and submit data. Users selecting
Submit access will need to certify they have the authority or have been given
the authority to submit data by an appropriately authorized person. This is a
self-certifying process and it is the responsibility of the user to select the
proper access and specify the proper authorization.

6 version 3.1 12/29/2016
IMPORTANT Note on Submit Access: Submit access should only be used by the
person directly affiliated to the owner/operator of the RE who has the authority to
sign and certify documents for the owning/operating company. For Title V sites
submit access should only be given to the Responsible Official or their Duly
Authorized Representative. Under no circumstances should a consultant be given
Submit access.
5. Complete all fields and enter one or more RNs. Click Add IDs towards the
bottom of the page then Confirm Add on the next page to complete set up.
Note about access: The user that submits the EI data can be different than the
user(s) that entered or loaded the data into AEIR.
After creating a STEERS account and setting up access to the AEIR system, the user’s
account is placed on probation, which limits system access. The user will remain on
probation until a STEERS Participation Agreement (SPA) is submitted. Making
changes to an existing STEERS account, such as adding more RNs for AEIR access,
places those changes on probation and requires a new SPA.
To submit a SPA, return to the STEERS home page and click the My Account button.
From the buttons near the top of the page there should be two options for submitting a
SPA: Paper SPA or E-sign SPA.
If the user has a valid Texas driver license the option to electronically sign the SPA may
be used. Click E-sign SPA, complete the appropriate fields, and follow the on-screen
prompts to submit the SPA.
If the user does not have a valid Texas driver license, click the Paper SPA button, then
click the Generate Your SPA button. Follow the onscreen instructions for completing
and submitting the paper SPA.
Once the STEERS account is taken off probation, the user will have access to all of the
requested functions.
For questions about the SPA, please refer to the STEERS help link or contact STEERS at
(512) 239-6925.
Navigating in the STEERS and AEIR Systems
Navigate between pages in the STEERS-AEIR applications using the navigation buttons
located at the top of each screen (Figure 1). The first row includes the Help, Contact Us,
and Logout buttons. The second row primarily navigates between specific AEIR pages.
The system does not display all buttons at all times. The status of the emissions
inventory and the authority of the user will determine which buttons are displayed.

7 version 3.1 12/29/2016
Figure 1: Navigation Buttons
Important Note: Do not use the web browser back, forward, or reload buttons.
Data may be lost or system errors occur if the browser buttons are used.
Select RN/Air Account Number
After signing in to STEERS and selecting the AEIR program, users with AEIR access for
multiple RNs will be taken to the Annual Emissions Inventory Report page. This page
lists all of the RNs the user can access through the STEERS-AEIR system. Selecting an
RN from the list takes the user to the Air Emissions Inventory Detail page for that RN.
If an RN for a site is not listed, ensure the RN was added to the user’s STEERS account
through the My Account set up and also ensure that a SPA was submitted.
If the user only has AEIR access for one RN, then the Air Emissions Inventory Detail
page is the first page displayed after logging into STEERS and selecting the AEIR
program.
From the Air Emissions Inventory Detail page the user can:
View details of the RN
Add, edit, and/or submit contact information changes
View and download any error logs
View status and tracking information
Begin the EI update process through either Upload File or EIQ Entry.
Updating contact information and the general EI update process are discussed in detail below.
Edit or Add Contact Information The user may update emissions inventory contact information on the Air Emissions
Inventory Detail page (Figure 2). Select the Edit button at the bottom of the screen to
make any changes. If no contact information is available in STARS or the STEERS
Work Area, the Add button is displayed on the bottom of the page. Click the Add button
to enter contact information. Please note that the system only allows the user to submit
contact information changes to STARS once a day.
After the user clicks the Edit or Add button, the user is brought to a page to enter or
update the contact information. Items marked with an asterisk are required. At the
bottom of the page, indicate if the changes entered are updates to the same contact or the

8 version 3.1 12/29/2016
addition of a new contact. Examples of updates for the ‘same contact’ may be a new
mailing address or a name change for an existing contact.
Figure 2: Air Emissions Inventory Detail Page
The user has two choices when saving the added or changed data.
Save – Saves and stores the data to the STEERS Work Area only. To transmit the
data to the TCEQ, have the appropriately authorized person submit the data to
TCEQ (see Save and Submit immediately below).
Save and Submit – For users with Submit access in STEERS-AEIR, saves the
data and submits the data to STARS. Selecting this button starts the submission
process for uploading the contact data to both the STEERS Work Area and to the
STARS database. The system will request certification of the changes. To certify
these changes, enter the STEERS password and select Confirm Submit button.
Only users with Submit access can submit data to the TCEQ.
Note: Submission of contact information is a separate process from the submission
of annual EI data through the Upload File and EIQ Entry options (detailed later in
this document). Submission of annual EI data does not automatically submit
contact data entered into the STEERS Work Area.
Create or Update Process for the Emissions Inventory Before an EI can be created or updated through the AEIR system, the RN must have
certain basic information present in the STARS database and TCEQ staff must process
the data for the upcoming inventory reporting cycle. This processing is done prior to the
mailing of the inventory request letters. The AEIR system is ready to accept updates if
the emissions inventory status field says EXTRACTED in the banner and either or both
of the Upload File and EIQ Entry buttons appear on the Air Emissions Inventory
Detail page.
MOE JOSEPH
EHS MANAGER

9 version 3.1 12/29/2016
If the RN has never submitted an EI, or if neither the Upload File and EIQ Entry
buttons is available for RNs that have previously submitted an EI, please contact the
TCEQ Emissions Assessment Section Help Line at 512-239-1773 for assistance.
Submitting an EI through the AEIR system is a three-step process. The three steps are
outlined below, and are discussed in more detail in subsequent sections:
1. Update or enter data into the Work Area using one of the two available
options. One option (EIQ Entry) allows the user to use a web browser to update
EI data in one or multiple sessions. Users update and save data in the Work Area
until it is complete and ready for submission. The second option (Upload File)
allows a single delta file to be loaded from the user’s workstation to the STEERS
Work Area.
Note: After choosing one EI update option and saving data (other than contact
information) into the Work Area, the other option will disappear. Thus, only one
of the Upload File or EIQ Entry buttons will remain available after the first time
Save is selected.
2. Attach non-confidential sample calculations and supporting documentation.
30 TAC §101.10 requires sample calculations supporting documentation, such as
sample calculations, be submitted to the TCEQ. This documentation is due at the
same time the EI is due. Non-confidential documents may be mailed or e-mailed
but attaching them as part of the AEIR submission should be the primary method
for delivery. Confidential documents should only be submitted by mail.
3. Submit the data from the Work Area into the STARS system. The system
validates the EI data for completeness as part of the submission process.
Successful completion of all three steps above are required for the EI to be considered
submitted per the reporting requirements of 30 TAC §101.10 (relating to Emissions
Inventory Requirements).
Once the EI data has been submitted through STEERS, TCEQ staff will upload the
validated data into the STARS database independent of the user. As part of this process,
the data are subject to additional quality assurance review, and the emissions inventory
contact may be contacted with questions.
Step 1: Enter Data into the Work Area The user may choose one of two options for entering EI data in the STEERS-AEIR Work Area.
The two options are outlined below and explained in more detail in the subsequent sections.
From the Air Emissions Inventory Detail page, the user chooses the method of updating
EI data by selecting one of two navigation buttons: EIQ Entry or Upload File.
EIQ Entry. This process allows direct entry of emissions and related data. The
user may save data in the Work Area in one or more work sessions until all data
are updated. Users who have historically submitted EI updates on paper may
prefer this process.

10 version 3.1
12/29/2016
Upload File. A single data text file, called a delta file, can be loaded from the
user’s workstation. This file is a complete update of the emissions inventory in the
proper format for database processing. Past users who have submitted updated EI
delta files on diskettes/CD-ROMs will most likely use this method.
Regardless of the option chosen to enter EI data into the AEIR Work Area, the Emissions
Inventory Status field must show EXTRACTED in the banner at the start of the process.
The Upload File and EIQ Entry navigation buttons must also be available at the top of
the Air Emissions Inventory Detail page. Contact the EAS Help Line at 512-239-1773
if the buttons are not available or the status does not list EXTRACTED.
After the user has started one of the two options for update, either by selecting a delta file
to upload or manually updating EI data via a Web browser into the AEIR Work Area, the
other update option is removed. For example, if an emissions point parameter is saved
into the Work Area using the EIQ Entry option, the option to upload a single text file
(delta file) is removed and the Upload File button is no longer available.
Option 1, EIQ Entry: Using a Web Browser to Create or Update an EI
After selecting the EIQ Entry button, the user will be directed to the Emissions
Inventory Questionnaire Entry Search page (figure 3). The page contains a drop-
down menu which allows access to any of the EI report sections (also called tables). The
user may select and update the sections in any order or may partially complete one
section and move to another. However, it is recommended the user follow the order
listed in the drop down.
Access a section by selecting a table name from the drop down menu and click Search.
For an existing EI the user can access the previous year’s information and provide
updates for existing equipment by selecting the Account-Site, FIN, EPN, CIN, and
EMISSION sections as appropriate. The user also can add new equipment to the EI
through each of the FIN, EPN, and CIN sections. The Add Path section allows the user
to create new emissions paths between new or existing equipment. When adding a path
to the EI, the user must add and report emissions for at least one contaminant.

11 version 3.1
12/29/2016
Figure 3: Emissions Inventory Questionnaire Entry Search
The system allows the user to save work-in-progress in the Work Area. Each section
must be fully updated prior to submission. Specific sections are discussed individually in
more detail below.
Update Account-Site Information
Select Account-Site from the drop-down menu on the Emissions Inventory
Questionnaire Entry Search page and click Search. The system displays RN/Air
Account and site information on the Edit Site Information page (Figure 4). The user
enters data in the fields under the New Value column. The data listed under the
Previous Value column are read-only with values from the most recently updated
inventory. These data are prefilled regardless of whether previously submitted EIs were
paper or electronic format.
Because the operating parameters at a site do not change often, for the user’s
convenience, many of the new values are pre-filled with the previously submitted values.
To change any data, the user enters a value in the New Value column and selects Save.
More than one item can be updated prior to selecting Save. The user must update all
mandatory fields. Because the number of emissions events (EE) and scheduled
maintenance and start-up shutdown activities (SMSS) typically vary from year to year at
a site, these fields may not be pre-filled and should be entered by the user.
If the user clicks Cancel without saving any data to the Work Area, this section will not
be complete. The EI data cannot be submitted until all sections are complete.

12 version 3.1
12/29/2016
Figure 4: Edit Site Information Page Showing New Value Entry Fields
Update FINs, EPNs, and CINs
The update process is the same for FINs, EPNs, and CINs and is discussed jointly in this
section.
From the Emissions Inventory Questionnaire Entry Search page select the desired
report section for FINs, EPNs, or CINs from the drop-down menu. All FINs, EPNs, and
CINSs currently in the EI are shown on the specific FIN, EPN or CIN list page. The FIN
List page is shown in Figure 5. A list page can be sorted by FIN, EPN, CIN, Name,
Profile, or Work Area Status by clicking the respective column headers.
When a list page is first opened, the Work Area Status column will be blank. The system
tracks work-in-progress by updating the Work Area Status after each equipment update
is saved. The user must update all the equipment (FINs, EPNs, and CINs) shown on the
list page or, if the data remains valid from the previously submitted data, select the No
Change box.

13 version 3.1
12/29/2016
Figure 5: Example of List Page for FINs
Because the parameters of a piece of equipment at a site do not change often, the user is
provided with a No Change option to select for any equipment listed. The user must
select Save before leaving the list page or the No Change selections will not be saved.
Once the Save button is clicked, the Work Area Status column will indicate No Changes
for all equipment that had the No Change box checked.
Note: The list of FINs includes all FINs from the STARS database for the site
regardless of status. For FINs that have a status of shutdown, demolished, or
ownership transfer, the only option for the user to select is No Change.
Selecting the equipment opens a details page with information for that equipment, an
EPN detail page is shown in Figure 6. This is the Edit EPN Information page; the edit
pages for FINs and CINs follow the same format and function. The user can make and
save changes or view the parameters for the equipment. For the user’s convenience, the
new values are pre-filled with the previous year’s values. If any of these values are no
longer valid, the user enters the new values into the entry boxes under the New Value
14 version 3.1
12/29/2016
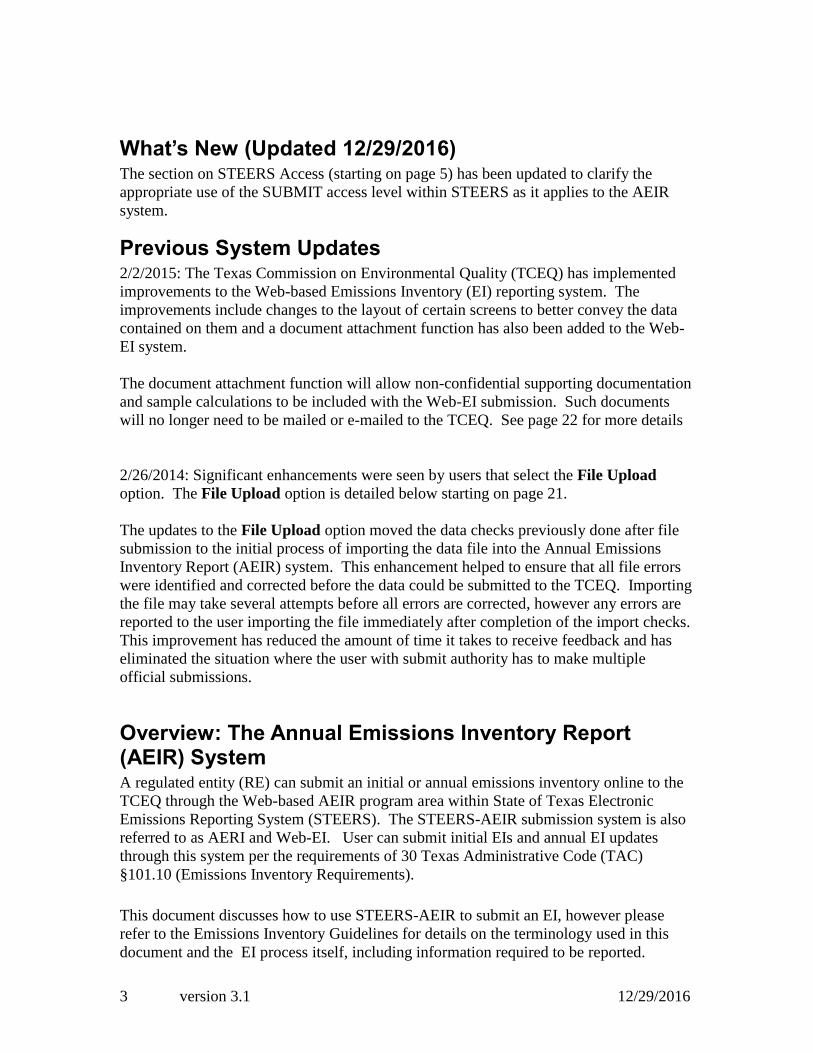
column. Some fields may initially be unpopulated because the data do not exist in
STARS. If the unpopulated field is a mandatory field, then the user must enter a value.
All mandatory fields must be updated. If there are any errors with the entered values, the
errors must be corrected before the data can be successfully saved to the Work Area.
When the user returns to the list page after a successful save, the Work Area Status will
indicate Updated.
Figure 6: Example of an EPN Detail Page for a Stack
The user can still make changes to a piece of equipment that has been marked No
Change by selecting the equipment from the list and making any change in the detail
page. The Work Area Status will then indicate Updated. After a change is made on any
equipment, the No Change option will be disabled.
The user must update or select the No Change box for all equipment. The Work Area
status remains blank until either the data are changed through the detail page or the No
Change check box is selected.
The user cannot change information located in the FIN, EPN, or CIN Detail header
present at the top of each Edit Information page. The header contains information such

15 version 3.1
12/29/2016
as labels, names, group, profile, and SCC. Please contact the TCEQ to request changes to
these types of information.
Update Emissions
The user can update emissions for each path (FIN/EPN pairing), including emissions
from planned maintenance, startup, and shutdown (MSS) activities and emissions events
(EE), if applicable. The user can also add new contaminants to any path.
Select the EMISSION section from the drop-down menu on the Emissions Inventory
Questionnaire Entry Search page. The Emissions List page will appear. This page
lists all the active paths for the site and the Work Area Status for each path (Figure 7).
The page also indicates whether a CIN is associated with the path by displaying a Y or N
link in the CIN column. Selecting the Y link for a path under the CIN column will
display the names of all of the control devices associated with the path. Also on the
Emissions List page, the user may remove any newly created paths (see How to Create
or Delete a New Path section below).
Figure 7: Emissions List page

16 version 3.1
12/29/2016
The Work Area Status column indicates the status of each path update. It remains blank
until emissions are entered for a path. The column will indicate In Progress if the user is
in the process of updating the emissions for a path and has not completed all entry. The
column will indicate Error if there are errors with the entered values. Unlike FIN, EPN,
and CIN data, emissions updates can be saved in stages, meaning emissions entry can be
partially completed, saved, and then resumed at a later date. Saving partially entered
emissions records can result in errors that must be corrected before submission of the EI.
Once all entry has been completed and any errors corrected, saving the data will update
the Work Area Status to Updated.
The user can pick a path by selecting either the FIN or EPN label in a row. The
contaminants associated with a path are listed on the Edit Emissions Information page,
shown in Figure 8. More than one page of contaminants for each path may be available.
Figure 8: Edit Emissions Information for a FIN/EPN Path
The previously reported annual and ozone season emissions will be displayed under the
Previous Annual and Previous Ozone columns. The entry columns for the new annual

17 version 3.1
12/29/2016
and ozone season emissions will be defaulted to blank when the page initially opens. The
SMSS and EE emissions will be defaulted to zero.
Since the ozone season is May through September, it is possible for a site to have ozone
season emissions but not have summer operations. If this is the case, enter a non-zero
summer operating percentage (i.e., 1%) in the FIN section and then report ozone season
emissions in the Emission section. See Chapter 4 of the Emissions Inventory Guidelines
for information of ozone season reporting requirements and guidelines. Ozone season
rates are not required for sites in certain counties. Enter a zero if no rate is required. The
system will not accept a blank ozone season emissions record.
In some cases, the user may determine that the current year’s emissions have not changed
from the previous year’s emissions. For this case a rollover function is available. If the
user selects Rollover, the current year’s annual and ozone season values will be set to the
previous year’s values for the selected contaminant. There is no function to rollover the
entire path’s emissions (i.e., all contaminant emissions for the path at one time). If there
are any issues with Java or active scripting in your browser the rollover function may not
work. Contact your computer support staff or other technical support personnel for
browser assistance.
For contaminants not previously reported, the user can add these emissions to a path by
clicking the Add Contaminant button. Clicking this button takes the user to the
contaminant search page (see Search for a Contaminant section below). After finding
the correct contaminant, the user will be taken back to the Edit Emissions Information
page where the user can enter the emissions for the new contaminant.
The user can delete any newly added contaminant from the Work Area by clicking the
Remove check box then clicking Save. To preserve historical data, the system will not
allow the user to delete any contaminant already present in the database.
If more than 25 contaminants are reported on a single path, then the user must use the on-
screen paging buttons to view and update all of the contaminants (25 at a time).
Search for a Contaminant
The user can search for contaminant information using one of three criteria: the
contaminant code, the contaminant name, or the Chemical Abstracts Service (CAS)
number. Figure 9 shows the Search Contaminants page. If multiple criteria are
entered, the system will use the first criterion listed on the page to perform the search.
The contaminant name search is a wild card search function. For example, searching for
“alcohol” will return contaminants with “alcohol” anywhere in the name. If no
contaminants exist for the provided search criterion, the page will list all the
contaminants in the database. The search page will not display contaminants already
reported on the path.

18 version 3.1
12/29/2016
Once the user selects a contaminant code, the system will return to the Edit Emissions
Information page with the selected contaminant appearing in a new row.
Figure 9: Search Contaminants page
Creating an Initial EI or Adding New FINs, EPNs, and CINs to an Existing EI
The user can add new equipment to the emissions inventory. Only FINs with an active
status can be added. All new equipment must be associated with another piece of
equipment in a path. The system does not allow the user to submit an inventory with any
unassociated equipment. An Initial EI can be created by using the add equipment
function.
To add equipment, select the appropriate section of the inventory (FIN, EPN, or CIN)
from the drop-down menu on the Emissions Inventory Questionnaire Entry Search
page. To add a new FIN, EPN, or CIN the user will:
1. Select Add FIN, Add EPN, or Add CIN at the bottom of the appropriate
List page.
2. Enter a label and name for the FIN, EPN, or CIN. Each FIN must be
uniquely named; each EPN must be uniquely named; and each CIN must
be uniquely named. See Chapter 3 of the Emissions Inventory Guidelines
for nomenclature guidelines.
3. For a FIN or EPN, select the appropriate profile from the drop-down.
4. For a FIN or EPN, select Next to display characteristics unique to the type
of FIN or EPN. Complete all required information.
5. For FINs, click Select SCC and search for the appropriate code.
6. For CINs, click Select Abatement and search for the appropriate code.
The system lists available Source Classification Codes (SCC) and abatement codes in
search page similar to the Search Contaminants page. The SCC description search
function is a wild card search. For example, searching for “electric” will return

19 version 3.1
12/29/2016
descriptions with “electric” anywhere in the name. If no description exists for the
provided search criteria, the page will list all the SCCs in the database.
Complete all required information. Click Save to save the newly created FIN, EPN, or
CIN information into the Work Area.
Important note: Each added FIN, EPN, or CIN must be placed on a path. The path
must contain one FIN, one EPN, and one or more emissions records. One or more
CINs can also be included on the path.
Deleting New FINs, EPNs, or CINs
The user can remove newly created FINs, EPNs, or CINs by selecting the Delete button on the
FIN, EPN, or CIN List page or at the bottom of a detail page. Only FINs, EPNs, or
CINs added by the user through the AEIR system can be deleted. Existing equipment
present in the STARS database cannot be deleted through the AEIR system.
How to Create or Delete a New Path
The user can add new paths by associating an existing or newly created FIN and EPN.
The path optionally includes one or more CINs and must include one or more emissions
records. To create a path, the user selects the FINs, EPNs, or CINs from the Work Area.
Before any FIN, EPN, or CIN can be included in a path, it must first be created or
updated and saved into the Work Area.
Figure 10: Add Path page
The user may create a new path using the following steps:
1. Select Add Path from the drop-down menu on the Emissions Inventory
Questionnaire Entry page to view the Add Path page (Figure 10).

20 version 3.1
12/29/2016
2. Choose Select FIN to search a list of FINs in the Work Area. After selecting a
FIN the system will flow to the Add Path page.
3. Choose Select EPN to search for an EPN in the Work Area. After selecting an
EPN the system will flow to the Add Path page.
4. Optionally, the user may add one or more CINs to the path. Choose Select CIN
to search a list of CINs saved in the Work Area. Since path can have multiple
CINs the Select CIN page uses check boxes to indicate which CINs will be
added. Check all CINs that need to be added and select Add Selected CINs.
5. Add at least one contaminant record with emissions by selecting Add
Emissions to start this process. Adding a contaminant to a new path uses the
same process as adding a contaminant to an existing path (see above).
Important Note: The system will not create a path if the process is canceled before
the user adds and saves an emissions record.
The user can delete new paths by going to the Emissions List page (select the
EMISSION section from the drop-down menu on the Emissions Inventory
Questionnaire Entry Search page). Because only newly created paths can be deleted the
system displays a Delete button only for those paths. Select the Delete button to remove
the path between a FIN and EPN. Because the emissions are associated with the path,
emissions reported on the selected path will be also be deleted from the Work Area.
After selecting Delete, a Delete Path and Emissions page will request the user to confirm
deletion of the path and its emissions. With this function, the user is deleting the path or
the association between two pieces of equipment. The FIN, EPN, and, if applicable, CIN
will not be deleted unless deleted in a separate specific step. To remove any newly added
equipment from the Work Area, the user must proceed to the FIN, EPN, or CIN lists
pages and delete the specific Fin, EPN, or CIN.
The system does not allow the user to delete an existing path that is already in STARS.
These paths have emissions history or other constraints preventing a deletion. Please
contact the EAS Help Line (512-239-1773) to request deletion of existing paths from the
inventory.
How to Add CINs to Existing Paths
The user can add control devices to existing paths. These paths are listed in the
Emissions table. A Y or N flag in the CIN column indicates whether control devices
already are associated with the path in the EI. Clicking on the Y or N indicator takes the
user to the Add/Delete CINs from Path page. This page lists any existing CINs on the
path and allows the user to add/remove new CINs.
1. Select the Emissions table in the drop-down menu on the Emissions
Inventory Questionnaire Entry Search page.
2. Select the Y or N indicator under the CIN column for a particular path.
3. Click Select CIN to go to the Select CIN page.
4. Select one or more CINs to add to the path.
5. Click Add Selected CINs on the Select CIN page.
6. Select Save on the Add/Delete CINs form Path page.

21 version 3.1
12/29/2016
Completing Online Entry of an EI
When the user has manually entered and updated all of the necessary data for the EI, then
the data can be submitted to the TCEQ for validation and loading into the STARS
database. See Step 2: Attach Supporting Documentation and Step 3: Submitting
Data from the Work Area below for more information on how to submit the EI data.
Clearing the Work Area
If at any point during the EIQ entry process, the user needs to start over due to incorrect
entry or major changes to entered data, the option exists to delete all saved data from the
Work Area. Once online entry has started in STEERS, the Clear Work Area button will
appear on the Air Emissions Inventory Detail Web page. Clicking this button will ask
for confirmation that the user wants to delete all data from the Work Area. Clicking Yes
will complete the deletion of all data saved in the Work Area. Using the Clear Work
Area function will require the user to restart EIQ data entry from the beginning.
Option 2, Upload File: Using a Single Text File to Submit an Updated EI
A user not wanting to update each FIN, EPN, CIN, and emissions record manually
through the EIQ Entry option may choose to upload a single text file (delta file) for
submission.
Creation of a delta file is a process entirely the responsibility of the user and/or the
company. Special data systems, associated software, and data services are most
commonly used to create delta files. For more information on delta files, see the
Electronic Reporting links on the TCEQ point source emissions inventory Web page:
http://www.tceq.texas.gov/airquality/point-source-ei/psei.html
Once the user has created a complete delta file containing all required EI updates, the
user will complete these steps to upload a file to the Work Area:
1. Name the delta file in this format: RN#########_UPLOAD.txt. The delta file
name must include the RN of the account to be submitted.
2. Log into STEERS, access the AEIR system and select the appropriate RN as
described in previous sections of this document to access the Air Emissions
Inventory Details page.
3. Select the Upload File button at the top of the page to go the Upload Air
Emissions Inventory File page (Figure 11).
4. Click Browse or Choose File (depending on your browser) to browse your PC for
the delta file. Highlight the delta file and click Open to return to the Upload Air
Emissions Inventory File.
5. Select Upload File to load the delta file into the Work Area.

22 version 3.1
12/29/2016
Figure 11: Upload Air Emissions Inventory File
Clicking Upload File starts the process for loading the selected delta file into the Work Area.
The amount of time it takes to process the EI file depends on the file size and current
database activity.
The user that loads the delta file into the work area receives an e-mail summarizing the
results of the import attempt. The status of the EI after the import process stars will be
one of the following:
IMPORTING - The file is in the queue waiting for processing.
IMPORTED - The delta file has successfully imported into the Work Area. This
step does not complete the submission of data to the TCEQ. The data must be
submitted from the Work Area to STARS.
IMPORT ERROR - Errors were detected in the file, and it was not imported. An
error log is attached to the e-mail sent to the user or can be viewed by selecting
the Error Log button on the Air Emissions Inventory Detail page. Choose
Import Errors from the drop-down menu and click Search. The user must
correct ALL errors off-line and reload the corrected delta file (repeat steps 2-
5).
Once a delta file is successfully imported into the Work Area, the user can submit the
data for validation and upload in the STARS database (see Step 2: Attach Supporting
Documentation and Step 3: Submitting Data from the Work Area below).
Step 2: Attach Supporting Documentation 30 TAC §101.10 requires sample calculations and supporting documentation be
submitted to the TCEQ as part of the annual EI. Failure to submit this documentation
may cause the annual EI submission to be considered incomplete and may result in
enforcement action. Refer to Chapter 1 of the Emissions Inventory Guidelines for more

23 version 3.1
12/29/2016
information.
The document attachment function can be used to attach non-confidential documents and
data to the AEIR submission. Any documents attached become part of the COR and are
permanently stored within STEERS. Documents may be e-mailed to
[email protected]; however the document attachment function is the
primary method to submit sample calculations and supporting documentation.
Any documents considered confidential should be mailed to the TCEQ. Under no
circumstances should confidential information be attached to the AEIR submission or e-
mailed as part of the EI process. Refer to Chapter 1 of the Emissions Inventory
Guidelines for more information.
Please note if there are any errors with the emissions inventory data entered into the
AEIR system the document attachment function will not be available until the errors are
corrected.
To attach documents to the AEIR submission:
1. Click the Work Area button located at the top of any page in the AEIR system.
2. Under the section of the Review or Submit Work Area Emissions Inventory
Records page (Figure 12) titled Attach Supporting Doucment(s)… click
Browse or Choose File (depending on your browser) to browse your PC for the
attachment.
3. Highlight the file and click Open to return to the Work Area page.
4. Click the Attach button (located below the Browse/Choose File button) to
complete the attachment process.

24 version 3.1
12/29/2016
Figure 12: The Review or Submit Work Area Emissions Inventory Records Page
with document attachment function
Repeat this process for each document to be attached. To remove any attachments (prior
to submission) simply click the red X button next to the attachment name.
Any user with Edit or Submit authority can access the Work Area page and attach or
remove documents at any time prior to submission of the Emissions Inventory.
Step 3: Submitting Data from the Work Area The EI data is ready to be submitted to the TCEQ after the updated data have been
completely entered using Option 1, EIQ Entry, or successfully uploaded using Option 2,

25 version 3.1
12/29/2016
Upload File, into the Work Area.
Access the Work Area by selecting the Work Area button located at the top of any page
in the AEIR system. The Review or Submit Work Area Emissions Inventory Records
page (Figure 12) is used to attach documents, review entered data or submit data to the
TCEQ. EI data can be reviewed prior to submission by selecting the appropriate section
from the drop-down menu. If, during the manual entry process, errors were found in any
data or portions were not updated, error messages will be displayed. All manual entry
errors and all portions of the EI must be corrected and updated before the EI can be
submitted.
After completing all manual entry or successfully loading a delta file, criteria emissions
totals are displayed.
Important note: Up to this point, all steps can be done by either a user with Edit or
Submit access. However, ONLY a user with Submit access can perform the next steps
in the EI reporting process: the Emissions Events certification and the submission of the
EI to the TCEQ.
Emissions Events Certification for the Site
As stated in Chapter 4 of the Emissions Inventory Guidelines, a signed statement is
required to be submitted with the EI if the site experienced no emissions events. The two
options for this certification are displayed on the Review or Submit Work Area
Emissions Inventory Records (Figure 12). Before submitting the EI to the TCEQ, a
user with Submit access must select whether the site experienced or did not experience
any emissions events during the calendar year. Selecting one of the radio button options
and submitting the EI to the TCEQ constitutes an electronic signature. Refer to Chapter 4
of the Emissions Inventory Guidelines for information on the certification statement.
Submit Work Area Emissions Inventory Records
Only users with Submit access can perform this step. After reviewing the data and
selecting the appropriate Emissions Event Certification option, clicking Submit takes the
user to the Review or Submit Work Area Emissions Inventory Records page. This
page shows the criteria emissions totals and several legal statements regarding the
certification of the EI data. These statements are analogous to the certifications and
signature blocks on the paper EIQ report. From here the user enters his/her STEERS
account password and selects Confirm to submit the EI file. If the password is correct,
the Confirm Work Area Emissions Inventory Records page will appear.
To submit the records in the Work Area, the user with Submit access will:
1. Review the EI data and indicate whether the site experienced any emissions
events by choosing the appropriate option on the Review or Submit Work Area
Emissions Inventory Records page.
2. Initiate the submission process by selecting the Submit button.
3. Review EI certification statements on the Submit Work Area Emissions
26 version 3.1
12/29/2016
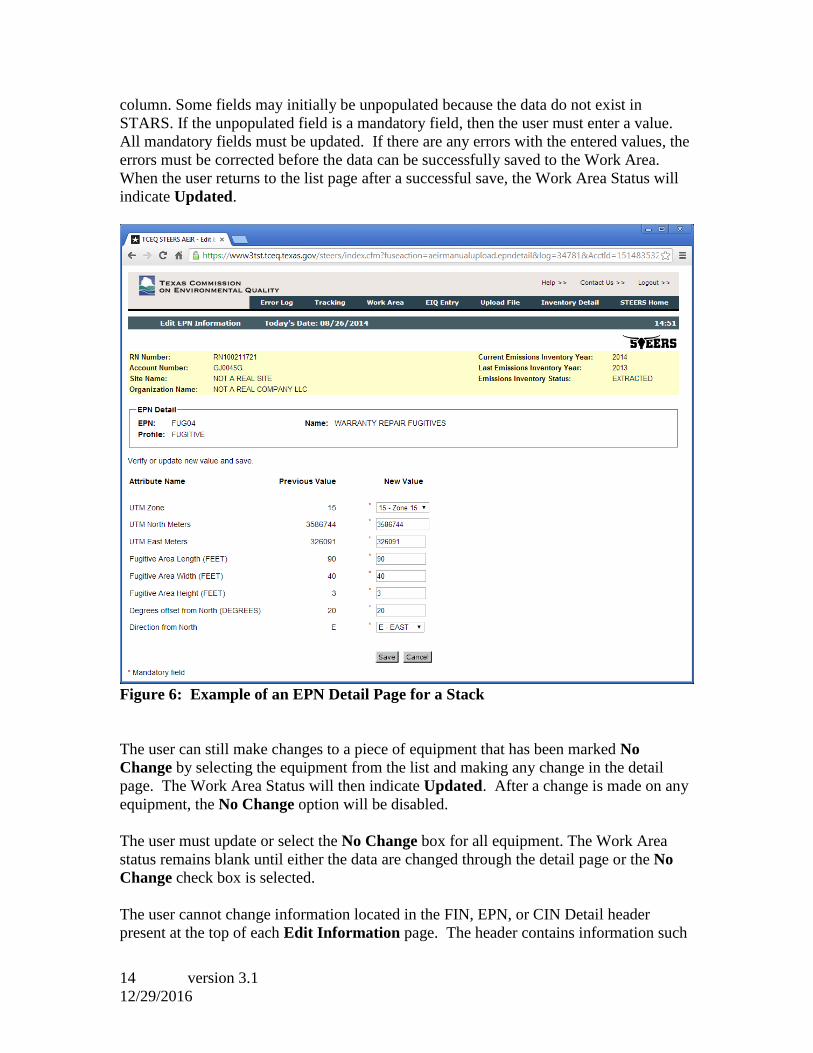
Inventory Records Page (Figure 13), enter their STEERS password and select
Confirm Submit to submit the EI records.
4. If Do Not Submit is selected, the user is returned to the Review or Submit Work
Area Emissions Inventory Records page and the EI is NOT submitted to the
TCEQ.
Figure 13: Submit Work Area Emissions Inventory Records Page
After submitting the EI, the Confirm Work Area Emissions Inventory Records page is
displayed (Figure 14). This page confirms the submission of the EI, provides the user a
confirmation number, provides details of future e-mail notifications regarding EI
processing status, and provides information on how to obtain the copy of record for the
EI submission. The user can further review the EI submission or select Finished.

27 version 3.1
12/29/2016
Figure 14: Confirm Work Area Emissions Inventory Records Page
The user starts the submit process by selecting Submit. All EIQs submitted through
STEERS (regardless of the EI update method chosen) undergo data and formatting
checks to ensure data completeness and proper formatting. This process is referred to as
validation; submitting the annual EI though the AEIR system starts the validation
process.
The EI file status displayed on the Web page headers in the AEIR system will change to
PROCESSING or PROCESSED. Depending on the amount of data submitted,
processing may take a few minutes. Once the EI status has updated to PROCESSED,
the data is placed in a queue for the validation routine, which typically occurs the night
after the EI is submitted to the TCEQ. After the validation process is complete, a
confirmation e-mail that includes the status of the validation processing (including any
errors) will be sent to all users with Edit and Submit authority for that RN.
After the validation process is complete the status of the EI file displayed on the Web
page headers in the AEIR system will be one of the following:
VALIDATED: The data passed validation and is now undergoing quality
assurance review in preparation for final upload into the STARS database. The
system assigns a received date for the RN the day the validation process is
successful. At this point the EIQ is considered received in accordance with 30
TAC §101.10. However, sample calculations and supporting documentation are
still required for a complete EI submission. Failure to submit sample calculations

28 version 3.1
12/29/2016
and supporting documentation may result in the removal of the received date and
potential issuance of a Notice of Violation and related enforcement action.
DATA-ERROR (only for users selecting the Upload File option): The EI delta
file failed validation and must be corrected and resubmitted. The notification e-
mail sent when the EI delta file fails validation will have the error log attached.
This error log can also be reviewed through the Air Emissions Inventory Detail
page by selecting the Error Log navigation button and choosing Validation
Errors in the drop-down menu. The user must correct these errors off-line, load a
corrected delta file into the AEIR Work Area, and have a user with Submit access
re-submit the delta file.
By design, users submitting the EI to the TCEQ using the EIQ Entry option
should not encounter data errors on validation. Data checks built into the manual
entry Web pages should not allow errors to be submitted to STARS. If an EIQ
Entry user submits annual EI data that fails validation, please contact the EAS
Help Line at (512) 239-1773. EAS staff will diagnose the problem with the user
and either assist the user on how to correct the data in the AEIR system or initiate
corrections from the TCEQ’s system.
Important Note: Annual EIQ submissions through STEERS that contain errors
will not be considered submitted and will not be assigned a received date. The
user must correct all errors and resubmit the annual EI for validation.
EI File Status in STEERS-AEIR and 30 TAC §101.10
To complete the annual EI update for an RN per the requirements of 30 TAC §101.10,
both successful validation of the annual EI (i.e., the records and/or delta file were/was
successfully submitted from the STEERS Work Area) and submission of the required
supporting documentation to the TCEQ are required. EI data submitted through the
AEIR system may be marked with a received date, but failure to submit sample
calculations and supporting documentation may cause the annual EI submission to be
considered incomplete and may result in enforcement action.
Final EI Data Upload into STARS After the AEIR data submitted from the Work Area passes validation, the TCEQ will
begin quality assurance review of the data and load the data into the STARS database. If
any problems are encountered while loading the data into STARS, TCEQ will contact the
EI contact with information on the errors. Depending on the nature of the issue,
correction may require the user to resubmit through the AEIR system. Staff may also
contact the user requesting additional documentation regarding the inventory update.
Quick-reference for EI File Status A user can determine each EI file’s update status from the Emissions Inventory Status
on the Annual Emissions Inventory Report page (if the users has access to multiple
RNs) or in the header of the Air Emissions Inventory Detail page.

29 version 3.1
12/29/2016
Prior to any data being entered or loaded into the Work Area, the status will indicate:
EXTRACTED – TCEQ processing complete and the AEIR system is ready for
users to being updating their EI
For user’s submitting a delta file, the status will indicate:
IMPORTING – delta file is being imported from a user’s personal computer to
the AEIR Work Area;
IMPORTED – delta file was successfully loaded; or
IMPORT-ERROR – an error was detected in the delta file. The user must
correct the error and reload the file.
The user will submit data from the Work Area to the TCEQ for processing. The status
will indicate:
PROCESSING – the data is in the queue to be processed or it is being processed; or
PROCESSED – the data has finished processing and been placed in a queue for
overnight validation.
Once the validation routine begins the status will change between:
VALIDATING – depending upon the size amount of data and how long it takes
to validate the data, the user may not see this status;
VALIDATED – the data was successfully validated; or
DATA-ERROR – errors were detected in the data. The user must correct the
data errors and resubmit the EI file; this file will undergo validation again.
TCEQ staff will initiate the final step of uploading the EI file data into STARS. The EI
file status will indicate:
COMPLETE – for data that have been successfully uploaded into STARS; or
UP-ERROR – staff may contact the user to correct errors and resubmit.
EI Update Tips When using the EIQ Entry option, the user can update the data (FINs, EPNs, CINs, and
EMISSIONs) in any order. However it is recommended that the user follow the order of
FINs, EPNs, CINs, and then EMISSIONs. Sections may be partially updated before
another section is started. Emission paths can be created after the needed equipment is
saved into the Work Area. Equipment can also be added to the inventory at any time
during the update process.
Work may be saved to the Work Area over several days or several work sessions.
Because of the system’s flexibility, it is possible to add equipment and neglect to create a
path for it by associating it with another piece of equipment. The AEIR system will not
allow the user to submit and EI with newly added equipment that is not associated

30 version 3.1
12/29/2016
properly.
Although the user chooses how to update the emissions inventory, the following update
process is recommended to help organize an EI update with added equipment or paths.
Update and save existing information first so that these data are stored in the Work Area.
1. Update and save information on existing equipment.
2. Update emissions and add any new contaminants for existing paths.
3. Create and add any new CINs for existing paths.
4. Add and save a new FIN, EPN, and/or CIN needed for a new path.
5. Create the new path by:
a. associating new equipment,
b. associating existing equipment,
c. Or by associating a combination of new and existing equipment.
6. Add and save all contaminants and emissions for the new path.
It is also recommended that a cross-reference list be made in advance of all new FINs,
EPNs, CINs, and paths. The Structural overview form available on the TCEQ’s point
source emissions inventory Web page serves as a useful template for this cross-reference
list.
Contact Us Emissions Inventory Help:
Help Line: 512-239-1773
E-mail at [email protected]
Documentation Submission:
USPS:
Emissions Assessment Section, MC-166
Texas Commission on Environmental Quality
P.O. Box 13087
Austin, TX 78711-3087
Overnight Service: Emissions Assessment Section, MC-166
Texas Commission on Environmental Quality
12100 Park 35 Circle, Building E
Austin, TX 78753
E-mail:
STEERS:
Help Line: 512-239-6925 or
31 version 3.1
12/29/2016
E-mail at [email protected]
Acronyms AEIR - Annual Emissions Inventory Reporting
EAS - Emissions Assessment Section
EI - Emissions Inventory
EIQ - Emissions Inventory Questionnaire
EPN - Emissions Point Number, the label for the point where emissions enter the
atmosphere
CIN - Control Identification Number, the label for a device controlling or reducing
emissions
FIN - Facility Identification Number, the label for the equipment that generates
emissions
RE - Regulated Entity
RN - Regulated Entity Reference Number
STARS - State of Texas Air Reporting System
STEERS - State of Texas Environmental Electronic Reporting System
SPA - STEERS participation agreement
TAC - Texas Administrative Code
TCEQ – Texas Commission on Environmental Quality
Glossary EAS - Emissions Assessment Section, a business unit within the TCEQ that is primarily
responsible for the collection and review of air emissions data.
Received Date - The date when an AEIR submission completes validation. This date is
typically one day after the user started the validation process.
STARS - The State of Texas Air Reporting System database is the repository for all

32 version 3.1
12/29/2016
historical point source air industrial emissions inventory data. Annual updates are made
to this database using data submitted from regulated entities.
STEERS - The State of Texas Environmental Electronic Reporting System is used by
authorized employees or representatives of the regulated entity to report environmental
data to TCEQ through the web.
Submitted Emissions Data - Data are submitted to the TCEQ in accordance with the
requirements of 30 TAC §101.10 after the data are validated. In addition to the AEIR
data, sample calculations and supporting documentation is required per 30 TAC §101.10.
Failure to submit this supporting documentation may cause the annual EI submission to
be considered incomplete and may result in enforcement action. Supporting
documentation can be attached to an AEIR submission, emailed to
[email protected], or mailed to:
Emissions Assessment Section, MC-166
Texas Commission on Environmental Quality
P.O. Box 13087
Austin, TX 78711-3087
Upload Process - The process for extracting a file from the user’s system and loading the
information into the STEERS Work Area.
Validation Process - The process that reviews submitted EI data for basic EAS data
checks. Data must be successfully validated to be considered submitted. EI data or EI
files that fail the validation process must be corrected by the user and resubmitted.
Work Area - The STEERS staging area that provides the user the ability to review data
to ensure proper and complete EI file transfer prior to submitting data. Please be aware
that data loaded into this staging area are not submitted to the TCEQ Emissions
Assessment Section until the certifications are signed, and the user with Submit level
access has selected Submit.