Weather Performance Task - Confex A cloud is a large collection of very tiny droplets of water or...
43
Weather Performance Task Gregg W. Nelsen Dr. Laura LaBelle
Transcript of Weather Performance Task - Confex A cloud is a large collection of very tiny droplets of water or...

Weather Performance Task
Gregg W. Nelsen
Dr. Laura LaBelle

Climate is the weather conditions of a
region, such as temperature, air pressure,
humidity, precipitation, sunshine,
cloudiness, and wind, throughout the year,
averaged over a number of years.
Climate
Evaporation of ocean water in the
water cycle affects the weather patterns.
Much of the water that evaporates into
Earth's atmosphere comes from tropical
oceans. As the water evaporates, it takes
in heat and cools nearby land. Wind
moves the water vapor to cooler areas,
where the water vapor may condense and
form precipitation.
Big Red Educational Products, LLC

Clouds A cloud is a large collection of very
tiny droplets of water or ice crystals. The
droplets are so small and light that they can
float in the air.
All air contains water. Near the
ground it is usually in the form of an
invisible gas called water vapor. When warm
air rises, it expands and cools. Cool air can't
hold as much water vapor as warm air, so
some of the vapor condenses onto tiny
pieces of dust that are floating in the air and
forms a tiny droplet around each dust
particle. When billions of these droplets
come together they become a visible cloud.
Weather
Rain Water droplets form from warm air.
As the warm air rises in the sky it cools.
Water vapor (invisible water in the air) always
exists in our air. Warm air holds quite a bit of
water. In the summer it is usually very humid.
When enough of these droplets collect
together, we see them as clouds. If the
clouds are big enough and have enough
water droplets, the droplets bang together
and form even bigger drops. When the drops
get heavy, they fall to Earth in the form of
rain.
Big Red Educational Products, LLC

Wind
Wind is air in motion. It
develops because of the uneven
heating of the earth’s surface by
the sun. The earth’s surface is
made of different land and water
formations which absorbs the
sun’s radiation unevenly. Wind is
always classified according to
speed (mph) and direction.
As the sun warms the
Earth's surface, the atmosphere
warms too. Some parts of the
Earth receive direct rays from
the sun all year and are always
warm. Other places receive
indirect rays, so the climate is
colder. Warm air, which weighs
less than cold air, rises. Then
cool air moves in and replaces
the rising warm air. This
movement of air is what makes
the wind blow.
Weather
Big Red Educational Products, LLC

Thunderstorm A thunderstorm is a storm
with lightning and thunder. It is
produced by a cumulonimbus cloud,
usually producing gusty winds,
heavy rain and sometimes hail.
A thunderstorm occurs
because of moisture, unstable air
and lift. Moisture is needed to form
clouds and rain. You need unstable
air that is relatively warm and can rise
rapidly. Finally, you need lift. This can
form from fronts, sea breezes or
mountains.
Weather
Big Red Educational Products, LLC

Lightning
Lightning is a bright flash of
electricity produced by a thunderstorm.
All thunderstorms produce lightning and
are very dangerous. If you hear the
sound of thunder, then you are in danger
from lightning. Lightning kills around
100 people each year which is more than
tornados and hurricanes combined.
Inside a thundercloud many small
bits of ice (frozen raindrops) bump into
each other as they move around in the air.
These collisions create an electric charge.
In time, the cloud fills up with electrical
charges. The positive charges (+) or
protons form at the top of the cloud and
the negative charges (-) or electrons form
at the bottom of the cloud. Opposites
attract, which causes a positive charge to
build up on the ground beneath the cloud.
The grounds electrical charge concentrates
around anything that sticks up, such as
mountains, buildings, people, or single
trees. The charge coming up from these
points eventually connects with a charge
reaching down from the clouds and - zap -
lightning strikes!
Weather
Big Red Educational Products, LLC

Hail Hail is created when small
drops of water are caught in the updraft
of a thunderstorm. The droplets are
lifted higher and higher into the sky
until they freeze into ice. Once they
become heavy, they will start to fall
(gravity). If the smaller hailstones get
caught in the updraft again, they will
get more water on them and get lifted
higher in the sky and become larger. If
they get lifted again, they freeze and
fall. This happens over and over again
until the hailstone is too heavy and
gravity forces them to the ground.
Fog Fog is basically a cloud on the
ground that reduces visibility. Fog is
usually formed when southerly winds
bring warm, moist air into a region. As
warm, moist air flows over much colder
soil or snow, dense fog often forms.
Warm, moist air is cooled from below as it
flows over a colder surface. If the air is
near saturation, moisture will condense
out of the cooled air and form fog. With
light winds, the fog near the ground can
become thick and reduce vision to zero.
Weather
Big Red Educational Products, LLC

Tornado A tornado is a violent
rotating column of air extending from
a thunderstorm to the ground. The
most violent tornadoes create
tremendous damage with wind
speeds of up to 300 mph. They can
destroy large buildings, uproot trees
and hurl vehicles hundreds of yards.
They can create damage in excess of
one mile wide to 50 miles long. In an
average year, 1000 tornadoes are
reported nationwide.
Most tornadoes form
from thunderstorms. You need
warm, moist air from the Gulf of
Mexico and cool, dry air from
Canada. When these two air
masses meet, they create
instability in the atmosphere. A
change in wind direction and an
increase in wind speed with
increasing height creates an
invisible, horizontal spinning
effect in the lower atmosphere.
Rising air within the updraft tilts
the rotating air from horizontal to
vertical.
Weather
Big Red Educational Products, LLC

Hurricane A hurricane is a very large
storm! It can be up to 600 miles wide
and have strong winds spiraling
inward and upward at speeds of 75 to
200 mph. They move about 10-20
miles per hour (mph) over the open
ocean and may last as long as a week
or more. Hurricanes gather heat and
energy through contact with warm
ocean waters. Evaporation from the
seawater increases their power.
Hurricanes rotate in a counter-
clockwise direction around an "eye."
The center of the storm or "eye" is the
calmest part. It has only light winds
and fair weather. When they come
onto land, the heavy rain, strong
winds and large waves can damage
buildings, trees and cars
Hurricanes can only form
over very warm ocean water of 80°F
or warmer. The air must cool off very
quickly the higher you go and the
wind must be blowing in the same
direction and at the same speed to
force air upward from the ocean
surface. Winds flow outward above
the storm allowing the air below to
rise.
Weather
Big
Red E
ducatio
na
l P
roducts
, LLC

High Pressure
System A high pressure system is a
whirling mass of cool, dry air that
generally brings fair weather and light
winds. When viewed from above,
winds spiral out of a high-pressure
center in a clockwise rotation in the
Northern Hemisphere. These bring
sunny skies.
Low Pressure
System
A low pressure system is a
whirling mass of warm, moist air that
generally brings stormy weather
with strong winds. When viewed from
above, winds spiral into a low-
pressure center in a counter-
clockwise rotation in the Northern
Hemisphere.
Weather
convection currents -- warm air rising, cold air
sinking. Related to weather patterns because it can form a low
pressure system.
Big Red Educational Products, LLC

A THERMOMETER measures the air temperature. Most
thermometers are closed glass tubes
containing liquids such as alcohol or
mercury. When air around the tube
heats the liquid, the liquid expands
and moves up the tube. A scale then
shows what the actual temperature is.
Weather
Big Red Educational Products, LLC

A BAROMETER measures
air pressure. It tells you whether
or not the pressure is rising or
falling. A rising barometer
means sunny and dry
conditions, while a falling
barometer means stormy and
wet conditions.
Weather
Big Red Educational Products, LLC
29.92 is average air pressure at sea level

Weather
An Anemometer is an
instrument used to measure
the speed of the wind. Wind
speed is measured in miles
per hour (mph).
Big Red Educational Products, LLC

Materials: • 5 small paper cups • Hole punch • Scissors • Duct tape • 3 thin wooden dowels • Empty water bottle
Procedure 1. Use the hole punch to make a hole in the side of each of the 4 paper cups. 2. Use the hole punch to make 4 holes spaced evenly around the rim of the
last cup. This will be the center of the anemometer. 3. Slide 2 of the wooden dowels through the holes in the center cup. They
should cross in an “X.” (perpendicular to each other – at 90° angles) 4. Insert the ends of the dowels into the holes of the other cups and tape
them into place. Make sure the cups are all facing the same direction. 5. Take the last wooden dowel and make a hole in the bottom of the center
cup. 6. Push the dowel up until it meets the X and tape everything together. This
will be your rotation axis. 7. Put the center dowel into an empty water bottle and begin testing!
Anemometer
Big Red Educational Products, LLC
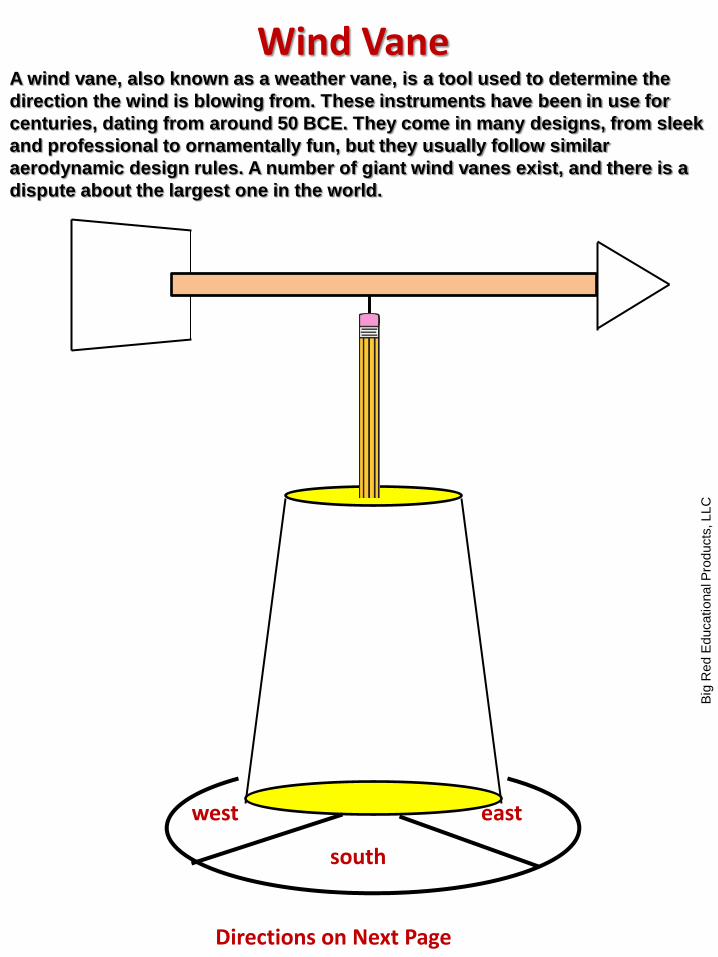
A wind vane, also known as a weather vane, is a tool used to determine the
direction the wind is blowing from. These instruments have been in use for
centuries, dating from around 50 BCE. They come in many designs, from sleek
and professional to ornamentally fun, but they usually follow similar
aerodynamic design rules. A number of giant wind vanes exist, and there is a
dispute about the largest one in the world.
south
east west
Wind Vane
Directions on Next Page
Big
Red
Ed
uca
tio
na
l Pro
du
cts
, L
LC
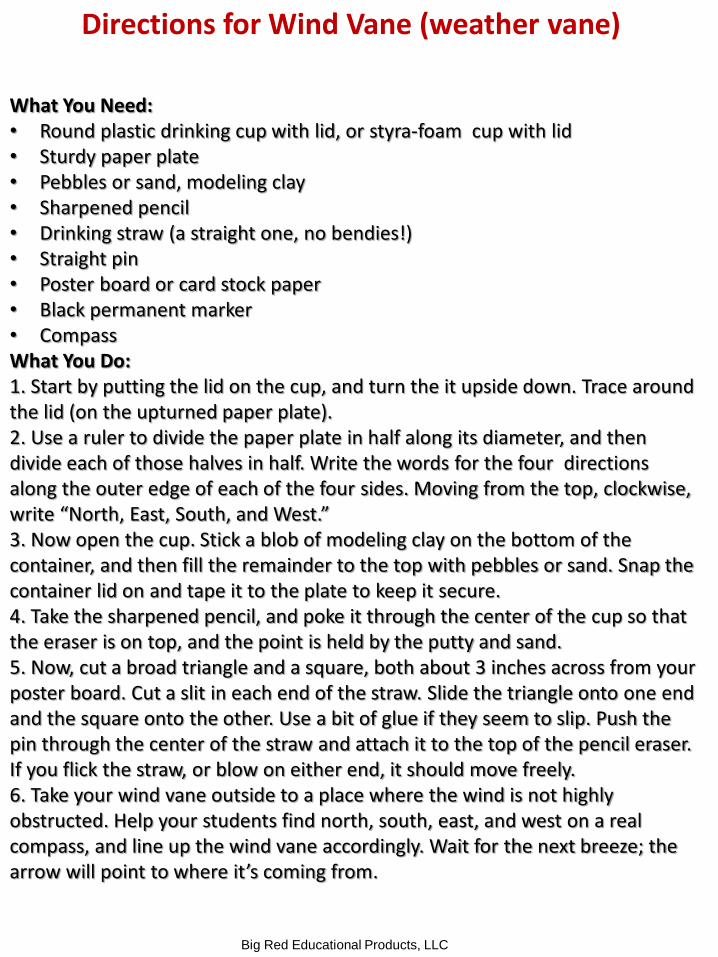
What You Need: • Round plastic drinking cup with lid, or styra-foam cup with lid • Sturdy paper plate • Pebbles or sand, modeling clay • Sharpened pencil • Drinking straw (a straight one, no bendies!) • Straight pin • Poster board or card stock paper • Black permanent marker • Compass What You Do: 1. Start by putting the lid on the cup, and turn the it upside down. Trace around the lid (on the upturned paper plate). 2. Use a ruler to divide the paper plate in half along its diameter, and then divide each of those halves in half. Write the words for the four directions along the outer edge of each of the four sides. Moving from the top, clockwise, write “North, East, South, and West.” 3. Now open the cup. Stick a blob of modeling clay on the bottom of the container, and then fill the remainder to the top with pebbles or sand. Snap the container lid on and tape it to the plate to keep it secure. 4. Take the sharpened pencil, and poke it through the center of the cup so that the eraser is on top, and the point is held by the putty and sand. 5. Now, cut a broad triangle and a square, both about 3 inches across from your poster board. Cut a slit in each end of the straw. Slide the triangle onto one end and the square onto the other. Use a bit of glue if they seem to slip. Push the pin through the center of the straw and attach it to the top of the pencil eraser. If you flick the straw, or blow on either end, it should move freely. 6. Take your wind vane outside to a place where the wind is not highly obstructed. Help your students find north, south, east, and west on a real compass, and line up the wind vane accordingly. Wait for the next breeze; the arrow will point to where it’s coming from.
Directions for Wind Vane (weather vane)
Big Red Educational Products, LLC

Protractor Wind Vane
Angle MPH KPH
0° 0 0
5° 4 6.5
10° 8 13
15° 10 16
20° 12 19
25° 13.5 22
30° 15 24
35° 16.5 26.5
40° 18 29
45° 19.5 31.5
50° 21 34
angle 10°
Materials: • Ping-pong ball • String • Scotch tape • Protractor • Poster board • Tongue depressor or
popsicle stick
1.Hold parallel to ground into the wind. 2.Check the angle (where string crosses protractor) from 90°. 3.Match angle to speed on chart in MPH or KPH.
tongue depressor
poster board
ping-pong ball
Approximate Wind Speed

rubber band
balloon
straw
toothpick
tape
coffee can
What you need: • a jar or coffee can • a rubber band • balloon • scotch tape • straw • paper
Barometer
Instructions 1. Blow up the balloon a little bit, the more air in the balloon, the greater the pressure
outwards which is what makes the balloon blow up. 2. Let the air out of the balloon and cut the tie end off. 3. Stretch the balloon tightly over the jar or can and use the rubber band to fix it tightly. 4. Tape the end of the straw to the center of the balloon and tape the toothpick to the
end. 5. Tape a card behind the barometer and mark where the pin is. 6. Leave for a few days and note any changes. Record what the weather is like each day
and how that affects the barometer.
Science behind: When the straw tilts up, the air pressure is high as the air pushes down on the balloon. When the straw points down the air pressure is lower which makes the air in the jar push up on the balloon.
Big Red Educational Products, LLC

Date: _____________ Day of Week: __________________ Wind: _____________ Temperature: Celsius: ______ Fahrenheit: _______ Barometer: _______ Precipitation: type _________________ Circle: sunny, cloudy, snowy, stormy, rainy, partly cloudy, windy, foggy
Date: _____________ Day of Week: __________________ Wind: _____________ Temperature: Celsius: ______ Fahrenheit: _______ Barometer: _______ Precipitation: type _________________ Circle: sunny, cloudy, snowy, stormy, rainy, partly cloudy, windy, foggy
Date: _____________ Day of Week: __________________ Wind: _____________ Temperature: Celsius: ______ Fahrenheit: _______ Barometer: _______ Precipitation: type _________________ Circle: sunny, cloudy, snowy, stormy, rainy, partly cloudy, windy, foggy
My Weather Journal
Name ____________________
(Elementary Journal)
Big Red Educational Products, LLC
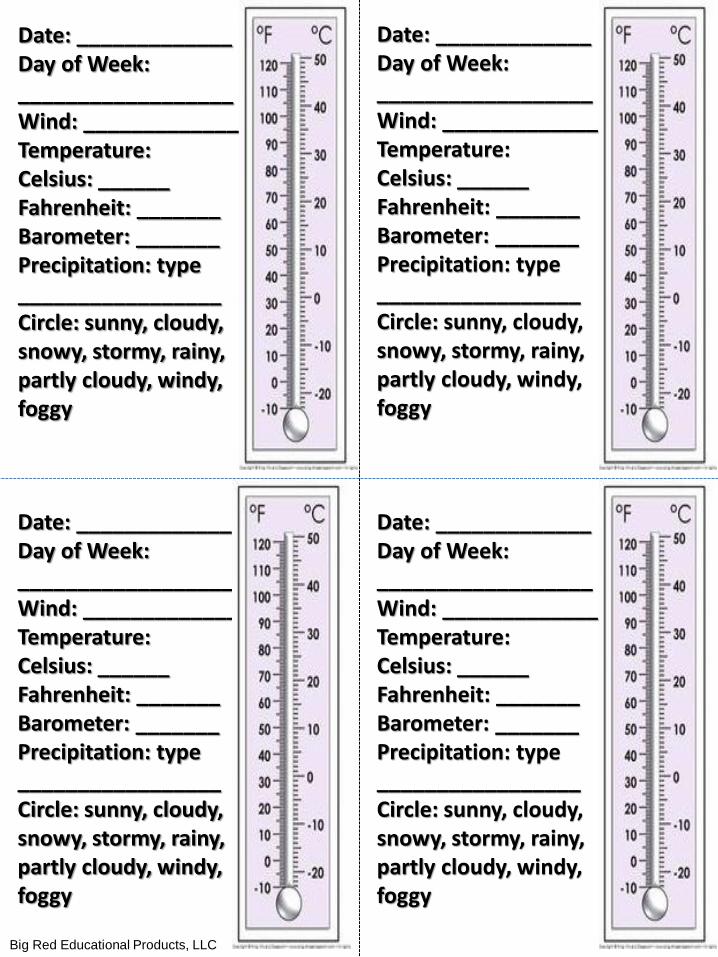
Date: _____________ Day of Week: __________________ Wind: _____________ Temperature: Celsius: ______ Fahrenheit: _______ Barometer: _______ Precipitation: type _________________ Circle: sunny, cloudy, snowy, stormy, rainy, partly cloudy, windy, foggy
Date: _____________ Day of Week: __________________ Wind: _____________ Temperature: Celsius: ______ Fahrenheit: _______ Barometer: _______ Precipitation: type _________________ Circle: sunny, cloudy, snowy, stormy, rainy, partly cloudy, windy, foggy
Date: _____________ Day of Week: __________________ Wind: _____________ Temperature: Celsius: ______ Fahrenheit: _______ Barometer: _______ Precipitation: type _________________ Circle: sunny, cloudy, snowy, stormy, rainy, partly cloudy, windy, foggy
Date: _____________ Day of Week: __________________ Wind: _____________ Temperature: Celsius: ______ Fahrenheit: _______ Barometer: _______ Precipitation: type _________________ Circle: sunny, cloudy, snowy, stormy, rainy, partly cloudy, windy, foggy
Big Red Educational Products, LLC

My Weather Journal
Name ____________________
Date: _____________ Day of Week: __________________ Wind: _____________ Temperature: Celsius: ______ Fahrenheit: _______ Barometer: _______ Precipitation: (write/describe weather) snowy, stormy, rainy, partly cloudy, windy, foggy
____________________________ ____________________________ ____________________________ ____________________________ ____________________________ ____________________________
(Upper Grade Journal)
Big Red Educational Products, LLC

Date: _____________ Day of Week: __________________ Wind: _____________ Temperature: Celsius: ______ Fahrenheit: _______ Barometer: _______ Precipitation: (write/describe weather) snowy, stormy, rainy, partly cloudy, windy, foggy
____________________________ ____________________________ ____________________________ ____________________________ ____________________________ ____________________________
Big Red Educational Products, LLC

Month
____________
Big Red Educational Products, LLC
Sat. Sun.
0
Fri.Thur.
30
35
40
45
Wed.Tues.Mon.
5
10
15
20
25
-20
-15
-10
-5
de
gre
es
C
els
iu
s
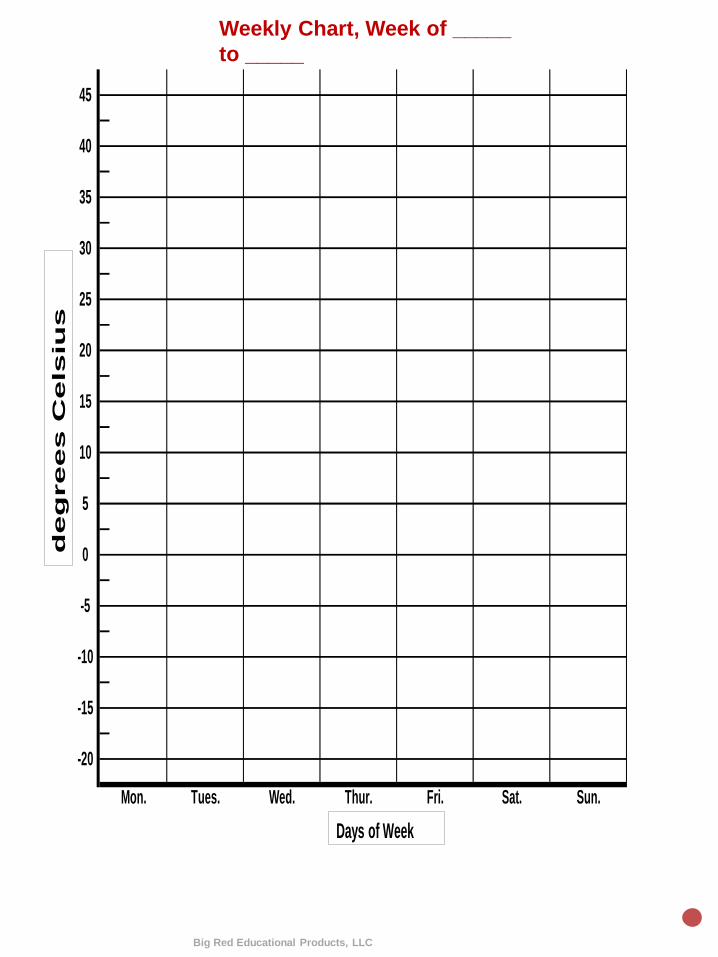
Days of Week
Weekly Chart, Week of _____
to _____
Big Red Educational Products, LLC

Weather Assessment
1. Of these bodies in the universe, which is the hottest?
A. the Earth B. the Moon C. the Sun D. Jupiter
2. Which pair of these weather conditions might cause a rainbow?
(snow, rain, fog, sunshine, clouds) ____________ & ____________
3. A severe ocean storm that happens when warm air and warm water cause
rapid circulation to occur is known as a(n)?
A. hurricane B. avalanche C. tornado D. dust devil
4. The air pressure is the greatest at
A. the top of a tall building. C. the desert.
B. the top of a tall mountain. D. the ocean.
5. A violent storm that occurs on land when a thunderstorm generates a
rotating column of air with winds up to 300 mph is a ____________ .
6. In the water cycle, which process is where water in a liquid form is
changed into water vapor?
A. photosynthesis C. evaporation
B. condensation D. precipitation
7. In June, Mrs. LaBelle’s class recorded the temperature & air pressure
every hour. One day, the temperature and the air pressure both continued to
drop each hour. What type of weather might be predicted for later that day?
A. snowy B. drying C. rainy D. hail
8. Another day in June, the class recorded the temperature and air pressure
both rising steadily every hour. What type of weather might be predicted for
that day?
A. snowy B. drying C. rainy D. hail
9. In the water cycle, what is the process called where water vapor is
changed into liquid water?
A. photosynthesis C. precipitation
B. evaporation D. condensation
10. About how long could a person survive without water?
A. 2 days B. 12 hours C. 2 weeks D. 1 month
11. Why does warm air rise faster than cold air? Big
Red
Ed
uca
tio
na
l Pro
du
cts
, L
LC

12. Which is NOT a form of precipitation?
A. Rain B. sunlight C. hail D. snow
Weather Assessment (continued)
13. When water disappears from a bird bath on a hot summer day, it is?
A. Precipitating B. boiling C. condensing D. evaporating
14. Wind is produced because the surface of the Earth is unevenly heated by
A. the moon C. the sun
B. forest fires D. volcanoes
15. The temperature is measured by a _________ and the air pressure is
measured by a __________?
A. thermometer, hydrometer C. hydrometer, barometer
B. barometer, thermometer D. thermometer, barometer
16. Hurricanes will most likely continue to gain strength as long as they?
A. pass over a large ship C. pass over a large body of land
B. stay over warm water D. stay over cold water
17. In a severe thunderstorm, a person’s greatest danger comes from?
A. lightning B. thunder C. hail D. wind
18. Natalie’s mother asked her to only water the lawn early in the morning.
Why was this good advice?
A. Water is cheaper in the morning.
B. Grass can only absorb water in the morning.
C. Less water will evaporate in the morning.
D. It’s cooler to work in the morning than afternoon.
19. On Earth, what gas in the air is necessary for humans to breathe?
A. Nitrogen B. oxygen C. carbon dioxide D. hydrogen
20. Generally, a rise in the air pressure means that the weather will be?
A. cloudy & wet C. stormy & rainy
B. sunny & dry D. sunny & wet
Big Red Educational Products, LLC
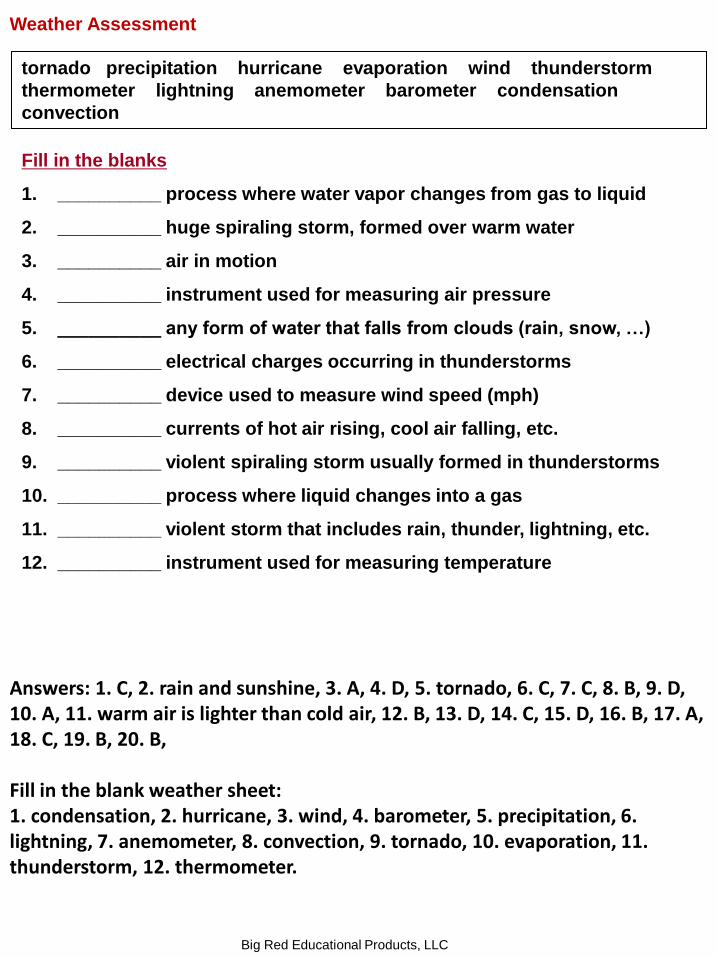
Fill in the blanks
1. __________ process where water vapor changes from gas to liquid
2. __________ huge spiraling storm, formed over warm water
3. __________ air in motion
4. __________ instrument used for measuring air pressure
5. __________ any form of water that falls from clouds (rain, snow, …)
6. __________ electrical charges occurring in thunderstorms
7. __________ device used to measure wind speed (mph)
8. __________ currents of hot air rising, cool air falling, etc.
9. __________ violent spiraling storm usually formed in thunderstorms
10. __________ process where liquid changes into a gas
11. __________ violent storm that includes rain, thunder, lightning, etc.
12. __________ instrument used for measuring temperature
tornado precipitation hurricane evaporation wind thunderstorm
thermometer lightning anemometer barometer condensation
convection
Weather Assessment
Big Red Educational Products, LLC
Answers: 1. C, 2. rain and sunshine, 3. A, 4. D, 5. tornado, 6. C, 7. C, 8. B, 9. D, 10. A, 11. warm air is lighter than cold air, 12. B, 13. D, 14. C, 15. D, 16. B, 17. A, 18. C, 19. B, 20. B, Fill in the blank weather sheet: 1. condensation, 2. hurricane, 3. wind, 4. barometer, 5. precipitation, 6. lightning, 7. anemometer, 8. convection, 9. tornado, 10. evaporation, 11. thunderstorm, 12. thermometer.

STEAM Activities:
ART!
Put together by
Dr. Laura LaBelle
Gregg Nelsen

Found on: http://kidworldcitizen.org/2014/03/23/diego-rivera-for-kids-make-your-own-mural/
Learn about Diego Rivera Before you begin, of course learn a bit about famous Mexican
muralist Diego Rivera. He was born in 1886 in Mexico and from a
very young age loved to paint huge murals. He studied art in
Mexico and Europe, and developed his own style. He was very
interested in helping indigenous people in Mexico to have a better
life, and often painted them in his murals to celebrate Mexican
culture and heritage; other themes included pre-Columbian
history, struggles of the working class, and the clash of nature
and technology.
Discuss: Talk about how murals are usually found in public places, and
how they generally tell a story. Diego Rivera’s murals are found in
Mexico and in the US (Detroit and New York City). Students may
also google Diego Rivera to learn more about his life and art.
STEP 1: Choose a mural (These are but three, many more
may be found online)
Diego Rivera Collaborative Murals

STEP 2: On the picture, draw a one inch grid
It doesn’t have to be perfect, but the squares should be even. For
example, if the math works out to be 1.5″ x 1.5″ that’s fine. Try to
make the grid into squares with equal heights and lengths.
STEP 3: On the back side, number the squares left to right
Because you will be cutting out the squares, this will help you re-
create the picture after the kids all work on their parts. Write down
how many squares wide and tall your grid is (for example, this is
4×4) so it is easier to assemble. Using cardstock (for your actual
mural) cut out the number of squares needed (in this case 16)
and number them on the backs with an arrow facing up. We
usually do 8×8″ squares (cut from an 8×11″ sheet of cardstock).

STEP 4: Cut apart the tiny squares and assign each one to a
child. They should try to replicate the square on their paper.
Students should take care to visualize where each part goes—
halfway down the page, a third down the side—so when pieces
get put back together, they’ll match up.
STEP 5: Tape the mural pieces together using the numbers
on back as a guide
Once you have all of the pieces colored in, you can use the
numbers on the back to piece them together. I suggest using the
same colors, either colored pencils or paint, so that there is more
of a match when pieced back together.

Directions: Divide your fine art poster into equal size pieces, one piece per student. (To make the numbers work, I sometimes have a teacher and/or teacher’s aide participate by creating one of the pieces!) On the back of each piece, write the row (A, B, C, etc.) and column number (1, 2, 3, etc.). Cut your card stock to the same size and same number of pieces as your poster. Label them the same way you labeled the poster pieces. Pass out the card stock pieces with their corresponding poster pieces and a set of oil pastels to each student. Make sure you write down and keep track of who has which piece – the parents will be asking which piece their child did! Have students duplicate their poster piece onto their card stock, matching shapes and colors as closely as they can. Layering and blending colors with oil pastels will greatly increase the range of colors
Masterpiece Mosaic! Materials for one Masterpiece Mosaic: Inexpensive fine art poster Card stock (black or white, depending on your print) Oil pastels Foam core board (black or white, to match your card stock), cut to the same size as your poster Glue or Paste Old credit card or plastic membership card or ruler to flatten picture Optional: Mod Podge (gloss), 1-1/2″ foam brush
5th Grade/Middle School Mosaic of “Starry Night” by Vincent Van Gogh, 24″ x 19″
www.teachkidsart.net/masterpiece-mosaics/
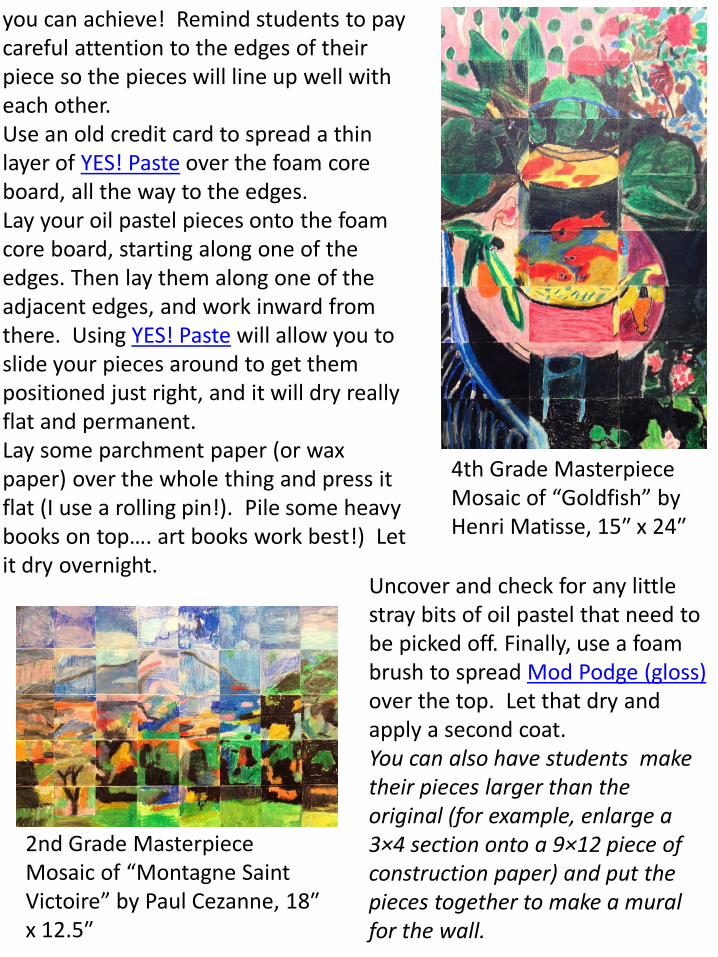
4th Grade Masterpiece Mosaic of “Goldfish” by Henri Matisse, 15″ x 24″
2nd Grade Masterpiece Mosaic of “Montagne Saint Victoire” by Paul Cezanne, 18″ x 12.5″
you can achieve! Remind students to pay careful attention to the edges of their piece so the pieces will line up well with each other. Use an old credit card to spread a thin layer of YES! Paste over the foam core board, all the way to the edges. Lay your oil pastel pieces onto the foam core board, starting along one of the edges. Then lay them along one of the adjacent edges, and work inward from there. Using YES! Paste will allow you to slide your pieces around to get them positioned just right, and it will dry really flat and permanent. Lay some parchment paper (or wax paper) over the whole thing and press it flat (I use a rolling pin!). Pile some heavy books on top…. art books work best!) Let it dry overnight.
Uncover and check for any little stray bits of oil pastel that need to be picked off. Finally, use a foam brush to spread Mod Podge (gloss) over the top. Let that dry and apply a second coat. You can also have students make their pieces larger than the original (for example, enlarge a 3×4 section onto a 9×12 piece of construction paper) and put the pieces together to make a mural for the wall.
Perspective on a String
Colorful string art + linear perspective = line art that POPS!
(art + math)
Mathematician Mary Everest Boole first used stitched
cards in the 19th century to help strengthen her students'
understanding of geometry and algebra. Her work inspired
sculptors Henry Moore and Naum Gabo to produce works
that incorporated string, and in the late 1960s string art
became extremely popular as a decorative craft.
Linear perspective in art is a geometrical way to depict
objects as three-dimensional on a two-dimensional plane.
It uses straight lines projected from defined points in the
same manner as string art. So, to combine string art with
perspective is really only a matter of changing up materials.
The traditional way to create string art is to suspend thread
or wire above the surface with nails or pins. This lesson
plan uses a process more like Mary Boole's stitched cards
by pulling string through holes pierced in foamboard. The
foamboard is rigid enough to remain flat and secure the
string, even if pulled tightly. It also has the benefit of being
preprinted on one side with a light grid, making perfect
spacing a breeze!
GRADES 9-12
Note: Instructions and materials are based upon
a class size of 24 students. Adjust as needed.
Preparation
1.
Cut 20" x 30" gridded foamboard into 7-1/2" x 10" pieces (eight
per sheet). As an option, create a grid on plain foamboard
using a permanent pen and ruler.
Process
1.
Starting on the gridded side of the foamboard, determine the
horizon line by finding the halfway mark and choosing a line
above it. It can be formatted either horizontally or vertically.
Mark the horizon line with a pencil to make it stand out from
the other grid lines.
2.
Along the horizon line, choose a point where a vertical line
intersects, and determine the vanishing point. Mark this with a
dot. (Note: mark a dot at either end of the horizon line for two-
point perspective.)
3.
Using a push pin,
punch holes on either
end of the horizon line
and on the vanishing
point. Next, punch
holes along each of the
grid intersections at
the top and the bottom
of the foamboard.
It
It should look something
like illustration (A).
Copyright © 2015
Dick Blick Art Materials
All rights reserved
800-447-8192 DickBlick.com
Materials (required)
Elmer's
®
Guide -Line Foamboard
,
3/16" thick, 20" x 30"
sheet, Black (13204-2053) or White, Package of 2
(13204-1043); share one sheet among eight students
Blick
®
No. 2 Pencil
, Box of 12 (20341-4002); one
pencil per student
Blick
®
Aluminum Non-Stick Rulers
, 12"
(56014-1012); one per student
Moore
®
Push Pins
, Package of 100,
assorted (57307-1009); share
across class
Blunt Tapestry Needle #18
,
Package of 12 (66903-1009);
need one per student
Creativity Street
®
Embroidery Floss
,
set of
24 skeins (63100-1009);
share among class
Optional Materials
Maysville Cotton Warp
,
8 oz, 800 yards (62800-)
• • • • • • • • • • • • • • • • • • • •
• • • • • • • • • • • • • • • • • • • •
•
•
•
(A)
Process - continued
4.
Choose a string that matches the foamboard color (Black or White). Cut a piece approximately 30" long and thread it
onto a blunt tapestry needle. Knot the string at one end.
5.
The gridded side of the foamboard will now be the back side. It doesn't matter what the back side of the board
looks like, so when the string is finished, always try to tie it off on the back side. The needle will need to be reloaded
frequently — it takes about 20 ft of string just to create the radial lines!
Step 1:
Stitch the horizon line. End at
the vanishing point and stitch from
the vanishing point up to the hole on
the end of the row above. Continue
stitching so that radial lines are
created from all of the holes at the top
of the board to the vanishing point.
Step 2:
Stitch radial lines from the
vanishing point to the holes at the
bottom of the canvas.
Step 3:
Choose a point on the far left
radial and punch a hole with the push
pin. Create a rectangle anchored on
each corner to a radial line. Use the
grid on the back side to line up the
points. Stitch with brightly colored
string.
Step 4:
Create a second rectangle
of the same color string, anchored
on the same radial lines. The second
rectangle will either be larger or
smaller than the first, depending on
the placement along the radial lines.
Step 5:
Join each of the corners with
string of the same color. Notice that
the color strings go right over the
radial lines. Now, it looks like a 3-D
box!
Step 6:
Repeat the same steps
to create more boxes. If the first
rectangle is anchored to just the
lower radial lines, then the second
one will be, too. The same rule applies
to boxes above the horizon line. Use
different colors of thread and try for
different shapes
— they can overlap
each other, too.
Step 7:
After you've
mastered 1-point perspecive,
try 2-point! The layout at
left shows how the radial
lines appear for 2-point
perspective and the finished
example is on the right.
2.
800-447-8192 DickBlick.com
•
• • • • • • • • • • • • • • • • • • •
• • • • • • • • • • • • • • • • • • • •
• • •
•
• • • • • • • • • • • • • • • • • • •
•
• • • • • • • • • • • • • • • • • • •
• • •
•
• • • • • • • • • • • • • • • • • • •
•
• • • • • • • • • • • • • • • • • • •
• • •
• • •
• • •
•
• • • • • • • • • • • • • • • • • • •
•
• • • • • • • • • • • • • • • • • • •
• • •
•
• • • • • • • • • • • • • • • • • • •
•
• • • • • • • • • • • • • • • • • • •
• • •
• • •
• • •
•
• • • • • • • • • • • • • • • • • • •
•
• • • • • • • • • • • • • • • • • • •
• • •
•
• • • • • • • • • • • • • • • • • • •
•
• • • • • • • • • • • • • • • • • • •
• • •
• • •
• • •
•
• • • • • • • • • • • • • • • • • • •
•
• • • • • • • • • • • • • • • • • • •
• • •
•
• • • • • • • • • • • • • • • • • • •
•
• • • • • • • • • • • • • • • • • • •
• • •
• • •
• • •
•
• • • • • • • • • • • • • • • • • • •
•
• • • • • • • • • • • • • • • • • • •
•
• • • • • • • • • • • • • • • • • • •
•
• • • • • • • • • • • • • • • • • • •
• • •
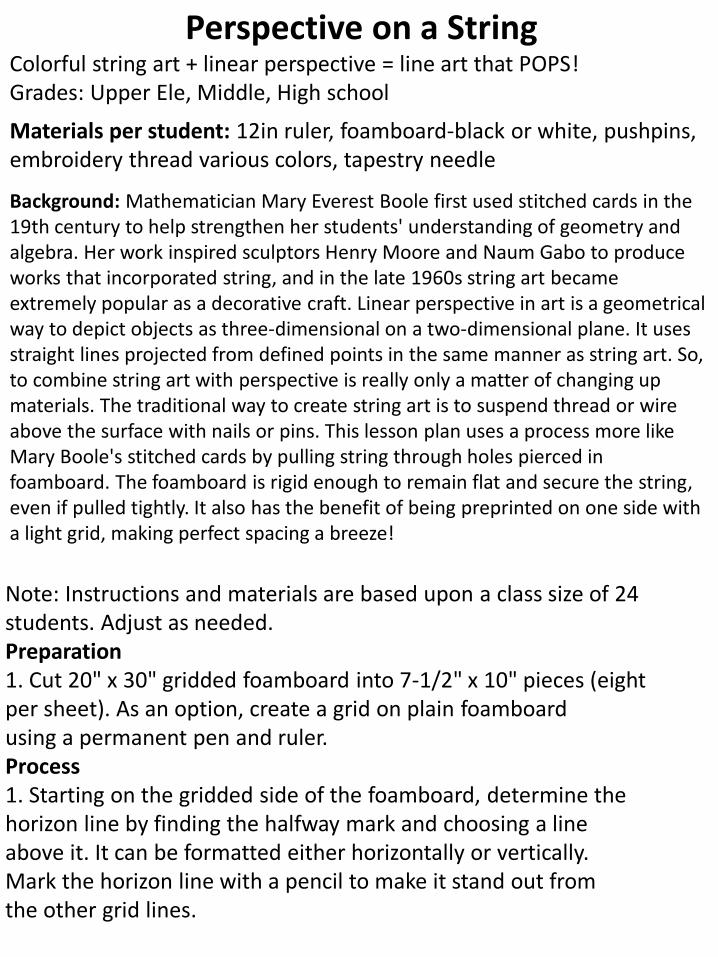
Note: Instructions and materials are based upon a class size of 24 students. Adjust as needed. Preparation 1. Cut 20" x 30" gridded foamboard into 7-1/2" x 10" pieces (eight per sheet). As an option, create a grid on plain foamboard using a permanent pen and ruler. Process 1. Starting on the gridded side of the foamboard, determine the horizon line by finding the halfway mark and choosing a line above it. It can be formatted either horizontally or vertically. Mark the horizon line with a pencil to make it stand out from the other grid lines.
Background: Mathematician Mary Everest Boole first used stitched cards in the 19th century to help strengthen her students' understanding of geometry and algebra. Her work inspired sculptors Henry Moore and Naum Gabo to produce works that incorporated string, and in the late 1960s string art became extremely popular as a decorative craft. Linear perspective in art is a geometrical way to depict objects as three-dimensional on a two-dimensional plane. It uses straight lines projected from defined points in the same manner as string art. So, to combine string art with perspective is really only a matter of changing up materials. The traditional way to create string art is to suspend thread or wire above the surface with nails or pins. This lesson plan uses a process more like Mary Boole's stitched cards by pulling string through holes pierced in foamboard. The foamboard is rigid enough to remain flat and secure the string, even if pulled tightly. It also has the benefit of being preprinted on one side with a light grid, making perfect spacing a breeze!
Perspective on a String Colorful string art + linear perspective = line art that POPS! Grades: Upper Ele, Middle, High school
Materials per student: 12in ruler, foamboard-black or white, pushpins, embroidery thread various colors, tapestry needle
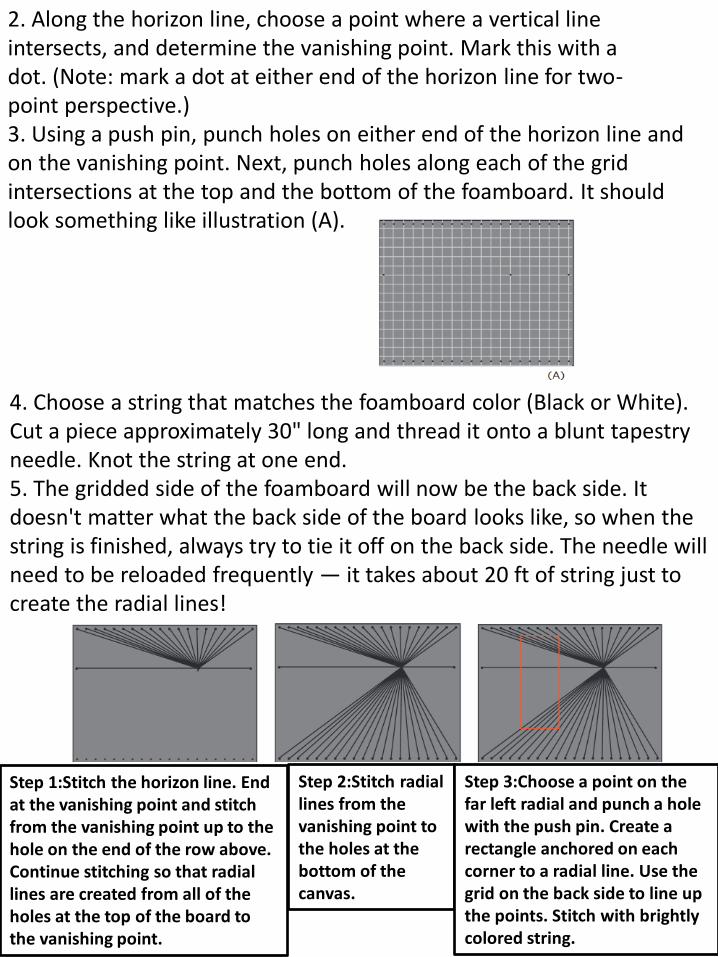
2. Along the horizon line, choose a point where a vertical line intersects, and determine the vanishing point. Mark this with a dot. (Note: mark a dot at either end of the horizon line for two- point perspective.) 3. Using a push pin, punch holes on either end of the horizon line and on the vanishing point. Next, punch holes along each of the grid intersections at the top and the bottom of the foamboard. It should look something like illustration (A).
4. Choose a string that matches the foamboard color (Black or White). Cut a piece approximately 30" long and thread it onto a blunt tapestry needle. Knot the string at one end. 5. The gridded side of the foamboard will now be the back side. It doesn't matter what the back side of the board looks like, so when the string is finished, always try to tie it off on the back side. The needle will need to be reloaded frequently — it takes about 20 ft of string just to create the radial lines!
Step 1:Stitch the horizon line. End at the vanishing point and stitch from the vanishing point up to the hole on the end of the row above. Continue stitching so that radial lines are created from all of the holes at the top of the board to the vanishing point.
Step 2:Stitch radial lines from the vanishing point to the holes at the bottom of the canvas.
Step 3:Choose a point on the far left radial and punch a hole with the push pin. Create a rectangle anchored on each corner to a radial line. Use the grid on the back side to line up the points. Stitch with brightly colored string.

Step 4:Create a second rectangle of the same color string, anchored on the same radial lines. The second rectangle will either be larger or smaller than the first, depending on the placement along the radial lines.
Step 5: Join each of the corners with string of the same color. Notice that the color strings go right over the radial lines. Now, it looks like a 3-D box!
Step 6: Repeat the same steps to create more boxes. If the first rectangle is anchored to just the lower radial lines, then the second one will be, too. The same rule applies to boxes above the horizon line. Use different colors of thread and try for different shapes—they can overlap each other, too.
Step 7:After you've mastered 1-point perspective, try 2-point! The layout at left shows how the radial lines appear for 2-point perspective and the finished example is below.
http://www.dickblick.com/lessonplans/perspective-on-a-string/

Background: Geometric art kicks both the "left" and "right" sides of the brain into gear! It's no secret that geometry and art are close friends. Since ancient times, artists have used shapes, portions of shapes, and repeating shapes to add interest to their art. Mathematical formulas based on the relationship of shapes to one another, such as the Golden Ratio and the Divine Proportion, have been used by artists, architects, and craftsmen for thousands of years in order to give their artwork dramatic impact. "Without mathematics there is no art,” said Luca Pacioli, a contemporary of Leonardo da Vinci. When a simple paper circle is divided into a semicircle (half), a quadrant (fourth), or smaller sectors (sixths, eighths) and those sectors are placed together on a plane (paper), geometric art is the result. As sectors of a circle overlap and interact with each other, the art becomes more complex, and so does the math. Overlapping colors form new colors. Intersecting lines form right, acute, and obtuse angles. Squares, triangles, and polygons are created within the design by aligning the straight portions of circle sectors. Using gridded paper to arrange pre-cut tissue paper circles is an easy way to align them and create symmetry. This lesson can be as simple as arranging circles and semi-circles for beginning mathematicians, while more advanced students use smaller sectors to create geometric patterns in their art.
Start with a Circle... Grades: K-8
Materials per student: Gridded Paper 11" x 17" 4 x 4 Grid Tissue Circles-assorted colors Elmer's X-TREME School Glue Stick Sharpie Fine Point Markers, black Student Scissors 12” ruler

Process - Elementary 1. Begin with a sheet of gridded paper. Determine the center by measuring or counting squares. 2. Using tissue paper circles and a glue stick, create a design using full circles, half-circles and/or quarter-circle segments from the defined point. Tissue circles can be cut by folding in halves or fourths and cutting on the fold lines. 3. As each tissue paper piece is put into place, outline it with a black fine point marker or a dark pencil. Shapes will overlap to define new shapes, and the outline will make them more visible and the overall artwork more cohesive
Step 3: Seal the design when finished using clear adhesive film or lamination.
http://www.dickblick.com/lessonplans/start-with-a-circle/

Glue Paint Symmetry Prints Grades: All Materials: Clear acetate, Elmer’s Glue All, Liquid watercolors—magenta, blue, yellow, Sharpie ultra fine markers in different colors, Tag board Background: A Surrealist technique brought to new life with a new medium! Surrealism took root in the mid-1920s in Eurpoean art and literature. It was a movement characterized by fantastic images and conflicting associations that were intended to illustrate unconscious thoughts and dreams. Seeking to free their imaginations as much as possible, Surrealists would invent games and techniques for inspiration and to create a starting point for finished works. The collaborative game of “Exquisite Corpse” and techniques such as frottage (pencil rubbings) and automatic drawing played important parts in inspiring Surrealist artists.“Decalcomania” was a techique that artists such as Óscar Domínguez and Max Ernst used to create impromptu paintings controlled largely by chance. They would apply paint to a smooth surface (such as glass) and either transfer it by pressing it onto a canvas or by placing a piece of paper or foil over it and lifting. Much like a Rorschach Ink-Blot test or looking for familiarity in cloud shapes, they would search for hidden imagery in the random, abstract patterns and develop it into a finished painting. To experience Decalcomania in a colorful, tidy, and highly interactive process, students use a finger painting-style of application. Glue paint — basic white glue tinted with any shade of watercolor — dries with a beautiful transparency that is enhanced when applied to a clear sheet. When the sheet is folded, the colors can be blended and moved about the page without actually touching it. Open it, allow it to dry, and look for the hidden images and contour lines that will fuel the imagination of a young surrealist!
“Decalcomania”

Preparation 1. Make glue paint by adding Liquid Watercolor to small glue bottles. Squeeze about a teaspoon of paint directly into an open glue bottle. Put the lid on it and shake. Depending upon the brand of glue used, it may blend readily or it may take hours for the color to saturate. Turning the bottle upside down occasionally or stirring the glue with a craft stick will help it blend.
Process 1. Fold a piece of acetate in half and reopen it. Squeeze multiple colors of glue paint randomly on one side. Keep the glue close to the center of the page and the fold, away from the edges. The more glue that is used, the stronger the color will be. 2. Fold acetate back over. With fingers or a rounded tool, press down on the glue to spread it and move it until the colors touch and blend. Extra pressure can move paint away completely and create open areas. 3. Open the fold and view the print. Allow to dry by either: (A) Set the print aside to dry overnight. The glue patterns will have more definition this way. Or, (B) While wet, press the print glue-side-down onto a heavy sheet of paper or board. Allow the glue to dry overnight. The paper will most likely curl. Once dry, it can be flattened again. Colors will become transparent as they dry and some bubbles may also form — leave them in for more interesting shapes and contrast. 4. Discuss the definition of a contour line — a line that defines the edges of a form — an outline.
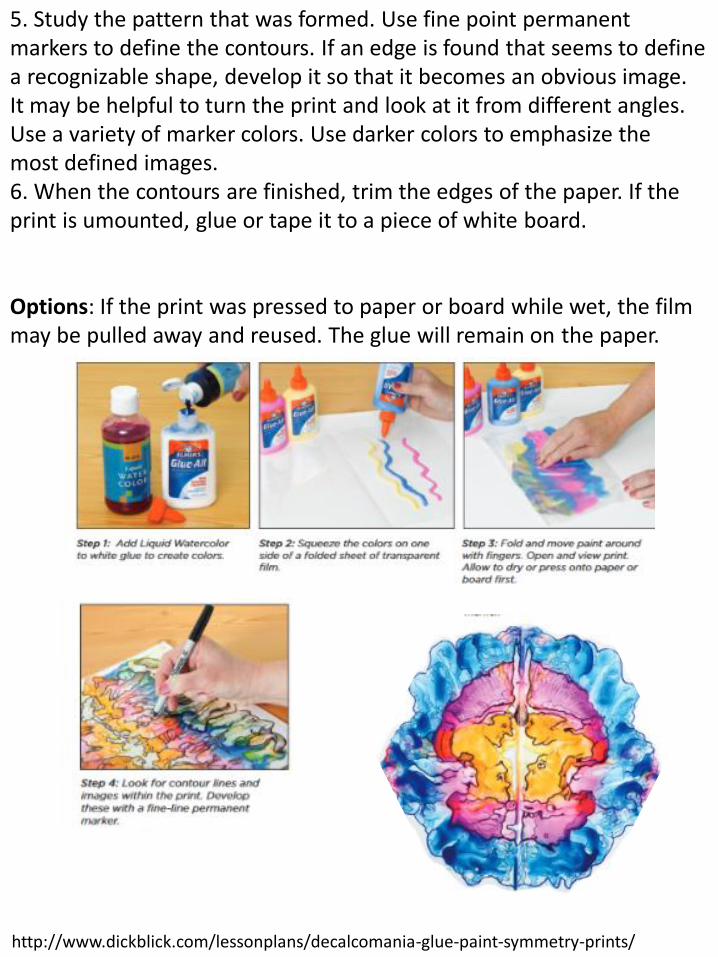
5. Study the pattern that was formed. Use fine point permanent markers to define the contours. If an edge is found that seems to define a recognizable shape, develop it so that it becomes an obvious image. It may be helpful to turn the print and look at it from different angles. Use a variety of marker colors. Use darker colors to emphasize the most defined images. 6. When the contours are finished, trim the edges of the paper. If the print is umounted, glue or tape it to a piece of white board. Options: If the print was pressed to paper or board while wet, the film may be pulled away and reused. The glue will remain on the paper.
Cat and dog
http://www.dickblick.com/lessonplans/decalcomania-glue-paint-symmetry-prints/

Books that POP!

http://www.dickblick.com/lessonplans/books-that-pop/