WAVES/ABBEY ROAD Reel ADT · Waves: Abbey Road Reel ADT is the first plugin to successfully emulate...
18
WAVES/ABBEY ROAD Reel ADT USER GUIDE
-
Upload
nguyentram -
Category
Documents
-
view
222 -
download
1
Transcript of WAVES/ABBEY ROAD Reel ADT · Waves: Abbey Road Reel ADT is the first plugin to successfully emulate...

WAVES/ABBEY ROAD
Reel ADT USER GUIDE
Waves / Abbey Road ADT User Guide
2
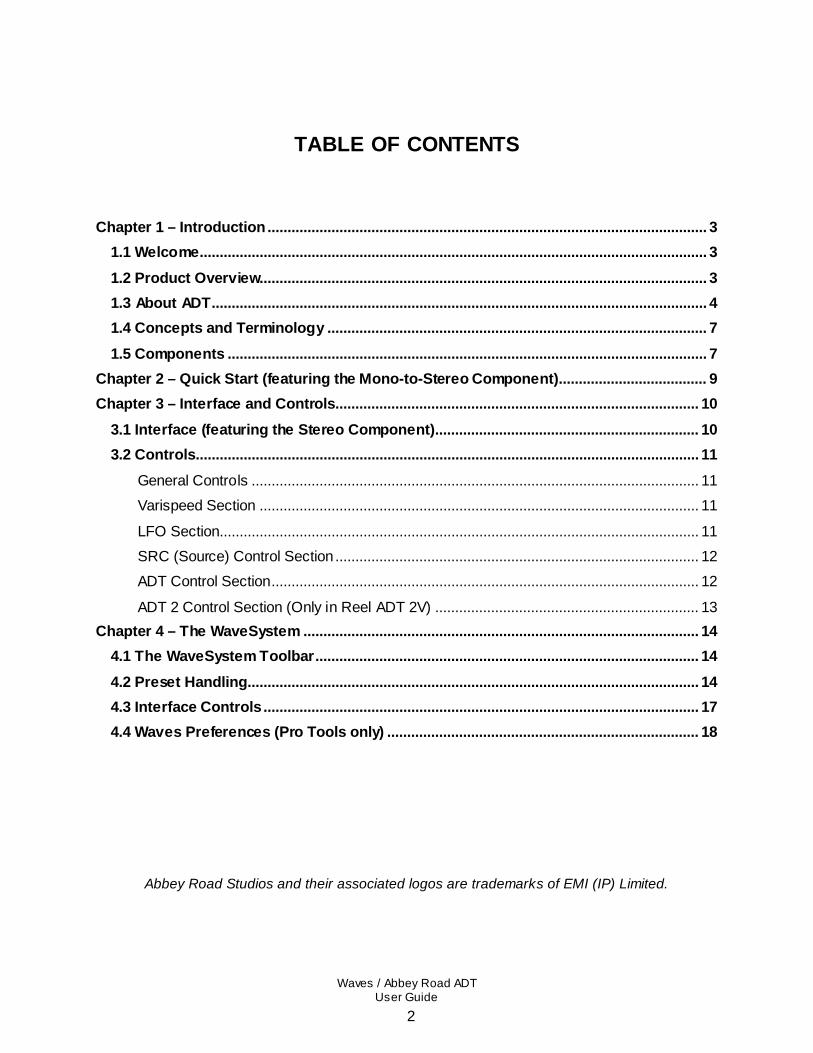
TABLE OF CONTENTS
Chapter 1 – Introduction .............................................................................................................. 3 1.1 Welcome............................................................................................................................... 3
1.2 Product Overview................................................................................................................ 3 1.3 About ADT............................................................................................................................ 4 1.4 Concepts and Terminology ............................................................................................... 7
1.5 Components ........................................................................................................................ 7 Chapter 2 – Quick Start (featuring the Mono-to-Stereo Component) ..................................... 9 Chapter 3 – Interface and Controls........................................................................................... 10
3.1 Interface (featuring the Stereo Component) .................................................................. 10 3.2 Controls.............................................................................................................................. 11
General Controls ................................................................................................................ 11 Varispeed Section .............................................................................................................. 11
LFO Section........................................................................................................................ 11 SRC (Source) Control Section ........................................................................................... 12 ADT Control Section........................................................................................................... 12
ADT 2 Control Section (Only in Reel ADT 2V) .................................................................. 13 Chapter 4 – The WaveSystem ................................................................................................... 14
4.1 The WaveSystem Toolbar ................................................................................................ 14
4.2 Preset Handling ................................................................................................................. 14 4.3 Interface Controls ............................................................................................................. 17 4.4 Waves Preferences (Pro Tools only) .............................................................................. 18
Abbey Road Studios and their associated logos are trademarks of EMI (IP) Limited.
Waves / Abbey Road ADT User Guide
3
Chapter 1 – Introduction
1.1 Welcome
Thank you for choosing Waves. To get the most out of your Waves processor, please take the time to read this manual.
We also suggest you become familiar with the resources available to you at waves.com. There you will find an extensive Answer Base, the latest Tech Specs, detailed Installation Guides, new Software Updates, and up-to-date information on Activation and Registration.
1.2 Product Overview
Waves: Abbey Road Reel ADT is the first plugin to successfully emulate Abbey Road Studios’ pioneering process of Artificial Double Tracking. The effect that became an integral part of Abbey Road’s signature sound was initially created at the famed studios in the 1960s to meet
the needs of some very special clients: The Beatles.
Reel ADT puts the magic of that era in your hands within seconds. Using its intuitive controls, you can advance or push back the doubled signal to achieve genuine, lush-sounding delay and
pitch variations. You can also drive each of the signals separately to add beautiful tape saturations.
With its authentic modeled valve tape machine sound and faithful emulation of wow and flutter,
this extraordinary plugin can enhance any track with the impression of two separate takes, giving you results as close as possible to real double tracking. Other classic Abbey Road tape effects such as flanging and phasing can also be achieved with ease.
All the character, depth and panoramic sound of this inimitable classic effect can now be
created digitally, simply and for real: Reel ADT.
Waves / Abbey Road ADT User Guide
4
1.3 About ADT
ADT was invented at Abbey Road Studios in the mid-1960s to produce a double tracking effect without the need to record two separate tracks.
The Original Setup
The original setup consisted of two tape machines:
Source Tape Machine: This was a valve tape machine with a unique feature. Most professional tape machines had three heads (ERASE, RECORD/SYNC and PLAY) and one output amplifier
to switch between the RECORD/SYNC head and the PLAY head, depending on whether the machine was being used for recording/overdubbing (the RECORD/SYNC head) or for mixing (the PLAY head). Abbey Road tape machines, by contrast, had two output amps: one for the RECORD/SYNC head, another for the PLAY head. Using an Abbey Road model, it was
therefore possible to output two instances of the same original signal simultaneously. Due to the physical gap between the two heads, there would be a slight delay between the two instances. This delay, along with the ability to play both outputs simultaneously, were the vital features that
made ADT possible. These unique features of Abbey Road’s tape machines may also explain why other studios were not able to recreate the Abbey Road ADT effect very convincingly.
ADT Tape Machine: This was a second valve tape machine with Varispeed control (a VCO, or
voltage-controlled oscillator, coupled with a powerful amp). The signal from the RECORD/SYNC head of the SOURCE tape machine would feed into this second tape machine. The ADT tape machine would be in INPUT/RECORD mode, so the signal fed into it would come straight back off the tape. This would create yet another delay, due to the gap between the RECORD/SYNC
head and the PLAY head of the second tape machine.
The delays caused by the head gaps in the two machines realigned the two signals, so that they were nearly simultaneous. The Varispeed could be used to fine-tune the length of delay and
even to advance the effected sound before the source sound.
The two resulting signals would then be fed into a mixing console. Different results could be achieved, depending on how the two signals were panned in the stereo field. When both signals
were panned to or near the center, the result would be a distinctive, if not entirely natural-sounding effect (this unnatural sound was, however, part of what made the technique so

Waves / Abbey Road ADT User Guide
5
appealing). However, when the signals were panned left and right in the stereo field, the double tracking effect could sound very convincing indeed. This version of ADT was often used to
create lush-sounding stereo imaging when using a four-track tape as the source for a stereo mixdown.
It was common practice to constantly move around the Varispeed of the second tape machine. This was done by hand, using the VCO remote control. Depending on the direction in which the
knob was turned and the speed at which this was done, subtle (or, if so desired, very unsubtle) movements could be created between the two sources. This is what made the effect sound so organic, as even certain words or phrases within a single vocal take could be treated differently.
The fact that each of the two tape machines had its own variations of wow and flutter, not to mention a different motor running at a slightly different speed, only enhanced this lush organic effect.
The resulting sound is the most legendary of all Abbey Road tape effects.
How ADT Was Invented
When working on ‘Tomorrow never Knows’, John Lennon complained about the tedious task of recording a doubled vocal take—a technique that was widely used in those days to boost and enrich vocal parts. He needed to match the second take as closely as possible to the lead take,
which took considerable time and effort on his part. In response, Abbey Road technical engineer Ken Townsend came up with ADT. Townsend understood that to achieve a natural-sounding effect, simply applying a different EQ or compression would not do; worse, it would create
phasing problems. What he needed was a process that would alter the timbre, time and pitch of the vocal take. He realized that changing the tape speed back and forth would create all those effects simultaneously.
The technique he finally came up with worked as follows. When mixing a song, the track to be
artificially doubled—usually a vocal track, though any other track could be treated similarly—would be routed from the recording head of the multitrack tape, which was ahead of the playback head, and fed to the recording head of the second tape machine. An oscillator would
then be used to vary the speed of the second machine, providing more or less delay depending on how quickly or how slowly the second machine was being run in relation to the first. This signal would then be routed from the playback head of the second machine to a separate fader

Waves / Abbey Road ADT User Guide
6
on the mixer. The tape operator had to ‘ride’ the Varispeed (VCO) control in order to create the desired effect; any mistake along the way would require another take.
The introduction of ADT was a milestone in the history of sound recording, and the technique was used heavily on many historic recording sessions at Abbey Road Studios. Over the years, many recording engineers have tried to replicate the effect, but with only partial success, largely because a definitive description of the exact process used at Abbey Road has until now been a
closely guarded secret.
Other Related Effects
ADT led Abbey Road’s engineers to experiment with a number of secondary effects. Two of these—flanging and phasing—are possible with the current plugin.
Flanging:
As noted in the Quick Start section of the present manual, the classic ADT sound is achieved with about 15 milliseconds of advance or delay between the two signals. When the two signals are placed closer together, however—between 0 and 5 ms (with the Varispeed controller used
to continuously vary the speed within that range)—the frequencies of the two signals combine to create a series of peaks and dips in the audio spectrum. This effect, known as flanging, was another firm Beatles favorite at Abbey Road.
It is worth noting that flanging almost certainly originated somewhere else, albeit using different methods and with slightly different results. Most Abbey Road engineers were not aware of previous experimentation with flanging, however, and were under the impression that the effect
and its name were invented at Abbey Road.
Phasing:
Phasing used the same set-up as flanging, but with the signal from the second tape machine phase-reversed by 180 degrees, giving a deeper effect. When the two signals reached the point
of zero delay, their waveforms were at equal strength but at opposite polarity, resulting in almost total cancelation. In contrast to flanging, then, which was an addition of signal frequencies, phasing was a subtraction of signal frequencies, creating more of a ‘ducking’ effect.

Waves / Abbey Road ADT User Guide
7
1.4 Concepts and Terminology
Understanding the following terms will help you achieve the best results using your ADT plugin:
• SRC (or Source) refers to the unmodulated signal.
• ADT refers to the effect side of the plugin, i.e. the modulated signal.
• Display Area refers to the top section of the plugin, where the user can see the overall
modulation of the ADT channel. This includes Varispeed modulation, LFO modulation,
and smoothing, the latter a modeling of the physical engine acceleration.
• Varispeed refers to the control used to vary the speed of the modulated ADT signal
manually.
• LFO is an automatic way of modulating the ADT signal. It uses a low-frequency oscillator
to ride the signal automatically.
•
1.5 Components
WaveShell technology enables us to split Waves processors into smaller plugins, which we call components. Having a choice of components for a particular processor gives you the flexibility
to choose the configuration best suited to your material. ADT includes the following
components:
• ADT Mono
• ADT Mono-to-Stereo
• ADT Stereo
• ADT 2V Mono-to-Stereo
• ADT 2V Stereo
• ADT Live Mono
• ADT Live Mono-to-Stereo
• ADT Live Stereo
• ADT Live 2V Mono-to-Stereo
• ADT Live 2V Stereo

Waves / Abbey Road ADT User Guide
8
ADT 2V adds a second ADT modulation of the signal, allowing you to control each of the two
modulated signals independently in order to generate a richer doubling effect.
Please note that both ADT Stereo and ADT 2V Stereo give users the option of either selecting
just one of the input stereo tracks, Left or Right, or summing both stereo tracks to mono (dividing the result by two to maintain perceived loudness).
ADT Live components have been added to meet the requirements of live performances by
providing especially low latency for live shows. ADT’s regular (non-live) components rely on latency to advance the ADT signal relative to the source signal. To minimize latency in a live
setting, the ADT Live components do not offer the option of advancing the ADT signal ahead of the source. In ADT Live, the ADT signal can only be delayed relative to the source. To allow preset sharing between the ADT and ADT Live components, the Live components automatically
translate negative ADT values to positive values.
Apart from the differences noted above, the ADT Live components are exactly the same as the Reel ADT’s regular components.

Waves / Abbey Road ADT User Guide
9
Chapter 2 – Quick Start (featuring the Mono-to-Stereo Component)
• Open the ADT plugin on a vocal track.
• Grab the ADT control in the display area above the ruler and play around with it until you
get a good-sounding static double effect. Recommended ranges are -10 to -15 ms (with the ADT signal playing in advance of the source) and 10 to 15 ms (with the ADT signal playing after the source).
• Experiment with the LFO, preferably on a random shape, and play with the range
(recommended range is 3-8 ms) until you get a good doubling effect that does not sound synthetic or unnatural.
• Try using the Varispeed control with wide range settings to emphasize word endings or
to adjust the effect to your liking.
• Add some drive to taste.
• To maximize the doubling effect, adjust the overall level of each channel so that the ADT and SRC channels both have the same apparent loudness.
• Experiment with the panning between the two signals. You will get a different sound if the signals are on top or close to one another, as opposed to panned mid to hard left and right.

Waves / Abbey Road ADT User Guide
10
Chapter 3 – Interface and Controls
3.1 Interface (featuring the Stereo Component)
Waves / Abbey Road ADT User Guide
11
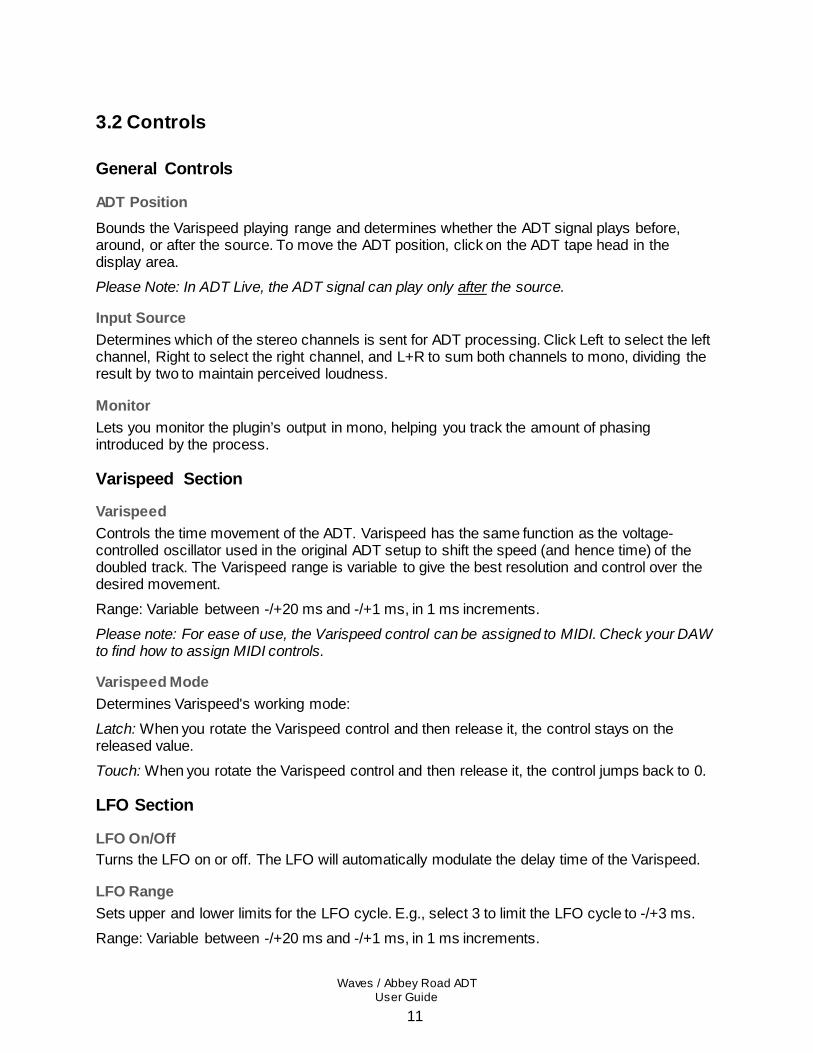
3.2 Controls
General Controls
ADT Position Bounds the Varispeed playing range and determines whether the ADT signal plays before, around, or after the source. To move the ADT position, click on the ADT tape head in the display area. Please Note: In ADT Live, the ADT signal can play only after the source.
Input Source Determines which of the stereo channels is sent for ADT processing. Click Left to select the left channel, Right to select the right channel, and L+R to sum both channels to mono, dividing the result by two to maintain perceived loudness.
Monitor Lets you monitor the plugin’s output in mono, helping you track the amount of phasing introduced by the process.
Varispeed Section
Varispeed Controls the time movement of the ADT. Varispeed has the same function as the voltage-controlled oscillator used in the original ADT setup to shift the speed (and hence time) of the doubled track. The Varispeed range is variable to give the best resolution and control over the desired movement. Range: Variable between -/+20 ms and -/+1 ms, in 1 ms increments. Please note: For ease of use, the Varispeed control can be assigned to MIDI. Check your DAW to find how to assign MIDI controls.
Varispeed Mode Determines Varispeed's working mode: Latch: When you rotate the Varispeed control and then release it, the control stays on the released value. Touch: When you rotate the Varispeed control and then release it, the control jumps back to 0.
LFO Section
LFO On/Off Turns the LFO on or off. The LFO will automatically modulate the delay time of the Varispeed.
LFO Range Sets upper and lower limits for the LFO cycle. E.g., select 3 to limit the LFO cycle to -/+3 ms. Range: Variable between -/+20 ms and -/+1 ms, in 1 ms increments.

Waves / Abbey Road ADT User Guide
12
LFO Shape Determines the shape of the LFO cycle: sine, triangular, reverse sine, reverse triangular, or random.
LFO Rate (Hz) Sets the rate at which the LFO completes the range selected in the LFO Range control.
LFO Rate (Bars) (only when LFO Sync mode is on) Sets the rate at which the LFO completes the range selected in the LFO Range control, only in terms of bars rather than Hz. For example, when the selected range is -/+3, LFO Sync is on; if the user selects 6 bars, the LFO will take 6 bars to complete a full cycle of -/+3 ms. Range: ¼, ½, 1, 1½, 2, 2½, 3, 3½, 4, 6, 8, 9, 12, 16
LFO Sync When Sync is on, the LFO rate is set automatically by calculating the session’s tempo, measure, and resolution and the selected Rate (Bars) setting. For example, the user can set the LFO Rate to 4 bars, and the plugin will calculate the actual rate needed to make this happen.
SRC (Source) Control Section
SRC Pan Controls the position of the source signal in the stereo image. Range: 100L–100R
SRC Drive Controls the amount of tape saturation. Range: 0–30
SRC Mute Mutes the source signal in the output.
SRC Phase Inverts the phase of the source signal (see ADT phase below).
SRC Level Controls the level of the source signal. Range: +12 to -Inf dB (continuous control, 0.1 dB resolution) Please note: The ADT output is normalized in order to maintain constant gain when the ADT and SRC channels are panned hard left and hard right.
ADT Control Section
ADT Pan Controls the position of the ADT signal in the stereo image. Range: 100L–100R
Waves / Abbey Road ADT User Guide
13
ADT Drive Controls the amount of tape saturation. Range: 0–30
ADT Mute Mutes the ADT signal in the output.
ADT Phase Inverts the phase of the ADT signal. Use this to create a Phasing effect when the two signals are very close to one another (between 0 and 5 ms).
ADT Level Controls the level of the ADT signal. Range: +12 to -Inf dB (continuous control, 0.1 dB resolution) Please note: The ADT output is normalized in order to maintain constant gain when the ADT and SRC channels are panned hard left and hard right.
ADT 2 Control Section (Only in Reel ADT 2V)
ADT 2 Pan Controls the position of the ADT signal in the stereo image. Range: 100L–100R
ADT 2 Drive Controls the amount of tape saturation. Range: 0–30
ADT 2 Mute Mutes the ADT signal in the output.
ADT2 Phase Inverts the phase of the ADT 2 signal.
ADT 2 Level Controls the level of the ADT signal. Range: +12 to -Inf dB (continuous control, 0.1 dB resolution) Please note: The ADT output is normalized in order to maintain constant gain when the ADT and SRC channels are panned hard left and hard right.

Waves / Abbey Road ADT User Guide
14
Chapter 4 – The WaveSystem
4.1 The WaveSystem Toolbar
All Waves plugins feature the WaveSystem toolbar, which takes care of most administrative functions you will encounter while working with your Waves software. The features of the
WaveSystem toolbar are the same on practically all Waves plugins, so familiarity with its features will be helpful with whichever plugin you are using.
Toolbar Functions
Opens the plugin About box Undo Undoes the last action (up to 32 actions) Redo Redoes the last action (up to 32 undone actions) Setup A/B Toggles between two presets, useful for comparison of parameter settings L/R Arrows Move to the previous or next preset Copy A→B Copies the current settings to the second preset register Load Recalls presets from file Save Saves presets in the Waves file formats ? Opens the PDF manual for the plugin you are using
4.2 Preset Handling
Preset Types
Factory Presets are permanent presets in the Load menu, which cannot be overwritten or
deleted. When applicable, different component plugins may have different factory presets. User Presets are your favorite settings of the plugin, saved as a preset in the Load menu under
‘User Presets’. User Presets can be overwritten and deleted. Setup Files may contain more than one preset. For example, a single file can contain all the
presets for a session. When you open a Setup File, all its setups become part of your Load pop-up menu for fast access. This can be particularly useful with multiple instances of a plugin in a

Waves / Abbey Road ADT User Guide
15
single session. By saving all the settings you create into a single Setup File, they can all be quickly available for every instance of that plugin. Loading Presets and Setups
Click on the Load button to see the Load pop-up menu. The menu is divided into four sections.
If a section is not currently available, it will not appear in the Load pop-up menu. Open Preset File… Select to open any setup or preset file, whether from the Library or your
own creations. ‘Filename.xps’: Displays any currently loaded Setup File and its presets. Factory Presets: Displays the default Factory Presets. User Presets: Displays any loaded User Presets.
Saving Presets and Setups
Click on the Save button to see the Save pop-up menu. Four options are available. If an option
is not currently available, it will be grayed out and inaccessible. Save to New File… Select this to start a new Setup file. There are two prompts
- first for the setup filename, then for the preset name. You must provide a name for both the setup file and the preset.
Click OK (ENTER) to complete the save. It is a good idea to create a folder in which to save several setup files for a project.
Save ‘File Name’ – “Preset Name” Overwrites the settings of the loaded preset (whether a
User Preset or a preset from a Setup File) with the current settings. If a Setup File is currently loaded, the name of the Setup File is displayed followed by the name of the preset
itself. If a User Preset is loaded, its name is displayed.

Waves / Abbey Road ADT User Guide
16
Save to ‘File Name’ As… Saves the current settings as a new preset into the Setup
file that is open (if one is not open, the option is grayed
out). You will be prompted to give the preset a name. Put into Preset Menu As… Save the current settings into a User Preset that will
always be in your Load menu (until deleted). You will be prompted to give this preset a name. User Presets are
stored in the plugin’s preference file. Deleting Presets
You may delete User Presets and presets within a Setup File. Factory Presets and Setup Library files cannot be deleted or overwritten.
1. Hold the Command (Mac)/Control (PC) key down. 2. Click-and-hold the Load button to see the pop-up menu. 3. While still holding the Command/Control key, select the preset or setup to delete. 4. A confirmation box will appear, allowing you to cancel or ‘OK’ the deletion.
A/B Comparison and Copying
The Setup A/Setup B button may be clicked to compare two settings. If you load a preset in the Setup B position, this will not affect the preset loaded into the Setup A position, and vice-versa.
If you want to modify the settings in Setup A slightly, you can copy them to Setup B by clicking on the Copy to B button, then alter Setup A and compare with the original Setup B.
The name of the current setup will be shown in the title bar (on platforms which support it), and will switch as you change from Setup A to Setup B. Note: an asterisk will be added to the preset name when a change is made to the preset.

Waves / Abbey Road ADT User Guide
17
4.3 Interface Controls
Controls can be in one of three states: 1. Not Selected where the control is not the target of any user entry
2. Selected where the control is the target of mouse control entry only 3. Selected and Active where the control is the target for both mouse and keyboard entry
Toggle Buttons
Toggle buttons display the state of a control, and allow switching between two or more states. Single-click to change the control’s state. Some toggle buttons have a text display which
updates with the current setting, and others (bypass, solo, or monitoring toggles) illuminate
when the control is active. Some plugins have link buttons between a pair of toggle buttons, allowing click-and-drag
adjustment while retaining the offset between the controls.
Value Window Buttons
Value windows display the value of a control and allow click-and-drag adjustment, or direct control via the keyboard.
• Using the mouse, click-and-drag on the value window to adjust. Some value windows
support left/right, some up/down (as you hover over a button, arrows will appear to let you know which direction of movement that button supports). You may also use your mouse-wheel to adjust parameter values.
• Using the arrow keys, click once with mouse to select the button, and then use
up/down – left/right (depending on the direction supported by that button) to move in the smallest incremental steps across the button’s range (holding down the arrow keys will move faster through the range).
• Using key entry, double click on the button to open the value window, and directly enter
the value from your keyboard. If you enter an out of range number, the button stays selected but remains at the current setting (system beeps if system sounds are on).
Some plugins have link buttons between a pair of value windows, allowing click-and-drag
adjustment while retaining the offset between the controls.

Waves / Abbey Road ADT User Guide
18
Sliders
Click or scroll the mouse-wheel on the slider itself or anywhere within the sliders track. The
numerical value of the slider settings is displayed in a hover window above the slider path.
Hover Box
Hovering boxes will appear and display the control value when hovering with the mouse over the control.
Multiple Control Selection
One of the most powerful features of the WaveSystem is the ability to select and adjust multiple controls simultaneously. Using the mouse, drag-select the desired group of buttons or graphic
controls by clicking and holding at a point outside the controls, and forming a rectangle that includes the controls you wish to adjust. Alternatively, press and hold Shift while clicking the mouse on any control you wish to link. This method is useful when you want to select two or
more controls that are not adjacent to one another.
TAB Functions
TAB moves the ‘selected’ status to the next control, with shift-TAB moving in the reverse direction. Additionally, the Mac has an option-TAB function for ‘down’ movement and shift-
option-TAB for ‘up’ movement where applicable. If you have several Value Window Buttons selected, TAB functions will take you through the selected controls only.
Hitting Esc or Return will return the 'focus' to the DAW application.
4.4 Waves Preferences (Pro Tools only)
When launching Pro Tools, hold Shift to view the Waves plugin Preferences window. The following options are available:
• Don't use AudioSuite plugins
• Don’t use RTAS plugins
• Rescan all plugins
• HUI control surface support (low resolution)
• Enable single-click text entry