Washlet S300 - · PDF fileReturn the Washlet to an authorized TOTO USA, Inc. dealer for repair...
52
✲ This is a sophisticated electronic product. Before using your Washlet, please read this Instruction Manual thoroughly and retain it for future reference. This Instruction Manual includes a Warranty. Please keep it for future use. ✲ NOTE TO INSTALLER Please give this manual to the customer after installation. Keep the Washlet S300 packaging and any parts you remove from your toilet (such as the existing toilet seat and bolts) in case you need to return the Washlet for servicing. Table of Contents Washlet S300 SW834 (Elongated Type) SW833 (Round Type) Installing the W ashlet S300 Important Safeguards .................... 2 Features ........................................... 6 Quick Reference .............................. 7 Precautions Before Installing the Washlet ................................... 9 Carton Contents ............................ 10 Installing the Base Plate ............... 11 Mounting the Washlet on the Toilet Bowl ............................ 13 Installing the Junction Valve ....... 14 Supplying Water to the Washlet .. 16 Installing the Remote Control ..... 17 Using the W ashlet S300 Before Using the Washlet ............ 20 Using the Washlet ........................ 23 Adjusting the Temperatures ........ 26 Using the Deodorizer Feature ..... 27 Using the Energy Saver Feature ......................................... 28 Instruction Manual Getting Started Preventing the Washlet from Freezing ....................................... 42 Troubleshooting ........................... 45 Specifications ............................... 49 Limited Warranty .......................... 50 Caring for the W ashlet S300 Daily Care ...................................... 33 Reassembling the Seat and Lid ... 34 Cleaning Underneath the Washlet S300 ........................ 36 Cleaning the Cleansing Wand ..... 38 Cleaning the Strainers ................. 39 Other Information Washlet (Front cover) 6/16/03, 9:30 AM 1
Transcript of Washlet S300 - · PDF fileReturn the Washlet to an authorized TOTO USA, Inc. dealer for repair...

✲ This is a sophisticated electronic product.Before using your Washlet, please read thisInstruction Manual thoroughly and retain itfor future reference.This Instruction Manual includes a Warranty.Please keep it for future use.
✲ NOTE TO INSTALLERPlease give this manual to the customerafter installation.Keep the Washlet S300 packaging and anyparts you remove from your toilet (such asthe existing toilet seat and bolts) in case youneed to return the Washlet for servicing.
Table of Contents
Washlet S300SW834 (Elongated Type)SW833 (Round Type)
Installin
g th
eW
ashlet S
300
Important Safeguards ....................2Features...........................................6Quick Reference..............................7
Precautions Before Installingthe Washlet ...................................9
Carton Contents............................10Installing the Base Plate...............11Mounting the Washlet onthe Toilet Bowl ............................13
Installing the Junction Valve .......14Supplying Water to the Washlet .. 16Installing the Remote Control .....17
Usin
g th
eW
ashlet S
300
Before Using the Washlet ............20Using the Washlet ........................23Adjusting the Temperatures ........26Using the Deodorizer Feature .....27Using the Energy Saver Feature .........................................28
Instruction Manual
Gettin
gS
tarted
Preventing the Washlet fromFreezing .......................................42
Troubleshooting ...........................45Specifications ...............................49Limited Warranty ..........................50
Carin
g fo
r the
Wash
let S300
Daily Care ......................................33Reassembling the Seat and Lid...34Cleaning Underneaththe Washlet S300 ........................36
Cleaning the Cleansing Wand .....38Cleaning the Strainers .................39
Oth
er In
form
ation
Washlet (Front cover) 6/16/03, 9:30 AM1

2
Important SafeguardsTO AVOID POTENTIAL PROPERTY DAMAGE DUE TO WATER LEAKAGE, WE STRONGLY RECOMMEND THAT THISPRODUCT BE INSTALLED BY SOMEONE EXPERIENCED IN PLUMBING REPAIRS. IN ADDITION, IF YOUR ROOM DOESNOT HAVE A SUITABLE ELECTRICAL OUTLET CLOSE ENOUGH TO THE LOCATION WHERE THIS PRODUCT WILL BEINSTALLED, YOU MUST HIRE A LICENCED ELECTRICIAN TO INSTALL THE NECESSARY ELECTRICAL OUTLET.YOU MUST INSTALL THIS PRODUCT IN ACCORDANCE WITH ALL APPLICABLE FEDERAL, STATE AND LOCAL CODESAND REGULATIONS.
When using this Washlet, especially by children and elderly persons, the following basic cautions should befollowed.
For your safety, please follow the instructions below.In this Instruction Manual, the following displays are shown in order to alert you to the possibility of personalinjury and damage to your property. Please read these displays carefully and thoroughly before using theWashlet S300 to ensure safe and proper use. After reading this Instruction Manual, keep it where it can beeasily seen by others who might use the Washlet.
Ignoring the instructions in this displaymay cause death or serious injury.Danger
Generalprohibitions
• Do not place or store the Washlet in a place where it can fall or be pulled into a tub orsink.
• Do not place the Washlet in water or other liquid.• Do not reach for the Washlet if it has fallen into water. If it falls into water, unplug it
immediately.• Possible electric shock. Avoid any water or cleaning agent contact (or splashing) with
electric outlet, power cord or main unit.• Do not use stagnant water in the main unit. The main unit water tank should be cleaned
or emptied if water has been left in the tank for at least 14 days without use. There maybe a risk of unhealthy bacteria levels in water that sits stagnant for this period of time.
• If any part of the Washlet becomes damaged and internal wires are exposed, unplugand do not use the Washlet. Return the Washlet to an authorized TOTO USA, Inc.dealer for repair or replacement.
• Do not use a toilet cleaning agent, detergent, benzine, thinner, cleanser, or a nylonscrub brush to clean the Washlet as it may damage the plastic. (The plastic may crackor peel, leading to exposed wires or product instability.)
• Possible mild burning.When using the seat heater, mild burning may occur. Be attentive to others (listedbelow) by turning off the seat heater (see page 26). Leave the seat heater off exceptwhen a person capable of properly operating the Washlet S300 is using the product.• Those who cannot control the seat temperature appropriately such as small children and some
elderly persons.• Those who have limitations in body movement or sensation such as ill or disabled persons.• Those who might fall asleep due to alcohol consumption, lack of sleep, or medication that
causes drowsiness.• If you stay on the seat for more than 15 minutes, turn off the seat heater.✲ About Low Temperature Burns
A burn gradually occurs when the skin has been exposed to high temperatures. However, a lowtemperature burn may occur when the skin has been in contact with an object at relatively lowtemperature (about 104°F). Susceptibility to burns also depends on an individual’s skinsensitivity and other factors.The temperature is set at the factory to about 97°F (36°C). At this temperature, no lowtemperature burn should occur for individuals with normal skin and skin sensitivity. However, ifany burning sensation, discomfort, or rash occurs, immediately turn off the seat heater andconsult a doctor.
• Do not place the Washlet in a room where the humidity exceeds 90% Rh. (It maycause fire or electric shock.)
• Do not install the Washlet in a location where water may be splashed or whereexcessive moisture can condense and form on the product surfaces.
• To avoid damage to electronic components due to high levels of humidity, provideadequate ventilation by opening a window and/or door when bathing. Operating anexhaust ventilating fan during times of high humidity will be beneficial.
Do not usein humid area
Washlet (Section 1) 6/16/03, 9:30 AM2

3
Gettin
gS
tarted
• Always unplug the power cord before maintaining or cleaning the Washlet. (Failureto do so may cause electric shock.)
• During lightning storms, disconnect the power cord. (Failure to do so may damagethe Washlet.)Unplug the
product
• Do not splash water or cleaning agent on the main unit or the power cord. (It maycause fire or electric shock.)
• Do not insert your finger or any other object in the ventilation grille at the back ofthe main unit. Do not block the ventilation grille; allow at least one inch clearance.(It may cause burns or electric shock.)
• The case of the main unit is plastic.Keep cigarettes and other fire hazards away from the Washlet. (It may cause fire.)
• Do not move the water drainage lever to the open position while the main unit issecured to the base plate and toilet (see page 43).(It may cause fire or electric shock.)
• Never attempt to disassemble, reassemble, repair, or modify the Washlet. (It maycause fire or electric shock.)
• Tampering with or disassembling the Washlet voids your Warranty.
Ignoring the instructions in this displaymay cause death or serious injury.Danger
Do notdisassemble
Generalprohibitions
Generalprohibitions
• Close supervision is necessary when this product is used by, or near, children, the elderly,or invalids.
• Use the Washlet only for its intended use as described in this manual. Do not useattachments not recommended by the manufacturer.
• Never operate the washlet product if it has a damaged cord or plug, if it is not workingproperly, if it has been dropped or damaged, or dropped into water. Return the Washlet toan authorized TOTO USA service center (1-888-295-8134) for examination and repair.
• Keep the cord away from the heated surfaces.• Never block the air openings of the product or place it on soft surfaces, such as a bed or
couch, where the air openings may be blocked. Keep the air openings free of lint, hair,and the like.
• Never use while sleeping or drowsy.• Never drop or insert any object into any opening or hose.• Do not use outdoors or operate where aerosol (spray) products are being used or where
oxygen is being administered.• Connect this product to a properly grounded outlet only. See Grounding Instructions
(page 5).• Do not bend or crush the connection hose. (It may cause water leakage.)• Do not pour hot water into a frozen hose or use a portable heater to thaw the frozen hose.
(It may cause a water leak.)• Stay close to the user if the user is infirm or is a child. Adjust the seat temperature, water
temperature, and dryer temperature appropriately when the Washlet is to be used by- A child, infirm or sick person- A person with particularly sensitive skin- A physically handicapped person
Ignoring this display may cause personalinjury and/or property damage.
Warning
Generalprohibitions
Important Safeguards (continued)
Washlet (Section 1) 6/16/03, 9:30 AM3

4
• Install a grounding system so as to meet all requirements for a Class 3 device(subject to any earth resistance being equal to, or less than, 100 ohms).(Failure to do so may cause electric shock.)
• Do not connect this product to semi-drinkable or industrial water supply lines.(It may cause inflammation or other skin ailments.)
• Insert the 120V (60 Hz) power cord plug fully and securely into the GFCI poweroutlet. Do not use a power outlet that does not hold the plug securely.(Electric shock or fire accident could result from using an improper outlet.)
Generalprohibitions
• Do not climb on, stand on, sit on, or place heavy objects on the seat, the lid, or themain unit, or permit a child to stand on the seat cover. (It is not designed to supportthe user’s weight.) You, or others, may be injured, or break, or damage the Washlet.
• Do not place the Washlet on the toilet in the opposite direction.(The Washlet might fall into the toilet bowl and may be damaged.)
• Do not pick up the Washlet by holding only the seat and lid.(The main unit may fall off and break.)
• Do not allow direct sunlight to shine on the Washlet at any time.(Discoloration, temperature irregularity of the seat heater, and/or remote controlmalfunction may occur.)
• Do not cover the seat sensor and/or the remote control reception window ortransmission window. (The seat sensor and/or the remote control may not operate.)
• When the Washlet is not used for a long period, remove the water and disconnectthe power cord. See “Draining Water from the Washlet” on page 42.(The water may become foul and may cause skin irritation.)
• Do not lean back against the lid when seated.(The lid may become cracked or damaged.)
• Keep the temperature in the room above the freezing point.(The water in the main unit may freeze when the temperature is below the freezingpoint and may cause a leak. Keep the room warm with a heater.)(See “Draining the Water from the Washlet” on page 42.)
• Do not drop the remote control on the floor or into the toilet bowl.(It may cause the remote control to malfunction.)
• Do not urinate or defecate onto the Wand.(It may cause the Wand to malfunction.)
• Only mount the SW834 (Elongated type) Washlet on toilets with elongated bowls, andonly mount the SW833 (Round type) Washlet on toilets with round bowls. Mountingthe Washlet on the wrong type of toilet may cause undue stress on the base plate andbolts with continued use, causing structural instability to the Washlet and possibleserious personal injury.
Ignoring this display may cause personalinjury and/or property damage.
Warning
Generalprohibitions
Important Safeguards (continued)
Do not ignore this display. If the installationwork is carried out incorrectly or unsuitably, itmay cause serious bodily injury or death.
Danger
Washlet (Section 1) 6/16/03, 9:30 AM4

5
Gettin
gS
tarted
GROUNDING INSTRUCTIONS
• This product should be grounded. In the event of an electrical short circuit,grounding reduces the risk of electric shock by providing an escape wire for theelectric current. This washlet is equipped with a cord having a grounding wire witha ground plug. The plug must be plugged into an outlet that is properly installedand grounded.
• If repair or replacement of the cord or plug is necessary, do not connect thegrounding wire to either flat blade terminal. The wire with insulation having anouter surface that is green with or without yellow stripes is the grounding wire.
• Check with a qualified electrician or serviceman if the grounding instructions arenot completely understood, or if in doubt as to whether the product is properlygrounded.
• This product is for use on a nominal 120 volt circuit and has a grounding plug thatlooks like the plug illustrated in Figure A. Make sure that the product is connectedto an outlet having the same configuration as the plug.
• No adapter should be used with this product.
Improper use of the grounding plug canresult in a risk of electric shock.
Danger
Generalprohibitions
• The electrical outlet must be a 120 volt, 60 Hz and at least a 15 AmpGROUNDED OUTLET, and should be located on the wall within reach of thewashlet power cord.
• This washlet must be on a separate circuit. No other appliance should share thecircuit with this Washlet. Sharing a circuit could cause the branch circuit fuse toblow or the circuit breaker to trip. Continuous usage under these conditions couldresult in a fire.
• A ground fault circuit interrupter (GFCI) should be installed on the circuitsupplying power to the Washlet.
Important Safeguards (continued)
Figure A
Grounding Pin
Washlet (Section 1) 6/16/03, 9:30 AM5

6
Features
Comfort Features (pages 21 – 27)Seat SensorSeat HeaterDryerDeodorizerWireless Remote Control
Soft Closing
• All the features operate when the seat is occupied.• Warms the seat.• Dries you underneath with warm air.• Removes odor from the air in the toilet bowl.• Lets you operate the Washlet from a comfortable position.• Tactile buttons for the visually impaired.• The seat and lid close slowly.
This section introduces you to the features of your TOTO Washlet S300. Try out these convenient features.
Cleansing Features (pages 23 – 25)Rear CleansingRear Cleansing (Soft)Front Cleansing
Wand Position AdjustmentTemperature AdjustmentWater Pressure AdjustmentOscillating
Pulsating
Soft Start
• Aims a gentle stream of water for rear cleaning.• Aims a more gentle stream of water for rear cleaning.• Aims a more gentle stream of warm water further forward for
feminine hygiene.• Adjust the wand to a comfortable position.
• Adjusts the temperature of the water, the seat, and the dryer.
• Adjusts the water pressure.• The Cleansing Wand moves back and forth, cleansing
thoroughly over a wide area.• Cleanses with water whose pressure changes between weak and
strong.• The water pressure starts out softly then gradually increases to
the pressure setting you selected.
Cleaning Features (pages 33 – 41)Seat and Lid Removal
Main Unit Removal
Self-Cleaning
“Wand Cleaning on/off”button
• You can separate the seat and lid from the main unit for easycleaning.
• One-touch removal of the main unit for easy cleaning of hard toreach areas.
• The Wand automatically and thoroughly cleans itself before andafter you wash.
• You can extend the Wand without spraying water for easycleaning by pressing the “Wand Cleaning” button.
Energy Saver Features (pages 28 – 32)“Timer on/off” button
“Saving Time” button
“Auto on/off” button
• You can save energy using the “Timer on/off” button (see page28-32 for details).
• Saves energy by shutting off the seat heater automaticallyevery day at the same time. (Can be set to shut off the heaterafter 3, 6, or 9 hours.)
• The Washlet S300 can remember the time frames in which it isnot used, and save energy by automatically reducing thetemperature of the heated seat.
Washlet (Section 1) 6/16/03, 9:30 AM6

7
Gettin
gS
tarted
Quick ReferenceThis section helps you become familiar with the basic features of your Washlet S300.
Deodorizer Filter
Water Drainage Outlet
WaterDrainageLever
Main Unit – Bottom Main Unit – Back
The Seat Sensor allows theCleansing features to workonly while the seat isoccupied.
Seat SensorLets you shut off the watersupply to the Washlet withoutshutting off the water supplyto the toilet.
Junction ValveMain Unit
Remote Control
RemoteControlHook
Lid
QuickReleaseButton
Seat Sensor
Cleansing Wand (Wand Head)ConnectionHose
Power Cord
Junction Valve
Water Drainage Plug
Seat with Heater
Label
Washlet (Section 1) 6/16/03, 9:30 AM7
8
Water
Seat
Dryer
Deodorizer
Temperature
on/off
hrs
Timer
Auto
Saving Time
Pressurehighmidlow
Deodorizerfront back
Position
hrs.“Water +/–” buttons
“Seat +/–” buttons
“Dryer” button
Cover Open
“Timer” button
“Saving Time” button
“Auto” button
“Front Cleansing”button
“Rear Cleansing” button
“Power” button
OperationPanel
For the visually impaired, we provide tactile buttons and raised bumps between the two paired▲/▼ buttons.
“Stop” button
“Oscillating” button“Pulsating” button
Remote Control Display
Case
Cover
“Dryer” button
“Front Cleansing” button“Rear Cleansing (Soft)” button
“Rear Cleansing” button
“Wand Cleaning” button
“Deodorizer” button
Main Unit Supplementary Panel
RemoteControlReceptionWindow
Seat Sensor
Remote Control
Energy Saver Settings
Main Unit Display
Temperature Settings
Quick Reference (continued)
Power Cleansingon/off Fronton/off Rear
on/off
EnergySaver
Deodor-izer
SeatPower
Washlet (Section 1) 6/16/03, 9:30 AM8

9
Installin
g th
eW
ashlet S
300
This section explains how to install the Washlet. Follow the instructions and install the Washletcorrectly. If you have any problems installing the Washlet, contact the store where you purchasedyour Washlet. For product information, contact TOTO Customer Service at 1-888-295-8134.Be sure to follow the Important Safeguards on pages 2 through 5.
Precautions Before Installing the Washlet
It has been our experience that local building codes in the United States providefor the power and water pressure to be within the ranges set forth below. However,you should consult with your local authorities, and with the proper electriciansand plumbers, to be sure.
• Use an AC 120V (60 Hz) power source. The maximum powerconsumption is 1277 W. Be sure to use suitable wiring for theserequirements.
• The length of the power cord installed in the product is about 3 feet(1 meter). The GFCI power outlet you plan to use should be locatedwithin 2 feet (0.6 meter) of the Washlet’s Operation Panel.
• Do not use direct current or 240V AC power. (It may cause a fire, leak,and/or malfunction.)
• The water pressure of the water supply should be between 20 p.s.i. and80 p.s.i. Adjust the water pressure so that it is within this range.
• The water temperature of the water supply should be between 32°F and95°F (0° to 35°C). Adjust the water temperature so that it is within thisrange.
• The length of the connection hose supplied with the product is about 20inches (0.5 meter). The junction valve should be installed within about 20inches (0.5 meter) of the water supply inlet of the Washlet’s main body.
• The electric power should be connected, and the water supply opened, tothe Washlet only after installation is fully complete.
• Only mount the SW834 (Elongated type) Washlet on toilets withelongated bowls, and only mount the SW833 (Round type) Washlet ontoilets with round bowls. Mounting the Washlet on the wrong type of toiletmay cause undue stress on the base plate and bolts with continued use,causing structural instability to the Washlet and possible serious personalinjury.
• When using a radio, move the radio away from the Washlet. (The radiomay pick up noise.)
INSTALLATION PRECAUTIONS
Section 1 Installing the Washlet S300 (continued)
Washlet (Section 2) 6/16/03, 9:30 AM9

10
Carton ContentsMake sure all of the following items are included.
Remote Control RemoteControlHook
AnchorPlugs (3)
Screws(3)
AA-typeBatteries (2)
Installation Overview
1 Install the Base Plate Page 11
2 Mount the Washlet Page 13
3 Install the Junction Valve Page 14
4 Install the Remote Control Page 17
Warning
• Do not lift the unit byholding the seat and/or lid.(If you lift the unit in thisway, the main unit maydetach from the seat andlid and fall.)
Installing the Washlet S300 (continued)
Base Plate Template(shown mounted in Base Plate)
Main Unit withSeat and Lid
Instruction Manual andQuestionnaire
Installing the
Jasmin W
ashlet
Using the
Jasmin W
ashlet
Caring for the
Jasmin W
ashlet
Other
Information
Getting
Started
Questionaire
Junction Valve
Packing Washers
Bolt
WasherLock Washer
Rubber Bushing
Connection Hosewith PackingWasher
Base Plate
Washlet (Section 2) 6/16/03, 9:31 AM10

11
Installin
g th
eW
ashlet S
300
Toilet Bowl
Bolt Center
Measurethis
distance
Bolt
ELONGATED
Bottom of tank
Black Line
Template
BasePlate
1 The Base Plate Template is used to correctly position thebase plate on the toilet. The template is attached to thebase plate when shipped from the factory.
If the template becomes separated from the base plate,follow the instructions printed on the template to reattachthe template to the base plate.
2 Insert the rubber bushings in the seat mounting holes.For easy insertion, wet the surface of the rubber bushings with water.
3 Loosely assemble the bolts, washers, lock washers andbase plate on the surface of the toilet.
4 Measure the distance between the bolt center and thefront end of the toilet.
• Elongated toilets measure approximately 18 1/2 inches (470 mm).• Round toilets measure approximately 16 1/2 inches (420 mm).
5 For Elongated toilets, align the bolt center with the word“ELONGATED” printed on the base plate template.
*Lock Washer
The lock washershould be assembled“face up”.Two small dentsindicate the “up” side.
2 smalldents
Installing the Base Plate
Installing the Washlet S300 (continued)
Phillips and flatheadscrewdrivers
Tools you will need:
Adjustablewrenches (2)
Base Plate Bolt
Washer
LockWasher*
Stopper
RubberBushing
Base PlateTemplate
BasePlate
RubberBushing
Seat Mounting Hole
Washlet (Section 2) 6/16/03, 9:31 AM11

12
Installing the Washlet S300 (continued)
6 For round toilets, align the bolt center with the word“ROUND” printed on the base plate template.
1. There should be a space of 1/16 inch (2 mm) between the low tankand the back surface of the template.
2. The black line printed on the template MUST either be in front of theedge of the bowl, or fit inside the edge of the bowl.
7 Fasten the base plate to the toilet by firmly holding thebase plate with your hand so that it will not shift position.
With a Phillips screwdriver, tighten the bolts into therubber bushings. The bushings will expand inside the seatmounting holes. Continue tightening until the bolts aresnug. Be careful not to over-tighten the bolts withexcessive force.
8 To remove the template, slowly pull up from the baseplate.
NoteAfter removal, you may want to keep the template in case ofreinstallation or relocation.
Bottomof tank
BlackLine
Toilet
Toilet
Black Line
Spa
ce
Alignedwith edgeof bowl
Alignedwith insideof bowl
Bolt
ROUND
ELONGATED
Move Base PlateWithin AdjustableRange
Bolt
ROUND
Bolt
Washlet (Section 2) 6/16/03, 9:31 AM12

13
Installin
g th
eW
ashlet S
300
Installing the Washlet S300 (continued)
Mounting the Washlet on the Toilet Bowl
9 Mount the Washlet by aligning the grooves underneath themain body with the grooves on the base plate and slidingthe main body onto the base plate until it clicks.Make sure the Washlet can be mounted smoothly and correctly withoutexcess stress or distortion.
10 Check the condition of the Washlet after installation.
NoteThe base plate can be adjusted forward and backward as neededdepending on your toilet. If there is any problem with the installation,remove the main unit and adjust the base plate.
11 Remove the Washlet by pressing the quick release buttonand sliding the main body forward.
12 Tighten the bolts securely until the base plate makescontact with the toilet bowl.The bolts should be securely tightened until the rubber gasket has beenflattened and the plastic base plate makes contact with the toilet bowl.
13 Mount the Washlet (see step 9).After you mount the Washlet on the toilet, you should be able to movethe Washlet slightly up and down and side to side. This is normal.There is a small gap between grooves in the main unit and base plateto allow easy and smooth mounting.
Base Plate
Any difficulty opening orclosing the seat and lid?
Is the seat installedstraight?
BasePlate
Toilet
RubberGasket
Quickreleasebutton
Warning
• Mounting your Washlet onthe wrong type of toilet maycause undue stress on thebase plate and bolts,causing structural instabilityto the Washlet and possibleserious injury.
Caution
• If you do not hear a click instep 9, repeat this step untilyou do hear a click.Attempting to force theWashlet into position maydamage or break theWashlet. The Washletshould mount with minimaleffort. To test the propermounting of the Washlet,gently pull the unit in theopposite direction of thearrows shown in step 9. Aproperly mounted Washletshould not slide away fromthe base plate. Do notattempt to apply more thanminimal force.
• Do not overtighten thebolts. Excess tighteningmay damage the bolts, thebase plate, the toilet or therubber gasket. You shouldtighten the bolts onlyenough to hold the baseplate firmly in position.
Washlet (Section 2) 6/16/03, 9:31 AM13

14
Installing the Junction ValveThe instructions and illustrations for this section are for common toilets found in most homes. Yourtoilet may vary in appearance. If you cannot find a described fixture or connection on your toilet,you may have a custom toilet installation that requires professional installation for the Washlet.
1 Close the water supply shut-off valve near the wall.Flush the toilet to empty the water tank, and place a container underthe tank’s water inlet.If water flows into the toilet or water tank, check the water supply shut-off valve to make sure it is completely closed. Failure to completelyclose this valve may result in flooding when the flexible tubing isdisconnected in the next step.
2 Remove the flexible tubing (or metal/copper tubing) fromthe tank’s water inlet using an adjustable wrench.Drain the water from the flexible tubing into a container.
Notes• If your tank is connected to the water supply shut-off valve with
metal or copper tubing, you must replace it with flexible tubing.• Check the condition of the flexible tubing. If it is cracked, worn or
damaged, replace it before continuing this procedure.
3 Place the packing washer inside the nut on the junctionvalve, and install the junction valve onto the tank’s waterinlet using an adjustable wrench.Make sure the washer is seated properly on the junction valve.
PackingWasher
AdjustableWrenches (2)
Tools you will need:
Caution
• If you are not familiarwith plumbing andinstalling plumbingfixtures, you may needto hire a contractor todo this installation.
• Improper tightening ofa connection, eitherunder-tightening orover-tightening canresult in water leakage.
FlatheadScrewdriver
Installing the Washlet S300 (continued)
JunctionValve
Turn the water supplyshut-off valve clockwise
Tank’s Water Inlet
Flexible Tubing
Container
Washlet (Section 2) 6/16/03, 9:31 AM14

15
Installin
g th
eW
ashlet S
300
4 Install the flexible tubing onto the junction valve.You may need to replace the packing washer on the flexible tubing if itis worn or damaged.
NoteIf you have removed the metal or copper supply tubing in step 2, youmust replace it with flexible tubing.
5 Place a packing washer inside the nut on the other end(1/2") of the connection hose and install the hose onto thewater inlet of the Washlet using two adjustable wrenches.The water inlet of the Washlet is covered by a protective cap.
6 Insert the plug side of the connection hose into the watersupply coupler of the junction valve.After plugging in the connection, turn the collar 90o in either direction.Accidental disconnection of the coupler may occur if the raised andindented portions are aligned.
NoteContinue pushing it in until you hear a click.Water Supply Coupler
Plug ofConnectionHose
Installing the Washlet S300 (continued)
Continued …
Caution
• Do not overtighten thenuts. Overtightening candamage the connectionand cause leaks. Usemoderate pressure totighten the nuts.
• When tightening thejunction valve, make surethat the hose does notbecome bent. If the hoseshould become bent, thewater supply may not beable to reach the Washlet.
JunctionValve
Flexible Tubing
Packing Washer
Stabilize
Tighten
Raise toinstall
Lower touse
Caution
• Do not apply torque to thewater inlet on the main unit.
• Use one wrench to stabilizethe water inlet on the mainunit and another wrench totighten the connection hoseto the water inlet. (Usingonly one wrench to tightenthe connection hose maydamage the water inlet andcause a leak.)
IndentedPortion
CollarRaisedPortion
Click
Washlet (Section 2) 6/16/03, 9:31 AM15

16
Supplying Water to the Washlet S300
1 Make sure the junction valve is open.Use a flat-head screwdriver to turn the valve counter-clockwise.
2 Slowly open the water supply shut-off valve.Check each connection for any water leakage. If you find a leak, trytightening the nut or re-install hose and junction valve.
NoteFor removal of the connection hose, see page 43.
Turncounter-clockwise
Turn counter-clockwise
Installing the Washlet S300 (continued)
Washlet (Section 2) 6/16/03, 9:31 AM16
17
Installin
g th
eW
ashlet S
300
Installing the Washlet S300
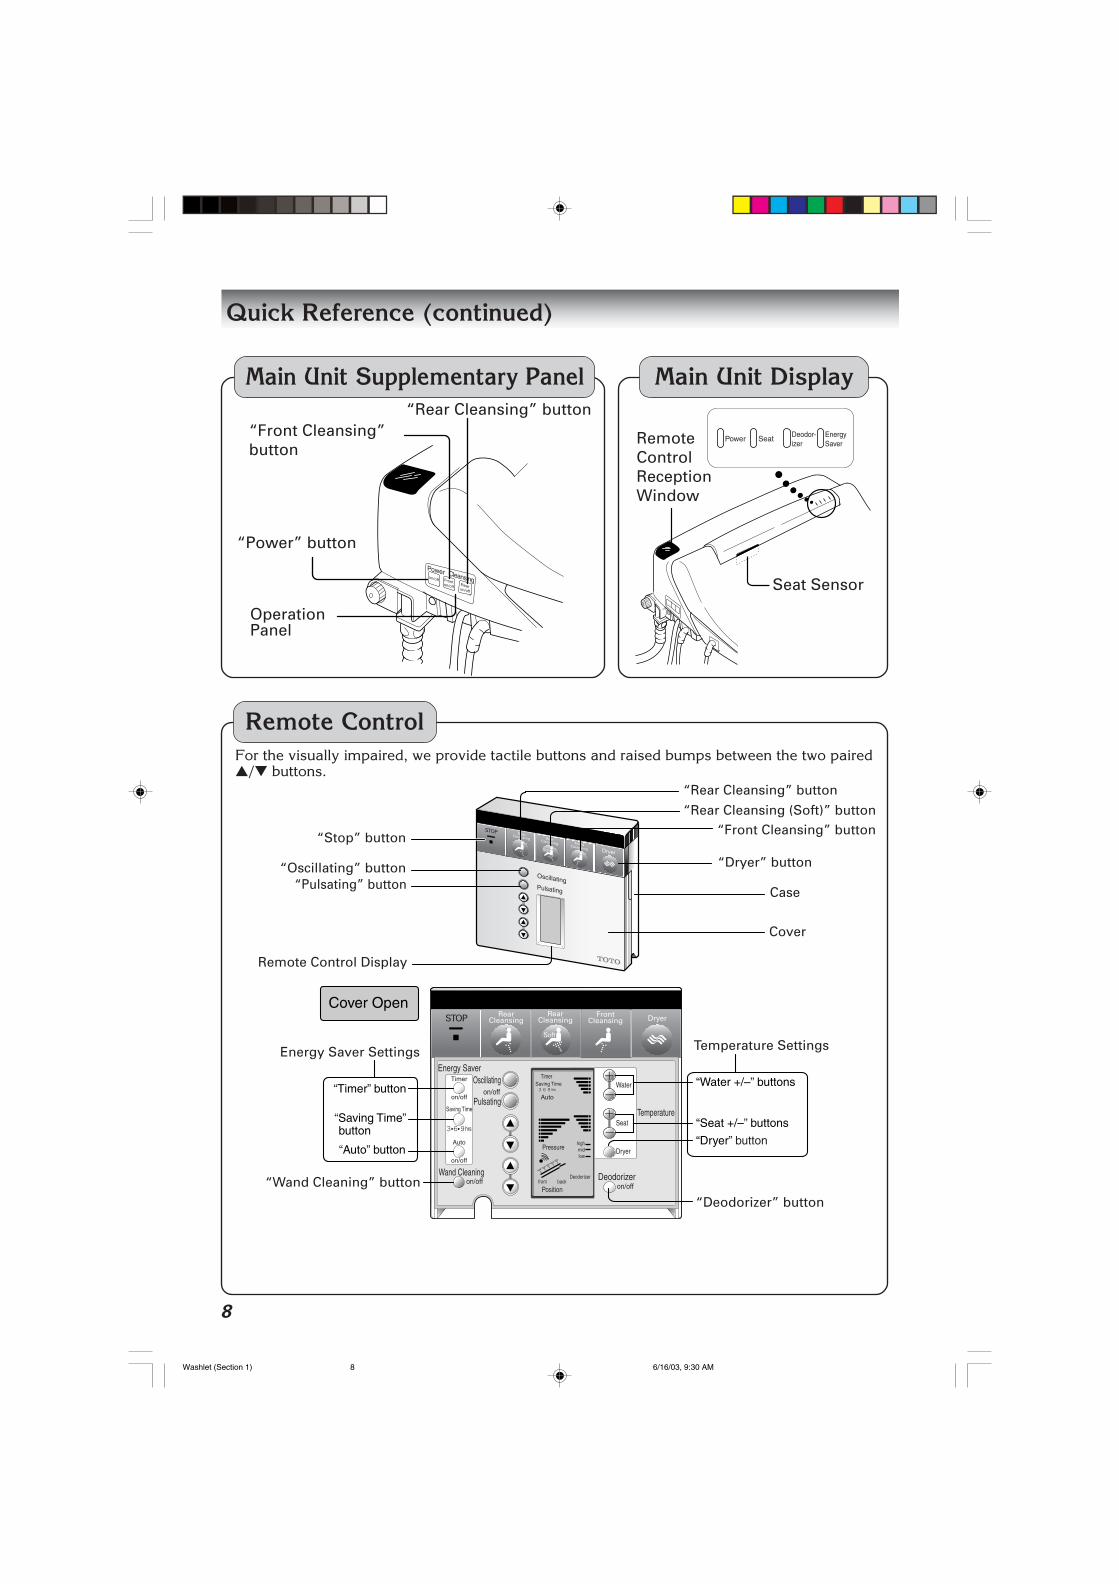
Installing the Remote Control
* Find a suitable installation location
Remote Control Hook
* If the wall is made of woodInstall the remote control hook using the supplied screws and aPhillips screwdriver.Then, go to step 5 on page 19.
PRECAUTION
Before installing the remote control, hold the remote controlagainst the wall where you plan to install it and operate theremote control to make sure the Cleansing features work.
Phillips Screwdriver
Tools you will need:
173⁄4"
371 ⁄2
"
6"
48"
30"
113⁄4"
Area where you can install the remotecontrol.
Area where you can use the remote control easilyand comfortably.
Area where you can install the remote control.
Area where you can use the remote control easily and comfortably.
Continued …
Washlet (Section 2) 6/16/03, 9:31 AM17
18
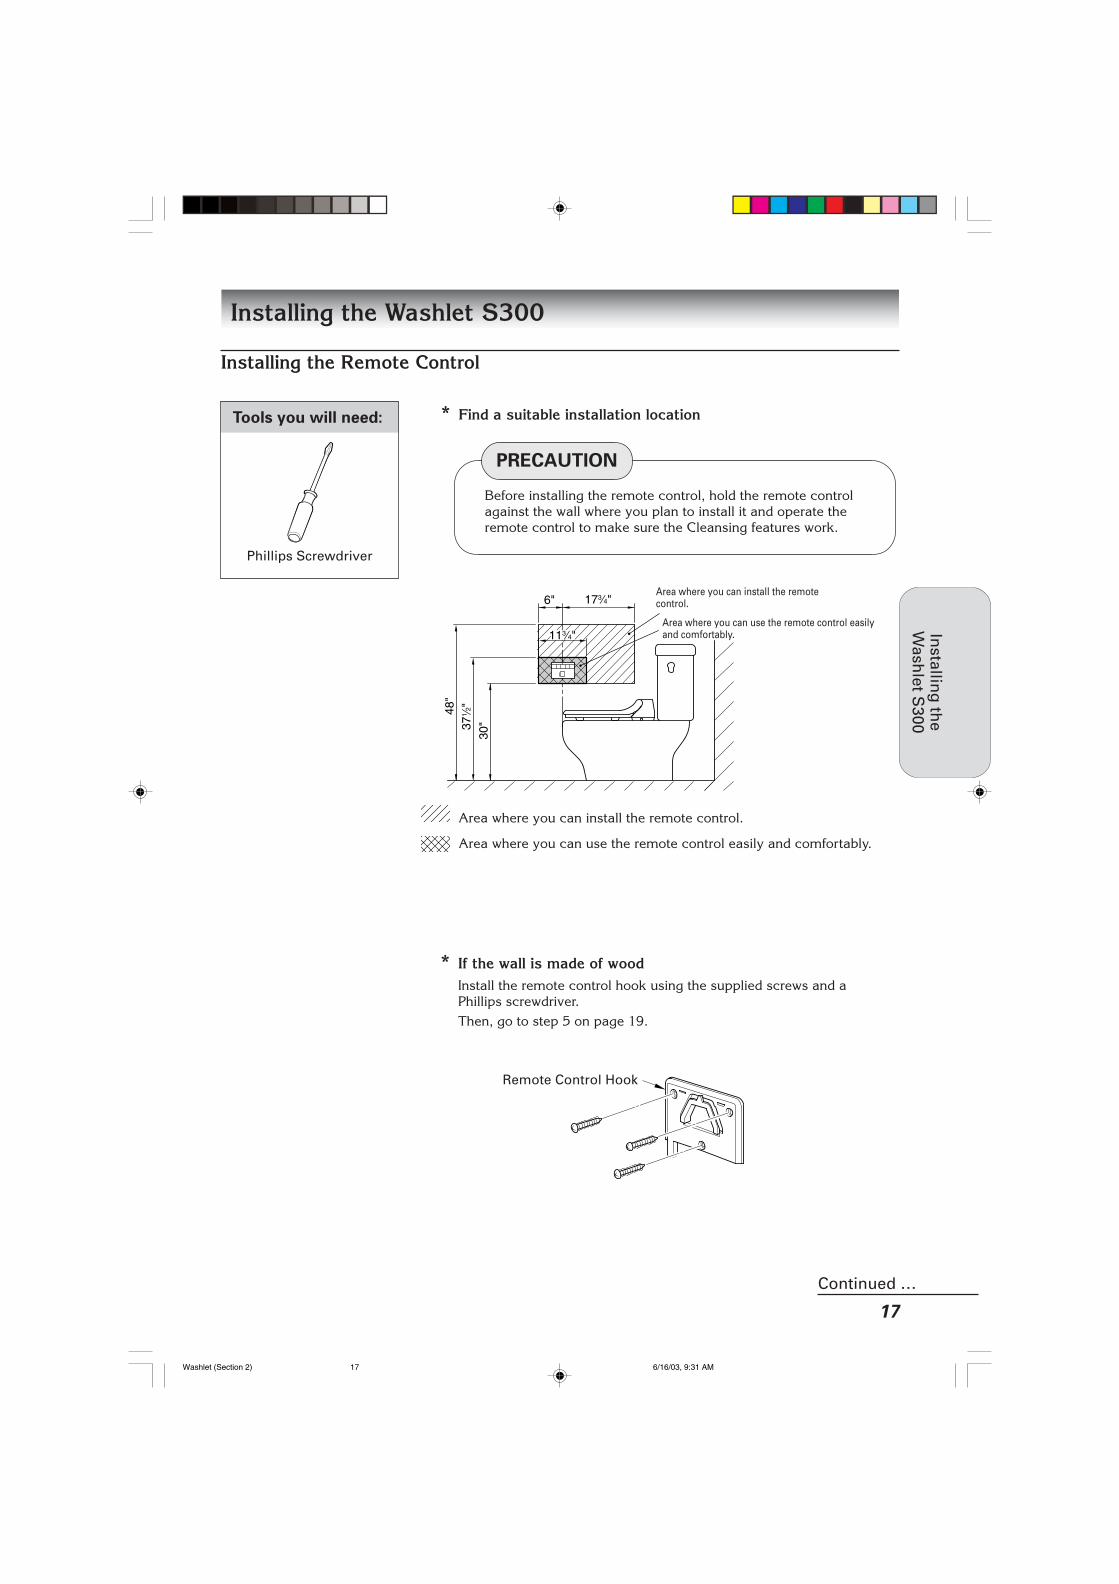
* If the wall is made of plaster board/sheet rock, tile, or concreteInstall the remote control hook using the supplied anchors.
1 Hold the remote control hook against the wall in thelocation where you want to install the remote control andmark the hole positions on the wall using a pencil.
2 Drill a 1/4" diameter hole at each of the marked holepositions.In case of tile or concrete wall, make the hole 13/8" deep.
3 Using a hammer, drive the anchor into the prepared hole.
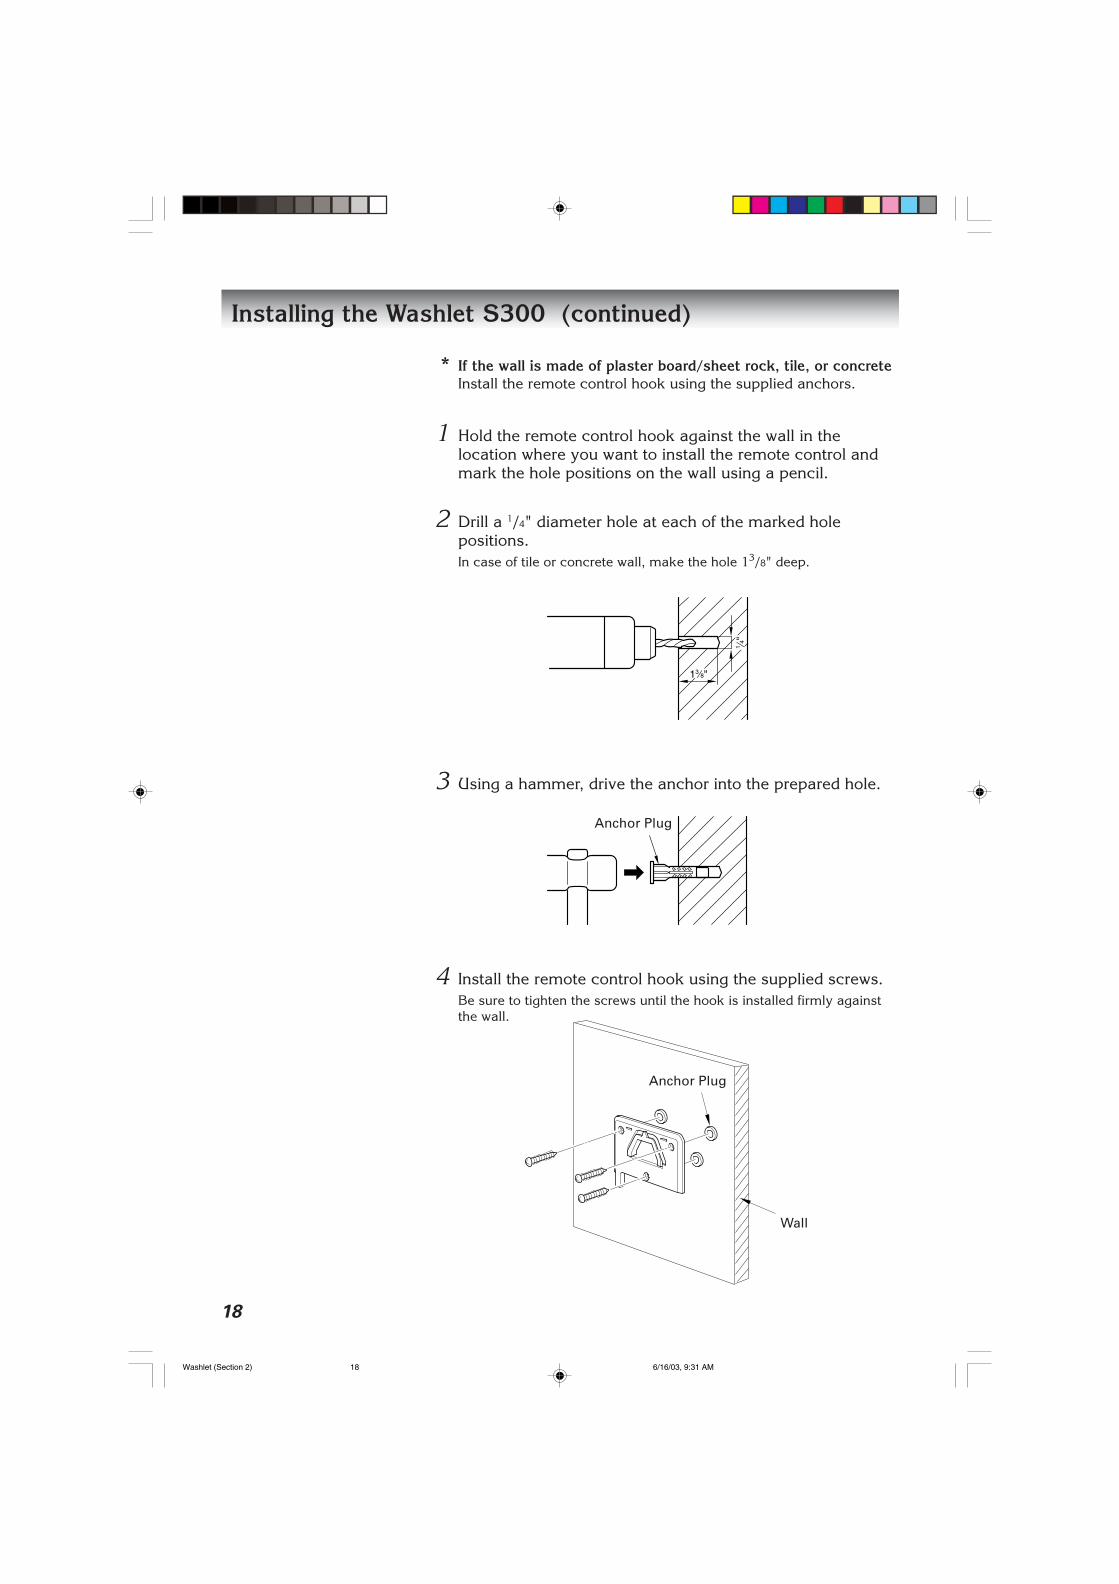
4 Install the remote control hook using the supplied screws.Be sure to tighten the screws until the hook is installed firmly againstthe wall.
Anchor Plug
13⁄8"
1 ⁄4"
Wall
Anchor Plug
Installing the Washlet S300 (continued)
Washlet (Section 2) 6/16/03, 9:31 AM18
19
Installin
g th
eW
ashlet S
300
Installing the Washlet S300
Continued …
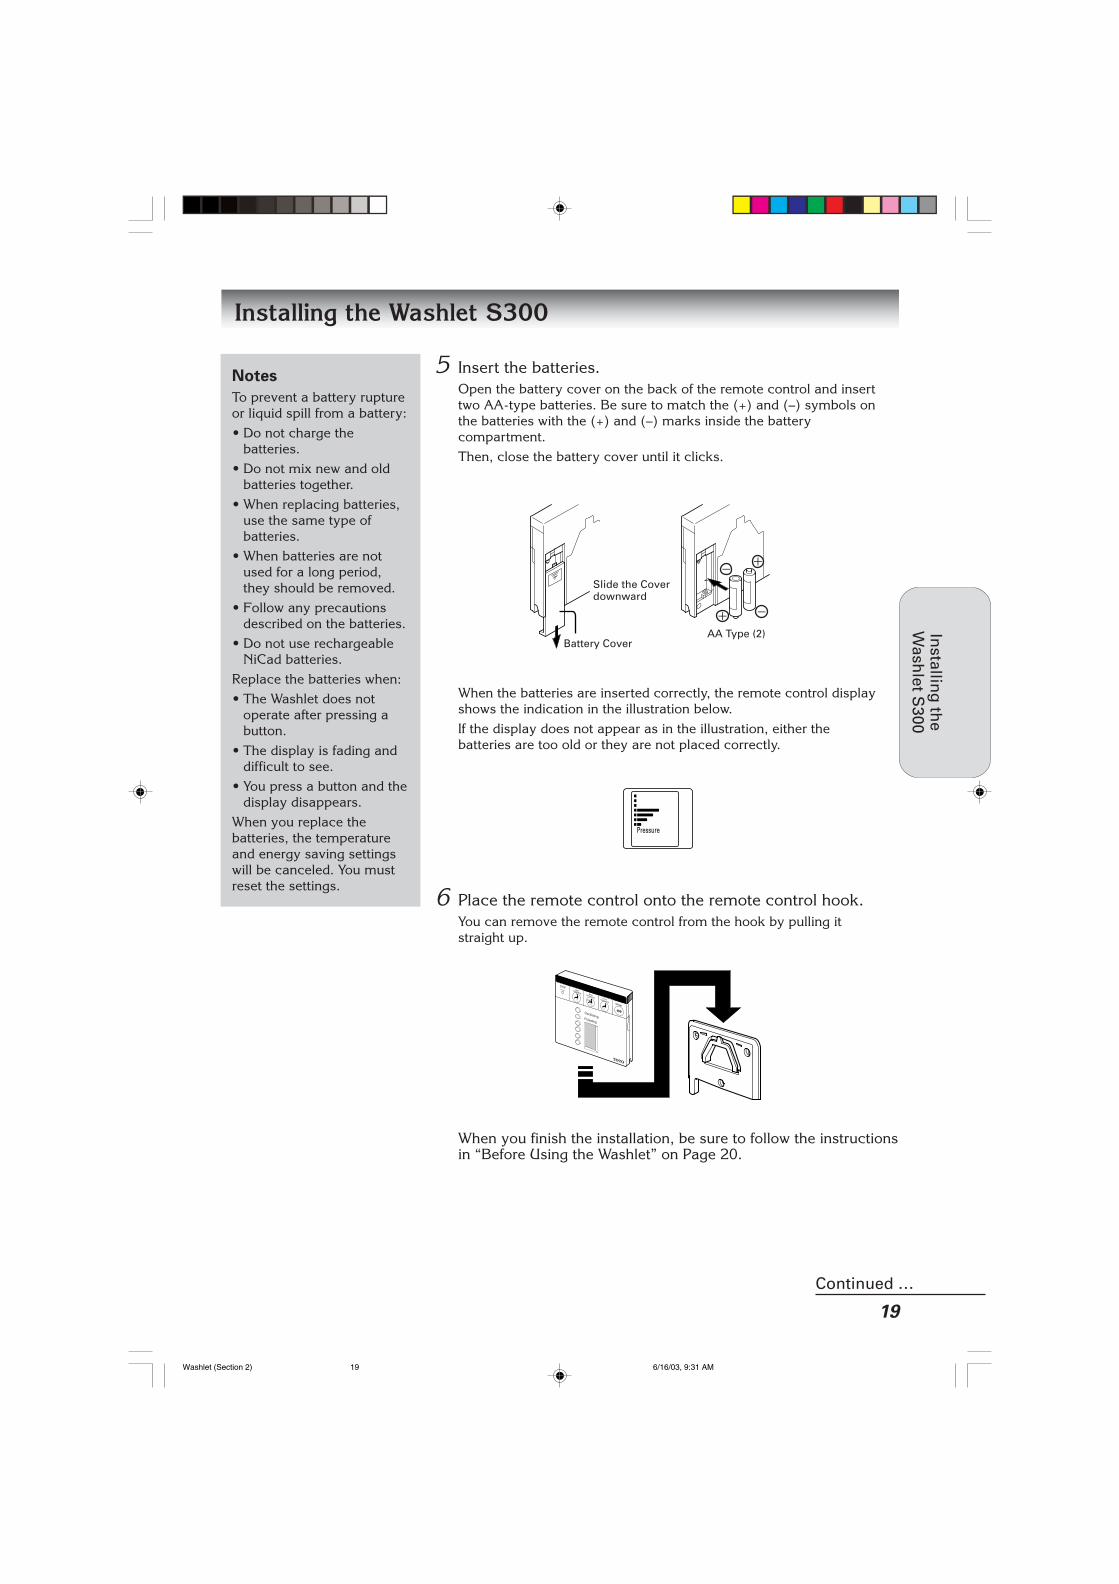
5 Insert the batteries.Open the battery cover on the back of the remote control and inserttwo AA-type batteries. Be sure to match the (+) and (–) symbols onthe batteries with the (+) and (–) marks inside the batterycompartment.Then, close the battery cover until it clicks.
When the batteries are inserted correctly, the remote control displayshows the indication in the illustration below.If the display does not appear as in the illustration, either thebatteries are too old or they are not placed correctly.
6 Place the remote control onto the remote control hook.You can remove the remote control from the hook by pulling itstraight up.
When you finish the installation, be sure to follow the instructionsin “Before Using the Washlet” on Page 20.
Slide the Coverdownward
Battery CoverAA Type (2)
Pressure
Notes
To prevent a battery ruptureor liquid spill from a battery:• Do not charge the
batteries.• Do not mix new and old
batteries together.• When replacing batteries,
use the same type ofbatteries.
• When batteries are notused for a long period,they should be removed.
• Follow any precautionsdescribed on the batteries.
• Do not use rechargeableNiCad batteries.
Replace the batteries when:• The Washlet does not
operate after pressing abutton.
• The display is fading anddifficult to see.
• You press a button and thedisplay disappears.
When you replace thebatteries, the temperatureand energy saving settingswill be canceled. You mustreset the settings.
Washlet (Section 2) 6/16/03, 9:31 AM19
20
Figure A
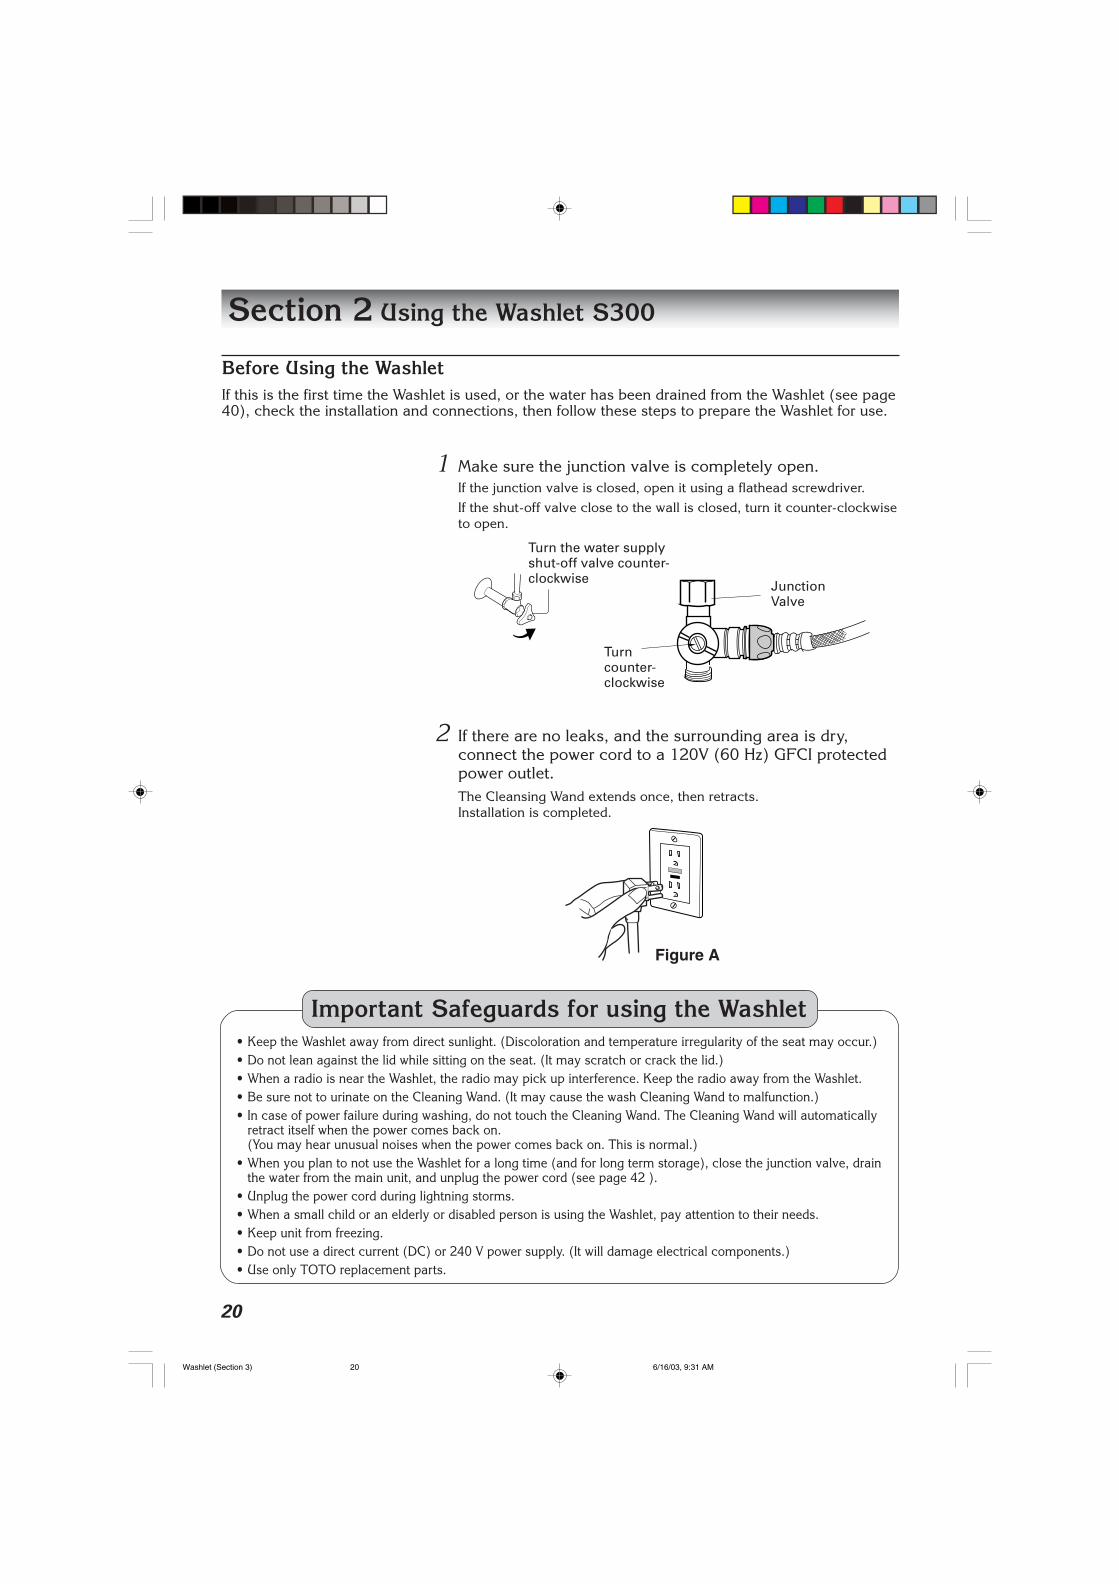
1 Make sure the junction valve is completely open.If the junction valve is closed, open it using a flathead screwdriver.If the shut-off valve close to the wall is closed, turn it counter-clockwiseto open.
2 If there are no leaks, and the surrounding area is dry,connect the power cord to a 120V (60 Hz) GFCI protectedpower outlet.The Cleansing Wand extends once, then retracts.Installation is completed.
Section 2 Using the Washlet S300
Before Using the WashletIf this is the first time the Washlet is used, or the water has been drained from the Washlet (see page40), check the installation and connections, then follow these steps to prepare the Washlet for use.
Turn the water supplyshut-off valve counter-clockwise
Turncounter-clockwise
• Keep the Washlet away from direct sunlight. (Discoloration and temperature irregularity of the seat may occur.)• Do not lean against the lid while sitting on the seat. (It may scratch or crack the lid.)• When a radio is near the Washlet, the radio may pick up interference. Keep the radio away from the Washlet.• Be sure not to urinate on the Cleaning Wand. (It may cause the wash Cleaning Wand to malfunction.)• In case of power failure during washing, do not touch the Cleaning Wand. The Cleaning Wand will automatically
retract itself when the power comes back on.(You may hear unusual noises when the power comes back on. This is normal.)
• When you plan to not use the Washlet for a long time (and for long term storage), close the junction valve, drainthe water from the main unit, and unplug the power cord (see page 42 ).
• Unplug the power cord during lightning storms.• When a small child or an elderly or disabled person is using the Washlet, pay attention to their needs.• Keep unit from freezing.• Do not use a direct current (DC) or 240 V power supply. (It will damage electrical components.)• Use only TOTO replacement parts.
Important Safeguards for using the Washlet
JunctionValve
Washlet (Section 3) 6/16/03, 9:31 AM20

21
Using the
Washlet S
300
Using the Washlet S300
3 Check the Main Unit Display and Remote Control Display.
• Is the “Power” lamp on?If not, press the “Power” button on the side of the main unit.
• Is the “Seat” lamp on?
If not, open the remote control cover and press the “SeatTemperature (+)” button .
• Does “Deodorizer” appear in the remote control display?If not, open the remote control cover and press the “Deodorizer”button . (When the unit accepts the operation, you will hear abeep.)
4 Check the Comfort Features.• Cover the seat sensor with a piece of white paper.
When the seat sensor is covered with white paper, it activatesthe seat sensor so all features are operable. (The seat must bedown.)
Water
Seat
Dryer
Deodorizer
Temperature
on/off
Timer
Auto
Saving Time
Pressurehighmidlow
Deodorizerfront back
Position
hrs.
Remote Control Display
White Paper
Seat Sensor
Continued …
Washlet (Section 3) 6/16/03, 9:31 AM21

22
Using the Washlet S300 (continued)
• Check the Deodorizer feature.Is air blowing from the right rear of the main unit?
• Check the drying feature.When you press the “Dryer” button, does warm air come out ofthe right side of the Cleaning Wand?When you press the “STOP” button, does the drying feature stopoperating?
• Check the seat heater feature.It takes about 15 minutes for the seat to warm up.
5 Check the Cleansing features.• Prepare to block the water with your hand and press the “Rear
Cleansing”, “Rear Cleansing (Soft)”, or “Front Cleansing” button.Does warm water run out of the Wand?
• Press the “Water Pressure ▲/▼” buttons. Does the water pressurechange?
• Press the “STOP” button. Does the Cleansing feature stopoperating?
6 Remove the white piece of paper from the seat sensor.The Washlet is ready to use.
Note• If any of the features of
your Washlet S300 are notworking properly, see theTroubleshooting sectionstarting on page 45 forpossible causes andremedies.
Air Outlet
Air Outlet(shown from back of unit)
Washlet (Section 3) 6/16/03, 9:31 AM22

23
Using the
Washlet S
300
Using the WashletOperating the Washlet S300 is very simple even for first time users. All of the Cleansing and Comfort featurescan be operated using the remote control.
1 Sit down• The seat sensor starts operating.• Water runs out of the wand area of the main unit and into the
toilet bowl for several seconds in order to make warm waterready.
• The Deodorizer starts operating.• The Cleansing and Dryer features are ready for use.
2 When you are ready to wash, press the “Rear Cleansing”,“Rear Cleansing (Soft)”, or “Front Cleansing” button.Warm water is aimed upwards to clean you.
About the Seat Sensor• The seat sensor detects a
person while they areseated.
• An infrared light is emittedfrom the seat sensor asshown in the illustration.When a person or objectreflects this light, theCleansing, Deodorizer andDryer features areoperable.
• The Cleansing, Dryer, andDeodorizer functions areoperable while the seat isoccupied.
• The seat sensor may notwork well when thefollowing occur:- When you are seated (or
bending) too far forward— change your posture.
- When the seat sensor iscovered with clothing,dust, or water— remove the clothing,dust, or water that iscovering the seat sensor.
- When you are wearing afabric that does notreflect light well— pull the clothing up alittle so that the sensorcan reflect off of yourskin.
Using the Washlet S300
Continued …
Press the appropriate button.
Washlet (Section 3) 6/16/03, 9:31 AM23

24
3 Adjust the water pressure.Press the up arrow to increase the water pressure. Press the down arrowto decrease the water pressure.Pressing the “Oscillating” button causes the Wand to move back and forthwhile cleansing. Press again to turn off.Pressing the “Pulsating” button causes the water pressure to alternatebetween strong and week pressure. Press again to turn off.
Adjust the water pressure(The display shows the waterpressure.)
Oscillating
Pulsating
Pressure
front back
Position
Wand moves back and forth
Alternates water pressure
Pleasant Cleansing 1 Oscillating
The Cleansing Wand moves backand forth, cleansing thoroughlyover a wide area.
Press the appropriate button.
When you press the PulsatingOn/Off button, pulsationcleansing begins.
(Pressing the Pulsating On/Offbutton again causes the Washletto return to the mode selected in
above.)
Pleasant Cleansing 2 Pulsating
The water pressure becomesweaker and stronger.
Press the appropriate button.
When you press theOscillating On/Off button,oscillation begins.
(Pressing the Oscillating On/Offbutton again causes the Washletto return to the mode selected in
above.)
Using the Washlet S300 (continued)
Note• Sit on the seat fully. The
cleaning position will bebetter adjusted and it willprevent water fromsplashing out.
Washlet (Section 3) 6/16/03, 9:31 AM24
25
Using the
Washlet S
300
Using the Washlet S300
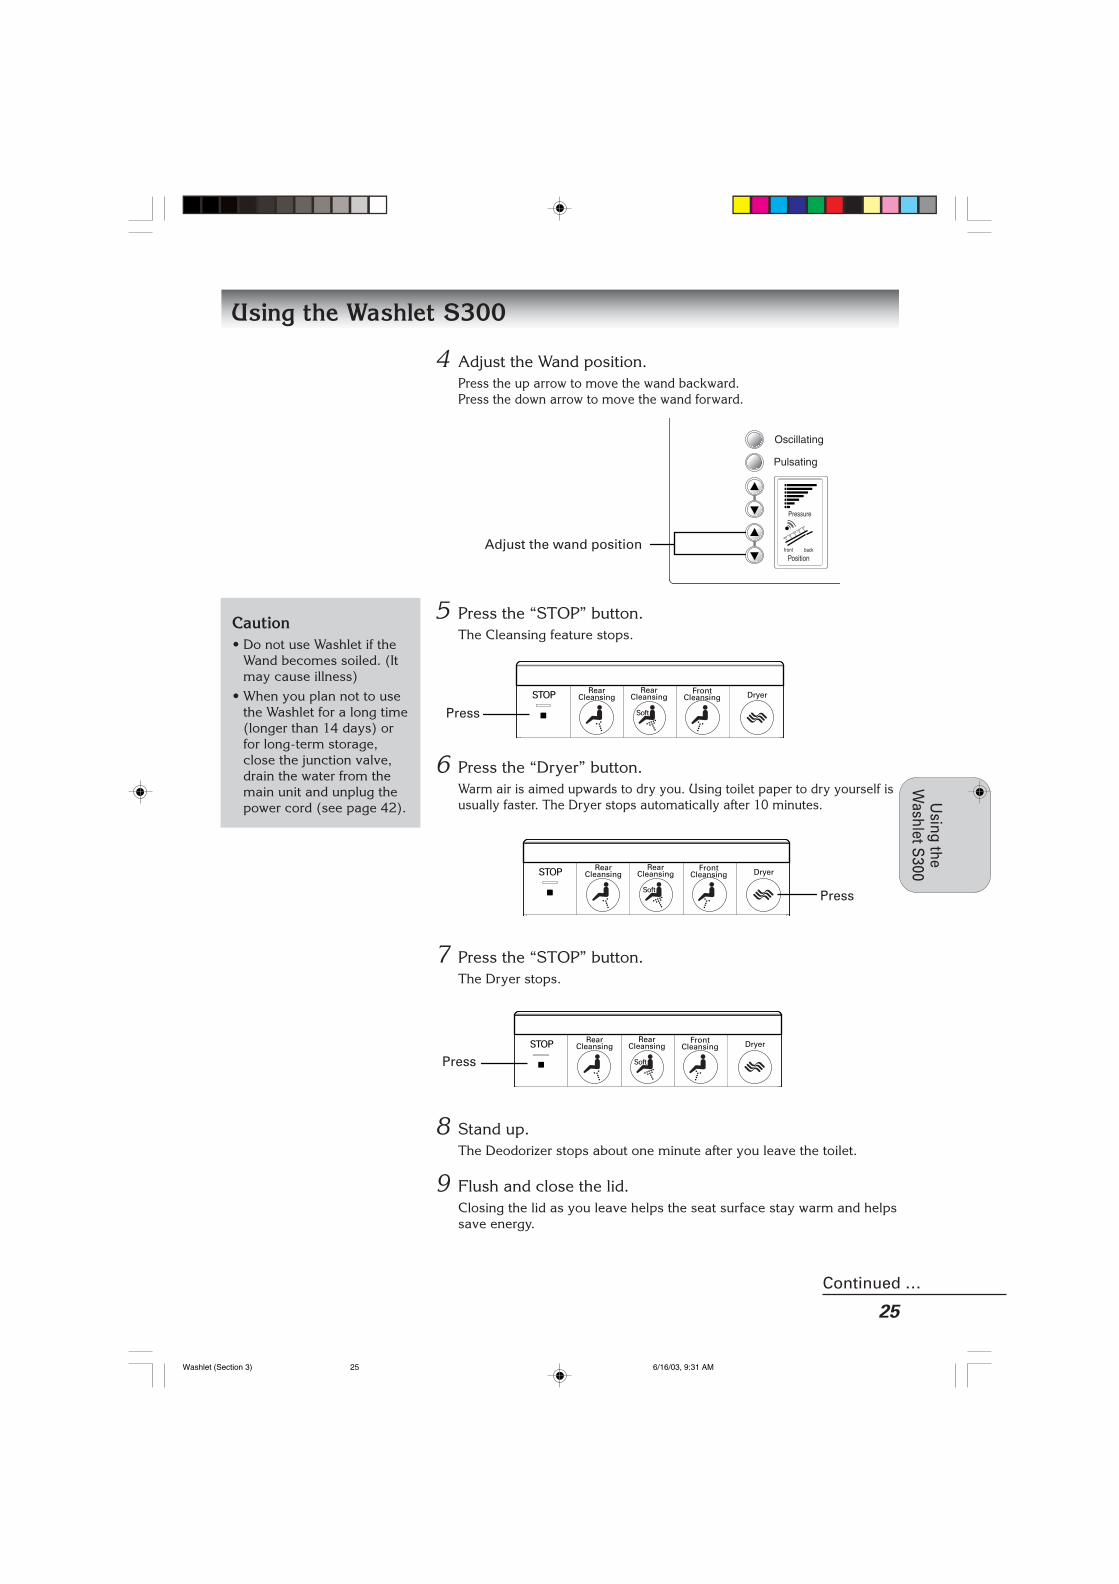
4 Adjust the Wand position.Press the up arrow to move the wand backward.Press the down arrow to move the wand forward.
5 Press the “STOP” button.The Cleansing feature stops.
6 Press the “Dryer” button.Warm air is aimed upwards to dry you. Using toilet paper to dry yourself isusually faster. The Dryer stops automatically after 10 minutes.
7 Press the “STOP” button.The Dryer stops.
8 Stand up.The Deodorizer stops about one minute after you leave the toilet.
9 Flush and close the lid.Closing the lid as you leave helps the seat surface stay warm and helpssave energy.
Caution• Do not use Washlet if the
Wand becomes soiled. (Itmay cause illness)
• When you plan not to usethe Washlet for a long time(longer than 14 days) orfor long-term storage,close the junction valve,drain the water from themain unit and unplug thepower cord (see page 42).
Press
Press
Press
Continued …
Oscillating
Pulsating
Pressure
front back
Position
Adjust the wand position
Washlet (Section 3) 6/16/03, 9:31 AM25
26
Adjusting the TemperaturesThe temperature of the water, seat, and dryer can be adjusted using the “Temperature” buttons under theremote control cover.
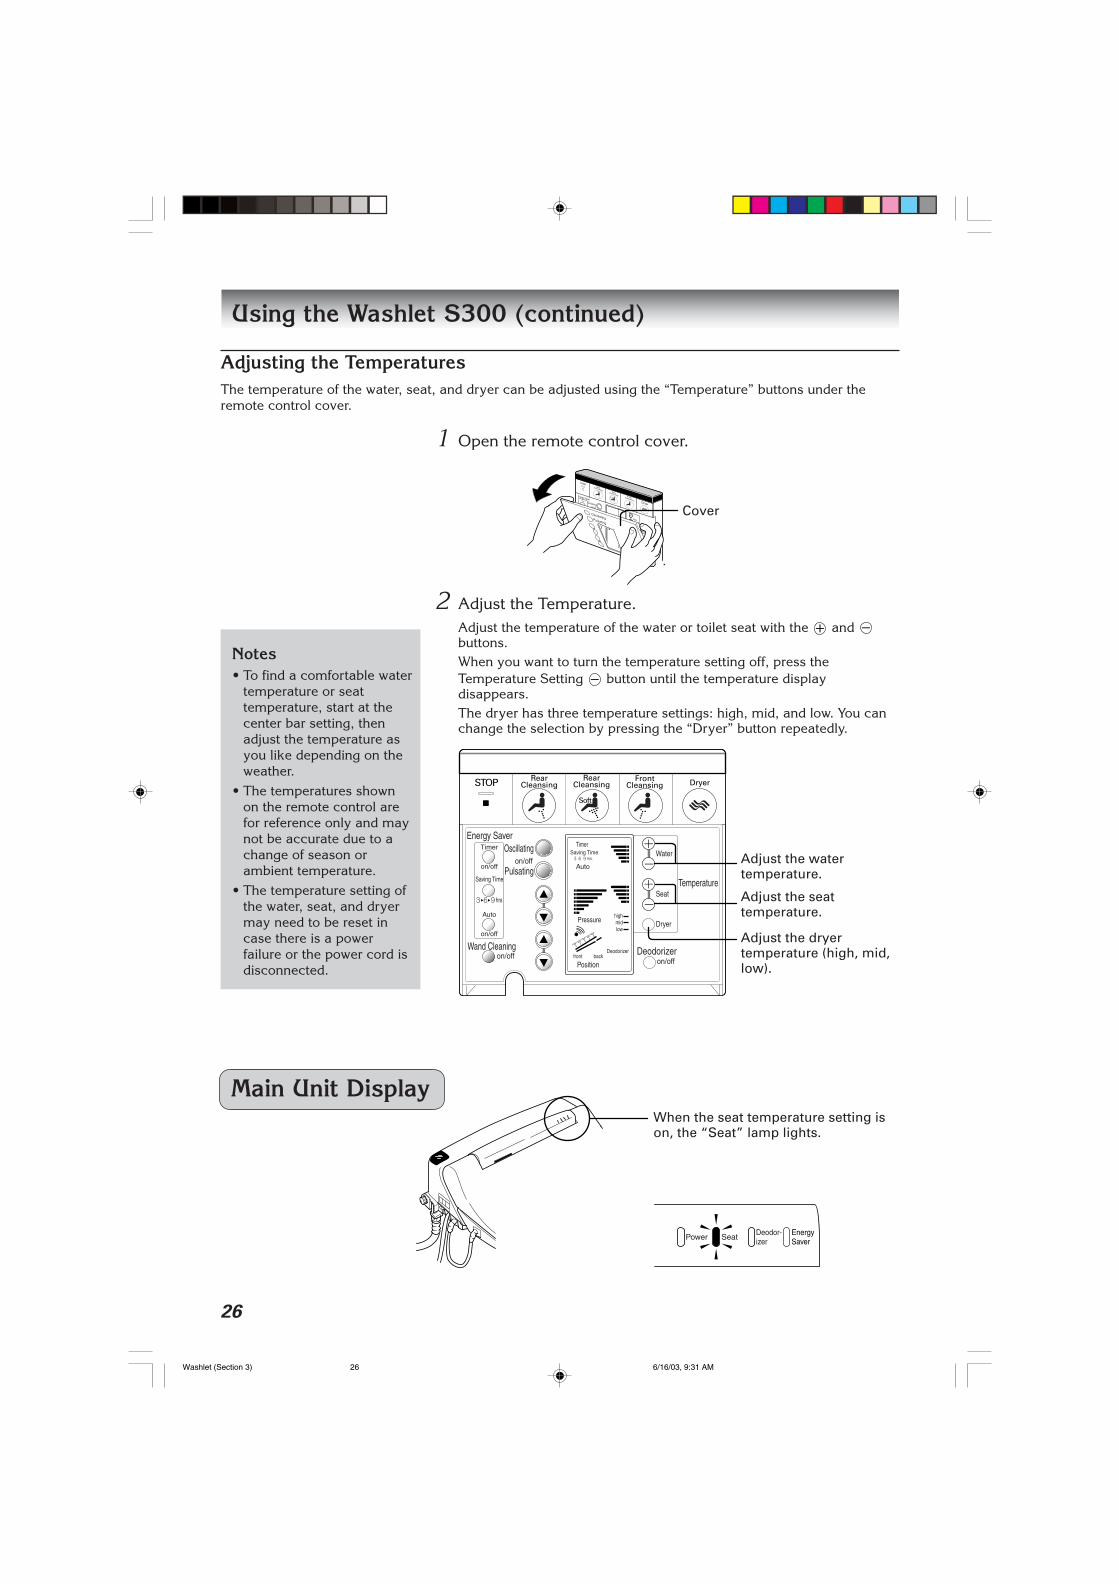
1 Open the remote control cover.
2 Adjust the Temperature.Adjust the temperature of the water or toilet seat with the and buttons.When you want to turn the temperature setting off, press theTemperature Setting button until the temperature displaydisappears.The dryer has three temperature settings: high, mid, and low. You canchange the selection by pressing the “Dryer” button repeatedly.
CoverWater
SEAT
DRYER
DEODORIZERON/OFF
TEMPERATURESETTINGHighMediumLow
Deodorizer
Timer
ON/OFF
Nozzle Cleaning
ON/OFF
Notes• To find a comfortable water
temperature or seattemperature, start at thecenter bar setting, thenadjust the temperature asyou like depending on theweather.
• The temperatures shownon the remote control arefor reference only and maynot be accurate due to achange of season orambient temperature.
• The temperature setting ofthe water, seat, and dryermay need to be reset incase there is a powerfailure or the power cord isdisconnected.
EnergySaver
Deodor-izer
SeatPower
When the seat temperature setting ison, the “Seat” lamp lights.
Main Unit Display
Adjust the watertemperature.
Adjust the seattemperature.
Adjust the dryertemperature (high, mid,low).
Water
Seat
Dryer
Deodorizer
Temperature
on/off
hrs
Timer
Auto
Saving Time
Pressurehighmidlow
Deodorizerfront back
Position
hrs.
Using the Washlet S300 (continued)
Washlet (Section 3) 6/16/03, 9:31 AM26
27
Using the
Washlet S
300
EnergySaver
Deodor-izer
SeatPower
Using the Washlet S300
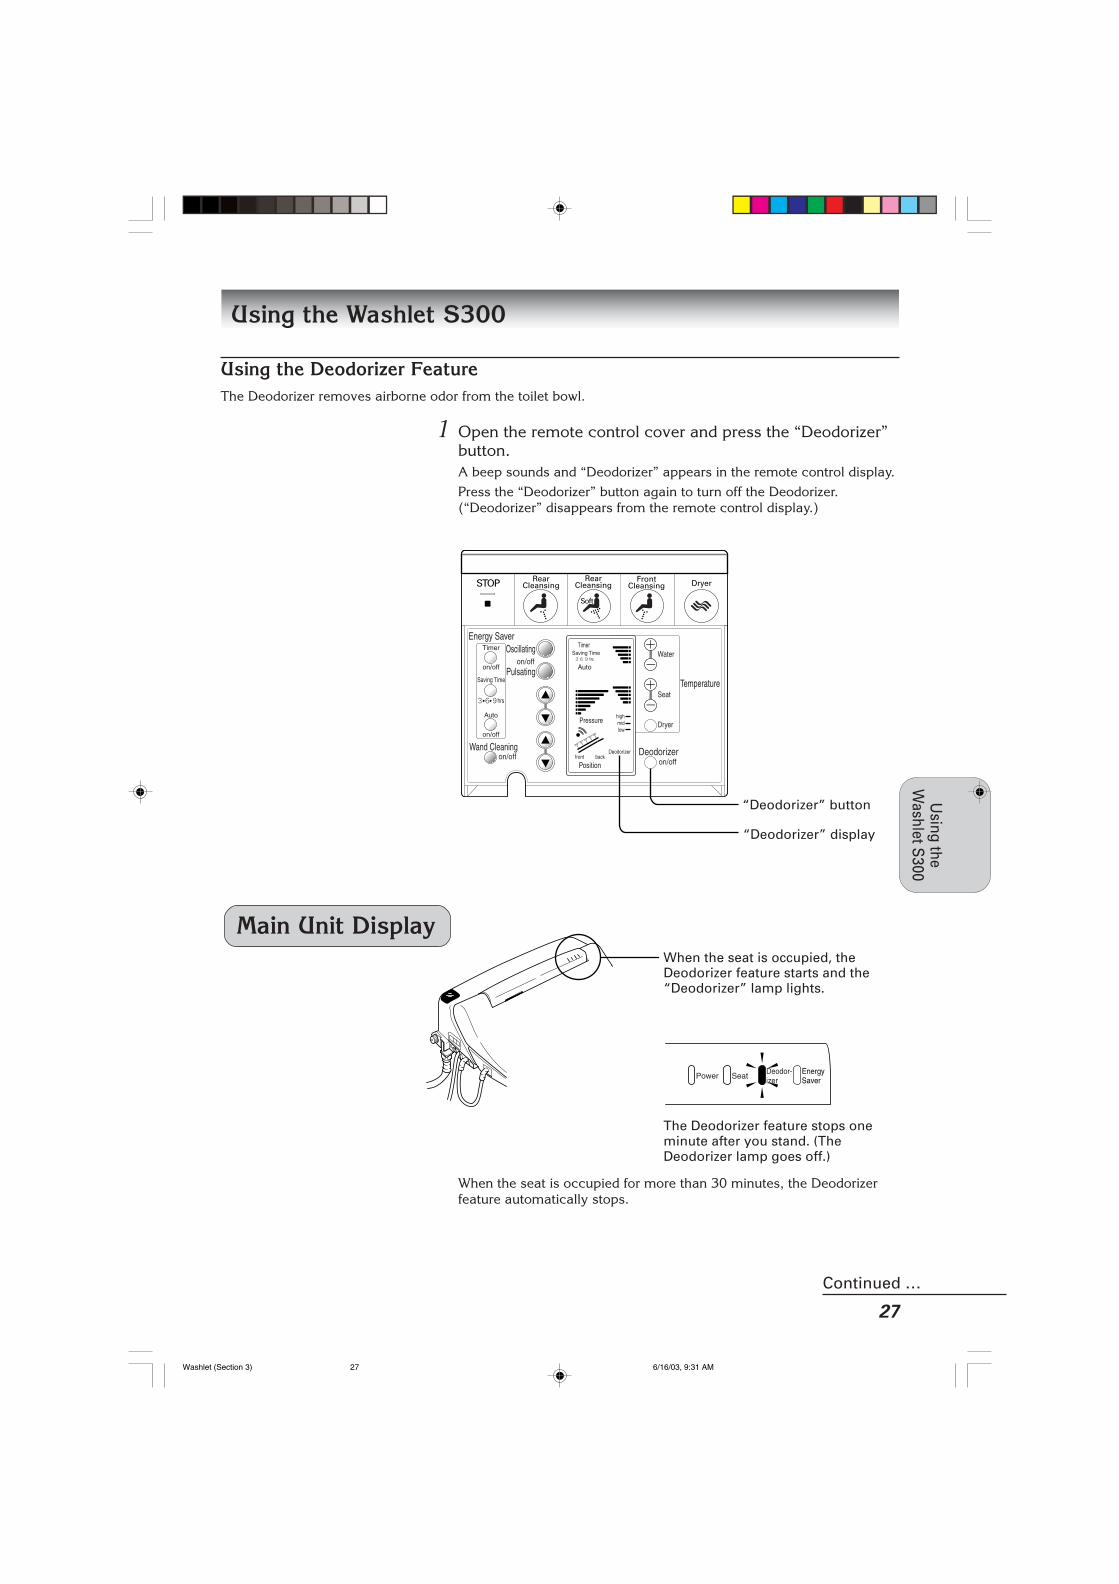
Using the Deodorizer FeatureThe Deodorizer removes airborne odor from the toilet bowl.
1 Open the remote control cover and press the “Deodorizer”button.A beep sounds and “Deodorizer” appears in the remote control display.Press the “Deodorizer” button again to turn off the Deodorizer.(“Deodorizer” disappears from the remote control display.)
When the seat is occupied, theDeodorizer feature starts and the“Deodorizer” lamp lights.
The Deodorizer feature stops oneminute after you stand. (TheDeodorizer lamp goes off.)
When the seat is occupied for more than 30 minutes, the Deodorizerfeature automatically stops.
Main Unit Display
Water
Seat
Dryer
Deodorizer
Temperature
on/off
hrs
Timer
Auto
Saving Time
Pressurehighmidlow
Deodorizerfront back
Position
hrs.
“Deodorizer” button
“Deodorizer” display
Continued …
Washlet (Section 3) 6/16/03, 9:31 AM27

28
Water
Seat
Dryer
Deodorizer
Temperature
on/off
hrs
Timer
Auto
Saving Time
Pressurehighmidlow
Deodorizerfront back
Position
hrs.
Press
Press
Press
Saving Time
Saving Time
Saving Time
Using the Energy Saver Feature – “Timer on/off”You can set your Washlet S300 to turn off the seat heater to save energy by pressing the “Timer on/off”button. The heater turns off for six hours to save energy. Each day afterwards, the Washlet automatically goesinto Energy Saver mode at the same time.
1 Open the remote control cover and press the “Timer”button at the time you want the Energy Saver feature tobegin operating.“Timer” and “Saving Time 6 hrs.” appear in the remote control display,and a beep sounds.The “Energy Saver” lamp in the main unit display lights.The seat heater turns off and energy saving starts.
Water
Seat
Dryer
Deodorizer
Temperature
on/off
hrs
Timer
Auto
Saving Time
Pressurehighmidlow
Deodorizerfront back
Position
hrs.
Timer
Auto
Saving Timehrs.
EnergySaver
Deodor-izer
SeatPower
2 Press the “Saving Time” button repeatedly to set theduration.Every time you press “Saving Time”, the display changes.Select the duration you want to set.
Notes• You can always change the
energy saving durationwithout changing theenergy saving start time.
• If you wish to change theenergy saving start time,turn off the energy savingtimer and press the“Timer” button again at thenew time.
Notes• The saving time is initially
set for 6 hours.• When batteries for the
remote control arereplaced, the settings willbe cleared. Reset thesettings.
• When you expect freezingtemperatures, keep theroom warm so that theroom temperature does notfall below freezing, andturn off the Energy Saverfeature.
• In case the power cord isdisconnected or a powerfailure occurs, the timermay not operate correctlyon that day, but it shouldoperate as originally setstarting on the followingday.
Using the Washlet S300 (continued)
Washlet (Section 3) 6/16/03, 9:31 AM28

29
Using the
Washlet S
300
Water
Seat
Dryer
Deodorizer
Temperature
on/off
hrs
Pressurehighmidlow
Deodorizerfront back
Position
No indication
* ExampleWhen you want to save energy for 6 hours between 12:00a.m. and 6:00 a.m. (while your family is sleeping), pressthe “Timer” button at midnight.
OperatingEnergysaving
Toilet
Se
at
He
ate
r
on
ToiletS
eat
Heateroff
Shutting Off Energy Saver Feature – “Timer on/off”The Washlet can be set to remember the times of day that you normally use the toilet, and will automaticallylower the temperature of the toilet seat to save energy when you do not expect to use the toilet.
1 Open the cover of remote control, and press the “Timer”button.• The “Timer” and “Saving Time” indicators in the remote control
display go out and a beep sounds.• The green “Power” lamp and the green “Seat” lamp on the main
unit display light.• The seat heater turns on and energy saving stops.
EnergySaver
Deodor-izer
SeatPower
The energy saving starts automatically at the same time and durationon every following day.How much energy do you save?(Figures based on 100% usage when no energy saving is in effect.)
3 Hours Energy Saving Duration Saves about 9%
6 Hours Energy Saving Duration Saves about 17%
9 Hours Energy Saving Duration Saves about 25%
Using the Washlet S300
Continued …
Note• When the toilet seat is
occupied during energysaving mode, the seatheater temporarily turnson. At this time, the green“Power” lamp lights.It takes about 15 minutesfor the seat to warm up.
Washlet (Section 3) 6/16/03, 9:31 AM29
30
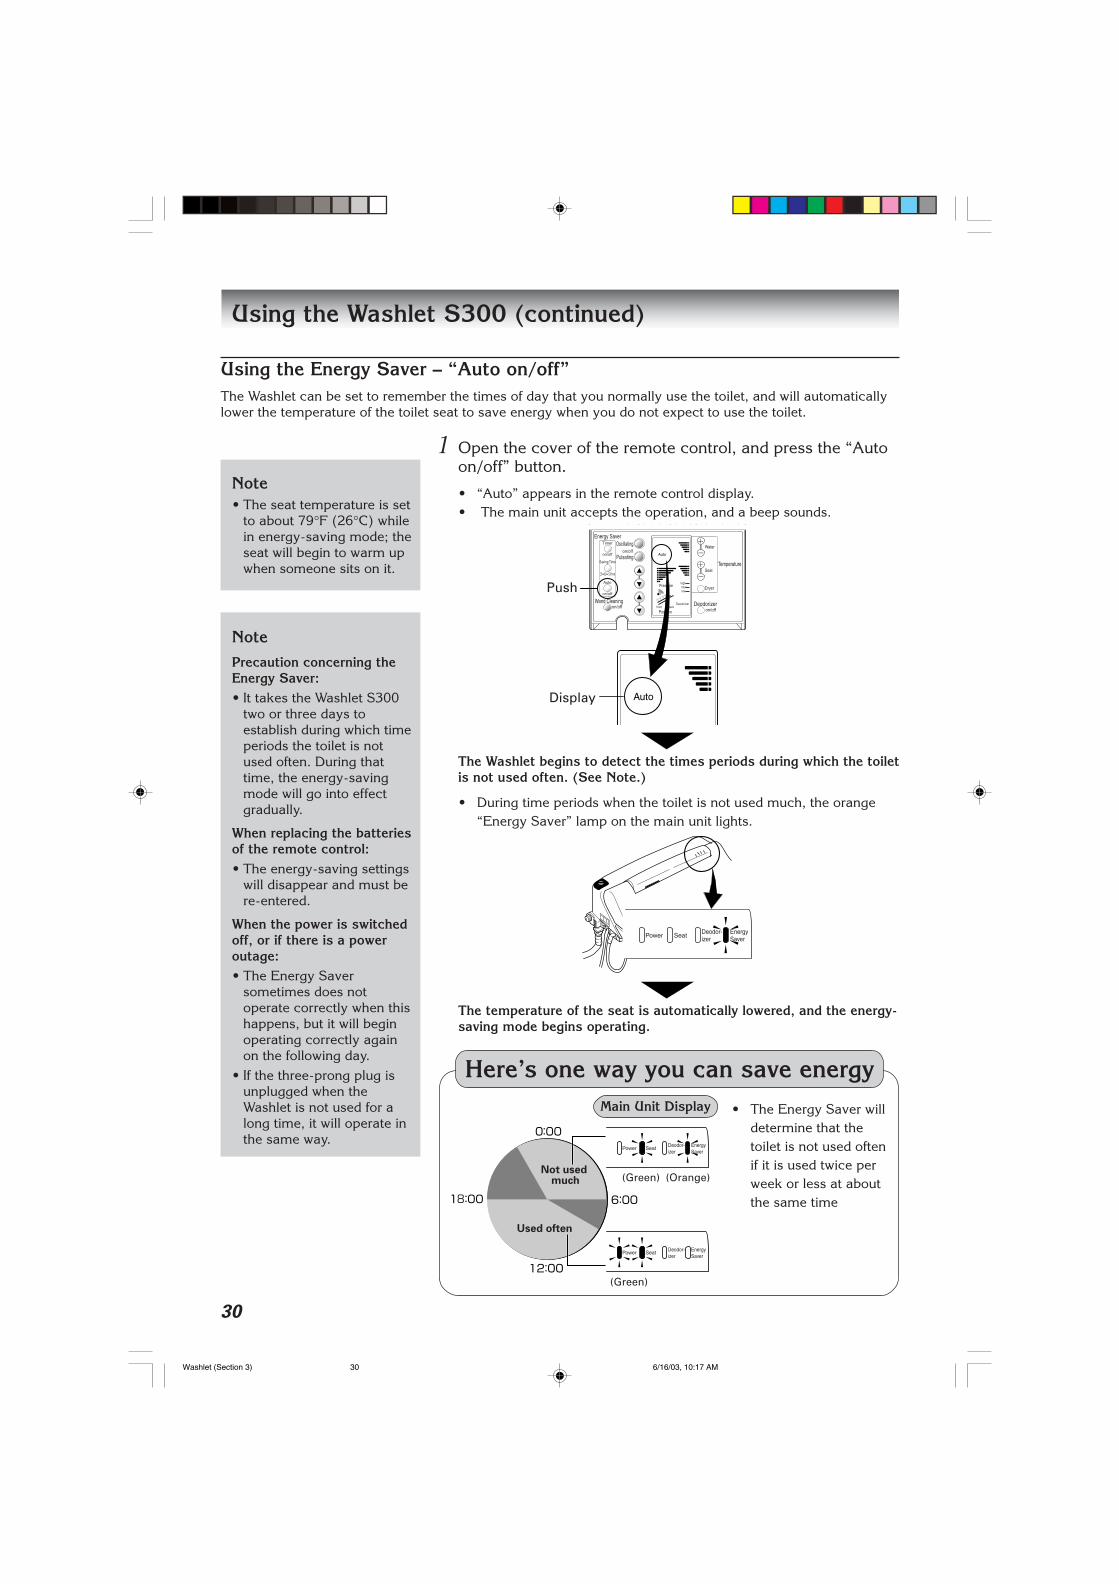
Using the Energy Saver – “Auto on/off”The Washlet can be set to remember the times of day that you normally use the toilet, and will automaticallylower the temperature of the toilet seat to save energy when you do not expect to use the toilet.
1 Open the cover of the remote control, and press the “Autoon/off” button.
• “Auto” appears in the remote control display.• The main unit accepts the operation, and a beep sounds.
The Washlet begins to detect the times periods during which the toiletis not used often. (See Note.)
• During time periods when the toilet is not used much, the orange“Energy Saver” lamp on the main unit lights.
The temperature of the seat is automatically lowered, and the energy-saving mode begins operating.
Water
Seat
Dryer
Deodorizer
Temperature
on/off
hrs
Auto
Pressurehighmidlow
Deodorizerfront back
Position
Auto
Here’s one way you can save energy
• The Energy Saver willdetermine that thetoilet is not used oftenif it is used twice perweek or less at aboutthe same time
Not used much
Used often
EnergySaver
Deodor-izer
SeatPower
EnergySaver
Deodor-izer
SeatPower
(Green)
(Green) (Orange)
Main Unit Display
Note
Precaution concerning theEnergy Saver:• It takes the Washlet S300
two or three days toestablish during which timeperiods the toilet is notused often. During thattime, the energy-savingmode will go into effectgradually.
When replacing the batteriesof the remote control:• The energy-saving settings
will disappear and must bere-entered.
When the power is switchedoff, or if there is a poweroutage:• The Energy Saver
sometimes does notoperate correctly when thishappens, but it will beginoperating correctly againon the following day.
• If the three-prong plug isunplugged when theWashlet is not used for along time, it will operate inthe same way.
Note• The seat temperature is set
to about 79°F (26°C) whilein energy-saving mode; theseat will begin to warm upwhen someone sits on it.
Using the Washlet S300 (continued)
Push
Display
EnergySaver
Deodor-izer
SeatPower
Washlet (Section 3) 6/16/03, 10:17 AM30

31
Using the
Washlet S
300
Shutting Off the Energy Saver Feature – “Auto on/off”
1 Open the cover of the remote control, and press the EnergySaver button.
• “Auto” disappears from the remote control display.• The main unit accepts the operation, and a beep sounds.• The green “Power” lamp on the main unit lights.
The Energy Saver shuts off
■ The Washlet can be used even during Energy Saving mode.
• If you sit on the seat when it is in Energy Saving mode, the seatwill warm up. When this occurs, the green “Power” lamp willcome on.
• The seat will take about 5 minutes to begin heating up.
Water
Seat
Dryer
Deodorizer
Temperature
on/off
hrs
Pressurehighmidlow
Deodorizerfront back
Position
Using the Washlet S300
Continued …
Push
EnergySaver
Deodor-izer
SeatPower
No indication
Washlet (Section 3) 6/16/03, 9:31 AM31

32
Using the Washlet S300 (continued)
If You Are Using the “Timer on/off” and the “Auto on/off” Features at theSame TimeYou can use the “Timer on/off” and “Auto on/off” Energy Saver Feature at the same time.
1 Open the cover of the remote control, and press the “Timeron/off” button when you want to begin saving energy.Note: For more details, see “Timer on/off” on page 28.
2 Next, press the “Auto on/off” button. (See note.)Note• When you are using both,
the remote control displaywill look as follows:
Note: One of a Saving Timeof 3, 6, or 9 hours willdisplay.
Water
Seat
Dryer
Deodorizer
Temperature
on/off
hrs
Timer
Auto
Saving Time
Pressurehighmidlow
Deodorizerfront back
Position
hrs.
Display
Timer
Auto
Saving Timehrs.
Here’s one way you can save energy
• It does not matter in which order you push the “Timer on/off” and“Auto on/off” buttons: “Timer on/off” first, then “Auto on/off”, orvice-versa.
• During the time that the “Timer on/off” is not operating, the “Autoon/off” operates and helps you save energy when the Washlet is notused often.
Turn the "Timer" on at midnight
EnergySaver
Deodor-izer
SeatPower
EnergySaver
Deodor-izer
SeatPower
EnergySaver
Deodor-izer
SeatPower
Used oftenNot used
much
Used often
"Timeron/off"EnergySaver
(Green)
(Green)
Main Unit Display
(Green) (Orange)
Washlet (Section 3) 6/16/03, 9:31 AM32

33
Carin
g fo
r the
Wash
let S300
Daily CareFollow these instructions for daily care of the main unit, seat, and lid.
• For general cleaningUse a soft cloth, wet it with water, squeeze out all of the excess waterand wipe the Washlet surfaces.
• When the main unit is soiledUse a soft cloth lightly moistened with diluted dishwashing detergent towipe the Washlet surfaces.After cleaning, wipe the area using a soft cloth lightly moistened withwater.
• When toilet bowl cleanser contacts the WashletWhen toilet bowl cleanser contacts the Washlet by accident, use a softcloth with water and wipe the area immediately.
Thorough CleaningFollow these instructions for thorough cleaning of the main unit, seat, and lid. You can remove the seat and lidfor thorough cleaning.
1 Remove the seat and lid.Raise the seat and lid, and lift the lock covers (one on theright and one on the left).
Seat and Lid
Lock Cover
Be sure to open thelock covers on both theright and left sides. Open
Section 3 Caring for the Washlet S300
Note• In an average household,
you should clean theWashlet every 14 days orwhenever the Washlet isvisibly soiled. An averagehousehold is defined as fourindividuals using theWashlet four times a day.Your cleaning schedulemay be more or lessfrequent depending on yourparticular household usage.
Danger• Do not use household or
toilet cleaning detergent,benzine, thinner, cleanser,or nylon scrubbers. (Usingany of these may scratchand crack the plastic, andyou may be injured.)
Warning• The Washlet is an electric
appliance. Unplug thepower cord before cleaning.
• Do not splash water ordetergent, or urinate on themain unit or power cord.(Doing so may causeelectric shock.)
• Do not bend or crush theconnection hose. (It maycause a water leak.)
Washlet (Section 4) 6/16/03, 9:31 AM33

34
Slide the hinges inward
Hinge
Caring for the Washlet S300 (continued)
Lift the seat and lidstraight up.
Lock Cover
Caution• The seat cord is not
removable. (Do not pullthe cord by force.)
• Do not lift the seat and liddiagonally or useexcessive force. If you pullthe seat and lid diagonallyit may break the hinges.
Reassembling the Seat and Lid
1 Attach the lid to the seat.Place the seat on the lid and move both of the hinges outward.
2 Remove the seat and lid.Hold the seat and lid securely and lift them straight up.Lay the seat and lid upside-down on a towel or carpeted surface to
prevent scratches.
3 Remove the lid from the seat.Slide both of the hinges inward. The seat and lid come apart.
The lock cover and hinges cannot be removed from the seat.
4 Clean the WashletSee the daily care instructions on page 33 for details.Clean the main unit, seat, and lid thoroughly.
Washlet (Section 4) 6/16/03, 9:31 AM34

35
Carin
g fo
r the
Wash
let S300
2 Hold the seat and lid vertically over the posts on the mainunit.Make sure both of the hinges are facing downward.
3 Lower the seat and lid onto the posts.Do not lower the seat and lid diagonally or apply excessive force.
4 Close the Lock CoversClose both of the lock covers securely until you hear a click.If the lock covers are not closed securely, the seat may come loosecausing serious personal injury.
Click
Seat and Lid
Lock Cover
Close
Seat and LidHold them in a vertical position.
Lock CoverOpen and leave the cover forward.
HingeMake sure the hinges are facing downward.
Caution• Make sure the seat cord is
not twisted. (The seat cordmay get into the spacebetween the seat and therim of toilet.)
Caring for the Washlet S300
Post on the Main Unit
Insert
Continued …
Washlet (Section 4) 6/16/03, 9:31 AM35

36
Caring for the Washlet S300 (continued)
Cleaning Underneath the Washlet S300Detaching the Washlet from the toilet allows you to clean underneath the main unit and the top surface of thetoilet.
1 Remove the main unitPress the quick release button on the right side of the main unit, andpull the main unit toward you.Be careful with the connection hose and power cord when removingthe unit. Do not apply unreasonable force.
Danger• Do not use toilet
detergents, house cleaningdetergents, benzine,thinner, scouring powder,or scouring pads on thisproduct.(These cleaning productsmay cause cracks in theWashlet.)
Base Plate
2 Clean the bottom of the main unit with a soft cloth lightlydampened with water.See “Daily Care” on page 33 for details.
Warning• This is an electric
appliance. Do not splashwater or liquid detergentson the main body orpower cord.(It may cause fire andelectric shock.)
• Do not turn the waterdrainage lever to the“Open” position while themain unit is detachedfrom the toilet.(It may cause fire andelectric shock.)
• Do not place the main unitupside-down. The Washletmight fall into the toiletbowl, or be scratched.
• The Washlet is stillconnected to the watersupply hose. Whendetaching the Washletfrom the toilet, do not pullwith too much force. Donot pull on, twist or put akink in the water supplyhose. (It may causeleaking from the watersupply hose.)
Quick Release Button
Press the quick release buttonand pull the unit toward you.
Washlet (Section 4) 6/16/03, 9:31 AM36

37
Carin
g fo
r the
Wash
let S300
3 Remove the deodorizer filterPush the hook on the right side of the deodorizer filter and pull thedeodorizer filter toward you.
4 Clean the deodorizer filterRemove dust from the deodorizer filter using a toothbrush.
5 Install the deodorizer filterPlace the left side of the deodorizer filter in the main unit, then push inthe hook on the right until it clicks.
6 Mount the main unit.Align the center of the main unit with the center of the base plate.Slide the main unit onto the base plate and push it in until it clicks.
"Click"
Hook
Push gently
Notes• Do not use detergent.• You can wash the filter with
water, but be sure to dry itbefore putting it back.
• Do not use a hard brushsuch as a wire brush.
Hook
Deodorizer Filter
Caring for the Washlet S300
Continued …
Washlet (Section 4) 6/16/03, 9:31 AM37

38
Cleaning the Cleansing WandThe Cleansing Wand can be extended, without spraying water, for easy cleaning. The power cord must beconnected to a power outlet.
1 Lift the seat and lid and press the “Wand Cleaning” buttonon the remote control.The Wand extends.
NoteThe Wand retracts automatically after five minutes.
2 Use a soft cloth lightly moistened with water and wipe theWand.When the Washlet is soiled, clean the area with a soft cloth usingdiluted dishwashing detergent, and wipe it with a soft cloth lightlymoistened with water.
3 Press the “Wand Cleaning” button again.The Wand retracts and cleans itself automatically.
Caring for the Washlet S300 (continued)
Press the “WandCleaning” button
Warning• Do not push, pull, or turn
the Wand with excessiveforce.
• If the Wand appearssoiled, clean itimmediately.
• Do not use the Wandwhen it is soiled, (Thismay cause illness).
hrs
WandStorage
hrsPress the “WandCleaning” button
WandStorage
Washlet (Section 4) 6/16/03, 9:31 AM38

39
Carin
g fo
r the
Wash
let S300
Cleaning the StrainersThere are two strainers that you need to clean, one is located at the main unit and the other is in the Junctionvalve unit. When the water pressure becomes weak, you should clean the strainers.
1 Close the water supply shut-off valve and junction valve.
2 To access the strainers, pressure in the both water line andmain unit must be reduced first. In order to do this, youmust follow these steps.• Flush the toilet.
• Press the “Wand Cleaning” button once on the remote control.
• Press again the “Wand Cleaning” button to retract the wand.
3 Place a container underneath the water drainage plug.Then turn the water drainage plug counter-clockwise andpull it out gently.
Caution• Rinse the strainer with
water. Do not usedetergent.
• Do not use a hard brushsuch as a wire brush.
Caring for the Washlet S300
Continued …
hrs
Turn clockwiseTurnclockwise
Water DrainagePlug with Strainer
Container
Washlet (Section 4) 6/16/03, 9:31 AM39

40
4 Clean the main unit strainer.Remove sediment from the strainer using a toothbrush.
5 Insert the water drainage plug with strainer and push it ingently while turning it clockwise.
6 To access the “junction valve” strainer, the junction valvecover must be removed. Use a large flathead screwdriveror coin and turn the valve cover counter-clockwise.Place a container underneath the junction valve.After removing the junction valve cover, gently pull the strainer out.
7 Clean the strainer.Remove sediment from the strainer using a toothbrush.
Caution• Rinse the strainer with
water. Do not usedetergent.
• Do not use a hard brushsuch as a wire brush.
Caring for the Washlet S300 (continued)
Water Drainage Plugwith Strainer
Container
Strainer
Water DrainagePlug
Junction Valve Cover(turn counter-clockwise to remove)
JunctionValve Strainer
Junction ValveCover
Washlet (Section 4) 6/16/03, 9:31 AM40

41
Carin
g fo
r the
Wash
let S300
8 Insert the junction valve cover with strainer.Push the junction valve cover with strainer into the junction valve andturn it clockwise. Be sure to tighten it securely.
9 Open the water supply shut-off valve and the junction valve.
Continued …
Caring for the Washlet S300
Turncounter-clockwise
Turn counter-clockwise
Junction Valve Cover(turn clockwise to reset)
ve
Washlet (Section 4) 6/16/03, 9:31 AM41

42
If the water inside the Washlet freezes, the main unit may be damaged and cause water leakage may occur.Repairing damage due to freezing is not covered by the limited warranty. When you expect freezingtemperatures, keep the bathroom warm so that the room temperature does not fall below freezing, and turnoff the Energy Saver Feature (see page 28).
Draining Water from the Toilet and WashletIf you will not be using the Washlet for several weeks, or you expect freezing temperatures in an unheatedroom, drain the water from the toilet and Washlet.
When you are ready to use the Washlet again follow the steps in “Before Using the Washlet” on page 20.
Follow these instructions in order to reduce the water pressure in the line and main unit.
1 Close the water supply shut-off valve and junction valve.
2 To access the strainers, pressure in the both water line andmain unit must be reduced first. In order to do this, youmust follow these steps.• Flush the toilet.• Press the “Wand Cleaning” button once on the remote control.• Press again the “Wand Cleaning” button to retract the wand.
3 Place a container underneath the water drainage plug.Then turn the water drainage plug counter-clockwise andpull it out gently.
Section 4 Other Information
Preventing the Washlet from FreezingTo prevent the Washlet from freezing, maintain the temperature in the bathroom so that it does not fall belowfreezing. If you do not use a heater to do this, you should drain the water from the toilet and Washlet.
hrs
Water DrainagePlug with Strainer
Container
TurnclockwiseTurn clockwise
Washlet (Section 5) 6/16/03, 9:31 AM42

43
Oth
er In
form
ation
4 Removing the Connection Hose.Line up the raised portion of the water supply coupler with indentedportion and push in. While pushing in on the water supply coupler, pullout the connection hose.
5 Remove the Connection Hose and hold it up to drain thewater from the hose.
6 Remove the Washlet from the toilet bowl by pressing thequick release button and sliding the main unit forward.See page 13, step 11.Place the main unit forward on the toilet bowl after it is removed. (Seethe illustration below.)
7 Open the water drainage lever.
Water (about 1.5 oz.) comes out of the bottom of the main unit andpours into the toilet bowl. Then water is automatically drained from thepump and Wand.Do not hold the main unit diagonally. Water may leak away from thetoilet bowl.
Other Information
Lift the water inlet untilit is positioned sideways.
Back of the Main Unit
CLOSE OPEN
Water drainage lever
push in pull out
Connection Hose
Junction Valve
Water Supply Coupler
RaisedPortion
IndentedPortion
Collar
Washlet (Section 5) 6/16/03, 9:31 AM43

44
8 Close the water drainage lever.
9 Mount the Washlet.See page 13, step 9.
10 Insert the water drainage plug with strainer and pushit in gently while turning it clockwise. Then, press the“Wand Cleaning” button again.
11 Disconnect the power cord.
12 Pour a small amount of antifreezing agent into theremaining water in the toilet bowl to prevent freezing.
Note• When you are ready to
use the Washlet again,follow the steps in “BeforeUsing the Washlet” onpage 20.
Other Information (continued)
Water Drainage Plugwith Strainer
Container
CLOSE OPEN
Washlet (Section 5) 6/16/03, 9:31 AM44

45
Oth
er In
form
ation
Troubleshooting
Before contacting a repairman, check the following common problems and solutions.
Do not disassemble, repair, or modify theWashlet S300. (It may cause electric shockand fire.)
Warning
Main Features
Problem Cause RemedyA power failure occurred.The power cord is disconnected.
The operation lamp is off.
The main unit is removed from thebase plate.
Wait until the power is restored.Insert the power cord intoa power outlet (see page 20).
Press the “Power” button(see page 21).
Mount the main unit onto thebase plate (see page 13).
Overall functions are notworking.
Problem Cause RemedyThe water doesn’t run.
The water pressure is low.
The water is cold.
Cleansing Features
Other Information
When I sit on the seat, waterstarts flowing into the toiletseveral seconds after theCleansing Wand movesforward
Press the “STOP” button on theremote control and wait until thewater supply comes back on.Open the water supply shut-off valve(see page 20).
See “About the Seat Sensor” on page23.
Press the “Water Pressure ▲” buttonto increase the setting (see page 24).
Clean the strainer (see page 39).
Press the “Water ” button on theremote control (see page 26).
Press the “STOP” button on theremote control and wait until thewater supply comes back on.
Press the “Rear Cleansing”, “RearCleansing (soft)” or “Front Cleans-ing” button again.
See “About the Seat Sensor” on page23.
—
The water supply is turned off.
The water supply shut-off valve isclosed.
The seat sensor is not detecting theuser.
The water pressure setting is too low.
The strainer is clogged.
The water temperature is too low.
The water supply is turned off.
Five minutes after pressing one of theCleansing buttons, washing automati-cally stops.
The seat sensor is not detecting theuser.
This is not a malfunction. When theseat sensor operates, a little watercomes out of the Cleansing Wand toclear it, preparatory to the start ofactual cleansing by the Wand. Also,the seat sensor goes on and off asyou change your posture on the seat,and water flows out of the CleansingWand for several seconds.
Water stops coming out ofthe Cleansing Wand beforeI’m finished cleansing.
Washlet (Section 5) 6/16/03, 9:31 AM45

46
Problem Cause Remedy
Seat Sensor
Dryer
Soft Closure
Problem Cause Remedy —
—
Other Information (continued)
The dryer temperature is toolow.
The dryer stops while drying.
The dryer does not stopautomatically when the userstands up and steps awayfrom the toilet.
The dryer does not work atall.
The dryer setting is set to Low.
Ten minutes after pressing the“Dryer” button, drying automati-cally stops.
The dryer is not controlled by theoperation of the seat sensor.
The seat sensor is not detecting theuser.
Press the “Dryer” button on theremote control and change thesetting to “Mid” or “High”.
Press the “Dryer” button again.
Press the “STOP” button.
See “About the Seat Sensor” onpage 23.
After a cover is placed onthe seat and lid, the seatand lid close more slowly.
The speed of the seat andlid closure varies in summerand winter.
Due to the added weight of the cover,the seat and lid close more slowly. Thisis not a malfunction.
Due to changes in room temperature orthe frequency of Washlet, the speed ofthe lid closure may vary. This is not amalfunction.
Problem Cause RemedyThe seat sensor is covered.
Toilet paper or an infant toilet seat ison the seat.
The seat sensor is covered with dustor water.
The seat sensor may not be able todetect you depending on the way youare sitting, the color or fabric of yourclothing.
The seat sensor is covered withclothing or the sensor is covered withdust or water.
The seat is not securely closed.
Remove any dust or cloth from theseat sensor (see page 23).
Do not cover the seat sensor (seepage 23).
Remove any dust or water.
Change the way you sit or pullyour clothing up a little so that thesensor can detect your skin (seepage 23).
Move your clothing or remove dustor water from the sensor (see page23).
Make sure there is nothing placedbetween the seat and toilet bowl.
Even though the seat isnot occupied, theCleansing, Deodorizer,or Dryer feature oper-ates when you pressthe button.
Even though the seat isoccupied, the Cleans-ing, Deodorizer, orDryer feature does notwork.
Washlet (Section 5) 6/16/03, 9:31 AM46

47
Oth
er In
form
ation
Energy Saver Feature
Deodorizer
Other Information
Problem Cause RemedyThe Deodorizer indicator in theremote control display is off.
Make sure the seat sensor isworking.
When the toilet seat is occupied formore than 30 minutes, the Deodor-izer feature stops automatically.
Some people are more sensitive toodor. Also, bodily conditions andenvironmental conditions can affectyour sense of smell.
The deodorizer filter is covered withdust.
The seat sensor sometimes detects aperson standing nearby and operates.This is not a malfunction.When the seat and lid are opened orclosed, the seat sensor may possiblydetect a user and operate. This is nota malfunction.
The Deodorizer featuredoesn’t work.
The Deodorizer featurestopped working inthe middle of theoperation.
Odor is not removed.
The Deodorizer featureoperates by itself.
Press the “Deodorizer” button(see page 27).
See “About the Seat Sensor” onpage 23.
Stand up and sit down again (seepage 27).
Press the “Deodorizer” buttonrepeatedly until the deodorizerstarts operating (see page 27).
Clean the deodorizer filter (seepage 37).
(See page 23)
Problem Cause Remedy —
—
The seat will be warm after youhave been seated for 15 minutes(see page 29).
The seat will warm up after youhave been seated for about 5minutes (see page 31).
It takes the Washlet two or three daysto determine the time periods duringwhich the toilet is not used much.
This is not a malfunction. TheWashlet may not go into energy-saving mode if the toilet is used threeor four times during the same timeperiod.
Did it stop working during “Timer on/off” operation?
Did it stop working during “Auto on/off” operation?
The “Auto on/off” EnergySaver Feature does notoperate even when the“Auto on/off” button switchis on.
The seat doesn’t get warm.
Washlet (Section 5) 6/16/03, 9:31 AM47

48
Other Information (continued)
Others
Remote Control
✲ If the remedies above do not solve your problem, please contact the installation com-pany, dealer, or TOTO Technical Support at 1-888-295-8134 for repair.
Problem Cause Remedy
Problem Cause Remedy
The remote control doesnot operate the Washlet.
You press certain buttonson the remote control but adifferent feature operates.
The batteries are getting old.
The batteries are not placedcorrectly.
The remote control reception windowis covered.
The remote control reception windowis covered with dust or water.
The seat sensor is not detecting theuser.
—
Replace the batteries(see page 19).
Insert the batteries correctly(see page 19).
Remove the object that is cover-ing the remote control receptionwindow.
Remove the dust or water andclean the remote control recep-tion window.
See “About the Seat Sensor” onpage 23.
Replace the batteries(see page 19).
The bolts for the base plate thatsecure the main unit are loose.
You may notice a little movementdue to gaps provided for the one-touch removal of the Washlet. This isnot a malfunction.
The seat sensor may detect andoperate while you are cleaning theWashlet S300 or flushing the toilet.This is not a malfunction.
When the room gets cold, theWashlet may automatically drain thewater to prevent freezing. At thistime, you may hear a draining soundfor about 10 seconds. This is not amalfunction.
The main unit moves bothup and down and right andleft.
Water runs out of the Wandarea of the main unit eventhough the seat is notoccupied.
Tighten the bolts for the baseplate.
—
—
—
Washlet (Section 5) 6/16/03, 9:31 AM48

49
Oth
er In
form
ation
Item
Rated Power Source
Rated Power Consumption
Standard Power Consumption per Hour
Length of Power Cord
Water Temperature
Capacity of Heater
Safety Features
Backflow Prevention
Air Temperature
Capacity of Air
Capacity of Heater
Safety Feature
Surface Temperature
Capacity of Heater
Safety Feature
Method
Capacity of Air
Water Supply Pressure
Water Supply Temperature
Environment Working Temperature
SW833 Round Type
SW834 Elongated Type
SW833 Round Type
SW834 Elongated Type
CleansingSystem
Amount ofWater to beSprayed
Rear Cleansing
Rear Cleansing (Soft)
Front Cleansing
DryingSystem
Toilet SeatHeatingSystem
DeodorizerSystem
Contents
AC 120 V 60 Hz
1277 W
21 Wh (Calculation based on an average usage of 12 times per day)
approx. 3 feet (1 meter) (including plug)
about 0.07 – 0.11 gal/min (at water pressure of 29 psi)
about 0.07 – 0.11 gal/min (at water pressure of 29 psi)
about 0.08 – 0.11 gal/min (at water pressure of 29 psi)
Temperature adjustment range of about 86 – 104°F (30 – 40°C)
1200 W
Temperature fuse, temperature overheating prevention device,overheating prevention float button
Vacuum breaker, check valve
High (about 140°F [60°C]), medium (about 122°F [50°C]), low (about104°F [40°C])
10.59 ft3 /min
350 W
Temperature fuse
Temperature adjustment range of about 86 – 97°F (30 – 36°C)
50 W
Temperature fuse
O2 deodorizer
5.65 ft3 /min
Required minimum water pressure: 20 psi (when flowing)Maximum water pressure: 80 psi
32 – 95°F (0 – 35°C)
32 – 104°F (0 – 40°C)
15 3/4 x 19 3/4 x 4 15/16 in (w/d/h)(400 x 502 x 125 mm)
15 3/4 x 20 15/16 x 4 15/16 in (w/d/h)(400 x 532 x 125 mm)
11 lbs. (5 kg)
11 lbs. (5 kg)
Other Information
Specifications
ProductDimensions
ProductWeight
Washlet (Section 5) 6/16/03, 9:31 AM49

50
Limited Warranty
One Year Limited Warranty
1) TOTO USA, Inc (“TOTO”) warrants its products to be free from manufacturing defects undernormal use and service for a period of one (1) year from the date of purchase. This warranty isextended only to the ORIGINAL PURCHASER.
TOTO’s obligations under this warranty are limited to repair or replacement, at TOTO’s option, ofproducts or parts found to be defective, provided that such products were properly installed andused in accordance with instructions. TOTO reserves the right to make such inspections as maybe necessary in order to determine the cause of the defect. TOTO will not charge for labor or partsin connection with warranty repairs or replacements. TOTO is not responsible for the cost ofremoval, return and/or reinstallation of products.
2) This warranty does not apply to the following items:a. Damage or loss sustained in a natural calamity such as fire, earthquake, flood, thunder and/
or electrical storm, etc.b. Damage or loss resulting from any unreasonable use, misuse, abuse, negligence, or
improper maintenance of the product.c. Damage or loss resulting from removal, improper repair, or modification of the product.d. Damage or loss resulting from sediments or foreign matter contained in a water system.e. Damage or loss resulting from improper installation or from installation of a Washlet in a
harsh and/or hazardous environment.
3) This warranty applies only to the Washlet, and not to any other items such as the toilet bowl,etc.
4) To obtain warranty repair service under this warranty, you must take the defective product ordeliver it prepaid (shipping and handling) to an authorized TOTO USA, INC. service center. Tofind the closest authorized dealer, please call 1-800-350-TOTO (8686).
5) In order for this limited warranty to be valid, TOTO USA, INC. must receive the completedattached warranty registration card and your proof of purchase within 30 days of the originalpurchase date.
6) If the danger label which has been placed over the seams on the back of the Washlet’s mainunit is broken or otherwise not intact, this limited warranty is void.
This written warranty is the only warranty made by TOTO. Repair or replacement as providedunder this warranty shall be the exclusive remedy available to the purchaser. TOTO shall not beresponsible for loss of the product or for other incidental, special or consequential damages orexpenses incurred by the purchaser, or for labor or other costs due to installation or removal, orcosts of repairs by others, or for any other expense not specifically stated above. TO THEEXTENT PERMITTED BY LAW, TOTO DISCLAIMS ALL OTHER IMPLIED WARRANTIESINCLUDING THAT OF MERCHANTABILITY AND FITNESS FOR A PARTICULAR PURPOSE.TOTO ALSO DISCLAIMS ANY LIABILITY FOR SPECIAL, INCIDENTAL, OR CONSEQUENTIALDAMAGES. Some states do not allow limitations of how long an implied warranty lasts or theexclusion or limitation of special, incidental or consequential damages, so these limitations andexclusions may not apply to you. This warranty gives the consumer specific legal rights. You may also haveother rights that vary from state to state. This warranty is to the original purchaser only, and excludes productdamage due to installation error, product abuse, or product misuse, whether performed by a contractor,service company, or the consumer.
Warning! TOTO shall not be responsible or liable for any failure of, or damage to, this plumbingproduct or product component caused by either chloramines in the treatment of public watersupply or cleaners containing chlorine (calcium hypochlorite).
Note: The use of a high concentrate of chlorine or chlorine related products can seriously damagethe fittings. This damage can cause leakage and serious property damage.
THIS IS OUR EXCLUSIVE WRITTEN WARRANTY.
Washlet (Section 5) 6/16/03, 9:31 AM50

51
Oth
er In
form
ation
Notes
Washlet (Section 5) 6/16/03, 9:31 AM51

For your safety, be sure to inspect your Washlet occasionally.• Is the power plug abnormally hot?• Is the power plug covered with dust?• Is the outlet loose?• Is your Washlet operating differently than usual?* In case anything is abnormal, contact TOTO USA to prevent a fire or an electrical shock.
1155 Southern Road Morrow, GA 30260
(770) 282 8686
THU680D06481-4R (‘03.8)©2003 TOTO USA, Inc.
Washlet (Section 5) 6/16/03, 10:35 AM52